

Page 1
TRAFx MANUAL: PART II Mountain Bike Counter 2018 www.trafx.net
1
TTR
RAAFFxx
M
Moouunnttaaiinn BBiikkee
C
Coouunntteerr
IInnssttrruuccttiioonnss
(For Generation 2, 3 and 4)
Key Info
• Optimized to detect and count bicycles on trails
• Advanced microelectronic design
• Self-contained design; no external wires or tubes
• Designed to be buried
• Small and easy to hide — reduces vandalism risk
• Long battery life (G4: up to 9 months)
• Large storage capacity (millions of counts)
• Built for outside: -40C (-40F) to +55C (131F)
• Low installation, operating, and maintenance costs
• Field-proven, Generation 4 design (>10 year history)
A
OVERVIEW ................................................................................................................ 2
B
INSTALLATION OPTIONS ......................................................................................... 3
C
SETTINGS ................................................................................................................. 4
D SET UP IN FIELD – STEPS ...................................................................................... 5
E
CHECKLISTS ............................................................................................................. 6
F LIGHTS, BATTERIES, NOTES ................................ .................................................. 7
G
TESTING ................................................................................................................... 8
H
TROUBLESHOOTING, MAINTENANCE AND SUPPORT ........................................ 9
Page 2
TRAFx MANUAL: PART II Mountain Bike Counter 2018 www.trafx.net
2
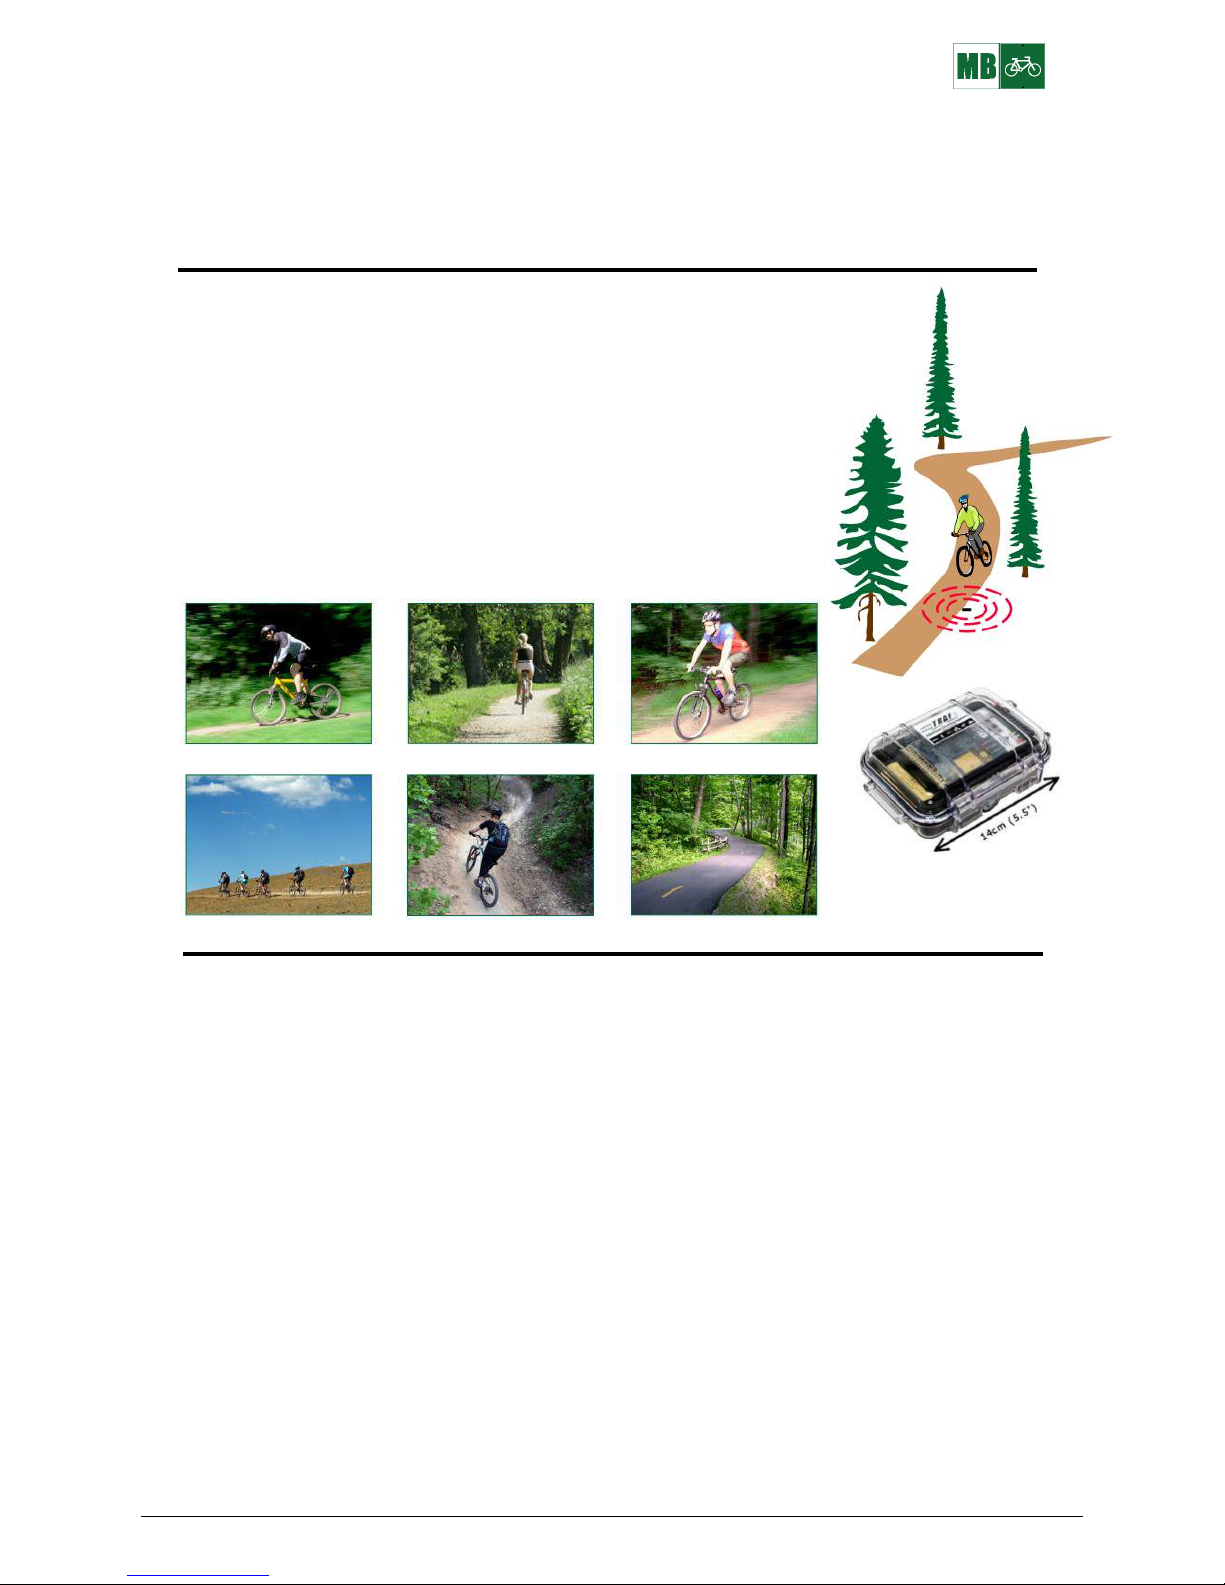
A OVERVIEW
These instructions apply to Generation 2, 3 and 4 TRAFx Mountain Bike Counters (2005 – 2017+).
CAREFULLY READ THESE INSTRUCTIONS BEFORE USING THE COUNTER.
Featuring an aerospace-quality magnetometer, this counter detects moving objects with ferrous
metal content (e.g., bike chains, cassettes, etc.). In essence, it’s a sophisticated metal detector.
PREPARATION
Finish TRAFx Manual – Part I first. Refer to its Quick Guide (p. 5) to understand the overall process. Download the
latest version at www.trafx.net/support
Here is the sequence:
1 2 3
TRAFx Manual TRAFx Manual DataNet Quick Guide
Part I Part II (with Part I)
You are here
WIRE GUIDE
(Note: The counter ships assembled.)
Two battery wires connect to the counter’s screw block, as shown below. Ensure wires are fully inserted and the
screws are tight. Gently tug test each wire. Incorrectly connected wires could cause damage and void the warranty.
R B 2 Battery wires
Note: the IR scope wires are only used for the TRAFx Infrared Trail Counter Conversion Kit
STUDY DESIGN
Study design is beyond the scope of this document, but key questions include: Which trails? How many
counters? How long? Is the sample size and study period sufficient statistically?
The TRAFx Vehicle Counter has three main modes: vehicle, OHV, and mountain bike. For mountain bikes,
ensure your counter is in mountain bike mode. See TRAFx Manual – Part I, p. 9 regarding how to select a
mode. View and download it at www.trafx.net/support
In mountain bike mode, the counter will also detect and count vehicles and OHVs but from much farther away
(approx. 6m / 20ft.) because they are much larger and have more metal.
Page 3
TRAFx MANUAL: PART II Mountain Bike Counter 2018 www.trafx.net
3
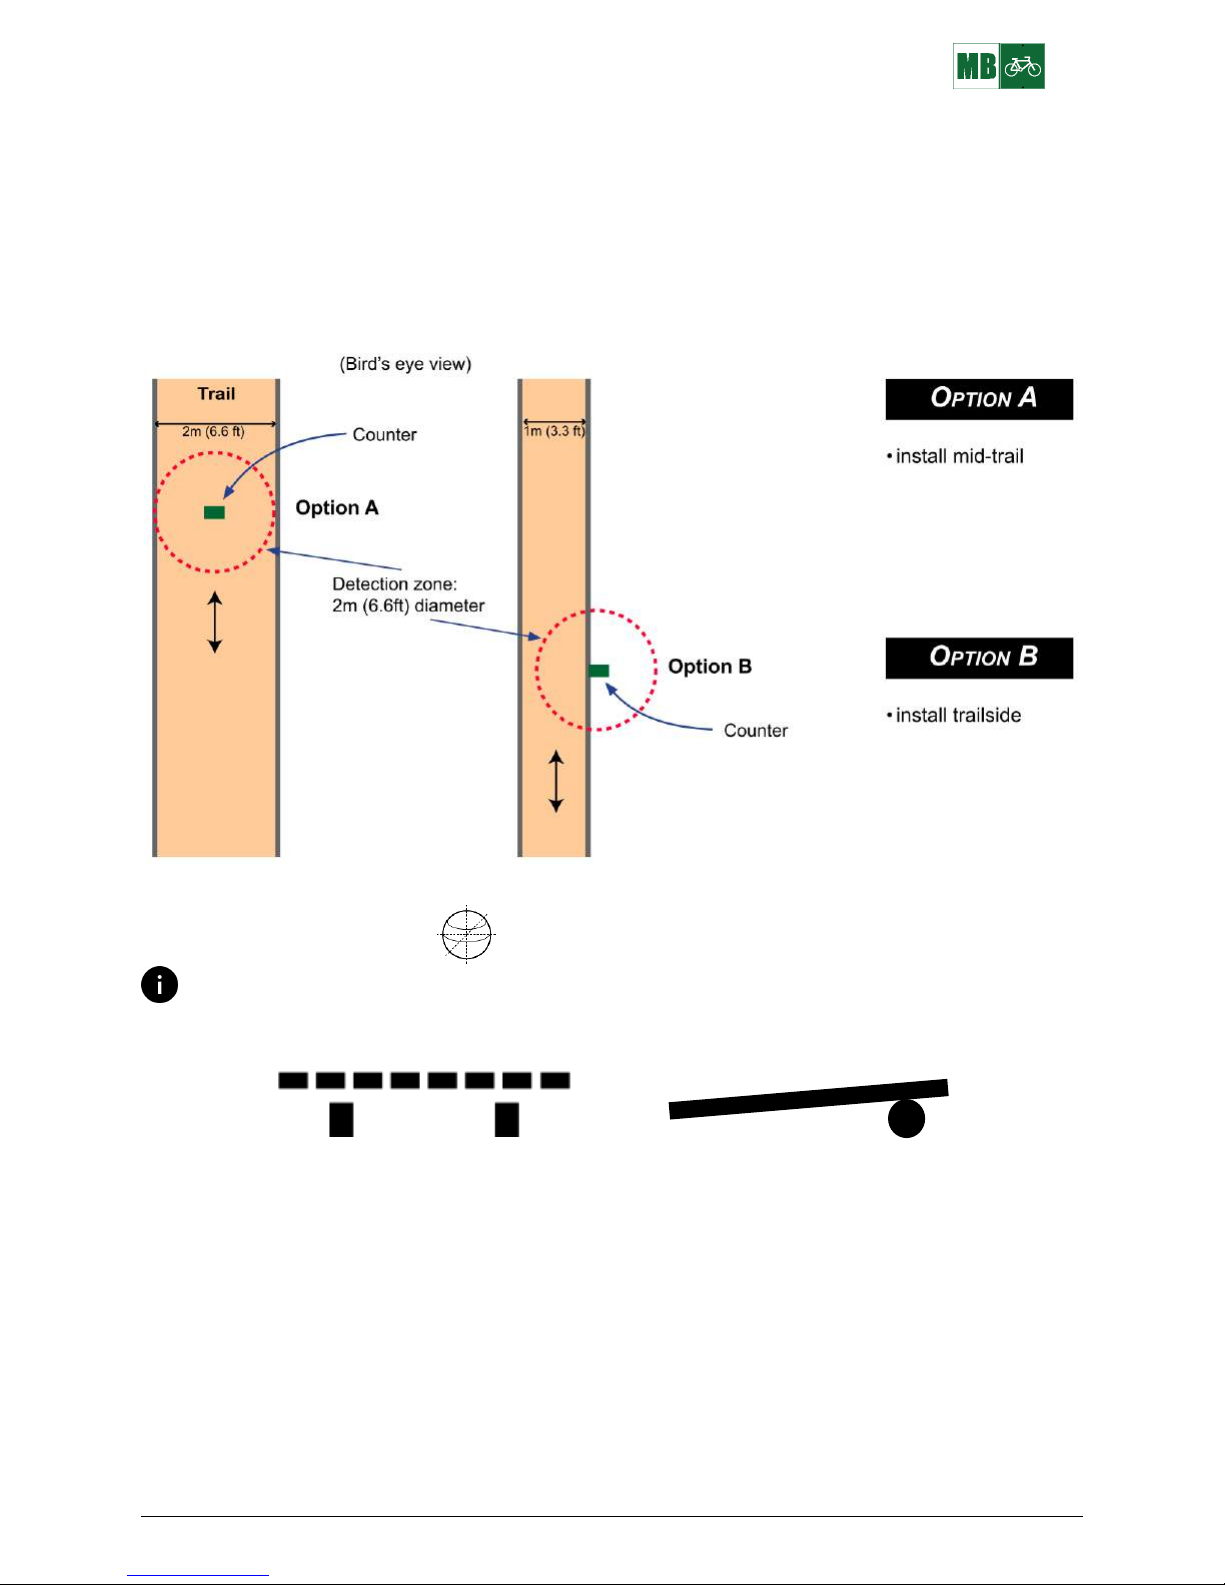
B INSTALLATION OPTIONS
There are two main installation options: (A) middle of the trail, or (B) at the side of the trail.
• The maximum detection range is approximately 1m (3.3ft.). That is, all bikes must pass within 1m (3.3ft.) of
the counter to be counted. Installing the counter within 0.75m (2.5ft.) of passing bikes is optimum. Overall
rule of thumb: the closer, the better.
• The detection zone is spherical, extending out in all directions from the counter.
• Use Option A on trails that are wider than 1m (3.3ft.); use Option B for trails less than 1m (3.3ft) wide.
Because the detection zone is spherical, the counter can be installed under a bridge or ramp as long as the
distances specified above are respected.
bridge ramp
Page 4

TRAFx MANUAL: PART II Mountain Bike Counter 2018 www.trafx.net
4
C SETTINGS
The counter has default settings (see black area below). Normally, only change these if a star below applies to you.
(The default settings are for G4 counters; however, they are also recommended for G2 and G3 counters.)
Settings
Mode
Notes
=TIME
=START
MB
--
--
TIME - automatically set by a dock in Shuttle Mode.
START - automatically set by a dock in Shuttle Mode to:
• top of the hour after Launch for hourly totals
• 5 minutes after Launch for timestamps
PERIOD
DELAY
THRESHOLD
001
008
008
MODE SETTINGS
PERIOD
(1/24/0)
PERIOD refers to the data format: hourly totals, daily totals, or timestamps (all are records)
▪ 14 000 is the maximum number of records (lines of data)
▪ Totals are much more memory efficient and download much faster than timestamps
001 = Hourly totals (default; recommended); stores 19 months of data (448 million counts max.)
024 = Daily totals (rarely used); whole days only; counting starts and stops at mid-night
000 = Timestamps (seldom used); each event creates a timestamp (14 000 counts max.)
yy-mm-dd,hr:mm,total
16-05-28,10:00,00435 Hourly totals
16-05-28,11:00,00473 (11 spans 11 to 12)
16-05-28,12:00,00530
16-05-28,13:00,00481
yy-mm-dd,hr:mm:ss,diagnostic value
16-05-28,14:15:50,18
16-05-28,14:15:56,42 Timestamps
16-05-28,14:19:08,19
16-05-28,14:19:22,31
DELAY
DELAY refers to “delay after event”
▪ During DELAY, other events (triggers) are ignored
▪ DELAY values (and seconds) are shown below
DELAY
Seconds
A count occurs in the detection zone. The DELAY prevents counting the same bike
again, while it is still in the zone.
000
004
008 =
016
032
048
064
0
0.25
0.5
1
2
3
4
▪ If bikes typically move slowly, increase DELAY to 016
▪ If bikes typically are closely spaced, decrease DELAY to 004
THRESHOLD
THRESHOLD adjusts the counter’s sensitivity
008 is the default (and recommended) THRESHOLD value
▪ Use THRESHOLD 006 (G4 counters only) if you are missing bikes. 006 is maximum sensitivity
▪ The other way to increase sensitivity is simply to move the counter closer to where bikes pass
▪ A THRESHOLD value greater than 012 is not recommended
Change settings
Here are the main steps to change settings:
1. Confirm your dock is in PC Mode
2. Connect: PC---cable(s)---dock---counter
3. Open TRAFx Communicator and click GO!
4. Enter C to configure a mode’s settings
See TRAFx Manual Part I, p. 10 for details. Download at www.trafx.net/support
Counters yield estimates. They are rarely 100% accurate. This applies to all types and brands. Counter
calibration is recommended when higher accuracy is desired. Calibration involves comparing counter
totals with those observed by a person, ideally over several hours. It is also a good opportunity to collect
additional data (youth vs. adult, etc.). For detailed instructions, download “How to calibrate a counter” at
www.trafx.net/support
Page 5

TRAFx MANUAL: PART II Mountain Bike Counter 2018 www.trafx.net
5
D SET UP IN FIELD – STEPS
STEP 1 — PREPARATION
The TRAFx Mountain Bike Counter is normally buried beside or in middle of the trail (though it can also be placed
under a bridge or ramp, or hidden under a log or stone at the trail side). If burying the counter, before going to the
field, decide on Option 1 or 2.
Option 1
Option 2
Ziploc-type bags (dry sites)
-put counter inside Ziploc-type bags (min. three)
-keeps field case lid seal clean, and adds protection
-only use if ground won’t become water saturated during
rain, winter, flooding, etc.
Second, sealed box (damp sites)
-put counter case inside a water-tight second box
-use if ground might become water saturated
-also use if leaving counter unattended over winter
-second box must have good seal
Google: HPL815M
--8 x 5 x 3in.; $9
Or, www.digikey.com or www.digikey.ca
and enter SR-R120
--8.7 x 7.5 x 3.9in.; very sturdy; ($20)
STEP 2 — SELECT AND PREPARE SITE
Before selecting a site to install the counter, review p. 3 and installation “do and don’t” on the
next page! A well selected site can be used for many years. Take the time to do it well.
For burial:
1. Dig a hole deep enough to accommodate the counter and some drainage rocks.
2. Fill the bottom with 5 to 7cm (2 to 3in) of rocks.
STEP 3 — LAUNCH AND PLACE COUNTER
1. Launch the counter using your dock in Shuttle Mode. Use Shuttle Mode’s checklist (next page).
2. Add a fresh desiccant pack and close the counter’s case (ensure its lid seal stays perfectly clean). Trail
3. Place counter case in hole, along with Option 1 or 2 (see above).
4. Position the counter’s long axis perpendicular to the trail, as shown at right. It must lie flat.
5. When resting in its final position, its Calibration LIGHT C must be OFF. If it is permanently ON,
see p. 9 for advice.
6. Cover with soil, rock, wood or other local material.
7. Take 2 photos, close and far (for your DataNet account / technical support purposes).
8. Take GPS reading (to find the counter and for your DataNet map).
9. Mark location well. (Use a metal detector if you forget its exact location.)
10. If this is a new installation, return in about a week and download the counter’s data.
11. When downloading a counter always use the checklists on the next page.
USE DESICCANTS!
Without desiccants, damaging condensation (moisture) forms when the air inside the counter’s case cools.
Replace desiccant packs each time you open the counter's case to download data.
• Store and transport in well sealed bag or container! (otherwise they expire in hours)
• Visit www.trafx.net/support regarding type, size and where to buy
• Use two in wet or humid climates
Page 6

TRAFx MANUAL: PART II Mountain Bike Counter 2018 www.trafx.net
6
E CHECKLISTS
Field Equipment Checklist
✓ TRAFx Manual: Part I and II
✓ Counters, dock, etc
✓ Desiccant packs (in sealed bag); spare batteries for counter; Ziploc bags
✓ Items you’ll need for installation
✓ Tape measure, camera, GPS, shovel, toothbrush, umbrella, safety equipment, etc
Installation do and don’t
Do:
✓ install at proper distance (p. 3); use tape measure!
✓ Install perpendicular to the trail (p. 5)
✓ install where bike speed is moderate (not on downhill)
✓ install at choke points where bikes are single file
✓ install where bicycles pass by without stopping
✓ place inside sealed bag, container or box (see p. 5)
Don’t install:
where water pools or collects
within 10m (33ft.) of a road
within 20m (65ft.) of a train line
near high-voltage powerlines (overhead or underground)
inside a steel box
Download, launch, etc. checklist
Dock in Shuttle Mode
(recommended)
Dock in PC Mode
(not recommended)
Use your dock in Shuttle Mode to Download / Launch a counter,
without a PC.
Before going to the field confirm:
1. The dock’s TIME is correct, (yy-mm-dd and 24 hr time).
2. The dock’s battery voltage is 3.4 or higher (if not, replace
dock’s batteries and reconfigure TIME).
3. Erase old data stored in the dock’s memory. Enter E.
Go to a counter in the field
1. Confirm dock is in Shuttle Mode.
2. Connect to a counter.
3. Do what the dock’s LIGHTs indicate.
--If the Replace Counter’s Batteries LIGHT blinks,
disconnect, replace the counter’s batteries and then
reconnect.
4. After disconnecting, the counter’s Status LIGHT should be
blinking rapidly; this confirms a successful launch. If not,
repeat 2 and 3.
5. Put a fresh desiccant pack inside the counter’s case.
Go to the next counter. Repeat 1 to 5.
Back in office
✓ Open TRAFx Communicator and follow its instructions
✓ Make sure you are in Shuttle Mode
✓ Click on Download+ to download and save Shuttle file
✓ Upload Shuttle file to your DataNet account
See TRAFx Manual Part I, p. 13 to 15 for details.
Using a PC to Download / Launch counters is not
recommended because it is slower and more prone to
human error than Shuttle Mode.
However, these are the main steps:
1. Confirm dock is in PC Mode .
2. Open TRAFx Communicator and follow its
instructions.
3. Click on Download+ to download and save data.
44.
.
Find saved data file and confirm successful
download.
To continue to collect data, you must relaunch the
counter by entering “L”. Ensure that the counter’s
TIME is correct. When prompted, erase existing data.
Data logging will begin at the START date/time. Also,
don’t forget to replace the desiccant pack.
After disconnecting, the counter’s Status LIGHT should
be blinking rapidly; this confirms a successful launch.
If not, connect up and launch it again.
See TRAFx Manual Part I, p. 10 to 12 for details.
Back in office
✓ Upload file to your DataNet account
Maintenance reminder: keep the field case’s lid seal free of dirt and organic material, with a toothbrush. Otherwise, it might
leak.
Page 7

TRAFx MANUAL: PART II Mountain Bike Counter 2018 www.trafx.net
7
F LIGHTS, BATTERIES, NOTES
LIGHTS
The counter’s three small indicator lights are explained below.
Status Detection
State
S - Status LIGHT
(RED)
C - Calibration LIGHT
(ORANGE)
D - Detection LIGHT
(GREEN)
Sleeping*
2x per second
not active
2x per second
At Launch
4x per second
(rapid)
on = calibrating**
off = calibrated
not active
After START
1x per 4 seconds
not active
blink = count
Calibration * Sleeping means the counter is idling, waiting to be launched; it is not counting.
**If the Calibration LIGHT is permanently on see #5 on p. 9
BATTERIES
Battery Info
RATE-FAST
(Bat. life)
Three 1.5V alkaline C cells
• cost approx. $1/each; widely sold (Costco, Home Depot, etc.)
• use quality alkaline batteries (e.g., Energizer)
• rechargeables (not recommended) last 40% to 70% less than alkaline batteries
• in extremely cold climates (consistently below -20C / -2F) plan on 50% less battery life
• battery failure risk increases above 55C / 131F
• maximum total voltage: 5V
G4 counters
8 to 9 months
G2/G3 counters
7 to 8 months
! Caution --- Never mix batteries (brands, types, or age)
NOTES
• Limitations: Two or more bikes in the detection zone at the same time may be counted as one.
• After the counter begins recording data (i.e., after START is reached), counts are recorded if you
move the counter, or move ferrous metal objects (e.g., shovel) near it.
To better secure
the batteries,
particularly if
moving the counter,
use duct tape.
• turn battery holder upside down
• tape from side to side as shown
• it is only necessary to tape the
two batteries shown
Page 8

TRAFx MANUAL: PART II Mountain Bike Counter 2018 www.trafx.net
8
G TESTING
Each TRAFx counter comes factory tested and ready to install. If installed according to instructions, paying careful
attention to the specified distances and other details, it is not normally necessary to test it. However, if desired, there are
several methods to test a counter.
1 WITH PC
With this method, counts immediately appear on your PC screen. This is useful when first learning about your counter
indoors, and also at installation locations, with a laptop. See below.
1. Confirm dock is in PC Mode
2. Connect: PC---cable(s)---dock---counter
3. Open TRAFx Communicator and click GO!
4. Enter “T” for TEST and press Enter ( )
As a bike passes within the detection zone, or as you move a ferrous metal object (pliers,
hammer, stapler – but not a magnet or magnetic screwdriver) near the counter (approx. 10cm
/ 6in.), this should trigger a count which appears on the PC’s screen. Try it. Ferrous metal
objects (i.e., metals with iron content) distort the earth's magnetic field as they move through
it, and this triggers a count. Pure aluminum (non-alloy aluminum) will not be detected.
Counts appear on screen
Moving the counter (i.e., pointing it in different compass directions, or tilting it, or jiggling or
jolting it) will also cause counts to occur try this. This is because the earth's magnetic field
has different strengths for different directions and tilts, and the counter senses this.
If you move the counter too close to a computer or other electrical equipment, counts might
also occur. This is because certain types of electrical equipment create changing electromagnetic fields, which the counter detects. It’s also sensitive to very rapid temperature
change (e.g., direct sun).
5. To end the TEST, enter ZZZZ
6. To ERASE the test counts from the counter’s memory, enter “E”
2 WITHOUT PC
For this method, launch the counter and collect data for a few hours. Note that counting begins at START (top of the hour)
and that you must wait a full hour after START to download data.
Example:
10:40 - Launched counter > Status LIGHT blinks rapidly until START is reached
11:00 - Top of the hour (START) > counting begins > Detection LIGHT blinks upon count
12:00 - Okay to download data now.
In short, wait at least a few hours before downloading data.
3 WATCH DETECTION LIGHT
This is a variation of Method 2. As mentioned above, counting begins at START (normally top of the hour). After START,
the counter’s Detection LIGHT blinks when a count occurs (two blinks means two counts).
watch the blinks
.
Page 9

TRAFx MANUAL: PART II Mountain Bike Counter 2018 www.trafx.net
9
H TROUBLESHOOTING, MAINTENANCE AND SUPPORT
TROUBLESHOOTING
The troubleshooting advice below is specific to settings and installation. If your problem is not addressed below, see
Chapter 4, TRAFx Manual – Part I, or better yet, visit our Support Hub at www.trafx.net/support
1 Higher than expected counts
If counts are moderately higher than expected, do the following:
a. Increase DELAY (see p. 4)
b. Increase THRESHOLD (see p. 4)
2 Lower than expected counts
If counts are moderately lower than expected, do the following:
a. Confirm counter is not too far away (this is usually the problem; see p. 3)
b. If “a” does not apply, then decrease THRESHOLD (see p.4)
3 Extremely high counts, even at night
If counts are extremely high, even at night when there is little traffic, increase THRESHOLD to 012 (p. 4). If the
problem persists, see #4 below.
4 Implausible or strange counts
Review installation “don’t” on p. 6. Do any of these apply to you? Also, see maintenance below.
5 Calibration light ON
After Launch, if counter’s Calibration LIGHT is permanently ON (i.e., solid), (a) rotate the counter 180 degrees; or
(b) remove and reinsert all its batteries, and Download / Launch it again; or (c) move it farther away from large
metal objects (e.g., large steel beam) or magnets.
MAINTENANCE
Control moisture
Replace the desiccants each time you open the counter’s case to download, otherwise
damaging condensation (moisture) forms when the air inside the counter’s case cools. To
dry a damp counter, remove batteries and use heat (car heater, hair dryer, lamp).
Remove finger grease
Remove possible finger grease on the counter’s gold fingers with an alcohol pad---the
combination of finger grease and moisture can cause problems (e.g., a counter stops
counting early).
Keep lid seal clean
Use a toothbrush to remove dirt, grit and other material from the field case seal otherwise
the case might leak, potentially damaging or destroying the counter. Make this part of your
field protocol.
SUPPORT
All technical support begins at our Support Hub at www.trafx.net/support Information about replacement parts and
repairs is available at the same location.
Limited warranty
See TRAFx Manual, Part I p. 2 for details. In a nutshell, limited warranty period is normally 1 year and covers
manufacturing defects.
 Loading...