

Page 1
QUICK INSTALLATION GUIDE
MB326
Please read the Safety Information in the Setup Guide or Printer Reference before using this machine.
It contains important information related to USER SAFETY and PREVENTING MACHINE PROBLEMS.
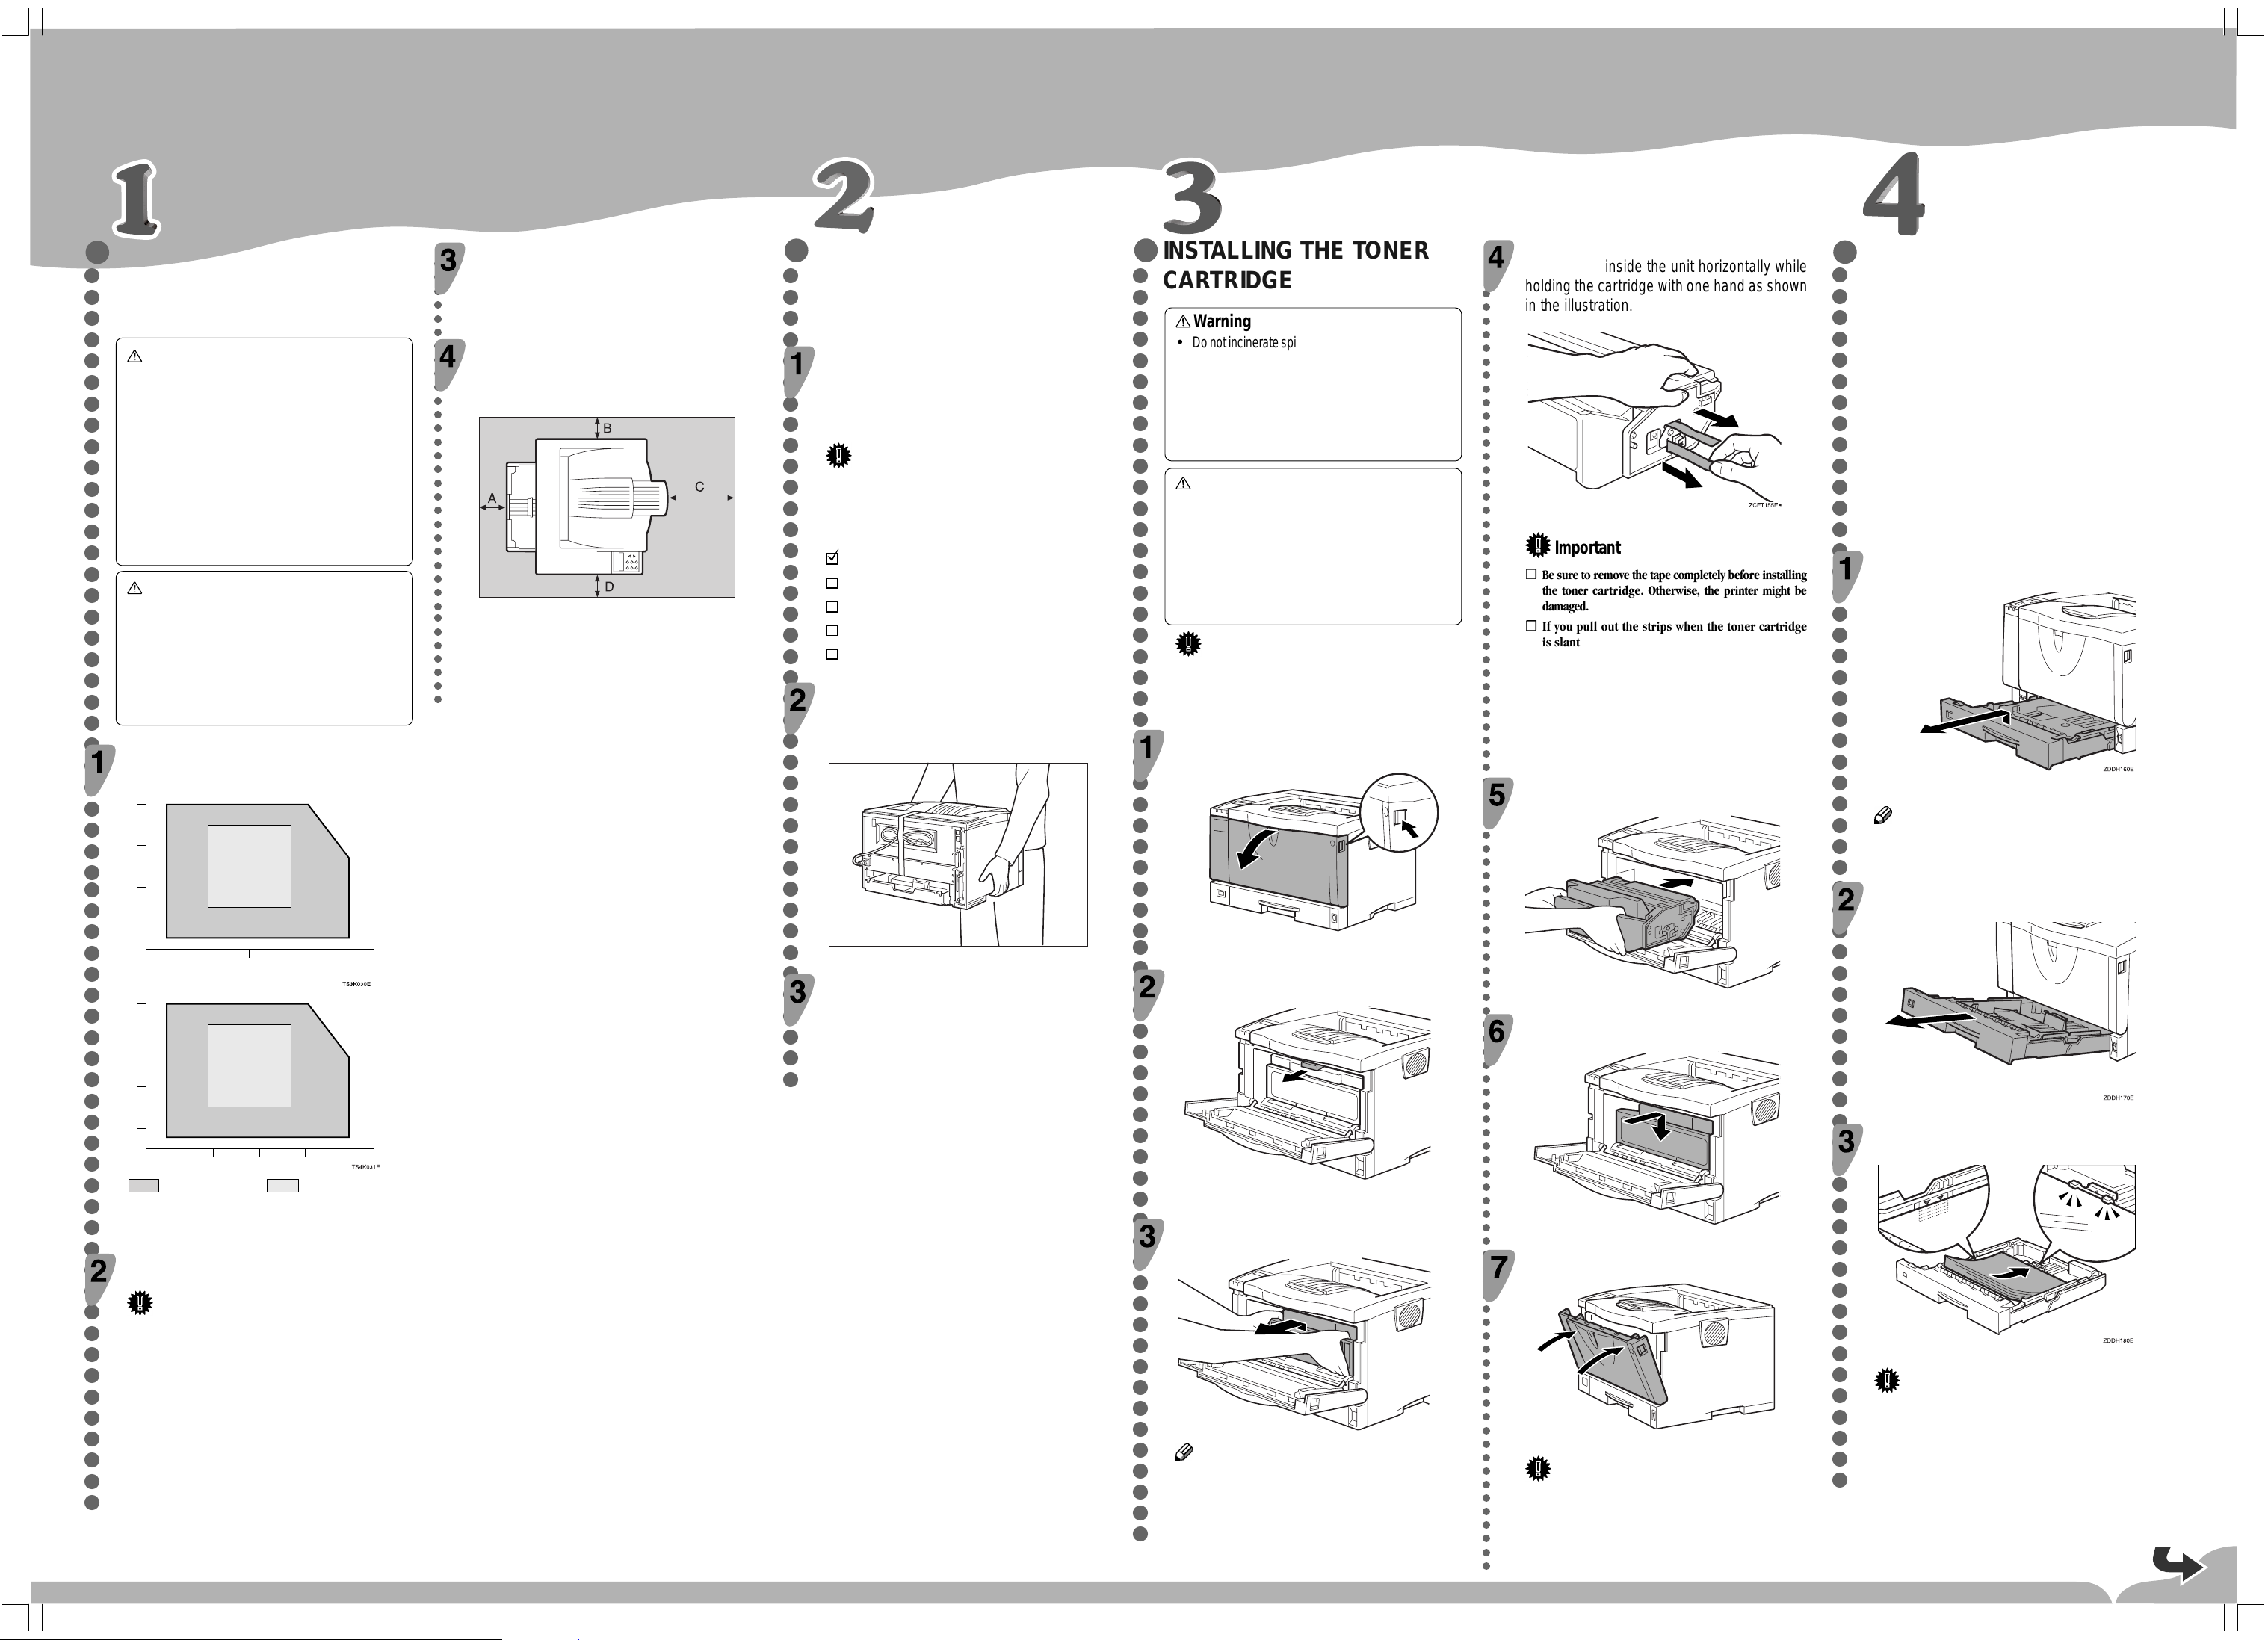
WHERE TO PUT THE PRINTER
○○○○○○○○○○○○○○○○○○○○○○○○○○○○○○○○○○○○○○○○○○○○○○○○○○○○○○○○○○○
The printer’s location should be carefully chosen
because environmental conditions greatly aff ect its
performance.
Warning
•
Confirm that the wall outlet is near the machine
and freely accessible, so that in event of an
emergency, it can be unplugged easily.
•
Only connect the machine to the power source
Power Connection
○○○○○○○○○○○○○○○○○○○○○○○○○○○○○○○○○
Connect the power cord to a power source with the following specifications:
❒ 120V, 60Hz, 8.4A or more
Space Required for Installing the Printer
Leave enough space around the printer. This space is necessary to operate the printer. The recommended (or minimum)
space requirement is as follows:
described on this sheet.
•
Avoid multi-wiring.
•
Do not damage, break or make any modifications to the power cord. Do not place heavy objects on it, pull it hard or bend it more than necessary. These actions could cause an electric
shock or fire.
Caution
•
Keep the machine a way from humidity and dust.
A fire or an electric shock might occur.
•
Place the machine on a strong and level surface. Otherwise, the machine might fall and
cause personal injury.
•
If you use the machine in a confined space, confirm that there is a continuous flow of air.
Optimum Environmental Conditions
Recommended temperature and humidity
%RH
80
60
15°C
70%
27
°
C 80%10°C 80%
25
70%
°
C
32°C
54%
A: more than 10 cm (4.0")
B: more than 10 cm (4.0")
C: more than 100 cm (40.0")
D: more than 10 cm (4.0")
ZDDH010E
UNPA CKING THE PRINTER AND
○○○○○○○○○○○○○○○○○○○○○○○○○○○○○○○○○○○○○○○
CHECKING THE CONTENTS OF
THE BO X
Check the contents of the box according to
the following list. If one or some items are missing, please contact your sales or service representative.
INSTALLING THE T ONER
○○○○○○○○○○○○○○○○○○○○○○○○○○○○○○○○○○○○○○○○○○○○○○○○○○○○○○○○○○○○○
CARTRIDGE
Warning
•
Do not incinerate spilled toner or used toner . Toner
dust might ignite when exposed to an open flame.
•
Disposal can take place at our authorized dealer
or at appropriate collection sites.
•
If you dispose of the used toner cartridge yourself, dispose of them according to your local regu-
Important
❒ The interface cable is not included in the box. Make
sure that the interface cable you use is appropriate
for your computer.
lations.
Caution
•
Do not eat or swallow toner.
•
Keep toner (used or unused) and the toner cartridge out of reach of children.
Quick Installation Guide (this sheet)
Setup Guide
CD-ROM (3)
•
Our products are engineered to meet the highest
standards of quality and functionality. When purchasing expendable supplies, we recommend
using only those provided by an authorized dealer .
Printer (including a starter toner cartridge)
Additional Documentation
Remove the plastic bag. Lift the printer and mov e
it to the place where you want to install it.
When lifting the machine, use the inset grips on both sides. Otherwise
the machine could break or cause injury if dropped.
Important
❒ Do not expose the toner cartridge to a light for a
long time. If you do, the toner cartridge will be
damaged and the print quality might be reduced.
Open the front cover b y pushing the front cov er
release button.
Place the toner cartridge on a flat surface . Pull
out the tape inside the unit horizontally while
holding the cartridge with one hand as shown
○○○○○○○○○○○○○○○○○○○○○○○○○○○○○○○○○○○○○○○○○○○○○○○○○○○○○○○○○○○○○○○○○○○○○○○○○○○○○○○○○○○○○○○○○○○○○○○
in the illustration.
INSTALLING THE PAPER TRA Y
○○○○○○○○○○○○○○○○○○○○○○○○○○○○○○○○○○○○○○○○○○○○○○○○○○○○○○○○○○
The default paper settings size are as follows:
Metric version: A4 L (long-edge feed)
Inch version: 81/2" x 11" L (long-edge feed)
For settings other than the default paper size, see
“Loading Paper and Other Media”
in the Printer
Reference pro vided as a PDF file on the CD-R OM
labeled "Operating Instructions".
For more information about the paper sizes that
can be set in the paper tray, see
Media Supported by this Printer”
“Paper and Other
in the Printer
Reference pro vided as a PDF file on the CD-R OM
labeled "Operating Instructions".
Important
❒ Be sure to remove the tape completely before installing
the toner cartridge. Otherwise, the printer might be
damaged.
❒ If you pull out the strips when the toner cartridge
is slant or standing on its side, the cartridge might
cause trouble with the printer.
❒ Be sure to pull the tape horizontally. Pulling it
upward or downward may cause the toner to scatter.
❒ Be careful not to make your cloths dirty with toner.
❒ After pulling the tape out of the cartridge, toner scatters
easily. Do not shake the cartridge.
Lift the paper tray slightly then pull it out until
it stops.
Holding the grips of the toner cartridge, insert
it into the printer until it stops.
Note
❒ Do not touch the three white pins on the left
front side of the printer.
°
C
°
C
40
20
%RH
80
60
40
20
The machine must be level within 5 mm, 0.2" both front to rear
and left to right.
15
30%
10
°
C 15%
10 20 30
50°F 80%
59°F
70%
59°F
30%
50°F 15%
50 80 90
60 70
Possible operation range
25
30%
32
80.6°F 80%
77°F
70%
77°F
30%
89.6°F 15%
Recommended range
°
C 15%
°
89.6°F
54%
°F
C
Environments to Avoid
Important
ZGDT052N
Remove the orange adhesive tape (7 pieces).
ZGDH126E
Remove the fixing material inserted between
toner cartridge and the printer.
ZGDT146E
While lifting the front side of the toner cartridge,
pull it out of the printer.
While lifting the front side of the tra y, pull it out of
the printer.
ZGDT121E
Insert the toner cartridge in its appropriate
position by gently pushing down.
Load paper into the paper tray with the print
side up.
ZGDT145E
Close the front cover.
❒
Locations exposed to direct sunlight or strong light
❒ Dusty areas
❒ Areas with corrosive gases
❒ Areas excessively cold, hot, or humid
❒ Locations near an air conditioner or humidifier
❒ Locations near other electronic equipment
❒ Locations where the printer might be subjected to
frequent strong vibration
ZGDT115E
Note
❒ Do not hold the toner cartridge upside down or
stand it vertically.
❒ Do not put the toner cartridge on an unstable
or tilted surface.
ZGDH135E
Important
❒ Do not close the front cover with force. If you
cannot close the cover easily, pull out the toner
cartridge from the printer and insert it again.
After that, close the front cover again.
Important
❒ Confirm that the top of the stack is not higher
than the limit mark inside the tray.
❒ Confirm that the paper fits under the rear guide.
Page 2
ZGDX115E
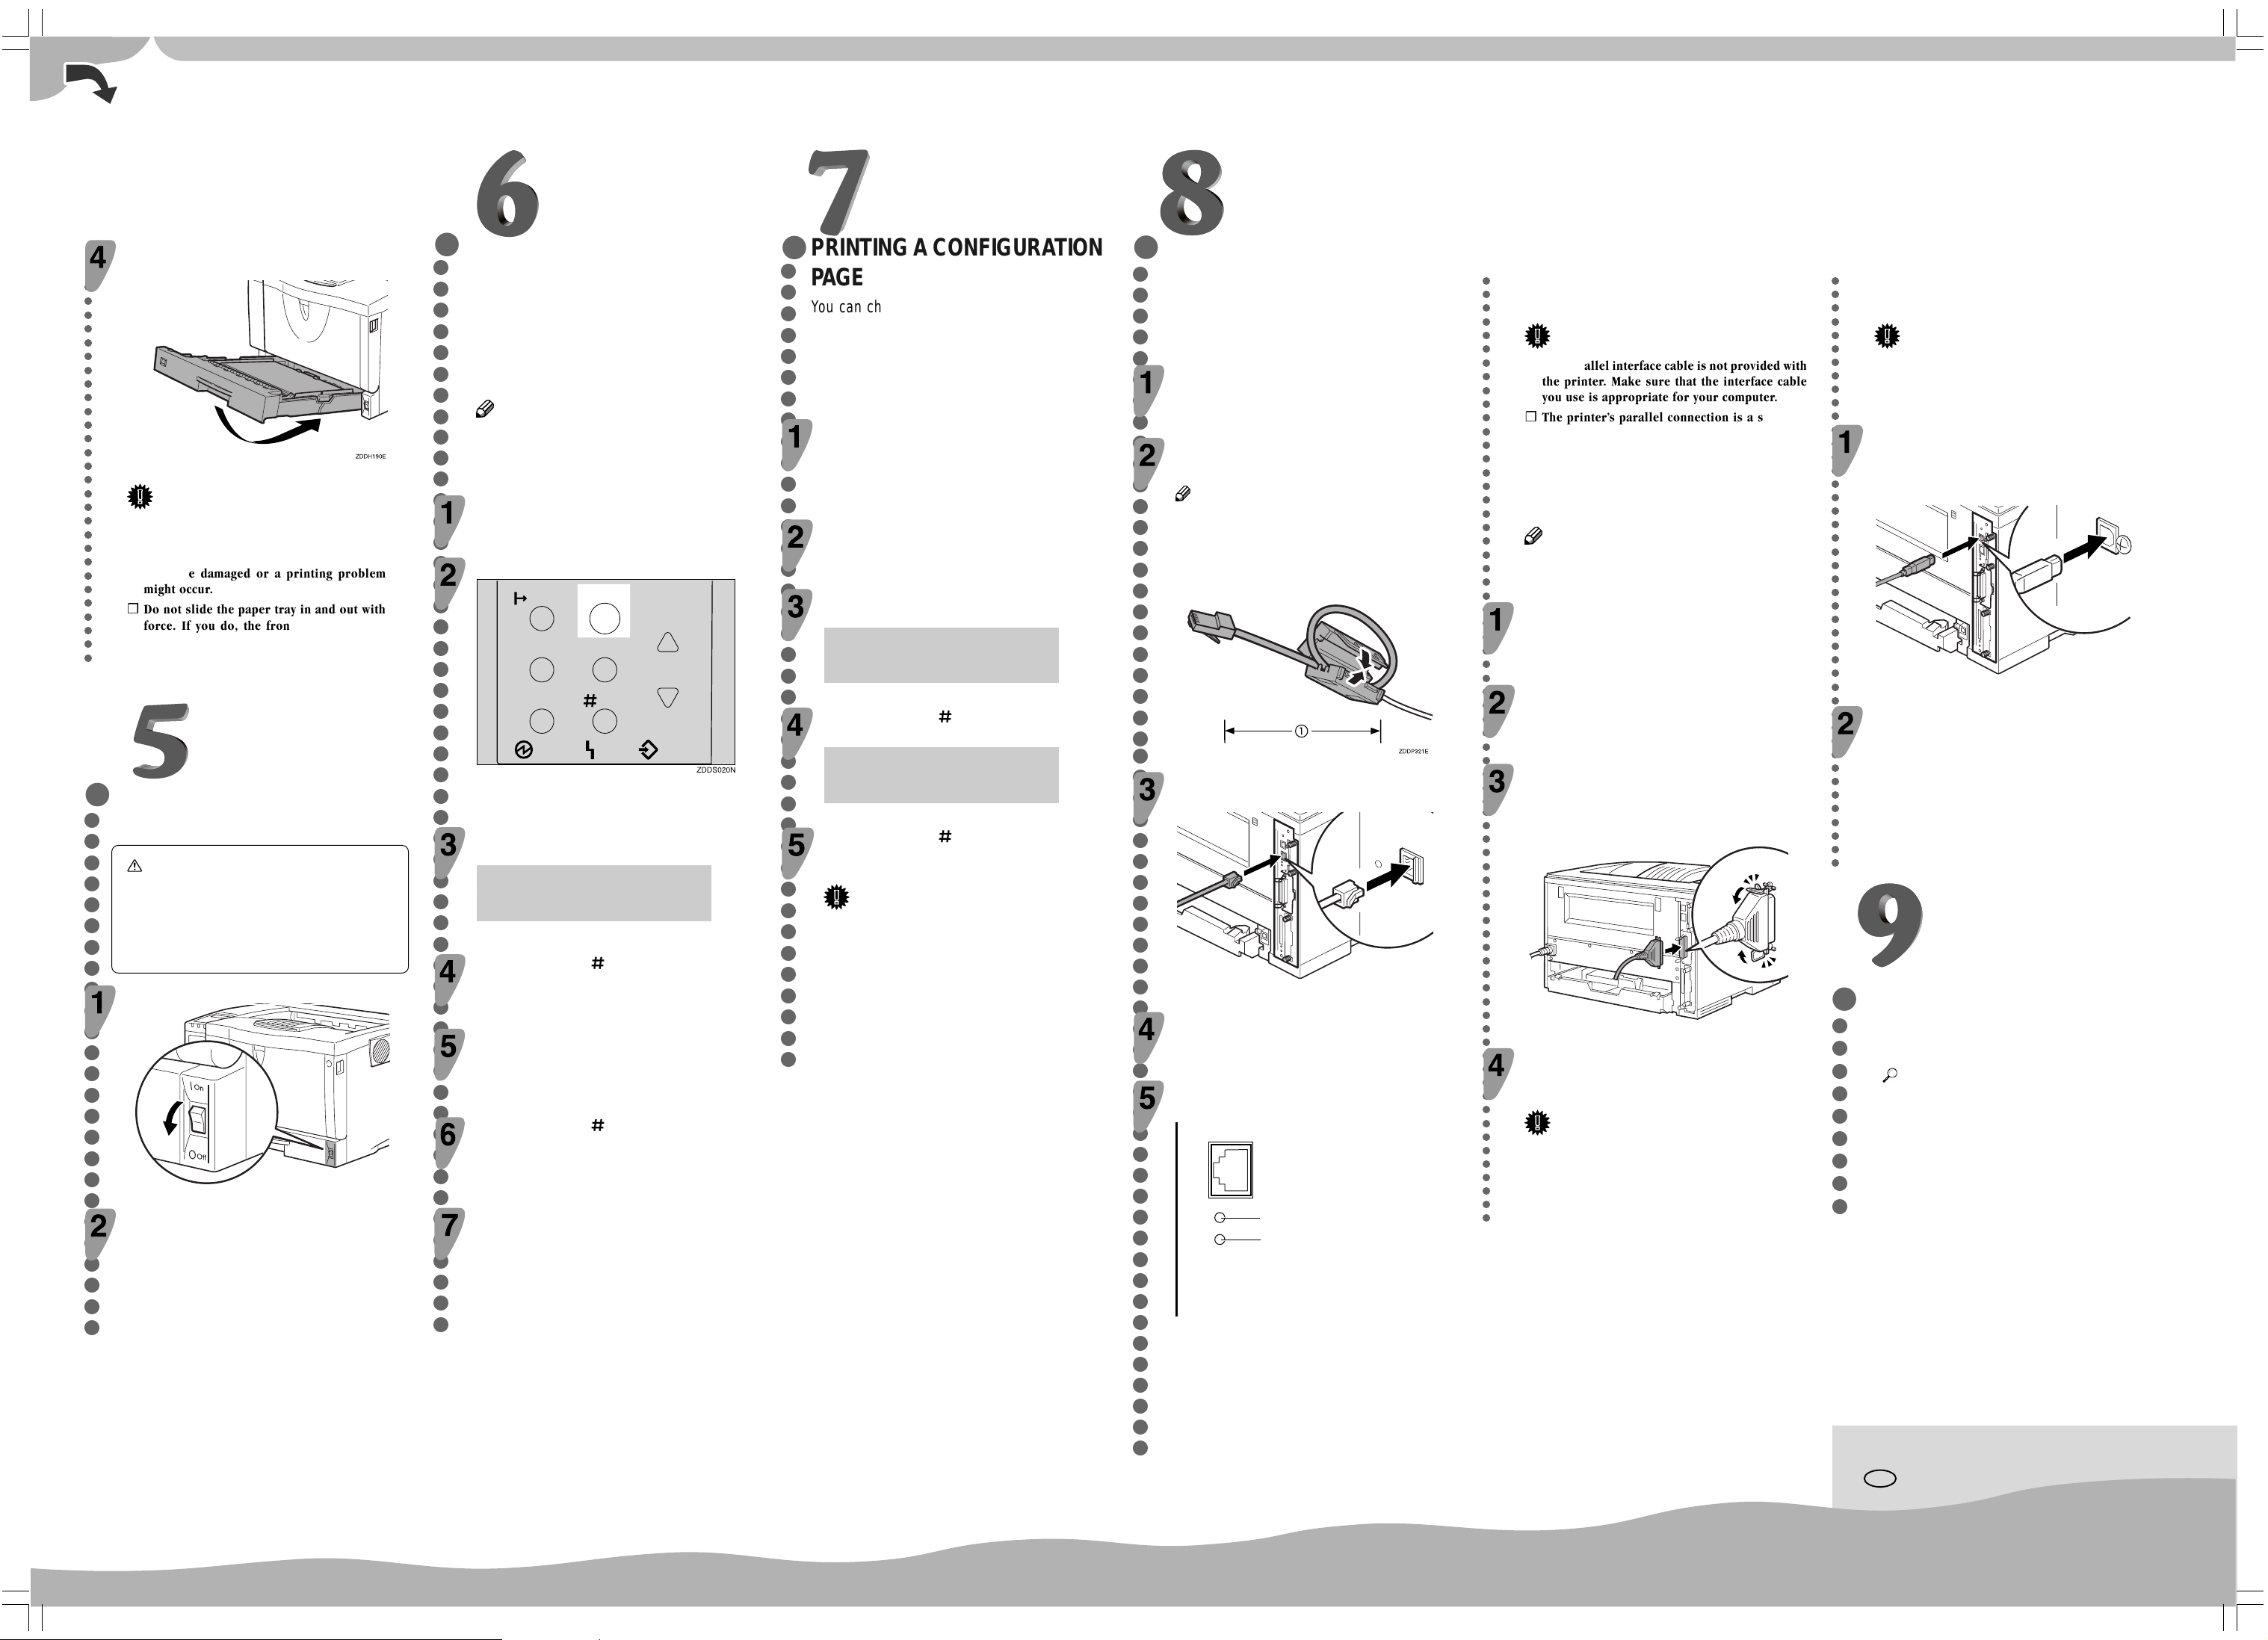
Carefully slide the paper tray into the
printer until it stops.
○○○○○○○○○○○○○○○○○○○○○○○○○○○○
SELECTING THE PANEL
○○○○○○○○○○○○○○○○○○○○○○○○○○○○○○○○○○○○○○○○○○○○○○○○○○○
DISPLAY LANGUA GE
Select a language following the procedures
described.
The message for the selected language will
appear on the panel display.
Note
❒ The default setting is English.
❒ If you want to use the English panel display, the
following procedures are unnecessary.
Important
❒ Confirm that the setting of the paper size
dial matches the size and feed direction of
the paper in the tray. Otherwise, the printer
might be damaged or a printing problem
might occur.
❒ Do not slide the paper tray in and out with
force. If you do, the front and side paper
guides will move out of the place.
Check that the power switch is turned on.
Press the {Menu} key.
On Line
Job Reset
Power Error Data In
"Menu" appears on the panel display.
Menu
Escape
EnterForm Feed
CONNECTING THE POWER
○○○○○○○○○○○○○○○○○○○○○○○○○
CORD
Caution
•
When you pull the plug out of the sock et,
grip the plug to avoid damaging the cord
and causing a fire or an electric shock.
•
It is dangerous to handle the plug with
wet hands. An electric shock might occur.
Check that the power switch is turned off.
ZGDH205E
Press the
{▲}
or
{▼}
message appears on the panel display.
Menu:
Language
Press the {Enter } key.
Press the
you want to select appears on the panel displa y.
Press the {Enter } key.
{▲}
or
{▼}
key until the following
key until the language
PRINTING A CONFIGURATION
○○○○○○○○○○○○○○○○○○○○○○○○○○○○○○○○○○○○○○
PAGE
You can check if the printer works properly by
printing a configuration page.
CONNECTING THE PRINTER T O A COMPUTER
○○○○○○○○○○○○○○○○○○○○○○○○○○○○○○○○○○○○○○○○○○○○○○○○○○○○○○○○○
❖
Network connection
If your printer is installed with the Network Interface
Board, follow the procedures below.
○○○○○○○○○○○○○○○○○○○○○○○○○○○○○○○○○○○○○○○○○○○○○○○○○○○○○○○○○○○○○○○○○○○○○○
However, you cannot check the connection
between the printer and the computer by printing
Turn off the power switch.
the configuration page.
Check that the power switch is turned on.
Loop the network interface cable and attach
the ferrite core.
Note
Press the {Menu} key.
"Menu" appears on the panel display.
Press the
{▲}
or
{▼}
key until the following
❒ The network interface cable loop should be about
15 cm(6")(a) from the end of the cable (on the
end closet to the printer). The ferrite core at the
end of the cable should be a ring type ferrite core.
message appears on the panel display.
Menu:
List/Test Print
Press the {Enter } key.
The following message appears on the panel display.
List/Test Print:
Config. Page
Press the {Enter } key.
The test printing will start.
Attach the network interface cable to the
jack on the board.
Important
❒ If you cannot complete the test printing correctly,
check if an error message appears on the panel
display. For more information about error
messages, see “Troubleshooting” in the Printer
Reference provided as a PDF file on the CD-ROM
labeled "Operating Instructions".
Connect the other end of the network interface
cable to the network.
Turn on the power switch.
Check the LEDs on the ethernet port.
ZGDT290E
❖
Parallel connection
Important
❒ The parallel interface cable is not provided with
the printer. Make sure that the interface cable
you use is appropriate for your computer.
❒ The printer’s parallel connection is a standard
bi-directional interface. It requires a standard
36-pin parallel cable compliant with IEEE 1284
and an available parallel port on your computer.
❒ To avoid electrical interference, use a shielded
cable.
Note
❒ Do not use a parallel cable more than 2.5 meters
(8.2 feet) long.
Turn off the power switch.
Turn the computer off.
Attach the interface cab le to the interface connector of the printer. Secure the cable with the
metal fittings as shown in the illustration.
Attach the other end of the interface cable to
the interface connector of the computer. Secure the cable.
Important
❒ Rating voltage of the parallel interface connector
for the computer ; Max. DC5V.
○○○○○○○○○○○○○○○○○○○○○○○○○○○○○○○○○○○○○○○○○○○○
❖
USB connection
Important
❒ The USB interface cable is not provided with the
printer. Make sure that the USB interface cable
you use is appropriate for your computer.
Attach the USB interface cable to the USB
interface connector of the printer. Secure the
cable.
ZGDT300E
Attach the other end of the interface cable to
the USB interface connector of the computer
or the USB Hub. Secure the cable.
SETTING UP FOR PRINTING
○○○○○○○○○
Printing requires installation of a printer driver
for the operating system.
Reference
❒ See “Printer Drivers for This Printer” in the
Setup Guide.
❒ If you want to install options, see “Installing
Options” in the Setup Guide.
Securely insert the power cord plug into the
wall socket.
Press the {On Line} key.
The settings are applied and the ready message appears on the panel
display.
1
2
ZGDH260J
1 is lit when the printer is securely connected to the network.
2 is lit when 100BASE-TX is in use and not lit when 10BASE-T is in
use.
Copyright © 2001 G074-8627
Printed in Russia
 Loading...