

Page 1

MAXTOR ONETOUCH
MINI EDITION
User’s Guide
™
III
Page 2

MAXTOR ONETOUCH III MINI EDITION
Contents
USER’S GUIDE
Windows Installation
Introduction
About this Guide . . . . . . . . . . . . . . . . . . . . . . . . . . . . . . . . . . . . . . . . . . . . . . . 1
Components . . . . . . . . . . . . . . . . . . . . . . . . . . . . . . . . . . . . . . . . . . . . . . . . . . 1
Included in Package . . . . . . . . . . . . . . . . . . . . . . . . . . . . . . . . . . . . . . . . . . . . 2
System Requirements . . . . . . . . . . . . . . . . . . . . . . . . . . . . . . . . . . . . . . . . . . 2
Handling Precautions . . . . . . . . . . . . . . . . . . . . . . . . . . . . . . . . . . . . . . . . . . . 2
Maxtor Product Support . . . . . . . . . . . . . . . . . . . . . . . . . . . . . . . . . . . . . . . . . 2
Installing the OneTouch III Mini Edition
Step 1 - Connect the Drive . . . . . . . . . . . . . . . . . . . . . . . . . . . . . . . . . . . . . . . 3
Step 2 - Install the Software . . . . . . . . . . . . . . . . . . . . . . . . . . . . . . . . . . . . . 3
Step 3 - Setup the Drive . . . . . . . . . . . . . . . . . . . . . . . . . . . . . . . . . . . . . . . . . 4
Using the OneTouch III Mini Edition
Maxtor OneTouch Manager . . . . . . . . . . . . . . . . . . . . . . . . . . . . . . . . . . . . . . 5
Maxtor OneTouch Utilities . . . . . . . . . . . . . . . . . . . . . . . . . . . . . . . . . . . . . . . 6
Customizing the OneTouch Button . . . . . . . . . . . . . . . . . . . . . . . . . . . . . . . . 6
Security Settings . . . . . . . . . . . . . . . . . . . . . . . . . . . . . . . . . . . . . . . . . . . . . . . 7
Unlock Drive . . . . . . . . . . . . . . . . . . . . . . . . . . . . . . . . . . . . . . . . . . . . . . . . . . 8
Erase Drive . . . . . . . . . . . . . . . . . . . . . . . . . . . . . . . . . . . . . . . . . . . . . . . . . . . 8
Backup . . . . . . . . . . . . . . . . . . . . . . . . . . . . . . . . . . . . . . . . . . . . . . . . . . . . . . . 9
Backup File Management. . . . . . . . . . . . . . . . . . . . . . . . . . . . . . . . . . . . . . . 10
Restore. . . . . . . . . . . . . . . . . . . . . . . . . . . . . . . . . . . . . . . . . . . . . . . . . . . . . . 10
Sync . . . . . . . . . . . . . . . . . . . . . . . . . . . . . . . . . . . . . . . . . . . . . . . . . . . . . . . . 11
Automatic Sync . . . . . . . . . . . . . . . . . . . . . . . . . . . . . . . . . . . . . . . . . . . . . . . 11
Rollback . . . . . . . . . . . . . . . . . . . . . . . . . . . . . . . . . . . . . . . . . . . . . . . . . . . . . 12
Automatic Restore Points . . . . . . . . . . . . . . . . . . . . . . . . . . . . . . . . . . . . . . 13
Maxtor Encryption. . . . . . . . . . . . . . . . . . . . . . . . . . . . . . . . . . . . . . . . . . . . . 14
OneTouch III Status Icons. . . . . . . . . . . . . . . . . . . . . . . . . . . . . . . . . . . . . . . 14
OneTouch III Settings . . . . . . . . . . . . . . . . . . . . . . . . . . . . . . . . . . . . . . . . . . 15
Storing Audio . . . . . . . . . . . . . . . . . . . . . . . . . . . . . . . . . . . . . . . . . . . . . . . . . 16
Connecting and Disconnecting the OneTouch III Mini Edition. . . . . . . . . . 16
Naming Your OneTouch III Mini Edition. . . . . . . . . . . . . . . . . . . . . . . . . . . . 16
. . . . . . . . . . . . . . . . . . . . . . . . . . . . . . . . . . . . . . . . . . . . . . . . . . . . 1
. . . . . . . . . . . . . . . . . . . . . . 3
. . . . . . . . . . . . . . . . . . . . . . . . . . . 5
Macintosh Installation
Introduction
About this Guide . . . . . . . . . . . . . . . . . . . . . . . . . . . . . . . . . . . . . . . . . . . . . . 17
Components . . . . . . . . . . . . . . . . . . . . . . . . . . . . . . . . . . . . . . . . . . . . . . . . . 17
Included in Package. . . . . . . . . . . . . . . . . . . . . . . . . . . . . . . . . . . . . . . . . . . 18
System Requirements . . . . . . . . . . . . . . . . . . . . . . . . . . . . . . . . . . . . . . . . . 18
Handling Precautions . . . . . . . . . . . . . . . . . . . . . . . . . . . . . . . . . . . . . . . . . 18
Maxtor Product Support . . . . . . . . . . . . . . . . . . . . . . . . . . . . . . . . . . . . . . . 18
Installing the OneTouch III Mini Edition
Step 1 - Connect the Drive. . . . . . . . . . . . . . . . . . . . . . . . . . . . . . . . . . . . . . .19
Step 2 - Install the Software . . . . . . . . . . . . . . . . . . . . . . . . . . . . . . . . . . . . .19
Step 3 - Format the Drive . . . . . . . . . . . . . . . . . . . . . . . . . . . . . . . . . . . . . . .20
Using the OneTouch III Mini Edition
Maxtor OneTouch Manager . . . . . . . . . . . . . . . . . . . . . . . . . . . . . . . . . . . . . 23
Opening the OneTouch Manager Utility . . . . . . . . . . . . . . . . . . . . . . . . . . . 23
Backup . . . . . . . . . . . . . . . . . . . . . . . . . . . . . . . . . . . . . . . . . . . . . . . . . . . . . 24
Restore . . . . . . . . . . . . . . . . . . . . . . . . . . . . . . . . . . . . . . . . . . . . . . . . . . . . . 24
MaxBack History . . . . . . . . . . . . . . . . . . . . . . . . . . . . . . . . . . . . . . . . . . . . . 25
OneTouch Button . . . . . . . . . . . . . . . . . . . . . . . . . . . . . . . . . . . . . . . . . . . . . 26
Security . . . . . . . . . . . . . . . . . . . . . . . . . . . . . . . . . . . . . . . . . . . . . . . . . . . . 27
Erase Drive . . . . . . . . . . . . . . . . . . . . . . . . . . . . . . . . . . . . . . . . . . . . . . . . . . 28
Sync . . . . . . . . . . . . . . . . . . . . . . . . . . . . . . . . . . . . . . . . . . . . . . . . . . . . . . . 29
To Manually Sync Folders . . . . . . . . . . . . . . . . . . . . . . . . . . . . . . . . . . . . . . 30
Editing Your Sync Set . . . . . . . . . . . . . . . . . . . . . . . . . . . . . . . . . . . . . . . . . 30
Storing Audio . . . . . . . . . . . . . . . . . . . . . . . . . . . . . . . . . . . . . . . . . . . . . . . . 30
Connecting and Disconnecting the OneTouch III Mini Edition . . . . . . . . . 31
Naming Your OneTouch III Mini Edition . . . . . . . . . . . . . . . . . . . . . . . . . . . 31
. . . . . . . . . . . . . . . . . . . . . . . . . . . . . . . . . . . . . . . . . . . . . . . . . . 17
. . . . . . . . . . . . . . . . . . . . . 19
. . . . . . . . . . . . . . . . . . . . . . . . . .23
© 2006 Seagate, Seagate Technology. Maxtor and the Maxtor stylized logo are registered trademarks and Maxtor OneTouch and Maxtor DriveLock are trademarks of Seagate Technology LLC. Other trademarks
are the property of their respective holders. Specifications subject to change without notice. Actual product may vary from photo shown. Seagate Technology, 920 Disc Drive, Scotts Valley, CA 95066 U.S.A.
Page 3
MAXTOR ONETOUCH III MINI EDITION
Introduction
Thank you for selecting a Maxtor product.
The new Maxtor OneTouch
backup and storage solution with Maxtor DriveLock™ to protect
the contents of your drive in case of loss or unauthorized use.
This user’s guide will help you setup your drive and includes
helpful tips for performing backups and getting the most out
of your new OneTouch III Mini Edition.
TM
III Mini Edition provides a simple
WINDOWS INSTALLATION
About this Guide
The following symbols and conventions are used in this guide:
Bold
Used for menu, command, and keyboard selections you make and
screens you will see.
Italics
Used for emphasis and to identify new terms, which may also be
defined in the Glossary.
The OneTouch III Mini Edition features:
– USB bus-powered storage solution
– Maxtor OneTouch™ button - the simple way to backup
your files
– Maxtor DriveLock™ security feature password-
protects the contents of your drive in case of loss or
unauthorized use
– Simple Maxtor user interface for backup scheduling
and security
The Maxtor OneTouch Manager features include:
– Maxtor Encryption to encrypt your sensitive data
– Diagnostic utilities to check the health of your
OneTouch III Mini Edition
– Customizing the OneTouch button to open frequently-
used programs
– Using Maxtor Backup to back up and restore data
Components
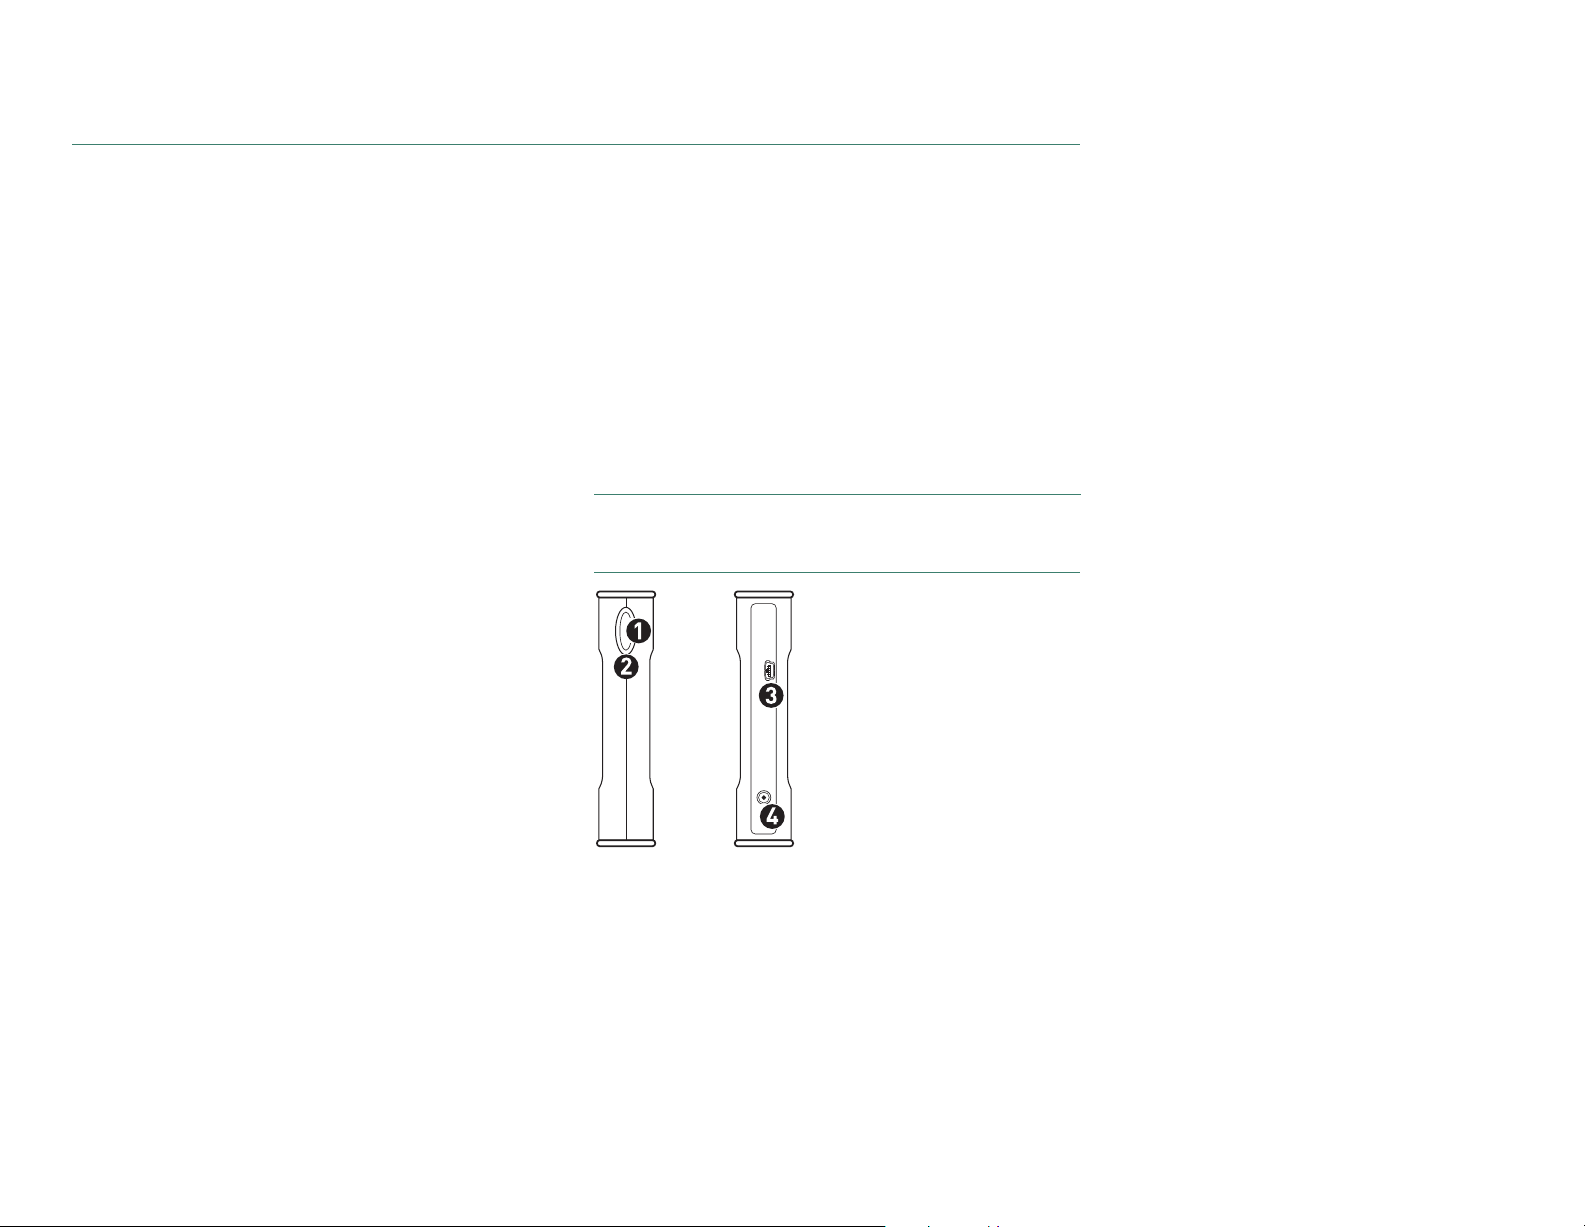
Before installing, review the solution features in Figure 1.
FIGURE 1
1. OneTouch Button
2. Status Light
3. Mini USB 2.0 Port
4. Optional Power Supply Port
SOLUTION FEATURES
PAGE 1
Page 4
MAXTOR ONETOUCH III MINI EDITION
WINDOWS INSTALLATION
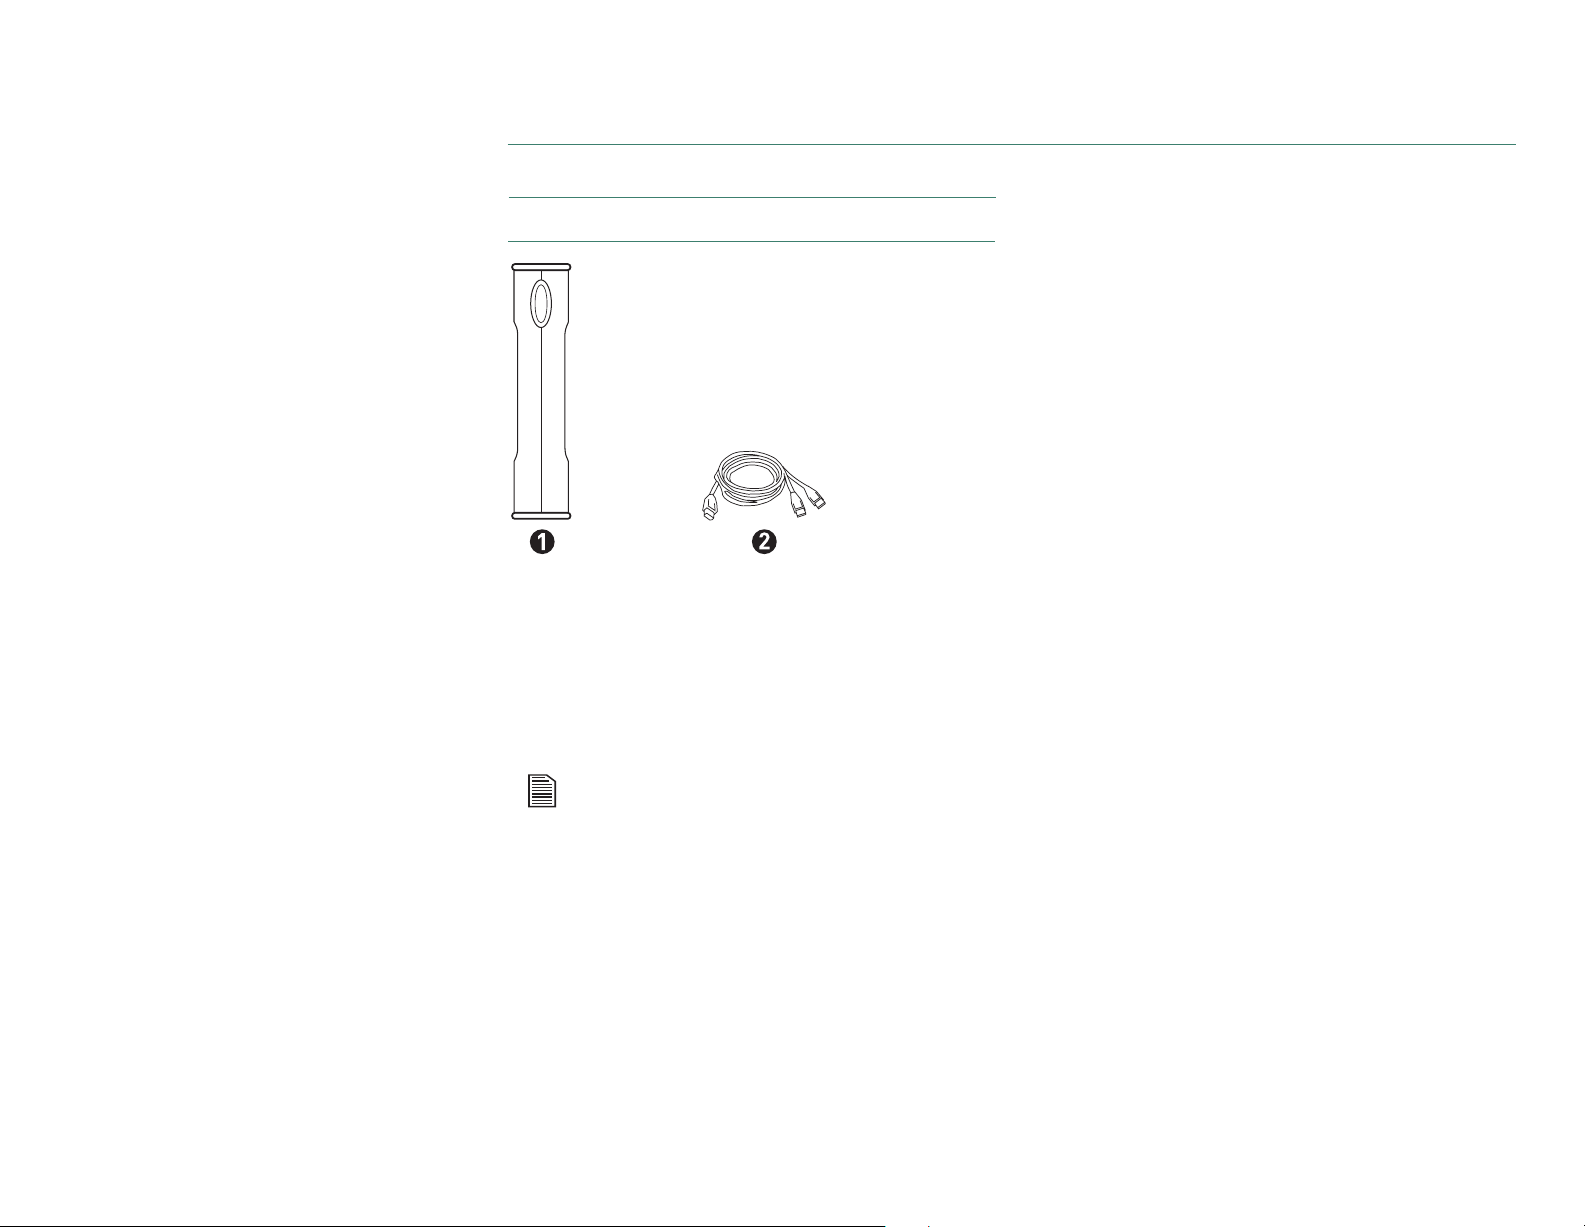
FIGURE 2
1. Backup Solution
2. USB Y-Cable
INCLUDED IN PACKAGE
System Requirements
–Pentium III, 500 Mhz equivalent processor or higher
– Windows
– 128MB RAM (256 recommended) or more as required
by operating system
–Available USB 2.0 interface port
®
2000 or XP
All references to Windows 2000 actually refer specifically to
Windows 2000 Professional.
Handling Precautions
Please handle your new OneTouch III Mini Edition with care!
Follow the precautions listed here or you could damage your
drive and void the product warranty. Review the Maxtor Limited
Warranty for more information.
Follow these precautions to prevent data loss
–
Do not
bump, move or drop the drive while in operation.
–
Do not
remove the interface cable or optional power
cord without first disconnecting the drive properly
through the operating system.
–
Do not
set any liquids or drinks on or near the drive.
Liquids will damage the internal electronics.
–
Do not
open the drive enclosure. This can cause loss of
data and will void the product warranty.
Maxtor Product Support
Maxtor Corporation provides a comprehensive product
support section on its web site, including the latest software
drivers, product specifications, a complete troubleshooting
section, and the Maxtor Knowledge Base.
Maxtor USA Support
Visit
www.maxtorkb.com for the following information:
–
Search the Hard Drive Knowledge Base
We store all resolved problems and FAQ’s in our
knowledge base. Search by product, category,
keywords, or phrases.
–
My Stuff
Login to modify or view your FAQ update
notifications or update your personal profile.
–
Most Popular Help Topics
Top five most frequently asked questions.
–
Software Download
Download installation and diagnostic programs
for your hard drive or external storage device.
Maxtor Worldwide Support
Visit
www.maxtor.com and click
worldwide support
contact us for product support outside of the USA.
or
PAGE 2
Page 5
MAXTOR ONETOUCH III MINI EDITION
Installing the OneTouch III Mini Edition
WINDOWS INSTALLATION
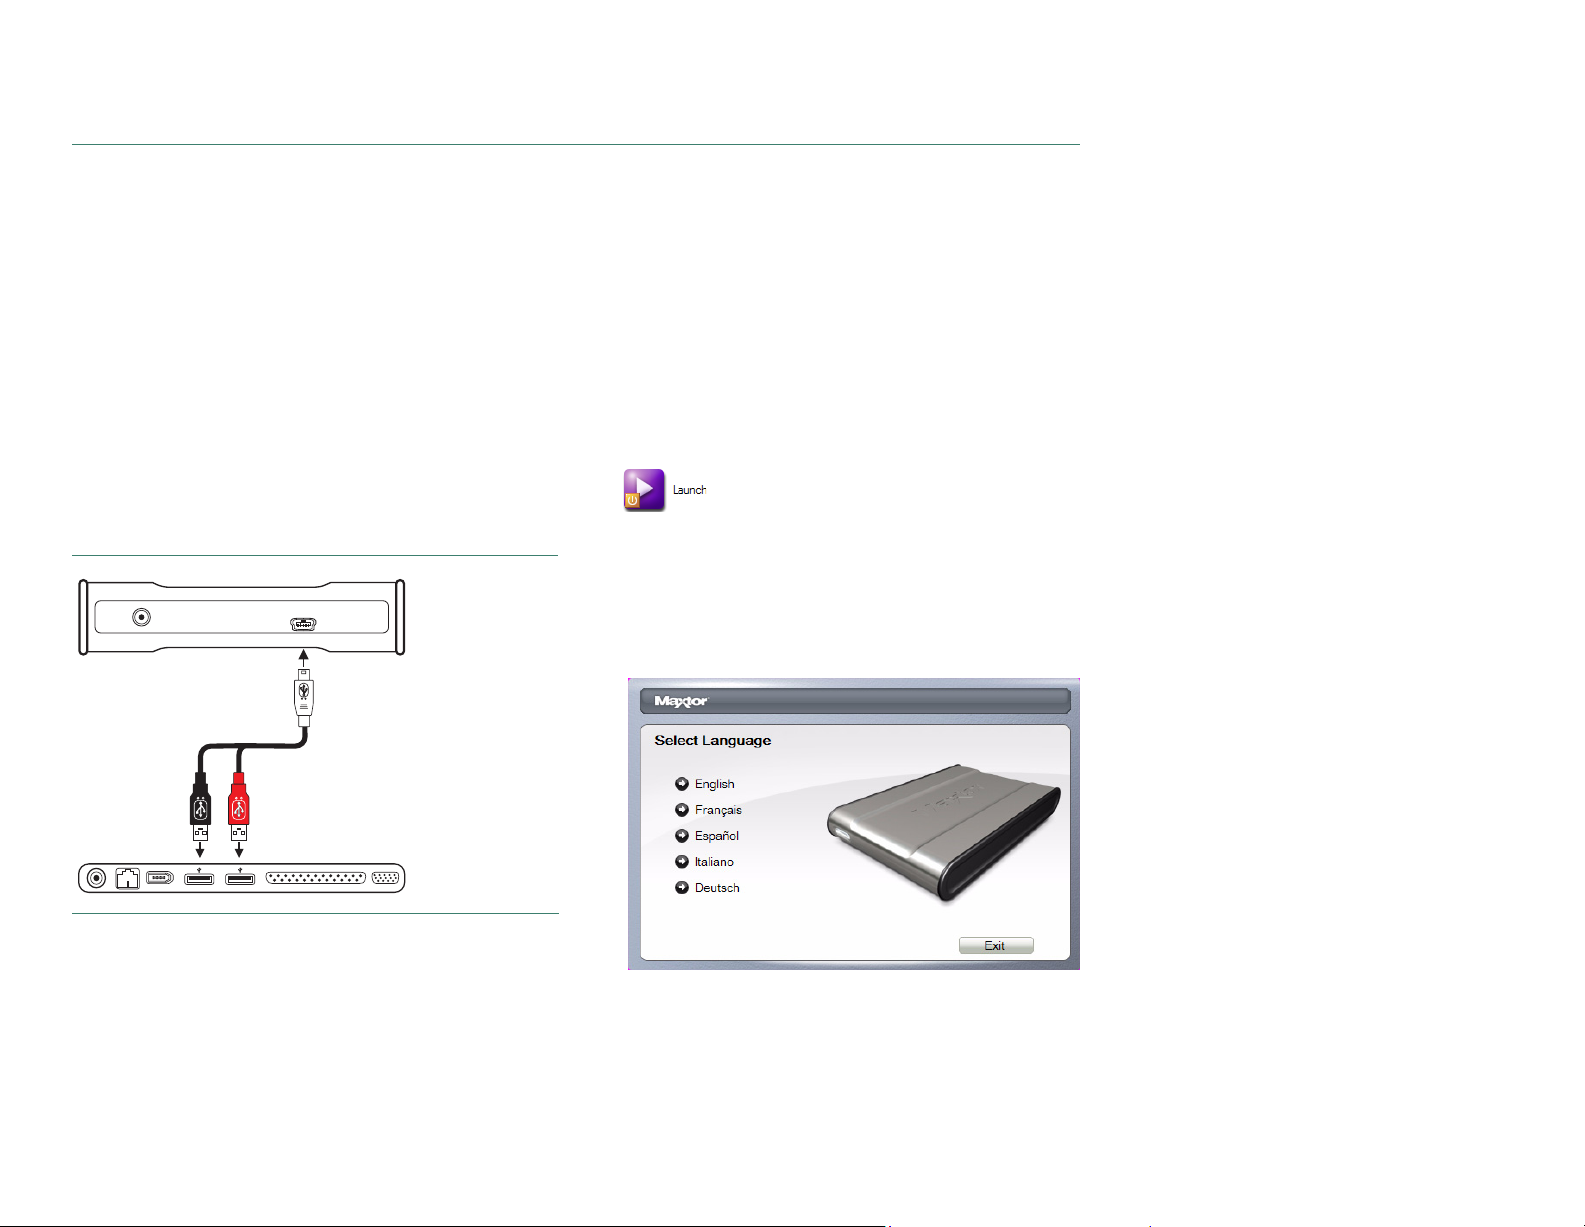
Step 1 – Connect the Drive
1. Connect the small connector on the ‘Y’ cable to your
OneTouch III Mini Edition and the red connector to any one
of the USB ports on your computer.
Note:
If your computer does not supply enough power to
the OneTouch III Mini Edition through the red connector,
plug in the unused black connector on the ‘Y’ cable to
another USB port on your computer (or a powered USB
hub).
If both ports fail to supply enough power to the drive, an
optional power supply should be purchased from Maxtor at
www.maxstore.com
FIGURE 3
CONNECTING THE ONETOUCH III MINI EDITION
Small
Connector
Black
Connector
Red
Connector
Step 2 – Install the Software
The installation software is located on the OneTouch III Mini
Edition. The following steps will guide you through the
installation procedure.
Highly Recommended
Edition to your local hard drive.
1. Click
2. From the
3. The following window displays. Select your
Start
OneTouch III Mini Edition’s drive letter and open
Launch.exe
Run
Note:
If an Autoplay window opens for the drive, select
Open folder
Launch.exe.
– Copy all files on the OneTouch III Mini
Run. Browse
.
window, click OK.
to view files, click OK and then double-click
to the drive letter used for the
Language
.
PAGE 3
Page 6
MAXTOR ONETOUCH III MINI EDITION
WINDOWS INSTALLATION
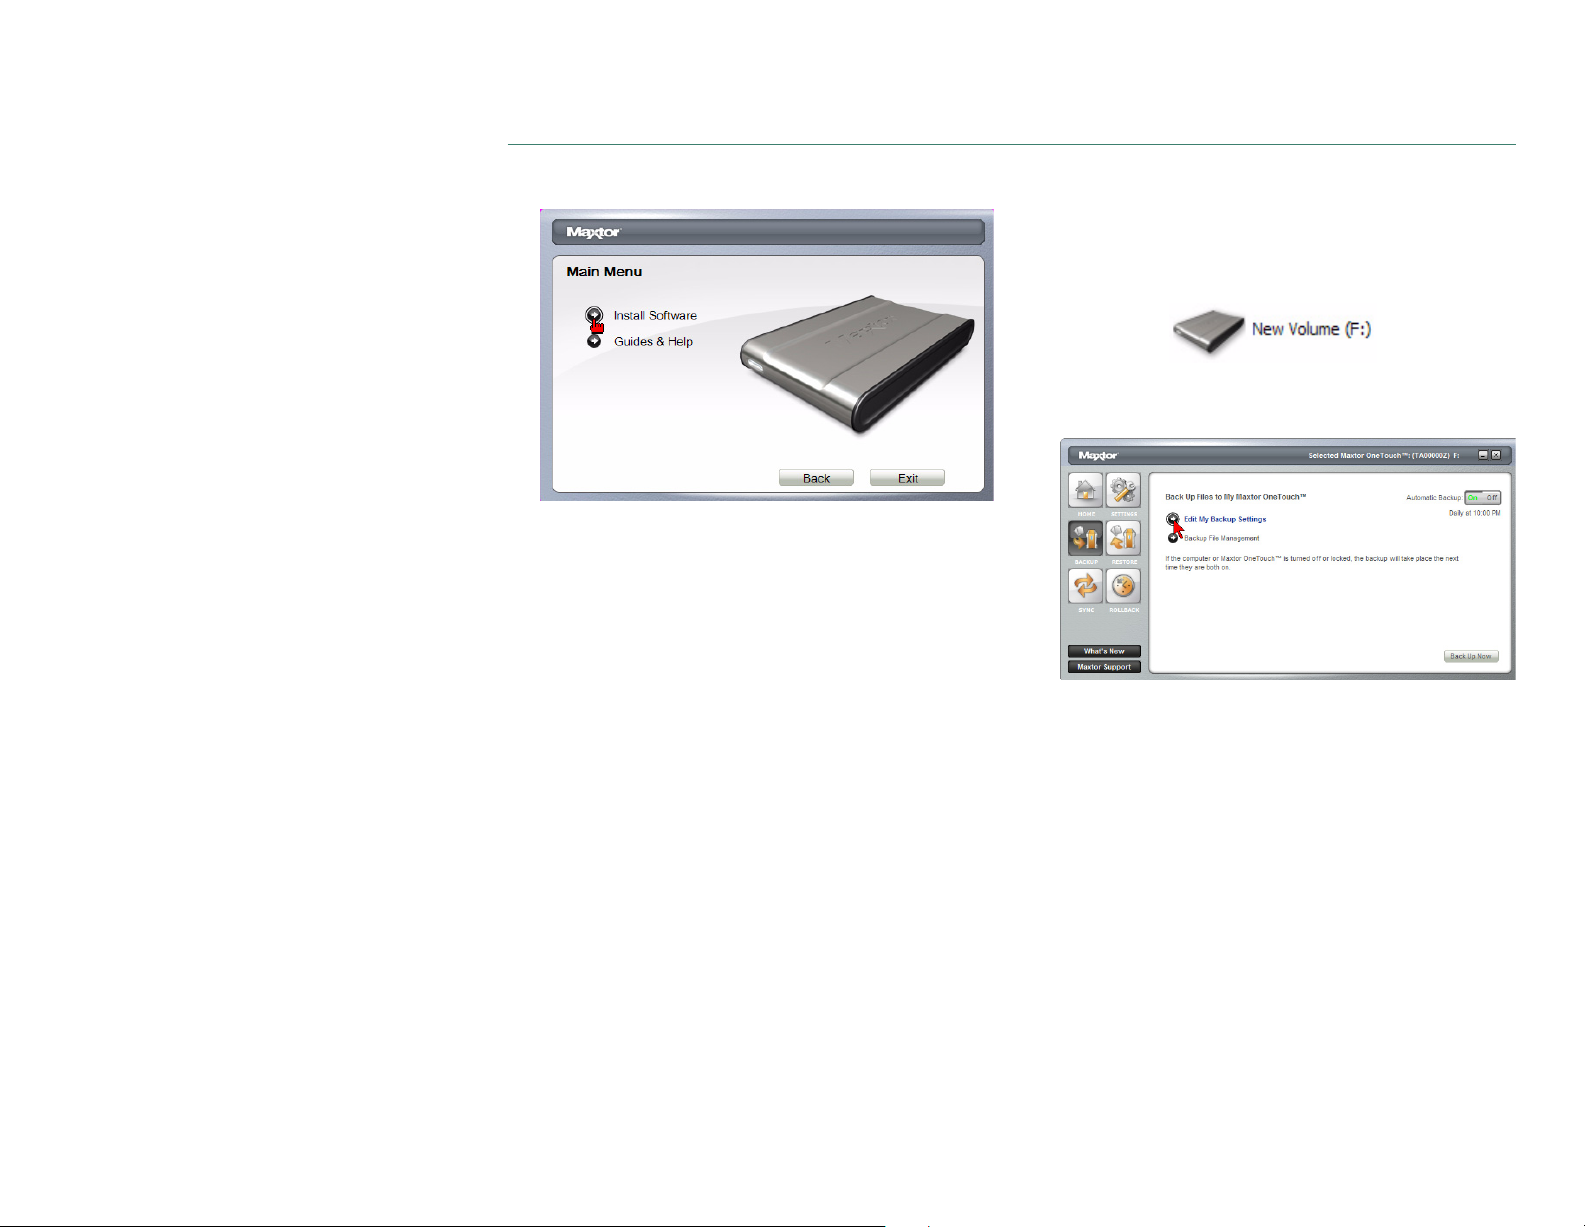
4. Click on
5. From the welcome screen, click
6. Review the
7. Select the
8. When the InstallShield Wizard completes, click
continue. The InstallShield Wizard for Maxtor Encryption
will open. From the welcome screen, click
9. Review the
10. Select the
11. When the InstallShield Wizard completes, click
continue. The InstallShield Wizard for Maxtor Backup will
open. From the welcome screen, click
12. Review the
Install Software
License Agreement
Destination Location
License Agreement
Destination Location
License Agreement
.
Next
.
and click
and click
and click
and click
Next
and click
Yes
to continue.
Next
to continue.
Next
Yes
to continue.
Next
to continue.
.
Yes
to continue.
Finish
.
Finish
to
to
Step 3 - Setup the Drive
Your new OneTouch III Mini Edition will appear in the same
way as your other drives, with a letter assigned to it by the
operating system. The assigned letter will vary depending
upon the number of other drives connected to your computer.
1. Press the
launches into the Backup: Settings Step 1 of 2.
2.
Select
3. The Backup: Settings Step 2 of 2 windows opens. Check
which
enter the
Click
4. The
displayed. To launch your first backup, click
OneTouch button
the
folders
you wish
days
you want your folders to be backed up and
time
that you want you your backup to start.
Finish
.
Back Up Files to My Maxtor OneTouch
. The Maxtor OneTouch Manager
to back up
. Click
Next
.
screen is
Back Up Now
.
13. Select the
14. When the InstallShield Wizard completes, click
restart your computer.
NOTE: Maxtor suggests that you copy the software
installation program located on the OneTouch III Mini
Edition to another location. If you opt not to create a copy
of this program or if your copy becomes corrupt, you can
download the program from Maxtor’s website at
www.maxtor.com.
Destination Location
and click
Next
to continue.
Finish
to
You can now back up your computer:
–Perform a backup at any time by pressing the OneTouch
button, or
– Right-click on the Maxtor icon in the System Tray and
select Back up now, or
– Allow Maxtor Backup to automatically run at the next
scheduled backup time.
PAGE 4
Page 7
MAXTOR ONETOUCH III MINI EDITION
Using the OneTouch III Mini Edition
Once installed, you can use your new OneTouch III Mini
Edition in the same way you use the other drives on your
computer. Some of the basic ways you can use your new
drive are:
–Move or copy files or folders from your other drives,
CD-ROMs, or other storage devices.
– Within virtually any application, save files to and open
files from the new drive.
–Store video files, spreadsheets, and other commonly
used files.
–Store copies of important files from your desktop or
laptop computer.
In this section, you can learn how to use the advanced
features of the Maxtor OneTouch III Mini Edition, including:
– Using the Maxtor OneTouch Manager to back up and
restore your data
– Customizing the OneTouch button
– Sync and system rollback
– Security settings
WINDOWS INSTALLATION
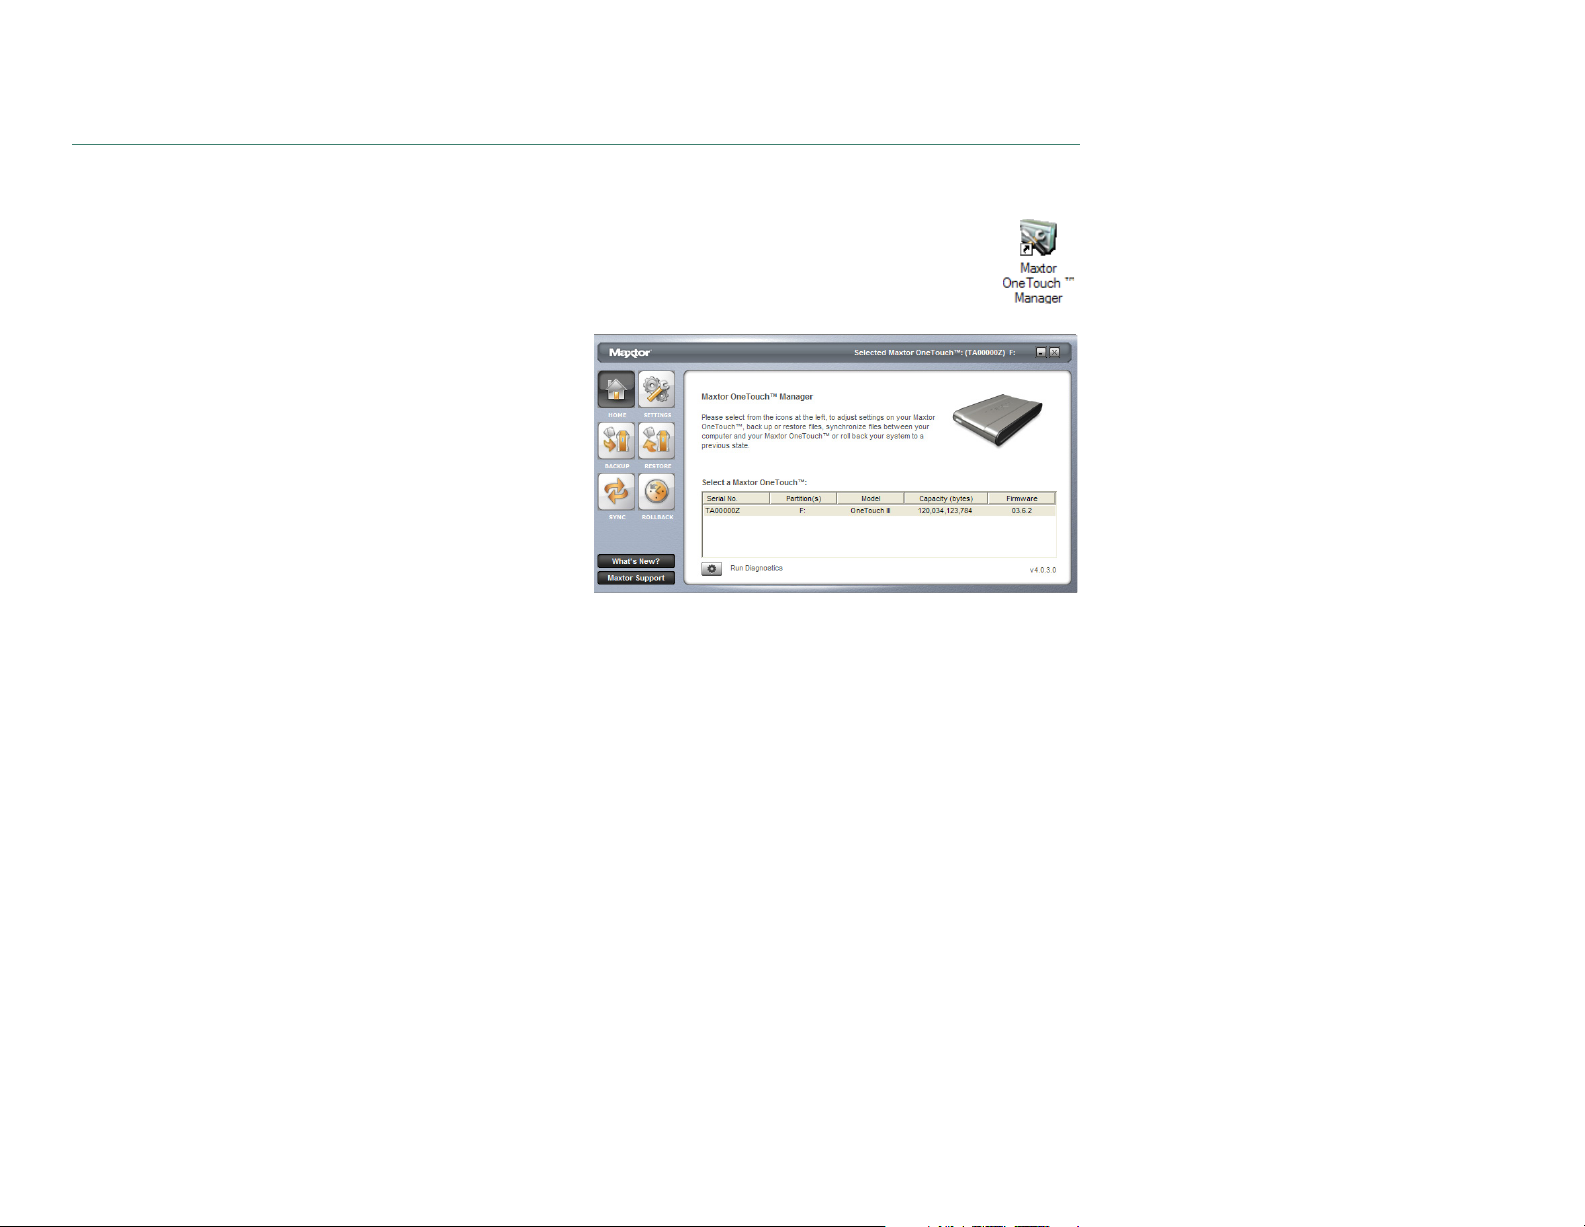
Maxtor OneTouch Manager
You can access the OneTouch Manager by
double-clicking on its desktop shortcut.
This launches the OneTouch Manager.
NOTE:
Serial number entries will be populated with your
OneTouch III Mini Edition’s drive information.
Other Options
What’s New
where you can find out all about the OneTouch III Mini
Edition’s new features.
– Click this and you’ll travel to Maxtor’s website
PAGE 5
Maxtor Support
click away from online technical support? By clicking on the
Maxtor Support button, you will be transported to Maxtor's
Knowledge Base.
- whoever thought that they could be just one
Page 8
MAXTOR ONETOUCH III MINI EDITION
WINDOWS INSTALLATION
Maxtor OneTouch Settings Utilities
The
Settings Utilities
to adjust and down times, set password level security, and
customize your OneTouch button. Press the
to access these utilities.
contains many features that allow you
Settings
button
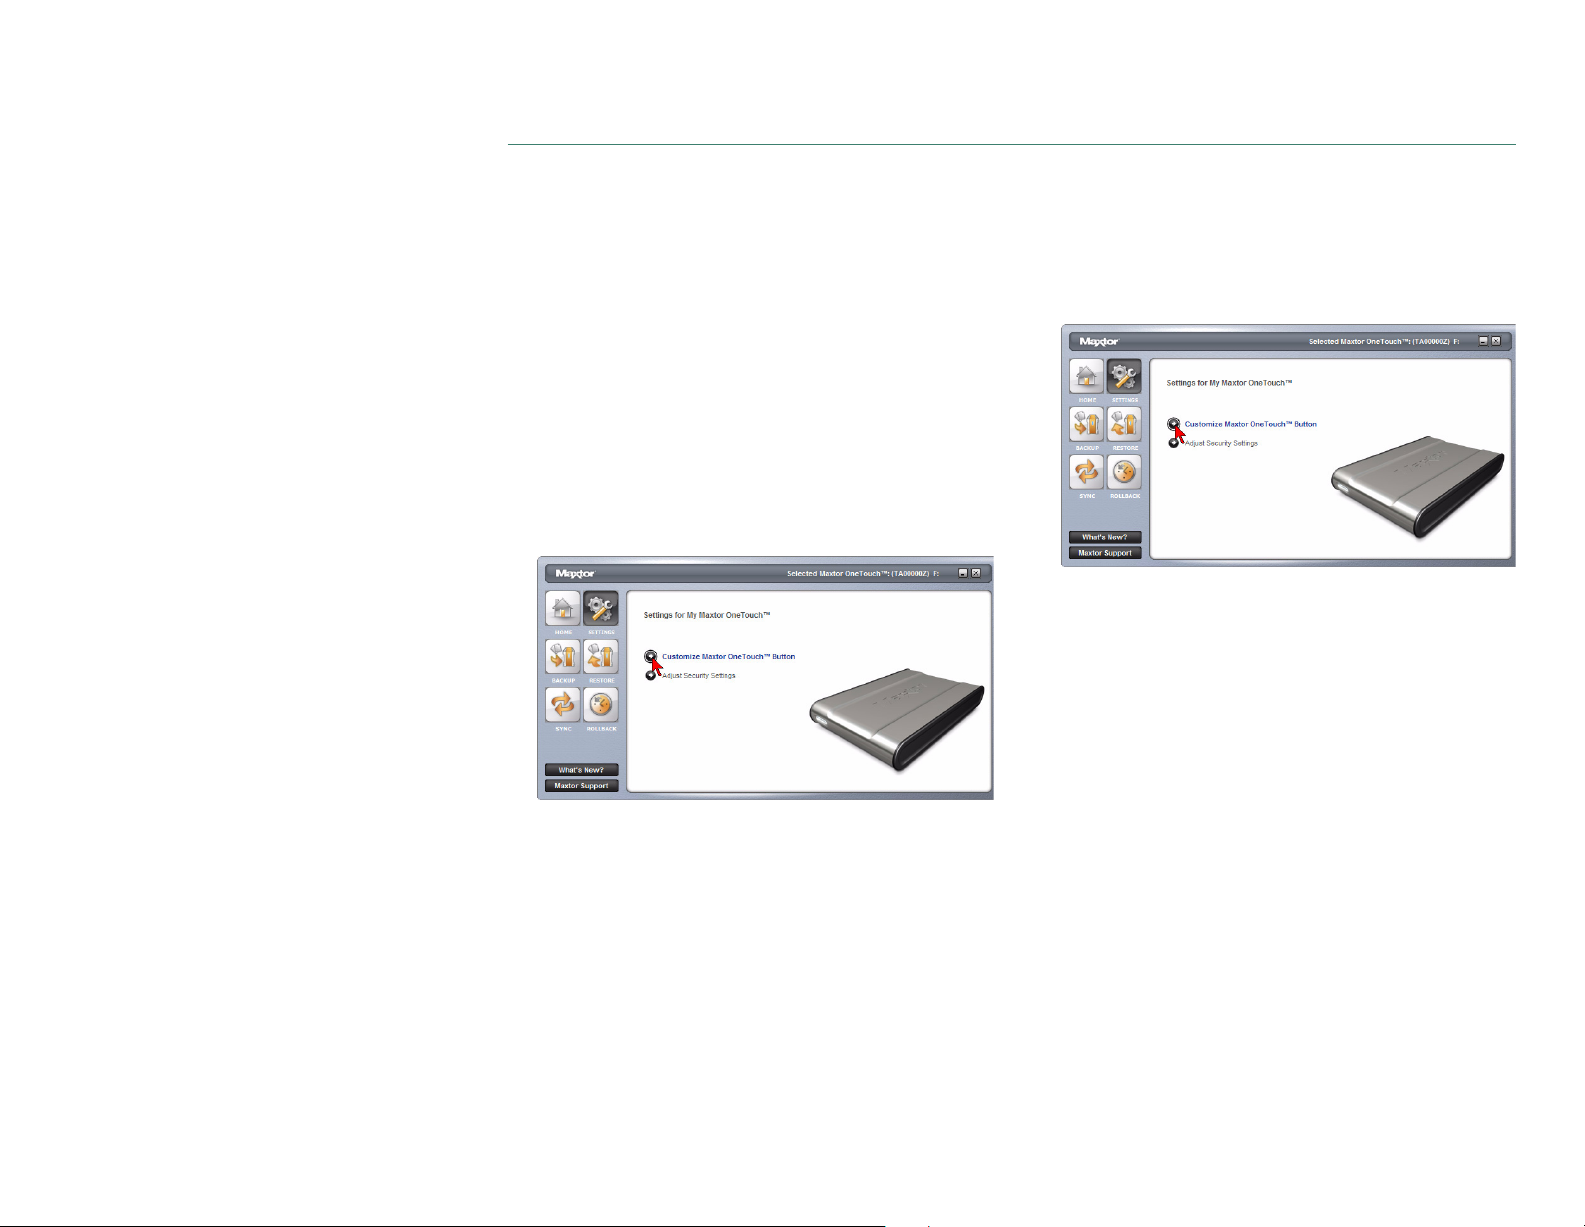
Customizing the OneTouch Button
This feature allows you to change the way that the OneTouch
button responds when you press it. By default, the OneTouch
Settings, Backup Now: Step 1 of 2 launches when you press
the OneTouch button.
To Customize Your OneTouch Settings
1. Click the
My Maxtor OneTouch
2. Click the
Settings
Customize OneTouch
button. This will open the
menu.
Settings for
button.
You can also customize the OneTouch button so that when
pressed, you will launch the Maxtor Sync program. To do this:
1. Click the
My Maxtor OneTouch
2. Click the
Note that the Maxtor OneTouch button is set by default to
launch a backup.
3. To associate the button so that it launches an application,
click the
click
4. You will be notified that the OneTouch button settings
have been customized. Click OK.
Settings
Customize OneTouch
Synchronize folders using Sync
Apply
button. This will open the
menu.
.
Settings for
button.
button, then
Note that the Maxtor OneTouch button is set by default to
launch a backup.
3. To associate the button so that it launches an application,
click the
4.
Browse
like to
5. After the name of the application has populated the
Browse
6. You will be notified that the OneTouch button settings
have been customized. Click OK.
Application
your PC and
associate
field, click
with the OneTouch button.
button then click
select an application
Apply
.
Browse
.
that you would
PAGE 6
Page 9
MAXTOR ONETOUCH III MINI EDITION
WINDOWS INSTALLATION
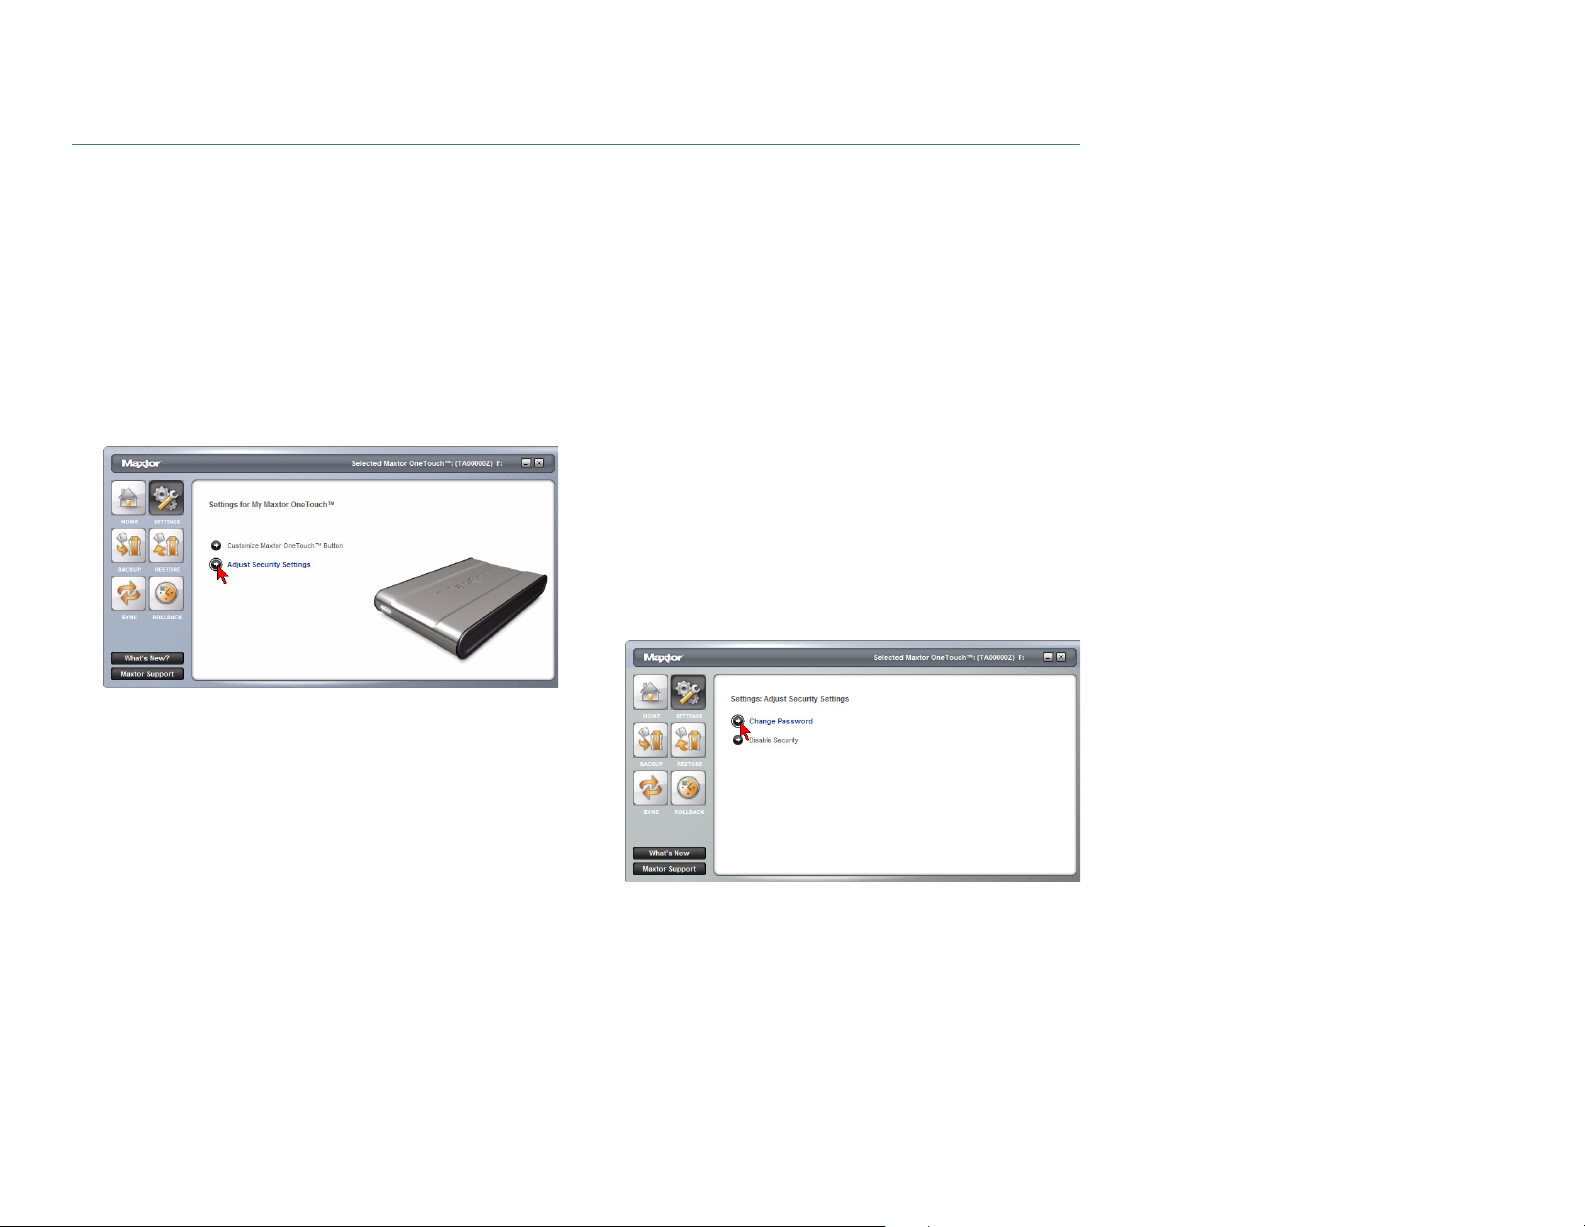
Security Settings
This feature allows you to password protect your OneTouch III
Mini Edition in the event that this drive is lost/stolen, no one
will be able to access its data unless they provide either the
password or if added, the answer that you provided to a secret
question.
Set Password
1. Click the
My Maxtor OneTouch
2. Click the
3. In the fields provided, enter a
password
characters in length and include at least one digit (for
example “abcdef” would not be a valid password;
“abcde1” would be a valid password).
Settings
Adjust Security Setting
. The password must be at least six or more
button. This will open the
menu.
button.
password
and
Settings for
re-enter
your
6. You'll be notified that a password has been set on the
OneTouch III Mini Edition. Click OK.
7. From now on, every time you restart your PC and the
OneTouch III Mini Edition is attached, or when you turn off
your drive and turn it back on, you will be prompted to
enter your password.
Type in your
or
Click the
the
Question
will be accessible.
Change Password
1. Click the
My Maxtor OneTouch menu.
2. Click the
3. You will see the following.
password
Secret
. Click OK and your OneTouch III Mini Edition
Settings
Adjust Security Setting
and click OK,
button and enter the
button. This will open the Settings for
Secret Answer
button.
to
Click
Apply
if you wish to just set a password.
Optional but Recommended
You can also provide an answer to a secret question to better
protect you in the advent that your password gets lost/stolen.
4. Click the
a
question
5. Enter the
Answer
PAGE 7
Choose a Question
.
Answer
to the secret question. Click
to the secret question and re-type the
drop-down menu and select
Apply
and
Confirm
.
Click
Change Password
4. Enter your current
button.
Click
Next
, or click the
Answer
5. Create a new password following steps 3 - 7 in Set
Password.
to the
Question
.
Password
Secret
. Then click
or click on the
button and enter the
Next
Secret
.
Secret
Page 10
MAXTOR ONETOUCH III MINI EDITION
WINDOWS INSTALLATION
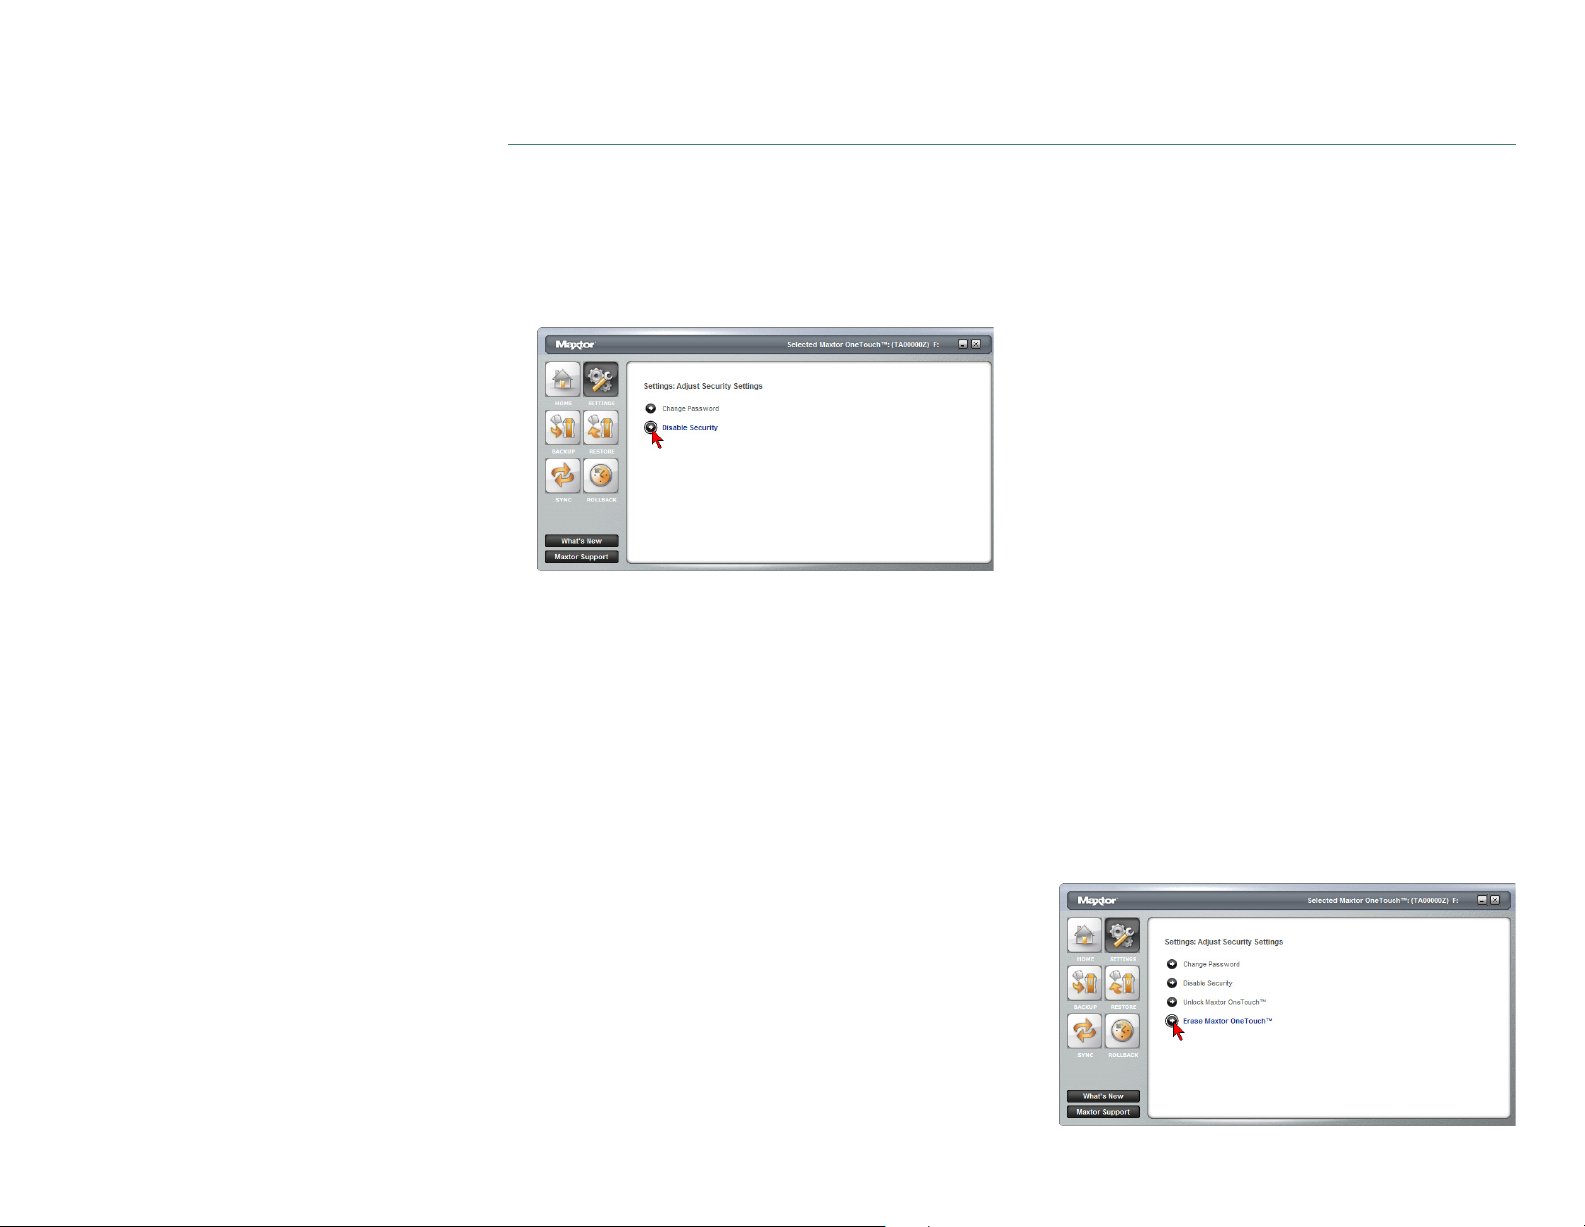
Disable Security
1. Click the
My Maxtor OneTouch
2. Click the
3. You will see the following.
Click
4. You will be prompted to enter your
Click OK, or click the
question
5. You will be informed that security has been disabled on
your OneTouch III Mini Edition. Click OK.
You can always re-create a password on the OneTouch III
Mini Edition. To do this, refer to the Set Password
procedure.
Settings
Adjust Security Setting
Disable Security
. Then click OK.
button. This will open the
menu.
.
Secret
button.
password
button and
Settings for
.
answer the secret
Unlock Drive
Though not widely used, the Unlock Drive feature can be
accessed without having to turn off you OneTouch III Mini
Edition or restarting your PC. To use this option:
1. Click the
My Maxtor OneTouch
2. Click the
Maxtor OneTouch
3. You will be prompted to enter your password.
Click OK, or click the
question
4. You will be informed that your OneTouch III Mini Edition
has been unlocked. Click OK.
Settings
Adjust Security Setting
, then click OK.
button. This will open the
menu.
.
Secret
button and
Settings for
button and click
answer the secret
Unlock
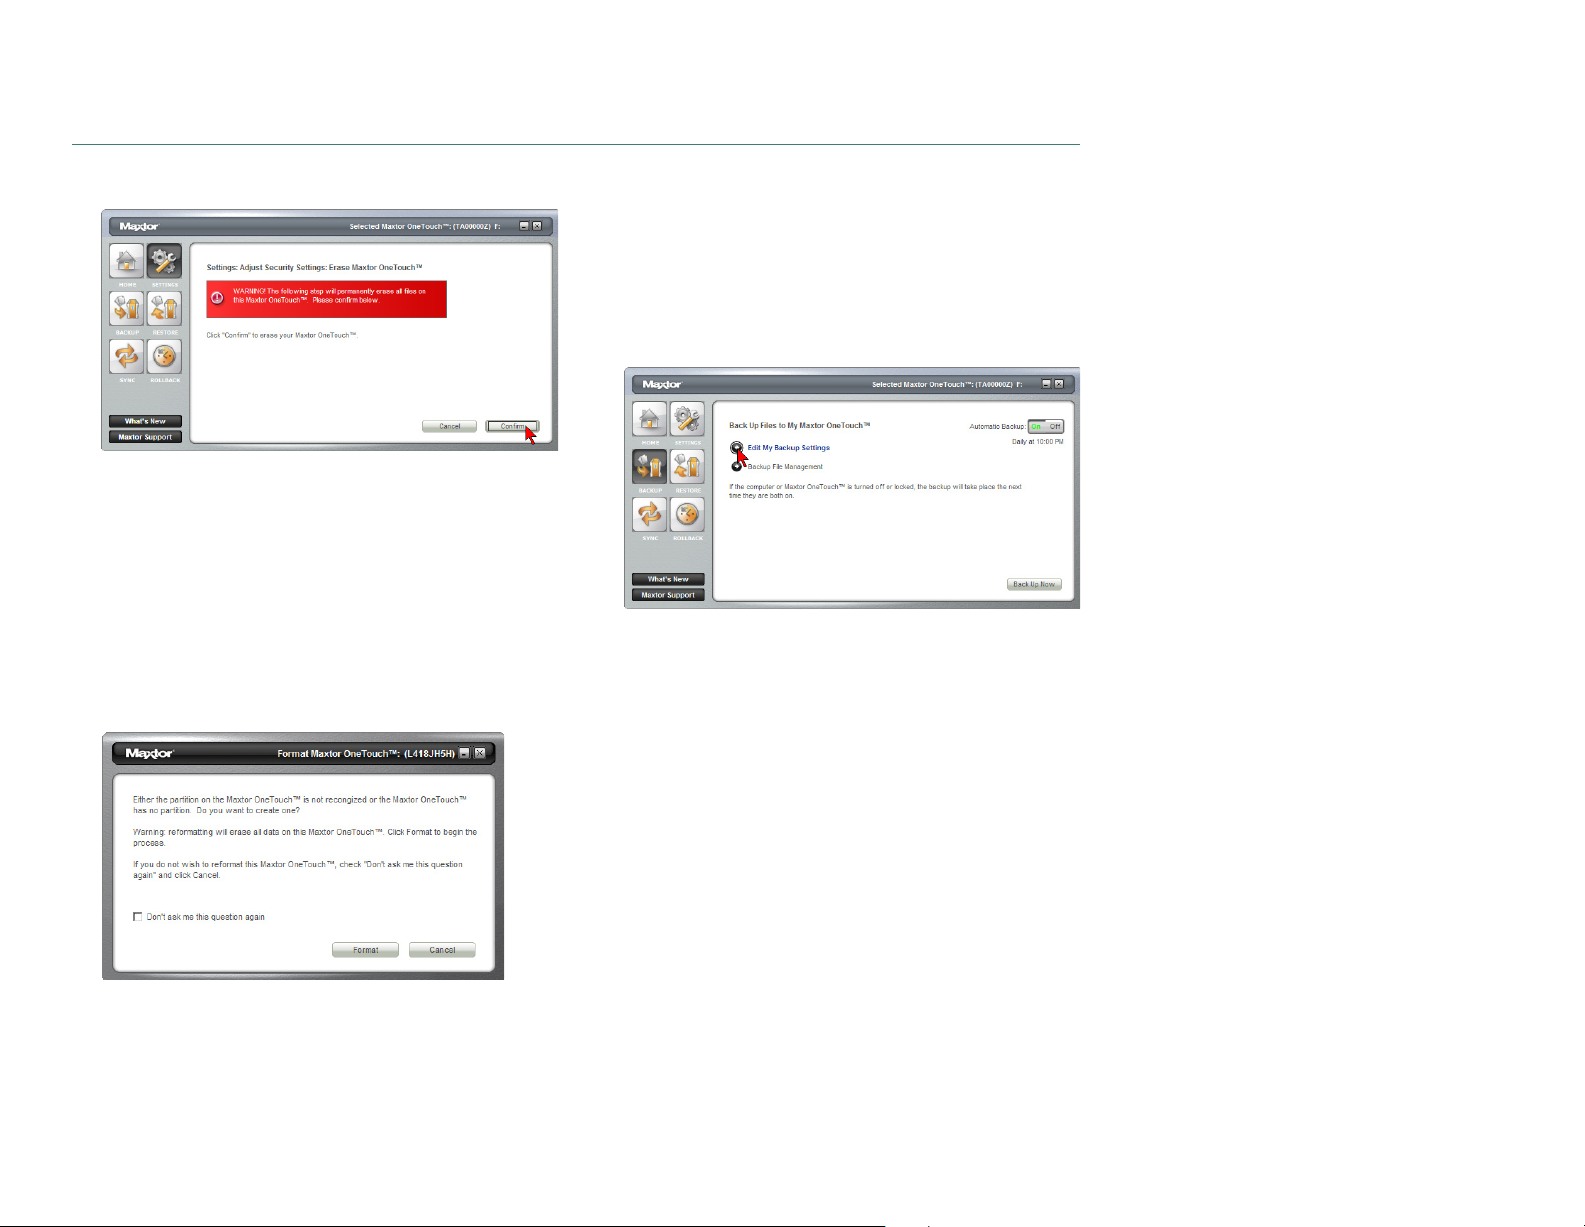
Erase Drive
If you have forgotten your password, you can attempt to reenter it or to recover it, by answering a question that you setup
originally when you created your password. You are allowed 5
attempts before you must turn off your drive and turn it back
on, to try again at which point you can try an additional 5 times.
If you are not able to recover your password, the only other way
to unlock the drive is to erase all of its contents.
1. Click the
My Maxtor OneTouch
2. Click the
3. You will see the following.
Settings
Adjust Security Setting
button. This will open the
menu.
Settings for
button.
PAGE 8
Page 11
MAXTOR ONETOUCH III MINI EDITION
Click
Erase Maxtor OneTouch
.
WINDOWS INSTALLATION
Backup
While setting up the OneTouch III Mini Edition, you learned
how to configure a backup using the Maxtor Backup Utility. In
this section, we will look at other features of this program.
To Edit Backup Settings
1. From the OneTouch Manager’s main window, click the
Backup
button.
WARNING:
4. Click
process.
NOTE:
5. When finished you will be notified that the drive is erased.
Click OK.
6. Remove then reconnect the USB connector on your
OneTouch III Mini Edition. Upon doing so, you will be
prompted to Format the drive.
The Erase Drive feature is data destructive!
Confirm
to proceed, then click
This process can take up to 1 hour to complete.
Yes
to start the
Erase
2. Click
3. Click
Automatic Backups
By default, the Backup feature will perform a backup of your
selected files at 10:00 pm daily, or at the time and on the days
that you selected when you edited the backup schedule.
To Disable (Turn Off) Scheduled Backups
1. From the OneTouch Manager’s main window, click on the
2. Click the
Edit My Backup Settings
Step 1 of 2:
you wish to back up (see Steps 1 of 2 and 2 of 2 above)
Step 2 of 2:
that you do not wish the backup to run; change the time
that you wish the backup to run.
window.
Backup
Select and/or deselect the files/folders that
Click on the checkboxes to deselect the days
Finish
. You will be returned to the
button.
Off
button to turn off scheduled backups.
.
Backup Settings
PAGE 9
Page 12

MAXTOR ONETOUCH III MINI EDITION
NOTE:
If Automatic Backups is turned
to launch backups manually:
By
pressing the OneTouch button
customized to the OneTouch button, or
By launching the
Back Up Now
To Re-enable (Turn On) Scheduled Backups
To Edit Backup Settings
1. From the OneTouch Manager’s main window, click the
Backup
2. Click the
button.
On
Maxtor OneTouch Manager ➔ Backup ➔
.
button to return to scheduled backups.
Backup File Management
This option will do the following:
– Edit the number of historical file versions saved to your
OneTouch III Mini Edition,
– Delete historical versions from your OneTouch III Mini
Edition and
–Clean up deleted files.
1. From the OneTouch Manager’s main window, click on the
Backup
2. Click
Edit Historical Versions
When you back up your files, you have the option to store
previous, or “historical,” versions of each file. You can then
restore any historical version based on the date when it was
backed up. By default, the OneTouch Manager will save five
(5) historical file versions of each revised file stored to the
OneTouch III Mini Edition.
1. To change this setting, click
down
2. Select the number of historical file versions you wish to
save to you backup this can be a number between 1-10.
3. Click
Management
button.
Backup File Management
Edit
menu.
Save
. You will return to the
menu.
Off
, you will be able
– provided it is
.
and select the
Backup File
drop-
WINDOWS INSTALLATION
Delete Historical Versions
Deletes all but the most current version of each file in your
“My Backup” folder. This can help create extra storage space
if you have numerous backup files.
1. Click
2. Click OK to return to the
Sync Backup to Computer
Deletes files in your “My Backup” folder if they no longer exist on
your computer. This can also help create extra storage space.
1. Click
2. Click OK to return to the
Restore
The OneTouch Manager’s Restore option provides you with a
simple way to restore files and folders back to your PC in the
event of data corruption or system failure.
1. From the OneTouch Manager’s Main window, click on the
To Restore a Previous File Version
1. Click on
2. Select a
Delete
, then click
from the OneTouch III Mini Edition.
Clean Up
OneTouch III Mini Edition.
Restore
from
My Maxtor OneTouch
Restore a Previous File Version (default option)
Choosing this option allows you to restore an individual
historical version of a file, based on the date it was backed
up. By default, 5 historical versions of each file are stored.
or
Restore Most Recent Files and Folders
will open the “My Backup” folder on your OneTouch III Mini
Edition, and allow you to restore multiple files and folders by
clicking and dragging them to wherever you want to put them.
up files
up files/folders will appear in the left.
populate. Once populated, use the scroll bar to
Version
, then click
button. This will launch the
Restore historical versions of individual backed-
. The
Restore Files
File column
of the file and where you want to restore the file to.
Yes
to delete historical versions
Backup File Management
Yes
to delete files from the
Backup File Management
Restore a Backup
window. You have two options:
- Choosing this option
window will appear. All backed
. This process may take awhile to
menu.
menu.
-
Select a
PAGE 10
Page 13

MAXTOR ONETOUCH III MINI EDITION
WINDOWS INSTALLATION
To Restore to the Original (default) Folder
1. Click the
folder on your computer.
2. Click
Version of the file is then copied to your computer from
the OneTouch III Mini Edition.
or
To Restore to the Temporary Folder - Restores file to the
following folder:
C:\MyDocuments\YourUserName\Maxtor_Restore
NOTE:
Click the
point, the select file will be copied to the
C:\MyDocuments\YourUserName\Maxtor_Restore folder
on your PC.
To Restore Most Recent Files and Folders:
1. Click the
will launch a window showing the root directory structure
of the Maxtor backup folder on the OneTouch III Mini
Edition.
Original
Restore
“YourUserName” is your Account Name.
Temporary
Restore most recent files and folders
button. This restores a file to its original
. If prompted, click
button, then click
Replace
Restore
. The Historic
. At this
button. This
Sync
You may select one or more folders on your computer to sync
to your OneTouch. Whenever a file changes in one of the
folders on your computer, it can be automatically copied to an
identical folder on your OneTouch. You may select folders on
one local disk (C: or D: for example) and any folders within
your My Documents folder. You can sync folders between
multiple computers. This makes it convenient for you to move
files between a computer at work and a computer at home.
1. Click the
folders that you wish to sync between your PC and the
OneTouch III Mini Edition.
2. Click
will then synchronize to the OneTouch III Mini Edition.
To Edit Sync Settings
1. Click the
Settings. Select folders that you wish to Sync with your
OneTouch III Mini Edition.
2. Click Apply.
Checking the Status of your Sync
1. Click the Sync button, then click Sync Status. The status
of your last Sync will display.
2. Click OK.
Sync button
Apply
, then click
Sync button and then click on Edit My Sync
and click
Sync Now
Set Folders
. Your selected folders
. Check the
2.
Browse
restore.
To restore files, simply drag and drop (cut/copy and paste)
files/folder from the OneTouch III to your computer.
PAGE 11
the directory and
locate files/folders
you wish to
Automatic Sync
The Automatic Sync feature can be turned on or off. By
default, this setting is On.
To Turn Automatic Sync Off
1. Click the Sync button. Click the Off button in the upper,
right corner of the Sync screen. Automatic Sync is now Off.
NOTE: If Automatic Sync is turned Off, you can launch
Sync manually:
By pressing the OneTouch button – if Sync is customized
to the OneTouch button, or
By launching the Maxtor OneTouch Manager ➔ Sync ➔
Sync Now.
Page 14

MAXTOR ONETOUCH III MINI EDITION WINDOWS INSTALLATION
To Turn Automatic Sync On
1. Click the On button located in the upper right corner of
the Sync screen. Automatic Sync is now On.
To Sync Files Between Multiple PCs
1. Sync your files from your original computer to your
OneTouch.
2. Disconnect your OneTouch III Mini Edition.
3. Connect your OneTouch III Mini Edition to the destination
computer. The Sync Settings screen will appear.
4. Select the local disk on the destination computer to store
the synchronized folders from your OneTouch III Mini
Edition.
Every time you move your OneTouch III Mini Edition
between computers, Sync will automatically compare the
folders on your OneTouch III Mini Edition to the ones on
your computer to look for files that have changed. If any
files have changed, it will ask you if you would like to
replace the older files with their newer versions.
To Manually Sync Folders
There are two ways to do this:
Using the Sync screen
1. Click the Sync button, then click Sync Now.
or
2. Press the OneTouch button.
Rollback
NOTE: The Rollback feature is only supported by Windows XP
Home and Windows XP Professional operating systems.
1. Click the Rollback button.
You can use rollback to undo changes to your computer
and restore its software and settings to a previous state,
based on a date in the past called a “Restore Point.” Think
of a restore point as a snapshot of your system.
It's good to create a restore point if you are about to make a
major change to your system, like installing new software
or making major changes to your computer's settings.
Rolling your computer back to a previous restore point
will not cause you to lose any of your current work, like
documents, email or web browser bookmarks.
Set Automatic Restore Points
1. Click Set automatic restore points.
2. Select an Automatic Restore Point Interval (by default the
interval is 24 hours). Move the slider to select the amount
of disk space used on the OneTouch III Mini Edition for
available restore points (by default, the value is 12%).
3. Click Apply.
NOTE: Decreasing the percentage of disk space used may
reduce the number of available restore points.
Creating a Restore Point
You may either create a restore point manually or set a
regular time for a restore point to be created automatically.
To manually create a restore point:
1. From the OneTouch Manager, click the Rollback button.
2. Click Create a restore point of my current system. The
Rollback: Create Restore Point window is displayed. In
the field provided, enter a name for your restore point.
3. Click Create. A window displays that the Creation of your
restore point is in progress. When finished, you will be
notified that the restore point has been created.
4. Click OK to return to the Rollback menu.
PAGE 12
Page 15

MAXTOR ONETOUCH III MINI EDITION WINDOWS INSTALLATION
Rolling Back Your System
You may select a date in the past and a restore point to
restore.
1. From the OneTouch Manager, click the Rollback button.
2. Click Restore my computer to a previous state. Select a
date and a restore point.
3. Click Next. A Rollback screen will display the selected
restore point.
NOTE: Save all files and close all open programs (other
than the OneTouch Manager) before continuing.
4. Click Restore. During the rollback process, your
computer will shut down. When your computer reboots,
the rollback will be complete.
Undoing a System Rollback
If, after you roll back your system, you decide that you want to
go back to your previous system state, you may undo the
rollback you just completed.
1. From the OneTouch Manager, click on the Rollback
button.
2. Click Undo my last system rollback system restore. A
Rollback: Undo screen will display.
NOTE: Save all files and close all open programs (other
than the OneTouch Manager) before continuing.
3. Click Undo.
During the rollback-undo process, your computer will
shut down. When your computer reboots, the rollback will
be complete and your system will return to its previous
state prior to your last rollback.
Automatic Restore Points
By default, a restore point will happen every 24 hours (or
when it has been configured via Set Automatic Restore
Points).
To Turn Automatic Restore Points Off
1. Click the Rollback button. Then click the Off button in the
upper right corner of the Rollback screen. Automatic
Restore Points is now Off.
NOTE: If Automatic Restore Points is shut off, you will
have to manually create restore points. There is no other
method to create them.
To Turn Automatic Restore Points On
1. Click the Rollback button.
2. Click the On button of the Rollback screen. Automatic
Restore Points is now On.
Maxtor Encryption
What is Encryption?
Encryption modifies a file, using a secret code, so that it is
unreadable until you unlock (or decrypt) it by entering a
special password.
Encryption is the easiest way to prevent other people from
opening your confidential files.
To Encrypt a File
1. Right-click on a file you wish to encrypt. From the pop-up
menu, select Encrypt/Decrypt.
PAGE 13
Page 16

MAXTOR ONETOUCH III MINI EDITION WINDOWS INSTALLATION
NOTE: You can only encrypt one file at a time. You cannot
encrypt a folder or encrypt multiple files at once.
2. Enter a password for your file.
Password Requirements
– Must be between 8 and 64 characters in length.
– Must contain both letters and numbers.
– Can contain any printable characters, including spaces.
3. In the Confirm Password box, re-enter your password.
4. Click OK. At this point, the Maxtor Encryption utility
secures your file and the filename will change to
associate with the Maxtor Encryption utility.
WARNING: There is no method for recovering a lost
encryption password. Maxtor recommends that you
choose a password that is memorable and/or write down
and store you password in a safe place to help avoid such
a situation.
To Decrypt a File
1. Double-click the encrypted file.
2. Enter the password for the file.
3. Click OK. At this point, the Maxtor Encryption utility will
decrypt your file. The icon for your file will change to its
original form (without a padlock) to indicate that your file
is decrypted (or unlocked).
4. You can now open your file.
OneTouch Status Icons
The OneTouch Status Icon(s) are located in the Windows
System Tray – located near the clock on your desktop.
The status icon can do the following
– Report OneTouch III Mini Edition connection and or the
status of the last backup
– Be used for accessing certain OneTouch Manager features
ONETOUCH STATUS ICONS
Icon Meaning
Blue
Green
OneTouch III Mini Edition is connected
but setting is not initialized.
Last backup completed successfully.
Yellow
Red
Backup is in progress.
Last backup failed.
PAGE 14
Page 17

MAXTOR ONETOUCH III MINI EDITION WINDOWS INSTALLATION
Using the status icon to access OneTouch Manager features
1. Click the Status Icon. You will see the following menu:
Let’s take a look at these options.
Backup Now
When selected, you will start an immediate backup of files/
folders selected through the OneTouch Manager’s Backup
feature.
2. Click Backup Now. When complete, click OK to close the
window.
Backup Status
When selected, this will open a text based report of your
backup history.
1. Click Backup Status.
2. Click Open to launch a text file showing the history of your
system backups. When finished, save the text file to your
system. It may be handy if future troubleshooting is
required.
Backup Settings
When selected, this will open the OneTouch Manager’s Backup
feature to the Back Up Files to My Maxtor OneTouch menu.
Click Backup Settings.
From this window, you can:
Restore
When selected, this will open the OneTouch Manager’s
Restore feature to the Restore a Backup from My Maxtor
OneTouch menu.
Click Restore. From this window, you can:
– Restore historical versions of individual backed-up files
– Restore most recent files and folders
OneTouch III Settings
When selected, this option will launch the Settings for My
Maxtor OneTouch menu.
Click OneTouch III Settings. From this menu, you can:
– Customize the OneTouch button
– Set Password Security
Exit
When selected, this option will exit the OneTouch Status and
remove the Status icon from the System Tray.
1. Click Exit.
2. Click Yes to close the OneTouch Status.
The Status icon is removed from the System Tray and the
OneTouch Status utility is closed.
How to Re-launch OneTouch Status
The Maxtor OneTouch Status will automatically launch upon
system restart. However, you can manually launch it without
having to reboot your PC. To do this, click Start ➔ Programs
(All Program for Windows XP) ➔ Maxtor ➔ OneTouch Status
➔ OneTouch Status icon.
– Edit Backup Settings
– Manage File Backups
– Launch an immediate File Backup
–Toggle Automatic Backups
PAGE 15
Page 18

MAXTOR ONETOUCH III MINI EDITION WINDOWS INSTALLATION
Important Note: For users of the Maxtor Shared Storage
Plus Quick Start Software
Both the OneTouch Manager and the Quick Start software
packages utilize the same status icons. If you have both
software packages installed, your menu will look similar to
the following:
Storing Audio
Using your computer as an audio jukebox is a very popular
application. This allows you to store and play thousands of
your favorite songs. You can also create and manage an audio
library from your Maxtor OneTouch III Mini Edition.
Connecting and Disconnecting the OneTouch III Mini Edition
The USB interface allow you to hot swap your Maxtor
OneTouch III Mini Edition; that is, connect and disconnect the
drive while the computer and your drive are turned on.
To Connect the OneTouch III Mini Edition to Your Computer
Plug the USB cable into your Maxtor OneTouch III Mini Edition
and your computer.
To Disconnect the OneTouch III Mini Edition from Your Computer
1. Double-click the Windows Unplug or Eject Hardware icon
in your system icon tray. A list of device choices appears.
2. Select your OneTouch III Mini Edition
and follow the on-screen directions
to eject the drive. The system will
display a
can safely remove the drive.
3. Disconnect your OneTouch III Mini Edition from your
computer. Your system may not allow you to disconnect
the drive. In this case, you may need to close all open
applications and documents or shut down your system
completely to disconnect the drive safely.
WARNING: Removing the OneTouch III Mini Edition from
your computer without disconnecting it properly through
the operating system can result in lost or damaged files.
message saying that you
Naming Your OneTouch III Mini Edition
Your untitled OneTouch III Mini Edition appears in the same
way as your other drives, with a new drive letter assigned by
the operating system. The assigned letter will vary depending
upon the number of other drives connected to your computer.
Make a note of this drive letter. Its a good idea to name your
new drive so it’s easy to identify later when you use it for
backing up your files.
1. Open the My Computer icon.
2. Right-click your Maxtor OneTouch III Mini Edition icon
and select Properties. The Properties window will open.
3. In the Label section at the top of the window, enter a
name. For example: “Maxtor.”
PAGE 16
Page 19

MAXTOR ONETOUCH III MINI EDITION
Introduction
Thank you for selecting a Maxtor product.
The new Maxtor OneTouch
backup and storage solution with Maxtor DriveLock™ to protect
the contents of your drive in case of loss or unauthorized use.
This user’s guide will help you setup your drive and includes
helpful tips for performing backups and getting the most out
of your new OneTouch III Mini Edition.
TM
III Mini Edition provides a simple
MACINTOSH INSTALLATION
About this Guide
The following symbols and conventions are used in this guide:
Bold
Used for menu, command, and keyboard selections you make and
screens you will see.
Italics
Used for emphasis and to identify new terms, which may also be
defined in the Glossary.
The OneTouch III Mini Edition features:
– USB bus-powered storage solution
– Maxtor OneTouch™ button - the simple way to backup
your files
– Maxtor DriveLock™ security feature password-
protects the contents of your drive in case of loss or
unauthorized use
– Simple Maxtor user interface for backup scheduling
and security
The Maxtor OneTouch Manager features include:
– Diagnostic utilities to check the health of your
OneTouch III Mini Edition
– Customizing the OneTouch button to open frequently-
used programs
– Using Maxtor Backup to back up and restore data
Components
Before installing, review the solution features in Figure 1.
FIGURE 1
1. OneTouch Button
2. Status Light
3. Mini USB 2.0 Port
4. Optional Power Supply Port
SOLUTION FEATURES
PAGE 17
Page 20

MAXTOR ONETOUCH III MINI EDITION
MACINTOSH INSTALLATION
FIGURE 2
1. Backup Solution
2. USB Y-Cable
INCLUDED IN PACKAGE
System Requirements
– Apple G4 processor or greater
– Mac OS X (10.2.8 or later)
– 128MB RAM (256 recommended) or more as required
by operating system
–Available USB 2.0 interface port
Handling Precautions
Please handle your new OneTouch III Mini Edition with care!
Follow the precautions listed here or you could damage your
drive and void the product warranty. Review the Maxtor Limited
Warranty for more information.
Follow these precautions to prevent data loss
–
Do not
bump, move or drop the drive while in operation.
–
Do not
remove the interface cable or optional power
cord without first disconnecting the drive properly
through the operating system.
–
Do not
set any liquids or drinks on or near the drive.
Liquids will damage the internal electronics.
–
Do not
open the drive enclosure. This can cause loss of
data and will void the product warranty.
Maxtor Product Support
Maxtor Corporation provides a comprehensive product
support section on its web site, including the latest software
drivers, product specifications, a complete troubleshooting
section, and the Maxtor Knowledge Base.
Maxtor USA Support
Visit
www.maxtorkb.com for the following information:
–
Search the Hard Drive Knowledge Base
We store all resolved problems and FAQ’s in our
knowledge base. Search by product, category,
keywords, or phrases.
–
My Stuff
Login to modify or view your FAQ update
notifications or update your personal profile.
–
Most Popular Help Topics
Top five most frequently asked questions.
–
Software Download
Download installation and diagnostic programs
for your hard drive or external storage device.
Maxtor Worldwide Support
Visit
www.maxtor.com and click
contact us for product support outside of the USA.
worldwide support
or
PAGE 18
Page 21

MAXTOR ONETOUCH III MINI EDITION
Installing the OneTouch III Mini Edition
MACINTOSH INSTALLATION
Step 1 – Connect the Drive
1. Connect the small connector on the ‘Y’ cable to your
OneTouch III Mini Edition and the red connector to any one
of the USB ports on your computer.
Note:
If your computer does not supply enough power to
the OneTouch III Mini Edition through the red connector,
plug in the unused black connector on the ‘Y’ cable to
another USB port on your computer (or a powered USB
hub).
If both ports fail to supply enough power to the drive, an
optional power supply should be purchased from Maxtor at
www.maxstore.com
FIGURE 3
CONNECTING THE ONETOUCH III MINI EDITION
Small
Connector
Black
Connector
Red
Connector
Step 2 – Install the MaxBack Software
NOTE:
You must first install this software in order to use the
OneTouch button and other OneTouch III features.
Highly Recommended
Edition to your local hard drive.
1. Double-click on the
Edition located on your Desktop.
2. From the Finder window, double-click on the
OneTouch Mini.dmg
3. Double-click on the icon labeled
located on your Desktop.
4. Select the folder associated with your language
(e.g., English).
– Copy all files on the OneTouch III Mini
USB icon
file.
for the OneTouch III Mini
Mac
Mac OneTouch III Mini
PAGE 19
5. Double-click on the icon labeled
6. From the Welcome screen, click
7. Review the
Continue
8. To confirm, click
9. Select a
Continue
Software License Agreement
.
Agree
.
Destination
.
(e.g., Macintosh HD) and click
OneTouch Manager
Continue
.
and click
.
Page 22

MAXTOR ONETOUCH III MINI EDITION
MACINTOSH INSTALLATION
10. Click
11. If prompted, enter your user
12. A window appears notifying you that the installation
13. At this point, the OneTouch Manager installs to your Mac.
14. When finished, click
Install
. After reading the
Accept
.
authenticate. Click OK to proceed.
process requires a system restart. When ready, click
Continue Installation
.
Restart
License Agreement
Name
and
Password
.
, click
to
Step 3 - Format the Drive
The OneTouch III Mini Edition is shipped with a Windows file
structure. The drive must be formatted and partitioned for
the appropriate Macintosh file system.
1. Open
2. Select the
3. Click the
Finder ➔
volumes window on the left side of screen.
Applications ➔
Maxtor OneTouch III
Erase
tab.
Utilities ➔
from the available
Disk Utility
.
4. After the Erase process is complete, select your
OneTouch III Mini Edition
PPPPaaaarrrrttttiiiittttiiiioooonnnn tab.
NOTE:
For detailed information about disk formatting
and partitioning a disk, please refer to
in the list and click on the
Mac Help
.
PAGE 20
Page 23

MAXTOR ONETOUCH III MINI EDITION
MACINTOSH INSTALLATION
Setup Your OneTouch Drive
1. Press the OneTouch button. You will see the following:
2. Click the Plus (+) Sign to Add folders to your backup.
3. Select folders that you wish to back up (e.g., Music). You
may select multiple folders in a list by holding down the
command key while clicking each folder.
4. After folders have been selected, click Open.
PAGE 21
Page 24

MAXTOR ONETOUCH III MINI EDITION
MACINTOSH INSTALLATION
Backup Scheduling
Enable Scheduled Backups.
This turns scheduled backups on or off.
Set Day and Time
1. Choose a time for your backup by clicking the arrow
buttons or typing.
2. Choose day(s) by clicking them.
Other Backup Options
Click on the
available:
Wake my Macintosh if it is asleep
Select this option to automatically wake up your Macintosh,
so that backup can take place. If you do not select this option,
you will need to manually wake up your Macintosh before
backup can start.
Start my Macintosh if it is not running
Select this option to automatically start your Macintosh, so
that backup can take place. This requires that the “automatically log in “option is selected for your Mac OS X user
account”.
If you currently log in manually and would like to switch to
automatic login:
1. Go to the Apple Menu and choose
2. Click
3. Click the
4. Type your
5. Click your
6. Click
Options
Accounts
Login Options
button. The following options are
.
lock
at the bottom of the window.
password
user account
and click OK.
.
.
System Preferences
.
7. Click
8. Choose your
9. Type your
Shut down my Macintosh when backup is finished
Select this option to automatically shut down your Macintosh
when backup is finished.
After you've selected the folders to back up, the day and the
time, you can back up your folders immediately by clicking
Back Up Now
Automatically
user name
password
.
log in as.
from the drop-down list.
and click OK.
PAGE 22
Page 25

MAXTOR ONETOUCH III MINI EDITION
Using the OneTouch III Mini Edition
MACINTOSH INSTALLATION
Maxtor OneTouch Manager
Your OneTouch III Mini Edition includes a utility that allows
you to:
– Find out more information about your drive
– Customize your OneTouch button to open a different
application or synchronize folders
– Control power management settings for your drive
– Enable password security to restrict access to your
OneTouch III Mini Edition
– Run diagnostic tests to troubleshoot potential hardware
problems with your OneTouch III Mini Edition
Opening the OneTouch Manager Utility
Go to
Finder
–
Applications
Manager.
Features
What’s New
where you can learn more about the OneTouch III Mini
Edition’s new features.
Maxtor Support
click away from online technical support? By clicking on the
Maxtor Support button, you will be transported to Maxtor's
Knowledge Base.
– click this and you’ll travel to Maxtor’s website
- whoever thought that they could be just one
and open the Maxtor OneTouch
Other Features
Diagnostics
Edition
Backup
Restore
Settings
apply password security
Sync Now
to the OneTouch III Mini Edition
Drive Information
This tool displays the selected OneTouch III Mini Edition’s
volume information, free space available, serial number and
firmware revision of the drive.
Click the
return the OneTouch Manager’s main window.
Diagnostic
If you suspect there may be problems with your OneTouch III
Mini Edition, you can run the diagnostic test.
Click on
The diagnostic test will launch immediately.
A status bar will appear along with a message indicating “The
drive is now being tested.”
When finished, a message will appear indicating “The drive
passed its most recent diagnostic test”.
If the test finds your drive to be defective, it will display a
Return Material Authorization (RMA) diagnostic code you will
use to return your drive for replacement under warranty.
– checks the health of your OneTouch III Mini
– launches MaxBack Directory.
– launches MaxBack Directory
– allows you to customize the OneTouch button and
– allows you to synchronize folders from your Mac
Information
Diagnostics
icon. Then click
.
Close
when finished to
PAGE 23
Page 26

MAXTOR ONETOUCH III MINI EDITION
MACINTOSH INSTALLATION
Backup
This feature will allow you to create/edit file backups to your
OneTouch III Mini Edition.
1. Launch the
2. Click on the
3. Click the
backup.
NOTE:
You may select multiple folders in a list by holding
down the command key while clicking each folder.
4. Select additional folders and click
NOTE:
To remove folders from the backup, click the minus (-)
sign to deselect existing folders from previous backups.
After you've selected the folders to back up, and specify the
day and time, you can back up your folders immediately by
clicking
OneTouch Manager
Backup
plus (+)
Back Up Now
.
button.
sign to select additional folders to
Open
.
.
Restore
This feature allows you to restore your files and folders backed
up on your OneTouch III Mini Edition to your Macintosh
computer.
1. Launch the
2. Click the
The following options are available:
Restore Recent Files and Folders
You can restore the most recent version of backed-up files and
folders.
Select a File or Folder
1. Click the arrow next to the hard drive where the current
files are stored to reveal the folders from which files or
folders were backed up.
2. Click the arrow next to each folder to reveal its contents
until you find the specific files and/or folders you wish to
restore.
3. Click the checkbox next to the files and/or folders you
wish to restore.
OneTouch Manager
Restore
button.
.
PAGE 24
Page 27

MAXTOR ONETOUCH III MINI EDITION
MACINTOSH INSTALLATION
Select a Restore Location
Original
Temporary
For example:
Restore the Files and Folders
After you've selected the file(s) and the restore location, click
Restore
Restores file(s) to their original location, replacing the
existing version.
Restores files to the temporary location in the Documents
folder of the current user.
/Users/Jon/Documents/Maxtor Restore
.
MaxBack History
This feature allows you to adjust Historical File Versions,
Delete Historical File Version History, and Delete Unused
Files from your OneTouch III Mini Edition.
1. Launch the
2. Click the
3. Click the
Historical Versions
When you back up your files, you have the option to store
previous, or “historical,” versions of each file. You can
then restore any historical version based on the date
when it was backed up. Choose the number of historical
versions from the pop-up menu. By default, 5 historical
versions of each file are stored.
OneTouch Manager
Backup
History
button.
tab. The following options are available:
.
Delete History
This deletes all but the most current historical version of
each backed-up file, creating extra space on your OneTouch
III Mini Edition.
1. Click the
Upon doing this, all Historical File Versions (except for
the most current) files will be automatically deleted from
the OneTouch III Mini Edition. When finished, the
message, “Delete History” has completed will appear at
the bottom of the History window.
Delete Unused
This deletes all backed-up files from your OneTouch III Mini
Edition that no longer exist on your Macintosh, creating extra
space on your OneTouch III Mini Edition.
1. Click the
Upon doing this, all backed-up files will be deleted from
the OneTouch III Mini Edition that are no longer on the
Macintosh computer. When finished, the message,
“
Delete Unused has completed
bottom of the History window.
Delete History
Delete Unused
button.
button.
” will appear at the
Change the number. You can save up to 10 historical
versions of your files.
The change will automatically appear in the Number of
historical versions field.
PAGE 25
Page 28

MAXTOR ONETOUCH III MINI EDITION
MACINTOSH INSTALLATION
OneTouch Button
By default, pressing the OneTouch button will launch
MaxBack to perform your Backup (e.g. Bootable Backup
Copy) to the OneTouch III Mini Edition. However, you can
customize the OneTouch button so that it will open an
application or file of your choice or synchronized data
between folders configured through the Sync feature.
To Synchronize folders with the touch of a button
NOTE:
This option will only work if you have already setup the
Sync
feature.
1. From the OneTouch Manager main page, click
2. In the
3. Click the
4. Close the
5. Press the
Settings
synchronize.
automatically synchronize from your internal drive to the
OneTouch III Mini Edition.
page, select the files/folders you want to
Synchronize
OneTouch Manager
OneTouch button
button.
.
and your selected folders will
Settings
To Open an Application
1. Click on the
2.
Browse
associate
Calculator was chosen.
.
3. Click
4. Close the OneTouch Manager.
5. Press the
will open.
To return to default settings:
1. Click the
Open
your Mac and
with the
Set Action
OneTouch button
Backup
button.
select the application
OneTouch button
.
and your selected application
button.
you wish to
. In this example,
2. Close the OneTouch Manager.
3. Press the
script will launch.
OneTouch button
and your Maxtor OneTouch
PAGE 26
Page 29

MAXTOR ONETOUCH III MINI EDITION
MACINTOSH INSTALLATION
Security
You can set a password for your OneTouch III Mini Edition.
Every time your drive is on and connected to your computer,
including when you start or restart your computer, or when
you turn off your drive and turn it back on, you will need to
enter your password or the answer to your secret question,
which you setup when you create your password, in order to
use your drive.
If you have forgotten your password, you can attempt to reenter it or to recover it, by answering your secret question.
You are allowed 5 attempts before you must turn off your
drive and turn it back on. At which point, you can try an
additional 5 times.
If you are not able to recover your password, the only other
way to unlock the drive is to erase all of its contents.
Setting your Password
1. From the OneTouch Manager main page, click
2. In the
3. Enter and re-enter a
If you do not want to choose a secret question and answer,
4. Choose a
5. Enter and re-enter an
6. Click
Settings
Your password must contain at least six characters and
one digit.
For further security, you may also choose a secret
question (from the list provided) and type in the answer.
go to step 6.
Set Password
a secret question and answer.
You will return to the original security screen. Close the
Maxtor OneTouch Manager.
page, click
Password
Secret Question
answer
or
Set Password and Q/A
Security
.
.
to the
.
question
Settings
.
, if you chose
.
Upon system restart with the OneTouch III Mini Edition
connected/powered on,
or
If the OneTouch III Mini Edition is power cycled, you will
be prompted to authenticate. Type in your password for
the OneTouch III Mini Edition or in the example below (if
applied). Enter the answer to the question to unlock the
drive.
Changing your Password
1. Click
2. Enter your current
3. Enter and re-enter a
4. Choose a
5. Enter and re-enter an
6. Click
Security
or
Enter the
You may also choose a secret question (from the list
provided) and type in the answer.
If you do not want to choose a secret question and
answer, go to step 5.
Change Password and Q/A
You will return to the original security screen. Close the
Maxtor OneTouch Manager.
.
Password
answer
Secret Question
to the
New Password
answer
.
question
.
to the
.
.
.
question
.
PAGE 27
Page 30

MAXTOR ONETOUCH III MINI EDITION
MACINTOSH INSTALLATION
Disable Security
If you decide you want to disable the password you created,
follow these steps:
1. Open the
Security
asks you for your password.
2. Enter your
3. Click
You will return to the original security screen. Close the
Maxtor OneTouch Manager
The default setting for the Security setting is
NOTE:
password security in the future.
Maxtor OneTouch Manager
or click
Disable Security
See
Open Utility
Password
Set Password
.
.
if you ever wish to re-enable
utility and click
from the Maxtor screen that
.
disabled
Erase Drive
If all attempts to recover your password fail and you need to
erase your OneTouch III Mini Edition, follow these steps:
A window will appear, asking you to confirm “...that you
intend to destroy all data on this drive.”
6. Type the
7. The
8. Upon completion, a message will appear stating that the
.
drive is erased.
Click OK.
9. Power Cycle the drive.
5-digit number
Erase
procedure will commence.
and click
Erase Drive
.
1. From the OneTouch Manager main page, click
2. In the
3. Click
4. Click
5. Enter the
Settings
Password Unknown
Erase Drive
Name
click OK.
page, click
. The Authenticate window will open.
and
Security
.
Password
.
for your computer and
Settings
10. When the erase process is complete, a message will
appear indicating that the disk is unreadable.
.
11. Click
Initialize
The
Apple Disk Utility
NOTE:
Do not turn off your computer or your drive
during the erase or formatting process.
.
will open.
PAGE 28
Page 31

MAXTOR ONETOUCH III MINI EDITION
MACINTOSH INSTALLATION
Sync
The Sync feature will allow you to synchronize folders
between your internal disk and your OneTouch III Mini
Edition. After this feature is enabled, you can connect the
OneTouch III Mini Edition to another Macintosh computer
running the OneTouch Manager software and synchronize
the files/folders from the OneTouch III Mini Edition to this
other Mac.
1. Click the
the lower left corner.
2. You will be asked to select your
In this example, the user's iTunes folder was selected.
After making your selection, click the
NOTE:
in your
Sync
tab. Then click the
Repeat steps 1-3 to add more that one (1) folder
Sync-My-Mac Source
add (+)
button located in
Sync-My-Mac Source
Add Sync
list.
.
button.
4. You will be prompted with the following.
Click OK.
5. The synchronization process starts.
6. When finished, click OK.
7. Close the OneTouch Manager.
You may select a local disk on your computer to store
folders that were originally copied to your OneTouch III
Mini Edition using Sync on another computer.
Every time you move your OneTouch III Mini Edition between
computers, Sync will automatically compare the folders on
your OneTouch III Mini Edition to the ones on your computer to
look for files that have changed. If any files have changed, it
will ask you if you would like to replace the older files with the
newer versions.
Once all folders have been selected, click the
Set
button.
3. In the main Sync screen, click
Auto Sync feature will be enabled automatically after the
first time Sync is activated.
PAGE 29
Sync
now. At this point, the
Save Sync
Page 32

MAXTOR ONETOUCH III MINI EDITION
MACINTOSH INSTALLATION
To verify the contents of your Sync Set
1. Open the volume containing your
2. Browse to the
3. You will see the contents of your Sync Set.
Sync Set File Structure
Your synchronized folders reside in your selected volume in a
folder called
subfolders.
–
Tilde (~) Folder
folders on the OneTouch III Mini Edition.
–
OT_MS_W Folder
synchronized to the OneTouch III Mini Edition. This can
be caused by a system interruption. In the event that
you see the following window:
MaxSync
MaxSync
folder.
. Within this folder, there are two (2)
– Contains your synchronized files/
– Contains data that was not properly
Sync Set
in the Finder.
To Manually Sync Folders
There are three (3) ways to manually sync folders:
Using the OneTouch Manager Screen
Launch the
Using the Sync Screen
Click the
Using the OneTouch Button on Your OneTouch III Mini Edition
Refer to “OneTouch Button” earlier in this section for additional
information. You only need to perform this customization once.
OneTouch Manager
Sync
button then click the
and click
Sync Now
Sync Now
button.
.
Editing Your Sync Set
Removing Folders from your Sync Set.
1. Click the
in the lower left corner.
or
If you wish to reverse your choice, click
folder back to your Sync Set.
2. When changes have been made, click
synchronize your folders from your Mac to the OneTouch
III Mini Edition.
Sync
tab. Then click the
minus (-)
Revert
Sync Now
button located
to add the
to
click OK to synchronize this data.
Storing Audio
Using your computer as an audio jukebox is a very popular
application. This allows you to store and play thousands of
your favorite songs. You can also create and manage an audio
library from your OneTouch III Mini Edition.
PAGE 30
Page 33

MAXTOR ONETOUCH III MINI EDITION
Connecting and Disconnecting the OneTouch III Mini Edition
The USB interface allow you to hot swap your OneTouch III
Mini Edition; that is, connect and disconnect the drive while
the computer and your drive are turned on.
To Connect the OneTouch III Mini Edition to Your Computer
Plug the USB cable into your OneTouch III Mini Edition and
your computer.
To Disconnect the OneTouch III Mini Edition from Your Computer
1. From the desktop, drag your OneTouch III Mini
Edition icon to the Trash. The drive will
disappear from the desktop.
2. Disconnect your OneTouch III Mini Edition from your
computer. Your system may not allow you to disconnect
the drive. In this case, you may need to close all open
applications and documents or shut down your system
completely to disconnect the drive safely.
MACINTOSH INSTALLATION
WARNING:
your computer without disconnecting it properly through
the operating system can result in lost or damaged files.
Removing the OneTouch III Mini Edition from
Naming Your OneTouch III Mini Edition
Your untitled OneTouch III Mini Edition appears in the same
way as other drives on your desktop. Follow these steps to
name the drive.
1. On your desktop, click the
The text will be to highlighted.
2. Enter a
PAGE 31
name
(for example “Maxtor”) for your OneTouch III
Mini Edition and press
name of the new drive’s icon
Return
.
.
Page 34

PN: 20335901
 Loading...