

Maxi-Cosi Priori XP User Manual [es]
LEBANON
Gebran Geahchan & Sons
Azar Bldg.
Horch Tabet
Po Box 55134
Sin El Fil
Tel. 961 1 482369
Fax 961 1 486997
LITHUNIA
AS Greifto
Pärnu mnt. 139c
11317 Tallinn
Tel. (6) 56 33 06
Fax. (6) 56 33 11
E-mail: greifto@datanet.ee
LUXEMBOURG
Dorel Benelux
Brussels Int. Trade Mart
Postbus/B.P. 301
Aquarelle 366
1000 Brussel/Bruxelles
Tel. 0800 1 17 40
Fax. +31 492 578 122
www.maxi-cosi.com
MALAYSIA
Planete Enfants Sdn. Bhd
No. 23, Jalan SS 26/15
Taman Mayang Jaya
47301 Petaling Jaya
Selangor, Malaysia
Tel. 603-78035523
Fax 603-78035323
E-mail:
julia.lim.my@gmail.com
MALTA
Rausi Company Limited
J.P.R. Buildings
Ta’ Zwejt Street
San Gwann Industrial Estate
San Gwann SGN 09
Tel. +356 21 44 56 54
Fax +356 21 44 56 57
E-mail: rausi.info@rausi.com.mt
MAURITIUS
Meem Trading
38 Sir S. Ramgoolam Street
Port Louis
Mauritius
Tel. 2302403632
Fax 2302411589
E-mail: meem@intnet.mu
MÉXICO
D'bebé SA de CV
Girardón # 84
Colonia Alfosno XIII,
Mixcoac.
México D.F. 01420
Tel. (52) (55) 15-00-23-23
Fax (52) (55) 55-98-51-08
E-mail:
dbebe@dbebe.com.mx
NEDERLAND
Dorel Netherlands
P.O. Box 6071
5700 ET Helmond
www.maxi-cosi.com
NEW ZEALAND
IGC Dorel Pty Ltd
655-685 Somerville Road
Sunshine West, VIC 3020
Australia
Tel.: +61(3) 8311 5300
Fax: +61(3) 8311 5390
E-mail: sales@igcdorel.com.au
NORGE
Dorel Netherlands
P.O. Box 6071
5700 ET HELMOND
THE NETHERLANDS
www.maxi-cosi.com
BabyWorld DA (sales agent)
Teglverksveien 25b
N - 3057 Solbergelva
Norway
Tel. 32 23 00 54 / 957 39 068
Fax 32 23 03 12
E-mail: info@baby-world.no
ÖSTERREICH
Dorel Germany
Vertrieb Österreich
Augustinusstraße 11b
50226 Frechen-Königsdorf
Tel. (+49) 22 34 96 430
Fax (+49) 22 34 96 4333
www.maxi-cosi.com
POLAND
Poltrade Waletko
Spolka Jawna
41-500 Chorzow
Ul. Legnicka 84/86
Tel. (032) – 346 00 81
Fax (032) – 348 00 82
E-mail: biuro@poltradewaletko.pl
www.poltradewaletko.pl
www.maxicosi.pl
PORTUGAL
Dorel Portugal LDA
Parque Industrial da Varziela
Árvore, 4480 Vila do Conde
Tel. 252 248 530
Fax 252 248 531
E-mail:
maxi-cosi@dorel-pt.com
ROMANIA
SC Miniblu SRL
Calea Rahovei, 266-268; corp 60
Etaj 1; Axele A Si B, Stalpii 15-16
Bir. 104-114; Sector 5, Bucuresti
Tel. +40 21 404 14 00
Fax. +40 21 404 14 01
E-mail: office@miniblu.ro
ROSSIÅ
(RUSSIA)
Carber Poriferra
107392 Moskva, Russia
1aå Pugahevskaå u ., 17
1st Pugachevskaya str. 17
RUS-107392 Moscow
Tel. +8(499) 161 25 91
Fax +8(499) 161 26 48
E-mail: maxi-cosi@carber.ru
SCHWEIZ
DOREL Juvenile Switzerland SA
Chemin de la Colice 4
1023 CRISSIER
Tel. 021 661 28 40
Fax 021 661 28 45
E-mail: info.suisse@chdorel.com
SINGAPORE
B.I.D. Trading
69, Kaki Bukit Avenue 1
Shun Li Industrial Park
Singapore 417947
Tel. (65) 6 844 1188
Fax (65) 6 844 1189
E-mail: sales@babyhyperstore.com
SLOVAKIA
LIBFIN SK s.r.o.
Soltesovej 12
811 08 Bratislava
Tel. +421 250 219 140
Fax. +421 250 219 240
E-mail: info@libfin.sk
www.libfin.sk
SLOVENIA
Baby Center d.o.o.
š
ka c. 3c
Letali
Ljubljana
Tel. 00386 01 546 64 30
Fax. 00386 01 546 64 31
E-mail:
uprava@baby-center.si
www.baby-center.si
SOUTH AFRICA
Anchor International
12 Kimberlite Road, Theata Ext. 5
Booysens Reserve,
Johannesburg, 2091.
P.O.Box 546, Crown Mines,
Johannesburg, 2025.
Tel. (011) 835 – 2520
Fax (011) 835 – 3718
E-Mail: anc.int@mweb.co.za
SOUTH KOREA
YK TRADING CO., LTD.
Level 5, Youngkwang Bldg, 773-3,
Yeoksam-dongKangnam-gu,
Seoul, South of Korea
Tel: 82-23452-8700
Fax: 82-23452-8660
E-Mail:
international@yk-korea.com
www.sbaby.co.kr
SVERIGE
Amvina
Box 7295
187 14 Täby, Sweden
Tel. +46 (0)8 732 88 50
Fax +46 (0)8 732 88 51
E-mail: info@amvina.se
www.amvina.se
Dorel Netherlands
P.O. Box 6071
5700 ET HELMOND
THE NETHERLANDS
www.maxi-cosi.com
TAIWAN
Topping Prosperity Inc.
6F, No.49, Lane 76,
Ruey-Guang Road,
Ney-Hwu District, Taipei, Taiwan
Tel. 02-87924158
Fax 02-87911586
E-mail: topping2@ms21.hinet.net
THAILAND
Diethelm
Sukhumvit Road 2535
Bangchaek
Prakhanong
10250 Bangkok
Tel. 662 332 6060-89
Fax 662 332 6127
E-mail: anuchida.i@dksh.com
TÜRKIYE
Grup Ltd
Grup Baby Plaza
Kayışdağı Cad. Hal Karşısı No.7
Carrefour arkası
Küçükbakkalköy - ISTANBUL
Tel: 0216 573 62 00 (8 hat)
Fax 0216 573 62 09
www.grupbaby.com
UKRAINE
Europroduct
4th floor, 53b
Arnautskaya St
65012 Odessa
Tel. 00 380 482 227 338
Fax 00 380 482 345 812
E-mail: europroduct@te.net.ua
Amigo Toys
bul. Shevchenko 29
Donetsk 83017
Tel. 00380-62-3353478
Fax 00380-62-3859974
E-mail: info@amigotoys.com.ua
UNITED KINGDOM
Dorel U.K.
Hertsmere House
Shenley Road
Borehamwood,
Hertfordshire WD6 1TE
Tel. (020) 8 236 0707
Fax (020) 8 236 0770
UNITED STATES
Dorel Juvenile Group, Inc.,
2525 State St., Columbus,
IN47201-7494
Tel. (800) 951-4113
10-08 xx.xxx DRU0624
Maxi-Cosi Priori XP
GB Instructions for use/Warranty
F Mode d’emploi/Garantie
D Gebrauchsanweisung/Garantie
NL Gebruiksaanwijzing/Garantie
E Modo de empleo/Garantía
I Istruzioni per l’uso/Garanzia
P Modo de emprego/Garantia
The safe world of Maxi-Cosi
GB Instructions for use / warranty 8 - 12
F Mode d’emploi / garantie 13 - 17
www.maxi-cosi.com
D Gebrauchsanweisung / garantie 18 - 22
NL Gebruiksaanwijzing / garantie 23 - 27
E Modo de empleo / garantía 28 - 32
I Istruzioni per l’uso / garanzia 33 - 37
P Modo de emprego / garantia 38 - 42
Maxi-Cosi Priori XP
1
1 2
2
1
5 8
9 12
13
2
1
6
2
3
1
10
2
1
14
3
7
2
1
11
15
16
1
2
3
4
2
1
4
www.maxi-cosi.com Illustrations
Contents
2
3
1
2
1
2
1
2
1
2
ARGENTINA
Bebehaus S.A.
GB
17
21 24
18
22
19
23
20
33 36
37 40
34
38
35
39
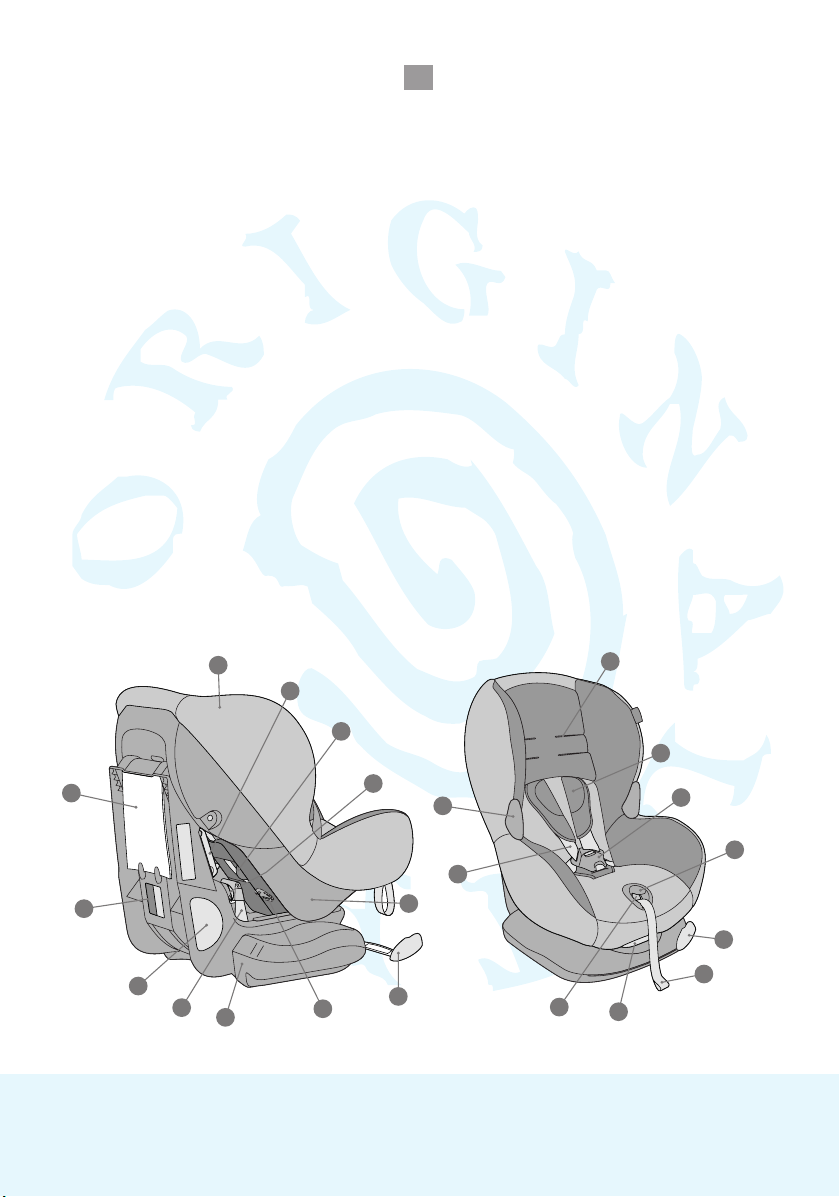
쐃
Cover
Belt clamp
Belt guard door
Red belt hooks
Shell
Belt clamping handle
Belt yoke
Base
Belt tensioner
쐅
User instruction sticker
쐈
ECE hallmark
쐉
Instruction manual
씈
Belt slots
씉
Belt pads
씊
Belt buckle
씋
Hook for securing buckle
씌
Adjuster belt
씍
Shell positioning handle
씎
Release button
씏
Shoulder belts seat belt system
쏹
Shoulder belt hooks
(harness belt system)
쐃
Housse
Pince pour la ceinture auto
Porte cache ceinture
Crochets rouges de la ceinture auto
Coque
Levier du tensionneur de ceinture
Boucle de regroupement des sangles
Socle
Tensionneur de la ceinture auto
쐅
Autocollant instruction
쐈
Homologation ECE
쐉
Mode d’emploi
씈
Encoches pour réglage en hauteur
des bretelles
씉
Protège-bretelles
씊
Fermoir du harnais
씋
Crochet pour maintien de l’entrejambe
씌
Sangle de serrage des bretelles
씍
Poignée de réglage des positions
씎
Bouton de réglage
씏
Bretelles
쏹
Crochets pour bretelles
NL
쐃
Bekleding
Autogordelklem
Gordeldeurtje
Rode autogordelhaken
Kuip
Autogordel spanhendel
Gordelplaat
25 26 27
28
29 30 31 32
42 4341 44
Onderstel
Autogordelspanner
쐅
Gebruiksaanwijzing sticker
쐈
ECE keurmerk
쐉
Gebruiksaanwijzing
씈
Gordelsleuven
씉
Gordelbeschermers
씊
Gordelslot
씋
Haak voor bevestiging slot
씌
Verstel gordelband
씍
Verstelhendel kuip
씎
Verstelknop
씏
Schoudergordels gordelsysteem
쏹
Haken voor de schoudergordels
(harnasgordelsysteem)
쐃
Revestimiento
Pinza cinturón del coche
Trampilla del cinturón
Ganchos rojos del cinturón del
coche
Caparazón
Palanca tensor cinturón del coche
Hebilla
Soporte
ITensor cinturón del coche
쐅
Pegatina modo de empleo
쐈
Marca ECE
쐉
Modo de empleo
씈
Ranuras para regulación altura tirantes
씉
Protector de tirantes
씊
Cierre del arnés
씋
Gancho para fijar el cierre
씌
Banda graduable
씍
Empuñadura graduable
씎
Botón graduable
씏
Tirantes
쏹
anchos para arnés
F
쐃
Bezug
Gurtarretierung
Gurtabdeckung
Haken für Beckengurt
Schale
Gurtspannhebel
Hakenbeschlag
Fuß
Gurtspanner
쐅
Kurzgebrauchsanweisung
쐈
ECE Prüfzeichen
쐉
Gebrauchsanweisung
씈
Gurtschlitze
씉
Gurtpolster
씊
Gurtschloss
씋
Haken zur Schlossbefestigung
씌
Verstellband/Gurtstraffer
씍
Einstellhebel (Schale)
씎
Verstelltaste (Gurtsysteem)
씏
Schultergurte
쏹
Gurthaken
E
쐃
Rivestimento
Arresto cintura di sicurezza
Coperchio della cintura di sicurezza
Gancio della cintura lombare
Guscio
Leva tendicintura
Piastra di fissaggio della cintura
Telaio
Fermo cintura
쐅
Adesivo con le istruzioni
쐈
Simbolo della qualità ECE
쐉
Istruzioni per l’uso
씈
Fessure per adattare le cinture delle spalle
씉
Imbottitura di protezione della cintura
씊
Fibbia della cintura
씋
Gancio di fissaggio della fibbia
씌
Cinghia di regolazione
씍
Leva regola posizione
씎
Tasto di regolazione
씏
Cintura per le spalle (sistema di cinture di
D
I
sicurezza)
쏹
Gancio per la cintura
Tel. + 54 (911) 6265 0665
Fax + 54 (911) 5050 2339
E-mail:
info@bebehaus.com.ar
www.bebehaus.com.ar
AUSTRALIA
IGC Dorel Pty Ltd
655-685 Somerville Road
Sunshine West, VIC 3020
Tel.: +61(3) 8311 5300
Fax: +61(3) 8311 5390
E-mail: sales@igcdorel.com.au
BELGIE/BELGIQUE
Dorel Benelux
Brussels Int. Trade Mart
Postbus/B.P. 301
Aquarelle 366
1000 Brussel/Bruxelles
Tel. 0800 1 17 40
Fax +31 492 578 122
www.maxi-cosi.com
BRASIL
Giro Imp & Exp Ltda - BBTrends
Al. Gabriel Monteiro da Silva,
235 - Jardins
Sao Paulo - SP - Brasil
Cep:01.441-000
Tel. +55 11 3377 9200
E-mail:
BBtrends@BBtrends.com.br
www.BBtrends.com.br
BULGARIA
Nedelchev & Nedelchev Ltd.
compl. “Gotze Delchev”
Ul. Silivria 16, Sofia 1404
Tel. 02-958 26 29
Fax 02-958 26 51
E-mail: info@nn-bg.com
www.nn-bg.com
CANADA
Dorel Distribution
873 Hodge
St. Laurent
QCH4N 2B1
C˘ESKÁ REPUBLIKA
Libfin s.r.o.
Legionár˘u˚ 72
276 01 Me˘lník
Tel. +420 315 62 19 61
Fax. +420 315 62 83 30
E-mail: info@libfin.cz
www.libfin.cz
CHILE
Mundo petit
Av. Nueva Costanera 3986,
Interior, Vitacura
Santiago
Tel. +56 (2) 415 9103 / 415 9864
Tel. +56 (8) 294 9628
Fax +56 (2) 356 4749
www.mundopetit.com
COLOMBIA
Cangurus Mom´s and babies
Cra. 7 A No. 121 - 33
Bogotá - Colombia
Tel. +57 1 6127257
Fax. +57 1 6127257
E-mail: info@cangurus.com.co
CROATIA
MAGMA d.d.
Baštijanova 52a
10000 Zagreb
Tel. +385 1 3656 888
Fax +385 1 3656 800
www.magma.hr
Media Commerce d.o.o.
CMP Savica
Majstorska 5, 10000 Zagreb
Tel. 00385 1 2406-500
Tel. 00385 1 2406-501
Fax 00385 1 2406-499
E-mail:
media-commerce@zg.htnet.hr
www.media-commerce.com.hr
CURACAO
Mom & Co.
Promenade Shopping Center C3
Tel. 00 5999 7360755
Fax 00 5999 7360744
E-mail: info@momandco.com
CYPRUS
Xenofon Demetriades and Son Ltd
Digeni Akrita 39H,
1070 Nicosia, Cyprus
Tel. 00357 99620137
Fax 00357 22750463
E-mail:
gkzorpas@cytanet.com.cy
www.demetriades.com.cy
DANMARK
BabySam A.m.b.A.
Egelund A 27-29
6200 Aabenraa
Tel. 74 63 25 10
Fax 74 63 25 11
E-mail: babysam@babysam.dk
DEUTSCHLAND
Dorel Germany
Augustinusstraße 9c
50226 Frechen-Königsdorf
Tel. (+49) 22 34 96 430
Fax (+49) 22 34 96 4333
www.maxi-cosi.com
DUBAI
Golden Toys
P. O. Box: 6761
U.A.E.
Tel. +9714 - 226 8448
Tel. +9714 - 225 1166
Fax +9714 - 225 7336
E-mail:
goldtoy@emirates.net.ae
Š
anci jug
Dutchkid FZ Co.
P.O. Box 333741
United Arab Emirates
Tel. +971 4 341 7500
Fax +971 4 341 7501
www.dutchkid.com
EESTI
AS Greifto
Pärnu mnt. 139C
11317 Tallinn
Tel. (6) 56 33 06
Fax (6) 56 33 11
E-mail: greifto@datanet.ee
ESPAÑA
Dorel Hispania S.A.
Edificio Del Llac Center
Pare Rodés n
Torre A 4
08208 Sabadell (Barcelona)
Tel. 937-243 710
Fax 937-243 711
FINLAND
Lastentarvike
Sarkatie 3
1720 Vantaa
Tel. +358 985205526
Fax. +358 985205426
FRANCE
Dorel France S.A.
Z.l./9 bd du Poitou– BP 905
49309 CHOLET CEDEX
Tél. 00.33.2.41.49.23.23
Fax 00.33.2.41.56.17.13
GREECE
Dionic SA
95 Aristotelous St.
136 71 Axarnes, Athens
Tel. +3 210 241 9582
Fax +3 210 240 4290
E-mail: info@unikid.gr
www.unikid.gr
GUATEMALA
Web solutions, s.a.
3 Avenida A 6-75 Zona 14
Colonia El Campo
Guatemala city 01015
Tel. 502 2369-4726
Tel. 502 5200-0867
HONG KONG
Chup Shing Trading Co. Ltd.
Block A, 7/F, Unit J
25-31 Kwai Fung Crescent
Marvel Industrial Building
Kwai Chung, N.T
Tel: (852) 2422-2101
Fax (852) 2489-1092
HUNGARY
Recontra Kft
Badacsonyi u. 24
1113 Budapest
Tel. 36-1-209-2632/
36-1-209-2633
Fax 36-1-209-2634
E-mail: recontra@recontra.hu
o
26
o2a
ICELAND
Fífa ehf.
Husgagnahollin
Bildshofda 20
IS-110 Reykjavik
Tel. +354-5522522
E-mail: fifa@fifa.is
www.fifa.is
INDONESIA
PT. Sumber Aneka Karya
Abadi
JL. Batu Ceper No. 2 B-C-E
Jakarta 10120
Tel. +62-21-3854444
Fax. +62-21-3442617
E-mail:
sakaindonesia@gmail.com
IRAN
Nowrouz Nia
Mirdamad Ave.-Valiasr Ave.
Eskan-Shopping Center
No. 13 Eskan-Maxi-Cosi
19696 Tehran
Tel. +98 21 87 87 378
Fax +98 21 87 75 702
E-mail: maxicosinia@yahoo.com
IRELAND
Dorel Ireland Ltd
All n one Ltd
42 Western Parkway
Business Park
Lower ballymount Road
Dublin 12, Ireland
Tel. 353-(1)4294055
Fax 353-(1)4294010
ISRAEL
Shesek Ltd.
28B Halechi Street
Bnei Brak 51200
Tel. 97 23 57 75 133
Fax 97 23 57 75 136
E-mail: einat a@shilav.com
ITALIA
Dorel Italia S.P.A.
Via Verdi, 14
24060 Telgate (Bergamo)
P.I. IT 02304040161
Tel. 035 44 21 035
Fax. 035 44 21 048
E-mail: info@it-dorel.com
JAPAN
GMP International Co.Ltd
1-19-4, Yoyogi-Park Bldg.
Tomigaya, Shibuya-Ku
Tokyo, 151-0063, Japan
Tel. +81 357 381 051
Fax +81 357 381 052
LATVIA
AS Greifto
Pärnu mnt. 139C
11317 Tallinn
Tel. (6) 56 33 06
Fax. (6) 56 33 11
E-mail: greifto@datanet.ee
4 5
IllustrationsIllustrations
Legend www.maxi-cosi.com
6
20
15
16
19
6
17
18
21
13
14
5
8
6
11
12
1
2
3
4
10
9
7
P
쐃
Capa
Grampo do cinto
Porta do cinto
Ganchos vermelhos do cinto
Assento
Pega para tensão do cinto de segurança do automóvel
Placa do cinto
Suporte
Tensor do cinto
쐅
Autocolante com o modo de emprego
쐈
Marca ECE
쐉
Modo de emprego
씈
Ranhuras do cinto
씉
Protectores peitorais
씊
Fecho do cinto
씋
Gancho para fixação do fecho
씌
Correia de ajuste
씍
Manípulo de ajuste do cinto
씎
Botão de desengate
씏
Cinto dos ombros
쏹
Ganchos do cinto dos ombros (armação do cinto)
Legend
7

Dear parents
Congratulations on the purchase of your Maxi-Cosi Priori XP.
Safety, comfort and user-friendliness have at all times played an important role in the development of the Maxi-Cosi
Priori XP. This product meets the most stringent safety regulations.
Research shows that a high number of car safety seats are installed incorrectly. Therefore, please take the time to read
GB
through this instruction manual carefully. Your child’s safety can only be guaranteed if this product is used according
to these instructions.
Continuous research by our development team, user tests and consumer reactions ensure that we are kept fully up-todate in the field of child safety. Therefore, if you have any questions concerning the use of the Maxi-Cosi Priori XP,
please do not hesitate to contact us.
Dorel
Important: Read first!
• WARNING: Read this instruction manual carefully. Study the illustrations in this instruction manual carefully
before use, and when installing the car seat. The Maxi-Cosi Priori XP is a safety product and is only safe when
used according to the instructions.
• WARNING: The correct fitting of the seat belt is of vital importance for the safety of your child. The seat belt
must be threaded along the red markings on the Maxi-Cosi Priori XP. See the Installation section and/or the
sticker on the side of the Maxi-Cosi Priori XP. Never use another belt routing other than specified.
• WARNING: For the future use of the seat, it is important that you store the instruction manual in the space
provided on the back of the Maxi-Cosi Priori XP.
• WARNING: Never leave your child unattended in the car.
• WARNING: Never use the Maxi-Cosi Priori XP on a seat equipped with a front airbag, as this can result in injury
or death. This does not apply to so-called "side airbags".
• The Maxi-Cosi Priori XP must only be used on a forward facing seat that is fitted with an automatic 3-point
safety belt, which is approved according to ECE R16 or an equivalent standard.
• The Maxi-Cosi Priori XP may be used on either the front or the back seat. However, we recommend that it is
fitted on the back seat.
• The Maxi-Cosi Priori XP has been approved according to the strictest European safety standards (ECE R44/04)
and is suitable for children weighing 9 to 18 kg (approx. age 9 months to 3,5 years).
• After an accident, the seat may become unsafe due to damage that is not immediately noticeable. It should
therefore be replaced.
• The safety of the seat can only be guaranteed by the manufacturer if it is used by the original owner.
• We strongly advise that you never use a second-hand product, as you can never be sure what has happened to it.
• The belt pads are important for the safety of your child, therefore use them at all times.
• Ensure that all luggage and objects likely to cause injury in the event of an accident are secured properly.
• It is recommended that car safety seats not be used longer than 5 years after the date of purchase. The product
properties may deteriorate due to ageing of the plastic and/or sunlight, without this being visibly apparent.
• The moving parts of the Maxi-Cosi Priori XP should not be lubricated in any way.
• WARNING: The manufacturer has taken into consideration the fact that car seats may cause indentations in the
car upholstery. This is unavoidable, however, due to the prescribed safety standards, and because the car seat
must be installed tightly in order to protect your child. Dorel is not liable for any damage that may occur to the
car upholstery as a result of this.
Other instructions
• The Maxi-Cosi Priori XP must not be used without the cover. Always use an original Maxi-Cosi Priori XP cover, as
the cover contributes to the safety of the seat.
• The seat must always be secured with a seat belt, even when not in use. An unsecured seat may injure other
passengers in the car in the event of an emergency stop.
• Ensure that the Maxi-Cosi Priori XP is not damaged by wedging it between or underneath heavy luggage, adjustable
seats or by slamming the car door, etc.
• No alterations may be made to the Maxi-Cosi Priori XP, as this could affect part or the overall safety of the seat.
• Always cover the Maxi-Cosi Priori XP when the car is parked in the sun, as plastic and metal parts may become
extremely hot and the fabric unnecessarily discoloured.
• In order to prevent damage to the cover, do not remove the logos.
• Always use the seat, even on short journeys, as this is when most accidents occur.
• Prior to purchase, check to make sure the seat fits properly in your car.
• Take short breaks on longer journeys so that your child has some freedom of movement.
• Set a good example and always wear your seat belt.
• Tell your child that he/she should never play with the belt buckle.
Questions
Contact your supplier or importer if you wish to make a warranty claim or have any other questions (see address list
on the back of the instruction manual).
The seat belt
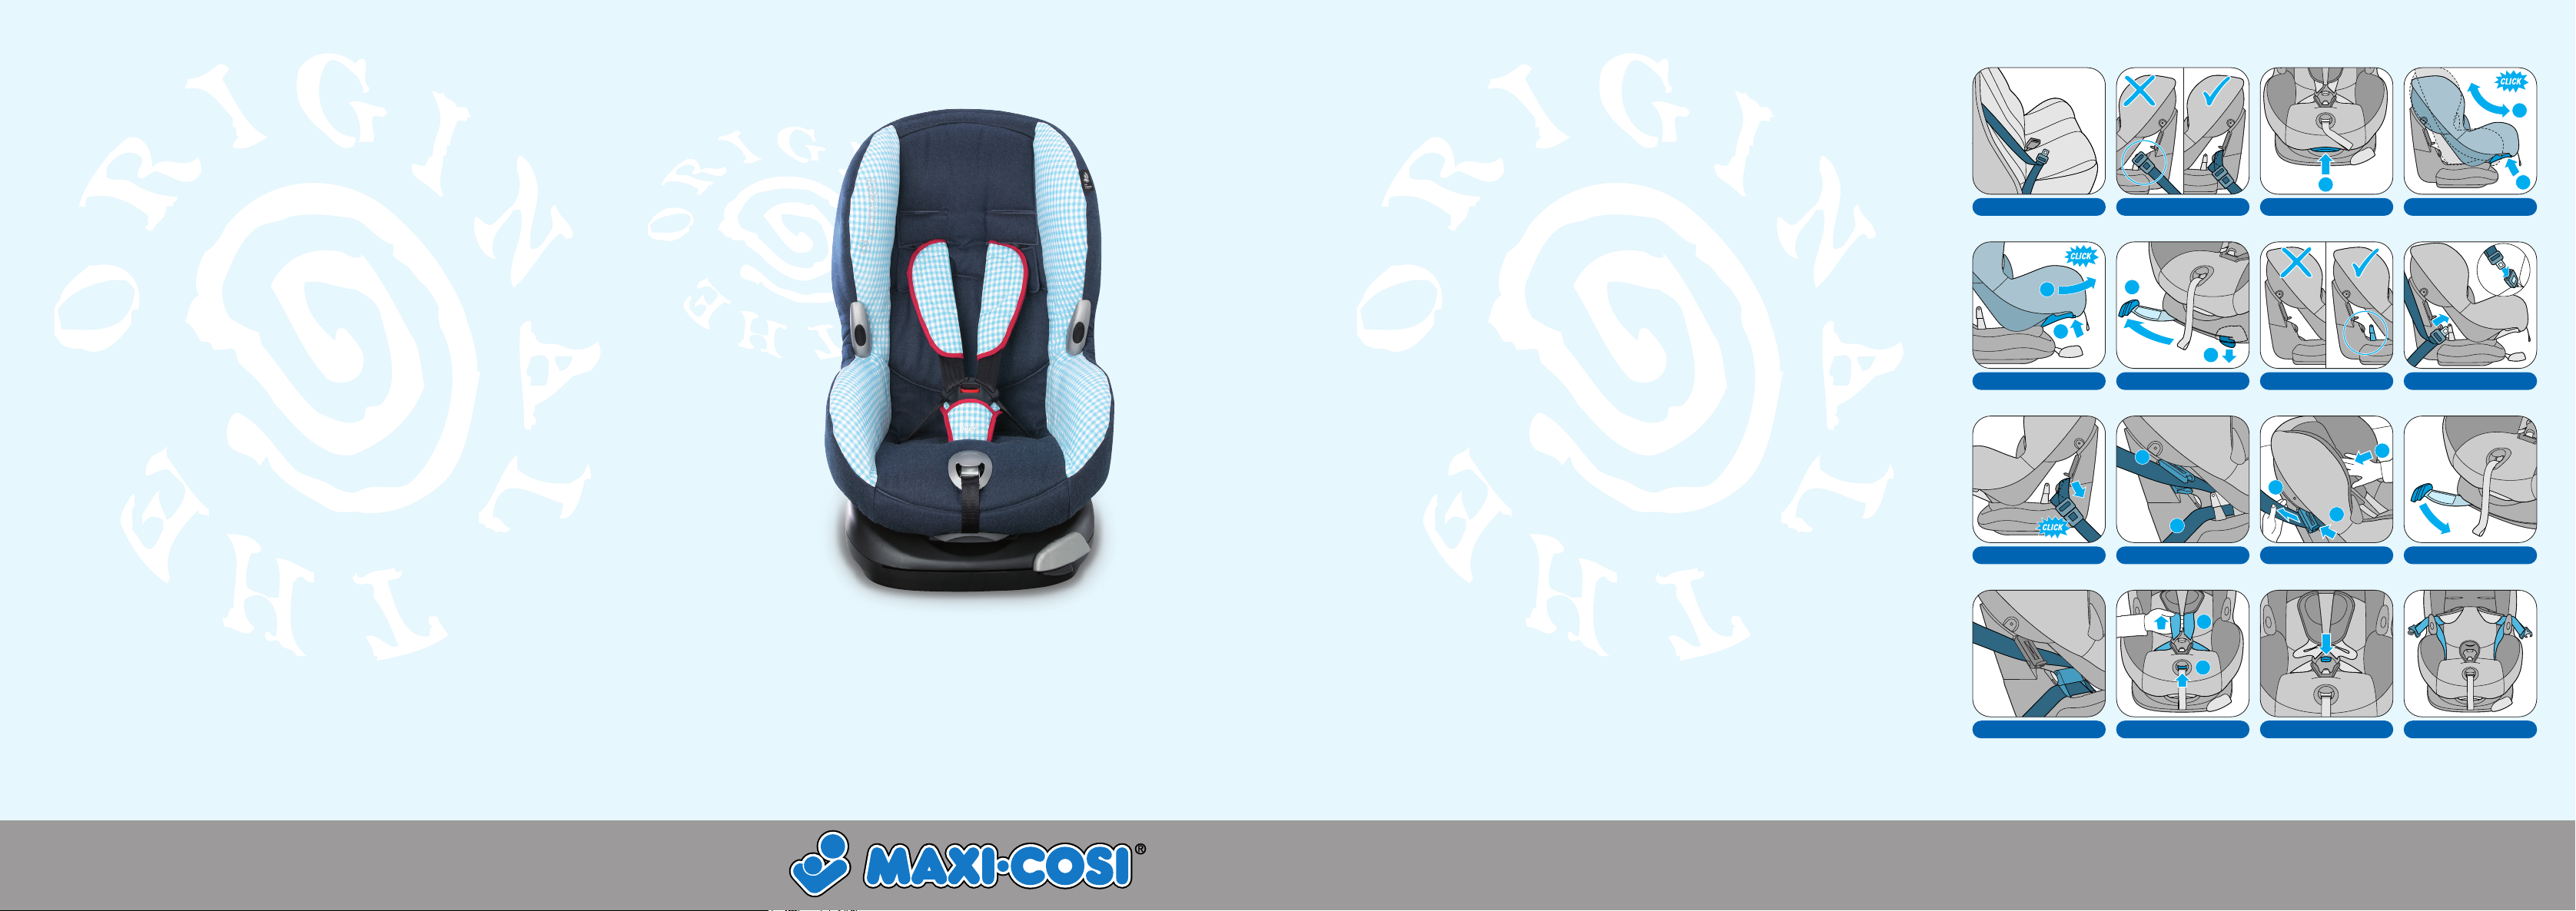
The Maxi-Cosi Priori XP may only be used with an automatic 3-point safety belt (01).
• The Maxi-Cosi Priori XP can be fitted safely in a forward-facing position on almost all seats in the car using the
existing seat belts. However, on some seats, the belts are fitted so far forward that proper installation is not possible.
If this is the case, try another seat.
• In some cases, the buckle of the car belt may be too long and therefore sits too high against the base of the Maxi-Cosi
Priori XP. The Maxi-Cosi Priori XP can therefore not be fitted securely. If this is the case, choose another position in
the car (02). Questions? Contact your supplier or importer.
Four positions of the Maxi-Cosi Priori XP
The Maxi-Cosi Priori XP may be used in four positions: Lift the adjusting handle under the front of the seat up (03)
and push or pull the seat forwards or backwards (04). Release the adjusting handle in the desired position and push
until you hear a distinct click. Before installing the Maxi-Cosi Priori XP, pull the seat towards you as far as possible
(sleeping position) (05).
Installing the Maxi-Cosi Priori XP
Please read the "Seat Belt" section before installing the Maxi-Cosi Priori XP.
• Place the Maxi-Cosi Priori XP on the car seat in the sleeping position (05).
• Release the belt tensioner. To do so, push the tab under the handle downwards and open the handle.
The handle will now visibly protrude from the base (06). The belt tensioner should no longer be positioned between
the red belt hooks (07).
• Thread the seat belt between the shell and the base. Make sure that the lap belt section of the seat belt is threaded
between the red hooks and the belt tensioner (08).
• Fasten the seat belt in the belt buckle of the car (08) and check to ensure the car seat belt is not twisted.
• The lap belt should now run under the red seat belt hooks (09) and the shoulder belt should run from the car seat
buckle directly diagonally upwards. Place the shoulder belt in the belt clamp (10) on one side only and fasten it
(11/1). IMPORTANT: The shoulder belt is now attached on the side of the roll-up mechanism only. The belt clamp is
now locked.
• Next, push the Maxi-Cosi Priori XP firmly into the car seat (11/2) whilst at the same time pulling the shoulder belt
tight (11/3), so that the Maxi-Cosi Priori XP is securely in place. Check this!
GB
8
Instructions for useEnglish
9

• Now return the handle to its original position (click) making sure it rests against the base (12). The belt tensioner
tightens the seat belt even further. The belt tensioner should now be positioned between both belt hooks on the lap
belt (13).
• You can now adjust the shell of the Maxi-Cosi Priori XP into the desired position.
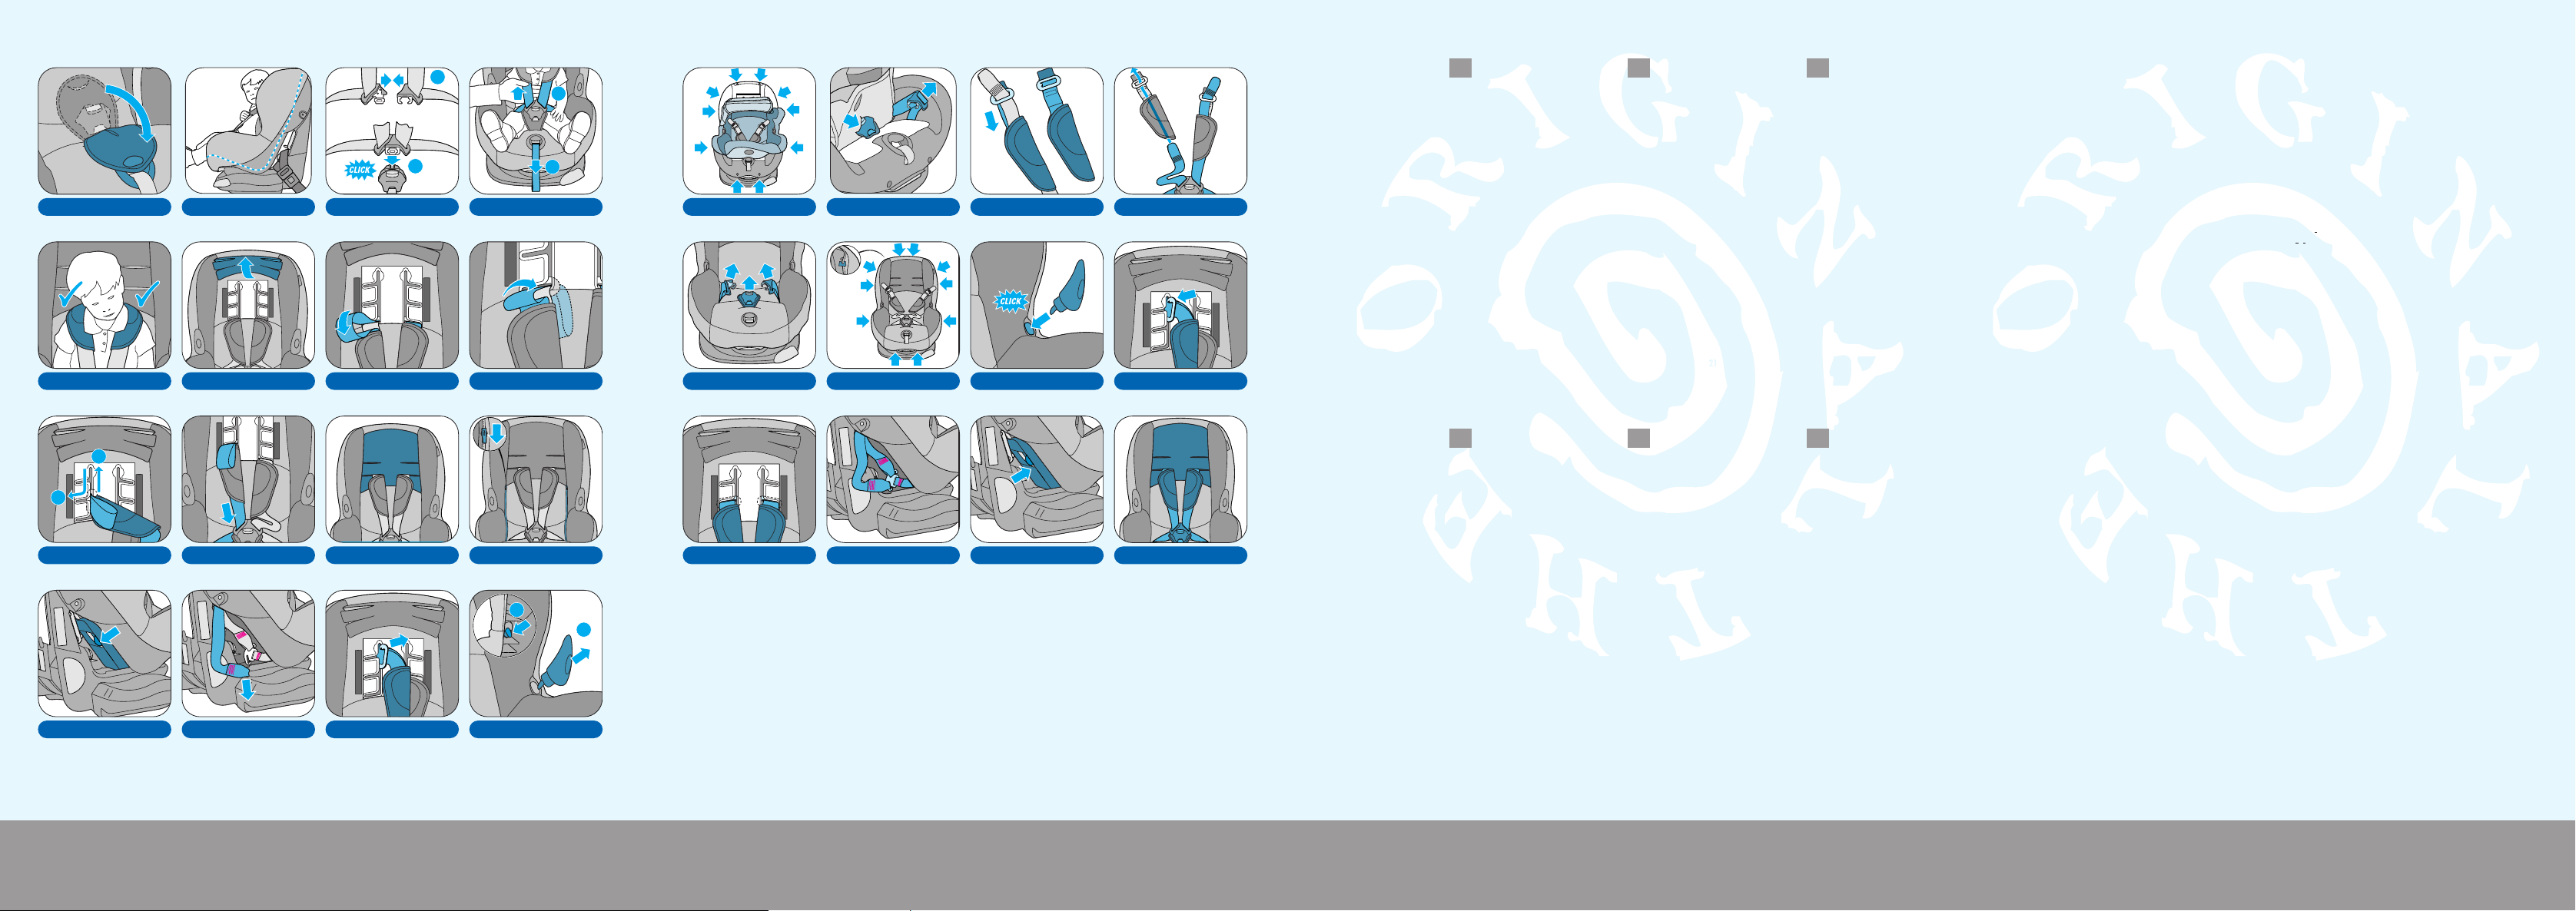
Placing your child in the Maxi-Cosi Priori XP
• Loosen the shoulder belts by pressing the release button and pulling the shoulder belts towards you (14). Important:
GB
Do not pull on the belt pads when doing so.
• Open the belt buckle (15) and drape the belts over the hooks on the shell (16).
• Pull the buckle forwards and hook the belt pad over lip (17).
• Position your child comfortably with his/her back against the shell (18) and make sure that there are no toys or other
hard objects in the shell.
• Slide buckle tongue sections together and insert them into the buckle (19).
• Position the lap belt as low as possible to ensure the hips sit firmly in the seat.
• Pull the shoulder belts tight (20/1) and pull the remaining slack out of the belt system by pulling the belts tight using
the adjuster belt (20/2).
IMPORTANT!
• The tighter the belts fit around your child, the better the protection. You should be able to fit only one finger between
the belts and your child.
• The textured side of the belt pads must be placed on your child’s shoulders.
• The belts should never be twisted.
• If you are unable to click the buckle sections into the buckle, unblock the buckle by pressing the red button and try
again.
• If you are not able to fasten the seat belt system properly or pull it tight, contact your supplier immediately. Do not
use the Maxi-Cosi Priori XP under any circumstances!
Adjusting the height of the shoulder belts
The correct belt height of the shoulder belts is attained when the belt disappears into the shell slightly above the
shoulder of the child. Make sure that the shoulder belts fit properly over the shoulders of the child (21).
• Loosen the shoulder belts by pressing the release button and pulling the shoulder belts towards you as far as
possible (14) Important: Do not pull the belt pads when doing so.
• Lift up the flap on the cover by the shoulder belt slots (22).
• To make the adjustment easier, pull the shoulder belts on top of the belt pad forward into a loop, loosening them (23).
• Next, push the loop back through the opening (24).
• Slide the shoulder belt and the belt pad strap through the slot together into the next position (25). Make sure that the
shoulder belt is positioned on top of the belt pad strap in the new position (26). Always do this on both sides.
• Pull the shoulder belts tight by pulling on the belts under the belt pads (26).
• Place the flap back in position and thread the belt pads through the correct slots in the flap and secure them with the
Velcro (27).
• Check whether you are able to use the belts and ensure they are not twisted.
Maintenance, removing the cover and belt pads
Remove the Maxi-Cosi Priori XP from the car before carrying out any of the following.
• The seat may be cleaned with lukewarm water and a gentle soap. Do not use abrasive detergents.
• The cover and the belt pads must be washed by hand at a maximum temperature of 30
see washing instructions.
• The belt buckle may be cleaned with warm water. Do not lubricate.
• It is advisable to buy an extra cover when you purchase the Maxi-Cosi Priori XP, so that you can use the Maxi-Cosi
Priori XP at all times, such as when the cover has to be cleaned (or dried).
o
C. Do not use a dryer. Also
• The design of the cover may differ.If the cover on your seat has Velcro on the side seam on the back (28), you can
leave the entire belt system in place in the shell. You only need to open the Velcro and then follow the instructions for
removing the cover.
Removing the cover and belt pads
• Make sure that the seat buckle is locked in order to prevent the belts from twisting.
• The belt clamping handle must be locked, i.e. positioned against the base.
• Loosen the shoulder belts. See "Adjusting the height of the shoulder belts".
• Place the Maxi-Cosi Priori XP in the sleeping position and open the belt guard door (29).
• Remove the shoulder belts from the belt yoke (30).
• Tilt the clasp on the belt pad and pull it together with the shoulder belt through the belt slots. This is easiest to do in
the uppermost vertical section (31).
• Remove both belt hooks by pushing the tab on the back of the seat downwards (32).
• Loosen the cover on all sides (33). Open the belt buckle.
• Pull the belts, belt pads, buckle sections and seat buckle through the openings in the cover.
• Now remove the cover. Important: Be careful when removing the cover around the edge of the release button (34).
• Slide the belt pads off the belts (35).
Replacing the cover and belt pads
• First slide both buckle sections together and lock into the belt buckle.
• Slide the shoulder belts through the clean belt pads ensuring that the textured side of the belt pad is facing
downwards. Push the shoulder belts through the large opening of the clasp. Important: Make sure the shoulder belts
are on top of the belt pad strap (36).
• Open the buckle and feed the buckle, shoulder belts and buckle parts through the openings in the cover (37).
• Place the cover over the edges of the release button and around the adjusting handle and secure it onto the cover
pins (38).
• "Click" both belt hooks into position (39) and check to make sure they are securely fastened.
• Secure the shoulder belt clasps in the belt slots at the desired height (40/41).
• Attach the shoulder belts to the belt yoke. Important: The red stitching on the shoulder belts and belt yoke must be
facing the shell (42). If not, this means the belts are twisted.
• Close the belt guard door (43).
• Fasten the belt buckle and close the flap on the cover (44) and check the functioning of the adjustment system.
Checklist
Read through this checklist before every journey!
• Check to make sure the Maxi-Cosi Priori XP is securely fastened with the seat belt and that the clamping handle is
locked.
• Check to make sure the shoulder belts are at the proper height.
• Check to make sure your child is fastened securely and that the buckle is locked properly.
• Check regularly that the belt in the Maxi-Cosi Priori XP is not damaged. If it is damaged, do not use the car seat under
any circumstances and contact your supplier or importer (see address list on the back of the instruction manual).
• If you have any questions, please contact your supplier. Make sure that you have the following details on hand:
- Serial number at the bottom of the orange sticker (on the back of the Maxi-Cosi Priori XP).
- Make and type of vehicle and seat on which the Maxi-Cosi Priori XP is being used.
- Your child’s age and weight.
Handy tips
• The belt tensioner does not open: Place the shell in the sleeping position first.
• The child sits on the belts when placed in the Maxi-Cosi Priori XP: Drape the belts over the belt hooks and hook belt
pad over lip by release button.
GB
10
Instructions for useInstructions for use
11

Warranty
We guarantee that this product was manufactured in accordance with the current European safety requirements and
quality standards which are applicable to this product, and that this product is free from defects in workmanship and
material at the time of purchase. During the production process the product was subjected to various quality checks. If
this product, despite our efforts, shows a material/manufacturing fault within the warranty period of 24 months, (with
normal use as described in the user instructions) we will comply with the warranty terms and conditions. In this case
please contact your dealer. For extensive information on applying the warranty terms and conditions, you can contact
GB
the dealer or look on our website: www.maxi-cosi.com.
The warranty is not valid in the following cases:
• In case of a use or purpose other than described in the manual.
• If the product is submitted for repair through a dealer that is not authorized by us.
• If the product is not supplied to the manufacturer with the original purchase receipt (via the retailer and/or importer).
• If repairs were carried out by third parties or a dealer that is not authorized by us.
• If the defect is the result of improper or careless use or maintenance, negligence or impact damage to the fabric
cover and/or frame.
• If the parts show normal wear and tear that may be expected from daily use of a product (wheels, rotating and
moving parts etc.)
Date of effect:
The warranty becomes effective on the date the product is purchased.
Warranty term:
The warranty period applies for a period of 24 consecutive months. The warranty only applies for the first owner and
is not transferable.
What to do in case of defects:
After purchasing the product, keep the purchase receipt. The date of purchase must be clearly visible on the receipt.
Should problems or defects arise please contact your retailer. Exchanging or taking back the product cannot be requested.
Repairs do not give entitlement to extension of the warranty. Products that are returned directly to the manufacturer
are not eligible for warranty.
This Warranty Clause conforms to European Directive 99/44/EG of 25 May 1999.
Chers parents,
Toutes nos félicitations pour votre acquisition de ce Maxi-Cosi Priori XP .
Notre souci constant lors de la conception du Maxi-Cosi Priori XP a été la sécurité, le confort et la facilité d'utilisation.
Ce produit répond aux normes de sécurité les plus sévères.
Des études démontrent que bon nombre de sièges auto ne sont pas utilisés correctement. Nous vous recommandons
donc de lire attentivement ce mode d'emploi. La sécurité maximum de votre enfant ne peut être garantie que si ce
produit est correctement utilisé.
Les études permanentes menées par notre service de développement des produits, les résultats de panels d’essais ainsi
que les réactions de nos clients garantissent que nous restons à la pointe du progrès pour la sécurité des enfants.
N'hésitez pas à nous contacter si vous avez des questions concernant l'utilisation du Maxi-Cosi Priori XP.
Dorel
Important: A lire en premier!
• AVERTISSEMENT: Lisez attentivement le mode d’emploi. Avant toute utilisation, regardez bien les illustrations
de ce mode d’emploi; le Maxi-Cosi Priori XP est un produit de sécurité qui n’assurera pleinement son rôle que
s’il est utilisé conformément aux instructions.
• AVERTISSEMENT: Le passage correct de la ceinture de sécurité auto est d’une importance capitale pour la
sécurité de votre enfant. La ceinture de sécurité auto doit passer le long des marques rouges sur le Maxi-Cosi
Priori XP. Pour cela, reportez-vous au chapitre Installation et/ou à l'autocollant situé sur le côté du Maxi-Cosi
Priori XP. N’utilisez jamais un autre parcours des sangles que celui indiqué.
• AVERTISSEMENT: Pour une future utilisation du siège enfant, il est important de conserver le mode d’emploi
dans l’espace prévu à cet effet qui se trouve à l’arrière du Maxi-Cosi Priori XP.
• AVERTISSEMENT: Ne laissez jamais votre enfant seul dans la voiture.
• AVERTISSEMENT: N’utilisez jamais le Maxi-Cosi Priori XP sur un siège équipé d’un airbag frontal. Ceci peut être
très dangereux. Cette recommandation n’est pas applicable aux airbags latéraux.
• Utilisez le Maxi-Cosi Priori XP uniquement à une place dirigée vers l’avant et équipée d’une ceinture à
enrouleur à trois points de fixation, à condition que celle-ci soit homologuée selon la norme ECE R16 ou une
norme équivalente.
• En Belgique le Maxi-Cosi Priori XP peut être utilisé sur les sièges avant ou sur la banquette arrière du véhicule.
Néanmoins nous vous conseillons d'installer le siège enfant sur la banquette arrière.
• En France le Maxi-Cosi Priori XP s’installe sur la banquette arrière du véhicule conformément au décret no.
91-1321 du 27 décembre 1991, qui spécifie: « Il est interdit aux enfants de moins de 10 ans de voyager assis aux
places avant, et ce dans n’importe quel véhicule automobile », excepté dans des sièges-auto (type coque) placés
dos à la route.
• Le Maxi-Cosi Priori XP est homologué selon les normes européennes les plus strictes (ECE R44/04) et convient
à des enfants de 9 à 18 kg (environ de 9 mois à 3,5 ans).
• Il peut arriver que le siège enfant ne soit plus totalement sûr après un accident, même si ce n’est pas
directement visible. Par conséquent, vous devez alors le remplacer.
• La sécurité du siège auto ne peut être garantie par le fabricant que lorsqu’il est utilisé par le premier acquéreur.
• Nous vous conseillons donc de ne jamais utiliser un produit d’occasion, car vous ne pouvez jamais savoir ce qui
lui est arrivé.
• Les protège harnais sont importants pour la sécurité de votre enfant et vous devez toujours les utiliser.
• Veillez à ce que les bagages et autres objets pouvant causer des blessures au cours d’un accident soient amarrés.
• Il est déconseillé d’utiliser le Maxi-Cosi Priori XP plus de 5 ans après l’achat. Par example, les propriétés du
plastique peuvent s’altérer à cause de son vieillissement, sans que cela puisse être observé.
• Les éléments mobiles du Maxi-Cosi Priori XP ne doivent en aucun cas être graissés.
F13FF
12
Warranty
Français

• AVERTISSEMENT: Le fabricant tient compte du fait que les sièges pour enfant peuvent laisser des marques sur le
revêtement des sièges de voiture. Compte tenu des normes de sécurité obligatoires et la force avec laquelle les
sièges pour enfant doivent être fixés, ceci est inévitable. Dorel refuse toute responsabilité pour des dommages
ainsi occasionnés.
Autres instructions
• Le Maxi-Cosi Priori XP ne doit pas être utilisé sans housse. La housse ne doit pas être remplacée par une autre
housse que celles fournies par le fabricant, car la housse joue aussi un rôle dans la sécurité du siège enfant.
• Le siège enfant doit toujours être fixé à l’aide de la ceinture de sécurité de la voiture, même lorsque l’enfant n’y est
pas assis. Un siège non fixé peut blesser d’autres passagers lors d’un coup de frein brutal.
• Assurez-vous que le Maxi-Cosi Priori XP n’est pas coincé ou écrasé par des bagages lourds, des sièges réglables ou
des portières qui claquent.
• Vous ne devez pas apporter de modifications au Maxi-Cosi Priori XP. Celles-ci pourraient en effet entraîner une perte
partielle ou totale de la sécurité.
• Couvrez toujours le Maxi-Cosi Priori XP si vous garez votre voiture en plein soleil. Les éléments en plastique ou en
métal peuvent devenir brûlants et le revêtement peut se décolorer.
• Le logo du Maxi-Cosi Priori XP qui figure sur la housse ne doit pas être enlevé, au risque d’abîmer la housse.
• Utilisez toujours le Maxi-Cosi Priori XP, même pour les petits trajets, car c’est sur les courtes distances que se
produisent la plupart des accidents.
• Avant l’achat, essayez le siège dans votre voiture pour vérifier qu’il soit bien adapté.
• Au cours des longs trajets, faites des pauses pour redonner à votre enfant sa liberté de mouvement.
• Donnez le bon exemple et attachez toujours votre propre ceinture de sécurité.
• Apprenez à votre enfant qu’il ne doit jamais jouer avec le harnais de son siège.
Questions
En cas de réclamations sur la garantie ou pour toute autre question, adressez-vous à votre revendeur ou à
l’importateur (voir la liste d’adresses au dos du mode d’emploi).
La ceinture de sécurité
Utilisez le Maxi-Cosi Priori XP uniquement avec une ceinture à enrouleur à trois points de fixation (01).
• Le Maxi-Cosi Priori XP peut être fixé en toute sécurité sur presque toutes les places de la voiture dirigées vers l'avant
et équipées de ceintures de sécurité. A certaines places, les ceintures sont parfois trop éloignées vers l’avant et
empêchent une installation correcte du siège enfant. Dans ce cas, essayez de l’installer à une autre place.
• Dans certains cas, la sangle de la boucle de la ceinture de sécurité peut être trop longue et se placer trop haut contre
le socle du Maxi-Cosi Priori XP, ce qui empêche de le fixer solidement. Choisissez alors une autre place dans la
voiture.
(02) Questions? Adressez-vous à votre fournisseur ou à l’importateur.
Les quatre positions du Maxi-Cosi Priori XP
Vous pouvez placer le Maxi-Cosi Priori XP dans quatre positions: poussez vers le haut la poignée située sous l’avant
du siège (03), puis tirez ou poussez le siège vers l’avant ou vers l’arrière (04). Lâchez la poignée de réglage lorsque
vous avez trouvé la position souhaitée et poussez jusqu’à ce que vous entendiez clairement un clic. Pour permettre
l'installation du Maxi-Cosi Priori XP, le siège doit être placé dans sa position la plus inclinée (05).
Installation du Maxi-Cosi Priori XP
Lors de l’installation, reportez-vous aux instructions dans le chapitre « La ceinture de sécurité ».
• Placez le Maxi-Cosi Priori XP dans la position la plus inclinée sur la banquette (05).
• Relachez le tensionneur de ceinture en poussant vers le bas la languette sous le levier. Le levier dépasse maintenant
visiblement le socle (06). Vous pouvez le vérifier: le tensionneur de la ceinture ne se trouve plus entre les crochets
rouges de la ceinture (07).
• Passez la ceinture auto entre la coque et le socle du siège enfant. Vérifier que la sangle abdominale de la ceinture
auto passe entre les crochets rouges et le tensionneur de la ceinture (08).
• Bouclez la ceinture de sécutité de la voiture et assurez-vous que les sangles ne soient pas torsadées (08).
• La sangle abdominale de la ceinture passe sous les crochets rouges de la ceinture auto (09) et la sangle épaule doit
être bien tendue directement depuis la boucle de la ceinture auto vers le haut en diagonale. Placez la sangle épaule
dans la pince (10), puis fermez le verrou (11/1). ATTENTION! La sangle épaule n’est fixée que sur le côté de
l’enrouleur. La pince est maintenant fermé.
• Tout en appuyant de tout votre poids sur le Maxi-Cosi Priori XP, tirer fermement sur la sangle épaule jusqu’a ce que
le siège soit presque immobilisé. Pensez à contrôler cela!
• Maintenant poussez le levier du tensionneur vers sa position d’origine jusqu’à ce qu’il soit immobilisé sous le socle
(clic) (12). Le tensionneur sert à tendre davantage la ceinture de sécurité. Vous pouvez contrôler cela en vérifiant que
le tensionneur de la ceinture auto se trouve maintenant entre les deux crochets de la ceinture abdominale (13).
• Vous pouvez maintenant placer la coque du Maxi-Cosi Priori XP dans la position désirée.
Installer votre enfant dans le Maxi-Cosi Priori XP
• Desserrez les bretelles en appuyant sur le bouton de réglage, puis tirez-les vers vous (14). Attention ! Ne tirez pas
sur les protège harnais.
• Ouvrez la boucle du harnais (15) et fixez les bretelles aux crochets latéraux de la coque (16).
• Placez le fermoir vers l'avant et tirez la boutonnière sur le crochet (17).
• Installez convenablement l’enfant avec son dos contre la coque (18) en veillant à ce qu'il n'y ait pas de jouets ou
autres objets durs dans la coque.
• Assemblez les deux brins des bretelles et enclenchez-les dans le fermoir (19).
• Positionnez la sangle abdominale aussi basse que possible afin de garantir un bon maintien du bassin de l’enfant.
• Tirez les bretelles vers le haut pour les tendre (20/1), puis ajustez le système des sangles en tirant la sangle centrale
de réglage (20/2).
ATTENTION !
• Plus les sangles sont ajustées à votre enfant et plus il est protégé. Vous ne devez pas pouvoir passer plus que
l’épaisseur d’un doigt entre les bretelles et l'enfant.
• Les côtés profilés des protège-bretelles doivent être en contact avec les épaules de votre enfant.
• Les bretelles ne doivent jamais être torsadées.
• Si vous ne parvenez pas à enclencher les boucles des bretelles dans le fermoir, débloquez-le en appuyant sur le
bouton rouge et essayez de nouveau.
• S’il n’est pas possible de bien fermer ou de tendre correctement l’ensemble du harnais, contactez tout de suite le
fournisseur. Dans ce cas, n’utilisez surtout pas le Maxi-Cosi Priori XP!
Modifier la hauteur des bretelles
Les bretelles sont à la bonne hauteur si elles disparaissent dans la coque juste au-dessus des épaules. Vérifiez que les
sangles sont bien en contact avec les épaules de l’enfant (21).
• Desserrez les bretelles en appuyant sur le bouton de réglage et tirez-les doucement vers vous au maximum pour
donner du mou (14). Attention! Ne tirez pas sur les protège-bretelles.
• Ouvrez vers le haut le rabat de la housse au niveau des fentes pour les bretelles (22).
• Tirez les bretelles, au-dessus du protège-bretelles, en décrivant une boucle vers l'avant pour faciliter le réglage (23).
• Passer la sangle dans l'ouverture et vers l'arrière (24).
• Glissez ensemble la sangle et la bande du protège-bretelles par la fente vers la position suivante (25). Veillez que la
bretelle passe bien en haut de la bande du protège-bretelles dans la nouvelle position (26). Cette opération doit
toujours être faite des deux côtés.
• Tendez les bretelles en tirant sur les sangles sous le protège-bretelles (26).
• Fermez le rabat en passant les protège-bretelles par les fentes appropriées et fermez la bande auto-agrippante (27).
• Vérifiez que vous pouvez utiliser les bretelles correctement et qu'elles ne soient pas torsadées.
Mode d’emploi
Mode d’emploi
1514
 Loading...