

Maxi-Cosi PrioriFix Instructions Manual
www.maxi-cosi.com
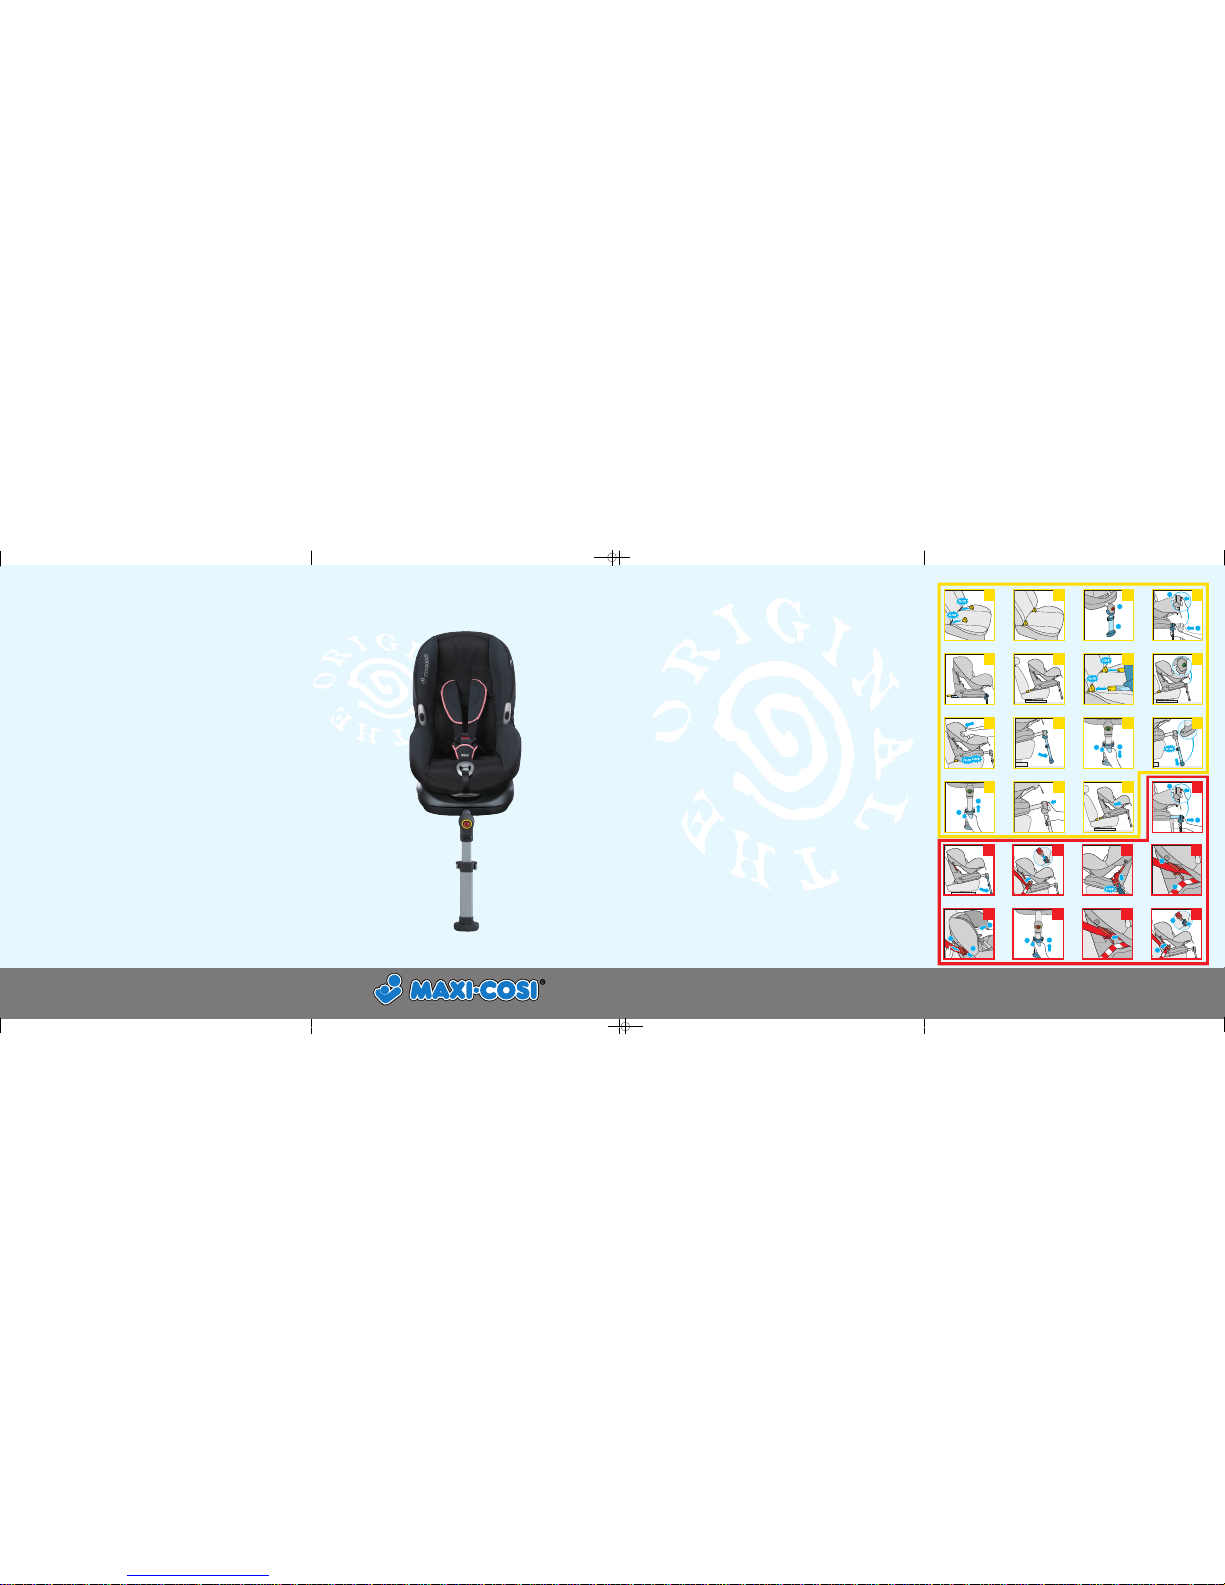
Illustrations
Contents
3
Maxi-Cosi PrioriFix
www.maxi-cosi.com
The safe world of Maxi-Cosi
2
DRU0630
LEBANON
Gebran Geahchan & Sons
Azar Building
Horch Tabet
P.O.Box 55134
Sin El Fil
Tel. 961 1 482369
Fax 961 1 486997
LITHUANIA
AS Greifto
Pärnu mnt. 139c
11317 Tallinn
Tel. (6) 56 33 06
Fax (6) 56 33 11
E-mail greifto@datanet.ee
LUXEMBOURG
Dorel Benelux
Brussels Int. Trade Mart
Postbus/B.P. 301
Aquarelle 366
1000 Brussel/Bruxelles
Tel. 0800 1 17 40
Fax +31 492 578 122
MALAYSIA
Planete Enfants Sdn. Bhd
No. 23, Jalan SS 26/15
Taman Mayang Jaya
47301 Petaling Jaya
Selangor, Malaysia
Tel. 603-78035523
Fax 603-78035323
E-mail julia.lim.my@gmail.com
MALTA
Rausi Company Limited
J.P.R. Buildings
Ta Zwejt Street
San Gwann Industrial Estate
San Gwann SGN 09
Tel. +356 21 44 56 54
Fax +356 21 44 56 57
E-mail rausi.info@rausi.com.mt
MAURITIUS
Meem Trading
38 Sir S. Ramgoolam Street
Port Louis
Mauritius
Tel. 2302403632
Fax 2302411589
E-mail meem@intnet.mu
MÉXICO
D'bebé SA de CV
Girardón # 84
Colonia Alfosno XIII, Mixcoac.
México D.F. 01420
Tel. (52)(55) 15-00-23-23
Fax (52)(55) 55-98-51-08
E-mail dbebe@dbebe.com.mx
NEDERLAND
Dorel Netherlands
P.O. Box 6071
5700 ET Helmond
Tel. 088 - 123 24 42
NEW ZEALAND
IGC Dorel Pty Ltd
655-685 Somerville Road
Sunshine West, VIC 3020 Australia
Tel. +61(3) 8311 5300
Fax +61(3) 8311 5390
E-mail sales@igcdorel.com.au
NORWAY
BabyWorld DA (sales agent)
Teglverksveien 25b
N - 3057 Solbergelva
Tel. 32 23 00 54 / 957 39 068
Fax 32 23 03 12
E-mail info@baby-world.no
NORWAY
Dorel Netherlands
P.O. Box 6071
5700 ET Helmond
The Netherlands
OSTERREICH
Dorel Germany
Vertrieb Österreich
Augustinusstraße 9c
D-50226 Frechen-Königsdorf
Deutschland
Tel. +49 2234 / 96 43 0
Fax +49 2234 / 96 43 33
POLAND
Poltrade Waletko
Spolka Jawna
41-500 Chorzow
Ul. Legnicka 84/86
Tel. (032) 346 00 81
Fax (032) 346 00 82
www.maxicosi.pl
biuro@poltradewaletko.pl
www.poltradewaletko.pl
PORTUGAL
Dorel Portugal LDA
Parque Industrial da Varziela
Árvore, 4480 Vila do Conde
Tel. 252 248 530
Fax 252 248 531
E-mail maxi-cosi@dorel-pt.com
ROMANIA
SC Miniblu SRL.
Calea Rahovei, 266-268, corp 60
Etaj 1; Axele A Si B, Stalpii 15-16
Bir. 104-114;Secotr 5, Bucuresti
Tel. +40 21 404 14 00
Fax +40 21 404 14 01
E-mail office@miniblu.ro
RUSSIA
Carber Poriferra
107392 Moskva, Russia
1aå Pugahevskaå u ., 17
1st Pugachevskaya str. 17
RUS-107392 Moscow
Tel. +8(499) 161 25 91
Fax +8(499) 161 26 48
E-mail maxi-cosi@carber.ru
SINGAPORE
B.I.D. Trading PTE Ltd.
69, Kaki Bukit Ave 1
Shun Li Industrial Park
Singapore 417947
Tel. +65 68441188
Fax + 65 68441189
E-mail sales@babyhyperstore.com
SLOVAKIA
LIBFIN SK s.r.o
Šoltésovej 12
811 08 Bratislava
Tel. +421 250 219 140
Fax +421 250 219 240
Email info@libfin.sk
www.libfin.sk
SLOVENIA
Baby Center d.o.o.
Letališka c. 3c
Ljubljana
Tel. 00386 01 546 64 30
Fax 00386 01 546 64 31
E-mail uprava@baby-center.si
SOUTH AFRICA
Anchor International
12 Kimberlite Road, Theta Ext.5
Booysens Reserve,
Johannesburg, 2091
P.O.Box 546, Crown Mines,
Johannesburg, 2025
Tel. (011) 835 - 2520
Fax (011) 835 - 3718
E-mail anc.int@mweb.co.za
SOUTH KOREA
YK Trading Co., Ltd.
Level 5, Youngkwang Bldg, 773-3,
Yeoksam-dongKangnam-gu,
Seoul, South of Korea
Tel. 82-23452-8700
Fax 82-23452-8660
E-mail international@yk-korea.com
www.sbaby.co.kr
SWEDEN
Amvina
Box 7295
187 14 Täby
Sweden
Tel. +46 (0)8 732 88 50
Fax +46 (0)8 732 8851
E-mail info@amvina.se
www.amvina.se
SWEDEN
Dorel Netherlands
P.O. Box 6071
5700 ET Helmond
The Netherlands
SWITZERLAND
Dorel Juvenile Switzerland SA
Chemin de la Colice 4
1023 Crissier
Tel. 0041 (0) 21 661 28 40
Fax 0041 (0) 21 661 28 45
E-mail info.suisse@ch-dorel.com
TAIWAN
Topping Prosperity Inc.
6F, No.49, Lane 76,
Ruey-Guang Road,
Ney-Hwu District, Taipei, Taiwan
Tel. 02-87924158
Fax 02-87911586
E-mail topping2@ms21.hinet.net
THAILAND
Diethelm
Sukhumvit Road 2535
Bangchak
Prakanong
10250 Bangkok
Tel. 662 332 6060-89
Fax 662 332 6127
anuchida.i@dksh.com
TURKEY
Grup LTD.
Kayisdagi Cad. No:7
Küçükbakkalköy-ISTANBUL
Tel. 0216 573 62 00 (pbx)
Faks 0216 573 62 09
E-mail destek@grupbaby.com
www.grupbaby.com
UKRAINE
Europroduct
4th floor, 53b
Arnautskaya St
65012 Odessa
Tel. 00 380 482 227 338
Fax 00 380 482 345 812
E-mail europroduct@te.net.ua
UKRAINE
Amigo Toys
bul. Shevchenko 29
Donetsk 83017
Tel. 00380-62-3353478
Fax 00380-62-3859974
E-mail info@amigotoys.com.ua
UNITED KINGDOM
Dorel U.K.
Hertsmere House
Shenley Road
Borehamwood, Hertfordshire WD6
1TE
Tel. (020) 8 236 0707
Fax (020) 8 236 0770
UNITED STATES
Dorel Juvenile Group, Inc.,
2525 State St., Columbus,
IN47201-7494
Tel. (800) 951-4113
SLO
Navodilo za uporabo/Garancija
Pred namestitvijo se vedno prepričajte,
da je vaše vozilo na seznamu vozil, ki so
primerni za namestitev otroškega sedeža
Maxi-Cosi PrioriFix.
RUS
Руководство по эксплуатации/Гарантия
Перед установкой всегда проверяйте
список риспособленных машин!
BUL
Упътване за употреба/Гаранция
Преди да инсталирате столчето, винаги
проверявайте списъка с колите, в които
то може да бъде монтирано!
GB Instructions for use/Warranty
Always check car fitting list before installation!
PL Instrukcja obsługi/Gwarancja
Przed montażem należy zapoznać się z listą
kompatybilnych modeli samochodów!
HU Használati utasítás/Garancia
A gyermekülés beszerelése el
őtt ellenőrizze
a gépkocsitípuslistát
CZ Návod k použití/Záruka
Před instalací vždy zkontrolujte seznam
pro montáž do automobilu!
EST
Kasutusjuhend/Garantii
Enne paigaldamist kontrollige alati
kinnitusarmatuuri nimekirja!
17 18 19
1
2
20
2
3
1
21
2
1
22 23
2
1
24
1 2
1
2
3
2
1
4
5 6 7 8
9 10
2
1
11 12
2
1
16
2
1
13 14 15
Maxi-Cosi PrioriFix
Instructions for use/Warranty 7 - 18
Instrukcja obsługi/Gwarancja 19 - 31
Használati utasítás/Garancia 32 - 44
Návod k použití/Záruka 45 - 56
Kasutusjuhend/Garantii 57 - 68
Navodilo za uporabo/Garancija 69 - 81
Руководство по эксплуатации/Гарантия 82 - 95
Упътване за употреба/Гаранция 96 - 109
GB
PL
HU
CZ
EST
SLO
RUS
BG
EXI0214_GBA_PrioriFix_II_CO:-- 03-12-2008 10:58 Pagina 1
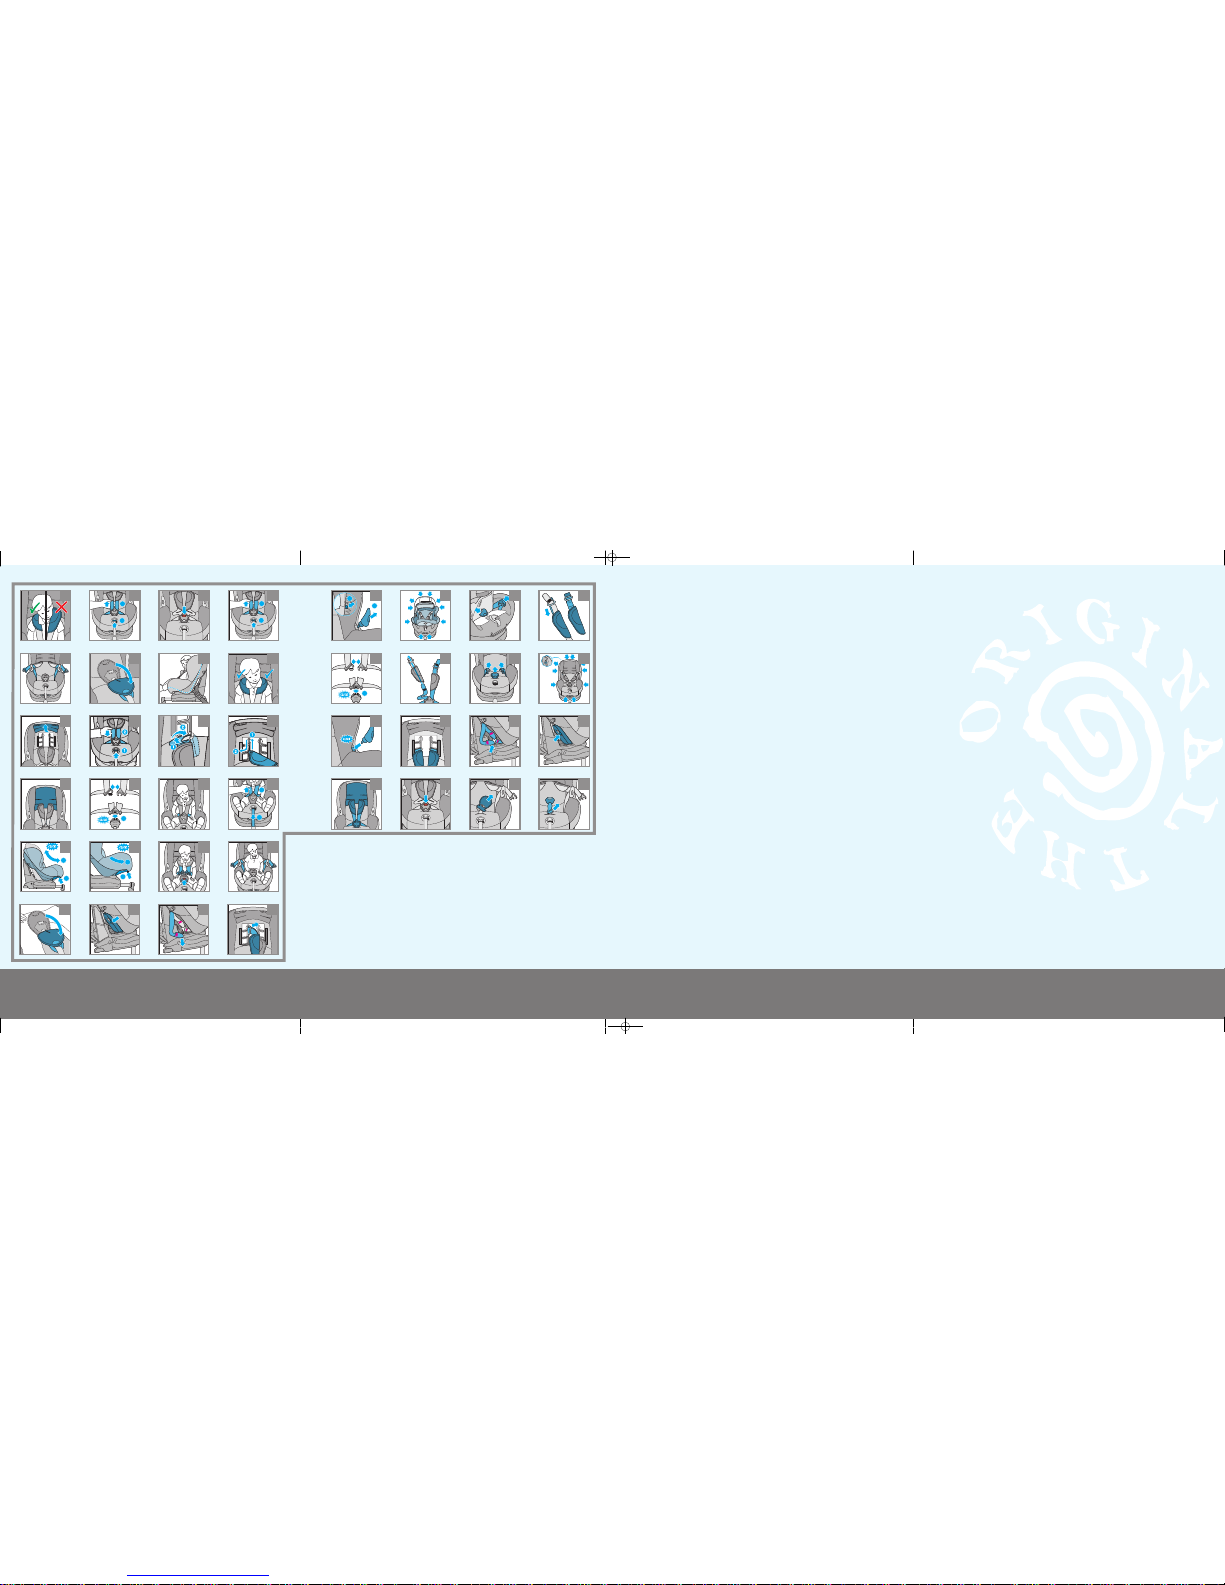
IllustrationsIllustrations
4
5
www.maxi-cosi.com www.maxi-cosi.com
6
ARGENTINA
Bebehaus S.A.
Guatemala 4831 Ciudad Autónoma de Buenos Aires
C1425BUO
Tel. + 54 (11) 4776-6954
Fax+ 54 (911) 6265 0665 /
+ 54 (911) 5050 2339
E-mail info@bebehaus.com.ar
www.bebehaus.com.ar
AUSTRALIA
IGC Dorel PTY Ltd
655-685 Somerville Road
Sunshine West, VIC3020
Tel. +61 (3) 8311 5300
Fax +61 (3) 8311 5390
E-mail sales@igcdorel.com.au
BELGIE/BELGIQUE
Dorel Benelux
Brussels Int. Trade Mart
Postbus/B.P. 301
Aquarelle 366
1000 Brussel/Bruxelles
Tel. 0800 1 17 40
Fax +31 492 578 122
www.maxi-cosi.com
BRASIL
Giro Imp&Exp Ltda - BBTrends
Al. Gabriel Monteiro da Silva,
235 - Jardins
Sao Paulo - SP - Brasil
Cep:01.441-000
Tel. +55 11 3377 9200
E-mail BBtrends@BBtrends.com.br
www.BBtrends.com.br
BULGARIA
Nedelchev & Nedelchev Ltd.
compl. "Gotze Delchev"
Ul. Silivria 16
Sofia 1404
Tel. 02-958 26 29
Fax 02-958 26 51
E-mail info@nn-bg.com
www.nn-bg.com
CANADA
Dorel
Dorel Distribution
873 Hodge
St. Laurent
QCH4N 2B1
CESKÁ REPUBLIKA
Libfin s.r.o.
Legionářů 72
276 01 Mělník
Tel. +420 315 621 961
Fax +420 315 628 330
E-mail: info@libfin.cz
www.libfin.cz
CHILE
Mundo petit
Av. Nueva Costanera 3986,
Interior, Vitacura
Santiago, Chile
Tel. +56 (2) 415 9103 / 415 9864
Tel. +56 (8) 294 9628
Fax +56 (2) 356 4749
http:///www.mundopetit.com
COLOMBIA
Cangurus Mom´s and babies
Cra. 7 A No. 121 - 33
Bogotá - Colombia
Tel. +57 1 6127257
Fax +57 1 6127257
E-mail info@cangurus.com.co
CROATIA
Media Commerce d.o.o.
CMP Savica Šanci
Majstorska 5
10000 Zagreb
Tel. 00385 1 2406-500
Tel. 00385 1 2406-501
Fax 00385 1 2406-499
E-mail mediacommerce@zg.htnet.hr
www.media-commerce.com.hr
CROATIA
Magma d.d.
Baštijanova 52a
10000 Zagreb, Croatia
Tel. +385 1 3656 888
Fax +385 3656 800
CURAÇAO
Mom & Co.
Promenade Shopping Center C3
Tel. 00 5999 7360 755
Fax 00 5999 7360 744
E-mail info@momandco.com
CYPRUS
Xenofon Demetriades and Son Ltd
Digeni Akrita 39H,
1070 Nicosia, Cyprus.
Tel. 00357 99620137
Fax 00357 22750463
E-mail gkzorpas@cytanet.com.cy
www.demetriades.com.cy
DANMARK
Babysam A.m.b.A.
Egelund A 27-29
6200 Aabenraa
Tel. 74 63 25 10
Fax 74 63 25 11
E-mail babysam@babysam.dk
DEUTSCHLAND
Dorel Germany
Augustinusstraße 9c
50226 Frechen-Königsdorf
Tel. 0049 (0) 2234 / 96 43 0
Fax 0049 (0) 2234 / 96 43 33
DUBAI
Golden Toys
P.O.BOX: 6761
U.A.E.
Tel. +9714 - 226 8448
Tel. +9714 - 225 1166
Fax +9714 - 225 7336
E-mail goldtoy@emirates.net.ae
DUBAI
DutchKid FZ Co.
P.O.Box 333741
Dubai,
United Arab Emirates
Tel. +971 4 341 7500
Fax +971 4 341 7501
www.dutchkid.com
ESPAÑA
Dorel Hispania S.A.
Edifici del Llac Center
C/ Pare Rodés, 26 - Torre A 4ª Planta
08208 Sabadell (Barcelona)
Tel. 937 243 710
Fax 937 243 711
ESTONIA
AS Greifto
Pärnu mnt. 139C
11317 Tallinn
Tel. (6) 56 33 06
Fax (6) 56 33 11
E-mail greifto@datanet.ee
FINLAND
Lastentarvike
Sarkatie 3
1720 Vantaa
Tel. +358 985205526
Fax +358 985205426
FRANCE
Dorel France
Z.l. / 9 bd du Poitou - BP 905
49309 CHOLET CEDEX
Tel. 00-33-2-41-49-23-23
Fax 00-33-2-41-56-17-13
GREECE
Dionic SA
95 Aristotelous Str
13671 Axarnes
Athens
Tel. +3 210 2419582
Fax +3 210 2404290
E-mail info@unikid.gr
GUATEMALA
Websolutions, S.A. 20
calle 24-60 Zona 10
Ofibodega No. 9
Guatemala City 01010
Tel. 502 2369-4726
Tel. 502 5200-0867
HONG KONG
Chup Shing Trading Co.Ltd.
Block A, 7/F, Unit J
25-31 Kwai Fung Crescent
Marvel Industrial Building
Kwai Chung N.T.
Tel. (852) 24 22 21 01
Fax (852) 24 89 10 92
HUNGARY
Recontra Kft.
Badacsonyi u. 24
1113 Budapest
Tel. (01) 209 26 32/209 26 33
Fax (01) 209 26 34
E-mail recontra@recontra.hu
ICELAND
Fífa ehf.
Husgagnahollin
Bildshofda 20
IS-110 Reykjavik
Tel. +354-5522522
E-mail fifa@fifa.is
INDONESIA
PT. Sumber Aneka Karya Abadi
JL. Batu Ceper No. 2 B-C-E
Jakarta 10120
Tel. +62-21-3854444
Fax +62-21-3442617
E-mail sakaindonesia@gmail.com
IRAN
Nowrouz Nia
Mirdamad Ave.-Valiasr Ave.
Eskan-shopping Center
No. 13 Eskan - Maxi Cosi
IRAN - 19 696 Tehran
Tel. + 982188787378
Fax + 982188775702
E-mail maxicosinia@yahoo.com
IRELAND
Dorel Ireland Ltd
All n one Ltd
42 Western Parkway
Business Park
Lower ballymount Road
Dublin 12
Ireland
Tel. 353-(1)4294055
Fax 353-(1)4294010
ISRAEL
Shesek Ltd.
28B Halechi Street
Bnei Brak 51200
Israel
Tel. 972 3 5775 133
Fax 972 3 5775 136
E-mail einat_a@shilav.com
ITALIA
Dorel Italia
Via Verdi, 14
24060 Telgate (Bergamo)
P.I. IT 02304040161
Tel. 035 44 21 035
Fax 035 44 21 048
E-mail info@it-dorel.com
JAPAN
GMP International Co.Ltd.
1-19-4, Yoyogi-Park Bldg.
Tomigaya, Shibuya-Ku
Tokyo, 151-0063
LATVIA
AS Greifto
Pärnu mnt. 139C
11317 Tallinn
Tel. (6) 56 33 06
Fax (6) 56 33 11
E-mail greifto@datanet.ee
25
1
2
26 27
1
2
28
29 30 31 32
33 34 35 36
37
1
2
38 39
1
2
40
1
2
3
4
1
2
41
1
2
42 43 44
1
2
49 50 51 52
1
2
53 54 55 56
57 58 59 60
61 62 63 64
45 46 47 48
EXI0214_GBA_PrioriFix_II_CO:-- 03-12-2008 10:58 Pagina 2
English
Dear parents
Congratulations on your purchase of the Maxi-Cosi PrioriFix.
Safety, comfort and user-friendliness played an important role in developing the Maxi-Cosi PrioriFix.
This product meets the most stringent safety requirements.
Studies have shown that a large percentage of car seats are not used correctly. Therefore, please take the
time to read through this manual carefully. Your child's safety can only be guaranteed if this product is used
according to these instructions.
Continuous research by our product development department, supported by intensive contact and consultation
with test persons and consumers ensure that we kept fully up-to-date in the field of child safety. If you have
any questions or comments on the use of the Maxi-Cosi PrioriFix, please do not hesitate to contact us.
Dorel (see the back of the instruction manual for address and telephone number)
GB
7
23
15
16
21
17
19
18
20
24
13
14
22
5
6
7
11
12
1
2
3
4
9
10
8
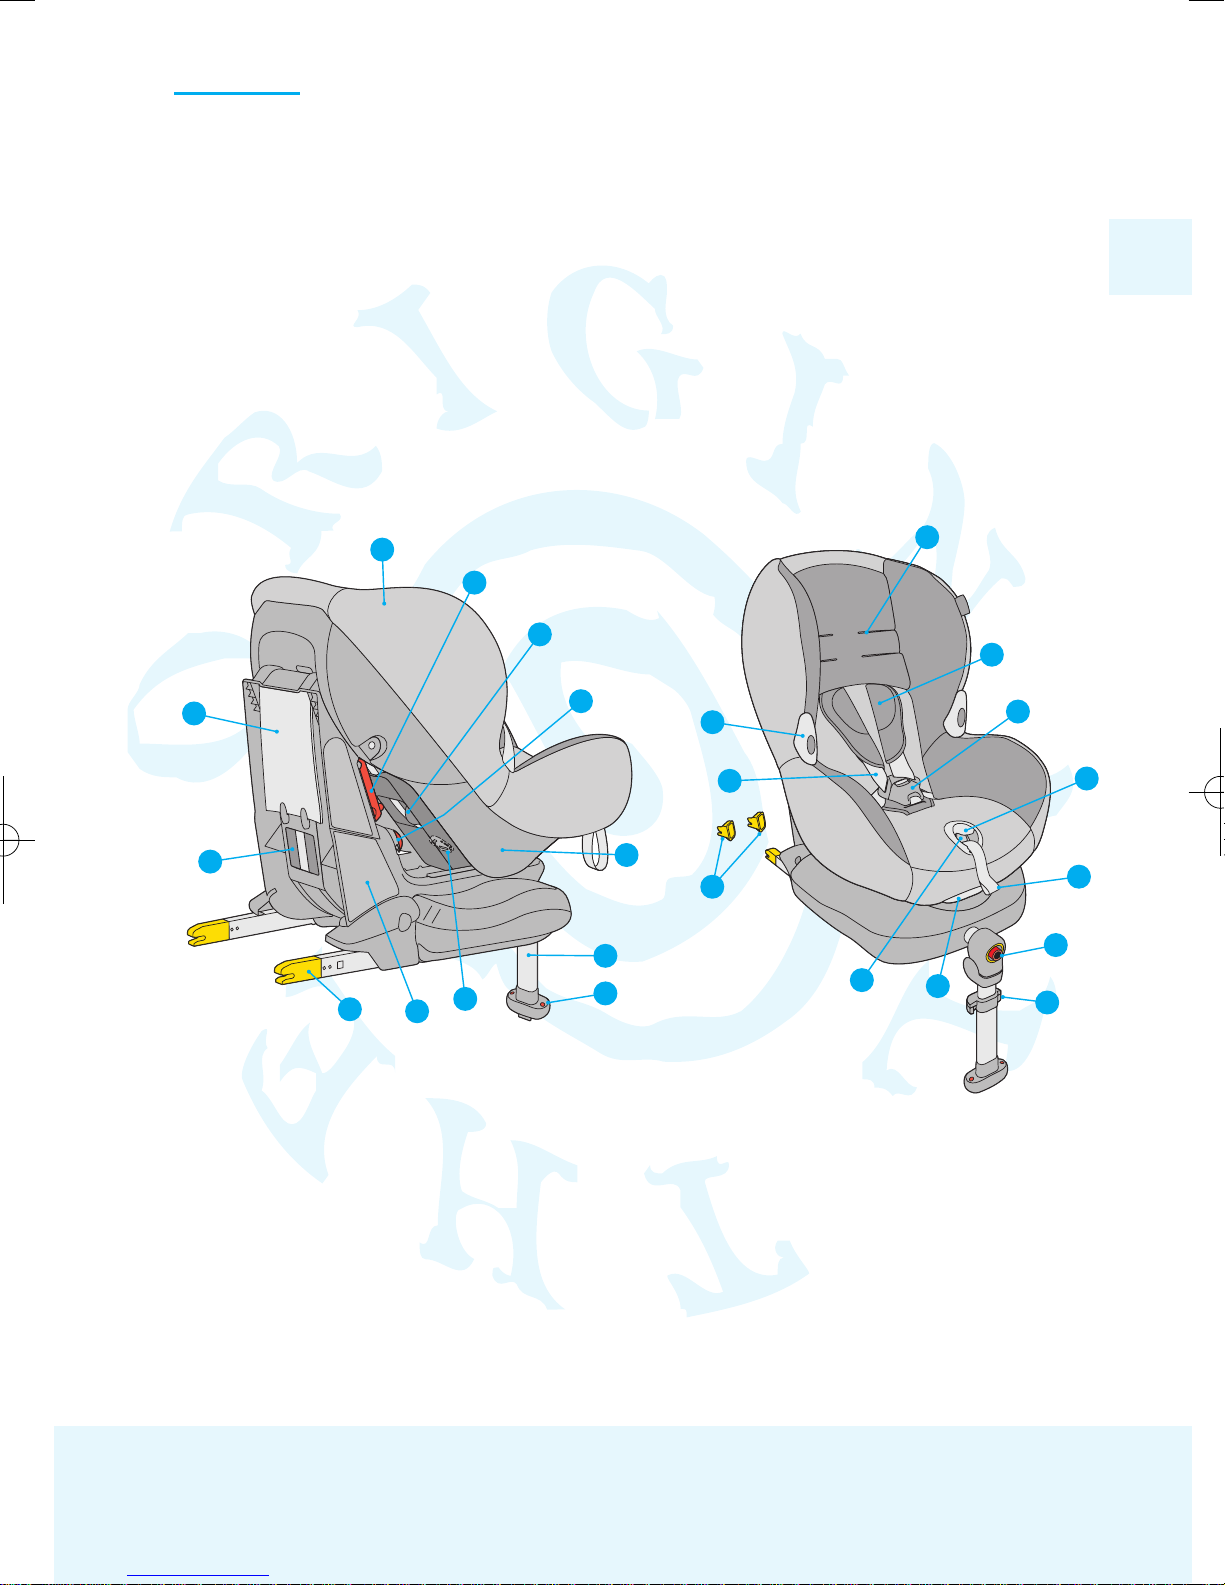
1. Cover
2. Belt clamp
3. Belt guard door
4. Red lap belt marking
5. Shell
6. Support leg
7. Support leg colour indicator
8. Belt yoke
9. Label
10. Isofix connector
11. ECE sticker
12. Instruction manual
13. Belt slots
14. Belt protector
15. Belt buckle
16. Hook for securing buckle
17. Adjustment strap for shoulder belts
18. Central button on the support leg with
colour indicator
19. Support leg control button
20. Seat positioning handle
21. Adjustment button for shoulder belts
22. Isofix guides
23. Shoulder belts
24. Belt hooks
English
CONTENTS
1. IMPORTANT: READ FIRST! . . . . . . . . . . . . . . . . . . . . . . . . . . . . . . . . . . . . . . . . . . . . . . . .8
2. APPROVED CAR USE . . . . . . . . . . . . . . . . . . . . . . . . . . . . . . . . . . . . . . . . . . . . . . . . . . . .8
3. INSTALLING AND REMOVING THE MAXI-COSI PRIORIFIX . . . . . . . . . . . . . . . . . . . . . . .9
3.1 Using Isofix (yellow marking on the product) and support leg . . . . . . . . . . . . . . . . . . . .9
3.2 Using a 3-point safety belt (red marking on product) and support leg . . . . . . . . . . . . . .10
4. PLACING YOUR CHILD IN THE MAXI-COSI PRIORIFIX . . . . . . . . . . . . . . . . . . . . . . . . . .12
4.1 Using the harness system . . . . . . . . . . . . . . . . . . . . . . . . . . . . . . . . . . . . . . . . . . . . . . . .12
4.2 Seat positions (adjusting the seat into sitting and reclining positions) . . . . . . . . . . . . . .13
4.3 Removing your child . . . . . . . . . . . . . . . . . . . . . . . . . . . . . . . . . . . . . . . . . . . . . . . . . . . . .13
5. MAINTENANCE . . . . . . . . . . . . . . . . . . . . . . . . . . . . . . . . . . . . . . . . . . . . . . . . . . . . . . . . .13
5.1 General . . . . . . . . . . . . . . . . . . . . . . . . . . . . . . . . . . . . . . . . . . . . . . . . . . . . . . . . . . . . . . .13
5.2 Seat cover . . . . . . . . . . . . . . . . . . . . . . . . . . . . . . . . . . . . . . . . . . . . . . . . . . . . . . . . . . . . .14
5.3 Belt buckle functioning and cleaning . . . . . . . . . . . . . . . . . . . . . . . . . . . . . . . . . . . . . . . .14
6. GENERAL INSTRUCTIONS . . . . . . . . . . . . . . . . . . . . . . . . . . . . . . . . . . . . . . . . . . . . . . . .15
7. WASTE SEPARATION . . . . . . . . . . . . . . . . . . . . . . . . . . . . . . . . . . . . . . . . . . . . . . . . . . . .16
8. NEXT STAGE CAR SEAT . . . . . . . . . . . . . . . . . . . . . . . . . . . . . . . . . . . . . . . . . . . . . . . . . .16
9. CAR FITTING LIST . . . . . . . . . . . . . . . . . . . . . . . . . . . . . . . . . . . . . . . . . . . . . . . . . . . . . .17
10. WARRANTY . . . . . . . . . . . . . . . . . . . . . . . . . . . . . . . . . . . . . . . . . . . . . . . . . . . . . . . . . . .17
11. QUESTIONS . . . . . . . . . . . . . . . . . . . . . . . . . . . . . . . . . . . . . . . . . . . . . . . . . . . . . . . . . . .18
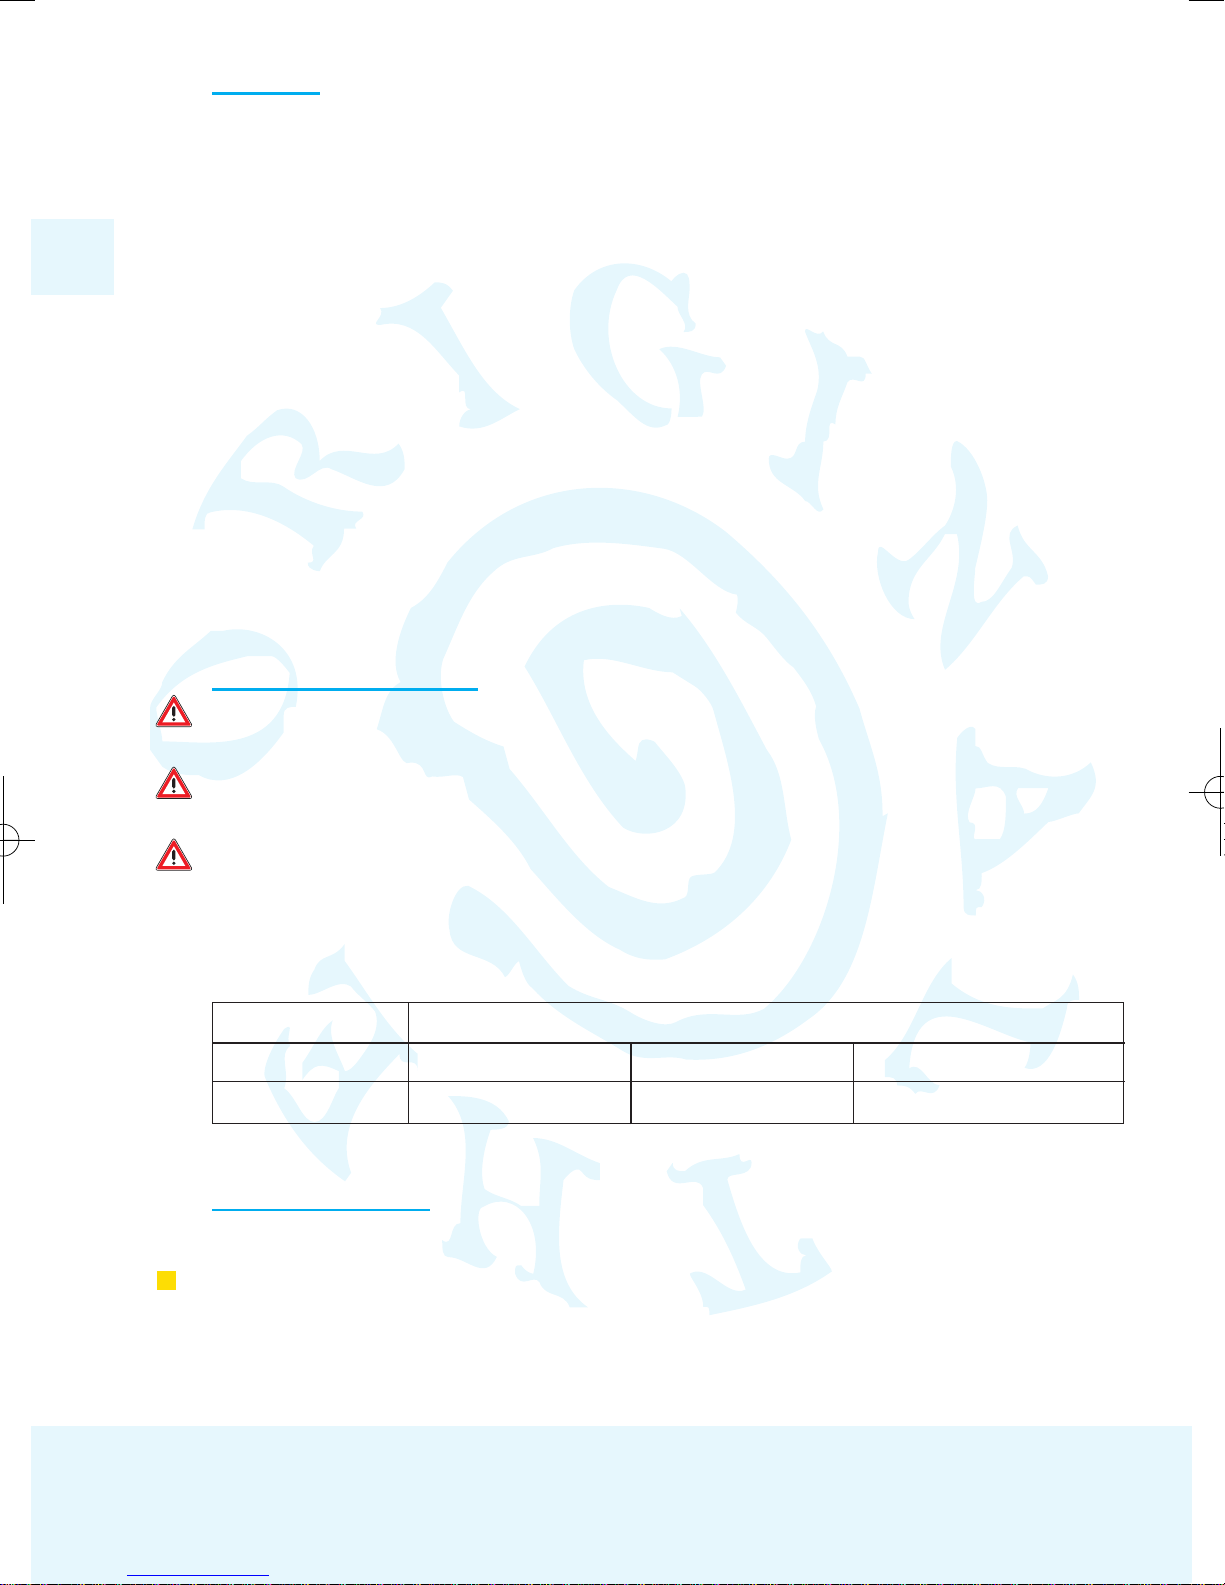
1. IMPORTANT: READ FIRST!
Read this instruction manual carefully and save it for future reference. Failure to follow the instructions in
this manual could result in serious injury to your child.
Use original accessories and manufacturer-approved parts only. Do not make any changes to the product.
If you have any problems or complaints, contact your retailer or importer.
Always check car fitting list before installation.
The Maxi-Cosi PrioriFix has been approved according to the most recent guidelines of the ECE R 44/04, the
European standard for car safety seats, and is suitable for children aged approximately 9 months to 3,5
years (9 to 18 kg).
2. APPROVED CAR USE
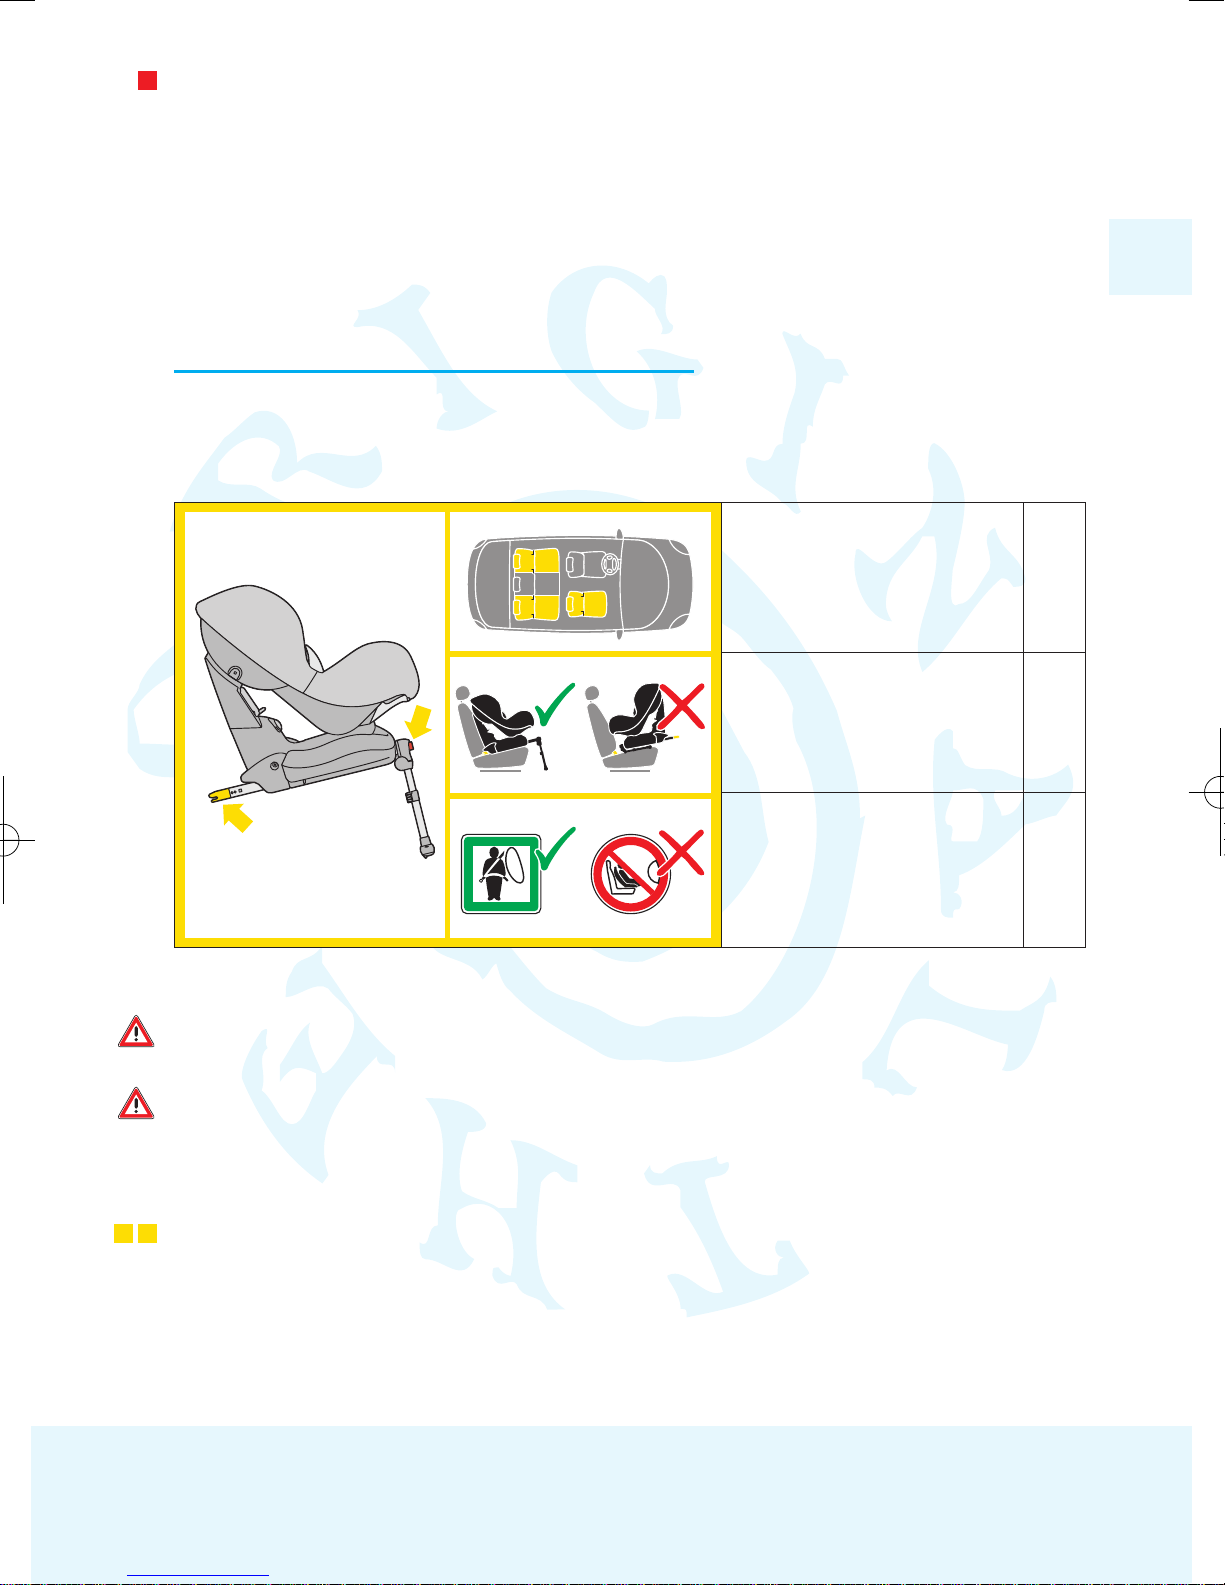
The Maxi-Cosi PrioriFix is approved for 2 types of car use:
Installation with Isofix and support leg* (see section 3.1);
For use in cars with approved Isofix anchor points (see Section 9: Car fitting list). Recognisable by the
yellow marking on the product and the yellow marking in the instruction manual.
GB
8
Suitability according to ECE R 44/04*
Group Body weight of child Age
Maxi-Cosi PrioriFix 1 9 – 18 kg 9 months – 3,5 years
Instructions for use
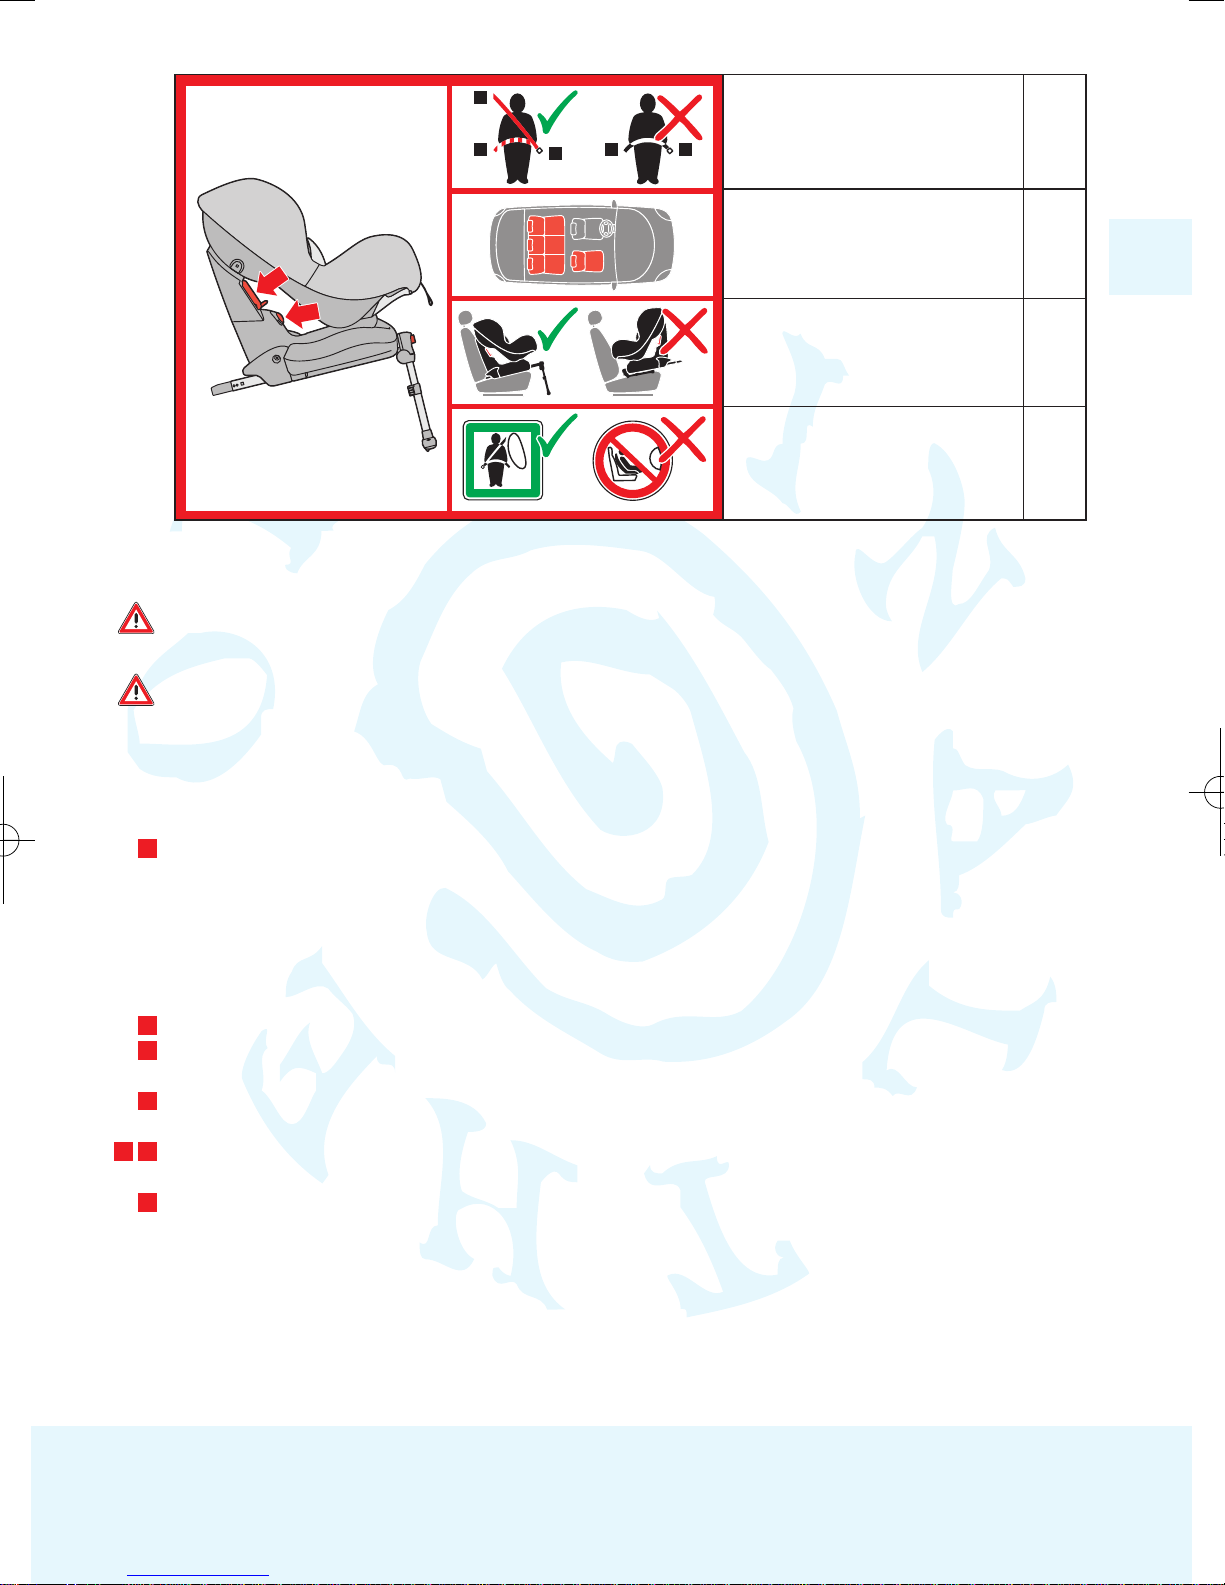
Installation using 3-point safety belt and support leg* (see section 3.2);
For use in cars fitted with an automatic 3-point safety belt, which is approved according to ECE R16 or an
equivalent standard (see Section 9: Car fitting list). Recognisable by the red marking on the product and the
red marking in the instruction manual.
* The use of the support leg and / or Isofix, which ensure optimum safety and easy installation, mean that the
Maxi-Cosi PrioriFix is not suitable for all types of cars. The Maxi-Cosi PrioriFix is designated as “semi-
universal” and therefore suitable for installation in certain types of cars. See the enclosed car fitting list (see
Section 9: Car fitting list).
3. INSTALLING AND REMOVING THE Maxi-Cosi PRIORIFIX
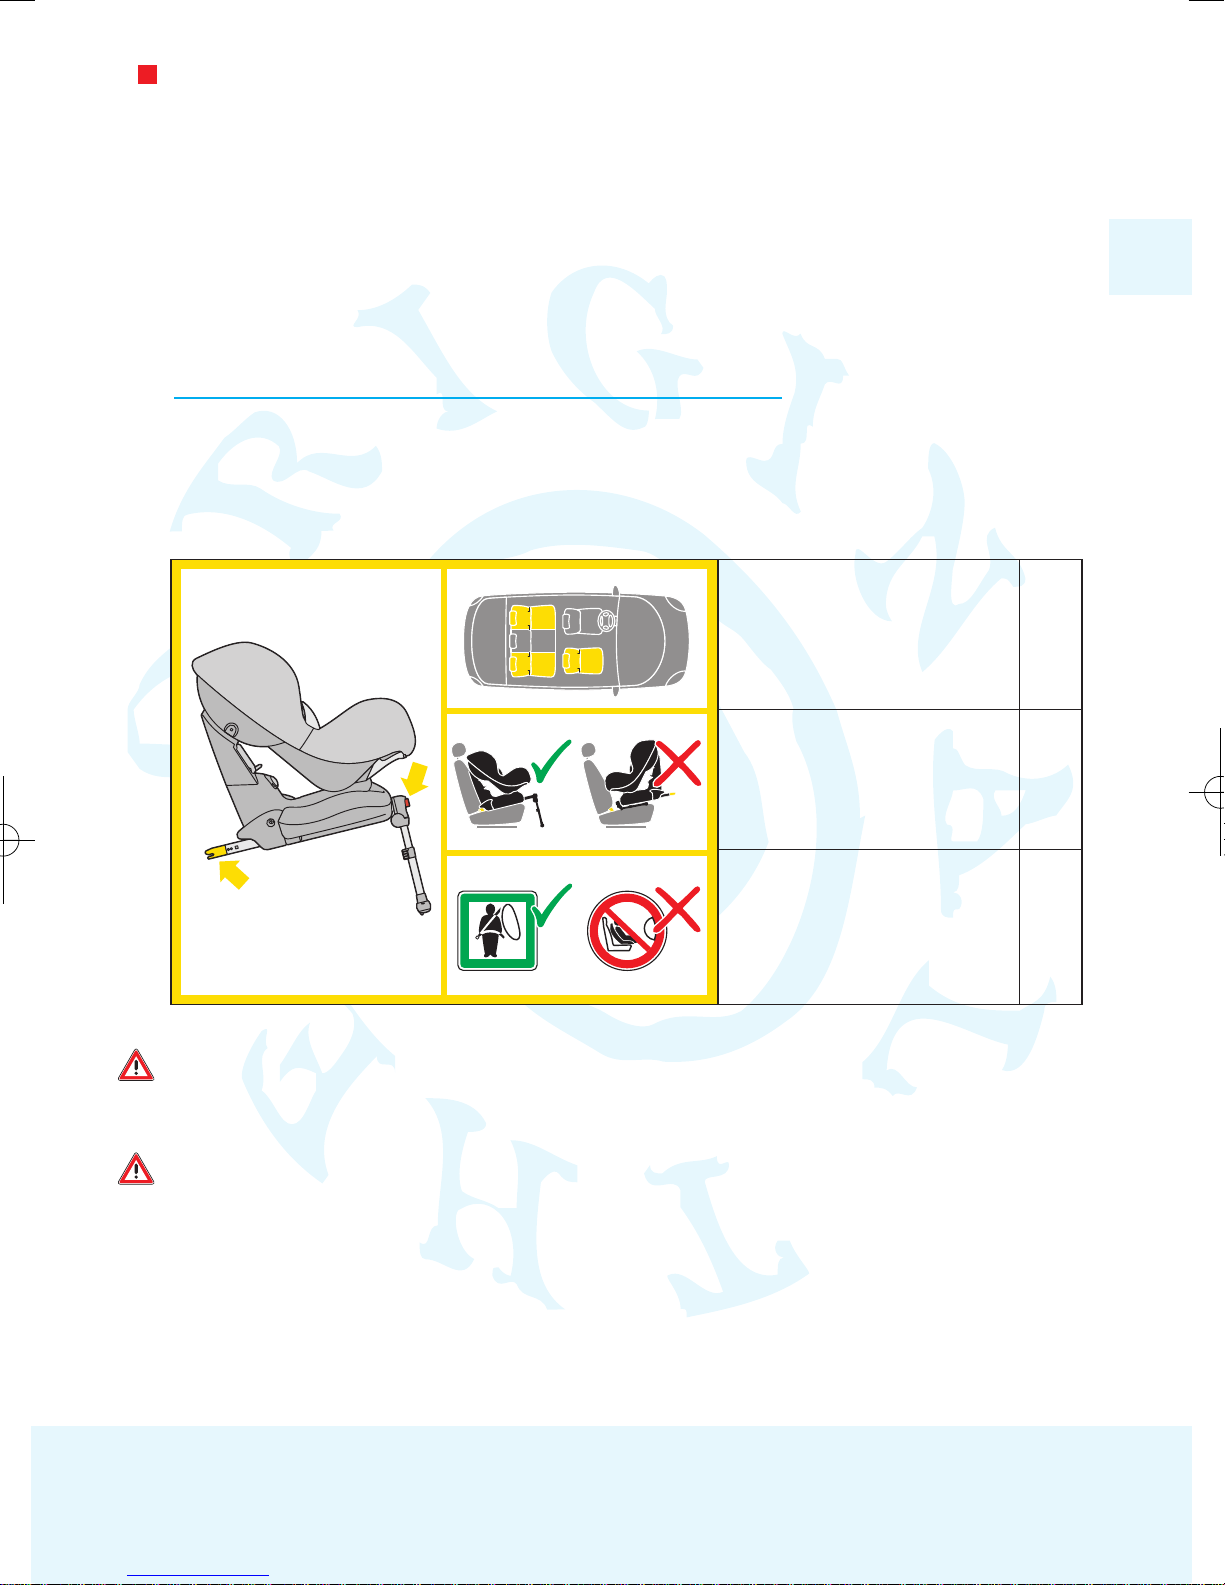
3.1 Using Isofix (yellow marking on the product) and support leg
If your car is equipped with Isofix anchor points, you can install the Maxi-Cosi PrioriFix using the Isofix
anchor points in combination with the support leg. To check whether your car is suitable for Isofix
attachment and the support leg, see Section 9: Car fitting list.
** Check car fitting list.
Only use the Maxi-Cosi PrioriFix on a forward-facing seat equipped with Isofix anchor points. Read the car
manufacturer’s handbook before use.
Correct attachment to the Isofix anchor points is essential for the safety of your child. Also see the yellow
outlined sticker on the side of the Maxi-Cosi PrioriFix. Never use a different installation method than the
one described here!
A. Preparing the Isofix
• Place the enclosed Isofix guides*** (1) on both Isofix anchor points between the seat and the seat back (2).
*** Isofix guides make it easier to install using the Isofix system and prevent damage to the upholstery.
For cars with fold-down seat backs, the Isofix guides must be removed before folding down the seat.
Functional failures usually occur because the Isofix guides are dirty (dust, dirt, food particles, etc.).
This can be avoided by frequently checking the Isofix guides for dirt and cleaning them if necessary.
GB
1 2
9
• Installed on seats fitted with Isofix Yes**
anchor points (located between seat
and seat back) & with room for the
support leg
• Rear-facing No
• Forward-facing Yes
• Isofix installation marking Yellow
• Frontal airbag No
• Side airbag Yes
Isofix class A

English
B. Installing with Isofix
• IMPORTANT! Secure any fold-down seats.
• IMPORTANT! Make sure the support leg is fully folded out (3,1) and that the indicator on the central
button is red (3,2).
• Press the central button on the support leg (4,1) and push the support leg backward as far as possible (4,2).
• The Isofix-connectors are now extended as far as possible (5) and the Maxi-Cosi PrioriFix is ready to be
installed.
• Place the Maxi-Cosi PrioriFix on the seat of the car.
• Line up the Isofix connectors with the Isofix guides (6).
• Click both Isofix connectors into the Isofix anchor points (7).
• IMPORTANT! Make sure that both Isofix connectors are securely attached to the Isofix anchor points.
There should be two audible clicks. The indicator on the central button should now be green (8).
• Check to make sure the Maxi-Cosi PrioriFix is securely installed by pulling on the seat.
• Place both hands on the seat and push it back as far as possible until it is situated firmly against the seat
back (you’ll hear a ‘rattling’ sound) (9).
• Check again to make sure the seat is secure by pulling on it.
C. Adjusting the length of the support leg
• IMPORTANT! Always use the support leg to ensure the safe use of the Maxi-Cosi PrioriFix.
• IMPORTANT! Make sure the support leg is fully folded out (10).
• Hold the support leg under the control button and press the control button with your thumb (11,1)
and keep the control button pressed and move the support leg downwards until it reaches the floor of
the car (11,2).
• IMPORTANT! Make sure the indicator at the base of the support leg is completely green (12).
• In some cases the Maxi-Cosi PrioriFix may not be fully supported by the car seat, but entirely by the
support leg.
• Release the control button and “click” the support leg into the locked position.
• Check to make sure the support leg is securely locked and stays in position by trying to move it up or
down without pressing the control button.
Checklist…
To ensure the optimum safety of your child, check the following after installation:
• Both Isofix connectors are securely attached to the Isofix anchor points: the indicator on the central
button on the support leg should be green.
• The support leg is fully folded out.
• The indicator on the base of the support leg is completely green.
• The entire Maxi-Cosi PrioriFix is installed securely and firmly in the car (check by pulling on the seat).
D. Removing the Maxi-Cosi PrioriFix
• Restore the support leg to its start position by pressing the control button (13,1) and sliding the support
leg upwards (13,2).
• Disconnect the Isofix connectors by pressing the central button on the support leg (14). The indicator on
the central button on the support leg should be red. Considerable force may sometimes be needed in
order to release the buckle. If this is the case, try pushing the car seat into the back of the vehicle seat
while pressing the release button.
• Remove the Maxi-Cosi PrioriFix from the Isofix anchor points (15).
• Remove the Maxi-Cosi PrioriFix from the car.
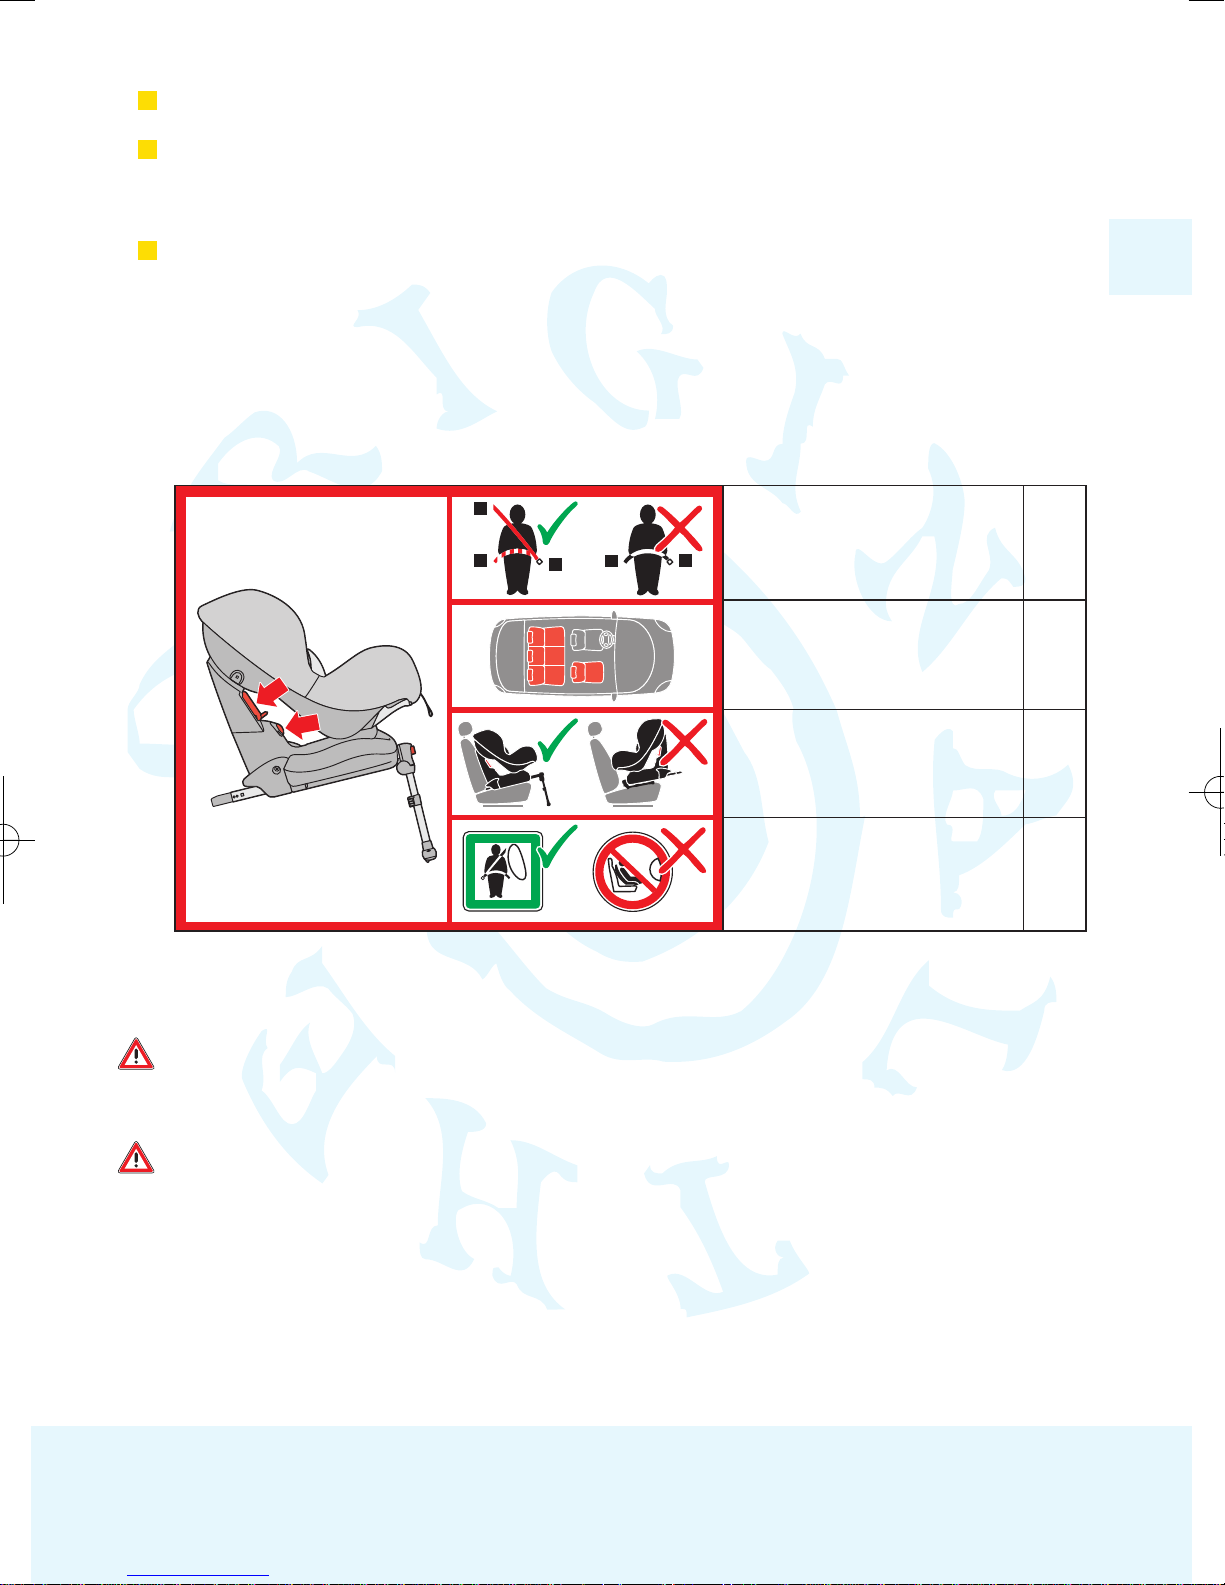
3.2 Using a 3-point safety belt (red marking on product) and support leg
If your car is not equipped with Isofix anchor points, you can install the Maxi-Cosi PrioriFix using a 3-point
safety belt in combination with the support leg. To check whether your car is suitable for installation using a
3-point safety belt and support leg, see Section 9: Car fitting list.
3
4
5
6
7
8
9
10
11
12
13
14
15
GB
10
Instructions for use
* Provided there is a 3-point safety belt in the middle position of the back seat and there is enough room
for properly installing the support leg. Check car fitting list.
Only install the Maxi-Cosi PrioriFix on a forward-facing seat fitted with an automatic 3-point safety belt
approved in accordance with ECE R16 or equivalent standard.
The proper threading of the seat belt is essential to your child’s safety. The seat belt must be threaded along
the red markings on the Maxi-Cosi PrioriFix. See the sticker outlined in red on the side of the Maxi-Cosi
PrioriFix. Never thread the belt in any other way!
A. Installing the Maxi-Cosi PrioriFix
• IMPORTANT! Make sure the Isofix connectors are retracted.
• Press the central button on the support leg (16,1) and pull the support leg forward as far as possible (16,2).
• IMPORTANT! Secure any fold-down seats.
• IMPORTANT! On some seats, the belts are fitted so far forward that proper installation is not possible. If
this is the case, try another seat.
• IMPORTANT! In some cases, the buckle of the car belt may be too long and therefore sits too high against
the base of the Maxi-Cosi PrioriFix. The Maxi-Cosi PrioriFix can therefore not be fitted securely. If this is
the case, choose another position in the car.
• Place the Maxi-Cosi PrioriFix in the sleeping position on the seat of the car (17) with the support leg
folded out.
• Thread the seat belt between the shell and the base (18).
• Make sure that the lap belt section of the seat belt is threaded under the red lap belt markings.
• Insert the seat belt into the belt buckle of the car (19).
• IMPORTANT! Make sure the car seat belt is not twisted.
• Place the car shoulder belt in one red belt clamp (20) on one side only (depending on the position of the
Maxi-Cosi PrioriFix in the car) and fasten it (21,1).
• Push the Maxi-Cosi PrioriFix firmly into the car seat (21,2) while at the same time pulling the shoulder belt
tight (21,3) so that the Maxi-Cosi PrioriFix is securely in place. Double-check it!
• Adjust the shell of the Maxi-Cosi PrioriFix to the sitting position (see section 4.2: Seat positions).
B. Adjusting the length of the support leg
• See section 3.1, point C: “Adjusting the length of the support leg”.
GB
16
17
18
19
20 21
21
11
1
3
2
1
2
• Installation with 3-point safety belt Yes
• Installation with 2-point safety belt No
• On passenger seat Yes
• On left/right side of back seat Yes
• In middle position of back seat Yes*
• Rear-facing No
• Forward-facing Yes
• Belt routing marking Red
• Frontal airbag No
• Side airbag Yes

English
Checklist …
To ensure the optimum safety of your child, check the following after installation:
• The seat belt is as tight as possible and not twisted.
• The lap part of the seat belt is threaded under the red lap belt marking.
• The (diagonal) shoulder part of the seat belt is secure in the red belt clamp.
• The support leg is fully folded out.
• The indicator at the base of the support leg is completely green.
• In some cases the Maxi-Cosi PrioriFix may not be fully supported by the car seat, but entirely by the
support leg.
• The entire Maxi-Cosi PrioriFix is installed securely and firmly in the car.
C. Removing the Maxi-Cosi PrioriFix
• Restore the support leg to its start position by pressing the control button (22,1) and sliding the support
leg upwards (22,2).
• Adjust the shell of the Maxi-Cosi PrioriFix to the sleeping position (see section 4.2: Seat positions).
• Release the red belt clamp (23).
• Release the seat belt and remove the seat belt from between the shell and base (24).
• Remove the Maxi-Cosi PrioriFix from the car.
4. PLACING YOUR CHILD IN THE Maxi-Cosi PRIORIFIX
4.1 Using the harness system
A. Adjusting the height of the harness
Before securing your child in the car seat using the harness system, you must first determine the correct
height of the shoulder belts for your child (25). Make sure that the shoulder belts fit properly over the
shoulders of the child.
• Loosen the shoulder belts by pressing the release button (26,1) and pulling the shoulder belts towards
you as far as possible (26,2).
• IMPORTANT! Do not pull on the belt pads when doing so.
• Open the belt buckle (27) by pressing the red button on the buckle.
• Loosen the shoulder belts by pressing the release button and pulling the shoulder belts towards you as far
as possible (28).
• Drape the belts over the hooks on the shell (29).
• Pull the buckle forwards and pull the buttonhole over the hook (30).
• Position your child with his or her back upright against the back of the Maxi-Cosi PrioriFix (31).
• Determine the correct height of the shoulder belts for your child.
• IMPORTANT! The correct height of the shoulder belts is attained when the belt disappears into the shell
slightly above your child’s shoulders (32).
• Remove your child from the Maxi-Cosi PrioriFix.
• To adjust the shoulder belts to the correct height, lift up the flap on the cover by the shoulder belt slots (33).
• Tip: Fold the flap double to keep it in place and place the shell in the sleeping position.
• To make the adjustment easier, pull the shoulder belts on top of the belt pads forward into a loop,
loosening them (34).
• Push the loop back through the opening.
• Slide the shoulder belt and the belt pad strap through the slot together into the desired position (35).
• IMPORTANT! Always do this on both sides.
• Pull the shoulder belts tight by pulling on the belts below the belt pads (36).
• Place the flap back in position and thread the belt pads through the correct slots in the flap (37).
• IMPORTANT! Make sure the belts are not twisted.
37
36
35
34
33
32
31
30
29
28
27
26
25
24
23
22
GB
12

Instructions for use
B. Placing your child in the Maxi-Cosi PrioriFix
• Slide the buckle sections together (38,1) and “click” them into the belt buckle (38,2).
• IMPORTANT! Position the lap belt part of the harness system as low as possible (39) to ensure the hips
sit firmly in the seat!
• Pull the shoulder belts tight (40,1) and remove any remaining slack by pulling them tightly using the
adjuster belt (40,2).
• IMPORTANT! Make sure you can fit only one finger between the harnesses and your child. The tighter the
belts fit around your child, the better the protection.
• IMPORTANT! Make sure the textured side of the belt pads are positioned properly on your child’s
shoulders/chest.
• IMPORTANT! Make sure the belts are not twisted.
If you are unable to fasten the harness belts properly or pull them tight, contact your supplier immediately.
Do not use the Maxi-Cosi PrioriFix under any circumstances.
Always use the belt pads, as they are essential to your child’s safety.
Instruct your child to never play with the belt buckle.
4.2 Seat positions (adjusting the seat into sitting and reclining positions)
The Maxi-Cosi PrioriFix can be adjusted to 4 different positions (41).
• Pull the positioning handle under the front of the seat upwards (42,1) and then pull or push the seat
forwards or backwards (42,2).
• Release the positioning handle in the desired position and push until you hear a “click”.
• IMPORTANT! Check to make sure the Maxi-Cosi PrioriFix is securely locked in the desired position by
pulling on it.
Checklist…
To ensure the optimal safety of your child, check before every trip to make sure that…
• The entire Maxi-Cosi PrioriFix is installed securely and firmly in the car.
• The height of the shoulder belts is suitable for your child.
• The belts are not twisted.
• The belt pads are positioned properly with the textured side against your child’s shoulders.
• Your child is securely fasted with the harnesses and the belt buckled is properly locked.
• The tether on the Maxi-Cosi PrioriFix is not damaged. If so, do not use the Maxi-Cosi PrioriFix under any
circumstances and contact your retailer or importer immediately.
4.3 Removing your child
• Place the Maxi-Cosi PrioriFix in the sitting position (also see section 4.2: Seat positions).
• Release the belt buckle (43) by pressing the red button on the buckle.
• Loosen the shoulder belts by pressing the release button and pulling the shoulder belts towards you as far
as possible (28).
• Drape the belts over the hooks on the shell (44).
• Pull the buckle forwards and pull the buttonhole over the hook (45).
• Remove your child from the Maxi-Cosi PrioriFix.
5. MAINTENANCE
5.1 General
• IMPORTANT! Always remove the Maxi-Cosi PrioriFix from the car before carrying out any of the following.
• Use lukewarm water, soap and a rag to clean the plastic parts of the seat. Do not use abrasive cleaners.
• IMPORTANT! Never use lubricants, not even for the moving parts on the Maxi-Cosi PrioriFix.
GB
45
44
28
43
42
41
40
39
38
13

English
5.2 Seat cover
Removing the cover
• Loosen the shoulder belts by pressing the release button and pulling the shoulder belts towards you as far
as possible (28).
• Place the Maxi-Cosi PrioriFix in the sleeping position and open the belt guard door (46).
• Pull the shoulder belts until the belt yoke on the back appears. Remove the shoulder belts from the belt
yoke (47).
• Tilt the clasp on the belt pad and pull it together with the shoulder belt through the belt slots. This is
easiest to do using the top belt slot (48).
• Remove both belt hooks by pushing the tab on the back of the seat downwards (49).
• Loosen the cover on all sides (50).
• Open the belt buckle.
• Pull the belts, belt pads, buckle sections and belt buckle through the openings in the cover (51).
• Remove the cover.
• Slide the belt pads off the shoulder belts (52).
Cleaning the cover
• Wash the cover and belt pads by hand (maximum of 30˚C). Do not place them in the dryer. Also see the
care instructions on the cover itself.
Tip: It is advisable to buy an extra cover when purchasing the Maxi-Cosi PrioriFix so that you can continue
to use the Maxi-Cosi PrioriFix at all times, even when washing or drying the cover.
Reattaching the cover
• IMPORTANT! Slide the buckle sections together (53,1) and “click” them into the belt buckle (53,2).
• Slide the clean belt pads, textured side down, back onto the shoulder belts.
• Thread the shoulder belts through the large opening of the clasp (54).
• Open the buckle and thread the buckle, shoulder belts and buckle sections through the openings in the
cover (55).
• Place the cover over the edges of the release button and around the adjusting handle and secure it onto
the cover hooks (56).
• “Click” both belt hooks into position (57) and check to make sure they are securely fastened.
• Secure the shoulder belt clasps at the desired height in the belt slots (58).
• Attach the shoulder belts to the belt yoke (59).
• IMPORTANT! The red stitching on the shoulder belts must be facing the shell.
• Close the belt guard door (60).
• Fasten the belt buckle and close the flap on the cover (61).
• Check the functioning of the harness system and make sure the belts are not twisted.
5.3 Belt buckle functioning and cleaning
The proper functioning of the belt buckle contributes substantially to the safety of your child. The most
common reason that the buckle does not function properly is because it is dirty (from dust, grim, food
particles, etc.). The following is a list of possible function failures and possible solutions.
A. Problems
• When opening the belt buckle, the buckle sections are released slowly.
• The belt buckle can only be opened with considerable force.
• It is difficult to click the buckle sections into the buckle (too much resistance).
• The buckle sections do not stay locked into the belt buckle (they are released again immediately).
• There is no “click” sound when locking the buckle sections in to the belt buckle.
61
60
59
58
57
56
55
54
53
52
51
50
49
48
47
46
28
GB
14

Instructions for use
B. Cleaning the belt buckle to solve the problem
Removing the belt buckle
• Release the buckle by pressing the red button (62).
• Remove the belt buckle pad (63).
• Place the Maxi-Cosi PrioriFix in the reclining position (see section 4.2: Seat positions)
• Grab the metal clasp under the shell, tilt it and remove the belt buckle (64).
Cleaning the belt buckle
• Rinse the belt buckle thoroughly under the tap and let it dry completely.
• IMPORTANT! Do not use lubricants!
Reattaching the belt buckle
• Push the metal clasp through the opening of the shell and tilt it so that the belt buckle is in the proper position.
• IMPORTANT! Check to make sure the belt buckle stays in place by pulling on it forcefully.
• Reattach the belt buckle pad.
If you are unable to close the belt buckle or if you are unsure whether you have solved the problem
correctly, contact your retailer or importer immediately (see back of instruction manual). Do not use the
Maxi-Cosi PrioriFix under any circumstances!
6. GENERAL INSTRUCTIONS
Always pay close attention to the following…
• Always use the seat, even on short trips, as this is when most accidents occur.
• Only use the Maxi-Cosi PrioriFix in a car and not at home. Car seats are not designed for home use.
• The Maxi-Cosi PrioriFix can be used on either the front or back seat. However, we recommend installing it
on the back seat.
• Never use the Maxi-Cosi PrioriFix on seats equipped with frontal airbags, as this can be extremely
dangerous.
This does not apply to so-called side airbags.
• The seat must always be secured with the seat belt/Isofix and support leg, even when not in use. A loose
seat could injure other passengers in a sudden stop or crash.
• Make sure the Maxi-Cosi PrioriFix does not become wedged by adjustable seats or slamming the car door
or overloaded with heavy luggage.
• Never use the Maxi-Cosi PrioriFix without its cover. Do not replace the cover with a cover other than the
one supplied by the manufacturer, as the cover contributes to the safety of the seat.
• Always cover up the Maxi-Cosi PrioriFix when the car is parked in the sun, as plastic and metal parts may
become extremely hot and discolour the fabric.
• To avoid damage to the fabric, do not remove the logos on the cover.
• Make sure that all luggage and objects likely to cause injury in the event of an accident (on the rear
window shelf for instance) are properly secured.
• Take short breaks on longer trips to give your child some freedom of movement.
• Never leave your child unattended in the car.
• Save the instruction manual for future reference in the space provided on the back of the Maxi-Cosi
PrioriFix.
• Never use a second-hand product, as you can never be certain what has happened to it. The safety of the
car seat can only be guaranteed by the manufacturer when used by the original owner.
• Replace the Maxi-Cosi PrioriFix after an accident, as the seat may become unsafe due to damage that is
not readily apparent.
• The manufacturer has taken into consideration the fact that car seats may cause indentations in car
upholstery. This is unavoidable, however, due to the prescribed safety standards and because the car seat
must be installed tightly in order to protect your child. Dorel is not liable for any damage that may occur
to the car upholstery as a result of this.
GB
64
63
62
15
English
And it goes without saying…
• Set a good example and always wear your seat belt!
7. WASTE SEPARATION
For the effective and safe use of a car seat, it should not be used for more than 5 years from the date of
purchase. Aging of the plastic (due to sunlight, for instance) could result in deterioration of the product’s
quality.
Once your child has outgrown the seat, we recommend that you discontinue using it and discard it as
waste. For reasons of environmental protection, we ask that you separate the waste generated by the
Maxi-Cosi PrioriFix from the purchase (packaging) to the moment of discarding (product parts), and
dispose of it properly.
Keep all plastic packaging away from children to avoid the risk of suffocation.
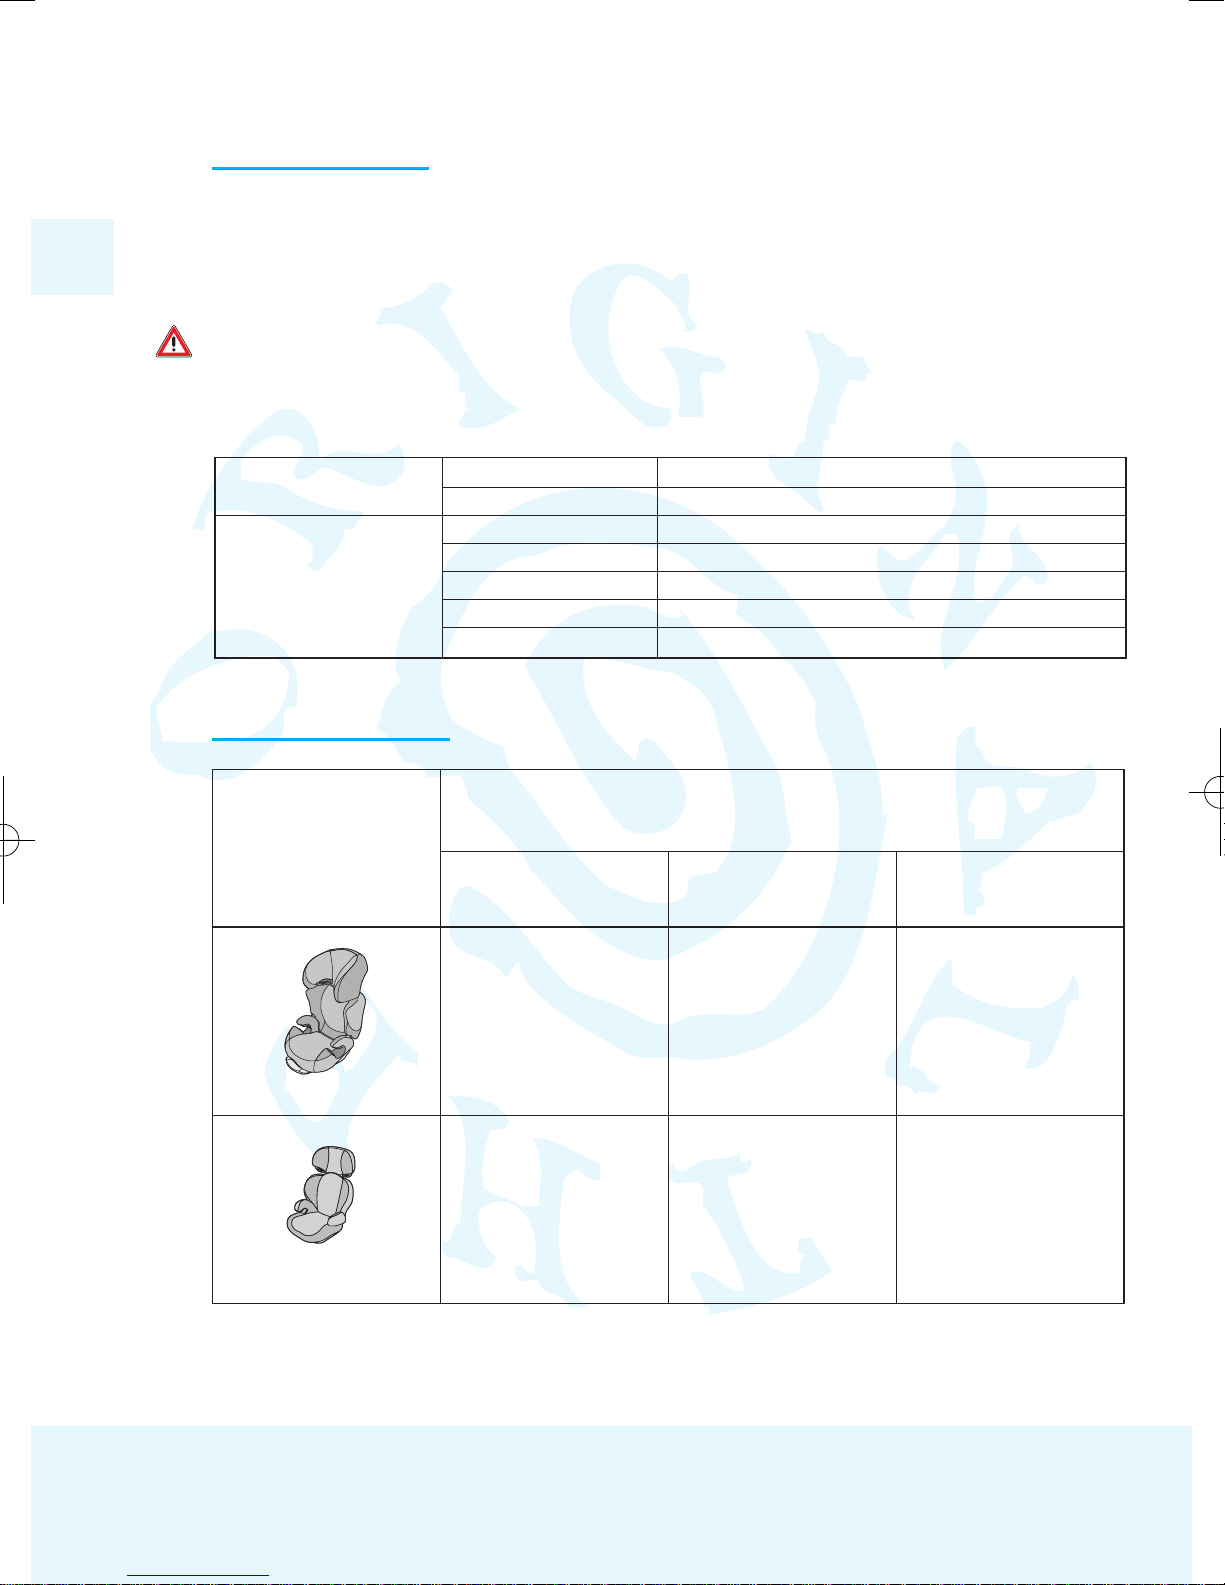
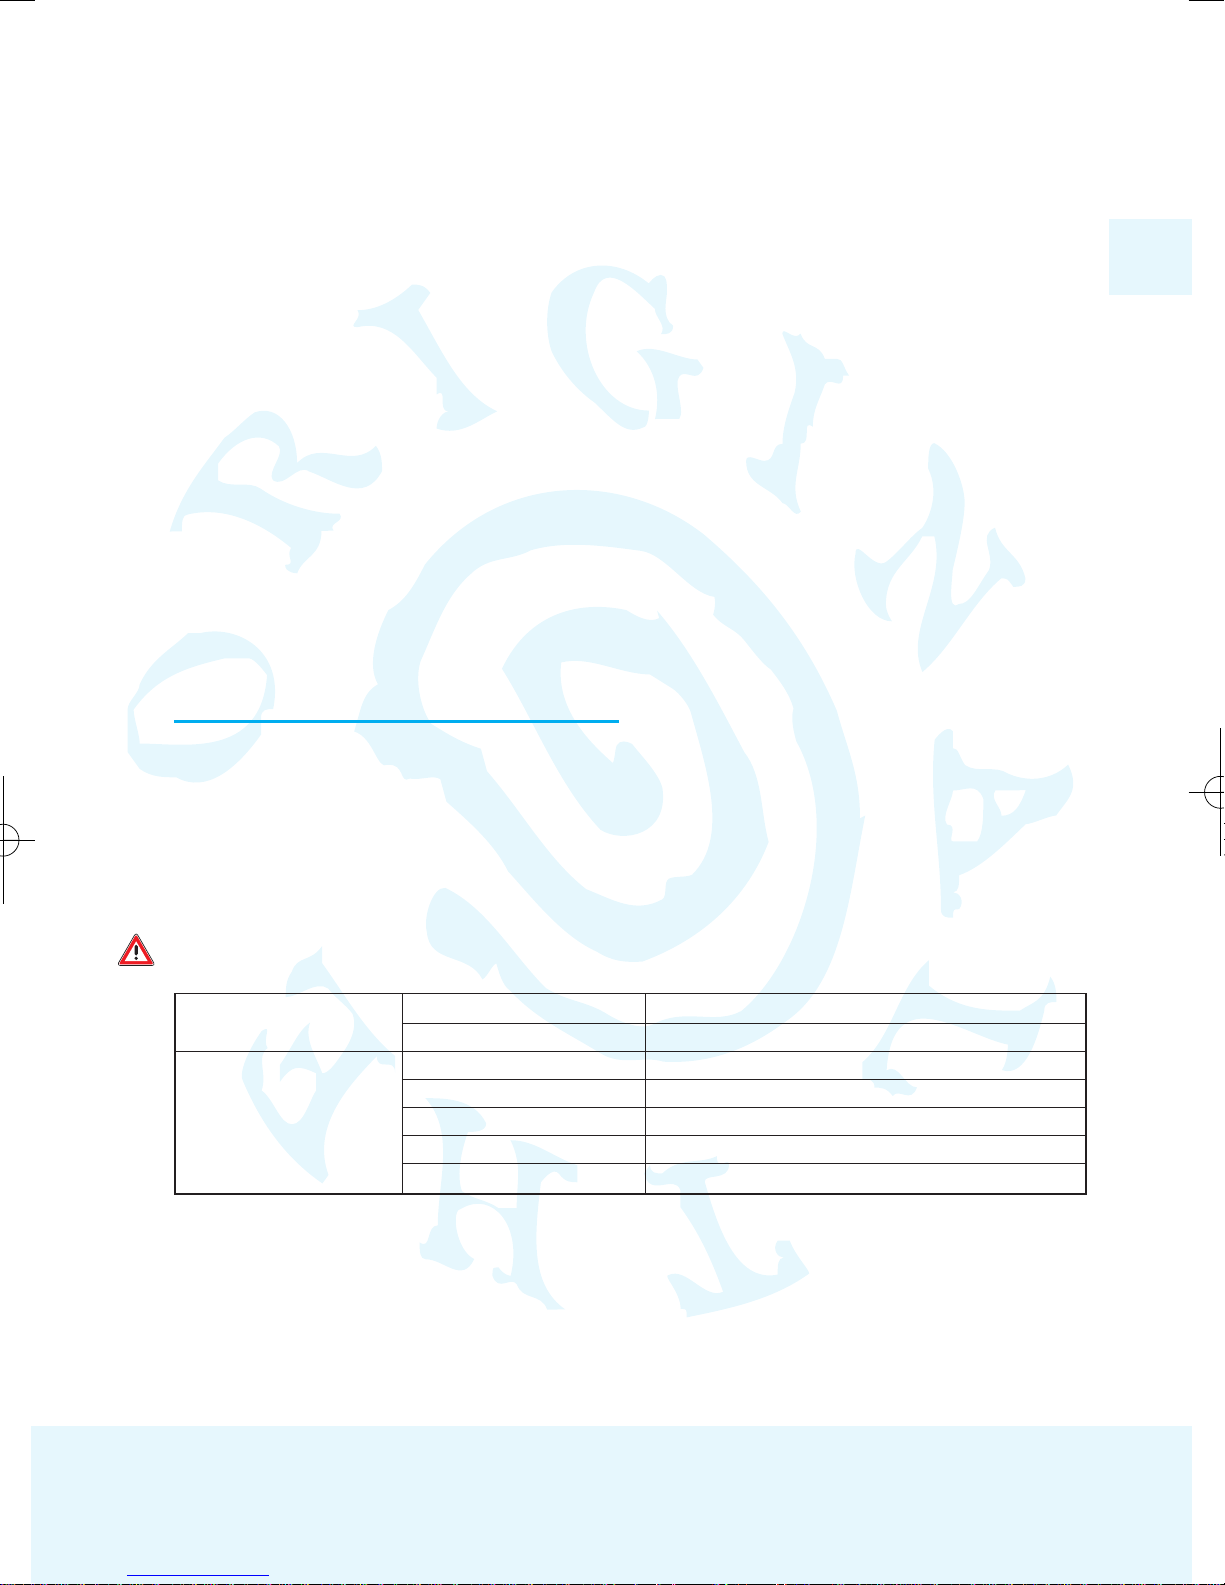
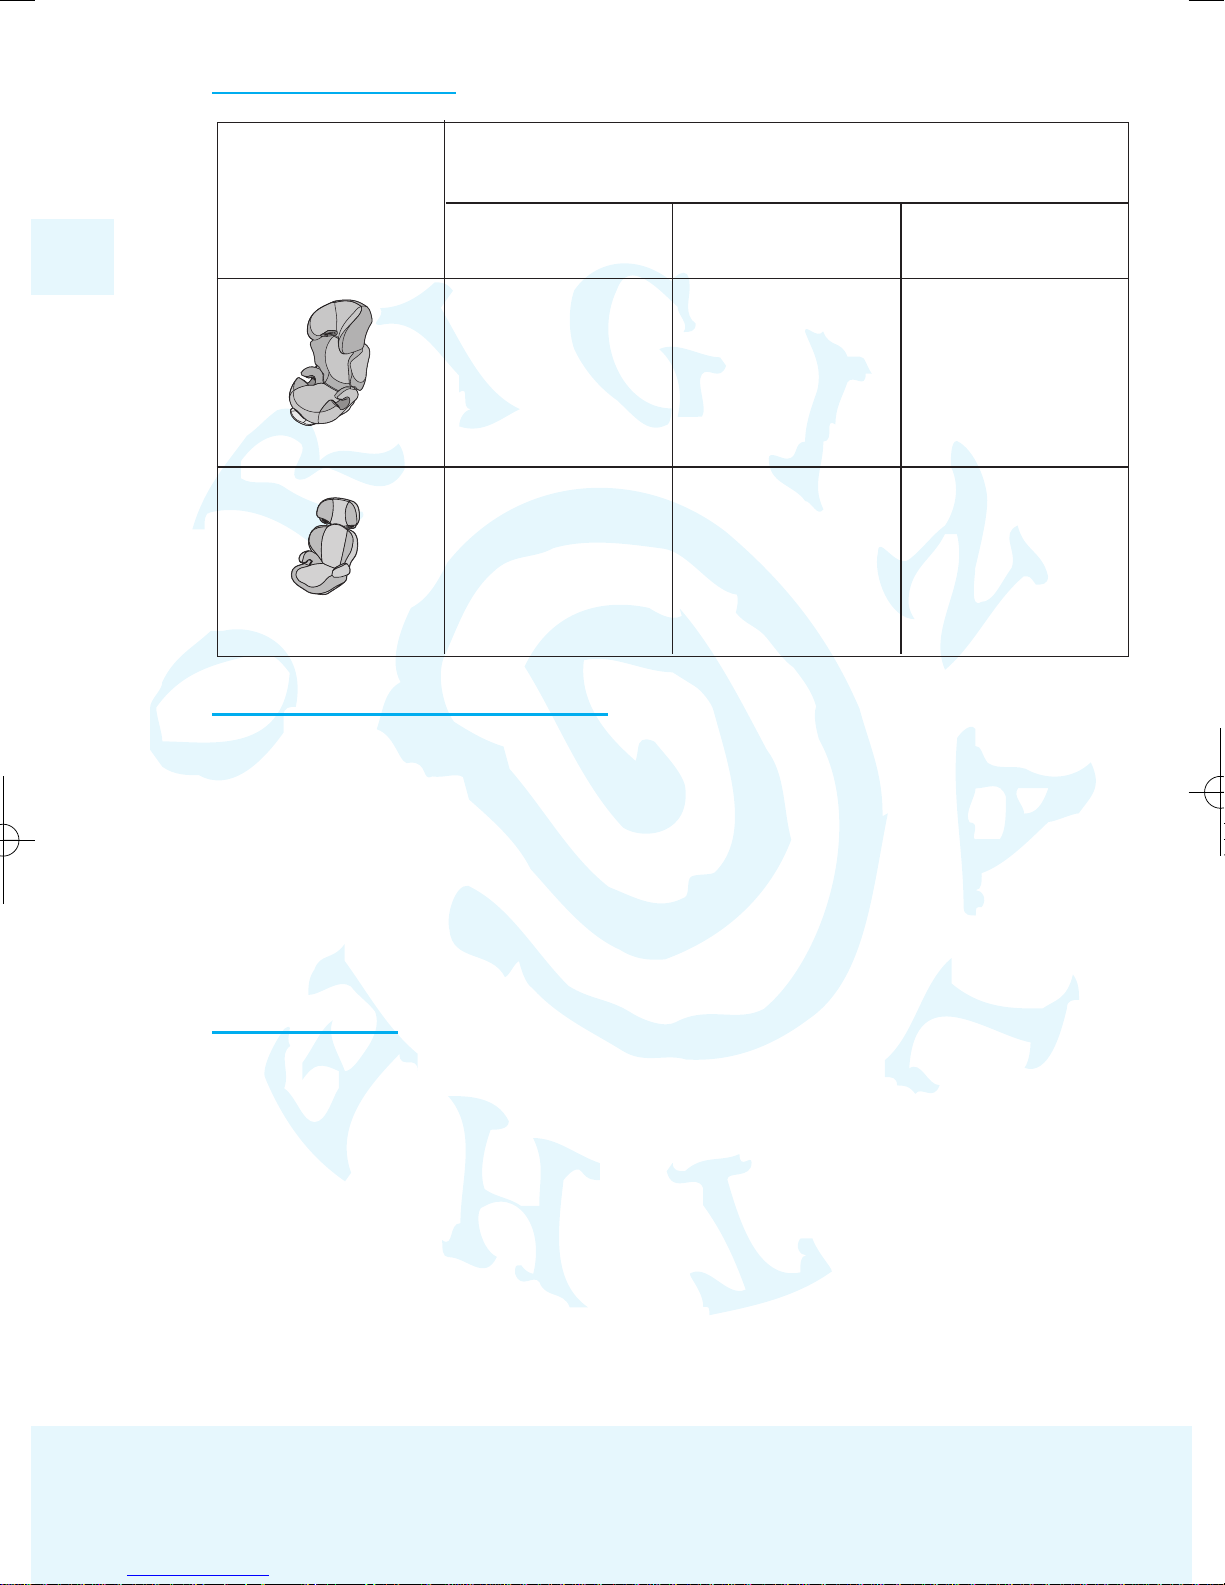
8. NEXT STAGE CAR SEAT
GB
16
Packaging Cardboard box Paper waste
Plastic bag Household waste
Product parts Fabric cover Household waste
Plastic parts Appropriate recycling container
Metal parts Container for metal
Tether Container for polyester
Belt buckle Household waste
Type of car seat
Group
Body Weight of child Age
Approved according to ECE R 44/04
2 + 3 15 to 36 kg 3,5 to 12 years
Maxi-Cosi Rodi XR
2 + 3 15 to 36 kg 3,5 to 12 years
Maxi-Cosi Rodi SPS

Warranty
9. CAR FITTING LIST
The use of Isofix anchors and the support leg, which ensure optimum safety and easy installation, mean
that the Maxi-Cosi PrioriFix is not suitable for all types of cars. The Maxi-Cosi PrioriFix is designated as
“semi-universal” and therefore suitable for installation on the seats of specific cars only. These cars have
been compiled in a list. However, this list is subject to change and additions. For an up-to-date version of
the car fitting list, visit the
Maxi-Cosi website at www.maxi-cosi.com and / or retail outlet for the Maxi-Cosi PrioriFix, where you can
inquire about the suitability of the Maxi-Cosi PrioriFix for your specific car. An up-to-date car fitting list is
included with the purchase of the Maxi-Cosi PrioriFix.
10.WARRANTY
We guarantee that this product was manufactured in accordance with the current European safety
requirements and quality standards which are applicable to this product, and that this product is free from
defects in workmanship and material at the time of purchase. During the production process the product
was subjected to various quality checks. If this product, despite our efforts, shows a material/manufacturing
fault within the warranty period of 24 months, (with normal use as described in the user instructions) we
will comply with the warranty terms and conditions. In this case please contact your dealer. For extensive
information on applying the warranty terms and conditions, you can contact the dealer or look on our
website: www.maxi-cosi.com.
The warranty is not valid in the following cases:
• In case of a use or purpose other than described in the manual.
• If the product is submitted for repair through a dealer that is not authorized by us.
• If the product is not supplied to the manufacturer with the original purchase receipt (via the retailer and/or
importer).
• If repairs were carried out by third parties or a dealer that is not authorized by us.
• If the defect is the result of improper or careless use or maintenance, negligence or impact damage to the
fabric cover and/or frame.
• If the parts show normal wear and tear that may be expected from daily use of a product (wheels, rotating
and moving parts etc.)
Date of effect:
The warranty becomes effective on the date the product is purchased.
Warranty term:
The warranty period applies for a period of 24 consecutive months. The warranty only applies for the first
owner and is not transferable.
What to do in case of defects:
After purchasing the product, keep the purchase receipt. The date of purchase must be clearly visible on the
receipt. Should problems or defects arise please contact your retailer. Exchanging or taking back the
product cannot be requested. Repairs do not give entitlement to extension of the warranty. Products that
are returned directly to the manufacturer are not eligible for warranty.
This Warranty Clause conforms to European Directive 99/44/EG of 25 May 1999.
GB
17

English
11. QUESTIONS
If you have any questions, call your retailer or importer (see back of instruction manual). Please have the
following information on hand when calling:
• Serial number at the bottom of the orange, white and orange sticker (on the back of the Maxi-Cosi
PrioriFix).
• Make and type of car and seat on which the Maxi-Cosi PrioriFix is installed.
• Your child’s age (height) and weight.
GB
18

Polski
Drodzy rodzice!
Gratulujemy zakupu Maxi-Cosi PrioriFix.
Bezpieczeństwo, wygoda oraz łatwość montażu odgrywają kluczową rolę w procesie
udoskonalania Maxi-Cosi PrioriFix. Produkt ten spełnia najbardziej surowe wymogi
bezpieczeństwa.
Badania wykazały, że znaczna ilość fotelików nie jest używana zgodnie ze swoim
przeznaczeniem. Dlatego prosimy o uważne zapoznanie się z niniejszą instrukcją obsługi.
Bezpieczeństwo Państwa dziecka może zostać zagwarantowane tylko dzięki ścisłemu
przestrzeganiu wytycznych zawartych w instrukcji obsługi.
Dokonywane przez nasz Dział Rozwoju Produktu badania, ciągły kontakt z klientami oraz
grupami użytkowników testujących produkt, a także wymiana opinii na jego temat,
umożliwiają nam stałe bycie na bieżąco w dziedzinie bezpieczeństwa dziecka. Jeśli mają
Państwo jakieś pytania lub uwagi dotyczące użycia Maxi-Cosi PrioriFix, prosimy o kontakt.
Dorel (dane teleadresowe znajdują się na odwrocie instrukcji obsługi)
PL
19
23
15
16
21
17
19
18
20
24
13
14
22
5
6
7
11
12
1
2
3
4
9
10
8
1. Pokrowiec
2. Zacisk pasa
3. Drzwiczki schowka na pas
4. Czerwone oznaczenie pasa biodrowego
5. Kadłub
6. Podpórka
7. Wskaźnik koloru na podpórce
8. Obejma pasa
9. Naklejka z instrukcją obsługi
10. Zaczep Isofix
11. Znaczek ECE
12. Instrukcja obsługi
13. Szczeliny do przeplecenia pasa
14. Ochraniacz pasa
15. Klamra pasa
16. Zatrzask zabezpieczający klamrę pasa
17. Pasek regulujący pasy barkowe
18. Przycisk główny na podpórce ze wskaźnikiem koloru
19. Przycisk kontrolny podpórki
20. Dźwignia pozycjonowania fotelika
21. Przycisk regulujący pasy barkowe
22. Prowadnice Isofix
23. Pasy barkowe
24. Haki przytrzymujące szelki fotelika
Polski
SPIS TREŚCI
1. WAŻNE: PRZECZYTAJ KONIECZNIE! . . . . . . . . . . . . . . . . . . . . . . . . . . . . . . . 20
2. WŁAŚCIWE ZASTOSOWANIE . . . . . . . . . . . . . . . . . . . . . . . . . . . . . . . . . . . . . 20
3. MONTAŻ I DEMONTAŻ FOTELIKA MAXI-COSI PRIORIFIX . . . . . . . . . . . . . . 21
3.1 Użycie Isofix (żółte oznaczenie na produkcie) i podpórki . . . . . . . . . . . . . . . 21
3.2 Użycie trzypunktowego pasa bezpieczeństwa (czerwone oznaczenie
na produkcie) i podpórki . . . . . . . . . . . . . . . . . . . . . . . . . . . . . . . . . . . . . . . . . 23
4. UMIESZCZANIE DZIECKA W FOTELIKU MAXI-COSI PRIORIFIX . . . . . . . . . 25
4.1 Użycie pasów bezpieczeństwa . . . . . . . . . . . . . . . . . . . . . . . . . . . . . . . . . . . . 25
4.2 Pozycje fotelika (dopasowanie do pozycji siedzącej lub spoczynkowej) . . . 26
4.3 Wyjęcie dziecka . . . . . . . . . . . . . . . . . . . . . . . . . . . . . . . . . . . . . . . . . . . . . . . . . 26
5. KONSERWACJA . . . . . . . . . . . . . . . . . . . . . . . . . . . . . . . . . . . . . . . . . . . . . . . . 26
5.1 Ogólne . . . . . . . . . . . . . . . . . . . . . . . . . . . . . . . . . . . . . . . . . . . . . . . . . . . . . . . . 26
5.2 Pokrowiec . . . . . . . . . . . . . . . . . . . . . . . . . . . . . . . . . . . . . . . . . . . . . . . . . . . . . 27
5.3 Działanie i czyszczenie klamry . . . . . . . . . . . . . . . . . . . . . . . . . . . . . . . . . . . . . 27
6. UWAGI OGÓLNE . . . . . . . . . . . . . . . . . . . . . . . . . . . . . . . . . . . . . . . . . . . . . . . 28
7. SEGREGACJA MATERIAŁÓW ZUŻYTYCH . . . . . . . . . . . . . . . . . . . . . . . . . . . 29
8. NASTĘPNY FOTELIK . . . . . . . . . . . . . . . . . . . . . . . . . . . . . . . . . . . . . . . . . . . . 30
9. LISTA SAMOCHODÓW KOMPATYBILNYCH . . . . . . . . . . . . . . . . . . . . . . . . . . 30
10. GWARANCJA . . . . . . . . . . . . . . . . . . . . . . . . . . . . . . . . . . . . . . . . . . . . . . . . . . 30
11. PYTANIA . . . . . . . . . . . . . . . . . . . . . . . . . . . . . . . . . . . . . . . . . . . . . . . . . . . . . . 31
1. WAŻNE: PRZECZYTAJ KONIECZNIE!
Przeczytaj uważnie poniższą instrukcję obsługi i zachowaj ją w razie późniejszych wątpliwości.
Niezastosowanie się do wytycznych zawartych w niniejszej instrukcji może spowodować
poważne obrażenia dziecka.
Korzystaj wyłącznie z oryginalnych elementów zatwierdzonych przez producenta. Nie dokonuj
samodzielnych modyfikacji produktu. Jeśli masz trudności lub zastrzeżenia skontaktuj się
z punktem sprzedaży lub dystrybutorem.
Przed montażem należy zapoznać się z listą kompatybilnych modeli samochodów!
Maxi-Cosi PrioriFix został zatwierdzony jako zgodny z aktualnymi wytycznymi europejskiej
normy bezpieczeństwa samochodowego ECE R 44/04 i jest przeznaczony dla dzieci w
wieku od 9 miesięcy do 3,5 lat (9 do 18 kg).
2. WŁAŚCIWE ZASTOSOWANIE
Maxi-Cosi PrioriFix posiada atest do dwóch rodzajów zastosowań:
Instalacja w systemie Isofix wraz z podpórką* (Patrz 3.1)
Do montażu w samochodach wyposażonych w zaczepy typu Isofix (Patrz 9: Lista
samochodów kompatybilnych). Oznaczonych na żółto na produkcie i w instrukcji obsługi.
PL
20
Zastosowanie według normy ECE R 44/04*
Grupa Waga dziecka Wiek
Maxi-Cosi PrioriFix 1 9 – 18 kg 9 miesięcy – 3,5 lata
Instrukcja obsługi
Instalacja przy zastosowaniu trzypunktowych pasów bezpieczeństwa i podpórki* (Patrz 3.2);
Dla samochodów wyposażonych w automatyczne trzypunktowe pasy bezpieczeństwa,
zgodnie z ECE R16 lub normą równoważną (Patrz 9: Lista samochodów kompatybilnych).
Oznaczonych na żółto na produkcie i w instrukcji obsługi.
* Użycie podpórki i/lub Isofix, które zapewniają optymalne bezpieczeństwo i łatwy
montaż, sprawia, że Maxi-Cosi PrioriFix nie nadaje się do zamontowania we wszystkich
typach samochodów. Maxi-Cosi PrioriFix określa się mianem ‘pół-uniwersalny', a tym
samym nadającym się do montażu wyłącznie w określonych typach samochodów. Lista
samochodów kompatybilnych w załączniku (Patrz 9: Lista samochodów kompatybilnych).
3. MONTAŻ I DEMONTAŻ FOTELIKA MAXI-COSI PRIORIFIX
3.1 Użycie Isofix (żółte oznaczenie na produkcie) i podpórki
Jeśli samochód jest wyposażony w zaczepy typu Isofix, można je wykorzystać do
montażu Maxi-Cosi PrioriFix w połączeniu z podpórką. Aby dowiedzieć się czy samochód
nadaje się do montażu fotelika w systemie Isofix wraz z podpórką Patrz 9: Lista samochodów kompatybilnych.
** Sprawdź listę samochodów kompatybilnych.
Montuj Maxi-Cosi PrioriFix wyłącznie na siedzeniu wyposażonym w zaczepy Isofix, zwróconym przodem do kierunku jazdy. Przed montażem przeczytaj dołączoną przez producenta
specyfikację samochodu.
Właściwy montaż na zaczepach Isofix jest kluczem do bezpieczeństwa Państwa dziecka.
Zapoznaj się również z naklejką (żółta obwódka) umieszczoną z boku Maxi-Cosi PrioriFix.
Nigdy nie montuj fotelika w sposób inny niż przedstawiony na naklejce!
PL
21
• Montowany na siedzeniach Tak**
wyposażonych w zaczepy
Isofix (umieszczone pomiędzy
siedzeniem a oparciem)
oraz przestrzenią na podpórkę
• Tyłem do kierunku jazdy Nie
• Przodem do kierunku jazdy Tak
• Oznaczenia montażu Isofix Żółty
• Przednia poduszka powietrzna Nie
• Boczna poduszka powietrzna Tak
Isofix klasa A

Polski
A. Przygotowanie Isofix
• Umieść dołączone prowadnice Isofix*** (1) na obu zaczepach Isofix pomiędzy siedzeniem
a oparciem (2).
*** Prowadnice Isofix ułatwiają montaż przy użyciu systemu Isofix i zapobiegają uszkodzeniom
tapicerki. W samochodach z odchylanym oparciem należy usunąć prowadnice przed
odchyleniem oparcia. Problemy w poprawnym działaniu zwykle są spowodowane
zabrudzeniem prowadnic (pył, kurz, fragmenty żywności, itp.). Można temu zapobiec
dokonując częstych kontroli stanu prowadnic i usuwając ich zabrudzenie.
B. Montaż w systemie Isofix
• WAŻNE! Zabezpiecz składane oparcia.
• WAŻNE! Upewnij się, że podpórka jest w pełni rozłożona (3,1), a wskaźnik na przycisku
głównym jest czerwony (3,2).
• Wciśnij przycisk główny na podpórce (4,1), a następnie wyciągnij ją najdalej jak to
możliwe (4,2).
• Zaczepy Isofix są teraz wysunięte najdalej jak to możliwe (5), a Maxi-Cosi PrioriFix jest
gotowy do montażu.
• Umieść Maxi-Cosi PrioriFix na siedzeniu samochodu.
• Ustaw zaczepy Isofix w jednej linii z prowadnicami (6).
• Zamocuj oba zaczepy Isofix na zaczepach samochodowych (7).
• WAŻNE! Upewnij się, że oba zaczepy są dobrze przymocowane. Powinieneś usłyszeć
dwa wyraźne kliknięcia.
• Sprawdź, czy Maxi-Cosi PrioriFix został właściwie zamocowany, pociągając za fotelik.
Wskaźnik na przycisku głównym powinien być teraz zielony (8).
• Połóż obie ręce na foteliku i pchnij go do tyłu tak, aby oparł się mocno o oparcie siedzenia
samochodu (usłyszysz charakterystyczny grzechoczący odgłos) (9).
• Pociągnij ponownie za fotelik, aby sprawdzić czy został właściwie zamontowany.
C. Dopasowywanie długości podpórki.
• WAŻNE! Zawsze używaj podpórki, by bezpiecznie korzystać z Maxi-Cosi PrioriFix.
• WAŻNE! Upewnij się, że podpórka jest całkowicie rozłożona (10).
• Chwyć podpórkę pod przyciskiem kontrolnym, a następnie naciśnij go kciukiem (11,1).
Trzymając wciśnięty przycisk wysuwaj podpórkę do dołu aż dotknie podłogi samochodu.
• WAŻNE! Upewnij się, że wskaźnik u podstawy podpórki jest zielony (12).
• W niektórych przypadkach siedzenie samochodu może nie być w pełni kompatybilne z
Maxi-Cosi PrioriFix, a w pełni kompatybilne z podpórką.
• Zwolnij przycisk kontrolny i złóż podpórkę do pozycji wyjściowej.
• Sprawdź czy podpórka jest zablokowana i pozostaje w pozycji zamkniętej poruszając nią
w górę i w dół, nie przyciskając przycisku kontrolnego.
Lista kontrolna...
Aby zapewnić maksimum bezpieczeństwa swojemu dziecku, po skończonym montażu
sprawdź następujące punkty:
• Upewnij się, że oba zaczepy Isofix są dobrze przymocowane do zaczepów samochodu.
Wskaźnik na przycisku głównym na podpórce powinien być zielony.
• Podpórka jest całkowicie rozłożona.
• Wskaźnik u podstawy podpórki powinien być zielony.
• Cały Maxi-Cosi PrioriFix został bezpiecznie i stabilnie zamontowany w samochodzie
(sprawdź pociągając za fotelik).
1 2
12
11
10
9
8
7
6
5
4
3
PL
22
Instrukcja obsługi
D. Demontaż Maxi-Cosi PrioriFix
• Złóż podpórkę do pozycji wyjściowej przyciskając przycisk kontrolny (13,1) i przesuwając
ją do góry (13,2).
• Odłącz zaczepy Isofix przyciskając przycisk główny na podpórce (14). Wskaźnik na
przycisku głównym na podpórce powinien być Czerwony. W niektórych sytuacjach
potrzebna jest dość duża siła do zwolnienia klamry. W takiej sytuacji spróbuj pchnąć
fotelik na tył siedzenia pojazdu wciskając równocześnie przycisk zwalniający klamrę.
• Zdejmij Maxi-Cosi PrioriFix z zaczepów samochodu (15).
• Wyjmij Maxi-Cosi PrioriFix z samochodu.
3.2 Użycie trzypunktowego pasa bezpieczeństwa (czerwone oznaczenie na produkcie) i
podpórki
Jeśli samochód nie jest wyposażony w zaczepy typu Isofix, do montażu Maxi-Cosi PrioriFix można wykorzystaj trzypunktowy pas bezpieczeństwa w połączeniu z podpórką. Aby
dowiedzieć się czy samochód nadaje się do montażu fotelika przy użyciu trzypunktowego
pasa bezpieczeństwa z podpórką, Patrz 9: Lista samochodów kompatybilnych.
* Pod warunkiem, że trzypunktowy pas bezpieczeństwa jest zainstalowany na środku tylnego
siedzenia, a przestrzeń na nogi pozwala na właściwy montaż podpórki. Sprawdź listę
samochodów kompatybilnych.
Dokonuj montażu Maxi-Cosi PrioriFix wyłącznie na siedzeniu zwróconym przodem do
kierunku jazdy, wyposażonym w trzypunktowy pas bezpieczeństwa zgodny z normą
ECE R16 lub normą równoważną.
Właściwy przeplot pasów bezpieczeństwa jest kluczowy dla bezpieczeństwa Państwa
dziecka. Pas bezpieczeństwa musi zostać przepleciony dokładnie wzdłuż czerwonych
oznaczeń na Maxi-Cosi PrioriFix. Zapoznaj się z nalepką (czerwona obwódka) umieszczoną
z boku Maxi-Cosi PrioriFix. Nigdy nie przeplataj pasa inaczej niż pokazano w instrukcji!
PL
15
14
13
23
1
3
2
1
2
• Montaż przy użyciu trzypunkt- Tak
owego pasa bezpieczeństwa
• Montaż przy użyciu dwupunkt- Nie
owego pasa bezpieczeństwa
• Na siedzeniu pasażera Tak
• Po lewej/prawej stronie na Tak
tylnym siedzeniu
• Na środku tylnego siedzenia Tak*
• Tyłem do kierunku jazdy Nie
• Przodem do kierunku jazdy Tak
• Oznaczenia przebiegu pasów Czer
wony
• Przednia poduszka powietrzna Nie
• Boczna poduszka powietrzna Tak

Polski
A. Montaż Maxi-Cosi PrioriFix
• WAŻNE! Upewnij się, że zaczepy Isofix są cofnięte.
• Wciśnij przycisk główny na podpórce (16,1), a następnie pociągnij ją do przodu najdalej
jak to możliwe (16,2).
• WAŻNE! Zabezpiecz składane oparcia.
• WAŻNE!W przypadku niektórych siedzeń samochodowych, pasy są zamontowane w
sposób uniemożliwiający właściwy montaż fotelika. W takiej sytuacji należy spróbować
zamontować inny fotelik.
• WAŻNE!W niektórych sytuacjach klamra pasa samochodowego może być zbyt długa i
znajdować się zbyt wysoko w stosunku do podstawy Maxi-Cosi PrioriFix. W takiej sytuacji nie da się bezpiecznie zamontować Maxi-Cosi PrioriFix. W takim wypadku należy
zmienić umiejscowienie fotelika w samochodzie.
• Umieść Maxi-Cosi PrioriFix w pozycji ‘spanie’ na siedzeniu samochodu (17) z odgiętą
podpórką.
• Przepleć pas bezpieczeństwa pomiędzy kadłubem a podstawą (18).
• Upewnij się, że część biodrowa pasa bezpieczeństwa jest przepleciona pod czerwonym
oznaczeniem pasa biodrowego.
• Umieść pas bezpieczeństwa w klamrze pasa samochodowego (19).
• WAŻNE! Upewnij się, że pas samochodowy nie jest poskręcany.
• Umieść samochodowy pas barkowy z jednej strony w jednym z czerwonych zacisków (20)
(zależnie od umieszczenia fotelika Maxi-Cosi PrioriFix w samochodzie) i zaciśnij go (21,1).
• Wpasuj Maxi-Cosi PrioriFix w siedzenie (21,2) równocześnie ściągając pas barkowy (21,3)
aż do zablokowania fotelika i uzyskania jego stabilnej i nieruchomej pozycji. Sprawdź
wszystko dwa razy!
• Dopasuj kadłub Maxi-Cosi PrioriFix do pozycji siedzącej (Patrz 4.2: Pozycje fotelika).
C. Dopasowywanie długości podpórki.
• Patrz 3.1, punkt C: „Dopasowywanie długości podpórki”.
Lista kontrolna...
Aby zapewnić maksimum bezpieczeństwa swojemu dziecku, po skończonym montażu
sprawdź czy:
• Pas bezpieczeństwa jest nieposkręcany i ściągnięty do maksimum.
• Pas biodrowy jest przepleciony pod czerwonym oznaczeniem pasa biodrowego.
• Ukośna część pasa barkowego jest solidnie zamocowana w czerwonym zacisku.
• Podpórka jest całkowicie rozłożona.
• Wskaźnik u podstawy podpórki jest zielony.
• W niektórych przypadkach siedzenie samochodu może nie być w pełni kompatybilne z
Maxi-Cosi PrioriFix, a w pełni kompatybilne z podpórką.
• Cały fotelik Maxi-Cosi PrioriFix jest solidnie zamontowany w samochodzie.
D. Demontaż Maxi-Cosi PrioriFix
• Złóż podpórkę do pozycji wyjściowej przyciskając przycisk kontrolny (22,1) i przesuwając
podpórkę do góry (22,2).
• Ułuż kadłub Maxi-Cosi PrioriFix do pozycji ‘spanie’ (Patrz 4.2: Pozycje fotelika).
• Zwolnij czerwony zacisk pasa (23).
• Zwolnij pas i wyciągnij go spomiędzy kadłuba i podstawy (24).
• Wyjmij Maxi-Cosi PrioriFix z samochodu.
24
23
22
21
20 21
19
18
17
16
PL
24

Instrukcja obsługi
4. UMIESZCZANIE DZIECKA W FOTELIKU MAXI-COSI PRIORIFIX
4.1 Użycie pasów bezpieczeństwa
A. Dopasowywanie wysokości pasów
Przed zapięciem dziecka w pasach fotelika, należy wpierw określić właściwą dla dziecka
wysokość pasów barkowych (25). Upewnij się, że pasy barkowe układają się odpowiednio
na ramionach dziecka.
• Poluzuj pasy barkowe naciskając przycisk zwalniający (26,1) i przyciągając je ku sobie
możliwie najbliżej (26,2).
• WAŻNE! Nie ciągnij za ochraniacz barkowy umocowany na pasie.
• Otwórz klamrę pasa (27) naciskając czerwony przycisk na klamrze.
• Poluzuj pasy barkowe naciskając przycisk zwalniający i przyciągając je ku sobie możliwie
najbliżej (28).
• Zaczep pasy na hakach przytrzymujących szelki fotelika (29).
• Pociągnij klamrę do przodu a otulinkę szelki krokowej zaczep o uchwyt przy guziku
regulacji długości szelek (30).
• Posadź dziecko w foteliku w taki sposób, aby jego plecy przylegały prosto do Maxi-Cosi
PrioriFix (31).
• Określ właściwą wysokość pasów barkowych dla swojego dziecka.
• WAŻNE!Właściwa wysokość pasów barkowych oznacza, że pas znika w kadłubie
nieznacznie powyżej ramion dziecka (32).
• Wyjmij dziecko z fotelika Maxi-Cosi PrioriFix.
• Dopasuj pasy barkowe do właściwej wysokości, podnieś klapkę pokrowca w okolicy
szczelin pasów barkowych (33).
• Wskazówka: Złóż klapkę dwukrotnie, aby nie rozwinęła się podczas regulacji pasów i
ułóż fotelik w pozycji ‘spanie’.
• W celu uproszczenia regulacji, złap pasy barkowe nad ochraniaczami barkowymi i
pociągnij je, by utworzyć pętlę i zluzować pasy (34).
• Przełóż pętlę z powrotem przez otwór.
• Przesuń pas barkowy i pasek ochraniacza przez szczelinę w celu uzyskania pożądanej pozycji
(35).
• WAŻNE! Zawsze zrób to z dwóch stron.
• Ściągnij mocno pasy barkowe ciągnąc za nie poniżej ochraniaczy (36).
• Umieść klaplę pokrowca na swoim miejscu i przeciągnij ochraniacze przez właściwe
szczeliny w klapce (37).
• WAŻNE! Upewnij się, że pasy nie są poskręcane.
B. Umieszczanie dziecka w foteliku Maxi-Cosi PrioriFix
• Złącz części klamry (38,1) i wepnij je w klamrę pasa (38,2).
• WAŻNE! Umieść pas biodrowy najniżej jak się da (39), aby zapewnić biodrom właściwe
oparcie w foteliku.
• Ściągnij mocno pasy barkowe (40,1) i usuń ewentualny ich luz pociągając za pasek
regulujący pasy barkowe (40,2).
• WAŻNE! Upewnij się, że pomiędzy dzieckiem a pasami jest miejsce na grubość tylko
jednego palca. Im ciaśniej pasy opinają dziecko, tym lepsza ochrona.
• WAŻNE! Upewnij się, że ochraniacze przylegają do ciała dziecka – ramion i klatki piersiowej
- właściwą stroną.
• WAŻNE! Upewnij się, że pasy nie są poskręcane.
PL
40
39
38
37
36
35
34
33
32
31
30
29
28
27
26
25
25

Polski
Jeśli nie mogą sobie Państwo poradzić z montażem lub właściwym zaciśnięciem pasów,
proszę skontaktować się z punktem sprzedaży. Pod żadnym pozorem nie należy w takiej
sytuacji korzystać z Maxi-Cosi PrioriFix.
Zawsze korzystaj z ochraniaczy, gdyż są one niezbędnym elementem bezpieczeństwa
dziecka.
Poinstruuj dziecko, aby nie bawiło się klamrą pasa.
4.2 Pozycje fotelika (dopasowanie do pozycji siedzącej lub spoczynkowej)
Fotelik Maxi-Cosi PrioriFix można ustawić w 4 różnych pozycjach (41).
• Pociągnij dźwignię pozycjonowania fotelika znajdującą się na przedzie fotelika do góry (42,1),
a następnie odchyl lub wyprostuj oparcie fotelika (42,2)
• Zwolnij dźwignię pozycjonowania fotelika w pożądanej pozycji i pchnij oparcie dopóki
nie usłyszysz charakterystycznego kiknięcia.
• WAŻNE! Pociągnij za fotelik i upewnij się, że Maxi-Cosi PririoFix jest nieruchomy w
wybranej pozycji.
Lista kontrolna...
Aby zapewnić swojemu dziecku maksymalne bezpieczeństwo, upewnij się przed każdą
podróżą, że...
• Cały fotelik Maxi-Cosi PrioriFix jest solidnie zamontowany w samochodzie.
• Wysokość pasów barkowych jest właściwa dla dziecka.
• Pasy nie są poskręcane.
• Ochraniacze są umieszczone na pasach właściwą stroną do ciała dziecka.
• Dziecko jest bezpiecznie zapięte pasami, a klamra pasa jest zamknięta.
• Pas fotelika nie jest uszkodzony. Jeśli pas jest uszkodzony, pod żadnym pozorem nie korzystaj z fotelika i skontaktuj się z punktem sprzedaży lub importerem.
4.3 Wyjęcie dziecka
• Ustaw fotelik Maxi-Cosi PrioriFix w pozycji siedzącej (Patrz również 4.2: Pozycje fotelika).
• Otwórz klamrę pasa (43) naciskając czerwony przycisk na klamrze.
• Poluzuj pasy barkowe naciskając przycisk zwalniający i przyciągając je ku sobie możliwie
najbliżej (28).
• Zaczep pasy na hakach przytrzymujących szelki fotelika (44).
• Pociągnij klamrę do przodu, a otulinkę szelki krokowej zaczep o uchwyt przy guziku
regulacji długości szelek (45).
• Wyjmij dziecko z fotelika Maxi-Cosi PrioriFix.
5. KONSERWACJA
5.1 Informacje ogólne
• WAŻNE! Należy zawsze wyjąć Maxi-Cosi PrioriFix z samochodu przed przystąpieniem do
czynności konserwacyjnych opisanych poniżej.
• Stosuj letnią wodę, mydło i szmatkę do oczyszczania plastikowych elementów fotelika.
Nie używaj chropowatych ściereczek do czyszczenia.
• WAŻNE! Nigdy nie stosuj smarów, nawet do ruchomych elementów Maxi-Cosi PrioriFix.
45
44
28
43
42
41
PL
26

Instrukcja obsługi
5.2 Pokrowiec
Zdejmowanie pokrowca
• Poluzuj pasy barkowe naciskając przycisk zwalniający i przyciągając je ku sobie możliwie
najbliżej (28).
• Ułóż fotelik w pozycji ‘spanie’ i otwórz drzwiczki schowka (46).
• Pociągnij pasy barkowe do momentu pojawienia się z tyłu obejmy pasa. Zdejmij pasy
barkowe z obejmy (47).
• Przekręć klamerkę przy ochraniaczu i przesuń ją przez szczelinę pasa razem z pasem
barkowym. Najprościej zrobić to używając górnej szczeliny pasa (48).
• Zdejmij haki przytrzymujące szelki fotelika przekręcając kołek z tyłu oparcia (49).
• Poluzuj pokrowiec ze wszystkich stron (50).
• Otwórz klamrę pasa.
• Przełóż pasy, ochraniacze i klamry przez otwory w pokrowcu (51).
• Zdejmij pokrowiec.
• Zdejmij ochraniacze z pasów (52).
Czyszczenie pokrowca
• Wypierz pokrowiec i ochraniacze ręcznie, w wodzie o maksymalnej temperaturze 30
stopni Celsjusza. Nie susz w suszarce. Przeczytaj zasady konserwacji umieszczone
na pokrowcu.
Wskazówka: Zaleca się kupno drugiego pokrowca przy zakupie fotelika Maxi-Cosi
PrioriFix,
aby można było korzystać z fotelika, nawet podczas konserwacji jednego z pokrowców.
Nakładanie pokrowca
• WAŻNE! Złącz części klamry (53,1) i wepnij je w klamrę pasa (53,2).
• Nałóż czyste ochraniacze właściwą stroną na pasy barkowe.
• Przepleć pasy barkowe przez duży otwór w klamerce (54).
• Otwórz klamrę i przepleć ją wraz z pasami przez otwory w pokrowcu (55).
• Przełóż krawędzie przycisku zwalniającego oraz dźwignię pozycjonowania fotelika przez
pokrowiec i zaczep pokrowiec na haczykach mocujących (56).
• Zamocuj oba haki przytrzymujące szelki fotelika (57) i sprawdź czy są solidnie
przytwierdzone.
• Zamocuj klamerki pasów barkowych na pożądanej wysokości w szczelinach pasów
barkowych (58).
• Przymocuj pasy barkowe do obejmy (59).
• WAŻNE! Czerwony szew na pasach barkowych musi być zwrócony w kierunku kadłuba.
• Zamknij drzwi schowka (60).
• Zamocuj klamrę i zamknij klapkę pokrowca (61).
• Sprawdź działanie pasów i upewnij się, że nie są one poskręcane.
5.3 Działanie i czyszczenie klamry
Właściwe działanie klamry ma znaczący wpływ na bezpieczeństwo dziecka. Najczęstszą
przyczyną niewłaściwego funkcjonowania klamry jest jej zabrudzenie (kurzem, piaskiem,
jedzeniem, itp.). Poniżej znajduje się lista możliwych przyczyn niewłaściwego
funkcjonowania klamry oraz sugerowane sposoby ich usunięcia.
PL
53
61
60
59
58
57
56
55
54
52
51
50
49
48
47
46
28
27

Polski
A. Problemy
• Klamra otwiera się powoli.
• Klamra otwiera się dopiero przy użyciu dużej siły.
• Zatrzaśnięcie klamry sprawia trudność (duży opór).
• Elementy klamry wypinają się (zaraz po wpięciu).
• Nie słychać kliknięcia towarzyszącego wpinaniu elementów do klamry.
B. Czyszczenie klamry w celu rozwiązania problemu
Wyjęcie klamry pasa:
• Otwórz klamrę naciskając czerwony przycisk (62).
• Zdejmij otulinkę (63).
• Ustaw fotelik Maxi-Cosi PrioriFix w pozycji spoczynkowej (Patrz również 4.2: Pozycje
fotelika).
• Chwyć metalową klamerkę pod kadłubem, przekręć ją i wyjmij klamrę pasa (64).
Czyszczenie klamry pasa:
• Przepłucz dokładnie klamrę pod bieżącą wodą i pozostaw do całkowitego wyschnięcia.
• WAŻNE! Nie stosuj smarów!
Zakładanie klamry pasa:
• Przełóż metalową klamerkę przez otwór w kadłubie i przekręć ją, aby ułożyć klamrę pasa
we właściwej pozycji.
• WAŻNE! Upewnij się, że klamra jest właściwie umieszczona chwytając ją i mocno
ciągnąc.
• Załóż otulinkę.
Jeśli nie możesz zamknąć klamry lub jeśli wydaje Ci się, że problem nie został rozwiązany,
skontaktuj się z punktem sprzedaży lub importerem (dane teleadresowe na odwrocie
instrukcji obsługi). Pod żadnym pozorem nie należy w takiej sytuacji korzystać z Maxi-Cosi
PrioriFix.
6. UWAGI OGÓLNE
Zawsze zwracaj szczególną uwagę na następujące punkty ...
• Zawsze korzystaj z fotelika, nawet podczas krótkich podróży, ponieważ właśnie wtedy
dochodzi do największej ilości wypadków.
• Używaj Maxi-Cosi PrioriFox tylko w samochodzie, a nie w domu. Foteliki samochodowe
nie są
przystosowane do użytku domowego.
• Maxi-Cosi PrioriFix można zamontować albo na przednim, albo na tylnym siedzeniu.
Zalecamy montaż na tylnym siedzeniu.
• Nigdy nie montuj Maxi-Cosi PrioriFix na siedzeniu wyposażonym w przednią poduszkę
powietrzną, ponieważ stanowi ona ogromne zagrożenie dla dziecka. Nie dotyczy to bocznych poduszek powietrznych.
• Fotelik musi być na stałe przymocowany przy pomocy pasów bezpieczeństwa/Isofix oraz
podpórki, nawet jeśli nie jest regularnie używany. Fotelik niezamocowany może
spowodować poważne obrażenia innych pasażerów podczas gwałtownego hamowania
lub zderzenia samochodu.
• Upewnij się, że Maxi-Cosi PrioriFix nie jest przytrzaskiwany oparciem lub drzwiami
samochodu ani przygniatany zbyt ciężkim bagażem.
• Nigdy nie używaj Maxi-Cosi PrioriFix bez pokrowca. Nie wymieniaj pokrowca na inny niż
dostarczony przez producenta, ponieważ jest on jednym z czynników odpowiedzialnych
za bezpieczeństwo dziecka.
64
63
62
PL
28
Instrukcja obsługi
• Zawsze przykrywaj Maxi-Cosi PrioriFix jeśli samochód zostaje zaparkowany na słońcu,
ponieważ plastikowe i metalowe części ulegają nagrzaniu i mogą powodować odbarwienia tkaniny.
• Aby uniknąć uszkodzeń tkaniny nie należy usuwać znaków firmowych z pokrowca.
• Upewnij się, że cały bagaż i wszystkie przedmioty mogące spowodować obrażenia w
sytuacji wypadkowej (np. leżące na półce pod tylną szybą) są właściwie zabezpieczone.
• Dokonuj krótkich postojów podczas dłuższych podróży, by dać dziecku czas ‘na
rozprostowanie nóg’.
• Nigdy nie zostawiaj dziecka bez opieki w samochodzie.
• Schowaj instrukcję obsługi Maxi-Cosi PrioriFix w schowku z tyłu fotelika.
• Nigdy nie używaj fotelika kupionego z ‘drugiej ręki’, ponieważ nie masz pewności czy
właściwie się z nim obchodzono. Producent gwarantuje bezpieczeństwo fotelika tylko
gdy jest on używany przez pierwszego nabywcę.
• Wymień Maxi-Cosi PrioriFix po wypadku, gdyż może on nie być w pełni bezpieczny z
uwagi na niewidoczne uszkodzenia wewnętrzne.
• Producent jest świadomy, że fotelik może spowodować wgniecenia tapicerki samochodu.
Jest to nieuniknione z uwagi na ustanowione normy bezpieczeństwa oraz sposób
montażu wymagający ścisłego przylegania fotelika do siedzenia w celu zapewnienia
maksymalnego bezpieczeństwa dziecka. Doral nie ponosi odpowiedzialności za
uszkodzenia tapicerki samochodu spowodowane montażem i użyciem fotelika.
Na koniec coś, co nie wymaga komentarza ...
• Bądź wzorem dla innych i zawsze zapinaj pasy bezpieczeństwa!
7. SEGREGACJA MATERIAŁÓW ZUŻYTYCH
Aby korzystanie z fotelika było skuteczne i bezpieczne, nie należy używać go dłużej niż
pięć lat od daty zakupu. Starzenie się plastiku (np. z powodu promieniowania słonecznego)
może spowodować pogorszenie się jakości produktu.
Zalecamy usunięcie fotelika z samochodu i pozbycie się go, kiedy dziecko z niego wyrośnie.
Ze względów ekologicznych prosimy o segregację elementów na elementy opakowania i
elementy fotelika i ich właściwą utylizację.
Aby uniknąć ryzyka uduszenia, plastikowe części opakowania należy trzymać z dala od dzieci.
PL
29
Opakowanie Pudło kartonowe Makulatura
Worek plastikowy Odpady kuchenne
Elementy produktu Pokrowiec z tkaniny Odpady kuchenne
Części plastikowe Pojemnik na odpady plastikowe
Części metalowe Pojemnik na odpady metalowe
Pas Pojemnik na poliester
Klamra pasa Odpady kuchenne
Gwarancja
8. NASTĘPNY FOTELIK
9. Lista samochodów kompatybilnych
Użycie systemu Isofix oraz podpórki, które zapewniają optymalne bezpieczeństwo i łatwy
montaż, oznacza, że Maxi-Cosi PrioriFix nie nadaje się do zamontowania we wszystkich
typach samochodów. Maxi-Cosi PrioriFix określa się mianem ‘pół-uniwersalny’, a tym
samym nadającym się do montażu wyłącznie na siedzeniach określonych typów samochodów. Została sporządzona lista marek tych samochodów. Ulega ona jednak stałym
modyfikacjom. Aby zapoznać się z aktualną listą samochodów kompatybilnych odwiedź
stronę internetową Maxi-Cosi www.maxi-cosi.com i/lub punkt sprzedaży detalicznej
mpatybilności fotelika z wybranym modelem samochodu. Aktualna lista samochodów
kompatybilnych jest dołączana do każdego zakupionego zestawu Maxi-Cosi PrioriFix.
10. GWARANCJA
Gwarantujemy, że niniejszy wyrób wyprodukowano zgodnie z aktualnymi europejskimi
normami bezpieczeństwa oraz wymaganiami dotyczącymi jakości, stosowanymi w
odniesieniu do tego produktu. Gwarantujemy również, że produkt w momencie zakupu
przez sprzedawcę detalicznego jest wolny od wad materiałowych i wykonawczych.
Podczas procesu produkcji wyrób poddano różnym testom jakości. Jeśli, pomimo naszych
wysiłków, produkt okaże się wadliwy pod względem materiałowym lub wykonawczym w
trakcie 24-miesięcznego okresu gwarancji (o ile będzie użytkowany w sposób normalny,
zgodnie z instrukcją obsługi), zobowiązujemy się do przestrzegania warunków gwarancji.
W takim przypadku prosimy, skontaktuj się ze swoim sprzedawcą. Szczegółowe
informacje na temat warunków obowiązywania gwarancji dostępne są u sprzedawcy lub
na stronie internetowej: www.maxi-cosi.com.
Gwarancja nie jest ważna w następujących przypadkach:
PL
30
Typ fotelika
Grupa
Waga dziecka
Wiek
Zastosowanie według normy ECE R 44/04
2 + 3 15 do 36 kg 3,5 do 12 lat
Maxi-Cosi Rodi XR
2 + 3 15 do 36 kg 3,5 do 12 lat
Maxi-Cosi Rodi SPS

Gwarancja
• W przypadku użytkowania w sposób inny lub w innym celu niż opisano w instrukcji
obsługi.
• Jeśli wyrób został przekazany do naprawy przez dealera nieautoryzowanego przez nas.
• Jeśli produkt dostarczono do producenta bez oryginalnego dowodu zakupu (za
pośrednictwem sprzedawcy i/lub importera).
• Jeśli napraw dokonała strona trzecia lub dealer nieautoryzowany przez nas.
• Jeśli wada jest wynikiem nieprawidłowego lub nieuważnego użytkowania bądź
konserwacji, lub zniszczenia tapicerki i/lub ramy na skutek uderzenia albo niedbalstwa.
• Jeśli części wykazują oznaki normalnego zużycia eksploatacyjnego, którego można
oczekiwać w wyniku codziennego użytkowania wyrobu (koła, obracające się i ruchome
części itp.)
Data wejścia w życie:
Gwarancja wchodzi w życie w dniu zakupu produktu.
Okres obowiązywania gwarancji:
Gwarancja obowiązuje przez okres 24 kolejnych miesięcy. Gwarancja dotyczy wyłącznie
pierwszego właściciela i jest nieprzenoszalna.
Postępowanie w przypadku wystąpienia wad:
Należy zachować rachunek za zakupiony wyrób. Na rachunku musi być wyraźnie widoczna
data zakupu. W przypadku wystąpienia wad lub innych problemów należy skontaktować
się ze sprzedawcą. Nie można zażądać wymiany lub przyjęcia zwrotu produktu. Naprawy
nie dają prawa do przedłużenia gwarancji. Produkty zwrócone bezpośrednio do
producenta nie podlegają gwarancji.
Niniejsza klauzula gwarancyjna jest zgodna z dyrektywą europejską 99/44/WE z dnia 25
maja 1999 roku.
11. PYTANIA
Jeśli mają Państwo jakieś pytania, proszę się skontaktować z punktem sprzedaży lub
importerem (dane teleadresowe na odwrocie instrukcji obsługi). W przypadku kontaktu
telefonicznego prosimy o podanie:
• Numeru seryjnego zamieszczonego u dołu biało-pomarańczowej nalepki (z tyłu Maxi-Cosi
PrioriFix).
• Marki i typu Państwa samochodu oraz siedzenia, na którym jest zamontowany Maxi-Cosi
PrioriFix.
• Wagi i wieku dziecka (wzrost).
PL
31
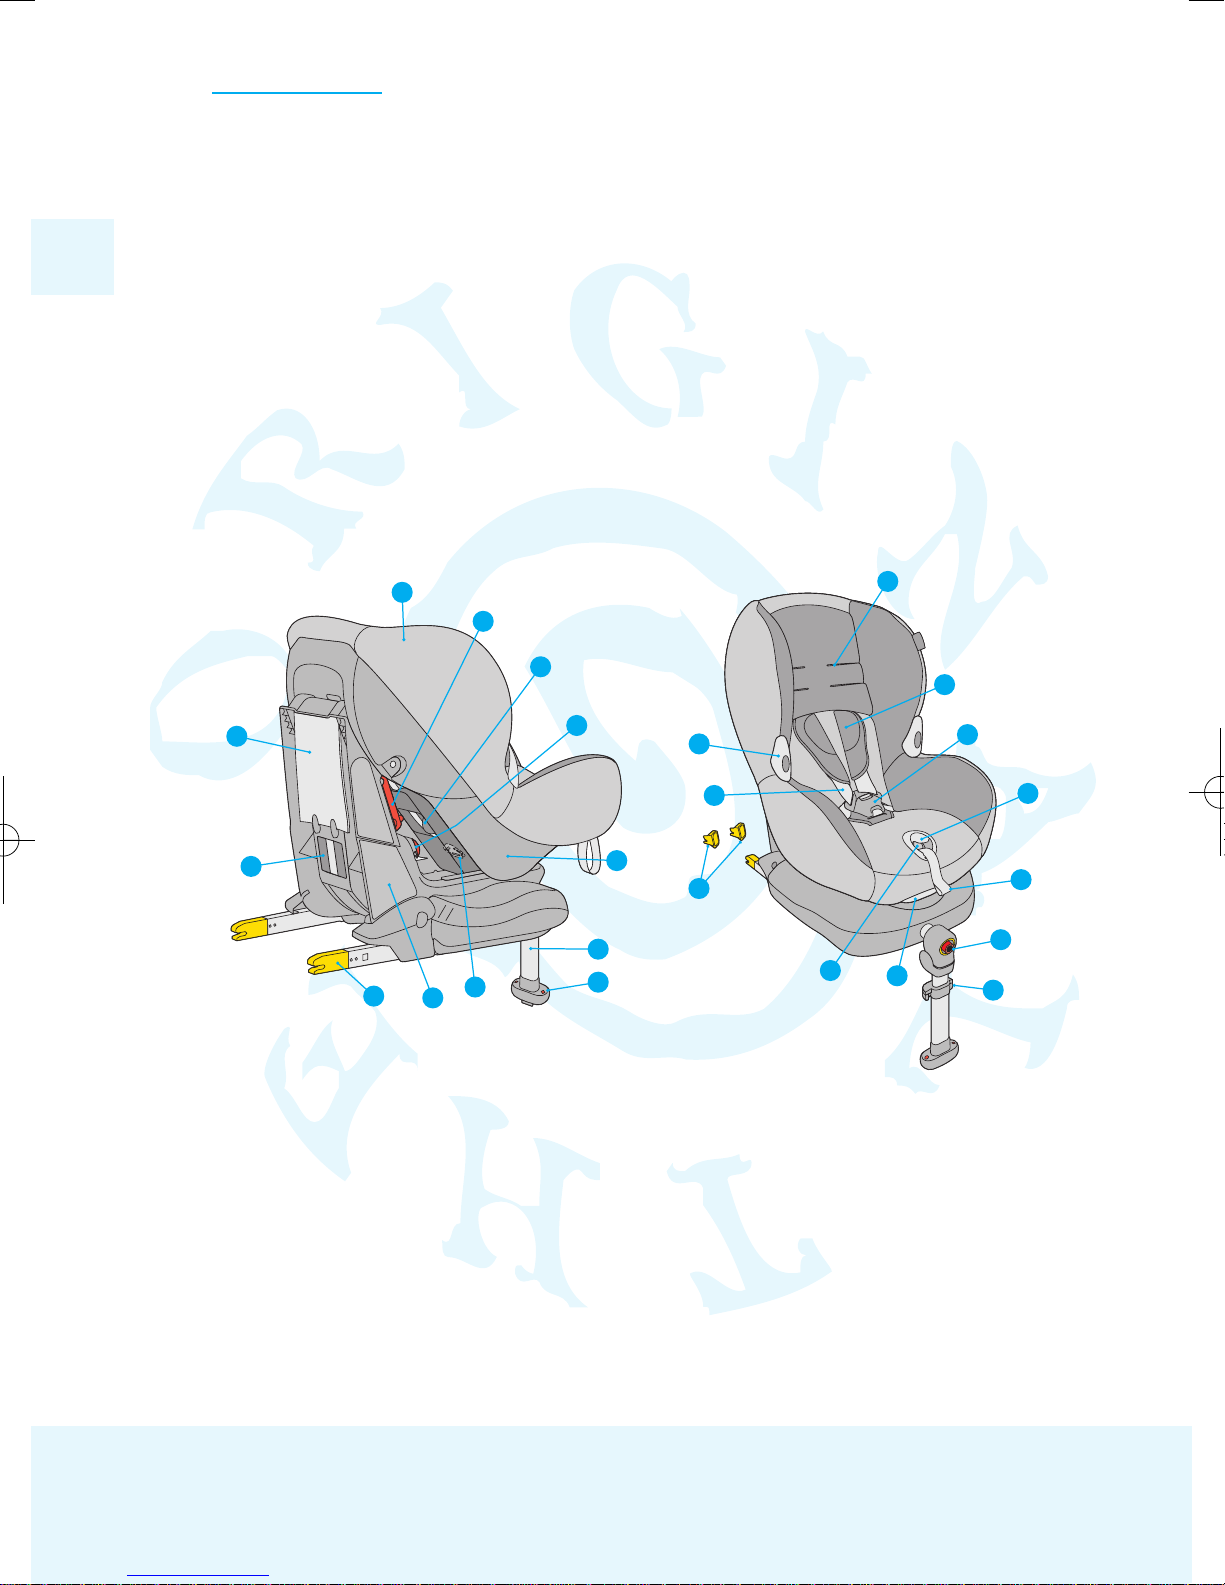
Magyar
Kedves Szülők!
Köszönjük, hogy a Maxi-Cosi PrioriFix gyermekülést választották.
A Maxi-Cosi PrioriFix kifejlesztésében kiemelkedő szerephez jutott a biztonság, a
kényelem és a felhasználóbarát kialakítás. A termék megfelel a legszigorúbb biztonsági
előírásoknak.
Vizsgálatok kimutatták, hogy számos autós gyermekülés használata nem megfelelően
történik. Kérjük, ezért olvassa el figyelmesen az útmutatót. Csak abban az esetben
garantált a gyermeke biztonsága, ha a terméket az utasításoknak megfelelően használja.
A termékfejlesztő csoportunk folyamatos kutatómunkájának, a felhasználók és egyéb
személyek bevonásával elvégzett termék-kipróbálásnak, illetve a vásárlóink
visszajelzéseinek köszönhetően gyermekbiztonsággal kapcsolatos ismereteink a
legaktuálisabb szinten állnak. Ha kérdései vagy észrevételei vannak a Maxi-Cosi PrioriFix
gyermekülés használatával kapcsolatban, kérjük, forduljon hozzánk bizalommal.
Dorel (a címet és telefonszámot a használati utasítás hátoldalán találja).
,
HU
32
1. Huzat
2. Övrögzítő
3. Biztonsági öv takarója
4. Piros medenceöv jelzés
5. Kagyló
6. Lábtámasz
7. Lábtámasz színkijelzője
8. Övszorító
9. Keret
10. Isofix csatlakozó
11. ECE matrica
12. Használati utasítás
13. Biztonsági öv nyílások
14. Övpárna
15. Biztonsági öv zárja
16. Rögzítő (zárhoz)
17. Vállpántállító
18. Színkijelzős központi gomb a
lábtámaszon
19. Beállítógomb a lábtámaszon
20. Ülésállító kar
21. Vállpántállító gomb
22. Isofix vezetők
23. Vállpántok
24. Biztonsági öv rögzítői
23
15
16
21
17
19
18
20
24
13
14
22
5
6
7
11
12
1
2
3
4
9
10
8
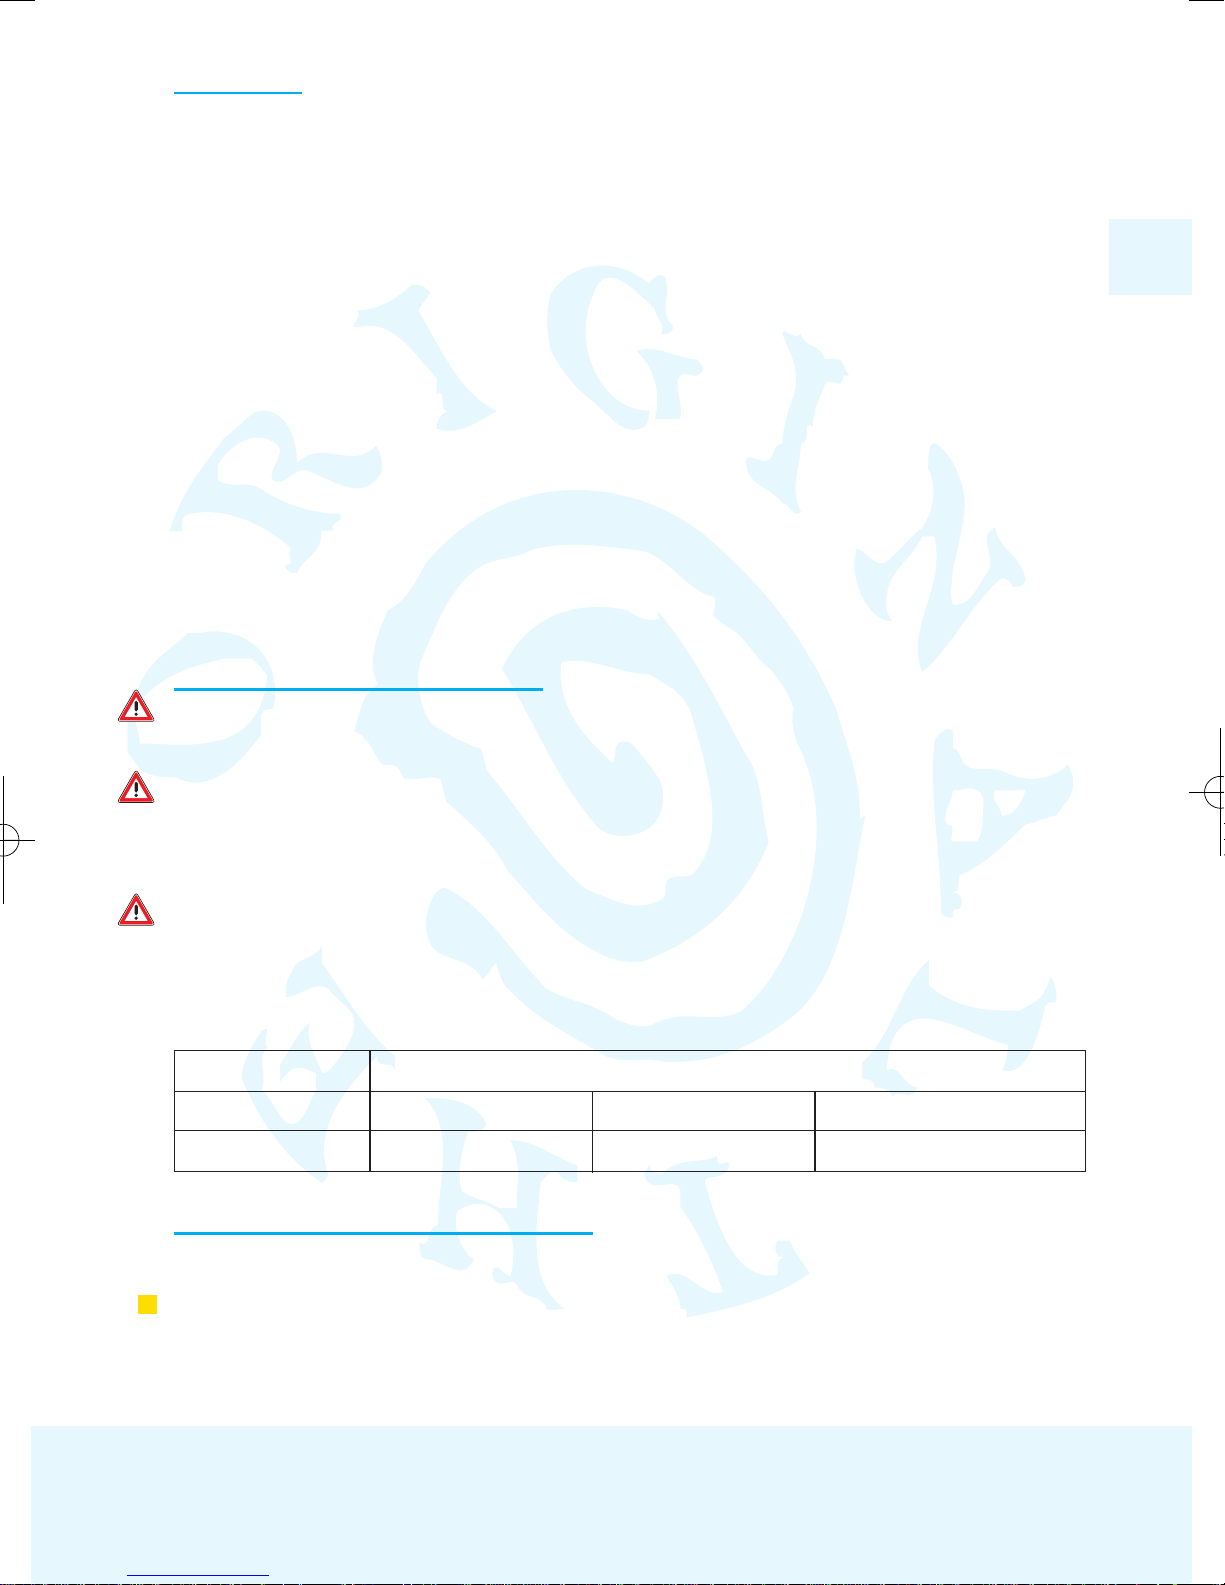
Tájékoztató füzet
TARTALO M
1. FONTOS: KÉRJÜK, OLVASSA EL! . . . . . . . . . . . . . . . . . . . . . . . . . . . . . . . . . . 33
2. HASZNÁLATI MÓDOK GÉPKOCSIBAN . . . . . . . . . . . . . . . . . . . . . . . . . . . . . . 33
3. A MAXI-COSI PRIORIFIX BESZERELÉSE ÉS ELTÁVOLÍTÁSA . . . . . . . . . . . . 34
3.1 Isofix (sárga jelzés a terméken) és lábtámasz használata . . . . . . . . . . . . . . 34
3.2 3-pontos biztonsági öv (piros jelzés a terméken) és lábtámasz használata 36
4. A GYERMEK BEHELYEZÉSE A MAXI-COSI PRIORIFIX ÜLÉSBE . . . . . . . . . . 38
4.1 A pántrendszer használata . . . . . . . . . . . . . . . . . . . . . . . . . . . . . . . . . . . . . . . . 38
4.2 Üléspozíciók (ülő és fekvő pozíciók) . . . . . . . . . . . . . . . . . . . . . . . . . . . . . . . . 39
4.3 A gyermek kivétele az ülésből . . . . . . . . . . . . . . . . . . . . . . . . . . . . . . . . . . . . . 39
5. POLÁS . . . . . . . . . . . . . . . . . . . . . . . . . . . . . . . . . . . . . . . . . . . . . . . . . . . . . . . . 39
5.1 ltalános . . . . . . . . . . . . . . . . . . . . . . . . . . . . . . . . . . . . . . . . . . . . . . . . . . . . . . . 39
5.2 Üléshuzat . . . . . . . . . . . . . . . . . . . . . . . . . . . . . . . . . . . . . . . . . . . . . . . . . . . . . . 39
5.3 Biztonsági öv zárjának mőködése és tisztítása . . . . . . . . . . . . . . . . . . . . . . . 40
6. LTALÁNOS UTASÍTÁSOK . . . . . . . . . . . . . . . . . . . . . . . . . . . . . . . . . . . . . . . . . 41
7. SZELEKTÍV HULLADÉKKEZELÉS . . . . . . . . . . . . . . . . . . . . . . . . . . . . . . . . . . . 42
8. KÖVETő GYERMEKÜLÉS . . . . . . . . . . . . . . . . . . . . . . . . . . . . . . . . . . . . . . . . . 42
9. GÉPKOCSITÍPUS-LISTA . . . . . . . . . . . . . . . . . . . . . . . . . . . . . . . . . . . . . . . . . . 43
10. GARANCIA . . . . . . . . . . . . . . . . . . . . . . . . . . . . . . . . . . . . . . . . . . . . . . . . . . . . 43
11. KÉRDÉSEK . . . . . . . . . . . . . . . . . . . . . . . . . . . . . . . . . . . . . . . . . . . . . . . . . . . . . 44
1. FONTOS: KÉRJÜK, OLVASSA EL!
Olvassa el a használati utasítást, és őrizze meg további felhasználás céljából. A használati
utasításban foglaltak be nem tartása a gyermek komoly sérülését okozhatja.
Kizárólag eredeti, illetve a gyártó által engedélyezett tartozékokat és alkatrészeket
használjon. Ne hajtson végre átalakításokat a terméken.
Ha problémái vagy panaszai merülnének fel, kérjük, forduljon a termék eladójához vagy
importőréhez.
A gyermekülés beszerelése előtt ellenőrizze a gépkocsitípus-listát.
A Maxi-Cosi PrioriFix megfelel a biztonsági gyermekülésekre vonatkozó ECE R44/04
európai szabvány aktuális irányelveinek, és a gyermek 9 hónapos korától annak 3,5 éves
koráig (9-18 kg) használható.
2. HASZNÁLATI MÓDOK GÉPKOCSIBAN
A Maxi-Cosi PrioriFix kétféleképpen használható gépkocsiban:
Beszerelés Isofix-szel és lábtámasszal (lásd 3.1. fejezet);
Engedélyezett Isofix csatlakozókkal rendelkező gépkocsikban történő használathoz (lásd 9.
fejezet: Gépkocsitípus-lista). A terméken és a használati utasításban látható sárga jelzés
hívja fel erre a figyelmet.
HU
33
ECE R44/04* megfelelőség
Csoport Gyermek testsúlya Gyermek életkora
Maxi-Cosi PrioriFix 1 9 – 18 kg 9 hónap – 3,5 év
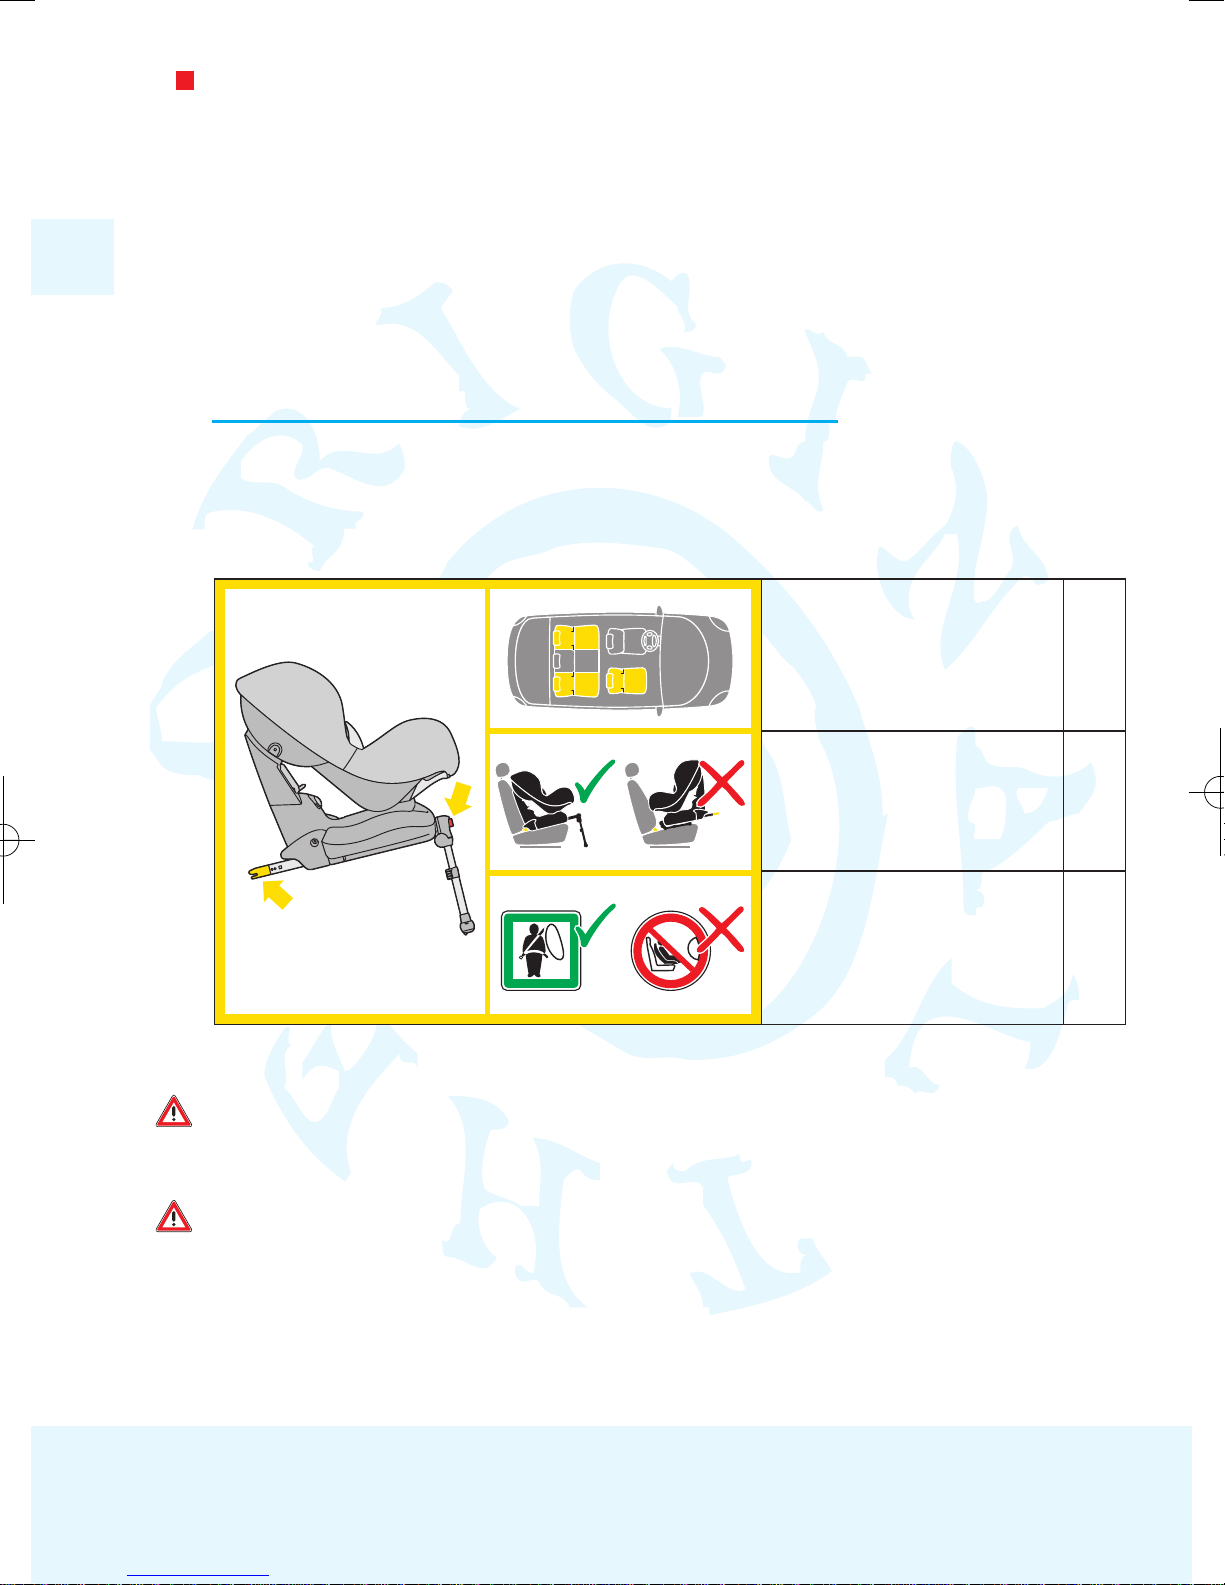
Magyar
Beszerelés 3-pontos biztonsági övvel és lábtámasszal* (lásd 3.2 fejezet);
Az ECE R16-os vagy annak megfelelő más szabvány szerint jóváhagyott automata 3pontos biztonsági övvel rendelkező gépkocsikban történő használathoz (lásd 9. fejezet:
Gépkocsitípus-lista). A terméken és a használati utasításban látható piros jelzés hívja fel a
figyelmet erre a lehetőségre.
* Az optimális biztonságot és egyszerű beszerelést garantáló lábtámasz és / vagy az Isofix
használata azt jelenti, hogy a Maxi-Cosi PrioriFix nem minden gépkocsitípushoz
alkalmazható. A Maxi-Cosi PrioriFix „félig univerzális” termék, ezért csak meghatározott
gépkocsi-típusokban alkalmazható. Lásd a mellékelt gépkocsitípus-listát (lásd 9. fejezet:
Gépkocsitípus-lista).
3. A MAXI-COSI PRIORIFIX BESZERELÉSE ÉS ELTÁVOLÍTÁSA
3.1 Isofix (sárga jelzés a terméken) és lábtámasz használata
Ha a gépkocsi rendelkezik Isofix csatlakozókkal, azok és a lábtámasz segítségével
elvégezheti a Maxi-Cosi PrioriFix beszerelését. Annak eldöntéséhez, hogy a gépkocsi
alkalmas-e az Isofix-szel és lábtámasszal történő beszereléshez, lásd 9. fejezet:
Gépkocsitípus-lista.
** Ellenőrizze a gépkocsitípus-listát.
A Maxi-Cosi PrioriFix gyermekülést csak Isofix csatlakozókkal rendelkező ülésen és
menetirányban használja. A termék használatbavétele előtt olvassa el a gyártó által
összeállított kézikönyvet.
A gyermek biztonsága érdekében ügyeljen a megfelelő csatlakoztatásra az Isofix
csatlakozási pontokhoz. Lásd még a Maxi-Cosi PrioriFix oldalán levő sárga keretes
matricát. Ne szerelje be a gyermekülést az útmutatóban foglaltaktól eltérő módon!
HU
34
• Isofix csatlakozókkal (az ülés és Igen**
annak hátoldala között
található) ellátott, és a
lábtámasz számára
elegendő
hellyel rendelkező ülésekhez
• Menetiránynak háttal Nem
• Menetirányba Igen
• Isofix jelzés Sárga
•
elülső légzsák Nem
• Oldallégzsák Igen
Isofix A osztály
 Loading...