

Page 1

WizooVerb W5
English
Die deutschsprachige V
Handbuchs fi
nden Sie ab Seite 79.
ersion dieses
Page 2

Page 3

WizooVerb W5
English
Page 4

The information in this document is subject to change without notice and does not represent a commitment on the part of Wizoo Sound Design GmbH.
The software described by this document is subject to a License Agreement and may
not be copied to other media.
No part of this publication may be copied, reproduced or otherwise transmitted or
recorded for any purpose, without prior written permission by Wizoo Sound Design
GmbH. All product names and company names are TM or ® trademarks of their respective owners.
Producer Peter Gorges
IR Engine Christian Knufinke
AIR Engine Matthias Klag, Klaus Piehl
User Interface Michael Ruf, Rainer Schütze, Stefan Zündorf
HDIR Recording Ralph Kessler, www.masterpinguin.de
Sound Design Matthias Klag
GUI Design Michael Ruf
Installer Martin Honisch
Additional Programming Andreas Frömming
Project Management Lars Slowak
Product Management Michael Ruf, Matthias Klag
Manual Ralf Kleinermanns, Matthias Klag
Translation Tom Green
Manual Layout Uwe Senkler
Artwork MOtype
Wizoo and WizooVerb W5 are trademarks of Wizoo Sound Design GmbH. VST is a regis-
tered trademark of Steinberg Media Technologies GmbH. The Audio Unit logo and the
Audio Unit symbol are trademarks of Apple Computer Inc. RTAS is a registered trademark of Avid Technology, Inc. and its subsidiaries and divisions. Pentium is a registered
trademark of Intel Corporation in the U.S. and other countries. AMD is a trademark of
Advanced Micros Devices Inc. The Mac logo is a trademark used under license. Macintosh, Power Macintosh and Mac OS are registered trademarks used under license.
Microsoft and Windows XP are either registered trademarks or trademarks of Microsoft
Corporation in the United States and/or other countries. All other product and company
names are TM or ® of their respective holders.
Unauthorized copying, hiring and lending of this software is strictly prohibited. All specifications are subject to change without notice.
© 2005 Wizoo Sound Design GmbH
All rights reserved.
Made in Germany.
Page 5

Heartfelt congratulations!
“WizooVerb is more than merely the world’s best reverb. It’s a milestone, a
landmark achievement. WizooVerb blurs the boundary between virtual
and real rooms. In fact, the awesome might of its creative powers blow
everything else away.”
Honestly—would you believe that kind of spin? You see—that’s precisely
my problem. How can I explain that WizooVerb is for real?
Let’s take it from the top: A year ago our developers cajoled me into attending the presentation of a “groundbreaking new reverb algorithm.”
My curiosity was negligible; my doubts weren’t: Does the world really need
another reverb? And if so, was the world begging for Wizoo, a no-name in
this field, to bring it to the table? In the face of such stiff competition and
rivals with legendary reputations? And even if the reverb was awesome—
who would believe us?
That was a year ago. Now the WizooVerb is here. So, what, you may ask,
prompted this about-face?
Well, firstly the reverb’s sound at that initial presentation was a jaw-dropping revelation! Not “promising” or “ok for starters,” not “less tinny” or
“denser than others”; it was simply a stupendous sensation in 3D sound.
No effect to be heard, only wonderful lifelike spatiality.
Though we were off to a very good start, we were unwilling to play it safe
and rest on these laurels.
We a spent a few more months with our noses firmly pressed to the grindstone. With everybody talking about impulse response reverb, we decided
to endow ours with the same.
When finally our reverb was tweaked to deliver both breeds of effect, there
was still a problem: Should they be commercial or internet freebies, virtually all available impulse responses have about as much in common with a
real room as a Big Mac has with real food. And none of them sounded near
as good as our algorithmic reverb. So, what to do?
English
Page 6

We searched everywhere for an exceptional impulse response and actually
found an engineer who had spent three years of his life pursuing this particular grail and had already produced an unbelievable library. He had even
developed his own post-processing software. Doubtless, a demigod among
designers! And we managed to sign him on. Exclusively, of course, much
to the chagrin of the competition.
The product approached perfection. Now all we needed was somebody to
notice.
The NAMM 2005 show was the breakthrough. Rumors about the world’s
best reverb spread like wildfire. Purists who were known to scoff at
$50,000 devices lay prostate before us, begging for an alpha version.
Now you enter the picture. Although Wizoo can’t hope to match the big
players’ publicity, and although your friends surely attempted to talk you
into buying a product sporting a better-known brand, you boldly decided to
go with the WizooVerb.
For that, we congratulate you and offer our heartfelt thanks. The rewards
for you will be great, because the WizooVerb more than makes good on the
performance promise: When you hear yours the first time, you will jettison
all your preconceptions about reverb.
Take our word for it. WizooVerb has brought tears of joy even to multiple
Grammy award-winning studio maestros. So break out the Kleenex!
On behalf of the team and everyone who had a hand in this miracle, here’s
wishing you lots of fun and success with WizooVerb.
Yours sincerely,
Best regards,
Peter Gorges
Page 7

Contents
About this Manual . . . . . . . . . . . . . . . . . . . . . . . . . . . . . . . . . . . . . 11
System Requirements and Installation . . . . . . . . . . . . . . . . . . 13
Running WizooVerb on a PC . . . . . . . . . . . . . . . . . . . . . . . . . . . . . . 13
Minimum requirements, PC . . . . . . . . . . . . . . . . . . . . . . . . . . 13
Installation on a PC . . . . . . . . . . . . . . . . . . . . . . . . . . . . . . . . . 13
De-installation from a PC . . . . . . . . . . . . . . . . . . . . . . . . . . . . . 14
Running WizooVerb on a Mac . . . . . . . . . . . . . . . . . . . . . . . . . . . . . 14
Minimum requirements, Mac . . . . . . . . . . . . . . . . . . . . . . . . . 14
Installation on a Mac . . . . . . . . . . . . . . . . . . . . . . . . . . . . . . . . 15
Setting up the Stand Alone Version . . . . . . . . . . . . . . . . . . . . 15
Wizoo Product Certification . . . . . . . . . . . . . . . . . . . . . . . . . . . . . . . 17
Online Certification . . . . . . . . . . . . . . . . . . . . . . . . . . . . . . . . . 18
Off-line Certification . . . . . . . . . . . . . . . . . . . . . . . . . . . . . . . . . 19
Getting Started with WizooVerb . . . . . . . . . . . . . . . . . . . . . . . . 21
The Control Features . . . . . . . . . . . . . . . . . . . . . . . . . . . . . . . . . . . . 21
Using Presets . . . . . . . . . . . . . . . . . . . . . . . . . . . . . . . . . . . . . . . . . . 22
Basics . . . . . . . . . . . . . . . . . . . . . . . . . . . . . . . . . . . . . . . . . . . . . . . . 25
Methods of Generating Reverb . . . . . . . . . . . . . . . . . . . . . . . . . . . . 25
How WizooVerb Works . . . . . . . . . . . . . . . . . . . . . . . . . . . . . . . . . . 26
What Causes Reverberation? . . . . . . . . . . . . . . . . . . . . . . . . . . . . . . 27
Music and Reverb . . . . . . . . . . . . . . . . . . . . . . . . . . . . . . . . . . . . . . . 29
Surround Sound in WizooVerb W5 . . . . . . . . . . . . . . . . . . . . . . . . . 29
English
1
2
3
4
7
Page 8

Contents
Global Parameters . . . . . . . . . . . . . . . . . . . . . . . . . . . . . . . . . . . . . 33
Input Section . . . . . . . . . . . . . . . . . . . . . . . . . . . . . . . . . . . . . . . . . . . 33
Input . . . . . . . . . . . . . . . . . . . . . . . . . . . . . . . . . . . . . . . . . . . . . . 34
Width . . . . . . . . . . . . . . . . . . . . . . . . . . . . . . . . . . . . . . . . . . . . . . 34
Output Section . . . . . . . . . . . . . . . . . . . . . . . . . . . . . . . . . . . . . . . . . . 34
Dry/Wet . . . . . . . . . . . . . . . . . . . . . . . . . . . . . . . . . . . . . . . . . . . . 35
Width . . . . . . . . . . . . . . . . . . . . . . . . . . . . . . . . . . . . . . . . . . . . . . 36
Presets Page . . . . . . . . . . . . . . . . . . . . . . . . . . . . . . . . . . . . . . . . . . . 37
Edit Page . . . . . . . . . . . . . . . . . . . . . . . . . . . . . . . . . . . . . . . . . . . . . . 39
Combining HDIR and AIR . . . . . . . . . . . . . . . . . . . . . . . . . . . . . . . . 39
Display and Functional Panels . . . . . . . . . . . . . . . . . . . . . . . . . . . . . 40
Loading HDIR Models . . . . . . . . . . . . . . . . . . . . . . . . . . . . . . . . . . . . 41
Reverse . . . . . . . . . . . . . . . . . . . . . . . . . . . . . . . . . . . . . . . . . . . . . . . . 41
Early Reflections . . . . . . . . . . . . . . . . . . . . . . . . . . . . . . . . . . . . . . . . . 42
Directivity . . . . . . . . . . . . . . . . . . . . . . . . . . . . . . . . . . . . . . . . . . 42
Pre-Delay . . . . . . . . . . . . . . . . . . . . . . . . . . . . . . . . . . . . . . . . . . . 43
ER/Tail Balance . . . . . . . . . . . . . . . . . . . . . . . . . . . . . . . . . . . . . 43
Spread . . . . . . . . . . . . . . . . . . . . . . . . . . . . . . . . . . . . . . . . . . . . . 44
ER/Tail Crossing . . . . . . . . . . . . . . . . . . . . . . . . . . . . . . . . . . . . . 44
Render ER . . . . . . . . . . . . . . . . . . . . . . . . . . . . . . . . . . . . . . . . . . 45
Tail . . . . . . . . . . . . . . . . . . . . . . . . . . . . . . . . . . . . . . . . . . . . . . . . . . . . 46
Main Time . . . . . . . . . . . . . . . . . . . . . . . . . . . . . . . . . . . . . . . . . 46
Low/High Freq . . . . . . . . . . . . . . . . . . . . . . . . . . . . . . . . . . . . . . 47
Low/High Time . . . . . . . . . . . . . . . . . . . . . . . . . . . . . . . . . . . . . 47
Render Tail . . . . . . . . . . . . . . . . . . . . . . . . . . . . . . . . . . . . . . . . . 48
Modulation . . . . . . . . . . . . . . . . . . . . . . . . . . . . . . . . . . . . . . . . . . . . . 50
Envelope . . . . . . . . . . . . . . . . . . . . . . . . . . . . . . . . . . . . . . . . . . . . . . . 51
Length . . . . . . . . . . . . . . . . . . . . . . . . . . . . . . . . . . . . . . . . . . . . . 52
Attack Time . . . . . . . . . . . . . . . . . . . . . . . . . . . . . . . . . . . . . . . . . 53
Decay Time . . . . . . . . . . . . . . . . . . . . . . . . . . . . . . . . . . . . . . . . . 53
Attack/Decay Slope . . . . . . . . . . . . . . . . . . . . . . . . . . . . . . . . . . 53
Delay . . . . . . . . . . . . . . . . . . . . . . . . . . . . . . . . . . . . . . . . . . . . . . . . . . 54
Serial/Parallel . . . . . . . . . . . . . . . . . . . . . . . . . . . . . . . . . . . . . . . 56
Pattern . . . . . . . . . . . . . . . . . . . . . . . . . . . . . . . . . . . . . . . . . . . . . 56
8
5
6
7
Page 9

Contents
BPM . . . . . . . . . . . . . . . . . . . . . . . . . . . . . . . . . . . . . . . . . . . . . . 56
Sync . . . . . . . . . . . . . . . . . . . . . . . . . . . . . . . . . . . . . . . . . . . . . . 57
Tempo . . . . . . . . . . . . . . . . . . . . . . . . . . . . . . . . . . . . . . . . . . . . 57
Divergence . . . . . . . . . . . . . . . . . . . . . . . . . . . . . . . . . . . . . . . . . 57
High Damp . . . . . . . . . . . . . . . . . . . . . . . . . . . . . . . . . . . . . . . . 57
Feedback . . . . . . . . . . . . . . . . . . . . . . . . . . . . . . . . . . . . . . . . . . 58
Main Level . . . . . . . . . . . . . . . . . . . . . . . . . . . . . . . . . . . . . . . . . 58
Time L/C/R/Ls/Rs . . . . . . . . . . . . . . . . . . . . . . . . . . . . . . . . . . 58
Level L/C/R/Ls/Rs . . . . . . . . . . . . . . . . . . . . . . . . . . . . . . . . . . . 58
Gate . . . . . . . . . . . . . . . . . . . . . . . . . . . . . . . . . . . . . . . . . . . . . . . . . . 59
Side Chain Input . . . . . . . . . . . . . . . . . . . . . . . . . . . . . . . . . . . . 60
Threshold . . . . . . . . . . . . . . . . . . . . . . . . . . . . . . . . . . . . . . . . . . 60
Attack . . . . . . . . . . . . . . . . . . . . . . . . . . . . . . . . . . . . . . . . . . . . . 60
Hold . . . . . . . . . . . . . . . . . . . . . . . . . . . . . . . . . . . . . . . . . . . . . . 61
Release . . . . . . . . . . . . . . . . . . . . . . . . . . . . . . . . . . . . . . . . . . . . 61
EQ . . . . . . . . . . . . . . . . . . . . . . . . . . . . . . . . . . . . . . . . . . . . . . . . . . . 61
Frequency . . . . . . . . . . . . . . . . . . . . . . . . . . . . . . . . . . . . . . . . . 63
Gain . . . . . . . . . . . . . . . . . . . . . . . . . . . . . . . . . . . . . . . . . . . . . . 63
Q . . . . . . . . . . . . . . . . . . . . . . . . . . . . . . . . . . . . . . . . . . . . . . . . . 63
8
Impulse Responses
. . . . . . . . . . . . . . . . . . . . . . . . . . . . . . . . . . . . 65
Loading Impulse Responses . . . . . . . . . . . . . . . . . . . . . . . . . . . . . . 66
Optimizing Impulse Responses . . . . . . . . . . . . . . . . . . . . . . . . . . . 67
Removing Direct Sound . . . . . . . . . . . . . . . . . . . . . . . . . . . . . . 67
Trimming Silence from the Start . . . . . . . . . . . . . . . . . . . . . . . 68
Adjusting Levels . . . . . . . . . . . . . . . . . . . . . . . . . . . . . . . . . . . . 68
Saving Impulse Responses . . . . . . . . . . . . . . . . . . . . . . . . . . . . . . . 68
English
9
Setup
. . . . . . . . . . . . . . . . . . . . . . . . . . . . . . . . . . . . . . . . . . . . . . . . . 69
Settings . . . . . . . . . . . . . . . . . . . . . . . . . . . . . . . . . . . . . . . . . . . . . . . 69
CPU Load . . . . . . . . . . . . . . . . . . . . . . . . . . . . . . . . . . . . . . . . . 69
Tool Tips . . . . . . . . . . . . . . . . . . . . . . . . . . . . . . . . . . . . . . . . . . 70
Knob Mode . . . . . . . . . . . . . . . . . . . . . . . . . . . . . . . . . . . . . . . . 71
Restore In & D/W . . . . . . . . . . . . . . . . . . . . . . . . . . . . . . . . . . . 71
Auxiliary Controls . . . . . . . . . . . . . . . . . . . . . . . . . . . . . . . . . . . 71
Save as Default . . . . . . . . . . . . . . . . . . . . . . . . . . . . . . . . . . . . . 72
9
Page 10

Output . . . . . . . . . . . . . . . . . . . . . . . . . . . . . . . . . . . . . . . . . . . . . . . . . 72
Bass Management . . . . . . . . . . . . . . . . . . . . . . . . . . . . . . . . . . . 72
Downmix . . . . . . . . . . . . . . . . . . . . . . . . . . . . . . . . . . . . . . . . . . 73
Certification . . . . . . . . . . . . . . . . . . . . . . . . . . . . . . . . . . . . . . . . . . . . 74
Routing . . . . . . . . . . . . . . . . . . . . . . . . . . . . . . . . . . . . . . . . . . . . . . . . 74
Device . . . . . . . . . . . . . . . . . . . . . . . . . . . . . . . . . . . . . . . . . . . . . 75
Inputs/Outputs . . . . . . . . . . . . . . . . . . . . . . . . . . . . . . . . . . . . . 75
Config (PC only) . . . . . . . . . . . . . . . . . . . . . . . . . . . . . . . . . . . . . 75
Buffer Size (Mac only) . . . . . . . . . . . . . . . . . . . . . . . . . . . . . . . . 75
Index of Parameters and Values
. . . . . . . . . . . . . . . . . . . . . . . . . . . . 77
Page 11

Page 12

Page 13

2 System Requirements and Installation
You can run WizooVerb W5 on a Windows XP PC or an OS X Mac. The following sections will help you install and activate it.
Running WizooVerb on a PC
Minimum requirements, PC
❖ Pentium® IV (1.3 GHz)
❖ 512 MB RAM
❖ 100 MB free hard disk space
❖ Windows® XP
❖ VST 2.0-compatible host software with 5.1 surround support
As an alternative to the plug-in versions, you can also use the stand-alone version
of the WizooVerb W5, for example, if you want to speedily turn your laptop into a
reverb device sans host software.
❖ Surround-compatible audio hardware
❖ DVD ROM disk drive for installation purposes
❖ Internet connection (via any computer) to activate the software
English
Installation on a PC
1 Switch your computer on.
2 Start Windows XP and ensure that you are registered as a system ad-
ministrator.
3 Insert the program DVD into the computer’s DVD disk drive.
4 Open the “PC” folder on the program DVD, launch “WizooVerb W5
Setup” and follow the installation program’s instructions.
5 On the “Choose Plug-Ins” page of the installation program indicate if
you want WizooVerb W5 to be installed in VST 2 plug-in format.
13
Page 14

2 System Requirements and Installation
6 On the “Choose VST-Plug-Ins Folder” page you can select the folder to
which you want to install the WizooVerb VST 2 plug-in.
The right choice of target folder for VST-2 plug-ins depends on your host program’s
settings.
7 On the “Choose Content Folder” page you can determine the target
folder for HDIR data and presets. If you do not use this option, the application will adopt the default directory path.
Upon completion of the installation procedure you will find the standalone version of WizooVerb W5 in the Windows start menu under “All Programs” > “Wizoo”. If the plug-in version was also installed, you can now
use WizooVerb W5 in every Surround-enabled, VST-2-compatible host program.
De-installation from a PC
If for some reason you later decide to remove WizooVerb W5 PC from your
system, you have two options for doing this:
❖ Select from the Windows start menu “All Programs” > “Wizoo” >
“WizooVerb W5” > “Uninstall” and follow the instructions on the
screen.
❖ Open the Windows Control Panel and double-click “Software”. Select
“WizooVerbW5” in the appearing list, click “Add or Remove Programs”
and follow the instructions on the screen.
Running WizooVerb on a Mac
Minimum requirements, Mac
❖ Apple PowerMac G4 1,42 GHz (G5 recommended)
❖ 512 MB RAM
❖ 100 MB available hard disk space
❖ Mac OS X 10.3.8
❖ VST-2-compatible host software with 5.1 surround support
14
Page 15

Running WizooVerb on a Mac
As an alternative to the plug-in versions, you can also use the stand-alone version
of WizooVerb W5.
❖ Surround-compatible audio hardware
❖ DVD ROM disk drive for installation purposes
❖ Internet connection (via any computer) to activate the software
Installation on a Mac
1 Switch your computer on.
2 Start Mac OS X and ensure that you are registered as a system adminis-
trator.
3 Insert the program DVD into the computer’s DVD disk drive.
4 Open the “Mac” folder on the program DVD, launch “WizooVerbW5.
mpkg” and follow the installation program’s instructions.
Upon completion of the installation procedure you will find the standalone version of WizooVerb W5 in your system’s “Applications” folder.
In addition, the VST plug-in has been installed so that you can now use
WizooVerb W5 in a VST-2-compatible host program.
English
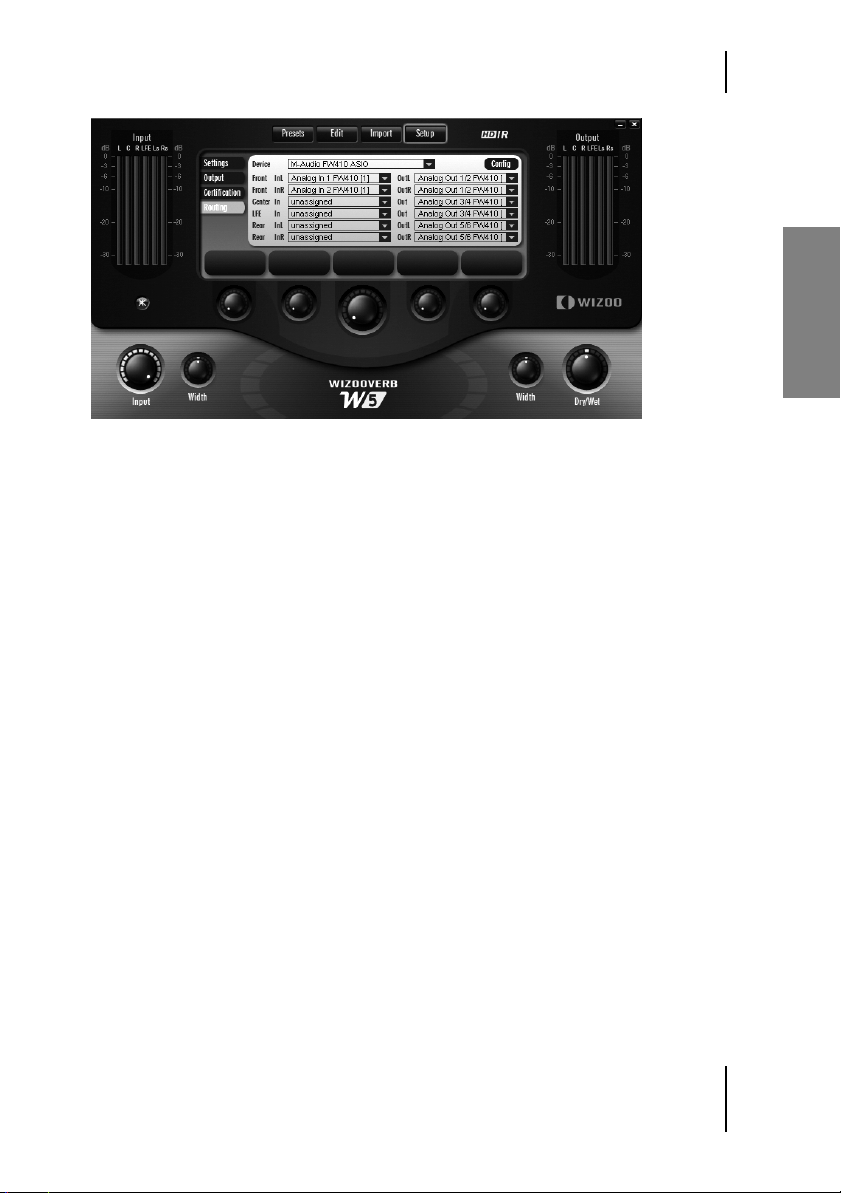
Setting up the Stand Alone Version
The stand-alone version of WizooVerb W5 converts your PC or Mac into a
high-end reverb unit—an especially handy option when using notebooks
on stage.
No special configuration of the Mac is required: the stand-alone version always sends and receives via the inputs and outputs of the audio hard-ware
selected in the Mac OS X ‘Sound’ System preferences.
In order to use WizooVerb W5 in 5.1 Surround mode, your audio hardware should be
equipped with six inputs/outputs. To learn how to use WizooVerb W5 as a simple
stereo reverb with just one pair of audio hardware inputs and outputs each, see the
“Setup” chapter starting on page 69.
15
Page 16

2 System Requirements and Installation
1 Launch the stand-alone version.
2 On WizooVerb W5’s user panel, click Setup and then the Routing
menu tab.
3 Select the desired driver for your audio hardware from the upper De-
vices list.
ASIO drivers are always your first choice for PCs because of their low la-tency. Your
only option for Macs is audio hardware offering Core Audio, which is also a low-latency solution.
4 Quit the stand-alone version and restart the pro-gram to actualize your
edited audio driver settings. The panel will now display all available inputs and outputs for the selected audio hardware.
5 Assign audio card inputs for routing audio signals into WizooVerb W5
by selecting the desired entries in the lists on the left.
6 Assign audio card outputs for routing audio signals out of WizooVerb
W5 by selecting the desired entries in the lists on the right.
In the PC version at the top right you’ll find the Config button; click it to access your audio card’s configuration menu.
In the Mac version you can select the buffer size directly via the Buffer Size
menu.
Note that when using the stand-alone version, you must first select an audio card and assign inputs and outputs.
16
Page 17
Wizoo Product Certification
When using the Stand-alone-Version of the WizooVerb W5 the sound card
must first be selected and inputs and outputs allocated.
Wizoo Product Certification
Be it a demo or full version, every Wizoo product must be certified before
you can use it. Certification serves to confirm that you are a legal user and
to enable your Wizoo product for use on your system.
English
If you want to certify a demonstration version, please proceed as described below, but
do not fill in the box for the certification code.
There is no need to install special programs or hardware for certification
purposes. All you need is a web browser or an e-mail program with Internet access.
The easiest option is to certify using the stand-alone version of WizooVerb
W5. This precludes pesky problems with the host software.
All plug-in versions are activated when you certify the stand-alone version of WizooVerb W5. You can try certifying using a WizooVerb plug-in, but depending on the host,
you may not be able to type characters into the plug-in’s certification panel.
17
Page 18

2 System Requirements and Installation
[W2_Certification
Certify WizooVerb W5 using the Certification panel of the Setup Page.
Online Certification
If your music computer is Internet-enabled, please follow the instructions
below.
If your music computer is unable to access the Internet, please skip these instructions
and go directly to the next section entitled “Off-line certification”.
1 Connect your computer to the Internet.
2 Open the stand-alone version of WizooVerb W5.
3 In WizooVerb W5, click Setup and then the Certification menu tab.
4 Enter into the Product Certification box the product certification code
found on the enclosed card, and then click Online.
5 WizooVerb retrieves the certification form from the Wizoo server and
opens it on your web browser.
6 The certification server fills in the “Product Certificate” box. Though
you should fill in all remaining boxes if possible, definitely fill in the
boxes marked with an asterisk (*).
7 Click “Submit” to have your certificate sent to you. It is sent immedi-
ately to the indicated e-mail address.
8 Retrieve the e-mail and double-click the attached file “WizooVerbW5” to
complete the certification process.
Upon successful certification, WizooVerb W5’s Certification panel on the
Setup Page will display the message “Valid full time license”.
18
Page 19

Wizoo Product Certification
Off-line Certification
If your music computer is unable to access the Internet, you can certify using another computer that is Internet-enabled:
1 Open the stand-alone version of WizooVerb W5.
2 In WizooVerb W5, click Setup and then the Certification menu tab.
3 Enter into the Product Certification box the product certification code
found on the enclosed card, and then click Offline.
4 On the desktop of your music computer you’ll now find the HTML file
“WizooVerb W5 Certification Request”. Load it to your Internet-enabled
computer and ensure that its Internet connection is up and running.
5 Double-click the file “WizooVerb W5 Certification Request” on your In-
ternet-enabled computer. WizooVerb will now retrieve the certification
form from the Wizoo server and open it in your web browser.
6 The certification server fills in the “Product Certificate” box. Though
you should fill in all remaining boxes if possible, definitely fill in the
boxes marked with an asterisk (*).
7 Click “Submit” to have your certificate sent to you. It is sent immedi-
ately to the indicated e-mail address.
8 Open the e-mail and load the attached file “WizooVerbW5” to your mu-
sic computer.
9 Double-click the “WizooVerbW5” file you have loaded to your music
computer to complete the certification process.
Upon successful certification, WizooVerb W5’s Certification panel on the
Setup Page will display the message “Valid full time license”.
English
19
Page 20

Page 21

3 Getting Started with WizooVerb
In this chapter you will become acquainted with the user interface’s main
features and learn how to load and store reverb programs.
The Control Features
WizooVerb W5’s central control element is its large, variable display. The
Page buttons at the top edge let you access different display pages. Most
have different functional panels that are accessed via the menu tabs at the
left edge.
At the lower edge of the display there are five parameter boxes. You will usually adjust their values using the knobs located below. Alternatively, you can
select values in the parameter boxes using the mouse, type in the target
value directly, and then confirm by pressing the ‰ key.
Depending on Page and functional panel, WizooVerb automatically assigns appropriate functions to the parameter boxes and knobs. The big
knob at the center is always assigned to the most important parameter. In
addition, you can grab and edit parameter values directly in the display on
some menu pages, for instance, in graphical editors and global settings.
Selection lists for all key operations appear at the right edge of the display to
facilitate the handling of WizooVerb W5. They make it easy for you to load,
store and delete data swiftly and easily. All lists may be organized in folders
and subordinate folders. Navigation is a piece of cake:
English
❖ To open a folder, double-click its name. You can also open folders by
clicking once directly on the folder icon.
❖ To quit a folder, scroll to the top within that folder and click the (..)
folder.
You’ll find a level meter on each side of WizooVerb W5 with controls located
below:
❖ The Input VU meter indicates the level of the unprocessed input signal.
The Input knob lets you adjust input sensitivity.
21
Page 22
3 Getting Started with WizooVerb
❖ The Output VU meter indicates the level of the output signal, which
consists of the dry direct signal and/or the reverb signal. The Dry/Wet
knob lets you determine the mix or balance of the original and the processed (reverb) signals.
In the input section you’ll also find the Width knob; it serves to allocate input signals. You can blend the five Surround channels L, C, R, Ls, and Rs or
route each of the five Surround channels to its neighboring channels. The
output section also features a Width knob; it controls the base width of the
reverb effect in the Surround field.
For details on these functions see the chapter “Global Parameters” starting on
page 33.
[W2_Complete
Using Presets
A preset is a complete reverb program comprising the HDIR model as
well as all parameters: When you load a preset, WizooVerb W5 is configured in the setup it was in when this preset was saved.
Because the Presets Page is many users’ first choice of interface, it opens
automatically when WizooVerb W5 is launched. The panel is divided into
two areas:
22
Page 23
Using Presets
The Info window on the left displays information on the loaded preset—
name, reverb time, type, file size, a description and the format of the corresponding HDIR model.
The preset selection list on the right affords you access to basic functions
such as loading, storing and deleting presets.
[W2_Presets_Close
Presets Page: The Info window and preset selection list
WizooVerb presets are ordered clearly and archived in folders. Loading, editing and saving presets is easy. Let’s give it a shot:
1 Click the “Halls” folder in the list to view presets contained therein.
Use the triangle at the upper edge to open the preset list and view longer names.
2 Simply click the “Classic Hall” preset to load it.
3 Now you can hear “Classic Hall” and edit key reverb parameters directly
on the Presets Page: Set Main Time to 6s in order to extend the hall and
set Pre-delay to 20 ms to add a short echo to the hall sound.
4 Feel free to change some of the entries on the left in the Info box. For
instance, you can select the entry that best classifies the preset in the
drop-down menus Type and Size, and type in a short description under
Application.
5 Now you can store the edited preset using the name of your choice. To
do this, click the disk icon at the upper edge of the preset list.
6 The standard dialog for saving files opens: Navigate to the subordinate
folder in which you want to store the preset.
English
23
Page 24

3 Getting Started with WizooVerb
You can also generate subdirectories here to create your own filing system for presets.
7 Type in the name under which you want to store the preset, and then
click Save to store the preset.
WizooVerb presets are saved in the standard VST format with the file extension
“.fxp”.
8 Now the stored preset appears in the preset list. If you want to delete it,
simply select dial and then click the ⌧ button at the top of the list.
If at some point you want to rename a preset, select it, click the ⌧ button and immediately thereafter the , and enter the desired name.
[W2_Liste_Head
Located at the head of the preset list, the Triangle extends the display length
of, the button saves, and the ⌧ button deletes presets.
24
Page 25

4 Basics
In the following chapter we will look at how natural reverberation is created and how it can be emulated. Armed with this basic knowledge, you
will be better equipped to understand the explanations of parameters provided in subsequent chapters.
Methods of Generating Reverb
Until recently there were only few ways of simulating reverberation. Electro-acoustical methods such as the traditional spring reverb and reverb
plate aside, there are only two processes of practical value that deliver a
sufficient level of sound quality:
❖ Algorithmic reverb (also known as digital reverb): Based on complex de-
lay and all-pass filter circuits, this method has been used since the ’80s
in all reverb devices and most plug-ins. Algorithmic reverb works in
real time and can be adjusted flexibly, but never sounds entirely natural
even with the most expensive devices and plug-ins.
❖ Impulse response: This procedure is based on the recorded impulse re-
sponse of real rooms. Because the underlying mathematical processes
require oodles of computing power, it has only been in recent years that
computers were powerful enough to generate reverb in real time using
this principle. This breed of plug-in has been around since the late
’90s. Impulse response-driven reverb can sound wonderfully lifelike,
but editing options are very limited, and it requires lots of computing
power.
An impulse response is sort of an acoustical snapshot that captures the sound of a
room. The standard procedure is to send a sine signal through a speaker and sweep
it through the room whose sound you want to capture, and record the room sound
using microphones and digital equipment. Once the sine sweep is computed out of
the recording, the original room sound can be simulated via a set of mathematical
equations far too complex for mere mortals to consider.
English
25
Page 26

4 Basics
Each of the two methods has its advantages. In WizooVerb, the two are so
closely intertwined that they afford you unheard-of options. And you are
free to choose the best of the bunch according to situation and desired result.
How WizooVerb Works
WizooVerb W5’s means and methods are quite different from the aforementioned procedures. It combines a highly advanced form of impulse response (HDIR; short for High Definition Impulse Response) with a proprietary approach to reverb generation (AIR, short for Acoustic Impulse
Rendition). As you will soon discover, these two new technologies complement each other remarkably well.
❖ A sophisticated standard for recording and processing impulse re-
sponse, HDIR ensures rooms are captured in all their sonic details.
HDIR outperforms conventional impulse response across the full
stretch of the recording and processing chain. That’s why it features so
prominently in WizooVerb. A special process is applied to analyze the
impulse response’s metadata, which WizooVerb W5 then uses to maximize sound quality and afford you comprehensive editing options. We
have coined the term “HDIR models” to describe the impulse responses integrated in WizooVerb.
Certified engineer Ralph Kessler invested years of research to develop HDIR. He
analyzed all the adverse effects that arise when recording and post-processing impulse responses, and developed special methods to eliminate them. He also succeeded in extracting metadata from impulse responses.
❖ Developed by Wizoo, AIR is a reverb-generating process that enables
select portions of impulse responses to be re-synthesized and then processed in real time. AIR generates reverb of hitherto unrivalled quality
and flexibility.
Though AIR is not based on the conventional combination of delay and all-pass
filter circuits, it offers all the advantages of the algorithmic method, including
placing a far lighter load on computers.
26
Page 27

What Causes Reverberation?
Courtesy of this combination, WizooVerb W5 offers unprecedented processing options and surprising flexibility, as well as outstanding sound
quality.
The following of rule of thumb applies to WizooVerb: HDIR is the best choice when you
want to accurately replicate a real room (natural reverb). AIR is the preferred choice if
you want more editing options or need to conserve computer performance. Because
the principles behind the modes are so different, each offers very different creative
possibilities that are explained fully in the following chapters. In beiden Modi haben
Sie prinzipbedingt unterschiedliche kreative Möglichkeiten, die später noch weiter
unten ausführlich erklärt werden.
What Causes Reverberation?
Let’s review some basic acoustics.
When a sound source sends an acoustic wave out into a room, it is reflected as well as absorbed by the walls, ceiling and floor, as well as by all
the objects in the room.
Reflection: If the direct path between the sound source and listener is unobstructed, the direct sound arrives at the ear first. It is followed by early re-
flections that rapidly condense to form the tail. Reverberation can be divided into three phases, depending on the time of the reflections’ arrival.
Though one phase morphs smoothly and seamlessly into the next, each
can have a varying impact on our perceptions:
English
❖ Reflections up to about 20 ms are largely perceived as unpleasant color-
ing.
❖ Reflections up about 20 to 50 ms serve to create a sense of spatiality,
that is, a room.
❖ After about 50 ms, reflections usually have condensed to create the dif-
fuse tail.
Absorption: Sound loses energy with every reflection so that towards the
end the tail tapers off gently. The time elapsing between the direct sound
and the tail’s decay is called reverberation or reverb time.
27
Page 28

4 Basics
In technically accurate terms, reverb time is defined as the length of time it takes for
the sound level to decay to 60 dB below the initial level.
Energy loss increases as the frequency rises, so reverb time is shorter for
high frequencies. The reverb gradually loses brightness, becoming quite
dark at the end of the tail. Hence the room’s absorptive properties not only
influence the duration but also the tone of the reverb.
Factors influencing our perception of the size and state of the room are
also important. Key factors include:
❖ Reverb time: It is instrumental in shaping our perception of the room’s
size because we associate long reverberation times with big rooms.
❖ Early reflections: On closer examination, early reflections’ loudness and
the time it takes for them to condense play important roles.
So, what does all this have to do with WizooVerb? Plenty: WizooVerb W5 is
not only based on these principles, it also makes use of them in unprecedented ways:
❖ WizooVerb W5 offers a remarkably intuitive approach to editing the
structures of natural reverberation.
❖ All of WizooVerb W5’s processing options are attuned specifically to the
listener’s perceptions.
The following chapters provide an in-depth introduction to these processing options and their effect on the listener’s subjective perceptions.
[W2_ER_Tail
The anatomy of a reverberation: Early reflections + tail
28
Page 29

Music and Reverb
Music and Reverb
HDIR models are particularly rich in detail and realistic. Rather than creating artificial reverb like conventional effects, HDIR actually replicates
rooms with stunning accuracy. For this reason, it delivers the best results
when the style or genre of music matches the room it would actually be
performed in.
An example should clarify this point: WizooVerb W5 lets you “play” drums
in a classical concert hall. Like in reality, though, the results may disappoint because concert halls were built for orchestras rather than drums!
Every HDIR model in WizooVerb W5 is patterned after a specific room and
for a specific type of performance. To achieve swiftly satisfying results, get
into the habit of selecting suitable models. If you can’t find what you’re
looking for in the HDIR archive, you can create a room of your own devising thanks to AIR technology.
Surround Sound in WizooVerb W5
WizooVerb’s True Surround capability, as well as its support of LFE signals
including bass management facility, affords you an entirely new approach
to shaping Surround sound. What’s more, the included HDIRs and AIR
algorithm offer special features that make working with Surround sound
so much easier for you.
English
True Surround’s end-to-end support of 5.1 Surround from the input to output considerably facilitates Surround mixing.
❖ True Surround: The reverb signal factors the position of the sound
source within the Surround panorama into the sonic equation. For this
reason, W5 is equipped with the 5.1 inputs required to enable genuine
Surround panning at the reverb’s input.
29
Page 30

4 Basics
Case in point: Most conventional Surround reverbs consist of a combination of several mono and/or stereo algorithms. Even if a plug-in features
5.1 inputs, the signal generally has to be mixed down to mono or stereo so
that all channels get the same reverb treatment. WizooVerb W5, in turn,
works like a real room: Simply place a sound source at any desired position
and W5 provides a natural-sounding reverb signal on all channels.
Regardless of which type of signal you use in the panorama—mono or stereo—W5 always delivers flawless Surround reverb, including correct signal localization. W5 can also lavish reverb on the entire 5.1 signal. When
mixing, you no longer need to fret over routing issues and are free to focus
fully on where you want to place a signal in the Surround field.
Beyond that, you can feed stereo signals into W5 via the L and R inputs at
any time, which lets you capitalize on the stereo down-mix option and use
W5 as a stereo reverb.
❖ Down-mix: This term describes the process of mixing a multichannel
recording down to fewer audio channels. 5.1 is also a format designation: W5 lets you mix down from 5.1 to 2.0, that is, from Surround to
stereo.
To learn how to activate Stereo Downmix, read the “Setup” chapter starting
on page 69.
Genuine 5.1 Surround sound requires the support of the LFE channel. You
can set up WizooVerb W5 so that an LFE signal is generated from the reverb’s five Surround channels L, C, R, Ls, and Rs.
❖ LFE: This term designates the 0.1 channel and stands for Low Fre-
quency Effects. It is used predominantly for low-frequency sound effects in movie theaters, for example, explosions or thunder. As ever
more music is being released in 5.1 Surround format, LFE’s application
range is sure to grow and gain currency in music productions.
The input’s dry LFE signal is blended with the LFE signal generated via
Dry/Wet in the same way that conventional processors let you blend dry
and wet signals. This capability comes courtesy of the HDIRs and the AIR
algorithm’s true bass response.
30
Page 31

Surround Sound in WizooVerb W5
You can engage W5’s Bass Management to audition the sonic image, as it
would sound on a hi-fi Surround system.
❖ Bass management: The signals of the Surround speakers are added,
low-pass filtered and routed to the LFE. The Surround speakers’ signal
is also high-pass filtered in order to prevent excessive bottom-end boost.
Bass management is an on-board feature found on most hi-fi Surround
systems. The Surround loudspeakers included in home systems are too
small to render low frequencies accurately. Whereas professional movie
theater systems’ subwoofers are reserved exclusively for LFE, home system subwoofers are also used to enhance Surround speakers’ bass response.
You’ll find out more on the use of LFE and Bass Management in the “Setup”
chapter starting on page 69.
WizooVerb W5 is the real deal—a pro solution that’s a big help in conjuring high-end Surround sound.
English
31
Page 32

Page 33

5 Global Parameters
At the bottom of the panel in the blue area you can see displayed a set of
global parameters that are accessible at all times. The two knobs on the left
control input signals; the two knobs on the right control output signals. A
knob’s current parameter value is indicated when the pointer hovers over
it.
On the Setup Page under Restore In & D/W, you can determine if presets also over-
write the global parameters Input and Dry/Wet when they are loaded (see also the
section “Setup > Settings” on page 69).
Input Section
In the Input section, you can control the level of the L, C, R, Ls and Rs signals. The VU meter located above indicates the input signal level.
[W2_Input
English
The Input section
33
Page 34

5 Global Parameters
Input
The Input knob lets you cut the level of the incoming signal. The signal remains unprocessed when the knob is turned all the way up.
Usually you will work with peak input level. If WizooVerb W5’s input is
overloaded, this is generally attributable to one of the following causes:
❖ WizooVerb is employed as a send effect and several send signals com-
bine to create a very powerful input signal.
❖ The energy level of WizooVerb’s input signal and the generated reverb
is so high that the signal’s dry/wet mix is overloading the output.
In this event, back off the input level until the signal is no longer saturated.
Width
Width controls the spread of the five input signals L, C, R, Ls and Rs before
they are patched into the reverb. You have two modes to choose from:
❖ Negative values: The five input signals are blended and routed propor-
tionally to each channel. At the far left position, all five channels receive
the same signal. The further you twist the Width knob to the left, the
more difficult it becomes to locate the sound source in the reverb signal.
❖ Positive values: The input signal of every channel is sent to its immedi-
ate neighboring channels until it is only audible there, whereby the
original signal is spread. The further you twist the Width knob to the
right, the bigger the sound source appears to be in the reverb signal.
Output Section
In the Output section, you can control the Dry/Wet balance and the reverb’s
Surround spread. The VU meter located above indicates the output signal
level.
34
Page 35

Output Section
[W2_Output
The Output section
Dry/Wet
The Dry/Wet knob lets you determine the balance between the dry signal
and the reverb effect. Working with this section requires you to make a
very important distinction: Are you using WizooVerb as a send or an insert
effect?
English
❖ Send: If you are using WizooVerb as a send effect, twist the Dry/Wet
knob all the way to the right to Wet. This way, WizooVerb sends the reverb signal only, and does not duplicate the direct signal. Use the faders
and send /return knobs on your hardware or software mixer to determine the desired effect depth.
❖ Insert: If you are using WizooVerb as an insert effect, you can adjust
Dry/Wet freely to achieve the desired depth in the mix: The further you
twist the knob from Dry to Wet, the further the signal moves into the reverb room.
35
Page 36

5 Global Parameters
Width
This Width knob controls the base width of the reverb in the Surround
field. The knob’s psychoacoustic effect actually lets you change the perception of the room’s width:
❖ Negative values: The further you twist the Width knob to the left, the
narrower the room becomes. It continues to contract between the
speakers until only a mono signal is audible over all channels.
❖ Positive values: The further you twist the Width knob to the right, the
wider the room becomes. It continues to expand even beyond the
speakers’ limits.
Use Width to place a narrow room in an outsized room, thereby creating additional
space in your mix.
This parameter does not influence WizooVerb W5’s down-mix compatibility.
36
Page 37

6 Presets Page
On the Presets Page, you can load, edit and store presets. If you read the
chapter “Getting Started with WizooVerb … > Using Presets” on page 22,
you know how this is done.
Knobs 1 to 3 afford you direct access to the most important reverb parameters. These are described in detail in the subsequent chapter Edit Page, so a
brief overview will suffice:
❖ Pre-delay delays the reverb signal by the amount of time indicated in
milliseconds.
❖ Room Size determines the size of the room.
❖ Main Time curtails or extends reverb time.
Slight changes to these parameters generally suffice to adapt a loaded preset to suit your wishes.
Edit parameters may be assigned freely to knobs 4 and 5. You’ll find applicable settings in the Setup menu under Auxiliary Controls (see the chapter
“Setup > Settings” on page 69).
[W2_Knobs
You can control up to five reverb parameters without even leaving the Presets
Page: Knobs 1 to 3 have fixed assignments; knobs 4 and 5 may be configured
at will.
English
37
Page 38

Page 39

7 Edit Page
This chapter will get you acquainted with all parameters on the Edit Page
and get you started working with HDIR models and AIR, step by step.
Combining HDIR and AIR
As you are aware, WizooVerb W5 offers two ways of generating reverb (see
the chapter “How WizooVerb Works” on page 26):
❖ HDIR: Picture this ultra advanced form of impulse response as a kind
of reverb sampler. HDIR is based on audio recordings of real rooms, so
the results generally sound extremely realistic. The downside is that
your editing options are limited. You can also load impulse responses
and use these separately or in combination with AIR (see the chapter
“Impulse Response” starting on page 65).
In the following we will distinguish between HDIR and impulse response only when necessary for reasons of clarity.
❖ AIR: Picture this algorithmic method of generating reverb as a kind of
reverb synthesizer. Although it simulates reverb, the results sounds
very good, and they can be edited freely.
WizooVerb W5’s great advantage is that you not only get HDIR or AIR, you
also get combinations of the two. A few words about these three options
and their effects:
English
❖ HDIR only: Editing reverb parameters commonly causes effect signal
to drop out briefly because converting an HDIR model requires a few
moments.
❖ HDIR + AIR: Part of the HDIR model is replaced with AIR. This lets
you do neat things like swap an HDIR model’s early reflections for an
AIR tail or vice versa. In these scenarios, many AIR parameters may be
tweaked without inviting dropouts. However, editing HDIR or AIR parameters that affect the HDIR model will cause the effect signal to drop
out briefly.
39
Page 40

7 Edit Page
❖ AIR only: This mode lets you edit every parameter in real time without
side effects and places the lightest load on the CPU.
In order to preclude redundant parameters, HDIR and AIR share a common parameter set that is handled in much the same way in all three modes.
In practice, you may find the combination of HDIR and AIR particularly
useful. If there’s a specific part of an HDIR model you are not fully satisfied with—for instance, early reflections or the tail—you can edit it as desired with AIR and replace it with something new.
Display and Functional Panels
The Edit Page window is divided into three areas:
❖ On the left you’ll find menu tabs for selecting panels for the functions
Early Reflections, Tail, Delay, Gate and EQ. If you use HDIR only, the Envelope panel will also be available for selection. It the tail is generated via
AIR, the Envelope option is hidden and the Modulation panel will be
made available for editing this tail.
The menu tab of the currently selected panel lights up green.
❖ The HDIR model’s waveform, parameter boxes or graphical editors ap-
pear at the center, depending on the selected functional panel.
❖ A selection list ordinarily appears on the right. It lets you load HDIR
models or User impulse responses to the main Edit Page, as well as load
suitable parameter sets called macros to the Render Tail, Gate, Delay and
EQ panels.
The selection lists for presets, HDIR models, impulse responses and macros all
follow the same handling principle. For more on this, see the chapter “Getting
Started with WizooVerb” on page 21.
In the Early Reflections and Tail panels, you can replace select parts of the
HDIR model with a part generated via AIR. To access the corresponding
AIR parameters, click Render ER or Render Tail at the top right.
40
Page 41

Loading HDIR Models
[W2_Edit
The Edit Page’s main area: You can load HDIR models or previously stored
User impulse responses via the selection list on the right.
Loading HDIR Models
When you open WizooVerb W5 and then call up the Edit Page, you’ll see
the selection list for HDIR models displayed on the right. It is always available to you in Early Reflections and Tail modes unless an AIR part is cur-
rently active.
If you have already imported impulse responses (see the chapter “Impulse Responses”
starting on page 65), you will find them in the User area of the list. The icons at the top
edge of the list let you navigate swiftly between HDIR and the User selection lists.
When you click the desired HDIR model, it is loaded immediately and
then displayed as a waveform. The button on the left lets you assign waveform views to the available channels.
Reverse
It’s all in the name: “Reverse” means that the reverb runs backwards;
building up slowly and cutting off abruptly.
English
[W2_Reverse_Button
41
Page 42

7 Edit Page
Click the Reverse button at the left of the waveform to create a reverse reverb effect based on the currently loaded HDIR model. Click the button
again to cancel the effect.
Reverse appears only in connection with HDIR models and impulse responses.
Early Reflections
The menu tab Early Refl affords you access to the panel for processing
early reflections. Bear in mind that the overall sound is produced by the
overlapping of early reflections and the dry signal. You will not hear the effect of Early Reflections parameters until a touch of the direct signal is
added to the mix.
[W2_Early
Early Reflections parameters: Directivity is only available when the early reflections originated from an HDIR model or an impulse response.
Directivity
Though a tail’s initial milliseconds provide important information that the
listener needs to localize the sound source in the room, they frequently
add an uncomely color to the tone.
Directivity lets you attenuate this coloring and achieve a more open soundscape by gating the tail’s first milliseconds.
The Directivity parameter is unavailable when Render ER is activated!
42
Page 43

Early Reflections
The further you turn down the Directivity knob, the more initial milliseconds are gated out—up to 20 ms at the far right position. As the knob is
cranked, the sound grows increasingly more open, and the location of the
sound source within the reverb effect becomes less distinctive, with quite
agreeable results in most instances. This is why Diffusion can also serve to
make a voice or an instrument sound “bigger.”
Pre-Delay
The time elapsing between the arrival of the direct sound and the first reflection is called pre-delay. In HDIR models, pre-delay is stored as it was
recorded.
The Pre-Delay knob lets you delay the reverb signal by as much as 200 milliseconds beyond HDIR model’s “natural” pre-delay.
❖ For vocals, you can use pre-delay to clearly separate the tail from the di-
rect signal. This enhances vocals’ intelligibility within the mix.
❖ For drums or percussion, longer pre-delay times are not advisable for
most mixes. Lengthy pre-delay times make the reverb effect’s starting
point clearly audible, so they can conjure echoes and chatter that frequently muddy the mix.
English
ER/Tail Balance
The ER/Tail Balance knob determines the relative levels of early reflections
and the tail:
❖ The further you rotate the knob from the neutral 12 o’clock position to-
ward the left, the more prominent early reflections become. This progressively enhances the sound’s presence, and the sound source gradually moves to the front of the mix.
❖ The further you rotate the knob from the neutral 12 o’clock position to-
ward the right, the more prominent the tail becomes. This drives the
sound source ever deeper into the room, moving it to the back of the
mix.
43
Page 44

7 Edit Page
Spread
Spread lets you compress early reflections along the time axis. The further
you twist the knob from its neutral position (far right: 100%) to the left,
the more the reflections are compacted and the smaller room appears to
become.
Note that you cannot enter spread values greater than 100%, and for good reason:
Though it would be possible to stretch early reflections beyond their actual scope, this
would thin them out, defeating the effect’s purpose of enlarging the room. If you want
a bigger room, select an HDIR model that provides it.
ER/Tail Crossing
ER/Tail Crossing defines the point where early reflections end and the tail
begins. This parameter marks the working point of ER/Tail Balance and
Spread, so shifting this point has an impact on these two processing functions’ effects.
When you add an AIR part using Render ER or Render Tail, the application hides ER/
Tail Crossing, AIR automatically determines the point of crossover.
Previously values remain unaltered when changing models. A model can
also be loaded with its own default settings. If and how you want to determine an ER/Tail Crossing point depends on whether you are using a HDIR
model or an impulse response:
❖ HDIR: HDIR models already contain the correct ER/Tail Crossing value.
Holding the ç key (PC) or the C key (Mac) when loading a model recalls the point’s analyzed location.
❖ Impulse response: Since User impulse responses do not contain an ER/
Tail Crossing value, holding the ç key (PC) or the C key (Mac) when
loading a model sets a default value of 50 ms. For very small rooms, you
should lower the value a little, and raise it somewhat for very big rooms.
44
Page 45

Early Reflections
Render ER
Render ER lets you replace the HDIR model’s early reflections with a reflection model generated by AIR. This conserves computing power and affords you unprecedented creative possibilities.
When you click Render ER, a selection list comprising 15 AIR ER model
opens. A mouse click onto the desired pattern suffices to load it. Bear in
mind that every AIR ER model is patterned for a specific type of room:
❖ If you want to retain the natural characteristics of the HDIR model, se-
lect a matching ER model, for example, combining the HDIR model
“Church” with the ER model “Church”. Though this doesn’t alter the reverb effect much, it certainly saves computing power.
❖ Feel free to select an utterly “inappropriate” model, for instance, com-
bining the HDIR model “Church” with the ER model “Club,” and hear
what happens.
Should you discover that you prefer the HDIR model’s original early reflections to an AIR reflection model, simply click Render ER again to deactivate it.
[W2_Render_ER
When you use Render ER to opt for AIR-generated early reflections, you have
15 preset reflection models to choose from.
English
45
Page 46

7 Edit Page
Tail
The menu tab Tail provides access to a panel that lets you edit the tail. Sim-
ply adjusting reverb time globally using Main Time frequently yields satisfactory results.
For detailed editing, you can use Low Freq/High Freq to divide the tail into
three frequency bands and adjust the reverb times of low and high frequencies using Low Time/High Time. This lets you shape signals so that
their low, middle and high frequency ranges decay at different rates.
You can use Render Tail to replace the HDIR model’s original tail with a tail generated
by AIR (see the section “Render Tail” starting on page 48). Please bear in mind that due
to the nature of the process, the Tail parameters described below have a more intense
effect when working with an AIR tail.
[W2_Tail
Tail parameters afford you both global and frequency-dependent control over
reverb.
Main Time
Main Time determines overall reverb time.
Main Time has an immediate effect on midrange frequencies’ reverb time. The reverb
times of low and high frequency ranges may be adjusted relatively to Main Time using
Low/High Time.
46
Page 47

Tail
Low/High Freq
Low Freq and High Freq let you divide the tail into three frequency ranges:
❖ Low: The frequency range below the selected Low Freq.
❖ Mid: The frequency range between the selected Low Freq and High Freq.
❖ High: The frequency range above the selected High Freq.
Low Freq influences the sound only when Low Time is other than 0%.
High Freq influences the sound only when High Time is other than 0%.
If you prefer to determine reverb time globally (Main Time) rather than frequency-specifically (Low/High Time), simply ignore Low/High Freq.
Low/High Time
These knobs let you dial in different reverb times for the low, middle and
high frequencies that you have defined using Low/High Freq:
❖ Low: Use Low Time to adjust low frequencies’ reverb time relative to
Main Time.
❖ Mid: Midrange frequencies’ reverb time is determined directly by the
Main Time setting.
❖ High: Use High Time to adjust high frequencies’ reverb time relative to
Main Time.
HDIR tails’ reverb times may only be adjusted in accordance with the original room’s spectrum. If the HDIR model contains few low or high frequencies, these frequency ranges’ reverb times can only be varied to a very
limited extent.
English
On the other hand, you are free to tweak an AIR tail’s frequency-dependent
decay times at will. For example, you can have the top end decay faster
than the low end, and vice versa.
Though HDIR models allow slight corrections of the tail, if you want edit
extensively or get really creative, change over to an AIR tail. And this is
how that’s done:
47
Page 48

7 Edit Page
Render Tail
When you click Render Tail, the HDIR model’s tail is replaced with a tail
generated via AIR. The combination of an HDIR model’s early reflections
and an AIR tail may well be the most interesting application WizooVerb
W5 has to offer.
A tail usually lasts a lot longer than early reflections, so Render Tail is also a great tool
for lightening the heavy load that an HDIR room places on the CPU.
The aforementioned basic parameters control the AIR tail as soon as you
activate Render Tail.
In addition, the display shows five additional parameters that you can adjust using faders or by typing in target values. These parameters influence
the room model that our AIR technology is based on.
On the right you can see a macro list offering a selection of many preset
AIR tails. Simply click the desired macro in order to load it, and then you
can edit any room parameters.
If you want to hear the original tail of the HDIR model again in place of an
AIR tail, simply click Render Tail using the mouse button to switch it off.
[W2_Render_Tail
Using Render Tail to generate a tail via AIR gives you more editing options.
Tail Delay
Tail Delay lets you delay the start of the tail after the end of the early reflections by as much as 200 milliseconds. Use this parameter when you want
to slap an echo effect on the tail.
48
Page 49

Tail
Room Size
Room Size changes the size of the virtual room that is generating the tail.
This lets you adjust the tail’s dimensions to match the early reflections’ dimensions.
Though you’re best off relying mainly on your hearing, there are some
standard values we want to share with you: A Room Size of 100% equates
with cathedrals and concert halls, 50% gives you a studio-size recording
room. For values below that, we’re talking speaker cabins and phone
booths.
Ambience
Ambience lets you nudge the sound source deeper into the room. The effect
is comparable to bringing up the level of ambient or overhead microphones during the mix.
This parameter is ideal for making voices or instruments sound “bigger.”
Density
Density influences the density of the tail’s reflection. The further you back
off Density, the more clearly you can hear individual reflections bouncing
off the room’s walls.
English
A Density value of 0% yields the reflection density of a canyon.
Color
Color adjusts the timbre or tonal quality of the tail from dark to bright.
At values of around 3,000 Hz the tail sounds dark; at about 6,000 Hz it
sounds very natural; at 8,000 Hz it starts to sound remarkably bright.
49
Page 50

7 Edit Page
Modulation
As soon as you activate Render Tail, the Envelope menu tab disappears be-
cause the envelope is applicable to an impulse response only. The menu
lists Modulation in its place. When this option is selected, three more reverb tail parameters appear in the display. These parameters are also accessed and stored via the tail macro in the list on the right.
Note that a reverb tail can be modulated in real time only, which is why you can select
Modulation exclusively in connection with Render Tail.
So, what does reverb tail modulation do? Imagine the effect achieved by
constantly changing a room’s size and you’ll get the idea. Delay times
change along with the dimension of the room, and you will hear a slight
change in the pitch of instruments whose signals sustain into in the reverb
tail. This pitch change will be more or less audible depending on the instrument, whether it is making a musical or more of a noise-like sound,
and the modulation depth setting.
Though the reverb tail in AIR mode works fine without modulation, you
can put this effect to creative use. The effect varies according to mode:
❖ Chorus: The pitch changes differently on all channels, which makes
this modulation less conspicuous. In fact it frequently treats the signal
to some real ear candy because the reverb tail sounds smoother and bigger. Use Chorus to do things like add girth to drums and vocals.
❖ Doppler: The pitch changes identically on all channels. This modula-
tion is very conspicuous and well suited for special effects. Use Doppler
to come up with “surreal” live rooms or to make an oil tank sound even
more metallic.
50
Page 51

Envelope
Access to the modulation parameters is provided when you use Render Tail to
generate a reverb tail via AIR.
Mode
Select the desired modulation model here. Your choices are Chorus and
Doppler.
Frequency
Use Frequency to determine the modulation rate.
Width
Width controls modulation width.
English
Envelope
The Envelope menu tab accesses—you guessed it—the Envelope panel. You
can do many fun things with it such as shorten the HDIR model and assign an amplitude envelope to it, say, to smooth out the reverb curve or create freaky non-linear reverb effects.
WizooVerb strives to sustain Render Tail’s real-time capability, so you can only access
Envelope if at least the tail is generated via an HDIR model or an impulse response. As
soon as you enable Render Tail, Envelope is hidden!
The envelope consists of two segments:
51
Page 52

7 Edit Page
❖ Attack controls the amplitude envelope’s initial phase, that is, the start
of the reverb effect. It lets you do things like create a special FX reverb
that surges to impressive proportions.
❖ Decay controls the amplitude envelope’s final phase. It lets you fade out
the reverb signal faster or conjure gated reverbs that cut off hard.
Though an Attack or Decay segment can extend across an entire HDIR
model, the two can never overlap. If the two segments verge on each other
directly, one always displaces the other. If they do not verge, a third “filler”
segment is generated that has no effect on the sound.
Every change made to an Envelope parameter must be computed into the HDIR model.
The reverb signal is briefly interrupted while the CPU performs these calculations.
[W2_Envelope
The Envelope panels lets you influence a reverb’s amplitude using an envelope.
Length
Length shortens the entire reverb signal. If you enter Length values lower
than 100%, the HDIR model is not played to its end.
Length values lower than 100% compact the envelope. The Attack and Decay phases’
relationship as determined by Attack/Decay Time does not, however, change.
52
Page 53

Envelope
Attack Time
Attack Time determines the length of the first envelope segment. The starting point of this segment is always identical with the beginning of early reflections. Accordingly, you can shift the end of the segment to the right using the Attack Time knob.
The Attack segment may encompass the entire reverb signal or only parts thereof. It
cannot, however, overlap with the Decay segment.
Decay Time
Decay Time determines the length of the final envelope segment. The end
of this segment is always identical with the end of the envelope. Accordingly, you can shift the starting point of the segment to the left using the
Decay Time knob.
The Decay segment may encompass the entire reverb signal or only parts thereof. It
cannot, however, overlap with the Attack segment.
Attack/Decay Slope
The Slope knobs let you contour independently the respective waveforms
of the Attack and the Decay segments. You can create various ascending attack and descending decay envelopes:
❖ Negative values yield an exponential curve.
❖ A value of 0% creates a straight line, that is, a linear ascent/descent.
❖ Positive values produce a logarithmic curve.
You can literally shape the reverb signal using the Slope knobs: For example, you can dial in very steep slopes for the attack and decay phases to create gated reverb, the length of which you can conveniently adjust using the
Length knob. If you do want reverb to cut off quite so abruptly, you can dial
in a fast fade using Decay Slope.
English
53
Page 54

7 Edit Page
[W2_Slopes
Boundless variety: You can sculpt Attack and Decay slopes to shape reverb
curves to taste.
Delay
The Delay menu tab affords you access to the integrated Surround Delay.
Located pre reverb in the signal chain, it can generate additional reflections, echoes and complex rhythmic patterns.
The display shows the delay routing, as well as the basic parameters Paral-
lel/Serial, Pattern, BPM, Tempo and Sync. The Sync, Pattern and Tempo parameters are indicated only if they are in fact required; the remaining parameters are always accessible. The Parallel/Serial button lets you select between two delay algorithms:
❖ Parallel: The five delays have fixed assignments to the L, C, R, Ls and Rs
channels. This allocation corresponds to the input signal fed to the delay as well as the positioning in the Surround panorama. The five delays
work independently and each is equipped with a discrete feedback circuit.
Example: A signal patched into the front left of the panel is delayed and
sent back to the front left and into the reverb, with feedback if desired. To
ensure that the signal of a mono source with a fixed assignment—for example, a vocal track assigned to the center channel—is not routed to
merely a single delay, you can distribute the signal to the other delays via
Divergence. The parallel delay is the best choice for generating single reflections on the five Surround channels.
❖ Serial: The five delays are configured in series, that is, the first delay’s
output routes the signal to the second delay’s input, and so forth. The
chain’s sequence is determined using a Pattern. The delays are assigned
to the L, C, R, Ls and Rs channels, via which signals are sent and re-
54
Page 55

Delay
ceived. Say a delay is assigned to channel L. Accordingly, this delay receives its input signal from channel L’s input and sends its output signal to channel L’s output. This allocation also corresponds to their position in the Surround panorama. The feedback loop runs from the
output of the last delay to the input of the first delay in the chain.
Every delay receives an input signal from its assigned input as well as from
the delay immediately preceding it in the given pattern’s signal chain.
Example: The selected pattern is L-C-R-Rs-Ls, which means that delay R receives a signal from the front right and a delayed signal from delay C’s output. Delay L, in turn, receives a signal from the front left only for the purposes of this example. A feedback circuit runs from the last delay to the
first delay of the series, so the signal can be routed repeatedly through all
delays in the pattern, in the indicated sequence.
The selected Pattern conjures complex delay patterns that spread across
the Surround field. You can use the serial delay to create diverse rhythm
patterns by synchronizing delay times with the song tempo.
Note that due to this function’s aforementioned properties, the distribution of signals across the panorama has an effect on the delay pattern. In
addition, you can route the same signal to all delays in serial mode using
Divergence.
English
The diagram shows the delay routing scheme and illustrates the influence of
the Divergence parameter.
55
Page 56

7 Edit Page
At the left edge of the screen you can see the three menu tabs for selecting
the Surround delay’s individual parameter panels.
❖ Common: Here you’ll find parameters that apply equally to all five de-
lays. These are Divergence, High Damp, Feedback and Main Level.
❖ Times: Set times for the five delays on this panel. The BPM box in the
display lets you set the time indicator to note values.
❖ Level: This panel lets you set individually the output levels of the five
delays before they are sent to the reverb.
The “Power” button at the bottom left of the display switches the entire delay on and off.
Finally, at the right edge of the display you’ll find a macro list to which you
can load preprogrammed delay patterns or store your own delay configurations.
To quit the Delay panel, simply click the Back button.
Serial/Parallel
Select the Surround delay algorithm; your choices are Serial and Parallel.
Pattern
This parameter is available in parallel delay mode only. Use it to determine
the sequence in which the signal is routed to the delays.
BPM
BPM lets you set the time to note values. The delay time is then determined by the selected note value and the reference tempo.
56
Page 57

Delay
Sync
Activate Sync if you want to adopt the host application’s tempo. Sync is
available only when BPM is activated.
The stand-alone version does not interface with host applications, so you won’t find
this button in this version. Tempo is determined by the value indicated manually under
Tempo.
Tempo
Tempo appears only when BPM mode is enabled. The program requires a
reference tempo to compute delay times on the basis of note values. Enter
the reference tempo here manually. If you chose Sync, the program adopts
the host application’s tempo, and this tempo can no longer be changed in
the text box.
Divergence
Divergence blends the L, C, R, Ls and Rs signals. When this knob is set to 0,
every delay receives its assigned input signal. As you turn the knob up,
each delay receives an increasingly larger proportion of the signals originally assigned to other delays. When Divergence is maxed out, all delays get
the same signal. This feature comes in quite handy: Even when processing
monaural signals, which are limited to one channel within the panorama,
all delays can be provided with the signal.
High Damp
The delays’ feedback loop sports a low-pass filter that lets you simulate the
high-frequency loss incurred with repeated echoes. Set High Damp to a
threshold frequency; frequencies above it are dampened in the feedback
loop. The value applies equally to all delays.
English
57
Page 58

7 Edit Page
Feedback
Connecting a delay’s output to its input creates a feedback loop. In parallel
mode, every delay has a dedicated feedback loop. In serial mode, the feedback loop runs from the last delay to the first delay in the chain. Feedback
determines for all delays the amount of signal patched from the output
back into the input.
When in parallel mode and using different delay times, employ the individual delays’
Level knobs to correct the trajectory of echoes drifting off into a specific direction
within the Surround soundscape.
Main Level
Use this control to adjust the master level of all delays before they are sent
to the reverb.
Time L/C/R/Ls/Rs
This is where you set the times for the individual delays within a range 0
ms to 8,000 ms. Bear in mind that in serial mode the delay times of your
sequence add up. When BPM mode is enabled, enter times as note values.
Use serial mode for rhythmic patterns when BPM is activated. If you employ just four of the five delays, for example, by setting the Time C knob to
the far left-hand position to None (that is, zero delay time) to leave delay C
out of the loop, you’ll find it easier to come up with patterns in 4/4 time.
Be sure to turn delay C’s level all the way down.
Level L/C/R/Ls/Rs
Here you can determine the output level of each delay. In serial mode, this
setting has no influence on the delay chain.
58
Page 59

Gate
Gate
The Gate menu tab affords you access to the integrated Surround Gate.
Sited immediately post reverb in the signal chain, it processes the effect
signal only—the direct or dry signal remains unaffected.
The gate analyzes an input signal via something called a side chain input,
and allows the signal to pass only when it exceeds a specific threshold level.
You can tap into the W5’s side chain signal at three locations—immediately after the input, after the Surround delay, and after the reverb. It is always the reverb’s effect signal that is gated. What’s more, the effect signal
is gated according to an envelope’s attack, hold and release times.
You can use the gate for both HDIR or AIR reverbs.
The five L, C, R, Ls and Rs input signals are blended before they are sent to
the side chain input. This is why the gate opens and closes in sync for all
five Surround channels. The gate responds differently depending on the
selected side chain signal:
❖ Input: In this case, the dry input signal is analyzed. Because the dry sig-
nal is not extended or washed out by the reverb, the gate’s analysis is far
more precise and a suitable threshold value is easy to dial in. Signals
sent from the delay are not analyzed, but they are gated along with the
dry signal.
❖ Delay: This mode takes delay signals into account. The gate analyzes the
dry input signal and the added delay. The gate will not close until the
delay’s echo falls below the threshold level.
❖ Reverb: Only the reverb signal is analyzed, which indirectly includes all
pre reverb signals. It is much more difficult to dial in a suitable thresh-
old setting because the reverb extends and washes out input and delay
signals.
English
Use the latter mode for a more transparent mix: It you set the threshold to −60 dB, the
reverb is faded out almost imperceptibly, which makes the mix more transparent because the reverb signal’s final few hundred milliseconds are cut out of the sonic picture.
59
Page 60

7 Edit Page
You can see displayed on the panel the selector for the side chain input, a
VU meter that gives you a read-out of the side chain signal, and a graphical
view for adjusting the threshold.
At the right edge of the display you can see a macro list that lets load preprogrammed gate configurations and store your own settings.
In order to quit the Gate panel, simply click another menu tab.
You can also set the threshold directly via the gate display node.
Side Chain Input
Select the desired side chain signal directly in the display. Mouse-click an
entry; the green background indicates that it is selected. Your choices comprise input, delay and reverb signals.
Threshold
Here is where you set the threshold values at which the gate opens and
closes.
Attack
Use attack to determine the amount of time it takes for the gate to open
once the signal exceeds the threshold level.
60
Page 61

EQ
Hold
In the hold phase the gate remains open and does not close even if the signal dips below the threshold level. The signal must run through the entire
hold phase before the gate can transition to the release stage. Use hold to
determine the length of time the gate will definitely remain open.
Release
Use release to determine the amount of time the gate takes to close once
the signal drops below the threshold level or the hold phase has run its
course.
EQ
The EQ menu tab affords you access to the parametric 4-band EQ. It is located post-reverb in the channels and processes only the wet or effects signal; the direct signal remains unchanged.
At the left edge you can see four menu buttons for selecting individual EQ
bands:
❖ Low/High Shelf: The Low-Shelf band serves to boost or cut low frequen-
cies; ditto for High Shelf and high frequencies. To this end, set the
band’s cutoff frequency using the Frequency knob and amplification/at-
tenuation intensity using the Gain knob.
❖ Mid 1/2: With the fully parametric midrange bands Mid 1 and Mid 2,
you can shape any two frequency ranges. Frequency determines the center frequency, Gain the amount of boost/cut, and Q the width of the filter band.
The Q-factor is adjustable in fully parametric filter bands only. The greater the Qfactor, the narrower the filter band! Though higher Q values are great for eliminating narrow-band interference such as mains hum, they may also be used to
forge striking filter effects. Dial in lower to medium Q values for less obtrusive,
more natural-sounding EQ.
English
61
Page 62

7 Edit Page
Once you have selected an EQ band, you can adjust its parameters via the
knobs below the display. Alternatively, you can manipulate the EQ right in
the curve. Each of the four EQ bands is represented by a dot via which you
can adjust the corresponding parameters:
❖ Frequency: Grab the dot with the left mouse button and drag it horizon-
tally.
❖ Gain: Grab the dot with the left mouse button and drag it vertically.
❖ Q: Grab the dot with the right mouse button and drag (PC) or press and
hold the C key (Mac) and drag it vertically.
You can adjust the Q parameter for the midrange bands Mid 1 and Mid 2
only!
The four On buttons on the left of the curve switch the individual EQ
bands on and off independently. The Power button located below switches
the entire EQ on and off. It enables fast, convenient A/B comparisons of
the reverb sound with and without the processing provided by the current
EQ configuration.
At the right edge of the display you can see a macro list that lets you load
preset EQ setups and save EQ configurations of your own devising.
Click the Back button to quit the EQ panel.
[W2_EQ
You can adjust the fully parametric 4-band EQ via knobs, as well as directly in
the view of the EQ curve.
62
Page 63

EQ
Frequency
Cutoff frequency (Shelf Low/High) and center frequency (Mid 1/2) of the fil-
ter band.
Gain
Amount of filter band amplification/attenuation.
Q
Q-factor of the filter band—available in the fully parametric midrange Mid
1/2 bands only.
English
63
Page 64

Page 65

8 Impulse Responses
The Import Page lets you load, audition, edit and save conventional—that
is, non-HDIR—impulse responses. It offers standard functions, as well as
editing tools far beyond the norm.
❖ Instant gratification: You have sampled a room or want to use an im-
pulse response off a CD or the Internet? No problem! As soon as you
have loaded an impulse response into WizooVerb W5, you can hear and
use the resultant reverb without further ado. Very handy when you’re
pressed for time or probably won’t want to use the impulse response
again in your productions.
Even if you have merely loaded an impulse response to a Wizoo Verb plug-in, all
you have to do is save the current song within the framework of your host software. As soon as you open the song later, WizooVerb W5 will automatically load
the appropriate impulse response.
❖ Optimize now and save for later: The editing functions Dir, Trim and
Gain let you optimize a loaded impulse response. These tools allow you
to bring its sound quality up to par and at the same time prepare it for
use with WizooVerb’s AIR functions. If you’re satisfied with the results,
you can save the optimized impulse response and later load it directly
from WizooVerb’s User list.
To make the most of what WizooVerb has to offer, make a habit of optimizing impulse responses with the editing functions and saving them as User impulse responses!
English
65
Page 66

8 Impulse Responses
[W2_Import
On the Import Page you can load, optimize and save conventional impulse responses.
Loading Impulse Responses
The Import Page display is arranged by function in the following areas:
❖ On the left you’ll find buttons for Stereo mode as well as Dir and Trim
functions.
❖ On the right you can see a file selection list serving to load impulse re-
sponses.
WizooVerb W5 is able to load pulse responses in WAV and AIFF formats.
The files for the front and rear channels must always be stereo files that
merge two channels into a single file (Interleaved format). The file for the
center channel can be mono or stereo. If you have a pulse response on
hand for the center channel, you can simply use it in mono. If you don’t
have this kind of pulse response, you can use, say, the front pulse response
to generate a center signal.
❖ F: To load the front pulse response, click the desired file in the selection
list on the right.
❖ R: To load the rear pulse response, press and hold the ç key, and the
click the file.
❖ C: To assign a center pulse response, press and hold the ‚ key, and
then click the desired file.
66
Page 67

Optimizing Impulse Responses
All three boxes must be filled in with files before the result can be stored as an “.irm”
file.
Once you have loaded an impulse response, its waveform is displayed. Immediately below it you’ll find the Clear button, which removes the impulse
response, and the Save button, which stores the impulse response and
adds it to the User list.
Optimizing Impulse Responses
The impulse response may require some polish, depending on how well or
poorly it was recorded and processed. With the Dir, Trim and Gain func-
tions, you can accomplish this in a jiffy …
Dir, Trim and Gain are non-destructive editing tools; the original impulse response is
not overwritten when you put them to use.
Removing Direct Sound
With the benefit of the Dir button, you can “tell” WizooVerb W5 whether or
not the impulse response contains direct sound, and to remove it automatically, if necessary and desired. This button’s status is very important because alongside shaping the sound of the reverb, it influences the impulse
response’s level and thus its interaction with our AIR technology.
A strong impulse at the beginning of the waveform is generally a telltale
sign that an impulse response contains direct sound. This causes undesirable cancellations when the wet and dry signals are blended.
If a loaded impulse response contains direct sound, definitely remove it by
activating Dir. WizooVerb W5 will then analyze the impulse response, adjust its level and remove direct sound automatically.
If you are unsure about the direct sound content, you can switch Dir on
and off as often as required or desired to hear the result of the optimization process with and without Dir. Like Trim and Gain, Dir is non-destruc-
tive, so there are no adverse effects to contend with.
English
67
Page 68

8 Impulse Responses
The comments accompanying impulse responses normally indicate whether or not they
contain direct sound. If this info is provided and you set Dir correctly before loading an
impulse response, you will achieve the same effect as processing it after loading.
Trimming Silence from the Start
Impulse responses are frequently preceded by superfluous silence before
the first impulse kicks in. Use Trim to cut these blank bits automatically.
You can undo this at any time by deactivating Trim again.
Adjusting Levels
The big pot at the center serves as a Gain knob. If necessary, use it to adjust the impulse response’s level manually.
Saving Impulse Responses
If you have optimized an impulse response and are satisfied with the result, it’s a good idea to save it for later use:
All three F, R and C boxes must be filled in with files before you can save the pulse response. If necessary, load the same file three times if you do not have a suitable pulse
response on hand.
1 Click the Save button below the waveform.
2 The standard dialog for saving files opens, whereby the appropriate
folder for archiving User impulse responses is selected automatically.
Feel free to create further subdirectories to sort your User impulse responses.
3 Type a name into the storage dialog. By naming the file, you are also
naming the User impulse response.
4 Confirm the dialog to complete the storage process.
Now you’ll find the stored impulse response in the Edit Page’s User selec-
tion list and can load at any time directly from there.
68
Page 69

9 Setup
This chapter discusses everything you need to know about the Setup panel,
which serves to certify WizooVerb W5 and configure some key settings.
Settings
The Settings menu tab accesses key defaults. Invest a few minutes to adapt
WizooVerb W5 to suit your demands and your computer’s performance capabilities. Time invested now will pay dividends later by making every session with WizooVerb easier and more productive.
[W2_Settings
The Settings panel is where you’ll find all the defaults.
English
CPU Load
CPU Load lets you adapt WizooVerb W5’s appetite for CPU power to your
computer’s capabilities. You have three settings to choose from.
Rest assured that WizooVerb sounds just as sweet in each of the three
modes. The only difference among these settings is the amount of latency
that processing adds to the input signal:
❖ High: If your computer boasts plenty of computing power, choose this
mode. It’s the only one in which WizooVerb W5 works without additional latency.
69
Page 70

9 Setup
In High mode, WizooVerb W5 runs with the same latency as your system. And its la-
tency hinges on diverse various factors such as CPU performance, sampling rate, audio
hardware / drivers and the host software’s settings.
❖ Mid: Select this mode if your computer’s performance is average. The
downside is that WizooVerb takes more time for its calculations, so the
reverb signal is delayed by an additional 2,048 samples. On the upside,
your computer’s load is lightened.
In 44.1-kHz mode, 2,048 samples translate to about 47 milliseconds.
❖ Low: Choose this mode if your computer only just meets minimum
standards. Here to, WizooVerb trades off latency to spare computing
power, only more so with latency coming to 8,192 samples.
In 44.1-kHz mode, 8,192 samples translate to about 186 milliseconds.
If you change the CPU Load mode, WizooVerb W5 will point out that you
must restart your host program for the settings to take effect.
When choosing a CPU Load mode, bear in mind that your system’s latency
also affects WizooVerb W5. And the same principle applies: The lower the
latency, the higher the load on the computer.
In practice, low latency is far more important during recording than during mixing. You can make the most of your system’s capabilities by resetting the latency of your host software (buffer size) and WizooVerb W5
(CPU Load) as the working situation dictates.
Most professional host programs are able to compensate for latency while they render
recorded tracks. If automatic latency compensation is available, definitely enable this
feature to do away with annoying delay.
Tool Tips
Tool Tips are short help texts that appear automatically when the mouse
pointer hovers over certain control features. This option lets you activate
and deactivate these Tool Tips.
70
Page 71

Settings
Knob Mode
This option lets you determine how the knobs on WizooVerb W5 work:
❖ from Host: WizooVerb adopts the host’s knob handling logic, provided
that it can be defined in the host software.
❖ Circular: Knobs are twisted by grabbing with the mouse and then rotat-
ing them in a circular motion. The greatest advantage of this option is
that the further you drag the mouse pointer away from the knob, the
finer you can tune the values.
❖ Relative Circular: This mode is like Circular, except that the adjusted
value changes relative to the current value. This prevents parameter
jumps when you adjust a value.
❖ Linear: Knobs are adjusted by grabbing and dragging the mouse up and
down. In other words, knobs handle like faders.
Restore In & D/W
When using the WizooVerb W5 as a send effect, it is usually not desirable
that global parameters such as Input und Dry/Wet are reset to their saved
values when loaded. To prevent these parameters from being affected
when loading presets switch Restore In & D/W off.
English
❖ Restore In &D/W affects only the loading of presets, when saving presets
the current Input und Dry/Wet values are always saved!
Auxiliary Controls
Auxiliary Controls 1 and 2 are the two rotary knobs located on the right of
the Presets Page.
Using the drop-down menus, you can assign an Edit parameter to each of
the two knobs and access that parameter directly on the Presets Page. The
drop-down menus list all available Edit parameters.
Note that if you use several Wizoo Verb plug-ins at the same time, this setting applies
only to the current plug-in instance. This of course means that you can vary the Auxil-
iary Controls’ assignments from one WizooVerb instance to another.
71
Page 72

9 Setup
Save as Default
Once you have configured all the options in the Setup panel to your satisfaction, you can save this configuration using the Save-as-Default button.
Henceforth WizooVerb W5 will automatically load these defaults as the
standard configuration.
Output
In the Output section, you can determine how WizooVerb W5 handles an
LFE signal; take advantage of bass management processing, or mix down
to stereo. All parameters are adjusted in the display.
Like preferences, these entries can be stored as standard settings using the Save-asDefault button.
❖ W5’s down--mix compatibility lets you generate an LFE signal using the
reverb’s L, C, R, Ls and Rs channels. These signals are mixed and lowpass filtered using the selected LFE HiCut Freq cutoff. Note that this
tool is far from commonplace. Low-end frequencies are frequently lost
to cancellations when mixing down. Not, however, with the W5. The filtered signal is routed from the output to the LFE channel at an adjustable LFE Level. The dry LFE signal is blended with the generated LFE
signal using the Dry/Wet knob.
Owing to the HDIRs and the AIR algorithm’s remarkably true bass response, the results
are very impressive, particularly when the source material is a musical arrangement.
Bass Management
Activate Bass Management to prevent over-the-top bass response when us-
ing LFE signals. When you do this, high-pass filters are inserted into the L,
C, R, Ls and Rs channels to cut bass frequencies at the selected LFE HiCut
Freq frequency.
72
Page 73

Output
Downmix
The entire process of mixing down to stereo takes place in the output section, dry input signals included. Activate Stereo Downmix if you want to
use W5 as a stereo reverb. The signals are mixed to the L and R outputs at
the following levels:
❖ Center: The center signal is mixed to the left and right sides at −3 dB,
respectively.
❖ Ls/Rs: The left Surround Ls channel is mixed at a level of −3 dB to the
left side, and the right Surround signal to the right side.
❖ LFE: The LFE signal is mixed at −20 dB level to the left and right sides.
If you employ W5 as a stereo reverb, be sure to use the L and R inputs because remain
intact when mixing down to stereo. Bear in mind that you must generate a Surround
track in your host application.
LFE HiCut Freq
This is where you set the cutoff frequency for the LFE. All frequencies below this cutoff are filtered out of the signal and subjected to LFE processing.
LFE Level
Adjust the level at which you want to send the generated signal here.
When the slider is pushed to the far left position, the generated LFE signal
is fully muted.
English
Bass Management
Cuts low-end frequencies from the Surround channels that would overlap
with the LFE signal.
Stereo Downmix
Mixes the 5.1 Surround reverb signal, including input channels, down to
2.0 stereo reverb format.
73
Page 74

9 Setup
Output section parameters are set globally and can be stored as standard settings via Save as Default.
Certification
The Certification menu provides access to a form that lets you certify this
product.
To learn more about certification, read the chapter “System Requirements and Installation > Wizoo Product Certification” starting on page 17.
Routing
When you run WizooVerb in stand-alone mode, you’ll find listed under
Setup the additional menu item Routing. Use it to determine the audio cable configuration connecting W5 to your audio hardware.
74
Page 75

Routing
Device
Select under Device the desired driver offering a 5.1 audio interface. If you
own a PC, be sure to select an ASIO for its lower latency. If you own a Mac,
your choices are limited to Core Audio-enabled interfaces, which are all
low in latency.
Inputs/Outputs
Assign the 5.1 channels to the corresponding inputs/outputs on your hardware. When you go to select devices, the application will propose a standard cable configuration to you. You can adapt it to your wishes at any time
using the selection list.
Config (PC only)
If you’re running the PC version, this is where you open the configuration
dialog for audio interfaces selected under Devices. It lets you do things like
set the audio buffer size, which also impacts your system’s overall performance.
Buffer Size (Mac only)
The Mac version lets you enter the desired audio buffer size directly via
this selection menu.
English
75
Page 76

Page 77

Index of Parameters and Values
A
AIR 26, 39
Ambience 49
Attack 52
Auxiliary Controls 37, 71
B
Bass Management 72
Bass management 31
C
Certification 74
Chorus 50
Color 49
CPU Load 69
D
Decay 52
Delay 54
Delete 24
Density 49
Dir 67
Directivity 42
Display 21
Divergence 56
Doppler 50
Dry/Wet 35
E
Early Reflections 42
Envelope 51
EQ 61
ER/Tail Balance 43
ER/Tail Crossing 44
F
Feedback 56
Frequency 62, 63
G
Gain 62, 63, 67
Gate 59
H
HDIR 26, 39
High Damp 56
High Freq 47
High Shelf 61
High Time 47
I
Import 66
Impulse Response 65
Impulse response 25
Input 34
Input Section 33
K
Knob Mode 71
L
Length 52
LFE 30
Load 23, 41, 66
Low Freq 47
Low Shelf 61
Low Time 47
M
Main Level 56
Main Time 37, 46
Menu tab 21
Mid 1/2 61
Model 41
Modulation 50
77
Page 78

Index
O
Output 72
Output section 34
P
Page button 21
Pre-delay 37
Presets 22
Q
Q 62, 63
R
Render ER 45
Render Tail 48
Restore In & D/W 71
Reverse 41
Room Size 37, 49
Routing 74
S
Save 24, 68
Save as Default 72
Settings 69
Slope 53
Spread 44
Surround Sound 29
T
Tail 46
Tail Delay 48
Time 53
Tool Tips 70
Trim 67
U
User 41, 68
V
VU meter 21, 22
W
Width 34, 36
78
Page 79

WizooVerb W5
Deutsch
Page 80

Die in diesem Dokument enthaltenen Informationen können ohne Vorankündigung
geändert werden und stellen keine Verpflichtung seitens der Wizoo Sound Design
GmbH dar.
Die in diesem Dokument beschriebene Software wird unter einer Lizenzvereinbarung
zur Verfügung gestellt und darf nicht kopiert werden.
Ohne ausdrückliche schriftliche Erlaubnis durch die Wizoo Sound Design GmbH darf
kein Teil dieses Handbuchs für irgendwelche Zwecke oder in irgendeiner Form reproduziert oder übertragen werden.
Alle Produkt. und Firmennamen sind TM- oder ®-Warenzeichen oder Kennzeichnungen
der entsprechenden Firmen.
Produzent Peter Gorges
IR Engine Christian Knufinke
AIR Engine Matthias Klag, Klaus Piehl
User Interface Michael Ruf, Rainer Schütze, Stefan Zündorf
HDIR Recording Ralph Kessler, www.masterpinguin.de
Sound Design Matthias Klag
GUI Design Michael Ruf
Installer Martin Honisch
Zusätzliche Programmierung Andreas Frömming
Projekt-Management Lars Slowak
Produkt-Management Michael Ruf, Matthias Klag
Handbuch Ralf Kleinermanns, Matthias Klag
Übersetzung Tom Green
Satz Uwe Senkler
Artwork MOtype
Wizoo und WizooVerb W5 sind Warenzeichen der Wizoo Sound Design GmbH. VST ist
ein eingetragenes Warenzeichen der Steinberg Media Technologies GmbH. Das AudioUnits-Logo und das Audio-Units-Symbol sind Warenzeichen von Apple Computer Inc.
RTAS ist ein eingetragenes Warenzeichen von Avid Technology, Inc., seiner Niederlassungen und seiner Unternehmensbereiche. Pentium ist ein eingetragenes Warenzeichen der Intel Corporation in den USA und anderen Ländern. AMD ist ein Warenzeichen
von Advanced Micro Devices Inc. Das Mac-Logo ist ein Warenzeichen, das unter Lizenz
benutzt wird. Macintosh, Power Macintosh und Mac OS sind eingetragene Warenzeichen, die unter Lizenz benutzt werden. Microsoft und Windows XP sind Warenzeichen
bzw. registrierte Warenzeichen der Microsoft Corporation in den USA und/oder anderen
Ländern. Alle anderen Produkt- und Firmennamen sind
TM oder ® ihrer jeweiligen Inha-
ber.
Nicht autorisiertes Kopieren, Mieten oder Verleihen dieser Software ist untersagt. Alle
Spezifikationen können ohne Ankündigung geändert werden.
© 2005 Wizoo Sound Design GmbH
Alle Rechte vorbehalten.
Hergestellt in Deutschland.
Page 81

Glückwunsch, von Herzen!
WizooVerb ist nicht nur der beste Hall der Welt. Nein, er ist ein Meilenstein, ein neues Zeitalter. Er steckt alles andere mit links in die Tasche. WizooVerb ist der Unterschied zwischen Halleffekt und wahrer Raumemulation.‹
Hand aufs Herz – würden Sie so was glauben? Sehen Sie – genau das ist
mein Problem. Wie mache ich es Ihnen mit Worten klar?
Beginnen wir von vorn: Vor einem Jahr lockten unsere Entwickler mich zu
einer Präsentation eines ›bahnbrechenden neuen Hall-Algorithmus‹.
Meine Neugier hielt sich in engen Grenzen. Meine Zweifel dagegen nicht:
Braucht die Welt wirklich noch einen Hall? Und dann ausgerechnet noch
von Wizoo, einem No-Name auf diesem Gebiet? Bei so viel etablierter und
teilweise legendenbehafteter Konkurrenz? Und selbst wenn der Hall unglaublich gut ist – wer soll uns das glauben?
Das war vor einem Jahr. Und der WizooVerb ist da. Was, werden Sie sich
fragen, hat diesen doch recht deutlichen Meinungsumschwung bewirkt?
Zunächst einmal: Der Hall klang bei der ersten Präsentation umwerfend!
Nicht ›viel versprechend‹ oder ›schon ganz gut‹, nicht ›weniger blechern‹
oder ›etwas dichter als andere‹ – absolut atemberaubend – kein Effekt, nur
wunderbarer Raum.
Ok – das war ein ganz guter Anfang – aber wir wollten sichergehen und
uns auf diesen Lorbeeren nicht ausruhen.
Also wurde noch ein paar Monate geschraubt und gebohrt – jeder redete
von Impulsantworten-Hall, also wurde unserer entsprechend erweitert.
Nun, da er quasi beides konnte, gab es immer noch ein Problem: Fast alle
erhältlichen Impulsantworten – ob kommerziell oder kostenlos aus dem
Internet – haben mit einem echten Raum so viel zu tun wie ein Big Mac
mit Essen, und sie klangen durchweg schlechter als unser algorithmischer
Hall. Was tun?
Wir suchten landauf, landab nach herausragenden Impulsantworten und
fanden tatsächlich einen Ingenieur, der drei Jahre seines Lebens einzig
diesem Thema gewidmet und bereits eine ordentliche Bibliothek produziert hatte. Sogar seine eigene Software zur Nachbearbeitung hatte er ent-
Deutsch
Page 82

wickelt. Ein Gott! Wir schafften es, ihn unter Vertrag zu nehmen. Natürlich exklusiv, liebe Konkurrenz.
Das Produkt war also perfekt. Nun musste es nur noch jemand merken.
Die NAMM 2005 war der Durchbruch – das Gerücht vom weltbesten Hall
sprach sich wie ein Lauffeuer herum. Hall-Päpste, die bisher jedem
50.000$-Hallgerät ins Gesicht gelacht hatten, lagen vor uns auf den Knien
und bettelten um Alphaversionen.
Und hier kommen Sie ins Spiel. Obwohl Wizoo vom Image her wahrlich
nicht mit den Big Names mithalten kann, und obwohl Ihre Freunde sicherlich versucht haben, Sie zum Kauf eines Produkts einer etwas arrivierteren Marke zu bewegen, haben Sie sich mutig für den WizooVerb entschieden.
Dazu gratulieren und dafür danken wir Ihnen von ganzem Herzen. Und
dafür belohnen wir Sie mit einem Versprechen: Von dem Moment an, da
Sie Ihren WizooVerb das erste Mal hören, werden Sie Ihre bisherige Definition von ›Hall‹ über den Haufen werfen.
Nehmen Sie uns beim Wort. WizooVerb hat knallharte, Grammy-überhäufte Studio-Giganten in Freudentränen ausbrechen lassen, also: Tempos raus!
Im Namen des Teams und aller, die an diesem kleinen Wunder beteiligt
waren, wünsche ich Ihnen viel Freude und Erfolg mit WizooVerb,
Ihr
Peter Gorges
Page 83

Inhalt
1 Über dieses Handbuch . . . . . . . . . . . . . . . . . . . . . . . . . . . . . . . . . 87
2 Systemvoraussetzungen und Installation . . . . . . . . . . . . . . . . 89
WizooVerb auf dem PC . . . . . . . . . . . . . . . . . . . . . . . . . . . . . . . . . . 89
Mindestvoraussetzungen PC . . . . . . . . . . . . . . . . . . . . . . . . . . 89
Installation auf dem PC . . . . . . . . . . . . . . . . . . . . . . . . . . . . . . 89
Deinstallation auf dem PC . . . . . . . . . . . . . . . . . . . . . . . . . . . . 90
WizooVerb auf dem Mac . . . . . . . . . . . . . . . . . . . . . . . . . . . . . . . . . 91
Mindestvoraussetzungen Mac . . . . . . . . . . . . . . . . . . . . . . . . . 91
Installation auf dem Mac . . . . . . . . . . . . . . . . . . . . . . . . . . . . . 91
Einrichten der Stand-alone-Version . . . . . . . . . . . . . . . . . . . . . . . . . 92
Wizoo-Produktzertifizierung . . . . . . . . . . . . . . . . . . . . . . . . . . . . . . 93
Online-Zertifizierung . . . . . . . . . . . . . . . . . . . . . . . . . . . . . . . . 94
Offline-Zertifizierung . . . . . . . . . . . . . . . . . . . . . . . . . . . . . . . . 95
3 Erste Schritte mit WizooVerb . . . . . . . . . . . . . . . . . . . . . . . . . . . 97
Die Bedienelemente . . . . . . . . . . . . . . . . . . . . . . . . . . . . . . . . . . . . . 97
Presets anwenden . . . . . . . . . . . . . . . . . . . . . . . . . . . . . . . . . . . . . . . 99
4 Grundlagen . . . . . . . . . . . . . . . . . . . . . . . . . . . . . . . . . . . . . . . . . . . 101
Methoden zur Hallerzeugung . . . . . . . . . . . . . . . . . . . . . . . . . . . . . 101
So arbeitet WizooVerb . . . . . . . . . . . . . . . . . . . . . . . . . . . . . . . . . . . 102
Wie entsteht Hall? . . . . . . . . . . . . . . . . . . . . . . . . . . . . . . . . . . . . . . . 103
Musik und Hall . . . . . . . . . . . . . . . . . . . . . . . . . . . . . . . . . . . . . . . . . 105
Surround Sound im WizooVerb W5 . . . . . . . . . . . . . . . . . . . . . . . . 106
Deutsch
83
Page 84

Inhalt
5 Globale Parameter . . . . . . . . . . . . . . . . . . . . . . . . . . . . . . . . . . . . . 109
Input-Sektion . . . . . . . . . . . . . . . . . . . . . . . . . . . . . . . . . . . . . . . . . . . 109
Input . . . . . . . . . . . . . . . . . . . . . . . . . . . . . . . . . . . . . . . . . . . . . . 110
Width . . . . . . . . . . . . . . . . . . . . . . . . . . . . . . . . . . . . . . . . . . . . . . 110
Output-Sektion . . . . . . . . . . . . . . . . . . . . . . . . . . . . . . . . . . . . . . . . . . 111
Dry/Wet . . . . . . . . . . . . . . . . . . . . . . . . . . . . . . . . . . . . . . . . . . . . 111
Width . . . . . . . . . . . . . . . . . . . . . . . . . . . . . . . . . . . . . . . . . . . . . . 112
6 Presets Page . . . . . . . . . . . . . . . . . . . . . . . . . . . . . . . . . . . . . . . . . . . 113
7 Edit Page . . . . . . . . . . . . . . . . . . . . . . . . . . . . . . . . . . . . . . . . . . . . . . 115
HDIR und AIR kombinieren . . . . . . . . . . . . . . . . . . . . . . . . . . . . . . 115
Display und Funktionsbereiche . . . . . . . . . . . . . . . . . . . . . . . . . . . . 116
HDIR-Modelle laden . . . . . . . . . . . . . . . . . . . . . . . . . . . . . . . . . . . . . 117
Reverse . . . . . . . . . . . . . . . . . . . . . . . . . . . . . . . . . . . . . . . . . . . . . . . . 118
Early Reflections . . . . . . . . . . . . . . . . . . . . . . . . . . . . . . . . . . . . . . . . . 118
Directivity . . . . . . . . . . . . . . . . . . . . . . . . . . . . . . . . . . . . . . . . . . 119
Pre-Delay . . . . . . . . . . . . . . . . . . . . . . . . . . . . . . . . . . . . . . . . . . . 119
ER/Tail-Balance . . . . . . . . . . . . . . . . . . . . . . . . . . . . . . . . . . . . . 119
Spread . . . . . . . . . . . . . . . . . . . . . . . . . . . . . . . . . . . . . . . . . . . . . 120
ER/Tail Crossing . . . . . . . . . . . . . . . . . . . . . . . . . . . . . . . . . . . . . 120
Render ER . . . . . . . . . . . . . . . . . . . . . . . . . . . . . . . . . . . . . . . . . . 121
Tail . . . . . . . . . . . . . . . . . . . . . . . . . . . . . . . . . . . . . . . . . . . . . . . . . . . . 122
Main Time . . . . . . . . . . . . . . . . . . . . . . . . . . . . . . . . . . . . . . . . . 123
Low/High Freq . . . . . . . . . . . . . . . . . . . . . . . . . . . . . . . . . . . . . . 123
Low/High Time . . . . . . . . . . . . . . . . . . . . . . . . . . . . . . . . . . . . . 124
Render Tail . . . . . . . . . . . . . . . . . . . . . . . . . . . . . . . . . . . . . . . . . 124
Modulation . . . . . . . . . . . . . . . . . . . . . . . . . . . . . . . . . . . . . . . . . . . . . 127
Envelope . . . . . . . . . . . . . . . . . . . . . . . . . . . . . . . . . . . . . . . . . . . . . . . 128
Length . . . . . . . . . . . . . . . . . . . . . . . . . . . . . . . . . . . . . . . . . . . . . 129
Attack Time . . . . . . . . . . . . . . . . . . . . . . . . . . . . . . . . . . . . . . . . . 130
Decay Time . . . . . . . . . . . . . . . . . . . . . . . . . . . . . . . . . . . . . . . . . 130
Attack/Decay Slope . . . . . . . . . . . . . . . . . . . . . . . . . . . . . . . . . . 130
Delay . . . . . . . . . . . . . . . . . . . . . . . . . . . . . . . . . . . . . . . . . . . . . . . . . . 131
Seriell/Parallel . . . . . . . . . . . . . . . . . . . . . . . . . . . . . . . . . . . . . . 134
Pattern . . . . . . . . . . . . . . . . . . . . . . . . . . . . . . . . . . . . . . . . . . . . . 134
84
Page 85

Inhalt
BPM . . . . . . . . . . . . . . . . . . . . . . . . . . . . . . . . . . . . . . . . . . . . . . 134
Sync . . . . . . . . . . . . . . . . . . . . . . . . . . . . . . . . . . . . . . . . . . . . . . 134
Tempo . . . . . . . . . . . . . . . . . . . . . . . . . . . . . . . . . . . . . . . . . . . . 134
Divergence . . . . . . . . . . . . . . . . . . . . . . . . . . . . . . . . . . . . . . . . . 135
High Damp . . . . . . . . . . . . . . . . . . . . . . . . . . . . . . . . . . . . . . . . 135
Feedback . . . . . . . . . . . . . . . . . . . . . . . . . . . . . . . . . . . . . . . . . . 135
Main Level . . . . . . . . . . . . . . . . . . . . . . . . . . . . . . . . . . . . . . . . . 135
Time L/C/R/Ls/Rs . . . . . . . . . . . . . . . . . . . . . . . . . . . . . . . . . . 136
Level L/C/R/Ls/Rs . . . . . . . . . . . . . . . . . . . . . . . . . . . . . . . . . . . 136
Gate . . . . . . . . . . . . . . . . . . . . . . . . . . . . . . . . . . . . . . . . . . . . . . . . . . 136
Side Chain Input . . . . . . . . . . . . . . . . . . . . . . . . . . . . . . . . . . . . 138
Threshold . . . . . . . . . . . . . . . . . . . . . . . . . . . . . . . . . . . . . . . . . . 138
Attack . . . . . . . . . . . . . . . . . . . . . . . . . . . . . . . . . . . . . . . . . . . . . 138
Hold . . . . . . . . . . . . . . . . . . . . . . . . . . . . . . . . . . . . . . . . . . . . . . 138
Release . . . . . . . . . . . . . . . . . . . . . . . . . . . . . . . . . . . . . . . . . . . . 139
EQ . . . . . . . . . . . . . . . . . . . . . . . . . . . . . . . . . . . . . . . . . . . . . . . . . . . 139
Frequency . . . . . . . . . . . . . . . . . . . . . . . . . . . . . . . . . . . . . . . . . 140
Gain . . . . . . . . . . . . . . . . . . . . . . . . . . . . . . . . . . . . . . . . . . . . . . 141
Q . . . . . . . . . . . . . . . . . . . . . . . . . . . . . . . . . . . . . . . . . . . . . . . . . 141
8 Impulsantworten . . . . . . . . . . . . . . . . . . . . . . . . . . . . . . . . . . . . . . 143
Impulsantworten laden . . . . . . . . . . . . . . . . . . . . . . . . . . . . . . . . . . 144
Impulsantworten optimieren . . . . . . . . . . . . . . . . . . . . . . . . . . . . . . 145
Direktschall entfernen . . . . . . . . . . . . . . . . . . . . . . . . . . . . . . . 145
Stille am Anfang entfernen . . . . . . . . . . . . . . . . . . . . . . . . . . . 146
Pegel anpassen . . . . . . . . . . . . . . . . . . . . . . . . . . . . . . . . . . . . . 146
Impulsantworten speichern . . . . . . . . . . . . . . . . . . . . . . . . . . . . . . . 146
Deutsch
9 Setup . . . . . . . . . . . . . . . . . . . . . . . . . . . . . . . . . . . . . . . . . . . . . . . . . 149
Settings . . . . . . . . . . . . . . . . . . . . . . . . . . . . . . . . . . . . . . . . . . . . . . . 149
CPU Load . . . . . . . . . . . . . . . . . . . . . . . . . . . . . . . . . . . . . . . . . 149
Tool Tips . . . . . . . . . . . . . . . . . . . . . . . . . . . . . . . . . . . . . . . . . . 151
Knob Mode . . . . . . . . . . . . . . . . . . . . . . . . . . . . . . . . . . . . . . . . 151
Restore In & D/W . . . . . . . . . . . . . . . . . . . . . . . . . . . . . . . . . . . 151
Auxiliary Controls . . . . . . . . . . . . . . . . . . . . . . . . . . . . . . . . . . . 152
Save as Default . . . . . . . . . . . . . . . . . . . . . . . . . . . . . . . . . . . . . 152
85
Page 86

Output . . . . . . . . . . . . . . . . . . . . . . . . . . . . . . . . . . . . . . . . . . . . . . . . . 152
Bass Managment . . . . . . . . . . . . . . . . . . . . . . . . . . . . . . . . . . . . 153
Downmix . . . . . . . . . . . . . . . . . . . . . . . . . . . . . . . . . . . . . . . . . . 153
Certification . . . . . . . . . . . . . . . . . . . . . . . . . . . . . . . . . . . . . . . . . . . . 154
Routing . . . . . . . . . . . . . . . . . . . . . . . . . . . . . . . . . . . . . . . . . . . . . . . . 155
Device . . . . . . . . . . . . . . . . . . . . . . . . . . . . . . . . . . . . . . . . . . . . . 155
Inputs/Outputs . . . . . . . . . . . . . . . . . . . . . . . . . . . . . . . . . . . . . 155
Config (nur PC) . . . . . . . . . . . . . . . . . . . . . . . . . . . . . . . . . . . . . 155
Buffer Size (nur Mac) . . . . . . . . . . . . . . . . . . . . . . . . . . . . . . . . . 156
Parameter- und Werte-Index . . . . . . . . . . . . . . . . . . . . . . . . . . . . . . . 157
Page 87

1 Über dieses Handbuch
Weil Sie sicher nicht mehr Zeit als nötig mit Handbuchlektüre verbringen
wollen, werden wir uns auf das Wesentliche beschränken: die Bedienung
von WizooVerb W5.
Im Folgenden gehen wir deshalb davon aus, dass Sie mit der Benutzung
Ihres Computers und Ihrer Audioprogramme vertraut sind, dass Sie sich
schon einmal ein wenig mit Hall beschäftigt haben und dass Sie die Unterschiede zwischen Insert- und Send-Effekten kennen.
Aber keine Sorge, dieses Handbuch ist keine lieblose Auflistung von Parametern:
❖ Kapitel 1 zeigt Ihnen, was bei der Installation zu beachten ist.
❖ Kapitel 2 hilft Ihnen beim schnellen Einstieg in WizooVerb W5.
❖ Kapitel 3 versorgt Sie mit Hintergrundwissen zur Hallerzeugung.
❖ Kapitel 4 bis 8 beschreiben die Funktionen von WizooVerb W5 im De-
tail.
Und nun kann es auch schon losgehen …
87
Deutsch
Page 88

Page 89

2 Systemvoraussetzungen und Installation
Sie können WizooVerb W5 auf dem PC unter Windows XP oder auf dem
Mac unter Mac OS X nutzen. Die folgenden Abschnitte helfen Ihnen bei
der Installation und der Freischaltung.
WizooVerb auf dem PC
Mindestvoraussetzungen PC
❖ Pentium® IV (1,3 GHz)
❖ 512 MB RAM
❖ 100 MB freier Festplattenplatz
❖ Windows® XP
❖ VST-2.0-kompatible Host-Software mit 5.1-Surround-Unterstützung
Alternativ zur Plug-In-Versionen können Sie auch die Stand-alone-Version des
WizooVerb W5 einsetzen, z.B. wenn Sie Ihren Laptop schnell mal ohne zusätzliche
Host-Software zum Hallgerät machen wollen.
❖ Surround-kompatible Audio-Hardware
❖ DVD-ROM-Laufwerk zur Installation
❖ Internet-Verbindung (auf einem beliebigen Computer) zur Freischal-
tung der Software
Deutsch
Installation auf dem PC
1 Schalten Sie Ihren Computer ein.
2 Starten Sie Windows XP und stellen Sie sicher, dass Sie als Systemad-
ministrator angemeldet sind.
3 Legen Sie die Programm-DVD in das DVD-Laufwerk des Computers.
89
Page 90

2 Systemvoraussetzungen und Installation
4 Öffnen Sie auf der Programm-DVD das Verzeichnis ›PC‹, starten Sie
›WizooVerb W5 Setup‹ und folgen Sie den Anweisungen des Installationsprogramms …
5 Wählen Sie im Installationsprogramm auf der Seite ›Choose Plug-Ins‹,
ob WizooVerb W5 im Plug-In-Format VST 2 installiert werden soll.
6 Auf der Seite ›Choose VST-Plug-Ins Folder‹ können Sie wählen, in wel-
chem Ordner das WizooVerb-VST-2- installiert werden soll.
Die richtige Wahl für den VST-2-Plug-Ins-Zielordner hängt von den Einstellungen
Ihres Host-Programms ab.
7 Auf der Seite ›Choose Content Folder ‹ können Sie das Zielverzeichnis
für HDIR-Daten und Presets bestimmen. Falls Sie diese Option nicht
nutzen, wird der voreingestellte Pfad übernommen.
Nach Abschluss der Installation finden Sie die Stand-alone-Version des
WizooVerb W5 im Windows-Startmenü unter ›Alle Programme‹ > ›Wizoo‹. Wurde zusätzlich die Plug-In-Version installiert, können Sie WizooVerb W5 nun in jedem 5.1-surroundfähigen VST-2-kompatiblen Host-Programm nutzen.
Deinstallation auf dem PC
Falls Sie WizooVerb W5 PC später aus irgend einem Grunde wieder aus
Ihrem System entfernen wollen, haben Sie dazu zwei Möglichkeiten:
❖ Wählen Sie im Windows-Startmenü ›Alle Programme‹ > ›Wizoo‹ >
›WizooVerb W5‹ > ›Deinstallation‹ und folgen Sie den Anweisungen
auf dem Bildschirm.
❖ Öffnen Sie die Windows-Systemsteuerung und klicken Sie doppelt auf
›Software‹. Wählen Sie in der folgenden Liste ›WizooVerbW5‹, klicken
Sie auf ›Entfernen‹ und folgen Sie den Anweisungen auf dem Bildschirm.
90
Page 91

WizooVerb auf dem Mac
WizooVerb auf dem Mac
Mindestvoraussetzungen Mac
❖ Apple PowerMac G4, 1,42 GHz (G5 empfohlen)
❖ 512 MB RAM
❖ 100 MB freier Festplattenplatz
❖ Mac OS X ab 10.3.8
❖ VST-2.0-kompatible Host-Software mit 5.1-Surround-Unterstützung
Alternativ zur Plug-In-Version können Sie auch die Stand-alone-Version des WizooVerb W5 nutzen.
❖ Surround-kompatible Audio-Hardware
❖ DVD-ROM-Laufwerk zur Installation
❖ Internet-Verbindung (auf einem beliebigen Computer) zur Freischal-
tung der Software
Installation auf dem Mac
1 Schalten Sie Ihren Computer ein.
2 Starten Sie Mac OS X und stellen Sie sicher, dass Sie als Systemadmi-
nistrator angemeldet sind.
3 Legen Sie die Programm-DVD in das DVD-Laufwerk des Computers.
4 Öffnen Sie auf der Programm-DVD das Verzeichnis ›Mac‹, starten Sie
›WizooVerbW5.mpkg‹ und folgen Sie den Anweisungen des Installationsprogramms.
Nach Abschluss der Installation finden Sie die Stand-alone-Version des
WizooVerb W5 im Ordner ›Applications‹ bzw. ›Programme‹ Ihres Systems.
Deutsch
Zusätzlich wurde automatisch die Plug-In-Version installiert, sodass Sie
WizooVerb W5 nun in jedem 5.1-surroundfähigen VST-2-kompatiblen
Host-Programm einsetzen können.
91
Page 92

2 Systemvoraussetzungen und Installation
Einrichten der Stand-alone-Version
Mit der Stand-alone-Version des WizooVerb W5 können Sie Ihren PC oder
Mac zum Edel-Hallgerät machen – besonders praktisch für Notebooks im
Bühneneinsatz.
Weil hier keine zusätzliche Host-Software im Spiel ist, müssen Sie zunächst den passenden Audio-Treiber und die Belegung der Ein- und Ausgänge wählen:
Um WizooVerb W5 in 5.1 Surround zu nutzen, sollte Ihre Audio-Hardware mit sechs
Ein- und Ausgängen ausgestattet sein. Wie Sie WizooVerb W5 als einfaches StereoReverb betreiben können, mit nur einem Ein- und Ausgangspärchen Ihrer Audio-Hardware, erfahren Sie im Kapitel ›Setup‹ ab Seite 149.
1 Starten Sie die Stand-alone-Version des WizooVerb W5.
2 Klicken Sie in WizooVerb W5 auf Setup und danach auf die Menü-Taste
Routing.
3 Wählen Sie unter Device über die obere Auswahlliste den gewünschten
Treiber Ihrer Audio-Hardware.
Auf dem PC sind ASIO-Treiber stets die erste Wahl, weil sie die niedrigste Latenz
haben. Auf dem Mac steht nur Audio-Hardware mit Core-Audio-Anbindung zur
Wahl, wodurch sich ebenfalls sehr geringe Latenzen ergeben.
4 Beenden Sie die Stand-alone-Version des WizooVerb W5 und starten
Sie das Programm neu, damit die Änderung wirksam werden. Nun
sind alle verfügbaren Ein- und Augänge der gewählten Audio-Hardware angemeldet.
5 Wählen Sie mit den linken Auswahllisten die Eingänge Ihrer Sound-
karte, von denen WizooVerb W5 Audio-Signale empfangen soll.
6 Wählen Sie mit den rechten Auswahllisten die Ausgänge Ihrer Sound-
karte, an denen WizooVerb W5 Audio-Signale ausgeben soll.
In der PC-Version finden Sie rechts oben den Config-Button, mit dem Sie
das Konfigurationsmenü Ihrer Soundkarte aufrufen können.
In der Mac-Version kann die Buffersize direkt über das Auswahlmenü Buf-
fer Size gewählt werden.
92
Page 93

Wizoo-Produktzertifizierung
[W2_Stand_alone
In der Stand-alone-Version des WizooVerb W5 müssen Sie zunächst Ihre
Soundkarte anmelden und die Belegung der Ein- und Ausgänge wählen.
Wizoo-Produktzertifizierung
Egal ob Demo- oder Vollversion – jedes Wizoo-Produkt muss zertifiziert
werden, bevor Sie es nutzen können. Dadurch weisen Sie sich als legaler
Anwender Ihres Wizoo-Produktes aus und schalten es für Ihr System frei.
Falls Sie eine Demoversion zertifizieren lassen wollen: Gehen Sie bitte genau so vor,
wie im Folgenden beschrieben, aber lassen Sie das Feld für den Zertifizierungscode
frei.
Zur Zertifizierung ist es nicht nötig, spezielle Programme oder gar Hardware zu installieren. Sie benötigen nur einen Web-Browser oder ein EMail-Programm mit Internet-Zugang.
Am einfachsten ist es, wenn Sie die Zertifizierung mit der Stand-aloneVersion von WizooVerb W5 ausführen. So schließen Sie eventuelle ›Störeinflüsse‹ der Host-Software aus.
Wenn Sie die Stand-alone-Version des WizooVerb W5 zertifizieren, werden dadurch
auch alle Plug-In-Versionen frei geschaltet. Sie können die Zertifizierung zwar auch mit
Hilfe eines WizooVerb-Plug-Ins ausführen. Je nach Host kann es dabei aber vorkommen, dass Sie innerhalb des Plug-Ins keine Ziffern eintippen können.
93
Deutsch
Page 94

2 Systemvoraussetzungen und Installation
[W2_Certification
Im Certification-Bereich der Setup Page können Sie WizooVerb W5 zertifizieren.
Online-Zertifizierung
Falls Ihr Musik-Computer eine Internet-Verbindung hat, folgen Sie bitte
der Schrittanleitung.
Falls Ihr Musik-Computer keine Internet-Verbindung hat, springen Sie bitte direkt zum
nächsten Abschnitt: ›Offline-Zertifizierung‹.
1 Stellen Sie sicher, dass Ihr Computer mit dem Internet verbunden ist.
2 Öffnen Sie die Stand-alone-Version des WizooVerb W5.
3 Klicken Sie in WizooVerb W5 auf Setup und danach auf die Menü-Taste
Certification.
4 Geben Sie im Feld Product Certification den Produktzertifizierungs-
Code ein, den Sie auf der beiliegenden Karte finden, und klicken Sie
dann auf Online.
5 WizooVerb fragt nun das Zertifizierungsformular vom Wizoo-Server ab
und öffnet es in Ihrem Web-Browser.
6 Das Feld ›Produktzertifikat‹ wird vom Zertifizierungs-Server ausge-
füllt. Füllen Sie möglichst alle übrigen Felder aus, zumindest aber die
mit einem Stern (*) markierten.
7 Klicken Sie auf ›Absenden‹, um Ihr Zertifikat erstellen zu lassen. Es
wird umgehend an die angegebene E-Mail-Adresse zurück geschickt.
94
Page 95

Wizoo-Produktzertifizierung
8 Rufen Sie die entsprechende E-Mail ab und klicken Sie die dort ange-
hängte Datei ›WizooVerbW5‹ doppelt an, um die Zertifizierung abzuschließen.
Nach erfolgreicher Zertifizierung zeigt WizooVerb W5 im Certification-Be-
reich der Setup Page die Meldung ›Valid full time license‹ an.
Offline-Zertifizierung
Falls Ihr Musik-Computer keinen Internet-Zugang hat, können Sie die Zertifizierung auch mit Hilfe eines anderen Rechners durchführen, der mit
dem Internet verbunden ist:
1 Öffnen Sie die Stand-alone-Version des WizooVerb W5.
2 Klicken Sie in WizooVerb W5 auf Setup und danach auf die Menü-Taste
Certification.
3 Geben Sie im Feld Product Certification den Produktzertifizierungs-
Code ein, den Sie auf der beiliegenden Karte finden, und klicken Sie
dann auf Offline.
4 Auf dem Desktop Ihres Musik-Computers finden Sie nun die HTML-
Datei ›WizooVerb W5 Certification Request‹. Übertragen Sie diese auf
den ›Internet-Computer‹ und stellen Sie sicher, dass dessen InternetVerbindung funktioniert.
5 Klicken Sie die Datei ›WizooVerb W5 Certification Request‹ auf dem
›Internet-Computer‹ doppelt an. WizooVerb fragt nun das Zertifizierungsformular vom Wizoo-Server ab und öffnet es im Web-Browser.
6 Das Feld ›Produktzertifikat‹ wird vom Zertifizierungs-Server ausge-
füllt. Füllen Sie möglichst alle übrigen Felder aus, zumindest aber die
mit einem Stern (*) markierten.
7 Klicken Sie auf ›Absenden‹, um Ihr Zertifikat erstellen zu lassen. Es
wird umgehend an die angegebene E-Mail-Adresse zurück geschickt.
8 Öffnen Sie die entsprechende E-Mail und übertragen Sie die dort ange-
hängte Datei ›WizooVerbW5‹ zurück auf Ihren Musik-Computer.
9 Klicken Sie die empfangene Datei ›WizooVerbW5‹ auf Ihrem Musik-
Computer doppelt an, um die Zertifizierung abzuschließen.
Deutsch
95
Page 96

2 Systemvoraussetzungen und Installation
Nach erfolgreicher Zertifizierung zeigt WizooVerb W5 im Certification-Be-
reich der Setup Page die Meldung ›Valid full time license‹ an.
96
Page 97

3 Erste Schritte mit WizooVerb
In diesem Kapitel werden Sie die Grundzüge der Benutzeroberfläche kennen lernen und erfahren, wie Sie Hallprogramme laden und speichern
können.
Die Bedienelemente
Das zentrale Bedienelement des WizooVerb W5 ist sein großes, variables
Display. Mit den Page-Tasten am oberen Rand können Sie verschiedene
Display-Seiten aufrufen. Die meisten haben verschiedene Funktionsbereiche, die Sie mit den Menü-Tasten am linken Rand erreichen.
Am unteren Rand des Displays gibt es fünf Parameterfelder. Meist werden
Sie deren Werte mit den darunter liegenden Reglern verändern. Alternativ
können Sie Werte in den Parameterfeldern aber auch mit der Maus selektieren, den Zielwert direkt eintippen und diesen dann mit der ‰-Taste
bestätigen.
Je nach Page und Funktionsbereich belegt WizooVerb die Parameterfelder
und Regler automatisch mit passenden Funktionen. Der große Regler in
der Mitte ist dabei stets für den wichtigsten Parameter zuständig. Darüber
hinaus können Sie Parameterwerte auf einigen Menüseiten auch direkt
im Display anfassen und ändern – etwa bei grafischen Editoren und globalen Einstellungen.
Um den Einsatz von WizooVerb W5 so einfach wie möglich zu machen,
gibt es in allen wichtigen Bereichen Auswahllisten am rechten Rand des
Displays. Dort können Sie die jeweils passenden Daten schnell und einfach laden, speichern oder löschen. Alle Listen können in Ordner und Unterordner gegliedert sein. Die Navigation ist ganz einfach:
Deutsch
❖ Klicken Sie den Namen eines Ordners doppelt an, um den Ordner zu
öffnen. Wenn Sie direkt auf das Ordner-Symbol klicken, können Sie
Ordner auch per Einfachklick öffnen.
❖ Scrollen Sie innerhalb eines Ordners ganz nach oben und klicken Sie
auf den (..)-Ordner, um den aktuellen Ordner wieder zu verlassen.
97
Page 98

3 Erste Schritte mit WizooVerb
Auf beiden Seiten des WizooVerb W5 sehen Sie ein Pegelmeter mit darunter platzierten Reglern:
❖ Das Input-VU-Meter zeigt den Pegel des unbearbeiteten Eingangssig-
nals. Mit dem Input-Regler können Sie die Eingangsempfindlichkeit
anpassen.
❖ Das Output-VU-Meter zeigt den Pegel des Ausgangssignals, das sich
aus dem trockenen Direktsignal und/oder dem Hallsignal zusammensetzt. Der Dry/Wet-Regler bestimmt dabei das Mischungsverhältnis
zwischen Direkt- und Hall-Anteil.
Zusätzlich gibt es am Eingang noch einen Width-Regler zum Verteilen der
Eingangssignale. Sie können zum einen die fünf Surroundkanäle L, C, R,
Ls und Rs zusammenmischen, zum anderen aber auch jeden der fünf Surroundkanäle auf ihre benachbarten Kanäle umrouten. Am Ausgang steht
ebenfalls ein Width-Regler zur Verfügung, er steuert die Basisbreite des
Halls im Surroundfeld.
Details zu diesen Funktionen finden Sie im Kapitel ›Globale Parameter‹
ab Seite 109.
[W2_Complete
98
Page 99

Presets anwenden
Presets anwenden
Ein Preset ist ein komplettes Hallprogramm das neben dem HDIR-Modell
auch alle Parameter erfasst. Wenn Sie ein Preset laden, wird WizooVerb
W5 in den Zustand versetzt, in dem es sich bei der Sicherung dieses Presets befand.
Weil die Presets Page für viele Anwender die Zentrale der Benutzeroberflä-
che ist, wird sie bei Start von WizooVerb W5 automatisch geöffnet. Das
Display ist hier in zwei Bereiche geteilt:
❖ Das Info-Fenster links zeigt Informationen zum geladenen Preset:
Name, Hallzeit, Typ, Dateigröße, eine Beschreibung sowie das Format
des zugehörigen HDIR-Modells.
❖ In der Preset-Auswahlliste rechts haben Sie Zugriff auf grundlegende
Funktionen wie das Laden, Speichern und Löschen von Presets.
[W2_Presets_Close
Presets Page: Info-Bereich und Preset-Auswahlliste
WizooVerb-Presets sind übersichtlich in Ordnern sortiert. Auch ansonsten
ist es sehr einfach, Presets zu laden, zu bearbeiten und zu sichern. Probieren wir es aus:
1 Klicken Sie den Ordner ›Halls‹. in der Liste an, um die dort enthal-
tenen Presets zu sehen.
Mit dem Dreieck am oberen Rand können Sie die Preset-Liste aufklappen, um auch
längere Namen vollständig anzeigen zu lassen.
99
Deutsch
Page 100

3 Erste Schritte mit WizooVerb
2 Klicken Sie das Preset ›Classic Hall‹ einfach an, um es zu laden.
3 Nun können Sie ›Classic Hall‹ hören und die wichtigsten Hallparame-
ter direkt auf der Presets Page ändern: Regeln Sie Main Time auf 6s, um
den Hall länger zu machen, und setzen Sie Pre-Delay auf 20 ms, sodass
der Hall ein kleines Echo bekommt.
4 Falls Sie wollen, können Sie links im Info-Bereich einige der Einträge
ändern. Wählen Sie etwa in den Drop-Down-Menüs Type und Size je-
weils den Eintrag, der das Preset am besten klassifiziert, und tippen Sie
unter Application noch eine kurze Beschreibung ein.
5 Nun können Sie das editierte Preset unter einem eigenen Namen spei-
chern. Klicken Sie dazu das Disketten-Symbol am oberen Rand der
Preset-Liste an.
6 Es öffnet sich der Standard-Dialog zum Speichern von Dateien: Navi-
gieren Sie zu dem Unterordner, in dem Sie das Preset speichern möchten.
Sie können hier auch selber Unterverzeichnisse anlegen, um Ihre Presets zu sortieren.
7 Tippen Sie den Namen ein, unter dem Sie das Preset speichern wollen,
und klicken Sie dann auf Speichern, um das Preset zu sichern.
WizooVerb-Presets werden im VST-Standardformat mit der Datei-Endung ›.fxp‹ gespeichert.
8 Nun ist das gesicherte Preset in der Preset-Liste enthalten. Falls Sie es
wieder löschen möchten, können Sie es anwählen und dann die KreuzTaste ⌧ oben in der Liste anklicken.
Falls Sie ein Preset nachträglich umbenennen wollen: Wählen Sie
es an, klicken Sie die ⌧
den gewünschten Namen ein.
- und gleich danach die -Taste, und geben Sie
[W2_Liste_Head
Der Kopf der Preset-Liste: Das Dreieck erweitert den Anzeigebereich, die
-Taste dient zum Sichern, die ⌧-Taste zum Löschen von Presets.
100
 Loading...