

Page 1

1.5
user guide
Page 2

Table of Contents
Torq 1.5 User Guide
Chapter 1 . . . . . . . . . . . . . . . . . . . . . . . . . . . . . . . . . . . . . . . . 4
Welcome . . . . . . . . . . . . . . . . . . . . . . . . . . . . . . . . . . . . . 4
Torq Overview . . . . . . . . . . . . . . . . . . . . . . . . . . . . . . . . . 4
Decks . . . . . . . . . . . . . . . . . . . . . . . . . . . . . . . . . . . . . . . 5
Main Waveform Display . . . . . . . . . . . . . . . . . . . . . . . . . . . . . 5
Mixer . . . . . . . . . . . . . . . . . . . . . . . . . . . . . . . . . . . . . . . 6
PFL/Headphone Cue . . . . . . . . . . . . . . . . . . . . . . . . . . . . . . 6
Browser/Database . . . . . . . . . . . . . . . . . . . . . . . . . . . . . . . . 6
Effect Racks . . . . . . . . . . . . . . . . . . . . . . . . . . . . . . . . . . . 7
Sampler . . . . . . . . . . . . . . . . . . . . . . . . . . . . . . . . . . . . . . 7
Snapshots . . . . . . . . . . . . . . . . . . . . . . . . . . . . . . . . . . . . . 7
Master Module . . . . . . . . . . . . . . . . . . . . . . . . . . . . . . . . . . 7
Chapter 2 . . . . . . . . . . . . . . . . . . . . . . . . . . . . . . . . . . . . . . . . 8
System Requir ement s . . . . . . . . . . . . . . . . . . . . . . . . . . . 8
Windows XP . . . . . . . . . . . . . . . . . . . . . . . . . . . . . . . . . . . 8
Windows Vista . . . . . . . . . . . . . . . . . . . . . . . . . . . . . . . . . . 8
Mac . . . . . . . . . . . . . . . . . . . . . . . . . . . . . . . . . . . . . . . . 8
Installation . . . . . . . . . . . . . . . . . . . . . . . . . . . . . . . . . . . . 9
Windows XP and Vista . . . . . . . . . . . . . . . . . . . . . . . . . . . . . . 9
Macintosh OS X . . . . . . . . . . . . . . . . . . . . . . . . . . . . . . . . . 9
Authorization . . . . . . . . . . . . . . . . . . . . . . . . . . . . . . . . . 10
Chapter 3 . . . . . . . . . . . . . . . . . . . . . . . . . . . . . . . . . . . . . . . 11
Decks . . . . . . . . . . . . . . . . . . . . . . . . . . . . . . . . . . . . . . 11
Displays . . . . . . . . . . . . . . . . . . . . . . . . . . . . . . . . . . . . . 11
Song Name . . . . . . . . . . . . . . . . . . . . . . . . . . . . . . . . 11
Artist Name . . . . . . . . . . . . . . . . . . . . . . . . . . . . . . . . 11
Time Elapsed . . . . . . . . . . . . . . . . . . . . . . . . . . . . . . . 11
Time Remain . . . . . . . . . . . . . . . . . . . . . . . . . . . . . . . . 12
Overview Waveform . . . . . . . . . . . . . . . . . . . . . . . . . . . 12
Controls . . . . . . . . . . . . . . . . . . . . . . . . . . . . . . . . . . . . . 12
Play/Pause . . . . . . . . . . . . . . . . . . . . . . . . . . . . . . . . 12
Seek . . . . . . . . . . . . . . . . . . . . . . . . . . . . . . . . . . . . 12
Cue. . . . . . . . . . . . . . . . . . . . . . . . . . . . . . . . . . . . . 13
Deck Mode . . . . . . . . . . . . . . . . . . . . . . . . . . . . . . . . 14
Looping . . . . . . . . . . . . . . . . . . . . . . . . . . . . . . . . . . 15
Speed Slider . . . . . . . . . . . . . . . . . . . . . . . . . . . . . . . 17
Key . . . . . . . . . . . . . . . . . . . . . . . . . . . . . . . . . . . . . 20
Sync Button . . . . . . . . . . . . . . . . . . . . . . . . . . . . . . . . 21
Tempo Master . . . . . . . . . . . . . . . . . . . . . . . . . . . . . . . 21
Nudge Buttons . . . . . . . . . . . . . . . . . . . . . . . . . . . . . . 22
Offset But tons . . . . . . . . . . . . . . . . . . . . . . . . . . . . . . 22
Chapter 4 . . . . . . . . . . . . . . . . . . . . . . . . . . . . . . . . . . . . . . . 23
Waveform Display . . . . . . . . . . . . . . . . . . . . . . . . . . . . . 23
Information Shown on Display . . . . . . . . . . . . . . . . . . . . . . . . . 23
Waveform . . . . . . . . . . . . . . . . . . . . . . . . . . . . . . . . . 23
Zoom . . . . . . . . . . . . . . . . . . . . . . . . . . . . . . . . . . . . 24
Loop Points . . . . . . . . . . . . . . . . . . . . . . . . . . . . . . . . 24
Cue Points . . . . . . . . . . . . . . . . . . . . . . . . . . . . . . . . . 24
Phase Grid . . . . . . . . . . . . . . . . . . . . . . . . . . . . . . . . 24
Tempo Anchors . . . . . . . . . . . . . . . . . . . . . . . . . . . . . . 25
Playback Manipulations . . . . . . . . . . . . . . . . . . . . . . . . . . . . 27
Vinyl Mode . . . . . . . . . . . . . . . . . . . . . . . . . . . . . . . . . 27
Hybrid Mode. . . . . . . . . . . . . . . . . . . . . . . . . . . . . . . . 27
CDJ Mode . . . . . . . . . . . . . . . . . . . . . . . . . . . . . . . . . 27
Chapter 5 . . . . . . . . . . . . . . . . . . . . . . . . . . . . . . . . . . . . . . . 28
Synchronization . . . . . . . . . . . . . . . . . . . . . . . . . . . . . . . 28
Automatic Tempo and Phase Detection . . . . . . . . . . . . . . . . . . . . 28
Phase Grid Manipulations . . . . . . . . . . . . . . . . . . . . . . . . . . . 28
Adjusting with the Mouse . . . . . . . . . . . . . . . . . . . . . . . . . 29
Adjusting with Nudge Buttons . . . . . . . . . . . . . . . . . . . . . . 29
Adjusting with Offset Buttons . . . . . . . . . . . . . . . . . . . . . . 29
Sync Button . . . . . . . . . . . . . . . . . . . . . . . . . . . . . . . . . . . 30
Locked Sync . . . . . . . . . . . . . . . . . . . . . . . . . . . . . . . . 30
Momentary Sync . . . . . . . . . . . . . . . . . . . . . . . . . . . . . 30
Global Tempo . . . . . . . . . . . . . . . . . . . . . . . . . . . . . . . 30
Global Tempo LEDs . . . . . . . . . . . . . . . . . . . . . . . . . . . 31
Global Tempo Metronome . . . . . . . . . . . . . . . . . . . . . . . . 31
Using a Deck as a Tempo Master . . . . . . . . . . . . . . . . . . . . 31
Chapter 6 . . . . . . . . . . . . . . . . . . . . . . . . . . . . . . . . . . . . . . . 32
External C ontrol . . . . . . . . . . . . . . . . . . . . . . . . . . . . . . 32
Enabling Vinyl/ CD C ontrol . . . . . . . . . . . . . . . . . . . . . . . . . . . 32
External C ontrol Calibration . . . . . . . . . . . . . . . . . . . . . . . . . . 34
Control Type . . . . . . . . . . . . . . . . . . . . . . . . . . . . . . . . 34
Velocity and Position . . . . . . . . . . . . . . . . . . . . . . . . . . . 34
Error Index . . . . . . . . . . . . . . . . . . . . . . . . . . . . . . . . . 36
Standard Mode . . . . . . . . . . . . . . . . . . . . . . . . . . . . . . . . . 36
Absolute Mode . . . . . . . . . . . . . . . . . . . . . . . . . . . . . . 36
Relative Mode . . . . . . . . . . . . . . . . . . . . . . . . . . . . . . . 36
AMPutate Mode . . . . . . . . . . . . . . . . . . . . . . . . . . . . . . . . 37
Deck Control . . . . . . . . . . . . . . . . . . . . . . . . . . . . . . . 37
BPM Matching . . . . . . . . . . . . . . . . . . . . . . . . . . . . . . 38
Runout Protection . . . . . . . . . . . . . . . . . . . . . . . . . . . . . . . 38
MIDI Control . . . . . . . . . . . . . . . . . . . . . . . . . . . . . . . . . . 38
Chapter 7 . . . . . . . . . . . . . . . . . . . . . . . . . . . . . . . . . . . . . . . 41
Sampler . . . . . . . . . . . . . . . . . . . . . . . . . . . . . . . . . . . . . 41
Signal Source . . . . . . . . . . . . . . . . . . . . . . . . . . . . . . . . . . 41
Sampler Controls . . . . . . . . . . . . . . . . . . . . . . . . . . . . . . . . 42
Record Sample Button . . . . . . . . . . . . . . . . . . . . . . . . . . 42
Trigger Sample Button . . . . . . . . . . . . . . . . . . . . . . . . . . 43
Loop Sample Button . . . . . . . . . . . . . . . . . . . . . . . . . . . 43
Sample Volume Knob . . . . . . . . . . . . . . . . . . . . . . . . . . . 43
Sample Speed/ Rate Knob . . . . . . . . . . . . . . . . . . . . . . . . 43
Sample Name Window . . . . . . . . . . . . . . . . . . . . . . . . . . 44
QuickScratch . . . . . . . . . . . . . . . . . . . . . . . . . . . . . . . 45
Chapter 8 . . . . . . . . . . . . . . . . . . . . . . . . . . . . . . . . . . . . . . . 46
Snapshots . . . . . . . . . . . . . . . . . . . . . . . . . . . . . . . . . . . 46
Snapshot List . . . . . . . . . . . . . . . . . . . . . . . . . . . . . . . . . . 46
Creating a Snapshot . . . . . . . . . . . . . . . . . . . . . . . . . . . . . . 46
Masking a Snapshot . . . . . . . . . . . . . . . . . . . . . . . . . . . . . . 47
Using Snapshots . . . . . . . . . . . . . . . . . . . . . . . . . . . . . . . . 47
Duplicate Snapshot . . . . . . . . . . . . . . . . . . . . . . . . . . . . . . 47
Swapping Snapshots . . . . . . . . . . . . . . . . . . . . . . . . . . . . . 48
Delete Snapshot . . . . . . . . . . . . . . . . . . . . . . . . . . . . . . . . 48
Momentary vs. Latching Behavior . . . . . . . . . . . . . . . . . . . . . . . 48
Polyphonic Snapshots . . . . . . . . . . . . . . . . . . . . . . . . . . . . . 48
Page 3

Table of Contents
Torq 1.5 User Guide
Chapter 9 . . . . . . . . . . . . . . . . . . . . . . . . . . . . . . . . . . . . . . . 49
Browser /Dat abase . . . . . . . . . . . . . . . . . . . . . . . . . . . . 49
Browser Pane . . . . . . . . . . . . . . . . . . . . . . . . . . . . . . . . . . 49
Database . . . . . . . . . . . . . . . . . . . . . . . . . . . . . . . . . 50
File List . . . . . . . . . . . . . . . . . . . . . . . . . . . . . . . . . . . . . 52
Editing Fields . . . . . . . . . . . . . . . . . . . . . . . . . . . . . . . 52
Loading Songs into the Decks . . . . . . . . . . . . . . . . . . . . . . 52
Unloading Songs from the Decks . . . . . . . . . . . . . . . . . . . . 52
Sorting the List . . . . . . . . . . . . . . . . . . . . . . . . . . . . . . 53
Searching the List . . . . . . . . . . . . . . . . . . . . . . . . . . . . . 53
Playlists . . . . . . . . . . . . . . . . . . . . . . . . . . . . . . . . . . 54
Session Playlist . . . . . . . . . . . . . . . . . . . . . . . . . . . . . . 57
iTunes . . . . . . . . . . . . . . . . . . . . . . . . . . . . . . . . . . . 58
iPods . . . . . . . . . . . . . . . . . . . . . . . . . . . . . . . . . . . . 59
Drives . . . . . . . . . . . . . . . . . . . . . . . . . . . . . . . . . . . 59
Audio CDs . . . . . . . . . . . . . . . . . . . . . . . . . . . . . . . . . 59
Chapter 10 . . . . . . . . . . . . . . . . . . . . . . . . . . . . . . . . . . . . . . . 60
Mixer . . . . . . . . . . . . . . . . . . . . . . . . . . . . . . . . . . . . . . . 60
Mixer Architecture . . . . . . . . . . . . . . . . . . . . . . . . . . . . . . . 60
Channels . . . . . . . . . . . . . . . . . . . . . . . . . . . . . . . . . 60
Gain /Mute . . . . . . . . . . . . . . . . . . . . . . . . . . . . . . . . . 61
EQ/ Kills . . . . . . . . . . . . . . . . . . . . . . . . . . . . . . . . . . 61
PFL/Headphone Cue . . . . . . . . . . . . . . . . . . . . . . . . . . . 62
Channel Volume Faders . . . . . . . . . . . . . . . . . . . . . . . . . 62
Line Input Buttons . . . . . . . . . . . . . . . . . . . . . . . . . . . . 62
Crossfader. . . . . . . . . . . . . . . . . . . . . . . . . . . . . . . . . 62
Chapter 11 . . . . . . . . . . . . . . . . . . . . . . . . . . . . . . . . . . . . . . . 64
PFL/Headphone Cue . . . . . . . . . . . . . . . . . . . . . . . . . . . 64
Volume Control . . . . . . . . . . . . . . . . . . . . . . . . . . . . . . . . . 64
Split Button and Source Knob . . . . . . . . . . . . . . . . . . . . . . . . . 64
Chapter 12 . . . . . . . . . . . . . . . . . . . . . . . . . . . . . . . . . . . . . . . 65
Master Output . . . . . . . . . . . . . . . . . . . . . . . . . . . . . . . . 65
Volume Control . . . . . . . . . . . . . . . . . . . . . . . . . . . . . . . . . 65
Level Meter and Limiter . . . . . . . . . . . . . . . . . . . . . . . . . . . . 65
Master Recorder . . . . . . . . . . . . . . . . . . . . . . . . . . . . . . . . 66
Filename . . . . . . . . . . . . . . . . . . . . . . . . . . . . . . . . . . 66
Setting the Record Level . . . . . . . . . . . . . . . . . . . . . . . . . 66
Recording . . . . . . . . . . . . . . . . . . . . . . . . . . . . . . . . . 66
Chapter 13 . . . . . . . . . . . . . . . . . . . . . . . . . . . . . . . . . . . . . . . 67
Effects . . . . . . . . . . . . . . . . . . . . . . . . . . . . . . . . . . . . . . 67
Controls . . . . . . . . . . . . . . . . . . . . . . . . . . . . . . . . . . . . . 67
Effect Slot . . . . . . . . . . . . . . . . . . . . . . . . . . . . . . . . . 67
Enable Button . . . . . . . . . . . . . . . . . . . . . . . . . . . . . . . 67
Mix Knob . . . . . . . . . . . . . . . . . . . . . . . . . . . . . . . . . . 68
Routing Button . . . . . . . . . . . . . . . . . . . . . . . . . . . . . . 68
Tweak Knob . . . . . . . . . . . . . . . . . . . . . . . . . . . . . . . . 6 8
Tweak Button . . . . . . . . . . . . . . . . . . . . . . . . . . . . . . . 69
Saving Effect Racks . . . . . . . . . . . . . . . . . . . . . . . . . . . 69
Loading Effect Racks . . . . . . . . . . . . . . . . . . . . . . . . . . . 69
Bypassing the Effects . . . . . . . . . . . . . . . . . . . . . . . . . . 69
Clearing all Effects . . . . . . . . . . . . . . . . . . . . . . . . . . . . 69
Built-In Effects . . . . . . . . . . . . . . . . . . . . . . . . . . . . . . . . . 70
Delay . . . . . . . . . . . . . . . . . . . . . . . . . . . . . . . . . . . . 70
Reverb . . . . . . . . . . . . . . . . . . . . . . . . . . . . . . . . . . . 71
Flanger . . . . . . . . . . . . . . . . . . . . . . . . . . . . . . . . . . . 72
Phaser . . . . . . . . . . . . . . . . . . . . . . . . . . . . . . . . . . . 72
Dual-Filter . . . . . . . . . . . . . . . . . . . . . . . . . . . . . . . . . 73
Distor tion . . . . . . . . . . . . . . . . . . . . . . . . . . . . . . . . . 74
Strobe . . . . . . . . . . . . . . . . . . . . . . . . . . . . . . . . . . . 75
Reverse . . . . . . . . . . . . . . . . . . . . . . . . . . . . . . . . . . 75
Brake . . . . . . . . . . . . . . . . . . . . . . . . . . . . . . . . . . . . 76
Repeat . . . . . . . . . . . . . . . . . . . . . . . . . . . . . . . . . . . 76
VST Effects . . . . . . . . . . . . . . . . . . . . . . . . . . . . . . . . . . . 77
Latency . . . . . . . . . . . . . . . . . . . . . . . . . . . . . . . . . . 77
Selecting Ef fects . . . . . . . . . . . . . . . . . . . . . . . . . . . . . 77
Assigning Controls . . . . . . . . . . . . . . . . . . . . . . . . . . . . 78
VST Crash Guard . . . . . . . . . . . . . . . . . . . . . . . . . . . . . 78
VST Preset Management . . . . . . . . . . . . . . . . . . . . . . . . . 78
Chapter 14 . . . . . . . . . . . . . . . . . . . . . . . . . . . . . . . . . . . . . . . 79
ReWire . . . . . . . . . . . . . . . . . . . . . . . . . . . . . . . . . . . . . . 79
Global Tempo . . . . . . . . . . . . . . . . . . . . . . . . . . . . . . . . . . 79
Audio Routing . . . . . . . . . . . . . . . . . . . . . . . . . . . . . . . . . . 80
Chapter 15 . . . . . . . . . . . . . . . . . . . . . . . . . . . . . . . . . . . . . . . 81
Preferences . . . . . . . . . . . . . . . . . . . . . . . . . . . . . . . . . . 81
Audio Tab . . . . . . . . . . . . . . . . . . . . . . . . . . . . . . . . . . . . 81
Torq Engine . . . . . . . . . . . . . . . . . . . . . . . . . . . . . . . . 82
Timestretching Qualit y . . . . . . . . . . . . . . . . . . . . . . . . . . 82
Auto Gain . . . . . . . . . . . . . . . . . . . . . . . . . . . . . . . . . 82
Audio Interface . . . . . . . . . . . . . . . . . . . . . . . . . . . . . . 82
Sample Rate . . . . . . . . . . . . . . . . . . . . . . . . . . . . . . . . 82
Buffer Size . . . . . . . . . . . . . . . . . . . . . . . . . . . . . . . . . 83
Mixer Mode . . . . . . . . . . . . . . . . . . . . . . . . . . . . . . . . 84
MIDI Tab . . . . . . . . . . . . . . . . . . . . . . . . . . . . . . . . . . . . . 85
Auto-Detect M-Audio Devices ([On ]/Off) . . . . . . . . . . . . . . . . 85
MIDI Soft Takeover . . . . . . . . . . . . . . . . . . . . . . . . . . . . 85
Scratch Sensitivity . . . . . . . . . . . . . . . . . . . . . . . . . . . . 86
Nudge Sensitivit y . . . . . . . . . . . . . . . . . . . . . . . . . . . . . 86
Crossfader Curve Control . . . . . . . . . . . . . . . . . . . . . . . . 86
MIDI SHIFT Key . . . . . . . . . . . . . . . . . . . . . . . . . . . . . . 86
Instant Doubles . . . . . . . . . . . . . . . . . . . . . . . . . . . . . . 86
MIDI Clock. . . . . . . . . . . . . . . . . . . . . . . . . . . . . . . . . 87
MIDI Devices . . . . . . . . . . . . . . . . . . . . . . . . . . . . . . . 88
External C ontrol Tab . . . . . . . . . . . . . . . . . . . . . . . . . . . . . . 89
External C ontrol . . . . . . . . . . . . . . . . . . . . . . . . . . . . . . 89
AMPutate Mode . . . . . . . . . . . . . . . . . . . . . . . . . . . . . . 89
Lead In . . . . . . . . . . . . . . . . . . . . . . . . . . . . . . . . . . . 89
Skip Protection . . . . . . . . . . . . . . . . . . . . . . . . . . . . . . 90
Plug-ins Tab . . . . . . . . . . . . . . . . . . . . . . . . . . . . . . . . . . . 91
System VST Plug-in Directory . . . . . . . . . . . . . . . . . . . . . . 91
Custom VST Plug-in Directory . . . . . . . . . . . . . . . . . . . . . . 91
Page 4

Miscellaneous Tab . . . . . . . . . . . . . . . . . . . . . . . . . . . . . . . 92
Skin . . . . . . . . . . . . . . . . . . . . . . . . . . . . . . . . . . . . 92
Tooltips . . . . . . . . . . . . . . . . . . . . . . . . . . . . . . . . . . 92
Search iTunes Librar y with Database . . . . . . . . . . . . . . . . . . 92
Search iPod with Database . . . . . . . . . . . . . . . . . . . . . . . 92
Transpor t Mode . . . . . . . . . . . . . . . . . . . . . . . . . . . . . . 93
Reset Speed on New Track . . . . . . . . . . . . . . . . . . . . . . . 93
Cue Exclusivity . . . . . . . . . . . . . . . . . . . . . . . . . . . . . . 93
Schaf fel Mode . . . . . . . . . . . . . . . . . . . . . . . . . . . . . . 93
Sync Mode . . . . . . . . . . . . . . . . . . . . . . . . . . . . . . . . 93
Loop /Cue Quantize . . . . . . . . . . . . . . . . . . . . . . . . . . . . 94
Loop Out Mode . . . . . . . . . . . . . . . . . . . . . . . . . . . . . . 94
QuickLoop Size . . . . . . . . . . . . . . . . . . . . . . . . . . . . . 94
QuickLoop Mode . . . . . . . . . . . . . . . . . . . . . . . . . . . . . 94
Beat Detection Style . . . . . . . . . . . . . . . . . . . . . . . . . . . 95
Beat Detection Limits . . . . . . . . . . . . . . . . . . . . . . . . . . . 95
Sample Counter . . . . . . . . . . . . . . . . . . . . . . . . . . . . . . 95
Chapter 16 . . . . . . . . . . . . . . . . . . . . . . . . . . . . . . . . . . . . . . . 96
Appendix . . . . . . . . . . . . . . . . . . . . . . . . . . . . . . . . . . . . 96
Preset Key Assignments . . . . . . . . . . . . . . . . . . . . . . . . . . . . 96
Global Key Commands . . . . . . . . . . . . . . . . . . . . . . . . . . 96
Ortofon: . . . . . . . . . . . . . . . . . . . . . . . . . . . . . . . . . . 96
Shure: . . . . . . . . . . . . . . . . . . . . . . . . . . . . . . . . . . . 96
Stanton: . . . . . . . . . . . . . . . . . . . . . . . . . . . . . . . . . . 96
Windows Key Commands . . . . . . . . . . . . . . . . . . . . . . . . 96
Mac Key Commands . . . . . . . . . . . . . . . . . . . . . . . . . . . 96
Page 5
4
WELCOME
Congratulations on your purchase of a Torq-based performance system, one of the
finest DJ tools available today. Each qualified M-Audio hardware product works with
Torq in a unique fashion, and those methods are outlined in each of their user manuals.
This manual will outline the use of the Torq application itself, and we recommend that
you read this manual first in order to familiarize yourself with the architecture of Torq.
It will then be easier to understand how your hardware works in conjunction with the
software.
TORQ OVERVIEW
Torq is a software extrapolation and extension of tried-and-true DJ tools and techniques
for your Mac OS X, Windows XP or Vista computer. Torq is not bound by the limits
of hardware—it embraces the technology of today’s most advanced audio production
applications and integrates with them in a fashion that makes you part of the music.
Exercising this level of control upon your collection of songs is a task that has many
facets, and Torq addresses each of these with a specialized array of controls and features
that are cleverly arranged and accessed throughout the user interface. This section will
give you an overview of these features and how they contribute to your arsenal of digital
mixing tools and techniques.
CHAPTER
1
English
Page 6
Torq 1.5 User Guide Chapter 1
Decks
DJing begins with music, so you will get to know Torq’s Decks very well. A Deck is what
Torq uses to play back a single digital music file and is analogous to the turntable or CD
player used by DJs. The Deck allows you to play a track, change its speed and its key,
as well as rearrange it by looping and jumping to new locations within the song. Torq is
equipped with two of these Decks—one on each side of the screen.
Main Waveform Display
One of the wonderful benefits of computer technology is the ability to visualize audio. While being interesting to the eyes
in their own right, waveform displays can be an invaluable tool when DJing. Torq’s user interface is dominated by two such
waveforms at the top-center of the screen, one corresponding to each of the Decks. Use these scrolling waveforms to check
the synchronization of tracks, locate sounds, predict breakdowns, edit Tempo Anchors, and much more.
5
Page 7
Torq 1.5 User Guide Chapter 1
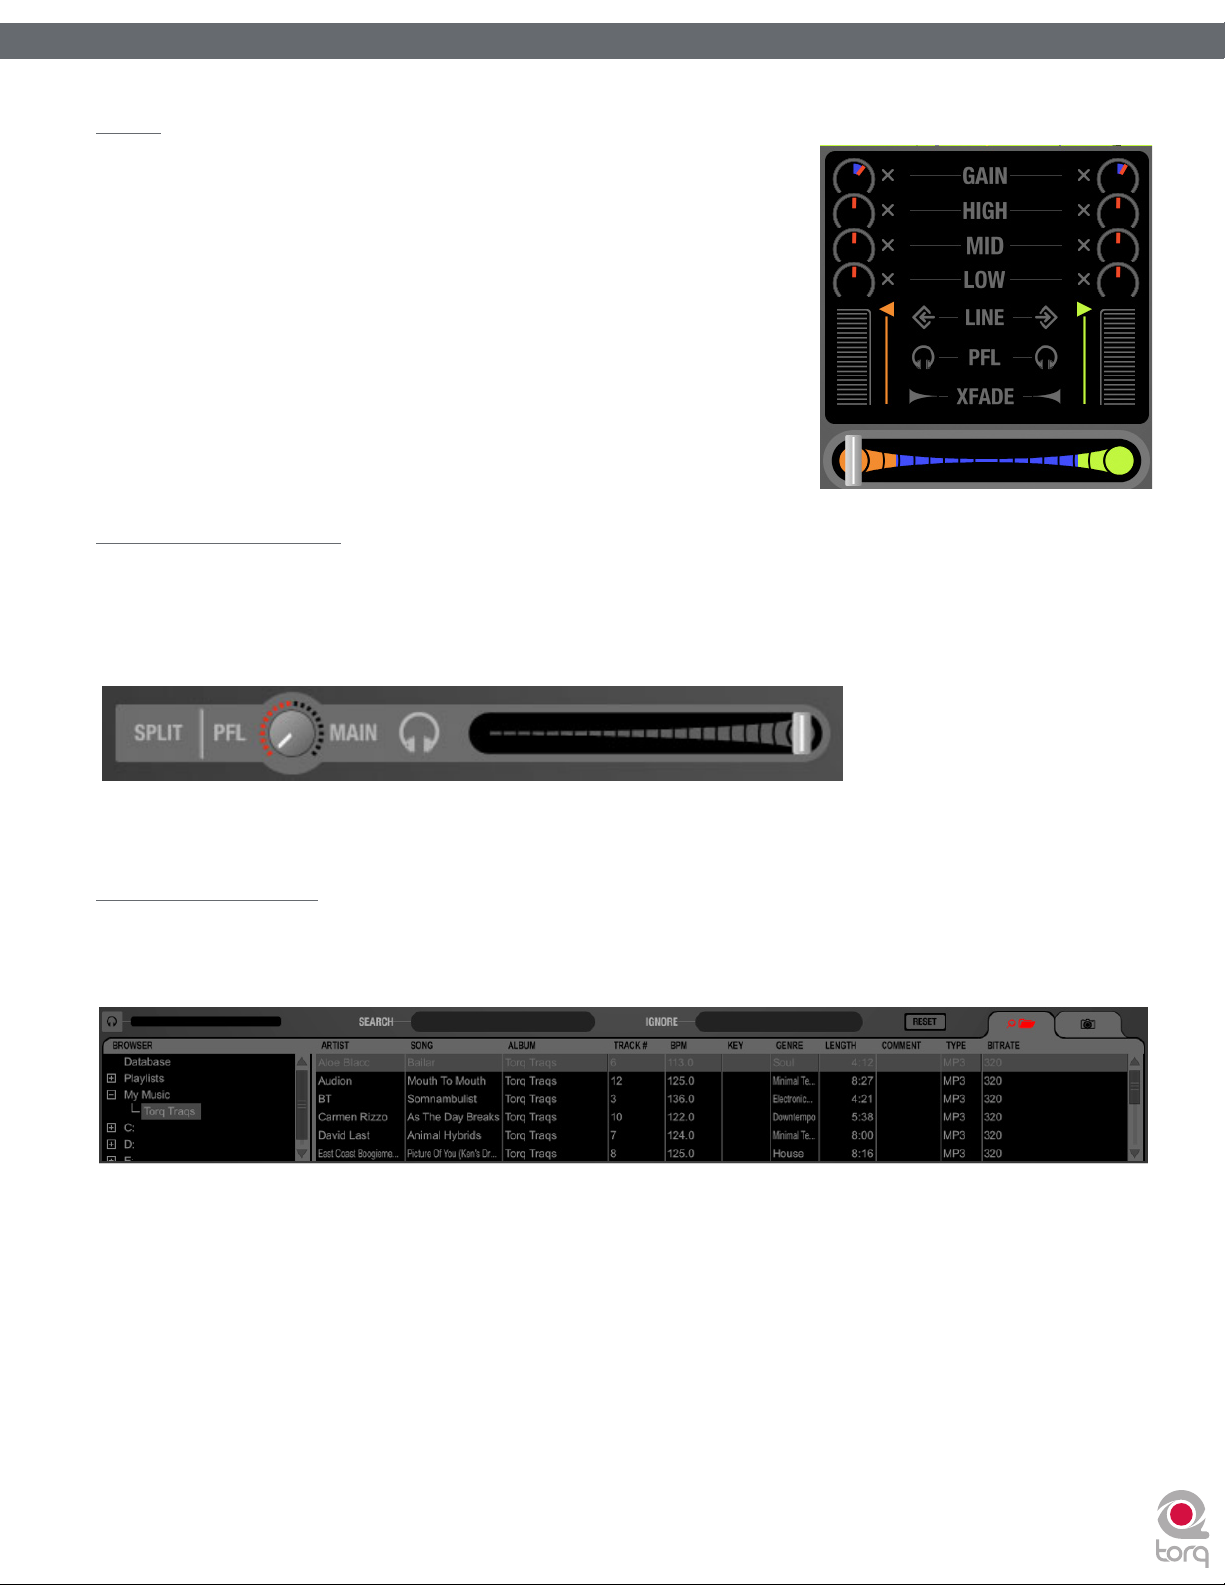
Mixer
It’s all in the mix, or so they say, and Torq’s Mixer delivers the goods. The Mixer
takes the audio from the two Decks and gives you control over what can be
heard by means of volume controls, audio equalizers, and a crossfader. Two
Decks and a Mixer: the essential tools for a DJ.
PFL/Headphone Cue
DJs commonly listen to a track on their headphones without letting their audience hear it. This allows them to match the
tempo of the new song to the current one, along with finding the correct starting position for the song. Torq will allow you
to monitor either Deck on headphones, preview music from the Browser, and also features a stereo headphone split normally
reserved for high-quality DJ mixers.
6
Browser/Database
There is a third ingredient to DJing, and that’s music—lots of music. To help you stay on top of your massive music collection,
Torq features a Database for cataloging and searching tracks. It will monitor your favorite folders and allow you to create
playlists for future performances.
Page 8
Torq 1.5 User Guide Chapter 1
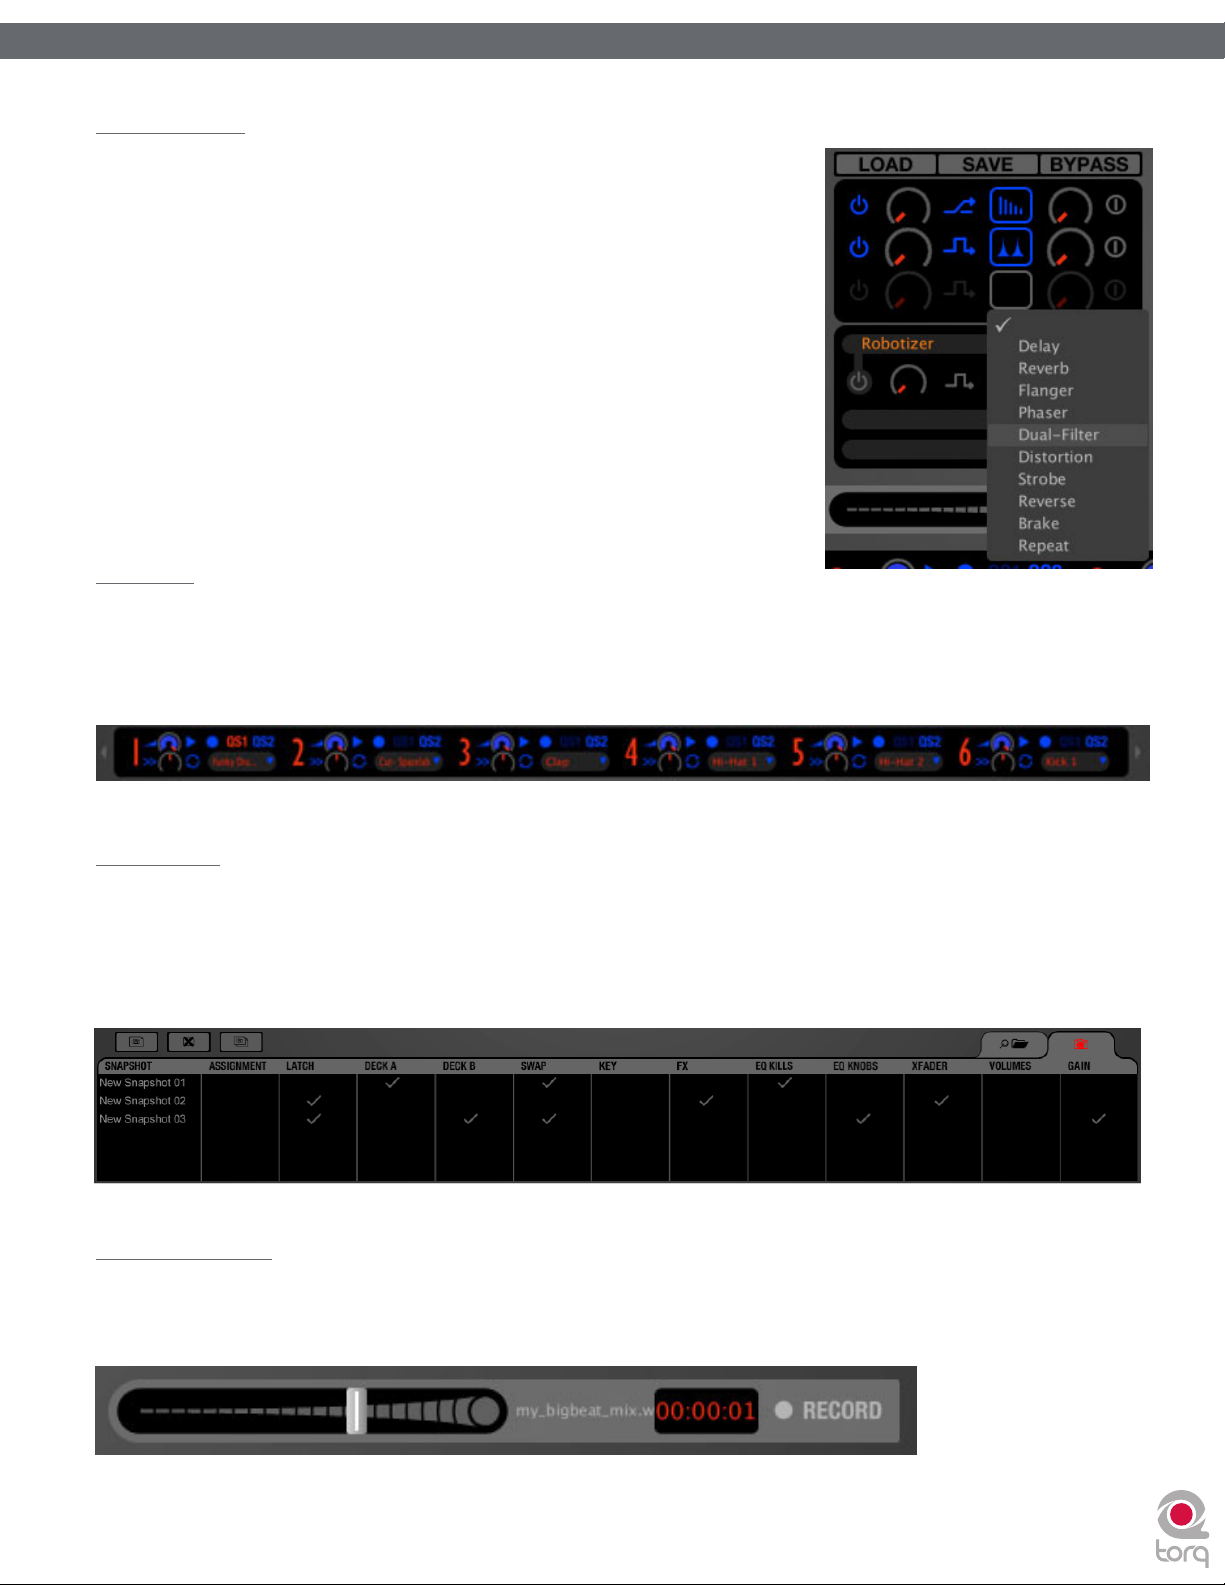
Effect Racks
Effects are a great way for you to manipulate (or mangle) your music in unique
ways to enhance your mix. Torq has a collection of built-in effects that are
specifically designed for DJ use: Tempo-synced delays and strobes. Shimmering
phasers and flangers. Glitchy repeats and distortions. Ten effects are ready to
go and full of creative potential. You can use up to three of these effects on each
Deck, and you can also expand your collection using widely-available VST plug-ins.
Sampler
A Sampler can be thought of as a miniature tape recorder. It can record a short segment of sound, and then play it back on
command at varying speeds and volumes. DJs use samplers to add additional sounds into their mix like vocal drops, crash
cymbals, boomy bass drums, and sound effects. Torq has a 16-cell sampler that can play audio files and record loops that play in
perfect sync with your mix.
7
Snapshots
DJing is done with the hands, but you may find that your mind wants to hear more than your two hands are capable of. To
surmount this obstacle, Torq allows you to combine multiple movements, such as button presses and knob tweaks, into one
grand gesture called a Snapshot that can be triggered by a single keypress. Torq manages a collection of Snapshots that can be
recalled interchangeably, even in rapid succession. The Snapshots can even be layered together to create massive changes in
your mix.
Master Module
When all is tweaked and mixed to perfection, the resultant audio is sent to the Master Output. Torq features an automatic
output limiter that will keep your music from distorting as well as a module for recording the final mix to a file as you play. You
can then burn the results onto a CD or convert them to MP3 for Podcasts.
Page 9
8
8
8
SYSTEM REQUIREMENTS
Windows XP
Minimum System Requirements
OS: Windows XP (SP3)
CPU: Pentium IV 1.4 GHz
RAM: 512 MB
USB: One available port
(for use by approved
M-Audio Hardware Device)
Windows Vista (32 bit / 64 bit)
Minimum System Requirements
OS: Windows Vista (32 bit / 64 bit)
CPU: Pentium IV 1.8 GHz
RAM: 1 GB
USB: One available port
(for use by approved M -Audio
Hardware Device)
Windows Experience Index of 3.0 or better
2
Mac
Minimum System Requirements
OS: Mac OS X 10.4.11
CPU: G4 1.67 GHz
RAM: 512 MB
USB: One available port (for use by approved M- Audio Hardware Device)
1
1
1
Recommended System Specifications
OS: Windows XP (SP3)
CPU: Pentium IV 2 .4 GHz (or greater)
RAM: 2 GB
USB: One available port
(for use by approved M -Audio Hardware Device)
System Disk: 7200RPM or faster
Secondary Dedicated Audio Hard Drive:
7200RPM or faster
Recommended System Specifications
OS: Winodws Vista (32 bit / 64 bit)
CPU: Pentium IV 2 .8 GHz (or greater)
RAM (32 bit Vista): 2 GB
RAM (64 bit Vista): 4 GB
USB: One available port
(for use by approved M -Audio Hardware Device)
System Disk: 7200RPM or faster
Secondary Dedicated Audio Hard Drive:
7200RPM or faster
Windows Experience Index of 4.2 or better
CHAPTER
CHAPTER
CHAPTER
1
3
2
Recommended System Specifications
Laptop:
OS: Mac OS X 10.5.5
CPU: Mac/Intel Core 2 Duo 2.4 GHz (or greater)
RAM: 2 GB
USB: One available port
(for use by approved M -Audio Hardware Device)
Secondary Dedicated Audio Hard Drive:
7200RPM or faster
1
Minimum System Requirements reflect the ability to run Torq using a basic feature set. Some advanced or intensive
features will require increased system specifications.
2
Mac User Known Issues:
• Mac users are strongly advised to pre-analyze all audio files prior to use in Torq.
• Mac G4 users are advised to not open the Timecode Preferences Dialog while streaming more than one
Timecode source into Torq, as this may degrade G4 performance. The user is advised to calibrate before
performing, one Timecode source at a time.
English
English
English
Page 10

Torq 1.5 User Guide Chapter 1
Torq 1.5 User Guide Chapter 2
INSTALLAT ION
✓ Note: The following directions are for installing the Torq software onto your computer. Torq will not run, however, unless an
appropriate M-Audio hardware device (such as the Conectiv interface) is installed and plugged in to your computer. Please follow
the installation instructions provided with your hardware device before launching Torq.
Windows XP and Vista
1. Place the Torq disc in your CD/DVD drive.
2. Windows will automatically launch the install screen. (If you are using Windows Vista and see an Autoplay dialog
window, click “Run autorun.exe” to launch the installer.) If the install screen fails to launch, you can manually start it
by clicking on Start > My Computer 3 > Torq CD-ROM.
3. Select Torq from the drop-down menu and click “Install.”
4. The Installation Wizard will appear. Choose “Next.”
5. The License Agreement window will appear. Select “I accept the agreement” then choose “Next.”
6. Windows will prompt you to select a destination folder. The default path is C:\Program Files\Torq. If you would like
to install Torq in another location, click the “Browse” button and choose a new location.
9
9
7. When you have chosen an install folder, click “Next.”
8. You will be asked where Torq should install the application shortcuts in the Windows Start menu. If you are not
familiar with this, leave the default selection and choose “Next.”
9. The installer will give you the option of creating a desktop icon. This icon is used to quickly launch Torq directly from
your desktop. Make your selection and choose “Next.”
10. Confirm your install settings and choose “Install.”
11. Torq will begin installing, its process indicated by a Windows progress bar.
12. When Torq is finished installing, choose “Finish.”
13. Close the installer screen.
14. Double-click the Torq application icon to launch the program.
3
If you are using Windows Vista, “My Computer” will be labeled “Computer” in this step.
Macintosh OS X
1. Place the Torq disc in your CD/DVD drive.
2. Double-click the Torq CD icon on your desktop. This will display the contents of the CD.
3. Double-click the “Open Me” icon.
4. Select Torq from the drop-down menu and click “Install.”
5. The Torq installer welcome screen will appear. Click “Continue.”
6. The Software License Agreement window will appear. Click “Continue.”
7. Choose “Agree” from the drop-down dialog box.
8. Select a drive on which to install Torq and click “Continue.”
✓ Note: By default, the “Applications” folder on your main hard drive will be selected; if you would like to select another
folder, click “Choose” and make a selection.
9. Click “Install” to begin the installation.
10. When installation has completed, select “Close.”
11. A Torq shortcut icon will be displayed on your desktop. Double-click the icon to launch the program.
Page 11

Torq 1.5 User Guide Chapter 1
Torq 1.5 User Guide Chapter 2
AUTHORIZATION
1. Launch Torq. You will be presented with a dialog box asking for your serial number.
2. Your serial number is on a printed card (included in boxed versions of Torq) or was sent to you electronically (for on-
line upgrades). If you have not purchased a serial number, click the “Buy” button and Torq will point your default web
browser to the M-Audio Webstore.
3. Type your serial number into the dialog box and click OK.
4. Torq is now unlocked and ready to use.
10
10
Page 12
11
11
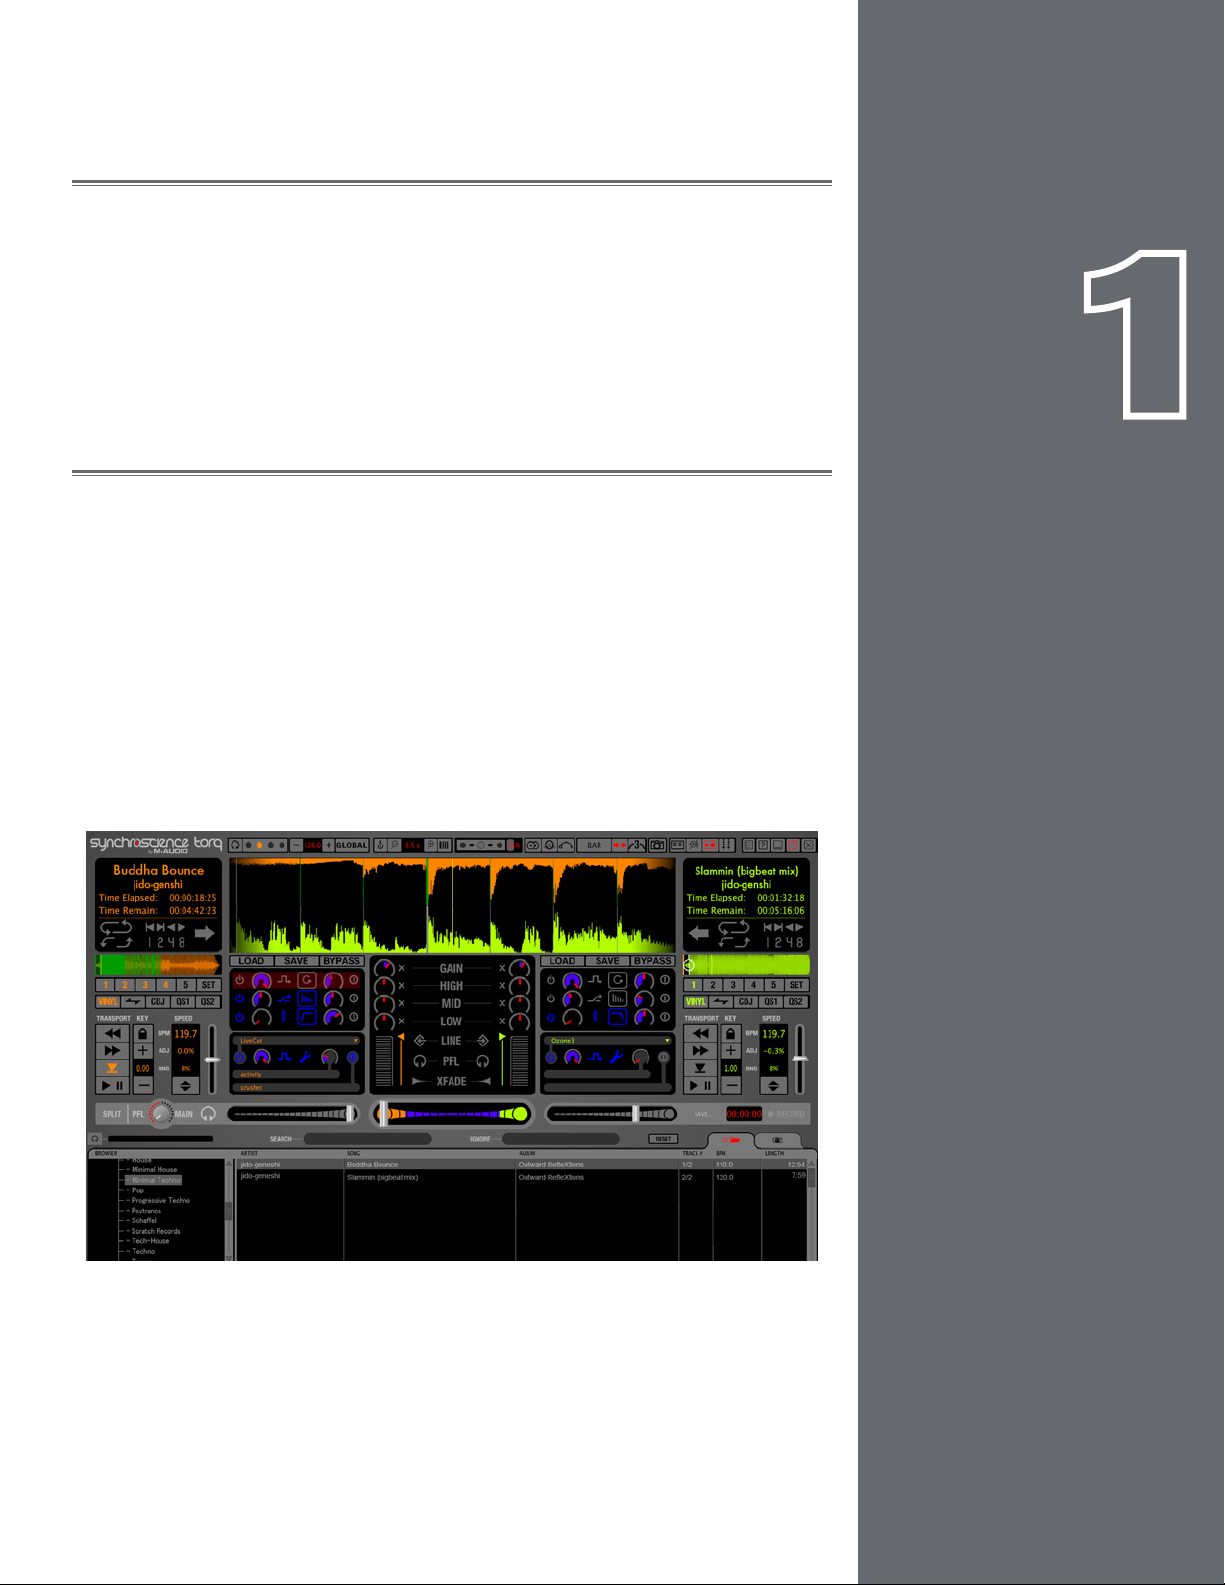
DECKS
When DJing, everything begins with the Decks.
The Decks will play the music that you’ll mix and
effect using all the tools in Torq. Traditionally, a DJ’s
decks will be turntables or CD players. Therefore,
the Decks in Torq have been designed to emulate
both turntables and CD players, as well as offering a
special hybrid mode only possible with software.
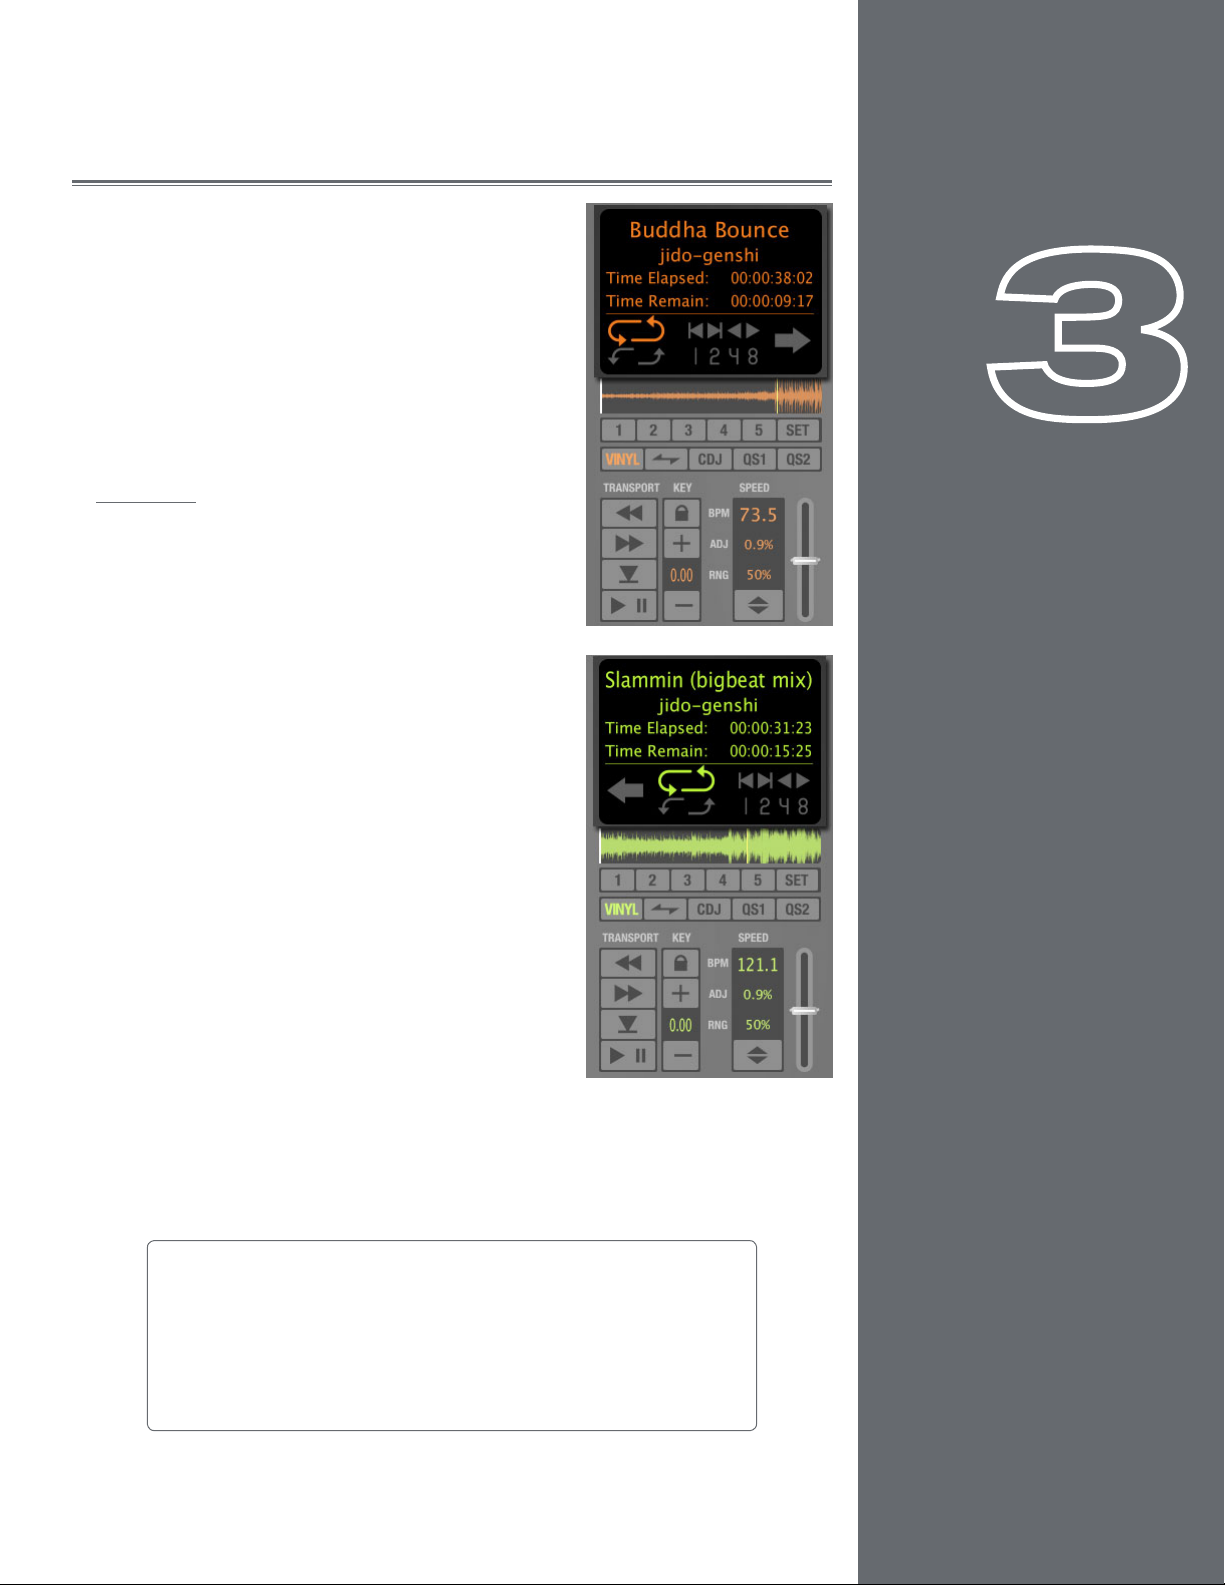
Displays
Each Deck has various informational displays
throughout the interface. These are mostly for
relaying information to you, such as which song is
playing, how long it’s been playing, and how much
time is remaining.
Song Name
At the top of the Deck is the name of the
current song. The name is taken from the song
category (seen in the File List). If there is no
song name listed in the File List, the name of
the actual file will be shown instead.
CHAPTER
CHAPTER
1
3
Artist Name
Below the Song Name is the Artist Name. Like
the Song Name, above, this field will be empty
if there is no entry in the Artist category of
the file.
Time Elapsed
This is the current location of the song, marked by the yellow Now Line in the
Overview Waveform Display. The Time Elapsed is expressed in hours/minutes/
seconds/frames (30 fps). When the Current Position Marker is at the beginning of
the song, the Time Elapsed will be 0:0:0.0.
Instant Doubles
Using the mouse, you can click and drag the song name from one Deck to the
other. Doing this will copy the song to the other Deck and will match playback
locations and speed, thus allowing you to juggle the two songs. This function can
also be triggered using the computer keyboard or an external MIDI controller.
Please see Chapter 15 “MIDI Tab” for information on making these assignments.
English
English
Page 13

Torq 1.5 User Guide Chapter 1
Torq 1.5 User Guide Chapter 3
Time Remain
This field indicates how much time is left before the song ends. At the beginning of the song, the Time Remaining will be
the same as the entire length of the song. When the Deck is playing, the Time Remaining will count down.
✓ Note: The Overview and Scrolling Waveform displays will begin to flash red when there is less than 30 seconds remaining
in the song. This is to notify you that you’d better get ready with another song to play!
Overview Waveform
Each Deck includes an Overview Waveform display which shows a miniaturized version of the song’s waveform in its
entirety. This display serves several purposes:
1. It allows you to see where the breaks and builds are in a song before they happen.
2. The yellow Now Line indicates your current location within the song.
3. White QuickCue points and green Tempo Anchors (described later) will be superimposed over this waveform.
4. You can click anywhere in this waveform and playback will jump to that location.
Controls
12
12
As mentioned before, the purpose of the Deck is to play a music file, similar to how iTunes
or WinAmp plays files on your computer. However, in the scope of DJing, things don’t stop
there. A DJ needs to be able to control the playback of the music with greater detail, such
as changing the speed and/or key of the song, looping sections of audio, and jumping to
other locations within the song. This allows the DJ to match tempos of various songs during
a mix, or to re-arrange the song (in essence, creating a live remix of the song). The Torq
Decks accomplish these tasks using the controls described below.
Play/Pause
Songs are played and stopped by clicking the Play/Pause button. Simply load a song
into the Deck and press Play/Pause to start it. Press Play/Pause again to pause
the music.
✓ Note: When you pause the music, the song will not return to the beginning—it
will stay in the same location as when you stopped it. If you want to return to the
beginning, use the Seek controls described below.
Seek
The Seek buttons are used to skip forward or backward through the song, allowing you to find certain points (or beats)
within the song from which you can start playing.
1. If you click briefly on the Forward or Backward buttons, the music will jump only slightly in that direction.
2. If you click and hold one of these buttons, Torq will scroll through the song, going faster and faster as long as you
hold the button. Scrolling will stop when you release the button.
3. To jump to either the beginning or end of the song, hold the Shift key while clicking Seek buttons.
Page 14
Torq 1.5 User Guide Chapter 1
Torq 1.5 User Guide Chapter 3
Cue
The Cue button will establish a primary Cue Point within a song. A Cue Point is a reference position within the track
that you can jump to instantly, rather than having to seek through the track to find it. Typically, a DJ will set the Cue
Point where the beat begins in a song. It is visible (in orange) within the Waveform Display. The Cue button abides by the
following rules:
1. If a song is playing, pressing the Cue button will make the song jump to the Cue Point and will pause there.
2. If Cue is pressed and held again, the music will begin playing from the Cue Point. The music will stop playing
when the Cue button is released and the song will jump back to the Cue Point.
3. If a song is paused in a location different from the Cue Point, pressing the Cue button will set the Cue Point to
the current location.
4. If you hold SHIFT and press Cue, a Cue Point will be placed at the current location, even if the song is already
playing.
5. If you hold Cue and press the Play/Pause button, the music will continue to play after you release both buttons.
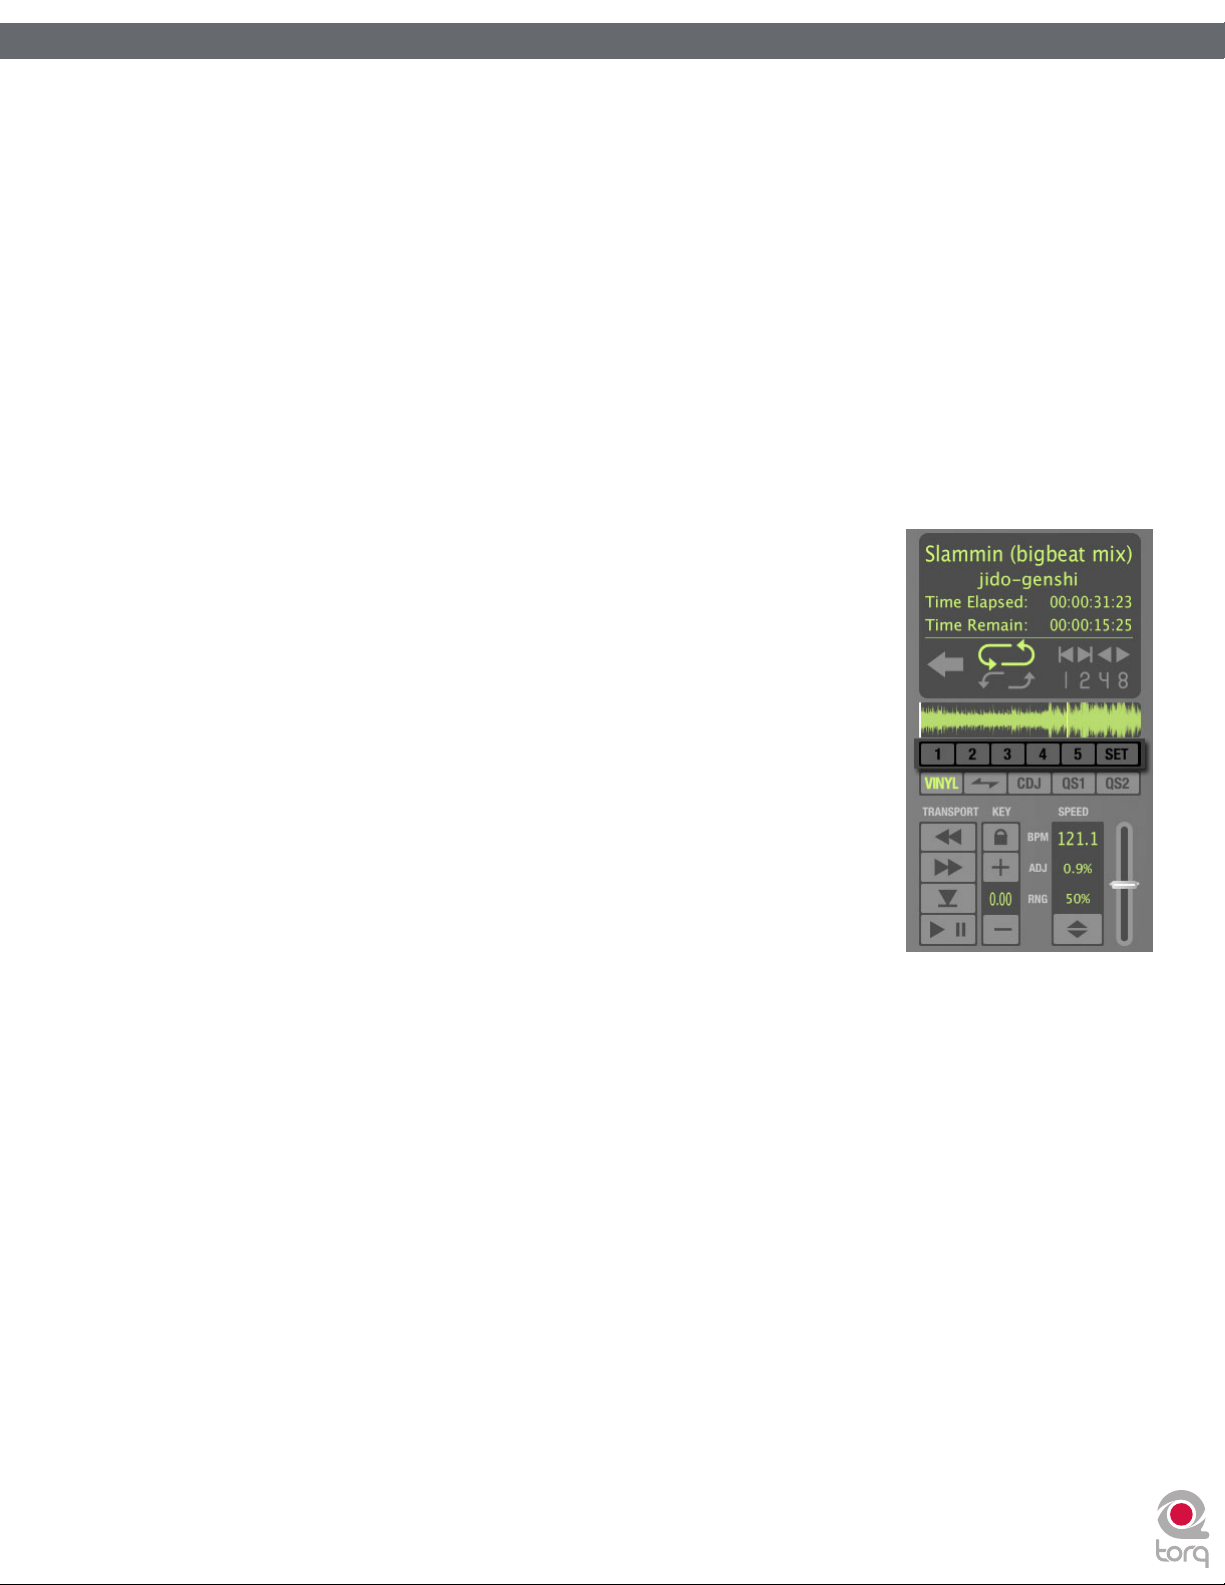
QuickCue
In addition to the primary Cue Point described above, Torq allows you to set up to
five QuickCue Points in a song that are assigned to the QuickCue buttons below the
Overview Waveform display. These buttons can then be used to quickly jump between
the various QuickCue points. Torq will save the locations of the five QuickCue points
with each song so they will be available the next time you play the song.
13
13
< Setting QuickCues
There are a few different ways to set QuickCue Points, but all methods
deliver the same results.
1. Click the Set button, then click one of the QuickCue buttons. A
QuickCue Point will be set at the current location (this can be done
while the Deck is playing or paused). When added, the QuickCue will
be visible in the Overview Waveform display.
2. Hold the Shift key while clicking one of the QuickCue buttons. Again,
the QuickCue Point will be set to the Now Line, whether the Deck
is playing or not. When added, the QuickCue will be visible in the
Overview Waveform display.
✓ Note: If Quantize is turned on in Torq’s Toolbar, new QuickCue points will be aligned to the nearest 16th-note in
a song.
✓ Note: If you try to assign a QuickCue to a button that is already set to a particular location, the old
QuickCue location will be overwritten in favor of the new one.
< Playing QuickCues
Once you’ve set a couple QuickCue Points, all you have to do is click on the desired QuickCue button and
the Deck will immediately jump to this new location and begin playing. If you set your QuickCue Points at key
positions within the song, you can immediately jump to different sections on-the-fly, such as jumping ahead to a
chorus or back to the intro.
✓ Note: If you reposition playback using one of the QuickCue buttons while Looping is activated, playback will jump
to the new location. Torq will then automatically place the Loop In Marker at that point and will place the Loop Out
Marker in a position to maintain the same loop length in use prior to pressing the QuickCue button.
< Clearing QuickCues
If you’d like to clear all of the QuickCues in a song, hold the Shift button while clicking the Set button. Torq will
ask if you really want to do this—click Yes to complete the procedure.
Page 15

Torq 1.5 User Guide Chapter 1
Torq 1.5 User Guide Chapter 3
Deck Mode
In order for Torq to feel familiar to all types of DJs, the Decks can be operated in one of three different modes.
< Vinyl Mode
Vinyl Mode will make the Deck behave as if it was a turntable. This means:
1. Pressing Play/Pause to pause playback will cause audio to stop, just like pressing stop on a turntable.
2. Clicking and dragging on the Scrolling Waveform will have audible results, like scratching a record.
< CDJ Mode
CDJ mode will make the Deck behave as if it was a CDJ player. In use:
1. Pressing Play/Pause to pause playback will cause the Deck to stop and begin repeating a small section of
audio. The repeating section corresponds to the position where playback will resume when you press
Play/Pause again.
2. While the audio is repeating, you can click and drag on the Scrolling Waveform to move the start
location—you’ll hear the repeating audio slice change as you do this. Press the Cue button to set the Cue
Point to this location and the repeating audio slice will stop.
3. Clicking and dragging on the Scrolling Waveform while the Deck is playing will not stop audio. Instead,
you’ll be able to drag left or right to offset the playback speed of the track. This will allow you to align the
track against the other Deck when beat-matching.
14
14
< Hybrid Mode
Hybrid mode provides a blend of the CDJ and Vinyl control modes:
1. Pressing Play/Pause to pause playback will cause audio to stop, just like in Vinyl mode.
2. While paused, clicking and dragging on the Scrolling Waveform will have audible results, like scratching in
Vinyl mode.
3. When playback is active, clicking and dragging on the Scrolling Waveform will not stop audio. Instead, you’ll
be able to drag left or right to offset the playback speed of the track like in CDJ mode. This will allow you
to align the track against the other Deck when beat-matching.
Page 16

Torq 1.5 User Guide Chapter 1
Torq 1.5 User Guide Chapter 3
Looping
Technology is always evolving, thus DJing is always evolving. With the introduction of DJ CD players, DJs gained many
new exciting capabilities that were unavailable to them when working within the confines of vinyl records. One of those
features is looping, which is merely the act of repeating a section of a song.
The creative aspect of DJing suggests that a simple trick such as looping can be exploited in a variety of ways. Indeed, you
can use looping to “remix” a song by changing the arrangement—extending your favorite parts of the song. You can also
use looping as a “safety net” allowing the end of a song to play infinitely, giving you more time to mix into the next song.
Looping can also be used to isolate a section of the song, such as the breakbeat, for layering on top of other songs.
Torq offers you two different ways to loop audio. You can specify the start and end points of the loop manually, or you
can capture loops of a specific length using the QuickLoop buttons. Furthermore, Torq will help you make the perfect
loop every time by automatically matching your loop points to the tempo of the song.
< Loop In/Out
Looping an entire song doesn’t have much benefit for a DJ, so Torq allows you to move the Loop Markers by
using the Loop In and Loop Out buttons:
1. Load a song into a Deck and press Play. The song will begin to play.
2. When playback reaches the beginning of the section you want to loop, click the Loop In button. This will
place a Loop In Marker at the Now Line (shown as a yellow marker line in the scrolling and overview
waveforms) and the song will continue to play. If the Quantize button is on, Loop In marker will snap to the
beginning of the nearest 16th-note in the song’s waveform.
15
15
3. When playback reaches the end of the section you want to loop, click the Loop Out button. This will place
a Loop Out Marker at the Now Line, which will also snap to the nearest 16th-note (this behavior can be
changed in the Preferences). At the same time, the Loop On/Off button will automatically be activated
causing playback to jump back to the Loop In Marker. The music will now loop between these two points
indefinitely.
4. When you’re finished looping this section of the song, you can click the Loop On/Off button to turn it off.
Now, when playback reaches the Loop Out Marker, it will simply pass it and proceed playing the rest of
the song.
✓ Note: If you reposition playback using one of the QuickCue buttons while Looping is activated, playback will
jump to the new location. Torq will then automatically place the Loop In Marker at that point and will place
the Loop Out Marker in a position to maintain the same loop length in use prior to pressing the QuickCue
button.
< Loop Out Preference
By default, Torq will always quantize the position of the Loop Out marker to a location that results in a quantized
16th-note length from the position of the Loop In marker. This requires that you press the Loop Out marker
within a 16th-note of where you want the loop to end. Torq has a second Loop Out mode that will make it
easier to achieve even loops without having to press the Loop Out button with 16th-note accuracy:
1. Open Torq’s Preferences and click on the Behaviors Tab.
2. Switch the Loop Out mode from “16th” to “Smart” and close the preferences.
Now, when you press Loop Out, Torq will place the Loop Out marker at a position that is a multiple of 2 in
length from the Loop In marker. In other words, Torq will only allow you to make loops with the lengths
of 1 beat, 2 beats, 4 beats (1 bar), 2 bars, 4 bars, 16 bars, etc.
< Loop On/Off
The Loop button will indicate whether Torq is looping audio or not. Whenever this button is illuminated, Torq
will be looping something, whether triggered with one of the QuickLoop buttons or set manually with the Loop
In and Loop Out buttons. Click this button to toggle looping on and off.
Page 17

Torq 1.5 User Guide Chapter 1
Torq 1.5 User Guide Chapter 3
< QuickLoop
More often than not, a DJ will loop audio that is an even number of beats or bars. That is, they will loop a single
bar (four beats) or two bars (eight beats), or may do micro-loops of only one or two beats. Instead of having
to quickly press the Loop In and Loop Out buttons to create loops of these lengths, Torq provides one-button
access to these loops via the QuickLoop buttons.
» Using QuickLoops
The QuickLoop buttons allow you to instantly loop a section of a song by a preset length. By default, each
of the four buttons represents a different bar length; one bar, two bars, four bars, and eight bars. Simply
press one of these buttons at the beginning of the section you want to loop and Torq will automatically
place the Loop In and Loop Out Markers in the appropriate locations:
1. Load a song into a Deck and press play.
2. Press the QuickLoop button labeled “1.” The Loop button will be switched on and the Loop In
Marker will immediately be placed at the Now Line. Furthermore, the Loop Out Marker will be
placed exactly one bar later and the song will begin looping a perfect bar.
3. To turn the loop OFF, click the Loop button. Playback will now proceed beyond the Loop
Out Marker.
» QuickLoop Size Preference
As mentioned above, the default loop lengths for the four QuickLoop buttons are one bar, two bars, four
bars, and eight bars. The QuickLoop Size preference allows you to change the QuickLoop buttons to beat
values instead of bar values:
16
16
1. Open the Torq Preferences menu and click on the Behaviors tab.
2. Click the arrow next to QuickLoop Size option and choose “Beat” from the drop-down list.
3. Click the “X” to close the Preferences window.
Now, when you use the QuickLoop buttons as described above, you’ll find that they capture loops of
one beat, two beats, four beats, and eight beats in size.
» Changing QuickLoop Lengths
Along with being able to capture loops of a specific size, the QuickLoop buttons also allow you to change
the size of the loops after they have been made. Torq has two methods for changing QuickLoop lengths
which are selected from the Preferences:
1. Open the Torq Preferences menu and click on the Behaviors tab.
2. Locate the QuickLoop Mode item—you’ll see that it has two settings: “Cut and Grow” and “Direct.”
Cut and Grow is the default behavior and was the only behavior available prior to Torq 1.5--use this setting
to preserve the Torq 1.0 workflow. When this mode is selected, each additional press of a QuickLoop
button will cut the current loop length in half. For example, if you press QuickLoop 4, Torq will grab a 4
bar loop. Pressing QuickLoop 4 again will result in a 2 bar loop. Press it again and you’ll get a 1 bar loop. If
you hold SHIFT while pressing the QuickLoop button, the loop will grow in size—doubling in length with
each press of the button.
Direct mode resembles the behavior found on some DJ CD players. When selected, the QuickLoop
buttons will become divisors once a loop has been captured. For example, pressing the QuickLoop 4
button will capture a 4 bar loop. Pressing QuickLoop 2 will now divide the loop length by 2 resulting in
a 2-bar loop (4 bars / 2 = 2 bars). Pressing QuickLoop 4 will result in a 1-bar loop (4 bars / 4 = 1 bar).
Pressing QuickLoop 1 will reset the loop back to its original length (4 bars / 1 = 4 bars).
» Pre-Loop
You can also reverse the behavior of the QuickLoop buttons by holding Shift when you create a loop. If
you do this, Torq will place the Loop Out marker at the current playback location and will set the Loop In
marker at the indicated number of Bars or Beats (depending on the QuickLoop Size preference) before the
playback location. Using this feature, you can loop sections of audio that just played. For example, to repeat
the last 2 bars of music that played, hold Shift and press/click QuickLoop 2.
Page 18
Torq 1.5 User Guide Chapter 1
Torq 1.5 User Guide Chapter 3
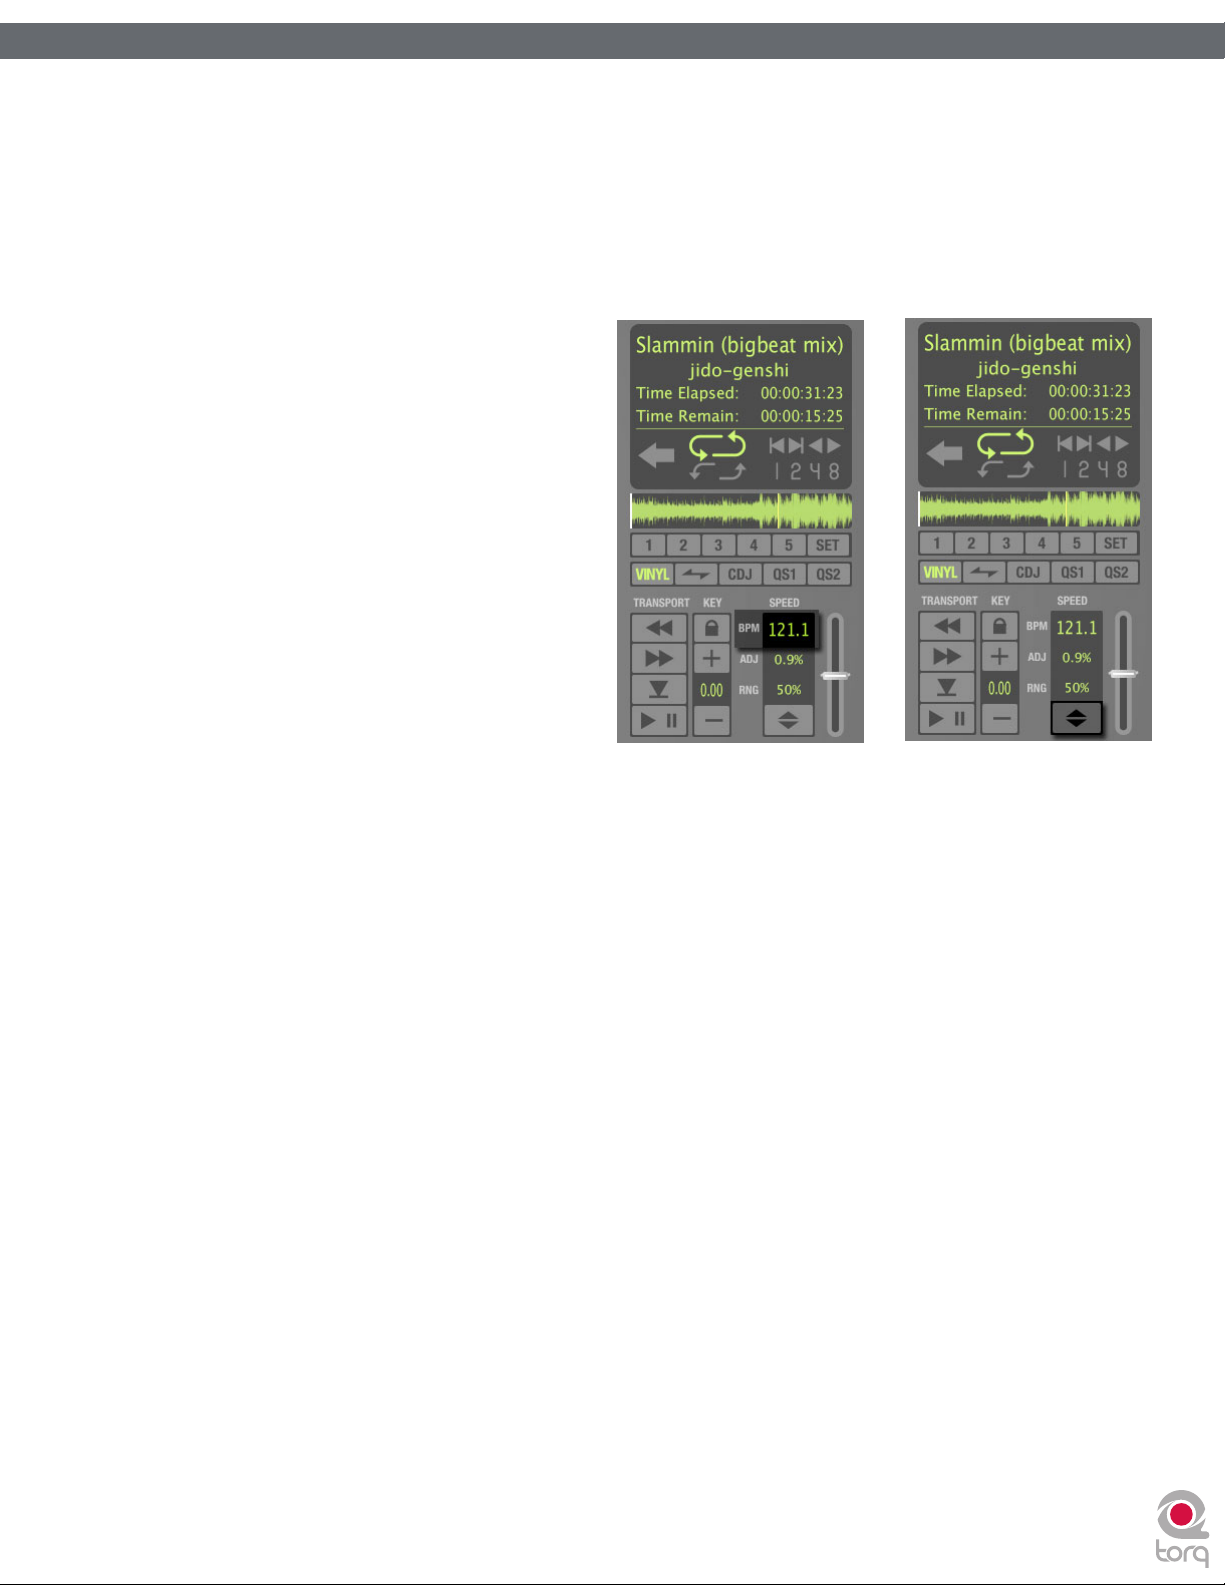
Speed Slider
Torq’s Decks are each equipped with a Speed
Adjust slider for the purpose of beat-matching
songs. This slider behaves just like the pitch
adjusters found on DJ turntables and CD players.
As you move this slider, the neighboring ADJ
display will show how much the song’s speed is
being altered (expressed as a percent where 0%
is the original speed of the song) and the BPM
display will change to show the new tempo of the
song.
For those not familiar with these controls, your
first impression may be that the slider is working
backward since the speed of the song will
increase as you move the slider down on screen.
However, this is the proper behavior for pitch
controls found on DJ turntables and CD players.
It makes sense if you consider the following:
17
17
The pitch adjust slider on a turntable is mounted flat on the surface of the turntable’s housing. Therefore, when you use
the slider, you either push it away from you or pull it towards you. When a song is going too fast, you push the slider
away from yourself, just as if you put out your hand in a “slow down” motion. If you need the song to go faster, you pull
the slider toward you, similar to how you would gesture towards yourself if you wanted someone to move quickly. After
a few hours of practice, this “backward” response will feel natural.
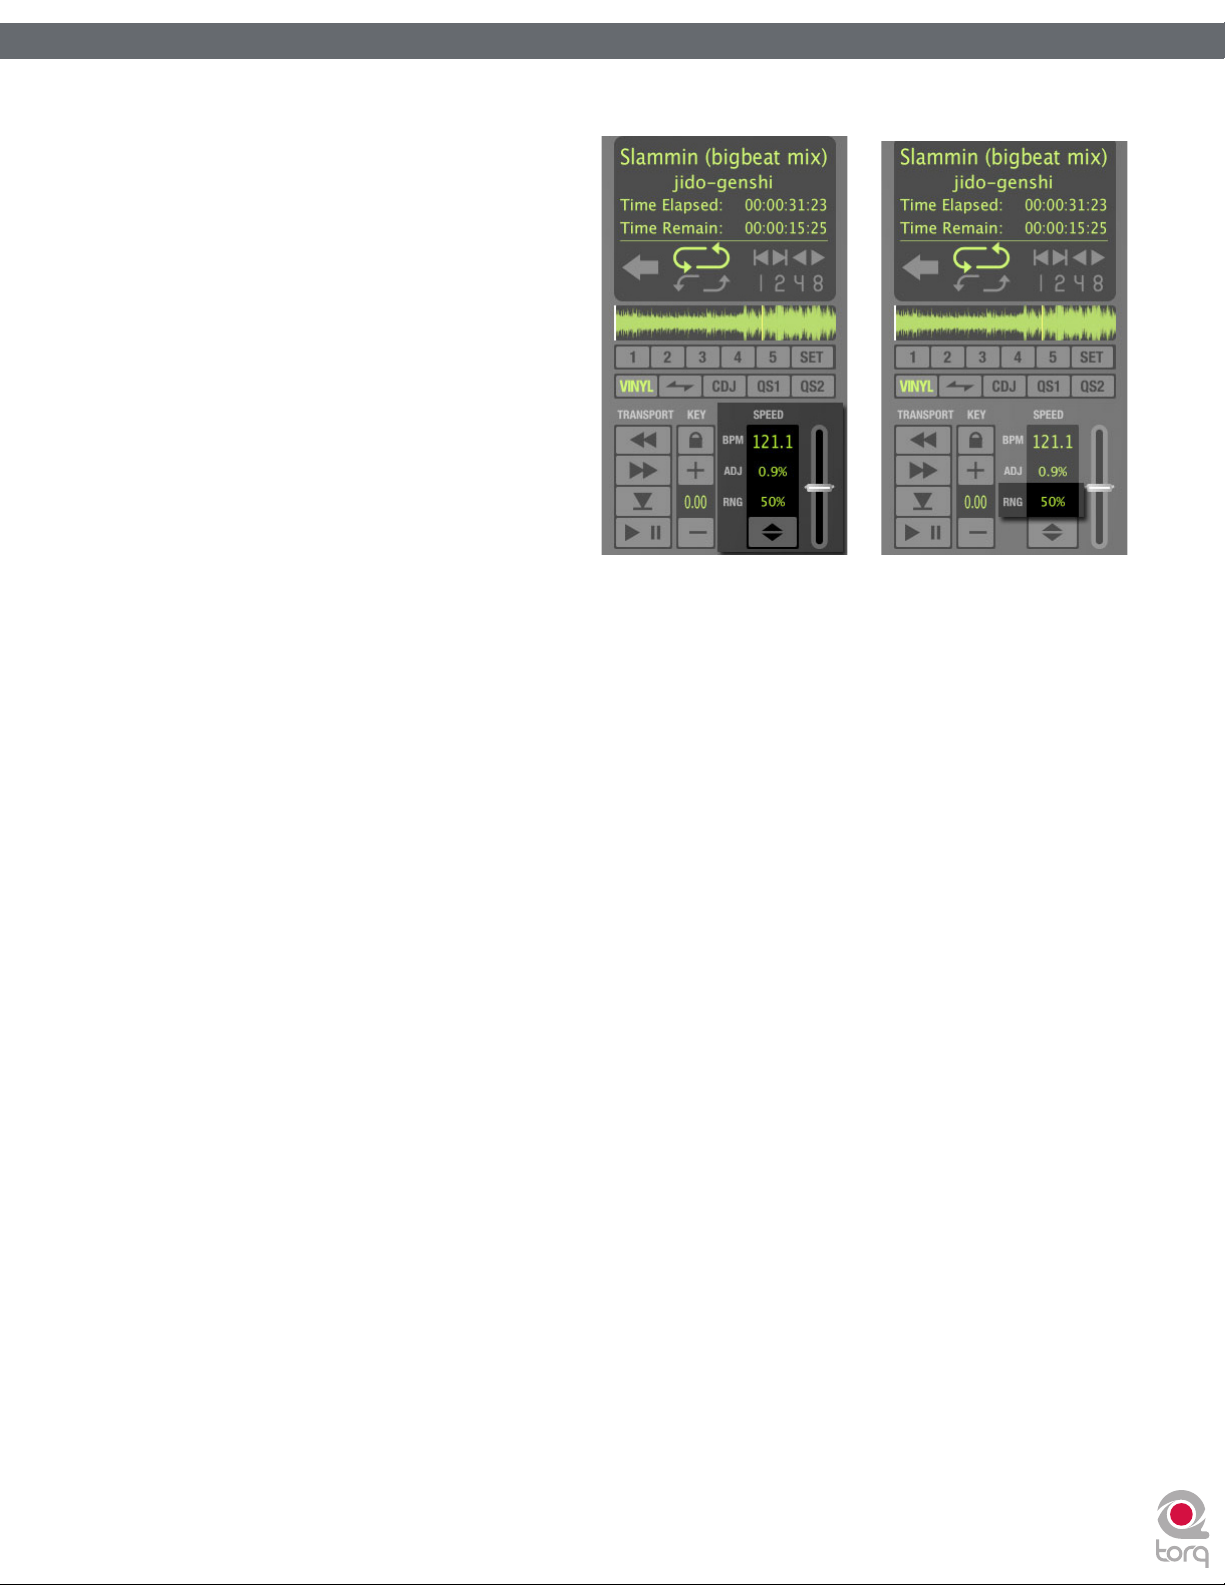
< Slider Range
By default, the range of the Speed Adjuster is +/- 8%. That means that if you move the slider to either of its
extremes, you’ll only get an 8% change in the speed of the song. To the left of the Speed Adjuster is a display
showing the current range setting for the slider:
You can change the range of the Speed Adjuster by clicking on this range display. Each time you click, the range
will advance to the next highest setting. The order is: 8%, 10%, 20%, 50%, then 100%. When you click the display
again, the range will “wrap around” back to 8%. You’ll only need to increase the range when you’re trying to
match two songs with very different tempos, or when you want to perform an extreme speed change as a special
effect (especially effective when the range is set to 100%).
Most experienced DJs will simply match the tempos of two songs by hand using the Speed Adjust slider, which
is a perfectly acceptable method of matching songs (indeed, this is the way it’s been done for decades). Since it
requires a lot of practice to hear when one song is playing faster or slower than another, those new to DJing will
benefit from some of the extra features built into Torq. Such features include automatic beat detection, BPM
displays, scrolling waveform displays, and automatic synchronization.
Page 19
Torq 1.5 User Guide Chapter 1
Torq 1.5 User Guide Chapter 3
< BPM Display
Tempo is a measurement of the speed of a song and is normally expressed as Beats Per Minute (BPM). As the
BPM increases, the speed of the song increases. In order for two songs to be mixed together with their beats
aligned, the two songs will need to be playing at the same tempo. This is why Torq’s Decks are equipped with
Speed Sliders. In the event that you are trying to mix two songs with different tempos (which happens more
often than not), you will need to use the Speed Sliders to match the tempo of the new song to the tempo of the
current song.
» Automatic BPM Detection
Any time you load a new track into
a Deck, Torq will analyze it and
attempt to determine the tempo
of the song. For most dance music,
Torq will be able to determine the
tempo accurately. Once scanned,
the tempo of the song will be shown
in the BPM display for the Deck,
which is located just to the left of
the Speed Adjust slider.
18
18
✓ Note: Determining the tempo
of a song is a complicated
process for a computer. While
Torq’s beat-detection system will
usually provide accurate results
when set to its default settings, some types of complex music can confuse the beat-detection system resulting
in incorrect tempos. To increase the accuracy of the beat-detection in these cases, you can specify the type
of music you’ll be using in the Preferences menu thus limiting the tempo range used by the beat-detection
system. Be sure your selection matches the type of music you’re trying to analyze. If you have “Drum & Bass”
selected as your style and attempt to analyze a trip-hop track, Torq will give you the wrong tempo. You can
then change the music type and re-analyze the song if needed.
The BPM shown here is a “living value”—it will change when you alter the speed of the song with the
Speed Adjuster. This is extremely helpful when trying to synchronize two songs since you’ll be able to
match the tempos of the two songs just by matching the BPM values shown in the displays.
» Double/Halve Button
When Torq incorrectly identifies the tempo of a song, it will often return a result that is a multiple of the
actual tempo. This occurs frequently when using Drum & Bass tracks with tempos in the neighborhood of
174 BPM. Torq may think that the tempo of the song is 87 BPM or 116 BPM. When this happens, you can
quickly adjust the tempo using the Double/Halve button.
This button works by applying a multiplication factor to the current BPM. The first time you press
this button, the up arrow will light and the tempo of the current song will be multiplied by 1.5 (the
multiplication factor will be shown in the Tooltip). If the song was detected as 116 BPM, it will now show
174 BPM (116 BPM x 1.5 = 174 BPM). The second time you press this button, the multiplication factor will
increase to 2. If the song had been detected as 87 BPM, it would now show 174 BPM (87 BPM x 2 = 174
BPM. The multiplication factor will continue to increase in .5 steps each time this button is pressed.
This button can also be used to divide the current BPM by the same amounts on the occasion that Torq
detects a BPM higher than it should be. Simply hold the SHIFT button when pressing the Double/Halve
button to move downward through the sequence of factors. If you decrease the factor to a point where
the new BPM is less than the detected BPM, the down arrow will be lit on the button.
Page 20

Torq 1.5 User Guide Chapter 1
Torq 1.5 User Guide Chapter 3
» Manual Tempo Adjustment
As mentioned above, Torq can determine the tempo of most dance music. Some music, however, is too
complex or not repetitive enough for Torq to detect the tempo with precision. Fortunately, you can help
Torq to determine the proper tempo through a number of different methods. The appropriate method will
be based on the type of tempo correction you’re trying to achieve.
» Tap Tempo
On rare occasions, Torq will determine an incorrect tempo that has no direct relation to the actual tempo
(not a fraction or multiple). At times like this, you’ll want to use the Tap Tempo feature to determine the
tempo of the song while it plays.
1. While the song is playing, click on the BPM display with each beat that you hear.
2. The BPM display will update the BPM to reflect the timing of the taps you performed.
3. The more taps you provide, the more precise the calculation will become.
✓ Note: If at any time you wish to revert back to the automatically determined tempo, hold the Shift key
while clicking on the BPM display. This will also clear any Tempo Anchors if any have been created. Tap
Tempo cannot be used if there are Tempo Anchors in a song.
19
19
» BPM Entry
If you happen to know the BPM of the song, you can manually enter it into the BPM display, thus overriding
the tempo detected by Torq.
1. Hold the Shift key and double-click on the BPM display.
2. Type in a new BPM value from your computer keyboard and press Enter.
3. The new BPM will then be set for the song.
✓ Note: If at any time you wish to revert back to the automatically determined tempo, hold the Shift key
while clicking on the BPM display. This will also clear any Tempo Anchors if any have been created.
» Tempo Anchors
Torq provides you with another alternative in the event that none of the above methods provide an
accurate BPM for the song, or when the song contains tempo changes. Torq will allow you to create a
custom tempo map for a song employing a feature called Tempo Anchors. Please see the Tempo Anchors
section in the next chapter for details.
Page 21

Torq 1.5 User Guide Chapter 1
Torq 1.5 User Guide Chapter 3
Key
The Key Adjust is used to raise or lower the key (pitch) of a song without changing the tempo. This is useful when
attempting to match the melodies of songs in both Decks during a mix, known as key-matching. You can adjust the key of
a song with the Key Adjust buttons or by dragging the up or down on the Key Display.
< Fine Tuning
1. Click and hold the mouse cursor over the Key Display number.
2. Drag the mouse up or down. The number will adjust in increments of one cent.
✓ Note: To reset the key transposition to 0, hold down the Shift key on your computer keyboard and click on either
of the Key Adjust buttons’ Key Displays. If you have adjusted the key in finer increments, the key will be reset to 0,
however the fraction will remain. For example, if the key is 4.23, resetting will make it 0.23.
< Key/Speed Lock
The Decks in Torq have the special ability to change the playback speed of the song without changing the pitch
of the song (this is known as time-compression and time-expansion). This means you don’t have to worry about
music changing pitch as you beat-match. However, if you would like to disable this feature and essentially lock the
Key and Speed of the music together, turn on the Key/Tempo Lock button. With this on, the music will behave
like a regular vinyl record (slowing down the music will make the music drop in pitch).
20
20
< MIDI Slider/Knob Control
MIDI control of the Key Adjust is different from other controls in Torq. You can assign a knob or slider to the
Key Adjust, or you can assign keys on your MIDI keyboard—the behavior of the Key Adjust is dependent on
your control method.
1. Make sure that your MIDI keyboard or control surface has been properly installed and is configured to
work with Torq. Please see chapter 6 for more information about configuring your external MIDI hardware
to control Torq.
2. Right-click (CTRL-click, Mac) on the Key Display; it will turn red indicating that it’s waiting for an
assignment.
3. Move a MIDI knob or slider on your MIDI controller. This will automatically assign the knob or slider to the
Key Adjust.
4. The Key will be adjustable in one-semitone steps.
5. MIDI CC value 64 equals + 0 semitones. This generally means when the knob or slider of your MIDI
controller is at center position, the Key will be at 0.
< MIDI Button Control
1. Make sure that your MIDI keyboard or control surface has been properly installed and is configured
to work with Torq. Please see chapter 6 for more information about configuring your external MIDI
hardware to control Torq.
2. Right-click (CTRL-click, Mac) on the [+] Key Adjust button. It will turn red indicating that it’s waiting for an
assignment.
3. Press a button on your MIDI controller to assign it to the [+] Key Adjust button.
4. Right-click (CTRL-click, Mac) on the [-] Key Adjust button. It will turn red indicating that it’s waiting for an
assignment.
5. Press a button on your MIDI controller to assign it to the [-] Key Adjust button.
6. Now that your buttons are assigned, press the button assigned to [+]. The Key will move up one semitone.
7. Now press both buttons simultaneously.
8. The Key Adjust will return to 0.
Page 22

Torq 1.5 User Guide Chapter 1
Torq 1.5 User Guide Chapter 3
< MIDI Keyboard Control
1. Make sure that your MIDI keyboard or control surface has been properly installed and is configured
to work with Torq. Please see chapter 6 for more information about configuring your external MIDI
hardware to control Torq.
2. Right-click (CTRL-click, Mac) on the Key Display. It will turn red indicating that it’s waiting for an
assignment.
3. Press a key on your MIDI keyboard. This key will automatically be assigned as the “root key” of the Torq
Key Adjust.
4. If you press a MIDI key that is 1 semitone ABOVE the root key, the Deck’s Key will be changed to +1
(semitones).
5. If you press a MIDI key that is 2 semitones BELOW the root key, the Deck’s Key will be changed to -2
(semitones).
6. The range of Key transposition is plus or minus (+/-) 12 semitones. This makes it possible to control the
Key Adjust of both Decks using a single MIDI controller keyboard, as long as the keyboard has enough keys
to make up four (4) octaves.
✓ Note: Torq will allow notes from the same controller and same MIDI channel to be used as long as the root
keys are at least two octaves apart.
21
21
< External Control
When using external Vinyl or CD control, Torq will preserve the pitch of the music even if you change the speed
of the turntable or CD player. When you scratch, Torq will disable time-stretching and will re-enable it when
you let the music play again. If you want Torq to respond like a true vinyl record, turn on the Key/Speed Lock
button so that key and speed are locked together. You will then hear pitch changes when altering the speed of
the turntable or CD player.
Sync Button
The Sync button provides an automatic method of synchronizing the beat and BPM of one Deck to the other or the
Global Tempo. When you engage Sync on a Deck (the Sync icon is on), it will change that Deck’s tempo to match the
other Deck or Global Tempo. Furthermore, when you press Play, Torq will align the song to the phase of the other Deck
or Global Tempo. Essentially, the Synced Deck will be “slaved” to the other Deck (which would be the “master”).
Sync will remain active until you turn it off by clicking the Sync button again. While Sync is active, the Deck will be
affected by tempo changes made to the opposite Deck or Global Tempo. If you slow down the “master” Deck, the
“slaved” Deck will also slow down in kind. If you attempt to scratch or re-align the “slaved” Deck, Torq will automatically
snap it back into alignment to match the phase of the “master” Deck.
Tempo Master
Torq also has the ability to use a Deck as a Tempo Master for the entire program. Simply hold SHIFT while pressing the
Sync button on a Deck. When doing this, you’ll see that the Sync button starts to flash, indicating that it is the Tempo
Master. Additionally, the Global Tempo will be activated and will follow the tempo of the Deck. With a Deck set as the
Tempo Master, all other aspects of the program will follow its tempo even if there are tempo changes (set with Tempo
Anchors). Looped samples will follow the Deck. The opposite Deck will also follow if its Sync button is turned on.
When you turn Sync off on a Deck, it will keep the tempo setting allowing the song to keep playing in time with the other
Deck. However, Torq will no longer attempt to keep the two Decks in sync if you make changes to them. Torq will no
longer snap the songs back into alignment if you move one of them, nor will Torq continue to match tempos if you change
them.
✓ Note: Setting a Deck as a Tempo Master is the only way to hear the original timing of the song after adding Tempo
Anchors.
Page 23

Torq 1.5 User Guide Chapter 1
Torq 1.5 User Guide Chapter 3
Nudge Buttons
If you’re not taking advantage of Torq’s ability to keep tracks aligned using Sync, you can do it manually using the Nudge
buttons. If you hear a song become ahead or behind the other, the Nudge buttons will allow you to push the song back
into alignment by creating a small change to the playback speed of the song. If the song is ahead of the beat, press the
right Nudge button to slow it down. You’ll see the waveforms of the two songs move in relation to each other. Release
the Nudge button once the songs are aligned properly and the original playback speed will be restored.
✓ Note: The behavior of the Nudge buttons can be reversed in the Preferences if you prefer the song to speed up when
pressing the right Nudge button.
Offset Buttons
Sometimes when mixing two songs together, you may find that the beats are aligned with each other, yet the two songs
are still out of phase. This is most obvious when one song is offset by one beat, causing the snare drums of the tracks to
be out of alignment. The Offset buttons can be used to correct this. Pressing these buttons will make the Current Song
Position jump forward or back by one beat-length.
✓ Note: : If you have the Sync Mode set to “Bar” in the Preferences/Toolbar, the Offset buttons will have no effect when the
Deck’s Sync button is on. This is because Torq will counteract a one-beat offset when set to Bar mode. If you want to offset
the music by one beat when Sync is on, you’ll need to offset the Phase Grid (which is explained later in the section titled
“Synchronization”), or switch Sync Mode to “Beat.”
22
22
Page 24
23
23
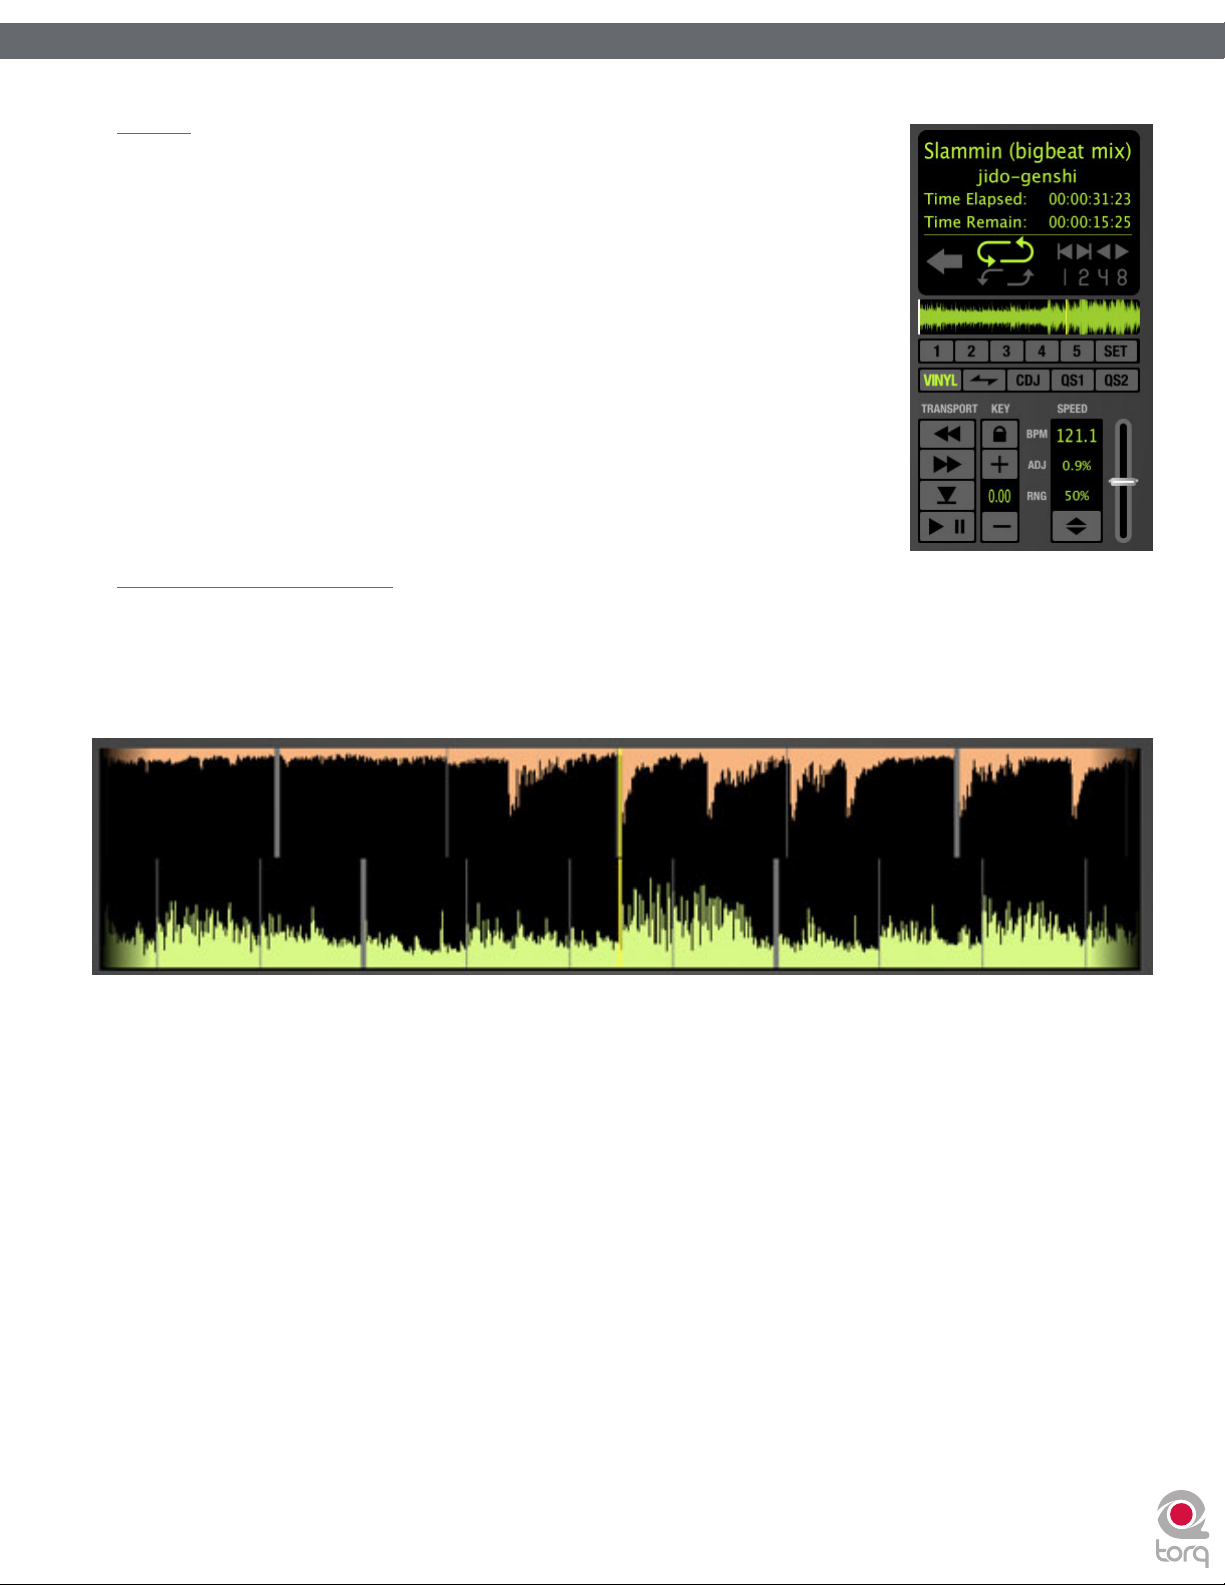
WAVEFORM DISPLAY
One of the most prominent features of the Torq user interface is the Scrolling
Waveform Display, which takes up a decent amount of real estate above the Mixer and
Effect Racks. Unlike the smaller Overview Waveforms found in each Deck, the Scrolling
Waveforms only show a few seconds of the current song before and after the current
play position. The song in Deck A (on the left) is shown at the top of the Scrolling
Waveform display. Deck B (on the right) is shown at the bottom of the window. While
the Now Line moves from left to right within the smaller Overview Waveform Display as
a Deck plays, the Now Line remains fixed in the Scrolling Waveform window while the
waveforms move behind it.
Information Shown on Display
So what purpose do these Scrolling Waveforms serve, other than looking really
cool? Answer: They offer you a way to visualize the alignment and synchronization
of the two Decks as well as providing some other important information:
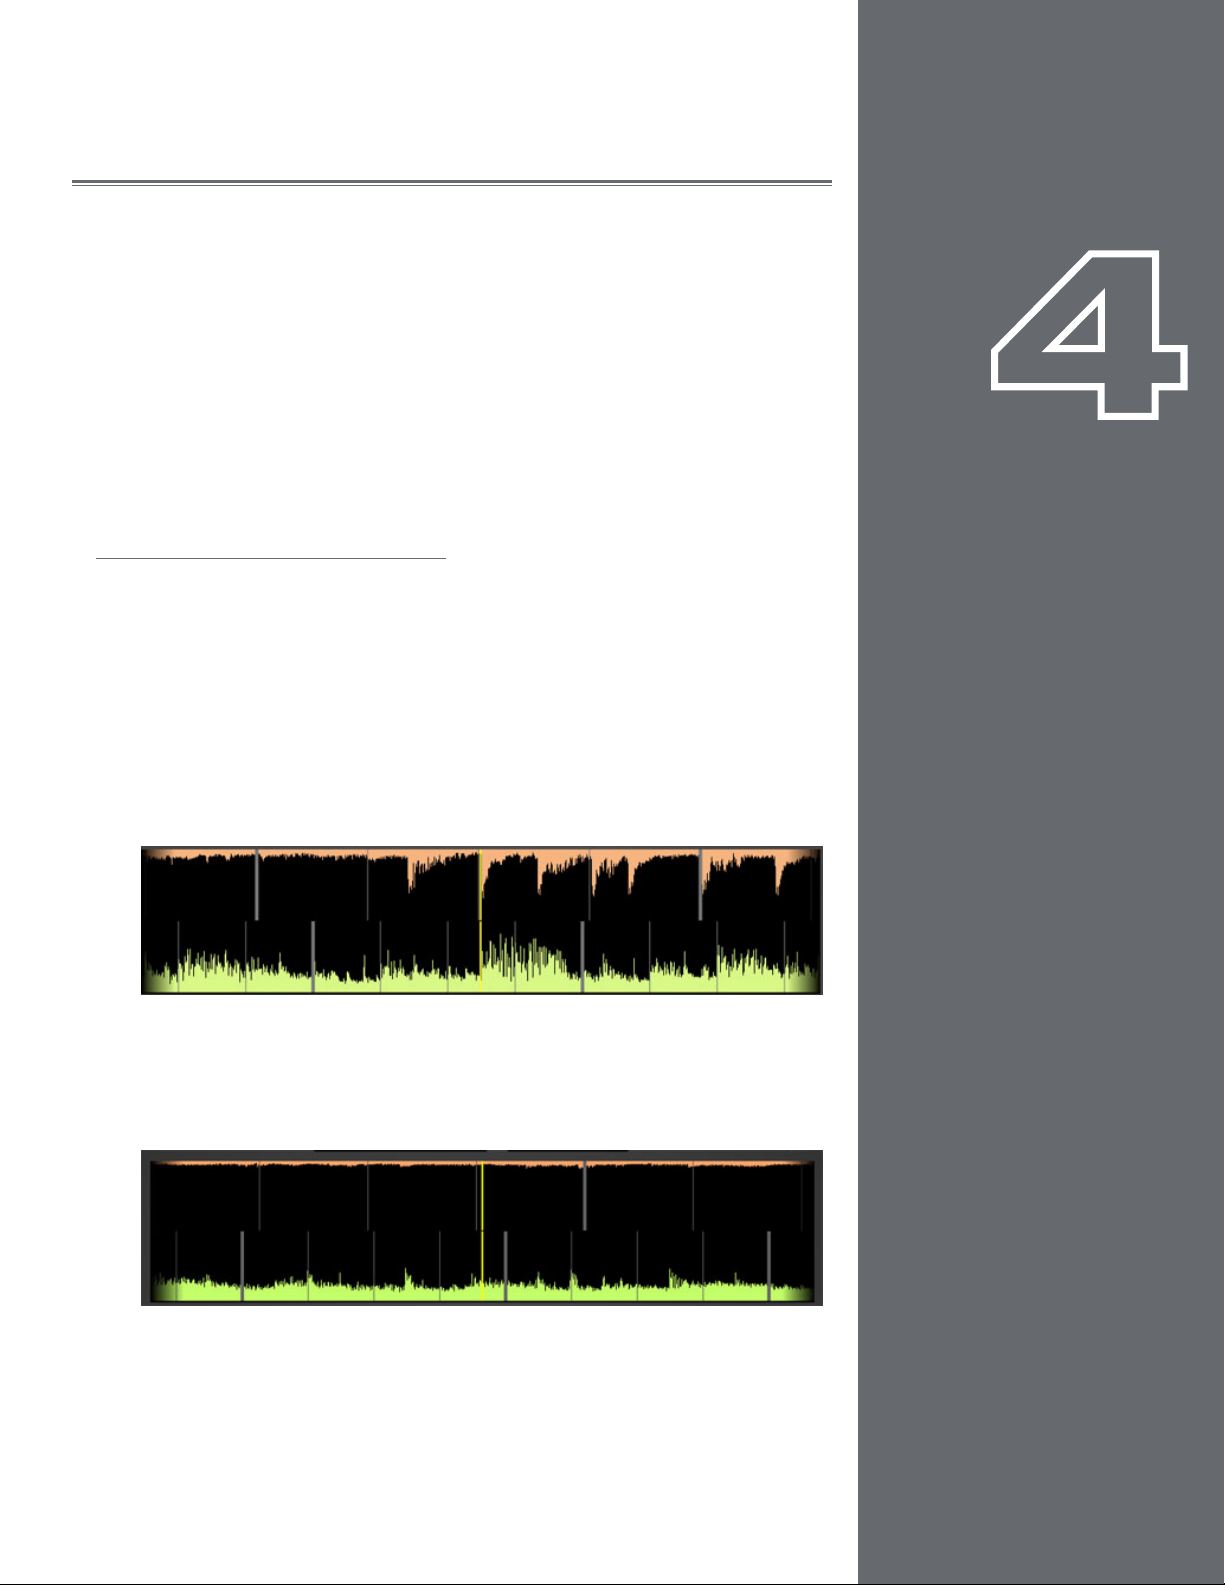
Waveform
By looking at the audio waveform itself, you can see where the beats are in the
song. These sharp hits (transients) typically look like long, thin spikes in the
waveform. In the picture below, you can see the heavy bass drum beats of both
songs in the Scrolling Waveforms.
CHAPTER
CHAPTER
4
1
When the drums stop, you’ll notice that the tall spikes go away. This is how you
can tell if a breakdown or slow section of the song is approaching. By the same
token, you’ll also be able to see where the drums come back in again.
English
English
Page 25
Torq 1.5 User Guide Chapter 1
Torq 1.5 User Guide Chapter 4
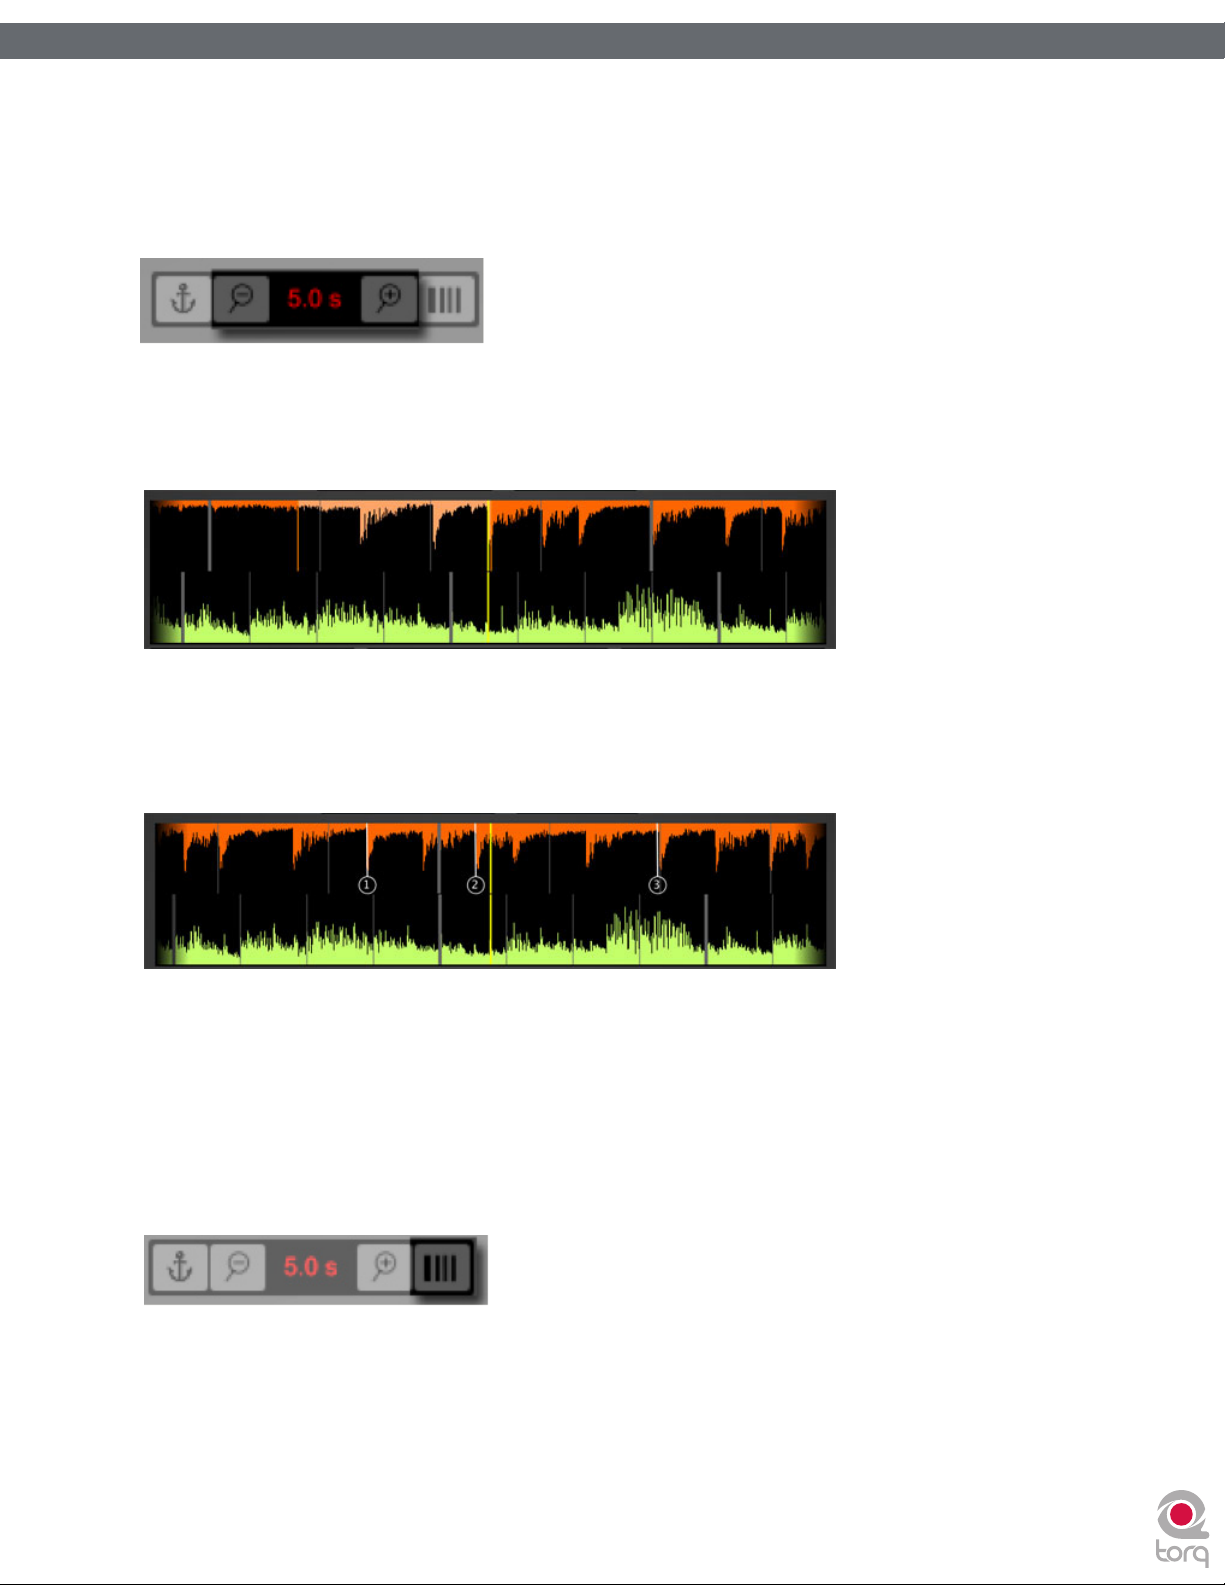
Zoom
At times, you may find yourself wanting to “zoom in” to the Scrolling Waveform Display to match beats more precisely
or to “zoom out” in order to see more of each track. Use the magnifying glass icons directly above the display to do this.
The magnifying glass button on the left zooms out while the button on the right zooms in. The total amount of time (in
seconds) from the left edge to the right edge of the Scrolling Waveform Display is listed between the two buttons.
Loop Points
The Loop Points of the song (set with the Loop In/Out buttons or the QuickCue buttons) will be shown on the
Waveform. The looped area of the music will appear in a lighter shade compared to the rest of the waveform.
24
24
Cue Points
If you’ve used the Cue button or QuickCue buttons to place various Cue Markers in the song, you will see them here.
The QuickCue markers have numbers attached to them (corresponding to the assigned QuickCue button) and the
standard Cue Point appears as an orange line.
Phase Grid
Torq superimposes a Phase Grid over the Scrolling Waveforms to indicate the location of the beats in a song. The thicker
lines in the Phase Grid indicate the locations of the downbeats in the music. Torq will attempt to position the Phase Grid
in the proper location as part of the analysis when loading a song into a Deck. Torq uses the position of the Phase Grid to
properly synchronize the song.
If you would like to turn the Phase Grid lines off, click the “Hide Phase Grid” button located above the waveform display
(next to the zoom controls).
Page 26
Torq 1.5 User Guide Chapter 1
Torq 1.5 User Guide Chapter 4
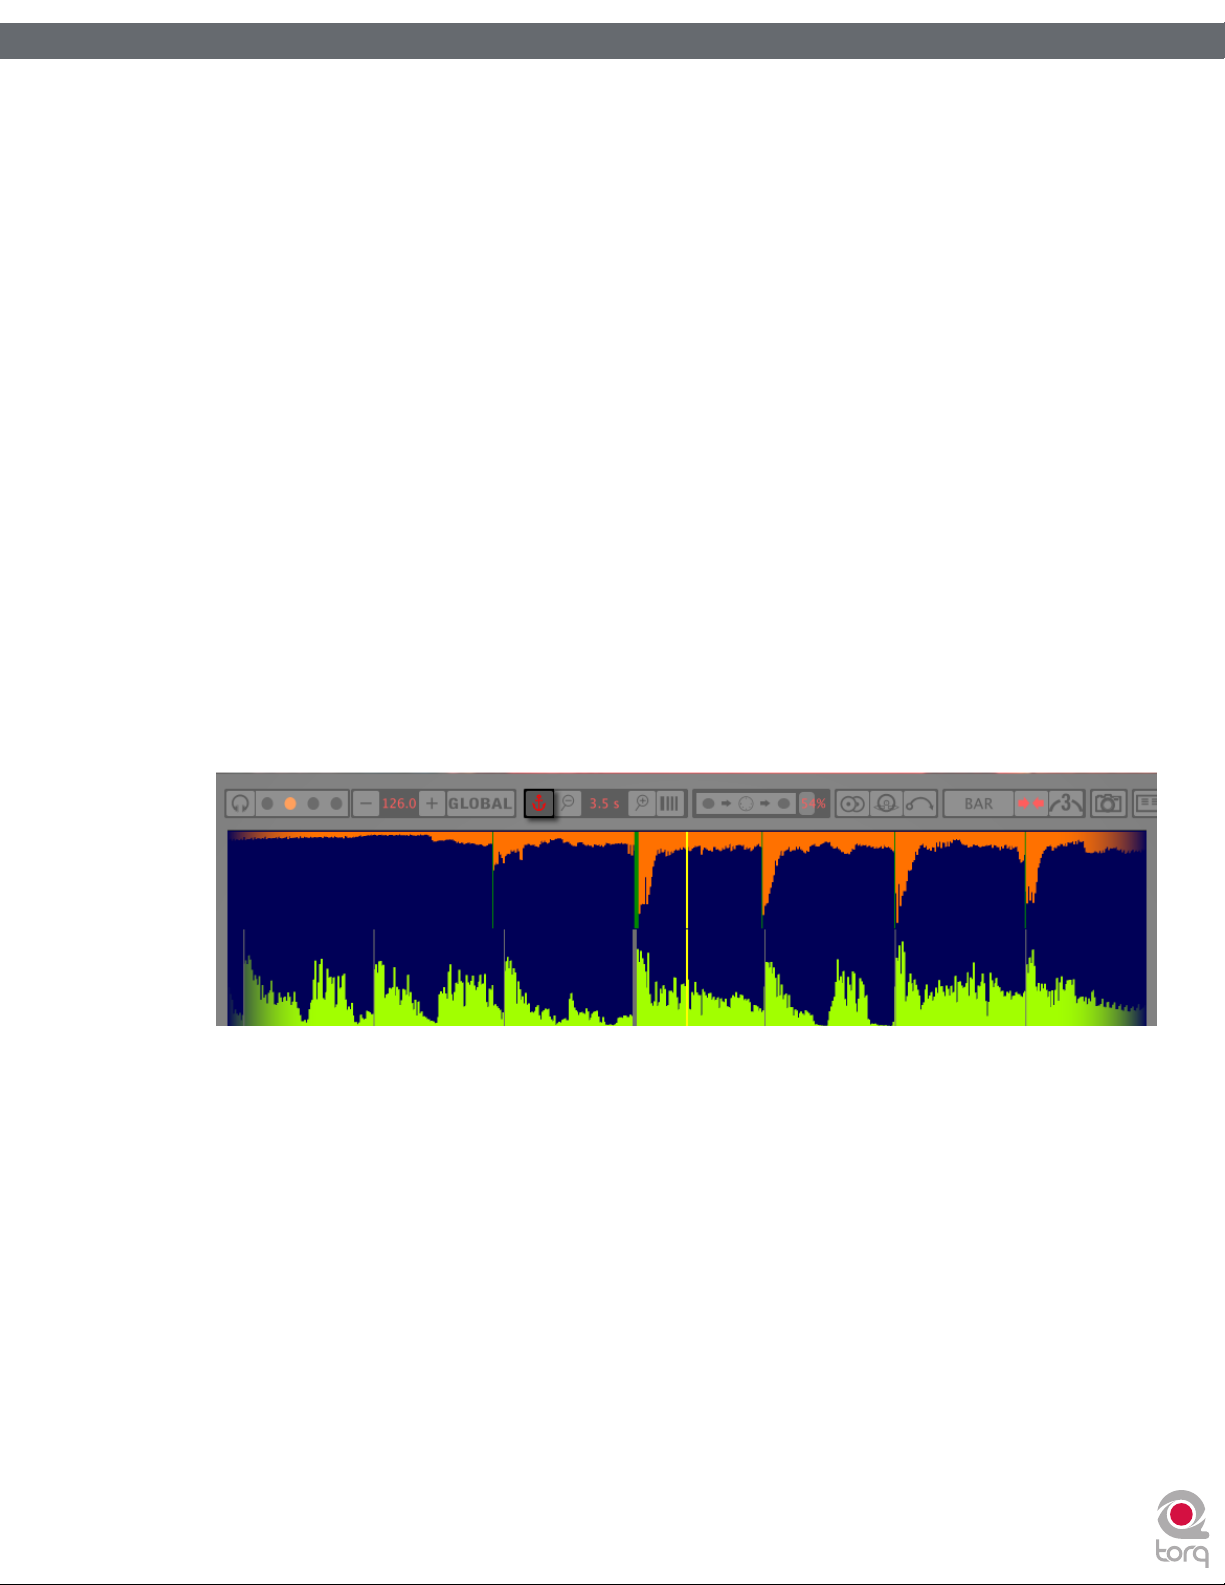
Tempo Anchors
In addition to its automatic BPM detection features, Torq provides you with another alternative for BPM matching that
becomes an indispensable tool when working with songs that include tempo changes or fluctuations (Torq’s automatic
beat detection is designed to work with songs that have a constant tempo). Using Tempo Anchors, you can manually
specify the location of beats within a song thus allowing Torq to follow the tempo of any song even if it speeds up or
slows down in the middle. Editing Tempo Anchors is a more involved process and should therefore only be used in the
event that none of the normal methods yield the proper results.
Tempo Anchors are edited within the Scrolling Waveform window and should be done at the highest zoom factor so you
can place the Anchors accurately. Furthermore, this is more of an “off-line” process—you should prepare a song with
Tempo Anchors before trying to play it to an audience. Torq will save the Tempo Anchors in the TQD file so that you will
only have to do this once for any particular song.
To properly add Tempo Anchors to a song:
1. Play the song.
2. Use the Tap Tempo feature to determine the approximate tempo while the song plays. This is very important
since this will get the Phase Grid close to the proper position leaving only minor edits for you to do later.
3. Stop the song and rewind back to the beginning.
4. Hold SHIFT and drag the Phase Grid so that the downbeat (the thicker line) is aligned with the first visible beat
of the song. This will ensure that the Phase Grid starts at the right location—you will only need to use Tempo
Anchors to fix issues where the Phase Grid drifts out of alignment.
25
25
5. Click the Tempo Anchor button in the Toolbar. The background of the Scrolling Waveforms will turn blue
6. Now, search through the song looking for places where the Phase Grid no longer aligns with the beats of the
7. Now that the grid line has been converted to a Tempo Anchor, you can now move it left or right until it aligns
8. Repeat steps 6 and 7 until all of the tempo anomalies have been accounted for. When complete, every grid line
indicating that Anchor Edit is active.
music. When you find one that is out of alignment, double-click it. The line will change from grey to green
indicating that the grid line has been turned to a Tempo Anchor.
with the beat. Simply click-and-drag the Anchor to set it to a new location.
and Tempo Anchor should visually align with the beats in the song.
Page 27

Torq 1.5 User Guide Chapter 1
Torq 1.5 User Guide Chapter 4
9. Click the Anchor icon again to exit Anchor Edit mode. The Scrolling Waveforms will revert to their original
color.
10. Now, when you play the song, it will play with a constant tempo (the tempo variations will be removed)
Some will say that editing Tempo Anchors is more of an art than a science. Indeed, there are other techniques
that can be used other than the steps listed above which will give the same results. As you edit more and more
songs, you’ll learn which techniques are best for various types of music. Here are a few other methods that can
assist with Tempo Anchors:
26
26
1. Tap Tempo Anchors. If you try using Tap Tempo when Anchor Edit is on, each tap will place a Tempo
Anchor at that location. If you’re working with a song that has lots of tempo changes (such as older music
that was not recorded to a click track) this can be very advantageous. Just tap along with the music and the
Phase Grid will be pretty close to where it needs to be. You can then manually adjust any of the Tempo
Anchors that need it.
2. Use fewer Tempo Anchors. While you could surely turn every single grid line into a Tempo Anchor, this is
usually not necessary. Often, long sections of a song will have a consistent tempo. In these cases, it’s usually
enough to place a Tempo Anchor at the beginning and another at the end of that section. All the grid lines
will distribute themselves evenly between the Tempo Anchors.
3. Fixing corrupted audio files. From time to time, you may notice that a song seems perfectly in sync then
suddenly falls out of sync. This can be due to corruptions within the audio file. Torq will skip over sections
of data that are corrupted and will continue to play the remainder of the song. Every time Torq skips over
corrupted data, it will make the Phase Grid look like it has shifted to the right. In cases like this, you can
use Tempo Anchors to adjust the tempo only where the jump occurs. Simply make two Tempo Anchors—
one right before the jump and one right after. Drag the second Anchor to the left until it is aligned with the
beat. All of the grid lines to the right of the last Anchor will shift as well so the remainder of the song will
then be in alignment (unless there is another corruption).
Page 28

Torq 1.5 User Guide Chapter 1
Torq 1.5 User Guide Chapter 4
Playback Manipulations
The Waveform Display allows you to manipulate the song playback in a variety of ways using your mouse. The method of
control differs depending on the control type you have selected for the Deck (Vinyl/CDJ/Hybrid).
Vinyl Mode
With this mode selected, using the mouse on the waveform will work in a similar fashion to using your hand on a
turntable.
1. Click and hold the mouse on the waveform. Playback will stop, as if you have placed your hand on a record to
stop it.
2. Continue holding the mouse button, then drag the mouse left and right. This will scrub, or “scratch,” the song.
3. Releasing the mouse button will cause the Deck to play the song back from the current location.
Hybrid Mode
With Hybrid mode active, the waveform will respond exactly like the CDJ mode while the Deck controls (Play/Pause,
Cue, etc.) behave like Vinyl Mode.
1. Click and hold on the waveform. The music will continue to play
2. While holding on the mouse button, drag the mouse left. The playback tempo will be momentarily increased,
making the waveform scroll a little faster to the left.
27
27
3. Now hold and drag the mouse to the right. Playback will remain going forward, but the tempo will be slowed
slightly, resulting in a waveform that still scrolls right to left, but at a slower rate.
4. As soon as you stop dragging, playback will return to its original tempo even if you are still holding the
mouse button.
CDJ Mode
With this mode selected, the waveform will not be “scratched” with the mouse. Instead, mouse movements will simply
nudge the music ahead or behind by a small amount.
1. Click and hold on the waveform. The music will continue to play
2. While holding on the mouse button, drag the mouse left. The playback tempo will be momentarily increased,
making the waveform scroll a little faster to the left.
3. Now hold and drag the mouse to the right. Playback will remain going forward, but the tempo will be slowed
slightly, resulting in a waveform that still scrolls right to left, but at a slower rate.
4. As soon as you stop dragging, playback will return to its original tempo even if you are still holding the
mouse button.
Page 29
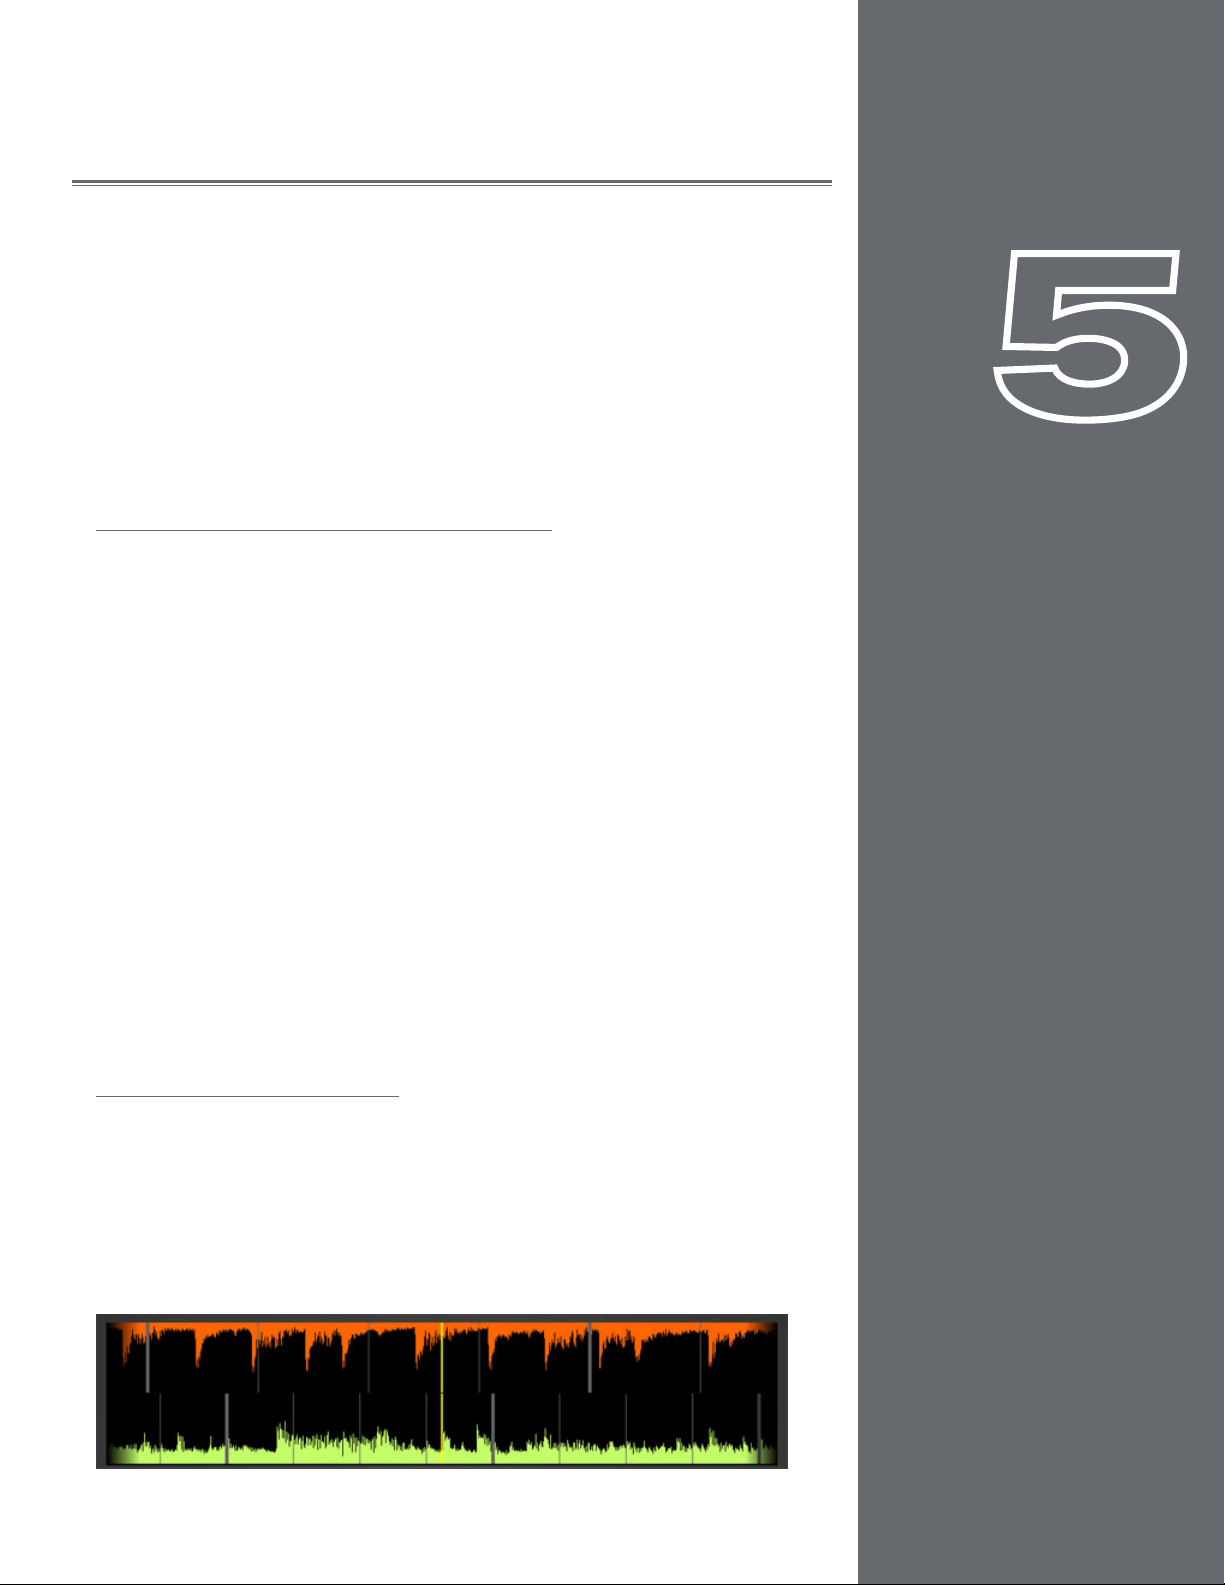
28
28
SYNCHRONIZAT ION
At most of today’s dance clubs and events, the DJ will mix the songs together using a
technique called beat-matching. The goal is to fade the volumes between two songs
while keeping them perfectly in beat with one another. If done properly, the audience
will never have to stop dancing as the beat of one song will blend in with the beat of the
new song—sounding like one single song. DJs will do this for hours at a time, creating
one gigantic non-stop mix from the individual songs they have in their collection. Proper
execution of this technique requires the mastery of two tasks: matching tempo and
matching phase.
Automatic Tempo and Phase Detection
As mentioned before, tempo is the measurement of speed of a song expressed as
BPM. Phase refers to the location within a song in reference to its downbeat. Torq
automatically determines the tempo and phase of a song when you load it onto a Deck,
so matching tempos is as simple as moving the Speed slider on a Deck until the BPM
Display shows the same value as the other Deck. If you’re using external vinyl or CD
control, you can adjust the speed of the song using the turntable’s or CD player’s pitch
adjuster.
Once you have matched the tempos of two songs, you need to start both songs at
precisely the right moment, or in-phase with each other. When beat-matching songs,
you’ll normally want the downbeats of both songs aligned with each other. When aligned
properly, the beats of both songs will blend together into one larger beat. If the songs
are misaligned or out-of-phase, it will sound terrible as the beats of the two songs will be
playing at different times (in DJ jargon, this is known as a “train wreck” and is something
that should be avoided at all times).
CHAPTER
CHAPTER
5
1
Torq’s Scrolling Waveforms will help you match the phases of the two songs. Not only
can you visually align the transients in the waveforms, you can also use the Phase Grid
for automatic synchronization.
Phase Grid Manipulations
Torq places a Phase Grid over the Scrolling Waveforms to help you see where the
beats are, even during a breakdown or rhythmless intro of a song. In order for Torq’s
automatic synchronization to work, the Phase Grid will need to be aligned properly with
the music. With the Phase Grids of both songs aligned properly, Torq will be able to
sync the two songs together without creating train wrecks. Torq will attempt to place
the Phase Grid in the proper location during song analysis. If Torq positions the Grid
incorrectly, it will be up to you to re-align it to the proper beat.
English
English
Page 30
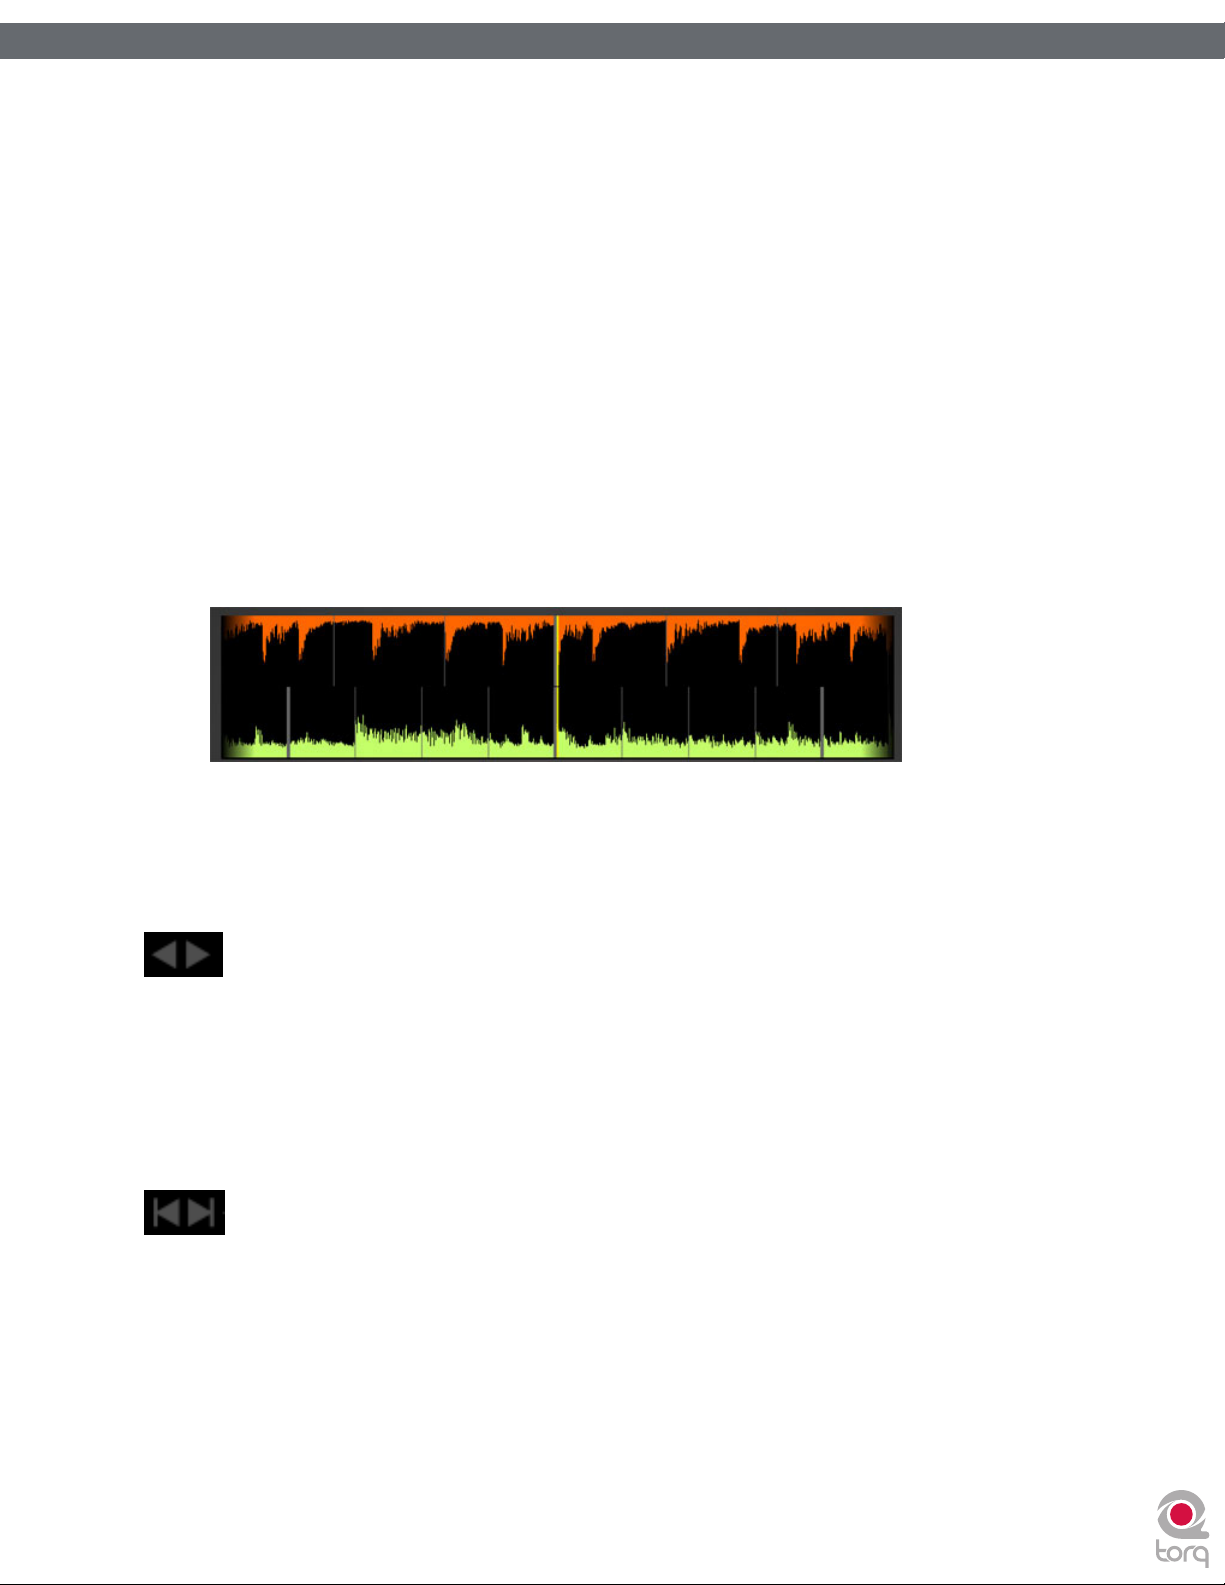
Torq 1.5 User Guide Chapter 1
Torq 1.5 User Guide Chapter 5
When a mis-alignment occurs (as seen above), you’ll see that the grid does not line up with the beginnings of the beats
(transients) in the waveform. In the example, the Phase Grid is too early, leaving a gap between the grid lines and the transients
in the waveform.
There are a number of ways to fix a mis-aligned Phase Grid. Which method you choose to use will probably depend on
whether you’re comfortable using the mouse and keyboard, or whether you prefer to use external MIDI control. The results
are all the same, so choose whichever feels good for you.
✓ Note: If the song you’re attempting to use has tempo variations, Torq’s automatic beat and phase detection will not work. You
will have to manually set the tempo for the song using Tempo Anchors as detailed in Chapter 3 before you will be able to exploit
Torq’s automatic synchronization.
Adjusting with the Mouse
1. Hold down the Shift key, then click-and-drag left or right with the mouse.
2. The Phase Grid will move left or right, following your mouse movements.
3. Once you have aligned the thicker “downbeat” marker of the grid to the downbeat of the music, release the
mouse button.
29
29
✓ Note: You can turn on Caps Lock instead of holding Shift if you need to adjust the grid using just one hand. Turn off
Caps Lock when you’re finished so you can regain proper control of the waveforms.
Adjusting with Nudge Buttons
1. Hold down the Shift key, then click on one of the Nudge buttons.
2. The Phase Grid will move left or right depending on which Nudge button you click.
3. Use the buttons to align the thicker “downbeat” marker of the grid to the downbeat of the music.
Adjusting with Offset Buttons
1. Hold down the Shift key, then click on one of the Offset buttons.
2. Instead of making a small change to the Phase Grid, this will have the effect of moving the grid an entire beat left
or right. This is a quick way to fix the Phase Grid if it happens to be aligned to the beats but has the downbeat in
the wrong location.
Page 31
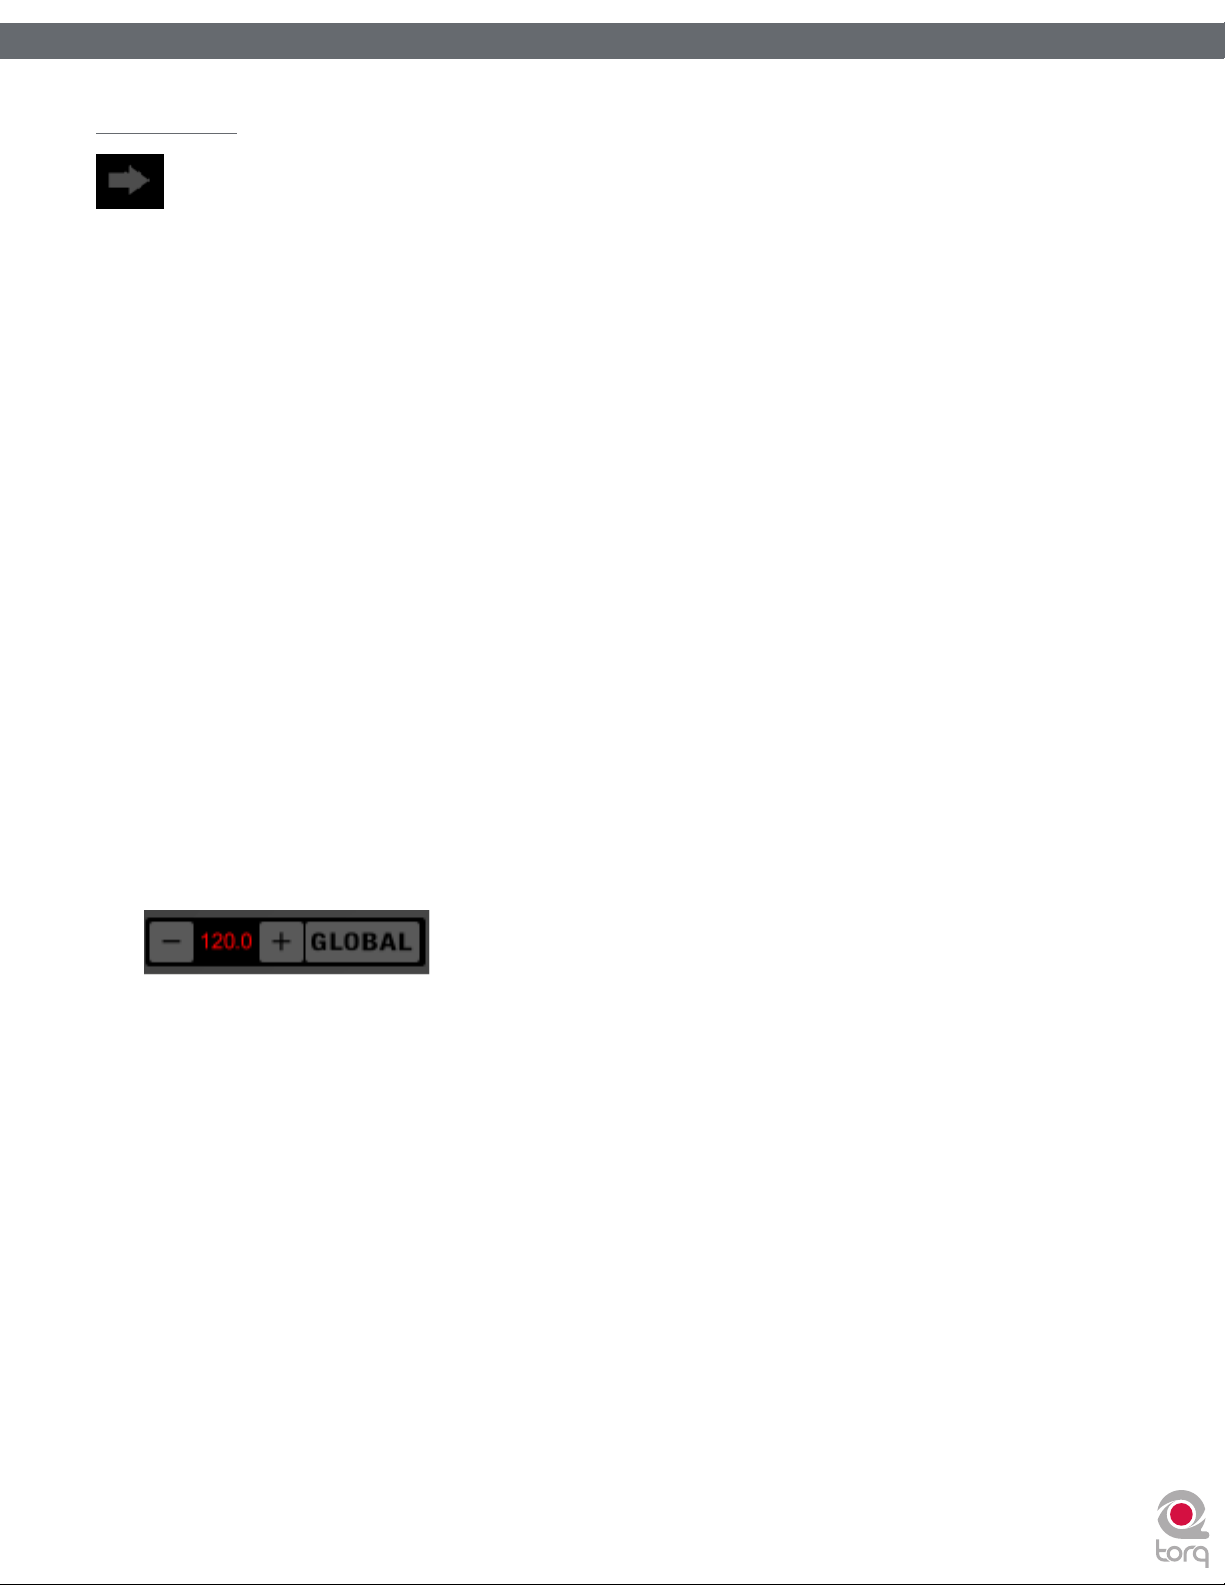
Torq 1.5 User Guide Chapter 1
Torq 1.5 User Guide Chapter 5
Sync Button
The Sync button is an automatic method of synchronizing the beat and BPM of one Deck to another. When you engage Sync
on a Deck (the Sync icon is on), it will change that Deck’s tempo to match the other Deck. Furthermore, when you press Play,
Torq will align the song to the phase of the other Deck. Essentially, the synced Deck will be “slaved” to the other Deck (which
would be the “master”).
Locked Sync
Sync will remain active until you turn it off by clicking the Sync button again. While Sync is active, the Decks will
effectively be locked together. The slaved Deck will be affected by tempo changes made to the opposite Deck. If you slow
down the master Deck, the slaved Deck will also slow down in kind. If you attempt to scratch or re-align the slaved Deck,
Torq will automatically snap it back into alignment to match the phase of the master Deck.
Momentary Sync
When you turn Sync off on a Deck, it will keep the tempo setting allowing the song to keep playing in time with the other
Deck. However, Torq will no longer attempt to keep the two Decks in sync if you make changes to them. Torq will no
longer snap the songs back into alignment if you move one of them, nor will Torq continue to match tempos if you change
them. So if you just need to synchronize for a moment and wish for the music to run freely afterward, click the Sync
button once to turn it on, then click it again to turn it back off—the Tempo will be matched to the other Deck, and you’ll
be free to start and manipulate the music as you wish.
30
30
Global Tempo
Using the Sync button as described above will allow you to sync one Deck to the other. However, if you wish to have your
looped samples sync up to your mix, or if you wish for your mix to follow the tempo of the ReWire host, you’ll use the
Global Tempo.
When you click the Global button, the Global Tempo will be active. Now, when you press the Sync button on a Deck, it
will sync to the Global Tempo as opposed to syncing to the other Deck. If you turn Sync on for both Decks, both Decks
will be synchronized to the Global Tempo and will therefore play in sync. Additionally, when you trigger looped samples,
those loops will play in sync with the Global Tempo (and any synced Decks).
Changing the Global Tempo will result in the same change to the synced Decks and the Sampler. There are a couple ways
to adjust the Global Tempo:
1. Use the + and – buttons to increment or decrement the current tempo by one BPM.
2. Hold the Shift key while dragging up and down on the Global Tempo Display to make smooth changes to the
tempo.
3. Click repeatedly on the Global Tempo Display to tap a new tempo.
Page 32

Torq 1.5 User Guide Chapter 1
Torq 1.5 User Guide Chapter 5
Global Tempo LEDs
To the left of the Global Tempo display is a horizontal arrangement of 4 lights. These will light in succession (creating
a “chase” pattern) that will indicate the Global Tempo’s position within a bar. These lights will only chase when Global
Tempo is activated.
Global Tempo Metronome
If you click the Headphone button next to the Global Tempo LEDs, you will hear a metronome sound in your
headphones. This will allow you to hear the position of the Global Tempo. Though the sound of the Metronome can be
heard in the headphones, it will not be recorded into the Sampler.
Using a Deck as a Tempo Master
Because songs can contain tempo changes (Tempo Anchors), it is now possible to have the Global Tempo follow a Deck.
To do this, hold SHIFT while engaging Sync. The Sync button will flash indicating that the Deck is now the Tempo Master
for Torq. The Global Tempo will follow the tempo changes in the song which will cause all other aspects of Torq to follow
the tempo changes.
31
31
Page 33

Turntable
or CD Player
INPUT BGROUND INPUT A
OUTPUT BOUTPUT A
Line Phono
Line Phono
32
32
EXTERNAL CONTROL
One of Torq’s greatest features is the ability to use external sources to control the
playback of your song files. In particular, you can use the Torq Control Vinyl or Torq
Control CDs to provide the familiar tactile sensation of DJing with traditional turntables
and/or CD decks. Torq also allows you to use external MIDI hardware to control nearly
any feature within the application.
The Control Vinyl and Control CD system works by using vinyl records and compact
discs imprinted with special control signals. You’ll play these control signals on your
turntables and/or CD players and feed that signal into any professional audio interface
that has four inputs (with phono preamplifiers on each input if you are using turntables)
such as the M-Audio Conectiv. Torq will listen to those audio signals and will use the
encoded information to control the playback of the Decks.
Enabling Vinyl/CD Control
1. Connect the outputs of your first turntable or CD player to inputs 1/2 of your
audio interface. If the interface has a “Line/Phono” input selector switch, be
sure to set it to “Phono” if using turntables, or “Line” if using CD players (or
turntables with built-in preamps).
CHAPTER
CHAPTER
6
1
2. Connect the outputs of your second turntable or CD player to inputs 3/4 of
your audio interface. Again, you’ll need to set its input selector switch as
described above.
Using Torq with only one turntable or CD player:
The connection diagram on this page assumes you have a traditional
DJ setup two CD players or turntables. However, Torq has a
special “AMPutate Mode” that allows you to control both decks
using only one turntable or CD player. This mode is described
later in this chapter.
English
English
Page 34

Torq 1.5 User Guide Chapter 1
Torq 1.5 User Guide Chapter 6
3. Open Torq’s Preferences and select the Audio tab.
33
33
4. Make sure your audio interface is selected in the “Audio Interfaces” drop-down menu.
5. Click the Control Input A drop-down menu and choose “input 1 -- input 2”.
6. Click the Control Input B drop-down menu and choose “input 3 -- input 4”.
7. Now click the “External Control” tab.
Note:
on the right side of the Preferences
window when certain M-Audio
products (such as the Xponent
DJ controller) are being used in
conjunction with Torq. This tab
contains parameters relating specifically
to the operation of the connected
M-Audio device. To learn more about
the contents of this additional tab, refer
to your new hardware’s User Guide.
An additional tab appears
Page 35

Torq 1.5 User Guide Chapter 1
Torq 1.5 User Guide Chapter 6
8. The first option enables External Control. Click the drop-down menu and select “Yes”.
9. The next step requires you to select the type of control signals you’ll be using for each Deck. If you’ll be using the
Torq Control Vinyl records, select “Torq Vinyl” for the Control Type. If you’ll be using the Torq Control CDs, select
“Torq CD” for the Control Type. Since this selection is independent for each Deck, you can use any combination of
vinyl and CD control that you’d like.
✓ Note: If you own the Ms. Pinky Interdimensional Wrecked System, you can use those vinyl records to control Torq.
Select “Gen1”, “Gen2”, or “Gen3” corresponding to the generation of records you own. Torq currently supports
generations 1 through 3.
10. The playback of the Decks will now be controlled by the incoming control signals you have selected.
✓ Note: You can also enable and disable the External Control system by clicking the External Control button in
Torq’s Toolbar.
34
34
External Control Calibration
While terms such as “digital vinyl” are sometimes used to describe vinyl control systems such as the one used in Torq, the truth
is that the system is still analog. There are “digits” encoded in the analog domain on the Torq Control Vinyls and CDs and those
digits are transferred to Torq by analog means through the inputs of your audio interface.
Because of this, the control system is subject to certain environmental and physical variables that can influence its performance.
The system is very robust and compensates for many of these factors, allowing a wide range of variance between equipment to
yield identical control response. This means the equipment you already own (turntables, cartridges, styli, CD players, etc.) is
probably sufficient for use with Torq’s external control system.
M-Audio has diligently tested the control system using a wide variety of equipment from different manufacturers, but not every
possible combination of gear could be tested. While unlikely, it is possible that there could be problems with components in
your DJ setup that might render the control system inoperable. When this happens, the Control Calibration displays on the
External Control Preferences tab will be your first place to look in order to diagnose the problem.
Control Type
If the external control system is enabled but doesn’t seem to be working, first check the Control Type settings for each
Deck before you tear out all the wiring in your DJ rig. If you have the wrong Control Type selected, Torq will not react
in the proper manner to the control signals. Once you’ve verified the setting here, you can continue diagnosing your
problem.
Velocity and Position
When the external control system is operating properly, it provides three vital pieces of information to Torq’s Decks:
the speed and direction of the Control Vinyl or Control CD as well as the current position on the record or CD. The
Velocity display shows a number that indicates both speed and direction at the same time. When the Velocity is 0, the
record or CD is stopped (or the needle has been lifted off the record). If the number is 1.0, that means the vinyl record
is running forward at normal speed (when using the Torq Control Vinyls, this refers to 33 1/3 RPM playback on the
turntable). When the number is -1.0, it means the record or CD is running backwards at normal speed (33 1/3 RPM). As
you manipulate the record or CD by hand or with their pitch adjusters, you’ll see the Velocity display change immediately
to reflect the movements.
The Position display shows a number that Torq uses to calculate the playback position for the audio file loaded into the
Deck. When the record or CD is playing forward, this number will increase—it will decrease if the record or CD is
playing backwards. You’ll also notice that this number will jump whenever you lift the needle off the record and place it
in another location (known as a “needle drop”). This is what allows Torq to play back a song just as if it was pressed right
into the Control Vinyl or Control CD.
Page 36

Torq 1.5 User Guide Chapter 1
Torq 1.5 User Guide Chapter 6
< Reversed Playback Direction
If you find that Torq seems to be responding backwards to the Control Vinyls or CDs, take a look at the Velocity
display. If the number shown is negative while the control source is playing forward, it could mean that the audio
cables connecting the turntable or CD player to your interface are backwards. Swap the left and right plugs on
the back of the audio interface and the problem should be fixed.
< Erratic Playback Position
If Torq seems to be jumping around to random locations in the song during playback, take a look at the Position
display. This number should be rapidly growing larger as the control source plays. If this number looks like it’s
counting erratically, this is most likely due to damaged control records (which is normal after extended use). This
could also be due to poor stereo separation in the turntable’s needle or preamp. This is especially common with
very old needles. To fix this, purchase a replacement vinyl record, replace your stylus, or purchase one of the
recommended styli/cartridges listed at the end of this manual.
< Erratic Velocity Values
A turntable is a very sensitive piece of equipment. It can take the smallest vibrations and amplify them into
audible sound. That’s what’s happening when you play a record—the grooves in the record vibrate the stylus
as they play and those vibrations are translated to audio. The problem with turntables, though, is that they
cannot distinguish between what is an intentional vibration caused by the moving grooves in the record and
an unintentional vibration picked up through the body of the turntable. For example, if you kick the table the
turntable is on, that “thump” will be transferred through the turntable up through the needle and translated into
sound.
35
35
What this means, in terms of the External Control system, is that vibrations and other unintentional noise can
“contaminate” the control signals being read from the records. When this happens, the noise can temporarily
throw off the ability of Torq to track the records.
In order to help minimize this problem, Torq has a setting called “Power Threshold” with various level settings.
The idea is to set this value above any of the extraneous noise such that Torq will only focus on the louder
control signals from the records. Here’s how to set this level properly:
1. Open the External Control Preferences and enable External Control.
2. Place the needle of your turntable on the Control Vinyl, but leave the turntable stopped.
3. Lower the Power Threshold to -40 and look at the Velocity value for the deck.
4. If the Velocity is showing random values even though the turntable is stopped, that means the Power
Threshold is too low—Torq is picking up noise and interpreting it as a control signal.
5. Increase the Power Threshold by 5dB and look at the Velocity value again. If you still see random Velocity
values, raise the Power Threshold another 5dB.
6. Eventually, you’ll reach a point where the Velocity stays at 0.00. This is the optimal setting for the Power
Threshold.
7. Please note that, if you’re in a noisy environment that does not have good physical isolation of the
turntables (to prevent external vibrations from being picked up by the stylus), you may need to raise the
Power Threshold setting a little higher to filter out the additional noise in the room.
Page 37

Torq 1.5 User Guide Chapter 1
Torq 1.5 User Guide Chapter 6
Error Index
If you’ve checked your audio cable connections and have also replaced your turntable’s needles yet still experience
problems, take a look at the Error Index displays. These displays will be showing a number typically between 0.15 and
1.50, which is perfectly normal. If the number is above 2.0, it will turn red, indicating that there is too much noise in the
audio signal for Torq to properly track position and velocity. Try cleaning the record using a high quality vinyl cleaning
system. Too much dirt on the record can cause errors in the tracking process.
A high Error Index can also be caused by wear and tear on the Control Vinyl. Each time a record is played, it is slightly
damaged, especially if the tracking weight of the needle is very heavy. After repeated use, the control signal may become
distorted and unreadable. Simply flip over the Control Vinyl to the second side or purchase a replacement record from
the M-Audio Webstore (www.m-audio.com).
If the output level of your stylus/cartridge is too low, this can also result in high Error Index readings. Try replacing your
stylus/cartridge with one of the recommended models at the end of this manual for a higher output level.
Standard Mode
When you enable External Control, Torq will be in Standard mode. In this mode, one control source is assigned to each Deck.
You will need two sources (2 turntables, 2 CD players, or one of each) in order to control the two Decks in Torq. This is just
like using traditional hardware to DJ.
When using Standard mode, you have two control styles to choose from—Absolute mode and Relative mode—which are
explained below.
36
36
Absolute Mode
This is the default control style when in Standard mode and is indicated by the [>|<] icon on what was previously the Play/
Pause button on the Decks. Absolute mode means that Torq will be following the position of the external control source.
This is most apparent when using the Control Vinyls—you can lift the needle and place it in different locations on the
record and Torq’s Decks will follow this position. If you place the needle at the beginning of the record (or rewind the
Control CD back to the beginning of a track), the song in the Deck will also jump back to the beginning.
This mode is obviously the mode that will recreate the sensation of using CDs and Vinyl with the greatest detail. You
will be able to control playback position from your turntables or CD players without having to interact with the Torq
interface.
Relative Mode
In contrast, Relative mode will ignore the playback position of the Control Vinyl or Control CD. Torq will only monitor
the direction and speed of the control source. To enable Relative mode on a Deck, click the Absolute mode button—its
icon will change to [<|>] indicating that Relative mode is now active (click the button again to toggle back to Absolute
mode).
You’ll now notice that placing the needle in different locations on the record will have no effect on the music—playback
will resume from the point it left off as soon as the needle touches the record again.
Even though the playback position of the Control Vinyl or Control CD is not affecting the playback position of the song
on the Deck, the speed and direction of the control source will still continue to work. You can change the playback speed
using the pitch adjusters on your turntables or CD players and the playback speed of the Deck will follow. You can even
scratch like normal. The added benefit is that, should the needle skip a groove while you’re scratching, you won’t lose the
sound you were using. You can continue to scratch the same location of the audio file even if the needle keeps skipping.
✓ Note: While there will be no audible change in music playback when switching a Deck from Absolute mode to Relative
mode, there is a chance that the playback position could jump to an unanticipated position when switching from Relative
mode back into Absolute mode. This is due to the fact that, while using the features of Relative mode, the playback position
of the Deck and the actual location of the control source could fall out of sync (for example, if you loop the song on the
Deck, the song will no longer proceed forward but the location of the control source will continue to play forward). When
you switch back to Absolute mode, Torq will immediately jump to the position indicated by the control source...this could
even be a position after the song has ended! Therefore, be extremely careful when toggling back to Absolute mode. Only
do so if (1) you know the location of the song and control source are still in sync or (2) you mute the Deck before switching
over, thus preventing any jumps from being heard by your audience.
Page 38

Torq 1.5 User Guide Chapter 1
Torq 1.5 User Guide Chapter 6
AMPutate Mode
While exploring the depths of Torq, you will repeatedly run into scenarios that would not be possible with traditional DJ
hardware—techniques that can only be achieved through the flexible power of computer technology. Torq’s AMPutate mode is
a perfect example of this—it allows you to DJ using only one turntable or CD player. Wait, what? DJing has always been about
two turntables and a mixer, right? When using AMPutate mode, it still is, but one of the turntables is “virtual.”
The idea behind AMPutate mode is that you generally need to manipulate only one song at a time when DJing. One song will
be playing freely (the one your audience is dancing to) while you play with the other turntable in order to match tempos and
find the perfect starting place for the next song. Once tempos are matched and the time is right, you’ll start the song and apply
small adjustments to it in order to keep it in sync while mixing it in. Once the song is fully mixed in and the previous song is
over, your need for manipulating the song will be over. At that point, you’d put a new record on the other turntable and begin
the process of cueing and beat-matching.
Deck Control
AMPutate mode allows you to control one of Torq’s Decks with a single Control Vinyl or Control CD while the other
Deck operates in Hybrid or CDJ mode. To enable AMPutate mode:
1. Open the Preferences and click on the External Control tab.
2. Ensure that External Control is enabled. If not, turn it on now by selecting “Yes” in its drop-down menu.
37
37
3. With External Control enabled, you’ll also be able to enable AMPutate mode by selecting “Yes” in its
drop-down menu.
4. AMPutate will use the control source chosen for Control Input A on the Audio Preferences tab. Check your
selection on this tab to make sure you have selected your desired control source.
5. Close the Preferences.
6. Load a track onto Deck A and click the Vinyl button (located right below the QuickCue buttons).
7. Deck A will now be under external control.
8. Start your turntable or CD player. Deck A will begin to play like normal.
9. Now, load a track onto Deck B and click its Vinyl button. You’ll notice that Deck A will automatically switch to
Hybrid or CDJ control (whichever mode you used last) and will continue to play! At the same time, the external
control source will now be controlling Deck B.
10. You can swap external control back and forth as you please and the music will remain playing on both Decks at
all times.
✓ Note: You can also enable and disable AMPutate Mode using the AMPutate button in Torq’s Toolbar.
So you can see that swapping external control is as simple as clicking the Vinyl button on the Deck you wish
to control (you could assign MIDI notes or keys on your computer’s keyboard to the Vinyl buttons, too). If the
external control source is stopped when you switch control to the other Deck, it will remain stopped. If the
control source was playing when you switch control to the other Deck, it will remain playing.
✓ Note: Because the AMPutate system allows you to swap control between two independent Decks, the Decks are
forced into Relative mode to prevent any undesirable jumps in playback position when toggling control. Therefore,
when using AMPutate mode, you will use the on-screen controls (Fast Forward, Rewind, Overview Waveform,
QuickCues, etc.) to set the playback position of the song—needle drops will not work.
Page 39

Torq 1.5 User Guide Chapter 1
Torq 1.5 User Guide Chapter 6
BPM Matching
So how does one go about doing a DJ set with only one turntable? It is a little different than doing it in Standard mode,
primarily due to the fact that you must use Torq’s on-screen Speed sliders to match tempos as opposed to using the pitch
sliders on your turntable or CD player.
Try it out: Click Vinyl on a Deck and start the external control source. While the song is playing, move the Deck’s onscreen Speed slider. Sure enough—the playback speed of the song changes, just as if you’d moved the pitch slider on the
actual turntable or CD player.
The reason for requiring the use of the on-screen controls lies in the fact that external control can be toggled back and
forth between the Decks at will. Any time you do this, you’ll want the Decks to keep their previous tempos. If the tempo
of a Deck changed when swapping external control, the mix would suddenly fall wildly out of sync.
Therefore, the speed of the Control Vinyl or Control CD must remain constant—Torq will scale the playback rate as
appropriate based on the setting of the Decks’ Speed sliders. If you change the speed of the control source, you’ll find
that the Decks suddenly change speed any time you toggle external control.
There is, however, one unique advantage to this setup: you can make use of Torq’s automatic beat-matching! Instead
of manually moving the on-screen Speed slider with the mouse or MIDI Control, you can simply click the Deck’s Sync
button and it’s Speed slider will be moved to match the tempo of the other Deck. Click the Sync button again to turn it
off, and the Deck will remain at the proper speed waiting for the external control signal to begin. All you have to do then
is start the music at the right time and keep it in alignment during the mix via external control. This makes the process of
preparing the next track much faster.
38
38
Runout Protection
Since there is only about 12 minutes of usable control signal on each side of the Control Vinyls or on each track of the CD,
it is possible that the song you are controlling could exceed the length of control signal available on the record or CD. This is
extremely common when using Relative mode since the needle or CD position could be halfway through when you start the
next track.
In order to prevent the music from stopping abruptly if the control signal runs out on the record or CD, Torq features Runout
Protection which essentially disables External Control when the record or CD reaches the last 30 seconds of its signal. When
this happens, the song’s waveform will start to flash yellow and the song on the Deck continue to play. You will now be able
to take the needle off the record and place it back at the beginning without Torq stopping the music (the same is true for the
CD—you can jump back to the beginning of the track without stopping the music). Once Torq reads a few seconds of signal
from the new location, the flashing will stop and Torq will re-engage External Control allowing you to scratch and manipulate
like normal.
✓ Note: If you are currently in Absolute mode when the last 30 seconds of control signal are reached, Torq will automatically
switch the Deck into Relative mode when it engages the Runout Protection. The Deck will remain in Relative mode after you
reset the record or CD, thus preventing the music from jumping to an unexpected location when external control is enabled
again.
MIDI Control
While the Torq Control Vinyl and Control CDs offer a great way to control song playback on the Decks, there are still plenty
of other features in Torq that would surely feel good under the fingertips. For that purpose, Torq provides the option of MIDI
control for nearly every button, knob, and slider on the interface. Since MIDI is a common protocol shared between all types of
musical gear, you can use almost anything capable of generating MIDI note or CC messages to control Torq—they do not need
to be specialized DJ controllers. This will offer you a way to experiment with different control methods when DJing, such as
using an M-Audio Trigger Finger to control samples or an M-Audio Axiom 25 keyboard to control effects and pitches.
Page 40

Torq 1.5 User Guide Chapter 1
Torq 1.5 User Guide Chapter 6
< MIDI Preferences
The second tab of the Preferences contains the MIDI
options. At the bottom of this tab is a list of all the
available MIDI input devices on your computer. Each
device has a “Yes/No” option to enable or disable it.
Set the MIDI device to “Yes” if you wish to use it to
control Torq. Otherwise, set the device to “No” and
Torq will ignore it (allowing you to use it to control
a different application, such as when ReWired into
another host program).
Once you have enabled a MIDI Input, you will be able
to use it to control Torq by means of MIDI Learn,
which will be described next.
< MIDI Learn
Every musician approaches their craft from a slightly
different direction. DJing is no different. That is why
Torq is basically a blank slate when run for the first
time—there are no pre-set control assignments for
any of the buttons, knobs, or sliders seen on screen
for you to memorize. Instead, you get to assign the
most important controls for you to whatever MIDI
controls make the most sense to you.
39
39
» Creating a MIDI Assignment
Torq uses a simple MIDI Learn scheme to make assigning controls on your MIDI controllers a breeze:
1. Right-click (CTRL-click on Mac) the button, knob, or slider you wish to control via MIDI. The control
will be highlighted in red indicating that Torq is standing by.
2. Move the desired control on your MIDI controller. That is, move the knob or slider you want to use
or press the button/key you wish to use.
3. Torq will intercept the incoming MIDI message and will instantly assign it to the control. The red
highlight will disappear and the MIDI control will be active.
» Clearing a MIDI Assignment
If you’ve assigned a MIDI control using MIDI Learn and you wish to clear the assignment, simply right-click
(CTRL-click on Mac) the desired control in Torq, then press the Delete key on your computer’s keyboard.
Any assignments for the control will be erased.
» Changing MIDI Assignment
If you assign a MIDI knob, for example, to the Low EQ in the Mixer, you can assign it to the Mid EQ by
simply right-clicking (CTRL-click on Mac) the Mid EQ knob and moving the MIDI Knob. Doing so will
clear the assignment to the Low EQ knob and the MIDI control will now be mapped to the Mid EQ knob.
This allows you to use a small controller for Torq since you can continually reassign its controls without
worrying about what the previous assignments were.
Page 41

Torq 1.5 User Guide Chapter 1
Torq 1.5 User Guide Chapter 6
< Keyboard Learn
You can also use your computer’s keyboard to control elements of the Torq interface using the same method
as MIDI Learn above. Simply right-click (CTRL-click for Mac) on a control on screen, then press a key on your
keyboard. That key will then be assigned to the selected control. The same method for changing and clearing
MIDI assignments described above also works for keyboard assignments.
< Assigning Buttons to Knobs or Sliders
If you so desire, you can assign a MIDI button/key or a key on your computer’s keyboard to a knob or slider
in Torq’s interface. When doing this, pressing the MIDI button or key will cause the knob or slider’s value to
toggle between an assignable minimum and maximum value. For example, assign the “X” key on your computer
keyboard to the Low EQ knob. Turn up the EQ to +6 using the mouse, then press the “X” key on your keyboard.
The EQ will jump to 0. Press “X” again, and the EQ will jump back up to +6.
< Assigning Knobs or Sliders to Buttons
Conversely, you could assign a MIDI knob or slider to one of Torq’s buttons. When doing this, the button will
turn on anytime the knob or slider is turned past its halfway point (outputting a MIDI value greater than 64). The
button will turn back off when the knob or slider is moved lower than its halfway point.
40
40
Page 42
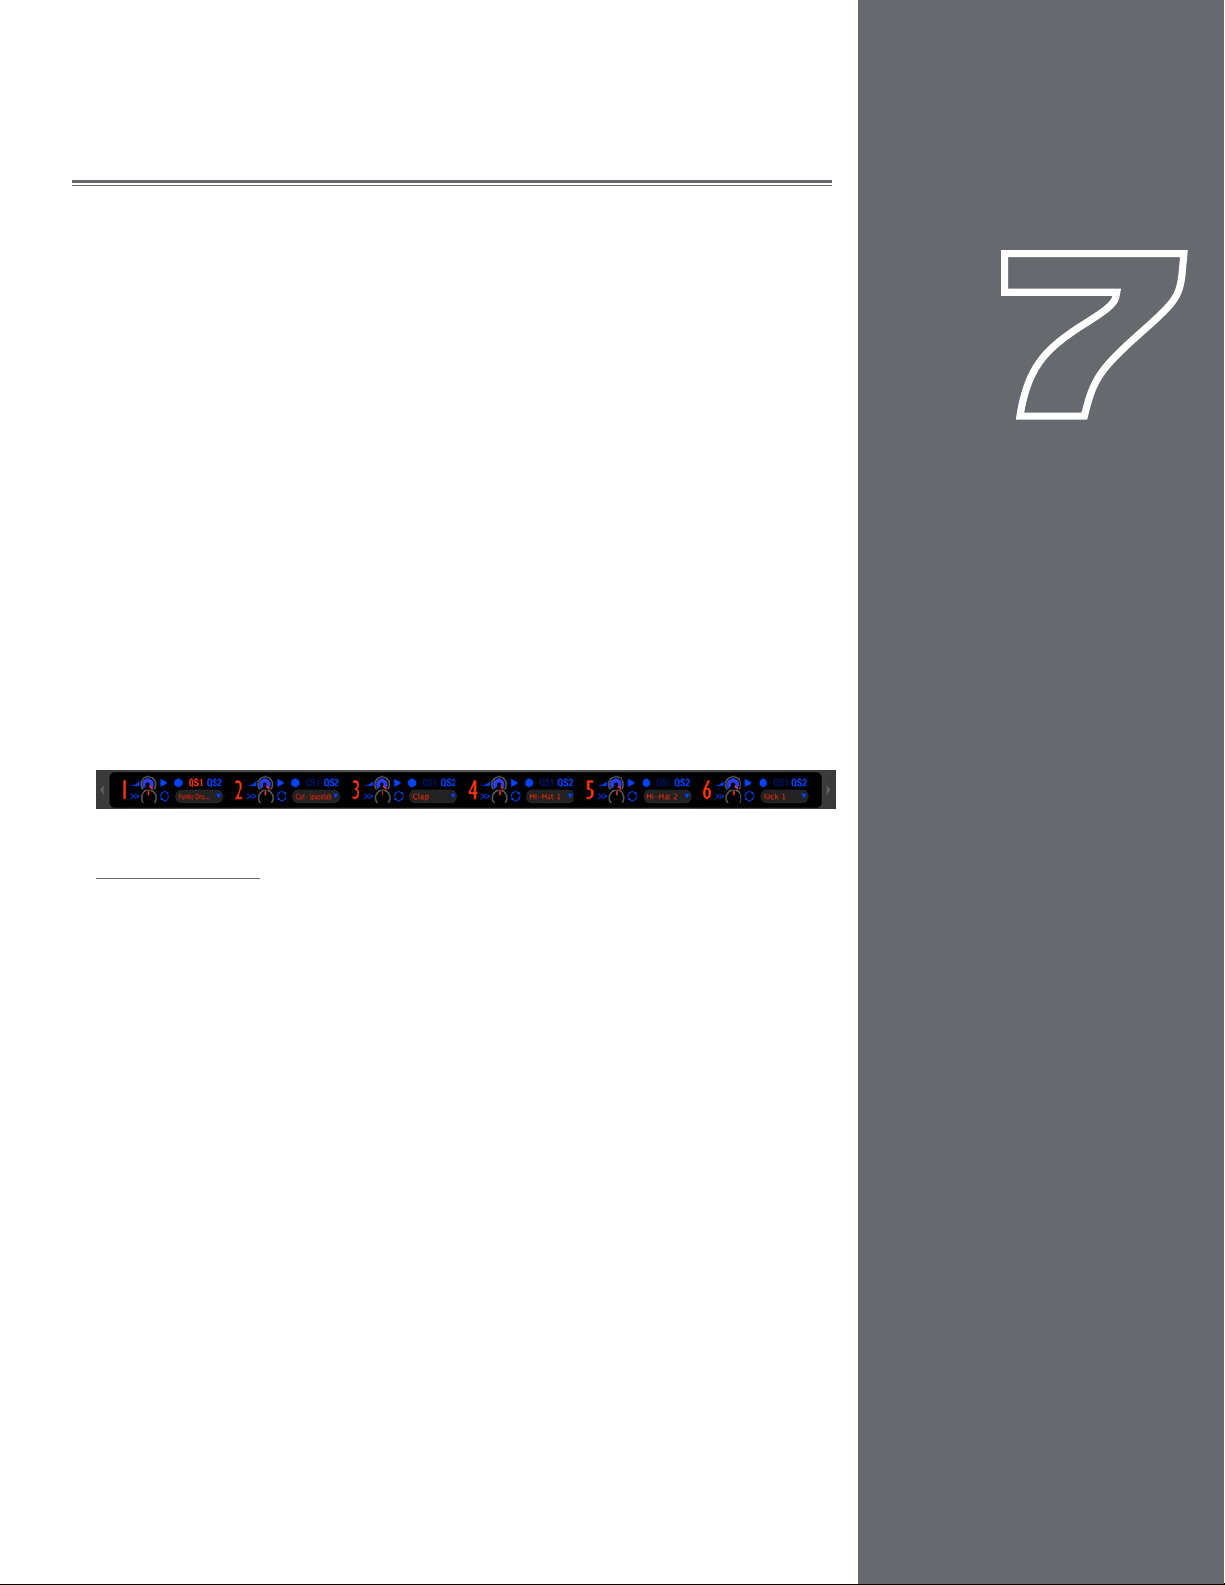
41
41
SAMPLER
When talking about music, a sampler is not a plate of hors d’oeuvres. A sampler is a
device that will digitally record a sound that you can then replay at various pitches. If
you’re into any kind of electronic dance music or hip-hop, you’ve undoubtedly heard
samplers in use.
But what good is a sampler for a DJ? In recent years, DJs have used samplers to add
sound effects to their mix. Such effects range from simple sounds like laser guns and
bombs to more complex passages, such as a radio station’s identification or the DJ’s
name. Torq’s Sampler will let you do the same—and due to its tight integration with the
Decks, you’ll also be able to record loops that will stay synchronized to your mix. This
will give you the ability to record and layer a song back on top of itself, or to play other
loops in sync with your music. This can be especially effective when using the Sampler
with various drum and percussion loops—you can create your own drum patterns to
layer with your mix for added emphasis, or to keep the beat flowing during a breakdown
in the music.
Torq has 16 individual Sample Slots, each capable of recording and playing back a single
audio sample. Below, you’ll learn the how to use the various controls in the Sampler
along with techniques for capturing perfect loops.
CHAPTER
CHAPTER
1
7
Signal Source
Before you can record a sample, you must choose an audio source for the sample. When
using Torq, this is as simple as engaging the PFL (headphone icon) on a Mixer channel.
When you do this, you’ll hear that channel in your headphones and it will also be routed
to the Sampler. This means that the Headphone Volume slider also acts as the Record
Level adjustment for the Sampler.
This routing scheme has two benefits. First, you can record a sample from an audio
source that your audience cannot hear. For example, you could record a vocal break
from your next song and play it to hint at the track you’re about to play. Secondly, this
routing scheme allows you to record from more than one source at a time. If you enable
the PFL on multiple Mixer channels, their signals will be mixed together for sampling as a
whole.
The idea when making any type of digital recording is to record the sound as loud as
possible, but not so loud that it causes distortion. Like “The Price Is Right,” you want to
get as close to the maximum without going over. Torq includes a limiter on the PFL, so
you won’t have to worry if the sound you’re recording has a few loud peaks—they won’t
cause distortion.
English
English
Page 43

Torq 1.5 User Guide Chapter 1
Torq 1.5 User Guide Chapter 7
Sampler Controls
This section provides an overview of the controls within the Sampler.
Record Sample Button
Samples can be categorized into two groups: one-shot samples and loops. One-shot samples are sounds that play once
when you trigger them and are not automatically synchronized to your mix. Loops are samples that will play repeatedly—
when the end of the sample is reached, playback will return to the beginning. Torq will play these loops in sync with the
Global Tempo, allowing you to use multiple loops from different sources all at once.
The method in which you use the Sampler’s Record button will determine whether you record a loop or one-shot
sample:
< Recording One-Shot Samples
1. Press the Pre-Fader Listen (PFL) button in the Mixer to indicate the desired source of the sample. The button
will light up.
2. Press the circular RECORD button in the sample-cell you want to record to. The button will turn red to
indicate that Torq is recording.
3. When the Record button is pressed again, the button will turn off, and the recording will stop. The sample is
now ready to play.
42
42
< Recording Looped Samples
1. To record a loop instead of a one-shot, press and hold SHIFT while clicking on the Record button. Instead of
beginning recording immediately, recording will wait for the downbeat (determined via the phase information
of the source Deck). The Record button will be yellow while it’s waiting for the downbeat. Once the
downbeat is reached, the button will turn red and recording will commence.
2. Clicking the Record button again while recording will not stop recording immediately. Instead, recording will
continue until the end of the next bar (again, determined by phase information from the source Deck). The
Record button will be yellow while it’s waiting for the end of the bar (the Sampler will be recording during
this time). Once the end of the bar is reached, recording will stop and the loop will be ready to play (loop will
already be selected).
< Naming Scheme for Recorded Samples
Each time you record a sample, Torq will give it the name “SampleXXX.wav” where XXX is an automatically
generated number. The number will increment every time you create a new sample, regardless of which Sampler
you use for the recording. The first sample you record will be named “Sample001.wav.” The next sample that is
recorded will be named “Sample002.wav,” and so on. This numbering can be reset to start at 001 within the Torq
Preferences menu. You can also rename any recorded sample using the Rename Sample function which is detailed
later in this section.
Page 44

Torq 1.5 User Guide Chapter 1
Torq 1.5 User Guide Chapter 7
Trigger Sample Button
Pressing this button causes the associated sample to play. One-shot and looped samples exhibit slightly different
behaviors:
< Triggering One-Shot Samples
1. Click the Trigger button. The button icon will light and the sample will play immediately. During playback, a
progress bar (behind the sample’s name) will fill from left to right. When the sample ends, the Trigger button
will turn off.
2. If the Trigger button is pressed while the sample is already playing, the sample playback position will
immediately jump back to the beginning of the sample.
3. To stop sample playback before the sample ends, hold the SHIFT key on your computer keyboard and click
the Trigger button. This will stop the sample immediately.
< Triggering Looped Samples
1. Click the Trigger button. The sample will start playing in sync with the Global Tempo (when the Global
Tempo button is active). If you trigger the sample at a point other than the downbeat, the sample will jump
to the proper playback location in order to remain in sync with the Global Tempo. If Global Tempo is off, the
loop will play independently of the current tempos.
43
43
2. To stop the loop, click the Trigger button again. The loop will stop immediately.
3. To stop the loop immediately, hold the Shift key while clicking the Trigger button. The loop will stop
immediately when clicked.
Loop Sample Button
The Loop option can be checked or unchecked to enable or disable sample looping. When active, the sample will loop
automatically when it reaches its end. The looping will be synchronized with the Global Tempo if the Global Tempo
button is activated.
When deactivated, the sample will be triggered as a one-shot. This means the sample will play only once when triggered.
✓ Note: If you wish to use samples already on your hard drive (as opposed to recording them in Torq), the sample will need
to be cut to an even bar length in order for the loop to play properly. You will need to use an external audio editor to cut the
loop if it’s not already trimmed to the proper length.
Sample Volume Knob
Each sample has its own volume control allowing you to mix multiple samples together with appropriate levels. Click and
drag up and down on this knob to change the sample playback volume. Hold SHIFT and click on the knob to reset the
volume to unity (the original sample volume).
Sample Speed/Rate Knob
This knob adjusts the playback speed of a one-shot sample, or will scale the playback rate of a looped sample.
When using one-shot samples, the Speed knob will set the playback speed/pitch for the sample. When the knob is set at
12 o’clock, the sample will play at its original speed.
When using looped samples, this knob will either double or halve the playback rate in order to remain in sync with the
Global Tempo. When the knob is turned counter-clockwise, the playback rate will be cut in half. Turned clockwise, the
playback rate will be doubled.
Page 45

Torq 1.5 User Guide Chapter 1
Torq 1.5 User Guide Chapter 7
Sample Name Window
The Sample Name window serves multiple purposes.
1. It will display the name of the sample file loaded into the slot.
2. The background of this window will fill from left to right as the sample plays, like a progress meter.
3. Clicking on this window will display a pop-up menu with the following options:
< Load Sample
Choosing this option will open a standard dialog box. Use this dialog to navigate to your hard drive and
locate a sample. If you load a sample into a slot that already has a sample loaded, the current sample will be
immediately replaced.
< Save Sample
Choosing this option opens a standard Save dialog box. Use this dialog to name the current sample and save it
to a specific location. The new name will also be displayed in the Sample Name window.
✓ Note: This option will be unavailable (grayed out) if the sample slot is empty.
< Rename Sample
Once you’ve recorded a sample, you can rename it from the generic “SampleXXX” naming format
automatically applied to new samples. Simply click this option in the menu and type in a new name for the
sample. The file on your hard drive will be renamed to match.
44
44
✓ Note: This option will be unavailable (grayed out) if the sample slot is empty.
< Unload Sample
Choosing this option will remove the current sample from the sampler.
< Load Sample Bank
This option will allow you to load a bank of 16 samples into the Sampler using only one action. Choosing this
option opens a standard dialog box that looks only for “.tsb” (Torq Sample Bank) files. Browse your hard drive
and select a .tsb file. Torq will read this file and load the required sample files into the appropriate slots. It will
then set the playback parameters for each sample.
✓ Note: This operation will replace any samples that are currently loaded into the Sampler. If you want to keep
the current configuration, save the bank (using the procedure below) before loading a new bank.
< Save Sample Bank
Once you have built a collection of samples (drum loops of a particular style or a collection of vocal stabs, for
example), you can save the collection as a sample bank. Choosing this option from the menu opens a standard
Save dialog box that will save a proprietary Sample Bank file. This file references the samples currently loaded
into the Sampler. Browse to your hard drive and choose a location to save the file. The file will be saved with
the extension “.tsb” (Torq Sample Bank). A file folder will also be created (of the same name) but with the
word “Samples” appended to the end. This “Samples” folder will contain copies of the samples used in the
bank for easy recall in the future.
Page 46

Torq 1.5 User Guide Chapter 1
Torq 1.5 User Guide Chapter 7
QuickScratch
While firing off samples using the Trigger buttons can be a lot of fun, it doesn’t always provide the level of control that
you may want for the sample. Torq’s QuickScratch feature allows you to control the sample using the variable-speed and
variable-key engine within a Deck. This means you can scratch the sample using the mouse or with the Torq Control Vinyl
or Control CD systems.
< Assigning Samples
Torq features two QuickScratch slots—QS1 and QS2. You’ll see that each sampler has a pair of these QS
buttons. Pressing one of the buttons assigns that sample to the associated QuickScratch slot (i.e. pressing the
QS1 button on Sampler 1 will assign the sample to QS1).
< Activating QuickScratch
Each of Torq’s Decks also have a pair of QuickScratch buttons. When you press one of them, the associated
sample assigned using the QuickScratch buttons in the Sampler will be immediately loaded into the Deck. You
can then manipulate the sample in the same manner used for full songs. Press the QuickScratch button again and
the original song will be loaded back into the Deck. Here’s a practical example:
You place your two favorite scratching sounds into the samplers—you put the “Aaaah” sample into Sampler 1
and the “Fresh” sample into Sampler 2. You then activate QS1 in Sampler 1 and QS2 in Sampler 2. Now, when
you press QS1 in a Deck, the “Aaaah” sample will be loaded. Pressing QS2 results in the “Fresh” sample being
loaded. This allows you to access your favorite scratch sounds with the quick push of a button.
45
45
< Looping a QuickScratch
If a one-shot sample is used as a QuickScratch, the sample will not be looped when loaded onto the Deck. If a
looped sample is used as a QuickScratch, the sample will be looped when loaded onto the Deck so that it will
play indefinitely.
✓ Note: If you change the QuickScratch assignment in the Sampler while using the QuickScratch feature on a Deck,
the sample used in the Deck will be updated immediately.
Page 47

46
46
SNAPSHOTS
By now, you’ve surely noticed that Torq has many features designed to make DJing
easier. Automatic tempo-detection and beat-matching allow you, the DJ, to spend your
time doing other things rather than manually keeping two tracks in sync. For example,
you can remix the song using loops and QuickCues, tweak the sound using effects and
EQ, and add samples to the mix. The sheer quantity of options available to you easily
exceeds the number of fingers you have on your hands, so controlling all these features
simultaneously can become a challenge. Torq’s innovative Snapshot system allows you
to overcome these obstacles by allowing you to perform multiple tasks with the simple
push of a button
or two.
A Snapshot is very much like it sounds—a virtual picture of settings within Torq. You
can configure the controls and effects in Torq as you like, then save all those settings
in a Snapshot that you can recall instantaneously. Torq enables you to make a virtually
unlimited list of Snapshots, all with unique control parameters, and sort them in the
Snapshot list—this list becomes an arsenal of your best tricks, which you can use at any
time.
Snapshot List
If you press the Tab key on your keyboard or click the Camera tab , the Database
and Browser will be replaced with the Snapshot List. The list has multiple columns, like
the File List, and each row represents one Snapshot. Press the Tab key again (or click the
Browser tab) to return to the Database and Browser.
CHAPTER
CHAPTER
8
1
Creating a Snapshot
To create a new Snapshot, simply click the New Snapshot button above the Snapshot
list or the New Snapshot button located in Torq’s Toolbar. Torq will immediately create
a new Snapshot entry and the name will be highlighted so that you can type in a proper
name for the Snapshot. Type in something you can remember and press Enter. You can
always rename the Snapshot by double-clicking its name and typing in a new one.
English
English
Page 48
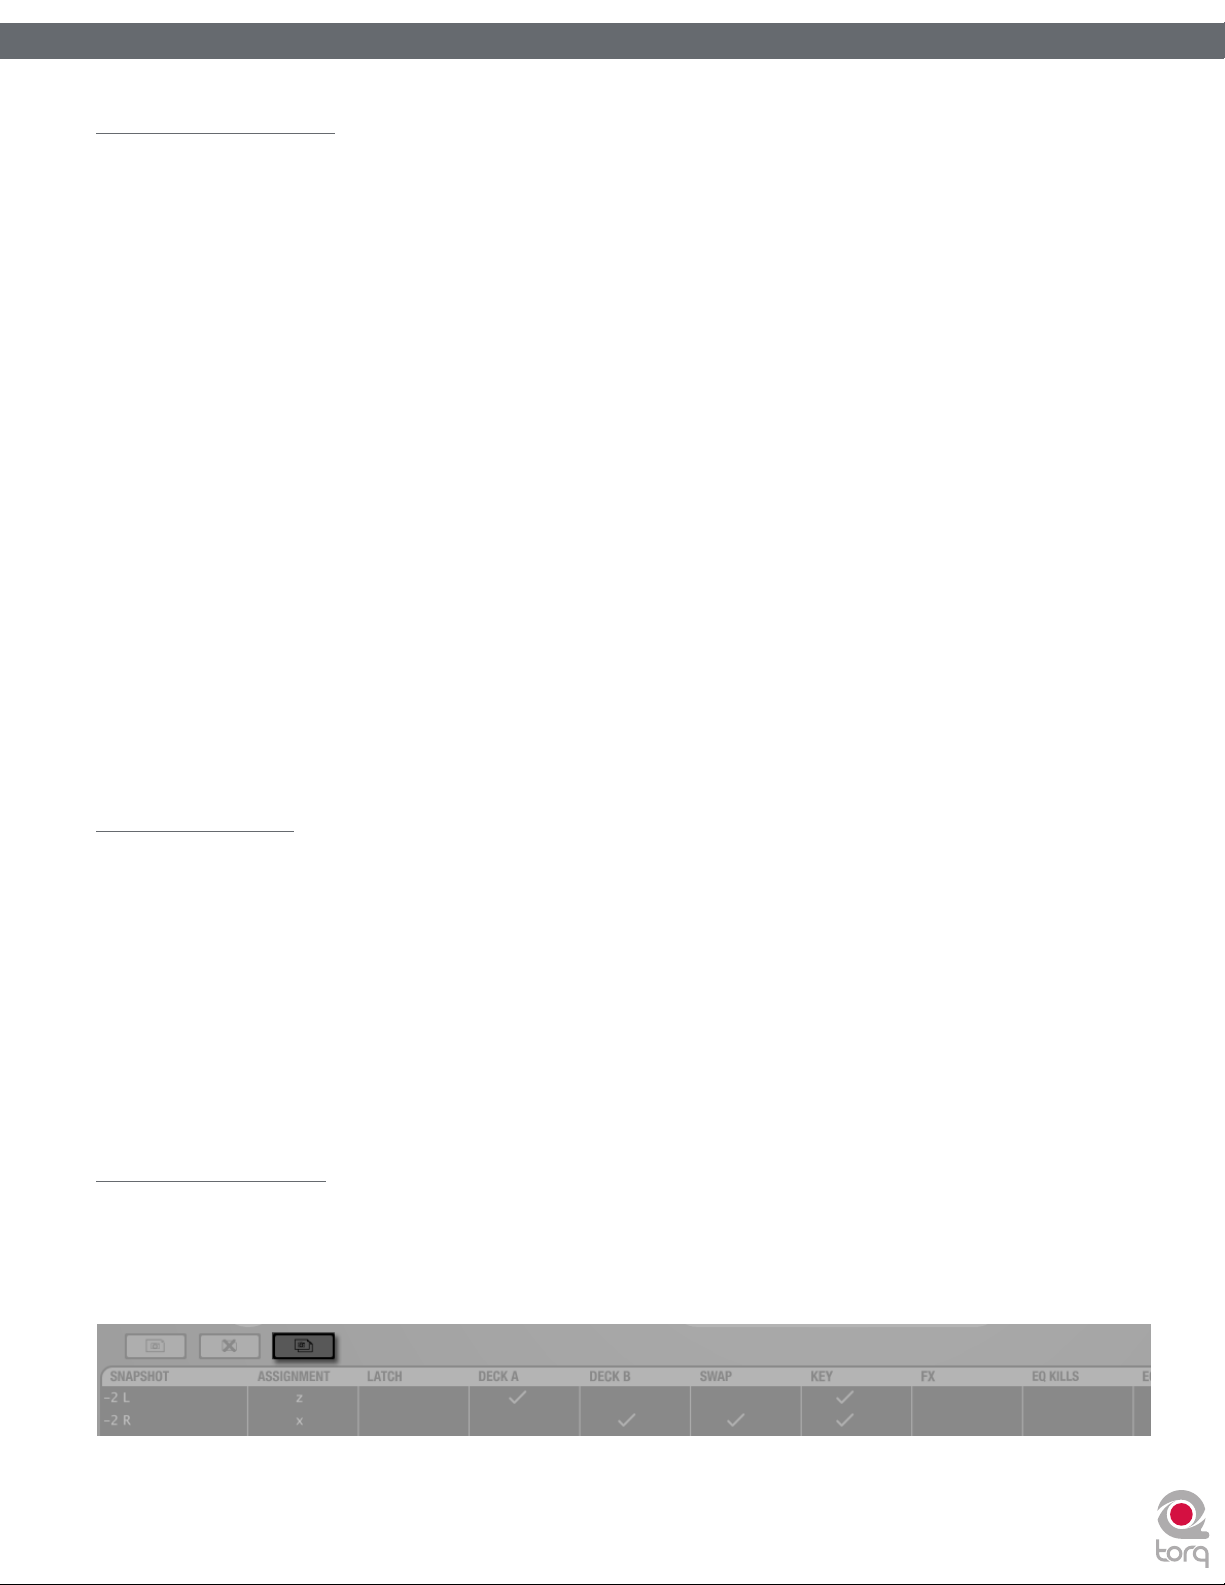
Torq 1.5 User Guide Chapter 1
Torq 1.5 User Guide Chapter 8
Masking a Snapshot
Each Snapshot you create contains the settings of almost every component in Torq. A Snapshot will remember the Key setting
of a Deck, the EQ settings in the Mixer (including the state of the EQ Kills), the channel gains and volumes, the Crossfader
position, and the contents and settings of the built-in Effect Racks (VST effects are not saved in the Snapshots). You can
therefore have a Snapshot that will update all of these parameters at once, if you wish.
More often than not, however, you’ll want to only override a portion of your current settings using a Snapshot. For example,
you may want to recall the settings of one effect rack while leaving all other settings (channel volumes, EQs, etc.) as they
currently are. This is the purpose of masking, which allows only particular portions of the Snapshot to be used.
Each column in the Snapshot List corresponds to certain portions of the Torq interface. You’ll find columns for Deck A and
Deck B, Key, FX, EQ Kills, EQ knobs, Crossfader, and channel volumes. When you create a new Snapshot, these columns will
be blank. As a result, nothing will happen when you trigger the Snapshot.
The way to enable the Snapshot is to place check boxes in these columns to indicate what portions of the interface you’d like
the Snapshot to control. If you put a check box in the Deck A column, the Snapshot will use the information for the left side of
the interface. You can check Deck B instead if you wish the Snapshot to only affect the right side of the interface. Check them
both and the entire interface can be updated with the Snapshot.
Once you’ve selected which Deck(s) should be controlled by the Snapshot, place additional check boxes in the columns
corresponding to the parameters you’d like to control. For example, if you check the Deck A and EQ knobs columns, only the
EQ knobs on the left side of the mixer will be updated when the Snapshot is triggered. Any other settings (the current key of
the song, any effects in the Effect Racks, etc.) will remain unchanged. If you were to also check the EQ Kills and Key columns,
the Deck’s Key setting will be updated by the Snapshot, along with the EQ Kills, too. Checking all of the columns and all
parameters within the Snapshot will override the current settings. When you release the Snapshot, all previous settings will be
restored.
47
47
Using Snapshots
The second column in the Snapshot list is labeled Assignment and contains the name of the current keyboard key or MIDI note
assigned to the Snapshot. When you make a new Snapshot, this column will be blank. Simply right-click (CTRL-click on Mac)
on the empty field and the message “Press a key...” will appear, indicating that Torq is waiting for your key assignment. Press a
key on your computer’s keyboard, or trigger a MIDI note on your external controller, and Torq will immediately bind it to the
Snapshot. Right-click again to assign a different key, if you wish. Now, the Snapshot will be activated any time you press the
assigned key.
✓ Note: Because of the large amount of Snapshots you may create while using Torq, you can to use modifier keys when making
assignments. For example, you can assign the W key, SHIFT+W, CTRL+W, and ALT+W to different Snapshots—you can even
use multiple modifiers, like CTRL + SHIFT + W.
Duplicate Snapshot
Click on a Snapshot in the list to select it, then click the Duplicate Snapshot button (the third button from the left). Another
Snapshot will appear in the list, but this one will contain an exact copy of the parameters from the previously selected
Snapshot. You can give the duplicate a new name, then select different masking parameters to make the Snapshot behave
differently. Assign a different key to this Snapshot, and you can fire off either with ease.
Page 49

Torq 1.5 User Guide Chapter 1
Torq 1.5 User Guide Chapter 8
Swapping Snapshots
Frequently, you may find that a Snapshot set up for Deck A would be useful for Deck B or vice versa. For example, you may
have created a Snapshot that loads a Delay effect while also killing the Low EQ on Deck A. Torq allows you to swap the left and
right assignment of Snapshots to do this easily.
To start with, duplicate the Snapshot as described above—a copy of the Snapshot will appear in the list. Give this new Snapshot
a new name (i.e. if the original Snapshot was called “HP Delay A”, you might rename it to “HP Delay B”). Once you’ve created
the new duplicate, place check marks in the Swap and Deck B columns and remove the checkmark from the Deck A column.
This will essentially take any assignments made to Deck A and now apply them to Deck B when using this Snapshot.
Delete Snapshot
The third button above the Snapshot list is the Delete Snapshot button. Select a Snapshot from the list then click this button to
delete it.
Momentary vs. Latching Behavior
By default, a Snapshot will only be active as long as you hold the assigned key. As soon as you release the key, the Snapshot is
deactivated and all previous settings are restored. This is excellent for simply “punching in” little tweaks and effects that you
only use for a few moments at a time.
48
48
If you place a check box in the “Latch” column of the Snapshot list, the Snapshot will become active when you press the
assigned key and will remain active even after you release the key. When you press the same key again, the Snapshot will be
turned off. This mode allows you to recall a setting that you may want to leave active for a while, such as a special stutter
pattern that you created using multiple Strobe effects.
Polyphonic Snapshots
On top of all this, you can trigger multiple Snapshots at a time. You can, for example, trigger one Snapshot that cuts the bass
and boosts the treble on Deck A while triggering another that detunes the track on Deck B.
You’ll notice that whenever you activate a Snapshot, its check boxes in the Snapshot List will light up, indicating that those
parameters are being controlled by the Snapshot. On the occasion that you trigger another Snapshot that has conflicting
settings (both Snapshots you’re triggering have FX checked, for example), the last Snapshot you triggered will take precedence.
You’ll note that the green check mark in the FX column of the first Snapshot will turn red, indicating that the parameter
is overridden by the other Snapshot. As soon as you deactivate the second Snapshot, the red check will turn green again,
indicating that the parameter in the first Snapshot is in use again.
Page 50

49
49
BROWSER/DATABASE
A DJ’s most important asset, beyond the gear he uses, is his collection of music. Without
a wealth of top-notch tracks in his arsenal, a DJ is not equipped to dominate a dance
floor. Anyone who has been DJing for even a short while will have amassed a decent
collection of songs, and finding those songs quickly is the job of Torq’s Browser and
Database.
The Browser is very similar to the navigation methods employed by your computer’s
operating system. The Browser will allow you to explore the contents of all your
hard drives (internal and external), connected MP3 players (such as iPods), and audio
CDs. You can then add music folders to the Torq Database in order to search for
songs using keywords or sorting techniques, which makes finding your music much
easier than thumbing through CD wallets or crates of vinyl. Torq also supports the
building of playlists which will allow you to pre-select a series of songs to use in a later
performance—and Torq will even document all of the songs you play in a set for later
review (the Session Playlist).
This section will show you how to navigate your hard drive(s) using the Torq Browser,
and how to add folders containing music files to the Database. It will also explain how to
search for particular songs, how to organize songs by categories for easier viewing, and
how to manage playlists.
Browser Pane
CHAPTER
CHAPTER
1
9
The Browser pane is located on the
bottom left of the Torq interface. It
allows you to navigate drives, folders,
and playlists through an easy-to-use file
structure.
The Browser contains three standard
headings: Database, Playlists, and your
local Music folder (called “Music” on
Mac and “My Music” on PC) which
are shown at the top of the Browser
pane. The Browser will also contain a
listing of each drive connected to your
system—those drives will be listed by their names (for example, “C:” or “Macintosh
HD”). Finally, all connected media players will have an entry along with any
inserted CDs.
Navigation in the Browser follows a few simple rules:
1. To view any songs contained in a folder, click on the folder’s name. If the folder
contains music files, those files will be displayed in the File List to the right
of the Browser pane. If Torq cannot identify any playable music files in the
selected folder, the list will be blank.
2. To view any sub-folders, click the plus sign (+) next to a folder. A list will
appear below the parent folder showing all available sub-folders. To close this
list, click the (–) in front of the parent folder.
English
English
Page 51

Torq 1.5 User Guide Chapter 1
Torq 1.5 User Guide Chapter 9
Database
The Database is the first item displayed in the Browser pane. The Database is simply a collection of file folders located
throughout your computer system (even on external disk drives) used to make locating and organizing you music more
efficient. Once a folder is added to the Database, the songs it contains will be listed in the File List whenever you click
on the Database heading. If you have multiple folders assigned to the Database, all the files in all folders will be listed
simultaneously in the File List. Therefore, to use the Database efficiently, you’ll only want to assign folders that contain
music you’d like
to spin.
< Adding Folders to Database
To add a music folder to the Database:
1. Use the browser to search for a folder.
2. Right-click on the folder you want
to add.
3. Choose “Add to database” from the pop-up menu.
4. The folder will then be assigned to the Database (you
can click the “+” in front of Database to see this new
folder listed beneath it).
50
50
5. Now, when you click on Database, the contents of
the folder you just assigned will be listed in the File List.
< Adding Multiple Folders
You may find that one folder will contain many folders that you’d like to add to the Database. A great example
of this is when your music is automatically sorted by a program like Apple iTunes. Typically, there will be a folder
for each artist in your collection, and each of these folders will contain individual folders for each album by that
artist. Therefore, if you want to add all the music by this particular artist to the Database, you actually need to
add all of the individual album folders.
To make this easier, Torq includes an option for adding folders, including their subfolders, to the Database:
1. Use the Browser to locate the folder containing the sub-folders you want to add.
2. Right-click (CTRL-click on Mac) the folder and select “Add folder to Database Recursively.” Torq will
automatically add the folder, along with all its sub-folders, to the Database.
Page 52

Torq 1.5 User Guide Chapter 1
Torq 1.5 User Guide Chapter 9
< Adding Folders from Your OS
If you’d prefer, you can add folders to the Database by dragging them from your operating system into the Torq
Browser. You can do this using either Explorer for Windows or Finder for Mac.
1. Find your desired folders using the tools of your operating system (Explorer or Finder).
2. Click and drag the folder from the operating system into the Browser.
3. Release the mouse button and the folder will be added to the Database.
✓ Note: You can also include the subfolders by holding the Alt key while dragging the folder into the Database.
< Searching Specific Database Folders
Clicking on the Database heading will display every song contained in the Database in the File List to the right of
the Browser window. If you would like to confine your search to only a particular folder within the Database:
1. Click the (+) in front of the Database heading. The list will expand to show all of the folders contained in
the Database.
2. Click on one of the folders. The File List will be updated to only show the songs contained in that specific
folder.
51
51
< Removing Folders from Database
There are two ways to remove folders from the Database. You can either search through the folders currently
listed within the Database and remove them, or you can locate the original folders on your hard drives to
remove them.
To remove folders directly from the Database:
1. Click the plus sign next to the Database. This will drop down a list of all folders assigned to the Database.
2. When you have found the folder you want to delete, right-click it.
3. Choose “Remove from database” from the pop-up menu. The folder will then be removed from the
To remove folders from the Browser:
1. Use the Browser to locate the original folder on your computer.
2. Right-click the folder to display the pop-up menu.
3. Click “Remove from Database” to remove this folder only. If the folder contains sub-folders that are part
4. Click “Remove from Database Recursively” to remove this folder, along with all of its sub-folders, from the
Database while the original audio files will still remain on your hard drives.
of the Database, they will remain in the Database.
Database.
Page 53

Torq 1.5 User Guide Chapter 1
Torq 1.5 User Guide Chapter 9
File List
The window to the right of the Browser pane is called the File List. If you have selected a source in the Browser that contains
music (such as the Database or an individual folder), the songs contained therein will be listed here. The File List not only shows
you the name of the song, but also shows the artist name, album name, track number, genre, and other fields contained within
the song’s ID3 tag. These additional categories can help you find song with greater efficiency.
✓ Note: While ID3 tags will support storage of the information listed above, it is common to find music files with some (if not all)
of the ID3 fields blank. Even if the music file does not contain information for all categories, you are still able to fill in the missing
info by hand in order to aid in searching through your files.
Editing Fields
Torq will extract the relevant song information from the file’s ID3 tag in order to populate the fields of the File List as
described above. You are free to edit the information shown in the File List simply by double-clicking a field, typing in new
data and hitting Enter.
It is important to note that Torq does not update the song’s ID3 tag with your edits. Instead, your edited fields are
stored in a special file with the same name as the song, but with the extension “.tqd” at the end. This is the Torq Data
file. By saving your edits to the TQD file, Torq can save your changes much faster (changing an ID3 tag requires re-writing
the entire audio file, something that could affect system performance during live use). Additionally, the audio file could
become corrupted during the re-write process. So, Torq leaves your precious music files untouched by saving data to the
TQD file.
52
52
Loading Songs into the Decks
To load a song from the File List into one of Torq’s Decks, you have a couple options.
< Click and Drag
1. Click and hold on the desired song in the File List. It will become highlighted.
2. While continuing to hold the mouse button, drag the song up into either of Torq’s Decks.
3. Once the song is over your desired Deck, release the mouse button and the track will be loaded into
the Deck.
✓ Note: You can also drag the song onto the Scrolling Waveforms. Dragging the track onto the top waveform will
load it into Deck A at the left. Dropping the track on the lower waveform will load it into Deck B at the right.
< Function Keys
1. Click on the desired song in the File List. It will become highlighted.
2. Press F1 to load the song onto Deck A or press F2 to load the song onto Deck B.
✓ Note: If using a Mac laptop computer, you may need to hold the Fn key while pressing the function keys in
order for these features to work.
Unloading Songs from the Decks
If you wish to unload a song from a Deck, hold Shift while pressing F1 (for Deck A) or F2 (for Deck B).
Page 54

Torq 1.5 User Guide Chapter 1
Torq 1.5 User Guide Chapter 9
Sorting the List
There are fourteen categories that can be displayed across the top of the File List window: Artist, Song, Album, Track #
(Track Number), BPM (Beats Per Minute), Key, Genre, Length, Comment, File Type, Bitrate, Label, Year and Filename.
These categories are taken from the ID3 tags of your music files or, in the case of song length and BPM, calculated as part
of Torq’s file analysis. An ID3 tag is a standard format for storing additional information within a music file.
You can resize the width of any of these columns simply by clicking and dragging left and right on any of the vertical lines
separating the columns. Additionally, you can re-order the arrangement of the columns by clicking and dragging the
column name to a new position (the column name will turn white while doing this). If you wish, you can also hide certain
columns from view by right-clicking on a category name and choosing which items to display from the pop-up menu.
You can sort the contents of the File List by clicking on any one of the categories at the top of the window. For example,
if you click the “Album” category, the File List will be sorted alphabetically (A to Z) by Album name. If you click “Album”
again, the order will be reversed (Z to A). You could also click on the BPM column to sort all your songs by their BPM.
This can be very useful when looking for songs of a similar BPM.
Click the Reset button to return to the default sort order.
✓ Note: The Filename column is available in the event that the music you’re trying to use does not contain an ID3 tag (such
as AIFF and WAV formats) or does not have the proper text filled in. Here, the actual name of the file (as it exists on your
hard drive) will be shown.
53
53
Searching the List
The simplest method for searching is to type a keyword (or keywords) into the Search field above the Database/Browser:
1. Click the Database heading in the Browser pane to select it.
2. Click in the Search field and type in your search term(s). Terms can include an artist’s name, a song title,
BPM, etc.
3. As soon as you start typing, Torq will begin searching the Database for the letters you have typed. There is no
need to hit the Enter key on your keyboard.
4. When you stop typing, you’ll have a list of all files that contain the search term in one of its fields.
For example, if you type the word “love” into the search field, Torq could return the following results:
4
Artist
Deee-Lite Power of Love World Clique
Jennifer Love Hewitt Can’t Stand in the Way of Love Let’s Go Bang
Love and Rockets Angels and Devils Express
Madonna I’d Rather Be Your Lover Bedtime Stories
Sade Flow Lover’s Rock
Song Album
< Search Categories
As you can see, the above search worked—it found songs that contained the word “love” in any category.
However, this may not be quite what you were looking for. You may have actually wanted files with “love” in the
song’s name only. To search for such titles, you’ll need to confine the scope of the search to the Song category
only.
To confine a search to a particular category:
1. Hold down the SHIFT key and click a category name. The category name will turn red.
2. Torq will refine its search results and only show songs that contain your search term within the selected
field.
3. You can hold SHIFT and click additional categories if you wish (i.e. you can select Song and Album
simultaneously).
4. SHIFT-clicking a selected category will de-select it.
Page 55

Torq 1.5 User Guide Chapter 1
Torq 1.5 User Guide Chapter 9
Using our example above, confining the search to the Song category would yield the following results:
4
Artist
Deee-Lite Power of Love World Clique
Jennifer Love Hewitt Can’t Stand in the Way of Love Let’s Go Bang
Madonna I’d Rather Be Your Lover Bedtime Stories
Song Album
Now, only the songs with “love” in their titles are shown.
< Ignore Field
Torq offers another method for refining your searches by means of the Ignore field. Here, you’ll enter terms
that you want Torq to omit from the search results. The Ignore command will only be applied to the currently
selected categories (explained above).
To omit terms from the search results:
1. Click to put a cursor in the Ignore Field.
2. Type in the term you would like to filter out of the search.
3. Torq will display only the songs that contain the information required in the Search field while omitting the
songs that fit the criteria of the Ignore field.
54
54
Again, using the example above, entering the term “Lover” into the Ignore field will return the following list:
4
Artist
Deee-Lite Power of Love World Clique
Jennifer Love Hewitt Can’t Stand in the Way of Love Let’s Go Bang
Song Album
You’ll see that, as a result, “I’d Rather Be Your Lover” has been removed from the list.
4
Note: Reference to artists and bands is for informational purposes only and does not imply an endorsement
or sponsorship of Torq by such artists or bands.
< Reset Button
When you are done with your search and are ready to begin a new one, press the Reset button. This will clear
the Search and Ignore fields as well as deselect any categories that had been previously selected.
Playlists
While many DJs will perform “off-the-cuff” without any previous rehearsal or forethought, other DJs will “pre-program”
their sets, either due to the complexity of the set or simply as a method for remembering vital songs (this can be helpful
for wedding or party DJs who take requests).
Torq features Playlists to help you organize and store lists of songs. You can create and manage multiple Playlists, each
with as many songs as you like. Each Playlist can then be edited by adding or deleting tracks, or by rearranging their order
within the Playlist.
Page 56

Torq 1.5 User Guide Chapter 1
Torq 1.5 User Guide Chapter 9
< Creating New Playlists
To start, you must create a new Playlist as follows:
1. Right-click (CTRL-click on Mac) on the Playlists heading in the Browser and choose “New Playlist” from the
pop-up menu.
2. A new Playlist titled “Empty Playlist” will appear below the Playlist heading (click the plus sign in front of
Playlists in order to see this list).
✓ Note: If there is already an “Empty Playlist” in the list, a number will be appended to the name to
differentiate it from the other(s), i.e. “Empty Playlist 1.”
< Rename Playlist
1. Right-click (CTRL-click on Mac) on your desired Playlist and choose “Rename Playlist” from the
pop-up menu.
2. Type in the new name you would like to give the Playlist and hit the Enter key on your computer keyboard.
3. The Playlist will display its new name.
< Deleting a Playlist
1. Right-click (CTRL-click on Mac) on the Playlist and choose “Delete Playlist” from the pop-up menu.
55
55
2. The Playlist will be removed from the list in Torq. It will still be on your computer, however, stored in the
“Deleted Playlists” folder. These Playlists will be kept for up to 30 days, then permanently deleted.
< Duplicating a Playlist
If you like a particular Playlist and would like to build a new one based upon it, you can duplicate (or copy) it for
future modification.
1. Right-click (CTRL-click on Mac) the Playlist you would like to duplicate and choose “Duplicate Playlist”
from the pop-up menu.
2. A duplicate of the selected playlist will be created and displayed underneath it.
3. A number will be added to the name of the Playlist to differentiate it from the original. Of course, you can
rename this Playlist using the method described above.
< Adding Songs to a Playlist
Once you have created and selected a Playlist, you’ll begin adding files to it using the following procedure:
1. Using the Browser or Database, locate the song (or songs) you’d like to add to the Playlist.
2. Right-click (CTRL-click on Mac) the song name(s) and select “Add to Playlist” from the pop-up menu.
3. The song(s) will be added to the bottom of the Playlist.
< Removing Songs from a Playlist
You can remove songs from a Playlist as follows:
1. Right-click (CTRL-click on Mac) the song in the Playlist you wish to delete.
2. Select “Remove from Playlist” from the pop-up menu.
3. Torq will remove the song from the Playlist, but the song will remain in the Torq Database (it will not be
deleted from your computer).
< Reordering Songs in a Playlist
The order in which your songs are displayed in the Playlist can be changed.
1. Click and drag the song up or down in the list.
2. If you drag the song on top of another existing song, releasing the mouse button will cause the song to be
inserted above the song in the list.
Page 57

Torq 1.5 User Guide Chapter 1
Torq 1.5 User Guide Chapter 9
< Activating a Playlist
When you select a Playlist, Torq runs a quick scan of your computer’s drives to ensure all the audio files
referenced by the Playlist are present on the computer. If Torq cannot locate one or more of the songs from the
Playlist (possibly because the drive containing the song is no longer connected to the computer, or the source
file has been deleted), a pop-up dialog will appear with the following message: “Cannot find one or more of the
files used in this Playlist. What would you like to do?” You will then have a choice of clicking one of the following
buttons.
» Ignore: Clicking this button will allow the Playlist to load, however all missing songs will be displayed in
red in the File List window.
» Auto-scan: Clicking this button will cause Torq to search all hard drives connected to your computer
in an attempt to find the missing file(s). If a file is found with the same name but in a different location,
another dialog box will appear with the following message: “Would you like to use this file for [name of
missing file]?”
1. By choosing “Yes,” Torq will use the file and automatically assume that the rest of the missing files will
also be in this same folder. Once found, these files will automatically be loaded. If the other missing
files are not in this location, Torq will continue searching the computer until another file is found.
2. Choosing “No” will allow the search to continue for another possible file in a different location.
56
56
3. If the search completes without finding the proper file, a dialog box will appear with the following
message: “Cannot find [name of missing file].” When you click “OK” Torq will display the file in red in
the File List, indicating that the song cannot be played. If there are other files to search for, the search
process will continue.
» Manual: Clicking this button will open a standard operating system dialog box that will allow you to manually
search for the audio file on your hard drive(s). Although you are searching for a specific missing file, it is
possible to select any audio file to be used in its place. If you choose a file that is different than the missing file
shown in the File List, the ID3 tag info for the new file will be shown (in the Playlist) in place of the original
song.
< Saving a Playlist
All playlists created using Torq are automatically saved to your local harddrive. These playlists can be opened by
any application that supports the .m3u playlist format.
• Torq playlist location, Windows XP 5:
C:\Documents and Settings\[username]\Application Data\M-Audio\Torq\Playlists
• Torq playlist location, Windows Vista 5:
C:\Users\[username]\AppData\Roaming\M-Audio\Torq\Playlists
• Torq playlist location, Mac:
~/Library/Application Support/M-Audio/Torq/Playlists
5
On Windows Vista and Windows XP systems, the playlists are located within hidden folders. You
will need to change your Folder Options > View settings to make these hidden folders visible before
you can access the playlist files.
Windows XP: From “My Computer” click on the Tools menu, select Folder Options, click
on the “View” tab and then select “Show hidden files and folders” from the list of options.
Windows Vista: From the Windows Control Panel, select Appearance and Personalization,
Folder Options, click on the “View” tab and then select “Show hidden files and folders.”
Page 58
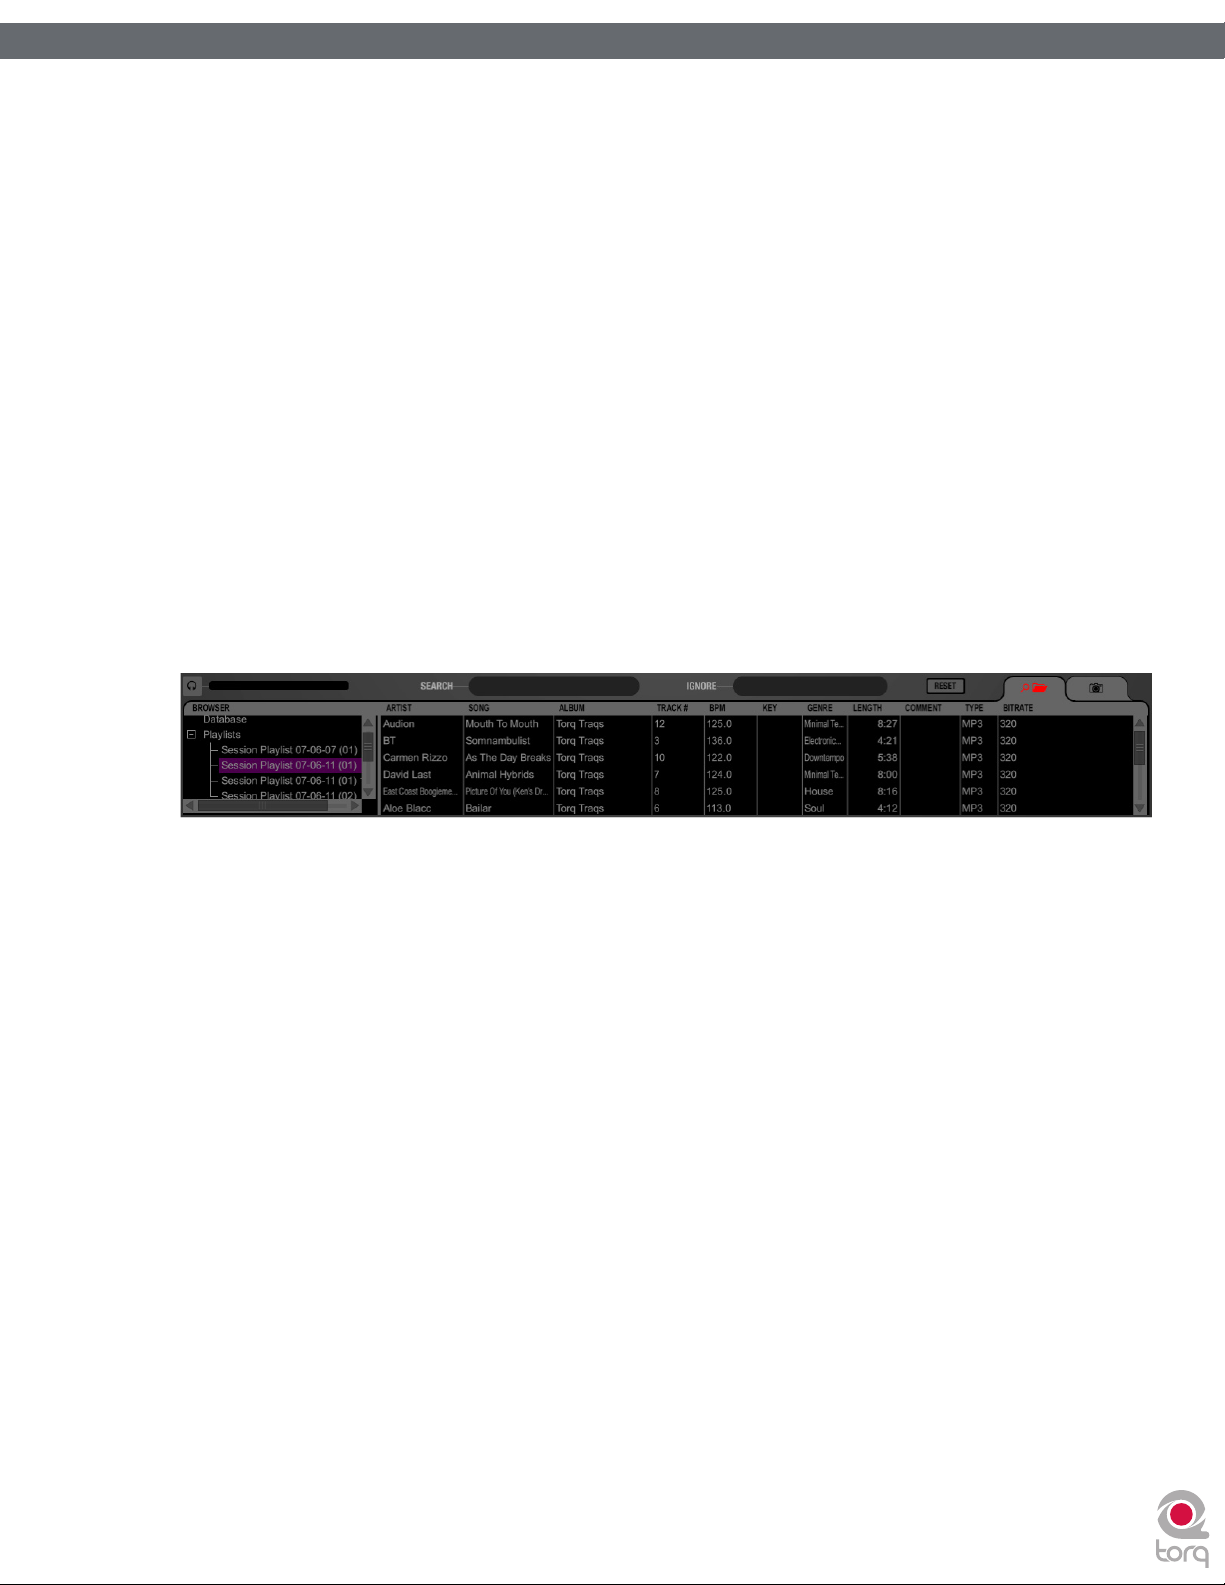
Torq 1.5 User Guide Chapter 1
Torq 1.5 User Guide Chapter 9
< Loading a Playlist
Torq can import Playlists created by other programs if they conform to the .m3u file format. To load one of
these Playlists:
1. Right-click (CTRL-click on Mac) the Playlist’s heading in the Browser pane.
2. Select “Load Playlist” from the pop-up menu.
3. A standard dialog box will open, allowing you to locate and select a Playlist.
4. Once selected, the Playlist will be imported into Torq and Torq will begin checking for the necessary files
(explained above).
Session Playlist
The Session Playlist is an automatic Playlist that keeps track of every song you’ve played since you launched Torq. This is
handy when you need to see if you’ve played a song already, or if you need to reference a list of what you played at a
previous gig.
An empty Session Playlist is created each time you launch Torq. It is named “Session Playlist YY-MM-DD” where YY-MMDD represents the year, month, and day of the Playlist, respectively. Each song you load into a Deck will automatically be
added to the bottom of the Session Playlist.
57
57
✓ Note: If a Playlist already exists with the current date, a number will be appended to differentiate it.
✓ Note: Torq will only store Session Playlists for the last 30 days. Any Session Playlists that are older than 30 days will be
If you find that you’d like to permanently keep a Session Playlist, all you have to do is rename it. Once renamed,
1. Right-click (CTRL-click on Mac) on the Session Playlist and choose “Rename” from the pop-up menu.
2. Type in a new name for the Playlist and press Enter.
3. The Playlist will be saved. If you renamed the current Session Playlist, a new Session Playlist will be created
You can delete the Session Playlists using the same method for deleting standard Playlists. If you delete the
automatically deleted in order to keep your hard drive from becoming overpopulated with Playlists.
< Rename the Session Playlist
the Playlist will be moved from the pool of Session Playlists and be kept with your normal Playlists. To do this:
that will track all songs played from that point onward.
< Deleting Session Playlists
current Session Playlist, a new one will be created that will track all songs played from that point forward.
Page 59

Torq 1.5 User Guide Chapter 1
Torq 1.5 User Guide Chapter 9
iTunes
iTunes is a free media player available from Apple for both Mac and Windows computers (www.itunes.com). It provides
an excellent way to download, organize, and rip music as well as interfacing with Apple’s famous portable media player,
the iPod.
Torq can interface with iTunes, providing you instant access to your entire collection of music and playlists without having
to manually add folders to the Database. Furthermore, any updates or changes that you make to your iTunes Library or
Playlists will automatically be reflected in Torq.
< Library
The iTunes Library is the entire collection of music and videos currently managed by iTunes. You can browse and
search the iTunes Library by clicking the plus sign in front of the iTunes heading in the Browser, then clicking the
Library heading. The contents of the Library will be shown in the File List.
58
58
✓ Note: If you have an especially large iTunes Library, it may take a moment for Torq to read the entire contents of
the Library the first time you select it in a Torq session.
Once you’ve clicked the Library heading, you can search and sort the Library contents in the same manner as the
Database (described earlier).
< Playlists
iTunes also supports the creation and editing of playlists, but they are a different format from the .m3u format
used by Torq. Not to worry—Torq can still access these playlists through the iTunes heading in the Browser.
Simply click the plus sign in front of Playlists to view them. Click on an individual Playlist to see its contents in the
File List.
< Searching iTunes with the Database
Torq can also automatically add the contents of the iTunes Library to the Database. That way, when you click the
Database heading in the Browser, you’ll get the files from all folders assigned to the Database as well as all files
within the iTunes Library. To enable this feature:
1. Open the Preferences.
2. Click the Misc tab.
3. Next to “Search iTunes Library with Database,” select “Yes.”
4. Close the Preferences.
5. Torq will now include the contents of the iTunes Library when you click the Database heading.
Page 60
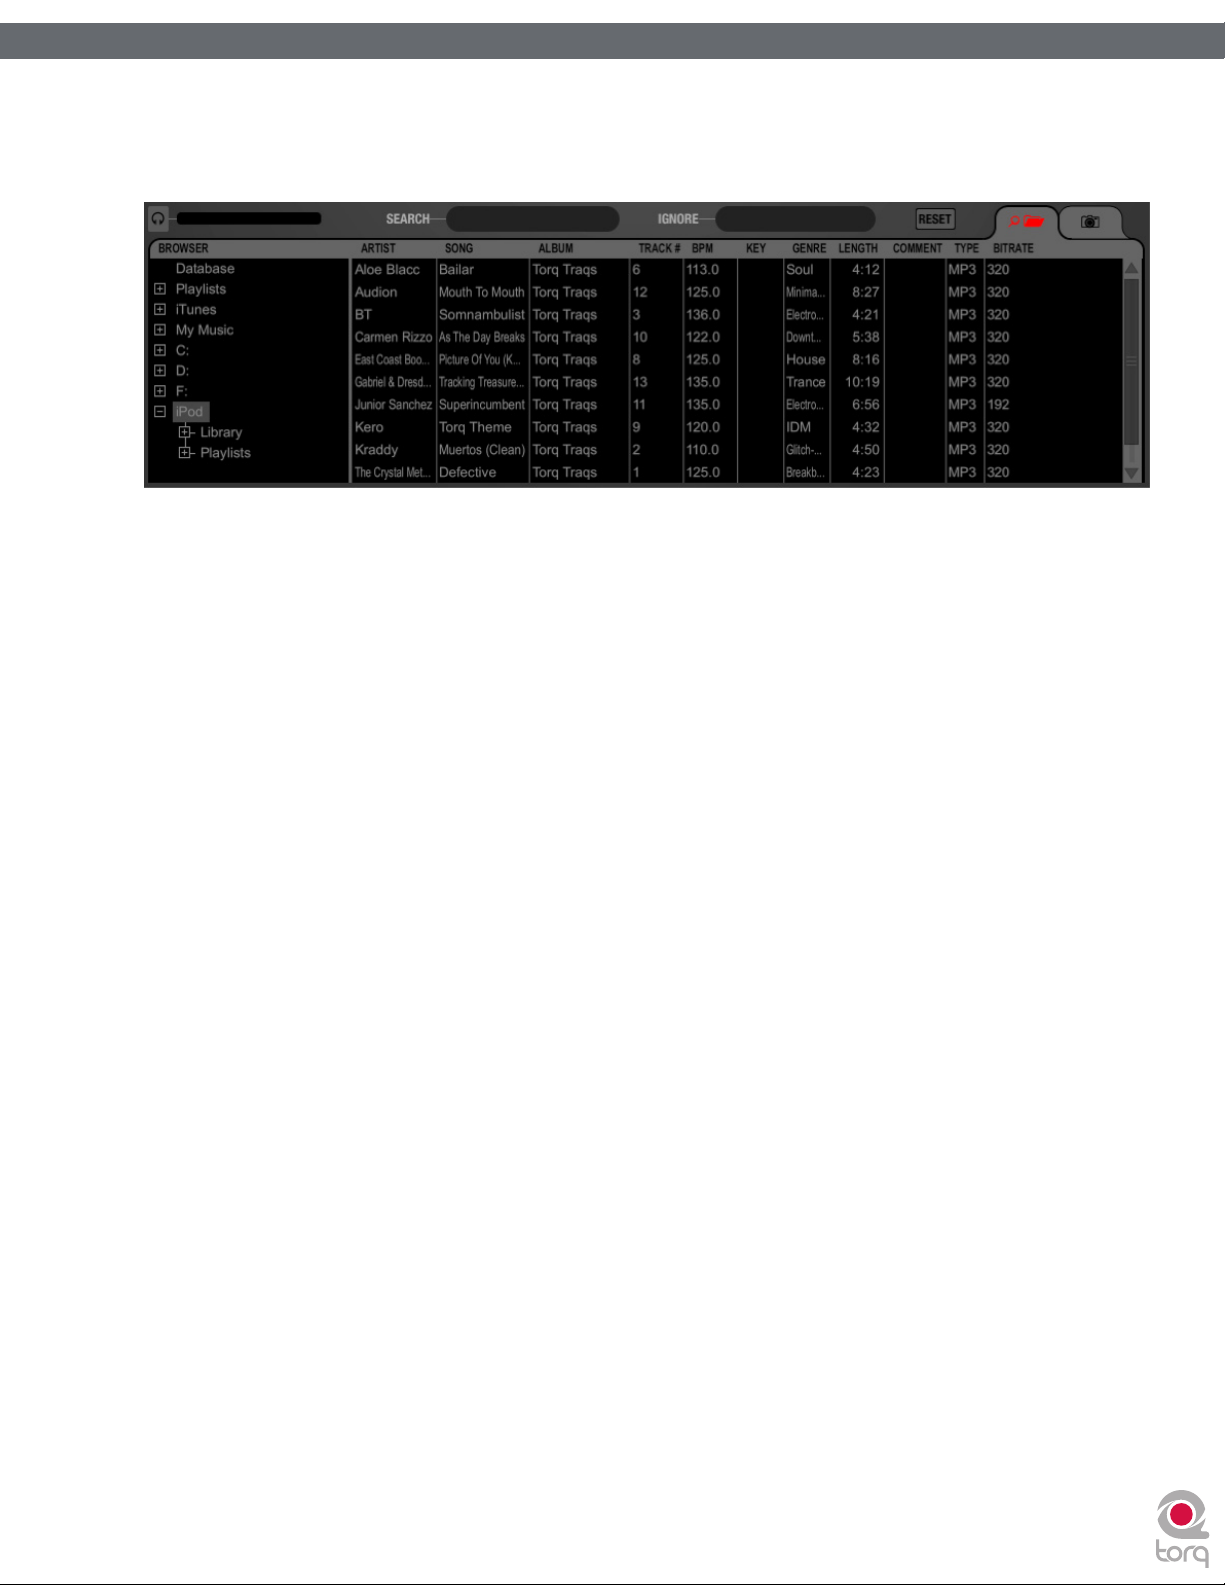
Torq 1.5 User Guide Chapter 1
Torq 1.5 User Guide Chapter 9
iPods
Torq also allows direct access to the contents of any connected iPod (excluding the iPod Shuffle, iPod touch, and iPhone
models). When an iPod is connected, it will be listed in the Browser window.
Like the iTunes Library above, the contents of the iPod can be searched using the Library or Playlist headings. You can
also include the contents of the iPod in the Database by doing the following:
1. Open the Preferences.
59
59
2. Click on the Misc tab.
3. Next to “Search iPod With Database,” select “Yes.”
4. Close the Preferences.
5. Torq will now include the songs from the iPod the next time you click the Database heading.
✓ Note: If using an iPod with a large collection of audio files, it may take Torq a moment to download the entire music
list the first time you try to access it during a Torq session.
Also keep in mind that Torq streams the music directly off the iPod. You cannot disconnect the iPod until you are done
playing any music contained on it.
Drives
Torq can also search any hard drives connected to your computer, whether they are internal hard drives or external
ones. Every drive available to the system will be listed in the Browser by name. Click the plus sign in front of the drives
to explore the contents of the drives. You can add folders from external drives to the Database using the same methods
described earlier.
Audio CDs
Torq can also play music from audio CDs inserted into your computer’s CD drives. Click on the Audio CD heading in the
Browser to choose an audio track from the CD.
Because Torq must rip the audio from the CD into a temporary file on your computer, it will take longer for the song to
be ready to play after loading it onto a Deck. This increased load time is normal.
Page 61
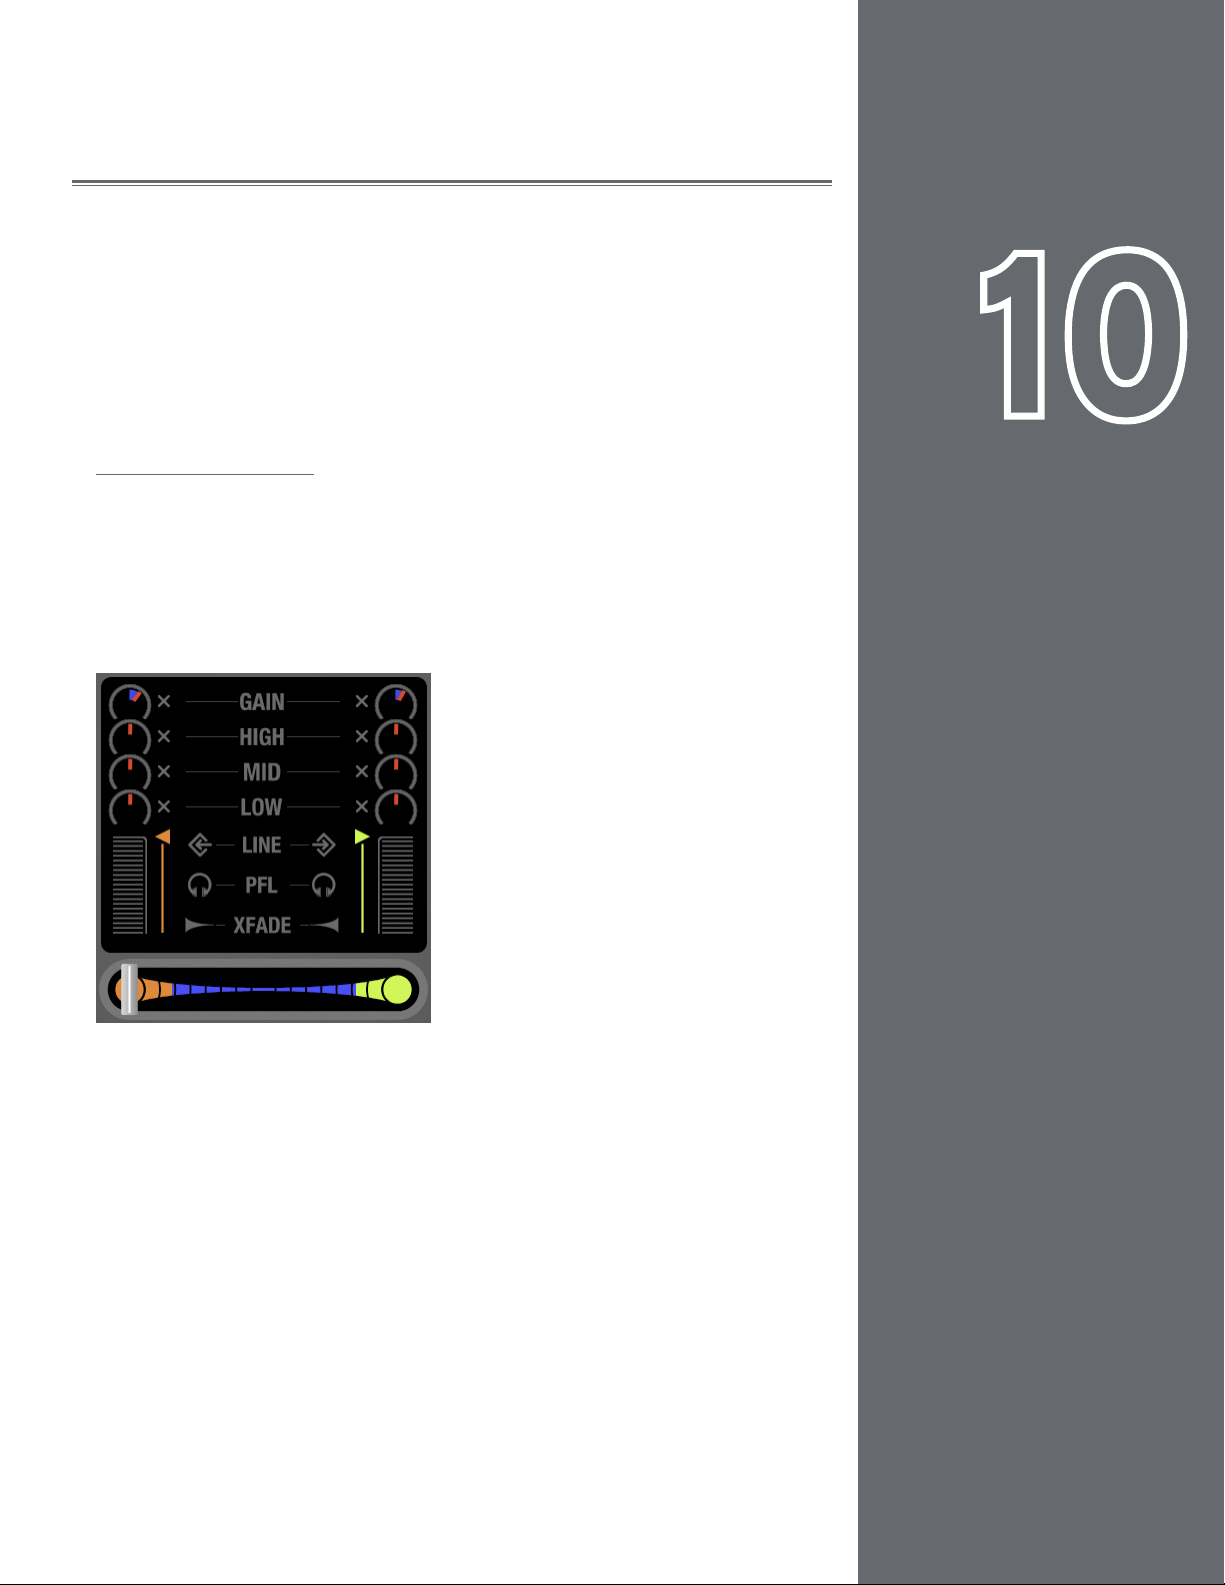
60
60
MIXER
Step one when DJing is controlling the music. That’s what Torq’s Decks are for. Step two
is blending, or mixing, the music together. As you’d expect, Torq has a section for that,
too. While existing in software, Torq’s Mixer sounds and behaves just like a top-of-theline hardware mixer. It is therefore instantly familiar to anyone who has used a mixer
before, and it is capable of performing the same tricks and techniques utilized by DJs on
traditional hardware mixers.
Mixer Architecture
Before you start tweaking knobs and sliders on the Mixer, you should have a basic
understanding of the components in the mixer and the signal flow between the
components. Without this basic understanding, some controls may seem to be
misbehaving or completely inoperative, only because you’ve unknowingly set another
control to a conflicting position. Additionally, there are some terms you should get to
know, as they will be used repeatedly throughout this User Manual.
CHAPTER
CHAPTER
10
1
Channels
When audio from a Deck enters the Mixer, it enters a channel. A channel is a
section within a mixer that processes a single audio signal. Since Torq has two
Decks, the Mixer has two channels, one for each Deck. While the signals from
both Decks enter the same mixer, they remain separate in their respective
channels, allowing you to process them differently before mixing them together
into a single channel (which is what your audience hears).
English
English
Page 62

Torq 1.5 User Guide Chapter 1
Torq 1.5 User Guide Chapter 10
Gain/Mute
When audio from a Deck enters a channel in the Mixer, the first thing it runs into is the Gain control (seen at the top of
each channel in the mixer). This knob will increase or decrease the volume of the incoming audio signal, allowing you to
boost the level of quiet songs or reduce the level of loud ones. This is a basic step in both maintaining high-quality audio
and matching the levels of the two songs you’re mixing together.
Torq’s Gain knobs will boost or cut the incoming signal by up to 12dB. The “X” button next to the Gain knob is the Mute
button. Activating this button will mute the incoming audio—resulting in a silent channel.
EQ/Kills
Next in the signal chain is the Equalizer, or EQ for short. While the Gain knob (above) increases or decreases the level
of the entire audio signal in the channel, an EQ increases or decreases the level of only a specific frequency range within
the audio signal. Torq is equipped with a 3-band EQ, meaning it can control the levels of three different frequency ranges
(bands), named High, Mid, and Low.
The 3-band EQ is comprised of three knobs and three buttons arranged vertically in each mixer channel. Naturally, the
High EQ is above the Mid EQ, which is above the Low EQ. The “X” buttons next to each EQ knob is a Kill. Activating
these buttons will completely remove, or kill, the associated frequency band from the audio—activating all three at the
same time will therefore completely mute the audio signal.
61
61
EQ may very well be the most powerful tool on the DJ mixer (though some would argue that the crossfader is the
ultimate weapon). The EQ controls are used to (1) improve the sound quality of poorly recorded or produced songs, (2)
assist in matching the overall frequency content of two songs, (3) add emphasis to the music by removing or isolating one
or more of the frequency ranges, and (4) mix songs together in a “jigsaw” fashion by swapping the frequency ranges of
two songs as they play together.
Old songs typically don’t have as much bass as today’s tracks. Therefore, you’ll often use the Low EQ to boost the bass
(low frequencies) of the old song to match the louder bass of a recent song. Without doing this, it may sound like the
music gets quieter as you mix from the recent song to the older one.
Likewise, even tracks recorded within the same year can sound different from one another, even when playing at the same
volumes. This is usually because one song will have stronger Mid frequencies compared to the other. If the bass parts in
both songs sound like they’re the same volume, you can use the Mid EQ to “turn down” the louder song until it more
closely matches the quieter song.
DJs also like to mix things up during their sets by adding their own manipulations to the songs they play. For example, a DJ
might cut the High and Low frequencies from a track a few beats before the chorus of a song, then bring them back right
when the chorus starts (the perfect job for Torq’s High and Low Kill buttons).
When two songs are playing at the same time, you’ll frequently find that the music sounds muddy. This is normally due
to “un-complementary” bass content in the two songs. This can be as simple as the two songs being in different keys, or
could occur if both songs have long, sustained bass notes. In order to clean things up, you can simply remove the bass
from one of the songs with one of the Low Kill buttons. This will leave the bass from the other song in the mix, so it will
still sound natural. When you’re ready, press both Low Kill buttons at the same time. This will kill the bass in the first
track while bringing in the bass from the other. This will sound like the bass part in the overall mix has changed (which it
has) and the mix will still sound full. You can also swap frequencies with the other frequency bands. You can also make the
swaps less abrupt by using the EQ knobs instead.
Page 63

Torq 1.5 User Guide Chapter 1
Torq 1.5 User Guide Chapter 10
PFL/Headphone Cue
Once the audio signal leaves the EQ, it is sent to two different locations. One location is the PFL Button, which looks like
a pair of headphones. PFL stands for Pre-Fader Listen, which refers to hearing an audio signal without being under the
influence of the Volume fader (on some mixers, this function is called “Cue”). That definition may not make sense if you’re
not familiar with a mixer, so think of it as a way to privately hear the music in a mixer channel regardless of what your
audience can or cannot hear.
This is what a DJ uses to listen to the next song before he plays it for his audience. When you press the PFL button, that
channel is sent to the PFL section, which is described below. You’ll be able to hear the music on the headphones and you’ll
even be able to record it into the Sampler.
Channel Volume Faders
Besides going to the PFL, the audio leaving the EQ also goes to the Channel Volume fader. This is the primary volume
control for the channel (though it is subordinate to the crossfader) which works just like a volume fader on a traditional
mixer. You can match volumes of the two tracks using the Channel Volume faders. However, some DJs prefer the
technique of leaving the Channel Volume faders fully up—you then match the volumes of the songs using the Gain knobs.
The reason for this is that you’re then free to use the Channel Volume faders for other effects such as volume fades, cuts,
and stutter effects, similar to the scratch techniques used on the Crossfader. Whichever approach you choose is entirely
up to you.
62
62
✓ Note: You can quickly return a Channel Volume fader to full volume by holding SHIFT and clicking on the fader.
Line Input Buttons
Located above the PFL icons in each channel of the Mixer is a Line Input icon. Clicking this icon will activate the line
input for that channel. This will allow you to feed audio from an external audio source (such as a CD player or turntable
connected to your audio interface) for mixing with Torq’s Mixer. All functions, such as EQ, Gain, Effects, and PFL, will still
work even when using external audio sources.
✓ Note: In order for Line Input to work you will need to assign audio channels to the Line Inputs in the Audio tab of the
Preferences. See the Preferences section for more information on setting up these inputs.
Crossfader
After the audio leaves the individual mixer channels via the Channel Volume faders, the signals enter their respective
sides of the Crossfader. The Crossfader is the large horizontal fader just below the Mixer. As you will see, its name is very
appropriate as it allows you to fade between the two channels in a motion that goes side to side across the mixer. When
the Crossfader is in its middle location, you will hear both of the mixer channels. If you move the Crossfader all the way
to the left, you will only hear the channel for the left Deck. Similarly, if you move the Crossfader all the way to the right,
you will only hear the right Deck.
The Crossfader was invented to offer DJs an easy way to fade out of one song while fading in another using only one
hand. Indeed, it still performs this task quite well. However, since its introduction, DJs have taken this simple tool and
transformed it into a virtual razor blade that allows them to perform lightning-fast cuts, scratches, and a myriad of other
techniques.
✓ Note: Torq’s Crossfader has been designed to be very quick and responsive. However, if you are only using a mouse to
control Torq, you probably won’t be able to use the Crossfader for more than fading between songs. If you want to use
the Crossfader for cuts and scratching, we recommend you control the Crossfader using one of the real crossfaders found
on M-Audio controllers, such as Xponent, since the tactile response of the Crossfader comprises part of the scratching
technique.
Page 64

Torq 1.5 User Guide Chapter 1
Torq 1.5 User Guide Chapter 10
< Crossfader Curve
Speaking of scratching, one of the improvements to crossfader design is an adjustable Crossfader Curve. This
refers to the rate at which the songs fade in and out as the crossfader is moved from one side to the other.
At one extreme is the Equal Power Contour, which is good for slow fades between two songs. As you move the
fader from the edge toward the center, it will slowly fade in one song. However, as it is fading in this song, it will
also start fading out the other song. The end result is that the overall volume remains the same as you fade, even
when both songs are playing at the same time.
At the other extreme of the adjustable range is the Hard Cut. This shape causes a song to fade in to full volume
almost immediately after moving the fader inward from the edge. Similarly, the other song will not begin to fade
out until the crossfader is almost all the way at the other edge. Then, right before the crossfader reaches the
edge, the other song will fade down. This is the shape preferred by scratch DJs as they can cut in a track to full
volume with very little motion of their hand. When performed quickly, you don’t even hear the volume fade up
and down—it sounds as if the sound is being abruptly cut in and out.
When Torq is launched for the first time, the Crossfader Curve will be set to a happy medium between these
two extremes. You can, of course, change this curve using either of the following:
» Adjusting with the Mouse
63
63
1. Hold down the SHIFT key on your computer keyboard
2. While holding down shift, click and drag over the Crossfader. The Crossfader itself will not move, but
the graphic below the Crossfader will change to indicate the new curve. As the blue bars expand toward
the edges, the curve approaches the Hard Cut shape. With no blue bars, the curve is an Equal Power
Contour.
» Adjusting via MIDI
1. Click the Preferences button to open the Preferences menu.
2. Click the MIDI tab.
3. Click the Learn button next to Crossfader Curve. The button will turn red.
4. Move the knob or fader that you want to use for Crossfader Curve control. Torq will read the incoming
MIDI messages and immediately assign it to the Crossfader Curve.
5. Exit the Preferences.
< Crossfader Assign
Another part in the evolution of the Crossfader is the Crossfader Assign. As explained above, the left Deck is
routed to the left side of the Crossfader while the right Deck is routed to the right side. Clicking the Crossfader
Assign buttons will swap the assignments so that the left Deck will be heard when the Crossfader is at the right,
and vice versa. This is sometimes known as “hamster style” control.
< Transform Buttons
Another feature to aid scratch DJs is the Transform button. The Transform buttons are found at the left and
right sides of the Crossfader. Pressing a Transform button will cause the associated channel to temporarily
bypass the Crossfader and go straight to the main mix. For example, if the Crossfader is fully left, you’ll only hear
the left Deck. If you press the right Transform button, you’ll hear the right Deck along with the left Deck.
Page 65

64
64
PFL/HEADPHONE CUE
You’ve undoubtedly seen the archetypical image of a DJ: standing behind a set of
turntables and a mixer...with a pair of headphones on. If everyone is dancing to the music
they hear on the speakers, what is the DJ listening to on the headphones? He’s listening
to the next song he’s going to play using PFL or Headphone Cueing. That’s how the DJ
can hear if he’s matched the tempo of the current song. It’s also how he locates the
perfect place to start the track. In Torq, the PFL system includes three controls: the Cue
Volume fader, the Cue Split button, and the Cue Source knob.
Volume Control
The Cue Volume fader simply adjusts the volume of the signal sent to the audio interface.
This can be used for volume control if the volume control of your audio interface is hard
to access (or does not exist).
Split Button and Source Knob
The Cue Split button (simply labeled “Split” in the user interface) determines the
behavior of the Cue Source knob which you hear in the headphones. When the Split
button is off, the Cue Source knob will blend between the PFL audio signal (which only
you can hear) and the Main Mix (which your audience can hear). Since the knob can blend
between these two sources, you can preview what your mix will sound like. It can be a
good way to check that your tracks are aligned properly and at the right volumes.
CHAPTER
CHAPTER
11
1
When you click the Split button to turn it on, the sound in the headphones will change.
What you’ll be hearing is the sound of the left Deck in the left side of your headphones
while the right Deck is in the right side of your headphones. It’s as if you had somehow
placed your head inside the mixer between the two channels and can now hear each
channel discretely. Some DJs find it easier to hear misalignments in rhythm and tempo in
this mode. Try it out for yourself and compare!
✓ Note: In Split mode, the Cue Source knob will adjust the relative volumes of the two
Decks in the headphones. Also, don’t forget that your audience can hear one of those
Decks!
English
English
Page 66

65
65
MASTER OUTPUT
The Master Output is the last step in Torq’s audio signal flow before the music goes
out to your audience. It contains a Master Level slider, a Master Level meter, a Master
Limiter, as well as an Audio Recorder. All of these controls are located below the right
Deck in a neat, horizontal arrangement.
Volume Control
As you may assume, the Master Volume slider controls the overall output of Torq’s Main
Outputs. This slider is also used to set the level of the Torq File Recorder (explained
later in this manual). Unlike the Channel Volume faders, the Master Volume slider is on
its side—moving the slider to the right will increase the output volume while moving to
the left will decrease it.
Level Meter and Limiter
The Master Level meter shares the same space as the Master Volume slider. You’ll see
the meter moving behind the slider while music is playing.
CHAPTER
CHAPTER
12
1
Since Torq is a digital audio system, it has a limited amount of headroom (dynamic range).
Whenever your mix exceeds the headroom, clipping (distortion) normally occurs. To
prevent this undesired sound, Torq features a Limiter on the Master Output which will
keep the Main Outputs from clipping.
Whenever the yellow circle (located at the right edge of the Master Volume meter)
lights, the Limiter is protecting the system against clipping. It does this by quickly
reducing the volume any time the Master Volume exceeds the maximum headroom. A
limiter is not foolproof, though—you’ll want to be sure that you aren’t triggering the
limiter all the time. If the volume of your mix is too loud, the limiter will reduce the
volume all the time, and this will sound strange. If you find that the yellow indicator is on
most of the time during your mix, you should turn down the Master Volume slider so
your mix doesn’t constantly peg the limiter. To make up for the reduced volume, turn up
the volume on the house sound system.
English
English
Page 67

Torq 1.5 User Guide Chapter 1
Torq 1.5 User Guide Chapter 12
Master Recorder
The Master module also includes a Recorder which allows you to record and save your mix as an audio file as you perform it.
You can then take your recorded mix and burn it onto a CD or distribute it as a Podcast, for example.
The process of recording your mix is extremely simple. You start by choosing a name for your mix and a location on your hard
drive for saving it. Then, you mix! When you’re done, press Stop and your file will be ready to go.
Filename
To set the filename for your recording:
1. Click the Filename button (which looks like “...” when no name is set). A dialog box will open.
2. Select the destination folder for your recording, then give it a name and press enter. The dialog box will close and
your new filename will be shown on the Filename button.
✓ Note: The sample rate of the recorded file will match the sample rate currently selected in the Audio tab of the
Preferences.
Setting the Record Level
The Master Volume slider will control the level of your recording. You’ll want to set this slider as high as possible without
constantly triggering the limiter (it’s OK if you trigger the limiter every once in a while). If you set the Master Volume
slider too low, your mix will be recorded quietly and will therefore have less fidelity.
66
66
✓ Note: Changes made to the Master Volume slider will be committed to your recording, even while you’re in the middle of
your mix.
Recording
Now that you have set the filename and recording level, you can begin recording:
1. Click the Record button. It will light up to indicate that recording has commenced. You’ll also see the Record
Time window begin to count the length of the recording.
2. Perform your mixing magic as you normally would.
3. Press the Record button again to stop the recording and save the file.
Page 68

67
67
EFFECTS
Effects are devices that alter an audio
signal. These alterations can range
from subtle to extreme and can be
a great source of creative fun within
Torq.
Each Deck can be processed
individually with multiple effects, and
that is the purpose of the Effect Racks.
The Effect Racks are located between
each Deck and the Mixer and will
house up to three effects from Torq’s
built-in library as well as one external
VST effect. This means you can be
using up to eight effects within your
mix at the
same time.
Controls
CHAPTER
CHAPTER
13
1
The controls for the built-in and external VST effects are basically the same and will be
described here. The VST effects have some additional controls and considerations of
which to be aware, and these will be covered in the next chapter.
Effect Slot
To begin using effects, you need to select an effect for use in one of the Effect
Slots. Each slot can hold one effect which you’ll choose from a list:
1. Click on an empty Effect Slot. A pop-up list of available effects will appear.
2. Click on one of the effect names from the list to load it into the slot.
When loaded, an icon will appear in the Effect Slot representing which
effect is
in use.
3. To remove an effect, choose the “blank” effect at the top of the pop-up list.
Enable Button
Before you can use an effect, you must turn it on, and that’s the purpose of the
Enable button. By default, this button will be off whenever you load a new effect.
This allows you to set the effect the way you desire before you use it in your mix.
✓ Note: Some of the effects don’t utilize the Enable button and will function in a
different way (which is outlined in the various effect sections later in this manual).
English
English
Page 69
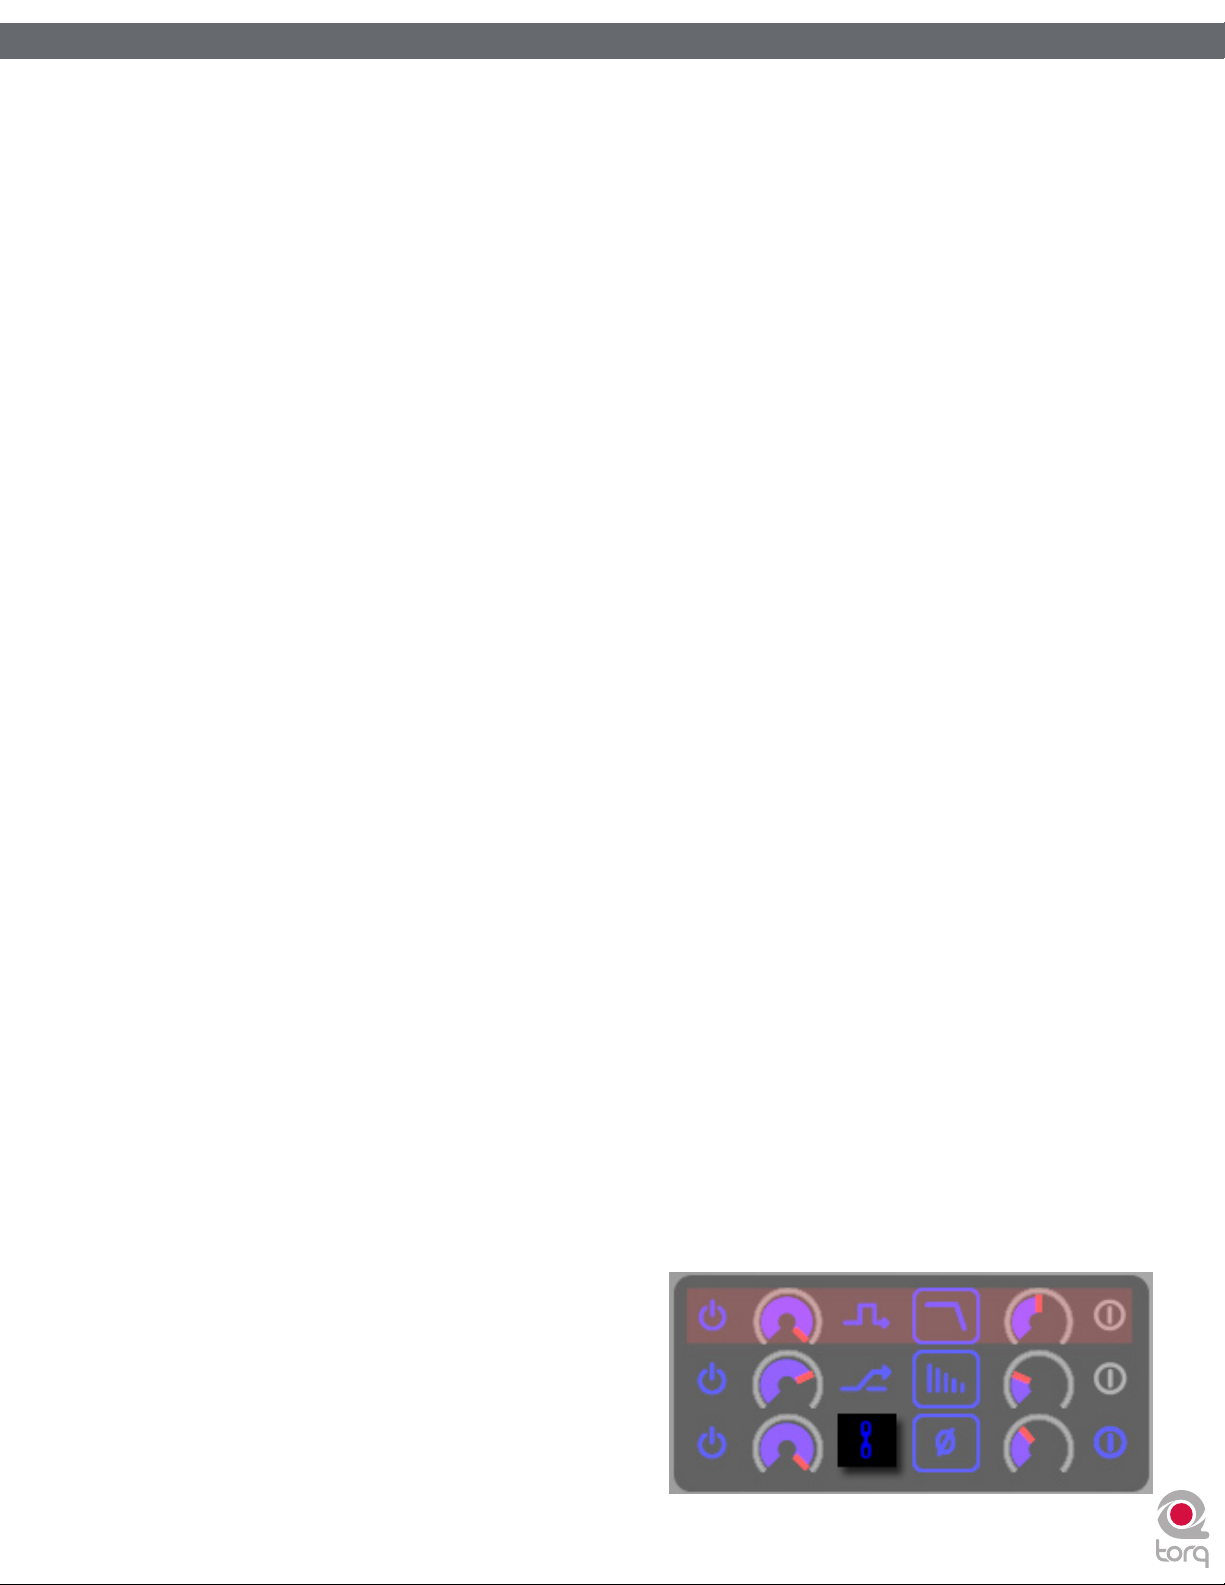
Torq 1.5 User Guide Chapter 1
Torq 1.5 User Guide Chapter 13
Mix Knob
The functionality of the Mix knob differs depending on the status of the neighboring Routing button:
» When the Routing Button is set to Insert/Chain—the Mix knob will adjust the wet/dry mix of the effect. When
the Mix knob is all the way to the left, only the original audio signal will be heard (no effect). When the Mix knob
is all the way to the right, only the output of the effect will be heard, thus becoming a full insert effect. When the
knob is at 12 o’clock, an even 50/50 mix of dry signal and wet effect will be created.
» When the Routing Button is set to Send—the knob will act as an effect send amount. When the Mix knob is
all the way to the left, no amount of the signal will be sent to the effect. As you begin to rotate the Mix knob
clockwise, signal will be sent to the effect and you will begin to hear the results of the effect in your mix. When
the Mix knob is all the way to the right, you’ll actually be boosting the signal to the effect, so the effect output
can be louder than the source audio.
Routing Button
When using effects, there are basically two different configurations that can be used: Insert and Send. An Insert Effect is
one that’s designed to be “inserted” between the Deck and the Mixer. The audio from the Deck can be fully processed
and replaced by the effect. Examples of effects that are typically used as inserts include Distortion, Dual-Filter, Phaser,
Flanger, Repeat, Strobe and Reverse.
Send Effects, by contrast, are not designed to completely replace the audio being processed in the way Insert effects do.
When using a Send Effect, the intention is to blend the sound of the effect back with the original music. The effects that
are typically used as Sends are Reverb and Delay. When using these effects, you typically want to add Reverb or add a
Delay to the music that is already playing. Therefore, think of Insert Effects as replacing your sound while Send Effects add
to your sound.
68
68
Each time you click the Routing Button, it will toggle its state between Insert and Send. When loading an effect, Torq will
automatically set the Routing Button to the mode most appropriate for the effect (i.e. the Reverb will be loaded in Send
mode while the Dual-Filter will be loaded in Insert mode).
In Torq 1.5, it is now also possible to create Chains with the Send Effects. This allows you to take the output of the Send
Effect and process it further with more Insert Effects. For example, you can take the output of the Delay and feed it
through the Phaser to create psychedelic echo patterns.
A Chain will automatically be created when you place an Insert Effect below a Send Effect in the rack. Instead of seeing
the normal Insert icon, you’ll see a Chain icon indicating that the effect is chained to the one above it. This indicates that
the effect is taking its audio from the output of the effect above it.
✓ Note: With this new effect routing, it is only possible to create an Insert Effect if the Effect is placed above any other Send
effect in the Rack. All Insert Effects placed below a Send Effect will be chained to that Send Effect. Also note that, when
using Chain mode, the output of Send effects will be sent to the Crossfader, meaning that the tail ends of effects (such as
delays and reverbs) will still be heard after turning down the Channel Volume fader. However, moving the Crossfader away
from the channel will silence both the music and the effects.
Tweak Knob
Effects are fun because you can alter their qualities while
you use them, such as changing the length of a Reverb or
Delay, or to change the intensity of a Phaser or Flanger. To
keep things simple and easy to manage, Torq provides one
knob, the Tweak knob, for parameter control on each effect.
Because effects alter audio in different ways, the function of
this knob will change depending on which effect is loaded
in the slot. These functions are listed in the Built-In Effect
reference in this manual.
Page 70

Torq 1.5 User Guide Chapter 1
Torq 1.5 User Guide Chapter 13
Tweak Button
The Tweak button works in the same way as the Tweak knob—it will toggle the state of a parameter in the selected
effect. Like the Tweak knob, the exact function of the Tweak button will depend on which effect you’re using. The
functions are listed in the Built-In Effect reference.
Saving Effect Racks
When you start getting deeper into the effects, you’ll begin creating multi-effects—effect chains of more than one plug-in.
You’ll find that you can get some jaw-dropping sounds when using multiple effects at the same time, and some of those
combinations may be worth saving for later use. You can save the entire state of an Effect Rack, including which effects
are in use as well as their settings, using the Save button at the top of the Rack:
1. Configure your Rack as desired and click the Save button at the top of the Rack. A standard Save dialog box will
appear.
2. Type a name for the file and choose a location on your hard drive to store it and click OK. The file will be saved
as a preset, containing all information regarding the Effect Rack configuration.
Loading Effect Racks
Obviously, if you can save the settings of an Effect Rack, you can recall them, too. That is accomplished with the Load
button at the top of the Rack.
69
69
1. Click the Load Rack button. A standard dialog box will appear.
2. Browse to the location on your hard drive in which the Effect Rack configuration file is stored, select the file, and
click OK. The file will load all Effects in your Rack configuration exactly as you saved them.
✓ Note: Loading an Effect Rack will discard all effects currently in the Rack. If you have a combination you like,
make sure to save it before you load in another configuration.
Bypassing the Effects
When using multiple effects at the same time, you may want to turn them on or off all at once (instead of clicking each
effect’s Enable button). Clicking the Bypass button at the top of the Rack will do just that—the audio from the Deck will
bypass the Effect Rack and will be sent straight to the Mixer. Click the button again to disengage the bypass.
Clearing all Effects
To clear all effects in a rack, hold the Shift button while clicking the rack’s Bypass button.
Page 71

Torq 1.5 User Guide Chapter 1
Torq 1.5 User Guide Chapter 13
Built-In Effects
The following is an explanation of the 10 built-in effects in Torq:
Delay
Delay is the technical term for what the Delay effect does, but you’ll probably like to think of this effect as an “echo.”
Essentially, the Delay effect listens to the incoming audio, holds on to it for a predetermined amount of time, then spits
it back out. When the Delay output is blended in with the audio, it sounds like an echo. Furthermore, you can feed the
Delay output back to its input again, causing echoes of the echoes (also known as Feedback).
DJs typically use Delays to fill up space during a break in a song (the last couple of beats before the break can be echoed)
or to stretch out the ending of a song by letting it echo and slowly fade away. Because of the tempo-synced nature of
Torq’s Delay effect, you’ll also be able to add rhythmic variance by layering echoes that are perfectly timed to the music.
< Enable Button
Deactivating this button stops the Delay effect. The output of the Delay will stop immediately when the effect is
turned off.
< Mix Knob / Routing Button
When the Routing button is set to “Send,” the Mix knob will control the amount of audio from the Deck to feed
into the Delay. When the knob is fully counterclockwise, no signal will be sent into the Delay so you will not
hear any echoes. As you begin to turn up the Mix knob, you’ll begin to hear the echoes from the Delay.
70
70
When the Routing button is set to Insert, turning up the Mix knob will cause the output of the Delay effect to
replace the sound from the Deck. This is a subtle difference that won’t be noticeable until you do one of the
following:
1. When you turn the Mix knob beyond its 12 o’clock position, the sound from the Deck will begin to fade
away, leaving only the sound of the Delay.
2. If you quickly turn the Mix knob back to 0, you will cut off any remaining echoes before they can be heard.
The Delay effect will load with the Routing button set to Send mode since this is the typical routing for a Delay.
< Tweak Knob
Use this button to change the Delay time of the effect. The Delay’s time will be set to match the rate at which
you tap this button. The maximum delay time is two bars and the minimum time is 1/16-note (1/16 of a bar). The
operation of this button is governed by a few rules:
1. When fully counterclockwise, feedback will be disabled.
2. When the knob is turned up to three quarters of the maximum, the feedback will be 100% (i.e. the delay
will never fade away).
3. When the knob is turned past three quarters, the feedback will be increased beyond 100%, allowing the
delay to get louder with each time it is repeated.
< Tweak Button
Use this button to change the Delay time of the effect. The Delay’s time will be set to match the rate at which
you tap this button. The maximum delay time is two bars and the minimum time is 1/16-note (1/16 of a bar). The
operation of this button is governed by a few rules:
1. Torq will determine the tempo within only two taps. This allows you to change the delay time very quickly,
even while the Delay is already active.
2. Since Torq knows the tempo of the song playing on the Deck, the delay time you tap using the Tweak
button will automatically be adjusted to match a note value at the current tempo. For example, if the song
BPM is 120, and you tap a tempo that is interpreted as 122 BPM, the delay time will be set to 120 BPM
(quarter-note delay). If you tap a tempo that is read as 158 BPM, the delay tempo will be rounded up to
160, which is a dotted-eighth.
Page 72

Torq 1.5 User Guide Chapter 1
Torq 1.5 User Guide Chapter 13
Reverb
Reverb is the phenomenon in which sound bounces off the walls within a room, creating hundreds (thousands?) of echoes
that cannot be individually identified by the human ear. The total result of all these echoes is a wide and ethereal sound
that can add a nice touch of space to your mix.
The most obvious characteristic of a Reverb is how long it lasts. This is referred to as the Reverb Time and is the only
adjustable parameter in Torq’s Reverb effect.
< Enable button
This button enables and disables the Reverb effect. If this button is switched off while the Reverb is active, the
sound of the Reverb will be cut off.
< Mix Knob and Routing Button
When the neighboring Routing button is set to Send mode, the Mix knob will set the amount of signal fed into
the Reverb processor. This signal will then be blended with the original signal from the Deck, making it sound like
the Reverb was added to the song.
71
71
When the Routing button is set to Insert mode, the Mix knob will adjust the Dry/Wet balance of the Reverb.
The difference is that the audio generated by the Reverb will replace the original song as you turn this knob up.
By default, the Reverb effect will load with the Routing button set to Send mode since this is the typical way to
use a Reverb. However, feel free to experiment with Insert mode—you can create ambient textures that can be
interesting to blend into your mix.
< Tweak Knob
This knob controls the Reverb time. When fully counterclockwise, the Reverb will be extremely short, similar to
the sound heard in a small shower stall. As you turn this knob clockwise, the Reverb will become longer until it
sounds similar to a huge cathedral.
< Tweak Button
Pressing this button will “freeze” the Reverb. When activated, the Reverb will stop accepting audio input from
the Deck and will feed back on itself instead. The result is a reverb that “hangs” or “stalls” indefinitely. When you
turn Freeze off, the Reverb will begin accepting input signals again, and the current “frozen” reverb will fade away
following the current Reverb Time. This can be another interesting way to fill up space during a break or to add
emphasis to a hit in the song.
Page 73

Torq 1.5 User Guide Chapter 1
Torq 1.5 User Guide Chapter 13
Flanger
A Flanger is a common effect found in most effect processors. Flanging grew from a studio trick where engineers
would play identical material on two tape decks, then make slight changes to the play speed of the two tape machines
by dragging their hand on the flanges of the tape reels. The result is a “wooshing” sound that can be compared to a jet
flyover.
< Enable Button
Naturally, this button turns the Flanger on and off.
< Mix Knob and Routing Button
Unlike the two effects discussed so far, the Flanger works best with the Routing button set to Insert mode. This
allows you to completely replace the original audio signal with the flanged version (by turning this knob fully
clockwise) in order to emphasize the effect.
✓ Note: The effect will still work in Send mode, but it will be less pronounced.
< Tweak Knob and Button
The function of the Flanger’s Tweak knob is determined by the state of the Tweak button:
72
72
» When the Tweak button is off, the Flanger will be in Manual mode. The Tweak knob will then control the
delay time of the Flanger. When the knob is counterclockwise, the Flange effect will be very tight. As the
knob is turned clockwise, the effect will become more dramatic and metallic in nature.
» If the Tweak button is on, the Flanger will be in Automatic mode. In this mode, the delay time for
the Flanger will be adjusted automatically. The Tweak knob will then set the rate of the automatic
adjustment—turning the knob clockwise will increase the modulation rate.
Phaser
A Phaser is a somewhat mellower version of the Flanger. Like the Flanger, a Phaser works on the principle of mixing two
identical audio sources together. However, unlike a Flanger, the timing difference between the two audio sources is very
small. The result is that some of the frequencies in the song will be removed or “cancelled out.” Some people describe
this sound as a “wind tunnel” effect.
< Enable Button
This button will turn the effect on and off.
< Mix Knob and Routing Button
Like the Flanger effect above, the Phaser works best with the Routing button set to Insert mode. This allows you
to completely replace the original audio signal with the phased version (by turning this knob fully clockwise) in
order to emphasize the effect.
✓ Note: The effect will still work in Send mode, but it will be less pronounced.
< Tweak Knob and Button
The function of the Phaser’s Tweak knob is determined by the state of the Tweak button:
» When the Tweak button is off, the Phaser will be in Manual mode. The Tweak knob will then control the
phase of the effect.
» If the Tweak button is on, the Phaser will be in Automatic mode. In this mode, the phase will be adjusted
automatically. The Tweak knob will then set the rate of the automatic adjustment—turning the knob
clockwise will increase the modulation rate.
Page 74

Torq 1.5 User Guide Chapter 1
Torq 1.5 User Guide Chapter 13
Dual-Filter
A coffee filter is designed to stop coffee grounds while allowing water to pass through. Audio filters work in a similar
fashion: they prevent particular frequency ranges within an audio signal from passing through the effect. Filters come in a
variety of flavors and Torq features three of the most popular types: Low-Pass, High-Pass, and Band-Pass. The names of
these filters are descriptive of what they do. A Low-Pass filter, for example, will only allow low frequencies (bass tones)
to pass through—it will remove the high-frequency (treble) content from the audio signal. A High-Pass filter works the
other way: it allows the treble to pass through while bass is removed. A Band-Pass filter is essentially a High- and LowPass filter put together: it will remove high and low frequencies from the audio signal, only allowing a narrow band of
frequencies to pass.
The most important parameter for a filter is its Cutoff Frequency. It determines the frequency where a filter will begin
to stop frequencies. For example, when using a Low-Pass filter with a cutoff frequency of 1kHz, frequencies below 1kHz
will pass through the filter unaffected while the frequencies above 1kHz are reduced or removed. While there are other
parameters that also affect the behavior of a filter, Cutoff Frequency is the parameter that you’ll be controlling in Torq.
< Enable button
This button will turn the Dual-Filter on and off.
73
73
< Mix Knob and Routing Button
The Dual-Filter is designed to be used as an Insert effect. For this reason, the Routing button will automatically
switch to Insert mode whenever you load this effect. Then, the Mix knob will serve as a Dry/Wet adjustment
which you will want to leave fully clockwise (so you only hear the output of the Dual-Filter).
< Tweak Button
The Tweak button is used to set the filter mode for the Dual-Filter effect. When this button is off, the two
filters (High-Pass and Low-Pass) will be adjusted only one at a time. When you turn this button on, the High-Pass
and Low-Pass filters will be linked, thus creating a Band-Pass filter where both filters are adjusted simultaneously.
< Tweak Knob
This knob will adjust the Cutoff Frequencies of the filters.
» When the Tweak button is off, the knob will behave as follows:
1. Placing the knob at 12 o’clock will result in the audio passing through the Dual-Filter unaffected.
2. Turning the knob counterclockwise from 12 o’clock will begin to lower the Cutoff Frequency of the
Low-Pass filter. You will hear the music become dull and muffled as you turn this down to the point
where you’ll only hear low bass rumbles.
3. Turning the knob clockwise from the 12 o’clock position will begin to raise the Cutoff Frequency of
the High-Pass filter. You will hear the music become more thin and brittle as you do this until only
the highest of the high frequencies remain.
» When the Tweak button is on, the Tweak knob will merely control the center frequency of the Band-Pass
filter. As you turn the knob down (counterclockwise), you’ll hear the high frequencies become muffled
while you begin to hear more of the bass.
Page 75

Torq 1.5 User Guide Chapter 1
Torq 1.5 User Guide Chapter 13
Distortion
Distortion, by definition, is the altering of a signal. In practical terms, it refers to feeding audio into a device so loudly that
it exceeds the dynamic range of the device. The result is a fairly raunchy noise that, at times, can be exactly what you’re
looking for. This is known as Overdrive Distortion, and is one of the two types of distortion possible with the Distortion
effect.
The other type of distortion available in Torq is Sample Rate Reduction. When an audio file has its sample rate lowered,
it looses the ability to accurately reproduce high-frequency sounds. Instead of sounding soft and muffled like a Low-Pass
filter, the Sample Reducer will sound grainy and harsh.
< Enable button
This button turns the Distortion on and off.
< Mix Knob and Routing Button
Like the Dual-Filter above, the Distortion is designed to be used as an Insert effect. The Routing button will
switch to Insert mode automatically any time you load the Distortion effect. You should also turn the Mix knob
fully clockwise so that you can only hear the output of the distortion (if you blend the distorted signal with the
original signal, the distortion will be less pronounced).
74
74
< Tweak Button
This button is used to set the operating mode of the Distortion. When the button is off, the Distortion is in
Overdrive mode. When the button is on, the Distortion will be in Sample Rate Reduction mode.
< Tweak Knob
» When set to Overdrive mode, the Tweak knob will increase the volume of the signal being fed into
the distortion. When the knob is fully counterclockwise, the input signal is not boosted and therefore
undistorted. As you turn this knob clockwise, the volume will begin to increase. At a certain point, you’ll
start to hear the audio become distorted. You can leave the knob here for a subtle distortion, or you can
continue to turn it clockwise in order to push the distortion into really nasty realms.
» When set to Sample Rate Reducer mode, the Tweak knob will control the output sample rate. When the
knob is fully counterclockwise, there is no sample rate reduction, so the audio will be undistorted. As you
turn the knob clockwise, the sample rate will be lowered. The high frequencies will be the first to exhibit
signs of distortion. As you continue turning the knob, the distortion will move lower and lower into the
frequency range of the audio until all that remains is low-sample junk.
Page 76
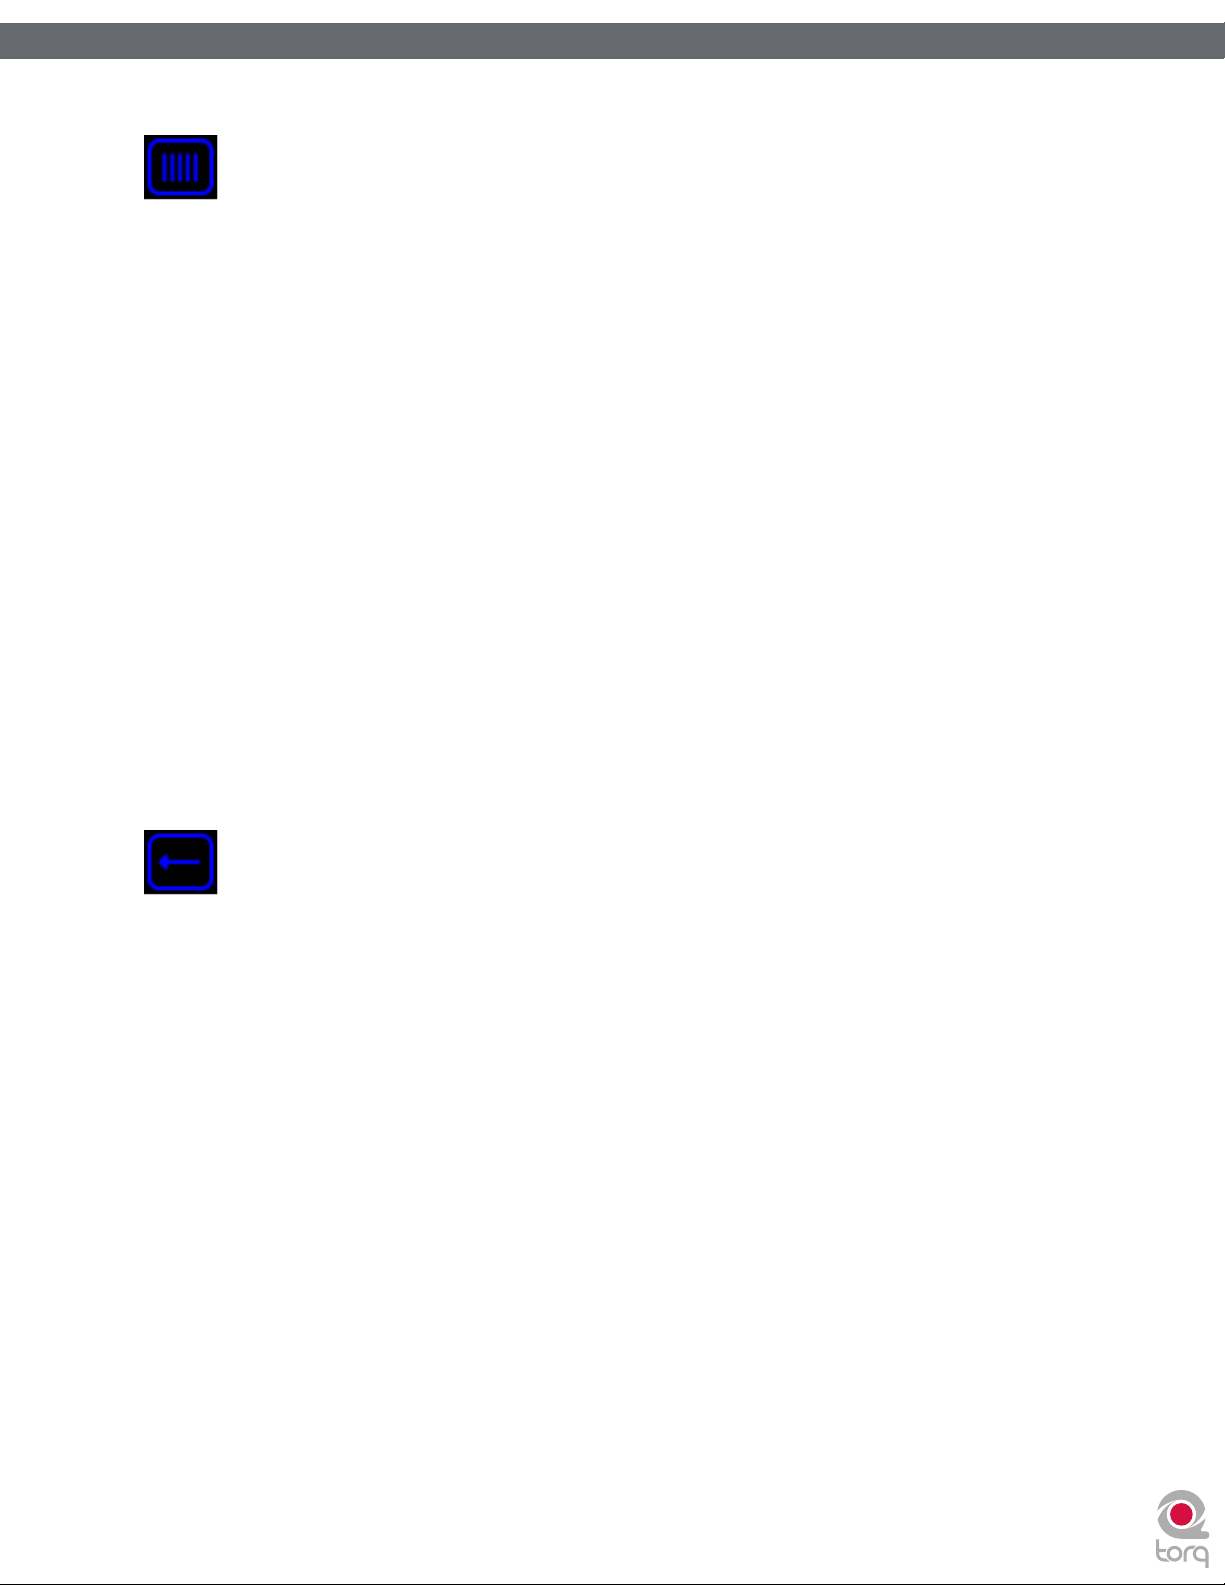
Torq 1.5 User Guide Chapter 1
Torq 1.5 User Guide Chapter 13
Strobe
Just about anyone who has been to a dance club in the last 20 years has experienced a strobe light. Those are the superbright lights that flash really quickly. They have the effect of making everyone look like they’re in “stop motion”—the flash
is so fast that you can’t see movement anymore.
Torq’s Strobe effect will create a similar stop-motion effect, but it will do it to audio. The Strobe will essentially mute and
unmute the audio at a rate that you can control. The rate can be as slow as one bar (2 beats unmuted followed by 2 beats
muted) or as fast as 1/64-note.
< Enable Button
Turns the Strobe effect on and off.
< Mix Knob and Routing Button
Because the Strobe effect is designed to mute the audio from a Deck, it needs to be used as an Insert effect.
Therefore, the Routing Button will be set to Insert mode whenever you load this effect.
The Mix knob will control the Dry/Wet mix of the effect. In use, this will control the depth of the Strobe effect.
Since the Strobe effect is muting the signal that passes through it, setting the Mix knob at 50% will result in 50%
of the signal still being present whenever the Strobe is muting. Therefore, you can use this knob to adjust the
intensity of the Strobe.
75
75
< Tweak Knob
This knob changes the rate of the Strobe. A tooltip will appear whenever you adjust this knob to show the
current rate (expressed in note values).
< Tweak Button
Activating this button reverses the behavior of the Strobe—what was normally muted will be unmuted and
vice versa.
Reverse
Reversing the playback direction of a song can be a fun party gimmick (you and your friends can look for hidden
messages “backmasked” in the song). However, it can be a useful DJ technique for adding emphasis, and it can also
be used to “censor” profanity (as heard on the radio). The traditional method for reversing playback is to actually
reverse the rotation of the turntable. This has a couple of inherent problems. First, the turntable can’t change direction
immediately—it must slow down to a stop then speed back up in the opposite direction. This can make reversing
playback seem sluggish. Additionally, if the song is playing backwards, it will no longer be in the proper location when you
resume normal playback. For example, if you reverse playback as a way to add emphasis one bar before the chorus in a
song, you’ll find that playback is now two bars before the chorus when you resume normal playback.
Torq overcomes these shortcomings by implementing reversed playback as an effect rather than as a function of the
Deck. By doing so, you can reverse playback instantaneously—there is no lag due to the turntable changing directions.
Furthermore, since this is an effect, the song on the Deck will continue to play normally (the waveform will continue to
scroll in the forward direction) thus keeping the play position correct as you switch the Reverse effect on and off.
< Enable Button
When using the Reverse effect, this button is always on and cannot be turned off.
< Mix Knob and Routing Button
The Mix knob has no function. The effect is routed as an Insert effect by default.
< Tweak Knob
The Tweak knob has no function.
< Tweak Button
This button will turn the Reverse on and off. This button is momentary, meaning you have to keep holding it
while the song plays backwards. When you release the button, normal playback will resume.
Page 77
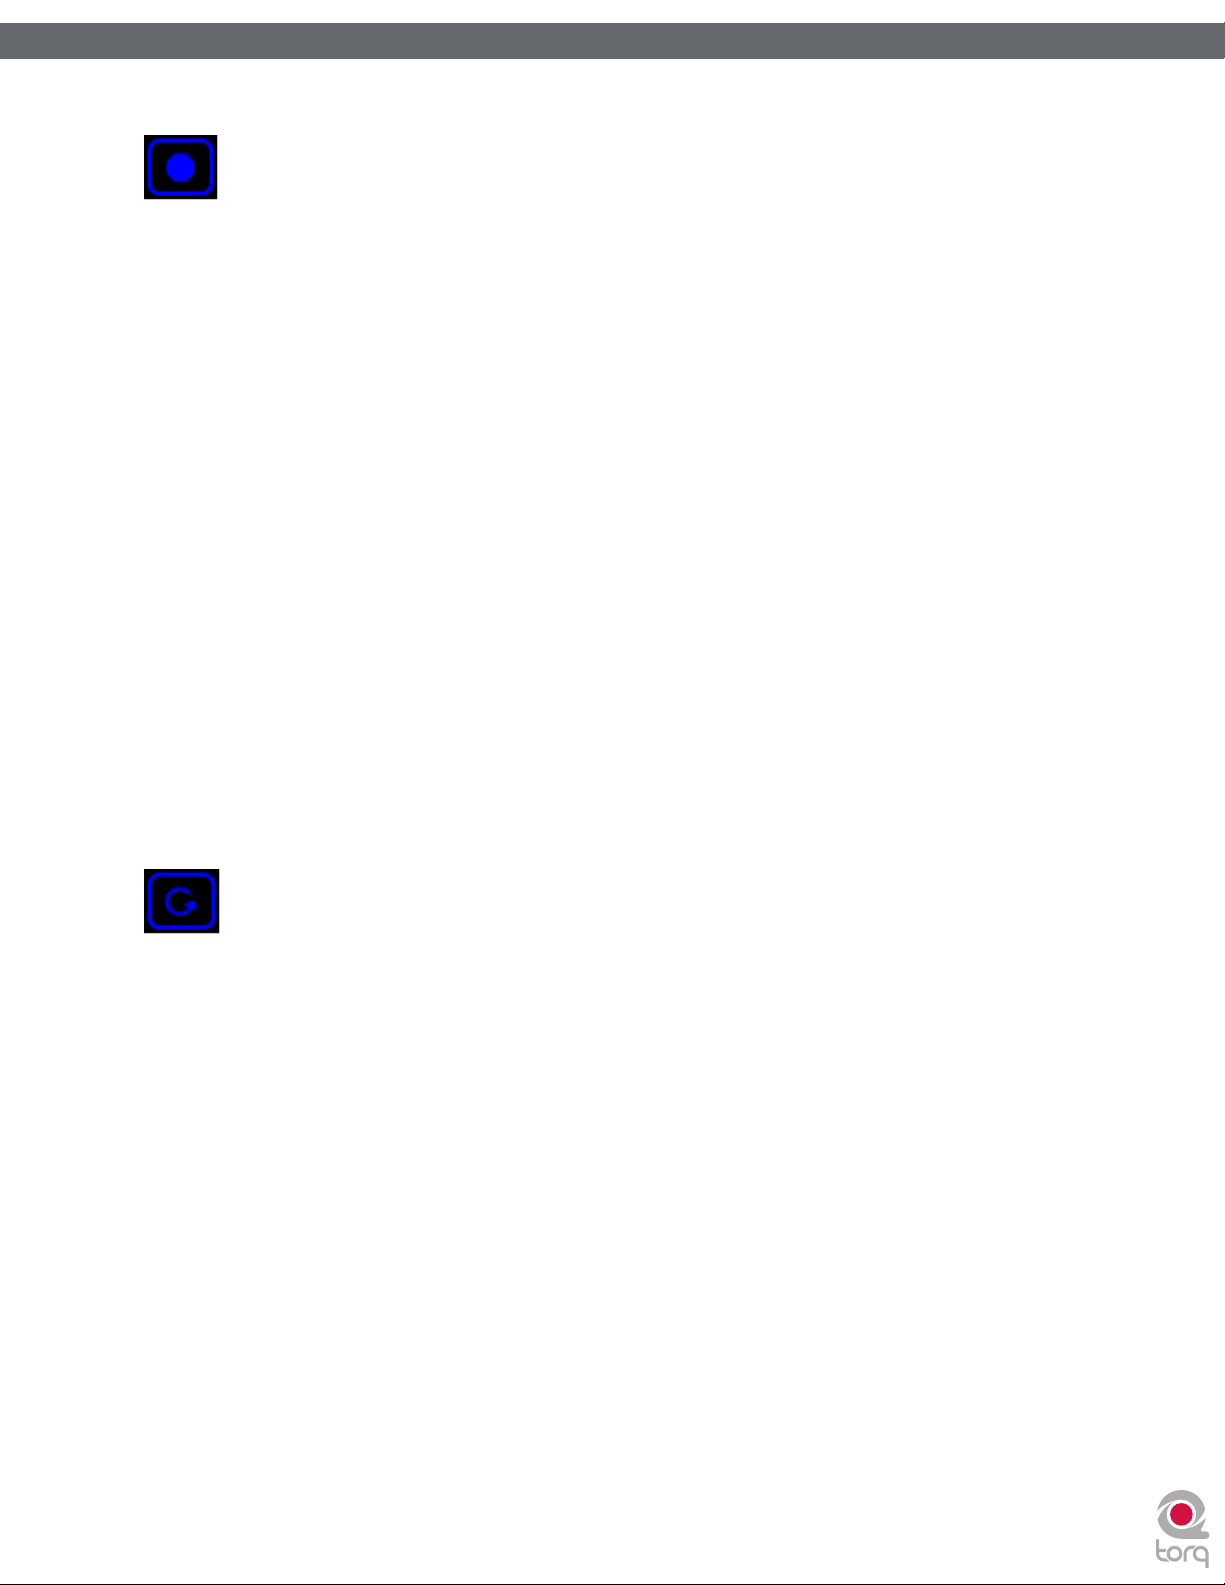
Torq 1.5 User Guide Chapter 1
Torq 1.5 User Guide Chapter 13
Brake
As mentioned above, turntables don’t respond instantly to changes in speed or direction. When you press Stop on
a turntable, it takes a moment for the turntable to slow down and reach a complete stop. This is due the weight and
momentum of the turntable—two factors that don’t exist in the virtual world of Torq. Still, some DJs like the sound of a
turntable slowing down to a stop, and creating that sound is the purpose of Torq’s Brake effect.
Like the Reverse effect above, the Brake effect does not actually stop the playback of the song on the Deck. Instead, it
just simulates the sound of the song slowing down while the song continues to play normally (as seen by the scrolling
waveform). Because the song keeps playing, you can use the Brake effect to create the “slow-to-stop” sound, then bring
the music back in on the next downbeat (which is impossible with real turntables or CD players).
< Enable Button
This button will be on at all times—it cannot be turned off.
< Mix Knob and Routing Button
The Mix knob sets the wet/dry mix of the effect--turn this knob fully clockwise for the proper sound. The Brake
effect is automatically configured as an Insert effect.
76
76
< Tweak Knob
This knob will set the Brake time. As you turn this knob clockwise, the Brake time will become longer.
< Tweak Button
Press this button to engage the Brake effect. The music will slow to a stop. Press the button again to resume
normal playback.
Repeat
This effect can be used to create the granular “hyper-repeats” heard in lots of today’s dance music. All you have to do is
trigger the effect and play with the loop length to get instant results. Here’s how it works:
< Enable Button
Engaging this button will start the effect. The Repeat will remain active until this button is turned off again.
< Mix Knob and Routing Button
The Mix knob will set the wet/dry mix of the Repeat effect. Turn the knob fully clockwise to hear only the
repeated audio. While the audio is repeating, you can use the Mix knob to fade the original music back in if you
wish. The effect will automatically be configured as an Insert effect when loaded.
< Tweak Knob
This knob sets the size of the audio slice being repeated. A tooltip will appear showing the current slice length
whenever you move this knob. The repeated slices will always be quantized to the current tempo.
< Tweak Button
When you press this button, it will “re-seed” the Repeat effect. In other words, the effect will begin repeating a
new section of audio whenever you press the button, as if you’d instantaneously turned the effect off and back
on again.
Page 78
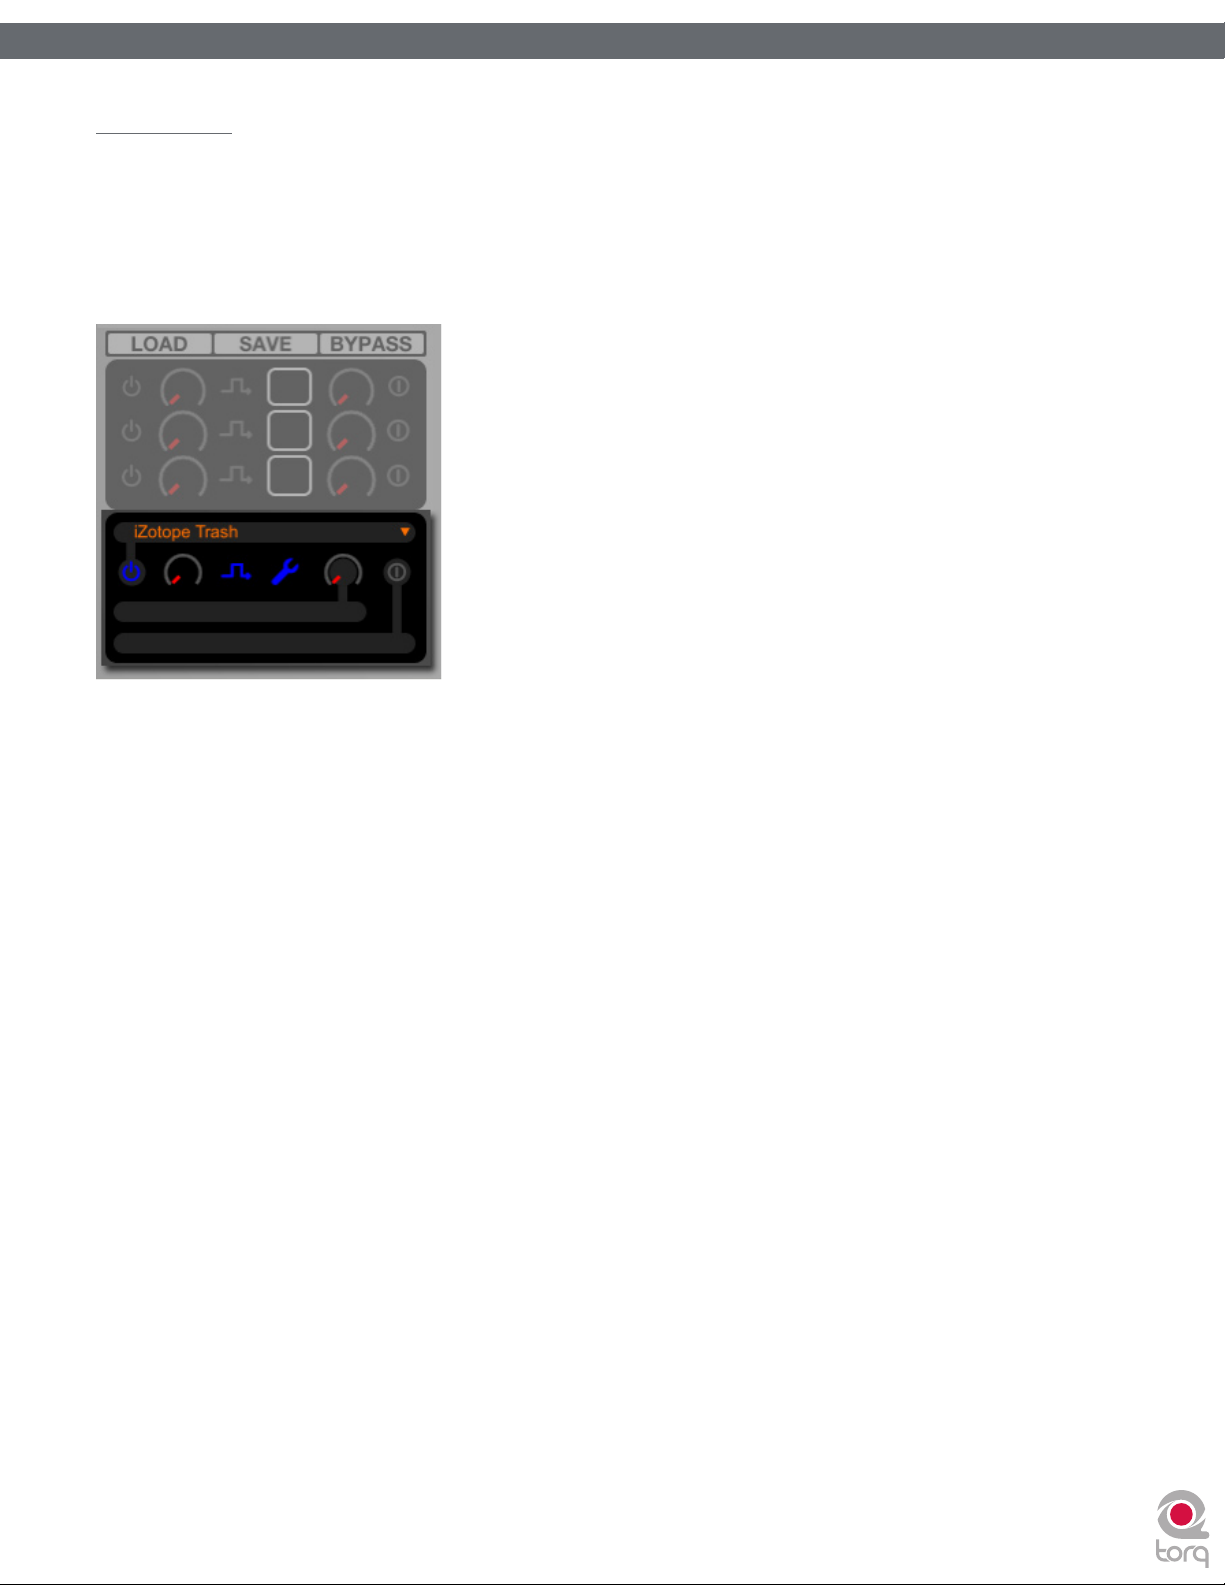
Torq 1.5 User Guide Chapter 1
Torq 1.5 User Guide Chapter 13
VST Effects
The 10 built-in effects provided with Torq cover a wide range of effects typically used by DJs—many DJs will never need more
than these built-in effects. Others, however, will want to explore the possibilities of additional effects. For this reason, Torq
allows you to use third-party plug-ins that adhere to the VST standard (referred to as “VST plug-ins”).
The amount of third-party VST effects available on the market today is staggering. The variety can range from top-of-the-line
audio mastering plug-ins to simple devices made by someone in their spare time. As a result, your mileage with VST plug-ins
will vary.
77
77
Latency
Another potential drawback from using VST plug-ins is latency. Latency is the observed lag between when you trigger an
event or action on the computer and when you finally hear the results. When running without any VST plug-ins, Torq’s
latency is nearly undetectable—Torq will respond to scratches, button presses, and knob tweaks immediately.
Some VST plug-ins, however, must perform very complex calculations on the audio. Sometimes, these calculations require
that the plug-in buffer the audio so that it can process it in large chunks. In these cases, the plug-in will fill its buffer with
some audio sent from Torq. It will then process the audio and send it to an output buffer. Once the output buffer is filled,
the audio is sent back to Torq. This process, while extremely fast, can still manifest itself as a perceived lag in response
time. And, as you can see, this phenomenon is beyond the control of Torq (the latency is created by the plug-in, not
Torq).
If you find that a VST plug-in you’re using is creating latency, you can try to find a similar-sounding plug-in with minimal
latency, or simply try to “play ahead” and anticipate the latency. While some other programs feature “Plug-in Delay
Compensation,” such a system would not work with Torq because the program is entirely real-time (the music and effects
are not preset or programmed).
Selecting Effects
To begin using a VST, you’ll need to select one from the list of available VSTs:
1. Click on the top window in the VST section of the Effect Rack. A pop-up menu will appear showing all valid VSTs
in the selected VST folder (see Plug-in Preferences).
2. Click on the name of a VST. It will be loaded immediately and the VST’s graphic interface will open and float over
the Torq interface.
3. To close the window, click the close icon in the window’s title bar or click the Wrench icon in the Effect Rack.
4. To open the same VST interface again, click the Wrench icon again.
✓ Note: At the top of the VST drop-down menu list, you will see a “blank” plug-in as an option. If you select it, no VST
will be loaded into the Slot (any current VST will be unloaded).
Page 79

Torq 1.5 User Guide Chapter 1
Torq 1.5 User Guide Chapter 13
Assigning Controls
It’s fun to tweak effects using knobs and buttons—VST effects are no exception. However, before you start messing with
the Tweak knob and button, you’ll need to assign a function to them. Unlike Torq’s 10 built-in effects, the VST Effect you
choose to use will probably have more than two parameters to play with. You can always adjust these parameters within
the VST Effect’s editor window. To gain MIDI control, however, you must assign one of the VST Effect’s parameter to the
Tweak knob or button (which you can control via MIDI). It’s a two-part process as outlined below:
1. Load a VST Effect. Its editor window will pop up when loaded.
2. Right-click on the Tweak knob in Torq’s interface. It will turn red indicating that it standing by for assignment.
3. Using the mouse, move a control in the VST Effect’s editor window. This could be a knob, slider, or button.
4. When you move the control, Torq will catch it and assign it to the Tweak knob. Moving the Tweak knob will now
operate the assigned VST parameter.
5. To assign a MIDI control to the Tweak knob, follow the usual procedure of right-clicking then moving your
desired MIDI control.
6. Once complete, the MIDI control will operate the VST parameter.
7. The same procedure above can be used for assigning a VST parameter to the Tweak button.
78
78
Once the assignments are made as described above, Torq will remember those assignments whenever you load that
VST Effect in the future.
✓ Note: : When running Torq in full-screen mode, clicking on the Torq interface will cause Torq to move to the
foreground and your VST Effect to move to the background, effectively being obscured from view. To bring the VST
Effect back to the front, click on the Wrench icon in the VST Effect slot or click the effect’s Taskbar/Dock icon.
VST Crash Guard
A plug-in works by inserting small bits of programming code into another program (in this case, you’ll be inserting an
effect processing plug-in into Torq). This can be problematic since some VSTs are made with little to no external testing
at all (and they may not have been tested with Torq specifically). Granted, it’s usually the free VST plug-ins found on
the web that lack the testing imposed by other professional plug-ins. These dirty plug-ins can be some of the most
experimental and creative offerings out there, which is why you may still want to try them.
Obviously, it would be completely unacceptable for Torq to crash right in the middle of a gig because of a little VST
plug-in. The music must keep playing at all times. For that reason, Torq has been designed with VST Crash Guard, which
is a system that will allow Torq to stay running even if an error should occur in the VST plug-in, causing it to crash. If
this occurs, Torq will detect the crash and will quickly bypass the offending plug-in to keep the music going. When this
happens, you can either attempt to re-load the plug-in (in hopes that it will reset and become functional again) or you can
remove the plug-in and try another. Either way, Torq’s got your back and will keep the music flowing.
VST Preset Management
Just like you can save the built-in Effect Rack, you can also save the settings for a VST plug-in. Some plug-ins will manage
their own presets from within the GUI. In these cases, you’ll need to consult the plug-in’s user manual to learn how to
use the presets.
Other VST plug-ins will rely on the host application (Torq, in this case) to manage their presets. In this case, you’ll need
to use the Preset Management tools (save and load) that appear above the plug-in’s GUI.
Page 80

79
79
REWIRE
Now that you’ve mastered all the techniques and tricks in Torq, where do you go from
here? Remixing and production. After all, Torq offers you so many tools for remixing
and sound design that you can cross over the boundary of simply playing songs and easily
enter the realm of music production.
Torq is unique in that it can operate as a ReWire slave. ReWire is a special technology
created by Propellerhead that allows two or more different audio applications to share
audio and MIDI data. The system is composed of a single ReWire host and multiple
ReWire slaves. The slaves will all send their audio outputs to the host, allowing you to
mix, EQ, and refine the audio using the tools within the host application. Furthermore,
the host and slaves will all share transport and timing information, allowing the multiple
software applications to act as a single unit.
Torq will interface with any ReWire host application such as Pro Tools or Ableton Live.
To begin a ReWire session:
1. Launch the ReWire Host application. This could be Ableton Live, Pro Tools
M-Powered, or any other application that will host a ReWire session.
2. Launch Torq. Since Torq is launched second, it will automatically launch into
ReWire Slave mode.
3. In order to hear Torq, you’ll need to select Torq as the source for audio
channels in the host application. In Live, this is done by selecting “Torq” in the
top box of the Channel I/O strip. You’ll also need to turn the Monitoring to
“In” to allow the audio from Torq to pass through Live. In Pro Tools, you’ll
create a new Aux track and select the ReWire plug-in in the top effect slot.
CHAPTER
CHAPTER
14
1
Global Tempo
Torq’s Global Tempo will lock to the tempo and timeline in the ReWire Host application.
This means that any song you play in Torq can sync up to whatever you’re currently
doing in Live or Pro Tools, even if you change the tempo while the music is playing.
Simply turn on Torq’s Global Tempo, then turn on Sync in the Decks. The Decks will
then sync to the Global Tempo shared by Torq and the ReWire Host.
English
English
Page 81

Torq 1.5 User Guide Chapter 1
Torq 1.5 User Guide Chapter 14
Audio Routing
When using two programs together via ReWire, the audio generated by Torq will be fed to audio channels in Live (or whatever
Host application you choose to use). With this system in place, you can further process the outputs of Torq using the Host
application’s effects. You can record the output of Torq into the application to add to your productions. You can also create
your own drum parts, basslines, and other loops in the Host which can be layered on top of the music you’re playing in Torq—
you can even play instruments in real time for spontaneous results.
When Torq is used with a regular audio interface, you have the option of assigning various output channels of Torq to outputs
on the audio interface (see Audio Preferences). When using ReWire, those same audio outputs are available within the Host
application. If you switch Torq into External Mixer mode, you’ll find that ReWire channels 1 and 2 carry the signal from Deck
A, channels 3 and 4 carry the signal from Deck B, and channels 5 and 6 will carry the audio from the PFL/Headphone signal (for
recording into Torq’s Sampler). If you use Internal Mixer mode, channels 1 and 2 will carry the Master Output (from the Mixer)
while channels 3 and 4 carry the PFL/Headphone signal. This allows you to create your own monitoring path or mixing path in
the Host application to suit your needs.
80
80
Page 82

81
81
PREFERENCES
This section provides a comprehensive review of the Preferences for Torq. Open the
Preferences by clicking the Preferences icon.
Note:
Preferences window when certain M-Audio products (such as the
Xponent DJ controller) are being used in conjunction with Torq.
This tab contains parameters relating specifically to the operation of
the connected M-Audio device. To learn more about the contents
of this additional tab, refer to your new hardware’s User Guide.
Audio Tab
An additional tab appears on the right side of the
CHAPTER
CHAPTER
15
1
This tab houses options relating to the audio interface used with Torq. You’ll select the
interface to use, set sampling rates and buffer sizes, and assign the various inputs and
outputs. Torq supports ASIO and DirectX protocols on Windows and Core Audio on
Mac OS X.
Note: Although Torq will work with a single stereo output audio
interface, it is recommended that you use a multiple-output audio
interface. The extra outputs allow you to make use of song cueing, i.e.
pre-listening to a song on headphones before you mix it.
English
English
Page 83

Torq 1.5 User Guide Chapter 1
Torq 1.5 User Guide Chapter 15
Torq Engine
This preference chooses the quality level of Torq’s audio engine. Normal is the default setting and should be used if you
experience no performance problems. Economy is the second option and should only be used if using a slow computer.
When Economy is selected, the quality of the resampling and EQ algorithms will be reduced thus lessening the CPU load.
Timestretching Quality
This preference chooses the type of Time-stretching to be used by Torq. The various time-stretching methods will create
different CPU loads:
• Standard: This is Torq’s default time-stretching algorithm and creates a very low CPU load. It is suitable for
making small changes in Key or Speed, but drastic changes will yield audio artifacts.
• Elastique: This mode employs the Elastique algorithm designed by zPlane. This algorithm will create a greater
CPU load, but the audio quality will be much higher. This algorithm is better suited for making more drastic
changes to pitch and key and yields very few audio artifacts. This is the preferred algorithm if you have a fast
computer.
Auto Gain
When this preference is set to Yes, Torq will automatically set the Gain Knob to a position that brings the volume of a
song up to 0dB RMS whenever a new one is loaded onto a Deck. This will ensure that the volumes of your tracks are
matched well before doing a mix.
82
82
Audio Interface
This preference allows you to select an audio interface for Torq.
1. Click the Audio Interface box.
2. A menu will be displayed, listing all audio interfaces currently connected to your computer.
3. Select the audio interface you want to use with Torq.
Sample Rate
Below the Audio Interface selection you will see sample rate adjustment. Increasing this value will improve sound quality
(depending on your source material) but will also place heavier demands on your computer. It is therefore recommended
to leave the sample rate only as high as you need it to be. If you only play MP3 files or songs from CDs, you won’t really
have any reason to raise this value beyond 44,100 since that is the sampling rate used by MP3s and CDs
Page 84

Torq 1.5 User Guide Chapter 1
Torq 1.5 User Guide Chapter 15
Buffer Size
The other important setting for your audio interface is the Buffer Size. This parameter can cause a lot of confusion for
some users, but is actually not that complicated. To understand how the buffer size affects the performance of Torq, you
must understand a little bit about how your computer processes audio.
Multi-tasking is a term that refers to doing multiple jobs all at once. It’s what allows your computer to run more than one
program at a time (i.e. listening to iTunes while surfing the Web). While it looks like the computer is doing two separate
things at once, it’s actually not—it’s still doing only one task at a time, but changing between tasks faster than you
can see.
This provides for a streamlined computing experience, but creates a problem when using audio applications. Audio is
non-stop—a 5-minute song will play for 5 minutes without interruption. So how can the computer keep audio playing
while it’s jumping around to do other tasks? The answer is buffering. An audio buffer is a temporary “storage tank” that
can hold a brief moment of audio. The computer will fill the audio buffer with music then let the buffer play while it does
other things (like update the clock on your screen, check your network connections, monitor RAM usage, etc.). When
all things work properly, the computer will complete its other tasks and fill the buffer with more data before the buffer
empties, thus resulting in perfect audio while multi-tasking.
If the audio buffer happens to empty before the computer can fill it with more data, the audio playback will stop until the
computer can fill the buffer again. These “dropouts” happen very quickly, not sounding like prolonged gaps of silence, but
sounding more like clicks and pops or otherwise distorted audio. When this happens, the solution is to either lighten the
CPU load (by closing unnecessary applications or processes that are wasting the computer’s time) or by increasing the
size of the audio buffer, allowing it to play longer (thus giving the computer enough time to perform its other tasks).
83
83
So why not just go with a large buffer size and avoid dropouts? The problem is that increasing the buffer size increases
the system latency. Latency is the time between when you tell the computer to do something (such as activating an EQ
Kill) and when you actually hear the results from the speakers. If you have a large audio buffer, the buffer will have to play
out its entire contents before you’ll hear any new EQ changes in the audio. When DJing, this can be a nightmare if you’re
trying to do things with accurate timing—all of your actions will have a delayed effect on the music.
The solution is to set the buffer size as low as it can go without inducing any audio problems. This is just like playing a
game of limbo:
1. Load some music into a Deck and play it.
2. While the music is playing, open the Audio Preferences.
3. If music is playing back properly, open the Buffer Size menu and select the next smallest buffer size. The buffer
will be updated immediately and the music will continue to play.
4. Listen to the music for a moment. If it sounds clean (no click, pops, or glitches), then lower the Buffer Size to the
next lowest setting.
5. Keep repeating this procedure, listening to the quality of the audio each time, until you reach a setting where the
audio breaks up.
6. Once you find this lower threshold, set the Buffer Size to the next highest setting (the last one that worked
properly) and your system will be optimized.
While Torq should be very stable at these settings, keep in mind that the system performance can be
compromised as you increase the CPU load. This is most notable when using CPU-intensive VST effects or the
Elastique time-stretching algorithm. Loading one of these effects may cause pops and click in your audio, at which
point you will have to increase the buffer size until the audio is clean again.
✓ Note: Using some external VST effects can introduce additional audio buffering within the Torq application. When
this happens, your manipulations of the Decks will seem sluggish—this is a side effect of the VST plug-in in use and
is not related to this buffer setting.
Page 85

Torq 1.5 User Guide Chapter 1
Torq 1.5 User Guide Chapter 15
Mixer Mode
This option allows you to switch between Internal and External Mixer mode.
Internal Mixer mode: This is the default setting where Torq’s on-screen mixer is used to blend the signals from
the Decks.
External Mixer mode: This will bypass the Torq mixer and route each Deck to its own output pair on your audio
interface. These individual stereo outputs can then be connected to your favorite DJ mixer in the same manner as
two turntables or CDJ’s. You’ll then mix and cue your tracks using your DJ mixer instead of Torq’s Mixer.
< Channel Assignments
Once you have selected an audio interface and selected a mixer mode, you can assign the outputs of Torq to the
channels of the selected audio interface. The assignment options will differ depending on which mixer mode is
active:
» Internal Mixer
• Master Output — Click to access the drop-down menu and select the stereo output pair for the
Torq Master Output. This is the output you will connect to the speakers.
• Cue Output — Click to access the drop-down menu and select the stereo output pair for cueing
(or pre-listening) to the output of a Deck. This is the output for the headphones.
84
84
• Line Input A — Click to access the drop-down menu and select the stereo input pair for use as
the Line Input for Channel A of the Mixer.
• Line Input B — Click to access the drop-down menu and select the stereo input pair for use as
the Line Input for Channel B of the Mixer.
• Control Input A — Click to access the drop-down menu and select the stereo input to which
your left turntable or CD player is connected. This is also the Control Input used by AMPutate
mode.
• Control Input B — Click to access the drop-down menu and select the stereo input to which
your right turntable or CD player is connected.
» External Mixer
• Deck A Output — Click to access the drop-down menu and select the stereo output for Deck A.
This signal will not be processed by Torq’s Mixer—it will be fed into a stereo channel of an external
DJ mixer.
• Deck B Output — Click to access the drop-down menu and select the stereo output for Deck B.
This signal will not be processed by Torq’s Mixer—it will be fed into a stereo channel of an external
DJ mixer.
• Sampler — Click to access the drop-down menu and select the stereo output for Torq’s Sampler.
• Line Input A — Click to access the drop-down menu and select the stereo input pair for use as
the Line Input for Channel A of the Mixer.
• Line Input B — Click to access the drop-down menu and select the stereo input pair for use as
the Line Input for Channel B of the Mixer.
• Control Input A — Click to access the drop-down menu and select the stereo input to which
your left turntable or CD player is connected. This is also the Control Input used by AMPutate
mode.
• Control Input B — Click to access the drop-down menu and select the stereo input to which
your right turntable or CD player is connected.
✓ Note: When Torq is being used as a ReWire slave (explained earlier in this guide), the Audio Interface
options will be disabled.
Page 86

Torq 1.5 User Guide Chapter 1
Torq 1.5 User Guide Chapter 15
MIDI Tab
85
85
This tab features all options pertaining to Auto-Setup and MIDI control.
Auto-Detect M-Audio Devices ([On]/Off)
When this option is enabled, Torq will automatically set the Audio and MIDI interface options to those of any known
M-Audio controller and interface that is connected to your system. This will ensure proper operation of Torq and
connected devices.
✓ Note: If you have created a custom mapping for your controllers or special assignments for your audio interface and don’t
want Torq to replace these mappings with the defaults upon the next startup, leave this option turned off.
MIDI Soft Takeover
Some of the features in Torq work automatically, such as Auto Gain and Auto Sync. When these features are used, it is
possible that the position of the on-screen controls can change (i.e. the Speed Slider can move to a new location when
matching tempos). When this happens, the position of the controls on your MIDI controller will no longer match those
on screen.
The MIDI Soft Takeover preference determines what will happen when you move one of these MIDI controls. When
MIDI Soft Takeover is Off, Torq’s on-screen controls will immediately jump to match the location of the MIDI control as
soon as you move it. This can cause undesired parameter jumps (i.e. the speed of a song suddenly increases to match the
position of the MIDI slider).
If MIDI Soft Takeover is set to On, Torq will not respond to the MIDI control until you’ve moved it to a location that
matches the on-screen control. When this happens, a transparent version of the control will be shown on screen. This
transparent control shows the location of the MIDI control in reference to the position of the on-screen control. Simply
move the MIDI control until the transparent control lines up with the actual control on screen. When that occurs, the
transparent control will disappear and Torq will resume reacting to MIDI control.
Page 87

Torq 1.5 User Guide Chapter 1
Torq 1.5 User Guide Chapter 15
Scratch Sensitivity
This option allows you to configure how rapidly a Deck
will respond to messages sent from a MIDI controller (it
has no effect on External Control with Vinyl or CDs). It is
designed for controllers that will move the waveform back
and forth, typically those with jog wheels.
1. By increasing the number, the Deck will respond
more rapidly.
2. By decreasing the number, the Deck will respond
more slowly.
Nudge Sensitivity
This setting allows you to adjust Torq’s sensitivity to
“nudging” or gradually slipping the phase of one deck to
match the phase of the other deck.
By default this parameter is set to 5, however:
1. By increasing the number, the Deck will nudge your
track more rapidly.
2. By decreasing the number, the Deck will nudge
your track more gradually.
Note that this setting differs from the “Scratch Sensitivity”
parameter which changes Torq’s sensitivity to scratches, which
“push” or “pull” your waveform much more quickly and forcefully than a nudge. Unlike a scratch, a nudge very gently slows down
or speeds up a track and is used to fine tune the timing of two tracks.
DJ oriented MIDI controllers with turntable
platters will vary in how they handle scratching and
nudging. Certain products will allow you to control
only nudging, while others (such as the M-Audio
Xponent) will allow you to control both nudging
and scratching. Refer to the product’s user guide to
learn if each turntable platter is capable of sending
out both MIDI note and CC information. If so,
assign each turntable’s MIDI note and CC commands
to the corresponding Main Waveform Display in
Torq (this is done using the “MIDI Learn” feature
described in the MIDI Preferences section of this
guide).
If your turntable can only send out MIDI CC
information but not MIDI note data (i.e., the
turntable is not touch sensitive), then you will only
be able to control nudging. Assign the turntable’s
MIDI CC output to control the corresponding Main
Waveform Display in Torq (again, this is done using
the “MIDI Learn” feature described in the MIDI
Preferences section of this guide).
86
86
Crossfader Curve Control
This preference allows you to assign a MIDI controller to the Crossfader Curve parameter. You can then control the
Crossfader Curve with a knob or slider on your MIDI controller.
1. Press the button labeled “Learn” to activate it. The button will turn red.
2. Turn a knob on your MIDI controller.
3. Torq will immediately assign the knob to the Crossfader Curve and the button will turn green. Check this by
looking at the Crossfader graphic in the main window while turning the knob.
MIDI SHIFT Key
When using Torq, the SHIFT key on your computer’s keyboard is used rather often. This option lets you assign a MIDI
Note to function as “SHIFT” in Torq, thus allowing you to do SHIFT-based combinations (such as SHIFT+Nudge) entirely
from an external MIDI controller. To assign a MIDI note:
1. Press the button labeled “Learn” to activate it. The button will turn red.
2. Push a button or key on your MIDI controller. The MIDI Shift Key button will turn green.
3. Torq will immediately assign the button as a Shift key for use within the program.
Instant Doubles
Torq will automatically copy the song from one Deck and place it on the other when using the Instant Doubles feature.
This function can be triggered by keys on your computer’s keyboard or with an external MIDI controller. There are two
preferences here—Instant Double A->B will copy the song from Deck A over to Deck B while Instant Doubles B->A will
do the opposite. To assign keys to these actions:
1. Click the button labeled “Learn” to activate it. It will turn red.
2. Push a button or key on your MIDI controller or keyboard. The Learn button will turn green.
3. Torq will immediately assign the key or button to the action—it is now ready for use.
Page 88

Torq 1.5 User Guide Chapter 1
Torq 1.5 User Guide Chapter 15
MIDI Clock
Torq’s Global Tempo can be slaved to an external device that transmits MIDI Clock (called MBC in Torq). When you
then enable Global Tempo, all aspects of Torq (the Sampler and synced Decks) will follow the MIDI Clock. Torq can
also transmit its Global Tempo as MIDI Clock so that other MIDI equipment can synchronize with Torq. External drum
machines, groove boxes, synths, etc. will all follow Torq’s Global Tempo, provided they can receive MIDI Clock.
In order to use these MBC features, you’ll need to have a MIDI interface connected to your computer. Some of the
M-Audio DJ products, such as the Xponent, have a MIDI interface built into them. If you do not have a MIDI interface
on your product (or are already using them for connections to other devices), you’ll need to add MIDI ports to your
computer. A solution is the M-Audio UNO, a simple 1-input, 1-output MIDI interface that connects to a USB port on
your computer. The UNO can be found at almost any music dealer or online retailer.
< Setting up MBC Input
To slave Torq’s Global Tempo to an external MIDI device:
1. Connect the MIDI Output of the external device to a MIDI Input on your computer.
2. In Torq’s MIDI Preferences, select the MIDI Input port mentioned above as the MBC Input. Close the
Preferences.
3. Click the Global button in Torq’s toolbar to enable Global Tempo. Torq’s Global Tempo will run
independently until an incoming MIDI Clock is received.
87
87
4. Enable transmission of MIDI Clock in your external device. Please refer to the product’s user manual for
the proper method of doing this.
5. Start the external device (possibly by pressing Play or Run).
6. Torq’s Global Tempo will change to match the tempo of the external device. The Global Tempo LEDs will
also chase in time with the external device.
< Setting up MBC Output
To slave an external MIDI device to Torq’s Global Tempo:
1. Connect a MIDI Output from your computer to the MIDI Input of the external MIDI device.
2. In Torq’s MIDI Preferences, select the MIDI Output port mentioned above as the MBC Output and close
the Preferences.
3. On your external MIDI device, enable reception of MIDI Clock. Please refer to the product’s user manual
for the proper method of doing this.
4. On some external devices, you’ll need to put it into a “standby” mode where it waits for MIDI Clock
before it starts to run. This may require pressing Play or Run—please check with the product’s user
manual to see if this is required.
5. In Torq, enable the Global Tempo in the Toolbar. When activated, Torq will begin to transmit MIDI Clock
at the specified tempo, but the external devices will not run.
6. In order to start the external devices, a MIDI Start command must be sent from Torq. In order to do
this, click the MIDI I/O indicator in Torq’s Toolbar. The button will turn yellow when clicked, indicating
that Torq is waiting for the downbeat of the music you’re playing. When the downbeat arrives, Torq will
transmit the MIDI Start command and the external device should begin to play. The Global Tempo LEDs
will also begin to chase, indicating your current position within a bar.
Page 89

Torq 1.5 User Guide Chapter 1
Torq 1.5 User Guide Chapter 15
< MIDI Stop Behavior
This preference determines what Torq will do when it receives a MIDI Stop command from an external device.
• STOP: When set to Stop, Torq will stop all Decks and Samples upon receiving MIDI Stop.
• FREEWHEEL: When set to Freewheel, Torq will continue to play, essentially ignoring the MIDI Stop
command, thus allowing the DJ set to continue after stopping the external device.
< MIDI Clock Phase Offset
These two parameters are used to adjust the timing between Torq and the external MIDI devices. If Torq is
following the MIDI Clock from an external device, use the MIDI Clock In Phase Offset option to align Torq. If
Torq is transmitting MIDI Clock to an external device, use the MIDI Clock Out Phase Offset option to align the
external device to Torq.
< Applications for MIDI Clock
Here is a brief list of possible applications for MIDI Clock. This isn’t an exhaustive list—there are surely more
possibilities that can be listed here and they are only limited by your creativity.
• External Drum Machine: Dance music is dance music thanks to the drums. You can make your DJ
sets even more dance-heavy by layering your own custom beats on the fly with an external drum machine.
Add extra kick drums and hi-hats. Double-up a snare drum with a hand clap. Create drum fills where none
existed before. Simply slave the drum machine to Torq using MIDI Clock and it will play in time with the
Global Tempo, even if you change the Global Tempo.
88
88
• External Synth/Sequencer: Beats are easy to add, but you may want to take it to the next level
and actually add your own synth parts on top of your mixes. New bass lines. Sound effects. Rapid-fire
sequencer patterns. Simply slave the external sequencer to Torq and you’re ready to go.
• Swapping DJs: If you’re in the middle of a Torq set and another Torq DJ is ready to play after you, you
can transmit your Global Tempo to that DJ allowing him to sync up everything on his computer to yours,
thus allowing for automatic beat-matched transitions between DJs. If you’re the first DJ, set your computer
to output MBC and set your last track as the Tempo Master (that will engage Global Tempo and transmit
it to the MIDI Output). If you’re the second DJ, set your computer to receive MBC and enable your Global
Tempo. Your computer will now be in sync with the other DJ. If you’re the second DJ, you should also set
your MIDI Stop preference to “Freewheel” to ensure that Torq doesn’t stop when the first DJ presses stop
on his system.
• Dual-DJ: If one DJ could sync the beginning of his set up to the end of another DJ’s set, then why not
sync up the entire length of both your sets? By sharing MIDI Clock between two computers running Torq,
two DJs can sync themselves together and create a massive 4-Deck mixing extravaganza.
• Torq and Live: Torq’s ReWire capabilities allow it to be run alongside applications such as Ableton Live
on the same computer. MIDI Clock will allow you to sync up the two applications across two computers.
While you won’t be able to transfer audio from Torq to the other application without making additional
audio interface connections, you can at least get both programs to run in sync with each other. Then,
adding clips in Live or tracks in Torq will result in one synchronized performance between both computers.
MIDI Devices
This list shows all MIDI devices currently recognized by Torq. Each device is listed by name and is followed by a box which
selects the device as being On or Off.
If you wish to use a device as a controller for Torq, click the drop-down menu and select On to activate it. Leave any
controller you do not wish to use with Torq set to Off.
Page 90
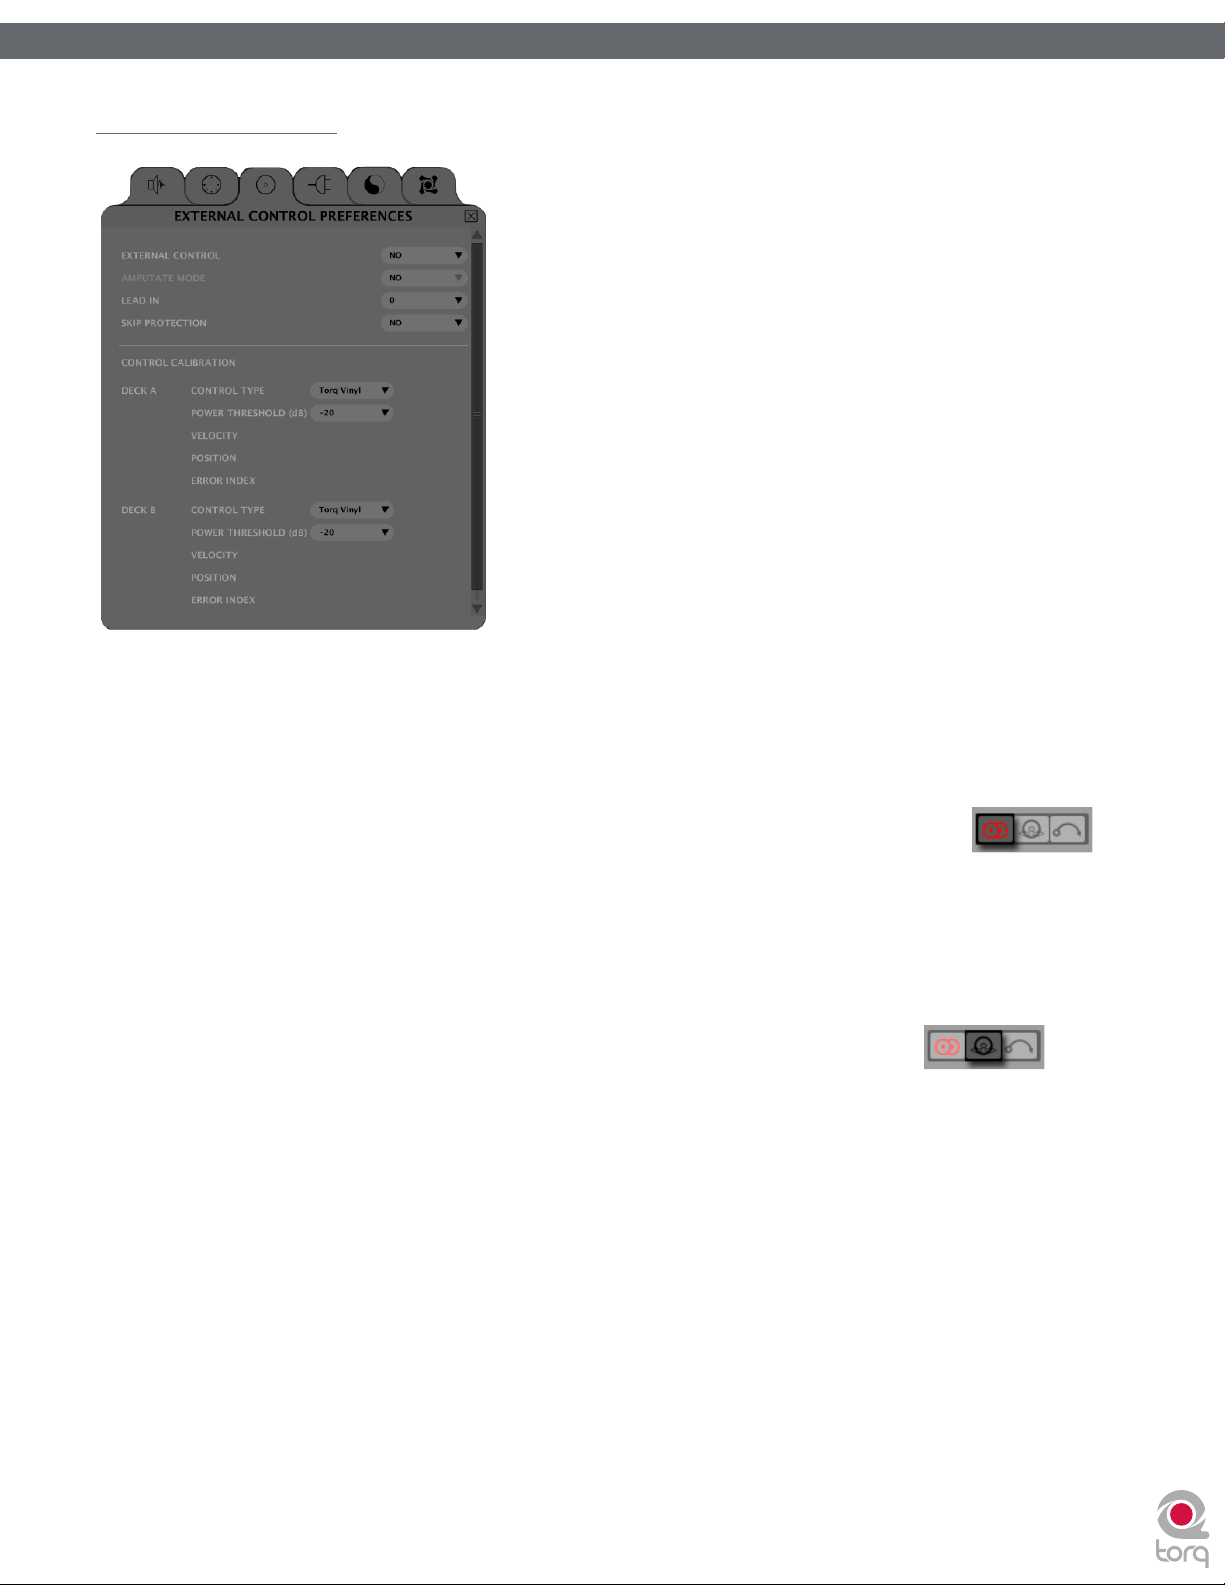
Torq 1.5 User Guide Chapter 1
Torq 1.5 User Guide Chapter 15
External Control Tab
89
89
This preference tab holds the options pertaining to external vinyl and CD control, as well as the option for enabling AMPutate mode.
External Control
When set to Yes, this option enables external vinyl or CD control for the Decks. The Deck Play/Pause buttons will also
change to Absolute/Relative buttons when this option is enabled (see External Control section earlier in this manual).
✓ Note: The state of External Control is also shown in the Toolbar. Clicking the External Control icon will
turn External Control on and off allowing you to toggle the state without having to open the Preferences.
AMPutate Mode
This option enables AMPutate mode, which allows one external control source to control either of the Decks. In
this mode, you can press the Vinyl button on the Deck you wish to control with record or CD. All other Decks will
automatically switch to Hybrid or CDJ mode.
✓ Note: The state of AMPutate Mode is also shown in the Toolbar. Clicking the AMPutate icon will turn
AMPutate Mode on and off allowing you to toggle the state without having to open the Preferences.
Lead In
Any practiced DJ knows that playing and scratching records will eventually destroy them. If the needle is exceptionally
heavy or if you scratch in the same place a lot, the grooves in the record can be eaten away thus tarnishing the sound
quality. This frequently happens at the beginning of records and is something DJs call “cue burn”.
With traditional records, cue burn was something to pay attention to because it didn’t sound very good. When using
control records like the Torq Vinyls, cue burn becomes a serious issue. This is due to the fact that you use the same two
records to play every song in your set all the time and because Torq might not be able to track the motion in a section
of the vinyl with cue burn. If you’re using Absolute mode, every song will begin at the same place on the record (at the
beginning). Constantly cueing and scratching in this area will eat away at the grooves on the Torq Vinyl.
When using traditional records, spotting cue burn is easy: you hear it. It sounds like the record is really dirty (as if it had
been scrubbed with sandpaper). However, when using the Torq Vinyl, you won’t hear cue burn because Torq will still
be playing pristine digital audio files. Instead of hearing the audio get scratchy when your control records start getting
burned, you’ll find that Torq’s ability to follow the control records is compromised. This usually manifests itself right
at the beginning of each song—the music will jump around erratically. This is because Torq is unable to determine the
proper location because the signal from the control records has been damaged.
Page 91

Torq 1.5 User Guide Chapter 1
Torq 1.5 User Guide Chapter 15
So, instead of hearing the audio get scratchy when your control records start getting burned, you’ll find that Torq’s ability
to follow the control records is compromised. This usually manifests itself right at the beginning of each song—the music
will jump around erratically. This is because Torq is unable to determine the proper location because the signal from the
control records has been damaged.
The usual solution for this is to either flip the record over to the other side or, if you’ve already done that, to throw the
record away and get a new one. However, using the “Lead In” option in the Preferences, you can extend the life of your
control records.
By default, Lead In is set to “0” which causes the music to start playing from the beginning of the record. Increasing
Lean In to “1” will make the music wait for an additional rotation of the record before starting. So, when the start of the
record gets burned, increase the Lead In by one value. Once that new location is burned, increase the Lead In again. Once
you’ve burned both sides of the record with the Lead In set to 5, you’ll have to buy a replacement.
Skip Protection
Skip Protection is a special feature that can help avoid embarrassing mistakes or unfortunate circumstances when using
the Torq Control records. When this option is active, Torq will maintain playback of the music even if the needle skips
across the record, be it from wind, someone bumping the DJ booth, etc. The way this works is similar to Relative mode
(the position of the needle will be ignored after it skips) except that the music will not stop playing immediately when the
needle comes off the record. If the needle looses contact with the record, the music will continue to play for about half of
a second. If the needle makes contact with the record again within that time, you’ll never hear the music stop. Be aware
that this feature has its limits: If the record player is bumped such that the tonearm bounces completely off the record,
the music will stop.
90
90
✓ Note: Skip Protection can be turned on and off from Torq’s Toolbar. Simply click the Skip Protection button
to toggle the feature.
Control Calibration
The settings within this preference are used to configure each input pair of Torq for use with external control records or
CDs. For vinyl control, you can use the Torq Control Vinyl records or some versions of the Ms. Pinky control records.
» Control Type (Gen1, Gen2, Gen3, Torq Vinyl, Torq CD)—this pop-up menu allows you to set the
vinyl or CD source to use for the Deck. To use the Torq Control Vinyl or Torq Control CD, select “Torq Vinyl”
or “Torq CD,” respectively. Gen1, Gen2, and Gen3 are for use with Ms Pinky records generations 1, 2, and 3.
» Power Threshold—this setting sets the minimum signal necessary to make External Control work. If this
setting is too low, quiet noises picked up by the turntable could be interpreted incorrectly as control signals. If
this setting is too high, the Deck will not respond to the external control signals at slow speeds. This should be
set as low as possible without introducing any anomalies. Please see the “External Control Calibration” section
earlier in this manual for the proper calibration procedure.
» Velocity—this display allows you to see the influence of the external control input. When working properly,
playing back the Control Vinyl or CD at its original speed should result in a number very close to 1.0 in this field.
» Position—when external control is working properly, this display will show a number that increases as the
source plays forward.
» Error Index—if the number displayed in this field is below 1.5, the control source is being read properly. If the
number is higher than 2.0, the display will turn red, indicating problems with the incoming control signal. You will
then need to adjust your control settings, clean your records, and/or replace your stylus to fix this.
Page 92
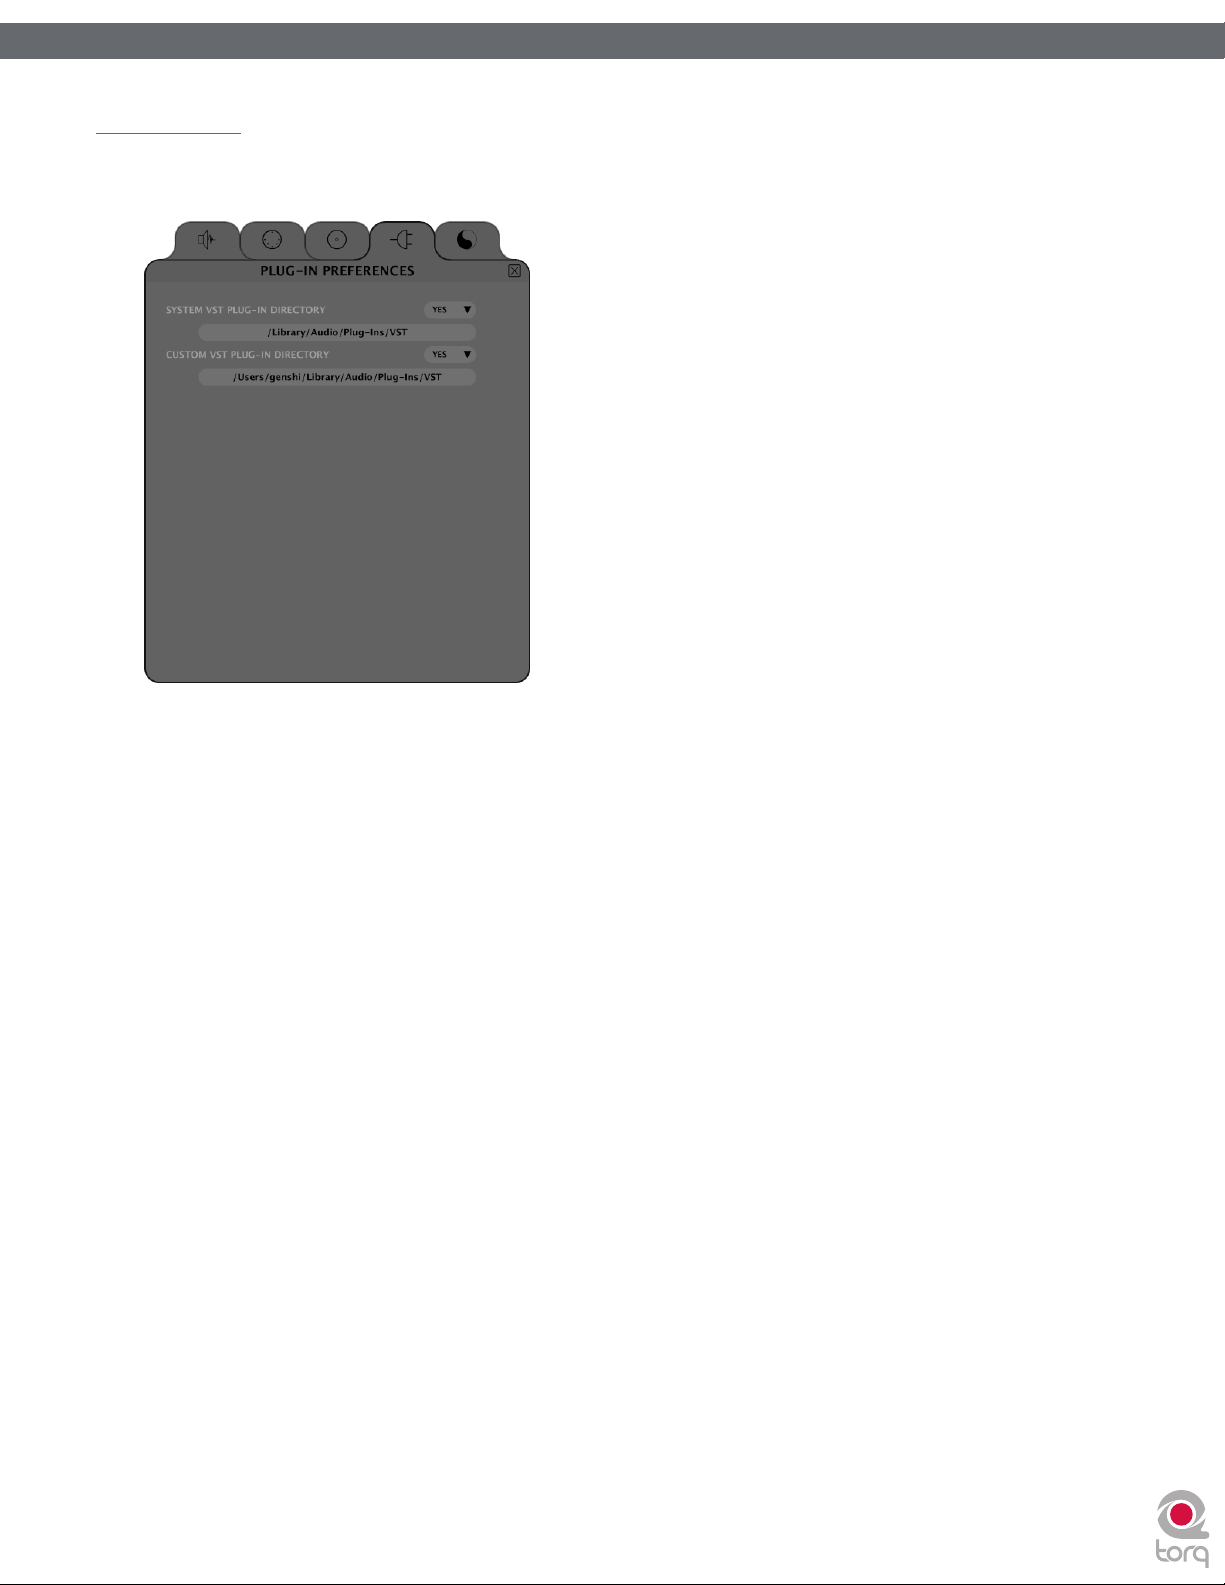
Torq 1.5 User Guide Chapter 1
Torq 1.5 User Guide Chapter 15
Plug-ins Tab
Torq allows you to use VST plug-in effects to further enhance and mangle your music. VSTs can be stored in various locations
on your hard drive, and these preferences will choose the plug-in locations for Torq to use.
91
91
System VST Plug-in Directory
This preference gives you the option to use your system VST plug-in directory as the VST folder for Torq.
1. Click the arrow next to the first option and select “yes” from the drop-down menu.
2. Torq will now use the VST plug-ins found at the path listed in the window just below.
Custom VST Plug-in Directory
This preference allows you to select an alternate folder of VST plug-ins for Torq to use. This will allow you to specify only
specific plug-ins to use by copying only the ones you need into a unique folder that you create.
1. Click the arrow next to the first option and select “Yes” from the drop-down menu.
2. Torq will now use the alternate VST plug-ins found at the path listed in the window just below.
3. To change the path, click on the path name.
4. This will open a standard System dialog box.
5. Select the folder in which your alternate VST plug-ins are stored.
Page 93
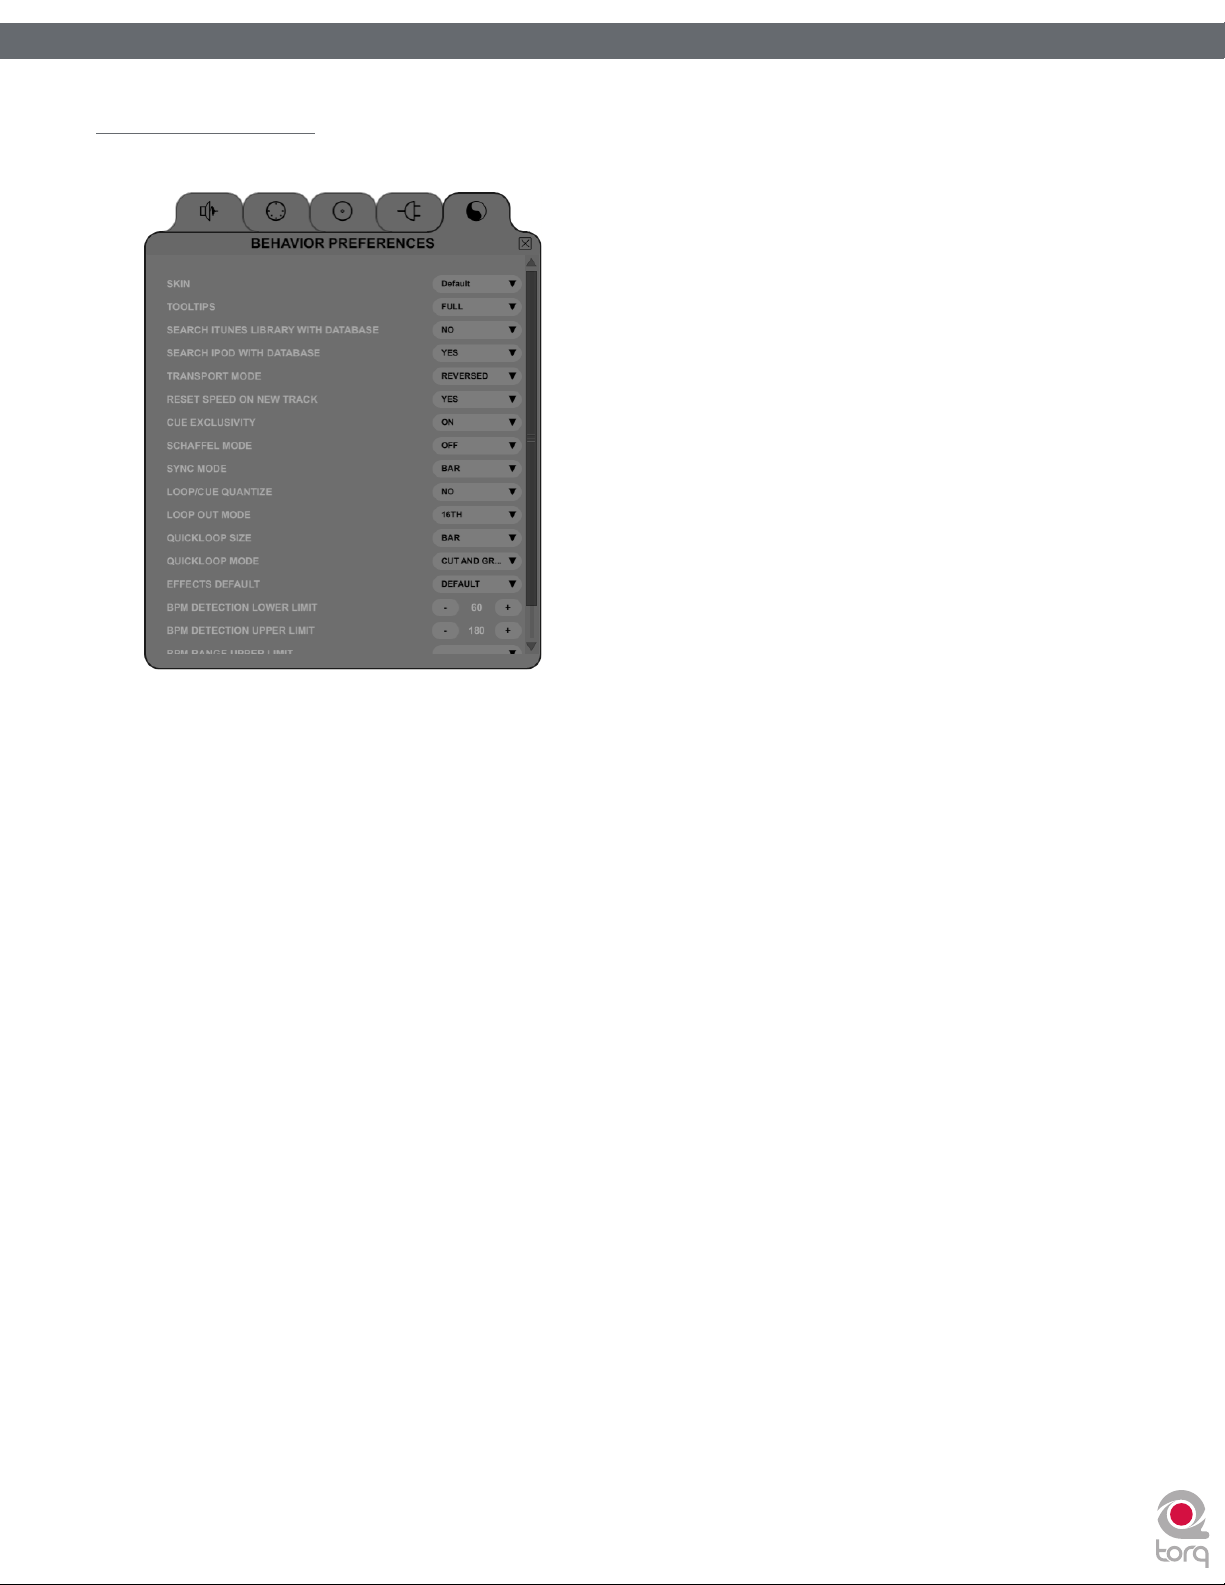
Torq 1.5 User Guide Chapter 1
Torq 1.5 User Guide Chapter 15
Miscellaneous Tab
This tab contains miscellaneous options that affect the behavior of certain features of Torq.
92
92
Skin
This option allows you to select a different “Skin” or color scheme for Torq.
1. Click to drop down the Skin menu.
2. Select a skin (color-scheme) from the list.
3. Torq will change its color scheme, but all interface features will maintain their shape and orientation within the
interface.
Tooltips
If you hover your mouse over a control in Torq, often a small Tooltip will appear describing the function of the control.
Additionally, when you move a knob or slider with the mouse, a Tooltip will be displayed showing the new setting of the
knob or slider. This preference chooses the level of detail in the Tooltips.
» Full—When selected, all Tooltips will be displayed, both when you hover your mouse and when you operate a
control.
» Adjust—When selected, the only Tooltips that will appear are those showing the adjustment applied to a knob
or slider. The normal Tooltips seen when hovering the mouse over a control will be hidden.
» None—When selected will disable all Tooltips entirely.
Search iTunes Library with Database
If you happen to have a copy of Apple iTunes installed on your computer, selecting “Yes” for this option will integrate
its Music Library into Torq’s Database. Any songs currently a part of your iTunes Library will be instantly accessible in
Torq along with all other folders assigned to the Database. If this option is off, you’ll have to specifically select the iTunes
Library in the Browser window to view its contents.
Search iPod with Database
When this preference is set to Yes, any connected iPods will have their music libraries incorporated into the Database
for instant searching. If this option is off, you will have to specifically select the iPod Library in the Browser to view its
contents.
Page 94

Torq 1.5 User Guide Chapter 1
Torq 1.5 User Guide Chapter 15
Transport Mode
The Nudge and Offset buttons in the Decks can have their directions reversed using this preference. By default, this
option is set to Reverse, meaning the buttons operate in a manner similar to a DJ using turntables. Instead of pressing
right to go faster or ahead in the song, you’ll press left (just like the closest edge of a record spinning past a DJ). If you
prefer more of a “tape machine” style control, switch this option to “Normal.”
Reset Speed on New Track
When this option is set to Yes, Torq will reset the speed of a Deck to 0% (original tempo) every time a new song is
loaded onto the Deck. With this option set to No, Torq will maintain the position of the Speed Slider even after loading
a new song. This is the preferred mode when using MIDI to control the Speed Sliders since the position of the on-screen
slider will remain synced to the position of the MIDI slider.
Cue Exclusivity
This option affects how the Deck Cue buttons behave.
When this option is On, pressing the Cue button on a channel will cause the other Cue button on the other channel to
turn off. This will ensure that you are only hearing one audio source through your headphones at a given time.
When this option is Off, you can cue multiple channels at once. These Cue sources are mixed and heard through
your headphones simultaneously. With each channel that is added to the Cue mix, the overall Cue bus volume will be
attenuated by 3dB in order to keep it from clipping.
93
93
Schaffel Mode
Schaffel is German for “shuffle,” which has become a popular form of dance music based on a triplet rhythm as opposed
to a straight 16th-note rhythm.
When this mode is activated, any of the effects (or parameters that quantize their values) will include triplets in their
quantizing options.
Take the Strobe effect for example: The Parameter knob changes the rate of the Strobe effect. Normally, this would
select rates of 1⁄2, 1⁄4, 1/8, 1/16, and 1/32. With Schaffel engaged, the knob would quantize to 1⁄ 2, 1⁄4, 1/8, 1/8T, 1/16T,
and 1/32T. The “T” after the number stands for “Triplet.”
✓ Note: Selecting a triplet quantization will give the effect or parameter a “shuffled” or funky feel.
✓ Note: Schaffel Mode can also be turned on and off from Torq’s toolbar. Click the Schaffel button to toggle Schaffel Mode
on and off.
Sync Mode
This option determines the “forcefulness” of the synchronization used in Torq.
» Bar—When selected, Torq will align a synced Deck to the tempo and downbeat of the other Deck or Global
Tempo. Any attempts to adjust the alignment of the track will result in Torq forcing the tracks back into
synchronization with their downbeats aligned (the thick lines of the Phase Grids will be aligned with each other
at all times).
» Beat—When selected, Torq will match a synced Deck to the tempo and beat of the other Deck or Global
Tempo with no regard to the downbeats in the Phase Grids. Any attempts to realign the synced Deck will result
in Torq forcing the track back into alignment with the nearest beat (the thick lines of the Phase Grids may be out
of alignment with each other).
» Tempo Only—When selected, Torq will only match the tempo of a synced Deck to the other Deck or Global
Tempo. When you press Play on the Deck, Torq will not force the song into alignment. It will be up to you to
start the music at the right moment and keep it in alignment.
✓ Note: The Sync Mode can also be changed from Torq’s toolbar. Each time you click the Sync Mode button, it will
cycle through Bar, Beat, and Tempo modes.
Page 95

Torq 1.5 User Guide Chapter 1
Torq 1.5 User Guide Chapter 15
Loop/Cue Quantize
By default, Torq does not quantize actions such as creating loops or QuickCues. This gives you the freedom to set these
points wherever you wish.
If Quantize is set to “Yes”, Torq will force each new Loop or QuickCue you make to the nearest 16th-note. This can help
ensure that your QuickCues and Loops occur right on beat when creating them on-the-fly.
✓ Note: Enabling Quantize does not change the positions of QuickCues or Loop points that are already set in a song. It only
governs the creation of new QuickCues and Loops.
✓ Note: Quantize can be turned on and off from Torq’s toolbar. Clicking the Quantize button will toggle it on and off.
Loop Out Mode
The default setting for this preference is “16th”. When set this way, Torq will make sure that a Loop Out marker is set at
a position that is quantized to the 16th-note relative to the position of the Loop In marker. In this mode, you can create
loops that are any number of 16th-notes long. For example, you can create a loop that is 16 16th-notes long (1 bar). You
could make a loop that is 2 bars, 1.5 bars, .5 bars (2 beats), etc. You can also make loops of strange lengths such as 15
16th-notes long. Loops like that will appear to fall out of sync because they don’t have even loop lengths.
To prevent some of the uncommon loop lengths that can be generated when using the “16th” setting, you can switch this
preference to “Smart”. In this mode, Torq will force every loop to a length that will always loop in time with the music.
Basically, it allows you to make a loop as small as a 16th-note and grows in powers of two from there. Therefore, you can
achieve the following loop lengths: 1/16-bar, 1/8-bar, 1/4-bar, 1/2-bar, 1 bar, 2 bars, 4 bars, 8 bars, 16 bars, etc.
94
94
QuickLoop Size
This option affects how the QuickLoop buttons behave.
When this preference is set to “Bar,” your loops will be established in lengths of musical bars. When this preference is set
to “Beat,” your loops will be established in lengths of musical beats.
QuickLoop Mode
This preference determines the behavior of the QuickLoop buttons after a QuickLoop has been engaged. By default, this
preference is set to “Cut and Grow”. In this mode, each additional press of a QuickCue button will cut the current loop
length in half. Therefore, if you press the 2 button to create a 2-bar loop, pressing 2 again will reduce the loop to 1 bar
in length. Pressing 2 again will cut the loop to half a bar (2 beats). You can continue pressing 2 again and again and the
loop will get smaller and smaller to the point where only a high-pitched sound is heard. If you hold the SHIFT key while
pressing the QuickLoop button, the loop will grow in length—doubling its previous length. There is no limit to how long
the loop can be, other than the length of the song.
The alternative setting for this preference is “Direct”. This mode more accurately resembles the loop functions on some
DJ CD players. After you’ve created your loop by pressing one of the QuickLoop buttons, you can use the QuickLoop
buttons to divide the loop length by their value. For example, pressing the 1 button will create a 1-bar loop. If you then
press 2, you will end up with a half-bar (2 beat) loop since 1 divided by 2 is 1/2. If you press the 4 button, the loop will
become 1 beat long (1 bar divided by 4 equals 1/4-bar [1 beat]). If you then press 1 again, the loop will return to its
original length (1 divided by 1 is 1). Another example: Press 2 to capture a 2 beat loop. Press 8 to reduce that loop to a
16th-note in length (2 beats divided by 8 equals 1/4-beat [16th-note]).
Page 96

Torq 1.5 User Guide Chapter 1
Torq 1.5 User Guide Chapter 15
Beat Detection Style
Torq attempts to determine the tempo and phase of a song when you load it into a Deck. Coaxing a computer to “hear”
the tempo of a song is partially art and science—this preference is here to assist when the science fails.
In the Beat Detection Style menu, you will find a list of various musical styles/genres. Choosing one of the styles will tell
Torq to alter its analysis algorithm for all future file analysis. Choosing a matching style will greatly improve the accuracy
of Torq’s beat detection.
For example, if you have “House” selected here and attempt to analyze a group of Drum & Bass tracks, the analysis will
return the incorrect tempo (it will be too slow). Set this preference to “Drum & Bass” then re-analyze the affected files.
Those files will now be analyzed with the proper tempo.
Beat Detection Limits
You can further fine-tune the beat-detection by setting your own upper and lower limits for the BPM. Once set, Torq will
ensure that all analyzed BPMs return within the specified tempo range.
✓ Note: Whenever you set your own upper and lower BPM limits, the Beat Detection Style will automatically be changed to
“Custom”.
Sample Counter
Pressing this button will reset the automatic numbering of newly recorded samples back to “000.”
95
95
Page 97

96
96
96
APPENDIX
Preset Key Assignments
While Torq is basically a “blank slate” as far as keyboard assignments are concerned,
there are a few keys that are preset to various functions in the Torq interface:
Global Key Commands
F1—Load selected track into Deck A Shift+1—Set QuickCue 1 on Deck A
F2—Load selected track into Deck B Shift+2—Set QuickCue 2 on Deck A
F6—Max Browser view Shift+3—Set QuickCue 3 on Deck A
F7—Max Waveform view Shift+4—Set QuickCue 4 on Deck A
F8—Hide Sampler Shift+5—Set QuickCue 5 on Deck A
F9—Hide Mixer Shift+6—Set QuickCue 1 on Deck B
Tab— Toggle Browser
and Snapshot views
1—QuickCue 1 on Deck A Shift+8—Set QuickCue 3 on Deck B
2—QuickCue 2 on Deck A Shift+9—Set QuickCue 4 on Deck B
3—QuickCue 3 on Deck A Shift+0—Set QuickCue 5 on Deck B
4—QuickCue 4 on Deck A SHIFT+F1: Unload Deck A
5—QuickCue 5 on Deck A SHIFT+F2: Unload Deck B
6— QuickCue 1 on Deck B SHIFT+SET: Clear all QuickCues on a Deck.
7—QuickCue 2 on Deck B SHIFT+BYPASS: Clear all effects in a rack.
8— QuickCue 3 on Deck B
9—QuickCue 4 on Deck B
0—QuickCue 5 on Deck B
Shift+7—Set QuickCue 2 on Deck B
CHAPTER
CHAPTER
CHAPTER
10
16
1
Windows Key Commands
ALT+F4 —Quit Torq
CTRL+,—Open Preferences
The following Styli and Cartridges have been tested and approved for
use with Torq using Conectiv Hardware:
Ortofon:
< Nightclub S and E
< DJ S
< Scratch S
Shure:
< M44-7
Stanton:
< D6800 HP
Mac Key Commands
CMND+Q—Quit Torq
CMND+,—Open Preferences
English
English
English
Page 98

Torq 1.5 User Guide Chapter 1
Torq 1.5 User Guide Chapter 16
WARRANTY
Warranty Terms
M-Audio warrants products to be free from defects in materials and workmanship, under normal use and provided that the
product is owned by the original, registered user. Visit www.m-audio.com/warranty for terms and limitations applying to your
specific product.
Warranty Registration
Immediately registering your new M-Audio product entitles you to full warranty coverage and helps M-Audio develop and
manufacture the finest quality products available. Register online at www.m-audio.com/register to receive FREE product
updates and for the chance to win M-Audio giveaways.
97
97
© 2008 Avid Technology, Inc. All rights reserved. Product features, specifications, system requirements and availability are subject to
change without notice. Avid, M-Audio, Conectiv, Xponent, Torq 1.5 are either trademarks or registered trademarks of Avid Technology,
Inc. All other trademarks contained herein are the property of their respective owners.
Page 99

M-Audio USA
5795 Martin Rd., Irwindale, CA 91706
Technical Support
web . . . . . . . . . . . . . . . . . . . . . . www.m-audio.com/tech
tel (pro products) . . . . . . . . . . . . . . . . . . .(626) 633-9055
tel (consumer products) . . . . . . . . . . . . . . (626) 633-9066
fax (shipping) . . . . . . . . . . . . . . . . . . . . .(626) 633-9032
Sales
e-mail . . . . . . . . . . . . . . . . . . . . . . .sales@m-audio.com
tel . . . . . . . . . . . . . . . . . . . . . . . . . . 1(866) 657-6434
fax . . . . . . . . . . . . . . . . . . . . . . . . . . .(626) 633-9070
Web . . . . . . . . . . . . . . . . . . . . . . . . . www.m-audio.com
M-Audio Germany
Kuhallmand 34, D-74613 Ohringen, Germany
Technical Support
email . . . . . . . . . . . . . . . . . . . . . . . support@m-audio.de
tel . . . . . . . . . . . . . . . . . . . . . . +49 (0)7941 - 9870030
tel . . . . . . . . . . . . . . . . . . . . . . +49 (0)7941 - 98 70070
Sales
e-mail . . . . . . . . . . . . . . . . . . . . . . . . info@m-audio.de
tel . . . . . . . . . . . . . . . . . . . . . . . +49 (0)7941 98 7000
fax . . . . . . . . . . . . . . . . . . . . . . +49 (0)7941 98 70070
Web . . . . . . . . . . . . . . . . . . . . . . . . . . www.m-audio.de
M-Audio U.K.
Avid Technology | M-Audio
Pinewood Studios, Pinewood Road
Iver Heath, Bucks, SL0 0NH, United Kingdom
Technical Support
e-mail . . . . . . . . . . . . . . . . . . . . . support@maudio.co.uk
tel (Mac and PC support) . . . . . . . . . . +44 (0)1753 658630
Sales
tel . . . . . . . . . . . . . . . . . . . . . . . +44 (0) 1753 659590
Web . . . . . . . . . . . . . . . . . . . . . . . . . www.maudio.co.uk
Benelux
Technical Support
Belgium tel . . . . . . . . . . . . . . . . . . . . . +32 22 54 88 93
Holland tel . . . . . . . . . . . . . . . . . . . . +31 35 625 0097
M-Audio France
Avid Technology | M-Audio
Pinewood Studios, Pinewood Road
Iver Heath, Bucks, SL0 0NH, United Kingdom
Renseignements Commerciaux
tel . . . . . . . . . . . . . . . . . . . . . . . . . . . 0 810 001 105
email . . . . . . . . . . . . . . . . . . . . . . . . . . info@m-audio.fr
Assistance Technique
PC . . . . . . . . . . . . . . . . . . . . . . . . . . . 0 820 000 731
Mac . . . . . . . . . . . . . . . . . . . . . . . . . . 0 820 391 191
e-mail (PC) . . . . . . . . . . . . . . . . . . . . support@m-audio.fr
email (Mac) . . . . . . . . . . . . . . . . . . . . . . mac@m-audio.fr
fax . . . . . . . . . . . . . . . . . . . . . . . +33 (0)1 72 72 90 52
Web . . . . . . . . . . . . . . . . . . . . . . . . . www.m-audio.com
M-Audio Canada
1400 St-Jean Baptiste Ave. #150, Quebec City,
Quebec G2E 5B7, Canada
Technical Support
e-mail . . . . . . . . . . . . . . . . . . . techcanada@m-audio.com
tel . . . . . . . . . . . . . . . . . . . . . . . . . . .(418) 872-0444
fax . . . . . . . . . . . . . . . . . . . . . . . . . . .(418) 872-0034
Sales
e-mail . . . . . . . . . . . . . . . . . . . infocanada@m-audio.com
tel . . . . . . . . . . . . . . . . . . . . . . . . . . .(866) 872-0444
fax . . . . . . . . . . . . . . . . . . . . . . . . . . .(418) 872-0034
Web . . . . . . . . . . . . . . . . . . . . . . . . . . .www.m-audio.ca
M-Audio Japan
エムオーディオ/アビッドテクノロジー
〒
107-0052
Avid Technology K.K.
4F ATT Bldg. 2-11-7 Akasaka, Minato-ku Tokyo 107-0052 Japan
カスタマーサポート
e-mail . . . . . . . . . . . . . . . . . . . . . . win-support@m-audio.jp
e-mail (Macintosh
tel . . . . . . . . . . . . 052-218-0859
セールスに関するお問い合わせ
e-mail . . . . . . . . . . . . . . . . . . . . . . . . . . info@m-audio.jp
tel . . . . . . . . . . . . . . . . . . . . . . . . . . . . . 052-218-3375
fax . . . . . . . . . . . . . . . . . . . . . . . . . . . . . 052-218-0875
Web
東京都港区赤坂
M-Audio
|
(
Technical Support
環境専用
. . . . . . . . . . . . . . . . . . . . . . . . . . . www.m-audio.jp
株式会社
2-11-7 ATT
) . . . . . . . . . . mac-support@m-audio.jp
(
Sales
ビル
新館
4F
)
(
10:00~12:00/13:00~17:00
)
)
 Loading...