

M-Audio tirgger finger pro Quick Start Manual
Quickstart Guide
English ( 3 – 9 )
Guía de inicio rápido
Español ( 10 – 16 )
Guide d'utilisation simplifié
Français ( 17 – 23 )
Guida rapida
Italiano ( 24 – 30 )
Schnellstart-Anleitung
Deutsch ( 31 – 37 )
Appendix
English ( 38 )
3
Quickstart Guide (English)
Introduction
Box Contents
Trigger Finger Pro USB Cable
Arsenal software
(download) Hex Key
AIR Drums software
(download) Quickstart Guide
Hybrid 3.0 software
(download) User Guide (download)
Software Download Card Safety & Warranty Manual
Important: Visit m-audio.com/TFP to download the complete User Guide and all software
applications.
Support
For the latest information about this product (system requirements, compatibility information,
etc.) and product registration, visit m-audio.com/TFP.
For additional product support, visit m-audio.com/support.
Getting Started
1. Download and Install the Software
We highly recommend downloading and installing the included software applications and their
sound content: Arsenal, AIR Drums, and Hybrid 3.0.
1. Go to m-audio.com/softwaredownload and download the installation files for the
software applications (for your computer's operating system) and sound content.
2. Open the first file and double-click the .exe (Windows) or .dmg (Mac OS X).
3. Follow the on-screen instructions to complete the installation.
4. Repeat Steps 2-3 for the remaining files. Sound content libraries can be large, so those
installations may take a while!
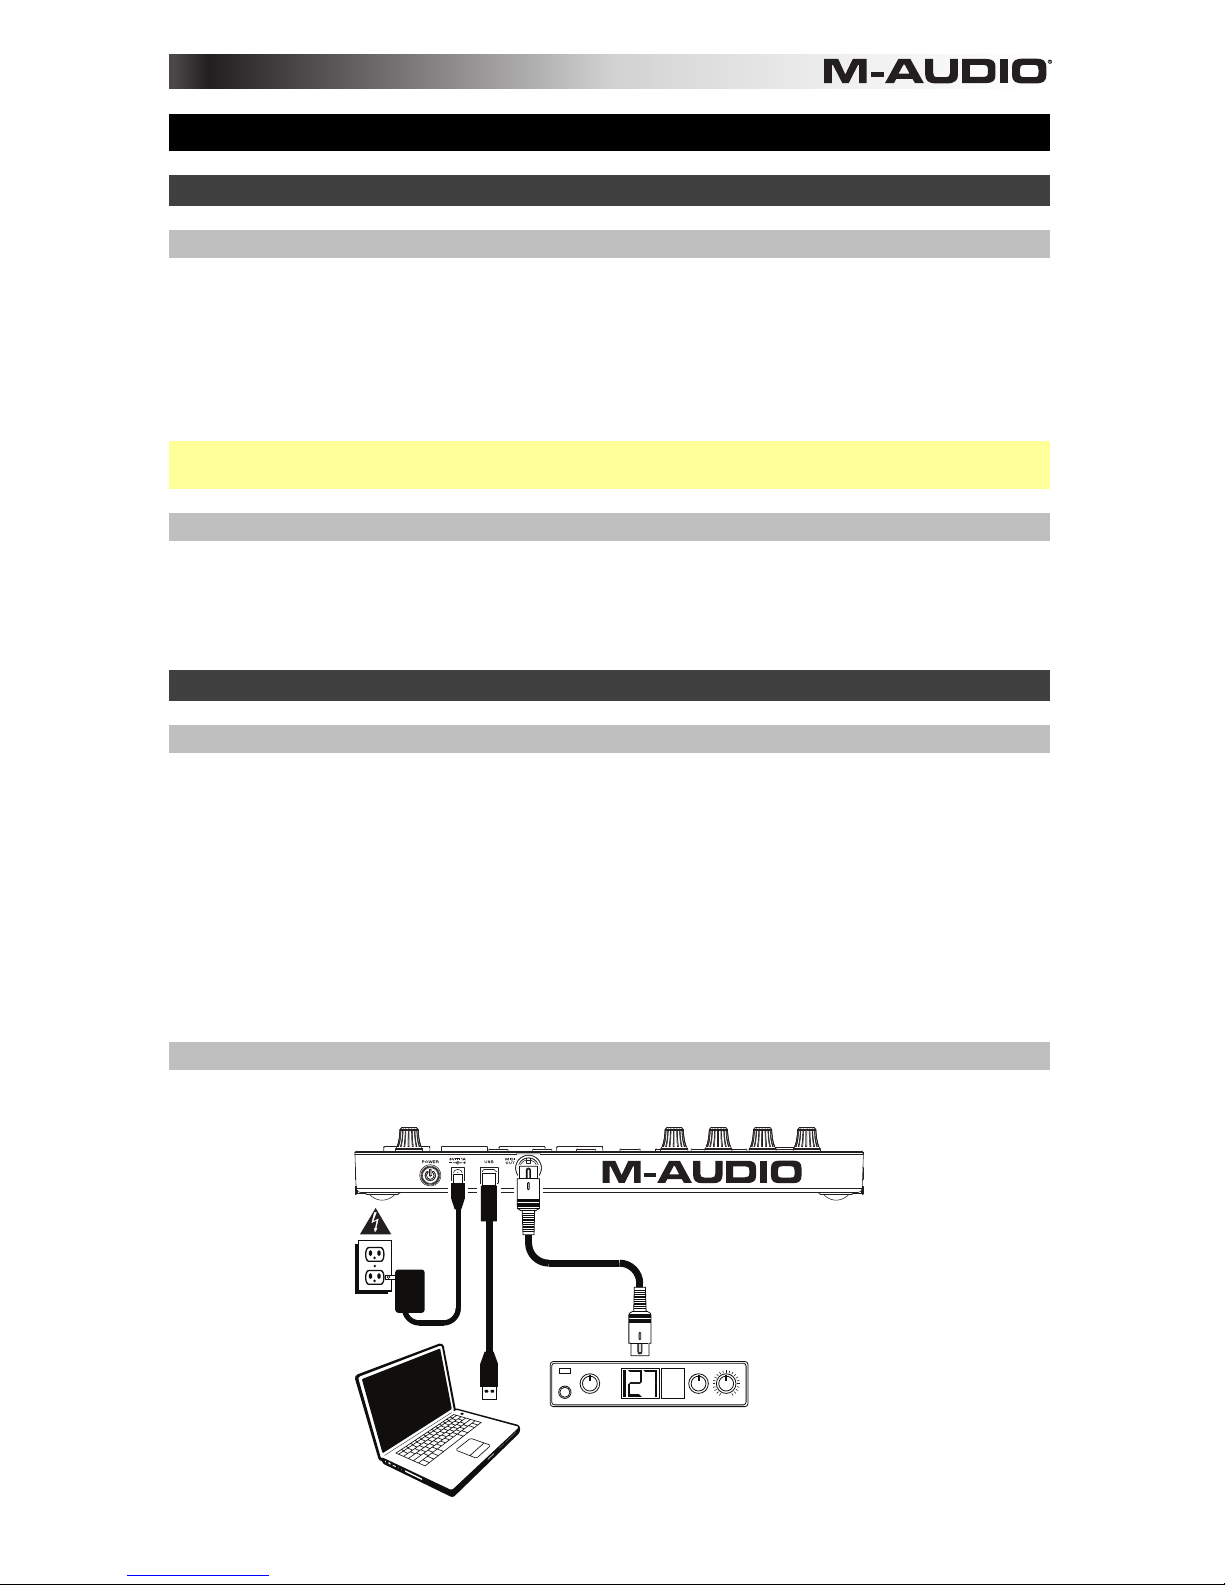
2. Connect
Here is just an example of how to use Trigger Finger Pro to your setup:
MIDI
PIANO
ORGAN
GUITAR/BASS
BRASS/ORCH
SYNTH/PAD
RHYTHM
SPECIAL FX
PATCH
PERFORM
RHYTHM
GM
Computer
Wall Power
(optional,
power adapter
sold separately)
External MIDI Sound Module
(optional)
Items not listed under in the Box Contents section are sold separately.

4
3. Set Up Trigger Finger Pro with Your Software
To select Trigger Finger Pro as a controller for your digital audio workstation (DAW):
1. Connect Trigger Finger Pro to your computer using a standard USB cable. (If you are
connecting Trigger Finger Pro to a USB hub, make sure it is a powered hub.)
2. Power on Trigger Finger Pro.
3. Open your DAW.
4. Open your DAW's Preferences (or Options, Device Setup, etc.), and select Trigger
Finger Pro as your controller. Make sure that MIDI Port 1 is enabled for standard MIDI,
MIDI Port 2 is enabled for Mackie Control or HUI communication, and MIDI Port 3 is
disabled (Trigger Finger Pro uses this port to communicate with Arsenal).
5. Turn Trigger Finger Pro's Value Dial to browse through the available Presets, and then
push it to select one that corresponds to your DAW.
Your Trigger Finger Pro can now communicate with your DAW.
Important: If you are using Arsenal and AIR Drums, we recommend using a Preset
whose name includes Arsenal. If you are using Hybrid 3.0, we recommend using a Preset
whose name is a scale (e.g., A Major, C Minor, etc.); these Presets are tailored for
melodic synths. You can use Arsenal presets with Hybrid 3.0 to automap Hybrid 3.0's
controls, but the pads' mapping will be different.
To set up Arsenal for use with Trigger Finger Pro (within your DAW):
1. Open your DAW and make sure Trigger Finger Pro is selected as a controller for your
DAW (described above).
2. Create a MIDI track in your DAW, and load Arsenal onto that track as you would with a
typical plugin, and select that track.
Important: You may need to open your DAW's Preferences (or Options, Device Setup,
etc.) and select the directory where Arsenal was installed before it appears in your DAW's
list of available plugins.
To set up AIR Drums, Hybrid 3.0, and other instrument plugins (within Arsenal):
1. Set up Trigger Finger Pro with Arsenal (described above).
2. In Arsenal, follow the on-screen instructions to locate and scan AIR Drums, Hybrid 3.0, or
other instrument plugins you have.
3. In the Plugin category pane, click the desired plugin to select it.
4. In the Preset pane on the right side of the window, click one of the available presets to
load it.
 Loading...