

Page 1
Quick Start Guide
English
Page 2
Session KeyStudio 25 ▸ Quick Start Guide 1
English
Installation and Setup
1. Connect the KeyStudio 25 keyboard.
The KeyStudio 25 USB keyboard is class-compliant. This means you may simply
connect the KeyStudio 25 keyboard to your Windows XP, Windows Vista or Mac OS X
computer using the provided USB cable and switch the keyboard on. No additional
installation or drivers are required.
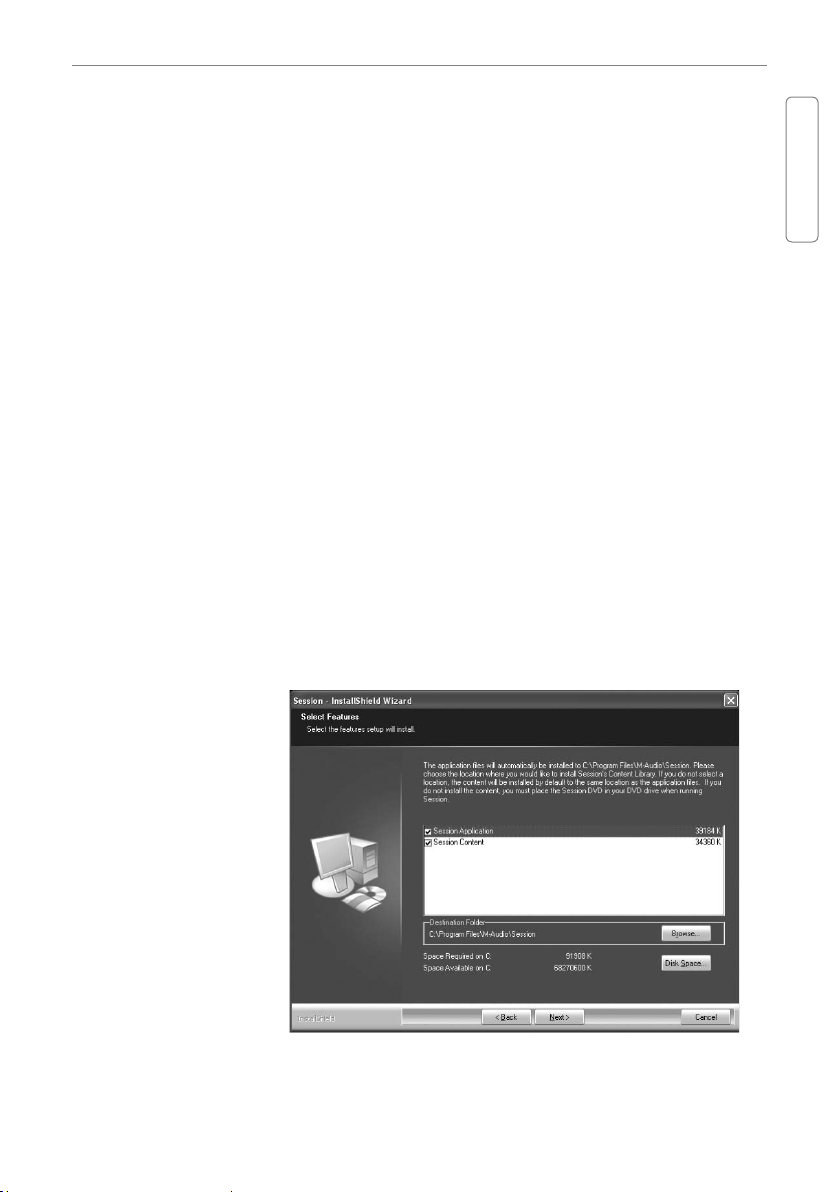
2. Install the Session music creation software (Windows only).
▸ 1) Insert the Session DVD-ROM into your computer’s DVD-ROM drive.
▸ 2) The computer will automatically display the install screen. If your computer
does not launch the installer, manually start it by clicking on Start > My
Computer* and then double-clicking Session.
▸ 3) Follow the software installer’s on-screen instructions.
➜ NOTE: Session comes with a large library of loops and instrument samples for
music creation, known as Session Content. During the installation process, you
will be asked if you would like to install the Session Content on your hard drive. If
you do not have 4 GB of disk space available, you may choose not to install the
Session Content, but you will then have to place the Session DVD in your
DVD-ROM drive whenever you run Session. Accessing Session’s content via
DVD-ROM results in slightly slower computer performance. If the required hard
drive space is available, installing the Session Content on your computer’s hard
drive is recommended.
Please be aware
that your Session
software’s Factory
Content Library
may take as long
as 30 minutes
to install. This
behavior is
normal. During
the installation
process, the
installer
displays helpful
Session tutorial
information.
▸ 4) Click “Finish” once the installer has completed the installation.
*If you are using Windows Vista, “My Computer” will be labeled “Computer” in this step.
Page 3
2 Session KeyStudio 25 ▸ Quick Start Guide
Getting Started Making Music with Session
1. Connect the KeyStudio 25 keyboard to your computer using the supplied USB cable
and make sure the keyboard is switched on.
2. Launch Session by clicking Start > All Programs > M-Audio > Session > Session.
Alternatively, if you chose to create a desktop shortcut icon during installation, you
can double-click the shortcut.
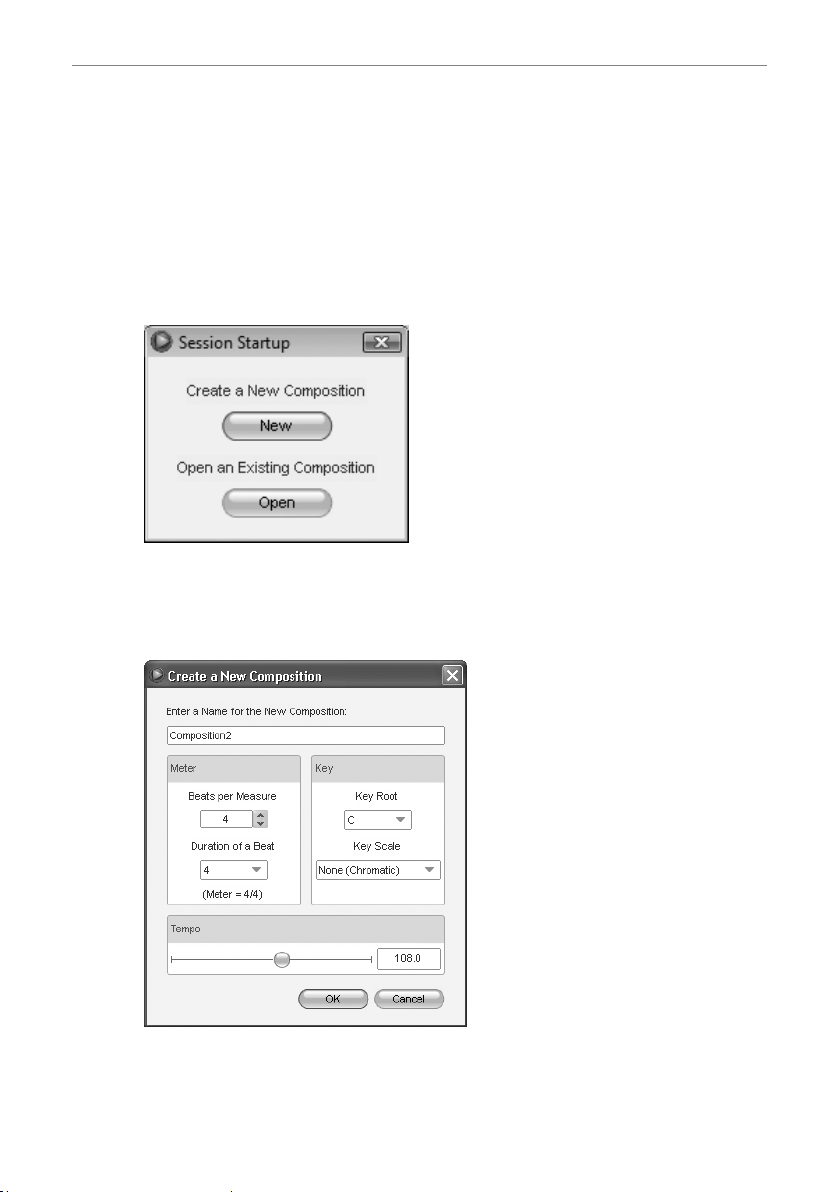
3. Click the button labeled “New” in the Session Startup window.
4. A New Composition dialog box will appear allowing you to choose a Name, Time
Signature, Key Root, Key Scale, and Tempo for your composition. After these choices
have been made, click OK.
Page 4

Session KeyStudio 25 ▸ Quick Start Guide 3
English
5. Click the Add a Track button in the upper left corner of the Session Main Screen.
6. The “What would you like to do?” dialog box
will now appear. For this example, select Play
and Record with your Keyboard, and click OK.
7. In the “Select Keyboard Sound” dialog box,
select the bank of sounds you would like
to associate with the rst track of your new
song, and click OK.
Add a Track
button
Page 5

4 Session KeyStudio 25 ▸ Quick Start Guide
8. The Session window will now appear. You may click the specic instrument you
would like to play from the instrument list appearing on the left side of the screen.
9. Try playing notes on your KeyStudio 25 keyboard. If you can hear instrument sounds,
you may skip steps 10-12. If your computer does not yet generate sounds when
KeyStudio 25 is played, proceed to step 10 for additional conguration instructions.
10. Go to Options > Audio Hardware and make sure the sound card you wish you use
(i.e., your computer’s built-in sound card or an installed ASIO compatible audio
interface) is selected in the Output Device and Input Device pull-down menus.
Click OK. See the following section in this Quick Start Guide (”More Information on
Conguring Session”) for further explanation of this.
11. Go to Options > MIDI Hardware and make sure “USB Audio Device,” “USB O2,” or “USB
O2 In” is selected in the Input Port box. KeyStudio will appear as “USB Audio Device”
in Windows XP and “USB O2” in Windows Vista if additional drivers have not been
installed. If the optional drivers are installed, KeyStudio will appear as “USB O2 In.”
Click OK.
12. You should now be able to use your KeyStudio keyboard to play instruments from
the Session instrument library.
Figure A: Session MIDI Hardware dialog
window without optional drivers installed
in Windows XP.
Figure B: Session MIDI Hardware dialog
window without optional drivers installed in
Windows Vista.
Page 6

Session KeyStudio 25 ▸ Quick Start Guide 5
English
More Information on Configuring Session
To play back and record audio in Session, Session
must communicate with your sound card. On rst
launch, Session attempts to choose the rst sound
card containing both an audio input and audio output,
eectively making this connection automatically. If
Session is not able to select audio inputs and outputs
automatically, it will open the Audio Hardware dialog.
If the process is successful (Session does not open
the Audio Hardware dialog automatically), but you
cannot play back or record audio with Session, you’ll
need to open the Audio Hardware dialog by choosing
Options>Audio Hardware.
The Audio Hardware dialog contains the following options:
▸ ASIO/WDM Switch
This control switches the Audio Hardware
dialog of Session between ASIO and WDM
mode. For best performance in Session, use
ASIO mode. Consult the documentation for
your sound card to determine if it
supports ASIO.
▸ Output and Input Device Selectors
These controls set the Output Device (sound card) through which Session plays
audio, and the Input Device (sound card) from which Session records audio. It is
recommended that you select the same sound card for audio input and output.
▸ Buffer Size Selector
This control sets the latency of Session. See the “About Latency” section found later
in this guide for additional information.
▸ Use Low Latency Streaming Checkbox
When checked, Session attempts to open the selected audio interface in low latency
mode (WDM Kernel Streaming). While most sound cards should “open” in this mode,
results vary widely based on the sound card in use. See the “About Latency” section
of this Quick Start Guide for further information on this.
Page 7

6 Session KeyStudio 25 ▸ Quick Start Guide
▸ OK Button
After making the desired settings, press the OK button to commit your changes and
close the Audio Hardware dialog.
▸ Cancel Button
Press the Cancel button to discard your changes and close the Audio Hardware
dialog.
About Latency
Latency is loosely dened as the amount of time it takes for a sound made in Session to
reach your speakers. For example, with a high latency (Buer Size) setting, there will be
a noticeable delay between the press of a key on KeyStudio 25, and the resultant sound.
Smaller Buer Size settings result in lower latency, but may not function well with slower
systems. If you hear clicks and pops, the Buer Size setting is too low. To adjust this
setting of Session, open the Audio Hardware dialog (Options > Audio Hardware), select
the desired buer size from the Buer Size selector, and then click the OK button.
➜ NOTE: Deselecting the “Low-Latency Streaming” checkbox may also reduce
any clicks and pops in Session audio. This setting is only available if WDM is
selected as the driver type.
Upgrading your Sound Card
If you nd that your sound card is incapable of producing acceptable latency times, we
recommend that you upgrade your sound card. Visit www.m-audio.com for a selection
of low latency ASIO audio interfaces for every purpose.
Page 8

Session KeyStudio 25 ▸ Quick Start Guide 7
English
Using KeyStudio with GarageBand
The M-Audio Session software was created for use with Windows. However, the KeyStudio
25 hardware can be used with Macintosh OS X computers as well. KeyStudio 25 integrates
seamlessly with the GarageBand music production software which comes pre-installed on
many late-model Apple computers.
To use KeyStudio 25 with GarageBand:
1. Be sure KeyStudio is connected to your Mac OS X computer via the provided USB
cable (See “Connect the KeyStudio 25 Keyboard.”)
2. Launch GarageBand.
3. Create a Software Instrument track by clicking Track > New Track > Software
Instrument > Create, or select a pre-existing Software Instrument track. The default
instrument GarageBand selects is a Grand Piano.
When a Software Instrument is selected, clicking the
button in the lower right
corner of the GarageBand window will open the Track Info screen. From this area, you
can select which instrument you would like to play.
Provided your computer’s speakers are not muted or turned down, you will now hear
sounds corresponding to notes you play on KeyStudio.
Additional Information and Support
More information about your new Session software can be found in Session’s built-in
Help menu.
Additional information about the KeyStudio 25 keyboard can be found in the complete
KeyStudio 25 User Guide.
In Windows XP and Vista, the KeyStudio 25 User Guide is automatically installed on your
computer’s hard drive when Session is installed. To access this User Guide, click on Start > All
Programs > M-Audio > Session > KeyStudio 25 User Guide.
In Macintosh OS X, the User Guide can be accessed directly from the Session DVD. Place the
Session DVD in the DVD drive, and double-click the DVD icon. Open the folder marked User
Guide, and double-click the User Guide icon to view the guide.
Page 9

8 Session KeyStudio 25 ▸ Quick Start Guide
Warranty Terms and Registration
Warranty Terms
M-Audio warrants products to be free from defects in materials and workmanship, under
normal use and provided that the product is owned by the original, registered user. Visit
www.m-audio.com/warranty for terms and limitations applying to your specic product.
Warranty Registration
Immediately registering your new M-Audio product entitles you to full warranty
coverage and helps M-Audio develop and manufacture the nest quality products
available. Register online at www.m-audio.com/register to receive FREE product
updates and for the chance to win M-Audio giveaways.
ESD and Fast Transient may cause the unit to temporarily malfunction. Switch o and on again to
restore normal operation.
WARNING: This product contains chemicals, including lead, known to the State of California
to cause cancer, and birth defects or other reproductive harm. Wash hands after handling.
KeyStudio 25
Tested to comply with
FCC standards
FOR HOME OR STUDIO USE
© 2007 Avid Technology, Inc. All rights reserved. Product features, specications, system
requirements and availability are subject to change without notice. Avid, M-Audio, O2, Session
and KeyStudio 25 are either trademarks or registered trademarks of Avid Technology, Inc. All other
trademarks contained herein are the property of their respective owners.
Page 10

M-Audio USA
5795 Martin Rd., Irwindale, CA 91706
Technical Support
web: www.m-audio.com/tech
tel (pro products): (626) 633-9055
tel (consumer products): (626) 633-9066
fax (shipping): (626) 633-9032
Sales
e-mail: sales@m-audio.com
tel: 1-866-657-6434
fax: (626) 633-9070
Web
www.m-audio.com
M-Audio U.K.
Floor 6, Gresham House, 53 Clarenden Road, Watford
WD17 1LA, United Kingdom
Technical Support
e-mail: support@maudio.co.uk
tel:(Mac support): +44 (0)1765 650072
tel: (PC support): +44 (0)1309 671301
Sales
tel: +44 (0)1923 204010
fax: +44 (0)1923 204039
Web
www.maudio.co.uk
M-Audio France
Floor 6, Gresham House, 53 Clarenden Road, Watford
WD17 1LA, United Kingdom
Renseignements Commerciaux
tel : 0 810 001 105
e-mail : info@m-audio.fr
Assistance Technique
PC : 0 0820 000 731
MAC : 0 0820 391 191
Assistance Technique
e-mail : support@m-audio.fr
mac@m-audio.fr
fax : +33 (0)01 72 72 90 52
Site Web
www.m-audio.fr
M-Audio Germany
Kuhallmand 34, D-74613 Ohringen, Germany
Technical Support
e-mail: support@m-audio.de
tel: +49 (0)7941 - 9870030
fax: +49 (0)7941 98 70070
Sales
e-mail: info@m-audio.de
tel: +49 (0)7941 98 7000
fax: +49 (0)7941 98 70070
Web
www.m-audio.de
M-Audio Canada
1400 St-Jean Baptiste Ave. #150, Quebec City,
Quebec G2E 5B7, Canada
Technical Support
email: techcanada@m-audio.com
phone: (418) 872-0444
fax: (418) 872-0034
Sales
e-mail: infocanada@m-audio.com
phone: (866) 872-0444
fax: (418) 872-0034
Web
www.m-audio.ca
071217_SsnKyStu25_QSG_EN01
 Loading...