

Page 1

Quick Start Guide
English
Page 2
ProjectMix I/O Quick Start Guide
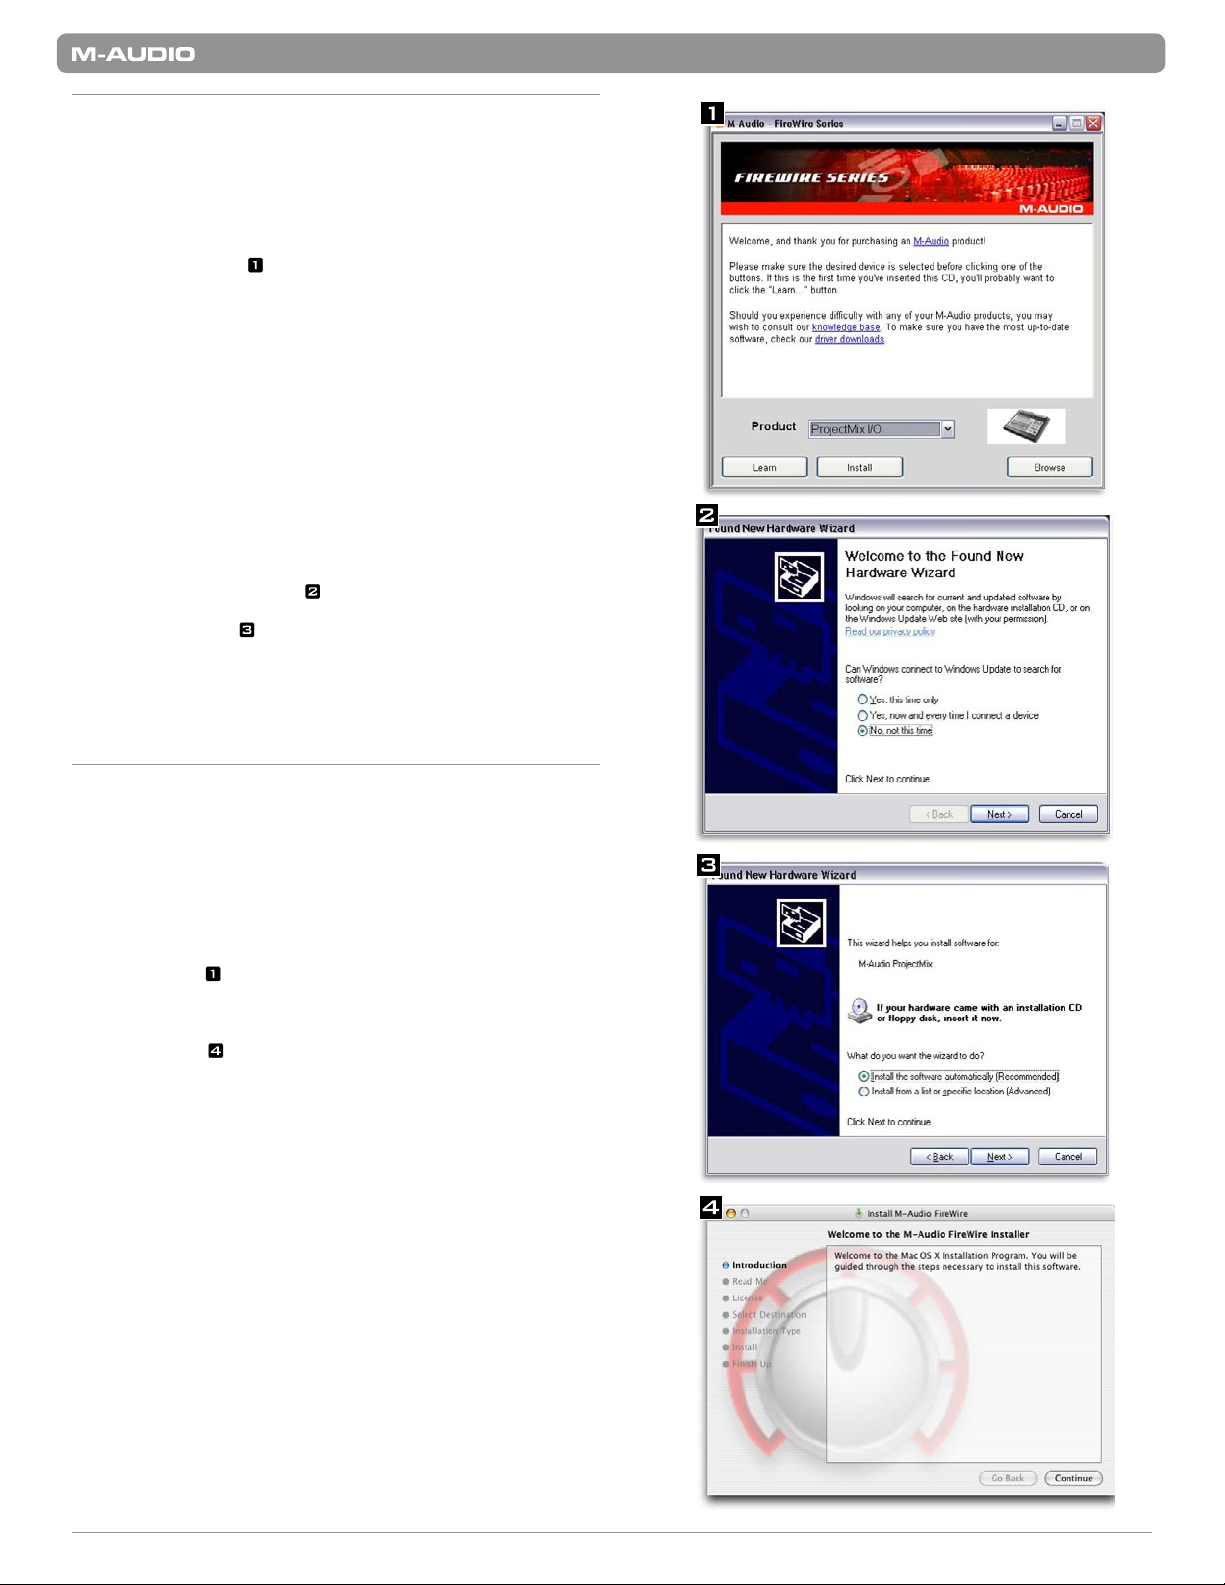
Installation Instructions For Windows XP
PLEASE NOTE: do not connect your ProjectMix I/O to your computer until the
appropriate driver files have been copied. Be sure to leave your ProjectMix I/O disconnected
until instructed to connect it below.
1. Insert the FireWire Driver CD-ROM into your computer’s CD-ROM
drive.
2. The computer will automatically display the interactive install screen
shown in picture
start the installer by clicking on Start>My Computer>FireWire Series.
3. Select ProjectMix I/O from the drop-down menu and click “Install” to
begin copying files.
4. Follow the driver installer’s on-screen direction prompts.
5. At various points in this installation process, you may be notified that
the driver being installed has not passed Windows Logo Testing. Click
“Continue Anyway” to proceed with the installation.
6. Once the driver installer has completed the installation, shut down your
computer.
7. After your computer has turned off, you may connect your ProjectMix
I/O to an available FireWire port using the cable provided. You will also
need to connect the included power supply to provide power to the
unit.
8. Turn on the ProjectMix I/O first, then turn on your computer.
9. When Windows boots up, it will identify the ProjectMix I/O. You will be
asked if you want to search the Internet for a driver. Select “No, not this
time” and press “Next” (
10. Windows will display a “Found New Hardware” Wizard like the one
seen in picture
11. Choose “Install the software automatically” and click “Next.”
12. Once the Wizard is completed, click “Finish.”
13. A pop up message will appear briefly that says “Your new hardware is
installed and ready to use.”
. If your computer fails to launch the installer, manually
).
.
English
Installation Instructions For Mac OS X
PLEASE NOTE: do not connect your ProjectMix I/O to your computer until the
appropriate driver files have been copied. Be sure to leave your ProjectMix I/O disconnected
until instructed to connect it below.
1. Insert the FireWire Driver CD-ROM into your computer’s CD-ROM
drive.
2. Double-click the CD icon when it appears on your desktop to view the
contents of the CD.
3. Double-click the “Open Me” icon to launch the driver selector shown
in picture
4. Select ProjectMix I/O from the drop-down menu on the welcome
screen then click “Install.”
5. The driver installer will launch. Follow the on-screen direction
prompts ( ).
6. When the installer has finished the installation, shut down your
computer.
7. After your computer is off, connect the ProjectMix I/O to your
computer’s FireWire port and the included power supply to a power
outlet, then power the ProjectMix I/O on.
8. Turn on your computer. When the computer has fully booted, your
ProjectMix I/O will be ready to use.
.
1
Page 3

ProjectMix I/O Quick Start Guide
Connecting Your Equipment to the ProjectMix I/O
< The ProjectMix I/O has multiple audio outputs which can serve a
number of purposes. However, the analog Outs 1 & 2 will always serve
as your default left and right outputs. Please connect Outs 1 & 2 to the
left and right channels, respectively, of your speakers, mixer, or other
monitoring system.
< You may also connect a pair of headphones to one of the headphone
jacks on the front of the unit allowing for monitoring or pre-listening in
private.
< The eight 1/4” line level inputs on the back of the ProjectMix I/O
accept line-level signals, such as those from keyboards, mixers, and CD
players. The XLR connectors above the line inputs are for use with
microphones. Use the Mic/Line selector switch to activate either the
1/4” or the XLR input for the individual input channels. In addition to
this, you can use the instrument input on the front to record to channel
one from sources like electric guitars or basses. To enable the front
panel instrument input, set the MIC/LINE selector switch for channel 1
to LINE (down position) and then activate the Instrument input selector
switch (down position).
For more detailed information and an explanation of all available inputs and outputs,
including digital formats, please refer to the ProjectMix I/O User Guide located on the
FireWire Driver CD.
Using the FireWire Control Panel
On a PC, you can access the ProjectMix I/O Control Panel by double-clicking the
M-Audio icon in your computer’s system tray (
Control Panel can be launched from the icon found in the System Preferences
panel ( ).
The default settings for the ProjectMix I/O Control Panel will ensure that normal
audio playback is routed to the analog Outs 1 & 2 of the ProjectMix I/O and
to the first headphone output. The Control Panel will allow you to change the
output routings when necessary, as well as set the function of the assignable level
controller (by default, the level controller will adjust the output volume) and select
digital sync options. For standard use, there will be no need to change the default
settings.
When it’s time to record an external source, such as a vocal, guitar track, or
keyboard part, you will want to monitor your input. Monitoring will allow you to
hear the signal being fed into the inputs while blending it with the output signals
coming from the computer. This way, you can hear your new parts live as you’re
recording them in. Most recording applications will handle the input monitoring for
you automatically, but if they don’t, you also have the option of enabling monitoring
manually from the Control Panel. The mixer tab of the Control Panel features input
columns, such as Analog Inputs 1&2 (ana 1/2 in). These columns have output bus
buttons located below them. If you plug a keyboard into Ins 1 & 2, you can hear the
keyboard by pressing the 1/2 button in the ana 1/2 in column (
routes the incoming audio to Outs 1 & 2 so you can hear it. The input signal is also
still being routed to the input channels of your software so they may be discretely
recorded.
For a full account of all Control Panel routings and functions, refer to the User Guide for
your product located on the FireWire Driver CD.
). For Mac OS X users, the
). This button
English
Double-click here to launch the
FireWire Control Panel
Click here to launch the
FireWire Control Panel
Click this button to send the incoming
audio to Outputs 1 & 2
2
Page 4

ProjectMix I/O Quick Start Guide
English
Configuring the ProjectMix I/O for the use with your
DAW software
The ProjectMix I/O natively supports a series of Digital Audio Workstation
(DAW) software titles that can utilize the Mackie Control or HUI protocol.
The ProjectMix I/O needs to be started into a specific mode to support these
applications. This is done by holding down one of the following buttons while
powering the unit on:
1. Pro Tools mode:
2. Cubase mode:
3. Logic mode: . . . . . . . . . . . . . . . . . . . . . . . . . . . . . . . . . .
4. Sonar mode:
5. Live mode: . . . . . . . . . . . . . . . . . . . . . . . . . . . . . . . . . . . Aux 5
6. Digital Performer mode: . . . . . . . . . . . . . . . . . . . . . . . .
Keep this button held down after powering the ProjectMix I/O on until you see a
confirmation message on the LCD screen.
Depending on the software you use, you may need to change additional settings
within your DAW to establish communication with the ProjectMix I/O. Generally,
you need to select or create a Mackie Control or HUI device and set the MIDI
Input (receive) and MIDI Output (transmit) ports to “ProjectMix Control Surface
MIDI.” Detailed setup steps for every natively supported DAW can be found in
the User Guide on the included FireWire Driver CD.
. . . . . . . . . . . . . . . . . . . . . . . . . . . . . . Aux 1
. . . . . . . . . . . . . . . . . . . . . . . . . . . . . . . Aux 2
Aux 3
. . . . . . . . . . . . . . . . . . . . . . . . . . . . . . . . . Aux 4
Pan
Additional Information and Support
We recommend checking the M-Audio website regularly for driver updates and
additional information. The web address for the site is www.m-audio.com. You’ll
find links to drivers, news stories, FAQs, additional products, and tech support.
051210_ProjMix_QSG_EN01
3
 Loading...