

Page 1

Avid
Installation Guide for
®
Editing Applications
Page 2

Legal Notices
Product specifications are subject to change without notice and do not represent a commitment on the part of Avid
Technology, Inc.
This product is subject to the terms and conditions of a software license agreement provided with the software. The
product may only be used in accordance with the license agreement.
Avid products or portions thereof are protected by one or more of the following United States Patents: 5,267,351;
5,309,528; 5,355,450; 5,396,594; 5,440,348; 5,467,288; 5,513,375; 5,528,310; 5,557,423; 5,568,275; 5,577,190;
5,584,006; 5,634,020; 5,640,601; 5,644,364; 5,654,737; 5,724,605; 5,726,717; 5,745,637; 5,752,029; 5,754,180;
5,754,851; 5,799,150; 5,812,216; 5,828,678; 5,842,014; 5,852,435; 5,905,841; 5,929,836; 5,930,445; 5,946,445;
5,986,584; 5,987,501; 5,999,406; 6,016,152; 6,018,337; 6,023,531; 6,038,573; 6,058,236; 6,069,668; 6,091,778;
6,105,083; 6,118,444; 6,130,676; 6,134,607; 6,141,007; 6,141,691; 6,198,477; 6,201,531; 6,211,869; 6,223,211;
6,249,280; 6,269,195; 6,330,369; 6,353,862; 6,404,435; 6,407,775; 6,426,778; 6,477,271; 6,489,969; 6,512,522;
6,532,043; 6,546,190; 6,552,731; 6,553,142; 6,570,624; 6,571,255; 6,583,824; 6,596,031; 6,618,547; 6,665,450;
6,678,461; 6,687,407; 6,704,445; 6,747,705; 6,763,134; 6,763,523; 6,766,063; 6,766,357; 6,791,556; 6,810,157;
6,847,373; 6,871,003; 6,871,161; 6,901,211; 6,907,191; 6,928,187; 7,043,058; 7,081,900; 7,103,231; 7,266,241;
7,280,117; 7,403,561; 7,433,519; 7,512,885; 7,545,957; 7,671,871; 7,684,096; D352,278; D372,478; D373,778;
D392,267; D392,268; D392,269; D395,291; D396,853; D398,912. Other patents are pending.
Avid products or portions thereof are protected by one or more of the following European Patents: 0506870;
0635188; 0674414; 0752174; 0857293; 0976108; 0988756; 1068723; 1068734; 1111910; 1173850; 1629675.
Other patents are pending.
©2010 Avid Technology, Inc.and its licensors. All Rights Reserved.
Attn. Government User(s). Restricted Rights Legend
U.S. GOVERNMENT RESTRICTED RIGHTS. This Software and its documentation are “commercial computer
software” or “commercial computer software documentation.” In the event that such Software or documentation is
acquired by or on behalf of a unit or agency of the U.S. Government, all rights with respect to this Software and
documentation are subject to the terms of the License Agreement, pursuant to FAR §12.212(a) and/or DFARS
§227.7202-1(a), as applicable.
Trademarks
Avid, the Avid logo, and Digidesign are trademarks or registered trademarks of Avid Technology, Inc. in the United
States and/or other countries. See www.avid.com/US/about-avid/legal-notices/trademarks for more information on
Avid's trademarks.
Adobe and Photoshop are either registered trademarks or trademarks of Adobe Systems Incorporated in the
United States and/or other countries. Apple and Macintosh are trademarks of Apple Computer, Inc., registered in
the U.S. and other countries. Windows is either a registered trademark or trademark of Microsoft Corporation in the
United States and/or other countries. All other trademarks contained herein are the property of their respective
owners.
Installation Guide for Avid Editing Applications • 0130-30372-02 Rev A • December 2010
2
Page 3

Contents
Chapter 1 Installation Guide for Avid Editing Applications . . . . . . . . . . . . . . . . . 5
Chapter 2 Guide d'installation des applications de montage Avid . . . . . . . . . . 29
Chapter 3 Installationshandbuch für Editing-Anwendungen von Avid . . . . . . 57
Chapter 4 Manuale di installazione per le applicazioni di montaggio Avid . . . 87
Chapter 5 Guía de instalación para aplicaciones de edición Avid . . . . . . . . . 115
Chapter 6 Avid 編集アプリケーションのインストール・ガイド ...............143
Chapter 7 Avid 편집 어플리케이션 설치 가이드 . . . . . . . . . . . . . . . . . . . . . . . . . . 173
Chapter 8 《Avid 編輯應用程式安裝手冊》 . . . . . . . . . . . . . . . . . . . . . . . . . . . . . . 199
Chapter 9 Avid 编辑应用程序的安装手册 . . . . . . . . . . . . . . . . .223
3
Page 4

4
Page 5

1 Installation Guide for Avid Editing Applications
The most current information about your Avid editing application is available in
the online version of the ReadMe. You should always check online for the most
up-to-date release notes or ReadMe because the online version is updated
whenever new information becomes available. To view these online versions,
select ReadMe from the Help menu of your Avid editing application, or visit the
Knowledge Base at www.avid.com/readme.
Installing the Software
Read through the following procedures prior to installing the editing application.
Procedures are provided for upgrade customers or new users. Choose the
applicable procedure for your installation:
• If you are a new user and have never installed the editing application on your
system, go to “Installing the Avid Editing Application” on page 6.
• If you are upgrading from a previous version of the editing application, you
must deactivate your software and uninstall the previous version before
installing the new software. See the following topics:
- “Deactivating the Software” on page 25
- “Uninstalling the Avid Editing Application” on page 27
- “Installing the Avid Editing Application” on page 6
Page 6

Installing the Avid Editing Application
For all Avid editing applications, you must first log in as the Administrator (not
just a user with administrator privileges), install the application, and initially start
the application as the Administrator. If you are working in a shared storage
environment, mount your workspaces. You may then subsequently run the Avid
editing application as a regular User.
n Installing the editing application software might take some time. For the
individual editing application, it might take 5 to 15 minutes to install. Installing
the entire editing application suite might take up to 35 minutes to install.
(Windows) To install the Avid editing application software:
1. Quit all active applications.
2. Insert the editing application DVD.
3. Click to Install the Avid Editor Suite or Individual Product and follow the on
screen instructions.
n If the FilesInUse dialog box appears, you can safely select Ignore and continue.
n If you receive user access warnings during the installation, select Continue
Anyway to continue your installation.
4. When prompted, select “Yes, restart my computer.”
5. Continue with “Starting the Editing Application” on page 7.
(Macintosh) To install the Avid Editing application software:
1. Quit all applications.
2. Insert the editing application DVD.
6 Installation Guide for Avid Editing Applications
Page 7

3. Double-click EditingApplicationName.mpkg.
4. Click to Install the Avid Editor Suite or Individual Product and follow the on
screen instructions.
5. When prompted, select “Yes, restart my computer.”
6. Continue with “Starting the Editing Application” on page 7.
Starting the Editing Application
The installation process adds a desktop icon and a pointer to your Avid editing
application in the Start menu.
If you install your Avid editing application on a laptop computer, a dialog box
might open with a message about incompatible power management schemes.
Avid recommends you use the “Always On” power scheme for Windows XP and
the “High Performance” power option for Windows Vista or Windows 7 when
you work with Avid editing applications. Other power schemes might affect
performance of editing functions (for example, capture and digital cuts).
(Windows) To start your Avid editing application, do one of the
following:
t Click Start > All Programs > Avid > Avid editing application.
t Double-click the Avid editing application desktop icon.
After your Avid editing application starts, the Avid Activation tool opens.
For more information on activating your software, see the Installation Guide
for Avid Editing Applications.
(Macintosh) To start your Avid editing application, do one of the
following:
t Double-click the alias icon for your Avid editing application on the desktop.
Installing the Software 7
Page 8

t Double-click the alias icon for your Avid editing application on the Dock.
t Select Go > Applications, and then double-click the Avid editing application
folder. Then double-click the Avid editing application file.
After your Avid editing application starts, the Avid Activation tool opens.
For more information on activating your software, see the Installation Guide
for Avid Editing Applications.
Getting Started
If you chose to install the sample startup project and media when you installed
your Avid editing application, you can open this project from the Select Project
dialog box. The startup project, called Avid Boston Project DV25, contains a
complete sequence with rendered effects and titles, as well as all the video and
audio clips used in the sequence.
Use the startup project to learn how to edit with your Avid editing application,
before you capture any media of your own. You can explore the sequence in the
Timeline to learn how it is assembled, and use the clips to practice viewing and
editing techniques described in this guide. See “Starting a Project” in the Help.
Firmware Update Note
When you first start your editing application after installing, you might receive a
dialog box requiring you to update the Avid hardware firmware. Choose to
Update. During the update process, do not access any other applications or move
any of the active windows. Accessing another application might result in the
update completion dialog box being hidden. If this happens, you will see the
update progress stay at 100% but have no option to proceed. The hidden window
which states the update is complete and prompts you to shut down your system
cannot be brought to the foreground. If this happens, you must shut down — not
just restart — the system and then power it up again.
8 Installation Guide for Avid Editing Applications
Page 9

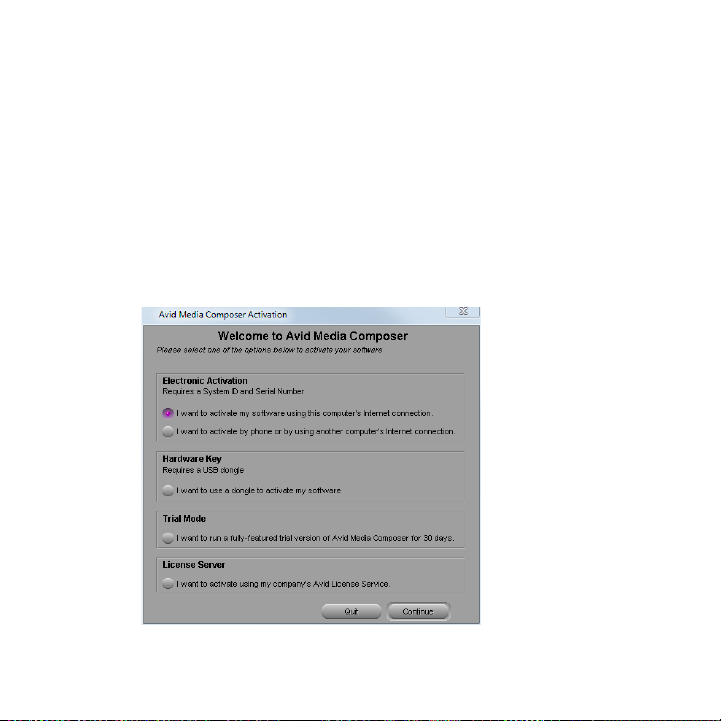
Avid Software Activation
After you install your software, you can activate your Avid editing application
using one of several methods:
• You can use an Internet connection to activate your software automatically.
Avid’s Activation tool lets you activate your software online using the
system identification number and serial number that came with your
software.
• You can use an Internet connection to activate your Avid editing application
manually. If the system running your Avid editing application is not
connected to the Internet, you can activate your software by using a different
computer with an Internet connection.
• You can activate your software by upgrading from a dongle-based version to
a software license. For more information, see “Upgrading the Software” on
page 17.
• You can activate your software by upgrading from a previously installed
software license version to a new software license. For more information,
see “Upgrading the Software” on page 17.
• You can activate your software over the telephone by calling Avid customer
service. This option lets you activate your Avid editing application if your
system configuration does not allow for access to the Internet.
• You can run your software for a 30-day trial period without activating it. The
trial period lets you access all functionality of your Avid editing application.
At the end of the trial period, you can choose to purchase the software and
activate it at that time.
Avid Software Activation 9
Page 10

n If you have an active Avid Support Contract, you might have the option to
upgrade your software with an existing application key (dongle). See the
instructions provided on the Avid Download Center for your upgrade or that came
with your upgrade kit for more information.
c If you change your system configuration — for example, by replacing your
hard drive or by upgrading your operating system — you must first
deactivate your Avid software. For information on deactivation, see
“Deactivating the Software” on page 25.
Activating the Software
After you install the software for your Avid editing application, you must activate
your copy of the application.
The Avid Activation tool launches the first time you start your Avid editing
application. If you are using the 30-day trial version of your Avid editing
application, the Activation tool launches when you start your Avid editing
application until the 30-day trial period expires.
c Activation uses the hardware address from a Network Interface Controller
(NIC) in the system, so it is important not to change your Ethernet
configuration once you have activated your software. If you need to disable
one or more NICs on your system, you must do this before activation. If you
install your software on a laptop that automatically disables your NIC — for
example, when you move between Ethernet and wireless Internet connections
— consult the documentation for your computer for instructions on how to
change your system’s NIC settings before you activate your Avid software.
n If you deactivate your Avid editing application during the 30-day trial, the trial
period continues to run and you cannot extend your trial beyond the 30-day limit.
10 Installation Guide for Avid Editing Applications
Page 11
If you are upgrading software that originally came with an application key, also
called a “dongle,” you must attach the key before activating your software with
Avid’s Activation tool (for more information, see “Connecting the Application
Key” in the Help). When you upgrade your Avid editing application from a
dongle-based version to a non-dongle version, the Activation tool automatically
deactivates your dongle when it registers your copy of the software. For
information on upgrading from a dongle-based editing application to a software
license, see “Upgrading the Software” on page 17.
To activate your Avid editing application automatically:
1. Start your Avid editing application.
The Activation tool opens.
Activating the Software 11
Page 12
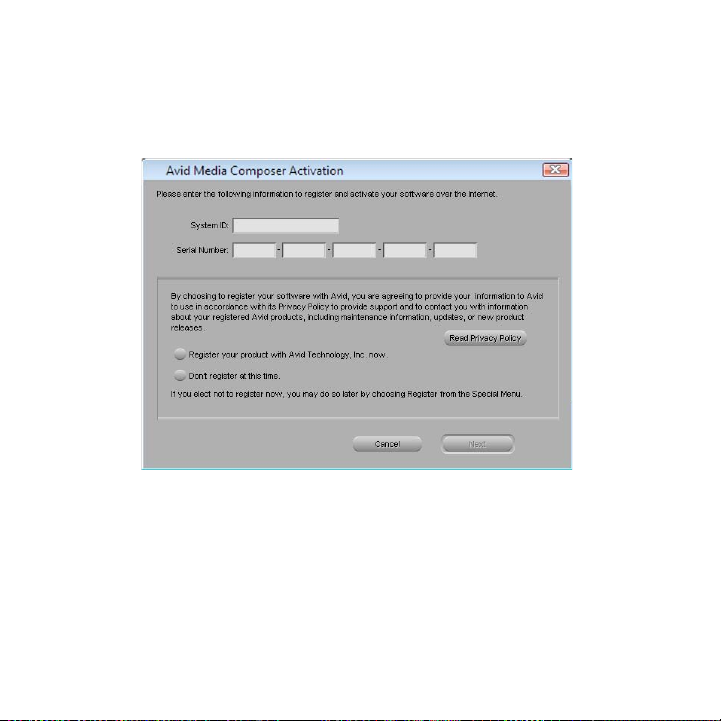
2. Select “I want to activate my software using this computer’s Internet
connection.”
3. Click Continue.
The Avid Activation dialog box opens.
4. Enter your system identification number in the System ID text box. Your
system identification number is located on the inside cover of this guide. If
you purchased your Avid software online, you received your system
identification number from Avid by e-mail. You can also view your system
identification number by logging in to your support account.
12 Installation Guide for Avid Editing Applications
Page 13

n You can copy and paste your system identification number and your serial number
from a text file to the appropriate text boxes.
5. Enter your serial number in the Serial Number text box. Your serial number
is located on the inside cover of this guide. If you purchased your Avid
software online, you received your serial number from Avid by e-mail. You
can also view your serial number by logging in to your support account.
6. If you want to review Avid’s privacy policy, click Read Privacy Policy.
7. Do one of the following:
t Select “Register your product with Avid Technology, Inc. now,” and
then click Next.
A registration dialog box opens. Avid’s online registration lets you
receive important updates and maintenance information.
t Select “Don’t register at this time,” and then click Activate.
The Activation tool confirms your system information. When the
activation is complete, a message informs you that your software has
been successfully activated.
n If you do not want to register your software now, you can register at any time by
selecting Special > Register in your Avid editing application.
8. If you choose to register your software, do the following:
a. In the Register dialog box, type your name, address, and contact
information in the appropriate text boxes. Asterisks (*) indicate
required fields.
b. Click Next
A registration dialog box opens.
Activating the Software 13
Page 14

c. Enter the appropriate product and customer information. Asterisks (*)
indicate required fields.
d. Click Activate and Register.
The Activation tool confirms your system information. When the
activation is complete, a message informs you that your software has
been successfully activated.
9. Click OK.
To activate your Avid editing application manually:
1. Start your Avid editing application.
The Activation tool opens.
2. Select “I want to activate by phone or by using another computer’s Internet
connection.”
3. Click Continue.
The Avid Activation dialog box opens.
4. Enter your system identification number in the System ID text box. Your
system identification number is located on the inside cover of this guide.
n You can copy and paste your system identification number and your serial number
from a text file to the appropriate text boxes.
5. Enter your serial number in the Serial Number text box. Your serial number
is located on the inside cover of this guide. If you purchased your Avid
software online, you received your serial number from Avid by e-mail. You
can also view your serial number by logging in to your support account.
14 Installation Guide for Avid Editing Applications
Page 15
6. If you are activating your software over the telephone, call your local Avid
Support Center. Avid Support Center contact information is available online
at http://www.avid.com/US/contact/video.
Your Avid representative provides an activation code for your software.
Once you have your activation code, proceed to step 12.
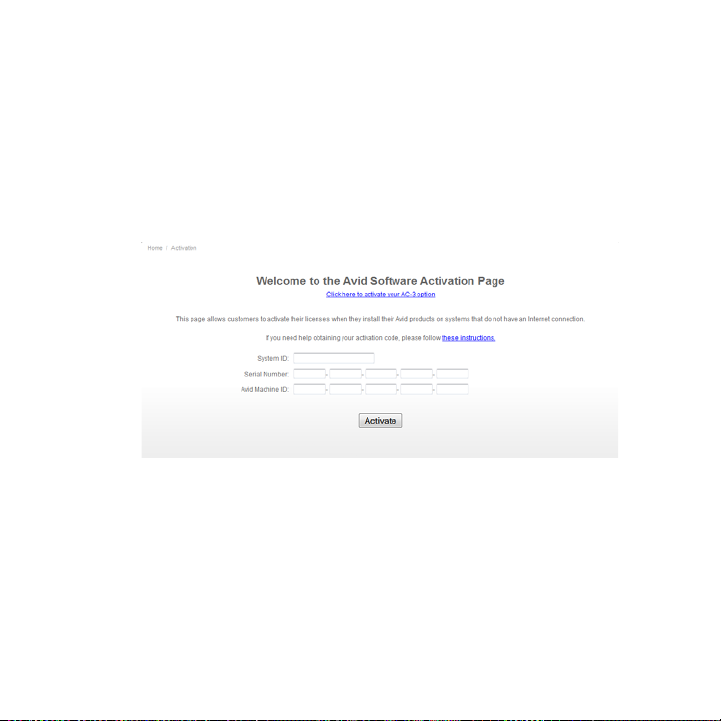
7. If you are using another computer to activate your software, on the second
computer open a Web browser and navigate to http://activate.avid.com.
The Avid Activation page opens.
8. Enter your machine identification number in the Avid Machine ID text box.
Your Avid Machine ID number is located on the Avid Activation dialog box.
9. Enter your system identification number in the System ID text box. Your
system identification number is located on the inside cover of this guide. If
you purchased your Avid software online, you received your system
identification number from Avid by e-mail. You can also view your system
identification number by logging in to your support account.
Activating the Software 15
Page 16

10. Enter your serial number in the Serial Number text box. Your serial number
is located on the inside cover of this guide. If you purchased your Avid
software online, you received your serial number from Avid by e-mail. You
can also view your serial number by logging in to your support account.
11. Click Submit.
The Avid Activation page generates your activation code.
12. Transfer the Activation Code to the system you want to activate. You can
copy the code to a text file and use a removable storage device such as a
USB drive, or you can transfer the data over your network.
13. In the Avid Activation dialog box, enter the activation code in the Activation
Code text box. Copying the entire Activation Code you received from the
Avid Activation page from a text file and pasting into the first text box
automatically fills the rest of the text boxes.
14. Click Activate.
The Activation tool confirms your system information. When the activation
is complete, a message informs you that your software has been successfully
activated.
15. Click OK.
To use your Avid editing application for a 30-day trial period:
1. Start your Avid editing application.
The Activation tool opens.
2. Select “I want to run a fully-featured, trial version of [the Avid editing
application] for 30 days.”
16 Installation Guide for Avid Editing Applications
Page 17

3. Click Continue.
A message informs you that your software has been successfully activated.
At any time during the 30-day trial period, you can choose to purchase a
copy of your Avid editing application and use the Activation tool to activate
it. If you choose not to purchase the software, your Avid editing application
is deactivated when the 30-day trial expires.
Upgrading the Software
You can upgrade your Avid editing application from either an existing software
license or a dongle license. If you upgrade from a dongle license and are changing
product models, then your upgrade kit includes a dongle updater card, upgrade
code, and software activation code. Please see the instructions in your upgrade kit
to update your software.
n Upgrading your dongle license to a software license updates your dongle
information and disables your dongle. Once you have activated your software
license, you do not need the dongle to run your Avid editing application.
If you have an upgrade for a major release and you upgrade from an existing
software license, you must first deactivate your current license. If you do not, a
message prompts you to deactivate the old license before activating the new
software license.
n If the upgrade is for a maintenance release (available to qualified support
contract customers), you do not have to deactivate your current license.
If you upgrade your existing dongle license and you have an active Avid Support
Contract, please read the instructions provided on the Avid Download Center or
that came with your upgrade kit before updating your system. All Avid Support
Contract customers must use the Versioner.avd. file to upgrade their software as
Upgrading the Software 17
Page 18

described in the last procedure in this topic. For more information, view the
“Software Licensing Upgrade Process for Support Customers” topic on the Avid
Knowledge Base (www.avid.com/US/support).
To upgrade your Avid editing application automatically from an
existing software license:
1. Start your Avid editing application.
The Activation tool opens.
2. Select “I want to activate my software using this computer’s Internet
connection.”
3. Click Continue.
The Avid Activation dialog box opens. The System ID text box contains
your existing system ID number.
4. Enter your serial number in the Serial Number text box. Use the serial
number for your new version of your software.
5. Do one of the following:
t If you have never registered your product, select “Register your product
with Avid Technology, Inc. now.” If you want to review Avid’s privacy
policy, click Read Privacy Policy. Then click Next.
A registration dialog box opens. Avid’s online registration lets you
receive important updates and maintenance information.
t Select “Don’t register at this time,” and then click Activate.
The Activation tool confirms your system information. When the
activation is complete, a message informs you that your software has
been successfully activated.
18 Installation Guide for Avid Editing Applications
Page 19

n If you do not want to register your software now, you can register at any time by
selecting Special > Register in your Avid editing application.
6. If you chose to register your software in step 5, do the following:
a. In the Register dialog box, type your name, address, and contact
information in the appropriate text boxes. Asterisks (*) indicate
required fields.
b. Click Next
A registration dialog box opens.
c. Enter the appropriate product and customer information. Asterisks (*)
indicate required fields.
d. Click Activate and Register.
The Activation tool confirms your system information. When the
activation is complete, a message informs you that your software has
been successfully activated.
7. Click OK.
To upgrade your Avid editing application automatically from a dongle
license:
1. Make sure you have attached your dongle to your Avid editing system.
2. Start your Avid editing application.
The Activation tool opens.
3. Select “I want to activate my software using this computer’s Internet
connection.”
Upgrading the Software 19
Page 20

4. Click Continue.
The Avid Activation dialog box opens, and lists the System ID from the
dongle in the System ID text box.
5. Enter your serial number in the Serial Number text box. Your serial number
is located on the inside cover of this guide. If you purchased your Avid
software online, you received your serial number from Avid by e-mail. You
can also view your serial number by logging in to your support account.
6. Do one of the following:
t If you have never registered your product, select “Register your product
with Avid Technology, Inc. now.” If you want to review Avid’s privacy
policy, click Read Privacy Policy. Then click Next.
A registration dialog box opens. Avid’s online registration lets you
receive important updates and maintenance information.
t Select “Don’t register at this time,” and then click Activate.
The Activation tool confirms your system information. When the
activation is complete, a message informs you that your software has
been successfully activated.
n If you do not want to register your software now, you can register at any time by
selecting Special > Register in your Avid editing application.
7. If you chose to register your software in step 6, do the following:
a. In the Register dialog box, type your name, address, and contact
information in the appropriate text boxes. Asterisks (*) indicate
required fields.
b. Click Next
A registration dialog box opens.
20 Installation Guide for Avid Editing Applications
Page 21

c. Enter the appropriate product and customer information. Asterisks (*)
indicate required fields.
d. Click Activate and Register.
The Activation tool confirms your system information. When the
activation is complete, a message informs you that your software has
been successfully activated.
8. Click OK.
To upgrade your Avid editing application manually to a software
license:
1. Start your Avid editing application.
The Activation tool opens.
2. Select “I want to activate by phone or by using another computer’s Internet
connection.”
3. Click Continue.
The Avid Activation dialog box opens, and lists the System ID from the
dongle in the System ID text box.
4. Enter your serial number in the Serial Number text box. Your serial number
is located on the inside cover of this guide. If you purchased your Avid
software online, you received your serial number from Avid by e-mail. You
can also view your serial number by logging in to your support account.
5. If you are activating your software over the telephone, call your local Avid
Support Center. Avid Support Center contact information is available online
at http://www.avid.com/US/contact/video.
Your Avid representative provides an activation code for your software.
Once you have your activation code, proceed to step 12.
Upgrading the Software 21
Page 22

6. If you are using another computer to activate your software, on the second
computer open a Web browser and navigate to http://activate.avid.com.
The Avid Activation page opens.
7. Enter your machine identification number in the Avid Machine ID text box.
Your Avid Machine ID number is located on the Avid Activation dialog box.
8. Enter your system identification number in the System ID text box. Your
system identification number is located on the inside cover of this guide. If
you purchased your Avid software online, you received your system
identification number from Avid by e-mail. You can also view your system
identification number by logging in to your support account.
9. Enter your serial number in the Serial Number text box. Your serial number
is located on the inside cover of this guide. If you purchased your Avid
software online, you received your serial number from Avid by e-mail. You
can also view your serial number by logging in to your support account.
10. Click Submit.
The Avid Activation page generates your activation code, and opens a page
that asks for a confirmation code. Do not close the confirmation code page.
11. Transfer the Activation Code to the system you want to activate. You can
copy the code to a text file and use a removable storage device such as a
USB drive, or you can transfer the data over your network.
12. In the Avid Activation dialog box, enter the activation code in the Activation
Code text box. Copying the entire Activation Code you received from the
Avid Activation page from a text file and pasting into the first text box
automatically fills the rest of the text boxes.
22 Installation Guide for Avid Editing Applications
Page 23

13. Click Activate.
The Activation tool confirms your system information. When the activation
is complete, a message informs you that your software has been successfully
activated.
14. Click OK.
A confirmation code is displayed.
15. On the computer connected to the Internet, enter the confirmation code, and
click OK.
n If the Confirmation Code text box is not visible, click “Click here to enter your
dongle confirmation code.”
To upgrade your Avid editing application with a dongle:
1. Make sure you have attached your dongle to your Avid editing system.
n You can activate your application with a dongle only if this option is available in
the Activation tool.
2. Double-click the DongleManager.exe
The Dongle Manager window opens.
3. Click the Update tab.
4. Click Open, and navigate to the location of your dongle updater (.avd) file.
5. Select the updater file and click Open.
6. Click Update.
The DongleManager.exe application updates your dongle and displays a
“Verification Complete” message.
Upgrading the Software 23
Page 24

7. Start your Avid editing application.
The Activation tool opens.
8. Select “I want to activate my software using my dongle.”
9. Click Continue.
The Activation tool confirms your system information. When the activation
is complete, a message informs you that your software has been successfully
activated.
10. Click OK.
To upgrade your Avid editing application using the Versioner.avd file
(Avid Support Contract customers only):
1. Download the Versioner.avd file for your editing application.
2. Place the Versioner.avd file in the editing application folder:
(Windows) [drive]:/Program Files/Avid/[Avid editing application]
(Macintosh) Macintosh HD/Applications/[Avid editing application]
3. Start your Avid editing application.
The Activation tool opens.
4. Do one of the following:
t Select “I want to activate my software using this computer’s Internet
connection.”
t Select “I want to activate by phone or by using another computer’s
Internet connection.”
t Select “I want to activate my software using my dongle.”
24 Installation Guide for Avid Editing Applications
Page 25

5. Click Continue.
The Avid Activation dialog box opens. The System ID text box contains
your existing system ID number, and the Serial Number text box contains
your existing serial number.
6. Continue with the upgrade license activation procedure described in this
section for the license option you selected in step 4.
Deactivating the Software
If you want to run your Avid editing application on another system, you first must
deactivate your software license before you can activate it on a second system.
Deactivation occurs while your Avid editing application is running, but the
deactivation process automatically saves all open bins and the current project. You
must be connected to the Internet to deactivate your software.
If your system has an Internet connection, you can reactivate your Avid editing
application automatically. Otherwise, you must reactivate your software license
manually by telephone or by using another computer’s connection to the Internet.
For more information on activating your software, see “Activating the Software”
on page 10.
To deactivate your Avid editing application:
1. Start your Avid editing application, and then open a project.
2. Select Special > Deactivate.
The Deactivate dialog box opens.
Deactivating the Software 25
Page 26
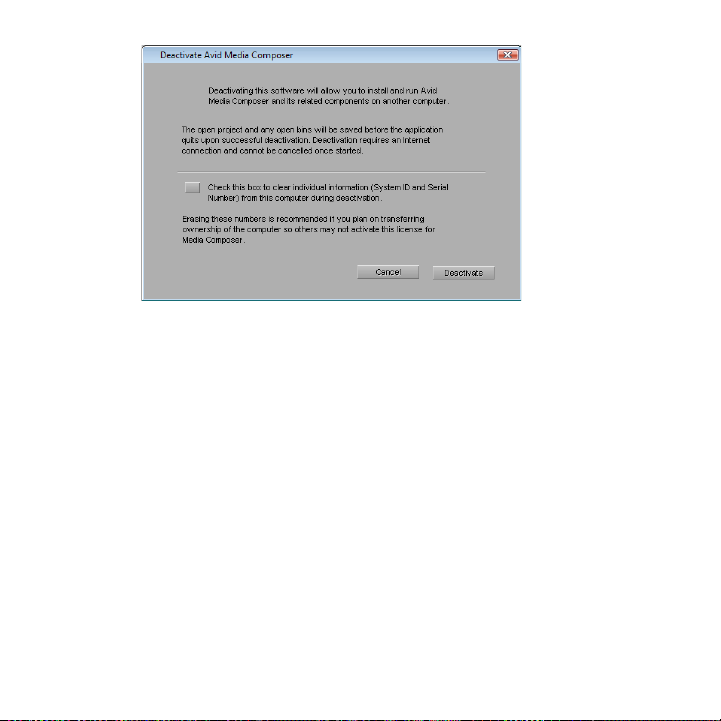
3. Do one of the following:
t If you plan to use your Avid editing application on this system at a later
time, deselect the option to clear the system ID and serial number
information (the option is deselected by default). This preserves the
local license information so you can easily reactivate your license.
t If you do not plan to use your system again — for example, if you plan
to retire the computer — select the option to delete the system ID and
serial number information. This removes the local license information
from your system and prevents other users from activating your license.
4. Click Deactivate.
When the deactivation is complete, a message informs you that your
software license has been successfully deactivated.
5. Click OK.
26 Installation Guide for Avid Editing Applications
Page 27

Your Avid editing application saves all open bins and the current project,
and then quits.
Uninstalling the Avid Editing Application
Prior to installing the editing application, you should uninstall Digi Drivers using
Add/Remove from the Control Panel. Reboot the system and then install the new
editing application. If you do not remove the Digi Drivers, the AudioSuite
plug-ins do not load and you might receive either the error message “This
software requires installation of device driver TPkd and a reboot before running”
or a “DAE Interface NOT Available” error message. If you see these errors on a
clean installation on a brand new system, install Hot fix KB926255 from
Windows Update to fix the problem.
(Macintosh Only) If you are upgrading from a previous version of the Macintosh
editing application, remove the Stereo Mixer.dpm and Surround Mixer.dpm
plug-ins from the following location: Macintosh HD/Library/Application
Support/Digidesign/Plug-Ins. If you do not remove these files, you might
experience problems with the AudioSuite tool.
For all Avid editing applications, you must first log in as the Administrator (not
just a user with administrator privileges), install the application, and initially
launch the application as the Administrator. If you are working in a shared storage
environment, mount your workspaces. You may then subsequently run the Avid
editing application as a regular User.
If you use any Pro Tools audio devices — for example, any of the Avid Mbox
family of devices or the Avid Pro Tools|HD Native hardware — you must install
Uninstalling the Avid Editing Application 27
Page 28

the device drivers separately. Avid audio device drivers are located in the
following directory:
• (Windows)
Files\Avid\Utilities\AudioDriverInstallers
• (Macintosh)
Audio Drivers
Program
Applications\Utilities\Avid Utilities\Avid
c (Macintosh only) If you uninstall your Avid editing application on a system
that has an Avid Pro Tools co-installation, do not uninstall the Avid Core
Runtime and Avid DIO Runtime drivers. These drivers are shared with Pro
Tools, and the Pro Tools application requires them to function correctly.
(Windows) To uninstall the Avid editing application software do one
of the following:
t Using the Add/Remove program, remove the editing application.
t (Windows XP) Access the Control Panel and click Add or Remove
programs, and select the editing application.
t (Windows Vista or Windows 7) Access the Control Panel and select
Programs > Uninstall a program and select the editing application.
(Macintosh) To uninstall the Avid editing application software:
1. Quit all active applications.
2. Insert the editing application DVD.
3. Go to Applications/Avid_Uninstaller/AvidEditingApplication.
4. Double-click the AvidEditingApplication uninstaller.
5. Follow the on-screen prompts.
6. Repeat for uninstalling AvidCoreRuntime, AvidDIORuntime and
AvidCodecs PE.
28 Installation Guide for Avid Editing Applications
Page 29

2 Guide d'installation des applications de montage
Avid
Les informations les plus récentes concernant votre application de montage Avid
sont disponibles dans la version en ligne du document Lisez-moi (ReadMe).
Recherchez systématiquement sur notre site Web les dernières notes de version ou
le document Lisez-moi le plus récent. La documentation en ligne est mise à jour
chaque fois que de nouvelles informations sont disponibles. Pour consulter ces
documents, sélectionnez ReadMe dans le menu d'aide de votre application de
montage Avid ou visitez la Base de connaissances sur le site
www.avid.com/readme.
Installation du logiciel
Parcourez les procédures suivantes avant d'installer l'application de montage. Ces
procédures sont destinées aux bénéficiaires de mises à niveau ou aux nouveaux
utilisateurs. Sélectionnez la procédure appropriée pour votre installation :
• Si vous êtes un nouvel utilisateur et n'avez jamais installé l'application de
montage sur votre système, consultez la section “Installation de l'application
de montage Avid” on page 30.
• Si vous procédez à la mise à niveau d'une version antérieure de l'application
de montage, désactivez votre logiciel puis désinstallez la version antérieure
avant d'installer le nouveau logiciel. Voir les rubriques suivantes :
- “Désactivation du logiciel” on page 52
- “Désinstallation de l'application de montage Avid” on page 54
- “Installation de l'application de montage Avid” on page 30
Page 30

Installation de l'application de montage Avid
Pour toutes les applications de montage Avid, vous devez vous connecter en tant
qu'administrateur (pas juste en tant qu'utilisateur possédant des droits
d'administrateur), installer l'application, puis lancer l'application en tant
qu'administrateur. Si vous travaillez dans un environnement de stockage partagé,
montez vos workspaces. Vous pourrez ensuite exécuter l'application de montage
Avid en tant que simple utilisateur.
n L'installation du logiciel de l'application de montage peut être longue.
L'installation de la seule application de montage peut durer de 5 à 15 minutes.
L'installation de la suite de montage dans son intégralité peut prendre jusqu'à
45 minutes.
(Windows) Pour installer le logiciel de l'application de montage Avid :
1. Quittez toutes les applications en cours d'exécution.
2. Insérez le DVD de l'application de montage.
3. Indiquez si vous souhaitez installer la suite Avid Editor ou un produit unique
en sélectionnant l'option appropriée et suivez les instructions qui s'affichent à
l'écran.
n Si la boîte de dialogue FilesInUse (Fichiers en cours d'utilisation) s'ouvre,
sélectionnez Ignore (Ignorer) et continuez.
n Si des alertes d'accès utilisateur s'affichent à l'écran au cours de l'installation,
sélectionnez Continue Anyway (Continuer) pour poursuivre l'installation.
4. Lorsque vous y êtes invité, sélectionnez "Yes, restart my computer" (Oui, je
souhaite redémarrer l'ordinateur).
30 Guide d'installation des applications de montage Avid
Page 31

5. Passez ensuite à la section “Démarrage de l'application de montage” on
page 31.
(Macintosh) Pour installer le logiciel de l'application de montage
Avid :
1. Quittez toutes les applications.
2. Insérez le DVD de l'application de montage.
3. Double-cliquez sur EditingApplicationName.mpkg.
4. Indiquez si vous souhaitez installer la suite Avid Editor ou un produit unique
en sélectionnant l'option appropriée et suivez les instructions qui s'affichent à
l'écran.
5. Lorsque vous y êtes invité, sélectionnez "Yes, restart my computer".
6. Passez ensuite à la section “Démarrage de l'application de montage” on
page 31.
Démarrage de l'application de montage
La procédure d'installation ajoute une icône sur le bureau ainsi qu'un raccourci
vers l'application de montage Avid dans le menu Démarrer. Si l'application Avid
est installée sur un ordinateur portable, il est possible qu'une boîte de dialogue
affiche un message signalant une incompatibilité de modes de gestion de
l'alimentation. Lors de l'utilisation des applications de montage Avid, Avid
recommande d'adopter le mode de gestion de l'alimentation Toujours actif sous
Windows XP, et Performances élevées sous Windows Vista et Windows 7.
L'utilisation d'autres modes de gestion de l'alimentation risque d'altérer les
performances des fonctions de montage (par exemple pour la capture ou les
sorties sur bande).
Installation du logiciel 31
Page 32

(Windows) Pour exécuter l'application Avid, effectuez l'une des
actions suivantes :
t Cliquez sur Démarrer > Tous les programmes > Avid > Application de
t Double-cliquez sur l'icône de bureau de l'application de montage Avid.
(Macintosh) Pour exécuter l'application Avid, effectuez l'une des
actions suivantes :
t Double-cliquez sur l'alias de l'application de montage Avid placé sur le
t Double-cliquez sur l'alias de l'application de montage Avid placé sur le
t Choisissez Aller > Applications, puis double-cliquez sur le dossier de
Prise en main
Si vous avez choisi d'installer le projet et les médias de démarrage fournis à titre
d'échantillons lors de l'installation de votre application de montage Avid, vous
pouvez ouvrir le projet en question depuis la boîte de dialogue Select Project
(Sélection du projet). Le projet de démarrage, intitulé Avid Boston Project DV25,
montage Avid.
Une fois l'application de montage Avid exécutée, l'outil Activation d'Avid
s'ouvre. Pour en savoir plus sur l'activation de votre logiciel, reportez-vous à
la section Guide d'installation des applications de montage Avid.
bureau.
bureau.
l'application de montage Avid. Ensuite, double-cliquez sur le fichier de
l'application de montage Avid.
Une fois l'application de montage Avid exécutée, l'outil Activation d'Avid
s'ouvre. Pour en savoir plus sur l'activation de votre logiciel, reportez-vous à
la section Guide d'installation des applications de montage Avid.
32 Guide d'installation des applications de montage Avid
Page 33

contient une séquence complète assortie d'effets calculés et de titres, ainsi que la
totalité des clips audio et vidéo utilisés dans la séquence. Utilisez le projet de
démarrage pour apprendre à exploiter l'application de montage Avid avant de
monter vos propres projets. Vous pouvez naviguer sur la timeline de la séquence
pour découvrir comment elle est assemblée et utiliser les clips pour mettre en
application les techniques de montage décrites dans ce guide. Reportez-vous à la
section Démarrage d’un projet dans l'Aide.
Note de mise à jour du microprogramme
Lorsque vous exécutez pour la première fois l'application de montage que vous
venez d'installer, une boîte de dialogue vous invitera peut-être à mettre à jour le
microprogramme du matériel Avid. Choisissez l'option Update (Mettre à jour).
Lors de la procédure de mise à jour, n'accédez à aucune autre application et ne
déplacez aucune des fenêtres actives. Accéder à une autre application risque de
masquer la boîte de dialogue signalant la fin de la procédure de mise à jour.
Auquel cas, la progression de la mise à jour restera figée à 100 % mais vous ne
disposerez d'aucune option pour finaliser la procédure. La fenêtre masquée qui
vous signale la fin de la mise à jour et vous invite à éteindre votre système ne peut
pas être rappelée au premier plan. Dans cette situation, vous devez éteindre votre
système, et non pas seulement le redémarrer, puis le remettre sous tension.
Activation d'un logiciel Avid
Une fois le logiciel installé, plusieurs méthodes d'activation de l'application de
montage Avid s'offrent à vous.
• Vous pouvez utiliser une connexion Internet pour activer le logiciel
automatiquement. L'outil Activation d'Avid permet d'activer le logiciel en
ligne à l'aide des numéros d'identification et de série du système fournis avec
le logiciel.
Activation d'un logiciel Avid 33
Page 34

• Vous pouvez également utiliser une connexion Internet pour activer
l'application de montage Avid manuellement. Si le système sur lequel
s'exécute votre application de montage Avid n'est pas connecté à Internet,
vous pouvez activer le logiciel en utilisant un autre ordinateur disposant
d'une connexion Internet.
• Vous pouvez activer le logiciel en procédant à une mise à niveau d'une
version basée sur une clé électronique (dongle) vers une licence logicielle.
Pour en savoir plus, reportez-vous à la section “Mise à niveau du logiciel” on
page 43.
• Vous pouvez activer le logiciel en procédant à une mise à niveau d'une
licence logicielle préalablement installée vers une nouvelle licence
logicielle. Pour en savoir plus, reportez-vous à la section “Mise à niveau du
logiciel” on page 43.
• Vous pouvez activer le logiciel par téléphone en appelant le Service Client
Avid. Cette option vous permet d'activer l'application de montage Avid si la
configuration de votre système ne permet pas l'accès à Internet.
• Vous pouvez utiliser le logiciel pendant une période d'essai de 30 jours sans
l'activer. Durant cette période, vous pourrez accéder à toutes les
fonctionnalités de l'application de montage Avid. Ensuite, vous pourrez
choisir d'acheter le logiciel et l'activer à ce moment.
n Si vous avez souscrit un contrat de support Avid, l'option vous est peut-être offerte
de mettre à niveau votre logiciel à l'aide d'une clé d'application (dongle). Pour en
savoir plus, reportez-vous aux procédures de mise à niveau accessibles depuis le
Centre de téléchargement Avid ou consultez les instructions accompagnant votre
kit de mise à niveau.
34 Guide d'installation des applications de montage Avid
Page 35

c Si vous modifiez la configuration de votre système (remplacement du disque
dur ou mise à niveau de votre système d'exploitation, par exemple), vous
devez d'abord désactiver votre logiciel Avid. Pour en savoir plus sur la
désactivation, reportez-vous à la section “Désactivation du logiciel” on page 52.
Activation du logiciel
Après avoir installé le logiciel de l'application de montage Avid, vous devez
activer votre exemplaire de l'application.
L'outil Activation d'Avid s'ouvre à la première exécution de l'application de
montage Avid. Si vous utilisez la version d'essai de l'application de montage Avid,
l'outil d'activation s'exécute chaque fois que vous démarrez l'application de
montage et jusqu'à expiration de la période d'essai de 30 jours.
c Cet outil utilise l'adresse matérielle d'un contrôleur NIC (Network Interface
Controller) dans le système, il est donc important de ne pas modifier la
configuration Ethernet une fois le logiciel activé. Si vous devez désactiver un
ou plusieurs contrôleurs NIC sur le système, vous devez le faire avant
d'activer le logiciel. Si vous installez le logiciel sur un ordinateur portable qui
désactive automatiquement votre contrôleur NIC (lorsque vous alternez
entre des connexions Internet Ethernet et sans fil, par exemple), consultez les
instructions de configuration du contrôleur NIC incluses dans la
documentation de votre ordinateur avant d'activer votre logiciel Avid.
n Si vous désactivez votre application de montage Avid au cours de la période
d'essai de 30 jours, celle-ci se poursuit normalement. Vous ne pourrez pas
prolonger la période d'essai au-delà de la limite de 30 jours.
Si vous procédez à la mise à niveau d'un logiciel fourni à l'origine avec une clé
électronique ou « dongle », vous devez connecter la clé avant d'activer le logiciel à
l'aide de l'outil Activation d'Avid (pour plus d'informations, voir la section
Activation du logiciel 35
Page 36

Connexion de la clé électronique dans l'aide). Lorsque vous mettez à niveau
l'application de montage Avid d'une version basée sur une clé électronique vers
une version standard, l'outil d'activation désactive automatiquement la clé lors de
l'enregistrement de votre exemplaire du logiciel. Pour en savoir plus sur la mise à
niveau d'une application de montage basée sur une clé électronique vers une
licence logicielle, reportez-vous à la section “Mise à niveau du logiciel” on
page 43.
Pour activer l'application de montage Avid automatiquement :
1. Démarrez l'application.
L'outil Activation s'affiche.
36 Guide d'installation des applications de montage Avid
Page 37

2. Sélectionnez I want to activate my software using this computer’s Internet
connection (Je souhaite activer le logiciel en utilisant la connexion Internet
de cet ordinateur).
3. Cliquez sur Continue.
La boîte de dialogue Avid Activation (Activation Avid) s'affiche.
4. Saisissez le numéro d'identification du système dans la zone de texte System
ID (ID du système). Ce numéro figure sur la page intérieure de la couverture
de ce guide. Si vous avez acheté le logiciel Avid en ligne, vous avez reçu ce
numéro d'Avid par courrier électronique. Vous pouvez également vous
connecter à votre compte de support pour consulter le numéro
d'identification de votre système.
Activation du logiciel 37
Page 38

n Vous pouvez copier et coller le numéro d'identification du système ainsi que le
numéro de série d'un fichier texte vers les zones de texte appropriées.
5. Saisissez le numéro de série dans la zone de texte Serial Number (Numéro
de série). Ce numéro figure sur la page intérieure de la couverture de ce
guide. Si vous avez acheté le logiciel Avid en ligne, vous avez reçu ce
numéro d'Avid par courrier électronique. Vous pouvez également vous
connecter à votre compte de support pour consulter votre numéro de série.
6. Si vous souhaitez consulter la charte de confidentialité d'Avid, cliquez sur
"Read Privacy Policy" (Lire la charte de confidentialité).
7. Effectuez l'une des opérations suivantes :
t Sélectionnez Register your product with Avid Technology, Inc. now
(Enregistrer votre produit auprès d'Avid Technology, Inc.) puis cliquez
sur Next.
La boîte de dialogue d'enregistrement s'affiche. L'enregistrement en
ligne sur le site d'Avid vous permet de recevoir d'importantes mises à
jour et informations de maintenance.
t Sélectionnez Don’t register at this time (Remettre l'enregistrement à
plus tard) puis cliquez sur Activate.
L'outil Activation confirme les informations du système. Une fois
l'activation terminée, un message vous informe que l'activation du
logiciel a bien été effectuée.
n Si vous préférez remettre cette formalité à plus tard, vous pourrez enregistrer
votre produit à tout moment en sélectionnant Special > Register (S'enregistrer)
depuis votre application de montage Avid.
38 Guide d'installation des applications de montage Avid
Page 39

8. Si vous choisissez d'enregistrer votre produit, procédez comme suit :
a. Depuis la boîte de dialogue d'enregistrement, renseignez vos nom,
adresse et coordonnées dans les zones de texte correspondantes. Les
astérisques (*) désignent les champs obligatoires.
b. Cliquez sur Next.
La boîte de dialogue d'enregistrement s'affiche.
c. Saisissez les informations appropriées (produit et client). Les
astérisques (*) désignent les champs obligatoires.
d. Cliquez sur Activate and Register.
L'outil Activation confirme les informations du système. Une fois
l'activation terminée, un message vous informe que l'activation du
logiciel a bien été effectuée.
9. Cliquez sur OK.
Pour activer l'application de montage Avid manuellement :
1. Démarrez l'application.
L'outil Activation s'affiche.
2. Sélectionnez I want to activate by phone or by using another computer’s
Internet connection (Je souhaite activer l'application par téléphone ou via la
connexion Internet d'un autre ordinateur).
3. Cliquez sur Continue.
La boîte de dialogue Avid Activation s'affiche.
4. Saisissez le numéro d'identification du système dans la zone de texte System
ID. Ce numéro figure sur la page intérieure de la couverture de ce guide.
Activation du logiciel 39
Page 40

n Vous pouvez copier et coller le numéro d'identification du système ainsi que le
numéro de série d'un fichier texte vers les zones de texte appropriées.
5. Saisissez le numéro de série dans la zone de texte Serial Number. Ce numéro
figure sur la page intérieure de la couverture de ce guide. Si vous avez acheté
le logiciel Avid en ligne, vous avez reçu ce numéro d'Avid par courrier
électronique. Vous pouvez également vous connecter à votre compte de
support pour consulter votre numéro de série.
6. Si vous activez votre logiciel par téléphone, contactez votre centre de
support Avid local. Les coordonnées du centre de support Avid sont
accessibles en ligne à l'adresse http://www.avid.com/US/contact/video.
Votre représentant Avid vous délivrera un code d'activation pour votre
logiciel. Lorsque vous aurez obtenu votre code d'activation, passez à l'étape
12.
7. Si vous utilisez un autre ordinateur pour activer votre logiciel, ouvrez un
navigateur Web depuis le deuxième ordinateur et accédez à l'adresse
http://activate.avid.com.
40 Guide d'installation des applications de montage Avid
Page 41

La page d'activation Avid s'affiche.
8. Saisissez le numéro d'identification de la machine dans la zone de texte Avid
Machine ID (ID de machine Avid). Ce numéro se trouve dans la boîte de
dialogue Avid Activation.
9. Saisissez le numéro d'identification du système dans la zone de texte System
ID. Ce numéro figure sur la page intérieure de la couverture de ce guide. Si
vous avez acheté le logiciel Avid en ligne, vous avez reçu ce numéro d'Avid
par courrier électronique. Vous pouvez également vous connecter à votre
compte de support pour consulter le numéro d'identification de votre
système.
10. Saisissez le numéro de série dans la zone de texte Serial Number. Ce numéro
figure sur la page intérieure de la couverture de ce guide. Si vous avez acheté
le logiciel Avid en ligne, vous avez reçu ce numéro d'Avid par courrier
électronique. Vous pouvez également vous connecter à votre compte de
support pour consulter votre numéro de série.
Activation du logiciel 41
Page 42

11. Cliquez sur Submit (Envoyer).
La page d'activation Avid génère votre code d'activation.
12. Transférez le code d'activation vers le système que vous souhaitez activer.
Vous pouvez copier le code dans un fichier texte et utiliser un périphérique
de stockage amovible tel qu'une clé USB, ou encore transférer les données
sur votre réseau.
13. Dans la boîte de dialogue Avid Activation, saisissez le code d'activation dans
la zone de texte correspondante. Si vous copiez le code d'activation complet
généré sur la page d'activation Avid à partir d'un fichier texte et que vous le
collez ensuite dans la première zone de texte, les autres zones de texte seront
remplies automatiquement.
14. Cliquez sur Activate.
L'outil Activation confirme les informations du système. Une fois
l'activation terminée, un message vous informe que l'activation du logiciel a
bien été effectuée.
15. Cliquez sur OK.
Pour utiliser l'application de montage Avid pour une période d'essai
de 30 jours :
1. Démarrez l'application.
L'outil Activation s'affiche.
2. Sélectionnez I want to run a fully-featured, trial version of the Avid editing
application for 30 days (Je souhaite exécuter une version d'essai disposant
de toutes les fonctions de l'application de montage Avid pendant 30 jours).
42 Guide d'installation des applications de montage Avid
Page 43

3. Cliquez sur Continue.
Un message vous informe que le logiciel a été activé. Pendant la période
d'essai de 30 jours, vous pouvez décider à tout moment d'acheter un
exemplaire de l'application de montage Avid et utiliser l'outil Activation
pour l'activer. Si vous choisissez de ne pas acheter le logiciel, votre
application sera désactivée à la fin de la période d'essai de 30 jours.
Mise à niveau du logiciel
Vous pouvez mettre à niveau l'application de montage Avid depuis une licence
logicielle existante ou depuis une licence basée sur un dongle. Si vous procédez à
la mise à niveau depuis une version de licence basée sur un dongle et changez de
modèle de produit, votre kit de mise à niveau inclut une carte de mise à jour du
dongle, un code de mise à niveau ainsi qu'un code d'activation du logiciel.
Reportez-vous aux instructions de votre kit de mise à niveau pour mettre à jour
votre logiciel.
n Mettre à niveau votre version de licence basée sur un dongle vers une version de
licence logicielle met à niveau vos informations de dongle et désactive celle-ci.
Une fois votre licence logicielle activée, vous n'aurez pas besoin du dongle pour
exécuter votre application de montage Avid.
Si vous disposez d'une option de mise à niveau vers un produit récent et souhaitez
procéder à l'opération depuis une licence logicielle existante, vous devrez d'abord
désactiver votre licence actuelle. À défaut, un message vous invitera à désactiver
celle-ci avant d'activer la nouvelle licence logicielle.
n Si la mise à niveau relève d'une offre de maintenance (accessible aux clients ayant
souscrit un contrat de support en cours de validité, vous n'aurez pas à désactiver
votre licence actuelle.
Mise à niveau du logiciel 43
Page 44

Si vous mettez à niveau votre licence basée sur un dongle et disposez d'un contrat
de support Avid en cours de validité, reportez-vous aux procédures de mise à
niveau accessibles depuis le Centre de téléchargement Avid ou consultez les
instructions qui accompagnaient votre kit de mise à niveau avant d'effectuer la
mise à niveau. Les clients qui ont souscrit un contrat de support Avid doivent
utiliser le fichier Versioner.avd. pour mettre à niveau leur logiciel, conformément
à la dernière procédure décrite dans cette section. Pour en savoir plus, consultez
l'article Software Licensing Upgrade Process for Support Customers (Procédure
de mise à niveau de licence logicielle pour les souscripteurs d'un contrat de
support) dans la Base de connaissances Avid (www.avid.com/US/support).
Pour mettre à niveau votre application de montage Avid
automatiquement depuis une licence logicielle existante :
1. Démarrez l'application.
L'outil Activation s'affiche.
2. Sélectionnez I want to activate my software using this computer’s Internet
connection (Je souhaite activer le logiciel en utilisant la connexion Internet
de cet ordinateur).
3. Cliquez sur Continue.
La boîte de dialogue Avid Activation s'affiche. Le champ System ID contient
le numéro d'identification de votre système.
4. Saisissez le numéro de série dans la zone de texte Serial Number. Utilisez le
numéro de série pour votre nouvelle version du logiciel.
44 Guide d'installation des applications de montage Avid
Page 45

5. Effectuez l'une des opérations suivantes :
t Si vous n'avez jamais enregistré votre produit, sélectionnez Register
your product with Avid Technology, Inc. now. Si vous souhaitez
consulter la charte de confidentialité d'Avid, cliquez sur Read Privacy
Policy. Cliquez ensuite sur Next.
La boîte de dialogue d'enregistrement s'affiche. L'enregistrement en
ligne sur le site d'Avid vous permet de recevoir d'importantes mises à
jour et informations de maintenance.
t Sélectionnez Don’t register at this time puis cliquez sur Activate.
L'outil Activation confirme les informations du système. Une fois
l'activation terminée, un message vous informe que l'activation du
logiciel a bien été effectuée.
n Si vous préférez remettre cette formalité à plus tard, vous pourrez enregistrer
votre produit à tout moment en sélectionnant Special > Register depuis votre
application de montage Avid.
6. Si vous avez choisi d'enregistrer votre logiciel à l'étape 5, procédez comme
suit :
a. Depuis la boîte de dialogue d'enregistrement, renseignez vos nom,
adresse et coordonnées dans les zones de texte appropriées. Les
astérisques (*) désignent les champs obligatoires.
b. Cliquez sur Next.
La boîte de dialogue d'enregistrement s'affiche.
c. Saisissez les informations appropriées (produit et client). Les
astérisques (*) désignent les champs obligatoires.
Mise à niveau du logiciel 45
Page 46

d. Cliquez sur Activate and Register (Activer et enregistrer).
L'outil Activation confirme les informations du système. Une fois
l'activation terminée, un message vous informe que l'activation du
logiciel a bien été effectuée.
7. Cliquez sur OK.
Pour mettre à niveau votre application de montage Avid
automatiquement depuis une version de licence basée sur un
dongle :
1. Vérifiez que vous avez connecté le dongle au système de montage Avid.
2. Démarrez l'application de montage Avid.
L'outil Activation s'affiche.
3. Sélectionnez I want to activate my software using this computer’s Internet
connection.
4. Cliquez sur Continue.
La boîte de dialogue Avid Activation s'ouvre. L'identifiant système de la clé
électronique s'affiche dans la zone de texte System ID.
5. Saisissez le numéro de série dans la zone de texte Serial Number. Ce numéro
figure sur la page intérieure de la couverture de ce guide. Si vous avez acheté
le logiciel Avid en ligne, vous avez reçu ce numéro d'Avid par courrier
électronique. Vous pouvez également vous connecter à votre compte de
support pour consulter votre numéro de série.
46 Guide d'installation des applications de montage Avid
Page 47

6. Effectuez l'une des opérations suivantes :
t Si vous n'avez jamais enregistré votre produit, sélectionnez Register
your product with Avid Technology, Inc. now. Si vous souhaitez
consulter la charte de confidentialité d'Avid, cliquez sur Read Privacy
Policy. Cliquez ensuite sur Next.
La boîte de dialogue d'enregistrement s'affiche. L'enregistrement en
ligne sur le site d'Avid vous permet de recevoir d'importantes mises à
jour et informations de maintenance.
t Sélectionnez Don’t register at this time puis cliquez sur Activate.
L'outil Activation confirme les informations du système. Une fois
l'activation terminée, un message vous informe que l'activation du
logiciel a bien été effectuée.
n Si vous préférez remettre cette formalité à plus tard, vous pourrez enregistrer
votre produit à tout moment en sélectionnant Special > Register depuis votre
application de montage Avid.
7. Si vous avez choisi d'enregistrer votre logiciel à l'étape 6, procédez comme
suit :
a. Depuis la boîte de dialogue d'enregistrement, renseignez vos nom,
adresse et coordonnées dans les zones de texte correspondantes. Les
astérisques (*) désignent les champs obligatoires.
b. Cliquez sur Next.
La boîte de dialogue d'enregistrement s'affiche.
c. Saisissez les informations appropriées (produit et client). Les
astérisques (*) désignent les champs obligatoires.
Mise à niveau du logiciel 47
Page 48

d. Cliquez sur Activate and Register (Activer et enregistrer).
L'outil Activation confirme les informations du système. Une fois
l'activation terminée, un message vous informe que l'activation du
logiciel a bien été effectuée.
8. Cliquez sur OK.
Pour mettre à niveau votre application de montage Avid
manuellement vers une licence logicielle :
1. Démarrez l'application.
L'outil Activation s'affiche.
2. Sélectionnez I want to activate by phone or by using another computer’s
Internet connection.
3. Cliquez sur Continue.
La boîte de dialogue Avid Activation s'ouvre. L'identifiant système de la clé
électronique s'affiche dans la zone de texte System ID.
4. Saisissez le numéro de série dans la zone de texte Serial Number. Ce numéro
figure sur la page intérieure de la couverture de ce guide. Si vous avez acheté
le logiciel Avid en ligne, vous avez reçu ce numéro d'Avid par courrier
électronique. Vous pouvez également vous connecter à votre compte de
support pour consulter votre numéro de série.
5. Si vous activez votre logiciel par téléphone, contactez votre centre de
support Avid local. Les coordonnées du centre de support Avid sont
accessibles en ligne à l'adresse http://www.avid.com/US/contact/video.
Votre représentant Avid vous délivrera un code d'activation pour votre
logiciel. Lorsque vous aurez obtenu votre code d'activation, passez à
l'étape 12.
48 Guide d'installation des applications de montage Avid
Page 49

6. Si vous utilisez un autre ordinateur pour activer votre logiciel, ouvrez un
navigateur Web depuis le deuxième ordinateur et accédez à l'adresse
http://activate.avid.com.
La page d'activation Avid s'affiche.
7. Saisissez le numéro d'identification de la machine dans la zone de texte Avid
Machine ID (ID de machine Avid). Ce numéro se trouve dans la boîte de
dialogue Avid Activation.
8. Saisissez le numéro d'identification du système dans la zone de texte System
ID. Ce numéro figure sur la page intérieure de la couverture de ce guide. Si
vous avez acheté le logiciel Avid en ligne, vous avez reçu ce numéro d'Avid
par courrier électronique. Vous pouvez également vous connecter à votre
compte de support pour consulter le numéro d'identification de votre
système.
9. Saisissez le numéro de série dans la zone de texte Serial Number. Ce numéro
figure sur la page intérieure de la couverture de ce guide. Si vous avez acheté
le logiciel Avid en ligne, vous avez reçu ce numéro d'Avid par courrier
électronique. Vous pouvez également vous connecter à votre compte de
support pour consulter votre numéro de série.
10. Cliquez sur Submit.
La page d'activation d'Avid génère votre code d'activation. Une nouvelle
page s'ouvre pour vous inviter à saisir votre code de confirmation. Ne fermez
pas la page du code de confirmation.
11. Transférez le code d'activation vers le système que vous souhaitez activer.
Vous pouvez copier le code dans un fichier texte et utiliser un périphérique
de stockage amovible tel qu'une clé USB, ou encore transférer les données
sur votre réseau.
Mise à niveau du logiciel 49
Page 50

12. Dans la boîte de dialogue Avid Activation, saisissez le code d'activation dans
la zone de texte correspondante. Si vous copiez le code d'activation complet
généré sur la page d'activation Avid à partir d'un fichier texte et que vous le
collez ensuite dans la première zone de texte, les autres zones de texte seront
remplies automatiquement.
13. Cliquez sur Activate.
L'outil Activation confirme les informations du système. Une fois
l'activation terminée, un message vous informe que l'activation du logiciel a
bien été effectuée.
14. Cliquez sur OK.
Un code de confirmation s'affiche.
15. Sur l'ordinateur connecté à Internet, saisissez le code de confirmation et
cliquez sur OK.
n Si la zone de texte Confirmation code (Code de confirmation) n'apparaît pas,
cliquez sur Click here to enter your dongle confirmation code (Cliquez ici pour
saisir le code de confirmation de la clé électronique).
Pour mettre à niveau votre application de montage Avid à l'aide d'une
clé électronique :
1. Vérifiez que vous avez connecté la clé électronique au système de montage.
n Vous pouvez activer votre application à l'aide d'une clé électronique seulement si
cette option est disponible dans l'outil Activation.
2. Cliquez deux fois sur DongleManager.exe.
La fenêtre de l'application DongleManager s'ouvre.
3. Cliquez sur l'onglet Upgrade (mettre à niveau).
50 Guide d'installation des applications de montage Avid
Page 51

4. Cliquez sur Open (Ouvrir) puis naviguez jusqu'à l'emplacement du fichier de
mise à niveau (.avd).
5. Sélectionnez le fichier de mise à niveau puis cliquez sur Open.
6. Cliquez sur Update.
L'application DongleManager.exe met à niveau votre clé électronique puis
affiche le message Verification Complete (Vérification terminée).
7. Démarrez l'application.
L'outil Activation s'affiche.
8. Sélectionnez I want to activate my software using my dongle (Je souhaite
activer mon logiciel à l'aide de ma clé électronique).
9. Cliquez sur Continue.
L'outil Activation confirme les informations du système. Une fois
l'activation terminée, un message vous informe que l'activation du logiciel a
bien été effectuée.
10. Cliquez sur OK.
Pour mettre à niveau votre application de montage Avid à l'aide du
fichier Versioner.avd (réservé aux souscripteurs d'un contrat de
support Avid) :
1. Téléchargez le fichier Versioner.avd correspondant à votre application de
montage.
2. Placez le fichier Versioner.avd dans le dossier de l'application de montage :
(Windows) [disque]:/Program Files/Avid/[application de montage Avid]
(Macintosh) Macintosh HD/Applications/[application de montage Avid]
Mise à niveau du logiciel 51
Page 52

3. Démarrez l'application.
L'outil Activation s'affiche.
4. Effectuez l'une des opérations suivantes :
t Sélectionnez I want to activate my software using this computer’s
Internet connection.
t Sélectionnez I want to activate by phone or by using another
computer’s Internet connection.
t Sélectionnez I want to activate my software using my dongle.
5. Cliquez sur Continue.
La boîte de dialogue Avid Activation s'affiche. Le champ System ID contient
le numéro d'identification de votre système. Le champ Serial Number
contient votre numéro de série.
6. Poursuivez la procédure d'activation de licence décrite dans cette section,
selon l'option de licence sélectionné à l'étape 4.
Désactivation du logiciel
Si vous souhaitez exécuter l'application de montage Avid sur un autre système,
vous devez commencer par désactiver la licence du logiciel pour pouvoir l'activer
sur un autre système. La désactivation s'effectue pendant l'exécution de votre
application de montage Avid, mais le processus de désactivation enregistre
automatiquement tous les chutiers ouverts et le projet en cours. Vous devez être
connecté à Internet pour désactiver votre logiciel.
52 Guide d'installation des applications de montage Avid
Page 53

Si votre système est connecté à Internet, vous pouvez réactiver l'application de
montage Avid automatiquement. Dans le cas contraire, vous devez réactiver la
licence du logiciel manuellement par téléphone ou en utilisant la connexion
Internet d'un autre ordinateur. Pour en savoir plus sur l'activation de votre logiciel,
reportez-vous à la section “Activation du logiciel” on page 35.
Pour désactiver l'application de montage Avid :
1. Démarrez l'application de montage Avid, puis ouvrez un projet.
2. Sélectionnez Special Deactivate (Désactiver).
La boîte de dialogue Deactivate s'affiche.
Désactivation du logiciel 53
Page 54

3. Effectuez l'une des opérations suivantes :
t Si vous avez l'intention d'utiliser l'application de montage Avid
ultérieurement sur ce système, désélectionnez l'option de suppression
des informations d'identifiant système et de numéro de série (cette
option est activée par défaut). Les informations de licence locales sont
conservées de façon à vous permettre de réactiver facilement votre
licence.
t Si vous n'avez pas l'intention de réutiliser le système (si vous prévoyez
de remplacer l'ordinateur, par exemple) sélectionnez l'option de
suppression des informations d'identifiant système et de numéro de
série. Les informations de licence locales sont supprimées du système,
ce qui empêche les autres utilisateurs d'activer votre licence.
4. Cliquez sur Deactivate.
Une fois la désactivation terminée, un message vous informe que la
désactivation de la licence du logiciel a bien été effectuée.
5. Cliquez sur OK.
Votre application de montage Avid enregistre tous les chutiers ainsi que le
projet en cours avant de se fermer.
Désinstallation de l'application de montage Avid
Avant d'installer l'application de montage, désinstallez également les pilotes
Digidesign à l'aide de la fonction d'ajout/suppression de programmes du Panneau
de configuration. Redémarrez le système puis installez la nouvelle application de
montage. Si vous ne supprimez pas les pilotes Digidesign, le chargement des
modules AudioSuite n'aura pas lieu et vous risquez de recevoir le message
d'erreur This software requires installation of device driver TPkd and a reboot
before running (Ce logiciel nécessite l'installation du pilote de dispositifs TPkd et
54 Guide d'installation des applications de montage Avid
Page 55

un redémarrage avant exécution) ou DAE Interface NOT Available (Interface
DAE NON disponible). Si ces erreurs s'affichent sur une version nouvellement
installée d'un système, installez le hot fix KB926255 de Windows Update pour
résoudre le problème.
(Macintosh uniquement) Si vous effectuez une mise à niveau à partir d'une
version précédente de l'application de montage Macintosh, supprimez les modules
Stereo Mixer.dpm et Surround Mixer.dpm des emplacements suivants : Macintosh
HD/Bibliothèque/Application Support/Digidesign/Plug-ins. Si vous ne supprimez
pas ces fichiers, il est possible que vous rencontriez des problèmes avec l'outil
AudioSuite.
Pour toutes les applications de montage Avid, vous devez vous connecter en tant
qu'administrateur (pas juste en tant qu'utilisateur possédant des droits
d'administrateur), installer l'application, puis lancer l'application en tant
qu'administrateur. Si vous travaillez dans un environnement de stockage partagé,
montez vos workspaces. Vous pourrez ensuite exécuter l'application de montage
Avid en tant que simple utilisateur.
Si vous utilisez des périphériques audio Pro Tools (par exemple, l'un des
périphériques de la famille Avid Mbox ou le matériel Avid Pro Tools|HD Native),
vous devez installer séparément les pilotes du périphérique. Les pilotes du
périphérique audio Avid se trouvent dans le répertoire suivant :
• (Windows)
Program
Files\Avid\Utilities\AudioDriverInstallers
• (Macintosh)
Applications\Utilities\Avid Utilities\Avid
Audio Drivers
Désinstallation de l'application de montage Avid 55
Page 56

c (Macintosh uniquement) Si vous désinstallez votre application de montage
Avid depuis un système où Avid Pro Tools est également installé, ne
désinstallez pas les pilotes Avid Core Runtime et Avid DIO Runtime. Ces
pilotes sont partagés avec Pro Tools : l'application Pro Tools nécessite que ces
pilotes s'exécutent correctement.
(Windows) Pour désinstaller le logiciel de l'application de montage
Avid, effectuez l'une des opérations suivantes :
t À l'aide de la fonction d'ajout/suppression de programmes, supprimez
l'application de montage.
t (Windows XP) Accédez au Panneau de configuration, cliquez sur Ajouter ou
supprimer des programmes puis sélectionnez l'application de montage.
t (Windows Vista ou Windows 7) Accédez au Panneau de configuration et
sélectionnez Programmes > Désinstaller un programme, puis sélectionnez
l'application de montage.
(Macintosh) Pour désinstaller le logiciel de l'application de montage
Avid :
1. Quittez toutes les applications en cours d'exécution.
2. Insérez le DVD de l'application de montage.
3. Accédez à Applications/Avid_Uninstaller/AvidEditingApplication.
4. Double-cliquez sur le programme de désinstallation AvidEditingApplication.
5. Suivez les instructions à l'écran.
6. Renouvelez l'opération pour désinstaller AvidCoreRuntime,
AvidDIORuntime et AvidCodecs PE.
56 Guide d'installation des applications de montage Avid
Page 57

3 Installationshandbuch für Editing-Anwendungen
von Avid
Die aktuellsten Informationen zu Ihrer Avid-Editing-Anwendung finden Sie in
der Online-Version der Readme-Datei. Sie sollten immer online nach den
neuesten Versionshinweisen oder Readme-Dateien suchen, da die
Online-Versionen aktualisiert werden, sobald neue Informationen verfügbar sind.
Um diese Online-Versionen zu finden, können Sie entweder die Readme-Option
aus dem Hilfemenü Ihrer Avid-Editing-Anwendung wählen oder die Knowledge
Base unter www.avid.com/readme besuchen.
Installieren der Software
Lesen Sie die folgenden Anleitungen durch, bevor Sie die Editing-Anwendung
installieren. Dieses Handbuch enthält Anleitungen sowohl für Upgrade-Kunden
als auch für neue Anwender. Wählen Sie die für Ihre Installation relevante
Anleitung:
• Wenn Sie ein neuer Anwender sind und noch nie die betreffende
Editing-Anwendung auf Ihrem System installiert haben, fahren Sie mit
“Installieren der Avid-Editing-Anwendung” on page 58 fort.
• Bei einem Upgrade von einer früheren Version der Editing-Anwendung
müssen Sie die Software deaktivieren und die vorherige Version
deinstallieren, um die neue Software installieren zu können. Informationen
dazu finden Sie in den folgenden Abschnitten:
- “Deaktivieren der Software” on page 81
- “Deinstallieren der Avid-Editing-Anwendung” on page 83
- “Installieren der Avid-Editing-Anwendung” on page 58
Page 58

Installieren der Avid-Editing-Anwendung
Bei allen Editing-Anwendungen von Avid müssen Sie sich zunächst als
Administrator anmelden (nicht nur als Anwender mit Administratorrechten), die
Anwendung installieren und den ersten Start der Anwendung als Administrator
ausführen. Falls Sie in einer Umgebung mit gemeinsamer Speichernutzung
arbeiten, müssen Sie Ihre Arbeitsbereiche mounten. Anschließend können Sie die
Avid-Editing-Anwendung als normaler Anwender ausführen.
n Das Installieren der Editing-Anwendung kann einige Zeit in Anspruch nehmen.
Für eine einzelne Editing-Anwendung dauert die Installation in der Regel 5 bis
15 Minuten. Die Installation des gesamten Editing-Systems kann bis zu
35 Minuten dauern.
(Windows) So installieren Sie die Avid-Editing-Anwendung:
1. Beenden Sie alle aktiven Anwendungen.
2. Legen Sie die DVD der Editing-Anwendung ein.
3. Wählen Sie, ob Sie das Editing-System von Avid oder das einzelne Produkt
installieren möchten, und folgen Sie den Anweisungen auf dem Bildschirm.
n Falls die Meldung angezeigt wird, dass Dateien verwendet werden, können Sie
problemlos auf „Ignorieren“ (Ignore) klicken und fortfahren.
n Sollten während der Installation Warnmeldungen der Benutzerzugriffsverwaltung
angezeigt werden, klicken Sie auf „Trotzdem fortfahren“ (Continue Anyway), um
die Installation fortzusetzen.
4. Wenn Sie dazu aufgefordert werden, wählen Sie die Option zum sofortigen
Neustart des Computers.
5. Fahren Sie mit “Starten der Editing-Anwendung” on page 59 fort.
58 Installationshandbuch für Editing-Anwendungen von Avid
Page 59

(Macintosh) So installieren Sie die Avid-Editing-Anwendung:
1. Beenden Sie alle Anwendungen.
2. Legen Sie die DVD der Editing-Anwendung ein.
3. Doppelklicken Sie auf die Datei „Name der Editing-Anwendung.mpkg“.
4. Wählen Sie, ob Sie das Editing-System von Avid oder das einzelne Produkt
installieren möchten, und folgen Sie den Anweisungen auf dem Bildschirm.
5. Wenn Sie dazu aufgefordert werden, wählen Sie die Option zum sofortigen
Neustart des Computers.
6. Fahren Sie mit “Starten der Editing-Anwendung” on page 59 fort.
Starten der Editing-Anwendung
Während des Installationsprozesses werden für Ihre Avid-Editing-Anwendung ein
Desktop-Symbol und ein Eintrag im Startmenü erstellt. Wenn Sie Ihre
Avid-Editing-Anwendung auf einem Laptop installieren, wird möglicherweise
eine Meldung bezüglich inkompatibler Energieverwaltungseinstellungen
angezeigt. Für die Arbeit mit Editing-Anwendungen von Avid ist es
empfehlenswert, die Einstellung „Dauerbetrieb“ (Always on) für Windows XP
bzw. „Höchstleistung“ (High Performance) für Windows Vista oder Windows 7
zu verwenden. Andere Energieverwaltungseinstellungen könnten die
Leistungsfähigkeit bestimmter Editing-Funktionen beeinträchtigen (z. B.
Einspielen und digitales Schneiden).
Installieren der Software 59
Page 60

(Windows) Sie haben folgende Möglichkeiten, Ihre
Avid-Editing-Anwendung zu starten:
t Klicken Sie auf „Start > Alle Programme > Avid >
Avid-Editing-Anwendung“.
t Doppelklicken Sie auf das Desktop-Symbol der Avid-Editing-Anwendung.
Nach dem Starten Ihrer Avid-Editing-Anwendung wird das
Avid-Aktivierungstool geöffnet. Weitere Informationen zum Aktivieren der
Software finden Sie im Installationshandbuch für Editing-Anwendungen von
Avid.
(Macintosh) Sie haben folgende Möglichkeiten, Ihre
Avid-Editing-Anwendung zu starten:
t Doppelklicken Sie auf dem Schreibtisch auf das Alias-Symbol für Ihre
Avid-Editing-Anwendung.
t Doppelklicken Sie auf dem Dock auf das Alias-Symbol für Ihre
Avid-Editing-Anwendung.
t Wählen Sie „Start > Programme“ und doppelklicken Sie anschließend auf
den Ordner der Avid-Editing-Anwendung. Doppelklicken Sie danach auf die
Programmdatei der Avid-Editing-Anwendung.
Nach dem Starten Ihrer Avid-Editing-Anwendung wird das
Avid-Aktivierungstool geöffnet. Weitere Informationen zum Aktivieren der
Software finden Sie im Installationshandbuch für Editing-Anwendungen von
Avid.
60 Installationshandbuch für Editing-Anwendungen von Avid
Page 61

Erste Schritte
Wenn Sie bei der Installation Ihrer Avid-Editing-Anwendung auch das
dazugehörige Beispiel-Startprojekt installiert haben, können Sie dieses über das
Select Project-Dialogfeld öffnen. Das Startprojekt mit dem Namen „Avid Boston
Project DV25“ enthält eine komplette Sequenz mit gerenderten Effekten und
Titeln sowie alle in der Sequenz verwendeten Video- und Audioclips. Mithilfe des
Startprojekts können Sie üben, Editing-Vorgänge mit Ihrer
Avid-Editing-Anwendung auszuführen, bevor Sie eigene Medien einspielen. Sie
können sich die Sequenz in der Timeline genau ansehen, um zu erfahren, wie sie
zusammengestellt wurde, und mithilfe der Clips Anzeige- und Editing-Techniken
üben. Informationen zum Starten eines Projekts finden Sie in der Hilfe.
Hinweis zur Firmware-Aktualisierung
Wenn Sie Ihre Editing-Anwendung nach der Installation zum ersten Mal starten,
werden Sie möglicherweise aufgefordert, die Firmware der Avid-Hardware zu
aktualisieren. Klicken Sie auf „Update“. Greifen Sie während der Aktualisierung
nicht auf andere Anwendungen zu und verschieben Sie keines der aktiven Fenster.
Wenn Sie auf eine andere Anwendung zugreifen, kann dies dazu führen, dass das
Dialogfeld zur Fertigstellung des Updates verborgen bleibt. In diesem Fall wird
der Fortschritt dauerhaft mit 100 % angezeigt, aber Sie haben keine Möglichkeit
fortzufahren. Das verborgene Fenster, in dem die Aktualisierung als
abgeschlossen angezeigt wird und Sie aufgefordert werden, das System
herunterzufahren, kann dann nicht mehr in den Vordergrund geholt werden. Wenn
dies geschieht, müssen Sie das System herunterfahren – nicht nur neu starten –
und anschließend wieder einschalten.
Installieren der Software 61
Page 62

Avid-Softwareaktivierung
Nach der Installation der Software haben Sie verschiedene Möglichkeiten, Ihre
Avid-Editing-Anwendung zu aktivieren:
• Sie können eine Internetverbindung verwenden, um die Software
automatisch zu aktivieren. Mithilfe des Avid-Aktivierungstools können Sie
die Software online aktivieren. Dazu benötigen Sie die zu Ihrer Software
gehörende System-ID und Seriennummer.
• Sie können eine Internetverbindung verwenden, um die Software manuell zu
aktivieren. Falls das System, auf dem Ihre Avid-Editing-Anwendung läuft,
nicht mit dem Internet verbunden ist, können Sie die Software von einem
anderen Computer aus aktivieren, der über eine Internetverbindung verfügt.
• Sie können die Software aktivieren, indem Sie ein Upgrade von einer
Version mit Kopierschutzstecker (Dongle) auf eine Softwarelizenz
durchführen. Weitere Informationen hierzu finden Sie unter “Durchführen
eines Software-Upgrades” on page 71.
• Sie können die Software aktivieren, indem Sie ein Upgrade von einer zuvor
installierten Version mit Softwarelizenz auf eine neue Softwarelizenz
durchführen. Weitere Informationen hierzu finden Sie unter “Durchführen
eines Software-Upgrades” on page 71.
• Mit einem Anruf beim Avid-Kundendienst können Sie die Software
telefonisch aktivieren. So haben Sie auch dann die Möglichkeit, Ihre
Avid-Editing-Anwendung zu aktivieren, wenn Ihre Systemkonfiguration
keinen Zugang zum Internet vorsieht.
• Sie können die Software 30 Tage lang testen, ohne sie zu aktivieren.
Während des Testzeitraums können Sie auf sämtliche Funktionen Ihrer
Avid-Editing-Anwendung zugreifen. Am Ende des Testzeitraums haben Sie
erneut Gelegenheit, die Software zu kaufen und zu aktivieren.
62 Installationshandbuch für Editing-Anwendungen von Avid
Page 63

n Wenn Sie über einen laufenden Avid-Supportvertrag verfügen, haben Sie eventuell
die Möglichkeit, ein Software-Upgrade mit einem vorhandenen Dongle
durchzuführen. Weitere Informationen können Sie den Anweisungen zu Ihrem
Upgrade entnehmen, die Sie entweder im Avid-Download-Center oder in Ihrem
Upgrade-Kit finden.
c Falls Sie Ihre Systemkonfiguration ändern möchten – indem Sie
beispielsweise die Festplatte austauschen oder das Betriebssystem
aktualisieren –, müssen Sie zuvor Ihre Avid-Software deaktivieren.
Informationen zur Deaktivierung finden Sie unter “Deaktivieren der
Software” on page 81.
Aktivieren der Software
Nach der Installation Ihrer Avid-Editing-Anwendung müssen Sie Ihre Software
aktivieren.
Das Avid-Aktivierungstool wird beim ersten Start der Avid-Editing-Anwendung
automatisch mit gestartet. Wenn Sie die 30-Tage-Testversion Ihrer
Avid-Editing-Anwendung verwenden, wird das Aktivierungstool bei jedem Start
der Avid-Editing-Anwendung automatisch mit gestartet, bis der Testzeitraum von
30 Tagen abgelaufen ist.
c Bei der Aktivierung wird die Hardware-Adresse eines NIC (Network
Interface Controller) im System verwendet. Deshalb ist es wichtig, dass Sie
Ihre Ethernet-Konfiguration nicht mehr ändern, sobald die Software
aktiviert ist. Falls Sie einen oder mehrere NICs in Ihrem System deaktivieren
müssen, tun Sie dies vor der Aktivierung der Software. Wenn Sie die
Software auf einem Laptop installieren, der Ihren NIC automatisch
deaktiviert – z. B. beim Wechsel zwischen Ethernet und einer drahtlosen
Aktivieren der Software 63
Page 64

Internetverbindung –, finden Sie in der Dokumentation Ihres Computers
Anweisungen dazu, wie Sie die NIC-Einstellungen des Systems vor der
Aktivierung der Avid-Software ändern können.
n Sollten Sie Ihre Avid-Editing-Anwendung während des 30-Tage-Tests
deaktivieren, läuft der Testzeitraum trotzdem weiter und Sie können ihn nicht über
das Limit von 30 Tagen hinaus verlängern.
Falls Sie ein Upgrade einer Software durchführen, zu deren Lieferumfang
ursprünglich ein Kopierschutzstecker, auch „Dongle“ genannt, gehört hat, müssen
Sie den Dongle anschließen, bevor Sie die Software mithilfe des
Avid-Aktivierungstools aktivieren. (Weitere Informationen zum Anschließen des
Kopierschutzsteckers finden Sie in der Hilfe.) Bei einem Upgrade Ihrer
Avid-Editing-Anwendung von einer Dongle-basierten Version auf eine Version
ohne Dongle deaktiviert das Aktivierungstool automatisch den Dongle, sobald
Ihre Software registriert ist. Informationen zum Upgrade von einer
Dongle-basierten Editing-Anwendung auf eine Softwarelizenz finden Sie unter
“Durchführen eines Software-Upgrades” on page 71.
64 Installationshandbuch für Editing-Anwendungen von Avid
Page 65

So aktivieren Sie Ihre Avid-Editing-Anwendung automatisch:
1. Starten Sie Ihre Avid-Editing-Anwendung.
Das Aktivierungstool wird geöffnet.
2. Wählen Sie „I want to activate my software using this computer’s Internet
connection“.
Aktivieren der Software 65
Page 66

3. Klicken Sie auf „Continue“.
Das Avid Activation-Dialogfeld wird geöffnet.
4. Geben Sie Ihre System-ID in das entsprechende Textfeld ein. Ihre
System-ID befindet sich auf der Umschlaginnenseite dieses Handbuchs.
Wenn Sie Ihre Avid-Software online gekauft haben, wurde Ihnen die
System-ID von Avid per E-Mail zugeschickt. Außerdem können Sie Ihre
System-ID anzeigen, indem Sie sich bei Ihrem Support-Konto anmelden.
n Sie können System-ID und Seriennummer aus einer Textdatei in die
entsprechenden Textfelder kopieren.
66 Installationshandbuch für Editing-Anwendungen von Avid
Page 67

5. Geben Sie Ihre Seriennummer in das Serial Number-Textfeld ein. Ihre
Seriennummer befindet sich auf der Umschlaginnenseite dieses Handbuchs.
Wenn Sie Ihre Avid-Software online gekauft haben, wurde Ihnen die
Seriennummer von Avid per E-Mail zugeschickt. Außerdem können Sie Ihre
Seriennummer anzeigen, indem Sie sich bei Ihrem Support-Konto
anmelden.
6. Wenn Sie die Datenschutzerklärung von Avid lesen möchten, klicken Sie auf
„Read Privacy Policy“.
7. Sie haben folgende Möglichkeiten:
t Wählen Sie „Register your product with Avid Technology, Inc. now“
und klicken Sie anschließend auf „Next“.
Ein Registrierungsdialogfeld wird geöffnet. Wenn Sie sich bei Avid
online registrieren, erhalten Sie wichtige Updates und
Wartungsinformationen.
t Wählen Sie „Don’t register at this time“ und klicken Sie anschließend
auf „Activate“.
Das Aktivierungstool bestätigt Ihre Systeminformationen. Nach
Abschluss der Aktivierung wird mit einer Meldung bestätigt, dass Ihre
Software erfolgreich aktiviert wurde.
n Falls Sie Ihre Software zu diesem Zeitpunkt nicht registrieren möchten, können
Sie dies auch später jederzeit tun, indem Sie in Ihrer Avid-Editing-Anwendung auf
„Special > Register“ klicken.
Aktivieren der Software 67
Page 68

8. Wenn Sie die Software registrieren möchten, gehen Sie folgendermaßen vor:
a. Geben Sie im Registrierungsdialogfeld Ihren Namen, Ihre Adresse und
Ihre Kontaktinformationen in die entsprechenden Textfelder ein.
Sternchen (*) kennzeichnen Pflichtfelder.
b. Klicken Sie auf „Next“.
Ein Registrierungsdialogfeld wird geöffnet.
c. Geben Sie die entsprechenden Produkt- und Kundeninformationen ein.
Sternchen (*) kennzeichnen Pflichtfelder.
d. Klicken Sie auf „Activate and Register“.
Das Aktivierungstool bestätigt Ihre Systeminformationen. Nach
Abschluss der Aktivierung wird mit einer Meldung bestätigt, dass Ihre
Software erfolgreich aktiviert wurde.
9. Klicken Sie auf „OK“.
So aktivieren Sie Ihre Avid-Editing-Anwendung manuell:
1. Starten Sie Ihre Avid-Editing-Anwendung.
Das Aktivierungstool wird geöffnet.
2. Wählen Sie „I want to activate by phone or by using another computer’s
Internet connection“.
3. Klicken Sie auf „Continue“.
Das Avid Activation-Dialogfeld wird geöffnet.
4. Geben Sie Ihre System-ID in das entsprechende Textfeld ein. Ihre
System-ID befindet sich auf der Umschlaginnenseite dieses Handbuchs.
n Sie können System-ID und Seriennummer aus einer Textdatei in die
entsprechenden Textfelder kopieren.
68 Installationshandbuch für Editing-Anwendungen von Avid
Page 69

5. Geben Sie Ihre Seriennummer in das Serial Number-Textfeld ein. Ihre
Seriennummer befindet sich auf der Umschlaginnenseite dieses Handbuchs.
Wenn Sie Ihre Avid-Software online gekauft haben, wurde Ihnen die
Seriennummer von Avid per E-Mail zugeschickt. Außerdem können Sie Ihre
Seriennummer anzeigen, indem Sie sich bei Ihrem Support-Konto
anmelden.
6. Wenn Sie die Software telefonisch aktivieren möchten, rufen Sie Ihr Avid
Support Center an. Kontaktinformationen der Avid Support Center finden
Sie online unter http://www.avid.com/US/contact/video.
Ihre Avid-Vertretung teilt Ihnen einen Aktivierungscode für die Software
mit. Sobald Sie Ihren Aktivierungscode haben, können Sie mit Schritt 12
fortfahren.
7. Falls Sie einen anderen Computer verwenden, um die Software zu
aktivieren, öffnen Sie auf diesem Computer einen Webbrowser und
navigieren Sie zu http://activate.avid.com.
Die Avid Software Activation-Seite wird geöffnet.
Aktivieren der Software 69
Page 70

8. Geben Sie Ihre Computer-ID in das Avid Machine ID-Textfeld ein. Ihre
Avid-Computer-ID finden Sie im Avid Activation-Dialogfeld.
9. Geben Sie Ihre System-ID in das entsprechende Textfeld ein. Ihre
System-ID befindet sich auf der Umschlaginnenseite dieses Handbuchs.
Wenn Sie Ihre Avid-Software online gekauft haben, wurde Ihnen die
System-ID von Avid per E-Mail zugeschickt. Außerdem können Sie Ihre
System-ID anzeigen, indem Sie sich bei Ihrem Support-Konto anmelden.
10. Geben Sie Ihre Seriennummer in das Serial Number-Textfeld ein. Ihre
Seriennummer befindet sich auf der Umschlaginnenseite dieses Handbuchs.
Wenn Sie Ihre Avid-Software online gekauft haben, wurde Ihnen die
Seriennummer von Avid per E-Mail zugeschickt. Außerdem können Sie Ihre
Seriennummer anzeigen, indem Sie sich bei Ihrem Support-Konto
anmelden.
11. Klicken Sie auf „Submit“.
Die Avid Software Activation-Seite generiert Ihren Aktivierungscode.
12. Übertragen Sie den Aktivierungscode auf das System, das Sie aktivieren
möchten. Sie können entweder den Code in eine Textdatei kopieren und ein
Wechselspeichermedium, z. B. einen USB-Stick, verwenden oder die Daten
über Ihr Netzwerk übertragen.
13. Geben Sie im Avid Activation-Dialogfeld den Aktivierungscode in das
entsprechende Textfeld ein. Wenn Sie den gesamten Aktivierungscode, den
Sie auf der Avid Software Activation-Seite erhalten haben, aus einer
Textdatei in das erste Textfeld kopieren, werden die übrigen Textfelder
automatisch ausgefüllt.
70 Installationshandbuch für Editing-Anwendungen von Avid
Page 71

14. Klicken Sie auf „Activate“.
Das Aktivierungstool bestätigt Ihre Systeminformationen. Nach Abschluss
der Aktivierung wird mit einer Meldung bestätigt, dass Ihre Software
erfolgreich aktiviert wurde.
15. Klicken Sie auf „OK“.
So testen Sie Ihre Avid-Editing-Anwendung 30 Tage lang:
1. Starten Sie Ihre Avid-Editing-Anwendung.
Das Aktivierungstool wird geöffnet.
2. Wählen Sie „I want to run a fully-featured, trial version of
[Avid-Editing-Anwendung] for 30 days“.
3. Klicken Sie auf „Continue“.
In einer Meldung wird bestätigt, dass Ihre Software erfolgreich aktiviert
wurde. Während des 30-tägigen Testzeitraums können Sie jederzeit Ihre
Avid-Editing-Anwendung kaufen und mithilfe des Aktivierungstools
aktivieren. Wenn Sie die Software nicht kaufen, wird Ihre
Avid-Editing-Anwendung nach Ablauf der 30 Tage deaktiviert.
Durchführen eines Software-Upgrades
Sie können ein Upgrade Ihrer Avid-Editing-Anwendung auf der Grundlage
entweder einer vorhandenen Softwarelizenz oder einer Dongle-Lizenz
durchführen. Falls Sie das Upgrade auf der Grundlage einer Dongle-Lizenz
durchführen und das Produktmodell wechseln, enthält Ihr Upgrade-Kit eine
Dongle-Aktualisierungskarte, einen Upgrade-Code und einen
Software-Aktivierungscode. Anweisungen zu dem Software-Upgrade finden Sie
in Ihrem Upgrade-Kit.
Durchführen eines Software-Upgrades 71
Page 72

n Beim Upgrade einer Dongle-Lizenz auf eine Softwarelizenz werden Ihre
Dongle-Informationen aktualisiert und Ihr Dongle wird deaktiviert. Sobald Sie
Ihre Softwarelizenz aktiviert haben, benötigen Sie den Dongle nicht länger zum
Ausführen Ihrer Avid-Editing-Anwendung.
Wenn Sie ein Upgrade für eine Hauptversion auf der Grundlage einer
vorhandenen Softwarelizenz durchführen, müssen Sie zunächst Ihre aktuelle
Lizenz deaktivieren. Andernfalls werden Sie mit einer Meldung aufgefordert, die
alte Softwarelizenz zu deaktivieren, bevor Sie die neue aktivieren.
n Bei einem Upgrade für eine Wartungsversion (die Kunden mit entsprechenden
Supportverträgen zur Verfügung steht) müssen Sie Ihre aktuelle Lizenz nicht
deaktivieren.
Wenn Sie ein Upgrade Ihrer vorhandenen Dongle-Lizenz durchführen und über
einen laufenden Avid-Supportvertrag verfügen, können Sie weitere Informationen
den Anweisungen zu Ihrem Upgrade entnehmen, die Sie entweder im Avid
Download-Center oder in Ihrem Upgrade-Kit finden. Alle Kunden mit
Avid-Supportverträgen müssen für das Software-Upgrade die Datei
„Versioner.avd“ verwenden, wie in der letzten Anleitung in diesem Abschnitt
beschrieben. Weitere Informationen finden Sie in der Avid Knowledge Base
(www.avid.com/US/support) im Thema „Software Licensing Upgrade Process for
Support Customers“.
So aktualisieren Sie Ihre Avid-Editing-Anwendung auf der Grundlage
einer vorhandenen Softwarelizenz automatisch:
1. Starten Sie Ihre Avid-Editing-Anwendung.
Das Aktivierungstool wird geöffnet.
2. Wählen Sie „I want to activate my software using this computer’s Internet
connection“.
72 Installationshandbuch für Editing-Anwendungen von Avid
Page 73

3. Klicken Sie auf „Continue“.
Das Avid Activation-Dialogfeld wird geöffnet. Das System ID-Textfeld
enthält Ihre vorhandene System-ID.
4. Geben Sie Ihre Seriennummer in das Serial Number-Textfeld ein.
Verwenden Sie die Seriennummer für die neue Version Ihrer Software.
5. Sie haben folgende Möglichkeiten:
t Sollten Sie Ihr Produkt noch nicht registriert haben, wählen Sie
„Register your product with Avid Technology, Inc. now“. Wenn Sie die
Datenschutzerklärung von Avid lesen möchten, klicken Sie auf „Read
Privacy Policy“. Klicken Sie anschließend auf „Next“.
Ein Registrierungsdialogfeld wird geöffnet. Wenn Sie sich bei Avid
online registrieren, erhalten Sie wichtige Updates und
Wartungsinformationen.
t Wählen Sie „Don’t register at this time“ und klicken Sie anschließend
auf „Activate“.
Das Aktivierungstool bestätigt Ihre Systeminformationen. Nach
Abschluss der Aktivierung wird mit einer Meldung bestätigt, dass Ihre
Software erfolgreich aktiviert wurde.
n Falls Sie Ihre Software zu diesem Zeitpunkt nicht registrieren möchten, können
Sie dies auch später jederzeit tun, indem Sie in Ihrer Avid-Editing-Anwendung auf
„Special > Register“ klicken.
Durchführen eines Software-Upgrades 73
Page 74

6. Wenn Sie sich in Schritt 5 für die Registrierung der Software entschieden
haben, gehen Sie folgendermaßen vor:
a. Geben Sie im Registrierungsdialogfeld Ihren Namen, Ihre Adresse und
Ihre Kontaktinformationen in die entsprechenden Textfelder ein.
Sternchen (*) kennzeichnen Pflichtfelder.
b. Klicken Sie auf „Next“.
Ein Registrierungsdialogfeld wird geöffnet.
c. Geben Sie die entsprechenden Produkt- und Kundeninformationen ein.
Sternchen (*) kennzeichnen Pflichtfelder.
d. Klicken Sie auf „Activate and Register“.
Das Aktivierungstool bestätigt Ihre Systeminformationen. Nach
Abschluss der Aktivierung wird mit einer Meldung bestätigt, dass Ihre
Software erfolgreich aktiviert wurde.
7. Klicken Sie auf „OK“.
So aktualisieren Sie Ihre Avid-Editing-Anwendung auf der Grundlage
einer vorhandenen Dongle-Lizenz automatisch:
1. Vergewissern Sie sich, dass der Dongle an Ihr Avid-Editing-System
angeschlossen ist.
2. Starten Sie Ihre Avid-Editing-Anwendung.
Das Aktivierungstool wird geöffnet.
3. Wählen Sie „I want to activate my software using this computer’s Internet
connection“.
74 Installationshandbuch für Editing-Anwendungen von Avid
Page 75

4. Klicken Sie auf „Continue“.
Das Avid Activation-Dialogfeld wird geöffnet und im System ID-Textfeld
wird die System-ID aus dem Dongle angezeigt.
5. Geben Sie Ihre Seriennummer in das Serial Number-Textfeld ein. Ihre
Seriennummer befindet sich auf der Umschlaginnenseite dieses Handbuchs.
Wenn Sie Ihre Avid-Software online gekauft haben, wurde Ihnen die
Seriennummer von Avid per E-Mail zugeschickt. Außerdem können Sie Ihre
Seriennummer anzeigen, indem Sie sich bei Ihrem Support-Konto
anmelden.
6. Sie haben folgende Möglichkeiten:
t Sollten Sie Ihr Produkt noch nicht registriert haben, wählen Sie
„Register your product with Avid Technology, Inc. now“. Wenn Sie die
Datenschutzerklärung von Avid lesen möchten, klicken Sie auf „Read
Privacy Policy“. Klicken Sie anschließend auf „Next“.
Ein Registrierungsdialogfeld wird geöffnet. Wenn Sie sich bei Avid
online registrieren, erhalten Sie wichtige Updates und
Wartungsinformationen.
t Wählen Sie „Don’t register at this time“ und klicken Sie anschließend
auf „Activate“.
Das Aktivierungstool bestätigt Ihre Systeminformationen. Nach
Abschluss der Aktivierung wird mit einer Meldung bestätigt, dass Ihre
Software erfolgreich aktiviert wurde.
n Falls Sie Ihre Software zu diesem Zeitpunkt nicht registrieren möchten, können
Sie dies auch später jederzeit tun, indem Sie in Ihrer Avid-Editing-Anwendung auf
„Special > Register“ klicken.
Durchführen eines Software-Upgrades 75
Page 76

7. Wenn Sie sich in Schritt 6 für die Registrierung der Software entschieden
haben, gehen Sie folgendermaßen vor:
a. Geben Sie im Registrierungsdialogfeld Ihren Namen, Ihre Adresse und
Ihre Kontaktinformationen in die entsprechenden Textfelder ein.
Sternchen (*) kennzeichnen Pflichtfelder.
b. Klicken Sie auf „Next“.
Ein Registrierungsdialogfeld wird geöffnet.
c. Geben Sie die entsprechenden Produkt- und Kundeninformationen ein.
Sternchen (*) kennzeichnen Pflichtfelder.
d. Klicken Sie auf „Activate and Register“.
Das Aktivierungstool bestätigt Ihre Systeminformationen. Nach
Abschluss der Aktivierung wird mit einer Meldung bestätigt, dass Ihre
Software erfolgreich aktiviert wurde.
8. Klicken Sie auf „OK“.
So aktualisieren Sie Ihre Avid-Editing-Anwendung manuell auf eine
Softwarelizenz:
1. Starten Sie Ihre Avid-Editing-Anwendung.
Das Aktivierungstool wird geöffnet.
2. Wählen Sie „I want to activate by phone or by using another computer’s
Internet connection“.
3. Klicken Sie auf „Continue“.
Das Avid Activation-Dialogfeld wird geöffnet und im System ID-Textfeld
wird die System-ID aus dem Dongle angezeigt.
76 Installationshandbuch für Editing-Anwendungen von Avid
Page 77

4. Geben Sie Ihre Seriennummer in das Serial Number-Textfeld ein. Ihre
Seriennummer befindet sich auf der Umschlaginnenseite dieses Handbuchs.
Wenn Sie Ihre Avid-Software online gekauft haben, wurde Ihnen die
Seriennummer von Avid per E-Mail zugeschickt. Außerdem können Sie Ihre
Seriennummer anzeigen, indem Sie sich bei Ihrem Support-Konto
anmelden.
5. Wenn Sie die Software telefonisch aktivieren möchten, rufen Sie Ihr Avid
Support Center an. Kontaktinformationen der Avid Support Center finden
Sie online unter http://www.avid.com/US/contact/video.
Ihre Avid-Vertretung teilt Ihnen einen Aktivierungscode für die Software
mit. Sobald Sie Ihren Aktivierungscode haben, können Sie mit Schritt 12
fortfahren.
6. Falls Sie einen anderen Computer verwenden, um die Software zu
aktivieren, öffnen Sie auf diesem Computer einen Webbrowser und
navigieren Sie zu http://activate.avid.com.
Die Avid Software Activation-Seite wird geöffnet.
7. Geben Sie Ihre Computer-ID in das Avid Machine ID-Textfeld ein. Ihre
Avid-Computer-ID finden Sie im Avid Activation-Dialogfeld.
8. Geben Sie Ihre System-ID in das entsprechende Textfeld ein. Ihre
System-ID befindet sich auf der Umschlaginnenseite dieses Handbuchs.
Wenn Sie Ihre Avid-Software online gekauft haben, wurde Ihnen die
System-ID von Avid per E-Mail zugeschickt. Außerdem können Sie Ihre
System-ID anzeigen, indem Sie sich bei Ihrem Support-Konto anmelden.
9. Geben Sie Ihre Seriennummer in das Serial Number-Textfeld ein. Ihre
Seriennummer befindet sich auf der Umschlaginnenseite dieses Handbuchs.
Wenn Sie Ihre Avid-Software online gekauft haben, wurde Ihnen die
Durchführen eines Software-Upgrades 77
Page 78

Seriennummer von Avid per E-Mail zugeschickt. Außerdem können Sie Ihre
Seriennummer anzeigen, indem Sie sich bei Ihrem Support-Konto
anmelden.
10. Klicken Sie auf „Submit“.
Die Avid Software Activation-Seite generiert Ihren Aktivierungscode und
öffnet eine Seite, auf der Sie zur Eingabe eines Bestätigungscodes
aufgefordert werden. Schließen Sie die Seite für den Bestätigungscode nicht.
11. Übertragen Sie den Aktivierungscode auf das System, das Sie aktivieren
möchten. Sie können entweder den Code in eine Textdatei kopieren und ein
Wechselspeichermedium, z. B. einen USB-Stick, verwenden oder die Daten
über Ihr Netzwerk übertragen.
12. Geben Sie im Avid Activation-Dialogfeld den Aktivierungscode in das
entsprechende Textfeld ein. Wenn Sie den gesamten Aktivierungscode, den
Sie auf der Avid Software Activation-Seite erhalten haben, aus einer
Textdatei in das erste Textfeld kopieren, werden die übrigen Textfelder
automatisch ausgefüllt.
13. Klicken Sie auf „Activate“.
Das Aktivierungstool bestätigt Ihre Systeminformationen. Nach Abschluss
der Aktivierung wird mit einer Meldung bestätigt, dass Ihre Software
erfolgreich aktiviert wurde.
14. Klicken Sie auf „OK“.
Ein Bestätigungscode wird angezeigt.
15. Geben Sie auf dem mit dem Internet verbundenen Computer den
Bestätigungscode ein und klicken Sie auf „OK“.
n Sollte das Confirmation Code-Textfeld nicht sichtbar sein, klicken Sie auf „Click
here to enter your dongle confirmation code“.
78 Installationshandbuch für Editing-Anwendungen von Avid
Page 79

So aktualisieren Sie Ihre Avid-Editing-Anwendung mit einem Dongle:
1. Vergewissern Sie sich, dass der Dongle an Ihr Avid-Editing-System
angeschlossen ist.
n Sie können Ihre Anwendung nur dann mit einem Dongle aktivieren, wenn die
entsprechende Option im Aktivierungstool verfügbar ist.
2. Doppelklicken Sie auf die Datei „DongleManager.exe“.
Das Dongle Manager-Fenster wird geöffnet.
3. Klicken Sie auf die Update-Registerkarte.
4. Klicken Sie auf „Open“ und navigieren Sie zum Speicherort Ihrer
Dongle-Aktualisierungsdatei (.avd).
5. Wählen Sie die Aktualisierungsdatei aus und klicken Sie auf „Open“.
6. Klicken Sie auf „Update“.
Die Anwendung „DongleManager.exe“ aktualisiert Ihren Dongle und zeigt
eine Meldung an, wenn die Verifizierung abgeschlossen ist.
7. Starten Sie Ihre Avid-Editing-Anwendung.
Das Aktivierungstool wird geöffnet.
8. Wählen Sie „I want to activate my software using my dongle“.
9. Klicken Sie auf „Continue“.
Das Aktivierungstool bestätigt Ihre Systeminformationen. Nach Abschluss
der Aktivierung wird mit einer Meldung bestätigt, dass Ihre Software
erfolgreich aktiviert wurde.
10. Klicken Sie auf „OK“.
Durchführen eines Software-Upgrades 79
Page 80

So aktualisieren Sie Ihre Avid-Editing-Anwendung mithilfe der Datei
„Versioner.avd“ (nur für Kunden mit Avid-Supportverträgen):
1. Laden Sie die zu Ihrer Editing-Anwendung gehörende Datei „Versioner.avd“
herunter.
2. Speichern Sie die Datei „Versioner.avd“ im Ordner der Editing-Anwendung:
(Windows) [Laufwerk]:/Programme/Avid/[Avid-Editing-Anwendung]
(Macintosh) Macintosh HD/Programme/[Avid-Editing-Anwendung]
3. Starten Sie Ihre Avid-Editing-Anwendung.
Das Aktivierungstool wird geöffnet.
4. Sie haben folgende Möglichkeiten:
t Wählen Sie „I want to activate my software using this computer’s
Internet connection“.
t Wählen Sie „I want to activate by phone or by using another computer’s
Internet connection“.
t Wählen Sie „I want to activate my software using my dongle“.
5. Klicken Sie auf „Continue“.
Das Avid Activation-Dialogfeld wird geöffnet. Das System ID-Textfeld
enthält Ihre vorhandene System-ID und das Serial Number-Textfeld Ihre
vorhandene Seriennummer.
6. Fahren Sie mit der Upgrade-Lizenzaktivierung fort wie in diesem Abschnitt
beschrieben (je nachdem, welche Lizenzoption Sie in Schritt 4 gewählt
haben).
80 Installationshandbuch für Editing-Anwendungen von Avid
Page 81

Deaktivieren der Software
Wenn Sie Ihre Avid-Editing-Anwendung auf einem anderen System ausführen
möchten, müssen Sie Ihre Softwarelizenz zunächst deaktivieren, um sie auf einem
zweiten System aktivieren zu können. Die Deaktivierung erfolgt, während Ihre
Avid-Editing-Anwendung läuft, jedoch werden bei dem Vorgang automatisch alle
geöffneten Bins und das aktuelle Projekt gespeichert. Sie benötigen eine
Internetverbindung, um die Software deaktivieren zu können.
Wenn Ihr System über eine Internetverbindung verfügt, können Sie Ihre
Avid-Editing-Anwendung automatisch reaktivieren. Andernfalls müssen Sie Ihre
Softwarelizenz manuell reaktivieren – telefonisch oder über die
Internetverbindung eines anderen Computers. Weitere Informationen zum
Aktivieren der Software finden Sie unter “Aktivieren der Software” on page 63.
So deaktivieren Sie Ihre Avid-Editing-Anwendung.
1. Starten Sie Ihre Avid-Editing-Anwendung und öffnen Sie anschließend ein
Projekt.
2. Wählen Sie „Special > Deactivate“.
Deaktivieren der Software 81
Page 82

Das Deactivate-Dialogfeld wird geöffnet.
3. Sie haben folgende Möglichkeiten:
t Falls Sie vorhaben, Ihre Avid-Editing-Anwendung zu einem späteren
Zeitpunkt erneut auf diesem System zu verwenden, deaktivieren Sie die
Option zum Löschen von System-ID und Seriennummer.
(Standardmäßig ist diese Option deaktiviert.) Dadurch bleiben die
lokalen Lizenzinformationen erhalten, sodass Sie Ihre Lizenz
problemlos reaktivieren können.
t Wenn Sie das System nicht wieder verwenden möchten – z. B. weil Sie
vorhaben, den Computer auszumustern –, aktivieren Sie die Option
zum Löschen von System-ID und Seriennummer. Dadurch werden die
lokalen Lizenzinformationen von Ihrem System gelöscht und es wird
verhindert, dass andere Anwender Ihre Lizenz aktivieren.
82 Installationshandbuch für Editing-Anwendungen von Avid
Page 83

4. Klicken Sie auf „Deactivate“.
Nach Abschluss der Deaktivierung wird mit einer Meldung bestätigt, dass
Ihre Softwarelizenz erfolgreich deaktiviert wurde.
5. Klicken Sie auf „OK“.
Ihre Avid-Editing-Anwendung speichert alle geöffneten Bins und das
aktuelle Projekt und wird anschließend beendet.
Deinstallieren der Avid-Editing-Anwendung
Vor der Installation der Editing-Anwendung müssen Sie die Digi-Treiber mithilfe
der Systemsteuerungsoption „Software“ deinstallieren. Starten Sie das System
neu und installieren Sie anschließend die neue Editing-Anwendung. Wenn Sie die
Digi-Treiber nicht entfernen, werden die AudioSuite-Plug-Ins nicht geladen und
Sie erhalten möglicherweise die Fehlermeldung „This software requires
installation of device driver TPkd and a reboot before running“ oder „DAE
Interface NOT Available“. Wenn diese Fehlermeldungen bei einer Neuinstallation
auf einem neuen System angezeigt werden, installieren Sie den Hotfix KB926255
von Windows Update, um das Problem zu beheben.
(Nur Macintosh) Bei einem Upgrade von einer früheren Version der
Editing-Anwendung für Macintosh müssen Sie die Plug-Ins Stereo Mixer.dpm
und Surround Mixer.dpm aus dem folgenden Verzeichnis entfernen:
Macintosh HD/Library/Application Support/Digidesign/Plug-Ins. Wenn Sie diese
Dateien nicht entfernen, kann dies Probleme mit dem AudioSuite-Tool nach sich
ziehen.
Bei allen Editing-Anwendungen von Avid müssen Sie sich zunächst als
Administrator anmelden (nicht nur als Anwender mit Administratorrechten), die
Anwendung installieren und den ersten Start der Anwendung als Administrator
Deinstallieren der Avid-Editing-Anwendung 83
Page 84

ausführen. Falls Sie in einer Umgebung mit gemeinsamer Speichernutzung
arbeiten, müssen Sie Ihre Arbeitsbereiche mounten. Anschließend können Sie die
Avid-Editing-Anwendung als normaler Anwender ausführen.
Falls Sie Pro Tools-Audiogeräte verwenden – z. B. Geräte aus der Avid
Mbox-Serie oder die Avid Pro Tools|HD Native-Hardware –, müssen Sie die
Gerätetreiber separat installieren. Audiogerätetreiber von Avid werden im
folgenden Verzeichnis gespeichert:
• (Windows)
Programme\Avid\Dienstprogramme\AudioDriverInstallers
• (Macintosh)
Utilities\Avid Audio Drivers
Programme\Dienstprogramme\Avid
c (Nur Macintosh) Wenn Sie Ihre Avid-Editing-Anwendung auf einem System
deinstallieren, auf dem auch Avid Pro Tools installiert ist, deinstallieren Sie
nicht die Treiber Avid Core Runtime und Avid DIO Runtime. Diese Treiber
werden mit Pro Tools gemeinsam genutzt und Pro Tools erfordert, dass sie
ordnungsgemäß funktionieren.
(Windows) So können Sie die Avid-Editing-Anwendung
deinstallieren:
t Entfernen Sie die Editing-Anwendung mithilfe der Option „Software“.
t (Windows XP) Öffnen Sie die Systemsteuerung, klicken Sie auf „Software“
und wählen Sie die Editing-Anwendung aus.
t (Windows Vista oder Windows 7) Öffnen Sie die Systemsteuerung, klicken
Sie auf „Programme > Programm deinstallieren“ und wählen Sie die
Editing-Anwendung aus.
84 Installationshandbuch für Editing-Anwendungen von Avid
Page 85

(Macintosh) So deinstallieren Sie die Avid-Editing-Anwendung:
1. Beenden Sie alle aktiven Anwendungen.
2. Legen Sie die DVD der Editing-Anwendung ein.
3. Rufen Sie das Verzeichnis
„Programme/Avid_Uninstaller/Avid-Editing-Anwendung“ auf.
4. Doppelklicken Sie auf das Deinstallationsprogramm für
Avid-Editing-Anwendung.
5. Folgen Sie den Anweisungen auf dem Bildschirm.
6. Wiederholen Sie den Vorgang zum Deinstallieren von AvidCoreRuntime,
AvidDIORuntime und AvidCodecs PE.
Deinstallieren der Avid-Editing-Anwendung 85
Page 86

86 Installationshandbuch für Editing-Anwendungen von Avid
Page 87

4 Manuale di installazione per le applicazioni di
montaggio Avid
Le informazioni più aggiornate sull'applicazione di montaggio Avid in uso sono
disponibili nella versione online del file ReadMe. È consigliabile verificare la
versione più aggiornata delle note di rilascio o del ReadMe online, poiché la
versione online viene aggiornata non appena sono disponibili nuove informazioni.
Per visualizzare le versioni online, scegliere ReadMe dal menu della guida
dell'applicazione di montaggio Avid in uso o consultare la Knowledge Base
all'indirizzo www.avid.com/readme.
Installazione del software
Prima di installare l'applicazione di montaggio in uso, consultare le procedure
seguenti. Sono disponibili procedure sia per utenti che eseguono l'aggiornamento
all'applicazione, sia per nuovi utenti. Scegliere la procedura applicabile:
• I nuovi utenti che non hanno mai installato l'applicazione di montaggio
devono passare alla sezione “Installazione dell'applicazione di montaggio
Avid” on page 88.
• Gli utenti che eseguono l'aggiornamento da una versione precedente
dell'applicazione di montaggio devono invece disattivare il software e
disinstallare la versione precedente prima di installare il nuovo software.
Vedere gli argomenti seguenti:
- “Disattivazione del software” on page 109
- “Disinstallazione dell'applicazione di montaggio Avid” on page 111
- “Installazione dell'applicazione di montaggio Avid” on page 88
Page 88

Installazione dell'applicazione di montaggio Avid
Per tutte le applicazioni di montaggio Avid è necessario innanzitutto eseguire
l'accesso come amministratore (non solo come utente con privilegi di
amministratore), installare l'applicazione, e avviare l'applicazione per la prima
volta come amministratore. Se si lavora in un ambiente di archiviazione
condiviso, montare le aree di lavoro. In seguito, sarà possibile eseguire
l'applicazione di montaggio Avid come utente comune.
n L'installazione del software dell'applicazione di montaggio Avid può richiedere
un certo tempo. L'installazione di una singola applicazione di montaggio può
richiedere da 5 a 15 minuti. L'installazione dell'intera suite di montaggio può
invece richiedere fino a 35 minuti.
(Windows) Per installare il software dell'applicazione di montaggio
Avid:
1. Chiudere tutte le applicazioni attive.
2. Inserire il DVD dell'applicazione di montaggio.
3. Scegliere l'opzione Install the Avid Editor Suite or Individual Product e
seguire le istruzioni visualizzate.
n Se viene visualizzata la finestra di dialogo FilesInUse, è possibile fare clic su
Ignora e continuare.
n Se durante l'installazione vengono visualizzati avvisi relativi all'accesso utenti,
fare clic su Continue Anyway e procedere con l'installazione.
4. Quando richiesto selezionare Yes, restart my computer.
5. Passare alla sezione “Avvio dell'applicazione di montaggio” on page 89.
88 Manuale di installazione per le applicazioni di montaggio Avid
Page 89

(Macintosh) Per installare il software dell'applicazione di montaggio
Avid:
1. Chiudere tutte le applicazioni.
2. Inserire il DVD dell'applicazione di montaggio.
3. Fare doppio clic su EditingApplicationName.mpkg.
4. Scegliere l'opzione Install the Avid Editor Suite or Individual Product e
seguire le istruzioni visualizzate.
5. Quando richiesto selezionare Yes, restart my computer.
6. Passare alla sezione “Avvio dell'applicazione di montaggio” on page 89.
Avvio dell'applicazione di montaggio
Con il processo di installazione vengono aggiunte un'icona sul desktop e una voce
relativa all'applicazione di montaggio Avid nel menu Start. Se l'applicazione di
montaggio Avid viene installata in un computer portatile, potrebbe essere
visualizzata una finestra di dialogo indicante la presenza di combinazioni per il
risparmio di energia incompatibili. Durante l'utilizzo delle applicazioni di
montaggio Avid, è consigliabile utilizzare la combinazione per il risparmio di
energia Sempre attivata per sistemi Windows XP e l'opzione Prestazioni elevate
per Windows Vista o Windows 7. Altre combinazioni potrebbero infatti avere
ripercussioni sulle prestazioni di alcune funzioni di montaggio quali
l'acquisizione e i tagli digitali.
Installazione del software 89
Page 90

(Windows) Per avviare l'applicazione di montaggio Avid, eseguire
una delle seguenti operazioni:
t Fare clic su Start > Tutti i programmi > Avid > applicazione di montaggio
t Fare doppio clic sull'icona del desktop dell'applicazione di montaggio Avid.
(Macintosh) Per avviare l'applicazione di montaggio Avid, eseguire
una delle seguenti operazioni:
t Fare doppio clic sull'icona dell'alias dell'applicazione di montaggio Avid
t Fare doppio clic sull'icona dell'alias dell'applicazione di montaggio Avid sul
t Scegliere Vai > Applicazioni, quindi fare doppio clic sulla cartella
Introduzione
Se durante l'installazione dell'applicazione di montaggio Avid si sceglie di
installare il progetto e il supporto introduttivi, è possibile aprire tale progetto nella
finestra di dialogo della selezione progetti. Il progetto introduttivo, denominato
Avid Boston Project DV25, contiene una sequenza completa con effetti e titoli
Avid.
Dopo l'avvio dell'applicazione di montaggio si apre lo strumento Avid
Activation. Per ulteriori informazioni sull'attivazione del software, vedere il
Manuale di installazione per le applicazioni di montaggio Avid.
sulla scrivania.
Dock.
dell'applicazione di montaggio Avid. In seguito, fare doppio clic sul file
dell'applicazione di montaggio Avid.
Dopo l'avvio dell'applicazione di montaggio si apre lo strumento Avid
Activation. Per ulteriori informazioni sull'attivazione del software, vedere il
Manuale di installazione per le applicazioni di montaggio Avid.
90 Manuale di installazione per le applicazioni di montaggio Avid
Page 91

renderizzati, nonché tutte le clip audio e video utilizzate nella sequenza. È
consigliabile apprendere a eseguire operazioni di montaggio con l'applicazione
Avid utilizzando il progetto introduttivo prima di acquisire altri tipi di supporti. È
possibile esaminare la sequenza nella timeline per vedere come è stata assemblata
e utilizzare le clip per mettere in pratica le tecniche di visualizzazione e
montaggio descritte nel presente manuale. Vedere l'argomento relativo all'avvio di
un progetto nella Guida in linea.
Nota sull'aggiornamento firmware
Al primo avvio dell'applicazione di montaggio dopo l'installazione, potrebbe
essere visualizzata una finestra di dialogo che richiede l'aggiornamento del
firmware dell'hardware Avid. Eseguire l'aggiornamento. Durante il processo di
aggiornamento, non accedere ad altre applicazioni né spostare le finestre attive. Se
si accede a un'altra applicazione, la finestra del completamento
dell'aggiornamento potrebbe venire nascosta. In tal caso, sarà possibile vedere che
l'avanzamento dell'aggiornamento è al 100% ma non sarà possibile procedere in
alcun modo. La finestra nascosta che indica il completamento dell'aggiornamento
e richiede di arrestare il sistema non può essere portata in primo piano. In tal caso,
è necessario arrestare (e non riavviare) il sistema e accenderlo di nuovo.
Attivazione del software Avid
Dopo aver installato il software, l'applicazione di montaggio Avid può essere
attivata in uno dei modi seguenti:
• È possibile utilizzare una connessione Internet per l'attivazione automatica
del software. Lo strumento Avid Activation consente di attivare il software
online mediante il numero di identificazione del sistema e il numero di serie
forniti con il software.
Attivazione del software Avid 91
Page 92

• È possibile utilizzare una connessione Internet per l'attivazione manuale
dell'applicazione di montaggio Avid. Se il sistema in cui è eseguita
l'applicazione di montaggio Avid non è connesso a Internet, è possibile
attivare il software da un altro computer che dispone della connessione
Internet.
• È possibile attivare il software eseguendo l'aggiornamento da una versione
basata su dongle a una versione con licenza software. Per ulteriori
informazioni, vedere “Aggiornamento del software” on page 100.
• È possibile attivare il software eseguendo l'aggiornamento da una versione
con licenza software precedentemente installata a una nuova versione con
licenza software. Per ulteriori informazioni, vedere “Aggiornamento del
software” on page 100.
• È possibile attivare il software per telefono contattando il servizio di
assistenza Avid. Tale opzione consente di attivare l'applicazione di
montaggio Avid nel caso in cui la configurazione del sistema non consenta
l'accesso a Internet.
• Il software può essere eseguito per un periodo di prova di 30 giorni senza
richiedere l'attivazione. Durante il periodo di prova è possibile accedere a
tutte le funzionalità dell'applicazione di montaggio Avid. Al termine di tale
periodo, si può scegliere di acquistare il software e attivarlo.
n In presenza di un contratto di assistenza Avid attivo, potrebbe essere possibile
aggiornare il software mediante una chiave applicazione esistente (dongle). Per
ulteriori informazioni, vedere le istruzioni relative all'aggiornamento disponibili
nell'area download Avid o fornite con il kit di aggiornamento.
92 Manuale di installazione per le applicazioni di montaggio Avid
Page 93

c Prima di modificare la configurazione del sistema, ad esempio sostituendo
l'unità disco rigido o aggiornando il sistema operativo, è necessario
disattivare il software Avid. Per informazioni sulla disattivazione, vedere
“Disattivazione del software” on page 109.
Attivazione del software
Una volta installato il software dell'applicazione di montaggio Avid, è necessario
attivare la copia dell'applicazione.
Lo strumento Avid Activation viene avviato al primo avvio dell'applicazione di
montaggio Avid. Se si utilizza la versione di prova di 30 giorni dell'applicazione
Avid, lo strumento Activation si avvia quando viene avviata l'applicazione di
montaggio Avid al termine del periodo di prova di 30 giorni.
c L'attivazione utilizza l'indirizzo del NIC (Network Interface Controller) del
sistema, pertanto è importante non modificare la configurazione Ethernet
una volta attivato il software. Se è necessario disattivare uno o più NIC nel
sistema, effettuare l'operazione prima dell'attivazione. Se si installa il
software in un laptop che disattiva automaticamente il NIC (ad esempio,
quando si alterna connessione Ethernet e connessione Internet wireless),
consultare la documentazione del computer per istruzioni sulla modifica
delle impostazioni del NIC di sistema prima dell'attivazione del software
Av id .
n Se si disattiva l'applicazione di montaggio Avid durante il periodo di prova di 30
giorni, il periodo di prova continua a essere vigente, e non è possibile continuare
a utilizzare la versione di prova una volta trascorsi i 30 giorni previsti.
Se si aggiorna software fornito in origine con una chiave applicazione, detta anche
dongle, è necessario connettere la chiave prima di attivare il software mediante lo
strumento Avid Activation (per ulteriori informazioni, vedere l'argomento della
Attivazione del software 93
Page 94

Guida in linea relativo alla connessione della chiave applicazione). Quando si
aggiorna l'applicazione di montaggio Avid passando da una versione provvista di
dongle a una versione senza dongle, lo strumento Activation disattiva
automaticamente il dongle al momento della registrazione della copia del
software in uso. Per informazioni sull'aggiornamento da un'applicazione basata su
dongle a una licenza software vedere “Aggiornamento del software” on page 100.
Per attivare automaticamente l'applicazione di montaggio Avid:
1. Avviare l'applicazione di montaggio Avid.
Viene visualizzato lo strumento Activation.
94 Manuale di installazione per le applicazioni di montaggio Avid
Page 95

2. Selezionare l'opzione che consente di attivare il software mediante la
connessione a Internet del computer.
3. Fare clic su Continue.
Viene visualizzata la finestra di dialogo Avid Activation.
4. Immettere il numero di identificazione del sistema nella casella di testo
System ID. Il numero di identificazione del sistema è riportato nella
copertina interna della presente guida. Se il software Avid è stato acquistato
online, l'utente ha ricevuto il numero di identificazione del sistema da Avid
tramite e-mail. In alternativa è possibile visualizzare il numero di
identificazione del sistema accedendo all'account di supporto.
Attivazione del software 95
Page 96

n È possibile copiare e incollare il numero di identificazione del sistema e il numero
di serie da un file di testo alle caselle di testo appropriate.
5. Immettere il numero serie nella casella di testo Serial Number. Il numero di
serie è riportato nella copertina interna della presente guida. Se il software
Avid è stato acquistato online, l'utente ha ricevuto il numero di serie del
sistema da Avid tramite e-mail. In alternativa è possibile visualizzare il
numero di serie del sistema accedendo all'account di supporto.
6. Per visualizzare l'informativa sulla privacy di Avid, fare clic su Read Privacy
Policy.
7. Eseguire una delle seguenti operazioni:
t Selezionare Register your product with Avid Technology, Inc. now,
quindi fare clic su Avanti.
Viene visualizzata una finestra di dialogo di registrazione. La
registrazione online Avid consente di ricevere importanti
aggiornamenti e informazioni di manutenzione.
t Selezionare Don't register at this time, quindi fare clic su Activate.
Lo strumento Activation conferma le informazioni di sistema. Al
completamento dell'attivazione, un messaggio indica che il software è
stato attivato correttamente.
n Per non registrare il software ora, è possibile eseguire l'operazione in un secondo
momento scegliendo Special > Register nell'applicazione di montaggio Avid.
96 Manuale di installazione per le applicazioni di montaggio Avid
Page 97

8. Se si decide di registrare il software, eseguire le seguenti operazioni:
a. Nella finestra di dialogo Register digitare il nome, l'indirizzo e le
informazioni di contatto nelle caselle di testo appropriate. Gli asterischi
(*) indicano campi obbligatori.
b. Fare clic su Avanti.
Viene visualizzata una finestra di dialogo di registrazione.
c. Immettere le informazioni del prodotto e del cliente appropriate. Gli
asterischi (*) indicano campi obbligatori.
d. Fare clic su Activate and Register.
Lo strumento Activation conferma le informazioni di sistema. Al
completamento dell'attivazione, un messaggio indica che il software è
stato attivato correttamente.
9. Fare clic su OK.
Per attivare manualmente l'applicazione di montaggio Avid:
1. Avviare l'applicazione di montaggio Avid.
Viene visualizzato lo strumento Activation.
2. Selezionare I want to activate by phone or by using another computer's
Internet connection.
3. Fare clic su Continue.
Viene visualizzata la finestra di dialogo Avid Activation.
4. Immettere il numero di identificazione del sistema nella casella di testo
System ID. Il numero di identificazione del sistema è riportato nella
copertina interna della presente guida.
Attivazione del software 97
Page 98

n È possibile copiare e incollare il numero di identificazione del sistema e il numero
di serie da un file di testo alle caselle di testo appropriate.
5. Immettere il numero serie nella casella di testo Serial Number. Il numero di
serie è riportato nella copertina interna della presente guida. Se il software
Avid è stato acquistato online, l'utente ha ricevuto il numero di serie del
sistema da Avid tramite e-mail. In alternativa è possibile visualizzare il
numero di serie del sistema accedendo all'account di supporto.
6. Per attivare il software per telefono contattare l'Avid Support Center più
vicino. I dati di contatto degli Avid Support Center sono disponibili online
all'indirizzo http://www.avid.com/US/contact/video.
Il rappresentante Avid fornirà un codice di attivazione per il software. Una
volta ottenuto il codice di attivazione, andare al passaggio 12.
7. Se per attivare il software si utilizza un altro computer, nel secondo
computer aprire un browser Web e accedere a http://activate.avid.com.
Viene visualizzata la pagina Avid Activation.
98 Manuale di installazione per le applicazioni di montaggio Avid
Page 99

8. Immettere il numero di identificazione del computer nella casella di testo
Avid Machine ID. Il numero Avid Machine ID è visualizzato nella finestra di
dialogo Avid Activation.
9. Immettere il numero di identificazione del sistema nella casella di testo
System ID. Il numero di identificazione del sistema è riportato nella
copertina interna della presente guida. Se il software Avid è stato acquistato
online, l'utente ha ricevuto il numero di identificazione del sistema da Avid
tramite e-mail. In alternativa è possibile visualizzare il numero di
identificazione del sistema accedendo all'account di supporto.
10. Immettere il numero serie nella casella di testo Serial Number. Il numero di
serie è riportato nella copertina interna della presente guida. Se il software
Avid è stato acquistato online, l'utente ha ricevuto il numero di serie del
sistema da Avid tramite e-mail. In alternativa è possibile visualizzare il
numero di serie del sistema accedendo all'account di supporto.
11. Fare clic su OK.
La pagina Avid Activation genera il codice di attivazione.
12. Trasferire il codice di attivazione al sistema da attivare. È possibile copiare il
codice in un file di testo e utilizzare un dispositivo di archiviazione
rimovibile, quale un'unità USB, oppure trasferire i dati in rete.
13. Nella finestra di dialogo Avid Activation, immettere il codice di attivazione
nella casella di testo Activation Code. Copiare dal file di testo l'intero codice
di attivazione ricevuto dalla pagina Avid Activation e incollarlo nella prima
casella di testo: le altre caselle verranno compilate automaticamente.
14. Fare clic su OK.
Lo strumento Activation conferma le informazioni di sistema. Al
completamento dell'attivazione, un messaggio indica che il software è stato
attivato correttamente.
Attivazione del software 99
Page 100

15. Fare clic su OK.
Per utilizzare l'applicazione di montaggio Avid per un periodo di
prova di 30 giorni:
1. Avviare l'applicazione di montaggio Avid.
Viene visualizzato lo strumento Activation.
2. Selezionare I want to run a fully-featured, trial version of [applicazione di
montaggio Avid] for 30 days.
3. Fare clic su Continue.
Un messaggio indica che il software è stato attivato correttamente. In
qualsiasi momento del periodo di prova di 30 giorni è possibile scegliere di
acquistare una copia dell'applicazione di montaggio Avid e utilizzare lo
strumento Activation per attivarla. Se si sceglie di non acquistare il software,
l'applicazione di montaggio Avid viene disattivata al termine del periodo di
prova di 30 giorni.
Aggiornamento del software
È possibile aggiornare l'applicazione di montaggio Avid da una licenza software
esistente o da una licenza su dongle. Se si aggiorna da una licenza su dongle e si
cambia modello di prodotto, il kit di aggiornamento include una scheda di
aggiornamento del dongle, un codice di aggiornamento e un codice di attivazione
del software. Per aggiornare il software, consultare le istruzioni incluse nel kit di
aggiornamento.
n L'aggiornamento della licenza del dongle a una licenza software aggiorna le
informazioni nel dongle e lo disattiva. Una volta attivata la licenza software, il
dongle non è più necessario per l'esecuzione dell'applicazione di montaggio Avid.
100 Manuale di installazione per le applicazioni di montaggio Avid
 Loading...