

Page 1
ese
Pr
tEditor
User Guide
English ( 2 – 54 )
Appendix
English ( 55 – 57 )
Page 2
Introduction
The Hammer 88 Pro Preset Editor software gives you a visual and intuitive way to edit the
various MIDI messages that your Hammer 88 Pro’s controls send to your computer.
Information & Support
For the latest information about this product (documentation, technical specifications, system
requirements, compatibility information, etc.) and product registration, visit m-audio.com.
For additional product support, visit m-audio.com/support.
Installation
®
1. Double-click the .exe (Windows
2. Follow the on-screen instructions.
After the installation has completed, open the Hammer 88 Pro Preset Editor by doing the
following:
• Windows: Click the Start Menu, click All Programs, click the M-Audio folder, and
then click Hammer 88 Pro Preset Editor.
• macOS: Double-click Hammer 88 Pro Preset Editor in Applications.
) or .pkg (macOS) installer file you downloaded.
2
Page 3

Operation
Getting Started
To open the Hammer 88 Pro Preset Editor:
1. Optional: Connect your Hammer 88 Pro to your computer using a standard USB cable. (If
you are connecting your keyboard to a USB hub, make sure it is a powered hub.) You can
still use the Hammer 88 Pro Preset Editor without connecting an Hammer 88 Pro, but you
will not be able to send presets to it or retrieve presets from it.
2. Open the Hammer 88 Pro Preset Editor. The window will show a graphical representation
of your Hammer 88 Pro with all of its editable controls.
3
Page 4

Managing Your Presets
About Presets
A preset is a preset file containing all of the assignments you make in the Preset Editor. This
includes MIDI assignments, and pad LED color assignments. Using presets lets you maintain
several different control configurations to use in different situations. For instance, you may use
different presets with different kinds of software, or you may use some presets for production
and others for performance.
Your Hammer 88 Pro can store 16 presets at a time. You can store additional presets on your
computer to load onto your Hammer 88 Pro keyboard with this Preset Editor.
This chapter explains how to load presets into the Preset Editor (Loading & Retrieving
Presets), save presets onto your computer (Saving Presets), and send presets to your
connected Hammer 88 Pro (Sending Presets).
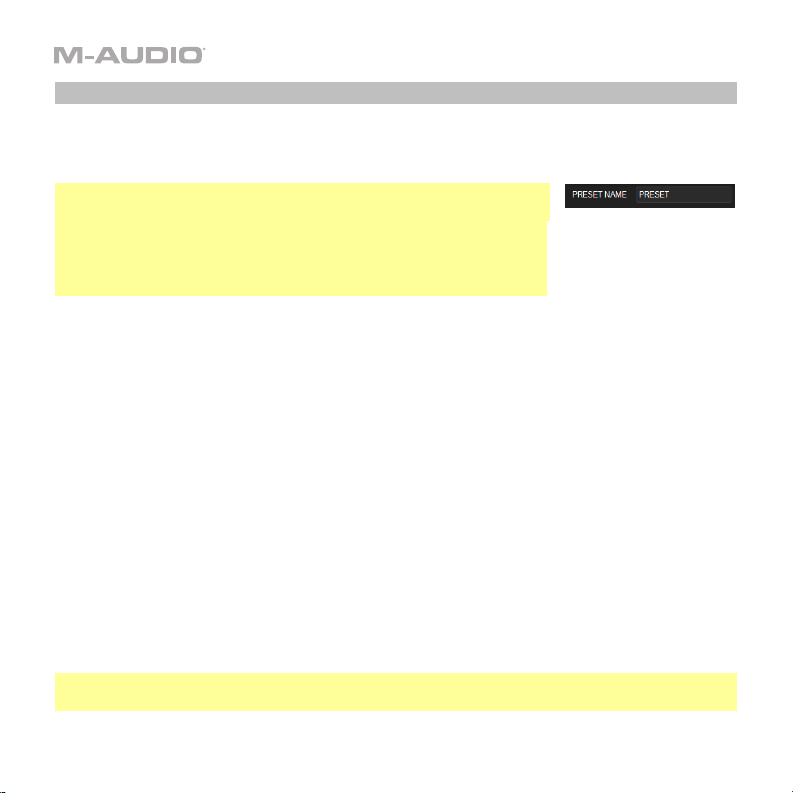
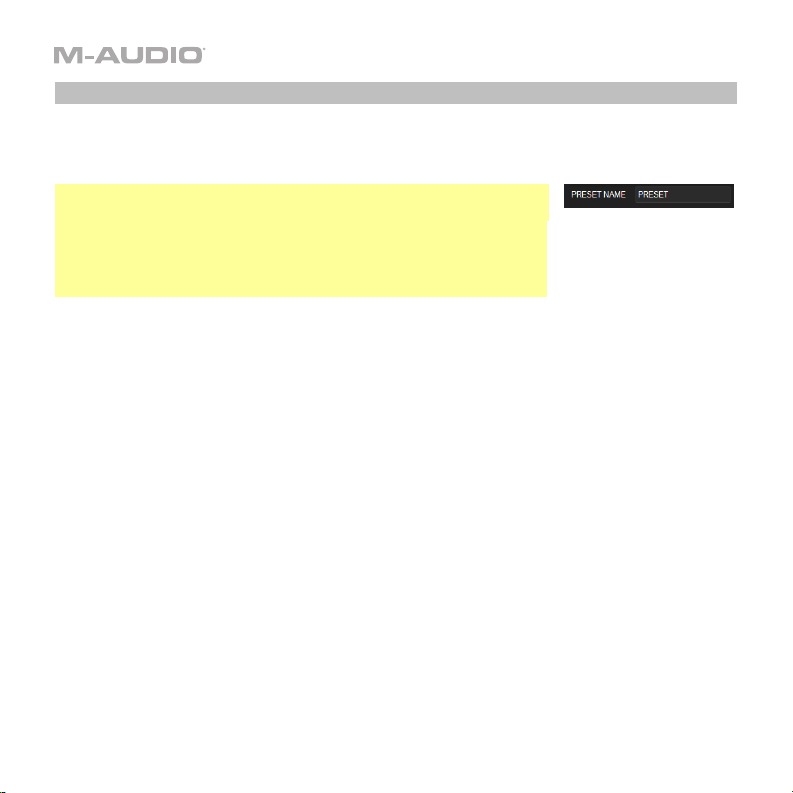
Note: The current preset’s name is shown in the middle right corner of the window. This is the
name that appears in your Hammer 88 Pro keyboard’s display when you load it. To change the
name, click the field and enter a new name. Preset names can be 7 characters long and can
include the following characters: A–Z, 0–9, [ ] / \ - = _ ' . and spaces.
4
Page 5
Loading & Retrieving Presets
To edit a preset, you first have to load it into the Preset Editor. You can load a preset from
your computer or retrieve a preset from your connected Hammer 88 Pro.
Note: The current preset’s name is shown in the lower-left corner of
the window. This is the name that appears in your Hammer 88 Pro’s
display when you load it. To change the name, click the field and
enter a new name. Preset names can be 7 characters long and can
include the following characters: A–Z, 0–9, [ ] / \ - = _ ' . and
spaces.
To load a preset from your computer, do one of the following:
• Click File and then click Load Preset.
• Press Ctrl+O (Windows) or Command+O (macOS).
After that, locate the desired preset file and click Open.
To retrieve a preset from your connected Hammer 88 Pro:
1. Click File and then click Retrieve Preset. Alternatively, press Ctrl+Shift+R (Windows) or
Command+Shift+R (macOS).
2. In the window that appears, click the drop-down menu to select the desired preset
number (Preset 1–16) or the current settings of your Hammer 88 Pro (RAM).
3. Click Get to confirm your choice, or click the X in the upper-left corner to close the
window and cancel the operation.
Important: Editing this preset will not affect the preset stored on your Hammer 88 Pro. See
Sending Presets below to learn how to send the edited preset to your Hammer 88 Pro.
5
Page 6
Saving Presets
Saving a preset on your computer lets you edit it or send it to your Hammer 88 Pro in the
future. All MIDI assignments that you see in the Preset Editor will be saved in the preset.
Note: The current preset’s name is shown in the lower-left corner of
the window. This is the name that appears in your Hammer 88 Pro’s
display when you load it. To change the name, click the field and
enter a new name. Preset names can be 7 characters long and can
include the following characters: A–Z, 0–9, [ ] / \ - = _ ' . and
spaces.
To save the preset, do one of the following:
• Click File and then click Save Preset.
• Press Ctrl+S (Windows) or Command+S (macOS).
If this is the first time you are saving the preset, select the desired location, enter a file name,
and click Save.
6
Page 7
Sending Presets
Sending a preset to your connected Hammer 88 Pro lets you transfer the preset from the
Preset Editor to your Hammer 88 Pro’s internal memory. All MIDI assignments that you see in
the Preset Editor will be sent to your Hammer 88 Pro.
Note: The current preset’s name is shown in the lower-left corner of
the window. This is the name that appears in your Hammer 88 Pro
keyboard’s display when you load it. To change the name, click the
field and enter a new name. Preset names can be 7 characters long
and can include the following characters: A–Z, 0–9, [ ] / \ - = _ ' .
and spaces.
To send a preset to your connected Hammer 88 Pro:
1. Click File and then click Send Preset. Alternatively, press Ctrl+Shift+S (Windows) or
Command+Shift+S (macOS).
2. In the window that appears, click the drop-down menu to select the desired preset
number (Preset 1–16) or the current settings of your Hammer 88 Pro (RAM).
3. Click Send to confirm your choice, or click the X in the upper-right corner to close the
window and cancel the operation. (Sending the preset will overwrite that preset number on
your Hammer 88 Pro.)
7
Page 8
Editing the Controls
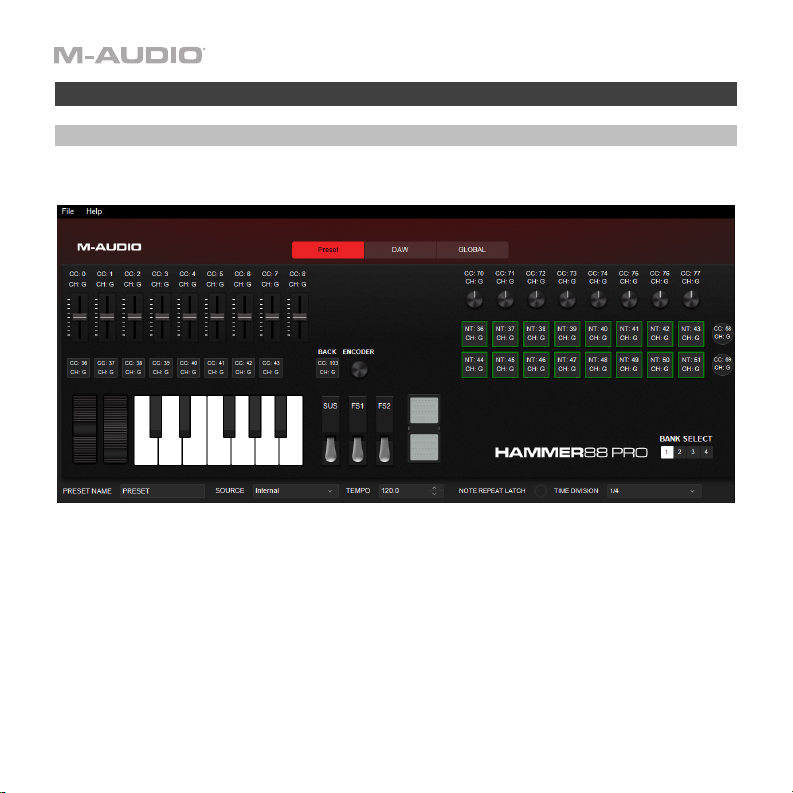
Overview
Graphical User Interface
To edit the parameters for a type of control on your Hammer 88 Pro, click the desired control
in the graphic of the Hammer 88 Pro in the software window.
Preset Name: Shows the name of the Preset that is selected.
Source: Selects whether the tempo is set from the keyboard’s internal tempo or synced to an
external DAW.
Tempo: Displays the preset’s tempo setting.
8
Page 9
Control Panel
The bottom part of the window is the control panel, which shows the
available and current modes and parameters of the selected Hammer 88
Pro control. Its name will appear in the upper-left corner of the control
panel, and it will be highlighted in the graphical user interface above it, as
well.
To select a control, click it.
To use a drop-down menu, click it to reveal the menu options, and
then click an option to select it.
To use a value field, do any of the following:
• Click it and enter a number (0–127).
• Click the up (∧) or down (∨) arrows next to the field.
• Click it and then use your computer’s up () or down () keys.
To use a checkbox, click it to fill (enable) or unfill (disable) it.
(Doing so may reveal or hide additional parameters that you can
set.)
9
Page 10

Encoder
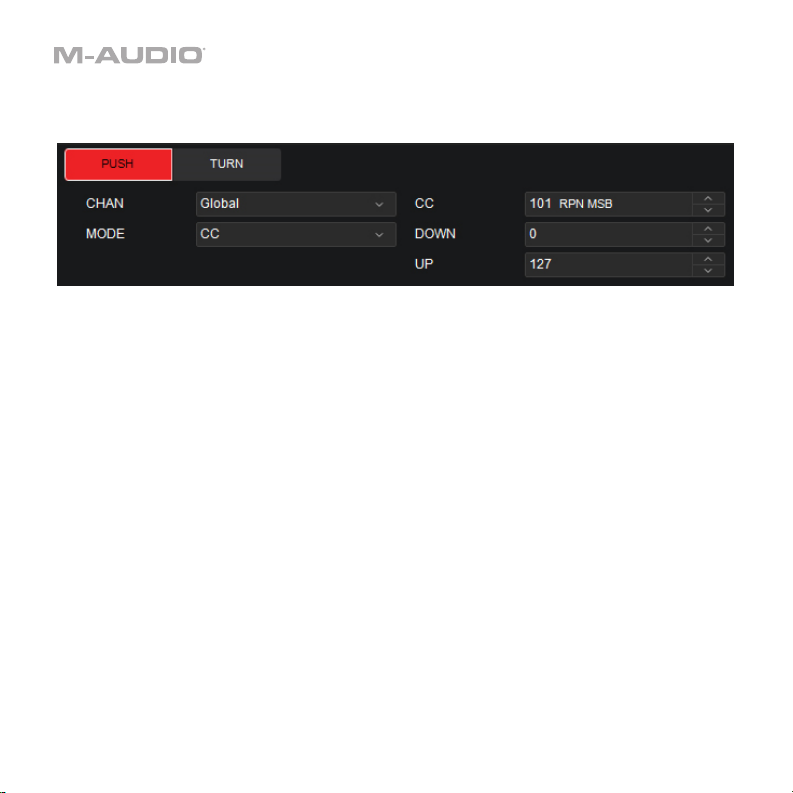
Click on the Encoder in Preset Mode to set the MIDI assignments for when it is pushed and when it is turned.
When the Push tab is selected in Preset Mode, select from these options. The parameters below will
depend on your selection.
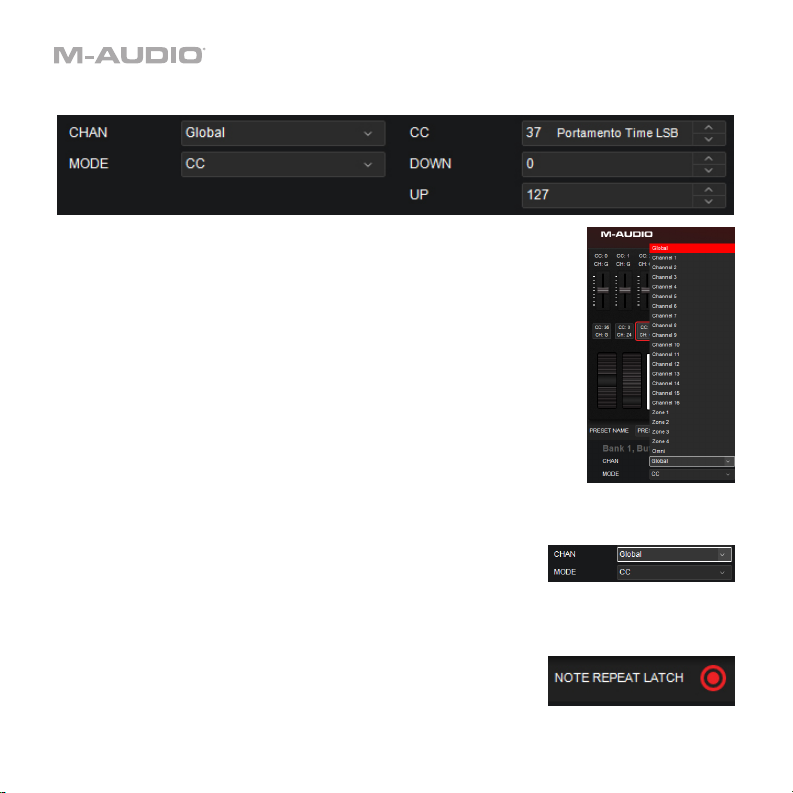
• Chan: The encoder will send its messages over this channel. Select the global channel (Global), a
specific channel (Channel 1–16), a zone (Zone 1–4), or all channels (Omni).
• Mode:
o CC: The encoder will send its MIDI messages when pressed using the selected CC number and
Up/Down values.
o Program: The encoder will send its MIDI messages using the selected Program number and
MSB and LSB values.
o Same As DAW: The encoder will send its MIDI messages based on what is set in your DAW.
• CC: Selects the MIDI CC value that will be sent when the encoder is pressed.
• Down: The encoder will send this CC value when you press it.
• Up: The encoder will send this CC value when you release it.
• Program: The encoder will send this program number when you press it.
• MSB: The encoder will send this Bank MSB (Most Significant Byte) number when you press it.
• LSB: The encoder will send this Bank LSB (Least Significant Byte) number when you press it.
10
Page 11
When the Push tab is selected in DAW Mode, select from these options to set the MIDI assignments
for when it is pushed. The parameters below will depend on your selection.
• Chan: The encoder will send its messages over this channel. Select the global channel (Global)
or a specific channel (Channel 1–16).
• Mode: This will specify what message will be sent when the Encoder is turned.
o CC: When set to CC, the encoder will send standard MIDI CC messages to your DAW.
o Program: The encoder will send its MIDI messages using the selected Program number
and MSB and LSB values.
o Mackie: When set to Mackie Control, you can use the encoder with a DAW that responds
to Mackie Control mode.
o Mackie/HUI: When set to Mackie/HUI, you can use the encoder with a DAW that
responds to HUI mode.
• CC: Selects the MIDI CC value that will be sent when the encoder is pressed.
• Down: The encoder will send this CC value when you press it.
• Up: The encoder will send this CC value when you release it.
• Program: The encoder will send this program number when you press it.
• MSB: The encoder will send this Bank MSB (Most Significant Byte) number when you press it.
• LSB: The encoder will send this Bank LSB (Least Significant Byte) number when you press it.
11
Page 12

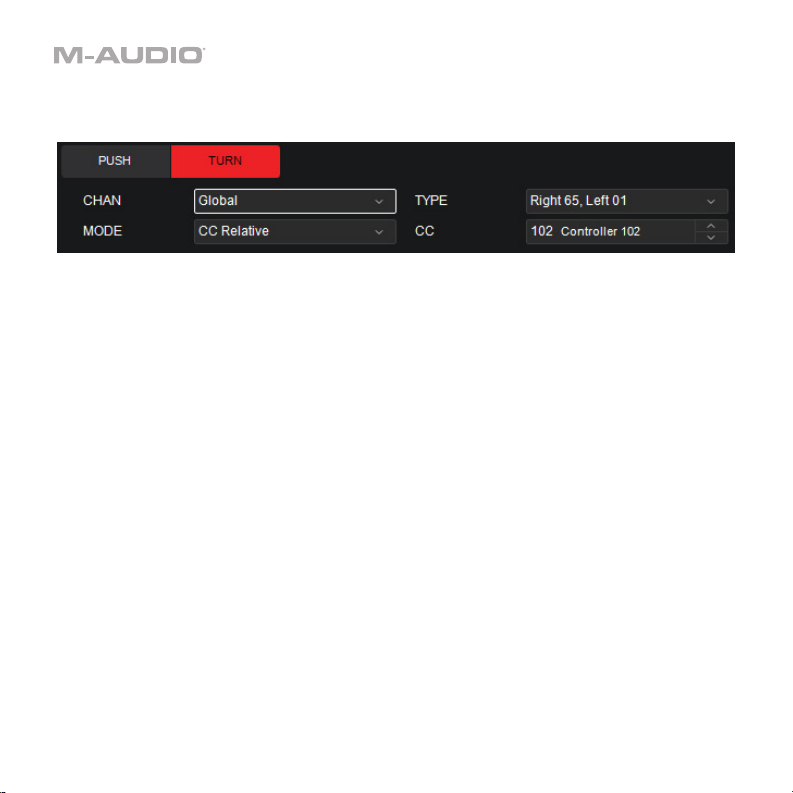
When the Turn tab is selected in Preset Mode, select from these options to set the MIDI
assignments for when it is turned.
The parameters below will depend on your selection.
• Chan: The encoder will send its messages over this channel. Select the global channel
(Global), a specific channel (Channel 1–16), a zone (Zone 1–4), or all channels (Omni).
• Mode: This will specify what message will be sent when the Encoder is turned.
o CC Relative: This is useful for controlling endless encoders in software. Select from
Right 65, Left 63; Right 63, Left 65; Right 127, Left 01; Right 01, Left 127.
o CC Cycle: This useful for controlling from 2 - 4 CC values, as seen on a button or VI
control with 2-4 parameters. Select from 2-4 values.
o CC Inc/Dec: This is useful for scrolling through several CC values.
o Program Cycle: This is useful for selecting between different presets in software or
external MIDI hardware. Select from 2-4 program messages.
o Program INC/DEC: This is useful to scroll through multiple program messages.
o Same as DAW: This assignment will match the message assigned to the Hammer 88
Pro's current DAW selection's encoder.
12
Page 13
When the Turn tab is selected in DAW Mode, select from these options to set the MIDI
assignments for when it is turned.
The parameters below will depend on your selection.
• Chan: The encoder will send its messages over this channel. Select the global channel
(Global) or a specific channel (Channel 1–16).
• Mode: This will specify what message will be sent when the Encoder is turned.
o CC Relative: This is useful to send standard MIDI CC messages to your DAW.
o CC Cycle: This useful for controlling from 2 - 4 CC values, as seen on a button or VI
control with 2-4 parameters. Select from 2-4 values.
o CC Inc/Dec: This is useful for scrolling through several CC values.
o Program Cycle: This is useful for selecting between different presets in software or
external MIDI hardware. Select from 2-4 program messages.
o Program INC/DEC: This is useful to scroll through multiple program messages.
o Mackie Up/Down: This is useful to scroll up/down in a DAW that responds to Mackie
Control Mode.
o Mackie Left/Right: This is useful to scroll left/right in a DAW that responds to Mackie
Control Mode.
o HUI Up/Down: This is useful to scroll up/down in a DAW that responds to HUI mode.
o HUI Left/Right: This is useful to scroll left/right in a DAW that responds to HUI mode.
13
Page 14
• CC Relative Type: The Encoder will send a value number in the range of values when
you turn it left or right.
o Right 65, Left 63
o Right 63, Left 65
o Right 127, Left 01
o Right 01, Left 127
• CC Cycle Mode Type: The Encoder will send from 2 to 4 values when turned.
• CC Cycle Value: Specifies what CC value will be sent.
• CC: Selects the MIDI CC value that will be sent when the encoder is turned.
• Program Cycle Mode Type: The Encoder will send from 2 to 4 values when turned.
• Program: Specifies what Program will be sent.
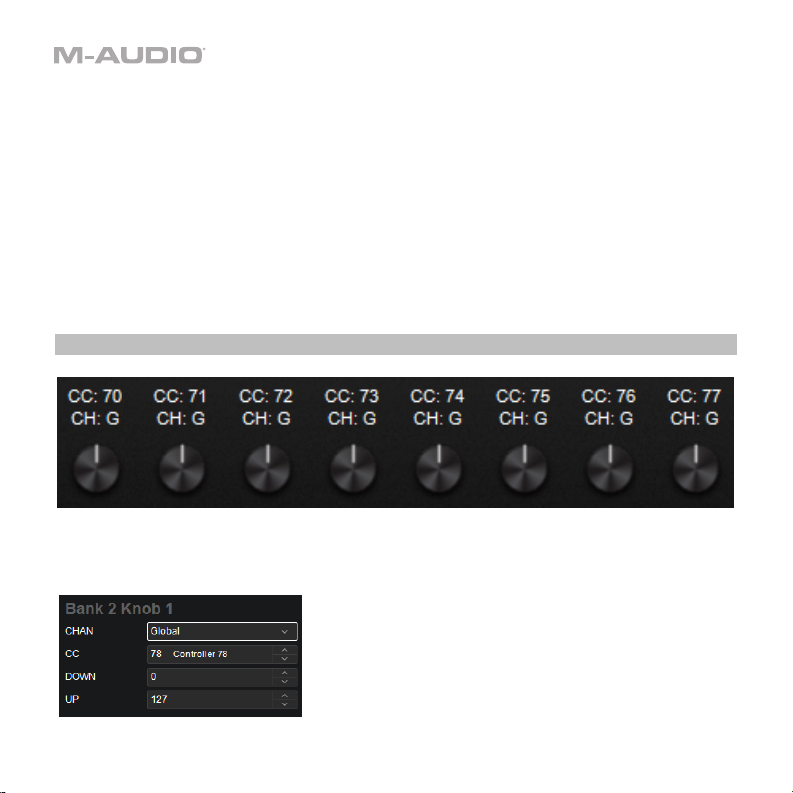
Knobs
In Preset Mode, click one of the knobs to set the MIDI assignments for the corresponding knob
on your Hammer 88 Pro. Click one of the Bank buttons (1–4) at the bottom of the window to
select another bank of knobs.
14
Page 15
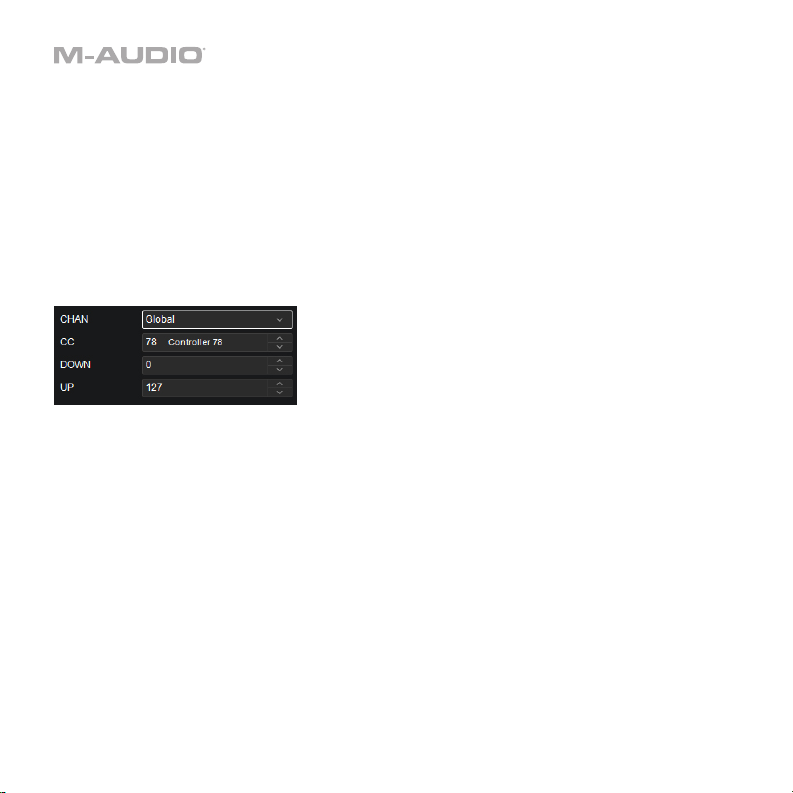
In Preset Mode, click on these buttons to select the corresponding mode for the knob.
• Chan: The knob will send its messages over this channel. Select the global channel
(Global), a specific channel (Channel 1–16), a zone (Zone 1–4), or all channels (Omni).
• CC: The knob will send its MIDI messages using this CC number.
• Down: The knob’s minimum position will correspond with this value. You can reverse the
knob’s polarity by making this value larger than the Up value.
• Up: The knob’s maximum position will correspond with this value. You can reverse the
knob’s polarity by making this value smaller than the Down value.
When set to DAW Mode, these are the available parameters. The parameters below will
depend on your selection.
• Chan: The knob will send its messages over this channel. Select the global channel
(Global), and a specific channel (Channel 1–16).
• Mode:
o CC: When set to CC, the knob will send standard MIDI CC messages to your DAW.
o Mackie: When set to Mackie Control, you can use the knob with a DAW that responds
to Mackie Control mode.
o Mackie/HUI: When set to Mackie/HUI, you can use the knob with a DAW that
responds to HUI mode.
15
Page 16
• CC: The knob will send its MIDI messages using this CC number.
• Down: The knob’s minimum position will correspond with this value. You can reverse the
knob’s polarity by making this value larger than the Up value.
• Up: The knob’s maximum position will correspond with this value. You can reverse the
knob’s polarity by making this value smaller than the Down value.
16
Page 17

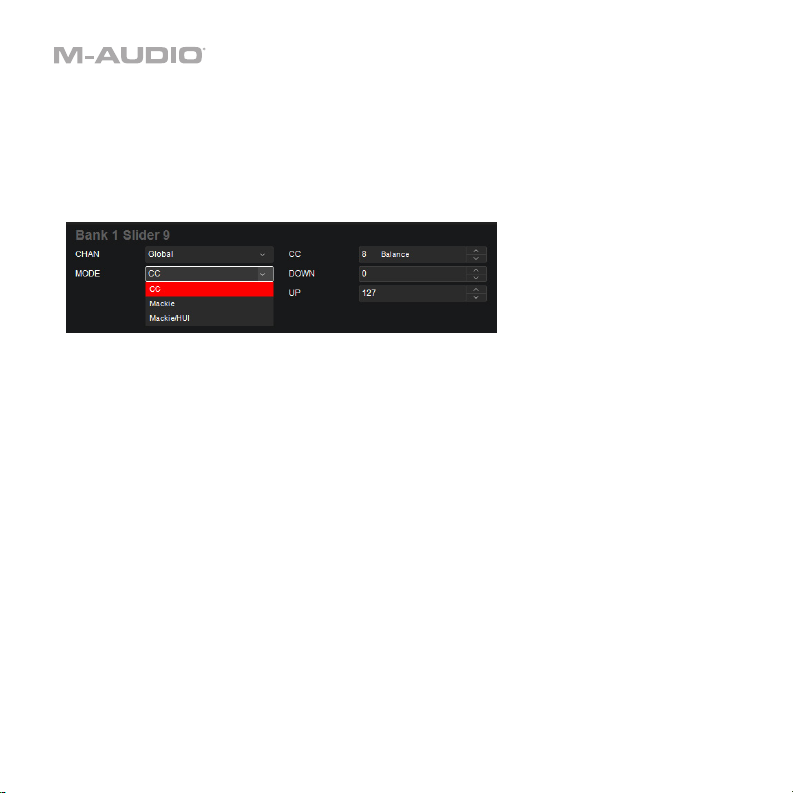
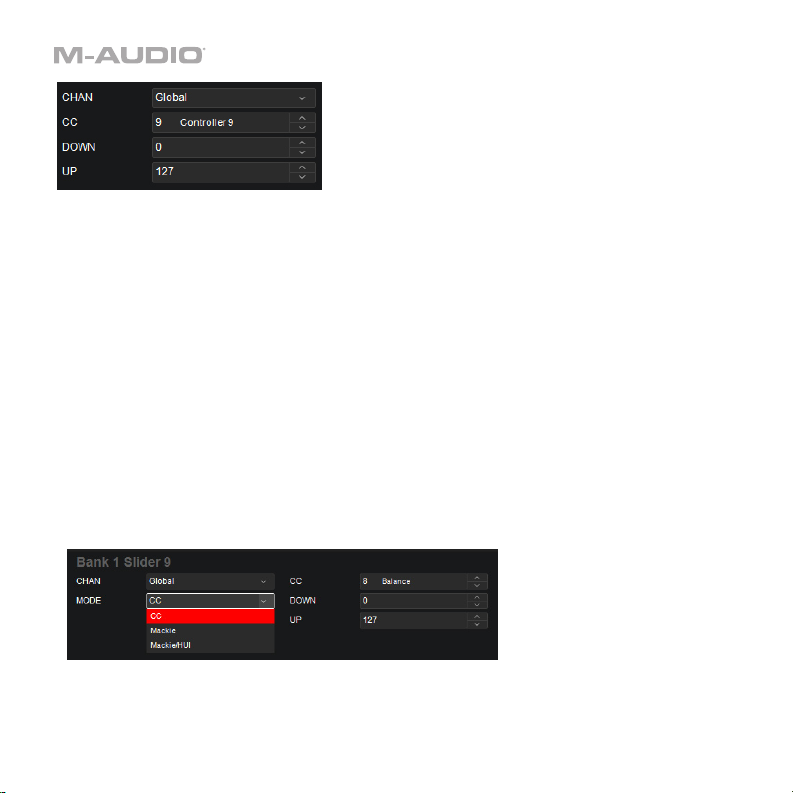
Faders
Click a fader to set the MIDI assignment for the corresponding fader on your Hammer 88 Pro.
Click one of the Bank buttons (1–4) at the bottom of the window to select another bank of
faders.
In Preset Mode, click on these buttons to select the corresponding mode for the fader.
• Chan: The fader will send its messages over this channel. Select the global channel
(Global), a specific channel (Channel 1–16), a zone (Zone 1–4), or all channels (Omni).
• CC: The fader will send its MIDI messages using this CC number.
• Down: The fader’s minimum position will correspond with this value. You can reverse the
fader’s polarity by making this value larger than the Up value.
• Up: The fader’s maximum position will correspond with this value. You can reverse the
fader’s polarity by making this value smaller than the Down value.
17
Page 18
When set to DAW Mode, these are the available parameters:
• Chan: The fader will send its messages over this channel. Select the global channel
(Global), and a specific channel (Channel 1–16).
• Mode:
o CC: When set to CC, the fader will send standard MIDI CC messages to your DAW.
o Mackie: When set to Mackie Control, you can use the fader with a DAW that responds
to Mackie Control mode.
o Mackie/HUI: When set to Mackie/HUI, you can use the fader with a DAW that
responds to HUI mode.
• CC: The fader will send its MIDI messages using this CC number.
• Down: Move the fader down to decrement the value. Move it up to increment the value.
• Up: Move the fader up to increment the value. Move it down to decrement the value.
18
Page 19

Buttons
In Preset Mode, click on a button (including the Clip buttons and Back button) to set the MIDI
assignment for the corresponding button on your Hammer 88 Pro. Click one of the Bank
buttons (1–4) at the bottom of the window to select another bank of buttons.
When the mode is set to CC, these are the available parameters:
• CC: The button will send its MIDI messages using this CC number.
• Down: The button will send the MIDI CC number with this value when you press it.
• Up: The button will send the MIDI CC number with this value when you release it.
• Chan: The button will send its messages over this channel. Select the global channel
(Global), a specific channel (Channel 1–16), a zone (Zone 1–4), or all channels (Omni).
19
Page 20

When the mode is set to CC Cycle, these are the available parameters:
• CC: The button will send its MIDI messages using this CC number.
• Chan: The button will send its messages over this channel. Select the global channel
(Global), a specific channel (Channel 1–16), a zone (Zone 1–4), or all channels (Omni).
• Type: The button will cycle through this many values with the CC number (one at a time)
when you press it: 1 Values, 2 Values, 3 Values, or 4 Values.
• Value: The button will send the value with this CC number when you press it, one at a
time, cycling through them with each press.
20
Page 21

When the mode is set to CC Inc/Dec, these are the available parameters:
• Type: The button will send the next (Increment) or previous (Decrement) value number in
the range of values when you press it.
• CC: The button will send its MIDI messages using this CC number.
• Min: The lowest value in the range of values will correspond with this setting.
• Max: The highest value in the range of values will correspond with this setting.
• Chan: The button will send its messages over this channel. Select the global channel
(Global), a specific channel (Channel 1–16), a zone (Zone 1–4), or all channels (Omni).
21
Page 22

When the mode is set to Program, these are the available parameters:
• Program: The button will send this program number when you press it.
• MSB: The button will send this Bank MSB (Most Significant Byte) number when you press it.
• LSB: The button will send this Bank LSB (Least Significant Byte) number when you press it.
• Chan: The button will send its messages over this channel. Select the global channel
(Global), a specific channel (Channel 1–16), a zone (Zone 1–4), or all channels (Omni).
When the mode is set to Program Cycle, these are the available parameters:
• Chan: The button will send its messages over this channel. Select the global channel
(Global), a specific channel (Channel 1–16), a zone (Zone 1–4), or all channels (Omni).
• Type: The button will cycle through this many values with the CC number (one at a time)
when you press it: 1 Values, 2 Values, 3 Values, or 4 Values.
• Program: The button will send the value with this Program number when you press it, one
at a time, cycling through them with each press.
22
Page 23

When the mode is set to Program Inc/Dec, these are the available parameters:
• Type: The button will send the next (Increment) or previous (Decrement) program number
in the range of programs when you press it.
• Min: The lowest program in the range of programs will correspond with this value.
• Max: The highest program in the range of programs will correspond with this value.
• Chan: The button will send its messages over this channel. Select the global channel
(Global), a specific channel (Channel 1–16), a zone (Zone 1–4), or all channels (Omni).
23
Page 24

When the mode is set to Note, these are the available parameters:
• Note: The button will send this MIDI note number when you press it.
• Chan: The button will send its messages over this channel. Select the global channel
(Global), a specific channel (Channel 1–16), a zone (Zone 1–4), or all channels (Omni).
• Type: When set to Latch On, the button will send one value when pressed and a different
value when pressed a second time, alternating between the two values with each press.
When set to Latch Off, the button will send one value when pressed and one value when
released.
• On: The button will send the MIDI note number with this velocity when you press it to turn
it on.
• Off: The button will send the MIDI note number with this velocity when you press it to turn
it off. This value will usually be 0 (to turn the note off).
24
Page 25

In DAW Mode, click on a button (including the Clip buttons and Back button) to set the MIDI
assignment for the corresponding button on your Oxygen Pro. Click one of the Bank buttons
(1–4) at the bottom of the window to select another bank of buttons.
When in the DAW tab, in addition to the parameters listed above, the following controls will be
available.
• Mode:
o Mackie: When set to Mackie Control, you can use the button with a DAW that
responds to Mackie Control mode.
o Mackie/HUI: When set to Mackie/HUI, you can use the button with a DAW that
responds to HUI mode.
The DAW buttons include assignable controls for the buttons when in Record, Solo, Mute, and
Track select.
25
Page 26

Pads
Click one of the pads (P1–P16) to set the MIDI assignments for the corresponding pad on your
Hammer 88 Pro. You can assign the parameters for the pads in MIDI Mode as well as the pads’
Colors.
26
Page 27

When set to CC, these are the available parameters:
• CC: The pad will send its MIDI messages using this CC number.
• Color: Select the primary color that you want to assign to the pad. See the section Colors
for more details.
• Color: Select the secondary color that you want to assign to the pad. See the section
Colors for more details.
• Down: The pad will send the MIDI CC number with this value when you press it.
• Up: The pad will send the MIDI CC number with this value when you release it.
• Chan: The pad will send its messages over this channel. Select the global channel
(Global), a specific channel (Channel 1–16), a zone (Zone 1–4), or all channels (Omni).
27
Page 28

When set to CC Cycle, these are the available parameters:
• CC: The pad will send its MIDI messages using this CC number.
• Color: Select the primary color that you want to assign to the pad. See the section Colors
for more details.
• Color: Select the secondary color that you want to assign to the pad. See the section
Colors for more details.
• Chan: The pad will send its messages over this channel. Select the global channel
(Global), a specific channel (Channel 1–16), a zone (Zone 1–4), or all channels (Omni).
• Type: The pad will cycle through this many values with the CC number (one at a time)
when you press it: 1 Values, 2 Values, 3 Values, or 4 Values.
• Value: The pad will send the value with this CC number when you press it, one at a time,
cycling through them with each press.
28
Page 29

When set to CC Inc/Dec, these are the available parameters:
• Type: The pad will send the next (Increment) or previous (Decrement) value number in
the range of values when you press it.
• Color: Select the primary color that you want to assign to the pad. See the section Colors
for more details.
• Color: Select the secondary color that you want to assign to the pad. See the section
Colors for more details.
• CC: The pad will send its MIDI messages using this CC number.
• Min: The lowest value in the range of values will correspond with this setting.
• Max: The highest value in the range of values will correspond with this setting.
• Chan: The pad will send its messages over this channel. Select the global channel
(Global), a specific channel (Channel 1–16), a zone (Zone 1–4), or all channels (Omni).
29
Page 30

When set to Program, these are the available parameters:
• Program: The pad will send this program number when you press it.
• Color: Select the primary color that you want to assign to the pad. See the section Colors
for more details.
• Color: Select the secondary color that you want to assign to the pad. See the section
Colors for more details.
• MSB: The pad will send this Bank MSB (Most Significant Byte) number when you press it.
• LSB: The pad will send this Bank LSB (Least Significant Byte) number when you press it.
• Chan: The pad will send its messages over this channel. Select the global channel
(Global), a specific channel (Channel 1–16), a zone (Zone 1–4), or all channels (Omni).
30
Page 31

When set to Program Cycle, these are the available parameters:
• Chan: The pad will send its messages over this channel. Select the global channel
(Global), a specific channel (Channel 1–16), a zone (Zone 1–4), or all channels (Omni).
• Color: Select the primary color that you want to assign to the pad. See the section Colors
for more details.
• Color: Select the secondary color that you want to assign to the pad. See the section
Colors for more details.
• Type: The pad will cycle through this many values with the CC number (one at a time)
when you press it: 1 Values, 2 Values, 3 Values, or 4 Values.
• Program: The pad will send the value with this Program number when you press it, one at
a time, cycling through them with each press.
31
Page 32

When set to Program Inc/Dec, these are the available parameters:
• Type: The pad will send the next (Increment) or previous (Decrement) program number in
the range of programs when you press it.
• Color: Select the primary color that you want to assign to the pad. See the section Colors
for more details.
• Color: Select the secondary color that you want to assign to the pad. See the section
Colors for more details.
• Min: The lowest program in the range of programs will correspond with this value.
• Max: The highest program in the range of programs will correspond with this value.
• Chan: The pad will send its messages over this channel. Select the global channel
(Global), a specific channel (Channel 1–16), a zone (Zone 1–4), or all channels (Omni).
32
Page 33

When set to Note, these are the available parameters:
• Chan: The pad will send its messages over this channel. Select the global channel
(Global), a specific channel (Channel 1–16), a zone (Zone 1–4), or all channels (Omni).
• Color: Select the primary color that you want to assign to the pad. See the section Colors
for more details.
• Color: Select the secondary color that you want to assign to the pad. See the section
Colors for more details.
• Type: When set to Latch On, the pad will send one value when pressed and a different
value when pressed a second time, alternating between the two values with each press.
When set to Latch Off, the pads will send one value when pressed and one value when
released.
• Note: The pad will send this MIDI note number when you press it.
• On: The pad will send the MIDI note number with this velocity when you press it to turn it
on.
• Off: The pad will send the MIDI note number with this velocity when you press it to turn it
off. This value will usually be 0 (to turn the note off).
33
Page 34

When set to Zone, these are the available parameters:
• Chan: The pad will send its messages over this channel. Select the global channel
(Global), a specific channel (Channel 1–16), a zone (Zone 1–4), or all channels (Omni).
• Color: Select the primary color that you want to assign to the pad. See the section Colors
for more details.
• Color: Select the secondary color that you want to assign to the pad. See the section
Colors for more details.
• Enabled: Turns the associated function on or off.
34
Page 35

In DAW Mode, click one of the pads (P1–P16) to set the MIDI assignments for the
corresponding pad on your Oxygen Pro. You can assign the parameters for the pads in MIDI
Mode as well as the pads’ Colors.
When set to CC, these are the available parameters:
• Chan: The pad will send its messages over this channel. Select the global channel (Global)
or a specific channel (Channel 1–16).
• Color: Select the primary color that you want to assign to the pad. See the section Colors
for more details.
• Color: Select the secondary color that you want to assign to the pad. See the section
Colors for more details.
• CC: The pad will send its MIDI messages using this CC number.
• Down: The pad will send the MIDI CC number with this value when you press it.
• Up: The pad will send the MIDI CC number with this value when you release it.
35
Page 36

When set to Note, these are the available parameters:
• Chan: The pad will send its messages over this channel. Select the global channel (Global)
or a specific channel (Channel 1–16).
• Color: Select the primary color that you want to assign to the pad. See the section Colors
for more details.
• Color: Select the secondary color that you want to assign to the pad. See the section
Colors for more details.
• Type: When set to Latch On, the pad will send one value when pressed and a different
value when pressed a second time, alternating between the two values with each press.
When set to Latch Off, the pads will send one value when pressed and one value when
released.
• Note: The pad will send this MIDI note number when you press it.
• On: The pad will send the MIDI note number with this velocity when you press it to turn it
on.
• Off: The pad will send the MIDI note number with this velocity when you press it to turn it
off. This value will usually be 0 (to turn the note off).
36
Page 37

When set to Same as Preset, the pads will send the same message assigned to the pads
when in Preset mode.
37
Page 38

Transport Control Buttons
Select from these parameters for sending transport controls for Rewind, Fast Forward, Loop,
Stop, Play, and Record commands:
• Mode:
o CC: When set to CC, the button will send standard MIDI CC messages to your DAW.
o Program: When set to Program, you can use the button with a DAW that responds to
Program messages.
o Mackie: When set to Mackie Control, you can use the button with a DAW that
responds to Mackie Control mode.
o Mackie/HUI: When set to Mackie/HUI, you can use the button with a DAW that
responds to HUI mode.
• Down: The button will send the MIDI CC number with this value when you press it.
• Up: The button will send the MIDI CC number with this value when you release it.
• Chan: The button will send its messages over this channel. Select the global channel
(Global) or a specific channel (Channel 1–16).
• Program: The button will send this program number when you press it.
• MSB: The button will send this Bank MSB (Most Significant Byte) number when you press
it.
• LSB: The button will send this Bank LSB (Least Significant Byte) number when you press
it.
38
Page 39

Hot Keys
Select the Hot Key setting for each pad or the metronome:
Note: Hot Keys are only available in the DAW tab of the Preset Editor.
Color: Select the color that you want to assign to the Hot Key. See the section Colors for more
details.
Mode: Select from CC, Note, and ASCII, None.
Key: Selects the keyboard key to use to trigger the pad or metronome.
Win Mod Key: Selects the Windows style modified keyboard key to use to trigger the pad or
metronome.
Mac Mod Key: Selects the MacOS style modified keyboard key to use to trigger the pad or
metronome.
39
Page 40

Colors
Each pad can have a set of colors assigned
to it, making it easier to distinguish
between their different functions, notes,
etc. Each pad can use up to 2 colors. Use
the Color drop-down menus to select from
these 13 different colors:
Chartreuse, Green, Aquamarine, Cyan,
Azure, Blue, Violet, Magenta, Rose, Red,
Orange, Yellow, and White.
40
Page 41

Keybed
Zones:
The keybed (the piano keys) on your Hammer 88 Pro can be divided into 1–4 “zones.” When
zones are active each zone can send its controls’ MIDI messages over its own MIDI channel.
You can assign the parameters for the keybed/zones in MIDI Mode only.
Tip: This feature is great for dividing your keyboard between different virtual instruments or
synthesizers. For example, you can create two zones, each using a different MIDI channel, and
play and control two virtual instruments simultaneously—one with each half of the keys.
Click one of the Zone 1–4 piano keys to set the MIDI assignments for the corresponding zone
on your Hammer 88 Pro. All 4 zones have the same parameters, which you can set
independently.
41
Page 42

These are the available parameters:
• Enabled: Turns the associated function on or off.
• First: The zone’s lowest key will correspond with this note.
• Last: The zone’s highest key will correspond with this note.
• Octave: The zone’s keys will send their notes using this octave shift (from their original
position on the keybed).
Note: The zone octave and transposition are independent from the keyboard’s overall
octave and transposition, but all of these affect the note a key sends out.
• Transpose: The zone’s keys will send their notes using this transposition (from their
original position on the keybed).
Note: The zone octave and transposition are independent from the keyboard’s overall
octave and transposition, but all of these affect the note a key sends out.
• Program: The zone will send this program number when you press a key in it.
• MSB: The zone will send this Bank MSB (Most Significant Byte) number when you press a
key in it.
• LSB: The zone will send this Bank LSB (Least Significant Byte) number when you press a
key in it.
• Chan: The zone will send its messages over this channel. Select the global channel
(Global) or a specific channel (Channel 1–16).
Note: Any other controls whose Chan settings are set to this zone will send their messages
using this channel, as well.
42
Page 43

Arp:
You can set various assignments for the arpeggiator.
To activate or deactivate the arpeggiator, tick the On/Off box.
To set the arpeggiator's type, click the Type field, and select the desired setting from the
pop-up menu. The mode determines how the arpeggiated notes are played back:
• Up: Notes will sound from the lowest to the highest.
• Down: Notes will sound from the highest to lowest.
• Inclusive: Notes will sound from the lowest to the highest, and then back down. The
lowest and highest notes will sound twice at the directional change.
• Exclusive: Notes will sound from the lowest to the highest, and then back down. The
lowest and highest notes will sound only once at the directional change.
• Order: Notes will sound in the order they were pressed.
• Random: Notes will sound in random order.
• Chord: Notes will sound in a chord.
43
Page 44

When Split is set to On, the Arp can be assigned to a specific section of the keybed, like a
Zone assignment.
Click the First field to set the lowest key that will correspond to the arp range.
Click the Last field, to set the highest key that will correspond to the arp range.
To activate or deactivate Latch, click the Latch field. When Latch is On, the Arpeggiator will
continue to arpeggiate the notes even after you lift your fingers. While holding down the keys,
you can add more notes to the arpeggiated chord by pressing down additional keys. If you
press the keys, release them, and then press down a new combination of notes, the
Arpeggiator will memorize and arpeggiate the new notes.
To set the arpeggiator's octave range, click the Octave field, and select the desired value:
1, 2, or 3 octaves.
To set the arpeggiator’s gate, click the Gate field, and select the desired value from 5-100.
To set the arpeggiator's swing, click the Swing field, and select the desired setting between
50% and 75%.
44
Page 45

Chord:
To activate or deactivate Chord mode, tick the On/Off box.
• Chan: The chord will send its messages over this channel. Select the global channel
(Global) or a specific channel (Channel 1–16).
• Split: When Split is set to On, the Chord assignment can be assigned to a specific section
of the keybed, like a Zone assignment.
• Mode: Smart mode lets you select the key of the song (ex. C Major). When a key is
pressed on the physical keyboard, a chord will play in that key. Custom mode lets you
input a custom chord. Once a chord has been input, press a key on the physical keyboard
to play a chord.
• Root: Selects what key the Smart Chord is in.
• Voices: This lets you choose what fingerings are active in Smart Chord mode.
• Scale: Selects what scale the chord will use.
45
Page 46

Scale:
To activate or deactivate Chord mode, tick the On/Off box.
• Chan: The scale will send its messages over this channel. Select the global channel
(Global) or a specific channel (Channel 1–16).
• Split: Selects whether the keyboard split range is activated.
• First: Select from the dropdown list to set the lowest key that will correspond to the scale
range.
• Last: Select from the dropdown list to set the highest key that will correspond to the scale
range.
• Root: Set the root note for the scale.
• Scale: Click the Set scale field and select what scale you want to apply: Chromatic,
Major, Dorian, Phrygian, Lydian, Mixolydian, Minor Harmonic, Locrian, Minor, Minor
Melodic, Pentatonic Major, Pentatonic Minor, Blues, Altered Dominant, Diminished
Whole Half, and Whole Tone.
46
Page 47

Aftertouch:
• Chan: The aftertouch will send its messages over this channel. Select the global channel
(Global), a specific channel (Channel 1–16), a zone (Zone 1–4), or all channels (Omni).
• Min: The lowest note played in the range will correspond with this value.
• Max: The highest note played in the range will correspond with this value.
47
Page 48

Modulation & Pitch Wheels
Click the modulation wheel (the right wheel) or the pitch-bend wheel (the left
wheel) to set the MIDI assignments for the corresponding wheel on your Hammer
88 Pro. You can assign the parameters for the modulation wheel and pitch wheel in
MIDI Mode only.
• CC: The wheel will send its MIDI messages using this CC number.
• Chan: The wheel will send its messages over this channel. Select the global channel (Global), a
specific channel (Channel 1–16), a zone (Zone 1–4), or all channels (Omni).
• Min: The wheel’s minimum position will correspond with this value. You can reverse the wheel’s
polarity by making this value larger than the Max value.
• Max: The wheel’s maximum position will correspond with this value. You can reverse the wheel’s
polarity by making this value smaller than the Min value.
• Down: The wheel’s minimum position will correspond with this value. You can reverse the
wheel’s polarity by making this value larger than the Up value.
• Up: The wheel’s maximum position will correspond with this value. You can reverse the wheel’s
polarity by making this value smaller than the Down value.
48
Page 49

Sustain Pedal
Click the sustain pedal option to set the MIDI assignments for the sustain pedal on your
Hammer 88 Pro.
• Latch: When Latch is enabled, the pedal will send one value when pressed and a different
value when pressed a second time, alternating between the two values with each press
(“latching” or “toggle” behavior). When Latch is disabled, the pedal will send one value
when pressed and one value when released (“momentary” behavior).
• Chan: The sustain pedal will send its messages over this channel. Select the global
channel (Global), a specific channel (Channel 1–16), a zone (Zone 1–4), or all channels
(Omni).
• CC: The sustain pedal will send its MIDI messages using this CC number.
• Min: The lowest program in the range of programs will correspond with this value.
• Max: The highest program in the range of programs will correspond with this value.
49
Page 50

Footswitches
Click the footswitch options to set the MIDI assignments for FS1 and FS2 on your Hammer 88
Pro.
• Latch: When Latch is enabled, the pedal will send one value when pressed and a different
value when pressed a second time, alternating between the two values with each press
(“latching” or “toggle” behavior). When Latch is disabled, the pedal will send one value
when pressed and one value when released (“momentary” behavior).
• Chan: The sustain pedal will send its messages over this channel. Select the global
channel (Global), a specific channel (Channel 1–16), a zone (Zone 1–4), or all channels
(Omni).
• CC: The sustain pedal will send its MIDI messages using this CC number.
• Min: The lowest program in the range of programs will correspond with this value.
• Max: The highest program in the range of programs will correspond with this value.
50
Page 51

Expression
Click the expression pedal options to set the MIDI assignments for the Expression input on
your Hammer 88 Pro.
• Chan: The sustain pedal will send its messages over this channel. Select the global
channel (Global), a specific channel (Channel 1–16), a zone (Zone 1–4), or all channels
(Omni).
• CC: The sustain pedal will send its MIDI messages using this CC number.
• Min: The lowest program in the range of programs will correspond with this value.
• Max: The highest program in the range of programs will correspond with this value.
51
Page 52

Global Settings
The Global Settings affect the overall operation of your Hammer 88 Pro, regardless of the
current preset.
These are the available settings:
• Channel: This menu lets you set the global channel (Channel 1–16). Any other controls or
zones whose Chan settings are set to Global will send their messages using this channel.
• Program: This field determines the number of the program change message that will be
sent when you click Send Settings.
• MSB: This field determines the number of the Bank MSB (Most Significant Byte) message
that will be sent when you click Send Settings.
Note: A Bank LSB or Bank MSB number may not have any effect until you send a program
change message after it.
• LSB: This field determines the number of the Bank LSB (Least Significant Byte) message
that will be sent when you click Send Settings.
Note: A Bank LSB or Bank MSB number may not have any effect until you send a program
change message after it.
• Octave: This field determines the current octave shift of the entire keybed.
Note: The keyboard’s overall octave and transposition are independent from the zones’
octaves and transpositions, but all of these affect the note a key sends out.
• Key Transpose: This field determines the current transposition of the entire keybed (-12
to 12).
Note: The keyboard’s overall octave and transposition are independent from the zones’
octaves and transpositions, but all of these affect the note a key sends out.
• Keyboard Sensitivity: This field determines the velocity sensitivity of the keybed—the
amount of force required to generate a note with a specific velocity. See Appendix >
Velocity Curves > Keybed for descriptions of the different settings.
52
Page 53

• Pad Sensitivity: This field determines the velocity sensitivity of the pads—the amount of
force required to generate a note with a specific velocity. See Appendix > Velocity
Curves > Pads for descriptions of the different settings.
• MIDI DIN Out: This field determines whether the 5-pin MIDI DIN connectors on the rear
panel will send MIDI data from just the keys (Keys), just from the USB MIDI data (USB),
the keys and USB MIDI data (Keys/USB) or no MIDI data is sent (Off).
• Operating System: Set this option for the computer operating system you are using, PC
or macOS.
• Chord Mode: This field determines whether when Chord mode is active it will activate
Chord Mode for the Keys, Pads, or Pads and Keys.
53
Page 54

A
Software Menus
File
Send Preset
Retrieve Preset
Load Preset
Save Preset
Exit
Help
Open User Guide
Select this to export the current settings from the Hammer 88 Pro Preset
Editor to your connected Hammer 88 Pro. Alternatively, press Ctrl+Shift+S
(Windows) or Command+Shift+S (macOS).
Select this to import the current settings from your connected Hammer 88
Pro keyboard into the Hammer 88 Pro Preset Editor. Alternatively, press
Ctrl+Shift+R (Windows) or Command+Shift+R (macOS).
Select this to locate and load a preset file on your computer to the Hammer 88
Pro Preset Editor. Alternatively, press Ctrl+O (Windows) or Command+O
(macOS).
Select this to save the Hammer 88 Pro Preset Editor’s current settings to
your computer as a preset file. Alternatively, press Ctrl+S (Windows) or
Command+S (macOS).
Select this to close the Hammer 88 Pro Preset Editor.
macOS users: This option is in the Hammer 88 Pro Preset Editor menu.
Select this to open this User Guide.
Pro Preset Editor
bout Hammer 88
Select this to view information about this version of the Hammer 88 Pro
Preset Editor.
macOS users: This option is in the Hammer 88 Pro Preset Editor menu.
54
Page 55

Appendix
Velocity Curves
Keybed
To select one of these curves, use the Key Curve field in the Global Settings. See the
Global Settings chapter to learn about this.
Curve Number Hammer 88 Pro
Display
Description
1 Low This is a low-sensitivity setting, useful for playing
notes with mostly low velocities.
2 Medium This is a medium-sensitivity setting (the default),
useful for playing with an average amount of force.
3 High This is a high-sensitivity setting, useful for playing
notes with mostly high velocities.
4 Linear This is a linear curve. The velocity of the note will
be proportional to the amount of force.
5 Fixed 64
6 Fixed 100
7 Fixed 127
All notes will have a fixed velocity of 64.
All notes will have a fixed velocity of 100.
All notes will have a fixed velocity of 127.
55
Page 56

Pads
To select one of these curves, use the Pad Curve field in the Global Settings. See the
Global Settings chapter to learn about this.
Curve Number Hammer 88 Pro
Display
Description
1 Low This is a low-sensitivity setting, useful for playing
notes with mostly low velocities.
2 Medium This is a medium-sensitivity setting (the default),
useful for playing with an average amount of force.
3 High This is a high-sensitivity setting, useful for playing
notes with mostly high velocities.
4 Linear This is a linear curve. The velocity of the note will
be proportional to the amount of force.
5 Fixed 64
6 Fixed 100
7 Fixed 127
8 Fixed 64,127
All notes will have a fixed velocity of 64.
All notes will have a fixed velocity of 100.
All notes will have a fixed velocity of 127.
All notes will have a velocity of 64 or 127,
depending on the amount of force.
9 Fixed 64, 100, 127
All notes will have a velocity of 64, 100, or 127,
depending on the amount of force.
10 Fixed 32, 64, 100, 127
All notes will have a velocity of 32, 64, 100, or 127,
depending on the amount of force.
56
Page 57

Trademarks & Licenses
M-Audio is a trademark of inMusic Brands, Inc., registered in the U.S. and other countries.
MacOS is a trademark of Apple Inc., registered in the U.S. and other countries.
Mackie Control and HUI are trademarks or registered trademarks of LOUD Technologies Inc.
Windows is a registered trademark of Microsoft Corporation in the United States and other
countries.
All other product names, company names, trademarks, or trade names are those of their
respective owners.
57
Page 58

Manual Version 1.0
 Loading...