

Page 1

M-AUDIO
Fast Track
English
Quick Start Guide
Page 2
Fast Track Quick Start Guide English 1
X
Installing Fast Track
Installation Instructions for Windows XP and Vista
PLEASE NOTE: Make sure Fast Track is not connected to your computer when beginning the
installation. The following instructions will indicate when you should connect the interface to your
computer.
1. Install the Fast Track drivers by doing one of the following:
• If you have Internet access, download the latest
Fast Track drivers from the Support > Drivers page
at www.m-audio.com. This is highly recommended
as it provides you with the newest drivers available.
Once the download is complete, double-click the file
to start the installation process.
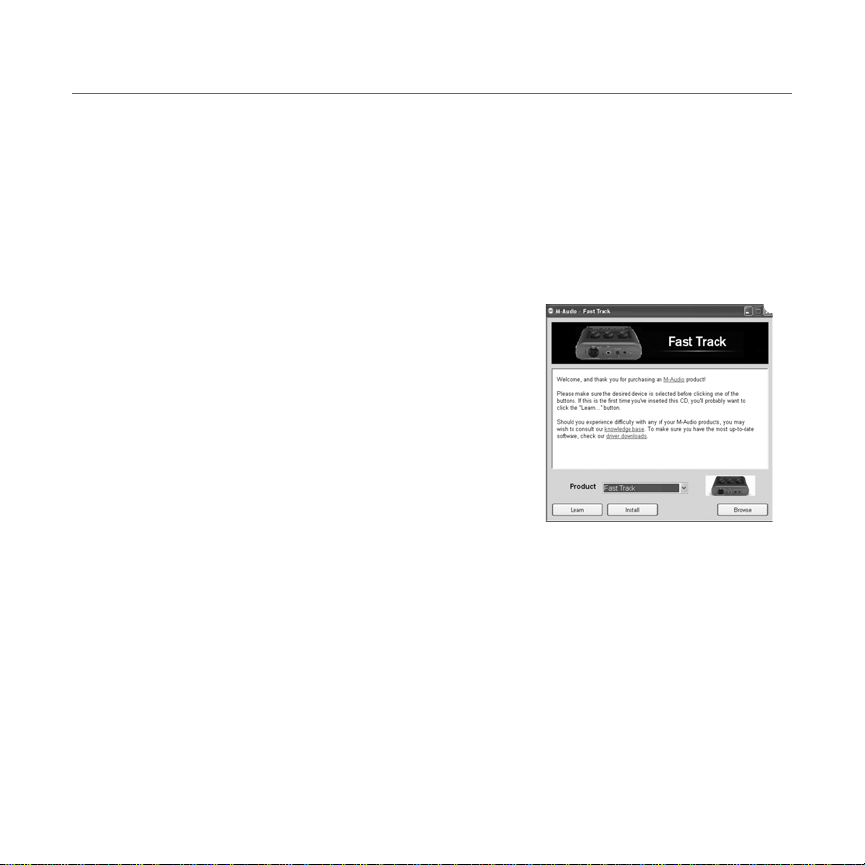
• If you do not have Internet access and are installing
drivers from the Fast Track CD-ROM, the computer
will automatically display the interactive install
screen
X when the CD-ROM is inserted. If your
computer fails to launch this application, you can
manually start it by clicking on Start > My Computer
Fast Track from the menu and click “Install.”
1
> Fast Track CD-ROM. Next, select
1
If you are using Windows Vista, “My Computer” will be labeled “Computer” in this step.
Page 3
2 English Fast Track Quick Start Guide
Y
Z
[
\
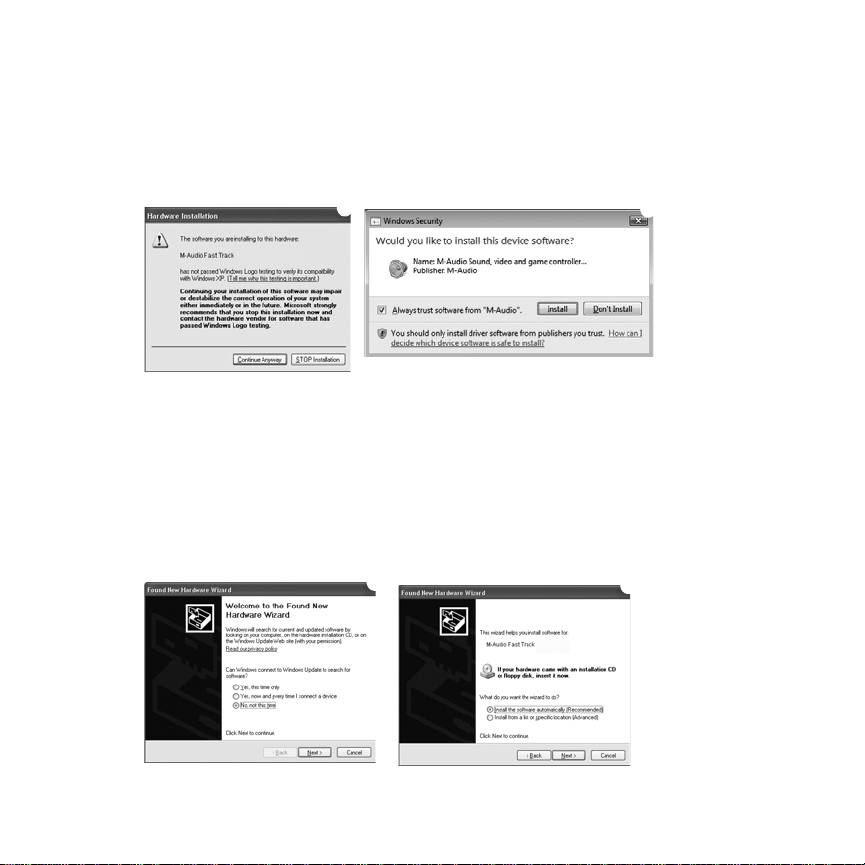
2. Follow the driver installer’s on-screen instructions. At various points in this installation
process, you may be notified that the driver being installed has not passed Windows Logo
Testing, or asked whether the program you wish to run is a trusted application. Click
“Continue Anyway”
installation.
3. Once the installer has completed, click “Finish.”
4. Connect Fast Track to an available USB port on your computer. If you are using Windows
Vista, your Fast Track installation is now complete. If you are using Windows XP, proceed
with steps 5-8.
5. Windows XP will identify the interface and will ask if you want to search the Internet for a
driver. Select “No, not this time” and press “Next.”
6. Windows XP will display a Found New Hardware Wizard dialog. Choose “Install the
software automatically” and click “Next.”
Y (Windows XP) or “Install” Z (Windows Vista) to proceed with the
[
\
Page 4

Fast Track Quick Start Guide English 3
7. Once the Wizard has completed, click “Finish.” If you are presented with another Found New
Hardware Wizard dialog, repeat steps 5-7.
8. When the installation is complete, you will see a message stating “Your new hardware is
installed and ready to use.”
Installation Instructions for Mac OS X
PLEASE NOTE: Make sure Fast Track is not connected to your computer when beginning the
installation. The following instructions will indicate when you should connect the interface to your
computer.
1. Install the Fast Track drivers by doing one of the following:
• If you have Internet access, download the latest Fast Track drivers from the Support >
Drivers page at www.m-audio.com. This is highly recommended as it provides you with
the newest drivers available.The downloaded file should automatically mount and
display its contents. If this file does not automatically mount after it has finished
downloading, click on the file from the download stack (Mac OS X 10.5), or double-click
the file from the desktop (Mac OS X 10.4) to display its contents. Next, double-click the
installer application.
• If you do not have Internet access and are installing drivers from the Fast Track CD-ROM,
a CD-ROM icon will appear on your desktop once the disc is inserted into your computer.
Double-click this icon to view the contents of the disc. Next, double-click “Open Me.”
Finally, select your product from the drop-down menu on the welcome screen and click
“Install.”
2. Follow the driver installer’s on-screen instructions.
During installation, Mac OS X will ask you to enter
your user name and password. Enter this
information and click OK to confirm. If you have not
configured a password for your computer, leave the
password field blank and click OK. If you are not the
computer’s owner, ask the owner or your
Administrator for this information.
Page 5

4 English Fast Track Quick Start Guide
3. When the installer has completed, click “Restart.” Your computer will reboot automatically.
4. After your computer has finished starting up, connect Fast Track to an available USB port
on your computer. Fast Track is now installed and ready to be used.
Recording with Fast Track
Recording using the Microphone Input
1. Turn the Microphone Gain knob fully counter-clockwise.
2. Connect a microphone to the Microphone Input on the front panel using an XLR cable.
3. If you are using a microphone that requires phantom power, set the Phantom Power switch
on the back panel of Fast Track to the “On” position. If you are not sure whether your
microphone requires this, please check your microphone's documentation before switching
on Phantom Power.
4. While the sound source is playing at its loudest levels, slowly turn the Mic Gain knob
clockwise until the red clip indicator begins to illuminate. Then, turn the knob
counter-clockwise until the clip indicator no longer illuminates. At this point, you should be
ready to record with the optimum gain setting.
5. In your recording software, select the Fast Track Microphone Input as the input source for a
mono track. You can select the Microphone Input in your recording software by selecting the
first (left) input of Fast Track.
Recording using the Guitar Input
1. Turn the Guitar Gain knob fully counter-clockwise.
2. Use a standard 1/4" instrument cable to connect an electric guitar, bass, or other instrument
to the Guitar Input on the front panel.
3. While playing the instrument at its loudest levels, slowly turn the Guitar Gain knob clockwise
until the red clip indicator begins to illuminate. Then, turn the knob counter-clockwise until
the clip indicator no longer illuminates. At this point, you should be ready to record with the
optimum gain setting.
4. In your recording software, select the Fast Track Guitar Input as the input source for a mono
track. You can select the Guitar Input in your recording software by selecting the second
(right) input of Fast Track.
Page 6

Fast Track Quick Start Guide English 5
Adjusting the Output Level
Connect the Fast Track Line Outputs (on the back of the interface) to a mixing console, amplifier
or powered monitors. The Line Outputs and the Headphone Output are both controlled by the
top-panel Output Level knob. Note that plugging headphones into the Headphone Output will
automatically mute the Line Outputs.
Using the Direct Monitor Button
Latency is the amount of time it takes for your microphone or
instrument signals to pass through the computer (and your
audio software) and become available at the Line and
Headphone Outputs. This delay is usually quite small and is
measured in milliseconds, but it may be large enough to
distract a performer who wishes to record while monitoring
through software. Fast Track provides a solution to this with latency-free input monitoring that is
activated by pressing the Direct Monitor button.
When you press the Direct Monitor button, a mono mix of sound from the Microphone and Guitar
Inputs is routed directly to the Line and Headphone Outputs, and mixed with the output signal
from your audio software. Note that the Direct Monitor button only affects what you hear through
your headphones or speakers and does not affect the inputs of your audio software in any way.
Fast Track always sends separate microphone and instrument signals to your recording software
without blending them, even though they may sound blended while using direct monitoring.
When Direct Monitoring is switched on, make sure that your audio software is not outputting
signal from the track you are currently recording. This would cause “double-monitoring,” resulting
in an undesired "phasing" or "slap-back" echo. Consult the documentation for your audio
application regarding disabling software monitoring.
Note: When recording with a
microphone, headphones
should be used in order to
prevent feedback.
Page 7

6 English Fast Track Quick Start Guide
Before Updating Your Mac or Windows System:
Please check the M-Audio driver download page at
www.m-audio.com/drivers for the availability of an updated driver before
you decide to install Microsoft or Apple operating system updates.
Before new M-Audio device drivers are released, they are tested for use with
operating system versions that are available at that time. When updates for
an operating system are released, all M-Audio device drivers have to be
re-tested and possibly updated to ensure proper operation.
M-Audio recommends refraining from installing operating system updates
until a driver has been posted to the M-Audio website for that specific
operating system. The M-Audio website (www.m-audio.com) contains the
latest drivers and program updates as well as useful links to news stories,
FAQs, and technical support. We recommend checking this site regularly to
ensure you have the latest drivers and most up-to-date information about
your M-Audio products.
Additional Information and Support
Information about the Fast Track software control panel, details regarding connections, and
descriptions of all the individual components on the device can be found in the Fast Track User
Guide, located on the included Fast Track CD-ROM.
Page 8

Fast Track Quick Start Guide English 7
Warranty
Warranty Terms
M-Audio warrants products to be free from defects in materials and workmanship, under normal
use and provided that the product is owned by the original, registered user. Visit
www.m-audio.com/warranty for terms and limitations applying to your specific product.
Warranty Registration
Immediately registering your new M-Audio product entitles you to full warranty coverage and
helps M-Audio develop and manufacture the finest quality products available. Register online at
www.m-audio.com/register to receive FREE product updates and for the chance to win M-Audio
giveaways.
Page 9

8 English Fast Track Quick Start Guide
Fast Track
FOR HOME OR STUDIO USE
Tested to comply with
FCC standards
Documentation Feedback
At M-Audio, we are always looking for ways to improve our documentation. If you have comments,
corrections, or suggestions regarding our documentation, email us at publications@m-audio.com.
WARNING: This product contains chemicals, including lead, known to the State of California to cause
cancer, and birth defects or other reproductive harm. Wash hands after handling.
© 2009 Avid Technology, Inc. All rights reserved. Product features, specifications, system requirements and availability are subject to change without notice. Avid, M-Audio and Fast Track are either
trademarks or registered trademarks of Avid Technology, Inc. All other trademarks contained herein
are the property of their respective owners.
Page 10

www.m-audio.com
M-AUDIO
5795 Martin Road
Irwindale, CA 91706, USA
TECHNICAL SUPPORT
Visit the M-Audio Online Support Center
at www.m-audio.com/support
PRODUCT INFORMATION
For company and product information
visit us on the web at www.m-audio.com
 Loading...