

Page 1
Introduction
Drum and Bass Rig • User Guide
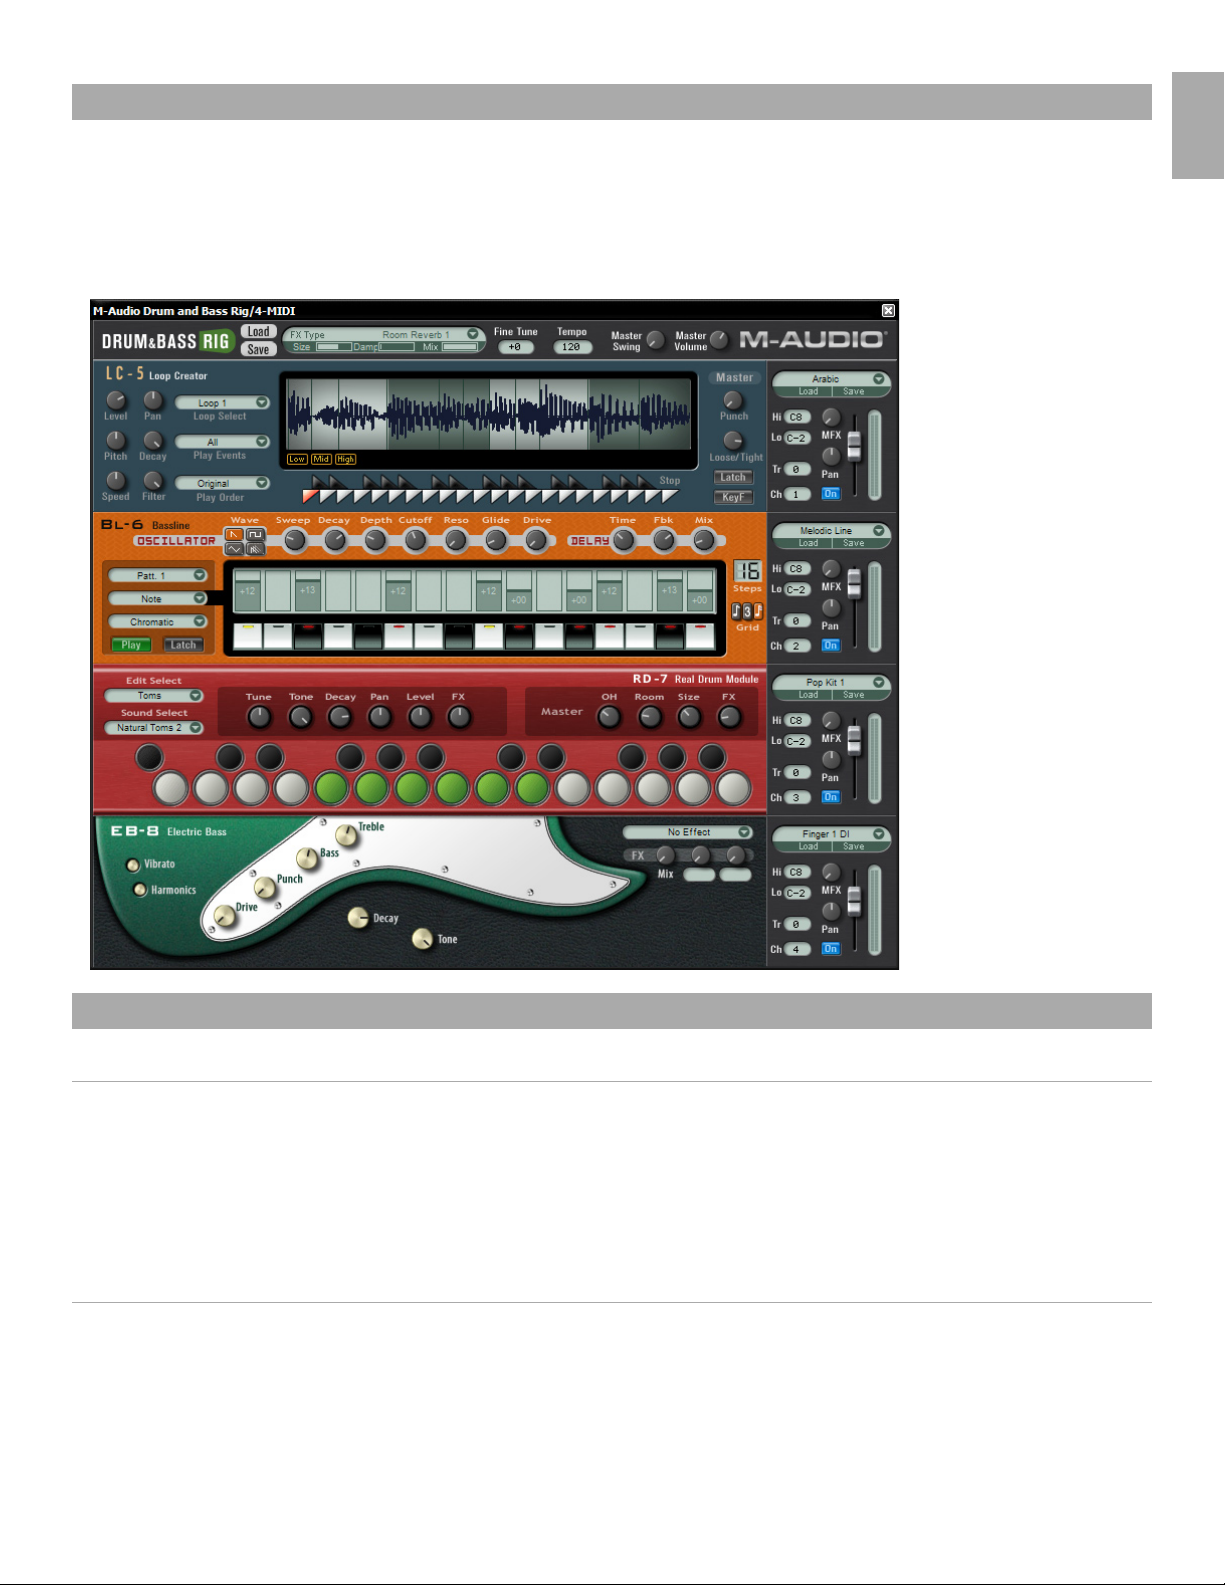
Congratulations on your purchase of the M-Audio Drum and Bass Rig software. This multi-function device includes 4 instruments:
• The LC-5 Loop Creator creates tempo-synced rhythms from preloaded audio files.
• The BL-6 Bassline is a subtractive synth combined with a step sequencer.
• The RD-7 Real Drum Module features over 100 realistic drum sounds arranged to follow the GM Drum Map standard.
• The EB-8 Electric Bass models the sounds of acoustic and electric basses.
English
System Requirements
Windows
• Pentium® III 500 MHz or AMD7 (P4 / Athlon 1 GHz or faster recommended)
• 256 MB RAM
• 600 MB free hard disk space
• Windows® XP
• VST 2.0 compatible host software
• MIDI interface
• CD-ROM drive for installation
• Internet connection (on any computer) for software certification
Macintosh
• Power Macintosh® G3 500 MHz (G4 or faster recommended)
• 256 MB RAM
• 600 MB free hard disk space
• Mac® OS X Version 10.3 or higher
• VST 2.0, AU or RTAS-compatible host software
• MIDI Interface
• CD-ROM drive for installation
• Internet connection (on any computer) for software certification
3
Page 2

Installation Procedure
Note: The Installation CD includes both the M-Audio Drum and Bass Rig as well as the M-Audio Key Rig installers. The Drum and Bass Rig
package includes a certification code for only the M-Audio Drum and Bass Rig, but you may authorize the M-Audio Key Rig as a fully working 30Day demo version (see below for Certification Information).
Windows
1. Insert the M-Audio Drum and Bass Rig CD-ROM in your computer’s CD-ROM drive.
2. Explore the CD and double-click the file named “M-Audio Drum and Bass Rig Setup.” The installer will execute.
3. During the installation, the installer will ask you to specify two directories on your computer. The first directory is your VST plug-in directory.
This is where the M-Audio Drum and Bass Rig VST plug-in will be installed. The second directory is Drum and Bass Rig’s sound data file. The
file is about 260 MB in size and can be placed in a different location from the program, if necessary.
4. When the installer finishes installing the software, press “Finish.”
5. M-Audio Drum and Bass Rig is now installed on your computer. You will need to certify your copy of the software before you begin making
music—please see “Certification” below for these directions.
Macintosh
1. Insert the M-Audio Drum and Bass Rig CD-ROM in your computer’s CD-ROM drive.
2. Double-click the CD that appears on your desktop
3. Open the folder for the plug-in format you require (AU, RTAS, VST, or stand-alone)
4. When the installer finishes installing the software, press “Close.”
5. M-Audio Drum and Bass Rig is now installed on your computer. You will need to certify your copy of the software before you begin making
music—please see “Certification” below for these directions.
Certification
1. Once the M-Audio Drum and Bass Rig software has been installed, start your host audio application (for example. Ableton Live).
2. Load the M-Audio Drum and Bass Rig and open its window.
3. Click on the “M-Audio” logo in the upper right corner of the Drum and Bass Rig. A pop-up window will appear.
4. Enter the Product Certification Code (printed on the Quick Start Guide included in the M-Audio Drum and Bass Rig package)
5. Once you’ve entered your code, you have two choices: you may certify your product on-line or off-line. If your computer is connected to the
Internet, go to the section named “Certify On-Line” below. If your music computer is not connected to the Internet, go to the “Certify Off-Line”
section below.
Certify On-Line
1. Click the “Certify On-Line” button and Drum and Bass Rig will open your default web browser and connect you to the M-Audio website.
2. Enter your registration information in the spaces provided, and press “Submit.”
3. In a few moments, you’ll receive an e-mail containing your registration certificate. Follow the directions in the e-mail to finish certification.
Certify Off-Line
1. Click the “Certify Off-Line” button. Drum and Bass Rig will create an Internet shortcut on your computer’s desktop.
2. Copy this shortcut onto a disk or memory card.
3. Place the disk or memory card in a computer that is connected to the Internet.
4. Double-click the Internet shortcut on the disk or memory card, and your web browser will open, connecting you to the M-Audio website.
5. Enter your registration information and press “Submit.”
6. In a few moments, an e-mail will be sent to you containing your registration certificate. Save the certificate to the disk or memory card.
7. Place the disk or memory card back into your music computer.
8. Double-click the product certification file on the disk or memory card to complete certification.
Using the Drum and Bass Rig as a Plug-in
The M-Audio Drum and Bass Rig runs as an RTAS, VST, or AU plug-in. Consult your host application’s documentation for information on loading
plug-ins
4
Page 3
Using the Drum and Bass Rig in Stand-Alone Mode
Drum and Bass Rig • User Guide
In addition to support for most popular plug-in formats, the M-Audio Drum and Bass Rig runs as a stand-alone application. On the Macintosh,
the stand-alone version of Drum and Bass Rig uses the default audio settings of the operating system. On Windows, the stand-alone version
includes additional configuration settings:
Windows Stand-Alone
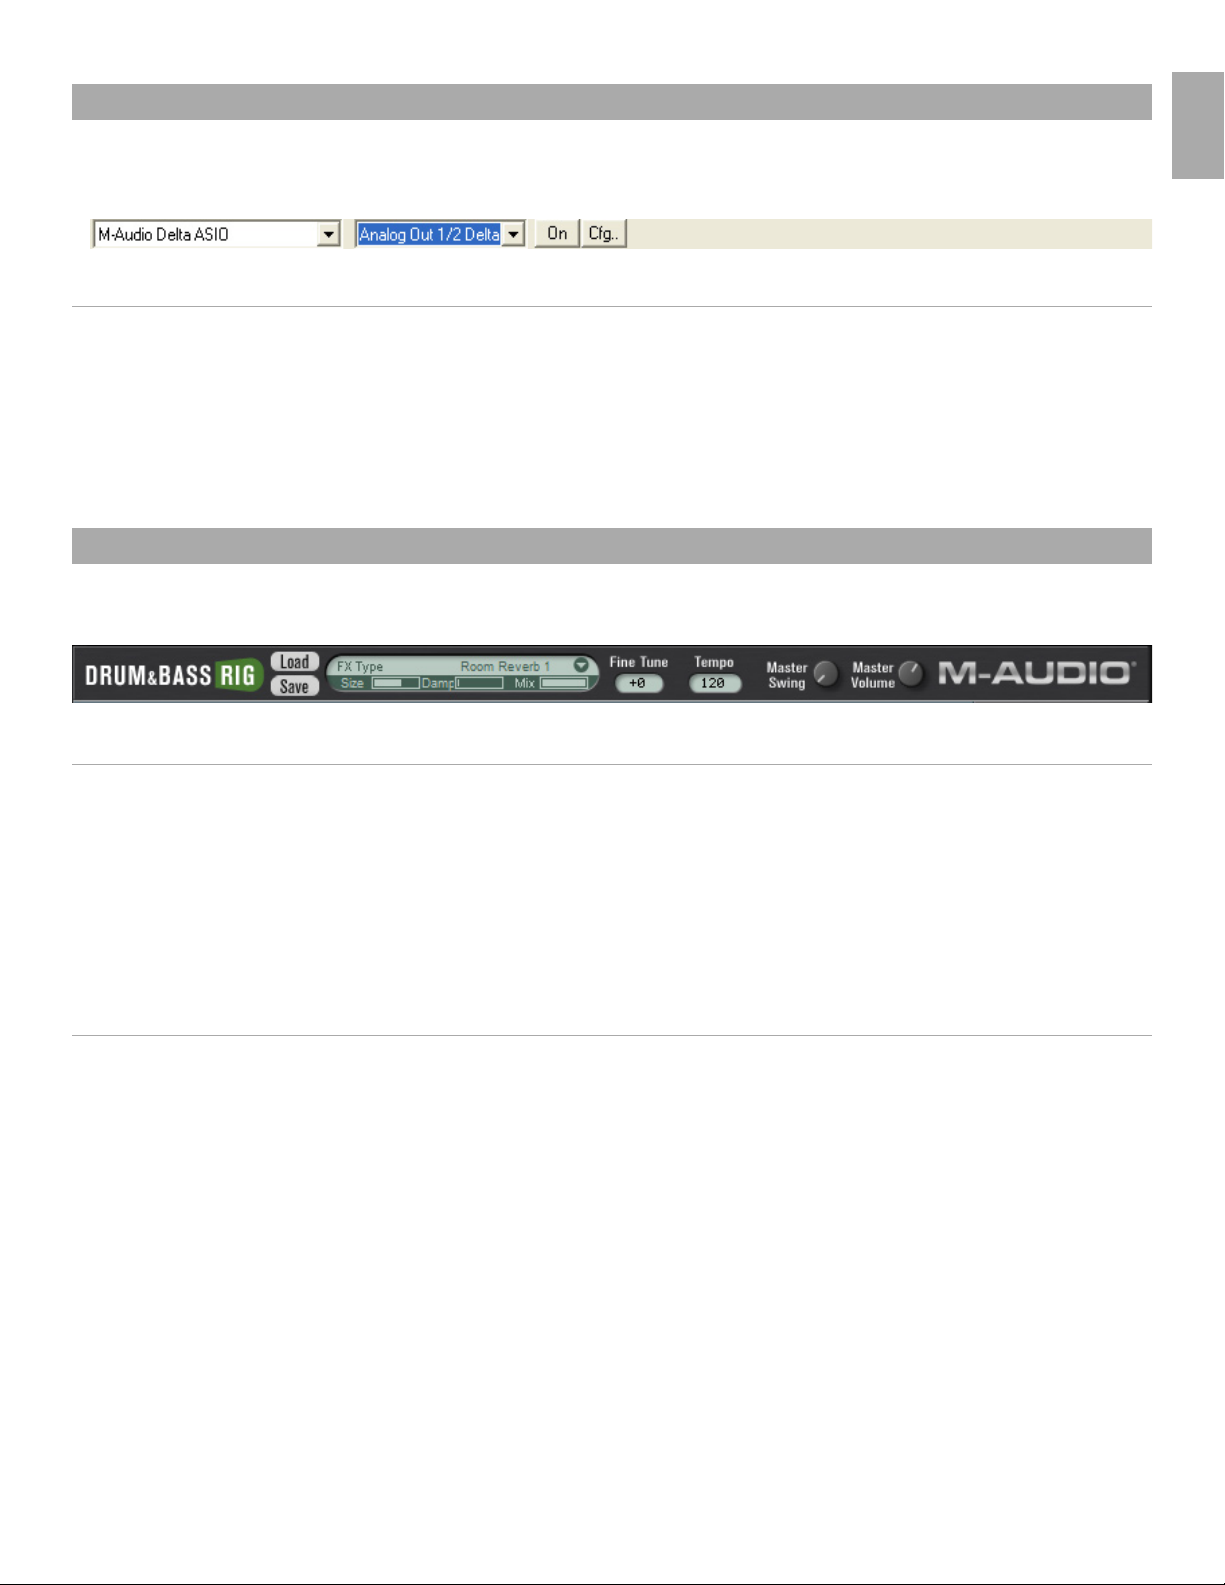
The Drum and Bass Rig stand-alone application for Windows includes four controls at the top of the application’s window:
The controls are as follows (from left to right):
Sound Card Selector
Output Selector: click this control to choose the audio outputs for Drum and Bass Rig (for multi-output sound cards only).
On Button: clicking this button turns Drum and Bass Rig on or off.
Cfg...: click this button to open the selected sound card’s ASIO Control Panel.
: click this control to select the desired sound card for audio output.
Using the M-Audio Drum and Bass Rig
The M-Audio Drum and Bass Rig is a device consisting of four instruments, a Master Effect Generator, and global settings. Each of these sections
are explained below:
English
Global
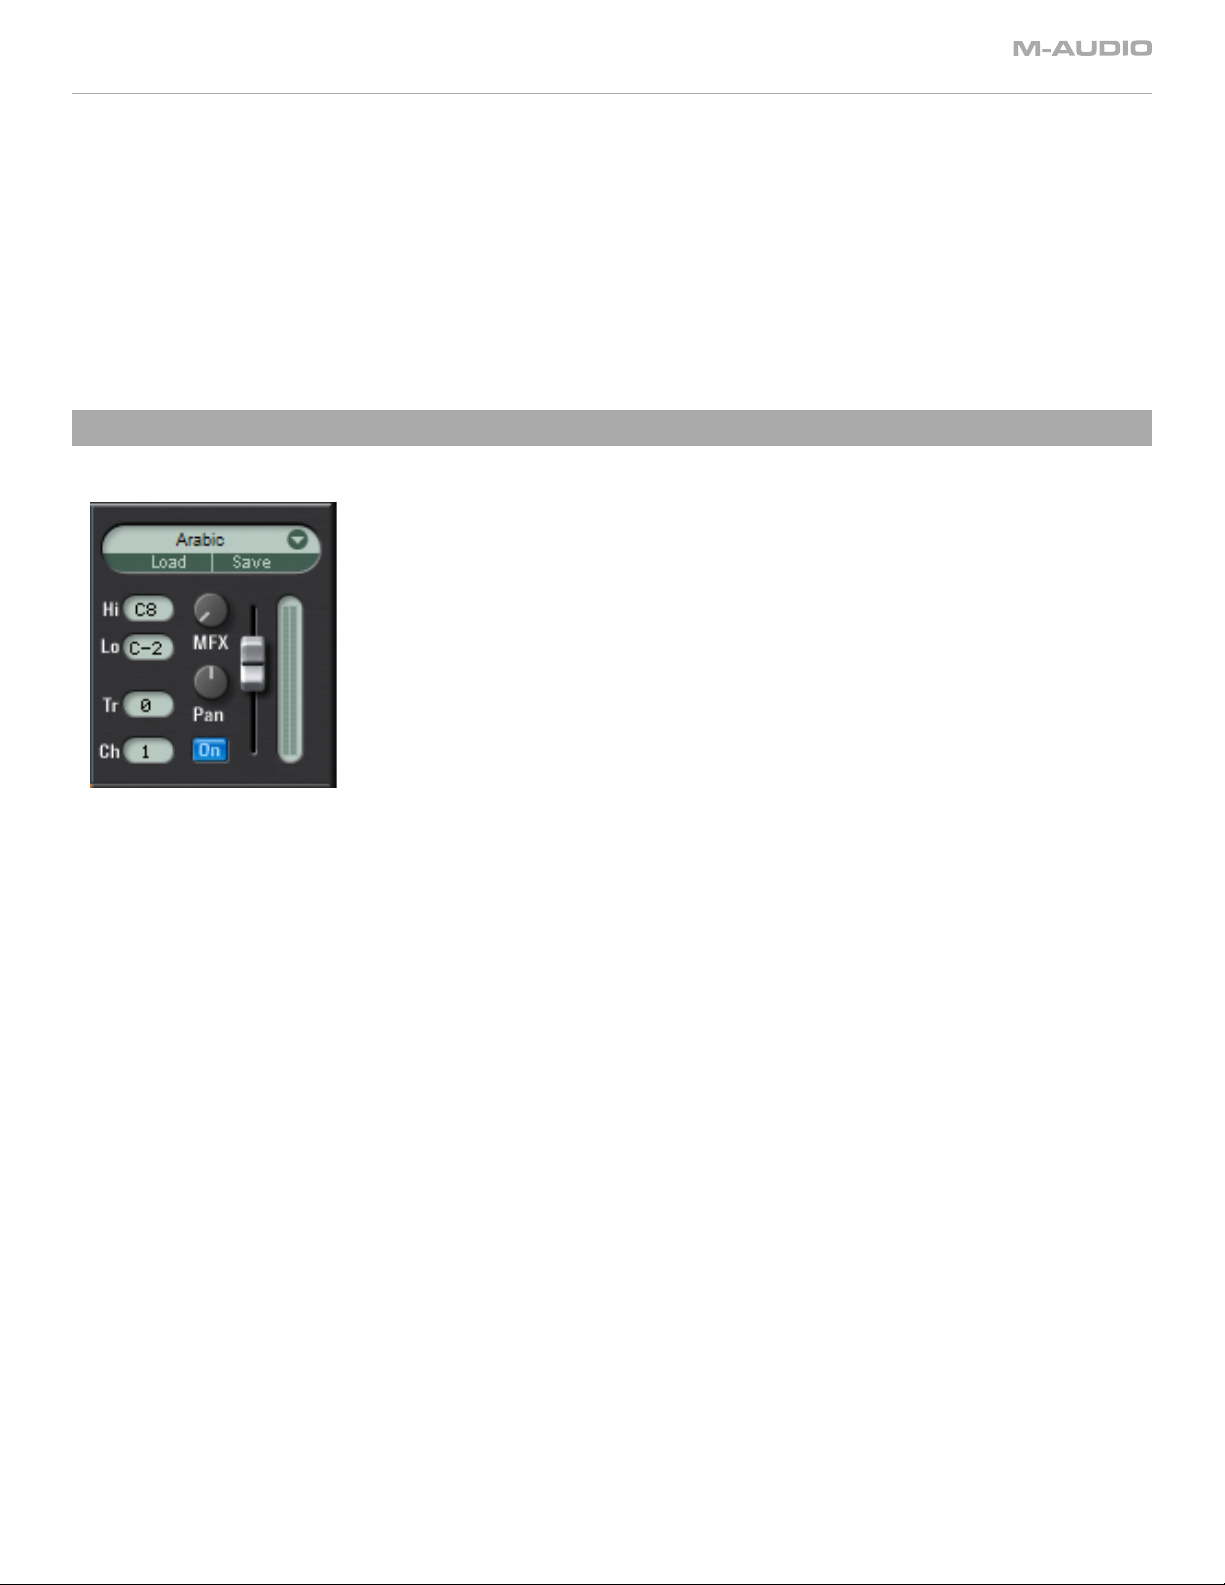
The strip at the top of the Drum and Bass Rig sets Global Settings that affect all instruments.
Certification Dialog: to open the Certification dialog, click the Drum and Bass Rig or M-Audio logos on the left or right side of the top strip of the
rig. This window also displays the Drum and Bass Rig version number information.
Load/Save: the Load/Save buttons at the top of the Drum and Bass Rig are for loading and saving bank files. These files contain all program/
patch information, MIDI channel and MIDI CC assignments, volumes, panning, key range, transpose, MFX (master effects) send, on/off status,
etc. for all four instruments within the Drum and Bass Rig, as well as the global MFX settings, fine tune, tempo, master swing and master volume
parameters. The user can also save and load banks via the menu that appears in their host application. Drum and Bass Rig banks are saved
and loaded from a folder called “Drum and Bass Rig Patches.”
Master FX
Clicking the master effects section produces a drop-down menu of 49 effects algorithms, organized into submenus by type. For a listing of effects
types see the “Effects Presets” listing below.
Once an effect is selected, the effect name will be displayed and two specially chosen effect edit parameters, plus a mix parameter, will be
displayed with useful preprogrammed preset settings. The names of the two effect edit parameters vary depending on the type of effect that is
in use. For example, a reverb may display “Size” and “Damp” (room size and damping) for its parameters. A delay may display “Time” and “Fbk”
(delay time (speed) and feedback (regeneration)).
Mix: governs the MFX wet/dry balance.
Fine Tune: adjusts the fine-tuning of all instruments in the Rig.
Tempo: allows the user to set a song tempo that will set tempo-sync’ed delays and LFOs when there is no tempo detected from the host by the
Drum and Bass Rig.
Master Volume:
Master Swing: a swing control that affects the LC-5 and the BL-6.
controls the output volume of the whole Drum and Bass Rig.
5
Page 4
MIDI CC Controls
All useful parameters in the Drum and Bass Rig have been pre-assigned MIDI controllers corresponding to the default CCs used by current
M-Audio keyboards (GM Patch).
It is also possible to customize these settings. Right-clicking (Windows) or control-clicking (Macintosh) a parameter opens a menu with the
following options:
CC: hover the mouse over this option to display a pop-up list of available MIDI continuous controllers, and select the desired continuous
controller from the list.
Learn: select this option and move a control on your hardware MIDI controller to assign it to the parameter automatically.
Forget: select this option to remove a MIDI continuous controller assignment.
Note: Each continuous controller may control only one parameter at a time.
Instrument Controls
To the right of all instruments in the Drum and Bass Rig is an instrument control area and mixer.
Load/Save: in addition to the global Load/Save menus at the top of the Rig, each instrument has its own Load/Save menu and library of
patches. Clicking the area above the Load and Save buttons produces a drop-down list of all factory content for an instrument. Patches can be
loaded for the instrument by clicking a patch in the drop-down list. The patch will be loaded and its name displayed in the slot. When clicking
Load or Save buttons, a Load/Save dialog appears. Patches are loaded and saved into folders with a name corresponding to the particular
instrument chosen.
Hi/Lo: sets the highest and lowest notes for the instrument’s key range.
Tr
: transposes the instrument by any amount within a range of plus or minus 24 semitones.
Ch:
selects the MIDI channel used to play the instrument.
MFX:
Pan:
On:
Volume: the slider on the right-hand side of the instrument controls section controls the instrument volume. A meter displays output level
sets the send level for the instrument to the MFX (master effects) at the top of the Rig.
sets the instrument‘s pan position.
turns the instrument on or off.
when the instrument is played.
6
Page 5

Drum and Bass Rig • User Guide
LC-5 Loop Creator
The LC-5 Loop Creator is a sliced loop player that includes 23 sets of 12 pre-sliced loops. These loops will play in sync at any tempo. Each set
contains loops for a certain musical style, e.g. Arabic or House. These loops can be freely assigned to the keys of your MIDI keyboard (three
octaves between C2 and B4), combined (by playing multiple MIDI keys), rearranged, and edited in many ways. The range (C2-B4) is chosen for
ease of use with smaller M-Audio keyboards, which have the lowest C on C2. As a convenience, the C2-B4 ranges are duplicated above (C5-B7)
and below (C-1-B1), but it’s important to note that these are simply the same zones repeated and therefore any edits made in these zones affect
the same key in other zones.
It’s not possible to import your own loops.
In the middle of the LC-5 is a waveform window displaying the slices of the selected loop. In this waveform inspector are three yellow buttons:
“Low,” “Mid” and “High.” These allow you to mute or play slices belonging to low, mid or high frequency ranges. Below the waveform display is a
“sawtooth” keyboard allowing you to play keys (loops) via mouse and to select which key (loop) you wish to edit. The highest C on the keyboard
is a stop key.
LC-5 Master Section
These controls affect all loops in the LC-5 patch.
Punch: Punch is a special compression algorithm, which accentuates attacks and makes the lower dynamic information louder.
Loose/Tight: Loose/Tight is a timing/quantization control. The waveform inspector displays timing changes. The 12 o‘clock position exhibits
no timing change. Turning to the right quantizes while turning to the left accentuates the natural timing of the loops.
Latch:
KeyF:
with Latch mode enabled, all triggered loops/notes play continuously until the Latch is turned off or the “Stop” key is used.
allows you to select MIDI keys/loops for editing via MIDI.
English
Loop Edit
The six knobs and three menus on the left of the LC-5 are edit parameters for individual loops within a patch. To select which loop or key is to
be edited, click on the “sawtooth” keyboard (the selected key will become red) or use a MIDI key with KeyF turned on.
Level: adjusts the selected loop’s volume.
Pan: adjusts the selected loop’s stereo panorama.
Pitch: adjusts the selected loop’s pitch up to plus or minus one octave.
Decay:
adjusts the decay time/length of the individual slices for the selected loop.
Speed: adjusts the selected loop’s speed: left is half-time while right is double-time.
Filter: adjusts the selected loop’s filter cutoff. Turning to the left reduces high frequencies.
Drop-Down Menus
Loop Select: displays which loop is assigned to a key and allows you to assign any other loop (from the 12 available loops) to a key. It is
possible to assign any loops to any keys or even the same loop to every key. The factory programs all use a simple assignment format: the
C‘s use loop 1, the C#‘s use loop 2, and so on, chromatically. The octave C2-B2 generally has a standard version of each loop and the other
two octaves have variations of the loops. For example, on C2 will be a standard version of a bass loop. On C3, there will be the same loop,
but with a different ordering for the slices. C4 can contain another variation of the same loop. This means you can expect variations of the
same loop when playing the same note in different octaves.
Play Events: reduces the selection of slices a loop will play according to a timing grid. For example, choosing “16
than a 16th. Choosing “Odd 16
Play Order: rearranges the loop by reordering (swapping) slices. For example, “Swap 2
th”
only plays notes that fall on the offbeat 16th notes of the bar, etc.
nd
” exchanges the first beat with the second beat
th”
removes any notes faster
and the third beat with the fourth beat of the bar.
7
Page 6

BL-6 Bassline
The BL-6 Bassline is a classic monophonic step sequencer synthesizer with four oscillator waveform types, a sequencer of up to 16 steps, delay, and
distortion. Each patch has 12 patterns which are usually variations of a bassline. These patterns can be selected during performance via MIDI keys
between C4 (pattern 1) and B4 (pattern 12). The bassline can also be played as a monophonic synth (without the sequencer playing) by clicking the
“Play” button off. In the center of the BL-6 is a strip of step sequencer values, and below this is a keyboard, which can be played via mouse clicks.
The Oscillator Section
Wave: the BL-6 has four waveform types: Sawtooth, Square, Triangle, and Unison Saw.
Sweep:
Sawtooth
Square . . . . . . . . sweep changes pulse width from square to pulse
Triangle
Unison Saw . . . . . sweep detunes sawtooth unison
Decay: filter envelope decay time—the filter envelope has a zero attack time and a zero sustain level so the decay parameter controls the
speed of the filter sweep.
Depth: filter envelope depth—this controls the amount of the filter envelope sweep.
Cutoff: sets filter cutoff frequency.
Resonance: filter resonance amount.
Glide:
Drive:
the Sweep control affects the shape of the chosen wave—
. . . . . . . sweep varies sync
. . . . . . . . . sweep clips the triangle so that it gradually becomes a ramped square, similar to a TB-303
portamento time—the time it takes for the synth to “slide” from one note to the next.
distortion—this is a specially programmed overdrive effect.
The Delay Section
Time: governs the delay rate (or speed) of the tempo-synced delay effect. Holding the mouse over this knob displays the delay rate.
Fbk:
Mix: controls the wet/dry balance of the delay effect.
Step Sequencer Section
Steps: this box on the right of the BL-6 sets the number of steps used by the sequencer. Clicking and dragging down or to the left reduces
Grid
Pattern: this drop-down menu selects which of the 12 patterns you are currently playing or editing.
Edit
The parameters listed below can be edited using the step-sequencer grid in the BL-6. To sequence these parameters, choose one from the
middle drop-down list (on the left of the display), click the appropriate step, and then adjust the parameter value. Parameters can be edited
while a sequence is playing and the LEDs in the keyboard flash red to display the sequence position.
Note: this edits the pitch of the steps in whole notes plus or minus 24 semitones. A setting of zero creates a space (no note).
Accent: any sequenced note can have an accent, which makes that note a little louder and brighter (i.e. higher cutoff).
Glide: on/off decides whether a note will glide from the previously played note. The glide time is set via the “Glide” knob, but the “Glide Time”
Depth: produces an offset to the depth knob (filter envelope depth) setting.
Cutoff:
Resonance:
Glide Time:
Scale: forces sequences to play within specific music key scales. Use the “Chromatic” setting when no scale limiting is desired.
controls the delay effect‘s feedback (or regeneration).
the number of steps (graying out the unused steps on the display) while clicking and moving vertically or to the right increases the numbers
of steps up to the maximum of 16 available.
: sets the playback rate to 8th note, triplet or 16th note.
parameter (below) allows the glide time to be offset for any steps in the sequence.
produces an offset to the cutoff knob setting.
produces an offset to the resonance knob setting.
produces an offset to the glide knob setting, allowing each step that contains a glide setting to have its own glide speed.
8
Page 7
Drum and Bass Rig • User Guide
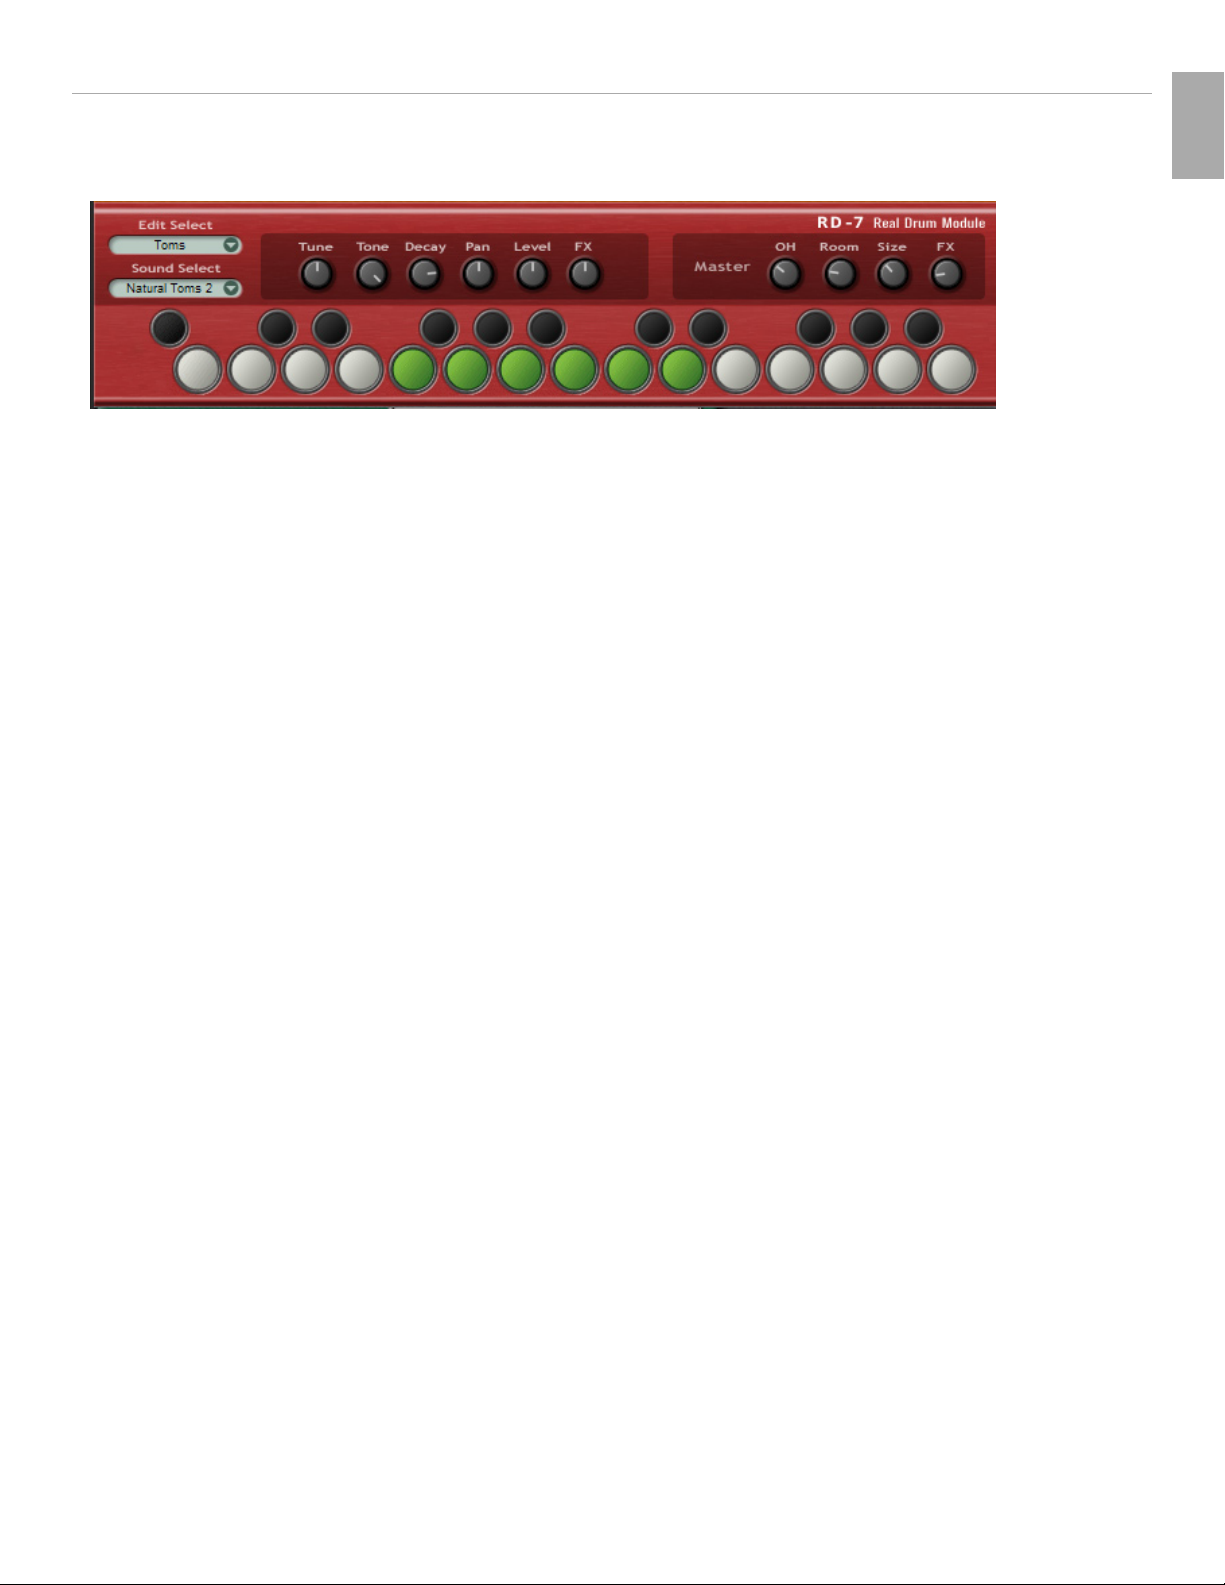
RD-7 Real Drum Module
The RD-7 is a stereo drum module with more than 100 drum sounds plus a full set of GM-compatible percussion. Drums are mapped in GM
standard mapping (from A#0-C5), featuring mixable overhead and room mics, plus special pre-programmed FX per kit. Drum sounds are easily
auditioned, assigned, and edited by first clicking a key on the stylized keyboard at the bottom of the instrument (toms, hats, crashes, and rides
are handled as sets).
Edit Select
Use this menu or click a pad/key on the keyboard to choose the sound or set you wish to edit. Clicking a pad/key also auditions the currently
selected sound.
Sound Select
Use this menu to choose a sound or set for the selected pad/key.
Sound Edit Knobs
The first six sound edit knobs affect only the selected pad/key.
Tune: fine-tunes the selected instrument or set.
Tone: adjusts the low pass filter for the selected instrument or set. Turning left reduces the treble in the sound.
Decay:
Pan:
Level:
FX: each preset kit has a preprogrammed special effect, which is not editable. These are mostly additional reverbs but sometimes distortion
shortens the decay and release time of the selected instrument or set.
sets the stereo panorama position of the selected instrument or set.
sets the volume of the selected instrument or set.
or modulation, etc.
English
Master Section
OH:
Room:
Size:
FX:
controls the overall level of the overhead mics for the kit.
controls the overall level of the room mics for the kit.
adjusts the size of the drum room.
controls the overall level of the preprogrammed FX for the kit.
9
Page 8

EB-8 Electric Bass
The EB-8 Electic Bass guitar module features various finger, pick, fretless and slap electric basses, an acoustic bass, and some useful synth bass
patches. All Electric Bass sounds have additional slides, dead notes, fret noise (from C5-C6) and harmonics, which switch via the mod wheel. Each
patch can have its own effects and each sound has a number of editing controls.
Sound Controls
Drive: tube amp overdrive.
Punch:
Bass
Treble:
Decay:
Tone: low pass filter control.
a special compression algorithm that accentuates the attack and controls the sustain portion of the sound.
: low frequency EQ control.
high frequency EQ control.
sets how long the bass notes will sustain.
Mod Wheel Response
On the left of the module are two knobs that determine how the EB-8 responds to mod wheel info.
Vibrato: when this button is in the down position, the mod wheel controls vibrato depth.
Harmonics: when this button is in the down position and the mod wheel is moved to a value higher than 65, the electric bass patches (only)
will switch to playing harmonics.
With only a little practice, most players can achieve normal bass playing with vibrato and harmonics quite easily, but for flexibility, we have
provided the above switches so the player can choose the behavior of the mod wheel.
10
Page 9
Contacting M-Audio
Drum and Bass Rig • User Guide
We at M-Audio have worked diligently to ensure that the Drum and Bass Rig is an optimal piece of software for your studio. However, due to the
wide variety of host computers and configurations, you may encounter unexpected behavior from your software. If you feel that Drum and Bass
Rig is not working properly, you can contact M-Audio Technical Support for assistance.
M-AUDIO U.S. -
5795 Martin Road, Ir windale, CA 91706-6211, U.S.A.
Sales Inform ation : . . . . . . . . . . . . . . . . . . . . . . . . . . . . . . . . . . . . . . . . . . .626-633-9050
Sales (fax): . . . . . . . . . . . . . . . . . . . . . . . . . . . . . . . . . . . . . . . . . . . . . . . . . . 626-633-9070
Sales Inform ation ( email ): . . . . . . . . . . . . . . . . . . . . . . . . . . . . . . . info@m- audio.com
Tech Supp ort (e mail): . . . . . . . . . . . . . . . . . . . . . . . . . . . . . . . . te chsupt @m-a udio.com
Tech Supp ort (f ax): . . . . . . . . . . . . . . . . . . . . . . . . . . . . . . . . . . . . . . . . . .626-633-9060
Internet Hom e Page: . . . . . . . . . . . . . . . . . . . . . . . . . . . . . .http://www.m-au dio.com
M-AUDIO U.K. -
Floor 6, Gresham House, 53 Clarendon Road, Watford, WD17 1LA, United Kingdom
Sales Inform ation ( phone): . . . . . . . . . . . . . . . . . . . . . . . . . . . . . . . 44 (0) 1923 204010
Sales Inform ation ( fax): . . . . . . . . . . . . . . . . . . . . . . . . . . . . . . . . . .44 (0) 1923 204039
Sales Inform ation ( email ): . . . . . . . . . . . . . . . . . . . . . . . . . . . . . . . info@maudio.co.uk
Technical Support (P C): . . . . . . . . . . . . . . . . . . . . . . . . . . . . . . . . . . .44 (0) 1309 671301
Technical Support (Mac): . . . . . . . . . . . . . . . . . . . . . . . . . . . . . . . . . 44 (0) 1765 650072
Technical Support (e mail) : . . . . . . . . . . . . . . . . . . . . . . . . . . . . support @maudio.co.uk
Internet Hom e Page: . . . . . . . . . . . . . . . . . . . . . . . . . . . . . .http://ww w.maud io.co.uk
M-AUDIO France -
Floor 6, Gresham House, 53 Clarendon Road, Watford, WD17 1LA, United Kingdom
Assi stance Techniqu e (aucu ne ques tions r eliée s aux vent es)
courr iel (as sistance PC): . . . . . . . . . . . . . . . . . . . . . . . support @m-audio-f rance.com
courr iel (as sistance Mac): . . . . . . . . . . . . . . . . . . . . . . . . . mac@m-audio -france.com
téléphone (assistance PC): . . . . . . . . . . . . . . . . .0820 000 731 (0,12 Euros par minute )
téléphone (assistance Mac): . . . . . . . . . . . . . . . 0820 391 191 (0,12 Euros par mi nute)
télécopieur/fax: . . . . . . . . . . . . . . . . . . . . . . . . . . . . . . . . . . . . . . . . . . . . .01 72 72 90 52
Ventes ( aucun a ppels d ’assis tance te chnique)
téléphone: . . . . . . . . . . . . . . . . . . . . . . . . . . . . . . . . . . . . . 0810 001 105 ( Numero Azur)
courr iel: . . . . . . . . . . . . . . . . . . . . . . . . . . . . . . . . . . . . . . . . info@m-au dio-france.com
télécopieur/fax: . . . . . . . . . . . . . . . . . . . . . . . . . . . . . . . . . . . . . . . . . . . . . 01 72 72 90 52
M-AUDIO Deutschland ( Germany) -
Kuhallmand 34, D-74613 Ohringen, Germany
Sales Inform ation : . . . . . . . . . . . . . . . . . . . . . . . . . . . . . . . . . . . . . . +49 (0 )7941 987000
Sales Inform ation ( email ): . . . . . . . . . . . . . . . . . . . . . . . . . . . . . . . . .info@ m-audio.de
Technical Support: . . . . . . . . . . . . . . . . . . . . . . . . . . . . . . . . . . . . . +49 (0)7941 9870030
Technical Support (e mail) : . . . . . . . . . . . . . . . . . . . . . . . . . . . . . support @m-audio.de
Technical Support (fa x): . . . . . . . . . . . . . . . . . . . . . . . . . . . . . . . . +49 (0)7941 98 70070
Internet Hom e Page: . . . . . . . . . . . . . . . . . . . . . . . . . . . . . . . . http://www.m-au dio.de
M-AUDIO Canada -
1400 St-Jean Baptiste Ave. #150, Quebec City, Quebec G2E 5 B7, Canada
Technical Support (e -mail ): . . . . . . . . . . . . . . . . . . . . . . . tech canada @m-audio.com
Technical Support (P C): . . . . . . . . . . . . . . . . . . . . . . . . . . . . . . . . . . . . . (418) 872-0444
Technical Support (Mac): . . . . . . . . . . . . . . . . . . . . . . . . . . . . . . . . . . . 1-800-638-2120
Technical Support (f ax): . . . . . . . . . . . . . . . . . . . . . . . . . . . . . . . . . . . . . (418) 872-0034
Sales (e-ma il): . . . . . . . . . . . . . . . . . . . . . . . . . . . . . . . . . . .info canada @m-audio.com
Sales (phone): . . . . . . . . . . . . . . . . . . . . . . . . . . . . . . . . . . . . . . . . . . . . . (866) 872-0444
Sales (fax): . . . . . . . . . . . . . . . . . . . . . . . . . . . . . . . . . . . . . . . . . . . . . . . . . (514) 396-7102
Internet Hom e Page . . . . . . . . . . . . . . . . . . . . . . . . . . . . . . . . http://www.m-audio.ca
M-AUDIO Japan -
(株式会社エムオーディオジャパン)
テクニカルサ ポート :.................................
テクニカルサ ポート
(Macintosh ):
テクニカルサ ポート
(Win dows):
Fax:............................................
ホームページ : .........................http://www.m-audio.co.jp
........................mac-support@m-audio.co.jp
..........................win-support @m-audio.co.jp
460-0 002
愛知県名古屋市中区丸の内
052-218-0859
052-218-0875
2-18-10
English
11
Page 10

LC-5 Loop Creator Patches
01 Arabic 15 House 2
02 Rock 1 16 Latin 2
03 Jazz 17 Reggae
04 Latin 1 18 Rnb 1
05 Bigbeat 19 Rnb 2
06 Dnb 1 20 Rock 2
07 Dnb 2 21 Techno 1
08 Downtemp 22 Techno 2
09 Dub 23 Techno 3
10 Electro
11 Funk
12 Hip Hop 1
13 Hip Hop 2
14 House 1
BL-6 Bassline Patches
01 Melodic Line 21 Crazy Bass 41 TB Saw 4
02 Noise Bass
03 Industrial 23 Dist Saw Bass 43 TB Saw FX
04 Dist TB Saw 1
05 Filter Bass 25 Three Sync 45 TB Sq 2
06 Eyeliner 26 E-Bass 46 TB Sq 3
07 Pulse Bass 1
08 Downbeat
09 Bass War
10 Overtone Baz
11 Dark Baseline
12 Bad Square
13 Resonar 33 Old School 52 Tri Stesse
14 Waltz Line
15 Wicked Pulse
16 Dist TB SQ1 36 Slow Waltz
17 EBM Line 1 37 Sync Bass
18 80s Bass 38 TB Saw 1
19 Bizarre Biz 39 TB Saw 2
20 Club Bass
22 Dist Fat Bass 42 TB Saw 5
24 DistTB Saw 2 44 TB Sq 1
27 EBM Line 2 47 TB Sq 4
28 Slow Space 47 TB Sq 5
29 Clean & Nice 48 Wicked Line
30 Fun Electric 49 Tri Angel
31 Industrial 2 50 Tri Some
32 Offbeat 51 TriPPer
34 Pattern Melo
35 Pulse Bass 2
40 TB Saw 3
12
Page 11

RD-7 Real Drums Patches
Drum and Bass Rig • User Guide
01 Pop Kit 1 16 Funk Kit 2
02 Pop Kit 2 17 Soul Kit 1
03 Pop Kit 3 18 Soul Kit 2
04 Pop Kit 4 19 RnB Set 1
05 Live Kit 20 RnB Set 2
06 Rock Drums 1 21 Jazz Brushes
07 Rock Drums 2 22 Jazz Sticks
08 Classic Rock Kit 1 23 Mod Kit
09 Classic Rock Kit 2 24 Hi Tuned Kit
10 Hip Hop 25 Mini Kit
11 Modern RnB 26 Big Arena
12 Gated Kit 27 Distorted Drums
13 Heavy Drums 1 28 Megaphone Kit
14 Heavy Drums 2
15 Funk Kit 1
English
13
Page 12
EB-8 Electric Bass Patches
00 Finger 1 DI 35 Slap 2 Delay
02 Finger 1 Amp
03 Finger 1 Punch 37 Acoustic Amp
04 Finger 1 Dirty 38 Acoustic Punch
05 Finger 1 Chorus
06 Finger 2 DI 40 Acoustic Reverb
07 Finger 2 Amp
08 Finger 2 Punch 42 Synth Bass Amp
09 Finger 2 Dirty 43 Synth Bass Punch
10 Finger 2 Autowah 44 Synth Bass Dirty
11 Pick 1 DI 45 Synth Bass Gate
12 Pick 1 Amp 46 Ultrasynth DI
13 Pick 1 Punch 47 Ultrasynth Amp
14 Pick 1 Dirty 48 Ultrasynth Punch
15 Pick 1 Phaser
16 Pick 2 DI 50 Ultrasynth Phaser
17 Pick 2 Amp
18 Pick 2 Punch 52 Sub Bass Amp
19 Pick 2 Dirty 53 Sub Bass Punch
20 Pick 2 Slapback
21 Fretless DI 55 Sub Bass Squash
22 Fretless Amp
23 Fretless Punch
24 Fretless Dirty
25 Fretless Chorus
26 Slap 1 DI
27 Slap 1 Amp
28 Slap 1 Punch
29 Slap 1 Dirty
30 Slap 1 Slapback
31 Slap 2 DI
32 Slap 2 Amp
33 Slap 2 Punch
34 Slap 2 Dirty
36 Acoustic DI
39 Acoustic Dirty
41 Synth Bass DI
49 Ultrasynth Dirty
51 Sub Bass DI
54 Sub Bass Dirty
14
Page 13

Effects Presets
050328_Drum&BassRig_UG_EN01
Drum and Bass Rig • User Guide
The following effects are available for the MFX (master FX and the EB-8 Electric Bass).
Parameter 1 Parameter 2
Reverb
Chorus Reverb Chor Depth Rev Time
Room Reverb 1 Size Damping
Room Reverb 2 Size Pre-Del
Hall Reverb 1 Size Damping
Hall Reverb 2 Size Pre-Del
Plate Reverb Size EQ
Gate Reverb Size EQ
Early Reflections Size EQ
Delay
Delay Delay Feedback
Lofi Delay Delay Feedback
Stereo Delay Delay Feedback
Lofi Stereo Delay Delay Feedback
Ping Pong Delay Feedback
Lofi Ping Pong Delay Feedback
Gallop Echo Delay Feedback
Vox Tape Echo Delay Feedback
Chorus
Chorus Rate Depth
Rich Chorus Rate Depth
Ensemble Rate Depth
Space Chorus Rate Depth
Quad Chorus Rate Depth
Stereo Width Width Delay
Tremolo
Tremolo Rate Shape
Autopan Rate Shape
Rotary Speaker Slow/Fast Rate
English
Flanger
Flanger Rate Depth
Deep Flanger Rate Depth
Death Flanger Rate Depth
Phaser
Phaser Rate Depth
Deep Phaser Rate Depth
Wah Wah
Auto Wah Depth Frequency
Mod Wah Rate Depth
Talkbox Rate Vowel
Pitch Shift
Detune Detune Delay
Stereo Pitch Left Right
EQ
2 Band EQ 1 Low Gain Hi Gain
2 Band EQ 2 Low Gain Hi Mid Gain
Sweep EQ Wide Gain Frequency
Sweep EQ Sharp Gain Frequency
Enhancer Hi Tune Lo Depth
Distortion
Distortion Drive Tone
Amp Simulator Drive Amp Model
Feedback Amp Drive Amp Model
Overdrive Drive Shape
Bit Crusher 1 Bit Depth Rate
Bit Crusher 2 Bit Depth Rate
Dynamics
Attack Compressor Drive Ratio
Squash Compressor Drive Ratio
Limiter Drive Attack
15
 Loading...