

Page 1

Dance Station Help Manual
Quick Overview:-
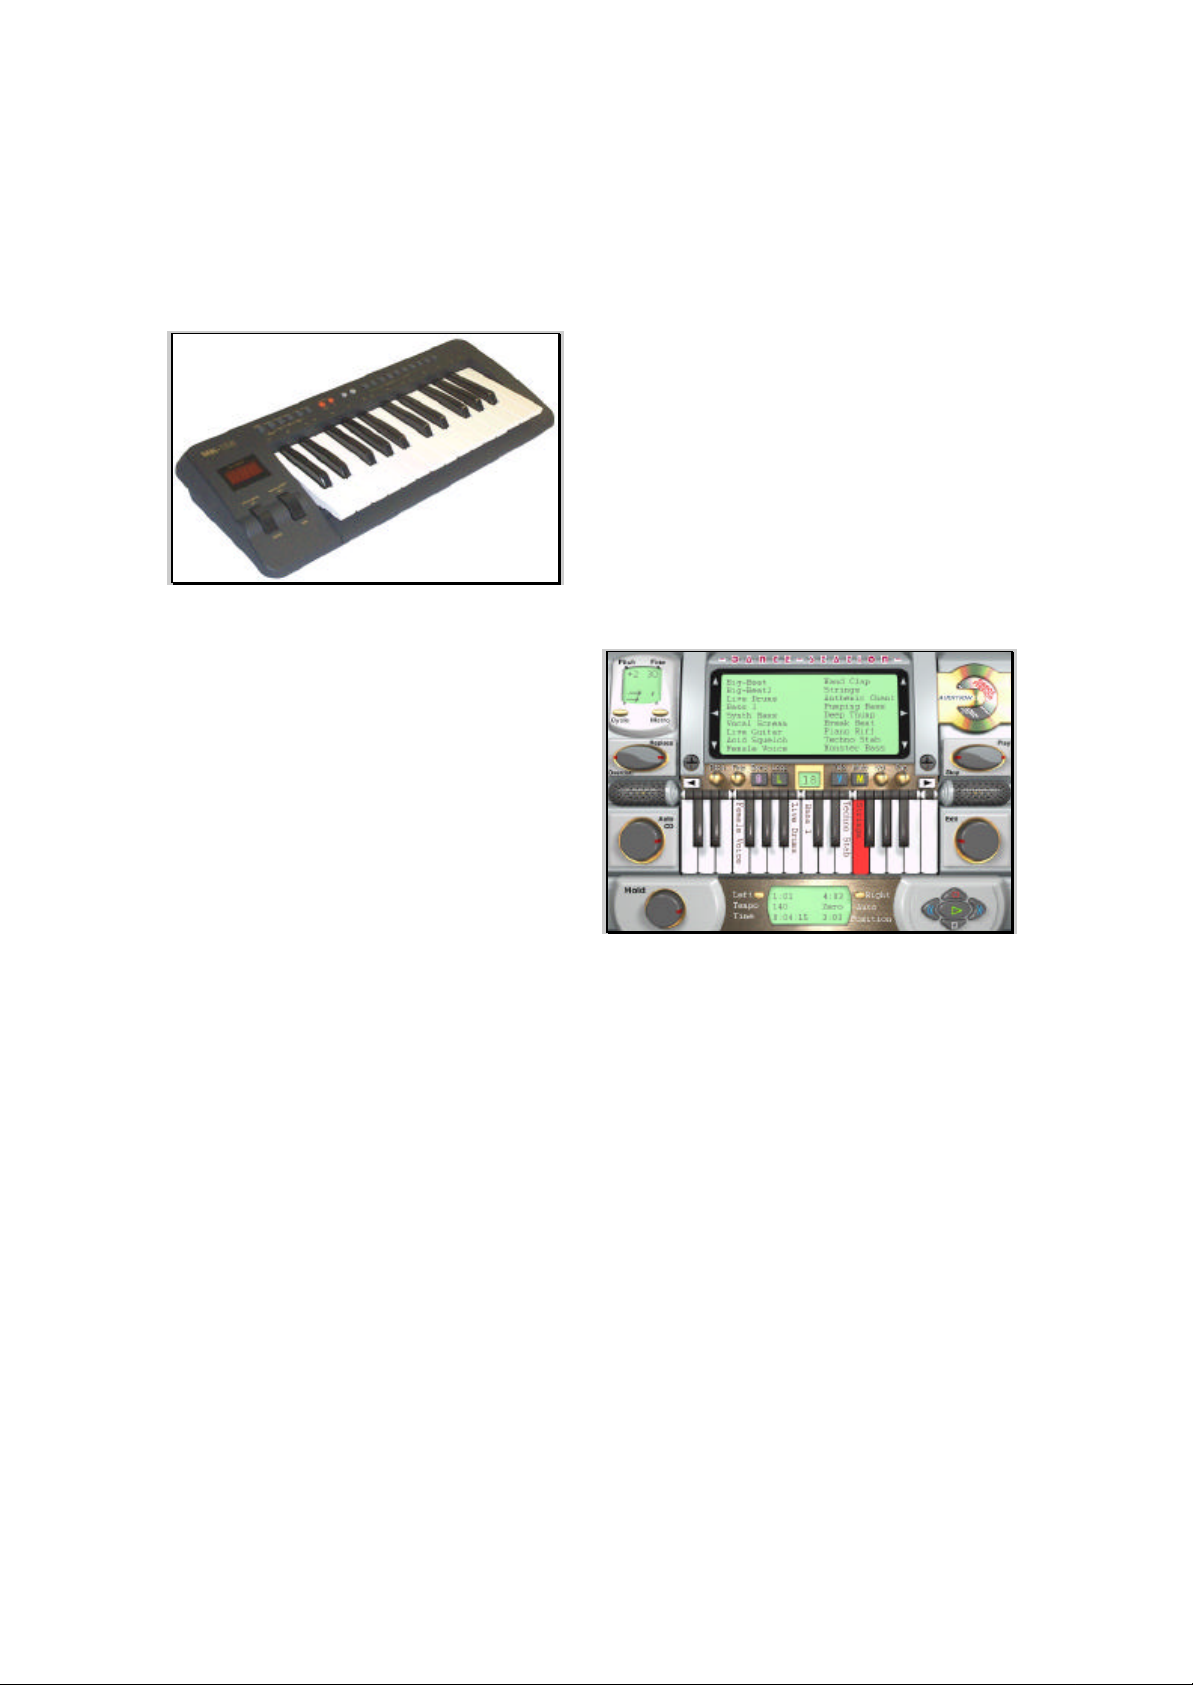
Evolution Dance Station™ is a realtime dance music-production package which allows the user to mix their
own tunes, live, using a 25 note keyboard to trigger high quality audio dance loops.
Audio Dance loops can be imported into the program from CD-ROM, Hard Disk or Floppy disk. The
Dance Station CD-ROM includes 1000 “ready-to-mix” professionally looped samples which will transform
your PC into your very own “Hit Factory”! Each sample may be assigned to one of 25 keys on a graphical
screen keyboard. Playback of samples will be polyphonic so that up to 25 keys may be pressed at the same
time (hardware dependent). This means you can create wicked mixes absolutely live.
Transport controls in the main screen will allow users to record their composition. The results will be
displayed in an editing screen. The editing screen allows you to move samples around the screen, copy
loops, change sample volume levels etc.
Key Features
• Get in the mix with over 1000 CD quality stereo samples
• Dance Station software, playback up to 25 samples simultaneously
• Mix, produce and save your own dance tracks
• Awesome graphics with state of the art real-time controls
• Unique hands-on mixing using the Dance Station keyboard
• Change the pitch of a sample in real-time with pitchbend wheel
• Drag new samples to the on-screen keyboard while in the mix
• Loop and hold samples
• Use your own samples or add samples from other extensive libraries (wav format)
• Editing window for easy post production work
• Quick Start Guide
• Online Help
• Exclusive Dance Station Web Site
License agreement:
Information in this document is subject to change without notice and does not represent a commitment on
the part of Evolution Electronics Ltd.
The software described in this document is furnished under a single-user license agreement. It may only
be copied for the purpose of a backup under the terms of the single-user agreement. Any other copying is
against the law. No part of this document may be reproduced or transmitted in any form or by any means,
electronic or mechanical, including photocopying and recording, for any purpose without the express
written permission of Evolution Electronics Ltd
Credits and copyright
Copyright (c) 1998 by Evolution Electronics Ltd. All rights reserved.
Dance Station is an Evolution Electronics production.
Dance Station was programmed by Stephen J. Mellin.
Help Text by Rhun Roberts
Readme file
Please check the disk for a file called README.WRI. This will list any changes made to the program after
the manual was printed.
1
Page 2

Updating your Software
To update your software to the latest version visit our web site on http://www.evolution.co.uk. Here you
will find patches exclusively for Evolution own brand products. Simply download the free updates, run the
patch.exe files and quickly update your software. Check out also the Excellent Dance Station Web site
www.dancestation.com to swap song files with fellow Dance Music Enthusiasts.
Technical support
Evolution Electronics offers free technical support for registered Dance Station users. If you have a
problem, before contacting Technical Support please read the relevant section of the on-line help. A list of
frequently asked questions (FAQs) is also on disk which may solve numerous queries.
If you still need technical assistance, please have the following information to hand:
OPERATING SYSTEM :e.g. Win 95/Win98
HARDWARE PLATFORM: e.g. IBM PC
CPU: e.g. Pentium
CPU SPEED: e.g. 133 MHz
RAM: e.g. 32 MB
SOUNDCARD:
Technical Support can be contacted:
Between 0900 and 1700 UK Time
Evolution Electronics Ltd,
8 Church Square,
Leighton Buzzard,
Bedfordshire,
LU7 7AE.
United Kingdom
Tel: (01525) 372621
Fax: (01525) 383228
Support E-Mail : support@evolution.co.uk
Sales E-Mail : sales@evolution.co.uk
http://www.evolution.co.uk
http://www.dancestation.com
International :
Tel: +44 1525 372621
Fax: +44 1525 383228
2
Page 3
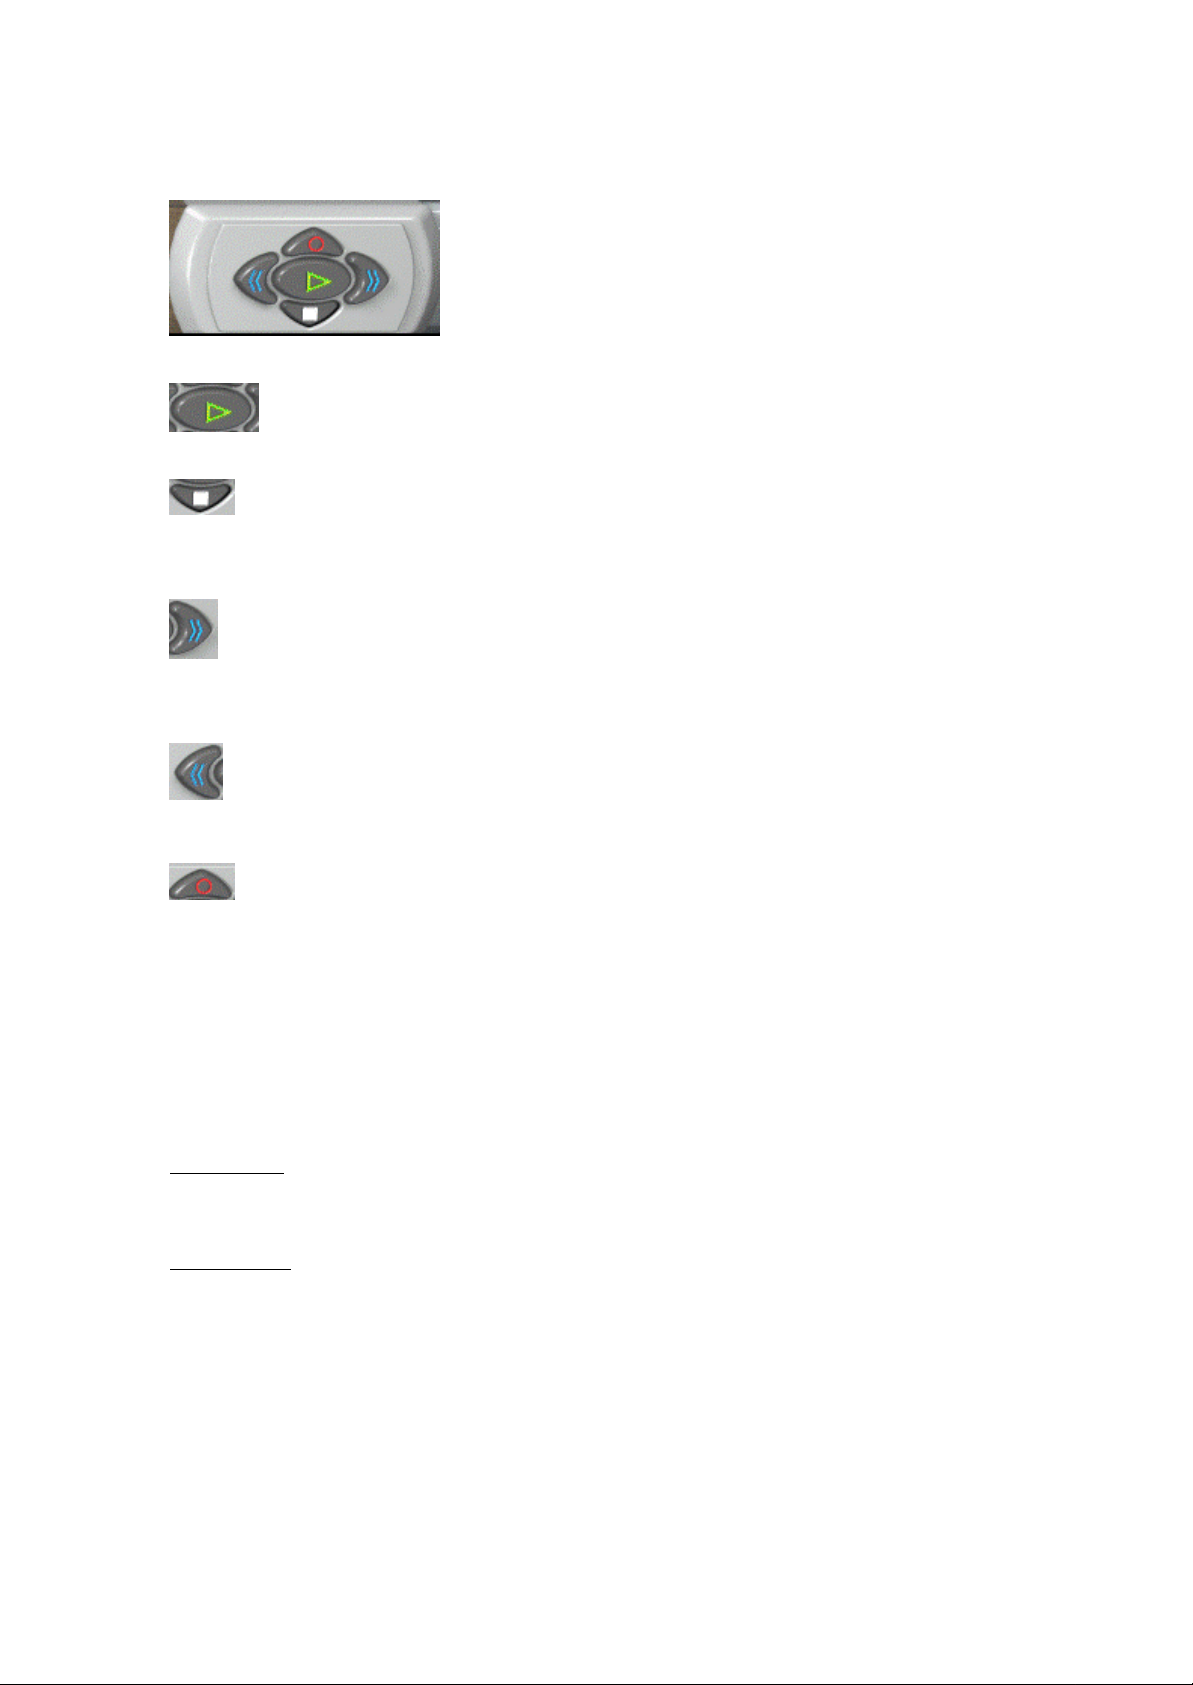
Transport Controls
Play Press this button to start the playback of your song.
Stop Press this button to stop the playback of your song. A double click on the Stop
button using the left mouse button will rewind the song to the start. This is a fast way of
returning to zero.
Fast Forward Button Press this button if you want to jump to any location further into the
song. It works the same way as the controls on a conventional tape player. Please note that after
pressing the fast forward button you might not hear the music being played back immediately, but
rather from the start of the next bar (whenever a sample is triggered).
Rewind Press this button to rewind the song. Pressing the “Home” key on your PC keyboard will
rewind the song to the start position.
Record The Record button allows you to record your live mix and store it as a song on your
hard disk. To start a recording, press the Red record button. To end a recording, press the stop
button. When the record button is pressed, the program will enter “stand-by” mode and will not start
recording until you play a note on your keyboard. There is also an option in the Preferences menu to get a
count-in for your recording. If this is selected you’ll get a 4 beat count-in before the play position starts
moving across the screen. Whilst the record button is pressed, all samples triggered from the MIDI
keyboard will be recorded to the edit window. When stop is pressed to end the recording, all samples will
be displayed on the screen.
The record feature works in 2 modes:Replace or Overdub
Replace Mode When this mode is selected, playing samples when in record mode will overwrite any
information you’ve already recorded. You cannot retrieve the original information when Replace mode has
been selected.
Overdub Mode This is the most useful Record mode as it allows you to layer samples during
subsequent recordings. This means you can lay down, say, your drum track during your first recording,
rewind to the start and build up your track bit by bit by adding more loops during each recording.
Controls
3
Page 4
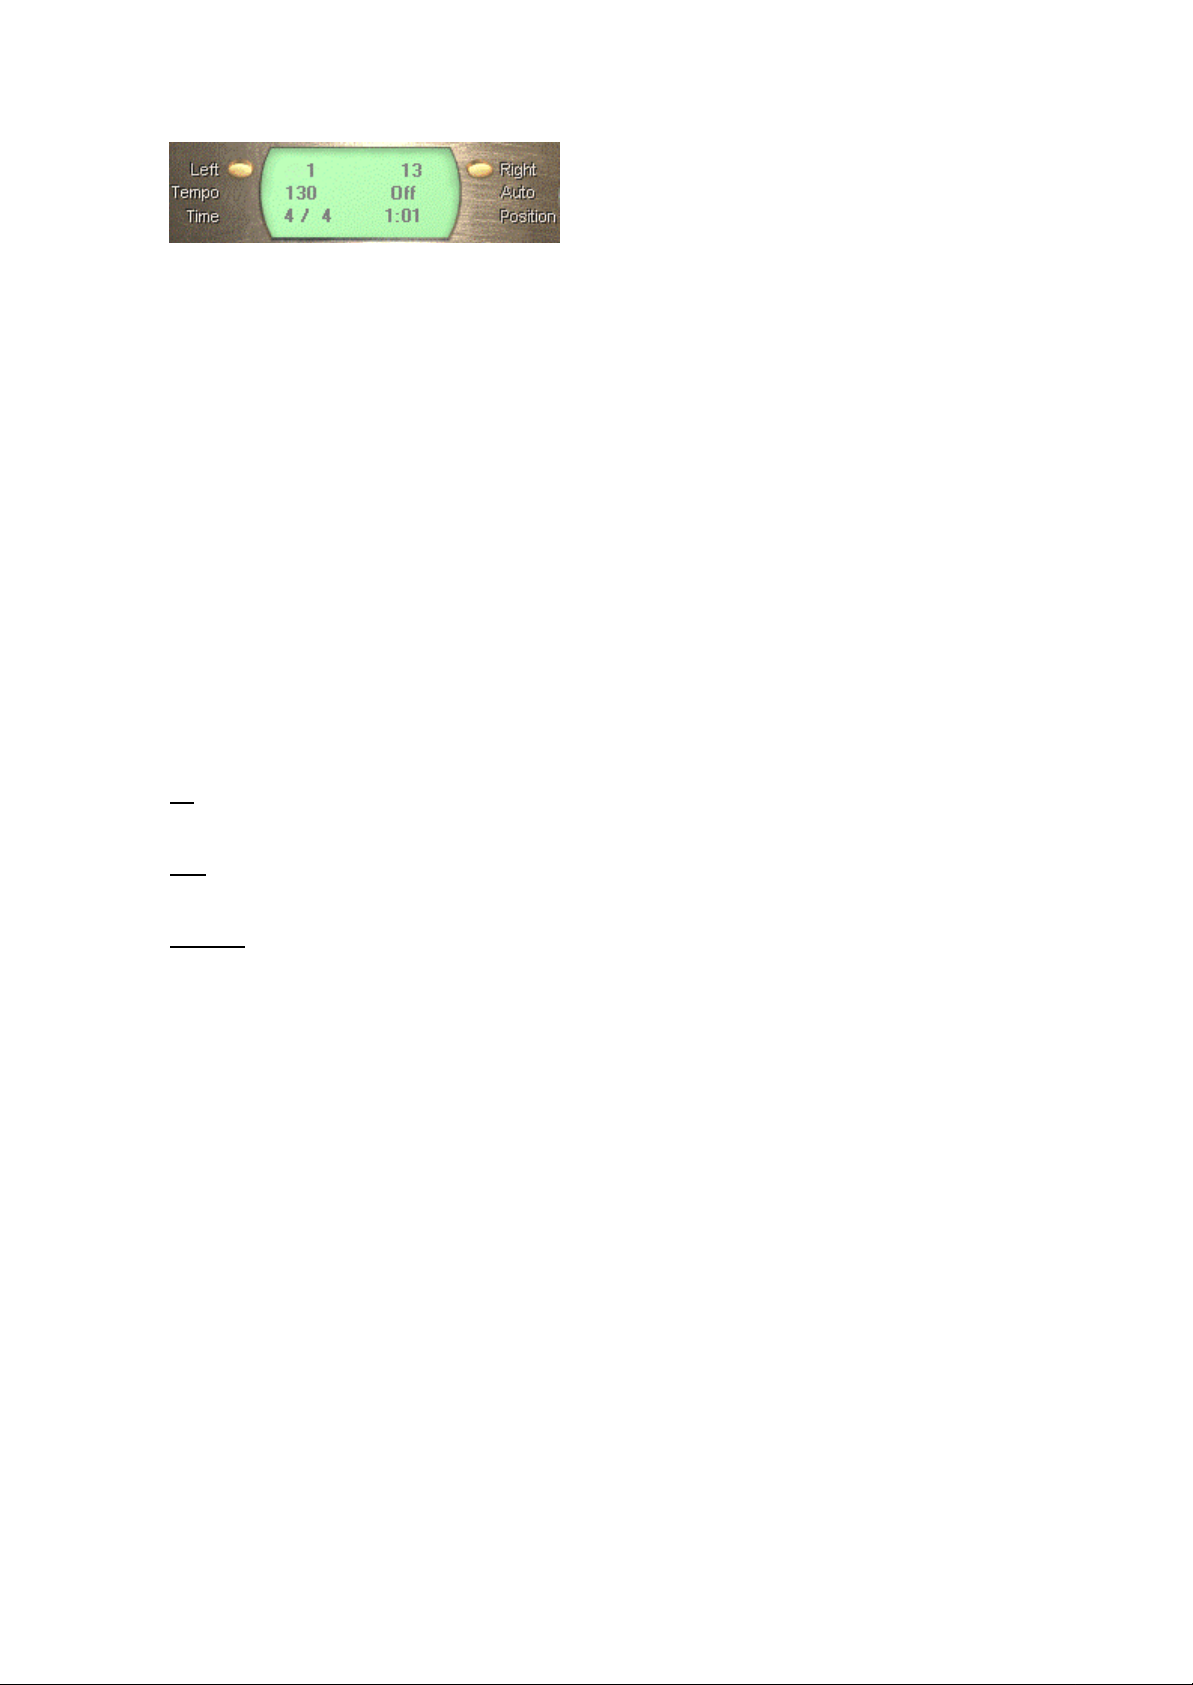
This is the main display area and is the section that displays all relevant information about the current play
position, the time signature and the left and right loop markers etc…
From Top left, clockwise,
Left The number adjacent to the Left button represents the bar position of the left marker. When in
loop mode, the left marker sets the start point of the loop. You can increase / decrease the value
respectively by clicking with the right and left mouse buttons. To set the left marker position, click on the
button marked to the right of “Left” as the track is playing. This sets the left marker position to the play
position at that particular instant.
You can jump from anywhere in the song to the left marker position by pressing the “L” key on your PC
keyboard
Right This works in the same way as the Left marker button. This sets the right marker position and
when loop mode is on, sets the end point of the loop. When the play position reaches this marker position
in loop mode, it jumps back to the left marker position.
Auto Clicking in this section with the left or right mouse buttons toggles between three possible
options. These options decide what happens to the play position when the stop button is pressed during
playback of a song.
Off If set to “Off”, pressing stop will leave the play position where it is so you can start from that
position next time your press play. This is the most common setting and is the default option.
Zero If set to “Zero”, pressing stop will return the play position to the start of the song. This is quite
convenient if you know you always want to start from the beginning every time.
Last Start If “Last Start” is selected, pressing stop will move the play position to the previous start
position. For example, if you start playback from bar 4, and play through to bar 10. Pressing Stop will take
the play position back to bar 4. If you fast forward the track to bar 6 and press play, this will be the start
position the next time you press stop. Easy isn’t it??!
Position Displays the current play position in units of Bars and beats. You can increase or
decrease the play position value by clicking on the units with the left or right mouse buttons. The Position
indicator increases as a track is playing.
Time Displays the current time signature. Basically, this tells you how many beats there are to
each bar. If it says 4/4, it means there are 4 beats to one bar (your typical “4 on the floor” beat). If it says
3/4, it means there are 3 beats to each bar (as you would hear in a Waltz). As all the loops in our collection
are in 4/4, setting the time signature to 3/4 could create some very strange results!
You can adjust the time signature by clicking on the values using the left and right mouse buttons.
The default value is 4/4 and only applies when a track is playing.
Tempo The Tempo value is only relevant when playing back songs and has no effect when
performing a live mix (unrecorded). You should find out what the BPM value is for the samples you are
using, and set the tempo value to be the same before you start any recordings. Otherwise you could end
up with samples being triggered at the wrong position. Please note that if you increase the tempo during
the playback of a track, it won’t speed up the samples you are playing, but will merely trigger them at a
faster rate. As soon as you grasp this concept, you’ll understand the association between the preset
sample BPM and the song tempo.
4
Page 5

You can increase / decrease the tempo value by clicking on the tempo with the right and left mouse
buttons respectively. The tempo range is between 1 and 999 !
5
Page 6
Key Parameters
Each of the 25 keys in Dance Station has 8 parameters associated with it.
From Left to Right these include:-
Pitch This allows you to specify a change in pitch (frequency) of any sample. The Pitch will
range between +12 and -12 semitones. There are 12 semitones in one octave (each key is one
semitone apart). The amount of Pitch change is displayed in the top left hand window.
To change the Pitch value, just click on the rotary control with your left mouse button and move your
mouse up or down to increase / decrease the pitch. To return the Pitch control to the default position,
click on the dial with the right mouse button.
If you change the pitch of a sample, you have to bear in mind that it will also affect the speed at which the
sample is played back as the pitch is directly related to the frequency of the audio sample. So, altering the
pitch of the drums will speed up or slow down the rhythm depending on which way you adjust the pitch.
Sometimes this can work well if you speed up a 100 BPM drum loop up, say 9 semitones and you end up
with a jungle rhythm!
Pitch is set to 0 by default and will play back the sample at the original tempo and pitch.
Fine tuning As well as assigning a pitch change in semitones to each of the 25 keys, you can
also fine tune each sample to within 100th of a semitone. Each of these steps is called 1 cent,
therefore, each key can be fine-tuned to either +50 or -50 cents. The value will be displayed in the
top left hand window.
Fine tune allows you to tweak samples so they are exactly in tune with each other. It can also be used to
alter the playback tempo slightly to create wacky effects. You could even detune two identical samples to
give a chorusing effect - great when combined with a wide Panning effect!
To change the Fine Pitch value, just click on the rotary control with your left mouse button and move your
mouse up or down to increase / decrease the pitch.
The Fine tune value is set to 0 by default. To return the Fine Pitch control to the default position, click on
the dial with the right mouse button.
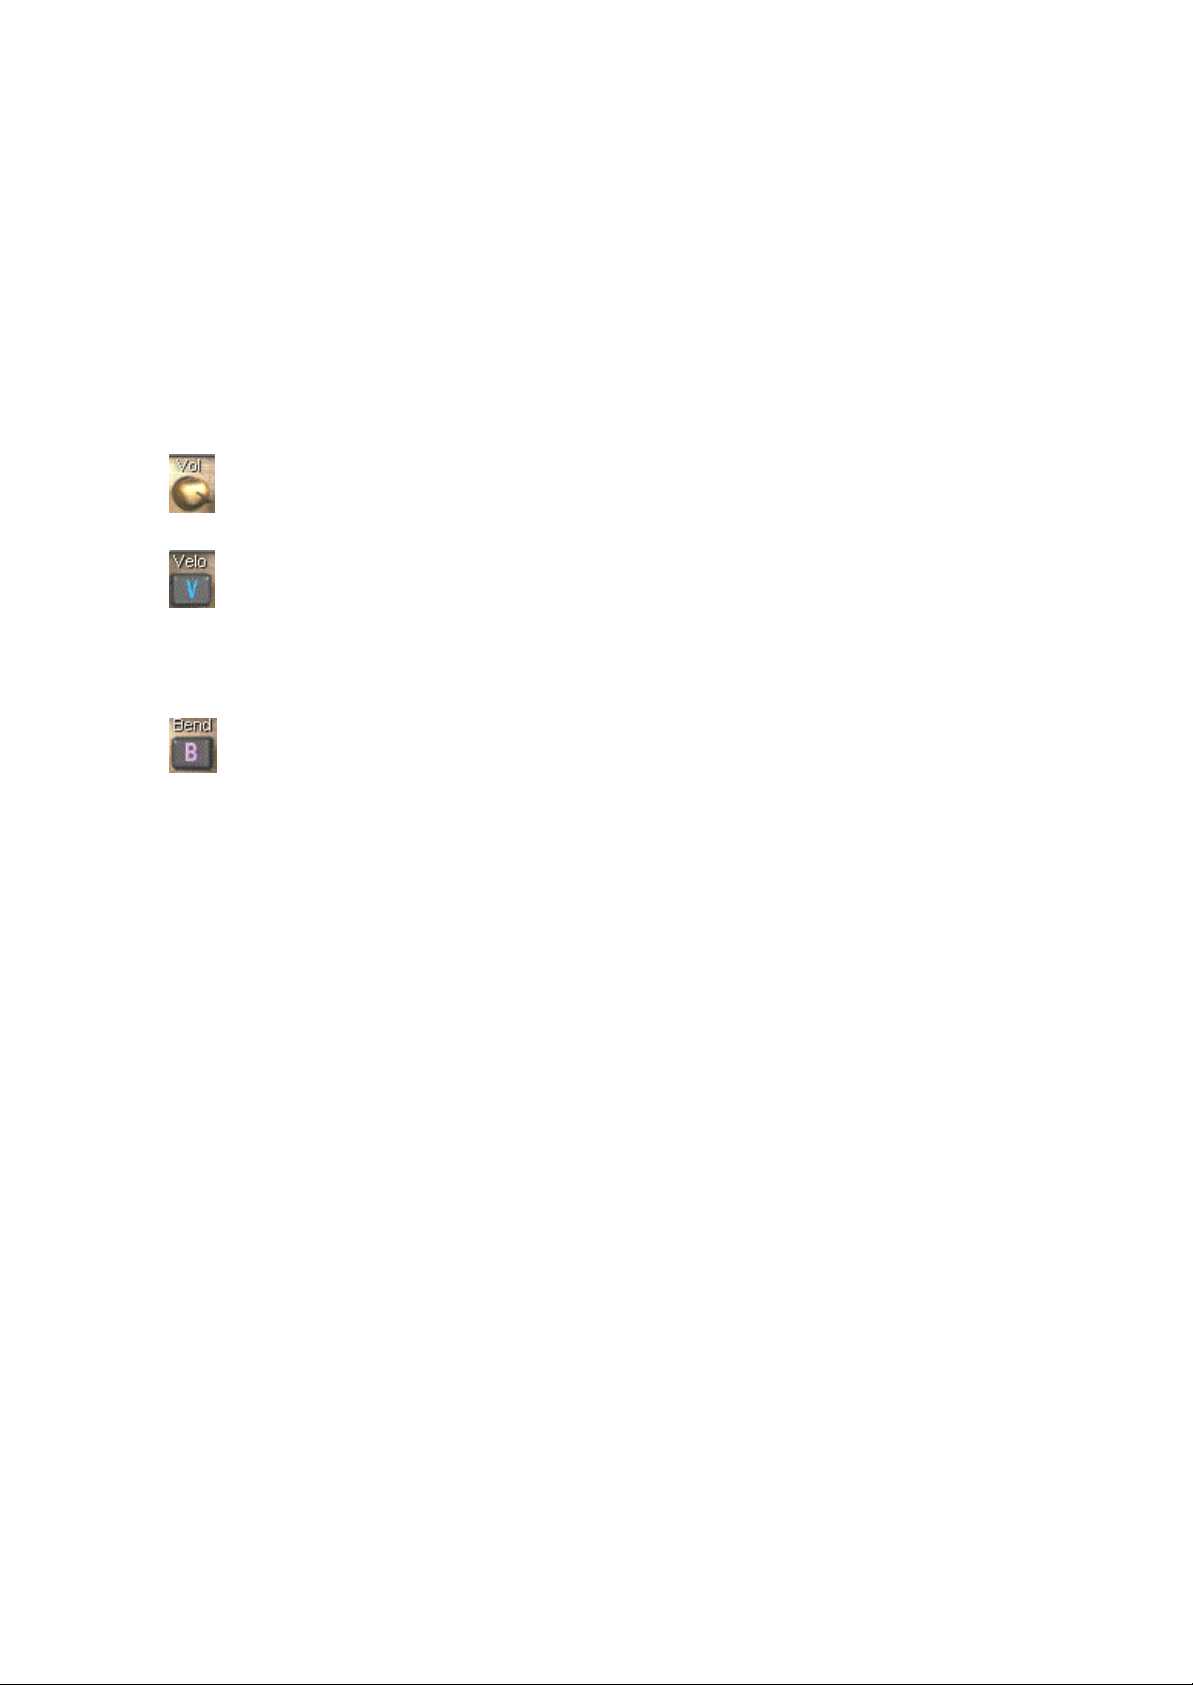
Bend The Bend button specifies whether or not a key responds to the pitch bend wheel of the
Evolution MIDI keyboard. When the button is ON, playing a key and moving the pitch bend
wheel up or down will speed up or slow down the sample being played. Just as a DJ kills a track at
the end of a set, you can create the same effect by moving the Pitch bend button all the way down. Takes
time to master…but is an essential tool for the more experienced DJ !
The Bend button is off by default.
Shortcut Key “F3”
Loop When a key has the Loop button enabled, the sample will repeat over and over again
whilst the key is held down. All the samples supplied with Dance Station have been carefully
edited which means they all loop without any glitches. This means you can hold down keys for
the duration of the song and know that the tempo will remain constant all the way through. Unless you
want to trigger a drum loop every bar, it is recommended to have loop mode turned on for keys assigned to
playing drums. Makes live mixing so much easier!
Shortcut Key “F4”
6
Page 7
Key Number The key number section tells you which of the 25 keys is currently selected.
The keys are numbered from 1 to 25 from note C2 to note C4 respectively. You can increase /
decrease the key number by clicking on the value in the window using the right and left mouse
buttons respectively. The key number will automatically update whenever a different key is
pressed. (This only applies if the 'Auto Key Tracking' Preferences switch is on)
Each key on the screen keyboard has above it a Key Selector (used for setting up all the parameters). This
turns green whenever a key is pressed. The Key number always matches up with the green key selector.
Velocity The MK-125 Dance Station keyboard is velocity sensitive which means the
harder you hit the keys, the louder the samples are played. You can specify using the Velocity
button if the samples respond to various key velocities. The default velocity in the Preferences
menu determines the velocity generated by the screen keyboard and the velocity given to a newly drawn
note in the Piano Roll. If the Velo switch for a key is off, the sample plays with maximum velocity]
There is a difference between Velocity and Volume. You will see this later when we look at the Volume
control.
Shortcut Key “F5”
Mute When you’re in the mix and you’ve got a few tracks pumping away, you can press the
mute button to temporarily silence a track. This is handy when you want to quickly flick through
each sample and see how the mix sounds with each of them dropped out.
Shortcut Key “F6”
Volume Use the Volume control to alter the output level of each key. Each key can have its own
unique volume level so you can balance up your samples against each other. To change the
Volume level, just click on the rotary control with your left mouse button and move your mouse up
or down to increase / decrease the volume level.
To return the control to its default position (maximum) just click on the control with the right mouse
button.
When a key is set to be velocity sensitive, the Volume control will act as the overall volume level for that
key. The velocity of the sample will be proportional to the overall volume level set for that key. The
loudest possible sample you could play would therefore have the volume set to maximum and the velocity
sensitivity turned off.
Pan The rotary Pan control is used to set the panoramic position of the sample in the stereo
field. Rotated all the way to the right, this will make the sound come from your right speaker
whereas a full rotation to the left will play back the sample from your left speaker. You can set the
Pan position anywhere between the extreme left and right positions.
You can create a cool effect when you assign the same sample, say a vocal line, and pan each track hard
left and right respectively. If you detuned one of them using the fine pitch option you can create a very
wide stereo effect.
To return the Pan control to the default position (panned centrally), just click on the control with the right
mouse button.
Nudge Right. Click on this button with the left mouse button to nudge the key selector one
step to the right. If you click and hold the button down it will quickly step through each key
allowing you to jump to various keys relatively quickly. A nudge left button is situated to the left of the
key parameters and is used to step through the keys from right to left.
Short Cut Key “F8”
7
Page 8

Hold Button The Hold button is to be found on the bottom left hand corner
of the screen and is related to the key parameters. Each key can have the Hold
feature enabled or disabled. The Hold button allows you to take your finger off a
key but keeps on “pumping-out” the sample.
To enable the hold button for a key, first select a key by clicking on it using your MIDI keyboard or by
clicking on a note on the screen keyboard using your left mouse button. Secondly, click on the Hold
button until the button is pressed in. A small red light appears on the Hold button when it’s active. After
the Hold button has been pressed you can take your finger off the key and it will stay red and keep
playing the sample until either
a) the same key is struck again.
b) the Hold button is turned off.
c) Loop mode is turned off for that key.
The Hold button will work in realtime which means you can press the button whilst you’re live in the mix.
A short cut key for Hold is the “F2” button.
Use the Hold button to free up some your fingers when you’ve got a whole bunch of samples on the go at
the same time!!
Edit Button The Edit button will open up the Edit Window. The edit window
takes the place of the wave list window at the top of the main screen.
You can click on the Edit window either when a track is playing or when it is stopped
to view the song information. There’s more about the powerful edit window later on.
Shortcut key “e”
Audition Play / Stop The Audition Play and Stop buttons are used to
audition wave files from the wave window before you assign them to the keyboard.
To listen to a wave file, simply press the play button. The wave file currently
highlighted will play and will loop indefinitely.
To stop auditioning the sample, press the stop button. Both Play and Stop
segments have a red indicator to tell you whether the audition mode is active or
not. Whilst in Audition mode, the CD at the top right hand corner of the screen
will rotate. You’ll also notice the cones in the speaker section of the window start
pumping away to indicate that music is playing.
To audition a wave file, click on the Play button with your left mouse button.
Shortcut Key “a”
Replace / Overdub
Replace Mode When this mode is selected, playing samples when in record
mode will overwrite any information you’ve already recorded. You cannot retrieve
the original information when Replace mode has been selected.
Overdub Mode This is the most useful Record mode as it allows you to layer samples during
subsequent recordings. This means you can lay down , say, your drum track during your first recording,
rewind to the start, and build up your track bit by bit by adding more loops during each recording.
Shortcut Key “o”.
8
Page 9
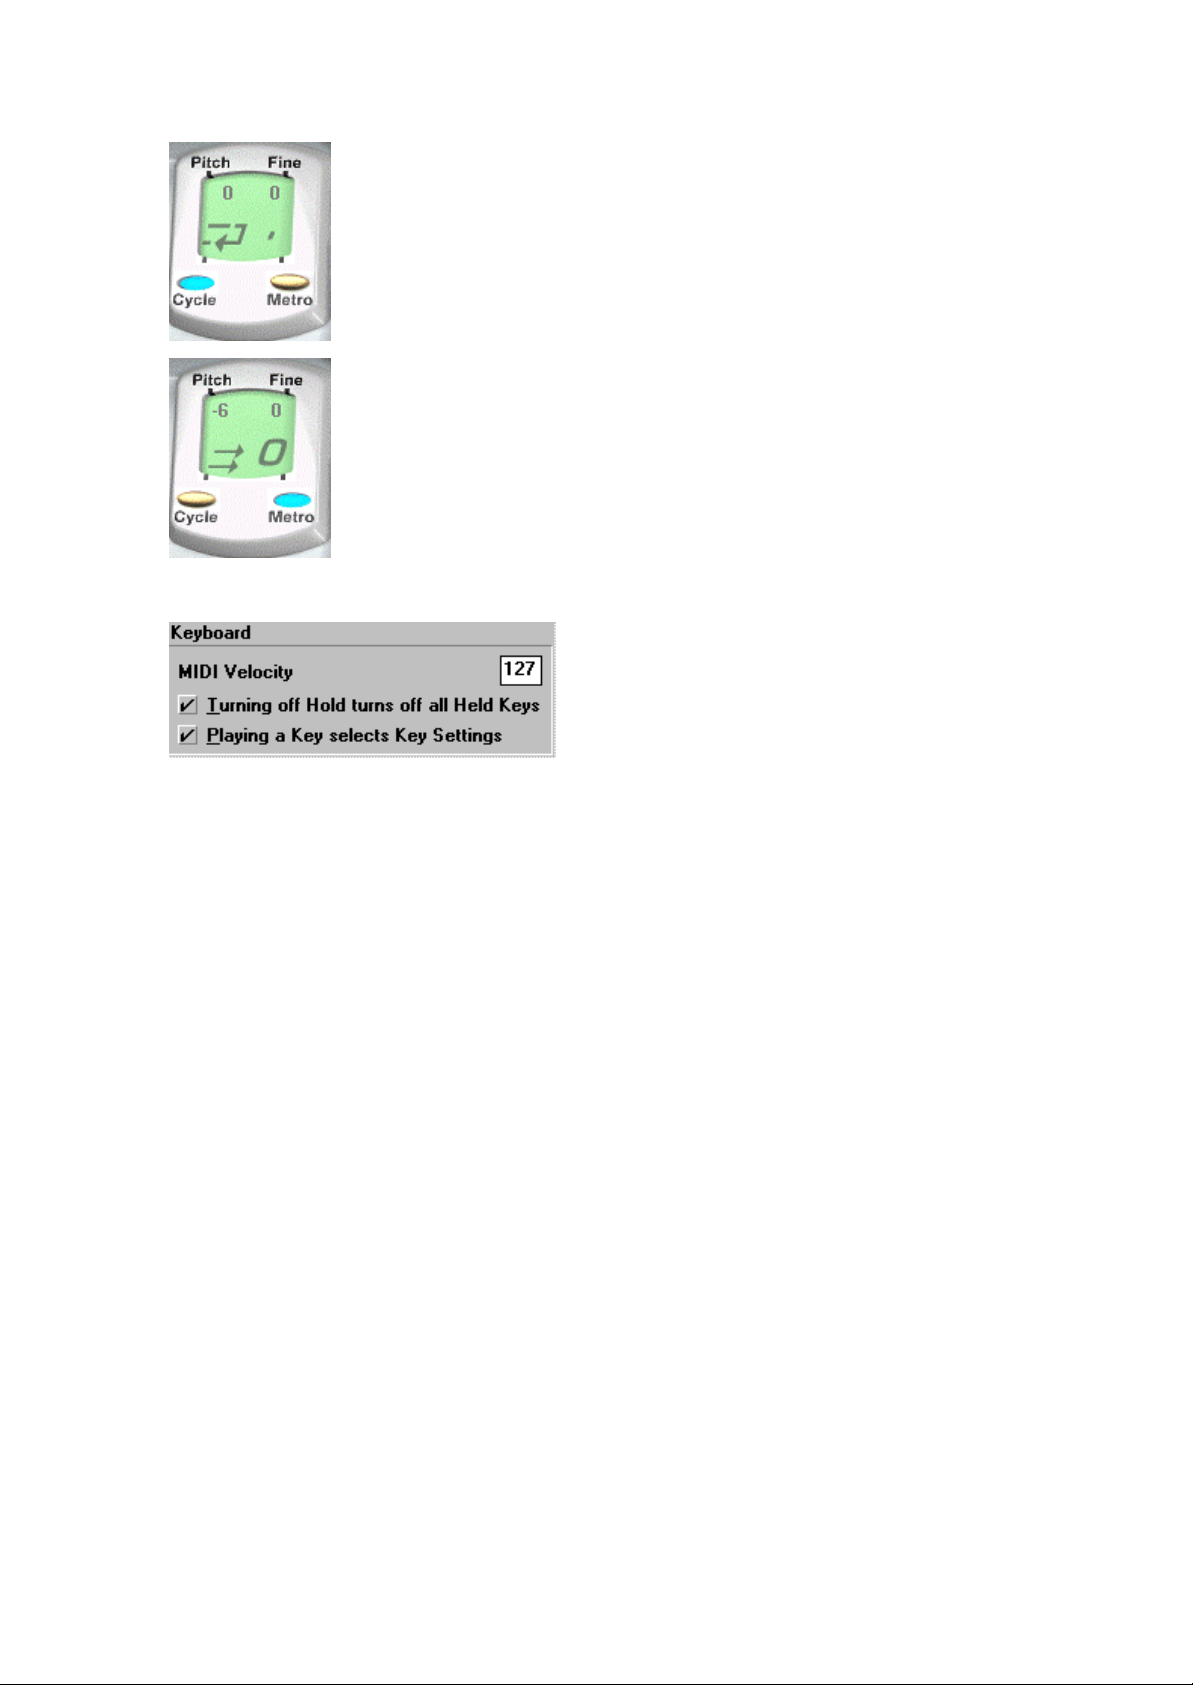
Cycle The cycle button operates when playing back a song file. When cycle is
enabled, the song will repeat between the left and right marker positions. This is
really handy if you’re working on a certain part of your track which you want to get
just right. All you do is set cycle mode on, enter overdub mode and just keep
adding material to your mix as you record.
Shortcut Key “c”
Metronome The metronome feature may be used when recording a new track
and you need a click track to help you with the rhythm. To enable the metronome
mode, click on the small metronome button with your left mouse button. There are
numerous options available in the Preferences menu that allow you to customize the
metronome settings to suit your own needs.
Shortcut Key “m”
9
Page 10

The Edit Window
The Edit window (short cut key “e”) is where all the fun editing stuff takes place. The edit window
displays all the recorded samples as rectangular blocks on a grid, against a keyboard down the left which
indicates the key played.
The lower part of the window, the Velocity
display, initially shows the velocity
information associated with each sample
but can also display pitch bend information. The velocity display area uses a graphical method of
displaying useful information and is therefore very straightforward and easy to use.
By selecting the cross hair tool on the right mouse button tool options, you can draw across the vertical
bars in the Velocity display area to alter the values. There’s more on this in the Mouse Tools section.
Horizontal Zoom In and Out The Magnifying glasses (Zoom In and Out
buttons ) allow you to home in on a specific area of music you’re currently working on. If you
hold the Control Key, a single click on a zoom button will set the zoom to its furthest extent.
Grid Selector This sets the resolution of the Sample Display area (spacing between the
grid lines) and is used for the note length during step time input. The resolution is
dependent on the zoom factor so if you increase it to 32 or 64, say, and are zoomed out, you
may not see the additional lines. If you zoom in, however, they will appear when the display is of a
sufficient resolution to avoid clutter.
If you want to insert a snare fill for example, you should change the grid selector so it displays 16 or 32,
then each note you insert in step time will be a very short note. A snare fill for the duration of a bar, or 4
bars is often used in dance tunes as a lead in to a new section.
Display This pull down menu lets you select the type of information to be shown
in the Velocity Display area. It defaults to Velocity but it can also show Pitch Bend
information.
Timeline The timeline is divided
into Bars and Beats and will display each
beat dependent on the zoom setting. If you click with the left mouse button in the Timeline the Play
Position jumps to that point.
Information Windows
These show detailed information about the selected sample. If more than one sample is selected, no
information is shown. The Information line gives details of the following parameters:-
10
Page 11
Key Displays the current key number. Key numbers range from C2 to C4
Position Shows the current position of the highlighted sample in
Bars, Beats and MIDI ticks (each beat is split up into 192 MIDI ticks).
Vel Displays the velocity level for the selected sample.
Length Displays the length of the currently selected sample in units of MIDI
ticks.
Each of these parameters can be edited by clicking on the values using the left or right mouse buttons to
decrease / increase the values, respectively.
Selecting samples in the Editing Screen
You can select samples in two ways:
• Clicking on a sample with the left mouse button turns it black indicating it has been selected. If you
click on a different sample, that will become selected instead. To select several samples, hold down the
Shift key while you click on them. If you Shift-Click on a selected sample it will be deselected.
• You can lasso a group of samples by clicking on a part of the Sample Display Area which does not
contain a sample and dragging a box around the samples. You can select or deselect individual samples
by Shift-clicking as described above. You must start the lassooing to the left of the samples you are
selecting.
When a single sample is selected, detailed information about it appears in the Information line and this can
be edited with the mouse. You can use the Up and Down cursor keys to move the selection to adjacent
samples.
Moving and Copying Samples
Selected samples and events can be moved and copied by clicking and dragging. To copy samples, hold
down the Ctrl Key and drag the samples to the new location. You can also use the Cut, Copy and Paste
commands from the Edit menu to move / copy samples and re-position them at the current play position.
Mouse Tools The Mouse Tools selector is activated by pressing the right
mouse button when the cursor is in the Sample Display Area. While holding down
the button, move the pointer to the tool you require and release the button.
The Arrow is the default tool and is used for selecting and dragging samples. If you have selected
another tool and move the cursor out of the Sample area, it changes to an Arrow so you can click
on the keyboard or edit the information line.
The Pencil is used for drawing and sizing. You can drop in a sample by clicking in the Sample
Display Area. The length of the sample is determined by the grid setting but you can create longer
samples by clicking and dragging the rectangular box across from left to right. You can change the
duration of a sample by clicking on its front or end and dragging left or right. If a sample is set to loop
mode, stretching the duration of the sample will increase the number of times the sample is looped.
The pencil is also used to draw in new data in the Velocity Display Area although it cannot generate new
velocity data as this is directly linked to samples. However, it can draw in Pitch Bend curves.
Clicking on a sample or on one of a selected group of samples with the Eraser will delete the note or
group.
11
Page 12

The Crosshairs is used to modify existing data in the Velocity Display Area. Hold down the
mouse button and drag it over some samples and their values will change according to the height
of the crosshairs. It can also move samples in the Sample Display Area.
The Knife is used to cut a sample in two. The position you click on a sample determines the end of
the first sample and the start of the second. This is great for cutting up vocal loops and create that
“Na na na na Nineteen” effect!
The Glue tool joins two samples on the same key together to create a new longer sample. Click
anywhere on the sample and if there’s another one on the same key further into the track, the two
will be joined. If there is a space between the two samples, the newly formed sample will span it creating a
sample the combined length of both existing samples and the gap. Confusing? Hope not!
This tool is only really useful when loop mode is enabled for that key.
Step Time Sample Entry
This is activated by the Step Switch.
If you’re not confident enough to make a live recording of your mix, or if you just want to insert samples in
your own time, you can enable the Step Time Switch. When Step mode is activated, single or multiple
samples triggered from your MIDI keyboard or the screen keyboard are recorded at the current Play
Position with a length determined by the Grid Setting. When you release a key on your keyboard, the play
position automatically advances. Samples are recorded with the Velocity generated when you played them.
(Velocity button must be enabled for each key for this to take effect).
You can advance the Play Position without entering a sample - to create rests (silent sections), for example
- by pressing the Space Bar.
You can also enter samples by clicking on the Vertical Keyboard in the edit window. The play position
does not advance automatically in order to allow you to enter multiple samples. To advance the Play
Position, press the Space Bar. Samples entered using the Screen Keyboard have their velocities
determined by the Velocity setting in the Preferences menu.
12
Page 13

The Sample Window
The sample window is the database for all dance loops you can load into the software. This screen
displays the filenames of all the sampled loops found on your Dance Station CD-ROM. Although all file
names would normally have a .WAV extension, in this window they are displayed without the extension.
Not only will the Sample Window display the contents of your Dance Station CD-ROM, but will also allow
you to look at the wave files on any hard disk or CD-ROM drive recognised by your system.
Th Sample List window allows you to select a sample, listen to it in audition mode and assign it to any of
the 25 keys on the screen keyboard.
Dance Station Loops
The Dance Station CD contains over 1000 professionally looped samples in various categories such as
House, Techno, Hip Hop and Ambient. The samples are grouped according to the loop type, such as
drums, basslines, synth or vocal samples. The samples are also grouped according to their BPM values
(Beats Per Minute). You’ll find samples ranging from 100 BPM all the way up to 160 BPM. In order for
samples to be in time with each other, it’s important to select samples from the same BPM group. You can
select samples from any musical category on the CD to mix together, but if they are not of the same BPM
value, they won’t necessarily sound great when looped.
When installing Dance Station, the installer asked if you wanted to transfer the wave files from CD onto
the hard disk. If you agreed to this, it would speed up the process of locating samples and storing them in
memory when the program is running. This also means that you wouldn’t need to have the Dance Station
CD always in the CD-ROM drive when running the software. This would allow you to place another
sample CD of wave files in your CD-ROM drive and mix them up with the Dance Station samples.
Navigating around the Sample Window
You can use the four cursor keys on your PC keyboard to navigate around the sample
window. This is sometimes faster than using the mouse when ‘live in the mix’ If using the
mouse, you can click on the arrows in the window to go up/down or horizontally across the
sample names.
Double click on the [ .. ] symbol to go up one directory level.
Double click on the [ \ ] symbol to go to the root directory of the currently selected drive.
Audition mode
13
Page 14

To listen to a sample without assigning it to a key, all you do is click on the
sample name with your left mouse button and press play on the Audition button.
(There might be a slight delay the first time a sample is played as it is being stored
in memory). The sample will automatically loop until you press the stop button, or
the play button again (the buttons are linked). To audition another sample, make
simply click on a different sample name and press the play button once again.
You must stop a sample from playing before another sample can be played. A
short cut for Audition mode is pressing the “A” key on your PC keyboard.
A sample name must be highlighted in the sample window before the audition
mode will work. If a drive letter is highlighted, or the [ / ] or [ .. ] symbols, the play
button will be disabled.
Whilst a sample is playing, the Audition CD will start spinning and the speakers
will start pumping away on the screen!
Drag and Drop samples onto the Screen Keyboard
If you’ve listened to a sample and you want to assign it to one of the keys so you
can play it in your mix, all you do is click on the sample name with your left mouse
button and drag it down to the screen keyboard. By clicking on a sample name, a
waveform image will be displayed next to the cursor indicating you are in “drag
mode”! Drop the sample onto the desired key. Hitting that key using your Dance
Station keyboard, will then play that sample. Easy isn’t it?!
If a sample is already mapped (assigned) to a key, dragging and dropping a new sample onto the same key
will remove the previous sample from that key (and will remove the sample from memory).
Another way of assigning samples to keys is to double click with the left mouse button on
the sample name. That sample will then be assigned to whichever key is currently selected
by the key selector button (as seen in the diagram on the left).
Removing samples from keys
To remove samples from any of
the keys, simply click on the
desired key with the right mouse
button. This will bring up an
option of removing the sample.
Click on “Yes” to remove the
sample from that key.
Please note that this function
will not delete the wave file from your hard disk, but will simply remove it from memory, allowing more
space for other samples.
14
Page 15
Menu Options
This section gives a detailed description of all the menu options in Dance Station. There aren’t many menu
options in the software, so it won’t take too long to get to know each one of them so you know exactly
what each option does. The preferences menu for example has many handy options for making live mixing
and recording as easy as possible.
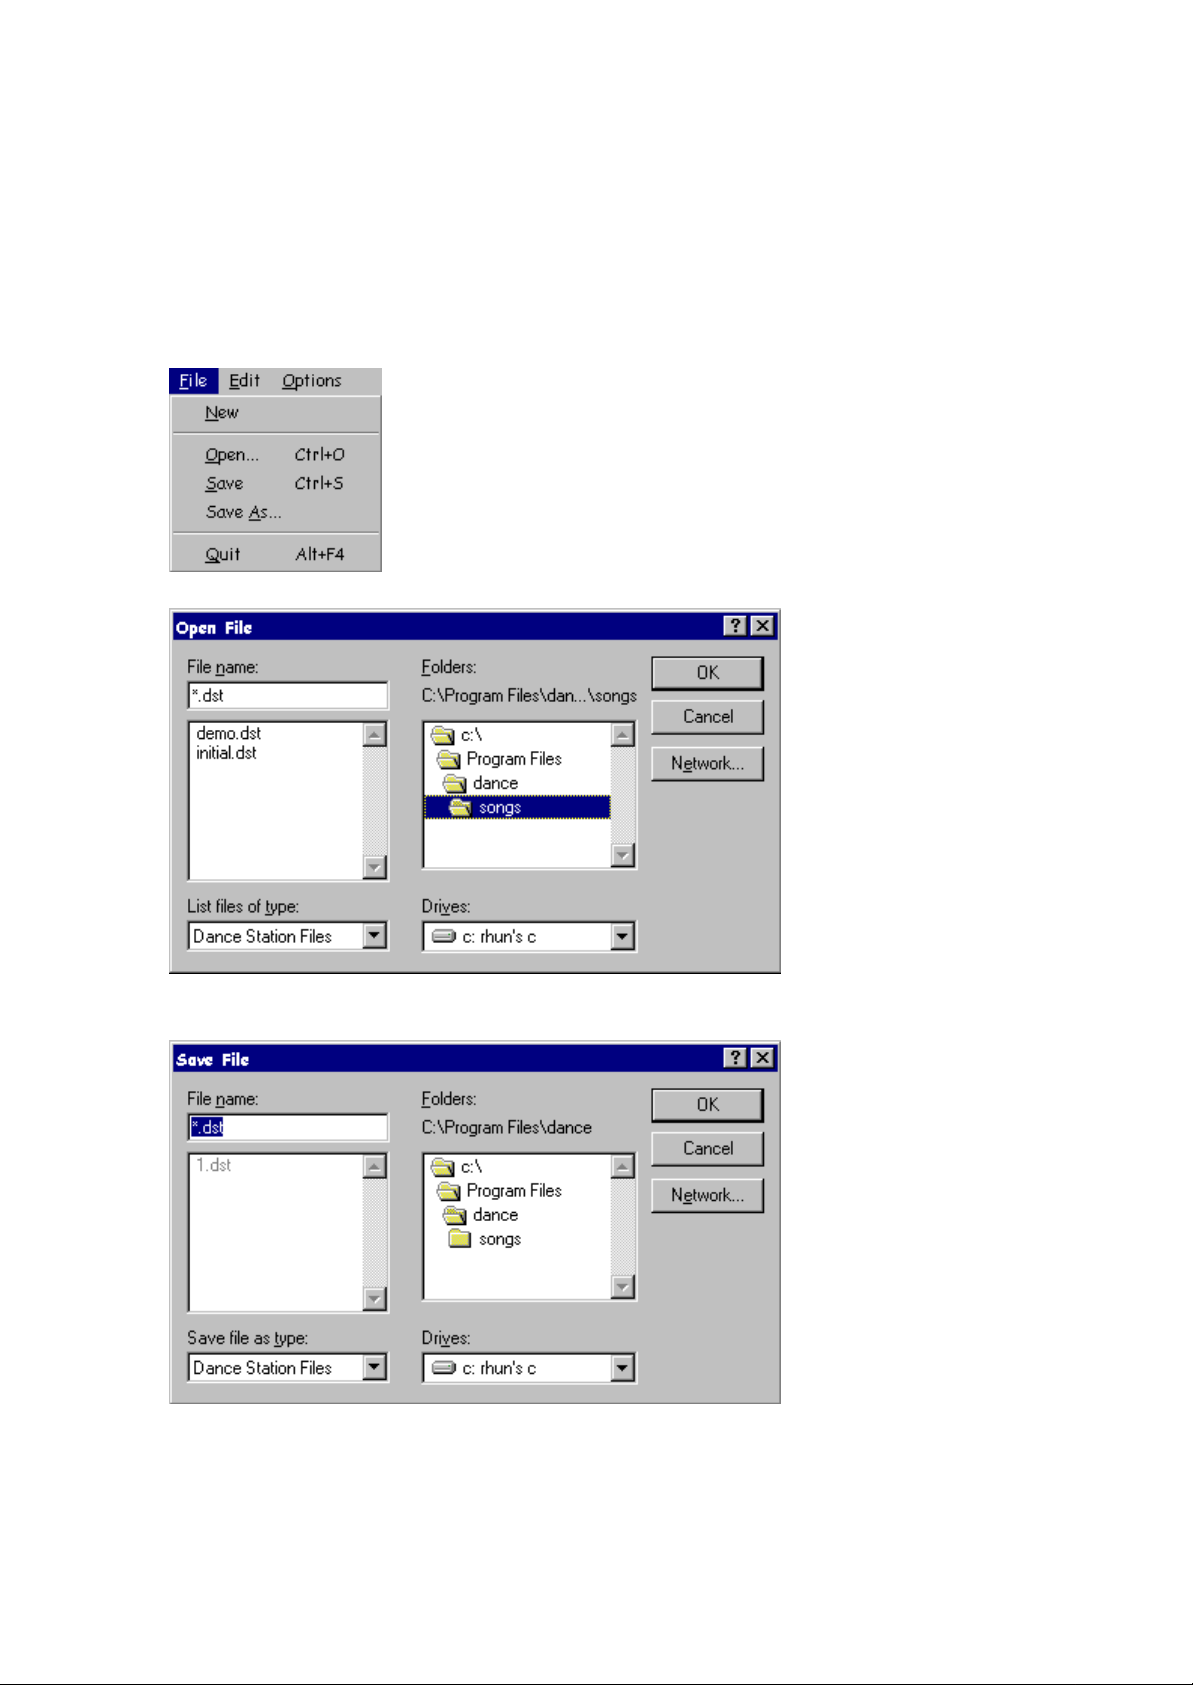
File menu
New This opens an empty edit window for you to work on a new track. If
you have a song which is unsaved, clicking on “New” will ask you if you
want to save your song. It will also ask if you wish to “Remove all Waves”. If
you click on “Yes”, it will remove all samples from the keys so they are no
longer stored in your computer’s memory. If you wish to use the same
samples in a new track (working on a remix for example), click on “NO” so that
the samples remain mapped to the keyboard.
Open… The Open File
option lets you locate and
open any Dance Station
song files that you have
saved to Hard Disk or
Floppy disk.
This is a standard
Windows File Open
dialogue box so its
operation would be very
similar to other Windows
95 applications.
Opening a Dance Station
File will load all wave files
into memory that are used
within the song and will remove any other samples which are not needed.
Save The save function allows you to save your song directly to your PC’s Hard Disk, a network drive
or to a floppy disk. Dance Station Files are not very large and therefore do not take up a lot of hard disk
15
Page 16
space. This makes it easy to swap your favourite mixes with friends who are Dance Station users either on
floppy disks or even via E-mail.
Techy Info!:- The .DST file format contains information regarding the position and length of the
samples in the song as well as the full path of all the samples used. It saves all Velocity values and Pitch
bend information embedded in the track.
Save As… The Save As… option allows you to save a song and specify a new name for it. This is
so you can create backup copies of your song as you go along. The layout of this window is identical to
the Save… window.
Quit No explanation is really necessary for this option, but clicking on quit will close down Dance
Station. Pressing “Alt F4” will also close down the program.
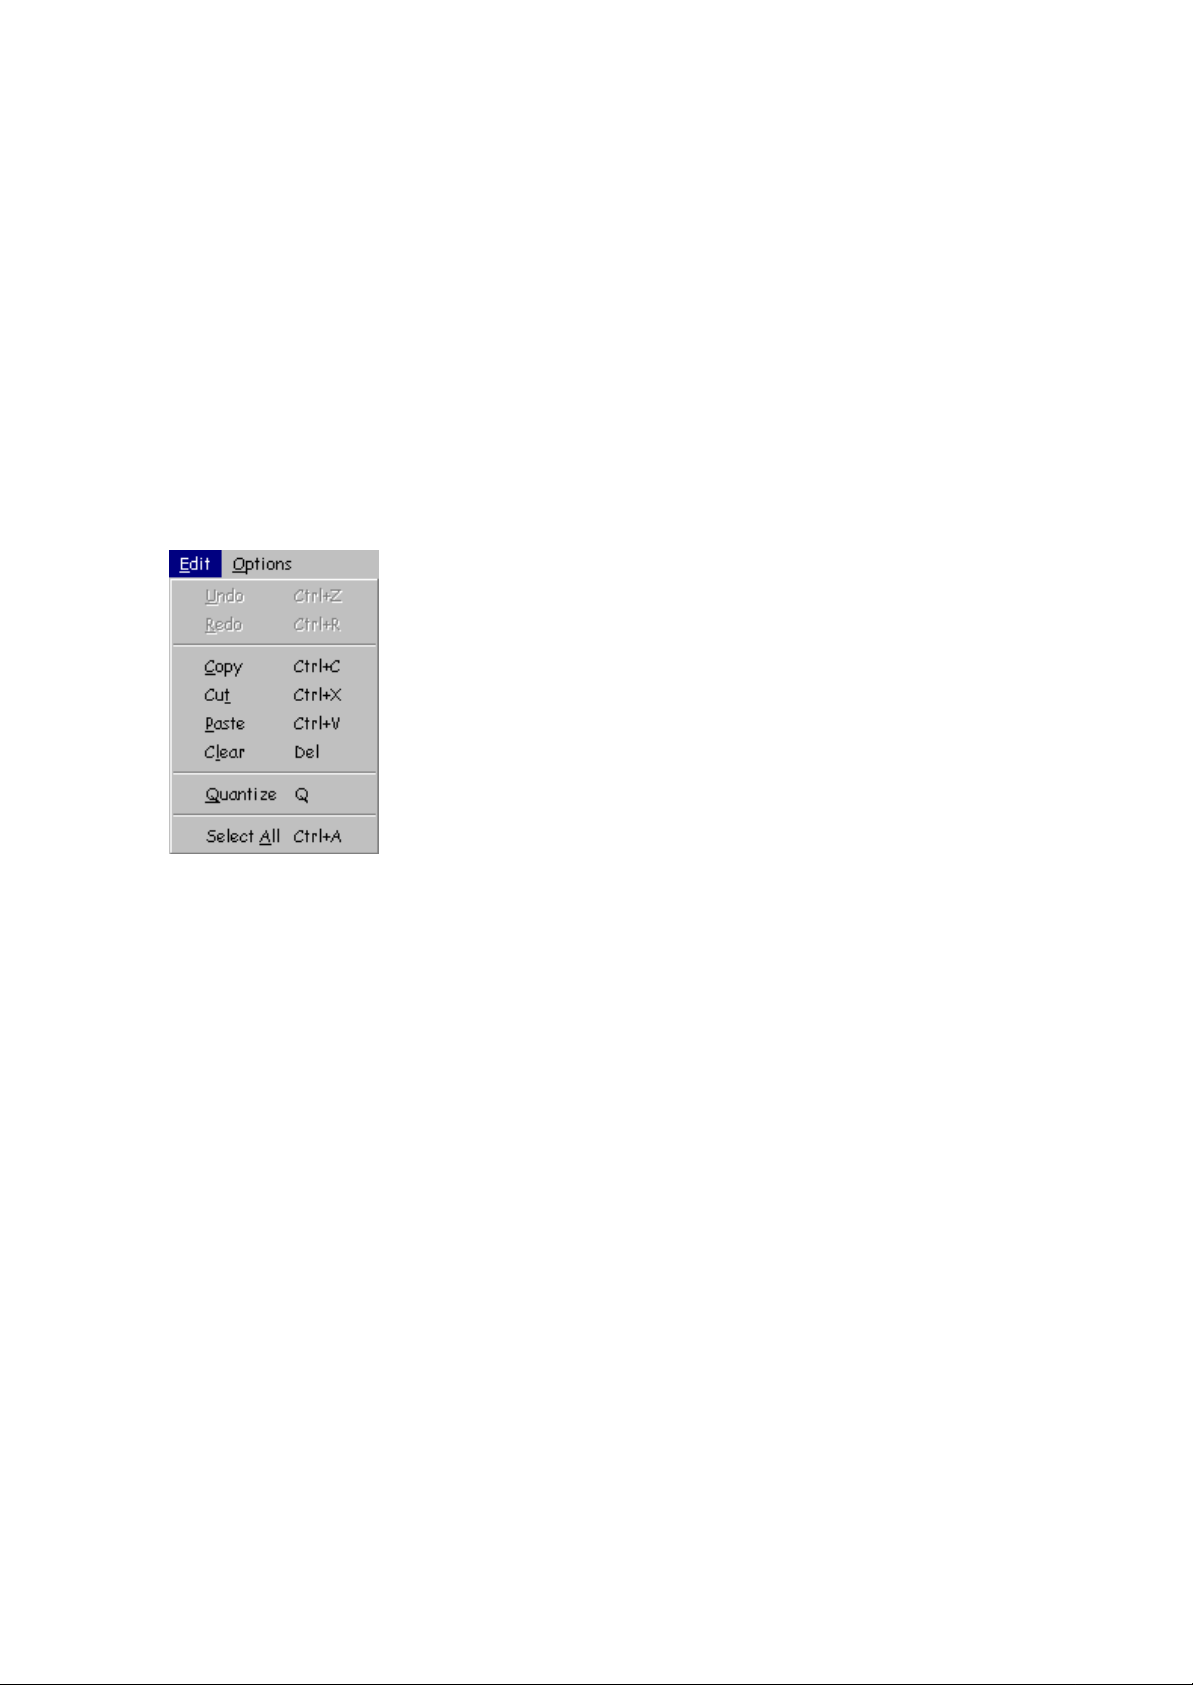
Edit Menu
Undo This option reverses the effect of the last editing operation. For
example, if you delete a note by mistake in the edit window, you can
press the Undo option to ‘undelete’ the note.
Redo The Redo option reverses the effect of Undo. In the situation above,
if you decided you wanted to delete the note after all, pressing the
Redo option would redo the original command (Undoing the Undo!!)
Copy Copies the selected samples to the Clipboard. The Clipboard is an
area of computer memory used for temporary storage of data. You can also
copy samples by clicking on them with the left mouse button to highlight
them, then press and Hold the Ctrl key whilst you drag the samples to a new
position. This is the fast and easy way of copying samples.
Cut Copies the selected items to the Clipboard and removes them from the song.
Paste Moves the data from the Clipboard to the song. The new items become the selected ones, which
makes it easy to move them elsewhere if required. The paste command will drop samples at the current play
position. You can paste samples accurately by first setting the Left or Right locator using the control
screen at the bottom of the window, then pressing the “L” or “R” keys to move the play position to the
Left or Right marker positions respectively.
Clear Removes the selected samples from the song. This does not copy the samples to the clipboard and may not be pasted back into the song.
Quantize During a live recording, the chances of getting every sample to start bang on the beat
are quite slim, you’ll be a few milliseconds early or late. This is where the Quantize option comes in handy.
This is a very powerful tool and may be used as part of post production to tidy up your mix. The Quantize
option (short cut “Q”) allows you to change the start positions of one or more samples so they are more
regularly placed. Samples move forward or backward depending on where the nearest beat or division of a
beat is. You can choose to Quantize only selected samples by highlighting them first before pressing the
Quantize option.
You can also choose to Quantize all samples which are on the same key throughout the song by right
clicking the mouse button on the vertical piano in the edit window on the corresponding key.
16
Page 17
By default, the Quantize option is set to 16ths which means when it is used, all samples will
be shifted to the nearest 16th beat. The Quantize value is dependant on the Grid Setting in the
edit window, so if the grid value is set at 8, the Quantize option will snap each note to the
nearest 8th beat (the bar will be divided up into 8 equal segments).
Select All Selects all samples in the edit window. Selected samples are black.
You can also select all samples on the same key by right clicking the mouse button on the appropriate key
on the vertical piano in the edit window.
Options Menu
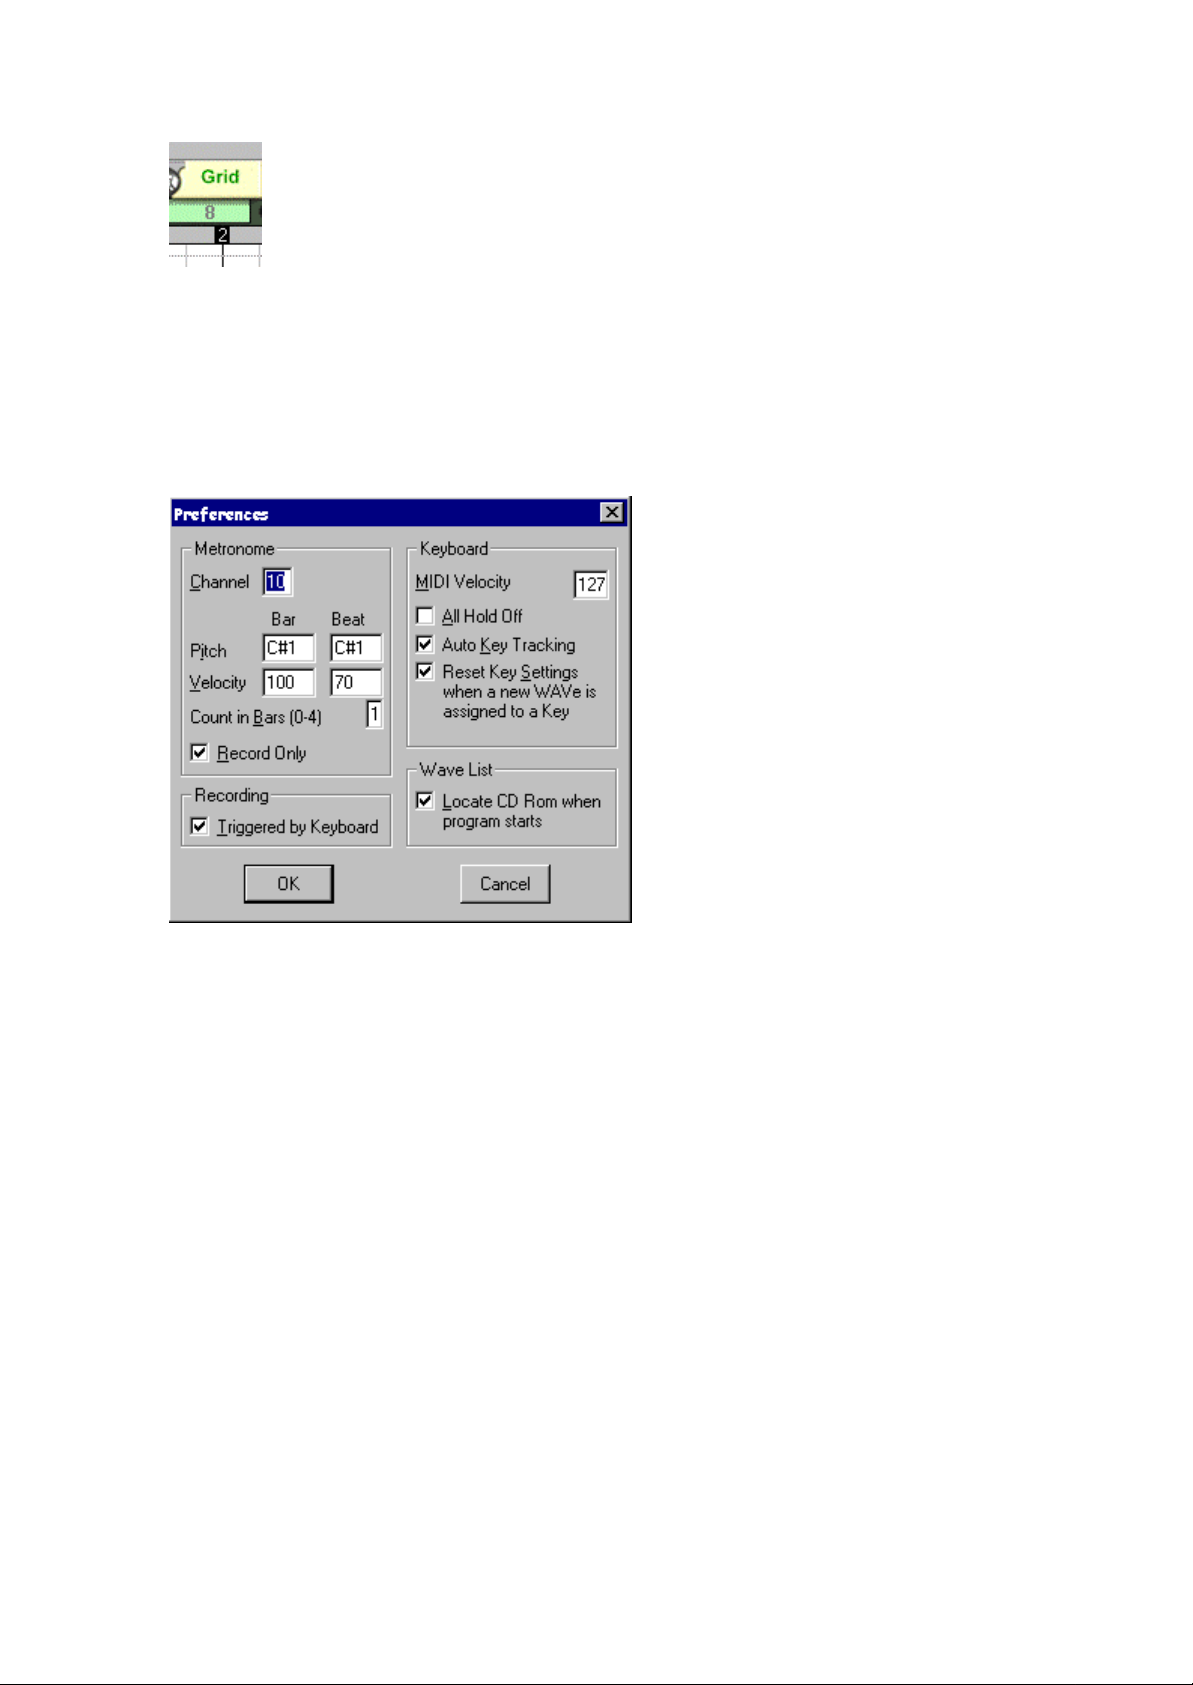
Preferences
Metronome The Metronome click will be
played through whichever MIDI device you
have set up in the Devices menu. You can set
the MIDI Channel the metronome will play
from by clicking in the Channel section of the
Preferences menu and typing in the new
channel number. By default the channel will
be 10 as this is the usual drum channel for GM
compatible soundcards.
You can also specify the Pitch and Velocity
of the two metronome clicks. The first click
occurs right at the beginning of the bar and
the second on every beat. By default the Bar
click gives a louder velocity than the Beat
click. Changing the pitch of the metronome
will change the instrument you hear playing
the click.
To set the number of bars count in you get before recording starts, enter a value in the “Count in Bars”
section. By default you will get a 1 bar count-in. It’s useful to have a count-in just to give you time to
attune yourself to the correct tempo.
When the Record only box is checked, the metronome will only play during a recording.
In the Recording section, you can decide if the recording starts as soon as you hit a key on your
keyboard, or with a count-in. By default, the “Triggered by keyboard” option is enabled allowing you to
initiate the recording of your track as soon as a key on your MIDI keyboard is played, or the mouse is
clicked on one of the one screen keyboard keys.
In the Keyboard section of the Preferences menu you can configure the way your Dance Station keyboard
controls the software:-
17
Page 18
MIDI Velocity
The default MIDI velocity in the Preferences menu determines the velocity
generated by the screen keyboard and the velocity given to a newly drawn
note in the Piano Roll. If the Velo switch for a key is off, the sample plays
with maximum velocity. To change the value, click in the Value window with
your left mouse button, delete the current value, then type in your new
Velocity value.
All Hold - OFF If multiple keys have the “Hold” feature assigned to them, enabling this option allows
you to quickly turn off all Held keys with a single button press.
This is off by default, as most of the time you wouldn’t want to drop out all samples from the mix
simultaneously. This option is convenient if you’re only rehearsing a mix and you want to quickly turn off
all held keys.
Auto Key tracking Before you can change any of the key parameters for a particular key you must
first set the key selector to match the key you are playing. This option saves you having to manually click
in the key selector row with your mouse. When this option is enabled, playing a key on your MIDI
keyboard or the on-screen keyboard, automatically sets the key selector to match that key.
Reset Key Settings When you drop a sample onto a key which already has a sample assigned to it,
enabling this option ensures the new sample will have the parameters reset to the default settings. This
means the Pan setting will return to the center, the Volume up yo maximum, and the Pitch settings back to
normal.
If you wish to keep the key parameters for any new samples dropped onto that key, disable this option.
Locate CD ROM when program starts If this option is enabled when
you run Dance Station, the program will search for your CD_ROM
drive and will display the contents of the disk in the sample
window. If you are only using samples from your hard disk
however, it’s best to turn this option off.
18
Page 19
Quick Start Recording Tutorial
Now that you have your Keyboard out of the box and the software installed, let’s get everything set up so
we can start knocking out some tunes!
Setting up the Keyboard
Before you can bang out those beats, you need to
hook up your MIDI keyboard to your soundcard using
the connecting cable supplied with the keyboard.
Simply connect the round end of the cable to the MIDI
OUT socket of your keyboard, and the 15 pin D-Type
connector to the Joystick / MIDI port of your
soundcard. This special cable acts as a power supply
for the keyboard so you don’t need to plug in a
separate adaptor. If all is well, the LED display will light
up in red on the front of the keyboard.
Setting up the software
Load Dance Station by clicking on the short cut
from the Start / Programs / Dance Station menu.
When the program is up on your screen, go to the
Options menu and click on the Devices section.
This allows you to set up your keyboard and
software so they can communicate with one
another. You must have options displayed in the
MIDI IN and the MIDI OUT sections. If not - you
should either re-install your soundcard or get in
touch with your soundcard manufacturer’s
technical support team for more assistance. Click
and highlight one input option and click on OK.
Try playing the keyboard. If the notes on the screen keyboard turn red as you play your MIDI keyboard ,
you’re nearly there! If you can hear sounds coming from your speakers, you’re ready to go!
If you can’t hear any sounds coming from your speakers, be sure to check out the Trouble Shooting
section of this Help document.
Triggering samples
Now that your keyboard is communicating with the software we can go on to start making some music.
Hit the bottom note on your MIDI keyboard (C2) and hold it down. Your speakers should now be pumping
out drum beats at a fairly high volume. If not… crank the volume up a bit!
Take your finger off the key and strike the note again. You should find there’s no delay between striking
the key and hearing the sample. This time, try playing 2 keys at the same time - the bottom note and the
white note to the right of it . As long as they’re both struck at the same time - the music you hear is
guaranteed to play at the same tempo. You can basically continue to drop in samples until you run out of
fingers!
Using the Hold Button
If you find it difficult to hold down a number keys, or if you just feel lazy, you can press the Hold button to
keep the loop playing continuously. The first thing you do is strike a key. Whilst the key is red, press the
Hold button with the mouse. Release your finger from the key. The note will remain red on screen and will
continue to loop the sample. To turn off Hold mode, simply press the Hold button again. If you want to
19
Page 20
keep the sample in Hold mode and just temporarily stop the sample, strike the same key. The Hold mode
will remain enabled but the loop will stop playing.
You can go on to add more samples in this manner by following the same procedure as above.
You must make sure that you drop and hold the samples on the correct beat otherwise the mix might sound
a bit messy.
Don’t worry if it doesn’t sound right immediately…it will sooner than you expect!
A quick way of enabling hold mode is to press the “F2” button on your PC keyboard.
Changing Sample parameters
Now that you’ve seen how to trigger samples in realtime, we’ll look at some of the controls associated to
each key so we can start doing some fun stuff to the sounds!
First of all, strike a key and press the Hold button. Then, click on the Volume control and move
your mouse up and down. This alters the volume level of that sample. Now try clicking and
rotating the Pan control. This will move the sample around in the stereo field.
Click on the Vel button. Strike some of the keys quite softly. You should hear the samples play
back at a fairly low volume. Try hitting the keys a bit harder and the volume will increase. You have
full control over the output level of each sample so you can play them as quietly or as noisy as
you wish!
Changing the Tempo of a drum loop
Another really cool feature of Dance Station is the Bend function. All you do is turn on the Bend
button for a key, then hit that key. As the sample is playing, move the pitch bend wheel on your
MIDI keyboard up and down. The loop tempo will increase / decrease depending on which way
you move it.
Now click on a different key until the key selector turns green above it. Press the Bend button again. Next
time you move the bend wheel, it should affect the tempo of both loops. You can do this for as many
samples as you like.
You have to remember that as a sample is slowed down, its pitch (tone) will also be affected. This is the
same effect you get when slowing down a record on a record deck.
20
Page 21

Trouble Shooting
If you encounter problems when running Dance Station, please check the following list of Questions and
Answers. There’s a good chance you can save yourself a call to our technical support team.
Q. When I run Dance Station it displays a warning stating it cannot find a Direct X driver. What do
I do?
A. You need to make sure that the Direct X drivers are fully installed on your system by re-installing the
Dance Station software and choose to install Direct X 5. If you have an older version of Direct X, we
recommend you over-write it with the latest available version of Direct X.
Q. Once the software is up on the screen and I load in a song, it takes ages for anything to appear
in the edit window. What’s going on?
A. When the “loading wave files” message appears in the wave list window, the program is in the process
of loading samples into your computer’s RAM from CD-ROM or your hard disk. The bigger the wave files,
the longer it will take to store them in memory. A song containing samples mapped to all 25 keys will take
longer to load than a song with only 1 sample for example.
Q. I cannot hear any sounds when playing a demo song in the software. What should I do?
A. First of all, make sure your speakers are connected to your soundcard with the volume level turned up.
Click on the loudspeaker icon on the bottom right hand corner of the Win95 task bar, and increase the
level of the volume fader.
If none of these work, go to the Control panel in Windows and click on the Multimedia option. In the
section that says “Preferred Device” make sure it has an Audio driver listed. If this is blank, with no
possible options, you should get in touch with your soundcard manufacturers for support, as it is likely
there is a conflict on your machine between the soundcard and other devices.
Q. I have plugged my keyboard into the soundcard and can hear demo songs OK when I play them. I
can even hear sounds when playing from the on-screen keyboard but I cannot hear anything when
playing from the MK-125 keyboard. What am I doing wrong?
A. This probably means that your soundcard has not been installed properly. Please follow the checklist
below:
1 If you are using the cable supplied with the keyboard, ensure that one end is connected to the
back of the keyboard and the other is plugged into the Game port of the soundcard. If you are
using another MIDI Cable, make sure the MIDI cable is properly set up – is the MIDI IN plug in the
keyboard’s MIDI OUT socket? It is worth swapping the plugs around, as some cables are
ambiguously marked.
2 Make sure you have the most up-to-date software drivers for your soundcard. It is worth getting in
touch with your soundcard manufacturers to ask them for the latest drivers. It is also quite common
to find the updated drivers on the manufacturers’ web site.
3 To test if the MIDI Input is working, open up the Dance Station software and select New from the
File menu. Play the keyboard and check the Screen Keyboard to see if the notes turn red. If the
notes turn red but no sound is heard, this is good news, as are 50% of the way there. All you now
need to do now is to make sure your speakers are turned up. If no input signal is observed or
heard, either install the soundcard again, or try installing the Microsoft MPU401 driver. (Get in
touch with your soundcard manufacturer’s technical support lines for more help in this area).
4 Check the Options / Devices menu in the Dance Station Software. If you have more than one MIDI
Input device showing in the Input column, it could be that one of them is causing a conflict on the
system and has stopped the MIDI input from working. In this instance you could try selecting
each of the MIDI Input drivers individually in turn to see if they’ll work, otherwise try removing
one of the drivers from your system. You will have to do this from the Device Manager section of
your control panel. See the Windows 95 help on Device Manager, disabling hardware devices.
21
Page 22

Q. When I try to play back an audio track, it gives me a warning such as: "Cannot open waveform
device”. What's causing this warning?
A. It could be that the soundcard is not 16 bit. It could be that another program is currently sharing the
same Audio driver (in which case, close down all other programs). It could be because you are attempting
to perform a record while playback of audio and your soundcard does not support this feature (known as
Full Duplex operation). Make sure the Direct X files are installed correctly onto your system and that your
soundcard is Direct X compatible. Just run the setup.exe file from the CD-ROM to install the Direct X
drivers.
Q. The software has been working fine, but has developed some strange behaviour which can’t be
fixed by restarting the software –How do I fix this?
A. Most of these types of problems can be fixed by resetting the software back to its initial default
settings. To do this, use Windows Explorer in Windows 95 to locate the directory where you installed the
software (normally c:\Program Files\Dance Station…). Take a look at the files within these
directories and delete a file called DEFAULT.DEF. After deleting this file, run the program again and the
software should then behave as it did when originally installed.
Q. The music stutters on playback. What can I do to stop this?
A. If you have any other programs running in the background, close them down. This will free up more
memory for the software. If you have no other programs running, try changing your virtual memory
settings to the recommended value from the control panel.
Try removing some of the samples which are mapped to the screen keyboard by clicking on the keys with
the right mouse button and click “OK” when it prompts you to remove the sample. All samples are stored
in your computer’s RAM, so if you load in large wave files, make sure you have enough RAM to store all
the samples.
On slower machines, samples will often stutter the very first time you play them, but will be OK after you
have played them through.
Q. What are the minimum requirements to run Dance Station?
A. We recommend you use a P100 with at least 16 MB RAM. Windows 95 with a 16 bit compatible
soundcard. CD-ROM drive plus a very loud set of speakers!
22
 Loading...