

Page 1

Studiophile™
CX5
User Guide
English
Page 2

1
English
StudiophileTM CX5 User Guide
1. Introduction
Thank you for choosing the M-Audio CX5 bi-amplified studio monitors. The CX line of
loudspeakers build on M-Audio’s legacy of high performance studio monitors and provide
accurate, high-resolution playback that is free of audible distortion and coloration. This
allows you to hear everything that is in your source recordings so that you can create better
mixes.
Even if you are experienced with recording and mixing, please take a moment to read
through this guide. It will give you valuable information about how to set up your CX
monitors and will help you get the most out of your new purchase.
2. What’s in the Box?
This package contains:
Pair of CX5 studio monitors
Pair of IEC power cables
Printed acoustic frequency response plot for each speaker
This User Guide
3. About CX Studio Monitors
Typical mass-market loudspeakers sound pleasing because their designs incorporate a
deliberately uneven, non-linear frequency response that artificially enhances certain bass
and treble frequencies. While it may be quite enjoyable to hear finished albums on such
speakers, actually mixing on this type of monitor is not recommended since such speakers
tend to “smooth over” problem areas and do not reveal everything that should be fixed
during a mix.
Unlike typical mass-market speakers, M-Audio’s CX line of bi-amplified studio monitors
have been designed to provide accurate, highly detailed, reliable playback that is free of
distortion or coloration. This is done by having a tightly integrated system in which the CX
drivers, internal electronics (amplifiers, crossover, etc.), and enclosure all work together
to provide accurate bass, smooth high-frequency transient response, and a highly linear
frequency response through the entire audible range of the speaker. This allows you to
hear everything in your recorded tracks—the good and the bad things—so that you can spot
and fix problems and ultimately create great mixes that “translate” well to other speakers
and audio playback systems.
English
Page 3

2
Note that the placement and
orientation of the CX monitors
within your studio is important
and correctly placed speakers will
result in improved imaging, clarity,
and overall performance. This
topic is covered in detail in the
“Setting up CX Monitors” section
of this guide.
Also note that the CX monitors
feature several switches that
help you contour the speaker
to your specific studio. When
these switches are left in their
default positions, the CX monitor
will exhibit the response characteristics found on the printed acoustic frequency
response plot that ships with each speaker. These anechoic* measurements represent
performance of the speaker in an “ideal” environment similar to that found in a
high-end recording studio with carefully tuned acoustics. In the real world, however, the
acoustics of your specific studio (or the placement of your speakers within the studio)
may cause your monitors to exhibit too little (or too much) bass, midrange, or treble.
To help compensate for this, the rear-panel switches contour the frequency response
of the speaker specifically to your studio. These switches are covered in detail in the
“About the Rear-Panel EQ Contour Switches” section of this guide.
*About anechoic chambers:
An anechoic chamber is a room in which the
floor, ceiling, and all walls are covered with
sound-absorbent acoustical wedges. These
wedges prevent sounds created within the room
from reflecting back and influencing the acoustic
measurement of the loudspeaker.
Anechoic chambers are considered to be
acoustically “neutral” spaces since the room itself
does not impart any kind of sound to an acoustical
source contained within the room. Because of
this, loudspeakers (including CX monitors) are
commonly measured and tuned in such rooms.
It’s in the details:
Did you know the shape and materials of a speaker cabinet can greatly affect the overall
sound of a speaker?
Your CX monitors feature thick walls and a carefully placed internal brace to prevent the
speaker from resonating at low frequencies. This means that the speaker cabinet itself will
not ring along with the low frequency sounds in your mix (such as a kick drum or a bass).
This translates into more accurate bass response.
Furthermore, the rounded (“radiused”) edges and contoured waveguide surrounding the
tweeter are not just cosmetic touches intended to improve the appearance of the speaker.
These features help spread high frequencies evenly around the room and widen the “sweet
spot” between the two speakers.
Page 4

3
English
StudiophileTM CX5 User Guide
4. Product Features & Specifications
CX5
5 ¼” woofer with 1 ½” voice coil
Waveguide loaded silk-dome tweeter with 1¼” voice coil
Bi-amplified class A/B amplifiers
50W woofer
40W tweeter
Frequency response: 50Hz to 30kHz
(+/- 3dB)
XLR, 1/4” TRS, and RCA inputs
Magnetically shielded for placement near CRT (tube-based) monitors and
televisions
Rear panel contour switches to optimize placement within any studio
Sturdy, acoustically inert 1” front and rear MDF baffles to prevent cabinet
resonances
Flared rear firing port for audibly increased system headroom
Optimized internal bracing to minimize sonic “coloration” caused by the cabinet
Radiused (rounded) cabinet edges and acoustical waveguide for even highfrequency dispersion
Speaker protection:
• Output current limiting
• Over-temperature
• Transient on/off protection to prevent speaker “pops”
• Subsonic lter
• External mains fuse
Page 5
4
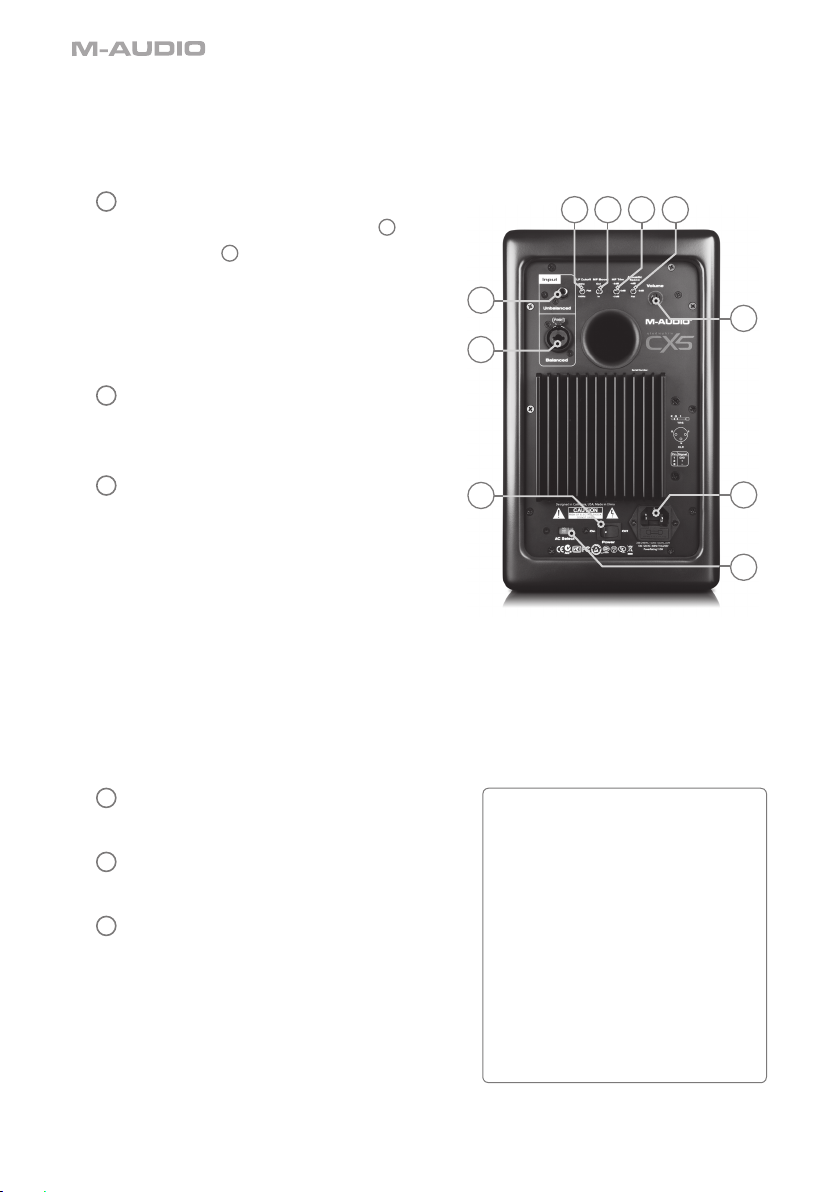
5. Hardware Controls and Indicators
Rear Panel
1
Input Gain Knob: This knob adjusts
the gain level of the XLR/TRS
3
and RCA 2 inputs. The gain is at
minimum when the knob is turned fully
counter-clockwise; the gain is set to its
maximum level when the knob is turned
fully clockwise.
2
RCA Input: This connector accepts
line-level signals from audio sources
with unbalanced RCA-style outputs.
3
XLR/TRS Input: This “combo” input
jack accepts both XLR and 1/4”
TRS-type connectors. Connect your
audio interface, mixer, or other line-level
audio source to this jack.
▶ NOTE: The XLR/TRS and RCA inputs are summed (i.e., mixed together) before arriving
at the CX amplifier and it is possible to have two sound sources connected to a speaker
at the same time. However, it is recommended that you do not play audio through both
connectors simultaneously as this may overload the inputs and result in clipping (distortion)
at the inputs.
4
Power Switch: This switch powers your
CX monitors on and off.
5
Power Connector: This socket accepts
a standard IEC-type power cable.
6
Input Voltage Selector: This recessed
switch adjusts the input voltage from
100-120V or 220-240V and allows your
CX monitor to be used worldwide. Make
sure this switch is set correctly for your
country to prevent damage to the speaker.
TIP: Power outlets in North
America, Japan, and many parts
of South America usually supply
between 100V and 120V whereas
outlets in Europe and most of Africa
and Asia provide between 220V and
240V. If you are not sure about your
region, be sure to check your power
outlet’s rating and set the Input
Voltage selector before connecting
and switching on your CX monitors.
Page 6

5
English
StudiophileTM CX5 User Guide
7
Acoustic Space Switch: This switch allows you to set a “shelf” EQ to tailor low
frequency response to your specific studio. See the section entitled “About the
Rear-Panel EQ Contour Switches” to learn more about this switch.
8
HF Trim Switch: This switch allows you to adjust the high-frequency response
of the speaker to your specific studio. See the section entitled “About the RearPanel EQ Contour Switches” to learn more about this switch.
9
MF Boost Switch: This switch allows you to contour the midrange response of
the speaker to your specific studio. See the section entitled “About the RearPanel EQ Contour Switches” to learn more about this switch.
10
LF Cutoff Switch: This switch sets the low-frequency cutoff point of your CX
monitor. See the section entitled “About the Rear-Panel EQ Contour Switches”
to learn more about this switch.
Front Panel
11
Power LED: This blue LED illuminates when the monitor is receiving power and
the rear panel Power Switch
4
is in the “ON” position.
Page 7

6
6. Connection Diagram
M-Audio CX monitors feature balanced XLR/TRS “Combo” and unbalanced RCA-type
analog inputs on the rear panel. Connect the outputs of your mixer, audio interface, or
other line-level device to these inputs.
!UDIO)NTERFACE
"ALANCED423TO"ALANCED42 3
-IXER
"ALANCED8,2TO"ALANCED423
#ONTROL2OOM2OUTER
"ALANCED423TO"ALANCED8,2
0REAMPLIFIER0ROCESSOR
5NBALANCED2#!TO5NBALANCED2#!
▶ NOTE: the XLR/TRS and RCA inputs are summed (i.e., mixed together) before arriving
at the CX amplifier and it is possible to have two sound sources connected to a speaker
at the same time. However, it is recommended that you do not play audio through
both connectors simultaneously as this may overload the inputs and result in clipping
(distortion) at the inputs.
TIP: If your mixer, interface, or other audio source features both XLR/TRS
and RCA-type outputs, use the XLR or TRS connectors instead of the RCA
connectors whenever possible. XLR and TRS cables incorporate a “balanced”
design that carries a signal over three conductors (“hot,” “cold,” and “ground”)
instead of two conductors as found in RCA cables (“hot,” and “ground”). This
results in lower noise, higher rejection of radio-frequency (RF) interference, and
better overall fidelity. If XLR/TRS jacks are unavailable, use RCA-style cables
but try to keep the cables as short as possible.
Page 8

7
English
StudiophileTM CX5 User Guide
7. Setting up CX Monitors
The configuration and placement of your CX monitors
within your studio may affect the performance of the
speakers. Use the following tips to achieve the best
possible performance out of your CX monitors:
Speaker Placement
Place the CX monitors so that the two speakers
and the engineer form an equilateral triangle when
viewed from above. Angle the speakers slightly
inward so that the woofer and tweeter face the
engineer.
In general, it is recommended that CX monitors
be placed at least one foot away from the nearest
wall, ceiling, or any other large, flat surface (the reason
for this is covered in detail in the following chapter of this
guide). If practical considerations such as limited studio
space make this impossible, CX monitors include an
Acoustic Space Switch
7
to compensate for placement
near walls and corners. See the following chapter of this
guide to learn more about this switch.
Speaker Height
Position the speakers so that they are parallel to the ground and that your ears are
between the midpoint of the woofer and the tweeter.
Speaker Orientation
If possible, place CX monitors in their upright position and
avoid laying the speakers on their sides. The CX woofer
and tweeter are vertically aligned and will provide the best
performance when the speakers are placed upright. Placing
them on their sides may create strong reflections from
nearby surfaces resulting in spectrally unbalanced sound.
If your CX monitors must be oriented horizontally due to
space or line-of-sight considerations, place the speakers so that their tweeters are on
the “inside” to improve imaging.
Tweeters
TIP: If possible, place your
CX monitors on speaker stands
instead of your desk top. Desks
tend to resonate sympathetically
at low frequencies and may
adversely affect the bass response
of your monitors. If speaker
stands are not possible due to
space restrictions and you notice
a buildup in bass, try placing
the monitors on “speaker pads”
to acoustically de-couple the
monitors from the desk.
Left Monitor Right Monito
r
Page 9

8
About the Rear-Panel EQ Contour Switches
These switches allow you to tailor
the EQ curve of your CX monitors
to complement the frequency
response of your studio.
Since studio monitors (including
the CX series) are designed to
have a flat frequency response, you may be wondering why these speakers include
additional EQ switches. These switches are included for three reasons:
1. Size, shape, and acoustical treatment of your specific studio:
CX monitors are tested and tuned in an anechoic chamber to be as linear (flat)
as possible. This means that leaving the switches set to their default settings will
result in the printed acoustic frequency response plot when monitoring takes place
in an “ideal” environment similar to those found in high-end recording studios. In
these studios, acousticians carefully determine the size and shape of the control
room, placement of the studio monitors and large furniture, construction materials
of the walls and ceiling, as well as all acoustical treatments that must be applied to
various parts of the room. All this ensures that studio monitors will sound as flat and
accurate as possible at the “mixing position.”
In the real-world, however, most project and home-based studios are set up in
preexisting rooms where the size/shape of the room cannot be easily modified to
improve acoustics. This means that the design of the room itself may have adverse
effects on the frequency response of the monitors (i.e, sound reflections from flat
surfaces in the room may cause the monitors to not sound linear). For that reason,
the CX line features “corrective” EQ switches to compensate for adverse effects
that may be caused by your room.
2. Placement of the CX monitors within your studio:
The proximity of your CX monitors to the walls (and floors/ceilings) may adversely
affect the frequency response of what you hear at the mixing position. This is
because all speakers radiate low-frequency sounds in all directions—not just toward
the mixing position. If there are large, flat surfaces (such as walls or ceilings) within
one foot of the speaker, these surfaces act as low frequency “sound reflectors” that
return bass energy projected from the rear of the speaker back into the studio. This
can result in bass that sounds “tubby” and exaggerated.
Page 10

9
English
StudiophileTM CX5 User Guide
3. Using a subwoofer:
If you plan to use a subwoofer with your CX monitors, you will need to filter out low
frequency sounds so that only the subwoofer plays low-frequency sounds (the CX
monitors will only play midrange and high-frequency sounds, in this scenario). This
needs to be done so that the subwoofer and CX monitors do not both play the same
low-frequency sounds, causing a greatly exaggerated bass response within your
studio.
The CX line of monitors address all three of these issues with the following switches:
Acoustic Space Switch
7
As stated earlier in this section, your CX
monitors should ideally be placed at least one
foot away from the nearest wall, ceiling, or
other large, flat surface. In the real-world, this
may be impractical due to space limitations
within your studio. For that reason, CX
monitors feature an Acoustic Space Switch.
This switch compensates for placement near
walls by “shelving” (reducing) frequencies below 200 Hz. This switch should be set
as follows:
0dB This default setting should be used if the monitors are placed at least one
foot away from the nearest wall.
-2dB This setting reduces frequencies below 200 Hz by 2dB. Use this setting if
the speakers must be placed closer than one foot from the nearest wall.
-4dB This setting reduces frequencies below 200 Hz by 4dB. Use this setting if
the speakers must be placed within one foot of the corner of a room (i.e.,
the intersection of two walls).
TIP: Be sure to leave at least
3” of space between the rear of
the speaker and a wall to allow
the rear-firing port to “breathe”
properly. Placing the speaker
any closer than 3” may adversely
affect low-frequency response.
Page 11

10
HF Trim Switch
8
This control allows you to boost or attenuate (reduce) your CX monitors’ high
frequency response above 3kHz. This switch can be set in the following ways:
0dB This default setting leaves high-frequency signals unaffected (high
frequency sounds are neither boosted nor attenuated).
+2dB This setting boosts signals above 3kHz by 2dB.
-2dB This setting attenuates signals above 3kHz by 2dB.
To configure the HF Trim switch, begin by mixing a few songs with this switch set
to the default “0dB” position. If your mixes sound good in the studio and on other
speakers (car stereos, “multimedia” computer speakers, etc.), leave this switch in the
default position.
If your mixes sound good in the studio but they sound “dull” and lack high-frequency
“sparkle” on other playback systems, set this switch to “-2dB.” Alternatively, if your
mixes sound good in the studio but sound too “crispy” or “brittle” and contain too
much high-frequency content, set this switch to “+2dB.” Setting this switch to either
“+2dB” or “-2dB” allows the CX monitors to compensate for a mixing environment
that is either too “live” (i.e., too much high-frequency reflection from the walls and
other surfaces) or too “dead” (i.e., not enough high frequency sound is being
reflected around the room).
MF Boost Switch
9
This control engages a midrange boost from 1.5 KHz - 2.5 kHz with a 2 dB peak at
2 kHz. This switch can be set in the following ways:
Out This default setting allows incoming signals to bypass the midrange boost
circuitry (the midrange of a signal is not affected).
In This setting engages the midrange boost circuitry and creates a 2dB peak
at 2kHz with a 1 kHz bandwidth (i.e., signals between 1.5 kHz - 2.5 kHz
are boosted).
To configure the MF Boost switch, leave the switch set to the “out” position
and mix a few songs. If you notice your mixes sound good in the studio but the
midrange tends to be too prominent (e.g., the vocals/guitars are too loud) on
other speakers, set this switch to “in.” This will make the midrange of your CX
monitors slightly more pronounced in the studio and will result in more balanced
mixes since you will be less inclined to “push” the midrange of your mixes.
Page 12

11
English
StudiophileTM CX5 User Guide
LF Cutoff Switch
10
This control allows you to engage a high-pass filter that removes low-frequency
sounds from the monitors. This switch can be set in the following ways:
Flat This default setting allows your
monitors to play their entire
frequency spectrum with no lowfrequency filtering.
80Hz This setting engages a second-
order (12dB/octave) filter that rolls
off frequencies below 80 Hz.
100Hz This setting engages a second-
order (12dB/octave) filter that rolls
off frequencies below 100 Hz.
If you are using your CX monitors with a
subwoofer that does not have a built-in
crossover, set this switch as close as
possible to the low-pass cutoff frequency of
your subwoofer. The low-pass cutoff of the
subwoofer should be listed in the “technical
specifications” section of the subwoofer’s
User Guide.
If your subwoofer has an internal crossover that sends high-frequency signals out
to your main monitors through a pair of outputs, leave the LF Cutoff Switch on
your CX monitors set to “Flat.”
TIP: Many subwoofers feature
a low-pass cutoff frequency of
80Hz. If you are not sure about
your subwoofer, use this setting
as a starting point. If playback still
sounds too bass-heavy, try setting
this switch to 100Hz to see if the
low-frequency bass extension
sounds more linear.
TIP: This switch can also be
engaged if you wish to hear what
your mixes would sound like on
speakers with smaller woofers
(such as those found in most
televisions).
Page 13

12
8. Appendix A - Technical Specifications
CX5
Frequency
response:
50Hz-30kHz (+/-3dB);
-10dB at 50Hz
Crossover
frequency:
2.6kHz
Low-frequency
amplifier power:
50 watts with 14 gauge wiring to this transducer
High-frequency
amplifier power:
40 watts with 14 gauge wiring to this transducer
LF cutoff Flat, 80Hz, and 100Hz
MF boost In/Out of 2dB centered at 2kHz
HF trim +2dB, 0dB, -2dB above 3kHz
Acoustic space 0dB, -2dB, and -4dB
Maximum
signal-to-noise
(dynamic range):
> 97 dB (typical A-weighted)
Polarity: positive signal at + input produce outward LF cone displacement
Input impedance: 20k ohms balanced,
10k ohms unbalanced
Input sensitivity: 100 mV pink noise input produces 92 dBA output SPL at one meter with volume control at
maximum
Power: factory programmed for either 115V ~50/60Hz or
230V ~50/60Hz
Protection: RF interference, output current limiting, over temperature,
turn-on/off transient, subsonic filter, external mains fuse
Cabinet: Front and rear baffle 1” MDF with ¾” MDF wrap. Black lacquer paint on enclosure with soft
touch black paint on curved front plate.
Size: 13” (H) x 7.5” (W) x 9” (D); 33cm x 19cm x 23cm
Weight: 16.75 lbs./unit; 7.60 kg
* Above specifications subject to change without notice
Page 14

13
English
StudiophileTM CX5 User Guide
9. Warranty
Warranty Terms
M-Audio warrants products to be free from defects in materials and workmanship,
under normal use and provided that the product is owned by the original, registered
user. Visit www.m-audio.com/warranty for terms and limitations applying to your
specific product.
Warranty Registration
Immediately registering your new M-Audio product entitles you to full warranty
coverage and helps M-Audio develop and manufacture the finest quality products
available. Register online at
www.m-audio.com/register to receive FREE product updates and for the chance to win
M-Audio giveaways.
CX5
Tested to comply with
FCC standards
FOR HOME OR STUDIO USE
WARNING: This product contains chemicals, including lead, known to the State of
California to cause cancer, and birth defects or other reproductive harm. Wash hands
after handling.
© 2008 Avid Technology, Inc. All rights reserved. Product features, specifications, system
requirements and availability are subject to change without notice. Avid, M-Audio and
CX5 are either trademarks or registered trademarks of Avid Technology, Inc. All other
trademarks contained herein are the property of their respective owners.
Page 15

M-Audio USA
5795 Martin Rd., Irwindale, CA 91706
Technical Support
web
. . . . . . . . www.m-audio.com/tech
tel (pro products) . . . . . (626) 633-9055
tel (consumer products)
. . (626) 633-9066
fax (shipping) . . . . . . . (626) 633-9032
Sales
e-mail
. . . . . . . . . . sales@m-audio.com
tel
. . . . . . . . . . . . . 1(866) 657-6434
fax . . . . . . . . . . . . . (626) 633-9070
Web
. . . . . . . . . . . www.m-audio.com
M-Audio U.K.
Avid Technology | M-Audio
Pinewood Studios, Pinewood Road
Iver Heath, Bucks, SL0 0NH, United Kingdom
Technical Support
e-mail . . . . . . . . .support@maudio.co.uk
tel
. . . . . . . . . . . +44 (0)1753 658630
. . . . . . . . . . . . . (Mac / PC support)
Sales
tel
. . . . . . . . . . .+44 (0) 1753 659590
Web
. . . . . . . . . . www.maudio.co.uk
Benelux
Technical Support
Belgium tel . . . . . . . . +32 22 54 88 93
Holland tel
. . . . . . . . +31 35 625 0097
M-Audio France
Avid Technology | M-Audio
Pinewood Studios, Pinewood Road
Iver Heath, Bucks, SL0 0NH, United Kingdom
Renseignements Commerciaux
tel . . . . . . . . . . . . . . 0 810 001 105
email
. . . . . . . . . . . . info@m-audio.fr
Assistance Technique
PC
. . . . . . . . . . . . . 0 820 000 731
Mac . . . . . . . . . . . . 0 820 391 191
e-mail (PC)
. . . . . . . support@m-audio.fr
email (Mac) . . . . . . . . mac@m-audio.fr
fax . . . . . . . . . .+33 (0)1 72 72 90 52
Web
. . . . . . . . . . . www.m-audio.com
M-Audio Germany
Kuhallmand 34, D-74613 Ohringen, Germany
Technical Support
email . . . . . . . . . .support@m-audio.de
tel
. . . . . . . . . .+49 (0)7941 - 9870030
tel . . . . . . . . . +49 (0)7941 - 98 70070
Sales
e-mail
. . . . . . . . . . . . info@m-audio.de
tel
. . . . . . . . . . . +49 (0)7941 98 7000
fax . . . . . . . . . +49 (0)7941 98 70070
Web
. . . . . . . . . . . . www.m-audio.de
M-Audio Canada
1400 St-Jean Baptiste Ave. #150,
Quebec City, Quebec G2E 5B7, Canada
Technical Support
e-mail . . . . . . techcanada@m-audio.com
tel
. . . . . . . . . . . . . .(418) 872-0444
fax . . . . . . . . . . . . .(418) 872-0034
Sales
e-mail
. . . . . . infocanada@m-audio.com
tel
. . . . . . . . . . . . . (866) 872-0444
fax . . . . . . . . . . . . .(418) 872-0034
Web
. . . . . . . . . . . .www.m-audio.ca
M-Audio Japan
エムオーディオ/アビッドテクノロジー
株式会社
〒
107-0052
東京都港区赤坂
2-11-7 ATT
新館
ビル
4F
Avid Technology K.K.
|
M-Audio
4F ATT Bldg. 2-11-7 Akasaka,
Minato-ku Tokyo 107-0052 Japan
カスタマーサポート
(
Technical Support
)
e-mail :
win-support@m-audio.jp
e-mail (Macintosh
環境専用
) :
mac-support@m-audio.jp
tel :
052-218-0859
(
10:00~12:00/13:00~17:00
)
セールスに関するお問い合わせ
(
Sales
)
e-mail . . . . . . . . . . . info@m-audio.jp
te
l . . . . . . . . . . . . 052-218-3375
fax . . . . . . . . . . . . 052-218-0875
Web . . . . . . . . . . . www.m-audio.jp
081022_CX5_UG_EN01
 Loading...