

Page 1

Audiosport Quattro Mac
Users Guide
Introduction . . . . . . . . . . . . . . . . . . . . . . . . . . . . . . . . . . . . . . . . . . . . . . . . . . . . . . .2
Quattro Features . . . . . . . . . . . . . . . . . . . . . . . . . . . . . . . . . . . . . . . . . . . . . . . . . . . .2
What’s in the Box? . . . . . . . . . . . . . . . . . . . . . . . . . . . . . . . . . . . . . . . . . . . . . . . . . .2
Minimum System Requirements . . . . . . . . . . . . . . . . . . . . . . . . . . . . . . . . . . . . . . . .3
Quattro Front Panel: . . . . . . . . . . . . . . . . . . . . . . . . . . . . . . . . . . . . . . . . . . . . . . . .3
Quattro Quick Start . . . . . . . . . . . . . . . . . . . . . . . . . . . . . . . . . . . . . . . . . . . . . . . . .4
Theory of Operation . . . . . . . . . . . . . . . . . . . . . . . . . . . . . . . . . . . . . . . . . . . . . . . . .5
Hardware & Software Installation on the Mac . . . . . . . . . . . . . . . . . . . . . . . . . . . . .6
Configuring OMS . . . . . . . . . . . . . . . . . . . . . . . . . . . . . . . . . . . . . . . . . . . . . . . . . . .7
Hooking up your AudioSport Quattro . . . . . . . . . . . . . . . . . . . . . . . . . . . . . . . . . . . .8
The Quattro and the Macintosh Sound Manager . . . . . . . . . . . . . . . . . . . . . . . . . . . .9
ASIO Operation on the Macintosh . . . . . . . . . . . . . . . . . . . . . . . . . . . . . . . . . . . . .10
ASIO Control Panel and Operating Modes . . . . . . . . . . . . . . . . . . . . . . . . . . . . . .10
Using the Input and Output Level Switches . . . . . . . . . . . . . . . . . . . . . . . . . . . . . .12
Using Direct Monitoring . . . . . . . . . . . . . . . . . . . . . . . . . . . . . . . . . . . . . . . . . . . . .13
MIDI Operation . . . . . . . . . . . . . . . . . . . . . . . . . . . . . . . . . . . . . . . . . . . . . . . . . . .13
Optimizing Your System for Audio . . . . . . . . . . . . . . . . . . . . . . . . . . . . . . . . . . . . .14
Technical Specs . . . . . . . . . . . . . . . . . . . . . . . . . . . . . . . . . . . . . . . . . . . . . . . . . . .15
Limited Lifetime Warranty . . . . . . . . . . . . . . . . . . . . . . . . . . . . . . . . . . . . . . . . . . .16
1
QuattroMac-072601
Page 2

Introduction
Thank you for purchasing the AudioSport Quattro USB Audio Interface,
designed and manufactured by M Audio. The Quattro provides four audio inputs
and four audio outputs, plus a 1x1 MIDI port on your USB equipped Macintosh
computer. High performance, 24-bit/96kHz audio is now possible in a compact,
portable package. All audio inputs and outputs are switchable between balanced
(+4dBu) and unbalanced (-10dBV) operation to accommodate any audio need.
The USB port is a convenient, high-speed connection that requires no tools to
install, with no need to open or reconfigure your computer. By following the
instructions in this manual, you will be up and running in no time.
Quattro Features
• Four (4) analog audio inputs on 1/4” TRS jacks.
• High performance, 24-bit/96kHz A/D and D/A converters, with
101dB dynamic range on input and 104dB on output.
• Input Level switch for +4/-10 input line level settings (one for each
stereo pair, 1/2 & 3/4).
• Output Level switch for +4/-10 output line level settings (one for
each stereo pair, 1/2 & 3/4).
• Direct Monitor switch for computer bypass monitoring option (one
for each stereo pair, 1/2 & 3/4).
• One (1) MIDI Input and one (1) MIDI Output on front panel.
• Expansion jack for connection to the Omni I/O Desktop System by
M Audio.
What’s in the Box?
Your Quattro USB Audio Interface box contains:
• This manual.
• The Quattro USB Audio Interface.
• One (1) USB cable.
• One (1) 9vAC 1,000mA wall-wart power supply.
• One (1) driver disk containing additional software.
2
Page 3
Minimum System Requirements
Mac
• Mac OS 9.1 minimum
• Mac G3 with onboard USB
• 128 MB RAM for 96kHz operation, 64MB for 48kHz or less.
• Opcode’s OMS required for MIDI operation
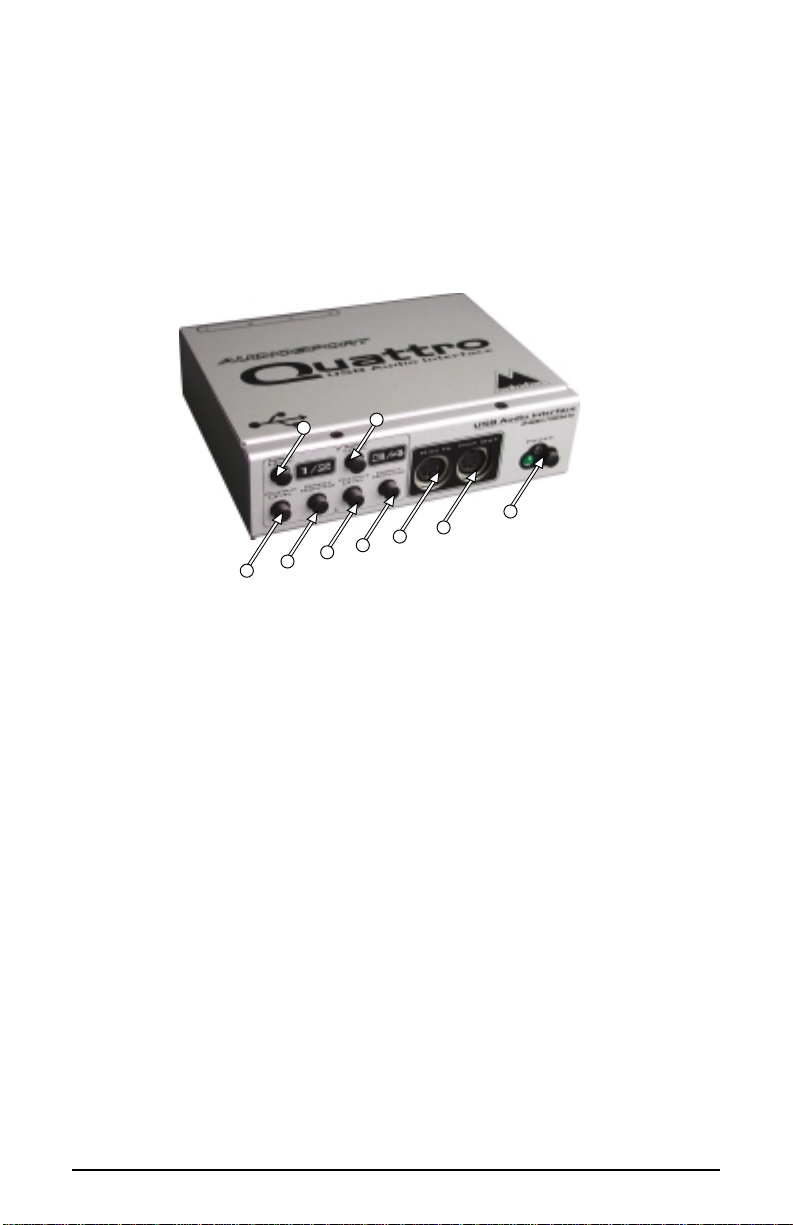
Quattro Front Panel:
1. 1/2 “Input Level” switch: In the ‘out’ position, the Quattro Inputs 1 & 2 are
set to -10dBV line level operation. Pressing in and engaging this switch sets
the these inputs to +4dBu line level.
2. 1/2 “Output Level” switch: In the ‘out’ position, the Quattro Outputs 1 & 2
are set to -10dBV line level operation. Pressing in and engaging this switch
sets these outputs to +4dBu line level.
3. 1/2 “Direct Monitor” switch: In the ‘out’ position, Quattro Inputs 1 & 2 are
routed to the computer for monitoring. Pressing in and engaging this switch
connects Inputs 1/2 to the Quattro Outputs 1/2.
4. 3/4 “Input Level” switch: In the ‘out’ position, the Quattro Inputs 3 & 4 are
set to -10dBV line level operation. Pressing in and engaging this switch sets
the these inputs to +4dBu line level.
5. 3/4 “Output Level” switch: In the ‘out’ position, the Quattro Outputs 3 & 4
are set to -10dBV line level operation. Pressing in and engaging this switch
sets these outputs to +4dBu line level.
6. 3/4 “Direct Monitor” switch: In the ‘out’ position, Quattro Inputs 1 & 2 are
routed to the computer for monitoring. Pressing in and engaging this switch
connects Inputs 1/2 to the Quattro Outputs 1/2.
7. “MIDI In” port: This MIDI jack provides MIDI input to your computer.
8. “MIDI Out” port: This port provides MIDI Output from your computer.
9. Power switch and LED: Pressing in and engaging this switch will power on the
Quattro and light the corresponding LED.
3
1
3
2
4
8
7
6
5
9
Page 4
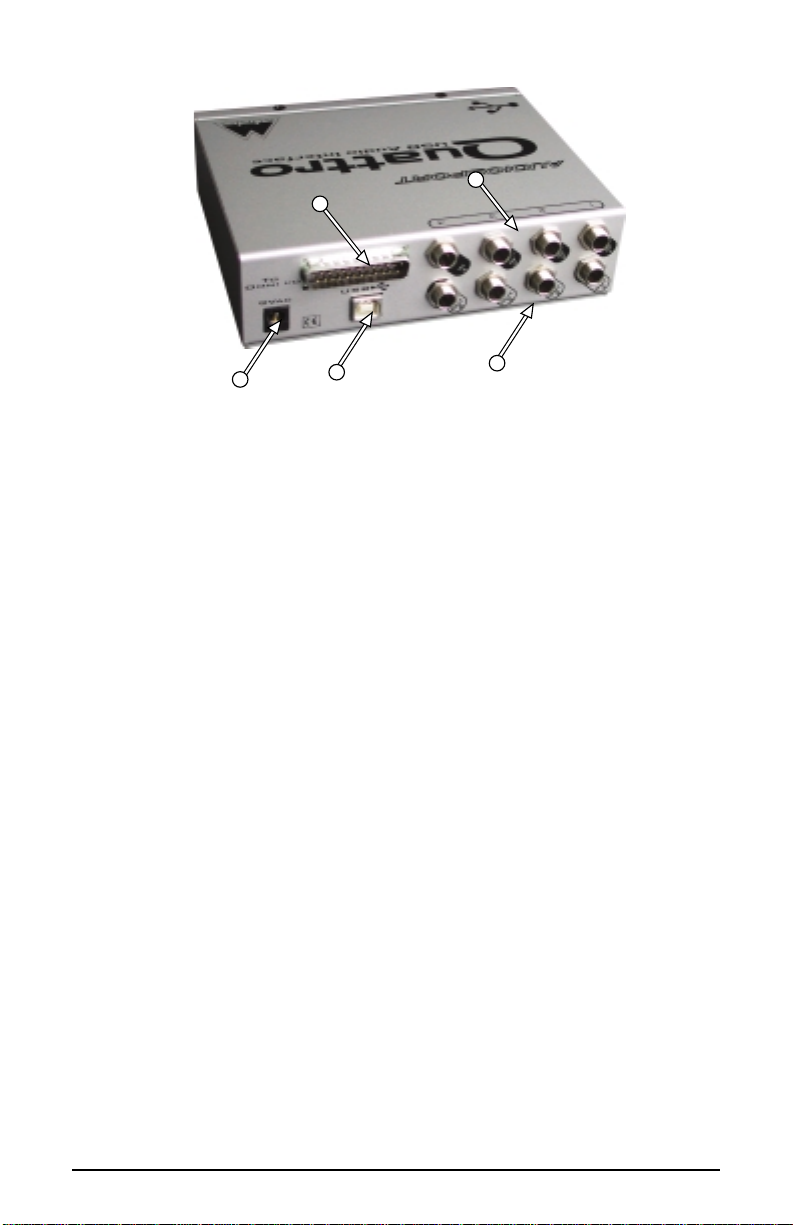
Quattro Rear Panel:
1. “9VAC” power jack: This jack accepts the wall-wart power supply that came
with the unit. Only the proper power-rated supply should be used.
2. “To Omni I/O” connector: This 15-pin DB connector accepts the female end
of the Omni I/O connection cable (supplied with the Omni I/O).
3. USB jack: This jack accepts the device-end of a standard USB cable.
4. Audio “In 4” through “In 1”: These 1/4” jacks accept either TRS or TS 1/4”
plugs. These are line level inputs, and generally will be connected to the
outputs of a line level instrument or preamp.
5. Audio “Out 4” through “Out 1”: These 1/4” jacks accept either TRS or TS
1/4” plugs. These are line level outputs, and generally will be connected to a
mixer, power amp, powered speakers, or a sound system.
Quattro Quick Start
It is recommended that you read this manual fully before installing and using
your AudioSport Quattro. This Quick Start guide may serve as an overview to
the steps ahead.
1. Plug the Quattro wall-wart into your wall receptacle and to the Quattro 9vAC
power jack.
2. Connect the USB cable to your computer and the Quattro. Install OMS, then
run the AudioSport Installer program supplied on the driver disk (for MIDI,
you will need to configure OMS). If you have a music program that is ASIO
compliant, drag the Quattro’s ASIO driver to the music program’s ASIO
folder. Power down the computer. Power up the Quattro, then power up the
computer.
3. With all audio levels turned down, connect your instruments to the Quattro
audio inputs, and connect the Quattro’s audio outputs to a mixer or
monitoring system.
4. Configure your music software and start recording.
4
4
2
1
3
5
Page 5

Theory of Operation
The USB port provides a high-speed connection to your computer. Devices can
be “hot-plugged” into the USB port with no need to power down the computer.
Additionally, there’s no need to open the computer, no tools are required, nor is
it necessary to configure the device other than plugging it in to the USB port and
installing the drivers.
The AudioSport Quattro utilizes the convenience of your computer’s USB port
to bring high quality, high resolution audio to your desktop or laptop computer.
In theory, multiple devices can be connected to the USB port (with the addition of a
USB hub). The AudioSport Quattro requires all of the bandwidth that is available on
the USB port, and therefore it is required that you plug the Quattro directly into your
computer’s USB port, and not into a USB hub with other USB devices. Of course, if
you are using a USB keyboard and mouse, you may have those plugged into your
computer’s other USB port (two are usually supplied).
Your AudioSport Quattro USB Audio Interface is a 96kHz/24-bit capable device.
That means that you can record at any sampling rate that your recording software
will allow, up to 96kHz at a bit width of 24-bits, and at 16- or 24-bits at a sampling
rate of 48kHz or less. An ASIO control panel is included with your driver software,
which allows you to set the Quattro to its several operating modes.
The Quattro provides four audio inputs as two stereo pairs, i.e. 1/2 and 3/4, and
four audio outputs, also as stereo pairs 1/2 and 3/4, The Quattro adds 1x1 MIDI
operation (one input and one output port) to your USB equipped Macintosh,
which can be used as your only MIDI interface or in conjunction with additional
MIDI devices. Note that Opcode’s OMS, or “Open Music System” MIDI
manager program is required for MIDI operation on the Mac, and must be
installed prior to installing the Quattro drivers.
When all four input and output stereo pairs (two input pairs and two output pairs)
are enabled, the Quattro will operate in 16-bit mode at either the 44.1k or 48k
sampling rates. With three stereo pairs enabled, i.e., either one input and two
output pairs or two input and one output pair, the Quattro will operate at 48kHz
sampling rate or lower, and at either 24- or 16-bit. When one stereo pair is
enabled and in 24-bit mode, the Quattro will operate at the 96kHz sampling rate
or lower. This is explained more fully in the section, “ASIO Control Panel
Operating Modes.”
The AudioSport can be configured for +4 or -10 line level operation simply by
pressing a button on the front panel. This allows for seamless integration into the
studio, compatible with professional balanced (balanced TRS, +4dBu) or
semi-pro (unbalanced TS, -10dBV) audio devices (see section, “Using the Input
and Output Level Switches”).
5
Page 6

The AudioSport Quattro can be used with the Sound Manager on the Macintosh,
and therefore can operate as your system sound card. ASIO drivers are also
provided, which allow you to use the AudioSport with ASIO compliant audio
software (such as Cubase by Steinberg). If your software is ASIO compliant, we
suggest using those drivers. ASIO will allow you to monitor audio
through the
program with greatly reduced latency. However, if you are not using ASIO or
otherwise wish to monitor the signal at the Quattro inputs, a “Direct Monitor”
switch is provided on the AudioSport for bypassing the computer and directly
monitoring the input signal present at the AudioSport Quattro (see section,
“Using Direct Monitoring).
Additionally, the AudioSport Quattro can be used in conjunction with the Omni
I/O Desktop Recording System by M-Audio. The Omni will add two
microphone/instrument preamps to the Quattro inputs, plus add a mixer to the
Quattro outputs. This Omni mixer will allow you to blend MIDI keyboards with
audio tracks, add effects to the Quattro outputs, control monitor and headphone
levels while separately mixing down. Check the M-Audio website,
www.m-audio.com, for more info on the Omni for the Quattro.
Hardware & Software Installation on the Mac
Here is a simple, step-by-step procedure for attaching and powering up the
Quattro on the Macintosh Computer. Just in case there are any installation
updates since this writing, please check the driver disk that came with your
Quattro for a readme file regarding installation.
The Quattro’s MIDI operation on the Macintosh requires the OMS (Open Music
System) program from Opcode. If your Quattro came with a CD, OMS is
included on this disk. If your Quattro came with a floppy disk, you will need to
go to either our website (http://www.midiman.com/drivers.htm, find the MacOS
9.x section, then OMS) or Opcode’s website (www.opcode.com) to download
OMS. The OMS program is a MIDI manager, which MUST be installed prior to
running the AudioSport Quattro Installer in order for the Quattro MIDI driver to
be properly placed in the OMS folder. See the next section, “Configuring OMS”
for more information.
The AudioSport Quattro comes with an installer program that will place all
driver components except the Quattro ASIO driver in their proper folders. The
Quattro ASIO driver will be placed in a folder on your desktop, and must be
inserted into your music program’s ASIO folder, provided that your music
program uses ASIO.
1. On the Driver Disk that came with your AudioSport Quattro, locate the folder
that contains the AudioSport Installer for the Macintosh. Double click on the
installer program. The Installer program installs all Quattro extensions, plus
6
Page 7

creates an “AudioSport QUATTRO Asio” folder on your desktop, containing
the Quattro’s ASIO driver.
2. If you are using a music software program that utilizes ASIO drivers, then
locate the program’s ASIO folder (it will be found within the program’s folder
on your Macintosh HD). Drag the AudioSport ASIO driver (located in the
“AudioSport QUATTRO Asio” folder created by the Installer) to that folder.
3. Properly shut down the computer.
4. Plug the Quattro wall-wart into your wall receptacle and to the Quattro 9vAC
power jack.
5. Connect the USB cable to your computer and the Quattro. Power up the
Quattro, then power up the computer.
For information on how to enable the Sound Manager to use the Quattro, see the
section “The Quattro and the Macintosh Sound Manager”). For further
information on using and configuring ASIO drivers, see the section “ASIO
Operation on the Mac.”
Configuring OMS
Go to the Control Panel or Chooser under the Apple Menu, and make sure AppleTalk
is turned off (this is recommended, although OMS will sense that it is on and prompt
you to turn it off). If you are installing your QUATTRO driver and configuring OMS
for the first time, follow these instructions to configure OMS.
First Time OMS Configuration Instructions:
1. In the Opcode folder, which you will find on your hard drive, locate the OMS
Applications folder, then OMS Setup. Double-click on OMS Setup.
2. OMS will inform you that it has not yet been configured. Click OK.
3. The “Create A New Studio Setup” dialog box now appears. Click OK.
4. The “OMS Driver Search” box asks you to choose the port on which you’ve
attached the QUATTRO (either Modem or Printer). DO NOT choose a port,
just click “Search.” OMS begins Searching. IMPORTANT: If the USB cable is
not correctly hooked up to the QUATTRO, setup will fail.
5. “OMS Driver Setup” shows the QUATTRO in a list when OMS successfully
finds the driver. Click OK. OMS will now define (shows “Identifying”) the
QUATTRO output port.
6. The “OMS MIDI Device Setup” dialog box will appear showing the
QUATTRO’s available output port with an open check box to the left of the
port. You will have to check this open box at this time to enable the output
port. Now click on OK.
7. Next, the “My Studio Setup” appears with a file save dialog box over it. You
will now need to name and save your new Studio Setup (or use the default
name) before you can assign various instruments to the QUATTRO’s output
and input. Assign your instrument (optional) and you are done.
8. Your QUATTRO is ready for use with MIDI.
7
Page 8

You can run the OMS ‘Test Studio’ utility by going to the ‘Studio’ menu and
releasing the mouse on “T est Studio”. Playing a note on your keyboard will give
you an audio message from your computer, “MIDI received,” while the arrow
pointing to the keyboard icon flashes. Clicking on a keyboard icon with the
mouse pointer will send a tone cluster to the QUATTRO MIDI output port. The
LED will light, and your sound module should play the chord.
You may now exit OMS Setup by quitting the application. The rest is up to
configuration within your music software. Generally, this means selecting “OMS
Compatibility,” or “Open Music System” for your MIDI system setup.
Hooking up your AudioSport Quattro
The Quattro provides four line inputs and four line outputs, and will accept a
+4dB balanced signal on 1/4” TRS plugs (tip-ring-sleeve), or a -10dB
unbalanced signal on 1/4” TS plugs (tip-sleeve). Each 1/4” jack will accept either
TRS or TS plugs.
You may connect the output of a line level instrument such as an electronic
keyboard or instrument preamp, the output of a microphone preamp (a mic
preamp is required for use with a microphone), or the output of a CD player or
similar line-level device. Check your device’s documentation for information on
its operating line level (+4 balanced or -10 unbalanced), and see the section,
“Using the Input Level and Output Level Switches” in this manual.
You may connect the four outputs of the AudioSport Quattro to a mixing console,
or use two of the outputs for a stereo send to a monitoring system (power amp
and speakers, or a home stereo), powered speakers, or a headphone amplifier.
Again, check your device’s documentation for information on its operating line
level, and see the section, “Using the Input and Output Level Switches.”
The diagrams below illustrate those scenarios. Typical Setup #1 shows the
AudioSport Quattro with a mic/instrument preamp plugged into Inputs 1/2 (we
suggest the DMP3 Preamp by M Audio), and a MIDI sound module’s audio
outputs plugged into Inputs 3/4. The four outputs of the Quattro are plugged into
a mixing board. T ypical Setup #2 shows a CD player plugged into Inputs 1/2, and
Outputs 1/2 plugged into a monitoring system.
8
Page 9

The Quattro and the Macintosh Sound
Manager
The Macintosh Sound Manager will allow you to select the AudioSport Quattro
as the system’s audio input and output device. However, if you are using the
Quattro ASIO driver, you should leave the Sound control panel set to “built-in.”
Open the Apple menu, then select “Sound” from the Control Panels list. The
Macintosh Sound Manager is limited to stereo input and stereo output, so only
Channels 1 and 2 are active on the Quattro under Sound Manager. The Quattro
will operate at 44.1kHz sampling rate at the 16-bit setting in this instance.
At this point in time, most music programs designed for the Mac utilize ASIO
drivers. If you decide to switch the Sound Manager to operate with the Quattro,
be sure and set it back to “built-in” before launching your music program.
MIDI
9
Sound
Module
N
I
Page 10

ASIO Operation on the Macintosh
If your Macintosh music program is ASIO compliant, you may install and use the
AudioSport ASIO driver with your Quattro. Open your Macintosh HD folder and
locate your music program. Within the program’s folder you should find an ASIO
folder. Drag the AudioSport Quattro ASIO driver to this folder.
Once the ASIO driver is installed, you may open your music program and go to
the audio setup page. The AudioSport Quattro ASIO driver will show up in the
program’s ASIO Driver list, allowing you to select it at this time if it is not
already selected by default.
If you are using an ASIO compliant music program, we suggest that you enable
and use the Quattro’s ASIO drivers. ASIO gives you the advantage of being able
to monitor your source through the program, similar to monitoring the record
inputs of a tape machine.
ASIO Control Panel and Operating Modes
Once the AudioSport Quattro ASIO driver is selected in your music program’s
audio setup page, you may launch the Quattro’s ASIO control panel. Within the
audio setup page you will find a button that allows you to launch the ASIO
device’s control panel. Clicking this button will launch the Quattro ASIO Control
Panel and allow you to access the AudioSport Quattro Settings.
The AudioSport Quattro Settings page shows you the M Audio and the Quattro
logo. In the bottom left-hand corner you will see a readout of the ASIO driver,
USB driver, and the Firmware currently in use. You will also see a checkbox that
reads “Support Legacy ASIO Hosts.” If your music program does not use ASIO
version 2, you should click on this box to check and enable Legacy ASIO
support.
Below is a screenshot of the Quattro settings panel with all four input and output
channels activated. There are two columns, one labeled “Active Channels” and
the other labeled “Sample Depth.” Settings in these two columns interact with
each other. With all four input and output channels activated, you will notice that
the 24-bit setting in the Sample Depth column is grayed out, and the “Maximum
sample rate” reads out at 48000 Hz.
10
Page 11

With all four stereo pairs enabled, i.e., Inputs 1&2, 3&4 and Outputs 1&2, 3&4,
the Quattro behaves as a “4x4” audio device at 16-bits, and at sample rates of
48kHz and below (that is, 48kHz or 44.1kHz). These two sampling rate options
as well as bit depth will be selectable from within your music program.
Clicking on any one of the active channel boxes and disabling that channel (in
this example, we have disabled Output 3&4) will free-up some of the USB
bandwidth. As a result, the 24-bit setting in the Sample Depth column will now
be accessible and consequently is no longer grayed out. The maximum sample
rate is still 48000 Hz.
With any combination of three stereo pairs enabled, the Quattro will function
either as a 2x4 or a 4x2 audio device, with one input and two output pairs or two
input and one output pair, respectively. In this mode, the Quattro is capable of
48kHz or 44.1kHz at either 24- or 16-bits, as set by the music program. Note that
when the 24-bit option is selected in the Quattro control panel, the input or output
stereo pair that is currently disabled will become grayed out.
11
Page 12

The Quattro will perform at 96kHz sampling rate with any one of the stereo pairs
enabled, and with the 24-bit Sample Depth selected. The Quattro will not operate
at 96kHz when the control panel is set to 16-bits. In the example below, Output
1&2 is enabled and 24-bit Sample Depth is selected, with the Maximum sample
rate showing 96kHz.
In the AudioSport Quattro Settings control panel, below the Sample Depth column
you will see a drop-down list that will set the “Latency” that you will experience in
monitoring input through your music program by setting the Quattro’s buffer size.
How low you will able to set the latency will depend on several factors, such as your
system’s performance and the performance of the music program itself. Try the “very
low” setting first (as shown in the previous screenshot), and if your system stutters or
performance falters, try the next higher setting until the system performance stabilizes.
Once you are satisfied with any of the control panel settings, click OK to close the
AudioSport Quattro Settings page.
Using the Input and Output Level Switches
Using the front panel Input Level and Output Level switches, you may change
the operating line level for each of the Quattro stereo pairs. In the “out” position,
the Quattro is set to a -10dBV line level. Pressing the input level switch and
locking it to the “in” position changes the operating line level to a +4dBu setting.
Each switch affects the line level for one of the input or output stereo pairs, i.e.
1/2 or 3/4. It is possible to have one setting for one of the stereo pairs, and a
different setting for the other. This will depend on the operating line level of the
device that is attached to that particular input or output. You can, in fact, have an
input set to one line level and the corresponding output set to another, depending
on your needs.
12
Page 13

Generally speaking, a device that runs at a -10dB line level will have outputs or
inputs that are single conductor with a ground, such as RCA jacks, or 1/4”
tip-sleeve phone jacks. Devices that run at a +4dB line level will have outputs or
inputs that are two conductor with a ground, such as XLR or 1/4” tip-ring-sleeve
jacks.
Using Direct Monitoring
When you wish to directly monitor the signal at the inputs of the Quattro, you
may engage the “Direct Monitor” switch for Input 1/2 and/or Input 3/4 by
pressing and locking it to the “in” position. Doing so connects the input (1/2 or
3/4) directly to the corresponding output, bypassing the computer and software.
You may choose to use the Direct Monitoring option to avoid any latency
inherent in your music recording system. Using the ASIO drivers and an ASIO
capable music program with the Quattro will allow you to monitor your
recording source with reduced latency, while using the Sound Manager can
introduce latency that is generally considered unacceptable. The Quattro’s Direct
Monitor option will allow you to monitor your recording source with zero
latency
MIDI Operation
The Quattro provides one (1) MIDI input and one (1) MIDI output. MIDI
operation on the Quattro is independent of the audio operation, and therefore
must be configured separately.
On the Mac, your music software has a MIDI device setup page. Open that page,
and click on the AudioSport Quattro “MIDI In” and “MIDI Out” devices to
select and enable them. As stated, the Quattro can be your only MIDI device, or
it can be used in conjunction with as many other MIDI devices in your system as
your music program allows. Your music software should allow you to arrange the
MIDI ports in a numerical order, according to your preferences.
The diagram below shows a typical MIDI setup involving the AudioSport
Quattro. Shown here is a controller keyboard plugged into the Quattro’s MIDI In
port, and a sound module plugged into the Quattro’s MIDI Out port.
13
Page 14

Optimizing Your System for Audio
Network cards and devices such as print monitors can cause interference with
USB audio, the resulting effect being clicks and pops in your audio performance.
As stated in the “Theory of Operation” section, the AudioSport Quattro requires
all of the USB bandwidth, so definitely do not have any active USB devices
attached when using the Quattro. If you experience clicks and pops in your audio
tracks, consider temporarily disabling network cards or modems.
Also, if your system board has an AGP graphics slot and you are using a PCIbased graphics card, purchasing an AGPgraphics card and utilizing the dedicated
AGP buss may improve performance both in audio and graphics. Additionally,
minimizing graphics use in your audio program, such as defeating waveform
displays while recording, can improve performance. It is also important that you
avoid running applications other than your music program while recording audio,
as recording and streaming digital audio is already rather processor intensive.
Here are some other things to consider:
• A hard drive that is dedicated to audio data is recommended. Withe the
operating system and programs on a separate drive, audio data will be
placed as close to the “front” of the drive, optimixing performance. Drives
with low seek times that run at a minimum of 7200 RPM are best.
• You can’t be too rich or have too much RAM. It’s a good idea to have at
least 128MB, while 256MB or more will greatly enhance performance.
14
Page 15

Technical Specs
Analog Audio
Peak Analog Input Signal: +19.6dBu (+4dBu setting),
+2.1dBV (-10dBV setting)
Peak Analog Output Signal: +20.0dBu (+4dBu setting),
+2.0dBV (-10dBV setting)
Dynamic Range:
Outputs: 104dB (a-weighted),
Inputs: 101dB (a-weighted)
THD (at 0dBFS):
Outputs: less than 0.002%,
Inputs: less than 0.002%
Frequency Response: 22Hz - 22kHz, -0.3,-0.2dB
Input Impedance: 10k ohms minimum
Input Connectors: 1/4" female TRS-type, balanced or
unbalanced
Output Connectors: 1/4" female TRS-type, balanced or
unbalanced
Digital Audio
Digital Output Sample Rate: 44.1kHz to 96kHz.
15
Page 16

Limited Lifetime Warranty
MIDIMAN warrants that this product is free of defects in materials and
workmanship under normal use so long as the product is: owned by the original
purchaser; the original purchaser has proof of purchase from an authorized
MIDIMAN dealer; and the purchaser has registered his/her ownership of the
product by sending in the completed warranty card.
This warranty explicitly excludes power supplies and included cables which may
become defective as a result of normal wear and tear.
In the event that MIDIMAN receives written notice of defects in materials or
workmanship from such an original purchaser, MIDIMAN will either replace the
product, repair the product, or refund the purchase price at its option. In the event
any repair is required, shipment to and from MIDIMAN and a nominal handling
charge shall be born by the purchaser. In the event that repair is required, a
Return Authorization number must be obtained from MIDIMAN. After this
number is obtained, the unit should be shipped back to MIDIMAN in a protective
package with a description of the problem and the Return Authorization clearly
written on the package.
In the event that MIDIMAN determines that the product requires repair because
of user misuse or regular wear, it will assess a fair repair or replacement fee. The
customer will have the option to pay this fee and have the unit repaired and
returned, or not pay this fee and have the unit returned unrepaired.
The remedy for breach of this limited warranty shall not include any other
damages. MIDIMAN will not be liable for consequential, special, indirect, or
similar damages or claims including loss of profit or any other commercial
damage, even if its agents have been advised of the possibility of such damages,
and in no event will MIDIMAN's liability for any damages to the purchaser or
any other person exceed the price paid for the product, regardless of any form of
the claim. MIDIMAN specifically disclaims all other warranties, expressed or
implied. Specifically, MIDIMAN makes no warranty that the product is fit for
any particular purpose.
This warranty shall be construed, interpreted, and governed by the laws of the
state of California. If any provision of this warranty is found void, invalid or
unenforceable, it will not affect the validity of the balance of the warranty , which
shall remain valid and enforceable according to its terms. In the event any
remedy hereunder is determined to have failed of its essential purpose, all
limitations of liability and exclusion of damages set forth herein shall remain in
full force and effect.
16
QuattroMac-072601
 Loading...