

Page 1

PROGUARD800™SERIES
OS826 OUTDOOR SIREN-FLASH
800
USER MANUAL 2
GEBRAUCHSANLEITUNG 7
GUIDE UTILISATEUR 12
MODO DE EMPLEO 17
MANUALE D’ISTRUZIONI 22
GEBRUIKSAANWIJZING 27
20191 / 20071121 • OS826
© ALL RIGHTS RESERVED MARMITEK ®
TM
Page 2

Page 3
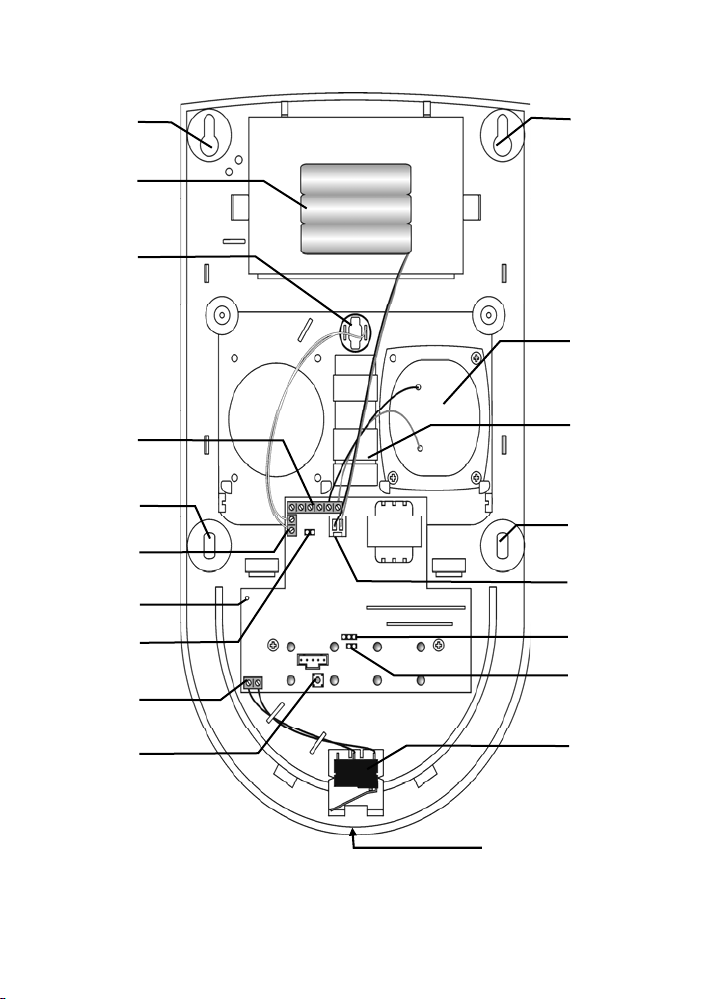
OS826 WIRELESS OUTDOOR SIREN WITH FLASH
y
r
r
A
Mounting
Upper
Hole
Backup
Batter
Pack
Upper
Mounting
Hole
Rear
Tampe
Switch
Siren
Terminal
Main
Block
Cable Entry
Hole
Lower
Mounting
Hole
Rear Tamper
Terminal
Block
Transmission
LED
External
Tamper Jumpe
Front Tamper
Terminal Block
Transmitter
Delete
Button
Lower
Mounting Hole
Battery Connector
Mode Jumper
(JP1)
rming Tones
Jumper (JP2)
Front Cover
Tamper Switch
Location of
Cover Screw
Figure 1; cover off
OS826 2
Page 4

SAFETY WARNINGS
• Do not expose the components of your systems to extremely high temperatures
or bright light sources.
• In case of improper usage or if you have altered and repaired the product
yourself, all guarantees expire. Marmitek does not accept responsibility in the case
of improper usage of the product or when the product is used for purposes other
than specified. Marmitek does not accept responsibility for additional damage other
than covered by the legal product responsibility.
• This product is not a toy. Keep out of reach of children.
• The product should only be repaired or serviced by a qualified repairman.
• Keep batteries out of the reach of children. Dispose of batteries as chemical
waste. Never use old and new batteries or different types of batteries together.
Remove the batteries when you are not using the system for a longer period of
time. Check the polarity (+/-) of the batteries when inserting them in the product.
Wrong positioning can cause an explosion.
• Only connect the adapter to the mains after checking whether the mains voltage
is the same as the values on the identification tags. Never connect an adapter
when it is damaged. In that case, contact your supplier.
INTRODUCTION
The OS826 is a wireless siren is a part of the Marmitek ProGuard800 series, and
operates together with the ProGuard800 alarm system. When you wish to know
more about the complete system, its possibilities and its settings, then you can
check out the installation manual or visit www.marmitek.com
In the event of an alarm the control panel activates the siren and strobe. The siren
is sounded until the end of the siren cutoff programmed at the control panel. After
the siren cutoff has expired, the strobe continues to flash until the system is
disarmed.
INSTALLATION
WARNING: Wear hearing protection when installing the siren.
1. Open the housing. To do so, remove the cover screw located at the bottom of
the housing and lift the front cover away from the rear housing.
2. Remove the strobe cover. To do so, carefully lift the bottom of the strobe
cover away from the rear housing and remove it from the strobe cover holding
hooks.
3. Using a Phillips screwdriver, remove the two screws that secure the metal
anti-vandal casing and lift the casing from the back cover of the siren.
4. Connect a 12VDC or 9VAC, 500mA transformer to terminals 3 and 4 on the
siren’s terminal block (polarity is not important) – see Figure 2.
.
3 © MARMITEK
Page 5
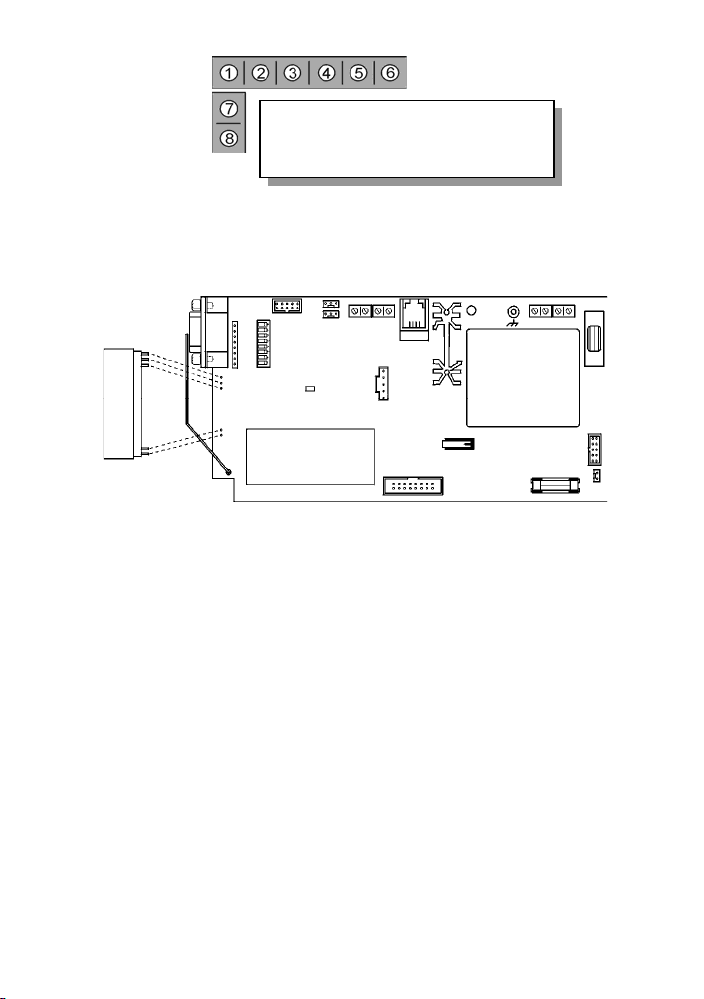
Terminals 1 & 2: External Tamper Input
Terminals 3 & 4: Power Input
Terminals 5 & 6: Siren Output
Terminals 7 & 8: Back Tamper Input
Figure 2: Wiring Connections
5. To support the OS826, the ProGuard800’s Main board must have the onboard transmitter installed. Plug the on-board transmitter into the control
panel’s Main board as shown in Figure 3.
ON-BOARD TX
Figure 3: Plugging in the On-Board Transmitter
Note: Power down the control panel before plugging in the on-board transmitter.
6. On the control panel, define the siren type as “2-Way Siren” as follows:
• From the Programming menu, select Devices, Siren, Ext. Siren Type
[9152].
• Select “2-Way Siren”.
• Define the siren delay
• Enter a siren delay time (00-59 sec).
7. Define the Siren Cut-off as follows:
• From the Programming menu, select Devices, Siren, Cut-Off [9154].
• Enter a siren cut-off time (00:10 - 20:00 minutes).
8. Set the siren to Registration mode by placing the Mode jumper (JP1) as
shown in Figure 4.
OS826 4
Page 6

REGISTRATION MODE
h
TRANSMISSION MODE h
Figure 4: Mode Jumper Configuration
9. Press the Transmitter Delete button on the siren in order to clear the siren’s
register; the siren sounds an acknowledge tone.
10. On the control panel, perform the External Siren Test twice in order to register
the control panel’s transmitter to the OS826’s receiver.
To perform an External Siren Test:
• From the Service menu, select WL. Siren Test [7]; Press 9 for
each transmission. The siren sounds an acknowledge tone when each
transmission is received. When you push 9 for a third time, you will hear a double
acknowledge tone.
Note: During the registration procedure, make certain that no other wireless
devices are transmitting so as not to interfere with registration. In the event
that the wrong transmitter is registered to the siren’s receiver, you can delete
the transmitter by pressing the Transmitter Delete button while the Mode
jumper (JP1) is set to Registration mode and repeat step 10.
11. Register the OS826’s transmitter to the control panel’s receiver.
12. Set the control panel to Registration mode as follows:
• From the Programming menu, select Devices, Siren, 1.WL. SIREN
REG. [915]. On the display you will see TRANSMIT 1
• Set the siren to Transmission mode by placing the Mode jumper (JP1)
as shown in Figure 4; the siren transmits a signal every few seconds.
• When Save? appears on the control panel’s LCD display, press 9 on
the control panel’s keypad.
13. Remove the Mode jumper (JP1) on the siren and place it over one pin for
storage and disconnect the power supply.
14. Configure the Arming Tones jumper (JP2) as required. If the jumper is
removed, the siren sounds tones and flashes the strobe on arm/disarm. If the
jumper is installed, the siren flashes the strobe on arm/disarm but no tones
are sounded.
15. Choose a suitable mounting position for the siren. The siren should be
mounted on a flat surface in a highly visible position for maximum deterrence
against potential intruders.
16. Before permanently mounting the siren, test the reception from the exact
mounting position. If necessary, relocate the siren to a better position.
17. To mount the OS826, place the back cover in position against the wall and
mark the upper and lower mounting holes. Install wall anchors in the
appropriate positions.
5 © MARMITEK
Page 7

18. Thread the cables through the cable entry hole on the back cover and mount
the back cover to the wall using four screws.
19. Connect the transformer to the terminal block and the backup battery to the
battery connector.– see Figure 2 for further information on wiring connections.
20. Replace the metal anti-vandal casing and the strobe cover.
21. Replace the front cover and secure using the cover screw provided. Make
certain that the screw is secured tightly so that it closes the front cover tamper
switch.
TECHNICAL DATA
Frequency: 868.35MHz FM
Antenna: Built-in internal whip
Operating Voltage: 12VDC or 9VAC (nominal)
Current Consumption: 250mA (alarm + strobe)
10mA (standby)
Backup Battery: 7.2V/910mAh NiMH (rechargeable)
Siren Output: 106dB (A) @ 1m
Tamper Protection: Front cover, removal from wall and external power
supply.
Dimensions: 300 x 170 x 75mm
Specifications may be modified without prior notice.
Environmental Information for Customers in the European Union
European Directive 2002/96/EC requires that the equipment bearing this symbol
on the product and/or its packaging must not be disposed of with unsorted
municipal waste. The symbol indicates that this product should be disposed of
separately from regular household waste streams. It is your responsibility to
collection facilities appointed by the government or local authorities. Correct disposal and
recycling will help prevent potential negative consequences to the environment and human
health. For more detailed information about the disposal of your old equipment, please contact
your local authorities, waste disposal service, or the shop where you purchased the product.
dispose of this and other electric and electronic equipment via designated
OS826 6
Page 8
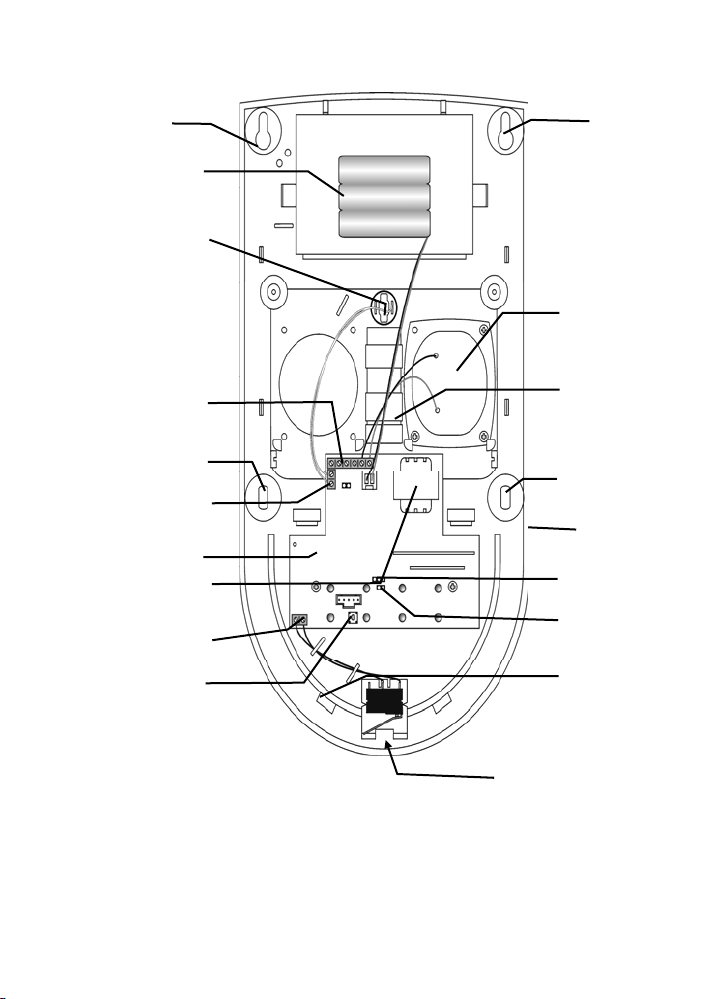
OS826 DRAHTLOSE AUßENSIRENE MIT BLITZGERÄT
r
r
r
r
A
Obere
Montage
bohrung
Backup
Batterie
fach
Hinterer
Sabotageschalte
Haupt- Anschluss-
Kontakte
Hinterer Sabotageschalte
Untere
Montagebohrung
Anschlusskontakt
Externer Sabotage- schalter
Vorderer Sabotageschalte
Sender LED
Jumpe
Anschlusskontakt
Sender
Löschtaste
Abbildung 1: Frontteil entfernt
Obere
Montage
bohrung
Sirene
Kabeldurchführung
Untere
Montagebohrung
Batterieanschluss
Modus Jumper JP1
ktivierungstöne
Jumper (JP2)
FrontkappeSabotageschalter
Befestigungschraube
Frontteil
7 © MARMITEK
Page 9

SICHERHEITSHINWEISE
• Setzen Sie die Komponente Ihres Systems nicht extrem hohen Temperaturen
oder starken Lichtquellen aus.
• Bei einer zweckwidrigen Verwendung, selbst angebrachten Veränderungen oder
selbst ausgeführten Reparaturen verfallen alle Garantiebestimmungen. Marmitek
übernimmt bei einer falschen Verwendung des Produkts oder bei einer anderen
Verwendung des Produktes als für den vorgesehenen Zweck keinerlei Produkthaftung. Marmitek übernimmt für Folgeschäden keine andere Haftung als die
gesetzliche Produkthaftung.
• Dieses Produkt ist kein Spielzeug. Außer Reichweite von Kindern halten.
• Überlassen Sie Reparaturen oder Wartung nur Fachleuten.
• Halten Sie die Batterien außerhalb der Reichweite von Kindern. Liefern Sie die
Batterien als chemischen Kleinabfall ein. Verwenden Sie niemals alte und neue
oder unterschiedliche Typen von Batterien durcheinander. Wenn Sie das System
längere Zeit nicht benutzen, entfernen Sie die Batterien. Achten Sie beim Einlegen
der Batterien auf die Polarität (+/-): Ein falsches Einlegen kann zu
Explosionsgefahr führen.
• Schließen Sie den Netzadapter erst dann an das Stromnetz an, nachdem Sie
überprüft haben, ob die Netzspannung mit dem auf dem Typenschild angegeben
Wert übereinstimmt. Schließen Sie niemals einen Netzadapter an, wenn diese
beschädigt sind. In diesem Fall nehmen Sie Kontakt mit Ihrem Lieferanten auf.
EINFÜHRUNG
Die OS826 ist eine drahtlose Sirene und gehört den Marmitek ProGuard800 Serien
an und arbeitet mit dem ProGuard800 Alarmsystem zusammen. Sie möchten mehr
erfahren über das komplette System, die Möglichkeiten und Einstellungen der
ProGuard800 Serie? Schauen Sie dann in die Installierungsvorschriften oder unter
www.marmitek.com
. Im Falle eines Alarms aktiviert das Control Panel die Sirene
mit Blitzlicht. Die Sirene wird nach Ablauf der im Control Panel programmierten
Alarmzeit ausgeschaltet. Nachdem die Alarmzeit abgelaufen ist, blinkt das Blitzlicht, bis das System deaktiviert wird.
INSTALLATION
WARNUNG: Tragen Sie während der Sireneninstallation Hörschutzmittel.
1. Öffnen sie das Gehäuse, indem Sie die Schraube unten am Gehäuse
entfernen, wonach Sie das Frontteil vom Gehäuse entfernen können.
2. Entfernen Sie die Blitzlichtkappe, indem Sie die Kappe von unten vorsichtig
abheben und von den Halterungen entfernen.
3. Entfernen Sie mithilfe eines Philips Schraubenziehers die zwei Schrauben,
die das vandalismusbeständige Metallgehäuse sichern und entfernen Sie die
Verkleidung an der Rückseite der Sirene.
4. Verbinden Sie einen 12VDC oder 9VAC, 500mA Transformator mit den
Haupt-anschlusskontakten 3 und 4 (Polarität spielt keine Rolle) – sehen Sie
Abbildung 2.
OS826 8
Page 10
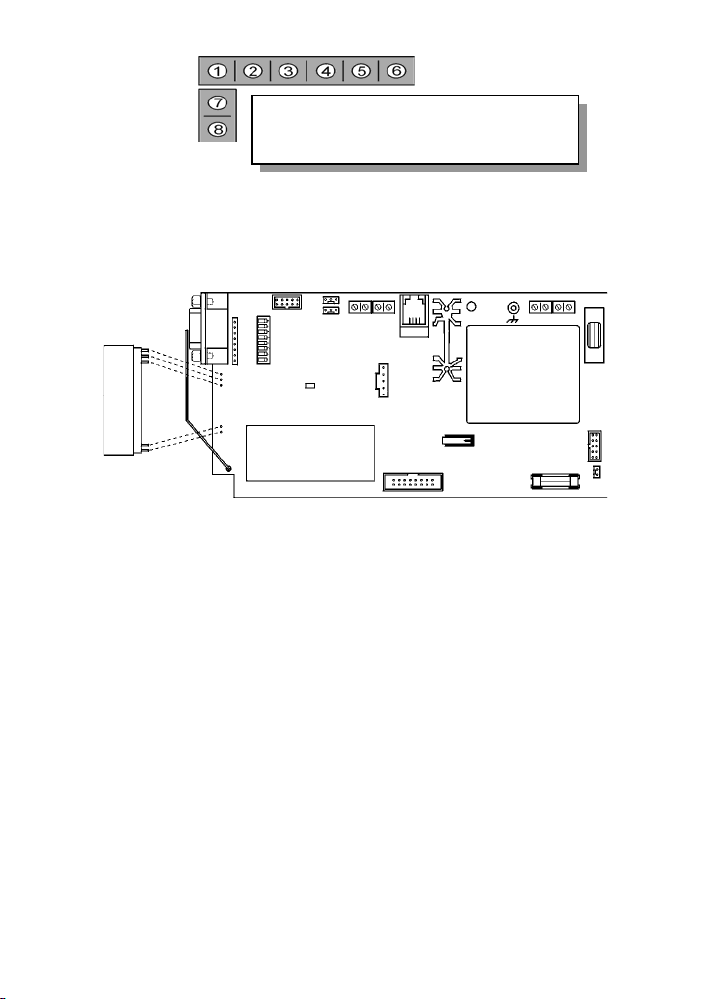
Terminals 1 & 2: Externer Sabotagekontakt Eingang
Terminals 3 & 4: Stromeingang
Terminals 5 & 6: Sirenenausgang
Terminals 7 & 8: Back Tamper Input
Figure 2: Kabelanschlusskontakte
5. Damit die OS826 funktionieren kann muss die ProGuard800 Hauptplatine mit
einem Sender ausgestattet sein. Verbinden Sie den Einbausender mit der
Hauptplatine, wie in Abbildung 3 dargestellt.
ON-BOARD TX
Abbildung 3: Anschließen vom Einbausender
Hinweis: Schalten Sie das Control Panel aus, bevor Sie den Sender anschließen.
6. Definieren Sie die Sirene im Control Panel folgendermaßen als “2-Weg
Sirene”:
• Wählen Sie im Programmierungsmenü Module, Sirene, Ext. Siren
Typ [9152].
• Wählen Sie “2-weg Siren”.
x Definieren Sie die Sirenenverzögerung
x Tippen Sie die gewünschte Sirenenverzögerungszeit ein (00-59
Sek.)
7. Definieren Sie die Sirenendauer folgendermaßen:
• Wählen Sie im Programmierungsmenü Module, Sirene, Sirenen dauer
[9154].
• Geben Sie eine Abschaltezeit der Sirene ein (00:10 - 20:00 Minuten).
8. Stellen Sie die Sirene in den Anmeldemodus, indem Sie den Modus Jumper
(JP1) platzieren wie in Abbildung 4 abgebildet.
9 © MARMITEK
Page 11

ANMELDE MODUS
h
SENDER MODUS h
Abbildung 4: Modus Jumper Einstellung
9. Drücken Sie die Sender Löschtaste um den Sirenenspeicher zu leeren: Der
Sender gibt einen Bestätigungston ab.
10. Führen Sie mit dem Control Panel das Testverfahren externe Sirene zweimal
durch damit der Sender vom Control Panel beim Empfänger von der OS826
Sirene angemeldet wird.
Durchführung Testverfahren externe Sirene:
• Im Servicemenü, wählen Sie Ext Siren Test [7]; Drücken Sie 2 Mal
auf 9 um das Testsignal zweimal zu versenden. Die Sirene gibt jedes Mal einen
Bestätigungston ab wenn das Signal empfangen wurde. Beim dritten Drücken
hören Sie einen doppelten Bestätigungston.
Hinweis: Überzeugen Sie sich, dass während der Anmeldung keine anderen
drahtlosen Geräte senden können und somit die Anmeldung stören. Wenn
ein falscher Sender beim Empfänger von der Sirene angemeldet wurde
können Sie den Sender löschen, indem Sie die Sender Löschtaste drücken,
weil der Modus Jumper (JP1) in Anmeldungsmodus versetzt wurde und
wiederholen Sie Schritt 10.
11. Melden sie den Sender des OS826 an auf den Empfänger der Zentraleinheit.
12. Schalten Sie das Control Panel auf Anmeldungsmodus wie folgt:
• Im Programmiermenü, wählen Sie Module, Sirene, Sir. Einlernen
[915 ]. Im Display sehen Sie Sende 1.
• Schalten Sie die Sirene auf Sendermodus indem Sie den Modus
Jumper (JP1) einstellen wie in Abbildung 4, die Sirene versendet jedes
Mal nach einigen Sekunden ein Signal.
• Wenn Speichern? auf dem Display vom Control Panel gezeigt wird,
drücken Sie 9 auf der Control Panel Tastatur.
13. Entfernen Sie den Modus Jumper (JP1) von der Sirene und drücken Sie den
Jumper auf einen einzigen Anschlusskontakt zur Aufbewahrung und schalten
Sie den Strom ab.
14. Bringen Sie den Jumper für die Aktivierungstöne an (JP2) wie gewünscht. Ist
der Jumper entfernt erklingen Töne und das Blitzlicht blinkt bei
Aktivierung/Deaktivierung. Ist der Jumper angebracht, wird die Sirene das
Blitzlicht blinken lassen, aber keinen Laut von sich geben bei Aktivierung /
Deaktivierung.
OS826 10
Page 12

15. Wählen Sie eine geeignete Montagestelle für die Sirene. Die Sirene soll gut
sichtbar hoch an oder auf einem flachen Untergrund montiert werden, damit
eventuelle Eindringlinge nicht an sie herankommen können.
16. Bevor Sie die Sirene definitiv montieren kontrollieren Sie den Empfang genau
an der Stelle wo die Sirene montiert werden soll. Wenn notwendig suchen Sie
eine bessere Montagstelle.
17. Sie montieren die OS826 indem Sie den Rückteil gegen die Wand halten und
die Montagebohrungen auf der Wand markieren. Bringen Sie dann an den
richtigen Stellen Dübel an.
18. Ziehen Sie die Kabel durch das Kabelloch im Rückteil und montieren Sie
dieses mit vier Schrauben an die Wand.
19. Verbinden Sie den Transformator mit den Hauptanschlusskontakten und die
Batterie mit den Batteriekontakten – sehen Se Abbildung 2 für weitere
Information über die Kabelverbindungen.
20. Bringen Sie das vandalismusbeständige Metallgehäuse und die Blitzlicht-
kappe wieder an.
21. Bringen Sie den Frontteil mit der Befestigungsschraube wieder an. Über-
zeugen Sie sich davon, dass die Schraube fest genug angedreht ist und den
vorderen Sabotagekontakt schließt.
TECHNISCHEN DATEN
Frequenz: 868,35MHz FM
Antenne: Eingebaute flexible Antenne
Speisung: 12VDC oder 9VAC (nominal)
Stromverbrauch: 250mA (Alarm + Blitzlicht)
10mA (standby)
Backup Battery: 7.2V/910mAh NiMH (aufladbar)
Lautstärke Sirene: 106dB(A) @ 1m
Sabotageschutz: Vorderteil, Wandentfernung und externe Speisung.
Abmessungen: 300 x 170 x 75mm
Spezifikationen können ohne vorhergehende Mitteilung geändert werden.
Umweltinformation für Kunden innerhalb der Europäischen Union
Die Europäische Richtlinie 2002/96/EC verlangt, dass technische Ausrüstung, die
direkt am Gerät und/oder an der Verpackung mit diesem Symbol versehen ist
nicht zusammen mit unsortiertem Gemeindeabfall entsorgt werden darf. Das
Symbol weist darauf hin, dass das Produkt von regulärem Haushaltmüll getrennt
elektrische und elektronische Geräte über die dafür zuständigen und von der Regierung oder
örtlichen Behörden dazu bestimmten Sammelstellen zu entsorgen. Ordnungsgemäßes
Entsorgen und Recyceln trägt dazu bei, potentielle negative Folgen für Umwelt und die
menschliche Gesundheit zu vermeiden. Wenn Sie weitere Informationen zur Entsorgung Ihrer
Altgeräte benötigen, wenden Sie sich bitte an die örtlichen Behörden oder städtischen
Entsorgungsdienste oder an den Händler, bei dem Sie das Produkt erworben haben.
entsorgt werden sollte. Es liegt in Ihrer Verantwortung, dieses Gerät und andere
11 © MARMITEK
Page 13

OS826 SIRÈNE SANS FIL EXTERNE AVEC FLASH
r
r
r
A
Trou de
Montage
Supérieu
Bloc Batterie
de Secours
Interrupteur de
Dérangement
Arrière
Bornier
Principal
Bornier Interrupteur de
Dérangement Arrière
Cavalier Interrupteur
Bornier Interrupteur de
Trou de
Montage
Inférieu
Émission DEL
de Dérangement
Externe
Dérangement
Couvercle Frontal
Bouton de
Suppression
de l’Émetteu
Figure 1 : OS826 (couvercle ouvert)
Sirène
Ouverture
Entrée Câble
Connecteur
Batterie
Cavalier Mode
(JP1)
Cavalier
Interrupteur
de
Dérangement
Couvercle
Emplacement Vis
du Couvercle
Trou de
Montage
Supérieur
Trou de Montage
Inférieur
rmement
OS826 12
Page 14

AVERTISSEMENTS DE SECURITE
• Ne pas exposer les composants de votre système à des températures
extrêmement élevées ou à des sources de lumières trop fortes.
• Toute utilisation impropre, toute modification ou réparation effectuée vous-même
annule la garantie. Marmitek n’accepte aucune responsabilité dans le cas d’une
utilisation impropre du produit ou d’une utilisation autre que celle pour laquelle le
produit est destiné. Marmitek n’accepte aucune responsabilité pour dommage
conséquent, autre que la responsabilité civile du fait des produits.
• Ce produit n’est pas un jouet et doit être rangé hors de la portée des enfants.
• Les réparations ou l'entretien ne doivent être effectués que par des personnes
compétentes.
• Tenir les piles hors de portée des enfants. Traiter les piles usagées comme des
petits déchets chimiques. Ne jamais utiliser simultanément des vieilles piles et des
piles neuves, ou des piles de types différents. Enlever les piles lorsque le système
sera mis longtemps hors de service. Respecter la polarité en insérant les piles (+/-)
: une insertion incorrecte peut engendrer un danger d’explosion.
• Brancher l’adaptateur secteur sur le réseau électrique seulement après avoir
vérifié que la tension d’alimentation correspond à la valeur indiquée sur les plaques
d’identification. Ne jamais brancher un adaptateur secteur lorsque celui-ci est
endommagé. Dans ce cas, veuillez contacter votre fournisseur.
INTRODUCTION
Le OS826 sirène sans fil fait partie de la série Marmitek ProGuard800 et fonctionne
avec le système d’alarme ProGuard800. Pour en savoir davantage sur le système
complet, les possibilités et le réglage de la série ProGuard800, voyez les
instructions d’installation sur notre site www.marmitek.com
déclenchement de l’alarme, le panneau de contrôle active la sirène et le
stroboscope. La sirène émet un signal sonore selon les délais réglés dans le
programme d’arrêt du panneau de contrôle. Le stroboscope continue de
fonctionner jusqu’au désarmement du système.
INSTALLATION
Avertissement : il est recommandé de porter un protecteur auditif lors de
l’installation de la sirène.
1. Ouvrir le boîtier en enlevant la vis du couvercle située au bas du boîtier.
Retirez le couvercle frontal de la base.
2. Retirez ensuite le couvercle du stroboscope en le soulevant avec précaution.
Dégagez le couvercle de la base en le retirant des crochets de retenue.
3. À l’aide d’un tournevis à pointe Philips, retirez les deux vis du boîtier de métal
antivandalisme. Retirez le boîtier de la base de la sirène.
4. Branchez un transformateur 500mA, 12VDC ou 9VAC, aux bornes 3 et 4 du
bornier principal (la polarité n’est pas importante) – voir Figure 2.
.Au moment du
13 © MARMITEK
Page 15

Bornes 1 et 2: Entrée interr. dérangement ext.
Bornes 3 et 4: Entrée courant
Bornes 5 et 6: Sortie sirène
Bornes 7 et 8: Entrée interr. dérangement arr.
Figure 2 : Connexions câblage
5. Pour être opérationnel avec le OS826, un émetteur de bord doit être installé
sur la carte principale du ProGuard800. Branchez l’émetteur de bord à la
carte principale du panneau de contrôle tel qu’illustré à la Figure 3.
Émetteur de bord
Figure 3 : Branchement émetteur de bord
Note : coupez le courant du panneau de contrôle avant de procéder au
branchement de l’émetteur de bord.
6. Sur le panneau de contrôle, définir la sirène comme « Sirène bidirectionnelle
» de la façon suivante :
• À partir du menu de programmation, sélectionnez Appareils, Sirène,
Type Sirèn. Ext. [9152].
• Sélectionnez « Sirène bidir. ».
• Définir le délai de la sirène
• Introduire le délai souhaité de la sirène (de 00 à 59 secondes).
7. Définir le temps d’arrêt de la sirène de la façon suivante :
• À partir du menu Programmation, sélectionnez Appareils, Sirène,
Temps Sirène [9154].
• Introduisez le temps d’arrêt souhaité (de 00:10 à 20:00 minutes).
8. Mettre la sirène en mode Enregistrement en positionnant le Cavalier Mode
(JP1) tel qu’illustré à la Figure 4.
OS826 14
Page 16

MODE ENREGISTREMENT
MODE ÉMISSION h
9. Appuyez sur le Bouton de Suppression de l’Émetteur sur la sirène afin de
Figure 4 : Configuration Cavalier Mode
vider le registre de la sirène. La sirène émettra une tonalité de validation.
10. Sur le panneau de contrôle, exécutez le Test Sirène Externe à deux reprises
afin d’enregistrer l’émetteur du panneau de contrôle au récepteur OS826.
Pour exécuter le Test Sirène Externe :
• À partir du menu Service, sélectionnez Test Siren. Rad. [7].
Appuyez 2 fois sur 9 afin d’envoyer 2 fois le signal de Test. La sirène
émettra une tonalité de validation pour chaque émission reçue. La 3
ème
fois que vous appuyez vous entendrez un double signal de validation.
Note : pendant la procédure d’enregistrement, assurez-vous qu’aucun
autre appareil sans fil n’est en mode émission afin de ne pas créer
d’interférences lors du processus d’enregistrement. Dans l’éventualité
d’un enregistrement erroné de l’émetteur, vous pouvez effacer
l’enregistrement fautif en appuyant sur le Bouton de Suppression de
l’Émetteur lorsque le Cavalier Mode (JP1) est configuré en mode
Enregistrement et répétez le point 10.
11. Enregistrer l’émetteur du panneau de contrôle au récepteur OS826
12. Mettre le panneau de contrôle en mode Enregistrement de la façon suivante :
• À partir du menu programmation, sélectionnez Appareils, Sirène,
Enregistre [915 ]. Sur l’écran vous voyez transmission 1.
• Mettre la sirène en mode Émission en positionnant le Cavalier Mode
(JP1) tel qu’illustré à la Figure 4. La sirène transmet un signal à
intervalles rapprochés de quelques secondes.
• Lorsque l’option Enregistrer? apparaît sur l’écran LCD du panneau de
contrôle, appuyez sur la touche 9 du clavier du panneau de contrôle.
13. Retirez le Cavalier Mode (JP1) de la sirène et le remettre en place sur une
seule broche de raccordement pour remisage. Débranchez l’alimentation
électrique.
14. Configurez le Cavalier Armement Tonalités (JP2), tel que requis. Si le cavalier
est retiré, la sirène émet des tonalités et fait clignoter le stroboscope lorsque
sur arm/desarm. Si le cavalier est mis en place, la sirène fait clignoter le
stroboscope lorsque sur arm/désarm., mais aucune tonalité n’est émise.
15. Choisissez un emplacement d’installation adéquat pour la sirène. La sirène
devrait être installée sur une surface plane et avec un maximum de visibilité
afin de dissuader toute éventuelle intrusion.
16. Avant de procéder à l’installation permanente de la sirène, testez la réception
à partir de l’emplacement exact de l’installation. Si nécessaire, repositionnez
la sirène à un endroit plus approprié.
15 © MARMITEK
Page 17

17. Pour installer le OS826, placez la base contre le mur et marquez sur celui-ci
les trous de montage supérieurs et inférieurs. Installez les ancrages muraux
aux positions appropriées.
18. Enfilez les câbles à travers l’Ouverture Entrée Câble de la base et fixez la
base sur le mur à l’aide de quatre vis.
19. Branchez le transformateur au bornier principal puis la batterie de secours au
Connecteur Batterie. – voir la Figure 2 pour des informations supplémentaires
concernant les connexions du câblage.
20. Replacez le boîtier de métal antisabotage et le couvercle du stroboscope.
21. Replacez le couvercle frontal et bien le refermer en utilisant la vis du
couvercle prévue à cet effet. Assurez-vous que la vis soit bien resserrée afin
de refermer l’Interrupteur de Dérangement du Couvercle Frontal.
CARACTÉRISTIQUES TECHNIQUES
Fréquence : 868,35MHz FM
Antenne : interne intégré
Tension de fonctionnement : 12VDC ou 9VAC (nominal)
Consommation : 250mA (alarme + stroboscope)
10mA (repos)
Batterie de secours : 7.2V/910mAh NiMH (rechargeable)
Niveau sonore sirène : 106dB (A) @ 1m
Protection antisabotage : Couvercle frontal, retrait du mur et alalimentation
électrique externe.
Dimensions : 300 x 170 x 75 mm
Spécifications peuvent être modifiées sans préavis.
Informations environnementales pour les clients de l’Union européenne
La directive européenne 2002/96/CE exige que l’équipement sur lequel est
apposé ce symbole sur le produit et/ou son emballage ne soit pas jeté avec les
autres ordures ménagères. Ce symbole indique que le produit doit être éliminé
dans un circuit distinct de celui pour les déchets des ménages. Il est de votre
électronique par les moyens de collecte indiqués par le gouvernement et les pouvoirs publics
des collectivités territoriales. L’élimination et le recyclage en bonne et due forme ont pour but
de lutter contre l’impact néfaste potentiel de ce type de produits sur l’environnement et la santé
publique. Pour plus d’informations sur le mode d’élimination de votre ancien équipement,
veuillez prendre contact avec les pouvoirs publics locaux, le service de traitement des déchets,
ou l’endroit où vous avez acheté le produit.
responsabilité de jeter ce matériel ainsi que tout autre matériel électrique ou
OS826 16
Page 18

OS826 SIRENA EXTERIOR INALÁMBRACA CON DISPARADOR
r
A
A
r
r
r
r
r
A
Agujero de
Montaje
Superio
Baterías de
Respaldo
Interrupto
del Tamper
Posterio
gujero de
Montaje
Superior
Sirena
Bloque de
Distribución
Principal
Agujero de
Montaje Inferio
Bloque Distr.
Tamper Posterio
LED Transmisión
Jumper del
Tamper Exterio
Front Tamper
Terminal Block
Botón Borrar
Transmisor
Figura 1: OS826 (sin tapa)
Localidad Tornillo
de la Tapa
gujero
para Cables
Hole
gujero de
Montaje
Inferior
Conector de
Batería
Jumper de Tonos
de Arrmado (JP2)
Interruptor del
Tamper
Frontal
17 © MARMITEK
Page 19

AVISOS DE SEGURIDAD
• No exponga los componentes del sistema a temperaturas extremamente altas o
a focos de luz fuertes.
• En caso de uso indebido o modificaciones y reparaciones montados por su
mismo, la garantía se caducará. En caso de uso indebido o impropio, Marmitek no
asume ninguna responsabilidad para el producto. Marmitek no asume ninguna
responsabilidad para daños que resultan del uso impropio, excepto según la
responsabilidad para el producto que es determinada por la ley.
• Este producto no es un juguete. Asegúrese de que está fuera del alcance de los
niños.
• Deja las reparaciones o servicios a personal experto.
• Ten cuidado que las pilas se encuentran fuera del alcance de niños. Entrega las
pilas como residuos químicos. Nunca use pilas nuevas y viejas o pilas de tipos
distintos a la vez. Quita las pilas si no usa el sistema durante mucho tiempo.
Cuando pone las pilas, presta atención a la polaridad (+ / -): si no son puestas de
manera justa, puede causar peligro de explosión.
• No conecte el adaptador de red a la red de alumbrado antes de que haya
controlado si la tensión de red corresponde con el valor indicado en la estampa de
tipo. Nunca conecte un adaptador de si ése está dañado. En este caso, por favor
entre en contacto con su proveedor.
INTRODUCCIÓN
La OS826 sirena inalámbrica forma parte de la serie ProGuard800 de Marmitek y
funciona en combinación con el sistema de alarma ProGuard800. ¿Quiere saber
más sobre el sistema completo, las posibilidades y los ajustes de la serie
ProGuard800? Visite www.marmitek.com
En caso de alarma, el panel de control activa la sirena y el estroboscopo. La sirena
suena hasta que el corte de sirena que se programó en el panel de control finalice.
Después de la expiración del corte de sirena, el estroboscopo continúa brillando
hasta que el sistema se desarma.
INSTALACIÓN
ATENCIÓN: Use protectores para los oidos durante la instalación de la
sirena.
1. Para abrir el gabinete quite el tornillo en el fondo del gabinete y deslize la
tapa frontal del gabinete posterior.
2. Retire la tapa del estroboscopo, quitando cuidadosamente el fondo del
estroboscopo de la tapa posterior.
3. Quite los dos tornillos que fijan el gabinete antivandalismo de metal,
utilizando un destornillador de Phillips y retire la tapa posterior de la sirena.
4. Conecte un transformador 12VDC o 9VAC, 500mA con los terminales 3 y 4
en el bloque de distribución de la sirena (la polaridad no importa) – vea Figura
2.
y mire el manual de instalación.
OS826 18
Page 20

Terminales 1 & 2: Entrada Tamper Exterior
Terminales 3 & 4: Entrada Alimentación
Terminales 5 & 6: Salida Sirena
Terminales 7 & 8: Entrada Tamper Posterior
Figura 2: Conexiones de Cableado
5. Para soportar la OS826, el transmisor on-board tiene que instalarse en la
placa principal del ProGuard800. Enclavije el transmisor en la placa principal
del panel de control como viene mostrado en Figura 3.
Nota: Apague el panel de control antes de enclavijar el transmisor on-board.
ON-BOARD TX
Figura 3: Enclavijar el Transmisor On-Board
6. Definición del Tipo de Sirena en el panel de control como Sirena Bidireccional:
• Desde el menú de Programación, seleccione Dispositivos, Sirena,
Tipo Siren. Ext. [9152].
• Seleccione Vias Sirena.
• Define la reducción de la sirena
• Ingrese la reducción de sirena deseada (00-59 sec.)
7. Definición de la duración del Corte de Sirena:
• Desde el menú de Programación, seleccione Dispositivos, Sirena,
Tiempo Sirena [9154].
19 © MARMITEK
Page 21

• Introduzca un tiempo de Corte de Sirena (00:10 - 20:00 minutos).
8. Ponga la sirena en el modo de Registro, colocando el Jumper de Modo (JP1)
como se muestra en Figura 4.
9. Presione el Botón de Borrar Transmisor en la sirena para borrar el registro de
la sirena; la sirena emitirá un tono de confirmación.
10. Realice el Test de Sirena Externa en el panel de control dos veces para
registrar el transmisor del panel de control en el receptor de la OS826.
Para realizar el Test de Sirena Externa:
• Desde el menú de Config. Servicio, seleccione Test Sirena Ext [7];
Pulse 2 veces el botón 9 para enviar la señal dos veces. La sirena emitirá un
tono de confirmación cada vez que recibe una transmisión. Cuando pulse la
tercera vez, escuchará una señal doble de confirmación.
Nota: Asegúrese que ningún otro dispositivo inalámbrico envíe
transmisiones durante el procedimiento de registro para evitar posibles
interferencias. Si se registra un falso transmisor en el receptor, se puede
borrar presionando el Botón de Borrar Transmisor cuando el Jumper de
Modo (JP1) está en modo de Registro y repite paso 10.
11. Registrar el transmisor del panel de control en el receptor de la OS826
12. Para poner el panel de control en el modo de Registro:
13. Retire el Jumper de Modos (JP1) de la sirena y almacénelo sobre uno de los
14. Configure el Jumper de Tonos de Armado (JP2) como requerido. Si el
15. Elija una posición adecuada para montar la sirena. Le aconsejamos montarla
16. Compruebe la recepción de la sirena antes de montarla definitivamente y
17. Para montar la OS826, coloque la tapa posterior contra la pared y marque los
• Desde el menú de Confg. Servicio, seleccione Dispositivos, Sirena,
Regist. Sirena [915]. En la pantalla se ve enviar primera vez.
• Ponga la sirena en el modo de Registro, colocando el Jumper de Modo
(JP1) como viene mostrado en la Figura 4; la sirena transmitirá una señal
cada pocos segundos.
• Cuando aparezca Guardar? en el display del panel de control, presione 9
en el teclado del panel de control.
pines. Desconecte la electricidad.
Jumper se ha retirado, la sirena emitirá tonos y el estroboscopo brillará al
armar/desarmar. Si el Jumper está instalado, el estroboscopo brillará al
armar/desarmar, pero la sirena no emitirá tonos.
en una superficie plana y en una posición bien visible para garantizar un
efecto disuasivo en potenciales intrusos.
desplácela en caso de una mala recepción.
agujeros de montaje superiores e inferiores. Instale las clavijas en las
posiciones adecuadas.
OS826 20
Page 22

18. Conduzca los cables por el agujero para los cables en la tapa posterior y fije
la tapa posterior en la pared utilizando cuatro tornillos.
19. Conecte el transformador al bloque de distribución y las baterías de respaldo
al conector de baterías – para información más detallada sobre Conexiones
de Cableado, vea Figura 2.
20. Recoloque el gabinete antivandalismo de metal y la tapa del estroboscopo.
21. Recoloque la tapa frontal consolidándola con el tornillo incluido en el set.
Asegúrese que el tornillo está atornillado firmemente, de manera que cierre el
interruptor del tamper frontal.
ESPECIFICACIONES TÉCNICAS
Frecuencia: 868.35MHz FM
Antena: Integrada
Voltaje de operación: 12VDC o 9VAC (nominal)
Consumo eléctrico: 250mA (alarma + estroboscopo)
10mA (standby)
Batería de respaldo: 7.2V/910mAh NiMH (recargable)
Salida de sirena: 106dB(A) @ 1m
Protección del tamper: tapa frontal, protección contra desmontaje.
Dimensiones: 300 x 170 x 75m
Las especificaciones pueden modificarse sin previo aviso.
Información medioambiental para clientes de la Unión Europea
La Directiva 2002/96/CE de la UE exige que los equipos que lleven este símbolo
en el propio aparato y/o en su embalaje no deben eliminarse junto con otros
residuos urbanos no seleccionados. El símbolo indica que el producto en
cuestión debe separarse de los residuos domésticos convencionales con vistas a
su eliminación. Es responsabilidad suya desechar este y cualesquiera otros
aparatos eléctricos y electrónicos a través de los puntos de recogida que ponen a su
disposición el gobierno y las autoridades locales. Al desechar y reciclar correctamente estos
aparatos estará contribuyendo a evitar posibles consecuencias negativas para el medio
ambiente y la salud de las personas. Si desea obtener información más detallada sobre la
eliminación segura de su aparato usado, consulte a las autoridades locales, al servicio de
recogida y eliminación de residuos de su zona o pregunte en la tienda donde adquirió el
producto.
21 © MARMITEK
Page 23

OS826 SIRENA ESTERNA SENZA FILI CON FLASH
Foro di
Foro di
montaggio
montaggio
superiore
superiore
Pacco
Pacco
batteria
batteria
di riserva
di riserva
Interruttore
Interruttore
antimanomissione
antimanomissione
posteriore
posteriore
Morsettiera
Morsettiera
principale
principale
Foro di
Foro di
montaggio
montaggio
inferiore
inferiore
Antimanomissione
Antimanomissione
posteriore morsettiera
posteriore morsettiera
LED di
LED di
trasmissione
trasmissione
Ponticello
antimanomissione esterno
antimanomissione esterno
Ponticello
Antimanomissione
Antimanomissione
anteriore morsettiera
anteriore morsettiera
Pulsante
Pulsante
cancellazione
cancellazione
trasmettitore
trasmettitore
Button
Button
Foro di
Foro di
montaggio
montaggio
superiore
superiore
Sirena
Sirena
Foro di entrata
Foro di entrata
cavi
cavi
Foro di montaggio
Foro di montaggio
inferiore
inferiore
Connettore batteria
Connettore batteria
Ponticello di
Ponticello di
modo (JP1)
modo (JP1)
Interruttore
Interruttore
antimanomessione
antimanomessione
copertura anteriore
copertura anteriore
Posizione della
Posizione della
vita di copertura
vita di copertura
Figura 1: OS826
Figura 1: OS826
(senza copertura)
(senza copertura)
OS826 22
Page 24

PRECAUZIONI DI SICUREZZA
• Non esporre i componenti del sistema a temperature eccessivamente alte o a
fonti intense di luce.
• In caso di utilizzo scorretto, di riparazioni o modifiche apportate personalmente
decade qualsiasi garanzia. Marmitek declina ogni responsabilità per i danni
derivanti da un utilizzo non appropriato del prodotto o da utilizzo diverso da quello
per cui il prodotto è stato creato. Marmitek declina ogni responsabilità per danni
consequenziali ad eccezione della responsabilità civile sui prodotti.
• Questo prodotto non è un giocattolo: tenerlo lontano dalla portata dei bambini.
• Lasciare fare riparazioni o modifiche esclusivamente a personale esperto.
• Batterie: conservare le batterie fuori dalla portata dei bambini. Consegnare le
batterie agli appositi centri per lo smaltimento. Non utilizzare mai in combinazione
batterie nuove e vecchie o di tipo diverso. Togliere le batterie quando l’apparecchio
non viene utilizzato per un lungo periodo di tempo. Inserire correttamente le
batterie prestando attenzione alla polarità (+ / -): un errato posizionamento delle
batterie può provocare una esplosione.
• Collegare l’alimentatore alla presa di corrente solamente dopo avere controllato
che la tensione della rete elettrica corrisponda alle indicazioni riportate sulla
targhetta. Non utilizzare mai un alimentatore danneggiato. In tal caso rivolgersi al
proprio rivenditore.
INTRODUZIONE
Il dispositivo OS826 sirena senza fili fa parte della serie Marmitek ProGuard800 e
può essere usato in combinazione con il sistema di allarme ProGuard800. Se
volete ulteriori informazioni sul sistema completo, le possibilità e le impostazioni
della serie ProGuard800, vi rinviamo al manuale di installazione o a
www.marmitek.com
In caso di un allarme il pannello di comando attiva la sirena e la luce strobocopica.
La sirena è suonata fino al momento di arresto della sirena programmato sul
pannello di comando. Dopo l’arresto della sirena, la luce strobocopica continua a
lampeggiare finché il sistema è disarmato.
INSTALLAZIONE
AVVISO: portare della protezione uditiva durante l’installazione della sirena.
1. Aprire l’alloggio: rimuovere la vite dell’alloggio presso il fondo dell’alloggio e
sollevare la copertura anteriore dalla parte posteriore.
2. Rimuovere la copertura della luce strobocopica: sollevare con prudenza il
fondo della copertura luce strobocopica dalla parte posteriore e rimuoverlo dai
ganci della copertura luce strobocopica.
3. Rimuovere le due viti che fissano l’allaggio metallico antivandalo con un
cacciavite Phillips, e sollevare l’alloggio dalla parte posteriore della sirena.
4. Collegare un trasformatore da 12Vc.c. o 9Vc.a, 500mA, ai morsetti 3 e 4 sulla
morsettiera sirena (polarità non è importante) – vedere la figura 2.
.
23 © MARMITEK
Page 25

Morsetti 1 & 2: Ingresso antimanom. esterno
Morsetti 3 & 4: Ingresso alimentazione
Morsetti 5 & 6: Uscita sirena
Morsetti 7 & 8: Ingresso antiman. posteriore
Figura 2: Collegamenti fili
5. Per supportare l’ OS826, il circuito principale del ProGuard800 deve avere il
trasmettitore a bordo. Collegare il trasmettitore a bordo al circuito principale
del pannello di comando, come indicato nella figura 3.
Nota: prima di collegare il trasmettitore a bordo, scollegare l’alimentazione
dal pannello di comando.
ON-BOARD TX
Figura 3: Collegamento del trasmettitore a bordo
6. Sul pannello di comando, definire il tipo di sirena “Sirena-a-2-vie” come
segue:
x Nel menu di programmazione, selezionare Prog Disposit, Sirena, Tipo
Sirena Ra [9152].
x Selezionare “CH Sirena”.
x Definire il ritardo della sirena.
x Introdurre il ritardo desiderato della sirena (00-59 sec).
7. Definire la durata sirena come segue:
x Nel menu di programmazione, selezionare Dispositivi, Sirena, Siren
cut off [9154].
x Introdurre un tempo di durata sirena (00:10 - 20:00 minuti).
8. Impostare la sirena nel modo di registrazione collocando il ponticello di modo
(JP1) come indicato nella figura 4.
OS826 24
Page 26

MODO REGISTRAZIONE
MODO TRANSMISSIONE
Figura 4: configurazione ponticello di modo
9. Premere il pulsante “cancellazione trasmettitore” sulla sirena per vuotare la
memoria della sirena. La sirena suona un tono di conferma.
10. Eseguire due volte il collaudo sirena esterna, sul pannello di comando, per
registrare il trasmettitore del pannello di comando sul ricevitore dell’OS826.
Per eseguire un collaudo sirena esterna:
x Nel menu di assistenza, selezionare Test Sirena WL. [7]; premere 9
per ogni trasmissione. La sirena suona un tono di conferma dopo il
ricevimento di ogni segnale. Quando si preme 9 per la terza volta, suonerà
un doppio tono di conferma.
Nota: durante la procedura di registrazione, assicurarsi che altri
dispositivi senza fili non trasmettano di modo che non interferiranno con
la registrazione. Se è stato registrato il trasmettitore sbagliato sul
ricevitore della sirena, si può cancellare il trasmettitore premendo il
pulsante “cancellazione trasmettitore”, mentre il ponticello di modo (JP1)
è impostato al modo di registrazione. Poi si deve ripetere il punto 10.
11. Registrare il trasmettitore dell’OS826 sul ricevitore del pannello di comando.
12. Impostare il pannello di comando nel modo di registrazione come segue:
x Nel menu di programmazione, selezionare Prog Disposit, Sirena, Reg. Sir.
rad [915]. Sul display apparisce Trasmissione 1.
x Impostare la sirena nel modo di trasmissione collocando il ponticello di modo
(JP1) come indicato nella figura 4; la sirena trasmette un segnale ad intervalli
di pochi secondi.
x Quando apparisce Salva? sul display del pannello di comando, premere 9
sul tastierino del pannello di comando.
13. Rimuovere il ponticello di modo (JP1) dalla sirena e collocarlo sopra un perno
per immagazzinamento e scollegare l’alimentazione.
14. Configurare il ponticello per Segnali Allarme (JP2) come richiesto. Se il
ponticello è stato rimosso, la sirena suonerà toni e lampeggierà quando è
attivata/disattivata. Se il ponticello è stato installato, la sirena lampeggierà
quando è attivata/disattivata, ma non suonerà dei toni.
15. Scegliere un’apposita posizione di montaggio per la sirena, che deve essere
montata su una superficie piana in una posizione molto visibile per il massimo
effetto.
16. Prima del montaggio definitivo della sirena, collaudare la ricezione dall’esatta
posizione di montaggio. All’occorrenza, cambiare la posizione di montaggio.
25 © MARMITEK
Page 27

17. Per il montaggio dell’OS826 collocare la copertura posteriore nell’apposita
posizione contro la parete e contrassegnare i fori di montaggio superiori ed
inferiori. Mettere i tasselli nei fori di perforazione.
18. Infilare i cavi attraverso il foro di entrata cavi nella copertura posteriore e
montare la copertura posteriore sulla parete tramite quattro viti.
19. Collegare il trasformatore alla morsettiera e la batteria di riserva al connettore
batteria. – vedere la figura 2 per ulteriori informazioni sui collegamenti dei
cavi.
20. Ricollocare l’alloggio metallico antivandalo e la copertura della luce strobo-
copica.
21. Ricollocare la copertura anteriore ed assicurare tramite la vite di copertura
fornita. Assicurarsi che la vite sia avvitata strettamente cosicché chiuderà
l’interruttore antimanomissione copertura anteriore.
CARATTERISTICHE TECNICHE
Frequenza: 868,35MHz FM
Antenna: antenna telescopica interna integrata
Tensione di esercizio: 12Vc.c. o 9Vc.a (nominale)
Assorbimento di corrente: 250mA (allarme + luce strobocopica)
10mA (stand-by)
Batteria di riserva: 7.2V/910mAh NiMH (ricaricabile)
Uscita sirena: 106dB(A) @ 1m
Protezione antimanomissione: copertura anteriore, rimozione dalla parete
e dall’alimentazione esterna.
Dimensioni: 300 x 170 x 75 mm
Le specifiche possono essere soggette a modifiche senza preavviso.
Informazioni relative all’ambiente per i clienti residenti nell’Unione Europea
La direttiva europea 2002/96/EC richiede che le apparecchiature contrassegnate
con questo simbolo sul prodotto e/o sull’imballaggio non siano smaltite insieme ai
rifi uti urbani non differenziati. Il simbolo indica che questo prodotto non deve
essere smaltito insieme ai normali rifi uti domestici. È responsabilità del
elettroniche mediante le specifi che strutture di raccolta indicate dal governo o dagli enti
pubblici locali. Il corretto smaltimento ed il riciclaggio aiuteranno a prevenire conseguenze
potenzialmente negative per l’ambiente e per la salute dell’essere umano. Per ricevere
informazioni più dettagliate circa lo smaltimento delle vecchie apparecchiature in Vostro
possesso, Vi invitiamo a contattare gli enti pubblici di competenza, il servizio di smaltimento rifi
uti o il negozio nel quale avete acquistato il prodotto.
proprietario smaltire sia questi prodotti sia le altre apparecchiature elettriche ed
OS826 26
Page 28

r
r
r
A
OS826 DRAADLOZE BUITENSIRENE MET FLITSER
Bovenste
montage
gat
Backup
Batterij
Sabotage
contact
Bovenste
montage
gat
Sirene
Hoofdaansluitingen
Sabotage contact voo
blok
Onderste
montage gat
Aansluiting voor
Sabotage
contact achte
Transmissie
LED
Externe
Sabotage Jumpe
Aansluiting voor
Zender
verwijder toets
Figuur 1: OS826 (zonder cover)
Locatie van de
cover schroef
27 © MARMITEK
Kabel gat
Onderste
montage gat
Batterij
aansluiting
Mode Jumper
(JP1)
larm
signalen
Jumper
(JP2)
Sabotage
contact
voorzijde
Page 29

VEILIGHEIDSWAARSCHUWINGEN
• Stel de componenten van uw systeem niet bloot aan extreem hoge temperaturen
of sterke lichtbronnen.
• Bij oneigenlijk gebruik, zelf aangebrachte veranderingen of reparaties, komen alle
garantiebepalingen te vervallen. Marmitek aanvaardt geen productaansprakelijkheid bij onjuist gebruik van het product of door gebruik anders dan waarvoor het
product is bestemd. Marmitek aanvaardt geen aansprakelijkheid voor volgschade
anders dan de wettelijke productaansprakelijkheid.
• Dit product is geen speelgoed. Buiten bereik van kinderen houden.
• Laat reparatie of service alleen over aan deskundig personeel.
• Houd batterijen buiten bereik van kinderen. Lever batterijen in als klein chemisch
afval. Gebruik nooit oude en nieuwe batterijen of verschillende typen batterijen
door elkaar. Verwijder de batterijen wanneer u het systeem langere tijd niet
gebruikt. Let bij het inleggen van de batterijen op de polariteit (+ / -): verkeerd
inleggen kan explosiegevaar opleveren.
• Sluit de voedingsadapter pas op het lichtnet aan nadat u hebt gecontroleerd of de
netspanning overeenkomt met de waarde die op de typeplaatjes is aangegeven.
Sluit een voedingsadapter nooit aan wanneer deze beschadigd is. Neem in dat
geval contact op met uw leverancier.
INTRODUCTIE
De OS826 draadloze sirene, maakt onderdeel uit van de Marmitek ProGuard800
series en werkt samen met het ProGuard800 alarmsysteem. Wilt u meer weten
over het complete systeem, de mogelijkheden en instellingen van de ProGuard800
serie, kijkt u dan in de installatiehandleiding of op www.marmitek.com
Wanneer er een alarmmelding plaatsvindt, activeert de centrale unit de sirene en
de flitser. De sirene blijft afgaan tot het einde van de ingestelde sirenetijd.
Vervolgens blijft de stroboscoop flitsen tot het alarm is uitgeschakeld.
INSTALLATIE
LET OP: Draag gehoorbeschermers tijdens installatie!
1. Open de behuizing. Dit doet u door de schroef van de afdekkap aan de onderkant van de behuizing te verwijderen. Til de afdekkap van de achterplaat af.
2. Verwijder de flitser lens. U doet dit door de lens voorzichtig op te tillen en uit
de klikgaten te nemen.
3. Gebruik een kruiskopschroevendraaier om de twee schroeven te verwijderen
die de metalen vandaal bestendige kap vasthouden. Verwijder deze van de
achterplaat.
4. Sluit een 12VDC of 9VAC, 500mA voedingsadapter aan op terminal 3 en 4
van het aansluitingsblok van de sirene (polariteit is niet van belang) – zie
Figuur 2.
.
OS826 28
Page 30

Aansluiting 1 & 2: extern sabotage contact ingang
Aansluiting 3 & 4: Voeding ingang
Aansluiting 5 & 6: Sirene uitgang Aansluiting 7 & 8:
Sabotage contact achter ingang
Figuur 2: bedrade aansluitingen
5. Om de OS826 te laten werken, dient de centrale unit van de ProGuard800
voorzien te zijn van een zender unit. Plaats de zender in de centrale unit zoals
aangegeven in figuur 3.
Let op: zorg ervoor dat er geen spanning staat op de centrale unit
tijdens het installeren van de zender.
ON-BOARD TX
6. Definieer de sirene op de centrale unit als tweeweg sirene:
x Selecteer in het programmeringmenu, Componenten, Sirene, EX
Sirene Type [9152].
x Selecteer “2-Weg Comm.”.
x Definieer de Sirene vertraging
x Toets de gewenste sirene vertraging in (00-59 sec)
7. Definieer de Sirene duur als volgt:
x Selecteer in het programmeringmenu, Componenten, Sirene, Sirene
duur [9154].
x Toets de gewenste sirene duur in (00:10 - 20:00).
8. Zet de sirene in Registratiemode door de Mode jumper (JP1) te plaatsen
zoals in figuur 4.
29 © MARMITEK
Page 31

REGISTRATIE MODE
h
VERZEND MODE h
Figuur 4: Mode Jumper Configuratie
9. Druk op de “Zender verwijder toets” van de sirene om het geheugen van de
sirene te wissen. De sirene laat een toon horen ter bevestiging.
10. Voer de externe sirene test tweemaal uit op de centrale unit, om de zender
van de centrale unit te registreren op de ontvanger van de OS826.
Om de externe sirene test uit te voeren:
x Selecteer in het Service menu, Test Sirene EX [7]; Druk 2 maal op 9 om
het test signaal 2 maal te versturen. De sirene laat een toon horen ter
bevestiging van ieder ontvangen signaal. Bij de derde keer drukken hoort u
een dubbel bevestigings signaal.
Let op: zorg ervoor dat er geen signalen worden verzonden door andere
draadloze sensoren, die de registratie van de sirene kunnen beïnvloeden.
Wanneer een foutieve zender wordt geregistreerd op de ontvanger van de
sirene, verwijder deze dan door de ‘zender verwijder toets’ in te drukken
terwijl de mode jumper (JP1) op registratie mode staat en herhaal punt
10.
11. Registreer de zender van de OS826 op de ontvanger van de centrale unit.
12. Om de centrale unit in registratiemode te zetten:
x Selecteer Componenten, Sirene, Externe Sirene Type [915] in het
programmeringmenu. Op het display ziet u 1
E
keer zenden.
x Zet de sirene in verzend mode door de mode jumper (JP1) te plaatsen als in
figuur 4; de sirene verstuurt nu iedere paar seconden een signaal.
x Wanneer Opslaan? op de display verschijnt, druk dan op 9 op het toetsen-
bord van de centrale unit.
13. Verwijder de Mode jumper (JP1) en plaats deze over één van de pinnen voor
opslag en haal de stroom van de sirene.
14. Plaats de Alarm Signalen Jumper (JP2) in de gewenste stand. Als de jumper
verwijderd is, dan zal de sirene bij het in- en uitschakelen van het systeem
zowel visueel als auditief actief zijn. Als de jumper is geïnstalleerd, dan komt
het geluid te vervallen en zal alleen de flitser oplichten.
15. Kies een geschikte plaats voor montage van de sirene. De sirene dient op
een vlakke ondergrond gemonteerd te worden. Voor optimaal effect adviseren
wij u deze op een goed zichtbare plaats te monteren.
16. Test alvorens u de sirene definitief monteert het functioneren en het bereik op
deze positie. Wijzig indien nodig de locatie van de sirene.
17. Monteer de OS826, plaats de achterplaat van de sirene tegen de muur en
teken de montagegaten af op de muur. Plaats de pluggen in de boorgaten.
OS826 30
Page 32

18. Trek de voedingskabel door het kabelgat in de achterplaat van de sirene en
plaats de kap terug op de achterplaat. Bevestig deze met de 4 schroeven.
19. Sluit de voedingsadapter aan op het aansluitingsblok en sluit de back-up
batterij aan. – zie Figuur 2 voor verdere informatie over de draad
aansluitingen.
20. Plaats de metalen vandaal bestendige kap en de flitser lens terug op hun
plaats.
21. Plaats de afdekkap terug en schroef deze vast met de meegeleverde schroef.
Zorg dat de schroef goed vast zit zodat hij de sabotageschakelaar afsluit.
TECHNISCHE GEGEVENS
Frequentie: 868,35 MHz FM
Antenne: Ingebouwde Antenne
Voeding: 12VDC of 9VAC (nominaal)
Stroomverbruik: 250mA (alarm + stroboscoop)
10mA (stand-by)
Back-up Batterij: 7.2V/910mAh NiMH (oplaadbaar)
Sirene Output: 106dB(A) @ 1m
Sabotage bescherming: verwijderen afdekplaat, verwijderen van muur en
stroomonderbreking.
Afmetingen: 300 x 170 x 75mm
Specificaties kunnen wijzigen zonder voorafgaande melding hiervan.
landelijke of plaatselijke overheid aangewezen inzamelingskanalen. De juiste vernietiging en
recycling van deze apparatuur voorkomt mogelijke negatieve gevolgen voor het milieu en de
gezondheid. Voor meer informatie over het vernietigen van uw oude apparatuur neemt u
contact op met de plaatselijke autoriteiten of afvalverwerkingsdienst, of met de winkel waar u
het product hebt aangeschaft.
Milieu-informatie voor klanten in de Europese Unie
De Europese Richtlijn 2002/96/EC schrijft voor dat apparatuur die is voorzien van
dit symbool op het product of de verpakking, niet mag worden ingezameld met
niet-gescheiden huishoudelijk afval. Dit symbool geeft aan dat het product apart
moet worden ingezameld. U bent zelf verantwoordelijk voor de vernietiging van
deze en andere elektrische en elektronische apparatuur via de daarvoor door de
31 © MARMITEK
Page 33

Hereby, Marmitek BV, declares that this OS826 is in compliance with the essential
Directive 1999/5/EC of the European Parliament and of the Council of 9 March 1999
on radio equipment and telecommunications terminal equipment and the mutual
DECLARATION OF CONFORMITY
requirements and other relevant provisions of the following Directives:
recognition of their conformity
Council Directive 89/336/EEC of 3 May 1989 on the approximation of the laws of the
Hiermit erklärt Marmitek BV die Übereinstimmung des Gerätes OS826 den grundlegenden
Richtlinie 1999/5/EG des Europäischen Parlaments und des Rates vom 9. März 1999
über Funkanlagen und Telekommunikationsendeinrichtungen und die gegenseitige
Rechtsvorschriften der Mitgliedstaaten über die elektromagnetische Verträglichkeit
Par la présente Marmitek BV déclare que l'appareil OS826 est conforme aux exigences
Directive 89/336/CEE du Conseil du 3 mai 1989 concernant le rapprochement des
législations des États membres relatives à la compatibilité électromagnétique
Directiva 1999/5/CE del Parlamento Europeo y del Consejo, de 9 de marzo de 1999,
sobre equipos radioeléctricos y equipos terminales de telecomunicación y
Directiva 89/336/CEE del Consejo de 3 de mayo de 1989 sobre la aproximación de
Member States relating to electromagnetic compatibility
Anforderungen und den anderen relevanten Festlegungen der Richtliniën:
Anerkennung ihrer Konformität
Richtlinie 89/336/EWG des Rates vom 3. Mai 1989 zur Angleichung der
essentielles et aux autres dispositions pertinentes de la directives:
Directive 1999/5/CE du Parlement européen et du Conseil, du 9 mars 1999,
concernant les équipements hertziens et les équipements terminaux de
télécommunications et la reconnaissance mutuelle de leur conformité
Marmitek BV declara que este OS826 cumple con las exigencias
esenciales y con las demás reglas relevantes de la directriz:
reconocimiento mutuo de su conformidad
las legislaciones de los Estados Miembros relativas a la compatibilidad
electromagnética
OS826 32
Page 34

Con ciò, Marmitek BV, dichiara che il OS826 è conforme ai requisiti essenziali ed altre
Direttiva 1999/5/CE del Parlamento europeo e del Consiglio, del 9 marzo 1999,
riguardante le apparecchiature radio e le apparecchiature terminali di
telecomunicazione e il reciproco riconoscimento della loro conformità
Direttiva 89/336/CEE del Consiglio del 3 maggio 1989 per il ravvicinamento delle
legislazioni degli Stati Membri relative alla compatibilità elettromagnetica
Bij deze verklaart Marmitek BV, dat deze OS826 voldoet aan de essentiële eisen en aan
Richtlijn 1999/5/EG van het Europees Parlement en de Raad van 9 maart 1999
betreffende radioapparatuur en telecommunicatie-eindapparatuur en de wederzijdse
Richtlijn 89/336/EEG van de Raad van 3 mei 1989 betreffende de onderlinge
aanpassing van de wetgevingen van de Lid-Staten inzake elektromagnetische
MARMITEK BV - P.O. BOX 4257 - 5604 EG EINDHOVEN – NETHERLANDS
disposizioni relative alla Direttiva :
de
overige relevante bepalingen van Richtlijnen:
erkenning van hun conformiteit
compatibiliteit
868.35MHz is not intended for use in BG, GR, PL & SI.
Copyrights
Marmitek is a trademark of Marmidenko B.V. OS826 is a trademark of
Marmitek B.V. All rights reserved.
Copyright and all other proprietary rights in the content (including but not
limited to model numbers, software, audio, video, text and photographs) rests
with Marmitek B.V. Any use of the Content, but without limitation, distribution,
reproduction, modification, display or transmission without the prior written
consent of Marmitek is strictly prohibited. All copyright and other proprietary
notices shall be retained on all reproductions.
33 © MARMITEK
Page 35

OS826 34
Page 36

ZI0513A
 Loading...