

Marmitek Mobile SMS Guard 300 Owner's Manual
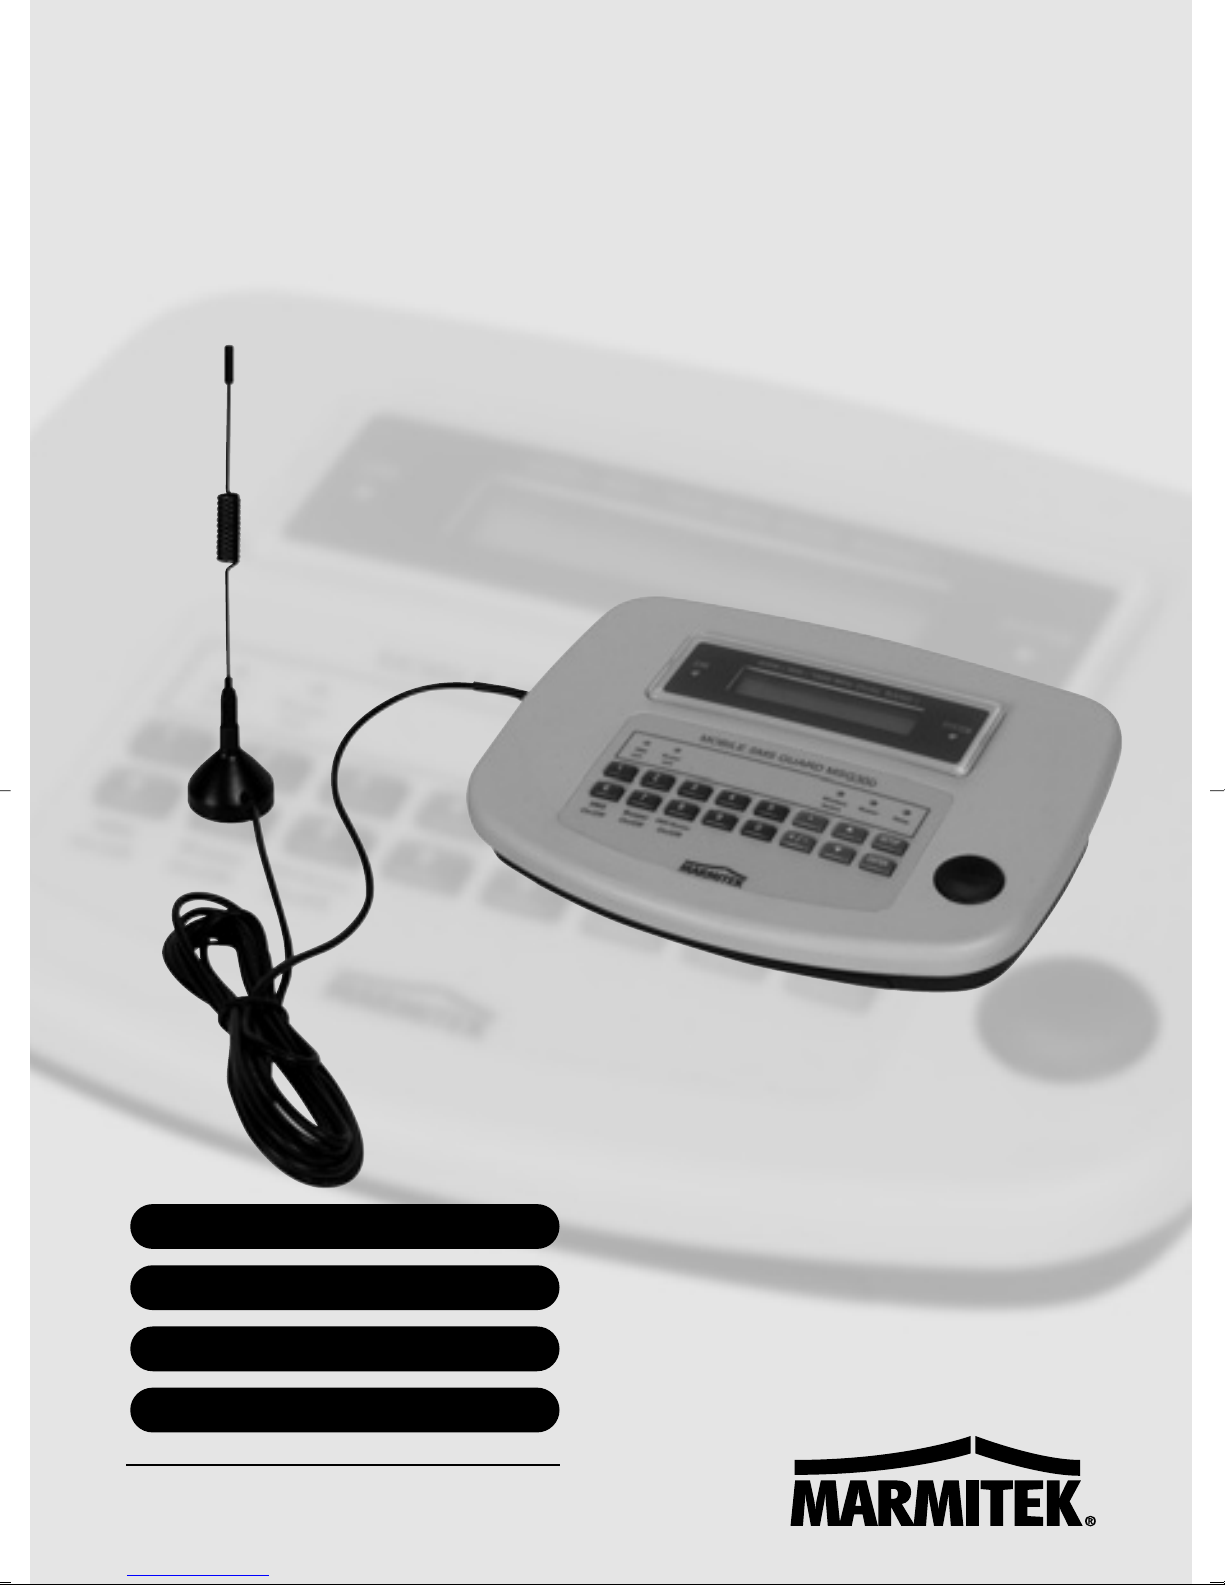
MOBILE
MOBILE
SMS GUARD 300
tm
SMS GUARD 300
OWNER’S MANUAL 3
BETRIEBSANLEITUNG 15
MODE D’EMPLOI 27
GEBRUIKSAANWIJZING 39
20112/121005
© ALL RIGHTS RESERVED MARMITEK ®

2 MARMITEK

SAFETY WARNINGS
• The wiring of your electrical installation is live (230 V) and extremely dangerous. Never
connect the module when plugged into the mains. Always turn off the mains switch
before starting the installation.
• To prevent short circuits, this product should only be used inside and only in dry spaces.
Do not expose the components to rain or moisture. Do not use the product close to a
bath, swimming pool etc.
• Do not expose the components of your systems to extremely high temperatures or bright
light sources.
• In case of improper usage or if you have opened, altered and repaired the product
yourself, all guarantees expire. Marmitek does not accept responsibility in the case of
improper usage of the product or when the product is used for purposes other than
specified. Marmitek does not accept responsibility for additional damage other than
covered by the legal product responsibility.
• Adapters: Only connect the adapter to the mains after checking whether the mains
voltage is the same as the values on the identification tags. Never connect an adapter
or power cord when it is damaged. In that case, contact your supplier.
• Batteries: keep batteries out of the reach of children. Dispose of batteries as chemical
waste. Never use old and new batteries or different types of batteries together. Remove
the batteries when you are not using the system for a longer period of time. Check the
polarity (+/-) of the batteries when inserting them in the product. Wrong positioning can
cause an explosion.
ENGLISH
Introduction
Congratulations on buying the Marmitek Mobile SMS Guard 300! You can now easily secure
your (holiday) home, caravan or other object. The Marmitek Mobile SMS Guard 300 immediately warns you in case of danger, by sending a text message to the mobile phone number
entered. You are no longer dependant on a land line.
Set content
• 1 Marmitek Mobile SMS Guard 300 module
• 1 antenna
• 1 adapter
• 2 door/window sensors WDS300 with accessories
• 1 (wired) siren B300
• user manual (4 languages)
Requirements for installation
• 1 SIM card (pre-paid) with phone number, PIN and PUK
• mains voltage where you want to install the Marmitek Mobile SMS Guard 300 module
• a mobile phone to test your Mobile SMS Guard 300 and SIM card to unlock the PIN
• screwdriver and/or drill to place the module and/or sensors on the wall, if necessary
3MOBILE SMS GUARD 300
2. Installation
The standard Marmitek Mobile SMS Guard 300 consists of a Mobile SMS Guard 300 module
and two door/window sensors. Connect the door/window sensors (using tape or a screw) to
the frame. The magnetic sensor can be placed on the window or door, at exactly the same
height as the sensor on the frame (the alignment has to be totally accurate for it to work!).
Unlock the SIM card with a mobile phone and place the card in the Mobile SMS Guard 300.
Follow the instructions for installation on the display to secure your home. You can use as
many door/window sensors as you want. These sensors are available separately.
As soon as the alarm goes off, the sensor contacts the Mobile SMS Guard 300, which sends a
text message to the phone number you entered. If you have connected a siren, this will also
be activated in case of an alarm. The Marmitek Mobile SMS Guard 300 has a built-in relay.
This offers you the opportunity to connect e.g. a lamp which will be turned on when the
alarm is triggered.
Attention:
Mobile SMS Guard 300 exits the Setup mode after about 20 seconds, which means that you
lose any settings you already entered. Make sure you know what all the buttons do first.
Step 1 Testing the SIM card and unlocking the PIN
• Unlock the PIN of the SIM card (of a provider of your choice) by placing it in a mobile
phone. Read the user manual of your mobile phone for information about unlocking
your SIM card.
• Use your mobile to check whether you can send and receive text messages (SMS) with
the SIM card.
• Use your mobile to check whether the range of the SIM card is sufficient at the place
where you want to place the Mobile SMS Guard 300 module (e.g. in a cupboard).
Attention
unlocked.
Step 2 Installing the SIM card
We advise you to read this entire user manual before starting the installation. The
: To be able to use the Marmitek Mobile SMS Guard 300, the SIM card needs to be
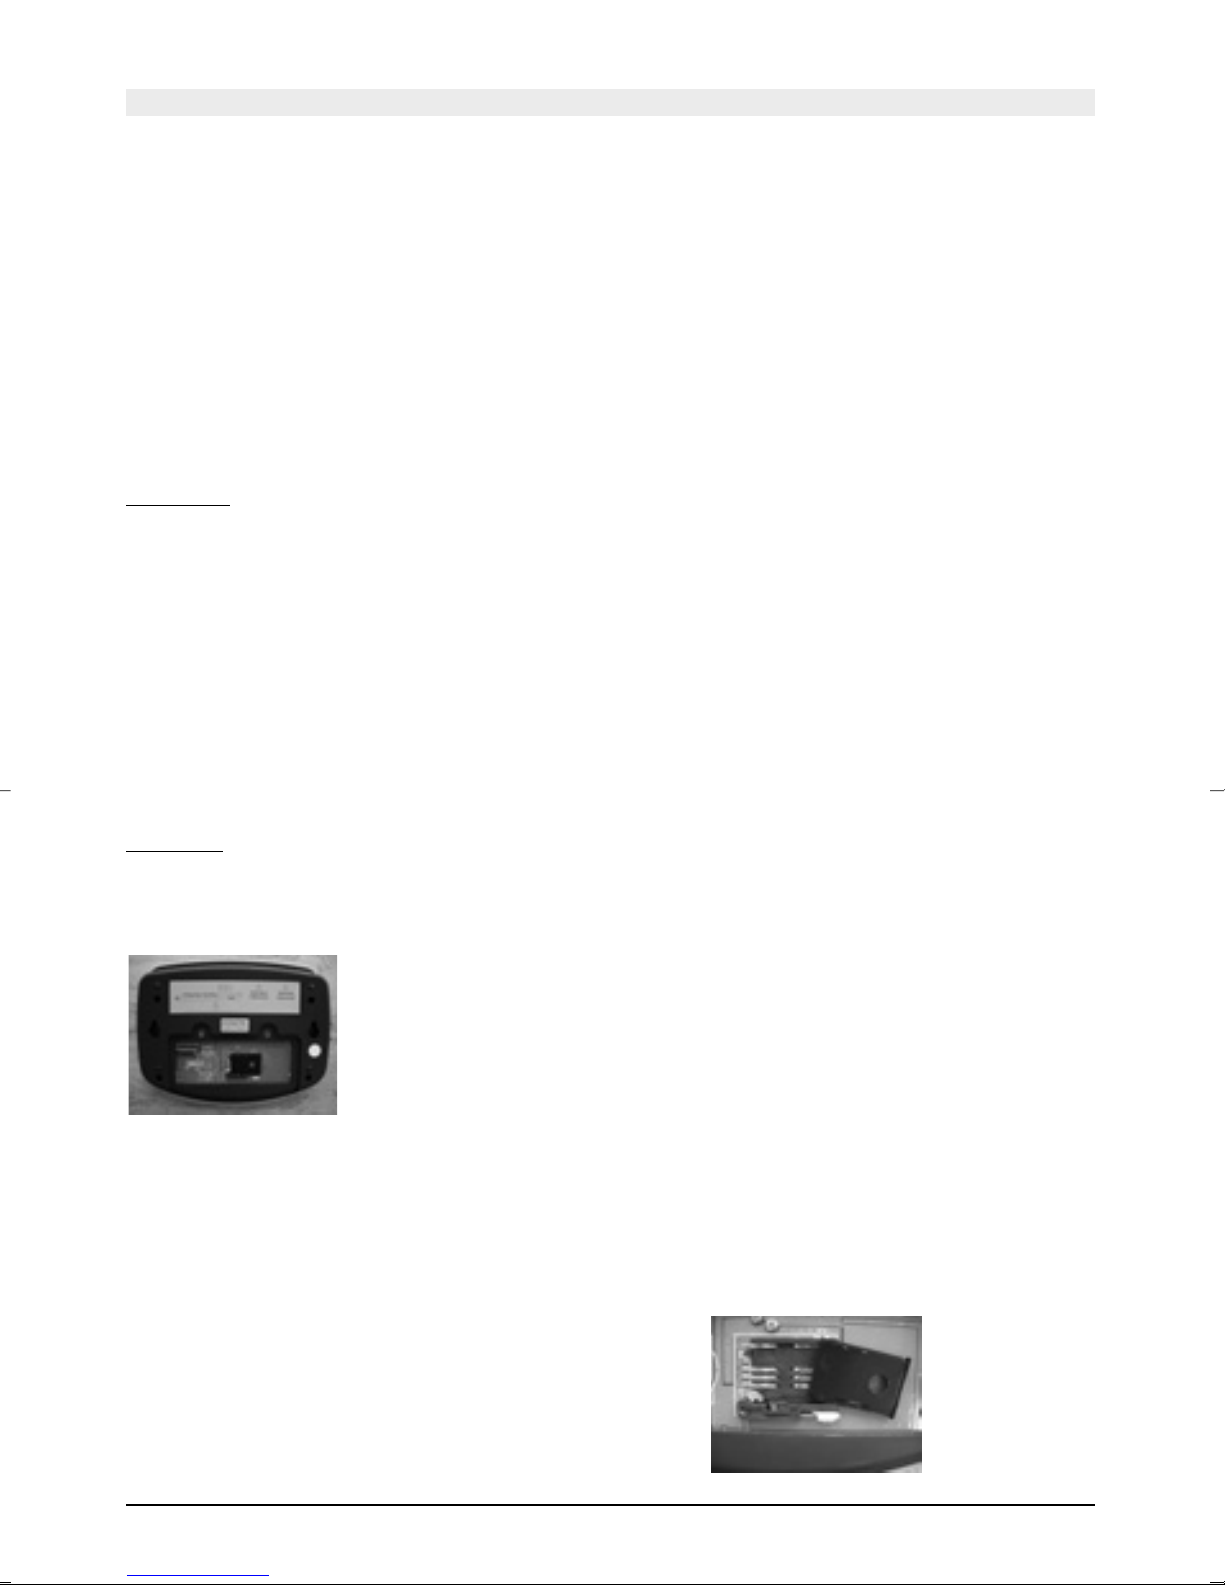
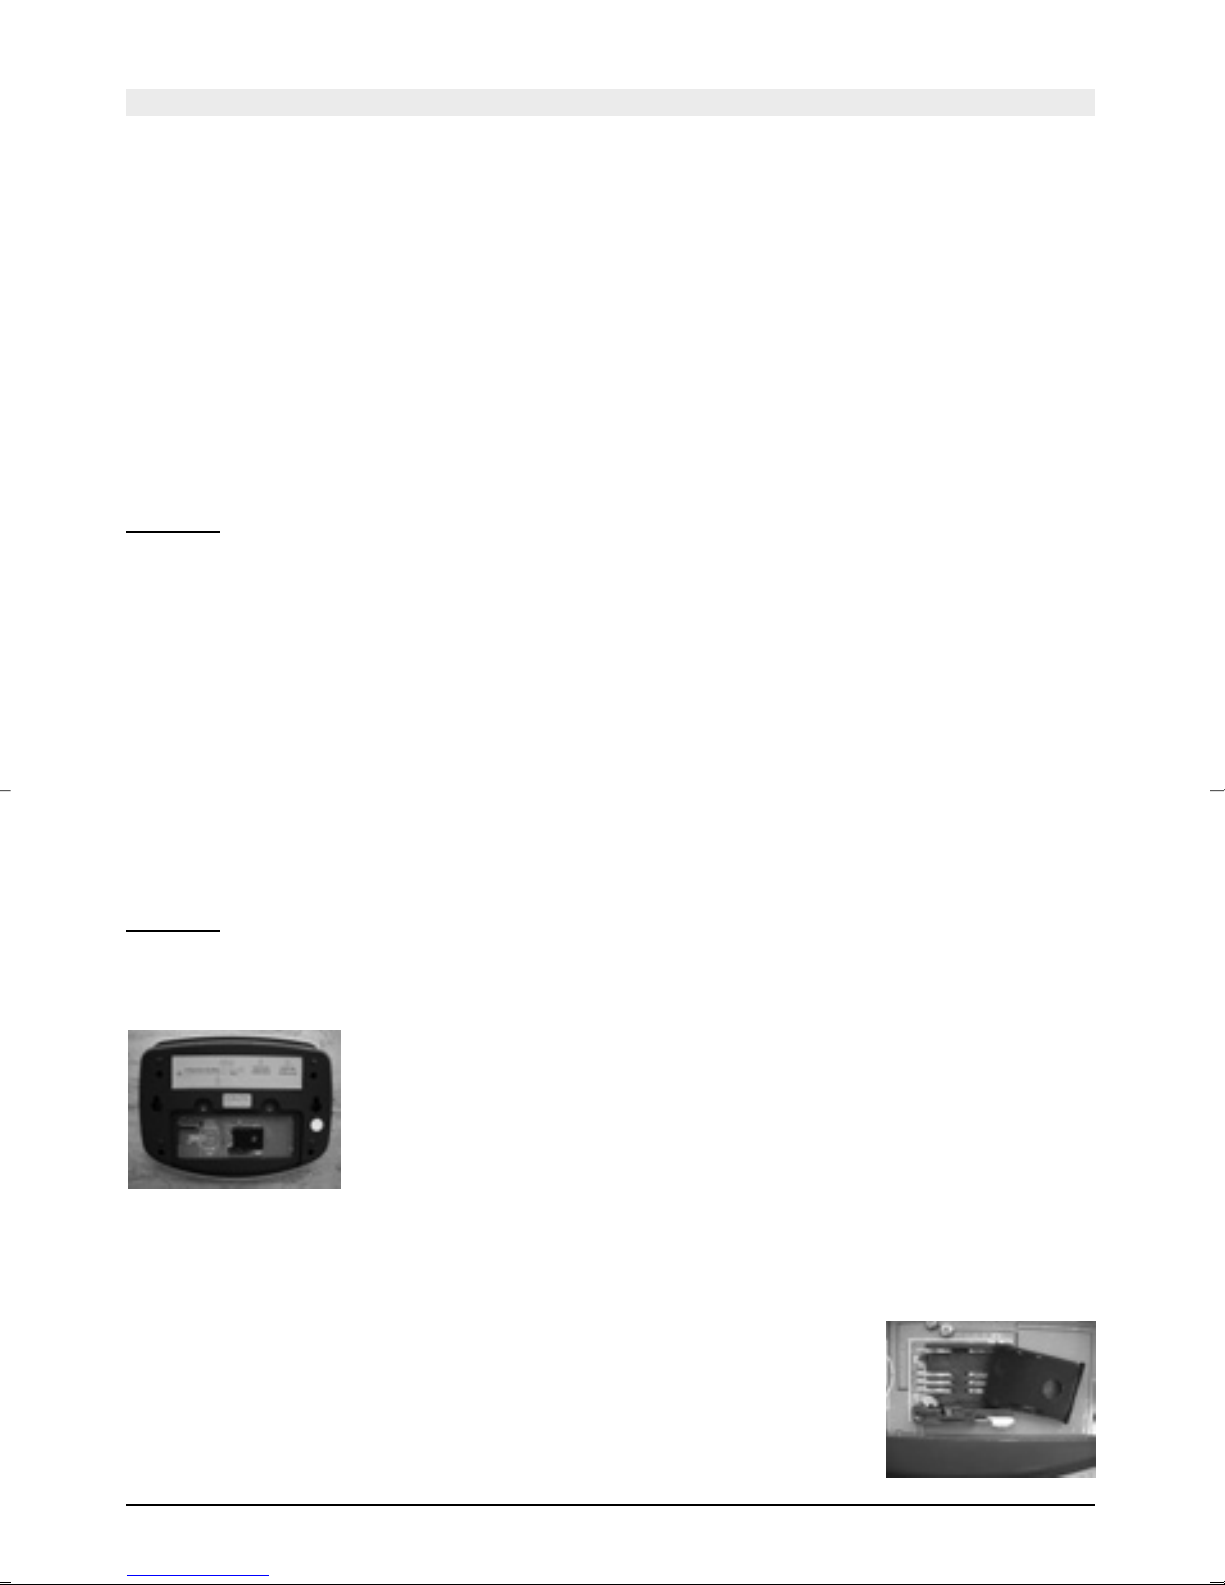
Figure 1
• Open up the back of the Mobile SMS Guard 300 module by loosening the two screws
and pushing the flap down.
• Open the SIM card holder by moving the yellow lip to the left. The black holder can be
removed from the Mobile SMS Guard 300 module. See figure 1.
• Place the SIM card with the chip-side up; this side will make contact with the Mobile
SMS Guard 300 module. There is an identical
notch in the SIM card holder, which means
the SIM card should fit perfectly. See figure 2.
• Place the SIM card holder with SIM card back
into the Mobile SMS Guard 300 module.
4 MARMITEK
Figure 2

Step 3 Setting the security code
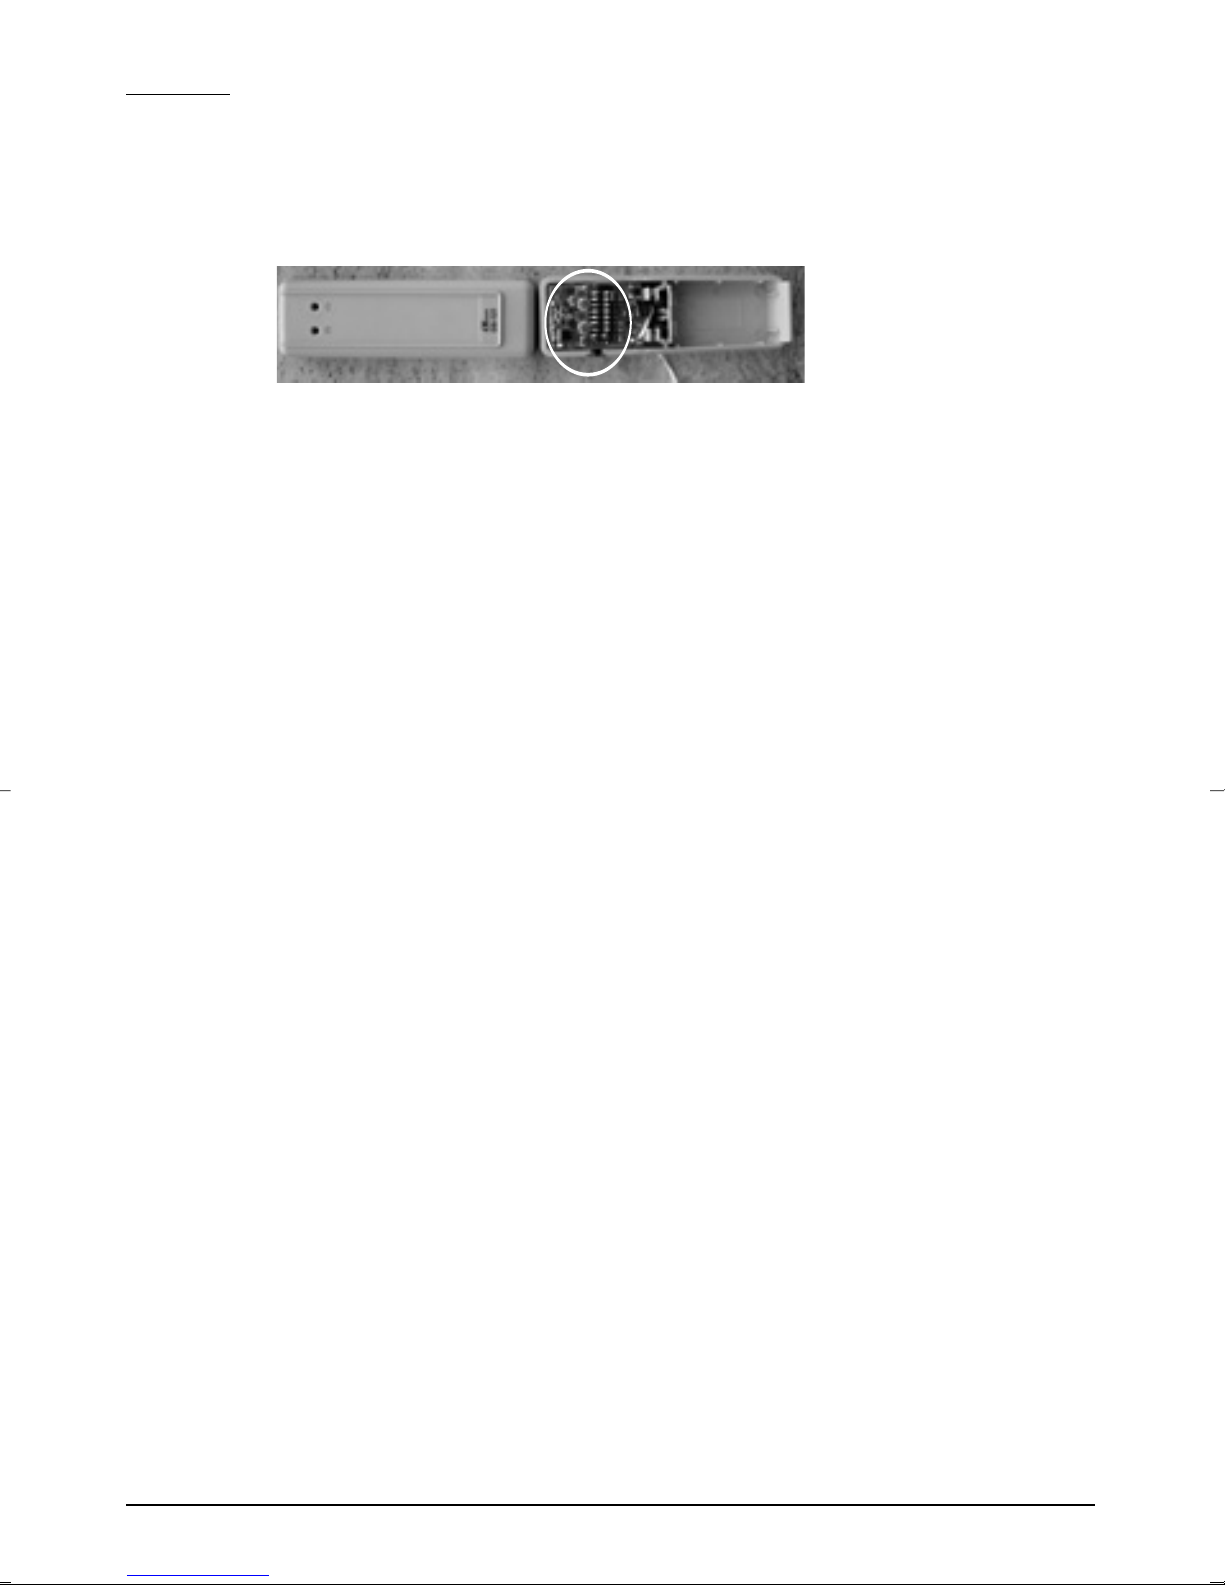
Figure 3
You need to set a security code for the Mobile SMS Guard 300, so that the module can communicate with the alarm sensors.
• Towards the top left of the SIM card holder, you can see a black square with 8 jump
switches. These together form the security code for your alarm system. See figure 3.
• Set the 8 switches in a random way and write down the security code. Later you will
need this code to set the door/window sensors!
• Replace the flap and tighten the screws.
Step 4 Installing the Mobile SMS Guard 300
ENGLISH
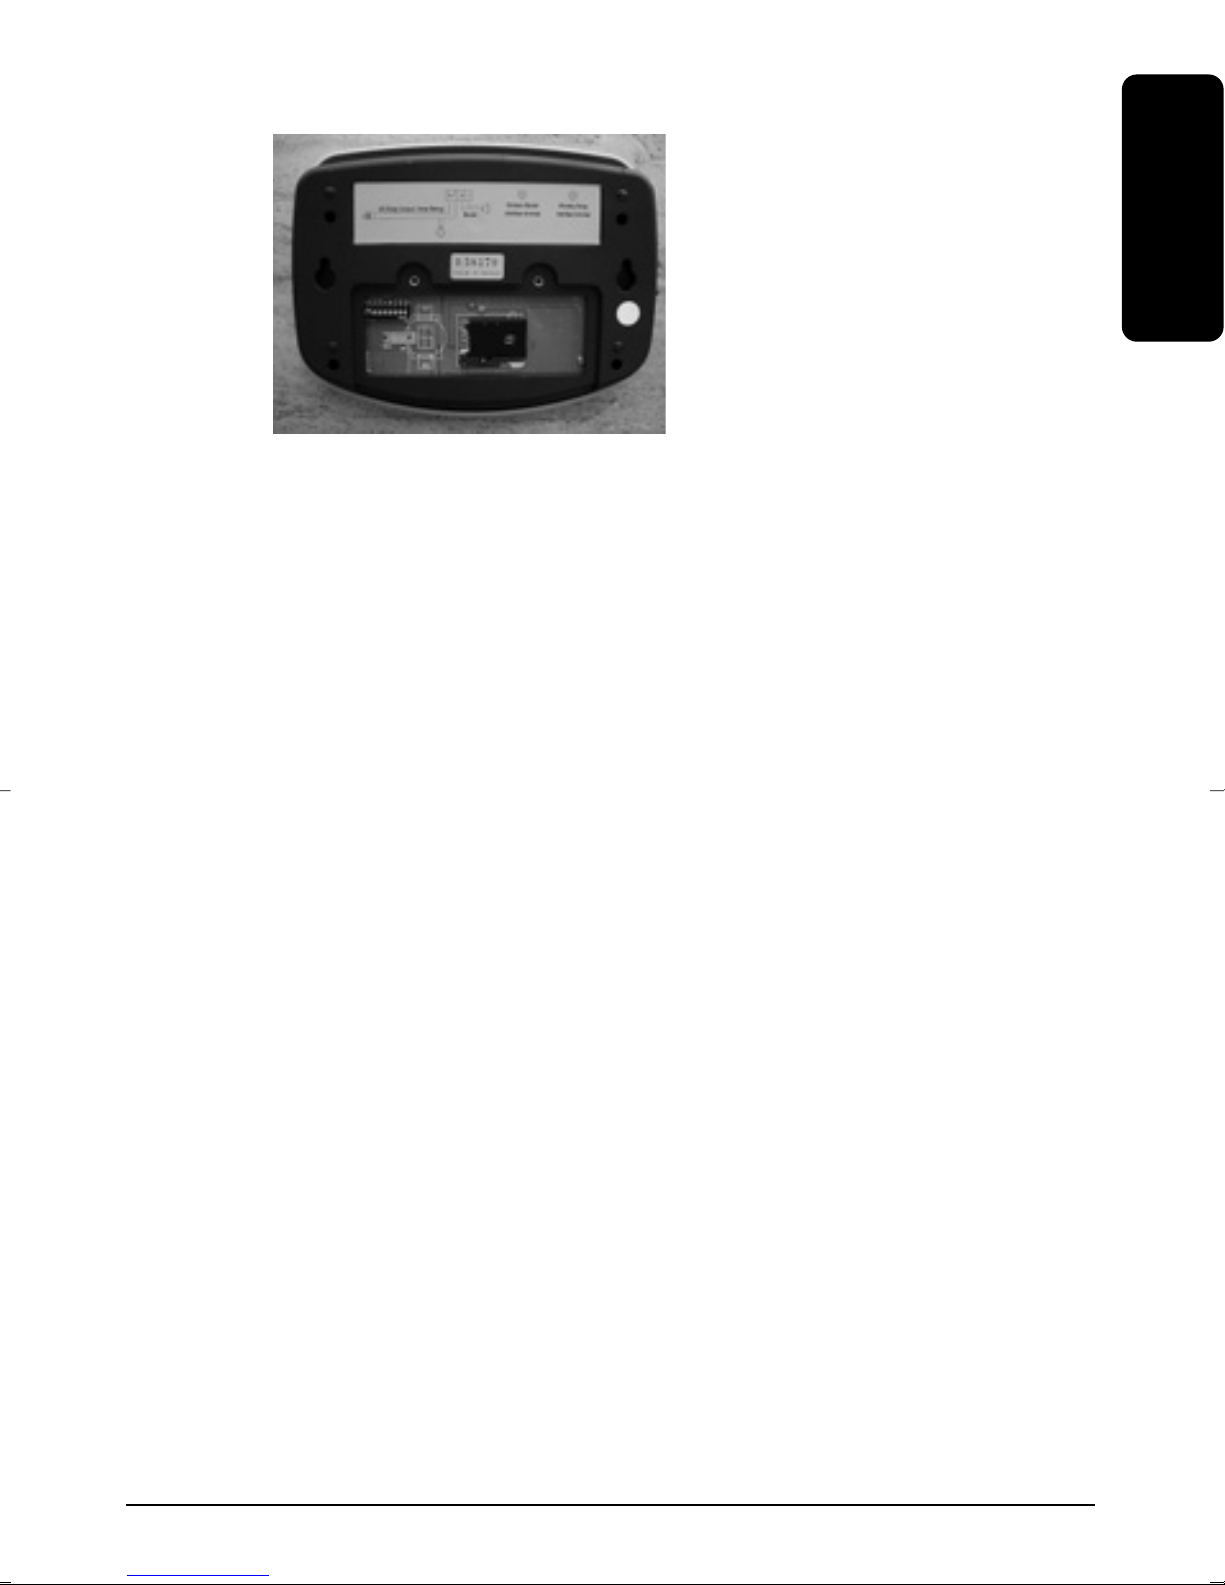
Figure 4
• Screw the antenna included onto the antenna connector, on the left side of the module.
• Make sure the antenna is placed upright. (It needs to point upwards.)
• Select a suitable place for the base station. Make sure there is a wall socket nearby (230 V).
• Connect the power adapter to the Mobile SMS Guard 300 module (left) and plug the
adapter into the wall socket.
• For optimal reception, place the base station as central as possible in relation to all
objects that you want to secure. This way, the distance between the base station and
the sensors is as small as possible.
Make sure that:
• The base station is not placed too close to large metal objects (radiators, cooker, etc).
• You have easy access to the base station.
• The base station is not placed too close to other electronic equipment, such as a
telephone switch board, computer or TV.
You can place the base station on any flat surface (table, sideboard, etc) or mount it
onto the wall. The antenna has a magnetic base.
Mounting the station onto the wall
• The base station can be mounted using two screws. The back of the station has two
screw holes (heart-heart distance 145 mm). Screws are not included.
Placing the station on a flat surface
• If you choose not to mount the station, place it on a flat surface.
Activating the module
• Switch on the Mobile SMS Guard 300 module by pressing the ON/OFF button on the
left-hand side (0= OFF, I = ON). The display now reads: ‘GSM SECURITY’. The module
now counts back from 90 seconds to 0. After the countdown, the following text
appears: ‘Normal Detect SW: OFF’. The ‘System’ LED also flashes every second.
The ‘GSM’ LED starts flashing every second, and after +/- 20 seconds every 3 seconds.
5MOBILE SMS GUARD 300
Attention: if the GSM LED continues to flash every second, the modem is not working (correctly). Turn off the Mobile SMS Guard 300, wait ten seconds and then turn it on again. If
after a minute the GSM LED still flashes every second, you can try it again with a SIM card
from a different provider. If the GSM LED does not light up, the SIM card has not been placed
correctly.
Step 5 Placing the door/window sensors
Figure 5
• Standard, two door/window sensors are included. Take the top and bottom parts apart.
You will now see the space to insert a 9V battery. Open the top part even further. You
will now see a black square with 8 jump switches. See figure 5. Use the same security
code as you used for the Mobile SMS Guard 300 (step 3). Insert a 9V battery (not
included) in the battery compartment of the sensors: Make sure the polarity is correct
when inserting the battery and close the top part of the sensor.
• Place the sensor as high up as possible: this guarantees the best possible range. Mark the
place for the transmitter and the magnetic contact. Do not place the magnetic contact
directly onto a metal surface. In the case of metal frames, or metal-fortified PVC frames,
it is best to place a piece of wood or plastic of min. 5 mm in between the magnetic
contact and the frame. On metal frames, the space between the sensor and the magnet
should not be more than 3 mm when the door or window is closed.
• Switch on the door/window sensor by flicking the switch on the left-hand side, 0 = OFF,
I = ON. The red LED (sun icon) will light up. Hold the magnetic sensor to the right-hand
side of the sensor. As soon as the red LED is extinguished, the two parts of the sensor
make contact properly. Position the magnetic sensor in such a way that the red LED
remains off when the door or window is closed. Make sure that the distance between
the transmitter and magnetic sensor parts are as small as possible. (max. 4 mm)
• If you have countersunk frames, you can also place the transmitter and magnetic sensors
parts at a 90 degree angle.
• If you have determined the definitive place for the sensor, we advise you to mount the
magnetic contact using screws (not included).
• Sliding/sash windows
In the case of sliding/sash windows, the sensor and the magnet should NOT rub over
each other. Place them in such a way that, if you close the window, the magnet and
sensor approach each other vertically.
• If the door/window sensors and magnetic sensors are correctly mounted and are
activated, continue with step 6.
6 MARMITEK
Step 6 Connecting the siren
Figure 6
Standard, a siren is included. You can connect the siren directly to the Mobile SMS Guard 300
Module. The connection diagram can be found on the back of the Mobile SMS Guard 300.
See figure 6. Connect the red wire to the + port and the black wire to the– port. You can
mount the siren in the right place using two screws (not included).
If you do not connect the siren, select Buzzer off in the Setup mode (also see step 8.2).
TIP: Instead of a siren, you can also connect X10 modules, e.g. the SM10, which can switch
on equipment, lights or a camera via the mains (also X10 connected) when the alarm is triggered. Read more about X10, the many possibilities to control devices remotely and Marmitek
surveillance cameras on www.marmitek.com.
ENGLISH
Step 7 Connecting a lamp (optional)
The Marmitek Mobile SMS Guard 300 has a built-in relay. This offers you the opportunity to
connect e.g. a lamp, which can be switched on and off via the text (SMS) commands
RELAY-ON, RELAY-OFF and CONTROL. The connection diagram can be found on the back of
the Mobile SMS Guard 300. Connect the wires to the respective ports on the back of the
Mobile SMS Guard 300.
TIP: Instead of a lamp you can also connect X10 modules, e.g. the SM10, which can switch
on equipment, lights or a camera via the mains (also X10 connected) when the alarm is triggered. Read more about X10, the many possibilities to control devices remotely and Marmitek
surveillance cameras on www.marmitek.com.
7MOBILE SMS GUARD 300

Step 8 User settings
Switch on the Mobile SMS Guard 300 module by pressing the ON/OFF button on the lefthand side (0= OFF, I = ON). The display now reads: ‘GSM SECURITY’. The module now counts
back from 90 seconds to 0. After the countdown, the following text appears: ‘Normal Detect
SW: OFF’.
1. Setting the telephone number
• Press ‘Setup’ and select 1 (1:TEL)
• Enter the telephone number for the mobile phone you want to receive the text
messages on.
Attention
: Press + and the country code first before you enter the rest of the number.
• Press ‘Enter’ when you have entered the number.
Attention
: The number has not been saved yet. See below.
• Press the arrow up if you want to enter a second or third number (max 3 phone numbers).
• To save the phone numbers you entered press ‘Setup’ again and then press 4: (4: SAVE).
The display now reads: ‘Save OK!, SETUP -> Exit’.
• Select ‘Setup’ to return to the Setup menu.
2. Selecting notification times
You can set the time between the moment the alarm is triggered and the moment you
receive a text message, the time between text messages and the number of times the siren
will go off.
• Press ‘Setup’ and select 2 (2: TIME)
• ‘SMS Delay’: enter the number of seconds for the delay between alarm and text
message. Enter a time of your choice, anywhere between 0 and 99 seconds.
Attention
: If you want to enter a delay shorter than 10 seconds, enter the number as
two digits, so starting with ‘0’.
• Press ‘Enter’.
• Press the arrow up: ‘SMS Period’, set the time delay within consecutive text messages.
Enter a time of your choice, anywhere between 1 and 20 minutes.
Example: 3m means 3 minutes: a text message is sent every 3 minutes.
• Press the arrow up: ‘Buzzer delay’, set the time delay before the siren should go off.
Enter a time of your choice, anywhere between 0 and 99 seconds
(e.g. 05 sec = 5 seconds after the alarm, the siren will go off).
• Press the arrow up: ‘Buzzer rep’, set the length of time the siren keeps going off.
Enter a time of your choice, anywhere between 0 and 99 minutes.
• To save all settings, press ‘Setup’ and select 4 (4: SAVE). The display now reads:
‘Save OK!, SETUP -> Exit’.
• Select ‘Setup’ to return to the Setup menu.
TIP: If you want to reset the factory settings for the notification times, press ‘Setup’, 2 (2:
TIME), arrow down. The display now reads: ‘Set to default, Press enter key’. If you select
‘Enter’, all settings are reset (only the notification settings).
The standard notification times (factory settings) are:
SMS Delay time: 20 seconds
SMS period time: 3 minutes
Buzzer relay time: 20 seconds
Buzzer repeat time: 5 minutes
Close the menu by pressing ‘Enter’. To save the settings, press ‘Setup’ and select 4
(4: SAVE). The display reads: ‘Save OK!, SETUP -> Exit’.
8 MARMITEK
3. Switching the relay
If you have connected a lamp to the relay (according to the connection diagram, see step 6),
in the Setup menu you can turn the relay on or off.
• Press ‘Setup’ and select 3 (3: RELAY).
• The display reads: ‘Relay OFF, (1) ON, (2) OFF’.
• Press the numerical keys 1 or 2 to switch the relay on or off.
• Press ‘Enter’.
• Press ‘Setup’ to return to the Setup menu. The relay flashes to indicate that the relay is on.
3. Using the Marmitek Mobile SMS Guard 300
TIP: Write down the telephone number of the SIM card in the Marmitek Mobile SMS Guard
300, or better, save it in your (mobile) phone’s memory.
Before you leave
Step 1.
Select what type of message you want to receive in case of an alarm. The Mobile SMS Guard
300 uses shortcuts to set the module to ‘SMS on’ and/or ‘Buzzer on’. When you leave the
house, you want to trigger the siren and receive text messages in case of an alarm. This can
be set as follows:
ENGLISH
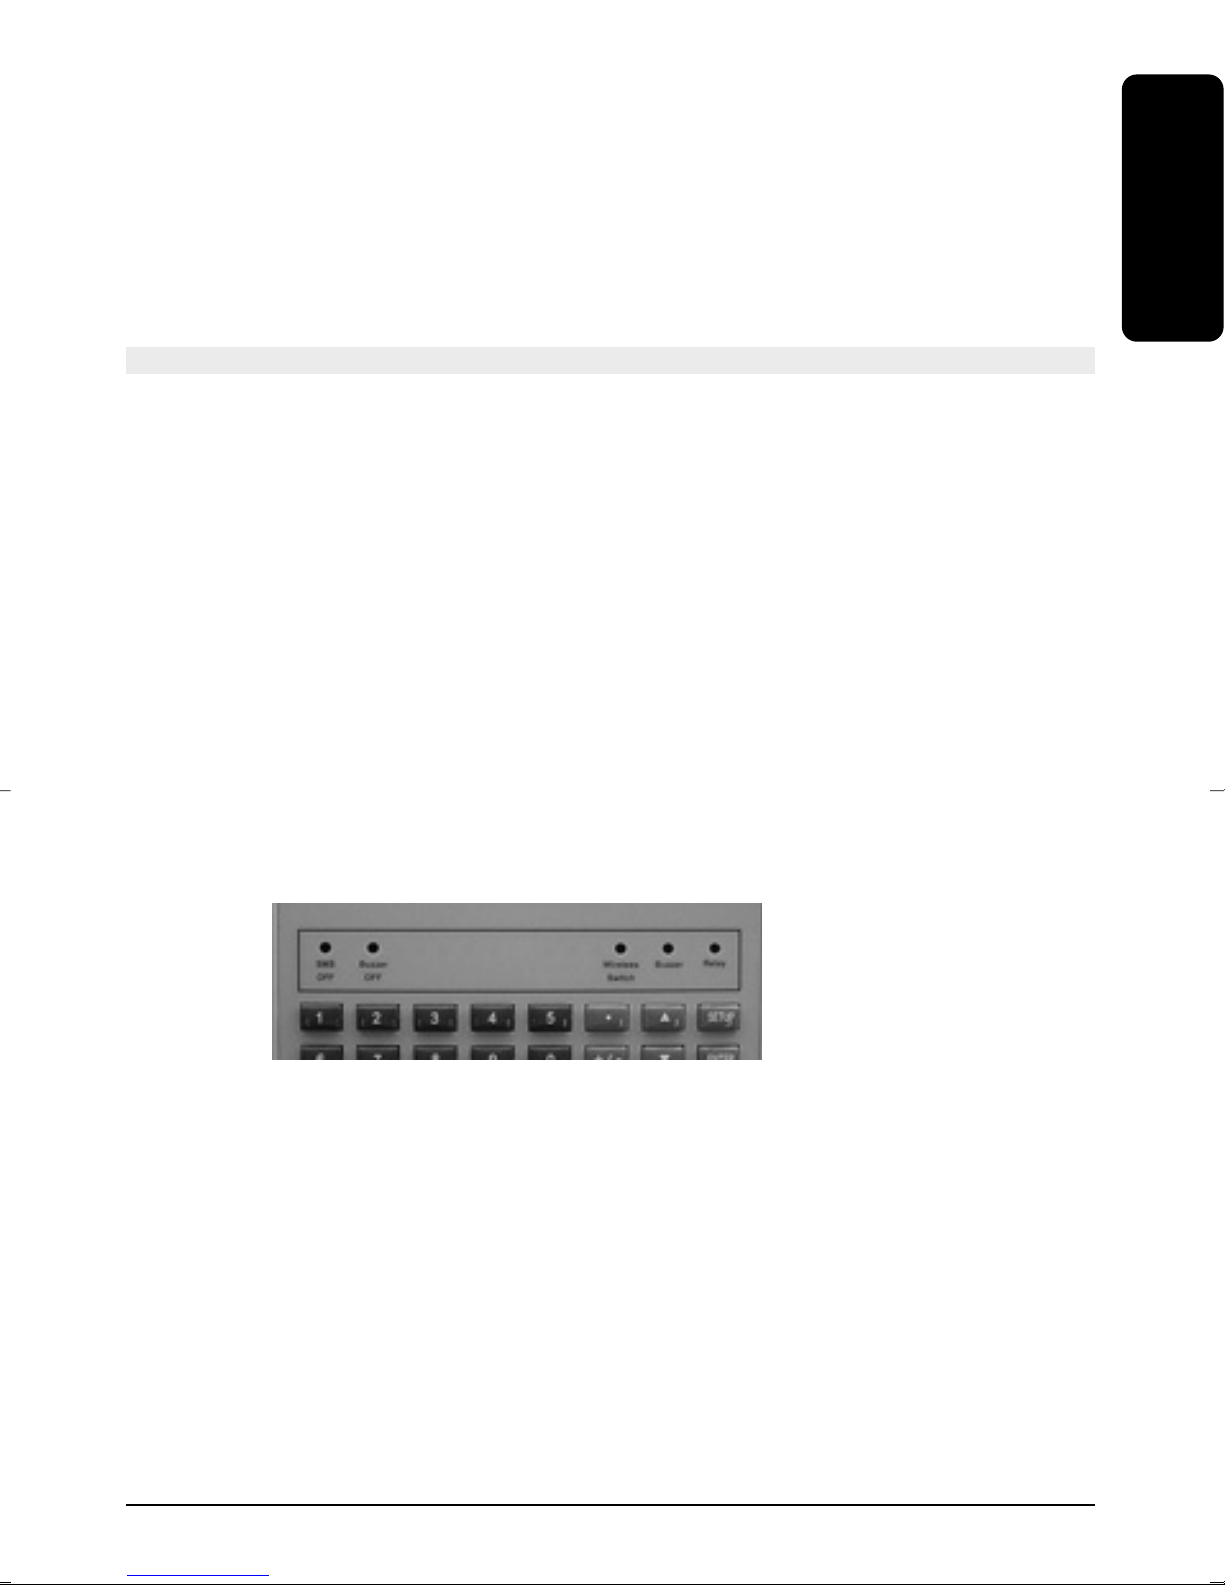
Press the numerical keys 6, 7 or 8 once to activate the corresponding function.
Press the button again to deactivate the function.
6: SMS on/off (text messages on/off)
7: Buzzer on/off (siren on/off)
8: SMS and Buzzer on/off (text messages and siren on/off)
When you deactivate text messages or the siren, the red LEDs for SMS OFF and
Buzzer OFF will flash. This does not have any adverse effects.
Figure 7
Step 2.
After selecting the setting for text messages or the siren, press Reset. You now have 90 seconds (delay) to leave your house, caravan or car.
TIP: If the relay is still on, it is now turned off. If you want the relay to remain on, you can
press 0 in stead of Reset. The sensors will now also be turned off for 90 seconds, but the
relay will stay on.
TIP: Before pressing Reset, the display needs to indicate that all sensor contacts are closed by
displaying the text Normal. If one of the contacts is open, the display will read Trouble and
the LED for Wireless Switch will flash.
9MOBILE SMS GUARD 300
TIP: Make sure all doors and windows with sensors are locked before the delay time is up. If
this is not the case, the alarm will go off after the 90 second delay. Depending on your settings, this can be a text message or a siren going off, or a combination of these two.
Coming back
As soon as you return home, turn of the text alarm and the siren. If you do not do this, the
alarm system will be triggered every time you open a door or window with a sensor. You can
deactivate the alarm by pressing 8: (SMS and Buzzer on/off (text messages and siren on/off).
When you deactivate text messages or the siren, the red LEDs for SMS OFF and Buzzer OFF
will light up. This does not have any adverse effects.
TIP: Make sure the delay for the siren and text messages is long enough, so that you have
plenty of time to walk from the front door to the alarm system without triggering the alarm
and siren.
TIP: If you open a window or door with a sensor, the Mobile SMS Guard 300 will send a message to the base station, even if text messages and the siren have been deactivated. This has
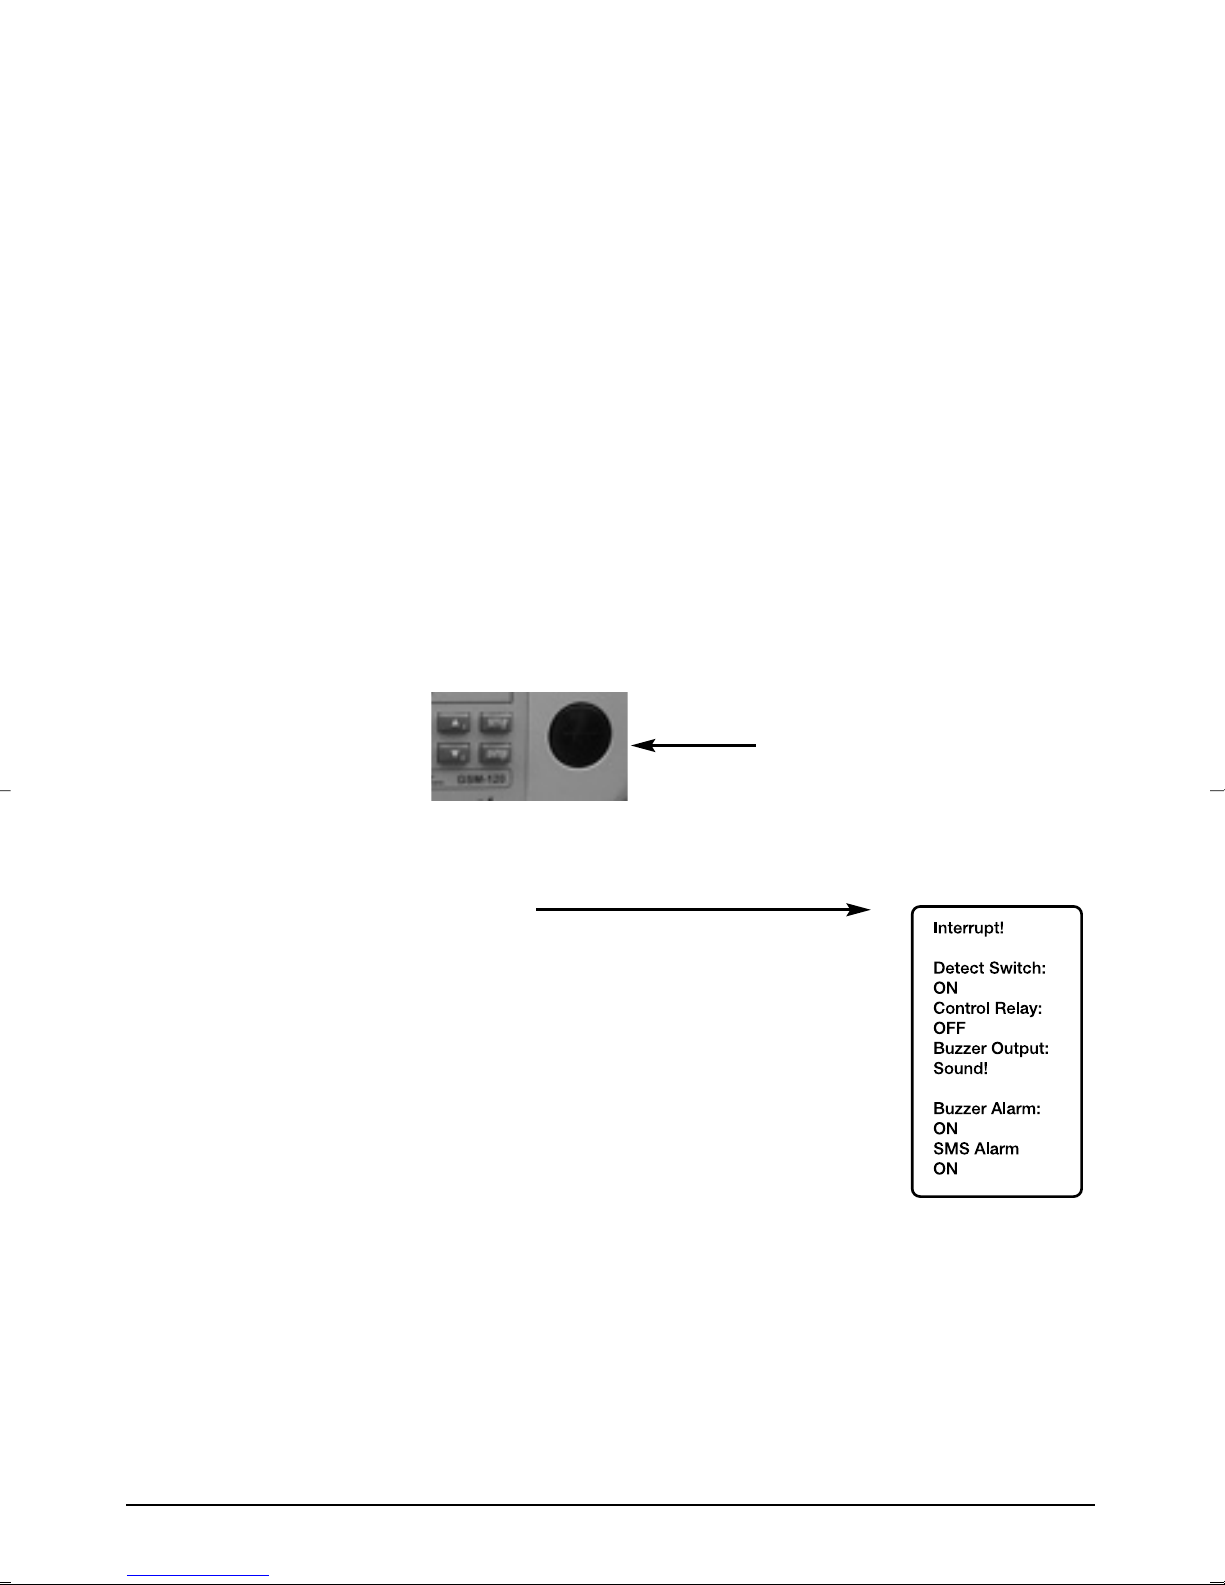
no further adverse effects. You can reset the Mobile SMS Guard 300 by pressing the round
‘Reset’ button. See figure 8.
In case of an alarm: reset
Figure 8
reset
If you are away and the Marmitek Mobile SMS Guard 300 receives an alert from one of the
sensors, you will receive a text message on the telephone number(s) entered.
The message looks as follows (depending on whether you have (de)activated the siren
and/or connected the relay.)
Depending on the settings (Relay on/off, siren on/off and text alarm
on/off, etc.) you see the following messages on your telephone display.
Depending on the length of time you have set on the module, you will
receive text messages until you have reset the Mobile SMS Guard 300.
Example: if you have set ‘SMS Period’ (see step 7.2) to ‘3 minutes’, you
will continue receiving text messages every 3 minutes until you have reset
the module.
In case of an alarm you can now take action (i.e. go home, warn the
neighbours/janitor etc.) After returning home, you (or the neighbours/janitor) need to reset
the Mobile SMS Guard 300 (Reset button) to turn the alarm off.
If you know the module has given a false alarm or if the alarm has been resolved, you can
also reset the Mobile SMS Guard 300 remotely. To do this, you should send a text message
back to the Mobile SMS Guard 300 with the following text (in CAPITALS): RESET. The module
will be reset in the same way as when you press the ‘Reset’ button.
10 MARMITEK
Remotely control the system
Attention:
commands will not work.
You can communicate with the Mobile SMS Guard 300 by sending text messages. Use the
following messages:
Use exactly the right spelling (also use of capitals and hyphens), otherwise the
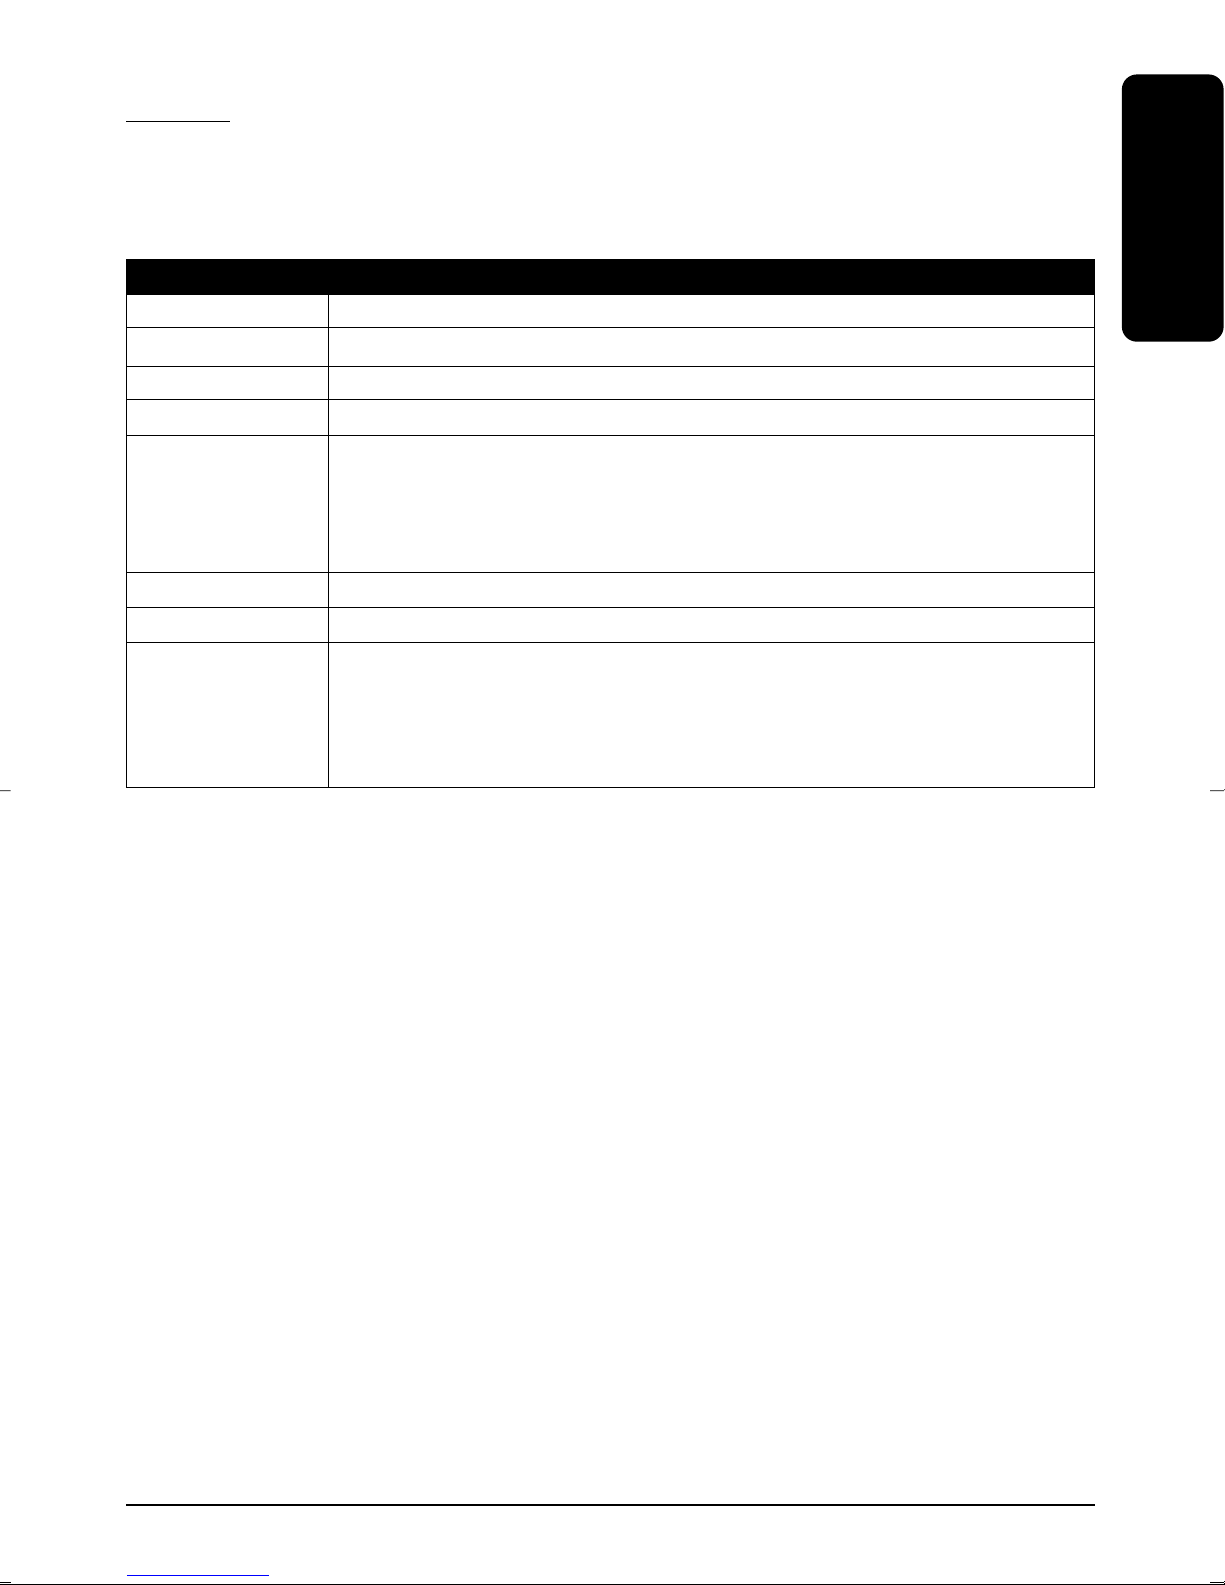
Text message Meaning
ALARM-ON Command to activate the text and siren
ALARM-OFF Command to deactivate the text and siren functions
RELAY-ON Command to activate the relay
RELAY-OFF Command to deactivate the relay
RELAY-TIME X.X Command to set the ON time for the relay.
This can be set to a value between 0.1 minute and 99.9 minutes.
Example: RELAY-TIME 20.3 : the relay will remain on for
20.3 minutes after the command CONTROL is given.
CONTROL
CHECK Command to check the system status
RESET Command to reset the alarm system. Attention: if you send this
Type in the text message on your mobile phone and send it to the phone number of the SIM
card.
Command to activate the relay for the duration set for RELAY-TIME.
command, you will not receive a text message. The system will
do a reset and deactivate the relay. The alarm system will
reactivate after 90 seconds.
ENGLISH
If you make a typing error, you will receive the following message: ‘WRONG INSTRUCTION!’.
Check whether you have spelled the command correctly, with use of capitals and
(if necessary) hyphens.
TIP: Make templates for text commands you use more often and save these in your mobile
phone’s memory.
11MOBILE SMS GUARD 300
Receiving text messages from the Mobile SMS Guard 300
The Marmitek Mobile SMS Guard 300 can send you a text message with the following information (when the alarm is triggered or in reply to a text message):
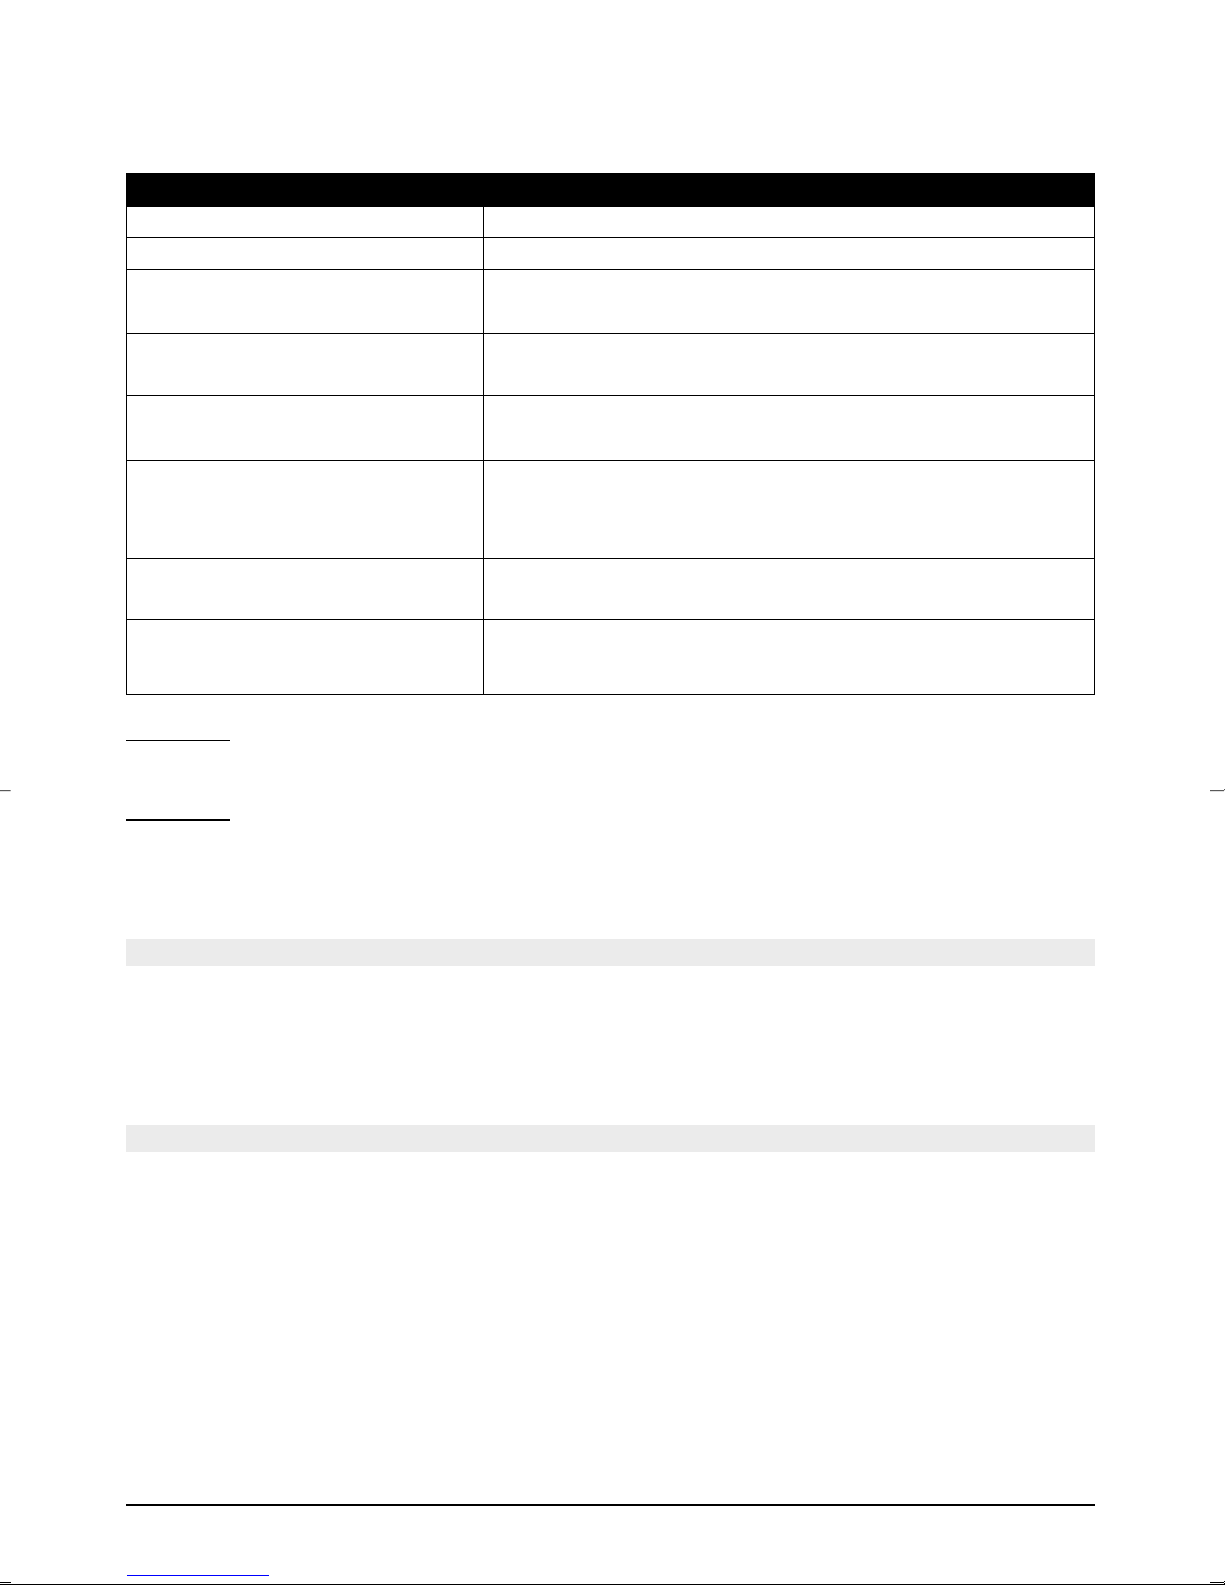
Message Meaning
Trouble! Alarm has been triggered
Normal System is functioning normally
Detect Switch ON / OFF ON: a sensor is reporting an alarm
OFF: the sensors do not report an alarm
Control Relay ON / OFF ON: the relay is switched on (lamp is on)
OFF: the relay is off
R-Time,Set: xx.x Min Time in minutes during which the relay will remain
on after the command CONTROL has been given.
Buzzer Output Silent / Sound Silent: the siren is silent
Sound: the siren has been activated/alarm
is triggered
Buzzer Alarm ON / OFF ON: siren will go off in case of an alarm
OFF: siren will remain silent in case of an alarm
SMS Alarm ON / OFF ON: text message will be sent in case of an alarm
OFF: no text message will be sent in case of an alarm
Attention: You should check the alarm system at least twice a year. Trigger the alarm while
you are in the house. This also allows you to check whether the SIM card is functioning
properly.
Attention:
by placing the SIM card in a mobile phone and then checking the credit by following the
instructions given by the provider. Make sure you renew your pre-paid credit before it runs
out!
You should check the credit on your SIM card at least twice a year. You can do this
4. Optional extras
Your Marmitek dealer also offers you the following extras: extra door/window sensors
(WDS300 art. No 09698). This makes your alarm system ‘undetectable’ for burglars!
The sensors are not connected to the alarm module via any wiring, which means the burglar
cannot find the alarm system to destroy or deactivate it.
5. FAQ
Q: The GSM LED does not flash, the modem does not work.
A: Try using a SIM card from a different provider
Q: The GSM LED continues flashing every second.
A: The SIM card has not been placed (correctly)
A: The modem is not working (properly). Turn off the Mobile SMS Guard 300 by pressing the
button on the left-hand side, wait ten seconds and then turn it on again. If after a minute the
GSM LED still flashes every second, you can try it again with a SIM card from a different
provider.
12 MARMITEK

Q: The Mobile SMS Guard 300 does not respond to an alarm triggered by one of the sensors.
A: Check whether the sensor is turned on. If that is the case, you can increase the sensor
range by unfolding the white wires (see the back of the sensor) and letting them stick out
from above or underneath the sensor.
Q: The door/window sensor keeps triggering the alarm.
A: Place the magnetic sensor at exactly the same height as the sensor on the frame.
Q: the door/window sensor is not working.
A: Check whether there is a battery in the door/window sensor and whether it is still charged.
A: Check whether the door/window sensor is turned on (switch on the left-hand side,
0 = ON, I = OFF).
Q: I get the message WRONG INSTRUCTION!
A: Check the spelling of the text command. Make sure you use capitals (and hyphens).
Q: I do not receive any text messages.
A: Check whether the SIM card is working and has enough credit by placing it in a mobile
phone and testing it.
Q: I do not receive a text message after resetting the module.
A: If you send the reset command, you do not receive a text message. The system will do a
reset and switch off the relay. After 90 seconds the system is activated again.
ENGLISH
6. Technical information
Specifications Mobile SMS Guard 300 module
Display: Dot Matrix LCD with screen lighting.
2 lines with 16 characters.
GSM Modem: 900/1800 MHz, dual band.
LED indicators: 7 LED indicators: GSM Indicator, System
indicator, SMS Alarm indicator,
Buzzer/Siren alarm off indicator, detect
switch indicator, buzzer/siren indicator,
control relay indicator
Frequency door/window sensors: 433.92 MHz
Relay output: 24VDC, 1A max, 250VAC, 1A max.
Working temperature: 0° – 50° C
Power source: DC 9V, with adapter
Power consumption: Mobile SMS Guard 300 active: DC210 mA
Mobile SMS Guard 300
stand-by: DC125 mA
Dimensions Mobile SMS Guard 300 module: 230 x 149 x 46 mm
Specifications door/window sensor
Power source: battery, 006P, DC 9V
Power consumption: If active: DC5.8 mA
Dimensions door/window sensor: 110 x 34 x 26 mm
13MOBILE SMS GUARD 300

14 MARMITEK

SICHERHEITSHINWEISE
• Auf der Verdrahtung Ihrer elektrischen Anlage steht lebensgefährliche 230V Netzspannung.
Schließen Sie das Modul niemals unter Spannung an. Schalten Sie den Hauptschalter aus,
bevor Sie mit der Installation beginnen.
• Um Kurzschluss vorzubeugen, dieses Produkt bitte ausschließlich innerhalb des Hauses und
nur in trockenen Räumen nutzen. Setzen Sie die Komponenten nicht Regen oder
Feuchtigkeit aus. Nicht neben oder nahe eines Bades, Schwimmbades usw. verwenden.
• Schließen Sie den Netzadapter erst an das Stromnetz an, nachdem Sie überprüft haben,
ob die Netzspannung mit dem angegebenen Wert auf den Typschildern übereinstimmt.
• Schließen Sie den Netzadapter oder die Netzschnur niemals an, wenn diese beschädigt sind.
Nehmen Sie in diesem Falle mit Ihrem Lieferanten Kontakt auf.
• Setzen Sie die Komponente Ihres Systems nicht extrem hohen Temperaturen oder starken
Lichtquellen aus.
• Bei einer zweckwidrigen Verwendung, selbst angebrachten Veränderungen oder selbst
ausgeführten Reparaturen verfallen alle Garantiebestimmungen. Marmitek übernimmt bei
einer falschen Verwendung des Produkts oder bei einer anderen Verwendung des Produktes
als für den vorgesehenen Zweck keinerlei Produkthaftung. Marmitek übernimmt für
Folgeschäden keine andere Haftung als die gesetzliche Produkthaftung.
• Netzadapter: Schließen Sie den Netzadapter erst dann an das Stromnetz an, nachdem Sie
überprüft haben, ob die Netzspannung mit dem auf dem Typenschild angegeben Wert
übereinstimmt. Schließen Sie niemals einen Netzadapter oder ein Netzkabel niemals an,
wenn diese beschädigt sind. In diesem Fall nehmen Sie Kontakt mit Ihrem Lieferanten auf.
• Batterien: Halten Sie die Batterien außerhalb der Reichweite von Kindern. Liefern Sie die
Batterien als chemischen Kleinabfall ein. Verwenden Sie niemals alte und neue oder
unterschiedliche Typen von Batterien durcheinander. Wenn Sie das System längere Zeit nicht
benutzen, entfernen Sie die Batterien. Achten Sie beim Einlegen der Batterien auf die
Polarität (+ / -): Ein falsches Einlegen kann zu Explosionsgefahr führen.
DEUTSCH
1. Einführung
Herzlichen Glückwunsch zum Erwerb der Marmitek Mobile SMS Guard 300! Sie können von nun
an Ihr (Ferien)Haus, Ihren Wohnwagen oder ein anderes Objekt einfach absichern. Die Marmitek
Mobile SMS Guard 300 warnt Sie bei Unrat unmittelbar indem es eine SMS an eine von Ihnen
gewählte Telefonnummer verschickt. Sie sind nicht von einem Anschluss ans Festnetz abhängig.
Verpackungsinhalt
• 1 Marmitek Mobile SMS Guard 300 Modul
• 1 Antenne
• 1 Netzadapter
• 2 Tür/Fenstersensoren WDS300 mit Zubehör
• 1 (verdrahtete) Sirene B300
• diese 4-sprachige Gebrauchsanleitung
Installationsbedarf
• 1 SIM-Karte (Prepaid) mit Telefonnummer, PIN und Freischaltkode
• Netzspannung am gewünschten Installationsort des Marmitek Mobile SMS Guard 300 Moduls
• Ein Handy, um Ihre Mobile SMS Guard 300 und Simkarte zu testen und PIN frei zu machen.
• Evt. Schraub- oder Bohrmaterial, um das Modul und/oder die Sensoren an einer
Wand/Mauer zu befestigen.
15MOBILE SMS GUARD 300
2. Installation
Die Marmitek Mobile SMS Guard 300 wird standardmäßig mit einem Mobile SMS Guard 300
Modul und zwei Tür-/Fenstersensoren geliefert. Die Tür/Fenstersensoren werden (mit
Klebeband oder einer Schraube) am Fensterrahmen befestigt. Die Magnetkontakte bringen
Sie am Fenster oder der Tür an, auf exakt der gleichen Höhe wie der Sensor am
Fensterrahmen (Achtung, dies erfordert Genauigkeit!). Sie machen die SIM-Karte Ihres Handys
PIN frei und setzen die SIM-Karte nun in die Mobile SMS Guard 300 ein. Folgen Sie den
Installationsanweisungen auf dem Display und Ihr Haus ist einbruchsicher. Sie können soviel
Tür-/Fenstersensoren anbringen wie Sie möchten. Diese sind zusätzlich erhältlich.
So wie ein Alarm ausgelöst wird, meldet der Sensor dies der Mobile SMS Guard 300 und
diese sendet sofort eine SMS an die von Ihnen angegebene Telefonnummer. Wenn Sie auch
die Sirene angeschlossen haben, so wird diese bei einer Alarmmeldung ebenfalls ertönen. In
die Marmitek Mobile SMS Guard 300 ist zudem ein Relais eingebaut. Dies ermöglicht Ihnen,
um zum Beispiel eine Lampe daran anzuschließen, die sich während eines Alarms einschaltet.
Achtung:
Sie mit der Installation beginnen. Die Mobile SMS Guard 300 verlässt nach ca. 20 Sekunden
den Set-Up Modus, wodurch möglicherweise Einstellungen verloren gehen. Machen Sie sich
zunächst mit den Tasten und Schaltern vertraut.
Schritt 1 SIM-Karte testen und PIN entsperren
• Machen Sie die SIM-Karte (eines Anbieters nach Ihrer Wahl) PIN frei indem Sie diese in
einem Handy installieren. Nehmen Sie die Anleitung Ihres Handy zur Hand, um die PIN
der Sim-Karte zu entsperren.
• Überprüfen Sie mit einem Handy, ob Sie mit der SIM-Karte SMS-Berichte versenden und
empfangen können.
• Überprüfen Sie mit einem Handy, ob der Sendebereich der SIM-Karte an dem Ort wo Sie
das Mobile SMS Guard 300 Modul anbringen wollen, groß genug ist. (beispielsweise in
einem Schrank).
Achtung:
PIN der SIM-Karte entsperrt worden sein.
Schritt 2 SIM-Karte einsetzen
Wir empfehlen Ihnen, um diese Gebrauchsanleitung gänzlich durchzulesen, bevor
Um die Marmitek Mobile SMS Guard 300 funktionstüchtig zu machen, muss die
Abbildung 1
• Öffnen Sie den Deckel an der Rückseite des Mobile SMS Guard 300 Moduls indem Sie
die zwei Schrauben losdrehen und den Deckel nach unten wegschieben.
• Öffnen Sie das SIM-Kartenfach indem Sie die gelbe Lasche nach links bewegen. Die
schwarze Halterung (das SIM-Kartenfach) kann dem Mobile SMS Guard 300 Modul
gänzlich entnommen werden. Siehe Abbildung 1.
• Setzen Sie die SIM-Karte mit der Chipseite nach oben ein,
diese Seite macht später Kontakt mit dem Mobile SMS Guard
300 Modul. Im SIM-Kartenfach ist eine identische Stelle ausgespart,
sodass die SIM-Karte exakt passt. Siehe Abbildung 2.
• Setzen Sie das SIM-Kartenfach mit SIM-Karte wieder in das
Mobile SMS Guard 300 Modul ein.
16 MARMITEK
Abbildung 2
 Loading...