

Page 1
IP EYE
E
IP EYE
ANYWHERE
™
NYWHER
Network Camera
QUICK INSTALLATION GUIDE 3
KURZ INSTALLATIONSANLEITING 11
GUIDE D’INSTALLATION RAPIDE 19
BREVE MANUAL DE INSTRUCCIONES 27
GUIDA RAPIDA ALL’INSTALLAZIONE 35
KORTE INSTALLATIE HANDLEIDING 43
20239/20080117 • IP Eye Anywhere™
ALL RIGHTS RESERVED MARMITEK ©
Page 2

2 © MARMITEK
Page 3

SAFETY WARNINGS
• To prevent short circuits, this product should only be used inside and only in dry spaces.
Do not expose the components to rain or moisture. Do not use the product close to a
bath, swimming pool etc.
• Do not expose the components of your systems to extremely high temperatures or bright
light sources.
• In case of improper usage or if you have altered and repaired the product yourself, all
guarantees expire. Marmitek does not accept responsibility in the case of improper usage
of the product or when the product is used for purposes other than specified. Marmitek
does not accept responsibility for additional damage other than covered by the legal
product responsibility.
• This product is not a toy. Keep out of reach of children.
• Do not open the product: the device may contain live parts. The product should only be
repaired or serviced by a qualified expert.
• Only connect the adapter to the mains after checking whether the mains voltage is
the same as the values on the identification tags. Never connect an adapter when it is
damaged. In that case, contact your supplier.
1 GETTING STARTED
Package Contents
Check the items contained in the package carefully. You should have the following items.
Once any item contained is damaged or missing, contact the local authorized dealer.
✔ One Marmitek IP Eye AnywhereTM IP Camera with built-in web server
✔ One Power Adapter
✔ One External Antenna (for wireless model)
✔ One Wall/ceiling bracket
✔ One RJ45 network cable
✔ One Installation CD-ROM with Ultra View software package and user manual (English)
✔ One Quick Installation manual
ENGLISH
System Requirement
■ Networking
LAN: 10Base-T Ethernet or 100Base-TX Fast Ethernet
WLAN: IEEE 802.11b/g (for wireless model)
■ Accessing the Camera using Web Browser
Platform: Microsoft® Windows® 2000/XP/Vista/7
CPU: Intel Pentium III 800MHz or above
RAM: 512MB
Resolution: 800x600 or above
User Interface: Microsoft® Internet Explorer 6.0 or above
Mozilla Firefox 2.00 or above
Apple Safari 2 or above
3IP EYE ANYWHERE™
Page 4
■ UltraView software
Platform: Microsoft® Windows® 2000/XP/Vista/7
CPU: Intel Pentium III 800MHz or above and 512MB RAM
for 1 camera connected
CPU: Intel Pentium 4 3.4 GHz or above and 2GB RAM
for 9 ~16 camera connected
Resolution: 1024x768 or above
2 SETTING UP THE CAMERA
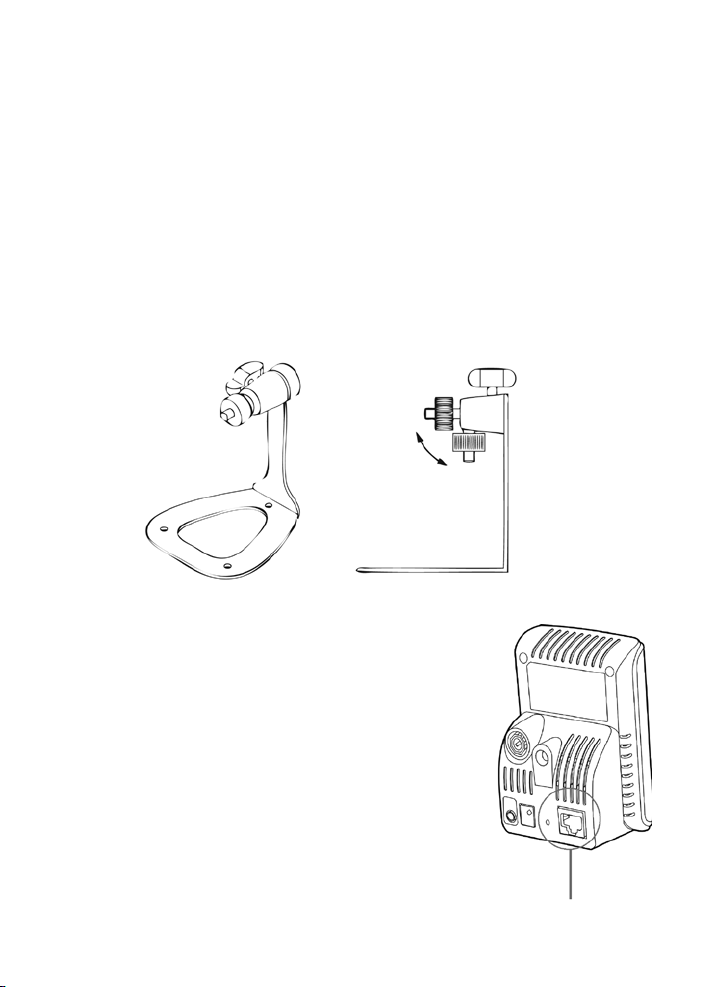
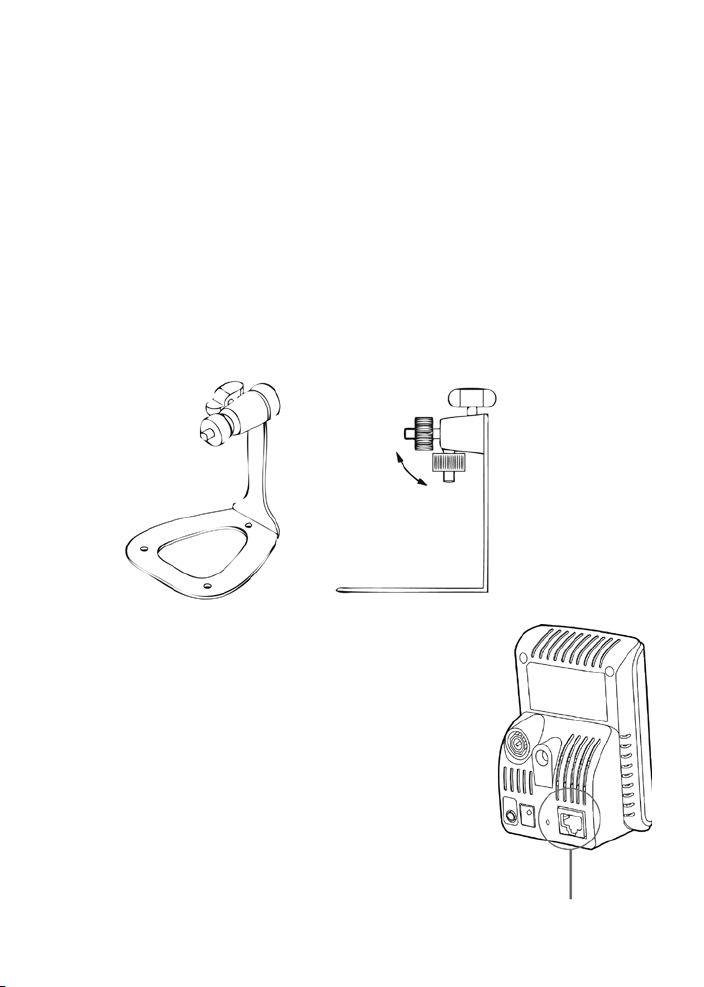
Installing the Camera Stand
The camera comes with a camera stand, which uses a swivel ball screw head to lock to the
camera’s screw hole. When the camera stand is attached, you can place the camera anywhere by
mounting the camera through the three screw holes located in the base of the camera stand.
The Camera Stand
Connecting the IP Eye AnywhereTM Camera to LAN
Use the provided Ethernet cable to connect the camera to
your local area network (LAN).
When you connect the AC power adapter, the camera is
powered on automatically. You can verify the power status
from the Power LED on the front panel of the camera.
Once connected, the Link LED starts flashing green light
and the camera is on standby and ready for use now.
Connecting the Ethernet cable
4 © MARMITEK
Page 5
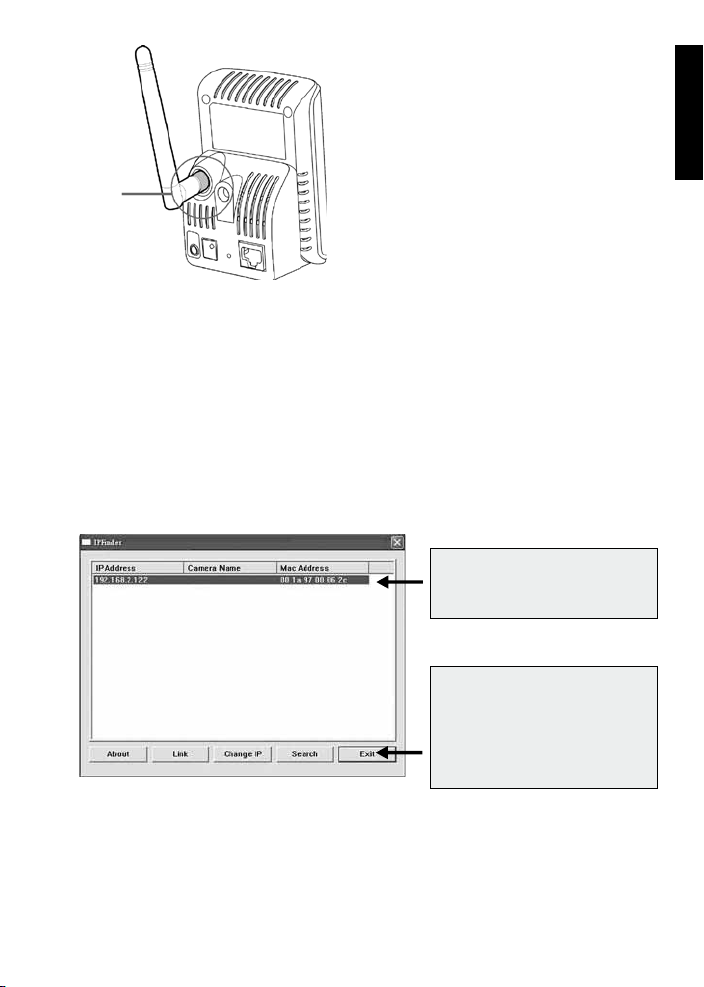
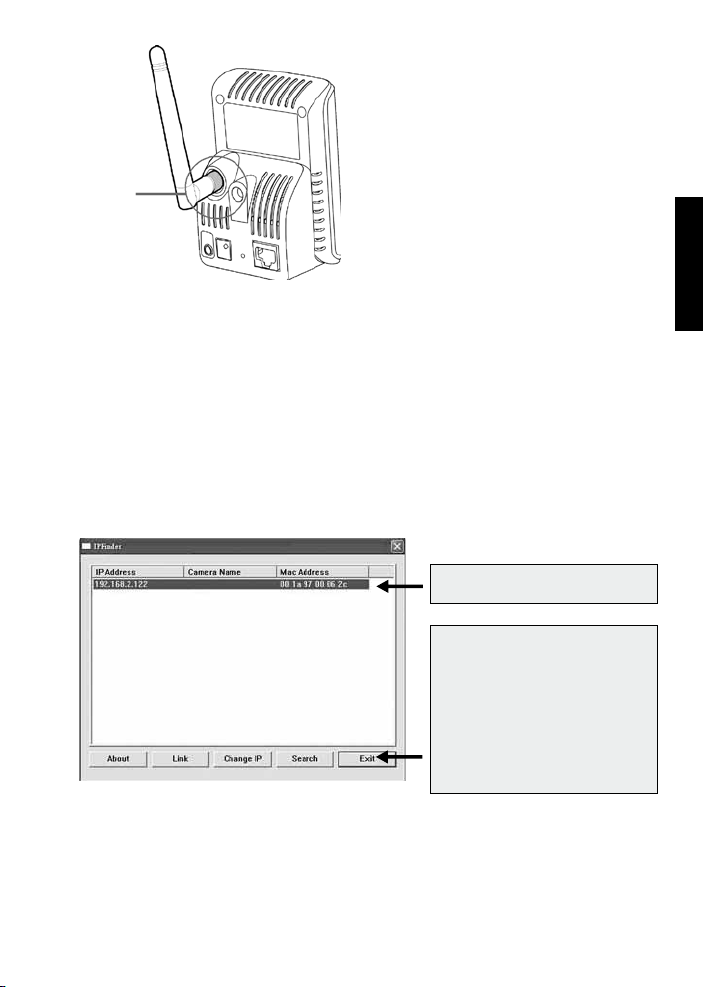
Connecting the Camera to WLAN
If you use a wireless network in your
application environment, you need to
attach the included external antenna to the
camera.
When the camera is powered on, the
Connecting the
External Antenna
camera will automatically search any access
point with “default” SSID.
NOTE If the camera cannot connect to your wireless network, you need to install the camera
in LAN and proceed with WLAN settings.
3 ACCESSING THE CAMERA
Using IPFinder
1. Insert the Installation CD-ROM into your computer’s CD-ROM drive to initiate the
Auto-Run program.
2. Click the IPFinder item to launch the utility. The control panel will appear as below.
Display the connec ted camera(s).
Double click to link the Camera.
ENGLISH
Click Search to find the IP address of
the connected camera(s).
Click Change IP to modify the IP
address of the selected camera.
Click Exit to close the utility.
3. Once you get the IP address of the camera, launch the Web browser or UltraView to
access your camera.
TIP The Installation CD-ROM provides a setup program that allows you to install IPFinder
on your computer. To install IPFinder, click Install Software then select IPFinder on
the Auto-Run screen.
5IP EYE ANYWHERE™
Page 6
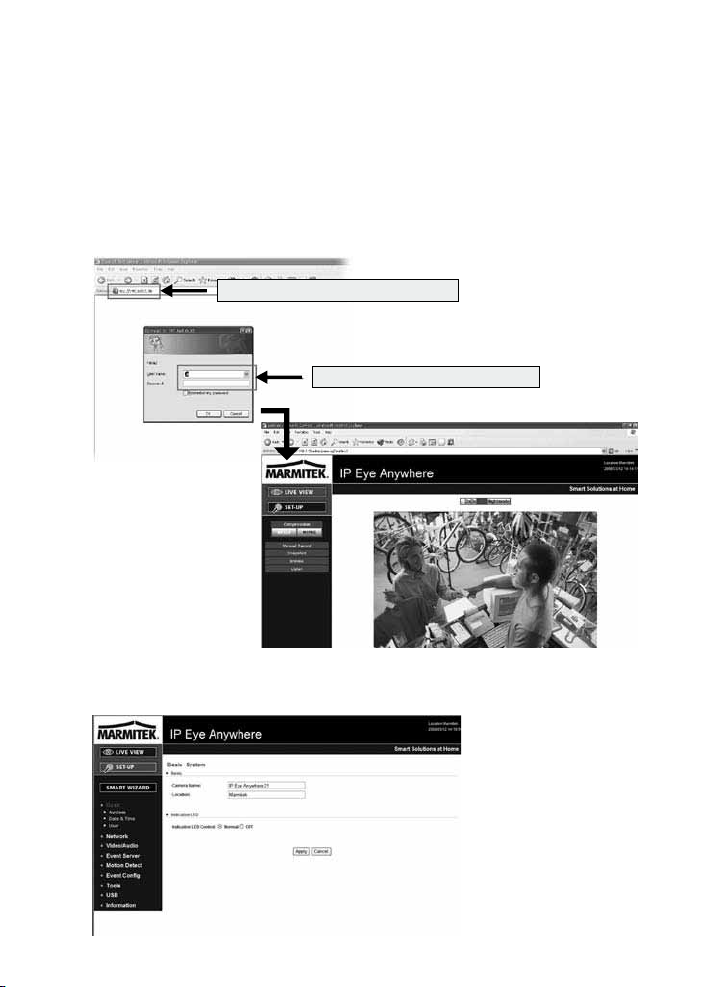
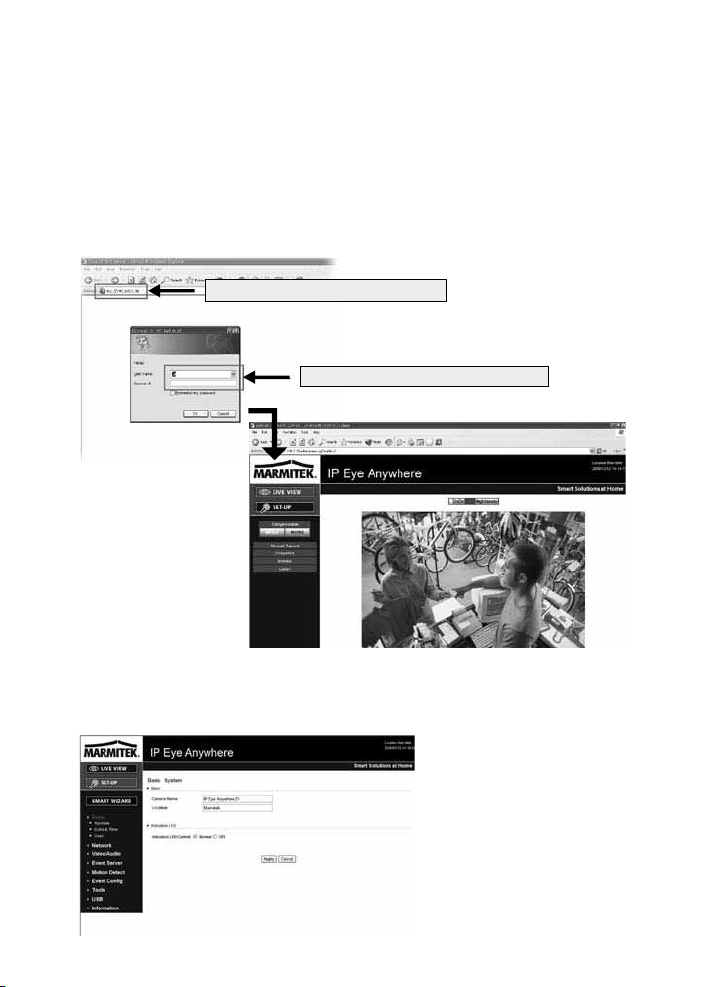
Accessing to the Camera
1. Open the Web browser on your computer (for example, Microsoft Internet Explorer in
this guide)
2. Type the default IP address (192.168.0.30) or the IP address found by IPFinder in the
Address bar, and then press [Enter].
3. When the login window appears, enter the default User name (admin) and
password (admin) and press OK to access to the main screen of the camera’s Web
Configuration.
4. Right click and select Install Active X Control.
5. Click Install.
Enter the IP address of the camera here.
Enter the User name and Password.
6. Click Setup and then Smart Wizard to set up your camera quickly. The Smart Wizard
will guide you through the necessary settings with detailed instructions on each step.
6 © MARMITEK
Page 7

4 TIPS
- For more information, please refer to the Advanced Installation Guide on the provided
Installation CD-ROM.
- For details of operating UltraView, please refer to the Software User Guide on the provided
Installation CD-ROM.
- If you have any problem on the product(s), please contact your local authorized dealer.
TECHNICAL DATA
See page 8 and 9
ATTENTION
This appliance is designed to be used in all EU and EFTA countries.
Attention: The use of this product may be restricted in the following countries:
• Belgium: 2.4 GHz Frequency. The use of this frequency may be restricted in some areas. See
http://www.bipt.be for current information.
• France: 2.4 GHz Frequency. The use of channels other than: 10, 11, 12, 13 (2457, 2462,
2467, and 2472 MHz) may be restricted in some areas. See l’Autorité de Régulation des
Télécommunications (http://www.art-telecom.fr) for current information.
Environmental Information for Customers in the European Union
European Directive 2002/96/EC requires that the equipment bearing this symbol on the product and/or its
packaging must not be disposed of with unsorted municipal waste. The symbol indicates that this product
should be disposed of separately from regular household waste streams. It is your responsibility to dispose
of this and other electric and electronic equipment via designated collection facilities appointed by the government or
local authorities. Correct disposal and recycling will help prevent potential negative consequences to the environment
and human health. For more detailed information about the disposal of your old equipment, please contact your local
authorities, waste disposal service, or the shop where you purchased the product.
ENGLISH
7IP EYE ANYWHERE™
Page 8
e
civedBSUtnuomsideblliwces4revodlohdnahsuPAN
NALsseleriWg/b11.208ANNALsseleriWg/b11.208ANsseleriW
gnimaertslaudGEPJM/4GEPMGEPJM
mm5.4mm6.4
8.26.2
ylsuoenatlumisseliforp3AN
hsalFRONetyBM8hsalFRONetyBM4
MARDSetyBM23MARDSetyBM61
enohporciMlanoitcerid-inmOlanretnIAN
.xamsttaw8.xamsttaw6
Bd3-/+Bd84-AN
zH00061~05AN
RMA/MCPAN
annetnAelopiDlanretxEANannetnAelopiDlanretxEANannetnA
distribution: 500mA Max.)
0.5 LUX
1/4” Color CMOS Sensor
640 x 480, 320 x 240, 160 x 120
Technical Data (1) IP Eye Anywhere 10 IP Eye Anywhere 11 IP Eye Anywhere 20 IP Eye Anywhere 21
Image Sensor
Image Sensor
Resolution
Ligh Minimum Illumination
Lens
Aperture (F/No.)
Focus Length
Yes
Yes
60 degree
View Angle (Diagonal)
Yes
Image Processing
Compression
Auto Exposure Control
Auto White Balance
Auto Gain control
TCP/IP, UDP, ICMP,DHCP,NTP,DNS,DDNS,SMTP,FTP,
ARM9 base
System
Network Processor
System ROM
System RAM
DC5V, 230VAC 50 Hz
One RJ45 port; IEEE 802.3u compliant
10/100 Mbps Fast Ethernet with Auto-MDIX
Storage: Temp: -15 ~ 60 Humidity: 0% ~ 90% non-condensing
Operation: Temp: 0 ~ 45 Humidity: 20% ~ 85% non-condensing
TCP/IP, UDP, ICMP,DHCP,NTP,DNS,
DDNS,SMTP,FTP,HTTP, PPPoE, UPnP HTTP, Samba, PPPoE, UPnP, RTP, RTSP, RTCP
Power
Power Consumption
Environment Operation:
Audio
Audio in
Sensitivity:
Freq Response:
Audio Codec
Communication
Ethernet
Supported Protocols
50Hz, 60Hz or Outdoor
VGA (640 x 480 ) : 30 fps, QVGA ( 320 x 240 ) : 30 fps, QQVGA ( 160 x 120) : 30 fps
Light Frequency
Image Resolution and Frame rate
Multi-profile
Orange Colour
LED and Button
Power LED
One Type A receptacle Connector USB 1.1 Host port (Power
Green Colour
NA
Push and Release button will be Reboot. Push and hold over 5 sec will be Factory reset
Link/act. LED
Reset button
Others
USB Port
USB dismount button
8 © MARMITEK
Page 9
ENGLISH
2APW,)PIKT(APW,tib821/46PEWAN2APW,)PIKT(APW,tib821/46PEWANytiruceSsseleriW
.g/b11.208EEEI.g/b11.208EEEIsseleriW
MA
RDSnierots)xam(smeti001AN
evobarozHM008IIImuitnePletnIevobarozHM053IIImuitnePletnI
3x
Yes
Yes (1-25fps,Auto)
Brightness, Sharpness, Saturation
5 levels setting : Lowest, Low, Normal, High, Highest
Technical Data (2) IP Eye Anywhere 10 IP Eye Anywhere 11 IP Eye Anywhere 20 IP Eye Anywhere 21
Feature
Image setting
Upside down and Mirror
Digital Zoom
Frame rate setting
Compression Ratio Setting
seYoN
/7
Recording Video file to PC, Network Storage, USB Flash Disk
Scheduling
2 scalable windows
Static IP Address, DHCP, PPPoE
Manual Time Setting, Time Server and NTP Support
Support SMTP mail, Scheduling, Two destination email account
NA
Events Triggered by Motion detection or according to schedule, Image Upload/Send over email, FTP
3GPP support
IP Setting
Email
Time Management
Event Management
FTP Upload
Motion detection
Guest User just have View video and listen Audio function only.
Yes
Backup/Restore to/from Configuration file
Web Based Administration, Application Software
Password protected and 3 levels of Authorization
Guest User just have View video function only.
IP Filter
System Management
Device Configuration
User Administration
Normal / Off
Quick Installation setup step by step
General User have all authority in Live view page
Administrator have View video and All configuration setting.(default: admin/admin)
System reboot button. Reset all configuration to factory default values button.
Internet Explore 6.0 above, Firefox (MJPEG mode only), Safari (MJPEG mode only)
System log
LED control
Smart Setup Wizard
Reset Function
Browser
Windows 2000/ XP/Vista
For developing application software
API
Software
Supported OS
BM
215BM821
Audio support
/7
1 camera connected: IntelPentium III 800MHz; 512MB RAM
5 ~ 8 cameras connected: Intel Pentium 4 2.4GHz; 1GB RAM
9 ~ 16 cameras connected: Intel Pentium 4 3.4GHz; 2GB RAM
2 ~ 4 cameras connected: Intel Pentium 4 1.3GHz; 512MB RAM
CD ROM drive
Microsoft® Windows® 2000/XP/Vista
Auto search IP Address of Camera in LAN
View channel:16 CHs, Record, Playback, Motion detect, Backup/Restore to/from Configuration file
Application Software
IPFinder
10Base-T Ethernet or 100Base-TX Fast Ethernet
Minimum system requirements
General
hardware
Operating system
network
800x600 or above
Microsoft® Internet Explorer 6.0 or above, Apple Safari 2 or above, Mozilla Firefox 2.00 or above
Camera
Processor
Memory
Screen Resolution
Web browser
1024x768 or above
1 camera connected: IntelPentium III 800MHz; 512MB RAM
5 ~ 8 cameras connected: Intel Pentium 4 2.4GHz; 1GB RAM
9 ~ 16 cameras connected: Intel Pentium 4 3.4GHz; 2GB RAM
2 ~ 4 cameras connected: Intel Pentium 4 1.3GHz; 512MB RAM
Application Software
Processor
Screen Resolution
9IP EYE ANYWHERE™
Page 10

10 © MARMITEK
Page 11

SICHERHEITSHINWEISE
• Um Kurzschluss vorzubeugen, dieses Produkt bitte ausschließlich innerhalb des Hauses
und nur in trockenen Räumen nutzen. Setzen Sie die Komponenten nicht Regen oder
Feuchtigkeit aus. Nicht neben oder nahe eines Bades, Schwimmbades usw. verwenden.
• Setzen Sie die Komponente Ihres Systems nicht extrem hohen Temperaturen oder starken
Lichtquellen aus.
• Bei einer zweckwidrigen Verwendung, selbst angebrachten Veränderungen oder selbst
ausgeführten Reparaturen verfallen alle Garantiebestimmungen. Marmitek übernimmt
bei einer falschen Verwendung des Produkts oder bei einer anderen Verwendung des
Produktes als für den vo rgesehenen Zweck keinerlei Produkthaf tung. Marmitek übernimmt
für Folgeschäden keine andere Haftung als die gesetzliche Produkthaftung.
• Dieses Produkt ist kein Spielzeug. Außer Reichweite von Kindern halten.
• Das Produkt niemals öffnen: Das Gerät kann Teile enthalten, worauf lebensgefährliche
Stromspannung steht. Überlassen Sie Reparaturen oder Wartung nur Fachleuten.
• Schließen Sie den Netzadapter erst dann an das Stromnetz an, nachdem Sie überprüft
haben, ob die Net zspannung mit dem auf dem Typenschild angeg eben Wert übereinstimmt.
Schließen Sie niemals einen Netzadapter an, wenn diese beschädigt sind. In diesem Fall
nehmen Sie Kontakt mit Ihrem Lieferanten auf.
1 INBETRIEBNAHME
Lieferumfang
Prüfen Sie sorgfältig den Inhalt der Packung. Die folgenden Artikel sollten mitgeliefert sein. Falls
irgendein Artikel fehlt oder beschädigt ist, wenden Sie sich bitte umgehend an Ihren Händler.
✔ Eine Marmitek IP Eye AnywhereTM-Netzwerkkamera
✔ Ein Netzteil
✔ Eine externe Antenne (für das Drahtlos-Modell)
✔ Ein Kamerafuß
✔ Ein Ethernet-Kabel (RJ-45)
✔ Eine Installations-CD-ROM (English)
✔ Eine Installations-Kurzanleitung
DEUTSCH
Systemanforderungen
■ Netzwerkverbindung
LAN: 10 Base-T Ethernet oder 100 Base-TX Fast Ethernet
WLAN: IEEE 802.11b/g (für das Drahtlos-Modell)
■ Zugriff auf die Kamera über einen Webbrowser
Plattform: Microsoft® Windows® 2000/XP/Vista/7
CPU: Intel Pentium III 800 MHz oder besser
RAM: 512 MB
Auflösung: 800 x 600 oder höher
Benutzerschnittstelle: Microsoft® Internet Explorer 5.0 oder aktueller
11IP EYE ANYWHERE™
Page 12
■ UltraView software
Platform: Microsoft® Windows® 2000/XP/Vista/7
CPU: Intel Pentium III 800MHz oder besser und 512MB RAM für 1
angeschlossene Kamera
CPU: Intel Pentium 4 3.4 GHz oder besser und 2GB RAM für 9 ~16
angeschlossene Kameras
Auflösung: 1024x768 oder besser
2 EINRICHTEN DER KAMERA
Installieren des Kamerafußes
Die Kamera wird mit einem Kamerafuß mit drehbarer Kugellagerung geliefert, die in
das Schraubgewinde der Kamera eingeschraubt werden kann. Nach dem Anbringen des
Kamerafußes können Sie die Kamera überall aufstellen, indem Sie die drei Schraublöcher am
Boden des Kamerafußes zur Befestigung verwenden.
Der Kamerafuß
TM
Verbinden der IP Eye Anywhere
Kamera mit einem
LAN
Verwenden Sie das beigelegte Ethernet-Kabel, um die
Kamera mit Ihrem lokalen Netzwerk (LAN) zu verbinden.
Sobald das Netzteil angeschlossen ist, wird die Kamera
sofort mit Strom versorgt. Sie können über die BetriebsLED an der Frontseite der Kamera den Betriebszustand des
Gerätes überprüfen.
Sobald die Stromversorgungsverbindung besteht, blinkt die
Link-LED grün. Die Kamera ist sofort betriebsbereit.
Hier Ethernet-Kabel anschließen
12 © MARMITEK
Page 13
Anschließen der
externen Antenne
Verbinden der Kamera mit einem
WLAN
Wenn Sie ein drahtloses Netzwerk
nutzen, müssen Sie die beigelegte externe
Antenne an der Kamera anbringen.
Sobald die Kamera mit Strom versorgt
wird, sucht das Gerät automatisch
nach einem Zugriffspunkt mit der SSID
„default”.
HINWEIS Falls die Verbindung der Kamera mit Ihrem drahtlosen Netzwerk fehlschlägt, müssen
Sie die Kamera mit einem LAN verbinden und die WLAN-Einstellungen darüber vornehmen.
3 ZUGREIFEN AUF DIE KAMERA
Verwenden des IP Finder
1. Legen Sie die Installations-CD-ROM in Ihr optisches Laufwerk ein. Die Software
startet automatisch.
2. Klicken Sie auf das Objekt IP Finder, um das Dienstprogramm zu starten. Die
nachstehend abgebildete Bedienoberfläche öffnet sich.
Zeigt verbundene Kameras
Auf Search [Suchen] klicken, um
die IP-Adresse(n) der verbundenen
Kamera(s) zu finden.
Auf Change IP [IP ändern] klicken,
um die IP-Adresse der ausgewählten
Kamera zu ändern.
Auf Exit [Beenden] klicken, um das
Dienstprogramm zu schließen.
3. Nachdem Sie die IP-Adresse der Kamera erhalten haben, starten Sie bitte Ihren
Webbrowser oder Ultra View, um auf die Kamera zuzugreifen.
Tipp Die Installations-CD-ROM enthält ein Einrichtungsprogramm, mit dem Sie IP
Finder auf Ihrem Computer installieren können. Klicken Sie auf Install Software
[Software installieren], wählen Sie dann IP Finder im geöffneten Fenster, um IP
Finder zu installieren.
DEUTSCH
13IP EYE ANYWHERE™
Page 14
So greifen Sie auf die Kamera zu
1. Öffnen Sie Ihren Webbrowser auf Ihrem Computer (in dieser Anleitung wird der
Microsoft Internet Explorer benutzt).
2. Geben Sie die Standard-IP-Adresse (192.168.0.30) oder die über IP Finder gefundene
IP-Adresse in das Adressfeld ein, drücken dann die Eingabetaste.
3. Wenn das Anmeldungsfenster erscheint, geben Sie bitte den Standardbenutzernamen
(admin) und das Standardkennwort (admin) ein. Klicken Sie anschließend auf OK, um
die Hauptseite der Kamera-Webkonfiguration zu öffnen.
4. Klicken Sie auf die rechte Maustaste und wählen Sie Active X Control aus.
5. Klicken Sie auf Install (Installieren).
IP-Adresse der Kamera hier eingeben.
Benutzernamen und Kennwort eingeben.
6. Klicken Sie auf Setup [Einstellen] und dann auf Smart Wizard [Intelligenter
Assistent], um Ihre Kamera schnell einzustellen. Der Assistent führt Sie mit detaillierten
Erläuterungen durch die notwendigen Schritte.
14 © MARMITEK
Page 15

4 TIPPS
Lesen Sie bitte die Erweiterte Installationsanleitung auf der beigelegten Installations-CDROM für weitere Informationen.
Lesen Sie bitte die Software-Bedienungsanleitung auf der beigelegten Installations-CDROM für Details zur Bedienung des Programms Ultra View.
Falls Probleme mit dem Produkt auftreten sollten, wenden Sie sich bitte an Ihren Händler.
TECHNISCHEN DATEN
Siehe Seite 16 und 17
ACHTUNG
Dieses Gerät ist für den Gebrauch in allen EU und EFTA Ländern gedacht.
Achtung: In nachfolgenden Ländern ist die Verwendung dieses Produktes begrenzt:
• Belgien: 2.4 GHz Frequenzband. Die Nutzung dieses Frequenzbandes ist begrenzt und
hängt von den verschiedenen Regionen ab. Schauen Sie unter http://www.bipt.be für
aktuelle Informationen.
• Frankreich: 2.4 GHz Frequenzband. Die Nutzung anderer Kanäle als: 10, 11, 12, 13 (2457,
2462, 2467, und 2472 MHz) kann eingeschränkt sein, dies ist departementabhängig. Schauen
Sie unter l ‘Autorité de Régulation des Télécommunications (http://www.art-telecom.fr) für
aktuelle Informationen.
Umweltinformation für Kunden innerhalb der Europäischen Union
Die Europäische Richtlinie 2002/96/EC verlangt, dass technische Ausrüstung, die direkt am Gerät und/oder an
der Verpackung mit diesem Symbol versehen ist nicht zusammen mit unsortiertem Gemeindeabfall entsorgt
werden darf. Das Symbol weist darauf hin, dass das Produkt von regulärem Haushaltmüll getrennt entsorgt
werden sollte. Es liegt in Ihrer Verantwortung, dieses Gerät und andere elek trische und elektronische Geräte über die
dafür zuständigen und von der Regierung oder örtlichen Behörden dazu bestimmten Sammelstellen zu entsorgen.
Ordnungsgemäßes Entsorgen und Recyceln trägt dazu bei, potentielle negative Folgen für Umwelt und die menschliche
Gesundheit zu vermeiden. Wenn Sie weitere Informationen zur Entsorgung Ihrer Altgeräte benötigen, wenden Sie sich
bitte an die örtlichen Behörden oder städtischen Entsorgungsdienste oder an den Händler, bei dem Sie das Produkt
erworben haben.
DEUTSCH
15IP EYE ANYWHERE™
Page 16

NALsolthardg/b11.208dneffertuzthcinNALsolthardg/b11.208dneffertuzthcinsoltharD
gnimaertSlauDGEPJM/4GEPMGEPJM
gitiezhcielgeliforP3dneffertuzthcin
hsalFRONetyBM8hsalFRONetyBM4
mm5,4mm6,4
8,26,2
MARDSetyBM23MARDSetyBM61
noforkiMselanoitkeridinmoenretnIdneffertuzthcin
.xamsttaW8.xamsttaW6
Bd3-/+Bd84-dneffertuzthcin
zH00061~05dneffertuzthcin
RMA/MCPdneffertuzthcin
ennetnalopiDenretxEdneffertuzthcinennetnalopiDenretxEdneffertuzthcinennetnA
0,5 LUX
1/4” Farbbild CMOS Sensor
640 x 480, 320 x 240, 160 x 120
Bildsensor
Technische Daten (1) IP Eye Anywhere 10 IP Eye Anywhere 11 IP Eye Anywhere 20 IP Eye Anywhere 21
Bildsensor
Auflösung
Mindestlichtstärke
60 Grad
Objektiv
Blende (F/No.)
Fokuslänge
Gesichtswinkel (diagonal)
JaJaJa
50Hz, 60Hz oder Outdoor
VGA (640 x 480 ) : 30 fps, QVGA ( 320 x 240 ) : 30 fps, QQVGA ( 160 x 120) : 30 fps
Bildbearbeitung
Kompression
Automatische Belichtungskontrole
Automatische Weißbalance
Automatische Stärkeregelung
Lichtfrequenz
Bildauflösung und Bildfolge
Multi-Profil
System
Basiert auf ARM9
DC5V, 230VAC 50 Hz
Netzwerkprozesor
System ROM
System RAM
Leistung
TCP/IP, UDP, ICMP,DHCP,NTP,DNS,DDNS,SMTP,FTP,
Grün
Orange
10/100 Mbps Fast Ethernet mit Auto-MDIX
Ein RJ45 Port; kompatibel mit IEEE 802.3u
Lageremperatur: -15 ~ 60, Luftfeuchigkeit 0% ~ 90% nicht kondensierend
Betriebstemperatur: 0 ~ 45, Luftfeuchtigkeit: 20% ~ 85% nicht kondensierend
TCP/IP, UDP, ICMP,DHCP,NTP,DNS,
DDNS,SMTP,FTP,HTTP, PPPoE, UPnP HTTP, Samba, PPPoE, UPnP, RTP, RTSP, RTCP
Unterstützte Protokolle
LED und Taste
Energie LED
Verbrauch
Umgebung:
Audio
Audio in
Empfindlichkeit:
Freq Response:
Audio Codec
Kommunikation
Ethernet
Link/Aktivität LED
Drücken und 4 Sekunden festhalten für Dismount USB Komponenten
Eine Typ A Steckdose USB 1.1 Host Port (Verteilernetz: 500mA Max.)
nicht zutreffend
nicht zutreffend
Taste drücken und loslassen für neustart. 5 Sekunden festhalten um zu den Fabrikseinstellungen zurückzukehren.
Reset-Taste
USB Port
USB Demontagetaste
Übriges
16 © MARMITEK
Page 17

.g/b11.208EEEI.g/b11.208EEEIsoltharD
MARDSnirehciepS).xam(smetI001dneffertuzthcin
reh
öhredozHM0083muitnePletnIrehöhredozHM0533muitnePletnI
3x
Ja
Helle, Schärfe, Sättigung
Technische Daten (2) IP Eye Anywhere 10 IP Eye Anywhere 11 IP Eye Anywhere 20 IP Eye Anywhere 21
Ausstattung
Bildeinstellung
Umgekehrt und Spiegelbild
Digitalzoom
aJnieN
betrachten und Audio hören
Registrierung Videodatei zum PC, Netzwerkspeicher, USB Flash Disk
Ja (1-25fps, Auto)
Statische IP Adresse, DHCP, PPPoE
5 Einstellungsebenen: niedrigst, niedrig, normal, hoch, höchst
Bildfolgeeinstellung
Kompressionsrate Einstellung
3GPP Support
IP Einstellung
Planung
2 adaptierbare Fenster
Manuelle Zeiteinstellung, Zeitserver und NTP Support
Unterstützt SMTP Mail, Planung, e-Mail Account mit zwei Bestemmungen
nicht zutreffend
Events getriggert durch Bewegungsdetektion oder nach Schema, Bild uploaden/über e-Mail, FTP versenden
E-mail
Zeitmanagement
Event Management
FTP Upload
Bewegungsmeldung
Gastanwender verfügen lediglich über die Funktion Video
Ja
Webbasierte Verwaltung, Anwendersoftware
Durch Kennwort geschützt und 3 Autorisationsebenen
Backup/wiederherstellen zur/von der Konfigurationsdatei
betrachten
Gastanwender verfügen lediglich über die Funktion Video
IP Filter
Systemmanagement
Konfiguration von Komponenten
Anwenderverwaltung
BM215BM821
Audio Support
/7
/7
Normal / Aus
Windows 2000/ XP/Vista
Zur Entwicklung von Anwendersoftware
Kurze Installationseinstellung Schritt für Schritt
Allgemeine Anwender sind alle autorisiert bis Live View Page
Verwalter hat Video betrachten und Alle Konfigurations-Einst. Fabrikeinst.:Verwalt/Verwalt)
Taste, um alle Einstellungen in die Fabrikeinstellung zurückzusetzen
Internet Explorer 6.0 oder höher, Firefox (nur MJPEG Modus), Safari (nur MJPEG Modus)
Kanal: 16 CHs, Registrieren, Playback, Bewegungsmeldung, Backup/wiederherstellen zur/von der Konfigurationsdatei
Absicherung drahtlos nicht zutreffend WEP 64/128 bit, WPA (TKIP), WPA2 nicht zutreffend WEP 64/128 bit, WPA (TKIP), WPA2
System Log
LED Kontrolle
Smart Setup Wizard
Reset-Funktion
Browser
API
Software
Supported OS
Anwendersoftware
CD ROM Drive
Microsoft® Windows® 2000/XP/Vista
Sucht automatisch IP Adresse der Kamera in LAN
IPFinder
10Base-T Ethernet or 100Base-TX Fast Ethernet
Mindest-Systemanforderungen
Allgemein
Hardware
Plattform
Netzwerk
Kamera
Prozessor
800x600 oder höher
Speicher
Bildschirmauflösung
DEUTSCH
1 angeschlossene Kamera: Intel Pentium III 800MHz; 512MB RAM
5 ~ 8 angeschlossene Kameras : Intel Pentium 4 2.4GHz; 1GB RAM
9 ~ 16 angeschlossene Kameras : Intel Pentium 4 3.4GHz; 2GB RAM
2 ~ 4 angeschlossene Kameras : Intel Pentium 4 1.3GHz; 512MB RAM
1024x768 oder höher
Microsoft® Internet Explorer 6.0 oder höher, Apple Safari 2 oder höher, Mozilla Firefox 2.00 oder höher
1 angeschlossene Kamera: Intel Pentium III 800MHz; 512MB RAM
5 ~ 8 angeschlossene Kameras : Intel Pentium 4 2.4GHz; 1GB RAM
9 ~ 16 angeschlossene Kameras : Intel Pentium 4 3.4GHz; 2GB RAM
2 ~ 4 angeschlossene Kameras : Intel Pentium 4 1.3GHz; 512MB RAM
Webbrowser
Anwendersoftware
Prozessor
Bildschirmauflösung
17IP EYE ANYWHERE™
Page 18

18 © MARMITEK
Page 19

AVERTISSEMENTS DE SECURITE
• Afin d’éviter un court-circuit, ce produit ne doit être utilisé qu’à l’intérieur, et uniquement
dans des endroits secs. Ne pas exposer les composants à la pluie ou à l’humidité. Ne pas
utiliser à côté de ou près d’une baignoire, une piscine, etc.
• Ne pas exposer les composants de votre système à des températures extrêmement élevées
ou à des sources de lumières trop fortes.
• Toute utilisation impropre, toute modification ou réparation effectuée vous-même
annule la garantie. Marmitek n’accepte aucune responsabilité dans le cas d’une utilisation
impropre du produit ou d’une utilisation autre que celle pour laquelle le produit est
destiné. Marmitek n’accepte aucune responsabilité pour dommage conséquent, autre que
la responsabilité civile du fait des produits.
• Ce produit n’est pas un jouet et doit être rangé hors de la portée des enfants.
• Ne jamais ouvrir le produit : Les appareils peuvent comprendre des composants dont la
tension est mortelle. Les réparations ou l’entretien ne doivent être effectués que par des
personnes compétentes.
• Brancher l’adaptateur secteur sur le réseau électrique seulement après avoir vérifié que
la tension d’alimentation correspond à la valeur indiquée sur les plaques d’identification.
Ne jamais brancher un adaptateur secteur lorsque celui-ci est endommagé. Dans ce cas,
veuillez contacter votre fournisseur.
1 DÉMARRAGE
Contenu de l’emballage
Vérifiez avec attention les éléments contenus dans l’emballage. Vous devez avoir ce qui suit.
Si un des éléments est manquant ou endommagé, contactez votre revendeur local agréé.
✔ Une caméra réseau Marmitek IP Eye AnywhereTM.
✔ Un adaptateur d’alimentation DC.
✔ Une antenne externe (pour le modèle sans fil).
✔ Un support caméra.
✔ Un câble Ethernet (de type RJ-45).
✔ Un CD-ROM d’installation (Anglais).
✔ Un Guide d’installation rapide.
FRANÇAIS
Configuration système requise
■ Mise en réseau
LAN: Ethernet 10Base-T ou Fast Ethernet 100Base-TX.
WLAN: IEEE 802.11b/g (pour le modèle sans fil).
■ Accéder à la caméra à l’aide d’un navigateur Web
Plate-forme: Microsoft® Windows® 2000/XP/Vista/7
CPU: Intel Pentium III 800MHz ou supérieur
RAM: 512MB
Résolution: 800x600 ou supérieure
Interface utilisateur: Microsoft® Internet Explorer 5.0 ou supérieur
19IP EYE ANYWHERE™
Page 20

■ UltraView software
Plate-forme: Microsoft® Windows® 2000/XP/Vista/7
CPU: Intel Pentium III 800MHz ou supérieur et 512MB RAM for 1 caméra
connectée
CPU: Intel Pentium 4 3.4 GHz ou supérieur et 2GB RAM for 9 ~16 caméra
connectée
Résolution: 1024x768 ou supérieure
2 CONFIGURER LA CAMÉRA
Installer le support de la caméra
La caméra est livrée avec son support, qui utilise une tête vissée pivotante sur bille qui se
verrouille sur le trou fileté de la caméra. Lorsque le support de la caméra est fixé, vous pouvez
placer la caméra n’importe où en montant la caméra via les trois trous de vis situés à l’embase
du support de caméra.
Le support de caméra
Connecter l’IP Eye AnywhereTM caméra au réseau
local (LAN)
Utilisez le câble Ethernet fourni pour brancher la caméra à
votre réseau local (LAN).
Lorsque vous branchez l’adaptateur d’alimentation ac,
la caméra est alimentée automatiquement. Vous pouvez
vérifier l’état d’alimentation via la DEL d’alimentation qui se
trouve sur la face avant de la caméra.
Une fois branchée, la DEL Link (Lien) commence à clignoter
en vert et la caméra se met en veille prête à l’emploi.
Connexion du câble Ethernet
20 © MARMITEK
Page 21

Connecter la caméra au réseau Wifi
(WLAN)
Si vous utilisez un réseau sans fil dans
votre environnement applicatif, vous devez
fixer sur votre caméra l’antenne externe
fournie.
Anschließen der
externen Antenne
Lorsque la caméra est alimentée, elle
recherche automatiquement tout point
d’accès avec le SSID “default” (par
défaut).
REMARQUE Si la caméra ne trouve pas de réseau sans fil, il vous faut installer la caméra sur
le réseau local et procéder au paramétrage WLAN.
3 ACCÉDER À LA CAMÉRA
Utiliser IP Finder (Trouveur d’IP)
1. Insérez le CD-ROM d’installation dans le lecteur de CD-ROM de votre ordinateur pour
initier le programme Auto-Run.
2. Cliquez sur l’élément IP Finder (Trouveur d’IP) pour lancer l’utilitaire. Le panneau de
commande apparaît comme ci-dessous.
Affiche la(les) caméra(s) connectée(s)
Cliquez sur Search (Rechercher)
pour trouver l’adresse IP de la (des)
caméra(s) connectée(s).
Cliquez sur Change IP (Modifier
IP) pour modifier l’adresse IP de la
caméra sélectionnée.
Cliquez sur Exit (Quitter) pour
fermer l’utilitaire.
FRANÇAIS
3. Une fois que vous avez obtenu l’adresse IP de la caméra, lancez le navigateur Web ou
Ultra View pour accéder à votre caméra.
ASTUCE Le CD-ROM d’installation fournit un programme de configuration qui vous
permet d’installer IP Finder sur votre ordinateur. Pour installer IP Finder, cliquez
sur Install Software (Installer le logiciel) puis sélectionnez IP Finder sur
l’écran Auto-Run.
21IP EYE ANYWHERE™
Page 22

Accéder à la caméra
1. Ouvrez le navigateur Web sur votre ordinateur (par exemple, Microsoft Internet
Explorer dans le présent guide).
2. Saisissez l’adresse IP par défaut (192.168.0.30) ou l’adresse IP trouvée par IP Finder
dans la barre d’adresse, puis appuyez sur [Entrée].
3. Lorsque la fenêtre d’identification apparaît, saisissez le User name (l’identifiant)
(admin) et password (mot de passe) (admin) puis appuyez sur OK pour accéder à
l’écran principal de la configuration Web de la caméra.
4. Faites un clic droit et sélectionnez Active X Controle.
5. Cliquez sur Install (Installer).
Saisissez ici l’adresse IP de la caméra.
Saisissez l’identifiant et le mot de passe.
6. Cliquez sur Setup (Configuration) puis sur l’assistant intelligent Smart Wizard pour
configurer rapidement votre caméra. L’assistant Smart Wizard vous guide à travers les
paramétrages nécessaires avec des instructions détaillées à chaque étape.
22 © MARMITEK
Page 23

4 ASTUCES
Pour de plus amples informations, veuillez vous référer au Guide d’installation avancé sur
le CD-ROM d’installation fourni.
Pour de plus amples détails sur l’utilisation d’Ultra View, veuillez vous référer au Guide
d’utilisation des logiciels sur le CD-ROM d’installation fourni.
Si vous avez un problème au sujet du (des) produit(s), veuillez contacter votre revendeur local
agréé.
CARACTÉRISTIQUES TECHNIQUES
Voir les pages 24 et 25
ATTENTION
Cet appareil est destiné à une utilisation dans l’ensemble des pays de l’Union européenne et
de l’AELE.
Attention : Dans les pays ci-dessous, l’utilisation de ce produit est limitée :
• Belgique : Bande 2,4 GHz. L’utilisation de cette bande est limitée en fonction du dépar tement
local. Pour des informations actuelles, consultez le site Internet http://www.bipt.be.
• France : Bande 2,4 GHz. L’utilisation d’autres canaux que les canaux 10, 11, 12, 13
(2457, 2462, 2467, et 2472 MHz) peut être limitée en fonction du département. Pour des
informations actuelles, voir l’Autorité de Régulation des Télécommunications (http://www.
art-telecom.fr).
Informations environnementales pour les clients de l’Union européenne
La directive européenne 2002/96 /CE exige que l’équipement sur lequel est apposé ce symbole sur le produit
et/ou son emballage ne soit pas jeté avec les autres ordures ménagères. Ce symbole indique que le produit
doit être éliminé dans un circuit distinct de celui pour les déchets des ménages. Il est de votre responsabilité
de jeter ce matériel ainsi que tout autre matériel électrique ou électronique par les moyens de collecte indiqués par le
gouvernement et les pouvoirs publics des collectivités territoriales. L’élimination et le recyclage en bonne et due forme
ont pour but de lutter contre l’impact néfaste potentiel de ce type de produit s sur l’environnement et la santé publique.
Pour plus d’informations sur le mode d’élimination de votre ancien équipement, veuillez prendre contact avec les pouvoirs
publics locaux, le service de traitement des déchets, ou l’endroit où vous avez acheté le produit.
FRANÇAIS
23IP EYE ANYWHERE™
Page 24

gnimaertslaudGEPJM/4GEPMGEPJM
A
mm5,4mm6,4
8,26,2
spmetemêmnesliforp3-
hsalFRONetyBM8hsalFRONetyBM4
MARDSetyBM23MARDSetyBM61
lennoitceridinmoenretnienohporcim-
.xamsttaw8.xamsttaw6
Bd3-/+Bd84--
zH00061~05-
NALlifsnasg/b11.208-NALlifsnasg/b11.208-lifsnaS
RMA/MCP-
enretxeloopidennetnA-enretxeloopidennetnA-ennetnA
USB
: 500mA max.)
0,5 LUX
Détecteur CMOS 1/4" couleur
640 x 480, 320 x 240, 160 x 120
Détecteur d'image
Caractéristiques techniques (1) IP Eye Anywhere 10 IP Eye Anywhere 11 IP Eye Anywhere 20 IP Eye Anywhere 21
Détecteur d'image
Résolution
Intensité d'éclairage minimum
Lentille
Oui
Oui
60 degrés
Diaphragme (F/No.
Préréglage de la mise au point
Angle optique (diagonal)
Traitement des images
Compression
Contrôle d'éclairage automatique
Balance des blancs automatique
Oui
Basé sur ARM9
Système
Processeur du réseau
Système ROM
Système RAM
DC5V, 230VAC 50 Hz
Port RJ45; compatible avec IEEE 802.3u
10/100 Mbps Fast Ethernet avec Auto-MDIX
Température : 0 ~ 45, humidité : 20% ~ 85% ne se condensant pas
Température de stockage : -15 ~ 60, humidité : 0% ~ 90% ne se condensant pas
Capacité
Consommation
Environnement
Audio
Audio in
Sensibilité
Fréquence de réponse
Audio Codec
Communication
Ethernet
50Hz, 60Hz ou Outdoor
VGA (640 x 480 ) : 30 fps, QVGA ( 320 x 240 ) : 30 fps, QQVGA ( 160 x 120) : 30 fps
Réglage automatique de l'intensité
Fréquence de lumière
Résolution de l'image et fréquence du cadre
Profil multiple
TCP/IP, UDP, ICMP,DHCP,NTP,DNS,DDNS,SMTP,FTP,
Vert
Orange
TCP/IP, UDP, ICMP,DHCP,NTP,DNS,
DDNS,SMTP,FTP,HTTP, PPPoE, UPnP HTTP, Samba, PPPoE, UPnP, RTP, RTSP, RTCP
Protocoles à l'appui
LED et bouton
Energie LED
Link/activité LED
ppuyez et tenir pendant 4 secondes pour démontage composant
Prise de courant type A USB 1.1 Port Host (distribution du courant
-
-
Appuyez et lâchez le bouton pour redémarrer. Appuyez pendant plus de 5 secondes pour revenir au réglage de l'usine
Bouton de redémarrage
Autres
Port USB
Bouton de démontage USB
24 © MARMITEK
Page 25

2APW,)PIKT(APW,tib821/46PEW-2APW,)PIKT(APW,tib821/46PEW-lifsnasétirucéS
iuOnoN
3x
oui
oui (1-25fps, Auto)
Clarté, netteté et saturation
5 niveaux de réglage : le plus bas, bas, normal, élevé, le plus élevé
Enregistrement document vidéo vers ordinateur, mémoire réseau, flash disk USB
Oui
Planning
2 cadres adaptables
Adresse IP statique, DHCP, PPPoE
Réglage du temps manuel, serveur de temps et support NTP
Soutient mail SMTP, Planning, account E-mail avec 2 destinations
-
Evénements déclenchés par détection de mouvement ou selon planning, télécharger image/par e-mail, envoyer FTP
MARDSsnaderiomém).xam(secèip001-
la vidéo et d'écoute de l'audio
Utilisateurs hôtes disposent uniquement d'une fonction de vue de
Normal / Arrêt
Pour développer logiciel d'application
backup/correction du fichier de configuration
Administration de base web, logiciel d'application
Protégé par mot de passe et 3 niveaux d'autorisation
Utilisateurs courants ont toutes les autorisations pour Live view page
la vidéo
Utilisateurs hôtes disposent uniquement d'une fonction de vue de
Réglage d'installation courte, pas à pas
Bouton pour remettre tout réglage au réglage d'usine
L'administrateur a la fonction de vue et tous les réglages de configuration (réglage d'usine : admin/admin)
Internet Explorer 6.0 ou plus élevé, Firefox (seulement mode MJPEG), Safari (seulement mode MJPEG)
é
v
elésulpuozHM0083muitnePletnIévelésulpuozHM0533muitnePletnI
BM215BM821
Support audio
/7
Drive CD ROM
Windows 2000/ XP/Vista
Microsoft® Windows® 2000/XP/Vista/7
10Base-T Ethernet ou 100Base-TX Fast Ethernet
Cherche automatiquement adresse IP de caméra dans LAN
Canal: 16 CHs, Enregistrer, Playback, Détection de mouvement, Backup/correction vers/de document de configuration
1 caméra reliée : IntelPentium III 800MHz; 512MB RAM
5 ~ 8 caméras reliées : Intel Pentium 4 2.4GHz; 1GB RAM
9 ~ 16 caméras reliées : Intel Pentium 4 3.4GHz; 2GB RAM
2 ~ 4 caméras reliées : Intel Pentium 4 1.3GHz; 512MB RAM
800x600 ou plus élevé
Microsoft® Internet Explorer 6.0 ou plus élevé, Apple Safari 2 ou plus élevé, Mozilla Firefox 2.00 ou plus élevé
1024x768 ou plus élevé
FRANÇAIS
1 caméra reliée : IntelPentium III 800MHz; 512MB RAM
5 ~ 8 caméras reliées : Intel Pentium 4 2.4GHz; 1GB RAM
9 ~ 16 caméras reliées : Intel Pentium 4 3.4GHz; 2GB RAM
2 ~ 4 caméras reliées : Intel Pentium 4 1.3GHz; 512MB RAM
Caractéristiques techniques (2) IP Eye Anywhere 10 IP Eye Anywhere 11 IP Eye Anywhere 20 IP Eye Anywhere 21
Equipement
Réglage
Inverse et à l'envers
Zoom digital
Réglage de fréquence du cadre
Réglage de compression
Support 3GPP
Réglage IP
E-mail
Management de temps
Management d'événements
Téléchargement FTP
Détection de mouvement
Filtre IP
Management système
Configuration de composants
Administration d'utilisateur
Log système
Contrôle LED
Smart Setup Wizard
Fonction reset
Browser
API
Logiciel
Support OS
Logiciel d'application
IPFinder
Exigences minimales du système
Généralités
Matériel
Platforme
Réseau
Sans fil .g/b11.208EEEI.g/b11.208EEEI
Caméra
Processeur
Mémoire
Résolution de l'écran
Web browser
Logiciel d'application
Processeur
Résolution de l'écran
25IP EYE ANYWHERE™
Page 26

26 © MARMITEK
Page 27

AVISOS DE SEGURIDAD
• Para evitar un cortocircuito, este producto solamente se usa en casa y en habitaciones
secas. No exponga los componentes del sistema a la lluvia o a la humedad. No se use
cerca de una bañera, una piscina, etc.
• No exponga los componentes del sistema a temperaturas extremamente altas o a focos
de luz fuertes.
• En caso de uso indebido o modificaciones y reparaciones montados por su mismo, la
garantía se caducará. En caso de uso indebido o impropio, Marmitek no asume ninguna
responsabilidad para el producto. Marmitek no asume ninguna responsabilidad para
daños que resultan del uso impropio, excepto según la responsabilidad para el producto
que es determinada por la ley.
• Este producto no es un juguete. Asegúrese de que está fuera del alcance de los niños.
• Nunca abra el producto: Puede contener piezas que se encuentren bajo una tensión
mortal. Deja las reparaciones o servicios a personal experto.
• No conecte el adaptador de red a la red de alumbrado antes de que haya controlado si la
tensión de red corresponde con el valor indicado en la estampa de tipo. Nunca conecte
un adaptador de si ése está dañado. En este caso, por favor entre en contacto con su
proveedor.
1 PRIMEROS PASOS
Contenido del paquete
Compruebe minuciosamente los artículos que contiene el paquete. Éste debe contener los
siguientes artículos. Si alguno de ellos falta o está dañado, póngase en contacto con su
distribuidor autorizado regional.
✔ Una cámara para conexión en red Marmitek IP Eye AnywhereTM.
✔ Un adaptador de alimentación de CA.
✔ Una antena externa (para el modelo inalámbrico).
✔ Una base para la cámara.
✔ Un cable Ethernet (tipo RJ-45).
✔ Un CD-ROM de instalación (Inglés).
✔ Una Guía de instalación rápida.
ESPAÑOL
Requisitos del sistema
■ Conexión de red
LAN: Ethernet 10Base-T o Fast Ethernet 100Base-TX.
WLAN: IEEE 802.11b/g (para el modelo inalámbrico).
■ Acceso a la cámara usando un explorador Web
Plataforma: Microsoft® Windows® 2000/XP/Vista/7
Procesador: Intel Pentium III 800 MHz o superior
Memoria RAM: 512 MB
Resolución: 800x600 o superior
Interfaz del usuario: Microsoft® Internet Explorer 5.0 o posterior
27IP EYE ANYWHERE™
Page 28

■ Software UltraView
Platafprma: Microsoft® Windows® 2000/XP/Vista/7
Procesador: Intel Pentium III 800MHz o superior y 512MB RAM for 1 cámara
conectada
Procesador: Intel Pentium 4 3.4 GHz o superior y 2GB RAM for 9 ~16 cámara
conectada
Resolución: 1024x768 o superior
2 CONFIGURAR LA CÁMARA
Instalar la base de la cámara
La cámara incluye una base, que utiliza un cabezal con tornillo esférico giratorio para fijarse
al orifico del tornillo de dicha cámara. Cuando la base de la cámara está acoplada, puede
colocar ésta en cualquier lugar montándola a través de los tres orificios de los tornillos
situados en la parte inferior de la base.
Base de la cámara
Conectar la IP Eye AnywhereTM cámara a una red LAN
Use el cable Ethernet proporcionado para conectar la
cámara a la red de área local (LAN).
Cuando conecte el adaptador de alimentación de CA, la
cámara recibirá alimentación automáticamente. Puede
comprobar el estado de la alimentación a partir del LED de
alimentación situado en el panel frontal de la cámara.
Una vez conectada, el LED de enlace comenzará a parpadear
en color verde. La cámara se encontrará en el modo de
espera y lista para usarse.
Conectar el cable Ethernet
28 © MARMITEK
Page 29

Conectar la cámara a una red WLAN
Si usa una red inalámbrica en su entorno de
aplicación, es necesario acoplar la antena
externa incluida a la cámara.
Cuando la cámara reciba alimentación,
buscará automáticamente cualquier punto
Conecte la antena
externa
de acceso con un SSID “predeterminado”.
NOTA Si la cámara no puede conectarse a la red inalámbrica, tendrá que instalarla en una
red LAN y definir la configuración WLAN.
3 OBTENER ACCESO A LA CÁMARA
Usar el buscador de direcciones IP
1. Inserte el CD-ROM de instalación en la unidad de CD-ROM del equipo para iniciar el
programa de ejecución automática.
2. Haga clic en el elemento IP Finder (Buscador de direcciones IP) para iniciar la
utilidad. Aparecerá el panel de control tal y como se muestra a continuación:
Mostrar las cámaras conectadas
Haga clic en Search (Buscar) para
localizar la dirección IP de las cámaras
conectadas.
Haga clic en Change IP (Cambiar
dirección IP) para modificar la
dirección IP de la cámara seleccionada.
Haga clic en Exit (Salir) para cerrar la
utilidad.
ESPAÑOL
3. Cuando consiga la dirección IP de la cámara, inicie el explorador Web o Ultra View para
obtener acceso a la cámara.
SUGERENCIA El CD-ROM de instalación contiene un programa de instalación que
permite instalar la aplicación IP Finder en su PC. Para instalar IP Finder,
haga clic en Install Software (Instalar software) y, a continuación,
elija IP Finder (Buscador de direcciones IP) en la pantalla de ejecución
automática.
29IP EYE ANYWHERE™
Page 30

Obtener acceso a la cámara
1. Abra el explorador Web en su PC (en esta guía se utiliza Microsoft Internet Explorer)
2. Escriba la dirección IP predeterminada (192.168.0.30) o la dirección IP encontrada por la
aplicación IP Finder en la barra Address (Dirección) y, a continuación, presione [Entrar].
3. Cuando aparezca la ventana de inicio de se sión, escriba el nombre de usuario y la contras eña
predeterminados (admin para ambos) en los campos User name (Nombre de usuario) y
Password (Contraseña), respectivamente. A continuación, presione OK (Aceptar) para
obtener acceso a la pantalla principal de la configuración Web de la cámara.
4. Haga clic con el botón derecho y seleccione Active X Control.
5. Haga clic en Install (Instalar).
Escriba aquí la dirección IP de la cámara.
Escriba el nombre de usuario y la contraseña.
6. Haga clic en Setup (Instalar) y, a continuación, en Smart Wizard (Asistente
inteligente) para configurar la cámara rápidamente. El Asistente inteligente le guiará
a través de la configuración necesaria con instrucciones detalladas sobre cada paso.
30 © MARMITEK
Page 31

4 SUGERENCIAS
Para más información, consulte la Guía de instalación avanzada que encontrará en el CDROM de instalación proporcionado.
Para obtener detalles sobre el funcionamiento de Ultra View, consulte la Guía del usuario de
software que encontrará en el CD-ROM de instalación proporcionado.
Si tiene algún problema relacionado con los productos, póngase en contacto con el
distribuidor local autorizado.
ESPECIFICACIONES TÉCNICAS
Vea las páginas 32 y 33
ATENCIÓN
Este aparato es apto para su uso en todos los países de la UE y de la AELC
Atención: En los siguientes países el uso de este producto es limitado:
• Bélgica: 2.4 GHz banda de frecuencia. El uso de esta banda de frecuencia es limitada,
dependiendo del departamento local. Vea esta información actualizada en http://www.bipt.be.
• Francia: 2.4 GHz banda de frecuencia. El uso de otros canales distintos de: 10, 11, 12, 13
(2457, 2462, 2467, y 2472 MHz) puede ser limitado, dependiendo del departamento local.
Vea en l’Autorité de Régulation des Télécommunications (http://www.art-telecom.fr) esta
información actualizada.
Información medioambiental para clientes de la Unión Europea
La Direc tiva 2002 /96/CE de la UE exige que los equipos que lleven este símbolo en el propio aparato y/o en
su embalaje no deben eliminarse junto con otros residuos urbanos no seleccionados. El símbolo indica que el
producto en cuestión debe separarse de los residuos domésticos convencionales con vistas a su eliminación.
Es responsabilidad suya desechar este y cualesquiera otros aparatos eléctricos y electrónicos a través de los puntos de
recogida que ponen a su disposición el gobierno y las autoridades locales. Al desechar y reciclar correctamente estos
aparatos e stará contribuye ndo a evitar posib les consecuencias negativ as para el medio ambiente y la salud d e las personas.
Si desea obtener información más detallada sobre la eliminación segura de su aparato usado, consulte a las autoridades
locales, al servicio de recogida y eliminación de residuos de su zona o pregunte en la tienda donde adquirió el producto
ESPAÑOL
31IP EYE ANYWHERE™
Page 32

12erehwynAeyEPI02erehwynAeyEPI11erehwynAeyEPI01erehwynAeyEPI)1(socincétsotaD
0,5 LUX
1/4” CMOS sensor colores
640 x 480, 320 x 240, 160 x 120
ocirbmálaniNALg/b11.208elbacilpaoNocirbmálaniNALg/b11.208elbacilpaoNocirbmálanI
gnimaertslaudGEPJM/4GEPMGEPJM
mm5,4mm6,4
8,26,2
SiSiSi
60 grados
opmeitomsimlasenegámi3elbacilpaoN
hsalFRONetyBM8hsalFRONetyBM4
MARDSetyBM23MARDSetyBM61
Basado en ARM9
50Hz, 60Hz o Outdoor
VGA (640 x 480 ): 30 fps, QVGA ( 320 x 240 ): 30 fps, QQVGA ( 160 x 120): 30 fps
DC5V, 230VAC 50 Hz
onretnilanoicceridinmoonofórciMelbacilpaoN
omixámomocsttaw8omixámomocsttaw6
Bd3-/+Bd84-elbacilpaoN
z
RMA/MCPelbacilpaoN
H00061~05elbacilpaoN
HTTP, Samba, PPPoE, UPnP, RTP, RTSP, RTCP
10/100 Mbps Fast Ethernet con Auto-MDIX
Una puerta RJ45; compatible con IEEE 802.3u
Temperatura de funcionamiento: 0 ~ 45, humedad del aire: 20% ~ 85% no condensante
Temperatura de almacenamiento: -15 ~ 60, humedad del aire: 0% ~ 90% no condensante
TCP/IP, UDP, ICMP, DHCP, NTP, DNS TCP/IP, UDP, ICMP, DHCP, NTP, DNS, DDNS, SMTP, FTP
DDNS, SMTP, FTP, HTTP, PPPoE, UPnP
anretxeolopidanetnAelbacilpaoNanretxeolopidanetnAelbacilpaoNanetnA
USB
500mA máx.)
Un enchufe typo A, host USB 1.1 (distribución de electricidad:
Naranja
Verde
Pulsar y dejar pulsado 4 segundos para dismount componente
No aplicable
No aplicable
Pulsar y soltar botón para reinicio (reset). Dejar pulsado más que 5 segundos para volver a ajustes por defecto
Sensor de imagen
Sensor de imagen
Resolución
Intensidad mínima de iluminación
Lente
Diafragma (F/No.)
Longitud de foco
Ángulo óptico (diagonal)
Adaptación de imagen
Compresión
Control de iluminación automático
Balance de blanco aotomático
Regulación de intensidad automática
Frecuencia de iluminación
Resolución de imagen y framerate
Multi imagen
Sistema
Procesador de redes
Sistema ROM
Sistema RAM
Capacidad
Consumo
Ambiente
Audio
Entrada de audio
Sensitividad
Respuesta en frecuencia
Códec de audio
Comunicación
Ethernet
Protocolos que se apoyan
LED y botón
LED de potencia
LED de enlace/actividad
Botón de reset
Otros
Puerta USB
Botón USB dismount
32 © MARMITEK
Page 33

2APW,)PIKT(APW,tib821/46PEWelbacilpaoN2APW,)PIKT(APW,tib821/46PEWelbacilpaoNacirbmálaninóiccetorP
12erehwynAeyEPI02erehwynAeyEPI11erehwynAeyEPI01erehwynAeyEPI)2(socincétsotaD
M
A
RDSneairomem).xámomoc(semetí001elbacilpaoN
.g/b11.208EEEI.g/b11.208EEEIocirbmálanI
otlasámozHM0083muitnePletnIotlasámozHM0533muitnePletnI
Si
3x
Si (1-25fps, Auto)
Claridad, nitidez, saturación
5 niveles de ajuste: lo más bajo, bajo, normal, alto, lo más alto
Equipo
Ajustes de imagen
Inversa y reflejada
Zoom digital
Ajuste framerate
Ajuste compresión ratio
iSoN
y Escuchar audio
Registrar fichero de video en ordenador, memoria de red, USB flash disk
Planificación
Dirección IP fija, DHCP, PPPoE
Apoya SMTP mail, planificación, cuenta de correo electrónico con dos destinos
Soporte 3GPP
Ajuste IP
Correo electrónico
2 ventanas adaptables
Ajuste de tiempo manual, servidor de tiempo y soporte NTP
No aplicable
Eventos causados por detección de movimiento o según esquema, upload imagen/enviar por correo electrónico, FTP
Organización de tiempo
Organización de eventos
FTP Upload
Detección de movimiento
Usuarios invitados solamente disponen de funciones Mirar video
Si
Normal / Apagado
Botón para volver a ajustes por defecto
Backup/restablecer a/de fichero de configuración
Protegido por contraseña y 3 niveles de autorización
Administración basada en Web, software de aplicación
Usuarios generales tienen autorización para Live view page
Usuarios invitados solamente disponen de función Mirar video
Filtro de IP
Organización de sistema
Configuración de componentes
Administración de usuarios
Breve setup de instalación paso por paso
Administrador tiene Mirar video y Todos ajustes de configuración (ajuste por defecto: admin/admin)
Internet Explorer 6.0 o más alto, Firefox (solamente modo MJPEG), Safari (solamente modo MJPEG)
Log del sistema
Control LED
Smart Setup Wizard
Función de reinicio
Navegador
Soporte audio
Windows 2000/ XP/Vista/7
Para desarrollar software de aplicación
Dirección IP de cámara se busca automáticamente en LAN
Canal: 16 CHs, Registro, Playback, Detección de movimiento, Backup/restablecer a/de fichero de configuración
API
Software
OS apoyado
Software de aplicación
IPFinder
Exigencias mínimas de sistema
BM215BM821
Lector de CD-ROM
Microsoft® Windows® 2000/XP/Vista/7
10Base-T Ethernet o 100Base-TX Fast Ethernet
Genaral
Hardware
Plataforma
Red
800x600 o más alto
Microsoft® Internet Explorer 6.0 o más alto, Apple Safari 2 o más alto, Mozilla Firefox 2.00 o más alto
Cámara
Procesador
Memoria
Resolución de pantalla
Navegador web
1 cámara conectada: Intel Pentium III 800MHz; 512MB RAM
5 ~ 8 cámaras conectadas: Intel Pentium 4 2.4GHz; 1GB RAM
9 ~ 16 cámaras conectadas: Intel Pentium 4 3.4GHz; 2GB RAM
2 ~ 4 cámaras conectadas: Intel Pentium 4 1.3GHz; 512MB RAM
ESPAÑOL
1 cámara conectada: Intel Pentium III 800MHz; 512MB RAM
5 ~ 8 cámaras conectadas: Intel Pentium 4 2.4GHz; 1GB RAM
9 ~ 16 cámaras conectadas: Intel Pentium 4 3.4GHz; 2GB RAM
2 ~ 4 cámaras conectadas: Intel Pentium 4 1.3GHz; 512MB RAM
Software de aplicación
Procesador
Resolución de pantalla 1024x768 o más alto
33IP EYE ANYWHERE™
Page 34

34 © MARMITEK
Page 35

PRECAUZIONI DI SICUREZZA
• Per evitare il pericolo di cortocircuito utilizzare questo prodotto esclusivamente al coperto
e in luoghi asciutti. Non esporre i componenti di questo prodotto a pioggia o umidità.
Non utilizzare vicino alla vasca da bagno, piscina, ecc.
• Non esporre i componenti del sistema a temperature eccessivamente alte o a fonti intense
di luce.
• In caso di utilizzo scorretto, di riparazioni o modifiche apportate personalmente decade
qualsiasi garanzia. Marmitek declina ogni responsabilità per i danni derivanti da un utilizzo
non appropriato del prodotto o da utilizzo diverso da quello per cui il prodotto è stato
creato. Marmitek declina ogni responsabilità per danni consequenziali ad eccezione della
responsabilità civile sui prodotti.
• Questo prodotto non è un giocattolo: tenerlo lontano dalla portata dei bambini.
• Non aprire mai il prodotto: L’apparecchio può contenere componenti la cui tensione è
estremamente pericolosa. Lasciare fare riparazioni o modifiche esclusivamente a personale
esperto.
• Collegare l’alimentatore alla presa di corrente solamente dopo avere controllato che la
tensione della rete elettrica corrisponda alle indicazioni riportate sulla targhetta. Non
utilizzare mai un alimentatore danneggiato. In tal caso rivolgersi al proprio rivenditore.
1 PREPARAZIONE
Contenuto della confezione
Controllare con attenzione i contentuti della confezione che deve contenere i seguenti
elementi. In caso gli elementi siano danneggiati o manchino, contattare il rivenditore
autorizzato locale.
✔ Una telecamera di rete Marmitek IP Eye Anywhere
✔ Un adattatore di corrente CA
✔ Un’antenna esterna (per i modelli wireless)
✔ Un supporto per la telecamera
✔ Un cavo Ethernet (tipo RJ-45)
✔ Un CD-ROM di installazione (English)
✔ Una Guida rapida all’installazione
TM
Requisiti del sistema
■ Rete
LAN: Ethernet 10Base-T o Fast Ethernet 100Base-TX.
WLAN: IEEE 802.11b/g (per il modello wireless).
■ Accedere alla telecamera usando il browser web
Piattaforma: Microsoft® Windows® 2000/XP/Vista/7
CPU: Intel Pentium III 800MHz o superiore
RAM: 512MB
Risoluzione: 800x600 o superiore
Interfaccia: Microsoft® Internet Explorer 5.0 o superiore
ITALIANO
35IP EYE ANYWHERE™
Page 36

■ Software UltraView
Piattaforma: Microsoft® Windows® 2000/XP/Vista/7
CPU: Intel Pentium III 800MHz o superiore e 512MB RAM per 1 camera
collegata
CPU: Intel Pentium 4 3.4 GHz o superiore e 2GB RAM per 9 ~16 camere
collegate
Risoluzione: 1024x768 o superiore
2 MONTAGGIO DELLA TELECAMERA
Installazione del supporto della telecamera
La telecamera è dotata di un supporto, che usa una testa filettata inclinabile per bloccare il
foro della vite. Quando il supporto è attacato, la telecamera può essere collocata ovunque,
montandola usando i tre fori per le viti sulla base del supporto.
Supporto della telecamera
Collegamento della IP Eye AnywhereTM telecamera
alla LAN
Utilizzare il cavo Ethernet in dotazione per collegare la
telecamera alla LAN.
L’apparecchio si accende automaticamente, una volta
collegato l’adattatore di corrente CA. È possibile verificare
lo stato dell’alimentazione mediante il LED sul pannello
anteriore della telecamera.
Una volta collegata, il LED inizia a lampeggiare di colore
verde. In questa fase la telecamera è in standby e pronta
per l’uso.
Collegamento del cavo Ethernet
36 © MARMITEK
Page 37

Collegamento della telecamera alla
WLAN
Se nell’ambiente di applicazione si usa una
rete wireless, è necessario collegare alla
telecamera l’antenna esterna in dotazione.
Quando è accesa, la telecamera cerca
Collegamento
dell’antenna esterna
automaticamente un punto d’accesso
mediante SSID “predefinito”.
NOTA Se la telecamera non è in grado di collegarsi alla rete wireless, è necessario utilizzare la
LAN e poi procedere con le impostazioni della WLAN.
3 ACCEDERE ALLA TELECAMERA
Uso di IP Finder
1. Inserire il CD-ROM di installazione nell’unità CD-ROM del computer per iniziare il
programma di esecuzione automatica.
2. Fare clic su IP Finder per avviare l’utilità. Il pannello di controllo apparirà come illustrato
di seguito.
Visualizza le telecamere collegate
Fare clic su Search (Cerca) per
trovare gli indirizzi IP delle telecamere
collegate.
Fare clic su Change IP (Modifica
IP) per modificare l’indirizzo IP della
telecamera selezionata.
Fare clic su Exit (Esci) per chiudere
l’utilità.
ITALIANO
3. Una volta ottenuto l’indirizzo IP della telecamera, avviare il browser web o Ultra View
per accedere alla telecamera.
SUGGERIMENTO Il CD-ROM di installazione fornisce un programma d’installazione che
consente di installare IP Finder sul computer. Per installare IP Finder, fare clic su Install
Software (Installa software), quindi selezionare IP Finder nella schermata d’esecuzione
automatica.
37IP EYE ANYWHERE™
Page 38

Accedere alla telecamera
1. Aprire il browser web del computer (ad esempio: Microsoft Internet Explorer, come in
questa guida).
2. Nella barra dell’indirizzo inserire l’indirizzo IP predefinito (192.168.0.30) o quello
trovato da IP Finder, quindi premere [Enter] (Invio).
3. Quando appare la finestra d’accesso, inserire il nome utente (admin) e la password
(admin) predefiniti, quindi premere OK per accedere alla schermata principale di
configurazione web della telecamera.
4. Cliccare sul pulsante destro e selezionare Install Active X Control.
5. Fare clic su Install.
Inserire qui l’indirizzo IP della telecamera.
Inserire nome utente e password.
6. Fare clic su Setup (Configurazione), quindi su Smart Wizard (Procedura guidata)
per configurare velocemente la telecamera. La procedura guidata Smart Wizard assisterà
durante le impostazioni necessarie, fornendo istruzioni dettagliate per ogni fase.
38 © MARMITEK
Page 39

4 SUGGERIMENTI
Per altre informazioni, fare riferimento alla Guida all’installazione avanzata contenuta nel CD
di installazione.
Per i dettagli sul funzionamento di Ultra View, fare riferimento alla Guida all’uso del software
contenuta nel CD di installazione in dotazione.
In caso di problemi con i prodotti, mettersi in contatto con il rivenditore autorizzato locale.
CARATTERISTICHE TECNICHE
Veda le pagine 40 e 41
ATTENZIONE
Questo apparecchio è destinato all’utilizzo in tutti gli Stati dell’UE e negli Stati EFTA.
Attenzione: si prevedono limitazioni nell’utilizzo di questo prodotto, nei seguenti Paesi:
• Belgio: Banda 2.4 GHz. L’utilizzo di questa banda è limitato e varia in base all’area geografica.
Per informazioni aggiornate, consultare il sito http://www.bipt.be.
• Francia: Banda 2.4 GHz. L’utilizzo di canali diversi da 10, 11, 12, 13 (2457, 2462, 2467 e 2472
MHz) può essere limitato e varia in base all’area geografica. Per informazioni aggiornate, si
rimanda all’Autorité de Régulation des Télécommunications (http://www.art-telecom.fr).
Informazioni relative all’ambiente per i clienti residenti nell’Unione Europea
La direttiva europea 2002/96/EC richiede che le apparecchiature contrassegnate con questo simbolo sul
prodotto e/o sull’imballaggio non siano smaltite insieme ai rifi uti urbani non differenziati. Il simbolo indica che
questo prodotto non deve essere smaltito insieme ai normali rifi uti domestici. È responsabilità del proprietario
smaltire sia questi prodotti sia le altre apparecchiature elettriche ed elettroniche mediante le specifi che strutture di
raccolta indicate dal governo o dagli enti pubblici locali. Il corretto smaltimento ed il riciclaggio aiuteranno a prevenire
conseguenze potenzialmente negative per l’ambiente e per la salute dell’essere umano. Per ricevere informazioni più
dettagliate circa lo smaltimento delle vecchie apparecchiature in Vostro posses so, Vi invitiamo a contattare gli enti pubblici
di competenza, il ser vizio di smaltimento rifi uti o il negozio nel quale avete acquistato il prodotto.
ITALIANO
39IP EYE ANYWHERE™
Page 40

12erehwynAeyEPI02erehwynAeyEPI11erehwynAeyEPI01erehwynAeyEPI)1(acincetadehcS
gnimaertslaudGEPJM/4GEPMGEPJM
mm5,4mm6,4
8,26,2
etnemaenaropmetnociliforp3elibacilppanoN
hsalFRONetyBM8hsalFRONetyBM4
MARDSetyBM23MARDSetyBM61
onretnielanoizeridinnoonoforciMelibacilppanoN
.xamsttaw8.xamsttaw6
Bd3-/+Bd84-elibacilppanoN
zH00061~05elibacilppanoN
ilifaznesNALg/b11.208elibacilppanoNilifaznesNALg/b11.208elibacilppanoNilifazneS
RMA/MCPelibacilppanoN
ica
anretsealopidannetnAelibacilppanoNanretsealopidannetnAelibacilppanoNannetnA
500mA Max.)
scollegamento USB
0,5 LUX
Sensore CMOS a colori da 1/4”
640 x 480, 320 x 240, 160 x 120
Sensore immagine
Sensore immagine
Risoluzione
Illuminazione minima
Lente
Diaframma (F/No.)
Lunghezza del fuoco
SiSiSi
60 gradi
50Hz, 60Hz o Outdoor (all'aperto)
VGA (640 x 480 ) : 30 fps, QVGA ( 320 x 240 ) : 30 fps, QQVGA ( 160 x 120) : 30 fps
Angolo di veduta (diagonale)
Elaborazione dell'immagine
Compressione
Controllo automatico di esposizione
Bilanciamento del bianco automatico
Controllo automatico di guadagno
Frequenza di illuminazione
Risoluzione immagine e immagini al secondo
Multiprofilo
Sistema
Basato su ARM9
DC5V, 230VAC 50 Hz
Processore di rete
Sistema ROM
Sistema RAM
Potenza
TCP/IP, UDP, ICMP,DHCP,NTP,DNS,DDNS,SMTP,FTP,
Arancione
10/100 Mbps Fast Ethernet con Auto-MDIX
Una porta RJ45; compatibile con IEEE 802.3u
Temperatura ambiente: 0 ~ 45, umidità di aria: 20% ~ 85% non condensando
Temperatura di memorizzazione: -15 ~ 60, umidità di aria: 0% ~ 90% non condensando
TCP/IP, UDP, ICMP,DHCP,NTP,DNS,
DDNS,SMTP,FTP,HTTP, PPPoE, UPnP HTTP, Samba, PPPoE, UPnP, RTP, RTSP, RTCP
Consumo
Ambiente
Audio
Audio in
Sensibilità
Risposta di frequenza
Audio Codec
Comunicazione
Ethernet
Protocolli di supporto
LED e tasto
LED di energia
Una presa tipo A porta host USB 1.1 (distribuzione di energia:
Verde
LED di collegamento/attività
Premere e tenerlo premuto per 4 secondi per il componente di
Non applicabile
Non applicabile
Premere e rilasciare il tasto per il riavvio. Tenerlo premuto durante più di 5 secondi per ritornare alle impostazioni di fabbr
Tasto di reset
Altri
Porta USB
Tasto di scollegamento USB
40 © MARMITEK
Page 41

2APW,)PIKT(APW,tib821/46PEWelibacilppanoN2APW,)PIKT(APW,tib821/46PEWelibacilppanoNilifaznesazzeruciS
12erehwynAeyEPI02erehwynAeyEPI11erehwynAeyEPI01erehwynAeyEPI)2(acincetadehcS
MARDSairomemallen).xam(inoizartsiger001elibacilppanoN
er
oirepusozHM0083muitnePletnIeroirepusozHM0533muitnePletnI
iSoN
Si
3x
Si (1-25fps, Auto)
Luminosità, definizione, saturazione
Caratteristiche
Regolazione immagine
Negativo e Mirror (specchio)
Indirizzo IP statico, DHCP, PPPoE
5 livelli di impostazione: più basso, basso, normale, alto, più alto
Zoom digitale
Impostazione immagini al secondo
Impostazione ratio di compressione
Supporto 3GPP
Impostazione IP
ascoltare audio
Registrazione per il file di video al PC, memoria di rete, disco USB flash
Progettazione
2 schermate scalabili
Impostazione dell'ora manuale, server di tempo e supporto NTP
Supporta mail di SMTP, progettazione, account E-mail con due destinazioni
Non applicabile
Eventi iniziati dalla rivelazione di movimento o secondo lo schema, scaricare un'immagine/trasmettere via e-mail, FTP
E-mail
Gestione tempo
Gestione eventi
Scarico FTP
Rivelazione di movimento
Utenti ospiti dispongono solo delle funzioni guardare video e
Si
Normale/Spento
Backup/ripristino al/del file di configurazione
Gestione basata sull'internet, software di applicazione
Protezione tramite password e 3 livelli di autorizzazione
Utenti generali sono autorizzati alla pagina di Live View (immagini dal vivo)
Utenti ospiti dispongono solo della funzione guardare video
Filtro IP
Gestione sistema
Configurazione di componenti
Gestione utenti
Installazione rapida, passo dopo passo
Tasto per ripristinare tutte le impostazioni di fabbrica
Il gestore dispone di Guardare video e Tutte le impostazioni di config. (impost. di fabbrica: admin/admin)
Log del sistema
Controllo LED
Smart Setup Wizard
Funzione di reset
Internet Explorer 6.0 o superiore, Firefox (solo nel modo MJPEG), Safari (solo nel modo MJPEG)
Navigatore
Supporto audio
/7
/7
Windows 2000/ XP/Vista
Per sviluppare il software di applicazione
Canale: 16 CHs, Registrazione, Replay, Rivelazione di movimento, Backup/ripristino al/del file di configurazione
API
Software
Sistema di operazione supportato
Software di applicazione
Lettore CD ROM
Microsoft® Windows® 2000/XP/Vista
10Base-T Ethernet o 100Base-TX Fast Ethernet
Cerca automaticamente nella LAN l'indirizzo IP della camera
Tracciatore IP
Requisiti di sistema minimali
Informazioni generali
Hardware
Piattaforma
Rete
Senza fili .g/b11.208EEEI.g/b11.208EEEI
BM215BM821
1 camera collegata: Intel Pentium III 800MHz; 512MB RAM
5 ~ 8 camere collegate : Intel Pentium 4 2.4GHz; 1GB RAM
9 ~ 16 camere collegate : Intel Pentium 4 3.4GHz; 2GB RAM
2 ~ 4 camere collegate : Intel Pentium 4 1.3GHz; 512MB RAM
800x600 o superiore
Microsoft® Internet Explorer 6.0 o superiore, Apple Safari 2 o superiore, Mozilla Firefox 2.00 o superiore
1024x768 o superiore
1 camera collegata: Intel Pentium III 800MHz; 512MB RAM
5 ~ 8 camere collegate : Intel Pentium 4 2.4GHz; 1GB RAM
9 ~ 16 camere collegate : Intel Pentium 4 3.4GHz; 2GB RAM
2 ~ 4 camere collegate : Intel Pentium 4 1.3GHz; 512MB RAM
ITALIANO
Camera
Processore
Memoria
Risoluzione schermo
Navigatore internet
Software di applicazione
Processore
Risoluzione schermo
41IP EYE ANYWHERE™
Page 42

42 © MARMITEK
Page 43

VEILIGHEIDSWAARSCHUWINGEN
• Om kortsluiting te voorkomen, dient dit product uitsluitend binnenshuis gebruikt te
worden, en alleen in droge ruimten. Stel de componenten niet bloot aan regen of vocht.
Niet naast of vlakbij een bad, zwembad, etc. gebruiken.
• Stel de componenten van uw systeem niet bloot aan extreem hoge temperaturen of
sterke lichtbronnen.
• Bij oneigenlijk gebruik, zelf aangebrachte veranderingen of reparaties, komen alle
garantiebepalingen te vervallen. Marmitek aanvaardt geen productaansprakelijkheid bij
onjuist gebruik van het product of door gebruik anders dan waarvoor het product is
bestemd. Marmitek aanvaardt geen aansprakelijkheid voor volgschade anders dan de
wettelijke productaansprakelijkheid.
• Dit product is geen speelgoed. Buiten bereik van kinderen houden.
• Het product nooit openmaken: de apparatuur kan onderdelen bevatten waarop levensgevaarlijke spanning staat. Laat reparatie of service alleen over aan deskundig personeel.
• Sluit de voedingsadapter pas op het lichtnet aan nadat u hebt gecontroleerd of de
netspanning overeenkomt met de waarde die op de typeplaatjes is aangegeven. Sluit een
voedingsadapter nooit aan wanneer deze beschadigd is. Neem in dat geval contact op
met uw leverancier.
1 INGEBRUIKNEMING
Inhoud van de verpakking
Controleer de inhoud van de verpakking zorgvuldig. De volgende artikelen moeten aanwezig
zijn. Wanneer een van de artikelen ontbreekt of beschadigd is, neemt u dan contact op met
uw geautoriseerde dealer.
✔ Marmitek IP Eye AnywhereTM netwerk camera
✔ AC power adapter
✔ Externe antenne (voor draadloos model)
✔ Camerastandaard
✔ Ethernet kabel (RJ-45 type)
✔ Installatie CD-ROM (Engels)
✔ Korte Installatie Handleiding
Systeemvereisten
■ Netwerkverbinding
LAN: 10Base-T Ethernet of 100Base-TX Fast Ethernet
WLAN: IEEE 802.11b/g (voor draadloos model)
■ Toegang tot camera via een Web Browser
Platform: Microsoft® Windows® 2000/XP/Vista/7
CPU: Intel Pentium III 800MHz of hoger
RAM: 512MB
Resolutie: 800x600 of hoger
NEDERLANDS
43IP EYE ANYWHERE™
Page 44

Gebruikersinterface: Microsoft® Internet Explorer 6.0 of hoger
Mozilla Firefox 2.00 of hoger
Apple Safari 2 of hoger
■ UltraView software
Platform: Microsoft® Windows® 2000/XP/Vista/7
CPU: Intel Pentium III 800MHz of hoger en 512MB RAM voor 1
aangesloten camera
CPU: Intel Pentium 4 3.4 GHz of hoger en 2GB RAM voor 9 ~16
aangesloten camera
Resolutie: 1024x768 of hoger
2 CAMERA-INSTALLATIE
Installatie van de camerastandaard
De camera wordt geleverd met een standaard, die met behulp van een draaibare kogellagering
in de schroefdraad van de camera vastgeschroefd kan worden. Na aanbrengen van de
camerastandaard kunt u de camera overal plaatsen. Door de drie schroefgaten in de voet van
de standaard kan deze makkelijk vastgezet worden.
De camerastandaard
Aansluiting van de IP Eye AnywhereTM camera op een
LAN
Gebruik de meegeleverde Ethernet kabel om de camera op
uw locale netwerk (LAN) aan te sluiten.
Zodra de AC power adapter aangesloten is, wordt de
camera meteen automatisch gevoed. De powerled aan de
voorkant van de camera geeft aan of deze aan of uit staat.
Zodra de camera aangesloten is, blinkt de Link LED groen
en is de camera bedrijfsklaar.
44 © MARMITEK
Ethernet kabel aansluiten
Page 45

Aansluiting van de camera op een
WLAN
Wanneer u een draadloos netwerk
gebruikt, moet u de meegeleverde externe
antenne op de camera aansluiten.
Zodra de camera aangesloten is, zoekt
Externe antenne
aansluiten
deze meteen een toegangspunt tot de
standaard SSID (netwerknaam).
OPMERKING: Wanneer de aansluiting van de camera op het draadloze netwerk niet
succesvol is, moet de camera op een LAN aangesloten worden en moeten vervolgens de
WLAN instellingen via deze LAN geconfigureerd worden.
3 TOEGANG TOT DE CAMERA
Gebruik van IPFinder
1. Plaats de installatie CD-ROM in het CD-ROM station van uw computer om het Auto-
Run programma te starten.
2. Klik op IPFinder om de applicatie te starten. De volgende gebruikersinterface verschijnt
op het beeldscherm.
Toont de aangesloten camera(s).
Dubbelklik om de camera’s te verbinden.
Klik Search [Zoeken] om het IP adres
van de aangesloten camera(s) te vinden.
Klik Change IP [IP wijzigen] om het
IP adres van de geselecteerde camera te
wijzigen.
Klik Exit [Beëindigen] om de interface
te sluiten.
3. Nadat u het IP adres van de camera heeft gevonden, moet u de Web browser of
UltraView starten om toegang tot de camera te verkrijgen.
TIP De installatie CD-ROM bevat een installatie programma om IPFinder op uw computer
te installeren. Om IPFinder te installeren, klik op Install Software [Software installeren]
en selecteer vervolgens IPFinder op de Auto-Run scherm.
NEDERLANDS
45IP EYE ANYWHERE™
Page 46

Toegang tot de camera
1. Open de Web browser op uw computer (bijvoorbeeld Microsoft Internet Explorer in
deze handleiding).
2. Voer het standaard IP adres (192.168.0.30) of het met IPFinder gevonden IP adres in de
adresbalk in en druk [Enter].
3. Wanneer het inlogscherm verschijnt, voer de standaard gebruikersnaam (admin) en
het standaard paswoord (admin) in en druk OK om toegang tot het hoofdscherm van
de camera Web Configuratie te verkrijgen.
4. Klik op rechter muistoets en selecteer Active X Control.
5. Klik op Install (installeren).
Hier IP adres van de camera invoeren.
Hier gebruikersnaam en paswoord invoeren.
6. Klik op Setup [Instellen] en vervolgens op Smart Wizard om uw camera snel in te
stellen. De Smart Wizard leidt u met behulp van gedetailleerde instructies stapsgewijs
door de instelling.
46 © MARMITEK
Page 47

4 TIPS
- Voor verdere informatie leest u a.u.b. de Uitgebreide Installatie Handleiding op de
meegeleverde installatie CD-ROM.
- Voor details over de bediening van UltraView leest u a.u.b. de Software Handleiding op
de meegeleverde installatie CD-ROM.
- Bij problemen met het product/de producten, neemt u a.u.b. contact op met uw locale
geautoriseerde dealer.
TECHNISCHE GEGEVENS
Zie pagina 48 en 49
LET OP
Dit toestel is bedoeld voor het gebruik in alle EU en EFTA landen
Let op: In de volgende landen is het gebruik van dit product beperkt:
• België: 2.4 GHz Band. Het gebruik van deze band is beperkt in het gebruik, dit is afhankelijk
van het plaatselijke departement. Zie http://www.bipt.be voor actuele informatie.
• Frankrijk: 2.4 GHz Band. Het gebruik van andere kanalen dan: 10, 11, 12, 13 (2457, 2462,
2467, en 2472 MHz) kan beperkt zijn, dit is afhankelijk van het departement. Zie l’Autorité de
Régulation des Télécommunications (http://www.arttelecom.fr) voor actuele informatie.
Milieu-informatie voor klanten in de Europese Unie
De Europese Richtlijn 2002/96/EC schrijf t voor dat apparatuur die is voorzien van dit symbool op het produc t
of de verpakking, niet mag worden ingezameld met niet-gescheiden huishoudelijk afval. Dit symbool geeft aan
dat het product apart moet worden ingezameld. U bent zelf verantwoordelijk voor de vernietiging van deze en
andere elektrische en elektronische apparatuur via de daarvoor door de landelijke of plaatselijke overheid aangewezen
inzamelingskanalen. De juiste vernietiging en recycling van deze apparatuur voorkomt mogelijke negatieve gevolgen voor
het milieu en de gezondheid. Voor meer informatie over het vernietigen van uw oude apparatuur neemt u contact op met
de plaatselijke autoriteiten of afvalverwerkingsdienst, of met de winkel waar u het product hebt aangeschaft.
NEDERLANDS
47IP EYE ANYWHERE™
Page 48

NALsooldaarDg/b11.208.t.v.NNALsooldaarDg/b11.208.t.v.NsooldaarD
gnimaertslaudGEPJM/4GEPMGEPJM
mm5,4mm6,4
8,26,2
gidjitkjilegneleiforp3.t.v.N
hsalFRONetyBM8hsalFRONetyBM4
MARDSetyBM23MARDSetyBM61
nooforcimelenoitceridinmoenretnI.t.v.N
.xamsttaw8.xamsttaw6
Bd3-/+Bd84-.t.v.N
z
H00061~05.t.v.N
RMA/MCP.t.v.N
ennetnaloopidenretxE.t.v.NennetnaloopidenretxE.t.v.NennetnA
component
500mA Max.)
0,5 LUX
1/4” Kleuren CMOS Sensor
640 x 480, 320 x 240, 160 x 120
Beeldsensor
Technische gegevens (1) IP Eye Anywhere 10 IP Eye Anywhere 11 IP Eye Anywhere 20 IP Eye Anywhere 21
Beeldsensor
Resolutie
Minimale verlichtingssterkte
60 graden
Lens
Diafragma (F/No.)
Focuslengte
Gezichtshoek (diagonaal)
JaJaJa
50Hz, 60Hz of Outdoor
Beeldbewerking
Compressie
Automatische belichtingscontrole
Automatische witbalans
Automatische sterkteregeling
Lichtfrequentie
HTTP, Samba, PPPoE, UPnP, RTP, RTSP, RTCP
Oranje
Gebaseerd op ARM9
DC5V, 230VAC 50 Hz
10/100 Mbps Fast Ethernet met Auto-MDIX
Een RJ45 poort; compatibel met IEEE 802.3u
Bedrijfstemperatuur: 0 ~ 45, luchtvochtigheid: 20% ~ 85% niet condenserend
VGA (640 x 480 ) : 30 fps, QVGA ( 320 x 240 ) : 30 fps, QQVGA ( 160 x 120) : 30 fps
Beeldresolutie en framerate
Multi profiel
Systeem
Netwerkprocessor
Systeem ROM
Opslagtemperatuur: -15 ~ 60, luchtvochtigheid: 0% ~ 90% niet condenserend
TCP/IP, UDP, ICMP,DHCP,NTP,DNS, TCP/IP, UDP, ICMP,DHCP,NTP,DNS,DDNS,SMTP,FTP,
DDNS,SMTP,FTP,HTTP, PPPoE, UPnP
Systeem RAM
Vermogen
Verbruik
Omgeving:
Audio
Audio in
Sensitivity:
Freq Response:
Audio Codec
Communicatie
Ethernet
Ondersteunde protocollen
LED en knop
Energie LED
Groen
Link/activiteit LED
Drukken en 4 seconden ingedrukt laten voor dismount USB
Een Type A contactdoos USB 1.1 Host poort (stroomverdeling:
N.v.t.
N.v.t.
Knop drukken en loslaten voor herstart. Houd meer dan 5 seconden vast om terug te gaan naar fabrieksinstellingen
USB Poort
Overige
USB dismount button
Reset knop
48 © MARMITEK
Page 49

2APW,)PIKT(APW,tib821/46PEW.t.v.N2APW,)PIKT(APW,tib821/46PEW.t.v.NsooldaardgnigilieveB
M
A
RDSninegueheg).xam(smeti001.t.v.N
.g/b1
regohfozHM0083muitnePletnIregohfozHM0533muitnePletnI
1.208EEEI.g/b11.208EEEIsooldaarD
Ja
3x
Ja (1-25fps, Auto)
Helderheid, scherpte, verzadiging
Technische gegevens (2) IP Eye Anywhere 10 IP Eye Anywhere 11 IP Eye Anywhere 20 IP Eye Anywhere 21
Uitrusting
Beeldinstelling
Omgekeerd en spiegelbeeld
Digitale zoom
Framerate instelling
aJeeN
en audio luisteren
Registrering video bestand naar PC, netwerkgeheugen, USB flash disk
Planning
Statisch IP adres, DHCP, PPPoE
5 instellingsniveaus: laagst, laag, normaal, hoog, hoogst
Ondersteunt SMTP mail, Planning, E-mail account met twee bestemmingen
Compressieratio instelling
3GPP support
IP instelling
E-mail
2 adapteerbare vensters
Handmatige tijdsinstelling, Tijdserver en NTP support
N.v.t.
Evenementen getriggerd door bewegingsdetectie of volgens schema, Beeld uploaden/via e-mail, FTP verzenden
Tijd Management
Evenementen Management
FTP Upload
Bewegingsdetectie
Gastgebruikers beschikken slechts over de functie video bekijken
Ja
Backup/herstellen naar/van configuratiebestand
Webgebaseerde administratie, Applicatiesoftware
Door paswoord beschermd en 3 autorisatieniveaus
Algemene gebruikers hebben alle autorisatie tot Live view page
Beheerder heeft Video kijken en Alle configuratie-inst. (fabrieksinst.:admin/admin)
Gastgebruikers beschikken slechts over de functie video bekijken
IP Filter
Systeem Management
Configuratie van componenten
Gebruikersadministratie
BM215BM821
Audio support
/7
Normaal / Uit
Windows 2000/ XP/Vista
Om applicatiesoftware te ontwikkelen
Korte installatie instelling stap voor stap
Knop om alle instellingen naar fabrieksinstelling terug te zetten
Internet Explorer 6.0 of hoger, Firefox (alleen MJPEG modus), Safari (alleen MJPEG modus)
Kanaal: 16 CHs, Registreren, Playback, Bewegingsdetectie, Backup/herstellen naar/van configuratiebestand
System log
LED controle
Smart Setup Wizard
Resetfunctie
Browser
API
Software
Supported OS
Applicatiesoftware
CD ROM drive
Microsoft® Windows® 2000/XP/Vista/7
Zoekt automatisch IP adres van camera in LAN
IPFinder
10Base-T Ethernet or 100Base-TX Fast Ethernet
Minimale systeemvereisten
Algemeen
hardware
Platform
Netwerk
Camera
Processor
800x600 of hoger
Geheugen
Beeldschermresolutie
1 aangesloten camera: Intel Pentium III 800MHz; 512MB RAM
5 ~ 8 aangesloten camera's : Intel Pentium 4 2.4GHz; 1GB RAM
9 ~ 16 aangesloten camera's : Intel Pentium 4 3.4GHz; 2GB RAM
2 ~ 4 aangesloten camera's : Intel Pentium 4 1.3GHz; 512MB RAM
Microsoft® Internet Explorer 6.0 of hoger, Apple Safari 2 of hoger, Mozilla Firefox 2.00 of hoger
1 aangesloten camera: Intel Pentium III 800MHz; 512MB RAM
5 ~ 8 aangesloten camera's : Intel Pentium 4 2.4GHz; 1GB RAM
9 ~ 16 aangesloten camera's : Intel Pentium 4 3.4GHz; 2GB RAM
2 ~ 4 aangesloten camera's : Intel Pentium 4 1.3GHz; 512MB RAM
Web browser
Applicatiesoftware
Processor
Beeldschermresolutie 1024x768 of hoger
NEDERLANDS
49IP EYE ANYWHERE™
Page 50

DECLARATION OF CONFORMITY
Hereby, Marmitek BV, declares that this IP Eye Anywhere is in compliance with the essential requirements
Directive 1999/5/EC of the European Parliament and of the Council of 9 March 1999 on radio equipment and
DIRECTIVE 20 04/108/EC OF THE EUROPEAN PARLIAMENT AN D OF THE COU NCIL of 15 December 2004 on the
Council Directive 73/ 23/EEC of 19 February 1973 on the harmonization of the laws of Member States relating to
Hiermit erklärt Marmitek BV die Übereinstimmung des Gerätes IP Eye Anywhere den grundlegenden
Richtlinie 1999/5/EG des Europäischen Parlaments und des Rates vom 9. März 1999 über Funkanlagen und
RICHT LINIE 200 4/108/EG DE S EUROPÄISCHEN PARL AMENTS U ND DES RATES vom 15. Deze mber 2004 zur An gleichung
Richtlinie 73/23/EWG des Rates vom 19. Februar 1973 zur Angleichung der Rechtsvorschriften der Mitgliedstaaten
Par la présente Marmitek BV déclare que l’appareil IP Eye Anywhere est conforme aux exigences essentielles
Directive 1999/5/CE du Parlement européen et du Conseil, du 9 mars 1999, concernant les équipements her tziens et les
DIRECTIVE 2004 /108/CE DU PARLEMENT EUROPÉEN ET DU CONSEIL du 15 décembre 2004 relative au rapprochement
Directive 73/23/CEE du Conseil, du 19 février 1973, concernant le rapprochement des législations des États membres
telecommunications terminal equipment and the mutual recognition of their conformity
approximation of the laws of the Member States relating to electromagnetic compatibility
Telekommunikationsendeinrichtungen und die gegenseitige Anerkennung ihrer Konformität
der Rechtsvorschriften der Mitgliedstaaten über die elektromagnetische Verträglichkeit
betreffend elektrische Betriebsmittel zur Verwendung innerhalb bestimmter Spannungsgrenzen
équipements terminaux de télécommunications et la reconnaissance mutuelle de leur conformité
relatives au matériel électrique destiné à être employé dans certaines limites de tension
and other relevant provisions of the following Directives:
electrical equipment designed for use within cer tain voltage limits
Anforderungen und den anderen relevanten Festlegungen der Richtliniën:
et aux autres dispositions pertinentes de la directives:
des législations des États membres concernant la compatibilité électromagnétique
50 © MARMITEK
Page 51

Marmitek BV declara que este IP Eye Anywhere cumple con las exigencias esenciales y con las demás reglas
Directiva 1999/5/CE del Parlamento Europeo y del Consejo, de 9 de marzo de 1999, sobre equipos radioeléctricos y
DIRECTIVA 2004/108/CE DEL PARLAMENTO EUROPEO Y DEL CONSEJO de 15 de diciembre de 2004 relativa a la
Directiva 73/23/CEE del Consejo, de 19 de febrero de 1973, relativa a la aproximación de las legislaciones de los Estados
Con ciò, Marmitek BV, dichiara che il IP Eye Anywhere è conforme ai requisiti essenziali ed alter disposizioni
Direttiva 1999/5 /CE del Parlamento euro peo e del Consiglio, del 9 marzo 1999, riguardante le apparecchiature radio e le
DIRETTIVA 2004/108/CE DEL PARLAMENTO EUROPEO E DEL CONSIGLIO del 15 dicembre 2004 concernente il
Direttiva 73/23/CEE del Consiglio, del 19 febbraio 1973, concernente il rav vicinamento delle legislazioni degli Stati
Bij deze verklaar t Marmitek BV, dat deze IP Eye Anywhere voldoet aan de essentiële eisen en aan de overige
Richtlijn 1999/5/ EG van het Europees Parlement en de Raad van 9 maar t 1999 betreffende radioapparatuur en
RICHTL IJN 2004/108 /EG VAN HE T EUROPEES PARLEMENT EN DE RAAD van 15 december 200 4 betreffende de
Richtlijn 73/23/EEG van de Raad van 19 februari 1973 betreffende de onderlinge aanpassing van de wettelijke
voorschriften der Lid-Staten inzake elektrisch materiaal bestemd voor gebruik binnen bepaalde spanningsgrenzen
equipos terminales de telecomunicación y reconocimiento mutuo de su conformidad
aproximación de las legislaciones de los Estados miembros en materia de compatibilidad electromagnética
Miembros sobre el material eléctrico destinado a utilizarse con determinados límites de tensión
apparecchiature terminali di telecomunicazione e il reciproco riconoscimento della loro conformità
ravvicinamento delle legislazioni degli Stati membri relative alla compatibilità elettromagnetica
Membri relative al materiale elettrico destinato ad essere adoperato entro taluni limiti di tensione
telecommunicatie- eindapparatuur en de wederzijdse erkenning van hun conformiteit
onderlinge aanpassing van de wetgevingen van de lidstaten inzake elektromagnetische compatibiliteit
MARMITEK BV - P.O. BOX 4257 - 5604 EG EI NDHOV EN - NETHERLANDS
relevantes de la directriz:
relative alla Direttiva :
relevante bepalingen van Richtlijnen:
0470
Copyrights
Marmitek is a trademark of Marmidenko B.V. IP Eye Anywhere™ is a trademark of Marmitek B.V. All rights reser ved.
Copyright and all other proprieta ry rights in the content (includ ing but not limited to mo del numbers, sof tware, audio, vide o,
text and photographs) rests with Marmitek B.V. Any use of the Content, but without limitation, distribution, reproduction,
modification, display or transmission without the prior written consent of Marmitek is strictly prohibited. All copyright and
other proprietar y notices shall be retained on all reproductions.
IP EYE ANYWHERE™ 51
Page 52

 Loading...