

Page 1

SVENSKA NEDERLANDS ESPAÑOL ITALIANO FRANÇAIS DEUTSCH ENGLISH
Blu-ray Disc Receiver
M-ER803
Page 2

Page 3
SAFETY PRECAUTIONS
n
CAUTION
RISK OF ELECTRIC SHOCK
DO NOT OPEN
CAUTION:
TO REDUCE THE RISK OF ELECTRIC SHOCK, DO NOT REMOVE
COVER (OR BACK). NO USER-SERVICEABLE PARTS INSIDE.
REFER SERVICING TO QUALIFIED SERVICE PERSONNEL.
The lightning flash with arrowhead symbol, within an equilateral
triangle, is intended to alert the user to the presence of
uninsulated “dangerous voltage” within the product’s enclosure
that may be of sufficient magnitude to constitute a risk of
electric shock to persons.
The exclamation point within an equilateral triangle is intended
to alert the user to the presence of important operating
and maintenance (servicing) instructions in the literature
accompanying the appliance.
WARNING:
TO REDUCE THE RISK OF FIRE OR ELECTRIC SHOCK, DO NOT
EXPOSE THIS APPLIANCE TO RAIN OR MOISTURE.
CLASS 1 LASER PRODUCT
LUOKAN 1 LASERLAITE
KLASS 1 LASERAPPARAT
ADVARSEL: USYNLIG LASERSTRÅLING VED ÅBNING, NÅR
SIKKERHEDSAFBRYDERE ER UDE AF FUNKTION.
UNDGÅ UDSAETTELSE FOR STRÅLING.
VAROITUS! LAITTEEN KÄYTTÄMINEN MUULLA KUIN TÄSSÄ
KÄYTTÖOHJEESSA MAINITULLA TAVALLA SAATTAA
ALTISTAA KÄYTTÄJÄN TURVALLISUUSLUOKAN 1
YLITTÄVÄLLE NÄKYMÄMTTÖMÄLLE LASERSÄTEILYLLE.
VARNING: OM APPARATEN ANVÄNDS PÅ ANNAT SÄTT ÄN I DENNA
BRUKSANVISNING SPECIFICERATS, KAN ANVÄNDAREN
UTSÄTTAS FÖR OSYNLIG LASERSTRÅLNING SOM
ÖVERSKRIDER GRÄNSEN FÖR LASERKLASS 1.
ATTENZIONE: QUESTO APPARECCHIO E’ DOTATO DI
DISPOSITIVO OTTICO CON RAGGIO LASER.
L’USO IMPROPRIO DELL’APPARECCHIO PUO’ CAUSARE
PERICOLOSE ESPOSIZIONI A RADIAZIONI!
IMPORTANT SAFETY
INSTRUCTIONS
1. Read these instructions.
2. Keep these instructions.
3. Heed all warnings.
4. Follow all instructions.
5. Do not use this apparatus near water.
6. Clean only with dry cloth.
7. Do not block any ventilation openings.
Install in accordance with the manufacturer’s instructions.
8. Do not install near any heat sources such as radiators, heat registers,
stoves, or other apparatus (including amplifiers) that produce heat.
9. Protect the power cord from being walked on or pinched particularly at
plugs, convenience receptacles, and the point where they exit from the
apparatus.
10. Only use attachments/accessories specified by the manufacturer.
11. Use only with the cart, stand, tripod, bracket, or table
specified by the manufacturer, or sold with the apparatus.
When a cart is used, use caution when moving the cart/
apparatus combination to avoid injury from tip-over.
12. Unplug this apparatus during lightning storms or when
unused for long periods of time.
13. Refer all servicing to qualified service personnel.
Servicing is required when the apparatus has been damaged in any way,
such as power-supply cord or plug is damaged, liquid has been spilled or
objects have fallen into the apparatus, the apparatus has been exposed to
rain or moisture, does not operate normally, or has been dropped.
14. Batteries shall not be exposed to excessive heat such as sunshine, fire or
the like.
ENGLISHDEUTSCHFRANÇAISITALIANOESPAÑOLNEDERLANDSSVENSKA
CAUTION:
To completely disconnect this product from the mains, disconnect
the plug from the wall socket outlet.
The mains plug is used to completely interrupt the power supply to
the unit and must be within easy access by the user.
VORSICHT:
Um dieses Gerät vollständig von der Stromversorgung abzutrennen,
ziehen Sie bitte den Stecker aus der Wandsteckdose.
Der Netzstecker wird verwendet, um die Stromversorgung zum
Gerät völlig zu unterbrechen; er muss für den Benutzer gut und
einfach zu erreichen sein.
PRECAUTION:
Pour déconnecter complètement ce produit du courant secteur,
débranchez la prise de la prise murale.
La prise secteur est utilisée pour couper complètement
l’alimentation de l’appareil et l’utilisateur doit pouvoir y accéder
facilement.
ATTENZIONE:
Per scollegare completamente questo prodotto dalla rete di
alimentazione elettrica, scollegare la spina dalla relativa presa a
muro.
La spina di rete viene utilizzata per interrompere completamente
l’alimentazione all’unità e deve essere facilmente accessibile
all’utente.
PRECAUCIÓN:
Para desconectar completamente este producto de la alimentación
eléctrica, desconecte el enchufe del enchufe de la pared.
El enchufe de la alimentación eléctrica se utiliza para interrumpir
por completo el suministro de alimentación eléctrica a la unidad
y debe de encontrarse en un lugar al que el usuario tenga fácil
acceso.
WAARSCHUWING:
Om de voeding van dit product volledig te onderbreken moet de
stekker uit het stopcontact worden getrokken.
De netstekker wordt gebruikt om de stroomtoevoer naar het toestel
volledig te onderbreken en moet voor de gebruiker gemakkelijk
bereikbaar zijn.
FÖRSIKTIHETSMÅTT:
Koppla loss stickproppen från eluttaget för att helt skilja produkten
från nätet.
Stickproppen används för att helt bryta strömförsörjningen till
apparaten, och den måste vara lättillgänglig för användaren.
CAUTION:
USE OF CONTROLS OR ADJUSTMENTS OR PERFORMANCE OF
PROCEDURES OTHER THAN THOSE SPECIFIED HEREIN MAY RESULT IN
HAZARDOUS RADIATION EXPOSURE.
THIS PRODUCT SHOULD NOT BE ADJUSTED OR REPAIRED BY ANYONE
EXCEPT PROPERLY QUALIFIED SERVICE PERSONNEL.
I
Page 4

ENGLISH DEUTSCH FRANÇAIS ITALIANO ESPAÑOL NEDERLANDS SVENSKA
NOTE ON USE / HINWEISE ZUM GEBRAUCH / OBSERVATIONS RELATIVES A L’UTILISATION / NOTE SULL’USO /
n
NOTAS SOBRE EL USO / ALVORENS TE GEBRUIKEN / OBSERVERA ANGÅENDE ANVÄNDNINGEN
WARNINGS WARNHINWEISE AVERTISSEMENTS AVVERTENZE ADVERTENCIAS WAARSCHUWINGEN VARNINGAR
• Avoid high temperatures.
Allow for sufficient heat
dispersion when installed in a
rack.
• Handle the power cord carefully.
Hold the plug when unplugging
the cord.
• Keep the unit free from
moisture, water, and dust.
• Unplug the power cord when
not using the unit for long
periods of time.
• Do not obstruct the ventilation
holes.
• Do not let foreign objects into
the unit.
• Do not let insecticides,
benzene, and thinner come in
contact with the unit.
• Never disassemble or modify
the unit in any way.
• Ventilation should not be
impeded by covering the
ventilation openings with
items, such as newspapers,
tablecloths or curtains.
• Naked flame sources such as
lighted candles should not be
placed on the unit.
• Observe and follow local
regulations regarding battery
disposal.
• Do not expose the unit to
dripping or splashing fluids.
• Do not place objects filled with
liquids, such as vases, on the
unit.
• Do not handle the mains cord
with wet hands.
• When the switch is in the OFF
position, the equipment is not
completely switched off from
MAINS.
• The equipment shall be
installed near the power supply
so that the power supply is
easily accessible.
• Vermeiden Sie hohe Temperaturen.
Beachten Sie, dass eine
ausreichende Belüftung
gewährleistet wird, wenn das Gerät
auf ein Regal gestellt wird.
• Gehen Sie vorsichtig mit dem
Netzkabel um.
Halten Sie das Kabel am
Stecker, wenn Sie den Stecker
herausziehen.
• Halten Sie das Gerät von
Feuchtigkeit, Wasser und Staub
fern.
• Wenn das Gerät längere Zeit
nicht verwendet werden soll,
trennen Sie das Netzkabel vom
Netzstecker.
• Decken Sie den Lüftungsbereich
nicht ab.
• Lassen Sie keine fremden
Gegenstände in das Gerät
kommen.
• Lassen Sie das Gerät nicht
mit Insektiziden, Benzin oder
Verdünnungsmitteln in Berührung
kommen.
• Versuchen Sie niemals das Gerät
auseinander zu nehmen oder zu
verändern.
• Die Belüftung sollte auf keinen
Fall durch das Abdecken der
Belüftungsöffnungen durch
Gegenstände wie beispielsweise
Zeitungen, Tischtücher, Vorhänge
o. Ä. behindert werden.
• Auf dem Gerät sollten keinerlei
direkte Feuerquellen wie
beispielsweise angezündete
Kerzen aufgestellt werden.
• Bitte beachten Sie bei der
Entsorgung der Batterien
die örtlich geltenden
Umweltbestimmungen.
• Das Gerät sollte keiner tropfenden
oder spritzenden Flüssigkeit
ausgesetzt werden.
• Auf dem Gerät sollten keine mit
Flüssigkeit gefüllten Behälter wie
beispielsweise Vasen aufgestellt
werden.
• Das Netzkabel nicht mit feuchten
oder nassen Händen anfassen.
• Wenn der Schalter ausgeschaltet
ist (OFF-Position), ist das Gerät
nicht vollständig vom Stromnetz
(MAINS) abgetrennt.
• Das Gerät sollte in der Nähe einer
Netzsteckdose aufgestellt werden,
damit es leicht an das Stromnetz
angeschlossen werden kann.
• Eviter des températures
élevées.
Tenir compte d’une dispersion
de chaleur suffisante lors de
l’installation sur une étagère.
• Manipuler le cordon
d’alimentation avec précaution.
Tenir la prise lors du
débranchement du cordon.
• Protéger l’appareil contre
l’humidité, l’eau et la poussière.
• Débrancher le cordon
d’alimentation lorsque l’appareil
n’est pas utilisé pendant de
longues périodes.
• Ne pas obstruer les trous
d’aération.
• Ne pas laisser des objets
étrangers dans l’appareil.
• Ne pas mettre en contact des
insecticides, du benzène et un
diluant avec l’appareil.
• Ne jamais démonter ou
modifier l’appareil d’une
manière ou d’une autre.
• Ne pas recouvrir les orifi ces
de ventilation avec des objets
tels que des journaux, nappes
ou rideaux. Cela entraverait la
ventilation.
• Ne jamais placer de flamme
nue sur l'appareil, notamment
des bougies allumées.
• Veillez à respecter les lois en
vigueur lorsque vous jetez les
piles usagées.
• L’appareil ne doit pas être
exposé à l’eau ou à l’humidité.
• Ne pas poser d’objet contenant
du liquide, par exemple un
vase, sur l’appareil.
• Ne pas manipuler le cordon
d’alimentation avec les mains
mouillées.
• Lorsque l’interrupteur est sur
la position OFF, l’appareil n’est
pas complètement déconnecté
du SECTEUR (MAINS).
• L’appareil sera installé près de
la source d’alimentation, de
sorte que cette dernière soit
facilement accessible.
• Evitate di esporre l’unità a
temperature elevate.
Assicuratevi che vi sia
un’adeguata dispersione del
calore quando installate l’unità
in un mobile per componenti
audio.
• Manneggiate il cavo di
alimentazione con attenzione.
Tenete ferma la spina quando
scollegate il cavo dalla presa.
• Tenete l’unità lontana
dall’umidità, dall’acqua e dalla
polvere.
• Scollegate il cavo di
alimentazione quando
prevedete di non utilizzare
l’unità per un lungo periodo di
tempo.
• Non coprite i fori di
ventilazione.
• Non inserite corpi estranei
all’interno dell’unità.
• Assicuratevi che l’unità non
entri in contatto con insetticidi,
benzolo o solventi.
• Non smontate né modificate
l’unità in alcun modo.
• Le aperture di ventilazione
non devono essere ostruite
coprendole con oggetti, quali
giornali, tovaglie, tende e così
via.
• Non posizionate sull’unità fi
amme libere, come ad esempio
candele accese.
• Prestate attenzione agli aspetti
legati alla tutela dell’ambiente
nello smaltimento delle
batterie.
• L’apparecchiatura non deve
essere esposta a gocciolii o
spruzzi.
• Non posizionate sull’unità alcun
oggetto contenente liquidi,
come ad esempio i vasi.
• Non toccare il cavo di
alimentazione con le mani
bagnate.
• Quando l’interruttore
è nella posizione OFF,
l’apparecchiatura non è
completamente scollegata da
MAINS.
• L’apparecchio va installato
in prossimità della fonte di
alimentazione, in modo che
quest’ultima sia facilmente
accessibile.
• Evite altas temperaturas.
Permite la suficiente dispersión
del calor cuando está instalado
en la consola.
• Maneje el cordón de energía
con cuidado.
Sostenga el enchufe cuando
desconecte el cordón de
energía.
• Mantenga el equipo libre de
humedad, agua y polvo.
• Desconecte el cordón de
energía cuando no utilice el
equipo por mucho tiempo.
• No obstruya los orificios de
ventilación.
• No deje objetos extraños
dentro del equipo.
• No permita el contacto
de insecticidas, gasolina y
diluyentes con el equipo.
• Nunca desarme o modifique el
equipo de ninguna manera.
• La ventilación no debe quedar
obstruida por haberse cubierto
las aperturas con objetos
como periódicos, manteles o
cortinas.
• No deberán colocarse sobre
el aparato fuentes inflamables
sin protección, como velas
encendidas.
• A la hora de deshacerse de las
pilas, respete la normativa para
el cuidado del medio ambiente.
• No exponer el aparato al goteo
o salpicaduras cuando se
utilice.
• No colocar sobre el aparato
objetos llenos de líquido, como
jarros.
• No maneje el cable de
alimentación con las manos
mojadas.
• Cuando el interruptor está en la
posición OFF, el equipo no está
completamente desconectado
de la alimentación MAINS.
• El equipo se instalará cerca
de la fuente de alimentación
de manera que resulte fácil
acceder a ella.
• Vermijd hoge temperaturen.
Zorg er bij installatie in een
audiorack voor, dat de door het
toestel geproduceerde warmte
goed kan worden afgevoerd.
• Hanteer het netsnoer
voorzichtig.
Houd het snoer bij de stekker
vast wanneer deze moet
worden aan- of losgekoppeld.
• Laat geen vochtigheid,
water of stof in het apparaat
binnendringen.
• Neem altijd het netsnoer uit
het stopkontakt wanneer het
apparaat gedurende een lange
periode niet wordt gebruikt.
• De ventilatieopeningen mogen
niet worden beblokkeerd.
• Laat geen vreemde
voorwerpen in dit apparaat
vallen.
• Voorkom dat insecticiden,
benzeen of verfverdunner met
dit toestel in contact komen.
• Dit toestel mag niet
gedemonteerd of aangepast
worden.
• De ventilatie mag niet
worden belemmerd door
de ventilatieopeningen af
te dekken met bijvoorbeeld
kranten, een tafelkleed of
gordijnen.
• Plaats geen open vlammen,
bijvoorbeeld een brandende
kaars, op het apparaat.
• Houd u steeds aan de
milieuvoorschriften wanneer u
gebruikte batterijen wegdoet.
• Stel het apparaat niet bloot aan
druppels of spatten.
• Plaats geen voorwerpen gevuld
met water, bijvoorbeeld een
vaas, op het apparaat.
• Raak het netsnoer niet met
natte handen aan.
• Als de schakelaar op OFF
staat, is het apparaat niet
volledig losgekoppeld van de
netspanning (MAINS).
• De apparatuur wordt in de
buurt van het stopcontact
geïnstalleerd, zodat dit altijd
gemakkelijk toegankelijk is.
• Undvik höga temperaturer.
Se till att det finns möjlighet
till god värmeavledning vid
montering i ett rack.
• Hantera nätkabeln varsamt.
Håll i kabeln när den kopplas
från el-uttaget.
• Utsätt inte apparaten för fukt,
vatten och damm.
• Koppla loss nätkabeln om
apparaten inte kommer att
användas i lång tid.
• Täpp inte till
ventilationsöppningarna.
• Se till att främmande föremål
inte tränger in i apparaten.
• Se till att inte insektsmedel
på spraybruk, bensen och
thinner kommer i kontakt med
apparatens hölje.
• Ta inte isär apparaten och
försök inte bygga om den.
• Ventilationen bör inte
förhindras genom att täcka
för ventilationsöppningarna
med föremål såsom tidningar,
bordsdukar eller gardiner.
• Placera inte öppen eld, t.ex.
tända ljus, på apparaten.
• Tänk på miljöaspekterna när du
bortskaffar batterier.
• Apparaten får inte utsättas för
vätska.
• Placera inte föremål fyllda
med vätska, t.ex. vaser, på
apparaten.
• Hantera inte nätsladden med
våta händer.
• Även om strömbrytaren står
i det avstängda läget OFF,
så är utrustningen inte helt
bortkopplad från det elektriska
nätet (MAINS).
• Utrustningen ska vara
installerad nära strömuttaget
så att strömförsörjningen är lätt
att tillgå.
II
Page 5
ENGLISHDEUTSCHFRANÇAISITALIANOESPAÑOLNEDERLANDSSVENSKA
• DECLARATION OF CONFORMITY
We declare under our sole responsibility that this product, to which this
declaration relates, is in conformity with the following standards:
EN60065, EN55013, EN55020, EN61000-3-2 and EN61000-3-3.
Following the provisions of Low Voltage Directive 2006/95/EC and EMC
Directive 2004/108/EC, the EC regulation 1275/2008 and its frame work
Directive 2009/125/EC for Energy-related Products (ErP).
• ÜBEREINSTIMMUNGSERKLÄRUNG
Wir erklären unter unserer Verantwortung, daß dieses Produkt, auf das
sich diese Erklärung bezieht, den folgenden Standards entspricht:
EN60065, EN55013, EN55020, EN61000-3-2 und EN61000-3-3.
Following the provisions of low voltage directive 2006/95/EC and EMC
directive 2004/108/EC, the EC regulation 1275/2008 and its frame work
directive 2009/125/EC for energy-related products (ErP).
• DECLARATION DE CONFORMITE
Nous déclarons sous notre seule responsabilité que l’appareil, auquel se
réfère cette déclaration, est conforme aux standards suivants:
EN60065, EN55013, EN55020, EN61000-3-2 et EN61000-3-3.
Selon la directive 2006/95/EC concernant la basse tension et la directive
CEM 2004/108/EC, la réglementation européenne 1275/2008 et la directive
2009/125/EC établissant un cadre de travail applicable aux produits liés à
l'énergie (ErP).
• DICHIARAZIONE DI CONFORMITÀ
Dichiariamo con piena responsabilità che questo prodotto, al quale la
nostra dichiarazione si riferisce, è conforme alle seguenti normative:
EN60065, EN55013, EN55020, EN61000-3-2 e EN61000-3-3.
Facendo seguito alle disposizioni della direttiva sul basso voltaggio
2006/95/EC alla direttiva EMC 2004/108/EC, alla norma EC 1275/2008 e
alla relativa legge quadro 2009/125/EC in materia di prodotti alimentati ad
energia (ErP).
QUESTO PRODOTTO E’ CONFORME
AL D.M. 28/08/95 N. 548
• DECLARACIÓN DE CONFORMIDAD
Declaramos bajo nuestra exclusiva responsabilidad que este producto al
que hace referencia esta declaración, está conforme con los siguientes
estándares:
EN60065, EN55013, EN55020, EN61000-3-2 y EN61000-3-3.
De acuerdo con la directiva sobre baja tensión 2006/95/CE y la directiva
sobre CEM 2004/108/CE, la normativa CE 1275/2008 y su directiva marco
2009/125/EC para productos relacionados con la energía (ErP).
• EENVORMIGHEIDSVERKLARING
Wij verklaren uitsluitend op onze verantwoordelijkheid dat dit produkt,
waarop deze verklaring betrekking heeft, in overeenstemming is met de
volgende normen:
EN60065, EN55013, EN55020, EN61000-3-2 en EN61000-3-3.
Volgens de voorzieningen van lage spanningsrichtlijn 2006/95/EC en
EMC-richtlijn 2004/108/EC, de EU-richtlijn 1275/2008 en de kaderrichtlijn
2009/125/EC voor energieverbruikende producten (ErP).
• ÖVERENSSTÄMMELSESINTYG
Härmed intygas helt på eget ansvar att denna produkt, vilken detta intyg
avser, uppfyller följande standarder:
EN60065, EN55013, EN55020, EN61000-3-2 och EN61000-3-3.
Uppfyller reglerna i lågspänningsdirektivet 2006/95/EC och EMC-direktivet
2004/108/EC, EU-förordningen 1275/2008 och ramverksdirektivet
2009/125/EC för energirelaterade produkter (ErP).
Marantz Europe
A division of D&M Europe B.V.
Beemdstraat 11, 5653 MA Eindhoven,
The Netherlands
A NOTE ABOUT RECYCLING:
This product’s packaging materials are recyclable and can be reused. Please
dispose of any materials in accordance with the local recycling regulations.
When discarding the unit, comply with local rules or regulations.
Batteries should never be thrown away or incinerated but disposed of in
accordance with the local regulations concerning battery disposal.
This product and the supplied accessories, excluding the batteries, constitute
the applicable product according to the WEEE directive.
HINWEIS ZUM RECYCLING:
Das Verpackungsmaterial dieses Produktes ist zum Recyceln geeignet und kann
wieder verwendet werden. Bitte entsorgen Sie alle Materialien entsprechend
der örtlichen Recycling-Vorschriften.
Beachten Sie bei der Entsorgung des Gerätes die örtlichen Vorschriften und
Bestimmungen.
Die Batterien dürfen nicht in den Hausmüll geworfen oder verbrannt werden;
bitte entsorgen Sie die Batterien gemäß der örtlichen Vorschriften.
Dieses Produkt und das im Lieferumfang enthaltene Zubehör (mit Ausnahme
der Batterien!) entsprechen der WEEE-Direktive.
UNE REMARQUE CONCERNANT LE RECYCLAGE:
Les matériaux d’emballage de ce produit sont recyclables et peuvent être
réutilisés. Veuillez disposer des matériaux conformément aux lois sur le recyclage
en vigueur.
Lorsque vous mettez cet appareil au rebut, respectez les lois ou réglementations en vigueur.
Les piles ne doivent jamais être jetées ou incinérées, mais mises au rebut conformément aux lois
en vigueur sur la mise au rebut des piles.
Ce produit et les accessoires inclus, à l’exception des piles, sont des produits conformes à la
directive DEEE.
NOTA RELATIVA AL RICICLAGGIO:
I materiali di imballaggio di questo prodotto sono riutilizzabili e riciclabili. Smaltire i materiali
conformemente alle normative locali sul riciclaggio.
Per lo smaltimento dell’unità, osservare le normative o le leggi locali in vigore.
Non gettare le batterie, né incenerirle, ma smaltirle conformemente alla normativa locale sui
rifiuti chimici.
Questo prodotto e gli accessori inclusi nell’imballaggio sono applicabili alla direttiva RAEE, ad
eccezione delle batterie.
ACERCA DEL RECICLAJE:
Los materiales de embalaje de este producto son reciclables y se pueden volver a utilizar.
Disponga de estos materiales siguiendo los reglamentos de reciclaje de su localidad.
Cuando se deshaga de la unidad, cumpla con las reglas o reglamentos locales.
Las pilas nunca deberán tirarse ni incinerarse. Deberá disponer de ellas siguiendo los reglamentos
de su localidad relacionados con los desperdicios químicos.
Este producto junto con los accesorios empaquetados es el producto aplicable a la directiva
RAEE excepto pilas.
EEN AANTEKENING MET BETREKKING TOT DE RECYCLING:
Het inpakmateriaal van dit product is recycleerbaar en kan opnieuw gebruikt worden. Er wordt
verzocht om zich van elk afvalmateriaal te ontdoen volgens de plaatselijke voorschriften.
Volg voor het wegdoen van de speler de voorschriften voor de verwijdering van wit- en bruingoed
op.
Batterijen mogen nooit worden weggegooid of verbrand, maar moeten volgens de plaatselijke
voorschriften betreffende chemisch afval worden verwijderd.
Op dit product en de meegeleverde accessoires, m.u.v. de batterijen is de richtlijn voor
afgedankte elektrische en elektronische apparaten (WEEE) van toepassing.
OBSERVERA ANGÅENDE ÅTERVINNING:
Produktens emballage är återvinningsbart och kan återanvändas. Kassera det enligt lokala
återvinningsbestämmelser.
När du kasserar enheten ska du göra det i överensstämmelse med lokala regler och bestämmelser.
Batterier får absolut inte kastas i soporna eller brännas. Kassera dem enligt lokala bestämmelser
för kemiskt avfall.
Denna apparat och de tillbehör som levereras med den uppfyller gällande WEEE-direktiv, med
undantag av batterierna.
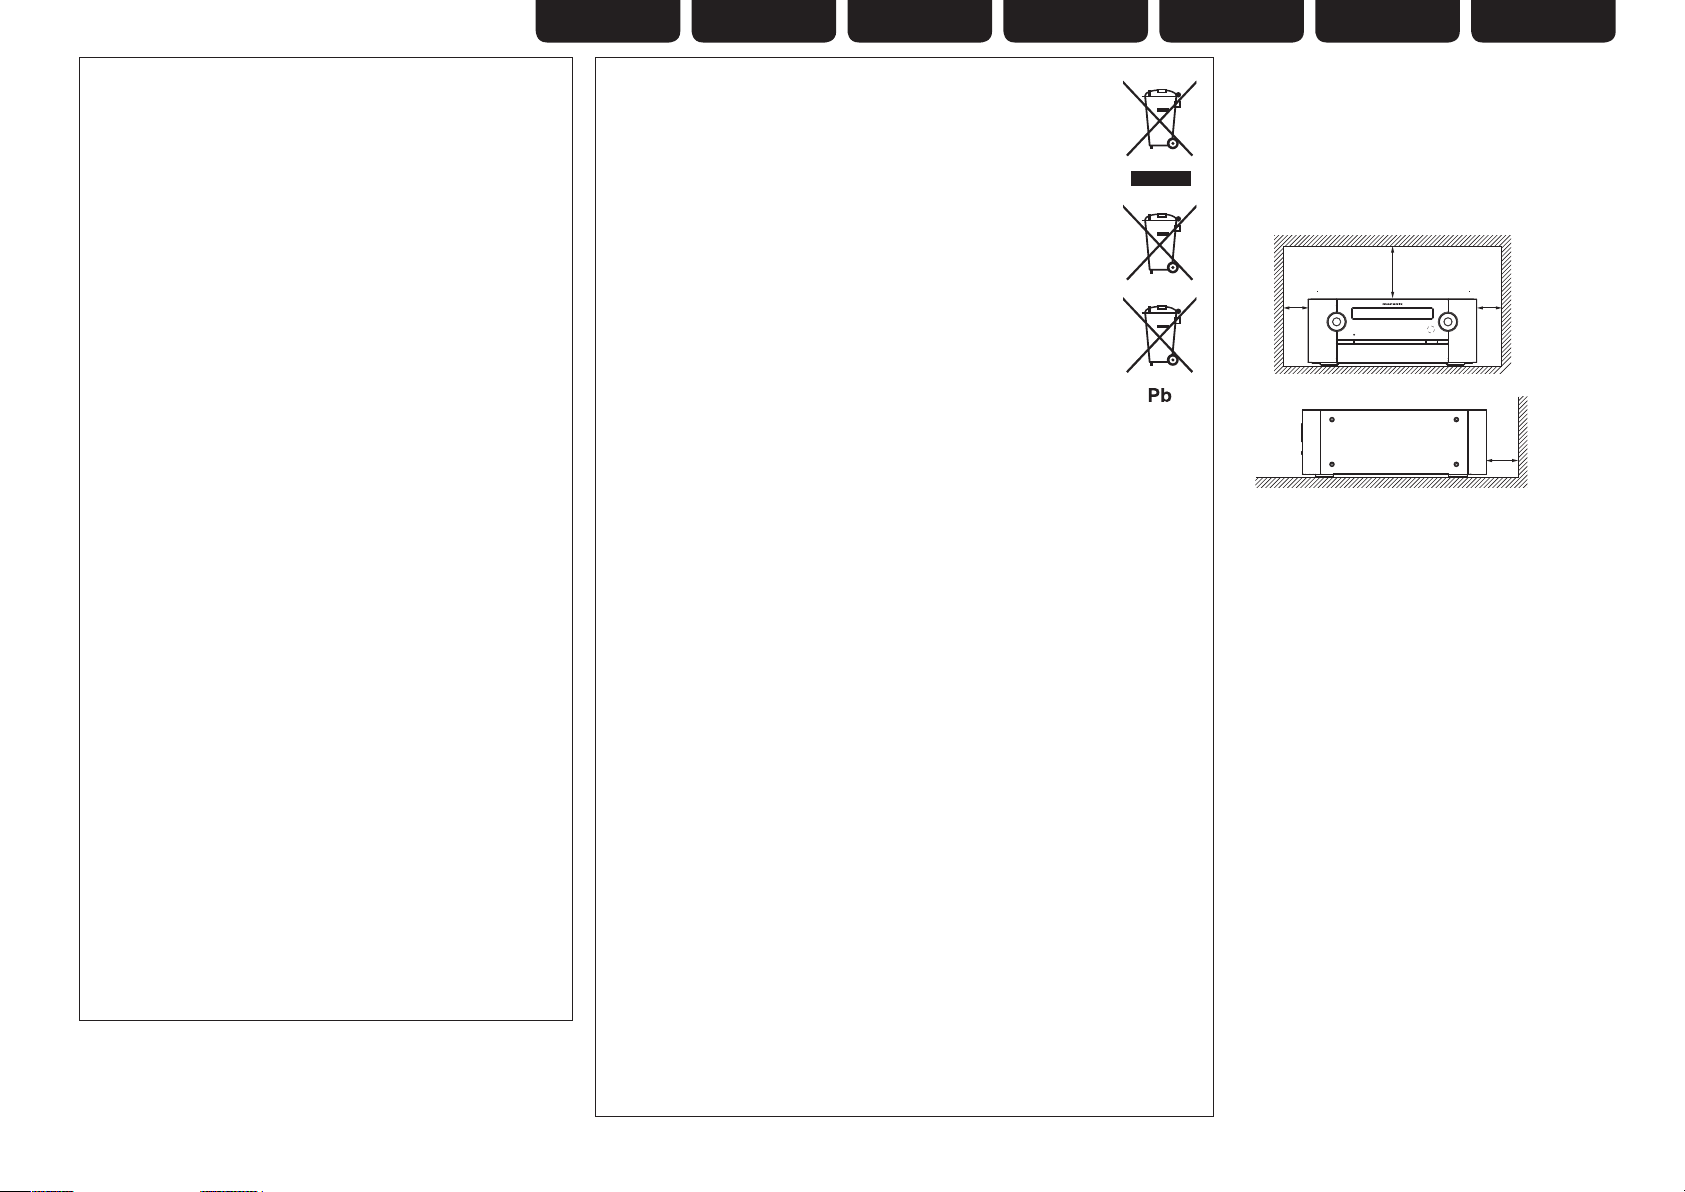
n CAUTIONS ON INSTALLATION
VORSICHTSHINWEISE ZUR AUFSTELLUNG
PRÉCAUTIONS D’INSTALLATION
PRECAUZIONI SULL’INSTALLAZIONE
EMPLAZAMIENTO DE LA INSTALACIÓN
VOORZORGSMAATREGELEN BIJ DE INSTALLATIE
FÖRSIKTIGHET VID INSTALLATIONEN
z
z z
Wall
Wand
Paroi
Parete
z
Pared
Muur
Vägg
z For proper heat dispersal, do not install this unit
in a confined space, such as a bookcase or similar
enclosure.
• More than 0.3 m is recommended.
• Do not place any other equipment on this unit.
z Stellen Sie das Gerät nicht an einem geschlossenen
Ort, wie in einem Bücherregal oder einer ähnlichen
Einrichtung auf, da dies eine ausreichende Belüftung
des Geräts behindern könnte.
• Empfohlen wird über 0,3 m.
• Keine anderen Gegenstände auf das Gerät stellen.
z Pour permettre la dissipation de chaleur requise,
n’installez pas cette unité dans un espace confiné tel
qu’une bibliothèque ou un endroit similaire.
• Une distance de plus de 0,3 m est recommandée.
• Ne placez aucun matériel sur cet appareil.
z Per una dispersione adeguata del calore, non
installare questa apparecchiatura in uno spazio
ristretto, come ad esempio una libreria o simili.
• Si raccomanda una distanza superiore ai 0,3 m.
• Non posizionare alcun altro oggetto o dispositivo su
questo dispositivo.
z Para la dispersión del calor adecuadamente, no
instale este equipo en un lugar confinado tal como
una librería o unidad similar.
• Se recomienda dejar más de 0,3 m alrededor.
• No coloque ningún otro equipo sobre la unidad.
z Plaats dit toestel niet in een kleine afgesloten ruimte,
zoals een boekenkast e.d., omdat anders de warmte
niet op gepaste wijze kan worden afgevoerd.
• Meer dan 0,3 m is aanbevolen.
• Plaats geen andere apparatuur op het toestel.
z För att tillförsäkra god värmeavledning får
utrustningen inte installeras i instängda utrymmen,
som t.ex. en bokhylla eller liknande.
• Mer än 0,3 m rekommenderas.
• Placera ingen annan utrustning ovanpå den här
enheten.
III
Page 6

ИНТЕГРИРОВАННЫЙ
УСИЛИТЕЛЬ
Marantz M-ER803
(РУКОВОДСТВО ПО ЭКСПЛУАТАЦИИ)
Вы приобрели устройство радиоприемное/проигрываюшее диски производства компании “D&M Холдингс Инк”, Япония (“D & M Holdings Inc.”, Japan). Модель
M-ER803 является DVD-ресивером и предназначена для приема радиовещания и проигрывания DVD/BD в домашних аудиосистемах. Это изделие широко
известно в кругах истинных ценителей высококлассного звука. Качество и безопасность подтверждены множеством тестов, проведенных как зарубежными, так и
российскими испытательными лабораториями.
Изготовитель в течение 3 лет (срок службы) после выпуска данного изделия обеспечивает наличие комплектующих в целях возможности проведения ремонта
и технического обслуживания, по истечении которого эксплуатация и техническое обслуживание продолжается в соответствии с действующими нормативными
документами. Изделие остается безопасным для жизни, здоровья человека и окружающей среды в течение всего срока эксплуатации. Гарантийный срок - 1 год.
Информация о Российской сертификации
No сертификата
соответствия
РОСС JP.АЯ46.B13708 РОСТЕСТ-МОСКВА ГОСТ Р МЭК 60065-2005
См. в конце инструкции
ВНИМАНИЕ: Если Вы приобрели аудиоаппаратуру надлежащего качества, то, по Российским законам, она не подлежит возврату или обмену на аналогичный товар других
размера, формы и т.д.
Орган по
сертификации
Нормативные документы Наименование сертифицированной продукции
Устройства радиоприемные (DVD/CD-ресиверы) До 11.04.2013
ГОСТ 5651-89
(Tабл. 1 (поз. 11), табл. 2 (поз. 6.7))
ГОСТ 22505-97
ГОСТ Р 51515-99
ГОСТ Р 51317.3.2-2006 (Pазд. 6.7)
ГОСТ Р 51317.3.3-2008
Основные технические характеристики
Срок действия
сертификата
D&M Холдингс Инк
Здание D&M, 2-1 Ниссин-тё
Кавасаки-ку, Кавасаки-си, Канагава
2108569, Япония
D&M Holdings Inc.
D&M Building, 2-1 Nisshin-Cho
Kawasaki-Ku, Kawasaki-Shi, Kanagawa
IV
2108569, Japan
Page 7

Getting started
ENGLISH
Getting
Started
Getting
Started
Thank you for purchasing this Marantz product. To ensure proper operation, please read this user guide carefully before using the product.
After reading the guide, be sure to keep it for future reference.
Contents
Getting started ·······································································1
Accessories ····················································································2
About this manual ········································································2
Main features ················································································· 2
Cautions on handling ···································································· 2
About discs ····················································································3
Inserting a disc··············································································3
Holding discs ················································································3
Loading discs ················································································3
Cautions on handling ····································································3
Cautions on storing discs······························································3
Cleaning discs ··············································································· 3
About discs and files·····································································4
Part names and functions·····························································4
Front panel ···················································································· 4
Display ··························································································5
Rear panel ····················································································· 6
Remote control unit ······································································6
Basic connections··································································8
Connecting speakers ····································································8
Connecting a TV ············································································9
Connecting a set-top box (Satellite tuner/Cable TV) ··············10
Connecting an antenna ······························································10
Connecting a wireless receiver (RX101)····································11
Remote control connection ························································11
Connecting the power cord························································11
Basic operations···································································12
Important information ································································12
Preparations ················································································12
Turning the power on ·································································12
Turning the power off ·································································12
Selecting the input source ··························································12
Operations possible during playback ········································ 13
Adjusting the master volume ······················································13
Turning off the sound temporarily ··············································13
Switching the display’s brightness ·············································13
Adjusting the tone ······································································13
Listening with headphones·························································13
Source direct mode ····································································13
Setting the current time (24-Hour Display) ······························14
Playable media ············································································14
Discs ···························································································14
Files ····························································································15
About playback information ······················································15
Information bar display ·······························································15
Playing Blu-ray Disc, DVD-Video and CD ··································16
Operations using disc menu, top menu, and pop-up menu ········16
Enjoying BD-LIVE Features ························································· 17
Playing BD-Video compatible with Bonus View ··························17
Playback (Basic) ··········································································· 18
Stop playback··············································································18
Pause playback ···········································································18
Step-by-step playback ································································· 18
Fast forward/fast reverse playback ············································· 19
Slow forward playback ································································19
Skipping to the chapter/track/file ················································19
Looking for specific sections using the search modes ··············· 19
Repeat playback··········································································20
Random playback········································································20
Switching the angle ····································································20
Switching the audio ····································································21
Switching the subtitles ·······························································21
Surround mode ···········································································21
Dolby Virtual Speaker playback ··················································· 21
Dolby Headphone playback ························································21
Stereo playback ··········································································21
Tuning in radio stations ·····························································22
Listening to FM/AM broadcasts ·················································22
Listening to preset stations ························································23
RDS (Radio Data System) ···························································23
PTY (Program Type) ····································································24
TP (Traffic Program) ····································································24
RT (Radio Text) ···········································································24
CT (Clock Time)···········································································24
Advanced connections······················································25
Connecting an iPod or USB memory device to the
iPod/USB1 port ···········································································25
Using the iPod stand···································································25
Connecting a USB memory device to the USB2 port ·············· 26
Connecting a portable audio player ·········································26
Connecting to the network ························································27
Advanced operations·························································28
Playing an iPod® ········································································· 28
Playing a USB memory device ··················································· 29
Playing files ·················································································· 30
Playing a portable audio player ·················································32
How to make detailed settings ····································33
Menu map ····················································································33
OSD (on-screen display) menu operation ································· 34
System ·························································································34
Network ·······················································································35
Display ·························································································· 36
Audio ····························································································36
Language ·····················································································37
Parental ························································································37
Other setting··········································································38
Timer setup ·················································································· 38
Audio delay ··················································································39
Auto standby ···············································································40
Registering preset codes ····························································40
Other functions ···········································································40
Other information ·······························································41
Explanation terms ·······························································42
Troubleshooting···································································44
Resetting the microprocessor ···················································· 46
Specifications ········································································47
Index ··························································································47
License ····························································End of this manual
List of preset codes ··································End of this manual
Connections
Basic
Operations
Basic
Connections
Advanced
Operations
Advanced
Settings
setting
Other
information
Other
Explanation
terms
Troubleshooting Specifications Index
1
Page 8
ENGLISH
Accessories
Check that the following parts are supplied with the product.
q Remote control unit (RC001ER) ..............................................1
w R03/AAA batteries ................................................................... 2
e Power cord ..............................................................................1
r AM loop antenna .....................................................................1
t FM indoor antenna ..................................................................1
y iPod stand ................................................................................ 1
u User guide ...............................................................................1
t
eq
y
r
About this manual
n Operation buttons
The operations described in this guide are based mainly on remote
control operation.
n Symbols
v
NOTE
This symbol indicates a reference page on which
related information is described.
This symbol indicates a supplementary information
and tips for operations.
This symbol indicates points to remember operations
or function limitations.
Main features
High quality amplifi er stressing sound quality
Equipped with a 70 W + 70 W (6 Ω) high-quality amplifi er circuits.
Direct Play for iPod® and iPhone® via USB
Music data from an iPod can be played back if you connect the
USB cable supplied with the iPod via the USB port of this unit, and
also an iPod can be controlled with the remote control for this unit.
Weight and Dramatic sound
The board and circuit confi guration has been redesigned to achieve
lower impedance. Since stable current is supplied to the power
amp and other sections, it is possible to realize as much as 70
watts of power.
“Simple & Straight” circuit design for sound
purity and free of coloration
This unit gives you high sound quality based on the “simple &
straight” concept. Circuitry is uncomplicated, signal paths are short,
and all adverse infl uences on sound quality have been minimized.
Playback of MP3 and WMA fi les
Supports playback of discs and USB memory devices on which
MP3 or WMA fi les are recorded. The unit’s display can display the
title of the track and the name of the artist of the current track.
Low standby power consumption
Designed with the environment in mind, the unit consumes just
0.5 W while in standby mode.
M-XPort (Marantz-eXtension Port)
This unit is equipped with the M-XPort, a Marantz original innovation
that provides outstanding expandability. You can connect the
Wireless Receiver RX101 (sold separately) to this port.
Cautions on handling
• Before turning the power switch on
Check once again that all connections are correct and that there are
no problems with the connection cables.
• Power is supplied to some of the circuitry even when the unit is
set to the standby mode. When going on vacation or leaving home
for long periods of time, be sure to unplug the power cord from the
power outlet.
• Image persistence (image burn-in)
Do not leave the still images of the disc menu, the unit menu, etc.,
displayed on the TV screen for long periods. This can result in image
persistence (image burn-in) on the screen.
• About Condensation
If this unit is moved from a cold place to a warm place, or installed
in a room subject to rapid temperature rise from a heater, etc.,
condensation (dew) may form on the internal parts of the unit
(operating parts and lenses).
If used in this condition, this unit will not operate correctly and
damage may result. If condensation is formed on the unit, leave this
unit for 1 to 2 hours with the power off before use.
• Cautions on using mobile phones
Using a mobile phone near this unit may result in noise. If that
occurs, move the mobile phone away from this unit when it is in use.
• Moving the unit
Be sure to remove a disc, turn off the power and unplug the power
cord from the power outlet. Next, disconnect the connection cables
to other system equipment before moving the unit.
• About Care
• Wipe the cabinet and control panel clean with a soft cloth.
• Follow the instructions when using a chemical cleaner.
• Benzene, paint thinner or other organic solvents as well as
insecticide may cause material changes and discoloration if brought
into contact with the unit, and should therefore not be used.
• Suffi ciently ventilate the place of installation
If the unit is left in a room full of the smoke from cigarettes, etc., for
long periods of time, the surface of the optical pickup could get dirty,
in which case it will not be able to read the signals properly.
n Illustrations
Note that the illustrations in this guide are for explanation purposes
and may differ from the actual unit.
2
Page 9
About discs
ENGLISH
Getting
Started
Getting
Started
Inserting a disc
• Set the disc with the labeled side facing up.
• Make sure the disc tray is fully open when inserting the disc.
• Place the disc horizontally in the tray, aligned with the tray guide.
“NO DISC” is displayed if a disc that cannot be played back on this
unit is loaded and the disc tray reopens in the case of some discs.
NOTE
• Only load one disc at a time. Loading two or more discs can damage
the unit or scratch the discs.
• Do not use cracked or warped discs or discs that have been repaired
with adhesive, etc.
• Do not use discs on which the sticky part of cellophane tape or labels
is exposed or on which there are traces of where labels have been
removed. Such discs can get caught inside the player and damage it.
• Do not use discs with special shapes, as they could damage the
player.
• Do not push the disc tray in by hand when the power is turned off.
Doing so could damage the set.
Holding discs
Do not touch the signal surface.
Loading discs
• Place the disc in the tray, label side up.
• Make sure the disc tray is fully open when inserting the disc.
• Place the discs flat, 12 cm discs in the outer tray guide (Figure 1), 8
cm discs in the inner tray guide (Figure 2).
Figure 1
Outer tray guide
12 cm disc
• Place 8 cm discs in the inner tray guide without using an adapter.
“NO DISC” is displayed if the disc is loaded upside-down or if no disc
is loaded.
Figure 2
Outer tray guide
8 cm disc
Cautions on handling
• Do not get fingerprints, oil or dirt on discs.
• Take special care not to scratch discs when removing them from
their cases.
• Do not bend or heat discs.
• Do not enlarge the hole in the center.
• Do not write on the labeled (printed) surface with ball-point pens,
pencils, etc., or stick new labels on discs.
• Water droplets may form on discs if they are moved suddenly from
a cold place (outdoors for example) to a warm place, but do not try to
dry them off using a hairdryer, etc.
Cautions on storing discs
• Be sure to remove discs after using them.
• Be sure to store discs in their cases to protect them from dust,
scratches, warping, etc.
• Do not store discs in the following places:
1. Places exposed to direct sunlight for long periods of time
2. Dusty or humid places
3. Places exposed to heat from heaters, etc.
Cleaning discs
• If there are fingerprints or dirt on a disc, wipe them off before using
the disc. Fingerprints and dirt can impair sound quality and cause
interruptions in playback.
• Use a commercially available disc cleaning set or a soft cloth to clean
discs.
Gently wipe the disc from the
inside towards the outside.
NOTE
Do not use record spray, antistatic agents, benzene, thinner or other
solvents.
Do not wipe in a circular motion.
Connections
Basic
Operations
Basic
Connections
Advanced
Operations
Advanced
Settings
setting
Other
information
Other
Explanation
terms
Troubleshooting Specifications Index
3
Page 10
ENGLISH
About discs
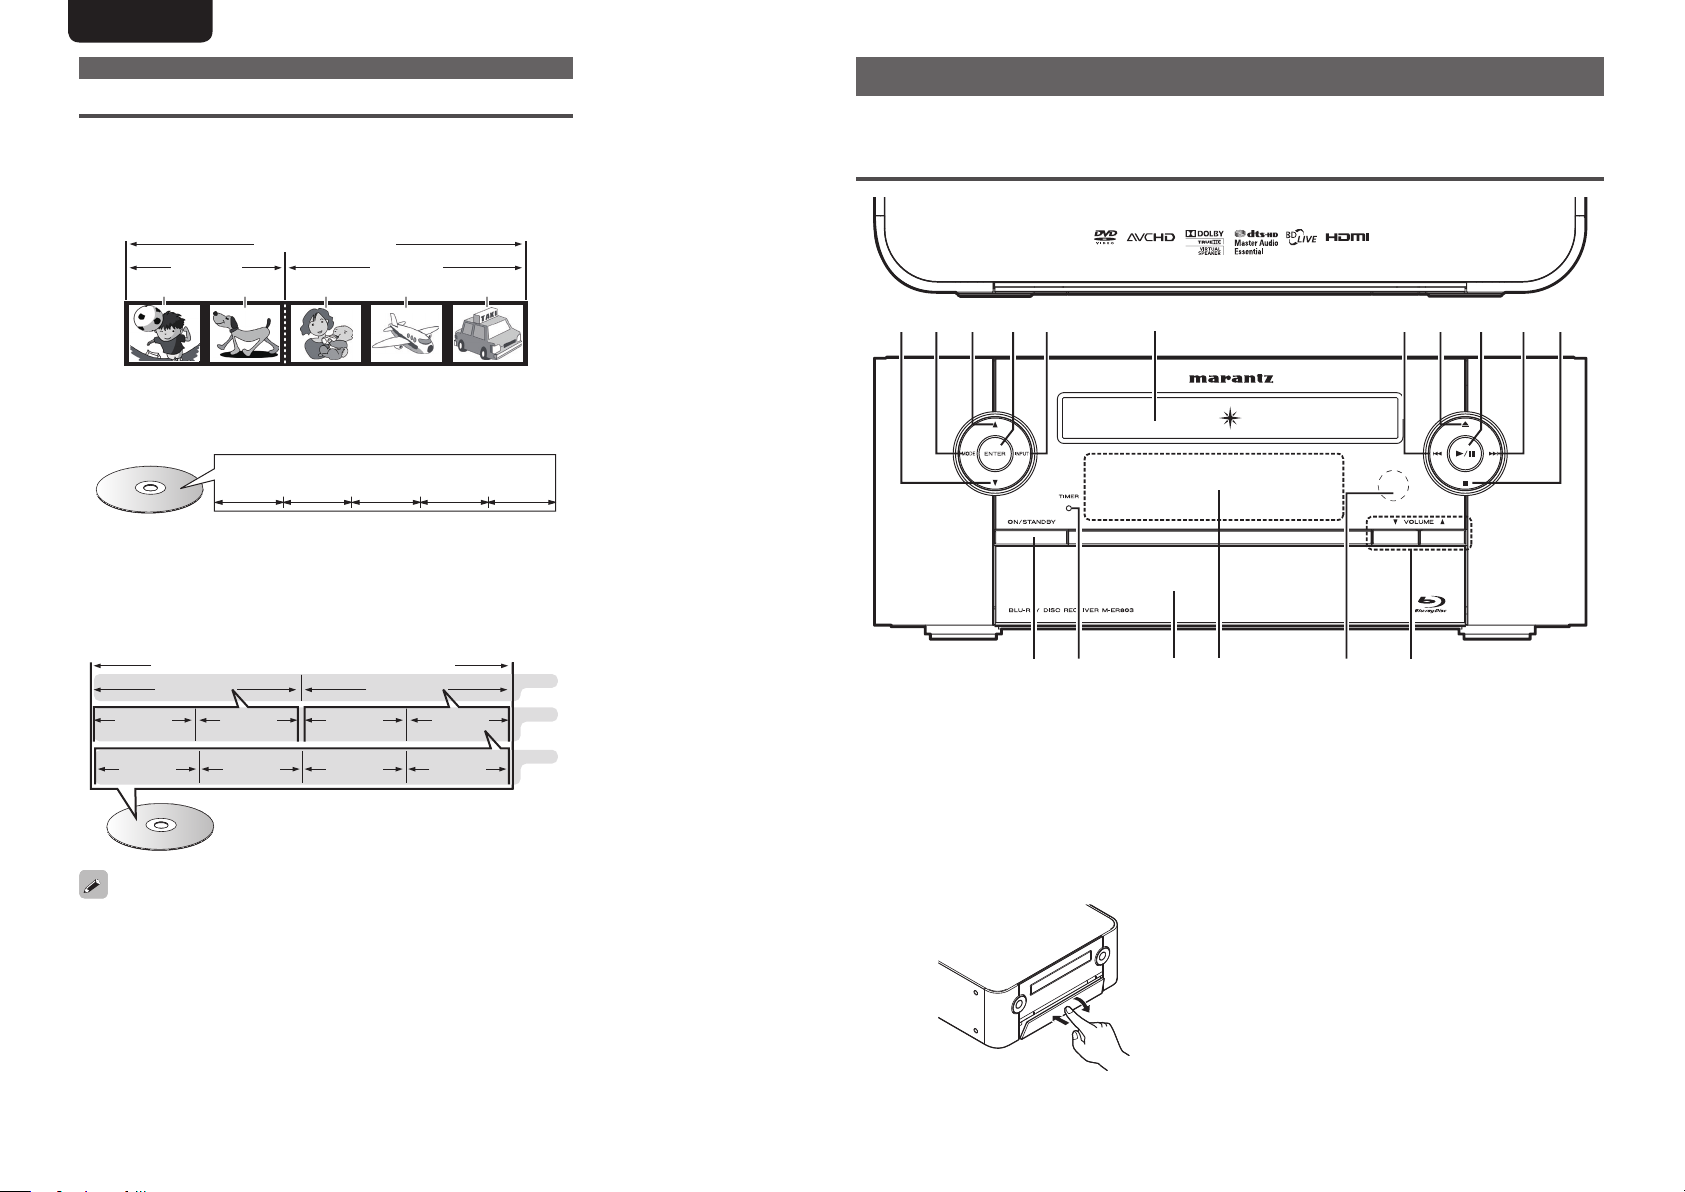
About discs and fi les
n BD-Video, DVD-Video
BD-Video/DVD-Video discs are divided into several large sections
(titles) and small sections (chapter). These sections are all allotted
numbers, called the title numbers and chapter numbers.
GExampleH
Blu-ray Disc, DVD
BD、DVD
タイトル1
Title1 Title2
チャプター1 チャプター2 チャプター1 チャプター2 チャプター3
n CD
CDs are divided into several sections (tracks). These sections are
all allotted numbers, called the track numbers.
Track1 Track2 Track3 Track4 Track5
n File
MP3/WMA/JPEG/WMV/AVI fi les recorded on CD-R/-RW are
divided into large segments (folders) and small segments (fi les).
Files are stored in folders, and folders can be placed for storage in
a hierarchy. This unit can recognize up to 8 hierarchies of folder.
DVD-R/-RW、CD-R/-RWまたはSDカード
Folder1 Folder2
File1 File2 File3
File4 File5
When writing MP3/WMA/JPEG/WMV/AVI fi les on a CD-R/-RW disc,
set the writing software’s format to “ISO9660”. The fi les may not play
properly if they are recorded in other formats. For details, refer to the
instructions of your writing software.
CD-R/-RW
タイトル2
Chapter 2Chapter 1Chapter 2Chapter 1
Chapter 3
Folder3
File6 File7
1st level
2nd level
3rd level
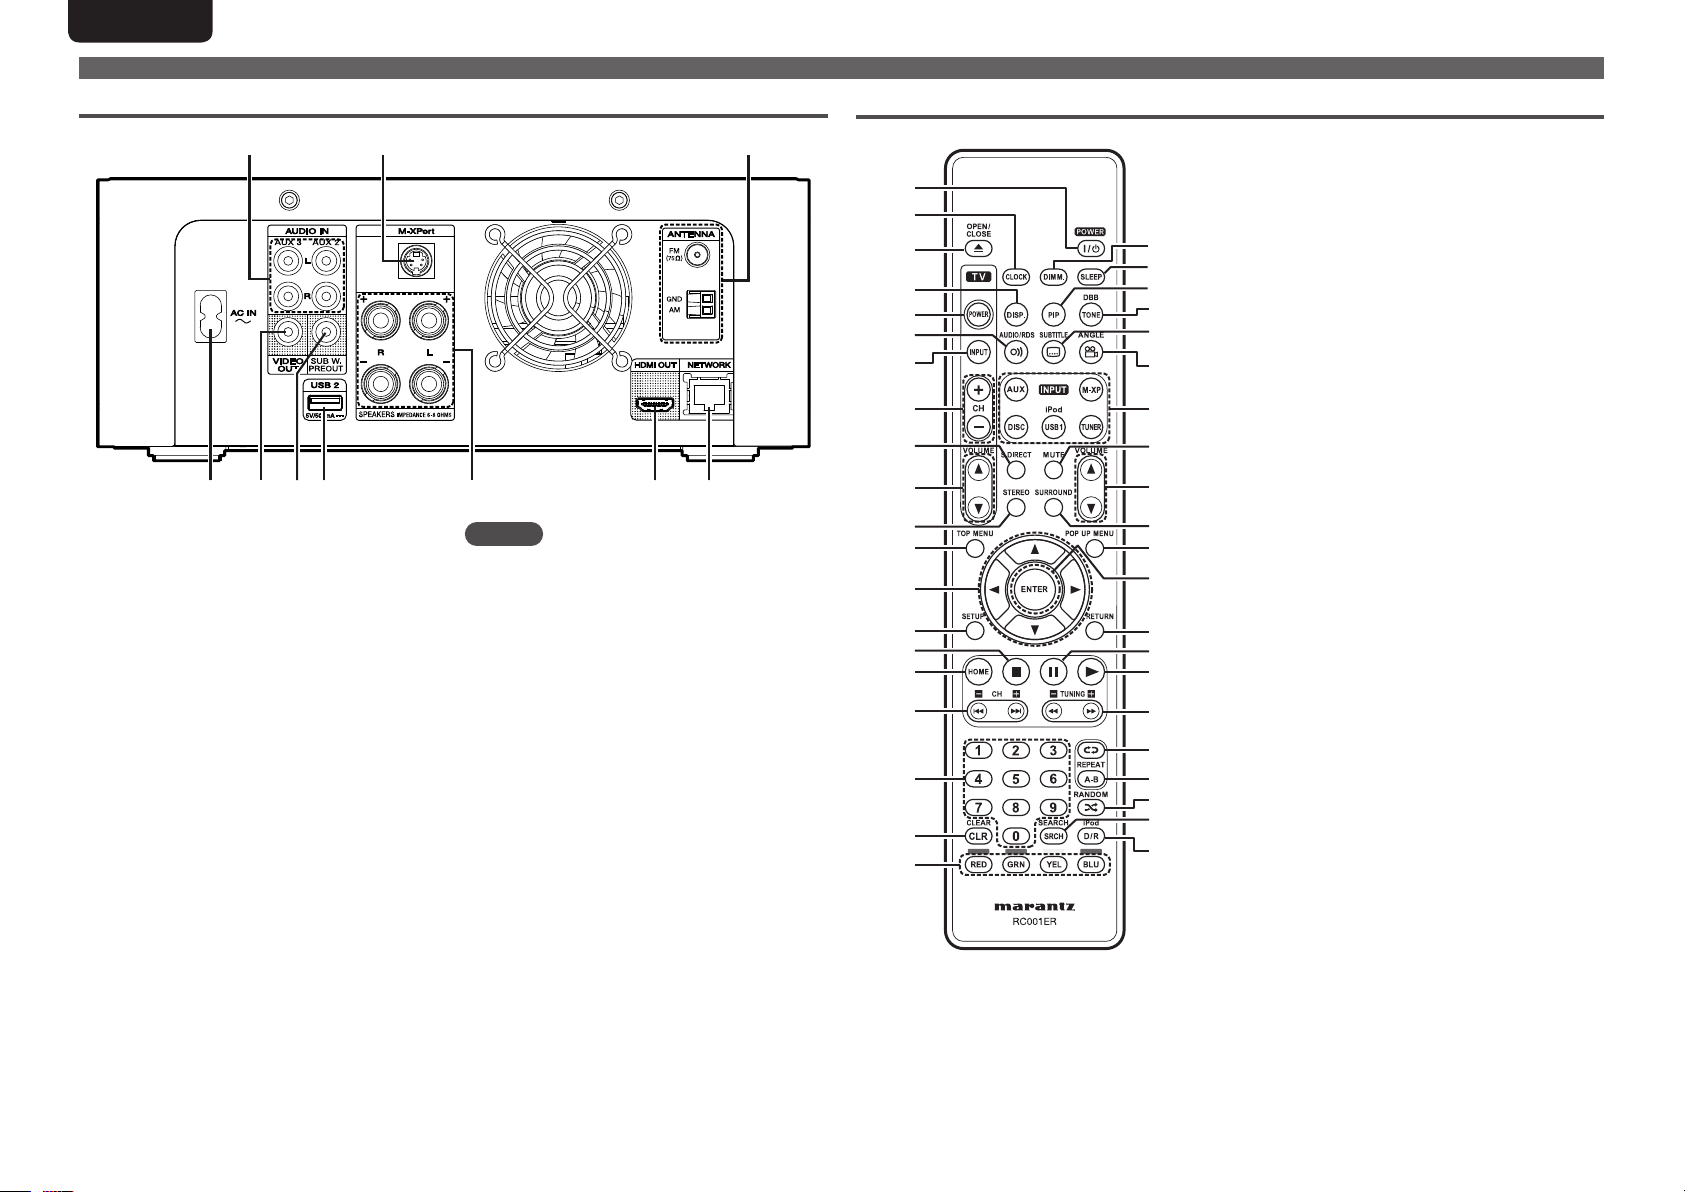
Part names and functions
For buttons not explained here, see the page indicated in parentheses ( ).
Front panel
Q5 Q3Q6 Q5 Q4 uiQ1 Q0 o
q
Power operation button
(ON/STANDBY) ······························(11, 12, 46)
w TIMER indicator ··········································(39)
e Door
When you are using buttons and/or terminals
behind the door, press the bottom of the door
to open it. When not using buttons and/or
terminals behind the door, close it. Be careful
not to catch your fi ngers when closing the door.
Q2
ye rq tw
r Display ··························································· (5)
t Remote control sensor ································(7)
y Master volume control buttons
(VOLUME d,f) ············································ (13)
u Stop button (2) ······························(11, 18, 22)
i Forward-skip/search button
(9) ················································ (19, 23, 46)
o Play/Pause button (1/3) ····················· (18, 40)
Q0 Disc tray open/close button (5) ················ (16)
Q1 Reverse-skip/search button
(8) ················································ (19, 23, 46)
Q2 Disc tray ························································(3)
Q3 Input source select button (INPUT) ·········· (12)
4
Page 11

Q4
ENTER button ······························· (11, 38 – 40)
Used to confi rm an item.
• TUNER mode ··············································· (22)
Used to register a broadcast station.
Q5 u/i buttons
• SETUP mode ··································· (11, 38, 40)
Used to select the item to be set.
• TUNER mode ··············································· (22)
Used when switching frequencies.
• DISC, iPod/USB mode ························ (28 – 31)
Used to select the item.
Q6 MODE button
• SETUP mode ··············································· (39)
Calls up the SETUP menu when pressed
continuously.
• TUNER mode ··············································· (22)
Used to select reception band.
Display
Part names and functions
Q0 o i u y
ew r
ENGLISH
tq
Getting
Started
Getting
Started
Connections
Basic
Operations
Basic
Connections
Advanced
GWith the door openH
Q7 Q8 W0 W1 W2Q9
Q7 Headphones jack ········································(13)
Q8 AUX1 input jack ·········································· (26)
Q9 iPod/USB1 port ··········································(25)
W0 SOURCE DIRECT button ····························(13)
W1 STEREO button ··········································· (21)
W2 SURROUND button ···································· (21)
q Tone indicators
DBB: Lights when the dynamic bass boost
function is set to “ON”.
TONE: Lights when the tone (bass/treble) is
being adjusted.
w Surround mode indicators ························(21)
e Information display
Various information is displayed here.
r Play mode indicators
Lights when the random playback mode or
repeat playback mode is used.
t Remote control signal reception indicator
y Timer operation indicator ·························· (39)
u Tuner reception mode indicators ·············(22)
These light according to the reception conditions
when the input source is set to “TUNER”.
TUNED: Lights when the broadcast is properly
tuned in.
RDS: This light when receiving RDS broadcasts.
AUTO: Lights when “FM AUTO” is selected.
ST: In the FM mode, this light when receiving
analog stereo broadcasts.
MONO: Lights when “FM MONO” is selected,
or when an analog monaural broadcast is
received.
i Decoder indicators
These light when the respective decoders are
operating.
o Playback mode indicators
1 : During playback
3 : During pause
Q0 USB/DISC indicators
Lights when a disc or USB memory device is
installed.
Operations
Advanced
Settings
setting
Other
information
Other
Explanation
terms
Troubleshooting Specifi cations Index
5
Page 12
ENGLISH
Part names and functions
Rear panel
q w te r y u
q AC inlet (AC IN) ··········································· (11)
w VIDEO OUT connector ·································(9)
e PREOUT connector (SUB W.) ······················(8)
r USB 2 port ··················································· (26)
t Speaker terminals ········································(8)
y HDMI OUT connector ··································· (9)
u NETWORK connector ································· (27)
i FM/AM antenna terminals ························(10)
o M-XPort connector ····································· (11)
Q0 Analog audio connectors
(AUX2, AUX3 IN) ····································(9, 10)
ioQ0
NOTE
• Do not touch the inner pins of the connectors on
the rear panel. Electrostatic discharge may cause
permanent damage to the unit.
• Do not put your finger or foreign object in the
fan opening. Doing so could cause injury or unit
failure.
• While the fan is operating, the faint fan noise may
be generated.
Remote control unit
q
w
e
r
t
y
u
i
o
Q0
Q1
Q2
Q3
Q4
Q5
Q6
Q7
Q8
Q9
W0
R1
R0
E9
E8
E7
E6
E5
E4
E3
E2
E1
E0
W9
W8
W7
W6
W5
W4
W3
W2
W1
q Power button (POWER) ·················(12, 14, 39)
w CLOCK button ············································· (14)
e Disc tray open/close button
(OPEN/CLOSE 5) ········································ (16)
r Display button (DISP.) ································ (15)
t TV POWER button ······································ (40)
y AUDIO/RDS button ······························(21, 23)
u TV INPUT button ········································(40)
i TV channel buttons (TV CH +/–) ··············· (23)
o Source direct button (S.DIRECT) ··············(13)
Q0 TV volume control buttons
(TV VOLUME df) ······································· (40)
Q1 STEREO button ··········································· (21)
Q2 TOP MENU button ·····································(16)
Q3 Cursor buttons (uio p) ·················· (34 – 37)
Q4 SETUP button ··················· (14, 22, 24, 38 – 40)
Q5 Stop button (2) ··········································(18)
Q6 HOME button ········································ (31, 34)
Q7 Reverse-skip/Forward-skip buttons
(8/9) ············································· (13, 19)
Channel buttons (CH +/–) ·························· (23)
Q8 Number buttons ·····························(23, 35, 37)
Q9 CLEAR button ·································(19, 22, 23)
W0 RED/GRN/YEL/BLU button
W1 iPod Direct/Remote button (iPod D/R) ····(28)
W2 SEARCH button ··········································(19)
W3 RANDOM button ········································(20)
W4 REPEAT A-B button ···································· (20)
W5 REPEAT button ···········································(20)
6
Page 13
W6 Fast-reverse-skip/Fast-forward buttons
(6/7) ····················································(19)
TUNING buttons (+/–) ································ (22)
W7 Play button (1) ························· (18, 19, 28, 29)
W8 Pause button (3) ········································(18)
W9 RETURN button ···························· (34 – 37, 39)
E0 ENTER button ····································· (34 – 37)
E1 POP UP MENU button ·······························(16)
E2 SURROUND button ···································· (21)
E3 Master volume control buttons
(VOLUME df) ············································· (13)
E4 MUTE button ··············································(13)
E5 Input source select buttons (INPUT) ········(12)
E6 ANGLE button ············································(20)
E7 SUBTITLE button ········································ (21)
E8 DBB/TONE button ······································ (13)
E9 Picture in picture button (PIP) ··················· (17)
R0 SLEEP button ·············································· (39)
R1 Dimmer button (DIMM.) ····························(13)
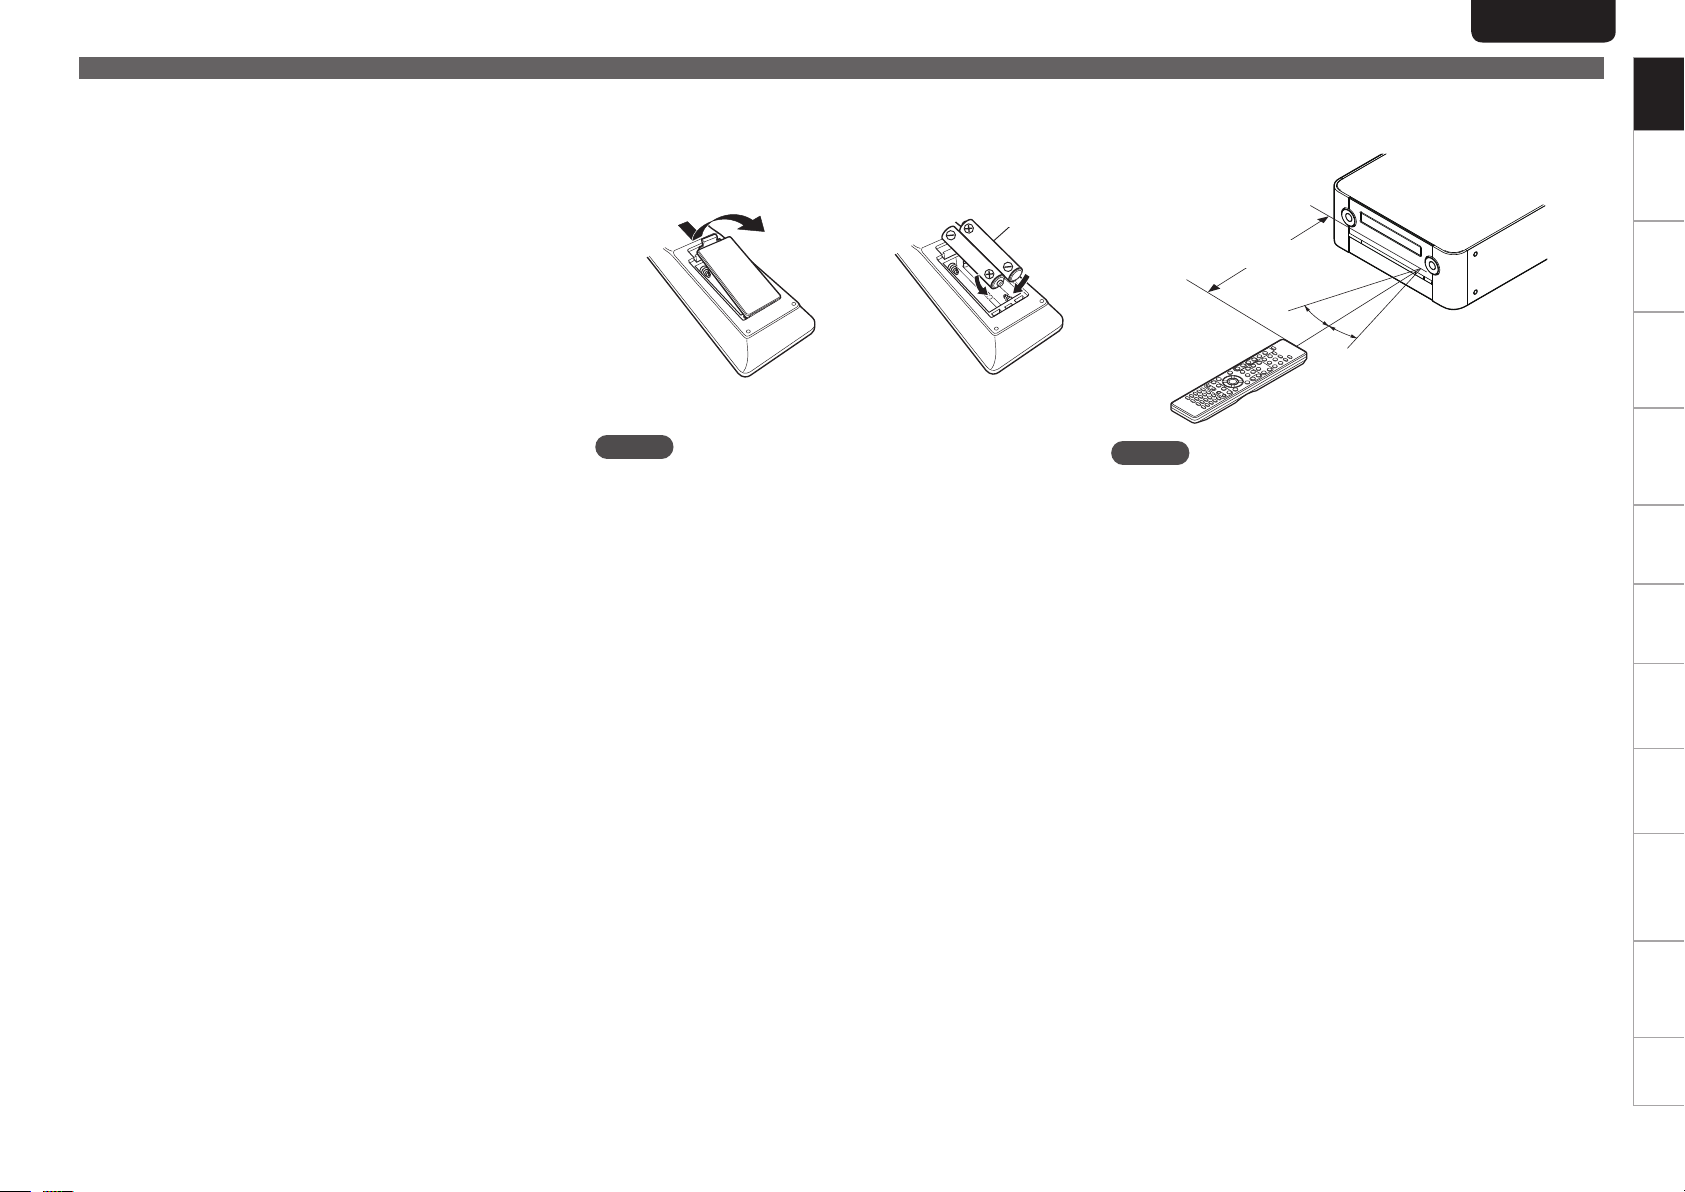
n Inserting the batteries
q Remove the rear lid in the
direction of the arrow and
remove it.
e Put the rear cover back on.
NOTE
• Replace the batteries with new ones if the set does not operate
even when the “remote control” is operated close to the unit.
• The supplied batteries are only for verifying operation.
• Be sure to insert the batteries in the proper direction, following the
q and w marks in the battery compartment.
• To prevent damage or leakage of battery fluid:
• Do not use a new battery with an old one.
• Do not use two different types of batteries.
• Do not attempt to charge dry batteries.
• Do not short-circuit, disassemble, heat or dispose of batteries in
a fire.
• Do not keep the battery in a place exposed to direct sunlight or in
places with extremely high temperatures, such as near a heater.
• If the battery fluid leaks, carefully wipe the fluid off the inside of the
battery compartment and insert new batteries.
• Remove the batteries from the “remote control” if it will not be used
for a long time.
• Used batteries should be disposed of in accordance with the local
regulations regarding battery disposal.
w Load the two batteries
properly as indicated by
the marks in the battery
compartment.
R03/AAA
ENGLISH
Part names and functions
n Operating range of the remote control unit
Operate the remote control unit while pointing it at the remote
sensor.
Approx. 7 m
30°
30°
NOTE
The set may function improperly or the “remote control” may not
operate if the remote control sensor is exposed in direct sunlight or
strong artificial light such as a fluorescent or infrared light.
Getting
Started
Getting
Started
Connections
Basic
Operations
Basic
Connections
Advanced
Operations
Advanced
Settings
setting
Other
information
Other
Explanation
terms
Troubleshooting Specifications Index
7
Page 14
ENGLISH
Basic connections
This section explains how to connect speakers, TV, set-top box, antennas and power cord.
For other connections, see the sections below.
n Connecting an iPod or USB memory device to the iPod/USB1 port (vpage25)
n Connecting a USB memory device to the USB2 port (vpage26)
n Connecting a portable audio player (vpage26)
n Connecting to the network (vpage27)
Connecting speakers
Carefully check the left (L) and right (R) channels and + (red) and – (black) polarities on the speakers being
connected to the unit, and be sure to connect the channels and polarities correctly.
Cables used for connections
Audio cable (sold separately)
Pin-plug cable
Speaker cable
Connecting the speaker cables
Peel off about 10 mm of sheathing from the tip
of the speaker cable, then either twist the core
wire tightly or terminate it.
NOTE
• Use speakers with an impedance of 6 to 8 Ω. The
protection circuit may be activated if speakers
with an impedance other than specified are used.
• Connect the speaker cables so they do not stick
out of the speaker terminals. The protection circuit
may be activated if the wires touch the rear panel
or if the + and – sides touch each other (vpage43
“Protection circuit”).
• Never touch the speaker terminals while the
power supply is connected. Doing so could result
in electric shock.
Protection circuit
The protection circuit is be activated in the
following situations:
• If the speaker cable wire touches the rear panel
or screws or if the speaker cable wire touches
the speaker cable’s + and – sides are touching
• If the surrounding temperature is extremely
high
• If the inside of the amplifier gets hot to
extended use at a high output
If this happens, unplug the power cord, then check
the connections of the speaker cables and input
cables. If the unit becomes very hot, wait for it to
cool off and improve the ventilation around it. After
doing this, plug the power cord back in.
If the protection circuit is activated even though
there are no problems with the ventilation around
the unit or in connections, the unit may be
damaged. Turn off the power and then contact a
Marantz service center.
NOTE
• Do not plug in the power cord until all connections have been completed.
• When making connections, also refer to the user guide of the other components.
• Be sure to connect the left and right channels properly (left with left, right with right).
• Do not bundle power supply cords together with connection cables.
Doing so can result in humming or noise.
Subwoofer
with built-in
amplifier
IN
(R) (L)
w q w q
8
Page 15
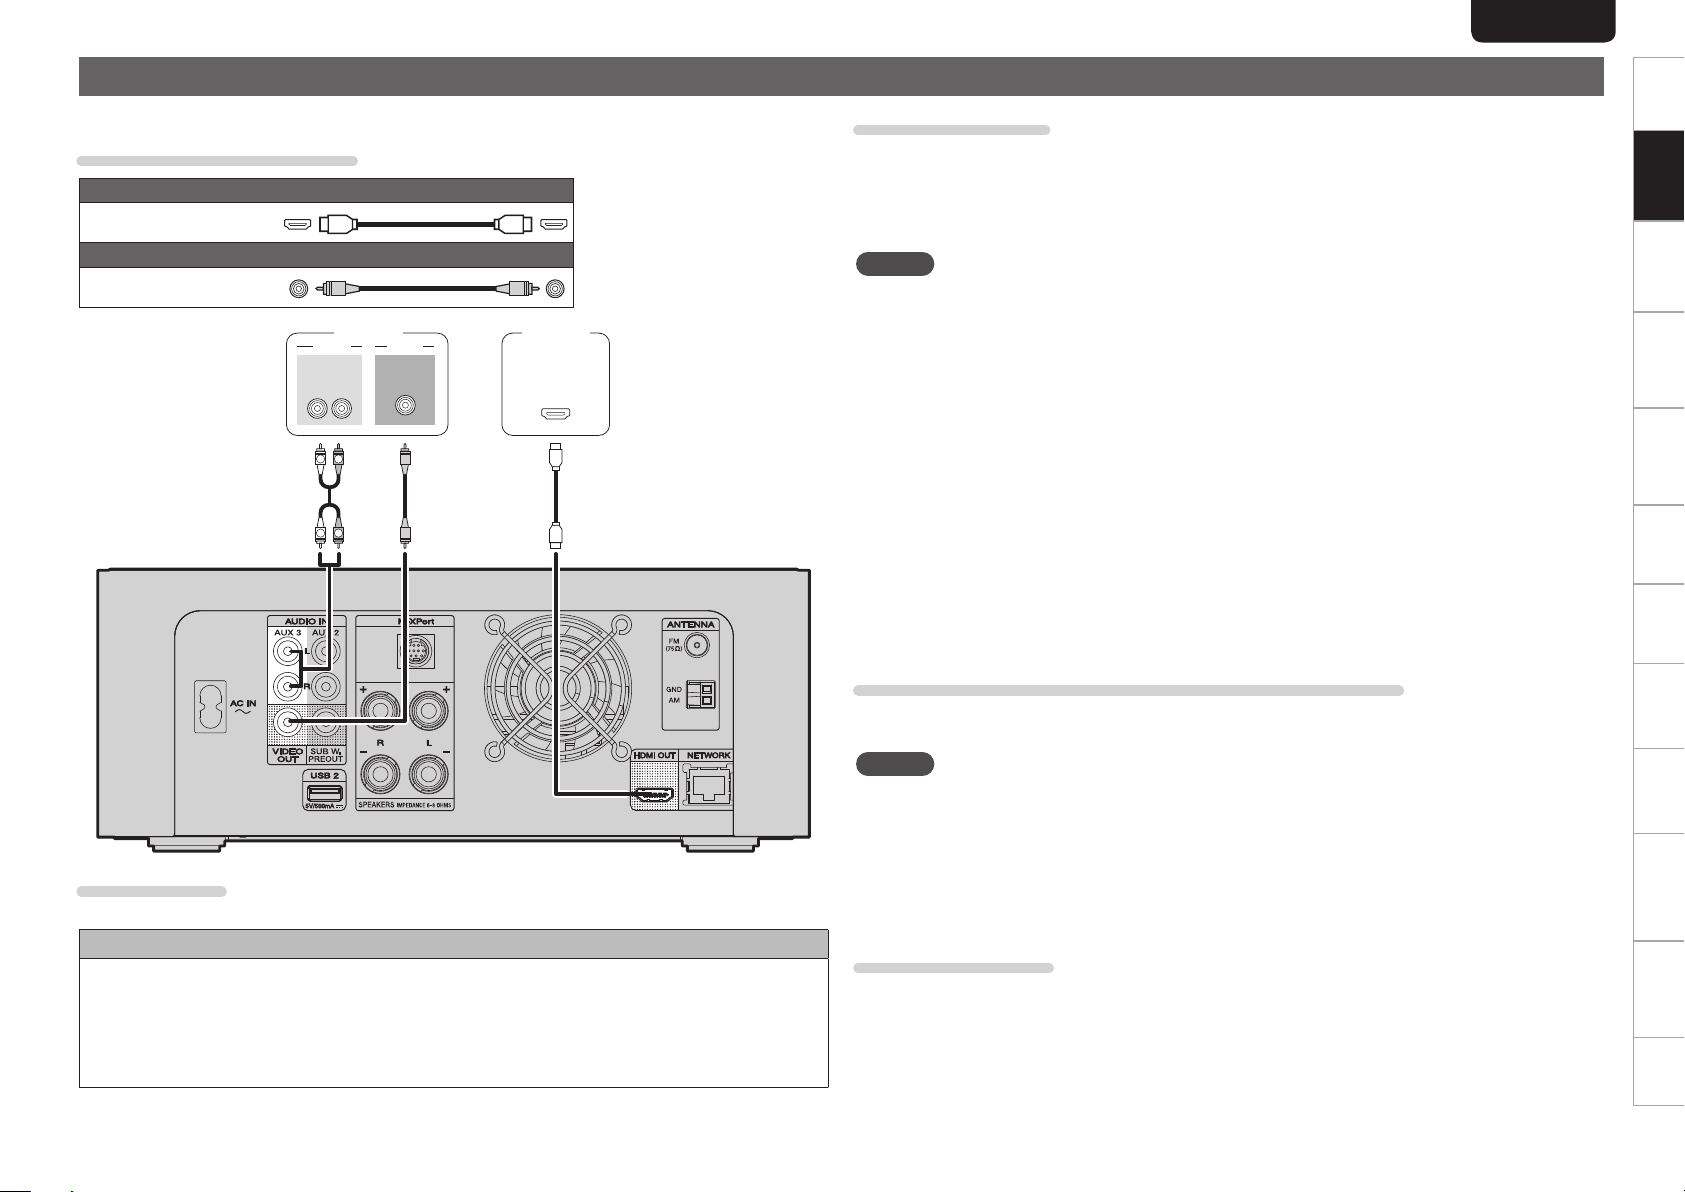
Connecting a TV
Select the connector to use and connect the device.
Cables used for connections
Audio and video cable (sold separately)
HDMI cable z
Video cable (sold separately)
Video cable
TV TV
AUDIO
AUDIO
OUT
L
L
VIDEO
VIDEO
RL
R
R
IN
HDMI function
• Deep Color (vpage36 “Color Depth”)
Copyright protection system
In order to play back digital video and audio such as BD-Video or DVD-Video via HDMI connection, both
this unit and TV need to support the copyright protection system known as HDCP (High-bandwidth
Digital Content Protection System). HDCP is copyright protection technology comprised of data
encryption and authentication of the connected AV device. This unit supports HDCP.
• If a device that does not support HDCP is connected, video and audio are not output correctly. Read
the user guide of your television for more information.
zThis interface allows transfer of
digital video signals and digital
audio signals over a single HDMI
cable.
HDMI
IN
ENGLISH
About HDMI cables
• Use a cable on which the HDMI logo is indicated (a certified HDMI product) for connection to the HDMI
connector. Normal playback may not be possible when using a cable other than one on which the HDMI
logo is indicated (a non-HDMI-certified product).
• When a device supporting Deep Color signal transfer is connected, use a cable compatible with HDMI
version 1.3a.
NOTE
• Do not connect the this unit’s video output via a VCR (Video Cassette Recorder). Some media contain
copy prohibit signals, which will disturb the screen image.
• When the HDMI video resolution is set to “HDMI Auto” as described in “Resolution” (vpage36), the
outputs the highest resolution video signal that is supported by the connected equipment.
• If the HDMI resolution is not set to “HDMI Auto”, set it to correspond with the resolution of your
television. Images will not be displayed normally if the television resolution and this unit’s output
resolution do not match.
• Audio and video will be temporarily interrupted if the power of the connected device currently playing
back is turned off, or input is switched.
• When you change the HDMI video resolution of this unit, it takes from a few seconds up to about 10
seconds for validation between this unit and the connected device. Audio/video is not output during this
period.
• If the resolution of video signal to be output from HDMI OUT does not match that of your TV, the picture
is not clear, natural or displayed.
Should this happen, first make (composite) video connection between this unit and TV, and select the
(composite) VIDEO as an input source on the TV to display the setting menu, then set the Resolution
correctly. (For details on the resolution acceptable for your TV, refer to its operating instructions.)
• Among the components that support HDMI, some components can control other components via the
HDMI connector. However, this unit cannot be controlled by another component via the HDMI connector.
Connecting to a device equipped with a DVI-D connector
When an HDMI/DVI conversion cable (sold separately) is used, the HDMI video signals are converted to
DVI signals, allowing connection to a device equipped with a DVI-D connector.
NOTE
• No sound is output when connected to a device equipped with a DVI-D connector. Set “HDMI Output”
(vpage36) in the menu to “Off Speaker”, and output audio from the speakers.
• Signals cannot be output to DVI-D devices that do not support HDCP.
• Depending on the combination of devices, the video signals may not be output.
• The video signal will be in RGB format.
n Settings related to HDMI connections
Set as necessary. For details, see the respective reference pages.
Audio (vpage36)
Make settings for HDMI video/audio output.
• HDMI Output
Getting
Started
Connections
Connections
Basic
Basic
Operations
Basic
Connections
Advanced
Operations
Advanced
Settings
setting
Other
information
Other
Explanation
terms
Troubleshooting Specifications Index
9
Page 16
ENGLISH
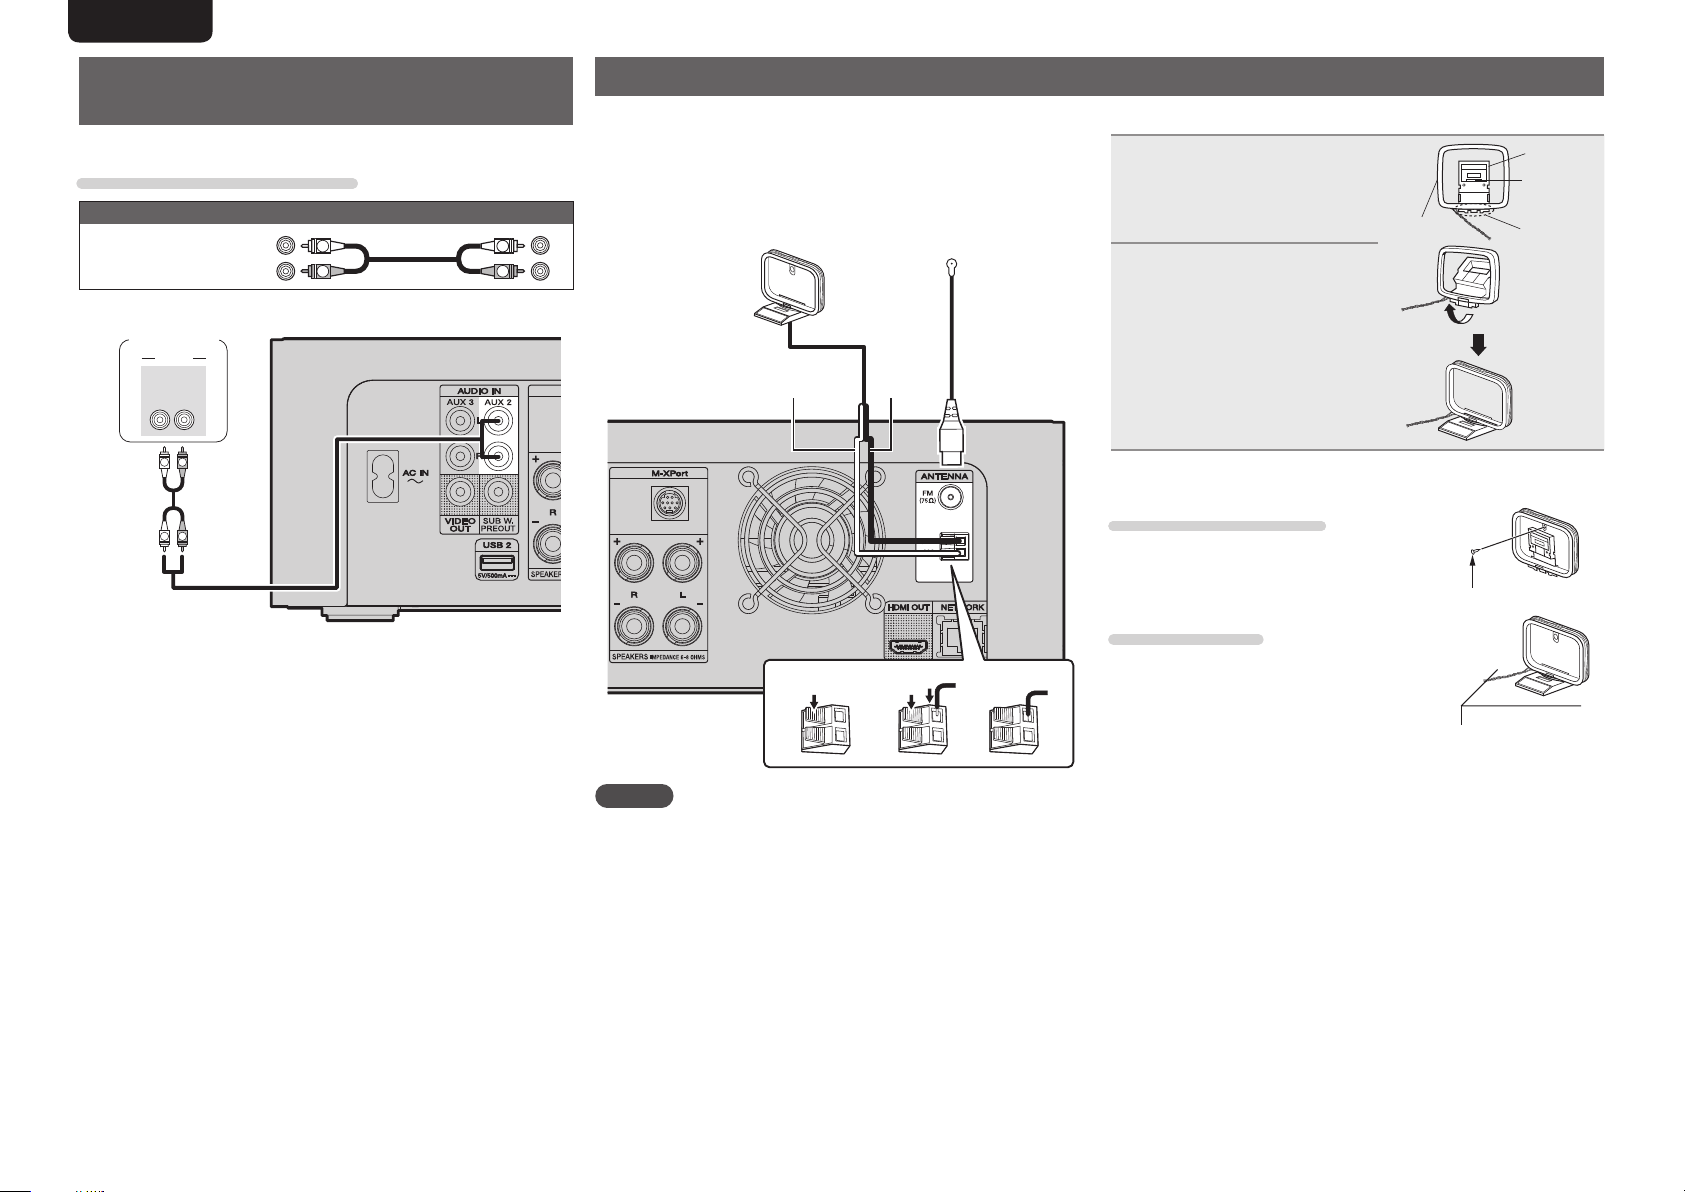
Connecting a set-top box (Satellite
tuner/Cable TV)
You can watch satellite or cable TV.
Cables used for connections
Audio cable (sold separately)
Audio cable
Satellite Tuner/
Cable TV
AUDIO
AUDIO
OUT
L
L
(White)
(Red)
RL
R
R
L
R
L
R
Connecting an antenna
• Connect the FM antenna or AM loop antenna supplied with the unit
to enjoy listening to radio broadcasts.
• After connecting the antenna and receiving a broadcast signal
(vpage22 “Listening to FM/AM broadcasts”), fix the antenna with
tape in a position where the noise level becomes minimal.
AM loop antenna
(Supplied)
White Black
q
FM indoor antenna
(Supplied)
w e
n AM loop antenna assembly
Put the stand section
1
through the bottom of the
loop antenna from the
rear and bend it forward.
Loop
antenna
Insert the projecting part
2
into the square hole in the
stand.
n Using the AM loop antenna
Suspending on a wall
Suspend directly on a wall without assembling.
Standing alone
Use the procedure shown upper to assemble.
Stand
Square
hole
Projecting
part
Nail, tack, etc.
10
NOTE
• Do not connect two FM antennas simultaneously.
• Even if an external AM antenna is used, do not disconnect the AM
loop antenna.
• Make sure the AM loop antenna lead terminals do not touch metal
parts of the panel.
• If the signal has noise interference, connect the ground terminal
(GND) to reduce noise.
• If you are unable to receive a good broadcast signal, we recommend
installing an outdoor antenna. For details, inquire at the retail store
where you purchased the unit.
Page 17
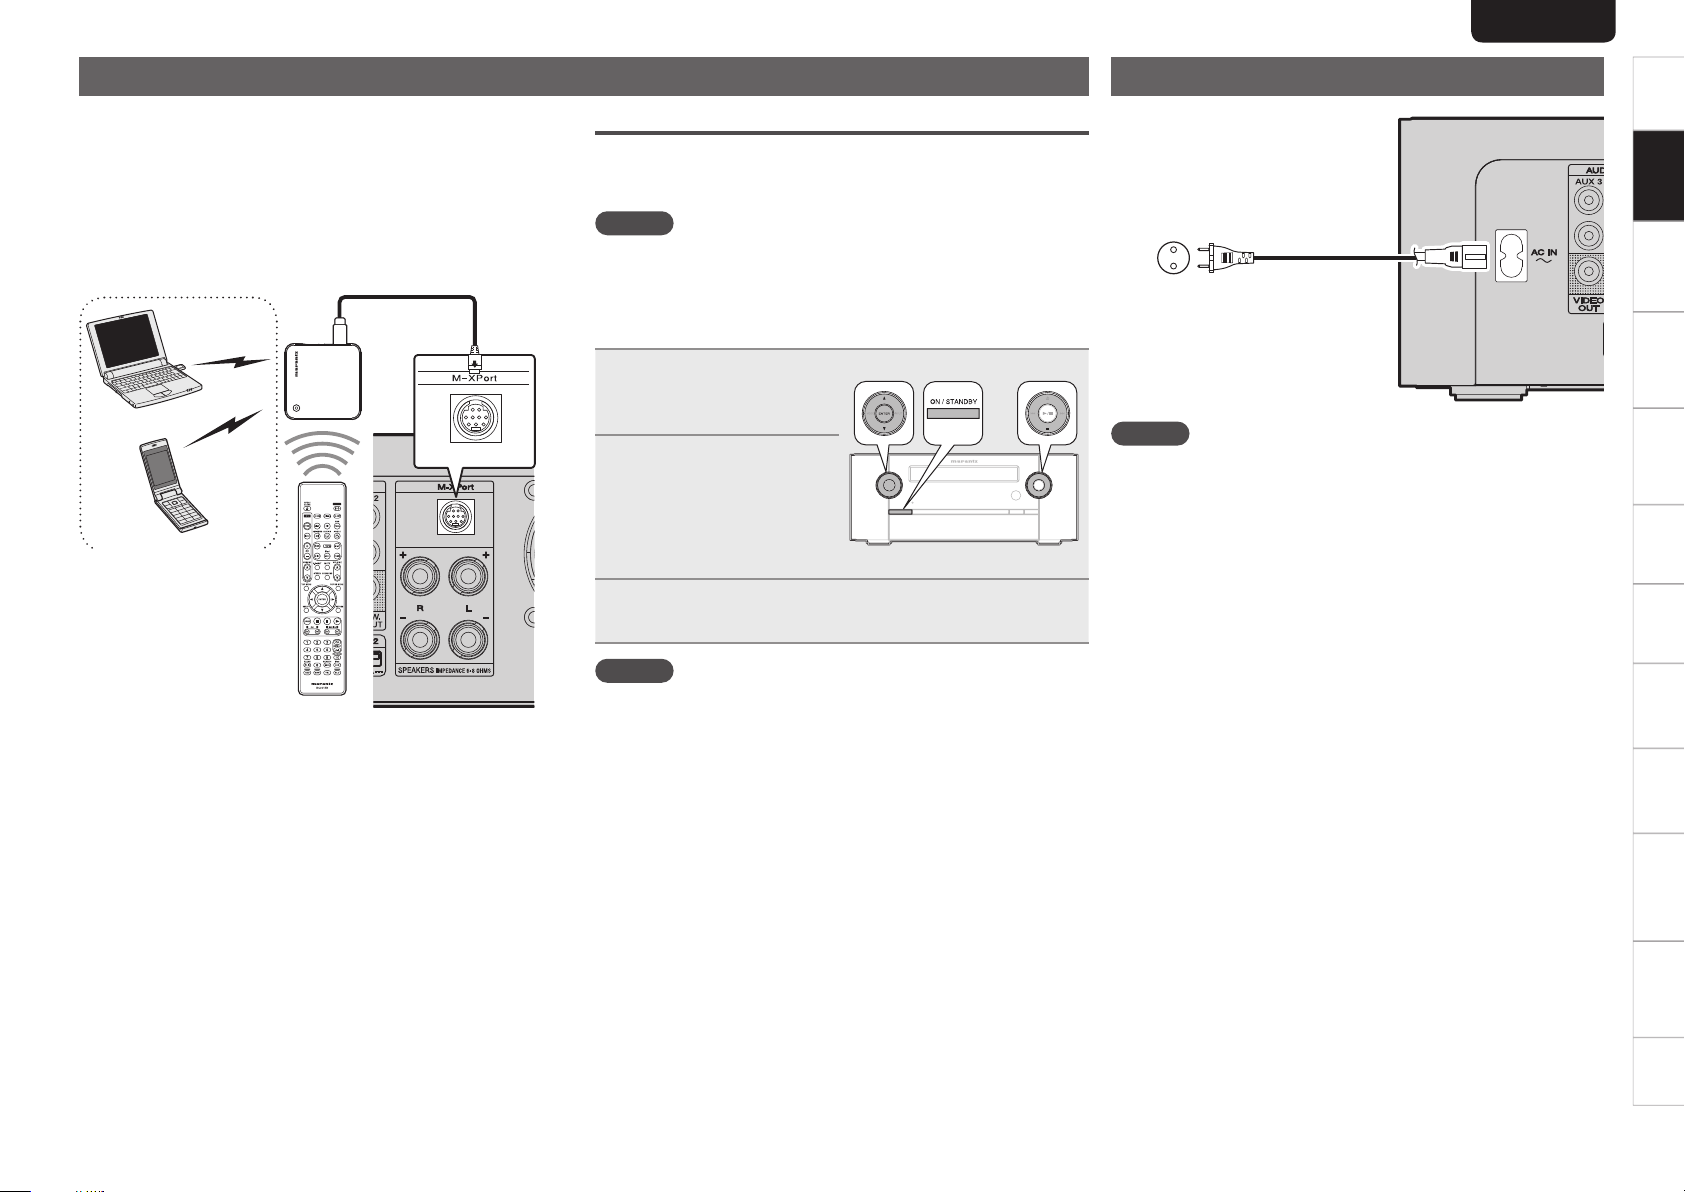
Connecting a wireless receiver (RX101)
By connecting a wireless receiver RX101 (sold separately) to this unit,
you can receive and playback audio signals from other devices using
the Bluetooth Communication Function.
• Use a Bluetooth device that is A2DP compatible (vpage 42
“A2DP”).
• You can also use wireless receiver RX101 as an external IR receiver.
• For instructions on the wireless receiver settings, refer to the
RX101’s operating instructions.
Wireless receiver RX101
Bluetooth device
( A2DP Compatibility)
Remote control connection
The unit can be controlled using the remote sensor of RX101
connected to the unit. Be sure to set “IR=DISABLE” when controlling
in this way.
NOTE
When making this remote control connection, be sure to set the IR
switch of RX101 that is connected to the unit, to ON.
n Setting the remote control
Press ON/STANDBY to
1
set the unit to standby
mode.
Press and hold down
2
2 and then press ON/
STANDBY
“IR=ENABLE” or
“IR=DISABLE” on the
display.
Press ui to select “IR=DISABLE” or
3
“IR=ENABLE” and then press ENTER.
.
ENGLISH
Connecting the power cord
Power cord
(Supplied)
To household power outlet
(AC 230 V, 50 Hz)
NOTE
• Do not plug in the power cord until all connections have been
completed.
• Only use the supplied power cord.
• Be sure the power cord is unplugged from the power outlet before
connecting or disconnecting it to the AC IN.
Getting
Started
Connections
Connections
Basic
Basic
Operations
Basic
Connections
Advanced
Operations
Advanced
Settings
setting
Other
Remote control unit
NOTE
The unit cannot be controlled using the remote controller while
“IR=DISABLE” is set.
information
Other
Explanation
terms
Troubleshooting Specifi cations Index
11
Page 18
ENGLISH
Basic operations
n Turning the power on (vpage12)
n Turning the power off (vpage12)
n Selecting the input source (vpage12)
n Adjusting the master volume (vpage13)
n Turning off the sound temporarily (vpage13)
n Switching the display’s brightness (vpage13)
n Adjusting the tone (vpage13)
n Listening with headphones (vpage13)
n Source direct mode (vpage13)
n Setting the current time (24-Hour Display)
(vpage14)
n Playable media (vpage14)
n About playback information (vpage15)
n Playing Blu-ray Disc, DVD-Video and CD
(vpage16)
Playback (Basic) (vpage18)
Advanced operations (vpage28)
Important information
Before starting playback, make the connections between the different
components and the settings on the receiver.
NOTE
Also refer to the operating instructions of the connected components
when playing them.
Preparations
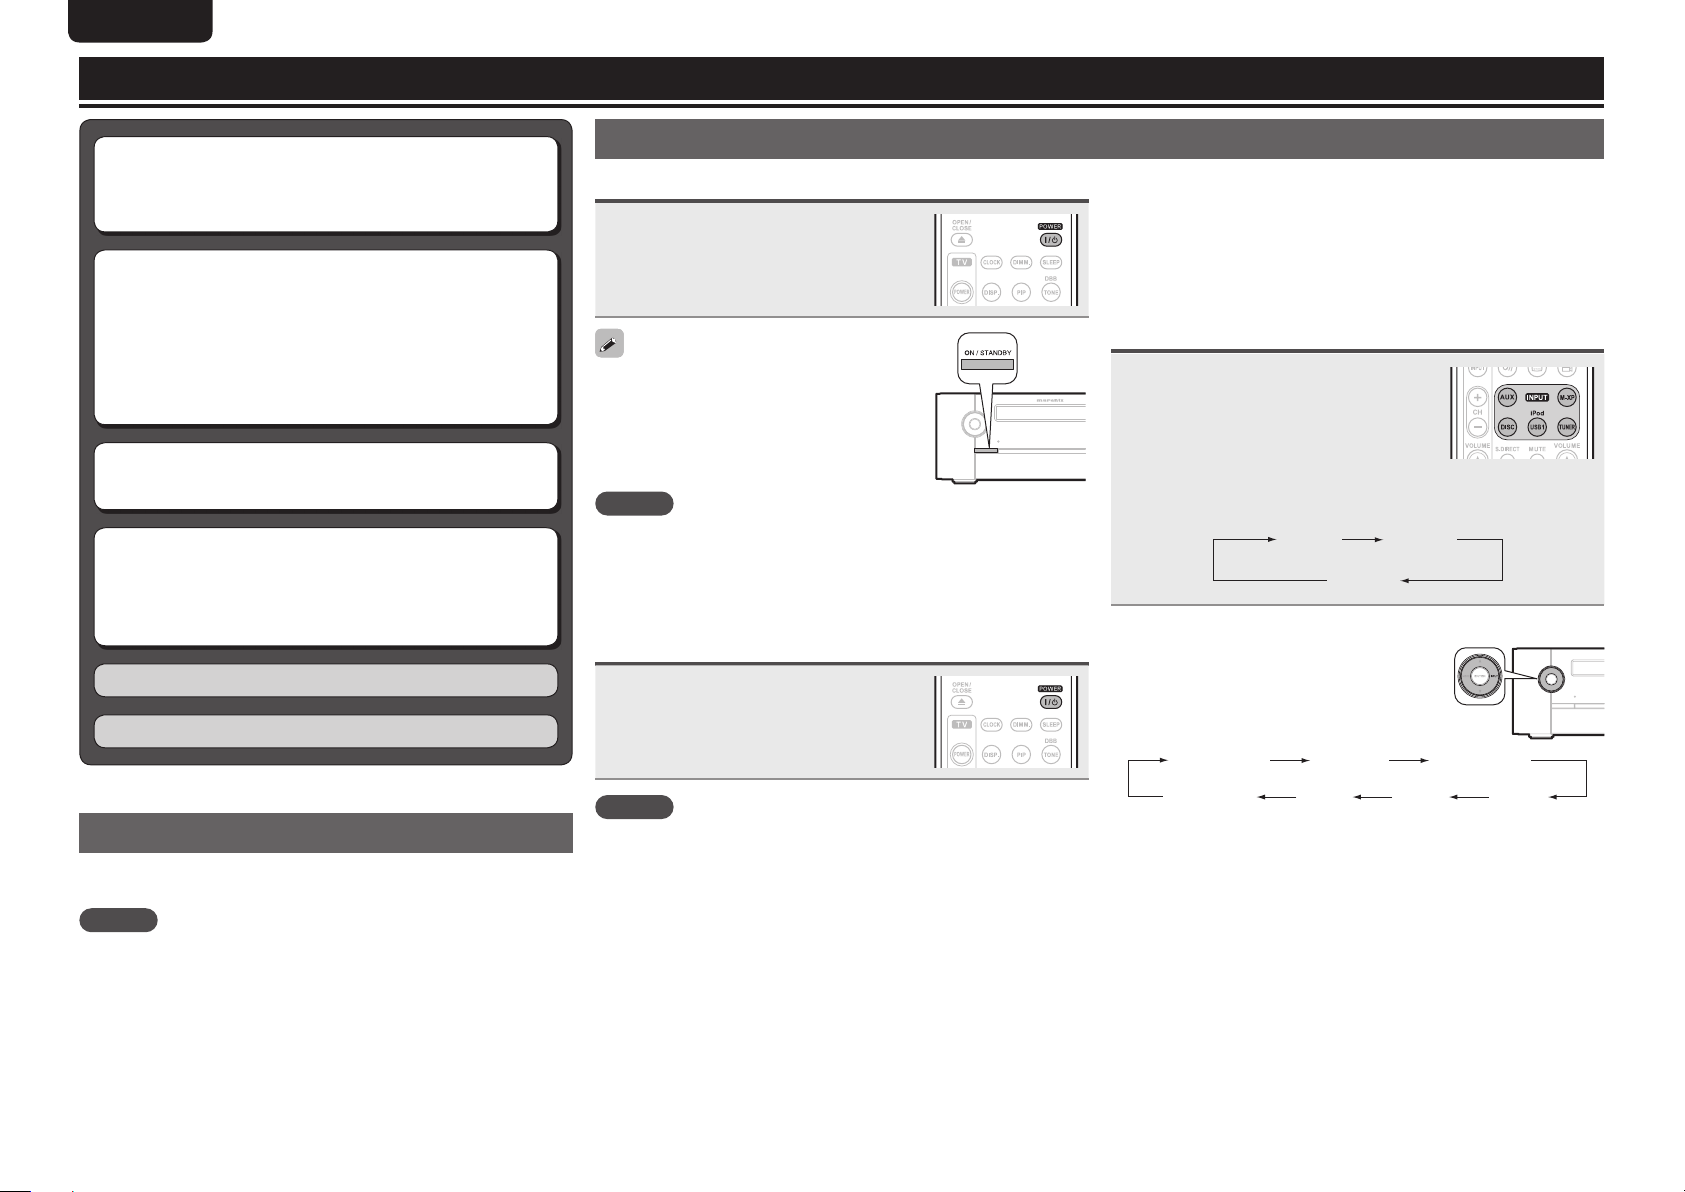
Turning the power on
Press POWER.
The power turns on.
You can also switch the power on by pressing
ON/STANDBY on the main unit.
Press again to set the power to standby.
NOTE
• Power continues to be supplied to some of the circuitry even when
the power is in the standby mode. When leaving home for long
periods of time, either press ON/STANDBY or POWER to turn off
the power, or unplug the power cord from the power outlet.
• Be sure to stop playback before turning the power off.
Turning the power off
Press POWER.
The power turns off.
NOTE
• Be sure to stop playback before turning the power off.
• Make sure that the disc tray is completely shut before turning off
the power.
• Do not push the disc tray by hand when the power is turned off.
Doing so could damage the set.
n Completely turning off the power
Unplug the power cord from the wall outlet.
• Note that the time setting is cleared when the power cord is
unplugged from the outlet.
• The settings made for the various functions may be cleared if the
power cord is left unplugged from a power outlet for an extended
period of time.
Selecting the input source
Press the input source select button
(AUXz, M-XP, DISC, iPod/USB1,
TUNER) to be played back.
The desired input source can be selected
directly.
z Each time AUX is pressed, the input source is changed as shown
below.
AUX2AUX1
AUX3
n Using the button on the main unit
Press INPUT.
• Each time INPUT is pressed, the input
source is changed as shown below.
TUNER iPod/USB1DISC/USB2
M-XPort
z “M-XPort” is displayed when a RX101 wireless receiver is
connected to “M-XPort”.
z
AUX3
AUX2 AUX1
12
Page 19

Operations possible during playback
ENGLISH
Getting
Started
Adjusting the master volume
Use VOLUME df to adjust the
volume.
The volume level is displayed.
GAdjustable rangeH
VOLUME 00 – 59, VOLUME MAX
• The variable range differs according to the
input signal.
You can also operate via the main unit. In this
case, perform the following operations.
Press VOLUME df to adjust the volume.
Turning off the sound temporarily
Press MUTE.
“MUTE ON” is displayed.
To cancel, press MUTE again. Muting can also be canceled by adjusting
the master volume.
Switching the display’s brightness
Adjusting the tone
Use DBB/TONE to select the tone
1
parameter to be adjusted.
DBB BASS
TREBLE
Adjust the volume with 8
2
9 or o p.
• To make other tone adjustments at this
time, press DBB/TONE.
• If no operation is performed for 5 seconds,
the adjustment is retained and the normal
display reappears.
DBB
GSelectable modesH
BASS
GVariable rangeH
TREBLE
GVariable rangeH
Settings made upon purchase:
• DBB .......................................OFF
• BASS ..................................... 0dB
• TREBLE ................................. 0dB
Emphasize the bass sound. (Dynamic Bass Boost)
ON
Adjusts the bass sound.
–10dB
Adjusts the treble sound.
–10dB
Listening with headphones
Plug the headphones (sold separately) into the .
• The sound from the speakers is automatically cut off.
Connections
Basic
Operations
Operations
Basic
Basic
Connections
Advanced
NOTE
To prevent hearing loss, do not raise the volume level excessively
when using headphones.
Operations
Advanced
Source direct mode
As the audio signal does not pass through the tone control circuit (DBB/
BASS/TREBLE) in source direct mode, the playback reproduction is
OFF
–
closer to the original sound.
Press S.DIRECT.
+10dB
–
+10dB
–
• If SOURCE DIRECT on the main unit is pressed, the same function
as with the remote control unit can be obtained.
Settings
setting
Other
information
Other
Explanation
terms
Press DIMM..
100 % 70 %
40 %Off
• The display’s brightness switches each
time the button is pressed.
DBB and BASS can be set simultaneously. If the settings were
performed at the same time, the BASS variable range may differ
depending on the volume level.
Troubleshooting Specifi cations Index
13
Page 20

ENGLISH
Setting the current time (24-Hour Display)
GExampleH Setting the current time to 10:15 am
Press POWER to turn on power to
1
the unit.
• If you perform operations on this unit, press
ON/STANDBY.
Press SETUP.
2
Various types of setting menus are
displayed.
• If you perform operations on this unit, press
and hold
3
MODE for 3 seconds and longer.
Use ui to select “CLOCK
SETUP”, then press ENTER or
p
.
S E T U P M E N U
C L O C K S E T U P
Use ui to set the “hours”.
4
C L O C K S E T U P
1 0 : 00
Press ENTER or p.
5
The “minutes” display fl ashes.
Use ui to set the “minutes”.
6
C L O C K S E T U P
1 0 : 15
Press ENTER or p.
7
The current time is set, and the normal
display reappears.
You can also perform the same operations as p on the remote control
unit with the INPUT button on this unit, respectively.
n Checking the current time when the power is on
Press CLOCK.
Press once more and the display returns to its original condition.
n Checking the current time when the power is
set to standby
Press CLOCK.
The current time is displayed for 10 seconds.
NOTE
The time cannot be set when in the standby mode. Turn on the power
fi rst.
Playable media
Discs
Playable
Playable discs
BD-Video,
BD-ROM,
BD-RE/
BD-R
z1,z2,z3
DVD-Video
z1,z2
DVD-R
DVD-RW
CD
CD-R
CD-RW
• Only BD-RE/-R, DVD-R/-RW and CD-R/-RW discs recorded in UDF or
ISO9660 format can be played back.
z1 BD-Video/DVD-Video discs may not operate as described in this
guide due to menu structure.
z2 The Blu-ray Disc player and BD-Video disc, and DVD player and
DVD-Video disc each have their region codes (code assigned for
each region). Playback is not possible if the codes do not match.
z3 This unit supports Ver 2.0 BD-ROM, Ver 3.0 BD-RE and Ver 2.0
BD-R.
The following discs will not play back on this unit.
• DVD+R/DVD+RW
• BD-RE Ver1.0 (BD disc with cartridge)
• BD-R/BD-RE in which BDAV is recorded
• HD DVD / DVD-RAM / DVD-Audio
• CDV (Only the audio part can be played)
• CD-G (Only the audio signals can be output)
• Non-standard CD (CD with copy protection, etc.)
• Unauthorised disc (Pirated disc)
• Disc with recording area less than 55 mm in diameter
• Hybrid disc
• Video Single Disc (VSD) / CVD / Video CD / Super Video CD /
Compact Disc-Interactive (CD-I) / Photo CDs / Super Audio CD
formats/
modes
BDMV,
AVCHD
format
Video
mode
Video
mode,
AVCHD
format
CD-DA –
Playable region
codes
Include region
Include region
ALL
2
–
Category
type
BD
AVCHD
DVD
DVD
AVCHD
CD
14
Page 21

Playable media
NOTE
• A disc may not be accessible or play back incorrectly due to audio
and video interruptions, etc., depending on the recording conditions
when recorded with a Blu-ray Disc recorder or DVD recorder.
• Un fi nalised BD-RE/-R, DVD-R/-RW, and CD-R/-RW discs may not
play back. Finalise discs before playing.
• Some 8cm BD-REs/8cm BD-Rs cannot be played on this unit.
• When a BD-Java title is played, loading may take longer than a
normal title, or some functions may perform slowly.
About playback information
Displays playback information on the information bar and media player
screen.
Press DISP..
Disc information is displayed on the TV
screen.
• To erase display, press DISP..
ENGLISH
Getting
Started
Connections
Basic
Operations
Operations
Basic
Basic
Files
Playable Files
(Extension)
AVI
(.avi)
WMV
(.wmv)
JPEG
(.jpg)
MP3
(.mp3)
WMA z
(.wma)
AAC z
(.m4a)
Playable codec : Xvid
Maximum size of image : 1920x1080-30 fps
Playable codec : WMV9
Maximum size of image : 1920x1080-30 fps
Maximum Resolution 4272x2848 pixels
MPEG-1 Audio Layer 3.
Windows Media Audio
MPEG-4 AAC
n Playable fi le
iPod/USB1
USB2
CD-R/-RW
z This unit cannot play back fi les recorded under DRM (Digital Rights
Management).
NOTE
• The abovementioned fi le type may also fail to play back depending
on conditions at the time of recording.
• If characters not supported on the menu screen are included in a
fi le name, title, artist name or album title, those are not displayed
correctly.
• JPEG format images stored in progressive format cannot be played
back.
AVI WMV JPEG
AVI WMV JPEG
File specifi cation Symbols
MP3 WMA AAC
MP3
WMA
MP3
WMA
AVI
WMV
JPEG
MP3
WMA
AAC
Displayed content differs depending on the media being played back.
Also, the information displayed during playback.
NOTE
• The (prohibited mark) may appear on the top right of the TV
screen during an operation. This means that the operation being
conducted is prohibited.
• Depending on the disc, certain operations may not be as described
in this guide. Check each disc user guide for more information.
• During playback of a 2-layered disc, pictures may stop momentarily.
This happens when the fi rst layer switches to the second layer. This
is not a malfunction.
Information bar display
BD DVD CD
GExampleH When playing a CD
Current track/total track number
Disc type
Track:
1/12
Proceeding bar
Total playing time of the current track
Elapsed time of the current track
Repeat playback mode
Random playback mode
Playback mode
Off Off Play
Connections
Advanced
Operations
Advanced
Settings
setting
Other
information
Other
Explanation
terms
Troubleshooting Specifi cations Index
15
Page 22

ENGLISH
Playing Blu-ray Disc, DVD-Video and CD
Prepare for playback.
q Turn on the TV and subwoofer power.
1
w Change the TV input to the input of this unit.
Press POWER to turn on power
2
to the unit.
Press DISC to switch the input
3
source to “DISC/USB2”.
Insert a disc.
• Press 5 to open/close the disc tray.
4
• The home menu will be displayed on
the TV screen.
Picture fi les
Video fi les
System settings
Loaded disc
Music fi les
Picture
Video
Setting
BD-ROM
Music
Operations using disc menu, top menu, and
pop-up menu
Many of BD-Video and DVD-Video contains disc menu, top menu or
pop-up menu which guides you through the available functions in the
disc.
NOTE
Contents of menus and corresponding menu operations may vary
among discs. For details, refer to the disc manual.
n Using the disc menu
During playback, press TOP
1
2
.
MENU
The disc menu is displayed on the TV
screen if present on the disc.
Use uio p to select the
desired item, then press ENTER.
The selected item is played back.
n Using the title menu
During playback, press POP UP
1
.
MENU
The title menu is displayed on the TV
screen if present on the disc.
BD DVD AVCHD
DVD AVCHD
DVDBD
n Using the pop-up menu
This is a special feature available for some BD-Video.
During playback, press POP UP
1
2
3
.
MENU
The pop-up menu is displayed on the TV
screen if present on the disc.
Use uio p to select the
desired item, then press ENTER.
The selected item is played back.
Press POP UP MENU to exit.
The pop-up menu will automatically
disappear for some discs.
AVCHD CD
BD
• When the “Optical Disc AutoPlay”
(vpage34) is set to “ON”, playback
automatically starts.
Should this happen, ignore step 5.
Use ui to select the disc, then press ENTER.
5
Playback starts.
• For some discs, the menu may be displayed fi rst.
• BD-Video or DVD-Video recorded in AVCHD format is displayed as
“BD” on the TV screen.
• If a disc that cannot be played back is inserted, the disc tray opens.
16
Use uio p to select the
2
desired item, then press ENTER.
The selected item is played back.
Page 23

Playing Blu-ray Disc, DVD-Video and CD
ENGLISH
Getting
Started
Enjoying BD-LIVE Features
BD
While playing back a disc compatible with BD-LIVE, you can connect to
the BD-LIVE site for Blu-ray Discs via the Internet and display special
features and caption information not available on the disc.
Connect a USB memory device on which BD-LIVE data is recorded to
the USB2 port on the rear panel.
• The various functions that can be used with BD-LIVE differ depending
on the disc used.
• For details on the functions and how to operate them, see the
individual disc’s on-screen displays and explanations.
• To play back a BD-LIVE-compatible Blu-ray Disc, you should first
install an USB memory device in this unit.
• To use BD-LIVE functions, connect this unit to the Internet and make
the settings described below, as necessary:
Connections : “Connecting to the network” (vpage27)
Settings : “Network” (vpage35)
• Depending on your network environment, in some cases time may
be required to connect to the network or connection may not be
possible.
NOTE
• Do not remove the USB memory device from this unit while playing
a BD-LIVE compatible disc.
• BD-LIVE and Bonus View functions cannot be used with the iPod/
USB1 port on the front panel.
NOTE for USB memory device
• Insert or remove a USB memory device while the power is in
standby. If you insert a USB memory device while the power is ON,
the USB memory device may not be read.
• Connect a USB memory device with a capacity of 1 GB or greater
supporting FAT32 and USB 2.0 High Speed (480Mbit/s) to the USB
connector.
• If a USB memory device containing other contents (previously
recorded) is used, the video and audio may not play back properly.
• Operation of USB memory devices is not guaranteed.
• Do not use a USB extension cable when connecting a USB memory
device to the USB connector.
Playing BD-Video compatible with Bonus
View
BD
With a disc that is compatible with bonus view (picture-in-picture),
besides the main video (primary video) stored on the disc, you can
play back the video director’s commentary and simultaneously
ongoing sub-story, as well as sub-video such as alternative camera
angle (secondary video).
• The playback method, etc., is determined by the disc, and varies
depending on the disc.
• For details on the functions and how to operate them, see the
individual disc’s on-screen displays and explanations.
During playback at the scene
1
that contains the secondary
video, press PIP.
Then the PIP (picture-in-picture) setting
menu is displayed for several seconds
on the TV screen.
Press p to enter the PIP mode
2
menu.
Press ui to select the secondary
3
video, and then press ENTER.
Main video
(primary video)
Sub video
(secondary video)
GExampleH Bonus view
Connections
Basic
Operations
Operations
Basic
Basic
Connections
Advanced
Operations
Advanced
Settings
setting
Other
information
Other
Explanation
terms
Troubleshooting Specifications Index
17
Page 24

ENGLISH
Playback (Basic)
Preparations (vpage12)
Operations possible during playback (vpage13)
Setting the current time (24-Hour Display)
(vpage14)
Playable media (vpage14)
About playback information (vpage15)
Playing Blu-ray Disc, DVD-Video and CD (vpage16)
n Stop playback (vpage18)
n Pause playback (vpage18)
n Step-by-step playback (vpage18)
n Fast forward/fast reverse playback (vpage19)
n Slow forward playback (vpage19)
n Skipping to the chapter/track/fi le (vpage19)
n Looking for specifi c sections using the search
modes (vpage19)
n Repeat playback (vpage20)
n Random playback (vpage20)
n Switching the angle (vpage20)
n Switching the audio (vpage21)
n Switching the subtitles (vpage21)
Surround mode (vpage21)
Stop playback
BD DVD AVCHD CD AVI WMV WMA MP3 JPEG
During playback, press 2.
Playback stops.
n About resume function
When playback is stopped, the stop position is memorized.
• When playing back data from the stop position, press 1 while
stop by the resume function.
n To cancel the resume function
Perform one of the following operations.
• During stop, press 2.
• Switch to the playback contents of the USB memory device
connected to a USB2 port.
• Open the disc tray.
The resume function is cancelled when the unit is switched to standby
mode, or when the power is switched off by removing the power plug
from the wall socket.
NOTE
The resume function does not work with menu playback or BD-J (Bluray Disc Java) compatible disc or CD.
BD DVD AVCHD
Pause playback
BD DVD AVCHD CD AVI WMV WMA MP3 JPEG
During playback, press 3.
The 3 indicator will light on the display.
• Resume normal playback by pressing 1.
You can also operate via the main unit. In this
case, perform the following operations.
During playback, press 1/3.
• Resume normal playback by pressing 1/3
again.
Step-by-step playback
BD DVD AVCHD AVI WMV
During pause, press 3.
The disc advances frame by frame each time
the button is pressed.
• Resume normal playback by pressing 1.
You can also operate via the main unit. In this
case, perform the following operations.
During playback, press 1/3.
• Resume normal playback by pressing 1/3
again.
Tuning in radio stations (vpage22)
Advanced operations (vpage28)
18
NOTE
Step-by-step reverse playback is not available with this unit.
Page 25

ENGLISH
Playback (Basic)
Getting
Started
Fast forward/fast reverse playback
BD DVD AVCHD CD AVI WMV WMA MP3
During playback, press 6 or 7.
The fast forward/fast reverse speed changes
each time the button is pressed.
• Speed varies with the disc and fi le.
• Resume normal playback by pressing 1.
NOTE
Audio is not output during fast forward/fast reverse of a Blu-ray Disc
or DVD.
Slow forward playback
BD DVD AVCHD AVI WMV
During pause, press 7.
The speed changes each time the button is
pressed.
• Resume normal playback by pressing 1.
Audio is not output during slow forward playback.
Skipping to the chapter/track/fi le
BD DVD AVCHD CD AVI WMV WMA MP3 JPEG
During playback, press 8 or
9.
Playback begins from the start of the
8
chapter/track/fi le being played.
Playback begins from the start of the
9
next chapter/track/fi le.
• Continue pressing and skip to the chapter/
track/fi le with just the number of times
pressed.
Looking for specifi c sections using the
search modes
BD DVD AVCHD CD AVI WMV WMA MP3
During playback, press SEARCH,
1
and then search mode.
The search mode setting bar is
displayed at the top of the screen.
• The search mode changes each time
the button is pressed.
Goto Title:
Goto Chapter:
Goto Time:
GContent compatible with search modeH
Contents
Search mode
Goto Chapter
Goto Title
Goto Track
Goto Time
Goto File
When the entry mode for chapter/title/track search continues for
about several seconds with no operation, it is canceled.
/ 7 (Current: 2)
/ 7 (Current: 2)
/ 0:03:15 (Current: 0:02:35)
BD
DVD
AVCHD
CD
AVI
WMV
WMA
MP3
Conducting search condition entry or setting on the
2
search mode setting bar.
Search specifi ed location on completion of entry.
n When entering title, chapter, track
number
GExampleH
For “3” ·······································3, ENTER
For “11” ··································1, 1, ENTER
n When entering the elapsed time
You can play a disc from the desired by
specifying the elapsed time from the
beginning of the current title/disc.
GExampleH
For “3 min. 5 sec.” ··············3, 0, 5, ENTER
For “1 hour. 9 min. 35 sec.”
···································· 1, 0, 9, 3, 5, ENTER
n When clearing the numbers entered
Use o p to select the number to be cleared, and then press
CLEAR.
The selected number will be cleared.
Connections
Basic
Operations
Operations
Basic
Basic
Connections
Advanced
Operations
Advanced
Settings
setting
Other
information
Other
Explanation
terms
Troubleshooting Specifi cations Index
NOTE
Skipping to the start of a title may be prohibited depending on the disc.
19
Page 26

ENGLISH
Repeat playback
BD DVD AVCHD CD AVI WMV WMA MP3 JPEG
Press REPEAT .
The “REPEAT” indicator lights on the display
and the repeat mode icon is displayed on the
TV screen.
• The repeat mode changes each time the
button is pressed.
• When REPEAT is pressed during
playback, the current setting is displayed.
Repeat playback mode
Track: 1/12
0:04:580:02:46
Playback (Basic)
n Repeat playback between specifi ed points
(A-B repeat)
BD DVD AVCHD CD
During playback, press REPEAT
1
at the desired starting point
A-B
(A).
The “A–” indicator lights on the display.
Random playback
CD AVI WMV WMA MP3
During playback, press RANDOM.
The “RANDOM” indicator lights on the
display and is displayed on the TV
screen.
• When RANDOM is pressed during playback,
the current setting is displayed.
Press the REPEAT A-B again at the desired ending
2
point (B).
The “B” indicator lights on the display, and A-B repeat playback
will commence.
• To resume normal playback, press
“Repeat Off” is displayed.
AllOff
Play
REPEAT A-B repeatedly untill
n Stopping random playback
Press RANDOM repeatedly until “RANDOM” indicator on the
display turns off or “Random Off” is displayed on the TV screen.
NOTE
• Random playback may not be enabled depending on the disc.
• Random playback is repeated until “Random Off” is set.
GAbout repeat modeH
Settable repeat modes vary depending on the disc or fi le you are
playing back.
Contents
Mode
Repeat Chapter
Repeat Track
Repeat File
Repeat Title
Repeat All
BD
DVD
AVCHD
CD
AVI
WMV
WMA
MP3
JPEG
Repeat
mode
display
n Stopping repeat playback
Press REPEAT repeatedly until “REPEAT” indicator on the
display turns off or “Repeat Off” is displayed on the TV screen.
NOTE
• Some repeat modes may not be accessible depending on the disc.
• Depending on the disc, even when set to repeat playback, the disc
may not return to the start of title or chapter, and may advance to
the next scene.
• The “Repeat Off” setting is not available for repeat modes of a USB
memory device connected to a iPod/USB1 port on the front panel.
• Set the ending point (B) setting at least 5 seconds after the starting
point (A) setting.
• If you perform a search operation during A-B repeat playback, A-B
repeat playback is canceled.
• A-B repeat playback may not be enabled depending on the scene.
• A-B repeat playback of AVI/WMV/WMA/MP3/JPEG fi les is not
available.
• A-B repeat playback is not available during repeat playback.
• A-B repeat playback may not be enabled depending on the AVCHD
fi le.
• For some BD-Video discs which support Java applications, the A-B
repeat function will not work.
Switching the angle
BD DVD
During playback of a Blu-ray Disc or DVD-Video recorded with several
camera angles, you can change the angle.
During playback, press ANGLE.
1
The angle number currently being
played is displayed.
Angle
Press p.
2
Then audio menu is displayed.
Use ui to select angle and then
3
press ENTER.
Angle
NOTE
Angle changing may be restricted, depending on the disc.
01/03
03/03
01/03
02/03
20
Page 27

Playback (Basic)
ENGLISH
Surround mode
Getting
Started
Switching the audio
BD DVD AVCHD
With discs and fi les that have multiple audio track recording, you can
change the audio during playback.
With Blu-ray Disc, you can set sub-track audio such as interactive
audio and audio commentary, etc., with “Secondary”.
During playback, press AUDIO/RDS.
1
The audio number currently being played is displayed.
Audio
PIP Audio
Use ui to select “Audio” or
2
“PIP Audio”, and then press
ENTER.
GWhen “Audio” is selectedH
Audio
• If multiple audio items are recorded, “the
current audio number/number of recorded
audio items” is displayed.
Use ui to select your desired audio language, and
3
then press ENTER.
• Depending on the disc, audio switching may be restricted to
operation of the disc menu. In this case, switch the audio on the
disc menu.
• Depending on the Blu-ray Disc, even if picture-in-picture playback is
set to “Off”, Secondary Audio only may be output.
01/03 ENG Dolby TrueHD
N/A
04/04 ENG DTS
01/04 ENG Dolby TrueHD
02/04 ENG Dolby Digital
Switching the subtitles
BD DVD AVCHD
During playback of a disc or fi le with recorded subtitles, you can switch
subtitle on/off as well as subtitle language.
During playback, press SUBTITLE.
1
The subtitle number currently being played is displayed.
Subtitle
PIP Subtitle
01/03 ENG
N/A
Use ui to select “Subtitle”,
2
“PIP Subtitle” and then press
ENTER.
GWhen “Subtitle” is selectedH
Off
Subtitle
Use ui to select your desired subtitle language,
3
and the press ENTER.
• Depending on the disc, subtitle switching may be restricted to
operation of the disc menu. In this case, switch the subtitles on the
disc menu.
• When the primary and the secondary subtitles are all switched, both
will be displayed on the TV screen. If confused, set either of subtitles
to Off.
01/03 ENG
02/03 JPN
Surround mode
When the input source is “DISC/USB2”, virtual surround processing
is performed for playback.
GDefaultH Stereo mode
Press SURROUND.
The “ ” indicator lights on the display.
Dolby virtual speaker playback begins.
Dolby Headphone playback
You can enjoy listening to multi-channel surround sound through
headphones using this mode.
Connect the headphone.
1
Press SURROUND.
2
The “ ” indicator lights on the
display.
Dolby Headphone playback begins.
Stereo playback
This is the mode for playing in stereo.
• Sound is output from the front left and right speakers.
• If multichannel sources are played, they are mixed down to 2-channel
audio.
Press STEREO.
The “STEREO” indicator lights on the display.
Stereo playback begins.
Connections
Basic
Operations
Operations
Basic
Basic
Connections
Advanced
Operations
Advanced
Settings
setting
Other
information
Other
Explanation
terms
Troubleshooting Specifi cations Index
Dolby Virtual Speaker playback
This delivers a full surround sound experience from two stereo
speakers.
• Sound is output from the front left and right speakers.
• If multichannel sources are played, they are mixed down to 2-channel
audio.
21
Page 28

ENGLISH
Tuning in radio stations
Listening to FM/AM broadcasts
Press TUNER to switch the input
1
source to “TUNER”.
Press TUNER to select the
2
reception band.
FM AUTO
AM
• If MODE on the main unit is pressed, the
same function as with the remote control
unit can be obtained.
FM AUTO
FM MONO
3
q To tune in automatically (Auto tuning)
w To tune in manually (Manual tuning)
• You can also perform the same operations by pressing ui on
this unit.
Select to automatically receive
and listen to analog stereo or
analog monaural FM broadcasts.
Select to receive and listen
to analog stereo as an analog
monaural FM broadcast.
When listening to an AM
AM
broadcast.
Tune in the desired broadcast
station.
Press and hold in TUNING + or TUNING – to select the station
you want to hear.
• Stations whose signal is weak cannot be tuned in.
• To stop auto tuning, press TUNING + or TUNING –.
Use TUNING + or TUNING – to select the station you want to
hear.
FM MONO
n Presetting FM stations automatically
(Auto preset)
Up to 40 stations can be preset.
Auto preset is not possible with AM broadcast stations.
Press SETUP.
1
• If you perform operations on this unit, press
and hold MODE for 3 seconds and longer.
Use ui to select “TUNER
2
SETUP”, then press ENTER or
p.
Use ui to select “FM AUTO
3
PRESET”, then press ENTER or
p.
“FM AUTO PRESET” display fl ashes.
Press ENTER while “FM AUTO
4
PRESET” is fl ashing.
Broadcast stations are preset
automatically.
Canceling auto presetting
Press TUNER, SETUP or 2.
• If you perform operations on this unit, press
MODE or 2.
NOTE
When auto preset is performed, the previously registered preset
details are erased. The newly preset FM station is newly registered to
the erased preset number.
n Giving station names to preset channels
Names of up to 8 characters can be input.
Tune in the preset channel you want to name.
1
Press ENTER twice.
2
The display switches to the station name input display.
Input the station name.
• Buttons that can be operated are as
3
follows.
u i: Selects the character.
o p : Moves the cursor to the left or
right.
CLEAR : Deletes the currently selected
character.
CLEAR (Press and hold) : All text is
erased.
• Characters that can be input are as
follows.
A ~ Z, 0 ~ 9, ^ ’ ( ) z + , - . / = (space)
• You can also perform the same operations
as o and p on the remote control unit with
the MODE button and the INPUT button on
this unit, respectively.
Press ENTER.
4
The characters you have input are
entered.
• To give names to other stations,
repeat steps 1 to 4.
• A humming sound may be heard when using a TV nearby while
receiving AM programs. If this happens, move the system as far
from the TV as possible.
• If the desired station cannot be tuned in with auto tuning, tune it in
manually.
22
Broadcast stations whose antenna signal are weak cannot be preset
automatically. If you wish to preset such stations, tune them in
manually.
Page 29

n Presetting FM/AM stations manually
(Manual preset)
Your favorite broadcast stations can be preset so that you can tune
them easily.
This unit can be preset with a total of 40 FM and AM broadcast
stations.
Tune in the station you want to
1
preset.
Press ENTER.
2
The minimum number display “P– –” for
the unregistered preset flashes.
• You can also perform the same operations as o and p on the
remote control unit with the MODE button and the INPUT button
on this unit, respectively.
• If you do not want to input a station name, press ENTER without
inputting anything else.
• If you make a mistake when inputting, perform the procedure
again. Whatever was previously input is overwritten.
Press ENTER.
5
The characters you have input are entered.
• To give names to other stations, repeat steps 1 to 5.
ENGLISH
Tuning in radio stations
RDS (Radio Data System)
RDS (works only on the FM band) is a broadcasting service which
allows a station to send additional information along with the regular
radio program signal.
The following four types of RDS information can be received with this
unit:
n RDS Search
Use this function to automatically tune to FM stations that provide
the RDS service.
Press TUNER to select “FM”.
1
Getting
Started
Connections
Basic
Operations
Operations
Basic
Basic
Connections
Advanced
Use o p, CH –, CH + or 0 – 9 to
3
select the number to be preset,
then press ENTER.
The reception frequency and reception
mode are preset and the display
switches to the station name input
display.
You can also select preset numbers with
8 or 9 on this unit.
NOTE
When the registered preset number is selected, “*” is displayed.
To overwrite this preset number, press ENTER.
F M * P 0 1
1 0 6 . 9 5 M H z
Input the station name.
• Names of up to 8 characters can be input.
4
• Buttons that can be operated are as follows.
u i: Selects the character.
o p : Moves the cursor to the left or right.
CLEAR : Deletes the currently selected character.
CLEAR (Press and hold) : All text is erased.
• Characters that can be input are as follows.
A ~ Z, 0 ~ 9, ^ ’ ( ) z + , - . / = (space)
Listening to preset stations
Press CH –, CH + or 0 – 9 to select the
desired preset channel.
You can also select preset numbers with
8 or 9 on this unit.
Canceling preset channels
q Receive the preset channel that you want
to erase.
w Press CLEAR.
e When “DELETE OK?” is flashing, press
either CLEAR or ENTER.
Press AUDIO/RDS.
2
Use ui to select “RDS
3
SEARCH”, then press ENTER
or p.
Press ENTER or o p.
4
Automatically begin the RDS search
operation.
• If no RDS station is found, “NO STATION”
is displayed.
Viewing information during reception
Press DISP. while receiving a RDS to display
the information currently being broadcast.
Frequency PS
CT PTYRT
zProgram service name
• If a station name is entered, it is displayed.
z
Operations
Advanced
Settings
setting
Other
information
Other
Explanation
terms
Troubleshooting Specifications Index
23
Page 30

ENGLISH
Tuning in radio stations
PTY (Program Type)
PTY identifies the type of RDS program.
The program types and their displays are as follows:
NEWS News
AFFAIRS Current Affairs
INFO Information
SPORT Sports
EDUCATE Education
DRAMA Drama
CULTURE Culture
SCIENCE Science
VARIED Varied
POP M Pop Music
ROCK M Rock Music
EASY M
LIGHT M Light Classical
CLASSICS Serious Classical
OTHER M Other Music
Easy Listening
Music
WEATHER Weather
FINANCE Finance
CHILDREN
SOCIAL Social Affairs
RELIGION Religion
PHONE IN Phone In
TRAVEL Travel
LEISURE Leisure
JAZZ Jazz Music
COUNTRY Country Music
NATION M National Music
OLDIES Oldies Music
FOLK M Folk Music
DOCUMENT Documentary
Children’s
programmes
n PTY search
Use this function to find RDS stations broadcasting a designated
program type (PTY).
For a description of each program type, refer to “PTY (Program
Type)”.
Press TUNER to select “FM”.
1
Press AUDIO/RDS.
2
Use ui to select “PTY
3
SEARCH”, then press ENTER or
p.
Use ui to call out the desired
4
program type.
TP (Traffic Program)
TP identifies programs that carry traffic announcements.
This allows you to easily find out the latest traffic conditions in your
area before leaving home.
n TP search
Use this function to find RDS stations broadcasting traffic programs
(TP stations).
Press TUNER to select “FM”.
1
Press AUDIO/RDS.
2
Use ui to select “TP SEARCH”,
3
then press ENTER or p.
Press ENTER or o p.
4
Automatically begin the TP search
operation.
• “NO STATION” is displayed when there is
no traffic information broadcast station.
RT (Radio Text)
RT allows RDS stations to send text messages that appear on the
display.
• When the RT mode is turned on while an RDS broadcast station not
offering an RT service is tuned in, “NO TEXT” is displayed on the
display.
• The RT mode cannot be set in the AM band or for FM stations not
offering RDS broadcasts.
NOTE
The operations described below selecting “RDS Search” will not
function in areas in which there are no RDS broadcasts.
CT (Clock Time)
Use this to correct the time of the clock on this unit.
q During CT reception, press
The “AUTO Adj mm:ss” is displayed.
w Press ENTER to set.
The “mm:ss” is displayed.
• The time on the set’s internal clock is
updated to the currently displayed “CT”
time.
Do not operate any buttons while the time is being updated. If buttons
are operated, CT reception is not possible and the time is not updated.
SETUP.
Press ENTER or o p.
5
Automatically begin the PTY search
operation.
• If no program of the specified type is found,
“NO STATION” is displayed.
24
Page 31

Advanced connections
ENGLISH
Getting
Started
This section explains how to connect a USB memory device,
iPod, portable player and the network.
For other connections, see the sections below.
n Connecting speakers (vpage8)
n Connecting a TV (vpage9)
n Connecting a set-top box (Satellite tuner/Cable TV)
(vpage10)
n Connecting an antenna (vpage10)
n Connecting the power cord (vpage11)
Connecting an iPod or USB memory
device to the iPod/USB1 port
You can enjoy music, stored on an iPod or USB memory device.
NOTE
• iPod can only be connected to the iPod/USB1 port on the front panel.
Do not connect an iPod to the USB2 port on the rear panel.
• A computer can not be connected to and operate the unit via its
USB port.
• Do not use an extension cable when connecting a USB memory
device.
• For details about USB memory devices, see “Playing a USB memory
device” (vpage29).
• When connecting an iPhone to this unit, place the iPhone at least
20 cm away from this unit. If the iPhone is placed too close to this
unit, noise may be output from this unit if a phone call is received
by the iPhone.
Cables used for connections
To connect an iPod to this unit, use the USB cable supplied with the
iPod.
iPod
USB memory
device
or
Marantz does not guarantee that all USB memory devices will operate
or receive power. When using a portable USB connection type HDD
of the kind to which an AC adapter can be connected to supply power,
use the AC adapter.
Using the iPod stand
You can set your iPod or iPhone on the supplied iPod stand.
n iPod stand assembly
Use the procedure below to set up the iPod stand.
q
w
e
NOTE
• Make sure to place the iPod stand on a fl at surface.
• Do not operate the iPod or iPhone while it is set on the iPod stand.
Doing so could cause the iPod or iPhone to fall off from the stand.
• Some iPod models cannot be set on the iPod stand because the
underside of the iPod is blocked when the iPod cable is connected.
• Make sure to disable the iPhone vibration function before you set it
on the iPod stand. If the iPhone vibrates when it is set on the stand,
it could fall off from the stand and be damaged.
• Do not use the iPod stand for purposes other than the one it is
intended to perform.
• Marantz will accept no responsibility whatsoever for any damage of
equipment connected to this unit while it is used.
Connections
Basic
Operations
Operations
Basic
Basic
Connections
Connections
Advanced
Advanced
Operations
Advanced
Settings
setting
Other
information
Other
Explanation
terms
Troubleshooting Specifi cations Index
25
Page 32

ENGLISH
Connecting an iPod or USB1 memory device to the iPod/USB1
Supported iPod models
port
Connecting a USB memory device
to the USB2 port
You can enjoy music, stored on a USB memory device.
NOTE
• iPod cannot be connected.
• A computer can not be connected to and operate the unit via its
USB port.
• Do not use an extension cable when connecting a USB memory
device.
• For details about USB memory devices, see “Playing fi les”
(vpage30).
USB memory
device
Connecting a portable audio player
Your portable audio player can be connected to this unit’s portable jack
to play tracks on the portable audio player.
Cables used for connections
Audio cable (sold separately)
Stereo mini
plug cable
Portable
audio player
HEADPHONE
26
n USB memory device for BD-LIVE
To enjoy the BD-LIVE functions, connect a USB memory device
(1GB capadity or greater) supporting FAT32 and USB 2.0 High
Speed (480 Mbit/s) to the USB2 connector (vpage17).
NOTE
The BD-LIVE function cannot be used with the iPod/USB1 port on
the front panel.
Page 33

Connecting to the network
• You can use a disc which offers BD-LIVE function by connecting the
unit to the Internet (vpage17).
• See “Network” (vpage35) for more information on network setting.
Cables used for connections
Cable (sold separately)
Ethernet
cable
Internet
Computer
Modem
Router
To WAN side
To LAN port
To LAN port
LAN port/
Ethernet
connector
n Required system
Broadband internet connection
Modem
Device that connects to the broadband circuit and conducts
communications on the Internet.
A type that is integrated with a router is also available.
Router
• When using this unit, we recommend you use a router equipped
with the following functions:
• Built-in DHCP server
• This function automatically assigns IP addresses on the LAN.
• Built-in 100BASE-TX switch
• When connecting multiple devices, we recommend a switching
hub with a speed of 100 Mbps or greater.
Ethernet cable
(CAT-5 or greater recommended)
• Use for wired LAN.
• Use only shielded STP or ScTP LAN cable which is available at
retailer.
• Some flat type Ethernet cables are easily affected by noise.
• We recommend using a normal type cable.
ENGLISH
NOTE
• A contract with an ISP is required to connect to the Internet.
• No additional contract is needed if you already have a broadband
connection to the Internet.
• The types of routers that can be used depend on the ISP. Contact an
ISP or a computer shop for details.
• Marantz assumes no responsibility whatsoever for any
communication errors or troubles resulting from customer’s network
environment or connected devices.
• This unit is not compatible with PPPoE. A PPPoE-compatible router
is required if you have a contract for a type of line set by PPPoE.
• Do not connect an ETHERNET connector directly to the LAN port/
Ethernet connector on your computer.
Getting
Started
Connections
Basic
Operations
Basic
Connections
Connections
Advanced
Advanced
Operations
Advanced
Settings
setting
Other
For connections to the Internet, contact an ISP (Internet
Service Provider) or a computer shop.
• If you have an Internet provider contract for a line on which network
settings are made manually, make the settings at “Network”
(vpage35).
• With this unit, it is possible to use the DHCP and Auto IP functions
to make the network settings automatically.
• When using this unit with the broadband router’s DHCP function
enabled, this unit automatically performs the IP address setting and
other settings.
When using this unit connected to a network with no DHCP function,
make the settings for the IP address, etc., at “Network” (vpage35).
• When setting manually, check the setting contents with the network
administrator.
information
Other
Explanation
terms
Troubleshooting Specifications Index
27
Page 34

ENGLISH
Advanced operations
Basic operations (vpage12)
Playback (Basic) (vpage18)
Surround mode (vpage21)
Tuning in radio stations (vpage22)
n Playing an iPod® (vpage28)
n Playing a USB memory device (vpage29)
n Playing fi les (vpage30)
n Playing a portable audio player (vpage32)
Playing an iPod
®
Connect an iPod directly to the iPod/USB1
port to play back
You can use the USB cable provided with the iPod® to connect the
iPod with the unit’s USB1/iPod port and enjoy music stored on the
iPod.
• This unit supports audio playback from the iPod (fi fth generation
or later), iPod nano, iPod classic, iPod touch and iPhone (it is not
compatible with iPod shuffl e).
• The factory setting is “Direct mode”.
Connect the iPod® to the
iPod/USB1 port (vpage 25
1
“Connecting an iPod or USB
memory device to the iPod/USB1
port”).
Press POWER to turn on power
2
to the unit.
Press iPod/USB1 to switch the input source to “iPod/
3
USB1”.
Press iPod D/R to select the
4
display mode.
• There are two modes for displaying the
contents recorded on the iPod.
Remote mode
on the display of this unit.
• English letters, numbers and certain
symbols are displayed. Incompatible
characters are displayed as “.” (period).
Direct mode
on the iPod screen.
• “Direct iPod” is displayed on the display
of this unit.
• The Direct mode is not supported on fi fth
generation iPod or fi rst generation iPod
nano.
Display mode
Playable
fi les
Active
buttons
z Only the sound is played.
Display iPod information
Display iPod information
Music fi le
Video fi le
Remote
control unit
(This unit)
®
iPod
Remote mode Direct mode
Use ui to select the item, then
5
press ENTER or p to select the
le to be played.
Press ENTER, p or 1.
6
Playback starts.
• You can also perform the same operations
by pressing
1/3 on this unit.
You can also perform the same operations as o on the remote control
unit with the MODE button on this unit, respectively.
NOTE
• Depending on the type of iPod and the software version, some
functions may not operate.
• Note that Marantz will accept no responsibility whatsoever for any
problems arising with the data on an iPod when using this unit in
conjunction with the iPod.
n iPod operation
Operation buttons Function
uio p
ENTER Enter setting
iPod D/R Direct/Remote mode switching
RETURN Return
RANDOM Shuffl ing playback
REPEAT
6 7
(Press and hold)
z
1
8 9
3
2
DISP.
Cursor operation
Repeat playback
Manual search
(fast-reverse/fast-forward)
Playback
Skipping to the fi le
Pause
Stop
Switches between title name/artist
name and title name/album name
displays (in Remote mode)
28
Page 35

Playing a USB memory device
ENGLISH
Getting
Started
There are two methods for USB memory device playback.
n Use the iPod/USB1 port on the front panel
n Use the USB2 port on the rear panel
(vpage30 “Playing files”)
NOTE
• Note that Marantz will accept no responsibility whatsoever for any
problems arising with the data on a USB memory device when using
this unit in conjunction with the USB memory device.
• USB memory devices will not work via a USB hub.
• Marantz does not guarantee that all USB memory devices will
operate or be supplied power. When using a USB portable hard disk
that can draw power from an AC adapter, we recommend using the
AC adapter.
• It is not possible to connect and use a computer via the USB port of
this unit using a USB cable.
• Copy protected files such as DRM (Digital Rights Management)
protected files are not playable.
Use the iPod/USB1 port on the front panel
Files stored on USB memory devices created in the formats below
can be played.
Playable
Files
(Extension)
AVI
(.avi)
WMV
(.wmv)
JPEG
(.jpg)
MP3
(.mp3)
WMA
(.wma)
AAC
(.m4a)
Resolution/
File
systems
(No Play) – – –
(No Play) – – –
(No Play) – – –
FAT16/32
FAT16/32
FAT16/32
Sampling
Frequency
32 / 44.1 /
48 kHz
44.1 / 48
kHz
44.1 / 48
kHz
size of
image/
Bitrate
32-320 kbps
48-192 kbps
64-192 kbps
Maximum
number of
playable files
and folders
File: 6000
Folder: 2000
Tag data
–
–
–
ID3-Tag
(Ver. 2)
META
Tag
–
NOTE
• If the USB memory device is divided into multiple partitions, only the
top partition can be selected.
• It is not possible to play back LPCM, JPEG or DivX files recorded on
a USB memory device.
• The characters that can be displayed are as follows:
A – Z a – z 0 – 9
! ” # $ % & : ; < > ? @ l [ ] _ ` | { } ˜ ^ ’ ( ) z + , - . / = (space)
Connect the USB memory
1
device to the iPod/USB1 port
(vpage 25 “Connecting an iPod
or USB memory device to the
iPod/USB1 port”).
Press POWER to turn on power
2
to the unit.
Press iPod/USB1 to switch the
3
input source to “iPod/USB1”.
Use ui to select the item, then
4
press ENTER or p to select the
le to be played.
Press ENTER, p or 1.
Playback starts.
5
• You can also perform the same operations
by pressing
1/3 on this unit.
You can also perform the same operations as o on the remote control
unit with the MODE button on this unit, respectively.
n USB operation
Operation buttons Function
uio p
ENTER Enter setting
RETURN Return
RANDOM Random playback
REPEAT
6 7
(Press and hold)
1
8 9
3
2
DISP.
Cursor operation
Repeat playback
Manual search
(fast-reverse/fast-forward)
Playback
Skipping to the file
Pause
Stop
Switches between title name/artist
name and title name/album name
displays (in the playback mode)
Connections
Basic
Operations
Basic
Connections
Advanced
Operations
Operations
Advanced
Advanced
Settings
setting
Other
information
Other
Explanation
terms
Troubleshooting Specifications Index
29
Page 36

ENGLISH
Music
Music
2 Item(s)
Playing fi les
• You can play music fi les such as MP3 and WMA, picture fi les such
as JPEG and video fi les such as AVI and WMV recorded onto a
CD-R/-RW or a USB memory device (USB2 port only).
• USB memory device and CD-R/-RW disc created in the format
described below can be played.
CD-R/-RW and USB2 port
Playable Files
(Extension)
AVI
(.avi)
WMV
(.wmv)
JPEG
(.jpg)
MP3
(.mp3)
WMA
(.wma)
AAC
(.m4a)
• CD-R/-RW discs recorded with UDF or ISO9660 format can be
played back.
• The characters that can be displayed are as follows:
File
systems
FAT32 –
FAT32 –
FAT32 –
FAT32 44.1 / 48 kHz
FAT32 44.1 / 48 kHz
(No Play) – – –
Sampling
Frequency
Resolution/
size of image/
Bitrate
1920x1080
/ 30 fps
1920x1080
/ 30 fps
4272x2848
pixels
Upto
320 kbps
Upto
192 kbps
A – Z a – z 0 – 9 -
If data that has more than 999 fi les is played back, the display
contents may not be shown correctly.
Maximum
number of
playable fi les
and folders
Folder: 999
Files: 999
Files playback
Press DISC to switch the input source to “DISC/
1
USB2”.
In the stop mode, load a disc or insert a USB memory
2
device into the USB2 port.
The music, picture and video fi le symbols, etc are displayed on
the home menu.
• If a USB memory device is connected to the USB2 port on the
rear panel during disc playback, playback of the disc stops, and the
home menu is displayed.
GExampleH When a USB memory device is inserted
Main Menu
Play Files
Video
Setting
Music
Picture
Playlist
USB 2
Video fi les
System Settings
Music fi les
Picture fi les
Press ui to select the type of
3
le to be played, then press p.
The play menu of the selected type of
fi le is displayed.
Brawse Pictures
Now Playing
AVI WMV WMA MP3 JPEG
Use ui to select the desired media in the media
4
menu, then press p.
The folder and fi les recorded onto the selected media are
displayed.
NOTE
• Even if a CD-R/CD-RW or a USB memory device contains a mix of
music, picture and video fi les, you will only be able to browse the
selected type of fi les (music, picture or video).
• When there are no fi les to be played onto the selected media or
folder, “ Empty” will be displayed.
Use uio p to select the desired le or folder,
5
then press ENTER.
If fi le is selected, the corresponding dialog box is displayed.
Press o to go to “play menu side”.
6
• The number of times o needs to be pressed until reaching the
“play menu side” differs depending on the folder construction.
Use ui to select “Play Files”,
7
then press ENTER.
Play mode is displayed.
Use ui to select the desired mode, then press
8
ENTER.
Only the selected fi le will be played (and the fi le information will
be displayed on the TV screen when playing a music fi le).
GExampleH When playing a music fi le
File: 2/13 Track02.wma
Title: Track02
Artist: Unknown Artist
Album:
Please select Play mode
Play All
Play Current Folder
Cancel
Off Off x2
30
Play menu side Media menu side
Page 37

ENGLISH
Playing Files
Getting
Started
To make a playlist
“Files playback” (vpage 30)
1
perform steps 1 – 4.
Use uio p to select the
2
desired le or folder, then press
ENTER.
The corresponding dialog box is
displayed depending on whether the
playlist is selected as a media or not as
follows.
• When selecting the optical disc
or the USB2
Add To Playlist
Play (File)
NOTE
When the JPEG file is selected as a type of file to be played, the
“Play(File)” cannot be selected.
Use ui to select the desired item in the dialog box,
3
then press ENTER.
n When selecting “Remove from Playlist”
• The selected file is cleared in the playlist.
• Repeat the above steps 2 and 3 until other files are cleared.
n When selecting “Add To Playlist”
• The selected file is added in the playlist.
• Repeat the above steps 2 and 3 until other files are added.
NOTE
• When a disc is unloaded or the USB memory device disconnected,
the files are all cleared in the playlist.
• When the home menu reappears, all picture (JPEG) files are
cleared in the playlist.
• When the file added to the
playlist is selected
Remove from Playlist
Play (File)
Selecting an item in the play menu
AVI WMV WMA MP3 JPEG
The items listed in the play menu may vary depending on the operation
status and the selected media, etc.
NOTE
• During playback of file, press 2 to display
the play menu, etc.
• In the stop mode, use ui to select an item
in the play menu, then press ENTER.
n When selecting “home menu” with the HOME
button
• The home menu will be returned to.
n When selecting “Play (File)”
• Press ui to select the desired play mode in the play menu,
then press ENTER. Then playback will start according to the
selected play mode.
NOTE
• When playing JPEG files, each file is displayed for the time
interval you specified.
• The selectable play mode may vary depending on the operation
status and the selected media, etc.
n When selecting “Browse Pictures” or the
“Browse Music”
• The JPEG file or the music file will be changed to as the type of
file to be played.
n When selecting “Add all to playlist”
• All the files are added in the playlist.
NOTE
You cannot add a folder in the playlist.
n When selecting “Remove all from playlist”
• All the files are cleared in the playlist.
n When selecting “Previous folder”
• Each time this item is selected, the previous folder or the previous
menu will be returned to.
n When selecting “Now Playing”
• The playback status for music files is displayed.
n Stop playback (vpage18)
Press 2.
n Pause playback (vpage18)
Press 3.
• You can also perform the same operations
by pressing
1/3 on this unit.
n Step-by-step playback (vpage18)
During pause, press 3.
• You can also perform the same operations
by pressing 1/3 on this unit.
n Fast forward/fast reverse playback
(vpage19)
During playback, press 6 7.
n Slow forward playback (vpage19)
During pause, press 7.
n Skipping to the file (vpage19)
During playback, press 8 9.
n Repeat playback (vpage20)
Press REPEAT .
n Random playback (vpage20)
Press RANDOM.
n Rapid playback
During playback, press 7.
• Each time 7 is pressed, the time interval to display is shortened
as follows:
5 seconds 2 1 No delay
5 seconds No delay
JPEG
n Displaying file information
(vpage15)
During playback, press DISP..
AVI WMV JPEG
n Playing the desired section of file (vpage19)
During playback, press SEARCH.
Connections
Basic
Operations
Basic
Connections
Advanced
Operations
Operations
Advanced
Advanced
Settings
setting
Other
information
Other
Explanation
terms
Troubleshooting Specifications Index
31
Page 38

ENGLISH
Playing Files
To change the effect on displaying pictures
JPEG
You can display the JPEG fi les at the slide show options you select.
During playback, press POP UP MENU.
1
The slide show menu is displayed for several seconds.
Slide Show Effects
Slide Show Delay
Use ui to select the desired item, then press p.
2
The selected item menu is displayed.
Slide Show Effects
Use ui to select the desired option, then press
3
ENTER.
Slide Show Effects
n When selecting the slide show effects
• You can select the desired of different display modes as follows:
None
None
n When selecting the slide show delay
• You can select the desired of different time intervals to display
the JPEG fi les as follows:
5 seconds
5 seconds
Shutter
Horizontal Scroll
None
Fade
Shutter
Shutter
None
5 sec(s)
None
Horizontal Scroll
Horizontal Scroll
Horizontal Scroll
101530
Fade
Fade
2 1
No delay
No delay
Playing both the music fi les and the JPEG
fi les simultaneously
WMA MP3 JPEG
During playback of music les,
1
press ENTER.
The play menu, etc are displayed.
Use ui to select “Browse
2
Pictures” in the play menu, then
press ENTER.
Use ui to select “USB2” in the media menu, then
3
press p.
Use uio p to select the desired JPEG le or
4
folder, then press ENTER.
If fi le is selected, the corresponding dialog box is displayed.
Press o to go to “play menu side”.
5
• The number of times o needs to be pressed until reaching the
“play menu side” differs depending on the folder construction.
Use ui to select “Play Files”,
6
then press ENTER.
Play mode is displayed.
Use ui to select the desired mode, then press
7
ENTER.
Select the some JPEG les to be played and play
8
them in the desired play mode.
You can view JPEG fi les while listening to music fi les.
• While playing both the music fi les and the JPEG fi les, the playback
controls are effective for the JPEG fi les only.
Please select Play mode
Play All
Play Current Folder
Cancel
n To control the music fi les
q Press 2 to stop the playback of the
JPEG fi les.
The play menu, etc. will be displayed.
w Use ui to select the “Now Playing”
in the play menu, then press ENTER.
The music fi le information is displayed
and you can control the music fi les.
Playing a portable audio player
Your portable audio player can be connected to this unit’s portable jack
to play tracks on the portable audio player.
Connect the portable audio player to the AUX1 jack
1
(vpage 26 “Connecting a portable audio player”).
Press POWER to turn on power
2
to the unit.
Press AUX to switch the input
3
source to “AUX 1”.
Play the portable audio player.
The player’s audio is output.
4
• Also read the portable audio player’s
operating instructions.
NOTE
When using the portable player’s headphone jack, set the volume on
the portable player to an appropriate level.
32
Page 39

How to make detailed settings
ENGLISH
Getting
Started
Menu map
For menu operation, connect a TV to this unit and display the menu on
the TV screen. For menu operations, see the following page.
System
Display
Network
Setting
Info
Display
Audio
Language
Parental
HDMI Status Connected
HDMI Preferred Format
TV Type
Resolution
TV Aspect
24P Mode
Color Depth
720P
PAL
HDMI Audio
16:9 Wide
Off
24 Bit
Setting items Detailed items Description Page
System Optical Disc AutoPlay Set whether to automatically play a disc or not when loading it or
34
turning on the Power under the condition that it is loaded.
BD-Live Internet Access Set the access restriction to BD-LIVE contents. 34
BD-Live Storage (USB) Set whether BD-LIVE contents is store into the USB memory device
34
or the internal memory of this unit.
Erase Blu-ray Storage? Erase the Virtual Package and BD-LIVE contents stored into the
34
internal memory and the USB memory storage.
Screen Saver Duration Set the period of time to activate screen saver function. 34
Reset Settings Reset all settings to the factory default except the Parental settings,
35
etc.
Network Wired Confi gures network settings depending on your internet environment,
35
etc. when connecting to the internet.
Network Test Detects the internet connection and automatically confi gures the
35
network settings by the DHCP server function of the router or
modem.
Information System information of this unit checked by the service adviser. –
Display TV type Set the video signal format depending on that of your TV and disc. 36
Resolution Set the resolution of the HDMI video signal. 36
TV Aspect Set the picture size according to aspect ratio of your TV. 36
24P Mode Set whether to output 1080/24p video signals from HDMI OUT
36
connector when playing fi lm-based materials (24 frame) on BD
discs.
Color Depth Set whether to output the HDMI video signal with the color depth
36
effect or not.
Audio HDMI Output Select HDMI audio output device. 36
Dynamic Range Control During Dolby Digital, Dolby Digital Plus or Dolby TrueHD audio
36
playback, the dynamic range (range difference between quiet
sounds and loud sounds) is compressed.
Language OSD Set the language for unit’s OSD (On-Screen Display). 37
Menu Set the language for disc menu or pop-up menu. 37
Audio Set the language for audio. 37
Subtitle Set the language for subtitle. 37
Parental Parental Control Set whether or not to parental control. 37
Parental Level Set the parental control level. 37
Parental Password Change the password for the parental control settings. 37
Connections
Basic
Operations
Basic
Connections
Advanced
Operations
Operations
Advanced
Advanced
Settings
Settings
setting
Other
information
Other
Explanation
terms
Troubleshooting Specifi cations Index
33
Page 40

ENGLISH
Connected
720P
PAL
HDMI Audio
16:9 Wide
Off
24 Bit
HDMI Preferred Format
Display
OSD (on-screen display) menu operation
When the input source is “DISC/USB2”, settings for audio and video can be performed from the OSD
menu.
The OSD (On-Screen Display) menu enables various
audio/visual settings and adjustments.
In the stop mode, press ui to select
1
“Settings” in the home menu, then
press ENTER.
System
Network
HDMI Status
TV Type
Resolution
TV Aspect
24P Mode
Color Depth
Info
Setting
• During playback of BD-Video, DVD-Video or CD,
2 or HOME is pressed, then the home menu
if
will be displayed.
• During playback of music, JPEG or video fi les,
if HOME is pressed, then the home menu will
be displayed.
Display
Audio
Language
Parental
Use ui to select the desired setting
2
category, then press p.
Use ui to select the desired setting
3
item, then press p.
The selected item’s option menu will be
displayed.
Use ui to select the desired option,
4
then press ENTER to con rm your
selection.
The previous screen will be displayed.
• To go back to the previous screen, press
RETURN.
Settings
System (vpage34)
Network (vpage35)
Display (vpage36)
Audio (vpage36)
Language (vpage37)
Parental (vpage37)
o or
System
Perform system-related settings.
Items Setting details
Optical Disc AutoPlay
Set whether to automatically
play a disc or not when
loading it or turning on the
Power under the condition
that it is loaded.
BD-Live Internet Access
Set the access restriction to
BD-LIVE contents.
BD-Live Storage (USB)
BD-LIVE contents is stored
into the USB memory
device.
Erase Blu-ray Storage?
Erase the Virtual Package
and BD-LIVE contents
stored into the USB memory
storage.
Screen Saver Duration
Set the period of time
to activate screen saver
function.
A TV screen may be burned
out if a static picture is
displayed for a long time
in the stop mode, etc..
To prevent this, the unit
automatically activate the
screen saver function if a
static picture is displayed
over the period of time you
set.
On : Starts play automatically.
Off : Turns off the autoplay.
Limit Access : Allows only the BD disc with owner certifi cation to access
contents from a BD-LIVE website.
Always Allow Access : Allows all BD-LIVE discs to access contents from
BD-LIVE websites.
Prohibit Access : Prohibit all BD-LIVE discs from accessing contents from
BD-LIVE websites.
• The available functions differ depending on the disc.
• Regarding playback method of BD-LIVE contents, etc., perform the
• To enjoy BD-LIVE functions, perform the broadband internet connection
USB2 (more than 1 GB)
Displays the storable memory capacity.
1. Use
2. Use o p to select “Ok”, then press ENTER.
Off : Inactivates screen saver function.
5/10/20/30 Minutes : Activates screen saver function if a static picture is
displayed over the period of time you set.
Default settings are underlined.
operations in accordance with the instructions in the BD-LIVE disc
manual.
and communication settings. (For details, refer to “Connecting to the
network” (vpage27) and “Network” (vpage35).)
ui to select “Erase Blu-ray Storage?”,
then press ENTER.
To inactivate screen saver function, press any button.
34
Remote control operation
buttons
Move the cursor
(Up/Down/Left/Right)
Confi rm the setting Return to previous menu
Page 41

Items Setting details
Valid range of each segment is 0 to 255.
Connection to 192.168.1.110...
Reset Settings
Reset all settings to the
factory default except the
Parental settings, etc.
NOTE
“Parental” (vpage37) is not
reset.
ui to select “Reset Settings”, then
1. Use
press ENTER.
2. Use o p to select “Ok”, then press ENTER.
System
Setting items Setting details
Wired
(Continued)
n When selecting “Manual”
• You can select IP Address, Subnet Mask, Gateway, Primary DNS and
Secondary DNS to configure them manually.
• On the IP Settings menu, “Link Status” and “Mac Address” display
the corresponding information merely.
q Use ui to select the desired option, then press ENTER.
Please enter a new IP Address.
ENGLISH
Network
Getting
Started
Connections
Basic
Operations
Basic
Network
Default settings are underlined.
• You can use a disc which offers BD-LIVE function by connecting the unit to the Internet (vpage27
“Connecting to the network”).
• When you set the communication setting manually, the following information of the connected router
or modem is required. Confirm the information prior to the setting : IP address, Subnet mask, Gateway,
Primary DNS and Secondary DNS.
Setting items Setting details
Wired
Configures network settings
depending on your internet
environment, etc. when
connecting to the internet.
NOTE
When IP Mode is set to Off,
Network Test cannot be
selected.
ui to select “Wired”, then press ENTER.
1. Use
2. Use ui to select “IP Mode”, then
press ENTER.
Off : Disables this unit’s LAN
capabilities.
Manual : Configures network
settings manually.
Dynamic : Automatically configures
the network settings by the DHCP
server function of the router or
modem.
Select “Manual” only when the
DHCP server function of the
router or modem cannot be used
for the automatic configuration.
Link Status
MAC Address
IP Mode
IP Address
Subnet Mask
Gateway
Primary DHS
Secondary DHS
IP Settings
Link Up
00:23:03:00:50:b4
Dynamic
192.168.1.110
255.255.255.0
192.168.1.1
168.126.63.1
0.0.0.0
Apply Cancel
3. Use ui to select the desired IP
mode, then press ENTER.
n When selecting “Off”
The values for IP Address, Subnet Mask, Gateway, Primary DNS and
Secondary DNS are all cleared.
Network Test
Detects the internet
connection and automatically
configures the network
settings by the DHCP server
function of the router or
modem.
Current value
New value
192.168.1.110
CancelOk
w Enter the new value pressing 0 - 9, then press i to select “OK”
and press ENTER.
e Repeat the above steps q and w until other new values are all
entered.
r Use ui to select “Apply”, then press ENTER.
Then the network test is automatically performed and the result is
displayed.
t Press ENTER to confirm the test result.
The network menu will be displayed.
n When selecting “Dynamic”
Then the network test is automatically performed and the result is
displayed.
q Use ui to select “Apply”, then press ENTER.
Then the network test is automatically performed and the result is
displayed.
w Press ENTER to confirm the test result.
The network menu will be displayed.
ui to select “Network Test”, then press
1. Use
ENTER.
• Then the network test is automatically performed
and the result is displayed.
2. Press ENTER to confirm the test result.
The network menu will be displayed.
Network Test
Cancel
Connections
Advanced
Operations
Advanced
Settings
Settings
setting
Other
information
Other
Explanation
terms
Troubleshooting Specifications Index
Remote control operation
buttons
Move the cursor
(Up/Down/Left/Right)
Confirm the setting Return to previous menu
35
Page 42

ENGLISH
Display
Set the video output signal according to the connected TV.
Items Setting details
TV type
Set the video signal format
depending on that of your
TV and disc.
Resolution
Set the resolution of the
HDMI video signal.
TV Aspect
Set the picture size
according to aspect ratio of
your TV.
24P Mode
Set whether to output
1080/24p video signals from
HDMI OUT connector when
playing film-based materials
(24 frame) on BD discs.
NTSC : Select this when the video signal format of your TV and the discs
is NTSC color system for U.S.A., Canada, etc..
PAL : Select this when the video signal format is PAL color system for
Europe, Australia, China, etc..
NOTE
If the color system of this unit is different from that of your TV and the
discs, the screen may be somewhat hard too see or the picture quality
may be poor. Only in this case, set the video signal format to another.
HDMI Auto : HDMI video resolution will be selected automatically
depending on the HDMIcompatible TV.
1080p : Outputs 1080 lines of progressive video.
1080i : Outputs 1080 lines of interlaced video.
720p : Outputs 720 lines of progressive video.
576p : Outputs 576 lines(PAL) (or 480 lines(NTSC) of progressive video.
576i : Outputs 576 lines(PAL) (or 480 lines(NTSC)) of interlaced video.
16:9 Wide : Select this when a wide-screen TV is connected. Discs
recorded in widescreen format is played back over the entire TV screen.
16:9 Pillarbox : When playing back 4:3 images, the picture is displayed in
the center of the 16:9 screen with a 4:3 aspect ratio.
4:3 Pan and Scan : Select this to play back the discs recorded in widescreen format with 4:3 TV in the pan and scan mode (with the sides of the
picture cut off). Discs which are not specified for pan and scan are played
back in the letter box mode.
4:3 Letterbox : Select this to play back the discs recorded in wide-screen
format with 4:3 TV in the letter box mode (with black strips at the top and
bottom).
On : Select this to output 1080/24p video signals from HDMI OUT
connector when playing film based materials (24 frame).
Off : Select this when playing a materials other than film based materials
(24 frame).
NOTE
• 1080/24p video signals are only output from the HDMI OUT connector.
• 1080/24p video signals can be output when the following conditions are
met.
• HDMI OUT connector is connected to TV compatible with 1080/24p
video signals.
• Resolution is set to “HDMI Auto” or “1080p”.
Default settings are underlined.
Items Setting details
Color Depth
Set whether to output the
HDMI video signal
with the color depth effect
or not.
Audio
Perform audio-related settings.
Items Setting details
HDMI Output
Select HDMI audio output
device.
Dynamic Range Control
During Dolby Digital, Dolby
Digital Plus or Dolby TrueHD
audio playback, the dynamic
range (range difference
between quiet sounds and
loud sounds) is compressed.
Display
36 Bit : Select this to output the HDMI video signal with the 36 Bit color
depth to TV which supports 36 Bit HDMI deep color.
30 Bit : Select this to output the HDMI video signal with the 30 Bit color
depth.
24 Bit : Select this to output the HDMI video signal without the color
depth effect to TV which does not support HDMI deep color.
For details on HDMI deep color which TV supports, refer to the
operating instructions of TV.
Default settings are underlined.
On (Auto) : HDMI audio is output from the TV connected to this unit.
Off Speaker : Audio is output from the speakers connected to this unit.
NOTE
When an audio CD recorded in DTS-ES or Dolby Digital EX is played, no
sound may be heard.
On : Turns on the dynamic range compression to hear low sounds easier.
Off : Turns it off.
Auto : When Dolby TrueHD audio is played back, the dynamic range is
automatically adjusted.
NOTE
Depending on status of connected TV HDMI, the dynamic range control
may not be effect.
36
Remote control operation
buttons
Move the cursor
(Up/Down/Left/Right)
Confirm the setting Return to previous menu
Page 43

Language
Please enter a new parental control password:
Set the language used for OSD, menus, playback dialogs and subtitle.
Items Setting details
OSD
Set the language for unit’s
OSD (On-Screen Display).
Menu
Set the language for disc
menu or pop-up menu.
Audio
Set the language for audio.
Subtitle
Set the language for
subtitle.
English / Français / Español / Italiano / Deutsch / Русский
Auto : Selects the language given priority in the disc.
English / Français / Español / Italiano / Deutsch / Русский / - - - - - - /
Urdu/Vietnamese/Yoruba
Auto : Selects the language given priority in the disc.
English / Français / Español / Italiano / Deutsch / Русский / - - - - - - /
Urdu / Vietnamese / Yoruba
Off : Displays no subtitles.
English / Français / Español / Italiano / Deutsch / Русский / - - - - - - /
Urdu / Vietnamese / Yoruba
Default settings are underlined.
NOTE
Depending on the discs, it may not be possible to change to the selected language.
In this case , change the “Audio” and “Subtitle” by pressing AUDIO/RDS or
SUBTITLE on the remote control.
ENGLISH
Parental
The parental control allows you to set a limit, which prevents your children from viewing inappropriate
materials. If the ratings exceed the levels you set, playback will be stopped, or inappropriate scenes such
as violent scenes can be cut or replaced with other scenes depending on the disc type.
NOTE
• When you set the parental level low, some discs may not be played at all, in this case, set the parental
level higher or the parental control to off.
• All discs may not respond to the parental level setting. Make sure this function works with your disc.
Setting items Setting details
Parental Control
Set whether or not to
parental control.
On : Parental control restricts playing discs according to parental level you
set.
Off : Parental control is inactive; all discs are played back.
n When selecting “On”
The parental password entry screen appears as follows.
Password
Ok Cancel
Getting
Started
Connections
Basic
Operations
Basic
Connections
Advanced
Operations
Advanced
Settings
Settings
setting
Other
Remote control operation
buttons
Move the cursor
(Up/Down/Left/Right)
Parental Level
Set the parental control
level.
Parental Password
Change the password for
the parental control settings.
Confirm the setting Return to previous menu
1. Press 0 - 9 to enter the 4-digit numbers, press i to select “Ok”.
2. Press ENTER.
The parental menu will be displayed.
NOTE
Do not forget the password. The default setting is “3308”.
1 [Kid Safe] : Suitable for children.
2 [G] : General audience.
3 [PG] : Parental guidance suggested.
4 [PG-13] : Unsuitable for children under 13.
5 [PG-R] : Parental guidance recommended.
6 [R] : Restricted; under 17 requires accompanying parent or adult
guardian.
7 [NC-17] : No one under 17 admitted.
8 [Adult] : Discs of any grades (adult/general/children) can be played back.
The lower the level value, the stricter the limitation.
1. Press
2. Press ENTER.
3. Perform the above step 1 and 2.
0 - 9 to enter the new 4-digit numbers, press i to select “Ok”.
The parental password entry screen for confirmation appears.
37
information
Other
Explanation
terms
Troubleshooting Specifications Index
Page 44

ENGLISH
Other setting
You can set the timers, Audio delay, Speaker Optimize, and Auto
standby functions.
These settings are not displayed on the TV.
They are only displayed on the unit's display.
Timer setup (vpage38)
Audio delay (vpage39)
Auto standby (vpage40)
Registering preset codes (vpage40)
Other functions (vpage40)
Timer setup
You can set the timers (Everyday timer / Once timer) for playback
input sources from “DISC”, “TUNER”, and “iPod/USB1”.
Timer order of priority
The order of priority when the times set for the different timers
overlap is as follows:
1. Sleep timer
2. Once timer
3. Everyday timer
If the current time is not set, enter timer setting mode to get time
setting mode.
Setting the timer
• Everyday timer (“EVERY DAY”)
Playback starts and stops (the power turns off) at the set times each
day.
• Once timer (“ONCE”)
Playback starts and stops (the power turns off) once only at the set
times.
NOTE
• When the input source is set to “DISC/USB2”, use CD-DA. Many
BD-Video/DVD-Video cannot be played back using this function.
Also, fi les from a CD-R/-RW disc and USB memory device (USB2
port) cannot be played back.
• If you playback with the timer by using CD-DA, do not connect USB
memory devices to the USB2 port on the rear panel.
• If the input source is “DISC/USB2”, and fi les are being played
back from the USB memory device (USB2 port) with the power on,
playback does not switch to disc playback even when the timer start
time is reached.
Press SETUP.
1
• If you perform operations on this unit, press
and hold MODE for 3 seconds and longer.
Use ui to select “TIMER
2
SETUP”, then press ENTER or
p.
Use ui to select the timer mode, then press ENTER
3
or p.
M O D E S E L E C T
O N C E T I M E R
Use ui to select the input source, then press
4
ENTER or p.
I N P U T S E L E C T
D I S C
DISC TUNER iPod/USB1
Only when the input source “TUNER” function
5
ui to select the preset number, then press
Use
is selected
ENTER or p.
• When no name has been registered for the selected preset
number, the frequency appears after the preset number is
displayed.
Use ui to select “hours” for the timer start time,
6
then press ENTER or p.
O N T I M E
1 0 : 0 0 > 0 0 : 00
Use ui to select “minutes” for the timer start time,
7
then press ENTER or p.
O N T I M E
1 0 : 3 0 > 0 0 : 00
Use ui to select “hours” for the timer stop time,
8
then press ENTER or p.
O F F T I ME
1 0 : 3 0 > 1 1 : 00
38
ONCE
You can also perform the same operations as o and p on the remote control unit with the MODE button and the INPUT button on this unit, respectively.
EVERYDAY
Page 45

Use ui to select “minutes” for the timer stop time,
9
then press ENTER or p.
O F F T I ME
1 0 : 3 0 > 1 1 : 30
Use o p to select “ON” or “OFF” for the timer,
10
then press ENTER.
• The indicator lights and the timer setting is entered.
• The timer settings are displayed for 3 seconds.
O N C E T I M E R O N
E V E R Y D A Y O F F
O N C E T I M E R O N
E V E R Y D A Y O F F
Press POWER to set the power to
11
standby.
Timer standby mode is set, and the
timer indicator lights red.
n Setting the timer to on or off
q Press SETUP.
• If you perform operations on this unit, press and hold MODE for
3 seconds and longer.
w Use ui to select “TIMER ON/OFF” , then press ENTER.
e Use ui to select “ONCE” or “EVERYDAY”.
r Use op to select “ON” or “OFF” for the timer, then press
ENTER.
The timer settings are displayed after this.
• When set to “OFF”, time operation is disabled, but the timer
settings remain unchanged.
n To check the timer settings
q Press SETUP.
• If you perform operations on this unit, press and hold MODE for
3 seconds and longer.
w Use ui to select “TIMER ON/OFF” , then press ENTER.
e When “ON” is displayed for the timer setting, press ENTER.
The timer settings are displayed for 3 seconds..
Timer setup
n To change the timer settings
Perform the operations at “Setting the timer” (vpage38).
n To change the setting while setting the timer
Press o or RETURN.
• If you perform operations on this unit,
press MODE.
The setting returns to the previous step.
• Display the setting you want to change,
then make the desired setting.
Setting the sleep timer
Use this function to automatically switch the power to the standby
mode after a specifi c amount of time (minutes).
The sleep timer can be set to up to 120 minutes.
During playback, press SLEEP and
display the time you want to set.
• After about 5 seconds, the setting is entered
and the display returns to as it was before.
120 90 60 50 40
20 3010OFF
n Canceling the sleep timer
Either press SLEEP to select “SLEEP OFF” or press POWER.
n To check the time remaining until the sleep
timer is activated
Press SLEEP.
ENGLISH
Audio delay
When the input source is “DISC/USB2”, timing delays between the
audio and images can be corrected while images are viewed.
Press SETUP.
1
• If you perform operations on this unit, press
and hold MODE for 3 seconds and longer.
Use ui to select “AUDIO
2
DELAY”, then press ENTER or
p.
S E T U P M E N U
A U D I O D E L A Y
Use ui to adjust a delay time.
3
A U D I O D E L A Y
8 0 m s e c
• Range : 0 to 160 msec
• Step : 10 msec
• Default : 0 msec
Press ENTER or p.
4
Getting
Started
Connections
Basic
Operations
Basic
Connections
Advanced
Operations
Advanced
Settings
setting
setting
Other
Other
information
Other
Explanation
terms
Troubleshooting Specifi cations Index
You can also perform the same operations as o and p on the remote control unit with the MODE button and the INPUT button on this unit, respectively.
39
Page 46

ENGLISH
Auto standby
With the auto standby on, this unit will automatically enter the standby
mode after about 30 continuous minutes of stop mode with no
operation.
Press SETUP.
1
• If you perform operations on this unit, press
and hold MODE for 3 seconds and longer.
Use ui to select “AUTO
2
STANDBY”, then press ENTER
or p.
Use ui to select “ON”, then
3
press ENTER or p.
The setting is entered.
NOTE
In the following situations, the Auto standby function does not operate.
• When the disc is being played back or paused.
• When an iPod or USB memory device is connected to the USB1 port
on the unit.
• When the input source is “TUNER”, “AUX2” or “AUX3”.
• When the input source is “AUX1” and a device is connected to the
portable jack.
• When the input source is “M-XPort”, and a RX101 wireless receiver
is connected to M-XPort.
Registering preset codes
The preset codes of TVs of manufacturers other than Marantz are
preset in the supplied remote control unit.
Use the preset codes table at the end of this manual to register the
preset codes.
Buttons used for operating the TV
• TV POWER button
• TV INPUT button
• TV channel buttons
(TV CH +/–)
• TV volume control buttons
(TV VOLUME df)
Press 0 – 9 while simultaneously
pressing 5 and ENTER.
• The numbers are shown in the preset code
table (vEnd of this manual).
Some manufacturers use more than one type of remote control code.
Refer to the included list of preset codes to change the number and
verify correct operation.
NOTE
Depending on the model and year of manufacture of your equipment,
some buttons may not operate.
Other functions
Auto power on
When the power is in standby, the power turns on when any of the
buttons below other than POWER on the remote control unit or ON/
STANDBY
is performed.
on the main unit is operated, and the respective operation
5
1 or 1/3
DISC
TUNER
iPod/USB1
AUX
M-XP
The disc tray opens.
The input source selected directly
before the power was switched to
standby is played back.
• If the last input source was “DISC/
USB2”, “AUX1”, “AUX2”, “AUX3”
or “M-XPort”, the disc set in the
main unit is played back. (Certain
types of disc cannot be played
back.)
The input source switches to “DISC/
USB2” and the disc starts playing.
(When “Optical Disc AutoPlay”
(vpage34) is “On”)
Playback of the tuner starts.
The input source switches to “iPod/
USB1” and the USB memory device
starts playing.
The input source switches to “AUX”.
The input source switches to
“M-XPort”.
If the RX101 wireless receiver is
not connected to M-XPort, the input
source switches to “DISC/USB2”.
40
You can also perform the same operations as
o and p on the remote control unit with the MODE button and the INPUT button on this unit, respectively.
Page 47

Other functions
Last function memory
This stores the settings as they were immediately before going into
the standby mode.
When the power is turned back on, the settings are restored to as
they were immediately before going into the standby mode.
Other information
About copyright
• Unauthorised copying, broadcasting, public performance and lending
of discs are prohibited.
• This item incorporates copy protection technology that is protected
by U.S. patents and other intellectual property rights of Rovi
Corporation. Reverse engineering and disassembly are prohibited.
• Portions of this product are protected under copyright law and
provided under license by ARIS/SOLANA/4C.
Trademark information
This product uses the following technologies:
is a trademark of the DVD
Format / Logo licensing Corporation.
“Blu-ray Disc” and are
trademarks.
“AVCHD” and “AVCHD” logo is the
trademark of Panasonic Corporation
and Sony Corporation.
“BD-LIVE” logo is trademark of Blu-ray
Disc Association.
“BONUSVIEW” is the trademark of
Blu-ray Disc Association.
Java and all other trademarks and
logos are trademarks or registered
trademarks of Sun Microsystems,
Inc. in the United States and/or other
countries.
Manufactured under license under
U.S. Patent #’s: 5,451,942; 5,956,674;
5,974,380; 5,978,762; 6,226,616;
6,487,535; 7,392,195; 7,272,567;
7,333,929; 7,212,872 & other U.S. and
worldwide patents issued & pending.
DTS and the Symbol are registered
trademarks, & DTS-HD, DTS-HD
Master Audio | Essential and the DTS
logos are trademarks of DTS, Inc.
Product includes software.
© DTS, Inc. All Rights Reserved.
ENGLISH
Manufactured under license from
Dolby Laboratories. “Dolby” and the
double-D symbol are trademarks of
Dolby Laboratories.
HDMI, the HDMI logo and HighDefinition Multimedia Interface are
trademarks or registered trademarks
of HDMI Licensing LLC.
Windows Media and the Windows
logo are trademarks or registered
trademarks of Microsoft Corporation
in the United States and/or other
countries.
“Made for iPod” and “Made for
iPhone” mean that an electronic
accessory has been designed to
connect specifically to iPod or iPhone,
respectively, and has been certified
by the developer to meet Apple
performance standards.
Apple is not responsible for the
operation of this device or its
compliance with safety and regulatory
standards.
iPhone, iPod, iPod classic, iPod nano,
iPod shuffle, and iPod touch are
trademarks of Apple Inc., registered in
the U.S. and other countries.
• Individual users are permitted to
use iPhone, iPod, iPod classic,
iPod nano, iPod shuffle, and iPod
touch for private copy and playback
of non-copyrighted contents and
contents whose copy and playback
is permitted by law. Copyright
infringement is prohibited by law.
Getting
Started
Connections
Basic
Operations
Basic
Connections
Advanced
Operations
Advanced
Settings
setting
setting
Other
Other
information
information
Other
Other
Explanation
terms
Troubleshooting Specifications Index
41
Page 48

ENGLISH
Explanation terms
Numerics
4:3 LB (letterbox)
When a wide (16:9) disc is played back by connecting
a 4:3 TV and this unit, this function plays back the
image with black area at the top and bottom.
4:3 PS (pan scan)
When a wide (16:9) disc is played back by
connecting a 4:3 TV and this unit, this function cuts
left and right of the played back image to the 4:3
size according to the disc’s control information.
A
A2DP
A2DP is one profile of Bluetooth definded for
in-car devices or AV devices that use wireless
communication instead of a cable.
AAC (Advanced Audio Coding)
This is an internationally standardized audio data
compression scheme. It has a compression ratio
1.4 times higher than the “MP3 audio compression
scheme adopted for “MPEG-1.
Aspect ratio
This is the length and width ratio of the TV screen.
The conventional TV’s screen ratio is 4:3 and the
wide screen TV’s screen ratio is 16:9.
Audio commentary
This is an audio program included as a bonus
feature in a DVD-Video or BD-Video. It uses a multiaudio function to provide an audio explanation or
commentary by members of the crew or director,
etc. to accompany the video.
AVCHD (Advanced Video Codec High Definition)
This is a high-definition digital camera (HD) standard
using high-efficiency encoding technology for
recording high-definition Hi-Vision signals to various
media.
AVI (Audio Video Interleaving)
A format developed by Microsoft for handling
video with audio on Windows computers. The
RIFF format used when storing multimedia data on
Windows is applied, and the format gets its name
from the way in which the audio data and video data
are interwoven.
B
BD-J (Blu-ray Disc Java)
With BD-Videos, there are fun software with
more interactive functions (games) using Java
applications.
BD-LIVE
This unit can be connected to the Internet to enjoy
a number of features, including additional contents
such as special videos or subtitles, network games,
etc.
Bit rate
This expresses the read amount per 1 second of
video/audio data recorded in a disc.
Blu-ray Disc
This is one-side 1 layer disc having 25 GB capacity
and can record high vision video movie and games.
Bonus View
Special images for BD-Videos. It includes comment
of the movie director, simultaneously developing
sub-story, and images from different angles.
C
Chapter
This is a break intended by a producer who
organizes the title of Blu-ray Disc or DVD-Video. The
chapter search function searches the beginning of
this break.
D
Deep Color
This technology allows expression of more number
of colors than the conventional 8 bits and can
reproduce colors close to natural ones without color
streak.
DHCP (Dynamic Host Configuration Protocol)
This mechanism automatically perform network
configuration such as IP address for network
devices including the unit, PC, and broadband
router.
Dolby Digital
Dolby Digital is a multi-channel digital signal format
developed by Dolby Laboratories.
A total of 5.1 channels are played: 3 front channels
(“FL” , “FR” and “C”), 2 surround channels
(“SL” and “SR”) and the “LFE” channel for low
frequencies.
Because of this, there is no crosstalk between
channels and a realistic sound field with a “threedimensional” feeling (sense of distance, movement
and positioning) is achieved.
A realistic, powerful sense of presence is achieved
when playing movie sources in AV rooms as well.
Dolby Digital EX
Dolby Digital EX is a 6.1-channel surround format
proposed by Dolby Laboratories that allows users
to enjoy in their homes the “DOLBY DIGITAL
SURROUND EX” audio format jointly developed by
Dolby Laboratories and Lucas Films.
The 6.1 channels of sound, including surround back
channels, provide improved sound positioning and
expression of space.
Dolby Digital Plus
Dolby Digital Plus is an improved Dolby Digital signal
format that is compatible with up to 7.1 channels
of discrete digital sound and also improves sound
quality thanks to extra data bit rate performance.
It is upwardly compatible with conventional Dolby
Digital, so it offers greater flexibility in response to
the source signal and the conditions of the playback
equipment.
Dolby Headphone
The Dolby Headphone technology provides
a surround sound listening experience over
headphones.
When listening to multichannel content such
as DVD movies over headphones, the listening
experience is fundamentally different than listening
to speakers. Since the headphone speaker drivers
are covering the pinna of the ear, the listening
experience differs greatly from traditional speaker
playback. Dolby utilizes patented headphone
perspective curves to solve this problem and
provides a non-fatiguing, immersive, home theater
listening experience. Dolby Headphone also
delivers exceptional 3D audio from stereo material.
Dolby TrueHD
Dolby TrueHD is a high definition audio technology
developed by Dolby Laboratories, using lossless
coding technology to faithfully reproduce the sound
of the studio master.
This format provides the facility to support up to 8
audio channels with a sampling frequency of 96 kHz
/ 24 bit resolution and up to 6 audio channels with
a sampling frequency of 192 kHz / 24 bit resolution.
Dolby TrueHD is adopted for applications that put
very high importance on sound quality.
Dolby Virtual Speaker
This is technology from Dolby Laboratories.
It is a surround system using just two speakers
to create the effect of surround sound, with
sound even coming from behind you as if it was a
5.1-channel system.
Downmix
This function converts the number of channels of
surround audio to less number of channels and
plays back.
DTS
This is an abbreviation of Digital Theater System,
which is a digital audio system developed by DTS.
When playing back audio by connecting this system
with a device such as DTS amplifier, accurate sound
field position and realistic sound effect as if you are
in a movie theater can be obtained.
DTS 96/24
DTS 96/24 is a digital audio format enabling high
sound quality playback in 5.1 channels with a
sampling frequency of 96 kHz and 24 bit quantization
on DVD-Video.
DTS Digital Surround
DTS Digital Surround is the standard digital surround
format of DTS, Inc., compatible with a sampling
frequency of 44.1 or 48 kHz and up to 5.1 channels
of digital discrete surround sound.
DTS-ES™ Discrete 6.1
DTS-ES™ Discrete 6.1 is a 6.1-channel discrete
digital audio format adding a surround back (SB)
channel to the DTS digital surround sound.
Decoding of conventional 5.1-channel audio signals
is also possible according to the decoder.
DTS-ES™ Matrix 6.1
DTS-ES™ Matrix 6.1 is a 6.1-channel discrete digital
audio format inserting a surround back (SB) channel
to the DTS digital surround sound through matrix
encoding. Decoding of conventional 5.1-channel
audio signals is also possible according to the
decoder.
42
Page 49

DTS Express
DTS Express is an audio format supporting low bit
rates (max. 5.1 channels, 24 to 256 kbps).
Manufactured under license under U.S. Patent
#s: 5,451,942; 5,956,674; 5,974,380; 5,978,762;
6,226,616; 6,487,535; 7,212,872; 7,333,929;
7,392,195; 7,272,567 & other U.S. and worldwide
patents issued & pending. DTS is a registered
trademark and the DTS logos, Symbol, DTS-HD and
DTS-HD Master Audio are trademarks of DTS, Inc.
© 1996-2008 DTS, Inc. All Rights Reserved.
DTS-HD
This audio technology provides higher sound quality
and enhanced functionality than the conventional
DTS and is adopted as an optional audio for Blu-ray
Disc. This technology supports multi-channel, high
data transfer speed, high sampling frequency, and
lossless audio playback. Maximum 7.1-channels are
supported in Blu-ray Disc.
DTS-HD High Resolution Audio
DTS-HD High Resolution Audio is an improved
version of the conventional DTS, DTS-ES and
DTS 96/24 signals formats, compatible with
sampling frequencies of 96 or 48 kHz and up to
7.1 channels of discrete digital sound. High data
bit rate performance provides high quality sound.
This format is fully compatible with conventional
products, including conventional DTS digital
surround 5.1-channel data.
DTS-HD Master Audio
DTS-HD Master Audio is a lossless audio format
created by Digital Theater System (DTS). This
format provides the facility to support up to 8 audio
channels with a sampling frequency of 96kHz/24bit
resolution and up to 6 audio channels with a
sampling frequency of 192kHz/24bit resolution.
It is fully compatible with conventional products,
including conventional DTS digital surround
5.1-channel data.
Dynamic range
The difference between the maximum undistorted
sound level and the minimum sound level that is
discernible above the noise emitted by the device.
F
Finalise
This is processing that enables playing back of
disc of BD/DVD/CD, which was recorded using a
recorder, by other players.
H
HDCP
When transmitting digital signals between devices,
this copyright protection technology encrypts
the signals to prevent content from being copied
without authorization.
HDMI
This is an abbreviation of High-Definition Multimedia
Interface, which is an AV digital interface that can
be connected to a TV or amplifier. Video signal and
audio signal can be connected using 1 cable.
I
Interlacing (interlaced scanning)
This conventional method used to project images
on a TV displays 1 frame of image in half and half,
respectively as 2 fields.
Interactive audio
Audio such as click sound that is generated during
operation and is recorded in the title of BD-Videos.
J
JPEG (Joint Photo graphic Experts Group)
This is a still picture data compression standard. Its
ability to reduce the size of a file with relatively little
deterioration in image quality means that it is widely
used for storing images in video cameras, etc.
L
Linear PCM
This signal is uncompressed PCM (Pulse Code
Modulation) signal. This is the same system as the
CD audio but this uses 192 kHz, 96 kHz, and 48 kHz
sampling frequencies in Blu-ray Disc or DVD and
provides higher sound quality than CD.
M
MP3 (MPEG Audio Layer-3)
This is an internationally standardized audio data
compression scheme, using the “MPEG-1” video
compression standard. It compresses the data
volume to about one eleventh its original size while
maintaining sound quality equivalent to a music CD.
MPEG (Moving Picture Experts Group), MPEG-2,
MPEG-4
These are the names for digital compression format
standards used for the encoding of video and audio.
Video standards include “MPEG-1 Video”, “MPEG2 Video”, “MPEG-4 Visual”, “MPEG-4 AVC”. Audio
standards include “MPEG-1 Audio”, “MPEG-2
Audio”, “MPEG-4 AAC”.
P
Picture-in-picture
This BD-Video function allows you to view making
or commentary scenes in the secondary video
while viewing the main story in the primary video.
Popup menu
This menu recorded in Blu-ray Disc software.
While playing back a Blu-ray Disc, this menu can
be displayed on the front of the screen and can be
operated.
Primary audio
This audio signal is recorded in the main story in
BD-Video.
Progressive (sequential scanning)
This is a scanning system of video signal that
displays 1 frame of video as one image. Compared
to the interlace system, this system provides
images with less flickering and bleeding.
Protection circuit
This is a function to prevent damage to components
within the power supply when an abnormality such
as an overload or excess voltage occurs for any
reason.
In this unit, the power indicator blinks and the unit
enters standby mode when an abnormality occurs.
R
Rating
Depending on the age of the viewer, this function
restricts playing back of BD-Video or DVD-Video.
This unit can be set to restrict viewing in 0 to 254
level for BD-Video, and 1 to 8 level for DVD-Video.
Region code
This code indicates country or region where the
Blu-ray Disc or DVD-Video can be played back.
S
Sampling frequency
Sampling involves taking a reading of a sound wave
(analog signal) at regular intervals and expressing
the height of the wave at each reading in digitized
format (producing a digital signal).
The number of readings taken in one second is
called the “sampling frequency”. The larger the
value, the closer the reproduced sound is to the
original.
Secondary audio
This is audio signals of comment of movie director
and other data recorded in the bonus view of
BD-Video.
ENGLISH
Explanation of terms
Speaker impedance
This is an AC resistance value, indicated in Ω
(ohms). Greater power can be obtained with this
value smaller.
T
Title
This is the unit of content that consists of chapters
of Blu-ray Disc or DVD-Video. Some Blu-ray Disc or
DVD-Video may include multiple titles.
V
Virtual Package
For BD-Video discs compatible with Virtual Package,
contents are copied from the discs or internet to
local storage. It is automatically copied to the local
storage prior to playback. You can enjoy a variety
of additional functions including secondary video,
secondary audio, subtitles, movie trailer, etc.
• The playback methods vary depending on the
disc. (For details, refer to the disc manual.)
W
WMA (Windows Media Audio)
This is audio compression technology developed by
Microsoft Corporation.
WMA data can be encoded using Windows
Media® Player Ver.7, 7.1, Windows Media® Player
for Windows® XP and Windows Media® Player 9
Series.
To encode WMA files, only use applications
authorized by Microsoft Corporation. If you use
an unauthorized application, the file may not work
properly.
WMV (Windows Media Video)
A video format developed by Microsoft based on
the video compression standard MPEG-4.
This is one of the formats supported as standard by
Windows Media Player, the standard media player
in the Windows operating system.
It was designed based on the assumption of
network delivery, and has such features as a high
compression rate, support for streaming playback,
and support for DRM (Digital Rights Management
Technology) to control copying.
Getting
Started
Connections
Basic
Operations
Basic
Connections
Advanced
Operations
Advanced
Settings
setting
Other
information
Other
Explanation
Explanation
terms
terms
Troubleshooting Specifications Index
43
Page 50

ENGLISH
Troubleshooting
If a problem should arise, first check the following:
1. Are the connections correct?
2. Is the set being operated as described in the user guide?
3. Are the other components operating properly?
If this unit does not operate properly, check the items listed in the table below. Should the problem persist,
there may be a malfunction.
In this case, disconnect the power immediately and contact your store of purchase.
GGeneralH
Symptom Cause/Solution Page
Power does not turn on. • Check whether the power plug is correctly inserted into the
power outlet.
• Check whether the power cord is correctly inserted into the
AC inlet.
• The protection circuit is active. Disconnect the power plug
from the electric outlet, wait 5 to 10 seconds and then insert
it back into the outlet.
Display is off. • The dimmer setting is set to “Off”. Set to something other
than “Off”.
The timer indicator is
blinking in intervals
of approximately 0.5
seconds.
The timer indicator is
blinking in intervals of
approximately 0.25
seconds.
After turning on the
power, the timer
indicator is blinking in
intervals.
Set does not operate
properly.
A disc that cannot
be played back was
inserted, and now cannot
be removed.
• The temperature inside the unit has risen. Please disconnect
the power plug from the electric outlet, and insert it back into
the outlet after the temperature has fallen sufficiently.
(Please re-install this unit in a place having good ventilation.)
• The speaker cable has shorted (is touching). Firmly twist
the core wire in the speaker cable, and re-connect it to the
speaker terminal. Then, disconnect the power plug from the
electric outlet, and insert it back into the outlet.
• The protection circuit is active. Disconnect the power plug
from the electric outlet, wait 5 to 10 seconds and then insert
it back into the outlet.
• The unit has failed. Turn off the power and please contact the
Marantz service adviser.
• Reset the microprocessor. 46
ON/STANDBY button on the unit to switch to standby
• Press
mode, then press 5 to open the disc tray and remove the
disc.
11
11
8
13
–
8
8
–
–
GVideoH
Symptom Cause/Solution Page
No picture appears. • Check the TV connection.
• Set the TV input correctly.
No picture appears, the
picture is disrupted, or
the Blu-ray disc or DVD
video picture appears in
black and white.
GAudioH
Symptom Cause/Solution Page
Audio is not output. • Check the connections for all devices.
No sound is
produced from
subwoofer.
DTS sound is not
output.
Dolby TrueHD, DTSHD, Dolby Digital
Plus audio is not
output.
GHDMIH
Symptom Cause/Solution Page
No audio is
output with HDMI
connection.
No video is
output with HDMI
connection.
• The picture may be slightly disturbed directly after fastforwarding or reversing. This is not a malfunction.
• Discs not compatible with this unit, or discs with different
region codes, cannot be played back. The region codes
compatible with this unit include “B” for BD-Video and “2” or
“ALL” for DVD-Video.
• Check the speaker connections.
• Check whether the audio device power is turned on.
• Adjust the master volume.
• Cancel the mute mode.
• Select a suitable input source.
• Disconnect the headphones. No sound is output from the speakers
or the PRE OUT connector when headphones are connected.
• Check the subwoofer connections.
• Turn on the subwoofer’s power.
• Check the speaker and HDMI connections. 8, 9
• Check the speaker and HDMI connections. 8, 9
• Check the connection of the HDMI connectors.
• To output HDMI audio from a connected device, set “HDMI
Output” in the menu to “Off Speaker”.
• Check the connection of the HDMI connectors.
• Check whether the TV is compatible with copyright protection
(HDCP). If connected to a device not compatible with HDCP, video
will not be output correctly.
• Check whether the HDMI video resolution set in this unit is
compatible with the TV resolution. If set to “HDMI Auto”, this unit
sets it automatically.
9
–
19
14
9, 10, 26
8
–
13
13
12
13
8
–
9
36
9
–
36
44
Page 51

ENGLISH
GBlu-ray DiscH
Symptom Cause/Solution Page
Picture freezes
momentarily during
playback.
Playback does not
start even when 1 is
pressed, or starts but
stops immediately.
• The disc may not play back correctly if it is scratched or dirty.
Either clean the disc or replace it.
• There may be a problem with the recorded disc.
• Check whether there is condensation on the inside of the unit or
disc. If there is condensation, turn off the power and let the unit
stand for 1 to 2 hours.
• The disc may not play back correctly if it is scratched or dirty.
Either clean the disc or replace it.
• Check whether the disc has been inserted upside down. Insert
the disc so that the recording surface to be played back faces
downward.
• Check whether a disc that cannot be played back on this unit has
been inserted.
Subtitles are not
displayed.
• Subtitles cannot be displayed for BD-Video or DVD-Video files that
do not contain subtitles.
• Check whether the subtitles setting is set to “Off”.
Wallpaper is not
displayed even after
• An internal error may have occurred in the unit. Set the power to
standby, wait awhile, then turn the power back on.
the disc has been
removed.
Button operation
does not work. The
unit fails to operate.
• Operations may not be permitted by the disc. Refer to the
instructions of the disc.
• The protection circuit is active. In this case, disconnect the power
plug from the electric outlet, wait 5 to 10 seconds and then insert
it back into the outlet.
The unit fails to read
the disc.
• The pickup lens may be dirty. Use a commercially available lens
cleaner to clean the laser pickup. Avoid use of cleaners equipped
with brushes, since they may scratch the lens.
Angle does not
switch.
• If a BD-Video or DVD-Video does not record multiple angles, angle
cannot be switched. Also, multiple angles may be recorded for
specific scenes.
Playback does not
start when the title is
• Playback may be prohibited by the viewing restriction setting.
Check “Parental” on the OSD menu.
selected.
The password for
• The default setting is “3308”. –
rating level has been
forgotten.
14
21
37
20
37
GRadioH
Getting
Started
Symptom Cause/Solution Page
–
–
2
Reception fails, or
there is a lot of noise
or distortion.
• Change the antenna orientation or position.
• Separate the AM loop antenna from the unit.
• Use an FM outdoor antenna.
• Separate the antenna from other connection cables.
10
10
10
10
Connections
Basic
GUSB memory deviceH
3
3
Symptom Cause/Solution Page
When a USB
memory device is
connected, “USB” is
not displayed on the
OSD menu.
• The OSD screen is only displayed when a USB memory device
is connected to the USB2 port on the rear panel. Set the input
source to “DISC/USB2”.
• The set cannot recognize a USB memory device. Check the
connection.
• A USB memory device not conforming to mass storage class is
30
26
30
Operations
Basic
Connections
Advanced
connected. Connect a USB memory device conforming to mass
storage class.
• A USB memory device cannot be connected via a USB hub.
–
Files on a USB
memory device
cannot be played.
• Set the USB memory device format to “FAT16” or “FAT32” for
USB1 port and “FAT32” for USB2 port. For details, refer to the
USB memory device’s operating instructions.
• If the USB memory device is divided into multiple partitions, only
3
8
The sound quality is
–
poor or there is noise
during playback.
“Connection Error”
is displayed.
“Communication
Error” is displayed.
“Overcurrent” is
displayed.
files stored in the top partition can be played.
• The file is recorded in an incompatible format. Please record it in
a compatible format.
• This unit cannot play back files covered by copyright protection.
• The file being played back has a low bit rate. –
• Unable to communicate properly. Turn off the power to this unit,
unplug the USB memory device and then plug it back in.
• The USB memory device is not responding. Turn off the power to
this unit, unplug the USB memory device and then plug it back in.
• The USB memory device is consuming too much power. When
using a USB portable hard disk that can be powered by an AC
29
29, 30
–
29
29, 30
–
–
–
–
Operations
Advanced
Settings
setting
Other
information
Other
Explanation
terms
adapter, connect its AC adapter.
Troubleshooting Specifications Index45Troubleshooting
Page 52

ENGLISH
GiPodH
Symptom Cause/Solution Page
iPod cannot be
played.
The fi le names
are not displayed
properly (“...”, etc.).
“Connection Error”
is displayed.
“Not Support” is
displayed.
“Communication
Error” is displayed.
GRemote control unitH
Symptom Cause/Solution Page
The set cannot be
operated with the
remote control unit.
• Check the iPod connections.
• Switch the input source to “iPod/USB1”.
• If using an iPod connected to the USB terminal, incompatible iPod
types cannot be played back.
• Characters that cannot be displayed on this unit are replaced by
“.” (period).
• Unable to communicate properly. Turn off the power to this unit,
disconnect the iPod and then reconnect it.
• The iPod connected to the unit is not compatible. Please make
sure the iPod you are connecting is compatible.
• The software version of the connected iPod is an old one. Please
update to the latest version.
• The iPod is not responding.Turn off the power to this unit,
disconnect the iPod and then reconnect it.
• Batteries are worn out. Replace with new batteries.
• Operate the remote control unit within a distance of about 7 m
from this unit and at an angle of within 30°.
• Remove any obstacle between this unit and the remote control
unit.
• Insert the batteries in the proper direction, checking the q and
w marks.
• The set’s remote control sensor is exposed to strong light (direct
sunlight, inverter type fl uorescent bulb light, etc.). Move the set
to a place in which the remote control sensor will not be exposed
to strong light.
25
28
28
28
25
Resetting the microprocessor
Perform this procedure if the display is abnormal or if operations cannot be performed.
When the microprocessor is reset, all the settings are reset to their default values.
ON/STANDBYENTER
–
–
–
8
During standby, press ON/STANDBY while pressing 8 and ENTER simultaneously.
1
Once the display starts fl ashing at intervals of about 1 second, release the two
2
7
7
–
7
–
buttons.
“INITIALIZING” is displayed.
If “INITIALIZING” does not display in step 2, start over from step 1.
NOTE
• Some function may not be used in some operation status and this is not failure of the unit. Read the
description in this user guide for details on correct operations.
• The volume may differ from disc to disc. This is due to the differences in how the signals are recorded
on the disc, and is not a malfunction.
• Some functions are prohibited on some discs.
46
Page 53

Specifications Index
ENGLISH
Getting
Started
n Audio Section
• Power amplifier
Rated output: 70 W + 70 W (1 kHz, 6 Ω, T.H.D. 10 %)
Effective maximum output: 55 W + 55 W (1 kHz, 6 Ω, T.H.D. 0.7 %)
Output connectors: 6 – 8 Ω
• Analog
Input sensitivity/Input impedance: AUX1: 100 mV/25 kΩ
AUX2/3: 200 mV/47 kΩ
n Video Section
• S-Video connectors
Output level and impedance: 1 Vp-p, 75 Ω
n Tuner section [FM] [AM]
Reception frequency range: 87.50 MHz – 108.00 MHz 522 kHz – 1611 kHz
Sensitivity (T.H.D. 3 %, IHF):
(S/N 30 dB):
FM stereo separation: 35 dB (1 kHz)
6 dBμV
–
–
60 dBμV/m
n Applicable Discs :
BD-Video discs : 12 cm 1 side 1 layer, 12 cm 1 side 2 layers
DVD-Video discs : 12 cm 1 side 1 layer, 12 cm 1 side 2 layers/
Compact Discs (CD-DA) : 12 cm / 8 cm discs
12 cm 2 sides 2 layers (1 side 1 layer)
8 cm 1 side 1 layer, 8 cm 1 side 2 layers/
8 cm 2 sides 2 layers (1 side 1 layer)
n General
Power supply: AC 230 V, 50 Hz
Power consumption: 67 W
Maximum external dimensions: 280 (W) x 111 (H) x 302 (D) mm
Weight: 5 kg
0.5 W (Normal standby)
n Remote Control Unit (RC001ER)
For purposes of improvement, specifications and design are subject to change without notice.
v Numerics
4:3 LB (letterbox) ·········································· 36, 42
4:3 PS (pan scan) ·········································· 36, 42
24P Mode ··························································· 36
v A
A2DP ····························································11, 42
AAC ··················································15, 29, 30, 42
Accessories ·························································· 2
AM loop antenna ·················································· 2
Angle ··································································20
Aspect ratio ··················································36, 42
Audio ··································································36
Audio commentary ············································· 42
Auto preset ························································22
AVCHD ·························································14, 42
AVI ···················································· 15, 29, 30, 42
v B
BASS ··································································13
BD-J ·····························································18, 42
BD-LIVE ························································ 17, 42
BD-Live Internet Access ····································34
BD-Live Storage ·················································34
BD-Video ····························································14
Bit rate ································································ 42
Bluetooth ···························································· 11
Blu-ray Disc ························································42
Bonus View ··················································17, 42
v C
Cable
Audio cable ······················································ 10
Ethernet cable·················································· 27
HDMI cable ························································ 9
Pin-plug cable····················································· 8
Speaker cable ····················································8
Stereo mini plug cable ····································· 26
Video cable ························································9
CD-R/CD-RW ·················································· 4, 14
CD-RW ·······························································14
Chapter ··························································· 4, 42
Characters ····················································29, 30
Color Depth ························································36
Connection
Antenna ··························································· 10
Cable TV ··························································· 10
iPod ·································································· 25
Network ··························································· 27
Portable audio player ········································26
Power cord ························································11
Satellite tuner ··················································· 10
Set-top box ······················································ 10
Speaker ······························································ 8
TV······································································· 9
USB memory device ·································· 25, 26
Wireless receiver (RX101) ·································11
Copyright protection ··········································· 41
CT ······································································· 24
Current time ·······················································14
v D
DBB ···································································· 13
Deep Color ·····················································9, 42
DHCP ···························································27, 42
Direct mode ·······················································28
Display ···························································· 5, 36
Display’s brightness ···········································13
Dolby
Dolby Digital····················································· 42
Dolby Digital EX ··············································· 42
Dolby Digital Plus ············································· 42
Dolby Headphone ······································ 21, 42
Dolby TrueHD ··················································· 42
Dolby Virtual Speaker ································· 21, 42
Downmix ···························································· 42
DTS
DTS 96/24 ························································ 42
DTS Digital Surround ·······································42
DTS-ES Discrete 6.1 ········································ 42
DTS-ES Matrix 6.1 ···········································42
DTS Express ···················································· 43
DTS-HD ···························································· 43
DTS-HD High Resolution Audio ······················· 43
DTS-HD Master Audio ····································· 43
DVD-R ································································14
DVD-R/DVD-RW ·················································14
DVD-RW ····························································· 14
DVD-Video ·························································· 14
DVI-D terminal ······················································ 9
Dynamic range ···················································43
Dynamic Range Control ·····································36
Connections
Basic
Operations
Basic
Connections
Advanced
Operations
Advanced
Settings
setting
Other
information
Other
Explanation
terms
Troubleshooting Specifications Index
Specifications
IndexTroubleshooting
47
Page 54

ENGLISH
v F
Fast forward ·······················································19
Fast reverse ·······················································19
File ········································································ 4
Finalise ·························································14, 43
FM indoor antenna ·············································10
Front panel ···························································4
v H
HDCP ·····························································9, 43
HDMI ······························································ 9, 43
HDMI Output ·····················································36
v I
Information ························································· 33
Input source ·······················································12
Interactive audio ··········································· 21, 43
Interlacing ··························································· 43
v J
JPEG ················································15, 29, 30, 43
v L
Language ···························································· 37
Audio ································································ 37
Menu ·······························································37
OSD ································································· 37
Subtitle····························································· 37
LPCM (Linear PCM) ···········································43
v M
Manual preset ····················································23
Menu map ·························································· 33
MP3 ·················································· 15, 29, 30, 43
MPEG ································································· 43
Mute ··································································· 13
v N
Network ·····························································35
Network Test ·····················································35
v O
Operation
Fast forward ····················································· 19
Fast reverse ····················································· 19
Pause ······························································· 18
Random ···························································20
Repeat ·····························································20
Skip ·································································· 19
Slow forward ············································· 19, 20
Step-by-step ····················································· 18
Stop ·································································18
Optical Disc AutoPlay ········································· 34
v P
Parental ······························································37
Parental Control ·················································· 37
Parental Level ····················································· 37
Parental Password ·············································37
Pause ·································································18
Picture-in-picture ··········································17, 43
Playable discs ····················································· 14
Playable files ······················································15
Playback
Blu-ray Disc/DVD-Video ···································· 16
Dolby Headphone ············································ 21
Dolby Virtual Speaker ······································· 21
DVD ·································································16
File ··································································· 15
FM/AM broadcasts ···································· 22, 23
iPod (USB port) ················································ 28
Portable audio player ········································32
Stereo ······························································ 21
USB memory device ········································ 29
Playback information ··········································15
Play menu ··························································31
Popup menu ················································· 16, 43
Preset codes ······················································40
Primary audio ···············································21, 43
Progressive ··················································36, 43
Protection circuit ············································8, 43
PTY ····································································· 24
v R
Random ······························································ 20
Rating ·································································43
RDS ····································································23
Rear panel ····························································6
Region code ·················································14, 43
Remote control unit ·············································6
Inserting the batteries ········································ 7
Remote mode ····················································28
Repeat ································································ 20
Reset Settings ···················································· 35
Resetting the microprocessor ···························· 46
Resolution ··························································36
Resume function ················································ 18
RT ······································································· 24
v S
Sampling frequency ·······························29, 30, 43
Screen Saver Duration ·······································34
Search mode ······················································19
Secondary audio ··········································· 21, 43
Skip ····································································19
Slow forward ······················································ 19
Source direct ······················································13
Speaker impedance ············································ 43
Step-by-step ·······················································18
Stop ···································································· 18
Subtitle ·······························································21
Subwoofer ···························································· 8
Switching audio ·················································· 21
System ·······························································34
v T
Timer ··································································38
Title ································································4, 43
Tone ···································································13
TP ·······································································24
Trademark ··························································41
TREBLE ······························································13
Turn off power ···················································12
Turn on power ···················································· 12
TV Aspect ··························································· 36
TV type ·······························································36
v V
Virtual Package ············································· 34, 43
Volume ·······························································13
v W
Wired ·································································· 35
WMA ················································ 15, 29, 30, 43
WMV ················································15, 29, 30, 43
48
Page 55

License / Lizenz / Licence / Licenza / License / Licentie· / Licens
This section describes software license used for this unit. To maintain the correct content, the
original (English) is used.
Dieser Abschnitt beschreibt die für dieses Geräts verwendete Software-Lizenz. Um den korrekten
Inhalt zu erhalten, wird das Original (Englisch) verwendet.
Cette section concerne la licence du logiciel utilisé pour cet appareil. Le document d’origine (en
anglais) est utilisé afin d’assurer l’exactitude du contenu.
Questa sezione descrive la licenza software usata per questa unità. Per mantenere il giusto
contenuto, viene usata la forma originale (in inglese).
Esta sección describe el contenido de la licencia del software para esta unidad. Para mantener el
contenido correcto, se utiliza el original (Inglés).
Deze sectie beschrijft de softwarelicentie voor het toestel. Om de juiste inhoud te handhaven,
wordt het origineel (Engels) gebruikt.
Denna sektion beskriver programvarulicenserna som används för enheten. För att behålla det
korrekta innehållet används originalspråket (engelska).
GNU GENERAL PUBLIC LICENSE
Version 2, June 1991
Copyright (C) 1989, 1991 Free Software Foundation, Inc.
51 Franklin Street, Fifth Floor, Boston, MA 02110-1301,
USA
Everyone is permitted to copy and distribute verbatim
copies of this license document, but changing it is not
allowed.
Preamble
The licenses for most software are designed to take
away your freedom to share and change it. By contrast,
the GNU General Public License is intended to guarantee
your freedom to share and change free software--to make
sure the software is free for all its users. This General
Public License applies to most of the Free Software
Foundation’s software and to any other program whose
authors commit to using it. (Some other Free Software
Foundation software is covered by the GNU Lesser
General Public License instead.) You can apply it to your
programs, too.
When we speak of free software, we are referring to
freedom, not price. Our General Public Licenses are
designed to make sure that you have the freedom to
distribute copies of free software (and charge for this
service if you wish), that you receive source code or can
get it if you want it, that you can change the software or
use pieces of it in new free programs; and that you know
you can do these things.
To protect your rights, we need to make restrictions that
forbid anyone to deny you these rights or to ask you to
surrender the rights. These restrictions translate to certain
responsibilities for you if you distribute copies of the
software, or if you modify it.
For example, if you distribute copies of such a program,
whether gratis or for a fee, you must give the recipients
all the rights that you have. You must make sure that
they, too, receive or can get the source code. And you
must show them these terms so they know their rights.
We protect your rights with two steps: (1) copyright the
software, and (2) offer you this license which gives you
legal permission to copy, distribute and/or modify the
software.
Also, for each author’s protection and ours, we want to
make certain that everyone understands that there is no
warranty for this free software. If the software is modified
by someone else and passed on, we want its recipients
to know that what they have is not the original, so that
any problems introduced by others will not reflect on the
original authors’ reputations.
Finally, any free program is threatened constantly by
software patents. We wish to avoid the danger that
redistributors of a free program will individually obtain
patent licenses, in effect making the program proprietary.
To prevent this, we have made it clear that any patent
must be licensed for everyone’s free use or not licensed
at all.
The precise terms and conditions for copying, distribution
and modification follow.
TERMS AND CONDITIONS FOR COPYING,
DISTRIBUTION AND MODIFICATION
0. This License applies to any program or other work which
contains a notice placed by the copyright holder saying it
may be distributed under the terms of this General Public
License. The “Program”, below, refers to any such
program or work, and a “work based on the Program”
means either the Program or any derivative work
under copyright law: that is to say, a work containing
the Program or a portion of it, either verbatim or with
modifications and/or translated into another language.
(Hereinafter, translation is included without limitation in
the term “modification”.) Each licensee is addressed as
“you”.
Activities other than copying, distribution and modification
are not covered by this License; they are outside its scope.
The act of running the Program is not restricted, and the
output from the Program is covered only if its contents
constitute a work based on the Program (independent of
having been made by running the Program). Whether that
is true depends on what the Program does.
1. You may copy and distribute verbatim copies of the
Program’s source code as you receive it, in any medium,
provided that you conspicuously and appropriately
publish on each copy an appropriate copyright notice and
disclaimer of warranty; keep intact all the notices that
refer to this License and to the absence of any warranty;
and give any other recipients of the Program a copy of
this License along with the Program.
You may charge a fee for the physical act of transferring a
copy, and you may at your option offer warranty protection
in exchange for a fee.
2. You may modify your copy or copies of the Program
or any portion of it, thus forming a work based on the
Program, and copy and distribute such modifications or
work under the terms of Section 1 above, provided that
you also meet all of these conditions:
a) You must cause the modified files to carry prominent
notices stating that you changed the files and the date
of any change.
b) You must cause any work that you distribute or publish,
that in whole or in part contains or is derived from the
Program or any part thereof, to be licensed as a whole
at no charge to all third parties under the terms of this
License.
c) If the modified program normally reads commands
interactively when run, you must cause it, when started
running for such interactive use in the most ordinary
way, to print or display an announcement including an
appropriate copyright notice and a notice that there is
no warranty (or else, saying that you provide a warranty)
and that users may redistribute the program under these
conditions, and telling the user how to view a copy of this
License. (Exception: if the Program itself is interactive
but does not normally print such an announcement, your
work based on the Program is not required to print an
announcement.)
These requirements apply to the modified work as a whole.
If identifiable sections of that work are not derived from the
Program, and can be reasonably considered independent
and separate works in themselves, then this License,
and its terms, do not apply to those sections when you
distribute them as separate works. But when you distribute
the same sections as part of a whole which is a work based
on the Program, the distribution of the whole must be on
the terms of this License, whose permissions for other
licensees extend to the entire whole, and thus to each and
every part regardless of who wrote it.
Thus, it is not the intent of this section to claim rights or
contest your rights to work written entirely by you; rather,
the intent is to exercise the right to control the distribution
of derivative or collective works based on the Program.
In addition, mere aggregation of another work not based
on the Program with the Program (or with a work based
on the Program) on a volume of a storage or distribution
medium does not bring the other work under the scope
of this License.
3. You may copy and distribute the Program (or a
work based on it, under Section 2) in object code or
executable form under the terms of Sections 1 and 2
above provided that you also do one of the following:
a) Accompany it with the complete corresponding machine-
readable source code, which must be distributed under
the terms of Sections 1 and 2 above on a medium
customarily used for software interchange; or,
b) Accompany it with a written offer, valid for at least three
years, to give any third party, for a charge no more than
your cost of physically performing source distribution, a
complete machine-readable copy of the corresponding
source code, to be distributed under the terms of
Sections 1 and 2 above on a medium customarily used
for software interchange; or,
c) Accompany it with the information you received as to
the offer to distribute corresponding source code. (This
alternative is allowed only for noncommercial distribution
and only if you received the program in object code
or executable form with such an offer, in accord with
Subsection b above.)
The source code for a work means the preferred form of
the work for making modifications to it. For an executable
work, complete source code means all the source code
for all modules it contains, plus any associated interface
definition files, plus the scripts used to control compilation
and installation of the executable. However, as a special
exception, the source code distributed need not include
anything that is normally distributed (in either source or
binary form) with the major components (compiler, kernel,
and so on) of the operating system on which the executable
runs, unless that component itself accompanies
the executable.
If distribution of executable or object code is made by
offering access to copy from a designated place, then
offering equivalent access to copy the source code from
the same place counts as distribution of the source code,
even though third parties are not compelled to copy the
source along with the object code.
4. You may not copy, modify, sublicense, or distribute
the Program except as expressly provided under this
License. Any attempt otherwise to copy, modify,
sublicense or distribute the Program is void, and will
automatically terminate your rights under this License.
However, parties who have received copies, or rights,
from you under this License will not have their licenses
terminated so long as such parties remain in full
compliance.
LICENSE
1
Page 56

5. You are not required to accept this License, since you
have not signed it. However, nothing else grants you
permission to modify or distribute the Program or its
derivative works. These actions are prohibited by law if
you do not accept this License. Therefore, by modifying
or distributing the Program (or any work based on the
Program), you indicate your acceptance of this License
to do so, and all its terms and conditions for copying,
distributing or modifying the Program or works based
on it.
6. Each time you redistribute the Program (or any work
based on the Program), the recipient automatically
receives a license from the original licensor to copy,
distribute or modify the Program subject to these
terms and conditions. You may not impose any further
restrictions on the recipients’ exercise of the rights
granted herein. You are not responsible for enforcing
compliance by third parties to this License.
7. If, as a consequence of a court judgment or
allegation of patent infringement or for any other
reason (not limited to patent issues), conditions
are imposed on you (whether by court order,
agreement or otherwise) that contradict the
conditions of this License, they do not excuse
you from the conditions of this License. If you
cannot distribute so as to satisfy simultaneously your
obligations under this License and any other pertinent
obligations, then as a consequence you may not
distribute the Program at all. For example, if a patent
license would not permit royalty-free redistribution of
the Program by all those who receive copies directly
or indirectly through you, then the only way you could
satisfy both it and this License would be to refrain
entirely from distribution of the Program.
If any portion of this section is held invalid or unenforceable
under any particular circumstance, the balance of the
section is intended to apply and the section as a whole is
intended to apply in other circumstances.
It is not the purpose of this section to induce you to
infringe any patents or other property right claims or
to contest validity of any such claims; this section has
the sole purpose of protecting the integrity of the free
software distribution system, which is implemented by
public license practices. Many people have made generous
contributions to the wide range of software distributed
through that system in reliance on consistent application
of that system; it is up to the author/donor to decide if he
or she is willing to distribute software through any other
system and a licensee cannot impose that choice.
This section is intended to make thoroughly clear what is
believed to be a consequence of the rest of this License.
8. If the distribution and/or use of the Program is restricted
in certain countries either by patents or by copyrighted
interfaces, the original copyright holder who places
the Program under this License may add an explicit
geographical distribution limitation excluding those
countries, so that distribution is permitted only in or
among countries not thus excluded. In such case, this
License incorporates the limitation as if written in the
body of this License.
9. The Free Software Foundation may publish revised and/
or new versions of the General Public License from time
to time.
Such new versions will be similar in spirit to the present
version, but may differ in detail to address new problems
or concerns.
Each version is given a distinguishing version number. If
the Program specifies a version number of this License
which applies to it and “any later version”, you have the
option of following the terms and conditions either of
that version or of any later version published by the Free
Software Foundation. If the Program does not specify a
version number of this License, you may choose any
version ever published by the Free Software Foundation.
10. If you wish to incorporate parts of the Program into
other free programs whose distribution conditions are
different, write to the author to ask for permission. For
software which is copyrighted by the Free Software
Foundation, write to the Free Software Foundation;
we sometimes make exceptions for this. Our decision
will be guided by the two goals of preserving the free
status of all derivatives of our free software and of
promoting the sharing and reuse of software generally.
NO WARRANTY
11. BECAUSE THE PROGRAM IS LICENSED FREE
OF CHARGE, THERE IS NO WARRANTY FOR
THE PROGRAM, TO THE EXTENT PERMITTED BY
APPLICABLE LAW. EXCEPT WHEN OTHERWISE
STATED IN WRITING THE COPYRIGHT HOLDERS
AND/OR OTHER PARTIES PROVIDE THE PROGRAM
“AS IS” WITHOUT WARRANTY OF ANY KIND,
EITHER EXPRESSED OR IMPLIED, INCLUDING,
BUT NOT LIMITED TO, THE IMPLIED WARRANTIES
OF MERCHANTABILITY AND FITNESS FOR A
PARTICULAR PURPOSE. THE ENTIRE RISK AS
TO THE QUALITY AND PERFORMANCE OF THE
PROGRAM IS WITH YOU. SHOULD THE PROGRAM
PROVE DEFECTIVE, YOU ASSUME THE COST OF ALL
NECESSARY SERVICING, REPAIR OR CORRECTION.
12. IN NO EVENT UNLESS REQUIRED BY APPLICABLE
LAW OR AGREED TO IN WRITING WILL ANY
COPYRIGHT HOLDER, OR ANY OTHER PARTY
WHO MAY MODIFY AND/OR REDISTRIBUTE THE
PROGRAM AS PERMITTED ABOVE, BE LIABLE TO
YOU FOR DAMAGES, INCLUDING ANY GENERAL,
SPECIAL, INCIDENTAL OR CONSEQUENTIAL
DAMAGES ARISING OUT OF THE USE OR INABILITY
TO USE THE PROGRAM (INCLUDING BUT NOT
LIMITED TO LOSS OF DATA OR DATA BEING
RENDERED INACCURATE OR LOSSES SUSTAINED
BY YOU OR THIRD PARTIES OR A FAILURE OF
THE PROGRAM TO OPERATE WITH ANY OTHER
PROGRAMS), EVEN IF SUCH HOLDER OR OTHER
PARTY HAS BEEN ADVISED OF THE POSSIBILITY OF
SUCH DAMAGES.
END OF TERMS AND CONDITIONS
How to Apply These Terms to Your New Programs
If you develop a new program, and you want it to be of
the greatest possible use to the public, the best way to
achieve this is to make it free software which everyone can
redistribute and change under these terms.
To do so, attach the following notices to the program. It
is safest to attach them to the start of each source file
to most effectively convey the exclusion of warranty; and
each file should have at least the “copyright” line and a
pointer to where the full notice is found.
One line to give the program’s name and a brief idea
of what it does.
Copyright (C) <year><name of author>
This program is free software; you can redistribute it
and/or modify it under the terms of the GNU General
Public License as published by the Free Software
Foundation; either version 2 of the License, or (at your
option) any later version.
This program is distributed in the hope that it will be
useful, but WITHOUT ANY WARRANTY; without
even the implied warranty of MERCHANTABILITY or
FITNESS FOR A PARTICULAR PURPOSE. See the
GNU General Public License for more details.
You should have received a copy of the GNU General
Public License along with this program; if not, write to
the Free Software Foundation, Inc., 59
Temple Place, Suite 330, Boston, MA 02111-1307 USA
Also add information on how to contact you by electronic
and paper mail.
If the program is interactive, make it output a short notice
like this when it starts in an interactive mode:
Gnomovision version 69, Copyright (C) year name of
author Gnomovision comes with ABSOLUTELY NO
WARRANTY; for details type ‘show w’. This is free
software, and you are welcome to redistribute it under
certain conditions; type ‘show c’ for details.
The hypothetical commands ‘show w’ and ‘show c’
should show the appropriate parts of the General Public
License. Of course, the commands you use may be called
something other than ‘show w’ and ‘show c’; they could
even be mouse-clicks or menu items--whatever suits your
program.
You should also get your employer (if you work as a
programmer) or your school, if any, to sign a “copyright
disclaimer” for the program, if necessary. Here is a sample;
alter the names:
Yoyodyne, Inc., hereby disclaims all copyright interest
in the program ‘Gnomovision’ (which makes passes at
compilers) written by James Hacker.
signature of Ty Coon, 1 April 1989
Ty Coon, President of Vice
This General Public License does not permit incorporating
you program into proprietary programs. If your program
is subroutine library, you may consider it more useful to
permit linking proprietary applications with the library. If
this is what you want to do, use the GNU Library General
Public License instead of this License.
License Information for the Software
Used in the Unit
About GPL (GNU-General Public
License), LGPL (GNU Lesser General
Public License) License
This product uses GPL/LGPL software and software
made by other companies.
After you purchase this product, you may procure,
modify or distribute the source code of the GPL/
LGPL software that is used in the product.
Marantz provides the source code based on the
GPL and LPGL licenses at the actual cost upon your
request to our customer service center. However,
note that we make no guarantees concerning the
source code. Please also understand that we do not
offer support for the contents of the source code.
2
LICENSE
Page 57

List of preset codes / Liste von voreingestellten Codes / Liste de codes préréglés / Lista dei codici pre-regolati /
Lista de códigos pre-ajustados / Lijst van vooringestelde codes / Förteckning över förinställda koder
DEVICE SELECT : TV
Television
Acer 1141
A
Admiral 1102, 1009 ,1089
Aiko 1059
Aiwa 1117, 1118
Akai 1001
Amtron 1023
Anam 1113
Anam National 1023, 1069, 1092
AOC 1003, 1024, 1049, 1127
Audiovox 1023
Bell & Howell 1009, 1025
B
Benq 1104, 1142
Broksonic 1003, 1097, 1098, 1113
Celebrity 1001
C
Citizen
Colortyme 1003, 1043
Contec 1113
Contec/Cony 1023, 1045, 1047
Craig 1020, 1022, 1023, 1113
Crown 1023, 1067
Curtis Mathes
Daewoo
D
Daytron 1003, 1013, 1016
Dimensia 1103, 1110
Dumont 1003, 1010, 1153
Electroband 1001
E
Electrohome 1001, 1003, 1069, 1133
Emerson
Envision 1003
Firstar 1025, 1051, 1091, 1160
F
Fujitsu 1038, 1124, 1125, 1155
Funai 1023, 1038, 1113
Gateway 1150
G
GE
Goldstar
1003, 1013, 1023, 1026,
1059, 1063
1003, 1013, 1025, 1026,
1062, 1103, 1110
1003, 1013, 1024, 1035,
1036, 1059, 1084, 1101
1003, 1013, 1015, 1020,
1021, 1022, 1023, 1025,
1038, 1044, 1045, 1048,
1055, 1061, 1094, 1096,
1099, 1101, 1113
1003, 1018, 1022, 1046,
1054, 1069, 1085, 1103,
1110, 1113, 1133, 1136,
1153
1003, 1013, 1024, 1030,
1045, 1080, 1100, 1112,
1154
Hallmark 1003
H
Hisense 1116
Hitachi
Infinity 1067
I
Janeil 1134
J
JBL 1067
JC Penney
Jensen 1003
JVC
Kawasho 1001, 1003
K
Kenwood 1003
Kloss Novabeam 1023, 1056, 1057, 1134
KTV
LG 1024, 1030
L
M.Wards 1002, 1009, 1038
M
Magnavox
Marantz 1003, 1031, 1067, 1122
Mitsubishi
Motorola 1014, 1069
NEC
N
Net-TV 1037, 1150
Orion 1020, 1096
O
Panasonic
P
Philips
Pioneer
Plasmsync 1135
Portland 1003, 1013, 1024, 1059
Price Club 1026
Prism 1018
Proscan
Proton 1003, 1045
Quasar
Q
Radio Shack
R
1003, 1012, 1031, 1032,
1037, 1041, 1045, 1047,
1065, 1068, 1082, 1088,
1094, 1139, 1140, 1145,
1159
1003, 1013, 1018, 1019,
1024, 1026, 1046, 1047,
1054, 1063, 1083, 1085,
1100, 1103, 1110, 1112,
1133, 1154
1028, 1029, 1045, 1047,
1050, 1060, 1065
1013, 1023, 1033, 1034,
1073, 1099, 1113
1003, 1052, 1053, 1056,
1057, 1063, 1067, 1081,
1106
1003, 1024, 1051, 1115,
1122, 1133
1003, 1012, 1024, 1043,
1069
1017, 1067, 1069, 1095,
1111
1003, 1011, 1045, 1052,
1054, 1056, 1057, 1058,
1063, 1067, 1069, 1106
1003, 1018, 1037, 1070,
1071, 1094, 1145, 1147,
1149
1004, 1005, 1006, 1007,
1008, 1085, 1103, 1110
1010, 1069, 1073, 1111,
1153
1003, 1013, 1015, 1023,
1024, 1025, 1045, 1100,
1103, 1110, 1113
RCA
Realistic
Runco 1010, 1153
Sampo 1150
S
Samsung
Sansui 1119
Sanyo
Sharp
Signature 1009
Sony 1001, 1102, 1108
Soundesign
Starlite 1023
Supre-Macy 1134
Sylvania
Symphonic 1023, 1039, 1044
Tandy 1014
T
Tatung 1069
Technics 1018
Techwood 1003, 1018
Teknika
Telecaption 1074
Toshiba
Totevision 1013
Universal 1046, 1054
U
Video Concepts 1113
V
Viewsonic
Wards
W
White
Westinghouse
Yamaha 1003, 1024
Y
Zenith
Z
1003, 1004, 1005, 1006,
1007, 1008, 1014, 1024,
1049, 1069, 1075, 1079,
1085, 1087, 1088, 1093,
1094, 1101, 1103, 1110,
1113, 1153
1013, 1015, 1023, 1025,
1045, 1100, 1103, 1110
1003, 1013, 1024, 1026,
1040, 1045, 1062, 1078,
1083, 1090, 1100, 1105,
1114, 1120, 1121, 1146,
1148, 1157
1003, 1025, 1051, 1072,
1077, 1091, 1156, 1157,
1158
1003, 1013, 1014, 1015,
1045, 1055, 1064, 1066,
1076, 1089, 1123
1003, 1023, 1038, 1063,
1113
1003, 1039, 1042, 1052,
1053, 1056, 1057, 1063,
1067, 1089, 1151
1003, 1009, 1013, 1023,
1024, 1026, 1038, 1045,
1047, 1059, 1063, 1111,
1113
1003, 1019, 1025, 1026,
1042, 1074, 1098, 1107,
1111, 1135, 1136
1006, 1022, 1109, 1128,
1129, 1130, 1131, 1138,
1143, 1145, 1150
1003, 1009, 1015, 1024,
1038, 1044, 1046, 1052,
1054, 1056, 1057, 1067,
1086, 1103, 1110
1101, 1001
1003, 1009, 1010, 1132,
1144, 1153
PRESET CODE
1
Page 58

Page 59

Dimensions / Dimensions / Dimensions / Abmessungen / Dimensioni / Afmetingen / Storlek
Unit : mm
302
300
2
280
105
6
111
Page 60

Printed in China 5411 10501 000D
D&M Holdings Inc.
 Loading...