

Page 1

Quick Start Guide
ENGLISH
FRANÇAIS
ESPAÑOL
D/A Converter
HD-DAC1
Guide de démarrage rapide
Guía de inicio rápido
Page 2
Welcome Before You Begin
Thank you for choosing a Marantz D/A Converter. This guide
provides step-by-step instructions for setting up your D/A
Converter.
Please do not return this unit to the store – call for
assistance.
If you need help… :
If you need additional help in solving problems, contact
Marantz customer service in your area.
1-855-ONE-Marantz
1-855-663-6272
Call for Assistance:
Monday – Friday 10:00AM to 10:00PM E.S.T,
Saturday 12:00PM to 8:00PM E.S.T
For frequently asked questions please visit
http://marantz.custhelp.com/app/answers/list
For US and Canada only
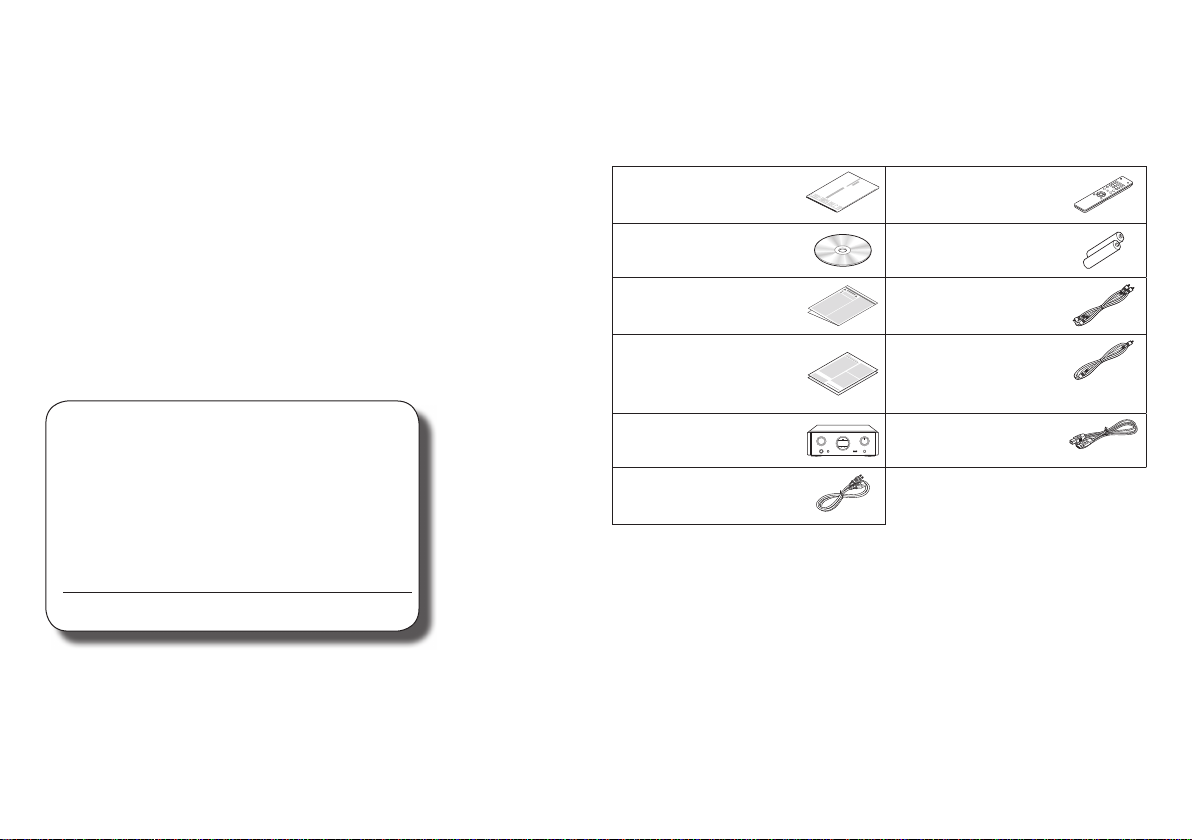
What’s In the Box
Quick Start Guide
Owner’s Manual R03/AAA batteries
Safety Instructions Audio cable
Warranty
(for USA/
for CANADA)
D/A converter USB cable
Power cord
Remote control unit
Remote connector
cable
1
Page 3
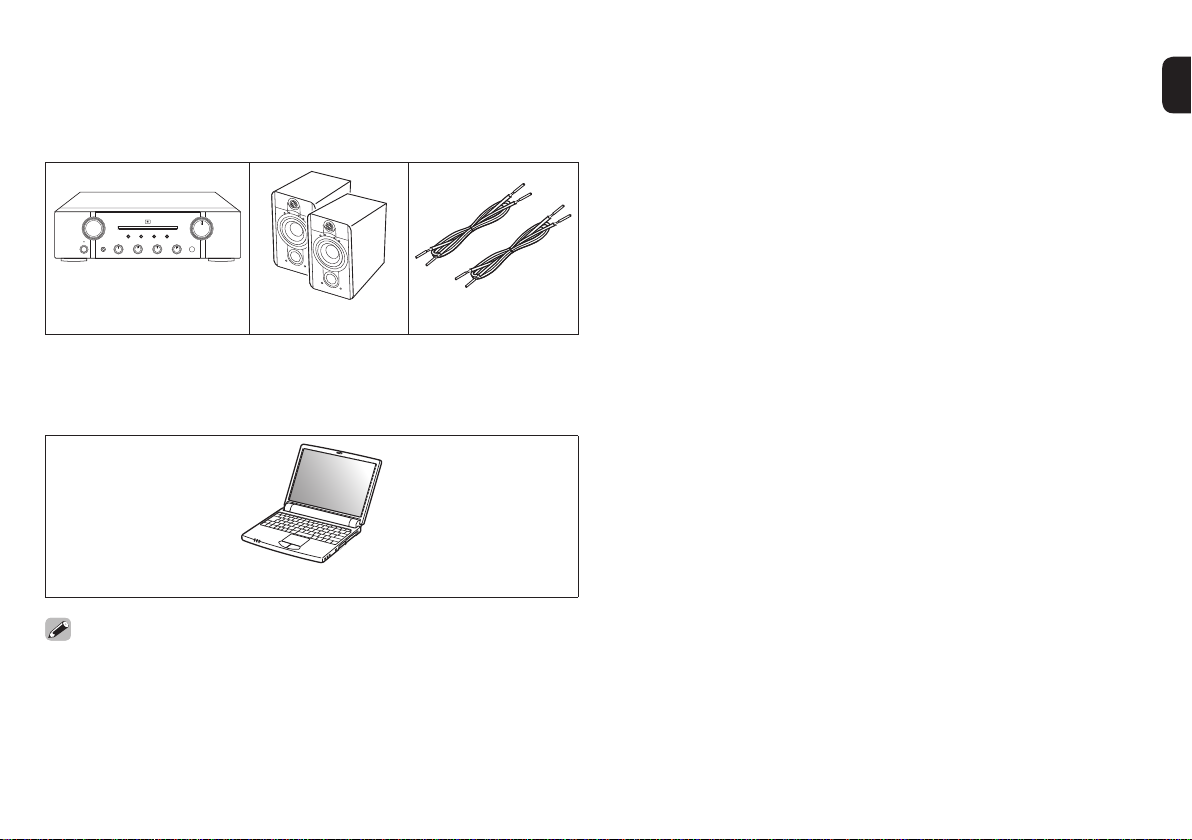
Required for Basic connections
Amplifier
Speaker systems
Speaker cables
Required for PC or Mac Audio
connections
Computer
These drawings are for illustrative purposes only and may
not represent the actual product(s).
2
Page 4
Setup
There are
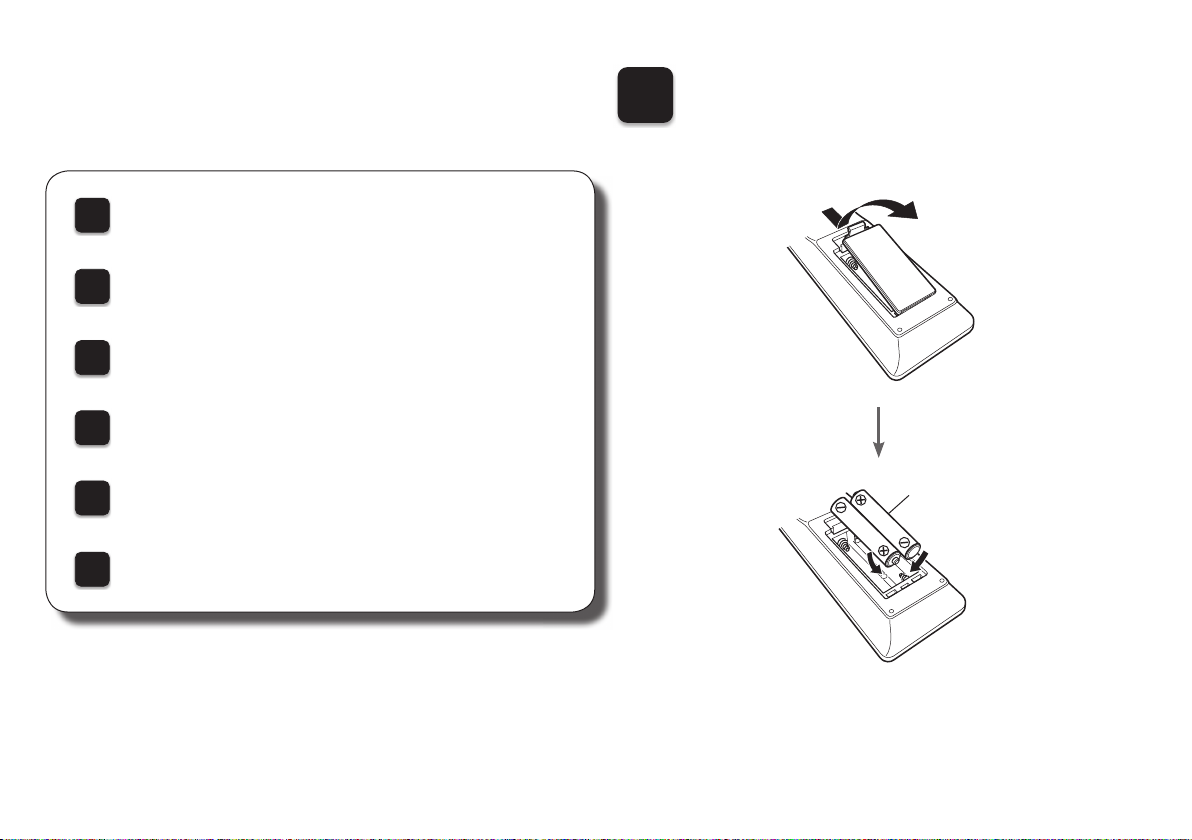
Before using the remote control unit
1
Installing the driver software onto your PC
2
(Windows OS only)
Connecting the D/A Converter to the amplifi er
3
or the headphone
Plug the power cord into a power outlet
4
six
steps to the setup process.
1
Before using the remote
control unit
Enjoying music using PC or Mac
5
Playing an iPod
6
3
R03/AAA
batteries
Page 5
2
Installing the driver software onto your PC
(Windows OS only)
1
Download the dedicated driver from the
“Download” section of the HD-DAC1 page of
the Marantz website
(http://www.marantz.com/pages/home.aspx)
onto your PC.
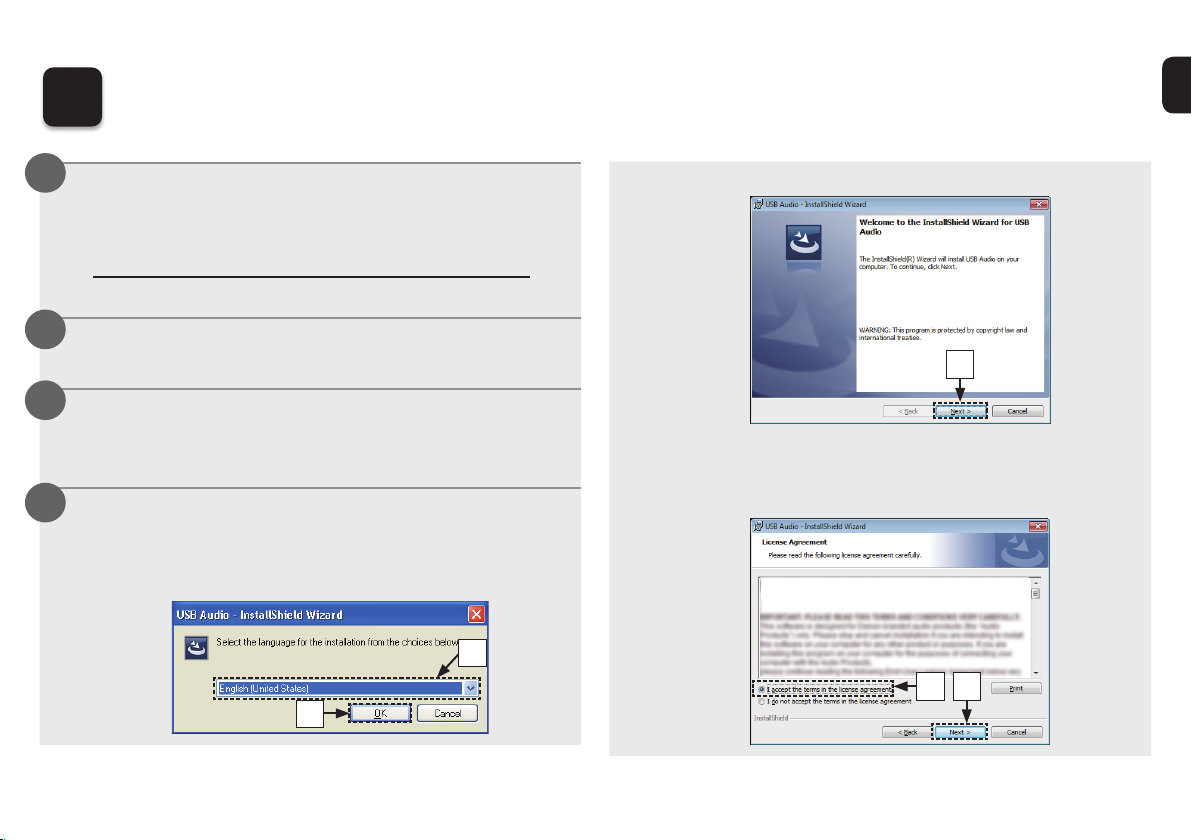
2
Unzip the downloaded le.
3
Select the 32 bit or 64 bit exe le that matches
your Windows operating system, and double-
click the le.
4
Install the driver.
qSelect the language to use for the installation.
wClick “OK”.
w
q
eThe wizard menu is displayed. Click “Next”.
e
r Read the Software Licensing Agreement, and click “I
accept the terms in the license agreement”.
tClick “Next”.
SOFTWARE LICENSING AGREEMENT
t
r
4
Page 6

yClick “Install” on the installation start dialog.
• The installation starts. Do not perform any operation on
the PC until the installation is completed.
y
u In the Windows security dialog, select “Always trust
software from DandM Holdings Inc.”.
iClick “Install”.
oWhen the installation is completed, click “Finish”.
o
u
i
5
Page 7

3
Connecting the D/A Converter to the amplifi er or the
headphone
n Connecting the amplifi er
Pre amplifier
Integrated amplifier
R L R L
%
An amplifi er and speaker need to be connected in order to
playback music. See the owner’s manual of the device you are
using for details on how to connect it.
NOTE
Do not connect a power amplifi er to the FIXED connectors.
Connecting a power amplifi er may cause damage to the speakers.
AUDIO
AUDIO
IN
LR
L
R
L
R
1 2
AUX
COAXIAL OPTICAL USB-DAC
/
DIGITAL AUDIO INAUDIO IN
AUDIO OUT
Power amplifier
AUDIO
AUDIO
IN
LR
L
R
L
R
REMOTE CONTROL
IN
INTERNAL
EXTERNAL
OUT
VARIABLEFIXED
AC IN
n Connecting the headphone
6
Page 8

4
Plug the power cord into a power outlet
AUDIO IN
AUX
R L R L
DIGITAL AUDIO IN
1 2
COAXIAL OPTICAL USB-DAC
AUDIO OUT
VARIABLEFIXED
REMOTE CONTROL
INTERNAL
EXTERNAL
IN
OUT
AC IN
Connect to household
power outlet
(AC 120 V, 60 Hz)
Power cord (supplied)
7
Page 9

5
A
E
Enjoying music using PC or Mac
n Connect to PC or Mac
1
Connect to PC or Mac.
Computer in which the driver and
player software is installed
AUDIO IN
DIGITAL AUDIO IN
1 2
AUX
COAXIAL OPTICAL USB-DAC
R L R
Type B
2
Press X on this unit.
AUDIO OUT
• When the unit power is turned on, the computer automatically
fi nds and connects to the unit.
REMOT
Type A
INTERN
EXTERNAL
VARIABLEFIXED
USB 2.0 cable
(supplied)
n Listen to PC or Mac Audio
1
Press USB-DAC to
change the input source
to “USB-DAC”.
2
Set the audio signal destination to this unit on
USB-DAC
OPT 1
the computer.
[Windows OS]
qClick the “Start” button and click “Control Panel” on the
PC.
• The control panel setting list is displayed.
wClick the “Sound” icon.
• The sound menu window is displayed.
eCheck that there is a checkmark next to “Default Device”
under in “Digital Audio Interface” of the “Playback” tab.
• When there is a checkmark for a different device, click
“Marantz USB Audio” and “Set Default”.
AUX
OPT 2
iPod/USB
COAX
8
Page 10

rSelect “Digital Audio Interface” and click “Properties”.
Apply
C
onfigure
S
et Default
Speakers
efaults
• The Digital Audio Interface Properties window is
displayed.
Sound
Playback
Recording CommunicationsSounds
Select a playback device below to modify its settings:
Digital Audio Interface
Default Device
Speakers
Ready
r
Configure
Set Default
Properties
ApplyCancelOK
tClick the “Advanced” tab.
ySelect the sampling rate and bit rate to be applied to the
D/A converter.
• It is recommended that “24 bit, 192000 Hz (Studio
Quality)” is selected.
uClick “Apply”.
iClick “Test”.
• Check that audio from this unit is output from the PC.
Digital Audio Interface Properties
General Supported Formats Levels Advanced
Default Format
Select the sample rate and bit depth to be used when running
in shared mode.
2 channel, 24 bit, 192000 Hz ( Studio Quality)
2 channel, 24 bit, 44100 Hz ( Studio Quality)
2 channel, 24 bit, 48000 Hz ( Studio Quality)
2 channel, 24 bit, 96000 Hz ( Studio Quality)
2 channel, 24 bit, 192000 Hz ( Studio Quality)
Allow applications to take exclusive control of this device
Give exclusive mode applications priority
t
i
Test
y
Restore Defaults
OK
u
ApplyCancel
9
Page 11

[Mac OS X]
qMove the cursor to “Go” on the computer screen, and
then click “Utilities”.
• The utility list is displayed.
wDouble-click “Audio MIDI Setup”.
• The “Audio Devices” window is displayed.
eCheck that “Use this device for sound output” is
checked in “HD-DAC1”.
• If a different device is checked, select and “Secondary
click” on “HD-DAC1”, and then select “Use this device
for sound output”.
rSelect the “HD-DAC1” format.
• It is normally recommended to set the format to
“192000.0 Hz” and “2ch-24 bit Interger”.
r
e
tClick “Quit Audio MIDI Setup”.
10
Page 12

3
Play back a music le with music playback
software such as Windows Media Player, iTunes,
foobar2000, Audirvana Plus and JRiver Media
Center.
USB-DAC
192k
NOTE
• Adjust the volume to an appropriate level on the computer.
• When using this unit with headphones connected, turn the
headphone volume adjustment knob to adjust the volume.
• Further settings might be required in your dedicated media
player software such as JRiver to enable high resolution
audio playback. Please refer to the owner’s manual of the
software.
11
The sampling frequency
of the music file is displayed.
%
Please refer to the owner's manual about the required
specifications of suiting computer.
Page 13

6
Playing an iPod
1
Connect the iPod to the
USB port.
2
Press iPod/USB to switch
the input source to “iPod/
USB”.
USB-DAC
OPT 1
AUX
OPT 2
iPod/USB
COAX
3
Operate iPod itself directly while seeing the
iPod screen to play back music.
Playback starts.
12
Page 14

Owner’s Manual
Please reference to the Owner's Manual for more details about the setup and operation of the receiver and its features.
n Online Version
Enter the following URL into your web browser:
manuals.marantz.com/HDDAC1/NA/EN/
Online Manual
Contents
Overview
Connections
Playback
Settings
Tips
Appendix
PDF
PDF Download
WEB Manual
D/A CONVERTER
HD-DAC1
D/A CONVERTER
c
Copyright 2014 D&M Holdings Inc. All Rights Reserved.
n Printable Version
Access the print version of the owner's manual from the
included CD-ROM or select the “PDF Download” link
from the Online Version.
1
Insert the disc into
your PC.
2
Follow the screen or double click on
the PDF le.
Product Name : D/A Converter
Model Number : HD-DAC1
13
Page 15

Page 16

Printed in China 5411 11243 10AM
D&M Holdings Inc.
 Loading...