

Marantz HD-CD1 Owner Manual
Contents Connections Playback Settings Tips Appendix
.
CD Player
HD-CD1
You can print more than one page of a PDF onto a single sheet of paper.
Front panel Display Rear panel Remote Index
1
Owner’s Manual
Contents Connections Playback Settings Tips Appendix
Contents
Accessories
Inserting the batteries
Operating range of the remote control unit
Features
High quality sound
High performance
Part names and functions
Front panel
Display
Rear panel
Remote control unit
Connections
Connecting to a device with digital audio input connectors
Connecting to a stereo audio amplifier
Connecting devices with remote control connectors
Connection
Setting
Connecting the timer device
Connecting the power cord
4
Playback
5
Basic operation
5
Turning the power on
6
Switching the display’s brightness
6
Playing CDs
6
Playing CDs
7
A-B repeat playback
7
Playing tracks in a specific order (Program playback)
9
10
11
16
17
18
18
18
19
20
Skipping tracks you don’t want to hear (Delete program playback)
Rewinding tracks slightly to listen again (Quick replay)
Switching the display (CD-TEXT)
Playing DATA CDs (MP3, WMA and AAC files)
Playing files
22
22
22
23
23
25
25
26
27
28
29
30
Front panel Display Rear panel Remote Index
2
Contents Connections Playback Settings Tips Appendix
Settings
Menu map
Menu operation
H/P AMP GAIN
Digital Out
Timer Play
Quick Replay
Auto Standby
Tips
Tips
Troubleshooting
Appendix
32
Playable media
33
34
34
35
35
35
37
38
Discs
Files
Playback order of music files
About discs and files
Cautions on using media
Inserting a disc
How to handle media
Cleaning discs
Explanation of terms
Trademark information
Specifications
Index
42
42
42
43
44
45
45
46
46
47
48
49
52
Front panel Display Rear panel Remote Index
3
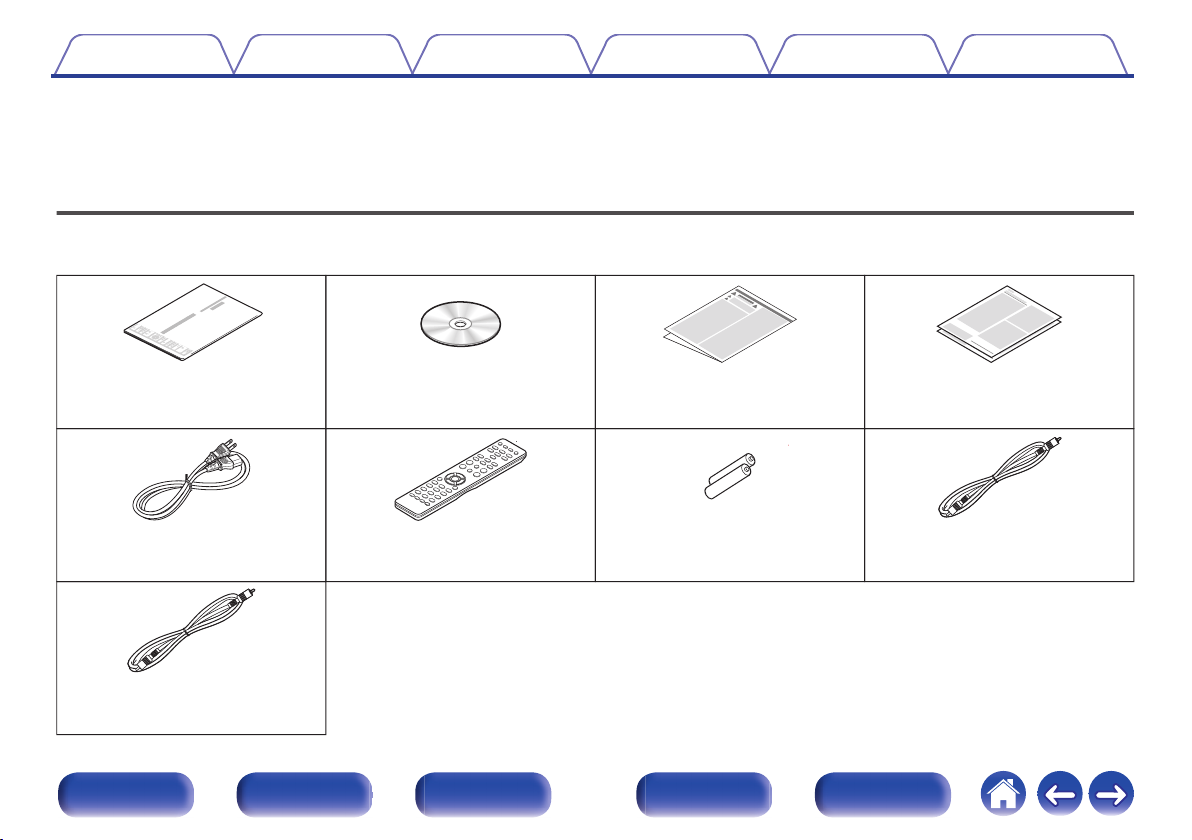
Quick Start Guide
CD-ROM
(Owner’s Manual)
Safety Instructions Warranty
(for USA/for CANADA)
Power cord Remote control unit
(RC003HD)
R03/AAA batteries Coaxial digital cable
(black)
Remote connector cable
(orange)
Contents Connections Playback Settings Tips Appendix
Thank you for purchasing this Marantz product.
To ensure proper operation, please read this owner’s manual carefully before using the product.
After reading this manual, be sure to keep it for future reference.
Accessories
Check that the following parts are supplied with the product.
.
Front panel Display Rear panel Remote Index
4

Batteries
Approx. 23 ft/7 m
30°
30°
Contents
Connections Playback Settings Tips Appendix
Inserting the batteries
Remove the rear lid in the direction of the arrow and
1
remove it.
.
Insert two batteries correctly into the battery
2
compartment as indicated.
.
NOTE
To prevent damage or leakage of battery fluid:
0
Do not use a new battery together with an old one.
0
Do not use two different types of batteries.
0
Remove the batteries from the remote control unit if it will not be in use for long
0
periods.
If the battery fluid should leak, carefully wipe the fluid off the inside of the battery
0
compartment and insert new batteries.
Operating range of the remote control
unit
Point the remote control unit at the remote sensor when operating it.
.
Put the rear cover back on.
3
Front panel Display Rear panel Remote Index
5
CD TEXT
TEXT
Contents
Features
Connections Playback Settings Tips Appendix
High quality sound
0
Using Marantz original HDAM® SA2 circuit
The unit uses an HDAM® SA2 circuit, whose quality has been proved in
Super Audio CD players and high-end amplifiers, as a high-speed
buffer amplifier.
You can enjoy the high speed and high-quality sound like that produced
by high-end equipment.
Incorporates a Cirrus Logic advanced D/A converter, CS4398
0
A D/A converter is an essential element for the audio quality of a CD
player. The CS4398 Cirrus Logic D/A Converter, which has a reputation
for high precision and has been adopted for other Marantz Super Audio
CD players, is adopted for this unit.
High grade headphone circuit
0
The high-grade headphone circuit incorporates a high-speed buffer
amplifier to enable headphone listening of high quality sound
reproduction, late at night or in other such situations.
High performance
Supports MP3, WMA and AAC file playback (v p. 29)
0
MP3, WMA and AAC files that have been recorded onto CD-R or CDRW discs can be played back on this CD player.
Gain selector function
0
This unit has a gain control function with three levels that can be
switched according to the characteristics of the connected headphones.
Quick replay function (Audio CDs only) (v
0
Simply press the Q.REPLAY P button on the remote control during
playback, and the track rewinds the set amount of time (setting range:
5-60 seconds), and resumes playing from the rewind point.
Supports CD-TEXT display
0
CD-Text is an extension to the existing audio CD standard that enables
text information, such as the name of the artist, album title and song
titles to be stored on an audio CD. CDs with the following logos support
this function.
.
Large 16-character / 2-line display
0
Text information appears on the large display during MP3 playback.
p. 27)
Front panel Display Rear panel Remote Index
6
q w e r tiuyoQ1Q0
Q
3
Q
2
Q
4
Contents Connections Playback Settings Tips Appendix
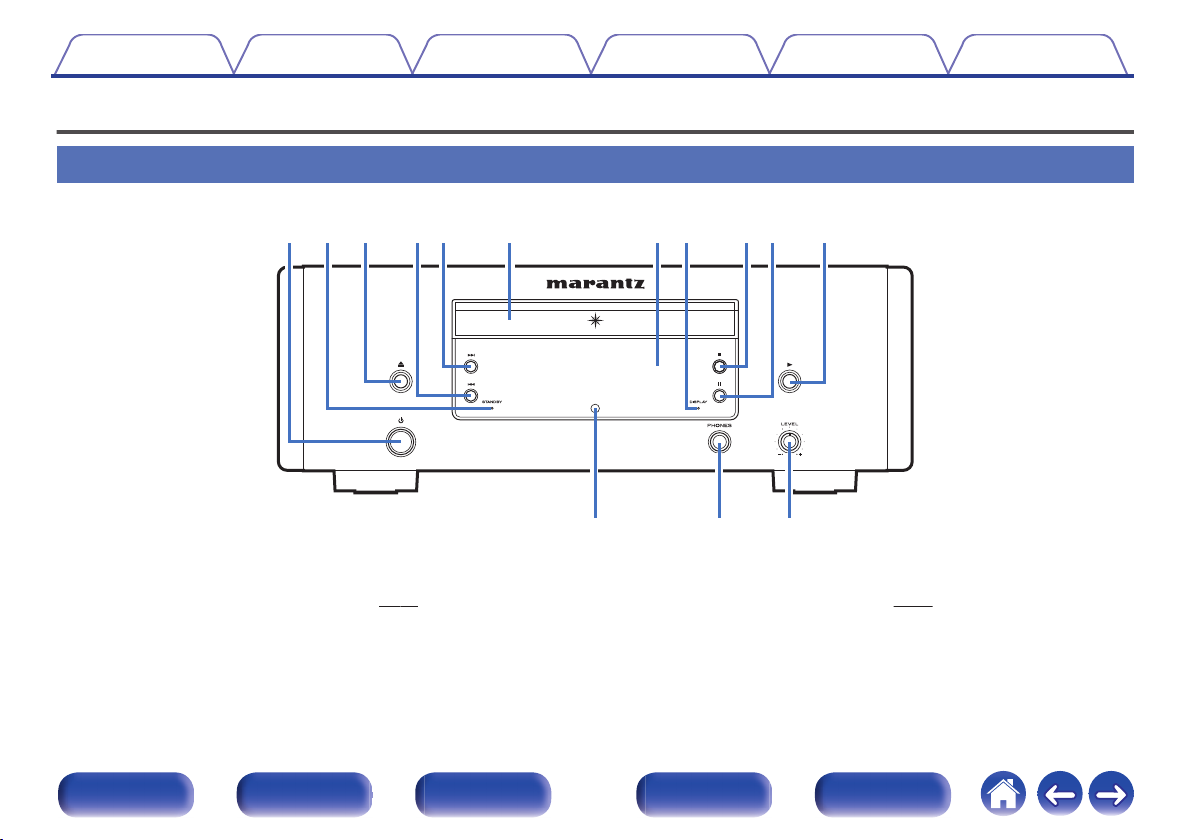
Part names and functions
Front panel
Power operation button (X)
A
This turns the power on/off (standby). (v p. 22)
STANDBY indicator
B
This is lit as follows according to the power status:
Power on : Off
0
Standby : Red
0
.
Front panel Display Rear panel Remote Index
Disc tray open/close button (5)
C
Opens and closes the disc tray. (v p. 23)
Fast-reverse/Reverse-skip button (8)
D
Returns to the start of the currently playing track. Press and hold to fastreverse the track.
7
Q
3
Q
2
Q
4
tiuyoQ1Q0
Contents
.
Fast-forward/Forward-skip button (9)
E
Plays the next track. Press and hold to fast-forward the track.
Disc tray
F
Used to insert a disc. (v p. 23)
Display
G
This displays various pieces of information. (v
DISPLAY indicator
H
Lights when the display is off. (v
Connections Playback Settings Tips Appendix
p. 9)
p. 22)
Stop button (2)
I
Stops playback.
Pause button (3)
J
Pauses playback.
Play button (1)
K
Playback starts.
Remote control sensor
L
This receives signals from the remote control unit. (v p. 5)
Headphones jack (PHONES)
M
Used to connect headphones.
NOTE
To prevent hearing loss, do not raise the volume level excessively when using
0
headphones.
Headphone volume control knob (LEVEL)
N
Adjusts the headphone volume.
Front panel Display Rear panel Remote Index
8

wq
t
y
er
Contents Connections Playback Settings Tips Appendix
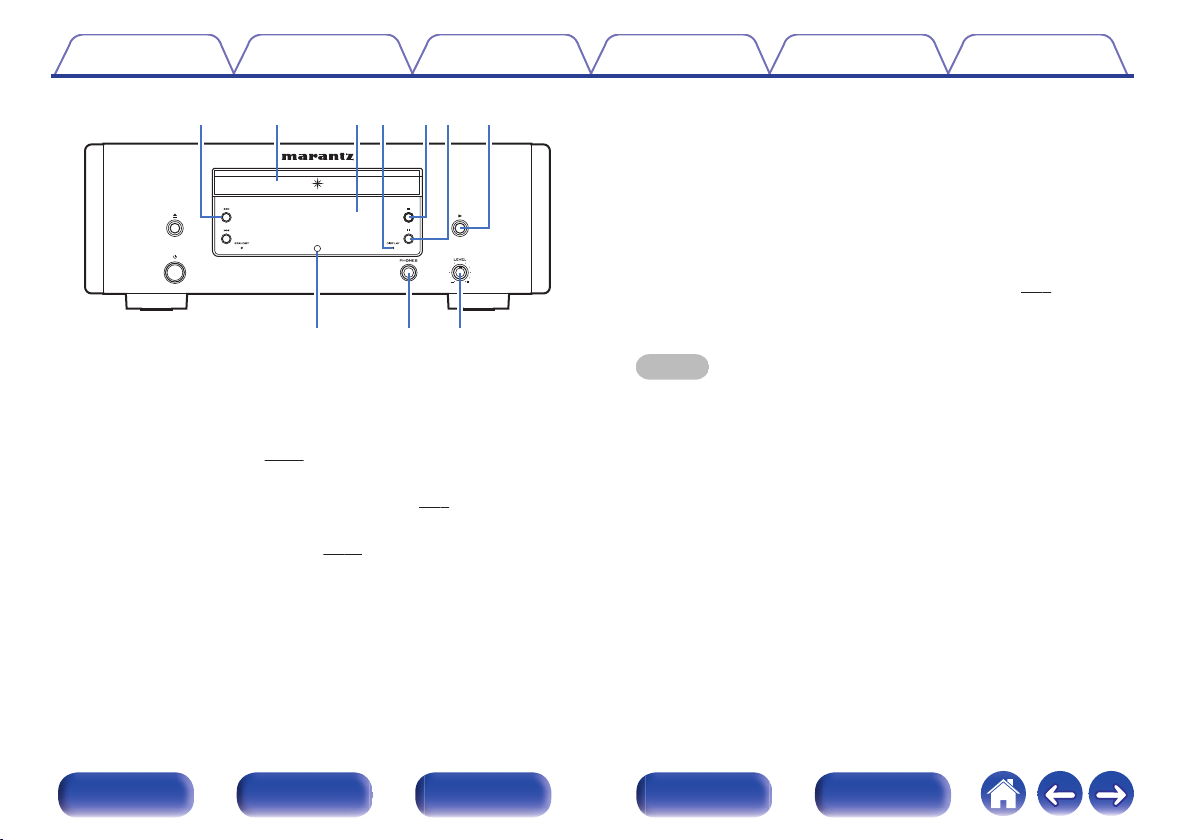
Display
.
Information display
A
Displays various information or playback elapsed time and so on of the
disc.
Playback mode indicators
B
1 : Lights up during playback.
3 : Lights up during pause.
TOTAL indicator
C
Lights when the total number of tracks and total time of the CD are
displayed.
Front panel Display Rear panel Remote Index
RANDOM indicator
D
Lights during random playback.
Repeat mode indicators
E
Lights to match the repeat mode settings.
Remote control signal reception indicator
F
Lights when a signal is received from the remote control.
9
q
we
tr
Contents
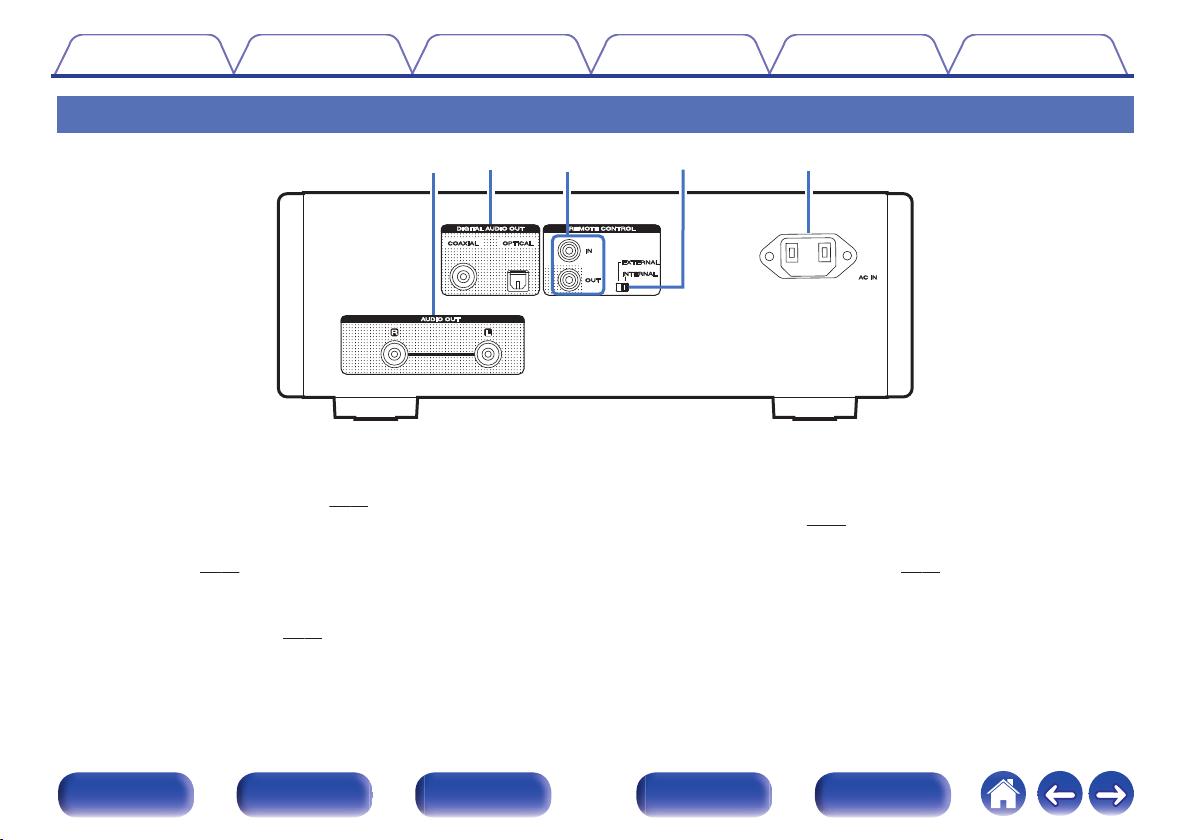
Rear panel
Connections Playback Settings Tips Appendix
.
AUDIO OUT connectors
A
Used to connect devices equipped with analog audio inputs connectors
or an external power amplifier. (v p. 17)
DIGITAL AUDIO OUT connectors (COAXIAL/OPTICAL)
B
Used to connect an Amplifier or D/A converter that has a digital input
connectors. (v p. 16)
REMOTE CONTROL jacks
C
Used to connect to a Marantz amplifier that is compatible with the
remote control function. (v p. 18)
Front panel Display Rear panel Remote Index
EXTERNAL/INTERNAL switch
D
Turn this switch to “EXTERNAL” to operate the unit by pointing the
remote control at the amplifier connected to this unit using the remote
control connection. (v p. 18)
AC inlet (AC IN)
E
Used to connect the power cord. (v
10
p. 20)
w
q
e
r
Contents Connections Playback Settings Tips Appendix
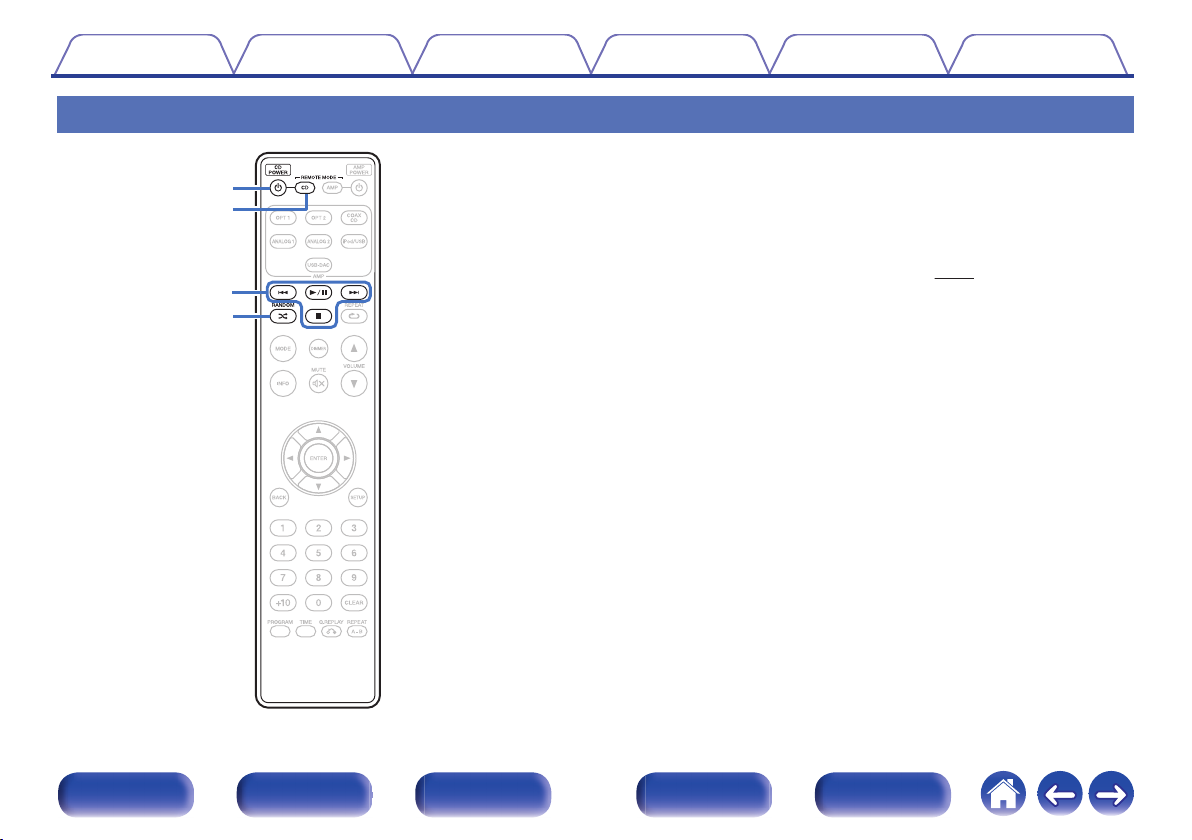
Remote control unit
o
Operating this unit
To operate CD player, press REMOTE MODE CD button to switch the
remote control to the CD operation mode.
REMOTE MODE CD button lights for approximately two seconds.
0
Power operation button (CD POWER X)
A
This turns the power on/off (standby). (v
Remote mode select button (REMOTE MODE CD)
B
This switches the remote control operating mode to CD.
System buttons
C
These perform playback related operations.
Skip buttons (8 / 9)
0
Play/pause button (1 / 3)
0
Stop button (2)
0
D
RANDOM button (P)
Switches the random playback.
p. 22)
.
Front panel Display Rear panel Remote Index
11
i
u
y
t
Q1
o
Q0
Contents
Connections Playback Settings Tips Appendix
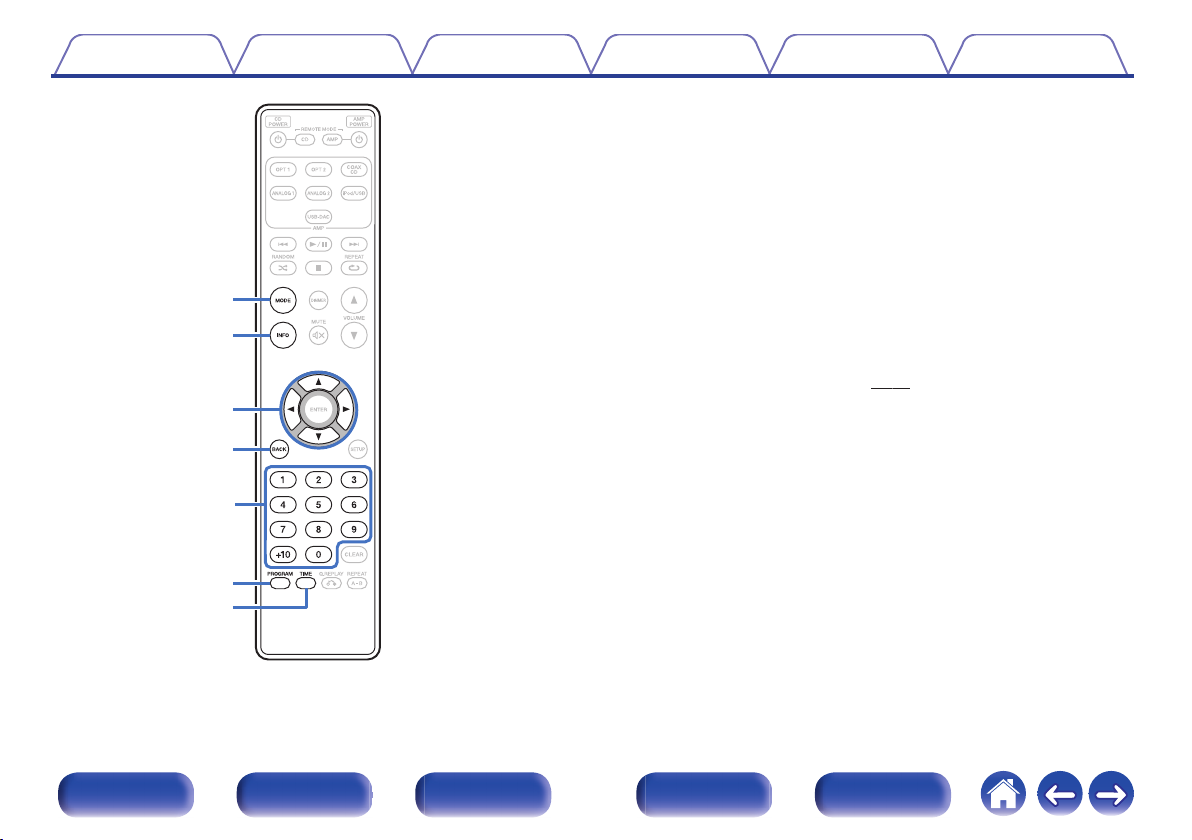
Playback mode switching button (MODE)
E
This switches the playback mode.
Information button (INFO)
F
This switches the track information shown in the display during
playback.
Cursor buttons (uio p)
G
These select items.
BACK button
H
This returns to the previous item.
Number buttons (0 – 9, +10)
I
These enter letters or numbers into the unit.
Program button (PROGRAM)
J
This sets program playback. (v
TIME button
K
This switches the playback time display.
p. 25)
.
Front panel Display Rear panel Remote Index
12
Q6
Q7
Q8
Q2
Q5
Q4
Q3
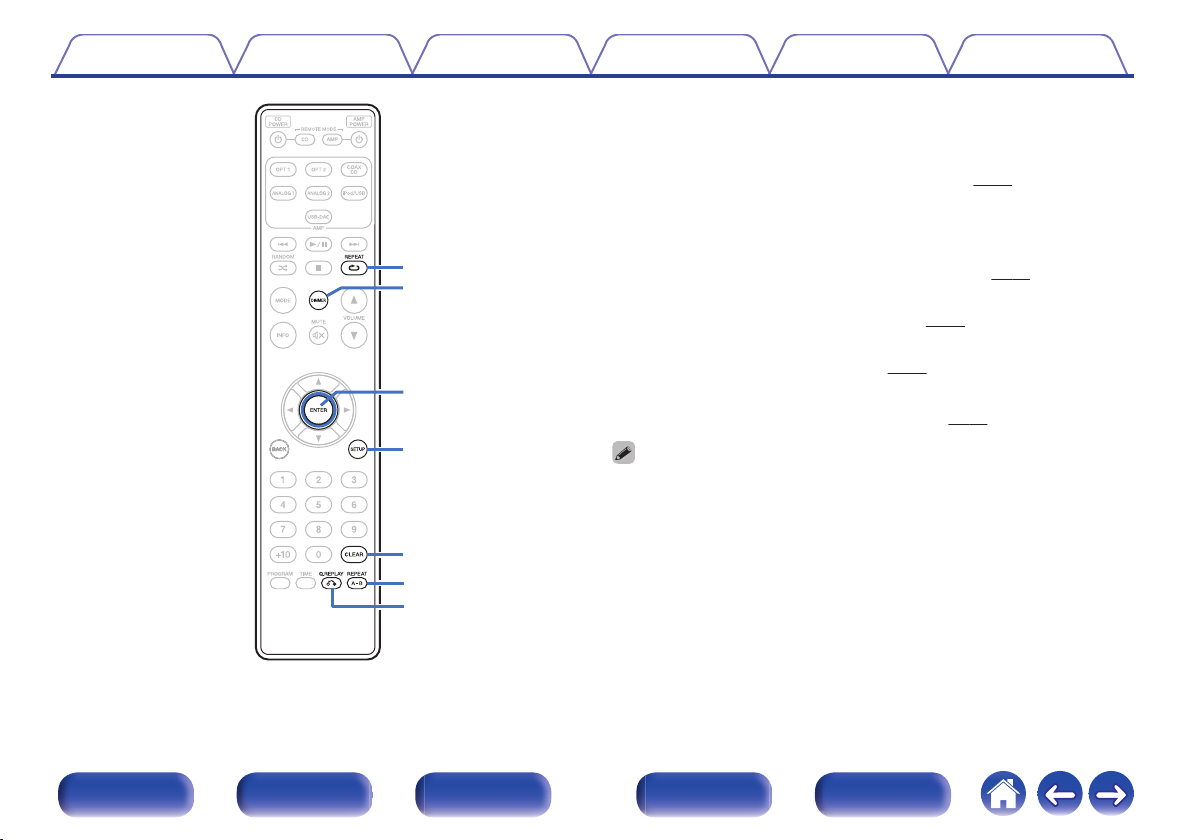
Contents Connections Playback Settings Tips Appendix
L
REPEAT button (L)
Switches the repeat playback.
DIMMER button
M
This switches the brightness of the display. (v p. 22)
ENTER button
N
This determines the selection.
SETUP button
O
p. 33)
This displays the setting menu on the display. (v
CLEAR button
P
This clears the program registration. (v
REPEAT A-B button
Q
This sets A-B repeat playback. (v
R
Q.REPLAY button (P)
Rewinding tracks slightly to listen again. (v p. 27)
p. 26)
p. 25)
The amp can be operated with the amp operation buttons even when the remote
0
control mode is CD.
.
Front panel Display Rear panel Remote Index
13
e
w
q
t
r
Contents
Connections Playback Settings Tips Appendix
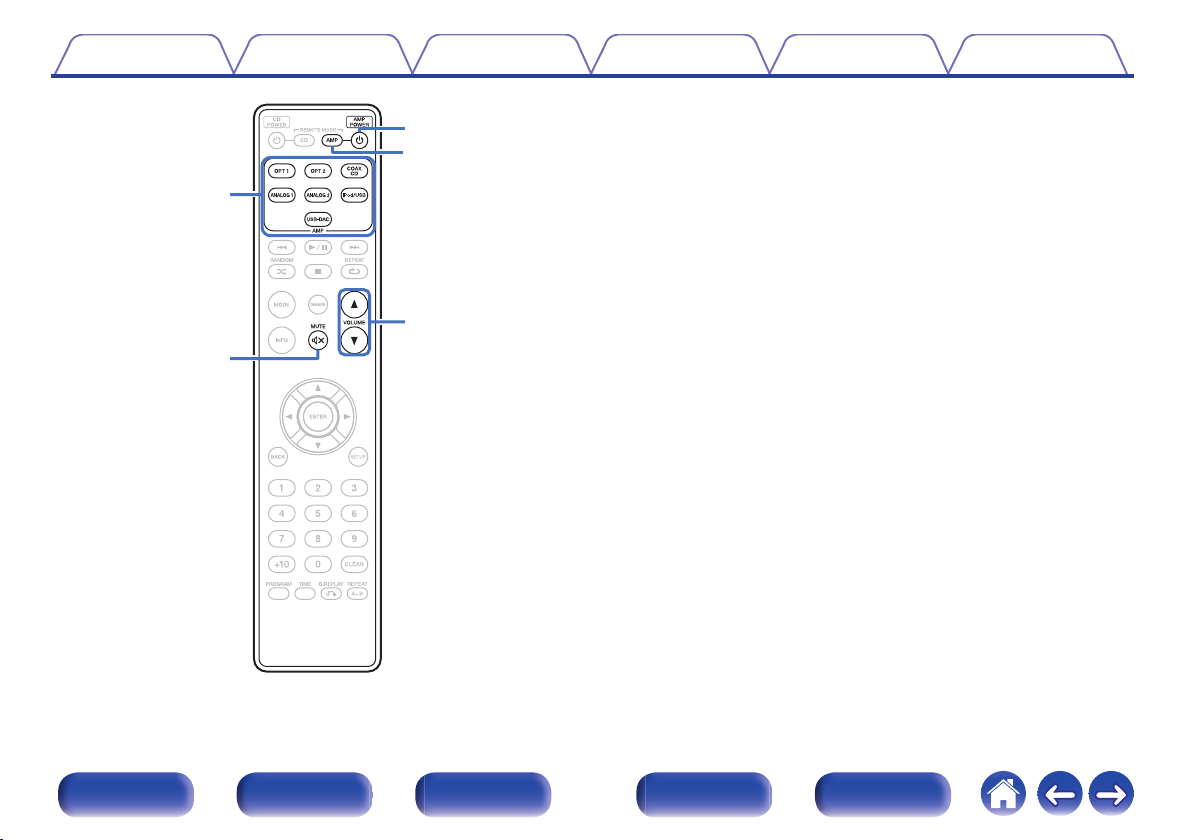
o
Amplifier operations
A Marantz amplifier can be operated.
Input source select buttons
A
MUTE button (:)
B
AMP POWER button (X)
C
Remote mode select button (REMOTE MODE AMP)
D
VOLUME buttons (df)
E
.
Front panel Display Rear panel Remote Index
14
R
L
R
L
Contents Connections Playback Settings Tips Appendix
Connections
o
Contents
Connecting to a device with digital audio input connectors 16
Connecting to a stereo audio amplifier 17
Connecting devices with remote control connectors 18
Connecting the timer device 19
Connecting the power cord 20
NOTE
Do not plug in the power cord until all connections have been completed.
0
Do not bundle power cords together with connection cables. Doing so can result in
0
noise.
o
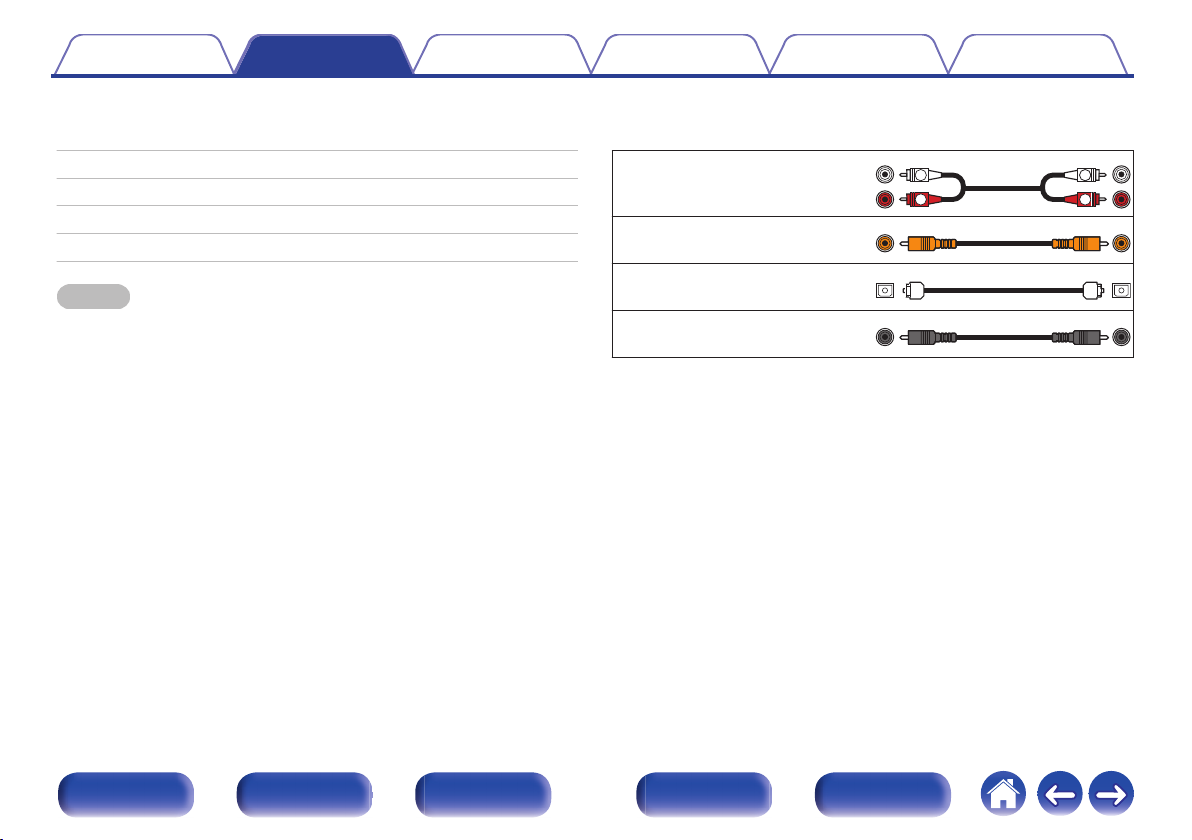
Cables used for connections
Provide necessary cables according to the devices you want to connect.
Audio cable (Sold separately)
.
Remote connector cable
(supplied)
.
Optical cable
(Sold separately)
.
Coaxial digital cable
(supplied)
.
Front panel Display Rear panel Remote Index
15
OPTICAL
IN
COAXIAL
IN
Amplifier /
D/A converter
Contents
Connections Playback Settings Tips Appendix
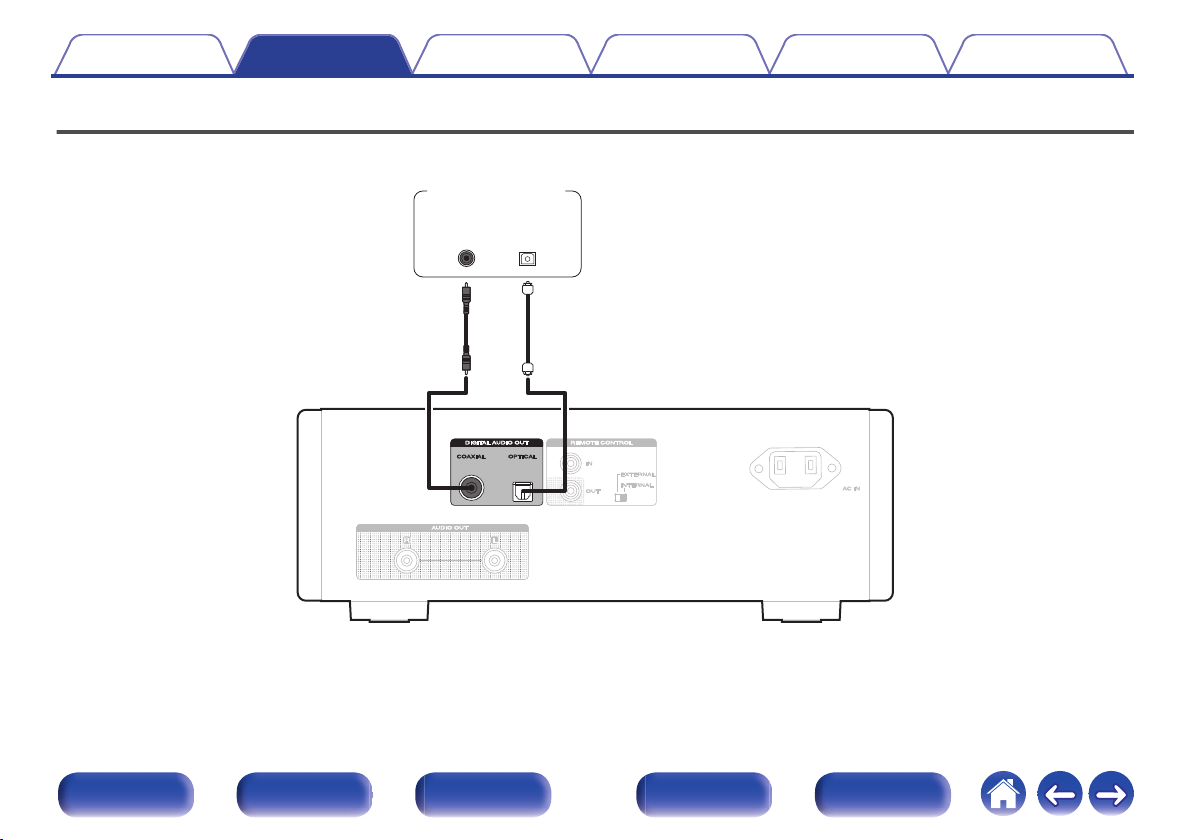
Connecting to a device with digital audio input connectors
You can enjoy digital audio playback by connecting an AV receiver or D/A converter that has a digital audio terminal to this unit.
.
Front panel Display Rear panel Remote Index
16
 Loading...