

Marantz HD-AMP1 Owners Manual
Contents Connections Playback Settings Tips Appendix
.
Integrated Amplifier
HD-AMP1
You can print more than one page of a PDF onto a single sheet of paper.
Front panel Display Rear panel Remote Index
1
Owner’s Manual
Contents Connections Playback Settings Tips Appendix
Contents
Accessories
About the remote control
Inserting the batteries
Operating range of the remote control unit
Main features
High quality sound
High performance
Easy operation
Part names and functions
Front panel
Display
Rear panel
Remote control unit
5
Connections
6
Connecting speakers
6
Speaker connection
6
Connecting an audio playback device
7
Connecting a PC or Mac
7
Connecting an iPod or USB memory device to the USB port
8
Connecting devices with remote control connectors
8
Performing operations by RC on this unit without visual contact
9
Remotely connecting Marantz audio devices
9
Connecting the power cord
11
12
13
17
19
20
21
22
24
24
24
25
Front panel Display Rear panel Remote Index
2

Contents Connections Playback Settings Tips Appendix
Playback
Basic operation
Turning the power on
Selecting the input source
Adjusting the volume
Turning off the sound temporarily (Muting)
Switching the display’s brightness
Using as a D/A converter
Connecting and playing back from a computer (USB-DAC)
Connect and playback from a digital device (COAX/OPT1/OPT2)
Playing back an iPod
Playing an iPod
Setting operation mode (On-Display mode)
Performing repeat playback
Performing random playback
Charging the iPod
Playing a USB memory device
Playing files stored on USB memory devices
Performing repeat playback
Performing random playback
Playing audio from devices connected to the ANALOG
connector
27
27
28
28
28
29
30
31
40
41
42
43
44
44
44
45
46
48
48
49
Settings
Menu map
Menu operation
S. Direct
Bass
Treble
Balance
Filter
H/P Gain
Dimmer
iPodMode
AutoStby
50
51
52
52
52
52
53
53
54
54
54
Front panel Display Rear panel Remote Index
3
Contents Connections Playback Settings Tips Appendix
Tips
Contents
Tips
Troubleshooting
55
56
57
Appendix
Playing back a USB memory devices
Playback order of files
About folders and files
How to handle media
D/A converter
Explanation of terms
Trademark information
Specifications
Index
65
66
67
67
68
69
71
72
75
Front panel Display Rear panel Remote Index
4
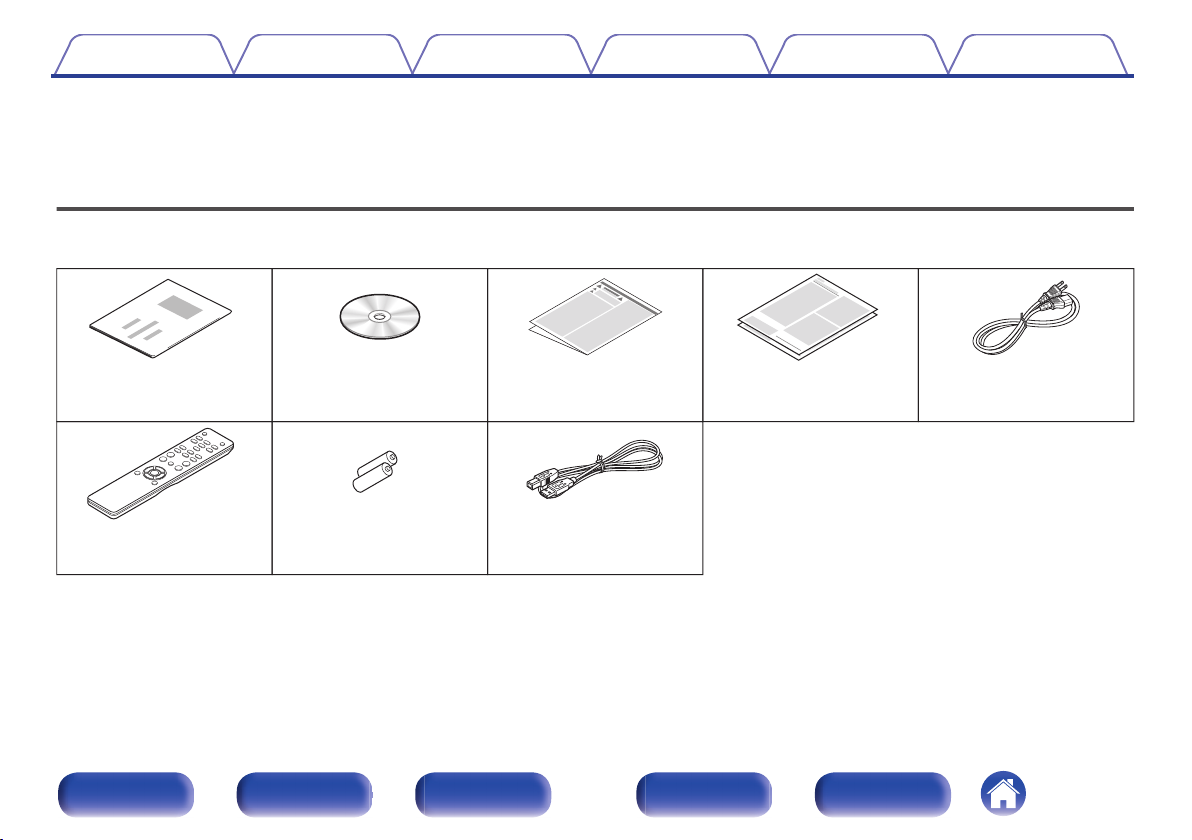
Quick Start Guide CD-ROM
(Owner’s Manual)
Safety Instructions
Warranty
(for USA/for CANADA)
Power cord
Remote control unit
R03/AAA batteries
USB cable
Contents Connections Playback Settings Tips Appendix
Thank you for purchasing this Marantz product.
To ensure proper operation, please read this owner’s manual carefully before using the product.
After reading this manual, be sure to keep it for future reference.
Accessories
Check that the following parts are supplied with the product.
.
Front panel Display Rear panel Remote Index
5
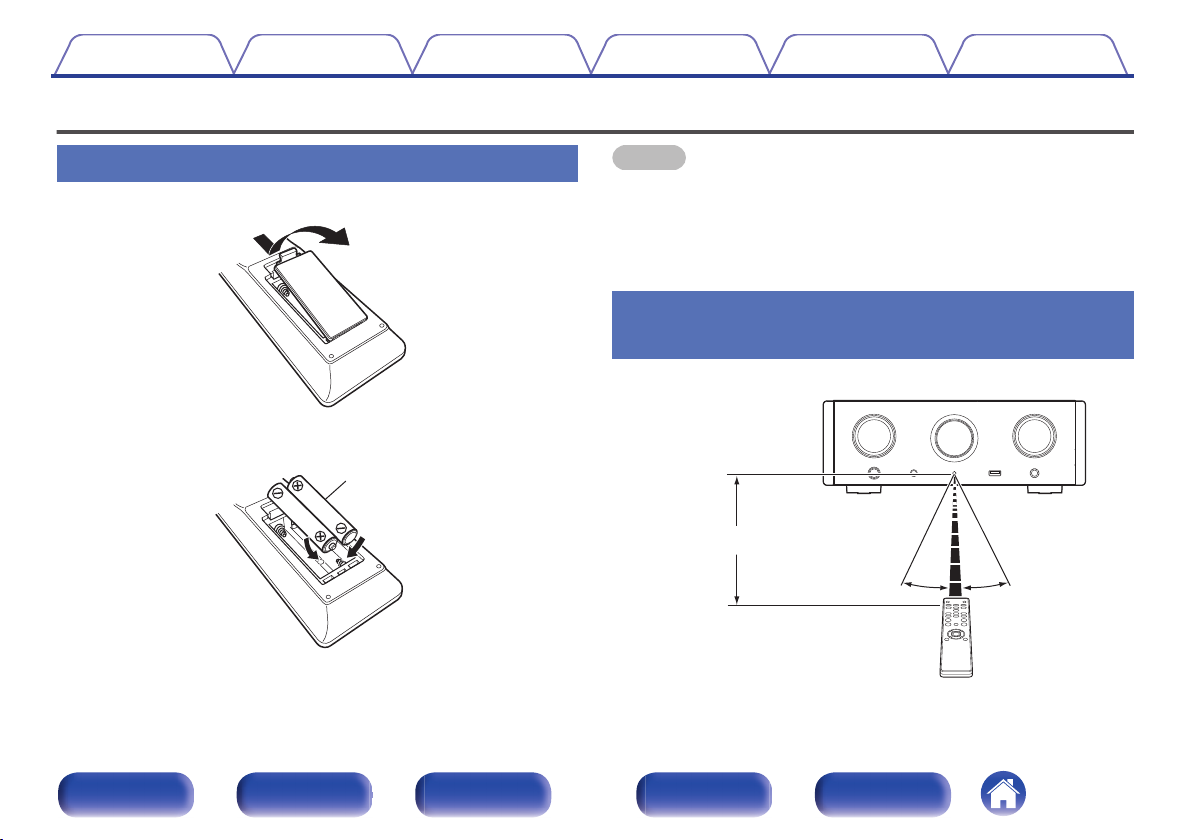
R03/AAA batteries
Approx. 23 ft/7 m
30°
30°
Contents
Connections Playback Settings Tips Appendix
About the remote control
Inserting the batteries
Remove the rear lid in the direction of the arrow and remove it.
A
Insert two batteries correctly into the battery compartment as indicated.
B
Put the rear cover back on.
C
.
.
NOTE
To prevent damage or leakage of battery fluid:
0
Do not use a new battery together with an old one.
0
Do not use two different types of batteries.
0
If the battery fluid should leak, carefully wipe the fluid off the inside of the battery
0
compartment and insert new batteries.
Operating range of the remote control
unit
Point the remote control unit at the remote sensor when operating it.
.
Front panel Display Rear panel Remote Index
6
Contents
Connections Playback Settings Tips Appendix
Main features
High quality sound
Large-capacitance block capacitor
0
A large capacitance 3,300 μF capacitor carefully selected for its
acoustic characteristics is incorporated into the power supply circuit.
Audiophile-grade film capacitors and electrolytic capacitors
0
The unit’s features the same audiophile-grade film capacitors and
electrolytic capacitors specifically used in top-range models.
Low noise amp due differential input HDAM, and equipped with a
0
low distortion filter circuit due to high speed HDAM®SA2 delivery
amp
Double-layered chassis
0
Marantz unique filtering technology (MMDF: Marantz Musical
0
Digital Filtering)
This unit is equipped with oversampling and digital filter functions using
an original algorithm created by Marantz. The unit supports PCM and
analog input signals. Toggle between the two types to suit your
preferences.
High grade headphone circuit
0
This unit has a two-amplifier structure based on the design concept of
luxury models, comprising a current feedback voltage amplifier using
the HDAM®SA2 and a feedbackless Darlington power buffer. This
allows higher speeds without creating dynamic strain in response to
impedance changes in the headphones.
Isolation design
0
To prevent audio quality from degrading due to noise from external
devices when this unit is connected to external devices such as
computers, the ground circuit for the USB input interface device is
isolated from the audio circuit.
Front panel Display Rear panel Remote Index
7
Contents Connections Playback Settings Tips Appendix
High performance
Equipped with a USB-DAC function to support playback of high-
0
resolution sound sources
This unit supports the playback of high resolution audio formats such as
DSD (2.8/5.6/11.2 MHz) and PCM files up to 384 kHz/32 bits. It
provides high quality playback of high resolution files into this unit from a
computer via USB-B connection.
DIGITAL AUDIO IN connectors (COAXIAL/OPTICAL)
0
You can play back PCM signals up to 192 kHz/24 bits by inputting digital
audio signals from an external device into this unit.
Plays USB memory devices (MP3/WMA/AAC/WAV/FLAC/ALAC/
0
AIFF/DSD) and iPod®/iPhone
You can play back audio files stored on a USB memory device or iPod/
iPhone by connecting the USB memory device or iPod/iPhone to the
USB port.
®
Easy operation
0
iPod® auto detect charges your device even after the unit
switches to standby mode (v p. 22)
Equipped with auto standby mode function that reduces power
0
consumption
Front panel Display Rear panel Remote Index
8
Q0iuyo
weqtr
Contents Connections Playback Settings Tips Appendix
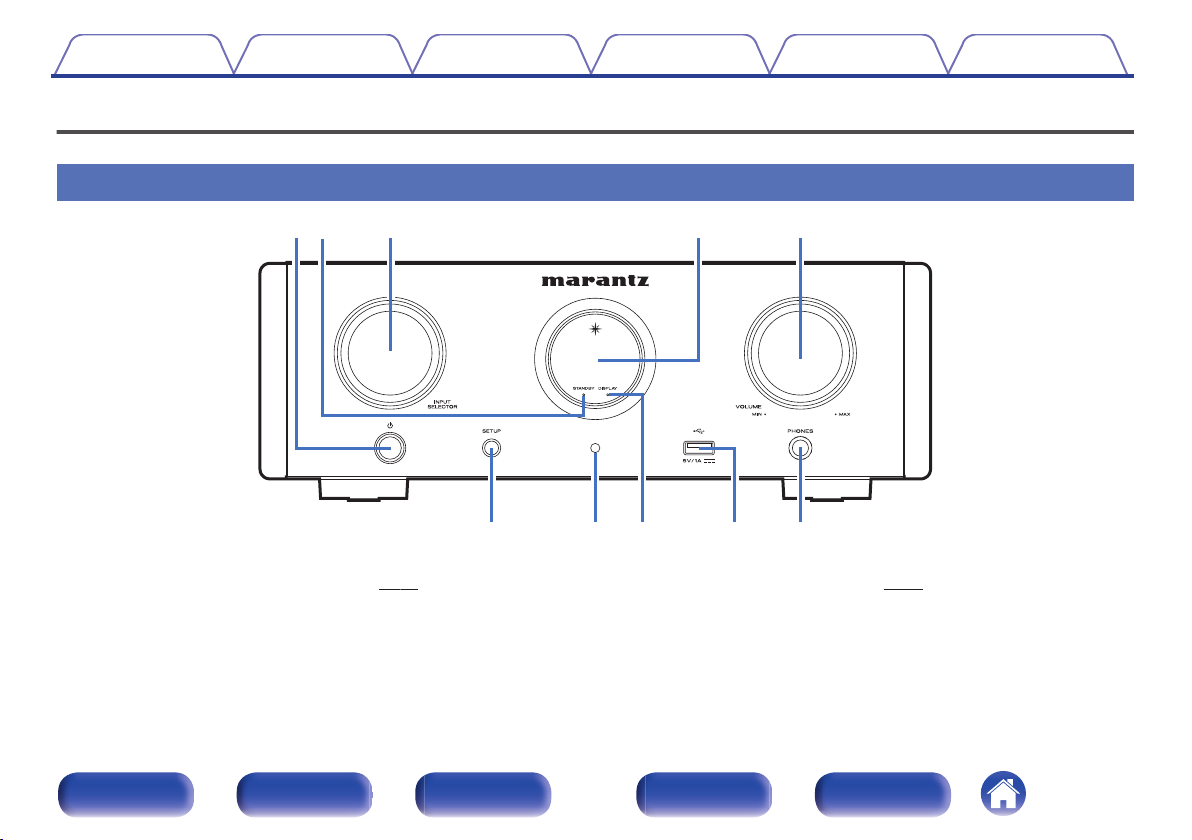
Part names and functions
For buttons not explained here, see the page indicated in parentheses ( ).
Front panel
Power operation button (X)
A
This turns the power on/off (standby). (v p. 27)
Standby indicator (STANDBY)
B
The standby indicator changes as shown below according to the status
of the unit.
Power on : Off
0
Normal standby : Red
0
iPod charge standby : Orange
0
Front panel Display Rear panel Remote Index
.
Input source select knob (INPUT SELECTOR)
C
These select the input source. (v
Display
D
Information such as the playback status and input source is displayed
here.
VOLUME knob
E
This adjusts the volume level.
9
p. 28)

Q
0
iuyo
Contents Connections Playback Settings Tips Appendix
.
SETUP button
F
Used to set up this unit.
Remote control sensor
G
This receives signals from the remote control unit. (v
Display off indicator (DISPLAY)
H
This indicator lights up when the display is off. (v
I
USB port (T)
Used to connect iPod or USB memory devices. (v p. 22)
Headphones jack (PHONES)
J
Used to connect headphones.
When the headphones are plugged into this jack, audio will no longer
0
be output from the speaker terminals, SUBWOOFER OUT
connector.
“S.Direct” is set to “On” when headphones are connected.
0
p. 52)
(v
NOTE
To prevent hearing loss, do not raise the volume level excessively when using
0
headphones.
p. 6)
p. 29)
Front panel Display Rear panel Remote Index
10
q w
tre
Contents Connections Playback Settings Tips Appendix
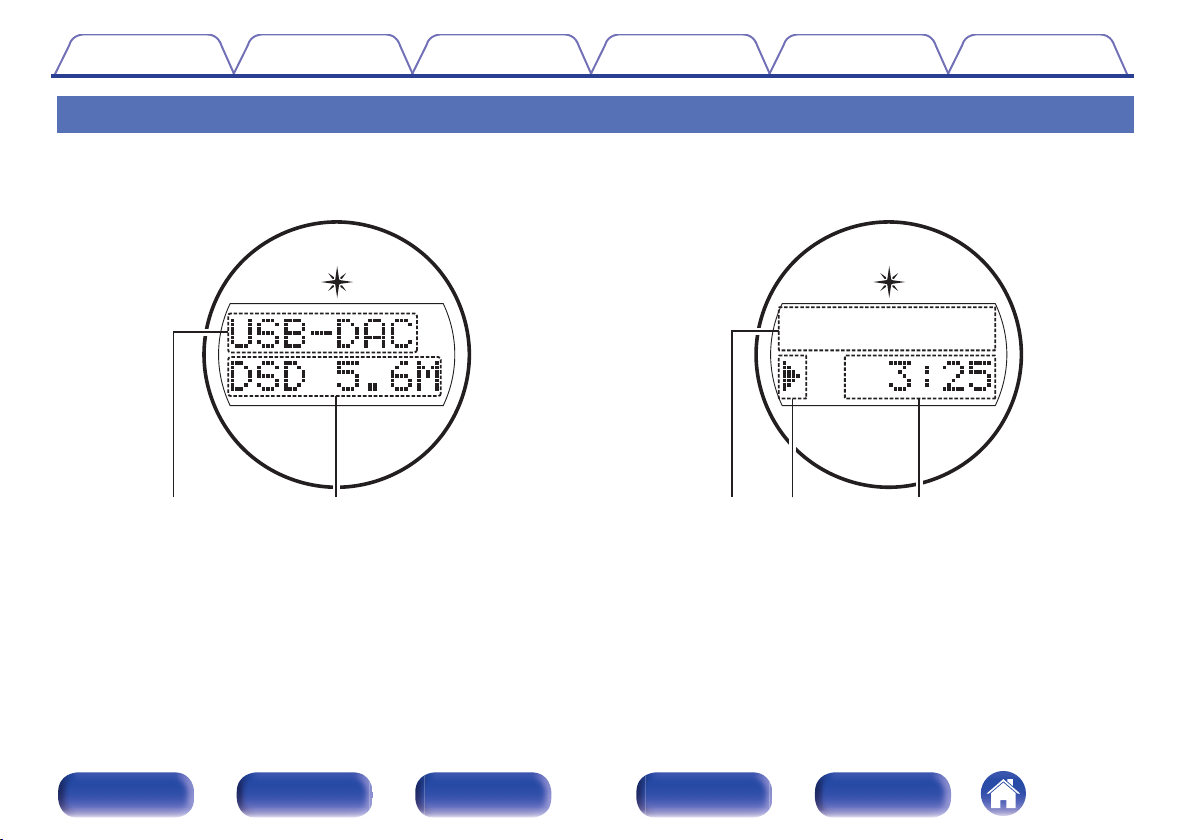
Display
The input source name, sampling frequency, setting values and other information are displayed here.
o
D/A converter display
.
Input source indicator
A
This indicator displays the selected input source (USB-DAC/COAX/
OPT1/OPT2).
Sampling frequency display
B
This indicator displays the sampling frequency of the input audio signal.
o
iPod/USB playback indicator
.
Information display
C
This indicator displays the track information, etc.
Playback mode indicators
D
1: Displayed during playback.
3: Displayed during pause.
Time indicator
E
This indicator displays the elapsed time of the current track.
Front panel Display Rear panel Remote Index
11
ININOUT
OUT
DIGITAL AUDIO IN
DIGITAL AUDIO IN
USB-DAC
USB-DAC
OPTICAL
OPTICAL
COAXIAL
COAXIAL
1
2
L
R
L
R
SUB
SUB
WOOFER
WOOFER
OUT
OUT
ANALOG2
ANALOG2
ANALOG1
ANALOG1
AC IN
AC IN
AUDIO OUT
AUDIO OUT
AUDIO IN
AUDIO IN
REMOTE CONTROL
REMOTE CONTROL
r t y
q w e
Contents Connections Playback Settings Tips Appendix
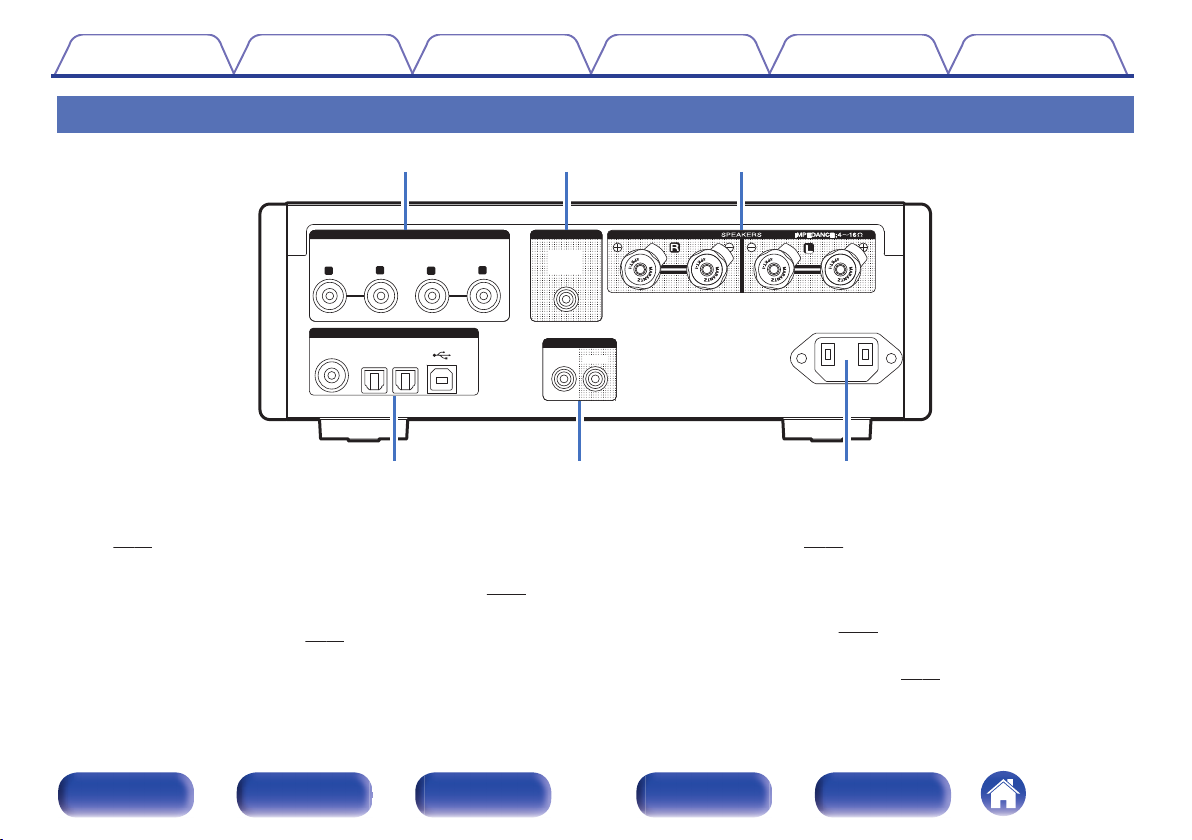
Rear panel
.
AUDIO IN connectors
A
Used to connect devices equipped with analog audio connectors.
(v p. 20)
SUBWOOFER OUT connector
B
Used to connect a subwoofer with a built-in amplifier. (v
Speaker terminals (SPEAKERS)
C
Used to connect speakers. (v
p. 19)
p. 19)
DIGITAL AUDIO IN connectors
D
Used to connect a computer or devices equipped with digital audio
output connectors. (v p. 20)
Remote control input/output connectors
E
(REMOTE CONTROL IN/OUT)
Used to connect to a Marantz audio device that is compatible with the
remote control function. (v p. 24)
AC inlet (AC IN)
F
Used to connect the power cord. (v p. 25)
Front panel Display Rear panel Remote Index
12
SETUP
RANDOM REPEAT
DIMMER
BACK
POWER
VOLUME
MUTE
INFO
MODE
OPT 1
COAX
iPod/USB
OPT 2
USB-DAC
ANALOG 2ANALOG 1
e
w
q
r
t
Contents
Connections Playback Settings Tips Appendix
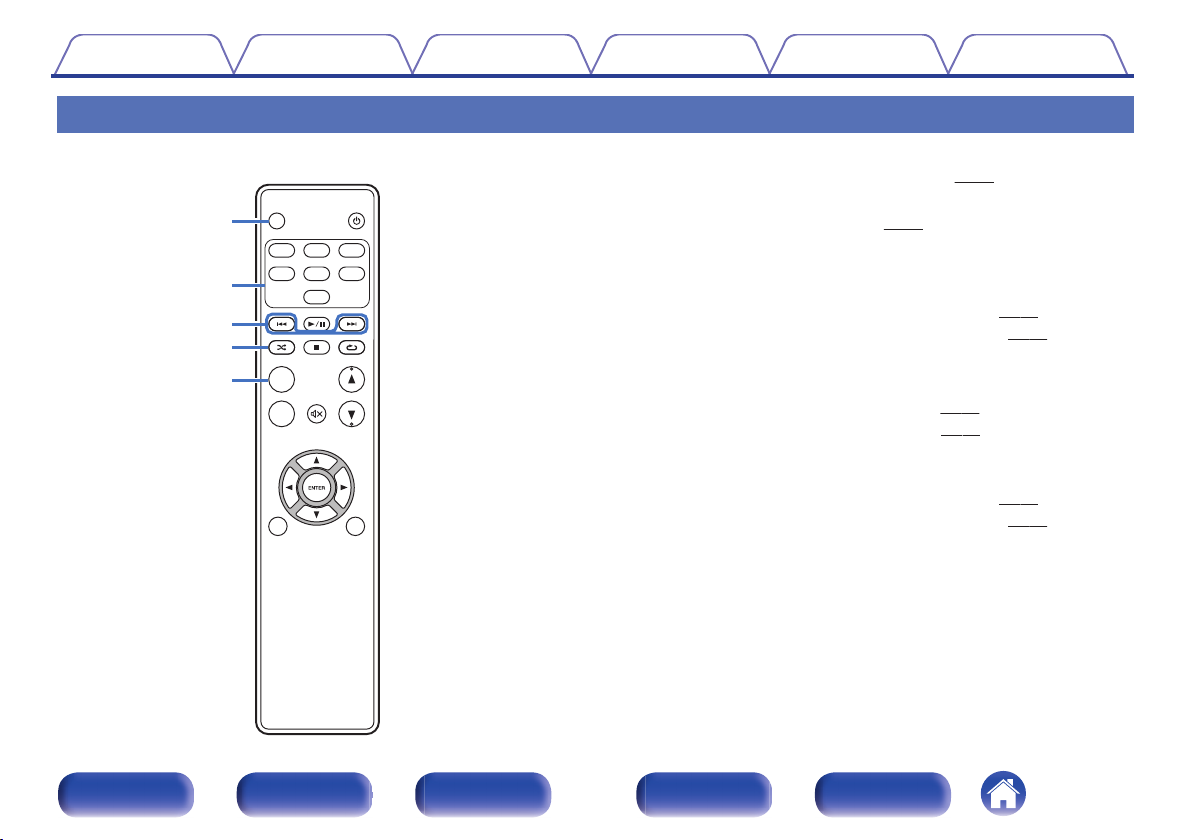
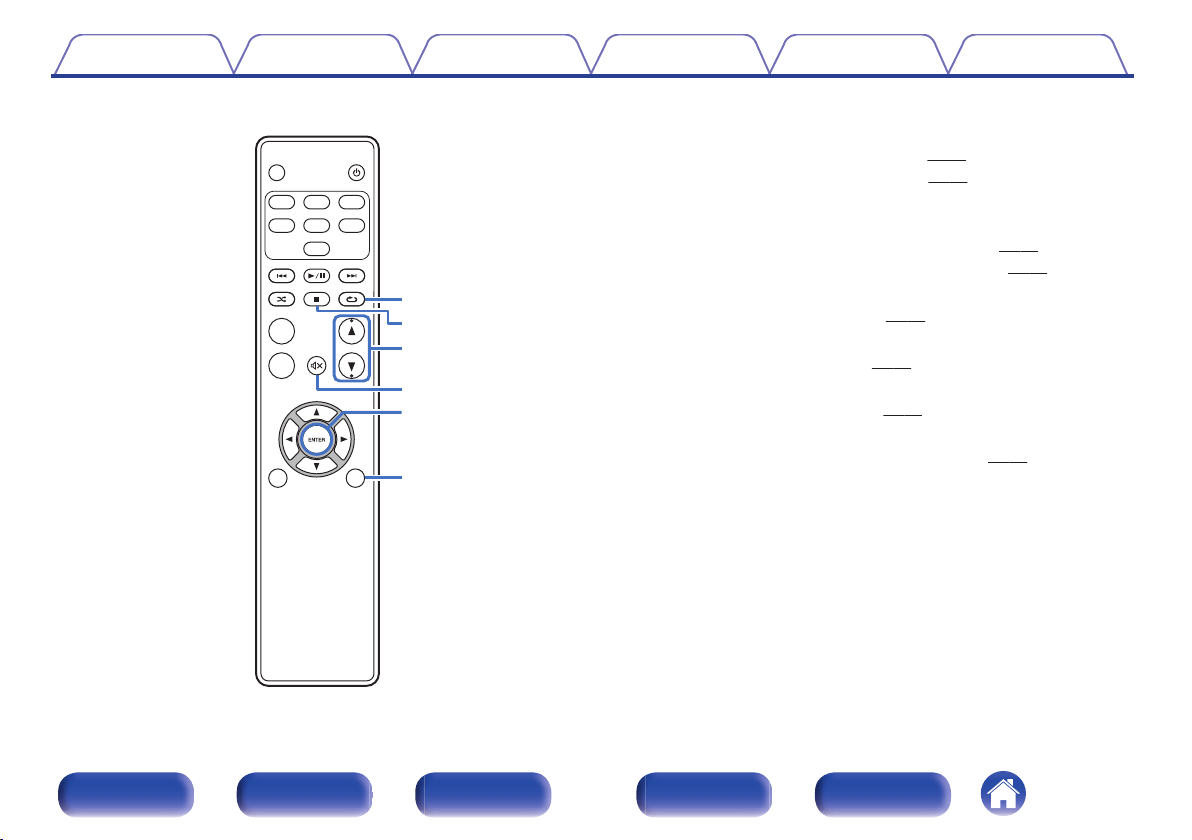
Remote control unit
DIMMER button
A
Adjust the display brightness of this unit. (v
Input source select buttons
B
p. 29)
These select the input source. (v p. 28)
Skip buttons (8, 9)
C
This skips to the start of the track. Press and hold to fast-forward/fast
reverse.
“Setting operation mode (On-Display mode)” (v
0
“Playing files stored on USB memory devices” (v p. 47)
0
D
RANDOM button (P)
p. 43)
Switches the random playback.
iPod: “Performing random playback” (v
0
USB: “Performing random playback” (v
0
MODE button
E
p. 44)
p. 48)
This switches the playback mode.
“Setting operation mode (On-Display mode)” (v
0
“Playing files stored on USB memory devices” (v
0
p. 43)
p. 47)
.
Front panel Display Rear panel Remote Index
13
SETUP
RANDOM REPEAT
DIMMER
BACK
POWER
VOLUME
MUTE
INFO
MODE
OPT 1
COAX
iPod/USB
OPT 2
USB-DAC
ANALOG 2ANALOG 1
Q0
o
y
u
i
Contents
Connections Playback Settings Tips Appendix
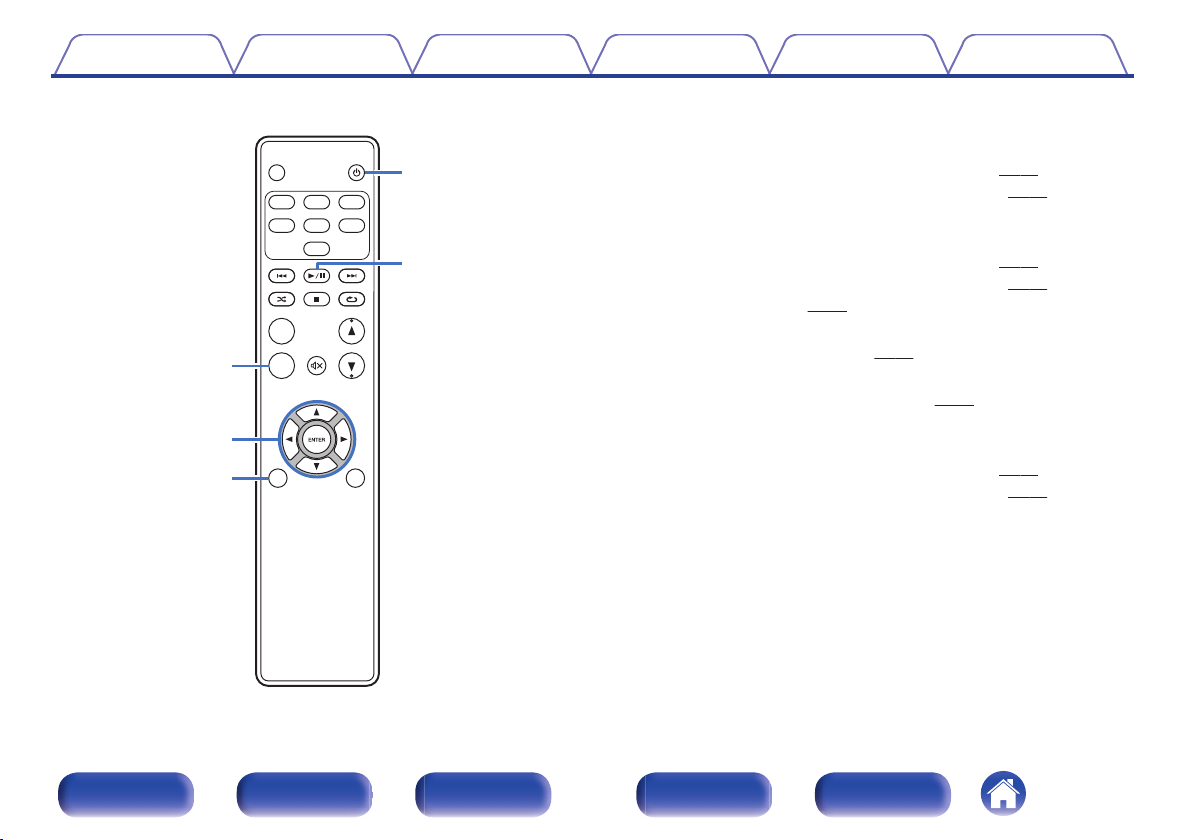
Information button (INFO)
F
This switches display items such as the album name and title name in
the playback screen.
“Setting operation mode (On-Display mode)” (v
0
“Playing files stored on USB memory devices” (v p. 47)
0
Cursor buttons (uio p)
G
These select items.
“Setting operation mode (On-Display mode)” (v
0
“Playing files stored on USB memory devices” (v p. 47)
0
“Menu operation” (v p. 51)
0
BACK button
H
Returns to the previous item. (v
POWER button (X)
I
p. 51)
This turns the power on/off (standby). (v p. 27)
Play/pause button (1/3)
J
Plays back or pauses a track.
“Setting operation mode (On-Display mode)” (v
0
“Playing files stored on USB memory devices” (v p. 47)
0
p. 43)
p. 43)
p. 43)
.
Front panel Display Rear panel Remote Index
14
SETUP
RANDOM REPEAT
DIMMER
BACK
POWER
VOLUME
MUTE
INFO
MODE
OPT 1
COAX
iPod/USB
OPT 2
USB-DAC
ANALOG 2ANALOG 1
Q5
Q2
Q1
Q3
Q6
Q4
Contents
Connections Playback Settings Tips Appendix
K
REPEAT button (L)
Switches the repeat playback.
iPod:“Performing repeat playback” (v
0
USB:“Performing repeat playback” (v
0
Stop button (2)
L
p. 44)
p. 48)
Stops playback.
“Setting operation mode (On-Display mode)” (v
0
“Playing files stored on USB memory devices” (v p. 47)
0
VOLUME buttons (df)
M
These adjust the volume level. (v
MUTE button (:)
N
p. 28)
This mutes the output audio. (v p. 28)
ENTER button
O
This determines the selection. (v p. 51)
SETUP button
P
The setting menu is displayed on the display. (v p. 51)
p. 43)
.
Front panel Display Rear panel Remote Index
15
R
L
R
L
Contents Connections Playback Settings Tips Appendix
Connections
o
Contents
Connecting speakers 17
Connecting an audio playback device 20
Connecting a PC or Mac 21
Connecting an iPod or USB memory device to the USB port 22
Connecting devices with remote control connectors 24
Connecting the power cord 25
NOTE
Do not plug in the power cord until all connections have been completed.
0
Do not bundle power cords with connection cables. Doing so can result in
0
humming or noise.
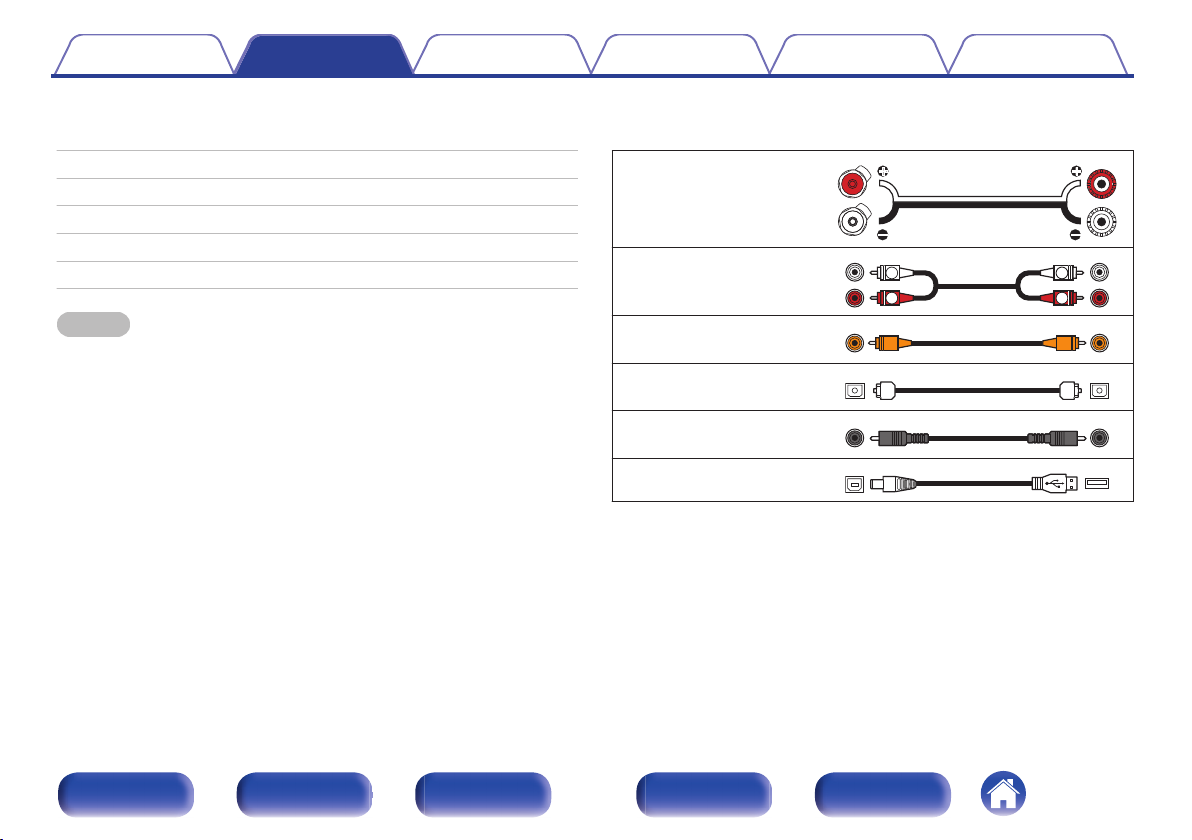
o
Cables used for connections
Provide necessary cables according to the devices you want to connect.
Speaker cable
.
Audio cable
.
Remote connector cable
Optical cable
Coaxial digital cable
USB cable (supplied)
.
.
.
.
Front panel Display Rear panel Remote Index
16
Contents
Connections Playback Settings Tips Appendix
Connecting speakers
NOTE
Disconnect this unit’s power plug from the power outlet before connecting the
0
speakers.
Connect so that the speaker cable core wires do not protrude from the speaker
0
terminal. The protection circuit may be activated if the core wires touch the rear
panel or if the + and - sides touch each other.
Never touch the speaker terminals while the power cord is connected. Doing so
0
could result in electric shock.
Use speakers with impedance of 4 - 16 Ω/ohms.
0
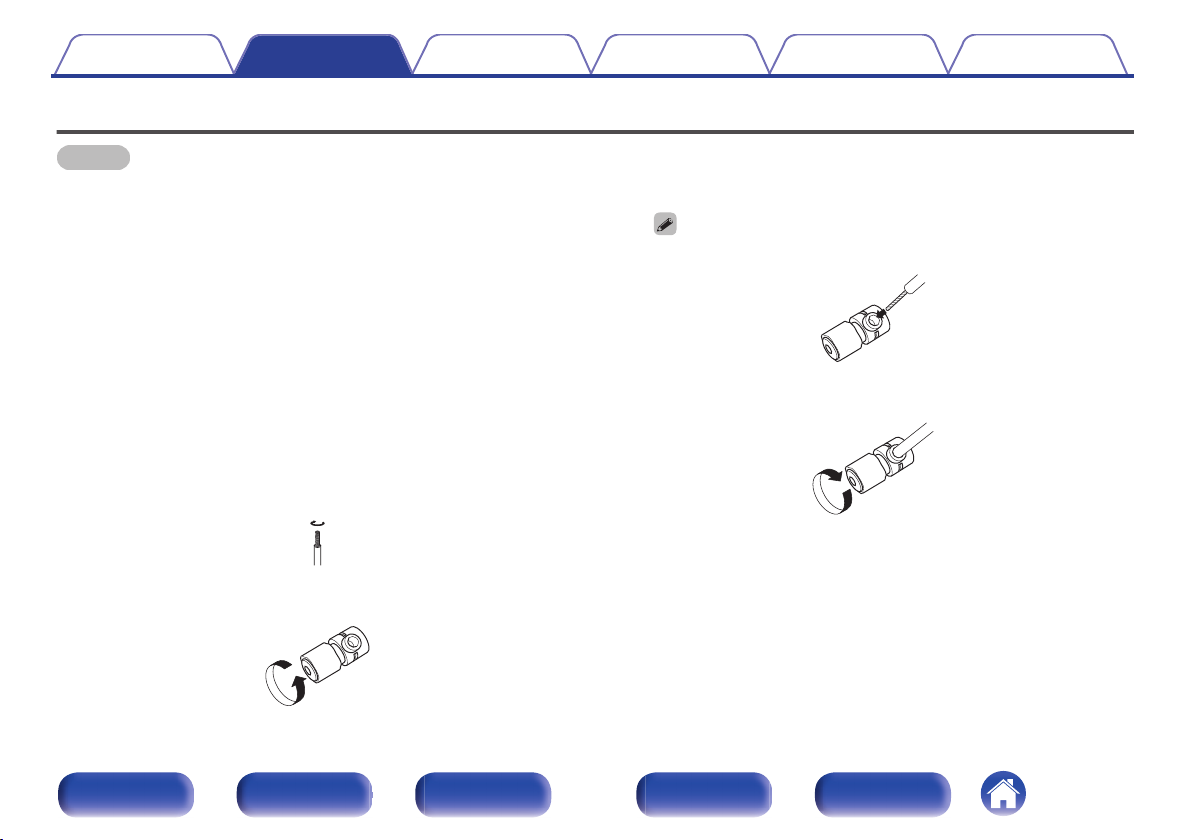
o
Connecting the speaker cables
Carefully check the left (L) and right (R) channels and + (red) and (white) polarities on the speakers being connected to this unit, and be
sure to connect the channels and polarities correctly.
Peel off about 3/8 inch (10 mm) of sheathing from the
1
tip of the speaker cable, then either twist the core wire
tightly or terminate it.
.
Turn the speaker terminal counterclockwise to loosen it.
2
.
Insert the speaker cable’s core wire to all the way into
3
the speaker terminal.
0
Wire gauge: less than N1/4 inch (N5 mm)
.
Turn the speaker terminal clockwise to tighten it.
4
.
Front panel Display Rear panel Remote Index
17
Contents Connections Playback Settings Tips Appendix
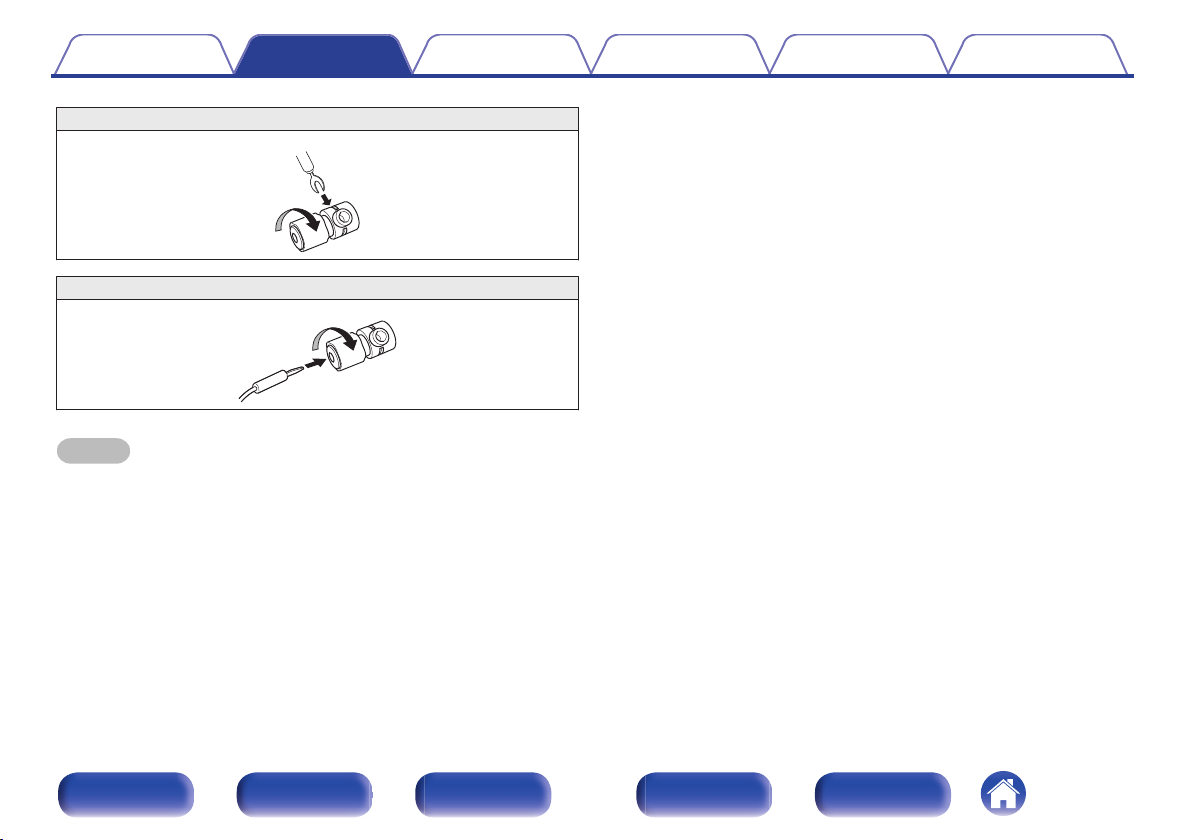
Spade lug connector
.
Banana plug
.
NOTE
When using banana plugs, rotate the terminals clockwise to tighten them before
0
inserting the banana plugs.
Front panel Display Rear panel Remote Index
18

ININOUT
OUT
L
R
L
R
ANALOG2
ANALOG2
ANALOG1
ANALOG1
AC IN
AC IN
AUDIO IN
AUDIO IN
REMOTE CONTROL
REMOTE CONTROL
DIGITAL AUDIO IN
DIGITAL AUDIO IN
USB-DAC
USB-DAC
OPTICAL
OPTICAL
COAXIAL
COAXIAL
1
2
SUB
SUB
WOOFER
WOOFER
OUT
OUT
AUDIO OUT
AUDIO OUT
wq
wq
(R) (L)
Subwoofer
Speakers
Contents
Connections Playback Settings Tips Appendix
Speaker connection
.
Front panel Display Rear panel Remote Index
19
ININOUT
OUT
SUB
SUB
WOOFER
WOOFER
OUT
OUT
AC IN
AC IN
AUDIO OUT
AUDIO OUT
REMOTE CONTROL
REMOTE CONTROL
DIGITAL AUDIO IN
DIGITAL AUDIO IN
USB-DAC
USB-DAC
OPTICAL
OPTICAL
COAXIAL
COAXIAL
1
2
L
R
L
R
ANALOG2
ANALOG2
ANALOG1
ANALOG1
AUDIO IN
AUDIO IN
OPTICAL
OUT
COAXIAL
OUT
AUDIO
OUT
LR
Analog device
Digital device
R
R
L
L
Contents
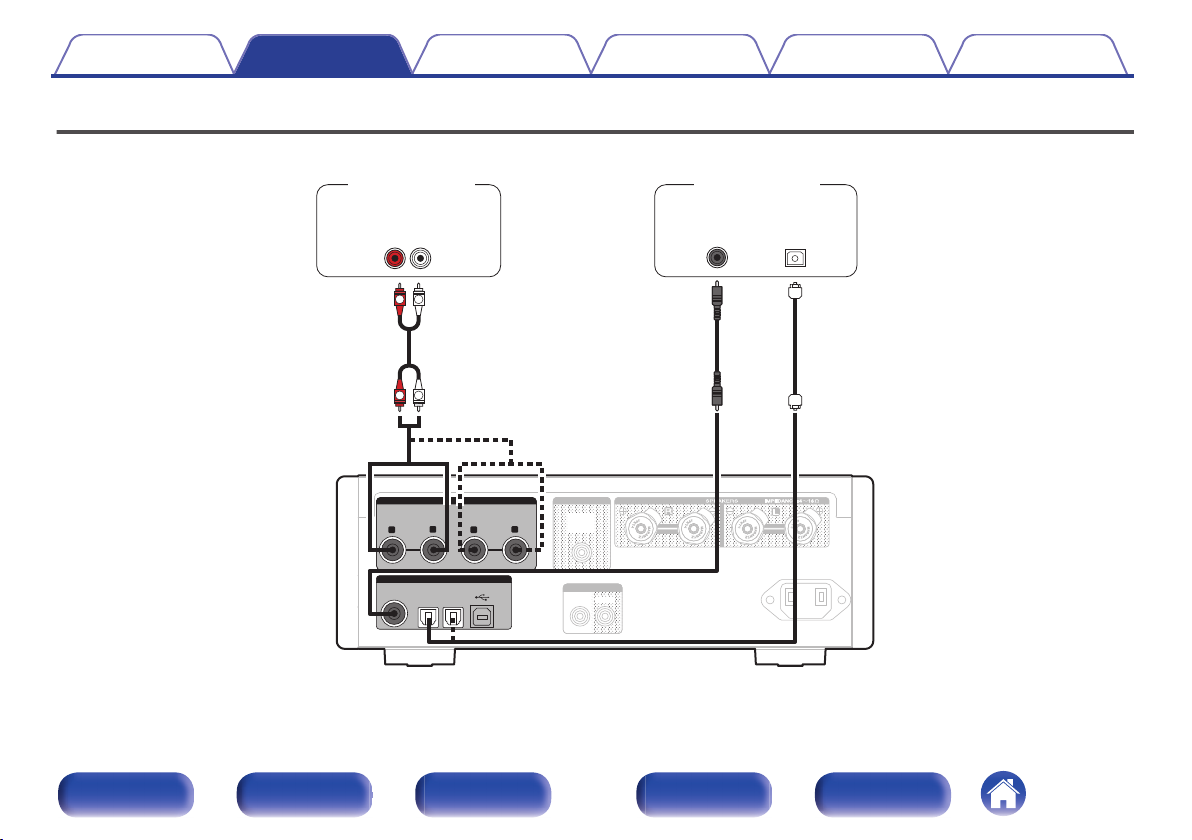
Connections Playback Settings Tips Appendix
Connecting an audio playback device
Connect the AUDIO IN or DIGITAL AUDIO IN to an audio playback device (CD player, Digital device, etc...) using the appropriate cables.
.
Front panel Display Rear panel Remote Index
20
ININOUT
OUT
L
R
L
R
SUB
SUB
WOOFER
WOOFER
OUT
OUT
ANALOG2
ANALOG2
ANALOG1
ANALOG1
AC IN
AC IN
AUDIO OUT
AUDIO OUT
AUDIO IN
AUDIO IN
REMOTE CONTROL
REMOTE CONTROL
DIGITAL AUDIO IN
DIGITAL AUDIO IN
USB-DAC
USB-DAC
OPTICAL
OPTICAL
COAXIAL
COAXIAL
1
2
Ty p e A
USB 2.0 cable
(supplied)
Ty p e B
Computer on which the driver software and audio
player software are installed
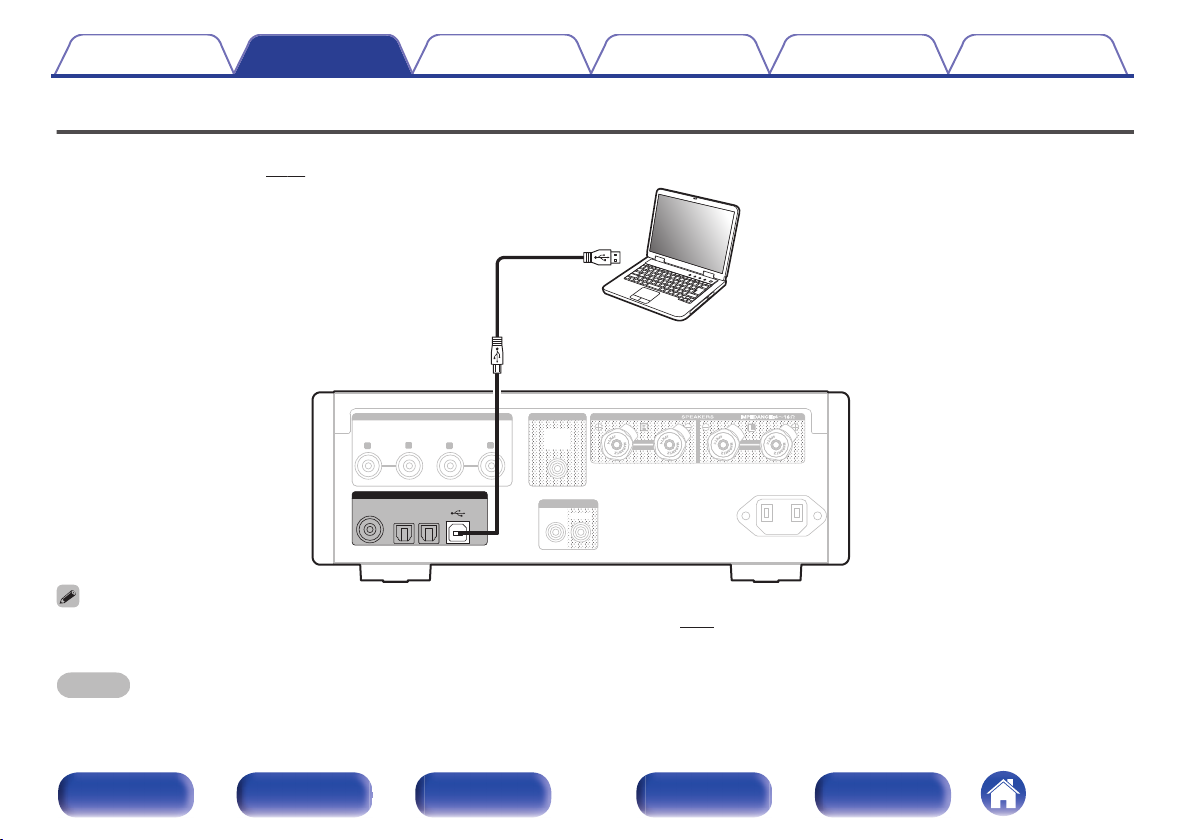
Contents Connections Playback Settings Tips Appendix
Connecting a PC or Mac
By connecting a computer to the USB port (USB-DAC) on the rear panel of this unit using a commercially available USB cable (supplied), this unit can be
used as a D/A converter. (v p. 31)
.
Before USB connecting this unit to your computer, install the driver software in your computer. (v p. 31)
0
Download the driver software from the HD-AMP1 page of the Marantz website.
0
NOTE
Use a cable that is 10 ft (3 m) or less to connect to the computer.
0
Front panel Display Rear panel Remote Index
21
or
iPod
USB memory
device
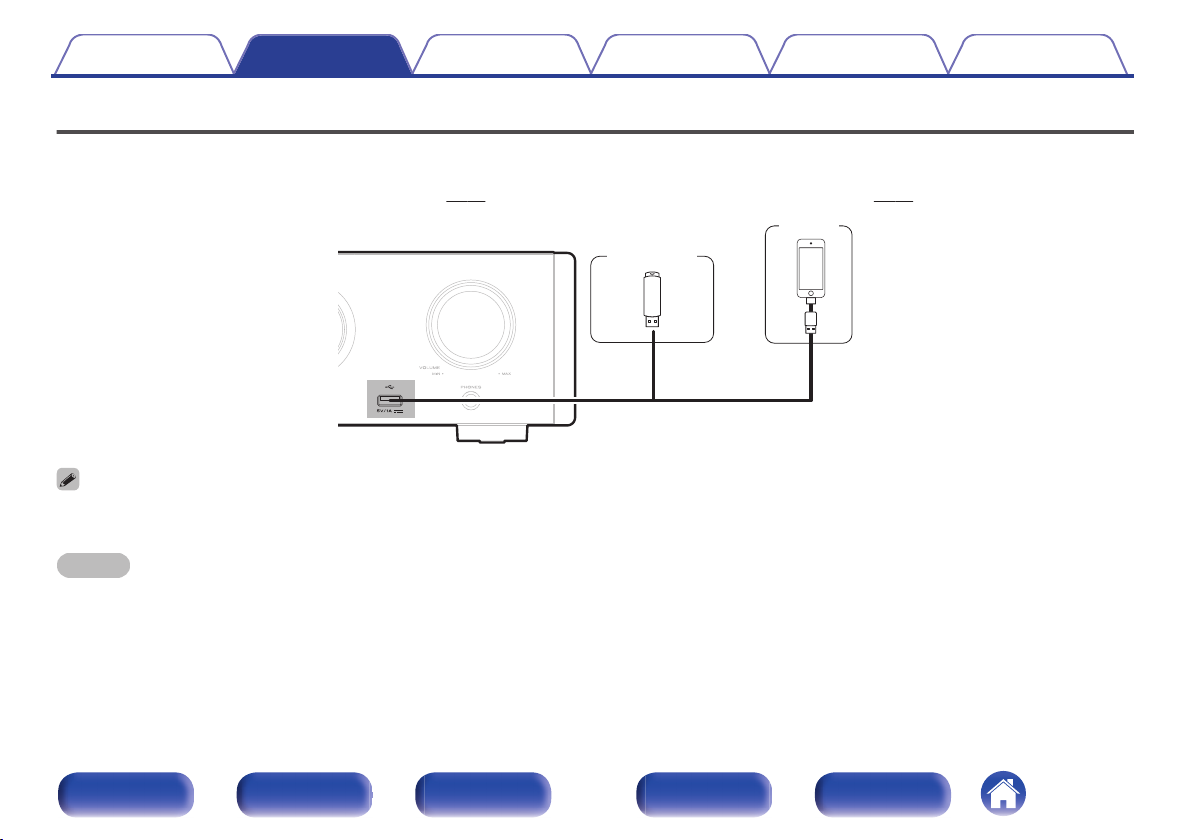
Contents Connections Playback Settings Tips Appendix
Connecting an iPod or USB memory device to the USB port
You can enjoy music stored on an iPod/iPhone or USB memory device.
To connect an iPod/iPhone to this unit, use the USB adapter cable that was supplied with the iPod/iPhone.
0
For operating instructions see “Playing an iPod” (v
0
.
Marantz does not guarantee that all USB memory devices will operate or receive power. When using a portable USB hard disk drive (HDD) which came with an AC adapter,
0
use that device’s supplied AC adapter.
NOTE
USB memory devices will not work via a USB hub.
0
Playback is not possible when connected to a PC via the front panel’s USB port. Connection to a PC is possible via the digital input USB-DAC port (Type B) on the rear panel.
0
Do not use an extension cable when connecting a USB memory device. This may cause radio interference with other devices.
0
p. 42) or “Playing files stored on USB memory devices” (v p. 46).
Front panel Display Rear panel Remote Index
22
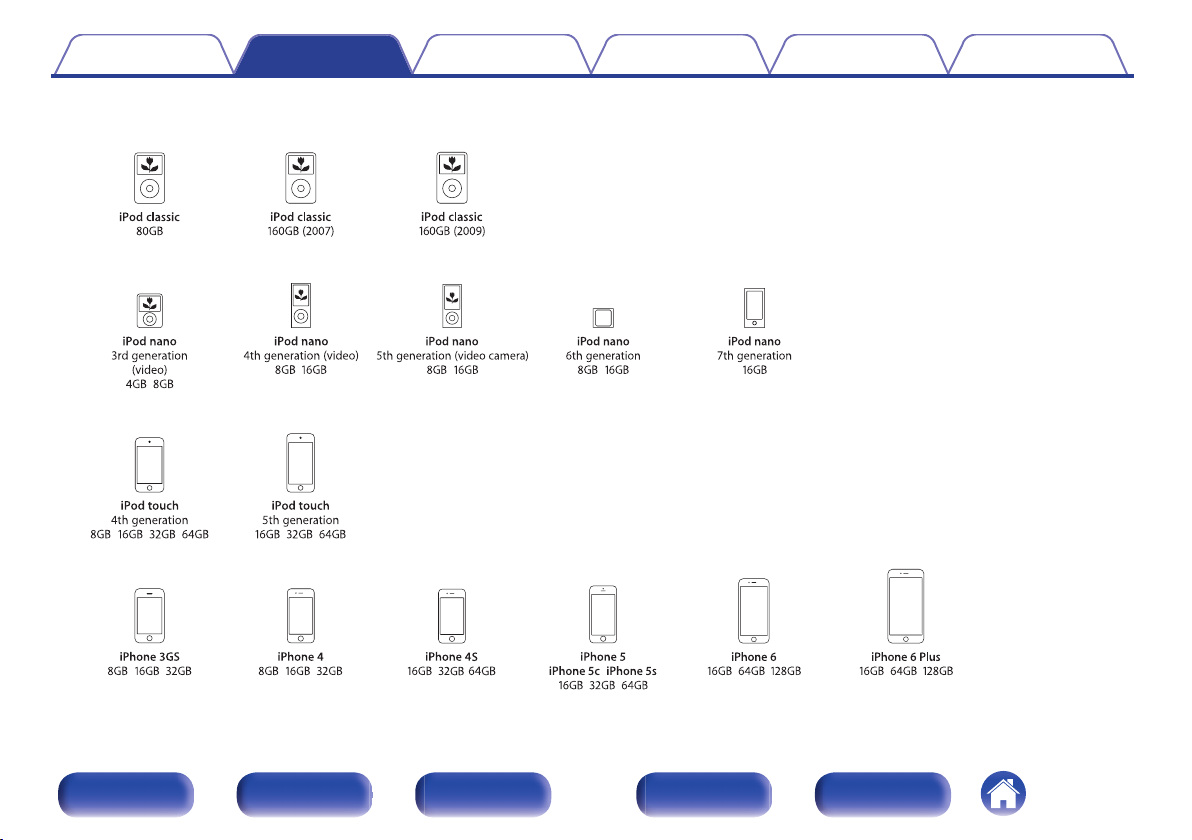
Supported iPod/iPhone models
• iPod classic
• iPod nano
• iPod touch
• iPhone
o
Contents
Connections Playback Settings Tips Appendix
.
Front panel Display Rear panel Remote Index
23
SUB
SUB
WOOFER
WOOFER
OUT
OUT
AC IN
AC IN
AUDIO OUT
AUDIO OUT
IN
IN
OUT
OUT
REMOTE CONTROL
REMOTE CONTROL
IN
IN
OUT
OUT
REMOTE CONTROL
REMOTE CONTROL
RC OUT
Infrared
retransmitter
Infrared
sensor
SUB
SUB
WOOFER
WOOFER
OUT
OUT
AC IN
AC IN
AUDIO OUT
AUDIO OUT
IN
IN
OUT
OUT
REMOTE CONTROL
REMOTE CONTROL
IN
IN
OUT
OUT
REMOTE CONTROL
REMOTE CONTROL
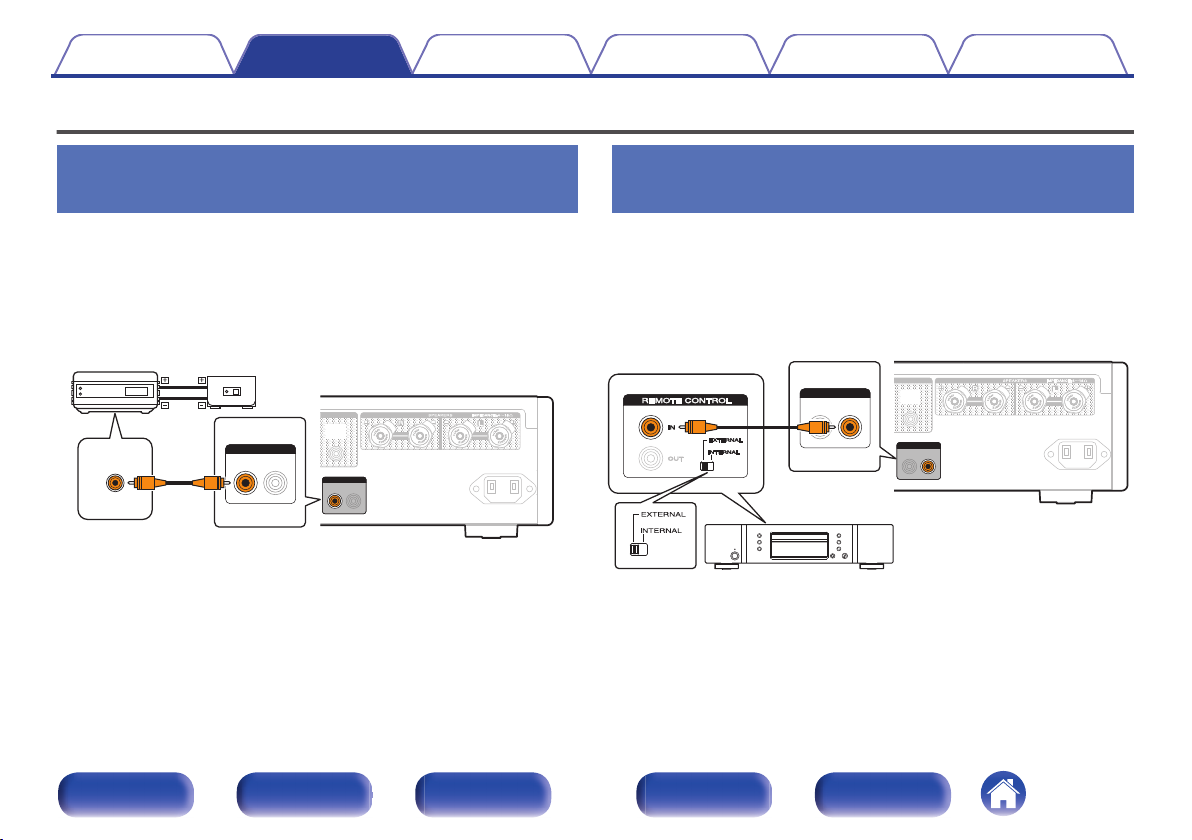
Contents Connections Playback Settings Tips Appendix
Connecting devices with remote control connectors
Performing operations by RC on this
unit without visual contact
You can connect an external IR receiver to the REMOTE CONTROL
connectors to perform operations on this unit with the supplied remote
control unit without visual contact. This might be necessary if the unit is
hidden in a cupboard or corner, so you can’t directly point with the remote
control unit to the device.
.
Front panel Display Rear panel Remote Index
Remotely connecting Marantz audio
devices
You can transmit remote control signals simply by connecting a Marantz
audio device to the REMOTE CONTROL IN/OUT connectors using the
remote connection cable provided with the device.
Set the remote control switch located on the rear panel of the connected
audio component to “EXTERNAL” to use this feature.
.
24
 Loading...