

Page 1

Integrated Amplifier HD-AMP1
Quick Start Guide
Start Here
Commencez ici
Iniciar aquí
Page 2
Before you begin
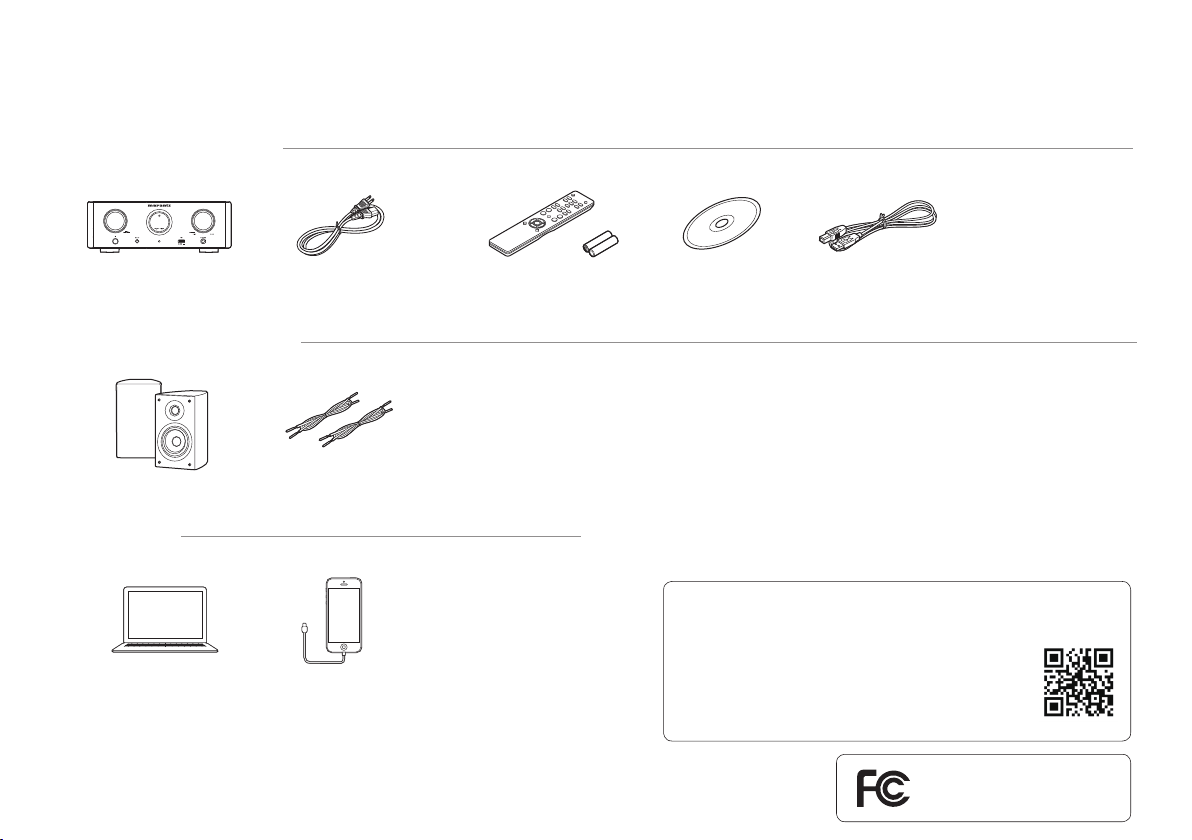
What’s In e Box
HD-AMP1 Power cord Remote and batteries Product manual
Required For Setup
Speakers
Optional
PC or MAC
1
Speaker cable
iPod/ iPhone and
USB cable
USB cable
on CD-ROM
• For more information, visit ww w.marantz.com
• Refer to the enclosed CD-RO M manual or Online Manual
for other functions information and operation
procedure details.
manuals.marantz.com/H DAMP1/N A/EN/
Product Name : Integrated Amplifier
Model Number : HD-AMP1
Page 3
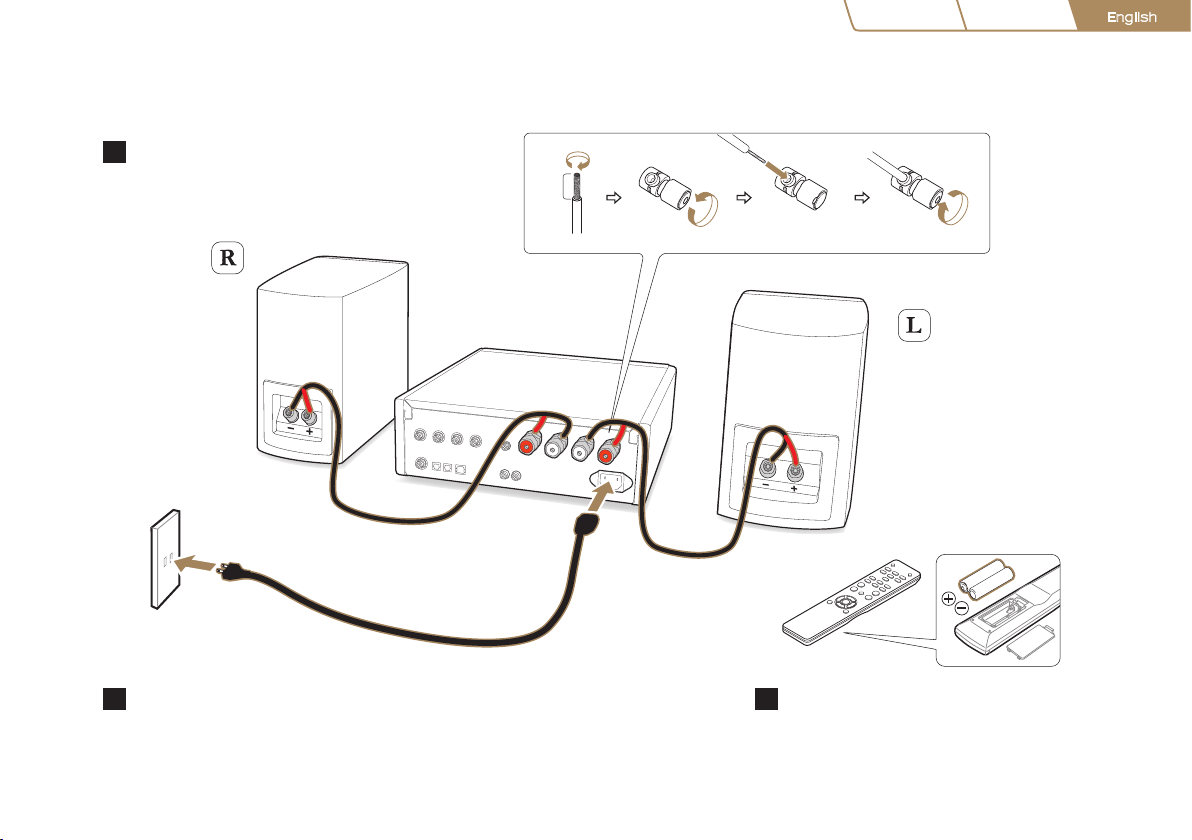
1. Connection
1
Connect the left and right speakers
3/8 inch
(10 mm)
Español Français
English
Connect the power cord from the HD-AMP1
2
to a power outlet
3
Insert the batteries into the remote
2
Page 4

2. Installing the Windows driver software
NOTE: Mac users will use the built-in driver software. No installation is required.
3
1
Download the dedicated driver
from the “Download” section of the
HD-AMP1 page of the Marantz
website (http://www.marantz.
com/pages/home.aspx) onto your
PC.
2
Unzip the downloaded le, and
double-click the exe le.
3
Install the driver.
1
Select the language to use for the
installation.
2
Click “OK”.
1
2
e wizard menu is displayed.
Follow the instructions on the screen.
4
When the wizard is completed,
click “Yes”.
4
Basic trouble shooting
• The driver software cannot be installed correctly if your PC is connected to the unit by a U SB cable.
• If the unit and your computer are connected by a USB cable and the computer is switched on before installation, disconnect the USB and restart the computer.
• Please see the FAQ at www.marant z.com if you experience any issues getting audio to play from your computer through the HD-A MP1. You may also want to check the suppor t pages for your audio
player application.
3
Page 5

3. Enjoying your music!
RANDO REPEAT
DIMMER
POWER
VOLUME
MUTE
INFO
MODE
OPT 1
COAX
iPod/USB
OPT 2
USB-DAC
ANALOG 2ANALOG 1
RANDO REPEAT
DIMMER
POWER
VOLUME
MUTE
INFO
MODE
OPT 1
COAX
iPod/USB
OPT 2
USB-DAC
ANALOG 2ANALOG 1
Enjoying music from your PC or Mac
1 2 3
Connect the HD-AMP1 to your
PC or Mac using the included
USB cable.
Power on. Press the “USB-DAC” button
Español Français
on the remote.
English
DIMMER
OPT 1
RANDO REPEAT
MODE
INFO
ANALOG 2ANALOG 1
USB-DAC
POWER
COAX
OPT 2
iPod/USB
VOLUME
MUTE
4
Page 6

4
On your PC or Mac, select the
HD-AMP1 as the current output
device.
System Requirements
• Windows 7 or 8/8.1
• Mac OS X 10.9 or 10.10
Windows OS
3
Make sure under “Playback” tab
the “HD-AMP1” is set as “Default
Device” indicated by the checkmark.
• When there is a checkmark for a different device, click
“HD-AMP1” and “Set Default”.
4 7
Select “HD-AMP1” and click
“Properties”.
• The Digital Audio Interface Properties window is
displayed.
6
Select the sampling rate and bit rate
to be applied to the D/A converter.
• It is recommended that “24 bit, 19200 0 Hz
(Studio Quality)” or “32 bit, 192000 Hz
(Studio Quality)” is selected.
Click “Apply”.
8
Cli c k “Te st”.
• Check that audio is heard from the speakers connected to
the H D- AMP 1.
1
Click the “Start” button and click
“Control Panel” on the PC.
• The control panel setting list is displayed.
2
Click the “Sound” icon.
• The sound menu window is displayed.
5
3
5
Click the “Advanced” tab.
5
8
6
4
7
Page 7

Español Français
English
Mac OS X
1
From the Finder, select the Utilities
menu item from the Go menu.
• The utility list is displayed.
2
Double-click “Audio MIDI Setup”.
• The “Audio Devices” window is displayed.
3
Check that “Use this device for sound
output” is checked in “HD-AMP1”.
• If a different device is checked, select and “Secondar y
click” on “HD-A MP1”, and then select “Use this device
for sound output”.
HD-AMP1
HD-AMP1
4
Select the “HD-AMP1” format.
• It is normally recommended to set the format to
“384 000.0 Hz” and “2ch-32 bit Interger”.
HD-AMP1
HD-AMP1
5
Click “Quit Audio MIDI Setup”.
5
Use your favorite music applications
on your PC/Mac to play audio
through the HD-AMP1.
•
For high resolution audio playback you will need to
obtain an advanced audio player sof tware such as JRiver
Media Center or Audir vana.
e sampling frequency
of the music le is displayed.
Note
• Additional settings to output audio to the HD-AMP1 may
have to be selected in your advanced audio player application.
Please refer to the user’s manual for your application.
6
Page 8

Enjoying music from your iOS device
RANDO REPEAT
DIMMER
POWER
VOLUME
MUTE
INFO
MODE
OPT 1
COAX
iPod/USB
OPT 2
USB-DAC
ANALOG 2ANALOG 1
1 2 3
Connect your iOS device to the USB
port on the front of the HD-AMP1
using the cable that came with your
iOS device.
Press the iPod/USB button
on the remote.
Use your favorite music applications
on your iOS device to play audio
through the HD-AMP1.
DIMMER
OPT 1
RANDO REPEAT
MODE
INFO
7
ANALOG 2ANALOG 1
USB-DAC
POWER
COAX
OPT 2
iPod/USB
VOLUME
MUTE
Page 9

Enjoying music from your USB storage devices
RANDO REPEAT
DIMMER
POWER
VOLUME
MUTE
INFO
MODE
OPT 1
COAX
iPod/USB
OPT 2
USB-DAC
ANALOG 2ANALOG 1
RANDO REPEAT
DIMMER
POWER
OPT 1
COAX
iPod/USB
OPT 2
USB-DAC
ANALOG 2ANALOG 1
1 2 3
Connect your USB storage device
to the USB port on the front of the
HD-AMP1.
Press the iPod/USB button
on the remote.
Español Français
English
After the contents of your device
are loaded, use the remote to select
something to play.
DIMMER
OPT 2
OPT 1
ANALOG 2ANALOG 1
USB-DAC
RANDO REPEAT
MODE
MUTE
INFO
iPod/USB
VOLUME
POWER
COAX
MODE
VOLUME
MUTE
INFO
BACK
SETUP
8
Page 10

Copyright © 2015 D&M Holdings Inc. All Rights Reserved.
Printed in China 5411 11340 01AM
 Loading...