


-m-rro-rntz.@
Model
Gompact
CDR-630
Disc
User
Recorder
Guide
:tffi
r
+
(o
(o
lr)
ol
r
\t
o
r
cv)
l. l{t',rtl
lrrslrrrt
ttitrl
lrt'lort.
tlrt',r1rPll.1111.f
2. lit'tlirr
r1'l.lir)('rl
3. I lt.r'tl
itrstntctiorrs
{.
lirllou'r'rl.
5. W,rlcr
t'titttrPlt',
bast'nrcrrt,
(r.
tlt,rl is
7. wall.r
cciling
lttslrtrtlions
l{rt
Iltllili.
Wirr.irrgs
slroultl
lirllow,
lrrstrur'tiorrs
arrtl
rreara
()r
(
lt ts
itttti
Starrtis
rctrrrrrntt,n,lr.rl
Ceili.g
only
as rt'conrntt'nrle{
tl. Vt'rrtilation
p()siti()u
rltrcs
applia.ce
'ray
should
bkrck the
as a bookcase
latitD
-'l'lrc
I le,rt
proriuce
()pen
itpplicirnt.t.slrotrlcl
lreat
heat.
venti
9.
raciiakrrs,
that
tions
All
-
l
lre s,rlety,nl(l
l.lr't1.n(
-
All
\\'.lr.iltcs
bt acilre
-
All oPt'pn1i11g
lrathlLrb,
(l
An
;rppliancc
carc.
nray
cilust'
swinltrirrg
-
Quick
,
l'he
rr,,rslrlrorr,l,
l lrt',rP1'1ill1q11'
Ity
tlrt' rrr,trrrrl,rt
tho applilllcg
Moistrrre
neilr
M.uutirrg
-
l'ht.
al,Pliarrt't'sltorrkl
not
interfcre
nrt
be
situated
ventilation
or cabinet
thai
ings.
registers,
stoves,
GENERAL
tlrr. satr'l1r
is oPcr,111,1l.
stops, exccssivo
with
openings;
,ln(l
('.
rt'cl
appliarrt.t,shoulti
arrcl
()l)(,rntin1,
().
tll(,
Io.
arrtl
kiteltt,rr
tnrl
[)(x)1,
slrorrltl
lrrrcr'.
c;rrt c()l)rbinati()t.r
ancl
-
Tlre
applicauce
[ry tho nranuiacuter.
bt.situatetl
its
proper
on
a bed,
or, placed
may impede
trt
situatt,cl
or
other
appliances
()l)(,rillit)t
irrslrrrt.tions
appliarcc
ust, irrstrut
rrot be
sirrk, latrrrtlr.y
tlrc like.
[rt,rrst.tl
force,
ancl
cart
conrbirration
slr.ulcl
so
ventilatiou.
sofa, rug,
in
atuilt-in
tl.re
flow
lway
irrslnrclions
arrtl
irr tlrt,.grer.rli.u
tiorrs
rrst,tl rrcar
orrly
witlr
shoulrl
Lre nroved
ultcven
bc'r.u'tecl
tlrat its
I,or
ex;rmplc,
or sir.nular
of air
trougli
lnrnt
lrt,at
(including
slrorrltl
slrorrlti
slrorrlti
lrc
wittt,r
ttrb,111..1
1y.,1
()r
rr
t.al.t
witlr
surfaces
t() ovcrturn.
t.
a wall
ltx.atiorr
or
thc
iurface
instalation,
the
sources
strclr its
amplificrs)
INFORMATION
lrt,
lrt,
_
sti)n(l
such
lor
that
10.I'orvt'rsorrrtt'.otrly
nppli1;1.,'.
| |. ( ilrtrrrrlirrg
tlrt'grotrrrtlirrg
.rpl)li.rn(.('
12.
l\rwcr-('.rel
lhey
agai.st
rcceptaclcs,
('lurrrirrg
13.
nra nrt
14.
Nrrrrrst'
lrorrr
15.
.object
and litluids
1 6. Danrago
.r
service
a. l-lrc
()bjects
b.
c. I'hc
'l'he
cl.
change
e. The
l7
Servicitrg
that
described
referred
ol tlrt'
ty|t' tlt'st
or' l\rl,rriz,rtiolr
or polarizatiorr
is not
arc rr.t likely
thcrrr,
Payil)ll
antl
-
l lrt,appli.'111g
lrct rl rer.
l\'r'irnls
tlrc outlt't
wlrt'rr
ancl
Litlrrir'l
arc not
llcrluiring
pcrsonncl
p(lw('r-supply
havt'lallcrr,
nppliiln(.c
appliance
in
perforrnance;
appliance
-'l-lrc
in
to
qualified
llrt'appliirnt't'.lrorrltl
t ilrt'rl
itt tll('
tlt,ttrrttrl.
l)r.tt'ttirr
t. bo walkt'tl
parti('ul.r
the point
thc
-'l
lclt
E'try
spillecl
wlrcn :
lras
cloes
has
usor
.perating
service
whcrc
lrt'powt,r
trrrusecl
itrkr
scrvice
corrl
or litltricl
bccn
not
beeu
sh.ultl
()l)('rirti()n
-
l 1tt,
1ry1,1.11;111y11s
rnc;tns
of
-
I'.wt'r-srrpply
.rr.r
attt:.ti.r
thcy
slroultl
bc
urrcl ol
for
a long
-
Care
should
tho
enclosure
-
The
aplia.ce
or
pltrg lrus
has
cxp()sc(l
appear
or
dropped,
personel.
bccn
[o rairr
to
or the
..t
attcrtrprt
i.structiorrs.
TIONS
lrt'trrrrrrt't.lt'tl
irrstnrt
atr
-.
c'rtls
pirrclretl
by
t.
c.rtls
cxit fr(nt
clcaltt:cl
tlrc appliitrrt.e
pcriril
be taken
through
should
bct,n
tlantagctl;
spillccl
or
;
operate
..rmally
enclosure
t.
scrvicc
Alr
lpalrrwt'rsrrpply
pr
Ii9rrs
tll,tt
sll()ulLl
|
.
l$
slr,ulcl
itcr.s
placccl
lt plrgs,
tlre appliance.
orrly
as recortrntctrclcci
slrolrlcl
of
tinrc.
so that
openings.
be
seviced
or
into
thc
or
damaged.
the
appliancc
otl-rer
servicl'g
as rrrarkctl
[rr,l.,rkt,rr
bc
r.utcrl
up.'.r
c()rvcllic.cu
lre
unpluggccl
obiects
do not
by
appliatrcc;
exhibits
shouli
lrr
Llre
so
thal
s. tlrat
by lhc
fall
qualified
or
a marketr
btyond
be
CAU'I
lON:
I{EMOVE
INSIDE.
ffi
'l'O
COVHI{
REFER
DO
ITISK
OF ELECTITIC
tfo
ITEDUCE
1'llE RISK
((){
I]ACK).
SEI{VICING
TO
REDUCE
NOT
EXPOSE
SHOCK
NoT OI'EN
()t-
ELECI'|{|C
NO
USER-SEITVICEABLE
TO
QUALIFIED
THE
SHOCK,
SEITVICE
I'ERSONNEL.
RISK
THIS
APPLIANCE
DO
N()T
I'AI{TS
WARNING
FIRE
OF
OR ELECTHC
TO
RAIN
OR MOISTURE.
The
lightning
within
alert
the user
"dangerous
enclosure
to
constitute
persons.
The
exclamation point
triangle
presence
maintenance
lilerature
SHOCK
,
flash
an equilateral
to the
voltage"
that
may
a risk
is intended
of important
(servicing)
accompanying
with
arrowhead
triangle,
presence
within
be
of sufficient
of
electric
within
to alert
operating
instructions
the
symbol,
is intended
of uninsulated
product's
the
magnitude
shock
to
an equilateral
the
user
to
the
and
in
appliance.
to
the
USE
OF
CONTBOLS
PERFORMANCE
THOSE
SPECIFIED
HAZARDOUS
The set
complies
OF PROCEDURES
RADIATION
with the FCC-Rules,
21 CFR 1040.10
Canada
This
digital
radio noise
Radio
Communications.
Cet appareil num6rique
d6passant
brouillage
communications
apparatus
emissions
Interference
les limites
radioelectriques
does not
from
Regulations
applicables
du
Canada.
This
CAUTION
OR ADJUSTMENTS
OTHER
HEREIN
n'6met
edict6
MAY
RESULT
EXPOSURE.
Parl
exceed the
digital apparatus
of the Canadian
pas
dans la reglement
par
warning
Class B limits
de bruits radioelectriques
le ministere
is located
as set
OR
THAN
IN
15 and with
for
out in the
Department
sur le
des
on the
of
rearside
TO PREVENT
BLADE
OF
PLUG
INSERTED.
POUR EVITER
INTRODUIRE
FICHE
DE LA
DANS
PRISE
LA LAME
LA BOBNE
ET POUSSER
LASER
Type
Wave lenghl
Output Power
Beam
divergence
and inside
this laser product.
CAUTION
ELECTRIC
TO
SHOCK,
WIDE
SLOT, FULLY
ATTENTION
LES
CHOCS ELECTRIQUES,
LA
PLUS
CORRESPONDANTE
JUSQU'AIJ
Semiconductor
775-795
2,5
mW
35 mW
60 degree
(at
nm
(Read)
(Write)
MATCH
LARGE
FOND.
laser
GaAlAs
25'C)
WIDE
DE LA
cot,t'otl**-F
WHEN OPEN.
DANGER:
vA
R o I lYil+^?f,:^'lf
VAR
N I N G !
THIS
DEVICE
OPERATION
INTERFERENCE,
MAY
CAUSE
This
equipment has
limits
for
FCC Rules.
protection
installation.
in accordance
interference
guarantee
installation.
DO NOT STARE
rNVrsrBLE LAsER
ALTTIINANAKYIVIATTOMAATLELASERSATEILYLTE.ALA
KAI
osyNt tG I ASFRSTRALNtNc
ocrr spARREN AR
COMPLIES \fITH
IS SUB,IECT
UNDESIRED
a Class B digital
These limits
against harmful interference
This
with the instructions,
to radio
that interference
---
SO SATEESEEN.
AND
been tested
equipment
communications. However,
INTO BEAM
RADrATroNWHENoprr'r.
ii3:xl5-l?,"'iH-,,*,,,0
NAR DFNNA
uRKoppLAD. BETRAKTA
PART 15
TO THE FOTLO\rING
(2)
THIS DEVICE
OPERATION.
and
device,
are designed
pursuant
generates,
will not
-
-
---
0,,,
DtL AB
oppNAD
EJ sTRALEN
OF THE FCC
MUST ACCEPT
found
to comply with
to
provide
to
in a residential
uses and
may cause
occur in a
I
]
T\TO
part
15 of the
reasonable
can be used
harmful
there is no
partrcular
CONDITIONS
or
DANGER
AVOID DIRECT
(U.S.A.)
RULES.
(1)
:
ANY INTERFERENCE
THIS DEVICE
NOTE
the
lf this
equipment
television reception,
equipment off
the interference
-
reorient or relocate
-
increase the
-
connect the
from that to which
consult the
helo.
-
Invisible
laser
EXPOSURE
RECI]IVED, INCLUDING
and on, the
separation between
equioment into
dealer or an experienced
MAY NOT
does cause
which
by one
or
the receiving
the receiver
user is encouraged
more
CAUSE
harmful interference
can be
determined
of the following
antenna.
the equipment
an outlet
is connected.
radiation
HARMFUL
INTERFERENCE
on a circuit different
radio/TV technician
when
TO
BEAM
THAT
to radio
by turning this
to try to
correct
measures
and receiver
open.
or
:
for
THIS PRODUCT WAS
CONNECTORS
THE POSSIBILITY
IF YOU HAVE
ANY
CHANGE OR MODIFICATIONS
MANUFACTURER
OR
ANY PROBLEMS
FCC VERIFIED
BEWTEEN
OF CAUSING INTERFERENCE
SYSTEM COMPONENTS. IT
COULD VOID THE
IMPORTANT
UNDER IEST
CONTACT YOUR DEALER.
TO THE EQUIPMENT
USER'S AUTHORITY TO
CONDITIONS THAT INCLUDED
IS IMPORTANT THAT
TO RADIOS
TELEVISION
BY THE
USER
OPERATE
USE OF SHIELDED
YOU USE
SETS AND
NOT
EXPRESSLY APPROVED
SUCH EOUIPMENT.
SHIELDED
OTI']ER ELECTRONIC DEVICES.
CABLES AND
CABLES
BY THE
TO
REDUCE
GRANTEE

PLAYER FRONT
PLAYER BACK
r-r:.E r-l[ru
llel |18l F7l 116l ll
nq F1
bl
l14l 113
p1
XLR
ANALOGUE terminals
(polarity)
@^J{
6
input
DISPLAY
62
oe
loal
161l
o
@
@
+
+
l58l
co
REMOTE
ai I
".1
lacl
l33l
34
rrl
l36l
i37l
38
O
INPUT
O
1
C)
4
O
7
cl
TRACX INCS PiOGRAM
flilaUzE
CONTROL
REPEAT
G
3
O
6
cl
9
O
l46l
l4sl
441
431
42
c0 sYilc flEc
141
l4o
13el
CONTENTS
I
t.s
lo
F
Descripci6n
Intrcducciijtt
Concxi6n
Uso
dc la Grabaclors....
Grulnci6n
de las
-
PrecsucioncJ
ilustraciones
............,......
....,,.......
.......2g
.......2g
............3O
........,...31
..........:12
Finalisation
Informations
Autres
Conseils pour
Nofns.,..........
Finolisaci6n
lnfbnnuci6n
Infonnoci6n
Oonseios poru
N(rfrr.r...........,
Effacement
/
compbmentaires
infonnations
une utilisstion
Ilorrodo
/
Complcnrcnturis
sdicionnl
optirrtizur
-
Lecture
...........
-
Rcprocluciin
-
el
uso..,,......
-
Remides
optimale
l.oculiztcititt
cas de
prcblenms
ilc
....,.........23
panne
..24
...,....26
.........,.,.3S
..J6
...,........32
............Jg
en
..................,........25
.............,........,,....22
..................,,........:lg
I
ls,
ts
l.[
I
lo
Itc
to
l,n"
I
I
l(o
It
lOl
t5
|'t
l\
lo
La.

ILLUSTRATION
For illustration: see fold-out
I
Front
!
,i
\_l
pOWER
a'l
I t I
$l
| 2 I
PHONES...............p|u9 for headphones
3
|
I LEVEL...................headohone volume
la I
oisplay
l5 | Disc
-
6
| OPEN/CLOSE
7
| REc.......................record
El ftrunlzf
-
[9 ] eRRSe..................erase
Il0 CO
-
pnrv
En
li2l ruexr )1..............nexr
plny
ltsl
_
pnUSe
+l
It
5l
l1
STOP I ................stop
LlQl Recording level
-
L1Z nUfOnUnN...........determine
EE OtSpUY...............select
1
el
INPUT
ON/OFF..lurns the UNIT on/off
(information
drawer
..............finatize recording
SYNC..............synchronized recording
screen)
A
ooens/closes disc drawer
when recording)
l{.............previ0us
).................start
lt...............interrupt
(analog)
...................select input
DESCRIPTIONS
track/disc
track
lrack
ptay
to
playing
display
record
or
or recording
recording
signal
track number
information
(automatic
start
system
Remote
lst
OpgN/CtOSE
32
1NPUT ...................se|ect
331
Number keys 0
341
SToP r
351
PREVIOUS l{......previous
136l
Search backward {{
l37l TRACK
Pq F1NA112E..............f
Fsl
COSyI'IC ...............synch
control
a..Open
-
..............,.stop
|NCB........marks
or close disc drawer
input
9 select
playback
track
track
inalize recording
ronized recording
when
record)
signal
track number
number
during recording
l+ol nec o..................record
pROCRnm
4ti
...........se|ect
lari rnsr.....................fast
la3l
l44l
l+sl
Eql
4Z nrprnr..,.............repeat
b4 OtSpl-Ry...............selection
forward
Search
}}
NEXT )1...............next
puY
).................ptay
pnUSe
............interrupt
playback
program
search
track
playing
or
play
for information
recording
(automatic
start
to be displayed
Back
_
20i
XLR Analog input
lzil
tnput level select
_
221
Analog
select
lz3l
Analog input
Analog
--1241
Lz! Digitat
[26]
-lzZ
l?9-J
Ed AC mains voltage
fd
output
input
oigitat
output
Optical digital input
Opticat
digital output
and CDR630F H)
Connection to AC mains
(left
and right)
(-10dBu/+4dBu)
switch
(XLR/Cinch (RCA))
switch
(left
and right)
(left
right)
and
selector
cord
(only
for 74 CDR630/02M
Display
Ksi
Remote control is
lsol
C0.........................CD
lstl newnfnBLE......CD-RW
ls4 ReCOnonBLE
L53l lndication
pnUSe
@
ERASE..................erase
P-ql
E ftrullZf
Ls3 nECOn 0...............
E9
cosvnc...............cDSyNC
IQQ] Track
Lql nepenf
le4 lUfO
p1c........................digital
lqgl
164l
ANALOG...............analog
pnOC....................p|aying
bd
.................pause
number
(1)..........repeat
THACK ......automatically
active
present
(a pre-recorded
CD-R
or CD-RW
present
disc
....CD-R
of recording
recor0-pause
erase-waiting
..............finalize
waiting
record
present
disc
playing
and
function is
last
track or entire
recorded
setting)
(f
lashes
recording
and duration
function
input
signal
input signal
based on
setting)
increasing track
CD or finalized
disc)
for recording
for recording
level
(flashes
CD
in finalize-
playback
setting)
ptaying
active - during
(flashes
CD
in record-pause
activated during
numbers
program
or
in
4

INTRODUCTION
Unpacking
Congratulations on the acquisition
This CD Recorder
own audio
play
to
You
The
There
1
pre-recorded
all
can now create
discs used to record
are two types of recordable AUDIO
Recordable
CD
Fully recorded
discs can be
disc can be recognized by the following logo:
ncoMPAcT
reJ[5G
DIGITALAUDIO
liET'lElEElI
CD ReWritable Audio
Recorded and linalized
most
CD
discs. An increasing
suitable for these
recognized by the following logo:
OIGITAL
now enables
Compact
COMPACT
IsG
Discs.
Naturally the recorder
CDs and combined CDs,
your
own high-quality audio recordings
musl bear the logos shown below. .
(record
Audio
and subsequently finalized audio
played
players
AUDIO
most
on
(multiple
audio CD-RW discs can be
and recorders that are suitable for CD-RW
number of
in
discs
your
of
you
to record,
once):
players
CD
0r
recording):
players
the future. A CD-RW disc can be
or
lRewritabte I
you
Once
to
use a ReWritable
while following the instructions
Attention!
start using the recorder,
'make'your
own
Recordings may
personal
It is forbidden to copy material
copyright, including computer
television and audio recordings. This appliance
not be used for applications of
Nevertheless, we recommend that
CDs.
(CD-RW)
use.
you
will discover how easy it is
digital audio disc on
given
here.
only be
made for
CDR630 CD Recorder.
play
and erase
can also be used
such as CD
discs:
CD-R
and recorders. A
ncoMpAcT
your
Extra.
on CD.
CD-R
EJ[5G
played
on
and recorders will be
ncoMpAcT
oIsG
IneWiitioiel
you
your
first attempt,
professional
protected
programs,
this type.
or
by
films,
may
First check the
following:
-
CD Recorder CDR630
-
Remote
-
Power cord
-
Audio
-
Digital coaxial audio
-
lnstructions
lf one of these
immediately.
you
move
contents of the
control with batteries
-
(2
cables
Save
the appliance.
with red
components is missing,
packaging
the
AC mains voltage
(for
74CDR630/02M
whether
Check
the
same as
recorder
position
the voltage indicated
the voltage
have a selector on the back
indicated for lhe local AC
packaging.
packaged
white
and
(with
cable
black
material - it may
selection
and
on the back of the appliance is
of the mains.
(29).
mains voltage.
lt
plugs)
plugs)
please
CDR630F H only)
Some
Set the selector to the
Setup
-
Place the recorder on a strong, vibration-free
-
Do not
sunlight.
-
Do not
-
lf the recorder is
space
ventilation.
Attention!
the recorder near a source of heat or in direct
olace
use the recorder under
placed
remains free
lf the appliance is not
with the instructions, this may result in
dangerous radiation or other risks.
Only authorized technicians
appliance casing or to
maintenance.
on all sides ol the recorder for
extremely damp conditions.
in a cabinet, make sure that a 1 inch
used or operated in accordance
are
perform
repairs or
should contain the
separately
your
inform
models
surface.
allowed to open the
supplier
come in handy if
of this
proper
exposure
to
l*
t.g
lul
tfi
L
Read the text carefully and keep the instructions close at
you
that
can refer to them if necessary.
hand
so
5

CONNECTIONS
(PRE-)
AMPLIFIER - CO
PLAYER. DAT RECORDER
The numbers between
ittustration.
1
!
$fhis
$l
CD Recorder can
amplifier
Fre-t
In
addition,
-to
connect the CD
audio equipment offers.
Please refer to the operating
-equipment
The following options are available:
-
Cinch
-
XLR
-
digital
-
optical connections
Cinch
For recordings and
1
with red and white
the following diagram:
on
from any digital or analog
the unit can be used as a
lirst.
(RCA)
connections
analog
connections
(RCA)
{PRE.}
parentheses
be used lo
Recorder based on the
analogue
connections
analog connections
playing,
plugs)
AMPLIFIER - CD
refer to the
record
directly
audio source.
regular CD
possibilities your
instructions for
connect
the CD
PLAYER . DAT RECORDER
your
(using
the enclosed cable
Recorder to
fold-out
or through a
player.
Read how
other
other audio
a source based
Analog input
2
select switch
"V,,,,"-
Input level select switch
3
nl.
.l
"O
It .,r-r'1
ll'',
(21)
l.
O.
_ll
3
,r rrL-n'.r'
I
a
(22)
choose either
ltlrtt',r'
lll l
XLR.
selects
rm'1
xLR
;
Lnrulloc
ttL
rml l@@
r-r
XLR CINCHI
;
Larurloc
rr rl
CINCH1
rHJ
-10dBu
|
I
l-
rnJ
D@
our
I
ANALOG
or +4 dBu.
-
lN
OUT
ANALoc
-
2 Analog input
select switch
(22)
selects Cinch
(RCA).
'),-
-lodBu
L..u=J
\p4ary
+4dBu
I r
XLB CINCHT
\k:$'-
XLR analog connections
1 For recording,
Recorder lo a source based on the following diagram:
connect
(using
analog balanced cables) the CD
o@'
I
!
ANALOG
ourl
J
@
ltN
l-o
Digital
1 For recording and
with
the following diagram :
connections
plug)
black
(PRE-}
the CD Recorder to a digital amplifier based on
AMPLIFIER - CD PLAYER - DAT RECORDER
m oo
playing,
connect
,@@;
owl
I'x
..r'r,,:r::,::'
tt
lL.-E
(using
-ll
E
llLJ
the
'*.
('
t,
.D
F{rroure
enclosed cable
*',1
6

Optical
digital
connections
Using
the
remote
control
1 For
recording
available
on the diagram
digital optical
caps.
(PRE.}
playing
and
your
from
supplier)
below.
connections.
AMPLIFIER
(using
a suitable
connect
To do
so, remove
We recommend
.
CD
1,"
PLAYEB
ourl
.
DAT
fibre-optic
the
CD Recorder
the
dust caps
that
vou
RECORDER
cable,
based
from the
save
the
lnserting
1
2
3 Reolace
the
Open the
Insert
two
indicated.
the lid.
batteries
battery
lid.
'AAA
(R03
,''
or UM-4)
r\-'-'--
batteries
in the
manner
I
ll,
l0
t
USING
The
numbers
THE
between
illustration.
Switching
1
Connect the
point
Press
CD Recorder
plug
(30).
Plug
the Power
to turn it on
RECORDER
parentheses
ON
and
power
on the
the cable into
ON/OFF
button
(display
refer to
OFF
cord in
the mains.
on the front
will
the fold-out
proper
the
(1)
light up)
connection
of the
or off.
Attention!
Do
not
Never
use
alkaline,
Note:
-
player
The
control.
-
Always
make sure
and the appliance.
-
When
Ottl
cannot be
point
the remote
there
you press
(49)
on the disptay
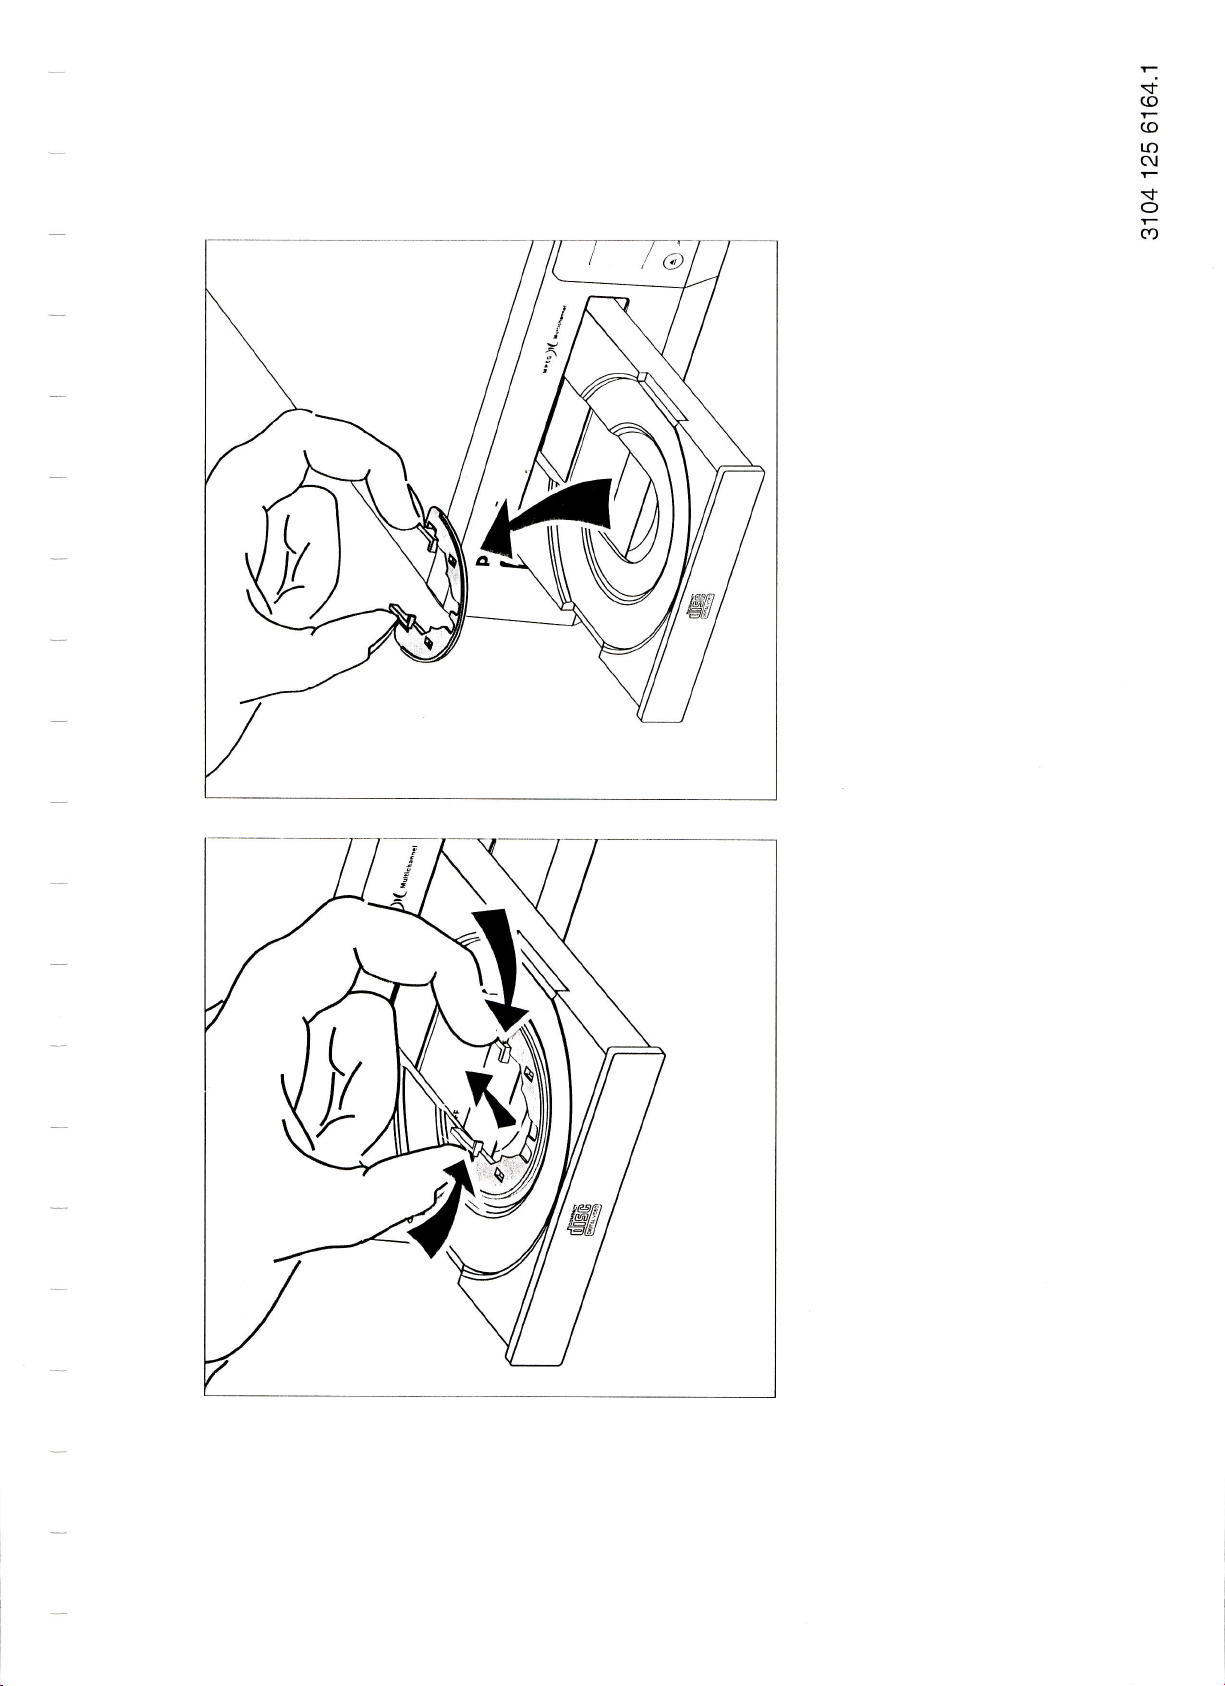
Inserting
Inserting
1
2 Insert
3 Gently
discs
Press the
to open
appropriate
button
OPEN/CLOSE
the disc
an appropriate
area
press
(6)
to
close the
use old
and
the front
and new
different
etc.)
are no obstacles
a button
types
together.
switched
control
on the remote
of the
removing
button
drawer.
(see
disc
in the drawer
of the drawer
drawer.
batteries
of batteries
on and
directly
between
CD Recorder
together.
off using the remote
towards the
the remote
control,
discs
(6)
on
the front of the
Introduction
with the
label facing up.
press
or
(standard,
recorder
the indicator
witt light
1
p.
and 2
the OPEN/CLOSE
and
control
up.
appliance
in
5)
the
7

g-
Note:
-
Check to ensure
Disc
Maintenance).
-
you
lf
insert
drawer,
During
the recorder
this
recording
Removing
1
discs
Press the
to
open the
2 Remove
3
press
Gently
(6/
button
RECORDING
The
numbers
-_illustration.
General
Make
sure the
REWRITABLE'is
types
of disc.
o,o ouro ,r0.,
t
A\Aroc
I
PRoc
I
qu"it:.i*uil ik : :
I
|
ru$':"rFEEE'l-s3s"s
lf the disc
automatically
can
Recordings
recording
Display
snown.
A maximum
._
already
be started
can
time left
button
that the recording
a blank disc
process,
time used
and the last
OPEN/CLOSE
disc drawer.
the
disc from
the front
to close the
between
Comments
display indicator'CD-RECORDABLE'
on; the recording
conlains
search for
from
there.
only be made
on the
(18/,
after which
gg
tolal
of
tracks can
nonlinalized
or
will calibrate
the
display willfirst
track number.
button
the drawer.
of the drawer
drawer.
parentheses
procedure
'oro,
,,rror,
,r"
recordings,
the
end of the last
if there
disc. You
can check
the remaining
be recorded
side of the
CD-R or CD-RW in
the
disc
for
show Di1_- and
(6)
on the front
press
or
refer
to the
is
,*oa*
,,",
the
CD Recorder
track
are
at least
this
recording
on a disc.
clean
(See
disc
is
the
optimum
recording.
then the
of the
appliance
the OPEN/CLOSE
fold-out
or'CD-
the
same for
aorrr.
lRFcoflDl
lFrNAuzEl
EB^SE
I
I
both
I
I
I
I
]
*::
]
will
so that recording
seven
seconds
pressing
by
time
the
will
of
be
Attention!
Never
this can
power
lf
a
Recorder
power
will
indicate Rff0r'ff?.
discard
tr(i
AUIO InACK nfPfAT
ANAL(JG
l-, l- t- l-t I
PROG
f(Lt-,-til
O)1, lnr(oRDAsrr
Manually
Preparing
.f
1 Press
2 By
r
+
Attention!
To
start recording
1 Press
to
begin recording
Make
sure lhe
the INPUT
display.
pressing
automatic
track marking.
TRACK'will
r,( n,o n
ANALOG'.'.,,-,,,'-l*
PROG
Ol)l lREroRDABrEl
lcD lREwRuABr€l
With
automatic
automatically
at least
three
manually.
With manual
time during
(37) (on
the remote
seconds. Track
lf
the original
seconds,
manually.
recommended
operation
the
REC
display
indicator
switch
the CD Recorder
damage the
failure
occurs
will
attempt to repair
is restored;
that
r : : :
.,
during
disc because it
I IOIAL REM
.30
!0
50
20 10
recording
disc is free
button
AUTO/MANU
appear
n.l),*EAr r rorAl
L: : :
Rlg
increments,
added
seconds;
increments, you
recording
numbers
the
you
lf
of the
(7)
button
will
of scratches
(19)
AL
"automatic"
lf
on the display.
l9 ::!
19 l!
after a
silence
track numbers
pressing
by
control);
cannot
pauses
has
track numbers
are recording
you
that
track numbering.
to
enter the Record-pause
start to flash
off when recording;
disc.
during recording,
the
disc as
procedure,
this
ll recover
is unsuccessful.
may no longer
TflACK TIMf
/
r-|:i
,_
tr
.6
3 0
ovtq
an analog
and/or
l-li,ttlL[]E
until
/l
L
you
(17),
mM
:q
a new track
(<
can
add track numbers
REC
the
minimum
be added
lasting
should
always
'BECORD'
appears
/l
i'#*!
can select
is
selected,
number
-50d8)
cannot
(7)
or TRACK
track length
after recordino.
less
be increased
from Lps,
select manual
the
soon as the
the
display
read/record.
source
particles.
dust
on the
manuat
'AUTO
will
be
on the
original of
be added
at any
INCR
is four
than three
it
is
mode.
CD
or
The
I

DIG AUTO
ANATOG
PNOG
Olll FFaOFDIBIEI
: : :-a
pq
To
set the desired recording
TRAC( REPEAT 1 TOTAL REM TffACX
L:::
40
50
30 20 r0
: :
B:
lstwnrrA8ul
level, start
source and adjust the recording
(16/
knob
light up on
so that
all of the blue but none
recording
the
and
playing
display during the loudest fragments.
+
you
lf
number,
DIG AUTO TNACK REruATI TOTAT
ANAI
OG MECoRDI
period
want
a
press
of silence
PAUSE
REM TRACK TIII,iT
(14).
A three-second
be recorded.
2 Press PLAY
anarog
{
The relevant
displayed. Press
total recording
3 Press the
(13)
to
source.
track number
the Display button
time remaining.
STOP button
recording,
start
and the recording time used will
(15)
to stop in lhe recording
Note:
-
ln the automatic mode, recording
second silence
-t
You can also
(15)
button if
-50d8)
(<
the PAUSE
use
you
want to
on the original.
button
stop and re-enter the Record-Pause
m00e.
-t
After recording, the
temporary table of contents of the disc will
be automatically up-dated. During
indicate LllaXE / t.
DIG AUTO TRACK REPEAT] TOTAL
ANALoG
PRoc t-.l
O))l
LCq IR€WRITABLE]
llnTl
:
r
tnEeof,DrBiEl
:
F
I
,40 -30 .20 -r0 -6
REI\4
l-t
r1
l-l
Aftention!
you
lf
want to
player,
discs'p.
play
the disc in another, regular CD-
the disc must
11.
be
.3
6
0
playing
the analog
level
using
the
record level
of the red segments
level indicator
on the
CDSYNC
at the beginning of a new
pause
(silence)
and.immediately
(18)
to view
start
the amount
modes.
will stop after a twenty
(14)
instead
process,
this
TII\,IE
TRACK
T- t- i!!!gRD!
i i_ Eil,lArlzEt
I
I_
.3
0 ovEB
linalized.
See'Finalizing
the
of
the display will
SYNC
CO
tEBAsE]
PAUSE
will
the
be
of
STOP
Press
the INPUT
jf1[,
i:;(L
,-1,i,
(19)
button
number
a
frfrf !]/7f or DFf
display.
DIG AUTO TMCK
ANAtoG
f-
'^oo
L
rREfdRbnnEL:::
ol)l
:..
Cq
iRFWBITABIEI
CXL SRC and OPT
FEPEAT] TOTAL REM TRACK TIME
\/
/\
R:
I
t_
50.40.30
: :
L: L:i
_t
20 10 6 3 0 JvtF
SRC are displayed in
Rate Conversion).
CXL 44 and OPT 44
you
lf
want
a full
with
sample frequency
pressing
2 By
automatic track
TRACK'will
DIq AUTO TffACK
aNAloG
PROG
O))l ,BLcoRoABrEl
HEwqtTABlfl
lcol
-f
In Auto
mode, track
the
digital source material. In
are displayed in SRC-off
(1
to 1)
copy
44.1k{z
of
(CXL
AUTO/MANU AL
marking. lf
"automatic"
appear on the display.
'i"#**"\
,..-.,,.....'j
}]EPEAT
: :
L:
50403020106
:
:
8:
1 IOTAL
numbers are automatically
+f 100
(17),
REM
this mode,
numbers manually.
+
In the manual
pressing
by
on REC
control). The
cannot be inserted
you
mode,
can add track numbers
(7)
or TRACK
minimum track length
after recording.
Note:
-
you
lf
try to make a full
digital source that
recording
may occur
will most likely not
and
(1
1)
to
copy
does exceed the 44.1 kHz
staft. ln some rare cases, mutes
recording
may
stop. Use a better source or use
OPT SRC or CXL SFC to avoid these
To start recording
1 Press
the REC
(7)
button
to enter the Record-Pause mode.
The display indicator'RECORD'
AUTO
DIG
ANALOG
PBO6
Olll
-50403020
FU LncY!n!r4qL!l
lf the digital
TRAC( REPEAT1 TOTAT
BEcofiDABLEI L
conneclion
is
incorrect, the display indicator'DlG'
will flash.
of times until
Llq
CDSYNC
l_
lf
|:::?Hl
L i;ffi]
SRC-on mode
l_,'il_
appears
PAUSE
on the
(Sample
mode.
44 or
OPT 44), a stable
pprn
must
you
can
select manual or
is selected,
TRACK TIME
3 0 ovtt
CDSYNC
lREcofiDl
ITTNALTZEI
ERASE
I
PAUSE
source
be used.
'AUTO
l
detected from
you
cannot insert lrack
point
at any
f34
(on
the remote
INCR
is four seconds. Increments
[OPT
44,
CXL
+/-
44]
100
of a
ppm
range,
problems.
will
flashing.
start
I
t.g
IU
ln
Manual
recording from a digital
source
Preparations for recording
In
DAT or MD
(depending
order
on the connection used) to record from a CD,
at\o
orc
4
ANAlr,ii.-
PBOG
Ol)l tnl:onolstH
[r,
lf the
digital source exceeds the 44.1 k1z +l- 100
and CXL44
flash. When the source
bad cable
THACK RtptATl TotAL RlM lffAcK rME
: : :
t
'hLwHilAurrl
Ln 40 .rn 20 Io l; I fi {\'!l
or OPT44 is selected, the display indicator DIG will
gets
connection) the
label
(for
better
stops blinking.
cosyNc
lntqnill
rNAr
l1r
ir
IRA5E
1
PAlisl
example
by
ppm
range
adjusting a
I

lf
PAUSE button
recorded.
--------
2
Press the PLAY button
I
start
!
(L+
The relevant track number and
appear
lnl
$l
3 Press STOP
automatic
+
In the
second silence
Note;
-
You can also use the
(15)
mode.
-
After recording, the temporary
automatically up-dated.
indicate LtFXRII.
want
pause
a
(14).
at the beginning of a
A three-second
you
(13)
the digital source.
on the display.
Press DISPLAY
remaining recording time.
(15)
to stop
mode.
automatic
mode, recording will stop after a
(-50d8)
PAUSE button
you
button if
want
to stop and
During
ANALOG
PEOG
OXI IR€CONDAELEI L:
IU' IHTWHIIAULTI
tlt*lTll-, I ttjf-
TRACK REPTAT 1
DIG AUTO
TOIAL 8EM
: :
50 40 io 20
new track,
pause
(silence)
to
recording and
start
the recording time used
(18)
to
press
will then be
immediately
will
view
the total
recording in either the manual or
twenty-
on the original.
(14)
instead of the STOP
re-enter the Hecord-Pause
Ltfl
table
of contents
process,Ihe
this
TRAC(
t
.10 6 .3
0
TIME
L
ovfir
will be
display will
CDSYNC
LSEq0Rql
[nNauzq
ERASE
I
I
PAUSE
the
To start recording
1 To record a single
one track;
press
tracks,
tracks; 1il"i\,'f
AUTO TRACK RIPEAT 1
DIG
ANATOG
l'n0G
lRtcouDABLEl
O)ll
lcd IREWRIABLEI
Wait
until
the
track,
-
:i!11'll-
i
SREC
will appear on the display.
L::
n:
pause
indicator'HECORD' starts to
AUIO
DJ6
ANALOG
PROG
L:
lilEcoRpABaEl
o)ll
IEO IREWITAE.E
lf
the digital connection
:
R
flash.
rRACK RTPTAT 1 TOTAT REM TRACK TIMT
PfrOG
t;
lstcoBDABLF
O)ll
cd
IEEWnIIABL.
R:
press
CD-SYNC
(10)
once
will appear on the display.
(10/
:
setting
in rapid succession to
twice
TOTAT
l-lllt,T
_I J,V L
.3020.10630own
TRACK TIME
REIV
is
activated and the display
flash.
is incorrect, the display
; ; ; = = =
: :
indicator'DlG'will
to record
To record all
record
all
Attention!
you
want to
lf
player,
play
the disc
the
must
in a different, regular CD-
disc
finalized.
be
'Finalizing
See
discs'p.11.
Automatic recording from a digital
_
source
In
order to
equipped with the handy CD-SYNC
-
used
original may be a CD,
Preparations for recording
-
1 Press the INPUT button
make recordings
to
synchronously
record individual tracks or entire discs. The
DAT
(depending
on the
connection
fFl 517[ or DPT
r\/t t-t-7t-
/\,_
,_
,TLLUhUAbLEI
I
__ .-_= _.50
Eq illwRtTABtft
.40 .30 .20 ..0 -6 .3
: :
x:
easily and
MD,
or
(19)
r7'r1'
Note:
-
you
lf
try to make a full
digital source
that
(1
to 1) copy
does exceed
recording will most likely not
may
occur and
OPT SRC or CXL SRC
+
Do not
recording may
the
start
to
avoid these
digital source
quickly,
the recorder is
function. This function
or any compatible digital source.
number
a
used) i:)(L 5fJl:,
of times until
l:)(L
appears on the display.
:ri,_
0 owR
PAUSE
44,
[OPT
the 44.1 kHz +/- 100
ln
start.
stop. Use
rare cases, mutes
some
a better source or use
problems.
yet.
CXL
44]
can be
of a
ppm
LlLl,
range,
+
lf the digital source exceeds
and CXL44 or OPT44
flash. When the source
the 44.1 k{z +l- 100
is
selected, the display
gets
better
(for
example by adjusting a
ppm
indicator DIG will
bad cable connection) the label stops blinking.
2 Press Play
+
The
start
recording
on the digital source.
Recorder will now
CD
the
in the middle
source
will nol
commence until the beginning of the
automatically
a track, automatic
of
start to record. lf
Synchro
track.
+
The relevant track number and the
appear on
{
To view the recording time remaining,
Press
3
+
In the automatic mode, recording will stop after a twenty-
second silence
the display.
(t5)
STOP
recording.
to stop
(<-50d8)
on the source.
recording
press
time used will
DISPLAY
Note;
-
You can also use the
stop and
-
After recording, the temporary table of contents will be
re-enter
automatically
PAUSE
Becord-Pause mode.
the
up-dated. During this
button
process,
(14)
instead
of STOP
the display
indicate UFXRrt.
AUTO TMCK NEMATI I01AL NEM TRACK TIME
DIG
ANAToG
PRoc
nlll l6aaaoni6'El
rcDi lRtw8ilA8tti
I I l-l t-l 11 T r
,-l f-
'sno302010630oiln
Ll
: :
n:
f1
|
L
CDSYNC
FEMFDI
IFIN_AIIZEI
TEN'FI
PAUSE
Attention!
you
lf
want to
player,
a disc',
the
disc
p.11.
play
the disc on a different, regular
must
finalized
be
first. See
'Finalizing
range
you
next
(18).
(15)
will
to
CD
10

ENGLISH
Auto
stoo recording:
ADDENDUM
FRANQATS
With AUro
With
Unfinalizing CD-RW discs:
For
you
lf
Contents
To
1 Press
{
2 Press
+
Nlte. This will take
Enregistrement
Lorsque
des
mode
Annulation
Cette
Pour
des matidres
rRAcK
Auro rnncx
CD-RW discs
wattt to make
(T0C)
the recorder
0n,
the Auro
off,
only.
more recordirrgs
will
be
urrfirralize:
ERASE twice.
0n the display,
ILli-
REC0BD within
IX[
and rnlsr light
approximately 1
d'arr6t
le message
magnetophones
"AUro
DAT ou DCC
d'arrdt automatique
la
de
finalisation
procedure
effacer des
s'applique
plages
(T0C,
Table
removed.
2 seconds.
continuously
automatique:
ou en
will stop
srop mode is
(or
erasures of tracks)
and rnnsr flash.
T
t-, t-
t
t_t t_
during erasure.
minute
rRAcK"
s'allume, l'enregistreur
s'arr0teront
est d6sactive.
(disques
uniquement
CD-RW):
aux disques
ajouter sur
of content).
automatically. Recordings from
disabled.
finalized
on a
#l
s'arr€te
aprds 20
secondes de silence.
de type
un disque finalise,
automatiquement.
CD-RW.
ilfaut
d'abord annuler
DAT or DCC will
you
disc
must unfinalize it first. The
Les enregistrements
que
Dds
le
message
la finalisation,
stop after 20 seconds
silence.
Table of
effectu6s d
"AUTo
TRAcK"
s'6teint, le
qui
ce
supprime la
partir
table
ESPAfrOL
Pour
annuler la f inalisation
I Appuyez
{
2 Appuyez
Ii,r[
+
Bemarque
GrabaciSn
Si est5 activada
detendr6n
Rehabilitaci6n
56lo discos
Si desea realizar
informaci6n
Para rehabilitar
I Pulse
.)
En la
,r,l,i
i'
'
,
i
deux
lL-l_
et ERASE
fois sur ERASE.
clignotent
sur RECORD
et ERAsE restent
procedure prend
: La
parada
de
la funci6n
tras
un silencio
de discos
CD-RW.
m6s
(tabla
TOC
un disco:
dos veces
ERASE.
pantalla parpadean,
llr
iili:f ill.;){iiil
:
sur I'afficheur.
T- t-7 r
I
t_t
dans les 2
allumes
automdtica:
"Auro
de 20 segundos.
CD-RW:
grabaciones
de contenidos).
lt)il
secondes
durant l'effacemenr.
environ I minute.
rRAcK",
(o
borrar
y
Il,-[
enasr.
:jirt
tf,.j.l.
T- l-l l- ,'
I
t-l
,_
qui
suivent.
grabadora
la
Si se desactiva
pistas)
iti.it:
l-
se detendr6 de forma
en un disco finalizado,
r:.itj,,:;al
ir'nsr
"AUTo
rBAcK",
autom5tica.
el modo
primero
parada
de
deber6 rehabilitarlo.
grabaciones
Las
automdtica
DAT
de
queda
DCC
o
desactivado.
Se eliminard la
se
Pulse
2
{
)bservacion:
BECORD
l'L'l[
y
ERAsE
Esta operaci1n
antes
de 2 segundos.
permanecen
iluminados
tardara
durante
aproximadamente
la operaci6n
1
minuto.
1
de
borrado
3104
125
6173.1

Note:
-
you
lt
do
not
recorded, you
-
Do
not
record
this
will result
numbers
-
A track
in
on a
information.
a
digital
signal.
milliseconds,
sometimes
start
the
recording
source).
want
a twenty-second
must
manually
programmed
a
in
the
wrong
the
original (non-programmed)
CD will
The
sometimes
CD
Recorder
Although
a fraction
not
be completely
manually (see
stop
sequence
track
numbering.
immediatety
witt
not
the reaction
of the
beginning
recorded.
Manuat
sitence (<-S\dB)
recording.
from
DAT,
a
Always
record
sequence.
start
start
unless
it
trme
rc tess
than
of
a number
tf
this happens, you
recording
from
to
be
because
with
music
recognizes
400
may
can
a digitat
ANALOG
PFOG
Olll
lci,
Erasing
1 From
the
the
within
t0
erase
display.
ANALOG
PROG
o)ll fREcoFD
lcd
OIG AUIO
LREc-oRDAq4
ffltwRrTA6lEl
entire
STOP
two
seconds,
the
entire
DIG
AUTO
BrEl r : :
lnewarueLrl
TRACK
T"f?',i
L:
.40
30 20.r0
=
R
disc
press
setting,
and
disc; 7/5i
TRACK REPEAT
-g 4
n
the EHASE
press
then
TOTAL
1
TI
!f
)20
30
106
/:.
.3
6
o
(Z)
REC
,ERASE'will
and
TBACK
TIME
t- t-
'--,
,' -/
,-{
-l
*\-*"..
(9/
button
within
appear
CDSYNC
FEaiiFDl
i,nlALi.ri
[iRASE I
PAUSE
twice
two
seconds
on the
FINALIZING/ERASING
Finalizing
Finalizing
order
necessary
Attention!
To start
1
2 From
t
Note:
-
During
commands.
-
ln
not
is an
play
to
Finalizing
CD-R
erased
finalizing
Place
the
yet
not
the
within
two
The
approximate
and will
During
finalization,
complete
recorded
finalization,
order
to
be switched
Erasing
With
a
CD-RW disc,
new recording.
There
are
two options:
Erasing
1
2
the
Place
the
the
recorder).
From
the
then
REC
l/7/1t_
t(
extremely
the
disc
if
the
disc is
disc. With
before
you
disc
in the
recorder).
STOP
seconds.
be
at least
when
appears
prevent
off or
a disc
last
recording
disc to
STOP
(/
within
'ERASE'
and
a
disc
simple
on
another,
used
in
makes
it
impossible
a CD-RW
it
can
want
to
finalize
setting,
press
finalization
two
minutes.
the
display
the
total number
in
the
display.
the
CD Recorder
damages
to
disconnected
recordings
be
erased in
press
setting,
two
seconds
will appear
procedure
regular
another
CD
disc, the
be
used
again,
in
the
FtNAL|ZE (S)
time
will
be
will
count
of
tracks
will not
the
disc, the
during
can
be
erased
the
CD Recorder
the
ERASE
to
erase the
on the
that
player.
CD
Recorder.
to record
entire
CD Recorder
shown
down.
and the
accept
CD Recorder
finalization.
and replaced
button
display.
is necessary
lt
further
and rhen
on the
is not
disc
REC
in
on a
must
(if
it
display
Finalization
total
time
any
operating
may
by
(if
it is
not
vet
(9)
once
and
last track;
is
is
a
(fl
be
in
+
This
process
Note:
-
Before
the disc
erased.
-
A finalized
again
-
While
disc must
to
record.
erasing,
PLAYING
The
numbers
illustration.
Normal
1 Press
when
track
display.
t
Press
track.
i
Press
playing
-t
Press
indicators
time
t
Press
button
t
Press
.t
Press
{
You
using the
digit
between
playing
PLAY (13)
the
disc
number
DISPLAY (18)
DISPLAY
time
of the
DISPLAY (l8)
(blue
passed
will
PAUSE (14)
again
to
NEXT (t2)
PREV
flt)
can select
number
number,
press
may
take
up to
is
finalized,
be comptetety
the
CD
Recorder
parentheses
playing
to
start
drawer
is
either
the
(18)
playing
to
view
a
second
and
disc.
a lhud
and
red indicators)
once
again
to temporarily
to
to
go
go
to
to the
playing.
number
continue
any track
buttons
the
two
1.5
minutes.
the
last
track recorded
erased
mav
not
refer
(this
button
open
or closed).The
passed
time
the remaining
time
to view
time
to
deactivate
on the
appear
on the
intenupt
the next
track.
previous
pressing
by
(3J)
on the
remote
digits
in rapid
before
being
be switched
to the
fold-out
may
be
will
appear
ptaying
the
total remaininq
lhe
display.
display.
playing.
track.
the
track
control.
succession.
can
be
used
off .
pressed
relevant
on the
time
of the
recoro
playing
The
press
this
number
For
a two-
11

pvsss
>>
(43)
or 11(36) on the remole
or backward at twice the
Press FAST
remote
(45)
and then
to search forward
s0ee0.
Press REPEAT
displayed.
ANALOG
PBOC
Ol))
(47)
repeat
'REPEAT
DrG AUTO TRACKLREPEATl
qFcuBoa8rFi
to
1' will
L:::
50401o20t06
to search forward
playing
speed.
))
(43)
or
{{
(36/
on the
or backward at eight times the
the track that is currently
appear on the
]OIAL
8EM
IRACK
display.
TIME
SYNC
CD
nEcoRDl
FINAI
ERASE
PAUST
rzEl
I
playing
Rfftlr'fR
....
recovery
power
fails,
no
IPIFFIL .... OPC has failed;
sff?r'Iff .... recorder's
conlact
N[ f]Uillfl
.. no
procedure
failure
during recording. lf this
the CD-R disc - unlike the
longer be usable
disc is damaged or
selitest has failed;
your
supplier
information
audio
performed
automatically after
CD-RW disc - mav
see
is available
procedure
player
'Fixing
the
on
is
defect
problems';
disc.
Press
REPEAT
programmed
Press STOP
Programmed
1
With the CD Recorder
remote
control.
2
Enter the tracks
For 2-digit
+
You
can
play your program,
3
To
+
To cancel the
(47)
again to repeat
sequence.
(15
'REPEAT'
or 34) to stop
play
stopped,
you
want to
track numbers, enter
program
to 20
up
press
program, press
the drawer.
ADDITIONAL
Specific
MESSAGE
FTFnING
0Pt ................|aser
NII
ill5t......no
UPllFIf ........the
display messages
....MEANING
....disc
information is
disc
table of contents
INFORMATION
power
calibration in
present
after a recordino
,JRII
IULL
............ the
............
the
player
playback
performing
is
program
numbers; it is
fULL......
tII
fMPIS ..........
there is no room for
the
disc contains no recordinos:
linalized
INFUI ..........
FINFL
no
..........
OPC has been
number
digital input was
of
calibrations): the
the entire disc or
will
appear on the display.
playing.
press
PROGRAM
play
using lhe numeric keys
both digits in rapid
tracks in any
PLAY
STOP
(13
(15
order.
or 45).
or
being read
progress
is
or disc
unreadable
of the
disc
internal
already
full
additional recording
selected for
performed
96 times
disc must
pre-
(41l
on
(33).
succession.
twice,
34)
is
or open
being updated
aclions
contains twenty
it cannot
be
CD-SYNC
(maximum
finalized
be
the
FIXING
The numbers
PROBLEMS
between
parentheses
illustration.
you
lf
first. Maybe
think
your
CD Recorder is
you
forgot a
defective, it is wise
simple step.
SYMPTOM..........SOLUTION
power.............
No
check to ensure that
.
check to ensure that
plugged
.
switch the recorder
in conectly
back ON
No
sound ...........
Amplifier
is
sound
distorted ......... the line
check the audio
.
if using an
amplifier, try using
outputs on the
connecled
is not
to the PHONO input;
the case
connections
Play will
not start........,......
Remote control
not work
check
to ensure that
facing
.
.
up
clean the disc
check that the
another
disc
does
point
the
disc
remote
control directly at the
Recorder
.
check
the batteries
Will not record
... no recordable
.
check the
.
use better source
disc
disc and replace il
or SR0-input mode
Recording is
distorted
20 second
recordings
Player
does
not react
make sure the recording
pause
between
.........
see'Automatic recording
CD-SYNC
use the
player
p.
oN/oFF
to
switch it off
10
(1)
refer to the fold-out
read
to
this list
POWER button
AC
the
oower
(1,)is
cord is
on.
OFF and then immediatelv
a different source
CD Recorder might
make
label
the
is
not defective
of the CD is
be
sure
by trying
this
CD
replace
and
if necessary
has been inserted
necessary
level is
not too high
from
a digital source'
button on the lront
of the
and back on
12

OTHER
lf the
malfunction
1
Switch the
2
Simultaneously
and
button.
+
The
{
After a few
iaE55tll.
+
lf
the {fl/7017
needs
Consumer Line
of the
+
lf the
the malfunction
instructions,
incorrect
user instructions
supplier.
you
lf
cenler.
Switch
exit from the
recorder
switch the
display will
minutes,
to be repaired.
Consumer
PllS:it
an inappropriate
connection.
cannot
off the recorder
INFORMATION
continues,
press
recorder
now indicate
message
to find
ll message
may be
once
solve the
Diagnostic
perform
off using
the PLAY
back
the
message
appears,
Consult
the nearest
Line
can be found
appears,
a result
To
solve this
again;
problem,
using
Program.
the Diagnostic
powER
the
(13)
on using the
,9L51l.
will change
your
your
of misinterpretation
disc,
you
can also
go
the POWER
oN/oFF
and
STOP
POWER
lo t_fll?01?
recorder
supplier
service
there
a mechanical
problem,
to the
in
the
is no
center.
contact
nearesl
ON/OFF
or call
guardntee
clear defect
carefully
program:
(1).
button
butons
ftq
ON/OFF
or
is defective
the Marantz
The number
defect
your
service
button
and
booklet.
and
of the user
or an
read the
(l)
(1)
to
Recorder
The
appliance
Do not
use cleaning
ammonia
Disc
maintenance
As is
the case with
disc
will not
disc is, the
extent
that the
.
To
write
never
because
.
Keep
the shiny
always
a
Never
a
Never
a
Never
disc to
maintenance
can
be cleaned
agents such
or scouring
directly
clarity
on the
use a
this could
wipe in
use
use other
leave the
extremely high
agents.
pre-recorded
affect the
of the reflected
quality
sound
printed
pen
with
damage
side of
a straight
cleaning
agents for
cleaning
disc in
using
a damp
as
alcohol, methylated
CDs, fingerprints
signal. Depending
signal may
diminishes.
side
of a
CD-R, use
point
a hard
the disc
line from
agents
direct sunlight
temperatures.
(such
the
recording.
clean. Use
the cenler
conventional
or scouring
leather
and spots
on how
deteriorate
a felt-tipped
as a
ball-point)
a non{luffy
to the
records.
agents.
and
do not subject
cloth.
spirits,
dirty the
to
edge.
on the
such an
pen;
cloth
and
the
I
t.e
lu
lc
L
l3

HINTS FOR
THE
MARANTZ
CD.R/CD.RW
I
i
1 How to
ri
:
v!l
$l
Media
Use
-
causes recording intenuptions
avoid recording errors?
proper
CD-R media, suitable for
OPTIMAL
USE OF
CDR63O
RECORDERS
1x speed.
and recording
Unsuitable media
errors.
See below.
(manufacturer)
Type
Philips
'Studio'
TDK
Taiyo Yuden
MitsuiToatsu
Ricoh
Gold Phtalo
general
In
better on 1x speed than
exception
the majority
of the types listed
Dye
Cyanine
Cyanine
Cyanine
Gold Phtalo
of
Cyanine
Cyanine
green
gold
discs
above.
(green)
(green)
(green)
discs
(Phtalo
(As
Designed
(gold)
(gold)
Sunflower
(Cyanine-dye) performs
Cyanine-dye) with the
of 1-1-1998).
for 1x Audio
2 type
Signalsources
Use
stable digital sources, meeting
_
<20ns,
Frequency
in
recording interruptions
-
Condition of media
Keep
CD's
markings.
Note
that a
of a CD Player.
Power
-
_
*
ON/OFF
power
Avoid
disc.
Temperature
The machine
environmental temperature
heating, for
around the
{ree
of
space
2 What type
deviation t50ppm).
(source
and tapes free from fingerprints,
scratched CD can
ON/OFF between
performs
example
product
by close mounting in
improves
above and below
of disc
should I use?
the lEC958-l/ll
Unstable sources
and recording
media
cause an unstable
the last recording
best at a stable,
(15-20
the
the unit for
errors.
and recording media)
low to normal
degrees
performance
standards
scratches
signal coming
and finalizing
Avoid
C).
a rack. A
adequate ventilation).
excessive
smooth air flow
(min.
2,5 cm/1
(Jitter
can result
and other
out
the
inch
position
Disc
3
When loading
the middle
and reading
4 Auto
The first
lDs
.
of the
errors.
Start Recording
pad
of track is
your
of
DAT
Use manual
source.
in
drawer
a
CDR disc, take
guides
of the loading
with DAT
cut off when
source are too
recording
or re-mark
care that the
drawer,
recording from
close to the
the start lDs
put properly
disc is
to avoid initializing
DAT. The
audio information.
on the DAT
start
in
The Marantz
according
specification lor
sold, should
-
therefore
practice
In
match between
-
recorder.
between
are less
Regarding
_
general
minutes versions.
minutes)
Marantz recommends
combination with the
(only
CDR630
to the Orange Book
CD Recorders
perform
be compatible with
however,
the disc
Specially
disc and recorder is
critical in terms
the recording
63-minutes
Discs with
are not recommended
74-minutes
types mentioned)
CD Recorders
specifications.
and
according to
quality
the
used and the writing
at 1x speed
of
capacity
produce
discs
the following
CDR630 for
Orange Book
our recorder.
of the recording
(stand
important
recording
of the disc, it
better results than
higher
due to very
audio applications:
are
developed to record
This is
the
CDR-media. Every
specification
depends
strategy
alone
audio) the match
(higher
quality).
capacity than 74
poor performance.
disc types
of the
recording
can be stated that
the 74minutes
for optimal
CDR-disc
and
on the
speeds
in
(80
results in
14

TECHNICAL SPECIFICATIONS
General
.
System
.
Number
.
Applicable discs
.
Power supply
.
.
Operating temperature
.
Weight
.
Audio
of channels
Power consumotion
Dimensions
: compact disc digital audio
(stereo)
: 2
:
CD-R, CD-RW
CD,
AC 100112012301240V
:
(74CDR630/02M,
(CDR630
120V
AC
: 15W
: 5-35"C
:4.7 kg
: 483(W)x305(D)x88(H)
CDR630F
U BL)
H)
mm
Recordingfunctions
.
Recording
-Auto
-Start
.
Auto Track
-PQ
(digital
-Track
(anatog
.
Manual Track increment
.
Pause
.
Erase last track
.
Erase disc
.
Remaining recording time display
.
Finalize
.
Recorded copy status : copy
recording
start
delay
increment
timing deviation : < 6
source)
detection level :
source)
Recording
(CD-RW
(writing
(CD
(CD-RW
discs)
TOC) : 2x speed
only digilal source
SYNC)
: 150 - 400ms
frames
-50d8
<
discs)
(analog
(80ms)
for more than 3 sec
protected (C
and digital source)
bit=O)
.
Frequency
.
Playback S/N
.
Playback dynamic range : 9BdB
.
Playback
.
Recording S/N
.
Recording dynamic
.
Becording
.
Line output
.
Digital coaxial output
.
Digital optical output
.
Headphones
.
Digital coaxial
.
Digital optical
.
Analog input Cinch
.
Analog
-sensitvity
-impedance
response :20H2-20kHz
: 105d8
total harmonic distortion : BSdB
:90d8
range : 95dB
total harmonic distortion
voltage : 2Vrms
0.5V(pp)/75o
-20dBm
0-5Vrms/8-2000f)
.recording
input
input
input XLR
32-48k1z
32-48k1z
500mVrms/50kO
+4dBu
-10dBu
30kQ
: BSdB
values for line
(sample
(sample
(max+16dBu)
(max+
rate conversion)
rate conversion)
2dBu)
input/output
Playback
.
Play
.
Pause
.
Stop
.
Direct track seleclion
.
Next/previous track selection
.
Search
.
Fast search forward/reverse
.
Repeat
.
Program
.
Time display switching
Accessoires
.
Remote control
.
Audio cable
.
Digital coaxial
.
AC mains cable
functions
forward/reverse
(alll
1 lrack)
play
(20
tracks)
(+
batteries)
(2x)
(1x)
cable
 Loading...