

Marantz CD-17-Mk2 Owners Manual
Model CD-17mk User Guide
Compact Disc Player
1

ENGLISH
ITALIANO
WARRANTY
For warranty information, contact your local Marantz distributor.
RETAIN YOUR PURCHASE RECEIPT
Your purchase receipt is your permanent record of a valuable purchase.
It should be kept in a safe place to be referred to as necessary for
insurance purposes of when corresponding with Marantz.
IMPORTANT
When seeking warranty service, it is the responsibility of the
consumer to establish proof and date of purchase. Your purchase receipt or invoice is adequate for such proof.
FOR U.K. ONLY
This undertaking is in addition to a consumer’s statutory rights
and does not affect those rights in any way.
FRANÇAIS
GARANTIE
Pour des informations sur la garantie, contacter le distributeur local
Marantz.
CONSERVER L’ATTESTATION D’ACHAT
L’attestation d’achat est la preuve permanente d’un achat de valeur. La
conserver en lieur sûr pour s’y reporter aux fins d’obtention d’une
couverture d’assurance ou dans le cadre de correspondances avec
Marantz.
IMPORTANT
Pour l’obtention d’un service couvert par la garantie, il incombe au client
d’établir la preuve de lachat et d’en corroborer la date. Le reçu ou la
facture constituent des preuves suffisantes.
DEUTSCH
GARANZIA
L’apparecchio è coperto da una garanzia di buon funzionamento della
durata di un anno, o del periodo previsto dalla legge, a partire dalla data
di acquisto comprovata da un documento attestante il nominativo del
Rivenditore e la data di vendita. La garanzia sarà prestata con la
sostituzione o la riparazione gratuita delle parti difettose.
Non sono coperti da garanzia difetti derivanti da uso improprio, errata
installazione, manutenzione effettuata da personale non autorizzato o,
comunque, da circostanze che non possano riferirsi a difetti di
funzionamento dell’apparecchio. Sono inoltre esclusi dalla garanzia gli
interventi inerenti l’installazione e l’allacciamento agli impianti di
alimentazione.
Gli apparecchi verranno riparati presso i nostri Centri di Assistenza
Autorizzati. Le spese ed i rischi di trasporto sono a carico del cliente.
La casa costruttrice declina ogni responsabilità per danni diretti o indiretti
provocati dalla inosservanza delle prescrizioni di installazione, uso e
manutenzione dettagliate nel presente manuale o per guasti dovuti ad
uso continuato a fini professionali.
PORTUGUÊS
GARANTIA
Para informações sobre a garantia, contactar o distribuidor Marantz
local.
GUARDAR O RECIBO DE COMPRA
O recibo é o registo permanente da compra que fez. Deve ser guardado
num local seguro, para ser apresentado em questões relacionadas com
o seguro ou para quando tiver de contactar a Marantz.
IMPORTANTE
Quando procurar assisténcia técnica ao abrigo da garantia, é da
responsabilidade do consumidor estabelecer a prova e data de compra.
O recibo é prova adequada.
GRANTIE
Bei Garantiefragen wenden Sie sich bitte an Ihren Marantz-Händler.
HEBEN SIE IHRE QUITTUNG GUT AUF
Die Quittung dient Ihnen als bleibende Unterlage für Ihre wertvolle
Anschaffung Das Aufbewahren der Quittung ist wichtig, da die darin
enthaltenen angaben für Versicherungszwecke oder bei korrespondenz
mit Marantz angeführt werden müssen.
WICHTIG!
Bei Garantiefrangen muß der Kunde eine Kaufunterlage mit kaufdatum
vorlegen. Ihre Quittung oder Rechnung ist als Unterlage ausreichend.
NEDERLANDS
GRANTIE
Voor inlichtingen omtrent garantie dient u zich te wenden tot uw plaatselijke
Marantz-handelaar.
UW KWITANTIE, KASSABON E.D. BEWAREN
Uw Kwitantie, kassabon e.d. vormen uw bewijs van aankoop van een
waardevol artikel en dienen op een veilige plaats bewaard te worden voor
evt. verwijzing, b.v. in verband met verzekering of bij correspondentie met
Marantz.
BELANGRIJK
Bij een evt. beroep op de garantie is het de verantwoordelijkheid van de
consument een gedateerd bewijs van aankoop te tonen. Uw kassabon of
factuur is zijn voldoende bewijs.
ESPAÑOL
GARANTÍA
Para información sobre las Condiciones de Garantía, sírvase consultar
el Certificado que encontará en le interior del embalaje del equipo.
CONSERVE EL COMPROBANTE DE LA COMPRA
La factura es el comprobante de la adquisición de un producto valioso.
Consérvela en lugar seguro para poder consultarla en caso necesario.
IMPORTANTE
Para disponer de servicios cubiertos por la garantía, el usuario deberá
acreditar la fecha y el lugar de adquisición del equipo. La factura o recibo
de la compra constituyen un comprobante válido a tal efecto.
2

SVENSKA
DANSK
GARANTI
Angáende garanti,kontakta din lokala Marantz handlare.
SPAR KVITTOT
Kvittot är din lnköpshandllng över lnköp av en värdefull vara.Det ska
placeras pá ett säkert ställe och hänvlsas till vid försäkringsfrágor eller vid
korrespondens med Marantz.
VIKTIGT
När garantiservice áberopas är det konsumentens ansver att visa datum
för inköp.Ditt kvitto eller din faktura är ett tillfredsställande bevis.
CONTENTS LIST
English ................................................................................................................................... page 4
Français ............................................................................................................................... page 17
Deutsch ................................................................................................................................ Seite 30
Nederlands........................................................................................................................ pagina 43
Italiano............................................................................................................................... pagina 56
GARANTI
Henvend dem til Deres MARANTZ-forhandler angående inrformation
om garantien.
GEM DERES KVITTERING
Deres købskvittering er Deres varige bevis på et dyrt køb. Den bør
gemmes godt og anvendes som bevis, hvis De vil tegne en forsikring,
eller hvis De kommunikerer med Marantz.
VIGTIGT
Det påhviler forbrugeren at skaffe bevis for købet og købsdatoen, hvis
han eller hun ønsker garantiservice. Deres købskvittering eller faktura
er et fuldgyldigt bevis herpå.
Português.......................................................................................................................... página 69
Español ............................................................................................................................. página 82
Svenska ............................................................................................................................... sidan 95
Dansk ................................................................................................................................... side 108
Specifications ..................................................................................................................... page 121
Figures ............................................................................................................................... page 122
ENGLISH:
CAUTION – USE OF CONTROLS OR ADJUSTMENTS OR PERFORMANCE OF PROCEDURES
FINNISH:
VAROITUS! Laitteen käyttäminen muulla kuin tässä käyttöohjeessa mainitulla tavalla saattaa
SWEDISH:
VARNING! Om apparaten används påannat sätt än vad som beskrivs 1 denna bruksanvisning kan
OTHER THAN THOSE SPECIFIED HEREIN MAY RESULT IN HAZARDOUS RADIATION
EXPOSURE.
altistaa käyttäjän turvallisuusluokan 1 ylittävuälle näkymättömälle lasersäteilylle.
användaren utsättas för osynlig laserstrålning som overskrider gränsen för laserklass 1 .
WARNINGS FOR LASER RADIATION
CAUTION : INVISIBLE LASER RADIATION WHEN OPEN. DO NOT STARE INTO BEAM.
DANGER : INVISIBLE LASER RADIATION WHEN OPEN. AVOID DIRECT EXPOSURE TO BEAM.
VARO! : AVATTAESSA JA SUOJALUKITUS OHITETTAESSA OLET ALTTIINANAKYMÄTTÖMÄALLE
LASERSÄTEILYLLE. ÄLÄ KATSO SÄTEESEEN.
VARNING! : OSYNLIG LASERSTRÅLNING NÄR DENNA DEL ÄR ÖPPNAD OCH SPÄRREN ÄR
URKOPPLAD. BETRAKTA EJ STRALEN.
3
FOREWORD
This section must be read carefully before any connection is made to the
mains supply.
English
WARNINGS
Do not expose the equipment to rain or moisture.
Do not remove the cover from the equipment.
Do not insert anything into the equipment through the ventilation
holes.
Do not handle the mains lead with wet hands.
CE marking (only /22 version)
This product is in conformity with the EMC directive
and low-voltage directive.
EQUIPMENT MAINS WORKING SETTING
Your Marantz product complies with the household power and safety
requirements in your area.
“/22” Version product can be powered by 230 V AC only.
IMPORTANT: (FOR /65 version only)
This apparatus is fitted with an approved moulded 13 Amp plug. To
change a fuse in this type of plug proceed as follows:
1. Remove fuse cover and fuse.
2. Fix new fuse which should be a BS1362 5A, A.S.T.A. or BSI approved
type.
3. Refit the fuse cover.
If the fitted plug is not suitable for your socket outlets, it should be cut off
and an appropriate plug fitted in its place.
If the mains plug contains a fuse, this should have a value of 5A. If a plug
without a fuse is used, the fuse at the distribution board should not be
greater than 5A.
NOTE : The severed plug must be destroyed to avoid a possible shock
hazard should it be inserted into a 13A socket elsewhere.
HOW TO CONNECT A PLUG
The wires in the mains lead are coloured in accordance with the following
code:
BLUE—”NEUTRAL” (“N”)
BROWN—”LIVE” (“L”)
1. The BLUE wire must be connected to the terminal which is marked with
the letter “N” or coloured BLACK.
2. The BROWN wire must be connected to the terminal which is marked
with the letter “L” or coloured RED.
3. Do not connect either wires to the earth terminal in the plug which is
marked by the letter “E” or by the safety earth symbol or coloured
green or green-and-yellow.
Before replacing the plug cover, make certain that the cord grip is
clamped over the sheath of the lead — not simply over the two wires.
ABOUT THIS USER’S GUIDE
Refer to the figures on the pages at the back of this user’s guide. The
callout numbers on the figures correspond to those found in the text.
• Some of the operations described in this user’s guide can only be
operated from the remote control unit. In the description of controls,
the names of the buttons which are available on both the main unit and
the remote control unit are enclosed in , and the names of the
buttons which are available only on the remote control unit are
enclosed in .
PRECAUTIONS
The following precautions should be taken when operating the equipment.
GENERAL PRECAUTIONS
When installing the equipment ensure that:
– the ventilation holes are not covered.
– air is allowed to circulate freely around the equipment.
– it is placed on a vibration-free surface.
– it will not be exposed to excessive heat, cold, moisture or dust.
– it will not be exposed to direct sunlight.
– it will not be exposed to electrostatic discharges.
In addition, never place heavy objects on the equipment.
If a foreign object or water does enter the equipment, contact your
nearest dealer or service center.
Do not pull out the plug by pulling on the mains lead; grasp the plug.
It is advisable when leaving the house, or during a thunderstorm, to
disconnect the equipment from the mains supply.
FEATURES
• CD-TEXT compatibility.
CD TEXT
• CD-RW (ReWritable) playback capability.
• Latest VAM1201 pickup mechanism.
• Digital inputs allowing the unit to be used as a high-performance D/A
converter.
• High-performance digital ICs "777 Devices", including the DAC7 1-bit
bit stream type D/A converter, the DF7 20-bit, 8-fs digital filter and the
CD7 digital servo IC.
• High audio quality parts including the MARANTZ-original HDAM
circuitry.
• Highly rigid, stylish design with extensive use of aluminum blocks.
• Stylish wireless remote control unit with aluminum top.
TEXT
COPYRIGHT
Recording and playback of some material may require permission. For
further information refer to the following:
– Copyright Act 1956
– Dramatic and Musical Performers Act 1958
– Performers Protection Acts 1963, and 1972
– Any subsequent statutory enactments and orders
4

COMPACT DISCS
The glossy side shining like a rainbow is the front side of the disc, and
the side on which the label is printed is the back.
Unlike conventional turntables for playing analog discs, the CD-17mkII
Compact Disc Player reads the information recorded on the disc from
underneath without contacting it using a beam of laser light. Therefore,
the performance of a compact disc will not degrade like conventional
analog records.
Handle discs carefully so as not to damage or scratch the front side.
To protect the disc, avoid placing it in the following locations:
– In direct sunlight or near a source of heat like a heater.
– In a place which is damp or dirty.
– In a place which could be exposed to rain, such as near a window.
Always keep the disc surface clean.
Up to six billion data units are recorded on the front side of the disc.
When cleaning the disc surface, always be sure to use a special
compact disc cleaner and wipe as shown below.
Wipe in a radial direction. Do not wipe in circumferential direction.
• Do not use conventional record cleaner for analog records, as this will
adversely affect the disc surface.
Store discs properly by placing them in their disc cases.
• Do not attach a piece of paper or sticker on the label side of disc.
When a disc has a piece of plastic tape or rental CD label with paste
protruded from the edge or when a disc has a trace of such a sticky
object, do not attempt to play the disc. If such a disc is played on the
CD player, impossibility of taking out the disc or other malfunction may
result.
• Do not use a disc with a special shape.
Do not attempt to play a disc with a special shape such as a heartshaped disc or octagonal disc. Otherwise the equipment malfunction
may result.
About CD-TEXT
The CD-TEXT is a new type of music CD featuring the recording of
character information on the performer names, album name, track
names, etc., in addition to the audio information contained in music CD.
The character information is recorded in an area which has not been
utilized by previous music CDs. This means that the CD-TEXT discs can
be played back in the same way as ordinary music CD discs on any CD
player and that a CD-TEXT compatible player such as this unit can view
the character information in them as well as the audio.
This unit detects the CD-TEXT compatibility of each disc automatically
and displays the result in the display panel.
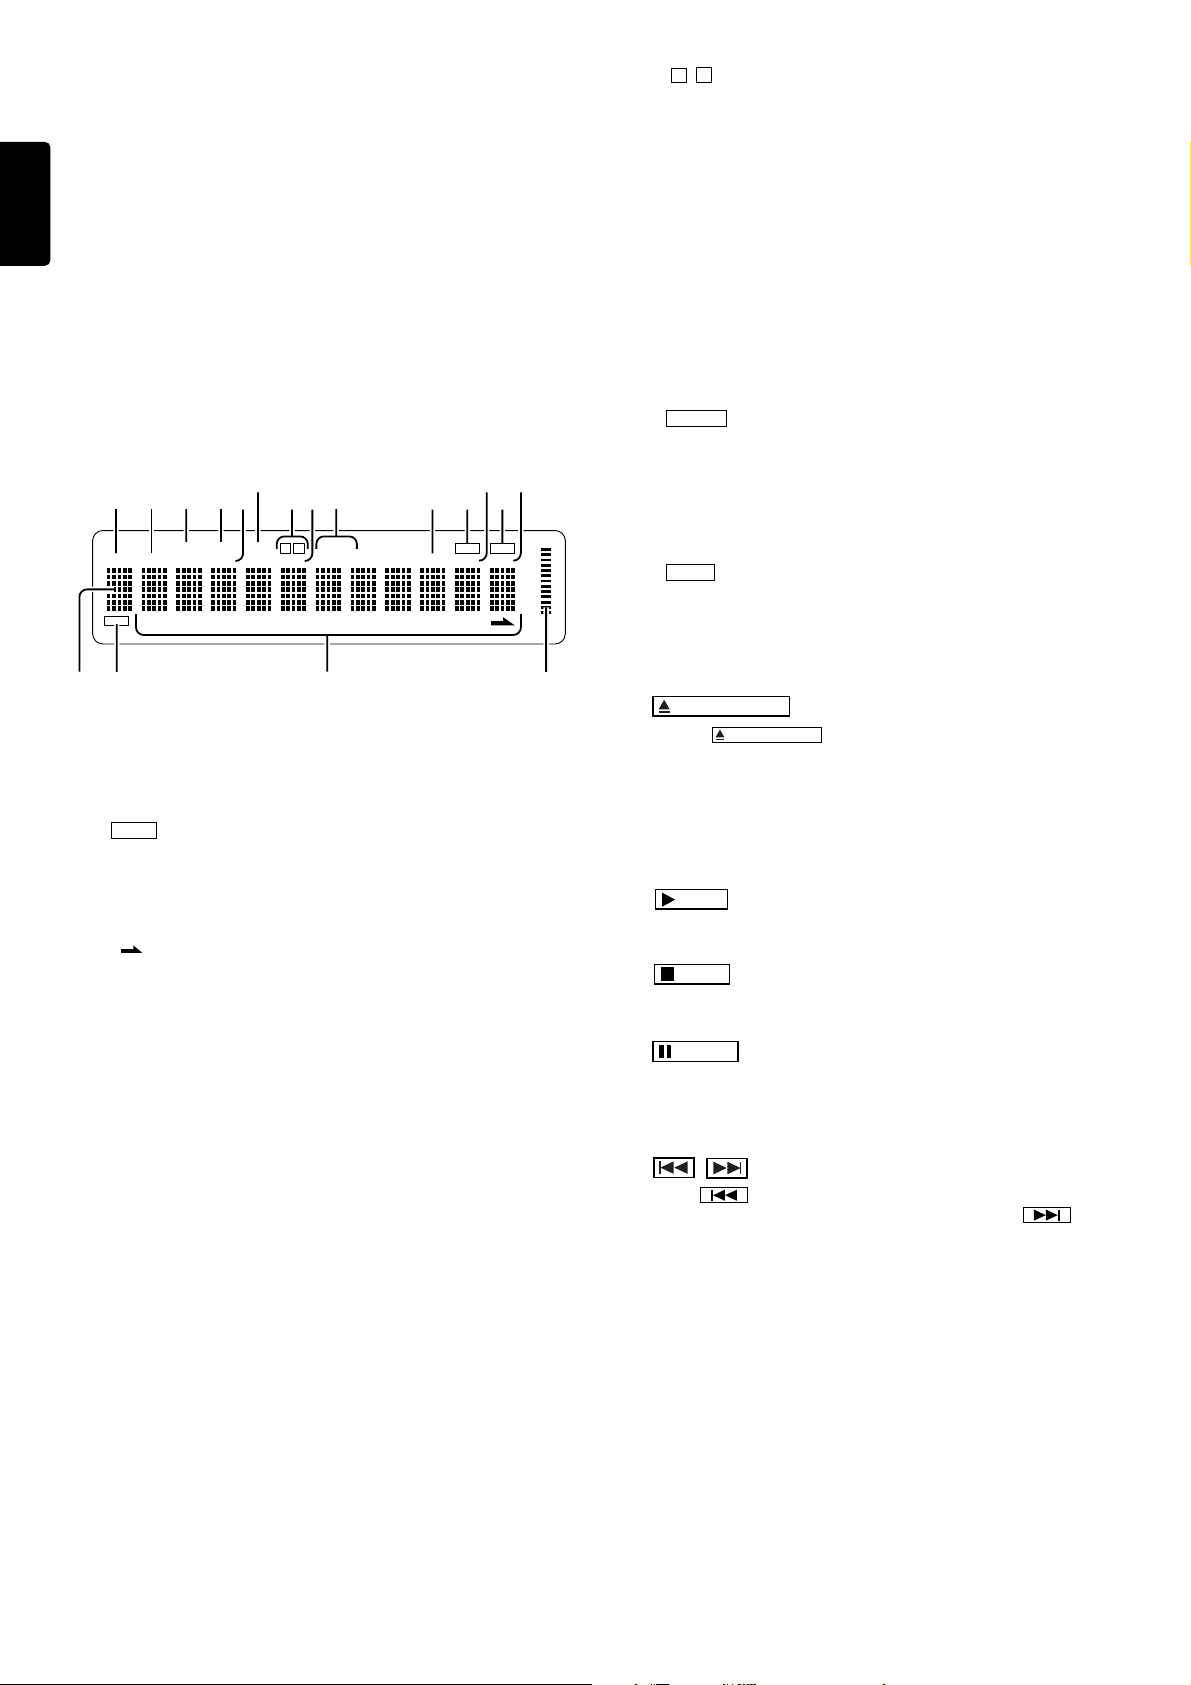
Main unit display
TOTAL TOTAL TIME
TEXT
1 2 3 4 5 6 7 8 9 10 1112 1314 1516 1718 1920
Lights up when the loaded disc is CD-TEXT compatible.
By operating the provided remote control unit, the display can show the
character information including the album name, track names, performer names, verse writer names, music composer names, arranger
names, message and music genre. However, note that the content of the
character information is variable depending on discs.
* For detailed operating procedures for displaying the character infor-
mation in the CD-TEXT, read the description in the main text of this
manual.
The display of this unit can display up to 12 characters at a time. If the
character information in a disc is longer, the characters are scrolled from
the left to the right on the display.
* Scrolling refers to a method of displaying characters by moving them.
This unit is capable of smooth scrolling by feeding characters bit by
bit.
Some of the CD-TEXT compatible discs also contains the recording of
the highlight sections of its tracks. This unit is capable of playing only the
highlight sections one after another, and this feature is referred to as
HIGHLIGHT SCAN.
Playing CD-RW discs
This unit can play back the CD-RW (ReWritable) discs as well as ordinary
music CD and CD-R (Recordable) discs.
* The CD-R and CD-RW discs should contain properly-recorded TOC
information so that they can be played back. With the CD recorder
system, writing the TOC information in a disc is referred to as finalizing
the disc. A disc cannot be recognized as a CD disc and played back
unless it has been finalized properly. For details, please read the
instruction manual provided with a CD recorder.
* TOC stands for Table Of Contents and contains information such as
the total number of tracks and total playing time of the disc.
* This unit can play only the discs recorded in the CD-DA format
designed for music reproduction. Do not attempt to play a disc
containing other data, such as a CD-ROM for PCs, on this unit.
* As the playback of a CD-RW disc necessitates partial change of the
player setup, it may take longer time for reading the TOC information
than when a music CD or CD-R disc is played.
English
5
CONTROLS, CONNECTIONS
AND INDICATORS
Please read the following instructions referring to the illustration on page
English
122.
FRONT
zz
z POWER switch
zz
Press to switch power ON, and press again to switch OFF.
xx
x DISC TRAY
xx
Place a disc with the label side up.
cc
c Display
cc
Shows information such as the power ON/OFF state, track number,
playing time and current operation mode.
yui
t
DISC TOTAL TRACK INDEX
TEXT
1 2 3 4 5 6 7 8 9 10 1112 1314 1516 1718 1920
we r
q
qq
q TIME/TEXT information
qq
Shows the time information when an ordinary music CD is played,
and shows the text information when a CD-TEXT compatible disc
is played.
ww
w TEXT CD-TEXT indicator
ww
Lights up when a CD-TEXT compatible disc is loaded.
!0 !6 !8
o!1
!2 !4 !5 !7!3
B
A
EDITPROGRNDM
RPT 1
PAUSE
PEAK TOTAL TIME
PLAY
A/B
!1!1
!1
!1!1
!2!2
!2 INDEX indicator
!2!2
!3!3
!3 RPT (Repeat) indicators
!3!3
!4!4
!4 PEAK indicator
!4!4
!5!5
!5 PAUSE indicator
!5!5
!6!6
!6 TOTAL indicator
!6!6
!7!7
!7 PLAY indicator
!7!7
!8!8
!8 TIME indicator
!8!8
vv
v
vv
Pressing the
disc on the tray with the label side facing up. Gently press the front of the
disc tray to close.
bb
b REMOTE SENSOR
bb
This window receives signals transmitted from the remote control unit.
indicators
Both indicators light up in the A-B repeat mode or one of them
lights up during playback of tape side A or B in the edit mode.
Lights up when the index number being played is displayed.
RPT: Lights up during all-track repeat mode, which plays all the
tracks on the disc repeatedly. Also lights up during program
repeat mode, which plays all the programmed tracks repeatedly.
RPT 1: Lights up during 1-track repeat mode, which repeatedly
plays a single track repeatedly.
Lights up during peak search, and flashes during playback of the
peak.
Light up in the pause mode.
Indicates the remaining playing thme of the entire disc. In program
mode, this indicator shows the remaining playing of the current
program.
Light up during CD playback.
Lights up in the time display mode.
OPEN/CLOSE
OPEN/CLOSE
button
button opens the disc tray. Place a compact
ee
e Track number indicator
ee
When a disc is placed on the tray and the tray is closed, the TOC*
is read and the numbers of all the tracks on the disc are displayed
“ ” lights up if there are more than 20 tracks on the disc. In
program mode only the track numbers of the programmed tracks
light up.
The track numbers go out in turn as each track finishes playing.
* TOC is the disc’s “Table Of Contents” and contains non-audio
data such as the track numbers and playing times of all the tracks
on the disc.
rr
r Output level indicator
rr
Shows the analog output level as a relative reference.
tt
t DISC indicator
tt
Blinks during TOC readout.
yy
y TOTAL indicator
yy
Lights up when the total number of tracks in a disc is displayed.
uu
u RNDM (Random) indicator
uu
Lights up in the random play mode.
ii
i PROG (Program) indicator
ii
Lights up in the programming or delete programming mode.
oo
o TRACK indicator
oo
Lights up when the track number being played is displayed.
!0!0
!0 EDIT indicator
!0!0
Lights up when the player is in edit mode.
nn
n
nn
Press to start playback.
mm
m
mm
Press to stop playback. This button is also used for deleting a program.
,,
,
,,
Press to interrupt playback temporarily. The indicator lights up during
pause. When pressed again, the indicator goes out and playback
resumes from the same position.
..
. , (Track Previous/Next) buttons
..
When the button is pressed during playback, play re-starts at
the beginning of the current or a previous track. When the button
is pressed, play re-starts at the beginning of the next or a subsequent
track. The same number of tracks as the number of times the button is
pressed can be skipped.
The selected track number is shown on the display.
These buttons can also be used to select a desired track from which to
start playback.
These buttons are also used in program mode to select tracks for
programming.
PLAY
STOP
PAUSE
button
button
button
6
 Loading...