

Page 1
POSTED 6-27-'04
This manual is for reference
This
page
This
may
not
be sold or distributed without the expressed
I have no,
This is the full text and
The main
you
If
Ave., High
Most
This
If
find
other
will
you
use
this manual usefirlo how
Bridge,
places
allow
Pay
you
If
page
08829-L701and
NJ
would
me
to continue
Pal
or
found
wish
historical
and
page
is
copyright O by
connection with any camera company
On-line camera
images from
the
manual. This may
purposes,
M,__B__ul_ku_s_,__NJ_.
rnanual library
this PDF document to download.
is located
charge
It'll make
this
please
you
to
to buy
to use
page
from
notify me
read
you
your
at www.butkus.org/chinon
about a donation of
your
send
for
$7.50
Xerox
new manuals
feel
better, won't
credit card, use the Pay Pal Link
any
other
mike@butkus.org
at
e-mail address so I can thank
a electronic copy
copy.
location
$3
and
it?
(other
rights reserved.
all
permission
take
3 full minutes for
M. Butkus,29
to:
or
$18.00
pay
their
shipping costs.
then a
of the
on
link)
producer
Lake
you.
for a hard
page.
my
Page 2

www.orphancameras.com
Page 3
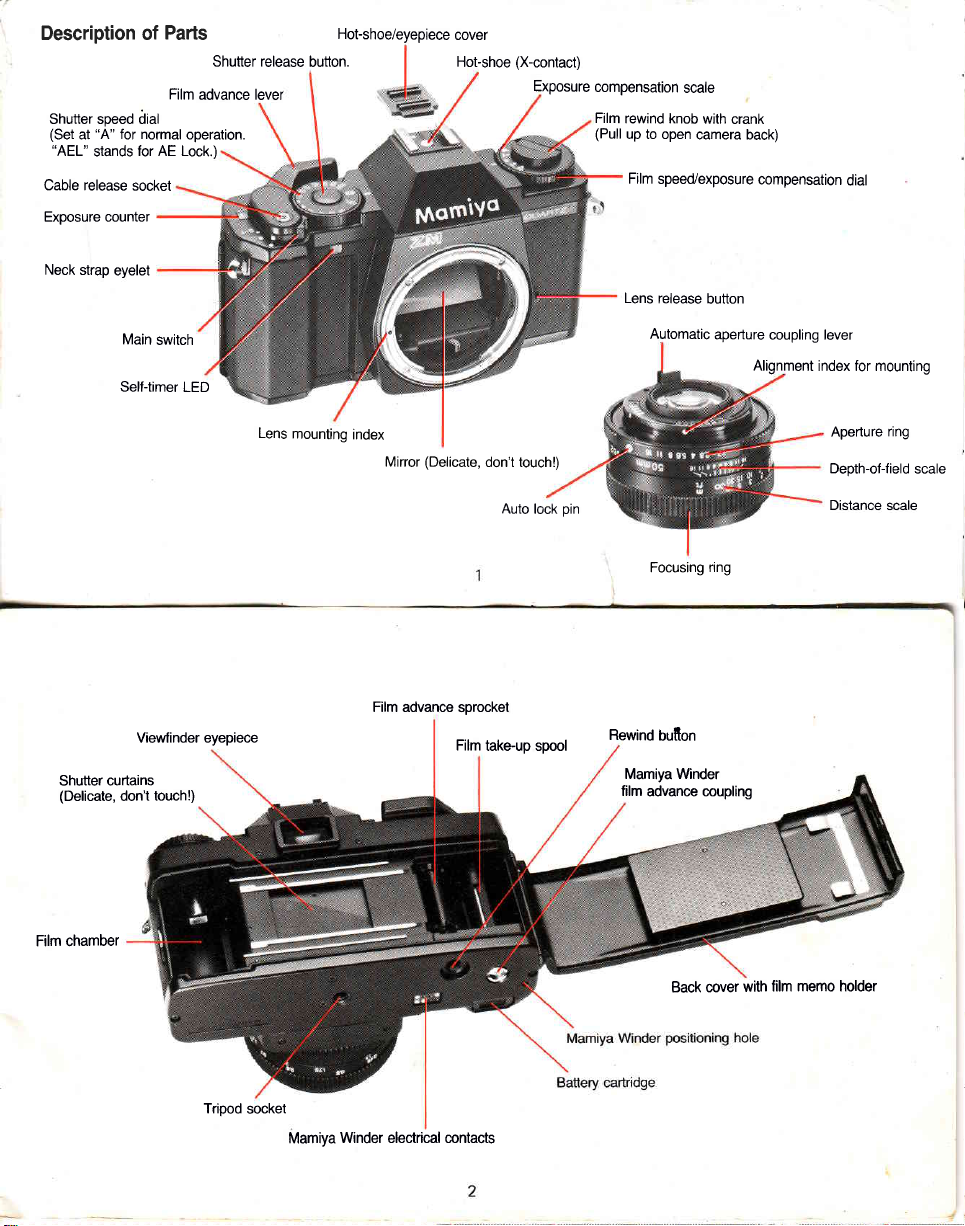
Description of
Shutter soeed dial
"A"
(Set
"AEL"
Cable release
Exposure counter
Neck
at
stands
strap
for normal
for AE Lock.)
socket
eyelet
Parts
Film
operation.
advance
Shutter release
lever
Hot-shoe/eyepiece
button.
cover
Hot-shoe
(X-contact)
Exposure
compensation
Film
rewind knob
(Pull
up to open
Film
speecVexposure
Lens
release
scale
with
crank
camera back)
button
compensation
dial
Main
Self-timer
Viewfinder eyepiece
Shutter curtains
(Delicate,
don't
switch
LED
touch!)
Lens
mounting
index
Minor
Film advance
(Delicate,
sprocket
Film
don't touch!)
Auto lock
take-up spool
pin
Automatic
Focusing
Rewind
bufton
Mamiya Winder
film
advance coupling
aperture
ring
coupling lever
Alignment
index for mounting
ring
Aperture
Depth-of-field
Distance scale
scale
Film chamber
Tripod
socket
Winder electrical contacts
Mamiya
Back
cover
film memo holder
with
Page 4
$.
www.orphancameras.com
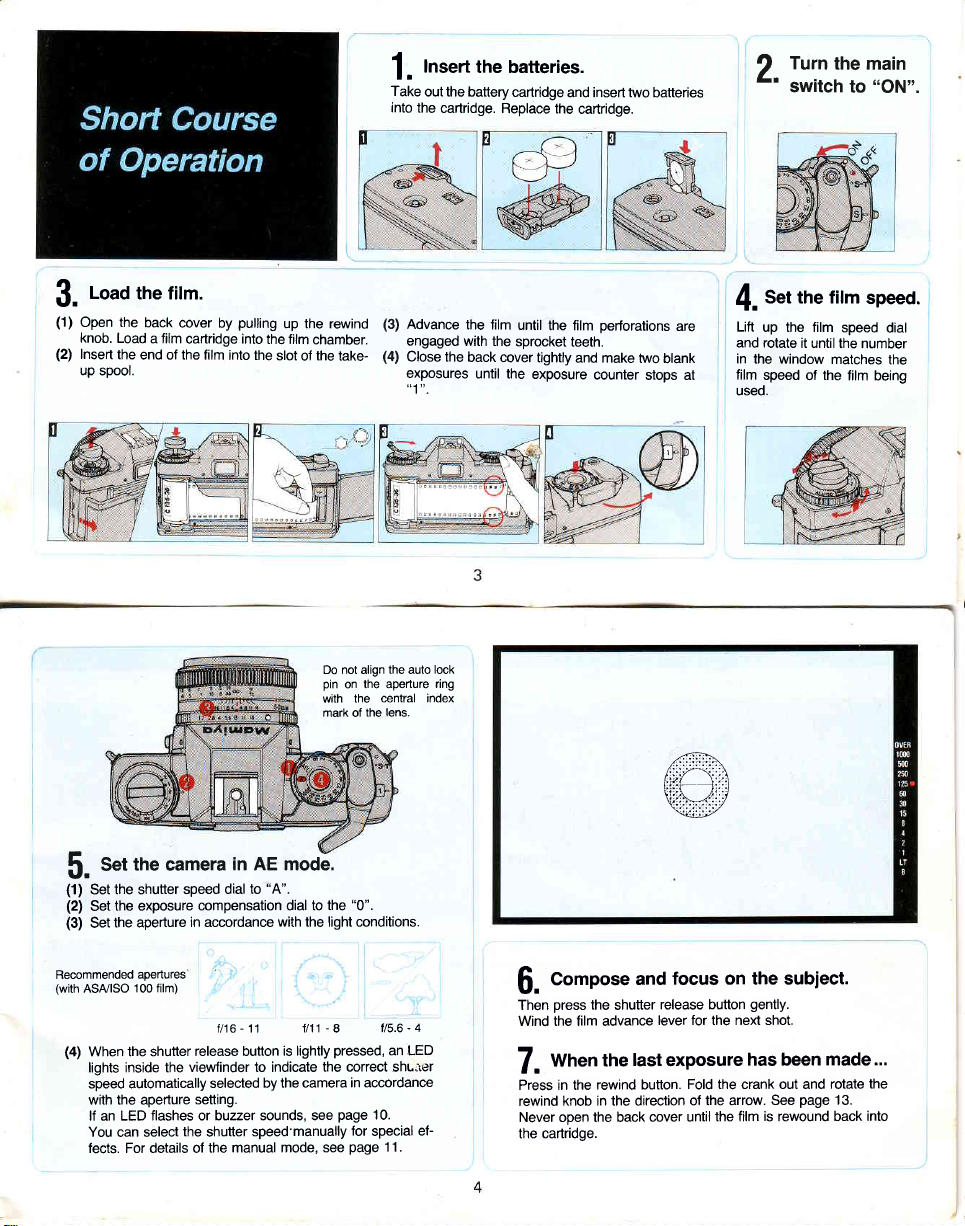
(1)
Open the
knob.
(2)
Inseft
up spool.
loaO
Load
the
the film.
back
cover by
a film
car.tridge into
end of the film
pulling
into the
up the rewind
the film
chamber.
slot
of the take-
l.
Take
into
the
(3)
Advance
engaged
(4)
Close the
exposures
"1".
Insert
the batteries.
out the battery
cartridge.
Replace the
the film
with the
back
cover tightly
until the
caftridge
and insert two batteries
caftridge.
until
the film
sprocket
teeth.
and make
exposure
pedorations
two
counter
stops at
are
blank
Turn
2.
switch
s"t the fitm
{.
Lift
up the film
and rotate
in
the window
film
speed
used.
the main
"ON".
to
speed.
speed
it
until the number
matches
the
of
film
being
dial
the
the camera
Set
$.
(1)
the shutter speed
Set
(2)
the exposure
Set
(3)
the aperture
Set
Recommended
(with
(4)
aDertures
100 film)
ASA/ISO
When the shutter
inside the
lights
speed automatically
with the aperture
ff an LED flashes or buzzer
You
can select
fects. For details of
in AE mode.
"A".
dial to
compensation dial to the
in accordance
release button
viewfinder to indicate
selected by
setting.
the
shutter
the manual
with the light conditions.
f/16-11 fl11
is lightly
the camera
sounds, see
speed'manually
mode, see
Do not align the auto
pin
on lhe aperture
central index
with the
mark of
the correct shL:rer
the
"0".
-8
pressed,
in accordance
page
for
special
page
lens.
1'15.6-4
an LED
10.
11.
ef-
lock
ring
4r
Compose
h
lfr
press
Then
Wind the film advance
wn"n the
/,
Press in the rewind
knob in the direction
rewind
Never open the back
the cartridge.
the
and
shutter
last
button.
/l';:.ia:'.'X
\ltili;-/
focus on the subiect.
release button
lever for the next shot.
exposure
Fold the crank out and
of the arrow.
cover until
gently.
has been made...
See
is
the film
rewound
page
rotate the
13.
back into
Page 5
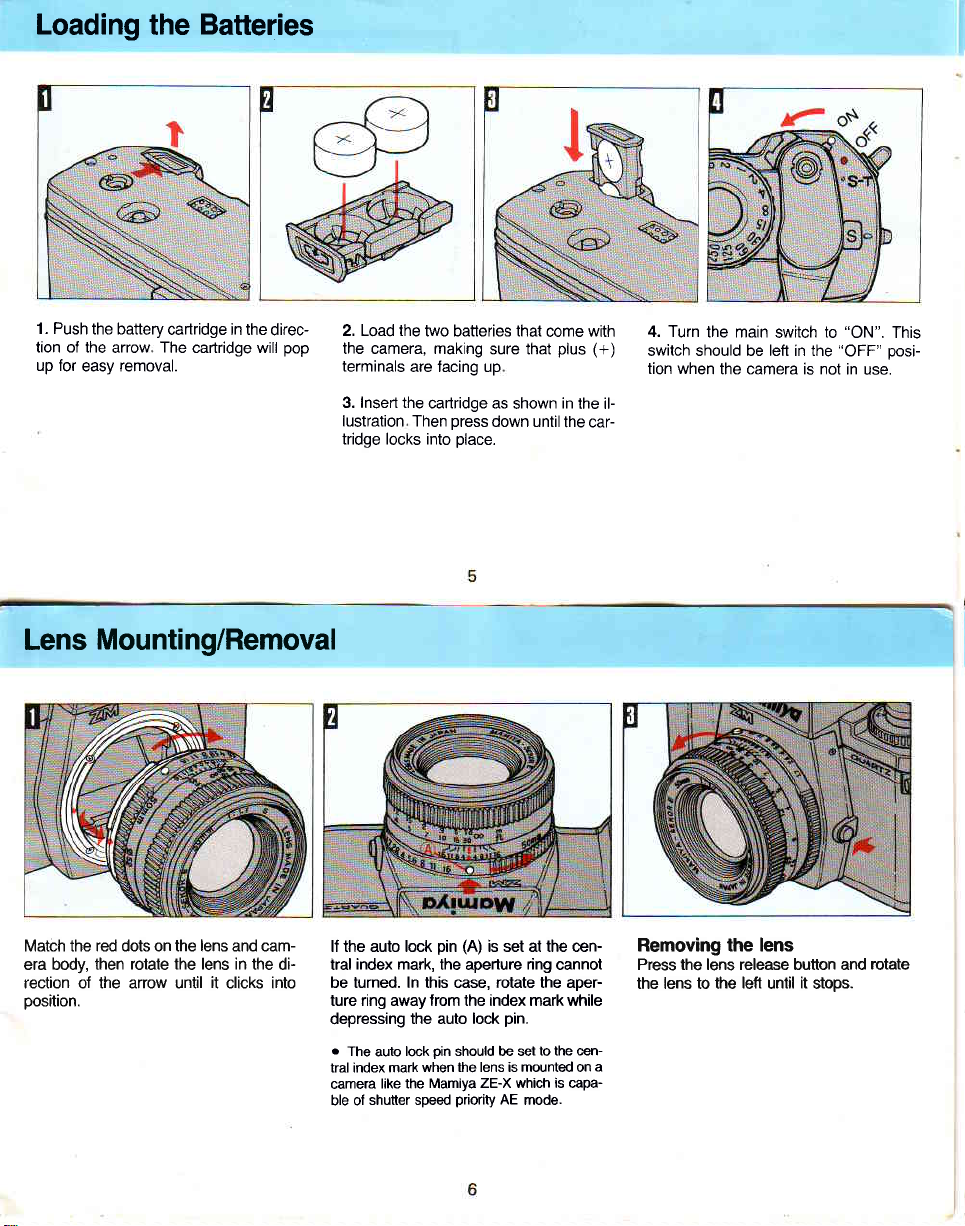
Loading
Batteries
the
1. Push
tion of the
up for
easy removal.
Lens
the battery
arrow
cartridge in the
The
cartridge will
direc-
pop
2. Load the
the camera, making
terminals
3. Insert the
lustration Then
tridge locks into
Mounting/Removal
two batteries that
are lacing up
cartridge as
press
place.
sure that
down until
come with
shown
plus
(+)
in
the il-
the car-
4. Turn
lhe main
switch should be left in the
tion when
the camera is not
switch
to
"ON".
"OFF"
in use.
This
posi-
Match the red dots on the lens and camera body, then
rection of the arrow until
position.
rotate the lens in
it
clicks into
the di-
lf the auto lock
index mark,
tral
be turned. In this case, rotate the aperture ring away lrom the index mark while
depressing
.
The
auto
tral index mark
camera
shutter speed
ble ol
pin (A)
is set at the cen-
the aperture
the auto lock
lock
should be set
oin
when the lens is mounted on
like the Mamiya
ZE-X which is capa-
priority
AE
pin.
ring
cannot
to the cen-
mode.
Removing the lens
Press the lens release button and
the lens to the
a
left
until
it
stops.
rotate
Page 6
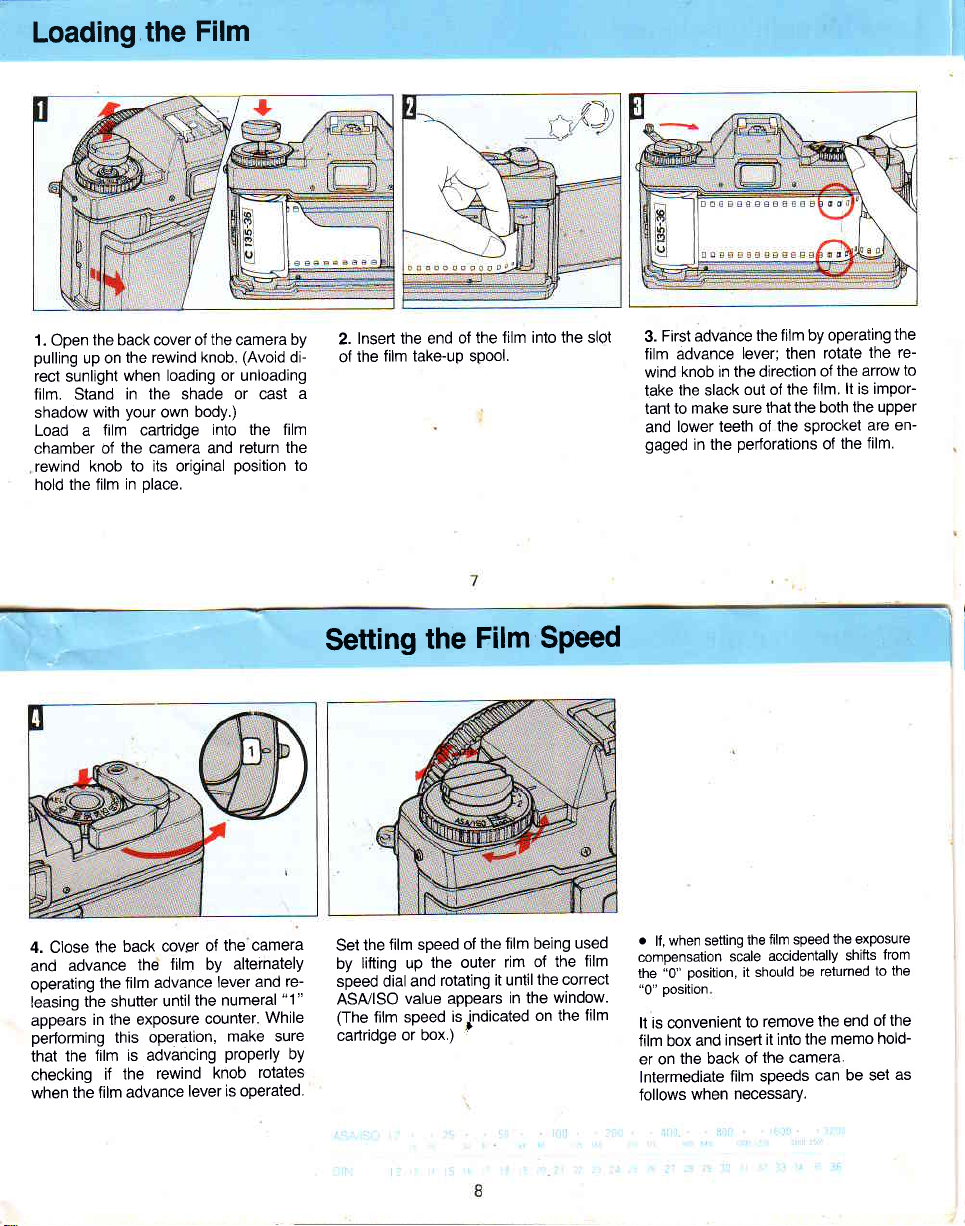
Loading
www.orphancameras.com
the
Film
the back cover of
1. Open
pulling
up on
rect sunlight
film. Stand
with
shadow
Load a
chamber of
rewind
hold the film
film cartridge
knob to its original
the
the rewind
when loading or unloading
in the shade or cast
your
the camera and return
in
knob
own body.)
into the film
place.
camera
(Avoid
the
position
by
di-
to
Insert the end
2.
the
of
a
Setting
film take-up spool.
of the
Film SPeed
the
film into the slot
First advance
3.
film advance
knob in the direction
wind
the slack
take
tant to
lower teeth of
and
gaged
lever; then
out of the
make sure
perforations
in the
the film by operating
that the both
the sprockel
rotate
the arrow
of
lt is impor-
film.
the
of
the re-
the
are enfilm.
upper
the
to
back cover
4. Close
and
operating
leasing
appears
performing
that
checking
when
the
advance
the
the film advance
the
advance
the film
the shutter
in the exposure
film is advancing
until
this operation,
rewind
the
if
of
film by
the
counter
knob
lever
the camera
alternately
and
lever
numeral
While
make sure
properly
rotates
is operated
re-
"1"
by
film speed
the
Set
lifting up
by
speed dial
ASA/ISO
(The
cadridoe or box.)
the outer
rotating
and
value appears
film speed
the film being
of
rim of
it until
in the
is jndicated
used
film
the
the conect
window.
on the film
.
when setting
lt,
compensation
"0"
the
"0"
oosition
It is convenient
film box
er on
lntermediate
follows
scale
position,
insert
and
the back
film speeds
when
necessary.
film speed
the
accidentally
it should
remove
to
it into the
the camera
of
the exposure
returned
be
the end
memo
can
shifts
to the
of the
hold-
be set
from
as
Page 7

(Automatic
AE
1.
Set the
shutter
(automatic
AE
2.
Set the
exposure
"0"
to the
mark
compensation
3.
Set the
cordance
shown in
aperture
with
the illustration
speed
exposure)
compensation
(How
to use
is
explained
after
the light
Exposure)
"A"
dial to
operation.
later.)
selecting
conditions
for
dial
exposure
in
ac-
as
Photography
.
Do
not align
aperture
ring
mark:
otheruise,
not
be
obtained
Recommended
(with
ASA/ISO
fl16-11
apertures
100
film)
fl11-I
the
with
correct
auto lock
the
central index
exposure
pin
on the
can-
4.
When the
pressed,
lightly
vieMinder
speed
automatically
camera in
setting.
"OVER"
.
The
buzzer
sounds at the rate
second
to indicate
tain
the correct
ture
ring
until the LED
"LT"
o
The
sounds
at the rate
to indicate
the
aperture
flashing
"LT"
.
A lit
shutter
speed is
1
second and 4
flash
unit is
so
dark that the
flashes.
o
lf
any
of
(2
slowly
zer
batteries
times
sounds,
are low
olaceo.
shutter !.elease
LED
an
to indicate
the
lights
correct
selected
accordance
LED
with the
flashes
of 8 times
overexposure.
exposure,
turn the
stops flashing
LED flashes
and the
of 8 times
underexposure.
ring
until the LED
LED
also indicates
set between more
seconds. The
recommended
"LT"
LED
remains lit
the
shutter
speed LEDs
per
second) and the
this is
indication
an
and
should
button is
inside
shufier
by the
aperture
and
To
aper-
buzzer
oer second
Again,
stops
that the
than
use
in
conditions
flash
buz-
that
be re-
the
the
per
ob-
turn
of a
or
the
o
Keeping
pressed
after the exposure
completed
continue
indicating the same shutter
speeds to
whether or
rect.
the
shutter
release button
has been
causes the
permit
LED
display
easy checking of
not the exoosure was cor-
o
Slow Shutter
When the shutter speed
to
selected
and
by
"AEL"
(AE
for hand-held shooting,
sound at
warning
the rate of 1 time
you
Warning
Speed
automatically
the camera in the
modes is too slow
Lock)
a buzzer
the lens to a
to set
10
"A"
per
(Auto)
will
second
wider
you
apenure
speed),
sturdy
(giving
or to mount
tripod to avoid the
a faster shutter
the
blurred oictures
The safe slowest
hand-held shooting
shutter speed
varies with the
length of the lens in use.
ter speed
adjust
change
It is also
photographs
warning system automatically
for this
variation when
lenses
possible
with
to take
preset
speeds
the
1. Set
sired soeed.
pressure
2. Light
will cause
button
dicate lhe shutter
lens
aperture
degree of
(4
flash
times
another soeed-
3. The correct
turning the
by
soeed dial
shutter
on the shutter
an LED
soeed selected
not appropriate
is
brightness, a second
per
second)
exposure
apenure
on a
camera
possibility
of
for
focal
The
slow
shut-
you
shutter
to the de-
release
to light and
can be obtained
ring until
in-
lf the
for the
LED will
to indicate
the
Page 8

Manual Exposure
www.orphancameras.com
Focusing
flashing LED and the
cide
o
When the shutter
propriate
will light
o
the LED remains lit for 10
the
lightly
release button is released
posure
even before ten seconds have
11 light
shutter release button for more than
seconds, the LED will disappear
as the button is released
for
(but
With manual
shutter
then released
and
is completed, the LED will
pressure
speed setting
lhe apedure, a
not flash)
shutter speed settings,
release
is maintained
LED
steady
single
seconds after
button is
11 the
after the ex-
coin-
is
oushed
shutter
go
elaosed
on the
as soon
ap-
LED
out
Manual
shutter soeeds
independently
allowing for maximum
ten
sure control. During manual
set the shutter
to accord with
ouirements
pressure
Light
button
rate of 4 times
appropriate
ture
setting. The exposure
iusted on this basis.
of the metering
speed and
your
specific exposure re-
will
on the
cause an LED to llash at the
per
second
shutter speed
Holding the Gamera
for
lhe ZM work
creativity in expo-
system,
operation,
lens
aperture
release
shutter
to indicate
for
the aper-
should be ad-
the
Before
must be brought
rotating the focusing
can be checked
conditions:
(1)
When lines
rangefinder appears
(2)
When the
microprism
fined
(3)
When the
matte field is clear and sharp
into sharp focus by
by any of
in the
pan
of
ring appears sharply de-
part
of
photograph,
taking a
the
subject
ring. Correct locus
the following
central split-image
straight.
the image in the
the image in the
the elbow
Press
your
body
of
the camera
using
lt is also recommended
cally.
press
the camera
for extra steadiness
Most bluned
camera shake
camera steady.
your pictures
oi
steady
gently
with a squeezing
jerking.
firmly against
for a steadier
agarnst
photographs
caused by
lmprove the sharpness
by
Depress the release
hold,
horrzontally
holding
that
your
forehead
are due
not holding the
your
motion,
the side
whether
vedi-
or
you
to
camera
button
withoul
Page 9

Hewinding
the'Fi|m
When the last exposure has been
made,
the Jilm must be rewound back into the
cartridge
camera.
until
1. Press in the rewind
before removing it from the
Never
the camera back
ooen
this has been done.
button
2. Fold the crank out
knob
rotate in the
and
arrow.
13
from the rewind
direction of
the
3. When the rewind
pull
lightly,
ooen
the
up on the
camera
back and
lilm.
.
When the film has been
film advance
the rewind button and
film advance
rewinding and it
tion
lever may stop
rewind the
lever fully after the completion
will return to its normal
knob
stans
to turn
rewind knob to
remove the
lully advanced, the
halfway Press
film Turn the
posi-
of
Page 10

Exposure
www.orphancameras.com
The center-weighted
o{
system
oossible exoosures
ing situations
ject
is situated
source such
in the shade
the
subject
against a
sure
quired
subject
may be accomplished
methods described
dark background,
increase
to bring out
The exposure compensation
Compensation
exposure
the ZM will
as snow, against
give you
in most
However,
against a bright
of a backlit
is
spotlighted
or decrease
the details of
below
metering
the best
all shoot-
of
when the
a window,
tree, or when
on stage
some expo-
may be re-
either of two
by
sub-
light
the
(1)
AE Lock
not only
difficult
position
Lock)
the camera
is removed
ZM is equipped
for obtaining
with backlighting,
lighting situation
the exposure
The Mamiya
cial device
sure
other
And this device
the shutter speed
Set
(AE
When the shutter
pressed
memorizes,
the finger
button
is called
dial
release
from the
15
with a spe-
correct
but
as
Lock
the AE
"AEL"
to the
is lightly
button
in, or
locks
reading until
release
expo-
any
well.
To use
close
of
lhe
ter release button
Hold the shutter
and
you
picture
make the exposure.
correctly
light conditions
lf it is
subject, determine
the oalm
about
so that sky
included
the exposure
sure
the AE Lock
to the subject until
the subject covers
viewfinder and
move back to
want
and
exposed even
not
12"
in the viewfinder;
as described
lightly
until the
release in this
the
photograph,
to
press
the
oossible
of the
to
hand at a distance
(30cm),
or
or other bright
value and
above
function, move
the desired
the center
place
release button to
The subject
move close to
the exposure
point
area of
press
the shut-
LED lights.
position
from
compose
under difficult
the camera
areas are
then
make the expo-
part
where
the
will be
the
using
of
not
lock in
the exposure compensation dial
Use of
is the most effective
compensation
proach your
person
slanding against
the river or spollighted on stage,
ross
erc.
The
dial surrounds
permits
up to
When compensation
sation.
may
it
be set
+2
+1
or exposure decrease
by rotating
tween settings
amount of
quired
depends
the beginning,
photo
same
the safe side
on
to
Be sure
exposure compensalion
needed to avoid exposure
set
method oJ exposure
you
when
subject closely, such
+2EV
for exposure
to the
may
increase or decrease
mainly on experience;
it's a
two
at
the
the snow ac-
the film rewind
(2
flstops)
setting
desired
be used. The
also
good
three
or
settings
back to
dial
is not longer
failures
to
cannot ap-
as a
knob
compen-
is required
increase
idea to take
at
"0"
-1 -2
In-be-
to be
when
at
re-
in
Exposure
increase
subject):
subject
Set the dial
-2
setting.
is situated
exposure
is spotlighted
such as on stage,
When the subject
background,
bright
creased
subjects):
When
the exposure.
to compensate
+1
+2 as required.
ot
Exposure decrease
your
background
a dark
results are obtained
best
-l
priate
or
(for
backlit
against a
must be in-
the dial to
Set
(for
frontlit
against
by decreasing
to the appro-
Page 11

Self-timer
(bulb)
B
Exposure
1. Set the main
should be advanced either belore or
after this
not function
2. The
shutter
leasing
proximately
timer is
and the
The LED flashes twrce
first 8 seconds, changing to 4 times a
second during the
warning
released
switch
adjustment
unless the
self-timer
release
button
the shutter after a
ten
seconds
in operation, an LED will flash
will
buzzer
that the shutter is about to
"S-T"
to
The
self-timer will
film
is advanced.
tlvill
start when the
pressed,
is
period
While the
inlermittently.
sound
a second for the
last 2
seconds as a
The film
re-
of ap-
self-
be
Depth-of-Field
.
Before shooting, cover the vieMinder
eyepiece with the hofshoe/eyepiece
cover
the eyepiece
cause the
exposed as a resull of extraneous
entering from the back.
o
after
ting the main switch to
.
again while the self-timer is operating,
the
val
o
the shutter soeed dial is set to
prevent
to
The self-timer can be halted even
the
lf the
shutter
shutter
10
of
The self-timer
light from
Failure
photograph
countdown
release
will
released
be
seconds
cannot be used
entering
to do so
to be incorrectly
has
started by sef
"On"
"OFF".
or
pushed
is
button
afler an
when
"B''
via
may
light
inter-
the
Set
(bulb)
At this
open
ton
release and
orevent
shutter soeed dial
for exposures
position
as long as the shutter release but
is held
down
camera shake
longer
the shutter
The
triood is recommended to
use of a cable
"8"
at the
than 2 sec
will remain
Stopped-down aperture
Focused distance
When the
ject,
of the
focus This
and increases
stopped down while
lens
To
or to
bother of
be stopped
of-focus.
appropriately
rendered in
camera is focused
a cenain distance
subject is also in
is
called the depth-of-field
as the lens
is
opened up to larger
render
a background in
allow snap-shooting
pinpoint
focusing,
down to increase
Opening up the lens
enables
sharp detail
Deolh'ot-lield
on
in front
and back
relatively
aoerture is
it decreases
apertures
sharp focus,
without
the lens
the depth-
aperture
a subject to
against a
a sub-
sharp
as the
the
can
be
pur-
posely
blurred background
ground
The
depth-of-field range can be
mined using
the
camera lens. Once the
ture is
ures
mark indicate the
aperture
For
example. if the
15ft
range from
(10m)
30ft
the depth-ofifield
selected, the
on both sides of the center index
on the distance scale.
(5m)
at an
approximately 10ft
will also
desired aoer-
corresponding fig-
depth-of-field for that
is focused
camera
aperture of
in
be
sharp
fore-
or
deter-
scale of
f/1 1,
(3m)
focus.
at
the
to
Page 12

Flash Photogiaphy
www.orphancameras.com
Infrared
Photography
1.
Clip-on typeflash units
lite ZE
on the hot
Mamiyalite MZ 36R), a sensor
must be attached to the hot shoe A sync
cord is not required.
2.
Set the shutter soeed dial
"AEL"
or
3. The Mamiyalite wilt be fully charged a
few seconds after lhe switch
on. lf
shutter release button while the flash
unit is being charged, the LED display
will
shift
natural light conditions to 1/60 sec. as
soon as the
When the shutter speed dial is at a manual soeed between
125
synchronizes
charging
1/60 sec and 2 sec,
18R)
or MZ
you
sec,
For
shoe
position.
maintain light
from the shutter speed for
flash is fully
the
camera
for flash at 1/60 sec. on
When the
(the
are mounted directly
grip
.1/1000
dial
the
18
Mamiya-
type units
to the
is turned
pressure
on the
charged
sec and
automatically
is
between
set
will
shutter
(the
base
"A''
1/
be
released at the selected
oressure on
will
cause
ter
speed
charged, an
"60"
1/60
flashing.)
4. Set the
by the
graphs
Mamiyalite instructions.
is a series control
tronic flash, so energy
distances.
stored
charged, shortening
extending
.
The lvlamiyalite lVlZ
flash
"MZ-AUTO"
"MANUAL"
the
shutter
an LED to appear
When the flash
setting
LED will start
(When
setting
the LED
sec.,
lens to the apedure
flash unit and start
as explained
The remaining energy
in a capacitor until
battery
if the
switch
setting.
the speed
will light up without
type automatic elec-
recycle
life
18R
on the flash unit is set
either the
Use
in detail
The Mamiyalite
is saved at close
or
Light
speed
release button
at the shuf
is fully
to flash at the
is
to
set
indicated
photo-
taking
in the
times and
will not
36R
or
is
to
the flash is re-
MZ
"AUTO"
(or
The red dot
center
frared mark.
cause
white infrared film differs
nary films. Compensation
applied
1 First focus
photography;
dicated
move this
oosition.
2. Ared filter should also
infrared
tions concerning
o
There is no need
sation
Use the
instructions.
red line) to
mark
index
This mark is
focusing when using black
as explained
the
then read
by the center
value to the infrared
film
refer to the
so
when using color
filters recommended
the right
the lens is the in-
oJ
provided
than with ordi-
below.
as for
camera
the
distance
index mark and
be used with
exposure.
film instruc-
for focus compen-
infrared films
the
of
be-
and
must
be
normal
in-
mark
in the film
Page 13

Macro
50mm f/3.5
Auto macro
ZE
spacer
135mm f/2.8
135mm
fl3.5 200mm f/4
Zoom
-
200mm fl3.8
80
24
,300mm
f/4
Page 14

Mamiya-Sekor
www.orphancameras.com
E/EF Lenses
Lens
f/2
35mm
Somm f/.1 4
somml/17
35mm f/2 8
28mmf
28mmf
35mm f/2 I
SOmml/14
5omm
5omm
Macro 5omm f/3 5 5 22 O7Sft or O22m 49mm Screw-in
c)
U
135mm f/2
135mm f /3 5
2c0mmf/4 5 5 12' 32
3mmm f/4
Zoom
28-50mm
Zoom 35-70mm t/35-45
Zoom 35-105mm
7G.lSomm f/38
Zoom
Zoom 8G20Omm
8
/28
/35
f/1 7
S
f/2
S
8
/35-45
f
tl35-43
f/3
8 14 30'-12' 32
Construction
Groups
6
6
5
7 8
5 5
6
6
5 6
A
/
8
6
IJ t5
I
10
Elements
6
I 7 4"-47' 22 2ft or06m 55mm Screw-in
12
Angle
vrew
ol
6
7
6
5
6
7
5 18" 22 sftor15m 52mm
A
5 8" 32
7
OJ
10'
74 22 1ft
63" 22
4:.'16
47'
18' 22 sftor15m 49mm Built-in
63'-34
Minl
apertu
63'-23
34'-17" 32
'*' '""r"
re
22
1 Sft orO4m 49mm
to
1
to
1 5tt
22
22 lft
1
1 5ft
to
1 Sft
to 1
sft or045m
'18ft
1 75ft or05m 55mm Screw-in
6m
22
3Sft
4fi
"f
d stl:e
5ft or 0 45m 49mm
or 0
or03m
or03m
Sft orO4m
or045m
or045m
7ft
or 2m 52mm
or
(27cm in macro)
orlm 52mm
or
I
45m 53oz
49mm
49mm
49mm Screw-in
4gmm
52mm
52mm
5m 77mm Builfin
55mm Screw-rn
1 3m
58mm Screw-rn
iit",
Lens hood Weight
t,."
25
Screw-in
Screw-in
Screw-in
Screw-in
screw-,a
Screw-in
Screw-in
Built-in
Built-in 14
Builtin
+l
(1459)
5.1o2.
71az
Qng)
(1509)
(3109)
10
9oz
(1659)
5 8oz
(1409)
4
9oz
(1459)
5.1o2.
ro.,ZOOS'
Z
(150g)
5 3oz
(1459)
5 1oz
(2@g)
7 1az
109oz,lt6g
(2859)
10 1oz
(405q)
3oz
(7309)
257a2
102oz
l2X)g)
(39Oq)
13
8oz
15
9oz
{4509)
(495q)
17
5oz
(7509)
26 5oz
Page 15

Accessories
27
Mamiyalite
This is
malic
flash intensity adjustment
choice of 3 different
tings In the manual mode, the flash intensity can be adjusted
1/1 6 to full intensity. The flash can be set
the
to
close-up
Guide
Angle
zontal
(Attaching
provides
angle lens.)
The flash can be rotated 90" upwards, 180" to the left and 150' to
the right.
Batteries: 8 AA-size
batteries
MZ
36R
grip
type series control auto-
a
elecironic
number:
of
flash
desired angle
photography
36
coverage: Vertical - 45',
-
60"
the wide-angle
coverage for a 28mm wide-
lts
unit
llash aoerture set
in five
for bounce and
(ASA/ISO
alkaline or
system of
permits
from
steps
100.m)
hori-
diffuser
Ni-Cd
Mamiyalite MZ 18R
The MZ 18R is a clip-on type electronic
flash
a
flash according lo the speed of the
use, it is not necessary to adjust the
aperture
long as the subject remains
unit's effective flash range. Naturally,
manual flash
ble
Guide number: 18
Angle
Batteries: 4 M-size alkaline or Ni-Cd
you
lf
unit
for
each change
photography
coverage: Vertical
of
zontal - 60'
(Attaching
provides
angle lens.)
batteries
the wide-angle diffuser
coverage
the lens aperture for
set
in
is also
(ASA/ISO
for a 28mm wide-
28
film
distance so
within
the
possi-
100.m)
-
45',
hori-
Mamiyalite
This is a clip-on type
comDact
in
flash aperture settings
photography
Guide
Angle of coverage:
zontal
(Attaching
provides
angle lens
Batteries: 4 M-size alkaline or
batteries
ZE
electronic flash unit
is also
number: 17
-
60"
the wide-angle drffuser
coverage
)
lightweight and
and manual flash
possible.
(ASA/ISO
Vertical - 45",
for a 28mm wide-
lt has 2
100.m)
hori-
Ni-Cd
Page 16

Accessories
www.orphancameras.com
Mamiya Winder
Mounting
camera eliminates the need
film manually
can be captured more
there
from the viewfinder
Single frame
simply removing
shutter release
the Mamiya
is no need
ZE
Winder
Photographic
photography
after each shot.
to take
for
film
the
finger
easily
the
advance
ZE
on the
to
advance
opportunities
because
eye
away
is
easy
by
from the
Continuous
possible
2 frames
down the
Power
Lene
Mamiya
cessory for
formance
they
which
lead to
Always
the
being used
at the rate
per
shutter release
source:
rechargeable
Hoods ZE
lens
from the
minimize
can
flare
use the lens
specitic
sequence
second
hoods
getting
the
cause internal
ghost
or
focal
photography
of
by
button.
Four AA-size
Ni-Cad
batteries
are
an
the
best
camera lens
entry of stray
images.
hood
length
29
approximately
merely
holding
alkaline or
important
possible per-
reflection
designed
of the
ac-
because
light
and
for
lens
Filters
is
Mamiya
optical
mance
available in the
(Y2),
SL-1B
Diopter
Farfind it
the
finder
can easily
diopter
These
able
+1,
Before
lens
actually
lenses
your
filters
glass
of
5056
(skylisht)
Correction Lenses ZE
near-sighted
and
difficult to focus
optical
system This situation,
correction lens
diopter
in
six
-1,
-2
purchasing
your
at
try
and select the
eyesight.
made
are
to maintain
the
camera lens
following five
(02),
SL3s
people
characteristics
be
correction
different strengths:
and
Mamiya
various
a camera
remedied
and
-3.
a diopter correction
dealer,
strength
of high-quality
They
types:
YG,
sometimes
due
the view-
ot
however,
using
by
adapter
are avail-
+3,
sure to
be
diopter
that
perfor-
SY48
suits
the high
(UV),
lenses
one
are
and
to
a
+2,
ORubber
This
diopter
The rubber
stray light
taking
To
remove
the
vr'ise;
replace
OMagnifier
The magnifier
focusing
close-up
plications
doubled
visible
nifier
from
Eye-cup ZE
adapter is required
correction lenses
eye-cup
entering lhe
photographs
attach the
eye-cup
the
mounting ring
by
put
then
the ring.
diopter
turning
the lens
ZE
is
a useful
required
as
photography,
The size
and only the
for more
also features
-5
to
accurate
+5
with
Adapter
for
attaching the
to the
camera
helps to
vienrfinder
correction lens,
it
and similar
of the
diopter
prevent
while
located
inside
counter-clock-
place
in
aid for
6opy
image
center
The
adjustment
critical
work,
part
mag-
in
work.
firsi
and
ap-
is
is
o
w
Angle
O
The
at
stops
360' rotation
from
finder
ment
Finder ZE
angle finder
low
angles
provided
are
the
side
features
also
-4
from
w
and for
possible
is
or from
to
@
is useful
+4
when
copy work
every
below The
built-in diopter
shooting
9O",
for viewing
Click
but full
even
angle
adjust
@Close-up
The
close-up
attachment
to
the filter threads
lens
enabling swift
to
close-up
Two models
No t having
lens No 2 having
Diameter of threads:
OAuto
A
set
tended
mount
lens,
camera metering
automatic
lengths
vidually
Lens
lenses
lenses which
photography.
are available: Close-up lens
+2
Extension Rings
three
of
between the
directly
extension rings
for
close-up
coupling with the
diaphragm Three
the
of
rings
or in
combination
o
G@
ZE
ZE
are convenient
screw
of the master
and easy
diopters,
and
+4
diopters.
49mm
photography
camera body
system
and
can be
o
directly
camera
conversion
Close-up
ZE
in-
are
and
and
ZM
the lens
ditferent
used indi-
Page 17

Accessories
a
@Auto
This is
bellows
matic
possible
And the
360',
lens for large magnification
images that
Bellows
an easy
type
aperture stop-down
using
front standard
permitting
ZE
to
close-up attachment Auto-
are
operate,
a double
simple reversing
sharp to the very
cable
can
coupling
be
precision
release
swiveled
the
of
ratios with
edges
Shift control
spective And
rotated
is
vertical
operation The
entire
and
tance
also enables
the
the
at
or horizontal
bellows unit to
forth
and
focusing rail
for sensitive
focusing
control of
camera
for
back
format with
be shifted
adjustment of dis-
per-
can also
a choice of
allows
back
be
easy
the
OSlide
This
the Auto Bellows
slides. Convenient film trays
lor
also
easier cropping of 35mm slides
Copier
device is mounted on the
copying film strips The slide
moves vertically
ZE
for making
are
and horizontally for
front of
copies of
provided
stage
Bellows Stand
@
with the Auto
Used
is used for
Stand
such
stamps,
as
provided
are
platform
precise
finished to
venient for measuring
glass platform
lighting
And the
positioning
provide
of subjects
ZE
Bellows, the Bellows
copying small
coins,
for holding sub.iects
platform
The
18%
is
also included for
insects,
reflectance,
exposures A
objects
etc Clips
rotates
platform
the
on
is
also
con-
clear
back-
Microscope Adapter ZE
€)
The microscope
permit photomicrography
to
Mamiya's ZE
to
for
connect the camera body to the microscope, allowing the magnified image
to be
observed through
the camera. Photomicrography
comes
easy,
lax
or exposure compensation.
adapter ZE is
Series cameras. lt serves
the viewfinder
problems
with no
o
':ri:l&
$
JZ
designed
using
of
be-
paral-
of
Adapter zE
645
@
The
signed to allow the 645
mounted
combines the high-pedormance lens
mediumjormat
shooting capabilities of the 35
era to enable
stopped-down apedure metering.
Adapter ZE is an
645
the ZE
onto
cameras
AE
adapter de-
lens
series camera. lt
with the raoid-
photography
mm
based on
to be
cam-
of
Page 18

1l;)
www.orphancameras.com
J
Precautions
I
The
Mamiya ZM has
warning
warning
the
The batteries
although several
teries
used for an
teries in
damage the internal mechanisms
.
LR44
cury batteries
camera normally
.
and
.
minus
sure to wipe
cloth to remove
.
when battery
LED
corresponding
buzzer
shutter release
go
.
Batteries
When replacing
(A-76),
Be
sure to replace
old batteries or batteries
When
terminals
Never
sounds at the rate
should
completely
should always
extended time Keep
the camera for long
batteries,
or
silver oxide batte.ies
are the
loading
batteries into the
are located
the terminals
any
take apart
batteries, short
exposures
both two
soiling or finger marks,
on Batteries
a built-in
to the
button is lightly
dead, the LEDs
same shape
circuit that
power
is running
correct
shutter speed flashes
of 2 times
replaced
be
can still be made.
be removed
periods
batteries at the
of different
properly.
of the batteries
when the
them in
may result in leakage
use 1
5V alkaline-manganese
SRzt4
and size, they will not
battery
Before loading
them, or throw them
pressed.
won'l light
a cool, dry
types or brands
cartridge, be
and the
automatically
low. In
this case, the
per
second when
quickly
as
(G-13).
same time Do not
etc
as
When the
at all.
camera is not to
place.
Leaving
which
Although 1
operate the
the
sure
the
batteries, oe
cartridge with a
into fire.
gives
and
possible,
bat-
bat-
could
batteries
3V mer-
mrx new
plus
and
dry
Handling
a
When
the camera is not in use, the main
"OFF"
position
the LEDs
a
be
will light up whenever the
premature
The
with a mount
camera may be damaged Do not
the
Avoid
on the delicately
camera
Do not
above
humidity
damaged if the
naphthalene
temoerature.
Never
should be blown
cloth Be
Always
other
gently
Inspect the
spect
cludes the film
chronization,
any irregularities
camera malfunctioning will not
Do not
covered Leave this to
battery exhaustion
depth ot the tripod socket is
screw
camera on a tripod
strong vibration and
or allow it to strike against objects.
keep the
(40"C)
100'F
or salt in the air The
or formalin
touch the
especially sure to never rub the
clean the camera carefully
place
where there is
wiping with
camera
parts
moving
etc. Test
try to repair
Cautions
lf the
longer
adjusted
camera
or below
camera is left for a long time in a.place where there is
surface of the miorror or lens with the hands Any
with
off
a soft, dry cloth. Never use
periodically
before trying to take important
advance and shutter
that may exist.
or
main
camera's
than this, the internal mechanisms
shock since this
parts
of the camera. Be careful nol to drop the
for
extended
5'F
camera
gas.
Always
a blower or wiped off by lightly applying a
in
salt
the air. Clean the many
when it is not
shots should also be taken if
(lncidenlal
be compensated
lubricate
the camera iJ
Mamiva
Vour
switch should be
is left
switch
shutter button
in
7/32
use excessive lorce when mounting
(
15"C),
mechanism
store color film
photographing
after
operation, electronic
dealer.
in the
is
(5.5mm)
may
cause adverse influence
periods
where temperature is
or where there is excessive
surface of the
solvents
being used.
photographs
possible
damage which results in this
)
some
left
in the
"ON"
depressed, causing
or film can also be
position,
lf a tripod is
at the designated
at the beach or
plastic parts
when
irregularity is
mirror
cleaning.
Be
sure
flash
to discover
used
of
dust
to in-
This in-
syn-
the
soft
dis-
by
Specifications
of camera:
Type
priority
automatic exposure
24mm x 36mm
format:
Picture
lenses: Mamiya-Sekor
Usable
Shutter:
Camera
Self-timer:
Sync
Metering system:
Metering
Exposure compensation:
Film speed
Viewfinder
Electronically
range from 4 sec.
2 sec. to
the shutter
hand-held
era in the
1/1000 sec. at
warning
shake
speed drops
shooting
Auto/AEL
Approx
by buzzer and
contact:
ing using SPD
X-sync on a
range:
flashing
(silicon
EV0.5 - EV18
EV1
range:
information
speeds of
shutter
LEDS and
exposure
an intermittent
and battery
In manual mode;
35mm single-lens
reflex
with manual override.
camera
E series and
controlled
1/1000 sec. at
to
metal
MANUAL and
: A buzzer sounds
the
below
according
slowest
to the lens used on
mode.
10-second delay;
timer operation
LED.
hot-shoe
TTL center-weighted,
photo
EV18
+2
(ASA/ISO
(ASA/ISO
f-stops
12-32OO
-
ASA/ISO
display:
1 - 1/1000 sec.,
diode)
LED
plus
open-apedure
100, f/2 lens)
dot
buzzerwarn
exhaustion
An LED dot
lights at the speed
(SLR),
aperture
EF series
plane
focal
position
AUTO
(bulb).
B
inlermittently
safe speed
the camsignalled
fil .7 lens)
1 00,
displays
LT. Flashing
B and
of over- and
lenses
Speed
and
when
for
meter-
indicate
under-
set for
manual shutter
the exposure
another LED
Viewfinder
field of
flashes at
magnification
(with
view
Focusing screen:
Film advance:
angle
Exposure
Using
and 30'stand-off
counter:
when camera
rewind: Manual
Film
source:
Power
batteries
or two
batteries.
Power switch:
Main switch
Flash synchronization:
Auto or
on
camera
sec, the shutter
when the
flash is
Winder coupling:
operation
Dimensions:
Weight:480
"
Specifications
with
140mm
g
design are subject
and
34
lf the
speed.
automatically
speed
calculated
later speed.
the
ratio: 0.85X
infinity).
lens at
50mm
Fixed spliVmicroprism
film advance
lever
angle
back
rewind
Two 1 5V
1.5V silver
rewind lever.
with
alkaline-manganese
oxide SR44
Automatic
type
Additive
is oPened
and shutter
When using
a
Manual and adiusted
is automatically
speed
fully charged
Electrical contact
the Mamiya
(W)
x
Winder ZE
(H) x
88mm
to change
and
without notice
is different
setting
with 93%
by
type
the camera,
coverage
with matte
with 130"
reset to
LR44
(5-76,
G-13,
release button.
Mamiyalite
to 11125
to
set
coupler
(D)
52mm
from
field.
winding
"S"
mark
-76)
(
etc)
with the
-
1/1000
1/60 sec.
in for
built
of
 Loading...