

Page 1

Preface
Congratulations on your purchase of the Mamiya 645 AFD
Camera.
Mamiya pioneered the 645 SLR system camera three decades ago and the
Mamiya 645 AFD , with its TTL auto-focus, auto-exposure, auto-flash and
1
2
3
4
5
Note:
In order to acquaint yourself with the functions of the camera, you will want to
practice without film. Please see bottom of page 11 how the camera can be tested
without film.
auto-film winding features is the latest Mamiya masterpiece and reflects its
long tradition of medium format camera expertise.
Combining 35mm handling ease and speed with the advantages of an almost
3x larger image size, it is a full-featured camera, utilizing many digital controls, LCD displays and is ready for the age of digital photography.
Its high-tech focal plane shutter with speeds up to 1/4000 sec. permits flash
sync up to 1/125 sec. and has an exclusive "Safety Retraction" feature, which
protects it against accidental damage.
The AE Prism Finder with its many features, protected by a sturdy magnesium housing, and also the Power Drive Grip, are now integral components of
the die cast aluminum camera body, designed for heavy professional use.
All the many features, safety interlocks and other important information are
covered in detail in these instructions. It is imperative that you read them
thoroughly before you put your camera to work, in order to ensure proper
operation and maximum results.
Special Advice To Professional Photographers
Your Mamiya 645 AFD is designed for heavy professional use and will give you a long
service life if properly maintained. Your camera and lenses have many moving parts
which require periodic lubrication. Its electronic components, too, are subject to wear
and tear and are affected by ambient conditions like dust, sand, sea air, heat and moisture.
If cameras had odometers like automobiles, it would be easier to specify servicing schedules. May we suggest that if you shoot thousands of film rolls per year, you send your
equipment annually for servicing by the Mamiya distributor in your country.
Mamiya 645 AFD corresponds with digital backs compatible with MSC (Mamiya Serial
Communication of External) system.
1 2
Page 2

Names of Parts and Functions
Exposure compensation dial lock
release button (page 63)
Eyepiece shutter lever
(page 74)
Exposure compensation dial
(page 63)
Main LCD (page 5)
Rear dial (page 8)
Strap lug (page 27)
Front dial (page 8)
Shutter release
button (page 38)
Shutter release mode
selector lever (page 51)
AF lock button (page 49)
Exposure metering mode
selector lever (page 61 & 62)
Exposure metering mode
selector lever lock release
Strap lug (page 27)
Dark slide
(page 19, 20 & 34)
Focus mode
selector lever
(page 43 & 45)
Lens release button (page 17 & 18)
button (page 61)
Hot shoe (page 80)
Exposure mode dial lock release
button (page 53 to 60)
Exposure mode setting dial
Electronic shutter release
(page 53 to 60)
Auto focus assist infrared
light emission window
ment mark (page 17)
Depth of field preview
(page 50)
Self timer lamp
(page 73)
* Do not touch the mirror
with your hand
Electronic contacts
Lens mount align-
Rubber eye piece
Diopter adjustment
Magazine release
contact (page 101)
Mirror
button (page 78)
dial (page 21)
button (page 20)
Magazine cover
release button
(page 31)
Magazine cover
lock button
(page 31)
Magazine lock
button (page 20)
Synchro terminal
(page 84)
Magazine LCD
panel (page 5)
Down button
(page 30)
Up button
(page 30)
Emergency
film wind button
(page 40)
Auto exposure lock
button (page 65 & 66)
Exposure metering difference
value display (page 59)
Diopter adjustment lens (standard accessory) (page 22)
Dark slide storage pocket (page 34)
Memo clip (page 101)
Screw cap for battery compartment for
magazine LCD (page 15)
External power socket (page 100)
Battery case lock lever (page 13)
Battery case (page 13)
Tripod socket (page 101)
Mirror up button
(page 71 & 72)
Main LCD backlight
button (page 76)
Multiple exposure
button (page 69)
Set button
(page 7, 23 to 26,
93, 95)
Flash auto
adjustment
select button
(page 82 & 83)
Auto bracketing
button (page 67)
3 4
Page 3
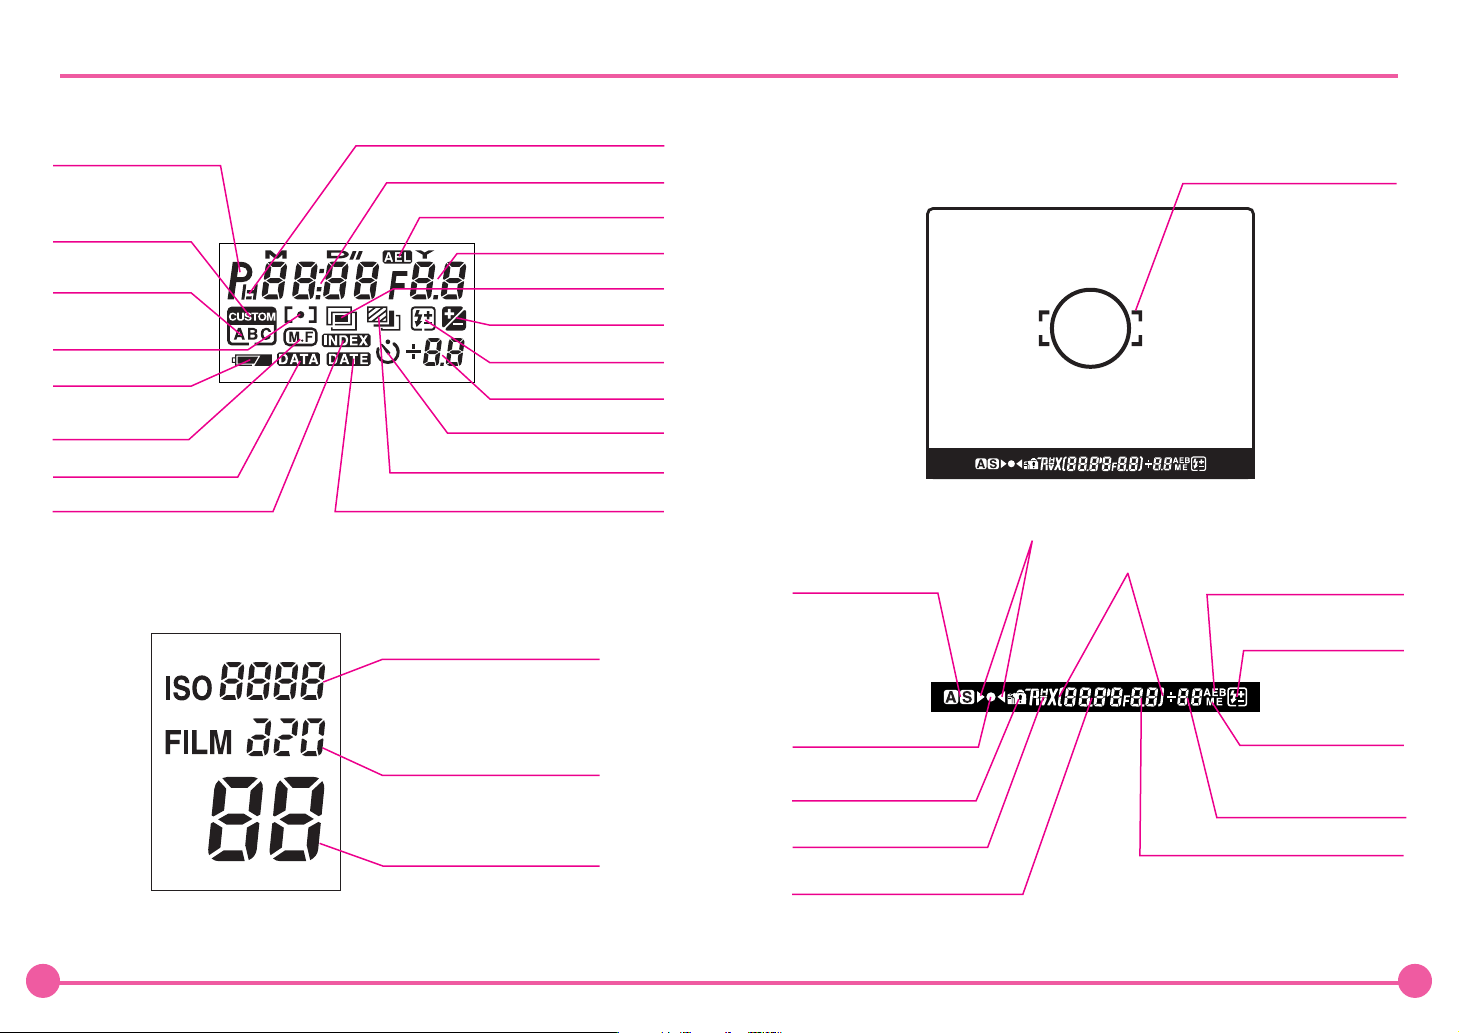
Each Liquid Crystal Display (LCD)
Main LCD
Program mode mark
Custom function
mode mark
User function mode mark
AF area mark
Battery power indicator
Manual focus mode
Superimpose mode shooting data
Superimpose mode index
This diagram is for explanatory purposes. The actual display may differ.
Magazine LCD
Program shift indicator
Shutter speed (second)/Calendar
AE lock mode mark
Aperture/Calendar
Multiple exposure mode mark
Exposure compensation
Flash auto adjustment
Exposure compensation
Self timer mode mark
Auto bracketing mode mark
Superimpose mode calendar
Film speed - ISO 25 to 6400
Film type display - 120 or 220
Frame counter display
mode mark
mode mark
value display
Viewfinder with LCD read-outs on bottom
Out of focus direction marks
Exposure metering
mode display
Focus marks:
Displayed when
subject is in focus
Camera mark
Exposure compensation
mark
Shutter speed
AE lock display
Auto bracketing mode mark
Auto focus area frame
Flash charge indicator
Flash auto adjustment
Exposure compensation
value display / Metered
value difference display
mode mark
Multiple exposure
mode mark
Aperture
This diagram is for explanatory purposes. The actual display may differ.This diagram is for explanatory purposes. The actual display may differ.
5 6
Page 4
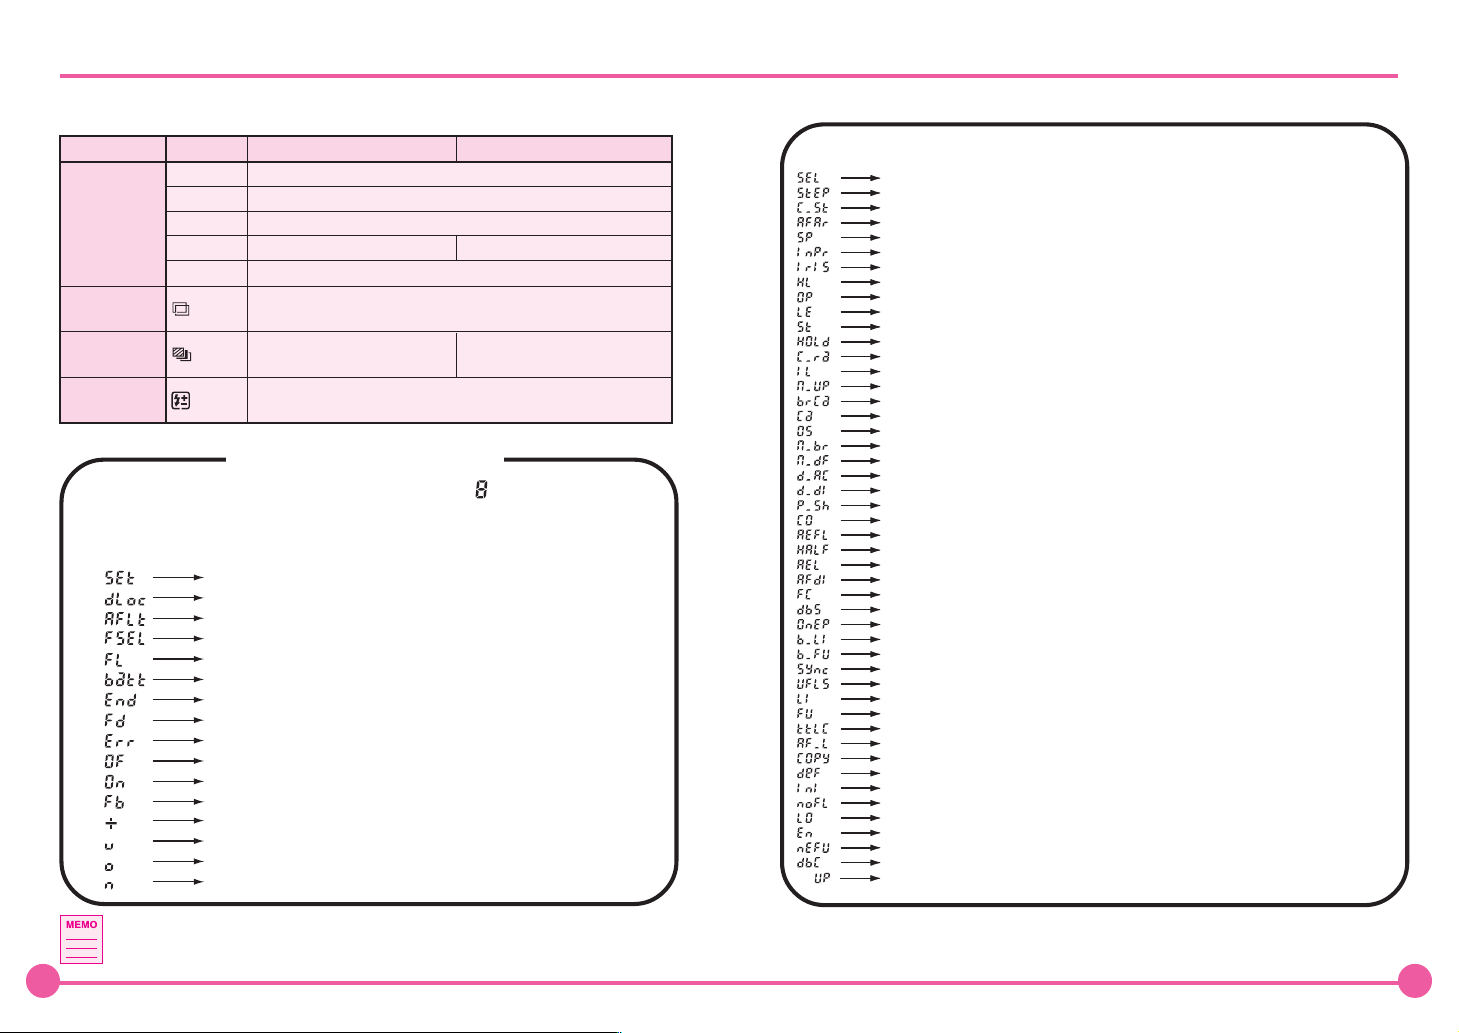
Electronic Dial Operations / Liquid Crystal Display
Electronic Dial Operation
Front dial Rear dial
Program shift (PH⇔P⇔PL)
Aperture adjustment
Shutter speed adjustment
Shutter speed adjustment Aperture adjustment
Aperture adjustment
Number of additional exposure
Specify the auto bracketing width
bracketing
Flash metering compensation
(when using Metz flash and SCA3952 adaptor)
Turn the auto bracket ON/OFF
Exposure mode
Multiple
exposure button
Auto-bracketing
button
SET button
Position
P
Av
Tv
M
X
displayed
displayed
displayed
Select the number of frames for auto
Liquid Crystal Display
All displays on the liquid crystal display consist of “ ” and the number of
places is limited. For this reason, some letters and words are abbreviated.
Display examples of the main LCD
SET
Dial Lock
AF Light (AF supplemental infrared light)
Flash Sel (Flash compensation)
Flash
Battery
END
Finder Display
Error
OFF
On
Film Back
+ (Plus)
Under
Over
Normal
Display examples when one of the custom functions is specified
Select function No. (Select one of the user functions)
Tv, Av step (Select step width for Tv and Av)
Compensation Value (Set the step width for exposure compensation)
AF area (Select an AF area)
Spot (Spot)
In Print (Select a data type for superimposing info on the picture)
Iris (Hold a specific lens iris value)
Hold (Hold)
OP (Not held, released)
LEast (Minimum)
STep (Number of steps from the release)
Power HOLD (Hold the power setting)
Cv range (Specify the range of exposure compensation)
Illumination (backlight illumination)
Mirror UP (Mirror up)
Bracket Cancel (Stop auto bracketing)
Cancel (Cancel)
One Shot (One shot)
Manual Bracket (Use bracketing in M mode)
Manual Dial Function (Swap the dial functions in the manual mode )
Dial Action (Specify a sub-dial for Tv and Av mode)
Dial Direction (Dial rotation direction)
Program Shift (Shift programs)
Tv,Av Compensation (Shift Tv and Av)
AE,AF Lock (Swap the AEL/AFL button functions)
Half Release (Enable a half-press release on the button)
AE Lock (Specify the operation of the AE lock button)
AF Display (Display an AF focus mark)
Focus in (Display just the focus mark)
Difference Between the Setting (Display the difference in metered brightness in the M mode)
One Push Action (Select the operation of a one push shift in the M mode)
Bulb Limit Time (Specify the max time for a bulb shot)
Bulb Function (Bulb exposure method)
Synchronize (Specify the synchronous speed in the X mode)
Use Flash Shutter Speed (Select a synchronous speed to use in the Av and P modes)
Limit (Specify a synchronous speed limit in the Av and P modes)
Full Range (Specify a synchronous speed to use in the Av and P modes)
TTL Compensation (Link the compensation between TTL metering and exposure compensation)
AF Light (Specify an AF compensation light operation)
Function Copy (Copy a function)
Default (Default)
Function Initialize (Initialize the functions)
No Film (Shutter release operation when no film is in the camera)
Lock (Does not release the shutter unless film is present)
Enable (Release the shutter without any film in the camera)
Multi Exposure Function (Multiple exposure operation)
Use Digital Back Custom No. (Identify the digital back)
Up
The functions controlled by the front and back dials can be changed
using the custom settings feature (See C-13, 14, 15, 16 on page 90 to 91).
7 8
Page 5

Content
Preface ........................................................................................................... 1 to 2
Names of Parts and Functions .................................................................... 3 to 4
Each Liquid Crystal Display (LCD) ............................................................. 5 to 6
Electronic Dial Operation/Liquid Crystal Display ...................................... 7 to 8
Camera Operation Test ...................................................................................... 11
Before Taking Photographs............................................................ 12 to 27
Inserting the Batteries ........................................................................................ 13
Checking the Battery Power .............................................................................. 14
Installing the Battery in the Magazine .............................................................. 15
Batteries Care ..................................................................................................... 16
Attaching / Removing Lens ..................................................................... 17 to 18
Attaching / Detaching the Magazine ....................................................... 19 to 20
Diopter Adjustment ............................................................................................ 21
Replacing the Diopter Correction Lens ............................................................ 22
Setting the Index Number ........................................................................ 23 to 24
Setting Date and Time .............................................................................. 25 to 26
Strap .................................................................................................................... 27
Basic Operation ............................................................................... 28 to 40
Attaching the Lens and Magazine ..................................................................... 29
Setting the Film Speed ....................................................................................... 30
Loading Film in the Magazine ................................................................. 31 to 34
Taking Photos in the Full Automatic Mode ............................................ 35 to 39
Shutter Release Button / Holding the Camera ................................................. 38
Removing a Partially Exposed Roll of Film ...................................................... 40
Applied Photography and Various Functions .............................. 42 to 85
Focus Modes ............................................................................................. 43 to 47
Single focus mode ........................................................................................... 43
Continuous focus mode ................................................................................... 43
Focus area ....................................................................................................... 44
Normal focus area ........................................................................................ 44
Spot focus area ............................................................................................. 44
Manual focus mode ................................................................................ 45 to 47
Lenses having the focus mode selector ....................................................... 46
Manual focusing using the focus mark ......................................................... 47
When Auto Focus is Failed ................................................................................ 48
Using the Focus Lock Function ........................................................................ 49
AF Assist Infrared Light ..................................................................................... 50
Shutter Release Modes ...................................................................................... 51
Exposure Modes ....................................................................................... 53 to 60
Program AE (P) ................................................................................................ 53
Shifting the Program (PH/PL) ............................................................................ 54
Aperture Priority AE (Av).................................................................................. 55
Shutter Priority AE (Tv) .................................................................................... 56
Manual Mode (M) .................................................................................... 57 to 60
One-push shift mechanism ........................................................................... 59
X Mode (X) ....................................................................................................... 60
CF (Custom Function) Mode (CF) ................................................................... 60
Exposure Metering Modes ....................................................................... 61 to 62
How to change to the Exposure Metering Mode .............................................. 61
Center average exposure metering mode (A) ................................................. 61
Spot exposure metering mode (S) ................................................................... 61
Average/spot auto switching exposure metering mode (AUTO A-S) ............... 62
Exposure Compensation ......................................................................... 63 to 64
AE Lock Mode ........................................................................................... 65 to 66
Auto Bracketing Mode ............................................................................. 67 to 68
Multiple Exposure Mode .......................................................................... 69 to 70
Taking Photos with the Mirror Up ........................................................... 71 to 72
Self Timer Mode .................................................................................................. 73
Eyepiece Shutter ................................................................................................ 74
Extended Exposure Mode (Bulb Modes) .......................................................... 75
Backlight button ................................................................................................. 76
Front / Rear Dial Lock Mechanisms .................................................................. 77
Depth of Field / Depth of Field Preview ............................................................ 78
Infrared Photography ......................................................................................... 79
Flash Photography ................................................................................... 80 to 81
Flash Compensation Settings ................................................................. 82 to 84
Superimposing Data ........................................................................................... 85
Custom Function ............................................................................. 86 to 95
Setting Custom Functions ................................................................................. 87
Types of Custom Function ...................................................................... 88 to 95
Miscellaneous Operations ............................................................ 96 to 110
Changing the Focusing Screen ............................................................... 97 to 98
Using the M645 Manual Focus Lenses ............................................................. 99
External Battery Socket ................................................................................... 100
Tripod / Electronic Shutter Release Contact / Memo Clip ............................ 101
When You Think Something Might Be “Faulty” ............................................. 102
When Any of These Displays Appear ................................................. 103 to 104
Specifications ....................................................................................... 105 to 106
Common Sense Camera Care and Practice ....................................... 107 to 108
Maintenance and check of the camera ........................................................... 107
After-sales Servicing ........................................................................................ 108
9 10
Page 6
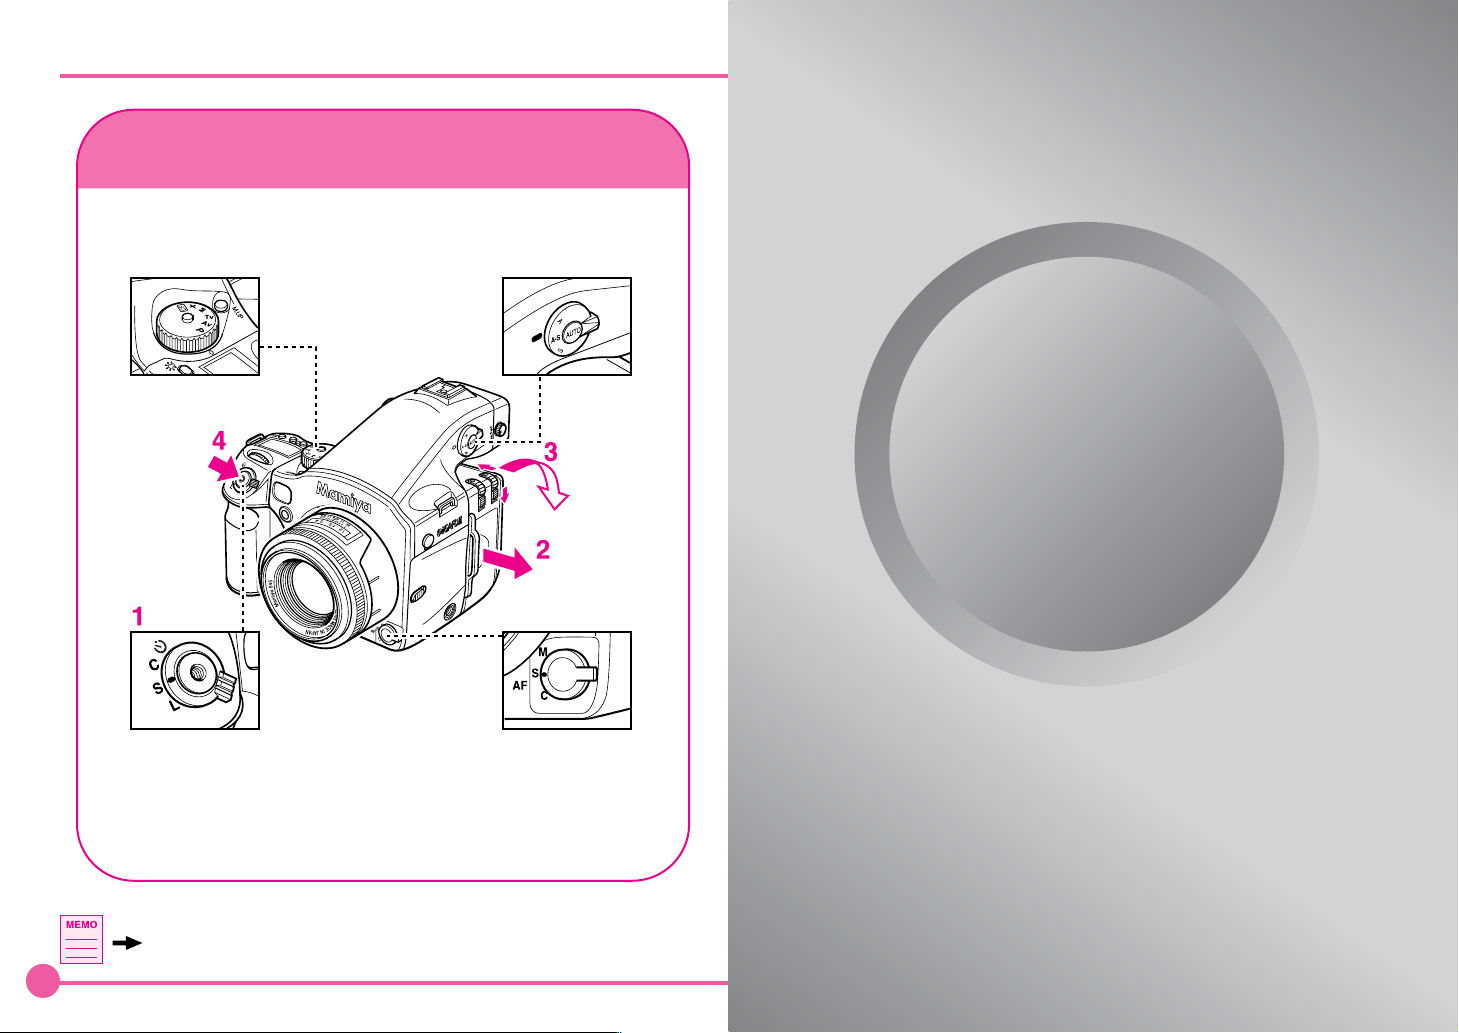
Camera Operation Test
This is a simple way to test the camera and auto focus without film.
“P” Mode is the easiest.
You may use any mode but “CF”.
“A-S” Mode is the
easiest. You may
use any mode.
1. Set the shutter release mode selector lever to “S” (to turn the
power on).
2. Remove the Dark Slide from the
magazine.
The camera can be set to release the shutter when the back cover is closed.
Custom settings (C-31 on page 94).
3. Open the back cover.
4. Set the auto focus mode selector lever to “S”.
5. Release the shutter.
Before Taking
Photographs
Preparation before
taking photographs
This chapter describes how to put in the batteries, how to install and remove the lens, and how to install and remove the
magazine.
11
Page 7
Inserting the Batteries ( )
without batteries
The camera will not operate
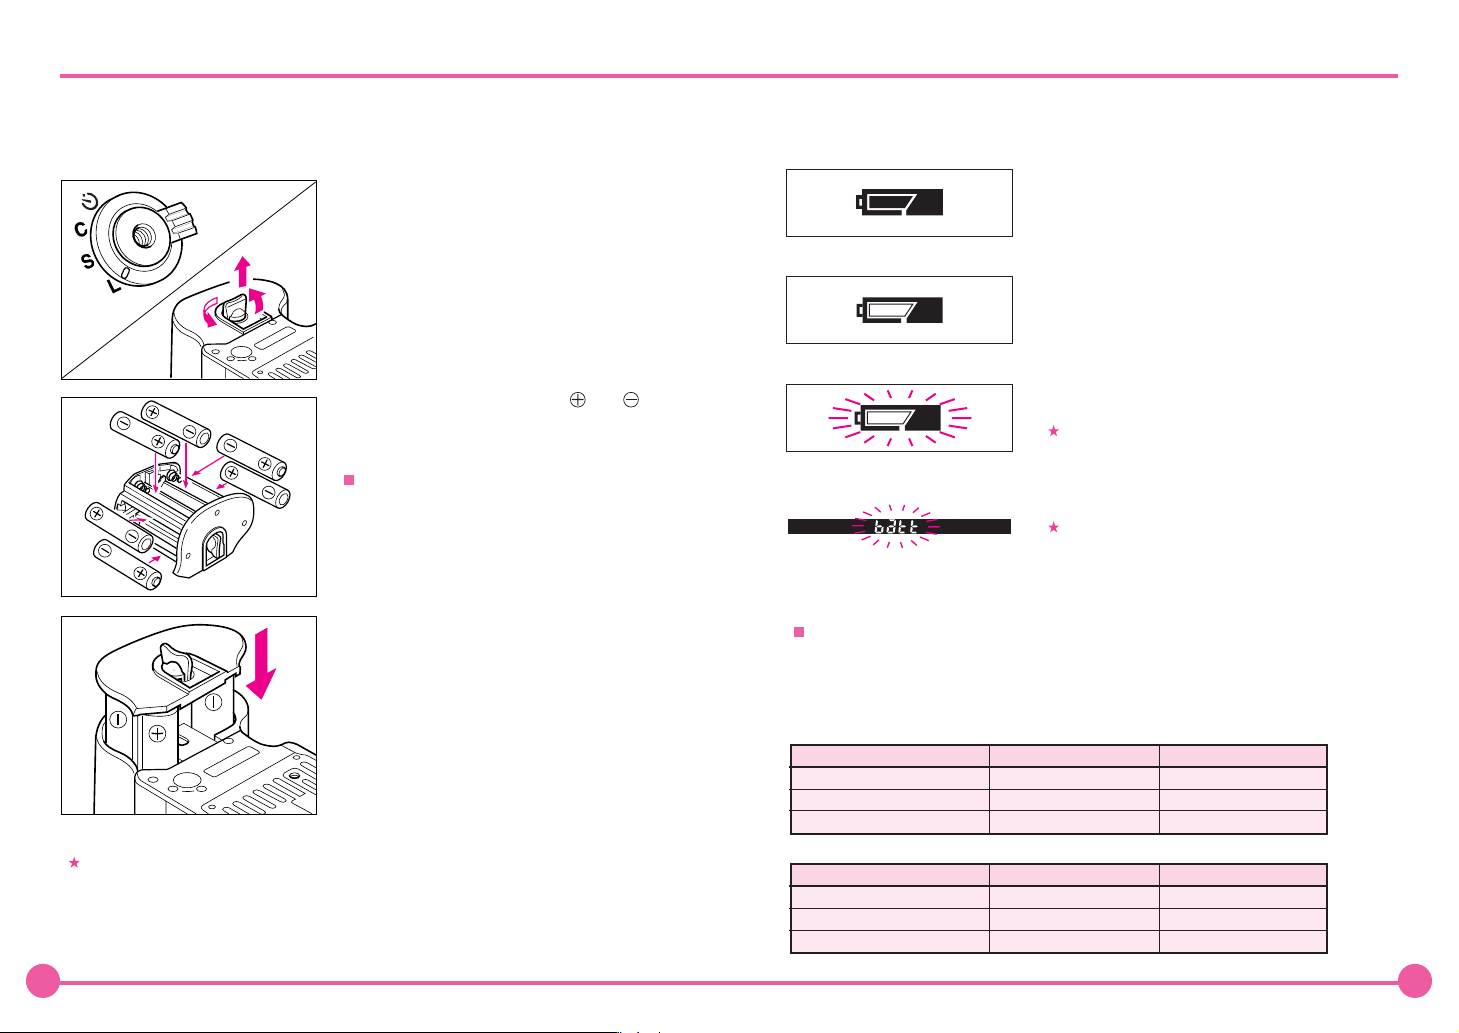
Checking the Battery Power
Be sure to turn the switch of the Shutter Release Button to “L” as shown in the top
illustration, to turn the power off. This prevents electrical damage to the circuits.
Set the shutter release mode selector lever to “L” (to turn the power off).
Use six “AA” alkaline or lithium batteries.
1. Lift the battery case lock lever, turn it counter
clockwise and pull out the battery holder.
2. Insert fresh batteries with the and ends
as shown in the drawing.
Be sure the batteries are placed with proper
polarity
3. Return the battery holder to its case and lock it
by turning the lever clockwise. Make sure it is
firmly attached.
Set the shutter release mode selector lever to “S” (to turn the power on).
Check the battery condition in the lower right corner of the main LCD.
The batteries are sufficiently charged.
There is little power remaining. Have new batteries
on hand.
Camera will still operate.
There is very little power remaining. Camera will not
operate.
Set the shutter release mode selector lever to “L”
Flashing
Flashing
When replacing the batteries, be sure to use six new batteries of the same type. Do
not mix different types of batteries or old batteries with new ones.
(to turn the power off) and replace the batteries
with new ones.
When the batteries are spent, “batt” flashes on
the main LCD and the viewfinder's LCD when the
shutter release button is pressed.
Number of rolls that can be exposed with a new set of batteries
After inserting the batteries, set the date and time. (See page 25.)
At normal temperature (20˚C) (68˚F)
Alkaline battery
120 type film
220 type film
Bulb time
-10˚C (14˚F)
120 type film
220 type film
Bulb time
Approx. 150
Approx. 130
Approx. 18 hours
Alkaline battery
Approx. 25
Approx. 25
Approx. 8 hours
(under our test conditions)
Lithium batteries
Approx. 400
Approx. 220
Approx. 24 hours
Lithium batteries
Approx. 280
Approx. 200
Approx. 24 hours
13 14
Page 8

Installing the Battery in the Magazine
Batteries Care
The button battery supplies power to the magazine's LCD when the film magazine is
detached from the camera. When the film magazine is attached to the camera body, it is
powered by the camera's batteries.
1. Remove the battery compartment
cover screw.
Use a coin or suitable screw driver and turn it
counter clockwise.
2. Insert a battery.
Insert the battery according to the polarity indication in the battery compartment, and close the
battery cover.
Battery used: Sony CR2032 or equivalent
Be sure to watch correct polarity
When the magazine is installed onto the body, the power will be supplied to the maga-
zine from the camera body.
You can take shots without installing the battery into the magazine. However, if you
remove the magazine from the body, the magazine does not indicate film sensitivity
or number of shots.
The magazine battery is not equipped with a battery level indicator. When the maga-
zine LCD panel becomes dark or disappears, replace the battery. As a rough guide-
line, the battery should last approx. one year.
1. Life of the batteries that come with the camera body is subject to storage conditions.
2. Bolts and fingerprints on terminals may cause loose connection and corrosion. Wipe
them off before loading the batteries.
3. It is advised to carry spare batteries when you travel where they may be difficult to
obtain.
4. Performance of the battery degrades in low temperature. Keep them warm when in
cold climate.
External battery case PE401 is available as an optional accessory.
5. Store the batteries in a cool and dry place, away from direct sunlight.
6. Keep the batteries out of the camera body, when it is not used for a long time. Leaving
them in the camera may cause corrosion.
7. Replace the batteries with new ones as soon as they are exhausted. Liquid leakage
from the battery may damage the camera.
8. Read the warning labels of the batteries for handling of the batteries.
15 16
Page 9

Attaching / Removing Lens
Attaching
1. Remove the front body cap, just like
you would remove a lens, by pushing
the lens release button
and then turn the front body cap or the
lens itself counter clockwise and lift
out.
To remove the front lens cap, squeeze the shiny
sections together and lift out.
20
5
ft
m
22
11
4
4
11
22
To remove rear lens cap turn it counter clockwise.
22
m
11
4
4
ft
11
22
5
20
backward
P
X
Av
Tv
M
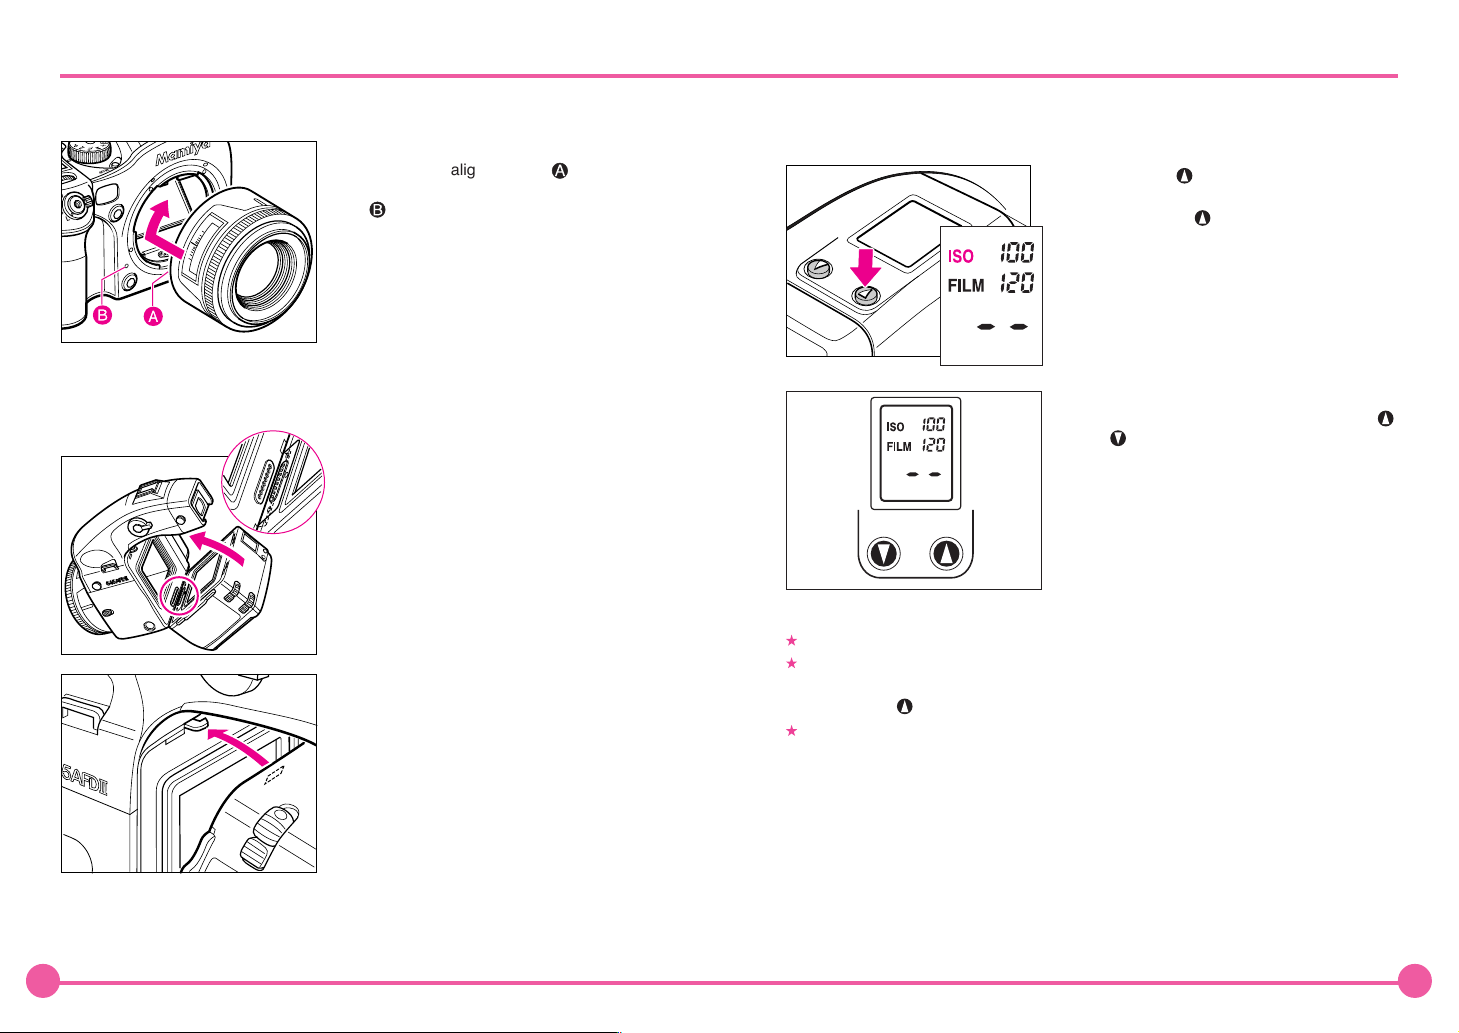
2. Attaching the lens
Align the white alignment dot of the lens (on the
shiny flange) with the camera's white dot, fit the
L
2
2
5
1
1
4
4
∞
M
1
1
S
2
AF
C
m
ft
M
a
m
i
5
y
4
a
6
lens into the camera and rotate it clockwise until
it clicks into place.
L
E
N
S
M
A
D
E
I
N
J
A
P
A
N
Do not touch the distance ring or other rotating parts during the auto focus opera-
tion.
When installing a lens, do not press the lens release button .
Removing
2
2
1
1
4
4
4
1
2
1
5
2
.
1
2
2
.
1
5
4
6
a
y
i
m
a
M
L
E
N
S
M
A
D
E
I
N
N
J
A
A
P
M
S
AF
C
While sliding the lens release button back ,
rotate the lens counter clockwise until it stops
and lift it off.
After removing the lens from the camera body, protect both ends by attaching the
caps.
Oil, dust, fingerprints or water on the electronic contacts could result in malfunction
or corrosion. Wipe such impurities off with a clean piece of cloth.
17 18
Page 10
Attaching / Detaching the Magazine
Installation and removal of the magazine and its dark slide
Unless the dark slide is inserted in the magazine, you cannot install and remove the
magazine. When the camera batteries are low or they are not installed, the dark slide
cannot be removed although the magazine can be mounted or removed.
Before installation
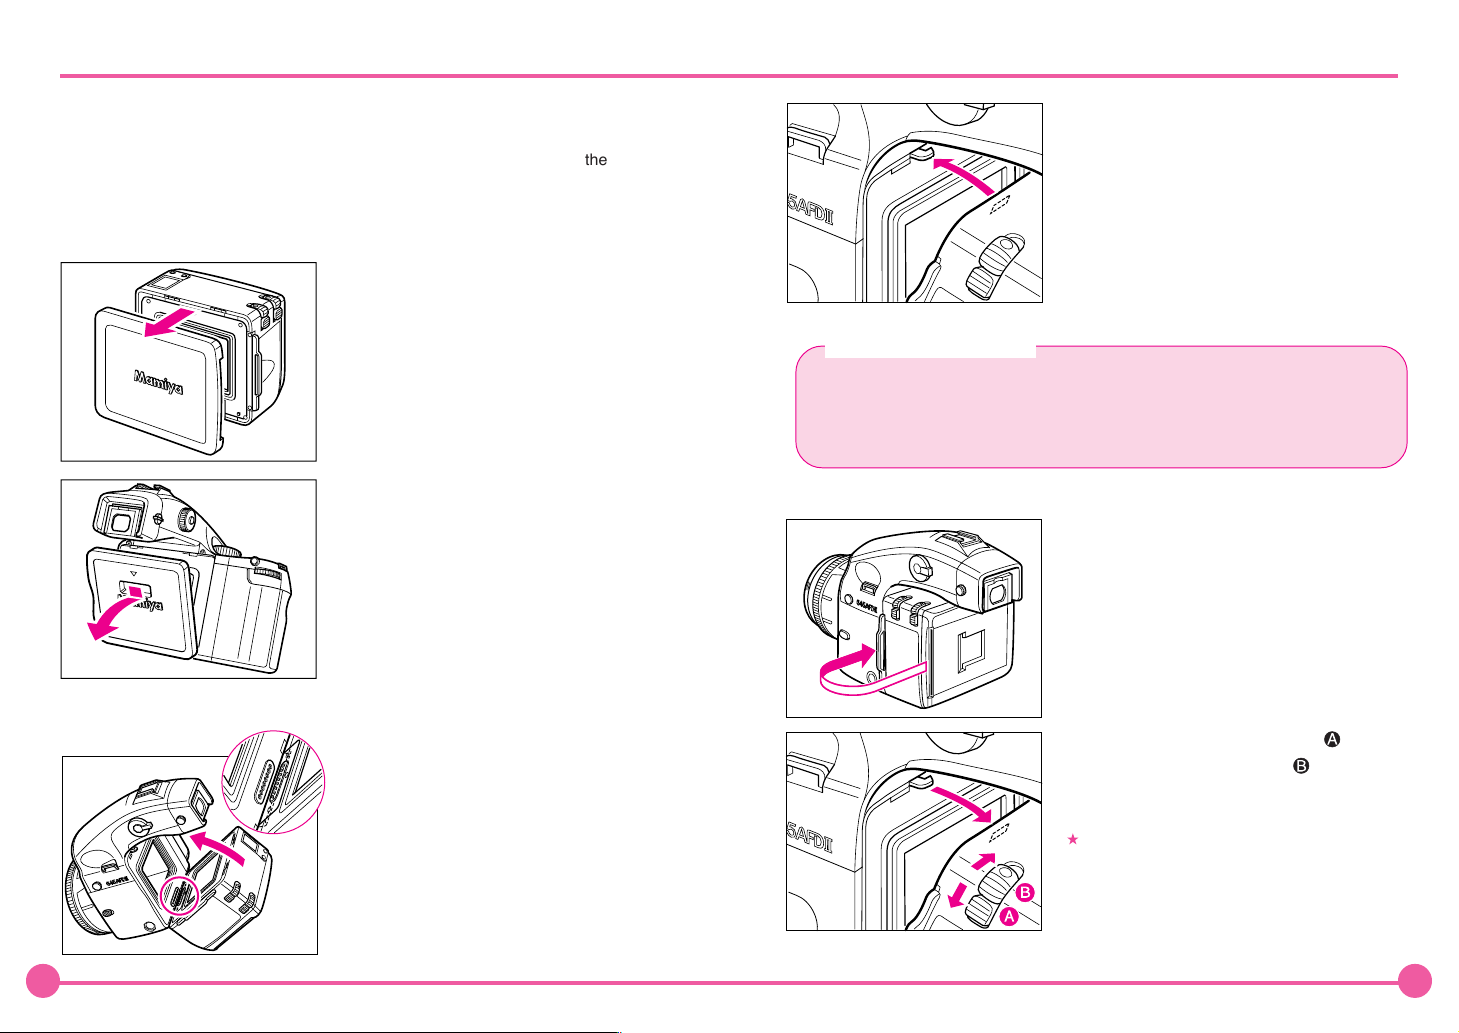
1. Remove the magazine protection cap.
Remove the camera rear body cap while putting
a finger into the notch and slide the cap down.
3. Then you move them together like you close
a book until they lock and you hear the focal
plane shutter open.
Shutter Safety Retraction
The precision shutter blades are made of very thin hyper-duralumin and could be
damaged if unprotected. Therefore the camera is designed to automatically retract the shutter into the open position when the magazine is removed. When it is
reattached the shutter automatically closes and is ready for normal function. (Batteries must be in camera).
Detaching
1. Insert the dark slide into the magazine.
Attaching
2. Match the groove on the magazine body
coupler with the holder bracket (lower) of the
camera body and snap the magazine into the
body.
2. With your thumb first push button down
and then simultaneously button in. The
magazine will separate itself from the camera
body.
When the magazine is removed, the shutter will
automatically open, as explained above, un-
der “Shutter Safety Retraction”
Film winding and shutter release are also
locked.
19 20
Page 11
Diopter Adjustment
Replacing the Diopter Correction Lens
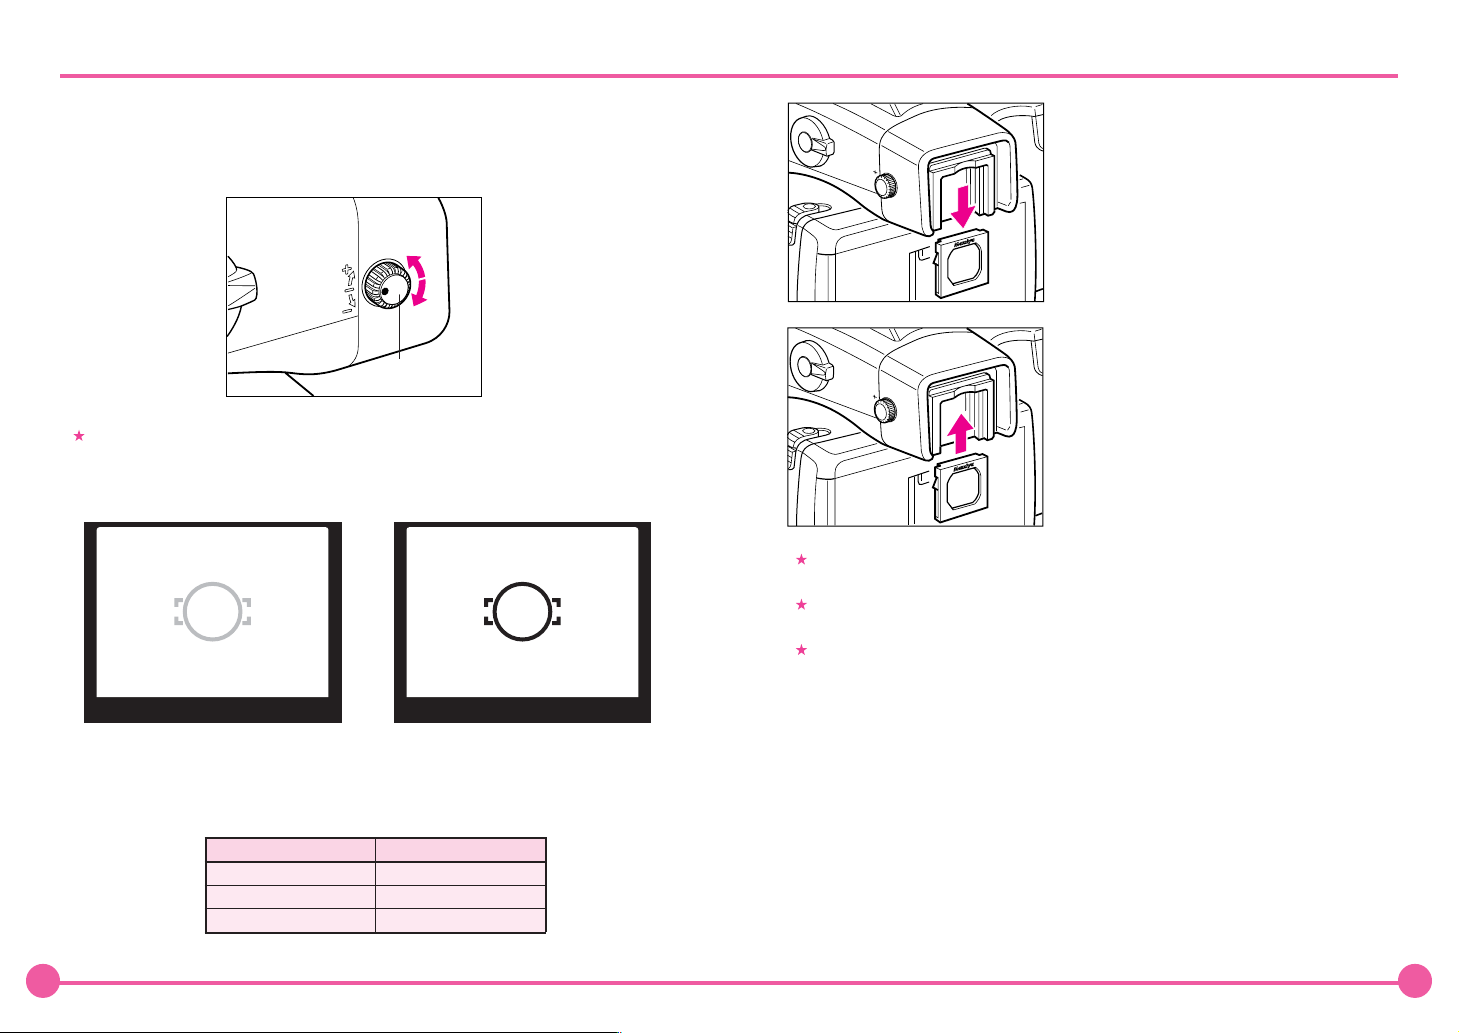
Look through the viewfinder and make sure that the focus frame (Rectangle with
Circle) is in sharp focus. If it is not, turn the diopter adjustment dial in the “–” direction
if you are nearsighted, in the “+” direction if you are farsighted. If this is not sufficient
you may require an optional diopter correction lens. See below.
Diopter
adjustment dial
Point the camera at a bright, plain object such as a white wall when making this
adjustment.
A
A-S
AUTO
S
MADE IN JAPAN
A
A-S
AUTO
S
MADE IN JAPAN
1. Remove the lens supplied with the finder by
pulling it downward.
2. Push the replacement diopter correction lens
upward into the viewfinder’s eyepiece frame
until it clicks into place.
If there is dirt or dust on the lens surface, remove it with a blower or sweep it off
gently with a lens brush.
If there are fingerprints or dirt on the lens surface, wipe it off with a piece of clean,
soft gauze.
Using solvents could discolor the diopter correction lens frame.
Diopter matches.Diopter does not match.
Range of adjustment of diopter correction lenses (Optional accessory)
Diopter correction lens Range of adjustment
DE401 (standard) -2.5 to +0.5
DE402 (for nearsighted users) -5.0 to -2.0
DE403 (for farsighted users) 0 to +3.0
21 22
Page 12
Setting the Index Number
The index number consists of 4 digits (0000 to 9999). The index number is stored in
the camera body so that when replacing a series of roll film holders, the camera will
superimpose sequential index numbers on exposures. This is effective when exposing
and managing a large number of rolls of different types of film.
Although the index number consists of 4 digits, only the lower 3 digits are superim-
posed on the exposure
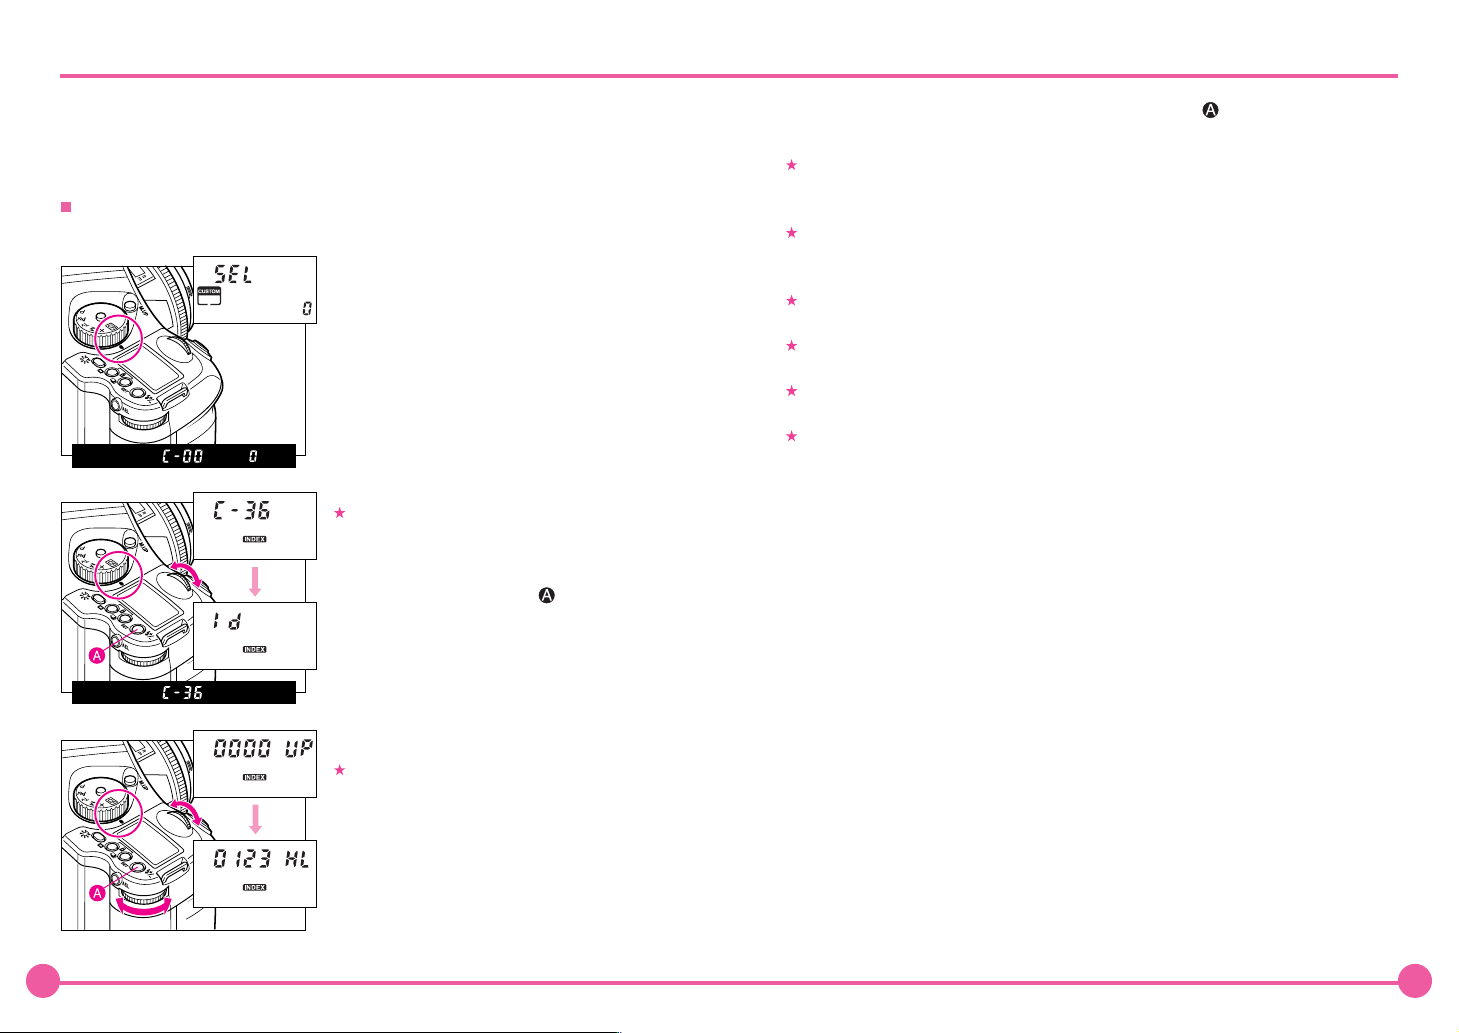
1. Turn on the power.
Set the shutter release mode selector lever to
“S” or “C.”
2. Press and hold down the exposure mode dial
lock-release button. Then, turn the exposure
mode dial to the CF position.
3. Turn the front dial to select custom number
C-36.
The display will immediately show C-36.
Turn the dial on either side to select a custom
number.
4. Press the set button
After pressing the set button , you will see
the index setting display.
5. Turn the front and back dials to set the index
number. (4 digits). Turn the front dial to select a
digit in the index number (the selected digit
blinks) and then change the number by turning
the rear dial.
6. After the index number is specified, press the set button for approximately one
second to store the setting.
The custom setting mode of the superimpose is not set under default. Please set at
custom setting (C-4 on page 88). If a film is not loaded, the index number does not
count.
The starting index number can be set at will. For example, when shooting in different
places or for different purposes, you can classify the photos by changing the start-
ing number of any of the digits.
Once the total number of photos taken reaches 999, counting starts over from 001.
000 can also be set using the index number setting procedure.
After 60 seconds, the index number setting mode is canceled and the setting is not
registered in memory.
Custom settings remain in the memory even when the shutter release mode selector
lever is set to “L” (turning the power off).
When the exposure mode is not set to the CF position and you press the set button
for approximately 2 seconds, you can check the index number previously stored.
Pressing the set button again will let you to check the "month-date-year" and "hour-
minute- seconds" settings.
Turn the front dial until "HL" blinks, so that
the camera always superimposes the in-
dex number specified. When "UP" is blink-
ing, each time you release the shutter the
index number will increase and be super-
imposed on the next exposure.
23 24
Page 13
Setting Date and Time
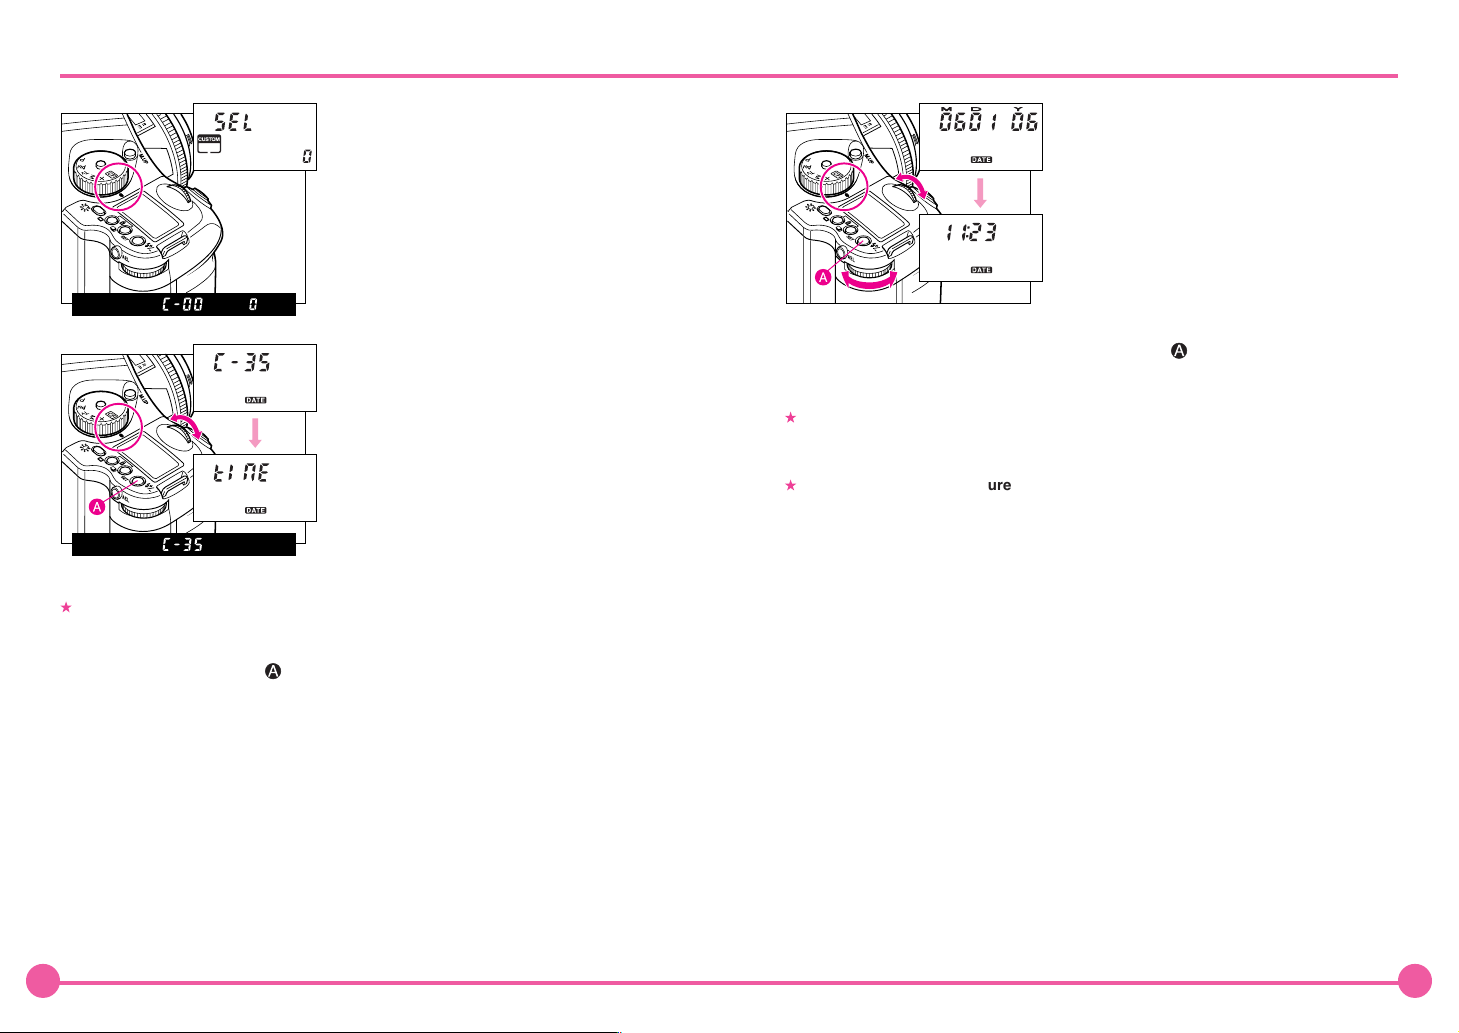
1. Turn on the power.
Set the shutter release mode selector lever to
“S” or “C.”
2. Hold down the exposure mode dial lockrelease button and turn the exposure mode dial
to the CF position.
3. Turn the front dial to select custom number C-
35.
The display will immediately show C-35.
Turn the dial on either side to select a custom number.
4. Press the set button
After pressing the set button , the display will change to the date setting mode.
5. Turn the front and back dials to set the date
and time.
Turn the front dial to select "month-date-year"
or "hour-minutes-seconds" and change the
value by turning the rear dial.
6. After the date and time are set, press the set button for approximately one
second to store the settings.
If you stop pressing buttons or turning dials while changing settings for 60 seconds
or more, the camera will automatically exit the setting mode and any changes to the
current setting will not be stored.
When not in the CF exposure mode, if the set button is pressed for approximately
two seconds the display will show the index number. Press the set button again to
check the date and time.
25 26
Page 14

Strap
Put the neck strap through the camera’s strap
lugs as shown on the diagram and tighten it.
For safety, check that the strap is securely
fastened to the strap mount.
For safety, pull the strap strongly to check if it is secured to the strap mounts.
Basic Operation
This section describes basic camera operations, how to load
film and basic full automatic photography.
27 6
Page 15
Attaching the Lens and Magazine
Setting the Film Speed
Attaching the lens
2
2
5
1
1
4
4
∞
1
1
2
m
ft
L
E
N
S
M
A
D
E
I
N
J
A
P
A
N
M
a
m
i
5
y
4
a
6
Attaching the magazine
1. Attach the lens.
Align the white alignment dot of the lens
(on the shiny flange) with the camera's white
dot , fit the lens into the camera and rotate
it clockwise until it clicks into place.
1. Match the groove on the magazine body
coupler with the holder bracket (lower) of the
camera body and snap the magazine into the
body.
2. Then you move them together like you
close a book until they lock and you hear the
focal plane shutter open.
The film speed (ISO sensitivity value) is the reference for all exposure and must be set
correctly. If the set value differs from the actual value of the film in use, under- or overexposure may occur.
1. Press the (up) button.
When the LCD panel displays information,
press and hold the (up) button on the bottom
part of the LCD for more than 1 second. The
ISO indicator will blink.
2. Set the film speed.
Set the film speed of the film by pressing the
(up) or (down) button. To lock the speed
setting, press and hold the two buttons
simultaneously for more than one second; the
film speed will be written in memory in 5
seconds.
The setting is not complete while the ISO indicator is blinking.
For a power-saving purpose, display on the LCD panel disappears in 5 seconds,
when the roll film holder is detached from the camera body. The display resumes by
pressing the button.
When the battery of the roll film holder is exhausted and it is not attached to the
camera body, no information will be displayed on the LCD panel. As it may cause
malfunction, replace the battery with a new one.
29 30
Page 16
Loading Film in the Magazine
A roll of film can be inserted into the magazine whether the magazine is installed onto
the camera body or not.
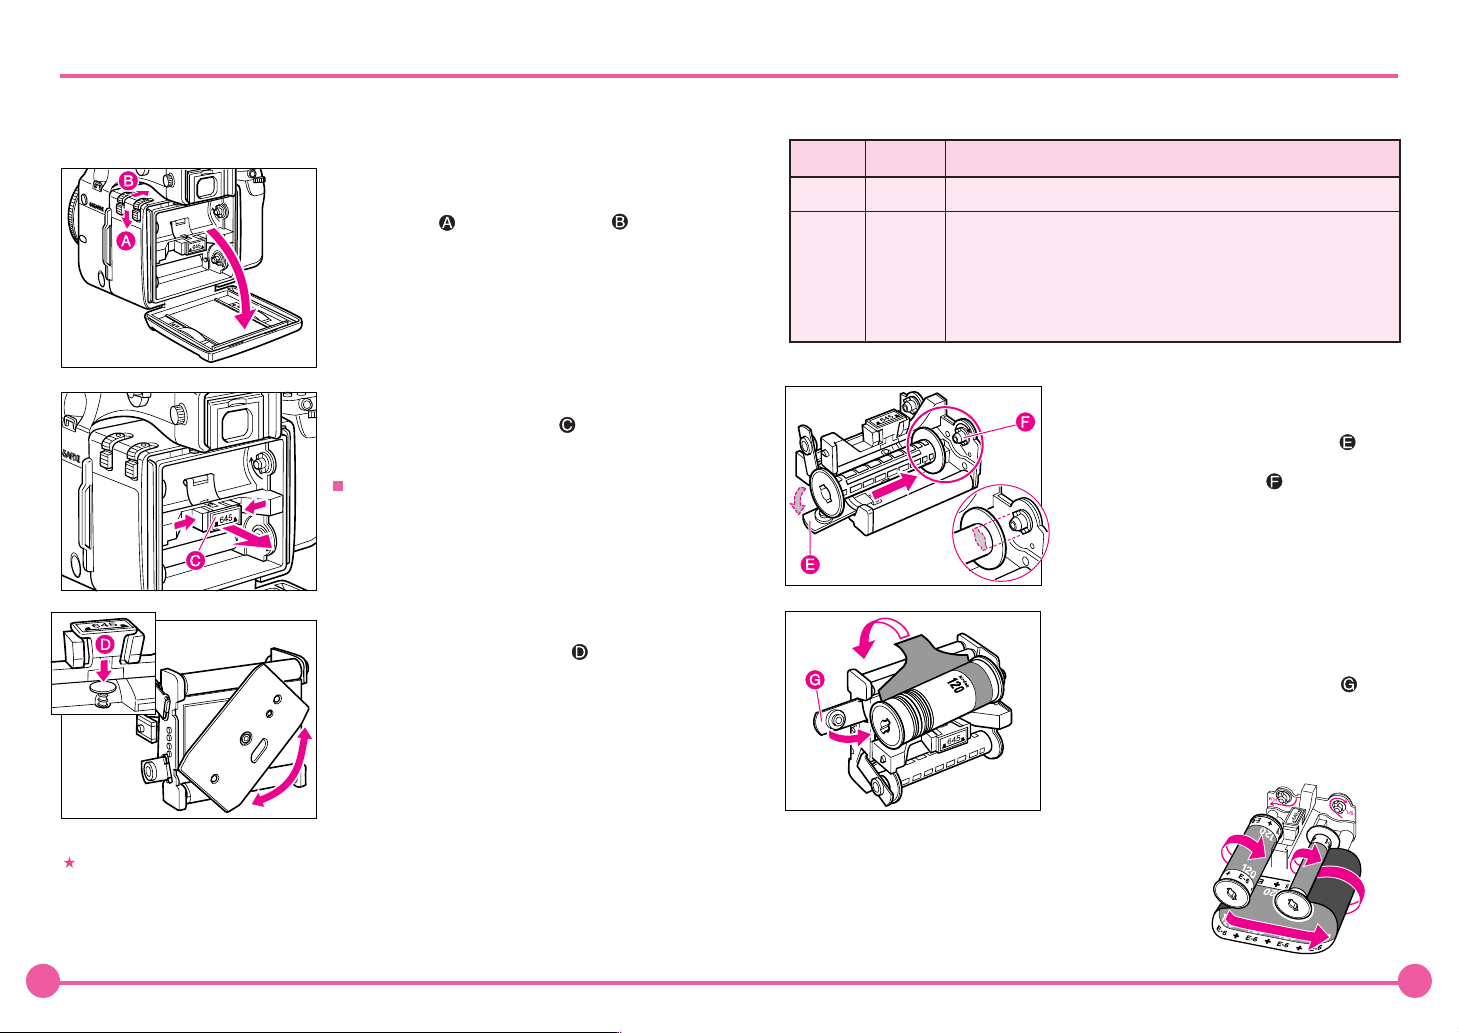
1. Open the back cover of the
magazine.
Hold down the button and press the
button to the right.
2. Take out the roll-film insert.
Squeeze the center block “645” between
your fingers and pull it out.
When you load film for the first time, remove
and discard the protective paper cover which
is attached to the film rails in the magazine.
3. Set the film type (120 or 220).
Push and hold the pressure shaft located
under the 645 center block. This frees the
pressure plate and permits it to be turned and
set for either 120 or 220 film.
When the pressure plate (120/220) is set erroneously:
Plate
Setting
120
220
Loaded
Film
220 type
120 type
Result
- Inaccurate focusing.
- Film winding after 16 exposures.
- Inaccurate focusing.
- After the 16th exposure has been made, the shutter can be released a
few times until the film's leader paper has run out, but the shutter
blades may be damaged by the leader paper at the film end or by the
film's sticker.
Insert the dark slide in the magazine and press the shutter button and
the mid-roll film advance button simultaneously. (See page 40)
4. Attach an empty spool to the rollfilm insert.
Flip the roll-film insert's lower spool clip
“SPL” away from the spool, fit an empty spool
between take-up spool studs , and return the
spool clip “SPL” to the original position.
5. Set the film.
Flip the roll-film insert's upper spool clip “FILM”
away from the spool, fit a roll of film as shown in
the illustration, and return the spool clip
“FILM” to the original position.
Be sure to align the lock pins with the holes on the pressure plate. The film type
should be displayed on the LCD of the magazine when the film insert is loaded.
Film path
31 32
Page 17
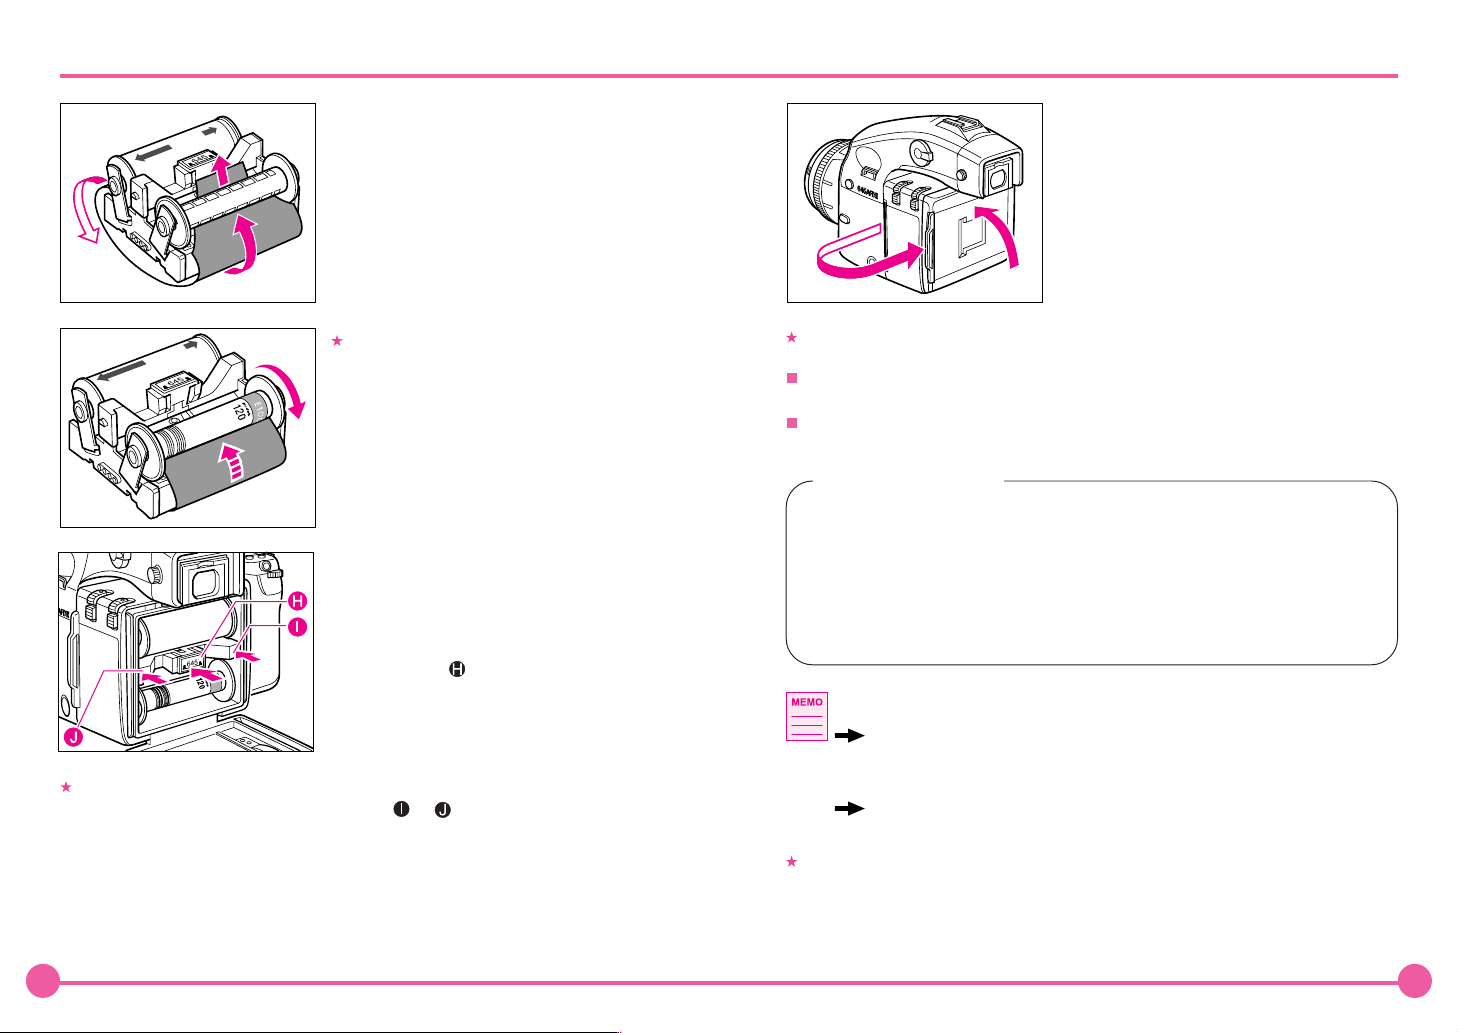
6. Attach the leader paper of the
film to the empty spool.
As shown in the figure left, gently insert the
leader paper tip into the groove on the empty
spool that is on the “SPL” side, and turn the
spool one or two turns to wrap the leader tape
around it. It is not necessary to finely adjust the
position of the film’s starting edge manually as
the film will be wound into the correct position
automatically.
8. Close the back cover.
Push in the upper part of the back cover firmly
to close it.
After attaching the magazine onto the camera
body, pull out the dark slide and press the
shutter button halfway; this will feed the film
automatically to frame No. 1.
Place the dark slide in the magazine's rear
storage pocket.
Turn the spool tight so that the film does not
sag.
When the film is not wound properly, the “- - ” mark appears in the LCD.
Do not wrap too much leader paper around the empty spool. Otherwise the film sec-
tion may be exposed to light.
To prevent accidental film fogging, do not pull out the leader paper too far or load/
unload film under direct sunlight.
6-exposure film
If you take more than 8 pictures when using a 6-exposure film, the shutter
blades may be damaged by the leader paper at the film end or by the film tape.
7. Insert the loaded film insert into
the magazine.
While squeezing the center latches together,
place the film insert, with the feed spool on top,
in the magazine and with pressure on the left
and right blocks push it into proper position.
(You will hear a click).
Make sure that the film insert is properly fixed. When one or both white latches are
out of position, press the projecting portion or until it clicks.
33 34
Follow the procedure below.
Photograph in the same way as with 120 film. Eight exposures can be taken.
After taking the 8th exposure, insert the dark slide in the magazine.
Then hold down the emergency film wind button and half-press the shutter release button.
1. The camera can be set to wind the film to the 1st frame position
automatically after the back cover is closed.
Custom settings (C-32 on page 94)
2. Normally, after the rear cover is closed the shutter cannot be released
without any film in the camera. However, the camera can be set to allow
you to release the shutter without any film.
Custom settings (C-31 on page 94)
If you do not operate the camera for 60 seconds, the camera will automatically enter
the sleep mode in order to save battery power. In the sleep mode the camera will not
automatically wind the film to the 1st frame, even if the custom setting is enabled (C-
31 on page 94). In this case, press the shutter release button halfway down to feed
the film to the 1st frame position.
Page 18

Taking Photos in the Full Automatic Mode
1. Set the shutter release mode selector lever to “S”
(single-frame advance mode).
There are two shutter release modes: “S”
(single-frame advance mode) and “C” (continuous advance mode). (See page 46.)
C
When set to “L,” the power is turned off.
S
L
2. Set the focus mode selector lever to “S” (single
focus mode). (This control is located at the lower left
front of the camera.)
There are three focus modes: “S” (single focus
mode), “C” (continuous focus mode) and “M”
M
S
AF
C
Focus mode Focusing
Single focus
S
mode
Continuous
C
focus mode
Manual focus
M
mode
Half-press the shutter release button to focus. When the focus mark
lights, the focus is fixed and the shutter can be released.
(See page 43.)
Focusing is performed continuously while the shutter release button
is half-pressed. The shutter can be released regardless of whether
or not the focus mark is lit. (See page 43.)
Focus manually. (See page 45.)
(manual focus mode).
3. Set the exposure mode selector dial to “P” (program auto exposure).
There are four exposure modes: “P” (program
AE), “Av” (aperture priority AE), “Tv” (shutter
X
CF
P
EL
Exposure mode Features
Program AE
P
Aperture
Av
priority AE
Shutter
Tv
priority AE
Manual mode
M
M.UP
M
Tv
Av
The aperture and shutter speed are determined automatically according to
the shooting conditions. This mode is best suited for general photography,
since it allows you to concentrate on the shooting. You can change the
shutter speed and aperture by turning the front and rear dials while the “P”
(Program AE) mode is selected. (See page 53 and 54.)
Set the desired aperture and the camera selects the correct shutter
speed. Use this mode to control depth of field. (See page 55.)
Set the desired shutter speed and the camera selects the correct
aperture. Use this mode to stop motion. (See page 56.)
Set this mode when you want to use special combinations of the aperture
and shutter speed. (See page 57 to 59.)
priority AE) and “M” (manual mode).
4. Set the exposure metering mode selector lever to
“A-S” (average/spot auto switching).
There are three exposure metering modes: “A”
in which the average light of the entire picture is
measured with emphasis on the center of the
picture, “S” in which the light in a spot at the
center of the picture is measured, and “A-S”
A
AUTO
A-S
S
which combines these two to automatically
switch the mode according to the extent of
difference between the brightness of the light
metered in the two modes and sets the
distribution ratio of the exposure metering
modes within an intermediate range. (See
page 61 and 62.)
35 36
Page 19

Shutter Release Button / Holding the Camera
5. Focus
1. Aim the camera so that the subject is within the focus frame .
2. Half-press the shutter release button, and focus will be adjusted automatically.
When the focus mark lights, the picture is in focus.
3. When lights, press the shutter release button further down to release the shutter.
Out of focus Marks
Flashing: The picture is not focused and the shutter cannot be released.
Either press the shutter release button again to adjust the
focus or move the camera to change the position of the focus frame.
Shutter Release Button
The shutter release button has a two-step action. When pressed lightly it stops at a
certain point. In this manual this position is called the “half-press” position.
When you “half-pressed” this button, camera functions are activated.
Normal
Half-press
Release position
Holding the Camera
Horizontal
Hold the camera still when taking photos to obtain sharp pictures.
Grasp the grip firmly, press your both elbows against your body and support the
camera at the bottom with your left hand.
At slow shutter speeds, or when using the self timer, it is best to use a tripod and a
cable release or an electromagnetic cable release (Optional accessories).
Vertical
While the camera is operated in the auto focus mode, lenses not equipped with the
focus mode selector ring (45, 55, and 80 mm lenses) turn their focusing rings auto-
matically to focus. Do not touch the focus ring.
37 38
Page 20

Removing a Partially Exposed Roll of Film
6. Unloading the exposed film.
When the roll of film is completely exposed, the camera automatically advances the film
completely to the end. The LCD panel displays “End.”
1. Open the back cover.
Hold down the button and press the button
to the right.
2. Remove the roll-film insert.
Pinch the knobs of the roll-film insert in the
film chamber with your fingers and take out the
roll-film insert.
3. Remove the film.
Push down the backing plate away from the
spool, and take out the film roll.
4. Seal the film with the film tape.
Secure with the provided film tape so that the
roll will not come loose.
Film tape
You can smoothly load the next roll of film, if you move the empty spool to the lower
compartment (printed “SPL”).
Precautions for Film Unloading
Do not unload an exposed film in direct sunlight.
The exposed film should promptly be put in a light shielding container and sent for
development.
Never detach the magazine from the camera body in the middle of film winding.
1. Insert the dark slide in the magazine.
10
ft
m
X
M.UP
CF
M
Tv
Av
P
2. Press the shutter release button and the
emergency film wind button simultaneously. The film will be advanced to the end.
And the magazine’s LCD panel will show
“End.”
SET
AEL
6-exposure film
If you take more than 8 pictures when using a 6-exposure film, the shutter
blades may be damaged by the leader paper at the film end or by the film tape.
Follow the procedure below.
Photograph in the same way as with 120 film. Eight exposures can be taken.
After taking the 8th exposure, insert the dark slide in the magazine.
Then hold down the emergency film wind button and half-press the shutter release button.
39 40
Page 21

Applied Photography
and Various Functions
This chapter describes various
functions of the camera.
41 36
Page 22

Focus Modes
Single focus mode (S)
This mode uses the focus-priority mechanism.
The shutter can be released when the focus
mark in the viewfinder is lit. This mode is
suited for still subjects. Focus is locked when
the focus mark lights in the viewfinder’s
LCD.
The shutter cannot be released if the subject
is not in focus (if the focus mark does not
light).
To take another photo with a different compo-
sition, take your finger off the shutter release
button then press the shutter release button
again.
AF
M
S
C
Continuous focus mode (C)
In this mode shutter release has priority to
focusing. The shutter can be released regardless of whether the focus mark in the
viewfinder’s LCD is lit. Focus is adjusted
continuously while the shutter release button is
half-pressed. This mode is suited for moving
subjects.
Focus Area
With custom functions (C-03 on page 88) you can select a focus area that suits the
subject.
Normal focus area
Position the subject within frame in the
focus fame in the viewfinder.
If there are multiple objects in the focus frame
located at various distances, the camera will
focus the nearest object.
AF area
Spot focus area
The camera focuses at the center of the
mark in the focus frame in the viewfinder.
Focus is not locked even if the focus mark
is lit.
The shutter can be released even if the fo-
M
S
AF
C
You can select whether or not to display the focus mark and the out-offocus direction mark.
Custom settings (C-20 on page 91)
cus mark is not lit.
AF area
43 44
Page 23

Manual Focus Mode (M)
The auto focus function can be cancelled, and you can focus manually.
1. Switch to “M” (manual focus
mode).
Turn the focus mode selector lever and set it to
“M” (manual focus mode). appears on the
external LCD panel.
2. Manual Focus Operation for
Telephoto and Zoom lenses.
All Mamiya 645 AF Telephoto and Zoom lenses
can be switched from Auto Focus to Manual
Focus by sliding the focusing ring on the lens
M
S
AF
C
22.5
0.7
4
4
25
11
22
0.8
ft
m
X
CF
M.UP
M
Tv
Av
P
FORWARD until it clicks. When this is done, the
“Auto Focus” inscription on the lens barrel is
covered and the lens can then be focused
manually. When the FOCUSING RING is set in
this position the external LCD display on the top
of the camera will show . It is not necessary
to set the FOCUS MODE SELECTOR on the
body to “M”. To switch back to auto focus,
simply slide the focusing ring BACK towards the
camera and the “Auto Focus” inscription on top
of the lens will again be visible.
This method applies Mamiya 645 AF Telephoto
and Zoom lens only.
3. Adjust the focus.
Turn the lens focusing ring until the subject
is in focus. When it is in focus, the focus
mark lights on the viewfinder LCD.
Lenses with the focus mode selector
When a lens with the focus mode selector is attached and the focus mode selector
lever of the camera body is set at “S” or “C”, you can change focus modes between
automatic and manual with the selector of the lens.
To use the auto focus function, both the camera body and the lens have to be set in
the auto focus mode.
When either the camera body or the lens is set in the manual focus mode, auto focus
does not function.
See the instruction manual for each lens for the way to switch focus modes on the
lens.
45 46
Page 24

When Auto Focus is Failed
Manual focusing using the focus mark
(Focus confirmation method)
With this camera, the focus mark lights in the viewfinder’s LCD when the picture is
in focus. With the shutter release button half-pressed, turn the lens focusing ring to
focus on the subject. When the subject is in focus, the focus mark lights in the
viewfinder’s LCD.
If is lit in the viewfinder’s LCD, the camera is focused on a point behind the object.
If is lit, the camera is focused on a point in front of the object.
In focus
Turn the focusing ring clockwise.
The auto focus function requires contrast on subject. Auto focusing may fail to achieve
focus with certain subjects described below. In such cases, either switch to the
manual focus mode and focus manually or focus an object at the same distance as
the object you want to photograph, lock the focus using the focus lock mechanism,
then take a picture. (See the next page)
Low-contrast subject (blue
skies, white walls and other
objects)
Two ore more objects overlap-
ping at different distances
within the focus frame
(animals in cages, etc.)
Turn the focusing ring counterclockwise.
Use the focus mark when taking photos in manual focus mode or using the M645
manual lens.
If you adjust focus using the focus mark with an M645 lens, make sure to open the
aperture. You can use this function with a lens of f/5.6 aperture or higher.
Subjects with continuous
repeated patterns (building
exteriors, blinds, etc.)
When the subject is far smaller than the focus frame
Extremely backlit reflective
subjects (car bodies, water
surfaces, etc.)
47 48
Page 25

Using the Focus Lock Function
AF Assist Infrared Light
If the object that you want to focus on is not in the focus frame , the camera
focuses on the background at the center. In such cases use the focus lock function to
lock the focus before releasing the shutter.
1. Set the focus mode selector
lever to “S” or “C.”
Put the subject in the focus frame and halfpress the shutter release button.
2. Locked focus.
When the focus mark in the viewfinder LCD
is lit, press the AF lock button on the front of the
camera to lock the focus.
3. Adjust the composition.
With the shutter release button half-pressed,
slide the camera to achieve the desired
composition, and release the shutter.
When the subject is dark or the low-key and the
camera fails to auto-focus, a red lamp may light
on the front of the camera when the shutter
release button is half-pressed. This is a light
that assists the camera’s auto focus function.
The AF assist infrared light is emitted only when the focus mode is set to “S” (single
focus mode).
Effective range of the AF assist infrared light is limited. It does not reach distant
subjects.
Range: 9m/29.5 ft. (using 80 mm f/2.8 lens under our test conditions)
When using a lens hood or a bellows lens hood (sold as an optional accessory) that
may interfere the assist light, set focus before mounting the hood.
When the focus mode is set at “S” (single focus mode) and the focus mark is lit,
hold the shutter release button halfway down to lock the focus.
Assignment of the AEL and AFL buttons can be swapped.
Custom settings (C-17 on page 91).
The AF assist infrared light can be disabled.
Custom settings (C-28 on page 93)
49 50
Page 26

Shutter Release Modes
ft
m
Single-Frame Mode
The film is advanced by one frame at time the shutter is released.
Set the shutter release mode selector lever to
“S”.
C
S
L
Continuous Mode
Photographs are taken continuously as long as the shutter release button is pressed.
Set the shutter release mode selector lever to “C”.
Photographs are taken continuously at a rate of
about 1.2 frames per second.
If you reach the end of the film when shooting in
the continuous mode, “End” flashes on the LCD
panel of film holder.
Self-Timer Mode ( )
In this mode, the shutter will be released 10 seconds after the shutter release button
is pressed.
Electrical Contacts
Oil, dirt, fingerprint, or moisture on the electrical contacts may cause malfunction or
corrosion. Keep the contacts clean with a dry clean cloth.
Turn the shutter release mode selector lever to
the " " position.
When the shutter release button is pressed, the
self timer lamp will blink for 7 seconds. Then, it
will blink more rapidly for 3 more seconds and
the camera releases the shutter. For instructions about the self timer function, see page 73.
51 52
Page 27

Exposure Modes
Program AE (P)
The aperture and shutter speed are determined automatically for the optimum
exposure, according to the existing ambient light. This mode is best suited for general
photography, allowing the user freedom to concentrate on the subject.
Hold down the button and turn the exposure
mode setting dial to “P” (program AE) position.
If a correct exposure cannot e obtained, the shutter speed and aperture value blink.
In such cases, the pictures can be taken but they may out too bright or too dark.
Program Shift (PH/PL)
You can change the shutter speed and aperture by turning the front and rear dials in
the “P” (Program AE) mode. In order to avoid blurred images (shake while releasing
the shutter), or to open the aperture, change to “PH” (high speed). For slower shutter
speeds and wider depth of field, change to “PL” (low speed). This function allows you
to make these changes quickly.
PL
Normal
PH
←→
645AFD program shift chart
6 7
8 9 10 11 12 13
5
4
3
2
1
0
-1
-2
-3
-4
8
4
30 15
Shutter speed
2 1 1/2 1/4 1/8 1/15 1/60
14 15 16 17 18 19 20 21 22
(ISO100/AF80mm F2.8)
1/30 1/125
1/250 1/ 1000 1/4000
1/500 1/2000
EV
F
32
22
16
11
8
5.6
4
2.8
Normal
Program shift area
If the shutter speed and aperture values blink on the main LCD and in the viewfinder
display when the program line is shifted, the proper exposure cannot be achieved.
Please select a different Program mode.
When the Program line is shifted, the aperture value changes along with the shutter
speed to maintain the proper exposure.
1. You can choose either aperture or shutter-speed to give priority in
program line shift. Custom settings (C-16 on page 91)
2. Increment of the aperture and shutter speed can be set at either 1/3 or
1/2-stop. Custom settings (C-01 on page 88)
53 54
Page 28

Aperture Priority AE (Av)
Set the desired aperture, and the camera selects the optimum shutter speed accordingly. Use the Av mode to maintain specific control over depth of field, i.e. taking
portraits or landscapes.
Shutter Priority AE (Tv)
Set the desired shutter speed and the camera selects the optimum aperture accordingly. Fast shutter speed can be used to freeze motion, and slow shutter speed can be
used to blur motion on purpose.
1. Hold down the button and turn the
exposure mode setting dial to “Av” (aperturepriority AE) position.
2. Turn the front or rear dial to set the desired
aperture.
The shutter speed value will blink when the subject is too dark or too bright for a
correct exposure. To obtain the correct aperture, adjust the aperture value until the
shutter speed value stops blinking and remains lit.
When the exposure is compensated with the rear dial (see pages 63 and 64), the
aperture can be set with the front dial only.
1. Hold down the button and turn the
exposure mode setting dial to “Tv” (shutterpriority AE) position.
2. Turn the front or rear dial to set the desired
shutter speed.
.
The aperture value will blink when the subject is too dark or too bright for a correct
exposure. To obtain the correct aperture, adjust the shutter speed value unitl the
aperture value stops blinking and remains lit.
When the exposure is compensated with the rear dial (see pages 63 and 64), the
shutter speed can be set with the front dial only.
1. Increment of the aperture can be set at either 1/3 or 1/2-stop.
Custom settings (C-01 on page 88)
2. Rotation direction of the dials to change the values can be altered.
Custom settings (C-15 on page 90)
3. The selected aperture level can be locked. Page 77
1. Increment of the shutter speed can be set at either 1/3 or 1/2-stop.
Custom settings (C-01 on page 88)
2. Rotation direction of the dials to change the values can be altered.
Custom settings (C-15 on page 90)
3. The selected aperture level can be locked. Page 77
55 56
Page 29

Manual Mode (M)
This mode is used to set both the aperture and shutter speed for total exposure
control.
Shutter speeds can be selected from B (bulb), 30 seconds to 1/4000 of a second.
Aperture values can be set from the open to the minimum aperture. B (bulb) can also
be specified in this mode.
1. Hold down the button and turn the
exposure mode setting dial to “M” (Manual)
position.
2. Turn the rear dial to set the desired aperture.
3. Turn the front dial to set the desired shutter
speed.
4. When the shutter release button is halfpressed, the difference between the present
settings and the metered value is displayed in
the viewfinder’s LCD panel. The value is
displayed in 1/3 stop increments within a
range of ±6 EV.
Example: “+2.3” indicates +2 EV,
“-5.7” indicates -5 EV.
When the exposure is compensated in the
Manual mode, the difference between the me-
tered value and the compensated value will
be displayed on the viewfinder LCD. In the B
(Bulb) mode, the difference with the metered
value is not displayed.
When the set value matches with the metered value, the difference indicator will
show “0.0”. When the difference between the set value and the metered value is
greater than
viewfinder LCD shows “– u –.” Contrarily when the set value is higher than the me-
tered value, the indicator shows “– o –.”
±±
±6EV and the set value is lower the metered value, the indicator in the
±±
1
3
2
3
1. Increment of the aperture and shutter speed value can be set at either
1/3 or 1/2-stop. Custom settings (C-01 on page 88)
2. The assignments of the front and rear dials can be swapped.
Custom settings (C-13 on page 90)
3. Rotation direction of the dials to change the values can be altered.
Custom settings (C-15 on page 90)
4. The dial selected aperture level can be locked. Page 77
57 58
Page 30

One-push shift function
When difference between the set value and metered value is displayed on the
viewfinder LCD in the Manual “M” mode, press the AEL button for approx. 1 second
and the camera will automatically adjust the shutter speed to achieve the correct
exposure based on the set aperture value.
While the difference between the set value
and the metered value is displayed on the
viewfinder LCD, press the AEL button for
approximately one second. The camera
changes the shutter speed to an appropriate
level.
X Mode (X)
Select this mode when you use a flash. The
shutter speed will be fixed of 1/125 second of
the synchronized speed.
When you take a photograph with TTL light metering with a Metz flash, see pages 81
and 82.
For flash photography, see pages 80 to 84.
1. The selected aperture value can be locked. See page 77
2. The synchronizing speed can be changed.
Custom settings (C-25 on page 92)
CF (Custom Function) mode (CF)
You can change the camera functions and
methods for using the camera using custom
functions.
1. The one push shift function can be disabled.
Custom settings (C-21 on page 92)
2. The aperture level can be selected for the parameter to shift.
Custom settings (C-22 on page 92)
For the details of the custom functions, see pages 86 to 95.
59 60
Page 31

Exposure Metering Modes
How to change to the Exposure Metering Modes
While pressing the exposure metering mode selector lever lock release button in, turn
the exposure metering mode selector lever up or down.
If a polarizing filter is necessary, use a circular
polarizing filter. A linear polarizing filter is not
compatible with the Mamiya 645 AFD and its
operations.
A
AUTO
A-S
S
Center average exposure metering mode (A)
(Set the exposure metering mode selector lever to “A”.)
The average light of the entire picture area is
measured, with emphasis on the center.
AUTO
A
S
A-S
Average/spot auto switching exposure metering
mode (A-S AUTO)
(Set the exposure metering mode selector lever to “A-S”.)
With the A-S auto metering mode, average or
spot exposure metering is selected automatically and the appropriate exposure is set
accordingly.
The spot mode is selected automatically when
A
AUTO
A-S
S
the brightness within the spot metering area is
lower than the brightness of the average
metering area by about 1.5 EV or greater. The
average mode is selected when the spot
exposure metering value is the same or brighter
than the average value. When the difference
between the spot value and average value is
between 0.75 and 1.5 EV, the appropriate
exposure is achieved at an intermediate value.
Spot exposure metering mode (S)
(Set the exposure metering mode selector lever to “S”.)
The light in the circle at the center of the picture
area is measured to determine the exposure.
This mode is best suited for strongly high-key
subjects, or when you desire to measure a
A
A-S
AUTO
S
61 62
specific area. When the spot you want to
measure is not at the center of the frame, use
the AE lock function. (See pages 65-66 AE Lock
Mode.)
Holding time of the metered exposure value can be altered.
Custom settings (C-06 on page 89)
Page 32

Exposure Compensation
In some situations, such as a great difference between the subject and background
brightness or overall subject tones that will not meter correctly because they are all
black or white, the resulting photograph may be under- or overexposed. When this
occurs, use the exposure compensation function. Exposure compensation can also be
used when you want to intentionally create overexposed or underexposed pictures.
With the exposure compensation dial
Turn the exposure compensation dial while
pressing the exposure compensation dial lock
release button in located on the right side of
the viewfinder.
The exposure can be adjusted up to
1/3 steps.
±±
±3 EV in
±±
With the rear dial
Hold down the button on the side of the
viewfinder, and turn the exposure compensation
dial until the mark lines up with the white
line.
Turn the rear dial left to increase the compensation. Turn it right to decrease the compensation.
You can check the exposure compensation
value in the main LCD display and in the LCD
readout in the viewfinder.
After taking pictures using the exposure compensation feature, be sure to return the
exposure compensation dial to the “0” position.
The exposure compensation dial is locked at the “0” and positions.
The exposure compensation feature is available during AE locked operation.
1. If you adjust the compensation value with the rear dial, the increment
can be set to 1/3, 1/2 , 2/3 or 1.0-stop.
Custom settings (C-02 on page 88).
2. The maximum amount of the compensation can be set either at
±±
±5. Custom settings (C-07 on page 89).
±±
±±
±3 or
±±
Display of the exposure compensation of the viewfinder LCD
(When a Metz flash is not equipped.)
Exposure mode Exposure compensation display
P Program AE
Av Aperture priority AE
Tv Shutter priority AE
M Manual mode
X Synchro mode Not displayed.
The difference between the metered value and the set
The set value is displayed.
exposure value is displayed.
63 64
Page 33

AE Lock Mode
The AEL button will lock the Auto-exposure value as the photo is being recomposed.
1. Turn the shutter release mode selector lever
to “S” or “C.”
2. Turn the exposure mode setting dial and
select any of “P,” “Av,” or “T”.
3. Focus on the subject for metering exposure,
and press the AEL button on the rear of the
grip. will appear on the viewfinder LCD,
indicating that the exposure value is locked.
4. Slide the camera to recompose the shot,
and take the picuture.
on the viewfinder LCL blinks to indicate
the exposure is locked, when you continue
to take the next picture in the AE lock mode.
When the exposure is compensated with the
rear dial (see pages 63 and 64), the shutter
speed can be set with the front dial only.
→
If you turn the shutter release mode selector
lever to the “L” (power OFF) position, or after
elapse of one hour, the AE lock mode will au-
tomatically be cancelled.
In the Manual “M” exposure mode, you can-
not use the AE lock function. When the differ-
ence between the metered value and the set
value is displayed, press the AEL button for
approximately one second, and one-push
shift function will be activated and the cam-
era will automatically adjust the shutter speed.
(See page 59)
Metered-value difference indicator
Keep pressing the AEL button , and the
difference between the metered exposure
value and the exposure of the new composition will be displayed on the viewfinder LCD.
This function can be used to see if an object of
very different brightness levels can be properly
photographed.
If the difference between the set value and the metered value exceeds 6EV, the
viewfinder LCD blinks “– u –” for underexposure and “– o – ” for overexposure.
By turning the front or rear dial in the AE lock mode, you can change the aperture
and shutter speed value without changing the exposure value that is set when
entered into AE lock mode.
In the “P” mode (Program AE) mode, turning either the front or rear dial shifts the
program to “PH” and “PL.” When in “Av” (Aperture-priority AE) or “Tv” (Shutterpriority AE), turning one of the dials changes both the aperture and shutter speed
values.
Exposure compensation and auto-bracketing function can be used when the
camera is in the AE lock mode in normal operation or with the mirror locked
up.
1. The way to cancel the AE lock can be changed.
Custom settings (C-19 on page 91)
2. Half-pressing of he shutter release button can activate the AE lock
mode. Custom settings (C-18 on page 91)
3. The assignment of the AEL button and AFL button can be swapped.
Custom settings (C-17 on page 91)
65 66
Page 34

Auto-Bracketing Mode
With auto exposure bracketing, you can bracket the exposure automatically for three
(or two) successive frames, when it is difficult to determine an exposure compensation
value.
1. Turn the shutter release mode selector lever
to the “S” or “C” position.
When set at the “S” position, you can shoot one
frame with each press of the shutter release
button. In the “C” mode, the camera takes three
(or two) frames successively with one press of
the shutter release button.
2. Keep pressing the auto-bracketing button
for approximately one second, and the auto
bracketing mark will blink on the top LCD
panel. Turn the rear dial before this indicator
goes out, and change “OF” on the display to
“On”.
When you want to cancel the auto-bracketing mode, turn the rear dial to change
“On” to “OF”.
4. Press the shutter release button.
In the auto-bracketing mode, type of exposure, order of the next shot and “AEB”
mark blink in the viewfinder LCD. With the auto bracketing mark on the top
LCD, you can check the type of the next exposure by half-pressing the shutter
release button.
Normal exposure
Under exposure
Normal exposure
Over exposure
Under exposure
Over exposure
X
M.UP
CF
M
Tv
Av
P
Single-Frame Mode (S)
Press the shutter release button for each shot.
The camera meters adequate exposure value for each shot and performs auto-bracketing. The camera stays in the auto-bracketing mode until the last frame of the roll film is
SET
AEL
AFL
exposed or you cancel the auto-bracketing mode manually.
If you turn the shutter release mode selector to the “C” position before taking three
(or two) frames, the camera will restart the auto-bracketing from the initial frame
(normal exposure in the default setting).
3. While the auto bracketing mark is blinking, turn the front dial to change number
of frames (3 or 2), sequence of the shorts in 2-shot mode (shown above), and
increment (1/3, 1/2, /2/3 or /1-stop).
The letters (n, u , o) indicate the type of exposure (“n” for normal, “u” for under-
exposure and “o” for over-exposure) and numbers indicate increment (0.3 for 1/3,
0.5 for 1/2, 0.7 for 2/3, and 1.0 for 1/1)
By pressing any other button or leaving the camera for 5 seconds, setting for the
auto bracketing will be stored.
Continuous Mode (C)
By pressing the shutter release button once, the camera takes 3 (or 2) shots in series.
With each press of the shutter release button, the camera repeats auto-bracketing. The
standard (normal) exposure value will be fixed when you take the first frame.
When the number of available frames of the current film is less than 3 (or 2) in the
auto-bracketing mode, the “– no – ” mark blinks and the camera automatically
cancels the auto-bracketing mode.
1. Order of the exposures in 3-shot auto-bracketing can be changed.
Custom settings (C-10 on page 90)
2. The way to cancel auto-bracketing mode can be changed.
Custom settings (C-11 on page 90).
67 68
Page 35

Multiple Exposure Mode
Using the multiple exposure mode, you can expose several shots on the same frame.
1. Turn the shutter release mode selector to the
“S” or “C” position.
M.UP
X
CF
M
Tv
Av
P
2. Keep pressing the multiple exposure setting
button for approximately one second to enter
the multiple exposure mode.
SET
AEL
You will see the multiple exposure mark “ ”
and number of exposures (0 is default) on the
top LCD panel.
3. Turn the front or rear dial to set the number
of desired exposures.
By turning the front or rear dial, you can specify
M.UP
X
CF
M
Tv
Av
P
SET
AEL
2 to 6 multiple exposures. After 5 seconds with
no operation or if you press any of the other
buttons, the setting will be stored.
4. Press the shutter release button.
The camera will make multiple exposures on
the same frame.
After exposures of the specified number have
been made, the camera will automatically
cancel the multiple exposure mode.
When the camera is in the multiple exposure mode, it shows the multiple exposure
mark “ ” on the main LCD panel.
To check number of the remaining shots, press the multiple exposure setting button.
To increase number of exposures to more than six in the middle of multiple expo-
sures, or to decrease the number of exposures, press the multiple exposure setting
button and turn the front or rear dial.
When number of the exposures is terminated in the “C” (continuous) shutter release
mode, the top LCD panel shows “End”, and the camera automatically cancels the
multiple exposure mode.
To cancel the multiple exposure mode before taking the first shot, press the multiple
exposure setting button and change the displayed number to 0.
To cancel the Multiple Exposure Mode
Make sure to pull the dark slide out. And hold
the emergency film winding button and halfpress the shutter release button.
The camera advances the film by one frame
and then exits from the multiple exposure
mode.
If the film holder is detached in the middle of multiple exposure, “-no- ” will blink on
the top LCD and go out in 3 seconds. The multiple exposure mode is now cancelled.
However, as the the film holder is still in the multiple exposure mode, the camera will
resume the multiple exposure mode when the same film holder is attached. The mul-
tiple exposure mark “ ” will blink on the LCD, and number of the remaining expo-
sure will be automatically set at “1”.
Guideline for exposure compensation during Multiple Exposure
Mode
As in the multiple exposure mode, several shots are exposed on a single frame,
exposure compensation may be needed depending on the subjects and the backgrounds.
Exposure compensation in typical multiple exposures
Number of exposures
2
3
4
The optimum exposure compensation value will vary depending on actual photo-
graphic conditions. We recommend taking test shots.
Exposure compensation
−1.0
−1.5
−2.0
Multiple exposure can be made each time the shutter is released without
setting number of the exposures in advance.
Custom settings (C-33 on page 94)
69 70
Page 36

Taking Photos with the Mirror Up
This function prevents mirror-caused vibrations which may blur the image in close-up
photography, when shutter speed is slow, when a telephoto lens is used, or when
photographing a poster or another picture.
When using the mirror-up, Electromagnetic Cable Release RE401 (optional) is
recommended.
Using auto focus and auto exposure
1. Select “S” (single focus mode) by turning the
focus mode selector lever.
M
S
AF
C
2. Turn the exposure mode-setting dial to
choose any of “P”, “Av”, or “Tv” exposure
mode.
3. Focus the subject, and determine composition and exposure.
4. Hold the shutter release button pressed
halfway down, and press the mirror up button
on the camera body. The mirror will be locked
up.
5. Press the shutter release button to take the
picture.
Hold the shutter release button pressed half-
way down. If it is released before an exposure,
the shutter will not be released.
When the shutter release mode selector lever
is set at the “C” position, the shutter will be
released continually at a certain interval with
the mirror locked up. The mirror remains
locked up when the shutter release button is
released. So press the mirror-up button once
to cancel the mirror-up mode.
Turn the shutter release mode selector to the “C” position and set the auto bracket-
ing before starting the mirror-up shot. Then, you can take 3 or 2 pictures in a row in
the auto bracket mode.
The mirror goes back to the normal position in 30 seconds. This can be changed to 60
seconds or no limitation by the custom setting function. (See page 89)
Not that keeping the mirror up consumes more power.
The mirror will return to the original position if the lens is removed from the camera
body.
Do not point the lens at the sun during the mirror up mode. The sun’s intense light
can scorch and damage the shutter curtain.
In the manual mode
1. Set the focus mode selector lever at “M”
(manual focus mode) position. Turn the lensfocusing ring to focus. Half-press the shutter
release button to meter exposure.
2. Turn the exposure setting dial to “M” (manual
mode) position. Turn either the front or rear dial
to adjust the shutter speed and aperture with
the metered values.
3. Lock the mirror up by pressing the mirror-up
button.
AF
M
S
C
22.5
0.7
4
4
25
11
22
0.8
ft
m
71 72
Page 37

Self Timer Mode
Eyepiece Shutter
With this function, under the default setting the shutter is released 10 seconds after the
shutter release button is pressed. The self timer lamp flashes slowly for the first 7
seconds, then flashes quickly for the last 3 seconds before the shutter is released. Use
this function to take group photos or to photograph yourself.
1. Mount the camera to a tripod.
2. Turn the shutter release mode selector to the
“ ” (self timer mode) position.
3. Check the view by looking through the
viewfinder. Make sure that the focus is correct,
press the shutter release button and the shutter
will be released after 10 seconds.
Change the self timer time
1. While in the self timer mode, hold down the
set button approximately one second.
2. The main LCD panel will display the self timer
mode mark “ ” and the default value 10 (a 10
second interval). Now you can change the self
timer by turning the front or rear dial. It can be
set from 2 to 10 seconds in units of 1 second
and for more than 10 seconds in 10 second
units.
Close the eyepiece shutter when there is a strong light source behind the camera or
when pressing the shutter release button without looking through the viewfinder.
(This prevents exposure error due to light entering from the viewfinder.)
Turn the eyepiece shutter lever in
the direction of the arrow.
To cancel the self timer mode or to stop it while the self timer is counting down, turn
the shutter release mode selector any other position than “ ”. By turning the selec-
tor to “L” (power OFF) the self timer interval will be reset to the default value (10
seconds).
If there is a bright light source behind the camera, light enters the viewfinder’s eye-
piece, affecting exposure metering. Close the eyepiece shutter with the lever.
73 74
Page 38

Extended Exposure Modes (Bulb Modes)
Backlight Button
To expose film longer than 30 seconds, adjust the shutter speed to “B” (bulb). In order to
prevent camera shake, use an electromagnetic shutter release and tripod.
1. While pressing the unlock button, turn the
exposure mode dial and set it to “M” (manual
mode).
2. Turn the front dial to select “bulb”, then turn
the rear dial to set the aperture.
3. Determine the composition, focus, then take
the picture. The shutter remains open as long
as the shutter release button is pressed.
Bulb mode is controlled by an electronic circuit so that the camera consumes battery
power while taking a photo. (See page 13)
To see the main panel at night or in dark places,
press the backlight button / .
The backlight will go on approximately 10
seconds and go off unless there is another
operation.
When releasing the shutter, or pressing the backlight button / while the back-
light is on, the backlight will go OFF.
When operating the camera while the backlight is on, the backlight will light on for
approximately another 10 seconds.
1. Normally the camera can take a picture with a bulb shot up to 60
minutes. However, the bulb shot time can be changed from one minute to
infinite. Custom settings (C-23 on page 92)
2. It is possible to set the camera as the shutter remains open until the
button is pressed once again. Custom settings (C-24 on page 92)
The backlight can be set to turn on during the camera is holding metered
value. Custom settings (C-8 on page 89)
75 76
Page 39

Front / Rear Dial Lock Mechanisms
Depth of Field / Depth of Field Preview
When the Electronic Dial Lock is “On,” all currently set values in “Av” (Aperture Priority
AE), “Tv” (Shutter Priority AE) and “M” (Manual mode) cannot be adjusted with the
front or rear dials. This prevents accidental change of shutter speed or aperture
values.
1. Set the shutter release mode selector lever
to “S” or “C” (to turn the power on).
2. Hold down both the multiple exposure mode
button and the auto bracketing mode button
for approximately one second, until the "On"
indicator blinks.
To release the mode, hold down the buttons
until "OF" blinks.
The setting will be stored after one second.
3. When this mechanism is selected, the “L” is
displayed on the LCD.
When the dial lock is ON, the shutter speed and aperture will not change even if you
turn the front or rear dial.
When you activate the electronic dial lock, and if you then operate the electronic dial,
the dial lock indicator “L” on the main panel blinks for three seconds to show that
the electronic dial lock is functioning.
Depth of Field
Depth of field (D.O.F.) is defined as the zone of sharpness before and behind the
plane of focus. It depends on distance to subject, focal length of lens, aperture setting
and distance the lens is focused at.
In addition to visual observation via the depth of field preview button (See page 66.),
the D.O.F. can be determined by using the depth of field scale on each lens. The f/
stop numbers appear on both the right and left side of the white index mark in the
center of the scale. Simply read the figures which appear above the f/stop numbers on
the distance scale of the lens. (see illustration below)
When the aperture is open
(the subject depth is small)
When the aperture is
stopped down
(the subject depth is large)
1.5
547
1. 51. 2 2
22 2211 1144
ft
m
Depth of Field Preview Button
When the preview button is pressed in, the depth of field for the aperture set on the
camera can be checked by looking through the viewfinder.
After focusing, press the preview button.
The diaphragm will be stopped down to the set
aperture.
While operating the preview button, you can-
not release the shutter.
77 78
Page 40

Infrared Photography
Flash Photography
When taking photos using infrared film, the position at which the subject is in focus is
slightly different than that of regular films. This is because the infrared rays have a
longer wavelength and the image converges behind the film plane of regular film. Use
the procedure described below when taking photos using infrared film.
1. Set the focus as usual. Read the point on the distance scale matching the center
index of the depth scale.
2. Set the focus mode selector lever to “M” (manual focus mode). Turn the focusing
ring clockwise and align the read point to the infrared index.
1. 5
547
1. 51. 2 2
ft
m
22 2211 1144
Use a red filter when taking photos using infrared film.
Be sure to read the infrared film’s usage instructions.
You cannot take photos in AE mode when using an infrared film.
In addition to its standard flash sync system, the Mamiya 645 AFD features TTL (through
the lens), off the film (OTF), electronic flash exposure metering. A flash sensor located inside
the camera body reads the flash reflected off the film surface at the moment of exposure.
The sensor is connected via the Mamiya 645 AFD s dedicated hot-shoe to a shoe- or
handle-mount style Metz flash unit via the Metz SCA 3952 TTL Adapter. Maximum flash
sync speed is 1/125 sec., making daytime synchronization possible.
The ISO of the flash is automatically set through the TTL connection from the camera's Film
Magazine; any adjustment to this is instantly recognized after the setting is locked and the
shutter release is half-pressed. Also, when Film Magazines with different ISO settings are
switched on the camera body, the TTL flash connection instantly recognizes the change.
To utilize the TTL flash feature with all TTL-operable Metz flash units, a Metz SCA 3952
Module is required. Please see the chart below for compatibility and/or additional adapters
that may be necessary.
Adapter
Metz Flash Unit
Metz 44 MZ-2 Shoe-mount x
Metz 54 MZ-3 Shoe-mount x
Metz 45 CL-3 and -4 Handle-mount x x
Metz 60 CT-4 Handle-mount x x
Metz 70 MZ-5 and -4 Handle-mount x
with all TTL systems, it requires manual compensation for differences in film surface
reflection characteristics. The amount of compensation is determined by experimentation
and is performed on the Mamiya Film Magazine ISO setting.
Type of Flash
SCA3952
Module
SCA3000C
Converter
The resulting flash exposure
automation determines correct flash
exposure and automatically adjusts
the output of the flash. It also
automatically corrects for exposure
compensation normally required
when using filters, close-up bellows
or extension tubes. However, as
1. Mount the SCA3952 adapter onto the Metz
flash, insert fully into the camera’s hot shoe,
then tighten with the locking knob .
2. Set the exposure mode, then check the
shutter speed and aperture.
Exposure mode Shutter speed Aperture
P Program AE
Av Aperture priority AE Any aperture
Tv Shutter priority AE
M Manual mode Any aperture
X Synchro mode 1/125 sec. Any aperture
With TTL flash photography, the reflection of the flash is metered and the intensity of
the flash is adjusted automatically, so TTL flash photography may not be able to suit
to all conditions. In the cases described below, we recommend that you use a flash
meter to check the intensity of the flash or to use a manual flash setting.
Automatically set by camera to 1/60 sec. when
the metered shutter speed is 1/60 or slower, and
1/125 when it is 1/125 sec. or faster.
Automatically set by camera to 1/125 when the
set shutter speed is 1/125 sec. or faster.
Automatically set
by camera
Automatically set
by camera
79 80
Page 41

働きます。
Flash Compensation Settings
For example:
(1) When the size of the subject you want to light with the flash is relatively small within the
picture
(2) When the background behind the subject is extremely bright or when there is a strongly
reflective object in the background
(3) When the background behind the subject is extremely dark (outdoors at night, etc.)
(4) For flash photography with a narrow film latitude
1. While in the P or Av modes, the camera can be set to release the
shutter at the metered value, even the background behind the subject is
dark. Custom settings (C-26 on page 93)
2. The sync. speed in the X mode can be set between 1/40 and 1/125
seconds. Custom settings (C-25 on page 92)
* When the shutter speed is set to 1/2 increments, the sync. speed can be set between 1/45 and 1/125
seconds.
By combined use of a Metz flash and the SCA3952 adapter, the camera adjusts for
flash. It can be adjusted within ±3EV in increments of 1/3 steps.
1. Turn on the power
Install the SCA3952 adapter on the Metz flash,
and put it on the camera then lock the flash in
place using the locking knob on the flash shoe.
Turn the shutter release mode selector lever to
the “S” or “C” position, and turn ON the flash
power switch.
Metz Flash SCA3952 System Functions
Charging completed
indicator in viewfinder
Automatic setting of
flash synchronizing
speed
Flash compensation
Auto zoom control
Auto AF assist beam
Display of flash range
(distance)
Data transfer
When using an SCA300 system flash (Metz 60CT-4, 45CL-4, etc.), use the SCA3000C
converter (sold separately).
For details, refer to the operating instructions of the flash and the SCA adapter.
To use the guide number indicated on the flash fully, wait several seconds after the
charging completed indicator lights.
Cautions on using instant film
Instant films (Polaroid 100-600 series and Fuji FP series), have a lower reflectivity
rate than regular film. Exposure compensation is necessary when using the flash in
the TTL mode.
In general, set the exposure compensation to about minus 1 or 1 1/3 EV.
81 82
When charging of the flash is completed, a charging completed flash
will illuminate in the viewfinder’s liquid crystal display panel.
icon
When exposure mode is set at “Av” or “P”, the shutter speed will be
automatically set to 1/60 to 1/125 sec. when charging of the flash is
completed.
When exposure mode is at “Tv” or “M” and the shutter speed is at
faster than 1/125 sec., the shutter speed will be automatically set to
1/125 sec.
The flash charge mark flashes after the shutter is released to
indicate that the flash was emitted properly.
The power zoom reflector is linked to the lens focal length. (Excluding the Metz 32Z-2)
When the focus mode is set to “S”, the auto focus assist beam is
emitted automatically in low light. (Excluding the Metz 32Z-2)
Displayed on the flash’s liquid crystal display panel. (Excluding the
Metz 32MZ-3 and Metz 32Z-2)
The film sensitivity data, exposure compensation data and aperture
data are sent from the camera to the flash.
2. When the flash charge confirmation lamp
M.UP
X
CF
M
Tv
Av
P
SET
AEL
lights, press the set button in. The “ ” is
displayed on the main LCD panel.
3. Turn the front or rear dial to select the flash
M.UP
X
CF
M
Tv
Av
P
SET
AEL
compensation value.
Page 42

External LCD Panel (normal display)
4. Half press the shutter release
button, the “ ” (when positive
adjustment) or “ ” (when negative
adjustment) displays.
Viewfinder LCD read-outs.
Keep pressing the set button to activate the flash compensation mode. You can check
the exposure compensation value.
If you turn the shutter release mode selector lever to the “L” (power OFF) position,
the compensation value will be canceled.
Flash Photography with electronic flash models other
than Metz
1. To use a grip type flashguns or a strobe with
other electric contacts than X contact, connect
the sync. cord to the camera’s sync. terminal.
(See note below about flashes designed
exclusively for other camera makes.)
Remove the rubber cover when connecting the sync. cord.
After shooting, be sure to attach the rubber cover in order to protect the synchro
terminal’s contacts.
2. While pressing the unlock button, turn the exposure mode setting dial and set it to
“X” (1/125 sec.) or “M” (manual).
When “M” (manual) is selected, turn the front dial and set the shutter speed to 1/125
sec. or slower.
3. Turn the rear dial to set the aperture, then take the picture.
This camera’s synchro contact is an X contact.
WARNING
- Using flashes designed exclusively for other makers of cameras may
damage the camera’s internal mechanisms if connected to the camera's
hot-shoe. In this situation, use an off-camera flash bracket and connect
a sync. cord to the camera's synchro terminal.
- When using flashes with a flash duration of 1/500 sec. or longer, set the
shutter speed to 1/30 sec. or less.
1. The selected shutter speed and aperture level can be locked.
See page 77
Exposure compensation and flash compensation can be linked.
Custom settings (C-27 on page 93)
2. The sync. speed can be set between 1/40 and 1/125 seconds.
Custom settings (C-25 on page 92)
* When the shutter speed is set to 1/2 increments, the sync. speed can be set between 1/45 and 1/125
seconds.
83 84
Page 43

Superimposing Data
This is a function to allow various pieces of
shooting information to be superimposed on the
edge of the film. The info that is superimposed
can be selected from the following three modes.
To specify this function, use the Custom settings
(C-04 on page 88).
This section describes the details of the
information that can be superimposed.
① Exposure mode
②Aperture value
③Shutter speed
④Exposure compensation value / frame order with
auto bracketing function: N, U, and O
⑤Metering mode*
⑥Index number
(Superimpose shooting info and an index number)
DATA/INDEX mode
Data superimposed in manual mode
① Exposure mode
② Aperture value
③ Shutter speed
④ AE mode
⑤ Exposure metering difference display
⑥ Metering mode*
⑦ Index number
1/60 -1.0Ev AsAv
① ② ③ ④ ⑤ ⑥
① ② ③ ④ ⑤ ⑥ ⑦
123
Custom Functions
When manual exposure is selected and when the exposure metering
difference exceeds ±6EV, "– o –" or "– u –" will be superimposed on ⑤.
DATE/INDEX mode
(Superimpose the date and an index number)
① Year, month, and date ② Time ③ Index number
① ② ③
INDEX mode
(Superimpose only an index number)
* When the metering mode is selected as AUTO A-S (automatic change between average and spot), and if “A” is
selected, “A” will be superimposed. If “S” is selected, “S” will be superimposed. If “AUTO A-S” is selected, “As” will be
superimposed.
The data superimpose function is available with films having sensitivity from ISO25
to 1600. When using other films, even if the data superimpose function is used, data
will not be superimposed.
Although the index number is displayed as 4 digits on the screen, only the lower 3
digits are superimposed on the image.
These functions allow the owner to change the camera functions
and settings as they prefer.
85 84
Page 44

Setting Custom Functions
Types of Custom Functions
The custom functions allow you to change the method for using or accessing the
camera functions as you like. Take photographs the way you are most comfortable
with.
The custom functions can store separate settings for 3 users. You can preset the
functions for indoor, outdoor or portrait photographs and for other conditions. When at
C-00, chose 1 (A), 2 (B), or 3 (C) to store a specific set of user function selections for
the group of custom settings from C-01 to C-30.
However, if you set C-00 to 0, the settings used will be the default set. With this choice
you can change only C-31 to 36.
1. Turn on the power.
Turn the shutter release mode lever to the
“S” or “C” position.
2. Turn the exposure mode dial to select “CF”
(Custom Function mode).
3. Turn the rear dial to select the settings for
user A, B, or C.
C-00: Choose a set of user functions
Choose user
C-01: Specify the Tv and Av step
Select increments of the shutter speed and aperture value, from 0.3 (1/3 EV) to
0.5 (1/2EV).
C-02: Specify the step for exposure compensation
Select increments for exposure compensation. The electronic dial can be used
to select 0.3 (1/3EV), 0.5 (1/2 EV), 0.7 (2/3 EV), or 1.0 (1EV).
Default settings
You cannot change the
C-01 to C-30 settings.
Three sets of user functions can be stored.
* This example shows how to store the settings
for the CUSTOM-A user.
* If you try to change the settings while in the
default mode (C-00 = 0), the CUSTOM mark
will blink.
C-03: Select the auto focus area
Normal area Spot area
C-04: Select the data to superimpose
Select the details to superimpose
4. Turn the front dial to select the item you
want to set.
Don’t superimpose any
information
Shooting data and
index number
Date and index number Index number only
There are 36 items from C-01 to C-36.
87 88
Page 45

Types of Custom Functions
C-05: Select a way of setting aperture after changing lenses.
The aperture is set to
the same.
C-06: Select an amount of time until the camera enters sleep mode.
Select an amount of time to keep displaying the exposure meter status in the
LCDs after the last time the shutter release button was pressed halfway down: 5,
10, 15, 20, 25, 30, 40, 50, 60 seconds, or infinite (always on).
* The default is 15 seconds. If you select infinite (always on), you have to pay
attention to the drain on the batteries.
C-07: Select the range of exposure compensation.
Select ±3 EV or ±5EV.
After replacing the lens,
the aperture is always
set to the open.
After replacing the lens,
the aperture is always
set to the minimum.
The camera stores the
number of steps from
the open.
C-08: Select the method for turning on & off the backlight on the main LCD display.
Turn the backlight on
using the backlight button
(goes off automatically
after approximately 10
seconds)
C-09: Select the time to cancel the mirror up status automatically.
Select 30 or 60, seconds, or on (no auto cancel).
Turn on when the release
button is pressed halfway down.
Always lit when metered value
is indicated on the LCD. (Linked
to the C-06 power hold time.)
C-10: Specify the order for taking pictures in an auto bracket shot.
Normal, under, and over
(N-U-O)
Normal, over, and
under (N-O-U)
Under, normal, and
over (U-N-O)
Over, normal, and
under (O-N-U)
C-11: Select how to cancel auto bracketing.
Cancel by turning off the
camera power.
C-12: Select the bracket shot operation method to use in the manual mode.
Choose whether or not to change shutter speed or aperture level in bracket
shots made in M mode.
Make bracket shots by
changing the shutter
speed.
Cancel manually.
Make bracket shots by
changing the aperture
value.
Release after each auto
bracket sequence.
C-13: Swap the function of the front and rear dials in M mode.
Front: Shutter speed
Rear: Aperture level
C-14: Enable operation of a sub-dial in Tv and Av modes.
Select whether or not to assign the same function as the front dial to the rear
dial when it is not assigned any other function. Even if you have assigned the
rear dial, it will still control exposure compensation in the electronic dial
exposure compensation setting.
On: Same function as the front dial
OF (OFF): No function
Front: Aperture level
Rear: Shutter speed
C-15: Set the direction for increasing or decreasing numbers by turning the dials.
Left turn: Decrease
Right turn: Increase
Left turn: Increase
Right turn: Decrease
89 90
Page 46

Types of Custom Functions
C-16: Select a way for the program shift.
Shift along the program
line
* The rear dial has the same function as the front dial. When electronic dial exposure compensation is selected, the rear dial is
dedicated to control of the exposure compensation.
Follows the setting of C-13. In the drawing,
the front dial is assigned the shutter speed
priority shifts, the rear dial is assigned the
aperture priority shifts. Exposure
compensation with the electronic dial is not
available.
Shift by putting priority
on the aperture value
Shift by putting priority
on the shutter speed
When program shift is
not selected, exposure
correction can be made
using the electronic dial.
C-17: Swap the functions of the AEL and AFL buttons.
Front: Lock AF
Rear: Lock AE
C-18: Specify the AE and AF lock operation when the shutter release button is pressed
halfway down.
Lock AF Lock AE Lock both AF and AE No lock function
Front: Lock AE
Rear: Lock AF
D-19: Select the AE lock method when operating the AE lock button.
C-21: Select whether or not to display the exposure meter difference in the M mode.
Displayed
C-22: Select whether the shutter speed or aperture value is shifted using the one-push
shift function to the metered value in the M mode.
Shift the shutter speed
C-23: Select the maximum exposure time in a bulb shot: 1, 2, 4, 8, 15, 30, or 60 minutes
or infinite (OF). The default time is set to 60 minutes. When infinite (OF) is
selected, pay attention to the drain on the batteries.
If the shutter is not closed in a bulb shot, the camera will force the shutter to close after the specified time.
This function also can be used as a long exposure timer in a bulb shot.
Not displayed
Shift the aperture level
Do not use this function
C-24: Select the bulb exposure operation method.
Hold the AE lock after
releasing the button.
* Release it by pressing
of the AE lock button
again.
Cancel the AE lock after
shutter release.
Only locked during the
AE lock button is
pressed down.
Expose while pressing
down the shutter release
button (bulb mode)
C-25: Select shutter speed for the X mode
Press the shutter release
button to open the shutter
and press again to close.
C-20: Method for displaying the AF focus mark in the viewfinder.
Display ON.
Display the defocus mark
in the manual focus
mode.
Don't display the mark
Display only the focus
mark
Default (1/125) 1/80 seconds (when 0.3
is selected in C-01)
1/90 seconds (when 0.5
is selected in C-01)
1/60 seconds 1/40 seconds (when
1/60 seconds 1/45 seconds (when
0.3 is selected in C-
01)
0.5 is selected in C-
01)
91 92
Page 47

Types of Custom Functions
C-26: Select a way of setting shutter speed when using the dedicated flash (in the P
and Av modes).
Auto setting between
1/60 and 1/125 seconds
C-27: Select whether or not to link camera exposure compensation with the flash
compensation.
Do not link the exposure
compensation
1/125 or faster (operate
in the exposure meter
mode)
Link the exposure
compensation
* Dedicated flash: Metz flash and
SCA3952 adapter
* This function is only enabled
when a Metz flash is installed.
C-28: Select whether or not to light an auxiliary AF light
Light
C-29: Copy the custom functions
Copy the current function details to another user channel.
C-30: Initialize the function details.
Reset the current user function settings to the default settings.
Do not light
Copy the details from A
into B
* The figure shows the user A function settings.
When user B functions are selected, the 1 will be
an A and the 2 will be a C. When user C
functions are selected, the 1 will be an A and the
2 will be a B.
Copy the details from A
into C
Press the set button
for one second to start
copying.
Common setting items
C-31 to C-36 are common settings. Each of these settings is reflected in other users.
Therefore, these items cannot be set differently for each user.
Even if the default function settings are selected (C-00 = 0), these items are still be
active.
Select "do" and press the set button for one
second. The user functions will be initialized.
93 94
Page 48

Types of Custom Functions
C-35: Adjust the date and time.
Press the set button
Select the month (M), date (D), year (Y), hour,
or minute using the front dial. The selected item
will blink. Change the value using the rear dial.
C-36: Set the index number
Set the index number
Select the digit to change using the front dial. The selected digit will blink.
Change the value using the rear dial.
Press the set button for one
second to store the settings
Press the set button
Press the set button for one
second to store the setting
Setting up superimpose
Select HL using the front dial. (HL will blink.) Change the value using the rear dial. (HL
and UP will blink alternately.)
HL: Always superimpose the specified index number.
UP: The index number is increased and superimposed each time the shutter is
released.
* When superimpose is not selected in C-04, the camera does not increase the index
number. The camera also does not increase the number if no film is loaded.
* The index number is increased frame by frame when multiple exposure mode.
If arbitrary ON/OFF is selected for the multiple exposure shot method, the camera
will not increase the index number.
Miscellaneous
Operations
95 86
Page 49

Changing the Focusing Screen
1. Remove the lens.
2. Pull the Focusing Screen Release lever
forward, as illustrated as shown, with the
tweezers to let the Focusing Screen down.
3. Remove the Focusing Screen from the
Focusing Screen Frame by grasping the tab on
the edge of the screen with tweezers as
illustrated.
Do not touch and damage the mirror in any way.
4. When installing the screen, pinch the tab of
the screen with tweezers, and put the screen on
the screen frame.
Caution
Since the Focusing Screens' surfaces are soft and easily damaged, handle them
carefully.
Never touch the surface with bare fingers. Should dust settle on it, merely blow away
by using a blower.
If the Focusing Screen needs cleaning, send it to the nearest authorized Mamiya
service center. Do not attempt to clean the surface of the Focusing Screen, as it is
very delicate.
5. Push up the screen frame up using the
tweezers until hearing a clicking sound. The
screen is now properly installed.
Never press down on other parts as this will
affect the focus function.
97 98
Page 50

Using the M645 Manual Focus Lenses
External Battery Socket
When using the MAMIYA M645 manual focus lens, mount the focusing screen for manual
focus lenses (sold separately).
1. Mount the M645 lens on the camera body, turn the A/M lever on the lens to the "M"
position. Set the lens to maximum aperture compose and focus.
You may use the focus mark to adjust focus.
2. Select exposure mode and set the desired aperture on the lens.
For auto exposure, select the “Av” (aperture priority AE) and choose the spot expo-
sure metering mode “S”, you can use the lens in conjunction with stop-down meter-
ing.
3. Half press the shutter release button to show shutter speed.
Available functions with M645 lens
P
Av
Tv
M
Exposure mode
Metering mode
Exposure compensation
Auto-bracketing mode
Multiple-exposure mode
×=not an available function
○=available function
×
○
×
×
○
×
×
○
×
×
○
×
×
○
×
X
○
○
○
×
○
×
○
×
○
○
When using the camera at cold temperatures where the battery capacity may drop,
use a External Battery Case PE401 (sold separately; PE401).
1. Turn the shutter release mode selector lever
to the “L” position (power OFF).
2. Use a coin or the like to turn and remove the
external power socket cap.
3. Remove the battery case from the camera
body.
4. Connect the External Battery Case to the
body.
Connect the plug of the External Battery Case
in which the batteries are installed, to the
external power socket.
You can adjust focus with assistance of the focus mark in the viewfinder LCD. When
stopping down slower than f/5.6, the focus mark will be unworkable. In this case, the
out of focus direction marks will blink and show that the picture is out of the
focus adjustment range.
The AF assist beam does not emit with these lenses.
99
5. Reinstall the original battery case, from
which the batteries were removed, in the body.
Turn the battery case lock lever to lock it in the
body.
Make sure to reinstall the empty battery case into the body.
100
Page 51

Tripod/Electronic Shutter Release Contact/Memo Clip
When You Think Something Might Be “Faulty”
Using a Tripod
When using a tripod with 3/8 inch screw thread
(instead of 1/4 inch screw thread) remove the
small screw from the tripod screw hole on
the bottom of the body using a plus screwdriver,
then use a coin to remove the tripod screw
adapter bushing .
Electronic Shutter Release Contact
This is the socket for connecting a Mamiya
electromagnetic cable release (sold separately)
helpful when taking photos with the mirror up,
with long exposures or with slow shutter
speeds.
#804821 1 m (3’)
#804822 5 m (15’)
Memo Clip
The Memo Clip on the Back Cover accepts the
box top of the film carton and can also be used
for other reminders.
Kodak Professional
1 2 0
EKTACHROME
Color Reversal Film
In the conditions below or when the LCDs display the items listed in
pages 103 and 104, they are not necessarily faults. Check the camera
while referring the descriptions below.
- Unable to release the shutter
Check to see if the batteries are installed. Check to see if the batteries are dead.
Check to see if the power is on (the shutter release selector lever should be set to
“S” or “C” position).
Check to see if the dark slide has been removed.
Check to see if the film back is set to the correct ISO sensitivity (ISO indicator
blinks).
Check to see if the camera is advancing the film.
Check to see if the rear door is open for shutter release tests without film.
- The viewfinder does not show LCD read-outs.
Check to see if the batteries are installed. Check to see if the batteries are dead.
Check to see if the power is on (the shutter release selector lever is other than in the
“L” position).
Check to see if the magazine is installed.
If the camera has not operated for longer than 15 seconds, the viewfinder LCD readouts will automatically disappear.
- The dark slide cannot be pulled out
Check to see if the batteries are installed. Check to see if the batteries are dead.
The magazine is not mounted onto the camera.
- Film cannot be wound.
Check to see if the batteries are dead.
The film still has some remaining frames.
Check to see if there is film loaded into the camera.
Check to see it the camera is in multiple exposure mode.
This camera employs a microcomputer. It is possible that the camera may malfunction when exposed to static electricity or the like. In this case, turn OFF the
camera power and then remove the batteries. Reinstall the batteries, then turn
the power on. If the camera does not function properly after these steps, contact
our sales office or service center.
101 102
Page 52

When Any of These Displays Appear
The camera caution mark will blink when the dark slide has not been pulled out,
no film is present, or when the camera detects an abnormality.
103 104
Page 53

Specifications
Camera Type : 6x4.5cm format, electronically controlled focal-plane shutter, TTL mul-
Actual Image Size : 56x41.5 mm
Film Type : 120 roll film (16 exposures);
Lens Mount : Mamiya 645 AF Mount, compatible with M645 Mount (manual
Viewfinder : Fixed prism viewfinder magnification x0.71; built-in diopter
Focusing Screen : Interchangeable, Matte (standard), Checker, and Microprism Type
Field of View : 94%* of actual image
Viewfinder Information
Auto focus method : TTL phase difference detection method; sensor: CCD line sensor
Focus area : Display the focus area in the viewfinder screen
AF assist beam : Activates automatically under low light, low contrast.
AF Lock : By pressing the shutter release button halfway down in the AF-S
Exposure Modes
AE metering mode : TTL metering, center-weighted average (AV), spot (S), and
Increments of shutter : Both the shutter speed and the aperture level can be set to 1/3 or
speed and aperture 1/2 using the electronic dial lock function
Metering Range : EV 2 to EV 19 (with ISO100 film, f/2.8 lens)
Exposure compensation
Film speed : ISO 25 to 6400
AE lock : With AEL button; canceled by pressing the button again or shutter
Shutter : Electronically controlled vertical metal focal-plane shutter. (vertical
Shutter speed : AE 30 to 1/4000 sec. (1/8 step), manual 30 to 1/4000 sec. (1/2 or
tiple mode AE, AF single lens reflex
220 roll film (32 exposures); Polaroid Land Pack Film (requires
special HP402 magazine)
focus confirmation, focus aid, stopped-down exposure metering)
adjustment (-2.5 to +0.5, optional diopter correction lenses provide
adjustment ranges of -5 to -2 diopter and 0 to +3 diopter); built-in
eye-piece shutter
C for Non-AF M645 lenses.
: Focus mark, defocus mark, warning mark, aperture value, shutter
speed, metering mode (A, S, A/S), exposure compensation value
(difference between set value and metered value) and flash ready
/ OK lamp with TTL Metz connection.
(I+I type); operating range: EV0 to EV18 (ISO 100)
Range: 9m, Automatic switching to flash unit's built-in assist beam
when Metz flash unit is attached.
mode, or by pressing the AFL button.
: Aperture-priority AE, shutter-priority AE, programmed AE (PH, PL
setting possible), and manual
variable ratio (A-S auto)
: ±3 EV (1/3 step) Expandable to ±5 EV
release
travel)
1/3 steps), X, B (Bulb, electronically controlled), shutter curtain
protection mechanism (open when magazine is removed,
automatically closed when magazine is attached)
Auto bracket shot : Enable with auto bracket button (2 frame shots, or 3 frame shot
Flash Synchronization
Flash control : TTL direct flash control, supports Metz SCA3002 system
Film transport : Automatic via built-in motor, single or continuous exposures
Film loading : Automatic advance to first frame when shutter release button is
Multiple Exposure : Enable with multiple exposure button (the number of exposures
Mirror up shot : Select by pressing the mirror up button.
LCD displays : Main LCD display: Program mode mark, custom function mode
Data Imprinting : 7 segment dot matrix; DATA mode: exposure mode, aperture
Sync terminal : X contact (sync speed 1/125 sec.)
Cable release socket : On shutter button
Remote-control terminal
Self-Timer : 2 to 60 sec. (standard: 10 sec., can be set in 1 sec. steps between
Depth-of-field confirmation
Custom settings : 36 items
Tripod Socket : U 1/4 inch and U 3/8 included
Power Requirements : 6 AA-size batteries (alkaline-magnesium, lithium)
External power socket : An external battery case can be connected.
Size & Weight : 6 ”(W)X5 ”(H)X7.3 ”(D) / 153(W)X128(H)X184(D)mm
with auto bracketing). Specify 1/3, 1/2, 2/3 or 1EV steps.
:X contact point, 1/125 seconds (when 1/3 step is selected it can
be set between 1/40 and 1/125 seconds).
(SCA3952 Adapter)
pressed once (Easy Loading)
can be set from 2 to 6). It can be canceled in the middle and the
number of exposures can be changed, or you can switch to an
arbitrary multiple exposure style.
mark, AF area mark, battery level indicator, manual focus mode,
superimpose mode, dial lock mark, shutter speed, AE lock mark,
aperture value, multiple exposure mode mark, exposure compensation mode mark, flash compensation mark, exposure compensation value, self-timer mark, auto bracket mark, time mark (while
setting the clock).
Magazine LCD panel: ISO sensitivity, 120/220, number of shots.
value, shutter speed value, exposure compensation, metering
mode, ID number; DAY mode; year, month, date, time, ID number,
ID mode; ID number
: On side of body; electromagnetic cable release
2 and 10 sec., and in 10 sec. steps between 10 and 60 sec.)
: Preview Button on body
: 3.8 pounds / 1,730 g (W/O battery)
* This information is based on a linear (horizontal/vertical) measurement.
105 106
Page 54

Common Sense Camera Care and Practice
Maintenance and check of the camera
• Read instructions before using camera.
• Protect camera against shocks and falls. Use the neck strap supplied with it, when-
ever possible.
• Check the battery frequently and always carry spares. The sealed battery supplied
with the camera may have been subject to storage conditions which have reduced its
service life.
• Be sure to wipe battery contacts before installation and watch correct polarity.
• Battery life differs, depending on frequency of use, type, age, storage condition, ambi-
ent temperature (use External Battery Case in very cold weather), etc.
• Always remove the battery (and film) when camera is not used for a long period of
time.
• Always keep covers on lenses and camera body.
• Do not store the camera at temperatures exceeding 40˚C (105˚F) and -10˚C (15˚F).
Also avoid humid or sea air environment.
• Prolonged disuse shortens camera life. Periodically exercise the shutter (at different
speeds), lens diaphragms (at different apertures) and focusing mechanism.
• Protect camera against rain and moisture.
• Do not touch lens surfaces. Use blower or lens tissue to remove dust particles.
• Always test your equipment before going on important assignments.
The Importance of Proper Maintenance
Your camera has mechanisms like film transport, shutter and diaphragm blades etc.
They are controlled by gears, levers, springs, and so on. All require special lubrication
from time to time. Ambient conditions can also affect these mechanisms, as well as the
electronic components and the optical glass of your lenses. We therefore suggest that
you have your camera and lenses checked, and if necessary serviced, periodically.
After-Sale Servicing
☆Be sure to read the terms and conditions in the warranty card.
1. For inquiries, opinions or questions concerning the product, please contact your near-
est Mamiya agent or service center.
2. Servicing after the expiration of the period specified in the warranty card will be charged
to the user. The freight and transport costs should always be paid by the user.
3. The servicing parts for use in repair of the product will be retained at the factory for ten
years from the date of discontinuation of production.
◎The servicing is available for the same period as the servicing part retention period.
As the product may be serviceable even after this period, please consult your dealer
or nearest Mamiya service center for the serviceability.
☆Servicing of malfunction or damage due to dropping, impact, fire, flood, etc.
1) The degree of such a malfunction or damage will be judged by the Mamiya service
department.
2) Such a malfunction or damage will be classified either non-serviceable or serviceable.
When the product is classified to be serviceable, it will be repaired at the expense of
the user, even if the malfunction or damage occurred within the warranty period.
Specifications and appearance are subject to change without notice.
107 108
Page 55

MEMO
109 110
Page 56

100% Recycled Paper
英語
Printed in Japan
320100-EH-01E
Instructions
 Loading...