

Page 1

Page 2

Congratulations on your purchase of the Mamiya 645 AF Camera.
tradition of medium format camera expertise.
controls, LCD displays and is ready for the age of digital photography.
which protects it against accidental damage.
professional use.
operation and maximum results.
Special Advice To Professional Photographers
Mamiya pioneered the 645 SLR system camera three decades ago and the
Mamiya 645 AF, with its TTL auto-focus, auto-exposure, auto-flash and autofilm winding features, is the latest Mamiya master piece and reflects its long
Combining 35mm handling ease and speed with the advantages of an
almost 3x larger image size, it is a full-featured camera, utilizing many digital
Its high-tech focal plane shutter with speeds to 1/4000 sec. permits sync
flash up to 1/125 sec. and has an exclusive "Safety Retraction" feature,
The AE Prism Finder with its many features, protected by a sturdy
magnesium housing, and also the Power Drive Grip, are now integral
components of the diecast aluminum camera body, designed for heavy
All the many features, safety interlocks and other important information are
covered in detail in these instructions. It is imperative that you read them
thoroughly before you put your camera to work, in order to ensure proper
Your Mamiya 645 AF is designed for heavy professional use and will give you a long
service life if properly maintained. Your camera and lenses have many moving parts
which require periodic lubrication. Its electronic components, too, are subject to wear
and tear and are affected by ambient conditions like dust, sand, sea air, heat and
moisture.
If cameras had odometers like automobiles, it would be easier to specify servicing
schedules. May we suggest that if you shoot thousands of film rolls per year, you send
your equipment annually for servicing by the Mamiya distributor in your country.
Note:
In order to acquaint yourself with the functions of the camera, you will want to
practice without film. Please see bottom of page 37 how the camera can be tested
without film.
1
2
Page 3
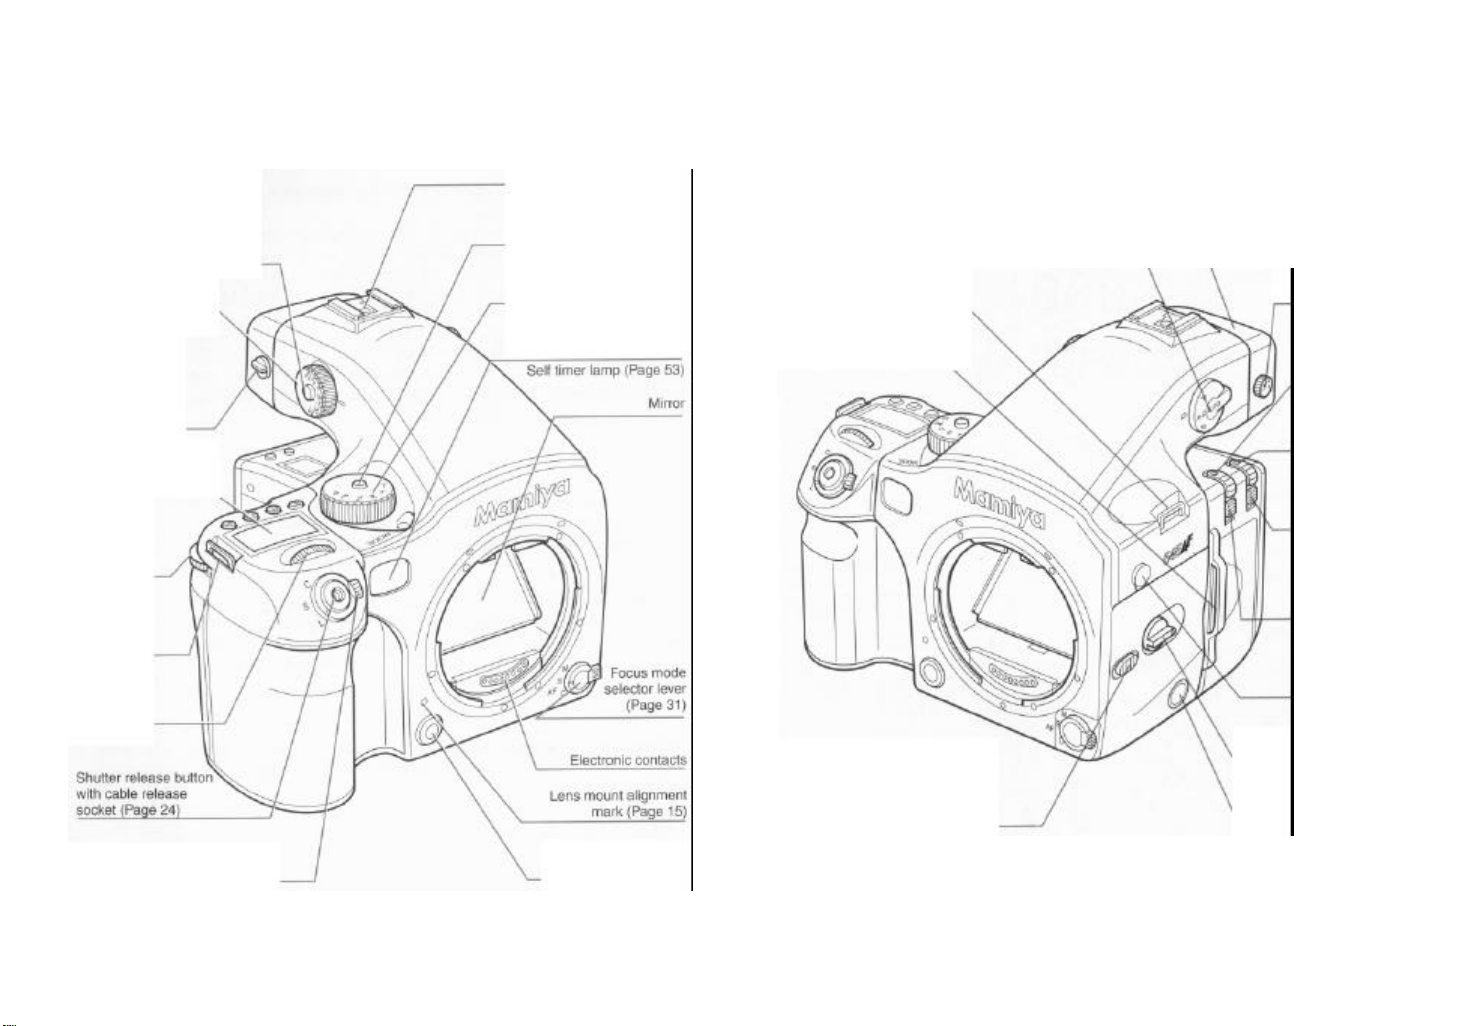
Names of Parts and Functions
lock release button (Page 46)
(Page 46)
Lever (Page 66)
Display (LCD) (Page 6)
(Page 71)
(Page 80)
(Page 71)
family of happy Mamiya camera owners!
Hot shoe (Page 63)
release button (Page 39)
(Page 39)
window (Page 36)
Strap lug (Page 80)
(Page 80)
Mirror up lever (Page 59)
button (Page 20)
(Page 21)
(Page 21)
(Page 20)
dial (Page 13)
selector lever (Page 45)
3
4
Exposure compensation dial
Exposure
compensation dial
Eyepiece Shutter
Main Liquid Crystal
Rear dial
Strap mount
Front dial
Exposure mode dial lock
Exposure mode setting dial
Auto focus supplemental
infrared light emission
Dark Slide (Page 20)
Exposure metering mode
Rubber eye piece
Diopter adjustment
Magazine
release button
Magazine cover
release button
Magazine cover
lock button
Magazine lock
Synchro terminal
(Page 65)
Shutter release mode selector
lever (Page 47)
Congratulations on your purchase of the Mamiya 645AF and welcome to the world-wide
Depth of field preview
button (Page 66)
Lens Release Button (Page 15)
Auxiliary release socket
Page 4
Diopter adjustment lens (standard accessory) (Page 14)
Dark slide storage pocket (Page 20)
Film box tab pocket
External power socket (Page 69)
(Page 11)
Battery case (Page 11)
Tripod socket (Page 80)
(Page 49)
BL button (Page 56)
(Pages 72,75 and 77)
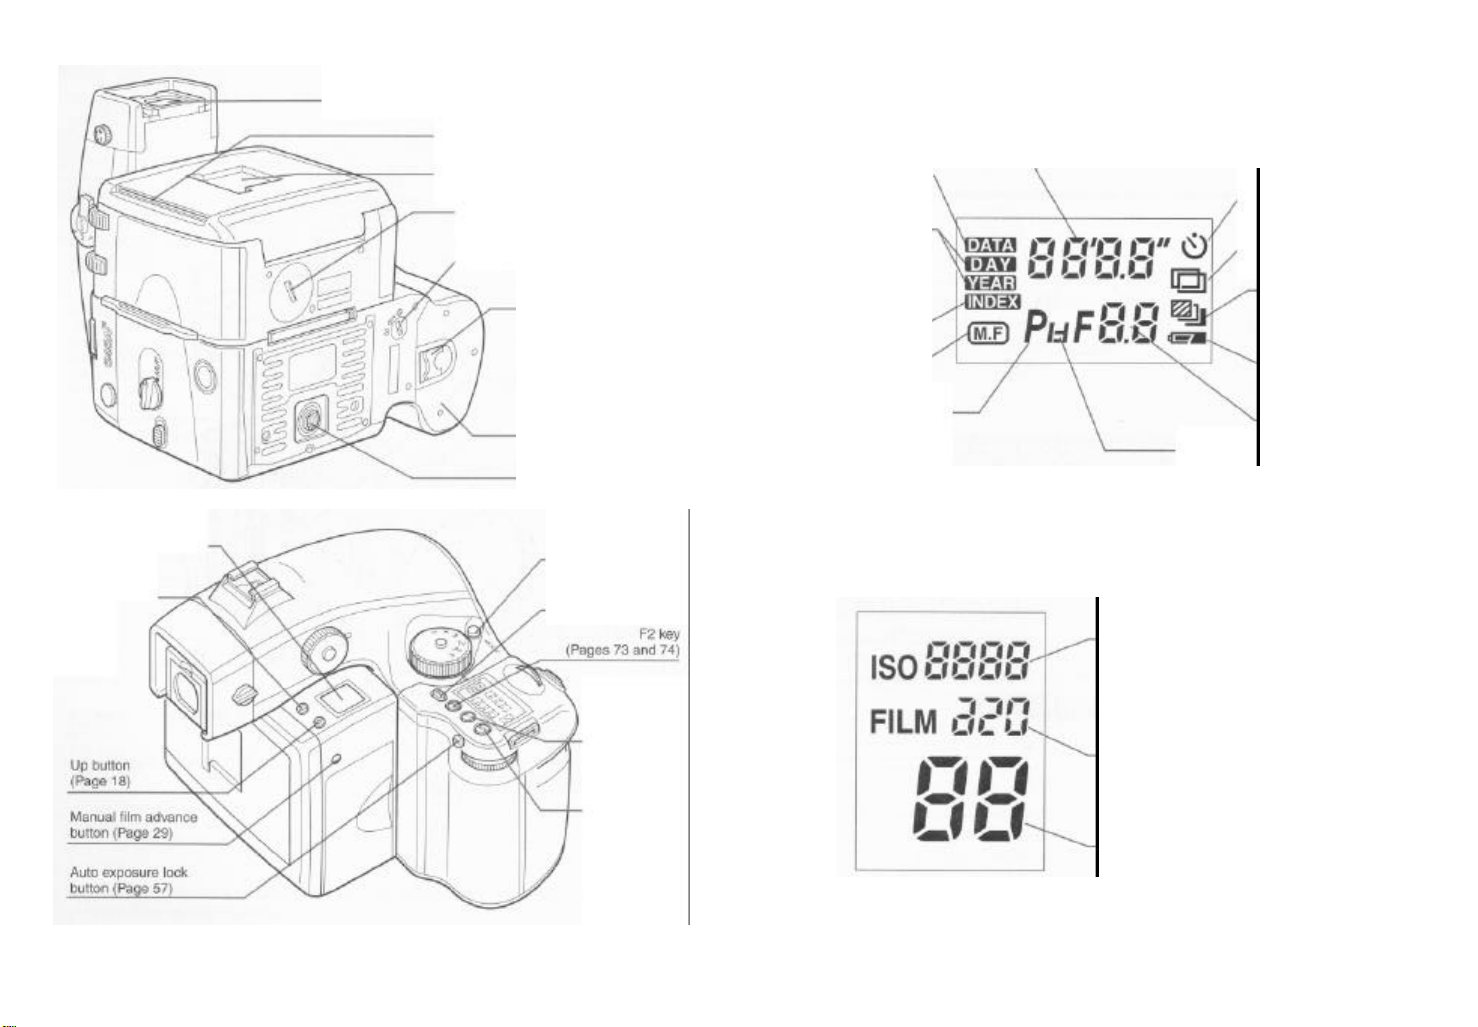
Main Liquid Crystal Display (LCD)
shooting data (Page 75)
Index mode (Page 74)
Program mode (Page 39)
Shutter time (seconds) (Page 41)
Multiple exposure
mode mark (Page 51)
indicator (Page 12)
Aperture (Page 40)
Program shift indicator (Page 39)
Dial lock indicator (Page 72)
Magazine LCD
Film sensitivity - ISO 25 to 6400
Film type display - 120 or 220
Number of photos disp
This diagram is for explanatory purposes. The actual display may differ.
Magazine LCD Panel
(Page 6)
5
6
Down button
(Page 18)
Screw cap for battery compartment for
magazine LCD (Page 17)
Battery case lock lever
Mode setting button
F1 key
Superimpose mode
Superimpose mode
calendar and index
number (Page 73)
Manual focus mode
(Page 32)
This diagram is for explanatory purposes. The actual display may differ.
Self timer mode mark
(Page 53)
Auto bracketing mode
mark (Page 49)
Battery power
SET button
(Page 72)
lay
Page 5
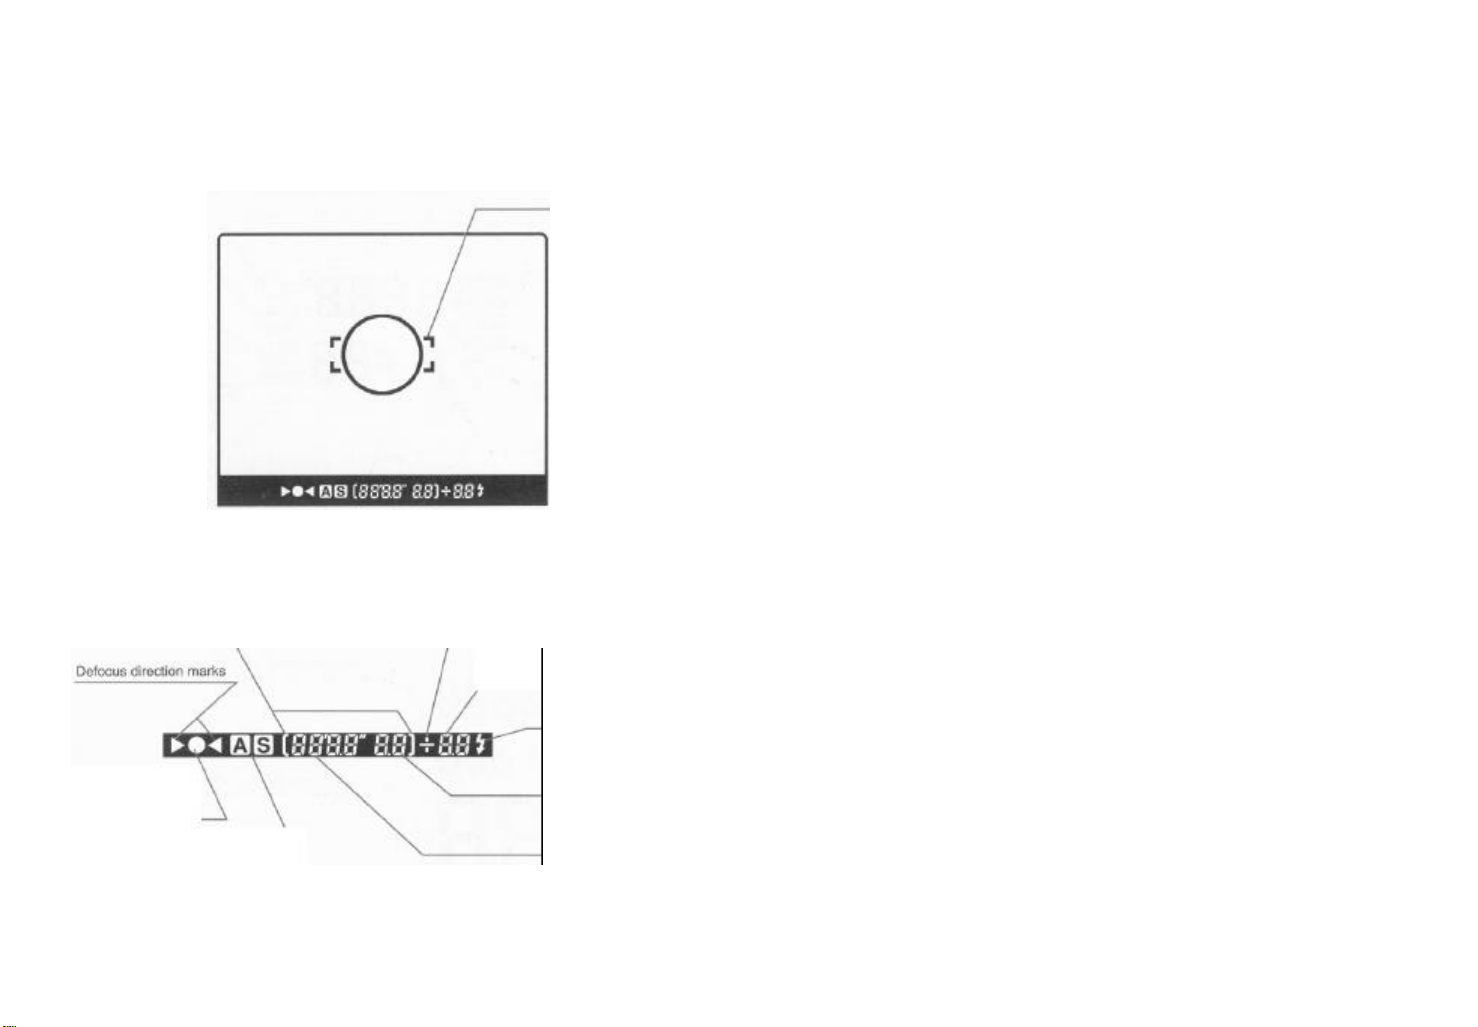
Viewfinder with LCD read-outs on bottom
Autofocus area frame
AE lock display
Focus marks
subject is in focus
This diagram is for explanatory purposes. The actual display may differ.
Shutter speed
Aperture
Flash charge indicator
between the setting and the
manual mode
Exposure compensation ± mark
Contents
7
8
displayed when
Exposure metering mode display
Exposure compensation value
display - displays the difference
metered value when in the
Names of Parts and Function .........................................................3~5
Main Liquid Crystal Display ..................................................................6
Magazine LCD ......................................................................................6
Viewfinder with LCD read-outs on button ............................................7
Basic Operation .................................................................................10
~29
Inserting the Batteries ........................................................................11
Checking the Battery Power ...............................................................12
Diopter Adjustment ............................................................................13
Replacing the diopter corrected lens ...............................................14
Attaching / Removing the Lens....................................................
15~16
Installing the Battery in the Magazine ................................................17
Setting the Film Speed .......................................................................18
Attaching / Detaching the Magazine.............................................19
Loading Film in the Magazine .....................................................21
~20
~23
Shutter Release Button / Holding the Camera ...................................24
Taking Photos in the Full Automatic Mode .................................
Removing a partially exposed film roll
.......................................................................29
Auto Focus Function ........................................................................30
25~28
~36
Single Focus Mode ........................................................................31
Continuous Focus Mode
................................................................................................31
Manual Focus Mode ......................................................................32
Manual focusing using the focus mark ...........................................33
Subjects With Which Auto Focusing May Not Work .......................34
Using the Focus Lock Function ..........................................................35
AF Supplemental Infrared Light
......................................................................................36
Camera Operation Test ......................................................................37
Exposure Modes ...............................................................................38
~43
Program AE ...................................................................................39
Shifting the Program ......................................................................39
Aperture Priority AE .......................................................................40
Shutter Priority AE .........................................................................41
Manual Mode ..........................................................................42
~43
X Mode ..........................................................................................43
Time Mode......................................................................................43
Exposure Metering and Film Advance Modes ................................44
~47
Average Exposure Metering Mode ................................................ 45
Spot Exposure Metering Mode .......................................................45
Average / Spot Auto Switching Exposure Metering Mode ............. 45
Page 6

camera in shooting position.
Exposure Compensation ....................................................................46
9
10
Single-Frame Mode / Continuous Mode .............................................47
Additional Shooting Modes ...............................................................48
Auto Bracketing Mode .................................................................49
Multiple Exposure Mode ..............................................................51
Self Timer Mode .................................................................................53
Applied Photography .........................................................................54
Extended Exposure Modes .........................................................55
AE Lock Mode .............................................................................57
Taking Photos with the Mirror Up ................................................59
Depth of field ......................................................................................61
Infrared Photography .........................................................................62
Flash Photography ......................................................................63
Metz Flash SCA3951 System Functions ........................................64
Flash Photography with Flashes other than Metz Flashes .............65
Depth of Field Preview /Eyepiece Shutter ..........................................66
Changing The Focusing Screen .........................................................67
Using the M645 Manual Focus Lenses ..............................................68
External Power Supply .......................................................................69
Date, Electronic Functions, and Miscellaneous ...............................70
Electronic Dial Operations ..................................................................71
Front / Rear Dial Lock Mechanisms ...................................................72
Superimposing Data ....................................................................73~76
Setting the Date and Time .............................................................73
Setting the Index Number ..............................................................74
Selecting the Data to be Superimposed .........................................75
Data superimpose modes ..............................................................75
Checking the data to be superimposed ..........................................76
Changing the Viewfinder Display in the Manual Mode "M" .................77
Error Messages ..................................................................................78
If the shutter cannot be released ........................................................79
Strap / Using a Tripod / Auxiliary Release Contact ............................80
Specifications of 645AF ...............................................................81~82
Common Sense Camera Care and Practice ................................83~85
The Importance of Proper Maintenance .........................................84
Batteries Care ................................................................................84
After-Sale Servicing .......................................................................85
Liquid Crystal Display.........................................................................86
~53
~50
~52
~69
~56
~58
~60
~65
~86
This section describes basic camera operations, how to load
film and basic full automatic photography.
When we refer to "left or right" we assume you are holding the
Page 7
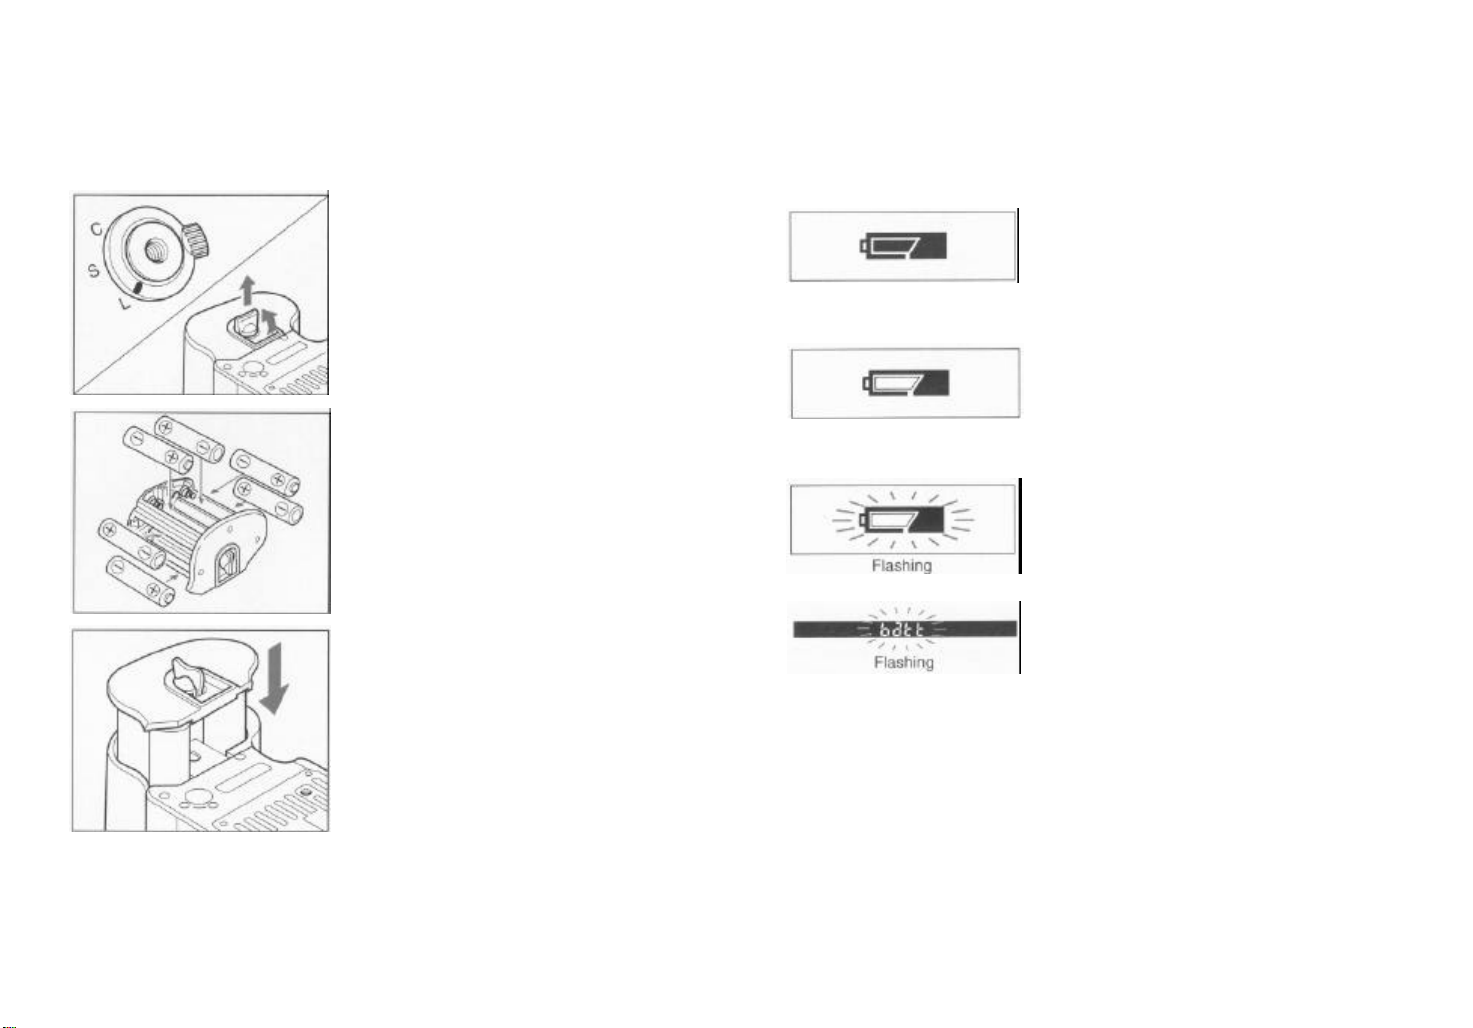
Inserting the Batteries (The camera will not operate
without batteries)
Use six "AA" alkaline and lithium batteries.
clockwise and pull out the battery holder.
shown in the drawing.
proper polarity
firmly attached.
*After inserting the batteries, set the date and time. (See page 73.)
Checking the Battery Power
Check the battery condition in the lower right corner of the main LCD.
The batteries are sufficiently charged.
Camera will still operate.
batteries with new ones.
when the shutter release button is pressed.
Lithium batteries : 300 rolls
11
12
Set the shutter release mode selector lever to "L" (to turn the power off).
1. Lift the battery case lock lever, turn it counter
2. Insert fresh batteries with the + and - ends as
• Be sure the batteries are placed with
3. Return the battery holder to its case and lock
it by turning the lever clockwise. Make sure it is
Set the shutter release mode selector lever to "S" (to turn the power on).
There is little power remaining. Have new batteries
on hand.
There is very little power remaining. Camera will
not operate.
*Set the shutter release mode selector lever to
"L" (to turn the power off) and replace the
*When the batteries are spent, "batt" flashes
on the main LCD and the viewfinder's LCD
• When replacing the batteries, be sure to use six new batteries of the same
type. Do not mix different types of batteries or old batteries with new ones.
Amount of film that can be taken with one set of batteries
At normal temperature (20°C), using new batteries, 120 roll film and under normal
usage.
Alkaline batteries : 150 rolls
Page 8
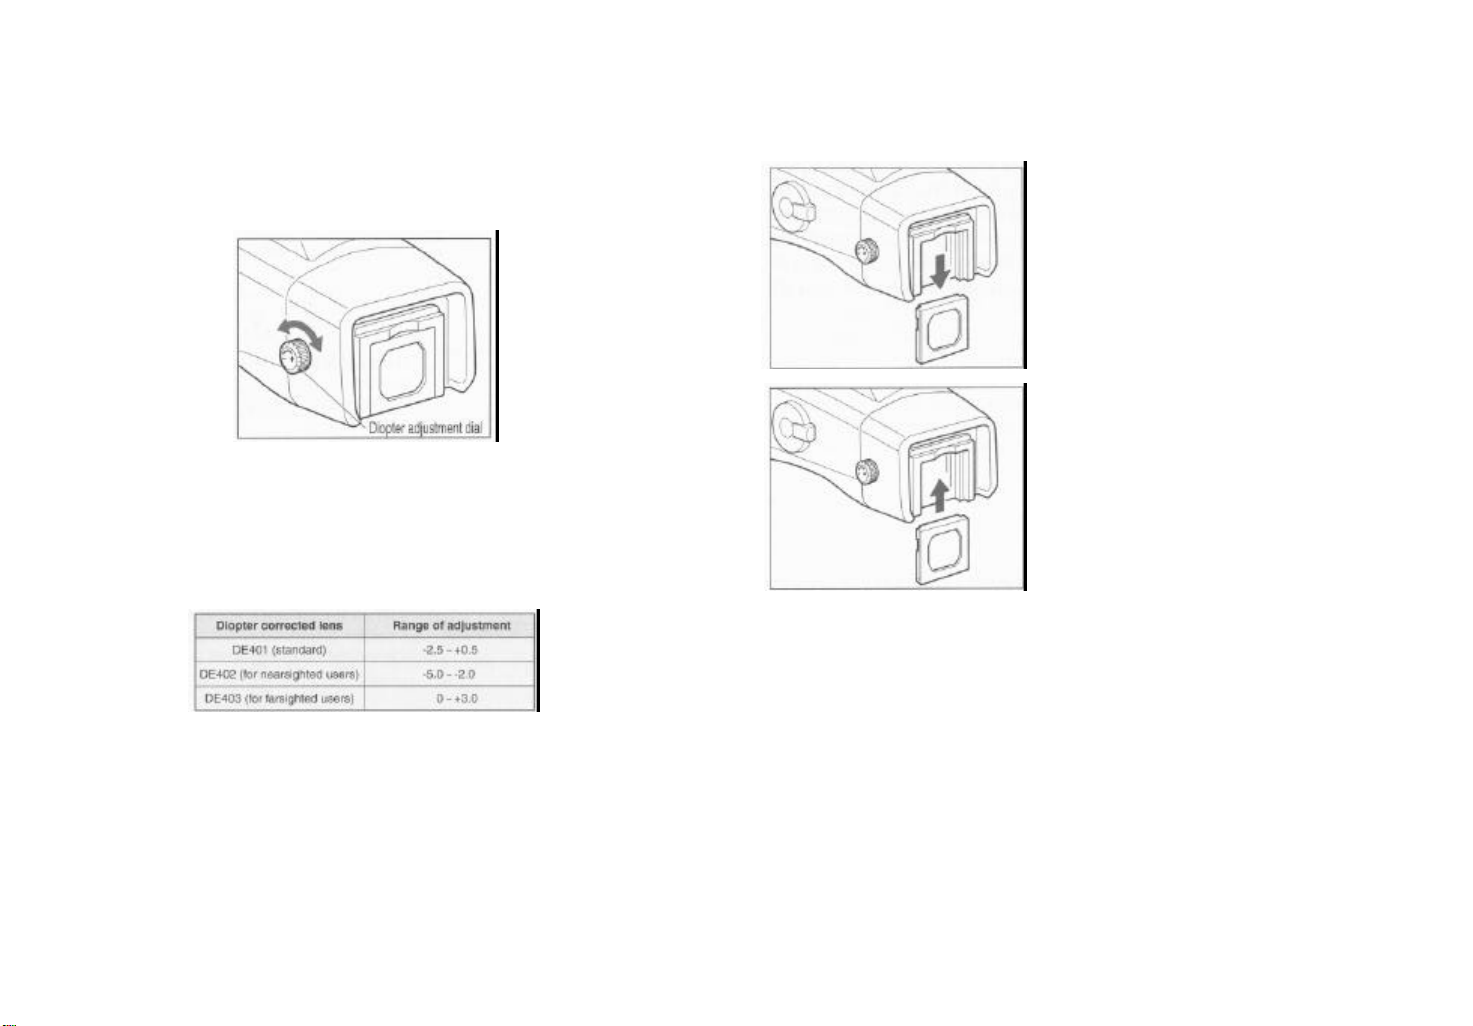
Diopter Adjustment
this adjustment.
lenses (Optional accessory)
Replacing the diopter corrected lens
pulling it downward.
until it clicks into place.
*Using solvents could discolor the diopter corrected lens frame.
13
14
Look through the viewfinder and make sure that the focus frame (Rectangle with Circle)
is in sharp focus. If it is not, turn the diopter adjustment dial in the "-" direction if you are
nearsighted, in the "+" direction if you are farsighted. If this is not sufficient you may
require an optional diopter corrected lens. See below.
*Point the camera at a bright, plain object such as a white wall when making
Range of adjustment of diopter corrected
1. Remove the lens supplied with the finder by
2. Push the replacement diopter corrected lens
upward into the viewfinder's eyepiece frame
*If there is dirt or dust on the lens surface, remove it with a blower or sweep it off
gently with a lens brush.
*If there are fingerprints or dirt on the lens surface, wipe it off with a piece of clean,
soft gauze.
Page 9
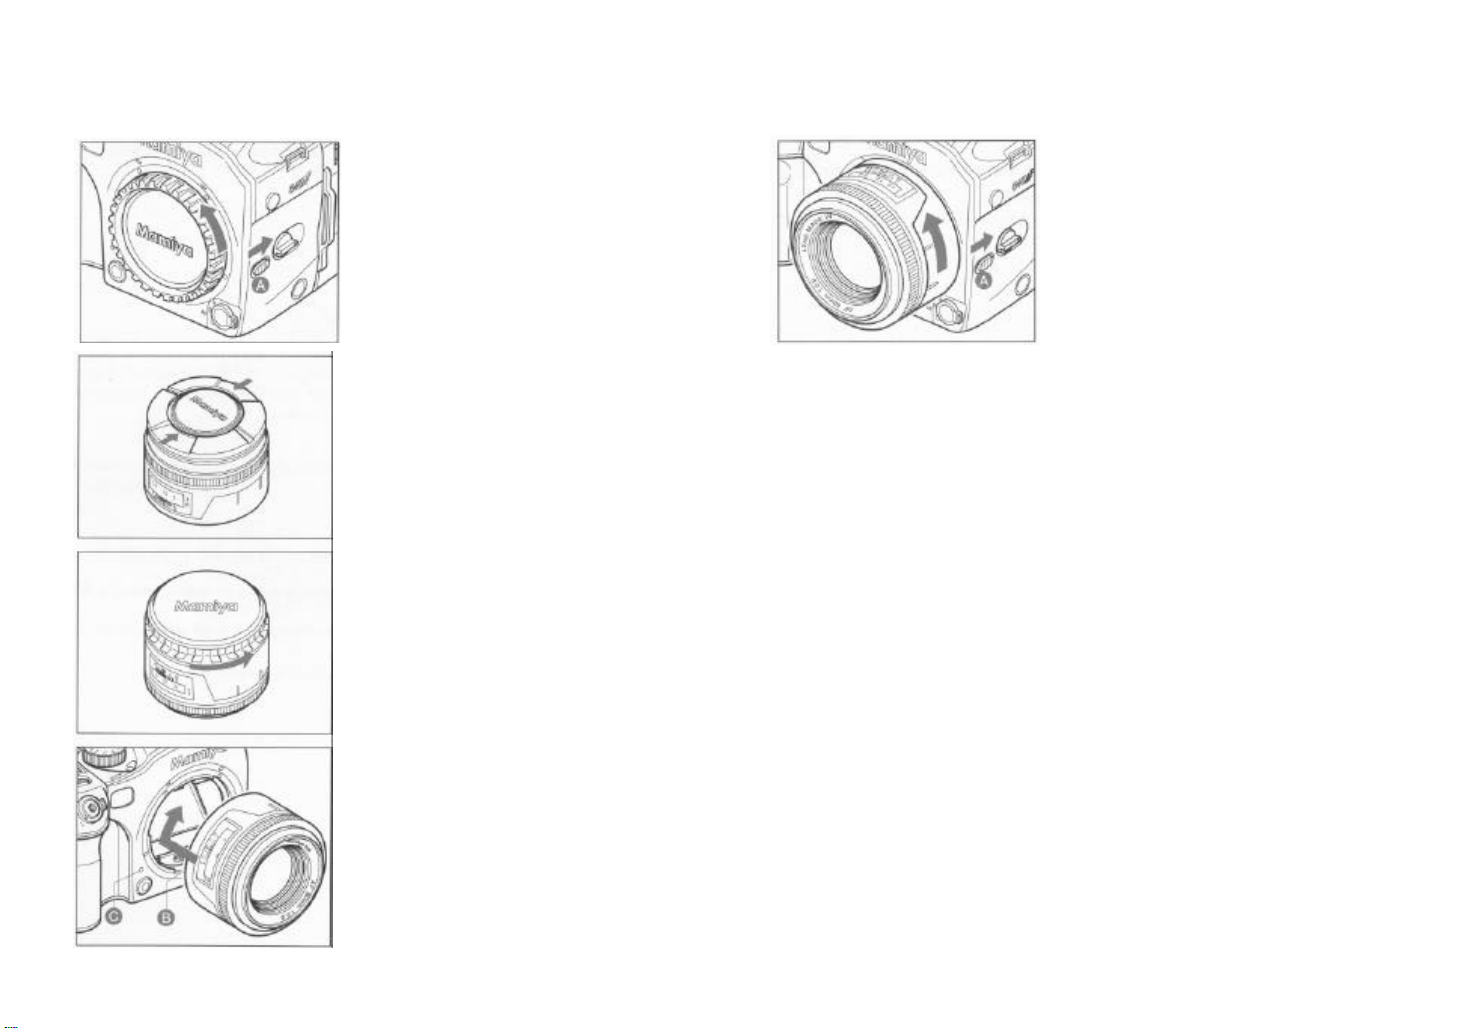
Attaching/Removing the Lens
Attaching
Removing
on or corrosion. Wipe such impurities off with a clean piece of cloth.
15
16
1. Remove the camera's lens opening
cap, just like you would remove a
lens, by pushing the lens release
button “A”
the lens cap or the lens itself
counter clockwise and lift out.
To remove the front lens cap, squeeze the shiny
sections together and lift out.
To remove rear lens cap turn it counter clockwise.
backward and then turn
While pushing the lens release button “A”, rotate
the lens counter clockwise until it stops and lift it
off.
*After removing the lens from the camera body, protect both ends by attaching
the caps.
*Oil, dust, fingerprints or water on the electronic contacts could result in
malfuncti
2. Attaching the lens
Align the red alignment dot of the lens (on the
shiny flange) with the camera's red dot, fit the
lens into the camera and rotate it clockwise until
it clicks into place.
*Do not touch the distance ring or other
rotating parts during the auto focus
operation.
Page 10
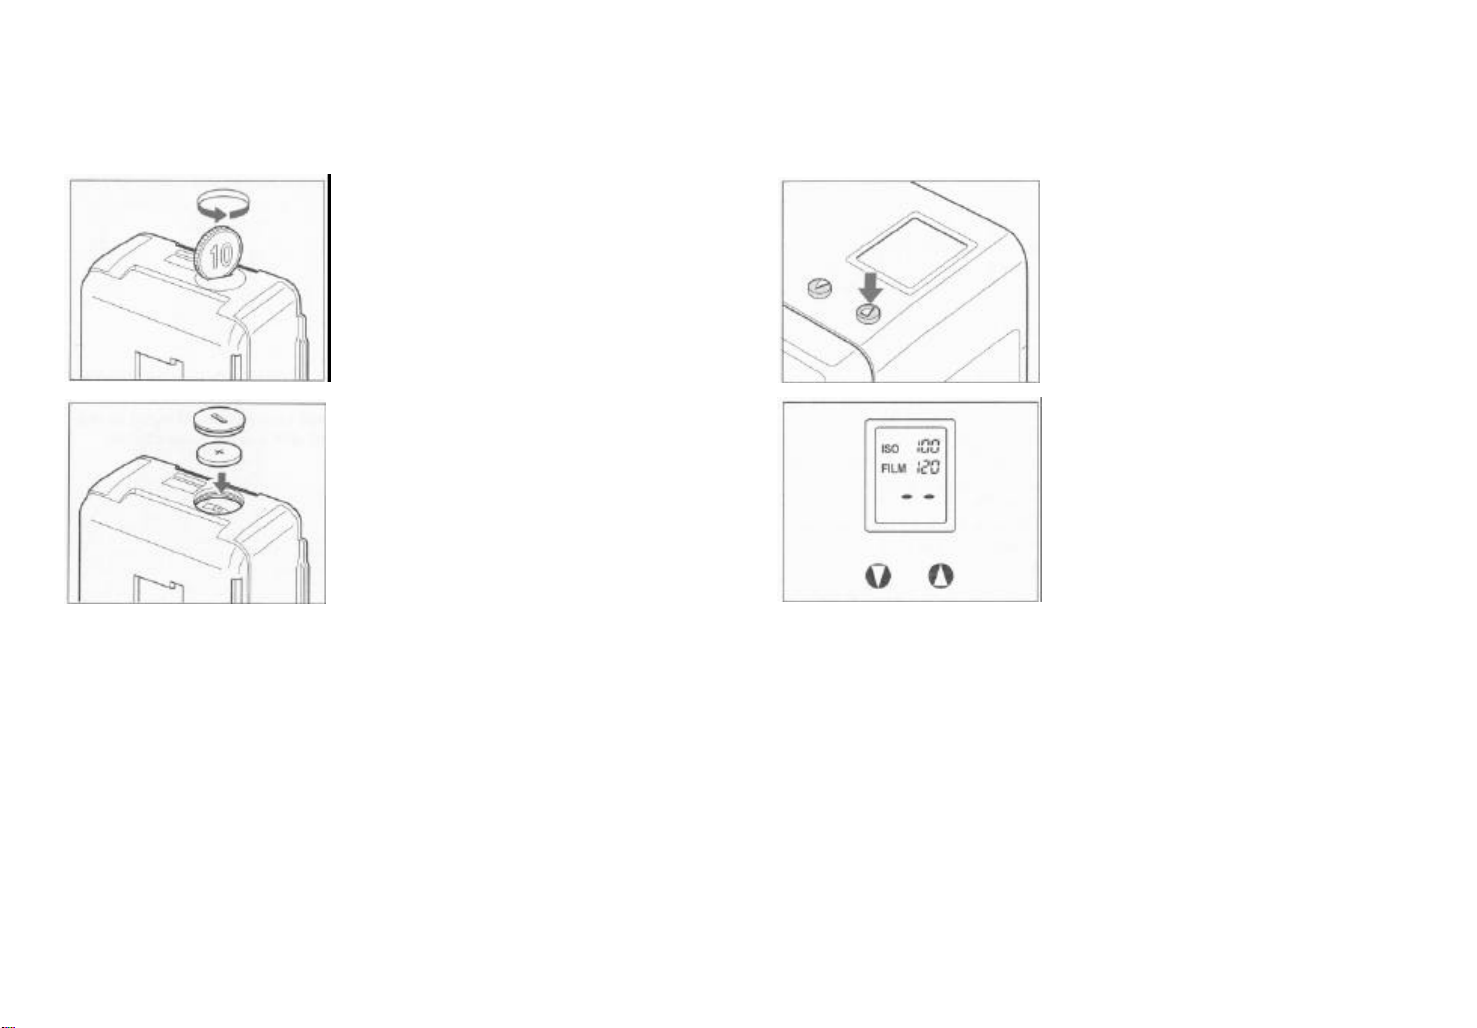
Installing the Battery in the Magazine
camera. When it is attached the power is supplied by the camera's batteries.
counter clockwise.
battery. Otherwise accidental battery fluid leakage may damage the contacts.
Setting the Film Speed
overexposure may occur.
17
18
The button battery supplies power to the magazine's LCD when it is detached from the
1. Remove the battery compartment
cover screw.
Use a coin or suitable screw driver and turn it
2. Insert a battery.
Insert the battery according to the polarity
indication + in the battery compartment, and
close the battery cover.
Battery used: Sony CR2032 or equivalent
•Be sure to watch correct polarity
*When the battery is exhausted, remove it immediately and replace with a new
The film speed (ISO sensitivity value) is the reference for all exposure and must be set
correctly. If the set value differs from the actual value of the film in use, under- or
1. Press the ▲ (up) button.
When the LCD panel displays information, press
and hold the ▲
the LCD for more than 1 second. The ISO
indicator will blink.
(up) button on the bottom part of
2. Set the film speed.
Set the film speed of the film by pressing the▲
(up) or ▼ (down) button. To lock the speed
setting, press and hold the two buttons
simultaneously for more than one second; the
film speed will be written in memory in 5 seconds.
*The setting is not complete while the ISO indicator is blinking.
*The information on the film in use, such as the type, ISO sensitivity value and
number of exposures, is stored in the back -up memory. However, when the
battery capacity has dropped during stand-alone use of the magazine, the
information may not be shown by the LCD panel.
*The information on the film (type, ISO sensitivity and number of exposures) is
stored in the memory, but when the battery power is low this information may be
displayed erroneously. Be sure to replace the batteries with new ones.
Page 11
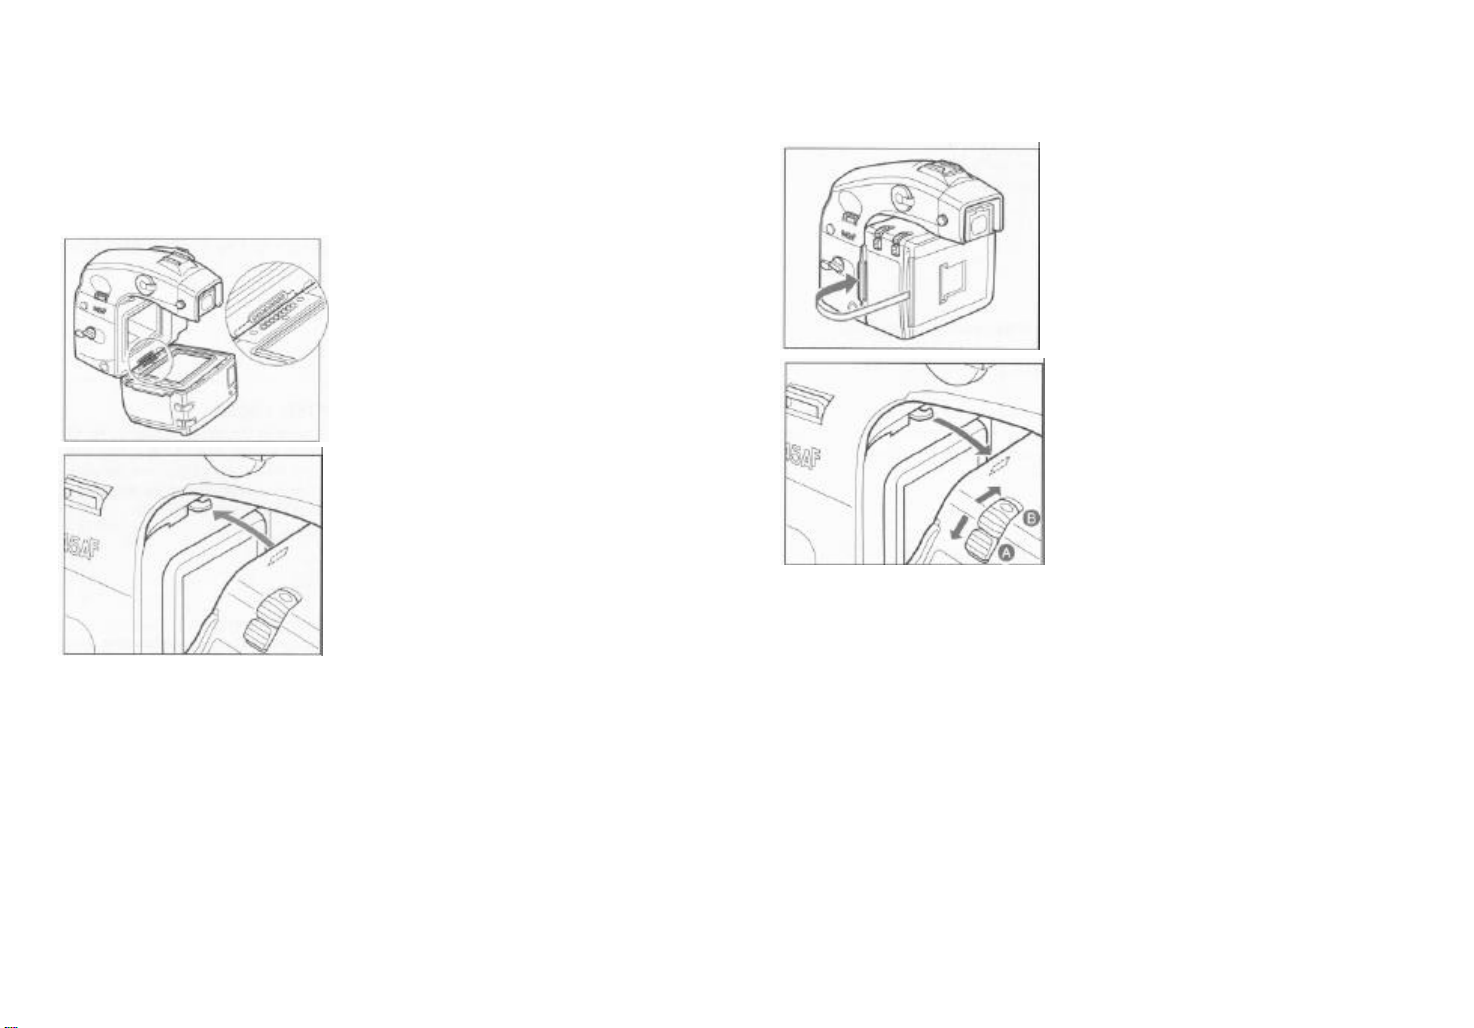
Attaching/Detaching the Magazine
this case.
Attaching
magazine's protection cap.
the shutter closing)
(Batteries must be in camera).
Detaching
1. Insert the dark slide into the magazine.
19
20
When there are no batteries in the camera, the shutter's "Safety Retraction" feature,
keeps it in the open position and the magazine's dark slide cannot be pulled out, even
when it is attached to the camera. Film winding and shutter release are also blocked in
1. Remove the camera's rear body cap and the
2. Fit the body coupler of the magazine into the
bottom channel of the camera, properly
centered.
3. Push the magazine against the camera body
until it snaps into place. (You will instantly hear
2. With your thumb first push button “A” down and
then simultaneously button “B” in. The magazine
will separate itself from the camera body.
*When the magazine is removed, the shutter will automatically open, as
explained on the previous page, under "Shutter Safety Retraction"
Film winding and shutter release are also locked.
Shutter Safety Retraction
The precision shutter blades are made of very thin hyper-duraluminum and could
be damaged if unprotected. Therefore the camera is designed to automatically
retract the shutter into the open position when the magazine is removed. When it
is reattached the shutter automatically closes and is ready for normal function.
Automatic film advance to #1
There is no need to line up the film's paper leader start mark. The magazine automatically advances the film to the first frame (See page 22).
The magazine cannot be attached or detached unless the dark slide is in place.
Page 12
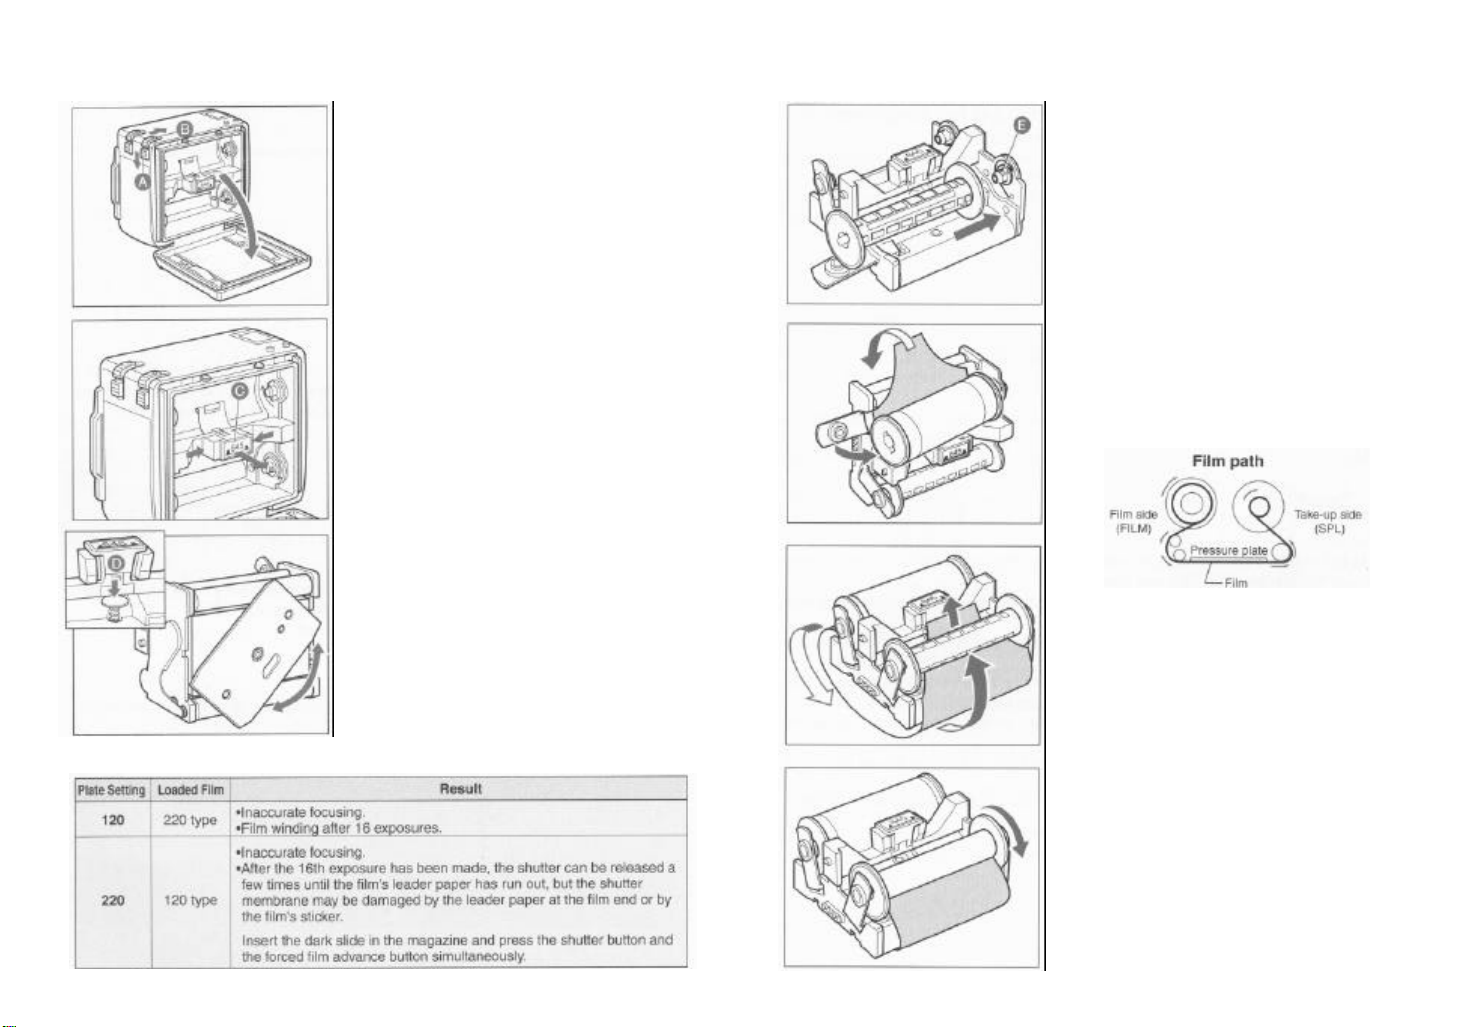
Loading Film in the Magazine
of the magazine.
When the pressure plate (120/220) is set erroneously:
" to the original position.
to the original position.
to wrap the leader tape around it.
21
22
1. Open the back cover of the magazine.
By first pushing the button “A” down and then
button “B” simultaneously.
2. Take out the roll-film insert.
Squeeze the center block "645" “C” between your
fingers and pull it out.
•When you load film for the first time, remove
and discard the protective paper cover which
is attached to the film rails in the magazine.
3. Set the film type (120 or 220).
Push and hold the pressure shaft “D” located under
the 645 center block. This frees the pressure plate
and permits it to be turned and set for either 120 or
220 film.
•Be sure to align the lock pins with the holes on
the pressure plate. The film type should be
displayed when the film is loaded on the LCD
4. Attach an empty spool to the roll-film
insert.
Flip the roll-film insert's lower spool clip "SPL"
away from the spool, fit an empty spool between
takeup spool studs “E”, and return the spool clip
"SPL
5. Set the film.
Flip the roll-film insert's upper spool clip "FILM"
away from the spool, fit a roll of film as shown in
the illustration, and return the spool clip "FILM"
6. Attach the leader paper of the film to
the empty spool.
Gently pull out some of the leader paper, insert
the tip of the leader paper into the take-up slot of
the empty spool, and rotate the spool a few times
Page 13
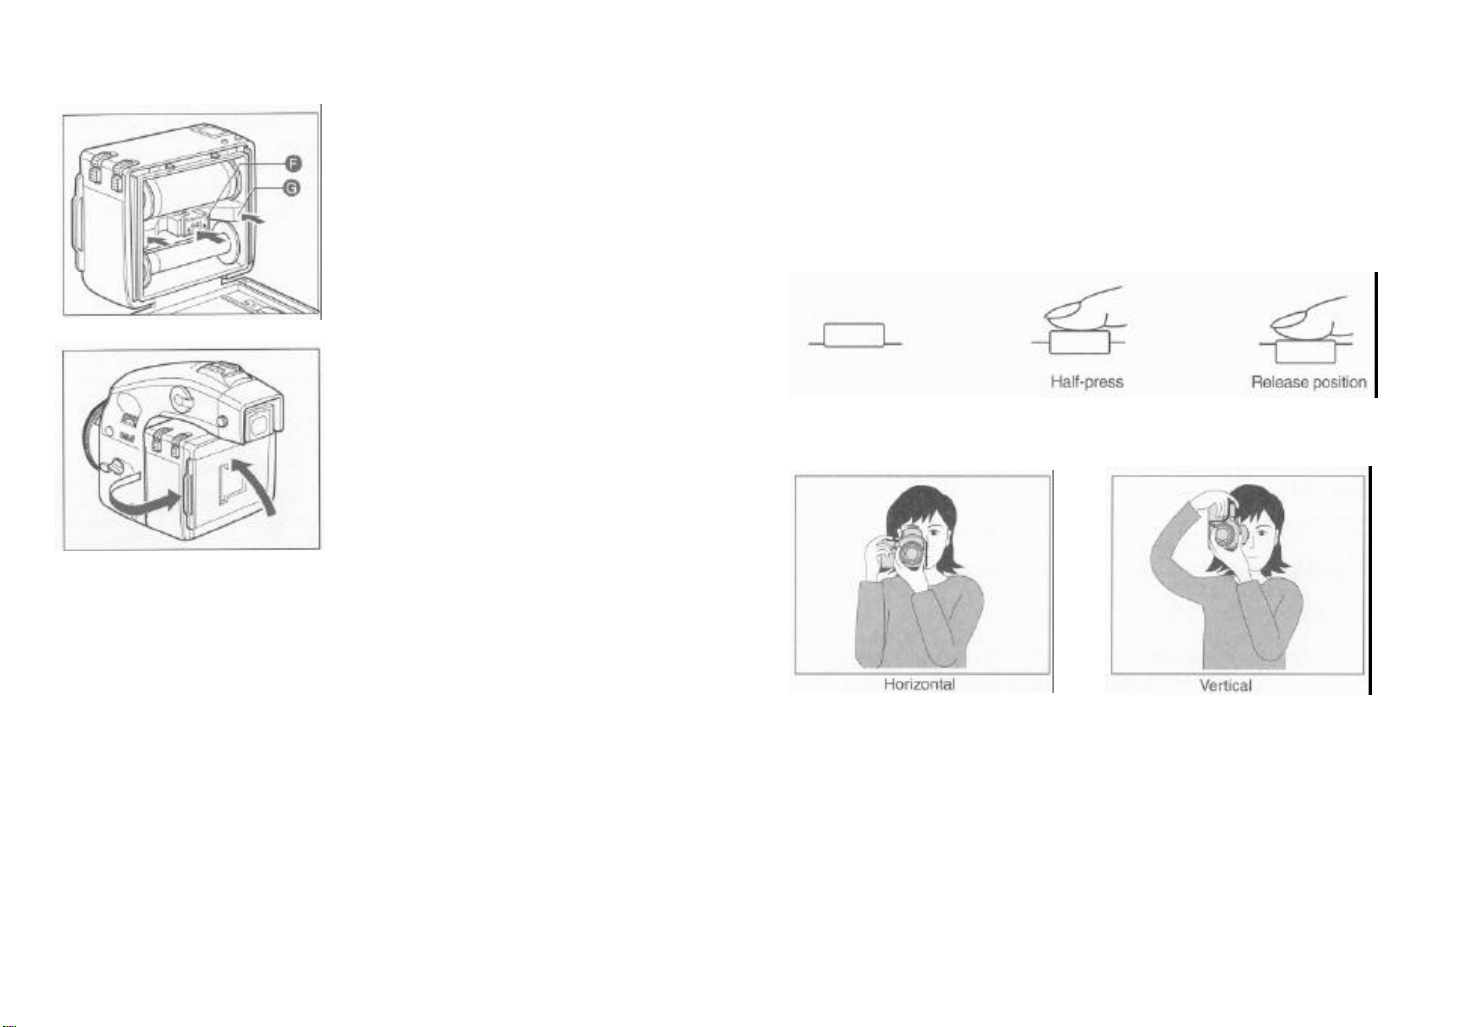
7. Insert the loaded film insert into the
(You will hear a click).
pocket
mark appears in the LCD.
Shutter Release Button/Holding the Camera
Shutter Release Button
When half-pressed, the power turns on and the camera becomes functional.
Holding the Camera
23
24
magazine.
While squeezing the center latches together,
place the film insert, with the feed spool on top,
in the magazine and with pressure on the left
and right blocks “G” push it into proper position.
8. Close the back cover.
Push in the upper part of the back cover firmly to
close it.
9. After attaching the magazine onto the camera
body, pull out the dark slide and press the shutter
button halfway; this will feed the film automatically
to frame No. 1.
Place the dark slide in the magazine's rear storage
*It is not required to align the film start mark, for the magazine will automatically
detect film frame No. 1 from any position.
*When the magazine is mounted on the camera body, the mirror and shutter which
has been freed will be set in position.
*Do not wrap too much leader paper around the empty spool. Otherwise the film
section may be exposed to light.
*When the magazine is separated from the camera, the power save mode is acti-
vated in 5 seconds after the start of stand-alone operation and the LCD panel
turns off. To release the power save mode and turn on the LCD panel, press the
▲ (up) button.
*To prevent accidental film fogging, do not pull out the leader paper too far or
load/unload film under direct sunlight.
*When the film is not wound properly, the counter display disappears and the “--"
The shutter release button has a two-step action, A half-press (light pressure) will activate the camera, heavier pressure will release the shutter. When pressed lightly it
stops at a certain point. In this manual this position is called the "half-press" position.
Grasp the camera firmly when taking photos. If the camera moves during exposure, the
picture will be out of focus.
*Grasp the grip firmly, tuck in both elbows and support the bottom of the camera
with your left hand.
*At slow shutter speeds, or when using the self timer, it is best to use a tripod
and cable release or electromagnetic cable release (Optional accessories).
Page 14
Taking Photos in the Full Automatic Mode
1. Set the shutter release mode selector lever to "S"
(single-frame advance mode).
front of the camera.)
(manual focus mode).
auto exposure).
"A-S" (average/spot auto switching).
25
26
3. Set the exposure mode selector dial to "P" (program
There are two shutter release modes: "S"
(singleframe advance mode) and "C"
(continuous advance mode). (See page 47.)
When set to "L", the power is turned off.
2. Set the focus mode selector lever to "S" (single
focus mode). (This control is located at the lower left
There are three focus modes: "S" (single focus
mode), "C" (continuous focus mode) and "M"
There are four exposure modes: "P" (program
AE), "Av" (aperture priority AE), "Tv" (shutter
priority AE) and "M" (manual mode).
4. Set the exposure metering mode selector lever to
There are three exposure metering modes: "A" in
which the average light of the entire picture is
measured with emphasis on the center of the
picture, "S" in which the light in a spot at the
center of the picture is measured, and "A-S"
which combines these two to automatically switch
the mode according to the extent of difference
between the brightness of the light metered in the
two modes and sets the distribution ratio of the
exposure metering modes within an intermediate
range. (See page 45.)
Page 15

5. Focus.
1
. Aim the camera so that the subject is within the focus frame
The focus is adjusted automatically.
When the focus mark ● lights……..The picture is focused.
3. When ● lights, press the shutter release button to make exposure(s).
Defocusing Marks
now.
(SPL), ready for loading the next film roll.
winding. Otherwise malfunction will result.
27
28
2. Half-press the shutter release button.
6. Unloading the exposed film.
When the fixed number of exposures have been taken, the camera automatically takes
up the film till the end and stops. The LCD panel on the magazine should display End
1. Open the back cover.
While holding down the magazine's back cover
lock release button “A” push the back cover
release button “B” to open the back cover.
2. Remove the roll-film insert.
Squeeze the release latches “C” of the roll-film
insert in the film chamber with your fingers and
take the roll-film insert out.
3. Remove the film.
Flip the roll-film clip's spool clip "SPL" away
from the spool, and take out the film roll.
4. Fasten the film with a sticker.
After unloading the film roll, attach the provided
sticker onto it to prevent unrolling.
*Move the empty spool from the top (FILM) to the lower take-up compartment
Flashing: The picture is not focused and the shutter cannot
be released.
Either press the shutter release button again to
adjust the focus or move the camera to change the
position of the focus frame.
Precautions for Film Unloading
Do not unload an exposed film in direct sunlight.
•
•The exposed film should promptly be put in a light tight bag or box and sent to
the processing lab as soon as possible.
•Never try to remove the magazine from the camera body in the middle of film
Page 16

Removing a partially exposed film roll
shows "End".
button to wind up the film.
29
30
To remove partially exposed film roll, insert the
dark slide in the magazine and press the shutter
button and the forced film advance button “A”
simultaneously. This causes the film to be taken
up till the end and the magazine's LCD panel
6-exposure film
If you continue photographing after the 8th exposure when using 6-exposure film, the
shutter membrane may be damaged by the leader paper at the film end or by the film's
sticker. Use the procedure described below.
Photograph in the same way as with 120 film. Eight exposures can be taken. After
taking the 8th exposure, insert the dark slide in the magazine,
then half-press the shutter release button while pressing in the forced film advance
This camera is equipped with a TTL phase difference detection
type auto focus function. When the brightness or contrast is
low and it is difficult to focus, a supplemental infrared light is
emitted automatically. Set the focus mode selector lever to "S"
(single focus mode) or "C" (continuous focus mode).
Page 17

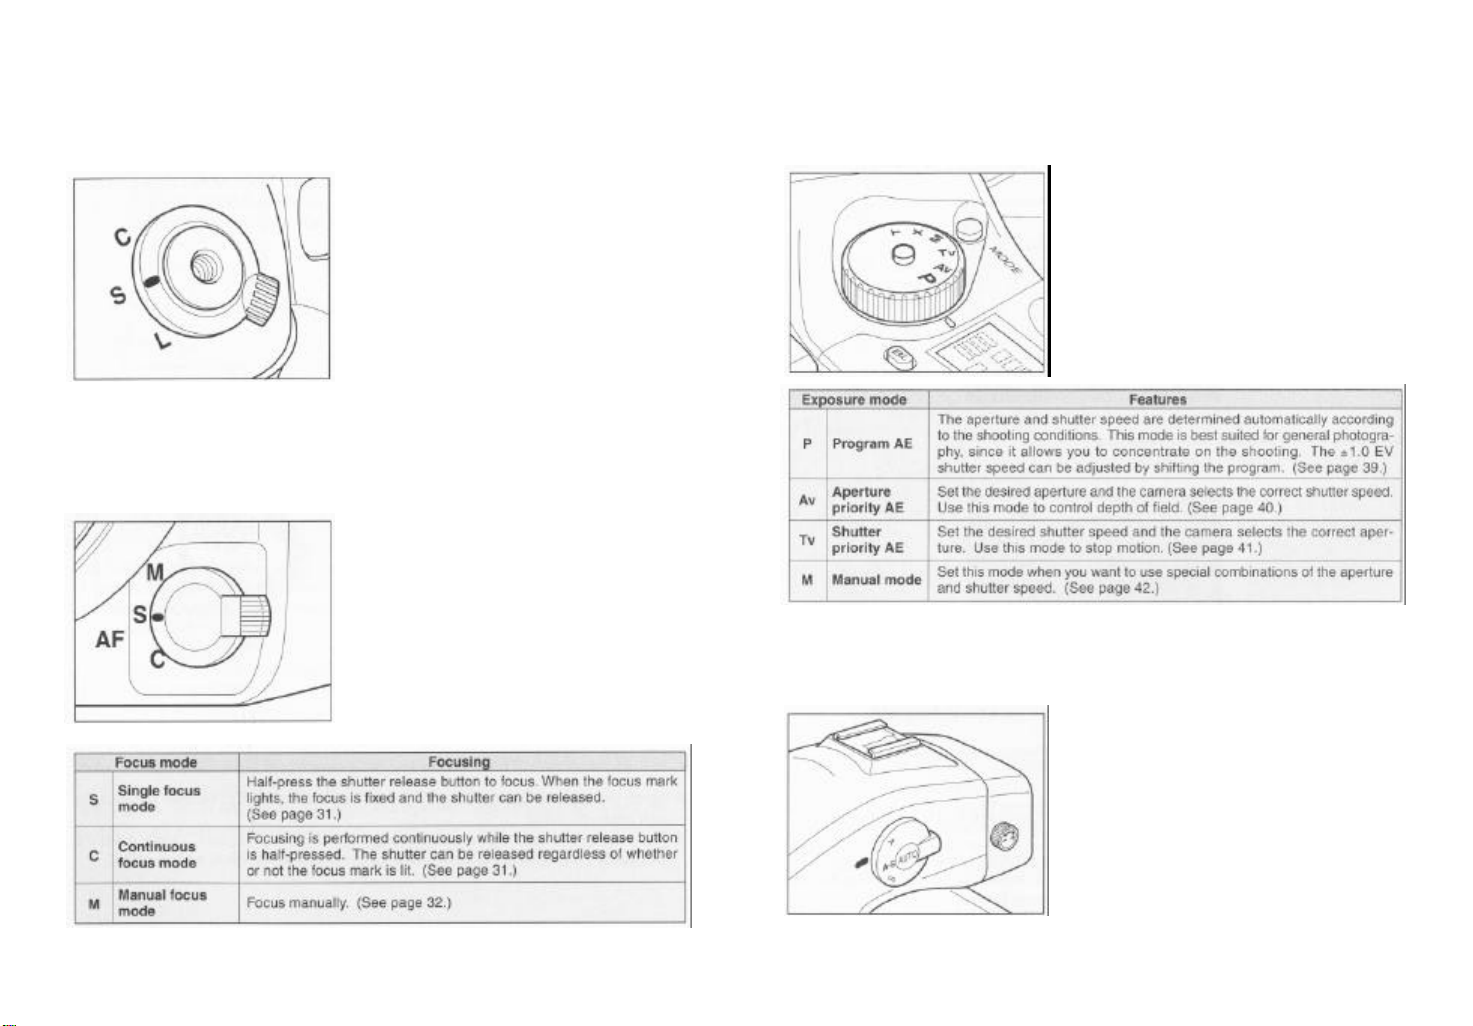
Single Focus Mode (S)
Continuous Focus Mode (C)
focus mark is not lit.
Manual Focus Mode (M)
The auto focus function can be turned off so the focus can be adjusted manually.
31
32
This mode uses the focus priority mechanism.
The shutter can be released when the focus mark
in the viewfinder is lit. This mode is suited for still
subjects. The focus is locked when the
mark lights in the viewfinder's LCD.
*The shutter cannot be released if the subject
is not in focus (if the
light).
*To take another photo with a different com-
position, take your finger off the shutter release button then press the shutter release
button again.
This mode uses the release priority mechanism.
The shutter can be released regardless of
whether the
LCD is lit. The focus is adjusted continuously
while the shutter release button is half-pressed.
This mode is suited for moving subjects.
*The focus is not locked even if the
mark is lit.
*The shutter can be released even if the
● focus mark in the viewfinder's
● focus mark does not
● focus
● focus
●
1. Set the focus mode selector lever
to "M" (manual focus mode).
Turn the focus mode selector lever to "M"
(manual focus mode). “M.F.” appears on the
main LCD panel liquid crystal display panel.
2. Adjust the focus.
Turn the lens focusing ring “A” and adjust the focus to the subject. When the subject is in focus,
● focus mark lights on the viewfinder's LCD.
the
Page 18

Manual focusing using the focus mark.
LCD.
In focus
Turn the focusing ring clockwise.
Turn the focusing ring counterclockwise.
M645 lenses. This method can be used when the lens aperture is f/5.6 or larger.
mechanism, then take the picture. (See next
faces, etc.)
focus frame
33
34
(Focus confirmation method)
With this camera, a focus mark ● lights in the viewfinder's LCD when the picture is in
focus. With the shutter release button half-pressed, turn the lens focusing ring to focus
on the subject. When the subject is in focus, the
● focus mark lights in the viewfinder's
Subjects With Which Auto Focusing May Not Work
The auto focus function requires subject contrast. Auto focusing may not be possible
with the types of subjects described below. If this is the case, either switch to the
manual focus mode and focus manually or point the camera at an object the same
distance as the object you want to photograph, lock the focus using the focus lock
page)
➊ When differences between light
and shade are not clear (blue
skies, white walls and other objects with no contrast)
*Use this method when shooting in the manual focus mode and when using the
➌ Subjects with continuous re-
peated patterns (building exteriors, blinds, etc.)
➍ Brightly shining subjects like
the sun or light sources or
objects in which these are reflected (car bodies, water sur-
➎ When the object on which you want to focus is far smaller than the
Page 19

Using the Focus Lock Function
the focus before taking the picture.
to "S".
AF Supplemental Infrared Light
assists the camera's auto focus function.
that of the lens, focus before mounting the hood.
35
36
If the object on which you want to focus is not in the focus frame, the camera focuses
on the background at the middle. In such cases use the focus lock mechanism to lock
1. Set the focus mode selector lever
2. Change the composition.
With the shutter release button half-pressed,
move the camera to achieve the desired
composition, then release the shutter.
When the subject is dark or the contrast is low
and the camera is having trouble focusing automatically, a red lamp may light on the front of
the camera when the shutter release button is
half-pressed. This is a supplemental light that
*The AF supplemental infrared light is only emitted when the focus mode is set
to "S" (single focus mode).
*The AF supplemental infrared light's reach is limited. It does not reach distant
subjects.
Range: 9 meters (when using an 80mm f/2.8 lens)
*When using a bellows lens hood (sold separately) with a diameter larger than
Page 20

Camera Operation Test
This is a simple way to test the camera and autofocus without film.
"
P" Mode is the easiest. You
may use any mode but "T".
priority AE and the manual mode.
37
38
1. Set the shutter release mode se- 3. Open the back cover.
lector lever to "S" (to turn the 4. Set the autofocus modeselector
power on). lever to "S".
2. Remove the Dark Slide from the 5. Release the shutter.
magazine.
This camera offers you a selection of four exposure modes program AE (automatic exposure), aperture priority AE, shutter
Page 21

Program AE (P)
allowing the user freedom to concentrate on the subject.
exposure mode setting dial.
PH" to record moving subjects with a high shutter speed.
Turn the front or rear dial to shift the shutter speed
-1.0 EV low speed side "PL".
PL =Program Low / slower (low) shutter speeds
PH= Program High / faster (high) shutter speeds
portraits or landscapes.
exposure mode setting dial.
increments.
speed value stops flashing and remains lit.
39
40
The aperture and shutter speed are determined automatically for the optimum exposure,
according to the existing ambient light. This mode is best suited for general photography,
Aperture Priority AE
Set the desired aperture and the camera selects the optimum shutter speed
accordingly. Use the Av mode to maintain specific control over depth of field, i.e. taking
Turn the exposure mode setting dial and set it to
"P" (program AE).
*In the "X" exposure mode the lock function
is activated. Press the exposure mode dial
lock release button while turning the
Shifting the Program
Use "PL” to record subjects with depth using a smaller aperture (landscapes, etc.),
"
between the +1.0 EV high speed side "PH" and
*If the aperture flashes on the main LCD and in
the viewfinder display when the program is
shifted, the proper exposure cannot be
achieved. Please select a different Program
mode.
* When the Program mode is shifted, the
aperture changes along with the shutter speed
to maintain the proper exposure.
1. Turn the exposure mode setting dial and set it
to "Av" (aperture priority AE).
* In the "X" exposure mode the lock function
is activated. Press the exposure mode dial
lock release button while turning the
2. Turn the front or rear dial to set the desired
aperture.
The aperture value is adjusted in 1/2 stop
*The shutter speed value on the main LCD and in the viewfinder display will
flash when photographing objects that are too bright or too dark for proper
exposure. The proper exposure cannot be achieved at the present settings.
Change the aperture value by turning the front or rear dial until the shutter
Page 22

Shutter Priority AE
sporting events or deliberately blurring your subject.
exposure mode setting dial.
increments.
independent hand-held exposure meter.
increments.
41
42
Set the desired shutter speed and the camera selects the optimum aperture
accordingly. Use the Tv mode to maintain specific control over action, i.e. shooting
Manual Mode (M)
Use the manual mode "M" when you desire to have complete control over shutter speed
and aperture settings. This mode is also best utilized in combination with an
1. Turn the exposure mode setting dial and set it
to "Tv" (shutter priority AE).
*In the "X" exposure mode the lock function
is activated. Press the exposure mode dial
lock release button while turning the
2. Turn the front or rear dial to set the desired
shutter speed.
The shutter speed value is adjusted in 1/2 stop
*The aperture value on the main LCD and in the viewfinder display will flash
when photographing objects that are too bright or too dark for proper exposure.
The proper exposure cannot be achieved at the present settings. Change the
shutter speed value by turning the front or rear dial until the aperture value
stops flashing and remains lit.
1. Turn the exposure mode setting dial and set it
to "M" (manual mode).
*In the "X" exposure mode the lock function
is activated. Press the exposure mode dial
lock release button while turning the
exposure mode setting dial.
2. Turn the rear dial to set the desired aperture.
The aperture value is adjusted in 1/2 stop
increments.
3. Turn the front dial to set the desired shutter
speed.
The shutter speed value is adjusted in 1/2 stop
4. When the shutter release button is halfpressed, the difference between the manual
settings and the metered value is displayed in the
viewfinder's LCD panel. The value is displayed in
1/3 stop increments within a range of ± 6 EV.
*For example, "+2.3" indicates +21/3EV, "-5.7"
indicates -5 2/3 EV.
*If the manual settings and the metered value
are the same, nothing is displayed as a
difference in the viewfinder's LCD panel.
Page 23

*If the difference between the manual setting and the metered value is greater
X Mode (X)
cannot be rotated. (See pages 63-65.)
Time Mode (T)
exposure mode setting dial.
See page 47 for Film Advance modes.
43
44
than 6 EV, "-u-" (under) or "-o-" (over) flashes in the viewfinder's LCD panel.
*Exposure compensation cannot be used while in the manual mode.
*When the difference between the manual setting and the metered value is
displayed in the viewfinder's LCD panel while in the manual mode and the
exposure compensation dial is set to a position other than "0", the value
displayed is the difference between the manual setting and the metered value
plus the exposure compensation value. This has no effect on the exposure.
This mode fixes shutter speed at the sync speed
of 1/125 sec. In this position, the dials lock and
This is a mechanically controlled mode for long
exposures. It consumes no battery power. (See
pages 55-56.)
*In the "X" exposure mode the lock function
is activated. Press the exposure mode dial
lock release button while turning the
There are three exposure metering modes: "A" in which the
average light of the entire picture area is measured with
emphasis on the center, "S" in which the light in a spot at the
center of the picture area is measured, and "A-S" which
combines these two to automatically switch the mode according
to the extent of difference between the brightness of the light
metered in the two modes. The distribution ratio of the exposure
metering modes is set within an intermediate range.
See pages 45-46 for Exposure Metering modes.
Page 24

Average Exposure Metering Mode (A)
(Set the exposure metering mode selector lever to "A".)
sured, with emphasis on the center.
(Set the exposure metering mode selector lever to "S".)
(Set the exposure metering mode selector lever to "A-S".)
is achieved at an intermediate value.
ing filter is not compatible with the Mamiya 645 AF and its operations.
Exposure Compensation
used when you want to intentionally create overexposed or underexposed pictures.
taking photos with exposure compensation.
the viewfinder's LCD panel
45
46
The average light of the entire picture area is
mea
Spot Exposure Metering Mode (S)
The light in the circle at the center of the picture
area is measured to determine the exposure. This
mode is best suited for strongly backlit subjects,
or when you desire to measure a specific area.
When the spot you want to measure is not at the
center of the picture, use the AE lock function.
(See pages 57-58 AE Lock Mode.)
Average/Spot Auto Switching Exposure Metering Mode (A-S AUTO)
With the A-S metering mode, average or spot exposure metering is selected automatically and the
appropriate exposure is set accordingly.
The spot mode is selected automatically when the
brightness within the spot metering area is lower than
the brightness of the average metering area by about
1.5 EV or greater. The average mode is selected
when the spot exposure metering value is the same
or brighter than the average value. When the
difference between the spot value and average value
is between 0.75 and 1.5 EV, the appropriate exposure
In some situations, such as a great difference between the subject and background
brightness or overall subject tones that will not meter correctly because they are all
black or white, the resulting photograph may be under- or overexposed. When this
occurs, use the exposure compensation function. Exposure compensation can also be
Turn the exposure compensation dial while
pressing the exposure compensation dial lock
release button “A”
the viewfinder. The exposure can be adjusted
within a range of ±3 EV in 1/3 steps.
Be sure to set the exposure compensation dial
back to the "0" position once you are finished
located on the right side of
Display of the exposure compensation in
•lf a polarizing filter is necessary, use a circular polarizing filter. A linear polariz-
Page 25

Single-Frame Mode/Continuous Mode
Single-Frame Mode
The film is advanced one frame at a time each time the shutter release button is pressed.
S".
Photographs are taken continuously as long as the shutter release button is pressed.
Magazine LCD panel.
cannot use these modes simultaneously.
47
48
Continuous Mode
Set the shutter release mode selector lever to
"
Set the shutter release mode selector lever to
"C". Photographs are taken continuously at a
rate of about 1.2 frames per second.
If you reach the end of the film when shooting in
the continuous mode, "End" flashes on the
The mode setting button can be used to set three modes: the
auto bracketing mode, the multiple exposure mode and the self
timer mode.
NOTE: Each of these modes can be used independently. You
Page 26

Auto Bracketing Mode
lly (overexposure, standard and underexposure).
the auto bracketing mode.
normal exposure and underexposure.
taken.
settings aside from the selected mode are reset to the default values.
Automatic exposure operation in the auto bracketing mode
fix the camera in place, for example by using a tripod.
49
50
In situations which are difficult to confidently meter for exposure, use the Auto Bracketing
function. In this mode, three frames are taken successively with different exposures set
automatica
1. Turn the mode setting dial and select "P",
"Av" or "Tv".
2. Press the mode setting button “A” once to set
3. Turn the front or rear dial to set the exposure
compensation steps.
When the dial is turned, the exposure
compensation step switches between 1/3, 1/2,
2/3 and 1 (displayed 0.3, 0.5, 0.7 and 1.0). The
setting is registered after 5 seconds or when the
shutter release button is pressed.
4. Press the shutter release button once. Three
photos are taken successively.
All exposures in the Auto Bracketing mode are
made in the following order: overexposure,
*In the auto bracketing mode, three photos are taken in succession. Be sure to
*The auto bracketing mode is automatically canceled once the three photos are
*When the shutter release mode selector lever is set to "L" (power off), all the
Page 27

Multiple Exposure Mode
With the multiple exposure mode, the same frame of film can be exposed multiple times.
ter the multiple exposure mode.
pressed.
times, after which the film is advanced.
exposures have been taken.
Canceling the Multiple Exposure Mode
manual film advance button “B”
51
52
1. Press the mode setting button ”A” twice to en-
2. Turn the front or rear dial to set the number of
additional exposures.
The number of additional exposures can be set
between 1 and 5. The setting is registered after 5
seconds or when the shutter release button is
*For example, when the number of
additional exposures is set to "2", the
same frame of film will be exposed three
3. Press the shutter release button. The current
frame is exposed multiple times.
The multiple exposure mode is canceled
automatically once the set number of additional
*The multiple exposure mode mark is displayed on the main LCD panel during the
multiple exposure mode.
*The same frame is exposed multiple times, so exposure compensation may be
required .
*To check the number of additional exposures remaining during the multiple ex-
posure mode, press the mode setting button “A” once. The remaining number of
additional exposures is displayed on the external liquid crystal display panel.
*If you wish to make more than 5 additional exposures, the number of additional
exposures can be incremented during the multiple exposure mode by pressing the
mode setting button “A”
*When the shutter release mode is set to "C" (continuous advance mode), once the
set number of additional exposures have been taken, the camera is reset to the
normal shooting mode.
*To cancel the multiple exposure mode, press the mode setting button “A”
The multiple exposure mode is canceled and the camera is reset to the normal
shooting mode.
*When the shutter release mode selector lever is set to "L" (power off), all the
settings aside from the selected mode are reset to the default values.
and turning the front or rear dial.
twice.
To cancel the multiple exposure mode before all
the additional exposures have been taken, with
the dark slide removed, half-press the shutter release button while pressing the roll film holder's
.
Page 28

Self Timer Mode
this function to take group photos or to photograph yourself.
to set the self timer mode.
53
54
With this function, under the default setting the shutter is released 10 seconds after the
shutter release button is pressed. The self timer lamp flashes slowly for the first 7 seconds, then flashes quickly for the last 3 seconds before the shutter is released. Use
1. Fix the camera to a tripod.
2. Press the mode setting button “A” three times
3. The number of seconds before the shutter is
released can be changed by turning the front or
rear dial. The number of seconds can be set between 3 and 60, in steps of 1 second from 3 to 10
seconds, in steps of 10 seconds from 10 to 60.
The setting is registered after 5 seconds or when
the shutter release button is pressed.
4. Looking through the viewfinder, determine the
composition, check that the focus is set properly,
then press the shutter release button. The shutter
is released after the set number of seconds.
* To cancel the self timer mode after pressing the shutter release button, either
press the mode setting button “A” or turn the exposure mode setting dial. Changing the exposure mode does not change the set self timer operating time.
*If there is a bright light source behind the camera or if the shutter release button is
pressed without looking through the viewfinder, light enters the viewfinder's
eyepiece, affecting exposure metering. Turn the eyepiece shutter open/close dial
to close the eyepiece shutter.
*When the shutter release mode is set to "C" (continuous advance mode), the self
timer mode can be used to take photos at intervals of 3 to 60 seconds while the
shutter release button is pressed.
*To cancel the self timer mode, press the mode setting button “A”
timer mode is canceled and the camera is reset to the normal shooting mode.
*When the shutter release mode selector lever is set to "L" (power off), all the
settings aside from the selected mode are reset to the default values.
once. The self
Page 29

Extended Exposure Modes
(Bulb and Time Modes)
during the entire exposure.
shutter release button is pressed.
sures. The batteries are not used to keep the shutter open during the exposure.
release button. The shutter opens.
to "X". The time exposure mode is canceled and the shutter closes.
55
56
To expose the film for extended times (over 30 seconds), set the shutter speed to bulb
or set the exposure mode setting dial to "T" (Time Mode).
Bulb Mode
The bulb mode uses electronic control, so the batteries are in constant use
1. Turn the exposure mode setting dial and set it
to “M" (manual mode).
2. Turn the front dial counterclockwise to select
"bulb", then turn the rear dial to set the aperture.
3. Determine the composition, focus, then take the
picture. The shutter remains open as long as the
Time Mode
The time mode uses mechanical control, so it is best suited for extended expo-
1. Turn the exposure mode setting dial and set it
to "T" (time mode).
2. Turn the front or rear dial to set the aperture.
3. Press the shutter release button. Determine
the composition, focus, then press the shutter
*To prevent the camera from moving, use both
an electromagnetic cable release (sold
separately) and a tripod.
*When the BL (Backlight) button ”A” is
pressed, the main LCD panel and the magazine LCD panel light for about 10 seconds.
This makes the liquid crystal display panels
easier to view in dark places, for example
when photographing night views.
*In the "X" exposure mode the lock function is
activated. To set a different mode, press the
exposure mode dial lock release button “B”
while turning the exposure mode setting dial.
4. Once you have achieved the desired exposure, turn the exposure mode setting dial
Page 30

AE Lock Mode
without changing the exposure.
after the AEL button “C” was pressed.
-u-" (under) or "-o-" (over) flashes on the viewfinder's liquid crystal display
the viewfinder's LCD panel.
57
58
When the AEL button “C” is pressed, the exposure is locked to the value metered at that
time. Use this when the object you want to use for exposure metering and the object on
which you want to focus are different or when you want to take continuous photographs
1. Set the shutter release mode selector lever to “S”.
2. Turn the exposure mode setting dial and select "P", "Av" or "Tv".
3. Focus on the object you want to use for expo-
sure metering, then with the shutter release button
half-pressed Press the AEL button “C”
rear of the grip. [ ] appears on the viewfinder's
liquid crystal display panel, indicating that the
exposure is locked.
4. With the shutter release button still halfpressed, aim the camera to achieve the desired
composition, then release the shutter.
*When the shutter release mode is set to "S"
(single-frame advance mode), the AE lock
mode is canceled when the shutter release
button is pressed. If you wish to take a
series of photos using the AE lock function,
switch the shutter release mode to "C"
(continuous advance mode).
*To cancel the AE lock mode before taking a
photo, press the AEL button “C”
*The focus is locked in "S" mode when the
shutter release button is half-pressed.
*When the AEL button “C”
difference between the metered exposure
and exposure with the new composition is
displayed in the viewfinder's LCD panel.
*The AE lock mode is canceled 5 seconds
is pressed in, the
once on the
again.
*If the difference between the set value and the metered value exceeds 6EV,
"
NOTE:
After setting the AE lock mode, the front or rear dial can be used to change the
aperture and shutter speed without changing the exposure set with the AE lock
function.
When the exposure mode is set to "P" (program AE), turning one of the dials shifts
the program between PH and PL. When the exposure mode is set to "Av"
(aperture priority AE) or "Tv" (shutter priority AE), turning one of the dials changes
the shutter speed or aperture changes, respectively.
Use of the exposure compensation dial during AE lock will change the shutter
speed in Av Mode and the aperture in Tv Mode. In the "P" Modes, exposure
compensation during AE lock will affect aperture and/or shutter speed, dependant
upon the conditions and the program shift mode selected. In all three situations,
the exposure compensation will be displayed to the left of the exposure settings in
How to meter and focus at two different distances
1. First point the camera at the object you want to use for exposure metering, half-press
the shutter release button, then press and hold in the AEL button “C”.
2. Point the camera to achieve the desired composition, half-press the shutter release
button again to refocus, then release the shutter.
Page 31

Taking Photos with the Mirror Up
Using auto focus and auto exposure
maintain the half-pressed status.
stops to raise the mirror.
photo.
*The lens cannot be removed when the mirror is up.
In the manual mode
then turn the lens focusing ring to focus.
shutter release button to take the photo.
and return the mirror to the down position directly after the exposure.
59
60
Use this when you want to avoid even the slightest shocks, for example when taking
photos with a slow shutter speed using a tripod, with a telescopic lens, for close-ups,
reproductions, etc.
Neither the auto focus mechanism nor the exposure metering mechanism function when
the mirror is raised. Set the focus and exposure compensation before raising the mirror.
To prevent the camera from moving, use both an electromagnetic cable release (sold
separately) and a tripod. Instructions for use of electromagnetic cable release on page 80.
1. Turn the focus mode selector lever and set it to
“S”.
2. Turn the exposure mode setting dial and set it
to "P", "Av" or "Tv".
Look through the viewfinder, determine the focus,
composition and exposure, then half-press the
shutter release button. (Use the electromagnetic
cable release (sold separately) or cable release to
3. Press the AEL button.
When the AEL button is pressed, the AE lock mark
[ ] appears in the viewfinder's LCD panel. Turn
the body's mirror up lever towards "M.UP" until it
*After taking a photograph with the mirror up, when the shutter release button is
pressed “-no-RE" flashes on the main LCD panel and the shutter is locked.
*To cancel the AE lock mode, press the AEL button again.
*Leaving the mirror up for long periods of time can result in film fogging. After
taking a photograph with the mirror up, be sure to set the mirror up lever back
to its original position.
*As a safety precaution, the mirror up lever does not work when no lens is
mounted on the body.
1. Turn the focus mode selector lever, select "M",
2. Set the exposure mode setting dial to "M", then
use the front and rear dials to set the measured
shutter speed and aperture.
3. Turn the body's mirror up lever towards "M.UP"
until it stops to raise the mirror, then press the
4. Press the shutter release button to take the
•If the lens is pointed at the sun with the mirror turned up and left like this, the
sunlight entering from the lens may focus on the shutter blades and damage
them. In this situtation, put the mirror up right before the moment of exposure
Page 32

Depth of field
Depth of field (D.O.F) is defined as the zone of sharpness before and behind the plane of
the lens. (see illustration below)
Infrared Photography
ring clockwise and set the distance scale to the above infrared index.
*Be sure to read the infrared film's usage instructions.
61
62
focus. It depends on camera subject/distance, focal length of lens, aperture setting and
distance the lens is focused at.
In addition to visual observation via the depth of field preview button (See page 66.), the
D.O.F can be determined by using the depth of field scale on each lens. f/stop numbers
appear on both the right and left side of the white index mark in the center of the scale.
Simply read the figures which appear above the f/stop numbers on the distance scale of
When the aperture is large
(the subject depth is small)
When the aperture is small
(the subject depth is large)
When taking photos using infrared film, the position at which the subject is in focus is
slightly different from during normal photography. This is because the infrared rays
have a longer wavelength and the image converges further back than normal. Use the
procedure described below when taking photos using infrared film.
1. Set the focus as usual. Find the point on the distance scale matching the subject
depth scale's central index.
2. Set the focus mode selector lever to "M" (manual focus mode). Turn the focusing
*Use a red filter when taking photos using infrared film.
Page 33

Flash Photography
may be necessary.
or extension tubes. However as
and is performed on the Mamiya 645 AF's Film Magazine ISO setting.
flash meter to check the intensity of the flash or to use a manual flash setting.
For flash photography with a narrow latitude film
Metz Flash SCA3951 System Functions
In general, set the exposure compensation to about 1 or 1 1/3 EV on the minus side.
63
64
In addition to its standard flash sync system, the Mamiya 645 AF features TTL (through the
lens), off the film (OTF), electronic flash exposure automation. A flash sensor located inside
the camera body reads the flash reflected off the film surface at the moment of exposure.
The sensor is connected via the Mamiya 645 AF's dedicated hot-shoe to a shoe- or
handle-mount style Metz flash unit via the Metz SCA 3951 TTL Adapter. Maximum flash
sync speed is 1/125 sec., making daytime syncronization possible.
The ISO of the flash is automatically set through the TTL connection from the camera's Film
Magazine; any adjustment to this is instantly recognized after the setting is locked and the
shutter release is half-pressed. Also, when Film Magazines with different ISO settings are
switched on the camera body, the TTL flash connection instantly recognizes the change.
To utilize the TTL flash feature with all TTL-operable Metz flash units, a Metz SCA 3951
Module is required. Please see chart below for compatibility and/or additional adapters that
The resulting flash exposure
automation determines correct
flash exposure andautomatically adjusts the output of the
flash. It also automatically corrects for exposure compensation normally required when
using filters, close-up bellows
with all TTL systems, it requires manual compensation for differences in film surface
reflection characteristics. The amount of compensation is determined by experimentation
1. Mount the SCA3951 adapter onto the Metz
flash, insert fully into the camera's hot shoe, then
tighten with the fixing knob “A”
2. Set the exposure mode, then check the shutter
speed and aperture.
*With TTL flash photography, the reflection of the flash is metered and the intensity of
the flash is adjusted automatically, so TTL flash photography is not necessarily
suited to all conditions. In the cases described below, we recommend that you use a
For example:
(1) When the size of the subject you want to light with the flash is relatively small within
the picture
(2) When the background behind the subject is extremely bright or when there is a
strongly reflective object in the background
(3) When the background behind the subject is extremely dark (outdoors at night, etc.)
(4)
*The shutter cannot be released if the flash's OK lamp is lit.
*When using an SCA300 system flash (Metz 60CT-4,45CL-4, etc.), also use the
SCA3000C converter (sold separately).
*For details, refer to the operating instructions of the flash and the adapter.
*To use the guide number indicated on the flash fully, emit the flash several seconds
after the charging completed indicator lights.
*Cautions on using instant film
Instant film (Polaroid 100-600 series and Fuji FP series), has a lower reflection rate
than regular film. Exposure compensation is necessary when using the flash in the
TTL mode.
Page 34

Flash Photography with Flashes other than Metz
Flashes
exclusively for other camera makes.)
synchro terminal's contacts.
less for MF grade flash bulbs, 1/15 sec. or less for M grade flash bulbs.
shutter speed to 1/30 sec. or less.
Depth of Field Preview/Eyepiece Shutter
Depth of Field Preview Button
camera can be checked by looking through the viewfinder.
and the focus is locked.
Eyepiece Shutter
error due to light entering from the viewfinder.)
direction of the arrow.
65
66
1. Mount the flash onto a flash bracket or if it is
a handle-mount style flash attach to the bottom
of the camera.
Do not attach a dedicated flash unit to the
camera's hot shoe that is not designed
specifically for the Mamiya 645AF. To use this
type of flash, use a flash bracket or other
means, and connect the synchro cord to the
camera's synchro terminal.
(See note below about flashes designed
*Remove the rubber cover when connecting the synchro cord.
After shooting, be sure to attach the rubber cover in order to protect the
When the preview button is pressed in, the depth of field for the aperture set on the
After focusing, press in the preview
button.
When using auto focus, the aperture is set to the
displayed aperture while the button is pressed
2. Turn the exposure mode setting dial and set it to "X" (1/125 sec.) or "M" (manual).
When "M" (manual) is selected, turn the front dial and set the shutter speed to 1/125
sec. or less.
3. Turn the rear dial to set the aperture, then take the picture.
*This camera's synchro contact is an X contact.
*When using MF or M grade flash bulbs, set the shutter speed to 1/30 sec. or
WARNING
Using flashes designed exclusively for other makes of cameras may
•
damage the camera's internal mechanisms if connected to the
camera's hotshoe. In this situation, use an off-camera flash bracket
and connect a PC cord to the camera's synchro terminal.
*When using flashes with a flash duration of 1/500 sec. or longer, set the
Use this when there is a strong light source behind the camera or when pressing the
shutter release button without looking through the viewfinder. (This prevents exposure
Turn the eyepiece shutter lever in the
Page 35

Changing The Focusing Screen
zers to let be Focusing Screen down.
is very delicate.
Using the M645 Manual Focus Lenses
brighter.
67
68
1. Remove the lens.
2. Slide the Focusing Screen Release lever “A”
forward, as illustrated, to the left with the twee-
3. Remove the Focusing Screen from the Focusing
Screen Frame by grasping the tab on the edge of
the screen with tweezers as illustrated.
4. In case of attaching, insert your desired
Focusing Screen to the Focusing Screen Frame
properly and then raise the frame until it clicks.
When using the M645 manual focus lenses, mount the exclusive viewfinder screen
#314474 (sold separately) and set the focus mode to "M" (manual) to enable shooting
with stop down metering.
1. Mount the M645 lens to the body, set the focus, then set the lens' A/M lever to "M".
Focus confirmation is given in the viewfinder's LCD panel.
2. Select the exposure mode and set the desired lens aperture. (See chart below).
3. Half-press the shutter release button. The shutter speed is displayed.
*With the M645 lens, adjust the exposure by using stop down metering in the
Av exposure mode. The proper exposure cannot be achieved in the "P"
(program AE) or "Tv" (shutter priority AE) exposure mode.
*When the M645 lens is mounted, the exposure metering mode is automatically
set to "S" (spot exposure metering).
*Focusing using the focus mark is possible when the lens brightness is F5.6 or
Caution
*Since the Focusing Screens' surfaces are soft and easily damaged, handle them
carefully.
*Never touch the surface with bare fingers. Should dust settle on it, merely blow
away by using a blower.
*If the Focusing Screen needs cleaning, send it to the nearest authorized Mamiya
service center. Do not attempt to clean the surface of the Focusing Screen, as it
Page 36

External Power Supply
When using an external battery case for cold weather operation (sold seperately),
connect it to the external power socket.
tery case lever again.
battery case to the external power socket.
case, but remove them for the safety of the camera's body.
69
70
1. Set the shutter mode selector lever to "L".
2. Remove the cap.
Use a coin, etc., to remove the external power
socket's cap.
3. Remove the batteries from the camera's battery case.
Turn the battery case detach lever, remove the
battery case, remove the batteries, then re-insert
the battery case into the body and lock the bat-
4. Connect the power cord from the external
*Be sure to attach the battery case to the body.
*The camera will operate even if the batteries are not removed from the battery
Page 37

Electronic Dial Operations
Front/Rear Dial Lock Mechanisms
(select "dLoc°")
or rear dials. This prevents accidental adjustment of shutter speed or aperture values.
" (to turn the power on).
"dLoc".
warning.
71
72
When the Electronic Dial Lock is "On", all currently set values in "Av" (Aperture Priority
AE), "TV” (Shutter Priority AE) and "M" (Manual mode) cannot be adjusted with the front
1. Set the shutter release mode selector lever to
"S
3. Turn the front or rear dial and select
to register the setting. When the dial lock is
turned on, "L" is displayed on the external
liquid crystal display panel.
*When a dial is turned while the electronic
dial lock is on, L flashes for 3 seconds as a
Page 38

Superimposing Data (the data is superimposed on the
film outside of the image area)
the image area. When selected, the superimposing mode is displayed on the main LCD.
Setting the Date and Time
S" (to turn the power on).
1" appears on the main LCD panel.
value.
register the setting.
power supply, and adjust as necessary.
Setting the Index Number
main LCD panel.
value.
counterclockwise
selector lever is set to "L' (turning the power off).
73
74
This function allows you to superimpose exposure or date information on the film outside
1. Set the shutter release mode selector lever to
"
2. Press the “F2” Key for about 2 seconds. "SEt
3. Press the “F2” Key again, then use the front and rear dials to set the date and time.
When the front dial is turned clockwise, the position switches between the month, day,
year, hours and minutes (the selected position flashes). Turn the rear dial to set the
1. Set the shutter release mode selector lever to "S"
(to turn the power on).
2. Press the “F2” Key for about 2 seconds, then
turn the front or rear dial to display "SEt 2" on the
3. Press the “F2” Key again, then use the front and rear dials to set the desired index
number (3 digits).
When the front dial is turned clockwise, the position switches between the first digit,
second digit and third digit (the selected position flashes). Turn the rear dial to set the
When the front dial is turned
clockwise
When the front dial is turned
4. After setting the date and time, press the “SET” Button for about 2 seconds to
*Check the date and time after replacing the batteries or using an external
4. After setting the index number, press the “SET” Button for about 2 seconds to
register the setting.
*The index number is displayed as a 3-digit number. Data on the number of
photos taken is stored in the camera, so the numbers of the photos continue to
increment when the magazine is removed and replaced with a different magazine.
This function is convenient for managing large amounts of film.
*The starting index number can be set at will. For example, when shooting in
different places or for different purposes, you can classify the photos by
changing the starting number any of the digits.
*Once the total number of photos taken reaches 999, counting starts over from
001. 000 can also be set using the index number setting procedure.
*After 60 seconds or when another priority button is pressed, the index number
setting mode is canceled and the setting is not registered in memory.
* Custom settings remain in the memory even when the shutter release mode
Page 39

Selecting the Data to be Superimposed (select "Func")
not desire to superimpose any information, this function may also be switched off.
press the “F1” Key again.
clockwise.
Data superimpose modes
number are superimposed.
superimposed.
The data superimpose function is turned off.
and the desired data superimpose mode is displayed on the main LCD panel.
Date (year, month and day) -Time - Index number
button is half-pressed or when another priority button is pressed.
This illustration is for explanatory purposes. The actual display may differ.
75
76
There are two data modes which will superimpose information onto the film. If you do
4. Display the desired data superimpose mode on the external liquid crystal display
panel, then press the “SET” Button for about 2 seconds. The setting is registered
1. Set the shutter release mode selector lever to
"S" (to turn the power on).
2. Press the “F1” Key for about 2 seconds to
display "Func" on the main LCD panel, then
3. Use the front and rear dials to select the data to be superimposed (DATA or DAY).
The mode of data to be superimposed changes when the front or rear dial is turned
DATA:
The exposure mode, aperture, shutter speed, exposure
compensation value, exposure metering mode and index
Checking the data to be superimposed
The data to be superimposed switches in the following order each time the “SET”
Button is pressed:
*The display on the main LCD panel returns to normal when the shutter release
DAY:
The date (year, month and day), time and index number are
OFF:
Page 40

Changing the Viewfinder Display in the Manual Mode"M"
(select 'Fd")
otherwise distracting.
display panel.
Turn the front or rear dial to select "OF'.
the “SET” Button for 2 seconds.
Error Messages
release mode.
AE), "Av" (aperture priority AE) or "Tv" (shutter priority AE).
auto bracketing mode is canceled.
camera cannot operate. Please replace batteries with a fresh set.
your nearest Mamiya agent or service center.
77
78
When the exposure mode setting dial is set to "M", it is possible to display only the
focus marks and flash charge mark in the viewfinder's LCD panel. This is useful when
exposure settings will not change, and this information in the viewfinder could be
1. Set the shutter release mode selector lever to
"S" (to turn the power on).
2. Press the “F1”
display "Func" on the external liquid crystal
3. Turn the front or rear dial to select "Fd".
4. Press the “F1” Key again to display
"OF" or "On" (flashing).
Key for about 2 seconds to
This is displayed for 3 seconds when the end of the film is
reached while shooting in the "C" (continuous advance) shutter
This is displayed when the shutter release button is pressed while
the mirror is up when the exposure mode is set to "P" (program
This is displayed when auto bracketing does not function, as follows:
• When the shutter release button is pressed while the exposure mode
is set to "M", "X" or "T", this is displayed, the shutter is not released
and the auto bracketing mode is canceled.
• When the shutter release button is pressed while shooting with the
exposure mode set to "Av", "Tv" or "P" and there are fewer than three
frames of film left, this is displayed, the shutter is not released and the
If the magazine is removed while the multiple exposure mode is
set, this is displayed and the multiple exposure mode is
canceled after the magazine is replaced on the camera.
This is displayed when the batteries are discharged and the
These are displayed when a problem is detected during
shooting.
If the error display is not canceled when the shutter release
button is pressed again, insert the Dark slide, half-press the
shutter release button while pressing the roll film holder's
manual film advance button to wind up the film, then contact
Returning to the normal display
*Repeat steps 1 to 4 about, turn the front or rear dial to select "On", then press
Page 41

If the shutter cannot be released
of over 1 second, the shutter closes and the long exposure mode is canceled.
Strap/Using a Tripod/Auxiliary Release Contact
Strap
fastened to the strap mount.
Using a Tripod
tripod screw adapter bushing “B”.
Auxiliary Release Contact
#804822.................5m (15')
79
80
●The shutter cannot be released when the batteries are discharged or no batteries
are loaded.
●The shutter cannot be released while the film is being advanced.
●The shutter cannot be released while the flash is charging (while the flash mark is
flashing) when the shutter release mode is set to "C" (continuous shooting) with a
Metz flash mounted with the SCA 3951 adapter. The shutter can be released
once flash charging is completed.
●The shutter cannot be released when the magazine is not mounted.
●The shutter cannot be released while the ISO sensitivity is being set after mounting
the magazine.
●The shutter cannot be released when the magazine is mounted and the dark slide is
inserted.
●The shutter cannot be released when the magazine is mounted and the rear lid is
closed with the film wound up.
●When the mode setting button is pressed while the self timer is operating, the
self timer is canceled and the shutter will not be released.
●When the exposure mode setting dial is turned while the self timer is operating, the
self timer is canceled and the shutter will not be released.
●When the shutter release mode selector lever is operated while the self timer
is operating, the self timer is
canceled and the shutter will not be released.
●When the focus mode selector lever is operated while the self timer is operating,
the self timer is canceled and the shutter will not be released.
●When the exposure mode selector lever is operated while the self timer is
operating, the self timer is canceled and the shutter will not be released.
●The shutter cannot be released when one of the error messages is displayed.
●When the shutter release mode selector lever is set to "L" during long exposures
Put the neck strap through the camera's strap
mount as shown on the diagram and tighten it.
For safety, check that the strap is securely
When using a tripod with 3/8 inch screw thread
(instead of 1/4 inch screw thread) remove the
small screw “A”
the bottom of the body using a Phillips
screwdriver, then use a coin to remove the
from the tripod screw hole on
This is the Port for connecting a Mamiya
electromagnetic cable release (sold separately)
when taking photos with the mirror up, with long
exposures or with slow shutter speeds.
#804821 ...............1m (3')
Page 42

Specifications of 645AF
: 1,730g(w/o battery)
81
82
Camera Type : 6x4.5cm format, electronically controlled focal-plane shutter, TTL
multiple mode AE, AF single lens reflex
Actual Image Size : 56x41.5 mm
Film Type : 120 roll film (16 exposures);
220 roll film (32 exposures); Polaroid Land Pack Film (requires
special HP402 magazine)
Lens Mount : Mamiya 645 AF Mount, compatible with M645 Mount (manual
focus confirmation, focus aid, stopped-down exposure
metering)
Viewfinder : Fixed prism viewfinder magnification x0.71; built-in diopter
adjustment
(-2.5 to +0.5, separate diopter correction lenses provide
adjustment ranges of -5 to -2 diopter and 0 to +3 diopter);
built-in eye-piece shutter
Focusing Screen : Interchangeable between Matte (standard) and Checker and
Microprism Type C for Non-AF M645 lenses.
Field of View : 94%* of actual image
Viewfinder Information : Focus mark, out-of-focus direction mark, aperture value,
shutter speed, metering mode (A, S, A/S), exposure compen sation value (difference between set value and actual value)
and flash ready / OK lamp with TTL Metz connection.
AF sub-beam : activates automatically under low light, low contrast.
Range: 9m, Automatic switching to flash unit's built-in sub beam when Metz flash unit is attached.
AF Lock : Half-press on shutter release in S Mode
Exposure Control Modes: Aperture-priority AE, shutter-priority AE, programmed AE (PH,
PL setting possible)
Metering method : Center-weighted average (AV), spot (S) and variable ratio
(1 .5-step A-S auto change by program shift setting), manual
Setting Steps : Shutter speed and aperture both can be set in half-stop
increments; electronic dial lock
Light Metering : TTL metering; center-weighted average (AV), spot (SP), and
auto A-S variable ratio
Metering Range : EV 2 to EV 19 (with IS0 100 film, f/2.8 lens)
Exposure compensation : ±3 EV (1/3 step)
Film speed : ISO 25 to 6400
AE lock : With AEL button; released by pressing twice or shutter
operation; light metering value differentiation in viewfinder
exposure compensation display when ELS button is held
down; ±6EV (1/3 step)
Specifications and features are subject to change without notice.
* This information is based on a linear (horizontal/vertical) measurement.
Shutter : Electronically controlled vertical metal focal-plane shutter.
(vertical travel)
Shutter speed : AE 30 to 1/4000 sec. (1/8 step), manual 30 to 1/4000 sec.
(1/2 step), X, B (Bulb, electronically controlled), T (time,
mechanically controlled), emergency shutter curtain open
mechanism (open when magazine is removed, automatically
closed when magazine is attached)
Auto-Bracketing : Enabled with Mode button, 1/3, 1/2, 2/3, 1-step units
Flash Synchronization : 1/125 sec., automatically sets to 1/125 at faster speeds,
synchronized to displayed speed at slower speeds (when
Metz flash unit is used)
Flash control : TTL direct metering, supports Metz SCA3000 system
(SCA3951 Adapter)
Film transport : Automatic via built-in motor, single or continuous exposures
Film loading : Automatic advance to first frame when shutter release button
is pressed once (Easy Loading)
Multiple Exposure : Enabled with Mode button (1 to 5 exposures); can be
cancelled
Main LCD panel : On camera body; shows aperture value, shutter speed value,
self-timer, BL (Backlight), battery check, multiple exposure,
programmed AE or programmed AE shift value, data
imprinting Interchangeable Film Magazine: ISO speed, type
of film (120/220), exposure number
Data Imprinting : 7 segment dot matrix; DATA mode: exposure mode, aperture
value, shutter speed value, exposure compensation,
metering mode, ID number; DAY mode; year, month, date,
time, ID number Switchable between enabled and disabled
Sync terminal : X contact (sync speed 1/125 sec.)
Cable release socket : On shutter button
Remote-control terminal: On side of body; electromagnetic cable release
Self-Timer : 3 to 60 sec. (standard: 10 sec., can be set in 1 sec. steps
between 3 and 10 sec., and in 10 sec. steps between 10 and
60 sec.)
Depth-of-field confirmation : Preview Button on body
Tripod Socket : U 1/4 inch and U 3/8 included
Power Requirements : 6 AA-size batteries
Size : 153(W)X128(H)X184(D)mm
Weiqht
(alkaline-magnesium, lithium)
Page 43

Common Sense Camera Care and Practice
83
84
The Mamiya 645 AF is a precision optical/mechanical instrument, built for heavy professional use and a long service life, if properly treated and maintained. Please observe
these basic caveats:
• Read instructions before using camera.
• Protect camera against shocks and falls. Use the neck strap supplied with it, whenever
possible.
• Check the battery frequently and always carry spares. The sealed battery supplied
with the camera may have been subject to storage conditions which have reduced its
service life.
• Be sure to wipe battery contacts before installation and watch correct polarity.
• Battery life differs, depending on frequency of use, type, age, storage condition, ambi ent temperature (use External Battery Case in very cold weather), etc.
• Always remove the battery (and film) when camera is not used for a period of time.
• Always keep covers on lenses and camera body.
• Do not store the camera at temperatures exceeding 40°C (105°F) and -10°C (15°F).
Also avoid humid or sea air environment.
• Prolonged disuse shortens camera life. Periodically exercise the shutter (at different
speeds, lens diaphragms and focusing mounts.
• Protect camera against rain and moisture.
• Do not touch lens surfaces. Use blower or lens tissue to remove dust particles.
• Always test your equipment before going on important assignments.
The Importance of Proper Maintenance
Your camera has mechanisms like film transport, shutter and diaphragm blades etc. They
are controlled by gears, levers, springs, and so on. All require special lubrication from time
to time. Ambient conditions can also affect these mechanisms, as well as the electronic
components and the optical glass of your lenses. We therefore suggest that you have your
camera and lenses checked, and if necessary serviced, periodically.
Batteries Care
1. The sealed, new battery which is supplied with this camera may have been subject to
storage conditions which have reduced its service life. Therefore it is desirable to replace
it with a fresh battery as soon as possible.
2. Carefully wipe the battery contacts before inserting into the chamber. Failure to do so
may result in poor electrical contact and consequent malfunctioning of the camera.
3. Always remove battery when camera is not used for a while. Always carry spare
batteries.
4. Battery life differs, depending on type, age, storage condition, ambient temperature,
frequency of use etc.
5. Be sure to match the poles of the battery with those shown in the diagram in the
chamber.
6. Always keep batteries out of the reach of children and never throw used batteries into
a fire or expose to excessive heat.
7. When going on trips be sure to carry spare batteries to ensure that the camera will
function. Also, as batteries tend to temporarily malfunction at temperatures below
freezing, when photographing in extremely cold climates, carry the External Battery Case.
8. When you carry spare batteries, leave them in the original factory packaging. If they are
"unpackaged", be sure to wrap them carefully in order to prevent them touching each
other or any metal objects which can cause them to short circuit and become useless.
Page 44

After-Sale Servicing
Specifications and appearance are subject to change without notice.
Liquid Crystal Display
abbreviated.
86
85
*Be sure to read the terms and conditions in the warranty card.
1. For inquiries, opinions or questions concerning the product, please contact your
nearest Mamiya agent or service center.
2. Servicing after the expiration of the period specified in the warranty card (one year after
the date of purchase) will be charged to the user. The freight and transport costs should
always be paid by the user.
3. The servicing parts for use in repair of the product will be retained at the factory for ten
years from the date of discontinuation of production.
O The servicing is available for the same period as the servicing part retention period. As
the product may be serviceable even after this period, please consult your dealer or
nearest Mamiya service center for the serviceability.
*Servicing of malfunction or damage due to dropping, impact, fire, flood, etc.
1) The degree of such a malfunction or damage will be judged by the Mamiya service
department.
2) Such a malfunction or damage will be classified either non-serviceable or serviceable.
When the product is classified to be serviceable, it will be repaired at the expense of the
user, even if the malfunction or damage occurred within the warranty period.
All displays on the liquid crystal display consist of "8" and the number of
places is limited. For this reason, some letters and words are
 Loading...