

Page 1
Page 2

Congratulations on your purchase of the New Mamiya 6, 6 x
1
range/viewfinder camera for
120/220
film, featuring interchangeable
6cm
lenses and automatic exposure control in a compact, lightweight body,
which handles as easily as a 35mm camera.
mount allows the lens to be partially recessed in the camera body
Its
innovative retractable lens
-
a unique feature which further adds to the camera’s compactness.
Three interchangeable lenses, a 75mm standard, a 50mm wide-angle
and a
150mm
telephoto, make the New Mamiya 6 a system camera that
serves many needs.
The New Mamiya 6 is built with traditional precision workmanship and
optical perfection. It is a product of Mamiya Camera Co., Ltd., Tokyo,
Japan, a pioneer in medium format cameras for over half a century.
While the New Mamiya 6 has undergone extensive quality control
checks, it is extremely important that this manual be read carefully before
attempting to use the camera. A thorough understanding of just how and
why your new camera works eliminates mishandling and ensures a long
service life.
Page 3

Special Features of the New Mamiya
Nomenclature and
Preparatory steps
Mounting/Removingg
Retract
How to
Inserting
Opening/Closingg
Releasing
BeforeLoading
Loading
Shutter
Shutter
LEDIndicators
Focusing
TakingPhotographs
AE (Automatic
AELock
Batteries
the
Speed
Release
theLens
(AEL)
FunctionalPartss
...............................................
for
use
............................................
Lenses
......................................
the
theeShutter......................................................
the
Film
..................................................................
in
Exposure)
Photography
Mount
Lens
............................................................
Light Shield
Film
..............................................................
Button
the Viewfinder
............................................................
.........................................................
Curtain
..................................................
....................................................
.....................................
Photography
...........................................
.........................
6
...............................
.............................
..........................
3
5
9
1 0
1 1
11
13
1 4
15
1 6
18
1 9
19
21
22
23
23
Photography
Manual
Self-Timer
Depth-of-Fieldd
Exposure
Time
Flash
Infrared
Emergency Winding-Stop
Howw
Lenses
Depth-of-Field
Accessories
Specifications
Trouble
Camera
Camera
Compensation
Exposures
Photography
Photography
Hold
to
..............................................................................
Shooting
Care
Storage
........................................................
.........................................................................
...................................................................
.................................................
...............................................................
...........................................................
.......................................................
.....................
Release
Camera.................................................
the
Tables.......................................................
Button
......................................................................
....................................................................
..............................................................
....................................................................
and
Maintenance
.................................
24
24
25
26
26
27
27
28
28
29
30
31
32
33
33
34
2
Page 4

Automatic Exposure
Utilizing the latest in electronic technology, the New Mamiya
aperture-priority
operations.
Just focus the lens and actuate the shutter with a touch of the
electromagnetic release. The many built in error-preventing interlocks will be
6 x 6 Square Format
The
6 x 6
finder camera, which has the handling ease of a 35mm camera but
the advantages of a 360% larger negative and therefore far
superior image quality. Composition details can be leisurely
decided in the darkroom.
Advantages of
Since rangefinder focusing is easier than groundglass focusing in
dim light, the New Mamiya 6 will be particularly useful to wedding
and party photographers. Sports, aerial and action photographers
will
also
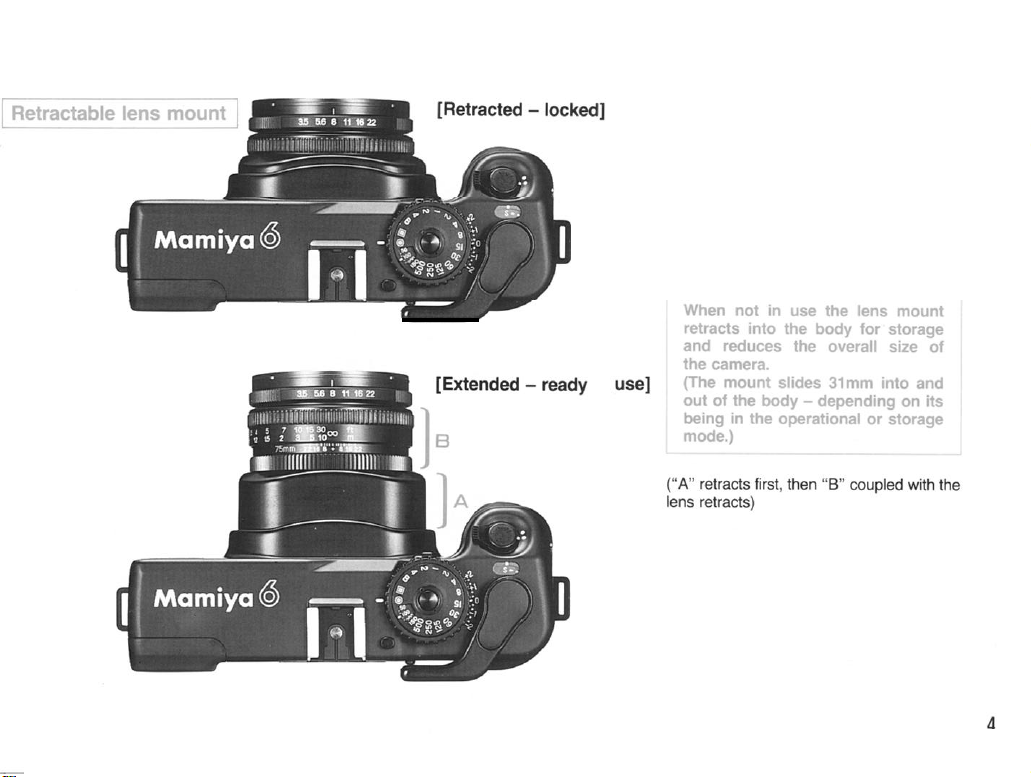
Innovative Retractable Lens Mount Compactness and
Safety Controls
The interchangeable lenses fit on a retractable lens
reduces the
The lens barrels and mount are made of a tough, durable light
weight aluminum alloy that promises
rough
AE control guarantees simplicity in all camera
welcomed
medium format lends itself to this “quick-draw”
benefit from its
storage
professional
(AE)/Simplicity at
by the pro working under pressure.
Rangefinder
fast
depth by 31mm (1-1/4").
use.
Camera
operational features.
a
long
Your Fingertips
service
range-
mount
which
life, even under
Precision and
Rangefinder
6
The rangefinder with its precision ground pentaprism is crisp and
clear and ensures quick, easy focusing. Focusing
substantially eliminated due to its long
any one of its three lenses, the corresponding field of view frames
in the viewfinder are automatically selected, and parallax is
automatically compensated for.
LED
Display/A
The
user
shutter speed.
ing LED signals when
A self-timer with a 10 second delay and electronic flash sychroni-
zation at all shutter speeds are additional features.
Wide Angle, Standard and Telephoto Lenses
The
high contrast, color balance and resolving power of
Mamiya multi-coated, high performance lenses reflect the latest
discoveries in optical technology. The short flange focal distance
design of these lenses contributes substantially to their outstanding quality.
The wide-angle lens in particular transmits large amounts of
peripheral light rays, resulting in corner to corner sharpness.
The image quality produced by these new Mamiya lenses is
unsurpassed, regardless of the subject matter-be it landscape,
aerial, industrial, scientific, fashion or
Accuracy/Double-lmage Superimposing
6Omm
base. When mounting
Variety of Safety Features
will find all relevant data on the LED display - correct
as well as over or under exposure indicator. A blink-
the batteries
need to be replaced.
portrait
photography.
error
has been
3
Page 5
to
The retractable
the profile of the New Mamiya 6. making it
more convenient to
Iens mount
store
greatly
and carry.
reduces
Page 6

5
Page 7
6
Page 8

_
7
Page 9

Body cap
Page 10
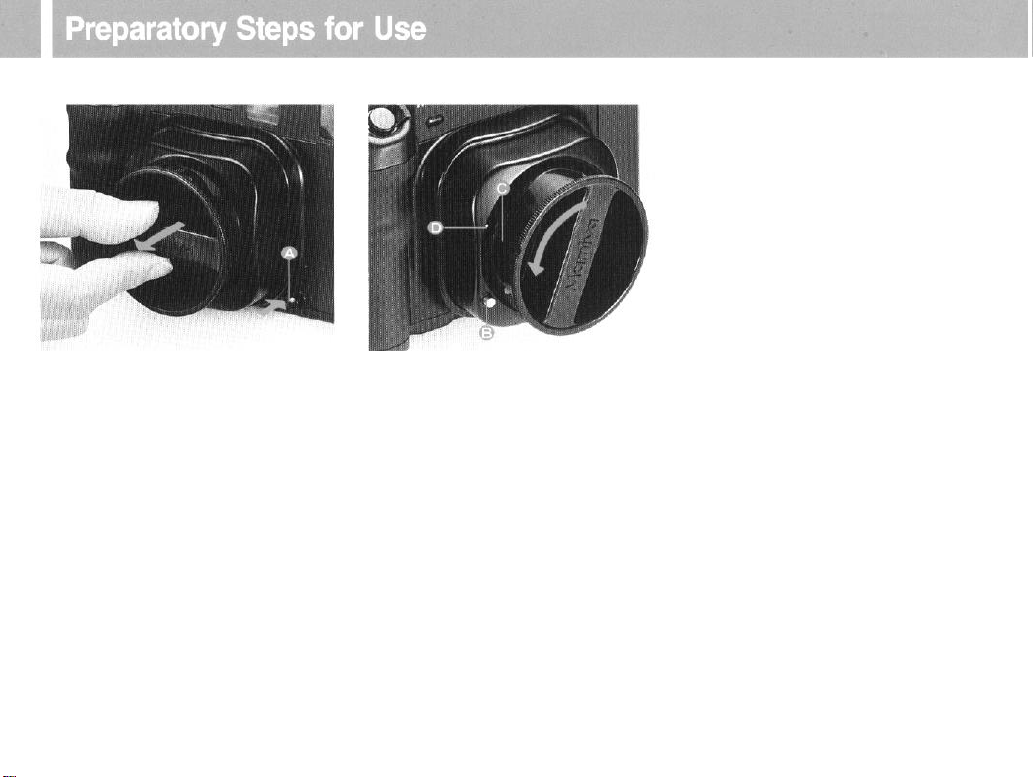
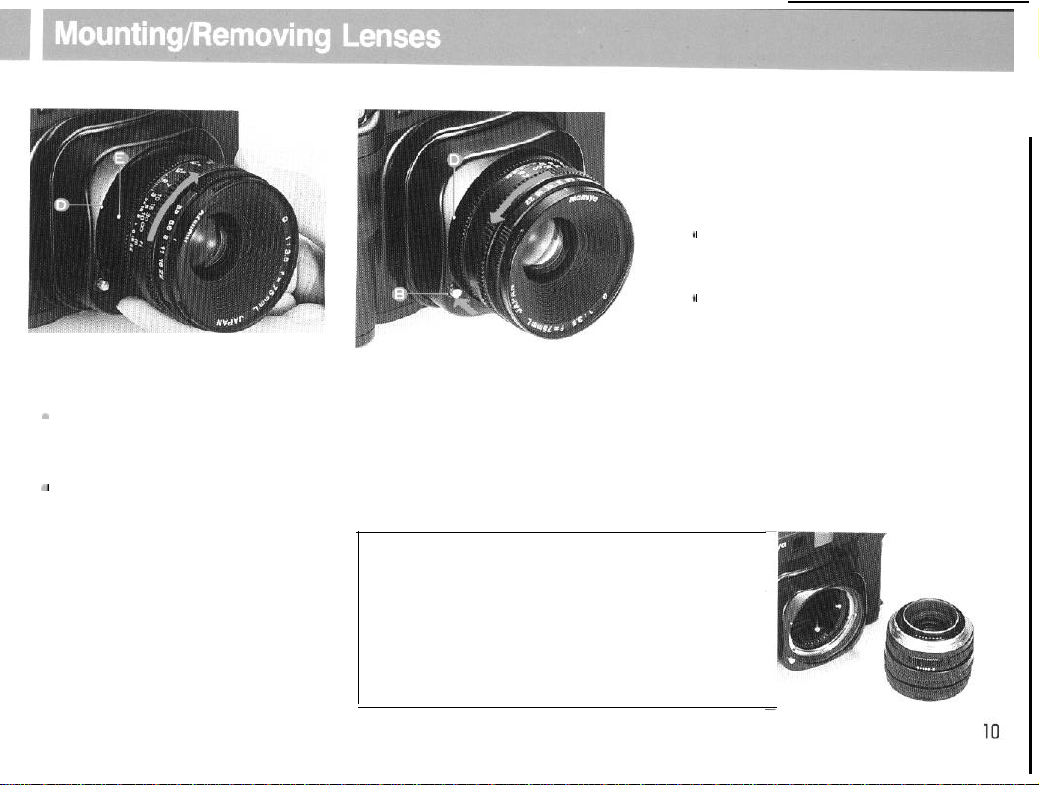
In
9
order to attach the lens, first pull out the
lens mount and remove the camera body
cap. To do this, while pressing the retraction/
extension button (A) in, pull the lens mount
out by gripping the cross bar of the lens cap.
Then, while pressing the lens release button
(B) in, rotate the cap counterclockwise, and
align the groove (C) on the cap’s side with
the lens alignment dot (D) on the body. The
body cap can then be pulled out.
*The lens release button cannot be pressed
when the light shield curtain is open. So make sure
the curtain is closed. For curtain
see page 13.
opening/closing
Page 11
[Mounting lens]
Remove the front and rear lens caps.
a
The front lens cap can be removed by
pressing in the tabs on the right and left
with your fingers and pulling the cap
towards you.
*
The rear lens cap can be removed by
rotating it counterclockwise.
[Removing lens]
Like removing the camera body cap, while
pressing in the lens release button (B),
rotate the lens in the direction of the arrow
until the lens alignment dot is lined up
with the white alignment dot (D) on the
camera body.
Changing lens
When changing lens, pull out the retractable
mount and proceed to the action mode.
l
Through mounting the lens is possible with the
mount retracted, removing it is not possible. (Interlocks!)
t
When the
is
release button will not work, preventing lens release.
+ Particularly
care so that the rear rim of the lens does not
the body’s rangefinder coupling cam.
*When the lens has been removed and film
remains in the camera body, avoid exposure to
direct
mount is retracted, or if the
open
when trying to remove the lens, the lens
when mounting the 50mm lens, take
sunlight as film fogging may result.
light baffle
touch
Align Lens Alignment Dot (E) With the
Camera Alignment Dot
into the camera body. Then
(D).
Insert the lens
turn
the lens in
the direction of the arrow until it clicks and
locks into place.
[CAUTION]
Gold Plated Electronic contacts
mount and at the rear of each lens. If oil, dirt, or other foreign matter
collects on the contacts poor electronic
result. When soiled, use a piece of clean cloth to wipe
thoroughly before installing the lens. Also,
not to touch them. (Position the front face of the lens which has
are
provided inside the retractable
information transfer
may
them
use the utmost care so as
been removed as shown in the photo.)
Page 12

[Pulling out the retractable
lens mount]
1. While pressing in the retraction button
(A) on the camera
the
arrow, pull out
until it clicks.
2.
When both have been pulled
your
fingers
make
sure
pulled out.
that both have been
body
the lens and lens
off the
retraction
in the direction of
mount
out,
take
button, and
completely
[Retracting (storing) the lens
mount]
1.
While pressing in the
(A) on the camera body in the direction of
the
arrow,
the camera
2.
in place, take your fingers off the button and
make sure that the
seated in the camera
push the lens
body.
When the lens
mount
retraction button
straight
in towards
has been retracted
lens
has been securely
body.
The camera will not function without
batteries.
1.
Remove the battery chamber cover on
the
bottom
screwdriver.
2. “+”
battery
teries,
battery with the
of the camera with a
is indicated on the inside of the
chamber
being sure to properly place each
cover. Insert
“+”
side up, facing the
the
two
coin
or
bat-
cover.
The New Mamiya 6 uses either two SR44
silver oxide batteries or two
manganese
batteries.
LR44
alkaline
.
1111
Page 13

[Battery check]
1.
Power can be
small lever beside the shutter release button.
(ON) Align the white dot on the lever with
the white dot on the camera body.
(OFF) Align the white dot on the lever with
the red dot on the camera body.
turned on/off
with the
2.
When the power is turned ON and the
shutter release button is touched slightly,
the shutter speed is indicated on the left
side of the viewfinder and a red LED indicator lights on the upper right side indicating
that power is normal.
*When battery power drops below normal,
when the batteries have been inserted improperly
the
shutter speed does
does not light.
l
When
the
shutter release
not
show and the red LED
button
is lightly touched.
or
,
CAUTION:
l Be sure to confirm proper polarity of the bat-
teries before insetting them.
l
Do not contaminate the battery surface with oil,
sweat, or other foreign matter. Failure to insert
clean batteries could result in
contact.
When contaminated, carefully wipe with a dry
cloth, or clean lens tissue.
l
After the
of photographing, or has been inactive for a long
time,
battery
use new batteries as needed.
[Spare batteries]
camera has bean used for many hours
insert
l
new batteries.
When the camera is used in low temperatures,
performance
deteriorates: below
poor
electrical
0°C. 34F
Can be stored inside the body cap.
If
the power
lights up when the shutter release
pressed,
Be sure to
on/off lever
resulting
keep the
is left ON, the LED
in early battery depletion.
on/off
lever OFF.
button
is
1212
Page 14

Before opening/closing the light
shield curtain, be sure to cock
the shutter, otherwise, it will not
open/close.
[Opening the light shield curtain]
[Closing the light shield curtain]
Never touch the light shield curtain or the
bellows. If touched, light leakage or a malfunction may result.
13
To open the light shield curtain, slide the
light shield curtain release lever along to follow the arrow
down and right. This
will cause curtain to snap open.
The light shield lever indicator
line) is then aligned with ” 3
-
(a white
“.
Rotate the light shield closing lever in the
direction of the arrow, away from the open
position
cator on the lever with
l
cannot
the lens.
l
ter cannot be
When taking a picture, open the light shield curtain.
(If the light shield curtain is closed, a
indicate that it is closed.)
” 2
”
and align the white indi-
”
@ ”
to close.
When the light shield curtain is open, the lens
be removed. Close the curtain to
remove
When the light shield curtain is closed, the shut-
released.
red
LED will
Page 15

Before using the camera, it is advisable
understand how it works.
Power
on/off
1.
2. Film advance lever ....
Light shield curtain
.
3
4
. Retractable lens mount
(Photographing position) (See page
5. Back
6. Release the shutter ......
Note:
If the shutter is
viewfinder will light; repeat steps 2 to 5 again.
lever ....................
.._................
cover .......................................
not
released, a red (LED) in the
set to ON.
(See
page
Wind
the lever to
cock the shutter.
Open.
(See
page 13)
._......_.._...
Pull
out.
Open.
(See
page
(See page
12)
11)
15)
19)
to
1414
Page 16

[Opening/closing the back cover]
[Setting the film
type]
Set the film speed of the film being used by
lining up the outer rim of the
dial and rotate it until the
appears in the window.
shutter speed
correct
IS0 value
15
While depressing the back
ton,
simultaneously
lever in the direction of the arrow and the
back will open.
When closing the back
press both corners until it clicks.
cover
cover,
lock but-
securely
push down the lock
This camera can use either
To
set the type of film used, simply rotate
the pressure plate in the direction of the
arrow until the white dot is at “120”
or
“220”.
When set. “120” or “220” will appear in
the small window under the memo clip.
120
or 220 film.
Page 17

[Memo clip]
The memo clip on the back
hold the film box to
reminder of the type of film in the camera or
for recording the date.
cover
serve
as a convenient
is used to
1.
Push the spool release lever of
to the
right,
the take-up spool chamber, then push
lower
and install the
spool
stud up.
right
take-up spool
side
in
the
2.
Like installing the take-up spool, push
the
spool release lever of
place a
roll
ing sure it seats properly. Make sure the
backing
of film in the film chamber, mak-
paper is in the position illustrated
left
side to
the
left,
16
Page 18

3. When the new
sure to reset the lower
roll
has been inserted, be
spool
stud by
pressing it in. (Also, be sure to reset the take-up
spool stud in a similar manner.)
4.
Pull out the backing paper, and insert the
tip into the slot on the take-up
spool
as
tured.
17
5. Wind the
film
advance lever until the
small arrow (the starting indicator on the
backing paper) aligns with the film starting
indicator
( V ) on the camera body. Then
close the back cover.
pic-
6 . Wind the film advance until it stops and
“1” appears in the exposure counter
window.
l
Make sure backing paper advances evenly between the spool flanges and does
slant. If it advances unevenly, remove the backing
paper from the take-up spool and refeed, starting
again.
l If the film is not properly aligned with the
indicator, the film may be improperly loaded.
e
When any other numeral than
the exposure counter window, it is an indication
film
that the
* Do not excessively pull on the backing
and do not load/unload the film in direct sunlight:
bright light may
t
Tightly
a couple of times. If this is not done, light may
enter from the spool flanges
unloaded.
is loaded. So do not open!
fog
wind
the film.
the backing paper around the spool
"S"
when
not
begin
“V”
appears in
paper.
the film is
to
Page 19

[Determining the shutter speed]
Shutter speed dial:
AE (automatic exposure)
Based on the aperture setting, the
camera automatically selects the shutter speed.
-.
The New Mamiya 6 has an aperture-prior-
ity, AE lens shutter. Once the aperture and
film speed are set, the AE meter selects a
proper shutter speed in relation to the set
aperture. Under the manual photographic
mode, proper shutter speed is indicated by
a red LED within the viewfinder.
1.
.
To set the diaphragm to a desired aperture, rotate the aperture ring (A) until the
appropriate figure is aligned with the central red index line (B). (Click stops are provided at each engraved aperture number
but the diaphragm can be set also for intermediate stops.)
2. Rotate the shutter speed dial and
select either the AE
0
or manual mode for
photographing.
Rotate the dial to align it with the white
index line (-) on the camera body.
l
At 0 or
13,
the
released by pressing the AE lock release button
dial is locked.
(A) in the center of the dial.
l In any position other than
speed dial moves freely from click-stop to
stop: it must be set on a specific click-stop and
cannot be used at an in between setting.
l Intermediate Diaphragm settings (between
click stops) are possible. Intermediate Shutter
Speeds (between engraved numbers) are not
possible.
The
lock
can be
0
or @, the shutter
click-
AEL (AE
lock)
The camera memorizes the aperture
when shutter release
button is
touched slightly so that, even when
the position of the subject or
changes, a picture can be taken with
the initial aperture setting and is not
affected by changes in light.
Bulb
exposure
At this position, the shutter will remain
open as long as the shutter release
~~
. .
button is pressed.
Shutter controls
On the shutter speed dial the yellow
numbers indicate the number of whole
seconds while the white numbers indicate fractions of seconds,
Example: “4”
while 125 indicates
indicates 4 seconds
1/125 seconds.
camera
1818
Page 20

The
all lenses.
shutter
that pressure can be applied in two stages.
release
When it is slightly touched, correct metering
data is displayed on the left side of the view
finder. When it is depressed all the way,
the shutter is released and an exposure
is made.
button
is designed
so
indicator
*The LED’s are located at the very left
margin of the finder in order not to interfere
with the
field
of view of the wide angle lens.
1919
Bright field of view frame (set by lens)
l
When the lens mount is retracted, the viewfinder frame
(i.e.
the bright frame) selected is the widest frame for
I~-
-~-i
Page 21

20
Page 22

When the lens has been focused, the double-image
superimposing rangefinder produces two superimposed images within the square 0 of the viewfinder.
How To:
[Photographic area covered]
21
1. Position the subject within the central square
of the viewfinder. As on the top left the subject
will appear as a double image.
2. Rotate the focusing ring until the two images
converge and are superimposed as on the
figure on the left. The lens is now focused.
The two images can also be superimposed by
using the boundary line between the viewfinder and
the square or split image.
Adjust the images until the boundary lines converge.
0
Within the viewfinder the photographic
area covered is indicated by the visible
bright frame. Parallax is automatically
compensated for according to the
to-lens distance.
The composition will be with in the lines of
the bright frame
view is visible at
the minimum focusing distance. The
appropriate bright frame area is auto-
matically selected upon lens interchange.
0.
83% of the field of
r;,
and 100% is visible at
subject-
Page 23

[Unloading the film]
1. Press the shutter release button when
you have focused and determined compos-
ition.
2. Advance the film by winding the film
advance lever until it stops. (The shutter is
then cocked.)
3. After completing the last exposure, wind
the advance lever several times, until the
film with its backing paper is completely
wound onto the take-up spool. The advance
lever will become easier to actuate when
the film has been completely wound on the
spool.
*
When the shutter release button is pressed and
the film is exposed, a red LED will light on the
upper right side of the viewfinder.
1. .
Open the back cover and remove the roll
of film. By pushing the
spool
stud release
lever to the right, disengage and remove the
spool. As shown, the roll of film can be easily removed from the take-up chamber if you
push up the spool up a little-it will then lift
out. When the back cover is opened, the
exposure counter will automatically return to
'S' (start).
2. Be careful not to let the roll of exposed
film unwind. Be sure to seal it immediately.
l
To prepare for another roll, remove the empty
spool from the film chamber, and place it in the
take-up chamber.
l
Wind
the advance lever until it
wise, a red LED in the
is impossible
l
adversely affect
t
To remove
roll, cap the lens and press the shutter release button and wind the
by frame.
to press
Do not advance the
viewfinder
the
shutter release button.)
film
too quickly, as
film
flatness, or frame spacing.
the film
before exposing the entire
film
onto the take-up spool frame
stops. (Other-
will signal that it
this
might
22
Page 24

1. Align ” 0 ” on the shutter speed dial with
the white line index mark on the camera
body.
2.
Be
sure to set the exposure compensa-
tion scale to 0.
3. Set the aperture to the desided
number according to conditions.
4. When the shutter release button is
slightly
touched, an LED indicating proper
exposure will automatically light in the view-
finder. When "
"
LED blinks, it indicates
over-exposure. Rotate the aperture ring to
stop down to a smaller exposure until an
LED indicates proper exposure.
23
f
Blinking "LT" indicates under-exposure:
the aperture ring until the LED stops blinking to
increase exposure.
t
Illuminating
for a relatively
"f"
seconds.
4
When taking pictures at such
careful not to move or vibrate the camera. Either
open the aperture for a higher shutter
use a tripod, or
l
(AE lock), the
continue to Operate as long as the shutter
lease button is touched slightly. When you
take your
go out.
"LT"
indicates
long
use
Under AE (automatic exposure) or AEL
LED display in the viewfinder will
finger off
exposure
a flash.
the
button.
that
the shutter is set
from
between 1 to
slow
speeds, be
speed,
the
LEDs
rotate
re-
will
Rotate the shutter speed dial until “m
aligns with the
camera
body.
white
index mark on the
Position the important part of your subject in
the central square of the viewfinder - this
will establish the correct exposure. Then
touch the shutter release button slightly and
an LED will light indicating the correct expc-
or
sure. After making any necessary adjust-
ments to the aperture, press completely for
your exposure. Even when light quality is
variable, an optimum exposure is possible.
If you cannot get close enough to your subject for another meter reading, make substitute measurements by pointing the camera
to light and dark areas and calculate a
mean exposure value or try taking a reading
off your palm.
”
Page 25

Page 26

The depth-of-field varies according to the
aperture. The smaller the aperture
(f/8, f
f/16...) the greater the depth-of-field; the
larger the aperture (f/8, f/5....) the smaller
the depth-of-field. To take pictures which
are sharp from foreground to infinity or
when taking snap shots, the focusing range
is extended or depth increased by using a
smaller aperture. When the subject is to
stand out, with the background out of
focus,
a larger aperture is appropirate.
25
The depth-of-field scale on the lens
cates depth-of-field in terms of the distance
/11
,
between subjects on both sides of the
scale. For example, when a 75mm lens is
stopped down to
f/8
and f/16, respectively,
everything photographed within the ranges
shown in the photo at the left will be sharp.
l
See page 30 for depth-of-field tables for all three
lenses.
indi-
Six types of diopter correcting lenses are
available for near/far-sighted people. Mount
as indicated above.
Powers available are: +3, +2.
+1
-1, -2
and -3.
Page 27

The exposure compensator functions in a
number of important ways. It can be used to
correct exposure values
ences in brightness between a primary subject and its background
over or under-exposures occur. It can also
be used when filters are employed or when
engaged in available light photography
or under high contrast conditions (i.e.
high key).
(EVs)
or the differ-
-
especially when
low
-
or
To set, press the compensator lock release
button (A), and move lever (B) to select the
desired EV: graduations are 1/3 EV.
[When a filter is
Whether using the AE or manual mode simply compensate for the
as indicated in the table below.
used]
filter
exposure factor
When taking an exposure longer than
4 seconds, set shutter to “B” (bulb). While
the button is pressed down, the shutter will
remain open. In order to prevent camera
movement, it is best to use a cable release
and tripod.
When set at
work.
The cable release can be screwed in the
release socket beside the shutter release
button as pictured above.
“B”
the self-timer does not
Fitter exposure factor
Exposure compensation value
(EV) 0
Xl x1.2 x1.5 xl.7 x2 x2.5 x3 x4
+‘h +zh +2h +1 +I’/+ +12h +2
26
Page 28

[Determining the aperture]
When using automatic flash units, refer to
the instructions on the flash unit for correct
aperture settings.
When using a manual electronic flash, the
guide number divided by subject distance
gives the correct aperture.
The new Mamiya 6 features an X synchro
flash terminal and its lens shutter system
permits flash synchronization at all shutter
speeds.
Shoe-mounted flash units can be attached
directly to the hot-shoe, while flash brackets
can be attached to the tripod socket for
larger flash guns.
Remove safety cover (A) to
attach
sync
cord in the socket.
27
Guide number (46)
Subject distance (6 m)
t
Charged
when they are attached to the camera. This does
not indicate a defective circuit.
l
manual
electronic flash units sometimes fire
When using electronic flash, be sure to read its
carefully.
= Correct aperture
setting (8)
When using infrared film, it is necessary to
make a focusing adjustment in order to
achieve accurate focus. This is because the
focus position of the image deviates from
normal since the infrared ray wavelength is
longer. After focusing in the usual manner,
check the distance on the distance scale
that is aligned with the center reference
mark of the lens. Make the focusing adjustment by turning the focusing ring in the
direction of the arrow in the accompanying
photograph so that the distance just
observed is aligned with the infrared mark.
Page 29

[Neck strap]
If the batteries have been depleted - especially when the power on-off lever has been
set to the
sures (at
OFF position during long expo-
"B"
; 4 seconds or 2 seconds)
the winding-stop prevents the film from
being wound.
If this happens, push the emergency ad-
vance/stop release button with a pen or
other pointed object as shown above. The
advance/stop is then released, allowing the
film to be wound. Please note that that par-
ticular frame will be poorly exposed.
l When the batteries have been depleted,
immediately replace them.
l
The emergency winding-stop release button
should
not
be used for any other purposes.
-
Since the New Mamiya 6 has a 6 x 6 format, it
is not necessary to adjust for vertical
and horizontal composition. Because most
out of focus pictures are the result of camera
movement, make sure
not
to move when
pressing the shutter button. Hold the camera
with your elbows close to your body: pressing
part
of the camera on your forehead
will help stabilize it. Then gently release the
shutter.
When making exposures longer than 1/30
sec.,
it is advisable to use a tripod with a
cable release.
Pass the neck strap through the
carrying strap lug, and fasten it
as shown.
[Using a tripod]
When using the camera
head, the head may interfere with the spood
stud, preventing
prevent this, use the optional tripod adapter
for the M645 Super.
*The threaded tripod screw hole is
and the use of a longer tripod screw might result in
the damage or breakage of internal working parts.
So be careful not to apply unnecessary pressure
when mounting the camera.
film
with a large tripod
from being loaded. To
5.5mm
deep
28
Page 30

G4/50L
(50mm f/4)
G3.5/75L
(75mm f/3.5)
G4.5/15OL (150mm
---
f/4.5)
Lens construction: 8 elements in 5 groups
Angle of view: 75°
Minimum aperture: 22
35mm equivalent: 28mm
Minimum focusing distance: 1 m
Minimum magnification: 0.059
Area covered: 945 x 945mm
Filter size: 58mm
Hood: Bayonet type
Dimensions: 55 (length) x 64mm (diameter)
Weight:
335g
29
Lens construction: 6 elements in 4 groups
Angle of view: 55°
Minimum aperture: 22
35mm equivalent: 41 mm
Minimum focusing distance: 1 m
Minimum magnification: 0.089
Area covered: 632 x 632mm
Filter size: 58mm
Hood: Bayonet type
Dimensions: 43 (length) x 64mm (diameter)
Weight:
250g
Lens construction: 6 elements in 5 groups
Angle of view: 30°
Minimum aperture: 32
35mm equivalent: 82mm
Minimum focusing distance:
Minimum magnification: 0.0996
Area covered: 562 x 562mm
Filter size: 67mm
Hood: Screw-in type
Dimensions: 86 (length) x 70mm (diameter)
Weight: 480g
1.8m
Page 31

G4/50L
G4.5/1 50L
G3.5/75L
30
Page 32

[Lens hood]
For 50mm
For 75mm f/3.5: Bayonet
For
All are supplied with the lenses.
f/4:
150mm f/4.5
Bayonet type
(58mm
in diameter)
type
(58mm in diameter)
Screw-in type
(67mm in diameter)
[Diopter correcting lens]
Focusing accuracy diminishes when the
eye diopter is incorrect. So, it is advisable
that near and far sighted people use diopter
correcting lenses.
Fit the proper diopter correcting lens to the
eyepiece.
“,v”_”
are available: +3, +2,
[Tripod adapter
(common to
This is used to mount the camera to the
tripod head.
Even when the tripod has a large head, the
adapter allows film to be loaded, while the
camera is attached to the tripod.
M645
N]
Super)
+1,
-1,
[Auto Close up Lens
The close-up adapter “Auto Close up Lens”
is designed for use with standard
f3.5 lens.
It will be very
ups of portraits, plants, flowers and insects,
as well as for the reproduction of books, and
similar items.
It can be simply mounted on or removed
from the camera, without special adjust-
ments. It easily couples with the
der, and allows close-ups to 50cm. (20 inch)
Subject
distance
Magnification
Area covered
Percentage of
the field of
view visible
convenient
From the film 110 - 61.7 (cm)
From the front frame of the
auto
x0.07 (100cm)-0.17
]
75mm/
for taking
close
up lens 100-50 (cm)
75x75-34x34 (cm)
90%-100
close-
rangefin-
(50cm)
%
[Lens case] Type A
The lens case is made of special material
which is very soft but tough.
Dimension: bottom diameter is 90mm and it
is
160mm
in length
31
Page 33

Camera type: 6 x 6cm format, interchangeable lens, rangefinder camera
Film type: 120 (12 exposures) or 220 (24 exposures)
Actual negative size: 56mm x 56mm
Lens type: Wide Angle
Focusing: A single 185° stroke
Shutter:
Exposure Control: Aperture priority AE; Silicon Photo Diode receptor in viewfinder; meter-
Film speed range:
Rangefinder:
Viewfinder: Coupled with rangefinder; automatic bright line frame selection
Internal “Dark Slide” curtain: For interchangeable lens function
Safety
Power supply: Two
Dimensions: Camera body: 6.1” (155mm) length x 4.3”
Weight: Camera Body: 31.4
*
Specifications and design are subject to change without notice.
Standard 75mm
Telephoto
#OO
electronic
tact, synchronizing at all speeds with hot shoe and cord
ing range: EV 3.5 to EV 18 (75mm lens f/3.5,
+2 to -2EV (in
Lens declination, double image superimposing system; base length 60mm
(effective base length
150mm): parallax compensation; magnification: 0.58X; 83% of the field of view
visible at infinity; built-in shutter speed and exposure display, safety interlock
warning L.E.D.
mechanisms: 1. Double exposure prevention
Body with 75mm lens: 6.1”
(106mm) depth
Body with 75mm lens: 40.2 oz
5Omm
f/4
f/3.5
150mm
f/4.5
leaf
shutter; B, 4 to
l/3
EV increments)
IS0
25 - 1600
2. Exposure prevention when internal dark slide engaged
3. Exposure prevention when lens mount is retracted
1.5V
batteries (MS 76,
depth - 2.1” (54mm) depth when lens mount retracted
-
2.9” (75mm) depth when lens mount retracted
oz (890g)
‘1500
34.8mm)
SR44
(155mm)
(1,140g)
roll
film
second, electromagnetic release; X con-
or
length x 4.3”
socket;
electronic self timer
IS0
100); exposure compensation:
(50mm, 75mm,
LR44)
(109mm)
height x 2.7”
(109mm)
height x 4.2”
(69mm)
32
Page 34

Uniquely designed to prevent mistakes, the New Mamiya 6
incorporates numerous safety features.
If the shutter will not function, it is very likely due to user
error rather than camera malfunction. Should something
appear to go wrong, be sure to review the following points.
0
When the shutter will not function.
@
Is the power on/off lever set to the ON position?
@
Has the film been completely advanced to the
next
frame?
Have all the exposures already been made (12 with
120, 24 with
@
Has the film advance lever been wound until it stops?
@
Is the lens mount retracted?
@
Is the light shield curtain closed?
220)?
(In the case of examples 0 - 0, the red LED will
flash a warning on the upper right side of the viewfinder.
0
When the lens cannot be removed:
0
Is the light shield curtain open?
@
Is the lens mount retracted or stored in the body?
0 Be
sure to use new batteries.
*
Expose the camera to cold air only when in use.
t
Batteries
which will not
returned to use at normal temperatures.
function
at low temperatures may be used when
Avoid quick heating or cooling as unstable voltage may result.
An automatic circuit will signal battery depletion.
When the shutter release button is touched slightly, an LED
blinks to indicate a suitable shutter speed. A few exposures can
be made, but replace the batteries as soon as possible.
When the batteries are depleted, the LED ceases to light and
the shutter cannot be released.
l Replace both batteries at the same time. Avoid using old
batteries with new ones, and avoid mixing different types
of batteries.
*
When inserting batteries in the battery chamber, verify correct
polarity. If contaminated with oil, sweat or other foreign matter,
be sure to wipe clean with a dry cloth or lens tissue.
33
Page 35

0 If the camera is not to be used for a long time, remove the
batteries and film.
l Do not store the camera at temperatures exceeding
40°C
or below - 10°C. Also avoid storing in a damp or sea air environ-
ment.
When stored in the vicinity of gaseous chemicals, such as
naphthaline and formalin, the camera and film may be adversely
affected. Read the instructions on the film carefully for proper
handling procedures.
9
As
your
camera is a precision instrument, avoid exposing it to
vibrations or severe shocks.
When handholding your camera, always use a neck strap and
exercise extreme caution when removing lenses and adjusting
the mount.
*
Prolonged disuse does not lengthen camera life, but shortens
it. So,
when storing for a long time, periodically take the camera
and release the shutter several times to keep it in good condition.
l
Do not touch either the front or the back of the lens surfaces.
If either needs cleaning use blower or lens tissue to remove dust
particles. A fingerprint can be removed with a drop of lens
cleaner and wiped off with lens tissue.
l Carefully read all instructions in the manual.
Periodic Examination
In order to maintain the camera in its best condition, it is advisable to pedodically check all functions.
When the camera has not been used for a long time, or when it
is to be used for very important photographs, check the camera
or take some trial pictures beforehand. (Be sure to check the
batteries, electronic flash synchronization, film advance,
upper and lower images in the rangefinder, correct
m
position, and shutter function.)
For a general
overhaul, cleaning, or repairs, take the camera to
your nearest authorized Mamiya Service Center or ask your
camera shop for advice.
This product employs a protective circuit for prevention of electrostatic
electrification. Should an electrostatic trouble occur, be sure to turn off
power to this Product before using it again. Be careful not to touch the
electrical
In rare cases,
electromagnetic wave. In such cases, carefully use this Product.
contact
of this
Product.
this Product may be affected by a
strong
external
34
 Loading...