

Page 1
GB
Power Mixer INSTRUCTION MANUAL
UA
Механічна мішалка ІНСТРУКЦІЯ З ЕКСПЛУАТАЦІЇ
PL
Mieszarka elektryczna INSTRUKCJA OBSŁUGI
RO
Maşină de amestecat MANUAL DE INSTRUCŢIUNI
DE
Rührgerät BEDIENUNGSANLEITUNG
HU
Elektromos keverőgép HASZNÁLATI KÉZIKÖNYV
SK
Výkonová miešačka NÁVOD NA OBSLUHU
CZ
Míchadlo NÁVOD K OBSLUZE
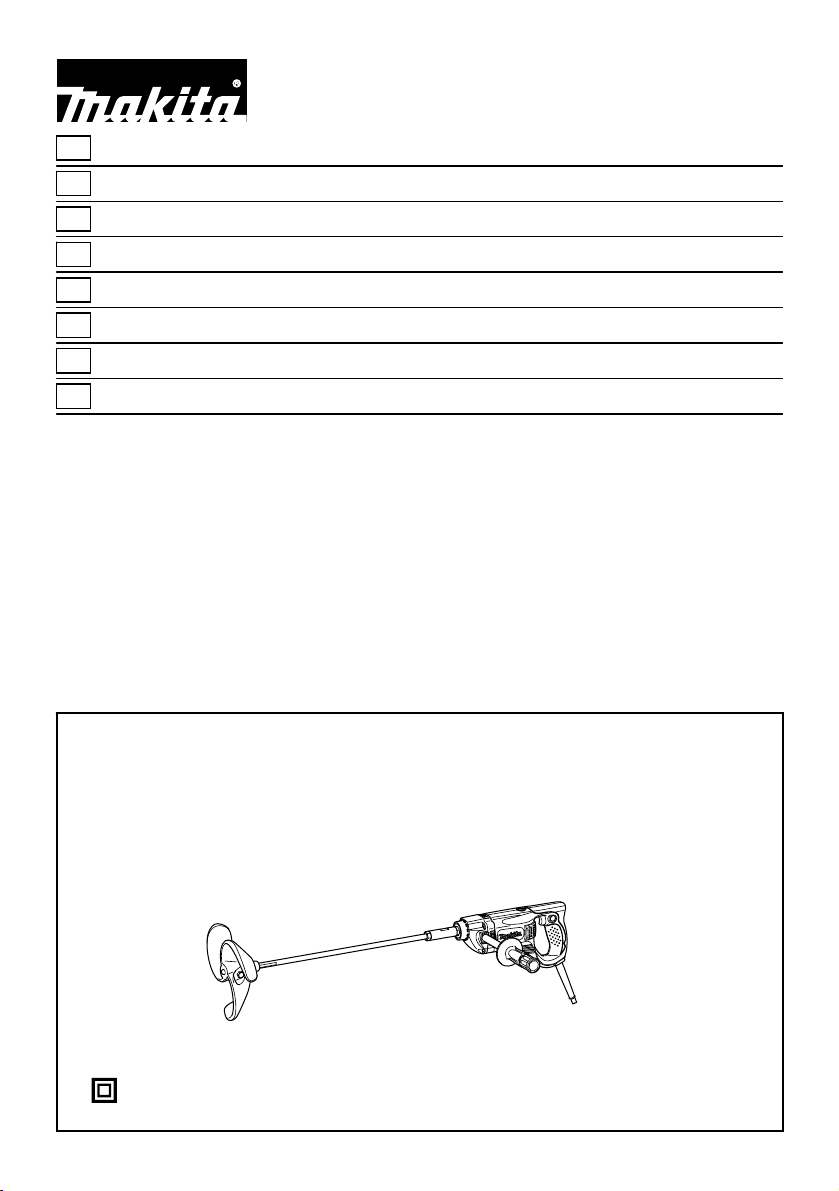
UT2204
1
Page 2
1
1
2
1
2
3
1 007096
1
2
3
4 007093
1
7 007103
2 007097
5 007101
2
8 007104
3 007092
1
1
2
3
6 007102
1
1
2
3
2
3
9 007098
1
2
1
10 001145
11 0070 99
2
Page 3
ENGLISH
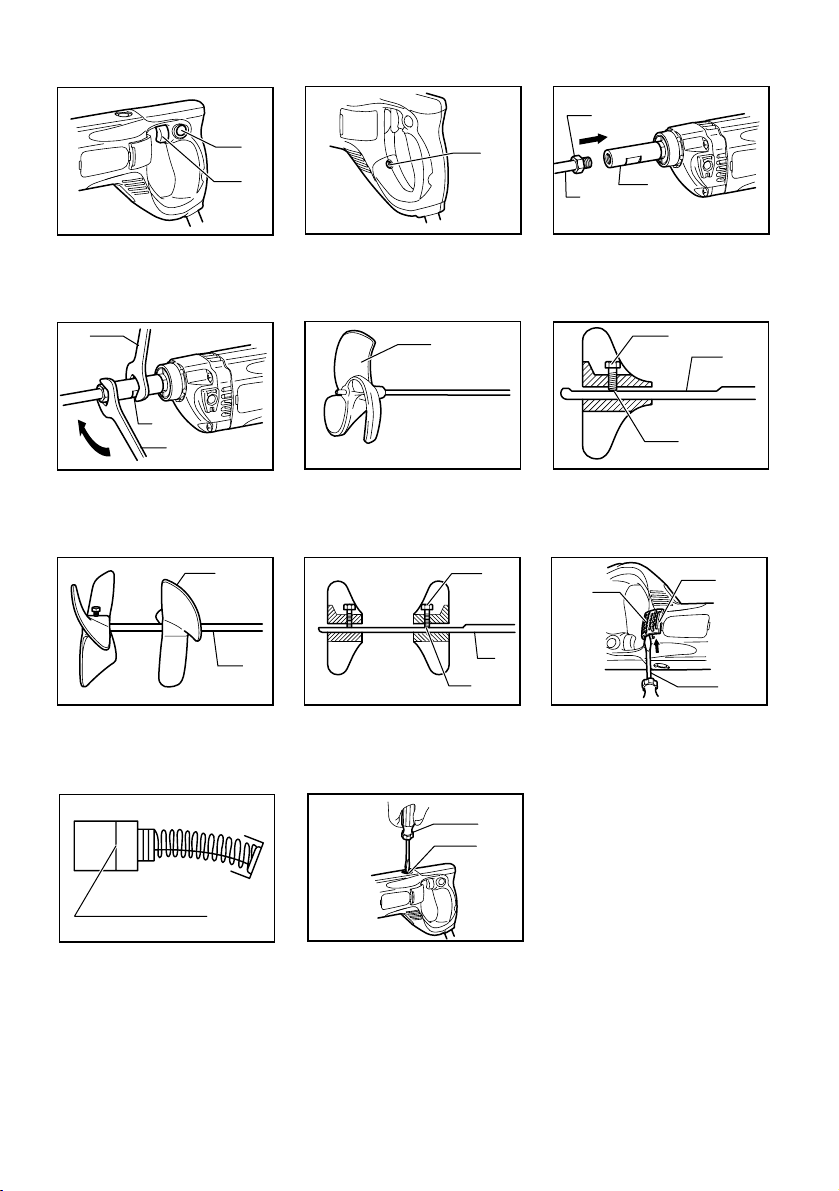
1-1. Lock button
1-2. Switch trigger
2-1. Indicator lamp
3-1. Hex nut
3-2. Shaft
3-3. Shaft holder
4-1. Wrench 19
4-2. Notch
Explanation of general view
4-3. Wrench 19
5-1. Mixing blade
6-1. Hex bolt
6-2. Shaft
6-3. Flat surface
7-1. Mixing blade
7-2. Shaft
8-1. Hex bolt
8-2. Shaft
8-3. Flat surface
9-1. Filter
9-2. Cover
9-3. Screwdriver
10-1. Limit mark
11-1. Screwdriver
11-2. Brush holder cap
SPECIFICATIONS
Model UT2204
No load speed (min-1) 550
Mixing blade diameter 220 mm
Overall length 929 mm
Net weight 3.7 kg
• Due to our continuing programme of research and development, the specifications herein are subject to change without notice.
• Note: Specifications may differ from country to country.
Intended use
The tool is intended for mixing wall materials, etc.
(except flammable materials)
Power supply
The tool should be connected only to a power supply of
the same voltage as indicated on the nameplate, and
can only be operated on single-phase AC supply. They
are double-insulated in accordance with European
Standard and can, therefore, also be used from sockets
without earth wire.
For European countries only
Noise and Vibration
The typical A-weighted sound pressure level is 83 dB (A).
Uncertainty is 3 dB(A).
The noise level under working may exceed 85 dB (A).
The typical weighted root mean square acceleration
value is not more than 2.5 m/s
These values have been obtained according to
EN60745.
For Model UT2204
EC-DECLARATION OF CONFORMITY
We declare under our sole responsibility that this
product is in compliance with the following standards of
standardized documents;
EN60745, EN55014, EN61000 in accordance with
Council Directives, 89/336/EEC, 98/37/EC.
Safety class /II
ENE056-1
ENF002-1
000087
MAKITA INTERNATIONAL EUROPE LTD.
Michigan Drive, Tongwell, Milton Keynes, Bucks MK15
8JD, ENGLAND
Responsible manufacturer:
Makita Corporation Anjo Aichi Japan
ENG003-2
SPECIFIC SAFETY RULES
DO NOT let comfort or familiarity with product
(gained from repeated use) replace strict adherence
to drill safety rules. If you use this power tool
unsafely or incorrectly, you can suffer serious
Wear ear protection.
2
.
personal injury.
1. Use auxiliary handles supplied with the tool.
Loss of control can cause personal injury.
2. Hold power tools by insulated gripping
surfaces when performing an operation where
the cutting tool may contact hidden wiring or
its own cord. Contact with a "live" wire will make
exposed metal parts of the tool "live" and shock
ENH101-5
the operator.
3. Always be sure you have a firm footing.
Be sure no one is below when using the tool in
high locations.
4. Hold the tool firmly.
5. Keep hands away from rotating parts.
6. Do not leave the tool running. Operate the tool
Yasuhiko Kanzaki CE2005
only when hand-held.
7. Do not touch the drill bit or the workpiece
Director
GEB001-2
3
Page 4
immediately after operation; they may be
extremely hot and could burn your skin.
8. Some material contains chemicals which may
be toxic. Take caution to prevent dust
inhalation and skin contact. Follow material
supplier safety data.
SAVE THESE INSTRUCTIONS.
WARNING:
MISUSE or failure to follow the safety rules stated in
this instruction manual may cause serious personal
injury.
FUNCTIONAL DESCRIPTION
CAUTION:
• Always be sure that the tool is switched off and
unplugged before adjusting or checking function on
the tool.
Switch action
Fig.1
CAUTION:
• Before plugging in the tool, always check to see
that the switch trigger actuates properly and
returns to the "OFF" position when released.
To start the tool, simply pull the switch trigger. Release
the switch trigger to stop.
For continuous operation, pull the switch trigger and
then push in the lock button.
To stop the tool from the locked position, pull the switch
trigger fully, then release it.
Indicator lamp
Fig.2
The green power-ON indicator lamp lights up when the
tool is plugged to the mains. If the indicator lamp is lit but
the tool does not start even if the tool is switched ON,
the carbon brushes may be worn out, or the motor or the
switch may be defective. If the indicator lamp does not
light up, the mains cord or the indicator lamp may be
defective. When the mains cord is defective, the tool
neither starts nor lights the indicator lamp. When the
indicator lamp is defective, the tool starts without the
indicator lamp lighting up.
ASSEMBLY
CAUTION:
• Always be sure that the tool is switched off and
unplugged before carrying out any work on the
tool.
Installing shaft
Fig.3
Tighten the shaft with hex. Nut into the shaft holder as
far as the hex nut comes into contact with the holder..
Hold the notch in the shaft holder with wrench 19 so that
it cannot revolve. With the notch held so, tighten the hex
nut with another wrench 19 in the direction of arrow
Fig.4
Installing mixing blades
Fig.5
Fig.6
Insert the mixing blade into the shaft and secure it with
the hex bolt.
At this time, position it so that the top end of the hex bolt
always fits to the flat surface on the shaft and tighten the
hex bolt with the provided wrench.
When installing the mixing blades at two different
positions (which is applicable only to the mixing blades
allowed to do so), mount and secure the two mixing
blades on the flat part of the shaft with the hex bolts so
that the same surface of blades faces each other as
shown in the figure.
Fig.7
Fig.8
OPERATION
Mixing
CAUTION:
• Do not use to mix flammable material such as paint
with thinner used as solvent. Failure to do so may
cause injury.
1. Hold the rear handle of the tool with one hand and
the grip with the other hand firmly, place the
mixing blade under material fully and turn on the
tool after making sure work site safety.
2. Move the mixing blade up and down during the
mixing operation so that whole part of material
can be mixed.
3. When finishing mixing, turn off the tool, make sure
that the mixing blade has come to a complete stop,
and then pull it out of the vessel.
MAINTENANCE
CAUTION:
• Always be sure that the tool is switched off and
unplugged before attempting to perform inspection
or maintenance.
Replacing filter
Fig.9
Replace the filter regularly as the cooling efficiency of
the tool is reduced due to built-up dust or particles in
the filter.
4
Page 5

Insert the slotted bit screwdriver and the like between
the tool and the cover as shown in the figure. Lift it up
just like using a shovel and remove the cover.
Replace the filter in the cover with a new one.
Reinstall the cover on the tool.
Replacing carbon brushes
Fig.10
Remove and check the carbon brushes regularly.
Replace when they wear down to the limit mark. Keep
the carbon brushes clean and free to slip in the holders.
Both carbon brushes should be replaced at the same
time. Use only identical carbon brushes.
Use a screwdriver to remove the brush holder caps.
Take out the worn carbon brushes, insert the new ones
and secure the brush holder caps.
Fig.11
To maintain product SAFETY and RELIABILITY, repairs,
any other maintenance or adjustment should be
performed by Makita Authorized Service Centers,
always using Makita replacement parts.
ACCESSORIES
CAUTION:
• These accessories or attachments are
recommended for use with your Makita tool
specified in this manual. The use of any other
accessories or attachments might present a risk of
injury to persons. Only use accessory or
attachment for its stated purpose.
If you need any assistance for more details regarding
these accessories, ask your local Makita Service Center.
• Mixing blades
• Shaft
5
Page 6
УКРАЇНСЬКА
1-1. Фіксатор
1-2. Кнопка вимикача
2-1. Лампочка індикатора
3-1. Шестигранна гайка
3-2. Вал
3-3. Shaft holder
4-1. Ключ 19
4-2. Прорізь
Пояснення до загального виду
4-3. Ключ 19
5-1. Диск для змішування
6-1. Болт із шестигранною голівкою
6-2. Вал
6-3. Пласка поверхня
7-1. Mixing blade
7-2. Вал
8-1. Болт із шестигранною голівкою
8-2. Вал
8-3. Пласка поверхня
9-1. Фільтр
9-2. Кришка
9-3. Викрутка
10-1. Обмежувальна відмітка
11-1. Викрутка
11-2. Ковпачок щіткотримача
ТЕХНІЧНІ ХАРАКТЕРИСТИКИ
Швидкість холостого ходу (хв-1) 550
Діаметр диска для змішування 220 мм
• Через те, що ми не припиняємо програми досліджень і розвитку, наведені тут технічні характеристики можуть бути змінені
без попередження.
• Примітка. У різних країнах технічні характеристики можуть бути різними.
Призначення
Інструмент призначено для змішування матеріалів
для виконання стін і т.д. (за винятком займистих
матеріалів)
Джерело живлення
Інструмент можна підключати лише до джерела
струму, що має напругу, зазначену в табличці з
заводськими характеристиками, і він може
працювати лише від однофазного джерела
перемінного струму. Інструмент має подвійну
ізоляцію згідно з європейським стандартом і, отже,
може підключатися до розеток без клеми
заземлення.
Тільки для країн Європи
Шум та вібрація
Типовий рівень звукового тиску за шкалою А
дорівнює83 дБ (A).
Погрішність становить3 дБ(A).
Рівень шуму під час роботи може перевищувати 85
дБ (A).
Користуйтеся засобами захисту слуху.
Типове зважене середньоквадратичне прискорення
не перевищує 2,5 м/с
Ці значення були отримані відповідно до стандарту
EN60745.
Модель UT2204
Загальна довжина 929 мм
Чиста вага 3,7 кг
Клас безпеки /II
ENE056-1
Для моделі UT2204
ДЕКЛАРАЦІЯ ВІДПОВІДНОСТІ ЄС
Ми заявляємо під нашу виключну відповідальність,
ENF002-1
що цей виріб відповідає вимогам наведених нижче
стандартів нормативної документації;
EN60745, EN55014, EN61000 у відповідності до
Директив Ради Європи 89/336/EEC, 98/37/EC.
Ясухіко Канзакі CE2005
000087
Директор
ENG003-2
МАКІТА ІНТЕРНЕШНЛ ЮРОП ЛТД.
Мічіган-Драйв, Тонгвелл, Мілтон-Кейнес, графство
Бекінгемшир MK15 8JD, АНГЛІЯ
Відповідальний виробник:
Макіта Корпорейшн Анджо Аічі Японія
Особливі правила техніки
безпеки
2
.
НЕ ДОЗВОЛЯЙТЕ недбалого поводження з цим
виробом (яке з'являється після регулярного
використання) замість суворого дотримання
правил безпеки при роботі з дрилем. При
використанні цього електроінструменту із
порушенням правил техніки безпеки або на за
призначенням, Ви можете отримати серйозну
травму.
1. Користуйтесь додатковими рукоятками, що
6
ENH101-5
GEB001-2
Page 7

постачаються з інструментом. Втрата
контролю призводить до травматизму.
2. При виконуванні робіт, при яких ріжучий
інструмент може контактувати зі схованою
проводкою або власним шнуром, необхідно
тримати електро інструмент за ізольовані
поверхні рукояток. Контакт з проводом фази
призведе до її попадання на відкриті металеві
деталі інструмента і може уразити користувача
електричним
3. Завжди майте тверду опору.
При виконанні висотних робіт
переконайтеся, що під Вами нікого немає.
4. Міцно тримайте інструмент.
5. Не торкайтесь руками частин, що
обертаються.
6. Не залишайте інструмент працюючим.
Працюйте з інструментом тільки тоді, коли
тримаєте його в руках.
7. Не торкайтесь свердла або заготовки
одразу після свердління; вони можуть
дуже гарячими і спричинити опіки шкіри.
8. Деякі матеріали мають у своєму складі
токсичні хімічні речовини. Будьте уважні,
щоб запобігти вдихання пилу та контактів зі
шкірою. Дотримуйтеся правил техніки
безпеки виробника матеріалу .
струмом .
бути
ЗБЕРІГАЙТЕ ЦІ ВКАЗІВКИ
УВАГА:
НЕДОТРИМАННЯ правил техніки безпеки,
наведених у цій інструкції з експлуатації, може
призвести до серйозного травмування.
ІНСТРУКЦІЯ З ВИКОРИСТАННЯ
ОБЕРЕЖНО:
• Перед регулюванням та перевіркою справності
інструменту, переконайтеся в тому, що він
вимкнений та відключений від мережі.
Дія вимикача.
Fig.1
ОБЕРЕЖНО:
• Перед вмиканням інструменту у мережу
обов'язково перевірте, чи кнопка вимикача
нормально спрацьовує і після відпускання
повертається в положення "вимкнено".
Щоб включити інструмент, просто натисніть кнопку
вимикача. Щоб зупинити - відпустіть кнопку вимикача.
Для довготривалої роботи натисніть кнопку вимикача,
після чого натисніть кнопку фіксатора.
Щоб зупинити інструмент із зафіксованим вимикачем,
натисніть кнопку
вимикача до кінця і відпустіть її.
Лампочка індикатора
Fig.2
Коли інструмент вмикають до сіті, загоряється зелена
індикаторна лампочка. Якщо індикаторна лампа
горить, але інструмент не запускається, навіть якщо
він увімкнений, то це може означати, що зношені
графітові щітки, або є дефект в моторі або в
перемикачу. Якщо лампочка індикатора не
загоряється, то це означає що є дефект в шнурі
живлення або індикаторній лампочці. У разі дефекту
шнура живлення інструмент не запускається, та
індикаторна лампочка не загоряється. У разі дефекту
індикаторної лампочки, інструмент запускається, а
індикаторна лампа не горить.
КОМПЛЕКТУВАННЯ
ОБЕРЕЖНО:
• Перед тим, як зайнятись комплектуванням
інструменту, переконайтеся в тому, що він
вимкнений та відключений від мережі.
Встановлення вала
Fig.3
Затягніть вал таким чином, щоб шестигранна гайка
зайшла у тримач вала до упора та торкнулась
тримача.
Трима йте прорізь в тримачі вала за допомогою ключа
№ 19, щоб він не обертався. Тримаючи прорізь таким
чином, затягніть шестигранну гайку іншим ключем №
19 у напрямку, що вказаний стрілкою.
Fig.4
Встановлення диска для змішування
Fig.5
Fig.6
Надіньте диск для змішування на вал та закріпіть
його шестигранним болтом.
Тепер його слід розташувати так, щоб верхній кінець
болта із шестигранною голівкою завжди прилягав до
пласкої поверхні на валу, а також затягнути болт із
шестигранною голівкою за допомогою ключа, що
додається.
Під час встановлення дисків для змішування у двох
різних положеннях (це стосується тільки тих дисків,
для яких це дозволено робити) слід встановити та
закріпити два диска для змішування на пласкій
частині валу за допомогою болтів із шестигранними
голівками, щоб одноіменні поверхні дисків були
направлені одне до одного, як показано на малюнку.
Fig.7
Fig.8
7
Page 8

ЗАСТОСУВАННЯ
Змішквання
ОБЕРЕЖНО:
• Заборонено змішувати займисті матеріали такі
як фарби з розчинниками. Невиконання цієї
умови може призвести до травм.
1. Трима йте задню ручку інструмента однією
рукою, а другою рукою міцно тримайте за
рукоять, повністю зануріть диск для
змішування в матеріал та увімкніть інструмент,
після того, як переконаєтесь у безпечності
робіт.
2. Пересувайте хмішуючий диск уверх
та вниз під
час змішування, щоб матеріал повністю
перемішався.
3. Наприкінці змішування слід вимкнути
інструмент, заждати доки змішуючий диск
повністю зупиниться, а потім витягнути його з
сосуда.
ТЕХНІЧНЕ ОБСЛУГОВУВАННЯ
ОБЕРЕЖНО:
• Перед тим, як оглянути інструмент, або
виконати ремонт, переконайтеся, що він
вимкнений та відключений від мережі.
Заміна фільтра
Fig.9
Регулярно замінюйте фільтр, оскільки ефективність
охолоджування інструмента хзнижується через пил
або частки, що накопичились у фільтрі.
Вставте викрутку із шліцовани наконечником або
подібний предмет між інсрументом та кришкою, як
показано на малюнку. Підніміть кришку, підчепивши її,
та зніміть кришку.
Замініть фильтр в кришці на новий.
Встановіть кришку назад на інструмент.
Заміна вугільних щіток
Fig.10
Регулярно знімайте та перевіряйте вугільні щітки.
Замінюйте їх, коли знос сягає граничної відмітки.
Вугільні щітки повинні бути чистими та вільно
рухатись у щіткотримачах. Одночасно треба
замінювати обидві вугільні щітки. Використовуйте
лише однакові вугільні щітки.
Для видалення ковпачків щіткотримачів користуйтесь
викруткою. Видаліть зношені вугільні щітки, вставте
нові та закріпіть ковпачки щіткотримачів.
Fig.11
Для того, щоб підтримувати БЕЗПЕКУ та
НАДІЙНІСТЬ, ремонт, технічне обслуговування або
регулювання мають виконувати уповноважені центри
обслуговування "Макіта", де використовуються лише
стандартні запчастини "Макіта".
ОСНАЩЕННЯ
ОБЕРЕЖНО:
• Це оснащення або приладдя рекомендовано
для використання з інструментами "Макіта", що
описані в інструкції з експлуатації.
Використання якогось іншого оснащення або
приладдя може спричинити травмування.
Оснащення або приладдя слід використовувати
лише за призначенням.
У разі необхідності, отримати допомогу в більш
детальному ознайомленні з оснащенням звертайтесь
до місцевого Сервісного центру "Макіта".
• Диски для змішування
• Вал
8
Page 9
POLSKI
1-1. Przycisk blokujący
1-2. Spust przełącznika
2-1. Kontrolka
3-1. Nakrętka sześciokątna
3-2. Trzonek mieszadła
3-3. Uchwyt
4-1. Klucz 19
4-2. Nacięcie
Objaśnienia do widoku ogólnego
4-3. Klucz 19
5-1. Mieszadło
6-1. Śruba sześciokątna
6-2. Trzonek mieszadła
6-3. Płaska powierzchnia
7-1. Mieszadło
7-2. Trzonek mieszadła
8-1. Śruba sześciokątna
8-2. Trzonek mieszadła
8-3. Płaska powierzchnia
9-1. Filtr
9-2. Pokrywa
9-3. Śrubokręt
10-1. Znak ograniczenia
11-1. Śrubokręt
11-2. Pokrywka uchwytu szczotki
SPECYFIAKCJE
Prędkość bez obciążenia (min-1) 550
• W związku ze stale prowadzonym przez naszą firmę programem badawczo-rozwojowym, niniejsze specyfikacje mogą ulec zmianom
bez wcześniejszego powiadomienia.
• Uwaga: Specyfikacje mogą różnić się w zależności od kraju.
Przeznaczenie
Narzędzie jest przeznaczone do mieszania różnych
materiałów nakładanych na ściany itp. (za wyjątkiem
materiałów łatwopalnych).
Zasilanie
Elektronarzędzie może być podłączane jedynie do
zasilania o takim samym napięciu jakie określa tabliczka
znamionowa i może być uruchamiane wyłącznie przy
zasilaniu jednofazowym prądem zmiennym. Przewody
są podwójnie izolowane zgodnie z Normami
Europejskimi i dlatego mogą być podłączone do
gniazdek bez przewodu uziemiającego.
Tylko dla krajów europejskich
Hałas i drgania
Normalne ciśnienie akustyczne na poziomie A wynosi 83
dB (A).
Błąd pomiaru wynosi 3 dB(A).
Poziom hałasu podczas pracy elektronarzędzia może
przewyższać 85 dB (A).
Nosić ochronniki słuchu
Typowa średnia ważona wartość skuteczna
przyspieszenia nie przekracza 2.5 m/s
Wartości te uzyskano zgodnie z EN60745.
Dla modelu UT2204
DEKLARACJA ZGODNOŚCI Z NORMAMI WE
Deklarujemy, na naszą wyłączną odpowiedzialność, że
niniejszy produkt jest zgodny z następującymi normami
dokumentów normalizacyjnych;
Model UT2204
Średnica mieszadła 220 mm
Długość całkowita 929 mm
Ciężar netto 3,7 kg
Klasa bezpieczeństwa /II
ENE056-1
EN60745, EN55014, EN61000 zgodnie z Dyrektywami
Rady, 89/336/EEC, 98/37/EC.
Yasuhiko Kanzaki CE2005
ENF002-1
000087
Dyrektor
MAKITA INTERNATIONAL EUROPE LTD.
Michigan Drive, Tongwell, Milton Keynes, Bucks MK15
8JD, ENGLAND (ANGLIA)
Producent odpowiedzialny:
ENG003-2
Makita Corporation Anjo Aichi Japan (Japonia)
GEB001-2
Szczególne zasady
bezpieczeństwa
NIE DOPUŚCIĆ, aby dobre obeznanie i
przyzwyczajenie do wyrobu (zdobyte przez częste
użytkowanie) zastąpiło ścisłe przestrzeganie zasad
bezpieczeństwa. Poprzez użytkowanie niniejszego
elektronarzędzia w sposób niebezpieczny lub
2
.
ENH101-5
nieprawidłowy, można doznać poważnych obrażeń
ciała.
1. Stosować uchwyty pomocnicze przewidziane
dla elektronarzędzia. Brak kontroli może
spowodować obrażenia ciała.
2. Podczas wykonywania pracy narzędziem
tnącym, trzymać elektronarzędzie za
izolowane powierzchnie uchwytów, ponieważ
ostrze narzędzia może natrafić na przewód
ukryty w materiale lub zetknąć się z
przewodem zasilania. Kontakt z przewodem pod
9
Page 10

napięciem spowoduje przepływ prądu do
metalowych zewnętrznych części
elektronarzędzia i porażenie operatora.
3. Zapewnić stałe podłoże.
Upewnić się, czy nikt nie znajduje się poniżej
miejsca pracy na wysokości.
4. Trzymać narzędzie w sposób niezawodny.
5. Trzymać ręce z dala od części obrotowych.
sama kontrolka jest przepalona. W przypadku
uszkodzenia przewodu zasilającego nie można
uruchomić narzędzia i kontrolka nie świeci się. Gdy
kontrolka jest przepalona, narzędzie można uruchomić,
ale kontrolka nie świeci się.
MONTAŻ
6. Nie pozostawiać załączonego elektronarzędzia.
Można uruchomić elektronarzędzie tylko
wtedy, gdy jest trzymane w rękach.
7. Nie dotykać końcówki wiertła lub części
obrabianej bezpośrednio po operacji; mogą
one być bardzo gorące i przypalić skórę.
8. Niektóre materiały zawierają
substancje
chemiczne, które mogą być toksyczne. Unikać
wdychania i kontaktu ze skórą. Przestrzegać
przepisów bezpieczeństwa podanych przez
dostawcę materiałów.
ZACHOWAĆ INSTRUKCJE
OSTRZEŻENIE:
NIEPRAWIDŁOWE STOSOWANIE lub
nieprzestrzeganie zasad bezpieczeństwa
określonych w niniejszej instrukcji obsługi może
spowodować poważne obrażenia ciała.
OPIS DZIAŁANIA
UWAGA:
• Przed rozpoczęciem regulacji i sprawdzania
działania elektronarzędzia, należy upewnić się, czy
jest ono wyłączone i nie podłączone do sieci.
Włączanie
Rys.1
UWAGA:
• Przed podłączeniem elektronarzędzia do sieci
zawsze sprawdzać czy spust włącznika działa
poprawnie i wraca do pozycji "OFF" po zwolnieniu.
W celu uruchomienia elektronarzędzia należy nacisnąć
na spust przełącznika. Zwolnić spust przełącznika, aby
wyłączyć elektronarzędzie.
Dla uruchomienia trybu pracy ciągłej, nacisnąć spust
• Przed wykonywaniem jakichkolwiek czynności na
Montaż trzonka mieszadła
Rys.3
Wkręcić trzonek mieszadła z nakrętką sześciokątną do
oporu do uchwytu mieszadła.
Przytrzymać kluczem 19 uchwyt mieszadła w miejscu
nacięcia w taki sposób, aby się nie obracał.
Przytrzymując uchwyt, za pomocą drugiego klucza 19
dokręć nakrętkę sześciokątną obracając klucz w
kierunku strzałki.
Rys.4
Montaż mieszadeł
Rys.5
Rys.6
Nasuń mieszadło na trzonek i zablokuj je śrubą
sześciokątną.
Mieszadło należy ustawić w taki sposób, aby końcówka
śruby sześciokątnej trafiła na płaską powierzchnię
trzonka, a śrubę sześciokątną dokręcić znajdującym się
w zestawie kluczem.
W przypadku montażu mieszadeł w dwóch różnych
pozycjach (co jest możliwe tylko w przypadku mieszadeł
do tego przystosowanych) należy je przymocować na
płaskiej powierzchni trzonka blokując śrubami
sześciokątnymi. Mieszadła ustawić w taki sposób, aby te
same powierzchnie łopatek były zwrócone ku sobie, jak
pokazano na rysunku.
Rys.7
Rys.8
DZIAŁANIE
Mieszanie
przełącznika, a następnie wcisnąć przycisk blokujący.
Do zatrzymania elektronarzędzia pracującego w trybie
ciągłym, należy nacisnąć spust przełącznika do oporu, a
następnie zwolnić go.
Kontrolka
Rys.2
• Nie wolno stosować do mieszania materiałów
1. Chwycić mocno narzędzie jedną ręką za rękojeść
Zielona kontrolka zasilania zapala się w momencie
podłączenia narzędzia do zasilania. Jeżeli kontrolka jest
zapalona, ale narzędzia nie można uruchomić, wówczas
mamy do czynienia z zużyciem szczotek bądź
uszkodzeniem silnika albo przełącznika. Jeżeli kontrolka
nie zapala się, uszkodzony jest przewód zasilający albo
10
UWAGA:
elektronarzędziu należy upewnić się, czy jest ono
wyłączone i nie podłączone do sieci.
UWAGA:
łatwopalnych, jak farba z rozcieńczalnikiem
używanym jako rozpuszczalnik. Niestosowanie się
do tej zasady może spowodować obrażenia.
tylną, a drugą – za uchwyt, zanurzyć mieszadło
całkowicie w materiale a następnie - po
sprawdzeniu bezpieczeństwa w miejscu pracy włączyć narzędzie.
Page 11

2. Podczas operacji mieszania należy poruszać
mieszadłem w górę i w dół, aby całość materiału
została dobrze wymieszana.
3. Po zakończeniu mieszania narzędzie należy
wyłączyć, sprawdzić, czy mieszadło zatrzymało
się całkowicie, i dopiero wówczas wyciągnąć z
pojemnika.
KONSERWACJA
UWAGA:
• Przed wykonywaniem kontroli i konserwacji należy
się zawsze upewnić, czy elektronarzędzie jest
wyłączone i nie podłączone do sieci.
Wymiana filtra
Rys.9
Filtr należy regularnie wymieniać, ponieważ
nagromadzony w filtrze pył i zanieczyszczenia mogą
obniżać skuteczność chłodzenia narzędzia.
Pomiędzy narzędzie a pokrywę włożyć śrubokręt płaski
lub podobny przyrząd, jak pokazano na rysunku.
Ściągnąć pokrywę podważając ją śrubokrętem.
Wymienić filtr w pokrywie na nowy.
Ponownie zamontować pokrywę w narzędziu.
Wymiana szczotek węglowych
Rys.10
Systematycznie wyjmować i sprawdzać szczotki
węglowe. Wymieniać je, gdy ich zużycie sięga znaku
granicznego. Szczotki powinny być czyste i łatwo
wchodzić w uchwyty. Należy wymieniać obydwie
szczotki jednocześnie. Stosować wyłącznie identyczne
szczotki węglowe.
Do wyjęcia pokrywek uchwytów szczotek używać
śrubokrętu. Wyjąć zużyte szczotki węglowe, włożyć
nowe i zabezpieczyć pokrywkami uchwytów szczotek.
Rys.11
Dla zachowania BEZPIECZEŃSTWA i
NIEZAWODNOŚCI wyrobu, naprawy oraz inne prace
konserwacyjne i regulacyjne powinny być wykonywane
przez Autoryzowane Centra Serwisowe Makita,
wyłącznie przy użyciu części zamiennych Makita.
AKCESORIA (WYPOSAŻENIE
DODATKOWE)
UWAGA:
• Zaleca się stosowanie wymienionych akcesoriów i
dodatków razem z elektronarzędziem Makita
opisanym w niniejszej instrukcji. Stosowanie
jakichkolwiek innych akcesoriów i dodatków może
stanowić ryzyko uszkodzenia ciała. Stosować
akcesoria i dodatki w celach wyłącznie zgodnych z
ich przeznaczeniem.
W razie potrzeby, wszelkiej pomocy i szczegółowych
informacji na temat niniejszych akcesoriów udzielą
Państwu lokalne Centra Serwisowe Makita.
• Mieszadła
• Trzonek mieszadła
11
Page 12

ROMÂNĂ
1-1. Buton de blocare
1-2. Trăgaciul întrerupătorului
2-1. Lampă indicatoare
3-1. Piuliţă hexagonală
3-2. Ax
3-3. Shaft holder
4-1. Cheie de 19
4-2. Crestătură
Explicitarea vederii de ansamblu
4-3. Cheie de 19
5-1. Paletă malaxoare
6-1. Şurub cu cap hexagonal
6-2. Ax
6-3. Suprafaţă plană
7-1. Paletă malaxoare
7-2. Ax
8-1. Şurub cu cap hexagonal
8-2. Ax
8-3. Suprafaţă plană
9-1. Filtru
9-2. Capac
9-3. Şurubelniţă
10-1. Marcaj limită
11-1. Şurubelniţă
11-2. Capacul suportului pentru perii
SPECIFICAŢII
Model UT2204
Turaţia în gol (min-1) 550
Diametrul paletei malaxoare 220 mm
Lungime totală 929 mm
Greutate netă 3,7 kg
• Datorită programului nostru continuu de cercetare şi dezvoltare, caracteristicile pot fi modificate fără o notificare prealabilă.
• Notă: Specificaţiile pot varia în funcţie de ţară.
Destinaţia de utilizare
Maşina este destinată amestecării materialelor de
zidărie etc. (exceptând materialele inflamabile).
Sursă de alimentare
Maşina se va alimenta de la o sursă de curent alternativ
monofazat, cu tensiunea egală cu cea indicată pe
plăcuţa de identificare a maşinii. Având dublă izolaţie,
conform cu Standardele Europene, se poate conecta la
o priză de curent fără contacte de împământare.
Doar pentru ţările europene
Zgomot şi vibraţii
Puterea acustică la funcţionarea în gol este de 83 dB (A).
Var ia ţia posibilă este de 3 dB(A).
Nivelul de zgomot în timpul lucrului poate depăşi 85 dB
(A).
Valoarea acceleraţiei vibraţiilor nu depăşeşte 2.5m/s
Aceste valori sunt în conformitate cu EN60745.
Pentru modelul UT2204
CE-DECLARAŢIE DE CONFORMITATE
Declarăm pe propria răspundere că acest produs este în
conformitate cu următoarele standarde şi reglementări;
EN60745, EN55014, EN61000 conform cu Directivele
Consiliului, 89/336/EEC, 98/37/EC.
000087
Clasa de siguranţă /II
ENE056-1
MAKITA INTERNATIONAL EUROPE LTD.
Michigan Drive, Tongwell, Milton Keynes, Bucks MK15
ENF002-1
8JD, ANGLIA
Producător:
Makita Corporation Anjo Aichi Japan
REGULI SPECIALE DE
ENG003-2
Purtaţi antifoane.
ENH101-5
Yasuhiko Kanzaki CE2005
SIGURANŢĂ
Familiarizarea cu această maşină (generată de
utilizarea îndelungată) nu poate suplini respectarea
strictă a acestor reguli de siguranţă. Dacă folosiţi
maşina incorect, este posibil să suferiţi vătămări
grave.
1. Folosiţi mânerele auxiliare furnizate cu maşina
Pierderea controlului poate cauza vătămarea
2
.
12
personală.
2. Susţineţi maşina de suprafeţele izolate atunci
când efectuaţi o operaţiune în care maşina de
tăiat poate intra în contact cu cabluri ascunse
sau cu propriul cablu de alimentare.
Contactul cu un cablu aflat sub tesniune va face
ca piesele de metal să fie parcurse de curent, iar
operatorul se va electrocuta.
3. Păstraţi-vă echilibrul.
Asiguraţi-vă că nu se află nimeni dedesubt
atunci când folosiţi maşina la înălţ
4. Ţineţi bine maşina
5. Nu atingeţi piesele în mişcare.
6. Nu lăsaţi maşina în funcţiune. Folosiţi maşina
numai când o ţineţi cu mâinile
7. Nu atingeţi burghiul sau piesa de lucru imediat
după operaţiune; acestea pot fi fierbinţi şi vă
Director
GEB001-2
ime.
Page 13

pot cauza arsuri
8. Unele materiale conţin substanţe chimice care
pot fi toxice. Aveţi grijă să nu inhalaţi praful şi
evitaţi contactul cu pielea. Respectaţi
instrucţiunile de siguranţă ale furnizorului
PĂSTRAŢI ACESTE
INSTRUCŢIUNI
AVERTISMENT:
Utilizarea necorespunzătoare sau nerespectarea
regulilor din manualul de instrucţiuni poate cauza
vătămări personale grave
DESCRIERE FUNCŢIONALĂ
ATE NŢIE:
• Asiguraţi-vă că aţi oprit maşina şi că aţi
debranşat-o de la reţea înainte de a o regla sau de
a verifica starea sa de funcţionare.
Acţionarea întrerupătorului
Fig.1
ATE NŢIE:
• Înainte de a branşa maşina la reţea, verificaţi dacă
trăgaciul întrerupătorului funcţionează corect şi
dacă revine la poziţia "OFF" (oprit) atunci când
este eliberat.
Pentru a porni maşina, trebuie doar să acţionaţi
întrerupătorul. Eliberaţi întrerupătorul pentru a opri
maşina.
Pentru o funcţionare continuă, apăsaţi întrerupătorul şi
butonul de blocare.
Pentru a opri maşina din poziţia blocată, acţionaţi la
maxim întrerupătorul, apoi eliberaţi-l.
Lampă indicatoare
Fig.2
Lampa indicatoare verde pentru alimentare PORNITĂ
se aprinde atunci când maşina este conectată la reţea.
Dacă lampa indicatoare este aprinsă dar maşina nu
porneşte chiar dacă este PORNITĂ, periile de cărbune
ar putea fi consumate, sau motorul sau comutatorul ar
putea fi defecte. Dacă lampa indicatoare nu se aprinde,
cablul de alimentare sau lampa indicatoare ar putea fi
defecte. Când cablul de alimentare este defect, maşina
nu porneşte iar lampa indicatoare nu se aprinde. Când
lampa indicatoare este defectă, maşina porneşte fără ca
lampa indicatoare să se aprindă.
MONTARE
ATE NŢIE:
• Asiguraţi-vă că aţi oprit maşina şi că aţi
deconectat-o de la reţea înainte de a efectua vreo
intervenţie asupra maşinii.
Instalarea axului
Fig.3
Strângeţi axul cu piuliţa hexagonală în suportul axului
până când piuliţa hexagonală intră în contact cu
suportul.
Fixaţi canelura din suportul axului cu o cheie de 19
pentru a nu se roti. Cu canelura astfel fixată, strângeţi
piuliţa hexagonală cu o altă cheie de 19 în direcţia
săgeţii.
Fig.4
Instalarea paletelor malaxoare
Fig.5
Fig.6
Introduceţi paleta malaxoare pe ax şi fixaţi-o cu şurubul
cu cap hexagonal.
În această fază, poziţionaţi-o astfel încât capătul
superior al şurubului cu cap hexagonal să se angreneze
întotdeauna cu suprafaţa plană de pe ax şi apoi
strângeţi şurubul cu cap hexagonal cu cheia livrată.
Când instalaţi paletele malaxoare în două poziţii diferite
(valabil numai în cazul paletelor malaxoare care permit
acest lucru), montaţi şi fixaţi cele două palete malaxoare
pe porţiunea plată a axului astfel încât suprafeţele
identice ale paletelor să fie orientate una către cealaltă
după cum se vede în figură.
Fig.7
Fig.8
FUNCŢIONARE
Amestecarea
ATE NŢIE:
• Nu folosiţi maşina pentru amestecarea materialelor
inflamabile cum ar fi vopseaua cu diluant. În caz
contrar există pericol de vătămări corporale.
1. Apucaţi ferm mânerul posterior al maşinii cu o
mână şi mânerul lateral cu cealaltă mână,
imersaţi paleta malaxoare complet în material şi
porniţi maşina după ce v-aţi convins că zona de
lucru este asigurată.
2. Deplasaţi paleta malaxoare în sus şi în jos pe
durata amestecării astfel încât să amestecaţi
întreg materialul.
3. După terminarea amestecării, opriţi maşina,
asiguraţi-vă că paleta malaxoare s-a oprit complet
şi apoi scoateţi-o din recipient.
ÎNTREŢINERE
ATE NŢIE:
• Asiguraţi-vă că aţi oprit maşina şi că aţi
debranşat-o de la reţea înainte de a efectua
operaţiuni de verificare sau întreţinere.
13
Page 14

Înlocuirea filtrului
Fig.9
Înlocuiţi filtrul la intervale regulate deoarece eficienţa
răcirii maşinii este redusă din cauza acumulării prafului
sau a particulelor în filtru.
Introduceţi o şurubelniţă cu vârf plat sau alt instrument
similar între maşină şi capac după cum se vede în figură.
Ridicaţi-o ca şi cum aţi folosi o lopată şi scoateţi capacul.
Înlocuiţi filtrul din capac cu unul nou.
Reinstalaţi capacul pe maşină.
Înlocuirea periilor de carbon
Fig.10
Detaşaţi periile de carbon şi verificaţi-le în mod regulat.
Schimbaţi-le atunci când s-au uzat până la marcajul
limită. Periile de carbon trebuie să fie în permanenţă
curate şi să alunece uşor în suport. Ambele perii de
carbon trebuie să fie înlocuite simultan cu alte perii
identice.
Folosiţi o şurubelniţă pentru a îndepărta capacul
suportului periilor de carbon. Scoateţi periile de carbon
uzate şi fixaţi capacul pentru periile de carbon.
Fig.11
Pentru a menţine siguranţa şi fiabilitatea maşinii,
reparaţiile şi reglajele trebuie să fie efectuate numai la
Centrele de service autorizat Makita, folosindu-se piese
de schimb Makita.
ACCESORII
ATE NŢIE:
• Folosiţi accesoriile sau piesele auxiliare
recomandate pentru maşina dumnavoastră în
acest manual. Utilizarea oricăror alte accesorii sau
piese auxiliare poate cauza vătămări. Folosiţi
accesoriile pentru operaţuinea pentru care au fost
concepute.
Dacă aveţi nevoie de asistenţă sau de mai multe detalii
referitoare la aceste accesorii, adresaţi-vă centrului local
de service Makita.
• Palete malaxoare
• Ax
14
Page 15

DEUTSCH
1-1. Blockierungstaste
1-2. Schalter
2-1. Anzeigenleuchte
3-1. Sechskantmutter
3-2. Spindel
3-3. Spindelhalter
4-1. Schlüssel 19
4-2. Kerbe
Erklärung der Gesamtdarstellung
4-3. Schlüssel 19
5-1. Rührkorb
6-1. Sechskantschraube
6-2. Spindel
6-3. Glatte Oberfläche
7-1. Rührkorb
7-2. Spindel
8-1. Sechskantschraube
8-2. Spindel
8-3. Glatte Oberfläche
9-1. Filter
9-2. Abdeckung
9-3. Schraubenzieher
10-1. Grenzmarke
11-1. Schraubenzieher
11-2. Kohlenhalterdeckel
TECHNISCHE DATEN
Modell UT2204
Leerlaufdrehzahl (min-1) 550
Rührkorbdurchmesser 220 mm
Gesamtlänge 929 mm
Netto-Gewicht 3,7 kg
Sicherheitsklasse /II
• Aufgrund der laufenden Forschung und Entwicklung unterliegen die hier aufgeführten technischen Daten Veränderungen ohne
Hinweis
• Anm.: Die technischen Daten können für verschiedene Länder unterschiedlich sein.
Verwendungszweck
Das Werkzeug wurde für das Rühren von
Wandmaterialien (mit Ausnahme von brennbarem
Material) entwickelt.
Speisung
Das Werkzeug darf nur an eine entsprechende Quelle
mit der gleichen Spannung angeschlossen werden, wie
sie auf dem Typenschild aufgeführt wird, und es kann
nur mit Einphasen-Wechselstrom arbeiten. Es besitzt in
Übereinstimmung mit den europäischen Normen eine
Zweifach-Isolierung, aufgrund dessen kann es aus
Steckdosen ohne Erdungsleiter gespeist werden.
Nur für europäische Länder
Lärm und Vibration
Typisches A-gewichtiges Niveau des Schalldrucks ist
83dB(A).
Ungenauigkeit ist 3dB(A).
Geräuschpegel bei der Arbeit kann 85 dB (A)
überschreiten.
Verwenden Sie Hilfsmittel für den Gehörschutz.
Der typische gewogene Wert der
Effektivbeschleunigung ist nicht größer als 2,5 m/s
Diese Werte wurden in Übereinstimmung mit EN60745
gemessen.
ENE056-1
ENF002-1
ENG003-2
2
.
Für Modell UT2204
ÜBEREINSTIMMUNGSERKLÄRUNG MIT DEN
EU-NORMEN
Wir erklären auf unsere eigene Verantwortung, dass
dieses Produkt in Übereinstimmung mit den
nachstehenden Normen oder standardisierten
Dokumenten steht:
EN60745, EN55014, EN61000, und zwar in
Übereinstimmung mit den Verordnungen des Rates
89/336/EEC, 98/37/EC.
Yasuhiko Kanzaki CE2005
000087
Direktor
MAKITA INTERNATIONAL EUROPE LTD.
Michigan Drive, Tongwell, Milton Keynes, Bucks MK15
8JD, ENGLAND
Verantwortlicher Hersteller:
Makita Corporation Anjo Aichi Japan
Besondere
Sicherheitsgrundsätze
LASSEN SIE NICHT ZU, dass Bequemlichkeit und
Vertrautsein mit dem Produkt (infolge seiner
wiederholten Verwendung) die strenge Einhaltung
der Sicherheitsgrundsätze beim Bohren ablösen.
Wenn Sie dieses elektrische Werkzeug in
gefährlicher und falscher Weise verwenden, können
Sie sich ernste Verletzungen zuziehen.
15
ENH101-5
GEB001-2
Page 16

1. Verwenden Sie die zum Werkzeug
mitgelieferten Hilfsgriffe. Eine Verlustkontrolle
kann Verletzungen verursachen.
2. Bei Arbeiten, bei denen das Bohrwerkzeug mit
verdeckten elektrischen Leitern oder mit der
eigenen Stromschnur in Kontakt kommen
kann, halten Sie es an den isolierten
Greifstellen. Beim Kontakt mit einem
"lebendigen" Leiter werden die ungeschützten
Metallteile gleichfalls zu "lebendigen" Leitern und
die Bedienperson vom elektrischen Strom
getroffen werden.
3. Achten Sie darauf, dass Sie immer einen
festen Stand haben.
Wenn Sie in der Höhe arbeiten, achten Sie
darauf, dass sich unter Ihnen niemand aufhält.
4. Halten Sie das Werkzeug fest in der Hand.
5. Nähern Sie die Hände nicht den sich
drehenden Teilen.
6. Lassen Sie das Werkzeug nicht
unbeaufsichtigt laufen. Arbeiten Sie nur mit
ihm, wenn Sie es in der Hand halten.
7. Berühren Sie unmittelbar nach Arbeitsende
nicht den Bohrer oder das bearbeitete Teil. Sie
können sehr heiß sein und Sie könnten sich
verbrennen.
8. Manche Materialien enthalten Chemikalien, die
giftig sein können. Geben Sie Acht, dass Sie
diese nicht einatmen oder berühren. Lesen Sie
die Material-Sicherheitsblätter des Lieferers.
BEWAHREN SIE DIESE
ANWEISUNGEN AUF.
WARNUNG:
Die FALSCHE VERWENDUNG oder Nichtbefolgung
der in dieser Anleitung aufgeführten
Sicherheitsgrundsätze kann ernste Verletzungen zur
Folge haben.
FUNKTIONSBESCHREIBUNG
ACHTUNG:
• Überzeugen Sie sich immer vor dem Einstellen
des Werkzeugs oder der Kontrolle seiner Funktion,
dass es abgeschaltet und der Stecker aus der
Dose gezogen ist.
Einschalten
Abb.1
ACHTUNG:
• Kontrollieren Sie immer vor dem Anschluss des
Werkzeugs in die Steckdose, ob der Schalter
richtig funktioniert und nach dem Loslassen in die
ausgeschaltete Position zurückkehrt.
Wenn Sie das Werkzeug ingangsetzen wollen, muss nur
der Schalter gedrückt werden. Wenn Sie das Werkzeug
16
abschalten wollen, lassen Sie den Schalter los.
Wenn Sie kontinuierlich arbeiten wollen, drücken Sie
den Schalter und dann die Blockierungstaste.
Wenn Sie das Werkzeug aus dem Blockierungsbetrieb
abschalten wollen, drücken Sie fest den Schalter und
lassen ihn dann los.
Anzeigenleuchte
Abb.2
Die grüne Anzeigenleuchte "Power-ON" leuchtet auf,
sobald das Werkzeug an den Hauptstromkreis
angeschlossen ist. Wenn die Anzeigenleuchte leuchtet
und das Werkzeug nicht startet, obwohl es eingeschaltet
wird, können die Kohlebürsten verbraucht sein, oder der
Motor oder Schalter ist defekt. Wenn die
Anzeigenleuchte nicht aufleuchtet, können das
Stromkabel oder die Lampe defekt sein. Bei einem
defekten Stromkabel wird weder das Werkzeug gestartet,
noch leuchtet die Anzeigenleuchte auf. Bei einer
defekten Anzeigenleuchte startet das Werkzeug ohne
Aufleuchten der Anzeige.
MONTAGE
ACHTUNG:
• Ehe Sie am Werkzeug irgendwelche Arbeiten
beginnen, überzeugen Sie sich immer vorher, dass
es abgeschaltet und der Stecker aus der Dose
gezogen ist.
Anbringen der Spindel
Abb.3
Ziehen Sie die Spindel mit der Sechskantmutter an.
Führen Sie die Spindel mit der Mutter in den
Spindelhalter, bis die Sechskantmutter den Halter
berührt.
Halten Sie den Spindelhalter an der Einkerbung mit dem
Gabelschlüssel 19, damit sich dieser nicht dreht. Ziehen
Sie dann die Sechskantmutter mit einem anderen
Gabelschlüssel 19 in Pfeilrichtung fest.
Abb.4
Anbringen des Rührkorbs
Abb.5
Abb.6
Setzen Sie den Rührkorb in die Spindel ein, und
befestigen Sie diesen mit der Sechskantschraube.
Positionieren Sie ihn dabei so, dass das obere Ende der
Sechskantschraube immer auf die glatte Oberfläche auf
der Spindel passt. Ziehen Sie die Sechskantschraube
mit dem mitgelieferten Schlüssel an.
Wenn die Rührkörbe an zwei verschiedenen Positionen
angebracht werden (diese Informationen gelten nur für
Rührkörbe, bei denen dies möglich ist), montieren und
befestigen Sie die beiden Rührkörbe mit den
Sechskantschrauben auf der flachen Seite der Spindel,
sodass sich dieselben Oberflächen der Schaufeln
gegenüber stehen (siehe Abbildung).
Page 17

Abb.7
Abb.8
ARBEIT
Rühren
ACHTUNG:
• Rühren Sie niemals brennbares Material wie
beispielsweise Farbe mit Verdünner als
Lösungsmittel. Zuwiderhandlungen können zu
Personenschäden führen.
1. Halten Sie den hinteren Griff des Werkzeugs mit
der einen Hand und den Griff fest mit der anderen
Hand. Setzen Sie den Rührkorb fest in das
Material, und schalten Sie das Werkzeug ein,
sobald Sie sich vergewissert haben, dass die
Arbeitsbedingungen sicher sind.
2. Bewegen Sie den Rührkorb beim Rühren von
oben nach unten und umgekehrt, damit das
gesamte Material gerührt wird.
3. Sobald Sie den Rührvorgang abgeschlossen
haben, schalten Sie das Gerät aus. Vergewissern
Sie sich, dass der Rührkorb wirklich gestoppt
wurde, und ziehen Sie ihn dann aus dem
Behälter.
WARTUNG
ACHTUNG:
• Bevor Sie mit der Kontrolle oder Wartung des
Werkzeugs beginnen, überzeugen Sie sich immer,
dass es ausgeschaltet und der Stecker aus der
Steckdose herausgezogen ist.
Austausch von Filtern
Abb.9
Der Filter muss in regelmäßigen Abständen ersetzt
werden, da die Kühlung des Werkzeugs auf Grund von
angesammelten Staubpartikeln im Filter beeinträchtigt
wird.
Stecken Sie einen Schlitzschraubendreher oder ein
ähnliches Werkzeug zwischen das Gerät und die
Abdeckung (siehe Abbildung). Heben Sie die
Abdeckung wie bei Verwendung einer Schaufel an, und
entfernen Sie diese.
Ersetzen Sie den Filter in der Abdeckung durch einen
neuen Filter.
Befestigen Sie die Abdeckung wieder am Gerät.
Kohlenwechsel
Abb.10
Nehmen Sie die Kohlen regelmäßig heraus und
wechseln Sie sie. Wenn sie bis zur Grenzmarke
verbraucht sind, müssen sie ausgewechselt werden. Die
Kohlen müssen sauber sein und locker in ihre Halter
hineinfallen. Die beiden Kohlen müssen gleichzeitig
ausgewechselt werden. Verwenden Sie ausschließlich
gleiche Kohlen.
Schrauben Sie mit einem Schraubenzieher den
Kohlenhalterdeckel ab. Wechseln Sie die
verschlissenen Kohlen, legen Sie neue ein und
schrauben Sie den Deckel wieder auf.
Abb.11
Zur Aufrechterhaltung der SICHERHEIT und
ZUVERLÄSSIGKEIT des Produkts müssen die
Reparaturen und alle Wartungen und Einstellungen von
den autorisierten Servicestellen der Firma Makita und
unter Verwendung der Ersatzteile von Makita
durchgeführt werden.
ZUBEHÖR
ACHTUNG:
• Für Ihr Werkzeug Makita, das in dieser Anleitung
beschrieben ist, empfehlen wir folgende
Zubehörteile und Aufsätze zu verwenden. Bei der
Verwendung anderer Zubehörteile oder Aufsätze
kann die Verletzungsgefahr für Personen drohen.
Die Zubehörteile und Aufsätze dürfen nur für ihre
festgelegten Zwecke verwendet werden.
Wenn Sie nähere Informationen bezüglich dieses
Zubehörs benötigen, wenden Sie sich bitte an Ihre
örtliche Servicestelle der Firma Makita.
• Rührkorb
• Spindel
17
Page 18

MAGYAR
1-1. Zárgomb
1-2. Kapcsoló kioldógomb
2-1. Jelzőlámpa
3-1. Hatlapfejű anya
3-2. Tengely
3-3. Shaft holder
4-1. Kulcs, 19
4-2. Bevágás
Az általános nézet magyarázata
4-3. Kulcs, 19
5-1. Keverőlapát
6-1. Hatlapfejű csavar
6-2. Tengely
6-3. Lapos felület
7-1. Mixing blade
7-2. Tengely
8-1. Hatlapfejű csavar
8-2. Tengely
8-3. Lapos felület
9-1. Szűrő
9-2. Fedél
9-3. Csavarhúzó
10-1. Határjelzés
11-1. Csavarhúzó
11-2. Kefetartó sapka
RÉSZLETES LEÍRÁS
Modell UT2204
Üresjárati sebeség (perc-1) 550
Keverőlapát átmérője 220 mm
Teljes hossz 929 mm
Tiszta tömeg 3,7 kg
• Folyamatos kutató- és fejlesztőprogramunk eredményeként az itt felsorolt tulajdonságok figyelmeztetés nélkül megváltozhatnak.
• Megjegyzés: A tulajdonságok országról országra különbözhetnek.
Rendeltetésszerű használat
A szerszám falazóanyagok, stb. keverésére használható
(gyúlékony anyagokat kivéve).
Tápegység
A szerszám csak a névtáblán feltüntetett feszültségű,
egyfázisú váltakozófeszültségű hálózathoz
csatlakoztatható. A szerszám az európai szabványok
szerinti kettős szigeteléssel van ellátva, így táplálható
földelővezeték nélküli csatlakozóaljzatból is.
Csak európai államokra érvényes
Zaj és rezgés
A jellemző A-súlyzott hangnyomás értéke 83 dB (A).
A bizonytalanság 3 dB(A).
Az üzemi zajszint meghaladhatja a 85 dB értéket. (A).
Használjon személyi hallásvédelmi segédeszközt.
A jellegzetes frekvenciával súlyozott gyorsulási értékek
négyzeteinek (rms) összegéből vont négyzetgyök értéke
nem nagyobb mint 2.5 m/s
Ezek az értékek a EN60745 szabvánnyal összhangban
lettek mérve.
A modellhez UT2204
Az Európai Közösség (EC) előírásainak való
megfelelési nyilatkozat
A kizárólagos felelősségünkre kijelentjük, hogy ezen
termék megfelel a következő szabványok előírásainak;
EN60745, EN55014, EN61000 összhangban a tanács
irányelveivel, 89/336/EEC, 98/37/EC.
Biztonsági osztály /II
ENE056-1
ENF002-1
000087
MAKITA INTERNATIONAL EUROPE LTD.
Michigan Drive, Tongwell, Milton Keynes, Bucks MK15
8JD, ENGLAND
Felelős gyártó:
Makita Corporation Anjo Aichi Japan
ENG003-2
Különleges biztonsági szabályok
NE engedje meg, hogy kényelem vagy (a termék
ismételt használatával szerzett) megszokás
helyettesítse a fúrásnál szükséges biztonsági
szabályok pontos betartását. Ha helytelenül vagy
nem bisztonságosan használja ezt az elektromos
szerszámot, komoly személyi sérülést szenvedhet.
2
.
Yasuhiko Kanzaki CE2005
ENH101-5
1. Használja a szerszámmal kapott kiegészítő
markolatokat. A szerszám feletti uralom
elvesztése személyi sérülést okozhat.
2. Tartsa az elektromos szerszámot annak
szigetelt markolófelületeinél ha olyan
műveletet végez amikor a vágószerszám
rejtett vezetékekkel vagy a szerszám saját
vezetékével érintkezhet. Az "élő" vezetékekkel
való érintkezés a szerszám nem szigetelt,
hozzáférhető fém részeit is "élővé" teszi és így a
kezelő áramütést szenvedhet.
3. Mindig bizonyosodjon meg arról hogy
szilárdan áll.
Bizonyosodjon meg arról hogy senki sincs
lent amikor a szerszámot magas helyen
Igazgató
GEB001-2
18
Page 19

használja.
4. Tartsa a szerszámot szilárdan.
5. Ne nyúljon a forgó részekhez.
6. Ne hagyja a szerszámot bekapcsolva. Csak
kézben tartva használja a szerszámot.
7. Ne érintse meg a fúróhegyet vagy a
munkadarabot közvetlenül a művelet
befejezése után; rendkívül forrók lehetnek és
megégethetik.
8. Némelyik anyag mérgező vegyületet
tartalmazhat. Gondoskodjon a por belélegzése
elleni és érintés elleni védelemről. Kövesse az
anyag szállítójának biztonsági utasításait.
ŐRIZZE MEG EZEKET AZ
UTASÍTÁSOKAT
FIGYELMEZTETÉS:
Az ebben a használati utasításban közölt szabályok
ELKERÜLÉSE vagy be nem tartása komoly személyi
sérülést eredményezhet.
MŰKÖDÉSI LEÍRÁS
VIGYÁZAT:
• Mindig bizonyosodjon meg a szerszám kikapcsolt
és a hálózathoz nem csatlakoztatott állapotáról
mielőtt ellenőrzi vagy beállítja azt.
A kapcsoló használata
Fig.1
VIGYÁZAT:
• A szerszám hálózatra csatlakoztatása előtt mindig
ellenőrizze hogy a kapcsoló kioldógombja
megfelelően mozog és visszatér a kikapcsolt
(OFF) állapotba elengedése után.
A szerszám elindításához egyszerűen nyomja meg a
kapcsolót. A megállításához engedje el a kapcsolót.
Folyamatos üzemhez nyomja meg a kapcsolót majd
nyomja be a zárgombot.
A szerszám megállításához zárt kapcsolónál teljesen
nyomja le majd engedje el a kapcsolót.
Jelzőlámpa
Fig.2
A zöld BEkapcsolást jelző lámpa kigyullad, amikor a
szerszámot csatlakoztatja az áramforráshoz. Ha a
jelzőlámpa világít, de a szerszám mégsem indul be, még
akkor sem, ha a szerszámot BE kapcsolja, akkor a
szénkefék elhasználódhattak vagy a motor, vagy a
kapcsoló meghibásodhatott. Ha jelzőlámpa nem gyullad
ki, akkor a hálózati csatlakozókábel vagy a jelzőlámpa
meghibásodhatott. Ha a hálózati csatlakozókábel
hibásodott meg, akkor a szerszám nem indul be és a
jelzőlámpa sem gyullad ki. Ha a jelzőlámpa hibásodott
meg, akkor a szerszám beindul, de a jelzőlámpa nem
gyullad ki.
ÖSSZESZERELÉS
VIGYÁZAT:
• Mindig bizonyosodjon meg a szerszám kikapcsolt
és a hálózathoz nem csatlakoztatott állapotáról
mielőtt bármilyen munkálatot végezne rajta.
A tengely felszerelése
Fig.3
Csavarja be a hatlapos résszel ellátott tengelyt.
Csavarja azt a tengelytartóba addig,amíg a hatlapfejű
anya nem érintkezik a tartóval.
Tartsa ellen a tengelytartót a bevágásnál egy 19-es
kulccsal, hogy ne tudjon elfordulni. A bevágást így
megfogva húzza meg a hatlapfejű anyát egy másik
19-es kulccsal a nyíl irányába.
Fig.4
A keverőlapátok felszerelése
Fig.5
Fig.6
Illessze a keverőlapátot a tengelyre és rögzítse a
hatlapfejű csavarral.
Eközben állítsa be azt úgy, hogy a hatlapfejű csavar
vége illeszkedjen a tengely lapos felületére, és húzza
meg a hatlapfejű csavart a mellékelt kulccsal.
Ha a keverőlapátokat két különböző helyzetben akarja
felszerelni egymáshoz képest (ami csak az erre
kialakított lapátoknál lehetséges), helyezze fel és
rögzítse a két keverőlapátot a tengely lapos felületén a
hatlapfejű csavarokkal úgy, hogy a lapátok azonos
részei az ábrán látható módon álljanak egymáshoz
képest.
Fig.7
Fig.8
ÜZEMELTETÉS
Keverés
VIGYÁZAT:
• Ne használja gyúlékony anyagok, mint például
hígítóval oldott festékek keverésére. Ennek
figyelmen kívül hagyása sérülésekhez vezethet.
1. Fogja meg a szerszám hátsó fogantyúját az egyik
kezével és a markolatot a másikkal, majd merítse
a keverőlapátot teljesen az anyagba és kapcsolja
be a szerszámot, de csak miután ellenőrizte, hogy
a munkahely biztonságos.
2. Mozgassa a keverőlapátot lefelé és felfelé a
keverés során, hogy az egész anyagot átkeverje.
3. A keverés befejezésekor kapcsolja ki a készüléket,
várja meg, amíg a keverőlapát teljesen megáll,
majd vegye ki azt az edényből.
19
Page 20

KARBANTARTÁS
VIGYÁZAT:
• Mindig bizonyosodjék meg arról hogy a szerszám
kikapcsolt és a hálózatra nem csatlakoztatott
állapotban van mielőtt a vizsgálatához vagy
karbantartásához kezdene.
A szűrő cseréje
Fig.9
Rendszeresen cserélje ki a szűrőt, mivel a szerszám
hűtési hatásfoka lecsökkenhet a szűrőben
felhalmozódott por és részecskék miatt.
Helyezzen egy hornyolt fejű csavarhúzót vagy más
hasonló szerszámot a szerszám és a burkolat közé, az
ábrán látható módon. Emelje azt fel, mint egy
emelőrudat és távolítsa el a fedelet.
Cserélje ki a burkolatban található szűrőt egy újra.
Helyezze vissza a burkolatot a szerszámra.
A szénkefék cseréje
Fig.10
A szénkeféket cserélje és ellenőrizze rendszeresen.
Cserélje ki azokat amikor lekopnak egészen a
határjelzésig. Tartsa tisztán a szénkeféket és biztosítsa
hogy szabadon mozoghassanak tartójukban. Mindkét
szénkefét egyszerre cserélje ki. Használjon egyforma
szénkeféket.
Csavarhúzó segítségével távolítsa el a kefetartó
sapkákat. Vegye ki a kopott szénkeféket, tegye be az
újakat és helyezze vissza a kefetartó sapkákat.
Fig.11
A termék BIZTONSÁGÁNAK és
MEGBÍZHATÓSÁGÁNAK fenntartásához, a
javításokat, bármilyen egyéb karbantartást vagy
beszabályozást a Makita Autorizált
Szervizközpontoknak kell végrehajtaniuk, mindig Makita
pótalkatrászek használatával.
TARTOZÉKOK
VIGYÁZAT:
• Ezek a tartozékok vagy kellékek ajánlottak az
Önnek ebben a kézikönyvben leírt Makita
szerszámához. Bármely más tartozék vagy kellék
használata személyes veszélyt vagy sérülést
jelenthet. A tartozékot vagy kelléket használja
csupán annak kifejezett rendeltetésére.
Ha bármilyen segítségre vagy további információkra van
szüksége ezekkel a tartozékokkal kapcsolatban,
keresse fel a helyi Makita Szervizközpontot.
• Keverőlapátok
• Tengely
20
Page 21

SLOVENSKÝ
1-1. Blokovacie tlačidlo
1-2. Spúšť
2-1. Indikátor zapnutia
3-1. Šesťboká matica
3-2. Hriadeľ
3-3. Shaft holder
4-1. Kľúč 19
4-2. Zárez
Vysvetlenie všeobecného zobrazenia
4-3. Kľúč 19
5-1. Zmiešavacia lopatka
6-1. Šesťboká skrutka
6-2. Hriadeľ
6-3. Rovný povrch
7-1. Zmiešavacia lopatka
7-2. Hriadeľ
8-1. Šesťboká skrutka
8-2. Hriadeľ
8-3. Rovný povrch
9-1. Filter
9-2. Kryt
9-3. Šraubovák
10-1. Medzná značka
11-1. Šraubovák
11-2. Veko držiaka uhlíka
TECHNICKÉ ÚDAJE
Model UT2204
Otáčky naprázdno (min-1) 550
Priemer zmiešavacej lopatky 220 mm
Celková dĺžka 929 mm
Hmotnosť netto 3,7 kg
• Vzhľadom k neustálemu výskumu a vývoju tu uvedené technické údaje podliehajú zmenám bez upozornenia.
• Poznámka: Technické údaje sa možu pre rozne krajiny líšiť.
Určené použitie
Tento nástroj je určený na miešanie omietkových
materiálov a pod. (okrem horľavých materiálov)
Napájanie
Nástroj sa môže pripojiť len k odpovedajúcemu zdroju s
napätím rovnakým, aké je uvedené na typovom štítku, a
môže pracovať len s jednofázovým striedavým napätím.
V súlade s európskymi normami má dvojitú izoláciu a
može byť preto napájaný zo zásuviek bez
uzemňovacieho vodiča.
Len pre európske krajiny
Hluk a vibrácie
Typická A-vážená úroveň akustického tlaku je 83 dB (A).
Nepresnosť je 3 dB(A).
Úroveň hlučnosti pri práci môže prekračovať 85 dB (A).
Používajte pomôcky na ochranu sluchu.
Typická vážená hodnota efektívneho zrýchlenia nieje
väčšia než 2,5 m/s
Tieto hodnoty boli odmerané v súlade s EN60745.
Pro Model UT2204
PREHLÁSENIE O ZHODE S NORMAMI EU
Prehlasujeme na našu vlastnú zodpovednosť, že tento
výrobok je v zhode s nasledujúcimi normami alebo
štandardizovanými dokumentami;
EN60745, EN55014, EN61000, a to v súlade s
Nariadeniami rady 89/336/EEC, 98/37/EC.
Trieda bezpečnosti /II
ENE056-1
ENF002-1
000087
MAKITA INTERNATIONAL EUROPE LTD.
Michigan Drive, Tongwell, Milton Keynes, Bucks MK15
8JD, ANGLICKO
Zodpovedný výrobca:
Makita Corporation Anjo Aichi Japan
ENG003-2
Zvláštne bezpečnostné zásady
NEDOVOĽTE, aby pohodlnosť a oboznámenosťs
výrobkom (vďaka jeho opakovanému používaniu)
nahradili prísne dodržovanie bezpečnostných zásad
pri vŕtaní. Pokiaľ budete používať tento elektrický
nástroj nebezpečným alebo nesprávnym spôsobom,
môžete utrpieť vážne zranenia.
2
.
1. Používajte pomocné rukoväte dodávané s
nástrojom. Strata kontroly môže spôsobiť
zranenie.
2. Pri práci, kedy vŕtací nástroj môže prísť do
styku so skrytými elektrickými vodičmi alebo s
ENH101-5
vlastným elektrickým káblom, držte ho za
izolované úchopné miesta. Pri kontakte so
„živým" vodičom sa stanú nechránené kovové
súčasti nástroja rovnako „živými" a obsluha môže
byť zasiahnutá elektrickým prúdom.
3. Dbajte, abyste vždy mali pevnú oporu nôh.
Ak pracujete vo výškach, dbajte, aby pod vami
Yasuhiko Kanzaki CE2005
nikto nebol.
4. Držte nástroj pevne .
5. Nepřibližujte ruky k otáčajúcim sa častiam.
21
riaditeľ
GEB001-2
Page 22

6. Nenechávajte nástroj bežať bez dozoru.
Pracujte s ním,len keď ho držíte v rukách.
7. Nedotýkajte sa bezprostredne po skončení
práce vrtáka ani opracovávaného dielu. Môžu
byť veľmi horúce a môžete sa o ne popáliť.
8. Niektoré materiály obsahujú chemikálie, ktoré
môžu byť jedovaté. Dávajte pozor, abyste ich
nevdychovali alebo sa ich nedotýkali.
Prečítajte si bezpečnostné materiálové listy
dodávateľa.
TIETO POKYNY USCHOVAJTE.
VAROVANIE:
NESPRÁVNE POUŽÍVANIE alebo nedodržovanie
bezpečnostných zásad uvedených v tomto návode
môže viesť k vážnemu zraneniu.
POPIS FUNKCIE
POZOR:
• Pred nastavovaním nástroja alebo kontrolou jeho
funkcie sa vždy presvedčte, že je vypnutý a
vytiahnutý zo zásuvky.
Zapínanie
Fig.1
POZOR:
• Pred pripojením nástroja do zásuvky vždy
skontrolujte, či spúšť funguje správne a po
uvoľnení sa vracia do vypnutej polohy.
Ak chcete nástroj spustit, stačí stlačiť jeho spúšť. Ak
chcete nástroj vypnúť, uvoľnite spúšť.
Ak chcete pracovať nepretržite, stlačte spúšť a potom
stlačte blokovacie tlačidlo.
Ak chcete nástroj vypnúť zo zablokovanej polohy, stlačte
spúšť naplno a potom ju pustite.
Indikátor
Fig.2
Pri zapojení nástroja do elektrickej siete sa rozsvieti
zelený indikátor zapnutia. Ak sa indikátor rozsvieti, ale
nástroj sa nespustí ani po zapnutí do polohy ON, môžu
byť opotrebované uhlíkové kefky alebo sa pokazil motor
alebo prepínač. Ak sa indikátor nerozsvieti, porucha
môže byť v sieťovom kábli alebo kontrolke. Keď je
poškodený sieťový kábel, nástroj sa nespustí, ani sa
nerozsvieti indikátor. Keď je poškodený indikátor, nástroj
sa spustí, ale nerozsvieti sa indikátor.
MONTÁŽ
POZOR:
• Než začnete na nástroji robiť akékoľvek práce,
vždy sa predtým presvedčte, že je vypnutý a
vytiahnutý zo zásuvky.
Montáž hriadeľa
Fig.3
Utiahnite hriadeľ pomocou šesťhrannej matice do
držiaka hriadeľa čo najďalej, kým sa matica nedostane
do kontaktu s držiakom.
Pomocou kľúča pridržiavajte drážku v držiaku hriadeľa,
aby sa nemohol otáčať. Pridržiavajte túto drážku a
súčasne utiahnite šesťhrannú maticu pomocou ďalšieho
kľúča 19 v smere šípky
Fig.4
Montáž zmiešavacích lopatiek
Fig.5
Fig.6
Vsuňte zmiešavaciu lopatku do hriadeľa a zaistite ju
pomocou šesťhrannej maticovej skrutky.
V tomto momente ju umiestnite tak, aby horná koniec
šesťhrannej maticovej skrutky vždy zapadol na rovný
povrch na hriadeli a utiahnite šesťhrannú maticovú
skrutku pomocou priloženého kľúča.
Pri montáži zmiešavacích lopatiek na dve rôzne pozície
(použiteľné len so zmiešavacími lopatkami, ktoré to
umožňujú), namontujte a zaistite dve zmiešavacie
lopatky na plochú časť hriadeľa pomocou šesťhranných
maticových skrutiek tak, aby mali lopatky oproti sebe
rovnaký povrch, ako vidno na obrázku.
Fig.7
Fig.8
PRÁCA
Miešanie
POZOR:
• Na miešanie nepoužívajte horľavý materiál,
napríklad farbu rozpustenú v riedidle. V opačnom
prípade môže dôjsť k úrazu.
1. Jednou rukou pevne držte zadnú rúčku nástroja a
druhou rukou rukoväť, vložte zmiešavaciu lopatku
celkom do materiálu a po kontrole bezpečnosti
miesta práce zapnite nástroj.
2. Pri miešaní pohybujte zmiešavacou lopatkou
nahor a nadol, aby sa premiešal celý objem
materiálu.
3. Po skončení miešania vypnite nástroj, skontrolujte,
či sa zmiešavacia lopatka úplne zastavila a
vytiahnite ju z nádoby.
ÚDRŽBA
POZOR:
• Než začnete robiť kontrolu alebo údržbu nástroja,
vždy se presvedčte, že je vypnutý a vytiahnutý zo
zásuvky.
22
Page 23

Výmena filtra
Fig.9
Filter vymieňajte pravidelne, lebo nánosy prachu alebo
čiastočiak vo filtri znižujú schopnosť chladenia nástroja.
Medzi nástroj a kryt vsuňte plochý skrutkovač alebo
podobný predmet podľa vyobrazenia. Nadvihnite ho ako
pri použití lopatky a odstráňte kryt.
Vymeňte filter v kryte za nový.
Kryt opäť namontujte na nástroj.
Výmena uhlíkov
Fig.10
Uhlíky pravidelne vyberajte a kontrolujte. Ak sú
opotrebované až po medznú značku, vymeňte ich.
Uhlíky musia byť čisté a musia voľne zapadať do svojich
držiakov. Oba uhlíky treba vymieňať súčasne.
Používajte výhradne rovnaké uhlíky.
Pomocou šraubováka odskrutkujte veká uhlíkov. Vyjmite
opotrebované uhlíky, vložte nové a zaskrutkujte veká
naspäť.
Fig.11
Kvôli zachovaniu BEZPEČNOSTI a SPOĽAHLIVOSTI
výrobkov musia byť opravy a akákoľvek ďalšia údržba či
nastavovanie robené autorizovanými servisnými
strediskami firmy Makita a s použitím náhradných dielov
Makita.
PRÍSLUŠENSTVO
POZOR:
• Pre váš nástroj Makita, opísaný v tomto návode,
doporučujeme používať toto príslušenstvo a
nástavce. Pri použití iného príslušenstva či
nástavcov može hroziť nebezpečenstvo zranenia
osôb. Príslušenstvo a nástavce sa možu používať
len na účely pre ne stanovené.
Ak potrebujete bližšie informácie týkajúce sa tohoto
príslušenstva, obráťte sa na vaše miestne servisné
stredisko firmy Makita.
• Zmiešavacie lopatky
• Hriadeľ
23
Page 24

ČESKÝ
1-1. Blokovací tlačítko
1-2. Spoušť
2-1. Kontrolka
3-1. Šestihranná matice
3-2. Hřídel
3-3. Držák hřídele
4-1. Klíč 19
4-2. Zářez
Legenda všeobecného vyobrazení
4-3. Klíč 19
5-1. Míchací nástroj
6-1. Šroub s šestihrannou hlavou
6-2. Hřídel
6-3. Plochý povrch
7-1. Míchací nástroj
7-2. Hřídel
8-1. Šroub s šestihrannou hlavou
8-2. Hřídel
8-3. Plochý povrch
9-1. Filtr
9-2. Kryt
9-3. Šroubovák
10-1. Mezní značka
11-1. Šroubovák
11-2. Víčko držáku uhlíku
TECHNICKÉ ÚDAJE
Model UT2204
Otáčky naprázdno (min-1) 550
Průměr míchacího nástroje 220 mm
Celková délka 929 mm
Hmotnost netto 3,7 kg
• Vzhledem k neustálému výzkumu a vývoji zde uvedené technické údaje podléhají změnám bez upozornění.
• Poznámka: Technické údaje se mohou pro různé země lišit.
Určení nástroje
Nástroj je určen k míchání zdících a podobných
materiálů (kromě hořlavin).
Napájení
Nástroj lze připojit pouze k odpovídajícímu zdroji s
napětím stejným, jaké je uvedeno na typovém štítku, a
může pracovat pouze s jednofázovým střídavým
napětím. V souladu s evropskými normami má dvojitou
izolaci a může být proto napájen ze zásuvek bez
zemnicího vodiče.
Pouze pro evropské země
Hluk a vibrace
Typická A-vážená úroveň akustického tlaku je 83 dB (A).
Nepřesnost je 3 dB(A).
Úroveň hlučnosti při práci může překračovat 85 dB (A).
Používejte pomůcky na ochranu sluchu.
Typická vážená hodnota efektivního zrychlení není větší
než 2,5 m/s
2
Tyto hodnoty byly změřeny v souladu s EN60745.
Pro Model UT2204
PROHLÁŠENÍ O SHODĚ S NORMAMI EU
Prohlašujeme na naši vlastní odpovědnost, že tento
výrobek je ve shodě s následujícími normami nebo
standardizovanými dokumenty;
EN60745, EN55014, EN61000, a to v souladu s
Nařízeními rady 89/336/EEC, 98/37/EC.
Třída bezpečnosti /II
ENE056-1
ENF002-1
000087
MAKITA INTERNATIONAL EUROPE LTD.
Michigan Drive, Tongwell, Milton Keynes, Bucks MK15
8JD, ANGLIE
Odpovědný výrobce:
Makita Corporation Anjo Aichi Japan
ENG003-2
Zvláštní bezpečnostní zásady
NEDOVOLTE, aby pohodlnost a obeznámenost s
výrobkem (díky jeho opakovanému používání)
nahradily přísné dodržování bezpečnostních zásad
při vrtání. Pokud budete používat tento elektrický
nástroj nebezpečným nebo nesprávným způsobem,
můžete utrpět vážné zranění.
.
1. Používejte pomocné rukojeti dodávané s
nástrojem. Ztráta kontroly může způsobit
zranění.
2. Při práci, kdy vrtací nástroj může přijít do
styku se skrytými elektrickými vodiči nebo s
ENH101-5
vlastní elektrickou šňůrou, držte jej za
izolovaná úchopná místa. Při kontaktu se
„živým" vodičem se stanou nechráněné kovové
součásti nástroje rovněž „živými" a obsluha může
být zasažena elektrickým proudem.
3. Dbejte, abyste vždy měli pevnou oporu nohou.
Pracujete-li ve výškách, dbejte, aby pod vámi
Yasuhiko Kanzaki CE2005
nikdo nebyl.
4. Držte nástroj pevně .
5. Nepřibližujte ruce k otáčejícím se částem.
ředitel
GEB001-2
24
Page 25

6. Nenechávejte nástroj běžet bez dozoru.
Pracujte s ním, jen když jej držíte v rukou.
7. Nedotýkejte se bezprostředně po skončení
práce vrtáku ani opracovávaného dílu. Mohou
být velmi horké a můžete se o ně popálit.
8. Některé materiály obsahují chemikálie, které
mohou být jedovaté. Dávejte pozor, abyste je
nevdechovali nebo se jich nedotýkali. Přečtěte
si bezpečnostní materiálové listy dodavatele.
TYTO POKYNY USCHOVEJTE.
VAROVÁNÍ:
NESPRÁVNÉ POUŽÍVÁNÍ nebo nedodržování
bezpečnostních zásad uvedených v tomto návodu
může vést k vážnému zranění.
POPIS FUNKCE
POZOR:
• Před nastavováním nástroje nebo kontrolou jeho
funkce se vždy přesvědčte, že je vypnutý a
vytažený ze zásuvky.
Zapínání
Fig.1
POZOR:
• Před připojením nástroje do zásuvky vždy
zkontrolujte, zda spoušť funguje správně a po
uvolnění se vrací do vypnuté polohy.
Chcete-li nástroj spustit, stačí stisknout jeho spoušť.
Chcete-li nástroj vypnout, uvolněte spoušť.
Chcete-li pracovat nepřetržitě, stiskněte spoušť a potom
stiskněte blokovací tlačítko.
Chcete-li nástroj vypnout ze zablokované polohy,
stiskněte spoušť naplno a pak ji pusťte.
Kontrolka
Fig.2
Zelená kontrolka Power On se rozsvítí při připojení
nástroje k elektrické síti. Pokud kontrolka svítí, ale
nástroj se po stisknutí spínače neuvede do chodu,
mohou být opotřebené uhlíky nebo může být vadný
motor či spínač. Pokud se kontrolka nerozsvítí, může být
vadný napájecí kabel nebo kontrolka. Je-li vadný
napájecí kabel, nástroj se neuvede do chodu ani se
nerozsvítí kontrolka. Pokud je vadná kontrolka, nástroj
se uvede do chodu bez rozsvícení kontrolky.
MONTÁŽ
POZOR:
• Než začnete na nástroji provádět jakékoliv práce,
vždy se předtím přesvědčte, že je vypnutý a
vytažený ze zásuvky.
Instalace hřídele
Fig.3
Utahujte hřídel šestihrannou maticí v držáku hřídele,
dokud se šestihranná matice nedostane do styku s
držákem.
Přidržte zářez v držáku hřídele klíčem 19 tak, aby se
nemohl pohybovat. S takto přidrženým zářezem
dotáhněte šestihrannou matici dalším klíčem 19 ve
směru šipky.
Fig.4
Instalace míchacích nástrojů
Fig.5
Fig.6
Zasuňte míchací nástroj do hřídele a zajistěte jej
šroubem s šestihrannou hlavou.
Nyní jej umístěte tak, aby horní konec šroubu s
šestihrannou hlavou vždy zapadl do plochého povrchu
na hřídeli; dotáhněte šroub s šestihrannou hlavou
dodaným klíčem.
Při instalaci míchacích nástrojů ve dvou různých
polohách (platí pouze v případě, že to míchací nástroje
umožňují) namontujte a uchyťte dva míchací nástroje na
ploché části hřídele šrouby s šestihrannou hlavou tak,
aby stejné povrchy nástrojů směřovaly k sobě jak je
ilustrováno na obrázku.
Fig.7
Fig.8
PRÁCE
Míchání
POZOR:
• Nemíchejte hořlavé materiály, jako je například
nátěrová hmota, ve které je jako rozpouštědlo
použito ředidlo. V opačném případě může dojít ke
zranění.
1. Uchopte pevně zadní držadlo nástroje jednou
rukou a druhou rukou rukojeť. Zasuňte míchací
nástroj úplně do materiálu a po kontrole
zabezpečení pracoviště uveďte nástroj do chodu.
2. Během míchání pohybujte míchacím nástrojem
nahoru a dolů tak, aby byl promíchán celý objem
materiálu.
3. Po ukončení míchání nástroj vypněte. Nechejte
míchací nástroj úplně zastavit a poté jej vytáhněte
z nádoby.
ÚDRŽBA
POZOR:
• Než začnete provádět kontrolu nebo údržbu
nástroje, vždy se přesvědčte, že je vypnutý a
vytažený ze zásuvky.
25
Page 26

Výměna filtru
Fig.9
Filtr je nutno pravidelně vyměňovat, protože z důvodu
hromadění prachu a částic ve filtru dochází ke snížení
účinnosti chlazení nástroje.
Zasuňte mezi nástroj a kryt plochý šroubovák, jak je
ilustrováno na obrázku. Zvedněte jej jako pomocí
lopatky a odejměte kryt.
Vyměňte filtr v krytu za nový.
Nainstalujte kryt zpět na nástroj.
Výměna uhlíků
Fig.10
Uhlíky pravidelně vyjímejte a kontrolujte. Jsou-li
opotřebené až po mezní značku, vyměňte je. Uhlíky
musí být čisté a musí volně zapadat do svých držáků.
Oba uhlíky je třeba vyměňovat současně. Používejte
výhradně stejné uhlíky.
Pomocí šroubováku odšroubujte víčka uhlíků. Vyjměte
opotřebené uhlíky, vložte nové a zašroubujte víčka
nazpět.
Fig.11
Kvůli zachování BEZPEČNOSTI a SPOLEHLIVOSTI
výrobku musí být opravy a veškerá další údržba či
seřizování prováděny autorizovanými servisními
středisky firmy Makita a s použitím náhradních dílů
Makita.
PŘÍSLUŠENSTVÍ
POZOR:
• Pro váš nástroj Makita, popsaný v tomto návodu,
doporučujeme používat toto příslušenství a
nástavce. Při použití jiného příslušenství či
nástavců může hrozit nebezpečí zranění osob.
Příslušenství a nástavce lze používat pouze pro
jejich stanovené účely.
Potřebujete-li bližší informace ohledně tohoto
příslušenství, obraťte se na vaše místní servisní
středisko firmy Makita.
• Míchací nástroje
• Hřídel
26
Page 27

27 28
Page 28

884659-972
Makita Corporation Anjo, Aichi, Japan
 Loading...