

Makita UN490D, BUN490 Instruction Manual
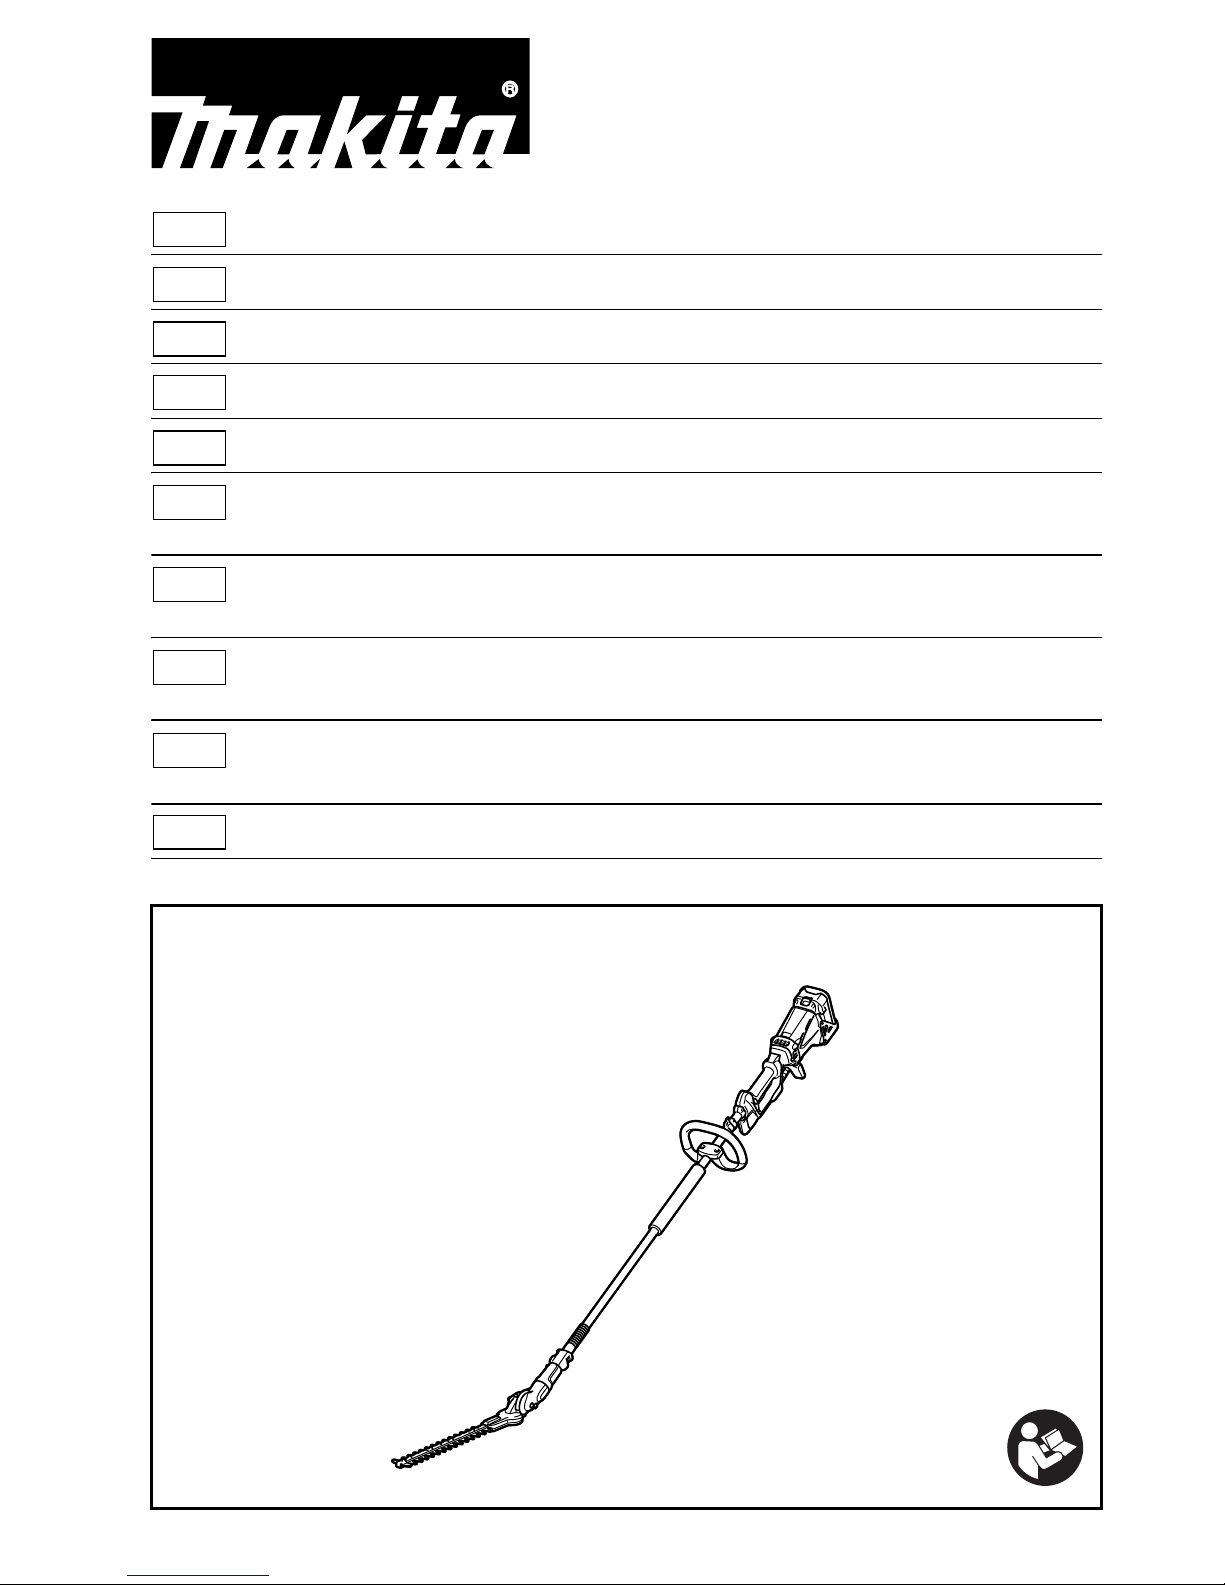
GB Cordless Pole Hedge Trimmer Instruction manual
F
Taille Haie Sur Perche Sans-Fil
Manuel d’instructions
D Akku-Heckenschneider Betriebsanleitung
I Tagliasiepi ad asta a batteria Istruzioni per l’uso
NL Accustokheggenschaar Gebruiksaanwijzing
E Cortasetos de Extensión Manual de instrucciones
Inalámbrico
P Aparador de Cerca Viva a Manual de instruções
Bateria
DK Batteridrevet Brugsanvisning
stanghækkeklipper
GR α πα
πααα
TR Akülü Uzun Çit Budama Kullanım kılavuzu
013949
UN490D
BUN490
2
1 014182
2 012942 3 012967
1
2
7
3
6
8
9
10
11
5
4
12
13
1
14
3
4 011715 5 010814
6 014102 7 010815
8 013905 9 015615
10 014297 11 013915
14
15
16
4
17
A
B
18
19
20
1
2
21
9
22
23
24
25
28
27
26
6
7

4
12 013913 13 013914
14 007559 15 013907
16 013908 17 013909
18 013910 19 013911
15 - 30
15 m
(50 ft)
15 m
(50 ft)
29
30
B
A

5
ENGLISH (Original instructions)
Explanation of general view
SPECIFICATIONS
• Due to our continuing program of research and development, the specifications herein are subject to change without
notice.
• Specifications and battery cartridge may differ from country to country.
• Weight, with battery cartridge, according to EPTA-Procedure 01/2003
• Wear ear protection.
ENG901-1
• The declared vibration emission value has been
measured in accordance with the standard test method
and may be used for comparing one tool with another.
• The declared vibration emission value may also be
used in a preliminary assessment of exposure.
WARNING:
• The vibration emission during actual use of the power
tool can differ from the declared emission value
depending on the ways in which the tool is used.
• Be sure to identify safety measures to protect the
operator that are based on an estimation of exposure in
the actual conditions of use (taking account of all parts
of the operating cycle such as the times when the tool
is switched off and when it is running idle in addition to
the trigger time).
Symbols
END115-1
The following show the symbols used for the equipment.
Be sure that you understand their meaning before use.
.................. Take particular care and attention.
................Read and follow the instruction manual.
...............Wear protective helmet, eye and ear
protection.
............... Wear protective gloves.
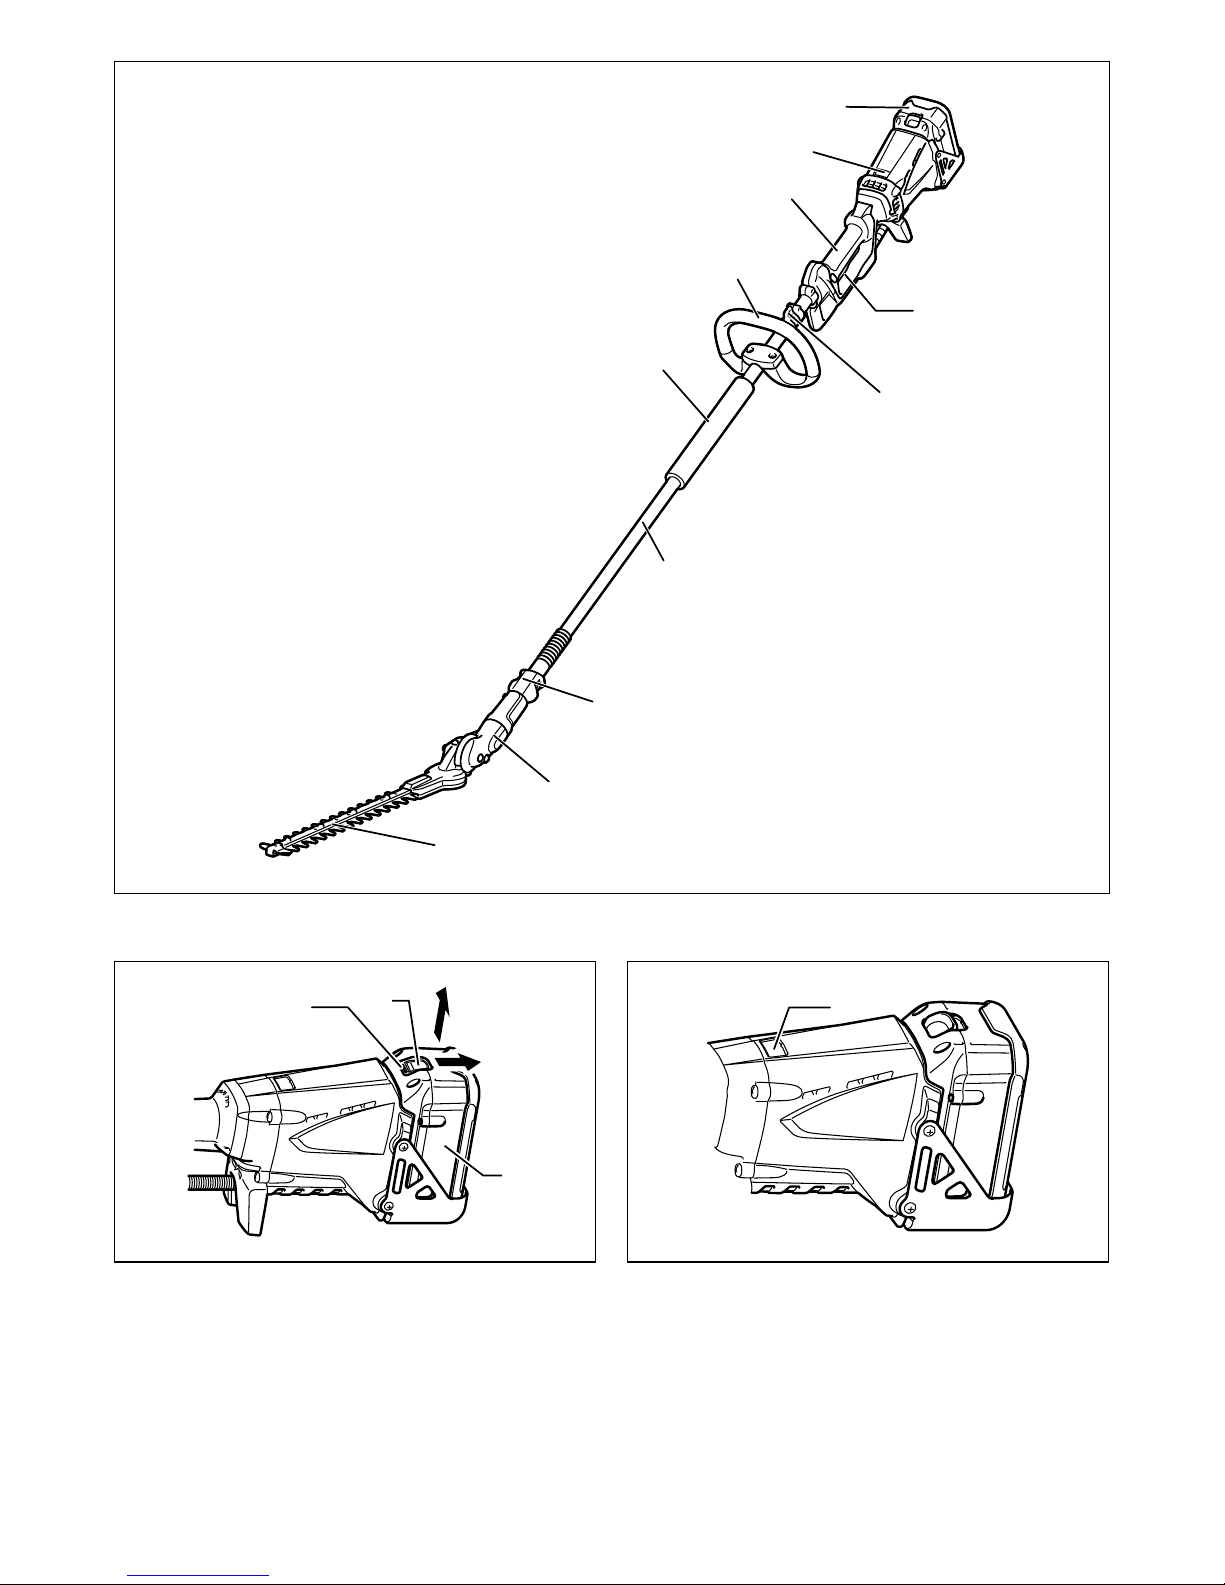
1. Battery cartridge
2. Indicator lamp
3. Control grip
4. Switch trigger
5. Hanger (suspension point)
6. Loop handle
7. Front grip
8. Shaft
9. Angle lock
10. Gear case
11. Blades
12. Red indicator
13. Button
14. Indicator lamps
15. CHECK button
16. Lock-off button
17. Reversing switch
18. A position depressed for normal
operation
19. B position depressed for
removing a branch in blades
20. Speed change switch lever
21. Handle
22. Bolt
23. Hex wrench
24. Socket wrench
25. Battery guard
26. Clamp
27. Clamp cover
28. Arrow mark
29. Nut
30. Truss bolt
Model UN490D, BUN490
Blade length 490 mm
Strokes per minute, Low/High 0 - 1,400/0 - 2,000 (min
-1
)
Cutting blade angle 135° (up 45°, down 90°)
Overall length 2,595 mm
Rated voltage D.C. 36 V
Standard battery cartridge (and charger)
Always keep the combinations of battery/charger on the
right columns.
BL3622A (DC36WA)/
BL3626 (DC36RA)
BL36120A (DC3600)
Net weight 6.9 kg 11.8 kg
Noise
Sound pressure level average Sound power level average
Applicable standard
LPA (dB (A)) Uncertainty K (dB (A)) LWA (dB (A)) Uncertainty K (dB (A))
82.9 2 93.2 2.2 ISO10517
Vibration
Left hand (Front grip) Right hand (Rear grip)
Applicable standard
ah (m/s2) Uncertainty K (m/s2)a
h
(m/s2) Uncertainty K (m/s2)
5.5 1.5 2.0 1.5 ISO10517

6
............... Wear sturdy boots with nonslip soles.
Steeltoed safety boots are
recommended.
....... Keep working area clear of persons and
pets.
................ Beware of pinching.
......... Beware of electrical line. Risk of electrical
shock.
......... Only for EU countries
Do not dispose of electric equipment or
battery pack together with household
waste material!
In observance of the European
Directives, on Waste Electric and
Electronic Equipment and Batteries and
Accumulators and Waste Batteries and
Accumulators and their implementation in
accordance with national laws, electric
equipment and batteries and battery
pack(s) that have reached the end of
their life must be collected separately and
returned to an environmentally
compatible recycling facility.
Intended use
ENE014-1
The tool is intended for trimming hedges.
For European countries only ENH021-7
EC Declaration of Conformity
We Makita Corporation as the responsible
manufacturer declare that the following Makita
machine(s):
Designation of Machine:
Cordless Pole Hedge Trimmer
Model No./ Type: UN490D, BUN490
Specifications: see “SPECIFICATIONS” table.
are of series production and
Conforms to the following European Directives:
2000/14/EC, 2006/42/EC
And are manufactured in accordance with the following
standards or standardised documents:
EN ISO 10517
The technical documentation is kept by:
Makita International Europe Ltd.
Technical Department,
Michigan Drive, Tongwell,
Milton Keynes, Bucks MK15 8JD, England
The conformity assessment procedure required by
Directive 2000/14/EC was in Accordance with annex V.
Measured Sound Power Level: 93.2 dB (A)
Guaranteed Sound Power Level: 95 dB (A)
11. 3. 2013
Tomoyasu Kato
Director
Makita Corporation
3-11-8, Sumiyoshi-cho,
Anjo, Aichi, 446-8502, JAPAN
General Power Tool Safety
Warnings GEA010-1
WARNING Read all safety warnings and all
instructions. Failure to follow the warnings and
instructions may result in electric shock, fire and/or
serious injury.
Save all warnings and
instructions for future reference.
CORDLESS POLE HEDGE
TRIMMER SAFETY WARNINGS
GEB111-1
Preparation
1. THIS HEDGE TRIMMER CAN CAUSE SERIOUS
INJURIES. Read the instructions carefully for the
correct handling, preparation, maintenance, starting
and stopping of the tool. Become familiar with all
controls and the proper use of the tool.
2. DANGER - Keep hands away from blade.
3. Keep all parts of the body away from the cutter blade.
Do not remove cut material or hold material to be cut
when blades are moving. Make sure the switch is off
when clearing jammed material. Blades coast after
turn off. A moment of inattention while operating the
tool may result in serious personal injury.
4. Carry the tool by the handle with the cutter blade
stopped. Proper handling of the tool will reduce
possible personal injury from the cutter blades.
5. Only use with handle and guard properly assembled
to the tool. The use of the tool without the proper
guard or handle provided may result in serious
personal injury.
6. Never allow children to use the tool.
7. Beware of overhead power lines.
8. Avoid operating while people, especially children, are
near by.
9. First-time users should have an experienced user
show them how to use the tool.
)
Cd
Ni-MH
Li-ion

7
10. Before operation, examine the work area for wire
fences, stones, or other solid objects. They can
damage the blades.
Personal protective equipment
11. Wear protective goggles, safety helmet and protective
gloves to protect yourself from flying debris or falling
objects.
12. Wear ear protection such as ear muffs to prevent
hearing loss.
13. Wear proper clothing and shoes for safe operation,
such as a work overall and sturdy, non-slip shoes.
14. When touching blades or adjusting the blade angle,
wear protective gloves. Blades can cut bare hands
severely.
Operation
15. Use right appliance. Do not use appliance for any job
except that for which it is intended.
16. In the event of an emergency, switch off the tool and
remove the battery cartridge immediately.
17. If cutting tool strikes any object or the tool starts
making unusual noise, switch off the tool and remove
the battery cartridge immediately and allow the tool to
stop. And then take the following steps:
- inspect for damage
- check for, and tighten, any loose parts
- have any damaged parts replaced or repaired with
genuine spare parts.
18. Switch off the tool and remove the battery cartridge
before leaving the tool unattended.
19. Be careful not to accidentally contact a metal fence or
other hard objects during operation. The blade will
break and may cause serious injury.
20. Avoid dangerous environment. Do not use appliances
in damp or wet locations.
21. While operating the tool, always ensure that the
operating position is safe and secure. Overreaching
with the tool, particularly from a ladder, is extremely
dangerous. Do not work from anything wobbly or
infirm. Do not over reach. Keep proper footing and
balance at all time.
22. Avoid unintentional starting. Do not carry the tool
when the battery cartridge is installed and with finger
on switch. Be sure switch is off when installing the
battery cartridge.
23. Do not grasp the exposed cutting blades or cutting
edges when picking up or holding the tool.
24. Do not operate the tool with a damaged or excessively
worn cutting device.
25. Always ensure that all handles and guards are fitted
when using the tool. Never attempt to use an
incomplete tool or one fitted with an unauthorized
modification.
26. Always use two hands to operate the tool fitted with
two handles. Hold the tool firmly when using the tool.
Using one hand could cause loss of control and result
in serious personal injury.
27. Hold the power tool by insulated gripping surfaces
only, because the cutter blade may contact hidden
wiring. Cutter blades contacting a “live” wire may
make exposed metal parts of the power tool “live” and
could give the operator an electric shock.
28. Do not force the tool. It will do the job better and with
less likelihood of a risk of injury at the rate for which it
was designed.
29. Always be aware of your surroundings and stay alert
for possible hazards of which you may not be aware
due to the noise of the tool. Watch what you are doing.
Use common sense. Do not operate the tool when you
are tired.
30. Do not use the tool in the rain or in wet or very damp
conditions. The electric motor is not waterproof.
Maintenance and storage
31. When the tool is stopped for servicing, inspection or
storage, switch off the tool and remove the battery
cartridge, and make sure all moving parts have come
to a stop. Allow the tool to cool before making any
inspections, adjustment, etc.
32. Always allow the tool to cool down before storing.
33. When transporting or storing the tool, always fit the
blade cover.
34. Store idle tool indoors. When not in use, the tool must
be stored indoors in dry, and high locked-up place, out
of reach of children.
35. Maintain the tool with care. Keep cutting edge sharp
and clean for best performance and to reduce the risk
of injury. Follow instructions for lubricating and
changing accessories. Keep handles dry, clean, and
free from oil and grease.
36. Check damaged parts. Before further use of the tool,
any part which is damaged should be carefully
checked to determine that it will operate properly and
perform its intended function. Check for alignment of
moving parts, binding of moving parts, breakage of
parts, mounting and any other condition that may
affect its operation. A guard or other part that is
damaged should be properly repaired or replaced by
your authorized service center.
37. Use genuine spare parts only.
SAVE THESE INSTRUCTIONS.
WARNING:
DO NOT let comfort or familiarity with product (gained
from repeated use) replace strict adherence to safety
rules for the subject product. MISUSE or failure to
follow the safety rules stated in this instruction
manual may cause serious personal injury.
IMPORTANT SAFETY
INSTRUCTIONS ENC007-8
FOR BATTERY CARTRIDGE
1. Before using battery cartridge, read all
instructions and cautionary markings on (1)
battery charger, (2) battery, and (3) product using
battery.
2. Do not disassemble battery cartridge.
3. If operating time has become excessively shorter,
stop operating immediately. It may result in a risk
of overheating, possible burns and even an
explosion.
4. If electrolyte gets into your eyes, rinse them out
with clear water and seek medical attention right
away. It may result in loss of your eyesight.
5. Do not short the battery cartridge:
(1) Do not touch the terminals with any
conductive material.

8
(2) Avoid storing battery cartridge in a container
with other metal objects such as nails, coins,
etc.
(3) Do not expose battery cartridge to water or
rain.
A battery short can cause a large current flow,
overheating, possible burns and even a
breakdown.
6. Do not store the tool and battery cartridge in
locations where the temperature may reach or
exceed 50°C (122°F).
7. Do not incinerate the battery cartridge even if it is
severely damaged or is completely worn out. The
battery cartridge can explode in a fire.
8. Be careful not to drop or strike battery.
9. Do not use a damaged battery.
10. Follow your local regulations relating to disposal
of battery.
SAVE THESE INSTRUCTIONS.
Tips for maintaining maximum battery life
1. Charge the battery cartridge before completely
discharged.
Always stop tool operation and charge the battery
cartridge when you notice less tool power.
2. Never recharge a fully charged battery cartridge.
Overcharging shortens the battery service life.
3. Charge the battery cartridge with room
temperature at 10°C - 40°C (50°F - 104°F). Let a hot
battery cartridge cool down before charging it.
4. Charge the battery cartridge once in every six
months if you do not use it for a long period of
time.
PARTS DESCRIPTION (Fig. 1)
FUNCTIONAL DESCRIPTION
WARNING:
• Always be sure that the tool is switched off and the
battery cartridge is removed before adjusting or
checking functions on the tool. Failure to switch off
and remove the battery cartridge may result in serious
personal injury from accidental start-up.
Installing or removing battery cartridge
CAUTION:
• Always switch off the tool before installing or removing
of the battery cartridge.
• Hold the tool and the battery cartridge firmly when
installing or removing battery cartridge. Failure to
hold the tool and the battery cartridge firmly may cause
them to slip off your hands and result in damage to the
tool and battery cartridge and a personal injury. (Fig. 2)
To remove the battery cartridge, slide it from the tool while
sliding the button on the front of the cartridge.
To install the battery cartridge, align the tongue on the
battery cartridge with the groove in the housing and slip it
into place. Insert it all the way until it locks in place with a
little click. If you can see the red indicator on the upper
side of the button, it is not locked completely.
CAUTION:
• Always install the battery cartridge fully until the red
indicator cannot be seen. If not, it may accidentally fall
out of the tool, causing injury to you or someone
around you.
NOTE:
• Do not install the battery cartridge forcibly. If the
cartridge does not slide in easily, it is not being inserted
correctly.
Battery protection system
Lithium-ion batteries are equipped with a protection
system. This system automatically cuts off power to the
tool to extend battery life.
The tool will automatically stop during operation if the tool
and/or battery are placed under one of the following
conditions:
• Overloaded:
The tool is operated in a manner that causes it to
draw an abnormally high current.
In this situation, release the switch trigger on the tool
and stop the application that caused the tool to
become overloaded. Then pull the switch trigger
again to restart.
If the tool does not start, the battery is overheated. In
this situation, let the battery cool before pulling the
switch trigger again.
• Low battery voltage:
The remaining battery capacity is too low and the tool
will not operate. In this situation, remove and
recharge the battery.
Indicator by battery/motor protection
system
The battery cartridge and tool are provided with protection
devices that will automatically reduce or cut off power to
the tool when overload situations develop that may cause
damage to the tool or battery cartridge.
If the tool becomes overloaded but not locked up a
protector is provided to reduce the revolutions to protect
the motor. In this case the two indicator lamps described
in the table below do not light or blink.
All other protection functions can be identified by the
indicator lamps described in the table below. (Fig. 3)
9
010823
Battery remaining capacity indicator (only
for models with Battery BL3622A)
Battery BL3622A is equipped with the battery remaining
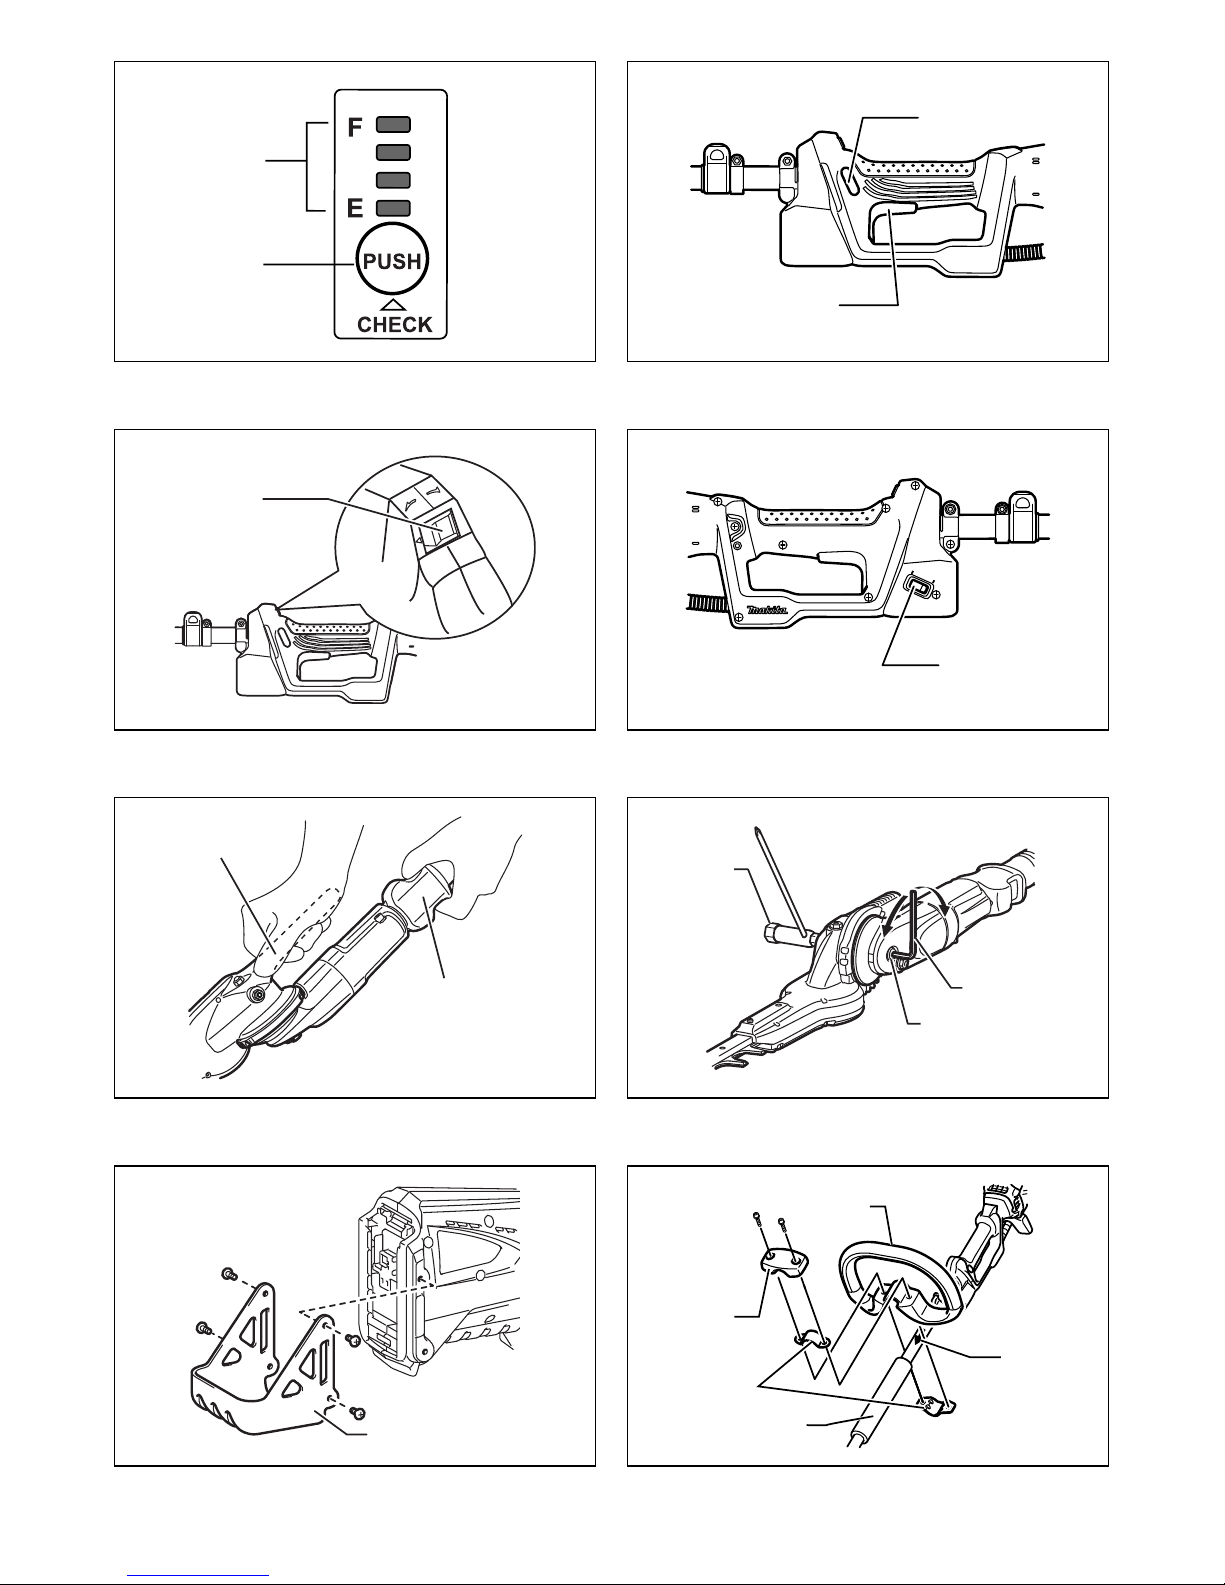
capacity indicator. (Fig. 4)
Press the CHECK button to indicate the battery remaining
capacity. The indicator lamps will then light for approx.
three seconds.
011713
• When only the lowermost indicator lamp (next to the
“E”) blinks, or when none of the indicator lamps light,
the battery capacity has run out, so the tool does not
operate. In these cases, charge the battery or replace
the empty battery with a fully charged one.
• When two or more indicator lamps do not light even
after charging is complete, the battery has reached the
end of its service life.
• When the upper two and lower two indicator lamps light
alternately, the battery may have malfunctioned.
Contact your local Makita authorized service center.
NOTE:
• The indicated capacity may be lower than the actual
level during use or immediately after using the tool.
• Depending on the conditions of use and the ambient
temperature, the indication may differ slightly from the
actual capacity.
Power switch action
WARNING:
• Before inserting the battery cartridge in the tool,
always check to see that the switch trigger
actuates properly and returns to the “OFF”
position when released. Do not pull the switch
trigger hard without pressing in the lock-off button.
This can cause switch breakage. Operating a tool
with a switch that does not actuate properly can lead to
loss of control and serious personal injury. (Fig. 5)
To prevent the switch trigger from being accidentally
pulled, a lock-off button is provided.
To start the tool, press in the lock-off button and pull the
switch trigger. The tool speed is increased by increasing
pressure on the switch trigger. Release the switch trigger
to stop.
Reversing switch for debris removal
(Fig. 6)
This tool has a reversing switch. To remove a branch
caught in the blades, depress the “B” side of the switch to
reverse the rotation. For normal operation, depress the
“A” side of the switch.
In the reverse position the tool operates only for a short
period of time and automatically shuts off.
NOTICE:
• Always check the direction of rotation before operation.
• Use the reversing switch only after the tool comes to a
complete stop. Changing the direction of rotation
before the tool stops may damage it.
Speed change (Fig. 7)
Two speed ranges can be preselected with the speed
change switch.
Flipping the speed change switch lever to the “1” position
will set the tool to the low speed range and the “2” position
will set the tool to the high speed range.
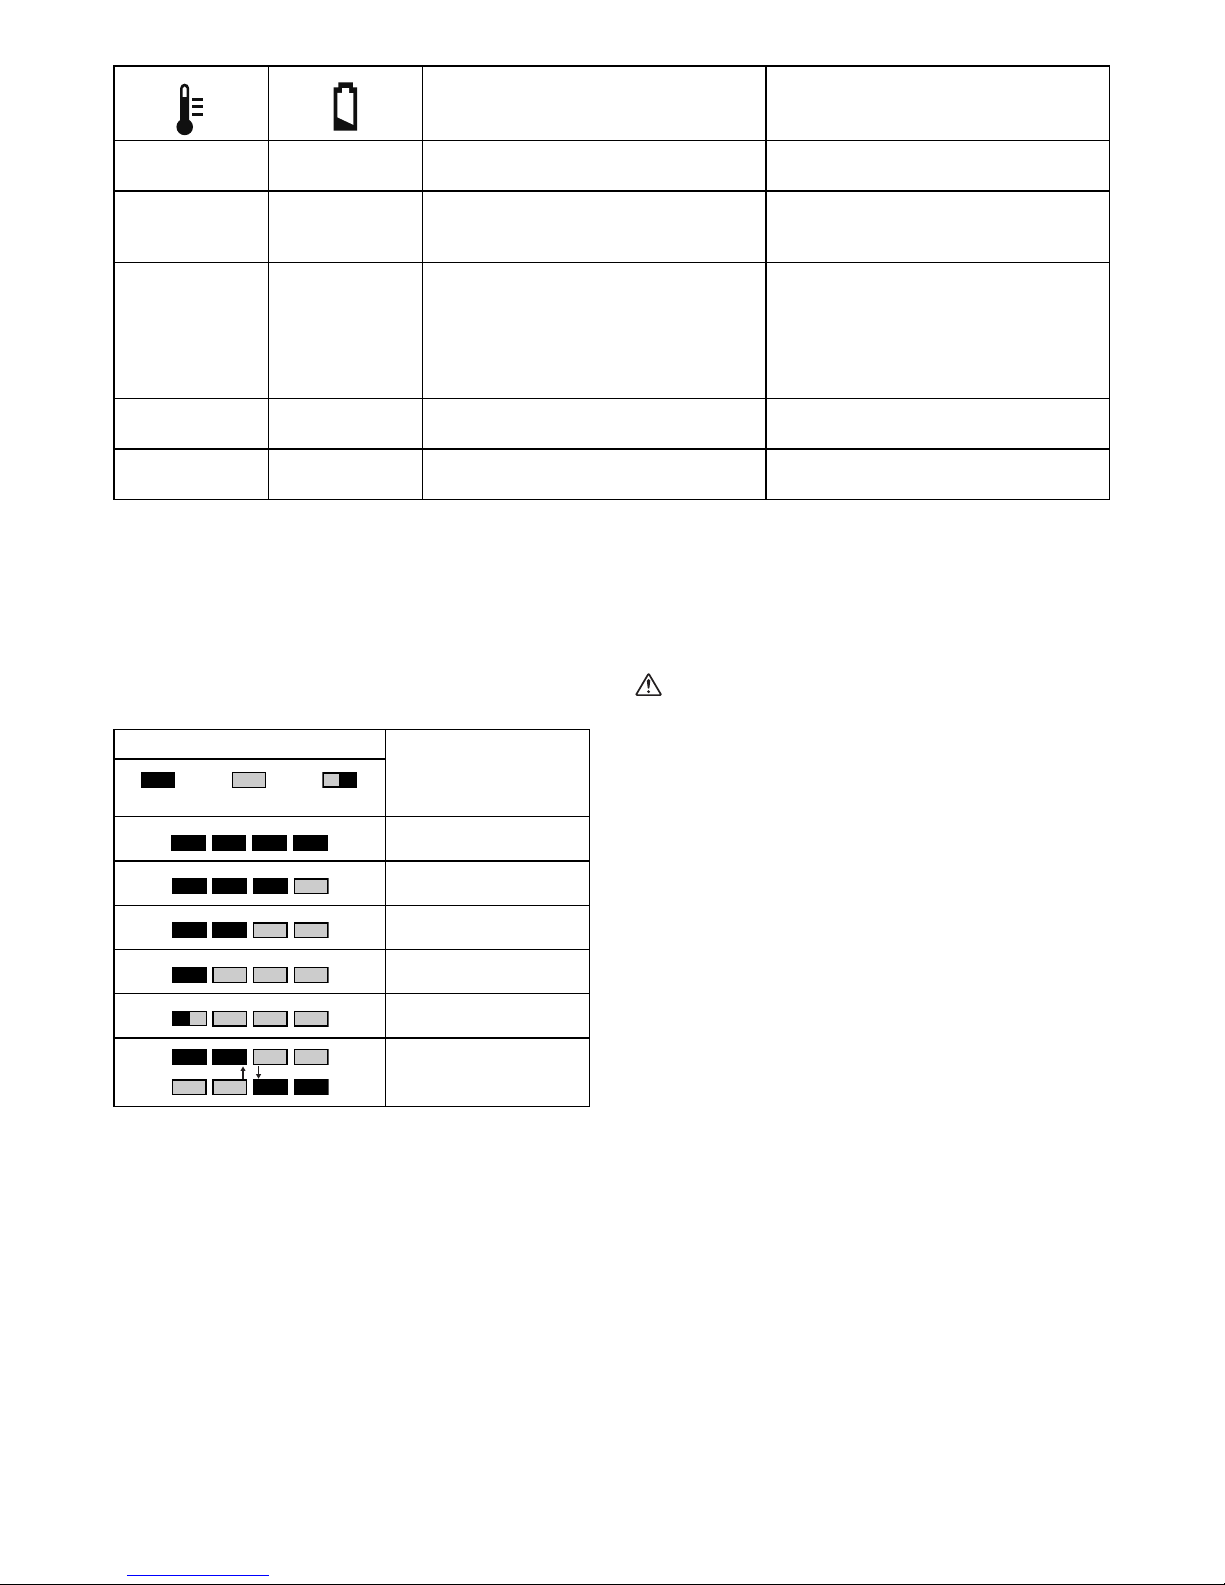
Status Action to be taken
-Blinking
Battery power has been nearly used
up.
Replace the battery with fully charged
one.
- Lighting On
Battery protector is shutting off the
power - battery power has been used
up.
Replace the battery with fully charged
one.
Blinking -
Overload protector is shutting off the
power - the motor was locked.
Release the switch trigger and remove
the cause of the motor lock or
overload. If the cutting tool is locked by
entangling weeds or the like, always
remove the battery cartridge before
clearing it.
Lighting On -
Overheat protector is shutting off the
power - overheating.
Rest the equipment for a while.
Blinking Blinking Electric or electronic malfunction
Ask your local authorized service
center for repairs.
Indicator lamps
Remaining capacity
Lighted Off Blinking
E F
70% to 100%
45% to 70%
20% to 45%
0% to 20%
Charge the battery.
The battery may have
malfunctioned.
 Loading...