

Page 1
GB Chain saw Instruction Manual
UA Ланцюгова пила
PL Pilarka łańcuchowa Instrukcja obsługi
RO Ferăstrău cu lanţ Manual de instrucţiuni
D Motor-Kettensäge Bedienungsanleitung
HU Láncfűrész Használati utasítás
SK Reťazová píla Návod na obsluhu
CZ Řetězová pila Návod k obsluze
Інструкції з експлуатації
UC3030A
UC3530A
UC4030A
UC4530A
UC3530AP
UC4030AP
Page 2

Important:
Read this instruction manual carefully before putting the chain saw into operation and strictly observe the safety
regulations! Keep this instruction manual!
Важливо:
Уважно прочитайте цю інструкцію перед тим, як експлуатувати ланцюгову пилу, та строго дотримуйтесь
правил безпеки! Зберігайте цю інструкцію з експлуатації!
Uwaga:
Przed uruchomieniem urządzenia prosimy przeczytać tę instrukcję, a przy pracy ściśle przestrzegać przepisów BHP!
Prosimy zachować niniejszą instrukcję użytkowania.
Atenţie:
Citiţi cu atenţie prezentele instrucţiuni de funcţionare înainte de prima punere în funcţiune a maşinii!
Păstraţi cu grijă aceste instrucţiuni de funcţionare.
Achtung:
Lesen Sie vor der ersten Inbetriebnahme diese Betriebsanleitung gründlich durch und befolgen Sie unbedingt
die Sicherheitsvorschriften!
Betriebsanleitung sorgfältig aufbewahren!
Figyelem:
Az első üzembehelyezés előtt figyelmesen olvassa át ezt az üzemeltetési utasítást, és feltétlenül tartsa be a
biztonsági előírásokat!
Az üzemeltetési utasítást gondosan őrizze meg!
POZOR:
Pred prvým uvedením do prevádzky dôkladne prečítajte tento Prevádzkový návod a bezpodmienečne
dodržiavajte bezpečnostné predpisy!
Prevádzkový návod starostlivo uschovať!
UPOZORNĚNÍ:
Před prvním použitím pročtěte pečlivě tento návod a dbejte bezpodmínečně bezpečnostních předpisů.
Návod pečlivě uschovejte!
2
Page 3
12
34
56
78
3
Page 4
910
Z
11 12
13 14
15 16
4
2 1/2
Page 5
C
o
45
A
B
D
A
17 18
19 20
B
C
21 22
SERVICE
23 24
5
Page 6
25 26
6
7
27 28
4
9 86
1
2
3
9 10
29 30
13 3
31 32
6
11
12
3
2
14
Page 7

2
33 34
35 36
23
SERVICE
1
37 38
39 40
Waste oil
7
Page 8
41 42
2
43 44
1
3
4
1 2
4
3
45 46
6
47 48
8
5
1
1
Page 9
49 50
51 52
53 54
0.64 mm
min.
3 mm
0.64 mm
55 56
4/5
30°
9
Page 10
1 2
57 58
1 2
59 60
SERVICE
1 2
61
10
Page 11
ENGLISH (Original instructions)
Thank you for your trust in our product
We congratulate you on your new MAKITA electric
chain saw. We are convinced that you will be satisfied
with this modern machine.
MAKITA electric chain saws are characterized by their
robust, high-efficiency motors and high chain velocities
which allow an excellent cutting efficiency. They
are equipped with numerous state-of-the-art safety
devices, are light, handy and can be put into operation
immediately wherever electric power is provided.
In order to guarantee the optimal function and
performance of your electric chain saw and to ensure
your personal safety we would request you to perform
the following:
Read this instruction manual carefully before
putting the electric chain saw into operation
for the first time and strictly observe the safety
regulations. Failure to do so can result in serious
injury to the operator and/or bystanders.
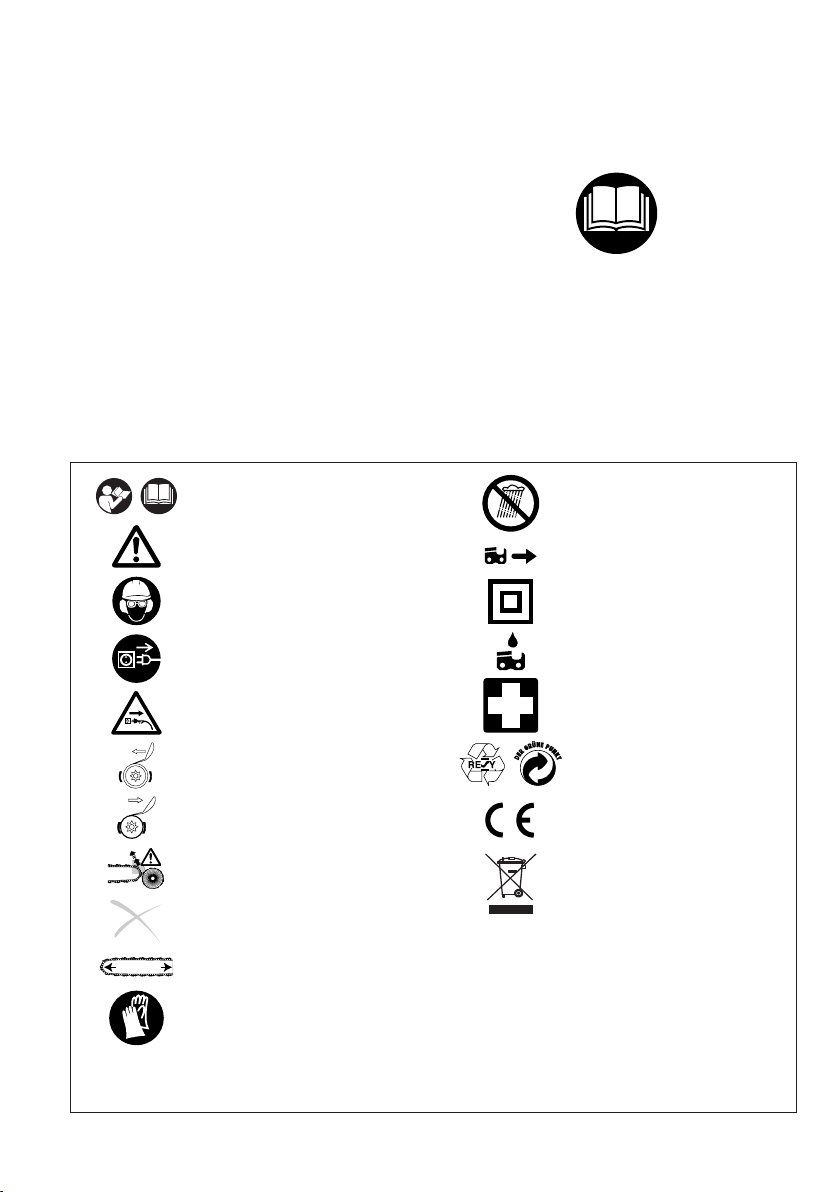
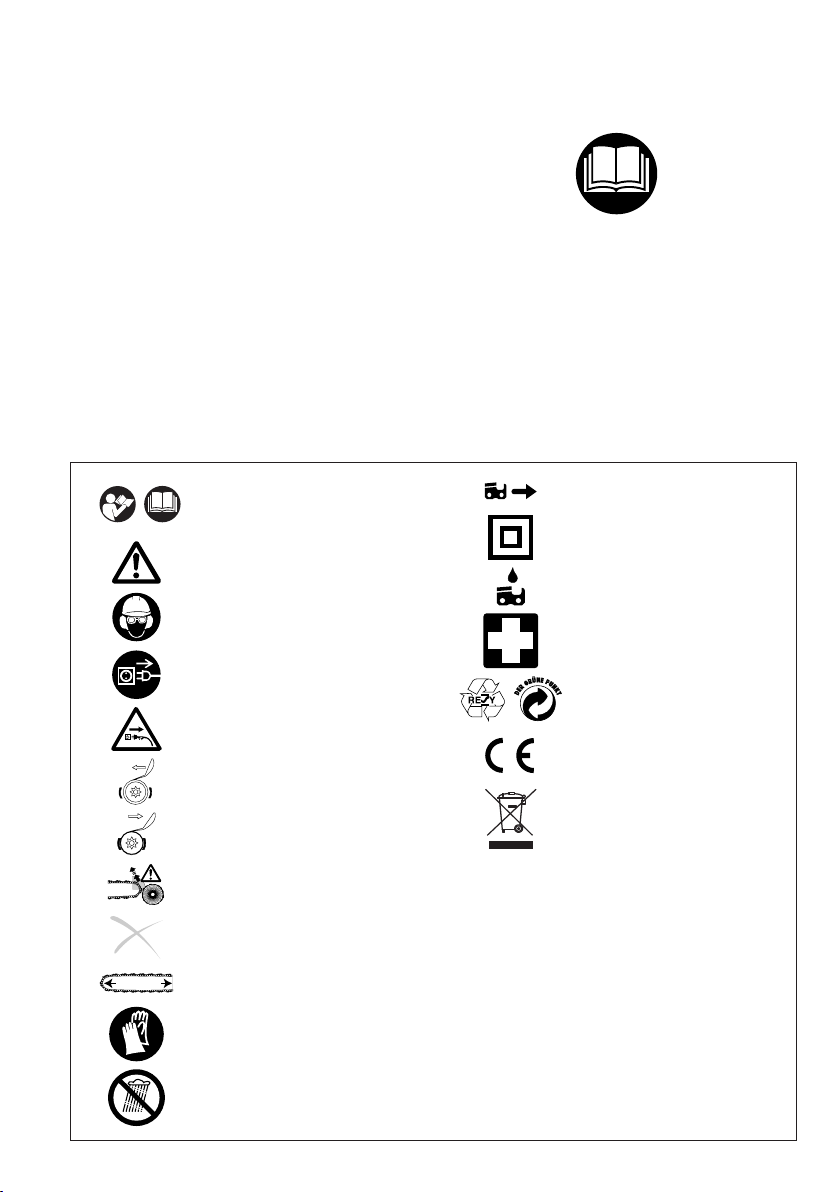
Symbols
You will notice the following symbols on the chain saw
and in the instruction manual:
Read instruction manual and
follow the warnings- and safety
precautions!
Protect against moisture!
..... mm
Particular care and attention!
Wear protective helmet, eye and
ear protection!
Pull out the power supply plug!
Pull out the power supply plug if
the cable is damaged!
Chain brake released
Chain brake actuated
Kickback!
Forbidden!
Maximum permissible cut length
Wear protective gloves!
Direction of chain travel
Double protective insulation
Saw chain oil
First aid
Recycling
CE-Marking
Be a good steward of the
environment! Do not dispose of
electrical appliances with the
household trash!
If the saw is no longer operable
or repairable, ask the appropriate
waste disposal authority about the
proper means of disposal.
In order to preclude any hazard
to other persons from a defective
electrical appliance, cut off the
power cord next to the housing.
CAREFUL! Before cutting off
the power cord, pull the plug.
Otherwise you can be exposed
to a life-threatening shock!
11
Page 12
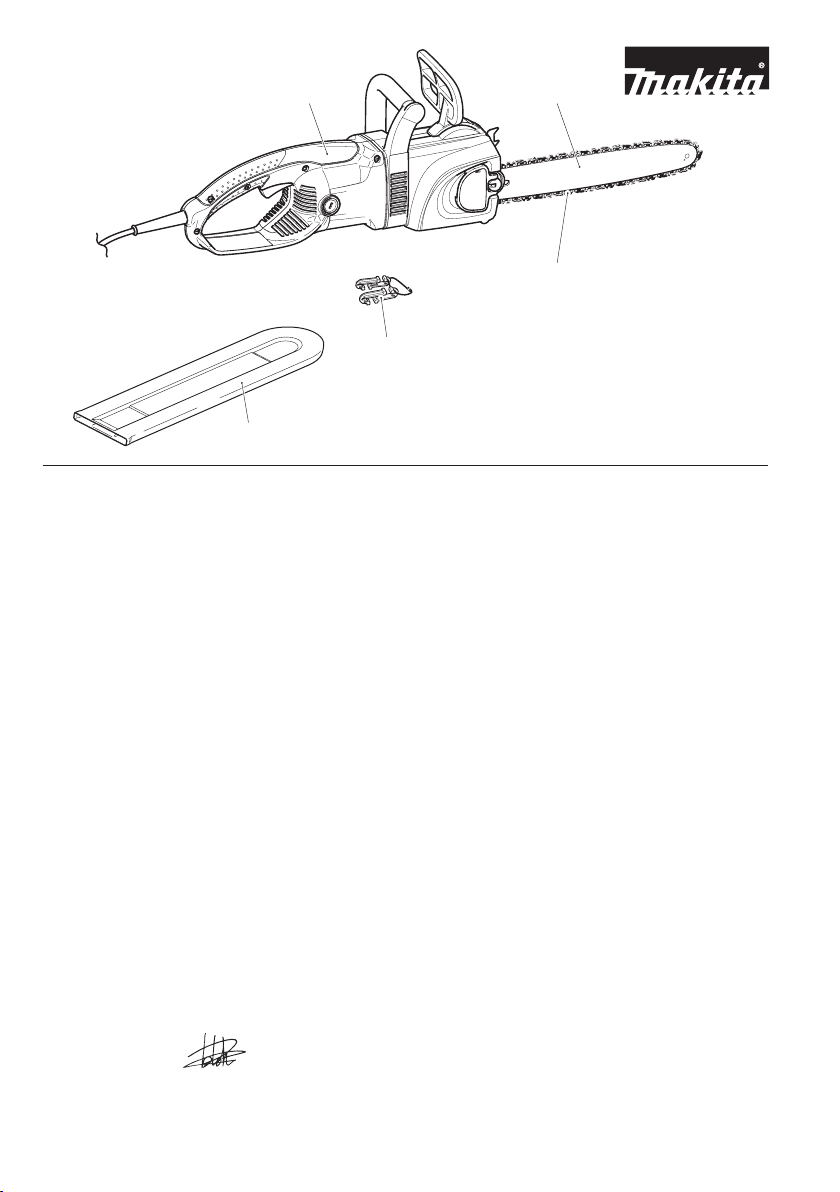
Minimum delivery inventory
1 2
4
5
3
1. Electric chain saw
2. Guide bar
3. Saw chain
4. Cord grip for electric cord
5. Chain protection cover
6. Instruction manual (not shown)
In the case that one of the parts listed should not be
included in the delivery inventory, please, consult your
sales agent.
For European countries only
EC Declaration of Conformity
We Makita Corporation as the responsible
manufacturer declare that the following Makita
machine(s):
Designation of Machine: Chain Saw
Model No./ Type: UC3030A, UC3530A, UC4030A,
UC4530A, UC3530AP, UC4030AP
Specifications: see “TECHNICAL DATA” table.
are of series production and
Conforms to the following European Directives:
2000/14/EC, 2006/42/EC
And are manufactured in accordance with the following
standards or standardised documents:
EN60745
The EC-Type Examination Certificate No.
M6T 09 07 24243 100
M6T 09 07 24243 099
The EC-Type Examination per 98/37/EC and
2006/42/EC was performed by:
TÜV SÜD Product Service GmbH,
Ridlerstraße 65, 80339 MÜNCHEN, Germany
Identification No. 0123
The technical documentation is kept by our authorised
representative in Europe who is:
Makita International Europe Ltd.,
Michigan, Drive, Tongwell,
Milton Keynes, Bucks MK15 8JD, England
The conformity assessment procedure required by
Directive 2000/14/EC was in Accordance with annex V.
Measured Sound Power Level: 101.8 dB
Guaranteed Sound Power Level: 103 dB
2nd July 2009
Tomoyasu Kato
Director
Makita Corporation
3-11-8, Sumiyoshi-cho,
12
Anjo, Aichi, JAPAN
Intended use
Electric saws
This electric saw may be used only for sawing wood.
It is intended for occasional use in thin wood, caring
for fruit trees, felling, removing limbs, and trimming to
length.
Persons who may not sue the saw:
This saw must not be used by persons who are not
familiar with this instruction manual, children, young
people, or anyone under the influence of alcohol, drugs
or medication.
Chain saw safety warnings: DO NOT let comfort
or familiarity with product (gained from repeated
use) replace strict adherence to chain saw safety
rules. If you use this tool unsafely or incorrectly,
you can suffer serious personal injury.
1. Keep all parts of the body away from the saw
chain when the chain saw is operating. Before
you start the chain saw, make sure the saw
chain is not contacting anything. A moment of
inattention while operating chain saws may cause
entanglement of your clothing or body with the saw
chain.
2. Always hold the chain saw with your right hand
on the rear handle and your left hand on the
front handle. Holding the chain saw with a reversed
hand configuration increases the risk of personal
injury and should never be done.
3. Wear safety glasses and hearing protection.
Further protective equipment for head, hands,
legs and feet is recommended. Adequate
protective clothing will reduce personal injury by
flying debris or accidental contact with the saw
chain.
4. Do not operate a chain saw in a tree. Operation
of a chain saw while up in a tree may result in
personal injury.
5. Always keep proper footing and operate the
chain saw only when standing on fixed, secure
Page 13

and level surface. Slippery or unstable surfaces
such as ladders may cause a loss of balance or
control of the chain saw.
6. When cutting a limb that is under tension be
alert for spring back. When the tension in the
wood fibres is released the spring loaded limb may
strike the operator and/or throw the chain saw out of
control.
7. Use extreme caution when cutting brush and
saplings. The slender material may catch the saw
chain and be whipped toward you or pull you off
balance.
8. Carry the chain saw by the front handle with
the chain saw switched off and away from
your body. When transporting or storing the
chain saw always fit the guide bar cover. Proper
handling of the chain saw will reduce the likelihood
of accidental contact with the moving saw chain.
9. Follow instructions for lubricating, chain
tensioning and changing accessories.
Improperly tensioned or lubricated chain may either
break or increase the chance for kickback.
10. Keep handles dry, clean, and free from oil and
grease. Greasy, oily handles are slippery causing
loss of control.
11. Cut wood only. Do not use chain saw for
purposes not intended. For example: do not use
chain saw for cutting plastic, masonry or nonwood building materials. Use of the chain saw for
operations different than intended could result in a
hazardous situation.
12. Causes and operator prevention of kickback:
Kickback may occur when the nose or tip of the
guide bar touches an object, or when the wood
closes in and pinches the saw chain in the cut. Tip
contact in some cases may cause a sudden reverse
reaction, kicking the guide bar up and back towards
the operator.
Pinching the saw chain along the top of the guide
bar may push the guide bar rapidly back towards the
operator.
Either of these reactions may cause you to lose
control of the saw which could result in serious
personal injury. Do not rely exclusively upon the
safety devices built into your saw.
As a chain saw user, you should take several steps
to keep your cutting jobs free from accident or injury.
Kickback is the result of tool misuse and/or incorrect
operating procedures or conditions and can be
avoided by taking proper precautions as given below:
- Maintain a firm grip, with thumbs and fingers
encircling the chain saw handles, with both
hands on the saw and position your body and
arm to allow you to resist kickback forces.
Kickback forces can be controlled by the operator,
if proper precautions are taken. Do not let go of the
chain saw.
- Do not overreach and do not cut above
shoulder height. This helps prevent unintended
tip contact and enables better control of the chain
saw in unexpected situations.
- Only use replacement bars and chains
specified by the manufacturer. Incorrect
replacement bars and chains may cause chain
breakage and/or kickback.
- Follow the manufacturer’s sharpening and
maintenance instructions for the saw chain.
Decreasing the depth gauge height can lead to
increased kickback.
Safety precautions
General precautions (Fig. 1)
- To ensure correct operation the user has to read
this instruction manual to make himself familiar with
the characteristics of the electric chain saw. Users
insufficiently informed will risk danger to themselves
as well as others due to improper handling.
- It is recommended only to lend the electric chain saw
to people who have proven to be experienced with
electric chain saws. Always hand over the instruction
manual.
- First users should ask the dealer for basic instructions
to become familiarized with the characteristics of
engine powered sawing.
- Familiarize yourself with the use of an electric chain
saw by cutting off lengths from a log on a sawhorse.
- Children and young persons aged under 18 years
must not be allowed to operate the electric chain saw.
Persons over the age of 16 years may, however, use
the chain saw for the purpose of being trained while
under supervision of a qualified trainer.
- Use electric chain saws always with the utmost care
and attention.
- Operate the electric chain saw only if you are in
good physical condition. Perform all work calm and
carefully. The user has to accept liability for others.
- Never use the electric chain saw after the
consumption of alcohol or drugs or medication.
(Fig. 2)
Personal protective equipment
- In order to avoid head, eye, hand or foot injuries
as well as to protect your hearing the following
protective equipment must be used during
operation of the electric chain saw.
- The kind of clothing should be appropriate, i. e. it
should be tight-fitting but not be a hindrance. Do
not wear jewellery or clothing which could become
entangled with bushes or shrubs.
- The protective helmet (1) is to be checked in regular
intervals for damage and is to be replaced after 5
years at the latest. Use only approved protective
helmets.If you have long hair wear a hairnet. (Fig. 3)
- The face shield (2) of the protective helmet (or the
goggles) protect against sawdust and wood chips.
During operation of the electric chain saw always
wear a goggle or a face shield to prevent eye injuries.
- Wear adequate noise protection equipment (ear
muffs (3), ear plugs, etc.). Octave brand analysis
upon request.
- The protective brace and bib overall (4) is made of
a nylon structure with 22 layers and protects against
cuts. We strongly recommend its use. In any case
wear a long pair of trousers made of solid material
during operation of the electric chain saw. (Fig. 4)
- Protective gloves (5) made of thick leather are part
of the prescribed equipment and must always be worn
during operation of the electric chain saw.
- During operation of the electric chain saw safety
shoes or boots (6) fitted with anti skid sole, steel toe
caps and protection for the leg are always to be used.
Safety shoes equipped with a protective layer provide
protection against cuts and ensure a secure footing.
13
Page 14

Putting into operation
- Do not operate the electric chain saw when it rains or
in wet or moist environment because the motor is not
waterproof. (Fig. 5)
- If the electric chain saw is moist, it must not be put
into operation.
- Avoid physical contact with grounded surfaces.
- Do not operate the electric chain saw next to
inflammable gases or dusts. Explosion hazard.
- Do always lead the power supply cable behind the
user. Take care that the cable is not clamped or cut by
sharp-edged objects. Lay the cable such that nobody
is endangered.
- Insert the plug only into safety sockets with approved
installation. Make sure that the mains voltage
corresponds to that on the identification plate. Backup fuse 16 A. If the saw is going to be used outdoors
connect it to a fault-current (FI) circuit breaker with
max. 30 mA triggering current.
- Pay attention to the diameter of the extension
cable. When using a cable roll the cable should be
completely wound off. Use only extension cords that
meet the specifications in “Technical data”. If using
the saw out of doors make sure that the extension
cord is approved for such use.
- Before starting work the electric chain saw must
be checked for perfect function and operating
safety according to the prescriptions.
Check especially the function of the chain brake,
the correct mounting of the guide bar, the correct
sharpening and tightening of the saw chain, the firm
mounting of the sprocket guard, the easy motion of
the power switch, the function of the locking button,
the good mechanical condition of cable and plug and
the cleanliness and dryness of the handles.
- Put the electric chain saw only into operation if it is
completely assembled. Never use the electric chain
saw when it is not completely assembled.
- Remove the adjusting tool before switching the saw
on.
- All protective installations and guard supplied with the
chain saw during operation.
- Make sure that there are no children or other persons
within the working range. Also pay attention to any
animals in the working vicinity. (Fig. 6)
- Before switching on the electric chain saw ensure that
you have a safe footing.
- When switching on the electric chain saw always
hold it with both hands. Take the back handle with
the right hand and the tubular handle with the left
hand. Hold the handles tightly with your thumbs facing
your fingers. The bar and chain must indicate away
from your body. (Fig. 7)
- Switch on the saw only in the manner described in
this manual. Do not overload your saw. It will work
better and more safely if you use it within its intended
performance range.
- Switch off the electric chain saw immediately if you
observe a change in its operating behavior.
CAUTION: When releasing the power switch the
chain keeps on running for a short period of time
(free-wheeling).
- Protect the power cord from heat, oil and sharp
edges.
- Route the power cord in such a way that in cannot get
caught in branches or other objects during sawing.
- If the cable is being damaged or cut, pull out the
14
power supply plug immediately. (Fig. 8)
- If the sawing device is hit by stones, nails or other
hard objects, pull out the power supply plug and
check the sawing device immediately.
- Pull out the power supply plug before checking
the chain tension, tightening the chain, replacing
it or clearing malfunctions. (Fig. 9)
• device malfunction
• maintenance
• refill oil
• sharpen the saw chain
• stop
• transport
• shutdown
- When stopping work or leaving the electric chain saw
switch off the chain saw and pull out the power supply
plug. Put the electric chain saw in a safe location to
prevent danger to others.
- For refilling the oil tank the power supply plug must be
pulled out. Do not smoke or light open fires.
- Avoid skin or eye contact with mineral oil products.
Always wear gloves when refilling the oil tank.
- Take care that no chain oil oozes into the soil
(environmental protection). Use an appropriate base.
- If oil has been spilt, clean the electric chain saw
immediately.
Working behavior/method of working
- Do not work on your own. There must be someone
around in case of an emergency (within shouting
distance).
- During sawing operation always hold the electric
chain saw with both hands. Thus you will be able to
guide it safely.
- Only use the electric chain saw during good light and
visibility periods. Be aware of slippery or wet areas,
and of ice and snow (risk of slipping). The risk of
slipping is extremely high when working on recently
peeled wood (bark).
- Never work on unstable surfaces. Make sure that
there are no obstacles in the working area, risk
of stumbling. Always ensure that you have a safe
footing.
- Never saw above your shoulder height.
- Never saw while standing on a ladder. (Fig. 10)
- Never climb up into trees to perform sawing with the
electric chain saw.
- Never bend forward by far to perform sawing.
- Guide the electric chain saw in such a way that no
part of your body is within the elongated swiveling
range of the saw. (Fig. 11)
- Use the electric chain saw for sawing wood only.
- Do not let the chain touch the ground when it is
running. If you are cutting wood lying directly on the
ground, turn it over before completing the cut so that
you do not cut into the ground.
- Clear the area of the cut of foreign objects such
as sand, stones, nails, wire etc. Such objects can
damage the blade and cause dangerous kickback.
- When sawing precut timber or thin woods use a safe
support (sawing jack, 12). When sawing precut timber
or thin pieces use a stable support (sawhorse, 12).
Do not saw stacked timber! Do not let another person
steady the timber, and do not steady it with your foot!
- Secure round timber.
- When working on slopes, always work facing the
slope.
Page 15

- For performing crosscuts the toothed ledge (Z,
Fig. 12) must be applied to the timber to be cut.
- Before performing a crosscut firmly apply the toothed
ledge to the timber, only then can the timber be cut
with the chain running. For this the electric chain
saw is lifted at the back handle and guided with the
tubular handle. The toothed ledge serves as a center
of rotation. Continue by slightly pressing down the
tubular handle and simultaneously pulling backwards
the electric chain saw. Apply the toothed ledge a little
bit deeper and once again lift the back handle.
- The sawing device must be running whenever you
remove the electric chain saw from the timber.
- When performing several cuts the electric chain saw
must be switched off in between.
- When the timber must be pierced for cutting
or longitudinal cuts are to be performed it is
urgently recommended to have these works
carried out by specially trained persons only
(high risk of kickbacks).
- For performing longitudinal cuts (Fig. 13) apply
the sawing device at an angle which is as small as
possible. Be very careful when carrying out this kind
of work because the toothed ledge cannot be used.
- When cutting with the bottom edge of the bar the
electric chain saw may be pushed in the direction
of the user if the chain is clamped. For this reason
use the top edge of the bar whenever possible. The
electric chain saw will then be pushed away from your
body. (Fig. 14)
- If the timber is not free of tension (Fig. 15), first cut
the pressure side (A). Then the crosscut can be
performed on the tension side (B). Thus clamping of
the bar is avoided.
- Be very careful when cutting splintery wood. Cut
pieces of wood may be pulled along (risk of injuries).
- Never use the electric chain saw for lifting up or
removing pieces of wood or other objects.
- When releasing the tension the electric chain saw
should be supported on the trunk (risk of kickbacks).
- Tension releasing works must be carried out by
trained persons. High risk of injuries.
- Be aware of branches under tension. Do not cut free
branches from below.
- Never perform tension releasing works standing on
the trunk.
- Do not use the electric chain saw for works in the
forest, i. e. for cutting down trees or carrying out
tension releasing works. The user’s mobility and
safety necessary for this kind of work are not
guaranteed due to the cable connection.
CAUTION:
Do not fell or debranch trees unless you are
specially trained for it! There is a high risk of
injury! Make sure to follow local regulations.
- Before cutting down a tree ensure that
a) only those persons are within the working range
which are actually involved in cutting down the tree
b) all persons involved in the felling have an
unhindered retreat route (the retreat path should
be about 45° diagonally and to the rear away from
the direction of fall). Be aware of the increased risk
of stumbling from electric cables!
c) the bottom part of the trunk is free from foreign
bodies, underbrush and branches. Make sure to
have a safe footing (risk of stumbling).
d) the next working place is at least 2 1/2 tree lengths
away. (Fig. 16) Before cutting down the tree
check the direction of fall and make sure that there
are neither other persons nor any objects within a
distance of 2 1/2 tree lengths. (Fig. 16)
=
Felling direction
= Danger zone
= Retreat path
- Judging the tree:
Direction of hanging - loose or dry branches - height
of the tree - natural hang over - is the tree rotten?
- Take into account the direction and the velocity of the
wind. If strong gusts are occuring, do not perform any
cutting down works.
- Cutting the roots:
Start with the strongest root. First perform the vertical
and then the horizontal cut.
- Notching the trunk (A, Fig. 17):
The notch determines the direction of fall and guides
the tree. The trunk is notched perpendicular to the
direction of fall and penetrates 1/3 -1/5 of the trunk
diameter. Perform the cut near the ground.
- When correcting the cut always do so over the whole
width of the notch.
- Cut down the tree (B, Fig. 18) above the bottom edge
of the notch (D). The cut must be exactly horizontal.
The distance between both cuts must be approx. 1/10
of the trunk diameter.
- The material between both cuts (C) serves as a
hinge. Never cut it through, otherwise the tree will fall
without any control. Insert felling wedges in the cut (B,
Fig. 18) in good time.
- Secure the cut only with wedges made of plastic or
aluminium. Do not use iron wedges.
- When cutting down a tree always stay sideways of the
falling tree.
- When withdrawing after having performed the cut
down be aware of falling branches.
- When working on a sloping ground the user of the
electric chain saw must stay above or sidewards of
the trunk to be cut or the already cut down tree.
- Be aware of trunks which may roll towards you.
Kickback
- When working with the electric chain saw dangerous
kickbacks may occur.
- Kickback occurs when the tip of the blade(especially
the top quarter) inadvertently comes into contact with
wood or other solid objects. (Fig. 19)
- In this case the electric chain saw is thrown without
any control and with high energy potentials in the
direction of the user (risk of injuries).
In order to prevent kickbacks follow the indicated
instructions:
- Never apply the end of the bar when starting to make
a cut. Always observe the end of the bar.
- Never use the bar end for sawing. Be careful when
continuing to cut.
- When starting to perform a cut the chain must be
running.
- Ensure that the chain is always sharpened correctly.
Pay special attention to the hight of the depth limiter
(for detailed information see the chap. “Sharpening
the saw chain”).
- Never cut several branches at the same time. When
cutting a branch ensure that no other branch is
touched.
- When crosscutting a trunk be aware of the trunks next
15
Page 16

to it. It is recommended to use a saw jack.
Transport and storage
- Carry the electric chain saw with the tubular handle.
The saw bar indicates backwards. Never carry or
transport the electric chain saw with the chain
running.
- Never carry the saw by the power cord. Do not
disconnect the plug by pulling on the power cord.
- When changing your position during work switch of
the electric chain saw and actuate the chain brake in
order to prevent an inadvertent start of the chain.
- When transporting the electric chain saw over long
distances the power supply plug must be pulled out
and the bar protection cover, included in the delivery,
must be applied. (Fig. 20)
- Ensure safe positioning of the electric chain saw
during car transportation to avoid oil leakage.
- Store the saw in a secure, dry, lockable room out of
reach of children. It must not be stored outdoors.
- For storing the electric chain saw over a long period
of time or shipping it the oil tank must be completely
emptied.
- Only use approved and marked containers for
transporting and storing chain oil.
Maintenance
- For performing maintenance works switch of
the electric chain saw, pull out the power supply
plug and secure it. (Fig. 21)
- Before starting to work, always make sure that the
saw is in safe working order, in particular the chain
brake and run-out brake. Make sure that the saw
chain is always sharpened and tightened correctly.
(Fig. 22)
- Have the chain brake and run-out brake inspected
regularly (see “Chain brake, run-out brake”).
- Regularly check the cable to the power supply for
damage of the covering.
- Regularly clean the electric chain saw.
- If the plastic case is damaged, have it immediately
repaired by a skilled person.
- Regularly check the tank cap for tightness.
- Do not use the saw if the ON/OFF switch is defective.
Have it repaired by a qualified person.
Observe the accident prevention instructions
issued by the competent trade federations and
insurance companies.
Do not perform any modifications on the electric
chain saw. You will endanger your safety.
Perform only the maintenance and repair works
described in the instruction manual. All other works
must be carried out by the MAKITA service. (Fig. 23)
Use only original MAKITA spare parts and
accessories.
Applying spare parts which are not original MAKITA
parts or accesories and bar/chain combinations
or lengths results in a high risk of accidents. For
accidents and damage resulting from using sawing
devices or accesories which have not been approved
we cannot accept any responsibility.
Should you ask for help, please, give the following
information:
- place of accident
- what happened
- number of injured persons
- kind of injuries
- your name.
NOTE
Individuals with poor circulation who are exposed to
excessive vibration may experience injury to blood
vessels or the nervous system.
Vibration may cause the following symptoms to
occur in the fingers, hands or wrists: “Falling asleep”
(numbness), tingling, pain, stabbing sensation,
alteration of skin colour or of the skin. If any of these
symptoms occur, see a physician!
First aid (Fig. 24)
For the event of a possible accident, please, make sure
that a first aid box is always immediately available close
by. Immediately replace any items used from the first
aid box.
16
Page 17

Technical data
UC3030A UC3530A / AP UC4030A / AP UC4530A
Chain type 092
Chain pitch inch 3/8”
Length of a cut cm 30 35 40 45
Max. chain speed m/s 13.3
Sound power level L
per EN 60745
Sound pressure level L
at the workplace per EN 60745
WA av
pA av
dB (A) 101.8
dB (A) 90.8
Uncertainty dB (A) K=0.73
Vibration acceleration a
per EN 60745
- Tubular handle m/s
- Rear handle m/s
Uncertainty m/s
h,w av
2
2
2
4.7
5.6
K=1.5
Oil pump automatic
Oil tank capacity ml 140
Power transmission direct
Overload protection electrical
Chain brake manually actuated
Run-out brake electrical
Weight
(Weight according to EPTAProcedure 01/2003)
kg 5.0 5.1 5.2 5.3
Protective case class II (double protective insulation)
Extension cable
(not included)
Due to our continuing programme of research and development, the specifications herein are subject to change
•
DIN 57282/ HO 7RN-F
L= 30 m max., 3x1.5 mm
2
without notice.
Specifications may differ from country to country.
•
The declared vibration emission value has been measured in accordance with the standard test method and may be
•
used for comparing one tool with another.
The declared vibration emission value may also be used i n a preliminary assessment of exposure.
•
WARNING:
The vibration emission during actual use of the power tool can differ from the declared emission value depending on
•
the ways in which the tool is used.
Be sure to identify safety measures to protect the operator that are based on an estimation of exposure in the actual
•
conditions of use (taking account of all parts of the operating cycle such as the times when the tool is switched off
and when it is running idle in addition to the trigger time).
17
Page 18
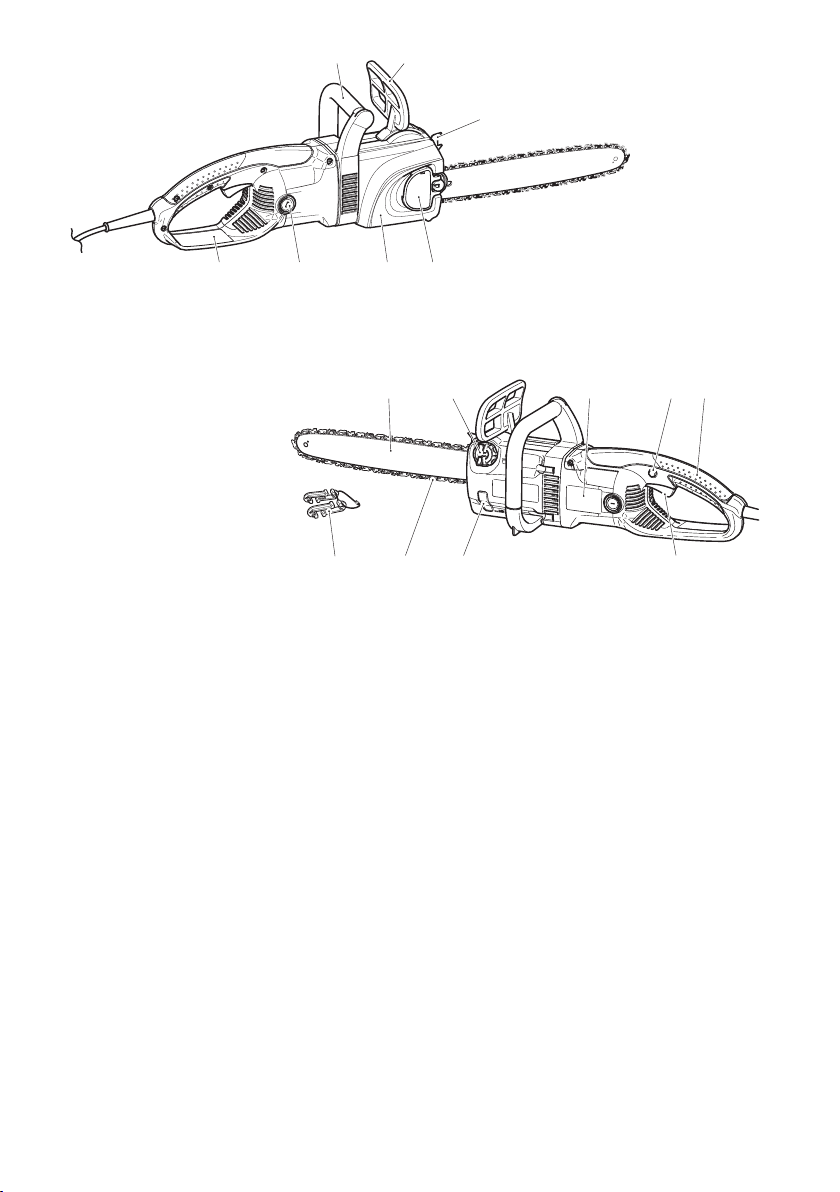
Denomination of components
1
2
3
1 Tubular handle
2 Hand guard (release for chain brake)
3 Spike bar
4 Sprocket guard quick tightener
5 Sprocket guard, chain brake
6 Carbon brush cover
7 Back hand guard
8 Guide bar
9 Oil tank cap
10 Identification plate
11 Locking button
12 Rear handle
13 Power switch
14 Sightglass for oil level
15 Saw chain
16 Cord grip for electric cord (pull relief)
67
45
8 9 10 11 12
13141516
18
Page 19

PUTTING INTO OPERATION (Fig. 25)
CAUTION:
When working on the guide bar or saw chain
always wear protective gloves and pull out the
power supply plug.
CAUTION:
Switch on the electric chain saw only after having
assembled it completely and inspected!
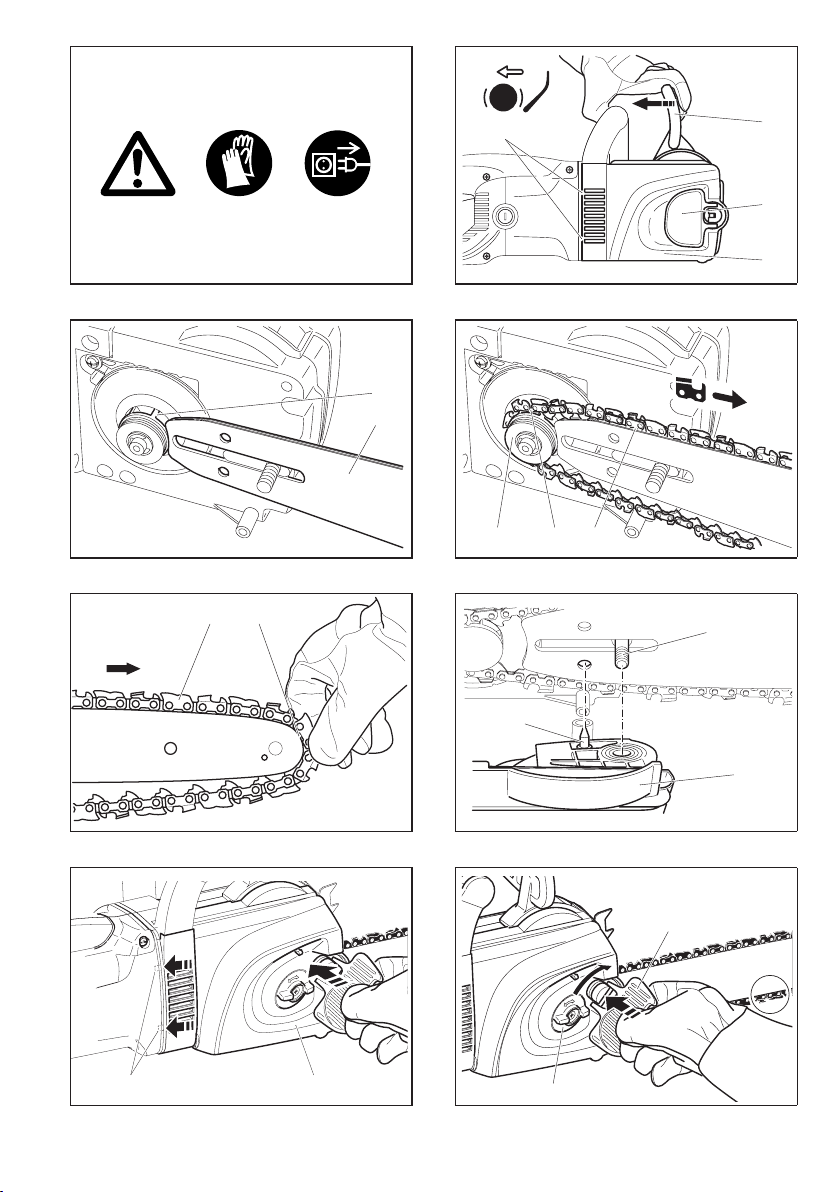
Mounting the guide bar and saw chain
(Fig. 26)
Put the electric chain saw on a stable surface and carry
out the following operations for mounting the bar and
chain:
Release chain brake. To do this, pull the hand guard (1)
in the direction of the arrow.
Flip up the sprocket guard quick tightener (2). (Fig. 31)
Push in the sprocket guard quick tightener firmly against
spring pressure, and slowly turn it counter-clockwise
until you feel it engage. Keep pushing in, and turn it as
far as possible counter-clockwise.
Release the sprocket guard quick tightener (remove
pressure) and now turn it clockwise to its original
position. Repeat this procedure until the sprocket guard
(3) is unscrewed.
Pull the sprocket guard (3) up slightly, pull out of the
rear fittings (4) and remove.
Position the guide bar (7) and push it against the
sprocket (6). (Fig. 27)
Place the saw chain (9) on the sprocket (6). Using your
right hand, guide the saw chain into the upper guide
groove (8) of the guide bar. (Fig. 28)
The cutting edges of the saw chain on the top of
the guide bar must point in the direction of the
arrow!
Using your left hand, lightly press the guide bar against
the holder on the housing and guide the saw chain (9)
around the nose sprocket (10) on the guide bar. While
doing this, pull the saw chain slightly in the direction
shown by the arrow. (Fig. 29)
Line up the hole in the sprocket guard with the threaded
pin (11).
Turn the chain tensioning screw (Fig. 32/14) to align
the chain tensioning pin (12) with the hole in the guide
bar. (Fig. 30)
First press the sprocket guard (3) into the mounting (13)
and then push it onto the threaded pin (Fig. 30/11).
(Fig. 31)
Tightening the saw chain (Fig. 32)
Firmly push in and simultaneously turn the sprocket
guard quick tightener (2, clockwise) in order to screw on
the sprocket guard (3), but do not tighten it yet.
Lift the tip of the guide bar slightly and turn the chain
tensioner (14) clockwise until the saw chain engages in
the guide groove on the lower side of the guide bar (see
the circle).
Push in the sprocket guard quick tightener (2) again and
tighten by turning clockwise.
Release the sprocket guard quick tightener (2) (remove
pressure) until it turns freely, then fold it in as shown in
the illustration. (Fig. 33)
Checking the chain tension (Fig. 34)
The chain has the proper tension when it lies against
the bottom edge of the guide bar and can be easily
pulled by hand about 2-4 mm (about 1/8”) up from the
guide bar.
Check the chain tension frequently - new chains tend to
get longer during use!
When checking the chain tension the motor must be
switched off and the power supply plug pulled out.
If the chain is too loose: Loosen the sprocket guard
quick tightener by about a quarter turn. Tighten the
chain as described under “Tighteneing the saw chain.”
HINT:
Use 2 or 3 saw chains alternately for even wear of the
chains, sprocket and guide bar running surfaces.
In order to guarantee a uniform wear of the groove
in the bar the bar should be turned over whenever
replacing the chain.
Chain brake (Fig. 35)
These models come with a chain brake as standard
equipment. If there is a kickback resulting from the
guide bar tip impacting the wood (see SAFETY
INSTRUCTIONS), the back of the hand hitting the
handguard will engage the chain brake.
The chain will stop within a fraction of a second.
Run-out brake
The electric chain saw come with a run-out brake as
standard equipment.
The run-out brake ensures that the chain comes to a
stop immediately when the ON/OFF switch is released,
thus preventing the chain from continuing to run and
presenting a hazard.
Testing of the run-out brake is described on later.
Chain and run-out brake maintenance (Fig. 36)
The brake systems are very important safety
features, and like any other part they are subject to
a certain amount of wear. Regular inspection and
maintenance is important for your personal safety,
and can be properly performed only by a MAKITA
service centre.
Engaging the chain brake (braking) (Fig. 37)
With your left hand, press the handguard (1) towards
the tip of the guide bar (arrow 2).
Releasing the chain brake
Pull the hand guard (1) towards you (arrow 3) until you
feel it catch. The brake is now released.
Note:
When the chain brake is actuated the power supply to
the motor will be cut off. Testing of the chain brake is
described on later.
19
Page 20

Saw chain oil (Fig. 38)
Use a special oil with adhesive addition for lubricating
the saw chain and bar. The adhesive addition prevents
that the oil is centrifuged too fast from the sawing
device.
Do not use mineral oils. In order to protect the
invironment the use of biologically decomposeable oil is
prescribed.
The saw chain oil sold by MAKITA, called BIOTOP,
is made of special vegetable oils and is biologically
decomposeable to 100%. BIOTOP has been granted
the “blue angel” for being particularly favourable to the
environment (RAL UZ 48).
BIOTOP oil is available in the following packing sizes to
suit your individual requirements:
1 liter order number 980 008 610
5 liters order number 980 008 611
Biologically decomposeable oil is stable only for a
limited period of time. It should be consumed within
2 years from the date of manufacture (printed on the
container). (Fig. 39)
Important note on bio-degradable chain oils
If you are not planning to use the saw again for an
extended period of time, empty the oil tank and put in a
small amount of regular engine oil (SAE 30), and then
run the saw for a time. This is necessary to flush out all
remaining bio-degradable oil from the oil tank, oil-feed
system, chain and guide bar, as many such oils tend
to leave sticky residues over time, which can cause
damage to the oil pump or other parts.
The next time you use the saw, fill the tank with
BIOTOP chain oil again. In case of damage caused by
using waste oil or unappropriate chain oil the product
guarantee will be null and void.
Your salesman will inform you about the use of chain oil.
Never use waste oil (Fig. 40)
Waste oil is very dangerous for the environment.
Waste oil contains high amounts of carcinogenic
substances.
The residues in the waste oil result in a high degree of
wear and tear at the oil pump and the sawing device.
In the case of damage caused by using waste oil or
unappropriate saw chain oil the product guarantee will
be null and void.
Your salesman will inform you about the use of saw
chain oil.
Avoid skin and eye contacts (Fig. 41)
Mineral oil products as well as oil degrease the skin.
If your skin repeatedly comes in contact with these
substances for a longer period of time, it will desiccate.
Various skin deseases may result. In addition, allergic
reactions are known.
Eyes can be irritated by contact with oil. If oil gets into
your eyes, immediately wash them with clear water. If
your eyes are still irrritated, go to see a doctor.
prevent dirt from entering the tank.
- Unscrew the tank cap (1) and fill in chain oil until it is
on a level with the bottom edge of the filler socket.
- Tightly screw on the tank cap.
- Thoroughly remove any oil that has overflown.
Important! (Fig. 43)
Before operating the saw for the first time, the oil feed
system must be completely filled, until the chain oil
lubricates the chain and guide bar.
This procedure can take up to two minutes.
- The oil level can be controlled in the sight glass (2).
In order to ensure sufficient lubrication of the saw chain
there must always be enough oil in the tank.
Lubricating the saw chain (Fig. 44)
Only if the motor is switched off and the power
supply plug is pulled out!
To guarantee a troublefree operation of the oil pump the
oil guide groove (3) as well as the oil inlet bore in the
guide bar (4) must be cleaned in regular intervals.
Note:
After the saw has been turned off it is normal for
residual chain oil to drip from the oil feed system,
the guide bar and the chain for a time. This does not
constitute a defect!
Place the saw on a suitable surface.
Plug in the saw (Fig. 45)
CAREFUL!
Before connecting the saw to a source of
electricity, always make sure to check that when
the ON/OFF switch (1) has been pressed in and
released, it automatically comes back out to the
“off” position. If it does not, do not under any
circumstances connect the saw to a power source
- do not plug it in. Take the saw to a MAKITA
service centre before doing any work with it.
Clip the extension cord and the saw’s power cord into
the cord grip (2).
Plug the saw plug (3) into the socket of the extension
cable (4).
Switching on the motor (Fig. 46)
- Plug in the saw (see above).
- When switching on the electric chain saw always
hold it with both hands. Take the back handle with
the right hand and the tubular handle with the left
hand. Hold the handles tightly with your thumbs facing
your fingers. The bar and chain must not be in contact
with any object.
- First depress the locking button (5) and then the
power switch (1). Then release the locking button (5).
- Attention: The chain starts running immediately.
Keep the power switch depressed as long as the
motor is to run.
CAUTION:
Never lock the power switch in the ON position.
Refilling the oil tank (Fig. 42)
Only if the motor is switched off and the power
supply plug is pulled out!
- Thoroughly clean the oil tank around the cap to
20
Switching off the motor
- Release the power switch (1).
NOTE:
When the chain brake is actuated the power supply
Page 21

to the motor will be cut off.
If the saw does not start when the ON/OFF switch
(1) is actuated, it will be necessary to release the
chain brake.
- Pull the hand guard (6) firmly in the direction of the
arrow until you feel it catch. (Fig. 47)
Important:
These models are equipped with a starting current
limiter. This electronic component prevents too abrupt
starting of the electric motor.
Excess current cutoff: When the electrical current to the
saw exceeds the permissible level, the power supply to the
motor is automatically cut off. This prevents overheating
of the motor and resulting damage. To start the saw up
again, release the ON/OFF switch and press it again.
CAUTION: Do not use the saw if the current cutoff
repeatedly switches off the saw. Consult a MAKITA
service centre.
Checking the chain brake (Fig. 48)
Do not work with the chain saw without first
checking the chain brake!
- Start the motor as described (make sure you have a
good footing, and place the chain saw on the ground
in such a way that the guide bar is free of contact).
- Grasp the tubular handle firmly with one hand and
hold the grip with the other.
- Switch on the motor and press the hand guard (1) in
the direction of the arrow with the back of your hand
until the chain brake engages. The chain should stop
immediately.
- Switch the motor off Immediately and release the
chain brake.
Important: If the saw chain does not stop
instantly when you carry out this test, do not
under any circumstances use the saw! Take the
chain saw to a MAKITA service center.
Testing the run-out brake (Fig. 49)
Do not work with the saw without first testing the
run-out brake!
- Start the motor as described (make sure you have a
good footing, and place the chain saw on the ground
in such a way that the guide bar is free of contact).
- Grasp the tubular handle firmly with one hand and
hold the grip with the other.
- Switch the motor on and then back off. The chain
should come to a full stop within two second of
switching off the motor.
Important: If the saw chain does not stop within
two second when you carry out this test, do not
use the saw! Inspect the carbon brushes.
Checking the chain lubrication (Fig. 50)
Never saw when a sufficient chain lubrication is not
guaranteed. Otherwise the life of the sawing device will
be reduced. Before starting work check the oil level in
the tank and the oil feeding. Check the fed oil quantity
by following the instructions below:
- Start the electric chain saw.
- Hold the running chain saw approx. 15 cm above a
trunk or the ground (use an appropriate surface).
If the lubrication is sufficient, you will see a light oiltrace
because oil will be centrifuged from the chain saw. Pay
attention to the direction the wind is blowing and avoid
unnecessary exposure to the oil spray!
MAINTENANCE
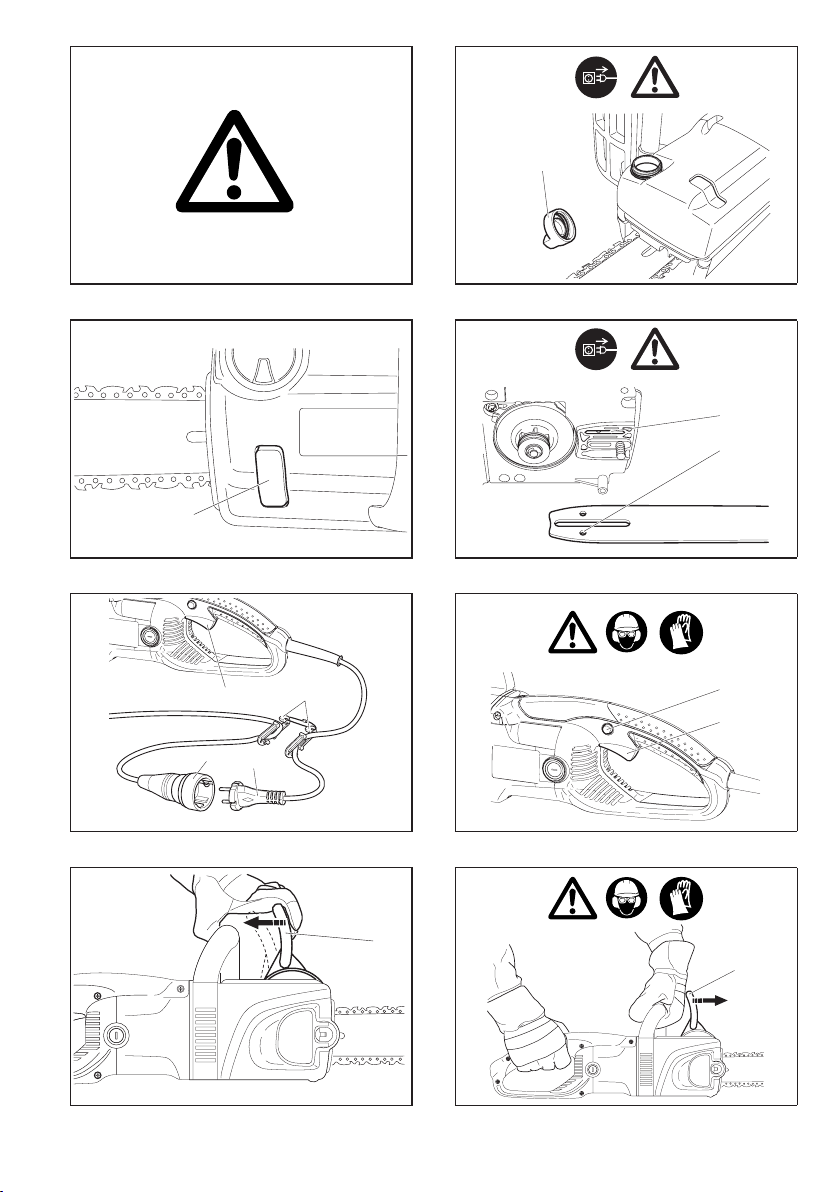
Sharpening the saw chain (Fig. 51)
When working on the saw chain you must always
pull out the power supply plug and wear protective
gloves.
The chain needs sharpening when:
- the sawdust from sawing humid wood looks like wood
flour.
- the saw chain penetrates the wood only under great
pressure.
- the cutting edge is visibly damaged.
- the sawing device is pulled to the left or the right
during the sawing operation. This is caused by
uneven sharpening of the chain or by damage to one
side of it.
Important: Sharpen frequently, but without
removing too much metal!
Generally, 2-3 strokes of the file will be enough.
Have the chain resharpened in a service center when
you have sharpened it yourself several times.
Proper sharpening: (Fig. 52)
CAUTION:
Use only chains and guide bars designed for this
saw!
- All cutters must be of the same length (dimension a).
Cutters with different lengths result in rough running of
the chain and can cause cracks in the chain.
- Minimum cutter length is 3 mm (0.11”). Do not
resharpen the chain when the minimum cutter length
has been reached; at this point, the chain must be
replaced.
- The depth of the cut is determined by the difference in
height between the depth limiter (round nose) and the
cutting edge.
- The best results are obtained with a depth-limiter
depth of 0.64 mm (.025”).
CAUTION:
Excessive depth increases the risk of kickback!
(Fig. 53)
- All cutters must be sharpened to the same angle, 30°.
Different angles result in a roughly, irregularly running
chain, increase wear and tear and cause chain
beakage. (Fig. 54)
- The 85° front rake of the cutter results from the cut
depth of the round file. If the proper file is used in the
right manner, the correct front rake will be obtained
automatically.
Files and how to work with them
- Sharpen using a special file holder with a saw chain
round file dia. 4.0 mm. Normal round files are not
appropriate for this work.
- The file should cut only when pushed forwards
(arrow). Lift the file when leading it backwards.
(Fig. 55)
- First sharpen the shortest cutter. The length of this
cutter is then the standerd for all other cutters of the
chain.
- Always guide the file as in fig. shown.
21
Page 22

- The file holder makes file guidance easier. It is
marked for the correct 30° sharpening angle (keep
the marks parallel with the chain when filing, see
illustration) and limits the cut depth to the correct 4/5
of the file diameter. (Fig. 56)
- After having sharpened the chain, the height of the
depth limiter must be checked by means of a chain
gauge.
- Correct even the smallest excess height with a special
flat file (1).
- Round off the front of the depth limiter (2). (Fig. 57)
Cleaning the guide bar, lubricating the
sprocket nose (Fig. 58)
CAUTION: Protective gloves must be worn.
Regularly inspect the bearing surfaces of the guide bar
for damage, and clean them with a suitable tool.
If the saw is used intensively it will be necessary to
lubricate the return sprocket bearings regularly (once
a week). To do this, first thoroughly clean the 2 mm
hole at the tip of the guide bar, and then press in a small
amount of multi-purpose grease.
Multi-purpose grease and grease guns are available as
accessories.
Multi-purpose grease (order no. 944 360 000)
Grease gun (order no. 944 350 000)
Replacing the saw chain (Fig. 59)
CAUTION:
Use only chains and guide bars designed for this
saw!
Check the sprocket (1) before mounting a new chain.
CAUTION:
Worn out sprockets (2) may damage the new chain and
must therefore be replaced.
Do not attempt to replace the sprocket yourself.
Sprocket replacement requires special training and
tools and must be done at a MAKITA service centre.
(Fig. 60)
saw again briefly and repeat the test until the brake
functions properly.
NOTE: After installing new carbon brushes, run the saw
about 5 minutes and then check the run-out brake.
Inspecting and replacing the carbon brushes
(Fig. 61)
Important:
Inspect the carbon brushes at regular intervals!
A notch on the brush shows the limit of wear.
NOTE:
The carbon brush is very delicate, so be careful not to
let it drop. When taking it out, be sure to note the
position it was installed in, since each brush is run
in with the rotor.
- Use a slotted bit screwdriver to unscrew the cover (1),
and then pull out the brush (2).
- If the wear limit has not yet been reached, put the
brush back in the same position and screw the cover
(1) back on.
- Run the saw briefly (about a minute) so the brushes
can run in again.
Important: Now test the run-out brake. If the saw chain
does not come to a full stop within two second, run the
22
Page 23

Trouble shooting
Malfunction System Observation Cause
Chain saw does not work total electric motor does not
function
no power supply,
cable defective
chain brake actuated
Mains fuse blown
insufficient performance Carbon brushes low pulling power Carbon brushes worn
down
no chain lubrication Oil tank, oil pump no oil on the saw chain oil tank empty,
oil guide groove dirty
Chain brake Brake Saw chain does not stop
Brake band worn down
instantly
Run-out brake Brake Saw chain continues to run Carbon brushes worn
down
Instructions for periodic maintenance
To ensure long life, prevent damage and ensure the full functioning of the safety features the following maintenance
must be performed regularly. Guarantee claims can be recognized only if this work is performed regularly and properly.
Failure to perform the prescribed maintenance work can lead to accidents!
The user of the electric chain saw is not allowed to perform maintenance works which are not described in the
instruction manual. All other works must be carried out by a MAKITA service centre.
General work Electric chain saw Regularly clean the outside.
Plastic case Check for cracks and ruptures. In case of damage have it
Saw chain Resharpen regularly.
Guide bar Turn over after a certain period of time so that the bearing
Sprocket Have it replaced in time at a service centre.
Chain brake Have it inspected regularly at a service centre.
Run-out brake Have it inspected regularly at a service centre.
Each time before putting
Saw chain Check for damage and sharpness.
the saw into operation
Guide bar Check for damage, and remove burrs if necessary.
Chain lubrication Functional check.
Chain brake Functional check.
Run-out brake Functional check.
Power switch Functional check.
Power supply cable In case of damage have it replaced at a service centre.
Oil tank cap Check for tightness.
After each shutdown Guide bar Clean the oil inlet bore.
Chain carrier Clean, especially the oil guide groove.
Storage Chain oil tank Empty.
Saw chain/guide bar Demount, clean and lubricate slightly.
Electric chain saw Store safely in a dry place. After a long storage time, have
immediately repaired at a service centre.
Replace in time.
surfaces are uniformly worn.
Replace in time.
Check the chain tension.
Clean the guide groove of the guide bar.
the electric chain saw checked at a service centre (residual
oil can become resinic and the valve of the oil pump
clogged).
23
Page 24

Service, spare parts and guarantee
Maintenance and repair
The maintenance and repair work of modern electric motors as well as all safety related assemblies require qualified
technical training and the availability of a special workshop equipped with special tools and testing devices.
Any work not described in this Instruction Manual must be performed only by a MAKITA service centre.
The MAKITA service centres are provided with all the necessary equipment and skilled and experienced personnel to
work out correct customer solutions and to advise you in all matters accordingly.
Repair attempts by third parties or unauthorised persons void all warranty claims.
Spare parts
A reliable and continuous operation as well as the safety of your chain saw is also subject to the quality of the spare
parts used. Use original MAKITA spare parts only.
Only original spare parts and accessories guarantee the highest quality in material, dimensions, functioning and safety.
Original spare parts and accessories can be obtained from your local dealer. He will also have the relative spare part
lists to determine the required spare part numbers, and will be constantly informed about the latest improvements and
also about spare part innovations. To find your local distributor, please visit www.makita-outdoor.com
Please, take in mind that in the case that foreign spare parts are used instead of the original MAKITA spare parts this
will automatically invalidate the MAKITA product guarantee.
24
Page 25
УКРАЇНСЬКА (Оригінальні інструкції)
Дякуємо за довіру до нашої продукції
Вітаємо Вас із покупкою нової електричної ланцюгової
пили MAKITA. Ми впевнені, що Ви будете задоволені
цим сучасним обладнанням.
Електричні ланцюгові пили MAKITA визначаються
надійними в експлуатації, високопродуктивними
двигунами та високою швидкістю ланцюга, що дозволяє
досягти відмінної ефективності пиляння. Вони обладнані
багатьма сучасними засобами безпеки, легкі, зручні у
використанні та можуть бути застосовані одразу
якому місці, де є доступ до електромережі.
Щоб гарантувати оптимальне функціонування та робочі
характеристики Вашої електричної ланцюгової пили та
забезпечити Вашу особисту безпеку, ми просимо Вас
виконати наступні вимоги:
Уважно прочитайте цю інструкцію перед тим,
як експлуатувати електричну ланцюгову пилу
вперше, та строго дотримуйтесь правил безпеки.
Невиконання цих правил може призвести до
серйозних поранень оператора та/або тих, хто
знаходиться поруч.
Символи
На ланцюговій пилі та в інструкції наведені такі
символи:
Ознайомтесь з цією
інструкцією та дотримуйтесь
застережень і заходів
безпеки!
Слід бути особливо уважним
та обережним!
Вдягайте захисний шолом та
засоби захисту зору та слуху!
Витягніть мережний
штепсель!
Витягніть мережний
штепсель, якщо кабель
пошкоджено!
Відпущено гальмо ланцюга
Задіяне гальмо ланцюга
Віддача!
Заборонено!
..... mm
Максимально припустима
довжина зрізу
Вдягайте захисні рукавички!
Захищайте пристрій від
вологи!
в будь-
Напрям руху ланцюга
Подвійна захисна ізоляція
Мастило для ланцюга пили
Перша допомога
Переробка
Маркування СЕ
Піклуйтеся про навколишнє
середовище! Не утилізуйте
електричне обладнання разом
із побутовим сміттям!
Якщо пила більше не придатна
до експлуатації або її не можна
відремонтувати, дізнайтеся у
відповідного органа з утилізації
відходів про належні способи
утилізації.
Щоб запобігти будь-яким
ризикам для інших осіб
через несправне електричне
обладнання, відріжте шнур
живлення поруч з корпусом.
ОБЕРЕЖНО! Перед
відрізанням шнура
від’єднайте його від мережі
живлення. Інакше Ви можете
зазнати електричного удару,
що становить загрозу життю!
25
Page 26

Мінімальний комплект постачання
5
1 2
1. Електрична ланцюгова пила
2. Шина
4
3. Ланцюг пили
4. Шнуровий ніпель для електричного шнура
5. Захисне покриття ланцюга
6. Інструкція (не показана)
Якщо одна з наведених складових не входить
до комплекту постачання, будь ласка,
проконсультуйтеся з Вашим торговим агентом.
3
Тільки для країн Європи
Декларація про відповідність стандартам
ЄС
Ми, компанія Makita, як відповідальний
виробник заявляємо, що наступне обладнання
Makita:
Позначення обладнання: Ланцюгова пила
Nº моделі / тип: UC3030A, UC3530A, UC4030A,
UC4530A, UC3530AP, UC4030AP
Технічні характеристики: див. таблицю “ТЕХНІЧНІ
ХАРАКТЕРИСТИКИ”.
є серійним виробництвом та
відповідає наступним Європейський
директивам:
2000/14/EC, 2006/42/EC
Виготовлене у відповідності до наступних
стандартів або стандартизованих документів:
EN60745
Nº сертифіката ЄС на проведення типових
випробувань
M6T 09 07 24243 100
M6T 09 07 24243 099
Типові випробування на відповідність директивам
ЄС 98/37/EC та 2006/42/EC були проведені:
TÜV SÜD Product Service GmbH,
Ridlerstraße 65, 80339 MÜNCHEN, Німеччина
Ідентифікаційний номер 0123
Технічна документація ведеться нашим
уповноваженим представником у Європі:
Makita International Europe Ltd.,
Michigan, Drive, Tongwell,
Milton Keynes, Bucks MK15 8JD, Англія
26
Процедура оцінки відповідності, яка вимагається
Директивою 2000/14/EC, відбулася згідно з
додатком V.
Виміряний рівень акустичної потужності: 101,8 дБ
Гарантований рівень акустичної потужності: 103 дБ
2 липня 2009 року
Томоязу Като
Директор
Makita Corporation
3-11-8, Sumiyoshi-cho,
Anjo, Aichi, JAPAN
Використання за призначенням
Електричні пили
Ця електрична пила може використовуватися
тільки для пиляння деревини. Вона призначена
для періодичного застосування в рідкому лісі, для
догляду за фруктовими деревами, валяння лісу,
видалення та підрізування гілок.
Особи, яким забороняється використовувати
пилу:
Цю пилу забороняється використовувати особам,
які не були ознайомлені з цією інструкцією, особам,
що знаходяться під впливом алкоголю, наркотиків
або медикаментів, а також дітям і молодим людям.
Попередження з техніки безпеки для
ланцюгової пили:
втрачати пильності та розслаблюватися
при користуванні виробом (що приходить
при частому користуванні), слід завжди
строго додержуватися правил безпеки під
час користування ланцюговою пилою. У разі
небезпечного або неправильного користування
цим інструментом, можна здобути серйозних
поранень.
НІКОЛИ НЕ СЛІД
Page 27

1. Коли ланцюгова пила працює, слід забрати
усі частини тіла від пильного ланцюга. Перед
тим, як запускати ланцюгову пилу слід
перевірити, щоб пильний ланцюг нічого не
торкався. Відволікання на короткий час під час
роботи пили може призвести до того, що одяг
буде затягнено пильним ланцюгом.
2. Слід завжди тримати ланцюгову пилу
правою рукою за задню ручку, а лівою – за
передню. Якщо пилу тримати по-іншому, то
це підвищує ризик травм, тому цього ніколи
неможна робити.
3. Слід одягати засоби захисту органів
зору та слуху. Також рекомендується
використовувати засоби захисту голови,
рук, ніг та ступнів. Належний захисний
одяг знижує кількість травм від сміття. Що
розлітається, або від випадкового контакту з
пильним ланцюгом.
4. Заборонено користуватись пилою,
знаходячись на дереві. Робота із пилою на
дереві може призвести до травм.
5. Слід завжди твердо стояти на ногах, та
працювати пилою стоячи на стійкій, надійній
та рівній поверхні. Робота на слизьких або
нестійких поверхнях, таких як драбини, може
призвести до втрати рівноваги та контролю над
пилою.
6. Під час різання гілки, що знаходиться під на
тяжінням, слід остерігатись відскоку. Коли
натяг волокон деревини знімається, то натягнута
гілка може вдарити оператора та/або відкинути
пилу із втратою контролю над нею.
7. Слід бути дуже обережнім під час обрізання
кущів та порості. Гнучкі гілки можуть бути
затягнені в пильний ланцюг та їх може потягнути
у напрямку до оператора, або оператора може
потягнути, і він втратить рівновагу.
8. Ланцюгову пилу слід переносити за передню
ручку у вимкненому стані, відвернувши її
від тіла. Під час перевезення або зберігання
пили на неї слід завжди встановлювати
кожух для шини. Вірне поводження із
ланцюговою пилою знизить вірогідність
випадкового контакту із пильним ланцюгом, що
рухається.
9. Виконуйте вимоги інструкцій щодо
змащування, натягу ланцюга та заміни
приналежностей. Невірно натягнута або
змащена пила може або зламатись, або буде
підвищено ризик віддачі.
10. Ручки повинні бути сухими, чистими та не
бути забрудненими мастило або жиром.
Жирні або забруднені мастилом ручки є
слизькими, що призводить до втрати контролю
над інструментом.
11. Можна різати тільки деревину. Пильний
ланцюг слід застосовувати тільки за їх
призначенням. Наприклад: Заборонено
використовувати ланцюгову пилу для
різання пластика або не дерев’яні будівельні
матеріали. Використання ланцюгової пили не
за призначенням може призвести до створення
небезпечної ситуації.
12. Причини та заходи запобігання віддачі: Якщо
кінець шини торкається якогось предмета, або
коли дерев’яна деталь закривається та защипає
ланцюг в пропилі, може трапитись віддача.
Торкання кінцем в деяких випадках може
призвести до раптової зворотної реакції, коли
шину буде підкинуто догори
та назад в напрямку
оператора.
Затискання пильного ланцюга у верхній частині
шини може призвести то різкого штовхання
шини в напрямку оператора. Будь-яка з цих
реакцій може призвести до втрати контролю
над пилою, що в свою чергу може призвести до
серйозних травм. Не слід суцільно покладатись
на засоби безпеки, встановлені
на пилі.
Як користувач ланцюгової пили, ви повинні
вжити декілька заходів, щоб захиститись
від нещасних випадків або поранень під час
пиляння. Причинами віддачі є неправильне
користування інструментом та/або неправильний
порядок експлуатації або умови експлуатації,
але їх можна уникнути дотримуючись запобіжних
заходів, що наведені нижче:
− Слід міцно тримати інструмент обома
руками таким чином, щоб великий палець
та інші пальці руки обгортали ручки
ланцюгової пили, та розташовувати своє
тіло та руки так, щоб була можливість
утриматись у разі віддачі. Силу віддачі
може контролювати користувач, за умови,
що було вжито належних запобіжних заходів.
Заборонено відпускати ланцюгову пилу.
− Неможна тягнутись або пиляти вище
рівня плечей. Це дає можливість запобігти
випадкове торкання кінцем шини, а також
дозволяє ліпше контролювати ланцюгову пилу
в непередбачених ситуаціях.
− Можна використовувати тільки вказані
виробником запасні шини та ланцюги.
Використання невірних запасних шин та
ланцюгів може призвести до поламки ланцюга
та/або віддачі.
− Слід дотримуватись інструкцій виробника
щодо заточування та обслуговування пили.
Зменшення висоти калібру глибини може
призвести до посилення віддачі.
Заходи безпеки
Загальні заходи безпеки (Мал.1)
- Щоб забезпечити належну роботу, користувач
повинен прочитати цю інструкцію для
ознайомлення із характеристиками електричної
ланцюгової пили. Недостатньо інформовані
користувачі піддають себе та оточуючих
людей небезпеці через невірне поводження з
інструментом.
- Рекомендується передавати цю електричну
ланцюгову пилу в користування тільки тим
особам, які мають досвід роботи з такими
інструментами. З цим пристроєм слід завжди
передавати й інструкцію.
- Особа, яка користується цим пристроєм вперше,
повинна попросити дилера надати основні
інструкції щодо характеристик пили з механічним
приводом.
- Ознайомтеся з використанням електричної
ланцюгової пили, відрізуючи частини колоди на
козлах для пиляння дров.
- Дітям та молодим людям, вік яких менше 18
років, заборонено користуватись електричною
27
Page 28

ланцюговою пилою. Разом з тим особам,
яким вже виповнилося 16, дозволяється
використовувати електричну ланцюгову пилу з
навчальною метою під наглядом кваліфікованого
інструктора.
- Електричною ланцюговою пилою слід завжди
користуватись із максимальною обережністю та
увагою.
- Працювати з електричною ланцюговою пилою
можна тільки у доброму фізичному стані. Всю
роботу слід виконувати спокійно та обережно
.
Користувач несе відповідальність за інших людей.
- Ніколи не використовуйте електричну ланцюгову
пилу, знаходячись у стані алкогольного або
наркотичного сп'яніння, а також під впливом
лікарських засобів. (Мал. 2)
Засоби індивідуального захисту
- Для запобігання травмам голови, очей, рук
або ніг, а також для захисту органів слуху під
час роботи з електричною ланцюговою пилою
слід використовувати такі засоби захисту.
- Слід вдягати відповідний одяг, який щільно
облягає та не створює перешкод. Заборонено
вдягати біжутерію або одяг, який може
заплутатись у гілках або кущах.
- Захисний шолом (1) повинен регулярно
перевірятись на наявність пошкоджень
та замінятись не рідше, ніж кожні 5 років.
Використовуйте тільки рекомендовані захисні
шоломи. Якщо у Вас довге волосся, також
вдягайте шолом. (Мал. 3)
- Щиток для обличчя (2) на захисному шоломі (або
захисні окуляри) захищають від тирси. Під час
роботи електричної ланцюгової пили слід завжди
вдягати захисні окуляри або щиток для обличчя
для запобігання травмам очей.
- Слід вдягати належні засоби захисту від шуму
(навушники (3), вушні втулки тощо). Октавний
аналізатор звуку за проханням.
- Захисний ремінь та нагрудник (4), виготовлені з
22 прошарків нейлону, захищають від порізів. Ми
наполегливо рекомендуємо їх використовувати.
У будь-якому випадку для роботи з електричною
ланцюговою пилою вдягайте довгі штани з міцного
матеріалу. (Мал. 4)
- Захисні рукавички (5), зроблені з товстої шкіри,
є частиною пропонованого обладнання, їх слід
завжди вдягати під час роботи із електричною
ланцюговою пилою.
- Під час роботи з електричною ланцюговою пилою
слід завжди вдягати захисні туфлі або захисні
черевики (6), обладнані неслизькою підошвою,
металевим ковпачком на пальцях та захистом
для ніг. Захисні туфлі, що мають захисний шар,
захищають від порізів та забезпечують стійке
положення ніг.
Введення в експлуатацію
- Не використовуйте електричну ланцюгову пилу
під час дощу, у вологому або вогкому оточенні,
оскільки двигун не є водонепроникним. (Мал. 5)
- Якщо електрична ланцюгова пила волога, її
забороняється використовувати.
- Уникайте фізичного контакту з заземленими
поверхнями.
- Не використовуйте електричну ланцюгову пилу
поблизу джерел займистих газів або пилу.
Небезпека вибуху.
28
- Користувач пристрою
повинен завжди вести
кабель живлення поза собою. Будьте обережні,
щоб кабель не був затиснутий або порізаний
предметами з гострими краями. Розташуйте
кабель таким чином, щоб це нікому не
загрожувало.
- Вставляйте штепсель тільки в захищені розетки,
встановлені належним чином. Переконайтеся, що
значення напруги в мережі відповідає значенню
напруги, вказаному на табличці
з паспортними
даними. Перевірте наявність плавкого
запобіжника. Якщо Ви плануєте використовувати
пилу поза приміщенням, приєднайте її до
автоматичного вимикача струму короткого
замикання з максимальним струмом замикання
30 мА.
- Зверніть увагу на діаметр кабелю-подовжувача.
У разі використання кабельної котушки, кабель
має бути повністю відмотаним. Використовуйте
тільки подовжувальні шнури, що відповідають
технічним вимогам, наведеним у розділі «Технічні
характеристики». У разі використання пили поза
приміщенням переконайтеся, що подовжувальний
шнур призначений для такого використання.
- Перед тим як почати роботу, слід перевірити,
щоб електрична ланцюгова пила нормально
та безпечно функціонувала відповідно до усіх
вимог.
Особливу увагу слід приділяти перевірці
гальма ланцюга, коректності установки шини,
коректності заточення та затягування ланцюга
пили, надійності встановлення захисного кожуха
зірочки, легкості руху вмикача живлення,
функціонування фіксуючої кнопки, належного
механічного стану кабелю та штепселя, а також
перевірці чистоти та сухості ручок.
- Експлуатація електричної ланцюгової пили
дозволяється, тільки якщо пила повністю зібрана.
Заборонено використовувати електричну
ланцюгову пилу, якщо вона зібрана неповністю.
- Зніміть регулювальний пристрій, перш ніж
вмикати пилу.
- Під час роботи встановіть всі захисні пристрої та
щиток, що входять до комплекту постачання пили.
- Перевірте, щоб на ділянці проведення робіт не
було дітей або сторонніх людей. Також зверніть
увагу на тварин на ділянці проведення робіт.
(Мал. 6)
- Перед запуском пили слід перевірити, що Ви
стоїте на надійній основі.
- При вмиканні електричної ланцюгової пили
завжди тримайте її обома руками. Візьміться
за задню ручку правою рукою, та лівою рукою - за
трубчасту ручку. За ручки слід триматись міцно,
обхвативши їх пальцями так, щоб кінець великого
пальця був направлений до інших пальців. Шина
та ланцюг повинні бути направлені від Вас.
(Мал. 7)
- Вмикайте пилу тільки таким чином, як описано
в цій інструкції. Не перенавантажуйте пилу.
Вона буде працювати краще та більш безпечно,
якщо Ви використовуватимете її в призначеному
діапазоні робочих характеристик.
- Якщо були помічені зміни у робочій поведінці
пили, її слід одразу ж вимкнути.
УВАГА! Після того як вмикач живлення був
відпущений, ланцюг ще обертається протягом
короткого часу (вільне обертання).
Page 29

- Тримайте шнур живлення подалі від джерел
тепла, мастил та гострих країв.
- Направляйте шнур живлення таким чином, щоб
він не заплутався у гілках або інших об'єктах під
час пиляння.
- Якщо шнур пошкоджено або порізано, негайно
витягніть мережний штепсель. (Мал. 8)
- Якщо пристрій для пиляння вдаряється об
каміння, цвяхи або
інші тверді предмети, слід
негайно витягнути мережний штепсель та
перевірити пристрій для пиляння.
- Необхідно витягнути мережний штепсель
перед перевіркою натягу ланцюга, його
затягуванням, заміною або чищенням.
(Мал. 9)
• несправність пристрою
• обслуговування
• заміна мастила
• заточка ланцюга пили
• зупинка пристрою
• перевезення
• вимкнення
- У разі призупинення роботи або залишення
електричної ланцюгової пили без нагляду її слід
вимикати та витягувати мережний штепсель.
Поміщайте електричну ланцюгову пилу у безпечне
місце, щоб уникнути небезпеки для інших.
- Для повторного заповнення баку витягуйте
штепсель. Не паліть та не запалюйте відкритих
вогнів.
- Уникайте контакту шкіри та очей з мінеральними
нафтопродуктами. Під час наповнення
мастильного баку вдягайте рукавиці.
- Будьте обережні, щоб мастило не протікало
на землю (охорона довкілля). Користуйтесь
належною основою.
- Якщо Ви розлили мастило, негайно прочистіть
електричну ланцюгову пилу.
Поведінка під час роботи/методика
виконання робіт
- Не працюйте наодинці. Поряд (на короткій
відстані) завжди повинен бути ще хто-небудь на
випадок надзвичайної ситуації.
- Під час пиляння завжди тримайте електричну
ланцюгову пилу обома руками. Таким чином Ви
зможете безпечно керувати пристроєм.
- Електричну ланцюгову пилу можна
використовувати тільки за умови доброго
освітлення та під час доброї видимості. Слід
уникати слизьких та мокрих ділянок, а також
снігу та льоду (ризик підсковзнутися). Ризик
підсковзнутись є дуже високим під час роботи на
деревині, з якої було щойно знято кору.
- Заборонено працювати на нестійких поверхнях.
Слід перевірити, щоб на ділянці роботи не було
перешкод, що створюють ризик спотикання. Слід
постійно перевіряти, чи основа, на якій Ви стоїте,
є надійною.
- Ніколи не слід пиляти вище рівня плеча.
- Заборонено пиляти, стоячи на драбині. (Мал. 10)
- Ніколи не залізайте на дерева для виконання
робіт з електричною ланцюговою пилою.
- Не нахиляйтеся занадто вперед для пиляння.
- Направляйте електричну ланцюгову пилу таким
чином, щоб жодна з частин тіла не була в межах
обертання пили. (Мал. 11)
- Використовуйте електричну ланцюгову пилу
тільки для пиляння деревини.
- Не торкайтеся ланцюгом землі, коли пилу
увімкнено. Якщо Ви пиляєте деревину, що
знаходиться безпосередньо на землі, переверніть
її, перш ніж завершити розріз, щоб не урізатися в
землю.
- Звільніть зону пиляння від
сторонніх предметів,
наприклад, від піску, каменів, цвяхів, дротів
тощо. Такі предмети можуть пошкодити лезо та
призвести до небезпечної віддачі.
- Під час пиляння попередньо нарізаної або тонкої
деревини слід використовувати безпечну опору
(козла для пиляння дров, 12). Під час пиляння
попередньо нарізаної деревини або тонких
дерев'яних брусків слід використовувати стійку
опору
(козла для пиляння дров, 12). Ніколи
не пиляйте деревину, укладену в штабелі! Не
дозволяйте іншим особам тримати деревину та не
утримуйте її ногою самі!
- Зафіксуйте круглу деревину.
- Під час роботи на похилій площині, завжди
працюйте, повернувшись до ухилу.
- Під час виконання поперечного пропилу до
деревини, яку Ви пиляєте, слід прикласти
зубчасту рейку (Z, Мал. 12).
- Перед виконанням поперечного пропилу слід
міцно притиснути зубчасту рейку до деревини,
і тільки після цього можна робити пропил
пилою, ланцюг якої вже обертається. Для цього
електричну ланцюгову пилу слід підняти за задню
ручку і направити за допомогою трубчастої ручки.
Зубчаста рейка служить як центр обертання.
Операцію слід продовжувати, злегка натискаючи
на трубчасту ручку та одночасно підтягуючи назад
електричну ланцюгову пилу. Помістіть зубчасту
рейку трохи глибше та підніміть задню ручку знов.
- Кожного разу, коли Ви знімаєте електричну
ланцюгову пилу з деревини, пристрій, що пиляє,
повинен працювати.
- При виконанні декількох пропилів електричну
ланцюгову пилу слід вимикати у проміжку між
ними.
- Якщо деревину слід проткнути для різання
або якщо треба виконати подовжні пропили,
настійно рекомендується, щоб таку операцію
виконувала тільки спеціально навчена особа
(існує дуже високий ризик віддачі).
- Для виконання подовжніх пропилів (Мал. 13)
тримайте пристрій, що пиляє, під якомога меншим
кутом. Будьте дуже уважні при здійсненні такої
роботи, оскільки зубчаста рейка не може бути
використана.
- Під час пиляння нижнім краєм шини електричну
ланцюгову пилу можна пересувати у напрямку
користувача, якщо ланцюг був затиснутий. З
цієї причини слід завжди, коли це можливо,
використовувати верхній край шини. У цьому
випадку електрична ланцюгова пила буде
відштовхуватися у протилежному від Вас
напрямку. (Мал. 14)
- Якщо деревина знаходиться під натягом
(Мал. 15), слід спочатку пиляти ту сторону,
яка знаходиться під тиском (А). Потім зробіть
поперечний пропил з боку натягу (В). Таким чином
запобігається затискання шини.
- Слід бути дуже обережним під час пиляння
слизької деревини. Обрізані шматки деревини
можуть бути протягнуті (ризик отримання травм).
- Заборонено використовувати електричну
29
Page 30

ланцюгову пилу для підняття або забирання
шматків деревини або інших предметів.
- Коли Ви знімаєте натяг, електричну ланцюгову
пилу слід підтримувати на стовбурі (ризик віддачі).
- Зняття натягу повинна виконувати спеціально
навчена особа. Високий ризик отримання
травм.
- Слід пам'ятати про гілки, що знаходяться під
натягом. Заборонено пиляти гілки знизу.
- Заборонено
виконувати роботи для зняття натягу,
стоячи на стовбурі.
- Не використовуйте електричну ланцюгову
пилу для робіт у лісі, тобто для пиляння
дерев або виконання робіт для зняття натягу.
Важлива для цього виду робіт рухливість та
безпека користувача не гарантується через
кабельне з'єднання.
УВАГА!
Не валіть дерева та не обрізуйте гілки, якщо у
Вас нема для цього відповідної кваліфікації!
Є високий ризик отримання травм!
Дотримуйтесь місцевих правил.
- Перед тим як спиляти дерево, слід перевірити
наступне:
а) у робочій зоні знаходяться тільки люди, задіяні
в пилянні дерева
б) усі особи, задіяні в пилянні, мають шлях для
відходу (він має розташовуватися приблизно
на 45° по діагоналі у напрямку, протилежному
напрямку падіння). Пам'ятайте про підвищений
ризик спотикання, який створюють електричні
кабелі!
в) біля нижньої частини стовбура немає сторонніх
предметів, кущів або гілок. Перевірте, щоб
під ногами була надійна основа (ризик
спотикання).
г) наступне робоче місце знаходиться на відстані
не менш ніж 2 1/2 довжини дерева (Мал. 16)
.
Перед тим як спиляти дерево, слід перевірити
напрямок падіння, та переконатись, що на
відстані 2 1/2 довжини дерева немає сторонніх
людей або будь-яких предметів (Мал. 16).
= Напрямок ваління лісу
=
Зона небезпеки
= Шлях для відходу
- Як оцінювати дерево:
Напрямок нависання - слабкі або сухі гілки -
висота дерева - природне нависання - дерево
гниле?
- Слід брати до уваги напрямок та швидкість
вітру. При сильних поривах вітру пиляння
забороняється.
- Обрізання коріння:
Починайте з найтовстішого кореня. Спочатку слід
виконувати вертикальний, а потім горизонтальний
пропил.
- Виконання вирізу в стовбурі (A, Мал. 17):
Виріз визначає напрямок падіння та направляє
дерево. Виріз на стовбурі виконується
перпендикулярно напрямку падіння на глибину 1/3
- 1/5 діаметра стовбура. Пропил слід виконувати
біля землі.
- У разі корегування пропилу це слід робити по всій
ширині вирізу.
- Пиляти дерево (B, Мал. 18) слід над нижнім
краєм вирізу (D). Пропил повинен бути чітко
горизонтальним. Відстань між обома пропилами
30
повинна дорівнювати приблизно 1/10 діаметра
стовбура.
- Матеріал, що знаходиться між обома пропилами
(C), виступає як шарнір. Заборонено перерізати
його повністю, бо дерево безконтрольно впаде.
Заздалегідь вставте валочний клин у пропил (B,
Мал. 18).
- Пропил слід закріпляти тільки пластиковими
або алюмінієвими клинами. Заборонено
використовувати залізні клини.
- Під час пиляння дерева слід завжди стояти збоку
від дерева, що падає.
- Відходячи після виконання пропилу, слід
берегтись гілок, що падають.
- Під час роботи на похилій поверхні користувач
електричної ланцюгової пили повинен стояти
вище або збоку від стовбура дерева, яке будуть
пиляти або вже спиляли.
- Слід берегтись стовбурів, які можуть покотитись
на Вас.
Віддача
- Під час роботи з електричною ланцюговою пилою
може трапитись небезпечна віддача.
- Віддача трапляється, коли кінець леза (особливо
- його верхня частина) неналежним чином
стикається з деревиною або іншими твердими
предметами. (Мал. 19)
- У цьому випадку електричну ланцюгову пилу
безконтрольно та з високим енергетичним
потенціалом кидає у напрямку користувача
(ризик отримання травм).
Для того щоб запобігти виникненню віддачі,
слід дотримуватись зазначених нижче
правил:
- Ніколи не починайте пропил, використовуючи
для цього кінець шини. Слід завжди слідкувати за
кінцем шини.
- Ніколи не використовуйте кінець шини для
пиляння. Будьте обережні, продовжуючи пиляння.
- У момент початку пиляння ланцюг повинен
обертатись.
- Перевіряйте, щоб ланцюг був завжди вірно
заточений. Звертайте особливу увагу на
обмежувач глибини та висоти (для отримання
додаткової інформації див. розділ «Заточка
ланцюга пили»)
- Заборонено одночасно обрізати декілька гілок.
Під час різання гілки слід дивитись, щоб пила не
торкалась інших гілок.
- Під час пиляння стовбура слід пам'ятати про
стовбури дерев, що стоять поряд. Рекомендується
використовувати козла для пиляння дров.
Транспортування та зберігання
- Переносити електричну ланцюгову пилу слід за
трубчасту ручку. Шина пили направлена назад.
Забороняється переносити або перевозити
електричну ланцюгову пилу з працюючим
ланцюгом пили.
- Ніколи не переносьте пилу, тримаючи її за шнур
живлення. Не вимикайте штепсель, тягнучи за
шнур живлення.
- Змінюючи своє місцеположення під час роботи,
слід вимкнути електричну ланцюгову пилу та
задіяти гальмо ланцюга, для того щоб запобігти
випадковому пуску пили.
- При перевезенні електричної ланцюгової пили
Page 31

на великі відстані слід від'єднати мережний
штепсель та надягти захисне покриття шини, яке
входить до комплекту постачання. (Мал. 20)
- Слід забезпечити безпечне розташування
електричної ланцюгової пили під час перевезення
в автомобілі, щоб запобігти розливу палива або
мастила для ланцюга.
- Пилу слід зберігати у надійному, сухому та
замкнутому приміщенні подалі
від дітей.
Зберігання на вулиці заборонене.
- Для зберігання електричної ланцюгової пили
протягом довгого періоду часу або перед її
перевезенням слід повністю злити мастило.
- Для перевезення та зберігання мастила для
ланцюга використовуйте тільки затверджені та
відповідним чином позначені контейнери.
Обслуговування
- Для виконання робіт з обслуговування
вимкніть електричну ланцюгову пилу,
витягніть та зафіксуйте мережний штепсель.
(Мал. 21)
- Перед початком робіт переконайтеся, що пила,
особливо гальмо ланцюга та інерційне гальмо,
знаходяться в безпечному робочому стані.
Переконайтеся, що ланцюг пили заточений та
затягнутий належним чином. (Мал. 22)
- Регулярно віддавайте гальмо ланцюга та
інерційне гальмо на перевірку (див. «Гальмо
ланцюга та інерційне гальмо»).
- Регулярно перевіряйте
кабель живлення на
наявність ушкоджень оболонки.
- Регулярно чистьте електричну ланцюгову пилу.
- Якщо пластиковий корпус пошкоджено, негайно
відремонтуйте його у кваліфікованого спеціаліста.
- Регулярно перевіряйте, щоб кришечка бака була
добре затягнута.
- Не користуйтеся пилою, якщо вимикач
пошкоджено. Віддайте її для проведення ремонту
кваліфікованому спеціалісту.
Слід дотримуватись інструкцій з запобігання
нещасним
випадкам, що видаються
відповідними федераціями профспілок та
страховими компаніями.
Забороняється будь-яким чином
модифікувати електричну ланцюгову пилу. Це
піддасть Вас небезпеці.
Можна виконувати лише роботи з обслуговування
та ремонту, зазначені в цій інструкції. Усі інші
роботи повинні здійснюватися сервісним центром
компанії MAKITA. (Мал. 23)
Слід використовувати тільки запчастини та
приналежності
виробництва MAKITA.
Використання запчастин, які не є оригінальними
деталями виробництва компанії MAKITA, а
також неоригінальних приналежностей та
комбінацій шин/ланцюгів призводить до високої
небезпеки нещасних випадків. Ми не беремо на
себе відповідальність за нещасні випадки або
шкоду, що трапляються через використання
незатверджених пристроїв, що пилять, або
приналежностей.
Перша допомога (Мал. 24)
Поряд завжди повинна знаходитись аптечка
для надання першої медичної допомоги у разі
нещасного випадку. Слід одразу ж заміняти
предмети з аптечки, які були використані.
Викликаючи допомогу, надавайте, будь ласка,
таку інформацію:
- місце нещасного випадку
- що сталося
- кількість травмованих людей
- тип травм
- Ваше ім'я.
ПРИМІТКА:
Людина, яка має поганий кровообіг та постійно
стикається з сильною вібрацією, може здобути
порушення кровоносних судин або нервової
системи.
Вібрація може спричинити наведені нижче
симптоми з боку пальців, рук або зап'ястя:
«Засинання» (оніміння), дзенькіт у вухах, біль,
гострий біль, зміна шкіри або кольору шкіри.
За наявності хоча б одного з цих симптомів
обов'язково порадьтесь з лікарем!
31
Page 32

Технічні характеристики
UC3030A UC3530A / AP UC4030A / AP UC4530A
Тип ланцюга 092
Крок ланцюга дюйм 3/8”
Довжина зрізу см 30 35 40 45
Макс. швидкість ланцюга м/с 13,3
Рівень акустичної потужності L
згідно з EN 60745
Рівень звукового тиску L
на робочому місці згідно з EN 60745
pA av
dB (A) 101,8
WA av
dB (A) 90,8
Неточність dB (A) K=0,73
Прискорення вібрації a
згідно з EN 60745
- Трубчаста ручка м/с
- Задня ручка м/с
Неточність м/с
h,w av
2
2
2
4,7
5,6
K=1,5
Мастильний насос автоматичний
Об'єм мастильного бака мл 140
Електропостачання постійний струм
Захист від перенавантаження електричний
Гальмо ланцюга ручне
Інерційне гальмо електричне
Вага
(Вага відповідно до EPTA-Procedure
01/2003)
кг 5,0 5,1 5,2 5,3
Захисний футляр клас II (подвійна захисна ізоляція)
Кабель-подовжувач
(до комплекту не входить)
•
У зв'язку із нашою безперервною програмою досліджень і розвитку технічні характеристики, представлені в
DIN 57282/ HO 7RN-F
макс. Д= 30 м., 3x1,5 мм
2
цій інструкції, можуть бути змінені без попереднього повідомлення.
•
Технічні характеристики можуть відрізнятися залежно від країни.
•
Заявлене значення вібрації було виміряне у відповідності до стандартних методів тестування та може
використовуватися для порівняння одного інструмента з іншим.
•
Заявлене значення вібрації може також використовуватися для попередньої оцінки впливу.
УВАГА:
•
Залежно від умов використання вібрація під час фактичної роботи інструмента може відрізнятися від
заявленого значення вібрації.
•
Забезпечте належні запобіжні заходи для захисту оператора, що відповідатимуть умовам використання
інструмента (слід брати до уваги всі складові робочого циклу, такі як час, коли інструмент вимкнено та коли
він починає працювати на холостому ході під
час запуску).
32
Page 33

Перелік компонентів
1
2
3
67
1 Трубчаста ручка
2 Щиток для руки (розблокування гальма ланцюга)
3 Дугоподібний кронштейн
4 Натяжний пристрій захисного кожуха зірочки
5 Захисний кожух зірочки, гальмо ланцюга
6 Покриття графітової щітки
7 Задній щиток для руки
8 Шина
9 Кришечка мастильного бака
10 Табличка з паспортними даними
11 Фіксуюча кнопка
12 Задня ручка
13 Вмикач живлення
14 Оглядове скло для контролю
рівня мастила
15 Ланцюг пили
8 9 10 11 12
16 Шнуровий ніпель для електричного
шнура (послаблення натягу)
45
13141516
33
Page 34

ВВЕДЕННЯ В ЕКСПЛУАТАЦІЮ (Мал. 25)
УВАГА!
Працюючи з шиною або ланцюгом пили,
завжди вдягайте захисні рукавиці та
від'єднуйте мережний штепсель.
УВАГА!
Вмикайте електричну ланцюгову пилу тільки
після того, як Ви повністю її зібрали та
оглянули!
Встановлення шини та ланцюга пили
(Мал. 26)
Встановіть електричну ланцюгову пилу на стійку
поверхню та виконайте наступні кроки для
встановлення шини та ланцюга:
Відпустіть гальмо ланцюга. Для цього потягніть
щиток для руки (1) у напрямку, показаному
стрілкою.
Переверніть натяжний пристрій захисного кожуха
зірочки (2). (Мал. 31)
Міцно притисніть натяжний пристрій захисного
кожуха зірочки проти сили пружини, після чого
повільно поверніть його проти годинникової
стрілки, доки не відчуєте, що він зафіксований.
Продовжуючи натискати, поверніть його проти
годинникової стрілки, наскільки це можливо.
Відпустіть натяжний пристрій захисного кожуха
зірочки (не тисніть на нього) та поверніть його
за годинниковою стрілкою до його вихідного
положення. Повторюйте цю процедуру, доки
захисний кожух зірочки (3) не буде відкручено.
Обережно потягніть захисний кожух зірочки (3)
вгору, витягніть та зніміть задні патрубки (4).
Встановіть шину (7) та притисніть її до зірочки (6).
(Мал. 27)
Розташуйте ланцюг пили (9) на зірочці (6). Правою
рукою направте ланцюг пили у верхній напрямний
жолоб (8) шини. (Мал. 28)
Ріжучі кромки ланцюга пили у верхній частині
шини повинні бути поверненими у напрямку,
показаному стрілкою!
Лівою рукою злегка притисніть шину до держака
на корпусі та проведіть ланцюг пили (9) навкруг
кінцевої зірочки (10) на шині. При цьому обережно
потягніть ланцюг пили у напрямку, показаному
стрілкою. (Мал. 29)
Вирівняйте отвір захисного кожуха зірочки з
різьбовим штирем (11).
Поверніть натяжний гвинт ланцюга (Мал. 32/14) та
вирівняйте натяжний штир ланцюга (12) з отвором в
шині. (Мал. 30)
Спочатку притисніть захисний кожух зірочки (3) до
кріплення (13), а потім надягніть його на різьбовий
штир (Мал. 30/11). (Мал. 31)
Натягування ланцюга пили (Мал. 32)
Міцно притисніть та одночасно поверніть
натяжний пристрій захисного кожуха зірочки (2, за
годинниковою стрілкою), щоб прикрутити його (3),
але поки що не затягуйте туго.
Злегка підніміть шину та поверніть натяжний
34
пристрій ланцюга (14) за годинниковою стрілкою,
доки ланцюг пили не зафіксується в напрямному
жолобу на нижній стороні шини (див. коло).
Натисніть
кожуха зірочки (2) знов та, обертаючи його за
годинниковою стрілкою, затягніть.
Відпустіть натяжний пристрій захисного кожуха
зірочки (2) (не тисніть на нього), доки він не буде
обертатися вільно, потім згорніть його, як показано
на малюнку. (Мал. 33)
натяжний пристрій захисного
Перевірка натягу ланцюга (Мал. 34)
Ланцюг має належний натяг, коли він розташований
проти нижнього краю шини та його можна легко
підняти вгору рукою на 2-4 мм (близько 1/8”) над
шиною.
Якомога частіше перевіряйте натяг ланцюга
- нові ланцюги часто стають довшими під час
використання!
Під час перевірки натягу ланцюга двигун слід
вимкнути, а мережний штепсель від'єднати. Якщо
ланцюг слабко натягнутий: Послабте натяжний
пристрій захисного кожуха зірочки, повернувши
його приблизно на чверть оберту. Натягніть ланцюг,
як описано в розділі «Натягування ланцюга пили».
ПІДКАЗКА:
Використовуйте 2 або 3 ланцюга пили по черзі
задля рівномірного зносу поверхонь ланцюгів,
зірочки та шини, що рухаються.
Щоб забезпечити рівномірний знос жолоба в шині,
під час кожної заміни ланцюга її слід перевертати.
Гальмо ланцюга (Мал. 35)
Ці моделі передбачають гальмо ланцюга в якості
стандартного обладнання. Якщо є ризик віддачі
в результаті зіткнення кінчика шини з деревиною
(див. «Інструкції з техніки безпеки»), задня частина
ручки, що штовхає щиток для руки, увімкне гальмо
ланцюга.
Ланцюг зупиниться за долю секунди.
Інерційне гальмо
До комплекту постачання електричної ланцюгової
пили також входить інерційне гальмо в якості
стандартного обладнання.
Інерційне гальмо негайно зупиняє ланцюг, коли
відпущено вмикач, таким чином запобігається
небезпека продовження руху ланцюга.
Перевірка інерційного гальма описується нижче.
Обслуговування гальма ланцюга та
інерційного гальма (Мал. 36)
Гальмові системи є дуже важливими засобами
безпеки, а як всі інші частини, вони теж
піддаються певному зносу. Їхня регулярна
перевірка та обслуговування мають велике
значення для Вашої особистої безпеки,
належним чином їх можна провести тільки в
сервісному центрі компанії MAKITA.
Використання гальма ланцюга (гальмування)
(Мал. 37)
Лівою рукою натисніть на щиток для руки (1) у
напрямку до кінчика шини (стрілка 2).
Розблокування гальма ланцюга
Потягніть щиток для руки (1) на себе (стрілка
Page 35

3), доки не відчуєте зчеплення. Тепер гальмо
розблоковано.
Примітка:
При активації гальма ланцюга живлення двигуна
буде припинено. Перевірка гальма ланцюга
описується нижче.
Мастило для ланцюга пили (Мал. 38)
Для змащення ланцюга пили та шини
використовуйте спеціальне мастило з адгезивною
добавкою. Адгезивна добавка перешкоджає
занадто швидкому відходженню мастила з
пристрою, що пиляє, під впливом відцентрової сили.
Не використовуйте мінеральне мастило. Для
захисту довкілля слід використовувати мастила, які
піддаються біологічному розкладанню.
Компанія MAKITA реалізує мастило для ланцюга
пили, яке має назву BIOTOP, складається зі
спеціальних рослинних олій, та може біологічно
розкладатись на 100%. Мастило BIOTOP
отримало нагороду «Голубий янгол» за особливу
сприятливість для довкілля (RAL UZ 48).
Мастило BIOTOP пропонується в наступних
упаковках, щоб задовольнити Ваші особисті
потреби:
1 літр номер замовлення 980 008 610
5 літрів номер замовлення 980 008 611
Мастило, що піддається біологічному розпаду,
залишається незмінним тільки протягом
обмеженого часу. Його слід використовувати
протягом 2 років від дати виробництва (яка
зазначена на контейнері). (Мал. 39)
Важлива примітка щодо мастил, які
підлягають біологічному розпаду:
Якщо Ви не плануєте використовувати пилу
протягом тривалого часу, слід спорожнити
мастильний бак та нанести невелику кількість
стандартного моторного мастила (SAE 30), а потім
дати пилі деякий час попрацювати. Це необхідно
для того, щоб вимити залишки мастила, що
піддається біологічному розпаду, з бака, системи
постачання мастила, з ланцюга та шини, оскільки
такі мастила
можуть завдати шкоди насосу або іншим деталям.
Наступного разу перед використанням пили
слід знов залити мастило BIOTOP у бак. У разі
пошкоджень через використання відпрацьованого
мастила або неналежного мастила для ланцюга
гарантію на продукцію буде анульовано.
Ваш торговельний агент проінформує Вас щодо
використання мастила для ланцюга.
часто залишають липкі залишки, які
Заборонено використовувати
відпрацьоване мастило (Мал. 40)
Відпрацьоване мастило є дуже шкідливим для
довкілля.
Відпрацьоване мастило містить велику кількість
канцерогенних речовин.
Осади у відпрацьованому мастилі призводять
до дуже сильного зносу мастильного насоса та
пристрою, що пиляє.
У разі пошкоджень через використання
відпрацьованого мастила або неналежного мастила
для ланцюга пили гарантію на продукцію буде
анульовано.
Ваш торговельний агент проінформує Вас щодо
використання мастила для ланцюга пили.
Уникайте контакту шкіри та очей з
мастилом (Мал. 41)
Очищайте шкіру після контакту з мінеральними
нафтопродуктами та мастилом. Якщо ці речовини
постійно попадатимуть на шкіру протягом тривалого
часу, то вона буде збезводнена. Це може призвести
до появи різних хвороб шкіри. Крім того, можуть
виникнути алергічні реакції.
Потрапляння мастила у вічі може викликати їх
подразнення. У разі потрапляння мастила у вічі
їх слід негайно промити чистою водою. Якщо
подразнення залишилося, слід негайно звернутись
до лікаря.
Повторне заповнення мастильного баку
(Мал. 42)
Тільки коли двигун вимкнено, а мережний
штепсель від'єднано!
- Ретельно прочистіть мастильний бак коло
кришечки, щоб запобігти потраплянню бруду в
бак.
- Відкрутіть кришечку бака (1) та налийте мастило
для ланцюга, доки воно не досягне одного рівня з
нижнім краєм патрубка отвору для наливання.
- Міцно затягніть кришечку баку.
- Ретельно видаліть мастило, яке пролилося.
Важливо! (Мал. 43)
Перед першим використанням пили систему
постачання мастила слід повністю заповнити, доки
мастило для ланцюга не змастить його та шину.
Ця процедура може зайняти до двох хвилин.
- Рівень мастила можна перевірити через оглядове
скло (2).
Щоб забезпечити належне змащення ланцюга пили,
в баку завжди повинно знаходитись достатньо
мастила.
Змащування ланцюга пили (Мал. 44)
Тільки коли двигун вимкнено, а мережний
штепсель від'єднано!
Щоб гарантувати надійну роботу мастильного
насоса, напрямний жолоб для мастила (3) та отвір
для наливання мастила в шині (4) слід регулярно
чистити.
Примітка:
Після вимкнення пили крапання залишків мастила
для ланцюга пили з системи постачання мастила,
шини та ланцюга протягом деякого часу є
нормальним. Це не є дефектом!
Встановіть пилу на належну поверхню.
Підключіть пилу до мережі (Мал. 45)
ОБЕРЕЖНО!
Перш ніж підключати пилу до джерела
електроенергії, переконайтеся, що вмикач (1)
автоматично повертається назад у положення
«вимкнено» після натискання та відпускання.
Якщо цього не трапляється, за жодних
обставин не підключайте пилу до джерела
електроенергії. Віднесіть пилу до сервісного
центра компанії MAKITA, перш ніж виконувати з
нею будь-які роботи.
Скріпіть подовжувальний шнур та шнур живлення
35
Page 36

пили за допомогою шнурового ніпеля (2).
Підключіть штепсель пили (3) до розетки кабелюподовжувача (4).
Увімкніть двигун (Мал. 46)
- Підключіть пилу до мережі (див. вище).
- При увімкненні електричної ланцюгової пили
завжди тримайте її обома руками. Візьміться
за задню ручку правою рукою, та лівою рукою - за
трубчасту ручку. За ручки слід триматись міцно,
обхвативши їх пальцями так, щоб кінець великого
пальця був направлений до інших пальців. Ані
шина, ані
предметів.
- Спочатку натисніть фіксуючу кнопку (5), потім
вмикач живлення (1). Потім відпустіть фіксуючу
кнопку (5).
- Увага: Ланцюг одразу починає рухатися.
Тримайте вмикач живлення в нажатому стані,
коли потрібна робота двигуна.
УВАГА!
Ніколи не фіксуйте вмикач живлення у
ввімкненому положенні.
ланцюг не повинні торкатись будь-яких
Вимкнення двигуна
- Відпустіть вмикач живлення (1).
ПРИМІТКА:
При активації гальма ланцюга живлення
двигуна буде припинено.
Якщо пила не запускається при активації
вмикача (1), слід відпустити гальмо ланцюга.
- Міцно потягніть щиток для руки (6) у напрямку,
позначеному стрілкою, доки не відчуєте
зчеплення. (Мал. 47)
Важливо:
Ці моделі обладнані обмежувачем пускового
струму. Цей електронний компонент запобігає
занадто різкому запуску електродвигуна.
Відсічка надлишкового струму: Коли
електричний струм, що подається до пили,
перевищує дозволений рівень, живлення двигуна
автоматично переривається. Це запобігає перегріву
двигуна та, як наслідок, його пошкодженню. Щоб
знов увімкнути пилу, відпустіть вмикач та натисніть
його знов.
УВАГА! Не користуйтеся пилою, якщо відсічка
струму постійно вимикає
сервісного центру компанії MAKITA.
її. Зверніться до
Перевірка гальма ланцюга (Мал. 48)
Заборонено працювати із пилою, не
перевіривши спочатку гальмо ланцюга!
- Запустіть двигун, як було описано
(переконайтеся, що стоїте на надійній основі,
розташуйте ланцюгову пилу на землі таким чином,
щоб шина не торкалася нічого).
- Міцно візьміться за трубчасту ручку однією рукою
та за іншу ручку другою рукою.
- Запустіть двигун та натисніть тильною стороною
долоні на щиток для руки (1) у напрямку,
вказаному стрілкою, доки не буде задіяне гальмо
ланцюга. Ланцюг повинен негайно зупинитись.
- Негайно вимкніть двигун та відпустіть гальмо
ланцюга.
Важливо: Якщо ланцюг пили не зупиняється
одразу, коли Ви проводите це випробування,
за жодних обставин не використовуйте пилу!
Віднесіть ланцюгову пилу до сервісного
центру компанії MAKITA.
36
Випробовування інерційного гальма
(Мал. 49)
Не працюйте з пилою, не протестувавши
інерційне гальмо!
- Запустіть двигун, як було описано
(переконайтеся, що стоїте на надійній основі,
розташуйте ланцюгову пилу на землі таким чином,
щоб шина не торкалася нічого).
- Міцно візьміться за трубчасту ручку однією рукою
та за іншу ручку другою рукою.
- Увімкніть двигун, а потім знов
повинен зупинитися протягом двох секунд після
вимкнення двигуна.
Важливо: Якщо ланцюг пили не зупиняється
протягом двох секунд під час виконання
випробування, не використовуйте пилу!
Огляньте графітові щітки.
вимкніть. Ланцюг
Перевірка змащення ланцюга (Мал. 50)
Ніколи не здійснюйте пиляння, коли достатнє
змащення ланцюга не може бути гарантовано.
У протилежному випадку буде скорочено строк
служби пристрою, що пиляє. Перед тим як починати
роботу, слід перевірити рівень мастила в баку, а
також його постачання. Дотримуючись наступних
інструкцій, перевірте кількість мастила, що
подається:
- Запустіть електричну ланцюгову пилу.
- Тримайте ланцюг, що рухається, приблизно
в 15 см над стовбуром або землею (слід
використовувати належну поверхню).
Якщо змащення достатнє, то можна буде побачити
світлий слід мастила, що спадає з ланцюгової пили
під впливом відцентрової сили. Слід враховувати
напрям вітру та уникати непотрібного контакту із
розпорошеним мастилом!
ОБСЛУГОВУВАННЯ
Заточення ланцюга пили (Мал. 51)
Під час роботи з ланцюгом пили завжди слід
вимикати мережний штепсель та вдягати
захисні рукавиці.
Ланцюг потрібно заточувати коли:
- тирса, що утворюється під час пиляння вологої
деревини, має вигляд деревного борошна.
- ланцюг пили входить у деревину тільки під
сильним тиском.
- ріжуча кромка явно пошкоджена.
- пристрій, що пиляє, протягується вліво
вправо під час пиляння. Це трапляється через
нерівномірне заточування ланцюга або через
пошкодження однієї з його сторін.
Важливо: Слід заточувати пилу часто, але не
знімаючи занадто багато металу!
Взагалі, 2-3 проходи напилком вистачає.
Після того як Ви декілька разів заточували ланцюг
самостійно, його слід заточити в сервісному
центрі.
Вірне заточування: (Мал. 52)
УВАГА!
Використовуйте тільки ланцюги та шини,
призначені для цієї пили!
або
Page 37

- Усі різаки повинні бути однакової довжини
(розмір а). Різаки різної довжини призводять до
нерівномірного руху ланцюга та можуть призвести
до тріщин в ланцюзі.
- Мінімальна довжина різака складає 3 мм (0,11”).
Не можна наново заточувати ланцюг, коли було
досягнуто мінімальної довжини різака; у такому
випадку ланцюг слід замінити.
- Глибина пропила визначається різницею
між обмежувачем глибини (круглим носом) та
ріжучою кромкою.
- Найліпші результати досягаються при глибині
обмежувача глибини 0,64 мм (0,025”).
УВАГА!
Занадто велика глибина підвищує ризик
віддачі! (Мал. 53)
- Усі різаки повинні бути заточені під однаковим
кутом 30°. Якщо кути різні, то це призводить до
нерівномірного руху ланцюга, підвищеного зносу
та навіть розриву ланцюга. (Мал. 54)
- Кут нахилу різака уперед на 85° пов'язаний
із глибиною круглого напилка. У разі вірного
використання належного напилка правильний
нахил уперед буде отримано автоматично.
по висоті
Напилки та методи роботи з ними
- Заточення виконуйте за допомогою спеціального
тримача та круглого напилка для ланцюга пили
діаметром 4,0 мм. Звичайні круглі напилки не
підходять для такої роботи.
- Напилок повинен зрізати, тільки коли він
рухається вперед (стрілка). Пересуваючи напилок
назад, його слід піднімати. (Мал. 55)
- Спочатку слід заточувати найкоротший різак.
Довжина цього різака потім є шаблоном для
решти різаків ланцюга.
- Завжди направляйте напилок так, як показано на
малюнку.
- Спрямовувати напилок легше за допомогою
тримача напилка. Він маркований під вірний кут
заточування 30° (мітки слід тримати паралельно
ланцюгу під час обробки, див. ілюстрацію) та
обмежує глибину обробки на вірну величину 4/5
діаметра напилка. (Мал. 56)
- Після того як ланцюг був заточений, слід
перевірити висоту обмежувача глибини за
допомогою щупа ланцюга.
- Слід коректувати навіть невеличку залишкову
висоту за допомогою спеціального плаского
напилка (1).
- Закругліть передню частину обмежувача глибини
(2). (Мал. 57)
Чищення шини, змащення кінцевої зірочки
(Мал. 58)
УВАГА! Треба вдягати захисні рукавички.
Регулярно перевіряйте несучі поверхні шини на
наявність пошкоджень та чистьте їх за допомогою
відповідних інструментів.
Якщо пила інтенсивно використовується, необхідно
регулярно змащувати підшипники зірочки
зворотного ходу (раз на тиждень). Для цього
спочатку слід ретельно очистити 2 отвори на
кінчику шини, а потім вприснути невелику кількість
багатоцільового мастила.
Багатоцільове мастило та мастильні шприци
продаються у якості приналежностей.
Багатоцільове мастило
(номер замовлення 944 360 000)
Маслянка
(номер замовлення 944 350 000)
Заміна ланцюга пили (Мал. 59)
УВАГА!
Використовуйте тільки ланцюги та шини,
призначені для цієї пили!
Перевіряйте зірочку (1) перед встановленням
нового ланцюга.
УВАГА!
Зношені зірочки (2) можуть пошкодити новий
ланцюг, тому їх необхідно заміняти.
Не намагайтеся замінити зірочку самотужки.
Заміна зірочки потребує спеціальної кваліфікації
та інструментів, її треба здійснювати у сервісному
центрі компанії MAKITA. (Мал. 60)
Огляд та заміна графітових щіток (Мал. 61)
Важливо:
Регулярно оглядайте графітові щітки!
Виріз на щітках визначає межу їх зношування.
ПРИМІТКА:
Графітова щітка дуже ламка, тому будьте уважні
та не упустіть її. Виймаючи щітку, запам'ятайте
положення, в якому її було встановлено,
оскільки кожна щітка зчеплена з ротором.
- Використовуйте плоску викрутку, щоб відкрутити
покриття (1), потім витягніть щітку (2).
- Якщо максимально припустиме зношування ще
не досягнуто, встановіть щітку назад в те саме
положення та прикрутіть покриття (1).
- На короткий час (біля хвилини) увімкніть пилу,
щоб щітки могли припрацюватися.
Важливо: Тепер випробуйте інерційне гальмо.
Якщо ланцюг не зупиниться через дві секунди,
запустіть пилу знов на короткий час та повторюйте
випробування, доки гальмо не буде працювати
належним чином.
ПРИМІТКА: Встановивши нові графітові щітки,
увімкніть пилу приблизно на 5 хвилин та перевірте
інерційне гальмо.
37
Page 38

Усунення несправностей
Несправність Система Спостереження Причина
Ланцюгова пила не
працює
Вся Електродвигун не
функціонує
Відсутнє живлення
Несправність кабелю
Задіяне гальмо ланцюга
Згоріли плавкі
запобіжники
Недостатня
Графітові щітки Недостатня тягова сила Зношені графітові щітки
продуктивність
Ланцюг не змащений Мастильний бак/насос Немає мастила на
ланцюзі пили
Мастильний бак
порожній
Забруднений напрямний
жолоб для мастила
Гальмо ланцюга Гальмо Ланцюг пили не
Зношена стрічка гальма
зупиняється одразу
Інерційне гальмо Гальмо Ланцюг пили продовжує
Зношені графітові щітки
рухатись
Інструкції з періодичного обслуговування
Для досягнення тривалого терміну служби, попередження ушкоджень та забезпечення повноцінного
функціонування засобів безпеки слід регулярно виконувати наступні роботи з обслуговування. Претензії в
рамках гарантійних зобов'язань приймаються, тільки якщо ці роботи регулярно проводились належним чином.
Невиконання зазначених робіт з обслуговування може призвести до нещасних випадків!
Користувачу електричної ланцюгової пили не дозволяється проводити роботи з обслуговування, які не
зазначені в даній інструкції. Усі інші роботи повинні здійснюватися сервісним центром компанії MAKITA.
Роботи загального
плану
Електрична
ланцюгова пила
Пластиковий корпус Перевіряйте на наявність тріщин та проломів. У разі
Ланцюгова пила Заточуйте регулярно.
Шина Перевертайте через певний період часу, щоб несучі
Зірочка Робіть своєчасну заміну в сервісному центрі.
Гальмо ланцюга Робіть регулярний огляд у сервісному центрі.
Інерційне гальмо Робіть регулярний огляд у сервісному центрі.
Кожного разу перед
Ланцюгова пила Перевіряйте на наявність пошкоджень, а також якість
початком експлуатації
пили
Шина Перевіряйте на наявність пошкоджень та заміняйте,
Змащування ланцюга Перевіряйте функціонування.
Гальмо ланцюга Перевіряйте функціонування.
Інерційне гальмо Перевіряйте функціонування.
Вмикач живлення Перевіряйте функціонування.
Кабель живлення У разі наявності пошкоджень слід замінити його у
Кришечка
мастильного бака
Після кожного
Шина Чистьте отвір для наливання мастила.
вимикання
Носій ланцюга Чистьте, особливо напрямний жолоб для мастила.
Зберігання Мастильний бак
ланцюга
Ланцюг пили/шина Знімайте, чистьте та злегка змащуйте.
Електрична
ланцюгова пила
38
Регулярно чистьте поверхню.
виявлення пошкоджень слід негайно забезпечити
ремонт у сервісному центрі.
Робіть своєчасну заміну.
поверхні зношувались рівномірно.
Робіть своєчасну заміну.
заточування.
Перевіряйте натяг ланцюга.
якщо необхідно.
сервісному центрі.
Перевіряйте на герметичність.
У порожньому стані.
Чистьте напрямний паз шини.
Зберігайте в безпечному сухому місці. Після зберігання
протягом довгого періоду часу віддавайте електричну
ланцюгову пилу для огляду в сервісний центр (масло,
що залишилось, може стати в'язким та засмітити
клапани мастильного насосу).
Page 39

Сервіс, запасні частини та гарантія
Обслуговування та ремонт
Обслуговування та ремонт сучасних електродвигунів, а також пристроїв безпеки потребує кваліфікованого
технічного навчання та спеціальної майстерні, обладнаної спеціальними інструментами та випробувальними
пристроями.
Будь-яка робота, не описана в цій інструкції, повинна виконуватись тільки в сервісному центрі компанії
MAKITA.
Сервісні центри компанії MAKITA мають все необхідне обладнання, а також кваліфікований та досвідчений
персонал, щоб належним чином виконувати клієнтські рішення та надавати консультації з усіх питань.
Гарантія на продукцію анулюється у разі спроби відремонтувати обладнання за допомогою третіх сторін або
неуповноважених осіб.
Запасні частини
Надійна та тривала робота і безпека Вашої ланцюгової пили також залежать від якості запчастин, що
використовуються. Використовуйте тільки оригінальні запчастини MAKITA.
Тільки оригінальні деталі та приналежності гарантують найвищу якість матеріалів, відповідність розміру,
функціональність та безпеку.
Оригінальні запчастини та приналежності можна придбати у місцевого дилера. Він також має переліки
відповідних запчастин, по яким можна визначити номер деталі, та його постійно інформують про поліпшення
та інновації в запчастинах. Щоб знайти Вашого місцевого дистриб'ютора, відвідайте www.makita-outdoor.com
Пам'ятайте, що в разі використання сторонніх запчастин замість оригінальних запчастин виробництва
компанії MAKITA, гарантію на продукцію компанії MAKITA буде автоматично анульовано.
39
Page 40

POLSKI (Oryginalna instrukcja)
Dziękujemy za zaufanie okazane nam przez zakup
naszego produktu
Gratulujemy zakupu nowej elektrycznej pilarki łańcuchowej
MAKITA. Jesteśmy przekonani, że to nowoczesne
narzędzie da Ci wiele satysfakcji!
Elektryczne pilarki łańcuchowe MAKITA charakteryzują
się wytrzymałymi i wysoko wydajnymi silnikami oraz dużą
prędkością łańcucha, co umożliwia uzyskanie doskonałych
wyników cięcia i wysokiej wydajności pracy. Są one
wyposażone w liczne i bardzo nowoczesne zabezpieczenia,
są lekkie i poręczne, ponadto są gotowe do pracy
natychmiast po podłączeniu do zasilania elektrycznego.
Aby zapewnić optymalną sprawność działania oraz
wydajność elektrycznej pilarki łańcuchowej, jak również
bezpieczeństwo jej użytkownika, wykonaj następujące
czynności:
Przeczytaj uważnie niniejszą instrukcję obsługi
przed pierwszym uruchomieniem elektrycznej
pilarki łańcuchowej i ściśle przestrzegaj przepisów
dotyczących bezpieczeństwa. Niezastosowanie się do
tego wymogu może spowodować poważne obrażenia
u użytkownika i/lub osób przebywających w pobliżu
narzędzia.
Symbole
Na pilarce łańcuchowej oraz w instrukcji obsługi
napotkasz na następujące symbole:
Przeczytaj instrukcję
obsługi i postępuj zgodnie
z ostrzeżeniami i zasadami
bezpieczeństwa!
Zachowaj szczególną staranność
i ostrożność!
Noś kask, gogle oraz stosuj
odpowiednią ochronę uszu!
Wyciągnij wtyczkę z gniazdka!
W przypadku uszkodzenia
przewodu zasilającego
natychmiast wyciągnij wtyczkę z
gniazdka!
Hamulec łańcucha zwolniony
Uruchomiony hamulec łańcucha
Odrzut!
Zabronione!
..... mm
40
Maksymalna dopuszczalna
długość cięcia
Noś rękawice ochronne!
Chroń narzędzie przed wilgocią!
Kierunek posuwu łańcucha
Podwójna izolacja ochronna
Olej do łańcucha tnącego
Pierwsza pomoc
Recykling
Oznaczenie CE
Pamiętać o środowisku
naturalnym! Urządzeń
elektrycznych nie wyrzucać do
opadów domowych!
Jeśli urządzenie jest
nieprzydatne, należy w Miejskim
Przedsiębiorstwie Oczyszczania
zasięgnąć informacji na temat
sposobu utylizacji.
Aby wykluczyć zagrożenie ze strony
uszkodzonego urządzenia, przewód
instalacyjny oddzielić bezpośrednio
przy obudowie.
UWAGA! Przed oddzieleniem
przewodu instalacyjnego
wyjąć wtyczkę z sieci. Istnieje
zagrożenie utraty życia wskutek
porażenia prądem!
Page 41

Minimalny zakres dostawy
1 2
4
5
3
1. Elektryczna pilarka łańcuchowa
2. Prowadnica
3. Łańcuch tnący
4. Uchwyt kablowy do kabla zasilania
5. Osłona łańcucha
6. Instrukcja obsługi (niepokazana na ilustracji)
W przypadku zauważenia braku któregokolwiek z
wymienionych elementów należy się skontaktować ze
sprzedawcą.
Dotyczy tylko krajów europejskich
Deklaracja zgodności UE
Niniejszym firma Makita Corporation jako
odpowiedzialny producent oświadcza, iż
opisywane urządzenia marki Makita:
Opis maszyny: Pilarka łańcuchowa
Nr modelu/Typ: UC3030A, UC3530A, UC4030A,
UC4530A, UC3530AP, UC4030AP
Dane techniczne: patrz tabela “DANE TECHNICZNE”.
są produkowane seryjnie oraz
są zgodne z wymogami określonymi w
następujących dyrektywach europejskich:
2000/14/WE, 2006/42/WE
Jest produkowane zgodnie z następującymi normami
lub dokumentami normalizacyjnymi:
EN60745
Numer certyfikatu badania typu na rynek WE
M6T 09 07 24243 100
M6T 09 07 24243 099
Badanie typu na rynek WE zgodnie z dyrektywami
98/37/WE i 2006/42/WE zostało przeprowadzone
przez:
TÜV SÜD Product Service GmbH,
Ridlerstraße 65, 80339 MÜNCHEN, Niemcy
Nr identyfikacyjny 0123
Dokumentacja techniczna przechowywana jest przez
naszego autoryzowanego przedstawiciela na Europę,
którym jest:
Makita International Europe Ltd.,
Michigan, Drive, Tongwell,
Milton Keynes, Bucks MK15 8JD, Anglia
Procedura oceny zgodności wymagana przez
Dyrektywę 2000/14/WE została przeprowadzona
zgodnie z Załącznikiem V.
Zmierzony poziom mocy akustycznej: 101,8 dB
Gwarantowany poziom mocy akustycznej: 103 dB
2 lipca 2009
Tomoyasu Kato
Dyrektor
Makita Corporation
3-11-8, Sumiyoshi-cho,
Anjo, Aichi, JAPAN
Przeznaczenie
Pilarki elektryczne
Ta pilarka elektryczna może być używana wyłącznie
do cięcia drewna. Przeznaczona jest do użytku
okazjonalnego, cięcia cienkiego drewna, pielęgnacji
drzewek owocowych, wyrębu, usuwania gałęzi i
przycinania.
Osoby, które nie mogą obsługiwać pilarki:
Z pilarki nie mogą korzystać osoby, które nie zapoznały
się z niniejszą instrukcją obsługi, dzieci, młodzież oraz
osoby będące pod wpływem alkoholu, narkotyków lub
leków.
Ostrzeżenia dotyczące bezpieczeństwa obsługi
pilarki łańcuchowej:
wygoda lub rutyna (nabyta w wyniku wielokrotnego
używania narzędzia) zastąpiły ścisłe przestrzeganie
zasad bezpieczeństwa obsługi piły. Używanie tego
narzędzia w sposób niebezpieczny lub niewłaściwy
grozi poważnymi obrażeniami ciała.
1. Gdy silnik jest włączony, należy trzymać
wszystkie części ciała z dala od łańcucha
tnącego. Przed rozpoczęciem pracy z pilarką
łańcuchową, należy upewnić się, że łańcuch
NIE WOLNO pozwolić, aby
41
Page 42

niczego nie dotyka. Podczas pracy z taką pilarką
chwila nieuwagi może spowodować pochwycenie
części ubrania lub ciała.
2. Prawa ręka powinna zawsze spoczywać na
tylnym uchwycie, a lewa na przednim. Trzymanie
pilarki łańcuchowej odwrotnie zwiększa ryzyko
powstania obrażeń ciała i absolutnie nie powinno
być praktykowane.
3. Używać okularów ochronnych i ochraniaczy
na uszy. Zaleca się używanie dodatkowego
wyposażenia chroniącego głowę, ręce, nogi
i stopy. Odpowiednia odzież ochronna obniża
ryzyko powstania obrażeń ciała powodowanych
odpryskami lub przypadkowym dotknięciem
łańcucha.
4. Nie wolno pracować z pilarką łańcuchową na
drzewach. Pracując z pilarką na drzewie mo
żesz
się poranić.
5. Należy zawsze stać pewnie i obsługiwać pilarkę
łańcuchową tylko stojąc na stałej, bezpiecznej
i równej powierzchni. Œliskie lub niepewne
podłoże, np. drabina może spowodować utratę
równowagi lub panowania nad pilarką.
6. Podczas cięcia naprężonych gałęzi należy
uważać na ich powracanie na miejsce/
odskakiwanie. Kiedy naprężenie gałęzi zostanie
zwolnione, gałąź może uderzyć obsługującego, a
także wyrwać mu pilarkę spod kontroli.
7. Należy bardzo uważać podczas cięcia krzaków
i młodych drzewek. Cienkie gałązki mogą być
chwytane przez łańcuch tnący i uderzać Cię, albo
pociągać wytrącając Cię z równowagi.
8. Pilarkę łańcuchową należy przenosić
wyłączoną, trzymając ją za uchwyt przedni i z
dala od siebie. Podczas transportowania lub
przechowywania pilarki łańcuchowej, pokrywa
prowadnicy musi być zawsze założona.
Prawidłowe obchodzenie się z pilarką zmniejsza
prawdopodobieństwo przypadkowego dotykania
poruszającego się łańcucha.
9. Smarowanie, napinanie łańcucha i wymianę
osprzętu należy przeprowadzać zgodnie
z instrukcjami. Nieprawidłowo napięty lub
nasmarowany łańcuch może się zerwać albo
powodować odrzucanie.
10. Uchwyty powinny być zawsze suche, czyste
i wolne od olejów i smarów. Tłuste uchwyty są
śliskie i uniemożliwiają panowanie nad narzędziem.
11. Dozwolone jest cięcie wyłącznie drewna.
Nie używaj tej pilarki niezgodnie z jej
przeznaczeniem. Na przykład: nie używaj
jej do cięcia tworzyw sztucznych, cegieł i
innych materiałów budowlanych innych niż
drewno. Używanie pilarki łańcuchowej do innych,
niezgodnych z przeznaczeniem celów może
stwarzać niebezpieczne sytuacje.
12. Przyczyny odrzutu narzędzia i zapobieganie
temu zjawisku przez operatora: Odrzut może
powstawać, kiedy nosek lub końcówka prowadnicy
dotyka czegoś, lub kiedy łańcuch zakleszczy się w
ciętym drewnie. Kontakt z końcówką prowadnicy
może nieraz powodować gwałtowną reakcję wstecz,
przez co prowadnica podskoczy do tyłu w kierunku
obsługującego.
Zakleszczenie się łańcucha u góry prowadnicy
może gwałtownie popchnąć prowadnicę w
kierunku obsługującego. Każda z tych reakcji może
spowodować utratę panowania nad pilarką, co grozi
42
poważnym zranieniem. Nie wolno polegać wyłącznie
na urządzeniach zabezpieczających, w które Twoja
pilarka jest wyposażona.
Użytkownik pilarki łańcuchowej musi podjąć szereg
kroków, aby nie dopuszczać do wypadków i obrażeń
podczas pracy. Odrzut jest wynikiem nieprawidłowej
eksploatacji narzędzia i/lub niewłaściwych procedur
lub warunków jego obsługi. Można go uniknąć
podejmując podane poniżej, odpowiednie środki
ostrożności:
− Przez cały czas należy narzędzie mocno
trzymać kciukami i palcami, obejmując
uchwyty pilarki łańcuchowej i ustawiając
się w taki sposób, aby przeciwdziałać siłom
odrzutu. Operator może jednak kontrolować siły
odrzutu, jeżeli zostaną podjęte odpowiednie środki
ostrożności. Nie dopuszczać do odrzutu pilarki
łańcuchowej.
− Nie wolno sięgać pilarką zbyt daleko i nie
tnij powyżej wysokości ramion. W ten sposób
zapobiegniesz przypadkowemu dotykaniu
końcówką prowadnicy; łatwiej jest też panować
nad pilarką w niespodziewanych sytuacjach.
− Stosuj wyłącznie zamienne prowadnice
i łańcuchy zalecane przez producenta.
Stosowanie nieodpowiednich prowadnic i
łańcuchów może powodować zrywanie się
łańcucha oraz/lub odrzuty.
− Należy przestrzegać instrukcji producenta
dotyczących ostrzenia i konserwacji
pilarki łańcuchowej. Zmniejszenie wysokości
ogranicznika głębokości cięcia może powodować
silne odrzuty.
Zasady bezpieczeństwa
Ogólne środki ostrożności (Rys. 1)
- W celu zapewnienia prawidłowej obsługi
narzędzia użytkownik musi przeczytać niniejszą
instrukcję obsługi, aby zaznajomić się z
charakterystyką pilarki łańcuchowej. Użytkownicy
posiadający niewystarczającą wiedzę w zakresie
obsługi narzędzia stwarzają zagrożenie zarówno dla
siebie samych, jak i dla innych osób.
- Zaleca się pożyczanie elektrycznej pilarki
łańcuchowej tylko osobom, które posiadają
odpowiednie doświadczenie w pracy z takimi
urządzeniami. Wraz z urządzeniem należy przekazać
również instrukcję obsługi.
- Osoby używające urządzenia po raz pierwszy
powinny poprosić sprzedawcę o podstawowe
informacje, które pozwolą im się zapoznać z obsługą
pilarki napędzanej silnikiem.
- Należy się zapoznać z obsługą elektrycznej pilarki
łańcuchowej, odcinając drewno z dłużycy na koźle do
piłowania.
- Nie należy pozwalać, aby elektryczną pilarkę
łańcuchową obsługiwały dzieci i młodzież poniżej
18 roku życia. Młodzież powyżej 16 roku życia może
używać pilarki łańcuchowej w celach szkoleniowych,
jednak tylko pod nadzorem wykwalifikowanego
instruktora.
- Podczas korzystania z pilarek łańcuchowych
należy zawsze zachować maksymalną ostrożność i
czujność.
- Z elektrycznej pilarki łańcuchowej należy korzystać
tylko wtedy, gdy jest się w doskonałym stanie
Page 43

fizycznym. Wszelkie czynności powinny być
wykonywane spokojnie i ostrożnie. Użytkownik jest
odpowiedzialny za bezpieczeństwo innych osób.
- Nigdy nie używać elektrycznej pilarki łańcuchowej
po spożyciu alkoholu, zażyciu narkotyków lub leków.
(Rys. 2)
Sprzęt ochrony osobistej
- Aby uniknąć obrażeń głowy, oczu, dłoni lub
stóp, jak również w celu ochrony słuchu,
podczas pracy z elektryczną pilarką łańcuchową
należy używać następującego sprzętu ochrony
osobistej.
- Typ odzieży powinien być dostosowany do
wykonywanej pracy, tzn. odzież musi przylegać do
ciała, ale nie może ograniczać swobody ruchów. Nie
należy nosić biżuterii lub odzieży, która mogłaby się
zaplątać w krzewy lub gałęzie.
- Kask ochronny (1) należy regularnie sprawdzać
pod kątem ewentualnych uszkodzeń i wymieniać
przynajmniej raz na 5 lat. Używać tylko atestowanych
kasków ochronnych. W przypadku długich włosów
należy zawsze nosić specjalną siatkę ochronną.
(Rys. 3)
- Osłona twarzy (2) kasku ochronnego (lub gogle)
chroni przed trocinami i wiórami. Podczas pracy z
elektryczną pilarką łańcuchową należy zawsze nosić
gogle lub osłonę twarzy, aby zapobiec urazom oczu.
- Należy stosować odpowiednie zabezpieczenia
słuchu (nauszniki (3), zatyczki do uszu itp.) Na
życzenie dostępna jest analiza oktawowa.
- Ochronne szelki i ogrodniczki (4) wykonane są
z 22 -warstwowej tkaniny nylonowej i są odporne na
przecięcia. Usilnie zalecamy ich używanie. W każdym
przypadku podczas pracy z elektryczną pilarką
łańcuchową należy zawsze nosić długie spodnie z
wytrzymałej tkaniny. (Rys. 4)
- Rękawice ochronne (5) wykonane z grubej skóry
stanowią część przepisowego sprzętu ochronnego
i muszą być zawsze noszone podczas pracy z
elektryczną pilarką łańcuchową.
- Podczas pracy z elektryczną pilarką łańcuchową
należy zawsze nosić trzewiki przeciwwypadkowe
lub dłuższe buty robocze (6) z podeszwą
przeciwpoślizgową i z metalowymi noskami. Obuwie
ochronne posiada warstwę zabezpieczającą przed
przecięciem i zapewnia bezpieczne chodzenie.
Uruchomienie
- Elektrycznej pilarki łańcuchowej nie wolno używać
podczas opadów lub w warunkach dużej wilgotności,
ponieważ silnik elektryczny nie jest wodoszczelny.
(Rys. 5)
- W przypadku zawilgocenia elektrycznej pilarki
łańcuchowej nie wolno jej używać.
- Należy unikać kontaktu fizycznego z uziemionymi
powierzchniami.
- Nie używać elektrycznej pilarki łańcuchowej w pobliżu
łatwopalnych gazów lub pyłów. Istnieje ryzyko
wybuchu.
- Kabel zasilający należy zawsze prowadzić tak, aby
znajdował się za użytkownikiem. Należy uważać,
aby nie przygnieść kabla ani nie narazić go na
przecięcie przez ostro zakończony przedmiot. Kabel
należy poprowadzić tak, aby nie stwarzał dla nikogo
zagrożenia.
- Wtyczkę kabla można podłączyć tylko do
bezpiecznego gniazdka podłą
czonego do sprawnej
instalacji elektrycznej. Upewnić się, że napięcie
sieciowe odpowiada napięciu podanemu na tabliczce
znamionowej. Bezpiecznik zapasowy 16 A. Pilarki
używane na dworze powinny być podłączone
do wyłącznika różnicowo-prądowego o prądzie
uruchamiającym nieprzekraczającym 30 mA.
- Zwracać uwagę na średnicę przedłużacza. Gdy
używany jest kabel nawinięty na bęben, należy
go rozwinąć na całej długości. Używać tylko
przedłużaczy spełniających wymogi określone w
rozdziale “Dane techniczne”. Jeżeli pilarka używana
jest na dworze, należy się upewnić, że przedłużacz
nadaje się do takich zastosowa
ń.
- Przed rozpoczęciem pracy z elektryczną pilarką
łańcuchową należy ją sprawdzić pod kątem
prawidłowego działania i bezpieczeństwa
użytkowania zgodnie z przepisami.
Należy uważnie sprawdzić zwłaszcza działanie
hamulca łańcucha, prawidłowe zamontowanie
prowadnicy, prawidłowe naostrzenie i naciąg
łańcucha, solidne zamocowanie osłony koła
łańcuchowego, swobodny ruch przełącznika
zasilania, działanie przycisku blokującego, dobry stan
kabla i wtyczki, jak również upewnić się, że uchwyty
są czyste i suche.
- Elektryczną pilarkę łańcuchową można uruchomić
tylko po całkowitym ukończeniu montażu. Nigdy
nie używać niekompletnie zmontowanej pilarki
łańcuchowej.
- Przed uruchomieniem pilarki należy z niej wyjąć
przyrząd regulacyjny.
- Wszystkie zabezpieczenia i osłony dostarczone wraz
z pilarką łańcuchową muszą być używane podczas
pracy.
- Należy się upewnić, że na obszarze roboczym nie
przebywakją dzieci ani inne osoby. Należy również
zwracać uwagę, czy w pobliżu stanowiska pracy nie
przebywają żadne zwierzęta. (Rys. 6)
- Przed uruchomieniem pilarki łańcuchowej należy się
upewnić, że stoi się w bezpiecznej i stabilnej pozycji.
- Podczas włączania elektrycznej pilarki
łańcuchowej należy ją zawsze trzymać oburącz.
Prawa ręka powinna spoczywać na tylnym uchwycie,
a lewa na uchwycie rurowym. Trzymać mocno
uchwyty w taki sposób, aby kciuki zwrócone były ku
palcom. Łańcuch i prowadnica muszą być zwrócone
na zewnątrz od ciała użytkownika. (Rys. 7)
- Pilarkę należy uruchamiać tylko w taki sposób,
jak opisano w niniejszej instrukcji obsługi. Pilarki
łańcuchowej nie wolno przeciążać. Będzie ona
działać lepiej i bezpieczniej, jeżeli będzie używana w
przewidzianej dla niej zakresie.
- W przypadku zauważenia jakichkolwiek zmian
podczas pracy elektrycznej pilarki łańcuchowej należy
ją natychmiast wyłączyć.
UWAGA: Po zwolnieniu przełącznika zasilania
łańcuch będzie się poruszać przez krótki
okres czasu (napęd z zastosowaniem sprzęgła
jednokierunkowego).
- Przewód zasilający należy chronić przed wysoką
temperaturą oraz kontaktów z olejem i ostrymi
krawędziami.
- Przewód zasilający należy poprowadzić w taki
sposób, aby podczas pracy pilarki nie mógł się
zaplątać w gałęzie, ani nie został pochwycony przez
inne przedmioty.
- W przypadku uszkodzenia lub przecięcia przewodu
zasilającego należy natychmiast wyjąć wtyczkę z
43
Page 44

gniazdka. (Rys. 8)
- W przypadku uderzenia pilarki w kamień, gwoździe
lub inne twarde przedmioty należy natychmiast wyjąć
wtyczkę z gniazdka i sprawdzić narzędzie.
- Przed przystąpieniem do kontroli napięcia
łańcucha, wymiany części lub usuwania usterki
należy zawsze wyjąć wtyczkę z gniazdka. (Rys. 9)
• nieprawidłowe działanie urządzenia
• konserwacja
• uzupełnianie oleju
• ostrzenie łańcucha pilarki
• zakończenie pracy
• transport
• wyłączanie
- W przypadku zakończenia pracy lub pozostawienia
elektrycznej pilarki łańcuchowej bez nadzoru należy
wyłączyć narzędzie i wyjąć wtyczkę z gniazdka. Aby
zapobiec niebezpieczeństwom grożącym osobom
trzecim, należy zawsze odłożyć pilarkę w bezpieczne
miejsce.
- Przed przystą
pieniem do napełniania zbiornika oleju
należy zawsze wyjąć wtyczkę z gniazdka. Nie palić i
nie używać otwartego ognia.
- Unikać kontaktu skóry lub oczu z produktami
zawierającymi oleje mineralne. Podczas napełniania
zbiornika olejem należy zawsze nosić rękawice
ochronne.
- Upewnić się, że paliwo lub olej nie przedostaje się do
gleby (ochrona środowiska). Używać odpowiedniej
podstawy.
- W przypadku rozlania oleju należy natychmiast
wyczyścić elektryczną pilarkę łańcuchową.
Zachowanie podczas pracy/metoda pracy
- Nie pracuj sam. W razie nagłego wypadku w pobliżu
musi być inna osoba (na tyle blisko, aby usłyszała
krzyk).
- Podczas pracy z elektryczną pilarką łańcuchową
należy ją zawsze trzymać oburącz. Umożliwi to jej
bezpieczne i stabilne prowadzenie.
- Pilarki łańcuchowej należy używać tylko przy
dobrym oświetleniu i widoczności. Pamiętaj o
ryzyku poślizgnięcia się lub wilgotnych obszarach,
jak również o lodzie i śniegu (ryzyko poślizgnięcia).
Ryzyko poślizgnięcia jest szczególnie duże podczas
cięcia drewna, które zostało niedawno pozbawione
kory.
- Nigdy nie pracuj na niestabilnych powierzchniach.
Upewnij się, że na obszarze roboczym nie znajdują
się żadne przeszkody - w przeciwnym wypadku
istnieje ryzyko potknięcia. Przez cały czas sprawdzaj,
czy stoisz w bezpiecznej i stabilnej pozycji.
- Nie wolno wykonywać cięć na powyżej barków.
- Nigdy nie tnij drewna, gdy stoisz na drabinie. (Rys.
10)
- Nigdy nie wchodź na drzewa, aby pracować z
elektryczną pilarką łańcuchową.
- Nigdy nie wychylaj się nadmiernie podczas piłowania.
- Prowadź narzędzie w taki sposób, aby żadna
część twojego ciała nie znajdowała się w obrębie
wydłużonej, obracającej się części pilarki. (Rys. 11)
- Używaj elektrycznej pilarki łańcuchowej tylko do
cięcia drewna.
- Nie dopuszczaj do tego, aby łańcuch dotykał ziemi,
gdy pilarka jest uruchomiona. Podczas cięcia drewna
leżącego bezpośrednio na ziemi obróć je przed
zakończeniem cięcia, aby nie ciąć na ziemi.
- Obszar, w którym będzie wykonywane cięcie, należy
44
oczyścić z piasku, kamieni, gwoździ, drutów itp. Mogą
one bowiem spowodować uszkodzenie ostrza oraz
prowadzić do niebezpiecznego odrzutu.
- Podczas cięcia naciętego wstępnie lub cienkiego
drewna używaj bezpiecznego wspornika (dźwignik,
12). Podczas cięcia naciętego wstępnie lub cienkiego
drewna używaj bezpiecznego wspornika (kozioł do
piłowania drewna, 12). Nie tnij drewna ułożonego
w stos! Nie pozwalaj innej osobie przytrzymywać
drewna i nie przytrzymuj go stopą!
- Unieruchom okrągłe bale drewna.
- Podczas pracy na nachyleniach zawsze wykonuj
pracę w kierunku nachylenia.
- Do wykonywania cięć poprzecznych należy
korzystać ze specjalnego progu z zębami (Z,
Rys. 12), który należy przyłożyć do ciętego
drewna.
- Przed przystąpieniem do cięcia poprzecznego
oprzyj przednią drewno o próg z zębami, a dopiero
potem przystąp do cięcia. W tym celu pilarkę należy
podnieść za uchwyt tylny i prowadzić za pomocą
uchwytu rurowego. Próg z zębami służy jako środek
obrotu. Kontynuuj pracę, dociskając lekko do dołu
uchwyt rurowy i równocześnie odciągając do tyłu
pilarkę łańcuchową. Dociśnij próg jeszcze głębiej i
ponownie podnieś uchwyt tylny.
- Za każdym razem, gdy pilarka łańcuchowa jest
zdejmowana z drewna, musi być ona uruchomiona.
- Podczas wykonywania serii cięć pilarką elektryczną
należy ją wyłączać pomiędzy kolejnymi cięciami.
- Wycięcia lub cięcia wzdłużne mogą być
wykonywane tylko przez odpowiednio
przeszkolone osoby (duże ryzyko odrzutu).
- Podczas wykonywaniacięć wzdłużnych (Rys. 13)
należy przykładać pilarkę do drewna pod jak
najmniejszym kątem. Podczas wykonywania prac
tego typu należy zachować szczególną ostrożność,
gdyż nie można wtedy używać progu z zębami.
- Jeżeli podczas cięcia za pomocą górnej krawędzi
prowadnicy łańcuch się zakleszczy, może dojść
do popchnięcia pilarki w stronę użytkownika. Z
tego powodu zaleca się używanie dolnej krawędzi
prowadnicy, gdy tylko jest to możliwe. Pilarka jest
wówczas popychana w kierunku od użytkownika.
(Rys. 14)
- Jeżeli drewno nie jest wolne od napięć, (Rys. 15),
rozpocznij cięcie od części pod naciskiem
(A). Następnie wykonaj końcowe cięcie po
stronie rozciąganej (B). W ten sposób unikniesz
zakleszczenia prowadnicy.
- Zachowaj ostrożność podczas cięcia
rozszczepiającego się drewna. Odcinanie kawałki
drewna mogą zostać pociągnięte (ryzyko obrażeń).
- Nigdy nie używaj pilarki łańcuchowej do podnoszenia
lub usuwania kawałków drewna lub innych
przedmiotów.
- Podczas zwalniania drewna pod naciskiem pilarka
łańcuchowa powinna być oparta o pień (ryzyko
odrzutu).
- Prace wymagające zwalniania nacisku mogą
być wykonywane tylko przez odpowiednio
przeszkolone osoby. Istnieje duże ryzyko
obrażeń.
- Pamiętaj o gałęziach, które są rozciągane. Nie wolno
ciąć gałęzi od spodu.
- Nigdy nie wykonuj prac wymagających zwalniania
nacisku, stojąc na pniu.
- Nie używaj elektrycznej pilarki łańcuchowej do
Page 45

prac w lesie, tzn. do ścinania drzew lub prac
wymagających zwalniania nacisku. Z uwagi na
to, że urządzenie jest podłączone przy pomocy
kabla, nie można wówczas zagwarantować
odpowiedniej mobilności i wymaganego
bezpieczeństwa użytkownika.
UWAGA:
Nie pracuj przy wyrębie lub ścinaniu gałęzi
drzew, jeżeli nie posiadasz odpowiedniego
przeszkolenia w tym zakresie! Istnieje duże
ryzyko obrażeń! Upewnij się, że postępujesz
zgodnie z miejscowymi przepisami.
- Przed ścięciem drzewa upewnij się, że:
a) na obszarze roboczym znajdują się tylko te osoby,
które są niezbędne do ścięcia drzewa.
b) wszystkie osoby uczestniczące w ścinaniu drzewa
mają wolną drogę ucieczki (ścieżka ucieczki
powinna przebiegać pod kątem 45° po przekątnej,
do tyłu od kierunku upadku drzewa). Pamię
o zwiększonym ryzyku potknięcia się o kable
elektryczne!
c) dolna część pnia jest wolna od ciał obcych,
podszycia i gałęzi. Upewnij się, że stoisz w
bezpiecznej i stabilnej pozycji (ryzyko potknięcia).
d) następne stanowisko robocze jest oddalone
przynajmniej o 2 1/2 długości drzewa (Rys. 16).
Przed ścięciem drzewa sprawdź kierunek upadku i
upewnij się, że w odległości 2 1/2 długości drzewa
nie znajdują się żadne osoby lub przedmioty
(Rys. 16).
=
Kierunek spadania
= Niebezpieczna strefa
taj
= Ścieżka ucieczki
- Ocena drzewa:
Kierunek zwisania - luźne lub suche gałęzie -
wysokość drzewa - naturalne części wystające - czy
drzewo jest spróchniałe?
- Weź pod uwagę kierunek i prędkość wiatru. W
przypadku silnych podmuchów wiartu przerwij
ścinanie drzewa.
- Cięcie korzeni:
Zacznij cięcie od najmocniejszego korzenia. Najpierw
wykonaj cięcie pionowe, a następnie poziome.
- Nacinanie pnia (A, Rys. 17):
Nacięcie określa kierunek upadku i prowadzi drzewo.
Pień jest nacinany w kierunku prostopadłym do
kierunku upadku, do 1/3 -1/5 jego średnicy. Wykonać
cięcie blisko gruntu.
- Podczas korygowania cięcia należy je zawsze
wykonać na całej szerokości nacięcia.
- Zetnij drzewo (B, Rys. 18) nad dolną krawędzią
nacięcia (D). Rząz ścinający powinien być wykonany
dokładnie w poziomie. Odległość pomiędzy dwoma
cięciami musi odpowiadać mniej więcej 1/10 średnicy
pnia.
- Materiał pomiędzy oboma cięciami (C) służy jako
zawias. Nie wolno go nigdy przecinać, w przeciwnym
wypadku drzewo spadnie w niekontrolowany sposób.
Wsuń na czas kliny do ścinania drzewa (B, Rys. 18).
- Zabezpieczaj przecięcia tylko klinami wykonanymi z
plastiku lub aluminium. Nie używaj klinów żelaznych.
- Podczas ścinania drzewa zawsze stój z boku
spadającego drzewa.
- Podczas wycofywania się po wykonaniu cięcia
uważaj na spadające gałęzie.
- Podczas pracy na nachylonym gruncie użytkownik
elektrycznej pilarki łańcuchowej musi stać u góry lub z
boku ścinanego pnia lub już ściętego drzewa.
- Uważaj na pnie, które mogą się stoczyć w twoim
kierunku.
Odrzut
- Podczas pracy z elektryczną pilarką łańcuchową
może dojść do niebezpiecznego odrzutu.
- Odrzut powstaje, gdy końcówka prowadnicy (w
szczególności górna ćwiartka) zetknie się z drewnem
lub innym sztywnym obiektem. (Rys. 19)
- W takim przypadku elektryczna pilarka łańcuchowa
zostaje odrzucona w niekontrolowany sposób
w kierunku użytkownika z dużą energią (ryzyko
obrażeń).
W celu uniknięcia odrzutu należy przestrzegać
poniższych zasad:
- Nigdy nie przykładaj końcówki prowadnicy
na początku cięcia. Zawsze obserwuj koniec
prowadnicy.
- Nigdy nie używaj końca prowadnicy do piłowania
drewna. Zachowaj ostrożność podczas kontynuacji
pracy.
- W momencie rozpoczęcia cięcia łańcuch musi być
uruchomiony.
- Upewnij się, że łań
cuch jest zawsze odpowiednio
naostrzony. Zwróć szczególną uwagę na wysokość
ogranicznika głębokości (szczegółowe informacje patrz rozdział “Ostrzenie łańcucha pilarki”).
- Nigdy nie tnij równocześnie kilku gałęzi. Podczas
cięcia gałęzi upewnij się, że pilarka nie styka się z
żadną inną gałęzią.
- Podczas przecinania pnia zwracaj uwagę na pnie
znajdujące się obok. Zaleca się używanie dźwignika.
Przewożenie i przechowywanie
- Przenoś pilarkę łańcuchową wraz z uchwytem
rurowym. Prowadnica pilarki zwrócona jest do tyłu.
Nie wolno przenosić lub przewozić pilarki, gdy
łańcuch tnący jest w ruchu.
- Nigdy nie przenoś pilarki, trzymając za kabel
zasilający. Nie odłączaj pilarki od zasilania, ciągnąc
za kabel.
- W przypadku zmiany miejsca pracy wyłącz pilarkę
łańcuchową i zaciągnij hamulec łańcucha, aby
zapobiec przypadkowemu uruchomieniu narzędzia.
- Podczas transportu elektrycznej pilarki łańcuchowej
na duże odległości należy używać osłony chroniącej
prowadnicę dostarczonej wraz z narzędziem. (Rys. 20)
- Upewnij się, że podczas transportu samochodowego
elektryczna pilarka łańcuchowa znajduje się w
prawidłowej pozycji, aby uniknąć wycieku oleju.
- Pilarkę łańcuchową należy przechowywać w
bezpiecznym, suchym i zamykanym pomieszczeniu,
do którego dzieci nie mają dostępu. Pilarki nie wolno
przechowywać na zewnątrz.
- Jeżeli pilarka ma być nieużywana przez dłuższy
okres czasu lub wysłana, należy całkowicie opróżnić
zbiornik oleju.
- Do transportu i przechowywania oleju do łańcucha
należy używać tylko atestowanych i odpowiednio
oznaczonych pojemników.
Konserwacja
- Przed przystąpieniem do prac konserwacyjnych
elektryczną pilarkę łańcuchową należy wyłączyć,
wyjąć wtyczkę z gniazdka i zabezpieczyć
narzędzie. (Rys. 21)
- Przed rozpoczęciem pracy zawsze się upewnij, że
pilarka jest sprawna, a szczególną uwagę zwróć na
hamulec łańcucha oraz hamulec bezwładnościowy.
Upewnij się, że łańcuch jest zawsze naostrzony i
prawidłowo napięty. (Rys. 22)
45
Page 46

- Regularnie zlecaj kontrolę hamulca łańcucha i
hamulca bezwładnościowego (patrz “Hamulec
łańcucha i hamulec bezwładnościowy”).
- Regularnie sprawdzaj, czy izolacja kabla zasilania nie
jest uszkodzona.
- Pilarkę elektryczną należy regularnie czyścić.
- Jeżeli plastikowa obudowa jest uszkodzona, należy
natychmiast zlecić jej naprawę wykwalifikowanej
osobie.
- Regularnie sprawdzaj szczelne dokręcenie korka
zbiornika.
- Nie używaj pilarki, jeżeli przełącznik ON/OFF jest
niesprawny. Zleć jego naprawę wykwalifikowanej
osobie.
Przestrzegaj instrukcji dotyczących zapobiegania
wypadkom wydanych przez organizacje
zawodowe i firmy ubezpieczeniowe.
Nie wykonuj żadnych modyfikacji w obrębie
pilarki elektrycznej. Takie modyfikacje
zagrażałyby twojemu bezpieczeństwu.
Wykonuj tylko prace konserwacyjne i naprawcze
opisane w instrukcji obsługi. Wszelkie inne czynności
powinny być wykonywane przez serwis firmy
MAKITA. (Rys. 23)
Używaj tylko oryginalnych akcesoriów i części
zamiennych firmy MAKITA.
Stosowanie części zamiennych innych niż oryginalne
marki MAKITA lub akcesoriów i nieprawid
łowych
kombinacji lub długości prowadnic/łańcuchów może
doprowadzić do wypadku. Nie ponosimy żadnej
odpowiedzialności za wypadki i szkody powstałe
wskutek stosowania narzędzi lub akcesoriów, które
nie zostały zatwierdzone do użytku.
Pierwsza pomoc (Rys.24)
Należy zadbać o to, aby w razie wypadku na miejscu
był zawsze dostępny zestaw do udzielania pierwszej
pomocy. Wszelkie ubytki z apteczki należy niezwłocznie
uzupełniać.
Wzywając karetkę, należy podać następujące
informacje:
- Miejsce wypadku
- Co się wydarzyło?
- Liczbę osób, które odniosły obrażenia
- Typ obrażeń
- Swoje imię i nazwisko.
UWAGA
U osób z problemami krążeniowymi, które są narażone
na działanie zbyt intensywnych drgań, może dochodzić
do uszkodzenia naczyń krwionośnych lub układu
nerwowego.
Drgania mogą wywoływać poniższe objawy w palcach,
rękach lub nadgarstkach: “senność” (odrętwienie),
mrowienie, bóle, wrażenie kłucia, zmiany w
zabarwieniu skóry lub zmiany na skórze. W przypadku
wystąpienia któregokolwiek z powyższych
objawów, należy zgłosić się do lekarza!
46
Page 47

Dane techniczne
UC3030A UC3530A / AP UC4030A / AP UC4530A
Rodzaj łańcucha tnącego 092
Podziałka łańcucha tnącego inch 3/8”
Długość prowadnicy cm 30 35 40
45
Maksymalna prędkość łańcucha m/s 13,3
Poziom mocy akustycznej L
wg EN 60745
Poziom dźwięku L
miejscu pracy wg EN 60745
pA av
WA av
dB (A) 101,8
dB (A) 90,8
Niepewność dB (A) K=0,73
Przyspieszenie drgań
a
wg EN 60745
h,w av
- Uchwyt rurowy m/s
- Uchwyt tylny m/s
Niepewność m/s
2
2
2
4,7
5,6
K=1,5
Pompa oleju automatyczna
Pojemność zbiornika oleju ml 140
Przeniesienie mocy bezpośrednie
Zabezpieczenie przed
przeciążeniem
elektryczne
Hamulec łańcucha uruchamiany ręcznie
Hamulec bezwładnościowy elektryczny
Ciężar
(Waga obliczona zgodnie z
procedurą EPTA 01/2003)
kg 5,0 5,1 5,2
5,3
Obudowa II klasa (podwójna izolacja ochronna)
Przedłużacz
(niedołączony)
Ze względu na stale prowadzone prace badawczo-rozwojowe, podane tu dane techniczne mogą ulec zmianie bez
•
DIN 57282/ HO 7RN-F
D= 30 m maks., 3x1,5 mm
2
powiadomienia.
W innych krajach urządzenie może mieć odmienne parametry techniczne.
•
Deklarowana wartość wytwarzanych drgań została zmierzona zgodnie ze standardową metodą testową i można ją
•
wykorzystać do porównywania narzędzi.
Deklarowaną wartość wytwarzanych drgań można także wykorzystać we wstępnej ocenie narażenia.
•
OSTRZEŻENIE:
Drgania wytwarzane podczas rzeczywistego użytkowania elektronarzędzia mogą się różnić od wartości
•
deklarowanej, w zależności od sposobu jego użytkowania.
W oparciu o szacowane narażenie w rzeczywistych warunkach użytkowania należy określić środki bezpieczeństwa
•
w celu ochrony operatora (uwzględniając wszystkie elementy cyklu działania, tj. czas, kiedy narzędzie jest
wyłączone i kiedy pracuje na biegu jałowym, a także czas, kiedy jest włączone).
47
Page 48

Oznaczenia komponentów
1
2
3
67
1 Uchwyt rurowy
2 Osłona ręki (zwoln. hamulca łańcucha)
3 Listwa z kolcem
4 Napinacz osłony koła łańcuchowego
5 Osłona koła łańcuchowego, hamulec łańcucha
6 Pokrywa szczotek węglowych
7 Osłona dłoni
8 Prowadnica
9 Korek wlewu oleju
10 Tabliczka znamionowa
11 Przycisk blokady
12 Uchwyt tylny
13 Przełącznik zasilania
14 Szybka wskaźnika poziomu oleju
15 Łańcuch tnący
16 Uchwyt kablowy do kabla zasilania
45
8 9 10 11 12
13141516
48
Page 49

URUCHOMIENIE (Rys. 25)
UWAGA:
Przed przystąpieniem do jakichkolwiek prac w
obrębie prowadnicy lub łańcucha zawsze zakładaj
rękawice ochronne i wyciągnij wtyczkę z gniazdka.
UWAGA:
Pilarkę elektryczną można włączyć dopiero po jej
całkowitym zmontowaniu i skontrolowaniu!
Montaż prowadnicy i łańcucha pilarki
(Rys. 26)
Ułóż pilarkę łańcuchową na stabilnej powierzchni i
wykonaj opisane poniżej czynności, aby zamontować
prowadnicę i łańcuch.
Zwolnij hamulec łańcucha. W tym celu pociągnij osłonę
dłoni (1) w kierunku wskazywanym przez strzałkę.
Przechyl do góry napinacz osłony koła łańcuchowego
(2). (Rys. 31)
Popchnij mocno napinacz osłony koła łańcuchowego
i powoli obracaj go w kierunku przeciwnym do
ruchu wskazówek zegara, aż zaskoczy. Kontynuuj
popychanie i obracaj do oporu w kierunku przeciwnym
do ruchu wskazówek zegara.
Zwolnij napinacz osłony koła łańcuchowego
(zwolnij nacisk) i obracaj go w kierunku zgodnym z
ruchem wskazówek zegara, aż powróci na miejsce.
Powtarzaj tę procedurę aż do odkręcenia osłony koła
łańcuchowego (3).
Pociągnij lekko osłonę koła łańcuchowego do góry (3),
wyciągnij z tylnych elementów mocujących (4) i wyjmij.
Ustaw prowadnicę we właściwej pozycji (7) i popchnij ją
ku kołu łańcuchowemu (6). (Rys. 27)
Umieść łańcuch (9) na kole łańcuchowym (6). Prawą
ręką naprowadź łańcuch na górny rowek (8) na
prowadnicy. (Rys. 28)
Pamiętaj, że krawędzie tnące wzdłuż górnej części
prowadnicy muszą być zwrócone w kierunku
wskazywanym przez strzałkę!
Dociśnij lekko lewą ręką prowadnicę do uchwytu na
obudowie i poprowadź łańcuch (9) wzdłuż noska
koła łańcuchowego (10) na prowadnicy. Podczas
wykonywania tej czynności pociągnij lekko łańcuch w
kierunku wskazywanym przez strzałkę. (Rys. 29)
Wyrównaj otwór w osłonie koła łańcuchowego z
kołkiem gwintowanym (11).
Obracaj śrubę napinającą łańcuch (Rys. 32/14), aby
wyrównać sworzeń napinający łańcuch (12) z otworem
na prowadnicy. (Rys. 30)
Najpierw wciśnij osłonę koła łańcuchowego (3) w
mocowanie (13), a następnie wepchnij ją na kołek
gwintowany (Rys. 30/11). (Rys. 31)
Dokręcanie łańucha pilarki (Rys.32)
Mocno wepchnij i równocześnie obracaj napinacz
osłony koła łańcuchowego (2, w kierunku zgodnym
z ruchem zegara), aby przykręcić osłonę koła
łańcuchowego (3), ale jeszcze go nie dokręcaj.
Podnieś lekko końcówkę prowadnicy i obracaj
napinacz łańcucha (14) w kierunku zgodnym z ruchem
wskazówek zegara, dopóki łańcuch nie zaskoczy w
rowku w dolnej części prowadnicy (patrz okrąg).
Wepchnij ponownie napinacz osłony koła
łańcuchowego (2) i napnij go, obracając w kierunku
zgodnym z ruchem wskazówek zegara.
Zwalniaj napinacz osłony koła łańcuchowego (2)
(zwalniając nacisk), aż zacznie się swobodnie obracać,
po czym złóż go tak, jak pokazano na ilustracji. (Rys.
33)
Kontrola naciągu łańcucha (Rys. 34)
Łańcuch jest prawidłowo napięty, gdy przylega do
dolnej krawędzi prowadnicy i daje się łatwo odciągnąć
ręcznie na 2-4 mm od prowadnicy.
Sprawdzaj regularnie naprężenie łańcucha - nowe
łańcuchy są często ulegają wydłużeniu w miarę
użytkowania!
Podczas sprawdzania napięcia łańcucha silnik musi
być wyłączony, a wtyczka wyjęta z gniazdka. Jeżeli
łańcuch jest za luźny: Poluzuj napinacz osłony koła
łańcuchowego o około jedną czwartą obrotu. Napnij
łańcuch zgodnie z opisem w rozdziale “Napinanie
łańcucha pilarki”.
WSKAZÓWKA:
Używaj na przemian 2 lub 3 łańcuchów, aby zapewnić
równomierne zużycie powierzchni roboczych
łańcuchów, koła łańcuchowego i prowadnicy.
Aby zapewnić równomierne zużycie prowadnicy,
powinna ona być obracana za każdym razem, gdy
wymienia się łańcuch.
Hamulec łańcucha (Rys. 35)
Te modele wyposażone są standardowo w hamulec
łańcucha. W przypadku odrzutu spowodowanego
uderzeniem końcówki prowadnicy w drewno (patrz
“Instrukcje dotyczące bezpieczeństwa”), grzbiet dłoni
uderzającej w osłonę dłoni uruchomi hamulec łańcucha.
Łańcuch zatrzyma się w ciągu ułamka sekundy.
Hamulec bezwładnościowy
Elektryczna pilarka łańcuchowa wyposażona jest
standardowo w hamulec bezwładnościowy.
Hamulec bezwładnościowy zapewnia natychmiastowe
zatrzymanie łańcucha po zwolnieniu przycisku ON/OFF,
uniemożliwiając jego dalszą pracę w niebezpiecznych
sytuacjach.
Testowanie hamulca bezwładnościowego opisane
zostało w dalszej części instrukcji.
Konserwacja hamulca łańcucha i hamulca
bezwładnościowego (Rys. 36)
Hamulce są elementami bardzo ważnymi dla
bezpieczeństwa i ulegają zużyciu w znacznie
większym stopniu, niż pozostałe elementy.
Regularne kontrole i konserwacje są bardzo
ważne dla twojego bezpieczeństwa i muszą być
wykonywane przez personel centrum serwisowego
MAKITA.
Uruchamianie hamulca łańcucha (hamowanie)
(Rys. 37)
Dociśnij lewą ręką osłonę dłoni (1) do końcówki
prowadnicy (strzałka 2).
Zwalnianie hamulca łańcucha
Ciągnij osłonę dłoni (1) ku sobie (strzałka 3), dopóki
nie poczujesz, ze zaskoczyła. Teraz hamulec jest
zwolniony.
49
Page 50

Uwaga:
Po uruchomieniu hamulca łańcucha silnik zostanie
odcięty od zasilania. Testowanie hamulca łańcucha
opisane zostało w dalszej części instrukcji.
Olej do smarowania łańcucha (Rys. 38)
Do smarowania łańcucha i prowadnicy używaj oleju
z dodatkiem substancji zwiększającej przyczepność.
Dodatek substancji zwiększającej przyczepność
zapobiega zbyt szybkiemu spływaniu oleju z urządzenia
tnącego .
Nie używaj olejów mineralnych. Aby chronić
środowisko, należy obowiązkowo używać olejów
ulegających biodegradacji.
Olej do smarowania łańcuchów BIOTOP sprzedawany
przez firmę MAKITA produkowany jest ze specjalnych
olejów roślinnych i jest w 100% biodegradalny.
Olejowi BIOTOP przyznano wyróżnienie “niebieskiego
anioła” jako produktowi szczególnie przyjaznemu dla
środowiska (RAL UZ 48).
Olej BIOTOP dostępny jest w opakowaniach o
następujących pojemnościach:
1 litr kod produktu 980 008 610
5 litrów kod produktu 980 008 611
Olej biodegradalny zachowuje stabilność tylko przez
określony okres czasu. Należy go zużyć w ciągu 2 lat
od daty produkcji (wytłoczonej na pojemniku). (Rys. 39)
Ważna informacja dotycząca olejów
biodegradalnych do smarowania łańcucha:
Jeżeli pilarka ma pozostać nieużywana przez dłuższy
okres czasu, opróżnij zbiornik na olej i wlej do niego
małą ilość zwykłego oleju silnikowego (SAE 30), po
czym uruchom narzędzie na chwilę. Jest to niezbędne
do usunięcia pozostałości oleju biodegradalnego
ze zbiornika, systemu doprowadzającego olej,
łańcucha oraz prowadnicy, ponieważ wiele olejów
biodegradalnych lepkie resztki, które mogą uszkodzić
pompę olejową lub inne części.
Przed następnym użyciem pilarki napełnij ponownie
zbiornik olejem BIOTOP. W przypadku uszkodzenia
pilarki wskutek używania oleju odpadowego lub
nieprawidłowego oleju do smarowania łańcucha
gwarancja na produkt zostanie unieważniona.
Sprzedawca udzieli ci informacji o zalecanych olejach
do smarowania łańcucha.
Nigdy nie używaj oleju odpadowego (Rys. 40)
Olej odpadowy jest bardzo szkodliwy dla środowiska.
Olej odpadowy zawiera duże ilości substancji o
działaniu kancerogennym.
Pozostałości niepożądanych substancji w oleju
odpadowym powodują szybkie zużycie pompy olejowej
i samej pilarki.
W przypadku uszkodzenia pilarki wskutek używania
oleju odpadowego lub nieprawidłowego oleju do
smarowania łańcucha gwarancja na produkt zostanie
unieważniona.
Sprzedawca udzieli ci informacji o zalecanych olejach
do smarowania łańcucha.
Unikaj kontaktu z oczami i skórą (Rys. 41)
Produkty zawierające oleje mineralne, jak również sam
olej, odtłuszczają skórę. W przypadku powtarzającego
się kontaktu skóry z tymi substancjami przez dłuższy
okres czasu skóra ulega wysuszeniu. Może to
spowodować różne choroby skóry. Dodatkowo mogą
50
wystąpić reakcje alergiczne.
Kontakt z olejem może również podrażnić oczy. W
przypadku dostania się oleju do oczu natychmiast
przemyj je obficie czystą wodą. Jeżeli oczy są nadal
podrażnione, natychmiast zasięgnij porady lekarskiej.
Napełnianie zbiornika oleju (Rys. 42)
Przystąpić do napełniania dopiero po wyłączeniu
silnika i wyjęciu wtyczki z gniazdka!
- Oczyść dokładnie zbiornik oleju wokół korka, aby
zapobiec przedostawaniu się zanieczyszczeń do
środka zbiornika.
- Odkręć korek zbiornika (1) i wlewaj olej, dopóki jego
poziom nie będzie równy z dolną krawędzią wlewu.
- Dokręć mocno korek zbiornika.
- Usuń dokładnie rozlany olej.
Ważne! (Rys. 43)
Przed pierwszym użyciem pilarki system
rozprowadzający olej musi być całkowicie napełniony
tak, aby olej smarował łańcuch i prowadnicę.
Ta procedura zajmuje do dwóch minut.
- Poziom oleju można sprawdzić w okienku wskaźnika
pokazanego na rysunku (2).
Aby zapewnić prawidłowe smarowanie łańcucha, w
zbiorniku musi się zawsze znajdować odpowiednia ilość
oleju.
Smarowanie łańucha pilarki (Rys. 44)
Przystąpić do napełniania dopiero po wyłączeniu
silnika i wyjęciu wtyczki z gniazdka!
Aby zapewnić bezproblemowe działanie pompy
olejowej, należy regularnie czyścić rowek
doprowadzający olej w obudowie (3) oraz otwór
wlotowy w prowadnicy (4).
Uwaga:
Po wyłączeniu pilarki często z systemu zasilania,
prowadnicy i łańcucha przez jakiś czas spływają resztki
oleju - jest to zupełnie normalne zjawisko. Nie świadczy
ono o żadnej usterce!
Umieść narzędzie na płaskiej powierzchni.
Podłącz pilarkę do zasilania (Rys. 45)
OSTROŻNIE!
Przed podłączeniem pilarki do źródła zasilania
prądem elektrycznym zawsze się upewnij, czy
po wciśnięciu i zwolnieniu przycisku ON/OFF
(1) powraca on automatycznie do pozycji “off”
(wył.). Jeżeli tak się nie dzieje, pod żadnym
pozorem nie podłączaj pilarki do zasilania. Przed
przystąpieniem do użytkowania pilarki odnieś ją do
centrum serwisowego MAKITA w celu sprawdzenia
i ewentualnej naprawy.
Zamocuj przedłużacz oraz kabel zasilania pilarki w
uchwycie kablowym (2).
Włóż wtyczkę pilarki (3) do gniazda przedłużacza (4).
Włączanie silnika (Rys. 46)
- Podłącz pilarkę do zasilania (patrz wyżej).
- Podczas włączania elektrycznej pilarki
łańcuchowej należy ją zawsze trzymać oburącz.
Prawa ręka powinna spoczywać na tylnym uchwycie,
a lewa na uchwycie rurowym. Trzymać mocno
uchwyty w taki sposób, aby kciuki zwrócone były ku
palcom. Prowadnica i łańcuch nie powinny stykać się
z żadnym przedmiotem.
- Najpierw wciśnij przycisk blokady (5), a następnie
Page 51

przełącznik zasilania (1). Następnie zwolnij przycisk
blokady (5).
- Uwaga: Łańcuch tnący zacznie się natychmiast
poruszać. Trzymaj przełącznik zasilania wciśnięty
przez cały czas pracy silnika.
UWAGA:
Nigdy nie blokuj przełącznika zasilania w pozycji
“ON” (wł.).
Wyłączanie silnika
- Zwolnij przełącznik zasilania (1).
UWAGA:
Po uruchomieniu hamulca łańcucha silnik zostanie
odcięty od zasilania.
Jeżeli pilarka nie uruchamia się po wciśnięciu
przycisku ON/OFF (1), należy zwolnić hamulec
łańcucha.
- Ciągnij osłonę dłoni (6) ku sobie, dopóki nie
poczujesz, ze zaskoczyła. (Rys. 47)
Ważne:
Te modele wyposażone są w ogranicznik prądu
rozruchowego. Ten podzespół elektroniczny zapobiega
zbyt gwałtownemu uruchomieniu silnika elektrycznego.
Odcinanie zasilania w przypadku prądu
nadmiarowego: Gdy parametry prądu elektrycznego
przekraczają dopuszczalne wartości, silnik zostaje
automatycznie odcięty od zasilania. Zapobiega to
przegrzaniu silnika i ewentualnym uszkodzeniom. Aby
ponownie uruchomić pilarkę, zwolnij przycisk ON/OFF i
wciśnij go ponownie.
UWAGA: Nie używaj pilarki, jeżeli została
automatycznie odcięta od zasilania kilka razy pod rząd.
Skontantuj się z centrum serwisowym MAKITA.
Sprawdzanie hamulca łańcucha (Rys. 48)
Nie rozpoczynaj pracy z pilarką bez uprzedniego
sprawdzenia hamulca łańcucha!
- Uruchom silnik zgodnie z opisem (upewnij się, że
stoisz w stabilnej pozycji i umieść pilarkę na podłożu
tak, aby prowadnica z niczym się nie stykała).
- Złap mocno jedną ręką uchwyt rurowy, a drugą
przytrzymaj rękojeść.
- Gdy silnik będzie pracować ze średnią prędkością,
wciskaj osłonę ręki (1) w kierunku wskazywanym
przez strzałkę, dopóki hamulec łańcucha nie włączy
się. Łańcuch powinien się natychmiast zatrzymać.
- Natychmiast wyłącz silnik i zwolnij hamulec
łańcucha.
Ważne: Jeżeli łańcuch nie zatrzymuje się
natychmiast podczas tego testu, w żadnym
wypadku nie używaj pilarki! Zanieś pilarkę do
centrum serwisowego MAKITA.
Test hamulca bezwładnościowego (Rys. 49)
Nie rozpoczynaj pracy z pilarką bez uprzedniego
sprawdzenia hamulca bezwładnościowego!
- Uruchom silnik zgodnie z opisem (upewnij się, że
stoisz w stabilnej pozycji i umieść pilarkę na podłożu
tak, aby prowadnica z niczym się nie stykała).
- Złap mocno jedną ręką uchwyt rurowy, a drugą
przytrzymaj rękojeść.
- Wyłącz silnik i odsuń się. Łańcuch powinien się
całkowicie zatrzymać w ciągu dwóch sekund od
wyłączenia silnika.
Ważne: Jeżeli łańcuch nie zatrzymuje się w ciągu
dwóch sekund podczas tego testu, w żadnym
wypadku nie używaj pilarki! Sprawdź szczotki
węglowe.
Sprawdzanie smarowania łańcucha (Rys. 50)
Nigdy nie używaj pilarki, jeżeli nie jest zapewnione
odpowiednie smarowanie łańcucha. W przeciwnym
wypadku żywotność urządzenia tnącego ulegnie
znacznemu skróceniu. Przed przystąpieniem do
pracy należy sprawdzić poziom oleju w zbiorniku
oraz systemie rozprowadzającym olej. Sprawdź
ilość doprowadzanego oleju zgodnie z poniższymi
instrukcjami:
- Uruchom elektryczną pilarkę łańcuchową.
- Trzymaj uruchomioną pilarkę około 15 cm nad pniem
lub gruntem (używaj odpowiedniej powierzchni).
Jeżeli smarowanie jest wystarczające, zauważysz
niewielką ilość oleju spływającą z pilarki. Zwracaj
uwagę na kierunek wiatru i unikaj niepotrzebnego
wystawienia na działanie z rozpylonym olejem!
KONSERWACJA
Ostrzenie łańucha pilarki (Rys. 51)
Przed przystąpieniem do jakichkolwiek prac
w obrębie łańcucha zawsze zakładaj rękawice
ochronne i wyciągnij wtyczkę z gniazdka.
Łańcuch wymaga ostrzenia, gdy:
- Trociny powstające podczas cięcia wilgotnego
drewna wyglądają jak mączka drewniana.
- Łańcuch wchodzi w drewno tylko przy dużym nacisku.
- Krawędź tnąca jest w sposób wyraźny uszkodzona.
- Podczas cięcia drewna pilarka jest ciągnięta w
lewo lub w prawo. Jest to spowodowane przez
nierównomierne naostrzenie łańcucha lub jego
uszkodzeniem po jednej stronie.
Ważne: Łańcuch należy ostrzyć często, ale bez
usuwania nadmiernej ilości metalu!
Z reguły wystarczają 2-3 przejścia pilnika.
Po kilkukrotnym samodzielnym naostrzeniu łańcucha
należy zlecić jego kolejne naostrzenie centrum
serwisowemu.
Prawidłowe ostrzenie: (Rys. 52)
UWAGA:
Używaj tylko łańcuchów i prowadnic
przewidzianych dla tej pilarki.
- Wszystkie zęby tnące muszą mieć tę samą długość
(wymiar a). Zęby tnące o różnej długości spowodują
nierównomierną pracę łańcucha i mogą spowodować
pęknięcia w obrębie łańcucha.
- Minimalna długość zęba tnącego wynosi 3 mm
(0,11”). Nie ostrz ponownie łańcucha po osiągnięciu
minimalnej długości zębów tnących - na tym etapie
łańcuch mus zostać wymieniony.
- Głębokość cięcia określona jest przez różnicę
wysokości pomiędzy ogranicznikiem głębokości
(okrągły nosek) a krawędzią tnącą.
- Najlepsze rezultaty osiąga się, gdy głębokość
ogranicznika wynosi 0,64 mm (,025”).
UWAGA:
Nadmierna głębokość zwiększa ryzyko odrzutu!
(Rys. 53)
- Wszystkie zęby tnące muszą być ostrzone pod
tym samym kątem wynoszącym 30°. Różne kąty
powodują nierówną i nieregularną pracę łańcucha,
przyspieszają jego zużycie i mogą spowodować jego
przerwanie. (Rys. 54)
- Kąt nachylenia przedniego zębów tnących wynoszący
51
Page 52

85° jest wynikiem głębokości cięcia okrągłego pilnika.
Jeżeli odpowiedni pilnik jest używany w prawidłowy
sposób, prawidłowy kąt nachylenia przedniego
uzyskiwany jest automatycznie.
Pilniki - jak ich używać
- Do ostrzenia używaj specjalnego uchwytu pilnika
z okrągłym pilnikiem o średnicy 4,0 mm. Do tej
czynności nie nadają się zwykłe pilniki okrągłe.
- Pilnik powinien ciąć tylko wtedy, gdy jest popychany
do przodu (strzałka). Podczas prowadzenia pilnika do
tyłu należy go podnieść. (Rys. 55)
- Najpierw naostrz najkrótszy ząb tnący. Długość
tego zęba tnącego będzie punktem odniesienia dla
wszystkich pozostałych zębów tnących łańcucha.
- Zawsze prowadź pilnik tak, jak pokazano na rysunku.
- Uchwyt pilnika ułatwia jego prawidłowe prowadzenie.
Posiada on oznaczenie prawidłowego kąta ostrzenia 30° (podczas ostrzenia trzymaj oznaczenie w
pozycji równoległej względem łańcucha) i ogranicza
głębokość cięcia do 4/5 średnicy pilnika. (Rys. 56)
- Po naostrzeniu łańcucha wysokość ogranicznika
głębokości musi zostać sprawdzona za pomocą
głębokościomierza do łańcuchów.
- Skoryguj nawet najmniejsze różnice wysokości za
pomocą specjalnego pilnika płaskiego (1).
- Ponownie należy zaokrąglić przednią część
ogranicznika głębokości (2). (Rys. 57)
Czyszczenie prowadnicy, smarowanie osłony
koła łańcuchowego (Rys. 58)
UWAGA: Podczas wykonywania tej pracy musisz
nosić rękawice ochronne.
Regularnie sprawdzaj powierzchnie nośne prowadnicy
pod kątem uszkodzeń i czyść je za pomocą
odpowiedniego narzędzia.
Jeżeli pilarka jest używana intensywnie, konieczne
jest regularne smarowanie łożysk koła zębatego (raz
w tygodniu). W tym celu najpierw oczyść dokładnie
2-milimetrowy otwór w końcówce prowadnicy, po czym
wciśnij do niego niewielką ilość smaru uniwersalnego.
Smar uniwersalny oraz pistolet do smaru są dostępne
jako akcesoria.
Smar uniwersalny (kod produktu 944 360 000)
Smarownica tłokowa (kod produktu 944 350 000)
Wymiana łańcucha pilarki (Rys. 59)
UWAGA:
Używaj tylko łańcuchów i prowadnic
przewidzianych dla tej pilarki.
Przed zamontowaniem nowego łańcucha sprawdź koło
łańcuchowe (1).
UWAGA:
Zużyte koła łańcuchowe (2) mogą uszkodzić nowy
łańcuch, dlatego należy je wymienić.
Nie wolno próbować dokonywać wymiany tej części
samodzielnie. Wymiana koła łańcuchowego wymaga
specjalnego przeszkolenia i odpowiednich narzędzi,
dlatego może być przeprowadzana tylko w centrum
serwisowym MAKITA. (Rys. 60)
Kontrola i wymiana szczotek węglowych
(Rys. 61)
Ważne:
Regularnie sprawdzaj szczotki węglowe!
Wcięcie na szczotce wskazuje limit zużycia.
UWAGA:
Szczotka węglowa jest bardzo delikatna, dlatego
uważaj, aby jej nie upuścić. Podczas jej wyjmowania
zapamiętaj pozycję, w której była zainstalowana,
ponieważ każda szczotka jest uruchamiana przez
wirnik.
- Użyj śrubokrętu płaskiego do odkręcenia pokrywy (1),
a następnie wyjmij szczotkę (2).
- Jeżeli szczotka nie osiągnęła jeszcze limitu zużycia,
zamontuj ją ponownie w tej samej pozycji i przykręć
pokrywę (1).
- Uruchom na krótko pilarkę (na ok. 1 minutę), aby
sprawdzić, czy szczotki się obracają.
Ważne: Teraz przeprowadź test hamulca
bezwładnościowego. Jeżeli ła
całkowicie w ciągu dwóch sekund, włącz na krótko piłę
i powtarzaj test, dopóki hamulec nie zacznie działać
prawidłowo.
UWAGA: Po zainstalowaniu nowych szczotek
węglowych uruchom pilarkę na ok. 5 minut i ponownie
sprawdź działanie hamulca bezwładnościowego.
ńcuch nie zatrzymuje się
52
Page 53

Rozwiązywanie problemów
Wadliwe działanie System Objaw Przyczyna
Pilarka łańcuchowa nie
działa
niewystarczająca moc Szczotki węglowe niska siła pociągowa Zużyte szczotki węglowe
Nienasmarowany łańcuch Zbiornik/pompa oleju Brak oleju na łańcuchu Pusty zbiornik oleju,
Hamulec łańcucha Hamulec Łańcuch pilarki
Hamulec
bezwładnościowy
Instrukcje dotyczące konserwacji okresowej
Aby zapewnić długą żywotność pilarki, zapobiec jej uszkodzeniu i zapewnić prawidłowe działanie wszystkich
zabezpieczeń, należy regularnie wykonywać wymienione poniżej prace konserwacyjne. Roszczenia gwarancyjne
mogą być uznane tylko w przypadku, gdy takie prace są wykonywane regularnie i w prawidłowy sposób.
Niewykonywanie zalecanych prac konserwacyjnych może doprowadzić do wypadków!
Użytkownik pilarki łańcuchowej nie może wykonywać żadnych prac konserwacyjnych, które nie zostały opisane
w niniejszej instrukcji obsługi. Wszelkie takie prace mogą być wykonywane tylko przez centrum serwisowe firmy
MAKITA.
Działanie ogólne Elektryczna pilarka
Za każdym razem przed
uruchomieniem pilatki
Po każdym wyłączeniu Prowadnica Wyczyścić otwór wlotowy oleju.
Przechowywanie Zbiornik na olej do
Cały silnik elektryczny nie
działa
nie zatrzymuje się
natychmiastowo
brak zasilania,
uszkodzony kabel
uruchomiony hamulec
łańcucha
przepalony bezpiecznik
Zabrudzony rowek
rozprowadzający olej
Zużyta taśma hamulca
Hamulec Łańcuch nadal się porusza Zużyte szczotki węglowe
łańcuchowa
Plastikowa obudowa Sprawdzić pod kątem pęknięć i uszkodzeń. W
Łańcuch tnący Regularnie ostrzy
Prowadnica Obrócić po pewnym czasie, aby zapewnić równomierne
Koło łańcuchowe Zlecać regularną wymianę personelowi centrum
Hamulec łańcucha Zlecać regularną kontrolę personelowi centrum
Hamulec
bezwładnościowy
Łańcuch tnący Sprawdzać pod kątem uszkodzeń i konieczności
Regularnie czyścić elementy zewnętrzne.
przypadku uszkodzenia zlecić natychmiast naprawę
wykwalifikowanemu serwisantowi.
Wymieniać w odpowiednim czasie.
zużycie powierzchni nośnych.
Wymieniać w odpowiednim czasie.
ć.
serwisowego.
serwisowego.
Zlecać regularną kontrolę personelowi centrum
serwisowego.
naostrzenia.
Sprawdzać naprężenie łańcucha.
Prowadnica Sprawdzać pod kątem uszkodzeń i w razie potrzeby usuwać
Smarowanie łańcucha Sprawdzenie prawid
zadziory.
łowości działania.
Hamulec łańcucha Sprawdzenie prawidłowości działania.
Hamulec
bezwładnościowy
Sprawdzenie prawidłowości działania.
Przełącznik zasilania Sprawdzenie prawidłowości działania.
Kabel zasilania W przypadku uszkodzenia zlecić natychmiast wymianę
wykwalifikowanemu serwisantowi.
Korek wlewu oleju Sprawdzać pod kątem szczelnego dokręcenia.
Mechanizm nośny
łańcucha
smarowania łańcucha
Łańcuch/prowadnica Zdemontować, wyczyścić i lekko naoliwić.
Elektryczna pilarka
łańcuchowa
Czyścić, zwłaszcza rowek doprowadzający olej.
Opróżnić.
Wyczyścić rowek prowadnicy.
Przechowuj pilarkę łańcuchową w suchym miejscu. Po
długim okresie przechowywania zleć kontrolę pilarki
personelowi centrum serwisowego (pozostałości oleju
mogą przybrać postać żywicy i zatkać zawór pompy oleju).
53
Page 54

Serwis, części zamienne i gwarancja
Konserwacja i naprawy
Konserwacja i naprawa nowoczesnych silników elektrycznych i zabezpieczeń wymaga specjalistycznej wiedzy i
kwalifikacji, jak również warsztatu wyposażonego w specjalistyczne narzędzia i przyrządy do testowania.
Wszelkie prace nieopisane w niniejszej instrukcji obsługi mogą być wykonywane jedynie w centrum serwisowym
MAKITA.
Centra serwisowe MAKITA posiadają cały niezbędny sprzęt i zatrudniają wykwalifikowany, doświadczony personel,
który jest w stanie opracować optymalne rozwiązania i doradzić użytkownikowi we wszystkich kwestiach technicznych.
Naprawy przeprowadzane przez osoby trzecie lub nieupoważnione do tego spowodują unieważnienie wszystkich
praw gwarancyjnych.
Części zapasowe
Niezawodne i ciągłe działanie oraz bezpieczeństwo pilarki łańcuchowej zależą między innymi od jakości stosowanych
części zamiennych. Używaj tylko oryginalnych części zamiennych firmy MAKITA.
Tylko oryginalne części zamienne i akcesoria gwarantują najwyższą jakość materiałów, precyzję wymiarów, działanie i
bezpieczeństwo.
Oryginalne części zamienne i akcesoria są do nabycia w miejscowym sklepie. Sprzedawca posiada również listy
części zamiennych z numerami części i jest na bieżąco informowany o najnowszych udoskonaleniach i innowacyjnych
częściach zamiennych. Aby znaleźć lokalny punkt sprzedaży, odwiedź naszą stronę internetową:
www.makita-outdoor.com
Pamiętaj, że stosowanie części zamiennych innych niż MAKITA powoduje automatyczne unieważnienie gwarancji na
produkt MAKITA.
54
Page 55

ROMÂNĂ (Instrucţiuni originale)
Vă mulţumim că aţi avut încredere în produsul
nostru
Vă felicităm pentru noul dumneavoastră ferăstrău
electric cu lanţ MAKITA. Suntem convinşi că veţi fi
satisfăcut de această unealtă modernă.
Ferăstraiele electrice cu lanţ MAKITA sunt dotate cu
motoare robuste, de înaltă eficienţă, şi viteze rapide
ale lanţului ce permit o tăiere excelentă. Sunt dotate
cu dispozitive de siguranţă ultramoderne, sunt uşoare,
practice şi pot fi utilizate imediat în orice loc alimentat
cu curent electric.
Pentru a garanta funcţionarea optimă a ferăstrăului
electric cu lanţ şi siguranţa personală, vă rugăm să
respectaţi următoarele criterii:
Citiţi cu atenţie acest manual de instrucţiuni
înainte de a pune în funcţiune pentru prima oară
ul electric cu lanţ şi respectaţi cu stricteţe
ferăstră
reglementările privind siguranţa. În caz contrar,
operatorul şi/sau persoanele din apropiere se pot
accidenta grav.
Simboluri
Veţi observa următoarele simboluri pe ferăstrăul cu lanţ
şi în manualul de instrucţiuni:
Citiţi manualul de instrucţiuni
şi respectaţi avertizările şi
măsurile de siguranţă!
Atenţie şi grijă deosebită!
Direcţia de mers a lanţului
Izolare dublă de protecţie
..... mm
Purtaţi cască de protecţie,
protecţie pentru ochi şi urechi!
Scoateţi ştecherul din priză!
Scoateţi ştecherul din priză
în cazul în care cablul este
deteriorat!
Frână de lanţ eliberată
Frâna de lanţ acţionată
Recul!
Interzis!
Lungime de tăiere maximă
admisibilă
Purtaţi mănuşi de protecţie!
Protejaţi de umiditate!
Ulei pentru lanţ de ferăstrău
Primul ajutor
Reciclare
Marcaj CE
Gândiţi-vă la mediul
înconjurător! Aparatele electrice
nu se aruncă în gunoiul
menajer!
Dacă aparatul nu mai poate fi
folosit, informaţi-vă la centrul
local de colectare a deşeurilor în
legătură cu măsurile necesare
pentru eliminare.
Pentru a nu pune în pericol terţi prin
utilizarea aparatului defect, tăiaţi
cablul de alimentare foarte aproape
de carcasă.
ATENŢ IE! Înainte de a tăia
scoateţi ştecărul din priză.
Pericol de electrocutare!
55
Page 56

Inventar minim de livrare
1 2
4
5
3
1. Ferăstrău electric cu lanţ
2. Lamă de ghidare
3. Lanţ ferăstrău
4. Dispozitiv de descărcare a sarcinii pentru cablul
electric
5. Teacă de protecţie a lanţului
6. Manual de instrucţiuni (neprezentat)
În cazul în care una dintre piesele enumerate nu este
inclusă în ambalaj, vă rugăm să consultaţi imediat
agentul de vânzări.
Pentru ţări europene, doar
Declaraţie de conformitate CE
Noi, Makita Corporation, ca producător
responsabil, declarăm că următoarea(le)
unealtă(e) Makita:
Denumirea uneltei: Ferăstrău cu lanţ
Nr. model/Tip: UC3030A, UC3530A, UC4030A,
UC4530A, UC3530AP, UC4030AP
Specificaţii: consultaţi tabelul “DATE TEHNICE”.
sunt produse de serie şi
sunt în conformitate cu următoarele Directive
Europene:
2000/14/CE, 2006/42/CE
Şi sunt fabricate în conformitate cu următoarele
standarde sau documente standardizate:
EN60745
Certificat de examinare tip CE nr.
M6T 09 07 24243 100
M6T 09 07 24243 099
Examinarea tip CE per 98/37/EC şi 2006/42/EC a fost
efectuată de:
TÜV SÜD Product Service GmbH,
Ridlerstraße 65, 80339 MÜNCHEN, Germania
Nr. de identificare 0123
Documentaţia tehnică este în posesia reprezentantului
nostru autorizat în Europa care este:
Makita International Europe Ltd.,
Michigan, Drive, Tongwell,
Milton Keynes, Bucks MK15 8JD, Anglia
56
Procedura de evaluare a conformităţii prevăzută de
Directiva 2000/14/CE a fost în conformitate cu anexa V.
Nivel presiune fonică măsurată: 101,8 dB
Nivel presiune fonică garantată: 103 dB
2 iulie, 2009
Tomoyasu Kato
Director
Makita Corporation
3-11-8, Sumiyoshi-cho,
Anjo, Aichi, JAPAN
Scopul utilizării
Fierăstraie electrice
Acest ferăstrău electric poate fi folosit doar pentru
tăierea lemnului. Este conceput pentru folosirea
ocazională pentru lemne subţiri, pentru îngrijirea
copacilor fructiferi, doborârea copacilor, tăierea
crengilor şi ajustarea lungimilor de tăiere.
Persoanele care nu pot folosi ferăstrăul:
Acest ferăstrău nu poate fi folosit de persoanele care nu
cunosc acest manual de instrucţiuni, de copii, tineri sau
persoane sub influenţa alcoolului sau medicamentelor.
Avertizări privind siguranţa pentru lanţul
ferăstrăului:
familiarizării cu produsul (obţinute prin utilizare
repetată) să înlocuiască respectarea strictă a
normelor de securitate pentru ferăstrăul cu lanţ.
Dacă folosiţi aceasta maşină incorect sau fără
a respecta normele de securitate, puteţi suferi
vătămări corporale grave.
1. Ţineţi toate părţile corpului la distanţă de
ferăstrăul cu lanţ în timpul funcţionării lanţului.
Înainte de a porni lanţul ferăstrăului asiguraţivă că acesta nu atinge nimic. Un moment de
NU permiteţi comodităţii şi
Page 57

neatenţie în timp ce utilizaţi ferăstrăul cu lanţ
poate produce prinderea hainelor sau corpului
dumneavoastră cu lanţul ferăstrăului.
2. Ţineţi întotdeauna ferăstrăul cu lanţ cu mâna
dreaptă pe mânerul din spate şi cu mâna stângă
pe mânerul din faţă. Ţinerea ferăstrăului cu o
configuraţie inversată a mâinilor creşte riscul de
rănire corporală şi nu trebuie făcută niciodată.
3. Purtaţi viziera şi mijloace de protecţie a auzului.
Suplimentar este recomandat echipamentul de
protecţie pentru cap, mâini, labele picioarelor
şi picioare. Îmbrăcămintea adecvată de protecţie
va reduce riscul rănirii personale datorită resturilor
proiectate sau contactului accidental cu lanţul
ferăstră
ului.
4. Nu utilizaţi ferăstrăul cu lanţ în copac. Utilizarea
ferăstrăului cu lanţ sus în copac poate produce
vătămarea corporală.
5. Păstraţi întodeauna un sprijin adecvat pentru
picoare şi utilizaţi ferăstrăul cu lanţ doar
stând pe o suprafaţă fixă, sigură şi orizontală.
Suprafeţele alunecoase sau instabile cum ar fi
scările pot produce pierderea echilibrului sau a
controlului ferăstrăului cu lanţ.
6. Când tăiaţi o ramură care este tensionată aveţi
grijă la destinderea acesteia. Atunci când este
eliminată tensiunea din fibrele lemnului, ramura
arcuită poate lovi operatorul şi/sau produce
aruncarea ferăstrăului cu lanţ în afara controlului.
7. Fiţi extrem de precauţi atunci când tăiaţi tufişuri
sau pomi tineri. Materialul suplu poate prinde lanţul
ferăstrăului şi poate fi biciuit către dumneavoastră
sau vă poate trage şi dezechilibra.
8. Transportaţi ferăstrăul cu lanţ ţinând-ul de
mânerul din faţă, oprit şi la depărtare de corpul
dumneavoastră. Întotdeauna montaţi capacul
barei de ghidaj când transportaţi sau depozitaţi
ferăstrăul cu lanţ. Manipularea adecvată a
ferăstrăului cu lanţ va reduce probabilitatea
contactului accidental cu lanţul în mişcare al
ferăstrăului.
9. Respectaţi instrucţiunile pentru lubrifiere,
tensionarea lanţului şi schimbarea accesoriilor.
Lanţul tensionat sau lubrifiat necorespunzător se
poate rupe sau poate creşte posibilitatea producerii
unui recul.
10. Ţineţi mânerele uscate, curate şi fără ulei sau
vaselină. Mânerele unsuroase, uleioase sunt
alunecoase şi pot produce pierderea controlului.
11. Tăiaţi numai lemn. Nu folosiţi ferăstrăul cu lanţ
în alte scopuri decât cele pentru care a fost
destinat. De exemplu: nu utilizaţi ferăstrăul
cu lanţ pentru tăierea plasticului, zidăriei
sau materialelor de construcţie care nu sunt
lemnoase. Utilizarea ferăstrăului pentru operaţiuni
diferite faţă de cele pentru care a fost destinat poate
avea ca rezultat producerea unei situaţii periculoase.
12. Cauzele şi modul de prevenire al reculului:
Reculul poate apărea când nasul sau vârful barei de
ghidare atinge un obiect sau când lemnul se strânge
şi prinde lanţul ferăstrăului în tăietură. În unele
cazuri, contactul vârfului poate produce o reacţie
inversă neaşteptată, smucind bara de ghidare în sus
şi înapoi, pe direcţia operatorului.
Strangularea lanţului ferăstrăului de-a lungul părţii
superioare a barei de ghidare poate împinge brusc
bara de ghidare înapoi spre operator. Oricare dintre
aceste reacţii poate produce pierderea controlului
asupra ferăstrăului, ceea ce poate produce
vătămarea corporală gravă. Nu vă bazaţi exclusiv pe
dispozitivele de siguranţă încorporate în ferăstrău.
Ca utilizator de ferăstrău cu lanţ, trebuie să
parcurgeţi câteva etape pentru a meţine
activitatea de tăiere fără accidente sau răniri.
Reculul este rezultatul utilizării incorecte a maşinii
şi/sau al procedeelor sau condiţiilor de lucru
necorespunzătoare, putând fi evitat prin adoptarea
unor măsuri de precauţie adecvate prezentate în
continuare:
− Menţineţi o prindere fermă, cu degetul mare
şi degetele înconjurând mânerele ferăstrăului
cu lanţ, cu ambele mâini pe fierăstrău şi
poziţionaţi-vă corpul şi braţul astfel încât
să vă permită să rezistaţi la forţele de recul.
Forţele de recul pot fi controlate de către operator,
dacă sunt luate măsurile de precauţie adecvate.
Nu scăpaţi fierăstrăul cu lanţ.
− Nu vă întindeţi şi nu tăiaţi deasupra înălţimii
umărului. Aceasta vă va ajuta să preveniţi
contactul neintenţionat al vârfului şi va permite
un control mai bun al ferăstrăului cu lanţ în situaţii
neprevăzute.
− Pentru înlocuire, utilizaţi doar bare şi lanţuri
recomandate de producător.
Barele şi lanţurile de schimb incorecte pot produce
ruperea lanţului şi/sau reculul.
− Pentru ascuţirea şi întreţinerea ferăstrăului cu
lanţ, respectaţi instrucţiunile producătorului.
Scăderea înălţimii indicatorului de adâncime poate
conduce la recul mărit.
Măsuri de siguranţă
Măsuri generale de siguranţă (Fig. 1)
- Pentru a asigura operarea corectă, utilizatorul
trebuie să citească acest manual de instrucţiuni
pentru a se familiariza cu caracteristicile ferăstrăului
electric cu lanţ. Utilizatorii insuficient informaţi se
pun în pericol atât pe ei, cât şi pe alţii, din cauza
manevrării greşite a uneltei.
- Se recomandă să împrumutaţi ferăstrăul electric cu
lanţ doar persoanelor care au experienţă în folosirea
acestor tipuri de ferăstraie. Înmânaţi întotdeauna şi
manualul de instrucţiuni.
- Cei care folosesc unealta pentru prima oară trebuie
să solicite distribuitorului instrucţiunile de bază, pentru
a se familiariza cu tăierea cu o unealtă cu motor.
- Familiarizaţi-vă cu ferăstrăul electric cu lanţ tăind
buşteni pe o capră de tăiat lemne.
- Nu trebuie permisă folosirea ferăstrăului electric cu
ţ de către copii şi tineri sub 18 ani. Persoanele de
lan
peste 16 ani pot, totuşi, să utilizeze ferăstrăul cu lanţ
pentru a fi face practică doar sub supravegherea unui
instructor calificat.
- Folosiţi întotdeauna ferăstrăul electric cu lanţ cu cea
mai mare grijă şi atenţie.
- Manevraţi ferăstrăul electric cu lanţ numai când vă
aflaţi într-o stare fizică bună. Executaţi fiecare lucrare
cu calm şi cu atenţie. Utilizatorul trebuie să accepte
că are răspunderi faţă de cei din jur.
- Nu folosiţi niciodată ferăstrăul electric cu lanţ după ce
aţi băut alcool sau dacă aţi luat medicamente. (Fig. 2)
57
Page 58

Echipament personal de protecţie
- Pentru a evita leziunile la cap, ochi, mâini sau
picioare, precum şi pentru a vă proteja auzul, în
timpul folosirii ferăstrăului electric cu lanţ trebuie
purtat următorul echipament de protecţie.
- Îmbrăcămintea trebuie să fie corespunzătoare, pe
corp, dar fără să jeneze libertatea de mişcare. Nu
purtaţi bijuterii sau haine care se pot agăţa în tufişuri
sau lăstăriş.
- Casca de protecţie (1) trebuie verificată la intervale
regulate pentru depistarea deteriorărilor şi trebuie
înlocuită după cel mult 5 ani. Folosiţi doar căşti de
protecţie autorizate. Dacă aveţi părul lung, purtaţi o
plasă pentru păr. (Fig. 3)
- Masca de protecţie (2) a căştii (sau ochelarii de
ţie) vă protejează de rumeguş şi aşchii. În
protec
timpul folosirii ferăstrăului cu lanţ purtaţi întotdeauna
ochelari de protecţie sau o mască de protecţie, pentru
a preveni leziunile la nivelul ochilor.
- Purtaţi echipament adecvat de protecţie la
zgomot (apărătoare pentru urechi (3), dopuri de
urechi etc.). Analizor de octavă la cerere.
- Salopeta cu bretele şi şorţ pentru protecţie
(4) este confecţionată dintr-o ţesătură de nylon cu
22 de straturi şi protejează împotriva tăieturilor.
Vă recomandăm călduros utilizarea sa. Dacă nu
o folosiţi, purtaţi o pereche de pantaloni dintr-un
material rezistent în timpul utilizării ferăstrăului electric
cu lanţ. (Fig. 4)
- Mănuşile de protecţie (5) confecţionate din piele
groasă fac parte din echipamentul recomandat
şi trebuie purtate întotdeauna în timpul utilizării
ferăstrăului electric cu lanţ.
- În timpul folosirii ferăstrăului electric cu lanţ, trebuie
să purtaţi întotdeauna pantofi de siguranţă sau
bocanci (6) cu talpă antiderapantă, cu vârful acoperit
cu oţel şi protecţie pentru picior. Pantofii de siguranţă
echipaţi cu un strat protector oferă protecţie împotriva
tăieturilor şi asigură o stabilitate solidă.
Punere în funcţiune
- Nu folosiţi ferăstrăul electric cu lanţ când plouă sau în
condiţii de umezeală, pentru că motorul nu este etanş.
(Fig. 5)
- Dacă ferăstrăul electric cu lanţ este umed, nu trebuie
pornit.
- Evitaţi contactul fizic cu suprafeţele cu legătură la
pământ.
- Nu folosiţi ferăstrăul electric cu lanţ lângă gaze sau
prafuri inflamabile. Există riscul unei explozii.
- Trageţi întotdeauna cablul de alimentare în spatele
utilizatorului. Verificaţi să nu fie prins cablul sau să nu
fie tăiat de obiecte ascuţite. Aşezaţi cablul în aşa fel
încât să nu reprezinte un pericol pentru nimeni.
- Introduceţi ştecherul doar în prize sigure, instalate
corect. Aveţi grijă ca tensiunea prizei să corespundă
tensiunii de pe plăcuţa de fabricaţie. Siguranţă de
rezervă de 16 A. Dacă folosiţi ferăstrăul în exterior,
conectaţi-l la un întrerupător cu curent de defect cu un
curent de declanşare de maxim 30 mA.
- Fiţi atent la diametrul prelungitorului. Dacă folosiţi o
bobină, desfăşuraţi complet prelungitorul. Folosiţi
doar prelungitoare care corespund specificaţiilor de
la “Date tehnice”. Dacă folosiţi ferăstrăul în aer liber,
asiguraţi-vă că prelungitorul este conform unei astfel
de utilizări.
- Înainte de a începe lucrul, trebuie verificată
58
funcţionare bună şi în siguranţă a ferăstrăului
electric cu lanţ, conform recomandărilor.
Verificaţi în special funcţionarea frânei de lanţ,
montajul corect al lamei de ghidare, ascuţirea
şi întinderea corectă a lanţului, montarea fermă
a apărătorii roţii de lanţ, mişcarea uşoară a
întrerupătorului pornire/oprire, funcţionarea butonului
de blocare, starea mecanică bună a cablului şi
a ştecherului şi faptul că mânerele sunt curate şi
uscate.
- Puneţi ferăstrăul electric cu lanţ în funcţiune numai
dacă este complet asamblat. Nu folosiţi niciodată
ferăstrăul electric cu lanţ dacă acesta nu este complet
asamblat.
- Scoateţi unealta de reglare înainte de a porni
ferăstrăul.
- Toate protecţiile şi apărătoarele furnizate cu ferăstrăul
cu lanţ în timpul folosirii acestuia.
- Asiguraţi-vă că în zona de lucru nu se află copii sau
alte persoane. De asemenea, aveţi grij
ă să nu fie
animale în zona de lucru. (Fig. 6)
- Înainte de a porni ferăstrăul electric cu lanţ, asiguraţivă că aveţi o poziţie stabilă.
- Când porniţi ferăstrăul electric cu lanţ, ţineţi-l
întotdeauna cu ambele mâini. Prindeţi mânerul din
spate cu mâna dreaptă şi mânerul tubular cu mâna
stângă. Apucaţi mânerele bine, cu degetele mari în
faţa celorlalte degete. Lama şi lanţul nu trebuie să fie
orientate spre corpul dumneavoastră. (Fig. 7)
- Porniţi ferăstrăul doar conform instrucţiunilor din acest
manual. Nu supraîncărcaţi ferăstrăul. Va funcţiona
mai bine şi mai în siguranţă dacă îl folosiţi în limitele
capacităţilor sale de funcţionare.
- Opriţi imediat ferăstrăul electric cu lanţ dacă observaţi
vreo schimbare în modul de funcţionare.
ATENŢIE: La eliberarea întrerupătorului, lanţul
continuă să se învârtă o perioadă scurtă de timp
(învârtire liberă).
- Ţineţi cablul de alimentare departe de căldură, ulei
sau muchii ascuţite.
- Aşezaţi cablul în aşa fel încât să nu se prindă în
crengi sau alte obiecte, în timpul tăierii cu ferăstrăul.
- În cazul în care cablul se deteriorează sau este tăiat,
scoateţi imediat ştecherul din priză. (Fig. 8)
- Când unealta de tăiere se loveşte în pietre, cuie
sau alte obiecte dure, scoateţi ştecherul din priză şi
verificaţi imediat unealta de tăiere.
- Scoateţi ştecherul din priză înainte de a verifica
tensiunea lanţului, de a-l strânge, de a-l înlocui
sau de a remedia unele defecţiuni. (Fig. 9)
• defecţiune dispozitiv
• întreţinere
• realimentare cu ulei
• ascuţirea lanţului de ferăstrău
• oprire
• transport
• închidere
- Când întrerupeţi lucrul sau când lăsaţi deoparte
ferăstrăul electric cu lanţ, opriţi ferăstrăul şi scoateţi
ştecherul din priză. Puneţi ferăstrăul electric cu
lanţ într-un loc sigur pentru a evita riscul oricărei
accidentări.
- Înainte de a umple rezervorul de ulei, scoateţi
ştecherul din priză. Nu fumaţi şi nu aprindeţi focuri în
aer liber.
- Evitaţi contactul pielii şi al ochilor cu produse pe bază
de ulei mineral. Purtaţi întotdeauna mănuşi atunci
când umpleţi rezervorul de ulei.
Page 59

- Asiguraţi-vă că uleiul de lanţ nu pătrunde în sol
(pentru protecţia mediului înconjurător). Folosiţi o
bază potrivită.
- Dacă aţi stropit cu ulei, ştergeţi imediat ferăstrăul
electric cu lanţ.
Comportament de lucru/metodă de lucru
- Nu lucraţi singur. Trebuie să fie cineva în apropiere
în caz de urgenţă (la o distanţă de la care să puteţi fi
auzit).
- În timpul procedurilor de tăiere, ţineţi întotdeauna
ferăstrăul electric cu lanţ cu ambele mâini. În acest fel,
îl veţi putea manevra în siguranţă.
- Folosiţi ferăstrăul electric cu lanţ numai în perioadele
cu lumină şi vizibilitate bune. Fiţi atent la zonele
alunecoase sau umede, cu zăpadă şi gheaţă (pericol
de alunecare). Pericolul de alunecare este extrem de
ridicat când lucraţi pe lemn recent cojit (scoarţă).
- Nu lucraţi niciodată pe suprafeţe instabile. Asiguraţi-
vă că nu există obstacole în zona de lucru, pericol
de împiedicare. Asiguraţi-vă că aveţi întotdeauna o
poziţie stabilă.
- Nu tăiaţi niciodată deasupra nivelului umerilor.
- Nu tăiaţi niciodată în timp ce staţi pe o scară. (Fig.
10)
- Nu vă căţăraţi niciodată în copaci pentru a tăia cu
ferăstrăul electric cu lanţ.
- Nu vă aplecaţi niciodată mult înainte pentru tăiere.
- Ghidaţi ferăstrăul electric cu lanţ astfel încât
nicio parte a corpului dumneavoastră să nu fie în
prelungirea razei de tăiere a ferăstrăului. (Fig. 11)
- Utilizaţi ferăstrăul electric cu lanţ numai pentru tăierea
lemnului.
- Lanţul nu trebuie să atingă pământul în timpul
funcţionării uneltei. Dacă lemnele pe care le tăiaţi sunt
pe sol, întoarceţi lemnele înainte de a tăia până la
capăt, pentru a nu tăia în pământ.
- Curăţaţi de nisip, pietre, cuie, sârme etc. zona în care
veţi tăia cu ferăstrăul. Astfel de obiecte pot deteriora
lama şi pot provoca reculuri periculoase.
- Când tăiaţi cherestea pretăiată sau lemne subţiri,
utilizaţi un suport sigur (un buştean de gater, 12).
Când tăiaţi cherestea pretăiată sau lemne subţiri,
utilizaţi un suport sigur (o capră de tăiat lemne,
12). Nu tăiaţi stive de lemne! Nu lăsaţi pe nimeni
să ţină cheresteaua nemişcată şi nici nu faceţi
dumneavoastră acest lucru cu piciorul!
- Fixaţi bine lemnele rotunde.
- Dacă lucraţi în pantă, staţi întotdeauna cu faţa spre
pantă.
- Pentru a efectua tăieri transversale, trebuie să
fixaţi lemnul pe care doriţi să-l tăiaţi cu bordura
dinţată. (Z, Fig. 12)
- Înainte de a efectua o tăietură transversală, sprijiniţi
ferm bordura dinţată de lemn şi abia apoi puteţi tăia
lemnul cu lanţul pornit. Pentru aceasta, ferăstrăul
electric cu lanţ este ridicat de la mânerul din spate
şi direcţionat cu mânerul tubular. Bordura dinţată
serveşte ca centru de rotaţie. Continuaţi apăsând
uşor mânerul tubular în jos şi trăgând simultan înapoi
ferăstrăul electric cu lanţ. Sprijiniţi şi mai adânc
bordura dinţată şi ridicaţi din nou mânerul din spate.
- Dispozitivul de tăiere trebuie să fie pornit de câte ori
îndepărtaţi ferăstrăul electric cu lanţ de pe cherestea.
- Dacă efectuaţi mai multe tăieri, opriţi ferăstrăul
electric cu lanţ în intervalul dintre ele.
- Când buşteanul trebuie străpuns pentru tăiere
sau trebuie efectuate tăieri longitudinale, se
recomandă cu tărie ca acestea să fie efectuate
numai de un personal special instruit (pericol
mare de recul).
- Pentru a efectua tăieri longitudinale (Fig. 13)
poziţionaţi dispozitivul de tăiere într-un unghi cât mai
mic posibil. Aveţi grijă când efectuaţi astfel de lucrări,
pentru că nu puteţi folosi bordura dinţată.
- Când tăiaţi cu muchia de jos a lamei de ghidare,
ferăstrăul electric cu lanţ trebuie împins în direcţia
utilizatorului dacă se prinde lanţul. Din acest motiv,
utilizaţi muchia superioară a lamei ori de câte ori este
posibil. Ferăstrăul electric cu lanţ va fi atunci împins
înspre exterior. (Fig. 14)
- Dacă buşteanul se află în tensiune (Fig. 15), tăiaţi
mai întâi partea tensionată (A). Apoi puteţi efectua
tăierea transversală pe partea detensionată (B).
Evitaţi astfel blocarea lamei.
- Fiţi atent când tăiaţi lemne care se despică uşor. Pot
sări bucăţi de lemn tăiat (pericol de leziuni).
- Nu folosiţi niciodată ferăstrăul electric cu lanţ pentru
ridicarea sau îndepărtarea bucăţilor de lemn sau a
altor obiecte.
- Când cepuiţi, sprijiniţi ferăstrăul electric cu lanţ de
trunchi (pericol de recul).
- Lucrările de cepuire trebuie efectuate de un
personal calificat. Pericol mare de leziuni.
- Fiţi atent la crengile în tensiune. Nu tăiaţi crengile
libere de dedesubt.
- Nu efectuaţi niciodată cepuiri în timp ce staţi pe
trunchi.
- Nu folosiţi ferăstrăul electric cu lanţ pentru
lucrări forestiere, de exemplu pentru doborârea
copacilor sau pentru lucrări de cepuire în pădure.
Mobilitatea şi siguranţa necesare utilizatorului nu
sunt garantate datorită conectării prin cablu.
ATENŢIE:
Nu doborâţi şi nici nu defrişaţi copaci dacă
nu aveţi o pregătire specială! Există pericolul
unor accidentări grave! Aveţi grijă să respectaţi
reglementările locale.
- Înainte de a doborî un copac, asiguraţi-vă că
a) în zona de lucru se află numai persoanele
implicate în tăierea copacului
b) toate persoanele implicate în doborârea copacului
au un spaţiu liber de retragere (panta de fugă
trebuie să fie la un unghi de 45° în diagonală
în spatele direcţiei de cădere). Pericol mare de
împiedicare în cablurile electrice!
c) baza trunchiului nu este obstrucţionată de obiecte
străine, tufişuri şi crengi. Asiguraţi-vă că aveţi o
poziţie stabilă (pericol de împiedicare).
d) următorul loc de lucru este la o distanţă de
cel puţin 2 ori şi jumătate lungimea copacului.
(Fig. 16) Înainte de a doborî copacul, verificaţi
direcţia de cădere şi asiguraţi-vă că pe o distanţă
de 2 ori şi jumătate lungimea copacului nu există
persoane sau obiecte. (Fig. 16)
= Direcţie de cădere
=
Zonă periculoasă
= Cale de retragere
- Evaluarea copacului:
Direcţia de înclinare - crengi rupte sau uscate -
înălţimea copacului - înclinare naturală - copacul este
putred?
- Luaţi în calcul direcţia şi viteza vântului. Dacă vântul
suflă în rafale, nu efectuaţi lucrări de tăiere.
59
Page 60

- Tăierea rădăcinilor:
Începeţi cu rădăcinile cele mai groase. Efectuaţi întâi
tăietura verticală şi apoi pe cea orizontală.
- Tăierea tapei (A, Fig. 17):
Tapa determină direcţia de cădere şi ghidează
copacul. Trunchiul este crestat perpendicular pe
direcţia de cădere şi crestătura are o adâncime de
1/3 - 1/5 din diametrul trunchiului. Efectuaţi tăietura
aproape de sol.
- La corectarea tăieturii, faceţi întotdeauna acest lucru
pe întreaga lăţime a tapei.
- Doborâţi copacul (B, Fig. 18) tăind deasupra fundului
tapei (D). Tăietura trebuie să fie perfect orizontală.
Lăsaţi netăiată linia de rupere aflată la o distanţă de
fundul tapei de aprox. 1/10 din diametrul trunchiului.
- Linia de rupere (C) serveşte ca punct de legătură.
iaţi complet, altfel copacul va cădea în mod
N-o tă
necontrolat. Introduceţi la timp o pană în tăietură. (B,
Fig. 18)
- Asiguraţi tăietura numai cu pene din plastic sau
aluminiu. Nu folosiţi pene din fier.
- La doborârea unui copac, staţi întotdeauna în lateralul
copacului în cădere.
- Când vă retrageţi după efectuarea tăieturii, fiţi atent la
crengile în cădere.
- Când lucraţi pe teren înclinat, cel care foloseşte
ferăstrăul electric cu lanţ trebuie să stea deasupra sau
în lateralul trunchiului ce urmează a fi doborât sau a
copacului deja tăiat.
- Fiţi atent la trunchiurile ce se pot rostogoli spre
dumneavoastră.
Recul
- Când lucraţi cu ferăstrăul electric cu lanţ, pot apărea
reculuri periculoase.
- Reculurile se produc când vârful lamei (în special
partea din faţă) vine brusc în contact cu lemnul sau cu
alte obiecte solide. (Fig. 19)
- În acest caz, ferăstrăul electric cu lanţ este aruncat în
mod necontrolat şi cu un potenţial mare de energie în
direcţia utilizatorului (pericol de accidentare).
Pentru a preveni reculurile, respectaţi regulile
indicate:
- Nu începeţi să tăiaţi cu vârful lamei de ghidare. Ţineţi
mereu sub observaţie capătul lamei de ghidare.
- Nu folosiţi niciodată vârful lamei de ghidare pentru
tăiere. Aveţi grijă când continuaţi să tăiaţi.
- Când începeţi să tăiaţi cu ferăstrăul, lanţul trebuie să
fie deja în mişcare.
- Asiguraţi-vă că lanţul este întotdeauna corect ascuţit.
Fiţi foarte atent la înălţimea limitatorului de adâncime
(pentru informaţii detaliate, consultaţi cap. “Ascuţirea
lanţului de ferăstrău”).
- Nu tăiaţi niciodată mai multe ramuri în acelaşi timp.
Când tăiaţi o ramură, asiguraţi-vă că nu sunt atinse şi
alte ramuri.
- Când tăiaţi transversal un trunchi, fiţi atent la
trunchiurile din jurul său. Se recomandă să folosiţi o
capră de tăiat lemne.
Transport şi depozitare
- Căraţi ferăstrăul cu lanţ de mânerul tubular. Lama
ferăstrăului trebuie orientată înspre spate. Nu duceţi
şi nu transportaţi niciodată ferăstrăul electric cu
lanţul în funcţiune.
- Nu transportaţi niciodată ferăstrăul ţinându-l de cablu.
60
Nu scoateţi ştecherul din priză trăgând de cablu.
- Când vă modificaţi poziţia în timpul lucrului, opriţi
ferăstrăul electric cu lanţ şi acţionaţi frâna de lanţ
pentru a preveni o pornire accidentală a lanţului.
- Când transportaţi ferăstrăul electric cu lanţ pe distanţe
lungi, scoateţi ştecherul
protecţie inclusă la livrare. (Fig. 20)
- Asiguraţi o poziţie sigură a ferăstrăului electric cu
lanţ în timpul transportului cu maşina pentru a evita
scurgerile de ulei.
- Depozitaţi ferăstrăul electric cu lanţ într-un loc sigur,
uscat, ce poate fi încuiat, şi la care nu au acces copiii.
Nu trebuie depozitat în aer liber.
- Pentru a depozita ferăstrăul electric cu lanţ o perioadă
mai lungă de timp sau pentru a-l expedia, rezervorul
de ulei trebuie golit complet.
- Folosiţi doar canistre omologate pentru transportarea
şi depozitarea uleiului de lanţ.
Întreţinere
- Pentru a efectua lucrări de întreţinere, opriţi
ferăstrăul electric cu lanţ, scoateţi ştecherul şi
asiguraţi-l. (Fig. 21)
- Înainte de a începe lucrul, verificaţi funcţionarea în
siguranţă a ferăstrăului, în special a frânei de lanţ
frânei inerţiale. Asiguraţi-vă că lanţul este întotdeauna
corect ascuţit şi întins. (Fig. 22)
- Verificaţi periodic frâna de lanţ şi frâna inerţială
(consultaţi “Frână de lanţ, frână inerţială”).
- Verificaţi regulat starea în care se află izolaţia cablului
de alimentare.
- Curăţaţi în mod regulat ferăstrăul electric cu lanţ.
- În cazul deteriorării carcasei de plastic, duceţi-o
imediat la reparat la o persoană calificată.
- Verificaţi regulat dacă este bine închis capacul
rezervorului.
- Nu folosiţi ferăstrăul dacă întrerupătorul PORNIRE/
OPRIRE este defect. Unealta trebuie reparată de
către o persoană calificată.
Respectaţi normele de prevenire a accidentelor
prevăzute de asociaţiile profesionale şi de
companiile de asigurări.
Nu efectuaţi niciun fel de modificări la ferăstrăul
electric cu lanţ. Vă puteţi pune siguranţa
personală în pericol.
Efectuaţi numai lucrările de întreţinere şi reparaţie
descrise în manualul de instrucţiuni. Orice alte lucrări
trebuie executate la un atelier de service MAKITA.
(Fig. 23)
Utilizaţi numai piese de schimb şi accesorii MAKITA.
Dacă montaţi piese de schimb sau accesorii
neomologate MAKITA şi combinaţii sau lungimi
diverse de lame/lanţuri, există pericolul mare de
accidentări. Nu ne asumăm răspunderea pentru
accidentele şi pagubele rezultate din utilizarea
dispozitivelor de tăiere sau a accesoriilor care nu au
fost omologate.
şi protejaţi lama cu teaca de
şi a
Primul ajutor (Fig. 24)
În eventualitatea unui accident, asiguraţi-vă că aveţi
întotdeauna la îndemână o trusă de prim ajutor. Înlocuiţi
imediat orice articole folosite din trusa de prim ajutor.
Când solicitaţi ajutor, oferiţi următoarele informaţii:
- locul accidentului
- ce s-a întâmplat
- numărul de persoane rănite
- tipul leziunilor
- numele dumneavoastră.
Page 61

NOTĂ
Persoanele cu probleme circulatorii care sunt expuse
la vibraţii intense pot suferi leziuni ale vaselor sanguine
sau ale sistemului nervos.
Vibraţiile pot provoca următoarele simptome la
nivelul degetelor, mâinilor sau articulaţiilor mâinilor:
“Amorţeală” (insensibilitate), furnicături, durere,
înţepături, modificarea culorii sau a texturii pielii. Dacă
apare oricare dintre aceste simptome, consultaţi
un medic!
61
Page 62

Date tehnice
UC3030A UC3530A / AP UC4030A / AP UC4530A
Tip lanţ 092
Diviziuni de lanţ inch 3/8”
Lungimea debitabilă cm 30 35 40 45
Viteză max. lanţ m/s 13,3
Nivel putere fonicăl L
conf. EN 60745
Nivel presiune fonică L
la punct de lucru conf.
EN 60745
WA av
pA av
dB (A) 101,8
dB (A) 90,8
Eroare de măsurare dB (A) K=0,73
Acceleraţie vibraţii
conf. EN 60745
a
h,w av
- Mâner tubular m/s
- Mâner spate m/s
Eroare de măsurare m/s
2
2
2
4,7
5,6
K=1,5
Pompă de ulei automată
Capacitate rezervor ulei ml 140
Transmisie de forţă directă
Protecţie suprasarcină electrică
Frână de lanţ acţionată manual
Frână inerţială electrică
Greutate
(Greutate conform Procedurii
EPTA-01/2003)
kg 5,0 5,1 5,2 5,3
Izolaţie de protecţie Cl. II (izolaţie dublă de protecţie)
Cablu prelungitor
(neinclus)
Datorită programului nostru continuu de cercetare şi dezvoltare, specificaţiile din prezentul document pot fi
•
DIN 57282/ HO 7RN-F
L= 30 m max., 3x1,5 mm
2
modificate fără o notificare prealabilă.
Specificaţiile pot diferi în funcţie de ţară.
•
Nivelul de vibraţii declarat a fost măsurat în conformitate cu metoda de test standard şi poate fi utilizat pentru
•
compararea unei unelte cu alta.
Nivelul de vibraţii declarat poate fi, de asemenea, utilizat într-o evaluare preliminară a expunerii.
•
AVERTISMENT:
Nivelul de vibraţii în timpul utilizării reale a uneltei electrice poate diferi de valoarea nivelului declarat, în funcţie de
•
modul în care unealta este utilizată.
Asiguraţi-vă că identificaţi măsurile de siguranţă pentru a proteja operatorul, acestea fiind bazate pe o estimare a
•
expunerii în condiţii reale de utilizare (luând în considerare toate părţile ciclului de operare, precum timpii în care
unealta a fost oprită, sau a funcţionat în gol, pe lângă timpul de declanşare).
62
Page 63

Denumirea componentelor
1
2
3
67
1 Mâner tubular
2 Apărătoare mâner (declanşare frână de lanţ)
3 Opritor cu gheară
4 Întinzător rapid de pe apărătoarea roţii de lanţ
5 Apărătoare roată de lanţ, frână de lanţ
6 Capac perie de cărbune
7 Apărătoare mâner spate
8 Lamă de ghidare
9 Capac rezervor de ulei
10 Plăcuţă de fabricaţie
11 Buton de blocare
12 Mâner spate
13 Întrerupător pornire/oprire
14 Vizor pentru nivelul uleiului
15 Lanţ ferăstrău
16 Dispozitiv de descărcare a sarcinii
pentru cablul electric
45
8 9 10 11 12
13141516
63
Page 64

PUNEREA ÎN FUNCŢIUNE (Fig. 25)
ATENŢIE:
Când executaţi lucrări la lama de ghidare sau la
lanţ, purtaţi întotdeauna mănuşi de protecţie şi
scoateţi ştecherul din priză.
ATENŢIE:
Porniţi ferăstrăul electric cu lanţ doar după ce l-aţi
montat complet şi l-aţi verificat!
Montarea lamei de ghidare şi a lanţului
(Fig. 26)
Puneţi ferăstrăul electric cu lanţ pe o suprafaţă stabilă şi
efectuaţi următoarele proceduri pentru montarea lamei
de ghidare şi a lanţului:
Desfaceţi frâna de lanţ. Pentru acest lucru, trageţi de
apărătoarea mânerului (1) în direcţia săgeţii.
Deschideţi întinzătorul rapid de pe apărătoarea roţii de
lanţ (2). (Fig. 31)
Apăsaţi cu putere întinzătorul rapid de pe apărătoarea
roţii de lanţ contra arcurilor şi răsuciţi-l încet în sens
antiorar până ce simţiţi că s-a angrenat. Continuaţi să
apăsaţ
i şi răsuciţi-l la maxim în sens antiorar.
Eliberaţi întinzătorul de pe apărătoarea roţii de lanţ
(detensionaţi) şi acum răsuciţi-l în sens orar în poziţia
originală. Repetaţi această procedură până ce
deşurubaţi apărătoarea roţii de lanţ (3).
Ridicaţi uşor în sus apărătoarea roţii de lanţ (3),
desfaceţi fitingurile din spate (4) şi scoateţi-o.
Poziţionaţi lama de ghidare (7) şi apăsaţi-o pe roata de
lanţ (6). (Fig. 27)
Poziţionaţi lanţul ferăstrăului (9) pe roata de lanţ (6). Cu
mâna dreaptă, ghidaţi lanţul în canalul de ghidare (8)
din partea de sus a lamei de ghidare. (Fig. 28)
Marginile tăietoare ale lanţului de pe partea
superioară a lamei de ghidare trebuie orientate în
direcţia săgeţii!
Cu mâna stângă, apăsaţi uşor lama de ghidare pe
suportul de pe carcasă şi conduceţi lanţul (9) în jurul
vârfului roţii de lanţ (10) de pe lama de ghidare. Trageţi
simultan lanţul ferăstrăului uşor în direcţia săgeţii.
(Fig. 29)
Aliniaţi orificiul din apărătoarea roţii de lanţ cu bolţul
filetat (11).
Rotiţi şurubul de întindere a lanţului (Fig. 32/14) pentru
a alinia bolţul de întindere (12) cu orificiul din lama de
ghidare. (Fig. 30)
Apăsaţi mai întâi apărătoarea roţii de lanţ (3) în
suport (13) şi apoi împingeţi-o în bolţul de întindere
(Fig. 30/11). (Fig. 31)
Întinderea lanţului de ferăstrău (Fig. 32)
Apăsaţi ferm şi răsuciţi simultan întinzătorul rapid (2, în
sens orar) pentru a înşuruba apărătoarea roţii de lanţ
(3), dar încă nu strângeţi bine.
Ridicaţi uşor vârful lamei de ghidare şi răsuciţi
întinzătorul de lanţ (14) în sens orar, până ce lanţul este
angrenat în canalul de ghidare de pe partea inferioară a
lamei de ghidare (vezi cercul).
Apăsaţi din nou întinzătorul rapid de pe apărătoarea
64
roţii de lanţ (2) şi strângeţi-l în sens orar.
Eliberaţi întinzătorul rapid de pe apărătoarea roţii de
lanţ (2) (detensionare) până când se roteşte liber, apoi
ţi-l conform imaginii. (Fig. 33)
închide
Verificarea întinderii lanţului (Fig. 34)
Lanţul este întins corect atunci când rămâne lipit de
partea inferioară a lamei de ghidare şi poate fi tras uşor
cu mâna în sus aproximativ 2-4 mm.
Verificaţi frecvent întinderea lanţului - lanţurile noi au
tendinţa să se lungească în timpul folosirii!
Când verificaţi întinderea lanţului, motorul trebuie să
fie oprit şi ştecherul scos din priză. Dacă lanţul este
prea slăbit: Slăbiţi întinzătorul rapid de pe apărătoarea
roţii de lanţ efectuând un sfert de rotaţie. Întindeţi lanţul
conform descrierii de la capitolul “Întinderea lanţului.”
SUGESTIE:
Folosiţi alternativ 2 sau 3 lanţuri pentru ca lanţurile,
suprafeţele roţii de lanţ şi ale lamei de ghidare să se
uzeze uniform.
Pentru a garanta o uzură uniformă a canalului de
ghidare a lamei, lama trebuie întoarsă la fiecare
înlocuire a lanţului.
Frâna de lanţ (Fig. 35)
Aceste modele sunt echipate standard cu o frână de
lanţ. Dacă are loc un recul în urma impactului vârfului
lamei de ghidare cu lemnul (consultaţi MĂSURI DE
SIGURANŢĂ), frâna de lanţ va fi declanşată de dosul
palmei care va lovi apărătoarea mânerului.
Lanţul se va opri într-o fracţiune de secundă.
Frână inerţială
Ferăstrăul electric cu lanţ este dotat standard cu o frână
inerţială.
Frâna inerţială asigură oprirea imediată a uneltei când
întrerupătorul PORNIRE/OPRIRE nu mai este apăsat,
evitând astfel ca lanţul să continue să funcţioneze şi să
reprezinte un pericol.
Testarea frânei inerţiale este prezentată ulterior.
Întreţinerea lanţului şi a frânei inerţiale
(Fig. 36)
Sistemele de frânare reprezintă dispozitive de
siguranţă foarte importante şi, ca orice alte piese,
sunt supuse uzurii. Verificarea şi întreţinerea
periodică sunt importante pentru siguranţa
dumneavoastră şi pot fi efectuate corespunzător
doar la un atelier de service MAKITA.
Acţionarea frânei de lanţ (frânare) (Fig. 37)
Apăsaţi apărătoarea mânerului cu mâna stângă (1) spre
vârful lamei de ghidare (săgeata 2).
Eliberarea frânei de lanţ
Trageţi apărătoarea mânerului (1) spre dumneavoastră
(săgeata 3) până simţiţi că s-a fixat. În acest moment
frâna este eliberată.
Notă:
Când este acţionată frâna de lanţ, alimentarea cu curent
a motorului este întreruptă. Testarea frânei de lanţ este
prezentată ulterior.
Page 65

Ulei de lanţ (Fig. 38)
Folosiţi un ulei special cu adaos adeziv pentru a unge
lanţul şi lama ferăstrăului. Adaosul adeziv are rolul de a
păstra mai mult timp uleiul pe unealta de tăiere.
Nu folosiţi uleiuri minerale. Se recomandă folosirea unui
ulei biodegradabil pentru a proteja mediul înconjurător.
Uleiul de lanţ vândut de MAKITA, numit BIOTOP, este
fabricat din uleiuri speciale vegetale care sunt 100%
biodegradabile. BIOTOP a fost numit “îngerul albastru”
datorită faptului că nu este dăunător mediului (RAL UZ
48).
Uleiul BIOTOP este disponibil în următoarele cantităţi
variabile, în funcţie de cerinţele individuale:
1 litru număr de serie 980 008 610
5 litri număr de serie 980 008 611
Uleiul biodegradabil este stabil numai o perioadă
limitată de timp. Acesta trebuie folosit în interval de 2
ani de la data fabricaţiei (tipărită pe recipient). (Fig. 39)
Notă importantă privind uleiurile de lanţ
biodegradabile:
Dacă nu intenţionaţi să folosiţi ferăstrăul o perioadă
mai lungă de timp, goliţi rezervorul de ulei şi puneţi în
acesta o cantitate mică de ulei de motor obişnuit (SAE
30), apoi puneţi în funcţiune ferăstrăul câtva timp. Acest
lucru este necesar pentru a clăti tot uleiul biodegradabil
rămas în rezervorul de ulei, în sistemul de alimentare
cu ulei, pe lanţ şi pe lama de ghidare, deoarece multe
astfel de uleiuri au tendinţa de a lăsa reziduuri lipicioase
în timp, ce pot deteriora pompa de ulei sau alte piese.
Data viitoare când folosiţi ferăstrăul cu lanţ, umpleţi
din nou rezervorul cu ulei de lanţ BIOTOP. În cazul
deteriorărilor cauzate de folosirea unui ulei uzat sau
a unui ulei de lanţ nepotrivit, garanţia produsului va
deveni nulă.
Agentul de vânzări din zona dumneavoastră vă va
informa despre utilizarea uleiului de lanţ.
Nu folosiţi niciodată ulei uzat (Fig. 40)
Uleiul uzat este foarte periculos pentru mediul
înconjurător.
Uleiul uzat conţine cantităţi mari de substanţe
cancerigene.
Reziduurile din uleiul uzat produc un grad mare
de uzură şi de deteriorare a pompei de ulei şi a
dispozitivului de tăiere.
În cazul deteriorărilor cauzate de folosirea unui ulei uzat
sau a unui ulei de lanţ nepotrivit, garanţia produsului va
deveni nulă.
Agentul de vânzări din zona dumneavoastră vă va
informa despre utilizarea uleiului de lanţ.
Evitaţi contactul cu pielea şi cu ochii (Fig. 41)
Produsele petroliere şi uleiurile duc la degresarea pielii.
Dacă pielea dumneavoastră vine în contact cu aceste
substanţe în mod repetat şi pentru o perioadă lungă de
timp, se va deshidrata. Pot apărea diferite boli de piele.
În plus, se cunosc şi anumite reacţii alergice.
Ochii pot fi iritaţi de contactul cu uleiul. Dacă vă intră
ulei în ochi, spălaţi-vă imediat cu apă rece. Dacă ochii
continuă să fie iritaţi, consultaţi un doctor.
Umplerea rezervorului de ulei (Fig. 42)
Doar când motorul este oprit şi ştecherul scos din
priză!
- Ştergeţi bine rezervorul de ulei în jurul capacului
pentru a evita pătrunderea mizeriei în rezervor.
- Desfaceţi capacul rezervorului (1) şi adăugaţi ulei
până la marginea inferioară a gurii de umplere.
- Strângeţi bine capacul rezervorului.
- Ştergeţi eventualele urme de ulei scurse.
Important! (Fig. 43)
Înainte de a pune ferăstrăul în funcţiune pentru prima
oară, sistemul de alimentare cu ulei trebuie să fie
complet plin, până ce uleiul de lanţ unge lanţul şi lama
de ghidare.
Această procedură poate dura până la două minute.
- Puteţi controla nivelul uleiului prin vizor (2).
Pentru a asigura o ungere optimă a lanţului ferăstrăului,
trebuie să fie întotdeauna suficient ulei în rezervor.
Ungerea lanţului (Fig. 44)
Doar când motorul este oprit şi ştecherul scos din
priză!
Pentru o bună funcţionare a pompei de ulei, canalul de
ghidare al uleiului (3), cât şi orificiul de ungere din lama
de ghidare (4) trebuie curăţate periodic.
Notă:
După ce ferăstrăul a fost oprit, este normal ca uleiul de
lanţ rezidual să se prelingă câtva timp din sistemul de
alimentare cu ulei, de pe lama de ghidare şi de pe lanţ.
Acest lucru nu reprezintă un defect!
Aşezaţi ferăstrăul pe o suprafaţă corespunzătoare.
Introduceţi ştecherul în priză (Fig. 45)
ATENŢIE!
Înainte de a conecta ferăstrăul la o sursă de
curent, verificaţi întotdeauna dacă întrerupătorul
PORNIRE/OPRIRE (1) revine pe poziţia de “oprire”
după ce l-aţi apăsat şi l-aţi eliberat. Dacă nu revine,
nu conectaţi sub nicio formă ferăstrăul la o sursă
de curent - nu introduceţi ștecherul în priză. Duceţi
ferăstrăul la un atelier de service MAKITA înainte
de a-l folosi.
Prindeţi prelungitorul şi cablul de alimentare al
ferăstrăului în dispozitivul de descărcare a sarcinii (2).
Introduceţi ştecherul (3) ferăstrăului în priza
prelungitorului (4).
Pornirea motorului (Fig. 46)
- Cuplaţi ferăstrăul (a se vedea mai sus).
- Când porniţi ferăstrăul electric cu lanţ, ţineţi-l
întotdeauna cu ambele mâini. Prindeţi mânerul din
spate cu mâna dreaptă şi mânerul tubular cu mâna
stângă. Apucaţi mânerele bine, cu degetele mari în
faţa celorlalte degete. Lama şi lanţul nu trebuie să fie
în contact cu niciun obiect.
- Întâi apăsaţi butonul de blocare (5) apoi întrerupătorul
de pornire/oprire (1). Apoi decuplaţi butonul de
blocare (5).
- Atenţie: Lanţul porneşte imediat. Ţineţi
întrerupătorul pornire/oprire apăsat atâta timp cât
funcţionează motorul.
ATENŢIE:
Nu blocaţi niciodată întrerupătorul pornire/oprire
pe poziţia PORNIRE.
65
Page 66

Oprirea motorului
- Eliberaţi întrerupătorul pornire/oprire (1).
NOTĂ:
Când este acţionată frâna de lanţ, alimentarea cu
curent a motorului este întreruptă.
Dacă ferăstrăul nu porneşte când este acţionat
întrerupătorul PORNIRE/OPRIRE (1), este necesar
să slăbiţi frâna de lanţ.
- Trageţi ferm apărătoarea mânerului (6) în direcţia
săgeţii până simţiţi că este angrenată. (Fig. 47)
Important:
Aceste modele sunt dotate cu un limitator de curent
iniţial. Această componentă electronică previne
pornirea bruscă a motorului electric.
Protecţie la suprasarcină: Când curentul electric
absorbit de ferăstrău depăşeşte nivelul admis, se
întrerupe automat alimentarea cu curent a motorului.
Acest lucru previne supraîncălzirea motorului şi
eventualele daune. Pentru a porni din nou ferăstrăul,
eliberaţi întrerupătorul PORNIRE/OPRIRE şi apăsaţi-l
din nou.
ATENŢIE: Nu folosiţi ferăstrăul dacă dispozitivul de
protecţie la suprasarcină opreşte ferăstrăul în mod
repetat. Consultaţi un atelier de service MAKITA.
Verificarea frânei de lanţ (Fig. 48)
Nu lucraţi cu ferăstrăul cu lanţ fără a verifica în
prealabil frâna de lanţ!
- Porniţi motorul conform instrucţiunilor (asiguraţi-vă
că aveţi o poziţie stabilă şi aşezaţi ferăstrăul cu lanţ
pe sol în aşa fel încât lama de ghidare să nu fie în
contact cu solul).
- Apucaţi ferm mânerul tubular cu o mână şi ţineţi
dispozitivul de prindere cu cealaltă.
- Porniţi motorul şi apăsaţi apărătoarea mânerului
(1) în direcţia săgeţii cu dosul palmei până când se
cuplează frâna de lanţ. Lanţul trebuie să se oprească
imediat.
- Opriţi motorul imediat şi eliberaţi frâna de lanţ.
Important: Dacă lanţul nu se opreşte instantaneu
când faceţi acest test, este absolut interzisă
folosirea ferăstrăului! Duceţi ferăstrăul la un
atelier de service MAKITA.
Testarea frânei inerţiale (Fig. 49)
Nu folosiţi ferăstrăul fără să testaţi mai întâi frâna
inerţială!
- Porniţi motorul conform instrucţiunilor (asiguraţi-vă
că aveţi o poziţie stabilă şi aşezaţi ferăstrăul cu lanţ
pe sol în aşa fel încât lama de ghidare să nu fie în
contact cu solul).
- Apucaţi ferm mânerul tubular cu o mână şi ţineţi
dispozitivul de prindere cu cealaltă.
- Porniţi motorul, apoi opriţi-l din nou. Lanţul trebuie să
se oprească complet la două secunde după ce aţi
oprit motorul.
Important: Dacă lanţul ferăstrăului nu se opreşte
în două secunde când efectuaţi testul, nu folosiţi
ferăstrăul! Verificaţi periile de cărbune.
Verificarea ungerii lanţului (Fig. 50)
Nu tăiaţi niciodată lemne dacă nu este asigurată o
ungere suficientă a lanţului. În caz contrar, durata de
viaţă a uneltei se va reduce. Înainte de a începe lucrul,
verificaţi nivelul uleiului din rezervor şi alimentarea
66
cu ulei. Verificaţi cantitatea furnizată de ulei urmând
instrucţiunile de mai jos:
- Porniţi ferăstrăul electric cu lanţ.
- Ţineţi ferăstrăul cu lanţ în funcţiune la aproximativ
15 cm deasupra unui trunchi sau a solului (folosiţi o
suprafaţă potrivită).
Dacă ungerea este suficientă, veţi vedea o dâră subţire
de ulei, deoarece uleiul se va prelinge de pe ferăstrău.
Fiţi atent la direcţia din care bate vântul şi evitaţi
expunerea inutilă la uleiul pulverizat!
ÎNTREŢINERE
Ascuţirea lanţului de ferăstrău (Fig. 51)
Când efectuaţi proceduri de întreţinere la lanţ,
trebuie să scoateţi întotdeauna ştecherul din priză
şi să purtaţi mănuşi de protecţie.
Lanţul are nevoie de ascuţire când:
- rumeguşul produs la tăierea lemnului umed arată ca
făina de lemn.
- lanţul pătrunde în lemn numai sub apăsare puternică.
- muchiile tăietoare sunt deteriorate vizibil.
- dispozitivul de tăiere este împins în stânga sau în
dreapta în timpul operaţiei de tăiere. Acest lucru este
provocat de ascuţirea neuniformă a lanţului sau de
deteriorarea unei laturi.
Important: Ascuţiţi frecvent, dar fără a îndepărta
prea mult metal!
În general, 2 sau 3 mişcări pe pilă vor fi suficiente.
După ce aţi ascuţit dumneavoastră lanţul de câteva
ori, duceţi-l la un atelier de service pentru reascuţire.
Ascuţirea corectă: (Fig. 52)
ATENŢIE:
Utilizaţi numai lanţuri şi lame de ghidare concepute
pentru acest ferăstrău!
- Toţi dinţii de tăiere trebuie să aibă aceeaşi lungime
(dimensiunea a). Dinţii de tăiere cu lungimi diferite au
ca rezultat o funcţionare neuniformă a lanţului şi pot
duce la apariţia fisurilor în lanţ.
- Lungimea minimă a dinţilor este de 3 mm (0,11”). Nu
reascuţiţi lanţul când dinţii de tăiere ajung la lungimea
minimă; în acest caz, lanţul trebuie înlocuit.
- Adâncimea tăieturii este determinată de diferenţa de
înălţime dintre limitatorul de adâncime (vârful rotund)
şi muchia tăietoare.
- Cele mai bune rezultate sunt obţinute cu o adâncime
a -limitatorului de adâncime de 0,64 mm (0,025”).
ATENŢIE:
Adâncimea exagerată măreşte riscul de recul!
(Fig. 53)
- Toţi dinţii de tăiere trebuie să fie ascuţiţi la acelaşi
unghi, 30°. Unghiurile diferite au ca rezultat o
funcţionare neregulată a lanţului, măresc gradul de
uzură şi duc la ruperea lanţului. (Fig. 54)
- Înclinaţia frontală de 85° a dintelui tăietor rezultă
din adâncimea de tăiere a pilei rotunde. Dacă este
folosită pila corectă în modul corect, va fi obţinută
automat înclinaţia frontală corectă.
Page 67

Pile şi mod de utilizare a acestora
- Ascuţiţi folosind un suport special de pilă şi o pilă
rotundă de lanţ cu diametru 4,0 mm. Pilele rotunde
normale nu sunt potrivite pentru această operaţie.
- Pila trebuie să taie numai când este împinsă în
direcţia înainte (săgeata). Ridicaţi pila când reveniţi
înapoi. (Fig. 55)
- Mai întâi ascuţiţi dintele cel mai scurt. Lungimea
acestui dinte devine apoi etalon pentru tot restul
dinţilor tăietori ai lanţului.
- Împingeţi întotdeauna pila ca în figura prezentată.
- Suportul pilei facilitează ghidarea pilei. Acesta este
marcat pentru un unghi corect de ascuţire de 30°
(menţineţi marcajele paralele cu lanţul când piliţi, vezi
figura) şi limitează adâncimea de tăiere la valoarea
corectă de 4/5 din diametrul pilei. (Fig. 56)
- După ce aţi ascuţit lanţul, înălţimea limitatorului de
adâncime trebuie să fie verificată cu ajutorul unui
calibru pentru lanţ.
- Corectaţi chiar şi cea mai mică depăşire de înălţime
cu ajutorul unei pile drepte speciale (1).
- Rotunjiţi din nou muchia frontală a limitatorului de
adâncime (2). (Fig. 57)
Curăţarea lamei de ghidare, ungerea vârfului
roţii de lanţ (Fig. 58)
ATENŢIE: Trebuie să purtaţi mănuşi de protecţie.
Verificaţi în mod regulat suprafeţele lagărului lamei de
ghidare pentru depistarea deteriorărilor şi curăţaţi-le cu
o sculă potrivită.
Dacă ferăstrăul este folosit în mod intensiv, va fi
necesară ungerea regulată a lagărelor roţii de lanţ de
întoarcere (săptămânal). Pentru a face acest lucru,
curăţaţi temeinic orificiul de 2 mm din vârful lamei de
ghidare, apoi introduceţi prin presare o cantitate mică
de vaselină universală.
Vaselina universală şi pistoalele de ungere sunt
disponibile ca accesorii.
Vaselină universală (nr. de serie 944 360 000)
Pompă de gresat (nr. de serie 944 350 000)
Reperul de pe perie arată limita de uzură.
NOTĂ:
Peria de cărbune este foarte delicată, aşa că aveţi grijă
să nu o scăpaţi pe jos. Când o scoateţi, fiţi atent
la poziţia de montare, deoarece fiecare perie se
rodează direct pe rotor.
- Folosiţi o cheie combi pentru a desface capacul (1) şi
apoi scoateţi peria (2).
- Dacă nu s-a ajuns la limita de uzură, puneţi peria
înapoi în aceeaşi poziţie şi înşurubaţi capacul (1) la
loc.
- Puneţi ferăstrăul puţin timp în funcţiune (aproximativ
1 minut) ca periile să se rodeze la loc.
Important: Acum testaţi frâna inerţială. Dacă lanţul nu
se opreşte complet în două secunde, porniţi ferăstrăul
scurt şi repetaţi testul până ce frâna funcţionează
corect.
NOTĂ: După montarea noilor perii de cărbune, lăsaţi
ferăstrăul să meargă circa 5 minute şi apoi verificaţi
frâna inerţială.
Înlocuirea lanţului de ferăstrău (Fig. 59)
ATENŢIE:
Utilizaţi numai lanţuri şi lame de ghidare concepute
pentru acest ferăstrău!
Verificaţi roata de lanţ (1) înainte de a monta un lanţ
nou.
ATENŢIE:
Roţile de lanţ uzate (2) pot deteriora lanţul nou şi de
aceea trebuie înlocuite.
Nu încercaţi să înlocuiţi dumneavoastră roata de lanţ.
Înlocuirea roţilor de lanţ necesită o calificare şi unelte
speciale şi trebuie efectuată la un atelier de service
MAKITA. (Fig. 60)
Verificarea şi înlocuirea periile de cărbune
(Fig. 61)
Important:
Verificaţi periile de cărbune la intervale regulate!
67
Page 68

Depanare
Defecţiune Sistem Observaţie Cauză
Ferăstrăul nu funcţionează complet motorul electric nu
funcţionează
nicio sursă de alimentare
cablu defect
frână de lanţ acţionată
Siguranţă tablou arsă
putere insuficientă Perii de cărbune putere de tracţiune
Perii de cărbune uzate
scăzută
lanţ neuns Rezervor, pompă de ulei nu există ulei pe lanţ rezervor de ulei gol,
canal murdar de ghidare a
uleiului
Frână de lanţ Frână Lanţul nu se opreşte
Bandă de frânare uzată
instantaneu
Frână inerţială Frână Lanţul continuă să meargă Perii de cărbune uzate
Instrucţiuni de întreţinere periodică
Pentru a asigura o durată mare de viaţă, a preveni deteriorarea şi a asigura funcţionarea deplină a dispozitivelor
de siguranţă, trebuie efectuate regulat următoarele operaţii de întreţinere. Solicitările de garanţie pot fi luate în
considerare numai dacă aceste lucrări sunt efectuate regulat şi corespunzător. Nerespectarea efectuării lucrărilor de
întreţinere poate duce la accidente!
Utilizatorul ferăstrăului electric cu lanţ nu are voie să efectueze lucrări de întreţinere care nu sunt descrise în acest
manual de instrucţiuni. Orice altfel de lucrări trebuie executate la un atelier de service MAKITA.
Lucrări generale Ferăstrău electric cu
A se curăţa exteriorul în mod regulat.
lanţ
Carcasă de plastic A se verifica dacă prezintă fisuri sau crăpături. În cazul în
care există deteriorări, reparaţi carcasa imediat la un atelier
de service.
Lanţ de ferăstrău A se reascuţi în mod regulat.
A se înlocui la timp.
ă de ghidare A se întoarce invers după o anumită perioadă de timp,
Lam
pentru a se uza uniform pe ambele suprafeţe.
A se înlocui la timp.
Roată de lanţ A se înlocui la timp la un atelier de service.
Frână de lanţ A se verifica regulat la un atelier de service.
Frână inerţială A se verifica regulat la un atelier de service.
De câte ori este pus
ferăstrăul în funcţiune
Lanţ de ferăstrău A se verifica eventualele deteriorări şi gradul de tocire.
A se verifica întinderea lanţului.
Lamă de ghidare A se verifica eventualele deteriorări şi a se debavura dacă
este necesar.
Ungerea lanţului Probă de funcţionare.
Frână de lanţ Probă de funcţionare.
Frână inerţială Probă de funcţionare.
Întrerupător pornire/
Probă de funcţionare.
oprire
Cablu de alimentare În cazul în care există deterioră
atelier de service.
Capac rezervor ulei A se verifica strângerea.
După fiecare decuplare Lamă de ghidare A se curăţa orificiul de ungere.
Suport lanţ A se curăţa în special canalul de ghidare a uleiului.
Depozitare Rezervor ulei de lanţ A se goli.
Lanţ/lamă de ghidare A se demonta, a se curăţa şi a se unge uşor.
A se curăţa canalul de ghidare a lamei de ghidare.
Ferăstrău electric cu
lanţ
A se depozita într-un loc sigur şi uscat. După o perioadă
lungă de depozitare, duceţi ferăstrăul la un atelier de service
pentru verificare (uleiul rezidual poate deveni răşinos şi
poate înfunda pompa de ulei).
68
ri, a se repara imediat la un
Page 69

Service, piese de schimb şi garanţie
Întreţinere şi reparaţii
Întreţinerea şi repararea motoarelor electrice moderne precum şi a dispozitivelor de siguranţă necesită instruire
tehnică calificată, precum şi un atelier specializat, echipat cu scule şi dispozitive de testare speciale.
Orice lucrare care nu este descrisă în acest Manual de Instrucţiuni trebuie efectuată doar la un atelier de service
MAKITA.
Atelierele de service MAKITA sunt dotate cu echipamentele necesare, având un personal calificat şi cu experienţă
care să ofere soluţii şi sugestii corecte clienţilor în mod corespunzător.
Încercările de reparaţie de către terţi sau persoane neautorizate duc la anularea garanţiei.
Piese de schimb
Funcţionarea corectă şi continuă, cât şi siguranţa ferăstrăului cu lanţ depind şi de calitatea pieselor de schimb utilizate.
Utilizaţi numai piese de schimb originale MAKITA.
Numai piesele de schimb şi accesoriile originale garantează cea mai înaltă calitate privind materialul, dimensiunile,
funcţionarea şi siguranţa.
Piesele de schimb şi accesoriile originale pot fi obţinute de la distribuitorul dumneavoastră local. Acesta va avea şi lista
cu piese de schimb pentru a determina numerele de serie ale pieselor de schimb necesare şi va fi mereu la curent cu
ultimele îmbunătăţiri şi inovaţii în ceea ce priveşte piesele de schimb. Pentru a găsi distribuitorul dumneavoastră local,
vizitaţi site-ul www.makita-outdoor.com
Vă rugăm să nu uitaţi că folosirea unor piese de schimb neoriginale, în locul pieselor de schimb originale MAKITA,
duce automat la anularea garanţiei produsului MAKITA.
69
Page 70

DEUTSCH (Originalanweisungen)
Vielen Dank für Ihr Vertrauen in unser Produkt
Herzlichen Glückwunsch zu Ihrer neuen MAKITA
Elektro-Motorsäge! Wir sind überzeugt, dass Sie mit
dieser modernen Maschine zufrieden sein werden.
MAKITA Elektro-Motorsägen zeichnen sich
durch robuste, leistungsstarke Motoren und
hohe Kettengeschwindigkeiten aus, durch die
hervorragende Schnittleistungen erreicht werden
können. Diese Motorsägen sind mit umfangreichen
Sicherheitseinrichtungen nach neuestem Stand der
Technik ausgestattet, leicht und handlich, und an jedem
Ort, an dem eine entsprechende Stromversorgung
vorhanden ist, sofort einsatzbereit.
Damit Funktionstüchtigkeit und Leistungsverhalten Ihrer
neuen Motorsäge stets optimal sind und damit zu jedem
Zeitpunkt Ihre persönliche Sicherheit gegeben ist,
haben wir eine Bitte an Sie:
Lesen Sie vor der ersten Inbetriebnahme der
Motorsäge diese Betriebsanleitung sorgfältig
durch, und befolgen Sie stets und ohne
Kompromisse die Sicherheitsvorschriften! Bei
Nichtbeachtung können Bedienperson und/
oder umstehende Personen lebensgefährliche
Verletzungen erleiden!
Symbole
In der Betriebsanleitung und an der Elektro-Motorsäge
finden Sie die folgenden Symbole:
Lesen Sie unbedingt diese
Bedienungsanleitung und
beachten Sie die Warnungen
und Sicherheitsvorschriften!
Besondere Vorsicht und
Aufmerksamkeit erforderlich!
Schutzhelm, Schutzbrille und
Gehörschutz tragen!
Netzstecker ziehen!
Bei beschädigtem Kabel
Netzstecker ziehen!
Kettenbremse frei
Kettenbremse ausgelöst
Rückschlag!
Verboten!
..... mm
Maximal zulässige Schneidlänge
Schutzhandschuhe tragen!
Vor Feuchtigkeit schützen!
Laufrichtung der Sägekette
Doppelt schutzisoliert
Sägenkettenöl
Erste Hilfe
Recycling
CE-Kennzeichen
Denken Sie an unsere Umwelt!
Elektrische Geräte dürfen nicht
in den Hausmüll!
Sollte das Gerät nicht mehr
benutzt werden können,
fragen Sie den zuständigen
Müllbeseitigungsverband nach
den notwendigen Maßnahmen zur
Entsorgung.
Um Gefährdung anderer durch
ein defektes Gerät zu vermeiden,
trennen Sie die Anschlussleitung
dicht am Gehäuse durch.
ACHTUNG! Vor dem
Durchtrennen der
Anschlussleitung,
Netzstecker ziehen. Es
besteht Lebensgefahr durch
Stromschlag!
70
Page 71

Mindestlieferumfang
1 2
1. Elektro-Motorsäge
2. Führungsschiene
4
3. Sägekette
4. Kabelhalter für Stromversorgungskabel
5. Ketten-/Schienenschutz
6. Bedienungsanleitung (nicht dargestellt)
3
5
Nur für europäische Länder
EG-Konformitätserklärung
Wir, Makita Corporation als verantwortlicher
Hersteller, erklären, dass die folgenden Geräte der
Marke Makita:
Bezeichnung des Geräts: Motor-Kettensäge
Nummer / Typ des Modells: UC3030A, UC3530A,
UC4030A, UC4530A, UC3530AP, UC4030AP
Technische Daten: siehe Tabelle „TECHNISCHE
DATEN“.
in Serienfertigung hergestellt werden und
den folgenden Richtlinien der Europäischen Union
genügen:
2000/14/EG, 2006/42/EG
Außerdem werden die Geräte gemäß den folgenden
Standards oder Normen gefertigt:
EN60745
Nummer der EG-Baumusterprüfbescheinigung:
M6T 09 07 24243 100
M6T 09 07 24243 099
Die EU-Baumusterprüfung nach 98/37/EU und
2006/42/EU wurde durchgeführt von:
TÜV SÜD Product Service GmbH,
Ridlerstraße 65, 80339 MÜNCHEN, Deutschland.
ID-Nr. 0123
Die technische Dokumentation erfolgt durch unseren
Bevollmächtigten in Europa:
Makita International Europe Ltd.,
Michigan, Drive, Tongwell,
Milton Keynes, Bucks MK15 8JD, England
Falls eines der aufgeführten Teile nicht mitgeliefert
wurde, wenden Sie sich bitte an Ihren Händler.
Das Verfahren zur Konformitätsbewertung, vorgesehen
in 2000/14/EG, erfolgte in Übereinstimmung mit
Anhang V.
Gemessener Schallleistungspegel: 101,8 dB
Garantierter Schallleistungspegel: 103 dB
2. Juli 2009
Tomoyasu Kato
Direktor
Makita Corporation
3-11-8, Sumiyoshi-cho,
Anjo, Aichi, JAPAN
Verwendungszweck
Elektro-Motorsäge
Diese Elektro-Motorsäge darf ausschließlich für das
Sägen von Holz verwendet werden. Diese Säge ist
für das gelegentliche Schneiden von dünnem Holz,
das Pflegen von Obstbäumen, das Auslichten von
Gehölzen, das Ausasten und das Ablängen von Hölzern
vorgesehen.
Folgenden Personen ist der Umgang mit
Motorsägen untersagt:
Personen, die nicht mit dieser Bedienungsanleitung
vertraut sind, Kindern, Jugendlichen und Personen,
die unter dem Einfluss von Alkohol, Drogen oder
Medikamenten stehen, ist der Umgang mit Motorsägen
verboten.
Sicherheitshinweise zu Kettensägen:
Lassen Sie sich NIE durch Bequemlichkeit oder
(aus fortwährendem Gebrauch gewonnener)
Vertrautheit mit dem Gerät dazu verleiten, die
Sicherheitsregeln für den Umgang mit der
Kettensäge zu missachten. Wenn dieses Werkzeug
fahrlässig oder nicht ordnungsgemäß verwendet
71
Page 72

wird, kann es zu schweren Verletzungen kommen.
1. Halten Sie mit allen Körperteilen Abstand zur
Sägekette, wenn der Motor der Kettensäge läuft.
Stellen Sie vor dem Starten der Kettensäge
sicher, dass die Sägekette frei ist und keinerlei
Gegenstände berührt. Beim Arbeiten mit
Kettensägen kann schon der kürzeste Moment an
Unaufmerksamkeit zur einer Berührung zwischen
Sägekette und Kleidung oder Körper führen.
2. Halten Sie die Kettensäge stets mit der rechten
Hand am hinteren Griff und mit der linken Hand
am vorderen Griff. Ein Erfassen der Kettensäge
mit der linken Hand am hinteren Griff und mit der
rechten Hand am vorderen Griff führt zu einer
deutlich höheren Verletzungsgefahr und hat zu
unterbleiben.
3. Tragen Sie Schutzbrille und Gehörschutz.
Außerdem wird das Tragen von
Schutzausrüstung für Kopf, Hände, Beine und
Füße empfohlen. Bei geeigneter Schutzkleidung
verringert sich das Verletzungsrisiko durch
herumfliegende Sägeabfälle oder durch
versehentlichen Kontakt mit der Sägekette.
4. Betreiben Sie die Kettensäge nicht auf einem
Baum. Bei Benutzung einer Kettensäge auf einem
Baum kann es zu Verletzungen kommen.
5. Achten Sie immer auf einen sicheren Stand,
die Benutzung der Kettensäge ist nur dann
zulässig, wenn Sie auf einer festen, sicheren
und waagerechten Fläche stehen. Auf rutschigen
und instabilen Standflächen, wie z. B. auf einer
Leiter, können Sie das Gleichgewicht und die
Kontrolle über die Kettensäge verlieren.
6. Achten Sie beim Sägen von unter Spannung
stehenden Ästen auf ein mögliches
Zurückschnellen. Wenn die Spannung im Holz
frei wird, kann der Bediener der Säge vom unter
Spannung stehenden Ast getroffen werden oder die
Säge kann außer Kontrolle geraten.
7. Beim Sägen von Gebüsch und jungen Bäumen
ist besondere Vorsicht geboten. Die Sägekette
kann das schlanke Material erfassen und in Ihre
Richtung peitschen oder Sie aus dem Gleichgewicht
bringen.
8. Tragen Sie die Kettensäge immer ausgeschaltet
und am vorderen Griff und vom Körper entfernt.
Transportieren und lagern Sie die Kettensäge
immer mit aufgesetztem Schutz über dem
Sägeschwert. Durch einen sachgemäßen Umgang
mit der Kettensäge können Sie eine Berührung der
sich bewegenden Sägekette vermeiden.
9. Halten Sie die Anweisungen für Schmieren,
Spannen der Kette und Austauschen von
Zubehörteilen ein. Eine unsachgemäß geschmierte
oder unsachgemäß gespannte Sägekette kann
reißen oder einen Rückschlag verursachen.
10
. Achten Sie darauf, dass die Griffe trocken,
sauber und frei von Öl und Schmiermittel sind.
Fettige oder ölige Griffe sind schlüpfrig, wodurch Sie
die Kontrolle über die Säge verlieren können.
11
. Schneiden Sie nur Holz. Verwenden Sie
die Kettensäge ausschließlich für den
vorgesehenen Zweck. Beispiel: Mit dieser
Kettensäge ist das Schneiden von Kunststoffen,
Ziegeln oder Baumaterialien, die nicht aus
Holz sind, zu unterlassen. Die zweckentfremdete
Verwendung der Kettensäge kann zu
Gefahrensituationen führen.
72
12
. Ursachen für Rückschläge und geeignete
Vorkehrungen: Wenn die Nase oder die Spitze
des Sägeschwerts ein Objekt berührt oder wenn
sich das Holz in den Schnitt biegt und die Sägekette
einklemmt, kann es zu einem Rückschlag kommen.
Wenn die Spitze mit Gegenständen in
Berührung kommt, kann es zu einer plötzlichen
Bewegungsumkehr kommen, wodurch das
Sägeschwert nach oben und in Richtung des
Bedieners gestoßen wird. Wenn die Sägekette
oben am Sägeschwert eingeklemmt wird, kann das
Sägeschwert plötzlich nach hinten in Richtung des
Bedieners gedrückt werden.
All diese Reaktionen können zu einem Verlust der
Kontrolle über die Säge und dadurch zu schweren
Verletzungen führen. Verlassen Sie sich nicht
ausschließlich auf die Sicherheitsvorrichtungen der
Säge. Als Benutzer einer Kettensäge müssen Sie
bezüglich Arbeitsschutz mehrere Dinge beachten:
Rückschlag wird durch eine zweckentfremdete
Nutzung des Werkzeugs und/oder unsachgemäße
Bedienschritte oder -umstände verursacht und
kann durch die unten aufgeführten Maßnahmen
vermieden werden:
- Halten Sie die Säge mit beiden Händen und
mit festem Griff und legen Sie dabei Finger
und Daumen um die Griffe der Kettensäge,
halten Sie Körper und Arme so, dass Sie
Rückschlagkräften standhalten können.
Bei sachgerechter Vorgehensweise kann der
Bediener auf sichere Weise mit Rückschlagkräften
umgehen. Lassen Sie die Kettensäge niemals
einfach los.
- Beugen Sie sich nicht zu weit nach vorn
und sägen Sie nicht über Schulterhöhe.
Dadurch können unbeabsichtigte Berührungen
der Schwertspitze mit Gegenständen vermieden
werden. Außerdem kann die Kettensäge in
unerwarteten Situationen besser unter Kontrolle
gehalten werden.
- Verwenden Sie ausschließlich die vom
Hersteller vorgeschriebenen Ersatzschwerter
und –ketten. Nicht zugelassene Ersatzschwerter
und –ketten können zu einem Riss der Kette und/
oder Rückschlag führen.
- Halten Sie die Vorschriften des Herstellers für
das Schärfen und die Wartung der Sägekette
ein. Bei Absenken des Tiefenanschlags kann es
zu höheren Rückschlagkräften kommen.
Arbeitsschutz
Grundsätzliche Schutzmaßnahmen (Abb. 1)
- Zur Gewährleistung der sicheren Handhabung
muss die Bedienperson unbedingt diese
Betriebsanleitung lesen, um sich mit der
Handhabung der Motorsäge vertraut zu machen.
Unzureichend informierte Bedienpersonen können
durch einen unsachgemäßen Umgang mit der Säge
sich selbst und andere gefährden.
- Diese Elektro-Motorsäge sollte nur an Personen
verliehen oder sonstwie zur Nutzung überlassen
werden, die nachweislich über eine entsprechende
Ausbildung zum Führen von Motorsägen
verfügen. Überreichen Sie stets auch diese
Bedienungsanleitung.
- Personen ohne Erfahrung im Umgang mit Motorsägen
sollten den Händler um eine Grundeinweisung zum
Page 73

Umgang mit motorgetriebenen Sägen ersuchen, um
sich mit der Verhaltensweise derartiger Maschinen
vertraut zu machen.
- Üben Sie den Umgang mit der Motorsäge durch
Ablängen von Rundholz auf einem Sägebock.
- Kindern und Jugendlichen unter 18 Jahren ist das
Bedienen von Motorsägen untersagt. Jugendliche
über 16 Jahre dürfen die Motorsäge ausschließlich
zu Ausbildungszwecken und ausschließlich unter
Aufsicht eines zugelassenen Ausbilders.
- Beim Umgang mit Motorsägen sind äußerste Vorsicht
und hohe Aufmerksamkeit gefordert.
- Betreiben Sie Motorsägen nur, wenn Sie sich in
guter körperlicher Verfassung befinden. Führen Sie
alle Arbeitsschritte ruhig und umsichtig aus. Die
Bedienperson ist gegenüber Dritten haftbar.
- Personen, die unter Einfluss von Alkohol, Drogen und/
oder Medikamenten stehen, ist das Bedienen von
Motorsägen streng verboten! (Abb. 2)
Persönliche Schutzausrüstung
- Um Kopf, Augen, Hände und Füße vor
Verletzungen sowie das Gehör vor
Schäden zu schützen, ist beim Arbeiten mit
Motorsägen unbedingt die unten aufgeführte
Schutzausrüstung zu tragen:
- Es ist geeignete Arbeitskleidung zu tragen, die
am Körper anliegt, jedoch die Bewegungsfreiheit
nicht einschränkt. Das Tragen von Schmuck oder
Kleidung, der bzw. die sich in Büschen oder Gestrüpp
verfangen können, ist nicht zulässig.
- Der Der Schutzhelm (1) muss regelmäßig auf
Beschädigungen überprüft und spätestens nach
5 Jahren ausgetauscht werden. Es dürfen nur
zugelassene Schutzhelme mit Prüfzeichen verwendet
werden. Langes Haar ist durch ein Haarnetz zu
bedecken. (Abb. 3)
- Der Gesichtsschutz (2) des Schutzhelms schützt
gegen Sägemehl und Holzspäne. Der Gesichtsschutz
ist beim Arbeiten mit Motorsägen vorgeschrieben und
schützt vor Gesichts- und Augenverletzungen.
- Das Tragen eines vorschriftsmäßigen
Gehörschutzes (Kapselgehörschutz (3),
Gehörschutzstöpsel usw.) ist vorgeschrieben.
Oktavbandanalyse auf Anfrage.
- Die Schnittschutzhose (4) besteht aus einer
mehrschichtigen Nylonfaserstruktur und schützt
gegen Schnitte. Für viele Einsatzfälle ist diese Hose
vorgeschrieben. Auf jeden Fall sollten Sie beim
Hantieren mit Motorsägen eine lange Hose aus
festem Material tragen. (Abb. 4)
- Schutzhandschuhe (5) aus dickem Leder sind
Bestandteil der vorgeschriebenen Ausrüstung
und müssen daher beim Arbeiten mit Motorsägen
unbedingt getragen werden.
- Beim Arbeiten mit Motorsägen ist das Tragen
von Sicherheitsschuhen oder -stiefeln (6)
mit rutschsicheren Sohlen, Stahlkappen und
Schnittschutz vorgeschrieben. Sicherheitsschuhe mit
Schnittschutz bieten Schutz vor Schnitten und einen
sicheren Stand.
Inbetriebnahme
- Da der Motor nicht wassergeschützt ist, darf diese
Elektro-Motorsäge nicht bei Regen oder in nassen
oder feuchten Umgebungen verwendet werden.
(Abb. 5)
- Eine feuchte Elektro-Motorsäge darf nicht in Betrieb
genommen werden.
- Vermeiden Sie Körperkontakt mit geerdeten Flächen.
- Betreiben Sie die Elektro-Motorsäge nicht in der
Nähe entzündbarer Gase oder Staube. Es besteht
Explosionsgefahr.
- Verlegen Sie das Stromversorgungskabel so, dass es
sich zu jeder Zeit hinter der Bedienperson befindet.
Sorgen Sie dafür, dass das Kabel nicht eingeklemmt
oder durch scharfkantige Objekte beschädigt werden
kann. Verlegen Sie das Kabel so, dass es keine
Personen gefährdet.
- Schließen Sie das Kabel ausschließlich an
vorschriftsmäßig installierte Steckdosen an. Stellen
Sie sicher, dass die Netzspannung den Angaben
auf dem Typenschild entspricht. Die Stromzufuhr ist
mit einer Leitungssicherung 16 A zu sichern. Wenn
die Säge im Freien betrieben wird, schließen Sie
die Säge an einen Fehlerstrom-Schutzschalter (FISchalter) an, der bei einem Differenzstrom von max.
30 mA auslöst.
- Achten Sie darauf, dass das Verlängerungskabel
einen ausreichenden Durchmesser aufweist. Bei
Verwendung einer Kabeltrommel sollte das Kabel
vollständig abgewickelt werden. Verwenden Sie
ausschließlich Verlängerungskabel, die den Vorgaben
unter „Technische Daten“ entsprechen. Stellen Sie
bei der Verwendung der Säge im Freien sicher, dass
das Verlängerungskabel für die Verwendung im
Freien zugelassen ist.
- Vor Beginn der Arbeiten ist die Elektro-
Motorsäge entsprechend den Vorschriften
auf ordnungsgemäße Funktion und
Betriebssicherheit zu überprüfen.
Überprüfen Sie insbesondere die Funktionstüchtigkeit
der Kettenbremse, die korrekte Montage der
Führungsschiene (Blatt, Schwert), die Sägekette
auf vorschriftsmäßige Schärfung und Spannung,
den Kettenraddeckel auf festen Sitz, den EIN-/AUSSchalter auf Leichtgängigkeit, die Funktionstüchtigkeit
der Sicherungstaste, Kabel und Stecker auf
einwandfreien mechanischen Zustand und Handgriffe
auf Sauberkeit und Trockenheit.
- Nehmen Sie diese Elektro-Motorsäge ausschließlich
im vollständig montierten Zustand in Betrieb. Wenn
Teile an der Motorsäge fehlen, ist der Betrieb der
Motorsäge unzulässig.
- Entfernen Sie vor dem Einschalten der Säge das
Einstellwerkzeug.
- Während des Betriebs der Säge sind alle zur Säge
gehörenden Schutzeinrichtungen zu verwenden.
- Stellen Sie sicher, dass sich keine Personen im
Arbeitsbereich aufhalten. Dies gilt insbesondere für
Kinder. Achten Sie auch auf Tiere im Arbeitsbereich.
(Abb. 6)
- Achten Sie vor dem Einschalten der Motorsäge auf
sicheren Stand.
- Halten Sie die eingeschaltete Motorsäge immer
mit beiden Händen fest. Erfassen Sie den hinteren
Griff mit der rechten Hand und den Bügelgriff mit der
linken Hand. Umfassen Sie die Griffe fest mit dem
Daumen. Schiene und Kette müssen dabei vom
Körper weg gerichtet sein. (Abb. 7)
- Schalten Sie die Säge ausschließlich wie in dieser
Anleitung vorgegeben ein. Überlasten Sie die
Säge nicht. Wenn die Säge im angegebenen
Leistungsbereich genutzt wird, lassen sich die
Arbeiten besser und sicherer ausführen.
- Schalten Sie die Säge sofort aus, wenn spürbare
73
Page 74

Veränderungen im Verhalten der Säge auftreten.
ACHTUNG: Nach dem Loslassen des EIN-/AUS-
Schalters läuft die Säge noch eine kurze Zeit
nach (Nachlauf).
- Schützen Sie das Kabel vor Hitze, Öl und scharfen
Gegenständen und Kanten.
- Verlegen Sie das Kabel so, dass es sich während
der Arbeiten nicht in Ästen oder sonstigen Objekten
verfangen kann.
- Wenn das Kabel während der Arbeiten beschädigt
wird, ziehen Sie sofort den Netzstecker. (Abb. 8)
- Wenn die Säge während der Arbeiten von Steinen,
Nägeln oder sonstigen harten Gegenständen
getroffen wird, ziehen Sie sofort den Netzstecker und
überprüfen Sie die Säge.
- Ziehen Sie unbedingt den Netzstecker, bevor
Sie die Spannung der Kette prüfen, die Kette
nachspannen oder wechseln oder Fehlfunktionen
beheben. (Abb. 9)
• Fehlfunktion der Säge
• Wartung
• ÖL nachfüllen
• Schärfen der Sägekette
• Pause
• Transport
• Feierabend
- Wenn Sie die Arbeiten beenden oder wenn Sie die
Säge unbeaufsichtigt lassen, schalten Sie die Säge
aus und ziehen Sie den Netzstecker. Legen Sie die
Elektro-Motorsäge an einem sicheren Ort ab, damit
sich niemand an der Säge verletzen kann.
- Ziehen Sie vor den Auffüllen des Öltanks unbedingt
den Netzstecker. Rauchen und offene Flammen sind
verboten.
- Vermeiden Sie Hautkontakt mit Mineralölprodukten.
Tragen Sie beim Befüllen des Öltanks
Schutzhandschuhe.
- Achten Sie darauf, dass kein Öl in das Erdreich
gelangt (Umweltschutz). Verwenden Sie eine
geeignete Unterlage.
- Reinigen Sie die Motorsäge sofort von verschüttetem
Öl.
Verhaltensregeln und Vorgehensweise für die
Arbeiten
- Arbeiten Sie niemals allein. Im Notfall muss Hilfe in
der Nähe sein (in Rufweite).
- Halten Sie beim Sägen die Säge immer mit beiden
Händen fest. Nur so können Sie die Säge sicher
führen.
- Arbeiten Sie mit der Elektro-Motorsäge nur bei
guten Sicht- und Lichtverhältnissen. Achten Sie
auf rutschigen und feuchten Untergrund und auf
Eis und Schnee (Rutschgefahr). Beim Arbeiten auf
frisch geschältem Holz (Rinde) ist die Rutschgefahr
besonders hoch.
- Arbeiten Sie niemals auf nicht stabilen Flächen.
Stellen Sie sicher, dass sich im Arbeitsbereich keine
Hindernisse befinden, über die Sie stolpern könnten.
Achten Sie jederzeit auf sicheren und festen Stand.
- Sägen Sie niemals über Schulterhöhe.
- Sägen Sie niemals auf einer Leiter. (Abb. 10)
- Klettern Sie niemals auf Bäume, um dort Arbeiten mit
der Elektro-Motorsäge auszuführen.
- Beugen Sie sich beim Sägen niemals zu weit vor.
- Führen Sie die Elektro-Motorsäge so, dass sich Ihr
Körper außerhalb des verlängerten Schwenkbereichs
der Säge befindet. (Abb. 11)
74
- Diese Elektro-Motorsäge darf ausschließlich für das
Sägen von Holz verwendet werden.
- Achten Sie darauf, dass die laufende Sägekette nicht
den Untergrund berührt. Wenn Sie direkt auf dem
Boden liegendes Holz sägen, drehen Sie das Holz
vor dem kompletten Durchschneiden, um ein Sägen
in den Untergrund zu vermeiden.
- Säubern Sie den Arbeitsbereich von Fremdkörpern
wie Sand, Steine, Nägel usw. Durch derartige Dinge
kann die Schiene beschädigt werden und es kann zu
einem gefährlichen Rückschlag kommen.
- Verwenden Sie zum Sägen von Schnittholz und
dünnem Gehölz eine sichere Auflage (Sägebock,12).
Verwenden Sie zum Sägen von Schnittholz
und kleineren Stücken eine sichere Auflage
(Sägebock 12). Sägen Sie niemals gestapeltes Holz!
Lassen Sie Schnittholz nicht durch andere Personen
festhalten, und sichern Sie Schnittholz nicht mit dem
Fuß!
- Rundhölzer müssen gesichert werden.
- Arbeiten Sie an Hängen immer in Richtung
hangabwärts.
- Zum Ausführen von Ablängschnitten muss
der Krallenanschlag (Z, Abb. 12) am zu
schneidenden Holz angesetzt werden.
- Setzen Sie vor dem Ausführen eines Ablängschnittes
den Krallenanschlag fest am zu schneidenden Holz
an, nur so kann das Holz von der laufenden Kette
durchtrennt werden. Heben Sie dazu die ElektroMotorsäge am hinteren Griff an und führen Sie die
Säge am Bügelgriff. Der Krallenanschlag dient dabei
als Drehpunkt. Führen Sie den Schnitt aus, indem
Sie den Bügelgriff nach unten drücken und dabei die
Motorsäge gleichzeitig nach hinten ziehen. Setzen
Sie den Krallenanschlag etwas tiefer an und heben
Sie die Säge wieder am hinteren Griff an.
- Ziehen Sie die Motorsäge nur bei laufender Sägekette
aus dem Holz.
- Beim Ausführen mehrerer Schnitte muss die
Motorsäge zwischen den Schnitten ausgeschaltet
werden.
- Stech- und Längsschnitte dürfen nur von
entsprechend ausgebildeten Personen
ausgeführt werden (hohe Gefahr von
Rückschlägen).
- Setzen Sie zum Ausführen von Längsschnitten
(Abb. 13) die Sägekette im kleinstmöglichen Winkel
an. Gehen Sie bei derartigen Schnitten äußerst
vorsichtig vor, da der Krallenanschlag nicht genutzt
werden kann.
- Wenn beim Schneiden mit der Schienenoberseite die
Sägekette einklemmt, kann die Motorsäge plötzlich in
Richtung Bedienperson gestoßen werden. Schneiden
Sie daher möglichst mit der Schienenunterseite.
Wenn beim Schneiden mit der Schienenunterseite die
Sägekette einklemmt, wird die Motorsäge vom Körper
der Bedienperson weg in Richtung Holz gezogen.
(Abb. 14)
- Wenn das zu schneidende Holz mechanisch unter
Spannung steht (Abb. 15), schneiden Sie zuerst
die unter Druckbelastung stehende Seite (A).
Führen Sie anschließend den Trennschnitt auf der
unter Zugbelastung stehenden Seite (B) aus. Bei
dieser Vorgehensweise wird ein Einklemmen der
Führungsschiene vermieden.
- Gehen Sie beim Schneiden von gesplittertem Holz
äußerst vorsichtig vor. Abgeschnittene Holzstücke
können mitgerissen werden (Verletzungsgefahr).
Page 75

- Verwenden Sie die Motorsäge niemals zum Abhebeln
oder Entfernen von Holzstücken oder anderen
Gegenständen.
- Beim Ausführen von Schnitten zum Lösen von
mechanischen Spannungen sollte die Motorsäge
möglichst am Baumstamm abgestützt werden
(Rückschlaggefahr).
- Sägearbeiten an mechanisch verspannten
Hölzern dürfen nur von entsprechend
ausgebildeten Personen ausgeführt werden. Es
besteht hohe Verletzungsgefahr.
- Achten Sie auf mechanisch verspannte Äste.
Durchtrennen Sie freihängende Äste nicht von unten.
- Führen Sie Schnitte zum Lösen von mechanischen
Spannungen niemals auf dem Baumstamm stehend
aus.
- Verwenden Sie diese Elektro-Motorsäge nicht
für Forstarbeiten z. B. für das Fällen von
Bäumen oder für Schnitte zum Lösen von
mechanischen Spannungen. Für diese Art von
Arbeiten muss die Bedienperson eine hohe
Bewegungsfreiheit haben und besondere
Arbeitsschutzvorschriften einhalten. Dies ist
aufgrund des Stromversorgungskabels nicht
gewährleistet.
VORSICHT:
Das Fällen und das Entasten von Bäumen
dürfen nur von entsprechend ausgebildeten
Personen ausgeführt werden! Es besteht
hohe Verletzungsgefahr! Halten Sie die örtlich
geltenden Bestimmungen ein.
- Vor dem Fällen eines Baumes ist Folgendes
sicherzustellen:
a) Es dürfen sich nur die direkt mit dem Fällen des
Baumes beschäftigten Personen im Arbeitsbereich
aufhalten.
b) Alle mit dem Fällen beschäftigen Personen
müssen einen hindernisfreien Fluchtweg haben
(der Fluchtweg sollte um ca. 45° nach hinten von
der Fallrichtung weg verlaufen). Bedenken Sie die
höhere Stolpergefahr durch Elektrokabel!
c) Der untere Teil des Baumstamms muss frei von
Fremdkörpern, Unterholz und Ästen sein. Achten
Sie auf sicheren Stand (Stolpergefahr).
d) Der nächste Arbeitsplatz muss mindestens 2 1/2
Baumlängen entfernt sein (Abb. 16). Überprüfen
Sie vor dem Fällschnitt die Fällrichtung und
stellen Sie sicher, dass sich in einem Umkreis von
2 1/2 Baumlängen keine anderen Personen oder
Gegenstände befinden (Abb. 16).
= Fällrichtung
=
Gefahrenbereich
= Fluchtweg
- Beurteilen des Baumes:
Hängerichtung - lose oder dürre Äste - Höhe des
Baumes - natürliche Neigung - ist der Baum morsch?
- Achten Sie auf Windrichtung und Windstärke. Führen
Sie bei stark böigem Wind keine Fällarbeiten aus.
- Beisägen von Wurzelanläufen:
Beginnen Sie an der stärksten Wurzel. Führen
Sie zuerst den senkrechten Schnitt und dann den
waagerechten Schnitt aus.
- Anlegen des Fallkerbs (A, Abb. 17):
Der Fallkerb gibt dem Baum Fallrichtung und
Führung. Der Kerb wird senkrecht zur Fallrichtung
und auf 1/5 bis 1/3 des Durchmessers des Stamms
in den Baum eingebracht. Führen Sie den Schnitt
möglichst nah am Boden aus.
- Korrekturen am Fallkerb sind über die gesamte Breite
des Kerbs nachzuschneiden.
- Setzen Sie den Fällschnitt (B, Abb. 18) über der
Unterkante (D) des Kerbs an. Der Fällschnitt muss
exakt waagerecht ausgeführt werden. Der Abstand
zwischen beiden Schnitten muss ca. 1/10 des
Stammdurchmessers betragen.
- Das Material zwischen den beiden Schnitten (C)
dient als Scharnier. Schneiden Sie den Baum
niemals vollständig durch, da der Baum sonst völlig
unkontrolliert fällt. Treiben Sie rechtzeitig Fällkeile in
den Schnitt ein. (B, Abb. 18)
- Als Fällkeile dürfen ausschließlich Keile aus
Kunststoff oder Aluminium verwendet werden.
Verwenden Sie keine Stahlkeile.
- Stellen Sie sich beim Ausführen des Fällschnitts
immer seitlich neben den fallenden Baum.
- Achten Sie beim Zurückgehen nach dem Fällschnitt
auf fallende Äste.
- Beim Arbeiten am Hang muss sich die Bedienperson
der Elektro-Motorsäge immer oberhalb oder seitlich
neben dem zu fällenden Baum bzw. des gefällten
Baums aufhalten.
- Achten Sie auf Baumstämme, die auf Sie zurollen
könnten.
Rückschlag
- Beim Arbeiten mit Motorsägen kann es zu einem
gefährlichen Rückschlagen (Kickback) der Säge
kommen.
- Rückschlag tritt auf, wenn die Spitze der Schiene
(insbesondere das obere Viertel) versehentlich
mit Holz oder einem sonstigen festen Objekt in
Berührung kommt. (Abb. 19)
- In dieses Situation wird die Elektro-Motorsäge ohne
Kontrolle und mit hoher Energie in die Richtung der
Bedienperson geschleudert (Verletzungsgefahr).
Um ein derartiges Rückschlagen zu vermeiden,
halten Sie die folgenden Anweisungen ein:
- Setzen Sie niemals das Schienenende an, um einen
Schnitt zu beginnen. Achten Sie immer auf das
Schienenende.
- Sägen Sie niemals mit dem Schienenende. Gehen
Sie beim weiteren Ausführen des Schnitts vorsichtig
vor.
- Ein Schnitt muss immer mit laufender Sägekette
angesetzt werden.
- Stellen Sie sicher, dass die Sägekette
ordnungsgemäß geschärft ist. Achten Sie
insbesondere auf die Höhe des Tiefenbegrenzers
(detaillierte Informationen finden Sie in Kapitel
„Schärfen der Sägekette“).
- Schneiden Sie niemals gleichzeitig mehrere Äste.
Achten Sie beim Schneiden eines Astes darauf, dass
die Motorsäge keinen anderen Ast berührt.
- Achten Sie beim Ablängen eines Stamms auf
benachbarte Stämme. Es wird die Benutzung eines
Sägebocks empfohlen.
Transport und Lagerung
- Tragen Sie die Elektro-Motorsäge am Bügelgriff. Die
Führungsschiene zeigt nach hinten. Tragen oder
transportieren Sie die Kettensäge niemals mit
laufender Sägekette.
- Tragen Sie die Elektro-Motorsäge niemals am
Stromversorgungskabel. Ziehen Sie den Stecker nicht
durch Ziehen am Kabel aus der Steckdose.
- Wenn Sie während der Arbeiten Ihren Standort
wechseln, schalten Sie die Elektro-Motorsäge aus
und aktivieren Sie Kettenbremse, um ein ungewolltes
Anlaufen der Sägekette zu verhindern.
75
Page 76

- Beim Transport der Elektro-Sögekette über eine
längere Wegstrecke ist unbedingt der Netzstecker
zu ziehen und der Schienenschutz aufzusetzen.
(Abb. 20)
- Achten Sie beim Transport der Motorsäge in einem
Kraftfahrzeug darauf, dass die Säge sicher steht,
damit kein Öl auslaufen kann.
- Bewahren Sie die Motorsäge in einem sicheren,
trockenen und abschließbaren Raum und außerhalb
der Reichweite von Kindern auf. Die Motorsäge darf
nicht im Freien aufbewahrt werden.
- Wenn Sie die Motorsäge für einen längeren Zeitraum
einlagern oder als Frachtgut versenden möchten, ist
der Öltank vollständig zu leeren.
- Lagern und transportieren Sie Sägekettenöl
ausschließlich in zugelassenen und ordnungsgemäß
beschrifteten Behältern.
Wartung
- Schalten Sie die Elektro-Motorsäge vor dem
Ausführen von Wartungsarbeiten aus, ziehen Sie
den Netzstecker aus der Steckdose und sichern
Sie den Netzstecker vor unbefugtem Einstecken.
(Abb. 21)
- Stellen Sie vor Beginn der Arbeiten sicher, dass
die Säge den Arbeitsschutzvorschriften genügt.
Kontrollieren Sie insbesondere Kettenbremse
und Nachlaufbremse. Stellen Sie sicher, dass die
Sägekette immer ordnungsgemäß geschärft und
gespannt ist. (Abb. 22)
- Lassen Sie Kettenbremse und Nachlaufbremse
regelmäßig überprüfen (siehe „Kettenbremse,
Auslaufbremse“).
- Überprüfen Sie das Stromversorgungskabel
regelmäßig auf Beschädigungen.
- Reinigen Sie die Elektro-Motorsäge regelmäßig.
- Lassen Sie ein beschädigtes Kunststoffgehäuse
unverzüglich durch eine Fachkraft reparieren.
- Überprüfen Sie den Tankdeckel regelmäßig auf
Dichtheit.
- Arbeiten Sie nicht mit der Säge, wenn der EIN-/AUSSchalter defekt ist. Lassen Sie die Säge von einer
Fachkraft reparieren.
Beachten Sie die relevanten Anweisungen
zum Arbeitsschutz, die von den
entsprechenden Berufsorganisationen und
Versicherungsunternehmen herausgebracht
werden.
Nehmen Sie keine technischen Veränderungen
an der Motorsäge vor. Bei technischen
Veränderungen ist der Arbeitsschutz nicht mehr
gewährleistet.
Nehmen Sie nur Wartungs- und Reparaturarbeiten
vor, die in der Bedienungsanleitung erläutert sind.
Alle darüber hinausgehenden Arbeiten müssen vom
MAKITA Service ausgeführt werden. (Abb. 23)
Verwenden Sie ausschließlich Originalersatzteile und
Originalzubehör von MAKITA.
Bei Verwendung von Ersatzteilen und Zubehör
anderer Hersteller oder anderer Kombinationen und
Längen für Schiene/Kette besteht eine sehr hohe
Unfallgefahr. Für Unfälle und Schäden, die aus der
Verwendung von Sägeketten/Führungsschienen
oder Zubehörteilen resultieren, die nicht von MAKITA
zugelassen wurden, übernimmt MAKITA keinerlei
Haftung.
Erste Hilfe (Abb. 24)
Stellen Sie sicher, dass ein vorschriftsmäßiger ErsteHilfe-Kasten am Arbeitsplatz vorhanden ist. Füllen Sie
aus dem Erste-Hilfe-Kasten entnommene Artikel sofort
wieder auf.
Machen Sie folgende Angaben, wenn Sie Hilfe
benötigen:
- Ort des Unfalls
- Was ist passiert
- Anzahl der verletzten Personen
- Art der Verletzungen
- Ihr Name.
HINWEIS:
Werden Personen mit schlechter Durchblutung
zu oft zu starken Vibrationen ausgesetzt, kann
es zu Schädigungen von Blutgefäßen und/oder
Nervensystem kommen.
Folgende Symptome können durch Vibrationen an
Fingern, Händen oder Handgelenken auftreten:
„Einschlafen“ von Körperteilen (Benommenheit),
Kribbeln, Schmerz, Stechen, Veränderung von
Hautfarbe oder Haut. Falls eines dieser Symptome
auftritt, suchen Sie einen Arzt auf!
76
Page 77

Technische Daten
UC3030A UC3530A / AP UC4030A / AP UC4530A
Kettentyp 092
Kettenteilung inch 3/8”
Schnittlänge cm 30 35 40 45
Kettengeschwindigkeit m/s 13,3
Schallleistungspegel L
nach EN 60745
Schalldruckpegel L
am Arbeitsplatz nach EN 60745
WA av
pA av
dB (A) 101,8
dB (A) 90,8
Abweichung dB (A) K=0,73
Schwingungsbeschleunigung
a
nach EN 60745
h,w av
- Bügelgriff m/s
- Hinterer Griff m/s
Abweichung m/s
2
2
2
4,7
5,6
K=1,5
Ölpumpe automatisch
Fassungsvermögen Öltank ml 140
Kraftübertragung direkt
Überlastungsschutz elektrisch
Kettenbremse manuelle Auslösung
Nachlaufbremse elektrisch
Gewicht
(Gewicht entsprechend EPTAVerfahren 01/2003)
kg 5,0 5,1 5,2 5,3
Schutzisolierung Klasse II (doppelt schutzisoliert)
Verlängerungskabel
(nicht im Lieferumfang)
Aufgrund unserer andauernden Forschungen und Weiterentwicklungen sind Änderungen an den hier angegebenen
•
DIN 57282/ HO 7RN-F
L= 30 m max., 3 x 1,5 mm
2
Technischen Daten ohne Vorankündigung vorbehalten.
Die Technischen Daten können in den einzelnen Ländern voneinander abweichen.
•
Der hier angegebene Wert für die erzeugten Schwingungen wurde gemäß dem genormten Testverfahren ermittelt
•
und kann als Vergleich zu anderen Werkzeugen herangezogen werden.
Der angegebene Wert für die erzeugten Schwingungen ist außerdem für eine vorbeugende Bewertung der
•
Belastung zu verwenden.
WARNUNG:
Die Schwingungsbelastung kann bei tatsächlichem Gebrauch des Elektrowerkzeugs in Abhängigkeit von der
•
Handhabung des Elektrowerkzeugs von dem hier aufgeführten Wert abweichen.
Stellen Sie sicher, dass Schutzmaßnahmen für den Bediener getroffen werden, die auf den unter den tatsächlichen
•
Arbeitsbedingungen zu erwartenden Belastungen beruhen (beziehen Sie alle Bestandteile des Arbeitsablaufs ein,
also zusätzlich zu den Arbeitszeiten auch Zeiten, in denen das Werkzeug ausgeschaltet ist oder ohne Last läuft).
77
Page 78

Bezeichnung der Bauteile
1
2
3
67
1 Bügelgriff
2 Handschutz (Auslöser für Kettenbremse)
3 Krallenanschlag
4 Schnellverschluss für Kettenraddeckel
5 Kettenraddeckel, Kettenbremse
6 Abdeckung Kohlebürste
7 Handschutz für hinteren Griff
8 Führungsschiene
9 Öltankdeckel
10 Typenschild
11 Sicherungstaste
12 Hinterer Griff
13 EIN-/AUS-Schalter
14 Schauglas für Ölfüllstand
15 Sägekette
16 Kabelhalter für Stromversorgungskabel
(Zugentlastung)
45
8 9 10 11 12
13141516
78
Page 79

INBETRIEBNAHME (Abb. 25)
VORSICHT:
Ziehen Sie vor Arbeiten an Führungsschiene und
Sägekette den Netzstecker aus der Steckdose, und
ziehen Sie Schutzhandschuhe an.
VORSICHT:
Schalten Sie die Elektro-Motorsäge nur
ein, nachdem Sie die Säge vollständig
zusammengebaut und überprüft haben!
Anbringen von Führungsschiene und
Sägekette (Abb. 26)
Legen Sie die Elektro-Motorsäge auf einer stabilen
Fläche ab und führen Sie die folgenden Schritte aus,
um Führungsschiene und Sägekette anzubringen:
Lösen Sie die Kettenbremse. Ziehen Sie dazu den
Handschutz (1) in Pfeilrichtung.
Klappen Sie den Kettenrad-Schnellspanner (2) nach
oben. (Abb. 31)
Drücken Sie den Schnellverschluss des
Kettenraddeckels fest entgegen der Federspannung
und drehen Sie den Schnellverschluss langsam
entgegen der Uhrzeigerrichtung, bis Sie fühlen,
dass der Schnellverschluss greift. Halten Sie den
Schnellverschluss gedrückt und drehen Sie den
Schnellverschluss so weit wie möglich entgegen der
Uhrzeigerrichtung.
Geben Sie den Schnellverschluss des
Kettenraddeckels frei (nicht mehr drücken) und drehen
Sie den Schnellverschluss in Uhrzeigerrichtung in
seine ursprüngliche Position. Wiederholen Sie diesen
Vorgang, bis der Kettenraddeckel (3) abgeschraubt ist.
Ziehen Sie den Kettenraddeckel (3) leicht an, ziehen
Sie die hinteren Halterungen (4) heraus und nehmen
Sie den Kettenraddeckel ab.
Setzen Sie die Führungsschiene (7) an und drücken Sie
die Schiene gegen das Kettenrad (6). (Abb. 27)
Legen Sie die Sägekette (9) auf das Kettenrad (6)
auf. Legen Sie die Sägekette mit der rechten Hand in
die obere Führungsnut (8) der Führungsschiene ein.
(Abb. 28)
Die Schneiden der Sägekette müssen oben auf der
Führungsschiene in Pfeilrichtung zeigen!
Drücken Sie die Führungsschiene mit der linken
Hand leicht gegen den Halter am Gehäuse und legen
Sie die Sägekette (9) um den Umlenkstern (10) der
Führungsschiene. Ziehen Sie dabei die Sägekette
etwas in die durch den Pfeil angegebene Richtung.
(Abb. 29)
Richten Sie die Öffnung im Kettenraddeckel zum
Gewindestift (11) aus.
Drehen Sie die Kettenspannschraube (Abb. 32/14),
um den Kettenspannstift (12) mit der Öffnung in der
Führungsschiene auszurichten. (Abb. 30)
Drücken Sie den Kettenraddeckel (3) zuerst in die
Halterung (13) und anschließend auf den Gewindestift
(Abb. 30/11). (Abb. 31)
Spannen der Sägekette (Abb. 32)
Drücken Sie den Schnellverschluss (2) des
Kettenraddeckels fest ein und drehen Sie
den Schnellverschluss dabei gleichzeitig in
Uhrzeigerrichtung, um den Kettenraddeckel (3)
anzuschrauben, ziehen Sie den Deckel jedoch noch
nicht fest.
Heben Sie die Spitze der Führungsschiene etwas
an und drehen Sie den Kettenspanner (14) in
Uhrzeigerrichtung, bis die Sägekette in der Führungsnut
an der Unterseite der Führungsschiene sitzt (siehe
Kreismarkierung).
Drücken Sie den Schnellverschluss (2) des
Kettenraddeckels hinein und ziehen Sie den Verschluss
in Uhrzeigerrichtung fest.
Geben Sie den Schnellverschluss (2) des
Kettenraddeckels frei (nicht mehr drücken), der
Verschluss kann sich frei drehen. Klappen Sie den
Verschluss wie in der Abbildung dargestellt ein.
(Abb. 33)
Überprüfen der Kettenspannung (Abb. 34)
Die Kette ist ordnungsgemäß gespannt, wenn sie
an der Unterkante der Führungsschiene anliegt und
von Hand ohne Kraftaufwand ca. 2 bis 4 mm von der
Führungsschiene abgezogen werden.
Kontrollieren Sie die Kettenspannung regelmäßig neue Ketten werden bei Gebrauch meist etwas länger!
Eine Kontrolle der Kettenspannung darf nur bei
ausgeschaltetem Motor und gezogenem Netzstecker
erfolgen. Wenn die Kette zu locker ist: Lösen Sie
den Schnellverschluss des Kettenraddeckels um ca.
eine Vierteldrehung. Spannen Sie die Kette wie unter
„Spannen der Sägekette“ erläutert.
TIPP:
Arbeiten Sie abwechselnd mit 2 oder 3 verschiedenen
Sägeketten, damit sich Ketten, Kettenrad und
Laufflächen der Führungsschiene gleichmäßig
abnutzen.
Um eine gleichmäßige Abnutzung der Führungsnut
in der Führungsschiene zu erreichen, sollte die
Führungsschiene bei jedem Kettenwechsel umgedreht
werden.
Kettenbremse (Abb. 35)
Diese Modelle sind serienmäßig mit einer
Kettenbremse ausgestattet. Wenn ein Rückschlag
aufgrund der Berührung der Schienenspitze mit Holz
kommt (siehe SICHERHEITSVORSCHRIFTEN),
wird durch die Berührung des Handschutzes mit dem
Handrücken die Kettenbremse ausgelöst.
Die Kette wird in Sekundenbruchteilen gestoppt.
Nachlaufbremse
Die Elektro-Motorsäge ist serienmäßig mit einer
Nachlaufbremse ausgestattet.
Die Nachlaufbremse sorgt dafür, dass beim Loslassen
des EIN-/AUS-Schalters die Kette sofort stoppt und
keine Gefahr durch Nachlaufen darstellt.
Das Testen der Nachlaufbremse wird weiter unten
erläutert.
79
Page 80

Wartung von Kettenbremse und
Nachlaufbremse (Abb. 36)
Die Bremssysteme sind sehr wichtige
Sicherheitseinrichtungen und unterliegen wie alle
anderen Bauteile einem gewissen Verschleiß. Die
regelmäßige Inspektion und Wartung ist für Ihre
persönliche Sicherheit von besonderer Bedeutung.
Diese Arbeiten müssen unbedingt von Fachkräften
eines MAKITA Service-Zentrums ausgeführt
werden.
Aktivieren der Kettenbremse (Bremsen) (Abb. 37)
Drücken Sie mit der linken Hand den Handschutz (1) in
Richtung Spitze der Führungsschiene (Pfeil 2).
Lösen der Kettenbremse
Ziehen Sie den Handschutz (1) in Ihre Richtung (Pfeil
3), bis Sie fühlen, dass der Handschutz einrastet. Die
Bremse ist nun gelöst.
Hinweis:
Beim Auslösen der Kettenbremse wird auch die
Stromzufuhr zum Motor unterbrochen. Das Testen der
Kettenbremse wird weiter unten erläutert.
Sägekettenöl (Abb. 38)
Verwenden Sie für die Schmierung von Sägekette
und Schiene ein Spezialöl mit Haftadditiv. Haftadditive
vermindern das Verschleudern des Öls von der
Sägekette beträchtlich.
Verwenden Sie keine Mineralöle. Aus Gründen des
Umweltschutzes ist die Verwendung von biologisch
abbaubaren Ölen vorgeschrieben.
Das von MAKITA vertriebene Sägekettenöl mit dem
Namen BIOTOP besteht aus speziellen Pflanzenölen
und ist zu 100% biologisch abbaubar. Dem Öl
BIOTOP wurde der „Blaue Engel“ für besondere
Umweltverträglichkeit (RAL UZ 48) verliehen.
Das Öl BIOTOP kann entsprechend des Bedarfs in den
folgenden Packungsgrößen bezogen werden:
1 Liter Bestellnummer 980 008 610
5 Liter Bestellnummer 980 008 611
Biologisch abbaubare Öle sind nur für eine gewisse Zeit
stabil. Derartige Öle sollten innerhalb von 2 Jahren ab
Herstellungsdatum (auf der Verpackung aufgedruckt)
verbraucht werden. (Abb. 39)
Wichtiger Hinweis zu biologisch abbaubaren
Kettenölen
Wenn Sie die Säge längere Zeit nicht benutzen
möchten, leeren Sie den Öltank und füllen Sie eine
geringe Menge an herkömmlichem Motorenöl
(SAE 30) ein und lassen Sie die Säge anschließend
eine kurze Zeit laufen. Dies ist notwendig, um das
verbliebene biologisch abbaubare Öl aus Tank und
Ölsystem und von Kette und Schiene zu entfernen, da
die meisten derartigen Öle dazu neigen, mit der Zeit
klebrige Rückstände zu bilden, durch die Ölpumpe und
andere Teile beschädigt werden können.
Füllen Sie vor dem nächsten Verwenden der Säge
wieder BIOTOP-Kettenöl in den Tank. Schäden, die
durch das Verwenden von Altöl oder ungeeignetem
Kettenöl entstanden sind, fallen nicht unter die
Produktgarantie und die Produktgarantie geht verloren.
Ihr Händler wird Sie über die Verwendung von Kettenöl
informieren.
80
Verwenden Sie niemals Altöl! (Abb. 40)
Altöl ist extrem umweltschädlich.
Altöl enthält hohe Mengen an krebserzeugenden
Substanzen.
Die Rückstände in Altöl führen zu hohem Verschleiß an
Ölpumpe, Sägekette und Führungsschiene.
Schäden, die durch das Verwenden von Altöl oder
ungeeignetem Sägekettenöl entstanden sind, fallen
nicht unter die Produktgarantie und die Produktgarantie
geht verloren.
Ihr Händler wird Sie über die Verwendung von
Sägekettenöl informieren.
Vermeiden Sie, dass Öl auf die Haut oder in
die Augen gelangt! (Abb. 41)
Sowohl Mineralölprodukte als auch biologische Öle
schädigen die Haut. Wenn Haut über längere Zeit
wiederholt mit derartigen Substanzen in Kontakt kommt,
trocknet die Haut aus. Dies kann verschiedenste
Hautkrankheiten zur Folge haben. Außerdem wurde
von allergischen Reaktionen berichtet.
Bei Kontakt mit Öl können Augenirritationen auftreten.
Falls Öl in ein Auge gelangt, spülen Sie das Auge sofort
mit klarem Wasser aus. Wenn Sie auch nach dem
Ausspülen Augenbeschwerden verspüren, suchen Sie
einen Arzt auf.
Auffüllen des Öltanks (Abb. 42)
Vorher Motor ausschalten und Netzstecker ziehen!
- Reinigen Sie den Öltank um den Verschluss herum,
um das Eindringen von Schmutz in den Tank zu
verhindern.
- Schrauben Sie den Tankverschluss (1) ab und füllen
Sie Kettenöl auf, bis der Ölstand die untere Kante des
Auffüllstutzens erreicht.
- Schrauben Sie den Tankverschluss wieder fest ein.
- Entfernen Sie übergelaufenes Öl sorgfältig.
Wichtig! (Abb. 43)
Vor der Erstbenutzung der Säge muss das gesamte
Ölsystem vollständig gefüllt werden, bis das Kettenöl
die Kette und die Führungsschiene ausreichend
schmiert.
Dies kann bis zu zwei Minuten dauern.
- Der Ölstand kann im Schauglas (2) überprüft werden.
Um eine ausreichende Schmierung der Sägekette
sicherzustellen, muss sich immer genügend Öl im Tank
befinden.
Schmieren der Sägekette (Abb. 44)
Vorher Motor ausschalten und Netzstecker ziehen!
Um einen problemlosen Betrieb der Ölpumpe
zu gewährleisten, müssen Ölzuführungsnut (3)
und Öleintrittsöffnung (4) der Führungsschiene in
regelmäßigen Abständen gereinigt werden.
Hinweis:
Nach dem Ausschalten der Säge tropft für eine kurze
Zeit restliches Kettenöl aus dem Ölsystem und von
Führungsschiene und Kette. Das ist normal und stellt
keinen Defekt dar!
Stellen Sie die Säge auf eier geeigneten Fläche ab.
Anschließen der Säge an die
Stromversorgung (Abb. 45)
VORSICHT!
Bevor Sie die Säge an die Stromversorgung
anschließen, überprüfen Sie immer, ob der EIN-/
AUS-Schalter (1) nach dem Drücken und Loslassen
Page 81

selbsttätig in die Position AUS zurückkehrt. Ist dies
nicht der Fall, schließen Sie die Säge unter keinen
Umständen an die Stromversorgung an - stecken
Sie den Stecker nicht in eine Steckdose. Bringen
Sie die Säge in ein MAKITA Servicezentrum, bevor
Sie mit oder an der Säge arbeiten.
Befestigen Sie Verlängerungskabel und
Stromversorgungskabel der Säge im Kabelhalter (2).
Stecken Sie den Stecker (3) der Säge in die Steckdose
des Verlängerungskabels (4).
Einschalten des Motors (Abb. 46)
- Schließen Sie die Säge an die Stromversorgung an.
- Halten Sie die Motorsäge beim und nach dem
Einschalten immer mit beiden Händen fest.
Erfassen Sie den hinteren Griff mit der rechten Hand
und den Bügelgriff mit der linken Hand. Umfassen
Sie die Griffe fest mit dem Daumen. Die Schiene und
Kette dürfen keine Gegenstände berühren.
- Drücken Sie zuerst die Sicherungstaste (5) und
anschließend den EIN-/AUS-Schalter (1). Lassen Sie
dann die Sicherungstaste (5) wieder los.
- Achtung: Die Kette läuft sofort an. Halten Sie den
EIN-/AUS-Schalter solange gedrückt, wie der Motor
laufen soll.
VORSICHT
Arretieren Sie den EIN-AUS-Schalter niemals in der
Position EIN.
Ausschalten des Motors
- Lassen Sie den EIN-/AUS-Schalter (1) los.
HINWEIS:
Beim Auslösen der Kettenbremse wird auch die
Stromzufuhr zum Motor unterbrochen.
Wenn die Säge beim Betätigen des EIN-/AusSchalters (1) nicht startet, muss möglicherweise
die Kettenbremse gelöst werden.
- Ziehen Sie den Handschutz (6) fest in die Richtung
des Pfeils, bis Sie ein Einrasten spüren. (Abb. 47)
Wichtig:
Diese Modelle sind mit einem Anlaufstrombegrenzer
ausgestattet. Diese Elektronik verhindert ein allzu
abruptes Anlaufen des Elektromotors.
Überstrom-Schutzschalter: Wenn die Stromstärke
durch die Säge den zulässigen Wert überschreitet, wird
die Stromversorgung des Motors automatisch getrennt.
Dadurch werden ein Überhitzen des Motors und die
damit verbundenen Schäden verhindert. Um die Säge
wieder zu starten, lassen Sie den EIN-/AUS-Schalter
los und drücken Sie den Schalter erneut.
VORSICHT: Wenn die Säge wiederholt durch den
Überstrom-Schutzschalter ausgeschaltet wird,
verwenden Sie die Säge nicht mehr. Wenden Sie sich
an en MAKITA Servicezentrum.
Überprüfen der Kettenbremse (Abb. 48)
Überprüfen Sie vor dem Beginn der Sägearbeiten
immer erst die Kettenbremse!
- Starten Sie den Motor wie erläutert (achten Sie auf
sicheren Stand und stellen Sie die Säge so auf dem
Boden ab, dass die Führungsschiene nichts berührt).
- Erfassen Sie mit einer Hand fest den Bügelgriff und
mit der anderen Hand den hinteren Griff.
- Schalten Sie die Motor ein und drücken Sie den
Handschutz (1) mit dem Handrücken in die Richtung
des Pfeils, bis die Kettenbremse anspricht. Die Kette
muss sofort anhalten.
- Schalten Sie den Motor sofort aus und lösen Sie die
Kettenbremse.
Wichtig: Wenn die Sägekette bei diesem Test
nicht sofort stoppt, dürfen Sie die Säge unter
keinen Umständen verwenden! Bringen Sie die
Motorsäge in ein MAKITA Servicezentrum.
Überprüfen der Nachlaufbremse (Abb. 49)
Überprüfen Sie vor dem Beginn der Sägearbeiten
immer erst die Nachlaufbremse!
- Starten Sie den Motor wie erläutert (achten Sie auf
sicheren Stand und stellen Sie die Säge so auf dem
Boden ab, dass die Führungsschiene nichts berührt).
- Erfassen Sie mit einer Hand fest den Bügelgriff und
mit der anderen Hand den hinteren Griff.
- Schalten Sie den Motor ein und wieder aus. Die
Kette muss spätestens zwei Sekunden nach dem
Ausschalten des Motors vollständig gestoppt haben.
Wichtig: Wenn die Sägekette bei diesem Test
nicht innerhalb von zwei Sekunden gestoppt hat,
verwenden Sie die Säge nicht! Überprüfen Sie
die Kohlebürsten.
Überprüfen der Kettenschmierung (Abb. 50)
Sägen Sie niemals mit der Säge, wenn keine
ausreichende Schmierung der Kette gegeben
ist. Anderenfalls verkürzt sich die Lebensdauer
der Sägegarnitur erheblich. Überprüfen Sie vor
Arbeitsbeginn den Ölstand im Tank und die Ölzufuhr.
Überprüfen Sie anhand folgender Anleitung die
zugeführte Ölmenge:
- Starten Sie die Motorsäge.
- Halten Sie die laufende Kette ca. 15 cm über einen
Baumstamm oder über den Boden (geeignete Fläche
auswählen).
Bei ausreichender Schmierung sehen Sie eine
schwache Ölspur, da Öl von der Sägekette
abgeschleudert wird. Achten Sie auf die Windrichtung
und vermeiden Sie, dass Sie sich unnötig dem
Ölaerosol aussetzen!
WARTUNG
Schärfen der Sägekette (Abb. 51)
Ziehen Sie vor Arbeiten an der Sägekette
immer den Netzstecker, und ziehen Sie
Schutzhandschuhe an.
Unter den folgenden Umständen muss die Kette
geschärft werden:
- Beim Sägen von feuchtem Holz sehen die Sägespäne
wie Holzmehl aus.
- Die Sägekette dringt nur bei starkem Druck in das
Holz ein.
- Die Schneiden sind sichtbar beschädigt.
- Beim Sägen wird die Sägegarnitur nach links
oder rechts gezogen. Dies tritt auf, wenn die Kette
ungleichmäßig geschärft oder auf einer Seite
beschädigt ist.
Wichtig: Schärfen Sie die Kette regelmäßig,
jedoch mit mäßigem Materialabtrag!
Allgemein reichen 2 bis 3 Striche mit der Feile aus.
Nachdem Sie die Kette bereits mehrere Male selbst
geschärft haben, lassen Sie die Kette in einem
Servicezentrum neu schärfen.
81
Page 82

Ordnungsgemäßes Schärfen: (Abb. 52)
VORSICHT:
Verwenden Sie ausschließlich nur solche Ketten
und Schienen, die für diese Säge zugelassen sind!
- Alle Schneidzähne müssen gleich lang (Maß a)
sein. Schneidzähne unterschiedlicher Länge führen
zu einem unruhigen Lauf der Kette und können zu
Rissen in der Kette führen.
- Die Schneidzähne müssen eine Länge von
mindestens 3 mm (0,11”) haben. Schärfen Sie eine
Kette, bei der die Schneidzähne auf Mindestlänge
abgenutzt sind, nicht nach; eine solche Kette muss
ersetzt werden.
- Die Tiefe des Schnitts wird durch den vertikalen
Abstand zwischen Tiefenbegrenzer (runde Nase) und
Schneidzahnoberkante bestimmt.
- Die besten Schnittleistungen werden mit einem
- vertikalen Abstand von Tiefenbegrenzer und
Schneidzahnoberkante von 0,64 mm (,025”) erreicht.
VORSICHT:
Zu große Abstände erhöhen die Gefahr des
Rückschlagens! (Abb. 53)
- Alle Schneidzähne müssen auf denselben Winkel von
30° geschärft werden. Unterschiedliche Winkel führen
zu einem unruhigen, unregelmäßigen Lauf der Kette,
erhöhtem Verschleiß und zu Kettenrissen. (Abb. 54)
- Der Spanwinkel von 85° des Schneidzahns ergibt
sich aus der Schnitttiefe der Rundfeile. Wenn die
richtige Feile auf richtige Weise verwendet wird, ergibt
sich der korrekte Spanwinkel automatisch.
Feilen und ihr Gebrauch
- Verwenden Sie zum Schärfen einen SpezialFeilenhalter mit Sägeketten-Rundfeile Durchm.
4,0 mm. Herkömmliche Rundfeilen sind für diese
Arbeiten nicht geeignet.
- Die Feile sollte nur im Vorwärtsstrich (Pfeil) Material
abtragen. Heben Sie beim Rückwärtsstrich die Feile
vom Material ab. (Abb. 55)
- Schärfen Sie zuerst den kürzesten Schneidzahn. Alle
anderen Schneidzähne der Kette werden dann auf
die Länge dieses Schneidzahns gebracht.
- Führen Sie die Feile immer so wie in der Abbildung
dargestellt.
- Der Feilenhalter erleichtert das Führen der Feile
erheblich. Auf dem Feilenhalter befinden sich eine
Markierungen für den korrekten Schärfwinkel von 30°
(achten Sie darauf, dass diese Markierungen beim
Feilen parallel zur Kette stehen, siehe Abbildung),
außerdem beschränkt der Feilenhalter die Schnitttiefe
auf die korrekten 4/5 des Feilendurchmessers.
(Abb. 56)
- Nach dem Schärfen der Kette muss mit Hilfe einer
Kettenmesslehre die Höhe der Tiefenbegrenzer
überprüft werden.
- Korrigieren Sie selbst die kleinste zu große Höhe mit
Hilfe einer speziellen Flachfeile (1).
- Runden Sie die Vorderflanke der Tiefenbegrenzer ab
(2). (Abb. 57)
Reinigen der Führungsschiene und Schmieren
des Umlenksterns (Abb. 58)
VORSICHT Tragen Sie unbedingt
Schutzhandschuhe.
Überprüfen Sie die Laufflächen der Führungsschiene
regelmäßig auf Beschädigungen und reinigen Sie diese
Flächen mit Hilfe eines geeigneten Werkzeugs.
82
Bei intensivem Gebrauch der Säge müssen die Lager
des Umlenksterns geschmiert werden (wöchentlich).
Reinigen Sie dazu zuerst sorgfältig die Öffnung von
2 mm an der Spitze der Führungsschiene und drücken
Sie anschließend eine kleine Menge an Schmierfett in
diese Öffnung.
Schmierfett und Fettpressen sind als Zubehör erhältlich.
Schmierfett (Bestellnr. 944 360 000)
Fettpresse (Bestellnr. 944 350 000)
Austauschen der Sägekette (Abb. 59)
VORSICHT:
Verwenden Sie ausschließlich nur solche Ketten
und Schienen, die für diese Säge zugelassen sind!
Überprüfen Sie vor dem Aufziehen einer neuen Kette
das Kettenrad (1).
VORSICHT:
Ein abgenutztes Kettenrad (2) kann die neue Kette
beschädigen und muss daher ausgetauscht werden.
Versuchen Sie nicht, das Kettenrad eigenhändig
auszutauschen. Für den Austausch von Kettenrädern
werden spezielle Kenntnisse und Sonderwerkzeuge
benötigt, der Austausch muss daher in einem MAKITA
Servicezentrum erfolgen. (Abb. 60)
Überprüfen und Auswechseln der
Kohlebürsten (Abb. 61)
Wichtig:
Überprüfen Sie die Kohlebürsten regelmäßig!
Die Verschleißgrenze wird durch eine Kerbe auf
der Kohlebürste angezeigt.
HINWEIS:
Die Kohlebürsten sind sehr empfindlich, achten Sie
daher darauf, dass Sie Kohlebürsten nicht fallenlassen.
Achten Sie beim Ausbau von Kohlebürsten auf die
Einbaulage, da jede Bürste individuell auf ihrem
Rotor eingelaufen ist.
- Schrauben Sie mit Hilfe eines
Schlitzschraubendrehers die Abdeckung (1) ab und
ziehen Sie die Bürste (2) heraus.
- Wenn die Verschleißgrenze noch nicht erreicht ist,
setzen Sie die Bürste wieder in der ursprünglichen
Position ein und schrauben Sie die Abdeckung (1)
wieder auf.
- Lassen Sie die Säge kurz (etwa 1 Minute) laufen,
damit die Bürsten wieder einlaufen.
Wichtig: Testen Sie jetzt die Nachlaufbremse. Wenn
die Säge nicht innerhalb von 2 Sekunden vollständig
gestoppt hat, lassen Sie die Säge nochmals kurz
laufen und wiederholen Sie den Test, bis die Bremse
ordnungsgemäß funktioniert.
HINWEIS: Nach dem Einbau neuer Kohlebürsten
lassen Sie die Säge ca. 5 Minuten laufen und testen Sie
dann die Nachlaufbremse.
Page 83

Problembehebung
Fehlfunktion System Beobachtung Ursache
Motorsäge arbeitet nicht gesamt Elektromotor funktioniert
nicht
keine Stromzufuhr,
Kabel defekt
Kettenbremse ausgelöst
Netzsicherung
durchgebrannt
Unzureichende Leistung Kohlebürsten zu geringe Durchzugkraft Kohlebürsten abgenutzt
keine Kettenschmierung Öltank, Ölpumpe kein Öl auf der Sägekette Öltank leer,
Ölführungsnut verschmutzt
Kettenbremse Bremse Sägekette stoppt nicht
Bremsband verschlissen
sofort
Nachlaufbremse Bremse Sägekette läuft weiter Kohlebürsten abgenutzt
Anleitung für zyklische Wartungsarbeiten
Um eine lange Lebensdauer des Werkzeugs zu erreichen, Schäden am Werkzeug zu vermeiden und die volle
Funktionstüchtigkeit der Sicherheitseinrichtungen des Werkzeugs sicherzustellen, sind in regelmäßigen Abständen
die folgenden Wartungsarbeiten auszuführen. Garantieansprüche können nur anerkannt werden, wenn diese Arbeiten
regelmäßig und sachgemäß ausgeführt wurden. Werden die vorgeschriebenen Wartungsarbeiten nicht ausgeführt,
kann es zu Unfällen kommen!
Wartungsarbeiten, die nicht in der Bedienungsanleitung der Elektro-Motorsäge aufgeführt sind, dürfen von Laien nicht
ausgeführt werden. Diese Arbeiten müssen in einem MAKITA Servicezentrum ausgeführt werden.
Allgemeine Arbeiten Elektro-Motorsäge Reinigen Sie das Äußere des Werkzeugs regelmäßig.
Kunststoffgehäuse Überprüfen Sie auf Risse und Brüche. Lassen Sie
ein beschädigtes Gehäuse unverzüglich in einem
Servicezentrum reparieren.
Sägekette Schärfen Sie die Kette regelmäßig nach.
Tauschen Sie die Kette rechtzeitig aus.
Führungsschiene Wenden Sie die Führungsschiene nach einer gewissen Zeit,
damit die Führungsflächen gleichmäßig abgenutzt werden.
Tauschen Sie die Führungsschiene rechtzeitig aus.
Kettenrad Lassen Sie das Kettenrad rechtzeitig in einem
Servicezentrum erneuern.
Kettenbremse Lassen Sie die Kettenbremse regelmäßig in einem
Servicezentrum überprüfen.
Nachlaufbremse Lassen Sie die Nachlaufbremse regelmäßig in einem
Servicezentrum überprüfen.
Vor jeder
Inbetriebnahme der
Säge
Sägekette Überprüfen Sie auf Beschädigungen und Schärfe.
Überprüfen Sie die Kettenspannung.
Führungsschiene Überprüfen Sie auf Beschädigungen und entfernen Sie ggf.
Grate.
Kettenschmierung Überprüfen Sie auf ordnungsgemäße Funktion.
Kettenbremse Überprüfen Sie auf ordnungsgemäße Funktion.
Nachlaufbremse Überprüfen Sie auf ordnungsgemäße Funktion.
Netzschalter Überprüfen Sie auf ordnungsgemäße Funktion.
Stromversorgungskabel
Lassen Sie ein beschädigtes Stromversorgungskabel
unverzüglich in einem Servicezentrum auswechseln.
Öltankdeckel Prüfen Sie auf festen Sitz.
Nach jedem Beenden
Führungsschiene Reinigen Sie die Öleintrittsöffnung.
der Arbeiten
Kettenträger Reinigen Sie den Kettenträger, insbesondere die
Ölführungsnut.
Einlagerung Kettenöltank Leeren Sie den Tank.
Sägekette/
Führungsschiene
Nehmen Sie Kette und Führungsschiene ab und ölen Sie
diese Teile leicht ein.
Reinigen Sie die Führungsnut der Führungsschiene.
Elektro-Motorsäge Lagern Sie die Säge an einem sicheren und trockenen Ort.
Lassen Sie die Elektro-Motorsäge nach längerer Lagerzeit
in einem Servicezentrum überprüfen (Ölreste können
verharzen und das Ventil der Ölpumpe verstopfen).
83
Page 84

Service, Ersatzteile und Garantie
Wartung und Reparatur
Für Wartungs- und Reparaturarbeiten an modernen Elektromotoren sowie an allen sicherheitsrelevanten Baugruppen
wird eine entsprechende technische Ausbildung benötigt, und diese Arbeiten müssen in einer Fachwerkstatt
ausgeführt werden, in der Sonderwerkzeuge und spezielle Prüfgeräte zur Verfügung stehen.
Alle Arbeiten, die nicht in dieser Bedienungsanleitung erläutert sind, dürfen ausschließlich in einem MAKITA
Servicezentrum ausgeführt werden.
Die MAKITA Servicezentren verfügen über die notwendigen Geräte und Anlagen und über entsprechend
ausgebildetes und erfahrenes Personal, das derartige Arbeiten sachgemäß und zu Ihrer Zufriedenheit ausführen und
Sie in allen Fragen sachkundig beraten kann.
Durch Reparaturversuche Dritter oder nicht qualifizierter Personen erlischt die Garantie.
Ersatzteile
Ein zuverlässiger und störungsfreier Betrieb sowie die Sicherheit Ihrer Motorsäge sind auch von der Qualität der
verwendeten Ersatzteile abhängig. Verwenden Sie ausschließlich Ersatzteile von MAKITA.
Nur Original-Ersatzteile und Original-Zubehör garantieren höchste Qualität beim Material, Abmessungen, Funktion und
Sicherheit.
Original-Ersatzteile und Original-Zubehör können Sie bei Ihrem Händler erwerben. Der Händler verfügt außerdem über
die entsprechenden Ersatzteillisten, in denen die Bestellnummern der benötigten Ersatzteile aufgeführt sind, und er
wird ständig über die neuesten Weiterentwicklungen und über Innovationen bei Ersatzteilen informiert. Ihren Händler
vor Ort finden Sie auf der Website www.makita-outdoor.com
Beachten Sie bitte, dass bei Verwendung von Ersatzteilen anderer Hersteller anstatt von Original-MAKITA-Ersatzteilen
automatisch die MAKITA Produktgarantie erlischt.
84
Page 85

MAGYAR (Eredeti útmutató)
Köszönjük a termékünkbe vetett bizalmát
Gratulálunk az új MAKITA elektromos láncfűrészéhez.
Meggyőződésünk, hogy meg lesz elégedve ezzel a
modern géppel.
A MAKITA elektromos láncfűrészek a kiemelkedő
vágási teljesítményt biztosító erős, nagyteljesítményű
motorjaik és nagy láncsebességük révén tűnnek ki.
Számos, a legmodernebb technikai megoldásokat
tartalmazó biztonsági berendezéssel vannak
felszerelve, könnyűek, egyszerűen használhatók és
bárhol azonnal üzembe helyezhetők, ahol a villamos
csatlakozás rendelkezésre áll.
Annak érdekében, hogy mindenkor szavatolhassuk
az elektromos láncfűrész optimális működését és
biztosíthassuk a személyes biztonságát, kérjük, tartsa
be a következőket:
Az elektromos láncfűrész első üzembe helyezése
előtt figyelmesen olvassa át ezt a használati
útmutatót, és feltétlenül tartsa be a biztonsági
előírásokat. Ezek figyelmen kívül hagyása
életveszélyes sérüléseket okozhat a kezelőnek és/
vagy a közelben levő személyeknek.
Szimbólumok
A láncfűrészen és az használati útmutató olvasása
közben az alábbi szimbólumokkal fog találkozni:
Olvassa el a használati
utasítást és tartsa be a
figyelmeztetéseket és a
biztonsági utasításokat!
Fokozott óvatosság és figyelem!
Óvja a nedvességtől!
A fűrészlánc futásának iránya
..... mm
Sisak, szem- és hallásvédő
eszköz viselendő!
Húzza ki a hálózati csatlakozót!
Ha a kábel megsérült, húzza ki a
hálózati csatlakozót!
A láncfék kiengedve
Bekapcsolt a láncfék
Visszarúgás!
Tilos!
Maximálisan engedélyezett
vágáshossz
Feltétlenül védőkesztyűt kell
viselni!
Kettős védelmi szigetelés
Fűrészláncolaj
Elsősegély
Újrafelhasználás
CE jelölés
Gondoljon környezetünkre! Az
elektromos készülékek nem valók
a háztartási hulladékok közé!
Amennyiben a készüléket már nem
lehet tovább használni, érdeklődjön
az illetékes hulladékeltávolító
ársaságánál a megsemmisítéshez
szükséges intézkedésekről.
Mások meghibásodott készülékkel
való veszélyeztetésének
elkerüléséhez a csatlakozóvezetéket
közvetlenül a háznál vágja el.
FIGYELEM! A csatlakozóvezeték
elvágása előtt ki kell húzni
a hálózati csatlakozót.
Életveszélyes áramütés
következhet be!
85
Page 86

Minimális rakjegyzék
1 2
1. Elektromos láncfűrész
2. Láncvezető
4
3. Fűrészlánc
4. Húzásmentesítő a tápkábelhez
5. Fűrészláncvédő
6. Használati utasítás (nem látható az ábrán)
3
5
Csak európai országokra vonatkozóan
EK Megfelelőségi nyilatkozat
Mi, a Makita Corporation, mint a termék felelős
gyártója kijelentjük, hogy a következő Makita
gép(ek):
Gép megnevezése: Láncfűrész
Típus sz./ Típus: UC3030A, UC3530A, UC4030A,
UC4530A, UC3530AP, UC4030AP
A műszaki jellemzőket lásd a “MŰSZAKI ADATOK”
című táblázatban.
sorozatgyártásban készül és
megfelel a következő Európai irányelveknek:
2000/14/EK, 2006/42/EK
A gyártás pedig a következő szabványoknak valamint
szabványosított dokumentumoknak megfelelően
történik:
EN60745
Az EK típusvizsgálat tanúsítványának száma:
M6T 09 07 24243 100
M6T 09 07 24243 099
Az EK típusú 98/37/EK és 2006/42/EK vizsgálatokat az
alábbi intézet végezte:
TÜV SÜD Product Service GmbH,
Ridlerstraße 65, 80339 MÜNCHEN, Németország
Azonosítószám: 0123
A műszaki dokumentáció Európában a következő
hivatalos képviselőnknél található:
Makita International Europe Ltd.,
Michigan, Drive, Tongwell,
Milton Keynes, Bucks MK15 8JD, Anglia
86
Ha valamelyik a rakjegyzékben szereplő alkatrész nincs
a csomagban, lépjen kapcsolatba az eladóval.
A 2000/14/EK irányelv által előírt megfelelőségi
értékelési eljárás az V. függelék szerint történt.
Mért hangteljesítményszint: 101,8 dB
Garantált hangteljesítményszint: 103 dB
2009. július 2.
Tomoyasu Kato
igazgató
Makita Corporation
3-11-8, Sumiyoshi-cho,
Anjo, Aichi, JAPAN
Rendeltetés
Elektromos fűrészek
Az elektromos fűrész csak favágásra használható.
Megfelelő vékony fák, gyümölcsfák karbantartására,
gallyazásra, fadöntésre és darabolásra szolgál.
Személyek, akik nem használhatják a láncfűrészt:
A láncfűrészt nem használhatják a használati utasítást
nem ismerő személyek, gyerekek, fiatal személyek, és
aki alkohol, gyógyszer vagy más tudatmódosító hatása
alatt áll.
A láncfűrész biztonsági figyelmeztetései: NE
HAGYJA, hogy (a termék többszöri használatából
eredõ) kényelem és megszokás váltsa fel az
láncfûrész biztonsági elõírásainak szigorú
betartását. Ha ezt a szerszámot felelõtlenül és
helytelenül használja, akkor komoly személyi
sérüléseket szenvedhet.
1. A láncfûrész mûködésekor tartsa távol a
testrészeit a fûrészlánctól. Mielõtt fûrészelni
kezd a láncfûrésszel, Ellenõrizze, hogy az nem
érintkezik semmivel. Egy figyelmetlen pillanatban
munka közben becsípheti a ruháját vagy valamely
Page 87

testrészét a láncfûrész.
2. Mindig tartsa a fûrészt jobb kézzel a hátsó
fogantyújánál és bal kézzel az elsõ fogantyún.
Ha fordított kézelhelyezést alkalmaz tartáskor,
megnöveli a személyi sérülés veszélyét, amit soha
ne tegyen.
3. Viseljen védõszemüveget és fülvédõt. A
fejen, kézen, lábfejen és lábon további
védõfelszerelés viselése javasolt. A megfelelõ
védõruha viselete csökkenti a személyi sérülés
kockázatát a törmelék által, illetve a láncfûrésszel
való véletlenszerű érintkezést.
4. Ne vágjon bele a fûrésszel egy élõ fába. Ha még
áll a fa, veszélyes láncfûrésszel vágni.
5. Mindig álljon stabilan munka közben, és a
fûrészt alkalmazza kizárólag stabil, biztonságos
és sima felületen állva. A csúszó vagy nem stabil
felületek, mint a létrák, az egyensúly és a láncfûrész
kontrolljának elvesztését okozhatják.
6. Feszültség alatt lévõ gally vágásakor legyen
résen, hogy hátraugorhasson. Amikor kioldódik a
farostokból, az eséssel meglendült gally megütheti
a kezelõt és / vagy a láncfûrészt kezelhetetlenné
teheti.
7. Legyen nagyon óvatos ágak és suhángok
vágásakor. A gyenge anyagba beakadhat a
láncfûrész és Ön felé verõdhet vagy kiránthatja az
egyensúlyából.
8. A láncfûrészt hordja az elsõ fogantyúnál tartva,
kikapcsolva, és a testétõl távol. A láncfûrész
szállítása vagy tárolása alatt mindig illessze
rá a láncvezetõ tetejét. A láncfûrész megfelelõ
kezelése lecsökkenti a véletlenszerû érintkezés
esélyét a mozgó láncfûrésszel.
9. A szerszám kenésekor, a lánc kifeszítésekor
vagy tartozékcsere alatt kövesse az
utasításokat. A nem szakszerûen kifeszített
vagy megkent lánc elszakadhat vagy megnöveli a
visszarúgás kockázatát.
10. A fogantyúkat tartsa szárazon, tisztán és
olajés zsírmentesen. A zsíros, olajos fogantyúk
csúszósak, és a kontroll elvesztését okozzák.
11. Csak fa vágására alkalmazza. Ne használja a
láncfûrészt a rendeltetésétõl eltérõ módon.
Például: Ne alkalmazza a láncfûrészt mûanyag,
kõmûvesmunka vagy nem fa építõanyagokra.
A láncfûrész nem rendeltetésszerû alkalmazása
veszélyes helyzetet okozhat.
12. A visszarúgás okai és annak megelőzése a
kezelő által: Visszarúgást okozhat, ha a láncvezető
orra vagy hegye egy tárggyal érintkezik, vagy ha a
fa lezárul és becsípi a fűrészt a vágásba. A heggyel
való érintkezés időnként fordított reakciót idéz elő,
felfele rúgva a láncvezetőt és hátra a kezelő felé.
Ha a láncfűrész a láncvezető felső részénél csípődik
be, ez gyorsan hátrafelé tolhatja a láncvezetőt
a kezelő irányába. Ezek a reakciók mindenike a
fûrész kontrolljának elvesztését okozhatja, ami
komoly személyi sérülést okozhat. Ne támaszkodjon
kizárólag a fûrészbe épített biztonsági szerkezetre.
Láncfûrész kezelõként tegyen meg néhány lépést
a vágási munkálatok balesetmentessége és a
sérülés elkerülésének érdekében. A visszarúgás a
szerszám helytelen használatának és/vagy a hibás
megmunkálási eljárásnak vagy a nem megfelelő
munkaviszonyok eredménye és az alább leírt
óvintézkedések betartásával elkerülhető:
− Szilárdan markolja meg a szerszámot úgy,
hogy hüvelykujjai és ujjai ráfonódjanak a
láncfűrész markolataira. Mindkét kezét a
fűrészen tartva irányítsa be úgy a testét és
karjait, hogy ellen tudjon állni a visszarúgó
erőknek. A visszarúgó erőket a kezelő
kézben tarthatja, ha megteszi a megfelelő
óvintézkedéseket. Ne engedje elszabadulni a
láncfűrészt.
− Ne terjedjen a vágási mûvelet a
vállmagasságon túl. Ez a segítség megelõzi
a nem szándékos hegyérintkezést, és lehetõvé
teszi a láncfûrész jobb szabályozását váratlan
helyzetekben.
− Csak a gyártó által elõírt láncvezetõvel
és lánccal cserélje le. A hibás láncvezetõ-
és lánccsere a lánc elszakadását és / vagy
visszarúgást okozhat.
− Kövesse a gyártó élezési és karbantartási
utasításait. A mélységmérõ magasságának
csökkentése növelt visszarúgást okozhat.
Biztonsági óvintézkedések
Általános elővigyázatosság (1. ábra)
- A biztonságos gépkezelés érdekében az
elektromos láncfűrész használójának kötelező
jelleggel el kell olvasnia ezt a használati
utasítást, hogy megismerhesse az elektromos
láncfűrésszel való bánásmódot. A hiányos
ismeretekkel rendelkező kezelő a helytelen kezelés
miatt saját magára és más személyekre is veszélyt
jelent.
- Az elektromos láncfűrészt csak olyan felhasználóknak
adja kölcsön, akik rendelkeznek tapasztalattal az
elektromos láncfűrész használata terén. Mindig adja
át a használati utasítást is.
- Az új felhasználók kérjék meg az eladót, hogy
lássa el őket az alapvető tudnivalókkal, hogy
megismerkedjenek a motorüzemű fűrész
tulajdonságaival.
- Gyakorolja az elektromos láncfűrésszel való
bánásmódot gömbfák hossztolásával fűrészbakon.
- Gyermekek és a 18 év alatti fiatalok nem
használhatják az elektromos láncfűrészeket. 16 év
fölötti fiatalok ezen tilalom alól abban az esetben
jelenthetnek kivételt, ha kiképzés céljából szakértő
felügyelete alatt állnak.
- Az elektromos láncfűrésszel végzendő munkák
különleges figyelmet igényelnek.
- Kérjük, hogy csak jó fizikai állapotban lévő személyek
használják az elektromos láncfűrészt. Minden
munkát nyugodtan és elővigyázatosan végezzen. A
gép használója másokkal szemben is felelősséggel
tartozik.
- Soha ne használja az elektromos láncfűrészt
szeszesital, kábítószerek vagy gyógyszerek hatása
alatt. (2. ábra)
Személyi védelmi eszközök
- Annak érdekében, hogy a fűrészelésnél
elkerülhetőek legyenek a fej-, a szem-, a kéz, a
lábsérülések és a halláskárosodás, viselni kell az
alábbi testi védő berendezéseket és eszközöket.
- A ruhadarabokat értelemszerűen kell a testen
elrendezni, vigyázva arra, hogy azok semmiféle
zavaró érzést ne okozzanak. A testen ékszert
vagy laza ruhadarabot ne hordjon, ezek ugyanis
87
Page 88

beakadhatnak a bozótba vagy az ágakba.
- A védősisakot (1) rendszeresen meg kell vizsgálni,
nem károsodott-e és legkésőbb 5 év elteltével ki kell
cserélni. Csak ellenőrzött védősisakot használjon.
Hosszú haj esetén viseljen hajhálót. (3. ábra)
- A sisak arcvédő ellenzője (2) (ill. ennek hiányában
a védőszemüveg) védelmet ad a faforgácsok és
a szilánkok ellen. A szemsérülések elkerülése
érdekében, az elektromos láncfűrésszel végzett
munkák során állandóan viselni kell a megfelelő
védőszemüveget, ill. a sisak-ellenzőt.
- A halláskárosodások elkerüléséhez, arra alkalmas
hallásvédő eszközöket (fülvédő (3), kapszula, stb.)
kell használni. Kérésre oktávtartomány-elemzést
végzünk.
- A biztonsági védőöltözet (4) 22-rétegű
nylonszövetből készült és véd a vágási sérülések
ellen. Használatát nagyon ajánljuk. Mindenesetre az
elektromos láncfűrész használatakor erős szövetből
készült hosszú nadrágot kell viselni. (4. ábra)
- Az erős bőrből készült munkakesztyű (5) az előírt
védőfelszerelés részét képezi és az elektromos
láncfűrésszel végzett munkák során állandóan
hordani kell.
- Az elektromos láncfűrésszel végzett munkák
során csúszásgátló talppal, acél felsőrésszel és
lábszárvédővel ellátott biztonsági cipőt
vagy
csizmát (6) kell viselnie. A vágás-álló bevonattal
ellátott biztonsági cipő védelmet ad a vágásból eredő
sebesülések ellen és biztos tartást ad.
Üzembe helyezés
- Esőben és vizes vagy idegen nedves környezetben
nem szabad az elektromos láncfűrésszel dolgozni,
mert a motor víz ellen nem védett. (5. ábra)
- Ha az elektromos láncfűrész nedves lett, nem szabad
üzembe helyezni.
- Kerülni kell a test érintkezését földelt felületekkel.
- Az elektromos láncfűrészt ne működtesse éghető
gázok és porok közelében. Robbanásveszély!
- A tápkábelt a kezelő személy mögött kell elvezetni.
Ügyeljen arra, hogy a kábel el ne szakadjon el és
ne vágják át éles sarkú tárgyak. A kábelt úgy kell
elrendezni, hogy senkit ne veszélyeztessen.
- A hálózati csatlakozót csak ellenőrzött villamos
szerelésű védőérintkezős dugaszoló aljzatba szabad
bedugni. Ellenőrizze, hogy a hálózati feszültség
megfelel a típustáblán szereplő adatoknak. A
biztosíték 16 A-es. A szabadban használt fűrészeket
hibaáram (FI)-védőkapcsolón keresztül kell
csatlakoztatni, max. 30 mA kioldó áramerősséggel.
- Feltétlenül ügyeljen a hosszabbítókábel teljesítménykeresztmetszetére. Kábeldob használata esetén
a kábelt teljesen le kell tekerni. Csak a ”Műszaki
adatok”-nak megfelelő hosszabbító kábelt használjon.
A fűrész szabadban történő használatakor feltétlenül
ügyeljen arra, hogy a kábel erre a célra engedélyezett
legyen.
- A munka megkezdése előtt ellenőrizze, hogy
az elektromos láncfűrész az előírásoknak
megfelelően tökéletesen és biztonságosan
működik.
Külön figyelmet kell fordítani a láncfék működésének,
a fűrészlánc vezetősín helyes összeszerelésének, a
fűrészlánc rendszeres feszülésének és élességének
az ellenőrzésére, fokozottan felül kell vizsgálni
a lánckerék védő megfelelő felerősítését, az
kapcsológomb könnyed működtethetőségét és a
88
reteszelőgomb működését, a kábel és a dugasz
műszaki állapotát, valamint a fogantyúk tisztaságát és
megfelelően száraz állapotát.
- Az elektromos láncfűrészt csak a teljes összeszerelés
után indítsa be. Az elektromos láncfűrészt soha ne
használja, ha nincs teljesen összeszerelve.
- A láncfűrész bekapcsolás előtt távolítsa el a beállító
szerszámokat.
- Az üzemeltetéshez rendszeresített
védőberendezéseket a láncfűrész alkalmazása során
használni kell.
- Ügyeljünk arra, hogy az elektromos láncfűrész
munkatartományában gyermekek vagy más
személyek ne tartózkodjanak . Ügyeljen a
munkaterületen tartózkodó állatokra is. (6. ábra)
- Az elektromos láncfűrész bekapcsolása előtt vegye
fel a helyes és biztos munkapozíciót.
- Bekapcsoláskor mindig mindkét kezével fogja az
elektromos láncfűrészt. A jobb kézzel fogja a hátsó
fogantyút, a bal kézzel pedig a kengyelfogantyút.
Szorosan meg kell fogni a fogantyút, úgy hogy a
hüvelykujj a többi ujjat leszorítsa. A vezetősínnek és a
fűrészláncnak a testtől távol kell mutatnia. (7. ábra)
- A láncfűrészt csak a használati utasításban leírtak
szerint kapcsolja be. Ne terhelje túl a láncfűrészt.
Jobban és biztonságosabban dolgozik a megadott
teljesítménytartományon belül.
- Ha az elektromos láncfűrész működésében,
viselkedésében valamilyen változást észlel, azonnal
állítsa le.
FIGYELEM: A kapcsoló felengedésével a lánc egy
rövid ideig még tovább forog (szabadonfutás).
- A tápkábelt védje a hőtől, olajtól és éles sarkoktól.
- Úgy vezesse el a tápkábelt, hogy ne akadjon be
ágakba vagy más tárgyakba fűrészelés közben.
- Ha a kábel megsérül vagy átvágják, azonnal húzza ki
a tápkábelt. (8. ábra)
- Ha a fűrész-szerkezet kövekkel, szögekkel vagy
egyéb kemény tárgyakkal érintkezik, azonnal húzza ki
a tápkábelt, és ellenőrizze a fűrész-szerkezet.
- A lánc feszülésének ellenőrzéséhez, a lánc
újbóli megfeszítéséhez, annak cseréjéhez illetve
a hibák elhárításához húzza ki a tápkábelt. (9.
ábra)
• készülék meghibásodása
• karbantartás
• olajbetöltés
• fűrészlánc élezése
• kikapcsolás
• szállítás
• üzemen kívül helyezés
- A munka megszakításakor és az elektromos
láncfűrész felügyelet nélkül hagyásakor kapcsolja ki a
láncfűrészt és húzza ki a hálózati csatlakozót. Tegye
az az elektromos láncfűrészt biztonságos helyre,
hogy ne veszélyeztessen másokat.
- Az olajtartály feltöltésekor a hálózati csatlakozót ki kell
húzni. Dohányzás és nyílt láng használata tilos.
- Kerülje az ásványi olaj termékek bőrrel való
érintkezését vagy szembe kerülését. Az olajtartály
feltöltésekor mindig viseljen védőkesztyűt.
- Ügyeljen arra, hogy a láncolaj ne kerüljön a talajba
(környezetvédelem). Csak a megfelelő anyagokat
szabad használni.
- Az olaj kifröccsenésekor azonnal tisztítsa meg az
elektromos láncfűrészt.
Page 89

Bánásmód és munkamódszer
- Soha ne dolgozzon egyedül. Vészhelyzetben mindig
legyen valaki a közelben (hallótávolságon belül).
- Fűrészeléskor mindig két kézzel tartsa az elektromos
láncfűrészt. Így tudja biztonságosan “vezetni”.
- Csak jó látási viszonyok és megfelelő világítás
mellett dolgozzon. Különösen figyelni kell arra, nem
csúszós-e, nedves-e, jeges-e vagy havas-e a talaj,
(csúszásveszély). A frissen hántolt fa (fakéreg)
különösen csúszásveszélyes.
- Instabil talajon soha sem szabad dolgozni. Ügyelni
kell a munkazónában esetlegesen előforduló
akadályokra (kibillenés, egyensúlyvesztés
kockázata). Állandóan ügyelni kell a megfelelő, biztos
alappozíció megtartására.
- Soha ne fűrészeljen vállmagasság fölött.
- Létrán állva soha ne fűrészeljen. (10. ábra)
- Az elektromos láncfűrésszel való fűrészeléshez soha
ne másszon fára.
- Fűrészeléskor ne hajoljon túlságosan előre.
- Úgy vezesse az elektromos láncfűrészt, hogy a
semelyik testrésze se kerüljön a fűrészlánc forgási
zónájának meghosszabbított síkjába. (11. ábra)
- Az elektromos láncfűrésszel csak fát fűrészeljen.
- Ne hagyja, hogy forgás közben a lánc a talajhoz érjen.
A földön fekvő fákat a teljes átfűrészelés előtt meg
kell fordítani, hogy elkerülje a láncnak a talajjal való
érintkezését.
- A vágás környezetét tisztítsa meg az idegen
tárgyaktól, úgymint homoktól, kövektől, szegektől,
dróttól, stb. Az idegen tárgyak károsíthatják a
fűrészszerkezetet és veszélyes visszarúgást
idézhetnek elő.
- Az elővágott rönk vagy vékony fák fűrészelésekor
gondoskodjon a biztonságos megtámasztásról
(fűrészbak, 12). Elővágott rönk vagy vékony fák
fűrészelésekor stabil támasztékot használjon
(fűrészbak, 12). Ne fűrészeljen kötegbe rakott
fadarabokat! Ne hagyja, hogy más személyek tartsák
a fát, és ne támassza ki a lábával sem!
- A rönkfákat rögzítse.
- Lejtőn végzett munka közben mindig a lejtő
magasabb részére álljon.
- Átvágáskor fogazott lécet (Z, 12. ábra) kell
alkalmazni a vágandó fánál.
- Mindenféle darabolási munka megkezdése el
nyomja erősen a fához a láncfűrész fogazott
lécét, csak így lehet a már működésben lévő
fűrészlánccal elkezdeni a fűrészelést. Ehhez az
elektromos láncfűrészt a hátsó fogantyú segítségével
emelje fel és a kengyelfogantyúval irányítsa. A
fogazott léc forgástengelyként szolgál. Folytassa a
kengyelfogantyú enyhe lenyomásával, miközben
hátrafelé húzza az elektromos láncfűrészt. A fogazott
lécet tolja egy kicsit mélyebbre, és újra emelje fel a
hátsó fogantyút.
- A fűrész-szerkezetnek működnie kell amikor kihúzza
a rönkből.
- Több vágás végzéskor a vágások között az
elektromos láncfűrészt ki kell kapcsolni.
- Süllyesztéses és hossztoló vágásokat kizárólag
csak speciálisan erre kiképzett személyek
hajthatnak végre (a nagyobb visszarúgási veszély
miatt).
- A hossztoló vágások (13. ábra) megkezdésekor
a fűrész-szerkezetet a lehető legkisebb szögbe kell
a fához tartani. Legyen nagyon óvatos a hosszanti
vágásoknál, mert a fogazott léc itt nem használható.
őtt
- Ha a fűrészlánc beakadt, a láncfűrész a kezelő
irányába tolódhat, miközben a vezetősín alsó részével
vág. Ezért ha lehetőség van rá, tanácsos a vezetősín
felső részével fűrészelni. Ekkor az elektromos
láncfűrész távolodni fog a kezelő testétől. (14. ábra)
- A nem teljesen feszültségmentes fát (15. ábra),
először a nyomási oldalon (A) fűrészelje be. Ezután
el lehet végezni az átvágást a feszülő oldalon (B). Így
elkerülhető a vezetősín beakadása.
- Óvatosan járjon el egy szilánkosan széthasadt fa
vágásakor. A lefűrészelt fadarabok szétszóródhatnak
(sérülésveszély).
- Soha ne használja az elektromos láncfűrészt a
fa elemelésére, eltávolítására, vagy más tárgy
mozgatására.
- A feszültség megszüntetésekor az elektromos
láncfűrészt a törzsnek kell támasztani (visszarúgás
veszélye).
- Feszültség alatt lévő fák fűrészelését csak
gyakorlott személyek végezhetik. Nagyon
balesetveszélyes!
- Fokozottan ügyeljen a megfeszített ágakra. Ne vágja
alulról az ágakat.
- Feszültségoldó vágásokat soha ne a fatörzsön állva
végezzen.
- Az elektromos láncfűrészt ne használja erdészeti
munkákhoz, pl. erdőben történő fadöntéshez
vagy feszültség megszüntetéséhez a fában. A
kezelő számára szükséges mozgékonyságot és
biztonságot a kábelkapcsolat nem teszi lehetővé.
FIGYELEM:
Fadöntési és gallyazási munkákat csak
képzett személyek végezhetnek! Nagyon
sérülésveszélyes! Tartsa be a helyi előírásokat.
- A fakivágás megkezdése előtt győződjön meg arról,
hogy
a) csak azok az emberek tartózkodnak a
munkaterületen, akik a fa kivágásában részt
vesznek,
b) minden a fadöntésben résztvevő személy számára
biztosított az akadálymentes menekülési útvonal
(a menekülési útvonalnak átlósan, hátrafelé és a
fa dőlésének irányától távolodva kell vezetnie).
Vegye figyelembe a villamos kábelek okozta
fokozottabb botlásveszélyt!
c) a törzs alsó részén nincsenek idegen tárgyak,
hajtások és ágak. Ügyeljen a biztos állásra állásról
(botlásveszély).
d) a következő munkaterület legalább a fa hosszának
két és félszeresére legyen (16. ábra). A kivágás
előtt ellenőrizze a dőlési irányt és győződjön meg
arról, hogy a fa hosszának két és félszeresét adó
távolságban senki sem tartózkodik, ill. semmiféle
tárgy nincs (16. ábra).
=
Esési irány
= Veszélyes zóna
= Visszavonulási útvonal
- A fa felmérése:
A fa elhajlási iránya – laza vagy száraz ágak – a fa
magassága – természetes átnyúlás – korhadt-e a fa?
- Vegye figyelembe a szél sebességét és irányát.
Erősebb széllökések mellett ne végezzen fadöntési
munkát.
- A gyökértövek bemetszése:
Kezdje a legerősebb gyökérrel. Először a vízszintes,
majd a függőleges vágást végezze el.
- A törzs bevágása (A, 17. ábra):
Ez a bevágás adja meg a fa dőlésének irányát és
89
Page 90

vezeti is a fát. A fa kidőlési irányához viszonyítva
derékszögben kell kialakítani, mérete pedig a törzs
átmérőjének 1/3 -1/5 része legyen. Ezt a bevágást a
talajhoz lehető legközelebb végezze.
- A dőlési bevágás esetleges korrekcióját teljes
szélességben el kell végezni.
- A fadöntési vágásnak (B, 18. ábra) a bevágás alsó
részénél (D) magasabban kell lennie. A vágásnak
vízszintes kell lennie. A két vágás közötti távolság a
törzs átmérőjének kb. 1/10-e kell legyen.
- A fa két vágás közötti része (C) csuklórészként
szolgál. Semmi esetre se vágja át, különben a fa
ellenőrizhetetlenül dőlhet ki. Időben helyezze be a
döntő ékeket (B, 18. ábra) a vágásba.
- A kiékelést csak alumíniumból vagy műanyagból
készült ékekkel végezze. Ne használjon vas ékeket.
- A kidőléskor kizárólag a kidőlő fától oldalirányban
szabad tartózkodni.
- A kivágás után vigyázni kell a lezuhanó ágakkal.
- Lejtős területen történő munkavégzéskor az
elektromos láncfűrész kezelőjének a megmunkálandó
törzs, ill. a kidőlt fa felett vagy attól oldalirányban kell
elhelyezkednie.
- Ügyeljen a lejtőn leguruló fatörzs-darabokra.
Visszarúgás
- Az elektromos láncfűrésszel végzett munka során
igen veszélyes visszarúgások fordulhatnak elő.
- Ez a visszarúgás akkor következik be, ha a
láncvezető csúcsa (különösen annak felső negyede)
véletlenül fát vagy más szilárd tárgyat érint. (19. ábra)
- Ekkor az elektromos láncfűrész ellenőrizetlenül,
nagy energiával a láncfűrész kezelőjének irányába
csapódik (sérülésveszély!).
A visszarúgások elkerülése érdekében tartsa be
a következő utasításokat:
- Soha ne a láncvezető csúcsával kezdje meg a vágást.
Mindig figyeljen a láncvezető csúcsára.
- Soha ne fűrészeljen a láncvezető csúcsával. Ügyeljen
erre a vágás folytatásakor is.
- A vágást forgó fűrészlánccal kezdje meg.
- Ügyeljen rá, hogy a láncfűrész lánca mindig
éles legyen. Fordítson különös figyelmet a
mélységhatároló magasságára (részletes
információért lásd a “A fűrészlánc élezése” fejeztet).
- Ne fűrészeljen egyszerre több ágat. Az ágak
fűrészelésekor ügyeljen arra, hogy ne érjen hozzá
más ágakhoz.
- Törzsek darabolásakor ügyeljen a szomszédos
fatörzsekre. Ajánlatos fűrészbak használata.
Szállítás és tárolás
- Az elektromos láncfűrészt a kengyelfogantyúnál fogva
szállítsa. A láncvezető hátrafelé nézzen. Mozgó
fűrészlánccal soha ne vigye, vagy szállítsa az
elektromos láncfűrészt.
- Soha ne szállítsa a láncfűrészt a tápkábelnél fogva.
Ne a tápkábelt fogva húzza ki a dugaszt az aljzatból.
- A munkavégzés során történő helyváltoztatáskor
az elektromos láncfűrészt ki kell kapcsolni és
működésbe kell hozni a láncféket, nehogy a lánc
véletlenül elinduljon.
- Nagyobb távolságra történő szállításkor húzza ki
a hálózati csatlakozót, és minden esetben tegye
fel láncvezetőre a géphez mellékelt láncvezető
burkolatot. (20. ábra)
- Járművön történő szállításkor győződjön meg arról,
hogy az elektromos láncfűrész helyzete stabil, nehogy
90
kifolyjon a lánc kenőolaj.
- A láncfűrészt biztonságos, száraz és zárható
helyiségben kell tárolni, ahol gyerekek nem tudnak
hozzáférni. A láncfűrészt tilos a szabadban tárolni.
- Az elektromos láncfűrész hosszabb idejű tárolása
vagy szállítása esetén teljesen ki kell üríteni az
olajtartályt.
- Csak engedélyezett és megjelölt tartályt használjon a
fűrészláncolaj tárolására és szállítására.
Karbantartás
- A karbantartási munkálatokhoz kapcsolja ki az
elektromos láncfűrészt, húzza ki és rögzítse a
tápkábelt. (21. ábra)
- A munka megkezdése előtt mindig ellenőrizze a
fűrész biztonságos működési állapotát, különösen a
láncféket és a túlfutóféket. Ügyeljen arra is, hogy a
fűrészlánc mindig éles és megfelelően megfeszített
legyen. (22. ábra)
- Rendszeresen vizsgálja át a láncféket és a
túlfutóféket (lásd a “Láncfék, túlfutófék” részt).
- Rendszeresen ellenőrizze a tápkábelt a szigetelés
sérülése tekintetében.
- Az elektromos láncfűrészt rendszeresen tisztítsa meg.
- A műanyag burkolatot sérülés esetén azonnal
javítassa meg egy szakképzett személlyel.
- Rendszeresen ellenőrizze a tartály zárókupakjának
tömítettségét.
- Ne használja a láncfűrészt, ha meghibásodott a BE/KI
kapcsoló. Egy szakképzett szakemberrel javítassa
meg.
Be kell tartani az illetékes szakmai szövetségek
és a biztosítótársaság által előírt balesetmegelőzési utasításokat.
Ne végezzen semmilyen módosítást az
elektromos láncfűrészen. Ezzel a saját
biztonságát veszélyezteti.
Csak a használati utasításban előírt karbantartási és
javítási munkákat végezze el a láncfűrészen. Minden
más munkálatot a MAKITA szakszerviznek kell
elvegeznie. (23. ábra)
Csak eredeti MAKITA pótalkatrészeket és
tartozékokat használjon.
Nem eredeti MAKITA pótalkatrészek, tartozékok,
láncvezető/lánc kombinációk/hosszak alkalmazása
esetén a balesetveszély növekedésével kell
számolnia. Olyan balesetek vagy károsodások
esetében, amelyek nem engedélyezett fűrészszerkezetek vagy tartozékok használatából erednek,
a MAKITA semmilyen felelősséget nem vállal.
Elsősegély (24. ábra)
Egy esetleges baleset ellátáshoz a munkahelyen mindig
rendelkezésre kell állnia egy elsősegély-doboznak. Az
abból kivett eszközöket azonnal pótolni kell.
Ha segítséget kell hívni, adja meg az alábbi
információkat:
- a baleset helyszíne
- mi történt
- a sérült személyek száma
- a sérülések típusa
- az Ön neve.
MEGJEGYZÉS
A keringési rendellenességben szenvedő egyének
véredényei vagy idegrendszere a túlzott mértékű
vibráció hatására megsérülhet.
A vibráció a következő tünetek megjelenését okozhatja
Page 91

az ujjakban, a kézben vagy a csuklóban: Álmosság
(zsibbadtság), bizsergő érzés, fájdalom, szúró
fájdalomérzet, a bőr- vagy annak színének elváltozása.
Ha ezen tünetek bármelyikét észleli önmagán,
forduljon orvoshoz!
91
Page 92

Műszaki adatok
UC3030A UC3530A / AP UC4030A / AP UC4530A
Lánc típusa 092
Láncosztás hüvelyk 3/8”
Vágáshossz cm 30 35 40 45
Max. láncsebesség m/s 13,3
Hangteljesítményszint L
az EN 60745 szerint
Hangnyomásszint L
a munkahelyen az EN 60745 szerint
pA av
WA av
dB (A) 101,8
dB (A) 90,8
Bizonytalanság dB (A) K=0,73
Vibráció gyorsulás
a
per EN 60745
h,w av
- Kengyelfogantyú m/s
- Hátsó markolat m/s
Bizonytalanság m/s
2
2
2
4,7
5,6
K=1,5
Olajszivattyú automatikus
Olajtartály térfogata ml 140
Erőátvitel közvetlen
Túlterhelésvédelem elektromos
Láncfék manuálisan kapcsolható
Túlfutófék elektromos
Tömeg
(Súly, az EPTA 01/2003 eljárás
szerint)
kg 5,0 5,1 5,2 5,3
Védőszigetelés II. osztály (kettős védőszigetelés)
Hosszabbító kábel
(nem tartozék)
A cégünknél folyó folyamatos kutatási és fejlesztési program miatt az itt megadott műszaki adatok előzetes értesítés
•
DIN 57282/ HO 7RN-F
L= 30 m max., 3x1,5 mm
2
nélkül módosulhatnak.
A műszaki adatok országonként eltérőek lehetnek.
•
A rezgéskibocsátás értéke a szabványos vizsgálati eljárásnak megfelelően lett mérve, és segítségével az elektromos
•
kéziszerszámok összehasonlíthatók egymással.
A rezgéskibocsátás értékének segítségével előzetesen megbecsülhető a rezgésnek való kitettség mértéke.
•
FIGYELEM:
A szerszám rezgéskibocsátása egy adott alkalmazásnál eltérhet a megadott értéktől a használat módjától függően.
•
Határozza meg a kezelő védelmét szolgáló munkavédelmi lépéseket, melyek az adott munkafeltételek melletti
•
vibrációs hatás becsült mértékén alapulnak (figyelembe véve a munkaciklus elemeit, mint például a gép leállításának
és üresjáratának mennyiségét az elindítások száma mellett).
92
Page 93

Az alkatrészek megnevezése
1
2
3
67
1 Kengyelfogantyú
2 Kézvédő (felengedésével aktiválódik a láncfék)
3 Tüskés rúd
4 Lánckerékvédő-gyorsfeszítő
5 Lánckerékvédő, láncfék
6 Szénkefe fedele
7 Hátsó kézvédő
8 Láncvezető
9 Olajtartály zárósapkája
10 Azonosítótábla
11 Reteszelőgomb
12 Hátsó markolat
13 BE/KI kapcsoló
14 Olajszint kémlelőablak
15 Fűrészlánc
16 Húzásmentesítő a tápkábelhez
(feszültségmentesítő)
45
8 9 10 11 12
13141516
93
Page 94

ÜZEMBEHELYEZÉS (25. ábra)
FIGYELEM:
A vezetőlemezen és a fűrészláncon végzett
bárminemű munkánál feltétlenül viseljen
védőkesztyűt és húzza ki a hálózati csatlakozót.
FIGYELEM:
Az elektromos láncfűrészt csak teljes
összeszerelés és ellenőrzés után indítsa be!
A láncvezető és a fűrészlánc felszerelése
(26. ábra)
Helyezze az elektromos láncfűrészt egy stabil felületre
és végezze el a következő műveleteket a lánc és a
láncvezető felszereléséhez:
Engedje ki a láncféket. Ehhez a kézvédőt (1) húzza a
nyíl irányába.
Hajtsa fel a lánckerékvédő-gyorsfeszítőt (2). (31. ábra)
Nyomja be erősen a lánckerékvédő-gyorsfeszítőt a
rugóerő ellenében, és forgassa lassan az óramutató
járásával ellentétes irányba addig, míg érezhetően
be nem fog. Tartsa benyomva, és a lehető legtovább
forgassa az óramutató járásával ellentétes irányba.
Engedje el (fesztelenítse) ismét a lánckerékvédőgyorsfeszítőt, és állítsa kiindulási helyzetbe az
óramutató járásával megegyező irányba forgatva.
Addig ismételje a műveletet, amíg a lánckerékvédőgyorsfeszítőt (3) ki nem csavarta.
Enyhén húzza fel a lánckerékvédő-gyorsfeszítőt (3),
húzza ki a hátsó tartókból (4) és vegye ki.
Helyezze fel a láncvezetőt (7) és nyomja a
lánckerékhez (6). (27. ábra)
A fűrészláncot (9) helyezze a lánckerékre (6). Jobb
kezével vezesse be a fűrészláncot a láncvezető felső
vezetőhornyába (8). (28. ábra)
A fűrészlánc vágóéleinek a láncvezető felső
oldalán a nyíl irányába kell mutatniuk!
Nyomja a láncvezetőt bal kézzel enyhén a házon lévő
tartóhoz, és vezesse el a fűrészláncot (9) a láncvezető
visszaterelő csillagkereke (10) körül. Közben húzza a
fűrészláncot enyhén a nyíl irányába. (29. ábra)
Igazítsa be a felfogató furatokat a lánckerékvédőn a
menetes csapokhoz (11).
Forgassa el a láncfeszítő csavart (32/14. ábra),
hogy egy vonalba hozza a láncfeszítő csapot (12) a
láncvezetőben lévő furattal. (30. ábra)
Először nyomja be a lánckerékvédőt (3) a tartóba (13)
és ezután nyomja rá a menetes csapra (30/11. ábra).
(31. ábra)
A fűrészlánc megfeszítése (32. ábra)
Egyszerre nyomja be erősen és forgassa el a
lánckerékvédő-gyorsfeszítőt (2, az óramutató járásának
irányába), hogy becsavarja a lánckerékvédőt (3), de
még ne húzza be.
Emelje meg kissé a láncvezető csúcsát és forgassa el a
láncfeszítőt (14) az óramutató járásának irányába, amíg
a fűrészlánc bele nem kap a láncvezető alsó részén
lévő vezetőhoronyba (lásd a kört).
Nyomja be újra a lánckerékvédő-gyorsfeszítőt (2) és
húzza be az óramutató járásának irányba forgatva.
94
Engedje el a lánckerékvédő-gyorsfeszítőt (2)
(fesztelenítse), amíg szabadon forgatható nem lesz,
mint az az ábrán is látható. (33. ábra)
A láncfeszesség ellenőrzése (34. ábra)
A fűrészlánc megfelelő feszessége akkor adott, ha
a fűrészlánc a láncvezető alsó oldalához felfekszik
és kézzel a láncvezetőről kb. 2-4 mm-nyire (kb. 1/8”)
könnyen leemelhető.
Gyakran ellenőrizze a láncfeszítést, mivel az új láncok
hajlamosak a megnyúlásra!
A lánc feszesség ellenőrzésekor a motornak
kikapcsolva kell lennie és a hálózati csatlakozót
ki kell húzni. Ha a lánc túl laza: Lazítsa
meg a lánckerékvédő-gyorsfeszítőt kb. egy
negyedfordulatnyival. Feszítse meg a láncot „A
fűrészlánc feszítése“ részben leírtak szerint.
TIPP:
Használjon felváltva 2-3 fűrészláncot, hogy a
fűrészlánc, a lánckerék és a láncvezető futófelülete
egyenletesen kopjon.
A láncvezető vájatának egyenletes kopása érdekében a
lánc cseréjekor meg kell fordítani a láncvezetőt.
Láncfék (35. ábra)
Ezek a típusok gyárilag felszerelt láncfékkel vannak
ellátva. Amennyiben visszarúgás fordul elő, amit a
láncvezető csúcsának a fához érintése idéz elő (lásd
a „BIZTONSÁGI ÚTMUTATÓ” részt), a kézvédővel
érintkező kézfeje behúzza a láncféket.
A lánc a másodperc töredéke alatt megáll.
Túlfutófék
Az elektromos láncfűrészek gyárilag túlfutófékkel
vannak felszerelve.
A túlfutófék hatására a BE/KI kapcsoló elengedése után
közvetlenül a fűrészlánc megáll, és így a fűrészlánc
nem fut tovább.
A túlfutófék ellenőrzésének módja később olvasható.
A láncfék és túlfutófék karbantartása
(36.
ábra)
A fékrendszerek igen fontos biztonsági
berendezések, és mint minden alkatrész, bizonyos
mértékű kopásnak vannak kitéve. A rendszeres
ellenőrzés és karbantartás az Ön saját biztonságát
szolgálja és azt egy MAKITA szakműhellyel lehet
szakszerűen elvégeztetni.
A láncfék behúzása (blokkolás) (37. ábra)
Bal kézzel tolja meg a kézvédőt (1) a láncvezető csúcsa
felé (2 nyíl).
A láncfék kiengedése
Húzza meg a kézvédőt (1) a nyíl irányába (3) amíg nem
érzi, hogy beakadt. A fék most ki van engedve.
Megjegyzés:
A láncfék aktiválásakor a motor áramellátása
megszakad. A láncfék ellenőrzésének módja később
olvasható.
Fűrészláncolaj (38. ábra)
A fűrészlánc és a láncvezető kenésére tapadásnövelő
adalékot tartalmazó fűrészlánc olajat kell használni.
A fűrészlánc olajban lévő tapadásnövelő adalék
Page 95

megakadályozza az olaj túl gyors leválását a fűrészszerkezetről.
Ne használjon ásványi olajat. A környezet kímélése
érdekében biológiailag lebomló fűrészláncolaj
használata javasolt.
A MAKITA által kínált BIOTOP fűrészláncolaj válogatott
növényi olajokból készült és biológiailag 100 %-ban
lebomlik. A BIOTOP környezetvédelmi “kék angyal”
címet kapott a környezetbarát tulajdonságai miatt (RAL
UZ 48).
A BIOTOP fűrészláncolaj a felhasználástól függően az
alábbi kiszerelésekben kapható:
1 liter rendelési szám: 980 008 610
5 liter rendelési szám: 980 008 611
A biológiailag lebomló fűrészláncolaj csak korlátozott
ideig tárolható. A flakonra rányomtatott gyártási
időponttól számított 2 éven belül fel kell használni. (39.
ábra)
A biológiailag lebomló fűrészláncolajokra
vonatkozó fontos megjegyzés
Ha a gép sokáig üzemen kívül van (ha az időtartam
meghaladja a fűrészlánc kenőolaj eltarthatósági idejét),
ki kell üríteni az olajtartályt, majd önteni kell bele egy
kis motorolajat (SAE 30), majd járatni kell egy ideig
a láncfűrészt. Ez szükséges ahhoz, hogy a bio olaj
maradványai kiöblítődjenek a tartályból, az olajtovábbító
rendszerből és a fűrészberendezésből, mert a
különféle bio olajok hajlamosak a tapadásra, aminek
következtében károsodhat az olajadagoló elemek vagy
az olajszivattyú.
A gép újbóli beindításakor öntse bele újra a
BIOTOP fűrészláncolajat. A használt olajak vagy
a nem megfelelő láncolajak használatából eredő
károsodásokat a garancia nem fedezi.
Az Ön által vásárolt termék szakképzett eladója
megad minden tájékoztatást a fűrészláncolajjal való
bánásmódra és az olaj használatára vonatkozóan.
Soha ne használjon fáradt olajat (40. ábra)
A fáradt olaj rendkívül nagy veszélyt jelent a
környezetre.
A fáradt olajak nagyon sok rákkeltő anyagot
tartalmaznak.
A fáradt olajban található szennyeződések az
olajszivattyú és a fűrész-szerkezet nagymértékű
kopását eredményezik.
A fáradt olajak vagy a nem megfelelő fűrészláncolajak
használatából eredő károsodásokat a garancia nem
fedezi.
Az Ön által vásárolt termék szakképzett eladója
megad minden tájékoztatást a fűrészláncolajjal való
bánásmódra és az olaj használatára vonatkozóan.
Kerülje a bőrrel való érintkezést és a szembe
jutást (41. ábra)
A kőolajtermékek, valamint az olajok zsírtalanítják a
bőrt. Ha a bőre ismételten és hosszabb ideig érintkezik
vele, kiszárad. Ennek következtében különféle
bőrbetegségek alakulhatnak ki. Emellett allergiás
reakciók is jelentkezhetnek.
Az olaj szemmel való érintkezése irritációkhoz vezet.
Ha az olaj a szemébe kerül, azonnal öblítse ki a szemét
tiszta vízzel. Ha az irritáció továbbra is fennáll, azonnal
forduljon orvoshoz!
Az olajtartály feltöltése (42. ábra)
Csak ha a motor ki van kapcsolva és ki van húzva
a hálózati csatlakozó!
- A tartály zárósapkájának környékét alaposan tisztítsa
meg, hogy semmiféle szennyeződés ne kerüljön az
olajtartályba.
- Csavarja le a tartály zárósapkáját (1) és töltse be a
fűrészláncolajat, amíg a betöltőcsonk alsó éléig nem
ér.
- Erősen tekerje be a tartály zárósapkáját.
- A túlcsordult fűrészláncolajat alaposan törölje le.
Fontos! (43. ábra)
Az első üzembe helyezés alkalmával előbb az
olajvezeték-rendszernek kell teljesen feltöltődnie, és a
fűrészláncolaj csak ezután kezdi el kenni a láncvezetőt.
Ez a folyamat két percig is eltarthat.
- Az olajszint a kémlelőablakon (2) ellenőrizhető.
A fűrészlánc kielégítő kenéséhez mindig elegendő
fűrészláncolajnak kell lennie a tartályban.
A fűrészlánc kenése (44. ábra)
Csak ha a motor ki van kapcsolva és ki van húzva
a hálózati csatlakozó!
Az olajszivattyú kifogástalan működéséhez az
olajadagoló hornyot (3) valamint a láncvezetőben lévő
olajadagoló furatot (4) rendszeresen meg kell tisztítani.
Megjegyzés:
A fűrész üzemen kívül helyezése után normálisnak
tekinthető, hogy az olajvezeték rendszerben és a
vezetősínen visszamaradó kisebb láncolaj mennyiség
egy darabig még csöpög. Ebben az esetben nincs szó
hibáról!
Helyezze a láncfűrészt sík felületre.
Csatlakoztassa a láncfűrészt a hálózatba
(45. ábra)
FIGYELEM!
Az elektromos láncfűrész elektromos hálózatra
való csatlakoztatása előtt mindig ellenőrizze,
hogy a benyomott BE/KI kapcsoló (1) felengedés
után magától visszatér a kikapcsolt pozícióba. Ha
ez nem így van, akkor az elektromos láncfűrészt
semmi esetre se csatlakoztassa az elektromos
hálózatba. Keresse fel a MAKITA-szakszervizt.
Akassza be a hosszabbító kábelt és az elektromos
láncfűrész tápkábelét a húzásmentesítőbe (2).
Dugja a hálózati csatlakozót (3) a hosszabbító kábel
foglalatába (4).
A motor bekapcsolása (46. ábra)
- Csatlakoztassa a láncfűrészt a hálózatba (lásd fent)
- Bekapcsoláskor mindig mindkét kezével fogja az
elektromos láncfűrészt. A jobb kézzel fogja a hátsó
fogantyút, a bal kézzel pedig a kengyelfogantyút.
Szorosan meg kell fogni a fogantyút, úgy hogy a
hüvelykujj a többi ujjat leszorítsa. A láncvezető és a
lánc nem érhet semmilyen tárgyhoz.
- Először nyomja le a reteszelő gombot (5) majd a
BE/KI kapcsolót (1). Ezután engedje fel a reteszelő
gombot (5).
- Figyelem: A fűrészlánc azonnal elkezd mozogni.
Mindig tartsa lenyomva a BE/KI kapcsolót, amíg a
motort működtetni akarja.
95
Page 96

FIGYELEM:
Soha ne rögzítse BE/KI-kapcsolót bekapcsolt
helyzetben.
A motor leállítása
- Engedje fel a BE/KI kapcsolót (1).
MEGJEGYZÉS:
A láncfék aktiválásakor a motor áramellátása
megszakad.
Ha a láncfűrész a BE/KI kapcsoló (1) aktiválására
nem indul be, ki kell engedni a láncféket.
- Húzza meg erősen a kézvédőt (6) a nyíl irányába
amíg nem érzi, hogy beakadt. (47. ábra)
Fontos:
Ezek a típusok indítóáram korlátozóval vannak
felszerelve. Ez az elektronikus alkatrész
megakadályozza az elektromos motor hirtelen
elindulását.
Túlterhelésvédelem: Ha az elektromos láncfűrész
áramfelvétele túllépi a megengedett szintet, akkor
automatikusan megszakad a motor áramellátása. Ez
megakadályozza motor túlhevülését és károsodását.
A láncfűrész újbóli beindításához engedje fel, majd
nyomja be újra a BE/KI kapcsolót.
FIGYELEM: Ne használja a láncfűrészt, ha a
túlterhelésvédelem többször kikapcsolja a láncfűrészt.
Lépjen kapcsolatba egy MAKITA szervizközponttal.
A láncfék ellenőrzése (48. ábra)
Minden munkavégzés előtt le kell ellenőrizni a
láncféket!
- Indítsa be a motort a leírtak szerint (álljon biztosan, és
az elektromos láncfűrészt úgy helyezze a talajra, hogy
a fűrészszerkezet szabadon álljon).
- Az egyik kezével erősen fogja meg a
kengyelfogantyút, a másikkal pedig a másik fogantyút.
- Kapcsolja be a motort és kézfeje hátsó részével
nyomja a kézvédőt (1) a nyíl irányába amíg a láncfék
be nem akad. A fűrészláncnak azonnal meg kell
állnia.
- Azonnal kapcsolja ki a motort és engedje ki a
láncféket.
Fontos: Ha a fűrészlánc ezen ellenőrzésekor nem
áll le azonnal, semmilyen körülmények között ne
használja a láncfűrészt! A láncfűrészt vigye el
egy MAKITA szervizközpontba.
A túlfutófék ellenőrzése (49. ábra)
Ne dolgozzon a láncfűrésszel, amíg nem
ellenőrizte a túlfutóféket!
- Indítsa be a motort a leírtak szerint (álljon biztosan, és
az elektromos láncfűrészt úgy helyezze a talajra, hogy
a fűrészszerkezet szabadon álljon).
- Az egyik kezével erősen fogja meg a
kengyelfogantyút, a másikkal pedig a másik fogantyút.
- Kapcsolja be a motort és kapcsolja ki. A
fűrészláncnak a motor kikapcsolása után két
másodpercen belül meg kell állnia.
Fontos: Ha a fűrészlánc ezen ellenőrzéskor nem
áll meg két másodpercen belül, ne használja a
láncfűrészt! Ellenőrizze a szénkeféket.
A lánckenés ellenőrzése (50. ábra)
Soha ne fűrészeljen megfelelő lánckenés nélkül.
Ellenkező esetben lecsökken a fűrész-szerkezet
élettartama. A munka megkezdése előtt ellenőrizze az
olajszintet a tartályban és az olajtovábbítást. Ellenőrizze
96
a továbbított olaj mennyiségét az alábbi módon:
- Indítsa be az elektromos láncfűrészt.
- Tartsa a működő fűrészláncot kb. 15 cm-rel a farönk
vagy a talaj felett (válasszon egy megfelelő felületet
ehhez).
Ha a kenés megfelelő, egy halvány olajfoltot fog látni,
mivel az olaj kifröccsen a fűrészből. Figyeljen a szél
irányára, hogy elkerülje az olaj ruhára spriccelését!
KARBANTARTÁS
A fűrészlánc megélezése (51. ábra)
A fűrészláncon végzett bárminemű munkánál
feltétlenül viseljen védőkesztyűt és húzza ki a
tápcsatlakozót.
A fűrészláncot meg kell élezni, ha:
- a forgács – nedves fa fűrészelésekor – porszerűvé
válik.
- a fűrészlánc – a rá gyakorolt erős nyomás ellenére – a
fába csak nehézkesen megy bele.
- a vágóélen látható sérülések vannak.
- a fűrész-szerkezet fűrészeléskor a fában egyoldalúan
balra vagy jobbra eltér. Ezt a fűrészlánc egyenetlen
élezése, vagy az egyik oldalon lévő sérülés okozza.
Fontos: Gyakran élezze a fűrészláncot, de kevés
anyagot távolítson el!
Általában a reszelő 2-3 elhúzása elég.
Többszöri saját élezés után a fűrészláncot a
szakműhelyben is éleztesse utána.
Megfelelő élezés: (52. ábra)
FIGYELEM:
Csak az erre a láncfűrészre előírt, engedélyezett
fűrészláncokat és láncvezetőket használjon.
- Minden vágószemnek egyforma hosszúnak
kell lennie (a méret). A különböző hosszúságú
vágószemek a lánc nehézkes működését és a lánc
törését okozhatják!
- A vágószemek minimális hossza 3 mm (0,11”). Ne
élezze újra a láncot, ha a vágószemek hosszúság már
elérte a minimális értéket; ekkor cserélje ki a láncot.
- A mélységhatároló (kerek orr-rész) és a vágóél közötti
távolság határozza meg a vágás mélységét.
- A legjobb vágás akkor érhető el, ha a
-mélységhatároló mélysége 0,64 mm (,025”).
FIGYELEM:
A túl nagy mélység növeli a visszarúgás veszélyét!
(53. ábra)
- Minden vágószemet egyforma, 30°-os szögben
kell élezni. Ha a szögek nagysága eltérő, a lánc
egyenetlenül és nehezen jár, ami megnöveli a kopási
hajlamot és lánctöréshez vezet. (54. ábra)
- A vágószem 85°-os vállazási (egyengetési) szöge
a kerek reszelő behatolási mélységétől függ. Ha
az előírás szerinti reszelő bevezetése megfelelő, a
megfelelő vállazási szög saját magától adódik.
Reszelők és a reszelők kezelése
- Az élezéshez speciális reszelőtartót kell használni
ø 4,0 mm-es fűrészlánc-kerekreszelővel. A normál
kerek reszelők nem alkalmasak erre a feladatra.
- A reszelő csak előretoláskor (nyíl iránya) fogjon.
Visszahúzáskor emelje fel a reszelőt. (55. ábra)
- Először a legrövidebb vágószemet élezze meg.
Page 97

Ennek a vágószemnek a hossza lesz azután a
típusméret a fűrészlánc összes többi vágószeméhez.
- A reszelőt mindig az ábrán bemutatott módon
vezesse.
- A reszelőtartó megkönnyíti a reszelő irányítását.
Jelölések vannak rajta a megfelelő, 30°-os élezési
szögre vonatkozóan (a jelöléseket a fűrészlánccal
párhuzamosra kell állítani) és behatárolja a behatolási
mélységet (a reszelő átmérőjének 4/5 része).
(56. ábra)
- Az élezés újbóli elvégzése után le kell ellenőrizni
a mélységhatároló magasságát a lánchoz való
idomszerrel.
- A speciális lapos reszelővel minden kiálló részt (1)
csiszoljon le, még a legkisebbeket is.
- Újra kerekítse le a mélységhatárolót (2) elől.
(57. ábra)
A lánc vezetősínjének tisztítása, és olajozása
(58. ábra)
FIGYELEM: A védőkesztyű viselése kötelező.
A láncvezető gördülési felületeit rendszeresen le
kell ellenőrizni, nem károsodtak-e, majd a megfelelő
eszközzel meg kell azokat tisztítani.
Az elektromos láncfűrész fokozott használata esetén
szükséges a visszaterelő csillagkerék csapágyának
rendszeres (1 x hetenként) utánkenése. A kenés előtt
alaposan tisztítsa meg a láncvezető csúcsán lévő 2
mm-es furatot és nyomjunk bele egy kevés kenőzsírt.
Univerzális kenőzsír és zsírzópumpa a tartozékok
között kapaható.
Univerzális kenőzsír (rendelési szám: 944 360 000)
Zsírzópumpa (rendelési szám: 944 350 000)
A fűrészlánc cseréje (59. ábra)
FIGYELEM:
Csak az erre a láncfűrészre előírt, engedélyezett
fűrészláncokat és láncvezetőket használjon.
Ellenőrizze a lánckerék (1) állapotát az új fűrészlánc
felszerelése előtt.
FIGYELEM:
Az elkopott lánckerekek (2) károsíthatják az új láncot és
ezért azokat ki kell cserélni.
Ne próbálja saját maga kicserélni a lánckereket. A
lánckerék cseréje speciális képesítést igényel és
csak speciális szerszámokkal felszerelt MAKITA
szakműhelyben végezhető el. (60. ábra)
A szénkefék átvizsgálása és cseréje (61. ábra)
- Ha a kopási határt még nem érte el, nyomja vissza a
helyére a szénkefét, és csavarja vissza a fedelet (1).
- A szénkefék újbóli bejáratásához egy kis ideig (kb.
egy percig) működtesse a láncfűrészt.
Fontos: Most ellenőrizze le a túlfutóféket. Ha a
fűrészlánc nem áll meg két másodpercen belül,
működtesse egy rövid ideig újra az elektromos
láncfűrészt, és ismételje meg az ellenőrzést mindaddig,
amíg a túlfutófék nem működik megfelelően.
MEGJEGYZÉS: Az új szénkefék beszerelés után kb.
5 percig működtesse a láncfűrészt, és csak azután
ellenőrizze a túlfutóféket.
Fontos:
Rendszeresen ellenőrizze a szénkeféket!
A szénkefén lévő bevágás mutatja a kopás
mértékét.
MEGJEGYZÉS:
A szénkefe nagyon törékeny, ügyeljen rá, nehogy
leejtse. Kivételkor jegyezze meg a szénkefe
pozícióját, mert minden szénkefe a motorral együtt
járatódott be.
- Egy lapos csavarhúzóval csavarja ki a fedelet (1),
majd húzza ki a kefét (2).
97
Page 98

Hibakeresés
Hiba Rendszer Megjegyzés Ok
A láncfűrész nem működik teljes a villanymotor nem forog nincs áramellátás,
hibás a kábel
bekapcsolt a láncfék
Kiégett a biztosíték
elégtelen teljesítmény Szénkefék gyenge húzóerő Elhasználódott szénkefék
nincs lánckenés Olajtartály, olajszivattyú nincs kenőolaj a
fűrészláncon
üres az olajtartály,
elkoszolódott az
olajadagoló horony
Láncfék Fék A fűrészlánc nem áll meg
Elhasználódott a fékszalag
azonnal
Túlfutófék Fék A fűrészlánc tovább forog Elhasználódott szénkefék
Utasítások a rendszeres karbantartásra és ápolásra vonatkozóan
A biztonsági berendezések hosszú élettartalmának és megfelelő működésének biztosításához és károsodásuk
elkerülése érdekében az alábbiakban leírt karbantartási munkákat rendszeresen el kell végezni. A reklamációkat csak
abban az esetben ismerjük el jogosnak, ha ezeket a munkákat rendszeresen és megfelelően elvégezték. A balesetek
oka lehet ezen előírások be nem tartása!
Az elektromos láncfűrész használóinak nem engedélyezett a használati utasításban ismertetett karbantartási és
állagmegóvási munkákon felüli karbantartási munkák elvégzése. Bármilyen más műveletet a MAKITA szakszervizben
kell elvégeztetni.
Általános munkálatok Elektromos láncfűrész Rendszeresen tisztítsa meg a burkolatot.
Műanyag ház Ellenőrizze törések és repedések tekintetében. Károsodás
Fűrészlánc Élezze meg rendszeresen.
Láncvezető Egy bizonyos idő után fordítsa meg, hogy egyenletesen
Lánckerék Idejében cseréltesse ki egy szervizközpontban.
Láncfék Rendszeresen vizsgáltassa át egy szervizközpontban.
Túlfutófék Rendszeresen vizsgáltassa át egy szervizközpontban.
A láncfűrész minden
Fűrészlánc Ellenőrizze a károsodást és az élességet.
egyes üzembe
helyezése előtt
Láncvezető Ellenőrizze a sérüléseket és szükség esetén távolítsa el a
A lánc kenése A működés ellenőrzése.
Láncfék A működés ellenőrzése.
Túlfutófék A működés ellenőrzése.
BE/KI kapcsoló A működés ellenőrzése.
Tápkábel Sérülés esetén cseréltesse ki egy szervizközpontban.
Olajtartály záró
sapkája
Minden leállítás után Láncvezető Tisztítsa ki az olajadagoló furatot.
Láncvezető Tisztítsa meg, különösen az olajadagoló hornyot.
Tárolás Láncolaj tartálya Ürítse ki.
Fűrészlánc/láncvezető
Elektromos láncfűrész Száraz, védett helyen tárolja. Hosszabb tárolás után az
esetén a javítást egy szervizközpontban végeztesse el.
Időben cserélje ki.
kopjanak a futófelületek.
Időben cserélje ki.
Ellenőrizze a lánc feszességét.
sorját.
Ellenőrizze a tömítettséget
Szerelje le, tisztítsa meg és enyhén olajozza be.
Tisztítsa meg a láncvezető vezetőhornyát.
elektromos láncfűrészt szervizközpontban ellenőriztesse (a
maradék olaj gyantásodhat és eltömítheti az olajszivattyú
szelepét).
98
Page 99

Gyári szerviz, pótalkatrészek és garancia
Karbantartás és javítások
A korszerű elektromos láncfűrészek továbbá a biztonság szempontjából fontos szerkezeti részek karbantartása és
javítása megfelelő szakképesítést és speciális szerszámokkal és vizsgálókészülékekkel felszerelt műhelyt igényel.
Minden a kézikönyvben nem meghatározott munkát csak MAKITA szakszervizben végeztesse el.
A MAKITA szervizközpontok minden szükséges berendezéssel, valamint képzett és tapasztalt szakemberekkel is
rendelkeznek, akik korrekt kapcsolatra törekednek az ügyfelekkel, és mindenben szívesen segítenek.
Harmadik ill. arra nem jogosult személy által végzett javítási kísérletek esetén a garancia érvényét veszti.
Pótalkatrészek
A fűrész megbízható, tartós és biztonságos üzeme a felhasznált pótalkatrészek minőségétől is függ. Csak eredeti
MAKITA pótalkatrészeket használjon.
Csak az eredeti alkatrészek biztosítják az optimális minőséget, ügyelve a méretekre és a megfelelő
működőképességre.
Az eredeti tartozékokra és pótalkatrészekre vonatkozó javaslatot attól a szakeladótól kapja meg, akitől a gépet
vásárolta. Ő rendelkezik a szükséges pótalkatrészek listáival, melyek segítségével meghatározható a szükséges
pótalkatrész száma és ő ad tájékoztatást a pótalkatrészekre vonatkozó ajánlatról, az esetleges javító módosítások és
újdonságok függvényében. A helyi forgalmazót a www.makita-outdoor.com weblapon találhatja meg.
Kérjük, vegye figyelembe, hogy nem eredeti MAKITA alkatrészek felhasználása esetén a MAKITA garancia
automatikusan érvényét veszti.
99
Page 100

SLOVENČINA (Pôvodné pokyny)
Ďakujeme za vašu dôveru v naše výrobky
Blahoželáme vám k zakúpeniu novej elektrickej
reťazovej píly značky MAKITA. Sme presvedčení že
budete s týmto moderným zariadením spokojní.
Elektrické reťazové píly MAKITA sú typické svojimi
masívnymi, vysoko účinnými motormi a vysokými
rýchlosťami reťaze, čo umožňuje vynikajúci rezný
výkon. Sú vybavené mnohými najmodernejšími
bezpečnostnými zariadeniami, sú ľahké, praktické a je
možné ich do činnosti uviesť okamžite a všade tam, kde
je zabezpečený prívod elektrickej energie.
Aby ste zabezpečili optimálne fungovanie a výkon
elektrickej reťazovej píly a aby ste zabezpečili osobnú
bezpečnosť, chceli by sme vás požiadať o vykonanie
nasledujúcich činností:
Pred použitím elektrickej reťazovej píly si
pozorne prečítajte tento návod na obsluhu a
striktne dodržiavajte bezpečnostné nariadenia.
Opomenutie môže mať za následok vážne
poranenie obsluhy a/alebo okolostojacich osôb.
Symboly
Na reťazovej píle a v návode na obsluhu nájdete
nasledujúce symboly:
Prečítajte si návod na obsluhu
a dodržiavajte výstražné a
bezpečnostné opatrenia!
Osobitná starostlivosť a
pozornosť!
Používajte ochrannú helmu,
chrániče zraku a sluchu!
Vytiahnite držiac zástrčku
sieťového kábla!
Pokiaľ je kábel poškodený,
vytiahnite zástrčku sieťového
kábla!
Brzda reťaze je uvoľnená
Brzda reťaze je aktivovaná
Spätný náraz!
Zakázané!
..... mm
Maximálne dovolená rezná dĺžka
Používajte ochranné rukavice!
Chráňte pred účinkom vlhkosti!
Smer pohybu reťaze
Dvojitá ochranná izolácia
Olej pre pílovú reťaz
Prvá pomoc
Recyklácia
Označenie CE
Pamätajte na naše životné
prostredie! Elektrické prístroje
nesmú byť likvidované
v komunálnom odpade!
Pokiaľ už nie je možné prístroj
používať, opýtajte sa príslušného
podniku pre likvidáciu odpadov na
opatrenia, nutné pri likvidácii.
Aby sa zabránilo ohrozeniu tretích
osôb defektným prístrojom, odrežte
prívodné vedenie tesne pri kryte.
POZOR! Pred oddelením
prívodného vedenia vytiahnite
zástrčku zo zásuvky. Hrozí
nebezpečenstvo ohrozenia
života zásahom elektrického
prúdu!
100
 Loading...