

Makita UC3050A, UC3550AP, UC3550A, UC3051A, UC3551A Instruction Manual
...
1
GB
Electric Chain Saw INSTRUCTION MANUAL
SI
Električna verižna žaga NAVODILO ZA UPORABO
AL
Sharra elektrike me zinxhir MANUALI I PËRDORIMIT
BG
Електрически верижен трион
РЪКОВОДСТВО ЗА ЕКСПЛОАТАЦИЯ
HR
Električna motorna pila PRIRUČNIK S UPUTAMA
MK
Електрична моторна пила
У
ПАТСТВО ЗА УПОТРЕБА
RO
Ferăstrău electric cu lanţ MANUAL DE INSTRUCŢIUNI
RS
Електрична ланчана тестера
У
ПУТСТВО ЗА УПОТРЕБУ
RUS
Электрическая Цепная Пила
РУКОВОДСТВО ПО ЭКСПЛУАТАЦИИ
UA
Електрична ланцюгова пила ІНСТРУКЦІЯ З ЕКСПЛУАТАЦІЇ
UC3050A
UC3550A
UC3550AP
UC4050A
UC4550A
UC3051A
UC3551A
UC4051A
UC4551A
2
1 014453
1
2
2 014393
1
3 014515
1
4 014516
1
5 014457
2
1
6 014448
3
1
2
7 014380 8 014454
1
2
9 014394
4
3
1
2
12 014359
1
2
13 014376
14 006921
1
2
15 014386
1
2
3
5
4
1
2
3
5
4
10 014680 11 014682
Reclaimend
oil
3
1
2
3
18 014387
1
32
19 014439
1
20 014517 21 014392
1
22 014389
23 006914
A
B
A
B
24 006915
25 014390
45
o
2 1/
2
45
o
1
26 006917 27 006918
28 006923
1
2
2
3
3
29 009202
30 006924
1
2
3
5
4
16 014680
1
2
3
5
4
17 014682
4
22
1
1
3
1
31 014456
30
30
11
32 014455
33 006927
30
34 006928
35 014344
36 006930
1
2
37 014391
1
38 014513
1
39 001145
1
2
40 014395
5
ENGLISH (Original instructions)
Explanation of general view
2-1. Lever
2-2. Sprocket cover
3-1. Adjusting screw
4-1. Adjusting dial
5-1. Sprocket
6-1. Guide bar
6-2. Hole
7-1. Hook
7-2. Hole
7-3. Pin
9-1. Lever
9-2. Sprocket cover
10-1. Loosen
10-2. Tighten
10-3. Chain adjusting screw
10-4. Guide bar
10-5. Saw chain
11-1. Loosen
11-2. Tighten
11-3. Adjusting dial
11-4. Guide bar
11-5. Saw chain
12-1. Cord hook
12-2. Tool's cord
12-3. Extension cord
12-4. Plug and socket (the shape may
differ from country to country)
13-1. Lock-off button
13-2. Switch trigger
15-1. Oil filler cap
15-2. Strap
16-1. Loosen
16-2. Tighten
16-3. Chain adjusting screw
16-4. Guide bar
16-5. Saw chain
17-1. Loosen
17-2. Tighten
17-3. Adjusting dial
17-4. Guide bar
17-5. Saw chain
18-1. Front hand guard
18-2. Lock
18-3. Unlock
19-1. Front hand guard
19-2. Unlock
19-3. Lock
20-1. Oil level sight
22-1. Spike bumper
26-1. Felling area
29-1. Felling direction
29-2. Danger zone
29-3. Escape route
31-1. Cutting length
31-2. Distance between cutting edge
and depth gauge
31-3. Minimum 3 mm
32-1. Side plate angle
37-1. Oil guide groove
37-2. Oil feed hole
38-1. Sprocket
39-1. Limit mark
40-1. Brush holder cap
40-2. Screwdriver
SPECIFICATIONS
Model
UC3050A UC3051A UC3550A
UC3550AP
UC3551A UC4050A UC4051A UC4550A
UC4551A
Max. chain speed 14.5 m/s (870 m/min)
Bar length 300 mm 350 mm 400 mm 450 mm
Cutting length 260 mm 320 mm 355 mm 415 mm
Standard guide
bar
Guide bar type Sprocket nose bar
Type 91PX
Pitch 3/8"
Standard saw
chain
No. of drive links 46 52 56 62
Recommended guide bar length 300 - 450 mm
Overall length (without guide bar) 505 mm
Net weight 5.4 kg 5.5 kg 5.5 kg 5.6 kg 5.5 kg 5.6 kg 5.7 kg
Extension cable (optional) DIN 57282/HO 7RN -F L=30 m max.,3x1.5 mm2
• Due to our continuing program of research and development, the specifications herein are subject to change without notice.
• Specifications may differ from country to country.
• Weight according to EPTA-Procedure 01/2003
END218-7
Symbol
The following show the symbols used for the equipment.
Be sure that you understand their meaning before use.
・ Read instruction manual and follow the
warnings and safety instructions.
・ Wear eye protection.
・ Wear ear protection.
・ DOUBLE INSULATION
・ Caution: particular care and attention
required!
・ Caution: withdraw the mains plug
immediately if the cable is damaged!
・ Caution: kickback!
・ Protect against rain and damp!
・ Wear a helmet, goggles and ear
protection!
・ Wear safety gloves!
6
・ Withdraw the mains plug!
・ First aid
・ Maximum permissible length of cut
・ Direction of chain travel
・ Chain oil
・ Chain brake released
・ Chain brake applied
・ Prohibited!
・ Only for EU countries
Do not dispose of electric equipment
together with household waste
material!
In observance of the European
Directive, on Waste Electric and
Electronic Equipment and its
implementation in accordance with
national law, electric equipment that
have reached the end of their life must
be collected separately and returned to
an environmentally compatible
recycling facility.
ENE085-1
Intended use
The tool is intended for cutting lumbers and logs.
ENF002-2
Power supply
The tool should be connected only to a power supply of
the same voltage as indicated on the nameplate, and
can only be operated on single-phase AC supply. They
are double-insulated and can, therefore, also be used
from sockets without earth wire.
ENG905-1
Noise
The typical A-weighted noise level determined
according to EN60745:
Sound pressure level (LpA) : 90.8 dB (A)
Sound power level (L
WA
) : 101.8 dB (A)
Uncertainty (K) : 2.5 dB (A)
Wear ear protection
ENG900-1
Vibration
The vibration total value (tri-axial vector sum)
determined according to EN60745:
Work mode : cutting wood
Vibration emission (a
h
) : 5.2 m/s
2
Uncertainty (K) : 1.5 m/s
2
ENG901-1
•
The declared vibration emission value has been
measured in accordance with the standard test
method and may be used for comparing one tool
with another.
• The declared vibration emission value may also be
used in a preliminary assessment of exposure.
WARNING:
• The vibration emission during actual use of the
power tool can differ from the declared emission
value depending on the ways in which the tool is
used.
• Be sure to identify safety measures to protect the
operator that are based on an estimation of
exposure in the actual conditions of use (taking
account of all parts of the operating cycle such as
the times when the tool is switched off and when it
is running idle in addition to the trigger time).
ENH030-5
For European countries only
EC Declaration of Conformity
Makita declares that the following Machine(s):
Designation of Machine:
Chain Saw
Model No./ Type: UC3050A, UC3550A, UC4050A,
UC4550A, UC3051A, UC3551A, UC3550AP, UC4051A,
UC4551A
Specifications: see "SPECIFICATIONS" table.
Conforms to the following European Directives:
2000/14/EC, 2006/42/EC
They are manufactured in accordance with the following
standard or standardized documents:
EN60745
The EC-Type Examination Certificate
No.5514056.14005
The EC-Type Examination per 2006/42/EC was
performed by:
DEKRA Testing and Certification GmbH
Enderstraße 92b
01277 Dresden
Germany
Identification No. 2140
The technical file in accordance with 2006/42/EC is
available from:
Makita, Jan-Baptist Vinkstraat 2, 3070, Belgium
The conformity assessment procedure required by
Directive 2000/14/EC was in Accordance with annex V.
Measured Sound Power Level: 101.9 dB (A)
Guaranteed Sound Power Level: 103 dB (A)

7
4.9.2014
000331
Yasushi Fukaya
Director
Makita, Jan-Baptist Vinkstraat 2, 3070, Belgium
GEA010-1
General Power Tool Safety
Warnings
WARNING Read all safety warnings and all
instructions.
Failure to follow the warnings and instructions
may result in electric shock, fire and/or serious injury.
Save all warnings and instructions for
future reference.
GEB037-8
Chain saw safety warnings
1.
Keep all parts of the body away from the saw
chain when the chain saw is operating. Before
you start the chain saw, make sure the saw chain
is not contacting anything.
A moment of inattention
while operating chain saws may cause entanglement
of your clothing or body with the saw chain.
2. Always hold the chain saw with your right
hand on the rear handle and your left hand on
the front handle. Holding the chain saw with a
reversed hand configuration increases the risk of
personal injury and should never be done.
3. Hold the power tool by insulated gripping
surfaces only, because the saw chain may
contact hidden wiring or its own cord. Saw
chains contacting a "live" wire may make
exposed metal parts of the power tool "live" and
could give the operator an electric shock.
4.
Wear safety glasses and hearing protection.
Further protective equipment for head, hands,
legs and feet is recommended.
Adequate protective
clothing will reduce personal injury by flying debris or
accidental contact with the saw chain.
5. Do not operate a chain saw in a tree. Operation
of a chain saw while up in a tree may result in
personal injury.
6. Always keep proper footing and operate the
chain saw only when standing on fixed,
secure and level surface. Slippery or unstable
surfaces such as ladders may cause a loss of
balance or control of the chain saw.
7. When cutting a limb that is under tension be
alert for spring back. When the tension in the
wood fibres is released the spring loaded limb
may strike the operator and/or throw the chain
saw out of control.
8. Use extreme caution when cutting brush and
saplings. The slender material may catch the
saw chain and be whipped toward you or pull you
off balance.
9. Carry the chain saw by the front handle with
the chain saw switched off and away from
your body. When transporting or storing the
chain saw always fit the guide bar cover.
Proper handling of the chain saw will reduce the
likelihood of accidental contact with the moving
saw chain.
10. Follow instructions for lubricating, chain
tensioning and changing accessories.
Improperly tensioned or lubricated chain may
either break or increase the chance for kickback.
11. Keep handles dry, clean, and free from oil and
grease. Greasy, oily handles are slippery causing
loss of control.
12. Cut wood only. Do not use chain saw for
purposes not intended. For example: do not
use chain saw for cutting plastic, masonry or
non-wood building materials. Use of the chain
saw for operations different than intended could
result in a hazardous situation.
13. Causes and Operator Prevention of Kickback:
Kickback may occur when the nose or tip of the
guide bar touches an object, or when the wood
closes in and pinches the saw chain in the cut.
Tip contact in some cases may cause a sudden
reverse reaction, kicking the guide bar up and
back towards the operator.
Pinching the saw chain along the top of the guide
bar may push the guide bar rapidly back towards
the operator.
Either of these reactions may cause you to lose
control of the saw which could result in serious
personal injury. Do not rely exclusively upon the
safety devices built into your saw. As a chain saw
user, you should take several steps to keep your
cutting jobs free from accident or injury.
Kickback is the result of tool misuse and/or
incorrect operating procedures or conditions and
can be avoided by taking proper precautions as
given below:
− Maintain a firm grip, with thumbs and
fingers encircling the chain saw handles,
with both hands on the saw and position
your body and arm to allow you to resist
kickback forces. Kickback forces can be
controlled by the operator, if proper
precautions are taken. Do not let go of the
chain saw.
8
014316
− Do not overreach and do not cut above
shoulder height. This helps prevent
unintended tip contact and enables better
control of the chain saw in unexpected
situations.
− Only use replacement bars and chains
specified by the manufacturer. Incorrect
replacement bars and chains may cause
chain breakage and/or kickback.
− Follow the manufacturer’s sharpening
and maintenance instructions for the saw
chain. Decreasing the depth gauge height
can lead to increased kickback.
ADDITIONAL SAFETY RULES
1. Read the instruction manual in order to familiarize
yourself with operation of the chain saw.
2. Before using the chain saw for the first time,
arrange to have instruction in its operation. If this
is not possible, at least practice cutting round
timber on a trestle before beginning work.
3. The chain saw must not be used by children or
young persons under 18 years of age. Young
persons over 16 years of age may be exempted
from this restriction if they are undergoing training
under the supervision of an expert.
4. Working with the chain saw requires a high level
of concentration. Do not work with the saw if you
are not feeling fit and well. Carry out all work
calmly and carefully.
5. Never work under the influence of alcohol, drugs
or medication.
Proper use
1. The chain saw is intended solely for cutting wood.
Do not use it for example to cut plastic or porous
concrete.
2. Only use the chain saw for operations described
in this instruction manual. Do not, for example,
use it to trim hedges or for similar purposes.
3. The chain saw must not be used for forestry work,
i.e. for felling and limbing standing timber. The
chain saw cable does not provide the operator
with the mobility and safety required for such
work.
4. The chain saw is not intended for commercial use.
5. Do not overload the chain saw.
Personal protective equipment
1. Clothing must be close-fitting, but must not
obstruct mobility.
2.
Wear the following protective clothing during work:
• A tested safety helmet, if a hazard is
presented by falling branches or similar;
• A face mask or goggles;
• Suitable ear protection (ear muffs, custom or
mouldable ear plugs). Octave brand analysis
upon request.
• Firm leather safety gloves;
•
Long trousers manufactured from strong fabric;
• Protective dungarees of cut-resistant fabric;
• Safety shoes or boots with non-slip soles,
steel toes, and cut-resistant fabric lining;
• A breathing mask, when carrying out work
which produces dust (e.g. sawing dry wood).
Protection against electric shock
・ The chain saw must not be used in wet
weather or damp environments, as the
electric motor is not waterproof.
1. Only plug the saw into sockets in tested electrical
circuits. Check that the system voltage matches
that on the rating plate. Ensure that a 16 A line
fuse is fitted. Saws used in the open air must be
connected to a residual current-operated circuitbreaker with an operating current no higher than
30 mA.
・ Should the connecting cable be
damaged, withdraw the mains plug
immediately.
Safe working practices
1. Before starting work, check that the chain saw is
in proper working order and that its condition
complies with the safety regulations. Check in
particular that:
• The chain brake is working properly;
• The run-down brake is working properly;
•
The bar and the sprocket cover are fitted correctly;
• The chain has been sharpened and tensioned
in accordance with the regulations;
•
The mains cable and mains plug are undamaged;
Refer to the "CHECKS " section.
2. Always ensure in particular that the extension
cable used is of adequate cross-section (see
"SPECIFICATIONS"). When using a cable reel,
wind the cable completely off the reel. When
using the saw in the open air, ensure that the
cable employed is intended for open-air use and
is rated accordingly.
3. Keep the cord away from the cutting area and to
position cord so that it will not be caught on
branches, and the like, during cutting.
4. Do not operate the chain saw in the vicinity of
flammable dust or gases, as the motor generates
sparks and presents a risk of explosion.

9
5. Work only on firm ground and with a good footing.
Pay particular attention to obstacles (e.g. the
cable) in the working area. Take particular care
where moisture, ice, snow, freshly cut wood or
bark may make surfaces slippery. Do not stand
on ladders or trees when using the saw.
6. Take particular care when working on sloping
ground; rolling trunks and branches pose a
potential hazard.
7. Never cut above shoulder height.
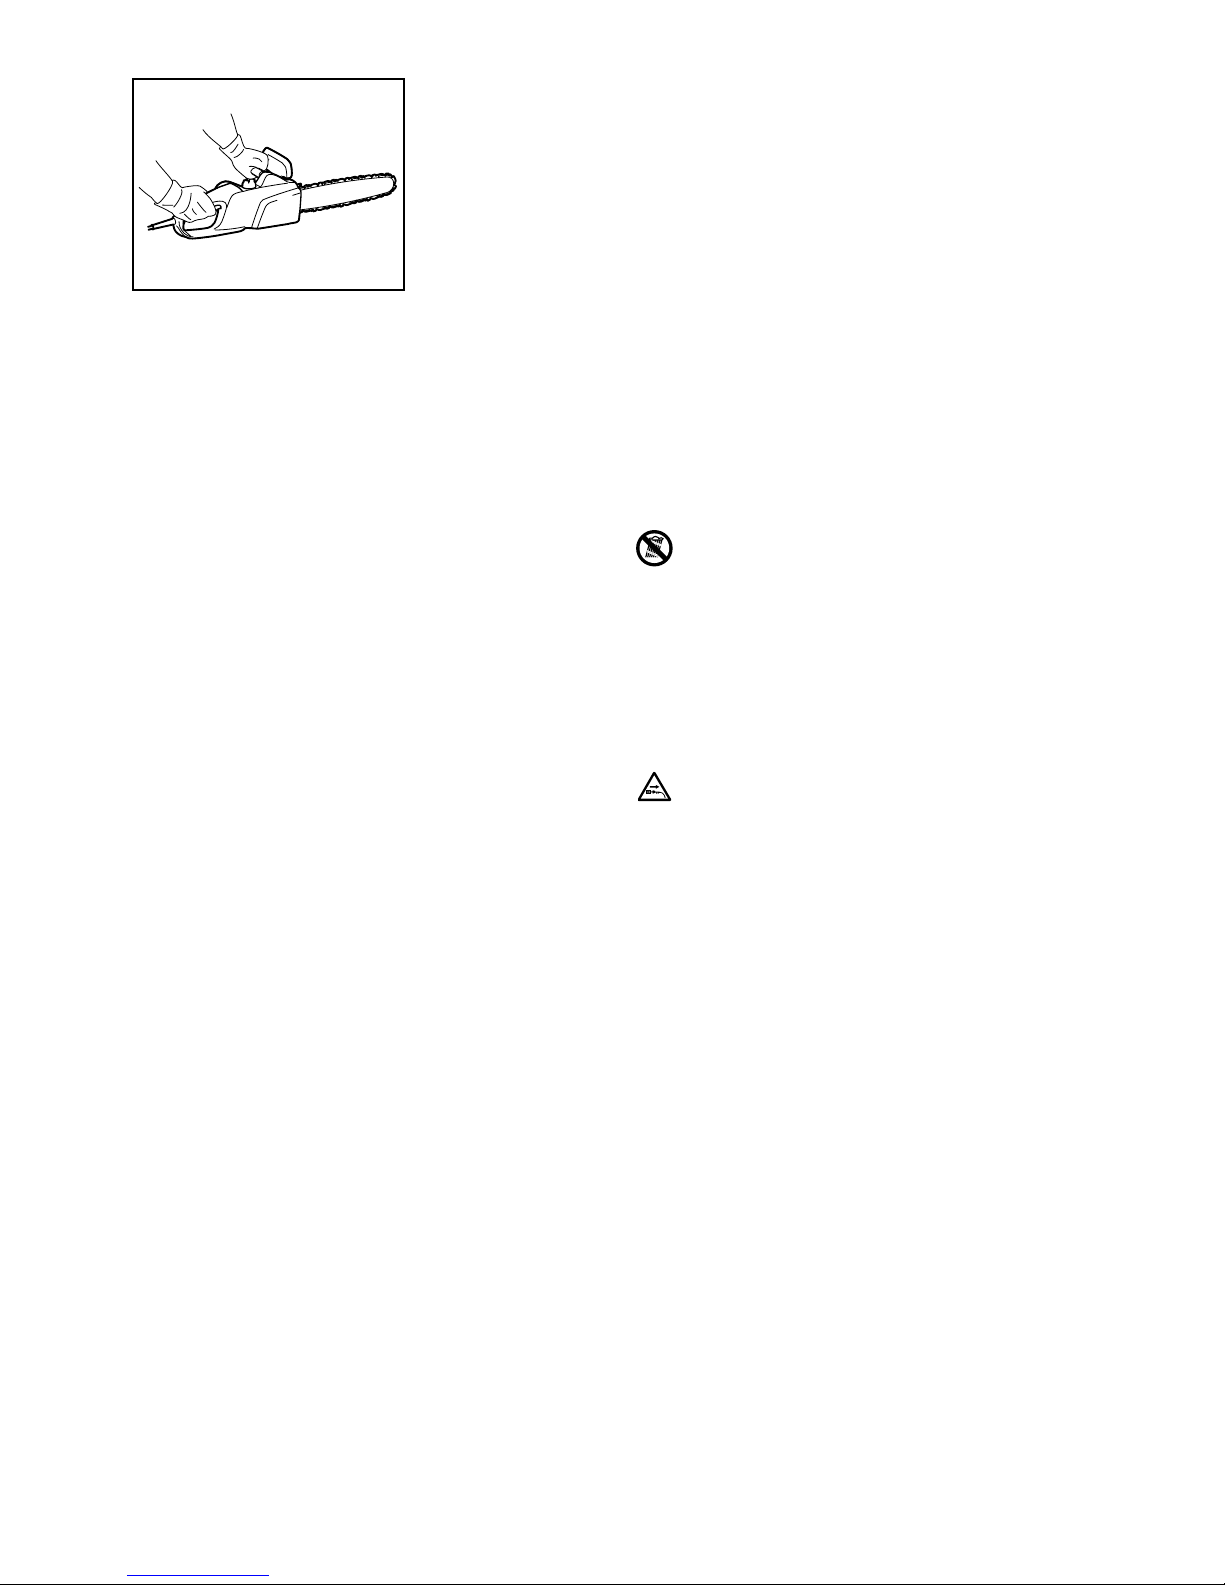
8.
Hold the chain saw with both hands when
switching it on and using it.
Hold the rear handle
with your right hand and the front handle with your
left. Hold the handles firmly with your thumbs. The
bar and the chain must not be in contact with any
objects when the saw is switched on.
014316
9.
Clean the area to be cut of foreign objects such as
sand, stones, nails, wire, etc. Foreign objects damage
the bar and chain, and can lead to dangerous kickback.
10. Take particular care when cutting in the vicinity of
wire fences. Do nut cut into the fence, as the saw
may kick back.
11. Do not cut into the ground.
12.
Cut pieces of wood singly, not in bunches or stacks.
13. Avoid using the saw to cut thin branches and
roots, as these can become entangled in the
chain saw. Loss of balance presents a hazard.
14.
Use a secure support (trestle) when cutting sawn timber.
15. Do not use the chain saw to prise off or brush
away pieces of wood and other objects.
16.
Guide the chain saw such that no part of your body is
within the extended path of the saw chain (see figure).
006909
17. When moving around between sawing operations,
apply the chain brake in order to prevent the
chain from being operated unintentionally. Hold
the chain saw by the front handle when carrying it,
and do not keep your finger on the switch.
18. Withdraw the mains plug when taking breaks or
leaving the chain saw unattended. Leave the
chain saw where it cannot present a hazard.
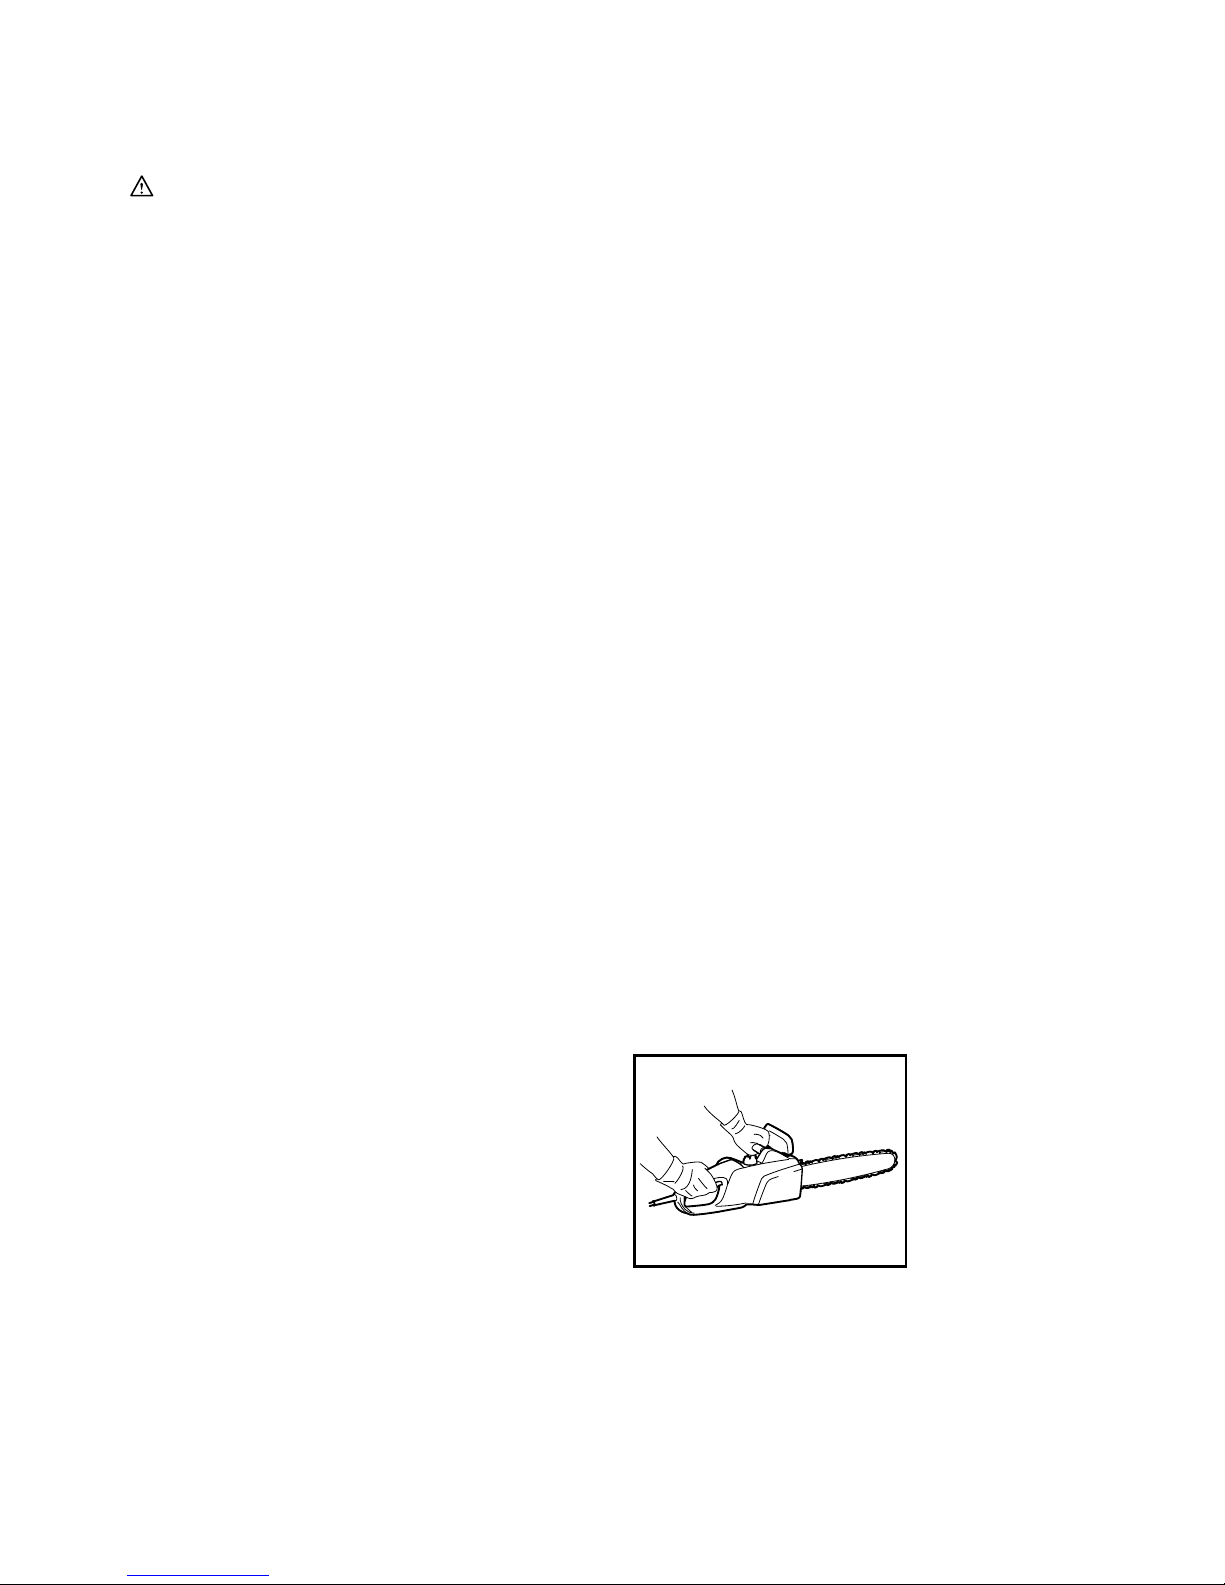
Kickback
1.
Hazardous kickback may arise during work with the
chain saw. Kickback arises when the tip of the bar (in
particular the upper quarter) comes into contact with
wood or another solid object. This causes the chainsaw
to be deflected in the direction of the operator.
006919
2. In order to avoid kickback, observe the following:
• Never begin the cut with the tip of the bar.
• Never use the tip of the bar for cutting. Take
particular care when resuming cuts which
have already been started.
• Start the cut with the chain running.
•
Always sharpen the chain correctly. In particular,
set the depth gauge to the correct height.
• Never saw through several branches at a time.
• When limbing, take care to prevent the bar
from coming into contact with other branches.
• When bucking, keep clear of adjacent trunks.
Always observe the bar tip.
• Use a trestle.
Safety features
1.
Always check that the safety features are in working
order before starting work. Do not use the chain saw
if the safety features are not working properly.
− Chain brake:
The chain saw is fitted with a chain brake which brings
the saw chain to a standstill within a fraction of a
second. It is activated when the hand guard is pushed
forwards. The saw chain then stops within 0.15 s, and
the power supply to the motor is interrupted.
12
014317
1. Chain brake
applied
2. Chain brake
released

10
− Run-down brake:
The chain saw is equipped with an run down brake
which brings the saw chain to an immediate stop
when the ON/OFF switch is released. This
prevents the saw chain from running on when
switched off, and thus presenting a hazard.
− The front and rear hand guards protect the user
against injury from pieces of wood which may be
thrown backwards, or a broken saw chain.
− The trigger lockout prevents the chain saw from
being switched on accidentally.
− The chain catcher protects the user against injury
should the chain jump or break.
Transport and storage
・ When the chain saw is not in use or is
being transported, withdraw the mains
plug and fit the guide bar cover
supplied with the saw. Never carry or
transport the saw with the saw chain
running.
1. Carry the chain saw by the front handle only, with
the bar pointing backwards.
2. Keep the chain saw in a secure, dry and locked
room out of the reach of children. Do not store the
chain saw outdoors.
MAINTENANCE
1. Withdraw the plug from the socket before carrying
out any adjustments or maintenance.
2. Check the power cable regularly for damage to
the insulation.
3. Clean the chain saw regularly.
4. Have any damage to the plastic housing repaired
properly and immediately.
5. Do not use the saw if the switch trigger is not
working properly. Have it properly repaired.
6. Under no circumstances should any modifications
be made to the chain saw. Your safety is at risk.
7. Do not carry out maintenance or repair work other
than that described in this instruction manual. Any
other work must be carried out by authorized
service centers.
8. Only use genuine replacement parts and
accessories intended for your model of saw. The
use of other parts increases the risk of accident.
9. We accept no responsibility for accidents or
damage should non-approved bars, saw chains
or other replacement parts or accessories be
used.
First aid
・ Do not work alone. Always work within
shouting distance of a second person.
1. Always keep a first-aid box to hand. Replace any
items taken from it immediately.
2. Should you request assistance in the event of an
accident, state the following:
• Where did the accident happen?
• What happened?
• How many persons are injured?
• What injuries do they have?
• Who is reporting the accident?
NOTE:
Individuals with poor circulation who are exposed to
excessive vibration may experience injury to blood
vessels or the nervous system.
Vibration may cause the following symptoms to occur in
the fingers, hands or wrists: "Falling asleep
"(numbness), tingling, pain, stabbing sensation,
alteration of skin colour or of the skin.
If any of these symptoms occur, see a physician!
SAVE THESE INSTRUCTIONS.
WARNING:
DO NOT let comfort or familiarity with product
(gained from repeated use) replace strict adherence
to safety rules for the subject product. MISUSE or
failure to follow the safety rules stated in this
instruction manual may cause serious personal
injury.
11
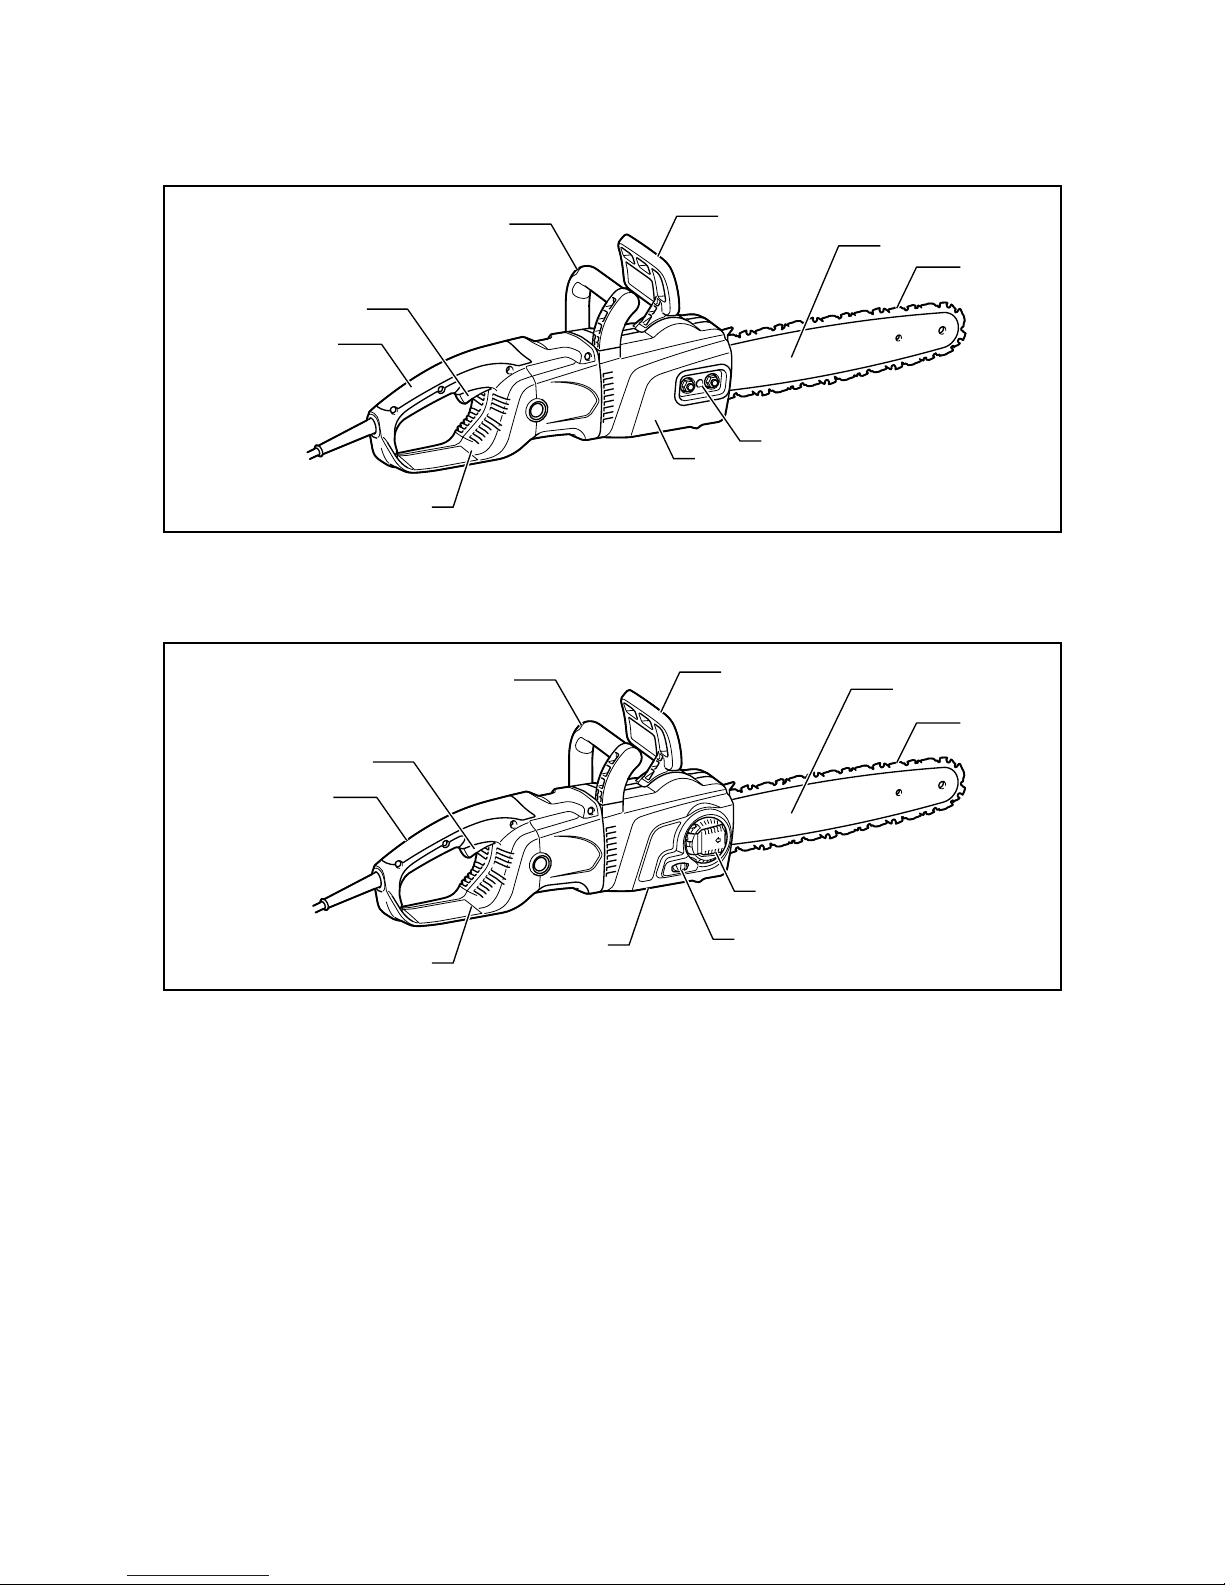
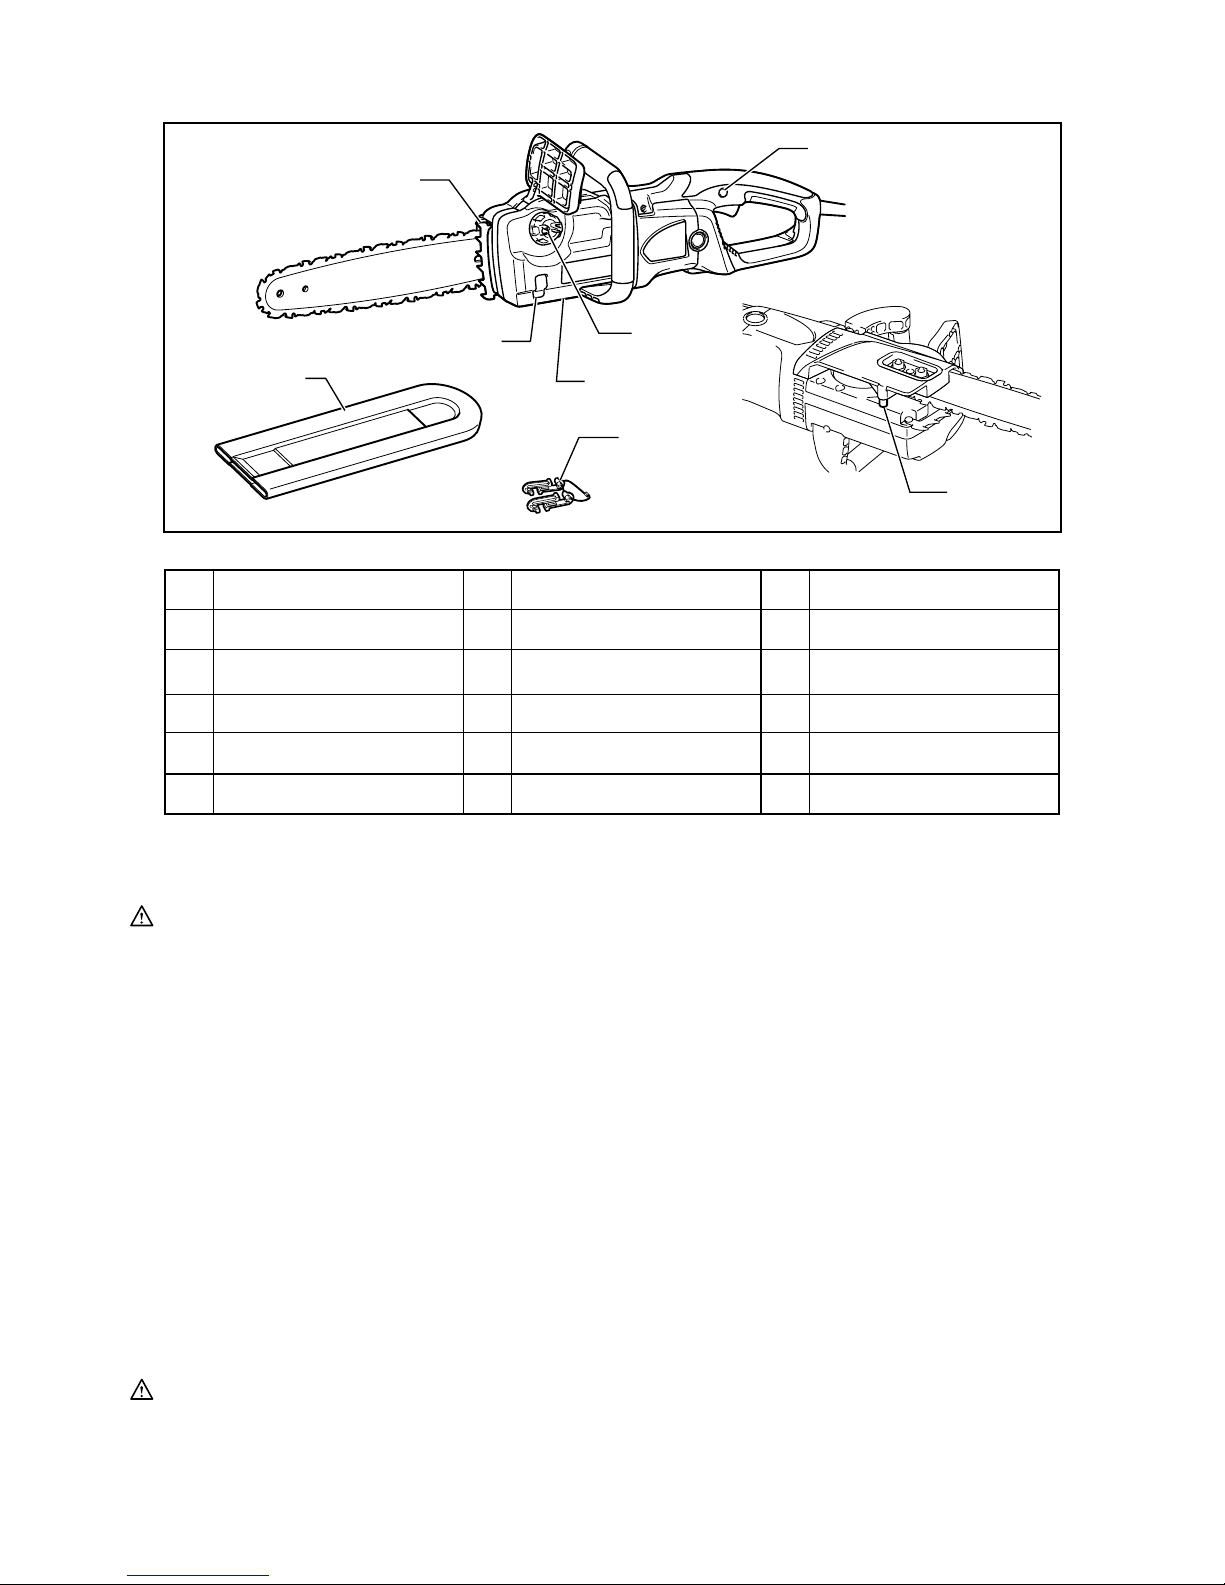
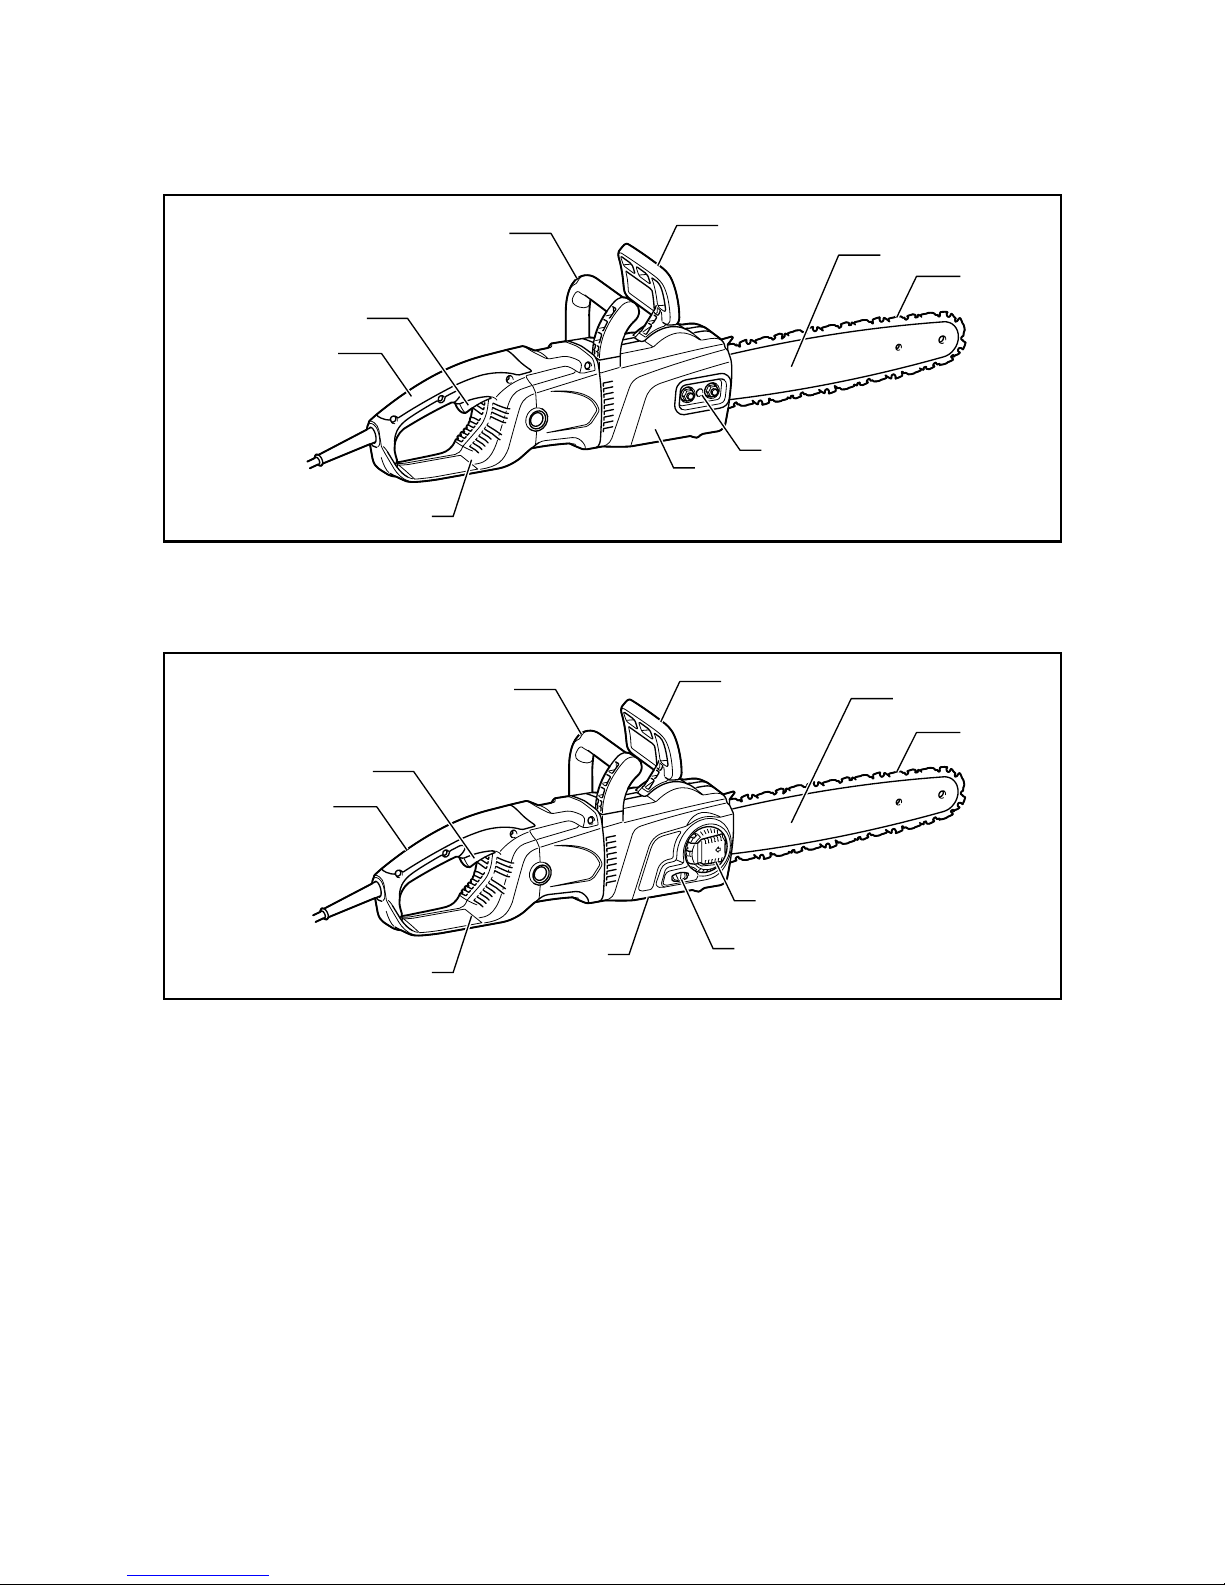
DESIGNATION OF PARTS
(Nut model: the sprocket cover is tightened by nuts.)
For Model UC3050A, UC3550A, UC3550AP, UC4050A,
UC4550A
1
2
3
4
5
6
9
10
8
014372
(Lever model: the sprocket cover is tightened by lever.)
For Model UC3051A, UC3551A, UC4051A, UC4551A
1
2
3
4
5
6
9
10
8
7
014373
12
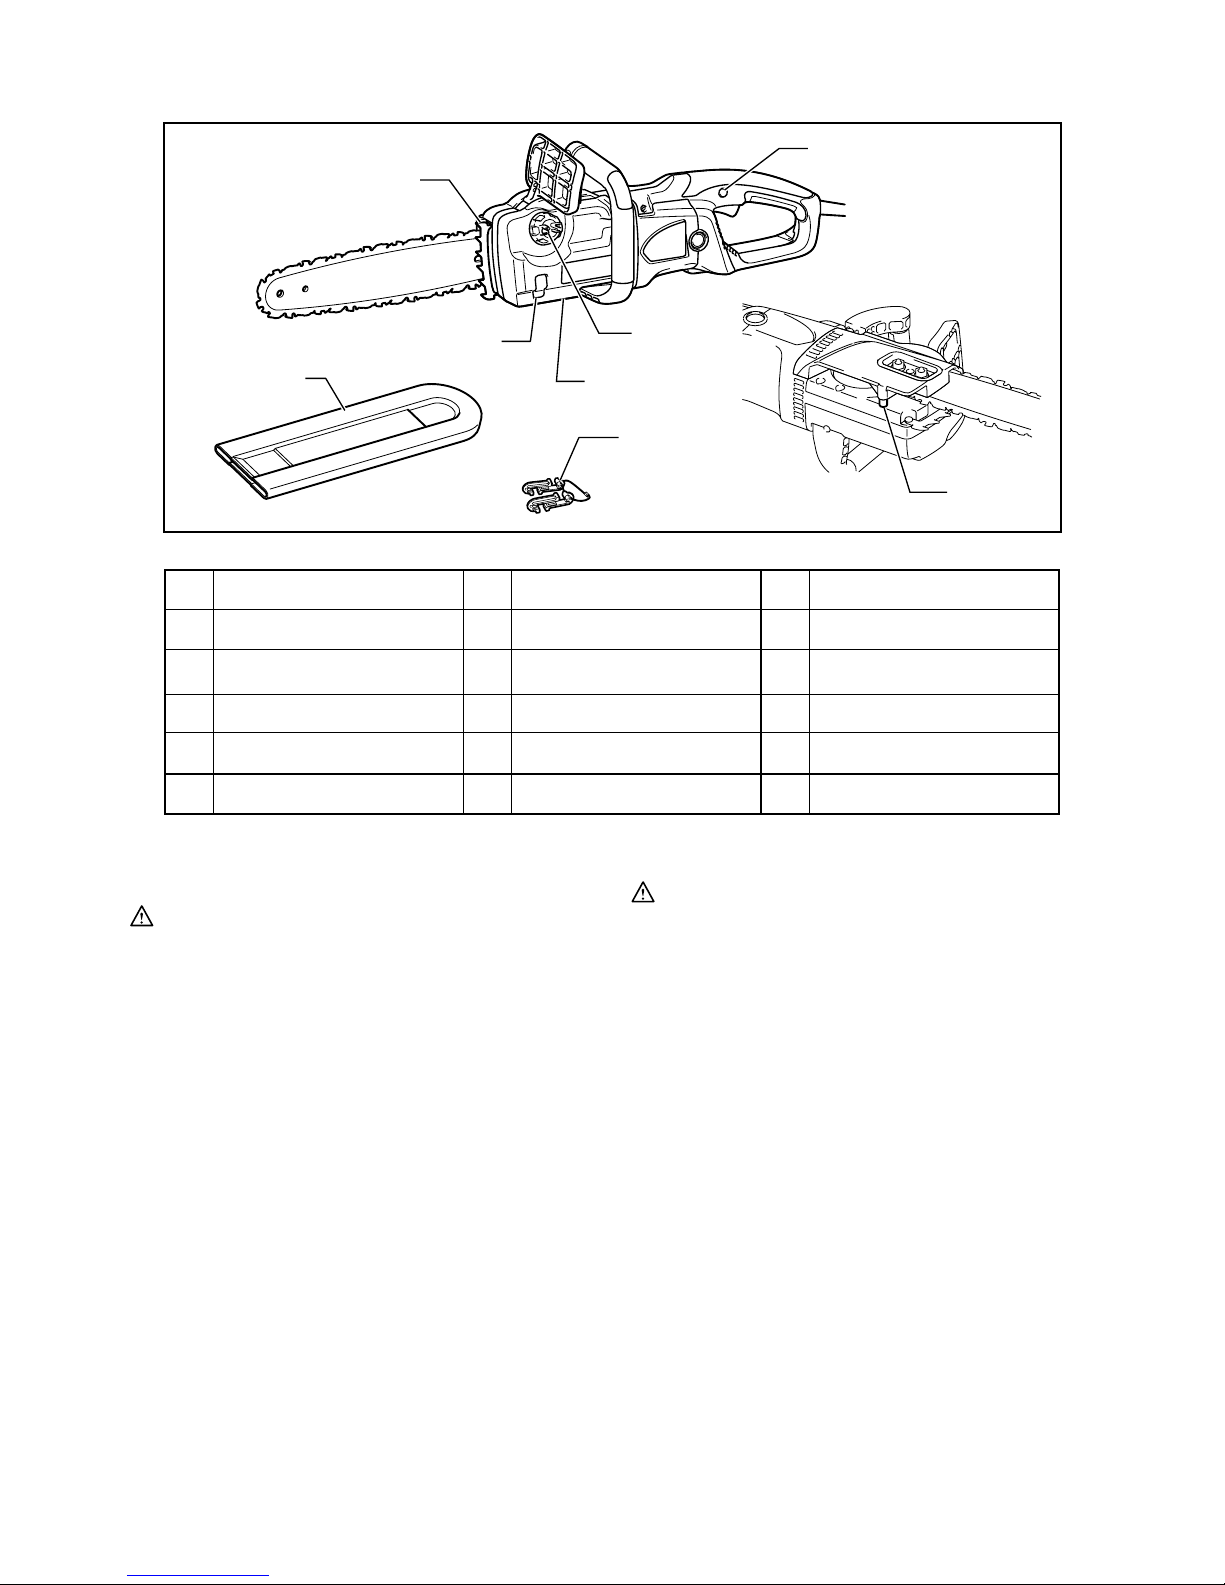
(For all models)
14
12
11
15
13
17
16
18
014514
Cord hook
1
2
3
4
5
6
7
9
8
10
11
12
13
Spike bumper
18
14
15
16
17
Rear handle
Switch trigger
Oil filler cap
Front handle
Front hand guard
Guide bar
Saw chain
Lever
Adjusting screw/dial
Oil level sight
Rear hand guard
Lock-off button
Chain catcher
Guide bar cover
Adjusting screw for oil pump
(at the bottom)
Sprocket cover
014375
ASSEMBLY
CAUTION:
•
Always be sure that the tool is switched off and
unplugged before carrying out any work on the tool.
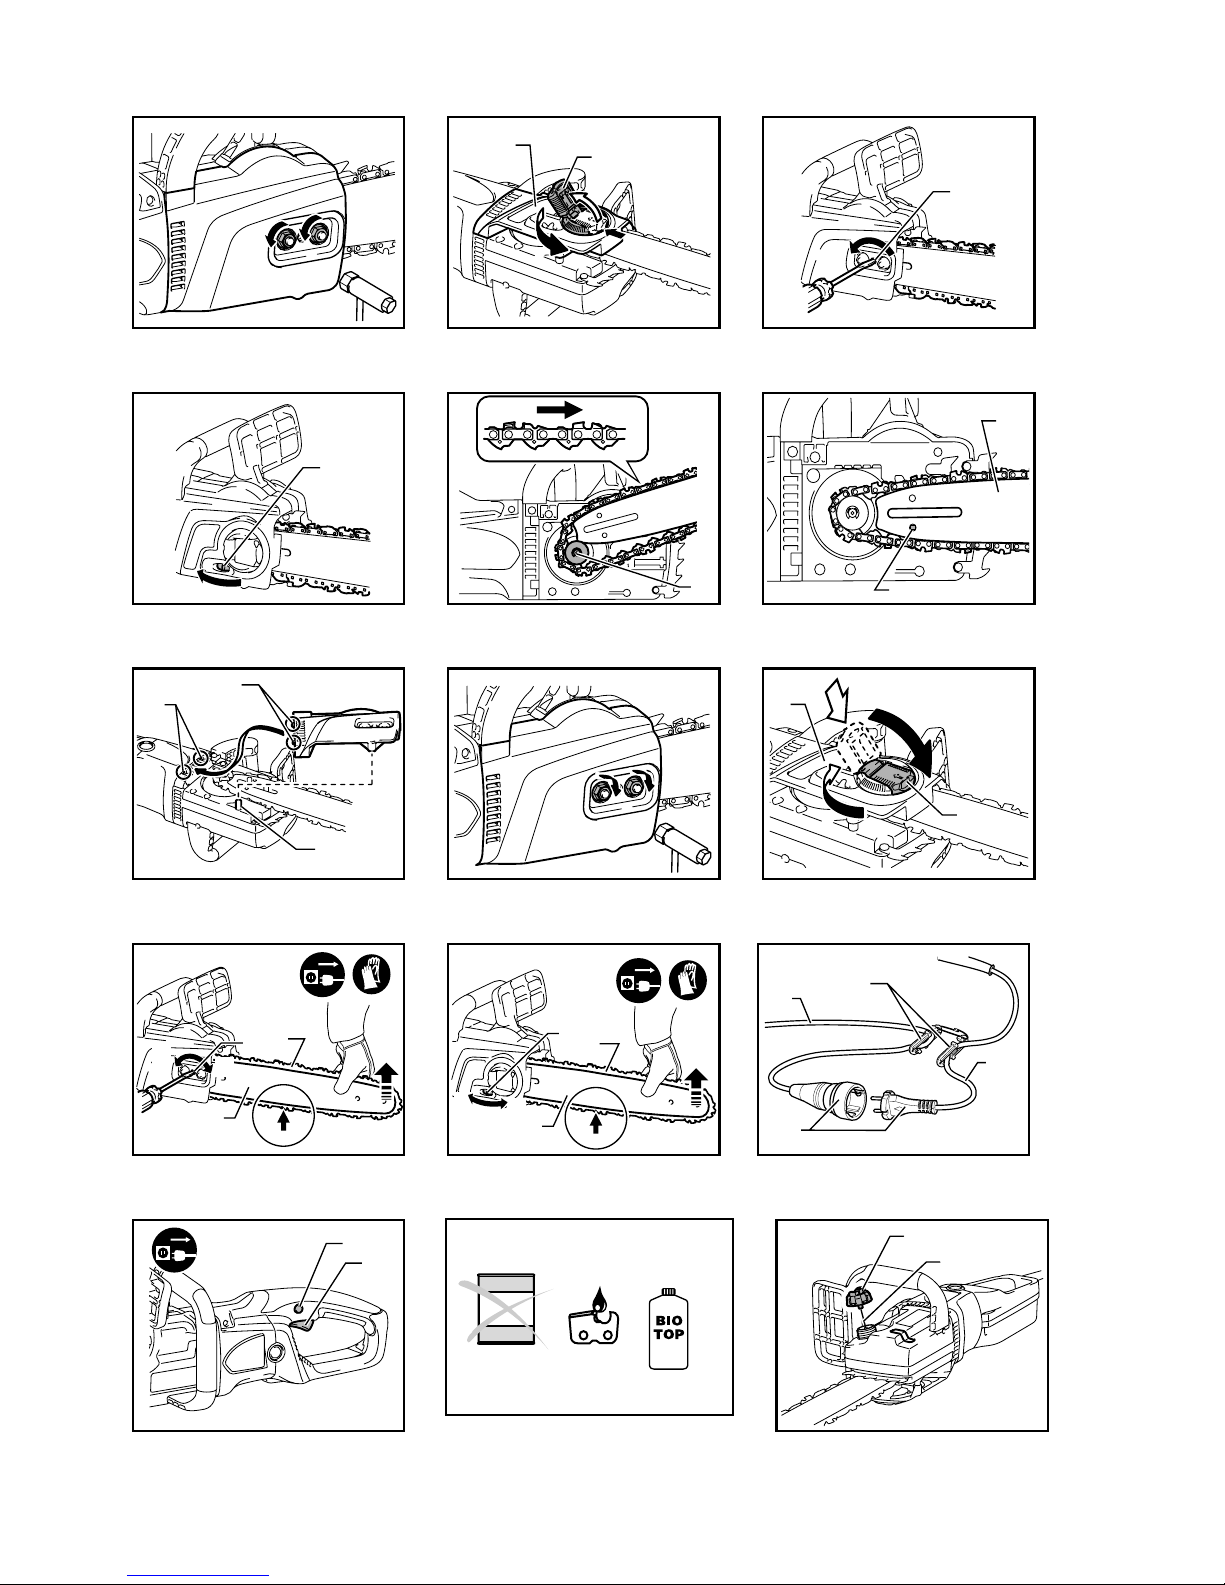
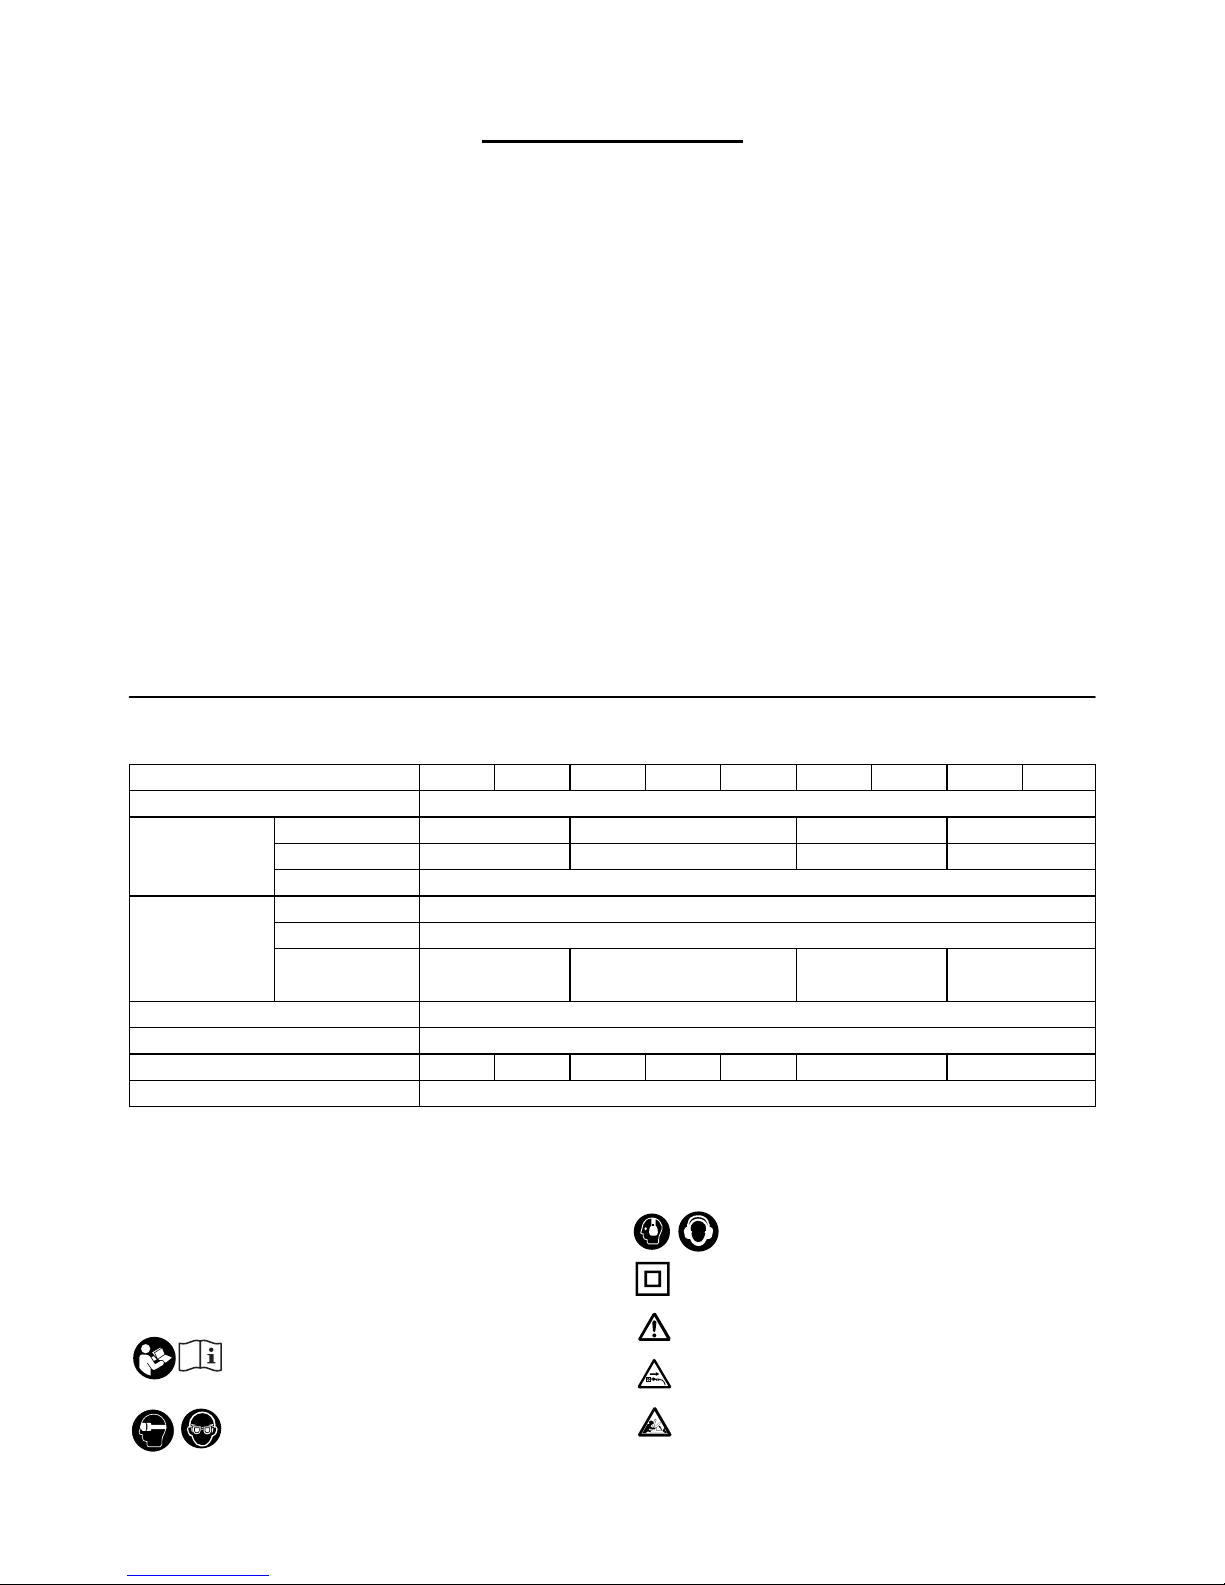
Removing or installing sprocket cover
To remove the sprocket cover, perform the following
steps:
(For nut models)
Fig.1
Loosen the nut.
(For lever models)
Fig.2
Press and fully open the lever until it stops.
Turn the lever counterclockwise.
To install the sprocket cover, perform the above steps in
reverse.
Removing or installing saw chain
CAUTION:
• Always wear gloves when installing or removing
the saw chain.
To remove the saw chain, perform the following steps:
1. Loosen the sprocket cover.
2. (For nut models) Turn the chain adjusting screw
counterclockwise to release the saw chain
tension.
(For lever models) Turn the adjusting dial to "-"
direction to loosen the saw chain tension.
Fig.3
Fig.4
3. Remove the sprocket cover.
4. Remove the saw chain and guide bar from the
chain saw.
To install the saw chain, perform the following steps:
5. Make sure the direction of the chain. The arrow
mark on the chain shows the direction of the
chain.
Fig.5
6. Fit in one end of the saw chain on the top of the
guide bar and the other end of it around the
sprocket.
7. Place the guide bar on the chain saw.
8. Align the tension slide with the hole of the guide
bar.

13
Fig.6
9. Holding the guide bar, and turn the chain
adjusting screw / dial to adjust the saw chain
tension.
10. Place the sprocket cover so that the hooks fit
alongside the holes and the pin fits its counterpart
on the sprocket cover.
Fig.7
11. Tighten the sprocket cover.
Fig.8
Fig.9
Adjusting saw chain tension
The saw chain may become loose after many hours of
use. From time to time check the saw chain tension
before use.
1. Loosen the sprocket cover lightly.
2. Lift up the guide bar tip slightly.
3. Turn the adjusting screw / dial to adjust saw chain
tension.
Fig.10
Fig.11
4. Tighten the saw chain until the lower side of the
saw chain fits in the guide bar rail (see circle).
5. Keep holding the guide bar lightly, tighten the
sprocket cover after adjusting the chain tension.
Make sure that the saw chain does not loose at
lower side.
Make sure the saw chain fits snugly against the lower
side of the bar.
CAUTION:
• Do not tighten the saw chain too much.
Excessively high tension of saw chain may cause
breakage of saw chain, wear of the guide bar and
breakage of the adjusting dial.
• A chain which is too loose can jump off the bar,
and therefore presents an accident risk.
• Carry out the procedure of installing or removing
saw chain in a clean place free from sawdust and
the like.
Engaging extension cord
CAUTION:
• Make sure that the extension cord is unplugged to
the mains outlet.
Fig.12
When engaging the extension cord, secure it to the
chain saw's cord with the cord hook.
Attach the cord hook about 100 - 200 mm from the
extension cord connector. This helps prevent
unintentional disconnection.
OPERATION
CAUTION:
• Hold the tool firmly with right hand on the rear
handle and left hand on the front handle when
performing the tool.
Switch action
Fig.13
CAUTION:
•
Always be sure that the tool is switched off and
unplugged before checking function on the switch trigger.
• Before plugging in the tool, always check to see
that the switch trigger actuates properly and
returns to the "OFF" position when released.
To prevent the switch trigger from being accidentally
pulled, a lock-off button is provided.
To start the tool, depress the lock-off button and pull the
switch trigger. Release the switch trigger to stop.
Lubrication
CAUTION:
• Always be sure that the tool is switched off and
unplugged before lubricating the saw chain.
Fig.14
Lubricate the saw chain and bar using biologically
degradable saw chain oil with an adhesion agent. The
adhesion agent in the saw chain oil prevents the oil from
being thrown off the saw excessively quickly. Mineral
oils must not be used, as they are harmful to the
environment.
CAUTION:
• Prevent the oil from coming into contact with the
skin and eyes. Contact with the eyes causes
irritation. In the event of eye contact, flush the
affected eye immediately with clear water, then
consult a doctor at once.
•
Never use waste oil. Waste oil contains carcinogenic
substances. The contaminants in waste oil cause
accelerated wear of the oil pump, the bar and the
chain. Waste oil is harmful to the environment.
• When filling the chain saw with chain oil for the
first time, or refilling the tank after it has been
completely emptied, add oil up to the bottom edge
of the filler neck. The oil delivery may otherwise be
impaired.
Fig.15
To fill the oil, perform the following steps:
1. Clean the area around the oil filler cap thoroughly
to prevent any dirt from entering the oil tank.
2. Unscrew the oil filler cap and add oil up to the
lower edge of the filler neck.
3. Screw the oil filler cap firmly back in place.
4. Wipe away any spilt chain oil carefully.

14
NOTE:
• When the chain saw is used for the first time, it
may take up to two minutes for the saw chain oil to
begin its lubricating effect upon the saw
mechanism. Run the saw without load until it does
so (see "CHECKS ").
CHECKS
Before starting work, carry out the following checks:
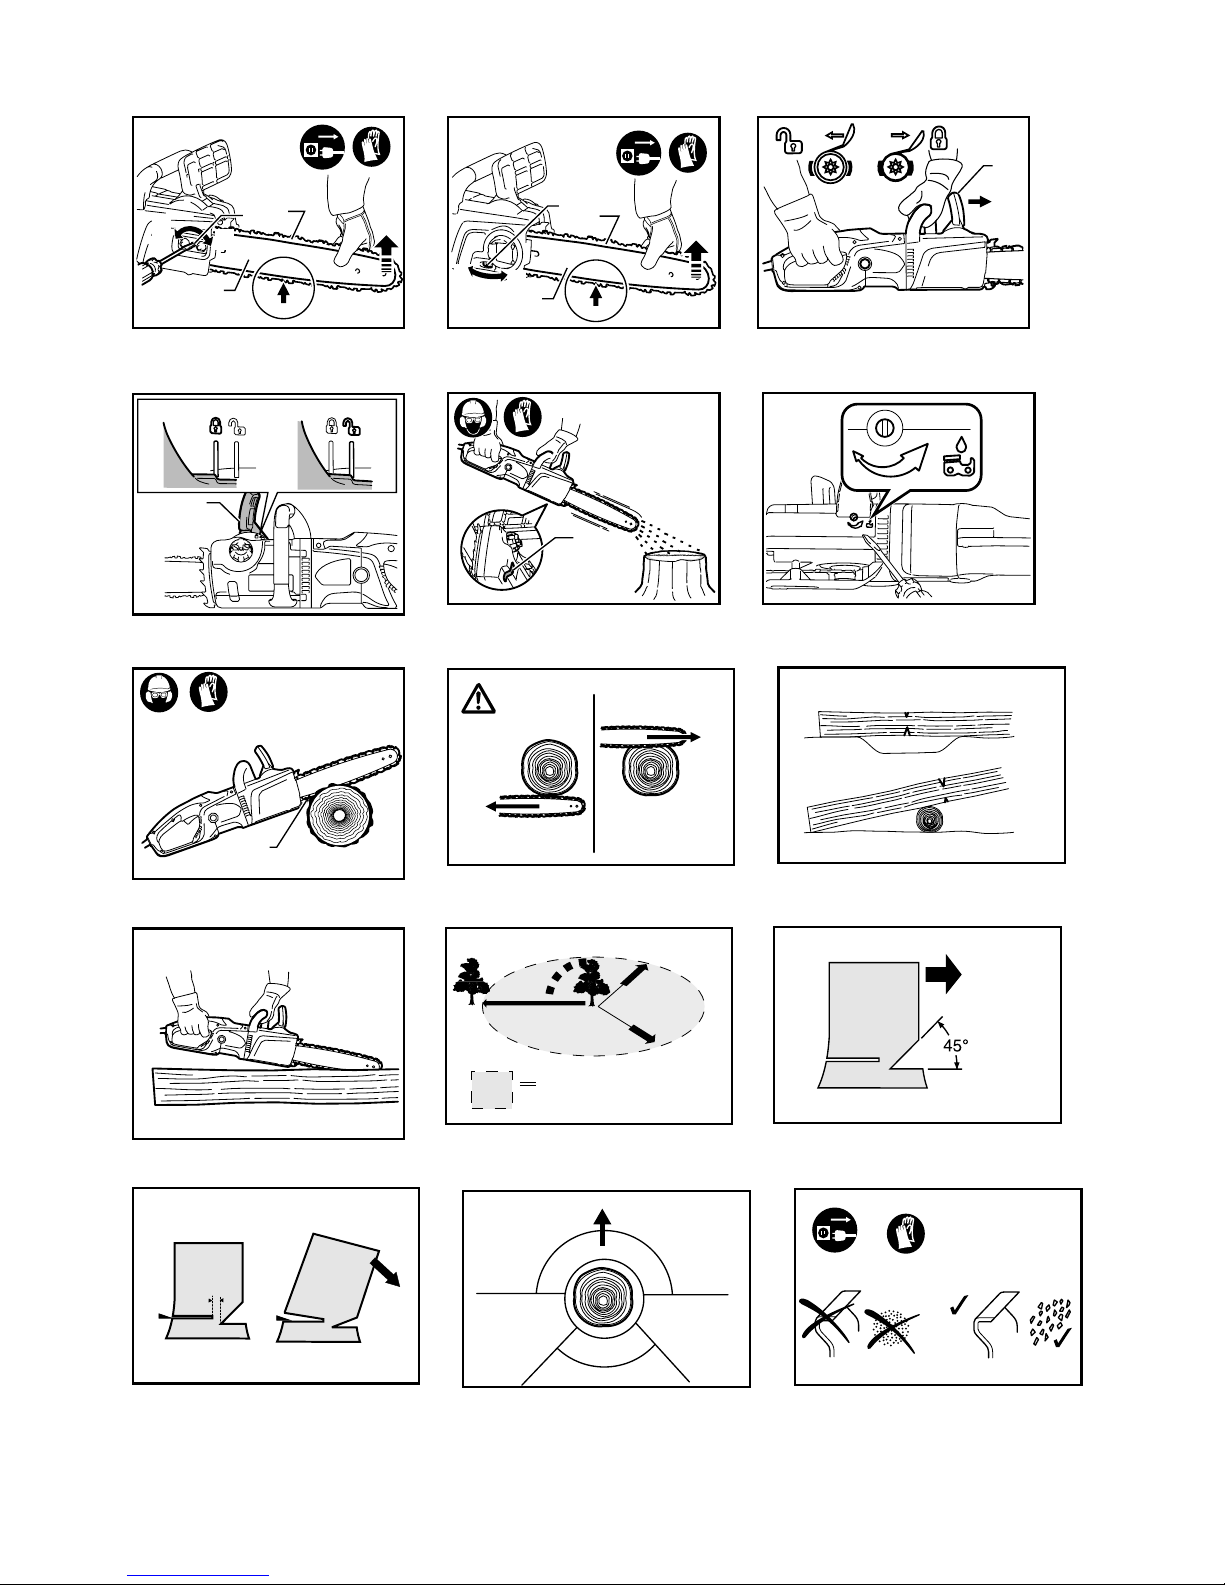
Checking the chain tension
WARNING:
• Always withdraw the mains plug before checking
the chain tension, and wear safety gloves.
(For nut models)
Fig.16
(For lever models)
Fig.17
Make sure the saw chain fits snugly against the lower
side of the bar (see circle).
Check the chain tension frequently, as new chains are
subject to elongation.
Excessively high tension of saw chain may cause
breakage of saw chain, wear of the guide bar and
breakage of the adjusting dial.
A chain which is too loose can jump off the bar, and
therefore presents an accident risk.
If the chain is too loose: Refer to the section titled
"Adjusting saw chain tension" and adjust the saw chain
tension again.
Checking the switch action
CAUTION:
Before plugging in the tool, always check to see that the
switch trigger actuates properly and returns to the
"OFF" position when released.
To prevent the switch trigger from being accidentally
pulled, a lock-off button is provided.
To start the tool, depress the lock-off button and pull the
switch trigger. Release the switch trigger to stop.
Do not pull the switch trigger hard without depressing
the lock-off button. This may cause switch breakage.
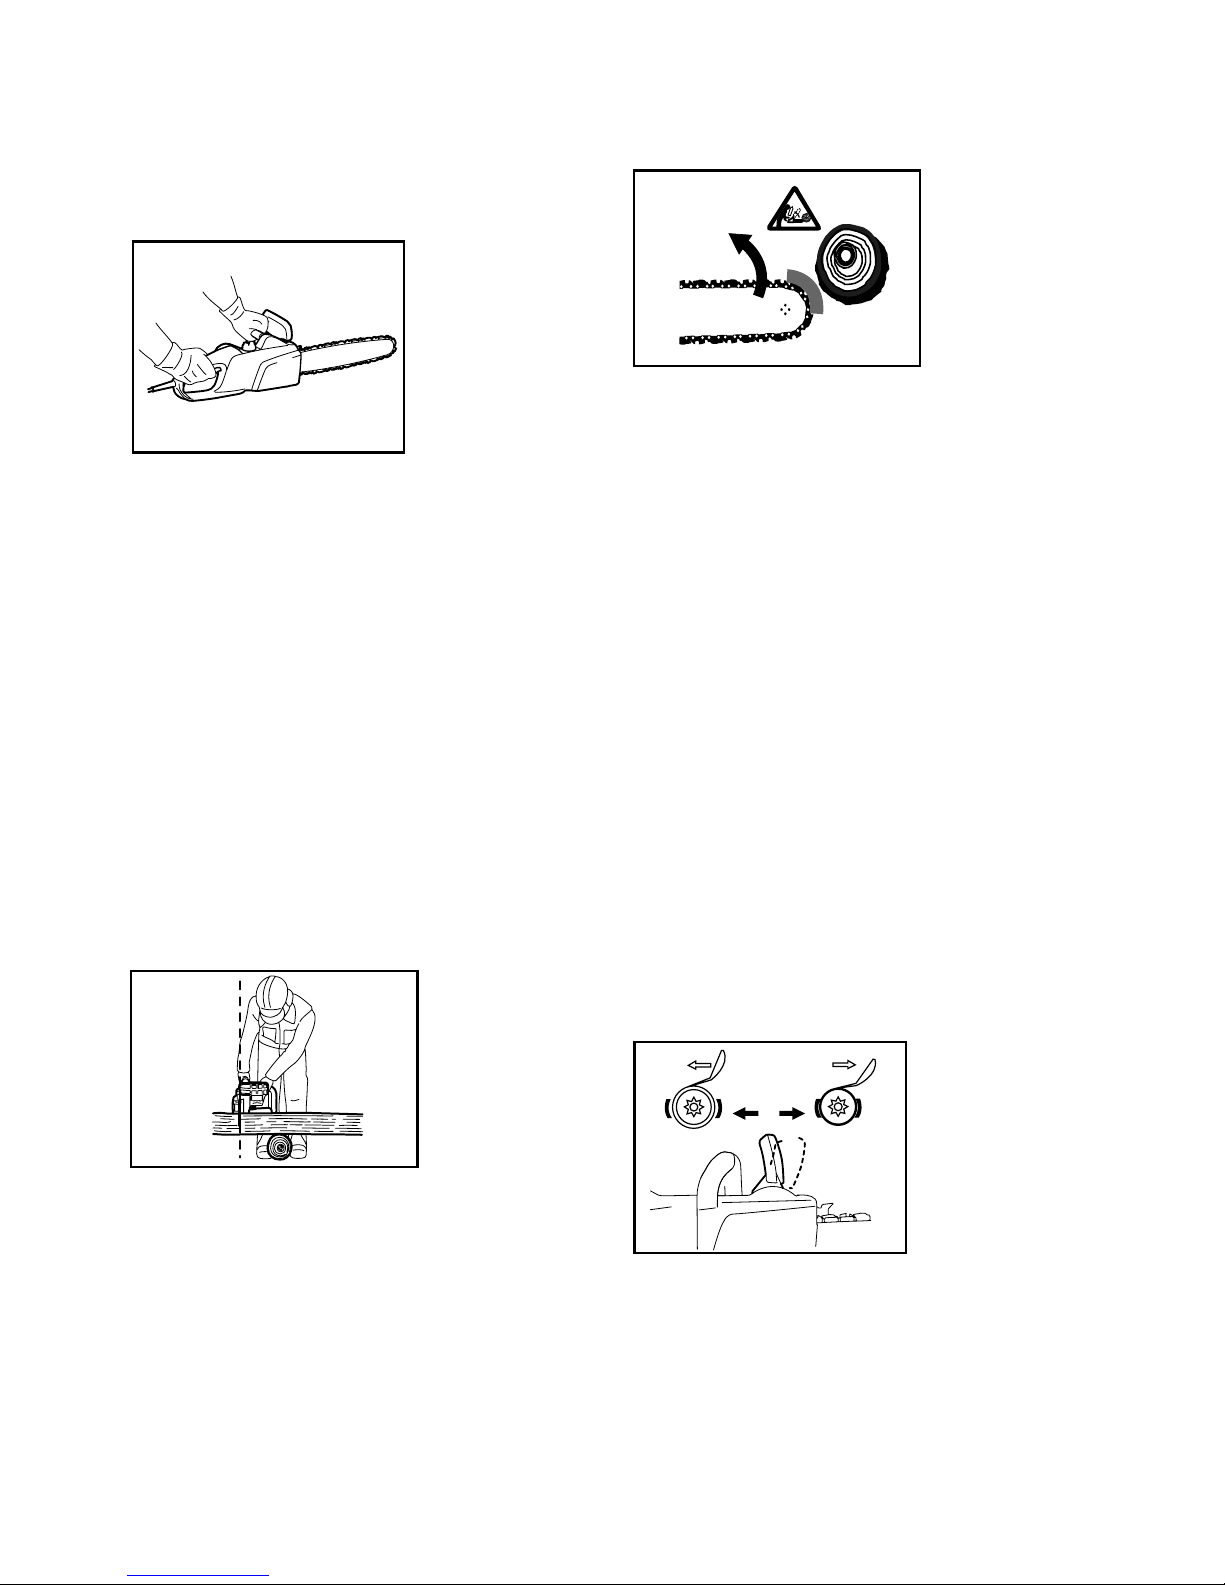
Checking the chain brake
NOTE:
• If the chain saw fails to start, check whether the
chain brake is released. To release the chain
brake, pull the hand guard backwards firmly until
you feel it engage.
Fig.18
Fig.19
Check the chain brake as follows:
1. Hold the chain saw with both hands when
switching it on. Hold the rear handle with your
right hand, the front handle with your left. Make
sure that the bar and the chain do not contact
with any object.
2. First press the lock-off button, then the switch
trigger. The saw chain starts immediately.
3. Press the front hand guard forwards using the
back of your hand. Make sure that the saw chain
comes to an immediate standstill.
CAUTION:
• If the saw chain does not stop immediately, do not
use the saw under any circumstances. Consult
Makita authorized service centers.
Checking the run-down brake
Switch on the chain saw.
Release the switch trigger completely. Make sure the
saw chain comes to a standstill within a second.
CAUTION:
• If the saw chain does not stop immediately, do not
use the saw under any circumstances. Consult
Makita authorized service centers.
Checking the chain oiler
Before starting work, check the oil level in the tank, and
the oil delivery.
The oil level can be seen in the oil level sight shown in
the figure.
Fig.20
Check the oil delivery as follows:
Start the chain saw.
With the saw running, hold the saw chain approximately
15 cm above a tree trunk or the ground. If lubrication is
adequate, the oil spray will produce a light oil trace.
Observe the wind direction, and do not expose yourself
to the oil spray unnecessarily.
CAUTION:
• If an oil trace is not formed, do not use the saw.
The lifespan of the chain will otherwise be reduced.
Check the oil level. Clean the oil feed groove and
the oil feed hole in the bar (refer to
"MAINTENANCE ").
Adjusting the chain lubrication
Fig.21
You can adjust the oil pump feed rate with the adjusting
screw.
WORKING WITH THE CHAIN SAW
CAUTION:
• Always use a front handle and rear handle and
firmly hold the tool by both front handle and rear
handle during operations.
• Always secure the timber to be cut, otherwise the
cut fragments may cause personal injury.

15
Bucking
Fig.22
For bucking cuts, rest the spike bumper shown in the
figure on the wood to be cut.
With the saw chain running, saw into the wood, using
the rear handle to raise the saw and the front one to
guide it. Use the spike bumper as a pivot.
Continue the cut by applying slight pressure to the front
handle, easing the saw back slightly. Move the spike
bumper further down the timber and raise the front
handle again.
When making several cuts, switch the chain saw off
between cuts.
CAUTION:
• If the upper edge of the bar is used for cutting, the
chain saw may be deflected in your direction if the
chain becomes trapped. For this reason, cut with
the lower edge, so that the saw will be deflected
away from your body.
Fig.23
Cut wood under tension on the pressure side (A) first.
Then make the final cut on the tension side (B). This
prevents the bar from becoming trapped.
Fig.24
Limbing
CAUTION:
•
Limbing may only be performed by trained persons.
A hazard is presented by the risk of kick-back.
When limbing, support the chain saw on the trunk if
possible. Do not cut with the tip of the bar, as this
presents a risk of kickback.
Pay particular attention to branches under tension. Do
not cut unsupported branches from below.
Do not stand on the felled trunk when limbing.
Burrowing and parallel-to-grain cuts
CAUTION:
• Burrowing and parallel-to-grain cuts may only be
carried out by persons with special training. The
possibility of kickback presents a risk of injury.
Fig.25
Perform parallel-to-grain cuts at as shallow an angle as
possible. Carry out the cut as carefully as possible, as
the spike bumper cannot be used.
Felling
CAUTION:
• Felling work may only be performed by trained
persons. The work is hazardous.
Observe local regulations if you wish to fell a tree.
Fig.26
− Before starting felling work, ensure that:
(1) Only persons involved in the felling operation
are in the vicinity;
(2) Any person involved has an unhindered path
of retreat through a range of approximately
45 ° either side of the felling axis. Consider
the additional risk of tripping over electrical
cables;
(3) The base of the trunk is free of foreign
objects, roots and ranches;
(4) No persons or objects are present over a
distance of 2 1/2 tree lengths in the direction
in which the tree will fall.
− Consider the following with respect to each tree:
• Direction of lean;
• Loose or dry branches;
• Height of the tree;
• Natural overhang;
• Whether or not the tree is rotten.
− Consider the wind speed and direction. Do not
carry out felling work if the wind is gusting strongly.
− Trimming of root swellings: Begin with the largest
swellings. Make the vertical cut first, then the
horizontal cut.
Fig.27
− Cut a scarf: The scarf determines the direction in
which the tree will fall, and guides it. It is made on
the side towards which the tree is to fall. Cut the
scarf as close to the ground as possible. First
make the horizontal cut to a depth of 1/5 -1/3 of
the trunk diameter. Do not make the scarf too
large. Then make the diagonal cut.
− Cut any corrections to the scarf across its entire
width.
Fig.28
− Make the back cut a little higher than the base cut
of the scarf. The back cut must be exactly
horizontal. Leave approximately 1/10 of the trunk
diameter between the back cut and the scarf.
The wood fibers in the uncut trunk portion act as a
hinge. Do not cut right through the fibers under
any circumstances, as the tree will otherwise fall
unchecked. Insert wedges into the back cut in time.
− Only plastic or aluminum wedges may be used to
keep the back cut open. The use of iron wedges is
prohibited.
− Stand to the side of the falling tree. Keep an area
clear to the rear of the falling tree up to an angle of
45 ° either side of the tree axis (refer to the " felling
area " figure). Pay attention to falling branches.
− An escape path should be planned and cleared as
necessary before cuts are started. The escape
path should extend back and diagonally to the rear
of the expected line of fall as illustrated in figure.
Fig.29

16
MAINTENANCE
CAUTION:
• Always be sure that the tool is switched off and
unplugged before attempting to perform inspection
or maintenance.
• Always wear gloves when performing any
inspection or maintenance.
• Never use gasoline, benzine, thinner, alcohol or
the like. Discoloration, deformation or cracks may
result.
Carry out the maintenance work described below at
regular intervals. Warranty claims will be accepted only
if these operations have been performed regularly and
properly.
Only maintenance work described in this instruction
manual may be performed by the user. Any other work
must be carried out by MAKITA authorized service
centers.
Cleaning the chain saw
Clean the saw regularly with a clean rag. The handles,
in particular, must be kept free of oil.
Checking the plastic housing
Carry out regular visual inspections of all parts of the
housing. If any parts are damaged, have them repaired
immediately and properly in MAKITA authorized service
centers.
Sharpening the saw chain
CAUTION:
• Always withdraw the mains plug and wear safety
gloves when performing work on the saw chain.
Fig.30
Sharpen the saw chain when:
− Mealy sawdust is produced when damp wood is
cut;
− The chain penetrates the wood with difficulty, even
when heavy pressure is applied;
− The cutting edge is obviously damaged;
− The saw pulls to the left or right in the wood. The
reason for this behavior is uneven sharpening of
the saw chain, or damage to one side only.
Sharpen the saw chain frequently, but remove only
a little material each time.
Two or three strokes with a file are usually sufficient for
routine resharpening. When the saw chain has been
resharpened several times, have it sharpened in
MAKITA authorized service center.
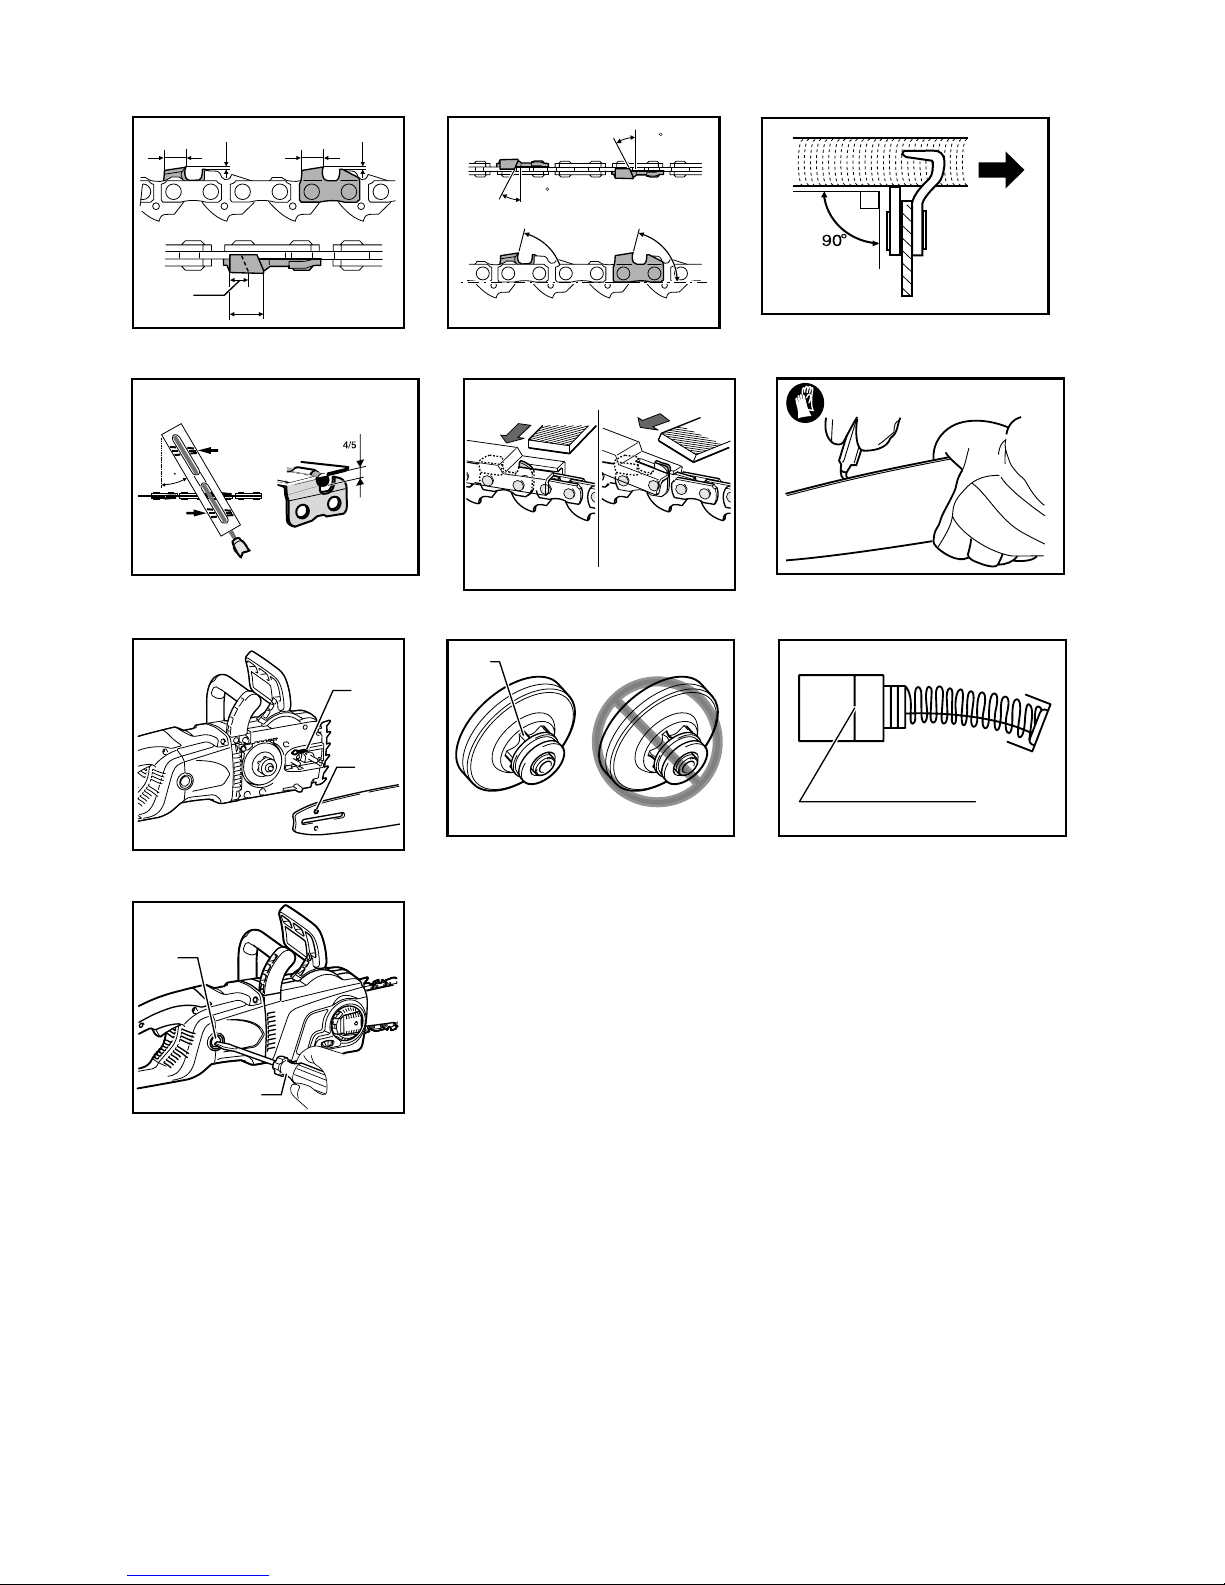
Sharpening criteria:
− All cutter length must be equal. Cutters of differing
length prevent the chain from running smoothly,
and may cause the chain to break.
− Do not sharpen the chain once a minimum cutter
length of 3 mm has been reached. A new chain
must then be fitted.
− The chip thickness is determined by the distance
between the depth gauge (round nose) and the
cutting edge.
− The best cutting results are obtained with following
distance between cutting edge and depth gauge.
Chain blade 91PX: 0.65 mm
Fig.31
WARNING:
• An excessive distance increases the risk of kick-
back.
− The sharpening angle of 30 ° must be the same on
all cutters. Differences in angle cause the chain to
run roughly and unevenly, accelerate wear, and
lead to chain breaks.
− The side plate angle of the cutter is determined by
the depth of penetration of the round file. If the
specified file is used properly, the correct side
plate angle is produced automatically.
− Side plate angle for each saw chain are as follows:
Chain blade 91PX: 80 °
Fig.32
File and file guiding
− Use a special round file (optional accessory) for
saw chains to sharpen the chain. Normal round
files are not suitable.
− Diameter of the round file for each saw chain is as
follows:
Chain blade 91PX: 4.0 mm
− The file should only engage the cutter on the
forward stroke. Lift the file off the cutter on the
return stroke.
− Sharpen the shortest cutter first. Then the length
of this shortest cutter becomes the standard for all
other cutters on the saw chain.
Fig.33
− Guide the file as shown in the figure.
− The file can be guided more easily if a file holder
(optional accessory) is employed. The file holder
has markings for the correct sharpening angle of
30 ° (align the markings parallel to the saw chain)
and limits the depth of penetration (to 4/5 of the
file diameter).
Fig.34
− After sharpening the chain, check the height of the
depth gauge using the chain gauge tool (optional
accessory).
Fig.35
− Remove any projecting material, however small,
with a special flat file (optional accessory).
− Round off the front of the depth gauge again.

17
Cleaning the guide bar and lubricating the
return sprocket
CAUTION:
• Always wear safety gloves for this task. Burrs
present a risk of injury.
Fig.36
Check the running surfaces of the bar regularly for
damage. Clean using a suitable tool, and remove burrs
if necessary.
If the chain saw receives frequent use, lubricate the
return sprocket bearing at least once a week. Before
adding new fresh grease, carefully clean the 2 mm hole
on the tip of the guide bar, then force a small quantity of
multi-purpose grease (optional accessory) into the hole.
Cleaning the oil guide
Fig.37
− Clean the oil guide groove and the oil feed hole in
the bar at regular intervals.
New saw chains
Use two or three saw chains alternately, so that the saw
chain, sprocket and running surfaces of the bar wear
evenly.
Turn the bar over when changing the chain so that the
bar groove wears evenly.
CAUTION:
• Only use chains and bars which are approved for
this model of saw (refer to "SPECIFICATIONS").
Fig.38
Before fitting a new saw chain, check the condition of
the sprocket.
CAUTION:
• A worn sprocket damages a new saw chain. Have
the sprocket replaced in this case.
Always fit a new locking ring when replacing the
sprocket.
Maintaining the chain and run-down brakes
The braking systems are very important safety features.
Like any other component of the chain saw, they are
subject to a certain degree of wear. They must be
inspected regularly by MAKITA authorized service
centers. This measure is for your own safety.
Replacing carbon brushes
Fig.39
Remove and check the carbon brushes regularly.
Replace when they wear down to the limit mark. Keep
the carbon brushes clean and free to slip in the holders.
Both carbon brushes should be replaced at the same
time. Use only identical carbon brushes.
Fig.40
Use a screwdriver to remove the brush holder caps.
Take out the worn carbon brushes, insert the new ones
and secure the brush holder caps.
After replacing brushes, plug in the tool and break in
brushes by running tool with no load for about 10
minutes.
Storing tool
Biologically degradable saw chain oil can only be kept
for a limited period. Beyond two years after manufacture,
biological oils begin to acquire an adhesive quality, and
cause damage to the oil pump and components in the
lubricating system.
− Before taking the chain saw out of service for a
longer period, empty the oil tank and fill it with a
small quantity of engine oil (SAE 30).
− Run the chain saw briefly to flush all residue of the
biological oil out of the tank, lubricating system
and saw mechanism.
NOTE:
• When the chain saw is taken out of service, small
quantities of chain oil leaks from it for some time
afterwards. This is normal, and is not a sign of a
fault.
Store the chain saw on a suitable surface.
Before returning the chain saw to service, fill up with
fresh BIOTOP saw chain oil.
To maintain product SAFETY and RELIABILITY, repairs,
any other maintenance or adjustment should be
performed by Makita Authorized Service Centers,
always using Makita replacement parts.

18
TROUBLE SHOOTING
Before asking for repairs, conduct your own inspection
first. If you find a problem that is not explained in the
manual, do not attempt to dismantle the tool. Instead,
ask Makita Authorized Service Centers.
No oil on the chain.
Chain does not stop
even the chain brake is
engaged.
The tool vibrates
abnormally.
Malfunction status
Possible cause Remedy
The chain saw does not
start.
Chain does not run.
Insufficient performance.
Cable defective.
Chain brake is engaged.
Carbon brush worn down.
Oil tank is empty.
Oil guide groove is dirty.
Oil pump adjusting screw
incorrectly adjusted.
Brake
band worn down.
Loose guide bar or saw
chain.
No power supply.
Release chain brake.
Ask your local authorized service center for repair.
Fill the oil tank.
Clean the groove.
Adjust the oil pump feed rate.
Adjust the guide bar and
saw chain tension.
Tool malfunction.
Tool malfunction.
Connect to the power supply.
Check the power supply.
Stop using the tool immediately, and ask your local
authorized service center.
Stop using the tool immediately, and ask your local
author
ized service center.
Stop using the tool immediately, and ask your local
authorized service center.
Stop using the tool immediately, and ask your local
authorized service center.
014314
OPTIONAL ACCESSORIES
CAUTION:
• These accessories or attachments are
recommended for use with your Makita tool
specified in this manual. The use of any other
accessories or attachments might present a risk of
injury to persons. Only use accessory or
attachment for its stated purpose.
If you need any assistance for more details regarding
these accessories, ask your local Makita Service Center.
• Saw chain
• Guide bar cover
• Guide bar
• Saw chain oil
NOTE:
• Some items in the list may be included in the tool
package as standard accessories. They may differ
from country to country.
19
SLOVENŠČINA (izvirna navodila)
Razlaga splošnega pogleda
2-1. Ročica
2-2. Pokrov zobca kolesa
3-1. Nastavitveni vijak
4-1. Nastavljalna številčnica
5-1. Vskočnik
6-1. Meč
6-2. Odprtina
7-1. Kljuka
7-2. Odprtina
7-3. Zatič
9-1. Ročica
9-2. Pokrov zobca kolesa
10-1. Zrahljati
10-2. Priviti
10-3. Prilagoditveni vijak verige
10-4. Meč
10-5. Veriga žage
11-1. Zrahljati
11-2. Priviti
11-3. Nastavljalna številčnica
11-4. Meč
11-5. Veriga žage
12-1. Kavelj za kabel
12-2. Kabel orodja
12-3. Kabelski podaljšek
12-4. Vtič in vtičnica (oblika se lahko
med posameznimi državami
razlikuje)
13-1. Sprostilni gumb
13-2. Sprožilno stikalo
15-1. Kapica nastavka za dolivanje olja
15-2. Jermen
16-1. Zrahljati
16-2. Priviti
16-3. Prilagoditveni vijak verige
16-4. Meč
16-5. Veriga žage
17-1. Zrahljati
17-2. Priviti
17-3. Nastavljalna številčnica
17-4. Meč
17-5. Veriga žage
18-1. Sprednji ščitnik za roko
18-2. Zakleni
18-3. Odkleni
19-1. Sprednji ščitnik za roko
19-2. Odkleni
19-3. Zakleni
20-1. Kontrola nivoja olja
22-1. Ostroga
26-1. Območje podiranja
29-1. Smer podiranja
29-2. Nevarno območje
29-3. Pot izhoda
31-1. Dolžina reza
31-2. Razdalja med rezalnim robom in
merilnikom globine
31-3. Najmanj 3 mm
32-1. Čelni kot
37-1. Utor vodila za olje
37-2. Odprtina za dolivanje olja
38-1. Vskočnik
39-1. Meja obrabljenosti
40-1. Pokrov krtačke
40-2. Izvijač
TEHNIČNI PODATKI
Model
UC3050A UC3051A UC3550A
UC3550AP
UC3551A UC4050A UC4051A UC4550A
UC4551A
Maks. hitrost verige 14,5 m/s (870 m/min)
Dolžina meča 300 mm 350 mm 400 mm 450 mm
Dolžina reza 260 mm 320 mm 355 mm 415 mm
Standardni meč
Tip meča Konica verižnika meča
Tip 91PX
Naklon 3/8"
Standardna
veriga žage
Št. pogonskih
povezav
46 52 56 62
Priporočena dolžina meča 300 - 450 mm
Skupna dolžina (brez meča) 505 mm
Neto teža 5,4 kg 5,5 kg 5,5 kg 5,6 kg 5,5 kg 5,6 kg 5,7 kg
Podaljšek kabla (izbirno) DIN 57282/HO 7RN -F D=30 m maks.,3x1,5 mm2
• Zaradi našega nenehnega programa raziskav in razvoja si pridržujemo pravico do spremembe tehničnih podatkov brez obvestila.
• Tehnični podatki se lahko razlikujejo od države do države.
• Teža je v skladu z EPTA-postopkom 01/2003
END218-7
Simbol
Naslednji simboli se uporabljajo v povezavi s strojem.
Pred uporabo proizvoda se obvezno seznanite z
njihovim pomenom.
・ Preberite navodila za uporabo in
upoštevajte opozorila in varnostna
navodila.
・ Uporabljajte zaščito za oči.
・ Uporabljajte zaščito za sluh.
・ DVOJNA IZOLACIJA
・ Pozor: zahtevana posebna nega in
pozornost!
・ Pozor: če je kabel poškodovan, takoj
izvlecite električni vtič!
・ Pozor: povratni udarec!

20
・ Zaščitite pred dežjem in vlago!
・ Nosite čelado, očala in zaščito za sluh!
・ Uporabljajte zaščitne rokavice!
・ Izvlecite električni vtič!
・ Prva pomoč
・ Največja dovoljena dolžina reza
・ Smer premika verige
・ Verižno olje
・ Zavora verige sproščena
・ Zavora verige pritisnjena
・ Prepovedano!
・ Le za države EU
Električnega orodja ne odlagajte skupaj
z gospodinjskimi odpadki!
V skladu z Evropsko direktivo o odpadni
električni in elektronski opremi in z njenim
izvajanjem v skladu z državno zakonodajo
se mora električna oprema, ki je prišla do
konca svojega življenjskega cikla, zbirati
ločeno in se vrniti v okoljsko združljivo
ustanovo za recikliranje.
ENE085-1
Namenska uporaba
Orodje je namenjeno za rezanje lesa in hlodov.
ENF002-2
Priključitev na električno omrežje
Napetost električnega omrežja se mora ujemati s
podatki na tipski ploščici. Stroj deluje samo z enofazno
izmenično napetostjo. Stroj je po evropskih smernicah
dvojno zaščitno izoliran, zato se ga lahko priključi tudi
na vtičnice brez ozemljitvenega voda.
ENG905-1
Hrup
Tipični, z A ocenjeni vrednosti hrupa glede na EN60745:
Raven zvočnega tlaka (LpA): 90,8 dB (A)
Raven zvočne moči (L
WA
): 101,8 dB (A)
Odstopanje (K): 2,5 dB (A)
Uporabljajte zaščito za sluh
ENG900-1
Vibracije
Skupne vrednosti vibracij (vektorska vsota treh osi) po
EN60745:
Delovni način: rezanje lesa
Oddajanje tresljajev (a
h
): 5,2 m/s
2
Odstopanje (K): 1,5 m/s
2
ENG901-1
•
Navedena vrednost oddajanja vibracij je bila
izmerjena v skladu s standardnimi metodami
testiranja in se lahko uporablja za primerjavo orodij.
• Navedena vrednost oddajanja vibracij se lahko
uporablja tudi pri predhodni oceni izpostavljenosti.
OPOZORILO:
•
Oddajanje vibracij med dejansko uporabo električnega
orodja se lahko razlikuje od navedene vrednosti
oddajanja, odvisno od načina uporabe orodja.
•
Upravljavec mora za lastno zaščito poznati varnostne
ukrepe, ki temeljijo na oceni izpostavljenosti v
dejanskih pogojih uporabe (upoštevajoč celoten
delovni proces v trenutkih, ko je orodje izključeno in
ko deluje v prostem teku z dodatkom časa sprožitve).
ENH030-5
Samo za evropske države
ES Izjava o skladnosti
Družba Makita izjavlja, da je/so naslednji stroj/-i:
Oznaka stroja:
Verižna žaga
Št. modela / tip: UC3050A, UC3550A, UC4050A,
UC4550A, UC3051A, UC3551A, UC3550AP, UC4051A,
UC4551A
Tehnični podatki: glejte tabelo "TEHNIČNI PODATKI".
Je skladen z naslednjimi evropskimi direktivami:
2000/14/ES, 2006/42/ES
Izdelan v skladu z naslednjim standardom ali
standardiziranimi dokumenti:
EN60745
Potrdilo o pregledu tipa ES št.5514056,14005
Pregled tipa ES v skladu z 2006/42/ES je izvedel:
DEKRA Testing and Certification GmbH
Enderstraße 92b
01277 Dresden
Nemčija
Identifikacijska št. 2140
Tehnična dokumentacija v skladu z direktivo
2006/42/ES je na voljo na:
Makita, Jan-Baptist Vinkstraat 2, 3070, Belgija
Postopek za ugotavljanje skladnosti, ki ga predpisuje
direktiva 2000/14/ES, je v skladu s prilogo V.
Izmerjena stopnja jakosti zvoka: 101,9 dB (A)
Zajamčena stopnja jakosti zvoka: 103 dB (A)
4.9.2014
000331
Yasushi Fukaya
Direktor
Makita, Jan-Baptist Vinkstraat 2, 3070, Belgija
21
GEA010-1
Splošna varnostna opozorila za
električno orodje
OPOZORILO Preberite vsa varnostna opozorila in
navodila.
Neupoštevanje opozoril in navodil lahko vodi do
električnega udara, požara, in/ali hudih telesnih poškodb.
Shranite vsa opozorila in navodila za
kasnejšo uporabo.
GEB037-8
Varnostna opozorila za uporabo
verižne žage
1. Med delovanjem verižne žage ne približujte
delov telesa verigi. Preden zaženete verižno
žago se prepričajte, da se veriga ničesar ne
dotika. Trenutek nepazljivosti pri delu z verižnimi
žagami lahko povzroči zapletanje vaših oblačil ali
telesa v verigo žage.
2. Vedno držite verižno žago z desno roko za
zadnji ročaj in z levo za sprednji ročaj. Obratno
držanje verižne žage poveča tveganje za osebne
poškodbe in ga nikoli ne smete izvesti.
3. Električno orodje držite samo na izoliranih
držalnih površinah, saj se lahko veriga žage
dotakne skritih žic ali lastnega kabla. Ob stiku
verige žage z vodniki pod napetostjo dobijo
napetost vsi neizolirani kovinski deli električnega
orodja, zaradi česar lahko uporabnik utrpi
električni udar.
4. Uporabljajte zaščitna očala in zaščito za sluh.
Priporočena je dodatna zaščita za glavo, roke,
noge in stopala. Zadostna zaščitna obleka bo
zmanjšala telesne poškodbe zaradi letečih
ostankov ali nenamernega stika z verigo žage.
5. Ne uporabljajte verižne žage na drevesu.
Uporaba verižne žage na drevesu lahko povzroči
telesne poškodbe.
6. Vedno uporabljajte ustrezno obutev in
uporabljajte verižno žago samo, če stojite na
trdni, varni in ravni površini. Drseča ali
nestabilna površina, kot so lestve, lahko povzroči
izgubo ravnotežja ali nadzora nad verižno žago.
7. Kadar režete napeto vejo, bodite pozorni, ko
odskoči nazaj. Ko se napetost lesnih vlaken
sprosti, lahko veja udari upravljavca in/ali
povzroči nenadzorovano premikanje verižne žage.
8. Bodite izjemno previdni pri rezanju mladik in
sadik. Vitek material lahko ujame verigo žage in
jo vrže proti vam ali povzroči izgubo ravnotežja.
9.
Verižno žago nosite tako, da jo izklopljeno držite
za sprednji ročaj in obrnjeno stran od telesa.
Kadar nosite ali shranjujete verižno žago, vedno
namestite pokrivalo meča.
Ustrezno ravnanje z
verižno žago bo zmanjšalo verjetnost nenamernega
stika s premikajočo se verigo.
10. Upoštevajte navodila glede mazanja,
napetosti verige in menjave pripomočkov.
Nepravilno napeta ali namazana veriga se lahko
strga ali poveča možnost povratnega udarca.
11. Ročaji morajo biti suhi, čisti in brez olja ter
masti. Mastni, naoljeni ročaji so drseči in
povzročijo izgubo nadzora.
12. Režite samo les. Verižne žage ne uporabljajte
v nepredvidene namene. Na primer: verižne
žage ne uporabljajte za rezanje plastike, zidov
ali nelesenih gradbenih elementov. Uporaba
verižne žage, ki ni v skladu z namensko uporabo,
lahko povzroči nevarno situacijo.
13. Vzroki in preprečevanje povratnega udarca s
strani upravljavca:
Povratni udarec se lahko pojavi, če se konica
meča dotakne kakšnega predmeta ali ko se les
zapre in uklešči verigo v reži.
Stik konice lahko v nekaterih primerih povzroči
nenadno obratno reakcijo, ki vrže meč navzgor in
nazaj proti upravljavcu.
Zagozditev verige žage na vrhu meča lahko hitro
potisne meč nazaj proti upravljavcu.
Katera koli izmed teh reakcij lahko povzroči izgubo
nadzora nad žago, kar lahko povzroči hude telesne
poškodbe. Ne zanašajte se izključno na zaščitne
naprave, vgrajene v vašo žago. Kot uporabnik
verižne žage morate izvesti nekaj korakov, da
preprečite nesreče ali poškodbe med delom.
Povratni udarec je posledica nestrokovnega
ravnanja z orodjem in/ali neugodnih okoliščin.
Preprečite ga lahko z upoštevanjem spodaj
navedenih opozoril.
− Trdno držite žago, tako da s sklenjenimi
prsti držite ročaja, imate obe roki na žagi
in namestite telo ter roki tako, da boste
lahko prestregli sile povratnega udarca.
Sile povratnega udarca lahko upravljavec
nadzoruje, če izvede pravilne previdnostne
ukrepe. Ne izpustite verižne žage.
014316
− Ne segajte previsoko in ne režite nad
višino ramen. S tem boste preprečili
nenameren stik konice in omogočili boljši
nadzor nad verižno žago v nepredvidenih
situacijah.

22
− Uporabljajte samo nadomestne meče in
verige, ki jih je določil proizvajalec.
Nepravi nadomestni meči in verige lahko
povzročijo strganje verige in/ali povratni
udarec.
− Upoštevajte navodila proizvajalca za
brušenje in vzdrževanje verige žage.
Zmanjšanje višine merilnika globine lahko
povzroči povečano možnost povratnega
udarca.
DODATNA VARNOSTNA
PRAVILA
1. Preberite navodila za uporabo, da se spoznate z
obratovanjem verižne žage.
2. Preden prvič uporabite verižno žago uredite, da
boste imeli uvajanje v delovanje. Če to ni mogoče,
pa pred začetkom dela vadite na okroglem lesu
na stojalu.
3. Verižne žage ne smejo uporabljati otroci ali mlajši
od 18 let. Mladoletniki, starejši od 16 let, so lahko
izvzeti iz te omejitve, če se usposabljajo pod
nadzorom strokovnjaka.
4. Delo z verižno žago zahteva visoko stopnjo
koncentracije. Ne delajte z verižno žago, če se ne
počutite dobro. Vsa dela opravljajte mirno in
previdno.
5. Nikoli ne delajte pod vplivom alkohola, drog ali
zdravil.
Pravilna uporaba
1. Verižna žaga je namenjena izključno rezanju lesa.
Ne uporabljajte je za rezanje plastike ali
poroznega betona.
2. Verižno žago uporabljajte samo za dela, opisana
v teh navodilih za uporabo. Ne, na primer,
uporabljajte je za rezanje žive meje ali v podobne
namene.
3. Verižne žage ni dovoljeno uporabljati za
gozdarska dela, torej za podiranje in klestenje
stoječega lesa. Kabel verižne žage ne omogoča
upravljavcu premičnosti in varnosti, ki je potrebna
za takšna dela.
4. Verižna žaga ni namenjena za komercialno
uporabo.
5. Ne preobremenjujte verižne žage.
Osebna zaščitna oprema
1. Obleka se mora tesno prilegati, vendar ne sme
ovirati gibljivosti.
2. Med delom nosite naslednja zaščitna oblačila:
• Atestirano zaščitno čelado, če obstaja
nevarnost padajočih vej ali podobna;
• Obrazno masko ali očala;
• Ustrezno zaščito sluha (čepki za ušesa,
običajni ali uliti ušesni čepki). Analiza znamke
Octave na zahtevo.
• Zaščitne rokavice iz trdega usnja;
• Dolge hlače iz močne tkanine;
• Zaščitne delovne hlače iz tkanine, odporne na
reze;
• Zaščitne čevlje ali škornje z nedrsečimi
podplati, jeklenim prstnim delom in oblogo iz
tkanine, odporne na reze;
• Dihalno masko, kadar delate v prašnem
okolju (npr. žaganje suhega lesa).
Zaščita pred električnim udarom
・ Verižne žage ne smete uporabljati pri
mokrem vremenu ali v vlažnem okolju,
saj električni motor ni vodoodporen.
1. Žago vključite samo v vtičnice preverjenega
tokokroga. Preverite, ali se napetost sistema
ujema s tisto na tipski ploščici. Prepričajte se, ali
je nameščena 16 A varovalka. Žage, ki jih
uporabljate na prostem, je treba priključiti na
odklopnik na diferenčni tok z delovnim tokom, ki
ne presega 30 mA.
・ Če je priključni kabel poškodovan, takoj
izvlecite električni vtič.
Varne delovne prakse
1. Pred začetkom dela preverite, ali verižna žaga
pravilno deluje in ali se njeno stanje sklada s
predpisi za varnost. Še posebej preverite:
• ali zavora verige pravilno deluje,
• ali zavora izteka pravilno deluje,
• ali sta meč in pokrov zobca kolesa pravilno
nameščena,
• ali je veriga naostrena in napeta v skladu s
pravili,
• ali sta električni kabel in vtič nepoškodovana;
Glejte razdelek "PREGLEDI".
2. Vedno zagotovite uporabo podaljškov kablov z
zadostnim prečnim prerezom (glejte "TEHNIČNI
PODATKI"). Pri uporabi navitja kabla v celoti
odvijte kabel. Kadar uporabljate žago na prostem,
zagotovite, da je uporabljeni kabel namenjen za
uporabo na prostem in ima ustrezne specifikacije.
3. Kabla ne približujte območju rezanja in namestite
kabel tako, da se med rezanjem ne bo zataknil v
veje ali podobno.
4. Ne uporabljajte verižne žage v bližini vnetljivega
prahu ali plinov, saj motor ustvarja iskre in
predstavlja nevarnost eksplozije.
5. Delajte samo na trdni podlagi z dobro obutvijo.
Posebno pozornost namenite oviram (npr. kablu)
v delovnem območju. Še posebej bodite pozorni
na območjih, kjer je zaradi vlage, ledu, snega,
sveže narezanega lesa ali lubja podlaga drseča.
Med uporabo žage ne stojte na lestvah ali
drevesih.
6. Bodite še posebej previdni pri delu na pobočjih;
kotaleča se debla in veje predstavljajo morebitno
nevarnost.
7. Nikoli ne režite nad višino ramen.
23
8. Med vklopom in uporabo držite verižno žago z
obema rokama. Zadnji ročaj držite z desno,
sprednjega pa z levo roko. Ročaja trdno držite z
obema palcema. Meč in veriga ne smeta biti v
stiku z nobenim predmetom, kadar je žaga
vključena.
014316
9. Iz območja rezanja odstranite tujke, kot so pesek,
kamni, žeblji, žice itd. Tujki poškodujejo meč in
verigo in lahko povzročijo nevaren povratni
udarec.
10. Bodite še posebej previdni pri rezanju v bližini
žičnih ograj. Ne zarežite v ograjo, saj lahko to
povzroči povratni udarec žage.
11. Ne zarežite v tla.
12. Režite posamezne kose lesa in ne svežnjev ali
kupov.
13. Izogibajte se uporabi žage za rezanje tankih vej
in korenin, saj se lahko zataknejo v verigo žage.
Izguba ravnotežja predstavlja tveganje.
14. Pri žaganju lesa uporabljajte varno podporo
(stojalo).
15. Ne uporabljajte verižne žage za dviganje ali
odstranjevanje kosov lesa in drugih predmetov.
16. Vodite verižno žago tako, da se noben del telesa
ne nahaja znotraj podaljšane poti verige žage
(glejte sliko).
006909
17. Pri premikanju med žaganjem uporabite zavoro
verige, da preprečite nenameren zagon verige.
Med nošenjem držite verižno žago za sprednji
ročaj in ne imejte prsta na sprožilcu.
18. Med odmori ali puščanjem nenadzorovane
verižne žage izvlecite električni vtič. Puščajte
verižno žago tam, kjer ne predstavlja nevarnosti.
Povratni udarec
1. Med delom z verižno žago lahko pride do
nevarnega povratnega udarca. Do povratnega
udarca pride, ko konica meča (še posebno
zgornja četrtina) pride v stik z lesom ali drugim
trdnim predmetom. To povzroči odboj verižne
žage v smeri upravljavca.
006919
2. Da boste preprečili povratni udarec, upoštevajte
naslednje:
• Nikoli ne začnite žagati s konico meča.
• Nikoli ne uporabljajte konice meča za žaganje.
Bodite še posebej previdni pri nadaljevanju
rezov.
• Začnite z rezom, ko veriga deluje.
• Vedno pravilno naostrite verigo. Še posebej
pravilno nastavite merilnik globine na pravilno
višino.
• Nikoli ne žagajte več vej hkrati.
• Pri klestenju bodite previdni, da preprečite stik
meča z drugimi vejami.
• Pri luženju se ne približujte sosednjim deblom.
Vedno glejte konico meča.
• Uporabite stojalo.
Varnostne funkcije
1. Pred začetkom dela vedno preverite, ali
varnostne funkcije delujejo. Ne uporabljajte
verižne žage, če varnostne funkcije ne delujejo
pravilno.
− Zavora verige:
Verižna žaga je opremljena z zavoro verige, ki
zaustavi verigo žage v delčku sekunde. Aktivira se,
ko potisnete ščitnik roke naprej. Veriga žage se nato
ustavi v 0,15 s, napajanje motorja pa se prekine.
12
014317
− Zavora izteka:
Veriga žage je opremljena z zavoro izteka, ki
nemudoma zaustavi verigo žage, ko spustite
stikalo za VKLOP/IZKLOP. To prepreči nevarnost
zagona verige, ko je žaga izklopljena.
− Sprednji in zadnji ščitniki rok ščitijo uporabnika
pred poškodbami zaradi letečih kosov lesa ali
strgane verige.
1. Pritisnjena zavora
verige
2. Sproščena zavora
verige

24
− Sprožilni zaklep preprečuje nenamerni vklop
verižne žage.
− Lovilnik verige ščiti uporabnika pred poškodbami,
če veriga odskoči ali se strga.
Prenašanje in hramba
・ Kadar verižne žage ne uporabljate ali
med prenašanjem, izvlecite električni
vtič in namestite pokrov meča, ki je
priložen žagi. Nikoli ne prenašajte ali
prevažajte žage z delujočo verigo.
1. Verižno žago nosite samo za sprednji ročaj, meč
pa mora biti obrnjen nazaj.
2. Verižno žago hranite v varnem, suhem in
zaklenjenem prostoru izven dosega otrok. Ne
hranite verižne žage na prostem.
VZDRŽEVANJE
1. Pred izvajanjem prilagoditev ali vzdrževanjem
izvlecite vtič iz vtičnice.
2. Redno preverjajte napajalni kabel glede
poškodovane izolacije.
3. Redno čistite verižno žago.
4. Morebitne poškodbe plastičnega ohišja je treba
ustrezno in takoj popraviti.
5. Ne uporabljajte žage, če sprožilno stikalo ne
deluje pravilno. Ustrezno ga popravite.
6. V nobenem primeru ni dovoljeno spreminjanje
verižne žage. Vaša varnost je ogrožena.
7. Ne izvajajte drugih vzdrževalnih del ali popravil
kot samo tiste, ki so opisani v teh navodilih za
uporabo. Vsakršno drugo delo mora izvesti
pooblaščeni servis.
8. Uporabljajte samo originalne nadomestne dele in
pripomočke, ki so namenjeni za vaš model žage.
Uporaba drugih delov poveča nevarnost nesreče.
9. Ne prevzemamo odgovornosti za nesreče ali
poškodbe, če se uporabljajo neodobreni meči,
verige ali drugi nadomestni deli ali pripomočki.
Prva pomoč
・ Ne delajte sami. Vedno delajte znotraj
slišne razdalje do druge osebe.
1. Vedno imejte pri roki škatlo za prvo pomoč. Takoj
nadomestite vse predmete, ki ste jih uporabili.
2. Če potrebujete pomoč v primeru nesreče,
navedite naslednje:
• Kje se je nesreča zgodila?
• Kaj se je zgodilo?
• Koliko oseb je poškodovanih?
• Kakšne vrste poškodb imajo?
• Kdo poroča o nesreči?
OPOMBA:
Pri posameznikih s slabo prekrvavitvijo, ki so
izpostavljeni čezmernim vibracijam, lahko pride do
poškodb krvnih žil ali živčnega sistema.
Vibracije lahko povzročijo naslednje simptome, ki se
pojavijo v prstih, dlaneh ali zapestjih: "Spanje"
(odrevenelost), mravljinci, bolečina, občutek zbadanja,
spremembe barve kože ali kože same.
Če opazite kateri koli izmed teh pojavov, poiščite
zdravniško pomoč!
SHRANITE TA NAVODILA.
OPOZORILO:
NE dopustite si, da bi zaradi udobnejšega dela ali
poznavanja izdelka (pridobljenega z večkratno
uporabo) opustili striktno upoštevanje varnostnih
pravil pri uporabi stroja. ZLORABA ali
neupoštevanje varnostnih pravil v teh navodilih za
uporabo lahko povzroči hude telesne poškodbe.
25
OZNAKA DELOV
(Model matice: pokrov verižnika se zategne z maticami.)
Za model UC3050A, UC3550A, UC3550AP, UC4050A,
UC4550A
1
2
3
4
5
6
9
10
8
014372
(Model ročice: pokrov verižnika se zategne z ročico.)
Za model UC3051A, UC3551A, UC4051A, UC4551A
1
2
3
4
5
6
9
10
8
7
014373
26
(Za vse modele)
14
12
11
15
13
17
16
18
014514
Kavelj za kabel
1
2
3
4
5
6
7
9
8
10
11
12
13
Ostroga
18
14
15
16
17
Zadnji ročaj
Sprožilno stikalo
Kapica nastavka za dolivanje olja
Sprednji ročaj
Sprednji ščitnik za roko
Meč
Veriga žage
Ročica
Prilagoditveni vijak/številčnica
Kontrola nivoja olja
Zadnji ščitnik za roko
Sprostilni gumb
Lovilnik verige
Pokrov meča
Prilagoditveni vijak črpalko za olje
(na dnu)
Pokrov zobca kolesa
014375
MONTAŽA
POZOR:
• Pred vsakim posegom v orodje se prepričajte, da
je le to izključeno in ločeno od električnega
omrežja.
Odstranjevanje ali nameščanje pokrova
verižnika
Za odstranjevanje pokrova verižnika izvedite naslednje
korake:
(Za modele z matico)
Sl.1
Odvijte matico.
(Za modele z ročico)
Sl.2
Pritisnite in v celoti odprite vzvod, dokler se ne ustavi.
Obrnite ročico v nasprotni smeri urinega kazalca.
Za nameščanje pokrova verižnika izvedite zgornje
korake v obratnem vrstnem redu.
Odstranjevanje ali nameščanje verige žage
POZOR:
• Pri nameščanju in odstranjevanju verige žage
vedno uporabljajte zaščitne rokavice.
Za odstranjevanje verige žage izvedite naslednje
korake:
1. Zrahljajte pokrov verižnika.
2. (Za modele z matico) Obrnite prilagoditveni vijak
verige v nasprotni smeri urinega kazalca, da
sprostite napetost verige žage.
(Za modele z ročico) Obrnite prilagoditveno
številčnico v smeri „-“, da sprostite napetost
verige žage.
Sl.3
Sl.4
3. Odstranite ščitnik verižnega koluta.
4. Odstranite verigo žage in meč z verižne žage.
Za namestitev verige žage izvedite naslednje korake:
5. Preverite smer verige. Puščična oznaka na verigi
kaže smer delovanja verige.
Sl.5
6. Namestite en konec verige na zgornjo stran meča,
drugega pa okrog verižnika.

27
7. Namestite meč na verižno žago.
8. Poravnajte napetostni drsnik z luknjo na meču.
Sl.6
9. Medtem ko držite meč, obrnite prilagoditveni vijak
verige/številčnico za nastavitev napetosti verige
žage.
10. Namestite pokrov verižnika tako, da se kavlji
prilegajo vzdolž luknje in da se zatiči prilegajo v
dvojnike v pokrovu verižnika.
Sl.7
11. Zategnite pokrov verižnika.
Sl.8
Sl.9
Nastavitev napetosti verige
Veriga se po več delovnih urah lahko sprosti. Zato pred
zagonom občasno preverjajte napetost verige.
1. Rahlo zrahljajte pokrov verižnika.
2. Rahlo dvignite konico meča.
3. Obrnite prilagoditveni vijak/številčnico, da
sprostite napetost verige žage.
Sl.10
Sl.11
4. Zategujte verigo žage, dokler se spodnja stran
verige žage ne prilega v vodilo meča (glejte krog).
5. Še vedno rahlo držite meč, nato pa po
nastavljanju napetosti verige zategnite pokrov
verižnika. Prepričajte se, ali se morda veriga žage
na spodnji strani ne zrahlja.
Prepričajte se, ali se veriga žage dobro prilega na
spodnjo stran meča.
POZOR:
• Verige žage ne zategnite preveč. Če je veriga
preveč napeta, lahko pride do poškodbe verige,
prezgodnje obrabe meča ali zloma nastavljalne
številčnice.
• Preohlapna veriga lahko odskakuje in predstavlja
nevarnost nesreče.
• Izvedite postopek nameščanja ali odstranjevanja
verige žage v čistem prostoru, kjer ni lesnega
prahu in podobnega.
Uporaba kabelskega podaljška
POZOR:
• Prepričajte se, ali je kabelski podaljšek odklopljen
z napajalne vtičnice.
Sl.12
Pri uporabi kabelskega podaljška je treba le-tega pritrditi
na kabel verižne žage s kavljem za kabel.
Priključite kavelj za kabel približno 100 - 200 mm od
priključka kabelskega podaljška. S tem boste preprečiti
nenameren odklop.
DELOVANJE
POZOR:
• Pri uporabi trdno držite orodje z desno roko za
zadnji ročaj in z levo za sprednji ročaj.
Delovanje stikala
Sl.13
POZOR:
• Pred vsakim pregledom delovanja sprožilnega
stikala se prepričajte, ali je le-ta izključeno in
ločeno od električnega omrežja.
• Pred priključitvijo orodja na električno omrežje se
vedno prepričajte, da je stikalo brezhibno in da se
vrača v položaj za izklop (OFF), ko ga spustite.
Za preprečevanje nenamerne sprožitve stikala je
nameščen sprostilni gumb.
Za zagon orodja hkrati pritisnite na sprostilni gumb in
sprožilno stikalo. Za izklop orodja spustite sprožilno
stikalo.
Mazanje
POZOR:
• Pred mazanjem verige žage se prepričajte, ali je
orodje izključeno in odklopljeno z električnega
omrežja.
Sl.14
Za mazanje verige in meča uporabljajte biološko
razgradljivo verižno olje z dodatkom za sprijemanje.
Dodatek preprečuje, da bi se verižno olje zaradi vrtenja
prehitro ločilo od verige. Mineralna olja onesnažujejo
okolje in zaradi tega niso dovoljena.
POZOR:
• Izogibajte se stika olja s kožo in z očmi. Olje draži
oči. Če pride do stika z očmi, prizadeto oko takoj
izperite s čisto vodo. Nato nemudoma poiščite
zdravniško pomoč.
•
Nikoli ne uporabljajte odpadnega olja. Odpadno olje
vsebuje kancerogene snovi. Nečistoče v odpadnem
olju povzročajo hitro obrabljanje oljne črpalke, meča
in verige. Odpadno olje je okolju škodljivo.
• Pri prvem polnjenju verižne žage z verižnim oljem
ali pri polnjenju povsem izpraznjenega rezervoarja
je treba olje nujno naliti do spodnjega roba
polnilnega nastavka. V nasprotnem primeru se olje
ne dovaja v zadostni meri.
Sl.15
Za dolivanje olja izvedite naslednje korake:
1.
Da bi preprečili vstop umazanije v rezervoar za olje,
temeljito očistite okolico pokrova rezervoarja za olje.
2. Odvijte pokrov oljnega rezervoarja in nalijte olje
do spodnjega roba polnilnega nastavka.
3. Trdno privijte pokrov oljnega rezervoarja.
4. Odvečno verižno olje skrbno obrišite.

28
OPOMBA:
• Pri prvem zagonu verižne žage lahko traja do dve
minuti, preden začne verižno olje mazati
mehanizem žage. Zato naj žaga deluje nekaj časa
brez obremenitve (glejte "PREGLEDI").
PREGLEDI
Pred začetkom dela opravite naslednje preglede:
Pregled napetosti verige
OPOZORILO:
• Pred pregledom napetosti verige izvlecite omrežni
vtič in si nadenite zaščitne rokavice.
(Za modele z matico)
Sl.16
(Za modele z ročico)
Sl.17
Prepričajte se, ali se veriga žage dobro prilega na
spodnjo stran meča (glejte krog).
Napetost verige preverjajte pogosto, saj se nova veriga
sčasoma podaljšuje.
Če je veriga preveč napeta, lahko pride do poškodbe
verige, prezgodnje obrabe meča ali zloma nastavljalne
številčnice.
Preohlapna veriga lahko odskakuje in predstavlja
nevarnost nesreče.
Če je veriga preohlapna: Glejte razdelek z naslovom
„Nastavitev napetosti verige“ in znova prilagodite
napetost verige.
Kontrola stikala za vklop/izklop
POZOR:
Pred priključitvijo orodja na električno omrežje se vedno
prepričajte, da je stikalo brezhibno in da se vrača v
položaj za izklop (OFF), ko ga spustite.
Za preprečevanje nenamerne sprožitve stikala je
nameščen sprostilni gumb.
Za zagon orodja hkrati pritisnite na sprostilni gumb in
sprožilno stikalo. Za izklop orodja spustite sprožilno stikalo.
Ne vlecite sprožilnega stikala močno, ne da bi pri tem
pritisnili sprostilni gumb. To lahko povzroči zlom stikala.
Pregled zavore verige
OPOMBA:
• Če se verižna žaga ne zažene, preverite, ali je
zavora verige sproščena. Za sprostitev zavore
verige s krepkim potegom povlecite ščitnik nazaj
do te mere, da se razločno zaskoči.
Sl.18
Sl.19
Preverite zavoro verige po naslednjem postopku:
1. Pri vklopu držite verižno žago trdno z obema
rokama. Držite zadnji ročaj orodja z desno roko in
sprednji ročaj z levo roko. Zagotovite, da se meč
in veriga ne dotikata nobenega predmeta.
2. Najprej pritisnite gumb za zaklep, nato pa
sprožilno stikalo. Veriga se takoj zažene.
3. Pritisnite sprednji ščitnik naprej s hrbtiščem roke.
Prepričajte se, ali se veriga žage takoj ustavi.
POZOR:
• Če se veriga žage ne ustavi takoj, žage v
nobenem primeru ne uporabljajte. Posvetujte se s
pooblaščenim servisom Makita.
Pregled zavore izteka
Vklopite verižno žago.
Popolnoma spustite sprožilno stikalo. Prepričajte se, ali
se veriga žage ustavi v sekundi.
POZOR:
• Če se veriga žage ne ustavi takoj, žage v
nobenem primeru ne uporabljajte. Posvetujte se s
pooblaščenim servisom Makita.
Pregled mazanja verige
Pred začetkom dela preverite količino olja v oljnem
rezervoarju in dovajanje olja.
Količino olja preverite na kontrolnem okencu za nivo olja,
kot kaže slika.
Sl.20
Kontrola dovajanja olja:
Zaženite verižno žago.
Medtem ko verižna žaga deluje, jo držite približno 15 cm
nad drevesnim štorom ali tlemi. Če je mazanje zadostno,
nastaja opazna sled brizgajočega olja.
Bodite pozorni na smer vetra in se ne izpostavljajte
brizgajočemu olju po nepotrebnem.
POZOR:
•
Če ne opazite sledi olja, verižne žage ne uporabljajte.
Brez mazanja je življenjska doba verige občutno krajša.
Preverite količino olja. Očistite žleb za olje in izvrtino za
dovod olja v meču (glejte "VZDRŽEVANJE").
Nastavitev mazanja verige
Sl.21
Hitrost dovajanja črpalke za olje lahko nastavite s
prilagoditvenim vijakom.
DELO Z VERIŽNO ŽAGO
POZOR:
•
Vedno uporabljajte sprednji in zadnji ročaj in med
uporabo trdno držite orodje za sprednji in zadnji ročaj.
• Vedno zavarujte les, ki ga boste rezali, sicer lahko
odrezani delci povzročijo telesne poškodbe.
Odrezovanje
Sl.22
Pri odrezovanju prislonite ostrogo na les, kot kaže slika.
Zarežite z verižno žago v les. Medtem dvignite žago z
zadnjim ročajem in jo vodite s sprednjim ročajem.
Ostrogo uporabite kot vrtišče.
Nadaljujte z rahlim pritiskanjem na sprednji ročaj. Pri
tem vlecite žago nekoliko nazaj. Prislonite ostrogo
globlje in spet dvigajte sprednji ročaj.

29
Kadar režete več kosov lesa, verižno žago med
posameznimi rezi izklopite.
POZOR:
• Pri rezanju z zgornjo stranjo meča lahko žaga v
primeru zagozdenja verige sunkovito udari proti
uporabniku. Iz tega razloga režite s spodnjo
stranjo meča, saj se žaga v primeru zagozdenja
verige premakne stran od telesa.
Sl.23
Če režete napeti les, morate zarezati najprej na napeti
strani (A). Nato izvedite ločilni rez na natezni strani (B).
Na ta način lahko preprečite zagozdenje meča.
Sl.24
Obvejevanje
POZOR:
• Obvejevanje smejo izvajati samo ustrezno
usposobljene osebe. Obstaja nevarnost poškodb
zaradi povratnega udarca.
Pri obvejevanju morate verižno žago podpreti čim bliže
deblu. V izogib povratnemu udarcu nikoli ne žagajte s
konico meča.
Bodite posebej pozorni na napete veje. Visečih vej ne
režite od spodaj.
Med obvejevanjem ne smete stati na ležečem deblu.
Vbodni in vzdolžni rezi
POZOR:
• Vbodne in vzdolžne reze smejo izvajati samo
ustrezno usposobljene osebe. Obstaja nevarnost
poškodb zaradi povratnega udarca.
Sl.25
Vzdolžne reze izvajajte pod čim manjšim kotom.
Potrebna je posebna mera previdnosti, saj uporaba
ostroge ni mogoča.
Podiranje dreves
POZOR:
• Podiranje dreves smejo izvajati samo ustrezno
usposobljene osebe. Delo je nevarno.
Pri podiranju dreves upoštevajte lokalne predpise.
Sl.26
− Pred začetkom podiranja drevesa zagotovite:
(1)
da se v območju podiranja dreves nahajajo samo
delavci, ki dejansko sodelujejo pri podiranju,
(2)
da je zagotovljen varen umik vseh udeleženih
oseb na obeh straneh osi podiranja pod
kotom približno 45°. Upoštevajte povečano
nevarnost spotikanja na električnem kablu;
(3) da je vznožje debla očiščeno vseh tujkov,
grmičevja in vej,
(4) Pred podiranjem morate preveriti smer
padca in zagotoviti, da se v območju 2 1/2
kratnika dolžine drevesa ne nahajajo niti
osebe niti predmeti.
− Pri vsakem drevesu upoštevajte naslednje:
• smer nagiba,
• majave ali suhe veje,
• višino drevesa,
• naravni previs,
• trhlost drevesa.
− Upoštevajte hitrost in smer vetra. Dreves ni
dovoljeno podirati ob močnih sunkih vetra.
− Obrezovanje oprijetih korenin: začnite pri največjih
koreninah. Najprej naredite navpičen in nato
vodoraven rez.
Sl.27
− Izdelava zaseka: Zasek določa smer padanja in
vodi drevo med padanjem. Zasek naredite na tisti
strani, v katero naj pade drevo. Zasek naj bo
izrezan čim bolj pri tleh. Najprej naredite
vodoraven rez v globini, ki znaša 1/5 - 1/3 premera
debla. Zasek ne sme biti prevelik. Nato naredite
poševni rez.
− Naredite ustrezne popravke zaseka po vsej širini.
Sl.28
− Ločilni rez naredite nekoliko višje od spodnjega
roba zaseka. Ločilni rez mora biti izveden v
natančni vodoravni liniji. Pred zasekom naj ostane
približno 1/10 premera debla kot prelomni del.
V neprežaganem deblu služi prelomni del kot tečaj.
Tega ne smete nikoli prežagati, saj je padec
drevesa potem nepredvidljiv. V ločilni rez
pravočasno vstavite kline.
− Ločilni rez smete zavarovati samo s klini iz
plastike ali aluminija. Uporaba železnih klinov je
prepovedana.
− Med padanjem drevesa se postavite bočno od
drevesa. Oddaljite se v območju kota 45° v nasprotni
smeri padanja drevesa (glejte sliko "Območje
padanja"). Bodite pozorni na padajoče veje.
− Treba je načrtovati izhodno pot in jo po potrebi
očistiti pred začetkom rezanja. Izhodna pot se
mora raztezati nazaj in hrbtno diagonalno od
pričakovane linije padanja, kot je prikazano v sliki.
Sl.29
VZDRŽEVANJE
POZOR:
• Preden se lotite pregledovanja ali vzdrževanja
orodja, se vedno prepričajte, da je orodje
izklopljeno in vtič izvlečen iz vtičnice.
• Med pregledi ali vzdrževanjem vedno uporabljajte
rokavice.
• Nikoli ne uporabljajte bencina, razredčila, alkohola
ali podobnega. V tem primeru se orodje lahko
razbarva, deformira, lahko pa tudi nastanejo
razpoke.
Spodaj navedena vzdrževalna dela izvajajte v rednih
presledkih. Garancijski zahtevki se priznajo le v primeru,

30
da se vzdrževalna dela izvajajo redno in v skladu z
navodili.
Sami izvajajte samo tista vzdrževalna dela, ki so
opisana v teh navodilih za uporabo. Vsakršno drugo
delo mora izvesti pooblaščeni servis MAKITA.
Čiščenje verižne žage
Žago redno čistite s čisto krpo. Posebno pozornost
namenite ročajem, ki ne smejo biti mastni.
Pregled plastičnega ohišja
Izvajajte redne vizualne preglede vseh delov ohišja. Če
so kateri koli deli poškodovani, nemudoma odpeljite
žago na popravilo v pooblaščeni servis MAKITA.
Brušenje verige žage
POZOR:
• Pri vseh opravilih na verižni žagi obvezno izvlecite
omrežni vtič in si nadenite zaščitne rokavice.
Sl.30
Verigo nabrusite:
− če opazite mokasto žagovino pri žaganju vlažnega
lesa,
− če veriga tudi pri močnejšem pritisku le stežka
prodira v les,
− če je rezilni rob vidno poškodovan,
− Če žago med prodiranjem v les vleče postrani v
levo ali desno. Do tega pride zaradi
neenakomerno nabrušene verige žage ali zaradi
enostranske poškodbe.
Verigo brusite pogosto, vendar s čim manjšim
odvzemanjem materiala.
Za ostrenje praviloma zadoščajo dva do trije potegi s
pilo. Po večkratnem ostrenju verige žage odnesite
verigo na ostrenje v pooblaščeni servis MAKITA.
Merila za brušenje:
− Dolžine vseh rezalnikov morajo biti enake.
Različno visoki rezalni zobci povzročajo grob tek
verige, zaradi katerega se veriga lahko pretrga.
− Verigo nabrusite takoj, ko opazite, da je dosežena
minimalna dolžina rezalnih zob 3 mm. V tem
primeru namestite novo verigo.
− Debelina odrezkov je odvisna od odmika med
omejevalnikom globine (okrogli rob) in rezalnim
robom.
− Za doseganje maksimalne zmogljivosti rezanja
mora odmik med rezalnim robom in
omejevalnikom globine znašati:
Rezalni zobec verige 91PX: 0,65 mm
Sl.31
OPOZORILO:
• Prevelik odmik povečuje nevarnost povratnega
udarca.
− Vsi rezalni zobci morajo biti nabrušeni pod kotom
30°. Različni koti brušenja povzročijo grob,
neenakomeren tek verige, hitro obrabljanje in
pretrg verige.
− Čelni kot rezalnega zoba je mogoče doseči z
ustrezno globino prodiranja z okroglo pilo.
Ustrezen čelni kot samodejno dosežete tako, da
pravilno vodite pilo, ki je predpisana za brušenje.
− Stranski koti zobcev vseh verig žage so naslednji:
Rezalni zobec verige 91PX: 80°
Sl.32
Pila in vodenje pile
− Za brušenje verige uporabljajte posebno okroglo
pilo za verige (izbirni dodatni pribor). Običajne
okrogle pile niso primerne.
− Premer okrogle pile za vse verige žage je
naslednji:
Rezalni zobec verige 91PX: 4,0 mm
− Pilo vodite tako, da brusi rezalni zobec samo med
potiskanjem naprej. Med povratnimi gibi pilo
dvignite z rezalnega zobca.
− Najprej nabrusite najkrajši rezalni zobec. Dolžina
tega zobca naj potem služi kot merilo za višino
vseh ostalih rezalnih zobcev verige žage.
Sl.33
− Pilo vodite v skladu s prikazom na sliki.
− Pilo je lažje voditi, če nanjo namestite držalo
(dodatni pribor). Držalo ima oznake za pravilen kot
brušenja 30° (oznake je treba poravnati vzporedno
z verigo) in omejuje globino prodiranja (4/5
premera pile).
Sl.34
− Ko je veriga nabrušena, preverite višino omejevalnika
globine z merilom za verige (dodatni pribor).
Sl.35
− Morebitne štrline, tudi če so minimalne, popravite
s posebno ploščato pilo (dodatni pribor).
− Omejevalnik globine spredaj ponovno zaoblite.
Čiščenje meča in mazanje vodilnega koluta
POZOR:
• Pri tem opravilu obvezno uporabite zaščitne
rokavice. Nevarnost poškodb na zarobkih.
Sl.36
Redno preverjajte, ali so tekalne površine meča
poškodovane. Očistite jih s primernim orodjem, po
potrebi posnemite robove.
Pri intenzivnejši uporabi verižne žage mažite ležaj
vodilnega koluta najmanj enkrat tedensko. Pred
mazanjem temeljito očistite 2 mm veliko odprtino na
konici meča, nato pa skozi odprtino vtisnite majhno
količino večnamenske masti (dodatni pribor).
Čiščenje žleba za olje
Sl.37
− Žleb za olje in izvrtino za dovod olja na meču je
treba čistiti v rednih presledkih.
 Loading...