

Page 1
Stone Polisher
Instruction Manual
Steinpolierer
Betriebsanleitung
Polerka do kamieni
Instrukcja obsługi
Шлифовальный станок для камня
Инструкция по эксплуатации
PW5000C
Page 2
1
2
12
5
6
B
3
A
4
34
8
9
7
56
10
11
12
78
2
Page 3
13
14
910
Symbols
The followings show the symbols used for the tool. Be sure that you understand their meaning before use.
Symbole
Die folgenden Symbole werden für die Maschine verwendet. Machen Sie sich vor der Benutzung unbedingt mit ihrer
Bedeutung vertraut.
Symbole
Poniższe symbole używane są do opisu urządzenia. Przed użyciem należy upewnić się, że rozumie się ich znaczenie.
Символы
Следующие объяснения показывают символы, используемые для инструмента. Убедитесь перед
использованием, что Вы понимаете их значение.
❏ Read instruction manual.
❏ Bitte Betriebsanleitung lesen.
❏ Przeczytaj instrukcję obsługi.
❏
Прочитайте инструкцию по эксплуатации.
❏ DOUBLE INSULATION
❏ DOPPELT SCHUTZISOLIERT
❏ PODWÓJNA IZOLACJA
❏
ДВОЙНАЯ ИЗОЛЯЦИЯ
❏ Wear safety glasses.
❏ Schutzbrille tragen.
❏ Noś okulary ochronne.
❏
Одевайте защитные очки.
3
Page 4

ENGLISH
1 Shaft lock
2 Slide switch
3 Speed adjusting dial
4Cock
5 Close
Explanation of general view
6Open
7 Side grip
8 Head cover
9Screw
10 Abrasive disc
11 Pad
12 Spindle
13 Exhaust vent
14 Inhalation vent
SPECIFICATION
Model PW5000C
Pad diameter Max 125 mm
–1
No load speed (min
Overall length 313 mm
Net weight 2.2 kg
Safety class /II
• Due to our continuing program of research and development, the specifications herein are subject to change
without notice.
• Note: Specifications may differ from country to country.
Intended use
The tool is intended for surface work with natural stone.
Power supply
The tool should be connected only to a power supply of
the same voltage as indicated on the nameplate, and can
only be operated on single-phase AC supply. They are
double-insulated in accordance with European Standard
and can, therefore, also be used from sockets without
earth wire.
) 2,000 – 4,000
SAFETY INSTRUCTIONS
Warning! When using electric tools, basic safety precautions should always be followed to reduce the
risk of fire, electric shock and personal injury, including the following. Read all these instructions before
attempting to operate this product and save these
instructions.
For safe operation:
1. Keep work area clean
Cluttered areas and benches invite injuries.
2. Consider work area environment
Don’t expose power tools to rain. Don’t use power
tools in damp or wet locations. Keep work area well
lit. Don’t use power tools in presence of flammable
liquids or gases.
3. Guard against electric shock
Prevent body contact with grounded surfaces (e.g.
pipes, radiators, ranges, refrigerators).
4. Keep children away
Do not let visitors contact tool or extension cord. All
visitors should be kept away from work area.
5. Store idle tools
When not in use, tools should be stored in dry, high,
or locked-up place, out of the reach of children.
6. Don’t force tool
It will do the job better and safer at the rate for which
it was intended.
7. Use right tool
Don’t force small tools or attachments to do the job
of a heavy duty tool. Don’t use tools for purposes not
intended; for example, don’t use circular saw for cutting tree limbs or logs.
8. Dress properly
Do not wear loose clothing or jewelry. They can be
caught in moving par ts. Rubber gloves and non-skid
footwear are recommended when working outdoors.
Wear protective hair covering to contain long hair.
9. Use safety glasses and hearing protection
Also use face or dust mask if cutting operation is
dusty.
10. Connect dust extraction equipment
If devices are provided for the connection of dust
extraction and collection facilities, ensure these are
connected and properly used.
11. Don’t abuse cord
Never carry tool by cord or yank it to disconnect it
from receptacle. Keep cord from heat, oil and sharp
edges.
12. Secure work
Use clamps or a vise to hold work. It’s safer than
using your hand and it frees both hands to operate
tool.
13. Don’t overreach
Keep proper footing and balance at all times.
14. Maintain tools with care
Keep tools sharp and clean for better and safer performance. Follow instructions for lubricating and
changing accessories. Inspect tool cords periodically and, if damaged, have repaired by authorized
service facility. Inspect extension cords periodically
and replace if damaged. Keep handles dry, clean
and free from oil and grease.
15. Disconnect tools
When not in use, before servicing, and when changing accessories such as blades, bits and cutters.
16. Remove adjusting keys and wrenches
Form the habit of checking to see that keys and
adjusting wrenches are removed from tool before
turning it on.
17. Avoid unintentional star ting
Don’t carry plugged-in tool with finger on switch. Be
sure switch is off when plugging in.
18. Outdoor use extension cords
When tool is used outdoors, use only extension
cords intended for use outdoors and so marked.
19. Stay alert
Watch what you are doing. Use common sense. Do
not operate tool when you are tired.
4
Page 5

20. Check damaged parts
Before further use of the tool, a guard or other part
that is damaged should be carefully checked to
determine that it will operate properly and perform
its intended function. Check for alignment of moving
parts, binding of moving parts, breakage of parts,
mounting, and any other conditions that may affect
its operation. A guard or other part that is damaged
should be properly repaired or replaced by an authorized service center unless otherwise indicated elsewhere in this instruction manual. Have defective
switches replaced by an authorized service center.
Do not use tool if switch does not turn it on and off.
21. Warning
The use of any other accessory or attachment other
than recommended in this operating instruction or
the catalog may present a risk of personal injury.
22. Have your tool repaired by an expert
This electric appliance is in accordance with the relevant safety rules. Repairing of electric appliances
may be carried out only by experts otherwise it may
cause considerable danger for the user.
ADDITIONAL SAFETY RULES FOR TOOL
1. Always use eye and ear protection. Other personal protective equipment such as dust mask,
gloves, helmet and apron should be worn.
2. Always be sure that the tool is switched off and
unplugged before carrying out any work on the
tool.
3. Accessories must be rated for at least the speed
recommended on the tool warning label. Wheels
and other accessories running over rated speed
can fly apart and cause injury.
4. Check the backing pad carefully for cracks, damage or deformity before operation. Replace
cracked, damaged or deformed pad immediately.
5. Check that the workpiece is properly supported.
6. Hold the tool firmly.
7. Keep hands away from rotating parts.
8. Make sure the abrasive disc is not contacting the
workpiece before the switch is turned on.
9. Do not leave the tool running. Operate the tool
only when hand-held.
10. Pay attention that the wheel continues to rotate
after the tool is switched off.
11. Do not touch the workpiece immediately after
operation; it may be extremely hot and could
burn your skin.
12. If working place is extremely hot and humid, or
badly polluted by conductive dust, use a shortcircuit breaker (30 mA) to assure operator safety.
13. Do not use the tool on any materials containing
asbestos.
14. Some material contains chemicals which may be
toxic. Take caution to prevent dust inhalation
and skin contact. Follow material supplier safety
data.
15. Always use the correct dust mask/respirator for
the material and application you are working
with.
16. Ensure that ventilation openings are kept clear
when working in dusty conditions. If it should
become necessary to clear dust, first disconnect
the tool from the mains supply (use non metallic
objects) and avoid damaging internal parts.
ENB078-2
17. For additional protection against electric shock,
be sure to WEAR RUBBER GLOVES AND RUBBER BOOTS during operation.
18. When using the water feed, be careful not to let
water get into the motor. If water runs into the
motor, an electric shock hazard may result.
19. Never use the tool without an isolating transformer.
SAVE THESE INSTRUCTIONS.
Important Notes about Mains Connection for
110 Volts, 50 – 60Hz
Caution! Read and observe these precautions before
using the tool. Non-observance of these precautions may
lead to personal injuries and damage to the tool!
The tool was built according to the European Standards
EN50144-1 (safety of hand-held, motor-driven power
tools; here in particular section 20.19: power tools with
water connection) and EN60309-2 (plugs, receptacles
and couplings for industrial applications). When applying
these standards, the earth contact position of the plug-in
device may only be carried out in “12 o’clock position”.
The tool has a plug-in device with a “12 o’clock” earth
contact position.
However, since the European Standard EN60309-2 does
not provide a differentiation regarding the supply voltage
and this earth contact position, there is the possibility to
confuse the connection to an isolating transformer with
another output voltage (e.g. 230 V). When connecting
the tool to an isolating transformer, make absolutely sure
to use the correct output voltage (110 V, 50
This tool is designed exclusively for connection to an isolating transformer with an output voltage of 110 V. Due to
its use in wet conditions (water connection on the tool),
this tool must never be connected to a power supply without an isolating transformer.
Damages caused by inappropriate tampering with the
plug-in device are not subject to warranty or legal guarantee claims.
Contact your specialist supplier for an isolating transformer suitable for your tool.
–
60 Hz).
FUNCTIONAL DESCRIPTION
CAUTION:
• Always be sure that the tool is switched off and
unplugged before adjusting or checking function on the
tool.
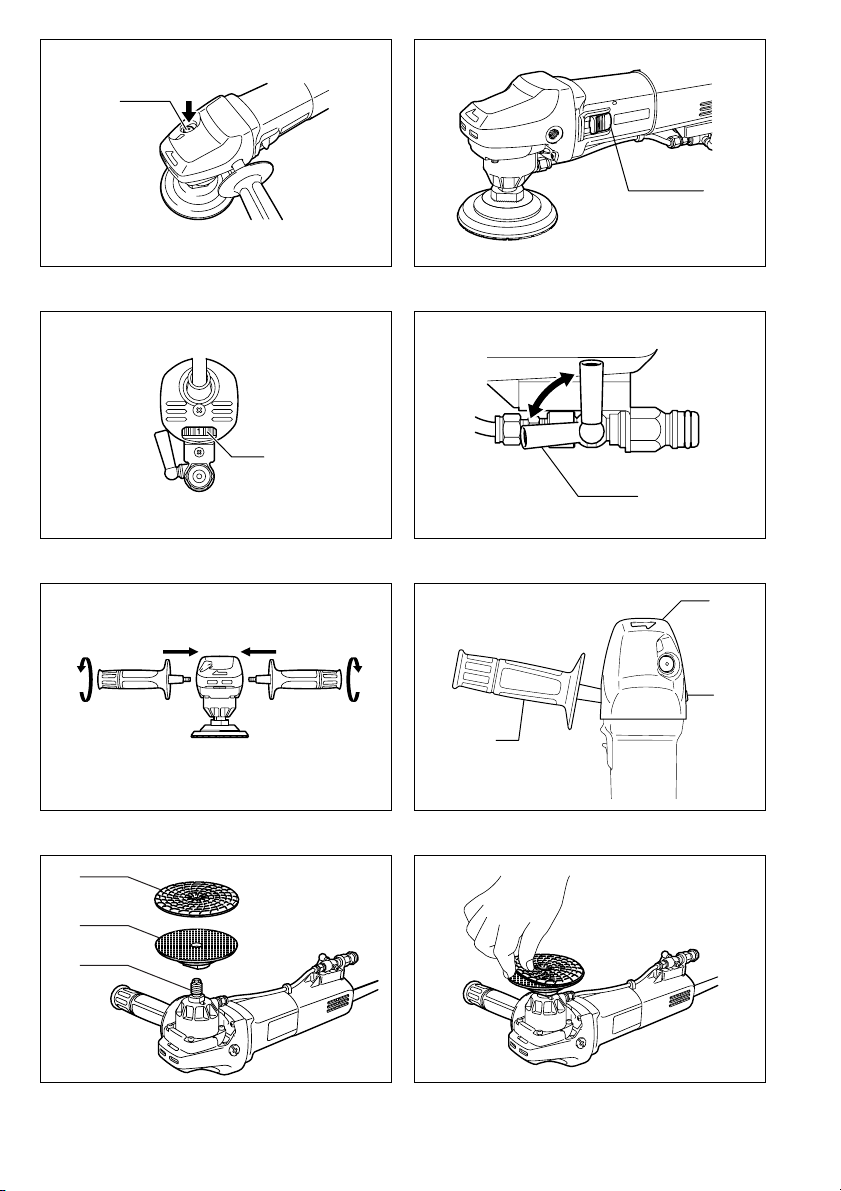
Shaft lock (Fig. 1)
CAUTION:
• Never actuate the shaft lock when the spindle is mov-
ing. The tool may be damaged.
Press the shaft lock to prevent spindle rotation when
installing or removing accessories.
5
Page 6

Switch action (Fig. 2)
CAUTION:
• Before plugging in the tool, always check to see that
the slide switch actuates properly and returns to the “O
(OFF)” position when the rear of the slide switch is
depressed.
• Switch can be locked in “I (ON)” position for ease of
operator comfort during extended use. Apply caution
when locking tool in “I (ON)” position and maintain firm
grasp on tool.
To start the tool, slide the slide switch toward the “I (ON)”
position. For continuous operation, press the front of the
slide switch to lock it.
To stop the tool, press the rear of the slide switch, then
slide it toward the “O (OFF)” position.
Speed adjusting dial (Fig. 3)
The rotating speed can be changed by turning the speed
adjusting dial to a given number setting from 1 to 5.
Higher speed is obtained when the dial is turned in the
direction of number 5. And lower speed is obtained when
it is turned in the direction of number 1.
Refer to the below table for the relationship between the
number settings on the dial and the approximate rotating
speed.
Number RPM (/min)
12,000
22,500
33,000
43,500
54,000
CAUTION:
• If the tool is operated continuously at low speeds for a
long time, the motor will get overloaded and heated up.
• The speed adjusting dial can be turned only as far as 5
and back to 1. Do not force it past 5 or 1, or the speed
adjusting function may no longer work.
Electronic function
Constant speed control
Possible to get fine finish, because the rotating speed is
kept constant even under the loaded condition.
Additionally, when the load on the tool exceeds admissible levels, power to the motor is reduced to protect the
motor from overheating. When the load returns to admissible levels, the tool will operate as normal.
Soft start feature
Soft start because of suppressed starting shock.
Opening or closing of water lever (Fig. 4)
To keep the lever on the tool for water flow open, turn it to
the position A where the water passage will be ready.
Return it to the position B to close.
The amount of water flow can be adjusted by changing
the lever position between the positions A and B.
ASSEMBLY
CAUTION:
• Always be sure that the tool is switched off and
unplugged before carrying out any work on the tool.
Installing side grip (handle)
CAUTION:
• Always be sure that the side grip is installed securely
before operation.
Screw the side grip securely on the position of the tool as
shown in the figure. (Fig. 5)
Remove one of the screws which secure gear housing
and head cover, then screw the side grip on the tool.
(Fig. 6)
Installing or removing abrasive disc (Fig. 7 & 8)
Remove all dirt or foreign matter from the pad.
Screw the pad onto the spindle with pressing the shaft
lock.
Attach the disc to the pad so carefully that the edges of
disc and pad overlap each other without protruding.
To remove the abrasive disc, pull off its edge from the
pad.
OPERATION
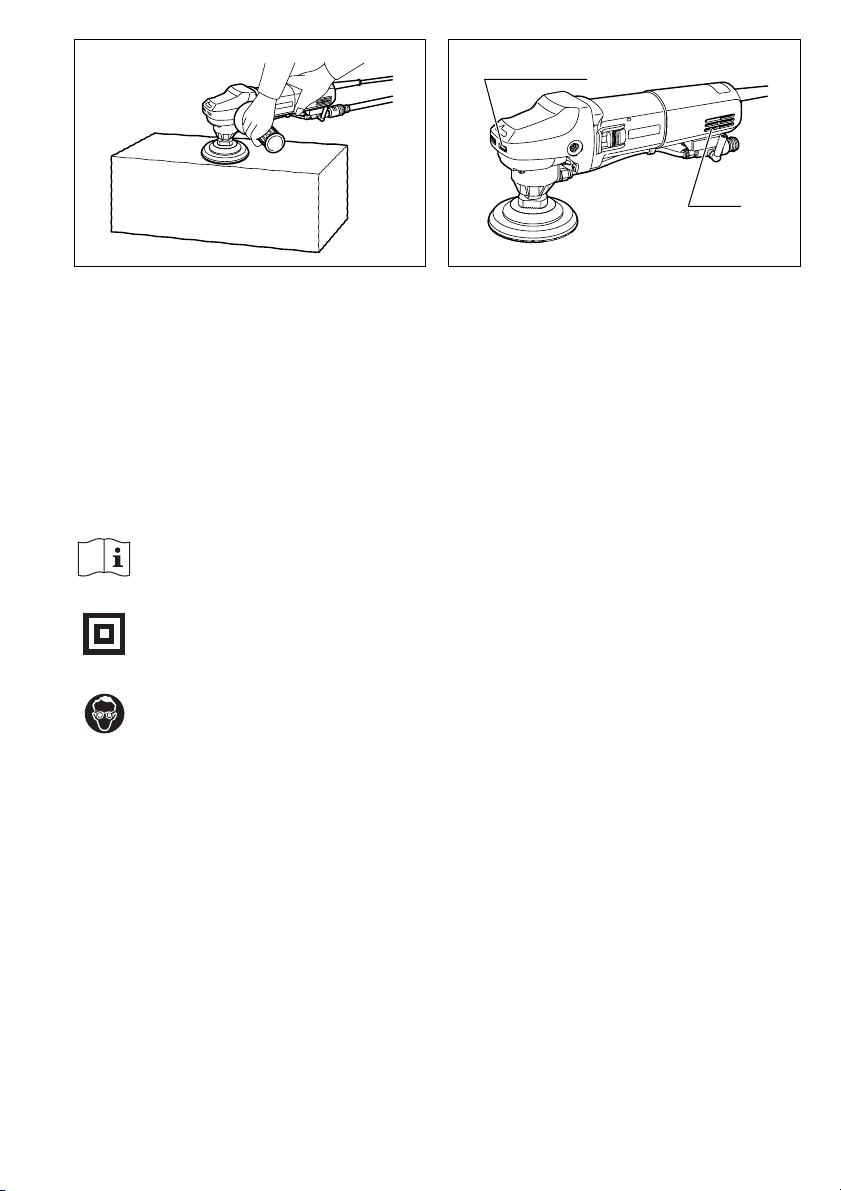
Polishing operation (Fig. 9)
WARNING:
• To reduce the risk of electric shock, check the tool’s
water supply system to ensure there is no damage to
the seals (“o” rings) or hoses. A damaged water supply
system may result in abnormal water flow to the tool,
which could be dangerous.
CAUTION:
• Always wear safety goggles or a face shield during
operation.
• Never switch on the tool when it is in contact with the
workpiece, it may cause an injury to operator.
• Never run the tool without the abrasive disc. You may
seriously damage the pad.
• Be sure to feed water to the abrasive disc during operation. Failure to do so may cause breakage to the tool.
• The temperature of water to be used should be within
the range of 0°C – 40°C (32°F – 104°F). Use of freezing or hot water beyond this range may cause damage
to the tool.
• The maximum permitted pressure of water supply is
7bar.
Make sure that the cock is closed. Connect the hose to
the tool. Make sure that water comes out when the water
lever is opened.
Hold the tool firmly. Turn the tool on and then apply the
abrasive disc to the workpiece.
Apply slight pressure only. Excessive pressure will result
in poor performance and premature wear to abrasive
disc.
6
Page 7

MAINTENA NCE
CAUTION:
• Always be sure that the tool is switched off and
unplugged before attempting to perform inspection or
maintenance.
The tool and its air vents have to be kept clean. Regularly
clean the tool’s air vents or whenever the vents start to
become obstructed. (Fig. 10)
To maintain product SAFETY and RELIABILITY, repairs,
carbon brush inspection and replacement, any other
maintenance or adjustment should be performed by Makita Authorized Service Centers, always using Makita
replacement parts.
ACCESSORIES
CAUTION:
• These accessories or attachments are recommended
for use with your Makita tool specified in this manual.
The use of any other accessories or attachments might
present a risk of injury to persons. Only use accessory
or attachment for its stated purpose.
If you need any assistance for more details regarding
these accessories, ask your local Makita service center.
• Abrasive discs
• Side grip
EC-DECLARATION OF CONFORMITY
We declare under our sole responsibility that this product
is in compliance with the following standards of standardized documents,
HD400, EN50144, EN55014, EN61000
in accordance with Council Directives, 73/23/EEC,
89/336/EEC and 98/37/EC.
Yasuhiko Kanzaki
MAKITA INTERNATIONAL EUROPE LTD.
Michigan Drive, Tongwell, Milton Keynes,
Bucks MK15 8JD, ENGLAND
CE 2003
Director
ENH001-1
Noise and Vibration
ENG003-1
The typical A-weighted sound pressure level is 85 dB (A).
The noise level under working may exceed 85 dB (A).
The typical weighted root mean square acceleration
value is not more than 2.5 m/s
– Wear ear protection. –
2
.
7
Page 8

DEUTSCH
1 Spindelarretierung
2 Schiebeschalter
3 Drehzahl-Stellrad
4Hahn
5 Schließen
Übersicht
6 Öffnen
7 Seitengriff
8 Kopfabdeckung
9Schraube
10 Schleifscheibe
11 Schleifteller
12 Spindel
13 Auslassöffnung
14 Einlassöffnung
TECHNISCHE DATEN
Model PW5000C
Schleiftellerdurchmesser Max. 125 mm
Leerlaufdrehzahl (min
Gesamtlänge 313 mm
Nettogewicht 2,2 kg
Sicherheitsklasse /II
• Wir behalten uns vor, Änderungen im Zuge der Entwicklung und des technischen Fortschritts ohne vorherige Ankündigung vorzunehmen.
• Hinweis: Die technischen Daten können von Land zu
Land abweichen.
Vorgesehene Verwendung
Diese Maschine ist für die Oberflächenbearbeitung von
Naturstein vorgesehen.
Stromversorgung
Die Maschine darf nur an die auf dem Typenschild angegebene Spannung angeschlossen werden und arbeitet
nur mit Einphasen-Wechselspannung. Sie ist entsprechend den Europäischen Richtlinien doppelt schutzisoliert und kann daher auch an Steckdosen ohne
Erdungskabel angeschlossen werden.
-1
) 2 000 – 4 000
SICHERHEITSHINWEISE
Achtung! Beim Gebrauch von Elektrowerkzeugen
sind zum Schutz gegen elektrischen Schlag. Verletzungsund Brandgefahr folgende grundsätzlichen Sicherheitsmaßnahmen zu geachten.
Lesen und beachten Sie diese Hinweise, bevor
Sie das Gerät benutzen.
1. Halten Sie Ihren Arbeitsbereich in Ordnung
Unordnung im Arbeitsbereich ergibt Unfallgefahr.
2. Berücksichtigen Sie Umgebungseinflüsse
Setzen sie Elektrowerkzeuge nicht dem Regen aus.
Benützen Sie Elektrowerkzeuge nicht in feuchter
oder nasser Umgebung. Sorgen Sie für gute
Beleuchtung. Benützen Sie Elektrowerkzeuge nicht
in Nähe von brennbaren Flüssigkeiten oder Gasen.
3. Schützen Sie sich vor elektrischem Schlag
Vermeiden Sie Körperberührung mit geerdeten Teilen, zum Beispiel Rohren, Heizkörpern, Herden,
kühlschränken.
4. Halten Sie Kinder fern!
Lassen Sie andere Personen nicht das Werkzeug
oder Kabel berühren, halten Sie sie von Ihrem
Arbeitsbereich fern.
5. Bewahren Sie Ihre Werkzeuge sicher auf
Unbenutzte Werkzeuge sollten in trockenem, verschlossenem Raum und für Kinder nicht erreichbar
aufbewahrt werden.
6. Überlasten Sie Ihr Werkzeug nicht
Sie arbeiten besser und sicherer im angegebenen
Leistungsbereich.
7. Benützen Sie das richtige Werkzeug
Verwenden Sie keine zu schwachen Werkzeuge
oder Vorsatzgeräte für schwere Arbeiten.
Benützen Sie Werkzeuge nicht für Zwecke und
Arbeiten, Wofür sie nicht bestimmt sind; zum Beispiel benützen Sie keine Handkreissäge, um Bäume
zu flällen oder Äste zu schneiden.
8. Tragen Sie geeignete Arbeitskleidung
Tragen Sie keine weite Kleidung oder Schmuck. Sie
können von beweglichen Teilen erfaßt werden. Bei
Arbeiten im Freien sind Gummihandschuhe und
rutschfestes Schuhwerk empfehlenswert. Tragen
Sie bei langen Haaren ein Haarnetz.
9. Schutzbrille und Gehörschutz tragen
Verwenden Sie eine Atemmaske bei stauberzeugenden Arbeiten.
10. Schlleßen Sie eine Staubabsaugvorrichtung an
Wenn Geräte für den Anschluß von Staubabsaugund-sammelvorrichtungen ausgelegt sind, sorgen
Sie dafür, daß Jiese angeschlossen und korrekt
benutzi werden.
11. Zweckentfremden Sie nicht das Kabel
Tragen Sie das Werkzeug nicht am Kabel, und
benützen Sie es nicht, um den Stecker aus der
Steckdose zu ziehen. Schützen Sie das Kabel vor
Hitze, Öl und scharfen Kanten.
12. Sichern Sie das Werkstück
Benützen Sie Spannvorrichtungen oder einen
Schraubstock, um das Werkstück festzuhalten. Es
ist damit sicherer gehalten als mit Ihrer Hand und
ermöglicht die Bedienung der Maschine mit beiden
Händen.
13. Überdehnen Sie nicht Ihren Standbereich
Vermeiden Sie abnormale Körperhaltung. Sorgen
Sie für sicheren Stand, und halten Sie jederzeit das
Gleichgewicht.
14. Pflegen Sie Ihre Werkzeuge mit Sorgtalt
Halten Sie Ihre Werkzeuge scharf und sauber, um
gut und sicher zu arbeiten. Befolgen Sie die Wartungsvorschriften und die Hinweise für Werkzeugwechsel. Kontrollieren Sie regelmäßig den Stecker
und das Kabel, und lassen Sie diese bei Beschädigung von einem anerkannten Fachmann erneuern.
Kontrollieren Sie Verlängerungskabel regelmäßig
und ersetzen Sie beschädigte. Halten Sie Handgriffe
trocken und frei von Öl und Fett.
8
Page 9

15. Ziehen Sie den Netzstecker
Bei Nichtgebrauch, vor der Wartung und beim Werkzeugwechsel, wie zum Beispiel Sägeblatt, Bohrer
und Maschinenwerkzeugen aller Art.
16. Lassen Sie keine Werkzeugschlüssel stecken
Überprüfen Sie vor dem Einschalten, daß die
Schlüssel und Einstellwerkzeuge entfernt sind.
17. Vermeiden Sie unbeabsichtigten Anlauf
Tragen Sie keine an das Stromnetz angeschlossene
Werkzeuge mit dem Finger am Schalter. Vergewissern Sie sich, daß der Schalter beim Anschluß an
das Stromnetz ausgeschaltet ist.
18. Verlängerungskabel im Freien
Verwenden Sie im Freien nur dafür zugelassene
und entsprechend gekennzeichnete Varlängerungs-
kabel.
19. Seien Sie stets aufmerksam
Beobachten Sie Ihre Arbeit. Gehen Sie vernünftig
vor. Verwenden Sie das Werkzeug nicht, wenn Sie
unkonzentriert sind.
20. Kontrollieren Sie Ihr Gerät auf Beschädigungen
Vor weiterem Gebrauch des Werkzeugs die Schutzeinrichtungen oder leicht beschädigte Teile sorgfäl-
tig auf ihre einwandfreie und bestimmungsgemäße
Funktion überprüfen. Überprüfen Sie, ob die Funktion beweglicher Teile in Ordnung ist, ob sie nicht
klemmen onder ob Teile beschädigt sind. Sämtliche
Teile müssen richtig montiert sein und alle Bedingungen erfüllen, um den einwandfreien Betrieb des
Gerätes zu gewährleisten.
Beschädigte Schutzvorrichtungen und Teile sollen
sachgemäß durch eine Kundendienstwerkstatt repariert oder ausgewechselt werden, soweit nichts
anderes in den Betriebsanleitungen angegeben ist.
Beschädigte Schalter müssen bei einer Kundendienstwerkstatt ersetzt werden. Benutzen Sie keine
Werkzeuge, bei denen sich der Schalter nicht ein
und ausschalten läßt.
21. Achtung!
Zu Ihrer eigenen Sicherheit, benützen Sie nur Zubehör und Zusatzgeräte, die in der Bedienungsanleitung angegeben oder vom Werkzeug-Hersteller
empfohlen oder angegeben werden. Der Gebrauch
anderer als der in der Bedienungsanleitung oder im
Katalog empfohlenen Einsatzwerkzeuge oder Zubehöre kann eine persönliche Verletzungsgefahr für
Sie bedeuten.
22. Reparaturen nur vom Elektrofachmann.
Dieses Elektrowerkzeug entspricht den einschlägi-
gen Sicherheitsbestimmungen. Reparaturen dürfen
nur von einer Elektrofachkraft ausgeführt werden,
andernfalls können Unfälle für den Betreiber entstehen.
ZUSÄTZLICHE
SICHERHEITSBESTIMMUNGEN
1. Tragen Sie stets eine Schutzbrille und Gehörschutz. Das Tragen weiterer Schutzvorrichtungen (Staubmaske, Handschuhe, Helm und
Schürze) wird dringend angeraten.
2. Vergewissern Sie sich vor der Ausführung von
Arbeiten an der Maschine stets, dass sie ausgeschaltet und vom Stromnetz getrennt ist.
3. Das Zubehör muss zumindest für die auf dem
Warnaufkleber der Maschine empfohlene Drehzahl ausgelegt sein. Schleifscheiben und andere
Zubehörteile, die sich schneller als die Nenndrehzahl drehen, können zerbersten und Verletzungen verursachen.
4. Überprüfen Sie den Schleifteller vor dem Betrieb
sorgfältig auf Risse, Beschädigung oder Verformung. Ein gerissener, beschädigter oder verformter Schleifteller muss unverzüglich
ausgewechselt werden.
5. Vergewissern Sie sich, dass das Werkstück
sicher abgestützt ist.
6. Halten Sie die Maschine mit festem Griff.
7. Halten Sie die Hände von rotierenden Teilen fern.
8. Vergewissern Sie sich vor dem Einschalten der
Maschine, dass die Schleifscheibe nicht das
Werkstück berührt.
9. Lassen Sie die Maschine nicht unbeaufsichtigt
laufen. Benutzen Sie die Maschine nur mit Handhaltung.
10. Beachten Sie, dass sich die Schleifscheibe nach
dem Ausschalten der Maschine noch weiterdreht.
11. Vermeiden Sie eine Berührung des Werkstücks
unmittelbar nach der Bearbeitung, weil es dann
noch sehr heiß ist und Hautverbrennungen verursachen kann.
12. Falls der Arbeitsplatz sehr heiß, feucht oder
durch leitfähigen Staub stark verschmutzt ist,
verwenden Sie einen Kurzschlussschalter
(30 mA) zum Schutz des Bedieners.
13. Verwenden Sie diese Maschine nicht zur Bearbeitung von asbesthaltigen Materialien.
14. Manche Materialien können giftige Chemikalien
enthalten. Treffen Sie Vorsichtsmaßnahmen, um
das Einatmen von Arbeitsstaub und Hautkontakt
zu verhüten. Befolgen Sie die Sicherheitsdaten
des Materialherstellers.
15. Verwenden Sie stets die korrekte Staubschutzoder Atemmaske für das jeweilige Material und
die Anwendung.
16. Achten Sie beim Arbeiten unter staubigen Bedingungen darauf, dass die Ventilationsöffnungen
frei gehalten werden. Sollte die Beseitigung von
Staub notwendig sein, trennen Sie die Maschine
zuerst vom Stromnetz (nichtmetallische Gegenstände verwenden), und vermeiden Sie eine
Beschädigung der Innenteile.
17. Als zusätzlichen Schutz gegen elektrische
Schläge sollten Sie beim Betrieb STETS GUMMIHANDSCHUHE UND GUMMISTIEFEL TRAGEN.
18. Achten Sie bei Verwendung der Wasserzufuhr
darauf, dass kein Wasser in den Motor gelangt.
Falls Wasser in den Motor läuft, besteht die
Gefahr eines elektrischen Schlags.
9
Page 10

19. Benutzen Sie die Maschine niemals ohne einen
Tre nn tra fo.
BEWAHREN SIE DIESE HINWEISE
SORGFÄLTIG AUF.
Wichtige Hinweise zum Netzanschluß für
110 Volt, 50 – 60 Hz
Achtung ! Nichtbeachtung dieser Hinweise kann zu Verletzungen und zum Defekt der Maschine führen!
Die Maschine wurde gemäß den europäischen Normen
EN50144-1 (Sicherheit handgeführter motorischer Elektrowerkzeuge; hier im besonderen Abschnitt 20.19: Elektrowerkzeuge mit Wasseranschluß) und EN 60309-2
(Stecker, Steckdosen und Kupplungen für industrielle
Anwendungen) gebaut. Bei Anwendung dieser Normen
darf die Erdkontaktstellung der Steckvorrichtung nur in
„12 Uhr Position“ ausgeführt werden.
Die Maschine verfügt über eine Steckvorrichtung mit der
Erdkontaktstellung in „12 Uhr Position“.
Da die Europäische Norm EN60309-2 jedoch keine Differenzierung im Zusammenhang mit der Versorgungsspannung und dieser Erdkontaktstellung vorsieht, besteht
eine Verwechslungsmöglichkeit des Anschlusses an
einen Trenntransformator mit einer anderen Ausgangsspannung (z.B. 230 Volt) Achten Sie bei Anschluß der
Maschine an einen Trenntransformator unbedingt auf die
richtige Ausgangsspannung (110 Volt, 50 – 60 Hz) .
Diese Maschine ist ausschließlich für den Anschluß an
einen Trenntransformator mit einer Ausgangsspannung
von 110 Volt vorgesehen. Aufgrund der Verwendung im
Naßbetrieb (Wasseranschluß an der Maschine) darf
diese Maschine niemals an eine Stromversorgung ohne
Tenntransformator angeschlossen werden.
Durch nicht fachgerechte Eingriffe in die Steckvorrichtung verursachte Schäden unterliegen nicht der Garantie
bzw. gesetzlichen Gewährleistungsansprüchen.
Einen auf die Maschine angepaßten Trenntransformator
erhalten Sie bei Ihrem Fachhändler.
FUNKTIONSBESCHREIBUNG
VORSICHT:
• Vergewissern Sie sich vor jeder Einstellung oder Funk-
tionsprüfung der Maschine stets, dass sie ausgeschaltet und vom Stromnetz getrennt ist.
Spindelarretierung (Abb. 1)
VORSICHT:
• Betätigen Sie die Spindelarretierung niemals bei rotie-
render Spindel. Die Maschine kann sonst beschädigt
werden.
Drücken Sie die Spindelarretierung, um die Spindel zum
Montieren oder Demontieren von Zubehör zu blockieren.
Schalterfunktion (Abb. 2)
VORSICHT:
• Vergewissern Sie sich vor dem Anschließen der
Maschine stets, dass der Schiebeschalter ordnungsgemäß funktioniert und beim Drücken der Rückseite in
die Stellung „O (AUS)“ zurückkehrt.
• Der Schalter kann zur Arbeitserleichterung bei längerem Einsatz in der Stellung „I (EIN)“ verriegelt werden.
Lassen Sie Vorsicht walten, wenn Sie den Schalter in
der Stellung „I (EIN)“ verriegeln, und halten Sie die
Maschine mit festem Griff.
Zum Einschalten der Maschine den Schalter auf die
Position „I (EIN)“ schieben. Für Dauerbetrieb den Schalter durch Drücken seiner Vorderseite einrasten.
Zum Ausschalten der Maschine die Rückseite des Schiebeschalters drücken, und dann den Schalter auf die Stellung „O (AUS)“ schieben.
Drehzahl-Stellrad (Abb. 3)
Die Drehzahl kann durch Drehen des Drehzahl-Stellrads
auf eine der Stufen von 1 bis 5 geändert werden.
Durch Drehen des Stellrads in Richtung der Stufe 5 wird
die Drehzahl erhöht. Durch Drehen des Stellrads in Richtung der Stufe 1 wird die Drehzahl verringert.
Die ungefähren Drehzahlen für die einzelnen StellradPositionen sind aus der nachstehenden Tabelle ersichtlich.
Nummer RPM (U/min)
12000
22500
33000
43500
54000
VORSICHT:
• Wird die Maschine über längere Zeitspannen im Dauerbetrieb mit niedriger Drehzahl betrieben, wird der
Motor überlastet und überhitzt.
• Das Drehzahl-Stellrad lässt sich nur bis 5 und zurück
auf 1 drehen. Wird es gewaltsam über 5 oder 1 hinaus
gedreht, lässt sich die Drehzahl möglicherweise nicht
mehr einstellen.
Elektronikfunktionen
Konstantdrehzahlregelung
Feines Finish wird ermöglicht, weil die Drehzahl selbst
unter Belastung konstant gehalten wird. Wenn die Belastung der Maschine das zulässige Maß überschreitet, wird
außerdem die Motorleistung reduziert, um den Motor vor
Überhitzung zu schützen. Sobald die Belastung auf
zulässige Werte abfällt, arbeitet die Maschine wieder
normal.
10
Page 11

Soft-Start-Funktion
Diese Funktion gewährleistet ruckfreies Anlaufen durch
Anlaufstoßunterdrückung.
Öffnen und Schließen des Wasserhahns (Abb. 4)
Um das Ventil für die Wasserzufuhr zu öffnen, drehen Sie
den Hebel an der Maschine auf die Stellung A. Drehen
Sie den Hebel auf die Stellung B zurück, um das Ventil
zu schließen.
Die Wasserdurchflussmenge kann durch Umstellen des
Hebels zwischen den Positionen A und B reguliert werden.
MONTAGE
VORSICHT:
• Vergewissern Sie sich vor der Ausführung von Arbeiten
an der Maschine stets, dass sie ausgeschaltet und vom
Stromnetz getrennt ist.
Montieren des Seitengriffs (Zusatzgriffs)
VORSICHT:
• Vergewissern Sie sich vor dem Betrieb stets, dass der
Seitengriff einwandfrei montiert ist.
Schrauben Sie den Seitengriff an der in der Abbildung
gezeigten Position fest an die Maschine. (Abb 5)
Entfernen Sie eine der Befestigungsschrauben von
Getriebegehäuse und Kopfabdeckung, und schrauben
Sie dann den Seitengriff an der Maschine fest. (Abb. 6)
Montage und Demontage der Schleifscheibe
(Abb. 7 und 8)
Den Schleifteller von jeglichem Schmutz oder Fremdkör-
pern säubern.
Den Schleifteller bei gedrückter Spindelarretierung auf
die Spindel schrauben.
Die Schleifscheibe sorgfältig am Schleifteller anbringen,
dass sich die Kanten von Schleifscheibe und Schleifteller
decken, ohne überzustehen.
Zum Entfernen der Schleifscheibe ziehen Sie ihre Kante
vom Schleifteller ab.
BETRIEB
Polierbetrieb (Abb. 9)
WARNUNG:
• Um die Gefahr eines elektrischen Schlags zu reduzieren, überprüfen Sie die Wasserversorgung der
Maschine, um sicherzustellen, dass die Dichtungen (ORinge) oder Schläuche nicht beschädigt sind. Eine
beschädigte Wasserversorgung kann zu einem anormalen Wasserfluss zur Maschine führen, der gefährlich
sein könnte.
VORSICHT:
• Tragen Sie bei der Arbeit stets eine Schutzbrille und
einen Gesichtsschutz.
• Schalten Sie die Maschine niemals ein, wenn sie mit
dem Werkstück in Berührung ist, weil sonst Verletzungsgefahr für die Bedienungsperson besteht.
• Benutzen Sie die Maschine niemals ohne Schleifscheibe. Der Schleifteller könnte sonst schwer beschä-
digt werden.
• Führen Sie der Schleifscheibe während der Arbeit
unbedingt Wasser zu. Anderenfalls kann die Maschine
beschädigt werden.
• Die Wassertemperatur sollte innerhalb des Bereichs
von 0°C – 40°C liegen. Wasser, dessen Temperatur
unter oder über diesem Bereich liegt, kann eine
Beschädigung der Maschine verursachen.
• Der höchstzulässige Druck der Wasserversorgung
beträgt 7 bar.
Vergewissern Sie sich, dass der Hahn geschlossen ist.
Schließen Sie den Schlauch an die Maschine an. Vergewissern Sie sich, dass Wasser herauskommt, wenn der
Wasserhahn geöffnet wird.
Halten Sie die Maschine mit festem Griff. Schalten Sie
die Maschine ein, und setzen Sie dann die Schleifscheibe an das Werkstück an.
Üben Sie nur leichten Druck aus. Übermäßiger Druck
führt zu schlechter Schleifleistung und vorzeitigem Verschleiß der Schleifscheibe.
WARTUNG
VORSICHT:
• Denken Sie vor der Durchführung von Überprüfungen
oder Wartungsarbeiten stets daran, die Maschine auszuschalten und vom Stromnetz zu trennen.
Halten Sie die Maschine und ihre Ventilationsöffnungen
stets sauber. Reinigen Sie die Ventilationsöffnungen der
Maschine regelmäßig oder im Anfangsstadium einer Verstopfung. (Abb. 10)
Um die SICHERHEIT und ZUVERLÄSSIGKEIT dieses
Produkts aufrechtzuerhalten, sollten Reparaturen, Über-
prüfung und Austausch der Kohlebürsten und andere
Wartungs- oder Einstellarbeiten nur von Makita-Kundendienstzentren unter ausschließlicher Verwendung von
Makita-Originalersatzteilen ausgeführt werden.
ZUBEHÖR
VORSICHT:
• Die folgenden Zubehör teile oder Vorrichtungen werden
für den Einsatz mit der in dieser Anleitung beschriebenen Makita-Maschine empfohlen. Die Verwendung
anderer Zubehörteile oder Vorrichtungen kann eine
Verletzungsgefahr darstellen. Verwenden Sie Zubehör-
teile oder Vorrichtungen nur für ihren vorgesehenen
Zweck.
Wenn Sie weitere Einzelheiten bezüglich dieser Zubehörteile benötigen, wenden Sie sich bitte an Ihre MakitaKundendienststelle.
• Schleifscheiben
• Seitengriff
11
Page 12

CE-KONFORMITÄTSERKLÄRUNG
Hiermit erklärt wir unter unserer alleinigen Verantwor-
ENH001-1
tung, daß dieses Produkt gemäß den Ratsdirektiven 73/
23/EWG, 89/336/EWG und 98/37/EG mit den folgenden
Normen von Normendokumenten übereinstimmen:
HD400, EN50144, EN55014, EN61000.
Yasuhiko Kanzaki
CE 2003
Direktor
MAKITA INTERNATIONAL EUROPE LTD.
Michigan Drive, Tongwell, Milton Keynes,
Bucks MK15 8JD, ENGLAND
Geräusch- und Vibrationsentwicklung
Der typische A-bewertete Schalldruckpegel beträgt
85 dB (A).
Der Lärmpegel kann während des Betriebs 85 dB (A)
überschreiten.
– Gehörschutz tragen. –
Der gewichtete Effektivwert der Beschleunigung beträgt
nicht mehr als 2,5 m/s
2
.
ENG003-1
12
Page 13

POLSKI
Wyjaśnienia dotyczące urządzenia i jego użycia
1 Blokada wałka
2 Włącznik przesuwny
3 Pokrętło regulacji prędkości
4Kurek
5 Zamykanie
6Otwieranie
7 Uchwyt przesuwny
8Pokrywa głowicy
9Śruba
10 Tarcza ścierna
DANE TECHNICZNE
Model PW5000C
Średnica podkładki Maks. 125 mm
Prędkość bez obciążenia (min
Całkowita długość 313 mm
Ciężar netto 2,2 kg
Klasa bezpieczeństwa /II
• Ze względu na prowadzony program udoskonaleń i
badań, podane dane techniczne mogą zostać
zmienione bez uprzedzenia.
• Uwaga: Dane techniczne mogą się różnić w zależności
od kraju.
Przeznaczenie
Urządzenie jest przeznaczone do szlifowania
powierzchni kamieni naturalnych.
Zasilanie
Urządzenie to, powinno być podłączone tylko do źródła
zasilania o takim samym napięciu jak pokazano na
tabliczce znamionowej i może być używane tylko dla
zmiennego prądu jednofazowego. Zgodnie ze
standardami Unii Europejskiej zastosowano podwójną
izolację i dlatego też możliwe jest zasilanie z gniazda bez
uziemienia.
–1
) 2 000 – 4000
INSTRUKCJE BEZPIECZEŃSTWA
Ostrzeżenie! Używając urządzeń elektrycznych
podstawowe środki ostrożności muszą być zawsze
zachowane, aby zmniejszyć ryzyko ognia, porażenia
prądem i uszkodzenia ciała, włączając poniższe.
Przeczytaj wszystkie podane instrukcje przed próbą
użycia tego produktu i zachowaj je do wglądu.
Dla bezpiecznego użycia:
1. Utrzymuj miejsce pracy w czystości
Zabałaganione miejsca i stoły warsztatowe
sprzyjają wypadkom.
2. Zastanów się nad warunkami pracy
Nie wystawiaj urządzeń elektrycznych na deszcz.
Nie używaj urządzeń elektrycznych w wilgotnych
lub mokrych miejscach. Utrzymuj miejsce pracy
dobrze oświetlone. Nie używaj urządzeń
elektrycznych w obecności łatwopalnych płynów
lub gazów.
3. Chroń się przed porażeniem prądu.
Zapobiegaj kontaktom ciała z uziemionymi
powierzchniami (np. rurami, grzejnikami,
kuchenkami, lodówkami).
11 Podkładka
12 Wrzeciono
13 Otwór wydechowy
14 Otwór zasysający
4. Nie pozwalaj zbliżać się dzieciom
Nie pozwalaj wizytującym osobom dotykać
urządzenia lub przedłużacza. Wszystkie wizytujące
osoby nie powinny zbliżać się do miejsca pracy.
5. Zachowaj nieczynne urządzenia.
Nieużywane urządzenia powinny być
przechowywane w suchych, wysokich lub
zamykanych miejscach tak, aby były niedostępne
dla dzieci.
6. Nie przeciążaj urządzenia.
Wykona ono pracę lepiej i bezpieczniej, pracując w
sposób, dla którego zostało ono zaprojektowane.
7. Używaj poprawnego urządzenia.
Nie nadużywaj małych lub dodatkowych urządzeń
do wykonania pracy urządzeń do dużej pracy. Nie
używaj urządzeń do celów, do których nie zostały
przeznaczone; na przykład, nie używaj piły
tarczowej do przecinania gałęzi lub kłód drzew.
8. Ubierz się odpowiednio
Nie noś luźnych ubrań lub biżuterii. Mogą one
zostać zahaczone o ruchome części. Gumowe
rękawiczki i przeciwpoślizgowe buty są wskazane
przy pracy na dworze. Zaleca się noszenie ochrony
na głowę przytrzymującej długie włosy.
9. Użyj okularów ochronnych i ochraniaczy uszu.
Użyj masek na twarz lub masek przeciwpyłowych
jeżeli czynność cięcia wytwarza pyły.
10. Podłącz urządzenie usuwające pył.
Jeżeli urządzenia posiadają podłączenia do
urządzeń do usuwania i składowania pyłu, upewnij
się, że są one poprawnie podłączone i użyte.
11. Uważaj na przewód sieciowy
Nigdy nie noś urządzenia trzymając za przewód i
nie odłączaj go od gniazda przez pociągnięcie
przewodu. Chroń przewód przed ciepłem, olejem i
ostrymi krawędziami.
12. Pewnie mocuj cięte elementy.
Użyj ścisków lub imadła do zamocowania ciętych
elementów. Jest to bezpieczniejsze niż używanie
rąk, a dodatkowo zwalnia obie ręce do
obsługiwania piły.
13. Używając piłę, nie oddalaj jej zbytnio od siebie.
Cały czas trzymaj dobrze ustawione nogi i
równowagę.
14. Pamiętaj o dobrej konserwacji urządzenia.
Utrzymuj urządzenie ostre i czyste dla jego lepszego
i bezpieczniejszego działania. Wykonaj podane
instrukcje w celu smarowania lub wymiany
elementów wyposażenia. Regularnie sprawdzaj
przewody urządzenia, i jeżeli są uszkodzone, oddaj
je do naprawy do autoryzowanego serwisu.
Regularnie sprawdzaj przewody przedłużające i
wymień je, jeżeli są uszkodzone. Utrzymuj uchwyty
suche, czyste i nie zabrudzone olejem lub smarem.
13
Page 14

15. Odłącz urządzenia
Przed konserwacją urządzenia lub zmianą
wyposażenia takiego jak tarcze, noże do struga i
noże do frezowania, gdy nie jest ono używane.
16. Wyjmij klucze regulacyjne
Nabierz zwyczaju sprawdzania czy klucze
regulacyjne są usunięte z urządzenia przed jego
użyciem.
17. Unikaj przypadkowych uruchomień.
Nie noś podłączonego urządzenia z palcem na
włączniku. Upewnij się, że urządzenie jest
wyłączone, gdy je podłączasz do zasilania.
18. Zastosuj przedłużacz używając urządzenia na
dworze.
Gdy urządzenie używane jest na dworze, stosuj
tylko przedłużacze przeznaczone i oznaczone do
pracy na dworze.
19. Bądź uważny
Patrz co robisz. Bądź rozsądny. Nie używaj
urządzenia, gdy jesteś zmęczony.
20. Sprawdzaj uszkodzone części.
Przed dalszym użyciem urządzenia, osłona lub inne
części, które są uszkodzone, muszą być uważnie
sprawdzone, aby upewnić się, że będą poprawnie
działać i wykonywać przeznaczone im funkcje.
Sprawdzaj ustawienia ruchomych części, oprawy
ruchomych części, pęknięcia części, zamocowania,
i jakiekolwiek inne warunki, które mogą wpływać na
działanie. Osłona lub inne części, które są
uszkodzone, powinny być naprawione lub
wymienione przez autoryzowany serwis, jeżeli w
instrukcji nie podano inaczej. Uszkodzone
przełączniki powinny być wymienione przez
autoryzowany serwis. Nie używaj urządzenia, jeżeli
włącznik nie może go włączyć lub wyłączyć.
21. Ostrzeżenie
Użycie jakiegokolwiek innego wyposażenia lub
części dodatkowych innych niż zalecane w tej
instrukcji obsługi lub katalogu, może stworzyć
ryzyko uszkodzenia ciała.
22. Naprawy urządzenia powinny być wykonywane
tylko przez specjalistę.
To urządzenie jest wykonane zgodnie z
odpowiednimi zasadami bezpieczeństwa. Naprawa
urządzeń elektrycznych może być wykonana
wyłącznie przez specjalistę, gdyż w przeciwnym
wypadku może ono stanowić zagrożenie dla
użytkownika.
D O D AT K O W E Z A S A D Y B E Z P I E C Z E Ń S T W A
1. Zawsze używaj ochrony oczu i uszu. Należy też
zakładać inne osobiste wyposażenie ochronne,
takie jak maska przeciwpyłowa, rękawice, kask i
fartuch.
2. Przed wykonywaniem jakiejkolwiek pracy nad
urządzeniem zawsze upewnij się, czy jest ono
wyłączone i odłączone od zasilania.
3. Wyposażenie musi mieć prędkość znamionową
nie mniejszą niż prędkość zalecana podana na
tabliczce ostrzegawczej urządzenia. Tarcze i
inne wyposażenie pracujące z prędkością
wyższą od znamionowej mogą rozpaść się i
spowodować wypadek.
4. Przed przystąpieniem do pracy sprawdź
dokładnie tylną podkładkę, czy nie jest
popękana, uszkodzona lub wypaczona. Wymień
natychmiast popękaną, uszkodzoną lub
wypaczoną podkładkę.
5. Sprawdź, czy szlifowany przedmiot jest
prawidłowo podparty.
6. Trzymaj urządzenie pewnie.
7. Trzymaj ręce z daleka od obracających się
części.
8. Upewnij się, czy tarcza ścierna nie dotyka
obrabianego przedmiotu przed włączeniem
urządzenia.
9. Nie odchodź od pracującego urządzenia.
Korzystaj z urządzenia tylko wtedy, jeżeli
trzymasz je w rękach.
10. Zwróć uwagę, że tarcza obraca się nadal po
wyłączeniu urządzenia.
11. Nie dotykaj obrabianego przedmiotu
natychmiast po zakończeniu pracy; może on być
bardzo gorący i poparzyć skórę.
12. Jeżeli miejsce pracy jest bardzo gorące lub
wilgotne albo zanieczyszczone przewodzącym
pyłem, używaj bezpiecznika
przeciwzwarciowego (30 mA), aby zapewnić
bezpieczną pracę.
13. Nie używaj urządzenia do żadnych materiałów
zawierających azbest.
14. Niektóre materiały zawierają substancje, które
mogą być toksyczne. Podejmij środki
zapobiegające wdychaniu pyłu i kontaktowi ze
skórą. Postępuj zgodnie z zaleceniami
producenta materiału.
15. Zawsze używaj właściwej dla obrabianego
materiału i wykonywanej pracy maski
przeciwpyłowej/respiratora.
16. Podczas pracy w miejscu zapylonym upewnij
się, czy otwory wentylacyjne są czyste. Jeżeli
trzeba będzie oczyścić pył, najpierw odłącz
urządzenie od zasilania (użyj niemetalowego
przedmiotu) i unikaj uszkodzenia części
wewnętrznych.
17. W celu dodatkowego zabezpieczenia przed
porażeniem prądem podczas pracy ZAKŁADAJ
GUMOWE RĘKAWICE I GUMOWE BUTY.
18. W przypadku korzystania ze strumienia wody
uważaj, aby woda nie dostała się do silnika.
Jeżeli woda dostanie się do silnika, może dojść
do porażenia prądem.
19. Nigdy nie używaj urządzenia bez transformatora
izolującego.
ZACHOWAJ INSTRUKCJĘ OBSŁUGI.
14
Page 15

Ważne uwagi dotyczące podłączenia do zasilania
–
110 V, 50
Uwaga: Przed użyciem urządzenia przeczytaj, a potem
stosuj następujące środki bezpieczeństwa.
Niestosowanie się do tych zaleceń może doprowadzić
do obrażeń i uszkodzenia urządzenia!
Urządzenie jest zbudowane zgodnie z Normą
Europejską EN50144-1 (bezpieczeństwo pracy z
urządzeniami elektrycznymi obsługiwanymi ręcznie,
zasilanymi silnikiem; zwłaszcza rozdział 20.19:
urządzenia elektryczne podłączone do wody) i
EN60309-2 (wtyczki, gniazda i podłączenia dla
zastosowań przemysłowych). W przypadku stosowania
tych norm położenie uziemienia urządzenia do
podłączania musi być w położeniu „godziny 12”.
Urządzenie wyposażone jest w urządzenie do
podłączania z położeniem uziemienia „na godzinę 12”.
Ponieważ jednak Norma Europejska EN60309-2 nie
rozróżnia napięcia zasilania i tego położenia uziemienia,
powstaje możliwość pomylenia podłączenia do
transformatora izolującego o innym napięciu
wyjściowym (np. 230 V). W przypadku podłączania
urządzenia do transformatora izolującego sprawdź
bardzo dokładnie, czy daje on właściwe napięcie
wyjściowe (110 V, 50 – 60 Hz).
Urządzenie jest zaprojektowane wyłącznie do
podłączenia do transformatora izolującego o napięciu
wyjściowym 110 V. Ze względu na używanie w mokrych
warunkach (podłączenie urządzenia do wody)
urządzenia nie wolno nigdy podłączać do zasilania bez
transformatora izolującego.
Uszkodzenia spowodowane niewłaściwym
przerabianiem urządzenia do podłączania nie podlegają
gwarancji i naprawom gwarancyjnym.
Po transformator izolujący właściwy dla niniejszego
urządzenia zwróć się do dostawcy urządzeń
specjalistycznych.
60 Hz
OPIS DZIAŁANIA
UWAGA:
• Przed regulacją lub sprawdzaniem działania
urządzenia zawsze upewnij się, czy jest ono
wyłączone i odłączone od zasilania.
Blokada wałka (Rys. 1)
UWAGA:
• Nigdy nie włączaj blokady wałka, kiedy wrzeciono
obraca się. Urządzenie może zostać uszkodzone.
Podczas zakładania lub zdejmowania wyposażenia
naciśnij blokadę wałka, aby zapobiec obracaniu się
wrzeciona.
Działanie włącznika (Rys. 2)
UWAGA:
• Przed podłączeniem urządzenia do zasilania zawsze
sprawdź, czy włącznik przesuwny działa prawidłowo i
powraca do położenia „O (OFF)” po naciśnięciu jego
tylnej części.
• Podczas długiej, nieprzerwanej pracy dla wygody
operatora można zablokować włącznik w położeniu „I
(ON)”. W przypadku blokowania włącznika w
położeniu „I (ON)” zachowaj ostrożność i trzymaj
pewnie urządzenie.
Aby uruchomić urządzenie, przesuń włącznik przesuwny
do położenia „I (ON)”. Dla zapewnienie pracy ciągłej
naciśnij przednią część włącznika przesuwnego, aby go
zablokować.
Aby zatrzymać urządzenie, naciśnij tylną część
włącznika przesuwnego, a następnie przesuń go do
położenia „O (OFF)”.
Pokrętło regulacji prędkości (Rys. 3)
Prędkość obrotową można zmienić obracając pokrętło
regulacji prędkości na określone ustawianie oznaczone
liczbą od 1 do 5.
Wyższą prędkość uzyskuje się obracając pokrętło w
stronę liczby 5. Niższą prędkość uzyskuje się obracając
w stronę liczby 1.
Zależność pomiędzy liczbą ustawioną na pokrętle a
przybliżoną prędkością obrotową podana jest w
poniższej tabeli.
Liczba Liczba obrotów na minutę
12000
22500
33000
43500
54000
UWAGA:
• Jeżeli urządzenie będzie pracowało długo z niską
prędkością, silnik może zostać przeciążony i
przegrzany.
• Pokrętło regulacji prędkości można obrócić tylko do 5 i
z powrotem do 1. Nie obracaj go na siłę poza 5 lub 1,
bo funkcja regulacji prędkości może przestać działać.
Funkcje elektroniczne
Kontrola stałej prędkości
Umożliwia uzyskanie dokładnego wykończenia, dzięki
utrzymywaniu stałej prędkości obrotowej nawet pod
obciążeniem.
Ponadto, kiedy obciążenie urządzenia przekroczy
dopuszczalny poziom, moc silnika zostanie
ograniczona, aby chronić go przed przegrzaniem. Kiedy
obciążenie powróci do dopuszczalnego poziomu,
urządzenie będzie pracowało dalej normalnie.
Funkcja łagodnego startu
Łagodny start dzięki złagodzeniu szoku towarzyszącego
rozpoczęciu pracy.
Otwieranie lub zamykanie dźwigni dopływu wody
(Rys. 4)
Aby dźwignia urządzenia sterująca dopływem wody była
stale otwarta, obróć ją do położenia A, gdzie tor wody
jest otwarty. Obróć z powrotem do położenia B, aby
zamknąć dopływ.
Natężenie strumienia wody można regulować zmieniając
położenie dźwigni pomiędzy A i B.
15
Page 16

SKŁADANIE
UWAGA:
• Przed wykonywaniem jakiejkolwiek pracy nad
urządzeniem zawsze sprawdź, czy jest ono wyłączone
i odłączone od zasilania.
Zakładanie uchwytu bocznego
UWAGA:
• Przed przystąpieniem do pracy zawsze sprawdź, czy
uchwyt boczny jest pewnie zamocowany.
Przykręć pewnie uchwyt boczny we właściwym miejscu
do urządzenia, w sposób pokazany na rysunku. (Rys. 5)
Wyjmij jedną ze śrub mocujących obudowę przekładni i
pokrywę głowicy, a następnie przykręć uchwyt boczny
do urządzenia. (Rys. 6)
Zakładanie lub zdejmowanie tarczy ściernej
(Rys. 7 i 8)
Oczyść podkładkę z brudu i ciał obcych.
Wkręć podkładkę na wrzeciono, naciskając blokadę
wałka.
Załóż starannie tarczę na podkładkę tak, aby brzegi
tarczy i podkładki przylegały do siebie i nie wystawały.
Aby zdjąć tarczę ścierną, podnieś jej brzeg z podkładki.
POSTĘPOWANIE
Polerowanie (Rys. 9)
OSTRZEŻENIE:
• Aby ograniczyć niebezpieczeństwo porażenia prądem,
sprawdź system doprowadzania wody do urządzenia,
aby upewnić się, czy uszczelki (pierścienie okrągłe) nie
są uszkodzone. Uszkodzony system doprowadzania
wody może spowodować nienormalny dopływ wody
do urządzenia, co może być niebezpieczne.
UWAGA:
• Podczas pracy zawsze zakładaj okulary ochronne lub
osłonę na twarz.
• Nigdy nie włączaj urządzenia, jeżeli dotyka ono
obrabianego przedmiotu, ponieważ może to
spowodować obrażenia u operatora.
• Nigdy nie uruchamiaj urządzenia bez tarczy ściernej.
Może to doprowadzić do poważnego uszkodzenia
podkładki.
• Koniecznie dostarczaj wodę do tarczy ściernej
podczas pracy. Niestosowanie się do tego zalecenia
może spowodować uszkodzenie urządzenia.
• Temperatura używanej wody powinna być w zakresie
0˚C – 40˚C (32˚F – 104˚F). Używanie bardzo zimnej lub
gorącej wody poza tym zakresem temperatur może
spowodować uszkodzenie urządzenia.
• Maksymalne dopuszczalne ciśnienie dopływu wody
wynosi 7 barów.
Upewnij się, czy kurek jest zamknięty. Podłącz wąż do
urządzenia. Upewnij się, czy woda płynie po otwarciu
dźwigni dopływu wody.
Chwyć pewnie urządzenie. Włącz je, a następnie zetknij
tarczę ścierną z obrabianym przedmiotem.
Wywieraj tylko lekki nacisk. Nadmierny nacisk może
doprowadzić do słabej wydajności i przedwczesnego
zużycia tarczy ściernej.
KONSERWACJA
UWAGA:
• Przed przystąpieniem do przeglądu urządzenia lub
jego konserwacji należy upewnić się, że zostało ono
wyłączone i odłączone od zasilania.
Urządzenie i jego otwory wentylacyjne należy
utrzymywać w czystości. Czyść regularnie otwory
wentylacyjne urządzenia lub kiedy tylko zaczną się
blokować. (Rys. 10)
W celu zachowania poziomu BEZPIECZEŃSTWA i
NIEZAWODONOŚCI wyrobu, wszelkie naprawy, innego
rodzaju prace konserwacyjne lub regulacje powinny być
przeprowadzane przez autoryzowany punkt serwisowy
narzędzi Makita, zawsze z użyciem części zamiennych
Makita.
WYPOSAŻENIE
UWAGA:
• Niniejsze wyposażenie i nakładki są zalecane do
używania wraz z urządzeniem Makita określonym w tej
instrukcji obsługi. Używanie jakiegokolwiek innego
wyposażenia lub nakładek może spowodować
niebezpieczeństwo zranienia osób. Używaj
wyposażenia i nakładek wyłącznie w celu, który
podano.
Jeżeli potrzebujesz pomocy związanej z dalszymi
szczegółami dotyczącymi niniejszego wyposażenia,
zwróć się do miejscowego punktu usługowego Makita.
• Tarcze ścierne
• Uchwyt boczny
UE-DEKLARACJA ZGODNOŚCI
Oświadczamy, biorąc za to wyłączną odpowiedzialność,
że niniejszy wyrób jest zgodny z następującymi
standardami standardowych dokumentów:
HD400, EN50144, EN55014, EN61000,
zgodnie z Zaleceniami Rady: 73/23/EEC i 89/336/EEC i
98/37/EC.
Yasuhiko Kanzaki
CE 2003
Dyrektor
ENH001-1
MAKITA INTERNATIONAL EUROPE LTD.
Michigan Drive, Tongwell, Milton Keynes,
Bucks MK15 8JD, ENGLAND
Szumy i drgania
ENG003-1
Typowy A-ważony poziom ciśnienia dźwięku wynosi
85 dB (A).
Poziom szumów w trakcie pracy może przekroczyć
85 dB (A).
Typowa wartość ważonej średniej kwadratowej
przyspieszenia nie jest większa niż 2,5 m/s
– Noś ochraniacze uszu. –
2
.
16
Page 17

РУССКИЙ ЯЗЫК
Объяснения общего плана
1 Фиксатор вала
2 Ползунковый переключатель
3 Регулятор скорости
4 Кран
5 Открыть
6 Закрыть
7 Боковой захват
8 Крышка передней части
9Винт
10 Шлифовальный диск
11 Подушка
12 Шпиндель
ТЕХНИЧЕСКИЕ ХАРАКТЕРИСТИКИ
Модель PW5000C
Диаметр подушки Макс. 125 мм
Скорость в незагруженном
состоянии (мин
–1
)
2000
–
4000
Общая длина 313 мм
Вес нетто 2,2 кг
Класс безопасности /II
• Вследствие нашей продолжающейся программы
поиска и разработок технические характеристики
могут быть изменены без уведомления.
• Примечание: Технические характеристики могут
различаться в зависимости от страны.
Предназначенное использование
Инструмент предназначен для поверхностной
обработки натурального камня.
Источник питания
Инструмент должен быть подсоединен только к
источнику питания с напряжением, указанным в
табличке номиналов, и может функционировать
только от однофазного источника питания
переменного тока. В соответствии с Европейским
стандартом имеется двойная изоляция,
следовательно, возможно использование с
розетками без провода заземления.
13 Выходные вентиляционные
отверстия
14 Входные вентиляционные
отверстия
ИНСТРУКЦИИ ПО МЕРАМ
БЕЗОПАСНОСТИ
Предостережение! При использовании
электрических инструментов следует всегда
соблюдать основные меры безопасности для
уменьшения опасности пожара, поражения
электрическим током и персональных травм,
включая следующие.
Прочитайте эти инструкции перед тем, как
пытаться управлять этим изделием, и сохраните
эти инструкции.
Для безопасного функционирования:
1. Поддерживайте чистоту на рабочем месте
Захламленные места и подставки могут
привести к травмам.
2. Учитывайте рабочую окружающую среду
Не подвергайте инструменты с электроприводом
воздействию дождя. Не используйте инструменты с
электроприводом в сырых или влажных местах.
Поддерживайте хорошее освещение на рабочем
месте. Не используйте инструменты с
электроприводом в присутствии возгораемых
жидкостей или газов.
3. Предохраняйтесь от поражения
электрическим током
Предотвращайте контакт тела с заземленными
поверхностями (например, трубами, радиаторами,
батареями, холодильниками).
4. Держитесь подальше от детей
Не позволяйте посетителям прикасаться к
инструменту или шнуру-удлинителю. Все
посетители должны находиться подальше от
рабочей области.
5. Правильно храните неработающие
инструменты
Если инструменты не используются, они должны
храниться в сухом, высоком или закрытом
месте, вне достижения детей.
6. Не прилагайте усилие к инструменту
Он будет выполнять работу лучше и безопаснее
при скорости, для которой он предназначен.
7. Используйте правильный инструмент
Не пытайтесь прилагать усилие к маленьким
инструментам или присоединениям для
выполнения работы инструмента тяжелого
назначения. Не используйте инструменты для
непредназначенных целей; например, не
используйте дисковую пилу для резки веток или
корней деревьев.
171717
Page 18

8. Одевайтесь правильно
Не одевайте свисающую одежду или украшения.
Они могут попасть в движущиеся части. При
работе на улице рекомендуется одевать
резиновые перчатки и нескользящую обувь.
Одевайте предохранительный головной убор для
убирания длинных волос.
9. Используйте защитные очки и
предохранительные приборы для слуха.
Если работа по резке является пыльной,
используйте также маску для лица или
пылезащитную маску
10. Подсоедините пылевсасывающее
оборудование
Если имеются подсоединения устройств для
всасывания и сбора пыли, убедитесь в том, что
они подсоединены и используются правильно.
11. Не прилагайте усилие к шнуру
Никогда не носите инструмент за шнур и не
дергайте за него для отсоединения его из
розетки. Держите шнур подальше от жарких
мест, масла и острых краев.
12. Закрепите рабочее изделие
Используйте зажимы или тиски для крепления
рабочего изделия. Это является более
безопасным, чем использование Вашей руки, и
при этом освобождаются две руки для
управления инструментом.
13. Не заходите слишком далеко
Сохраняйте правильную стойку и баланс все
время.
14. Осторожно обращайтесь с инструментами
Держите инструменты острыми и чистыми для
более лучшей и безопасной работы. Следуйте
инструкциям для смазки и смены
принадлежностей. Периодически проверяйте
шнуры инструмента, и, если они повреждены,
обращайтесь относительно ремонта в
уполномоченный центр по техобслуживанию.
Периодически проверяйте шнуры-удлинители и
заменяйте, если они повреждены. Держите ручки
сухими чистыми и свободными от масла или
смазки.
15. Отсоединяйте инструменты
Если не используются, перед техобслуживанием, и
при смене принадлежностей, таких, как лезвия,
резцы и резаки.
16. Убирайте регулировочные ключи и гаечные
ключи
Сформируйте привычку проверять, что
регулировочные ключи и гаечные ключи убраны
с инструмента перед его включением.
17. Избегайте случайных запусков
Не носите подсоединенный к сети инструмент с
пальцем, находящемся на переключателе. Перед
подсоединением инструмента к сети убедитесь,
что переключатель находится в положении
“выкл”.
18. Шнуры-удлинители для использования на
улице
Когда инструмент используется на улице,
используйте только шнуры-удлинители,
предназначенные для использования на улице с
указанием этого.
19. Будьте бдительны
Наблюдайте за тем, что Вы делаете. Используйте
разумный подход. Не управляйте инструментом,
если Вы устали.
20. Проверяйте поврежденные части
Перед дальнейшим использованием
инструмента, предохранитель или другая часть
должны быть тщательно проверены для
определения того, что они будут
функционировать правильно и выполнять
предназначенную функцию. Проверьте на
предмет совмещения движущихся частей,
соединения движущихся частей, поломки
частей, монтажа и других условий, которые
могут повлиять не их функционирование.
Предохранитель или другая часть должны быть
правильно отремонтированы или заменены в
уполномоченном центре по техобслуживанию,
если только не указано другое в этой
инструкции по эксплуатации. Дефектные
переключатели должны быть заменены в
уполномоченном центре по техобслуживанию.
Не используйте инструмент, если невозможно
его включение и выключение с помощью
переключателя.
21. Предостережение
Использование любой другой принадлежности
или присоединения, отличного от рекомендуемого
в этой инструкции по эксплуатации или каталоге,
может привести к опасности персональной
травмы.
22. Используйте для ремонта услуги
специалиста
Это электрическое оборудование соответствует
относящимся к нему правилам безопасности.
Ремонт электрического оборудования может
проводиться только специалистами, в
противном случае, он может вызвать
существенную опасность для пользователя.
ДОПОЛНИТЕЛЬНЫЕ ПРАВИЛА
БЕЗОПАСНОСТИ
1. Всегда используйте защиту для глаз и ушей.
Также должно использоваться другое
индивидуальное защитное оборудование
такое, как пылезащитная маска, перчатки,
шлем, фартук.
2. Следует всегда быть уверенным, что
инструмент выключен и отключен от сети
перед проведением любых работ с
инструментом.
3. Принадлежности должны быть рассчитаны,
по крайней мере, на скорость,
рекомендованную на предупреждающей
этикетке инструмента. Диски и другие
принадлежности, работающие на скорости
выше, чем номинальная скорость, могут
отлететь в сторону и причинить травму.
4. Тщательно проверьте нижнюю подушку
перед началом эксплуатации на предмет
наличия трещин, повреждения или
деформации. Немедленно замените
треснувшую, поврежденную или
деформированную подушку.
5. Проверьте, что рабочее изделие правильно
закреплено.
6. Крепко удерживайте инструмент.
181818
Page 19

7. Держите руки подальше от вращающихся
частей.
8. Убедитесь в том, что шлифовальный диск не
контактирует с рабочим изделием перед тем,
как включать инструмент.
9. Не оставляйте работающий инструмент.
Эксплуатируйте инструмент только тогда,
когда он удерживается руками.
10. Обратите внимание на то, что режущий диск
продолжает вращаться после того, как
инструмент выключается.
11. Не прикасайтесь к рабочему изделию сразу
же после эксплуатации; оно может быть
очень горячим и обжечь Вашу кожу.
12. Если рабочее место является чрезмерно
жарким или влажным, или сильно
загрязнено проводящей пылью, используйте
прерыватель цепи (30 мА), чтобы обеспечить
безопасность эксплуатации.
13. Не используйте инструмент ни с какими
материалами, содержащими асбест.
14. Некоторые материалы содержат химикаты,
которые могут быть токсичными. Примите
меры, чтобы предотвратить вдыхание пыли
и контакт с кожей. Выполняйте указания по
безопасности поставщика материала.
15. Всегда используйте правильную
пылезащитную маску/респиратор для
материала и способа обработки, которые Вы
используете.
16. Убедитесь в том, что при работе в пыльных
условиях вентиляционные отверстия
содержатся в чистоте. Если становится
необходимым очистить пыль, сначала
отсоедините инструмент от сетевой розетки
(используйте неметаллический предмет), и
избегайте повреждения внутренних частей.
17. Для дополнительной защиты от поражения
электрическим током обязательно
ИСПОЛЬЗУЙТЕ РЕЗИНОВЫЕ ПЕРЧАТКИ И
РЕЗИНОВУЮ ОБУВЬ во время работы.
18. Во время подачи воды будьте внимательны,
чтобы не позволить воде попасть в мотор.
Если вода попадет в мотор, может
возникнуть опасность поражения
электрическим током.
19. Никогда не используйте инструмент без
разделительного трансформатора.
СОХРАНИТЕ ЭТУ ИНСТРУКЦИЮ.
Важные примечания относительно
сетевого подсоединения для 110 Вольт,
50 – 60 Гц
Предупреждение! Прочитайте и соблюдайте эти
предписания перед использованием инструмента.
Несоблюдение этих предписаний может привести к
травмам и повреждению инструмента!
Инструмент изготовлен в соответствии с
Европейскими Стандартами EN50144-1
(безопасность ручного электромеханического
инструмента; в частности раздел 20.19:
электрические инструменты, использующие воду) и
EN60309-2 (штепселя, штепсельные розетки и
соединения для промышленного инструмента). При
использовании этих стандартов позиция контакта
заземления устройства подсоединения может быть
выполнена только в положении “12 часов”.
Этот инструмент имеет устройство подсоединения с
позицией контакта заземления “12 часов”.
Однако, так как в Европейском Стандарте EN603092 не существует различия относительно напряжения
питания и позиции этого контакта заземления, то
имеется вероятность ошибочного подсоединения к
разделительному трансформатору с другим
выходным напряжением (например, 230 В). При
подсоединении инструмента к разделительному
трансформатору следует быть абсолютно
уверенным, чтобы использовать правильное
выходное напряжение (110 В, 50 – 60 Гц).
Этот инструмент разработан исключительно для
подсоединения к разделительному трансформатору
с выходным напряжением 110 В. Так как этот
инструмент используется во влажных условиях
(подача воды в инструмент), то он никогда не должен
подсоединяться к электрической сети без
разделительного трансформатора.
Повреждения, вызванные неправильным
обращением с устройством подсоединения, не
покрываются гарантией и не являются случаем
гарантийной претензии.
Обращайтесь к специалисту Вашего поставщика за
разделительным трансформатором, походящим для
Вашего инструмента.
ОПИСАНИЕ ФУНКЦИОНИРОВАНИЯ
ПРЕДУПРЕЖДЕНИЕ:
• Следует всегда быть уверенным, что инструмент
выключен и отключен от сети перед настройкой
или проверкой функционирования инструмента.
Фиксатор вала (Рис. 1)
ПРЕДУПРЕЖДЕНИЕ:
• Никогда не приводите в действие фиксатор вала,
когда шпиндель движется. Инструмент может быть
поврежден.
Нажмите фиксатор вала, чтобы предотвратить
вращение шпинделя во время установки или
удаления принадлежностей.
191919
Page 20

Операция переключения (Рис. 2)
ПРЕДУПРЕЖДЕНИЕ:
• Перед подсоединением инструмента всегда
проверяйте, чтобы видеть, что ползунковый
переключатель действует правильно и
возвращается в положение “O (OFF)” (выкл.) после
высвобождения задней стороны ползункового
переключателя.
• Пусковой механизм может быть заблокирован в
положении “I (ON)” (вкл.) для удобства работы
оператора при длительном использовании. Будьте
внимательны при блокировке инструмента в
положении “I (ON)” (вкл.) и крепко удерживайте
инструмент.
Для запуска инструмента передвиньте ползунковый
переключатель в направлении положения “I (ON)”.
Для непрерывного функционирования нажмите
переднюю сторону ползункового переключателя,
чтобы зафиксировать его.
Для остановки инструмента нажмите заднюю
сторону ползункового переключателя, а затем
передвиньте его в направлении положения “O (OFF)”.
Регулятор скорости (Рис. 3)
Скорость вращения может быть изменена с
помощью поворота регулятора скорости на номер
нужной установки от 1 до 5.
Более высокая скорость достигается, когда
регулятор поворачивается в направлении номера 5.
И более медленная скорость достигается, когда он
поворачивается в направлении номера 1.
Обращайтесь к таблице внизу относительно
соотношения между номером, установленным на
регуляторе, и приблизительной скоростью
вращения.
Номер Оборотов в мин. (/мин)
12000
22500
33000
43500
54000
ПРЕДУПРЕЖДЕНИЕ:
• Если инструмент непрерывно функционирует на
маленькой скорости в течение длительного
времени, то мотор перегрузится и нагреется.
• Регулятор скорости может поворачиваться только
до значения 5 и обратно до значения 1. Не
прилагайте силу, чтобы повернуть его дальше 5 или
1, или же регулятор скорости может больше не
работать.
Электронная функция
Регулирование постоянной скорости
Это дает возможность аккуратно завершить
операцию, т.к. скорость вращения сохраняется
постоянной даже в режиме нагрузки.
К тому же при превышении нагрузки инструмента
допустимого уровня, мощность питания мотора
уменьшается, чтобы предохранить мотор от
перегрева. Когда нагрузка возвратится к
допустимому уровню, инструмент будет работать в
нормальном режиме.
Функция плавного запуска
Плавный старт возможен из-за сдерживания удара
при запуске.
Открытие или закрытие водяного крана
(Рис. 4)
Чтобы сохранять кран на инструменте открытым для
тока воды, поверните его в положение А, где водоток
будет в состоянии готовности. Чтобы закрыть его,
верните в положение В.
Скорость подачи воды может регулироваться
изменением положения крана между положением А
и В.
СБОРКА
ПРЕДУПРЕЖДЕНИЕ:
• Следует всегда быть уверенным, что инструмент
выключен и отключен от сети перед проведением
любых работ с инструментом.
Установка бокового захвата (ручки)
ПРЕДУПРЕЖДЕНИЕ:
• Перед началом эксплуатации следует всегда быть
уверенным, что боковой захват установлен
надежно.
Привинтите боковой захват в таком положении на
инструменте, как показано на рисунке. (Рис. 5)
Удалите один из винтов, которые крепят корпус
механизма и крышку передней части, затем
привинтите боковой захват на инструмент. (Рис. 6)
Установка или удаление шлифовального
диска (Рис. 7 и 8)
Удалите всю грязь и посторонние предметы с
подушки.
Нажимая фиксатор вала, привинтите подушку на
шпиндель.
Аккуратно прикрепите диск на подушку так, чтобы
края диска и подушки перекрывали друг друга без
выступов.
Чтобы удалить шлифовальный диск, снимите за его
угол с подушки.
202020
Page 21

ЭКСПЛУАТАЦИЯ
Операция шлифования (Рис. 9)
ПРЕДОСТЕРЕЖЕНИЕ:
• Для уменьшения риска поражения электрическим
током, проверьте систему подачи воды, чтобы
удостовериться, что уплотнения (уплотнительные
кольца) и шланги не повреждены. Повреждение
системы подачи воды может привести к
ненормальному току воды на инструменте, что
может быть опасным.
ПРЕДУПРЕЖДЕНИЕ:
• Всегда носите защитные очки или защитную маску
во время работы.
• Никогда не включайте инструмент, когда он
контактирует с рабочим изделием, так как это
может привести к травме оператора.
• Никогда не запускайте инструмент без
шлифовального диска. Вы можете серьезно
повредить подушку.
• Во время эксплуатации обязательно подавайте
воду на шлифовальный диск. Невыполнение этого
условия может привести к поломке инструмента.
• Температура используемой воды должна быть в
диапазоне 0°C – 40°C. Использование замерзшей
или горячей воды вне этого диапазона может
привести к повреждению инструмента.
• Максимально допустимое давление подачи воды
составляет 7 бар.
Убедитесь в том, что кран закрыт. Подсоедините
шланг к инструменту. Убедитесь в том, что вода
льется, когда кран открыт.
Крепко удерживайте инструмент. Включите
инструмент, а затем приложите шлифовальный диск
к рабочему изделию.
Прилагайте только небольшое давление. Излишнее
давление приведет к ухудшению
производительности и преждевременному износу
шлифовального диска.
ОБСЛУЖИВАНИЕ
ПРЕДУПРЕЖДЕНИЕ:
Следует всегда быть уверенным, что инструмент
выключен и отсоединен от сети перед выполнением
проверки или обслуживания.
Инструмент и его вентиляционные отверстия
должны поддерживаться чистыми. Регулярно
очищайте вентиляционные отверстия инструмента
или всякий раз, когда вентиляционные отверстия
начинают засоряться. (Рис. 10)
Для поддержания БЕЗОПАСНОСТИ и
ДОЛГОВЕЧНОСТИ изделия ремонт, любое другое
обслуживание и регулировка должны проводиться в
уполномоченном центре по техобслуживанию Makita,
всегда используя сменные части Makita.
ПРИНАДЛЕЖНОСТИ
ПРЕДУПРЕЖДЕНИЕ:
• Эти принадлежности или приспособления
рекомендуются для использования с Вашим
инструментом Makita, указанном в руководстве.
Использование любых других принадлежностей
или приспособлений может вызвать риск
причинения травмы. Используйте принадлежности
или приспособления только для указанных целей.
Если Вам необходима какая-либо помощь
относительно дальнейших подробностей об этих
принадлежностях, обращайтесь в Ваш местный
центр по техобслуживанию Makita.
• Шлифовальные диски
• Боковой захват
ЕС ДЕКЛАРАЦИЯ СООТВЕТСТВИЯ
Мы заявляем под свою собственную
ответственность, что этот продукт находится в
соответствии со следующими стандартами
документов по стандартизации:
HD400, EN50144, EN55014, EN61000,
согласно сборникам директив 73/23EEC, 89/336/EEC
и 98/37/EC.
Ясухико Канзаки
Директор
CE 2003
ENH001-1
MAKITA INTERNATIONAL EUROPE LTD.
Michigan Drive, Tongwell, Milton Keynes,
Bucks MK15 8JD, ENGLAND
Шум и вибрация
ENG003-1
Типичный А-взвешенный уровень звукового
давления составляет 85 дБ (А).
Уровень шума при работе может превышать
85 дБ (А).
Типичное взвешенное значение квадратного корня
ускорения составляет не более чем 2,5 м/с
– Надевайте защиту для ушей. –
2
.
212121
Page 22

222222
Page 23

232323
Page 24

Makita Corporation
Anjo, Aichi, Japan
884518A209
 Loading...