

Page 1
INSTRUCTION MANUAL
MANUEL D'INSTRUCTION
MANUAL DE INSTRUCCIONES
Portable Power Pack
Support d’alimentation portable
Unidad Portátil de Alimentación
Eléctrica
PDC01
IMPORTANT: Read Before Using.
IMPORTANT : Lire avant usage.
IMPORTANTE: Lea antes de usar.
Page 2
ENGLISH (Original instructions)
SPECIFICATIONS
Intended use
The portable power pack enables the batteries and the
tool or machine to be separated, making it suitable for a
long time work by switching the installed batteries.
This unit can be used with the following tools or machines.
• 18 V battery-powered tool or machine
• 36 V (18 V x 2) battery-powered tool or machine
• Battery-powered tool or machine (direct connection to portable power pack)
About this instruction manual
The term "unit" in this instruction manual refers to portable power pack.
Compatible tool or machine
category
• Cordless Chain Saw, Cordless Pole Saw, Cordless
Blower, Cordless Grass Trimmer, Cordless String
Trimmer, Cordless Multi Function Power Head,
Cordless Hedge Trimmer, Cordless Grass Shear,
Cordless Pole Hedge Trimmer, Cordless Angle
Grinder, Cordless Rotary Hammer*
* Except for DHR280 / DHR281 / DHR282 /
DHR283 / XRH08 / XRH10 / XRH11
The compatible category of tool or machine is subject to
change without notice. Refer to the latest instruction manual for
the information on the compatible category of tool or machine.
WARNING: Never use this unit with tools or
machines categorized below. Using this unit with
non-compatible tools or machines may cause personal injury or malfunction.
• Cordless Garden Sprayer, Battery Powered
Pruning Shears, Battery Powered Wheelbarrow,
Motor-Assisted Bicycle, Cordless Backpack
Vacuum Cleaner, Robotic Cleaner, Cordless
Fan Jacket, Cordless Heated Jacket
Applicable battery cartridge and
charger
Battery cartridge BL1815N / BL1820B / BL1830
Charger DC18RC / DC18RD /
• Some of the battery cartridges and chargers listed
above may not be available depending on your
region of residence.
WARNING: Only use the battery cartridges
and chargers listed above. Use of any other battery
cartridges and chargers may cause injury and/or re.
/ BL1830B / BL1840B /
BL1850B / BL1860B
DC18RE / DC18SD / DC18SE
/ DC18SF / DC18SH
SAFETY WARNINGS
Portable power pack safety warnings
1. Be sure to read the instruction manual of the
tool or machine before use.
2. Do not pick up or carry this unit by holding
only the cord. Do not pull the cord while you
are wearing or using this unit.
3. Before wearing the unit, remove the adapters
from the tool or machine.
4. When you leave the tool or machine, be sure to
remove the adapters from the tool or machine,
or remove the unit from your body.
5. Be careful not to trip over the cord during
operation.
6. Do not use this unit on an unstable surface, or
unstable high places.
7. Do not use multiple units by connecting one
unit to another unit.
8. During operation, keep the cord away from
obstacles. The cord caught by obstacles may
cause serious injury.
9. Do not insert the adapters into the charger.
10. Do not install the adapters to the battery ports
of this unit.
11. This unit is designed exclusively for use with
18 V batteries. Do not use the batteries other
than 18 V batteries.
12. Inspect the unit, cords, and harness before
use. If they are damaged, ask your local Makita
Authorized Service Center for repair.
13. When attaching the cord to the cord holder, be
sure to attach it slowly and securely.
14. Always make sure that the tool or machine is
switched o and the adapters are removed
before attempting to perform inspection or
maintenance of the tool or machine.
15.
When using this unit with a tool equipped with a
blade, be sure to keep the cord away from the blade.
16. Do not use this unit when you are using a
safety harness.
17. Do not use this unit while you are climbing up
in a tree.
18. Do not use this unit when you are wearing
cordless fan jacket or cordless heated jacket.
19. Do not expose this unit to sparks.
20. When using this unit without wearing it, be
sure to lay down the unit.
21. Do not let water enter into the cover.
22. Do not disassemble, repair, or modify the unit.
23. Be careful not to entangle the harness or belt
by the tool or machine.
24. When using the unit, be careful not to cut the
cords with the tool or machine.
2 ENGLISH
Page 3
Symbols
The followings show the symbols used for tool.
volts
direct current
Important safety instructions for
battery cartridge
1. Before using battery cartridge, read all instructions and cautionary markings on (1) battery
charger, (2) battery, and (3) product using
battery.
2. Do not disassemble or tamper the battery
cartridge. It may result in a re, excessive heat,
or explosion.
3. If operating time has become excessively
shorter, stop operating immediately. It may
result in a risk of overheating, possible burns
and even an explosion.
4. If electrolyte gets into your eyes, rinse them
out with clear water and seek medical attention right away. It may result in loss of your
eyesight.
5. Do not short the battery cartridge:
(1) Do not touch the terminals with any con-
ductive material.
(2) Avoid storing battery cartridge in a con-
tainer with other metal objects such as
nails, coins, etc.
(3) Do not expose battery cartridge to water
or rain.
A battery short can cause a large current
ow, overheating, possible burns and even a
breakdown.
6. Do not store and use the tool and battery cartridge in locations where the temperature may
reach or exceed 50 °C (122 °F).
7. Do not incinerate the battery cartridge even if
it is severely damaged or is completely worn
out. The battery cartridge can explode in a re.
8. Do not nail, cut, crush, throw, drop the battery
cartridge, or hit against a hard object to the
battery cartridge. Such conduct may result in a
re, excessive heat, or explosion.
9. Do not use a damaged battery.
10. The contained lithium-ion batteries are subject
to the Dangerous Goods Legislation requirements.
For commercial transports e.g. by third parties,
forwarding agents, special requirement on packaging and labeling must be observed.
For preparation of the item being shipped, consulting an expert for hazardous material is required.
Please also observe possibly more detailed
national regulations.
Tape or mask o open contacts and pack up the
battery in such a manner that it cannot move
around in the packaging.
11. When disposing the battery cartridge, remove
it from the tool and dispose of it in a safe
place. Follow your local regulations relating to
disposal of battery.
12. Use the batteries only with the products
specied by Makita. Installing the batteries to
non-compliant products may result in a re, excessive heat, explosion, or leak of electrolyte.
13. If the tool is not used for a long period of time,
the battery must be removed from the tool.
14. During and after use, the battery cartridge may
take on heat which can cause burns or low
temperature burns. Pay attention to the handling of hot battery cartridges.
15. Do not touch the terminal of the tool immediately after use as it may get hot enough to
cause burns.
16. Do not allow chips, dust, or soil stuck into the
terminals, holes, and grooves of the battery
cartridge. It may result in poor performance or
breakdown of the tool or battery cartridge.
17. Unless the tool supports the use near
high-voltage electrical power lines, do not use
the battery cartridge near high-voltage electrical power lines. It may result in a malfunction or
breakdown of the tool or battery cartridge.
18. Keep the battery away from children.
SAVE THESE INSTRUCTIONS.
CAUTION: Only use genuine Makita batteries.
Use of non-genuine Makita batteries, or batteries that
have been altered, may result in the battery bursting
causing res, personal injury and damage. It will
also void the Makita warranty for the Makita tool and
charger.
Tips for maintaining maximum
battery life
1. Charge the battery cartridge before completely
discharged. Always stop tool operation and
charge the battery cartridge when you notice
less tool power.
2. Never recharge a fully charged battery cartridge. Overcharging shortens the battery
service life.
3. Charge the battery cartridge with room temperature at 10 °C - 40 °C (50 °F - 104 °F). Let
a hot battery cartridge cool down before
charging it.
4. When not using the battery cartridge, remove
it from the tool or the charger.
5. Charge the battery cartridge if you do not use
it for a long period (more than six months).
3 ENGLISH
Page 4
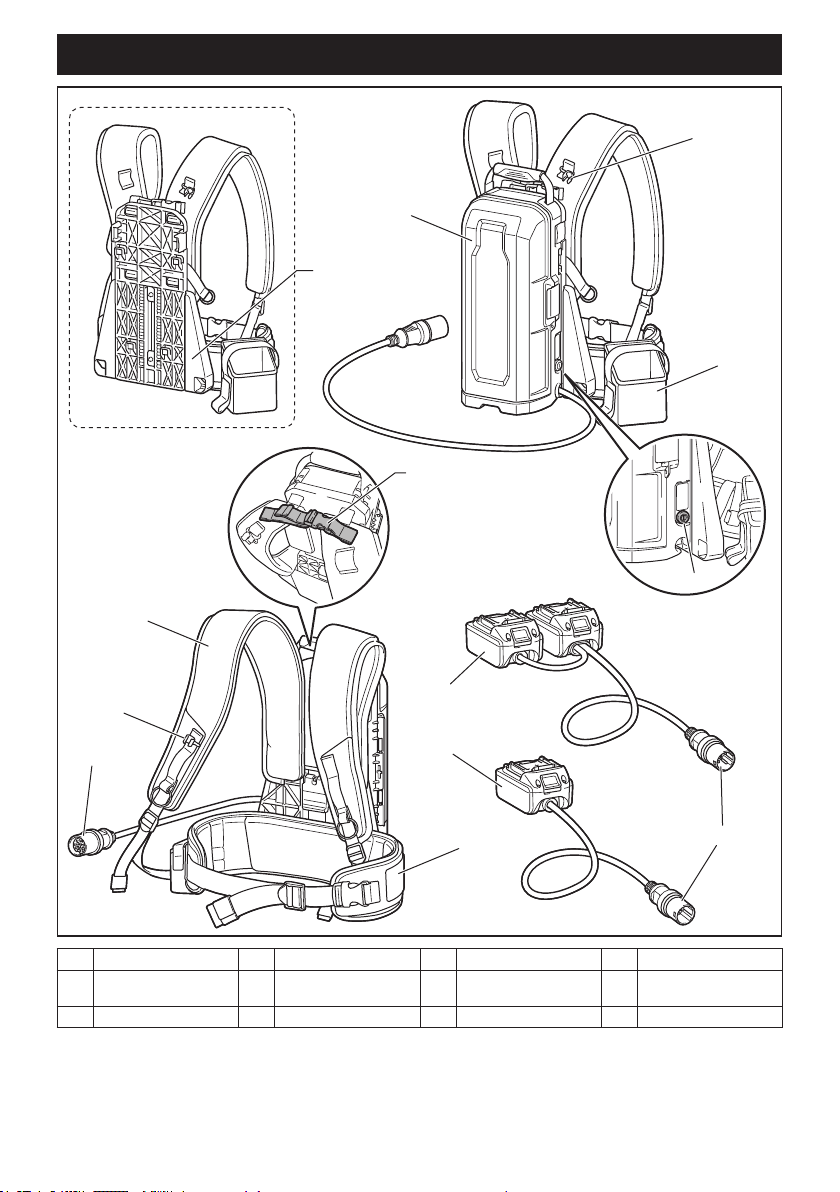
PARTS DESCRIPTION
1
11
3
2
4
9
5
3
12
7
8
10
1 Base plate 2 Battery box 3 Cord holder 4 Adapter pocket
5 Power button 6 Plug 7 Adapters for 36 V (18 V
9 Width adjustment belt 10 Waist belt 11 Shoulder harness 12 Socket
x 2) (optional accessory)
4 ENGLISH
8 Adapter for 18 V
(optional accessory)
6
Page 5
FUNCTIONAL
DESCRIPTION
CAUTION: Always be sure that the unit is
switched o and the battery cartridge is removed
before adjusting or checking function on the unit.
Installing or removing battery
cartridge
CAUTION: Always switch o the unit before
installing or removing of the battery cartridge.
CAUTION: Hold the unit and the battery car-
tridge rmly when installing or removing battery
cartridge. Failure to hold the unit and the battery
cartridge rmly may cause them to slip o your hands
and result in damage to the unit and battery cartridge
and a personal injury.
CAUTION: When installing or removing the
battery cartridge, place the unit on a at and stable surface. Otherwise, the battery cartridge may fall
accidentally and cause an injury.
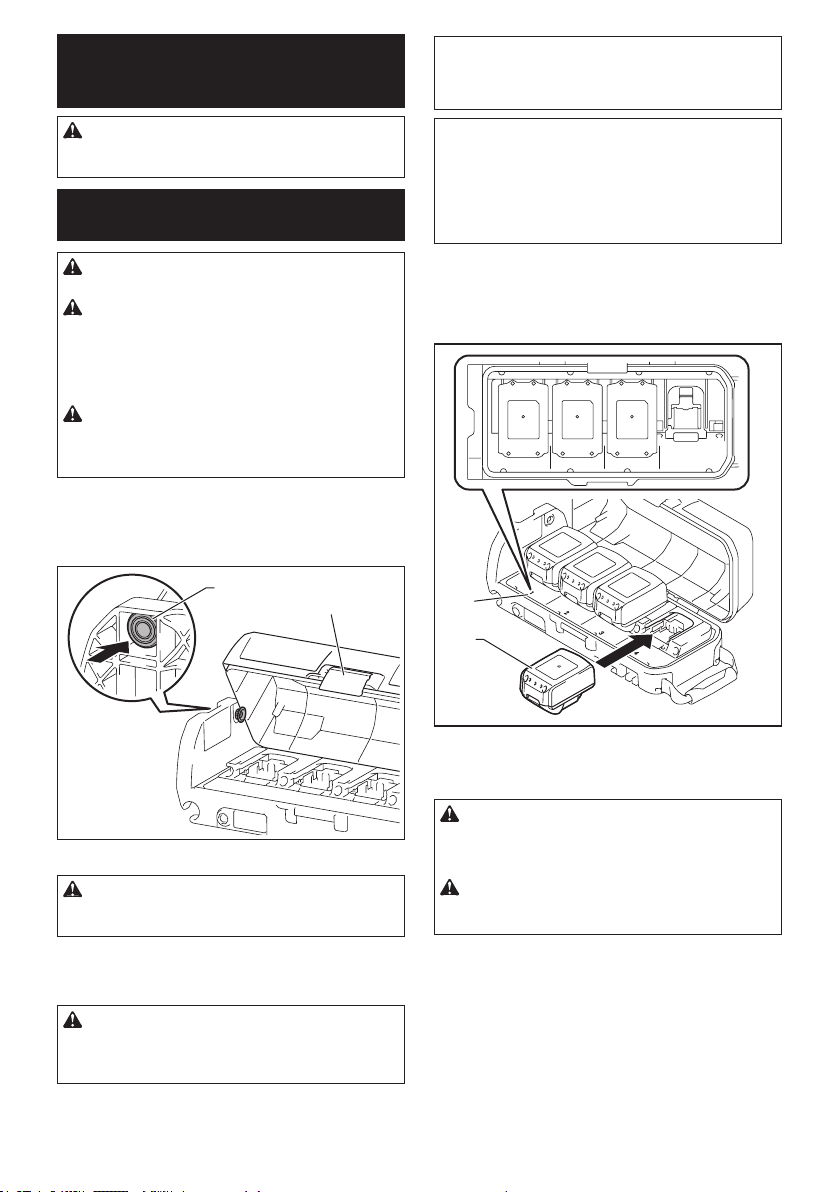
1. Pull up the lever and open the cover of the battery
box.
2. Push the lock button, and then lock the cover with
the lock button.
NOTICE: When using this unit with 36 V (18 V x
2) battery-powered tool or machine, install at least
one battery to battery port 1 or 2, and at least one
battery to battery port 3 or 4.
NOTE: This unit automatically switches the batteries
to be used among the installed batteries. The unit
selects the appropriate battery every time the tool or
machine is turned on.
NOTE: When using this unit with 18 V battery-powered tool or machine, install at least one battery cartridge to one of the battery ports.
To install the battery cartridge, align the tongue on the
battery cartridge with the groove in the housing and slip
it into place. Insert it all the way until it locks in place
with a little click. If you can see the red indicator on the
upper side of the button, it is not locked completely.
1234
1
2
► 1. Lock button 2. Lever
CAUTION: Make sure that the cover is locked
with the lock button securely. Otherwise, the cover
may close accidentally, and cause an injury.
3. Install the battery cartridges.
4. Raise the cover to release the lock button, and
then close the cover and lock the cover with the lever.
CAUTION: Make sure that the cover is closed
securely and locked. Otherwise, water or rain may
enter inside the battery box and cause an electric
shock or malfunction.
1
2
► 1. Battery port 2. Battery cartridge
To remove the battery cartridge, slide it from the unit
while sliding the button on the front of the cartridge.
CAUTION: Always install the battery cartridge
fully until the red indicator cannot be seen. If not,
it may accidentally fall out of the unit, causing injury to
you or someone around you.
CAUTION: Do not install the battery cartridge
forcibly. If the cartridge does not slide in easily, it is
not being inserted correctly.
5 ENGLISH
Page 6
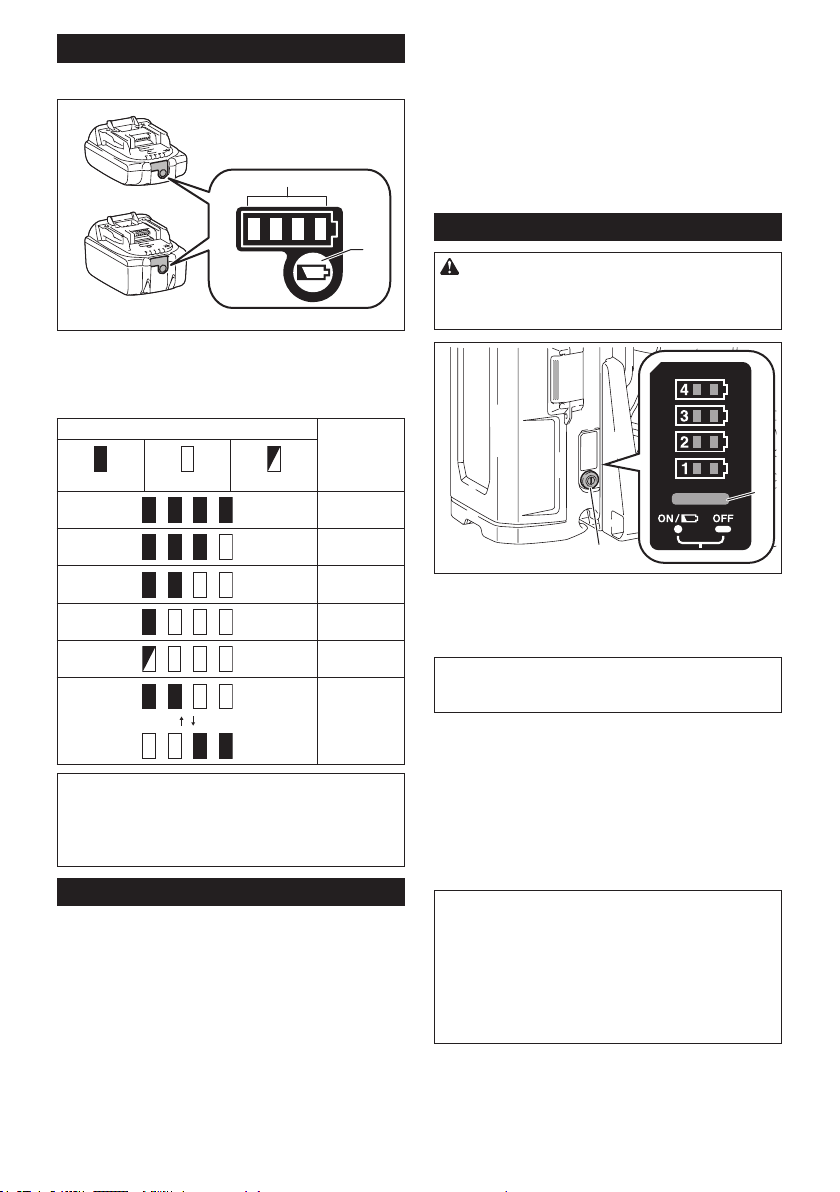
Indicating the remaining battery capacity
Only for battery cartridges with the indicator
1
2
► 1. Indicator lamps 2. Check button
Press the check button on the battery cartridge to indicate the remaining battery capacity. The indicator lamps
light up for a few seconds.
Indicator lamps Remaining
capacity
Overheat protection
When the tool or battery is overheated, the tool stops
automatically. In this case, let the tool and battery cool
before turning the tool on again.
Overdischarge protection
When the battery capacity is not enough, the tool stops
automatically. In this case, remove the battery from the
tool and charge the battery.
Power button and battery indicator
CAUTION: Make sure that the tool or machine
is turned o before turning on the unit. Otherwise,
the tool or machine may start suddenly and cause an
injury.
Lighted O Blinking
75% to 100%
50% to 75%
25% to 50%
0% to 25%
Charge the
battery.
The battery
may have
malfunctioned.
NOTE: Depending on the conditions of use and the
ambient temperature, the indication may dier slightly
from the actual capacity.
NOTE: The rst (far left) indicator lamp will blink when
the battery protection system works.
Tool / battery protection system
The tool is equipped with a tool/battery protection sys-
tem. This system automatically cuts o power to the
motor to extend tool and battery life. The tool will automatically stop during operation if the tool or battery is
placed under one of the following conditions:
Overload protection
When the tool or battery is operated in a manner that
causes it to draw an abnormally high current, the tool
automatically stops without any indication. In this sit-
uation, turn the tool o and stop the application that
caused the tool to become overloaded. Then turn the
tool on to restart.
1
2
► 1. Main power lamp 2. Power button
To turn the power on, press the power button. The main
power lamp lights up in green. To turn the power o,
press the power button for a few seconds.
NOTE: If the unit and connected tool or machine are
left unattended for 8 hours, the unit automatically
turns o.
If the main power lamp blinks in green, the adapter is
not connected to the unit, or the batteries are empty. In
this case, connect the adapter to the unit, or charge the
batteries. If the lamp keeps blinking in green, refer to
the troubleshooting.
If the main power lamp blinks in red and green alter-
nately, turn the power o, and then turn the power on.
If the main power lamp keeps blinking in red and green
alternately after turning the power on, ask your local
Makita Authorized Service Center for repair.
NOTE: If you turn on the main power switch of the
tool or machine just after turning on the portable
power pack, the indicator(s) on the tool or machine
may show that the protection system is working. In
this situation, start the tool or machine once. If the
indicator(s) turns o, you can operate the tool or
machine. If the indicator(s) is still on, check the main
power lamp of the portable power pack and refer the
section "TROUBLESHOOTING" to solve the problem.
Press the power button to indicate the remaining battery
capacity. The indicator lamp that corresponds to each
battery port lights up for approximately 5 seconds.
6 ENGLISH
Page 7
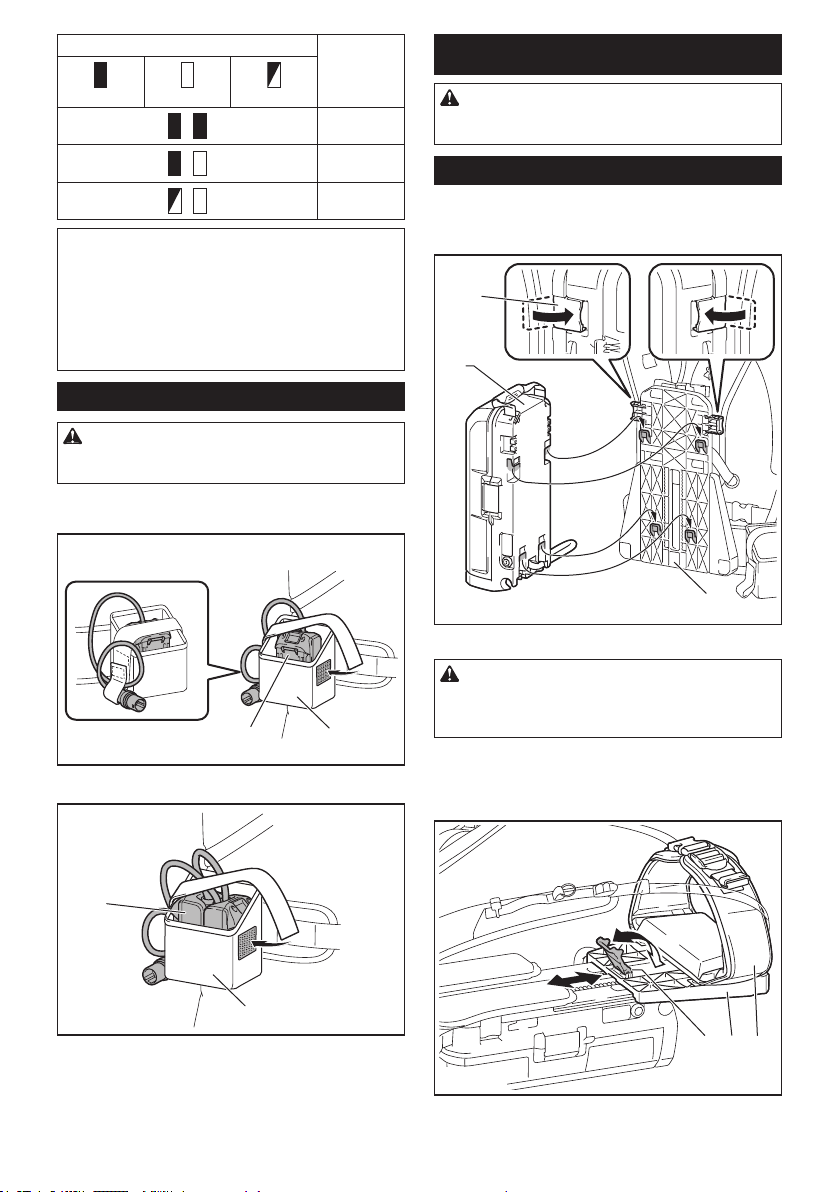
Indicator lamps Remaining
12
capacity
ASSEMBLY
Lighted O Blinking
50% to 100%
0% to 50%
Charge the
battery.
NOTE: The indicator lamps for remaining battery
capacity is just for a reference. The actual bat-
tery capacity may dier depending on the usage
conditions.
NOTE: If the tool or machine has indicator lamps for
remaining battery capacity, do not refer to the indicator lamps of the tool or machine but to the indicator
lamps of this unit.
Using the adapter pocket
CAUTION: Do not use this unit with the cord
xed using the hook and loop fastener of the
adapter pocket.
You can put the adapters into the adapter pocket as
shown in the gure.
► 1. Adapter 2. Adapter pocket
CAUTION: Always be sure that the unit is
switched o and the battery cartridge is removed
before carrying out any work on the unit.
Assembling the unit
1. Attach the battery box to the base plate as shown
in the gure. Be sure to lock the levers on both sides of
the base plate after attaching the battery box.
1
2
3
► 1. Lever 2. Battery box 3. Base plate
CAUTION: Make sure that the battery box is
securely xed to the base plate, and locked with
levers. Otherwise, the battery box may fall when you
wear the unit or use the unit, and cause an injury.
2. Adjust the position of the waist belt. Pull up the
height adjustment lever, then adjust the position of the
waist belt by sliding the base plate, and then return the
lever.
1
► 1. Adapter 2. Adapter pocket
2
1 32
► 1. Height adjustment lever 2. Base plate 3. Waist
belt
7 ENGLISH
Page 8
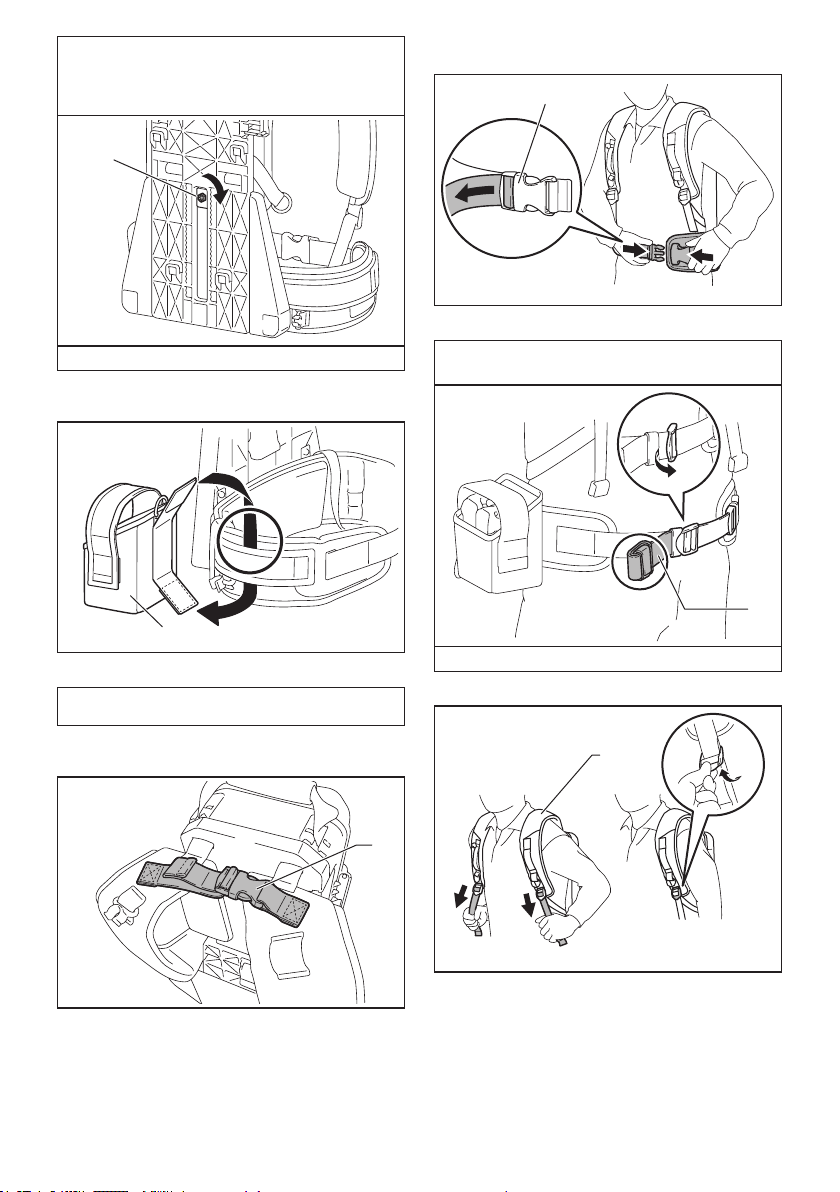
NOTICE: If the height adjustment lever is loose,
tighten the nut of the height adjustment lever.
When tightening the nut, do not tighten it excessively.
Otherwise, the height adjustment lever will not move.
1
5. Wear the unit, then lock the buckle of the waist
belt, and then adjust the length of the waist belt.
1
► 1. Buckle
► 1. Nut
3. Attach the adapter pocket to the waist belt with the
hook and loop fastener as shown in the gure.
1
► 1. Adapter pocket
NOTE: The adapter pocket can be attached on either
left or right side of the waist belt.
4. Adjust the width of the shoulder harness using the
width adjustment belt.
1
NOTE: You can fold and x the belt with the hook and
loop fastener as shown in the gure.
1
► 1. Belt
6. Adjust the length of the shoulder harness.
1
► 1. Width adjustment belt
► 1. Shoulder harness
8 ENGLISH
Page 9
NOTE: You can fold and x the belt with the hook and
12
loop fastener as shown in the gure.
1
► 1. Belt
OPERATION
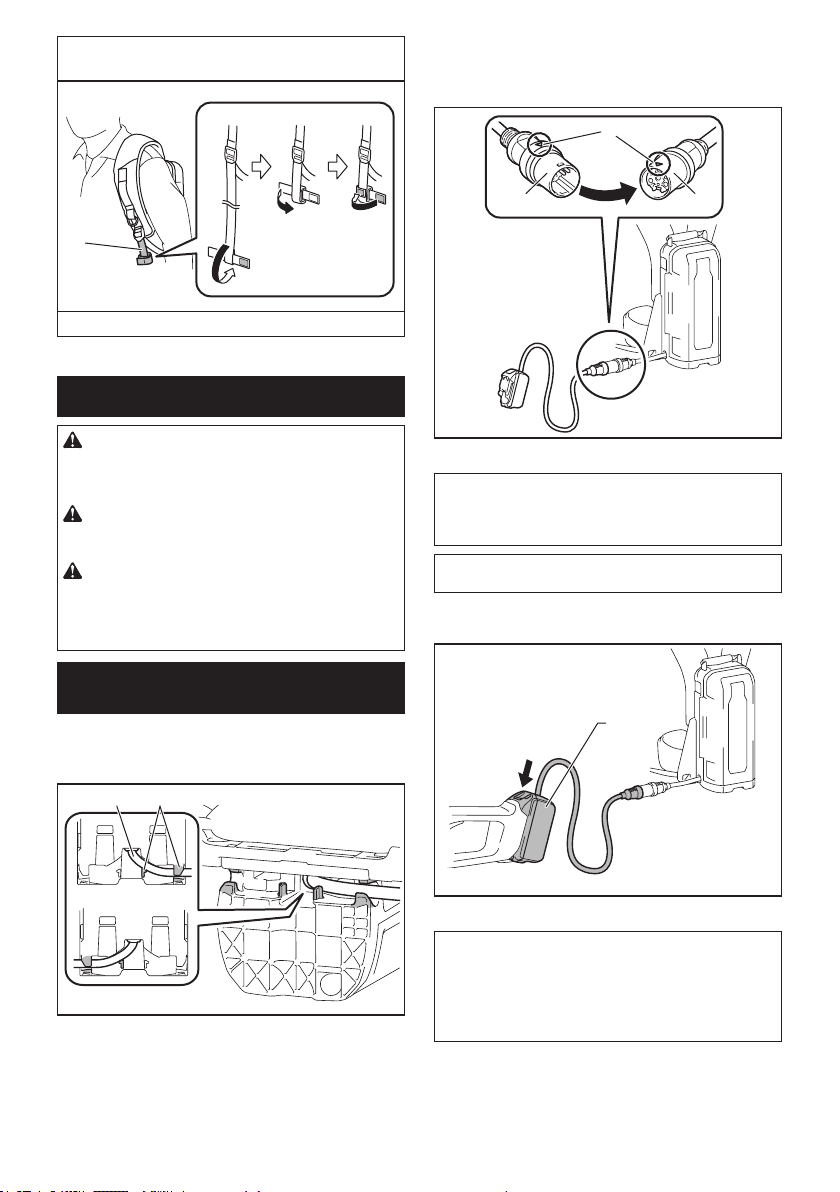
3. Insert the plug of the adapter or power tool/
machine into the socket of the battery box all the way so
that the arrow mark on the plug is aligned with that on
the socket.
3
CAUTION: When wearing the unit, be sure
to put shoulder harness on your both shoulders.
Otherwise, the unit may fall when you wear the unit or
use the unit, and cause an injury.
CAUTION: When wearing the unit, be sure to
wear the unit on your back. Otherwise, the unit may
fall during operation and cause an injury.
CAUTION: Always switch o the tool or
machine before turning on the unit, or connecting
the plug of the adapter or power tool/machine to
the socket of the battery box. Otherwise, the tool or
machine may start suddenly and cause an injury.
Connecting the unit to the tool or
machine
1. Pull out the cord from either left or right side of the
battery box. When pulling out the cord, be sure to set
the cord in the holders as shown in the gure.
21
► 1. Cord 2. Holder
2. Wear the unit.
► 1. Plug 2. Socket 3. Arrow mark
NOTICE: When disconnecting the plug and
socket, do not hold the cords but hold the plug
and socket. Otherwise, the cords may be damaged
and cause a malfunction of the unit.
NOTE: The plug and socket are disconnected if a
certain load is applied.
4. Install the adapters to the tool or machine in the
same way as the battery cartridge.
1
► 1. Adapter
NOTICE: For 18 V battery-powered tool or
machine, use the adapter for 18 V. For 36 V (18
V x 2) battery-powered tool or machine, use the
adapters for 36 V (18 V x 2).
For direct connection type tool or machine, no
adapter is required.
9 ENGLISH
Page 10
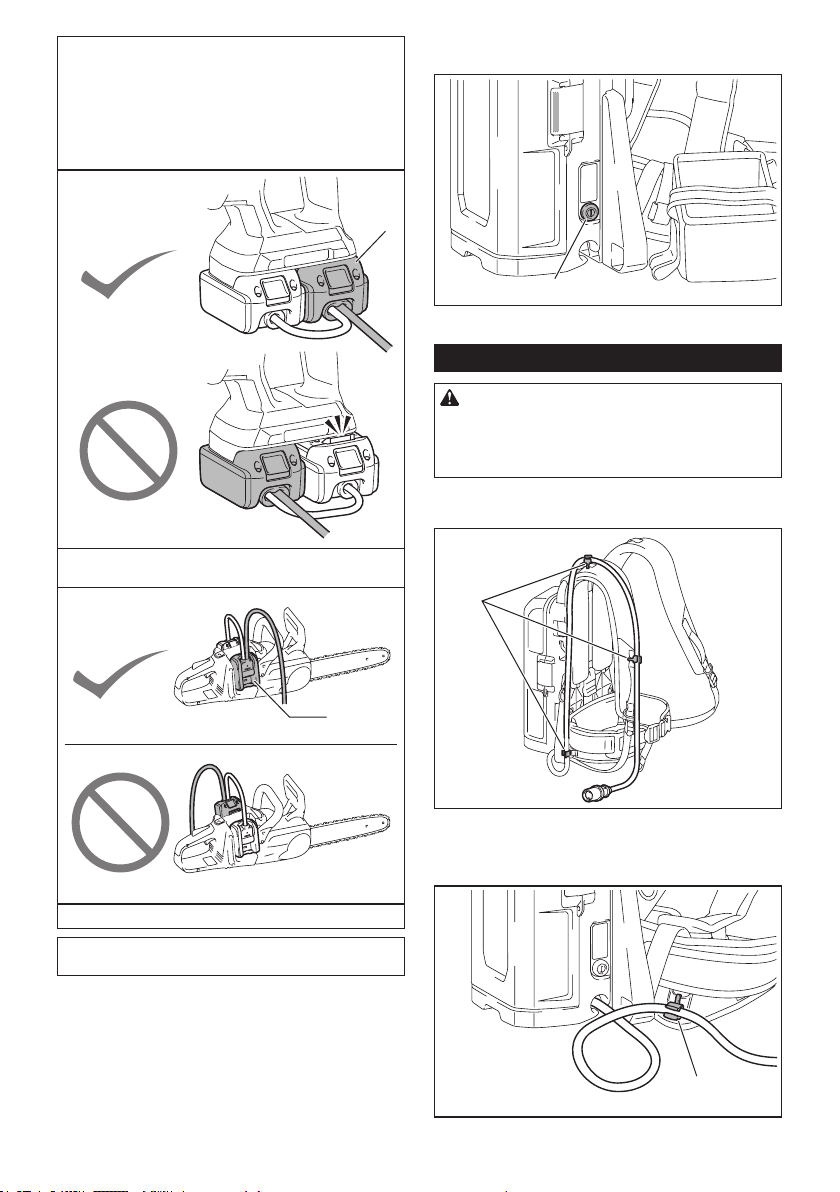
NOTICE: When installing adapters to the tool or
machine, be sure to install the adapter equipped
with 2 cords to the location shown in the gure.
If you install the adapters incorrectly, the adapter
equipped with 2 cords cannot be inserted all the
way. In this case, do not insert the adapter forcibly. Otherwise, the tool or machine may be damaged.
► 1. Adapter with 2 cords
5.
Press the power button to turn the power on. To turn
the power o, press the power button for a few seconds.
1
1
► 1. Power button
Using the cord holders
CAUTION: Attach only the cord of the battery
box to the cord holders. Do not attach the cord
of the adapters to the cord holders. Attaching the
cord of the adapters may invite accident and cause
an injury.
You can attach the cord of the battery box to the cord
holders as shown in the gure.
1
1
► 1. Adapter with 2 cords
NOTE: The direction of the cord of the adapter can be
changed in the range of approximately 180 degrees.
► 1. Cord holder
You can also attach the cord using only the cord holder
of the waist belt as shown in the gure.
1
► 1. Cord holder
10 ENGLISH
Page 11
The cord holders can be attached on either left or right
side of the shoulder harness and waist belt.
1
► 1. Cord holder
Using the hanging band
Optional accessory
You can use the hanging band for cordless grass trimmer or cordless string trimmer with this unit.
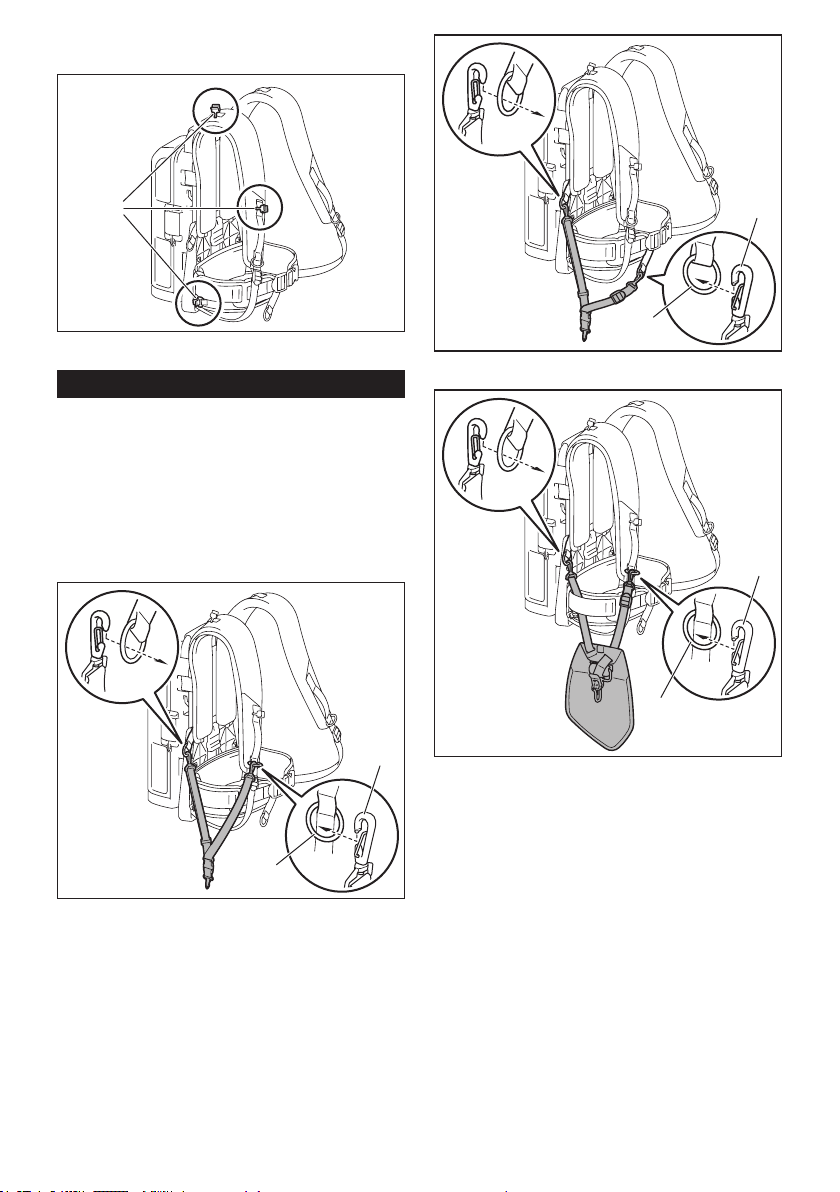
Attaching the hanging band
1. Attach the hooks of the hanging band to the rings
of the shoulder harness or waist belt as shown in the
gure. Select the type of band and the connecting
method appropriate for your usage.
2
2
1
► 1. Ring 2. Hook
2
1
► 1. Ring 2. Hook
► 1. Ring 2. Hook
1
11 ENGLISH
Page 12

2. Attach the hook to the tool.
1
1
► 1. Hook
2
► 1. Ring 2. Hook
NOTE: If the tool is bike handle type, attach the band
so that the band passes through inside of the waist
belt as shown in the gure.
1
2
► 1. Waist belt 2. Band
Detaching the tool
Push the levers on the buckle to unlock the buckle.
1
► 1. Lever
NOTE: The buckle is not equipped depending on the
type of band.
12 ENGLISH
Page 13
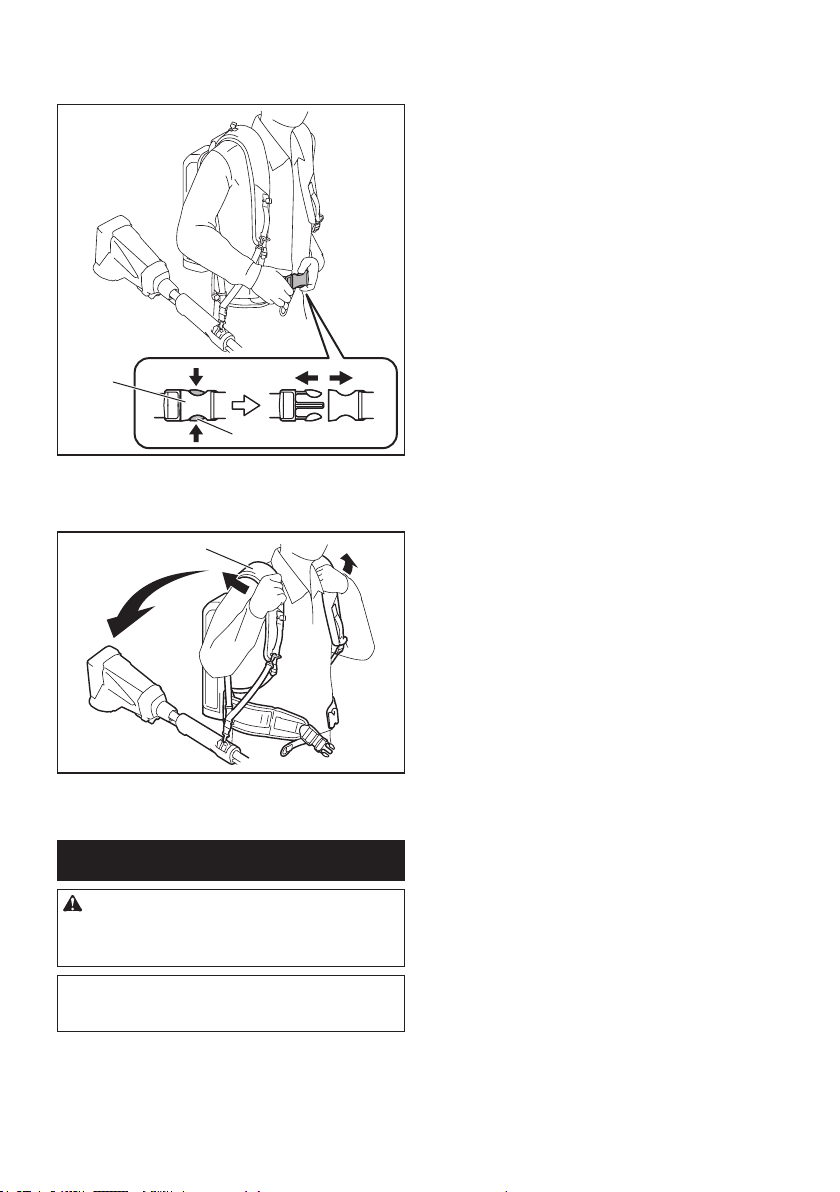
Emergency detachment
1. Push the levers on the buckle of the waist belt to
unlock the buckle.
1
2
► 1. Buckle 2. Lever
2. Take o the shoulder harness to release the tool
and the unit.
1
► 1. Shoulder harness
MAINTENANCE
CAUTION: Always be sure that the unit is
switched o and the battery cartridge is removed
before attempting to perform inspection or
maintenance.
NOTICE: Never use gasoline, benzine, thinner,
alcohol or the like. Discoloration, deformation or
cracks may result.
To maintain product SAFETY and RELIABILITY,
repairs, any other maintenance or adjustment should
be performed by Makita Authorized or Factory Service
Centers, always using Makita replacement parts.
13 ENGLISH
Page 14
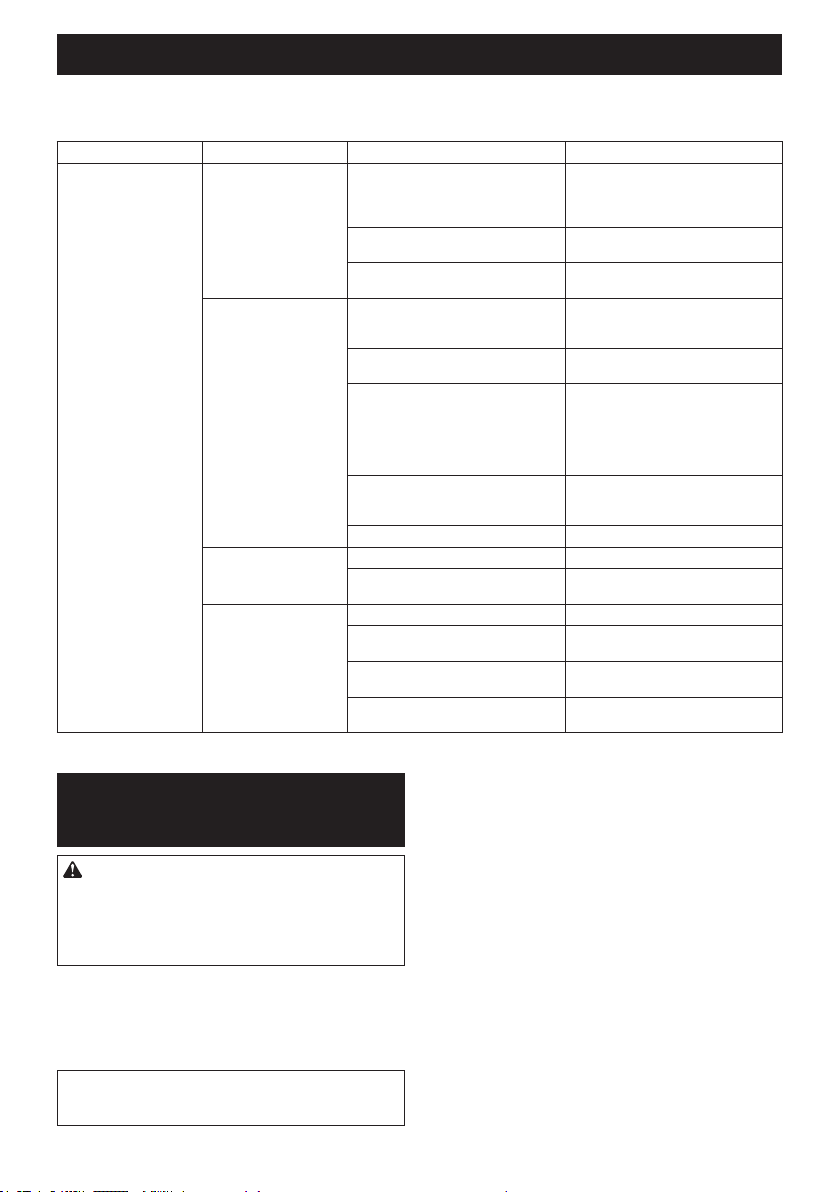
TROUBLESHOOTING
Before asking for repairs, conduct your own inspection rst. If you nd a problem that is not explained in the manual,
do not attempt to dismantle the tool, machine, or unit. Instead, ask Makita Authorized Service Centers, always using
Makita replacement parts for repairs.
State of abnormality Main power lamp Cause Remedy
The tool or machine
does not start.
The lamp lights up in
green.
The lamp blinks in
green.
The lamp blinks in red
and green alternately.
The lamp does not
light up.
The adapters are not installed to the
tool or machine.
The tool or machine, or the cords of
the adapters are overheated.
The tool or machine, or the unit is
broken.
The plug of the adapter or power tool/
machine and the socket of the battery
box are not connected.
The remaining battery capacity is not
enough.
Two batteries are not installed to
the unit when using the unit with the
battery-powered tool or machine with
higher voltage than 18V.
The remaining battery capacity of two
batteries is not enough.
The unit needs to switch the battery. Switch o the tool or machine, and
The cord of the unit is overheated. Cool down the unit.
The unit has detected an abnormality. Turn o the unit, and then back on.
The tool or machine, or the unit is
broken.
The unit is not turned on. Turn on the unit.
The batteries are not installed to the
unit.
The remaining battery capacity is not
enough.
The unit is broken. Ask Makita Authorized Service
Install the adapters to the tool or
machine.
Check that the adapters are installed
securely.
Cool down the tool or machine, and
the unit.
Ask Makita Authorized Service
Centers for repair.
Connect the plug and the socket.
Check that the plug and socket are
connected securely.
Charge the batteries, or replace the
batteries with charged ones.
Install at least one battery to battery
port 1 or 2, and at least one battery to
battery port 3 or 4.
Charge the batteries, or replace the
batteries with charged ones.
then back on.
Press the power button of the unit.
Ask Makita Authorized Service
Centers for repair.
Install the batteries to the unit.
Charge the batteries, or replace the
batteries with charged ones.
Centers for repair.
OPTIONAL
ACCESSORIES
CAUTION: These accessories or attachments
are recommended for use with your Makita tool
specied in this manual. The use of any other
accessories or attachments might present a risk of
injury to persons. Only use accessory or attachment
for its stated purpose.
If you need any assistance for more details regarding
these accessories, ask your local Makita Service Center.
• Makita genuine battery and charger
• Adapters for 36 V (18 V x 2)
• Adapter for 18 V
NOTE: Some items in the list may be included in the
tool package as standard accessories. They may
dier from country to country.
14 ENGLISH
Page 15

FRANÇAIS (Mode d’emploi original)
SPÉCIFICATIONS
Utilisation prévue
Le support d’alimentation portable permet de séparer les batteries et l’outil ou la machine, le rendant ainsi adéquat pour un travail de longue durée en permutant entre les batteries installées.
Cet appareil peut être utilisé avec les outils ou
machines qui suivent.
• Outil ou machine à batterie 18 V
• Outil ou machine à batterie 36 V (18 V x 2)
• Outil ou machine à batterie (connexion directe à
un support d’alimentation portable)
À propos de ce manuel d’instructions
Le terme « appareil » utilisé dans ce manuel d’instructions fait référence au support d’alimentation portable.
Catégorie d’outils ou de machines
compatibles
•
Tronçonneuse sans l, Scie à long manche sans l, Soueur
sans l, Coupe herbe sans l, Moteur multi-fonctions sans l,
Taille-haie sans l, Taille-herbe sans l, Taille haie sur perche
sans-l, Meuleuse d’angle sans l, Perforateur sans l*
* Sauf pour DHR280 / DHR281 / DHR282 /
DHR283 / XRH08 / XRH10 / XRH11
La catégorie d’outils ou de machines compatibles est indi-
quée sous réserve de modication sans préavis. Reportez-
vous au plus récent manuel d’instructions pour plus d’informations sur la catégorie d’outils ou de machines compatibles.
MISE EN GARDE : N’utilisez jamais cet
appareil avec des outils ou des machines de la
catégorie ci-dessous. Utiliser cet appareil avec des
outils ou machines non compatibles peut entraîner
une blessure ou un dysfonctionnement.
• Pulvérisateur de jardin sans-l, Sécateur à
batterie, Brouette à batterie, Vélo à assistance
électrique, Aspirateur dorsal sans l, Aspirateur
robot, Blouson ventilé sans l, Veste chauante
Batteries et chargeurs applicables
Batterie BL1815N / BL1820B / BL1830
Chargeur DC18RC / DC18RD /
• Suivant la région où vous habitez, il se peut que
certaines des batteries et certains des chargeurs
énumérés ci-dessus ne soient pas disponibles.
MISE EN GARDE : Utilisez exclusivement
les batteries et chargeurs énumérés ci-dessus.
L’utilisation de toute autre batterie ou tout autre chargeur peut entraîner une blessure et/ou un incendie.
/ BL1830B / BL1840B /
BL1850B / BL1860B
DC18RE / DC18SD / DC18SE
/ DC18SF / DC18SH
CONSIGNES DE SÉCURITÉ
Consignes de sécurité pour support
d’alimentation portable
1. Veillez à lire le manuel d’instructions de l’outil
ou de la machine avant l’utilisation.
2. Ne prenez pas ou ne transportez pas cet appareil en le tenant uniquement par le cordon. Ne
tirez pas sur le cordon pendant que vous portez ou utilisez cet appareil.
3. Avant de porter cet appareil, retirez les adaptateurs de l’outil ou de la machine.
4.
Lorsque vous quittez l’outil ou la machine,
veillez à retirer les adaptateurs de l’outil ou de la
machine, ou à retirer l’appareil de votre corps.
5. Prenez garde de trébucher sur le cordon pendant l’utilisation.
6. N’utilisez pas cet appareil sur une surface
instable ou dans des endroits élevés instables.
7. N’utilisez pas plusieurs appareils en les
connectant les uns aux autres.
8. Pendant l’utilisation, gardez le cordon à l’écart
des obstacles. Le cordon coincé par des obstacles peut entraîner de graves blessures.
9.
N’insérez pas les adaptateurs dans le chargeur.
10. N’installez pas les adaptateurs sur les ports de
batterie de cet appareil.
11.
Cet appareil est exclusivement conçu pour être
utilisé avec des batteries de 18 V. N’utilisez pas
d’autres batteries que les batteries 18 V.
12. Inspectez l’appareil, les cordons et le harnais
avant l’utilisation. S’ils sont endommagés,
demandez à votre centre de service aprèsvente Makita agréé de les réparer.
13.
Lorsque vous xez le cordon au support de
cordon, veillez à le xer lentement et solidement.
14. Assurez-vous toujours que l’outil ou la
machine est éteint et que les adaptateurs sont
retirés avant de procéder à l’inspection ou à
l’entretien de l’outil ou de la machine.
15. Lorsque vous utilisez cet appareil avec un
outil muni d’une lame, veillez à garder le cordon à l’écart de la lame.
16. N’utilisez pas cet appareil lorsque vous utilisez
un harnais de sécurité.
17. N’utilisez pas cet appareil lorsque vous grimpez dans un arbre.
18.
N’utilisez pas cet appareil lorsque vous portez un
blouson ventilé sans l ou une veste chauante.
19. N’exposez pas cet appareil à des étincelles.
20. Lorsque vous utilisez cet appareil sans le
porter, veillez à le déposer à l’horizontale.
21.
Ne laissez pas l’eau pénétrer dans le couvercle.
22.
Évitez de démonter, réparer ou modier l’appareil.
15 FRANÇAIS
Page 16

23. Prenez garde d’enchevêtrer le harnais ou la
ceinture avec l’outil ou la machine.
24.
Lorsque vous utilisez l’appareil, prenez garde de
couper les cordons avec l’outil ou la machine
.
Symboles
Les symboles utilisés pour l’outil sont indiqués ci-dessous.
volts
courant continu
Consignes de sécurité importantes
pour la batterie
1. Avant d’utiliser la batterie, lisez toutes les
instructions et les mises en garde apposées
sur (1) le chargeur de batterie, (2) la batterie et
(3) le produit utilisant la batterie.
2. Ne démontez pas et ne modiez pas la batte-
rie. Cela peut entraîner un incendie, une chaleur
excessive ou une explosion.
3.
Cessez immédiatement l’utilisation si le temps de
fonctionnement devient excessivement court. Il y a
risque de surchaue, de brûlures, voire d’explosion.
4.
Si l’électrolyte pénètre dans vos yeux, rincez-les
à l’eau claire et consultez immédiatement un
médecin. Il y a risque de perte de la vue.
5. Ne court-circuitez pas la batterie :
(1) Ne touchez les bornes avec aucun maté-
riau conducteur.
(2)
Évitez de ranger la batterie dans un conteneur avec d’autres objets métalliques tels
que clous, pièces de monnaie, etc.
(3)
Évitez d’exposer la batterie à l’eau ou à la pluie.
Un court-circuit de la batterie pourrait provo-
quer un fort courant, une surchaue, parfois
des brûlures et même une panne.
6.
Ne rangez pas et n’utilisez pas l’outil ou la batterie dans des emplacements où la température
peut atteindre ou dépasser 50 °C (122 °F).
7.
Ne jetez pas la batterie au feu même si elle est
sérieusement endommagée ou complètement épuisée. La batterie peut exploser au contact du feu.
8.
Évitez de clouer, de couper, d’écraser, de lancer
ou d’échapper la batterie, ou de heurter un objet
dur contre la batterie. Cela peut entraîner un incen-
die, une chaleur excessive ou une explosion.
9.
N’utilisez pas une batterie si elle est endommagée.
10. Les batteries lithium-ion fournies sont soumises aux exigences de la législation sur les
marchandises dangereuses.
Des exigences particulières sur l’emballage et
l’étiquetage doivent être respectées lors du transport commercial par des tiers, des transitaires, etc.
Pour préparer la marchandise à expédier, consultez un expert en matériaux dangereux si nécessaire. Respectez aussi les éventuelles réglementations nationales plus détaillées.
Recouvrez de ruban isolant les contacts exposés,
et emballez la batterie de sorte qu’elle ne puisse
pas se déplacer à l’intérieur de l’emballage.
11. Lors de l’élimination de la batterie, retirez-la
de l’outil et éliminez-la dans un endroit sûr.
Respectez la réglementation locale concernant
l’élimination de la batterie.
12. N’utilisez les batteries qu’avec les produits
spéciés par Makita. Installer les batteries sur
des produits non conformes peut entraîner un
incendie, une chaleur excessive, une explosion ou
une fuite d’électrolyte.
13. Si l’outil reste inutilisé pour une période pro-
longée, la batterie doit en être retirée.
14. Pendant et après l’utilisation, la batterie peut
accumuler de la chaleur, ce qui peut causer
des brûlures ou des brûlures à basse température. Faites attention lors de la manipulation
des batteries chaudes.
15. Ne touchez pas la borne de l’outil immédiatement après l’utilisation, car elle peut être assez
chaude pour causer des brûlures.
16. Ne laissez pas les copeaux, les poussières ou
la terre se coincer dans les bornes, les trous et
les rainures de la batterie. Cela peut entraîner
un fonctionnement médiocre ou une panne de
l’outil ou de la batterie.
17. À moins que l’outil ne soit compatible avec
l’utilisation à proximité des lignes électriques
haute tension, n’utilisez pas la batterie à
proximité d’une ligne électrique haute tension.
Cela peut entraîner un dysfonctionnement ou une
panne de l’outil ou de la batterie.
18. Gardez la batterie à l’écart des enfants.
CONSERVEZ CES
INSTRUCTIONS.
ATTENTION : Utilisez exclusivement les bat-
teries fabriquées par Makita. Les batteries autres
que celles fabriquées par Makita ou les batteries
modiées peuvent exploser et causer un incendie,
une blessure ou des dommages. Cela annule aussi la
garantie Makita de l’outil et du chargeur Makita.
Conseils pour maintenir la
durée de service maximale de la
batterie
1. Rechargez la batterie avant qu’elle ne soit
complètement déchargée. Arrêtez toujours
l’outil et rechargez la batterie quand vous
remarquez que la puissance de l’outil diminue.
2. Ne rechargez jamais une batterie complètement chargée. La surcharge réduit la durée de
service de la batterie.
3. Chargez la batterie à une température
ambiante comprise entre 10 °C et 40 °C (50 °F
et 104 °F). Si la batterie est chaude, laissez-la
refroidir avant de la charger.
4. Lorsque vous n’utilisez pas la batterie, retirez-la de l’outil ou du chargeur.
5. Chargez la batterie si elle est restée inutilisée
pendant une période prolongée (plus de six
mois).
16 FRANÇAIS
Page 17

DESCRIPTION DES PIÈCES
2
1
11
3
4
9
5
3
12
7
8
10
1 Plaque de base 2 Boîtier de batterie 3 Support de cordon 4 Pochette pour
5 Bouton d’alimentation 6 Fiche 7 Adaptateurs pour 36 V
9 Courroie de réglage de
la largeur
10 Ceinture de taille 11 Sangle d’épaule 12 Prise
17 FRANÇAIS
(18 V x 2) (accessoire
en option)
adaptateur
8 Adaptateur pour 18 V
(accessoire en option)
6
Page 18

DESCRIPTION DU
FONCTIONNEMENT
ATTENTION : Assurez-vous toujours
que l’appareil est éteint et que sa batterie est
retirée avant de l’ajuster ou de vérier son
fonctionnement.
Installation ou retrait de la batterie
ATTENTION : Éteignez toujours l’appareil
avant d’installer ou de retirer la batterie.
ATTENTION : Tenez fermement l’appareil et la
batterie lors de l’installation ou du retrait de cette
dernière. Sinon, l’appareil et la batterie pourraient
vous glisser des mains, ce qui risque d’endommager
l’appareil et la batterie, ou d’entraîner des blessures.
ATTENTION : Lors de la pose ou du retrait de
la batterie, placez l’appareil sur une surface plane
et stable. Autrement, la batterie risque de tomber
accidentellement et d’entraîner une blessure.
1. Tirez le levier vers le haut et ouvrez le couvercle
du boîtier de batterie.
2. Appuyez sur le bouton de sécurité, puis verrouillez
le couvercle avec le bouton de sécurité.
AVIS : Lors de l’utilisation de cet appareil avec
un outil ou une machine à batterie 36 V (18 V x 2),
installez au moins une batterie sur le port de batterie 1 ou 2, et au moins une batterie sur le port de
batterie 3 ou 4.
NOTE : Cet appareil permute automatiquement entre
les batteries à utiliser parmi les batteries installées.
L’appareil sélectionne la batterie appropriée chaque
fois que l’on allume l’outil ou la machine.
NOTE : Lors de l’utilisation de cet appareil avec un
outil ou une machine à batterie 18 V, installez au
moins une batterie sur un des ports de batterie.
Pour installer la batterie, alignez sa languette sur la
rainure pratiquée dans le boîtier, et glissez la batterie en
place. Insérez-la à fond jusqu’à ce que vous entendiez
un léger déclic. Si vous pouvez voir l’indicateur rouge
sur le dessus du bouton, la batterie n’est pas complètement verrouillée.
1234
1
2
► 1. Bouton de sécurité 2. Levier
ATTENTION : Assurez-vous que le couvercle
est verrouillé solidement par le bouton de sécurité. Autrement, le couvercle risque de se fermer
accidentellement et d’entraîner une blessure.
3. Installez les batteries.
4. Soulevez le couvercle pour libérer le bouton de
sécurité, puis fermez le couvercle et verrouillez-le avec
le levier.
ATTENTION : Assurez-vous que le couvercle
est fermé solidement et verrouillé. Sinon, de l’eau
ou de la pluie pourrait pénétrer à l’intérieur du boîtier
de batterie et provoquer une décharge électrique ou
un dysfonctionnement.
1
2
► 1. Port de batterie 2. Batterie
Pour retirer la batterie, faites-la glisser de l’appareil tout
en faisant glisser le bouton qui se trouve à l’avant de la
batterie.
ATTENTION : Installez toujours la batterie
à fond, jusqu’à ce que l’indicateur rouge ne soit
plus visible. Autrement, elle risque de tomber acci-
dentellement de l’appareil, ce qui comporte un risque
de blessure pour vous-même et pour les personnes
présentes.
ATTENTION : Ne forcez pas sur la batterie
pour l’installer. Si la batterie ne glisse pas facile-
ment, c’est qu’elle n’est pas insérée correctement.
18 FRANÇAIS
Page 19

Achage de la charge restante de la
batterie
Uniquement pour les batteries avec voyant
Protection contre la surcharge
Lorsque l’outil ou la batterie est utilisé d’une manière
entraînant une consommation anormale de courant,
l’outil s’arrête automatiquement sans aucune indication.
Le cas échéant, éteignez l’outil et cessez l’application
qui a causé sa surcharge. Rallumez ensuite l’outil pour
redémarrer.
1
2
► 1. Témoins indicateurs 2. Bouton de vérication
Appuyez sur le bouton de vérication de la batterie pour
acher la charge restante de la batterie. Les témoins
indicateurs s’allument pendant quelques secondes.
Témoins indicateurs Charge
Allumé Éteint Clignotant
NOTE : Suivant les conditions d’utilisation et la
température ambiante, il se peut que l’indication soit
légèrement diérente de la charge réelle.
NOTE : La première lampe témoin (à l’extrémité
gauche) clignote lorsque le dispositif de protection de
la batterie s’active.
restante
75 % à 100 %
50 % à 75 %
25 % à 50 %
0 % à 25 %
Chargez la
batterie.
La batterie a
peut-être mal
fonctionné.
Dispositif de protection de l’outil et
de la batterie
L’outil est équipé d’un système de protection d’outil/
batterie. Ce système coupe automatiquement l’alimentation du moteur pour augmenter la durée de vie de
l’outil et de la batterie. L’outil s’arrête automatiquement
pendant l’utilisation lorsque l’outil ou la batterie est dans
l’une des situations suivantes :
Protection contre la surchaue
Lorsque l’outil ou la batterie est surchaué, l’outil s’arrête automatiquement. Le cas échéant, laissez refroidir
l’outil et la batterie avant de rallumer l’outil.
Protection contre la décharge
excessive
Lorsque la charge de la batterie est insusante, l’outil
s’arrête automatiquement. Dans ce cas, retirez la batterie de l’outil et chargez la batterie.
Bouton d’alimentation et voyant de
batterie
ATTENTION : Assurez-vous que l’outil ou
la machine est éteint avant d’allumer l’appareil.
Autrement, l’outil ou la machine risque de démarrer
soudainement et d’entraîner une blessure.
1
2
► 1. Témoin d’alimentation secteur 2. Bouton
d’alimentation
Pour mettre le contact, appuyez sur le bouton d’alimentation. Le témoin d’alimentation secteur s’allume
en vert. Pour couper le contact, appuyez sur le bouton
d’alimentation pendant quelques secondes.
NOTE : Si l’appareil et l’outil ou la machine connecté
sont laissés sans surveillance pendant 8 heures,
l’appareil s’éteint automatiquement.
Si le témoin d’alimentation secteur clignote en vert, cela
signie que l’adaptateur n’est pas connecté à l’appareil
ou que les batteries sont épuisées. Le cas échéant,
connectez l’adaptateur à l’appareil ou chargez les batteries. Si le témoin continue de clignoter en vert, consultez la section de dépannage.
Si le témoin d’alimentation secteur clignote alternativement en rouge et en vert, éteignez l’appareil puis
rallumez-le. Si le témoin d’alimentation secteur continue
de clignoter alternativement en rouge et en vert une fois
l’appareil allumé, demandez à votre Centre de service
après-vente Makita agréé de le réparer.
19 FRANÇAIS
Page 20

NOTE : Si vous allumez l’interrupteur d’alimentation
12
principale de l’outil ou de la machine juste après
avoir allumé le support d’alimentation portable, il
se peut que les voyants de l’outil ou de la machine
indiquent que le système de protection est activé.
Le cas échéant, démarrez l’outil ou la machine une
fois. Si les voyants s’éteignent, vous pouvez utiliser
l’outil ou la machine. Si les voyants restent allumés,
vériez le témoin d’alimentation secteur du support
d’alimentation portable et reportez-vous à la section «
DÉPANNAGE » pour régler le problème.
Appuyez sur le bouton d’alimentation pour acher la
charge restante de la batterie. La lampe témoin correspondant à chaque port de batterie s’allume pendant
environ 5 secondes.
Témoins indicateurs Charge
Allumé Éteint Clignotant
NOTE : Les lampes témoin de la capacité restante de
la batterie ne servent qu’à titre indicatif. La capacité
réelle de la batterie peut varier en fonction des conditions d’utilisation.
NOTE : Si l’outil ou la machine est équipé de lampes
témoin de capacité restante de la batterie, ne vous
référez pas aux lampes témoin de l’outil ou de la
machine mais à celles de cet appareil.
restante
50 % à 100 %
0 % à 50 %
Chargez la
batterie.
1
2
► 1. Adaptateur 2. Pochette pour adaptateur
ASSEMBLAGE
ATTENTION : Assurez-vous toujours que
l’appareil est éteint et que sa batterie est retirée
avant d’eectuer tout travail sur l’appareil.
Assemblage de l’appareil
1. Fixez le boîtier de batterie à la plaque de base tel
qu’indiqué sur la gure. Veillez à verrouiller les leviers
des deux côtés de la plaque de base après avoir xé le
boîtier de batterie.
1
Utilisation de la pochette pour
adaptateur
ATTENTION : N’utilisez pas cet appareil avec
le cordon xé à l’aide de la fermeture velcro de la
pochette pour adaptateur.
Vous pouvez mettre les adaptateurs dans la pochette
pour adaptateur tel qu’indiqué sur la gure.
► 1. Adaptateur 2. Pochette pour adaptateur
2
3
► 1. Levier 2. Boîtier de batterie 3. Plaque de base
ATTENTION : Assurez-vous que le boîtier de
batterie est solidement xé à la plaque de base et
verrouillé par les leviers. Autrement, le boîtier de
batterie risque de tomber pendant que vous portez ou
utilisez l’appareil et d’entraîner une blessure.
20 FRANÇAIS
Page 21

2. Ajustez la position de la ceinture de taille. Tirez le
levier de réglage de la hauteur vers le haut, puis ajustez
la position de la ceinture de taille en faisant glisser la
plaque de base, puis ramenez le levier.
1 32
► 1. Levier de réglage de la hauteur 2. Plaque de
base 3. Ceinture de taille
AVIS : Si le levier de réglage de la hauteur est
lâche, serrez l’écrou du levier de réglage de la
hauteur. Ne serrez pas l’écrou excessivement.
Autrement, le levier de réglage de la hauteur ne se
déplacera pas.
1
NOTE : La pochette pour adaptateur peut être xée
du côté droit ou gauche de la ceinture de taille.
4. Ajustez la largeur de la sangle d’épaule à l’aide de
la courroie de réglage de la largeur.
1
► 1. Courroie de réglage de la largeur
5. Portez l’appareil, verrouillez la boucle de la cein-
ture de taille, puis ajustez la longueur de la ceinture de
taille.
1
► 1. Écrou
3. Fixez la pochette pour adaptateur à la ceinture
de taille avec la fermeture velcro tel qu’indiqué sur la
gure.
1
► 1. Pochette pour adaptateur
► 1. Boucle
NOTE : Vous pouvez plier et xer la ceinture à l’aide
de la fermeture velcro tel qu’indiqué sur la gure.
1
► 1. Ceinture
21 FRANÇAIS
Page 22

6. Ajustez la longueur de la sangle d’épaule.
12
1
► 1. Sangle d’épaule
NOTE : Vous pouvez plier et xer la ceinture à l’aide
de la fermeture velcro tel qu’indiqué sur la gure.
1
Connexion de l’appareil à l’outil ou à
la machine
1. Sortez le cordon du côté gauche ou droit du boî-
tier de batterie. En sortant le cordon, veillez à le placer
dans les supports tel qu’indiqué sur la gure.
21
► 1. Cordon 2. Support
2. Portez l’appareil.
3. Insérez la che de l’adaptateur, de l’outil élec-
trique ou de la machine à fond dans la prise du boîtier
de batterie, de sorte que la marque de èche de la che
soit alignée sur celle de la prise.
3
► 1. Ceinture
UTILISATION
ATTENTION : Lorsque vous portez l’appareil,
veillez à mettre la sangle d’épaule sur vos deux
épaules. Autrement, l’appareil risque de tomber
pendant que vous portez ou utilisez l’appareil et
d’entraîner une blessure.
ATTENTION : Lorsque vous portez l’appareil,
veillez à le porter sur votre dos. Autrement, l’appa-
reil risque de tomber pendant l’utilisation et d’entraîner une blessure.
ATTENTION : Éteignez toujours l’outil ou la
machine avant d’allumer l’appareil ou de connec-
ter la che de l’adaptateur, de l’outil électrique ou
de la machine dans la prise du boîtier de batterie.
Autrement, l’outil ou la machine risque de démarrer
soudainement et d’entraîner une blessure.
► 1. Fiche 2. Prise 3. Marque de èche
AVIS : Pour déconnecter la che et la prise, ne
saisissez pas les cordons mais plutôt la che
et la prise. Autrement, les cordons risquent d’être
endommagés et d’entraîner un dysfonctionnement de
l’appareil.
NOTE : La che et le prise se déconnectent si une
certaine charge est appliquée.
22 FRANÇAIS
Page 23

4. Installez les adaptateurs sur l’outil ou la machine
de la même façon que la batterie.
1
► 1. Adaptateur
AVIS : Pour un outil ou une machine à batterie 18
V, utilisez l’adaptateur pour 18 V. Pour un outil ou
une machine à batterie 36 V (18 V x 2), utilisez les
adaptateurs pour 36 V (18 V x 2).
Aucun adaptateur n’est requis pour un outil ou
une machine à connexion directe.
AVIS : Lorsque vous installez des adaptateurs
sur l’outil ou la machine, veillez à ce qu’ils soient
dotés de deux cordons à l’emplacement indiqué
sur la gure.
L’adaptateur doté de deux cordons ne pourra pas
être inséré à fond s’il n’est pas installé correctement. Le cas échéant, n’insérez pas l’adaptateur
par la force. Autrement, l’outil ou la machine risque
de subir des dommages.
1
► 1. Adaptateur à deux cordons
► 1. Adaptateur à deux cordons
NOTE : L’orientation du cordon de l’adaptateur peut
être modiée sur une plage d’environ 180 degrés.
23 FRANÇAIS
1
Page 24

5. Appuyez sur le bouton d’alimentation pour mettre
le contact. Pour couper le contact, appuyez sur le bouton d’alimentation pendant quelques secondes.
1
► 1. Bouton d’alimentation
Utilisation des supports de cordon
ATTENTION :
batterie aux supports de cordon. Ne xez pas le cordon des
adaptateurs aux supports de cordon. Fixer le cordon des adaptateurs peut ouvrir la porte aux accidents et entraîner une blessure.
Vous pouvez xer le cordon du boîtier de batterie aux
supports de cordon tel qu’indiqué sur la gure.
1
Ne xez que le cordon du boîtier de
Les supports de cordon peuvent être xés du côté
gauche ou droit de la sangle d’épaule et de la ceinture
de taille.
1
► 1. Support de cordon
Utilisation de la bande de
suspension
Accessoire en option
Vous pouvez utiliser la bande de suspension pour
coupe herbe sans l avec cet appareil.
Fixation de la bande de suspension
1. Fixez les crochets de la bande de suspension
aux anneaux de la sangle d’épaule ou de la ceinture de
taille tel qu’indiqué sur la gure. Sélectionnez le type de
bande et la méthode de connexion qui conviennent à
l’usage prévu.
► 1. Support de cordon
Vous pouvez également xer le cordon uniquement à l’aide du support de cordon de la ceinture de taille tel qu’indiqué sur la gure.
1
► 1. Support de cordon
2
1
► 1. Anneau 2. Crochet
24 FRANÇAIS
Page 25

2
1
1
► 1. Anneau 2. Crochet
► 1. Anneau 2. Crochet
2
► 1. Anneau 2. Crochet
NOTE : Si l’outil est de type guidon de vélo, xez la
bande de sorte qu’elle passe à travers l’intérieur de la
ceinture de taille tel qu’indiqué sur la gure.
2
1
1
2
► 1. Ceinture de taille 2. Bande
25 FRANÇAIS
Page 26

2. Fixez le crochet à l’outil.
1
► 1. Crochet
Retrait de l’outil
Enfoncez les leviers sur la boucle pour déverrouiller la
boucle.
1
Retrait d’urgence
1. Enfoncez les leviers sur la boucle de la ceinture
de taille pour déverrouiller la boucle.
1
2
► 1. Boucle 2. Levier
2. Enlevez la sangle d’épaule pour libérer l’outil et
l’appareil.
1
► 1. Levier
NOTE : Il se peut qu’il n’y ait pas de boucle, suivant le
type de bande.
► 1. Sangle d’épaule
ENTRETIEN
ATTENTION : Assurez-vous toujours que
l’appareil est éteint et que la batterie est retirée
avant de procéder à tout travail d’inspection ou
d’entretien.
AVIS : N’utilisez jamais d’essence, de benzine,
de solvant, d’alcool ou autres produits similaires.
Une décoloration, une déformation ou la forma-
tion de ssures peuvent en découler.
Pour maintenir la SÉCURITÉ et la FIABILITÉ du produit, les réparations et tout autre travail d’entretien
ou de réglage doivent être eectués dans un centre
de service après-vente autorisé ou une usine Makita,
exclusivement avec des pièces de rechange Makita.
26 FRANÇAIS
Page 27

DÉPANNAGE
Avant de faire une demande de réparation, faites d’abord votre propre inspection. Si vous constatez un problème qui
n’est pas expliqué dans le manuel, n’essayez pas de démonter l’outil, la machine ou l’appareil. Demandez plutôt à
un centre de service après-vente Makita agréé de faire la réparation avec des pièces de rechange Makita.
État anormal Témoin d’alimentation
L’outil ou la machine ne
démarre pas.
secteur
Le témoin s’allume en
vert.
Le témoin clignote en
vert.
Le témoin clignote
alternativement en rouge
et en vert.
Le témoin ne s’allume
pas.
Les adaptateurs ne sont pas installés
sur l’outil ou la machine.
L’outil, la machine ou les cordons des
adaptateurs surchauent.
L’outil, la machine ou l’appareil est
cassé.
La che de l’adaptateur, de l’outil électrique ou de la machine et la prise du boîtier de batterie ne sont pas connectées.
La charge restante de la batterie est
insusante.
Il n’y a pas deux batteries installées sur
l’appareil lors de l’utilisation de l’appareil
avec un outil ou une machine à batterie
d’une tension supérieure à 18 V.
La charge restante des deux batteries
est insusante.
L’appareil doit permuter la batterie. Éteignez puis rallumez l’outil ou la
Le cordon de l’appareil est surchaué. Laissez refroidir l’appareil.
L’appareil a détecté une anomalie. Éteignez puis rallumez l’appareil.
L’outil, la machine ou l’appareil est
cassé.
L’appareil n’est pas allumé. Allumez l’appareil.
Les batteries ne sont pas installées
sur l’appareil.
La charge restante de la batterie est
insusante.
L’appareil est cassé. Demandez à votre Centre de ser-
Cause Solution
Installez les adaptateurs sur l’outil ou
la machine.
Assurez-vous que les adaptateurs
sont solidement installés.
Laissez refroidir l’outil ou la machine,
et l’appareil.
Demandez à votre centre de service
après-vente Makita agréé de le
réparer.
Connectez la che et la prise.
Assurez-vous que la che et la prise
sont solidement connectées.
Chargez les batteries ou remplacez-les par des batteries chargées.
Installez au moins une batterie sur le
port de batterie 1 ou 2, et au moins
une batterie sur le port de batterie
3 ou 4.
Chargez les batteries ou remplacez-les par des batteries chargées.
machine.
Appuyez sur le bouton d’alimentation
de l’appareil.
Demandez à votre centre de service
après-vente Makita agréé de le
réparer.
Installez les batteries sur l’appareil.
Chargez les batteries ou remplacez-les par des batteries chargées.
vice après-vente Makita agréé de le
réparer.
ACCESSOIRES EN OPTION
ATTENTION : Ces accessoires ou pièces
complémentaires sont recommandés pour l’utili-
sation avec l’outil Makita spécié dans ce manuel.
L’utilisation de tout autre accessoire ou pièce complémentaire peut comporter un risque de blessure.
N’utilisez les accessoires ou pièces complémentaires
qu’aux ns auxquelles ils ont été conçus.
Si vous désirez obtenir plus de détails sur ces accessoires, veuillez contacter le centre de service aprèsvente Makita le plus près.
• Chargeur et batterie authentiques Makita
• Adaptateurs pour 36 V (18 V x 2)
• Adaptateur pour 18 V
NOTE : Certains éléments de la liste peuvent être
inclus avec l’outil comme accessoires standards. Ils
peuvent varier suivant les pays.
27 FRANÇAIS
Page 28

ESPAÑOL (Instrucciones originales)
ESPECIFICACIONES
Uso pretendido
La unidad portátil de alimentación eléctrica permite que
las baterías y la herramienta o máquina estén separadas, algo idóneo cuando se realiza un trabajo prolongado al cambiar las baterías instaladas.
Esta unidad se puede utilizar con las siguientes herramientas o máquinas.
• Herramienta o máquina inalámbrica de 18 V
• Herramienta o máquina inalámbrica de 36 V (18 V
x 2)
• Herramienta o máquina inalámbrica (de conexión
directa a una unidad portátil de alimentación
eléctrica)
Acerca de este manual de
instrucciones
El término “unidad” en este manual de instrucciones se
reere a la unidad portátil de alimentación eléctrica.
Categoría de herramientas o
máquinas compatibles
• Electrosierra inalámbrica, Sierra de extensión
inalámbrica, Sopladora inalámbrica, Cortador
inalámbrico de pasto, Desbrozadora inalámbrica, Herramienta multifuncional inalámbrica,
Cortasetos Inalámbrico, Tijeras inalámbricas para
hierba, Cortasetos de extensión inalámbrico,
Esmeriladora angular inalámbrica, Martillo rotativo
inalámbrico*
* Excepto para los modelos DHR280 / DHR281 /
DHR282 / DHR283 / XRH08 / XRH10 / XRH11
La categoría de herramientas o máquinas compatibles
está sujeta a cambios sin previo aviso. Consulte el
manual de instrucciones más reciente para obtener
información sobre la categoría de herramientas o
máquinas compatibles.
ADVERTENCIA: Nunca utilice esta unidad
con las herramientas o máquinas categorizadas
a continuación. El uso de esta unidad con herra-
mientas o máquinas no compatibles podría ocasionar
lesiones personales o averías.
• Fumigador inalámbrico para jardín, Tijera de
podar inalámbrica, Carretilla propulsada a batería, Bicicleta asistida por motor, Aspiradora de
mochila a batería, Robot limpiador, Chamarra
ventilada inalámbrica, Chamarra electro-térmica
a batería
Cartucho de batería y cargador
aplicables
Cartucho de batería BL1815N / BL1820B / BL1830
Cargador DC18RC / DC18RD /
• Algunos de los cartuchos de batería y cargadores
enumerados arriba podrían no estar disponibles
dependiendo de su área de residencia.
ADVERTENCIA: Use únicamente los cartu-
chos de batería y los cargadores indicados arriba.
El uso de cualquier otro cartucho de batería y cargador podría ocasionar una lesión y/o un incendio.
/ BL1830B / BL1840B /
BL1850B / BL1860B
DC18RE / DC18SD / DC18SE
/ DC18SF / DC18SH
ADVERTENCIAS DE
SEGURIDAD
Advertencias de seguridad para
la unidad portátil de alimentación
eléctrica
1. Asegúrese de consultar el manual de instrucciones de la herramienta o máquina antes de
usarla.
2. No levante o transporte esta unidad sosteniéndola solamente por el cable. No jale del cable
de la unidad mientras la traiga puesta o la esté
utilizando.
3. Antes de colocarse la unidad, retire los adaptadores de la herramienta o máquina.
4. Cuando deje la herramienta o la máquina,
asegúrese de retirar los adaptadores de la
herramienta o la máquina, o retire la unidad de
su cuerpo.
5. Tenga cuidado de no tropezarse con el cable
durante la operación.
6. No utilice esta unidad sobre una supercie
inestable o en lugares altos inestables.
7. No utilice varias unidades a la vez, como
conectarlas en serie.
8. Durante la operación, mantenga el cable lejos
de los obstáculos. Podrían ocurrir lesiones
graves si el cable queda atrapado entre
obstáculos.
9. No inserte los adaptadores en el cargador.
10. No instale los adaptadores en los puertos para
batería de esta unidad.
28 ESPAÑOL
Page 29

11. Esta unidad está diseñada exclusivamente
para su uso con baterías de 18 V. No utilice
baterías que no sean de 18 V.
12. Inspeccione la unidad, los cables y el arnés
antes de utilizarlos. Si están dañados, solicite
la reparación a su Centro local de servicio
autorizado de Makita.
13. Al acoplar el cable en el sujetador de cable,
asegúrese de colocarlo lenta y rmemente.
14. Asegúrese siempre de que la herramienta o
máquina estén apagadas y que los adaptadores hayan sido extraídos, antes de intentar
realizar una inspección o mantenimiento en la
herramienta o máquina.
15. Cuando utilice esta unidad con una herramienta equipada con una cuchilla, asegúrese
de mantener el cable alejado de la cuchilla.
16. No utilice esta unidad mientras usa un arnés
de seguridad.
17. No utilice esta unidad mientras sube por un
árbol.
18. No utilice esta unidad mientras trae puesta
una chamarra ventilada inalámbrica o una
chamarra electro-térmica a batería.
19. No exponga esta unidad a chispas.
20. Cuando utilice esta unidad sin traerla puesta,
asegúrese de que esté apoyada en un lugar
estable.
21. No permita el ingreso de agua por la cubierta.
22. No desarme, repare ni modique la unidad.
23. Tenga cuidado de que el arnés o la correa
no se enreden con la herramienta o con la
máquina.
24. Cuando utilice la unidad, tenga cuidado de no
cortar los cables con la herramienta o con la
máquina.
Símbolos
A continuación se muestran los símbolos utilizados
para la herramienta.
volts o voltios
corriente directa o continua
Instrucciones importantes de
seguridad para el cartucho de
batería
1. Antes de utilizar el cartucho de batería, lea
todas las instrucciones e indicaciones de
precaución en el (1) el cargador de batería, (2)
la batería, y (3) el producto con el que se utiliza
la batería.
2. No desarme ni modique el cartucho de bate-
ría. Podría ocurrir un incendio, calor excesivo o
una explosión.
3. Si el tiempo de operación se ha acortado en
exceso, deje de operar de inmediato. Podría
correrse el riesgo de sobrecalentamiento,
posibles quemaduras e incluso explosión.
4. En caso de que ingresen electrolitos en sus
ojos, enjuáguelos bien con agua limpia y consulte de inmediato a un médico. Esto podría
ocasionar pérdida de visión.
5. Evite cortocircuitar el cartucho de batería:
(1) No toque las terminales con ningún mate-
rial conductor.
(2) Evite guardar el cartucho de batería en un
cajón junto con otros objetos metálicos,
tales como clavos, monedas, etc.
(3) No exponga el cartucho de batería al
agua o la lluvia.
Un cortocircuito en la batería puede causar
un ujo grande de corriente, sobrecalentamiento, posibles quemaduras e incluso una
descompostura.
6. No guarde ni utilice la herramienta y el cartucho de batería en lugares donde la temperatura pueda alcanzar o exceder los 50 °C (122
°F).
7. Nunca incinere el cartucho de batería incluso
en el caso de que esté dañado seriamente o
ya no sirva en absoluto. El cartucho de batería
puede explotar si se tira al fuego.
8. No clave, corte, aplaste, lance o deje caer el
cartucho de batería, ni golpee un objeto sólido
contra el cartucho de batería. Dicha acción
podría resultar en un incendio, calor excesivo o en
una explosión.
9. No use una batería dañada.
10. Las baterías de ión de litio están sujetas a los
requisitos reglamentarios en materia de bienes peligrosos.
Para el trasporte comercial, por ej., mediante
terceros o agentes de transporte, se deben tomar
en cuenta los requisitos especiales relativos al
empaque y el etiquetado.
Para efectuar los preparativos del artículo que se
va a enviar, se requiere consultar a un experto
en materiales peligrosos. Si es posible, consulte
además otras regulaciones nacionales más detalladas.
Pegue o cubra con cinta adhesiva los contactos
abiertos y empaque la batería de manera que ésta
no pueda moverse dentro del paquete.
11. Para deshacerse del cartucho de batería,
sáquelo de la herramienta y deséchelo en un
lugar seguro. Siga las regulaciones locales
relacionadas al desecho de las baterías.
12. Utilice las baterías únicamente con los pro-
ductos especicados por Makita. Instalar las
baterías en productos que no cumplan con los
requisitos podría ocasionar un incendio, un calentamiento excesivo, una explosión o una fuga de
electrolito.
13. Si no se utiliza la herramienta por un
período largo, debe extraerse la batería de la
herramienta.
14. El cartucho de batería podría absorber calor
durante y después de su uso, lo que ocasionaría quemaduras o quemaduras a baja temperatura. Tenga cuidado con la manipulación de
los cartuchos de batería que estén calientes.
29 ESPAÑOL
Page 30

15. No toque el terminal de la herramienta inmediatamente después de su uso, ya que el
mismo podría estar lo sucientemente caliente
como para provocarle quemaduras.
16. No permita que las rebabas, el polvo o la tierra
queden atrapados en los terminales, oricios
y ranuras del cartucho de batería. Esto podría
ocasionar un desempeño deciente o descompostura de la herramienta o del cartucho de batería.
17. No utilice el cartucho de batería cerca de
cables eléctricos de alto voltaje, a menos que
la herramienta sea compatible con el uso cercano a estos cables eléctricos de alto voltaje.
Esto podría ocasionar una avería o descompostura de la herramienta o del cartucho de batería.
18. Mantenga la batería alejada de los niños.
GUARDE ESTAS
INSTRUCCIONES.
PRECAUCIÓN: Utilice únicamente baterías
originales de Makita. El uso de baterías no origina-
les de Makita, o de baterías alteradas, puede ocasionar que las baterías exploten causando un incendio,
lesiones personales y daños. Asimismo, esto invalidará la garantía de Makita para la herramienta y el
cargador Makita.
Consejos para alargar al máximo
la vida útil de la batería
1. Cargue el cartucho de batería antes de que
se descargue completamente. Pare siempre la operación y cargue el cartucho de
batería cuando note menos potencia en la
herramienta.
2. No cargue nunca un cartucho de batería que
esté completamente cargado. La sobrecarga
acortará la vida de servicio de la batería.
3. Cargue el cartucho de batería a una temperatura ambiente de 10 °C - 40 °C (50 °F - 104 °F).
Si un cartucho de batería está caliente, déjelo
enfriar antes de cargarlo.
4. Cuando no utilice el cartucho de batería,
sáquelo de la herramienta o del cargador.
5. Cargue el cartucho de batería si no va a utilizarlo durante un período prolongado (más de
seis meses).
30 ESPAÑOL
Page 31

DESCRIPCIÓN DE LAS PIEZAS
2
1
9
11
3
4
5
3
12
1 Placa de base 2 Caja para baterías 3 Sujetador de cable 4 Bolsillo para adaptador
5 Botón de encendido/
apagado
9 Correa para ajuste de
anchura
6 Enchufe 7 Adaptadores para 36
10 Cinturón 11 Arnés para hombros 12 Enchufe hembra
7
8
10
V (18 V x 2) (accesorio
opcional)
31 ESPAÑOL
6
8 Adaptador para 18 V
(accesorio opcional)
Page 32

DESCRIPCIÓN DEL
FUNCIONAMIENTO
PRECAUCIÓN: Asegúrese siempre de que la
unidad esté apagada y que el cartucho de batería
haya sido extraído antes de realizar cualquier
ajuste o revisión del funcionamiento de la unidad.
Instalación o extracción del
cartucho de batería
PRECAUCIÓN: Apague siempre la unidad
antes de instalar o extraer el cartucho de batería.
PRECAUCIÓN: Sujete la unidad y el cartu-
cho de batería con rmeza al colocar o quitar el
cartucho de batería. Si no se sujeta con rmeza la
unidad y el cartucho de batería, puede ocasionar que
se resbalen de sus manos resultando en daños a la
unidad y al cartucho de batería, así como lesiones a
la persona.
PRECAUCIÓN: Cuando instale o extraiga
el cartucho de batería, coloque la unidad sobre
una supercie plana y estable. De lo contrario, el
cartucho de batería podría caerse accidentalmente y
ocasionar una lesión.
1. Levante la lengüeta y abra la cubierta de la caja
para baterías.
2. Oprima el botón de bloqueo y luego asegure la
cubierta con el botón de bloqueo.
1
2
PRECAUCIÓN: Asegúrese de que la cubierta
esté asegurada y bloqueada rmemente. De lo
contrario, podría entrar agua o lluvia dentro de la caja
para baterías y provocar una descarga eléctrica o
una avería.
AVISO: Cuando utilice esta unidad con una
herramienta o máquina inalámbrica de 36 V (18
V x 2), instale al menos una batería en el puerto
para batería 1 o 2, y al menos una batería en el
puerto para batería 3 o 4.
NOTA: Esta unidad se cambia automáticamente
entre las baterías instaladas que pueden ser utilizadas. La unidad selecciona la batería adecuada cada
vez que se enciende la herramienta o máquina.
NOTA: Cuando utilice esta unidad con una herramienta o máquina inalámbrica de 18 V, instale al
menos un cartucho de batería en uno de los puertos
para batería.
Para colocar el cartucho de batería, alinee la lengüeta
sobre el cartucho de batería con la ranura en la carcasa
y deslice en su lugar. Inserte por completo hasta que
se je en su lugar con un pequeño clic. Si puede ver el
indicador rojo del lado superior del botón, esto indica
que no ha quedado jo por completo.
1234
► 1. Botón de bloqueo 2. Lengüeta
PRECAUCIÓN: Asegúrese de que la cubierta
esté asegurada con el botón de bloqueo. De lo
contrario, la cubierta podría cerrarse accidentalmente
y ocasionar una lesión.
3. Instale los cartuchos de batería.
4. Levante la cubierta para liberar el botón de
bloqueo, luego cierre la cubierta y asegúrela con la
lengüeta.
1
2
► 1. Puerto para batería 2. Cartucho de batería
Para quitar el cartucho de batería, deslícelo de la unidad mientras desliza el botón sobre la parte delantera
del cartucho.
PRECAUCIÓN: Siempre introduzca com-
pletamente el cartucho de batería hasta que el
indicador rojo no pueda verse. De no hacerlo, éste
podría caer accidentalmente de la unidad, ocasionándole lesiones a usted o a alguien cerca de usted.
PRECAUCIÓN: No instale el cartucho de
batería a la fuerza. Si el cartucho no se desliza al
interior fácilmente, se debe a que no está siendo
insertado correctamente.
32 ESPAÑOL
Page 33

Indicación de la capacidad restante
de la batería
Únicamente para cartuchos de batería con el
indicador
1
2
► 1. Luces indicadoras 2. Botón de vericación
Oprima el botón de vericación en el cartucho de la
batería para que indique la capacidad restante de la
batería. Las luces indicadoras se iluminarán por algunos segundos.
Luces indicadoras Capacidad
Iluminadas Apagadas Parpadeando
restante
75% a 100%
50% a 75%
Protección contra sobrecarga
Cuando la herramienta o la batería se estén utilizando de una
manera que cause que consuman una cantidad de corriente
anormalmente alta, la herramienta se detendrá automáticamente sin indicación alguna. En este caso, apague la herramienta y detenga la aplicación que causó que la herramienta se
sobrecargara. Luego encienda la herramienta para reiniciarla.
Protección contra sobrecalentamiento
Cuando la herramienta o la batería se sobrecalienten,
la herramienta se detendrá automáticamente. En este
caso, permita que la herramienta y la batería se enfríen
antes de volver a encender la herramienta.
Protección en caso de sobredescarga
Cuando la capacidad de la batería no es suciente, la
herramienta se detiene automáticamente. En este caso,
retire la batería de la herramienta y cárguela.
Botón de encendido/apagado e
indicador de batería
PRECAUCIÓN: Asegúrese de que la herra-
mienta o máquina esté apagada, antes de encender la unidad. De lo contrario, la herramienta o
máquina podría arrancar súbitamente y ocasionar
una lesión.
25% a 50%
0% a 25%
Cargar la
batería.
La batería
pudo haber
funcionado
mal.
NOTA: Dependiendo de las condiciones de uso y
la temperatura ambiente, la indicación podrá diferir
ligeramente de la capacidad real.
NOTA: La primera luz indicadora (extrema izquierda)
parpadeará cuando el sistema de protección de
batería esté en funcionamiento.
Sistema de protección para la
herramienta/batería
La herramienta está equipada con un sistema de protección de la herramienta/batería. Este sistema corta
en forma automática el suministro de energía al motor
para prolongar la vida útil de la herramienta y la batería.
La herramienta se detendrá automáticamente durante
la operación si la herramienta o la batería se someten a
una de las siguientes condiciones:
1
2
► 1. Luz indicadora de alimentación principal 2. Botón
de encendido/apagado
Para el encendido, oprima el botón de encendido/
apagado. La luz indicadora de alimentación principal
se iluminará en verde. Para apagar la unidad, oprima el
botón de encendido/apagado durante unos segundos.
NOTA: Si la unidad y la herramienta o máquina
conectada se dejan desatendidas durante 8 horas, la
unidad se apaga automáticamente.
Si la luz indicadora de alimentación principal parpadea en
color verde, el adaptador no está conectado a la unidad o las
baterías están descargadas. En este caso, conecte el adaptador a la unidad o cargue las baterías. Si la luz sigue parpadeando en color verde, consulte la resolución de problemas.
Si la luz indicadora de alimentación principal parpadea
en color verde y rojo alternadamente, apague la alimentación y enciéndala. Si la luz indicadora de alimentación
principal sigue parpadeando en color verde y rojo alternadamente después de encender la alimentación, solicite la
reparación a su centro de servicio autorizado de Makita.
33 ESPAÑOL
Page 34

NOTA: Si enciende el interruptor de alimentación
12
principal de la herramienta o de la máquina justo
después de encender la unidad portátil de alimentación eléctrica, el o los indicadores en la herramienta
o máquina podría(n) mostrar que el sistema de protección está funcionando. En esta situación, arranque
la herramienta o la máquina una sola vez. Si el o
los indicadores se apaga(n), puede operar la herramienta o la máquina. Si el o los indicadores sigue(n)
encendido(s), verique la luz indicadora de alimentación principal de la unidad portátil de alimentación
eléctrica y consulte la sección “RESOLUCIÓN DE
PROBLEMAS” para resolver el problema.
Oprima el botón de encendido/apagado para que se
muestre la capacidad restante de la batería. La luz
indicadora que corresponda a cada puerto para batería
se iluminará por aproximadamente 5 segundos.
Luces indicadoras Capacidad
restante
1
2
► 1. Adaptador 2. Bolsillo para adaptador
MONTAJE
Iluminadas Apagadas Parpadeando
50% a 100%
0% a 50%
Cargar la
batería.
NOTA: Las luces indicadoras que muestran la capacidad restante de la batería solo son para referencia.
La capacidad real de la batería puede variar, según
las condiciones de uso.
NOTA: Si la herramienta o la máquina tienen luces
indicadoras para la capacidad restante de la batería,
no eche un vistazo a las luces indicadoras de la
herramienta o la máquina, sino a las luces indicadoras de esta unidad.
Uso del bolsillo para adaptador
PRECAUCIÓN: No utilice esta unidad con el
cable jo mediante el sujetador de enganche y
cierre del bolsillo para adaptador.
Puede poner los adaptadores dentro del bolsillo para
adaptador, tal como se muestra en la ilustración.
PRECAUCIÓN: Asegúrese siempre de que la
unidad esté apagada y el cartucho de batería haya
sido extraído antes de realizar cualquier trabajo
en la unidad.
Ensamble de la unidad
1. Acople la caja para baterías en la placa de base,
tal como se muestra en la ilustración. Asegúrese de
cerrar las lengüetas por ambos lados de la placa de
base después de acoplar la caja para baterías.
1
2
3
► 1. Lengüeta 2. Caja para baterías 3. Placa de base
► 1. Adaptador 2. Bolsillo para adaptador
PRECAUCIÓN: Asegúrese de que la caja
para baterías esté bien jada a la placa de base
y asegurada con las lengüetas. De lo contrario,
la caja para baterías podría caerse cuando porte la
unidad o utilice la unidad y ocasionar una lesión.
34 ESPAÑOL
Page 35

2. Ajuste la posición del cinturón. Levante la lengüeta para ajuste de altura, luego ajuste la posición del
cinturón deslizando la placa de base y luego regrese la
lengüeta.
1 32
► 1. Lengüeta para ajuste de altura 2. Placa de base
3. Cinturón
AVISO: Si la lengüeta para ajuste de altura está
oja, apriete la tuerca de la lengüeta para ajuste
de altura. Cuando apriete la tuerca, no la apriete en
exceso. De lo contrario, la lengüeta para ajuste de
altura no se moverá.
1
NOTA: El bolsillo para adaptador puede acoplarse ya
sea en el lado izquierdo o derecho del cinturón.
4. Ajuste la anchura del arnés para hombros
mediante la correa para ajuste de anchura.
1
► 1. Correa para ajuste de anchura
5. Colóquese la unidad y luego cierre la hebilla
del cinturón, y posteriormente ajuste la longitud del
cinturón.
1
► 1. Tuerca
3. Acople el bolsillo para adaptador en el cinturón
con el sujetador de enganche y cierre, tal y como se
ilustra en la gura.
1
► 1. Bolsillo para adaptador
► 1. Hebilla
NOTA: Puede doblar y jar la correa con el sujeta-
dor de enganche y cierre, tal y como se ilustra en la
gura.
1
► 1. Correa
35 ESPAÑOL
Page 36

6. Ajuste la longitud del arnés para hombros.
12
1
► 1. Arnés para hombros
NOTA: Puede doblar y jar la correa con el sujeta-
dor de enganche y cierre, tal y como se ilustra en la
gura.
Conexión de la unidad a la
herramienta o máquina
1. Jale hacia afuera el cable ya sea del lado
izquierdo o derecho de la caja para baterías. Cuando
jale el cable hacia afuera, asegúrese de jar el cable en
los sujetadores tal como se muestra en la gura.
21
► 1. Cable 2. Sujetador
2. Póngase la unidad.
3. Inserte el enchufe del adaptador o de la herra-
mienta eléctrica/máquina en el enchufe hembra de
la caja para baterías completamente, hasta que la
marca de echa del enchufe quede alineada con la del
enchufe hembra.
1
► 1. Correa
OPERACIÓN
PRECAUCIÓN: Cuando lleve puesta la uni-
dad, asegúrese de colocar el arnés para hombros
en ambos hombros. De lo contrario, la unidad
podría caerse mientras la lleva puesta o la utiliza, y
ocasionar una lesión.
PRECAUCIÓN: Cuando lleve puesta la uni-
dad, asegúrese de colocar la unidad sobre su
espalda. De lo contrario, la unidad podría caerse
durante la operación y ocasionar una lesión.
PRECAUCIÓN: Apague siempre la herra-
mienta o la máquina antes de encender la unidad
o de conectar el enchufe del adaptador o de la
herramienta eléctrica/máquina al enchufe hembra
de la caja para baterías. De lo contrario, la herra-
mienta o máquina podría arrancar súbitamente y
ocasionar una lesión.
3
► 1. Enchufe 2. Enchufe hembra 3. Marca de echa
AVISO: Al desconectar el enchufe y el enchufe
hembra, no sujete los cables, sino el enchufe y el
enchufe hembra. De lo contrario, los cables podrían
dañarse y ocasionar una avería de la unidad.
NOTA: El enchufe y el enchufe hembra se desconectarán si se aplica cierta presión sobre ellos.
36 ESPAÑOL
Page 37

4. Instale los adaptadores a la herramienta o
máquina, de la misma manera que el cartucho de
batería.
1
► 1. Adaptador
AVISO: Para una herramienta o máquina inalám-
brica de 18 V, use el adaptador para 18 V. Para una
herramienta o máquina inalámbrica de 36 V (18 V
x 2), use los adaptadores para 36 V (18 V x 2).
Para una herramienta o máquina de tipo conexión
directa, no se requiere adaptador.
AVISO: Cuando instale adaptadores a la herra-
mienta o la máquina, asegúrese de instalar el
adaptador equipado con dos cables en la ubica-
ción que se muestra en la gura.
Si instala los adaptadores incorrectamente, el
adaptador equipado con dos cables no se podrá
insertar por completo. En este caso, no inserte el
adaptador forzadamente. De lo contrario, la herra-
mienta o máquina podrían dañarse.
1
► 1. Adaptador con dos cables
► 1. Adaptador con dos cables
NOTA: La dirección del cable del adaptador se
puede cambiar en el rango de aproximadamente 180
grados.
37 ESPAÑOL
1
Page 38

5. Oprima el botón de encendido/apagado para
encender la unidad. Para apagar la unidad, oprima el
botón de encendido/apagado durante unos segundos.
También puede poner el cable usando solamente el
sujetador de cable del cinturón, tal como se muestra en
la ilustración.
1
► 1. Botón de encendido/apagado
Uso de los sujetadores de cable
PRECAUCIÓN: Coloque solamente el cable
de la caja para baterías en los sujetadores de
cable. No coloque el cable de los adaptadores en
los sujetadores de cable. Colocar el cable de los
adaptadores puede abrir la posibilidad a un accidente
y causar una lesión.
Puede colocar el cable de la caja para baterías en
los sujetadores de cable, tal y como se muestra en la
ilustración.
1
► 1. Sujetador de cable
1
► 1. Sujetador de cable
Los sujetadores de cable pueden colocarse ya sea en
el lado izquierdo o derecho del arnés para hombros y
del cinturón.
1
► 1. Sujetador de cable
38 ESPAÑOL
Page 39

Uso de la banda para colgado
Accesorio opcional
Puede usar la banda para colgado para el cortador
inalámbrico de pasto o la desbrozadora inalámbrica con
esta unidad.
Acoplamiento de la banda para
colgado
1. Acople los ganchos de la banda para colgado a
los anillos del arnés para hombros o del cinturón, tal y
como se ilustra en la gura. Seleccione el tipo de banda
y el método de conexión apropiado para su uso.
2
1
► 1. Anillo 2. Gancho
2
1
► 1. Anillo 2. Gancho
► 1. Anillo 2. Gancho
1
2
2
► 1. Anillo 2. Gancho
1
39 ESPAÑOL
Page 40

NOTA: Si la herramienta es del tipo de manija de
bicicleta, coloque la banda de manera que ésta pase
a través del interior del cinturón, tal como se muestra
en la ilustración.
1
2
NOTA: La hebilla no se suministra, dependiendo del
tipo de banda.
Desacople de emergencia
1. Oprima las lengüetas en la hebilla del cinturón
para desbloquearla.
1
► 1. Cinturón 2. Banda
2. Acople el gancho a la herramienta.
1
► 1. Gancho
Desacople de la herramienta
Oprima las lengüetas en la hebilla para desbloquearla.
1
► 1. Lengüeta
2
► 1. Hebilla 2. Lengüeta
2. Quítese el arnés para hombros para liberar la
herramienta y la unidad.
1
► 1. Arnés para hombros
MANTENIMIENTO
PRECAUCIÓN: Asegúrese siempre de que
la unidad haya sido apagada y que el cartucho de
batería haya sido extraído antes de intentar realizar una inspección o tarea de mantenimiento.
AVISO: Nunca use gasolina, bencina, diluyente
(tíner), alcohol o sustancias similares. Puede que
esto ocasione grietas o descoloramiento.
40 ESPAÑOL
Page 41

Para mantener la SEGURIDAD y FIABILIDAD del producto, las reparaciones, y cualquier otra tarea de mantenimiento o ajuste deberán ser realizadas en centros
de servicio autorizados o de fábrica Makita, empleando
siempre repuestos Makita.
RESOLUCIÓN DE PROBLEMAS
Antes de solicitar alguna reparación, primero realice una inspección por su cuenta. Si detecta algún problema que
no esté explicado en el manual, no intente desensamblar la herramienta, la máquina o la unidad. En vez de esto,
solicite la reparación a un centro de servicio autorizado de Makita, usando siempre piezas de repuesto Makita.
Estado de la anomalía Luz indicadora de ali-
La herramienta o
máquina no arranca.
mentación principal
La luz se ilumina en
color verde.
La luz parpadea en
verde.
La luz parpadea en
color rojo y verde
alternadamente.
La luz no se enciende. La unidad no se enciende. Encienda la unidad.
Los adaptadores no están instalados
a la herramienta o máquina.
La herramienta o máquina o los
cables de los adaptadores están
demasiado calientes.
La herramienta o máquina o la unidad
están rotas.
El enchufe del adaptador o herramienta eléctrica/máquina y el enchufe
hembra de la caja para baterías no
están conectados.
La capacidad restante de la batería no
es suciente.
No se instalan dos baterías en la unidad cuando se usa con la herramienta
o máquina inalámbrica con un voltaje
superior a 18 V.
La capacidad restante de dos baterías
no es suciente.
La unidad necesita cambiar de
batería.
El cable de la unidad está demasiado
caliente.
La unidad ha detectado una anomalía. Apague la unidad y vuélvala a
La herramienta o máquina o la unidad
están rotas.
Las baterías no están instalados en
la unidad.
La capacidad restante de la batería no
es suciente.
La unidad está averiada. Solicite la reparación a un centro de
Causa Solución
Instale los adaptadores a la herramienta o máquina.
Verique que los adaptadores estén
instalados rmemente.
Permita que la herramienta o máquina
y la unidad se enfríen.
Solicite la reparación a un centro de
servicio autorizado de Makita.
Conecte el enchufe y el enchufe
hembra.
Verique que el enchufe y el enchufe
hembra estén conectados rmemente.
Cargue las baterías o reemplácelas con unas que estén totalmente
cargadas.
Instale al menos una batería en el
puerto para batería 1 o 2, y al menos
una batería en el puerto para batería
3 o 4.
Cargue las baterías o reemplácelas con unas que estén totalmente
cargadas.
Apague la herramienta o máquina y
vuélvala a encender.
Oprima el botón de encendido/apagado de la unidad.
Enfríe la unidad.
encender.
Solicite la reparación a un centro de
servicio autorizado de Makita.
Instale las baterías en la unidad.
Cargue las baterías o reemplácelas con unas que estén totalmente
cargadas.
servicio autorizado de Makita.
41 ESPAÑOL
Page 42

ACCESORIOS
OPCIONALES
PRECAUCIÓN: Estos accesorios o aditamen-
tos están recomendados para utilizarse con su
herramienta Makita especicada en este manual.
El empleo de cualquier otro accesorio o aditamento
puede conllevar el riesgo de lesiones personales.
Utilice los accesorios o aditamentos solamente para
su n establecido.
Si necesita cualquier ayuda para más detalles en
relación con estos accesorios, pregunte a su centro de
servicio local Makita.
• Batería y cargador originales de Makita
• Adaptadores para 36 V (18 V x 2)
• Adaptador para 18 V
NOTA: Algunos de los artículos en la lista pueden
incluirse en el paquete de la herramienta como accesorios estándar. Éstos pueden variar de país a país.
42
ESPAÑOL
Page 43

43
Page 44

Makita Corporation
www.makita.com
3-11-8, Sumiyoshi-cho,
Anjo, Aichi 446-8502 Japan
885727C936
EN, FRCA, ESMX
20200508
 Loading...