

Makita JV2000 User Manual

MODEL
INSTRUCTION MANUAL
JVZOOO
SPEC1
FICATIONS
Max.
cutting capacities
of
stroke
20
mm
(3/4")
*
Manufacturer reserves the right to change specifications without notice
Note: Specifications may differ from country to country.
1
in
50"
wood
(2")
1
6
mm
(114")
1
0-3'400
263
1
(10-3/8")
DOUBLE
INSULATION
mm 1.6 kg
(3.5
Ibs)
IMPORTANT
I
SAFETY
INSTRUCTIONS
(For
All
Tools)
PRECAUTIONS SHOULD ALWAYS BE FOLLOWED
TY
REDLCE
SONAL
READ
1.
2.
3.
4.
5.
6.
7.
8.
9.
IO.
11.
12.
THE RISK OF FIRE, ELECTRIC SHOCK,
INJURY, INCLUDING THE FOLLOWING:
ALL
WORK
IDER
CHILDREN AWAY. All
let visitors contact tool or extension cord.
ing parts. Rubber gloves and non-skid footwear are recommended
SAFETY GLASSES. Also
ptacle. Keep cord from heat, oil, and sharp edges.
URE
hand and
N'T OVERREACH.
INTAIN TOOLS WITH CARE.
INSTRUCTIONS.
AREA CLEAN.
WORK
TOOL.
PROPERLY.
WORK. Use clamps or a vise to hold work. It's safer than using
AREA ENVIRONMENT.
Don't force small tool or attachment to do the job of a
Don't wear loose clothing or jewelry. They can be caught
it
frees both hands to operate tool.
Cluttered areas and benches invite injuries.
Don't use power tools
visitors should be kept away from work area.
use face or dust mask if cutting operation is
Keep proper footing and balance at all times.
Keep tools sharp and clean for better and
AND
PER-
in
damp
TO
13.
2

IMOVE ADJUSTING KEYS AND WRENCHES. Form habit
14.
F
E
!e that keys and adjusting wrenches are removed from tool before turning
I'
on.
JOlD UNINTENTIONAL STARTING. Don't carry plugged-in tool with finger
15.
L
C
I
switch. Be sure switch is OFF when
16.
(
UTDOOR USE EXTENSION CORDS. When tool is used outdoors, use only
:tension cords intended for use outdoors and
E
17.
$
TAY ALERT. Watch what you are doing, use common sense. Don't operate
t
01
when you are tired.
HECK DAMAGED PARTS. Before further use of the tool, a guard or other
18.
(
irt that is damaged should be carefully checked to determine that
F
C
ierate properly and perform its intended function. Check for alignment of
r
oving parts, binding of moving parts, breakage of parts, mounting, and any
c
her conditions that may affect its operation. A guard or other part that
I
damaged should be properly repaired or replaced by an authorized serv-
I'
e
center unless otherwise indicated elsewhere
t
we defective switches replaced by authorized service center. Don't use
t
01
if switch does not turn
19.
(
UARD AGAINST ELECTRIC SHOCK. Prevent body contact
irfaces. For example; pipes, radiators, ranges, refrigerator enclosures.
I
20.
F
!PLACEMENT PARTS. When servicing, use only identical replacement parts.
vo
LT
,GE WARNING: Before connecting the tool to a power source (receptacle,
outle
namc
for
the
voltas
etc.) be sure the voltage supplied is the same as that specified on the
)late of the tool. A power source with voltage gr.eater than that specified
!
tool can result
tk
01.
If
in
tl
e
doubt, DO NOT PLUG IN THE TOOL. Using a power source with
less than the nameplate rating is harmful to the motor.
in
SERIOUS INJURY to the user - as well as damage to
it
on
and off.
plugging
in.
so
marked.
in
this instruction manual.
of
with
checking to
it
will
grounded
3

ADDITIONAL SAFETY RULES
1.
Avoid cutting nails. Inspect for and remove all nails from the workpiece be-
fore operation.
2.
Don't cut hollow pipe.
3.
Do
not cut oversize workpiece.
4.
Check for the proper clearance beneath the workpiece before cutting
the blade will not strike the floor, workbench, etc.
5.
Hold the tool firmly.
6.
Check the blade is not contacting the workpiece before the switch
on.
7.
Keep hands away from moving parts.
8.
When cutting through walls, floors or wherever "live" electrical wires may
DO
be encountered,
Hold the tool only by the plastic handle to prevent electric shock
through a "live" wire.
9.
Do
not leave the tool running. Operate the tool only when hand-held.
IO.
Always switch off and wait for the blade to come to a complete stop before
removing the blade from the workpiece.
11.
Do
not touch the blade
may be extremely hot and could burn your skin.
NOT TOUCH ANY METAL PARTS
or
the workpiece immediately after operation; they
OF
THE TOOL!
SAVE THESE INSTRUCTIONS.
so
is
turned
if
you cut
that
4
HOW
TO
USE
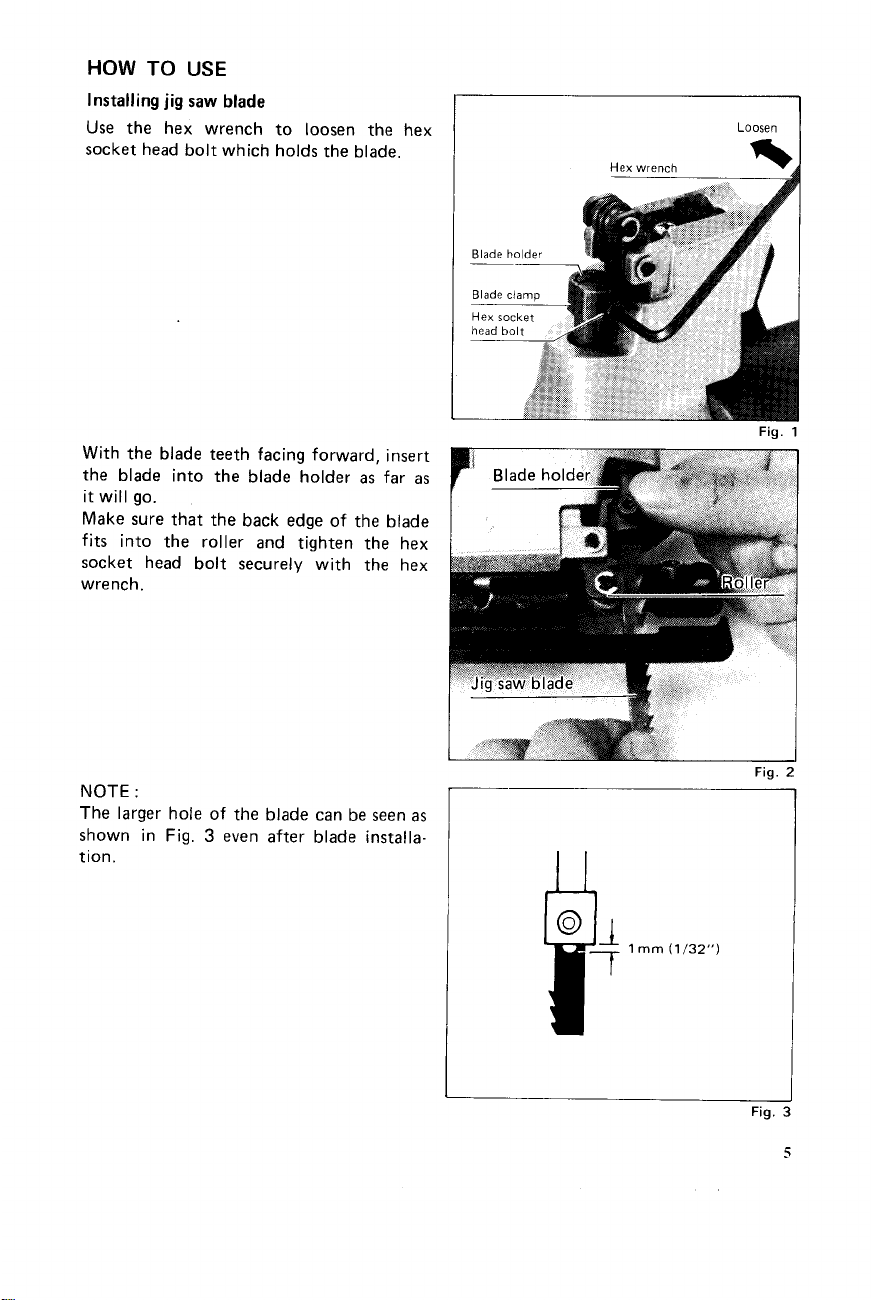
Installing jig saw blade
Use the hex wrench to loosen the hex
socket head bolt which holds the blade.
With the blade teeth facing forward, insert
the blade
it
will go.
Make sure that the back edge of the blade
fits into the roller and tighten the hex
socket head bolt securely with the hex
wrench.
into the blade holder
as
far
as
m
Loosen
Fig
I
1
NOTE
:
The larger hole of the blade can be seen
shown
tion.
in Fig.
3
even after blade installa-
as
Fia
2
r
-
r4
Fig.
:
S
 Loading...