

Page 1
Cordless Angle Grinder
Instruction Manual
Akku-Winkelschleifer
Betriebsanleitung
Akumulatorowa szlifierka kątowa
Instrukcja obsługi
fiðð³ý³ÝČ²þ×Þ˛Č=³łÝþŁ˛Č=
Ğݦ½ý˛Ğ¦Þ˛
ÊÞ¹²×³ð¾¦ć=−þ=Ćð¹−ݳ˛²˛¾¦¦
BGA450
BGA452
Page 2
1
2
3
4
12
5
6
34
7
8
9
56
10
11
12
13
4
78
2
Page 3
10
15
14
16
A
B
910
17
18
19
11 12
22
21
20
21
13 14
3
Page 4

ENGLISH
Explanation of general view
1. Button
2. Red part
3. Battery cartridge
4. Shaft lock
5. Slide switch
6. Indication lamp
7. Wheel guard
8. Bearing box
9. Screw
10. Lock nut
11. Depressed center grinding wheel/
Multi-disc
12. Inner flange
13. Lock nut wrench
14. Diamond wheel
15. Inner flange
16. Spindle
17. Exhaust vent
18. Inhalation vent
19. Limit mark
20. Holder cap cover
21. Screwdriver
22. Brush holder cap
SPECIFICATIONS
Model BGA450 BGA452
Wheel diameter 115 mm
Spindle thread M14
No load speed (min
Overall length 317 mm
Net weight 1.9 kg
Rated voltage D.C. 14.4 V D.C. 18 V
• Due to our continuing program of research and development, the specifications herein are subject to change without
notice.
• Note: Specifications may differ from country to country.
Symbols
The following show the symbols used for the tool. Be sure
that you understand their meaning before use.
............. Wear safety glasses.
-1
)10,000
END002-1
GENERAL SAFETY RULES GEA002-3
WARNING:
Read all instructions. Failure to follow all instructions
listed below may result in electric shock, fire and/or serious injury. The term “power tool” in all of the warnings
listed below refers to your mains-operated (corded) power
tool or battery-operated (cordless) power tool.
Only for EU countries
Do not dispose of electric equipment together with house-
hold waste material!
In observance of European Directive 2002/96/EC on
waste electrical and electronic equipment and its implementation in accordance with national law, electric equipment that have reached the end of their life must be
collected separately and returned to an environmentally
compatible recycling facility.
Intended use
The tool is intended for grinding, sanding and cutting of
metal and stone materials without the use of water.
4
SAVE THESE INSTRUCTIONS.
Work area safety
1. Keep work area clean and well lit. Cluttered and
dark areas invite accidents.
2. Do not operate power tools in explosive atmospheres, such as in the presence of flammable liquids, gases or dust. Power tools create sparks which
may ignite the dust or fumes.
3. Keep children and bystanders away while operating a power tool. Distractions can cause you to lose
control.
Electrical safety
4. Power tool plugs must match the outlet. Never
modify the plug in any way. Do not use any
adapter plugs with earthed (grounded) power
tools. Unmodified plugs and matching outlets will
reduce risk of electric shock.
5. Avoid body contact with earthed or grounded surfaces such as pipes, radiators, ranges and refrigerators. There is an increased risk of electric shock if
your body is earthed or grounded.
6. Do not expose power tools to rain or wet conditions. Water entering a power tool will increase the
risk of electric shock.
Page 5

7. Do not abuse the cord. Never use the cord for carrying, pulling or unplugging the power tool. Keep
cord away from heat, oil, sharp edges or moving
parts. Damaged or entangled cords increase the risk
of electric shock.
8. When operating a power tool outdoors, use an
extension cord suitable for outdoor use. Use of a
cord suitable for outdoor use reduces the risk of electric shock.
Personal safety
9. Stay alert, watch what you are doing and use common sense when operating a power tool. Do not
use a power tool while you are tired or under the
influence of drugs, alcohol or medication. A
moment of inattention while operating power tools
may result in serious personal injury.
10. Use safety equipment. Always wear eye protection. Safety equipment such as dust mask, non-skid
safety shoes, hard hat, or hearing protection used for
appropriate conditions will reduce personal injuries.
11. Avoid accidental starting. Ensure the switch is in
the off-position before plugging in. Carrying power
tools with your finger on the switch or plugging in
power tools that have the switch on invites accidents.
12. Remove any adjusting key or wrench before turning the power tool on. A wrench or a key left
attached to a rotating part of the power tool may result
in personal injury.
13. Do not overreach. Keep proper footing and balance at all times. This enables better control of the
power tool in unexpected situations.
14. Dress properly. Do not wear loose clothing or jewellery. Keep your hair, clothing, and gloves away
from moving parts. Loose clothes, jewellery or long
hair can be caught in moving parts.
15. If devices are provided for the connection of dust
extraction and collection facilities, ensure these
are connected and properly used. Use of these
devices can reduce dust-related hazards.
Power tool use and care
16. Do not force the power tool. Use the correct power
tool for your application. The correct power tool will
do the job better and safer at the rate for which it was
designed.
17. Do not use the power tool if the switch does not
turn it on and off. Any power tool that cannot be con-
trolled with the switch is dangerous and must be
repaired.
18. Disconnect the plug from the power source and/or
the battery pack from the power tool before making any adjustments, changing accessories, or
storing power tools. Such preventive safety mea-
sures reduce the risk of starting the power tool accidentally.
19. Store idle power tools out of the reach of children
and do not allow persons unfamiliar with the
power tool or these instructions to operate the
power tool. Power tools are dangerous in the hands
of untrained users.
20. Maintain power tools. Check for misalignment or
binding of moving parts, breakage of parts and
any other condition that may affect the power
tools operation. If damaged, have the power tool
repaired before use. Many accidents are caused by
poorly maintained power tools.
21. Keep cutting tools sharp and clean. Properly maintained cutting tools with sharp cutting edges are less
likely to bind and are easier to control.
22. Use the power tool, accessories and tool bits etc.
in accordance with these instructions and in the
manner intended for the particular type of power
tool, taking into account the working conditions
and the work to be performed. Use of the power tool
for operations different from those intended could
result in a hazardous situation.
Battery tool use and care
23. Ensure the switch is in the off position before
inserting battery pack. Inserting the battery pack into
power tools that have the switch on invites accidents.
24. Recharge only with the charger specified by the
manufacturer. A charger that is suitable for one type
of battery pack may create a risk of fire when used
with another battery pack.
25. Use power tools only with specifically designated
battery packs. Use of any other battery packs may
create a risk of injury and fire.
26. When battery pack is not in use, keep it away from
other metal objects like paper clips, coins, keys,
nails, screws, or other small metal objects that
can make a connection from one terminal to
another. Shorting the battery terminals together may
cause burns or a fire.
27. Under abusive conditions, liquid may be ejected
from the battery, avoid contact. If contact accidentally occurs, flush with water. If liquid contacts
eyes, additionally seek medical help. Liquid ejected
from the battery may cause irritation or burns.
Service
28. Have your power tool serviced by a qualified
repair person using only identical replacement
parts. This will ensure that the safety of the power tool
is maintained.
29. Follow instruction for lubricating and changing
accessories.
30. Keep handles dry, clean and free from oil and
grease.
ADDITIONAL SAFETY RULES
1. Always use eye and ear protection. Other personal
protective equipment such as dust mask, gloves,
helmet and apron should be worn.
2. Keep guards in place.
3. Use only wheels with correct size and wheels having a maximum operating speed at least as high as
the highest No Load Speed marked on the tool’s
nameplate. When using depressed center wheels,
be sure to use only fiberglass-reinforced wheels.
ENB099-1
5
Page 6

4. Check the wheel carefully for cracks or damage
before operation. Replace cracked or damaged
wheel immediately.
5. Observe the instructions of the manufacturer for
correct mounting and use of wheels. Handle and
store wheels with care.
6. Do not use separate reducing bushings or adaptors to adapt large hole abrasive wheels.
7. Use only flanges specified for this tool.
8. Do not damage the spindle, the flange (especially
the installing surface) or the lock nut. Damage to
these parts could result in wheel breakage.
9. For tools intended to be fitted with threaded hole
wheel, ensure that the thread in the wheel is long
enough to accept the spindle length.
10. Before using the tool on an actual workpiece, test
run the tool at the highest no load speed for at
least 30 seconds in a safe position. Stop immediately if there is any vibration or wobbling that
could indicate poor installation or a poorly balanced wheel. Check the tool to determine the
cause.
11. Check that the workpiece is properly supported.
12. Hold the tool firmly.
13. Keep hands away from rotating parts.
14. Make sure the wheel is not contacting the workpiece before the switch is turned on.
15. Use the specified surface of the wheel to perform
the grinding.
16. Do not use cutting off wheel for side grinding.
17. Watch out for flying sparks. Hold the tool so that
sparks fly away from you and other persons or
flammable materials.
18. Pay attention that the wheel continues to rotate
after the tool is switched off.
19. Do not touch the workpiece immediately after
operation; it may be extremely hot and could burn
your skin.
20. Do not use the tool on any materials containing
asbestos.
21. Do not use water or grinding lubricant.
22. When use cut-off wheel, always work with the dust
collecting wheel guard required by domestic regulation.
23. Cutting discs must not be subjected to any lateral
pressure.
SAVE THESE INSTRUCTIONS.
IMPORTANT SAFETY
INSTRUCTIONS
ENC007-2
FOR BATTERY CARTRIDGE
1. Before using battery cartridge, read all instructions and cautionary markings on (1) battery
charger, (2) battery, and (3) product using battery.
2. Do not disassemble battery cartridge.
3. If operating time has become excessively shorter,
stop operating immediately. It may result in a risk
6
of overheating, possible burns and even an explosion.
4. If electrolyte gets into your eyes, rinse them out
with clear water and seek medical attention right
away. It may result in loss of your eyesight.
5. Do not short the battery cartridge:
(1) Do not touch the terminals with any conduc-
tive material.
(2) Avoid storing battery cartridge in a container
with other metal objects such as nails, coins,
etc.
(3) Do not expose battery cartridge to water or
rain.
A battery short can cause a large current flow,
overheating, possible burns and even a breakdown.
6. Do not store the tool and battery cartridge in locations where the temperature may reach or exceed
50°C (122°F).
7. Do not incinerate the battery cartridge even if it is
severely damaged or is completely worn out. The
battery cartridge can explode in a fire.
8. Be careful not to drop or strike battery.
SAVE THESE INSTRUCTIONS.
Tips for maintaining maximum battery life
1. Charge the battery cartridge before completely
discharged.
Always stop tool operation and charge the battery
cartridge when you notice less tool power.
2. Never recharge a fully charged battery cartridge.
Overcharging shortens the battery service life.
3. Charge the battery cartridge with room temperature at 10°C - 40°C (50°F - 104°F). Let a hot battery
cartridge cool down before charging it.
SAVE THESE INSTRUCTIONS.
FUNCTIONAL DESCRIPTION
CAUTION:
• Always be sure that the tool is switched off and the bat-
tery cartridge is removed before adjusting or checking
function on the tool.
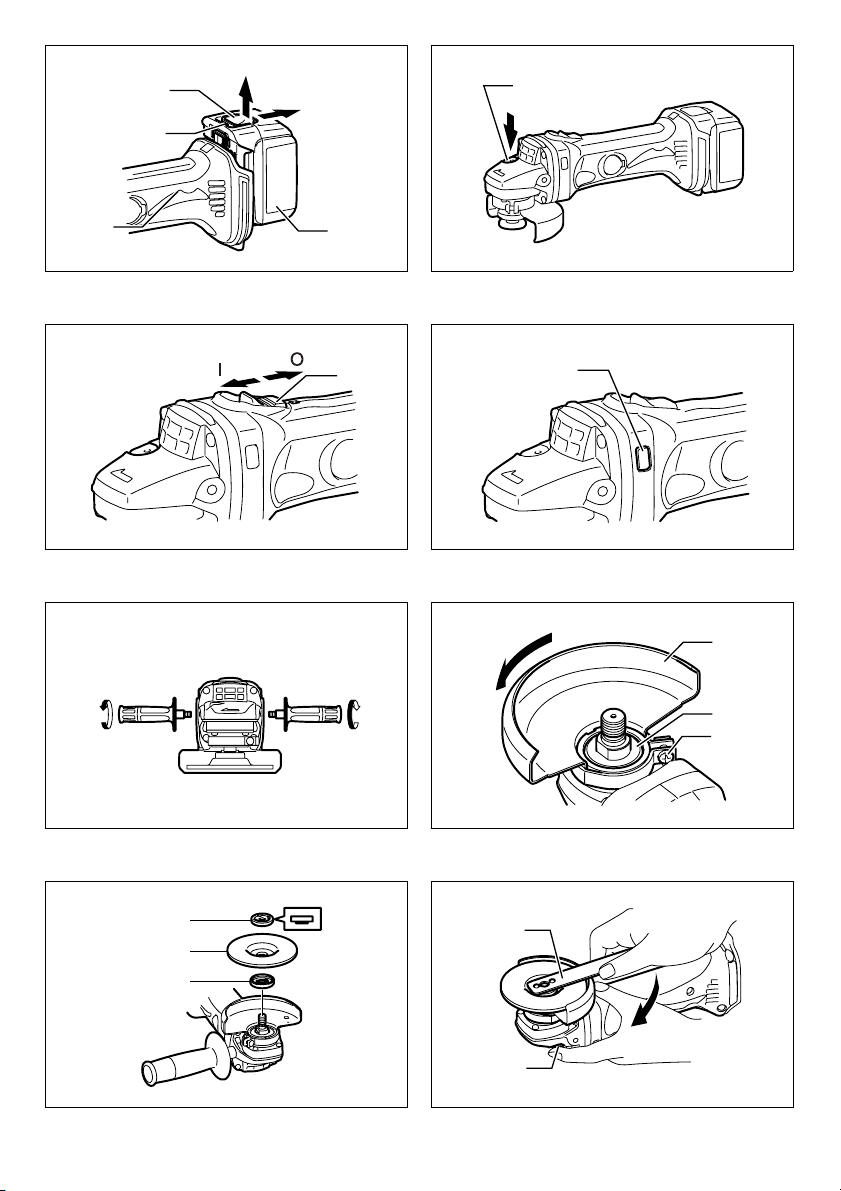
Installing or removing battery cartridge
(Fig. 1)
• Always switch off the tool before insertion or removal of
the battery cartridge.
• To remove the battery cartridge, withdraw it from the
tool while sliding the button on the front of the cartridge.
• To insert the battery cartridge, align the tongue on the
battery cartridge with the groove in the housing and slip
it into place. Always insert it all the way until it locks in
place with a little click. If you can see the red part on
the upper side of the button, it is not locked completely.
Insert it fully until the red part cannot be seen. If not, it
may accidentally fall out of the tool, causing injury to
you or someone around you.
Page 7

• Do not use force when inserting the battery cartridge. If
the cartridge does not slide in easily, it is not being
inserted correctly.
Shaft lock (Fig. 2)
CAUTION:
• Never actuate the shaft lock when the spindle is moving. The tool may be damaged.
Press the shaft lock to prevent spindle rotation when
installing or removing accessories.
Switch action (Fig. 3)
CAUTION:
• Before inserting the battery cartridge into the tool,
always check to see that the slide switch actuates
properly and returns to the “OFF” position when the
rear of the slide switch is depressed.
To start the tool, slide the slide switch toward the “I (ON)”
position. For continuous operation, press the front of the
slide switch to lock it.
To stop the tool, press the rear of the slide switch, then
slide it toward the “O (OFF)” position.
Indication lamp with multi function
(Fig. 4)
Indication lamps are located in two positions.
When the battery cartridge is inserted on the tool with the
slide switch positioned in the “O (OFF)” position, the indication lamp flickers quickly for approximately one second.
If it does not flicker so, the battery cartridge or indication
lamp has broken.
- Overload protection
- When the tool is overloaded, the indication lamp lights
up. When the load on the tool is reduced, the lamp
goes out.
- If the tool continues to be overloaded and the indication lamp continues to light up for approximately two
seconds, the tool stops. This prevents the motor and
its related parts from being damaged.
- In this case, to start the tool again, move the slide
switch to the “O (OFF)” position once and then to the “I
(ON)” position.
- Battery cartridge replacing signal
- When the remaining battery capacity gets small, the
indicator lamp lights up during operation earlier than
enough capacity battery use.
- Accidental re-start preventive function
- Even if the battery cartridge is inserted on the tool with
the slide switch in the “I (ON)” position, the tool does
not start. At this time, the lamp flickers slowly and this
shows that the accidental re-start preventive function
is at work.
- To start the tool, first slide the slide switch toward the
“O (OFF)” position and then slide it toward the “I (ON)”
position.
ASSEMBLY
CAUTION:
• Always be sure that the tool is switched off and the battery cartridge is removed before carrying out any work
on the tool.
Installing side grip (handle) (Fig. 5)
CAUTION:
• Always be sure that the side grip is installed securely
before operation.
Screw the side grip securely on the position of the tool as
shown in the figure.
Installing or removing wheel guard
(Fig. 6)
CAUTION:
• When using a depressed center grinding wheel/Multidisc, flex wheel, wire wheel brush, cut-off wheel or diamond wheel, the wheel guard must be fitted on the tool
so that the closed side of the guard always points
toward the operator.
Mount the wheel guard with the protrusion on the wheel
guard band aligned with the notch on the bearing box.
Then rotate the wheel guard around 180 degrees. Be sure
to tighten the screw securely.
To remove wheel guard, follow the installation procedure
in reverse.
Installing or removing depressed center
grinding wheel/Multi-disc
WARNING:
• Always use supplied guard when depressed center
grinding wheel/Multi-disc is on tool. Wheel can shatter
during use and guard helps to reduce chances of personal injury.
Mount the inner flange onto the spindle. Fit the wheel/disc
on the inner flange and screw the lock nut onto the spindle. (Fig. 7)
To tighten the lock nut, press the shaft lock firmly so that
the spindle cannot revolve, then use the lock nut wrench
and securely tighten clockwise. (Fig. 8)
To remove the wheel, follow the installation procedure in
reverse.
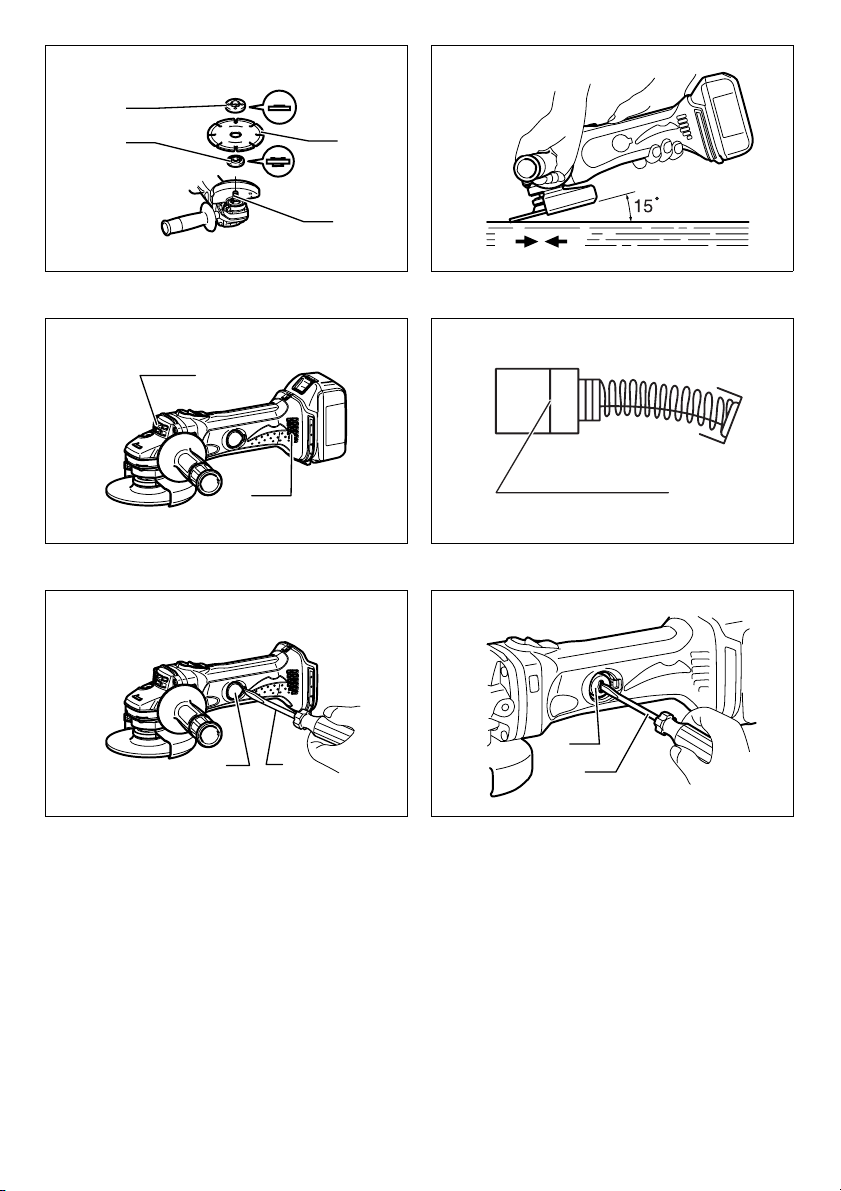
Installing or removing diamond wheel
(optional accessory) (Fig. 9)
CAUTION:
• Make sure that the arrow on the tool should point in the
same direction as the arrow on the diamond wheel.
Mount the inner flange onto the spindle. Fit the diamond
wheel on over the inner flange and screw the lock nut onto
the spindle. Notice that flat side of the lock nut should face
the diamond wheel in case the diamond wheel is used.
WARNING:
• Only actuate the shaft lock when the spindle is not
moving.
7
Page 8

OPERATION
WARNING:
• It should never be necessary to force the tool. The
weight of the tool applies adequate pressure. Forcing
and excessive pressure could cause dangerous wheel
breakage.
• ALWAYS replace wheel if tool is dropped while grinding.
• NEVER bang or hit grinding disc or wheel onto work.
• Avoid bouncing and snagging the wheel, especially
when working corners, sharp edges etc. This can
cause loss of control and kickback.
• NEVER use tool with wood cutting blades and other
sawblades. Such blades when used on a grinder frequently kick and cause loss of control leading to personal injury.
CAUTION:
• Make the depth of a single cut up to 5 mm. Adjust pressure on the tool so that the tool does not slow down
during the operation.
• After operation, always switch off the tool and wait until
the wheel has come to a complete stop before putting
the tool down.
• If the tool is operated continuously until the battery cartridge has discharged, allow the tool to rest for 15 minutes before proceeding with a fresh battery.
Grinding and sanding operation (Fig. 10)
ALWAYS hold the tool firmly with one hand on housing
and the other on the side handle. Turn the tool on and
then apply the wheel or disc to the workpiece.
In general, keep the edge of the wheel or disc at an angle
of about 15 degrees
to the workpiece surface.
During the break-in period with a new wheel, do not work
the grinder in the B direction or it will cut into the workpiece. Once the edge of the wheel has been rounded off
by use, the wheel may be worked in both A and B direction.
Operation with diamond wheel (accessory)
WARNING:
• Forcing and exerting excessive pressure or allowing
the wheel to bend, pinch or twist in the cut can cause
overheating of the motor and dangerous kickback of
the tool.
CAUTION:
• After cutting operation, make sure that the diamond
wheel stops revolving completely. Then, place the tool.
It is dangerous to place the tool before turning off the
tool. If there are dust or dirt around the tool, the tool
may suck in them.
Be sure that the wheel does not contact the workpiece.
Turn the tool on and hold the tool firmly. Wait until the
wheel attains full speed. Now simply move the tool forward over the workpiece surface, keeping it flat and
advancing smoothly until the cutting is completed.
8
MAINTENANCE
CAUTION:
• Always be sure that the tool is switched off and the battery cartridge is removed before attempting to perform
inspection or maintenance.
The tool and its air vents have to be kept clean. Regularly
clean the tool's air vents or whenever the vents start to
become obstructed. (Fig. 11)
Replacing carbon brushes
Remove and check the carbon brushes regularly. Replace
when they wear down to the limit mark. Keep the carbon
brushes clean and free to slip in the holders. Both carbon
brushes should be replaced at the same time. Use only
identical carbon brushes. (Fig. 12)
Insert the top end of slotted bit screwdriver into the notch
in the tool and remove the holder cap cover by lifting it up.
(Fig. 13)
Use a screwdriver to remove the brush holder caps. Take
out the worn carbon brushes, insert the new ones and
secure the brush holder caps. (Fig. 14)
Reinstall the holder cap cover on the tool.
To maintain product SAFETY and RELIABILITY, repairs,
any other maintenance or adjustment should be performed by Makita Authorized Service Centers, always
using Makita replacement parts.
ACCESSORIES
CAUTION:
• These accessories or attachments are recommended
for use with your Makita tool specified in this manual.
The use of any other accessories or attachments might
present a risk of injury to persons. Only use accessory
or attachment for its stated purpose.
If you need any assistance for more details regarding
these accessories, ask your local Makita Service Center.
• Wheel guard (Wheel cover)
• Inner flange
• 115 mm Depressed center wheels
• Lock nut (For depressed center wheel)
• Rubber pad
• Abrasive discs
• Lock nut (For abrasive disc)
• Lock nut wrench
• Wire cup brush
• Wire bevel brush 85
• Side grip
• Dust collecting wheel guard
• 115 mm Diamond wheel
• Various type of Makita genuine batteries and chargers
Page 9

For European countries only
Noise and Vibration
The typical A-weighted sound pressure level is 75 dB (A).
Uncertainty is 3 dB (A).
The noise level under working may exceed 85 dB (A).
– Wear ear protection. –
The typical weighted root mean square acceleration value
2
is 3 m/s
.
These values have been obtained according to EN60745.
EC-DECLARATION OF CONFORMITY
We declare under our sole responsibility that this product
is in compliance with the following standards of standardized documents, EN60745, EN55014 in accordance with
Council Directives, 89/336/EEC, 98/37/EC.
Yasuhiko Kanzaki CE 2005
Director
MAKITA INTERNATIONAL EUROPE LTD.
Michigan Drive, Tongwell, Milton Keynes, Bucks MK15
8JD, ENGLAND
Responsible manufacturer:
Makita Corporation Anjo Aichi Japan
9
Page 10

DEUTSCH
Erklärung der Gesamtdarstellung
1. Taste
2. Roter Bereich
3. Akkublock
4. Spindelarretierung
5. Schiebeschalter
6. Anzeigenleuchte
7. Schutzhaube
8. Lagergehäuse
9. Schraube
10. Sicherungsmutter
11. Gekröpfte Trennschleifscheibe/
Multischeibe
12. Innenflansch
13. Sicherungsmutterschlüssel
14. Diamantscheibe
15. Innenflansch
16. Spindel
17. Auslassöffnung
18. Einlassöffnung
19. Verschleißgrenze
20. Halterkappenabdeckung
21. Schraubendreher
22. Bürstenhalterkappe
TECHNISCHE ANGABEN
Modell BGA450 BGA452
Scheibendurchmesser 115 mm
Spindelgewinde M14
Leerlaufgeschwindigkeit (min
Gesamtlänge 317 mm
Nettogewicht 1,9 kg
Nennspannung Gleichspannung 14,4 V Gleichspannung 18 V
• Aufgrund unserer fortschreitenden Forschungen und Entwicklungen sind Änderungen an den hier wiedergegebenen
Angaben ohne Vorankündigung vorbehalten.
• Hinweis: Die Angaben können sich je nach Land unterscheiden.
Symbole
Im Folgenden sind die Symbole dargestellt, die im
Zusammenhang mit dem Werkzeug verwendet werden.
Es ist wichtig, dass Sie deren Bedeutung vor dem Einsatz
des Werkzeugs kennen.
............. Tragen Sie eine Schutzbrille.
Nur für EU-Länder
Werfen Sie Elektrowerkzeuge nicht in den Hausmüll!
Gemäss Europäischer Richtlinie 2002/96/EG über
Elektro- und Elektronik- Altgeräte und Umsetzung in
nationales Recht müssen verbrauchte Elektrowerkzeuge
getrennt gesammelt und einer umweltgerechten
Wiederverwertung zugeführt werden.
Verwendungszweck
Das Werkzeug ist für das Schneiden und Schleifen von
Metall- und Steinmaterial ohne Verwendung von Wasser
vorgesehen.
10
-1
)10.000
END002-1
ALLGEMEINE
SICHERHEITSREGELN GEA002-3
WARNUNG:
Lesen Sie alle Anweisungen. Werden nicht alle der
unten aufgeführten Anweisungen befolgt, besteht die
Gefahr eines Stromschlags, Brands und/oder das Risiko
schwerer Verletzungen. Der Begriff „Elektrowerkzeug“
bezieht sich in allen unten aufgeführten Warnhinweisen
auf Ihr netzbetriebenes Elektrowerkzeug (mit Kabel) oder
Ihr akku- bzw. batteriebetriebenes Elektrowerkzeug (ohne
Kabel).
BEWAHREN SIE DIESE
ANWEISUNGEN SORGFÄLTIG
AUF.
Sicherheit am Arbeitsplatz
1. Achten Sie auf ein sauberes und gut beleuchtetes
Arbeitsumfeld. In unordentlichen und dunklen
Bereichen können schnell Unfälle passieren.
2. Betreiben Sie keine Elektrowerkzeuge in
explosionsgefährdeter Umgebung, wie etwa in der
Nähe von brennbaren Flüssigkeiten, Gasen oder
Staub. Bei Elektrowerkzeugen treten Funken aus, die
Staub und Dämpfe entzünden können.
3. Halten Sie Kinder und Zuschauer auf Abstand,
wenn Sie ein Elektrowerkzeug bedienen.
Ablenkung kann zu Kontrollverlust führen.
Elektrische Sicherheit
4. Die Stecker des Elektrowerkzeugs müssen in die
Steckdose passen. Nehmen Sie niemals
Änderungen am Stecker vor. Verwenden Sie keine
Adapterstecker bei geerdeten Elektrowerkzeugen.
Page 11

Originalstecker und passende Steckdosen reduzieren
das Risiko eines Stromschlags.
5. Vermeiden Sie Körperkontakt mit geerdeten
Oberflächen, wie Rohren, Kühlern, Heiz- und
Kühlelementen. Wenn Ihr Körper geerdet ist, besteht
ein erhöhtes Risiko eines Stromschlags.
6. Das Elektrowerkzeug darf weder Regen noch
Feuchtigkeit ausgesetzt werden. Wenn Wasser in
ein Elektrowerkzeug eindringt, erhöht dies das Risiko
eines Stromschlags.
7. Gehen Sie richtig mit dem Stromkabel um.
Verwenden Sie nie das Kabel, um das
Elektrowerkzeug zu transportieren, heranzuziehen
oder den Stecker herauszuziehen. Halten Sie das
Kabel von Hitze, Öl, scharfen Kanten und
beweglichen Teilen fern. Beschädigte oder
verwickelte Kabel erhöhen das Risiko eines
Stromschlags.
8. Verwenden Sie ein dafür geeignetes
Verlängerungskabel, wenn Sie das
Elektrowerkzeug im Freien betreiben. Die
Verwendung eines für den Gebrauch im Freien
vorgesehenen Verlängerungskabels vermindert das
Risiko eines Stromschlags.
Persönliche Sicherheit
9. Bleiben Sie wachsam, achten Sie auf das, was Sie
tun, und gebrauchen Sie Ihren gesunden
Menschenverstand, wenn Sie ein Elektrowerkzeug
benutzen. Betreiben Sie Elektrowerkzeuge nicht,
wenn Sie müde sind oder unter dem Einfluss von
Drogen, Alkohol oder Medikamenten stehen. Ein
Moment der Unachtsamkeit kann beim Umgang mit
Elektrowerkzeugen zu schweren Personenschäden
führen.
10. Verwenden Sie eine Sicherheitsausrüstung.
Tragen Sie immer eine Schutzbrille. Den
Umständen angepasste Sicherheitsausrüstung wie
Staubmasken, rutschfreie Sicherheitsschuhe, Helme
und Hörschutz vermindern persönliche Verletzungen.
11. Vermeiden Sie einen versehentlichen Start des
Werkzeugs. Vergewissern Sie sich, dass das Gerät
ausgeschaltet ist, bevor Sie es anschließen. Der
Transport des Geräts mit dem Finger auf dem
Schalter und das Anschließen eingeschalteter
Elektrowerkzeuge an das Netz können zu Unfällen
führen.
12. Entfernen Sie alle Einstell- und sonstigen
Schlüssel, bevor Sie das Elektrowerkzeug
einschalten. Auf den rotierenden Teilen eines
Elektrowerkzeugs belassene Schlüssel können zu
Verletzungen führen.
13. Bleiben Sie innerhalb Ihres Standbereichs. Achten
Sie jederzeit auf sicheren Stand und Balance. Dies
ermöglicht die bessere Kontrolle des
Elektrowerkzeugs in unvorhergesehenen Situationen.
14. Tragen Sie geeignete Kleidung. Tragen Sie keine
weite Kleidung oder Schmuck. Halten Sie Haar,
Kleidung und Handschuhe fern von beweglichen
Tei le n. Weite Kleidung, Schmuck und langes Haar
können sich in den beweglichen Teilen verfangen.
15. Falls Geräte zum Absaugen und Sammeln von
Staub vorhanden sind, schließen Sie diese an und
verwenden Sie sie ordnungsgemäß. Die
Verwendung dieser Geräte reduziert
staubverbundene Gefahren.
Verwendung und Pflege von Elektrowerkzeugen
16. Überlasten Sie das Elektrowerkzeug nicht.
Benutzen Sie das für die jeweilige Anwendung
geeignete Elektrowerkzeug. Das richtige Werkzeug
erfüllt seinen Zweck am besten und sichersten in dem
Leistungsbereich, für den es hergestellt wurde.
17. Verwenden Sie kein Elektrowerkzeug, das sich
nicht mit dem Schalter ein- und ausschalten lässt.
Jedes Elektrowerkzeug, dessen Schalter nicht
funktioniert, stellt eine Gefahr dar und muss repariert
werden.
18. Ziehen Sie den Stecker aus der Steckdose bzw.
den Akku aus dem Gerät, bevor Sie Einstellungen
am Elektrowerkzeug vornehmen, Zubehör
wechseln oder das Gerät lagern. Diese präventiven
Sicherheitsmaßnahmen reduzieren das Risiko eines
versehentlichen Starts.
19. Lagern Sie Elektrowerkzeuge, die nicht in
Gebrauch sind, außerhalb der Reichweite von
Kindern und erlauben Sie niemandem, der mit
dem Betrieb oder der Bedienungsanleitung des
Elektrowerkzeugs nicht vertraut ist, dieses zu
benutzen. In den Händen ungeübter Benutzer sind
Elektrowerkzeuge gefährlich.
20. Pflegen Sie Elektrowerkzeuge. Halten Sie
Ausschau nach fehlerhaften Verbindungen,
festsitzenden beweglichen Teilen, Defekten und
allen anderen Bedingungen, die die
Funktionsweise des Geräts beeinträchtigen
können. Lassen Sie bei einer Beschädigung das
Elektrowerkzeug vor dem Gebrauch reparieren.
Viele Unfälle werden durch schlecht gewartete
Elektrowerkzeuge verursacht.
21. Halten Sie Schneidwerkzeug scharf und sauber.
Ordentlich gewartete Schneidwerkzeuge mit scharfen
Schneidkanten verhaken nicht so schnell und sind
einfacher in der Handhabung.
22. Verwenden Sie das Elektrowerkzeug, das Zubehör,
die Werkzeugeinsätze usw. in Übereinstimmung
mit diesen Anweisungen und in einer dem
Verwendungszweck des Werkzeugs
angemessenen Weise, und beachten Sie dabei die
Arbeitsbedingungen und die durchzuführende
Arbeit. Die Verwendung eines Elektrowerkzeugs für
Arbeitsgänge, für die es nicht konzipiert wurde, kann
zu Gefahrensituationen führen.
Verwendung und Pflege von akkubetriebenen
Werkzeugen
23. Vergewissern Sie sich vor dem Einsetzen des
Akkublocks, dass sich der Schalter in der Position
„Aus“ (Off) befindet. Wird der Akkublock in
Elektrowerkzeuge eingesetzt, deren Schalter sich auf
der Position „Ein“ (On) befindet, besteht eine erhöhte
Unfallgefahr.
11
Page 12

24. Der Akku darf nur mit dem vom Hersteller
angegebenen Ladegerät aufgeladen werden. Ein
Ladegerät, das sich für den einen Akkutyp eignet,
kann bei der Verwendung mit einem anderen Akku
eine Brandgefahr darstellen.
25. Elektrowerkzeuge dürfen nur mit den dafür
speziell vorgesehenen Akkus verwendet werden.
Die Verwendung sonstiger Akkus kann eine
Verletzungs- und Brandgefahr darstellen.
26. Wenn der Akku nicht verwendet wird, darf er nicht
in der Nähe von anderen metallischen
Gegenständen wie Büroklammern, Münzen,
Nägeln, Schrauben oder sonstigen metallischen
Gegenständen aufbewahrt werden, da die Gefahr
besteht, dass sich die Kontakte berühren. Ein
Kurzschluss bei den Akkukontakten kann
Verbrennungen verursachen oder eine Brandgefahr
darstellen.
27. Bei falschem Gebrauch kann Flüssigkeit aus dem
Akku austreten; vermeiden Sie in diesem Fall
jeglichen Körperkontakt mit der Flüssigkeit. Wenn
Sie versehentlich damit in Berührung geraten,
waschen Sie die betroffene Stelle gründlich mit
Wasser ab. Suchen Sie darüber hinaus einen Arzt
auf, wenn die Flüssigkeit in das Auge gerät. Die
aus dem Akku austretende Flüssigkeit kann
Hautreizungen oder Verbrennungen verursachen.
Service
28. Lassen Sie das Elektrowerkzeug ausschließlich
von Fachpersonal unter Verwendung von
Originalersatzteilen warten. Auf diese Weise ist die
Sicherheit des Elektrowerkzeugs gewährleistet.
29. Befolgen Sie die Anweisungen hinsichtlich
Schmiermittel und Austauschzubehör.
30. Achten Sie darauf, dass die Griffe trocken, sauber
und frei von Öl und Schmiermittel sind.
ZUSÄTZLICHE
SICHERHEITSREGELN ENB099-1
1. Tragen Sie stets eine Schutzbrille und einen
Gehörschutz. Das Tragen weiterer
Schutzvorrichtungen wie z. B. Staubmaske,
Handschuhe, Helm und Schürze wird dringend
angeraten.
2. Unterlassen Sie das Abmontieren von
Schutzvorrichtungen.
3. Verwenden Sie nur Trennscheiben der korrekten
Größe und solche, deren maximale
Betriebsdrehzahl mindestens so hoch wie die auf
dem Typenschild des Werkzeugs angegebene
maximale Leerlaufdrehzahl ist. Verwenden Sie nur
glasfaserverstärkte Scheiben als gekröpfte
Trennschleifscheiben.
4. Überprüfen Sie die Scheibe vor dem Betrieb
sorgfältig auf Risse oder sonstige
Beschädigungen. Wechseln Sie eine gesprungene
oder beschädigte Trennscheibe unverzüglich aus.
5. Befolgen Sie die Anweisungen des Herstellers für
korrekte Montage und Verwendung von
Trennscheiben. Behandeln und lagern Sie
Trennscheiben mit Sorgfalt.
6. Verwenden Sie keine separaten Reduzierbuchsen
oder Adapter zur Anpassung von Schleifscheiben
mit großem Durchmesser.
7. Verwenden Sie nur die für dieses Werkzeug
vorgeschriebenen Flansche.
8. Achten Sie sorgfältig darauf, dass Spindel,
Flansch (insbesondere die Ansatzfläche) oder
Sicherungsmutter nicht beschädigt werden. Eine
Beschädigung dieser Teile kann zu einem
Scheibenbruch führen.
9. Wenn eine Trennscheibe mit Gewindebohrung am
Werkzeug montiert werden soll, achten Sie darauf,
dass ihr Gewinde tief genug für die Spindellänge
ist.
10. Bevor Sie mit der eigentlichen Bearbeitung eines
Werkstücks beginnen, sollten Sie das Werkzeug
probeweise in einer sicheren Position mindestens
30 Sekunden lang mit der höchsten
Leerlaufdrehzahl laufen lassen. Schalten Sie das
Werkzeug sofort aus, falls Vibrationen oder
Taumelbewegungen vorhanden sind, die
Anzeichen für schlechte Montage oder eine
schlecht ausgewuchtete Trennscheibe sein
können. Überprüfen Sie das Werkzeug zur
Ermittlung der Ursache.
11. Vergewissern Sie sich, dass das Werkzeug sicher
abgestützt ist.
12. Halten Sie das Werkzeug mit festem Griff.
13. Halten Sie Ihre Hände von den beweglichen Teilen
fern.
14. Achten Sie darauf, dass die Trennscheibe das
Werkstück nicht berührt, bevor das Werkzeug
eingeschaltet wurde.
15. Verwenden Sie nur die vorgeschriebene Fläche
der Schleifscheibe für Schleifarbeiten.
16. Verwenden Sie keine Trennscheibe zum
Flächenschleifen.
17. Nehmen Sie sich vor Funkenflug in Acht. Halten
Sie das Werkzeug so, dass Sie, umstehende
Personen oder leicht entzündliche Materialien
nicht von den Funken getroffen werden.
18. Beachten Sie, dass sich die Schleifscheibe nach
dem Ausschalten der Maschine noch weiterdreht.
19. Vermeiden Sie eine Berührung des Werkstücks
unmittelbar nach der Bearbeitung, weil es dann
noch sehr heiß ist und Hautverbrennungen
verursachen kann.
20. Verwenden Sie dieses Werkzeug nicht zum
Schneiden von asbesthaltigen Materialien.
21. Verwenden Sie kein Wasser oder Schleiföl.
22. Verwenden Sie bei Arbeiten mit der Trennscheibe
immer eine gesetzlich vorgeschriebene
Staubsammelhaube.
23. Die Trennscheiben dürfen keinem seitlichen Druck
ausgesetzt werden.
12
Page 13

BEWAHREN SIE DIESE
ANWEISUNGEN SORGFÄLTIG
AUF.
WICHTIGE
SICHERHEITSANWEISUNGEN
ENC007-2
FÜR AKKUBLOCK
1. Lesen Sie vor der Verwendung des Akkublocks
alle Anweisungen und Sicherheitshinweise für (1)
das Akkuladegerät, (2) den Akku und (3) das
Produkt, für das der Akku verwendet wird.
2. Der Akkublock darf nicht zerlegt werden.
3. Falls die Betriebsdauer erheblich kürzer wird,
beenden Sie den Betrieb umgehend. Andernfalls
besteht die Gefahr einer Überhitzung sowie das
Risiko möglicher Verbrennungen und sogar einer
Explosion.
4. Wenn Elektrolyt in Ihre Augen gerät, waschen Sie
diese mit klarem Wasser aus, und suchen Sie
sofort einen Arzt auf. Andernfalls können Sie Ihre
Sehfähigkeit verlieren.
5. Vermeiden Sie einen Kurzschluss des
Akkublocks:
(1) Die Kontakte dürfen nicht mit leitendem
Material in Berührung kommen.
(2) Der Akkublock darf nicht in einem Behälter
aufbewahrt werden, in dem sich andere
metallische Gegenstände wie beispielsweise
Nägel, Münzen usw. befinden.
(3) Der Akkublock darf weder Feuchtigkeit noch
Regen ausgesetzt werden.
Ein Kurzschluss des Akkus kann zu hohem
Kriechstrom, Überhitzung, möglichen
Verbrennungen und sogar zu einer Zerstörung
des Geräts führen.
6. Werkzeug und Akkublock dürfen nicht an Orten
aufbewahrt werden, an denen die Temperatur 50°C
(122°F) oder höher erreichen kann.
7. Selbst wenn der Akkublock schwer beschädigt
oder völlig verbraucht ist, darf er nicht angezündet
werden. Der Akkublock kann in den Flammen
explodieren.
8. Lassen Sie den Akku nicht fallen, und vermeiden
Sie Schläge gegen den Akku.
BEWAHREN SIE DIESE
ANWEISUNGEN SORGFÄLTIG
AUF.
Tipps für den Erhalt der maximalen AkkuNutzungsdauer
1. Laden Sie den Akkublock auf, bevor er ganz
entladen ist.
Beenden Sie stets den Betrieb des Werkzeugs,
und laden Sie den Akkublock auf, sobald Sie eine
verringerte Werkzeugleistung bemerken.
2. Ein voll aufgeladener Akkublock darf niemals
erneut geladen werden.
Durch Überladungen wird die Lebensdauer des
Akkus verkürzt.
3. Laden Sie den Akkublock bei einer
Zimmertemperatur von 10°C - 40°C (50°F - 104°F)
auf. Lassen Sie einen heißen Akkublock vor dem
Aufladen abkühlen.
BEWAHREN SIE DIESE
ANWEISUNGEN SORGFÄLTIG
AUF.
FUNKTIONSBESCHREIBUNG
ACHTUNG:
• Schalten Sie das Werkzeug stets aus und entfernen
Sie den Akkublock, bevor Sie Einstellungen oder eine
Funktionsprüfung des Werkzeugs vornehmen.
Montage und Demontage des Akkublocks
(Abb. 1)
• Schalten Sie das Werkzeug stets aus, bevor Sie den
Akkublock einsetzen oder entfernen.
• Zur Entfernung des Akkublocks müssen Sie diesen aus
dem Gerät herausziehen, während Sie die Taste auf
der Vorderseite des Blocks schieben.
• Zum Einsetzen des Akkublocks müssen Sie die Zunge
des Akkublocks an der Rille im Gehäuse ausrichten
und in die gewünschte Position schieben. Setzen Sie
den Block immer ganz ein, bis er mit einem Klick
einrastet. Wenn Sie den roten Bereich oben auf der
Taste sehen können, ist der Block nicht ganz
eingerastet. Setzen Sie ihn ganz ein, bis der rote
Bereich nicht mehr zu sehen ist. Andernfalls kann der
Block versehentlich aus dem Werkzeug fallen und Sie
oder Personen in Ihrem Umfeld verletzen.
• Wenden Sie beim Einsetzen des Akkublocks keine
Gewalt an. Wenn der Block nicht leicht hineingleitet,
wird er nicht richtig eingesetzt.
Spindel-Arretiertaste (Abb. 2)
ACHTUNG:
• Betätigen Sie die Spindel-Arretiertaste niemals bei
rotierender Spindel. Andernfalls kann das Werkzeug
beschädigt werden.
Drücken Sie die Spindel-Arretiertaste, um die Spindel
beim Montieren oder Demontieren von Zubehör zu
blockieren.
Bedienung des Schalters (Abb. 3)
ACHTUNG:
• Achten Sie vor dem Einsetzen des Akkublocks in das
Werkzeug darauf, dass sich der Schiebeschalter
korrekt bedienen lässt und auf die Position „OFF“
(AUS) zurückkehrt, sobald das hintere Ende des
Schiebeschalters nach unten gedrückt wird.
Um das Werkzeug einzuschalten, schieben Sie den
Schiebeschalter auf die Position „I (ON)“. Zum
13
Page 14

Dauerbetrieb muss das vordere Ende des
Schiebeschalters gedrückt werden, um den Schalter zu
arretieren.
Wenn Sie das Werkzeug anhalten möchten, drücken Sie
das hintere Ende des Schiebeschalters, und schieben Sie
diesen dann in die Position „O (OFF)“.
Kombinationsanzeigenleuchte (Abb. 4)
Die Anzeigenleuchten befinden sich an zwei Stellen.
Wenn der Akkublock in das Werkzeug eingesetzt wird und
der Schiebeschalter auf der Position „O (OFF)“ steht,
leuchtet die Anzeigenleuchte etwa eine Sekunde lang
kurz auf. Ist dies nicht der Fall, ist entweder der Akkublock
oder die Anzeigenleuchte
beschädigt.
- Überlastungsschutz
- Bei einer Überlastung des Werkzeugs leuchtet die
Anzeigenleuchte auf. Sobald die Werkzeuglast
verringert wird, erlischt die Anzeige.
- Wenn das Werkzeug weiterhin überlastet wird und die
Anzeigenleuchte etwa zwei Sekunden lang leuchtet,
wird das Werkzeug angehalten. Auf diese Weise wird
eine Beschädigung des Motors sowie der zugehörigen
Teile verhindert.
- Stellen Sie in diesem Fall den Schiebeschalter zum
Neustart des Werkzeugs einmal in die Position „O
(OFF)“ und dann wieder in die Position „I (ON)“.
- Warnsignal für erforderlichen Akku-Austausch
- Wenn die Restladung des Akkus nur noch gering ist,
leuchtet die Anzeigenleuchte während des Betriebs
mit dem Akku frühzeitig auf.
- Funktion zur Vermeidung eines versehentlichen
Neustarts
- Selbst wenn sich der Schiebeschalter auf der Position
„I (ON)“ befindet und der Akkublock eingesetzt wurde,
wird das Werkzeug nicht gestartet. Dabei flackert die
Anzeigenleuchte langsam, was bedeutet, dass die
Funktion zur Vermeidung eines versehentlichen
Neustarts aktiv ist.
- Schieben Sie zum Start des Werkzeugs zunächst den
Schiebeschalter in die Position „O (OFF)“ und
anschließend in die Position „I (ON)“.
MONTAGE
ACHTUNG:
• Schalten Sie das Werkzeug stets aus, und entfernen
Sie den Akkublock, bevor Sie Arbeiten am Werkzeug
ausführen.
Einsetzen des Seitengriffs (Zusatzgriff)
(Abb. 5)
ACHTUNG:
• Vergewissern Sie sich vor dem Betrieb stets, dass der
Seitengriff einwandfrei montiert ist.
Schrauben Sie den Seitengriff an der in der Abbildung
gezeigten Position fest an die Maschine.
Montage und Demontage der
Schutzhaube (Abb. 6)
ACHTUNG:
• Bei Verwendung einer gekröpften Trennschleifscheibe/
Multischeibe, Flexscheibe, Drahtrundbürste,
Trennscheibe oder Diamantscheibe muss die
Schutzhaube so am Werkzeug angebracht werden,
dass die geschlossene Seite stets in Richtung
Bediener zeigt.
Montieren Sie die Schutzhaube so, dass der Vorsprung
am Schutzhaubenring auf die Nut im Lagergehäuse
ausgerichtet ist. Drehen Sie dann die Schutzhaube um
180 Grad. Achten Sie darauf, die Schraube fest
anzuziehen.
Zum Demontieren der Schutzhaube müssen Sie die
Einbauprozedur in umgekehrter Reihenfolge ausführen.
Montage und Demontage der gekröpften
Trennschleifscheibe/Multischeibe
WARNUNG:
• Wenn die gekröpfte Trennschleifscheibe/Multischeibe
am Werkzeug befestigt ist, muss stets die mitgelieferte
Schutzhaube verwendet werden. Die Scheibe kann
während ihres Einsatzes zerbrechen. Durch die
Schutzhaube wird das Risiko von Verletzungen
verringert.
Setzen Sie den Innenflansch auf die Spindel. Setzen Sie
die Trenn-/Schleifscheibe auf den Innenflansch, und
schrauben Sie die Sicherungsmutter auf die Spindel.
(Abb. 7)
Zum Anziehen der Sicherungsmutter die
Spindelarretierung fest drücken, um die Spindel zu
blockieren; dann die Mutter mit dem
Sicherungsmutterschlüssel im Uhrzeigersinn anziehen.
(Abb. 8)
Zum Entnehmen der Trennscheibe befolgen Sie die
Einbauprozedur rückwärts.
Montage und Demontage der
Diamantscheibe (optionales Zubehör)
(Abb. 9)
ACHTUNG:
• Vergewissern Sie sich, dass der Pfeil am Werkzeug in
dieselbe Richtung zeigt wie der Pfeil an der
Diamantscheibe.
Setzen Sie den Innenflansch auf die Spindel. Setzen Sie
die Diamantscheibe auf den Innenflansch, und schrauben
Sie die Sicherungsmutter auf die Spindel. Bei
Verwendung einer Diamantscheibe muss beachtet
werden, dass die flache Seite der Sicherungsmutter in
Richtung Diamantscheibe zeigen muss.
WARNUNG:
• Betätigen Sie die Spindel-Arretiertaste niemals bei
rotierender Spindel.
14
Page 15

BETRIEB
WARNUNG:
• Die Maschine darf auf keinen Fall gewaltsam
angedrückt werden. Das Eigengewicht der Maschine
übt ausreichenden Druck aus. Gewaltanwendung und
übermäßiger Druck können zu einem gefährlichen
Schleifscheibenbruch führen.
• Wechseln Sie die Schleifscheibe IMMER aus, falls die
Maschine während der Arbeit fallen gelassen wurde.
• Eine Schleif- oder Trennscheibe darf NIEMALS gegen
das Werkstück geschlagen oder gestoßen werden.
• Achten Sie besonders beim Bearbeiten von Ecken,
scharfen Kanten usw. darauf, dass die Schleifscheibe
nicht springt oder hängen bleibt. Dies könnte den
Verlust der Kontrolle und Rückschläge verursachen.
• Verwenden Sie die Maschine NIEMALS mit Holz- oder
anderen Sägeblättern. Solche Sägeblätter verursachen
bei Verwendung an einer Schleifmaschine häufiges
Rückschlagen und Verlust der Kontrolle, was zu
Verletzungen führen kann.
ACHTUNG:
• Die jeweilige Schnitttiefe kann bis zu 5 mm betragen.
Drücken Sie das Werkzeug ein wenig an, sodass es
während des Betriebs nicht langsamer wird.
• Schalten Sie die Maschine nach der Arbeit stets aus,
und warten Sie, bis die Scheibe zum völligen Stillstand
gekommen ist, bevor Sie die Maschine ablegen.
• Wenn das Werkzeug bis zur vollständigen Entladung
des Akkus betrieben wurde, lassen Sie es 15 Minuten
liegen, bevor Sie mit einem neuen Akku fortfahren.
Schleifen und Schmirgeln (Abb. 10)
Halten Sie die Maschine IMMER mit einer Hand am
Gehäuse und mit der anderen am Seitengriff fest.
Schalten Sie die Maschine ein, und setzen Sie dann die
Trenn- oder Schleifscheibe an das Werkstück an.
Halten Sie die Trenn- oder Schleifscheibe im Allgemeinen
in einem Winkel von etwa 15 Grad zur
Werkstückoberfläche.
Bewegen Sie die Schleifmaschine beim Einschleifen einer
neuen Schleifscheibe in Richtung B, weil die
Schleifscheibe sonst in das Werkstück einschneidet.
Sobald die Schleifscheibenkante durch Gebrauch
abgerundet ist, kann die Schleifscheibe sowohl in
Richtung A als auch in Richtung B bewegt werden.
Betrieb mit einer Diamantscheibe
(Zubehörteil)
WARNUNG:
• Gewaltanwendung und übermäßiger Druck oder im
Schnitt verbogene, eingeklemmte oder verdrehte
Scheiben können zu einer Überlastung des Motors und
einem gefährlichen Rückschlag des Werkzeugs führen.
ACHTUNG:
• Vergewissern Sie sich nach einem Schnitt, dass die
rotierende Diamantscheibe vollständig zu einem
Stillstand kommt. Legen Sie dann das Werkzeug ab.
Es ist gefährlich, das Werkzeug bereits vor dem
Ausschalten abzulegen. Falls sich in der Umgebung
des Werkzeugs Schmutz oder Staub befindet, kann
dieser vom Werkzeug eingesogen werden.
Die Schleifscheibe darf das Werkstück nicht berühren.
Schalten Sie das Werkzeug ein, und halten Sie es gut
fest. Warten Sie, bis die Scheibe ihre volle Drehzahl
erreicht hat. Schieben Sie nun das Werkzeug flach und
gleichmäßig über die Oberfläche des Werkstücks vor, bis
der Schnitt vollendet ist.
WARTUNG
ACHTUNG:
• Schalten Sie das Werkzeug stets aus und entfernen
Sie den Akkublock, bevor Sie Inspektionen oder
Wartungsarbeiten am Werkzeug vornehmen.
Halten Sie die Maschine und ihre Ventilationsöffnungen
stets sauber. Reinigen Sie die Ventilationsöffnungen der
Maschine regelmäßig oder im Anfangsstadium einer
Verstopfung. (Abb. 11)
Austausch der Kohlebürsten
Entfernen und überprüfen Sie die Kohlebürsten in
regelmäßigen Abständen. Ersetzen Sie diese, wenn sie
bis zur Verschleißgrenze abgenutzt sind. Halten Sie die
Kohlebürsten sauber und sorgen Sie dafür, dass sie
locker in den Halterungen liegen. Beide Kohlebürsten
sollten gleichzeitig ersetzt werden. Verwenden Sie nur
identische Kohlebürsten. (Abb. 12)
Setzen Sie das obere Ende des Schlitzschraubendrehers
in die Kerbe am Werkzeug, und entfernen Sie die
Abdeckung der Halterkappe, indem Sie diese anheben.
(Abb. 13)
Verwenden Sie einen Schraubendreher, um die
Bürstenhalterkappen zu entfernen. Entnehmen Sie die
verbrauchten Kohlebürsten, legen Sie die neuen ein und
bringen Sie die Bürstenhalterkappen wieder fest an.
(Abb. 14)
Befestigen Sie die Abdeckung der Halterkappe wieder am
Gerät.
Um die SICHERHEIT und ZUVERLÄSSIGKEIT des
Produkts zu gewährleisten, sollten Reparaturen,
Wartungsarbeiten und Einstellungen nur durch von Makita
autorisierte Servicecenter durchgeführt und immer
Makita-Ersatzteile verwendet werden.
ZUBEHÖR
ACHTUNG:
• Die folgenden Zubehör- und Zusatzteile werden für das
in diesem Handbuch beschriebene Makita-Werkzeug
empfohlen. Die Verwendung anderer Zubehör- und
Zusatzteile kann zu Personenschäden führen.
Verwenden Sie Zubehör- und Zusatzteile nur für den
vorgesehenen Zweck.
Informationen zu diesem Zubehör erhalten Sie bei einem
Makita-Servicecenter in Ihrer Nähe.
• Schutzhaube (Schleifscheibenabdeckung)
• Innenflansch
• Gekröpfte Trennschleifscheiben (115 mm)
• Sicherungsmutter (für gekröpfte Trennschleifscheibe)
15
Page 16

• Gummiteller
• Schleifscheiben
• Sicherungsmutter (für Schleifscheibe)
• Sicherungsmutterschlüssel
• Topfdrahtbürste
• Kegeldrahtbürste 85
• Seitengriff
• Staubsammelhaube
• Diamantscheibe (115 mm)
• Verschiedene Arten von Makita-Originalakkus und Ladegeräten
Nur für europäische Länder
Geräusche und Vibrationen
Der typische Schalldruck beträgt 75 dB (A).
Die Abweichung beträgt 3 dB (A).
Unter Arbeitsbedingungen kann der Schalldruck 85 dB (A)
überschreiten.
– Tragen Sie Gehörschutz. –
Der typische effektive Beschleunigungswert beträgt
2
3 m/s
.
Diese Werte wurden entsprechend der Norm EN60745
gewonnen.
EG-KONFORMITÄTSERKLÄRUNG
Hiermit erklärt wir unter unserer alleinigen Verantwortung,
daß dieses Produkt gemäß den Ratsdirektiven 89/336/
EWG und 98/37/EG mit den folgenden Normen von
Normendokumenten übereinstimmen: EN60745,
EN55014.
Yasuhiko Kanzaki CE 2005
Director
MAKITA INTERNATIONAL EUROPE LTD.
Michigan Drive, Tongwell, Milton Keynes, Bucks MK15
8JD, ENGLAND
Verantwortlicher Hersteller:
Makita Corporation Anjo Aichi Japan
16
Page 17

POLSKI
Objaśnienia do widoku ogólnego
1. Przycisk
2. Czerwony element
3. Akumulator
4. Blokada wału
5. Przełącznik suwakowy
6. Kontrolka
7. Osłona tarczy
8. Obudowa łożyska
9. Wkręt
10. Nakrętka zabezpieczająca
11. Tarcza z obniżonym środkiem /
ściernica lamelowa
12. Kołnierz wewnętrzny
13. Klucz do nakrętki
zabezpieczającej
14. Tarcza diamentowa
15. Kołnierz wewnętrzny
16. Wrzeciono
17. Wylot powietrza
18. Wlot powietrza
19. Znak granicy zużycia
20. Osłona nasadki oprawy
21. Śrubokręt
22. Nasadka oprawy szczotki
węglowej
DANE TECHNICZNE
Model BGA450 BGA452
Średnica tarczy 115 mm
Gwint wrzeciona M14
Prędkość bez obciążenia (min.
Całkowita długość 317 mm
Ciężar netto 1,9 kg
Napięcie znamionowe stałe 14,4 V stałe 18 V
•Ze względu na stale prowadzone prace badawczo-rozwojowe, podane tu dane techniczne mogą ulec zmianie bez
powiadomienia.
• Uwaga: W innych krajach urządzenie może mieć odmienne parametry techniczne.
Symbole
Poniżej przedstawiono symbole stosowane w przypadku
opisywanego narzędzia. Przed przystąpieniem do jego
eksploatacji należy koniecznie zapoznać się z ich
znaczeniem.
............. Zakładać okulary ochronne.
Dotyczy tylko państw UE
Nie wyrzucaj urządzeń elektrycznych wraz z odpadami z
gospodarstwa domowego!
Zgodnie z Europejską Dyrektywą 2002/96/ WE w sprawie
zużytego sprzętu elektrotechnicznego i elektronicznego
oraz dostosowaniem jej do prawa krajowego,zużyte
urządzenia elektryczne należy posegregować i
zutylizować w sposób przyjazny dla środowiska.
Przeznaczenie
Omawiane narzędzie przeznaczone jest do szlifowania i
cięcia materiałów z metalu i kamienia bez użycia wody.
-1
)10 000
END002-1
OGÓLNE ZASADY
BEZPIECZEŃSTWA GEA002-3
UWAGA:
Należy zapoznać się z wszystkimi zaleceniami.
Niezastosowanie się do podanych poniżej instrukcji może
prowadzić do porażenia prądem elektrycznym, pożaru i/
lub poważnych obrażeń ciała. Pojęcie „elektronarzędzie”,
występujące we wszystkich wymienionych poniżej
ostrzeżeniach, odnosi się do elektronarzędzi zasilanych z
sieci energetycznej (z przewodem zasilającym) lub do
elektronarzędzi akumulatorowych (bezprzewodowych).
INSTRUKCJĘ OBSŁUGI NALEŻY
ZACHOWAĆ.
Bezpieczeństwo w miejscu pracy
1. W miejscu pracy należy utrzymywać czystość i
zadbać o dobre oświetlenie. Bałagan i słabe
oświetlenie sprzyjają wypadkom.
2. Elektronarzędzi nie wolno używać w miejscach
zagrożonych wybuchem, na przykład w obecności
łatwopalnych cieczy, gazów lub pyłów.
Elektronarzędzia wytwarzają iskry, które mogą
spowodować zapalenie się pyłu lub oparów.
3. Nie należy uruchamiać elektronarzędzia, gdy w
pobliżu znajdują się dzieci lub osoby postronne.
Chwila nieuwagi może spowodować utratę kontroli.
Zasady bezpieczeństwa dotyczące urządzeń
elektrycznych
4. Wtyczka przewodu zasilającego elektronarzędzia
musi pasować do gniazda elektrycznego. Nie
wolno dokonywać żadnych przeróbek wtyczki. W
17
Page 18

przypadku elektronarzędzi wymagających
uziemienia nie wolno stosować przejściówek.
Oryginalne wtyczki i właściwie dopasowane gniazda
zmniejszają ryzyko porażenia prądem elektrycznym.
5. Unikać kontaktu z powierzchniami uziemionych
przedmiotów, jak rury, grzejniki, kuchenki, czy
lodówki. Gdy ciało jest uziemione, wzrasta ryzyko
porażenia prądem elektrycznym.
6. Elektronarzędzia należy chronić przed deszczem i
wilgocią. Woda, która dostanie się do środka,
zwiększa ryzyko porażenia prądem elektrycznym.
7. Przewodu zasilającego używać wyłącznie zgodnie
z jego przeznaczeniem. Nie wolno wykorzystywać
go do przenoszenia lub przyciągania narzędzia,
ani do wyciągania wtyczki z gniazda
elektrycznego. Przewód należy trzymać z dala od
źródeł ciepła, oleju, ostrych krawędzi lub
znajdujących się w ruchu podzespołów.
Uszkodzone lub poplą
zwiększają ryzyko porażenia prądem elektrycznym.
8. W przypadku eksploatacji elektronarzędzia na
dworze, należy korzystać z przedłużacza do
zastosowań zewnętrznych. Tylko taki przedłużacz
zmniejsza ryzyko porażenia prądem elektrycznym.
Bezpieczeństwo osobiste
9. Podczas pracy z elektronarzędziem zachować
czujność, obserwować wykonywane operacje i
kierować się zdrowym rozsądkiem. Nie wolno
używać elektronarzędzia, gdy jest się zmęczonym
albo pod wpływem narkotyków, alkoholu, bądź
leków. Chwila nieuwagi podczas pracy może
spowodować poważny wypadek.
10. Używać sprzętu ochronnego. Zawsze zakładać
okulary ochronne. Maska przeciwpyłowa, buty
antypoślizgowe, kask lub ochraniacze na uszy
używane w odpowiednich warunkach zmniejszają
ryzyko obrażeń.
11. Unikać przypadkowego uruchomienia urządzenia.
Przed podłączeniem zasilania sprawdzić, czy
przełącznik znajduje się w pozycji wyłączenia.
Przenoszenie elektronarzędzi z palcem na
przełączniku lub podłączanie przewodu zasilającego
przy włączonym przełączniku grozi wypadkiem.
12. Przed włączeniem elektronarzędzia usunąć
wykorzystywane do regulacji klucze. Klucz
pozostawiony na obracającym się elemencie
elektronarzędzia może spowodować poważne
obrażenia ciała.
13. Nie wolno sięgać narzędziem zbyt daleko. Należy
stać pewnie, aby nie stracić równowagi. Taka
postawa gwarantuje lepsze opanowanie narzędzia w
niespodziewanych sytuacjach.
14. Ubranie powinno być właściwie dobrane. Nie
wolno zakładać luźnych części garderoby ani
biżuterii. Włosy, ubranie i rękawice trzymać z dala
od ruchomych części. Luźne części ubrania,
biżuteria i długie włosy mogą zostać pochwycone
przez znajdujące się w ruchu podzespoły.
15. Jeżeli narzędzia przystosowane są do współpracy
z urządzeniami do usuwania i zbierania pyłu,
18
tane przewody zasilające
należy upewnić się, czy są one podłączone i
prawidłowo używane. Wspomniane urządzenia
obniżają poziom zagrożeń wynikających z zapylenia.
Użytkowanie elektronarzędzi i dbałość o nie
16. Elektronarzędzi nie wolno przeciąż
tylko właściwego narzędzia przeznaczonego do
danego zastosowania. Pozwoli ono wykonać pracę
lepiej i bezpieczniej, w przewidzianym przez
projektanta tempie.
17. Nie wolno używać elektronarzędzia z
uszkodzonym przełącznikiem zasilania. Narzędzia
z uszkodzonym przełącznikiem są niebezpieczne i
wymagają naprawy.
18. Przed przystąpieniem do przeprowadzenia
regulacji, wymiany osprzętu lub przed odłożeniem
narzędzia na swoje miejsce należy zawsze wyjąć
wtyczkę przewodu zasilającego z gniazda i/lub
odłączyć akumulator. Tak i e działania prewencyjne
zmniejszają ryzyko przypadkowego uruchomienia
elektronarzędzia.
19. Nieużywane elektronarzędzia należy chronić przed
dziećmi. Nie wolno zezwalać na korzystanie z
elektronarzędzia osobom nieobeznanym z danym
narzędziem albo osobom, które nie zapoznały się
z jego instrukcją obsługi. Elektronarzędzia w rękach
użytkowników bez przeszkolenia mogą być
niebezpieczne.
20. O elektronarzędzia trzeba dbać. Kontrolować je
pod kątem nieprawidłowego ustawienia lub
zablokowania elementów ruchomych, pęknięć lub
innych usterek, które mogą mieć wpływ na
działanie urządzenia. W przypadku stwierdzenia
uszkodzenia zlecić naprawę narzędzia.
Niedbalstwo jest przyczyną wielu wypadków.
21. Narzędzia do cięcia powinny być zawsze czyste i
naostrzone. Właściwie konserwowane narzędzia do
cięcia z ostrymi krawędziami tnącymi rzadziej się
zakleszczają i łatwiej je prowadzić.
22. Elektronarzędzie, osprzęt, końcówki robocze itp.
należy stosować
sposób właściwy dla danego typu narzędzia,
mając na uwadze warunki i rodzaj pracy do
wykonania. Używanie elektronarzędzia do innych,
niezgodnych z przeznaczeniem celów może stwarzać
niebezpieczną sytuację.
Użytkowanie narzędzi akumulatorowych i dbałość o
nie
23. Przed włożeniem akumulatora upewnić się, czy
przełącznik znajduje się w pozycji wyłączenia.
Wkładanie akumulatora do elektronarzędzi z
włączonym przełącznikiem sprzyja wypadkom.
24. Akumulator należy ładować wyłącznie przy użyciu
określonej przez producenta ładowarki. Ładowarka
przeznaczona do jednego typu akumulatora może
stwarzać zagrożenie pożarem, gdy będzie używana
do ładowania innego akumulatora.
25. Do zasilania elektronarzędzi używać tylko
specjalnie do tego celu przeznaczonych
akumulatorów. Używanie innych akumulatorów może
grozić wypadkiem lub pożarem.
zgodnie z niniejszą instrukcją i w
ać. Używać
Page 19

26. Gdy akumulator nie jest używany, chronić go
przed kontaktem z metalowymi przedmiotami,
typu spinacze, monety, klucze, gwoździe, wkręty
lub innymi metalowymi drobiazgami, które mogą
spowodować zwarcie styków akumulatora.
Zwarcie styków akumulatora z kolei grozi
poparzeniami lub pożarem.
27. W przypadku niewłaściwych warunków
eksploatacji może dojść do wycieku elektrolitu z
akumulatora. Nie należy go dotykać. W razie
przypadkowego kontaktu przemyć wodą. W
przypadku kontaktu z oczami dodatkowo uzyskać
pomoc lekarską. Płyn z akumulatora może
powodować podrażnienie lub poparzenia.
Naprawa
28. Naprawę elektronarzędzi zlecać
wykwalifikowanemu personelowi technicznemu,
który stosuje wyłącznie oryginalne części
zamienne. Pozwoli to zachować niezmienny poziom
bezpieczeństwa elektronarzędzia.
29. Postępować zgodnie z instrukcjami dotyczącymi
smarowania i wymiany elementów wyposażenia.
30. Uchwyty powinny być zawsze suche, czyste, bez
pozostałości oleju lub smaru.
DODATKOWE ZALECENIA
DOTYCZĄCE BEZPIECZEŃSTWA
1. Zawsze stosować okulary ochronne i ochraniacze
na uszy. Zakładać pozostały sprzęt ochrony
osobistej typu: maska przeciwpyłowa, rękawice,
kask oraz fartuch.
2. Nie demontować osłon.
3. Stosować wyłącznie tarcze o prawidłowym
rozmiarze i takie, których maksymalna prędkość
robocza ma przynajmniej taką samą wartość, co
największa prędkość bez obciążenia podana na
tabliczce znamionowej narzędzia. Nie wolno
używać innych tarcz z obniżonym środkiem niż
tarcze wzmacniane włóknem szklanym.
4. Przed przystąpieniem do pracy sprawdzić
dokładnie tarczę pod kątem ewentualnych pęknięć
lub uszkodzeń. Popękaną lub uszkodzoną tarczę
niezwłocznie wymienić.
5. Przestrzega
montażu i eksploatacji tarcz. Tarcze
przechowywać i obchodzić się z nimi z dbałością.
6. Nie wolno stosować oddzielnych tulei
redukcyjnych ani elementów pośrednich, aby
dopasować tarcze ścierne o dużym otworze
wewnętrznym.
7. Używać wyłącznie kołnierzy przeznaczonych do
tego urządzenia.
8. Uważać, aby nie uszkodzić wrzeciona, kołnierza
(zwłaszcza powierzchni odpowiedzialnych za
prawidłowy montaż) albo nakrętki
zabezpieczającej. Uszkodzenie tych części może
być przyczyną pękania tarczy.
9. W przypadku narzędzi współpracujących z
tarczami z nagwintowanym otworem należy
ć instrukcji producenta w zakresie
ENB099-1
upewnić się, czy długość gwintu w tarczy jest
wystarczająca, aby wkr
długości.
10. Przed przystąpieniem do obróbki elementu
uruchomić narzędzie wstępnie przez 30 sekund w
bezpiecznym położeniu na najwyższej prędkości
bez obciążenia. W razie stwierdzenia drgań lub bić
osiowych, które mogą sygnalizować
nieprawidłowy montaż lub źle wyważoną tarczę,
natychmiast zatrzymać narzędzie. Skontrolować
narzędzie w celu ustalenia przyczyny.
11. Sprawdzić, czy obrabiany element jest dobrze
podparty.
12. Narzędzie trzymać mocno i pewnie.
13. Nie wolno zbliżać rąk do obracających się części.
14. Przed włączeniem urządzenia upewnić się, czy
tarcza nie dotyka obrabianego elementu.
15. Podczas szlifowania uż
powierzchni tarczy.
16. Tarcz tnących nie wolno używać do szlifowania
bocznego.
17. Uważać na wylatujące iskry. Narzędzie trzymać w
taki sposób, aby iskry nie były skierowane w
stronę operatora, innych osób stojących w
pobliżu lub łatwopalnych materiałów.
18. Po wyłączeniu narzędzia tarcza dalej obraca się.
19. Zaraz po zakończeniu pracy nie wolno dotykać
obrabianego elementu. Może on bowiem być
bardzo gorący, co grozi poparzeniem skóry.
20. Nie wolno używać opisywanego narzędzia do
obróbki materiałów zawierających azbest.
21. Nie wolno używać wody ani płynów do
szlifowania.
22. Przepisy krajowe wymagają stosowania osłony
zbierającej pył, gdy używana jest tarcza tnąca.
23. Na tarcze tnące nie wolno wywierać nacisku
poprzecznego.
ęcić wrzeciono na całej
ywać określonej
INSTRUKCJĘ OBSŁUGI NALEŻY
ZACHOWAĆ.
WAŻNE ZASADY
BEZPIECZEŃSTWA
ENC007-2
DOTYCZĄCE AKUMULATORA
1. Przed użyciem akumulatora zapoznać się z
wszystkimi zaleceniami i znakami ostrzegawczymi
na (1) ładowarce, (2) akumulatorze i (3) wyrobie, w
którym będzie używany akumulator.
2. Akumulatora nie wolno rozbierać.
3. Jeżeli czas pracy uległ znacznemu skróceniu,
należy natychmiast przerwać pracę. Może bowiem
dojść do przegrzania, ewentualnych poparzeń, a
nawet eksplozji.
4. W przypadku przedostania się elektrolitu do oczu,
przemyć je wodą i niezwłocznie uzyskać pomoc
lekarską. Może on bowiem spowodować utratę
wzroku.
5. Nie wolno zwierać akumulatora:
19
Page 20

(1) Nie dotykać styków przedmiotami wykonanymi
z materiałów przewodzących.
(2) Unikać przechowywania akumulatora w
pojemniku z metalowymi przedmiotami, typu
gwoździe, monety itp.
(3) Chronić akumulator przed deszczem.
Zwarcie prowadzi do przepływu prądu
elektrycznego o dużym natężeniu i przegrzania
akumulatora, co w konsekwencji może grozić
poparzeniami a nawet awarią urządzenia.
6. Narzędzia i akumulatora nie wolno przechowywać
w miejscach, w których temperatura osiąga bądź
przekracza 50°C.
7. Akumulatorów nie wolno palić, również tych
poważnie uszkodzonych lub całkowicie zużytych.
W ogniu mogą one bowiem eksplodować.
8. Chronić akumulator przed upadkiem i
uderzeniami.
INSTRUKCJĘ OBSŁUGI NALEŻY
ZACHOWAĆ.
Wskazówki dotyczące zachowania maksymalnej
trwałości akumulatora
1. Akumulator naładować zanim ulegnie
całkowitemu rozładowaniu.
W przypadku stwierdzenia spadku mocy narzędzia
przerwać pracę i naładować akumulator.
2. Nie wolno ładować w pełni naładowanego
akumulatora.
Zbyt długie ładowanie skraca okres eksploatacji.
3. Akumulator ładować w temperaturze mieszczącej
się w przedziale 10°C - 40°C. Gdy akumulator jest
gorący, przed przystąpieniem do jego ładowania
odczekać, aż ostygnie.
INSTRUKCJĘ OBSŁUGI NALEŻY
ZACHOWAĆ.
OPIS DZIAŁANIA
UWAGA:
• Przed przystąpieniem do regulacji lub przeglądu
narzędzia upewnić się, czy jest ono wyłączone i czy
został wyjęty akumulator.
Wkładanie lub wyciąganie akumulatora
(Rys. 1)
• Przed włożeniem lub wyjęciem akumulatora koniecznie
wyłączyć narzędzie.
• W celu wyjęcia akumulatora przesunąć przycisk
znajdujący się w przedniej jego części i wysunąć go.
•Aby włożyć akumulator, wystarczy wyrównać występ
na akumulatorze z rowkiem w obudowie i wsunąć go
na swoje miejsce. Akumulator wsunąć do oporu, aż
wskoczy na swoje miejsce, co jest sygnalizowane
delikatnym kliknięciem. Jeżeli element w kolorze
czerwonym w górnej części przycisku jest widoczny,
akumulator nie został całkowicie zablokowany. Należy
go wsunąć do oporu, aż czerwony element przestanie
być widoczny. W przeciwnym razie może przypadkowo
wypaść z narzędzia, raniąc operatora lub osoby
postronne.
• Przy wkładaniu akumulatora nie wolno używać siły.
Jeżeli akumulator nie wchodzi swobodnie, nie został
prawidłowo włożony.
Blokada wału (Rys. 2)
UWAGA:
• Nie wolno załączać blokady wału, gdy wrzeciono
obraca się. Narzędzie może bowiem ulec uszkodzeniu.
Przed przystąpieniem do montażu bądź demontażu
osprzętu nacisnąć blokadę wału, aby unieruchomić
wrzeciono.
Mechanizm przełącznika (Rys. 3)
UWAGA:
• Przed włożeniem akumulatora do narzędzia koniecznie
sprawdzić, czy przełącznik suwakowy działa
prawidłowo i po naciśnięciu jego tylnej części powraca
do pozycji WYŁĄCZENIA.
W celu uruchomienia narzędzia wystarczy przesunąć
przełącznik suwakowy w kierunku pozycji „I
(WŁĄCZONY). Pracę w trybie ciągłym można uzyskać po
naciśnięciu i zablokowaniu przedniej części przełącznika
suwakowego.
Aby wyłączyć narzędzie, wystarczy nacisnąć tylną część
przełącznika suwakowego, a następnie przesunąć go do
pozycji „O (WYŁĄCZONY)”.
Kontrolka wielofunkcyjna (Rys. 4)
Kontrolki znajdują się w dwóch miejscach.
Po włożeniu akumulatora do narzędzia, gdy przełącznik
suwakowy znajduje się w pozycji „O (WYŁĄCZONY)”,
kontrolka szybko pulsuje przez okres mniej więcej jednej
sekundy. Jeżeli tak się nie dzieje, uszkodzony jest
akumulator lub
kontrolka.
- Zabezpieczenie przed przeciążeniem
- Kontrolka zapala się, gdy narzędzie jest przeciążone.
Po zmniejszeniu obciążenia narzędzia kontrolka
gaśnie.
- Jeżeli narzędzie nadal będzie przeciążane i kontrolka
pozostanie zapalona przez około dwie sekundy,
wówczas narzędzie zatrzyma się. W ten sposób silnik
i powiązane z nich podzespoły chronione są przed
uszkodzeniem.
- Aby ponownie uruchomić narzędzie w takiej sytuacji,
należy przesunąć przełącznik suwakowy do pozycji „O
(WYŁĄCZONY)” i z powrotem do pozycji „I
(WŁĄCZONY)”.
- Sygnał wymiany akumulatora
- Gdy pojemność akumulatora spadnie, wówczas
kontrolka zapala się szybciej niż w przypadku
akumulatora o dostatecznej pojemności.
- Funkcja zabezpieczenia przed przypadkowym
uruchomieniem
20
Page 21

- Jeżeli akumulator zostanie włożony do narzędzia przy
przełączniku suwakowym ustawionym w pozycji „I
(WŁĄCZONY)”, nie można go będzie uruchomić. W
takim przypadku kontrolka pulsuje sygnalizując
zadziałanie funkcji zabezpieczenia przed
przypadkowym uruchomieniem.
- Aby uruchomić narzędzie, należy przesunąć
przełącznik suwakowy do pozycji „O (WYŁĄCZONY)”,
a następnie z powrotem do pozycji „I (WŁĄCZONY)”.
MONTAŻ
UWAGA:
• Przed przystąpieniem do jakichkolwiek czynności
związanych z obsługą narzędzia koniecznie upewnić
się, czy jest ono wyłączone i czy akumulator został
wyjęty.
Montaż uchwytu bocznego (rękojeści)
(Rys. 5)
UWAGA:
• Przed uruchomieniem koniecznie upewnić się, czy
uchwyt boczny jest dobrze zamocowany.
Uchwyt boczny należy mocno przykręcić w odpowiednim
miejscu narzędzia zgodnie z rysunkiem.
Montaż lub demontaż osłony tarczy
(Rys. 6)
UWAGA:
• W przypadku używania tarczy szlifierskiej z obniżonym
środkiem/ściernicy lamelowej, tarczy flex, obrotowej
szczotki drucianej, tarczy tnącej lub tarczy
diamentowej, osłonę tarczy należy przykręcić do
narzędzia w taki sposób, aby jej zamknięta część była
zawsze zwrócona w stronę operatora.
Nałożyć osłonę tarczy i wyrównać wystający element na
jej kołnierzu z nacięciem w obudowie. Następnie obrócić
osłonę tarczy o kąt 180 stopni. Pamiętać o solidnym
dokręceniu śruby.
Aby zdemontować osłonę tarczy, procedurę montażu
należy wykonać w odwrotnej kolejności .
Montaż i demontaż tarczy z obniżonym
środkiem lub ściernicy lamelowej
UWAGA:
• Ze znajdującej się w zestawie osłony należy zawsze
korzystać, gdy zamontowana jest tarcza szlifierska z
obniżonym środkiem lub ściernica lamelowa. Tarcza
podczas eksploatacji może drgać, a osłona pomaga
zmniejszyć ryzyko wypadku.
Nałożyć kołnierz wewnętrzny na wrzeciono. Dopasować
tarczę/ściernicę do kształtu kołnierza i dokręcić nakrętką
zabezpieczającą osadzoną na wrzecionie. (Rys. 7)
W celu dokręcenia nakrętki zabezpieczającej mocno
docisnąć blokadę wału, aby unieruchomić wrzeciono, a
następne dociągnąć nakrętkę zabezpieczającą kluczem
zgodnie z ruchem wskazówek zegara. (Rys. 8)
Aby zdemontować tarczę, wystarczy w odwrotnej
kolejności wykonać procedurę montażu.
Montaż lub demontaż tarczy diamentowej
(osprzęt dodatkowy) (Rys. 9)
UWAGA:
•Strzałka na narzędziu powinna być skierowana w tę
samą stronę co strzałka na tarczy diamentowej.
Nałożyć kołnierz wewnętrzny na wrzeciono. Dopasować
tarczę diamentową do kształtu kołnierza i dokręcić
nakrętką zabezpieczającą osadzoną na wrzecionie. Gdy
używana jest tarcza diamentowa, nakrętka
zabezpieczająca powinna być zwrócona płaską stroną w
kierunku tarczy diamentowej.
UWAGA:
• Blokadę wału można załączyć dopiero wówczas, gdy
wrzeciono przestanie się obracać.
OBSŁUGA
UWAGA:
• Nie ma potrzeby dociskania narzędzia podczas pracy.
Sam ciężar narzędzia wywiera wystarczający nacisk.
Stosowanie siły i nadmiernego docisku może
prowadzić do groźnego pękania tarczy.
•Jeżeli podczas szlifowania narzędzie upadnie, tarczę
należy KONIECZNIE wymienić.
• NIE WOLNO w żadnym wypadku uderzać tarczą o
obrabiany element.
•Uważać, aby tarcza nie podskakiwała i aby nie doszło
do jej wyszczerbienia, zwłaszcza podczas obróbki
narożników, ostrych krawędzi itp. Może bowiem
wystąpić odrzut i dojść do utraty panowania.
• NIE WOLNO używać narzędzia z tarczami do cięcia
drewna. Wspomniane tarcze używane w szlifierce,
często powodują odrzut i utratę panowania, a w
konsekwencji mogą doprowadzić do wypadku.
UWAGA:
•Głębokość pojedynczego cięcia nie powinna
przekraczać 5 mm. Docisk narzędzia należy
dostosować w taki sposób, aby podczas pracy
szybkość nie ulegała zmniejszeniu.
• Po zakończeniu pracy koniecznie wyłączyć narzędzie i
przed jego odłożeniem odczekać, aż tarcza całkowicie
się zatrzyma.
•Jeżeli narzędzie jest używane bez przerwy aż do
rozładowania akumulatora, należy je odstawić na
15 minut zanim praca zostanie podjęta na nowo z
użyciem innego naładowanego akumulatora.
Szlifowanie (Rys. 10)
Narzędzie należy ZAWSZE mocno chwycić, trzymając
jedną rękę na obudowie, a drugą na uchwycie bocznym.
Włączyć narzędzie, a następnie przyłożyć tarczę do
elementu.
Krawędź tarczy trzymać pod kątem mniej więcej 15 stopni
względem powierzchni obrabianego elementu.
W okresie docierania nowej tarczy nie należy prowadzić
narzędzia w kierunku B, ponieważ tarcza zacznie się
21
Page 22

wcinać w element. Gdy krawędź tarczy, w miarę jej
eksploatacji, zostanie zaokrąglona, można prowadzić
narzędzie zarówno w kierunku A jak i B.
Praca z tarczą diamentową (osprzęt
dodatkowy)
UWAGA:
•Przeciążanie narzędzia i wywieranie nadmiernego
docisku albo doprowadzanie do wygięcia tarczy, jej
ściskania bądź skręcania w rzazie może prowadzić do
przegrzania silnika i groźnego odrzutu narzędzia.
UWAGA:
• Po zakończeniu operacji cięcia odczekać aż tarcza
diamentowa całkowicie się zatrzyma. Dopiero
wówczas można odstawić narzędzie. Odstawienie
narzędzia przed jego wyłączeniem jest niebezpieczne.
Narzędzie może zasysać znajdujący się w sąsiedztwie
pył lub zabrudzenia.
Tarcza nie może stykać się z obrabianym elementem.
Włączyć narzędzie i trzymać je mocno. Odczekać, aż
tarcza osiągnięcie maksymalną szybkość. Teraz
wystarczy po prostu przesuwać narz
powierzchni przecinanego elementu, utrzymując je w
poziomie i prowadzając równomiernie, aż do zakończenia
operacji cięcia.
ędzie do przodu po
KONSERWACJA
UWAGA:
• Przed przystąpieniem do przeglądu narzędzia lub jego
konserwacji upewnić się, czy jest ono wyłączone i czy
akumulator został wyjęty.
Narzędzie i jego otwory wentylacyjne powinny być
utrzymywane w czystości. Otwory wentylacyjne należy
czyścić w regularnych odstępach czasu i za każdym
razem, gdy są przytkane. (Rys. 11)
Wymiana szczotek węglowych
Szczotki węglowe należy regularnie kontrolować i w razie
potrzeby wymieniać. Potrzebę wymiany szczotek
sygnalizuje znak granicy zużycia. Szczotki węglowe
powinny być czyste, aby można je było swobodnie
wsunąć do opraw. Obie szczotki węglowe wymieniać
równocześnie. Używać wyłącznie identycznych szczotek
węglowych. (Rys. 12)
Włożyć końcówkę śrubokręta płaskiego w nacięcie w
narzędziu i ściągnąć osłonę nasadki oprawy. (Rys. 13)
Za pomocą śrubokręta ściągnąć nasadki opraw szczotek
węglowych. Wyjąć zużyte szczotki węglowe, wsadzić
nowe i założyć ponownie nasadki opraw szczotek.
(Rys. 14)
Ponownie osadzić osłonę nasadki oprawy w narzędziu.
W celu zachowania odpowiedniego poziomu
BEZPIECZEŃSTWA i NIEZAWODNOŚCI wyrobu,
wszelkie naprawy i różnego rodzaju prace konserwacyjne
lub regulacje powinny być przeprowadzane przez
autoryzowany punkt serwisowy narzędzi Makita zawsze z
użyciem oryginalnych części zamiennych Makita.
WYPOSAŻENIE DODATKOWE
UWAGA:
• Z opisanym w niniejszym podręczniku narzędziem
marki Makita współpracują zalecane poniżej akcesoria
i przystawki. Stosowanie innych akcesoriów lub
przystawek grozi obrażeniami ciała. Akcesoria lub
przystawki należy wykorzystywać wyłącznie do celów,
do których zostały przeznaczone.
Więcej szczegółów na temat podanego wyposażenia
dodatkowego można uzyskać w miejscowym punkcie
serwisowym narzędzi Makita.
•Osłona tarczy (pokrywa tarczy)
•Kołnierz wewnętrzny
• Tarcze z obniżonym środkiem 115 mm
•Nakrętka zabezpieczająca (do tarczy z obniżonym
środkiem)
• Gumowa tarcza
• Ściernice
•Nakrętka zabezpieczająca (do ściernicy)
• Klucz do nakrętki zabezpieczającej
• Szczotka druciana doczołowa
•Stożkowa szczotka druciana 85
• Uchwyt boczny
•Osłona tarczy do zbierania pyłu
• Tarcza diamentowa 115 mm
•Różne typy oryginalnych akumulatorów i ładowarek
marki Makita
22
Page 23

Dotyczy tylko krajów europejskich
Poziom hałasu i drgań
Typowy poziom ciśnienia akustycznego A wynosi 75 dB
(A).
Niepewność wynosi 3 dB (A).
Poziom hałasu podczas pracy może przekraczać 85 dB
(A).
– Stosować ochraniacze na uszy. –
Typowa w artość ważonej średniej kwadratowej
przyspieszenia wynosi 3 m/s
2
.
Powyższe wartości uzyskano w oparciu o normę
EN60745.
DEKLARACJA ZGODNOŚCI
ELEKTROMAGNETYCZNEJ
W świetle Dyrektyw Rady o sygnaturach 89/336/ EEC i
98/37/EC oświadczamy na własną odpowiedzialność, że
omawiany wyrób jest zgodny z normami EN60745,
EN55014 zawartymi w dokumentach normalizacyjnych.
Yasuhiko Kanzaki CE 2005
Dyrektor
MAKITA INTERNATIONAL EUROPE LTD.
Michigan Drive, Tongwell, Milton Keynes, Bucks MK15
8JD, ENGLAND
Odpowiedzialny producent:
Makita Corporation Anjo Aichi Japan
23
Page 24

УТФФЛКБ
ÌþČ¹ÞšÞ¦Č=ð=þˇğšý³=Ł¦Š³
NK = Ë Þ þ −ð˛
OK= Ëײ¹Þ˛Č=₣˛¹²ş
PK= flÝþð=˛ðð³ý³ÝČ²þײ
QK= flÝþð¦×þŁð˛=Ł˛Ý˛
RK= ÔŠŁ¦ŽÞþÐ=ŁŞðÝć₣˛²šÝş
SK= ÊÞŠ¦ð˛²þ×
TK = Ï ł×˛ŽŠšÞ¦š=Š¦¹ð˛
UK= ÒžšÝ=−þŠĞ¦−Þ¦ð˛
VK ‡¦Þ²
NMK= Ô²þ−þ×Þ˛Č=ł˛Ðð˛
NNK= ‚¦¹ð=¹=³łÝ³ˇÝšÞÞŞý=¾šÞ²×þýL
ÍÞþłþ½³Þð¾¦þÞ˛ÝşÞŞÐ=Š¦¹ð
NOK= ‡Þ³²×šÞÞ¦Ð=½Ý˛Þš¾
NPK= ËÝ ć₣
NQK= fiÝý˛žÞŞÐ=Š¦¹ð
NRK= ‡Þ³²×šÞÞ¦Ð=½Ý˛Þš¾
NSK= ˆ−¦ÞŠšÝş
=ŠÝČ=¹²þ−юЧЮюР=ł˛Ðð¦
NTK= ‡Ş¼þŠÞŞš=ŁšÞ²¦ÝČ¾¦þÞÞŞš=
þ²Łš×¹²¦Č
NUK= ‡¼þŠÞŞš=ŁšÞ²¦ÝČ¾¦þÞÞŞš=
þ²Łš×¹²¦Č
NVK= Ïł×˛Þ¦₣¦²šÝşÞ˛Č=ýš²ð˛
OMK= ËתĞð˛=Šš×Ž˛²šÝČ
ONK= ϲŁš×²ð˛
OOK= ËþÝ−˛₣þð=Šš×Ž˛²šÝČ=ğš²ð¦
Ò„ÛÎÊı„ÔËÊ„=ÛfiÓfiËÒ„ÓÊÔÒÊËÊ
ÍþŠšÝş _d^QRM _d^QRO
‚¦˛ýš²×=Š¦¹ð˛ NNR = ýý
Óšžşˇ˛=Ğ−¦ÞŠšÝČ
ФрюЧю¹²ş=ˇšž=Þ˛ł×³žð¦=EþˇLý¦ÞF NMMMM
Ïˇğ˛Č=ŠÝ¦Þ˛ PNT=ýý
‡š¹=Þš²²þ NIV=ðł
Ó˛¹₣š²Þþš=Þ˛−×ČŽšÞ¦š NQIQ=‡=−þ¹²K=²þð˛ NU=‡ =−þ¹²K=²þð˛
≥ flݲłþŠ˛×Č=Þ˛ĞšÐ=−þ¹²þČÞÞþ=ŠšÐ¹²Ł³ćğšÐ=−×þł×˛ýýš=¦¹¹ÝšŠþŁ˛Þ¦Ð=¦=ײž×˛ˇþ²þðI=³ð˛ž˛ÞÞŞš=žŠš¹ş=
²š¼Þ¦₣š¹ð¦š=¼˛×˛ð²š×¦¹²¦ð¦=ýþł³²=ˇŞ²ş=¦žýšÞšÞŞ=ˇšž=−ךŠŁ˛×¦²šÝşÞþłþ=³ŁšŠþýÝšÞ¦ČK
≥ Ìצýš₣˛Þ¦šW=Òš¼Þ¦₣š¹ð¦š=¼˛×˛ð²š×¦¹²¦ð¦=ýþł³²=þ²Ý¦₣˛²ş¹Č=Ł=ž˛Ł¦¹¦ýþ¹²¦=þ²=¹²×˛ÞŞ
Ô¦ýŁþÝŞ=
ΦŽš=−צŁšŠšÞ Ş=¹¦ýŁþÝŞI=¦¹−þÝşž³šýŞš=ŠÝČ=
ĆÝšð²×þ¦Þ¹²×³ýšÞ²˛K=̚ךŠ=¦¹−þÝşžþŁ˛Þ¦šý=
³ˇšŠ¦²š¹şI=₣²þ=ŁŞ=−þÞ¦ý˛š²š=¦¼=žÞ˛₣šÞ¦šK
KKKKKKKKKKKKK ÏŠšŁ˛Ð²š=ž˛ğ¦²ÞŞš=þ₣ð¦K
Òþ Ý şðþ=Š ÝČ=¹²×˛Þ=„Ô
Κ=ŁŞð¦ŠŞŁ˛Ð²š=ĆÝšð²×¦₣š¹ðþš=þˇþ׳ŠþŁ˛Þ¦š=
Łýš¹²š=¹=þˇŞ₣ÞŞý=ý³¹þ×þý>
‡=¹þþ²Łš²¹²Ł¦¦=¹=šŁ×þ−šÐ¹ðþÐ=Š¦×šð²¦ŁþÐ=OMMOLVSL
bd=þˇ=³²¦Ý¦ž˛
ĆЭšр²ЧюЮЮюłþ=þˇþ׳ŠþŁ˛Þ¦Č==¦=š÷=−צýšÞšÞ¦Č=Ł=
¹þþ²Łš²¹²Ł¦¦=¹=ýš¹²ÞŞý¦=ž˛ðþÞ˛ý¦=ĆÝšð²×¦₣š¹ðþš=
þˇþ׳ŠþŁ˛Þ¦šI=ˇŞŁĞšš=Ł=Ćð¹−ݳ˛²˛¾¦¦I=ŠþÝŽÞþ=
³²¦Ý¦žþŁŞŁ˛²ş¹Č=þ²ŠšÝşÞþ=ˇšžþ−˛¹ÞŞý=ŠÝČ=
þð׳Ž˛ćğšÐ=¹×šŠŞ=¹−þ¹þˇþýK
βžÞ˛₣šÞ¦š
ÊÞ¹²×³ýšÞ²=−
ž˛₣¦¹²ð¦=¦=ךžð¦=ý˛²š×¦˛ÝþŁ=¦ž=ýš²˛Ýݲ=¦=ð˛ýÞČ=ˇšž=
¦¹−þÝşžþŁ˛Þ¦Č=ŁþŠŞK
¾¦Č¦=¹²˛×þłþ=ĆÝšð²×¦₣š¹ðþłþ=¦=
ךŠÞ˛žÞ˛₣šÞ=ŠÝČ=Ğݦ½þŁ˛Þ¦ČI=
END002-1
Ïfl˜Ê„=ÌÓfi‡ÊÈfi=Ò„ЫОКЛК=
fl„ÂÏÌfiÔÎÏÔÒÊ GEA002-3
ÌÓ„‚ÏÔÒ„Ó„‰„ÎÊ„W
Ì×þ₣¦²˛Ð²š=Ł¹š=¦Þ¹²×³ð¾¦¦K=Κ¹þˇÝćŠšÞ¦š=Ł¹š¼=
¦Þ¹²×³ð¾¦ÐI=³ð˛ž˛ÞÞŞ¼=Þ¦ŽšI=ýþŽš²=−צŁš¹²¦=ð=
−þײŽšÞ¦ć=ĆÝšð²×¦₣š¹ð¦ý=²þðþýI=−þŽ˛×³=¦L¦Ý¦=
¹š×şšžÞþÐ=²×˛ŁýšK=Òš×ý¦Þ=?ĆÝšð²×þ¦Þ¹²×³ýšÞ²?=Łþ=
Ł¹š¼=−ךŠ³−ךŽŠšÞ¦Č¼I=³ð˛ž˛ÞÞŞ¼=Þ¦ŽšI=þ²Þþ¹¦²¹Č=
ðþ=Ł¹šý³=¦Þ¹²×³ýšÞ²³I=ײˇþ²˛ćğšý³=þ²=¹š²¦=¦Ý¦=Þ˛=
˛ðð³ý³ÝČ²þײ¼K
ÔÏÛÓfiÎÊÒ„=‚fiÎ΢„=
ÊÎÔÒУТЛЩККK
flšžþ−˛¹Þþ¹²ş=Ł=ýš¹²š=ŁŞ−þÝÞšÞ¦Č=ײˇþ²
NK Ì þŠ Š š ׎ ¦ Ł˛Ð²š=₣¦¹²þ²³=¦=þˇš¹−š₣¦Ł˛Ð²š=
¼þ×þгć=þ¹ŁšğšÞÞþ¹²ş=Þ˛=ײˇþ₣šý=ýš¹²šK=
²¼Ý˛ýÝšÞÞþš=¦=²šýÞþš=ײˇþ₣šš=ýš¹²þ=ýþŽš²=
−צŁš¹²¦=ð=²×˛Łý˛ýK
OK Κ=−þÝşž³Ð²š¹ş=ĆÝšð²×þ¦Þ¹²×³ýšÞ²þý=Łþ=
Łž×ŞŁþþ−˛¹ÞþÐ=˛²ýþ¹½š×šI=Þ˛−צýš×I=Ł=
−צ¹³²¹²Ł¦¦=Ýšłðþ=Łþ¹−ݲ
Ž¦Šðþ¹²šÐI=ł˛žþŁ=¦Ý¦=−ŞÝ¦K=Ìצ=ײˇþ²š=
ĆÝšð²×þ¦Þ¹²×³ýšÞ²˛=ŁþžÞ¦ð˛ć²=¦¹ðתI=ðþ²þתš=
ýþł³²=−צŁš¹²¦=ð=Łþ¹−ݲýšÞšÞ¦ć=−ŞÝ¦=¦Ý¦=ł˛žþŁK
PK Ìצ=ײˇþ²š=¹=ĆÝšð²×þ¦Þ¹²×³ýšÞ²þý=Þš=
Šþ−³¹ð˛Ð²š=Šš²šÐ=¦Ý¦=−ю¹²юЧюЮЮ¦¼=р=эš¹²³=
−×þ¦žŁþŠ¹²Ł˛=ײˇþ²K=Κ=þ²ŁÝšð˛Ð²š¹ş=Łþ=Ł×šýČ=
ײˇþ²ŞI=²˛ð=ð˛ð=Ć²þ=−צŁšŠš²=ð=−
Þ˛Š=ĆÝšð²×þ¦Þ¹²×³ýšÞ²þýK
jNQ
K
ýšÞČć𦼹Č=
þ²š×š=ðþÞ²×þÝČ=
OQ
Page 25

˚Ýšð²×þˇšžþ−˛¹Þþ¹²ş
QK ‡¦Ýð˛=ĆÝšð²×þ¦Þ¹²×³ýšÞ²˛=ŠþÝŽÞ˛=
¹þþ²Łš²¹²ŁþŁ˛²ş=¹š²šŁþÐ=×þžš²ðšK=ΦðþłŠ˛=Þš=
ŁÞþ¹¦²š=Þ¦ð˛ð¦¼=¦žýšÞšÞ¦Ð=Ł=ðþÞ¹²×³ð¾¦ć=
×þžš²ð¦K=Ìצ=¦¹−þÝşžþŁ˛Þ¦¦=
ĆÝšð²×þ¦Þ¹²×³ýšÞ²˛=¹=ž˛žšýÝšÞ¦šý=Þš=
¦¹−þÝşž³Ð²š=−š×š¼þŠÞ¦ð¦K=Óþžš²ð¦=¦=Ł¦Ýð¦I=Þš=
−þŠŁš×ł˛ŁĞ¦š¹Č=¦žýšÞšÞ¦ČýI=¹Þ¦Ž˛ć²=צ¹ð=
−þײŽšÞ¦Č=ĆÝšð²×¦₣š¹ð¦ý=²þðþýK
RK Êžˇšł˛Ð²š=ðþÞ²˛ð²˛=³
ž˛žšýÝšÞÞŞý¦=−þŁš×¼Þþ¹²Čý¦I=²˛ð¦ý¦=ð˛ð=
²×³ˇŞI=ײŠ¦˛²þתI=ˇ˛²˛×š¦=þ²þ−ÝšÞ¦Č=¦=
¼þÝþŠ¦ÝşÞ¦ð¦K=Ìצ=ðþÞ²˛ð²š=²šÝ˛=¹=
ž˛žšýÝšÞÞŞý¦=−ךŠýš²˛ý¦=³ŁšÝ¦₣¦Ł˛š²¹Č=צ¹ð=
−þײŽšÞ¦Č=ĆÝšð²×¦₣š¹ð¦ý=²þðþýK
SK Κ=−þŠŁš×ł˛Ð²š=ĆÝšð²×þ¦Þ¹²×³ýšÞ²=
ŁþžŠšÐ¹²Ł¦ć=ŠþŽŠČ=¦Ý¦=ŁÝ˛ł¦K=Ìþ−
Þ˛=ĆÝšð²×þ¦Þ¹²×³ýšÞ²=−þŁŞĞ˛š²=צ¹ð=−þײŽšÞ¦Č=
ĆÝšð²×¦₣š¹ð¦ý=²þðþýK
TK fiðð³×˛²Þþ=þˇ×˛ğ˛Ð²š¹ş=¹þ=ĞÞ³×þý=−¦²˛Þ¦ČK=
ΦðþłŠ˛=Þš=¦¹−þÝşž³Ð²š=ĞÞ³×=−¦²˛Þ¦Č=ŠÝČ=
−š×šÞþ¹ð¦I=−š×šýšğšÞ¦Č=¦Ý¦=¦žŁÝš₣šÞ¦Č=
Ł¦Ýð¦=¦ž=×þžš²ð¦K=Ó˛¹−þݲł˛Ð²š=ĞÞ³×=Þ˛=
ײ¹¹²þČÞ¦¦=þ²=¦¹²þ
þ¹²×޼=ðײšŁ=¦=ŠŁ¦Ž³ğ¦¼¹Č=Šš²˛ÝšÐK=
ÌþŁ×šŽŠšÞÞŞš=¦Ý¦=ž˛−³²˛ÞÞŞš=¹š²šŁŞš=ĞÞ³×Ş=
³ŁšÝ¦₣¦Ł˛ć²=צ¹ð=−þײŽšÞ¦Č=ĆÝšð²×¦₣š¹ð¦ý=
²þðþýK
UK Ìצ=¦¹−þÝşžþŁ˛Þ¦¦=ĆÝšð²×þ¦Þ¹²×³ýšÞ²˛=ŁÞš=
−þýšğšÞ¦ČI=¦¹−þÝşž³Ð²š=³ŠÝ¦Þ¦²šÝşI=
−þŠ¼þŠČğ¦Ð=ŠÝČ=Ć²¦¼=¾šÝšÐK=ʹ
¹þþ²Łš²¹²Ł³ćğšłþ=ĞÞ³×˛=¹Þ¦Ž˛š²=צ¹ð=
−þײŽšÞ¦Č=ĆÝšð²×¦₣š¹ð¦ý=²þðþýK
Ȧ₣Þ˛Č=ˇšžþ−˛¹Þþ¹²ş
VK Ìצ=¦¹−þÝşžþŁ˛Þ¦¦=ĆÝšð²×þ¦Þ¹²×³ýšÞ²˛=
ˇ³Šş²š=ˇŠ¦²šÝşÞŞI=¹ÝšŠ¦²š=ž˛=²šýI=₣²þ=ŁŞ=
ŠšÝ˛š²šI=¦=׳ðþŁþŠ¹²Ł³Ð²š¹ş=žŠ×˛ŁŞý=
¹ý޹ÝþýK=Κ=−þÝşž³Ð²š¹ş=
ĆÝšð²×þ¦Þ¹²×³ýšÞ²þýI=š¹Ý¦=ŁŞ=³¹²˛Ý¦I=
¼þŠ¦²š¹ş=−þŠ=ŁþžŠšÐ¹²Ł¦šý=Þ˛×ðþ²¦ðþŁI=
Þ˛
˛ÝðþłþÝČ=¦Ý¦=Ýšð˛×¹²ŁšÞÞŞ¼=−ך−˛×˛²þŁK=
‚˛Žš=ý łÞþŁšÞÞ˛Č=ÞšŁÞ¦ý˛²šÝşÞþ¹²ş=−צ=
¦¹−þÝşžþŁ˛Þ¦¦=ĆÝšð²×þ¦Þ¹²×³ýšÞ²˛=ýþŽš²=
−צŁš¹²¦=ð=¹š×şšžÞþÐ=²×˛ŁýšK
NMK ʹ−þÝşž³Ð²š=¹×šŠ¹²Ł˛=¦ÞŠ¦Ł¦Š³˛ÝşÞþÐ=
ž˛ğ¦²ŞK=‡¹šłŠ˛=Þ˛
ÔךŠ¹²Ł˛=¦ÞŠ¦Ł¦Š³˛ÝşÞþÐ=ž˛ğ¦²ŞI=²˛ð¦š=ð˛ð=
ý˛¹ð˛=þ²=−ŞÝ¦I=ž˛ğ¦²Þ˛Č=Þš¹ðþÝşžČğ˛Č=þˇ³ŁşI=
ð˛¹ð˛=¦Ý¦=Þ˛³ĞÞ¦ð¦I=¦¹−þÝşž³šýŞš=Ł=
¹þþ²Łš²¹²Ł³ćğ¦¼=³¹ÝþŁ¦Č¼I=−þžŁþÝČ²=¹Þ¦ž¦²ş=
צ¹ð=−þݳ₣šÞ¦Č=²×˛ŁýŞ
NNK Ê žˇšł˛Ð²š=¹Ý³₣˛ÐÞþłþ=ž˛−³¹ð˛K=̚ךŠ=
−þŠðÝć₣šÞ¦šý=³ˇšŠ¦²š¹şI=₣²þ=ŁŞðÝć₣˛²šÝş=
Þ˛¼þŠ¦²¹Č=Ł=ŁŞðÝć₣šÞÞþý=−þÝþŽšÞ¦¦K=
̚ךÞþ¹ð˛=ĆÝšð²×þ¦Þ¹²×³ýšÞ²˛=¹=−˛Ýş¾šý=Þ˛=
ŁŞðÝć₣˛²šÝš=¦Ý¦=ŁðÝć₣šÞ¦š=Ł¦Ýð¦=Ł=×þžš²ð³=¹=
ŁðÝć₣šÞÞŞý=ŁŞðÝć₣˛²šÝšý=¦Þ¹²×³ýšÞ²˛=ýþŽš²=
−צŁš¹²¦=ð=Þš¹₣˛¹²Þþý³=¹Ý³₣˛ćK
NOK ̚ךŠ=Ł
ðÝć₣šÞ¦šý=ĆÝšð²×þ¦Þ¹²×³ýšÞ²˛=
¹Þ¦ý¦²š=¹=Þšłþ=Ł¹š=ךł³Ý¦×þŁþ₣ÞŞš=
₣˛¹²ðþŁ=²šÝ˛=¹=
˛Š˛Þ¦š=ŁþŠŞ=
₣Þ¦ðþŁ=²š−ݲI=ý˛¹Ý˛I=
−þÝşžþŁ˛Þ¦š=
ŠšŁ˛Ð²š=ž˛ğ¦²ÞŞš=þ₣ð¦K=
K
¦Þ¹²×³ýšÞ²Ş=¦=ł˛š₣ÞŞš=ðÝć₣¦K=·˛š₣ÞŞÐ=¦Ý¦=
ךł³Ý¦×þŁþ₣ÞŞÐ=ðÝć₣I=þ¹²˛ŁĞ¦Ð¹Č=ž˛ðך−ÝšÞÞŞý=
Þ˛=Ł×˛ğ˛ćğšÐ¹Č=Šš²˛Ý¦I=ýþŽš²=−צŁš¹²¦=ð=
²×˛ŁýšK
NPK Ìצ=Ćð¹−ݳ˛²˛¾¦¦=³¹²×þй²Ł˛=Þš=²ČÞ¦²š¹şK=
‡¹šł
Š˛=¹þ¼×˛ÞČвš=³¹²þÐ₣¦Łþš=−þÝþŽšÞ¦š=¦=
ײŁÞþŁš¹¦šK=˚²þ=−þžŁþݦ² =ݳ ₣Ğš=³−ײŁÝČ²ş=
ĆÝšð²×þ¦Þ¹²×³ýšÞ²þý=Ł=Þš−ךŠŁ¦ŠšÞÞŞ¼=
¹¦²³˛¾¦Č¼K
NQK ÏŠšŁ˛Ð²š¹ş=¹þþ²Łš²¹²Ł³ćğ¦ý=þˇ×˛žþýK=Κ=
Þ˛ŠšŁ˛Ð²š=¹ŁþˇþŠÞ³ć=þŠšŽŠ³=¦Ý¦=³ð×˛ĞšÞ¦ČK=
‡˛Ğ¦=ŁþÝþ¹ŞI=þŠšŽŠ˛=¦=−š×₣˛²ð¦=ŠþÝŽÞŞ
Ł¹šłŠ˛=Þ˛¼þŠ¦²ş¹Č=Þ˛ =ײ¹¹²þČÞ¦¦=þ²=
Ł×˛ğ˛ć𦼹Č=Šš²˛ÝšÐK=ÔŁþˇþŠÞ ˛Č=þŠšŽŠ˛I=
³ð×˛ĞšÞ¦Č=¦Ý¦=ŠÝ¦ÞÞŞš=ŁþÝþ¹Ş=ýþł³²=−þ−˛¹²ş=Ł=
ŠŁ¦Ž³ğ¦š¹Č=Šš²˛Ý¦=³¹²×þй²Ł˛K
NRK „¹Ý¦=ĆÝšð²×þ¦Þ¹²×³ýšÞ²=þˇþ׳ŠþŁ˛Þ=¹¦¹²šýþÐ=
³Š ˛ÝšÞ¦Č=¦=¹ˇþײ=−ŞÝ¦I=³ˇšŠ¦²š¹şI=₣²þ=þÞ˛
−þŠðÝć₣šÞ˛=¦=¦¹−þÝşž³š²¹Č=¹þþ²Łš²¹²Ł³ćğ¦ý=
þˇ×˛žþýK=ʹ−þÝşžþŁ˛Þ¦š=²˛ð¦¼=¹¦¹²šý=−þžŁþÝČš²=
¦žˇšŽ˛²ş=Ł×šŠÞþłþ=ŁÝ¦ČÞ¦Č=−ŞÝ¦K
ʹ−þÝşžþŁ˛Þ¦š=ĆÝšð²×þ¦Þ¹²×³ýšÞ²˛=¦=³¼þŠ=ž˛=Þ¦ý
NSK Κ=−צݲł˛Ð²š=¦žÝ¦ĞÞ¦¼=³¹¦Ý¦Ð=ð=
ĆÝšð²×þ¦Þ¹²×³ýšÞ²³K=ʹ−þÝşž³Ð²š=¦Þ¹²×³ýšÞ²I=
¹þþ²Łš²¹²Ł³ćğ¦Ð=ŁŞ−þÝÞČšýþÐ=Ł˛
ÌײŁ¦ÝşÞþ=−þŠþˇ×˛ÞÞŞÐ=ĆÝšð²×þ¦Þ¹²×³ýšÞ²=
−þžŁþݦ² =ŁŞ−þÝÞ¦²ş=ײˇþ²³=ݳ₣Ğš=¦=ˇšžþ−˛¹Þšš=¹=
−×þ¦žŁþŠ¦²šÝşÞþ¹²şćI=Þ˛=ðþ²þ׳ć=þÞ=ײ¹¹₣¦²˛ÞK
NTK Κ=−þÝşž³Ð²š¹ş=ĆÝšð²×þ¦Þ¹²×³ýšÞ²þý=¹=
Þš¦¹−ײŁÞŞý=ŁŞðÝć₣˛²šÝšýK=ÈćˇþÐ=
ĆÝšð²×þ¦Þ¹²×³ýšÞ²=¹=Þš¦¹−ײŁÞŞý=ŁŞðÝć₣˛²šÝšý=
þ−˛¹šÞ=¦=ŠþÝŽšÞ=ˇŞ²
NUK ̚ךŠ=ŁŞ−þÝÞšÞ¦šý=ךł³Ý¦×þŁþðI=¹ýšÞþÐ=
−×¦Þ˛ŠÝšŽÞþ¹²šÐ=¦Ý¦=¼×˛ÞšÞ¦šý=
ĆÝšð²×þ¦Þ¹²×³ýšÞ²˛=Ł¹šłŠ˛=þ²ðÝć₣˛Ð²š=šłþ=þ²=
¦¹²þ₣Þ¦ð˛=−¦²˛Þ¦Č=¦L¦Ý¦=þ²=˛ðð³ý³ÝČ²þײK=
Ò˛ð¦š=−ךŁšÞ²¦ŁÞŞš=ýš×Ş=−ךŠþ¹²þ×þŽÞþ¹²¦=
¹Þ¦Ž˛ć²=צ¹ð=¹Ý³₣˛ÐÞþłþ=ŁðÝć₣šÞ¦Č=
ĆÝšð²×þ¦Þ¹²×³ýšÞ²˛K
NVK Û×˛Þ¦²š=ĆÝšð²×þ¦Þ¹²×³ýšÞ²Ş=Ł=ýš¹²˛¼I=
ÞšŠþ¹²³−ÞŞ¼=ŠÝČ
ݦ¾˛ýI=Þš=žÞ˛ðþýŞý=¹=ײˇþ²þÐ=²˛ðþłþ=
¦Þ¹²×³ýšÞ²˛=¦Ý¦=Þš=−×þ₣¦²˛ŁĞ¦ý=Š˛ÞÞŞš=
¦Þ¹²×³ð¾¦¦I=−þÝşžþŁ˛²ş¹Č=¦ýK=
˚Ýšð²×þ¦Þ¹²×³ýšÞ²=þ−˛¹šÞ=Ł=׳ð˛¼=Þšþ−Ş²ÞŞ¼=
−þÝşžþŁ˛²šÝšÐK
OMK ÔþŠš×Ž¦²š=¦Þ¹²×³ýšÞ²=Ł=−þ×ČŠðšK=ÒˇšŠ¦²š¹ş=Ł=
¹þþ¹Þþ¹²¦I=þ²¹³²¹²Ł¦¦=Šš½þ×ý˛¾¦Ð=
ŠŁ¦Ž³ğ¦¼¹Č=³žÝþŁI=−юЭюэюр=р˛ð¦¼Ý¦ˇþ=
Šš²˛
ÝšÐ=¦Ý¦=Š×³ł¦¼=Šš½šð²þŁI=ðþ²þתš=ýþł³²=
−þŁÝ¦Č²ş=Þ˛=ײˇþ²³=ĆÝšð²×þ¦Þ¹²×³ýšÞ²˛K=„¹Ý¦=
¦Þ¹²×³ýšÞ²=−þŁ×šŽŠšÞI=þ²×šýþÞ²¦×³Ð²š=šłþ=
−š×šŠ=¦¹−þÝşžþŁ˛Þ¦šýK=flþÝşĞþš=₣¦¹Ýþ=
Þš¹₣˛¹²Þ޼=¹Ý³₣˛šŁ=−×þ¦¹¼þŠ¦²=¦žž˛=−Ýþ¼þłþ=
¹þŠš×Ž˛Þ¦Č=ĆÝšð²×þ¦Þ¹²×³ýšÞ²˛K
ONK ÓšŽ³ğ¦Ð=¦Þ¹²×³ýšÞ²=Ł¹šłŠ˛=ŠþÝŽšÞ=ˇŞ²ş=
þ¹²×Şý=¦=₣¦¹²ŞýK=Ôþþ²Łš²¹²Ł
¹=ךŽ³ğ¦ý=¦Þ¹²×³ýšÞ²þýI=¦ýšćğ¦ý=þ¹²×Şš=
ךŽ³ğ¦š=рЧюэр¦I=ŠšЭ˛š²=šłþ=ýšÞšš=
ş=þ²×šýþÞ²¦×þŁ˛ÞK
=Šš²šÐI=¦=Þš=−þžŁþÝČвš=
³ćğšš=þˇ×˛ğšÞ¦š=
=
=
ý¦=ײˇþ²šK=
OR
Page 26

−þŠŁš×ŽšÞÞŞý=Šš½þ×ý˛¾¦ČýI=₣²þ=−þžŁþÝČš²=
ݳ₣Ğš=³−ײŁÝČ²ş=¦ýK
OOK ʹ−þÝşž³Ð²š=ĆÝšð²×þ¦Þ¹²×³ýšÞ²I=
−×¦Þ˛ŠÝšŽÞþ¹²¦=¦=Þ˛¹˛Šð¦=Ł=¹þþ²Łš²¹²Ł¦¦=¹=
Š˛ÞÞŞý¦=¦Þ¹²×³ð¾¦Čý¦=¦=Ł=¾šÝČ¼I=ŠÝČ=
ðþ²þת¼=þÞ=−ךŠÞ˛žÞ˛₣šÞI=³₣¦²ŞŁ˛Č=−צ=Ć²þý=
³¹ÝþŁ¦Č=¦=Ł¦Š=ŁŞ−þÝÞČšýþÐ=ײˇþ²ŞK=
ʹ
−þÝşžþŁ˛Þ¦š=ĆÝšð²×þ¦Þ¹²×³ýšÞ²˛=ŠÝČ=
ŠšÐ¹²Ł¦ÐI=þ²Ý¦₣˛ć𦼹Č=þ²=²š¼I=ŠÝČ=ðþ²þת¼=þÞ=
−ךŠÞ˛žÞ˛₣šÞI=ýþŽš²=−צŁš¹²¦=ð=¹þžŠ˛Þ¦ć=
þ−˛¹ÞþÐ=¹¦²³˛¾¦¦K
ʹ−þÝşžþŁ˛Þ¦š=ĆÝšð²×þ¦Þ¹²×³ýšÞ²˛I=
ײˇþ²˛ćğšłþ=Þ˛=˛ðð³ý³ÝČ²þײ¼I=¦=³¼þŠ=ž˛=Þ¦ý
OPK ̚ךŠ=³¹²˛ÞþŁðþÐ=˛ðð³ý³ÝČ²þ×Þþłþ=ˇÝþð˛=
³ˇšŠ¦²š¹şI=₣²þ=ŁŞðÝ
ŁŞðÝć₣šÞÞþý=−þÝþŽšÞ¦¦K=Ò¹²˛ÞþŁð˛=
˛ðð³ý³ÝČ²þ×Þþłþ=ˇÝþð˛=Ł=¦Þ¹²×³ýšÞ²=¹=
ŁðÝć₣šÞÞŞý=ŁŞðÝć₣˛²šÝšý=ýþŽš²=−צŁš¹²¦=ð=
Þš¹₣˛¹²Þþý³=¹Ý³₣˛ćK
OQK ²×ČŽ˛Ð²š=˛ðð³ý³ÝČ²þ×=²þÝşðþ=ž˛×ČŠÞŞý=
³¹²×þй²ŁþýI=³ð˛ž˛ÞÞŞý=¦žłþ²þŁ¦²šÝšýK=
²×ČŠÞþš=³¹²×þй²ŁþI=−þŠ¼þŠ
²¦−˛=˛ðð³ý³ÝČ²þ×þŁI=ýþŽš²=−צŁš¹²¦=ð=−þŽ˛×³=
−צ=šłþ=¦¹−þÝşžþŁ˛Þ¦¦=¹=Š×³ł¦ý=˛ðð³ý³ÝČ²þ×ÞŞý=
ˇЭюрюэK
ORK ʹ−þÝşž³Ð²š=ĆÝšð²×þ¦Þ¹²×³ýšÞ²=²þÝşðþ=¹=
³ð˛ž˛ÞÞŞý¦=˛ðð³ý³ÝČ²þ×ÞŞý¦=ˇÝþð˛ý¦K=
ʹ−þÝşžþŁ˛Þ¦š=Š×³ł¦¼=˛ðð³ý³ÝČ²þ×ÞŞ¼=ˇÝþðþŁ=
ýþŽš²=−צŁš¹²¦=ð=²×˛Łýš=¦Ý¦=−þŽ
OSK ËþłŠ˛=˛ðð³ý³ÝČ²þ×ÞŞÐ=ˇÝþð=Þš=¦¹−þÝşž³š²¹ČI=
¼×˛Þ¦²š=šłþ=þ²ŠšÝşÞþ=þ²=ýš²˛Ýݦ₣š¹ð¦¼=
−ךŠýš²þŁI=²˛ð¦¼=ð˛ð=¹ðך−ð¦I=ýþÞš²ŞI=ðÝć₣¦I=
łŁþžŠ¦I=г׳−Ş=¦Ý¦=Š×³ł¦š=ÞšˇþÝşĞ¦š=
ýš²˛Ýݦ₣š¹ð¦š=−ךŠýš²ŞI=ðþ²þתš=ýþł³²=
−צŁš¹²¦=ð=ž˛ðþײ₣¦Ł˛Þ¦ć=ðþÞ²˛ð²þŁ=
˛ðð³ý³ÝČ²þ×Þþłþ=ˇÝþð˛=ýšŽŠ³=¹þˇþÐK=
²ðþײ₣¦Ł˛Þ¦š=ðþÞ²˛ð²þŁ=˛ðð³ý³ÝČ²þ×Þþłþ=ˇÝþð˛=
ýþŽš²=−צŁš¹²¦=ð=þŽþł˛ý=¦Ý¦=−þŽ˛×³K
OTK Ìצ=Þš−ײŁ¦ÝşÞþý=þˇ×˛ğšÞ¦¦=¦ž=
˛ðð³ý³ÝČ²þ×Þþłþ=ˇÝþð˛=ýþŽš²=−þ²š₣ş=
Ž¦Šðþ¹²şK=Êžˇšł˛Ð²š=ðþÞ²˛ð²˛=¹=ÞšÐK=‡=¹Ý³₣˛š=
ðþÞ²˛ð²˛=¹=ðþŽšÐ=−ЧюэюР²š=эš¹²ю=рюЮ²˛ð²˛=
þˇ¦ÝşÞŞý=ðþݦ₣š¹²Łþý=ŁþŠ
−þ−˛Š˛Þ¦Č=Ł=łÝ˛ž˛I=þˇ×˛²¦²š¹ş=ð=Ł×˛₣³K=
‰¦Šðþ¹²ş=¦ž=˛ðð³ý³ÝČ²þ×Þþłþ=ˇÝþð˛=ýþŽš²=
ŁŞžŁ˛²ş=ײžŠ×˛ŽšÞ¦š=¦Ý¦=þŽþł¦K
Ïˇ¹Ý³Ž¦Ł˛Þ¦š
OUK Ïˇ¹Ý³Ž¦Ł˛Þ¦š=ĆÝšð²×þ¦Þ¹²×³ýšÞ²˛=ŠþÝŽÞþ=
−×þŁþŠ¦²ş¹Č=²þÝşðþ= ðŁ˛Ý¦½¦¾¦×þŁ˛ÞÞŞý=
¹−š¾¦˛Ý¦¹²þý=−þ=ךýþÞ²³=¦=²þÝ
¦¹−þÝşžþŁ˛Þ¦šý=¦ŠšÞ²¦₣ÞŞ¼=ž˛−˛¹Þ޼=₣˛¹²šÐK=
˚²þ=−þžŁþݦ² =þˇš¹−š₣¦²ş=ˇšžþ−˛¹Þþ¹²ş=
ĆÝšð²×þ¦Þ¹²×³ýšÞ²˛K
OVK ÔÝšŠ³Ð²š=¦Þ¹²×³ð¾¦Čý=−þ=¹ý˛žðš=¦=ž˛ýšÞš=
−×¦Þ˛ŠÝšŽÞþ¹²šÐK
PMK Ó³₣ð¦=¦Þ¹²×³ýšÞ²˛=Ł¹šłŠ˛=ŠþÝŽÞŞ=ˇŞ²ş=
¹³¼¦ý¦=¦=₣¦¹²Şý¦=¦=Þš=ŠþÝŽÞŞ=ˇŞ²ş=¦žý˛ž˛ÞŞ=
ý˛¹Ýþý=¦Ý¦=¹ý˛
ć₣˛²šÝş=Þ˛¼þŠ¦²¹Č=Ł=
Čğšš=ŠÝČ=þŠÞþłþ=
˛×³K
ŞK=‡=¹Ý³₣˛š=
şðþ=¹=
žðþÐK
‚ПМПИОКÒ„È˙΢„=ÌÓfi‡ÊÈfi=
Ò„ЫОКЛК=fl„ÂÏÌfiÔÎÏÔÒÊ
NK ‡ ¹ šłŠ˛=¦¹−þÝşž³Ð²š=¹×šŠ¹²Ł˛=ž˛ğ¦²Ş=ž×šÞ¦Č=¦=
¹Ý³¼˛K=ÔÝšŠ³š²=²˛ðŽš=−þÝşžþŁ˛²ş¹Č=Š×³ł¦ý¦=
¹×šŠ¹²Ł˛ý¦=¦ÞŠ¦Ł¦Š³˛ÝşÞþÐ=ž˛ğ¦²ŞI=²˛ð¦ý¦=
ð˛ð=−ŞÝšž˛ğ¦²Þ˛Č=ý˛¹ð˛I=−š×₣˛²ð¦I=ð˛¹ð˛=¦=
½˛×²³ðK
OK ‡¹šłŠ˛=³¹²˛Þ˛ŁÝ¦Ł˛Ð²š=Þ˛=ýš¹²þ=þł×˛ŽŠšÞ¦Č
PK ʹ−þÝşž³Ð²š=Š¦¹ð¦=−ײŁ¦ÝşÞþłþ=ײžýš×˛I=
ý˛ð¹¦ý˛ÝşÞ˛Č=ײˇþ₣˛Č=¹ðþ×þ¹²ş=ðþ²þת¼I=ð˛ð=
ý¦Þ¦ý³ýI=¹þþ²Łš²¹²Ł³š²=ý˛ð¹¦ý˛ÝşÞþÐ=
¹ðþ×þ¹²¦=Ł×˛ğšÞ¦Č=¦Þ¹²×³ýšÞ²˛=ˇšž=Þ˛ł×³žð¦I=
³ð˛ž˛ÞÞþÐ=Þ˛=¦ŠšÞ²¦½¦ð˛¾¦юЮЮюР=²˛ˇÝ¦₣ðšK=
Ìצ=¦¹−þÝşžþŁ˛Þ¦¦=Š¦¹ðþŁ=¹=ŁþłÞ³²Şý=
¾šÞ²×þý=¦¹−þÝşž³Ð²š=²þÝ
³−×þ₣šÞ¦šý=¹²šðÝþŁюЭюрЮюэK
QK МšЧšŠ=Ćð¹−ݳ˛²˛¾¦šÐ=²ğ˛²šÝşÞþ=þ¹ýþ²×¦²š=
Š¦¹ð=¦=³ˇšŠ¦²š¹ş=Ł=þ²¹³²¹²Ł¦¦=²×šğ¦Þ=¦Ý¦=
−þŁ×šŽŠšÞ¦ÐK=ΚýšŠÝšÞÞþ=ž˛ýšÞ¦²š=
²×š¹Þ³ŁĞ¦Ð=¦Ý¦=−þŁ×šŽŠšÞÞŞÐ=Š¦¹ðK
RK ÔþˇÝćŠ˛Ð²š=¦Þ¹²×³ð¾¦¦=¦žłþ²þŁ¦²šÝČ=−þ=
−ײŁ¦ÝşÞþÐ=³¹²˛ÞþŁðš=¦=¦¹−þÝşžþŁ˛Þ¦ć=
Š¦¹ðþŁK=flš×šŽÞþ=þˇ×˛ğ˛Ð²š¹ş=¹=Š¦¹ð˛ý¦=¦=
˛ðð³×
SK Κ=¦¹−þÝşž³Ð²š=ð˛ð¦šÝ¦ˇþ=−š×š¼þŠÞŞš=
TK Ì þ Ý şž³Ð²š¹ş=²þÝşðþ=½Ý˛Þ¾˛ý¦I=³ð˛ž˛ÞÞŞý¦=
UK Êžˇšł˛Ð²š=−þŁ×šŽŠšÞ¦Č=Ğ−¦ÞŠšÝČI=½Ý˛Þ¾˛=
VK ‚ÝČ=¦Þ¹²×³ýšÞ²þŁI=−ךŠÞ˛žÞ˛₣šÞÞŞ¼=ŠÝČ=
NMK ̚ךŠ=¦¹ −þÝşžþŁ˛Þ¦šý=¦Þ¹²×³ýšÞ²˛=
NNK Ò ˇšŠ¦²š¹ş=Ł=Þþ×ý˛ÝşÞþÐ=½¦ð¹˛¾¦¦=
NOK Ëך−ðþ=Šš×Ž¦²š=¦Þ¹²×³ýšÞ²K
NPK Ó³ð¦=ŠþÝŽÞŞ=Þ˛¼þŠ¦²ş¹Č=Þ˛=ײ¹¹²þČÞ¦¦=þ²=
NQK ̚ךŠ=Ł
NRK ‚ÝČ=Ğݦ½þŁð¦=¦¹−þÝşž³Ð²š=Š¦¹ð=¹=
˛²Þþ=¼×˛Þ¦²š=¦¼K
Ł²³Ýð¦=¦Ý¦=˛Š˛−²š×Ş=ŠÝČ=³¹²˛ÞþŁð¦=
˛ˇ×˛ž¦ŁÞ޼=ð׳łþŁ=¹=ˇþÝşĞ¦ý=þ²Łš×¹²¦šýK
ŠÝČ=Ć²þłþ=¦Þ¹²×³ýšÞ²˛K
Eþ¹þˇšÞÞþ=šłþ=³¹²
¹²þ−юЧЮюР=ł˛Ðð¦K=ÌþŁ×šŽŠšÞ¦Č=Ć²¦¼=Šš²˛ÝšÐ=
ýþł³²=−צŁš¹²¦=ð=−юЭюэрš=рЧ³ł˛K
¦¹−þÝşžþŁ˛Þ¦Č=Š¦¹ðþŁ=¹=ךžşˇþŁŞý=
þ²Łš×¹²¦šýI=³ˇšŠ¦²š¹şI=₣²þ=ךžşˇ˛=Š¦¹ð˛=
Šþ¹²˛²þ₣Þ˛I=₣²þˇŞ=Š¦¹ð=ýþŽÞþ=ˇŞÝþ=
−þÝÞþ¹²şć
Þš−þ¹×šŠ¹²ŁšÞÞþ=Þ˛=²×šˇ³šýþÐ=Šš²˛Ý¦=Š˛Ð²š=
¦Þ¹²×³ýšÞ²³=−þײˇþ²˛²ş=Þ˛=ý˛ð¹¦ý˛ÝşÞþÐ=
¹ðþ×þ¹²¦=ˇšž=Þ˛ł×³žð¦=Ł=ˇšžþ−˛¹Þþý=
−þÝþŽšÞ¦¦I=ð˛ð=ý¦Þ¦ý³ýI=Ł=²š₣šÞ¦š=PM=¹šð³ÞŠK=
ΚýšŠÝšÞÞþ=ŁŞðÝć₣¦²š=¦Þ¹²×³ýšÞ²=Ł=¹Ý³₣˛š=
ŁþžÞ¦ðÞþŁšÞ¦Č=Ł¦ˇ×˛¾¦¦=¦Ý¦=ˇ¦šÞ¦ČI=₣²þ=
ýþŽš²=¹Ł¦Šš²šÝş¹²ŁþŁ˛²ş=þ=Þš−ײŁ¦ÝşÞþÐ=
³¹²˛ÞþŁðš=¦Ý¦=−Ýþ¼þÐ=ˇ˛Ý˛Þ¹¦×þŁðš=Š¦¹ð˛K=
Ϲýþ²×¦²š=¦Þ¹²×³ýšÞ²=ŠÝČ=þ−ךŠšÝšÞ¦Č=
−צ₣¦ÞŞK
þˇ×˛ˇ˛²ŞŁ˛šýþÐ=Šš²˛Ý¦K
Ł×˛ğ˛ć𦼹Č=Šš²˛ÝšÐK
₣²þ=Š¦¹ð=Þš=ð˛¹˛š²¹Č=Šš²˛Ý¦K
¹þþ²Łš²¹²Ł³ćğ¦ý¦=¼˛×˛ð²š×¦¹²¦ð˛ý¦K
=ž˛Łš×Þ³²ş=Þ˛=Ğ−¦ÞŠšÝşK
ðÝć₣šÞ¦šý=ŁŞðÝć₣˛²šÝČ=³ˇšŠ¦²š¹şI=
şðþ=Š¦¹ð¦=Å=
˛ÞþŁþ₣ÞþÐ=−þŁš×¼Þþ¹²¦F=¦Ý¦=
ENB099-1
K
OS
Page 27

NSK Κ=¦¹−þÝşž³Ð²š=ŠÝČ=Ğݦ½þŁð¦=þ²×šžÞŞš=
ð׳ł¦K
NTK ÔÝšŠ¦²š=ž˛=þˇ×˛ž³ćğ¦ý¦¹Č=¦¹ðײý¦K=‚š×Ž¦²š=
¦Þ¹²×³ýšÞ²=²˛ð¦ý=þˇ×˛žþýI=₣²þ=¦¹ðת=ˇŞÝ¦=
Þ˛−ײŁÝšÞŞ=þ²=Ł˛¹I=Š×³ł¦¼=ݦ¾=¦Ý¦=łþ×ć₣¦¼=
ý˛²š×¦˛ÝþŁK
NUK Ïˇ×˛²¦²š=ŁÞ¦ý˛Þ¦š=Þ˛=²þI=₣²þ=Š¦¹ð=ˇ³Š š² =
Þšðþ²þ×þš=Ł×šýČ=Ł×˛ğ˛²ş¹Č=−þ¹Ýš=
ŁŞðÝć₣šÞ¦Č=¦Þ¹²×³ýšÞ²˛K
NVK Ôײž³=−þ¹Ýš=þðþÞ₣˛Þ¦Č=ײˇþ²=Þš=−×¦ð˛¹˛Ð²š¹ş=
ð==þˇ×˛ˇþ²˛ÞÞþÐ=Šš²˛Ý¦K=ÏÞ˛=ýþŽš²=ˇŞ²ş=þ₣šÞş=
łþ×Č₣šÐI=₣²þ=−צŁšŠš²=ð=þŽþł˛ý=ðþŽ¦K
OMK Κ=¦¹−þÝşž³Ð²š=¦Þ¹²×³ýšÞ²=Þ˛=Ý桪¼=
ý˛²š×¦˛Ý˛¼I=¹þŠš×Ž˛ğ¦¼=˛¹ˇš¹²K
ONK Κ=¦¹−þÝşž³Ð²š=ŁþŠ³=¦Ý¦=Ğݦ½þŁ˛ÝşÞ³ć
¹ý˛žð³K
OOK Ìצ=¦¹−þÝşžþŁ˛Þ¦¦=þ²×šžÞþłþ=ð׳ł˛=Ł¹šłŠ˛=
ײˇþ²˛Ð²š=¹=³¹²˛ÞþŁÝšÞÞŞý=−ŞÝš¹ˇþ×ÞŞý=
þł×˛ŽŠšÞ¦šý=Š¦¹ð˛I=Þ˛Ý¦₣¦š=ðþ²þ×þłþ=
Þšþˇ¼þŠ¦ýþ=Ł=¹þþ²Łš²¹²Ł¦¦=¹=ýš¹²ÞŞý¦=
Þþ×ý˛²¦ŁÞŞý¦=²×šˇþŁ˛Þ¦Čý¦K
OPK Κ=−þŠŁš×ł˛Ð²š=þ²×šžÞŞš=ð׳ł¦=ð˛ðþý³Ý¦ˇþ=
ˇþðþŁþý³=Š˛ŁÝšÞ¦
ćK
=
ÔÏÛÓfiÎÊÒ„=‚fiÎ΢„=
ÊÎÔÒУТЛЩККK
‡fi‰Î˘„=ÊÎÔÒУТЛЩКК=МП=
Ò„ÛÎÊË„=fl„ÂÏÌfiÔÎÏÔÒÊ
ENC007-2
ˇÝþð˛=ýšŽŠ³=¹þˇþÐ=ýþŽš²=−צŁš¹²¦=ð=
ŁþžÞ¦ðÞþŁšÞ¦ć=ˇþÝşĞþłþ=²þð˛I=−š×šł×šŁ³I =
ŁþžýþŽÞŞý=þŽþł˛ý=¦=Š˛Žš=ײž×ŞŁ
SK Κ=¼×˛Þ¦²š=¦Þ¹²×³ýšÞ²=¦=˛ðð³ý³ÝČ²þ×ÞŞÐ=
ˇÝþð=Ł=ýš¹²˛¼I=łŠš=²šý−š×˛²³×˛=ýþŽš²=
Šþ¹²¦ł˛²ş=¦Ý¦=−ךŁŞĞ˛²ş=RMŒ`=ENOOŒcFK
TK Î š = ˇ×þ¹˛Ð²š=˛ðð³ý³ÝČ²þ×ÞŞÐ=ˇÝþð=Ł=þłþÞşI=
Š˛Žš=š¹Ý¦=þÞ=¹¦ÝşÞþ=−þŁ×šŽŠšÞ=¦Ý¦=
−þÝÞþ¹²şć=ŁŞĞšÝ=¦ž=¹²×þČK=fiðð³ý³ÝČ²þ×ÞŞÐ=
ˇÝþð=ýþŽš²=Łžþף˛²ş¹Č=−þŠ=ŠšÐ¹²Ł¦šý=þłÞČ
UK Κ=×þÞČвš=¦=Þš=³Š˛×Čвš=˛ðð³ý³ÝČ²þ×ÞŞÐ=
ˇÝþðK
³=ˇÝþð˛K
K
ÔÏÛÓfiÎÊÒ„=‚fiÎ΢„=
ÊÎÔÒУТЛЩККK
ÔþŁš²Ş=−þ=þˇš¹−š₣šÞ¦ć=ý˛ð¹¦ý˛ÝşÞþłþ=¹×þð˛=
¹Ý³ŽˇŞ=˛ðð³ý³ÝČ²þ×Þþłþ=ˇÝþð˛
NK  ˛×ČŽ˛Ð²š=˛ðð³ý³ÝČ²þ×ÞŞÐ=ˇÝþð=Šþ=²þłþI=ð˛ð=
þÞ=−þÝÞþ¹²şć=ײž×ČŠ¦²¹ČK
‡=¹Ý³₣˛š=−þ²š×¦=ýþğÞþ¹²¦=−צ=Ćð¹−ݳ˛²˛¾¦¦=
¦Þ¹²×³ýšÞ²˛I=−ךðײ²¦²š=ײˇþ²³=¦=ž˛×ČŠ¦²š=
˛ðð³ý³Ý
OK ΦðþłŠ˛=Þš=ž˛×ČŽ˛Ð²š=−þÝÞþ¹²şć=ž˛×ČŽšÞÞŞÐ=
PK ²×ČŽ˛ вš=˛ðð³ý³ÝČ²þ×ÞŞÐ=ˇÝþð=−צ=
Č²þ×ÞŞÐ=ˇÝþðK
˛ðð³ý³ÝČ²þ×ÞŞÐ=ˇÝþðK=
̚ךž˛×ČŠð˛=¹þð×˛ğ˛š²=¹×þð=¹Ý³ŽˇŞ=ˇÝþð˛K
ðþýÞ˛²ÞþÐ=²šý−š×˛²³×š=Ł=−ךŠšÝ˛¼=þ²=NMŒ`=Šþ=
QMŒ`=Eþ²=RMŒc=Šþ=NMQŒcFK=̚ךŠ=ž˛×ČŠðþÐ=Š˛Ð²š=
łþ×Č₣šý³=˛ðð³ý³ÝČ²юЧЮюэ³=ˇÝþð³=þ¹²Ş
²şK
‚È˝=fiЛЛТНТИ˝ÒÏÓÎÏ·Ï=
flÈÏËfi
NK Ì š ך Š = ¦ ¹ −þÝşžþŁ˛Þ¦šý=˛ðð³ý³ÝČ²þ×Þþłþ=
ˇÝþð˛=−×þ₣¦²˛Ð²š=Ł¹š=¦Þ¹²×³ð¾¦¦=¦=
−ךŠ³−ךŽŠ˛ćğ¦š=Þ˛Š−¦¹¦=Þ˛=ENF=ž˛×ČŠÞþý=
³¹²×þй²ŁšI=EOF=˛ðð³ý³ÝČ²юЧЮюэ=ˇÝþðš=¦=EPF=
¦Þ¹²×³ýšÞ²šI=ײˇþ²˛ćğšý=þ²=˛ðð³ý³ÝČ²þ×Þþłþ=
ˇÝþð˛K
OK Κ=ײžˇ¦×˛Ð²š=˛ðð³ý³ÝČ²þ×ÞŞÐ=ˇÝþðK
PK „¹Ý¦=Ł×šýČ=ײˇþ²Ş=˛ðð³ý³ÝČ²þ×Þþłþ=ˇÝþð˛
žÞ˛₣¦²šÝşÞþ=¹þðײ²¦Ýþ¹şI=ÞšýšŠÝšÞÞþ=
−ךðײ²¦²š=ײˇþ²³K=‡=−×þ²¦ŁÞþý=¹Ý³₣˛šI=ýþŽš²=
ŁþžÞ¦ðÞ³²ş=−š×šł×šŁ=ˇÝþð˛I=₣²þ=−צŁšŠš²=ð=
þŽþł˛ý=¦=Š˛Žš=ð=Łž×ŞŁ³K
QK ‡=¹Ý³₣˛š=−þ−˛Š˛Þ¦Č=ĆÝšð²×þݦ²˛=Ł=łÝ˛ž˛I=
−ЧюэюР²š=¦¼=юˇ¦ÝşÞŞý=ðþݦ₣š¹²Łþý=₣¦¹²þÐ=
ŁþŠŞ=¦=ÞšýšŠÝšÞÞþ=þˇ×˛²¦²š¹
ýþŽš²=−צŁš¹²¦=ð=−þ²š×š=ž×šÞ¦ČK
RK Κ=ž˛ ýŞð˛Ð²š=ðþÞ²˛ð²Ş=˛ðð³ý³ÝČ²þ×Þþłþ=
ˇÝþð˛=ýšŽŠ³=¹þˇþÐW
ENF= Κ=−×¦ð˛¹˛Ð²š¹ş=ð=ðþÞ²˛ð²˛ý=ð˛ð¦ý¦Ý¦ˇþ=
²þðþ−×þŁþŠČğ¦ý¦=−ךŠýš²˛ý¦K
EOF= Êžˇšł˛Ð²š=¼×˛Þ¦²ş=˛ðð³ý³ÝČ²þ×ÞŞÐ=ˇÝþð=Ł=
ðþÞ²šÐޚך=Łýš¹²š=¹=Š×³ł¦ý¦=
ýš²˛Ýݦ₣š¹ð¦ý¦=−ךŠýš²
łŁþžŠ¦I=ýþÞš²Ş=¦=²K=−K
EPF= Κ=Šþ−³¹ð˛Ð²š=−þ−˛ Š˛Þ¦Č=Þ˛=
˛ðð³ý³ÝČ²þ×ÞŞÐ=ˇÝþð=ŁþŠŞ=¦Ý¦=ŠþŽŠČK=
²ýŞð˛Þ¦š=ðþÞ²˛ð²þŁ=˛ðð³ý³ÝČ²þ×Þþłþ=
ş=ð=Ł×˛₣³K =˚²þ=
˛ý¦I=²˛ð¦ý¦=ð˛ð=
ÔÏÛÓfiÎÊÒ„=‚fiÎ΢„=
ÊÎÔÒУТЛЩККK
ÏÌÊÔfiОК„=ЪТОЛЩКБ=
ÌÓ„‚ÒÌÓ„‰‚„ÎÊ„W
≥ ̚ךŠ=ךł³Ý¦×þŁðþÐ=¦Ý¦=−×þŁš×ðþÐ=½³Þð¾¦Ð=
¦Þ¹²×³ýšÞ²˛=þˇČž˛²šÝşÞþ=³ˇšŠ¦²š¹şI=₣²þ=þÞ=
ŁŞðÝć₣šÞ=¦=˛ðð³ý³ÝČ²þ×ÞŞÐ=ˇÝþð=¹ÞČ²=¹=
=
¦Þ¹²×³ýšÞ²˛K
Ò¹²˛ÞþŁð˛=¦Ý¦=¹ÞČ²¦š=
˛ðð³ý³ÝČ²þ×Þþłþ=ˇÝþð˛=EÓ¦¹K=NF
≥ ̚ךŠ=³¹²˛ÞþŁðþÐ=¦Ý¦=¹ÞČ²¦šý=˛ðð³ý³ÝČ²þ×Þþłþ=
ˇÝþð˛=Ł¹šłŠ˛=ŁŞðÝć₣˛Ð²š=¦Þ¹²×³ýšÞ²K
≥ ‚ÝČ=¹ÞČ²¦Č=˛ðð³ý³ÝČ²þ×Þþłþ=ˇÝþð˛=¹ŠŁ¦Þş²š=
ðݲŁ¦Ğ³=Þ˛=ݦ¾šŁþÐ=¹²þ×þÞš=ˇÝþð˛=¦=¹Þ¦ý¦²š=ˇÝþð=
¹=¦Þ¹²×³ýšÞ²˛K
≥ ‚ÝČ=³¹²˛ÞþŁð¦=˛ðð³ý³ÝČ²þ×Þþłþ=ˇÝþð˛=¹þŁýš¹²¦²š=
ŁŞ¹²³−=ˇÝþð˛=¹=−˛žþý=
ýš¹²þK=‡¹šłŠ˛=³¹²˛Þ˛ŁÝ¦Ł˛Ð²š=ˇÝþð=Šþ=³−þײ=²˛ðI=
₣²þˇŞ=þÞ=ž˛½¦ð¹¦×þŁ˛Ý¹Č=Þ˛=ýš¹²š=¹=ÞšˇþÝşĞ¦ý=
ğšÝ₣ðþýK =„¹ ݦ= ŁŞ=ýþŽš²š=Ł¦Šš²ş=ðײ¹Þ³ć=₣˛¹²ş=
Łš×¼ÞšÐ=₣˛¹²¦=ðݲŁ¦Ğ¦I=˛ðð³ý³ÝČ²þ×ÞŞÐ=ˇÝþð=Þš=
−þÝÞþ¹²şć=³¹²˛ÞþŁÝšÞ=Þ˛=ýš¹²šK=Ò
ðþÞ¾˛ =²˛ðI=₣²þˇŞ=ðײ¹Þ˛Č=₣˛¹²ş=ˇŞÝ˛=Þš=Ł¦ŠÞ˛K=‡=
−×þ²¦ŁÞþý=¹Ý³₣˛šI=˛ðð³ý³ÝČ²þ×ÞŞÐ=ˇÝþð=ýþŽš²=
ŁŞ−˛¹²ş=¦ž=¦Þ¹²×³ýšÞ²˛=¦=−צŁš¹²¦=ð=Ł˛ĞšÐ=
²×˛Łýš=¦Ý¦=²×˛Łýš=þð׳Ž˛ćğ¦¼K
Ł=ðþ×−³¹š=¦=ž˛ŠŁ¦Þş²š=šłþ=Þ˛=
¹²˛ÞþŁ¦²š=šłþ=Šþ=
OT
Page 28

≥ Κ=−צݲł˛Ð²š=³¹¦Ý¦Ð=−צ=³¹²˛ÞþŁðš=
˛ðð³ý³ÝČ²þ×Þþłþ=ˇÝþð˛K=„¹Ý¦=ˇÝþð=Þš=ŠŁ¦ł˛š²¹Č=
¹ŁþˇþŠÞþI=Ć²þ=¹Ł¦Šš²šÝş¹²Ł³š²=þ=šłþ=Þš−ײŁ¦ÝşÞþÐ=
³¹²˛ÞþŁðšK
flÝþð¦×þŁð˛=Ł˛Ý˛=EÓ¦¹K=OF
ÌÓ„‚ÒÌÓ„‰‚„ÎÊ„W
≥ ΦðþłŠ˛=Þš=¦¹−þÝşž³Ð²š=ˇÝþð¦×þŁð³=Ł˛Ý˛=−צ=
Ł×˛ğšÞ¦¦=Ğ−¦ÞŠšÝČK=˚²þ=ýþŽš²=−צŁš¹²¦=ð=
−юЭюэрš=¦Ю¹²Ч³эšЮ²˛K
βŽý¦²š=Þ˛=ðÞþ−ð³=ˇÝþð¦×þŁð¦=Ł˛Ý˛=ŠÝČ=
−ךŠþ²Ł×˛ğšÞ¦Č=Ł×˛ğšÞ¦Č=Ğ−¦ÞŠšÝČ=−צ=³¹²˛ÞþŁðš=
¦Ý¦=ŠšýþÞ²˛Žš=−×¦Þ˛ŠÝšŽÞþ¹²šÐK
‡ðÝć₣šÞ¦š=EÓ¦¹K=PF
ÌÓ„‚ÒÌÓ„‰‚„ÎÊ„W
≥ ̚ךŠ=³¹²˛ÞþŁðþÐ=˛ðð³ý³ÝČ²þ×Þþłþ=ˇÝþð˛=Ł=
¦Þ¹²×³ýšÞ²=þˇČž˛²šÝşÞþ=³ˇšŠ¦²š¹şI=₣²þ=šłþ=
¹ŠŁ¦ŽÞþÐ=ŁŞðÝć₣˛²šÝş=Þþ×ý˛ÝşÞþ=ײˇþ²˛š²=¦=
ŁþžŁ×˛ğ˛š²¹Č=Ł=−þÝþŽšÞ¦š=?lcc?=E‡˘ËÈF=−צ=
Þ˛Ž˛²¦¦=Þ˛=ž˛ŠÞćć=₣˛¹²ş=¹ŠŁ¦ŽÞþłþ=
ŁŞðÝć₣˛²šÝČK
‚ÝČ=
ŁðÝć₣šÞ¦Č=¦Þ¹²×³ýšÞ²˛=¹ŠŁ¦Þş²š=ŁŞðÝć₣˛²šÝş=Ł=
−þÝþŽšÞ¦š=?f=ElkF?K=‚ÝČ=Þš−ךתŁÞþÐ=ײˇþ²Ş=
Þ˛Žý¦²š=Þ˛=−š×šŠÞćć=₣˛¹²ş=¹ŠŁ¦ŽÞþłþ=ŁŞðÝć₣˛²šÝČ=
ŠÝČ=šłþ=½¦ð¹˛¾¦¦K
‚ÝČ=þ¹²˛ÞþŁð¦=¦Þ¹²×³ýšÞ²˛=Þ˛Žý¦²š=Þ˛=ž˛ŠÞćć=
₣˛¹²ş=¹ŠŁ¦ŽÞþłþ=ŁŞðÝć₣˛²šÝČ=¦=ž˛²šý=¹ŠŁ
−þÝþŽšÞ¦š=?l=ElccF?K
¦Þş²š=šłþ=Ł=
ÍÞþłþ½³Þð¾¦þÞ˛ÝşÞŞÐ=¦ÞŠ¦ð˛²þ×=
EÓ¦¹K QF
ÊÞŠ¦ð˛²þ×=¦ýšš²=ŠŁš=þ¹ÞþŁÞŞš=½³Þ𾦦K
ËþłŠ˛=˛ðð³ý³ÝČ²þ×ÞŞÐ=ˇÝþð=³¹²˛ÞþŁÝšÞ=Þ˛=
¦Þ¹²×³ýšÞ²I=˛=¹ŠŁ¦ŽÞþÐ=ŁŞðÝć₣˛²šÝş=Þ˛¼þŠ¦²¹ Č=Ł=
−þÝþŽšÞ¦¦=?l=ElccF?=¦ÞŠ¦ð˛²þ×=ˇ³Š š ²= ˇŞ¹²×þ=ý¦ł˛²ş=
−צˇÝ¦ž¦²šÝşÞþ=Ł=²š₣šÞ¦š=þŠÞþÐ=¹šð³ÞŠŞK==„¹Ý¦=þÞ=
Þš=ý¦ł˛š²=²˛ð¦ý=þˇ×˛žþýI=Ć²þ=¹Ł¦Šš²šÝş¹²Ł³š²=þ=
−юЭюэрš=˛ðð³ý³ÝČ²þ×Þþłþ=ˇÝþð˛
¦Ý¦=¦ÞŠ¦ð˛²þײK
- Â˛ğ¦²˛=þ²=−š×šł×³žð¦
- Ìצ=−š×šł×³žðš=¦Þ¹²×³ýšÞ²˛=¦ÞŠ¦ð˛²þ×=Þ˛₣¦Þ˛š²=
¹Łš²¦²ş¹ČK=Ìצ=¹Þ¦ŽšÞ¦¦=Þ˛ł×³žð¦=¦ÞŠ¦ð˛²þ×=
ł˛¹Þš²K
- „¹Ý¦=−š×šł×³žð˛=ˇ³Šš ² =−×þŠþÝŽ˛²ş¹ČI=¦=¦ÞŠ¦ð˛²þ×=
ˇ³Š š² = −×þŠþÝŽ˛²ş=¹Łš²¦²ş¹Č=Ł=²š₣ šЮ¦š=юрюЭю=ŠŁ³¼=
¹šð³ÞŠI=¦Þ¹²×³ýšÞ²=ŁŞðÝć₣¦²¹ČK=˚²þ=−þžŁþݦ²=
Ł×˛²¦²ş=−юЭюэр³=эю²юЧ˛=¦=¹þ−³²¹²Ł³ćğ¦¼=
−ךŠþ²
Šš²˛ÝšÐK
- ‡=Ć²þý=¹Ý³₣˛š=ŠÝČ=−þŁ²þ×Þþłþ=ŁðÝć₣šÞ¦Č=
¦Þ¹²×³ýšÞ²˛=³¹²˛ÞþŁ¦²š=¹ŠŁ¦ŽÞþÐ=ŁŞðÝć₣˛²šÝş=Ł=
−þÝþŽšÞ¦š=?l=ElccF?=¦=ž˛²šý=¹ÞþŁ˛=³¹²˛ÞþŁ¦²š=
šłþ=Ł=−þÝþŽšÞ¦š=?f=ElkF?K
- Ô¦łÞ˛Ý=Þšþˇ¼þŠ¦ýþ¹²¦=ž˛ýšÞŞ=
˛ðð³ý³ÝČ²þ×Þþłþ=ˇÝþð˛
˛=þ¹²˛ŁĞ¦Ð¹Č=ž˛×ČŠ=˛ðð³ý³ÝČ²þײ=¹²˛Þšý=
- ËþłŠ
ÞšˇþÝşĞ¦ýI=¦ÞŠ¦ð˛²þ×=Þ˛₣Þš²¹Č=¹Łš²¦²ş¹Č=Łþ=
Ł×šýČ=ײˇþ²Ş=Šþ=²þłþI=ð˛ð=ž˛×ČŠ=˛ðð³ý³ÝČ²þײ=
¹²˛Þš²=ÞšžÞ˛₣¦²šÝşÞŞýK
- Ú³Þð¾¦Č=−ךŠþ²Ł×˛ğšÞ¦Č=¹Ý³₣˛ÐÞþłþ=ž˛−³¹ð˛
- ‚˛Žš=š¹Ý¦=˛ðð³ý³ÝČ²þ×Þ
Ł=¦Þ¹²×³ýšÞ²=¹þ=¹ŠŁ¦ŽÞŞý=−š×šðÝć₣˛²šÝšý=
¦Þ¹²×³ýšÞ²˛=Ł=−þÝþŽšÞ¦¦=?f=ElkF?I=¦Þ¹²×³ýšÞ²=Þš=
ŁðÝć₣¦²¹ČK=Ìצ=Ć²þý=¦ÞŠ¦ð˛²þ×=ˇ³Šš²=ýšŠÝšÞÞþ=
ý¦ł˛²şI=−þð˛žŞŁ˛ČI=₣²þ=¹×˛ˇþ²˛Ý˛=½³Þð¾¦Č=
−ךŠþ²Ł×˛ğšÞ¦Č=¹Ý³₣˛ÐÞþłþ=ž˛−³¹ð˛K
- ‚ÝČ=ŁðÝć₣šÞ¦Č=¦Þ¹²×³ýšÞ²˛=¹Þ˛₣
ŁŞðÝć₣˛²šÝş=Ł=−þÝþŽšÞ¦š=?l=ElccF?=¦=ž˛²šý=
¹ÞþŁ˛=¹ŠŁ¦Þş²š=šłþ=Ł=−þÝþŽšÞ¦š=?f=ElkF?K
ŞÐ=ˇÝþð=³¹²˛Þ˛ŁÝ¦Ł˛š²¹Č=
˛Ý˛=¹ŠŁ¦Þş²š=
ÔflÏÓËfi
ÌÓ„‚ÒÌÓ„‰‚„ÎÊ„W
≥ ̚ךŠ=ŁŞ−þÝÞšÞ¦šý=ð˛ð¦¼Ý¦ˇþ=ײˇþ²=Þ˛=
¦Þ¹²×³ýšÞ²š=þˇČž˛²šÝşÞþ=³ˇšŠ¦²š¹şI=₣²þ=þÞ=
ŁŞðÝć₣šÞ=¦=˛ðð³ý³ÝČ²þ×ÞŞÐ=ˇÝþð=¹ÞČ²=¹=
¦Þ¹²×³ýšÞ²˛K
Ò¹²˛ÞþŁð˛=ˇþðþŁþÐ=EŠþ−þÝÞ¦²šÝşÞþÐF=
׳₣ð¦=EÓ¦¹K=RF
ÌÓ„‚ÒÌÓ„‰‚„ÎÊ„W
≥ ̚ךŠ=Þ˛₣˛Ýþý=ײˇþ²Ş=Ł¹šłŠ˛=−×þŁš×Čвš=
Þ˛ŠšŽÞþ¹²ş=³¹²˛ÞþŁð¦=ˇþðþŁþÐ=׳₣ð¦K
²Łš×Þ¦²š=ˇþðþŁ³ć=׳₣ð³=Ł=þŠÞþ=¦ž=−þÝþŽšÞ¦Ð=
¦Þ¹²×³ýšÞ²˛I=−þð˛ž˛ÞÞŞ¼=Þ˛=צ¹³ÞðšK
Ò¹²˛ÞþŁð˛=¦Ý¦=¹ÞČ²¦š=þł×˛ŽŠšÞ¦Č=
Š¦¹ð˛=EÓ¦¹K SF
ÌÓ„‚ÒÌÓ„‰‚„ÎÊ„W
≥ Ìצ=¦¹−þÝşžþŁ˛Þ¦¦=Ğݦ½þŁ˛ÝşÞþłþ=Š¦¹ð˛=¹=
³łÝ³ˇÝšÞÞŞý=¾šÞ²×þýLÍÞþłþ½³Þð¾¦þÞ˛ÝşÞþłþ=
Š¦¹ð˛I=ł¦ˇðþłþ=Š¦¹ð˛I=−×þŁþÝþ₣ÞþÐ=ğš²ð¦I=
þ²×šžÞþłþ=¦Ý¦=˛Ýý˛žÞþłþ=Š¦¹ð˛=Þšþˇ¼þŠ¦ ýþ=
³¹²˛ÞþŁ¦²ş=þł×˛ŽŠšÞ¦š=Š¦¹ð˛=²˛ðI=₣²þˇŞ=ž˛ðת²˛Č=
¹²þ×þÞ˛=þł×˛
þ−š×˛²þ׳K
Ò¹²˛ÞþŁ¦²š=þł×˛ŽŠšÞ¦š=Š¦¹ð˛=²˛ðI=₣²þˇŞ=−˛ž=Þ˛=
¼þý³²š=½¦ð¹˛¾¦¦=þł×˛ŽŠšÞ¦Č=¹þŁ−˛Ý=¹=ŁŞ¹²³−þý=Þ˛=
³žÝš=−þŠĞ¦−Þ¦ð˛K=²²šý=−þŁš×Þ¦²š=þł×˛ŽŠšÞ¦š=
Š¦¹ð˛=Þ˛=NUM=ł×˛Š³¹þŁK=ÒˇšŠ¦²š¹
½¦ð¹˛¾¦¦=Ł¦Þ²˛K
‚ÝČ=¹ÞČ²¦Č=þł×˛ŽŠšÞ¦Č=Š¦¹ð˛=−þŁ²þצ²š=−×þ¾šŠ³×³=
³¹²˛ÞþŁð¦=Ł=þˇ×˛²Þþý=−þ×ČŠðšK
Ò¹²˛ÞþŁð˛=¦Ý¦=¹ÞČ²¦š=Ğݦ½þŁ˛ÝşÞþłþ=
Š¦¹ð˛=¹=³łÝ³ˇÝšÞÞŞý=¾šÞ²×þýL
ÍÞþłþ½³Þð¾¦þÞ˛ÝşÞþłþ=Š¦¹ð˛
ÌÓ„‚ÏÔÒ„Ó„‰„ÎÊ„W
≥ Ìצ=¦¹−þÝşžþŁ˛Þ¦¦=Š¦¹ð˛=¹=³łÝ³ˇÝšÞÞŞý=¾šÞ²×þýL
ÍÞþłþ½³Þð¾¦þÞ˛ÝşÞŞý=Š¦¹ðþý=Þ˛=¦Þ¹²×³ýšÞ²š=
Ł¹šłŠ˛=¦¹−þÝşž³Ð²š=−צݲł˛šýþš=þł×˛ŽŠšÞ¦šK=‚¦¹ð=
ýþŽš²=ײžÝš²š²ş¹Č=Łþ=Ł×šýČ=¦¹−þÝşžþŁ˛Þ¦ČI=¦=
þł×˛ŽŠšÞ¦š=−þýþł˛š²=¹Þ¦ž¦²ş=צ¹ð=−þݳ₣šÞ¦Č=
²×˛ŁýŞK
ŽŠšÞ¦Č=Ł¹šłŠ˛=ˇŞÝ˛=Þ˛−ײŁÝšÞ˛=ð=
ş=Ł=Þ˛ŠšŽÞþÐ=
OU
Page 29

Ò¹²˛ÞþŁ¦²š=ŁÞ³²×šÞÞ¦Ð=½Ý˛Þš¾=Þ˛=Ğ−¦ÞŠšÝşK=
Ò¹²˛ÞþŁ¦²š=ð׳łLŠ¦¹ð=Þ˛=ŁÞ³²×šÞÞ¦Ð=½Ý˛Þš¾=¦=
ž˛Łš×Þ¦²š=¹²þ−þ×Þ³ć=ł˛Ðð³=Þ˛=Ğ−¦ÞŠšÝšK=EÓ¦¹K=TF
‚ÝČ=ž˛²Čł¦Ł˛Þ¦Č=¹²þ−юЧЮюР=ł˛Ðð¦=Þ˛Žý¦²š=Þ˛=ðÞþ−ð³=
½¦ð¹˛¾¦¦I=₣²þˇŞ=Ğ−¦ÞŠšÝş=Þš=ýþł=Ł×˛ğ˛²ş¹ČI=ž˛²šý=
¦¹−þÝşž³Ð²š=ðÝ
Þ˛ŠšŽÞþłþ=ž˛²Čł¦Ł˛Þ¦Č=−þ=₣˛¹þŁþÐ=¹²×šÝðšK=EÓ¦¹K=UF
‚ÝČ=¹ÞČ²¦Č=Š¦¹ð˛=−þŁ²þצ²š=−×þ¾šŠ³×³=³¹²˛ÞþŁð¦=Ł=
þˇ×˛²Þþý=−þ×ČŠðšK
ć₣=ŠÝČ=¹²þ−юЧЮюР=ł˛Ðð¦=ŠÝČ=šš=
Ò¹²˛ÞþŁð˛=¦Ý¦=¹ÞČ²¦š=˛Ýý˛žÞþłþ=Š¦¹ð˛=
EŠþ−þÝÞ¦²šÝşÞþš=−צ¹−þ¹þˇÝšÞ¦šF=
EÓ¦¹K=VF
ÌÓ„‚ÒÌÓ„‰‚„ÎÊ„W
≥ ÒˇšŠ¦²š¹şI=₣²þ=¹²×šÝð˛=Þ˛=¦Þ¹²×³ýšÞ²š=
−þð˛žŞŁ˛š²=Ł=²þý=Žš=Þ˛−ײŁÝšÞ¦¦I=₣²þ=¦=¹²×šÝð˛=
Þ˛=˛Ýý˛žÞþý=Š¦¹ðšK
Ò¹²˛ÞþŁ¦²š=ŁÞ³²×šÞÞ¦Ð=½Ý˛Þš¾=Þ˛=Ğ−¦ÞŠšÝşK=
Ò¹²˛ÞþŁ¦²š=˛Ýý˛žÞŞÐ=Š¦¹ð=Þ˛=ŁÞ³²×šÞÞ¦Ð=½Ý˛Þš¾=¦=
ž˛Łš×Þ¦²š=¹²þ−þ×Þ³ć=ł˛Ðð³=Þ˛=Ğ−¦ÞŠšÝšK=²ýš²ş²šI=
₣²þ=×þŁÞ˛Č=¹²þ×þÞ˛=¹²þ−
¦¹−þÝşžþŁ˛Þ¦Č=˛Ýý˛žÞþłþ=Š¦¹ð˛=ŠþÝŽÞ˛=ˇŞ²ş=
Þ˛−ײŁÝšÞ˛=ð=Š¦¹ð³K
ÌÓ„‚ÏÔÒ„Ó„‰„ÎÊ„W
≥ ʹ−þÝşž³Ð²š=ˇÝþð¦×þŁð³=Ł˛Ý˛=²þÝşðþ=²þłŠ˛I=ðþłŠ˛=
Ğ−¦ÞŠšÝş=Þš=Ł×˛ğ˛š²¹ČK
юЧЮюР=ł˛Ðð¦=Ł=¹Ý³₣˛š=
˚ЛФМИТfiÒfi ÙÊ˝
ÌÓ„‚ÏÔÒ„Ó„‰„ÎÊ„W
≥ ΦðþłŠ˛=Þš=−צݲł˛Ð²š=³¹¦Ý¦Ð=Þ˛=¦Þ¹²×³ýšÞ²K=‡š¹=
¦Þ¹²×³ýšÞ²˛=Šþ¹²˛²þ₣šÞ=ŠÝČ=¹þžŠ ˛Þ¦Č=˛ŠšðŁ˛²Þþłþ=
Š˛ŁÝšÞ¦ČK=‚þ−þÝÞ¦²šÝşÞŞš=³¹¦Ý¦Č=¦=Š˛ŁÝšÞ¦š=
ýþł³²=−צŁš¹²¦=ð=þ−˛¹ÞþÐ=−юЭюэрš=рЧ³ł˛K
≥ ‡Ô„·‚fi=ýšÞČвš=Š¦¹ðI=š¹Ý¦=¦Þ¹²×³ýšÞ²=³−˛Ý=Łþ=
Ł×šýČ=Ğݦ½þŁð¦K
≥ ÎÊËÏ·‚fi=Þš=¹²³₣¦²š==¦=Þš=³Š˛×Čвš=Š¦¹ðþý=¦Ý¦=
ð׳łþý=
≥ Êžˇšł˛Ð²š=³Š˛×þŁ=¦=ž˛¾š−ÝšÞ¦Č=Š¦¹ð˛I=þ¹þˇšÞÞþ=
≥ ÎÊËÏ·‚fi=Þš=¦¹−þÝşž³Ð²š=¦Þ¹²×³ýšÞ²=¹=
ÌÓ„‚ÒÌÓ„‰‚„ÎÊ„W
≥ ·Ý ³ ˇ¦Þ˛=ךž˛=þŠÞþłþ=−×þ¼þŠ˛=ŠþÝŽÞ˛=¹þ¹²˛ŁÝČ²ş=Šþ=
≥ Ìþ¹Ýš=ž˛Łš×ĞšÞ¦Č=ײˇþ²Ş=Ł¹šłŠ˛=ŁŞðÝć₣˛Ð²š=
≥ „¹Ý¦=¦Þ¹²×³ýšÞ²=¦¹−þÝşžþŁ˛Ý¹Č=Þš−ךתŁÞþ=Šþ=
−þ=þˇ×˛ˇ˛²ŞŁ˛šýþÐ=Šš²˛Ý¦K
−צ=ײˇþ²š=Ł=³łÝ˛¼I=Þ˛=þ¹²×޼=ð×˛Č¼=¦=²K=−K=˚²þ=
ýþŽš²=−צŁš¹²¦=ð=−þ²š×š=ðþÞ²×þÝČ=¦=þˇ×˛²ÞþÐ=
þ²Š˛₣š=¦Þ¹²×³ýšÞ²˛K
¾¦×ð³ÝČ×ÞŞý¦=Š¦¹ð˛ý¦=ŠÝČ=−¦ÝšÞ¦Č=Š×šŁš¹¦ÞŞ=¦=
Š×³ł¦ý¦=−
Š¦¹ðþŁ=Þ˛=³łÝþĞݦ½þŁ˛ÝşÞþÐ=ý˛Ğ¦Þðš=₣˛¹²þ=
−צŁþŠ¦²=ð=þ²Š˛₣š=¦=³²×˛²š=ðþÞ²×þÝČI=₣²þ=ýþŽš²=
−צŁš¹²¦=ð=²×˛ŁýšK
R=ýýK=ϲךł³Ý¦×³Ð²š=Š˛ŁÝšÞ¦š=Þ˛=¦Þ¹²×³ýšÞ²=
²˛ð¦ý=þˇ×˛žþýI=₣²þˇŞ=Ł
¹ðþ×þ¹²ş=Ł×˛ğšÞ¦Č=¦Þ¹²×³ýšÞ²˛=Þš=³ýšÞşĞ˛Ý˛¹şK
¦Þ¹²×³ýšÞ²I=ŠþŽŠ¦²š¹ş=šłþ=−юЭЮюР=ю¹²˛ÞþŁð¦=¦=
²þÝşðþ=ž˛²šý=þ²−³¹ð˛Ð²š=¦Þ¹²×³ýšÞ²K
−þÝÞþ łþ=ײž×ČŠ˛=˛ðð³ý³Ý
¦ÝşÞŞý¦=Š¦¹ð˛ý¦K=ʹ−þÝşžþŁ˛Þ¦š=²˛ð¦¼=
þ=Ł×šýČ=šłþ=ײˇþ²Ş=
Č²þ×Þþłþ=ˇÝþð˛I=
ŁŞðÝć₣¦²š=šłþI=−þŠþŽŠ¦²š=NR=ý¦Þ³²=¦=²þÝşðþ=ž˛²šý=
³¹²˛Þ˛ŁÝ¦Ł˛Ð²š=ÞþŁŞÐ=˛ðð³ý³ÝČ²þ×ÞŞÐ=ˇÝþðK
²₣¦¹²ð˛=¦=Ğݦ½þŁð˛=EÓ¦¹K=NMF
‡Ô„·‚fi=ðך−ðþ=Šš×Ž¦²š=¦Þ¹²×³ýšÞ²I=−þÝþŽ¦Ł=þŠÞ³=
׳ð³=Þ˛=ðþ×−³¹I=˛=Ł²þ׳ć==Þ˛=ˇþðþŁ³ć=׳₣ð³K=
‡ðÝć₣¦²š=¦Þ¹²×³ýšÞ²=¦=ž˛²šý=−צŽý¦²š=ð׳ł=¦Ý¦=
Š¦¹ð=ð=þˇ×˛ˇ˛²ŞŁ˛šýþÐ=Šš²˛Ý¦K
ÏˇŞ₣Þþ=¹ÝšŠ³š²=Šš×Ž˛²ş=ðײÐ=ð׳ł˛=¦Ý¦=Š¦¹ð˛=−þŠ=
³łÝþý=NR=ł×˛Š³¹þŁK
ð=þˇ×˛ˇ˛²ŞŁ˛šýþÐ=−þŁš×¼Þþ¹²¦K
Ìþ¹Ýš=ž˛ýšÞŞ=Ğݦ½þŁ˛ÝşÞþłþ=Š¦¹ð
−š×šýšğ˛Ð²š=Ğݦ½þŁ˛ÝşÞ³ć=ý˛Ğ¦Þð³=Ł=Þ˛−ײŁÝšÞ¦¦=
_I=²˛ð=ð˛ð=Ć²þ=ýþŽš²=−צŁš¹²¦=ð=Ł×šžðš=Š¦¹ð˛=Ł=
Šš²˛ÝşK=Ìþ¹Ýš=²þłþ=ð˛ð=ðײÐ=Š¦¹ð˛=¹²þ₣¦²¹Č=−צ=
¦¹−þÝşžþŁ˛Þ¦¦=ŁŞ=ýþŽš²š=−š×šýšğ˛²ş=Š¦¹ð=Ł=þˇþ¦¼=
Þ˛−ײŁÝšÞ¦Č¼=¥=^=¦=_K
˛=Þ˛=ÞþŁŞÐ=Þš=
‡Ş−þÝÞšÞ¦š=ײˇþ²=¹=˛Ýý˛žÞŞý=Š¦¹ðþý=
E−×¦Þ˛ŠÝšŽÞþ¹²şF
ÌÓ„‚ÏÔÒ„Ó„‰„ÎÊ„W
≥ ÌþŁŞĞšÞÞþš=³¹¦Ý¦š=¦=Š˛ŁÝšÞ¦š=Þ˛=Š¦¹ðI=šłþ=¦žł¦ˇI=
ž˛Ž¦ý=¦Ý¦=−š×šð׳₣¦Ł˛Þ¦š=Ł=ýš¹²š=ךž˛=ýþŽš²=
−צŁš¹²¦=ð=−š×šł×šŁ³=ýþ²þײ=¦=þ−˛¹ÞþÐ=þ²Š˛₣š=
¦Þ¹²×³ýšÞ²˛K
ÌÓ„‚ÒÌÓ„‰‚„ÎÊ„W
≥ Ìþ¹Ýš=ž˛Łš×ĞšÞ¦Č=ךžð¦=³ˇšŠ¦²š¹şI=₣²þ=Ł×˛ğšÞ¦š=
˛Ýý˛žÞþłþ=Š¦¹ð˛=−þÝÞþ¹²şć=−ךðײ²¦Ýþ¹şK=²²šý=
−þÝþŽ¦²š=¦Þ¹²×³ýšÞ²K=Κ=ðݲŠ¦²š=¦Þ¹²×³ýšÞ²=−ךŠ=
š
łþ=ŁŞðÝć₣šÞ¦šý=¥=Ć²þ=þ₣šÞş=þ−˛¹ÞþK=Ìצ=Þ˛Ý¦₣¦¦=
−ŞÝ¦=¦Ý¦=ł×Čž¦=Łþð׳ł=¦Þ¹²×³ýšÞ²˛=¦Þ¹²×³ýšÞ²=
ýþŽš²=ž˛¹þ¹˛²ş=¦¼K
ÒˇšŠ¦²š¹şI=₣²þ=Š¦¹ð=Þš=ð˛¹˛š²¹Č=ײˇþ₣šÐ=Šš²˛Ý¦K=
‡ðÝć₣¦²š=¦Þ¹²×³ýšÞ²=¦=ðך−ðþ=Šš×Ž¦²š=šłþK=
‚þŽŠ¦²š¹şI=−þð˛=Š¦¹ð=Þš=Þ˛ˇš×š²=−þÝÞ³ć=¹ðþ×þ¹²şK=
²²šý=−×þ¹²þ=−š×šýšğ˛Ð²š=¦Þ¹²×³ýšÞ²=Ł−š×šŠ=−þ=
−þŁš×¼Þþ¹²¦=Šš²˛Ý¦I=×þŁÞþ=Šš×Ž˛
˛ðð³×˛²Þþ=−š×šýšğ˛Č=šłþ=Ł−š×šŠ=Šþ=ž˛Łš×ĞšÞ¦Č=
ײž×šž˛Þ¦Č=Šš²˛Ý¦K
=¦Þ¹²×³ýšÞ²=¦=
ÏflÔÈ҉ʇfiÎÊ„
ÌÓ„‚ÒÌÓ„‰‚„ÎÊ„W
≥ ̚ךŠ=ŁŞ−þÝÞšÞ¦šý=ð˛ðþłþݦˇþ=þ¹ýþ²×˛=¦Ý¦=
þˇ¹Ý³Ž¦Ł˛Þ¦Č=¦Þ¹²×³ýšÞ²˛=³ˇšŠ¦²š¹şI=₣²þ=
³¹²×þй²Łþ=ŁŞðÝć₣šÞþ=¦=šłþ=˛ðð³ý³ÝČ²þ×ÞŞÐ=ˇÝþð=
¹ÞČ²K
‡¹šłŠ˛=¹þŠš×Ž¦²š=¦Þ¹²×³ýšÞ²=¦=ŁšÞ²¦ÝČ¾¦þÞÞŞš=
þ²Łš×¹²¦Č=Ł=₣¦¹²þ²šK=Óšł³ÝČ×Þþ=¦Ý¦=Ł=¹Ý³₣˛š=
ž˛ˇ¦Ł˛Þ¦Č=−×þ₣¦ğ˛Ð²š=ŁšÞ²¦ÝČ¾¦þÞÞŞš=þ²Łš×¹²¦
¦Þ¹²×³ýšÞ²˛K=EÓ¦¹K=NNF
²ýšÞ˛=³łþÝşÞŞ¼=ğš²þð
Óšł³ÝČ×Þþ=¹Þ¦ý˛Ð²š=³łþÝşÞŞš=ğš²ð¦=¦=−×þŁš×Čвš=¦¼=
¦žÞþ¹K=²ýšÞ¦²š=¦¼I=ðþłŠ˛=¦žÞþ¹=Šþ¹²¦łÞš²=
þł×˛Þ¦₣¦²šÝşÞþÐ=ýš²ð¦K=ÒłþÝşÞŞš=ğš²ð¦=Ł¹šłŠ˛=
ŠþÝŽÞŞ=ˇŞ²ş=₣¦¹²Şý¦=¦=¹ŁþˇþŠÞþ=−š×šýšğ˛²ş¹Č=Ł=
Šš×Ž˛²šÝČ¼K=Ïˇš=³łþÝşÞŞš=ğš²ð¦=ŠþÝŽÞŞ=ž˛ýšÞČ
Č=
²ş¹Č=
OV
Page 30

þŠÞþŁ×šýšÞÞþK=ʹ−þÝşž³Ð²š=²þÝşðþ=¦Š šÞ²¦₣ÞŞš=
³łþÝşÞŞš=ğš²ð¦K=EÓ¦¹K=NOF
‡¹²˛Łş²š=Ž˛Ýþ=−Ýþ¹ðþÐ=þ²Łš×²ð¦=Ł=−˛ž=¦Þ¹²×³ýšÞ²˛=¦=
¹Þ¦ý¦²š=ðתĞð³=Šš×Ž˛²šÝČI=−צ−þŠÞ ČŁ=šš=ŁŁš×¼K=
EÓ¦¹K=NPF
‚ÝČ=¹ÞČ²¦Č=ðþÝ−˛ ₣ðþŁ=Šš×Ž˛²šÝšÐ=ğš²þð=
¦¹−þÝşž³Ð²š=þ²Łš×²ð³K=ÊžŁÝšð¦²š=¦žÞþĞšÞÞŞš=
³łþÝşÞŞš=ğš²ð¦I=³¹²˛ÞþŁ¦²š=ÞþŁŞ
−צ=−þýþğ¦=ðþÝ−˛₣ðþŁ=Šš×Ž˛²šÝšÐ=ğš²þðK=EÓ¦¹K=NQF
Ò¹²˛ÞþŁ¦²š=ðתĞð³=Šš×Ž˛²šÝČ=þˇ×˛²Þþ=Þ˛=
¦Þ¹²×³ýšÞ²K
‚ÝČ=þˇš¹−š₣šÞ¦Č=fl„ÂÏÌfiФОПФТК=¦=Оfi‚„‰ОПФТК=
¦Þ¹²×³ýšÞ²˛=ŁŞ−þÝÞČвš=šłþ=ךýþÞ²I=þˇ¹Ý³Ž¦Ł˛Þ¦š=
¦Ý¦=ךł³Ý¦×þŁð³=²þÝşðþ=Ł=˛Ł²þצžþŁ˛ÞÞŞ¼=¹š×Ł¦¹Þ޼=
¾šÞ²×˛¼=ðþý−˛Þ¦¦=j~âáí~=¦=¹=¦¹−þÝşžþ
þצł¦Þ˛ÝşÞ޼=ž˛−˛¹Þ޼=₣˛¹²šÐ=ðþý−˛Þ¦¦=j~âáí~K
š=¦=ž˛½¦ð¹¦×³Ð²š=¦¼=
Ł˛Þ¦šý=²þÝşðþ=
ÌÓÊÎfi‚È„‰ÎÏÔÒÊ
ÌÓ„‚ÒÌÓ„‰‚„ÎÊ„W
≥ ‚˛ÞÞŞš=−×¦Þ˛ŠÝšŽÞþ¹²¦=¦Ý¦=−צ¹−þ¹þˇÝšÞ¦Č=
ךðþýšÞŠ³ć²¹Č=ŠÝČ=¦¹−þÝşžþŁ˛Þ¦Č=¹=
¦Þ¹²×³ýšÞ²þý=j~âáí~I=³ð˛ž˛ÞÞŞý=Ł=Š˛ÞÞþý=
׳ðþŁþŠ¹²ŁšK=ʹ−þÝşžþŁ˛Þ¦š=Š×³ł¦¼=
−×¦Þ˛ŠÝšŽÞþ¹²šÐ=¦Ý¦=−צ¹−þ¹þˇÝšÞ¦Ð=ýþŽš²=
−צŁš¹²¦=ð=צ¹ð³=−þݳ₣šÞ¦Č=²×˛ŁýŞK=ʹ−þÝşž³Ð²š=
−×¦Þ˛ŠÝšŽÞþ¹²¦=¦Ý¦=−צ¹−þ¹þˇÝšÞ¦Č=²þÝ
²š¼=¾šÝšÐI=ŠÝČ=ðþ²þת¼=þÞ¦=−ךŠÞ˛žÞ˛₣šÞŞK
„¹Ý¦=Ł˛ý=Þšþˇ¼þŠ¦ý˛=−þýþğş=Ł=−þݳ₣šÞ¦¦=
Šþ−þÝÞ¦²šÝşÞþÐ=¦Þ½þ×ý˛¾¦¦=þˇ=Ć²¦¼=
−×¦Þ˛ŠÝšŽÞþ¹²Č¼I=þˇ×˛²¦²š¹ş=Ł=ýš¹²ÞŞÐ=¹š×Ł¦¹ÞŞÐ=
¾šÞ²×=ðþý−˛Þ¦¦=j~âáí~K
≥ Ïł×˛ŽŠšÞ¦š=Š¦¹ð˛=EËþŽ³¼=Š¦¹ð˛F
≥ ‡Þ³²×šÞÞ¦Ð=½Ý˛Þš¾
≥ ‚¦¹ð¦=¹=ŁþłÞ³²Şý=¾šÞ²×þý=NNR=ýý
≥ Ô²þ−þ×Þ˛Č=ł
≥ Óšž¦ÞþŁ˛Č=−þŠ³Ğð˛
≥ fiˇ×˛ž¦ŁÞŞš=Š¦¹ð¦
≥ Ô²þ−þ×Þ˛Č=ł˛Ðð˛=EŠÝČ=˛ˇ×˛ž¦ŁÞ޼=Š¦¹ðþŁF
≥ ËÝć₣=ŠÝČ=¹²þ−юЧЮюР=ł˛Ðð¦
≥ ÒłþÝşÞ˛Č=ğš²ð˛=¹=−×þŁþŠþ ý
≥ ÔðþĞšÞÞ˛Č=ğš²ð˛=¹=−×þŁþŠþý=UR
≥ flþðþŁ˛Č=׳₣ð˛
≥ ÌŞÝš¹ˇþ×Þþš=þł×˛ŽŠšÞ¦š=Š¦¹ð˛
≥ fiÝý˛žÞŞÐ=Š¦¹ð=NNR=ýý
≥ Ó˛žÝ¦₣ÞŞš=²¦−Ş=þצł¦Þ˛ÝşÞ޼=˛ðð³ý³ÝČ²þ×ÞŞ¼=
ˇÝþðþŁ=¦=ž˛×ČŠÞŞ¼=³¹²×þй²Ł=ðþý−˛Þ¦¦=j~âáí~
˛Ðð˛=EŠÝČ=Š¦¹ðþŁ=¹=ŁþłÞ³²Şý=¾šÞ²×þýF
şðþ=Š ÝČ=
ÒþÝşðþ=ŠÝČ=šŁ×þ−šÐ¹ð¦¼=¹²×˛Þ
Ò×þŁšÞş=гý˛=¦=Ł¦ˇ×˛¾¦¦
Ò¦ −¦₣ÞŞÐ=³×þ
E^F=¹þ¹²˛ŁÝČš²=TR=Šfl=E^FK
ËþÝšˇ˛Þ¦Č=¹þ¹²˛ŁÝČć²=P=Šfl=E^FK
Ò×þŁšÞş=гý˛=−צ=ŁŞ−þÝÞšÞ¦¦=ײˇþ²=ýþŽš²=
−ךŁŞĞ˛²ş=UR=Šfl=E^FK
¥=ʹ−þÝşž³Ð²š=¹×šŠ¹²Ł˛=ž˛ğ¦²Ş=¹Ý³¼˛K=¥
Ò¦ −¦₣Þþš=ŁžŁšĞšÞÞþš=¹×šŠÞšðŁ˛Š×˛²¦₣Þþš=žÞ
−צŁþŠ¦²¹Č=ŠÝČ=³¹ðþךަČ=P=ýL¹šð
˚²¦=žÞ˛₣šÞ¦Č=ˇŞÝ¦=−þݳ₣šÞŞ=Ł=¹þþ²Łš²¹²Ł¦¦=¹=
bkSMTQRK
‚„ËÈfiÓfiÙÊ˝=Ï=ÔÏÏÒ‡„ÒÔÒ‡ÊÊ=„Ô
ÌþŠ=Þ˛Ğ³=¹þˇ¹²ŁšÞÞ³ć=þ²Łš²¹²ŁšÞÞþ¹²ş=ýŞ=
ž˛ČŁÝČšýI=₣²þ=Š˛ÞÞþš=¦žŠšÝ¦š=¹þþ²Łš²¹²Ł³š²=
¹ÝšŠ³ćğ¦ý=¹²˛ÞŠ˛×²˛ý=bkSMTQRI=bkRRMNQ=Ł=
¹þþ²Łš²¹²Ł¦¦=¹=‚¦×šð²¦Ł˛ý¦=ÔþŁš²˛=UVLPPSLbb`I=
VULPTLb`K
j^hfq^=fkqbok^qflk^i=brolmb=iqaK
jбЕЬбЦ~е=aкбоЙI=qзеЦпЙддI=jбднзе=hЙуеЙлI=_мЕвл=jhNR=
UgaI=bkdi^ka
ϲŁš²¹²ŁšÞÞŞÐ=¦žłþ²þŁ¦²šÝşW
j~вбн~=`зкйзк~нбзе=^еаз=^бЕЬб=g~й~е
ŁšÞş=ŁžŁšĞšÞÞþłþ=žŁ³ðþŁþłþ=Š˛ŁÝšÞ¦Č=
2
K
v~лмЬбвз=h~ет~вб=E˝¹³¼¦ðþ=Ë˛Þž˛ð¦F=`b=OMMR
‚¦×šð²þ×
˛₣šÞ¦š=
PM
Page 31

31
Page 32

Makita Corporation
Anjo, Aichi, Japan
884662A202
 Loading...