

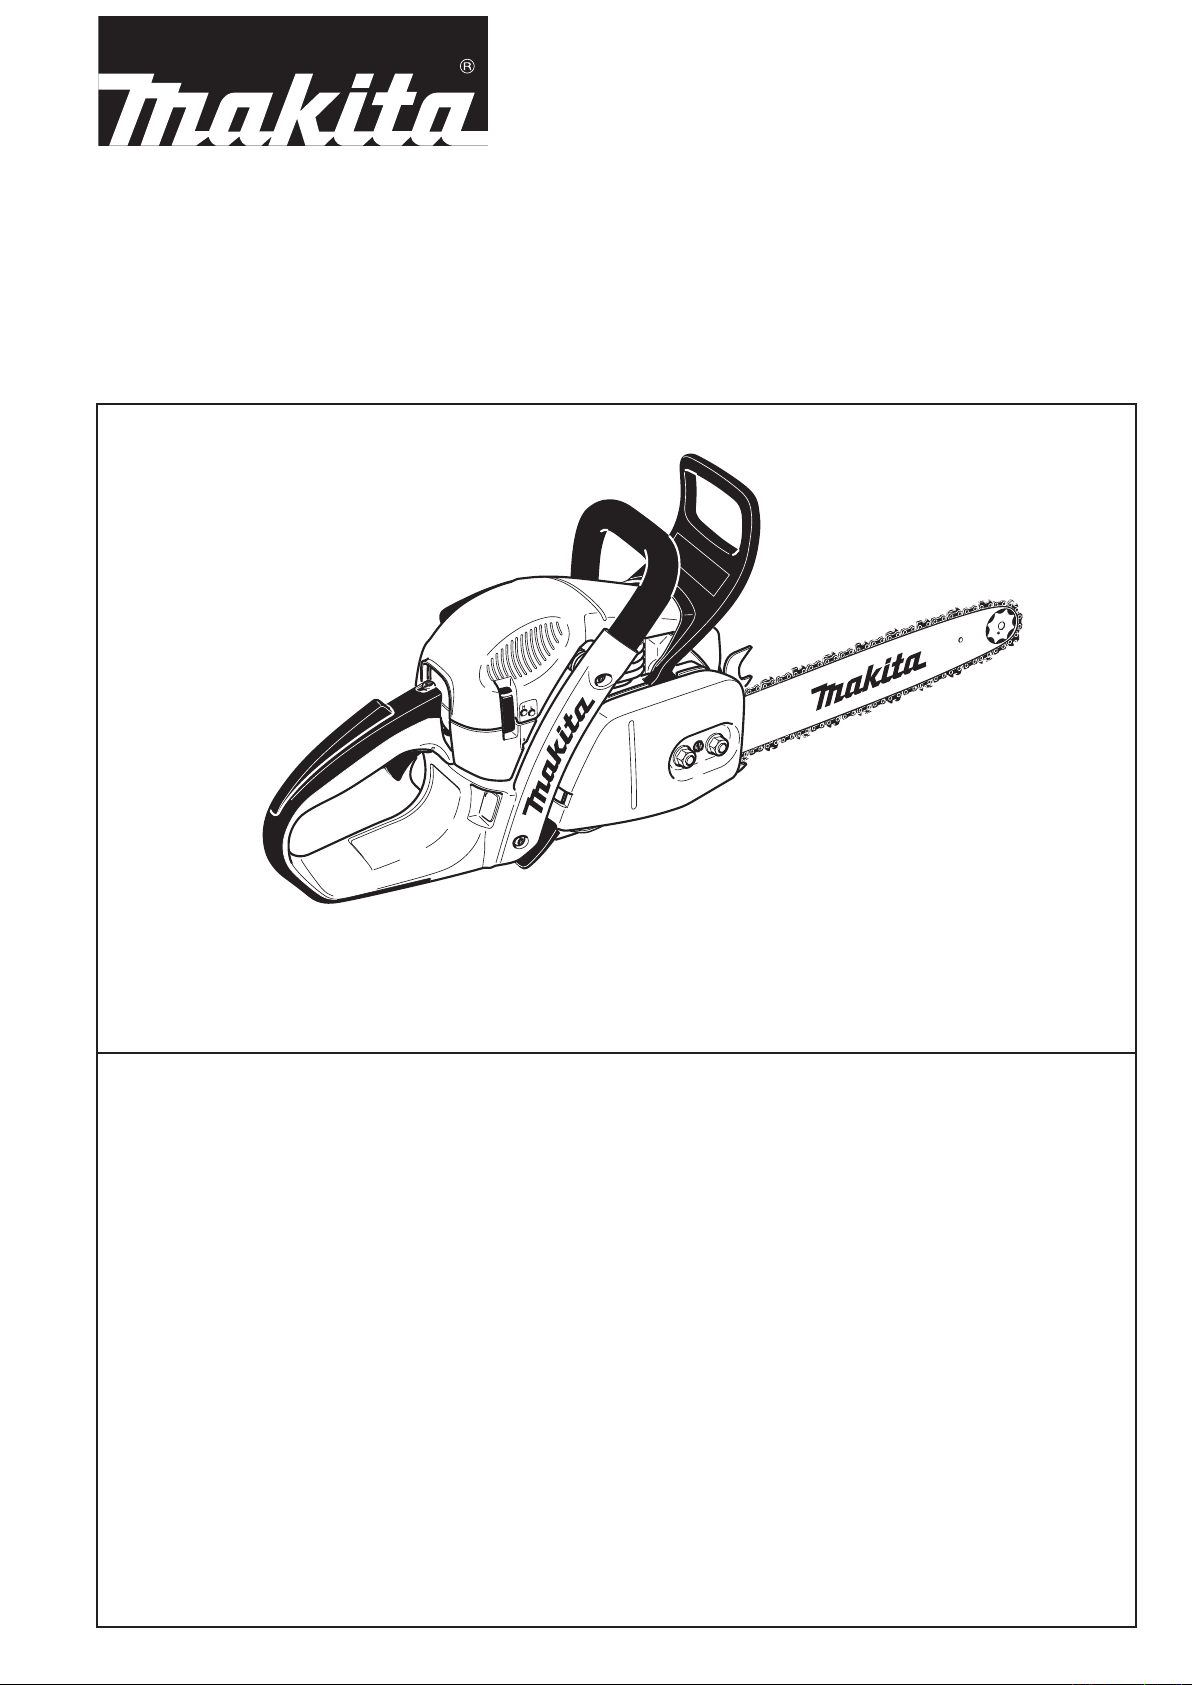
Owner’s and Safety Manual
for Gasoline Chain Saws (page 2 - 39)
Manuel d’emploi et de sécurité
de tronçonneuses thermiques (page 40 - 77)
DCS460
DCS5121
WARNING!
Read and understand this Manual. Always follow safety precautions in the Owner’s and Safety Manual. Improper use can cause serious injury! The engine exhaust from this
product contains chemicals known to the State of California to cause cancer, birth defects or other reproductive harm. Preserve this Manual carefully!
WARNING!
FUELS WITH MORE THAN 10% ETHANOL ARE NOT APPROVED FOR USE IN MAKITA 2-STROKE ENGINES!
Use of alternative fuels, such as E-20 (20% ethanol), E-85 (85% ethanol) or any fuels not meeting MAKITA requirements are not approved for use in MAKITA 2-stroke gasoline engines!
USE OF ALTERNATIVE FUELS CAN CAUSE THE FOLLOWING PROBLEMS:
Poor engine performance, loss of power, overheating, fuel vapor lock, improper clutch engagement, premature deterioration of fuel lines, premature deterioration of gaskets,
premature deterioration of carburetors.
USING ALTERNATIVE FUELS AND/OR 2-STROKE OILS NOT ACCORDING TO JASO FC OR ISO-L-EGD IN MAKITA 2-STROKE ENGINES WILL VOID YOUR ENGINE WARRANTY!
ATTENTION!
Suivez toujours les conseils de sécurité du présent manuel d’emploi et de sécurité. Une utilisation incorrecte de la tronçonneuse peut entraîner des blessures graves! Lisez et comprenez
ce manuel. Les gaz d’échappement émis par ce produit contiennent des produits chimiques connus par l’Etat de Californie pour provoquer le cancer, des défauts de naissance
ou autres dommages de reproduction. Conservez avec soin ce manuel!
ATTENTION!
LES CARBURANTS CONTENANT PLUS DE 10 % D’ÉTHANOL NE SONT PAS AUTORISÉS POUR L’UTILISATION DANS LES MOTEURS 2 TEMPS!
Les carburants alternatifs, tels que E-20 (20 % d‘éthanol), E-85 (85 % d’éthanol) ou tout autre carburant n’étant pas conformes aux exigences MAKITA ne sont pas autorisés
pour l’utilisation dans les moteurs essence à 2 temps MAKITA!
L’UTILISATION DE CARBURANTS ALTERNATIFS PEUT CAUSER LES PROBLÈMES SUIVANTS:
Faible performance moteur, Perte de puissance, Surchauffe, Bouchons de vapeur dans la conduite d’essence, Embrayage incorrect, Détérioration prématurée des conduites
d’essence, Détérioration prématurée des joints d’étanchéité, Détérioration prématurée des carburateurs.
L’UTILISATION DE CARBURANTS ALTERNATIFS ET/OU D’HUILES 2 TEMPS NON-CONFORMES À LA NORME JASO FC OU ISO-L-EGD DANS LES MOTEURS À 2 TEMPS
MAKITA ANNULERA VOTRE GARANTIE MOTEUR!
1

2
EMISSIONS COMPONENT DEFECT WARRANTY COVERAGE
MAKITA U.S.A, Inc warrant to the initial retail purchaser and each subsequent owner, that this utility equipment was designed, built,
and equipped to conform at the time of initial sale to all applicable regulations of the U.S.
Environmental Protection Agency (EPA), and that the engine is free of defects in materials and workmanship which would cause this
engine to fail to conform with EPA regulations during its warranty period.
For the components listed under PARTS COVERED, the service dealer authorized by MAKITA will, at no cost to you, make the necessary diagnosis, repair, or replacement necessary to ensure that the engine complies with applicable U.S. EPA regulations.
EMISSION COMPONENT DEFECT WARRANTY PERIOD
The warranty period for this engine begins on the date of sale to the initial purchaser and continues for a period of 2 years.
PARTS COVERED
Listed below are the parts covered by the Emission Components Defect Warranty. Some of the parts listed below may require sche-
duled maintenance and are warranted up to the rst scheduled replacement point for that part.
Fuel Metering System
Carburetor and internal parts
Ignition System
Spark plugs
Fuel lter, if applicable Flywheel Magneto
Throttle stopper, if applicable Ignition Coil
Choke System, if applicable
Air Induction System Miscellaneous Items Used in Above Systems
Pre lter, if exist Fuel hoses, clamps and sealing gaskets
Air lter, Air cleaner case, Intake manifold
OBTAINING WARRANTY SERVICE
To obtain warranty service, take your engine to the nearest MAKITA Factory Service Center or service Center authorized by MAKITA.
Bring your sales receipts indicating date of purchase for this engine. The dealer of service authorized by MAKITA will perform the
necessary repairs or adjustments within a reasonable amount of time and furnish you with a copy of the repair order. All parts and
accessories replaced under this warranty become the property of MAKITA.
WHAT IS NOT COVERED
• Conditions resulting from tampering, misuse, improper adjustment (unless they were made by the service dealer authorized by
MAKITA during a warranty repair), alteration, accident, failure to use the recommended fuel and oil, or not performing required
maintenance services.
• The replacement parts used for required maintenance services.
• Consequential damages such as loss of time, inconvenience, loss of use of the engine or equipment, etc.
• Diagnosis and inspection charges that do not result in warranty-eligible service being performed.
• Any non-authorized replacement part, or malfunction of authorized parts due to use of non-authorized parts.
OWNER’S WARRANTY RESPONSIBILITIES
As the engine owner, you are responsible for the performance of the required maintenance listed in your owner’s manual.
MAKITA recommends that you retain all receipts covering maintenance on your engine, but MAKITA cannot deny warranty solely
for the lack of receipts or for your failure to ensure the performance of all scheduled maintenance. As the engine owner, you should
however be aware that MAKITA may deny warranty coverage if your engine or a part has failed due to abuse, neglect, improper
maintenance or unapproved modications.
You are responsible for presenting your engine to the nearest service dealer authorized by MAKITA when a problem exists.
If you have any questions regarding your warranty rights and responsibilities, you should contact the MAKITA Warranty service
Department at 1-800-4-MAKITA (462-5482) for the information.
THINGS YOU SHOULD KNOW ABOUT THE EMISSION CONTROL SYSTEM WARRANTY:
MAINTENANCE AND REPAIRS
You are responsible for the proper maintenance of the engine. You should keep all receipts and maintenance records covering the
performance of regular maintenance in the event questions arise. These receipts and maintenance records should be transferred
to each subsequent owner of the engine. MAKITA reserves the right to deny warranty coverage if the engine has not been properly
maintained. Warranty claims will not be denied, however, solely because of the lack of required maintenance or failure to keep
maintenance records.
MAINTENANCE, REPLACEMENT OR REPAIR OF EMISSION CONTROL DEVICES AND SYSTEMS MAY BE PERFORMED BY
ANY REPAIR ESTABLISHMENT OR INDIVIDUAL; HOWEVER, WARRANTY REPAIRS MUST BE PERFORMED BY A SERVICE
DEALER AUTHORIZED BY MAKITA. THE USE OF PARTS THAT ARE NOT EQUIVALENT IN PERFORMANCE AND DURABILITY
TO AUTHORIZED PARTS MAY IMPAIR THE EFFECTIVENESS OF THE EMISSION CONTROL SYSTEM AND MAY HAVE A BEARING ON THE OUTCOME OF A WARRANTY CLAIM.
If other than the parts authorized by MAKITA are used for maintenance replacements or for the repair of components affecting emission control, you should assure yourself that such parts are warranted by their manufacturer to be equivalent to the parts authorized
by MAKITA in their performance and durability.
HOW TO MAKE A CLAIM
All repair qualifying under this limited warranty must be performed by a service dealer authorized by MAKITA. In the event that any
emission-related part is found to be defective during the warranty period, you shall notify MAKITA Warranty service Department
at 1-800-4-MAKITA (462-5482) and you will be advised of the appropriate warranty service dealer or service providers where the
warranty repair can be performed.

WARNING !
RE Y
Careless or improper use of this product can cause serious or even fatal injury.
Before operating a chain saw or other MAKITA products it is important that you read, fully understand and
carefully follow the instructions outlined in this owners manual. Kickback may cause severe or fatal injury and
is one of many potential dangers in operating a chain saw. Kickback and other safety related precautions are
described in detail within this owners manual. Additional owners manuals are available from www.makitausa.
com and 1-800-4-MAKITA (462-5482) and MAKITA CANADA INC.,1950 Forbes Street, Whitby, Ontario, L1N
7B7, Canada, Telephone: (905) 571 22 00.
This product complies with: American National Standard Institute B 175.1-2000 chain saw safety standard.
Canadian Standards Association Z62.1-03 chain saw safety standard.
Z62.3-04 chain saw kickback standard.
Society of Automotive Engineers SAEJ 335-Jun 95 „Multiposition small
engine exhaust system re ignition
suppression”
With the purchase of this chain saw you have chosen a German quality product. Important instructions for the
assembly and operation of this saw are given in this manual. For your own safety, we ask you to read the accident prevention instructions very carefully before putting your chain saw into operation, as incorrect handling can,
despite all precautions, lead to accidents. With a little care and attention you will have good service and lasting
satisfaction from this rst-rate product.
DCS460, DCS5121
Contents
Page
Delivery inventory .................................................... 4
Symbols ................................................................... 4
Safety precautions ..............................................5-16
Denomination of components ................................ 17
Technical data........................................................ 18
Mounting the guide bar and saw chain .............19-20
Checking the chain tension ...................................21
Retightening the saw chain ...................................21
Chain brake ........................................................... 21
Engaging the chain brake ...................................... 21
Fuel / Refuelling................................................22-23
Chain lubrication .................................................... 24
Starting the engine ................................................25
Stopping the engine............................................... 25
Checking the chain brake ...................................... 26
Working in winter ................................................... 26
Adjusting the carburetor ........................................27
Contents
Page
Sharpening the saw chain ................................ 28-29
Cleaning the brake band and sprocket interior ...... 30
Cleaning the guide bar ..........................................30
Replacing the saw chain........................................ 31
Cleaning the air lter.............................................. 32
Replacing the spark plug ....................................... 33
Checking the mufer screws .................................33
Replacing the starter cable .................................... 34
Replacing the return spring ...................................34
Replacing the starter spring................................... 34
Mounting the fan housing ...................................... 34
Cleaning the cylinder area ..................................... 35
Replacing the fuel lter .......................................... 35
Replacing / cleaning the spark arrester screen ..... 35
Instructions for daily and periodic maintenance ....36
Service, spare parts and guarantee .................36-37
Troubleshooting ..................................................... 37
Extract from the spare parts list ........................38-39
The DCS460, DCS5121 will be delivered in a protective cardboard box to prevent transport damage. Cardboard
is a basic raw material and is consequently reuseable or suitable for recycling (waste paper recycling).
3
4
1
4
5 6 7
32
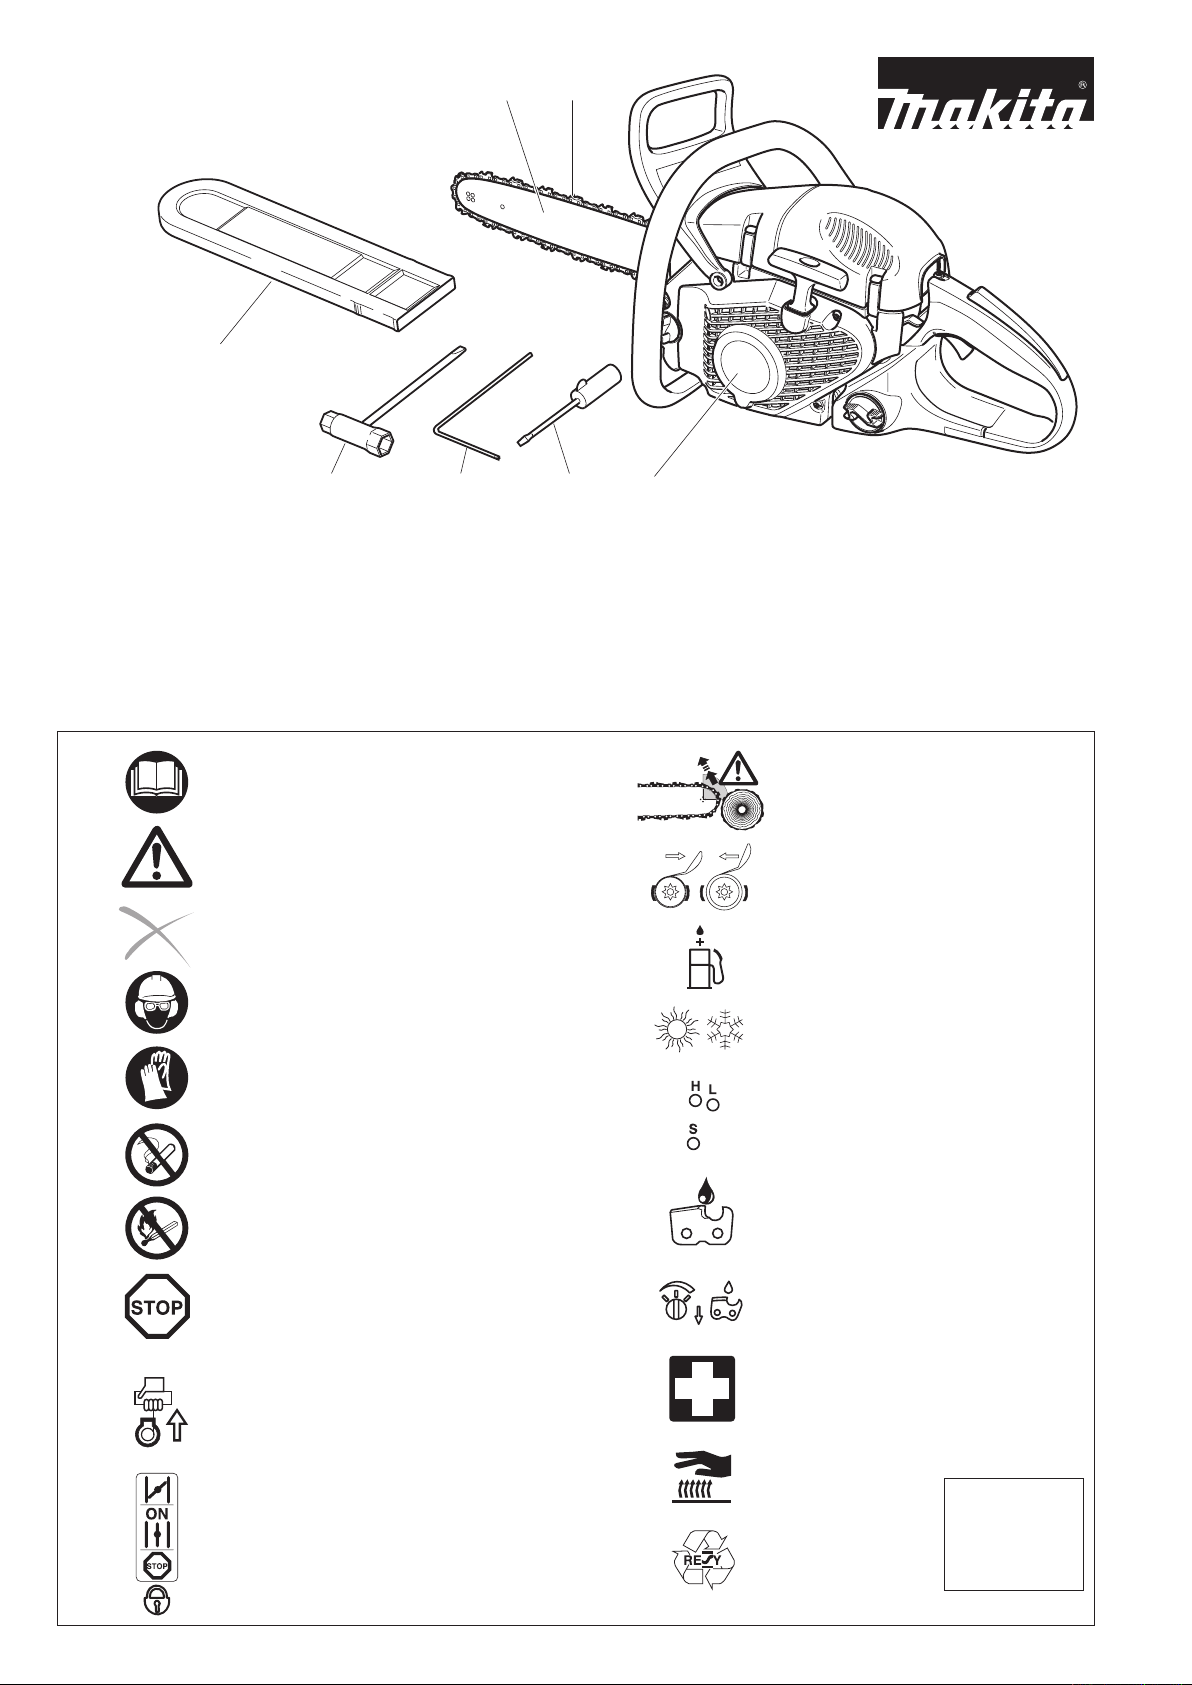
Delivery inventory
1 Chain saw
2 Guide bar
3 Saw chain
4 Chain protection cover
5 Universal wrench
6 Wrench
7 Screw driver for carburetor adjustment
8 Owner’s and Safety Manual (not shown)
In case one of the parts listed should not be included in the
delivery inventory, please consult your sales agent.
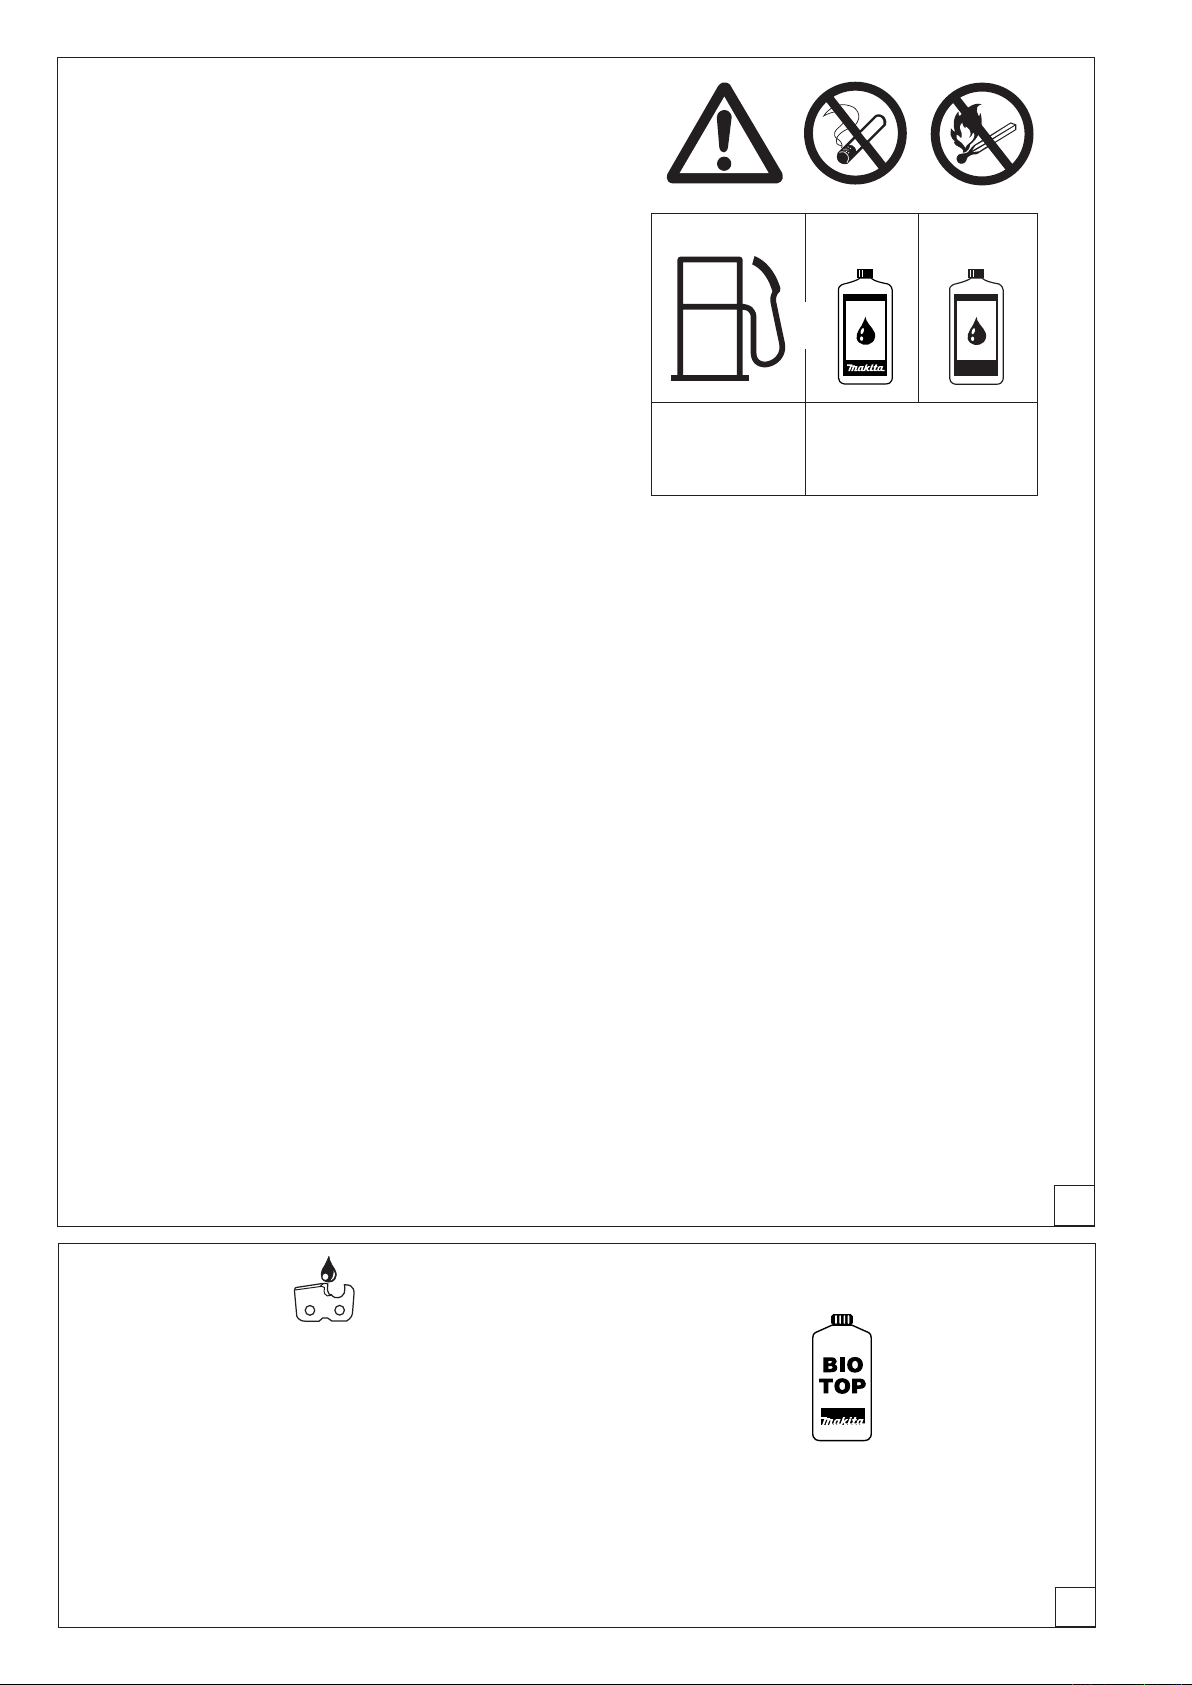
Symbols
You will notice the following symbols on the chain saw and in the Owner’s and Safety Manual:
Read instruction manual and
follow the warning- and safety
precautions!
Particular care
and caution!
Forbidden!
Wear protective helmet,
eye and ear protection!
Wear protective
gloves!
No smoking!
No open re!
Caution, kickback!
Chain brake
Fuel and oil mixture
Normal / Winter operation
Carburetor adjustment
Chain oil ll/oil pump
Stop engine!
Start engine
Combination switch
Choke, Start/Stop (I/O)
Safety position
Saw chain oil
adjustment screw
First aid
Do not touch
hot surfaces!
Further
symbols
Recycling
see page 6.

Safety precautions for chain saw operators
Additional safety precautions
While operating the chain saw please observe the
following rules:
a) Contact of the guide bar nose with any object
should be avoided.
b) Tip contact may cause the guide bar to move
suddenly upward and backward, which may
cause serious or fatal injury.
c) Always operate the chain saw with both hands.
WARNING!
Read and follow all safety precautions in the owner’s
manual. Failure to follow instructions could result in
serious injury. It is recommended to lend the chain
saw only to people who are experienced in working
with chain saws. Always hand over the Owner’s
and Safety Manual.
WARNING!
This chain saw is capable of severe kickback that
could result in serious injury to the operator. Do
not operate this chain saw unless you have extraordinary cutting needs and experience in and
special training for dealing with kickback. Chain
saws with signicantly reduced kickback potential
are available.
The following additional safety precautions must be
observed by all users of chain saws:
1. Do not operate a chain saw when you are fatigued.
2. Use safety footwear; snug-tting clothing; protec
tive gloves; and eye, hearing, and head protection
devices.
3. Use caution when handling fuel. Move the chain
saw at least 10 feet (3 m) from the fueling point
before starting the engine.
4. Do not allow other persons to be near the chain saw
when starting or cutting with the chain saw. Keep
bystanders and animals out of the work area.
5. Do not start cutting until you have a clear work
area, secure footing, and a planned retreat path
from the falling tree.
6. Keep all parts of your body away from the saw
chain when the engine is running.
7. Before you start the engine, make sure that the
saw chain is not contacting anything.
8. Carry the chain saw with the engine stopped, the
guide bar and saw chain to the rear, and the mufer
away from your body.
-
WARNING!
Kickback may occur when the nose or tip of the
guide bar touches an object, or when the wood
closes in and pinches the saw chain in the cut.
This contact may abruptly stop the saw chain and
in some cases may cause a lightning fast reverse
reaction, kicking the guide bar up and back towards
the user, or push the guide bar back towards the
operator. Kickback may cause you to lose control
of the saw.
As a chain saw user, you can take several steps to
reduce the risk of a kickback and potential injury.
A. With a basic understanding of kickback, you
can reduce or eliminate the element of surprise. It is a sudden surprise that contributes
to accidents.
B. Keep a good rm grip on the saw with both
hands, your right hand on the rear grip and
your left hand on the tubular handle, when the
engine is running. Use a rm grip with thumbs
and ngers encircling the chain saw handles. A
rm grip can neutralize kickback and help you
maintain control of the saw. Don’t let go!
C. Make sure that the area in which you are cut
ting is free from obstructions. Do not let the
nose of the guide bar contact the log, branch,
or any other obstructions which could be hit
while you are operating the saw.
D. Do not overreach or cut above shoulder
height.
E. Follow manufacturer’s sharpening and main-
tenance instructions for the saw chain.
F. Only use replacement bars and chains speci-
ed by the manufacturer or the equivalent.
9. Do not operate a chain saw that is damaged,
is improperly adjusted, or is not completely and
securely assembled. Be sure that the saw chain
stops moving when the throttle control trigger is
released.
10. Shut off the engine before setting it down.
11. Use extreme caution when cutting small size brush
and saplings because slender material may catch
the saw chain and be whipped toward you or pull
you off balance.
12. When cutting a limb that is under tension be alert
for springback so that you will not be struck when
the tension on the wood bers is released.
13. Keep the handles dry, clean, and free of oil or fuel
mixture.
14. Operate the chain saw only in well-ventilated
areas.
15. Do not operate a chain saw in a tree unless you
have been specically trained to do so.
16. All chain saw service, other than the items listed
-
in the owner’s manual maintenance instructions,
should be performed by MAKITA. (For example,
if improper tools are used to remove the ywheel
or if an improper tool is used to hold the ywheel
in order to remove the clutch structural damage to
the ywheel could occur and could subsequently
cause the ywheel to burst.)
17. When transporting your chain saw, use the chain
protection cover.
18. Low kickback bars and low kickback chains are
designed to reduce the risk of kickback injury. Ask
your MAKITA dealer about these devices.
5
6
C US
General Safety Precautions
XXX.YYY.ZZZ
XXX.YYY.ZZZ
max. CKA 40
O
The use of any chain saw may be hazardous. At full
throttle chain speed can reach 45 mph (20 m/s). It
is important that you read; fully understand and observe the following safety precautions and warnings.
Read the Owner’s Manual and the safety instructions
periodically.
Maximum Computed Kickback Angle
(CKA)* without using the chain brake when
using the recommended bar and chain
combinations (In this example the CKA is 45°).
Ma ximumCompu ted Kickback An gle
(CKA)* with using the chain brake when
using the recommended bar and chain
combinations (In this example the CKA is 40°).
WARNING !
Reactive forces, including kickback, can be dangerous. Careless or improper use of any chain saw
may cause serious or fatal injury.
Have your MAKITA dealer show you how to operate
your chain saw. Observe all applicable local safety
regulations, standards and ordinances.
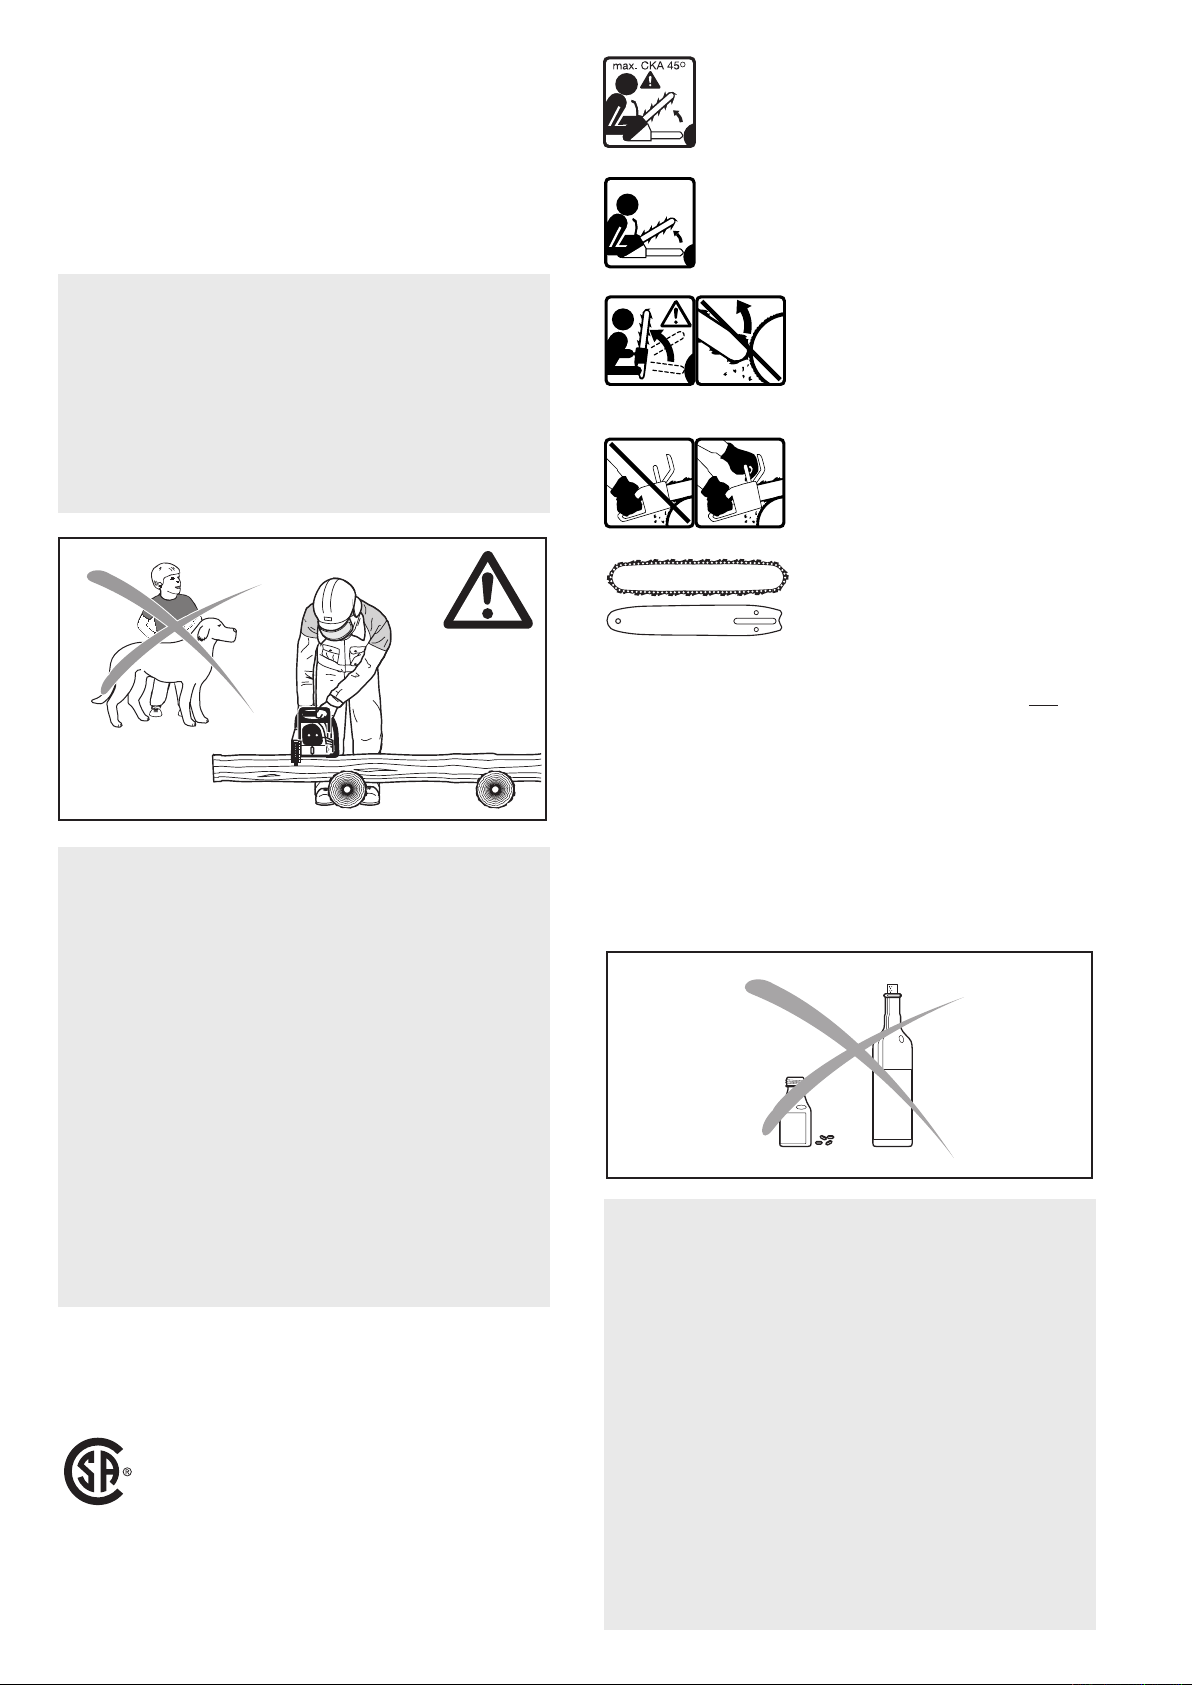
1
WARNING!
Minors should never be allowed to use a chain
saw.
Bystanders, especially children and animals should
not be allowed in the area where a chain saw is
in use (g. 1).
Never let the saw run unattended.
Store it in a locked place away from children. Fill
the fuel tank to 7/8 th full (see storing the saw).
Do not lend your chain saw without this Owner’s
and Safety Manual. Be sure that anyone using your
saw understands the information given.
Contact of the guide bar tip with
any object should be avoided!
Tip contact may cause the guide
bar to move suddenly upward
and backward, which may cause
serious injury!
Always use two hands when
operating the chain saw!
Reduced Kickback Bar and
Chain combination that has been
evaluated with the power head
to achieve kickback protection
(according to ANSI and CSA
standards).
* The Computed Kickback Angle is a calculated value
from energies measured on a test bench.It is not the
angle of the guide bar moved upward in case of a
KICKBACK.
The operator
Physical Condition
You must be in good physical condition and mental
health and not under the inuence of any substance
(drugs, alcohol), which might impair vision, dexterity
or judgment.
2
Proper use of a chain saw involves
1. the operator
2. the saw
3. the use of the saw.
Discription of symbols used on chain
saws:
CSA Standards Z62.1-03
Class 1A Z62.3-04
ANSI Standard B175.1-2000
SAE Standard SAE J335
WARNING !
Prolonged use of chain saws exposing the operator
to vibrations may produce Whitenger disease (Ray-
naud’s phenomenon). This phenomenon reduces
the hand’s ability to feel and regulate temperature,
produces numbness and burning sensations and
may cause nerve and circulation damage and
tissue necrosis.
All MAKITA saws are therefore provided with an
antivibration system which is essential for those
using chain saws on a regular or sustained basis.
Antivibration systems do not guarantee that you
will not sustain Whitenger disesase, however, they
reduce this danger considerably. Nevertheless,
continual and regular users should observe their
hands and ngers and in case of any abnormal
symptoms, seek medical advice immediately.
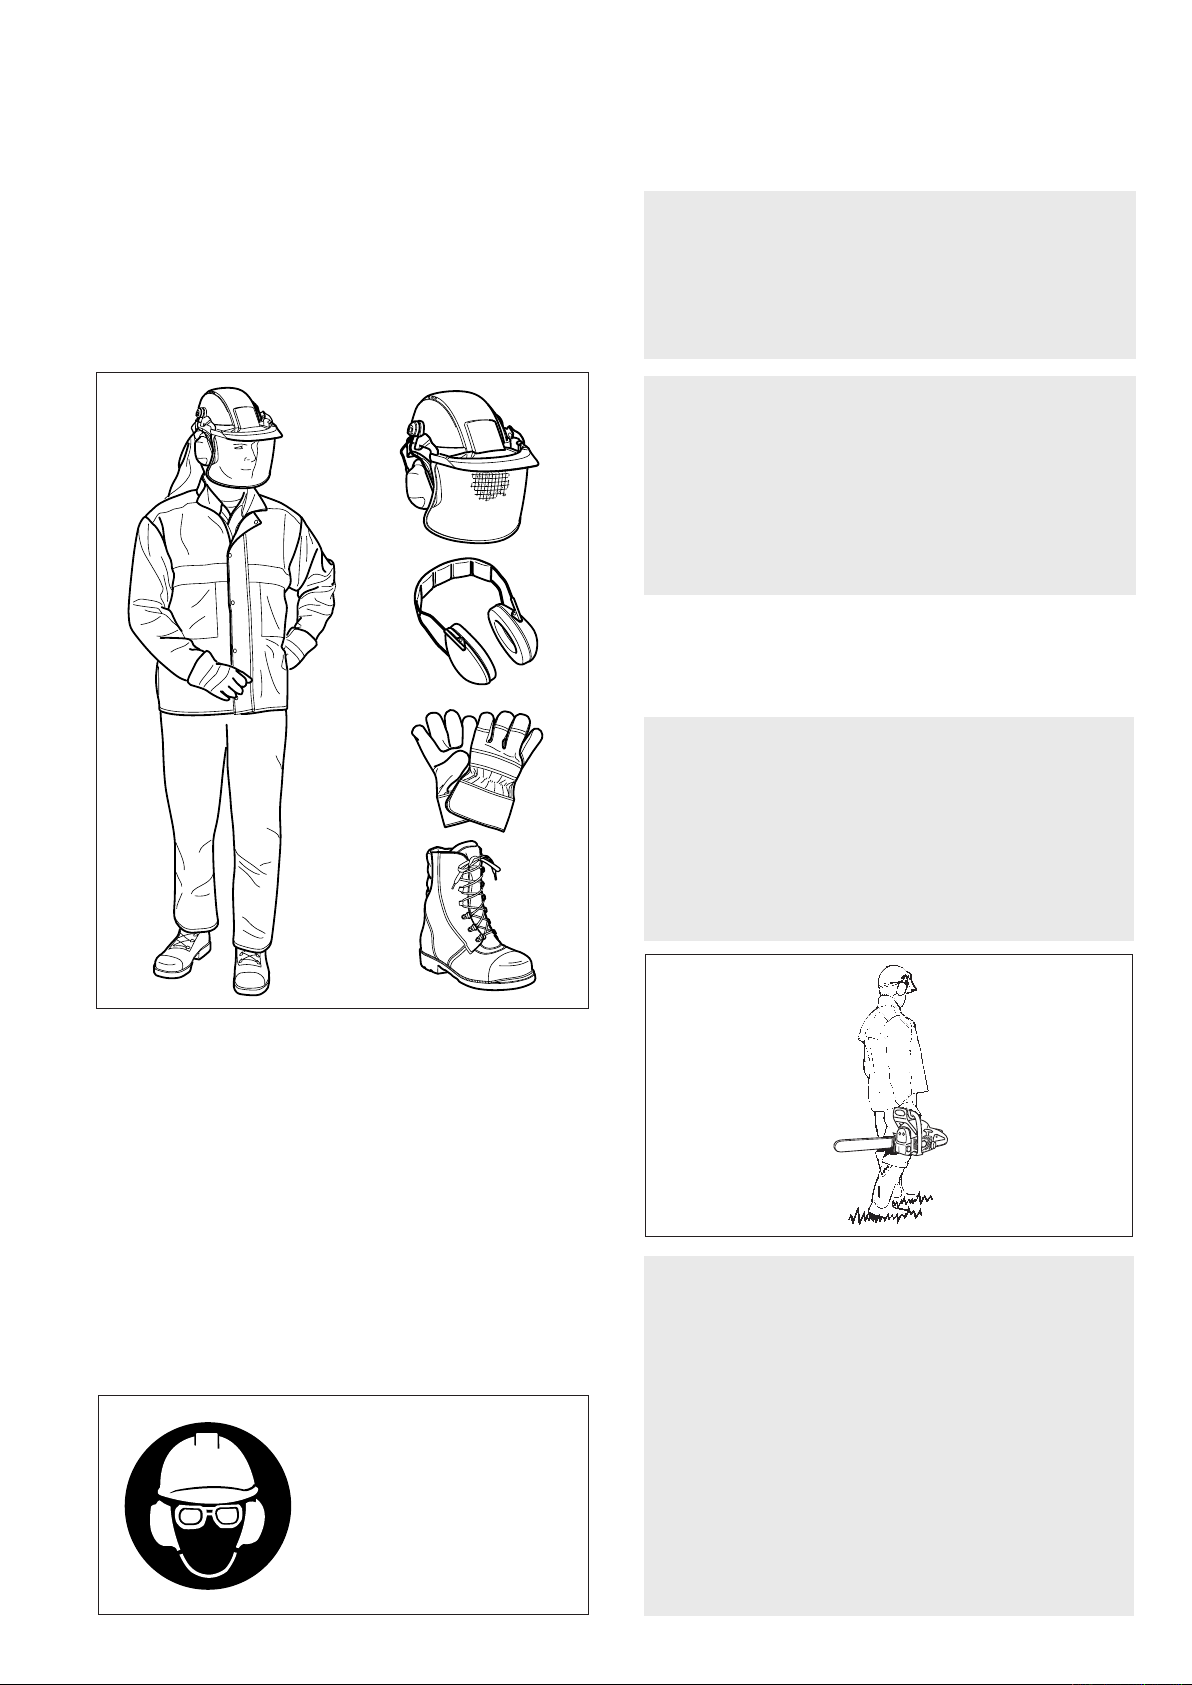
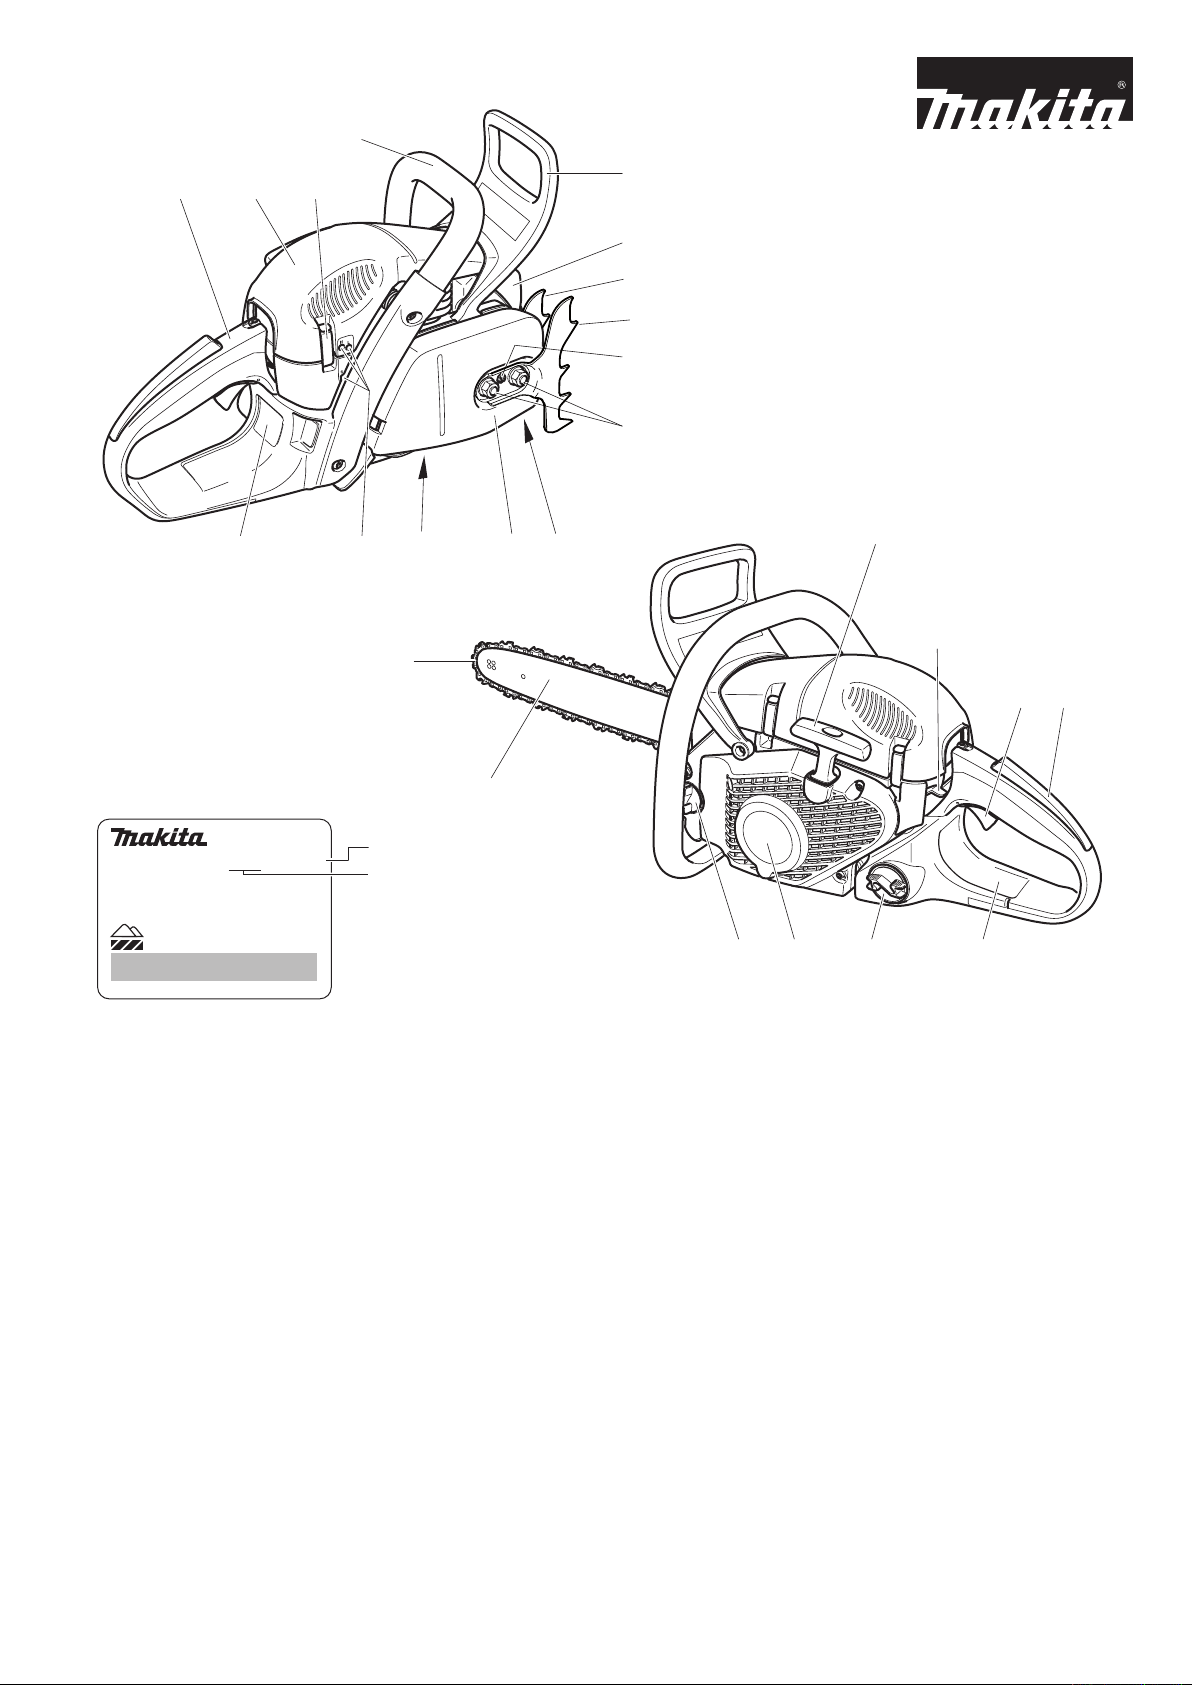
Proper clothing
The saw
Clothing must be sturdy and snug-tting, but allow
complete freedom of movement. Avoid loose-tting
jackets, scarfs, neckties, jewelry, ared or cuffed pants,
or anything that could become entangled with the saw
or brush. Wear overalls or jeans with a reinforced cutting
resistant insert (g. 3).
Protect your hands with gloves when handling saw and
saw chain. Heavy-duty, nonslip gloves improve your
grip and protect your hands.
Parts of the chain saw: illustrations and description of
parts see page 17.
WARNING !
Never modify a chain saw in any way. Only attach-
ments supplied by MAKITA or expressly approved
by MAKITA for use with the specic saw are au-
thorized.
WARNING !
Bow guide bars substantially increase the potential
for kickback and severe or fatal injury due to the
greater kickback zone of the bow design. Bow guide
bars are not recommended for use on MAKITA
chain saws nor are they approved by the ANSI B
175.1-2000 chain saw safety standard.
The use of the saw
Transporting the chain saw
3
Good footing is most important in chain saw work.
Wear sturdy boots with nonslip soles. Steel-toed safety
boots are recommended.
Proper eye protection is a must. Non-fogging, vented
goggles and a face screen is recommended. Their
use reduces the risk of eye and facial injury.
Wear an approved safety hard hat to protect your
head. Chain saw noise may damage your hearing.
Always wear noise protection equipment (ear plugs
or ear muffs) to protect your hearing.
Continual and regular users should have their
hearing checked regularly.
WARNING!
Always stop the engine before putting a chain
saw down or carrying it. Carrying a chain saw
with the en- gine running is extremely dangerous.
Accidental acceleration of the engine can cause
the chain to rotate.
Avoid touching the hot mufer.
4
By hand: When carrying your saw by hand, the
engine must be stopped and the saw must be in
the proper position.
The chain protection cover should be over the
chain and the guide bar must point backwards.
When carrying your saw the bar should be behind
you (g. 4).
Wear protective helmet,
eye and ear protection!
By vehicle: When transporting in a vehicle, keep
chain and bar covered with the chain guard. Properly
secure your saw to prevent turnover, fuel spillage
and damage to the saw. Make sure the saw in not
exposed to heat or sparks.
7
8
Chain saw operating instructions
For assembly follow the procedure in the appropriate
section "Mounting Guide Bar and Chain" of this manual.
MAKITA chain, guide bar and sprocket must match each
other (see the appropriate section in this manual).
WARNING!
Proper tension of the chain is extremely important. In order to avoid false setting the tensioning
procedure must be followed as described in this
manual. Always make sure the hexagonal nut(s)
for the sprocket guard is (are) tightened securely
after tensioning the chain. Check chain tension once
more after having tightened the nuts and thereafter
at regular intervals (always before starting to work).
If the chain becomes loose while cutting, shut off
the engine and then tighten. Never try to tighten
the chain while the engine is running!
Fueling
Your MAKITA saw uses on oil-gasoline mixture for fuel
(see chapter "Fuel" of this manual).
Wipe off any spilled fuel before starting your saw and
check for leakage.
Check for fuel leakage while refueling and during operation. If fuel or oil leakage is found, do not start or run
the engine until leak is xed and spilled fuel has been
wiped away. Clothing with fuel on it has to be changed
immediately (this is a danger to your life!).
Avoid skin contact with fuel. Never loosen or remove
the cap of the fuel tank while the engine is running.
Starting
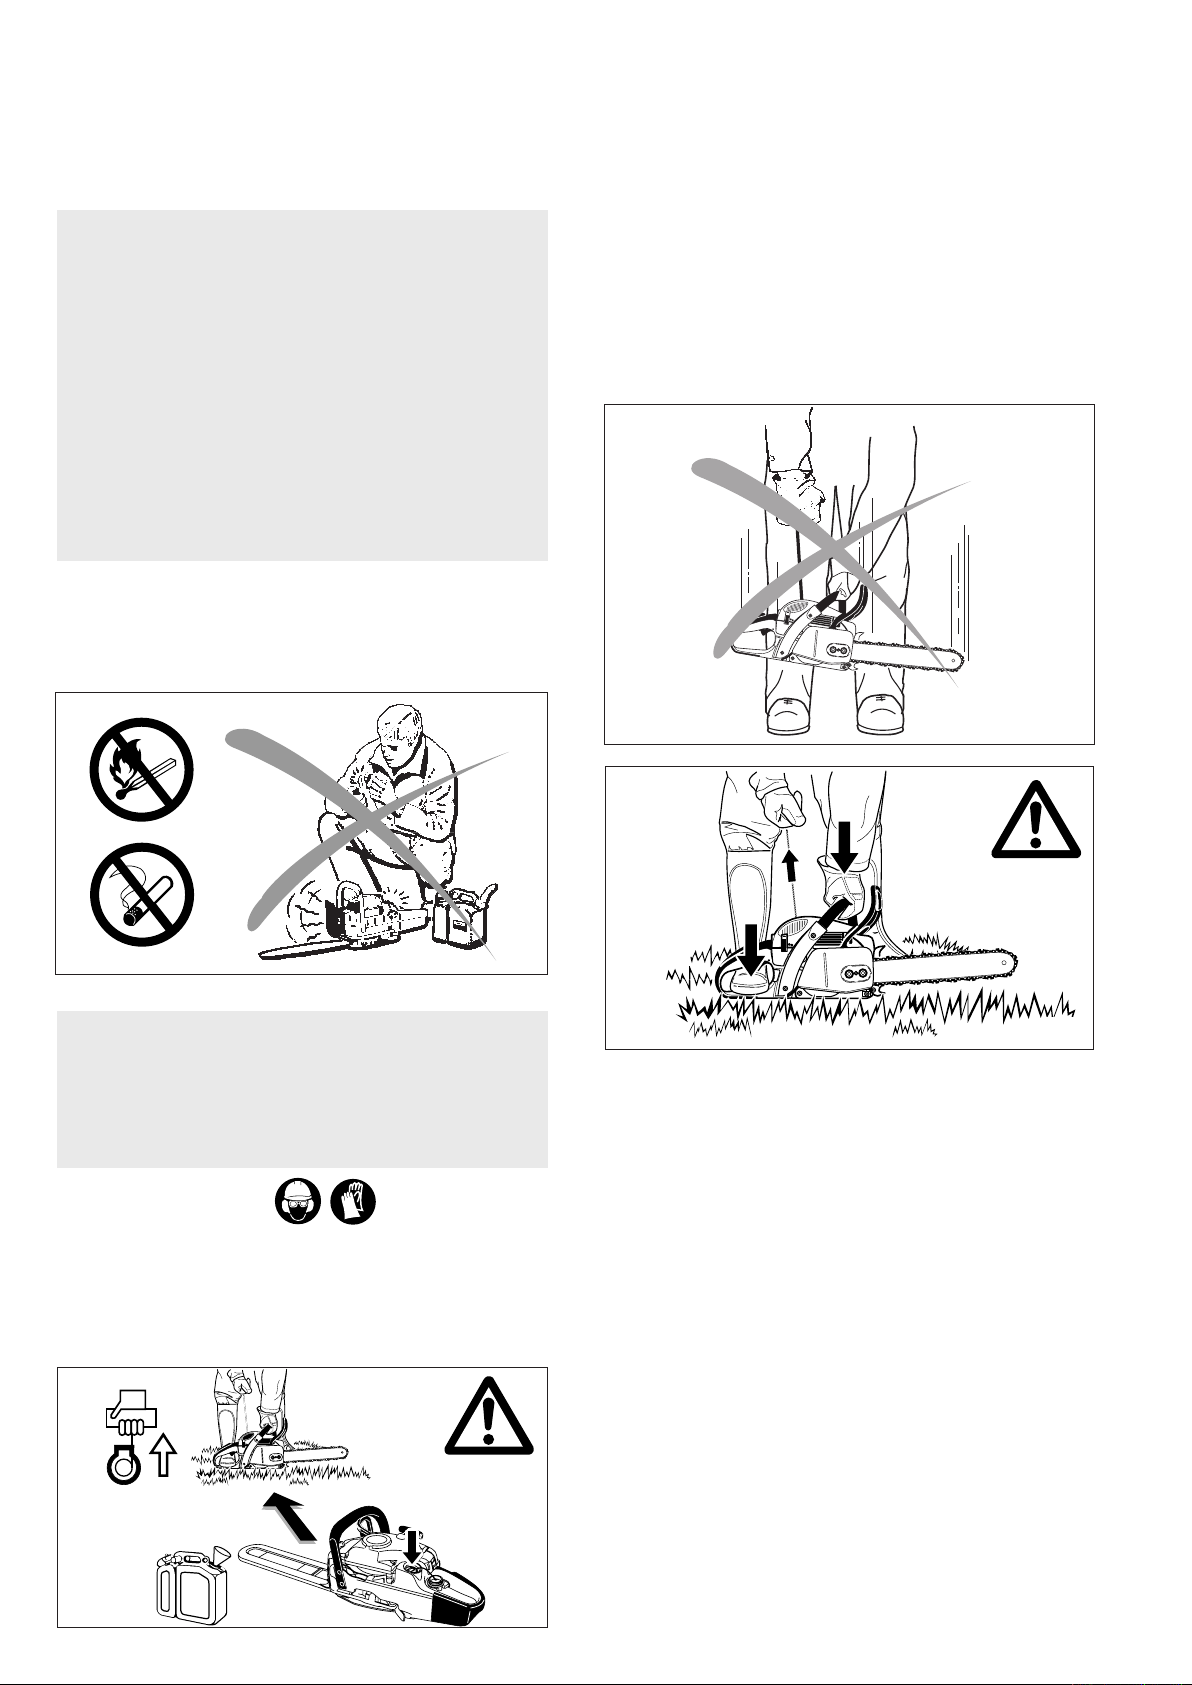
Do not drop start. This method is very dangerous be-
cause you may lose control of the saw (g. 6).
5
WARNING!
Gasoline is an extremely ammable fuel. Use extreme caution when handling gasoline or fuel mix.
Do not smoke or bring any sparks or ame near
the fuel (g. 5).
Fueling instructions
Fuel your chain saw in well ventilated areas or outdoors. Always shut off the engine and allow it to cool
before refueling. Select bare ground for fueling and
move the chain saw at least 10 feet (3 m) from fueling
spot before starting the engine (g. 5a).
6
6a
Place the chain saw on rm ground or other solid
surface in an open area. Maintain a good balance and
secure footing. Place your right foot through the rear
handle opening and rmly grasp the front handle with
your left hand (g. 6a).
Be absolutely sure that guide bar and chain are clear
of you or all other obstructions and objects, including
the ground, because when the engine starts in semithrottle position, engine speed will be fast enough for
the clutch to engage the sprocket and turn the chain
which may cause a kickback.
Never attempt to start the saw when the guide bar is
in a cut or kerf.
When you pull the starter grip, don’t wrap the starter
rope around your hands. Do not allow the grip to snap
10 feet
back, but guide the starter rope slowly back to permit
the rope to rewind properly. Failure to follow this pro-
cedure may result in injury to hand or ngers and may
damage the starter mechanism.
5a
Important adjustments
WARNING!
At correct idle speed, chain should not turn. For directions to adjust idle speed, see the appropriate
section of this instruction manual.
Do not use a saw with incorrect idle speed adjustment. Adjust the idle speed yourself according to
the appropriate section of this manual.
Have your MAKITA dealer check your saw and
make proper adjustments or repairs.
Wrap your ngers tightly around the handles, keeping
the handles cradled between your thumb and forenger (g. 7). With your hands in this position, you can
best oppose and absorb the push, pull and kickback
forces of your saw without having it slip out of your
grip (see section of reactive forces). Make sure your
chain saw handle and grip are in good condition and
free of moisture, pitch, oil or grease.
Always start a cut with the chain running at full speed
and the spike bar in contact with the wood.
Check the saw chain tension frequently, especially
just after installing a new chain. New chains may
stretch more during their initial use. A properly adjusted saw chain can be pulled freely around the
guide bar by hand without sagging. Always stop
the engine and wear gloves when checking or adjusting the chain tension.
Working conditions
Operate your chain saw only outdoors. Operate the saw
under good visibility and daylight conditions only.
WARNING!
Take extreme care in wet and freezing weather
(rain, snow, ice). Put off the work when the weather
is windy, stormy or rainfall is heavy. Clear the area
where you are working.
WARNING!
Avoid stumbling on obstacles such as stumps,
roots or rocks and watch out for holes or ditches.
Be extremely cautious when working on slopes or
uneven ground. There is increased danger of slipping on freshly debarked logs.
WARNING!
Never use the saw with one hand. You cannot
control reactive forces (see pages 10 to 12) and
may lose control of the saw.
8
WARNING!
Do not operate your chain saw in semi-throttle
position. Cutting in this position does not permit
the operator proper control of the saw or chain
speed.
WARNING!
Never come too close to a rotating chain with your
hands or body.
Cutting instructions
Always hold the saw rmly with both hands when the
engine is running. Place your left hand on the tubular
handle and your right hand on grip and throttle lever.
Left-handers should follow these instructions too.
7
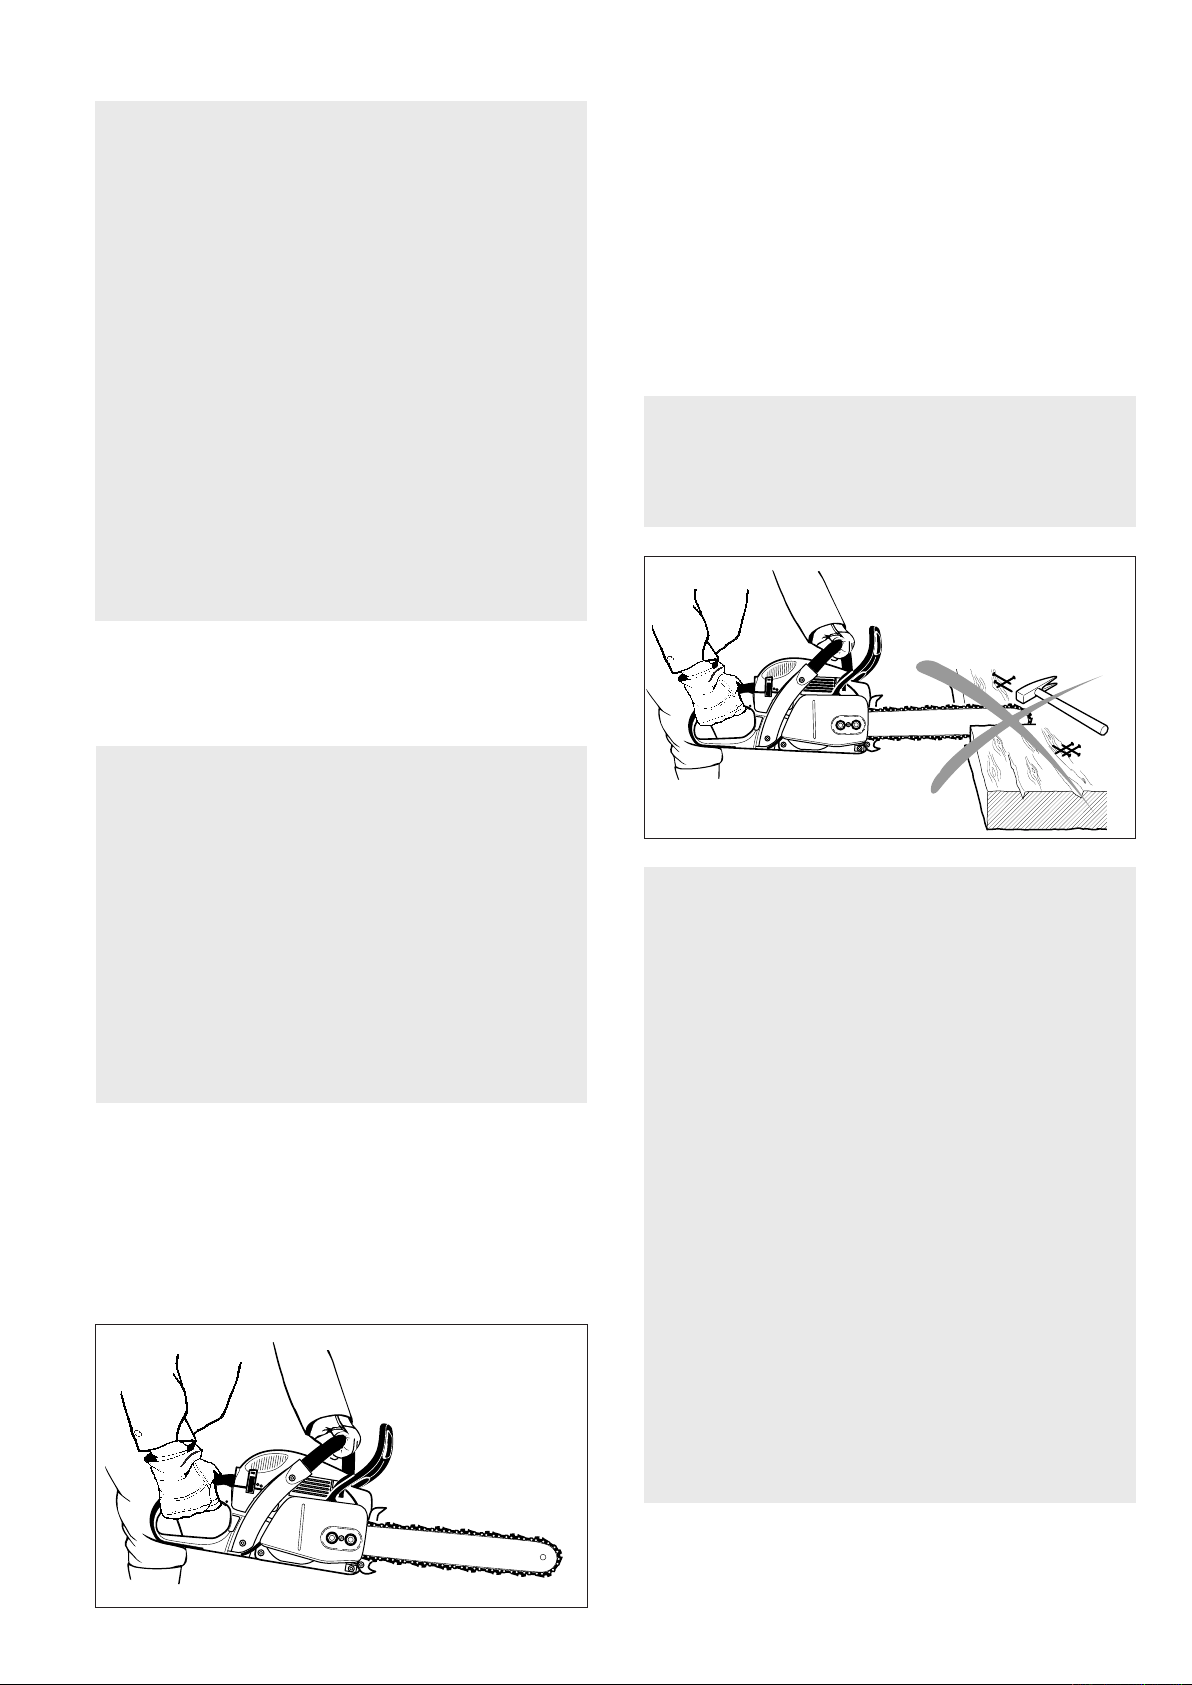
WARNING!
Do not cut any material other than wood or
wooden objects.
Use your chain saw for cutting only. It is not designed for prying or shoveling away limbs, roots
or other objects.
When sawing, make sure that the saw chain does
not touch any foreign materials such as rocks, nails
and the like (g. 8). Such objects may be ung
off, damage the saw chain or cause the saw to
kickback.
9
10
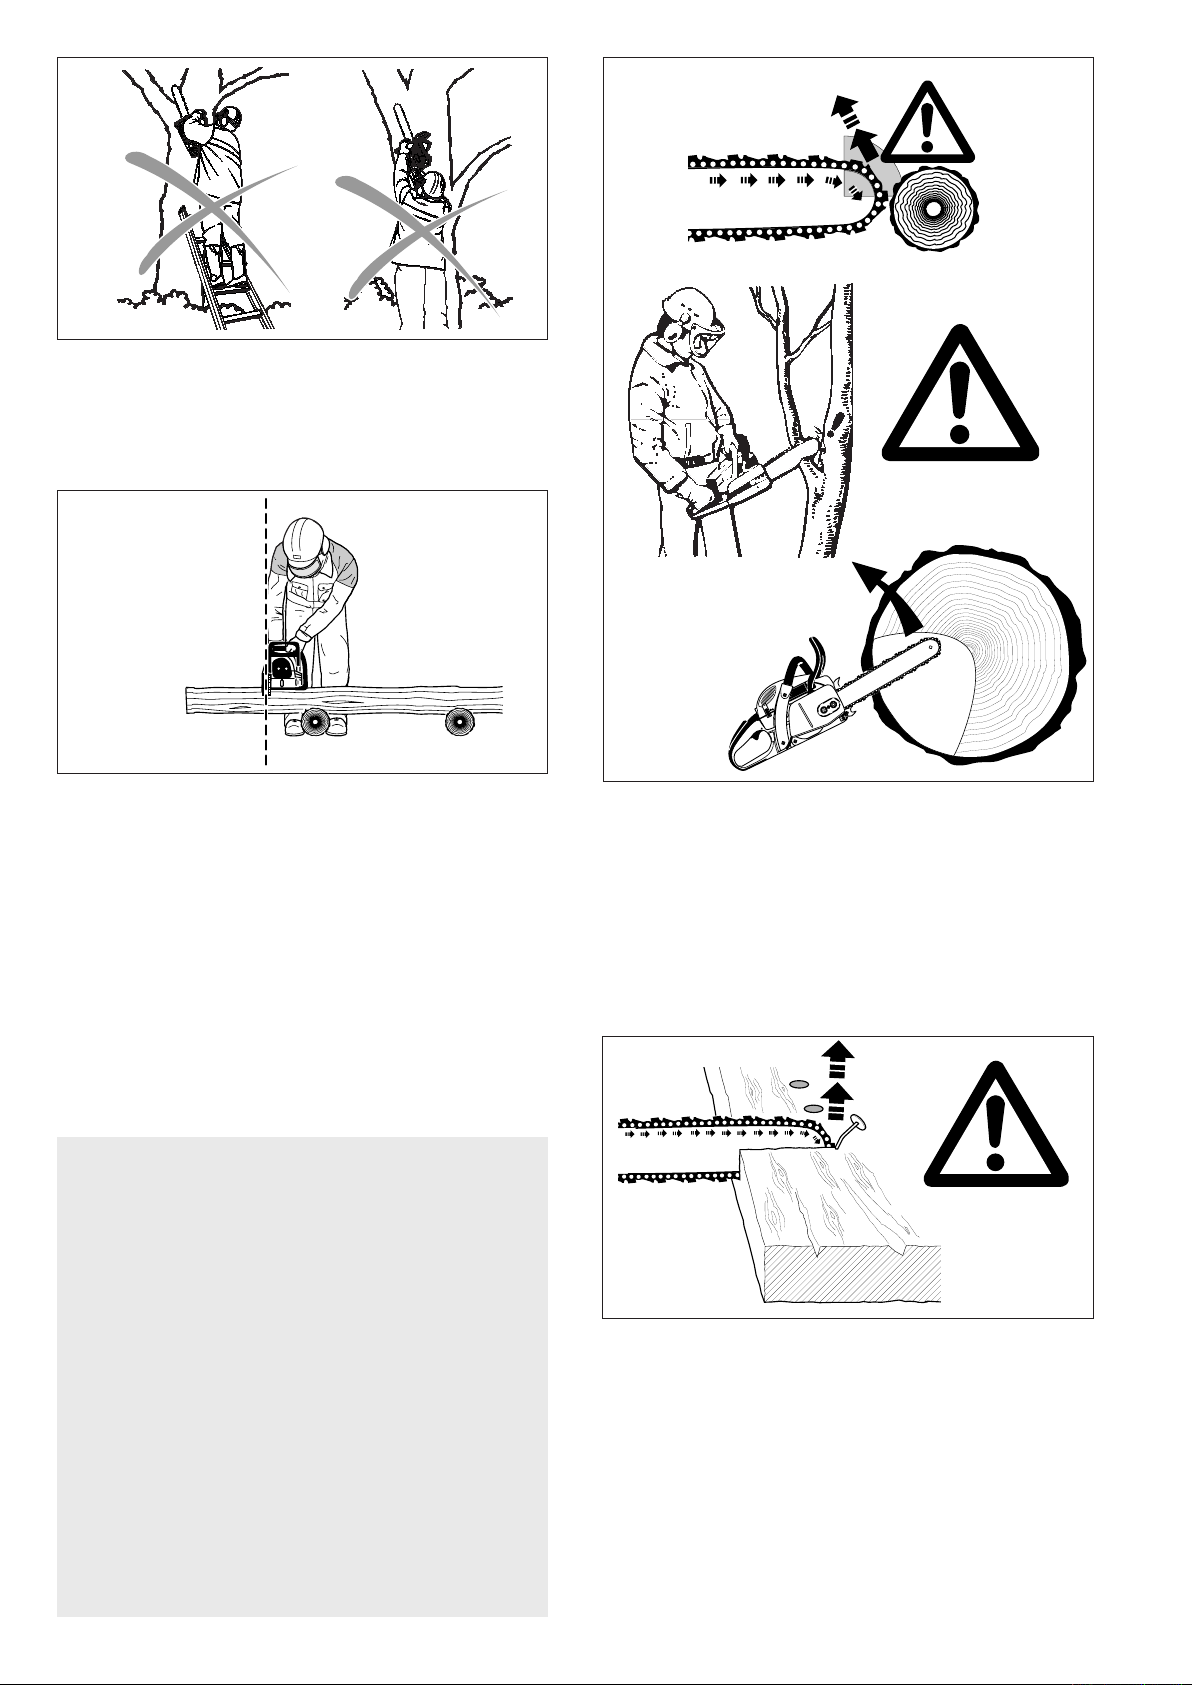
9
In order to keep control of your saw, always maintain
a rm foothold. Never work on a ladder, in a tree or on
any other insecure support. Never use the saw above
shoulder height (g. 9).
10
Position the chain saw in such a way that your body is
clear of the cutting attachment whenever the engine
is running (g. 10).
Don’t put pressure on the saw when reaching the end
of a cut. The pressure may cause the bar and rotating
chain to pop out of the cut or kerf, go out of control
and strike the operator or some other object. If the
rotating chain strikes some other object a reactive
force (see pages 11 to 13 ) may cause the chain to
strike the operator.
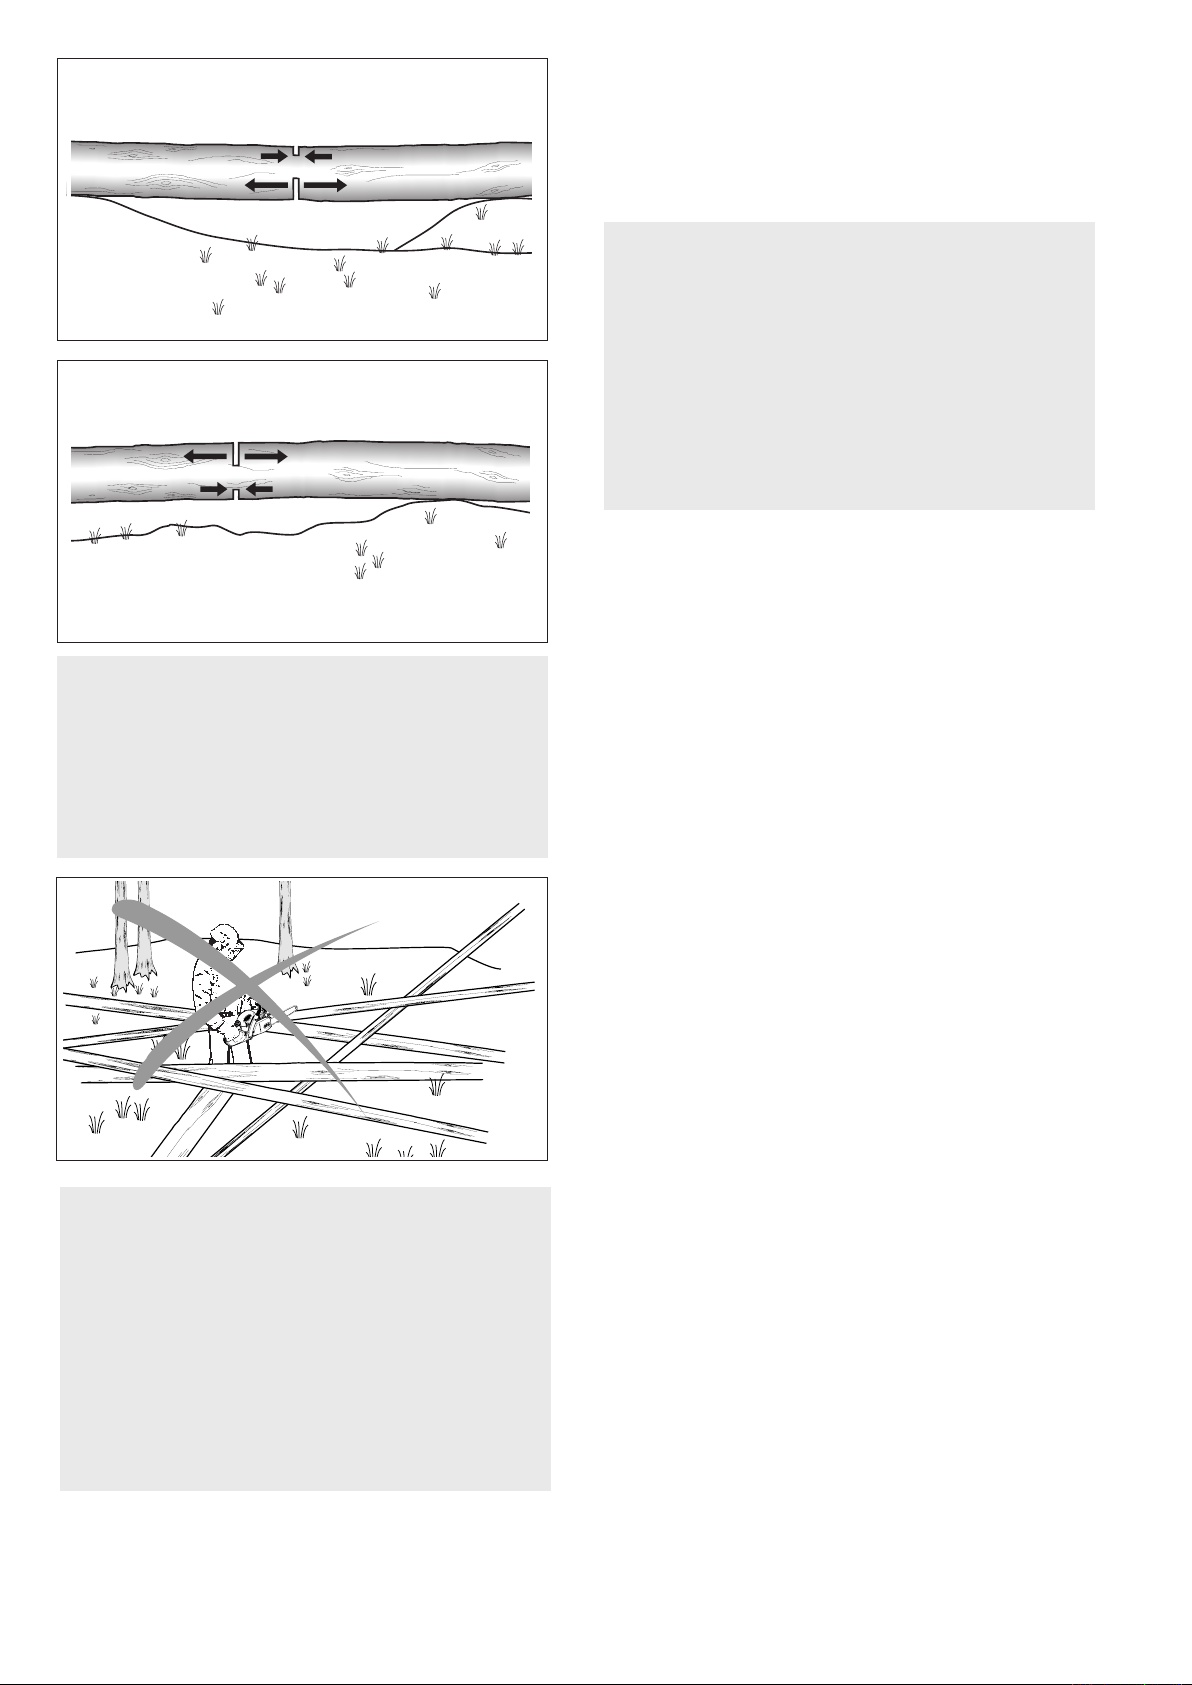
Reactive forces during the cut, including kickback
WARNING!
Reactive forces, that may occur during any cut are
kickback, pushback and pull-in. Reactive forces
can be dangerous! In any chain saw, the powerful
force used to cut wood can be reversed (and work
against the operator).
If the rotating chain is suddenly stopped by contact with any solid object like a log or branch or is
pinched, the reactive forces instantly occur. These
reactive forces may result in loss of control which
may, in turn, cause serious or fatal injury. An understanding of the causes of these reactive forces
may help you avoid loss of control.
The most common reactive forces are
- kickback,
- pushback,
- pull-in.
11
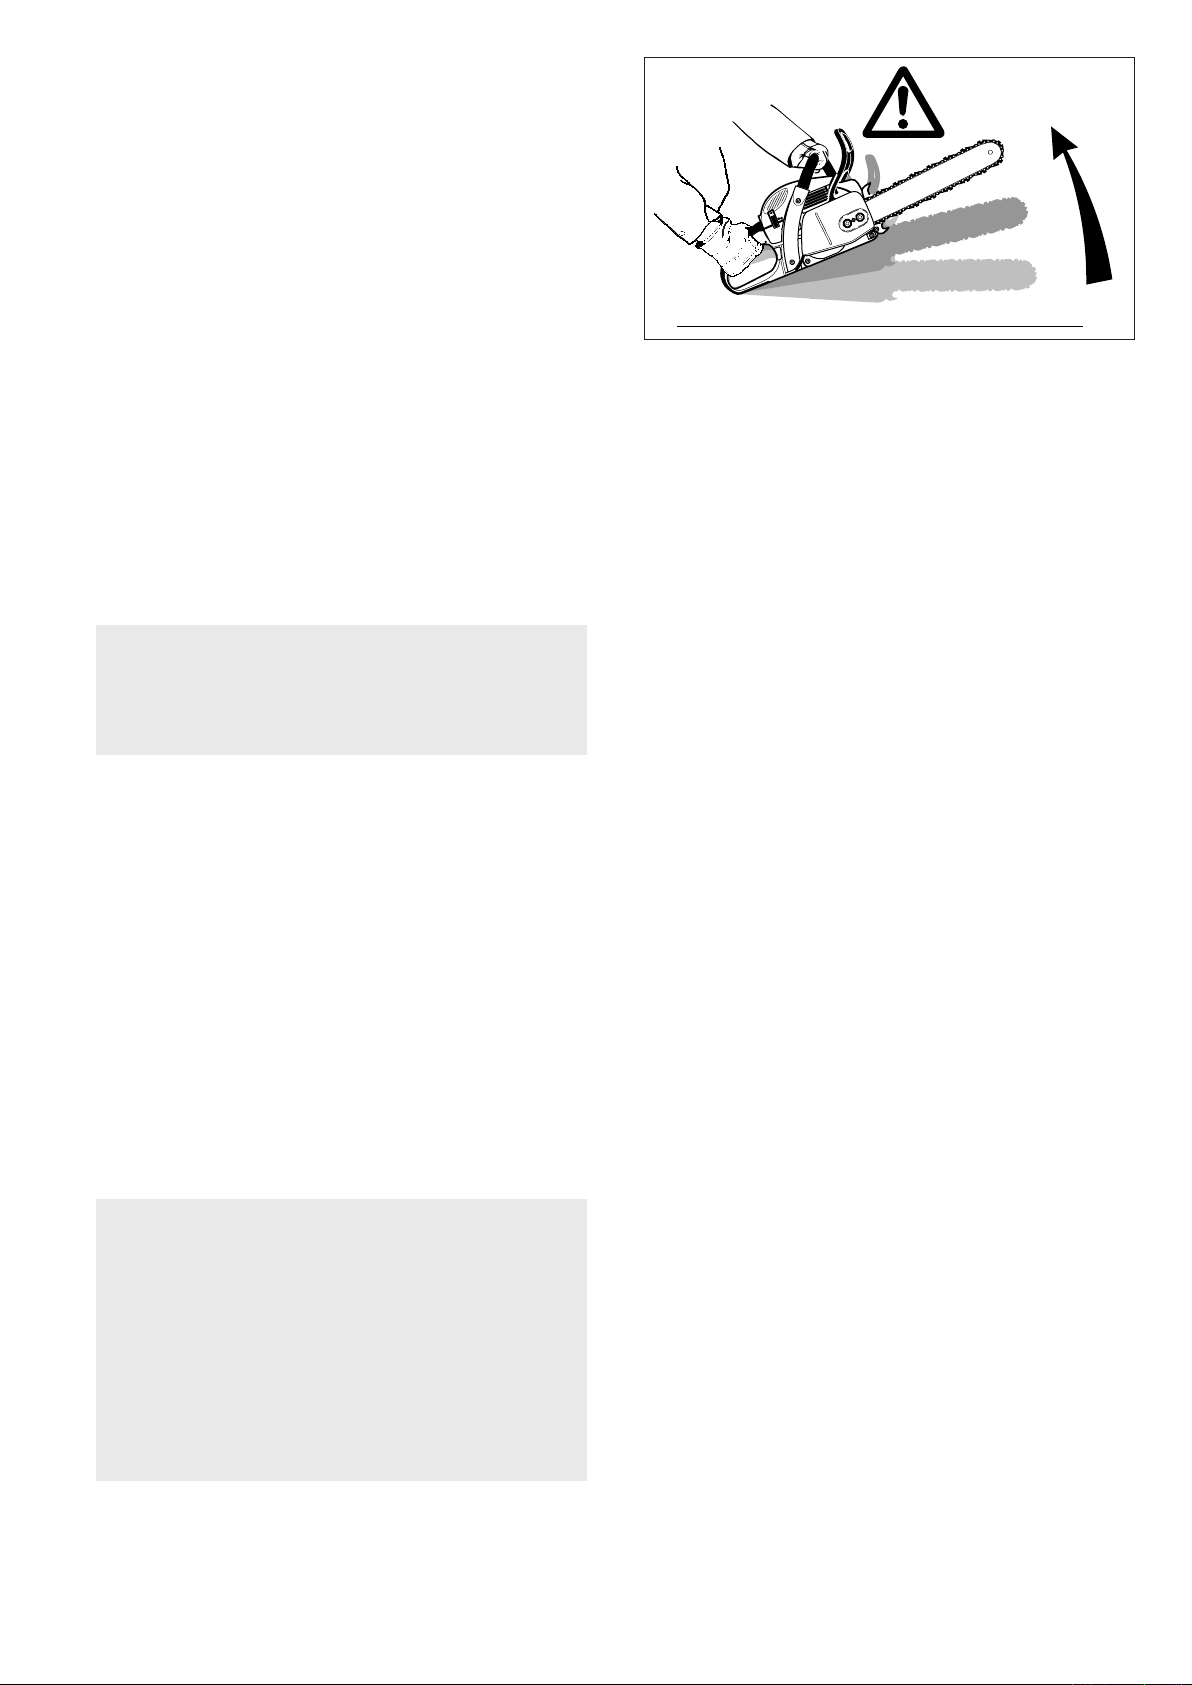
Kickback:
Kickback occurs when the upper quadrant of the bar
nose contacts a solid object in the wood or is pinched
(g. 11). The reaction of the cutting force of the chain
causes a rotational force of the chain saw in the direc
tion opposite to the chain movement, mainly in the plane
of the bar. This may ing the bar in an uncontrolled arc
towards the operator.
12
This reaction can occur in a fraction of a second and
under some circumstances, cause the guide bar and
chain to strike the operator with enough force to cause
severe or fatal injury. It may also occur during limbing. It
also occurs when the nose of the guide bar is pinched
unexpectedly, unintentionally contacts solid material
in the wood (g.12) or is incorrectly used to begin a
plunge or boring cut.
The greater the force of the kickback reaction, the
more difcult it becomes for the operator to control
the saw.
Many factors inuence the occurence and force of
the kickback reaction. The type of bar and saw chain you
use is a factor in the force of the kickback reaction.
The speed of contact at which the cutter contacts
the object.
Kickback force increase with the rate of impact.
The contact angle between the nose of the bar
and the foreign object (g. 11).
Kickback is most pronounced in the upper quadrant
of the bar nose.
MAKITA chain types are designed to reduce kickback
forces.
The depth gauges:
Improper lowering of the depth gauges also increases
the risk of a kickback.
Saw chain cutter sharpness:
13
To avoid kickback
The best protection from personal-injury that may result
from kickback is to avoid kickback situations:
1. Hold the chain saw rmly with both hands and
maintain a secure grip.
2. Be aware of the location of the guide bar nose at
all times.
WARNING!
A dull improperly sharpened chain may increase
the risk of kickback. Always cut with a properly
sharpened chain.
Devices for reducing the risk of kickback injury
MAKITA have developed a special chain brake to
reduce the risk of kickbacks.
This chain brake increases the safety factor on the
job, e.g. when the saw suddenly bucks upwards the
chain stops rotating within a fraction of a second. A
deection guard on the disengaging lever of the chain
brake and a scoop rear handle ensure that the operator’s hands are fully protected at all times.
Kickback tendency increases as the radius or size of
the guide bar nose increases. MAKITA have developed guide bars with small nose radius, to reduce the
kickback tendency.
WARNING!
No chain brake prevents kickback.
These brakes are designed only to stop the chain,
if activated.
To ensure a proper operation of the chain brake, it
must be properly maintained. Furthermore, there
must be a sufcient distance between the operator and the bar to ensure that the chain brake has
sufcient time to activate and stop the chain before
potential contact with the operator.
3. Never bring the nose of the guide bar in contact
with any object. Do not cut limbs with the nose of
the guide bar. Be especially careful with small,
tough limbs, small size brush and saplings which
may easily catch the chain.
4. Don’t overreach.
5. Don’t cut above shoulder height.
6. Begin cutting and continue at full throttle.
7. Cut only one log at a time.
8. Use extreme caution when re-entering a previous
cut.
9. Do not attempt plunge cuts (see page 14) if you are
not experienced with these cutting techniques.
10. Be alert for shifting of the log or other forces that
may cause the cut to close and pinch the chain.
11. Maintain saw chain properly. Cut with a correct-
ly sharpened, properly tensioned chain at all
times.
12. Stand to the side of the cutting path of the chain
saw.
11
12
Pushback:
To avoid pull-in
Pushback occurs when the chain on the top of the
bar is suddenly stopped when it is pinched, caught
or encounters a foreign object in the wood. The reac-
tion of the chain drives the saw straight back toward
the operator causing loss of saw control. Pushback
fre-quently occurs when the top of the bar is used for
cutting (g. 14).
14
To avoid pushback
1. Be alert to forces or situations that may cause
material to pinch the top of the chain.
2. Do not cut more than one log at a time.
3. Do not twist the saw when withdrawing the bar
from a plunge cut or under buck cut (gures 25 to
27 and 33, pages 14 and 16), because the chain
can pinch.
Pull-in:
Pull-in occurs when the chain on the bottom of the bar
is suddenly stopped. The chain on the bottom of the
bar stops when it is pinched, caught or encounters a
foreign object in the wood (see g. 15). The reaction of
the chain pulls the saw forward, causing the operator
to lose control.
1. Always start a cut with the chain rotating at full speed
and the spike bar in contact with the wood.
2. Pull-in may also be prevented by using plastic
wedges to open the kerf or cut.
Cutting techniques
Felling
Felling is cutting down a tree.
Before felling a tree, consider carefully all conditions
which may affect the direction of fall, including:
The intended direction of the fall.
The neutral lean of the tree.
Any unusually heavy limb structure.
Surrounding trees and obstacles.
The wind direction and speed.
WARNING!
Always observe the general condition of the tree.
Look for decay and rot in the trunk. If it is rotted
inside, it could snap and fall toward the operator
while being cut.
Also look for broken or dead branches which could
vibrate loose and fall on the operator. When felling on a slope, the operator should stand on the
up-hill side.
Pull-in frequently occurs when the spike bar of the
saw is not held securely against the tree or limb and
when the chain is not rotating at full speed before it
contacts the wood.
15
WARNING!
Use extreme caution when cutting small size brush
and saplings which may easily catch the chain and
pull you off balance.
16
When felling in the vicinity of roads, railways and
power lines, etc., take extra precautions (see g.
16). Inform the police, utility company or railway
authority before beginning to cut.
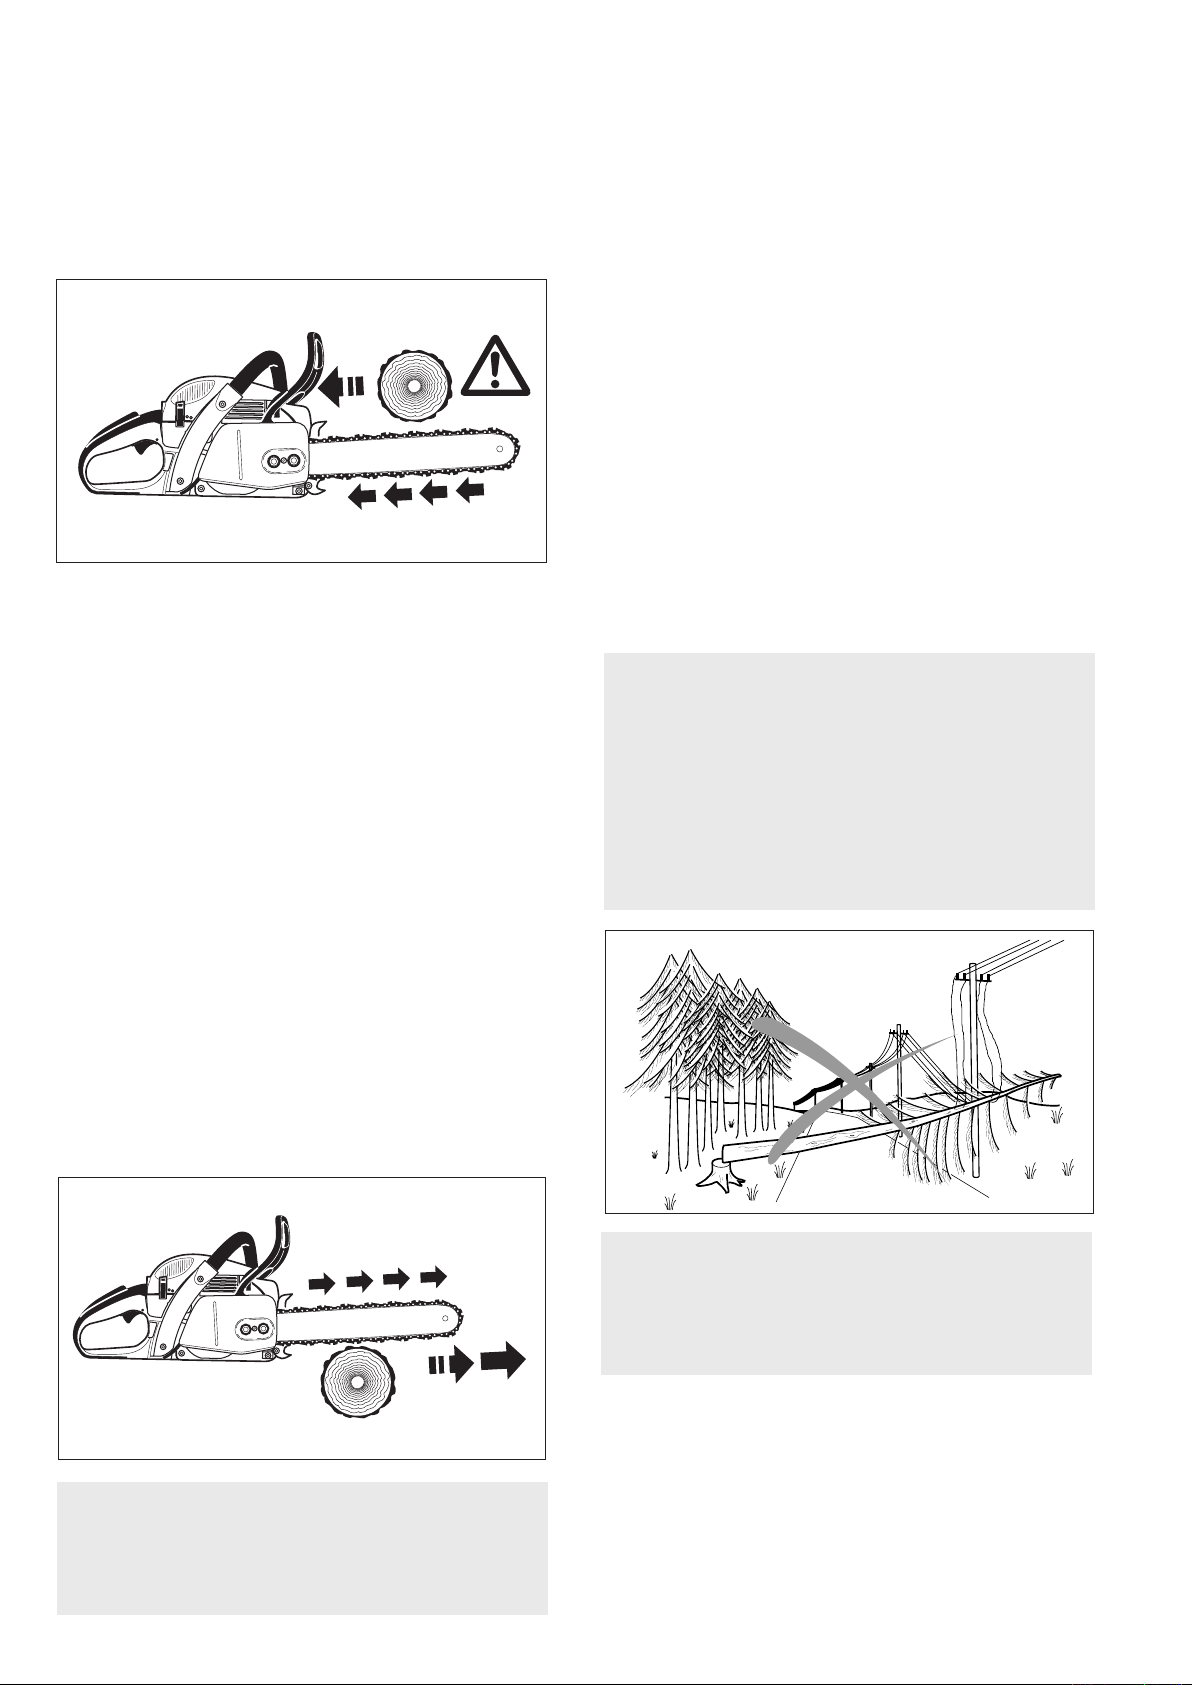
45°
1
2
2
45°
= cutting down area
17
When felling, maintain a distance of at least 2 1/2 tree
lengths from the nearest person (see g. 17).
Note:
The noise of your engine may drown any warning call.
Felling instructions:
First cut
Second cut
20
If the tree has large buttress roots, cut into the largest
buttresses vertically rst (horizontally next) and remove
(g. 20).
Direction of fall
21
18
First clear the tree base and work area from interfering limbs and brush and clean its lower portion an
axe (see g. 18).
45°
19
Then, establish a path of escape and remove all obstacles. This path should be opposite to the planned
direction of the fall of the tree and at a 45° angle (g.
19). An alternate path must also be selected. Place
all tools and equipment a safe distance away from the
tree, but not on the escape path.
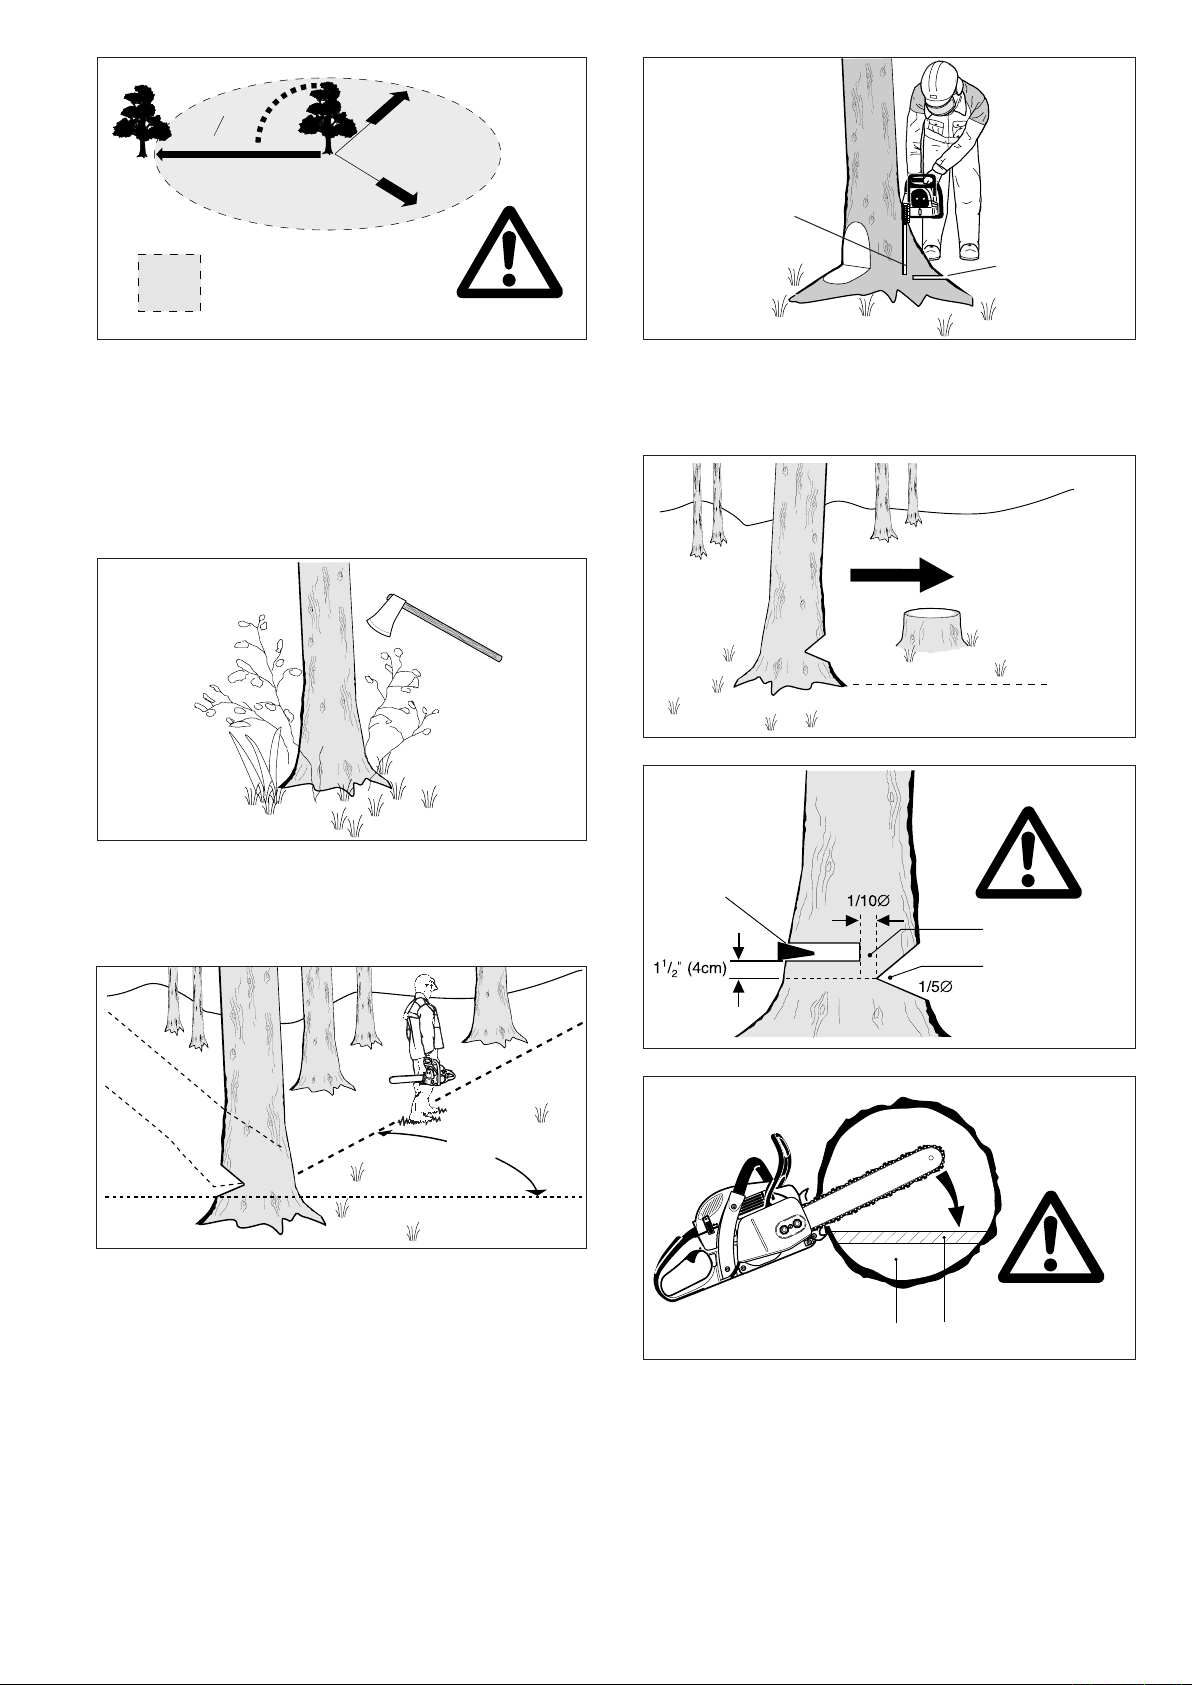
Felling cut
Hinge
Felling notch
22
Felling notch
Hinge
23
Then, determine the placement of the felling notch
(g. 21). The felling notch when properly placed de-
termines the direction in which the tree will fall. It is
made perpendicular to the line of fall and should be as
close to the ground as possible. Cut the felling notch
to a depth of about one-fth to one-fourth of the trunk
diameter (g. 22). It should be in no case higher than
it is deep. Make the felling notch very carefully.
13
14
1
2
3
Begin the felling cut slighty higher than the felling notch
and on the opposite side of the tree (g. 22). Then cut
horizontally through towards the felling notch. Apply
the chain saw with its spikes directly behind the uncut
portion of wood and cut toward the notch (g. 23).
Leave approximately 1/10 of the tree diameter uncut!
This is the hinge (g. 23). Do not cut through the hinge
because you could lose control of the direction of the
fall. Drive wedges into the felling cut where necessary
to control the direction of the fall. Wedges should be of
wood, light alloy or plastic - never of steel, which can
cause kickback and damage to the chain.
Always keep to the side of the falling tree. When the
tree starts to fall, shut off the engine, withdraw the
bar and walk away on the pre-planned escape path.
Watch out for falling limbs.
WARNING!
Be extremely careful with partially fallen trees which
are poorly supported.
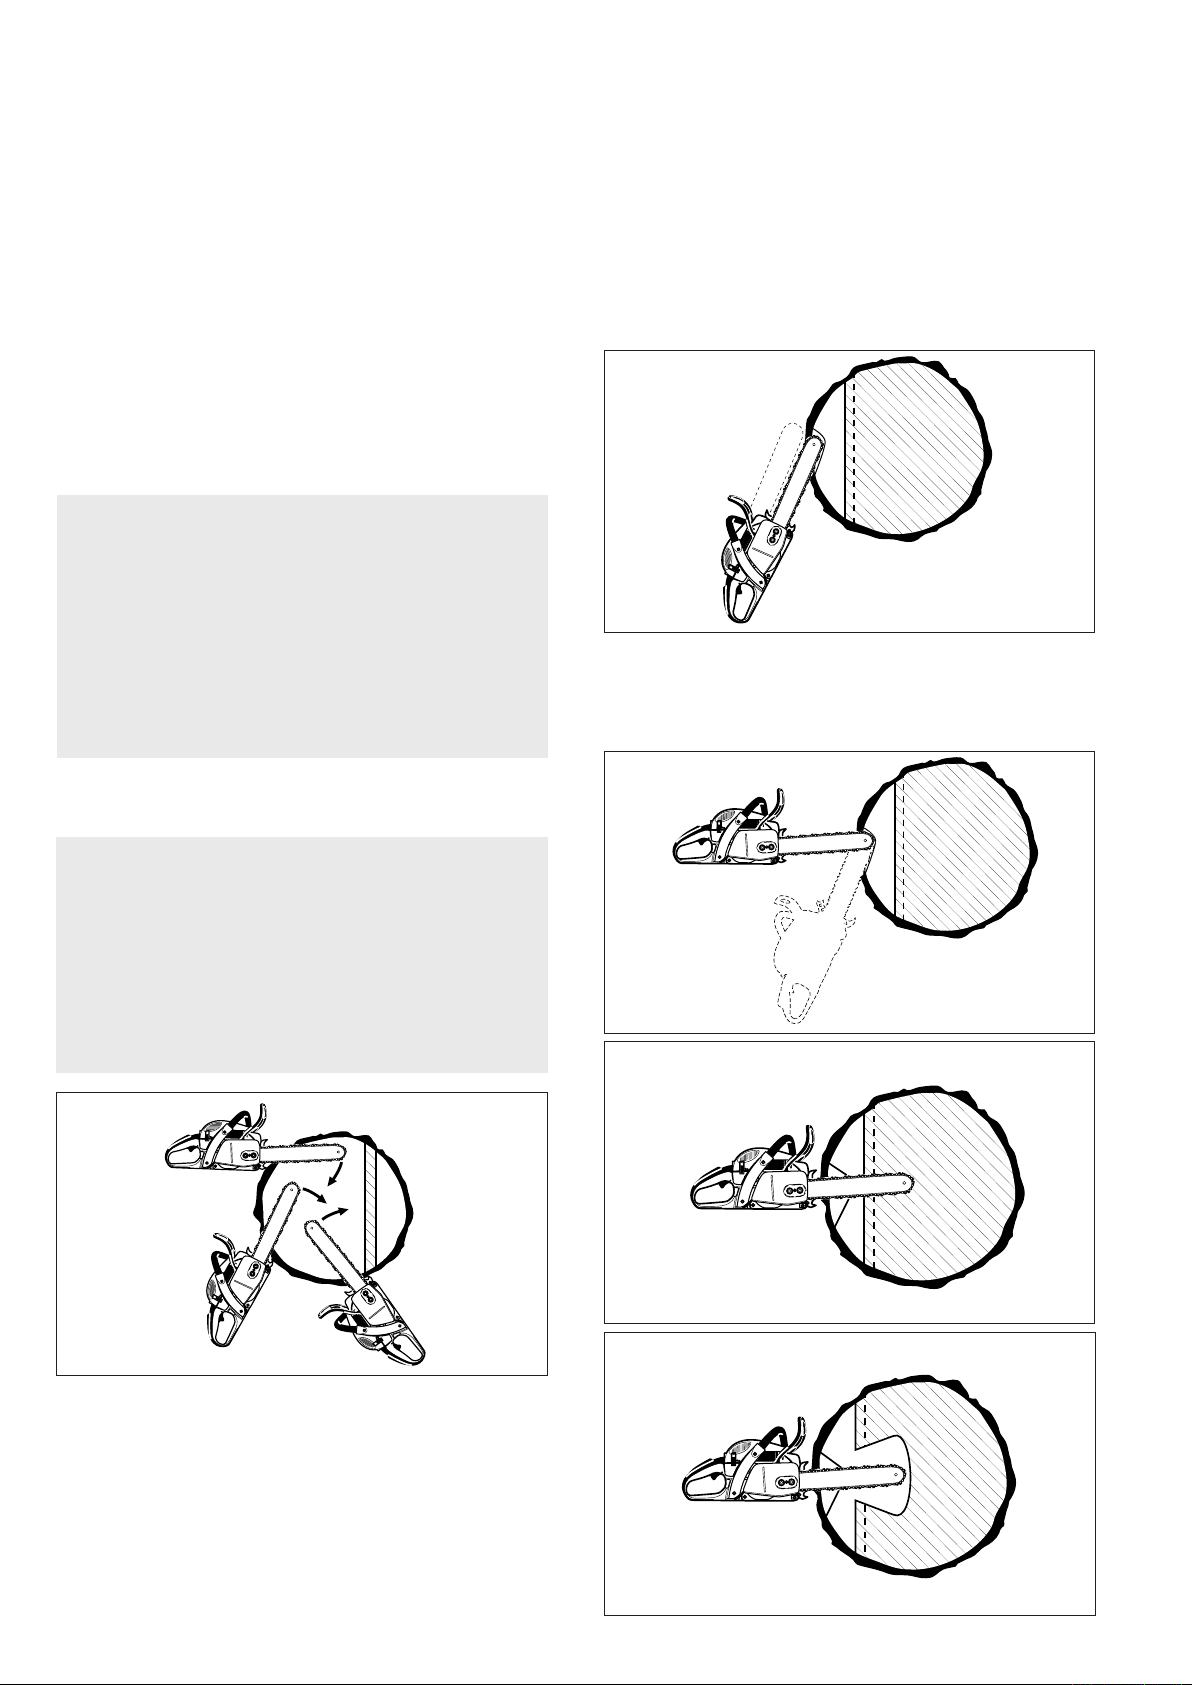
Plunge-Cut Method
Timber having a diameter more than twice the length
of the guide bar reauires the use of the plunge-cut
method before making the felling cut.
First, cut a large, wide notch. Make a plunge cut in the
center of the notch.
The plunge cut is made with the guide bar nose. Begin
the plunge cut by applying the lower portion of the
guide bar nose to the tree at an angle (g. 25). Cut until
depth of the kerf is about the same as the width of the
guide bar (g. 26). Next, align the saw in the direction
When the tree hangs or for some other reason does
not fall completely, set the saw aside and pull the
tree down with a cable winch, block and tackle or
tractor. If you try to cut it down with your saw, you
may be injured.
Sectioning Method
WARNING!
Felling a tree that has a diameter greater than the
length of the guide bar requires use of either the
sectioning or plunge-cut method. These methods
are extremely dangerous because they involve
the use of the nose of the guide bar and can result
in kickback. Only properly trained professionals
should attempt these techniques.
25
in which the recess is to be cut. With the saw at full
throttle, insert the guide bar in the trunk (g. 27).
Enlarge the plunge cut as shown in illustration (g. 28)
26
24
For the sectioning method (g. 24) make the rst cut
with the guide bar fanning in toward the hinge. Then,
using the bumper spike as a pivot, reposition the saw
for the next cut. Avoid repositioning the saw more than
necessary. When repositioning for the next cut, keep
the guide bar fully engaged in the kerf to keep the
felling cut straight. If the saw begins to pinch, insert
a wedge to open the cut. On the last cut, do not cut
the hinge.
27
28
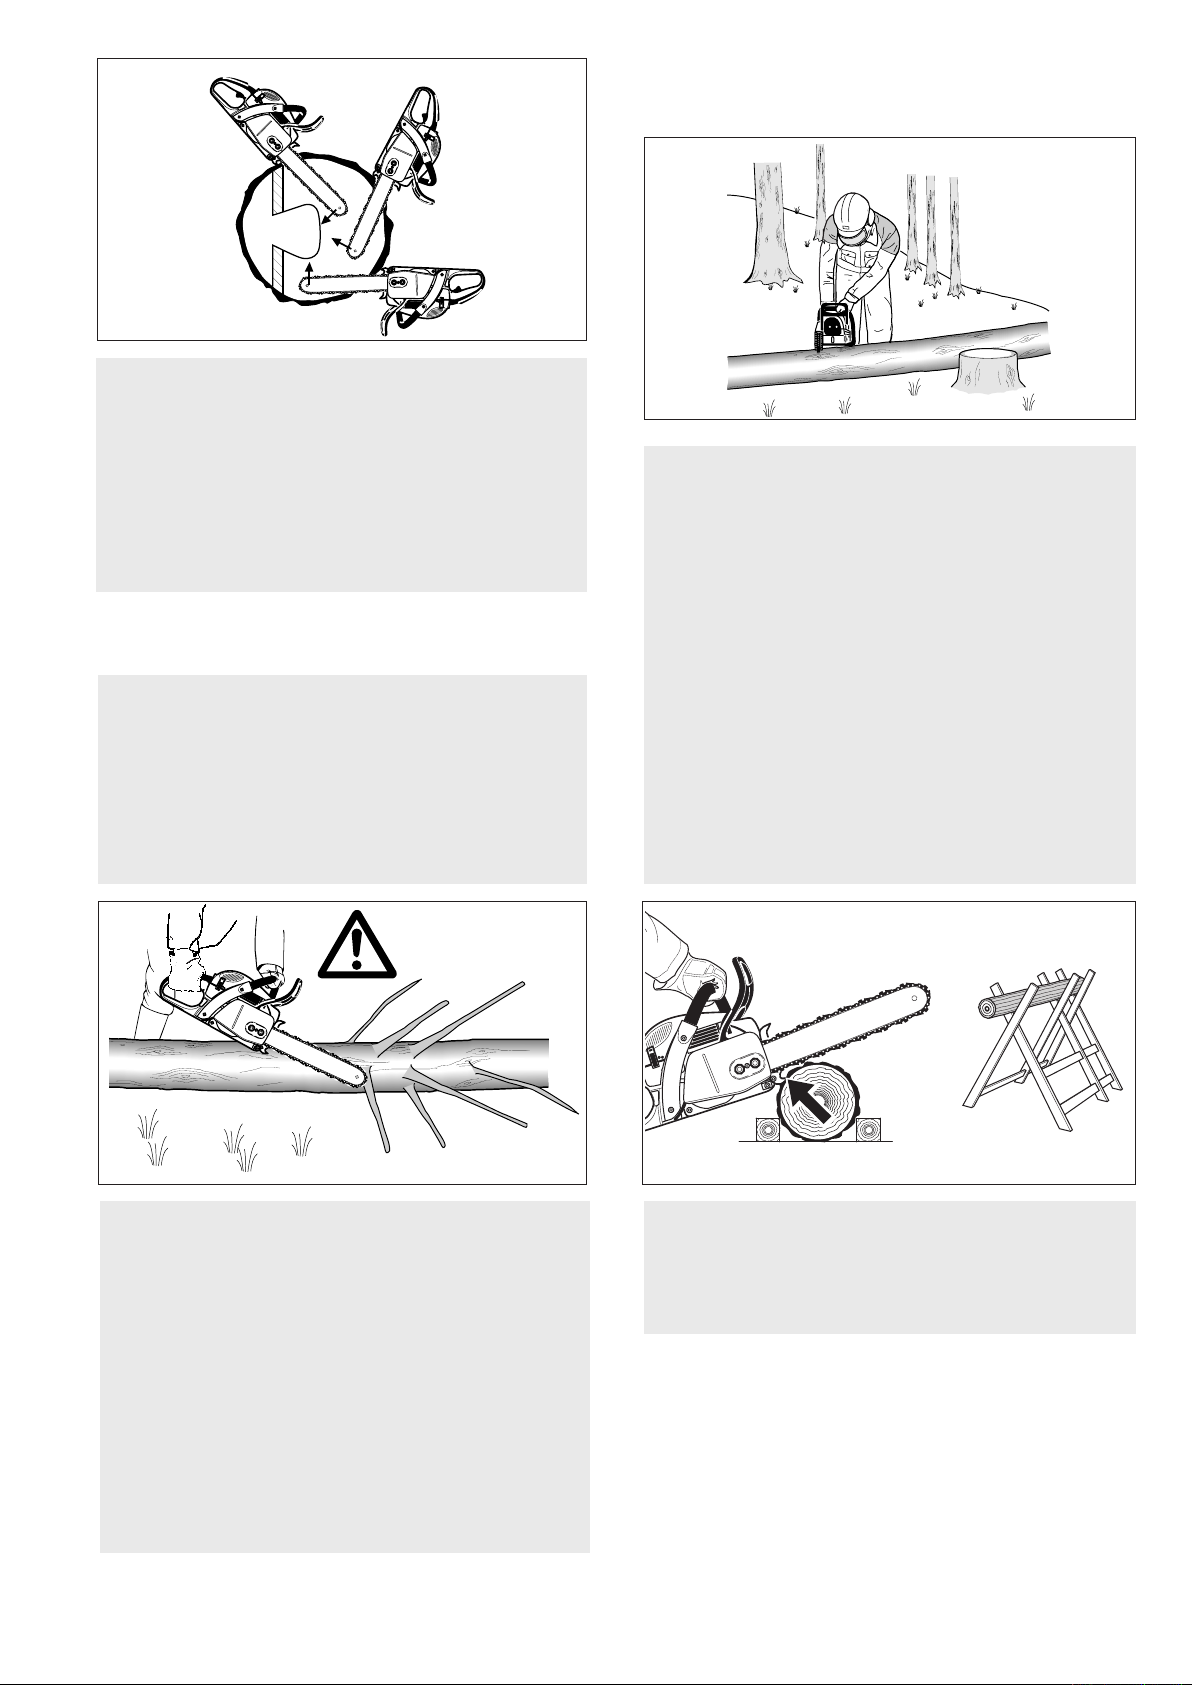
1
2
3
29
Bucking
Bucking is cutting a log into sections.
WARNING!
There is an extreme danger of kickback at this
point. Extra caution must be taken to maintain
control of the saw. To make the felling cut, follow
the sectioning method described previously (g.
29). If you are inexperienced with a chain saw
plunge-cutting should not be attempted. Seek the
help of a professional.
Limbing
Limbing is removing the branches from a fallen tree.
WARNING!
There is an extreme danger of kickback during the
limbing operation. Do not work with the nose of the
bar. Be extremely cautious and avoid contacting
the log or other limbs with the nose of the guide
bar. Do not stand on a log while limbing it - you
may slip or the log may roll.
31
WARNING!
1. When bucking, do not stand on the log. Make
sure the log will not roll down-hill. If on a slope,
stand on the up-hill side of the log (see g. 31).
Watch out for rolling logs.
WARNING!
2. Cut only one log at a time.
WARNING!
3. Shattered wood should be cut very carefully.
Sharp slivers of wood may be caught and ung
in the direction of the operator of the saw.
30
Start limbing by leaving the lower limbs to support
the log off the ground (g. 30). Always cut from
the top of the limb. Do not underbuck freely hanging limbs. A pinch may result or the limb may fall,
causing loss of control. If a pinch occurs, stop the
engine and remove the saw, by lifting the limb.
Be extremely cautious when cutting limbs under
tension. The limbs could spring back toward the
operator and cause loss of control of the saw or
injury to the operator.
WARNING!
32
WARNING!
4. When cutting small logs, use a sawhorse (g.
32). Never permit another person to hold the
log. Never hold the log with your leg or foot.
15
16
1. Relieving cut
2. Cross cut
Tension side
Pressure side
1. Relieving cut
2. Cross cut
Tension side
Pressure side
33
Maintenance and Repair
Never operate a chain saw that is damaged, improperly
adjusted or not completely or securely assembled.
Follow the maintenance and repair instructions in the
appropriate section of this manual.
WARNING !
Always stop the engine and make sure that the chain
is stopped before commencing any maintenance
or repair work or cleaning the saw. Allow the chain
saw to cool off before doing any maintenance work
(burn hazard)! Chain saws with catalytic converter
take longer to cool down!
Do not attempt any maintenance or repair work not
described in this manual. Have such work performed
by your MAKITA service shop only.
Maintaining and storing the saw
34
WARNING!
5. Logs under strain require special attention to
prevent the saw from pinching. The rst cut is
made on the compression side to relieve the
stress on the log (see g. 33, 34). The bucking
cut is then made as shown. If the saw pinches,
stop the engine and remove it from the log.
35
Keep the chain, bar and sprocket clean and lubricated;
replace worn sprockets or chains.
Keep the chain sharp. You can spot a dull chain when
easy-to-cut wood becomes hard to cut and burn marks
appear on the wood.
Keep the chain at proper tension. Tighten all nuts, bolts
and screws except the carburetor adjustment screws
after each use.
Keep spark plug and wire connection tight and clean.
Store saws in a high or locked place, away from
children.
WARNING!
6. Only properly trained professionals should work
in an area where the logs, limbs and roots are
tangled (i. e. a blowdown area, g. 35). Working
in blowdown areas is extremely hazardous.
WARNING!
7. Drag the logs into a clear area before cutting.
Pull out exposed and cleared logs rst.
23
24
2
15
16
17 18
3
4
1
6
7
5
8
9
19202122
101112
1314
7*
Denomination of components
DCS5121
18 inch (45 cm) 0703 012345
chain bar
3/8” 513.496.664 443.045.661
.325” 513.486.672 445.045.641
XXX.XXX. XXX Typ 182
22045 Hamburg, Germany
(*) Only in delivery for model
DCS5121
Identication plate
Indicate when ordering spare parts!
1 Handle
2 Filter cover
3 Filter hood clip
4 Tubular handle
5 Hand guard (release for chain brake)
6 Mufer with spark arrester screen
7 Spike bar
(toothed stop for holding saw steady against wood)
8 Chain tensioning screw
Serial no.
Year of manufacture
13 Adjusting screws for carburetor
14 Identication plate
15 Starter grip
16
Combination switch (Choke / Start / Stop)
17 Throttle lever
18 Safety locking button
19 Rear hand guard
20 Fuel tank cap
9 Retaining nuts
10 Chain catch
11 Sprocket guard
12 Adjusting screw for oil pump (bottom side)
21 Fan housing with starting assembly
22 Oil tank cap
23 Guide bar
24 Chain (Blade)
17

18
Technical data
Stroke volume cu. in (cm
DCS460 DCS5121
3)
2.8 (45.6) 3.1 (50.0)
Bore inch (mm) 1.69 (43) 1.77 (45)
Stroke inch (mm) 1.24 (31.4) 1.24 (31.44)
Max. power at speed hp / rpm 2.9 / 10,000 3.3 / 10,000
Max. torque at speed Nm / rpm 2.7 / 7,000 2.9 / 7,000
Max. engine speed with bar and chain rpm 13,800 13,800
Idling speed rpm 2,500 2,500
Coupling speed rpm 3,900 3,900
Sound Pressure Level at the operator‘s ear
at full load according to ANSI B 175.1 db(A) 103.2 103.9
Sound Pressure Level at the bystander‘s position
(50 ft/15 m distance) according to ANSI B 175.1 db(A) 76.2 76.2
Carburetor Type diaphragm carburetor with limiter caps
Ignition system Type electronic ignition system
Spark plug Type NGK BPMR 7A
or spark plug Type BOSCH WSR-6F
Electrode gap inch (mm) .020 (0.5)
Fuel consumption at max. load per ISO 7293 kg/h 1.1 1.2
Specic consumption at max. load per ISO 7293 g/kWh 500 480
Fuel tank capacity oz 15.9
Chain oil tank capacity oz 9.1
Mixture ratio (fuel/two-stroke oil)
- when using MAKITA synthetic oil 50:1
- when using other synthetic oil 50:1 (oil quality must be JASO FC or ISO-L-EGD)
Chain brake engages manually or in case of kickback
Sprocket pitch inch .325 or 3/8
Number of teeth Z 7
Chain type see the Extract from the spare-parts list
Pitch / gauge inch .325 / 0.050 or 3/8 / 0.050
Guide bar, length of a cut inch 16 / 18
Guide-bar type see the Extract from the spare-parts list
Weight (fuel tank empty, without chain, guide bar and accessories) lbs 12.1 12.1
WARNING:
This chain saw is capable of severe kickback that coult result in serious injury to the user. Do not operate this chain
saw unless you have extraordinary cutting needs and experience and specialized training for dealing with kickback.
Chain saws with signicantly reduced kickback potential are available.

5 7
A
a
6 5 4
1
2
3
*
B
PUTTING INTO OPERATION
CAUTION:
Before doing any work on the guide bar or chain, always
switch off the engine and pull the plug cap off the spark
plug (see "Replacing the spark plug"). Always wear protective gloves!
CAUTION:
Start the chain saw only after having assembled it completely and inspected.
Mounting the guide bar and saw chain
Use the universal wrench delivered with the chain saw for the
following work.
Put the chain saw on a stable surface and carry out the following
steps for mounting the guide bar and saw chain:
Release the chain brake by pulling the hand guard (1) in direction of arrow.
Unscrew retaining nuts (2).
Remove the spike bar (*). Note: Only in delivery for model
DCS5121.
Pull off the sprocket guard (3).
C
Remove the plastic transport cover (a) and dispose of properly.
Turn chain tensioning screw (4) to the left (counter-clock-
wise) until the pin (5) of the chain tensioner is underneath the
threaded pin (6).
Put on the guide bar (7). Make sure that the pin (5) of the chain
tensioner engages in the hole in the guide bar.
D
19
20
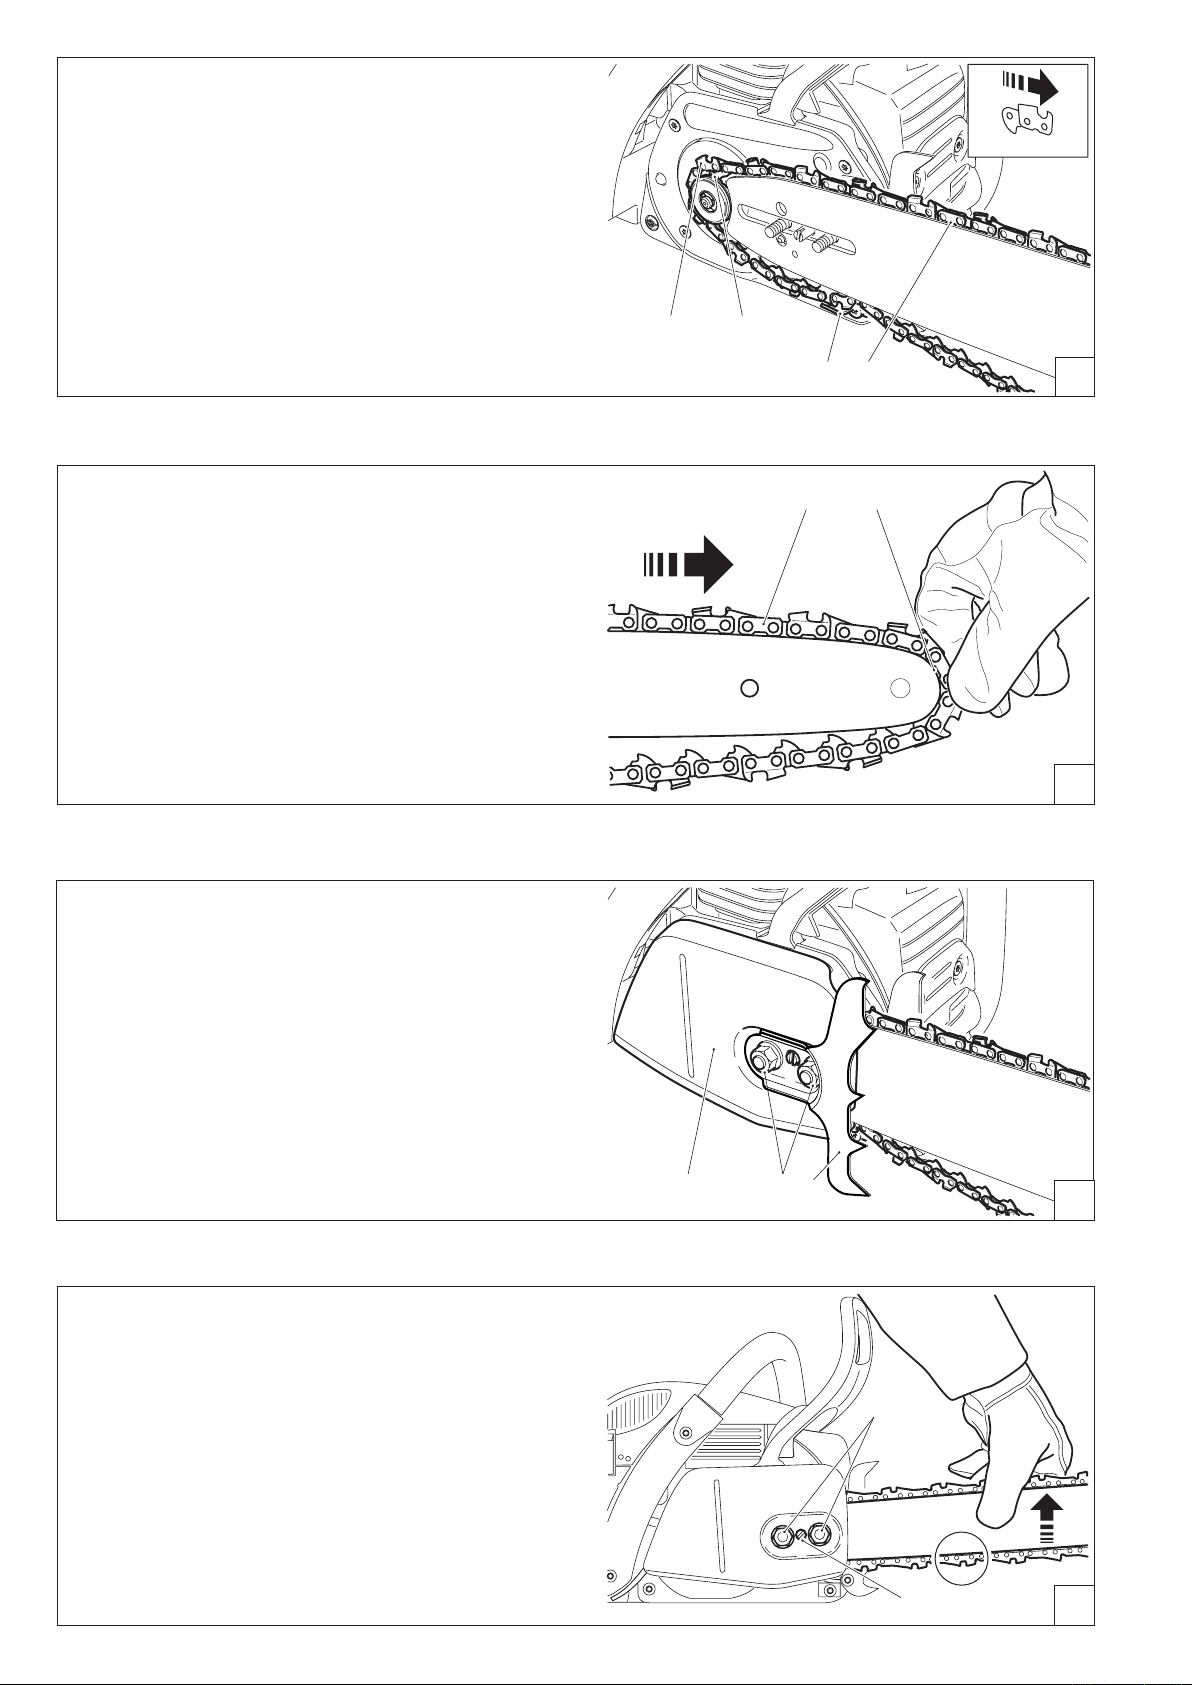
2
*
3
8
1011
9
Lift the chain (9) over the sprocket (8).
9 12
2
4
CAUTION:
Do not insert the chain between the chain sprocket and the
disc.
Guide the chain from above about halfway into the groove (10)
on the guide bar.
Place the chain over the chain catch (11) on the bottom.
CAUTION:
Note that the cutting edges along the top of the chain must
point in the direction of the arrow!
Pull the chain (9) around the sprocket nose (12) of the guide
bar in the direction of the arrow.
E
Replace the sprocket guard (3).
Replace the spike bar (*).
Tighten the nuts (2) only hand-tight to begin with.
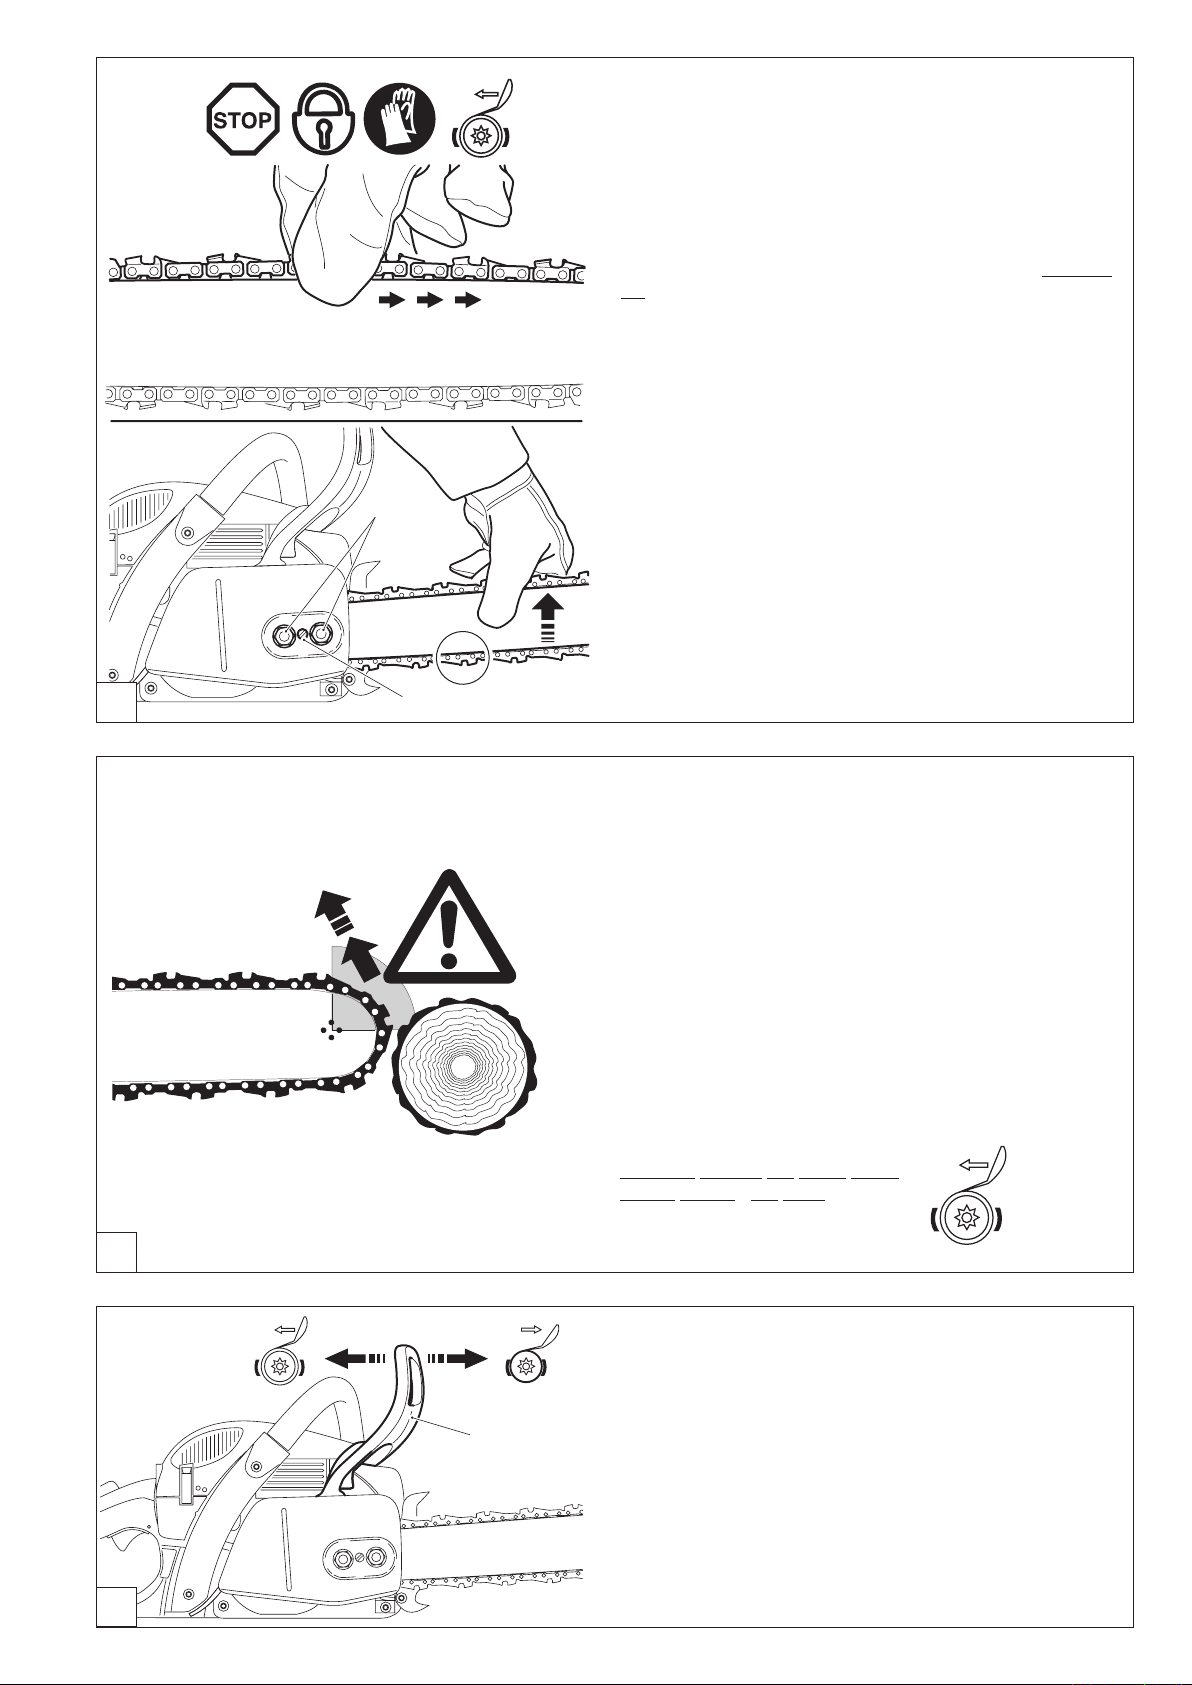
Tightening the saw chain
Turn the chain tensioning screw (4) to the right (clockwise) until
the saw chain catches in the groove on the lower side of the
guide bar (see circle).
Slightly lift the end of the guide bar and turn the chain adjusting
screw (4) to the right (clockwise) until the chain rests against
the bottom side of the guide bar.
While still holding up the tip of the guide bar, tighten the retaining
nuts (2) with the universal wrench.
F
G
H
2
4
12
1
Checking the chain tension
The tension of the chain is correct if the chain rests against
the bottom side of the guide bar and can still be easily turned
by hand.
While doing so the chain brake must be released.
Check the chain tension frequently - new chains tend to get
longer during use!
When checking the chain tension the engine must be switched
off.
NOTE:
It is recommended to use 2-3 chains alternatively.
In order to guarantee uniform wear of the guide bar the bar
should be turned over whenever replacing the chain.
Retightening the saw chain
Loosen the nuts (2) about one turn with the universal wrench.
Raise the tip of the guide bar a little and turn the chain tensioning
screw (4) to the right (clockwise) until the saw chain is again up
against the bottom edge of the guide bar (see circle).
While keeping the tip of the guide bar raised, tighten the nuts
(2) again with the universal wrench.
A
B
Chain brake
The DCS460 / DCS5121 comes with an inertia chain brake as
standard equipment. If kickback occurs due to contact of the
guide-bar tip with wood (see SAFETY PRECAUTIONS, page
10), the chain brake will stop the chain through inertia if the
kickback is sufciently strong.
The chain will stop within a fraction of a second.
The chain brake is installed to block the saw chain before
starting it and to stop it immediately in case of an emergency.
IMPORTANT: NEVER run the saw with the chain brake activated (except for testing, see “Testing chain brake”)! Doing so
can very quickly cause extensive engine damage!
ALWAYS release the chain brake
before starting the work!
C
Engaging the chain brake (braking)
If the kickback is strong enough the sudden acceleration of the
guide bar combined with the inertia of the hand guard (1) will
automatically actuate the chain brake.
To engage the chain brake manually, simply push the hand
guard (1) forward (towards the tip of the saw) with your left
hand (arrow 1).
Releasing the chain brake
Pull the hand guard (1) towards you (arrow 2) until you feel it
catch. The brake is now released.
21
22
OIL
50:1
OIL
Fuel
CAUTION:
This saw is powered by petroleum products (gasoline (pe-
trol) and oil).
Be especially careful when handling gasoline (petrol).
Do not smoke. Do not allow gasoline to come near ames,
sparks or re (explosion hazard).
Gasoline
50:1
MAKITA oil other oil
50:1
Fuel mixture
This tool is powered by a high-performance air-cooled two-stroke
engine. It runs on a mixture of gasoline and two-stroke engine
oil.
The engine is designed for unleaded regular gasoline with a
min. octane value of 87 (R+M)/2. In case no such fuel is available, you can use fuel with a higher octane value. This will not
affect the engine.
In order to obtain an optimum engine output and to protect
your health and the environment use unleaded fuel only.
To lubricate the engine, use a synthetic oil for two-stroke air-cooled
engines (quality grade: JASO FC or ISO-L-EGD), which has to
be added to the fuel. The engine has been designed for use of
MAKITA synthetic two-stroke engine oil and a mixture ratio of
ONLY 50:1 to protect the environment. In addition, a long service
life and reliable operation with a minimum emission of exhaust
gases are ensured.
MAKITA synthetic two-stroke engine oil (50:1) is available in the
following sizes to suit your individual requirements:
2.6 oz. order number T-00745
6.4 oz. order number T-00739
In case MAKITA synthetic two-stroke engine oil is not available,
it is recommended to use a mixture ratio of 50:1 with other
synthetic two-stroke engine oils, as otherwise optimum operation of the engine cannot be guaranteed.
The correct mixture ratio:
50:1 when using MAKITA synthetic two-stroke engine oil , i.
e. mix 50 parts gasoline with 1 part oil.
50:1
when using other synthetic two-stroke engine oils
(quality grade JASO FC or ISO-L-EGD), i. e. mix 50 parts
gasoline with 1 part oil.
NOTE:
For preparing the fuel-oil mixture rst mix the entire oil quantity with half of the fuel required, then add the remaining fuel.
Thoroughly shake the mixture before lling it into the chain
saw tank.
+
1.0 Us-gal. (3.7 l)
2.5 Us-gal. (9.4 l)
5.0 Us-gal. (18.9 l)
It is not wise to add more engine oil than specied
to ensure safe operation. This will only result in a
higher production of combustion residues which
will pollute the environment and clog the exhaust
channel in the cylinder as well as the mufer. In
addition, fuel consumption will rise and performance will decrease.
Storage:
Fuels have a limited storage life. Fuel and fuel mixtures
age through evaporation, especially at high tempera-
tures. Aged fuel and fuel mixtures can cause starting
problems and damage the engine.Purchase only that
amount of fuel, which will be consumed over the next
few months. At high temperatures, once fuel has been
mixed it should be used up in 6-8 weeks.
Use only approved and marked containers for
transport and storage. Store fuel only in dry, cool
and secure locations!
AVOID SKIN AND EYE CONTACT
Mineral oil products degrease your skin. If your skin
comes in contact with these substances repeatedly
and for an extended period of time, it will desiccate.
Various skin deseases may result. In addition, allergic
reactions are known to occur.
Eyes can be irritated by contact with oil. If oil comes into
your eyes, immediately wash them with clear water.
If your eyes are still irritated, see a doctor immediately!
2.6 oz. (75 cm3)
6.4 oz. (189 cm3)
12.8 oz. (378 cm3)
D
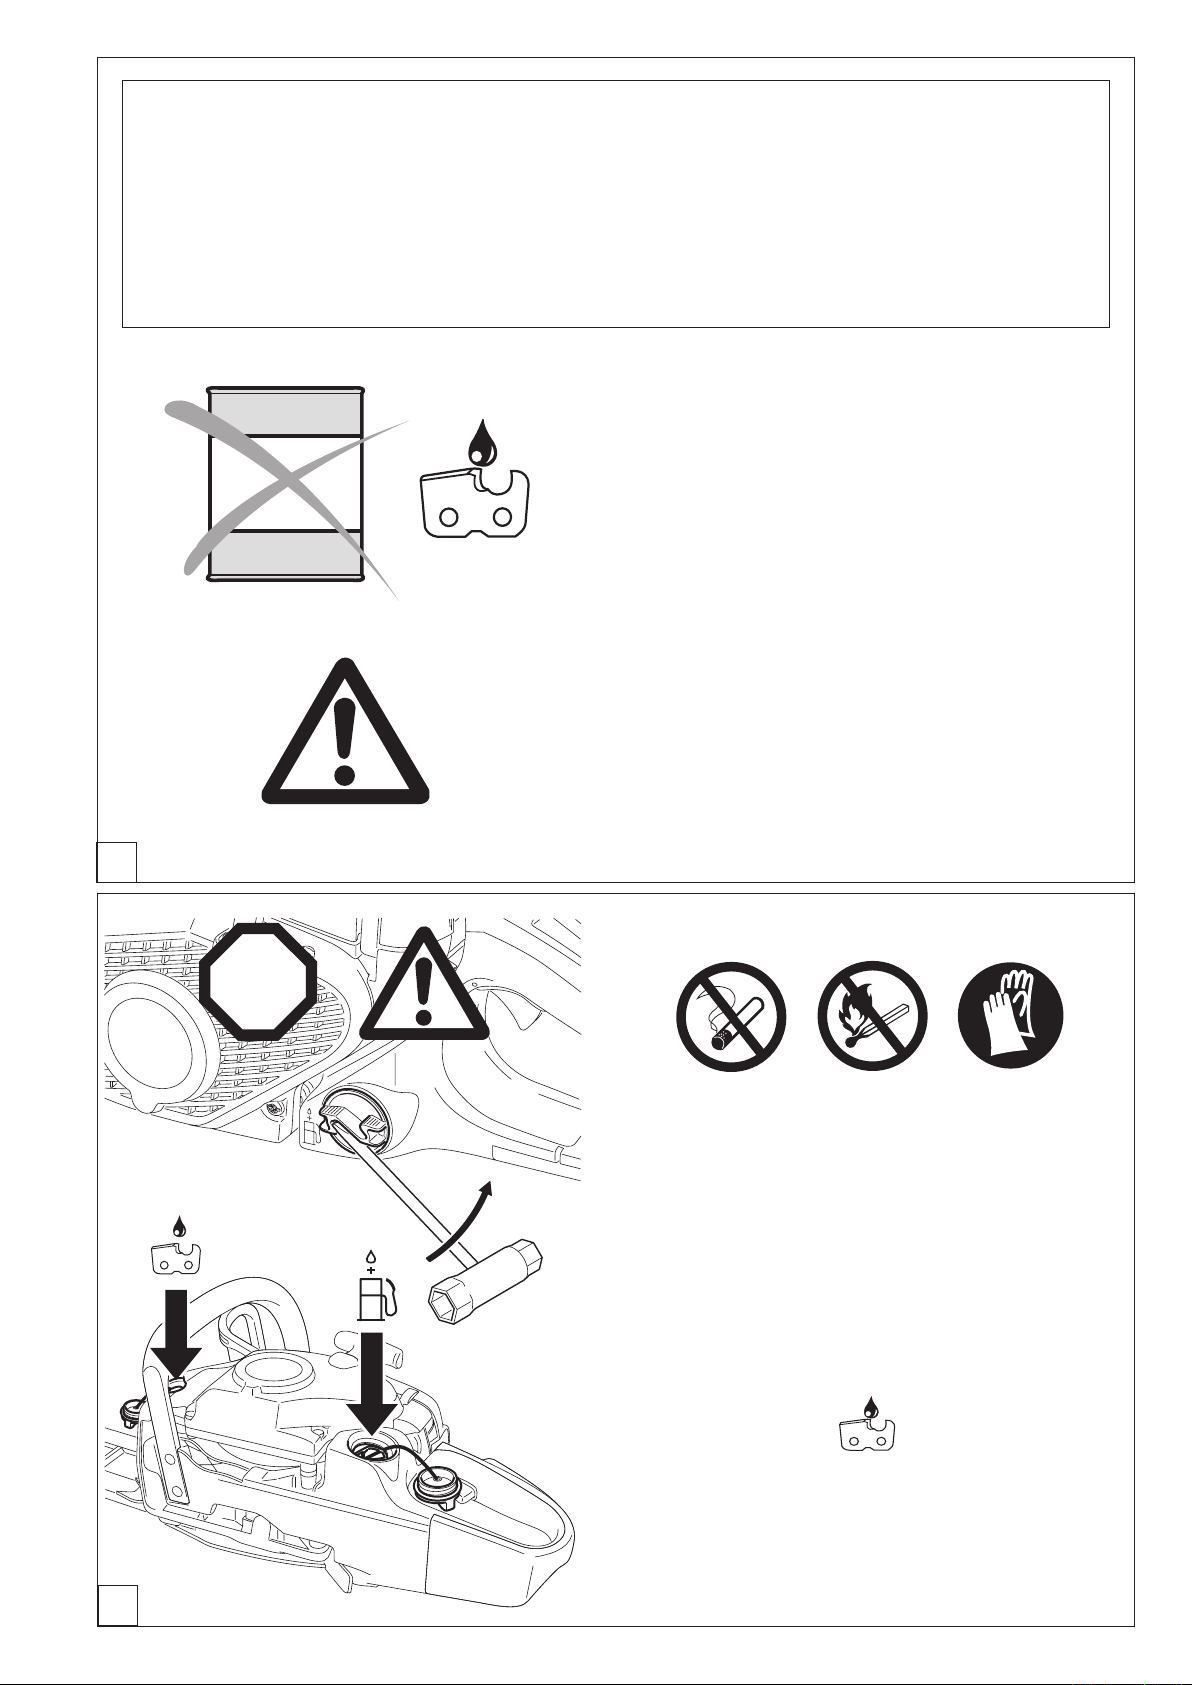
Chain oil
Use an oil with adhesive additive for lubricating the chain and
guide bar. The adhesive additive prevents the oil from being
ung off the chain too quickly.
We recommend the use of chain oil which is bio-degradable in
order to protect the environment. The use of bio-degradable oil
may even be required by local regulations.
The chain oil BIOTOP sold by MAKITA is made of special
vegetable oils and is 100% bio-degradable. BIOTOP has been
granted the "blue angel" (Blauer Umweltschutz-Engel) for being
particularly environment-friendly (RAL UZ 48).
Bio-degradable oil is stable only for a limited period of
time. It should be used within 2 years from the date of
manufacture (printed on the container).
E
Important note on bio-degradable chain oils
STOP
If you are not planning to use the saw again for an extended period of time, empty the oil tank and put in a
small amount of regular engine oil (SAE 30), and then
run the saw for a time. This is necessary to ush out all
remaining bio-degradable oil from the oil tank, oil-feed
system, chain and guide bar, as many such oils tend to
leave sticky residues over time, which can cause damage
to the oil pump or other parts.
waste oil
The next time you use the saw, ll the tank with BIOTOP
chain oil again. In case of damage caused by using waste
oil or unappropriate chain oil the product guarantee will be
null and void.
Your salesman will inform you about the use of chain oil.
NEVER USE WASTE OIL
Waste oil is very dangerous for the environment.
Waste oil contains high amounts of carcinogenic substances.
Residues in waste oil result in a high degree of wear and tear
at the oil pump and the sawing device.
In case of damage caused by using waste oil or unappropriate
chain oil the product guarantee will be null and void.
Your salesman will inform you about the use of chain oil.
AVOID SKIN AND EYE CONTACT
Mineral oil products degrease your skin. If your skin comes in
contact with these substances repeatedly and for an extended
period of time, it will desiccate. Various skin deseases may result.
In addition, allergic reactions are known to occur.
Eyes can be irritated by contact with oil. If oil comes into your
eyes, immediately wash them with clear water.
If your eyes are still irritated, see a doctor immediately!
A
chain oil
fuel/oil mixture
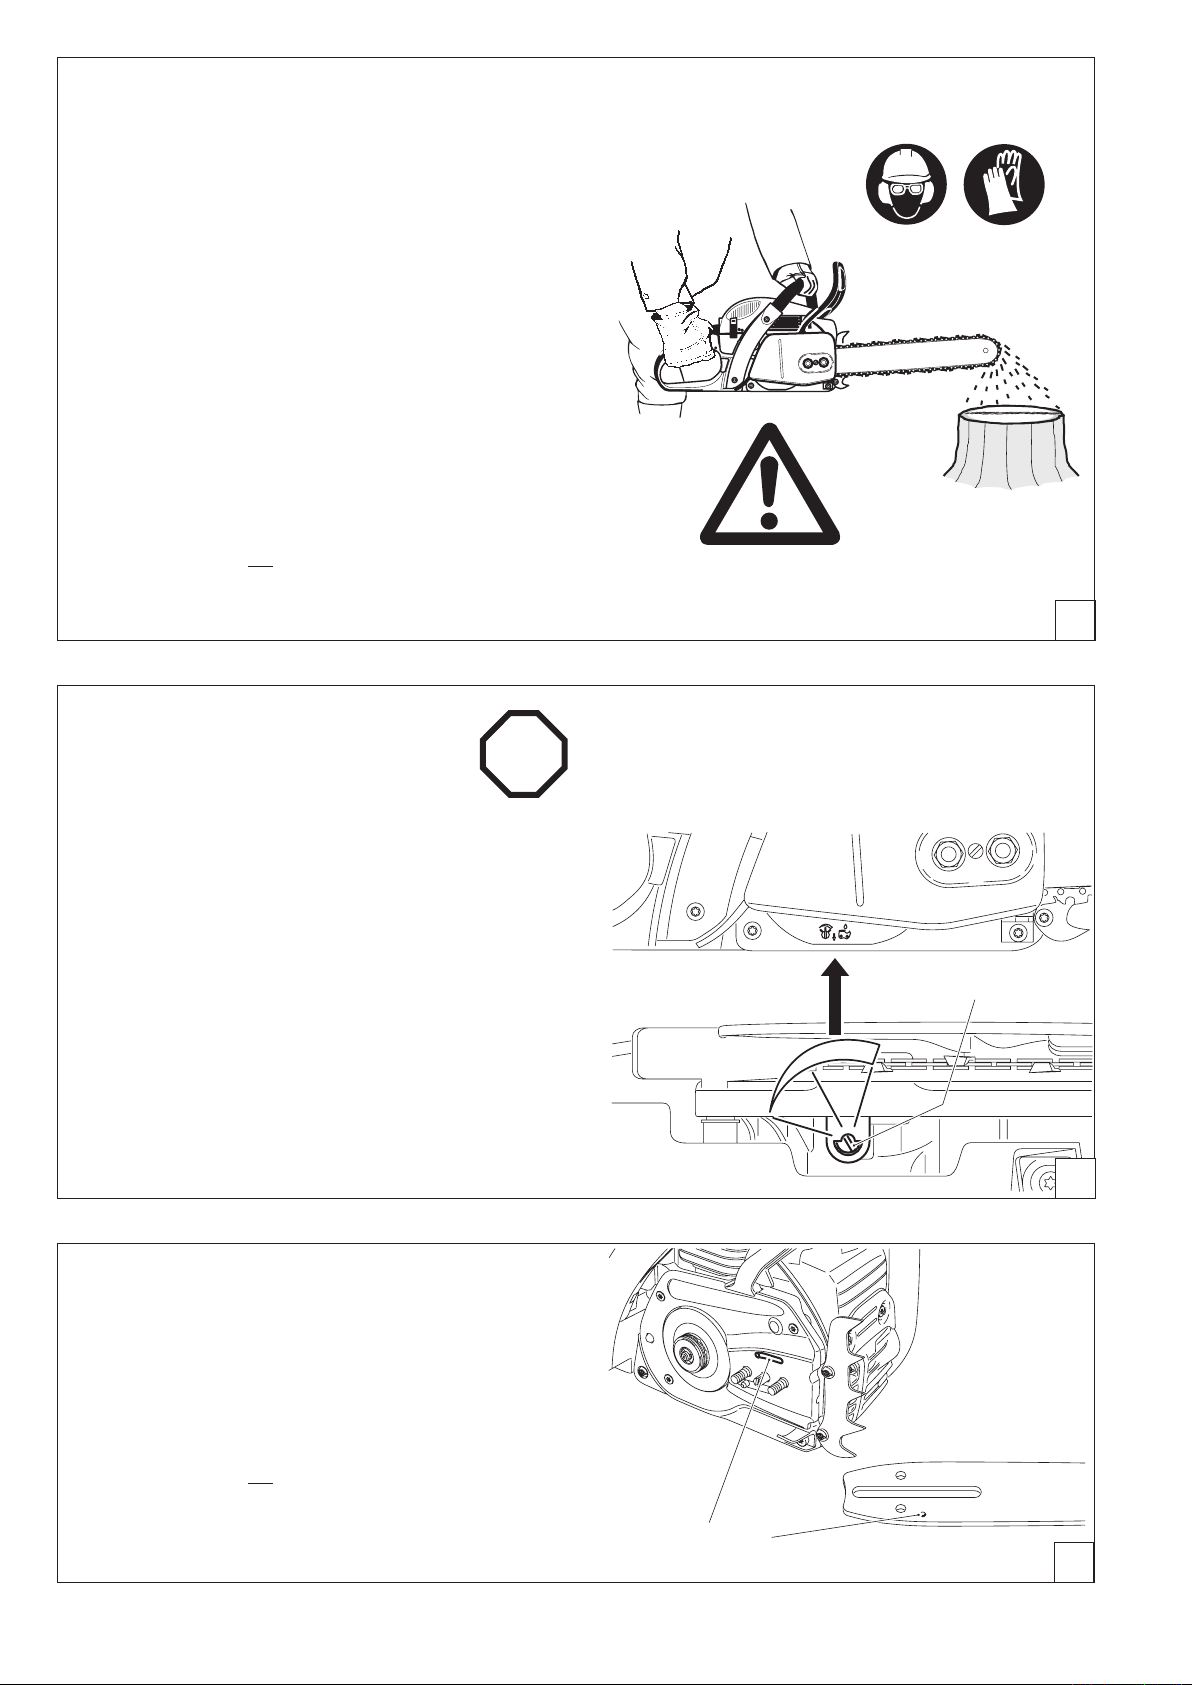
Refuelling
FOLLOW THE SAFETY PRECAUTIONS!
Be careful and cautious when handling fuels.
The engine must be switched off!
Thoroughly clean the area around the caps, to prevent dirt from
getting into the fuel or oil tank.
Unscrew the tank cap (use the universal wrench if necessary,
see illustration) and ll tank with fuel mixture or saw chain oil
up to the bottom edge of the lling neck. Be careful not to spill
fuel or chain oil! Be careful not to spill fuel or chain oil!
Screw on the tank cap by hand all the way.
After refuelling, clean screw cap, tank and check for lekages.
B
Lubricating the chain
During operation there must always be sufcient chain oil in the
chain-oil tank to provide good chain lubrication. One lling is
sufcient for about one half-hour of continuous operation. During
this procedure check whether there is enough the chain oil in
the tank and rell if necessary. Do this only with the engine
turned off! Screw on the tank cap by hand all the way.
23
24
1
2 3
STOP
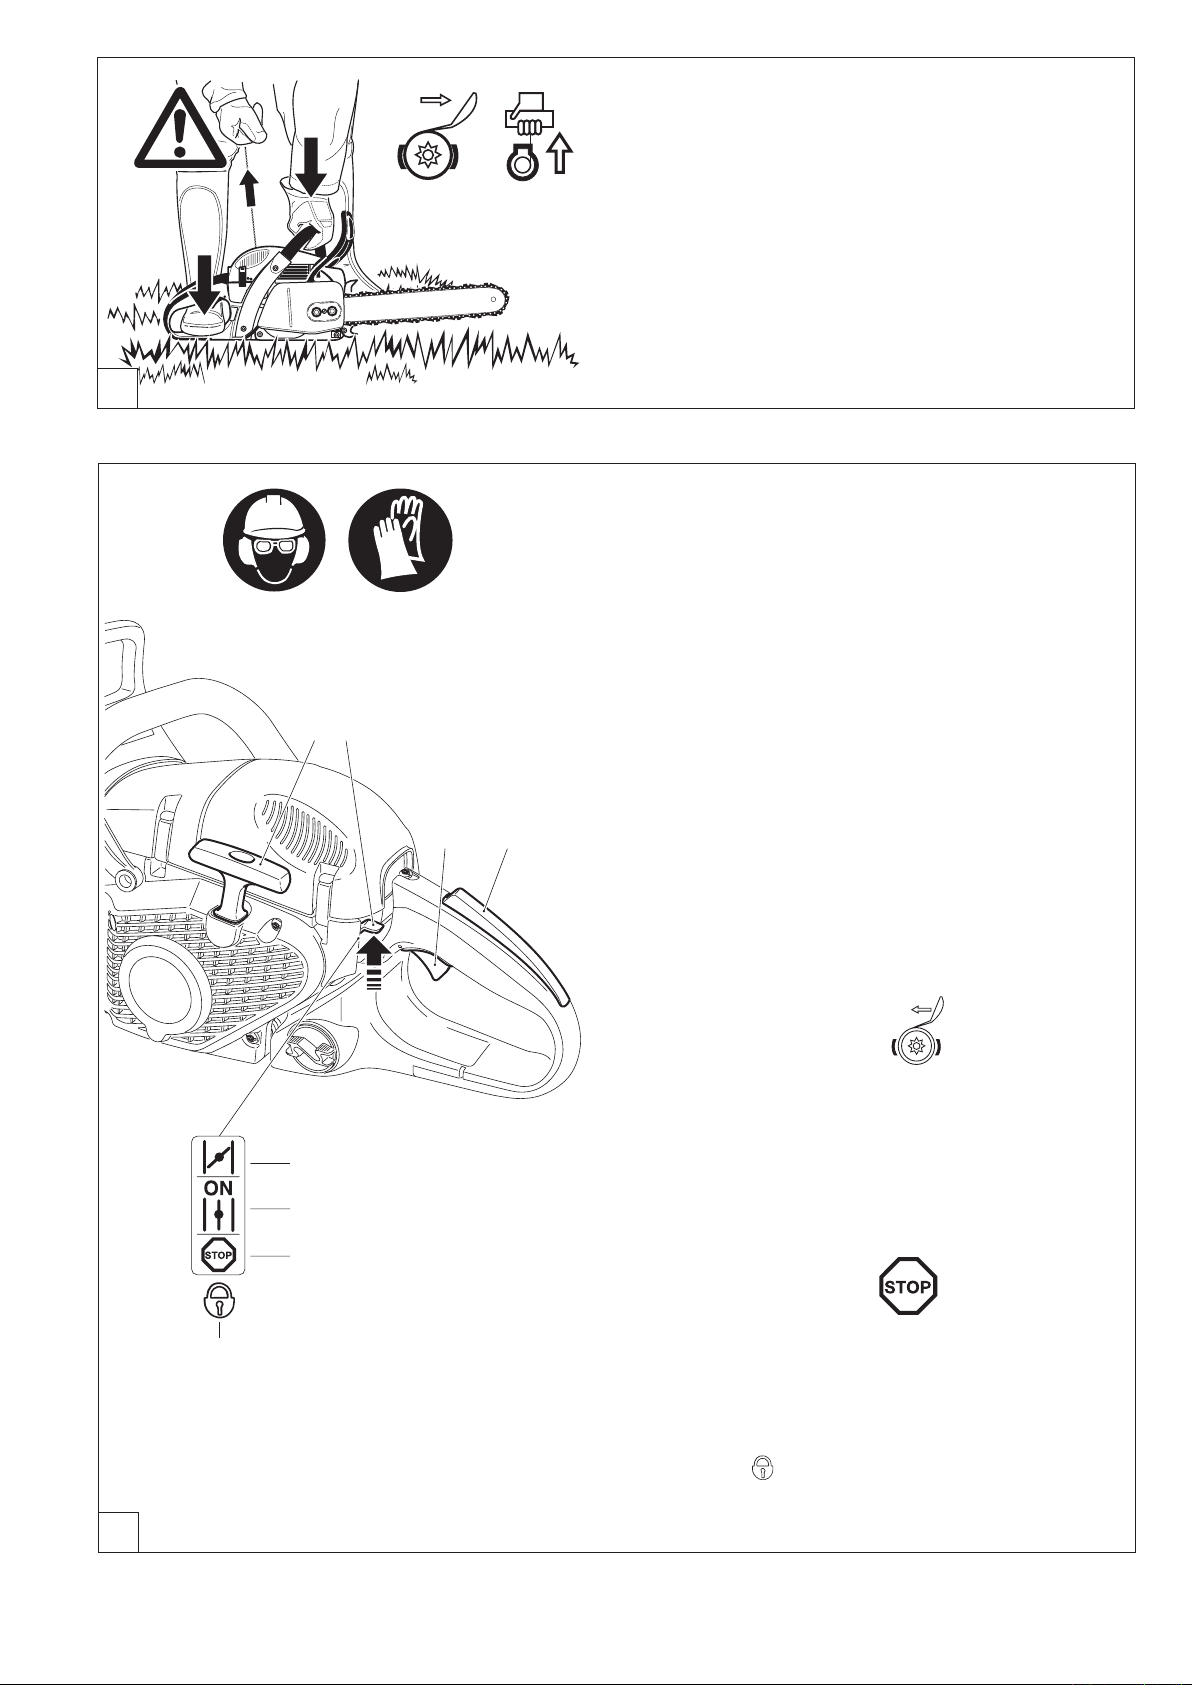
Checking the chain lubrication
Never work with the chain saw withoute sufcient chain lubri-
cation. Otherwise the service life of the chain and guide bar
will be reduced. Before starting work check the oil level in the
tank and the oil feed.
Check the oil feed rate as described below:
Start the chain saw (see „Starting the engine”).
Hold the running chain saw by middle engine speed approx. 6"
(15 cm) above a trunk or the ground (use an appropriate
base).
If the lubrication is sufcient, you will see a light oil trace because oil will be ung off the sawing device. Pay attention to the
direction the wind is blowing and avoid unnecessary exposure
to the oil spray!
Note:
After the saw has been turned off it is normal for residual chain
oil to drip from the oil feed system, the guide bar and the chain
for a time. This does not constitute a defect!
Place the saw on a suitable surface.
C
Adjusting the chain lubrication
The engine must be switched off.
You can adjust the oil pump feed rate with the adjusting screw
(1). The adjusting screw is on the bottom side of the housing.
The oil pump comes factory-set to a medium feed rate.
To adjust the supply rate, use a small screwdriver to turn the
adjusting screw:
• to the right for a faster
• to the left for a slower
oil feed rate.
Pick one of the three settings depending on the length of the
guide bar.
While working make sure there is enough chain oil in the tank.
If necessary, add oil.
To ensure troublefree operation of the oil pump the oil guide
groove at the crank case (2) and the oil inlet bore in the guide
bar (3) must be cleaned regularly.
Adjustment range about 90°
D
Note:
After the saw has been turned off it is normal for residual chain
oil to drip from the oil feed system, the guide bar and the chain
for a time. This does not constitute a defect!
Place the saw on a suitable surface.
E
A
1
4 3
2
Starting the engine
Do not start the chain saw until after it is completely assembled and checked!
Move at least 10 feet (3 m) away from the place where the
chain saw was fuelled.
Make sure you have a secure footing, and place the saw on
the ground in such a way that the guide bar and chain are not
near anything.
Actuate the chain brake (block it).
Hold the front handle rmly with one hand and press the saw
against the ground.
Hold the down rear handguard with your right foot as shown.
Cold starting:
Move the combination switch (1) up (choke position). This also
actuates the half-throttle lock.
Pull the starter cable (2) out slowly until you feel resistance (the
piston is now just before top dead center).
Now pull it quickly and powerfully until you hear the rst
audible ignition.
CAUTION: Do not pull the starter cable more than about 20”
(50 cm) out, and let it back in slowly by hand.
Move the combination switch (1) to the central “ON” position.
Pull the starter cable again, quickly and rmly. As soon as the
engine is running, grasp the rear handle (the safety lock button
(3) is actuated by the palm of the hand) and press the throttle
trigger (4).
The half-throttle lock will disengage and the engine will now
idle.
CAUTION: The engine must be put in idle immediately after
starting. If this is not done, the clutch can be damaged.
Now disengage the chain brake.
Cold start (Choke)
Warm start (ON)
Engine off
Warm starting:
As described above for cold starting, but before starting push
the combination switch (1) up (Choke position) and
then right away back to the middle “ON” position. This is only
to engage the half-throttle lock. If the engine doesn’t start after
2 or 3 pulls, repeat the entire starting procedure as described
for cold starting.
Stopping the engine
Depress the combination switch (1).
Combination switch
in safety position
(ignition current cut off,
necessary for all
maintenance, repair, and
installation work)
B
NOTE: After being pressed down, the combination switch will
revert to the ON position again. The engine is switched off, but can
be turned on again without moving the combination switch.
IMPORTANT: To cut off the ignition current, push the combination switch all the way down past the resistance point to the
safety position ( ).
25

26
6
Checking the chain brake
7
8
The chain brake must be checked before every use of the
saw!
Start the engine as described above (have a secure footing,
place the chain saw on the ground so that the chain and guide
bar are not near anything).
Hold the front handle rmly, with your other hand on the rear
grip.
Let the engine run at medium speed and push the handguard
(6) in the direction of the arrow using the back of your hand,
until the chain brake engages. The chain should now stop immediately.
Bring the engine back to idle and release the chain brake.
Caution: If the chain does not stop immediately in this test,
turn off the engine immediately. Do NOT use the chain saw
in this condition! Contact a MAKITA service center.
Working in winter
In order to prevent carburetor icing in conditions of low tempe-
rature combined with high humidity, and below + 5°C (40° F) in
order to get up to operating temperature faster, heated air can
be taken from the cylinder.
Remove the cover (see “Cleaning the air lter”).
Remove the insert (7) and insert it as shown for winter operation.
If the temperature is above + 5°C (40°F) the engine needs to
induct cold air. If this is not done, the cylinder and piston
can be damaged!
For temperatures above + 5°C (40°F) turn the insert 180° so
that after it is inserted the induction opening (8) is closed.
Put the cover back on.
Note: When working in snow, the insert (7) can be replaced by a
specal insert with nylon screen, which prevents snow from getting
in. It is available as an accessory, part no. 957 173 250.
C
Symbol on top when inserted – Normal operation
Symbol on top when inserted – Winter operation
D

Adjusting the carburetor
HS L
CAUTION:
Do not adjust the carburetor until the machine has been
completely assembled and checked! Do not adjust the
carburetor without a tachometer!
Carburetor adjustment is necessary for optimum engine
performance, for safer and more economical operation.
Adjust the carburetor only with the engine warm, a clean
air lter, and properly installed cutting tool.
Carburetor adjustment may be done only by a MAKITA
service center. Improper adjustment can cause damage
to the engine.
In order to comply with new emissions legislation, limits have
been placed on the carburetor adjusting screws (H) and (L).
This limitation (to about 180 degrees) prevents an excessively rich mixture. This in turn ensures compliance with
emissions rules as well as optimum engine performance and
economical fuel consumption.
You will need a tachometer (part No. 950 233 210) for optimum adjustment. Exceeding the maximum permissible
speed can lead to overheating and under-lubricating, and
damage to the engine!
Factory setting of adjusting screws (H) and (L): Turned out
almost all the way (counterclockwise).
Use a screwdriver (blade width 4 mm, part No. 944 340 001)
to adjust the screws.
For proper adjustment, proceed as follows:
Checking adjusting screw (H)
Before starting the engine make sure that adjusting screw (H) is
turned out counterclockwise until it reaches a noticeable stop.
The limitations do not prevent excessively lean running!
Start engine and let it warm up (3-5 minutes)
1.
Set idle
2.
Check acceleration
3.
Set maximum permissible speed
4.
Check idle speed
5.
Set idle
2.
Set the idle speed per the technical specications.
Turning the adjusting screw (S) in (clockwise) increases the
idle speed. Turning it out (counter-clockwise) lowers the idle
speed. The cutting tool must not rotate!
4. Set maximum permissible speed
Set the maximum speed by
the adjusting screw (H) in accordance with the technical specications. Turning the adjusting screw (H)
clockwise increases the speed. Never exceed the
maximum permissible speed!
For units with electronic engine speed limitation:
No tachometer is necessary to determine the
maximum permissible speed, since exceeding
this speed will result in clearly audible ignition
misses!
Check idle speed
5.
Check the idle speed after setting the top speed (the
cutting tool must not rotate!).
Repeat the adjustment procedure starting at Step 2,
until the engine runs with the correct idle speed, good
acceleration, and maximum permissible speed.
minimal adjustments of
Check acceleration
3.
When the throttle is pressed, the engine should go smoothly
from idle to high speed.
Turn adjusting screw (L) out (counterclockwise) in small
increments until acceleration is good.
A
27

28
α
α
ββ
min.
3 mm (0.11”)
MAINTENANCE
Sharpening the saw chain
CAUTION: Before doing any work on the guide bar or chain,
always switch off the engine and pull the plug cap off the
spark plug (see "Replacing the spark plug"). Always wear
protective gloves!
The chain needs sharpening when:
The sawdust produced when sawing damp wood looks like
wood our.
The chain penetrates the wood only under great pressure.
The cutting edge is visibly damaged.
The saw is pulled to the left or right when sawing. This is caused
by uneven sharpening of the chain.
Important: Sharpen frequently, but without removing too
much metal!
Generally, 2 or 3 strokes of the le will be enough.
Have the chain resharpened at a service center when you have
already sharpened it yourself several times.
A
Proper sharpening:
CAUTION: Use only chains and guide bars designed for
this saw (see the Extract from the spare-parts list)!
All cutters must be of the same length (dimension a). Cutters
with different lengths result in rough running of the chain and
can cause cracks in the chain.
The minimum cutter length: 0.11" (3 mm). Do not resharpen
the chain when the minimum cutter length has been reached;
at this point, the chain must be replaced (see the Extract from
the spare-parts list and "Replacing the saw chain").
The depth of the cut is determined by the difference in height
between the depth limiter (round nose) and the cutting edge.
The best results are obtained with a depth-limiter depth of .025"
(0.64 mm).
CAUTION: Excessive depth
increases the risk of kickback!
The sharpening angle (α) must be identical for all cutters!
25° for chain type 486, 496
.025"
(0.64 mm)
.025"
(0.64 mm)
B
The teeth will have the proper angle (β) automatically if the
proper round le is used.
60° for chain type 486, 496
Different angles result in a roughly, irregularly running chain,
increase wear and tear and cause chain beakage.
C

1 2
D
Files and how to work with them
Use a special saw chain round le for sharpening. Standard round
les are unsuitable. For the order number, see “Accessories”.
Type 486: Use 11/64" (4,5 mm) dia. round saw-chain le.
Type 496: Use 7/32" (5,5 mm) dia. round saw-chain le.
The le should cut only when pushed forwards (arrow). Lift the
le when leading it backwards.
First sharpen the shortest cutter. The length of this cutter is then
the standerd for all other cutters of the chain.
New saw teeth must be led to the exact same shape as the
used teeth, including on their running surfaces.
Chain typ
File depending on chain type (10° to the guide bar).
486
496
A le holder makes le guidance easier. It is marked for the
4/5
α
correct sharpening angle of:
α = 25°
(keep the marks parallel with the chain when ling, see illustration)
and limits the cut depth to the correct 4/5 of the le diameter.
See "Accessories" for the order number.
E
F
After having sharpened the chain, the height of the depth limiter
must be checked by means of a chain gauge. See "Accessories"
for the order number.
Correct even the smallest excess height with a special at
le (1). See "Accessories" for the order number.
Round off the front of the depth limiter (2).
29

30
7
2
3
1
4
6 5
Cleaning the brake band and sprocket interior
CAUTION: Before doing any work on the guide bar or chain,
always switch off the engine and pull the plug cap off the
spark plug (see "Replacing the spark plug"). Always wear
protective gloves!
CAUTION: Start the chain saw only after having assembled
it completely and inspected.
Remove the sprocket guard (1) (See "PUTTING INTO OPERA-
TION" gs. B) and clean the interior with a brush.
Turn the chain tensioning screw (2) to the left (counter-clockwise)
until pin (3) of the chain tensioner is underneath the threaded
pin (4).
Remove the chain (5) and guide bar (6).
NOTE:
Make sure there are no residues or foreign matter remaining in
the oil guide groove (7) or on the chain tensioner (3).
For replacing the guide bar, chain, and sprocket see "PUTTING
INTO OPERATION".
NOTE:
The chain brake is a very important safety device and like
any other component subject to normal wear and tear.
Regular inspection and maintenance are important for
your own safety and must be done by a MAKITA service
center.
Cleaning the guide bar
CAUTION: Protective gloves must be worn.
Regularly inspect the bearing surfaces of the guide bar for
damage, and clean them with a suitable tool.
SERVICE
A
B

8
12 13
11
9
14
15
Replacing the saw chain
CAUTION: Use only chains and guide bars designed for this saw (see the Extract from the spare-parts list)!
When changing chain types, always make sure to use the clutch drum cpl. (12). It may be necessary to change the
clutch drum cpl.
IMPORTANT: If the chain type is changed from .325" to 3/8", the chip deector must be modied. See under „Instruc-
tions for changing the chain type.“
Check the sprocket before mounting a new chain.
Worn out sprockets (8) may damage the new chain and must
therefore be replaced.
Remove the sprocket guard (See "PUTTING INTO OPERATI-
ON" gs. B).
Remove the chain and guide bar.
Remove circlip (9).
CAUTION: The circlip will pop out of the groove. When removing
it, hold your thumb against it to prevent it from popping off.
Remove thrust washer (11).
If the chain sprocket (8) is worn, the clutch drum cpl. (12) must
be replaced. For the part number consult the “Extract from the
spare parts list”.
Put on the washer disc (13), new clutch drum cpl. (12), cup
washer (11) and new circlip (9) montieren (for the order number
see “Extract from the spare parts list”).
For replacing the guide bar, chain, and sprocket see "PUTTING
INTO OPERATION A-H".
NOTE:
Don’t use a new chain on a worn chain sprocket. By the time
2 chains have worn, the sprocket has become worn out, so
it should be replaced at least at every second chain replacement. To distribute the chain oil evenly, run a new chain at
half-throttle for a few minutes before use.
New chains stretch, so check the chain tension frequently (see
“Checking the chain tension”).
Instructions for changing the chain type
Always wear protective gloves!
- Before using a
marked section of the chip deector (14)!
- To do this, rst cut along the marking (
and then cut across to remove the piece.
NOTE:
If switching to chain type .325" it will be necessary to install a
newchip deector (see „Extract from the spare parts list“ for
the part number).
3/8" saw chain, be sure to rst cut out the
15) with a sharp knife
C
31

32
5
3
6
4
1
2
5
3
4
5a
Cleaning the air lter
CAUTION: To prevent eye injury, always wear eye protection
when cleaning the lter with compressed air!
Do not use fuel to clean the air lter.
Disengage the cover clasp (1) with the universal wrench and
take off the cover (2).
Push up the combination switch (3) (Choke position) to prevent
dirt particles from falling into the carburetor.
Unhook the clasp (4) in the direction of the arrow with a nger
or the universal wrench.
Pull the air lter (5) up and out.
Take the pre-lter (5a) out of the cover (2).
IMPORTANT: Cover the intake opening with a clean cloth to
prevent dirt particles from getting into the carburetor.
Choosing the right lter: The eece lter is for use in dry or
dusty conditions. The nylon lter (available as accessory) is for
use in damp conditions. The pre-lter keeps out sawdust, and
prevents powder snow from getting in when working in winter.
Pry apart the top and bottom of the air lter as shown in Figure.
Cleaning the eece lter: Carefully tap out dust or carefully
blow out dust from the inside with compressed air. Do not
brush the eece, as this will force dirt particles into the fabric.
If the lter is very dirty, it can be washed in lukewarm water
with regular dishwashing detergent. Note that the eece lter
does not need to be cleaned until there is a noticeable loss of
power. If cleaning the lter does not bring an improvement in
performance, it is time to replace it.
Cleaning the nylon lter: Use a soft brush or blow out dirt
from the inside with compressed air. If the lter is very dirty, it
can be washed in lukewarm water with regular dishwashing
detergent. Clean frequently (several times a day) when working
in very dusty or dirty conditions. Full engine power is possible
only with a clean air lter!
Cleaning the pre-lter: When the pre-lter becomes dirty, wash
it in lukewarm soapy water using standard dishwashing liquid.
Let the air lter dry completely.
Put the top and bottom sections back together.
Place the pre-lter back in the cover.
Before assembling the air lter, check the choke ap for any dirt
particles. If there are any, remove them with a brush.
CAUTION: If the air lter becomes damaged, replace imme-
diately! Pieces of cloth or large dirt particles can destroy
the engine!
Insert the air lter (5) and press the clasp (4) in the direction of
the arrow until it engages.
Move the combination switch (3) down and press the throttle (6)
once all the way, to deactivate the half-throttle lock.
Put the cover (2) back on and afx it with the cover clasps
(1).
A

8
9
7
11
10
12
B
Replacing the spark plug
CAUTION:
Do not touch the spark plug or plug cap if the engine is
running (high voltage).
Switch off the engine before starting any maintenance work.
A hot engine can cause burns. Wear protective gloves!
The spark plug must be replaced in case of damage to the
insulator, electrode erosion (burn) or if the electrodes are very
dirty or oily.
Remove the lter cover (see "Cleaning the air lter").
Pull the plug cap (7) off the spark plug. Use only the combination
wrench supplied with the saw to remove the spark plug.
Electrode gap
The electrode gap must be .020" (0.5 mm).
CAUTION: Use only the following spark plugs: NGK BPMR 7A
or BOSCH WSR 6F.
C
Checking the ignition spark
With the spark plug removed and the spark plug cap rmly
seated, use insulated pliers to hold the spark plug (8) against
the cylinder (not the spark plug hole).
Put combination switch (9) in the ON position.
Pull the starter cable hard.
If the function is correct, an ignition spark must be visible near
the electrodes.
Checking the mufer screws
D
Remove the retaining plate (10) by unscrewing screws (11,
short) and (12, long).
The mufer screws are now accessible through the blind holes
and can be checked for tight t. If they are loose, hand-tighten
them (Important - do not overtighten!).
33

34
1
2
7
8
6
5
14
13
4
4
4
9
10
12
11
3
Replacing the starter cable/ Replacing the return
spring pack/Replacing the starter spring
Unscrew four screws (1).
Remove fan housing (2).
Remove the air guide (3) from the fan housing.
CAREFUL! Injury hazard! Do not unscrew screw (7) if the
return spring is under tension.
If the starter cable is to be replaced although it is not broken,
it will be necessary to rst de-tension the cable drum return
spring (13).
To do this, use the grip to pull the cable all the way out of the
fan housing.
Hold the cable drum with one hand, and with the other push the
cable into the space (14).
Carefully let the drum turn until the return spring is no longer
under tension.
Unscrew screw (7) and remove the driver (8) and spring (6).
Carefully remove the cable drum.
Remove any cable pieces.
Thread a new cable (dia. 0.14" (3.5 mm), length 43.3" (1100
mm)) as shown in the illustration (don’t forget the washer (10))
and knot both ends as shown.
Pull knot (11) into the cable drum (5).
Pull knot (12) into the starter grip (9).
Put the drum on its spindle and turn it slightly until the return
spring engages.
Place the spring (6) in the driver (8) and place them together
in the cable drum (5) while turning slightly counter-clockwise.
Insert screw (7) and tighten.
Guide the cable into the slot (14) on the cable drum and turn
the drum with the cable clockwise three times.
Hold the cable drum with your left hand and with your right hand
untwist the cable, pull it tight and hold it.
Carefully release the cable drum. The spring will wind the cable
around the drum.
Repeat the procedure once. The starter grip should now stand
straight up on the fan housing.
NOTE: With the cable pulled all the way out, it must still be
possible to turn the pulley another 1/4 turn against the return
spring.
CAUTION: Danger of injury! Secure the cable grip when
pulled out! It will whip back if the cable pulley is released
by accident.
Replacing the return spring pack
Disassemble the fan housing and cable drum (see above).
CAREFUL! Injury hazard! The return spring can pop out!
Always wear eye protection and protective gloves!
Lightly tap the fan housing on a wooden surface with the entire
surface of the hollow side, and hold it down. Now lift the fan
housing carefully and in small steps. This will allow the return
spring pack (13), which should now have fallen out, to relax in
a controlled manner if the return spring has popped out of the
plastic pack.
Carefully insert a new return spring cassette and press down
until it engages.
Place the cable drum on it and turn it slightly until the return
spring engages.
Install the spring (6) and driver (8) and screw on tight with
screw (7).
Tension the spring (see above).
Replacing the starter spring
NOTE: If the spring (6) in the Featherlight-Starting system is
broken, more effort will be required to start the engine and you
will notice some resistance when pulling the starter cable. If
you notice this, check the spring (6) and replace if necessary.
Mounting the fan housing
Insert the air guide (3) in the fan housing so that the three
recesses (4) engage.
Position the fan housing against the housing, press against it
lightly and pull the starter grip until the starter engages.
Tighten screws (1).
A

14
B
15
17
16
17
16
Cleaning the cylinder area
After prolonged use, dirt and sawdust can build up on the cylin-
der and cause the engine to overheat. The cylinder n cleaner
helps remove deposits between the cylinder ns and between
the cylinder and the mounting plate.
Remove cover.
Remove the fan housing.
CAUTION: To prevent eye injury, always wear eye protection
when cleaning the lter with compressed air!
The entire area (14) can now be brushed clean or cleaned with
compressed air.
A bottle brush can come in handy for cleaning out the cylinder
ribs.
With the cyinder ribs cleaner (accessories, not delivered with
the chain saw), clean out the area between the cylinder ribs
and between the cylinder and the mounting plate.
Do not use force. Be careful not to damage the short-circuit
wire and the ignition wire.
C
Replacing the fuel lter
The felt lter (15) of the fuel lter can become clogged.
It is recommended to replace the fuel lter once every
three months in order to ensure unimpeded fuel ow to the
carburetor.
To remove the fuel lter for replacement, pull it out through
the tank ller neck using a piece of wire bent at one end to
form a hook.
Replacing/cleaning the spark arrester screen
The spark arrester screen should be checked and cleaned
regulary. Loosen the screw (16) and remove the spark arrester
screen (17).
Caution: Do not use sharp or pointed objects for screen cleaning.
Damaged or misformed screen wires may result.
Reassembly the spark arrester screen and tighten the screw.
Replacing/cleaning the spark arrester screen
Models with catalytic converter (DCS5121)
The spark arrester screen should be checked and cleaned
regulary. Loosen the two screws (16) and remove the spark
arrester screen (17).
Caution: Do not use sharp or pointed objects for screen cleaning.
Damaged or misformed screen wires may result.
D
Reassembly the spark arrester screen and tighten the two
screws.
Information on the catalytic converter: The catalytic converter
reduces the pollutant content of the exhaust.
35

36
Instructions for periodic maintenance
To ensure long life, prevent damage and ensure the full functioning of the safety features the following maintenance must be performed regularly. Guarantee claims can be recognized only if this work is performed regularly and properly. Failure to perform the
prescribed maintenance work can lead to accidents!
The user of the chain saw must not perform maintenance work which is not described in the instruction manual. All such work must
be carried out by a MAKITA service center.
Page
General Chain saw Clean exterior, check for damage. In case of damage,
have repaired by a qualied service center immediately
Saw chain Sharpen regulary, replace in good time 28-29
Chain brake Have inspected regularly at an authorized service center
Guide bar Turn over to ensure even wear of bearing surfaces
Replace in good time 21, 30
Starter cable Check for damage. Replace if damaged. 34
Before each start Saw chain Inspect for damage and sharpness 28-29
Check chain tension 21
Guide bar Check for damage
Chain lubrication Functional check 24
Chain brake Functional check 26
Combination switch,
Safety locking button,
Throttle lever Functional check 25
Fuel/oil tank
cap Check for tightness
and lekages
Every day Air lter Clean (several times daily if necessary) 32
Guide bar Check for damage, clean oil intake bore 30
Guide bar support Clean, in particular the oil guide groove 24, 30
Idle speed Check (chain must not run) 27
Every week Fan housing Clean to maintain good cooling air ow. 17, 35
Cylinder area Clean to maintain good cooling air ow. 35
Spark plug Check and replace if necessary 33
Mufer Check tightness of mounting, Check screws 33
Spark arrester screen Clean Clean or replace if necessary 35
Chain guide Check 20
Screws and nuts Check their condition and that they are rmly secured.
Every 3 months Fuel lter Replace 35
Fuel, oil tanks Clean
Annually Chain saw Check at an authorized service center
Storage Chain saw Clean exterior, check for damage. In case of damage,
have repaired by a qualied service center immediately
Guide bar/chain Demount, clean and oil slightly
Clean the guide groove of the guide bar 30
Fuel, oil tanks Empty and clean
Carburetor Run empty
Service, spare parts and guarantee
Maintenance and repair
The maintenance and repair of modern engines as well as all safety devices require qualied technical training and a special workshop equipped with special tools and testing devices.
Any work not described in this Manual may be performed only by a MAKITA service center.
The MAKITA service centers have all the necessary equipment and skilled and experienced personnel, who can work out cost-effective
solutions and advise you in all matters.
Repair attempts by third parties or unauthorized persons will void all warranty claims.
Please contact your nearest service center.

Spare parts
Reliable long-term operation, as well as the safety of your chain saw, depend among other things on the quality of the spare parts
used. Use only original MAKITA parts, marked
Only original spare parts and accessories guarantee the highest quality in material, dimensions, function and safety.
Original spare parts and accessories can be obtained from your local dealer. He will also have the spare part lists to determine the
required spare part numbers, and will be constantly informed about the latest improvements and spare part innovations.
Please bear in mind that if parts other than original MAKITA spare parts are used, this will automatically invalidate the MAKITA
product guarantee.
Guarantee
MAKITA guarantees the highest quality and will therefore reimburse all costs for repair by replacement of damaged parts resulting
from material or production faults occurring within the guarantee period after purchase. Please note that in some countries particular
guarantee conditions may exist. If you have any questions, please contact your salesman, who is responsible for the guarantee of
the product.
Please note that we cannot accept any responsibility for damage caused by:
• Disregard of the instruction manual.
• Non-performance of the required maintenance and cleaning.
• Incorrect carburetor adjustment.
• Normal wear and tear.
• Obvious overloading due to permanent exceeding of the upper performance limits.
• Use of guide bars and chains which have not been approved.
• Use of guide bar and chain lengths which have not been approved.
• Use of force, improper use, misuse or accidents.
• Damage from overheating due to dirt on the fan housing.
• Work on the chain saw by unskilled persons or inappropriate repairs.
• Use of unsuitable spare parts or parts which are not original MAKITA parts, insofar as they have caused the damage.
• Use of unsuitable or old oil.
• Damage related to conditions arising from lease or rent contracts.
• Damages caused by disregarding loose outer bolted connections.
Cleaning, servicing and adjustment work is not covered by the guarantee. All repairs covered by the guarantee must be performed
by a MAKITA service center.
Troubleshooting
Malfunction System
Chain does not run Chain brake Engine runs Chain brake actuated.
Engine does not start or Ignition system Ignition spark Malfunction in fuel supply system, com-
only with difculty pression system, mechanical malfunction.
No ignition spark Switch on STOP, fault or short-circuit in the
wiring, plug cap or spark plug defective.
Fuel supply Fuel tank is lled Choke in wrong position, carburetor defective,
fuel lter dirty, fuel line bent or interrupted.
Compression Inside Cylinder base packing ring defective, radial
system shaft packings defective, cylinder or piston rings
defective
Outside Spark plug does not seal.
Mechanical Starter does not engage Spring in starter broken, broken parts
malfunction inside the engine.
Warm start difculties Carburetor Fuel tank is lled Wrong carburetor adjustment.
Ignition spark
Engine starts, but Fuel supply Fuel tank is lled Wrong idling adjustment, fuel lter or
dies immediately carburetor dirty. Tank venting defective, fuel
line interrupted, cable defective, STOP switch
defective.
Observation Cause
Insufcient power Several systems Engine is idling Air lter dirty, wrong carburetor adjust-
may be involved ment, mufer clogged, exhaust channel in cylin-
simultaneously der clogged, spark arrester screen clogged.
No chain lubrication Oil tank/pump No oil on the chain Oil tank empty.
Oil guide groove dirty.
Oil-pump adjusting screw incorrectly adjusted.
37
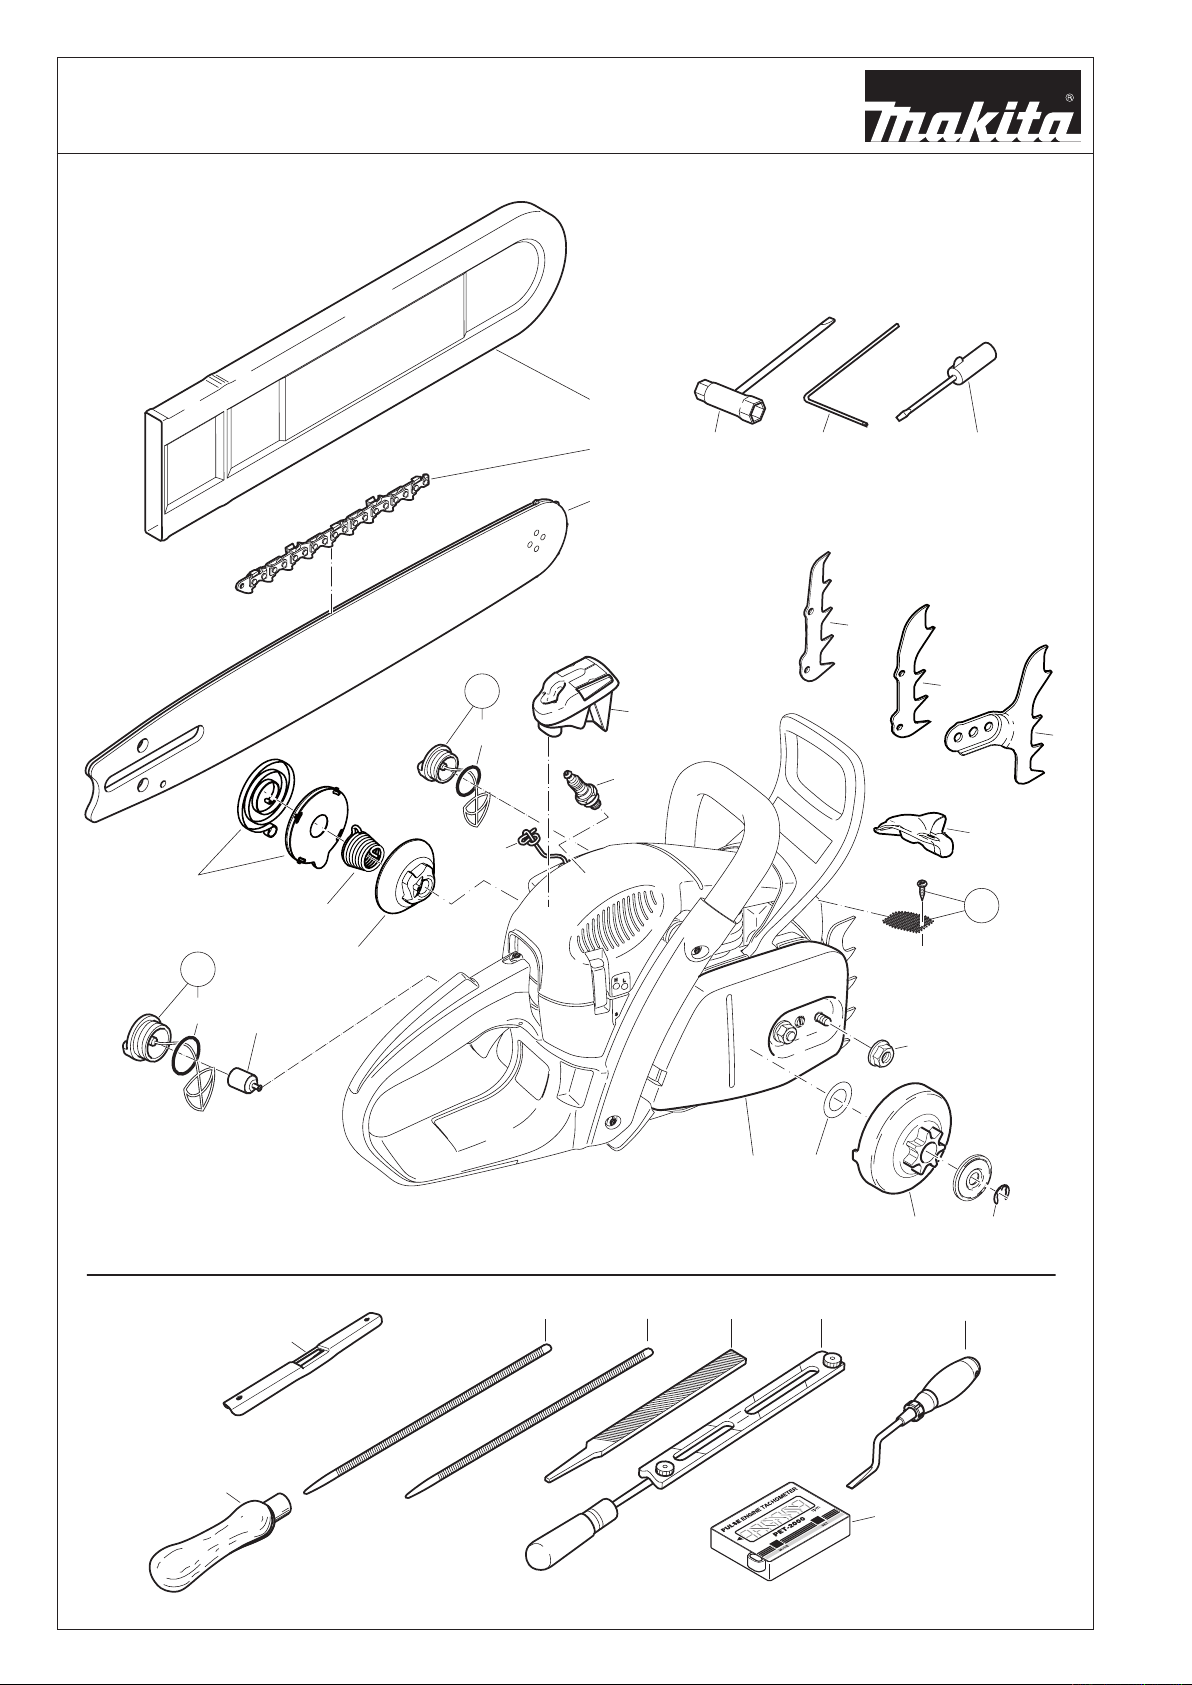
38
Extract from the spare parts list
29
36
30
31
32 33/34
28
2220
876
5
23
1
2
3
14
16
12
13
4
15
22
24
25
26
27
35
17
10
11
9
18
19
Use only original MAKITA parts. For repairs and
replacement of other parts, see your MAKITA service center.
DCS460, DCS5121

Extract from the spare parts list
Use only original MAKITA parts. For repairs and
replacement of other parts, see your MAKITA service center.
DCS460, DCS5121
Pos. MAKITA-No. Qty. Denomination
1 445 040 641 1 Sprocket nose bar .325", 16"
445 045 641 1
2 513 486 666 1
513 486 672 1
1 443 045 661 1
2 513 496 664 1 Saw chain 3/8" for 18"
3 952 010 640 1 Chain protector for 16"
952 020 650 1 Chain protector for 18"
4 957 213 600 1
5 923 208 004 2
6 941 719 131 1 Universal wrench SW 19/13
7 940 827 000 1
8 944 340 001 1
9 010 114 010 1
10 181 114 202 1
11 963 229 036 1 O-Ring 29,3x3,6 mm
12 170 114 061 1
13 963 225 030 1
14 965 603 021 1
15 181 164 020 1
16 181 173 240 1
16 181 173 190 1
17 181 163 050 1 Return spring pack, complete
18 181 163 080 1 Spring
19 181 163 090 1 Driver
Sprocket nose bar .325", 18"
Saw chain .325" for 16"
Saw chain .325" for 18"
Sprocket nose bar 3/8", 18"
Sprocket guard, cpl.
Hexagonal nut M8
Offset screwdriver
Carburetor screwdriver
Fuel lter
Fuel tank cap, cpl.
Oil tank cap, cpl.
O-Ring 25x3 mm
Spark plug
Starter cable 3,5x1100 mm
Air lter (nylon)
Air lter (eece)
Accessories (not delivered with the chain saw)
28 953 100 090 1 Chain gauge
29 953 004 010 1 File handle
30 953 003 100 1 Round le, dia. 11/64", (4,5 mm)
31 953 003 040 1 Round le, dia. 7/32", (5,5 mm)
32 953 003 060 1 Flat le
33 953 030 020 1 File holder 11/64”
34 953 009 000 1 File holder
35 944 500 795 1 Cylinder ribs cleaner
36 950 233 210 1 Tachometer
- 949 000 035 1 Combined can
(for 5l fuel, 2.5l chain oil)
7/32”
20 181 223 310 1 Clutch drum cpl. .325", 7-tooth
181 223 320 1 Clutch drum cpl. .3/8", 7-tooth
21 927 408 000 1 Circlip
22 021 224 011 1 Disc
23 181 174 250 1 Spark collector, cpl.
24 181 174 470 1 Spark collector, cpl.
(for models with catalyst)
25 181 250 030 1 Spike bar
26 181 250 020 1 Spike bar
27 181 250 011 1 Spike bar
39

40
EMISSIONS COMPONENT DEFECT WARRANTY COVERAGE
MAKITA U.S.A, Inc garantit à l’acheteur au détail initial et à chaque propriétaire ultérieur que cet équipement utilitaire est conçu,
construit et équipé en conformité, à la date d’achat initiale, à toutes réglementations applicables de l’ U.S. Environmental Protection
Agency (Agence de protection environnementale des Etats-Unis) et que le moteur est exempt de tout défaut de matériaux et de main
d’œuvre susceptible de le rendre non conforme aux réglementations de l’EPA pendant sa durée de garantie.
Pour les composants gurant sous PIECES COUVERTES, le concessionnaire agréé par MAKITA fera gratuitement le diagnostic
nécessaire, la réparation ou le remplacement de façon à ce que le moteur soit conforme aux réglementations applicables de l’US
EPA.
PERIODE DE GARANTIE POUR LES DÉFAUTS DE COMPOSANTS D’EMISSISON
La période de garantie pour ce moteur commence à la date où il a été vendu à l’acheteur initial et continue pendant une période de
2 ans.
PIECES COUVERTES
Les pièces gurant ci-dessous sont couvertes par la garantie concernant les défauts de composants d’émission. Certaines pièces
gurant ci-dessous peuvent nécessiter une maintenance planiée et sont garanties jusqu’au premier point de remplacement prévu
pour cette pièce.
Système de dosage de combustible Système d’allumage
Carburateur et pièces internes Bougie d’allumage
Filtre à carburant, si applicable Volant magnétique
Obturateur d’étrangleur, si applicable Bobine d’allumage
Système de starter, si applicable
Système à induction d’air Unités diverses utilisées dans les systèmes ci-dessus
Préltre, si disponible, ltre à air Tuyaux d’essence, brides et joints d’étanchéité
Carter de ltre à air, manchon de jonction
OBTENTION DU SERVICE DE GARANTIE
Pour obtenir le service de garantie, apportez la machine au centre de service après-vente MAKITA le plus proche ou le service SAV
agréé par MAKITA et fournir la preuve d’achat indiquant la date d’achat de cette machine. Le concessionnaire SAV agréé par MAKITA effectuera les réparations ou réglages nécessaires en un temps raisonnable et vous remettra une copie de la commande de
réparation. Toutes les pièces et tous les accessoires remplacés sous cette garantie deviendront la propriété de MAKITA.
CE QUI N’EST PAS COUVERT
• Dommages dus à une manipulation impropre, usage incorrect, ajustage inadéquat (à moins qu’ils étaient effectués par le conces
sionnaire SAV agréé par MAKITA pendant une réparation de garantie), altération, accident, défaut d’utiliser l’essence et l’huile
recommandée ou le fait de n’avoir pas effectué les services d’entretien nécessaires.
• Les pièces de rechange utilisées pour les services d’entretien nécessaires
• Dommages conséquents comme perte de temps, désagréments, perte due à la non-utilisation de la machine ou de l’équipement
etc.
• Frais de diagnostic et d’inspection n’aboutissant pas à la réalisation d’un service de garantie
• Toute pièce de rechange non-autorisée, ou mauvais fonctionnement de pièces autorisées dû à l’utilisation de pièces non-autori
sées.
RESPONSABILITÉS DE GARANTIE DU PROPRIÉTAIRE
En tant que propriétaire de la machine, vous êtes tenu responsable de l’exécution de la maintenance requise indiquée dans le manuel
du propriétaire. MAKITA recommande de conserver toutes les quittances couvrant l’entretien de votre machine, car MAKITA ne peut
pas refuser la garantie seulement à cause du manque de quittances ou parce que vous avez manqué à assurer la réalisation de
toute la maintenance prévue. En tant que propriétaire de la machine, vous devez toutefois être conscient que MAKITA peut refuser
la couverture de la garantie si votre machine ou une partie de celle-ci est défaillante à cause d’abus, de négligence, de maintenance
inadéquate ou de modications non autorisées. Vous avez la responsabilité de présenter votre machine au concessionnaire SAV
agréé par MAKITA le plus proche en cas de problème. Pour toute question concernant vos droits de garantie et responsabilités,
n’hésitez pas à contacter le Département de Service de Garantie MAKITA à 1-800-4-MAKITA (462-5482).
CHOSES À SAVOIR CONCERNANT LA GARANTIE DU SYSTÈME DE CONTRÔLE D’ÉMISSION :
MAINTENANCE ET RÉPARATIONS
Vous êtes responsable de la maintenance adéquate de la machine. Vous devez conserver tous les reçus et les rapports d’entretien
concernant la réalisation de l’entretien régulier en cas de problèmes. Ces reçus et rapports d’entretien doivent être transmis à tout
propriétaire suivant de la machine. MAKITA se réserve le droit de refuser la couverture de garantie si la machine n’a pas été entretenue convenablement. Les réclamations faites au titre de la garantie ne seront pas refusées, à moins que la maintenance requise
n’ait pas été effectuée ou que les rapports d’entretien n’aient pas été conservés.
LA MAINTENANCE, LE REMPLACEMENT ET LA RÉPARATION D’UNITÉS DE CONTRÔLE D’EMISSION DOIVENT ÊTRE EFFECTUÉS PAR UNE PERSONNE QUELCONQUE OU TOUT ETABLISSEMENT DE RÉPARATION ; TOUTEFOIS, LES RÉPARATIONS
SOUS GARANTIE DOIVENT ÊTRE REALISÉES PAR UN CONCESSIONNAIRE SAV AGRÉÉ PAR MAKITA. L’UTILISATION DE
PIÈCES NON EQUIVALENTES SUR LE PLAN PERFORMANCE ET DURABILITÉ AUX PIÈCES AUTORISÉES PEUT PORTER
ATTEINTE À L’EFFICACITÉ DU SYSTÈME DE CONTRÔLE D’EMISSION ET PEUT AVOIR UNE IMPORTANCE SUR LE RÉSULTAT
D’UNE RECLAMATION FAITE AU TITRE DE LA GARANTIE.
Si des pièces autres que celles agréées par MAKITA sont utilisées pour des remplacements d’entretien ou pour la réparation de
composants concernant le contrôle d’émission, vous devez vous assurer que ces pièces sont garanties par leur constructeur comme
étant équivalentes aux pièces autorisées par MAKITA dans leur performance et durabilité.
-
-
COMMEN FAIRE UNE RÉCLAMATION
Toutes les réparations tombant sous cette garantie limitée doivent être effectuées par un concessionnaire SAV autorisé par MAKITA.
Au cas où une pièce relative aux émissions s’avère être défectueuse pendant la durée de garantie, vous devez prévenir le Département de Service de Garantie MAKITA à 1-800-4-MAKITA (462-5482) et vous serez informé par le concessionnaire garantie SAV
ou des prestataires de service où la réparation sous garantie peut être effectuée.

ATTENTION!
RE Y
Une utilisation négligente ou incorrecte de ce produit peut entraîner des blessures graves ou mortelles!
Avant d’utiliser une tronçonneuse ou d’autres produits MAKITA, il est important que vous ayez lu et entièrement
compris et que vous suiviez avec soin les instructions fournies par le présent mode d’emploi. Le retour de
chaîne peut entraîner des blessures graves ou mortelles et constitue l’un des nombreux dangers potentiels
liés à l’utilisation d’une tronçonneuse. Ce mode d’emploi décrit de faç on détaillée le retour de chaîne et les
autres mesures de sécurité. D’autres exemplaires de ce mode d’emploi peuvent être commandés auprès de
www.makitausa.com et 1-800-4-MAKITA (462-5482) et MAKITA CANADA INC.,1950 Forbes Street, Whitby,
Ontario, L1N 7B7, Canada, Telephone: (905) 571 22 00.
Ce produit est en conformité avec: la norme de sécurité pour tronçonneuses B 175.1-2000 de l’American
National Standard Institute,
la norme de sécurité pour tronçonneuses Z62.1-03 de la Canadian
Standards Association,
la norme relative au choc de recul pour tronçonneuses Z62.3-04.
SAEJ 335-Juin 95 „Petit système d’échappement portable ne produisant
aucune étincelle”
Société du génie automobile
Cette tronçonneuse est un produit allemand de qualité. Ce mode d’emploi contient des instructions importantes
pour son montage et son utilisation. Pour votre sécurité, lisez très soigneusement les instructions de prévention
des accidents avant de mettre en service votre tronçonneuse car une utilisation incorrecte peut, malgré toutes
les précautions prises, entraîner des accidents. Avec un peu de soin et d’attention, ce produit de toute première
qualité vous rendra d’excellents services et vous donnera entière satisfaction pendant très longtemps.
DCS460, DCS5121
Sommaire page
Etendue de la fourniture ........................................ 42
Symboles ............................................................... 42
Mesures de sécurité ......................................... 43-54
Désignation des composants ................................55
Caractéristiques techniques .................................. 56
Montage du guide et de la chaîne de sciage ....57-58
Contrôle de la tension de la chaîne ....................... 59
Retendre la chaîne de sciage ................................ 59
Frein de chaîne de sécurité ................................... 59
Enclencher le frein de chaîne ................................ 59
Carburant/ravitaillement ...................................60-61
Graissage de la chaîne.......................................... 62
Démarrer le moteur ...............................................63
Arrêter le moteur.................................................... 63
Vérier le frein de chaîne de sécurité .................... 64
Fonctionnement en hiver ....................................... 64
Réglage du carburateur ......................................... 65
Affûtage de la chaîne de sciage ....................... 66-67
Sommaire
page
Nettoyer l’intérieur de la bande de
frein de chaîne et de la roue à chaîne ................... 68
Nettoyer le guide de la chaîne ............................... 68
Nouvelle châine de sciage..................................... 69
Nettoyage du ltre d’air.......................................... 70
Replacement de bougie......................................... 71
Vérication des vis du silencieux ........................... 71
Remplacement du cordon de lancement ............... 72
Remplacement du ressort de rappel .....................72
Remplacement le ressort de démarrage ............... 72
Montage du carter du ventilateur ........................... 72
Nettoyage de l’espace cylindre.............................. 73
Replacement de la crépine d’aspiration ................73
Changement / nettoyage du pare-étincelles .......... 73
Instruction d’entretien quotidien et périodique ....... 74
Service d’atelier,
pièces de rechange et garantie ........................ 74-75
Recherche de pannes ...........................................75
Extrait de la liste des pièces de rechange ........76-77
Les tronçonneuses DCS460, DCS5121 sont livrées dans un carton qui les protège des dommages dus au transport.
Le carton est une matière première de base qui peut être réutilisée ou recyclée (recyclage des vieux papiers).
41

42
Etendue de la fourniture
1
4
5 6 7
32
1. Tronçonneuse
à essence
2. Chaîne
3. Guide
4. Housse de protection du guide
5. Outillage de montage
6. Tournevis coudé
7. Tournevis pour le réglage du carburateur
8. Manuel d’emploi et de sécurité (sans illustration)
Si un des composants indiqués ici ne devait pas être dans
la fourniture, veuillez vous adresser à votre vendeur!
Symboles
Vous rencontrerez les symboles suivants sur l’appareil et dans le manuel d’emploi et de sécurité:
Lire instructions d‘emploi et
suivre les consignes de sécurité
et d‘avertissement!
Danger et attention
particulirs!
Interdit!
Porter le casque, les lunettes et
acoustiques de protection!
Porter des gants de
protection
Interdiction de fumer!
Pas de feu ouvert!
Attention,
choc de recul (Kickback)
Frein de chaîne
Mélange carburant
Mode Normal/Hiver
Réglage du carburateur
Huile pour chaîne de sciage
Arrêter le moteur!
Démarrer le moteur
Bouton multi-position
Starter/Démarrage/Stop (I/O)
Position de sécurité
Vis de réglage pour l’huile de
chaîne de sciage
Premier secours
Ne touchez pas les
surfaces chaudes!
Symboles
Recyclage
additionnels
voir page 44.

Mesures de sécurité à respecter par les
utilisateurs de tronçonneuses
Lorsque vous utilisez la tronçonneuse, veuillez
respecter les règles suivantes :
a) Evitez tout contact entre la pointe du guide et
tout objet.
b) Le contact de la pointe peut entraîner un dé
placement brutal du guide vers le haut et vers
l’arrière et être à l’origine de blessures graves
ou mortelles.
c) Il faut toujours utiliser la tronçonneuse en la
tenant des deux mains.
ATTENTION!
Lisez et respectez toutes les mesures de sécurité
indiquées dans le mode d’emploi. Le non-respect
des instructions peut avoir pour conséquence des
blessures graves. Ne prêter des tronçonneuses
qu’a des utilisateurs ayant une expérience avec
les tronçonneuses à chaîne. Dans ce cas, les
instructions d’emploi et de sécurité doit être remise
au prêteur.
ATTENTION!
Cette tronçonneuse est capable de violents
retours de chaîne qui peuvent blesser gravement
l’utilisateur. N’utilisez cette tronçonneuse que
si vous avez besoin de procéder à des travaux
intensifs et si vous disposez d’une expérience et
d’une formation vous permettant de maîtriser le
choc de recul. Il existe des tronçonneuses à risque
de choc de recul réduit.
ATTENTION!
Le choc de recul peut se produire lorsque la pointe
ou l’extrémité du guide touche un objet ou lorsque le
bois se referme et coince la chaîne dans la coupe.
Le contact peut arrêter brutalement la chaîne et
dans certains cas causer une réaction inverse
extrêmement rapide, entraînant un déplacement du
guide vers le haut et vers l’arrière vers l’utilisateur.
Le choc de recul peut vous faire perdre le contrôle
de la tronçonneuse.
Certaines mesures peuvent être prises par les
utilisateurs de tronçonneuses pour réduire le risque
de choc de recul et de blessure.
A. Si vous avez bien assimilé le principe du choc de
recul, vous pouvez réduire ou éliminer l’effet de
surprise qui augmente le risque d’accident.
B. Lorsque le moteur tourne, tenez fermement
la tronçonneuse à deux mains, la main droite
sur la poignée arrière et la main gauche sur
la poignée tubulaire. Tenez fermement les
poignées de la tronçonneuse en les entourant
avec le pouce et les autres doigts. Une prise
ferme peut neutraliser le choc de recul et vous
aider à garder le contrôle de la tronçonneuse.
Ne lâchez pas prise!
C. Assurez-vous que la zone où vous travaillez
ne présente pas d’obstacles. Ne laissez pas la
pointe du guide toucher le rondin, la branche
ou tout autre obstacle qui pourrait être heurté
pendant que vous utilisez la tronçonneuse.
D. Ne coupez pas les bras tendus ou plus haut
qu’à hauteur d’épaules.
E. Respectez les instructions du fabricant relatives
à l’affûtage et à l’entretien de la tronçonneuse.
F. N’utilisez que les guides et les chaînes indiqués
par le constructeur ou des pièces équivalentes.
Mesures de sécurité supplémentaires
Tous les utilisateurs de tronçonneuses doivent
respecter les mesures de sécurité supplémentaires
ci-dessous :
1. Ne travaillez pas avec une tronçonneuse lorsque
vous êtes fatigué.
-
2. Utilisez des chaussures de sécurité, des vêtements
ajustés, des gants de sécurité ainsi que des lunettes,
un casque antibruit et un casque de sécurité.
3. Maniez le carburant avec prudence. Eloignez la
tronçonneuse d’au moins 10 pieds (3 m) du point
de ravitaillement avant de démarrer le moteur.
4. Assurez-vous que personne ne se trouve à proximité
de la tronçonneuse au moment du démarrage ou
pendant la coupe. Maintenez les spectateurs et les
animaux en dehors de la zone de travail.
5. Ne commencez pas la coupe avant d’avoir dégagé
la zone de travail, de vous être assuré une position
stable au sol et d’avoir prévu une voie de repli
vous permettant de vous retirer lorsque l’arbre
s’abattra.
6. Lorsque le moteur tourne, maintenez la chaîne de
la tronçonneuse à distance de votre corps.
7. Avant de démarrer le moteur, assurez-vous que la
chaîne ne touche aucun objet.
8. Portez la tronçonneuse moteur arrêté, le guide et
la chaîne vers l’arrière et le pot d’échappement
éloigné de vous.
9. N’utilisez pas de tronçonneuse endommagée,
incorrectement réglée ou incomplètement et
incorrectement montée. Assurez-vous que la
chaîne s’arrête lorsque vous relâchez la gâchette
des gaz.
10. Arrêtez le moteur avant de poser la tronçonneuse.
11. Soyez extrêmement prudent lorsque vous coupez
des broussailles et des jeunes arbres de petites
dimensions car du petit bois peut se prendre dans la
chaîne de la tronçonneuse et être projeté vers vous
ou vous tirer en vous faisant perdre l’équilibre.
12. Lorsque vous coupez des grosses branches qui
forcent, faites attention à la détente pour ne pas
être heurté lorsque la tension sur les bres du bois
se relâchera.
13. Maintenez les poignées de la tronçonneuse sèches,
propres et exemptes d’huile ou de mélange deux
temps.
14. N’utilisez la tronçonneuse que dans des endroits
correctement ventilés.
15. Ne montez pas dans un arbre avec la tronçonneuse
à moins d’avoir reçu une formation spécique pour
ce type d’utilisation.
16. Toutes les opérations d’entretien de la tronçonneuse
autres que celles indiquées dans les instructions
d’entretien du mode d ‘emploi doivent être
effectuées par MAKITA. (Par exemple, l’utilisation
d’outils inappropriés pour retirer le volant ou pour
maintenir le volant an de retirer l’embrayage peut
entraîner des détériorations du volant et par voie
de conséquence son éclatement).
17. Ne transportez la tronçonneuse que munie de la
protection de chaîne.
18. Les guides et les chaînes à faible choc de recul sont
conçus pour réduire le risque de blessure par choc
de recul. Pour toute information sur ces produits,
adressez-vous à votre revendeur MAKITA.
43

44
Mesures générales de sécurité
C US
XXX.YYY.ZZZ
XXX.YYY.ZZZ
max. CKA 40
O
L’utilisation de toute tronçonneuse peut être
dangereuse. A plein régime, la chaîne peut atteindre
une vitesse de 45 mph (20 m/s). Il est important que
vous ayez lu et entièrement compris et que vous
suiviez les mesures de sécurité et les mises en
garde suivantes. Relisez de temps en temps le mode
d’emploi et les instructions de sécurité.
Angle maximum de choc de recul calculé
(CKA)* sans frein de chaîne, avec les
combinaisons de barre et de chaîne recom-
mandées (ici, l'angle CKA est de 45°).
Angle maximum de choc de recul calculé
(CKA)* avec frein de chaîne, avec les
combinaisons de barre et de chaîne recom-
mandées (ici, l'angle CKA est de 40°).
ATTENTION!
Les forces de réaction, y compris le choc de
recul, peuvent être dangereuses. Une utilisation
négligente ou incorrecte de toute tronçonneuse peut
entraîner des blessures graves ou mortelles.
Demandez à votre revendeur MAKITA de vous
montrer comment utiliser la tronçonneuse.
Respectez l’ensemble des règlements, normes et
arrêtés de sécurité localement en vigueur.
ATTENTION!
L’utilisation d’une tronçonneuse doit être interdite aux
mineurs.
Il faut éloigner les spectateurs, en particulier les
enfants et les animaux, de la zone d’utilisation de la
tronçonneuse (g. 1).
Ne laissez jamais la tronçonneuse fonctionner sans
surveillance.
Conservez-la sous clé hors de portée des enfants.
Remplissez le réservoir de carburant aux 7/8 (cf.
stockage de la tronçonneuse).
Ne prêtez pas votre tronçonneuse sans ce mode
d’emploi. Assurez-vous que toute personne utilisant
votre tronçonneuse a bien compris les informations
fournies.
L’utilisation correcte d’une tronçonneuse dépend :
1. de l’utilisateur
2. de la tronçonneuse
3. de l’utilisation qui est faite de la tronçonneuse.
Description des symboles gurant sur
les tronçonneuses:
CSA normes Z62.1-03
Classe 1A Z62.3-04
ANSI norme B175.1-2000
SAE norme SAE J335
Il faut éviter tout contact de la
pointe du guide avec un objet quelconque. Le contact de la pointe
peut entraîner un déplacement
brutal du guide vers le haut et vers l’arrière et être à
l’origine de blessures graves ou mortelles.
Il faut toujours utiliser la
tronçonneuse en la tenant des
deux mains!
1
Combinaison réduite entre barre de recul et chaîne évaluée
avec le moteur pour obtenir une
protection contre le recul (selon
normes ANSI et CSA).
* L’angle de choc de recul calculé est une valeur
calculée à partir d’énergies mesurées sur un banc
d’essai. Ce n’est pas l’angle du guide remontant en
cas de CHOC DE RECUL.
L’utilisateur
Condition physique
Vous devez être en bonne forme physique et mentale et
n’être sous l’inuence d’aucune substance (stupéants,
alcool) pouvant diminuer votre acuité visuelle, votre
habileté ou votre jugement.
2
ATTENTION!
L’utilisation prolongée de tronçonneuses expose
l’utilisateur à des vibrations qui peuvent entraîner
l’apparition de la maladie de Raynaud. Cette
maladie se manifeste par une réduction de la
sensibilité et de la régulation de la température au
niveau des mains, par des engourdissements et
des brûlures. Elle peut également entraîner des
lésions nerveuses et circulatoires et une nécrose
des tissus. Toutes les tronçonneuses MAKITA
sont donc munies d’un système antivibration qui
est très important pour les personnes utilisant des
tronçonneuses de façon régulière ou prolongée.
Les systèmes antivibration ne garantissent pas
que vous n’aurez pas la maladie de Raynaud mais
elles en réduisent considérablement le risque.
Les personnes utilisant une tronçonneuse de
façon continuelle et régulière doivent toutefois
examiner leur mains et leurs doigts et, si elles
constatent des symptômes anormaux, consulter
immédiatement un médecin.

Quels vêtements porter?
La tronçonneuse
L’utilisateur doit porter des vêtements robustes et
ajustés mais qui lui laissent une complète liberté de
mouvement. Evitez les vestes amples, les écharpes, les
cravates, les bijoux, les pantalons à pattes d’éléphant
ou à revers ou quoi que ce soit qui puisse se prendre
dans la tronçonneuse ou les broussailles. Portez
une combinaison ou des jeans munis de renforts de
protection contre la coupe (g. 3).
Portez des gants de sécurité lorsque vous manipulez
la tronçonneuse et la chaîne. Les gants antidérapants
très résistants améliorent votre prise et protègent vos
mains.
Pièces composant la tronçonneuse : cf. les illustrations
et les descriptions de la page 55.
ATTENTION!
Ne modiez jamais une tronçonneuse de quelque
façon que ce soit. Seuls les accessoires fournis
par MAKITA ou expressément agréés par MAKITA
pour une utilisation avec la tronçonneuse spéciée
sont autorisés.
ATTENTION!
Les guides à étrier augmentent de façon importante
le risque de choc de recul et donc de blessure
grave ou mortelle en raison de la plus grande
zone de choc de recul de la conception à étrier.
Les guides à étrier ne sont pas conseillés pour les
tronçonneuses MAKITA et il ne sont pas agréés par
la norme de sécurité pour tronçonneuses ANSI B
175.1-2000.
Utilisation de la tronçonneuse
Transport de la tronçonneuse
3
Pour travailler avec la tronçonneuse, il est important
d’avoir une position stable au sol. Portez des
chaussures montantes robustes munies de semelles
antidérapantes. Il est conseillé de porter des chaussures
de sécurité à embout acier.
Il est absolument indispensable de protéger correcte-
ment les yeux. Il est conseillé d’utiliser des lunettes
antibuée ventilées et un evisière pour réduire le risque
de blessure aux yeux et au visage.
Protégez-vous la tête en portant un casque de sécurité
approprié. Le bruit de la tronçonneuse peut entraîner
des lésions de l’ouïe. Utilisez donc toujours une
protection antibruit (bouchons ou casque antibruit).
Les personnes utilisant une tronçonneuse de façon
continuelle et régulière doivent faire examiner
régulièrement leur acuité auditive.
Porter le casque, les
lunettes et acoustiques
de protection!
ATTENTION!
Il faut toujours arrêter le moteur avant de déposer
ou de porter la tronçonneuse. Il est très dangereux
de porter la tronçonneuse avec le moteur en marche.
Une accélération intempestive du moteur peut
mettre la chaîne en marche.
Evitez de toucher le pot d’échappement (risque
de brûlure).
4
Transport à la main: lorsque vous portez votre
tronçonneuse à la main, le moteur doit être arrêté
et la tronçonneuse doit être en position correcte.
La protection de la chaîne doit être mise et le guide
doit être orienté vers l’arrière. Lorsque vous portez
la tro nçonneuse, le guide doit être derrière vous
(g. 4).
Dans un véhicule: lors du transport de la
tronçonneuse dans un véhicule, la chaîne et le guide
doivent être recouverts avec la protection. Fixez
correctement la tronçonneuse pour l’empêcher de
se renverser et éviter les fuites de carburant et les
détériorations de la tronçonneuse. Assurez-vous
que la tronçonneuse n’est pas exposée à la chaleur
ou à des étincelles.
45

46
Instructions d’utilisation de la tronçonneuse
Pour monter la tronçonneuse, suivez la procédure
indiquée au chapitre „Montage du guide et de la
chaîne“ de ce mode d’emploi. La chaîne, le guide et
le pignon MAKITA doivent être assortis (cf. chapitre
correspondant de ce mode d’emploi).
ATTENTION!
Il est extrêmement important que la chaîne soit
correctement tendue. Pour éviter un réglage
incorrect, il faut tendre la chaîne en suivant la
procédure indiquée dans ce mode d’emploi. Après
avoir tendu la chaîne, assurez-vous toujours que le
ou les écrous hexagonaux du cache-pignon sont
bien serrés. Vériez encore une fois la tension
de la chaîne après avoir serré les écrous puis à
intervalles réguliers (toujours avant le début du
travail). Si la chaîne se détend pendant la coupe,
arrêtez le moteur et tendez-la. N’essayez jamais
de tendre la chaîne pendant que le moteur est en
marche!
Ravitaillement en carburant
Votre tronçonneuse MAKITA fonctionne au mélange
deux temps (cf. chapitre „Carburant“ de ce mode
d’emploi).
Essuyez le carburant renversé avant de démarrer votre
tronçonneuse et examinez-la pour voir si elle fuit.
Examinez votre tronçonneuse pour voir s’il y a des
fuites pendant le ravitaillement et l’utilisation. Si
vous constatez des fuites de carburant ou d’huile, ne
démarrez pas ou ne faites pas fonctionner le moteur
avant d’avoir remédié à la fuite et essuyé le carburant
renversé. Changez immédiatement de vêtements s’ils
sont souillés de carburant (danger de mort!). Evitez
le contact de la peau avec le carburant. Ne jamais
dévisser ou retirer le bouchon du réservoir de carburant
pendant que le moteur tourne.
Démarrage
Ne démarrez pas la tronçonneuse en la laissant
descendre au bout du cordon. Cette méthode est très
dangereuse car vous pouvez perdre le contrôle de la
tronçonneuse (g. 6).
5
ATTENTION!
L’essence est un carburant très inammable. Soyez
extrêmement prudent lorsque vous manipulez
l’essence ou le mélange deux temps. Ne fumez pas
et évitez la présence de toute étincelle ou amme
à proximité du carburant (g. 5).
Instructions de ravitaillement
Faites le plein de votre tronçonneuse dans des endroits
bien ventilés ou à l’extérieur. Il faut toujours arrêter le
moteur et le laisser refroidir avant de faire le plein. Faites
le plein sur un sol nu et éloignez la tronçonneuse d’au
moins 10 pieds (3 m) du point de ravitaillement avant
de démarrer le moteur (g. 5a).
10 pieds
5a
6
6a
Posez la tronçonneuse sur un sol ferme ou sur une
autre surface dure à un endroit dégagé. Assurez-vous
que vous avez une position stable au sol et un bon
équilibre. Passez le pied droit dans la poignée arrière
et prenez fermement la poignée avant de la main
gauche (g. 6 a).
Il faut absolument vous assurer que ni le guide ni la
chaîne ne sont en contact avec vous ou avec tout
autre obstacle ou objet ou le sol. En effet, lorsque le
moteur démarre avec les gaz à moitié, la vitesse du
moteur est sufsante pour que l’embrayage entraîne
le pignon et fasse tourner la chaîne, causant ainsi un
risque de choc de recul. N’essayez jamais de démarrer
le moteur lorsque le guide se trouve dans une coupe
ou dans une entaille.
Lorsque vous tirez sur la poignée du démarreur,
n’enroulez pas le cordon autour de votre poignée. Ne
relâchez pas brusquement la poignée, accompagnezla lentement pour permettre au cordon de s’enrouler
correctement. Le non-respect de cette méthode peut
entraîner des blessures de la main ou des doigts et
détériorer le démarreur.

Réglages importants
ATTENTION!
Lorsque le ralenti est correctement réglé, la chaîne
ne doit pas tourner. Pour le réglage du ralenti,
reportez-vous au chapitre correspondant de ce
mode d’emploi.
N’utilisez pas de tronçonneuse dont le ralenti
n’est pas correctement réglé. Réglez le ralenti
vous-même de la façon indiquée dans le chapitre
correspondant de ce mode d’emploi.
Demandez à votre revendeur MAKITA d’examiner
votre tronçonneuse et de procéder aux réglages
corrects ou aux réparations.
Vériez souvent la tension de la chaîne, surtout
juste après avoir monté une chaîne neuve. Les
chaînes neuves peuvent se détendre de façon plus
importante pendant les premiers temps d’utilisation.
Si la chaîne est bien réglée, il est possible de la
tirer librement à la main autour du guide sans
qu’elle pende. Pour vérier ou régler la tension
de la chaîne, il faut toujours arrêter le moteur et
porter des gants.
Maintenez fermement les poignées dans le creux de la
main en les entourant entre le pouce et l’index (g. 7).
Cette position vous permet de mieux résister et absorber
les forces de recul, de traction et de choc de recul de
votre tronçonneuse sans qu’elle vous glisse des mains
(cf. le point relatif aux forces de réaction). Assurez-vous
que les poignées de la tronçonneuse sont en bon état et
exemptes d’humidité, de poix, d’huile ou de graisse.
Commencez toujours la coupe avec la chaîne tournant
à pleine vitesse et la barre à griffe en contact avec le
bois.
ATTENTION!
N’utilisez jamais la tronçonneuse d’une seule
main car vous ne pouvez pas contrôler les forces
de réaction (cf. pages 48 à 50) et vous pourriez
perdre le contrôle de la tronçonneuse.
Conditions de travail
N’utilisez la tronçonneuse qu’à l’extérieur et uniquement
de jour et dans de bonnes conditions de visibilité.
ATTENTION!
Soyez extrêmement prudent par temps humide ou
par gel (pluie, neige, glace). Remettez le travail à
plus tard en cas de vent, de tempête ou de pluie
violente. Dégagez la zone où vous travaillez.
ATTENTION!
Evitez de trébucher sur des obstacles tels que
souches, racines ou pierres et faites attention aux
trous et aux fossés. Soyez extrêmement vigilant
lorsque vous travaillez sur un terrain incliné ou sur
un sol accidenté. Il ya un risque de glissade accru
sur les rondins fraîchement écorcés.
Instructions de coupe
Lorsque le moteur tourne, tenez toujours fermement
la tronçonneuse à deux mains. Posez la main gauche
sur la poignée tubulaire et la main droite sur la poignée et sur la gâchette des gaz. Ces instructions sont
également valables pour les gauchers.
8
ATTENTION!
N’utilisez pas la tronçonneuse avec les gaz à moitié
car cette position ne vous permet pas de contrôler
correctement la tronçonneuse ou la vitesse de la
chaîne.
ATTENTION!
Ne jamais trop approcher les mains ou tout autre partie
de votre corps d’une chaîne en mouvement.
ATTENTION!
Ne coupez jamais d’autres matériaux que du bois
ou des objets en bois.
N’utilisez votre tronçonneuse que pour couper,
pas pour casser ou pousser des branches, des
racines ou d’autres objets.
Lorsque vous sciez, faites attention à ce que la
chaîne ne touche pas de corps étrangers tel que
pierres, clous et autres (g. 8). Ils pourraient être
projetés, détériorer la chaîne ou entraîner un choc
de recul.
7
47

48
9
Pour garder la maîtrise de votre tronçonneuse, ayez
toujours une position stable au sol. Ne travaillez jamais
sur une échelle, dans un arbre ou sur tout autre support
instable. N’utilisez jamais la tronçonneuse plus haut
qu’à hauteur d’épaules (g. 9).
10
Positionnez la chaîne de sorte que votre corps soit
éloigné du dispositif de coupe lorsque le moteur tourne
(g. 10).
N’appuyez pas sur la tronçonneuse lorsque vous arrivez
à la n d’une coupe. Sous l’effet de la pression, le
guide et la chaîne peuvent sauter hors de la coupe ou
de l’entaille, ne plus pouvoir être contrôlés et frapper
l’utilisateur ou un autre objet. Si la chaîne en mouvement
heurte un objet, une force de réaction (cf. pages 49 à
51) peut faire que la chaîne heurte l’utilisateur.
Forces de réaction pendant la coupe, y compris
le choc de recul
11
Choc de recul (Kickback):
Le choc de recul se produit lorsque le quadrant supérieur
de la pointe du guide entre en contact avec un objet
dur dans le bois ou qu’il est coincé (g. 11). La réaction
de la force de coupe de la chaîne rotative entraîne une
force de rotation de la tronçonneuse dans la direction
opposée au mouvement de la chaîne, généralement
dans le plan du guide. Ceci peut projeter de façon
incontrôlée le guide qui décrit alors un arc de cercle
vers l’utilisateur.
ATTENTION!
Les forces de réaction qui peuvent se produire
pendant toute coupe sont le choc de recul, le recul
et la traction. Les forces de réaction peuvent être
dangereuses sur toutes les tronçonneuses car la
puissance utilisée pour couper le bois peut être
renversée et se retourner contre l’utilisateur.
Si la chaîne en mouvement est brusquement arrêtée
par le contact avec tout objet solide comme un rondin
ou une branche ou si elle est coincée, les forces
de réaction s’exercent immédiatement. Ces forces
de réaction peuvent entraîner la perte de contrôle
qui, à son tour, peut être à l’origine de blessures
graves ou mortelles. Comprendre les causes de
ces forces de réaction peut vous aider à éviter de
perdre le contrôle de votre tronçonneuse.
Les forces de réaction les plus courantes sont :
- le choc de recul
- le recul
- la traction.
12
Cette réaction peut se produire en l’espace d’une
fraction de seconde et, dans certaines circonstances,
le guide et la chaîne peuvent frapper l’utilisateur avec
une force sufsante pour lui occasionner des blessures
graves ou mortelles. Elle peut aussi se produire
pendant l’ébranchage. Elle se produit aussi lorsque la
pointe du guide est coincée de façon inattendue, entre
de façon intempestive en contact avec un objet solide
dans le bois (g. 12) ou est utilisée de façon incorrecte
pour amorcer une plongée ou un perçage.
Plus la force de la réaction du choc de recul est forte,
plus il est difcile pour l’utilisateur de contrôler la
tronçonneuse.
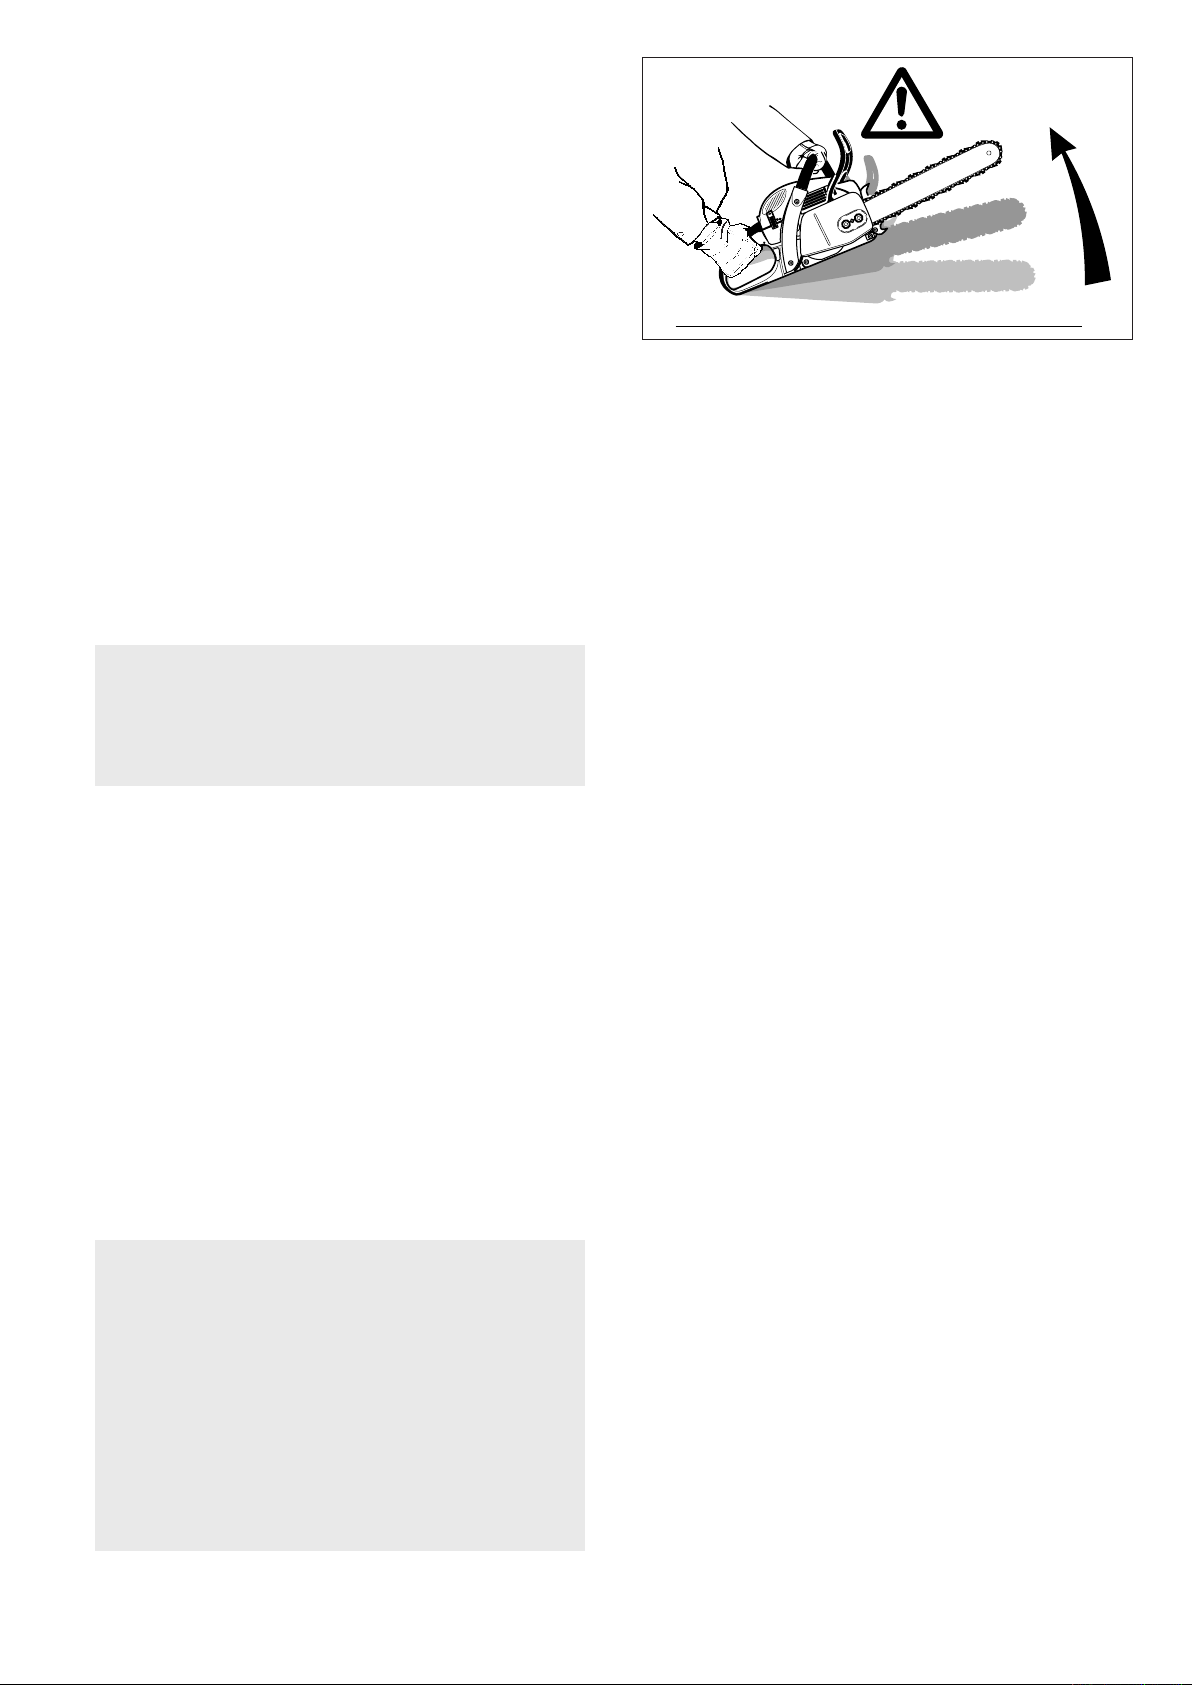
De nombreux facteurs déterminent l’apparition et la
force de la réaction de choc de recul. Le type du guide
et de la chaîne utilisés jouent également un rôle dans
la force de la réaction de choc de recul.
La vitesse à laquelle la chaîne entre en contact
avec l’objet.
La force de choc de recul est proportionnelle à l’impact.
L’angle de contact entre la pointe du guide et le
corps étranger (g. 11).
Le choc de recul est plus marqué dans le quadrant
supérieur de la pointe du guide.
13
Pour éviter le choc de recul
Les modèles de chaîne MAKITA sont conçus pour
réduire les forces de choc de recul.
Les limiteurs de profondeurs:
L’abaissement incorrect des limiteurs de profondeur
augmente également le risque de choc de recul.
Affûtage des plaquettes de coupe de la
chaîne:
ATTENTION!
Une chaîne émoussée ou incorrectement affûtée peut
augmenter le risque de choc de recul. Ne travaillez
qu’avec une chaîne correctement affûtée.
Dispositifs de réduction du risque de blessure
par choc de recul.
MAKITA a mis au point un frein de chaîne spécial
destiné à réduire le risque de choc de recul.
Le frein de chaîne augmente la sécurité du travail,
c.-à-d. que lorsque la chaîne remonte brusquement, la
chaîne s’arrête de tourner en l’espace d’une fraction
de seconde. Une protection main située sur le levier
de débrayage du frein de chaîne et une poignée
arrière munie d’une protection protègent en permanence
les mains de l’utilisateur.
La tendance au choc de recul augmente proportionnellement au rayon ou à la taille de la pointe du guide.
MAKITA a mis au point des guides avec une pointe à petit
rayon qui réduisent la tendance au choc de recul.
ATTENTION!
Aucun frein de chaîne ne peut empêcher le choc
de recul.
Ces freins ne sont conçus que pour arrêter la chaîne
lorsqu’ils sont actionnés.
Pour garantir un fonctionnement able du frein de
chaîne, il faut l’entretenir correctement. Par ailleurs,
la distance entre l’utilisateur et le guide doit être
sufsante pour que le frein de chaîne ait le temps
de réagir et d’arrêter la chaîne avant un éventuel
contact avec l’utilisateur.
Le meilleur moyen de se protéger contre les blessures
dues au choc de recul est d’éviter les situations qui
le favorisent :
1. Tenez fermement la tronçonneuse à deux mains
et assurez toujours une prise ferme.
2. Sachez toujours où se trouve la pointe du guide.
3. Ne faites jamais entrer la pointe du guide en
contact avec un objet quelconque. Ne coupez
pas les branches avec la pointe du guide. Soyez
particulièrement prudent avec les petites branches
dures, les broussailles et les jeunes arbres de
petites dimensions car ils peuvent facilement se
prendre dans la chaîne.
4. Ne coupez pas les bras tendus.
5. Ne coupez pas au-dessus de la hauteur d’épaules.
6. Commencez la coupe et continuez plein gaz.
7. Ne coupez qu’un rondin à la fois.
8. Soyez extrêmement prudent lorsque vous ren-trez
dans une coupe déjà existante.
9. N’essayez pas les coupes en plongée (cf. page
52) si vous n’avez pas l’expérience de ces
techniques.
10 . Soyez toujours attentif à un déplacement du rondin
ou aux autres forces qui pourraient fermer la
coupe et coincer la chaîne.
11. Assurez un entretien correct de la chaîne. Ne
travaillez qu’avec une chaîne bien affûtée et
correctement tendue.
12. Tenez-vous à côté de la coupe de la tronçonneuse.
49

50
Le recul:
Pour éviter la traction
Le recul se produit lorsque la chaîne se trouvant sur
la partie supérieure du guide est arrêtée subitement
lorsqu’elle est coincée, prise ou rencontre un corps
étranger dans le bois. La réaction de la chaîne pousse
la tronçonneuse directement vers l’utilisateur, lui
faisant perdre le contrôle de la tronçonneuse. Le
recul se produit souvent lorsque l’on coupe avec la
partie supérieure du guide (g. 14).
14
Pour éviter le recul
1. Soyez attentif aux forces ou aux situations dans
lesquelles le bois peut coincer la partie supérieure
de la chaîne.
2. Ne coupez pas plus d’un rondin à la fois.
1. Amorcez toujours une coupe avec la chaîne tourn-
ant à pleine vitesse et la barre à griffe en contact
avec le bois.
2. Il est également possible d’éviter la traction en uti
lisant des coins en plastique pour ouvrir l’en-taille
ou la coupe.
Techniques de coupe
Abattage
L’abattage est la coupe d’un arbre sur pied.
Avant d’abattre un arbre, prenez en considération
toutes les conditions pouvant inuencer le sens de
la chute, à savoir:
le sens voulu de la chute,
l’inclinaison normale de l’arbre,
une structure de branchages particulièrement marquée,les arbres et obstacles environnants,
la direction et la vitesse du vent.
-
3. Ne tordez pas la tronçonneuse lorsque vous retirez
le guide d’une coupe en plongée ou par dessous
(gures 25 à 27 et 33, pa ges 52 et 54) car la chaîne
peut être coincée.
La traction:
La traction se produit lorsque la chaîne se trouvant
sur la partie inférieure du guide est arrêtée subitement
lorsqu’elle est coincée, prise ou rencontre un corps
étranger dans le bois (g. 15). La réaction de la chaîne
tire la tronçonneuse vers l’avant, faisant perdre à
l’utilisateur le contrôle de la tronçonneuse.
La traction se produit souvent lorsque la barre à griffe de
la scie n’est pas maintenue fermement contre l’arbre ou
la branche et lorsque la chaîne ne tourne pas à pleine
vitesse lorsqu’elle entre en contact avec le bois.
ATTENTION!
Examinez toujours l’état général de l’arbre. Cherchez
les traces de pourriture dans le tronc. S’il est pourri à
l’intérieur, il peut se rompre et tomber sur l’utilisateur
pendant la coupe.
Cherchez aussi les branches cassées ou mortes qui
pourraient être détachées par les vibrations et tomber
sur l’utilisateur. En cas d’abattage en terrain incliné,
l’utilisateur doit se trouver au-dessus de l’arbre.
16
ATTENTION!
Soyez extrêmement prudent lorsque vous coupez
des broussailles et des jeunes arbres de petites
dimensions car ils peuvent facilement se prendre
dans la chaîne et vous tirer en vous faisant perdre
l’équilibre.
15
En cas d’abattage à proximité de routes, de voies
ferrées et de lignes électriques, etc., prenez des
précautions supplémentaires (cf . g. 16). Informez
la police, la régie d’électricité ou la compagnie de
chemin de fer avant de commencer le travail.

1
2
2
= zone d’abattage
45°
première
coupe
45°
seconde
coupe
17
Lors de l’abattage, respectez une distance d’au moins
2 fois et demi la hauteur de l’arbre entre l’arbre et la
personne la plus proche (cf. g. 17).
Remarque: Tout avertissement peut être couvert
par le bruit de votre moteur.
Instructions d’abattage:
18
Dégagez dans un premier temps la base de l’arbre et
la zone de travail des branches et broussailles gênantes et nettoyez la partie inférieure de l’arbre à la
hache (cf. g. 18).
20
Si l’arbre a de grosses racines latérales, coupez dans
les plus grandes racines, d’abord verticalement puis
horizontalement et enlevez le morceau ainsi découpé
(g. 20).
sens de chute
21
coupe
d’abattage
tenant
encoche
d’abattage
45°
19
Etablissez ensuite une voie de repli et dégagez-la
de tous les obstacles. Cette voie doit être opposée à
la direction prévue de la chute de l’arbre et avoir un
angle de 45 ° (g. 19). Il faut aussi choisir une seconde
voie. Placez tous les outils et l’ensemble du matériel
en sécurité à une distance sufsante de l’arbre mais
pas sur la voie de repli.
22
encoche d’abattage
tenant
23
Déterminez ensuite l’emplacement de l’encoche
d’abattage („camembert“) (g. 21). Lorsqu’elle est
correctement positionnée, l’encoche d’abattage
détermine dans quelle direction l’arbre va tomber. Elle
doit être pratiquée perpendiculairement à la ligne de
chute aussi près que possible du sol. Coupez l’encoche
d’abattage à une profondeur comprise entre un tiers
et un quart du diamètre de l’arbre (g. 22). Elle ne
doit jamais être plus haute que profonde. Pratiquez
l’encoche d’abattage avec grand soin.
51

52
Amorcez la coupe d’abattage légèrement plus haut
1
2
3
que l’encoche d’abattage sur le côté opposé de
l’arbre (g. 22). Coupez ensuite horizontalement dans
la direction de l’encoche d’abattage. Appliquez la
tronçonneuse avec ses griffes directement derrière la
partie de bois non coupée et coupez en direction de
l’encoche d’abattage (g. 23). Laissez une portion non
coupée égale à environ 1/10 du diamètre de l’arbre.
Cette portion constitue le tenant (g. 23). Ne coupez
pas le tenant car vous ne pourriez plus contrôler la
direction de la chute. Si nécessaire, enfoncez des
coins dans la coupe d’abattage pour contrôler le sens
de la chute. Les coins doivent être en bois, en métal
léger ou en plastique mais jamais en acier, car ils
peuvent entraîner une réaction de choc de recul et
détériorer la chaîne.
Restez toujours sur le côté de l’arbre qui s’abat.
Lorsque l’arbre commence à s’abattre, coupez le
moteur, retirez le guide et éloignez-vous sur la voie
de repli que vous avez préparée. Faites attention aux
chutes de branches.
ATTENTION!
Soyez extrêmement prudent avec les arbres
partiellement abattus qui ont un soutien médiocre.
Si l’arbre reste en suspens ou si pour une raison
ou une autre il ne tombe pas complètement, posez
la tronçonneuse de côté et tirez l’arbre à l’aide d’un
treuil à câble, d’un palan ou d’un tracteur. Si vous
essayez de l’abattre complètement en le coupant
à la tronçonneuse, vous risquez de vous blesser.
Méthode de sectionnement
ATTENTION!
Lorsque vous repositionnez la tronçonneuse pour la
coupe suivante, maintenez le guide complètement en
gagé dans l’encoche pour que la coupe d’abattage
soit droite. Si la tronçonneuse commence à se coincer,
enfoncez un coin pour ouvrir la coupe. A la dernière
coupe, ne coupez pas le tenant.
Méthode de coupe en plongée
Les arbres d’un diamètre supérieur à deux fois la longueur
du guide nécessitent de mettre en oeuvre la méthode de
coupe en plongée avant de faire la coupe d’abattage.
Dans un premier temps, coupez une encoche d’abattage
grande et large. Faites une coupe en plongée au centre
de l’encoche. On procède à la coupe en plongée avec
la pointe du guide. Commencez la coupe en plongée en
appliquant la partie inférieure de la pointe du guide sur
l’arbre selon un angle (g. 25). Coupez jusqu’à ce que
la profondeur de l’encoche soit à peu près égale à la
largeur du guide (g. 26). Ensuite, orientez la scie dans la
direction de l’endroit où l’évidement doit être creusé.
25
Mettez les gaz à fond et introduisez le guide dans le
tronc (g. 27).
Agrandissez la coupe en plongée comme indiqué sur
l’illustration (g. 28).
Pour abattre un arbre dont le diamètre est supérieur
à la longueur du guide, il faut utiliser la méthode
de sectionnement ou de coupe en plongée. Ces
méthodes sont extrêmement dangereuses car elles
utilisent la pointe du guide et peuvent entraîner
des réactions de choc de recul. Ces techniques ne
doivent être utilisées que par des professionnels
ayant reçu une formation appropriée.
Pour la méthode de sectionnement (g. 24), pratiquez
la première coupe en faisant pivoter le guide vers le
tenant. Ensuite, en utilisant la griffe du butoir comme
un pivot, repositionnez la tronçonneuse pour la coupe
suivante. Evitez de repositionner la tronçonneuse
plus que c’est nécessaire.
24
26
27
28
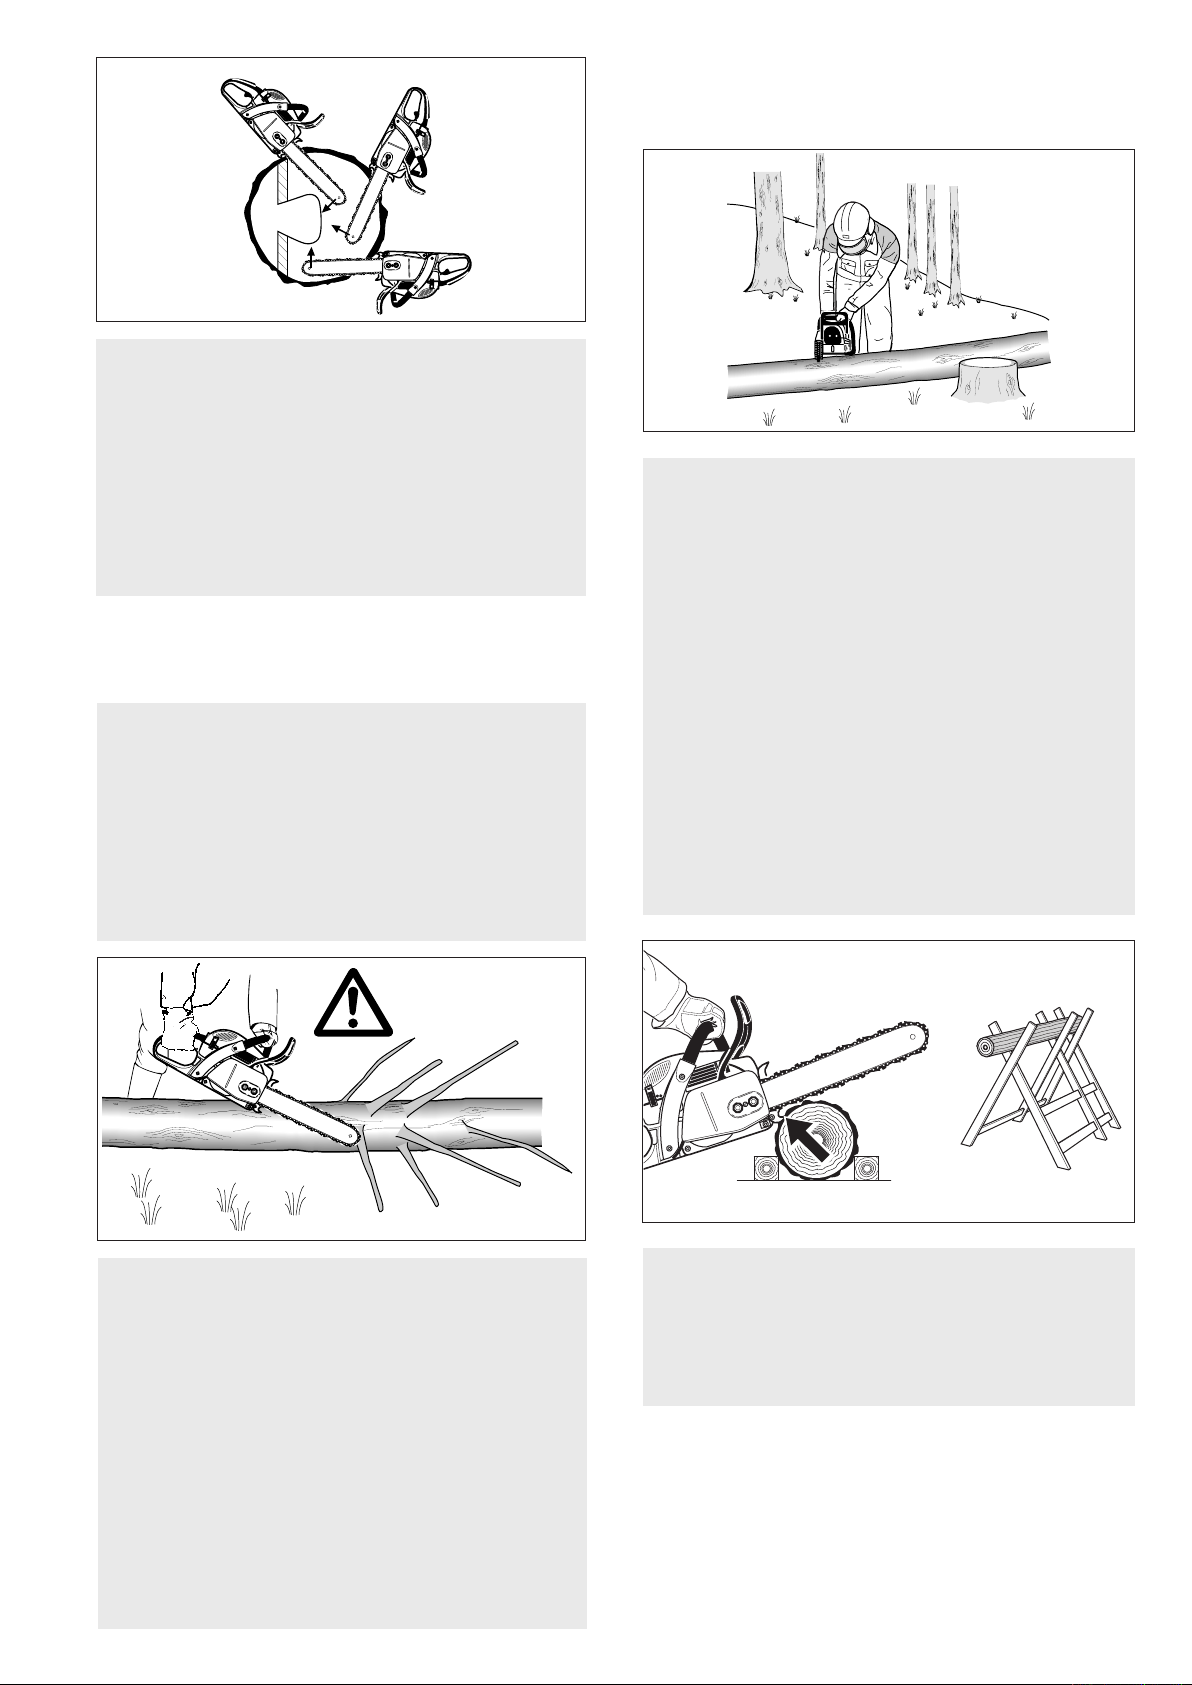
1
2
3
ATTENTION!
Débitage
Le débitage consiste à découper un rondin en
plusieurs morceaux.
29
A ce point, il y a un très grand danger de choc de
recul. Il faut être extrêmement prudent pour garder
le contrôle de la tronçonneuse. Pour faire la coupe
d’abattage, suivez la méthode de sectionnement
décrite précédemment (g. 29). Si vous n’avez pas
l’expérience du travail avec une tronçonneuse,
n’essayez pas de faire de coupe en plongée.
Demandez l’assistance d’un professionnel.
Ebranchage
L’ébranchage consiste à couper les branches d’un
arbre abattu.
ATTENTION!
Le risque de choc de recul est très grand pendant
l’ébranchage. Ne travaillez pas avec la pointe du
guide. Soyez extrêmement prudent et évitez tout
contact entre la pointe du guide et le tronc ou
les branches. Ne montez pas sur le tronc que vous
êtes en train d’ébrancher car il pourrait rouler ou
vous pourriez glisser.
31
ATTENTION!
1. Ne montez pas sur le rondin que vous êtes en
train de débiter. Assurez-vous que le rondin ne
peut pas descendre la pente. En cas de débitage en terrain incliné, l’utilisateur doit se trouver
au-dessus du rondin (cf. g. 31). Faites attention
aux rondins qui roulent.
ATTENTION!
2. Ne coupez qu’un rondin à la fois.
ATTENTION!
3. Il faut être très prudent pour couper le bois en
éclats car des échardes acérées peuvent être
entraînées pas la tronçonneuse et projetées
vers l’utilisateur.
30
Commencez l’ébranchage en laissant les branches
inférieures pour maintenir le tronc à une certaine
distance du sol (g. 30). Ne coupez pas les branches
pendantes par dessous. La tronçonneuse pourrait
être coincée ou la branche pourrait tomber, vous
faisant perdre le contrôle de la tronçonneuse. Si
le guide est coincé, arrêtez le moteur et retirez la
tronçonneuse en soulevant la branche.
ATTENTION!
Soyez extrêmement prudent lorsque vous
coupez des branches qui forcent. Les branches
peuvent sauter vers l’utilisateur et entraîner une
perte de contrôle de la tronçonneuse ou blesser
l’utilisateur.
32
ATTENTION!
4. Pour couper les petits rondins, utilisez un
chevalet (fig. 32). Empêchez toute autre
personne de tenir le rondin. Ne maintenez
jamais le rondin avec la jambe ou le pied.
53
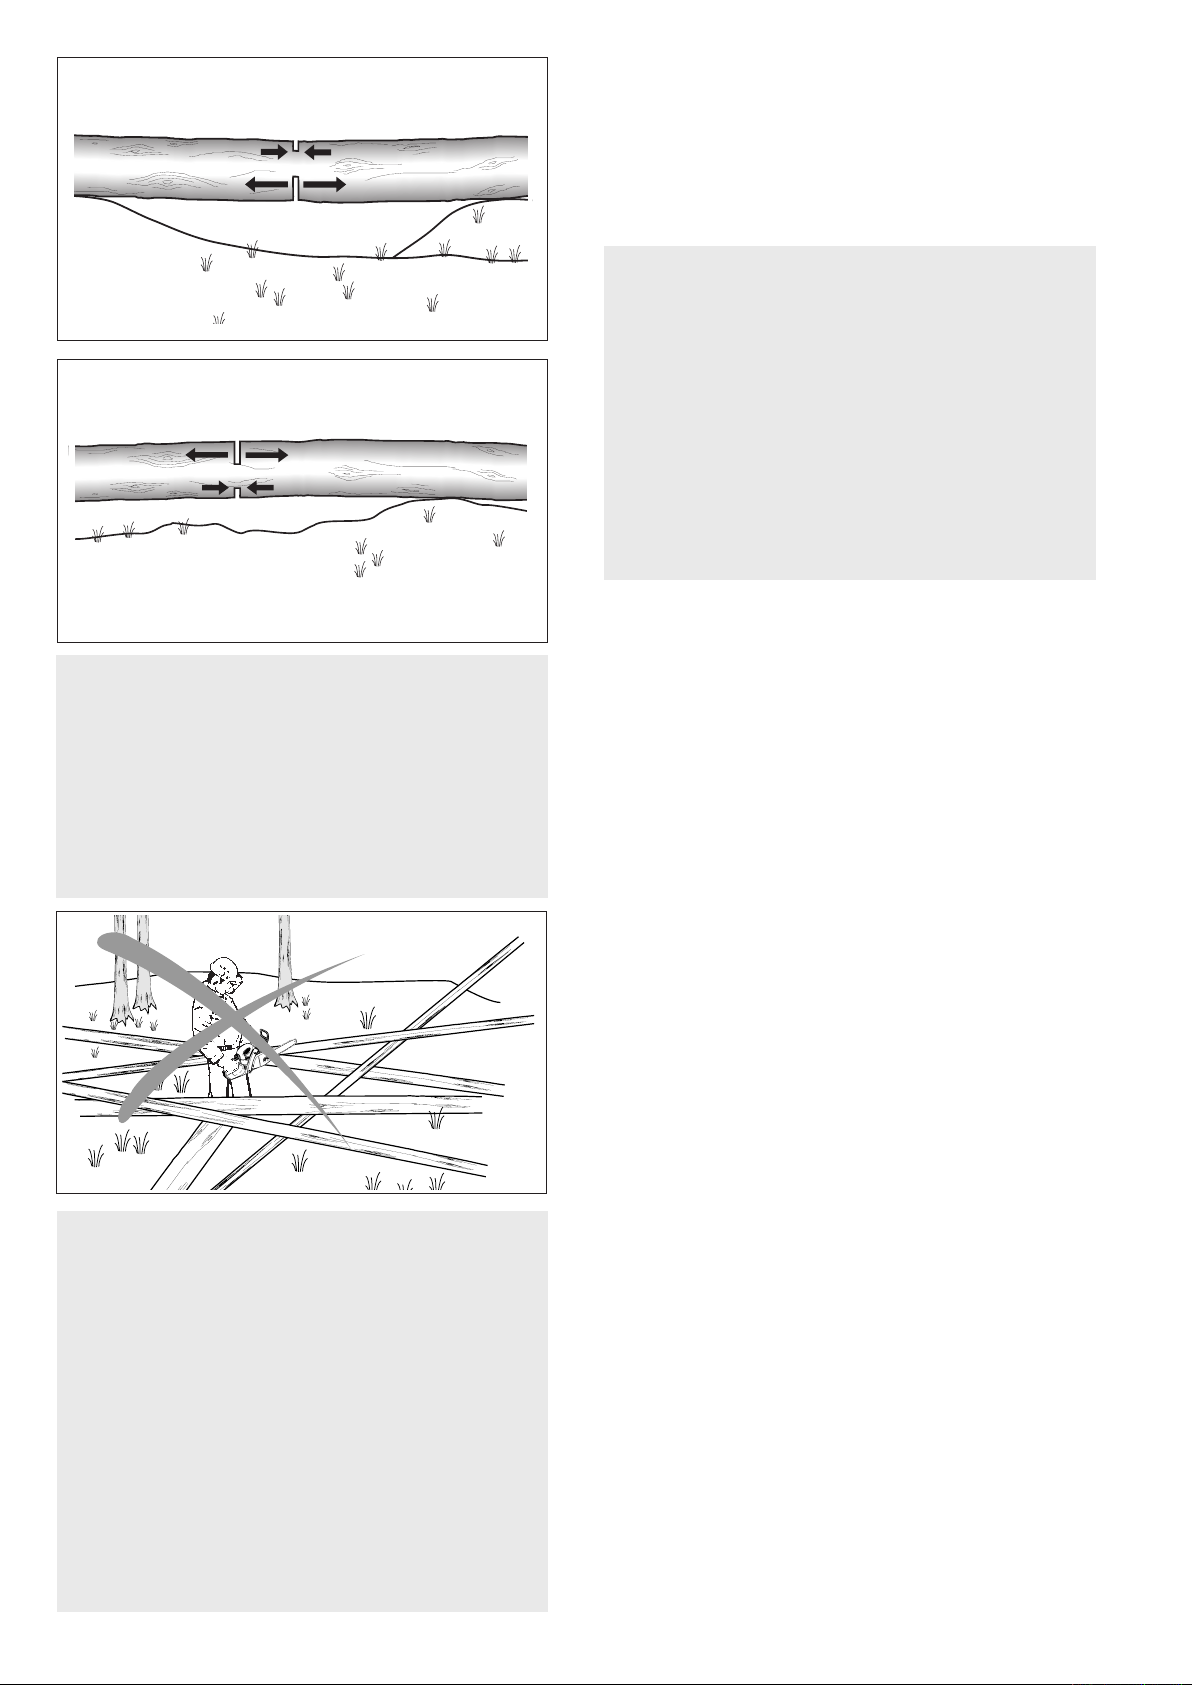
54
1. coupe de décharge
2. coupe transversale
côté tension
côté pression
1. coupe de décharge
2. coupe transversale
côté tension
côté pression
Entretien et réparation
N’utilisez jamais une tronçonneuse endommagée,
incorrectement réglée ou incomplètement ou
incorrectement assemblée. Respectez les instructions
d’entretien et de réparation du chapitre correspondant
du présent mode d’emploi.
ATTENTION!
33
34
ATTENTION!
5. Lorsque vous coupez des rondins qui forcent,
il faut être extrêmement prudent pour éviter
que la tronçonneuse soit coincée. La première
coupe est pratiquée sur le côté comprimé pour
soulager la tension du rondin (cf. g 33, 34). On
procède ensuite à la coupe de débitage de la
façon indiquée. Si la tronçonneuse est coincée,
arrêtez le moteur et retirez-la du rondin.
Avant de commencer toute opération d’entretien,
de réparation ou de nettoyage de la tronçonneuse,
il faut toujours arrêter le moteur et s’assurer que la
chaîne est arrêtée. Laisser refroidir la tronçonneuse
avant les travaux d‘entretien (risque de brûlure)!
Les temps de refroidissement nécessaires sont
plus longs pour les tronçonneuses équipées d’un
catalyseur! Ne procédez pas à des opérations
d’entretien ou de réparation qui ne gurent pas
dans ce mode d’emploi. Conez-les uniquement
à votre agence technique MAKITA.
Entretien et stockage de la tronçonneuse
Maintenez la chaîne, le guide et le pignon propres et
lubriés ; changez les chaînes et les pignons usés.
La chaîne doit toujours être correctement affûtée. On
reconnaît que la chaîne est émoussée au fait que le
bois tendre est difcile à couper et que des traces de
brûlure apparaissent sur le bois.
ATTENTION!
6. Le travail dans une zone où les rondins, les
branches et les racines sont enchevêtrés (p.ex.
dans une zone où les arbres ont été abattus
par le vent, g. 35) ne doit être fait que par
des professionnels ayant reçu une formation
appropriée. Le travail dans une zone où les
arbres ont été abattus par le vent est très
dangereux.
ATTENTION!
7. Amenez les rondins dans une zone dégagée
avant de commencer le débitage. Tirez d’abord
les rondins exposés et dégagés.
Assurez-vous que la chaîne est toujours correctement
tendue. Après chaque utilisation, resserrez tous les
écrous, boulons et vis à l’exception des vis de réglage
du carburateur.
Assurez-vous que la bougie et le câble d’allumage
sont toujours propres et bien xés.
Conservez les tronçonneuses en hauteur ou sous
clé hors de portée des enfants.
35

Désignation des pièces
23
24
2
15
16
17 18
3
4
1
6
7
5
8
9
19202122
101112
1314
7*
DCS5121
18 inch (45 cm) 0703 012345
chain bar
3/8” 513.496.664 443.045.661
.325” 513.486.672 445.045.641
XXX.XXX. XXX Typ 182
22045 Hamburg, Germany
(*) Seulement inclu dans la livraison
DCS5121.
Plaque signatique
à indiquer lors de commande
de pièces de rechange!
1 Poignée
2 Couvercle du ltre
3 Clip de fermeture du capot de ltre
4 Poignée-étrier
5 Protége-main (déclencheur pour frein de chaîne)
6 Silencieux avec pare-étincelles
7 Rive dentée
fermement la tronçonneuse contre le bois)
8 Vis de serrage de la chaîne
9 Ecrous de xation
10 Arrête chaîne
11 Protection roue à chaîne
12
Vis de réglage p. pompe à huile (face inférieure)
13 Vis de réglage pour le carburatuer
No. de série
Année de construction
(Butée à griffe pour maintenir
14 Plaque signalétique
15
Poingnée de lancement
16
Bouton multi-positions
(Starter / Démarrage / Stop)
17 Levier de gaz
18
Touche de verrouillage de sécurité
19 Protège-main arrière
20 Bouchon de fermeture du réservoir carburant
21 Carter ventilateur avec dispositif de lancement
22 Bouchon de fermeture du réservoir huile
23 Guide de la chaîne de la scie
24 Chaîne de sciage
55

56
Caractéristiques techniques
Cylindrée cu. in (cm3)
DCS460 DCS5121
2.8 (45.6) 3.1 (50.0)
Alésage inch (mm) 1.69 (43) 1.77 (45)
Course inch (mm) 1.24 (31.4) 1.24 (31.44)
Puissance max. en fonction du régim hp / rpm 2.9 / 10,000 3.3 / 10,000
Couple max. en fonction du régimel Nm / rpm 2.7 / 7,000 2.9 / 7,000
Régime de limitation avec guide et chaîne rpm 13,800 13,800
Vitesse de rotation à vide rpm 2,500 2,500
Vitesse de rotation d’embrayage rpm 3,900 3,900
Niveau sonore à pleine charge mesuré aux
oreilles de l'opérateur selon ANSI B 175.1 db(A) 103.2 103.9
Niveau sonore pour une personne voisine
(à une distance de 50ft/15 m) selon ANSI B 175.1 db(A) 76.2 76.2
Carburateur Type membrane carburateur avec capuchons limiteurs
Dispositif d’allumage Type Equipo de encendido de electronique
Bougie d’allumage Type NGK BPMR 7A
ou bougie d’allumage Type BOSCH WSR-6F
Ecartement électrodes inch (mm) .020 (0.5)
Consommation carburant/puissance max.
selon ISO 7293 kg/h 1.1 1.2
Consommation spéc./puissance max. selon ISO 7293 g/kWh 500 480
Capacité réservoir carburant oz 15.9
Capacité réservoir huile oz 9.1
Dosage mélange (carburant/huile 2 temps)
- avec utilisation huile
- avec utilisation autre huile
synthétique
synthétique
MAKITA 50:1
50:1 (échelle de qualité JASO FC ou ISO-L-EGD)
Frein de chaîne manuel / choc de recul
Pas roue à chaîne inch .325 or 3/8
Nombre de dents Z 7
Type de chaîne
(voir extrait de la liste des pièces de rechange)
Pas/épaisseur maillon entraîneur inch .325 / 0.050 or 3/8 / 0.050
Guide longueur de coupe inch 16 / 18
Type de guide de chaîne (voir extrait de la liste des pièces de rechange)
Poids (réservoirs vides, sans barre, chaîne et accessoires) lbs 12.1 12.1
ATTENTION:
Cette tronçonneuse à chaîne peut entraîner un rebond risquant de blesser l’utilisateur. N’utilisez cette tronçonneuse
à chaîne que si vous avez des besoins importants de coupe et sufsamment acquis d’expérience, notamment en ce
qui concerne les rebonds éventuels. Les tronçonneuses à chaîne présentant des risques de rebond assez réduits sont
également disponibles.
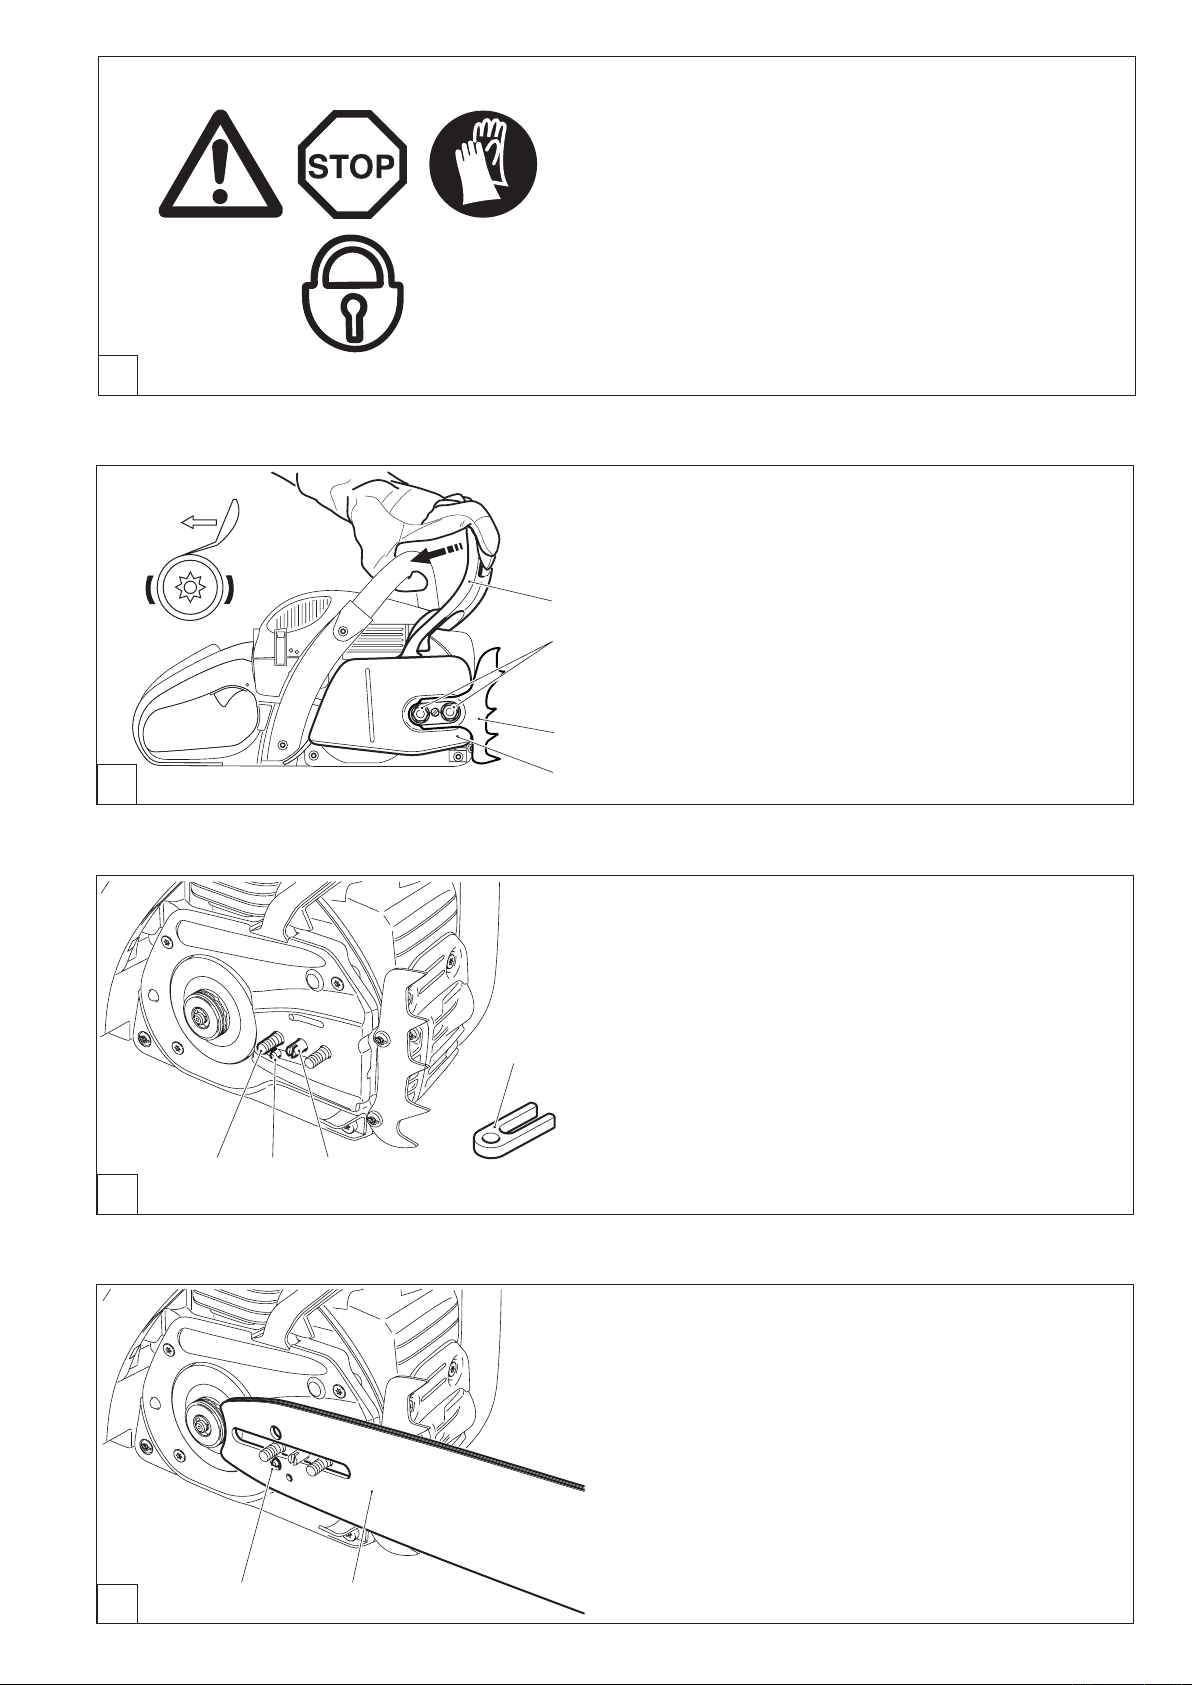
5 7
A
a
6 5 4
1
2
3
*
B
MISE EN ROUTE
ATTENTION:
Pour tous travaux effectués sur le guide de la chaîne de
sciage, le moteur doit être impérativement arrêté et la
che de bougie doit être enlevée (voir paragraphe pour le
remplacement de la bougie) et le port de gants de protection
est obligatoire!
ATTENTION:
La tronçonneuse ne peut être démarrée qu’après le montage
complet et le contrôle effectué!
Montage du guide et de la chaîne de sciage
Utiliser la clé combinée livrée avec la machine pour les travaux
suivants.
Placer la tronçonneuse sur un support stable et exécuter les
opérations suivantes pour le montage de la chaîne de sciage
et du guide de la chaîne.
Desserrer le frein de chaîne. Pour cela, tirer le protège-main
(1) dans le sens de la èche.
Dévisser les écrous de xation (2).
Retirer la rive dentée (*). Remarque: Seulement inclu dans
la livraison DCS5121
Retirer la protection de la roue à chaîne (3).
.
C
Retirer et éliminer la protection de transport en plastique (a).
Tourner la vis de réglage pour le tendeur de chaîne (4) vers la
gauche (dans le sens inverse des aiguilles) jusqu’à ce que le
tenon (5) du tendeur de chaîne soit sous le boulon (6).
Poser le guide (7). S’assurer que le tenon (5) du tendeur de
chaîne s’engrène dans le trou de la chaîne de sciage.
D
57

58
2
*
3
9 12
2
4
8
1011
9
Poser la chaîne de sciage (9) sur le plateau (8).
ATTENTION:
Ne pas placer la chaîne de sciage entre la roue à chaîne et
le disque.
Introduire la chaîne de sciage vers le haut environ jusqu’à moitié
dans la rainure de guidage (10) du guide.
Mettre la chaîne de sciage vers le bas au-dessus de l’intercepteur de chaîne (11).
ATTENTION:
Les arêtes coupantes de la chaîne de sciage doivent être dirigées
dans le sens de la èche sur la partie supérieure du guide!
Guider la chaîne de sciage (9) autour de l’étoile de renvoi (12)
du guide de la chaîne, en tirant légèrement la chaîne de sciage
dans le sens de la èche.
E
Poser la protection de la roue à chaîne (3).
Poser la retirer le rive dentée (*).
Serrer d’abord à la main les écrous de xation (2).
Tendre la chaîne de sciage
Tourner la vis de réglage (4) vers la droite (dans le sens des
aiguilles) jusqu’à ce que la chaîne de sciage s’engrène dans la
rainure de guidage de la partie inférieure du guide (voir cercle).
Lever légèrement la pointe du guide et tourner la vis de réglage
(4) vers la droite (dans le sens des aiguilles) jusqu’à ce que
la chaîne de sciage soit de nouveau sur la partie inférieure du
guide (voir cercle).
Continuer à relever la pointe du guide et serrer les écrous de
xation (2) à bloc avec la clé combinée.
F
G
H

2
4
12
1
Contrôle de la tension de la chaîne
Une tension correcte de la chaîne est réalisée lorsque la
chaîne s’applique sur le rail inférieur et qu’elle peut encore être
légèrement écartée du guide à la main.
Ce faisant, le frein de la chaîne doit être libéré.
Contrôler fréquemment la tension de la chaîne, les chaînes
neuves ayant tendance à s’allonger!
Par conséquent, vérier souvent la tension de la chaîne le
moteur étant arrêté.
REMARQUE:
En pratique, on devrait utiliser alternativement 2 à 3 chaînes
de sciage.
Pour atteindre une usure régulière des rails, on devra retourner
le guide de la chaîne lors du changement de la chaîne.
Retendre la chaîne de sciage
Desserrer les écrous de xation (2) d’un tour environ au
moyen de la clé universelle. Lever légèrement la pointe de
la chaîne de sciage et tourner la vis de réglage (4) vers la
droite (dans le sens des aiguilles) jusqu’à ce que la chaîne
de sciage repose de nouveau sur la partie inférieure du guide
(voir cercle).
Continuer de soulever la pointe de la chaîne de sciage et bien
resserrer les écrous de xation (2) avec la clé universelle.
A
B
Frein de chaîne
Les modèles DCS460, DCS5121 sont équipés en série d’un frein
de chaîne à déclenchement d’accélération. Si un contrecoup se
produit (kickback), dû à un heurt de la pointe du guide contre
le bois (voir chapitre «CONSIGNES DE SECURITE» à la page
48), le frein de chaîne se déclenche automatiquement en cas
de contrecoup sufsamment fort par inertie de masse.
La chaîne de sciage est interrompue pendant une fraction de
seconde.
Le frein de chaîne n’est prévue que pour des cas d’urgence
et pour le blocage de la chaîne avant le démarrage.
ATTENTION: Ne jamais utiliser la tronçonneuse quand le
frein de chaîne est déclenché (sauf pendant le contrôle, voir
chaîne « Contrôle du frein de chaîne »), sinon la tronçonneuse
risque de s’abîmer en très peu de temps!
Desserrer impérativement
le frein de chaîne avant de
commencer à travailler!
C
Enclencher le frein de chaîne (bloquer)
En cas de contrecoup sufsamment fort, le frein de chaîne se
déclenche automatiquement dû à l’accélération rapide de la
chaîne de sciage et à l’inertie de masse du protège-main (1).
Lors d’un enclenchement manuel le protège-main (1 ) est
poussé par la main gauche en direction de la pointe du guide
de la chaîne (èche 1).
Libérer le frein à main
Tirer le protège-main (1) en direction de la poignée en étrier
(èche 2) jusqu’à son enclenchement. Le frein à frein est
libéré.
59

60
OIL
OIL
50:1
Carburants
ATTENTION:
L’appareil est utilisé avec des produits de pétrole (essence
et huile)!
Votre attention est requise lorsque vous manipulez
l’essence.
Il est interdit de fumer et tout feu immédiat n’est pas autorisé
(risque d’explosion).
Carburant
50:1
huile MAKITA autre huile
50:1
Mélange carburant
Le moteur de cet appareil est un moteur à deux temps de haute
capacité refroidi à l'air. Ce moteur est alimenté par un mélange
de carburant et d’huile moteur deux temps.
La conception du moteur a été réalisé pour fonctionner à l’essence
normal sans plomb avec un degré d’octane mini-mum de 87
(R+M)/2. Si un tel type de carburant n’était pas disponible, on
peut aussi utiliser un carburant d’un degré d’octane plus élevé.
Le moteur n’en subit aucun dommage.
Pour un fonctionnement optimal, ainsi que pour la protection de la santé et de l’environnement, utilisez toujours un
carburant sans plomb.
Le graissage du moteur est réalisé par une huile moteur à deux
temps synthétique pour moteurs à deux temps refroidis à l’air
(échelle de qualité JASO FC o ISO-L-EGD) qui est additionnée au carburant. En usine le moteur a été réglé pour l’huile
synthétique moteur deux temps de MAKITA avec un rapport
de mélange de 50:1. Ceci garantit une longue durée de vie et
un fonctionnement able avec un très faible dégagement de
fumées du moteur.
En cas de non-disponibilité d’huile synthétique deux temps de
MAKITA, il est impératif d’observer un rapport de mélange de
50:1 en cas d’utilisation d’autres huiles synthétique deux temps.
Sinon, un fonctionnement impeccable ne peut être garanti.
L’huile synthétique deux temps de MAKITA (50:1) peut être
livrée selon les besoins dans des bidons aux contenances
suivantes:
2.6 z. N° de commande T-00745
6.4 z. N° de commande T-00739
Réalisation du rapport correct du mélange
50:1 En utilisant l’huile synthétique deux temps de MAKITA,
ceci signie mélanger 50 parties d’essence avec une
partie d’huile.
50:1 En utilisant une autre huile synthétique moteur deux
temps (échelle de qualité JASO FC or ISO-L-EGD), ceci
signie mélanger 50 parties d’essence avec une partie
d’huile
REMARQUE: Pour fabriquer le mélange essence-huile, il faut
toujours mélanger préalablement le volume d’huile prévu dans la
moitié du volume d’essence, puis y ajouter le volume d’essence
restant. Avant de remplir la tronçonneuse avec le mélange, bien
secouer le mélange terminé.
+
1.0 Us-gal. (3.7 l)
2.5 Us-gal. (9.4 l)
5.0 Us-gal. (18.9 l)
Il n’est pas raisonnable que par excès de conscience de sécurité d’augmenter la part d’huile au
delà du rapport indiqué du mélange, le résultat
serait plus de résidus de combustion ce qui
polluerait l’environnement et boucherait la sortie
d’échappement dans le cylindre, ainsi que le silencieux. En outre, la consommation de carburant
augmenterait et la puissance diminuerait.
2.6 oz. (75 cm3)
6.4 oz. (189 cm3)
12.8 oz. (378 cm3)
Stockage de carburants
Les carburants ne sont stockables que de manière
restreinte. Le carburant et les mélanges de carburant
vieillissent par évaporant sous l’effet de températures
élevées. Le carburant et les mélanges de carburant
stockés pendant une trop longue durée peuvent entraîner des problèmes de démarrage et endommager
le moteur. N’acheter que la quantité de carburant à
consommer en l’espace de quelques mois. Consommer le carburant mélangé en 6-8 semaines en cas de
températures élevées. Ne transporter et ne stocker
le carburant et l’huile de chaîne que dans des nourrices agrées et portant les indications nécessaires.
Stocker le carburant uniquement au sec, au froid
et en toute sécurité!
EVITEZ LE CONTACT AVEC LA PEAU ET LES YEUX
Les produits pétroliers, ainsi que les huiles, dégraissent
la peau. Lors d’un contact répété et prolongé la peau
se dessèche. Les suites peuvent être différentes maladies de peau. D’autre part, on connait les réactions
allergiques.
Le contact avec les yeux de l’huile conduit à des irritations. en cas de contact, rincer immédiatement l’oeil
avec de l’eau claire. Si l’irritation continue, consulter
immédiatement un médecin.
D
Huile de chaîne
de sciage
Pour le graissage de la chaîne de sciage et du rail, il faut utiliser une huile de chaîne avec un additif d’adhérence. L’additif
d’adhérence à l’huile de chaîne empêche une rapide jetée de
l’huile du dispositif de sciage.
Pour protéger l’environnement, il est conseillé d’utiliser une huile
de chaîne biodégradable. Souvent, les instances régionales
prescrivent l’utilisation d’huile biodégradables.
L’huile de chaîne de sciage BIOTOP proposée par MAKITA est
fabriquée à base d’huiles végétales sélectionnées et elle est
100% biodégradables. BIOTOP porte comme référence l’ange
bleu d’environnement (RAL UZ 48).
L’huile de chaîne biodégradable ne se conserve que
pendant un temps limité et devra être utilisée dans un
délai de 2 ans après la date de fabrication imprimée.
E

Remarque importante pour les huiles de chaîne
STOP
de sciage bio
Avant une longue mise hors service, le réservoir à huile
doit être vidé et rempli ensuite d’un peu d’huile moteur
(SAE 30). Ensuite, faire marcher la tronçonneuse pendant
quelques temps de manière à rincer les restes d’huile bio
du réservoir, du systéme de conduite d’huile et du dispositif
de sciage. Cette mesure est indispensable car différentes
huile bio ont tendance à coller ce qui peut détériorer la
Huile
Usagée
A
pompe à huile ou des éléments d’alimentation d’huile.
Lors de la remise en marche, verser à nouveau l’huile de
chaîne BIOTOP. Les dommages résultant de l’utilisation
d’huiles usagées ou d’huiles de chaîne non appropriées
ne sont pas couverts par la garantie.
Votre vendeur spécialisé vous informe sur la manipulation
et l’utilisation d’huile de chaîne de sciage.
N’UTILISEZ JAMAIS DE HUILES USAGEES
Une huile usagée est extrêmement dangereu se pour
l’environnement!
Les huiles usagées contiennent une grande part de produits
connus pour être cancérigènes.
Les souillures dans les huiles usagées amènent une grande
usure de la pompe à huile et du dispositif de sciage.
Les dommages résultant de l’utilisation d’huiles usagées ou
d’huiles de chaîne non appropriées ne sont pas couverts par
la garantie.
Votre vendeur spécialisé vous informe sur la manipulation et
l’utilisation d’huile de chaîne de sciage.
EVITEZ LE CONTACT AVEC LA PEAU ET LES YEUX
Les produits pétroliers, ainsi que les huiles, dégraissent la peau.
Lors d’un contact répété et prolongé la peau se dessèche. Les
suites peuvent être différentes maladies de peau. D’autre part,
on connait les réactions allergiques.
Le contact avec les yeux de l’huile conduit à des irritations. en cas
de contact, rincer immédiatement l’oeil avec de l’eau claire.
Si l’irritation continue, consulter immédiatement un médecin.
Huile de
chaîne
B
Mélange carburant
Remplissage des réservoirs
RESPECTER IMPERATIVEMENT LES REGLES DE
SECURITE!
La manipulation de carburants exige une manipulation avec
précaution et prudence.
Ne le faire que si le moteur est arrêté!
Bien nettoyer le pourtour des emplacements de remplissage
pour éviter la pénétration de salissures dans le réservoir de
mélange de carburant ou d’huile.
Desserrer le bouchon du réservoir (le dévisser si nécessaire avec
la clé universelle, cf. Figure) et verser le mélange de carburant ou
l’huile de chaîne de sciage jusqu’au bord inférieur de la tubulure
de remplissage. Verser avec précaution pour ne pas renverser
de mélange de carburant ou d’huile de chaîne de sciage.
Visser le bouchon du réservoir à la n jusqu’à la butée.
Après avoir rempli le réservoir, nettoyer le bouchon leté,
le réservoir et vérier s’il fuit.
Graissage de la chaîne de sciage
Pour graisser sufsamment la chaîne de sciage, l’huile de
chaîne de sciage doit être toujours sufsante dans le réservoir.
Le volume du réservoir suft pour environ une demie heure de
service permanent. Vérier pendant le travail s’il y a sufsam-
ment d’huile de chaîne dans le réservoir, le remplir si nécessaire.
Seulement à l’arrêt du moteur !
Bien serrer le bouchon du réservoir à la main jusqu’à la butée.
61

62
1
2 3
STOP
Vérier le graissage de la chaîne
Ne jamais scier sans graissage sufsant. Vous risquez sinon
de réduire la durée de vie du dispositif de sciage!
Vérier avant de démarrer le travail la quantité d’huile dans le
réservoir, ainsi que le débit d’huile.
Le débit d’huile peut être vérié de la manière suivante:
Démarrer la tronçonneuse (voir chapître «Démarrer le moteur»).
Maintenir la chaîne de sciage en marche env. 6" (15 cm) par
dessus une souche d’arbre ou le sol. Laisser tourner le moteur
à mi-vitesse (choisir une base adéquate).
Lorsque le graissage est sufsant, on doit observer une légère
trace d’huile par l’huile éjectée. Faire attention à la direction du
vent et ne pas s’exposer inutilement à la vapeur d’huile.
Remarque:
Après la mise hors service de la tronçonneuse, il est normal
que de petites quantités d’huile de chaîne restant encore dans
le système de conduite d’huile et sur le guide s’écoulent encore
un certain temps. Il ne s’agit pas d’un défaut dans ce cas.
Utiliser un support adéquat!
C
Réglage du graissage de la chaîne
A effectuer que si le moteur est arrêté!
Le débit de l’huile est réglable avec la vis de réglage (1). La vis
de réglage se trouve sur le dessous du carter.
La pompe à huile est réglée en usine pour un débit moyen.
Pour changer le débit, tourner au moyen d’un petit tournevis:
• vers la droite pour augmenter le débit
• vers la gauche pour réduire le débit.
En fonction de la longueur du guide, choisir l’une des trois
possibilités.
Vérier pendant le travail qu’il y a sufsamment d’huile à chaîne
dans le réservoir. Si nécessaire, faire l’appoint.
Pour que la pompe à huile fonctionne toujours parfaitement,
la rainure de guidage d’huile sur le carter du vilebrequin
(2), ainsi que les orices d’entrée d’huile dans le guide
de la chaîne (3) doivent régulièrement être nettoyés.
Plage de réglage env. 90°
D
Remarque:
Après la mise hors service de la tronçonneuse, il est normal
que de petites quantités d’huile de chaîne restant encore dans
le système de conduite d’huile et sur le guide s’écoulent encore
un certain temps. Il ne s’agit pas d’un défaut dans ce cas.
Utiliser un support adéquat!
E

A
STOP
1
4 3
2
Démarrer le moteur
La tronçonneuse ne peut être démarrée qu’après le montage
complet et le contrôle effectué!
Démarrer le moteur au moins 3 m de l’endroit du réservoir.
Prendre une position stable et sure, puis placer la tronçonneuse
sur le sol pour que le dispositif de sciage soit dégagé.
Libérer le frein de chaîne (bloquer).
Saisir fermement la poignée-étrier avec une main et plaquer la
tronçonneuse sur le sol.
Placer la pointe du pied droit dans le protège-main arrière.
Démarrage à froid:
Appuyer sur le bouton multi-positions (1) vers le haut (position
Starter). Ceci actionne simultanément la fonction de blocage
mi-gaz.
Tirer le cordon de lancement (2) lentement jusqu’à sentir une
résistance (le piston se trouve au point mort haut).
Puis, tirer fortement et rapidement jusqu’au déclenchement
du premier allumage audible.
Attention: Ne pas retirer le cordon de lancement de plus de
50 cm/20" et le ramener lentement à la main.
Appuyer sur le bouton multi-positions (1) au centre « ON ». Tirer
de nouveau d’un coup sec sur le cordon de lancement. Dès que
le moteur tourne, serrer la poignée (la touche de blocage de
sécurité (3) est pressée par la paume de la main) et presser
légèrement l’accélérateur (4).
L’arrêt d’admission réduite s’annule et le moteur tourne au
ralenti.
Démarrage à froid (starter)
Démarrage à chaud (ON)
Arrêter le moteur
Bouton multi-positions
en position Sécurité
(circuit d’allumage interrompu,
nécessaire en cas de travaux
d’entretien et de montage)
Attention: le moteur doit être mis au ralenti dès le démarrage
pour éviter d’endommager l’embrayage.
Libérer maintenant le frein de chaîne.
Démarrage à chaud:
Comme décrit pour le démarrage à froid, appuyer sur le bouton
multi-positions (1) vers le haut (position starter) et de nouveau
au centre « ON » pour activer uniquement la fonction de blocage
mi-gaz. Si le moteur ne tourne pas après avoir tiré 2 ou 3 fois,
répéter l’opération de démarrage intégrale comme décrit dans
la section Démarrage à froid.
Arrêter le moteur
Appuyer sur le bouton multi-touches (1) vers le bas .
NOTE: Le bouton multi-positions revient en position « ON »
après l’avoir enfoncé. Le moteur est arrêté, mais peut être
aussi lancé sans devoir appuyer de nouveau sur le bouton
multi-positions.
ATTENTION: Pour interrompre le courant d’allumage, appuyer
entièrement sur le bouton multi-positions pour le mettre en
position ( ).
B
63

64
6
Vérier le frein de chaîne
7
8
Le frein de chaîne doit être vérié avant de commencer
tous travaux.
Démarrer le moteur comme décrit (prendre une position stable
et poser la tronçonneuse sur le sol de façon à ce que le dispositif
de sciage soit libre).
Bien tanier la poignée-étrier d’une main, l’autre main étant sur
la manette.
Laisser tourner le moteur à mi-vitesse et appuyer sur le protègemains (6) avec le dos de la main dans la sens de la èche jusqu’à
ce que le frein de chaîne se bloque. La chaîne de sciage doit
immédiatement s’immobiliser.
Faire tourner immédiatement le moteur au ralenti et redésserrer
le frein de chaîne.
Attention: Si la chaîne de sciage ne s’immobilise pas immédiatement pendant ce contrôle, arrêter aussitôt le moteur.
Il est interdit dans ce cas d’utiliser cette tronçonneuse.
Consulter un atelier spécialisé MAKITA.
Fonctionnement en hiver
Pour éviter que le carburant gèle lors de températures basses
et en cas d’humidité de l’air élevée et pour atteindre plus rapidement la température de service lors de températures inférieures
à + 5°C, de l’air chaud peut être aspiré par le cylindre.
Enlever le couvercle (cf. Nettoyage du ltre à air).
Sortir l’insert (7) et le placer comme montré sur la Figure.
Pour des températures supérieures à + 5°C, de l’air froid doit
être impérativement aspiré. En ne respectant pas cette consigne, le cylindre et le piston peuvent être endommagés!
Pour les températures supérieures à + 5°C, tourner l’insert de
180° de façon à ce que l’orice d’aspiration (8) soit fermé après
avoir placé le couvercle.
Remonter le couvercle.
C
Symbole positionnement en bas – service normal
Symbole positionnement en haut – service hivernal
Note: Pour travailler dans la neige, l’insert (7) peut être remplacé par un insert spécial avec crible en nylon empêchant la
neige poudreuse de pénétrer. Celui-ci est disponible en tant
qu’accessoire sous le numéro de commande 957 173 250.
D
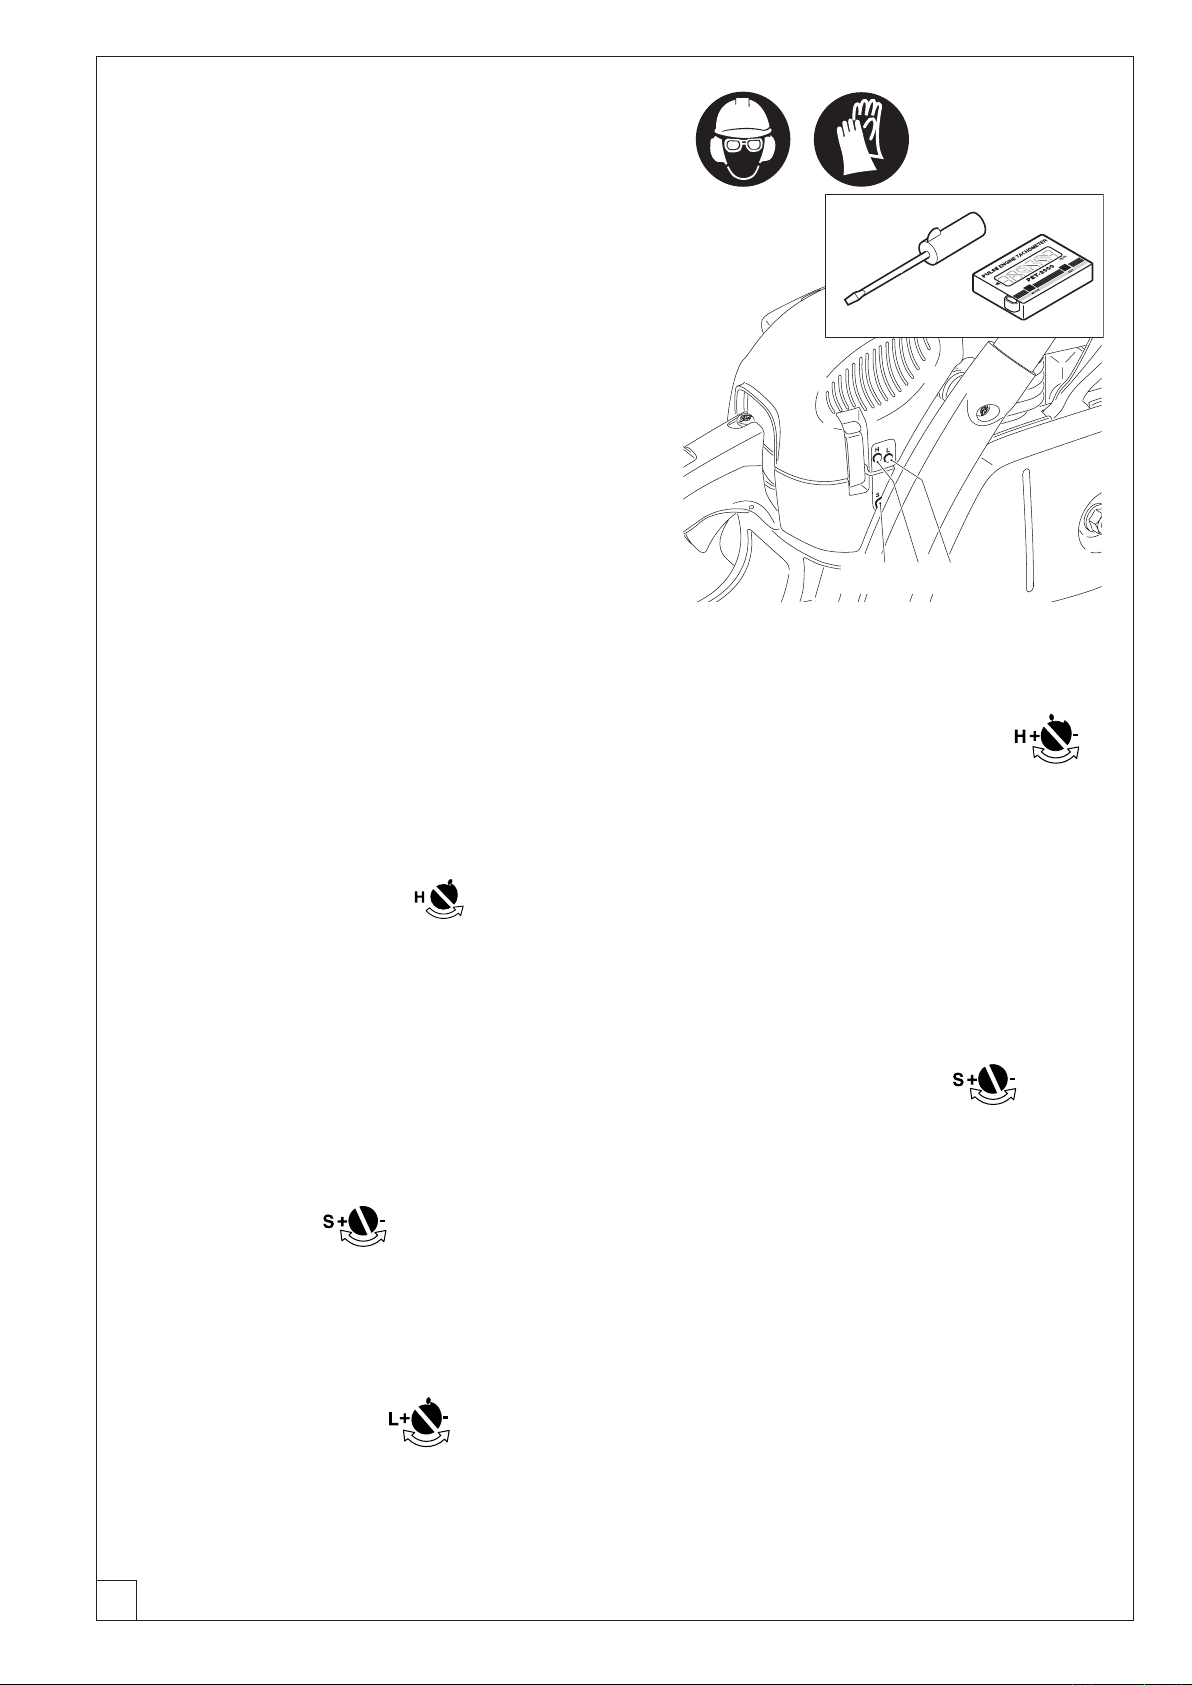
HS L
Réglage du carburateur
ATTENTION: Le réglage du carburateur ne doit être ef-
fectué qu’après l’assemblage complet et la vérication
de l’appareil! Il n’est pas permis d’effectuer des réglages
sans tachymètre!
Le réglage du carburateur sert à garantir un fonctionnement
optimal, une consommation économique et une sécurité
d’utilisation sans compromis. Il doit être réalisé quand le
moteur est chaud, le ltre à air est propre et quand l’outil
de coupe a été correctement monté. Faire effectuer impérativement le réglage du carburateur par un atelier spécialisé
MAKITA, pour éviter toute erreur de réglage susceptible
d’endommager le moteur.
En raison des nouvelles directives en matière de gaz
d’échappement, les vis de réglage (H) et (L) du carburateur sont
dotées de limitations. Ces possibilités de réglage limitées
(environ 180 degrés) permettent d’empêcher un réglage
de carburateur trop gras. Cela permet de respecter les
règlements en matière de gaz d’échappement et garantit une
puissance optimale du moteur et une consommation d’essence
économique.
Un tachymètre (n° de commande 950 233 210) est indispen-
sable pour effectuer un réglage optimal étant donné que
le dépassement du régime maximal autorisé peut causer
une surchauffe et un manque de lubriant. Risque de détériorations du moteur!
Ajustage par défaut des vis de réglage (H) et (L) : Dévissé
presque jusqu’au bout (dans le sens inverse des aiguilles).
Régler le carburateur au moyen d’un tournevis (largeur de lame
4 mm, réf. 944 340 001)
Les opérations suivantes sont nécessaires pour un réglage
correct:
Contrôle de la vis de réglage (H)
Avant de démarrer, s’assurer que la vis de réglage (H) soit
dévissée dans le sens inverse des aiguilles jusqu’à sentir la
résistance. Les limitations ne protègent pas le moteur de
dégraisser!
1. Démarrer le moteur et le faire tourner à chaud
(3 à 5 minutes)
Régler le ralenti
2.
Contrôler l’accélération
3.
Régler le régime maximal autorisé
4.
Contrôler le régime de ralenti
5.
2. Réglage du ralenti
Régler le ralenti conformément aux caractéristiques tech
niques.
Tourner la vis de réglage (
augmenter le ralenti. Tourner la vis de réglage (S) dans le
sens inverse des aiguilles pour réduire le ralenti. L’outil de
coupe ne doit pas être entraîné!
S) dans le sens des aiguilles pour
4. Réglage du régime maximal autorisé
Régler le régime maximal autorisé en ajustant au
minimum la vis de réglage (H) conformément aux
caractéristiques techniques. Visser la vis de réglage
(H) dans le sens des aiguilles pour augmenter le régime. Dépasser en aucun cas la vitesse maximale
autorisée!
Note concernant les appareils à limitation de ré
gime électronique: Sur ces appareils, la vitesse
maximale est difcile à lire sur le tachymètre.
Lorsque la vitesse maximale est atteinte, des
ratés d’allumage sont perceptibles.
5. Contrôle du régime de ralenti
Contrôler le régime de ralenti après avoir réglé le
régime maximal autorisé (l’outil de coupe ne doit pas
être entraîné !).
Répéter l’opération de réglage à partir du paragraphe
2 jusqu’à obtenir un régime de ralenti, une bonne
accélération et un régime autorisé maximal.
-
-
3. Contrôle de l’accélération
Dès que l’accélérateur est actionné, le moteur doit accélérer
du ralenti à une vitesse élevée sans transition.
Dévisser progressivement la vis de réglage (
dans le sens inverse des aiguilles jusqu’à ce que le moteur
accélère bien.
L) en tournant
A
65

66
α
α
ββ
min.
3 mm (0.11”)
TRAVAUX DE MAINTENANCE
Affûtage de la chaîne de sciage
ATTENTION: Pour tous travaux effectués sur le guide de
la chaîne de sciage, le moteur doit être impérativement
arrêté et la che de bougie doit être enlevée (voir pragraphe
pour le remplacement de la bougie) et le port de gants de
protection est obligatoire!
La chaîne de sciage doit être affûtée lorsque:
les copeaux deviennent farineux en sciant du bois humide.
la chaîne, tout en exerçant une forte pression, ne „tire“ que
péniblement dans le bois.
les arêtes de coupe sont visiblement endommagées.
le dispositif de sciage gauchit dans le bois latéralement vers
la gauche ou la droite. La raison est un affûtage irrégulier de
la chaîne de sciage.
Important: affûter souvent, sans enlever de trop de
matériau!
Lors d’un simple affûtage, il suft souvent de 2 à 3 coups de lime.
Après avoir effectué soi-même plusieurs affûtages, faire affûter
la chaîne à l’atelier spécialisé.
A
Critères d’affûtage:
ATTENTION: N’utiliser que des chaînes et guide permis
pour cette tronçonneuse (voir extrait de la liste de pièces de
rechange)!
Toutes les dents de rabotage doivent avoir la même longueur
(dimension a). Des dents de rabotage de hauteur différente
signient une marche dure de la chaîne et peuvent provoquer
des ruptures de chaîne!
Longueur minimale de dent de rabotage = 0.11" (3 mm). Ne pas
raffûter la chaîne de sciage lorsque la longueur minimale de
dent de rabotage est atteinte. Une nouvelle chaîne de sciage
doit être alors montée (voir „extrait de la liste des pièces de
rechange“ et chapitre „Nouvelle chaîne de sciage“).
L’écart entre le limiteur de profondeur (nez rond) et l’arête de
coupe détermine l’épaisseur du copeau.
Les meilleurs résultats de coupe sont obtenus avec une distance
du limiteur de profondeur de .025" (0,64 mm).
ATTENTION: Une distance trop
augmente le danger d’un choc de recul!
L’angle d’affûtage (α) doit être impérativement identique sur
toutes les dents de rabotage.
25° pour type de chaîne 486, 496
.025"
(0.64 mm)
.025"
(0.64 mm)
B
L’angle d’attaque de la dent (β) se détermine en utilisant la
lame ronde correcte.
60° pour type de chaîne 486, 496
Des angles différents provoquent une marche irrégulière et
rude de la chaîne, augmentent l’usure et aboutissent à des
ruptures de chaîne!
C

1 2
D
Type de chaîne
486
496
Lime et guidage de la lime
Pour aiguiser, utiliser une lame ronde spéciale pour chaîne de
sciage. Les limes rondes normales ne sont pas appropriées.
Numéro de commande, voir accessoires.
Type 486: La lime ronde de la chaîne de sciage ø 11/64"
(4,5 mm).
Type 496: La lime ronde de la chaîne de sciage ø 7/32"
(5,5 mm).
La lime ne doit attaquer que lors de la passe en avant (èche).
Lors du retour, relever la lime du matériel.
La dent de rabotage la plus courte est affûtée la première. La
longueur de cette dent est alors la mesure type pour toutes les
autres dents de rabotage de la chaîne de sciage.
Les nouvelles dents de rabotage doivent être exactement
adaptées aux formes des dents usées, ainsi qu’aux surfaces
de roulement.
Guider la lame en fonction du type de chaîne (10° vers le
guide).
E
Un porte-lime facilite le guidage de la lame, il porte des repères
4/5
α
pour l’angle d’affûtage correct de:
α = 25°
(orienter les repères parallèlement à la chaîne de scie) et limite
la profondeur de pénétration (4/5 du diamètre de la lime). Voir
accessoires pour le n° de commande.
A la suite du nouvel affûtage, vérier la hauteur du limiteur
de profondeur avec la jauge de mesure pour chaîne. Voir
accessoires pour le n° de commande.
Enlever avec la lime plate spéciale (1) tout dépassement, même
le moindre.
Arrondir à nouveau le limiteur de profondeur à l’avant (2).
F
67
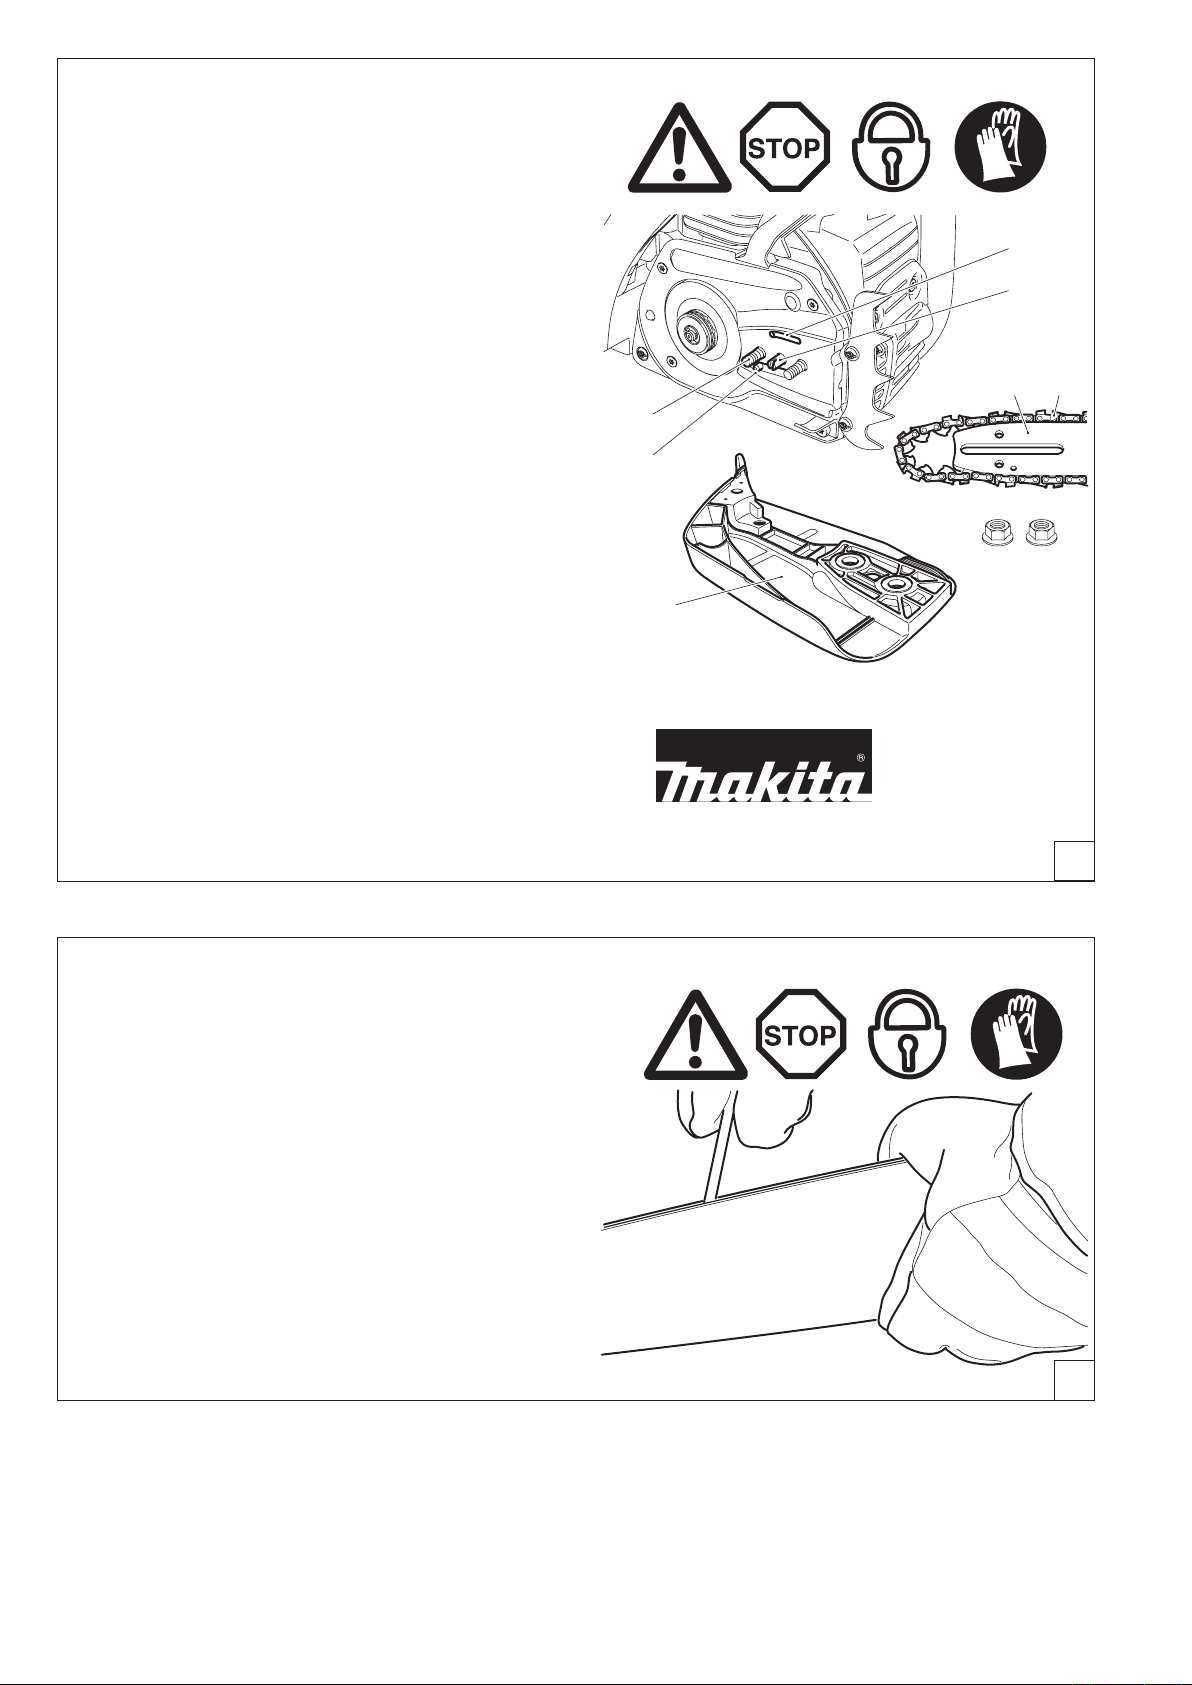
68
7
2
3
1
4
6 5
Nettoyer l’intérieur de la bande de frein de chaîne
et de la roue à chaîne
ATTENTION: Pour tous travaux effectués sur le guide de la
chaîne de sciage, le moteur doit être impérativement arrêté
et la che de bougie doit être enlevée (voir pragraphe pour le
remplacement de la bougie) et le port de gants de protection
est obligatoire!
ATTENTION: La tronçonneuse ne peut être démarrée
qu’après le montage complet et le contrôle effectué!
Enlever la protection de roue à chaîne (1) (voir chapitre „MISE
EN ROUTE“ B) nettoyer l’intérieur à l’aide d’un pinceau.
Visser la vis de serrage de chaîne (2) vers la gauche (dans
le sens inverse des aiguilles) jusqu’à ce que le tenon (3) du
tendeur de chaîne soit sous le boulon (4).
Enlever la chaîne de sciage (5) et le guide-rail de chaîne (2).
NOTE:
S’assurer qu’aucun résidu ne reste dans la rainure de guidage
de l’huile (7) et sur le tendeur de chaîne (3).
Montage du guide de chaîne, de la chaîne de sciage et de la pro-
tection de la roue à chaîne voir chapitre „MISE EN ROUTE“.
REMARQUE:
Le frein de chaîne est un dispositif de sécurité très
important et il est soumis comme chaque pièce à une
certaine usure.
Une vérication et une maintenance régulières servent
à vous assurer votre propre protection et doivent être
effectuées par un atelier spécialisé MAKITA.
Nettoyer le guide de la chaîne
ATTENTION! Porter impérativement des gants de
protection.
Les surfaces de roulement du guide de chaîne doivent
être régulièrement vériées pour voir si elles ne sont pas
endommagées et nettoyées avec un outillage adapté.
SERVICE
A
B
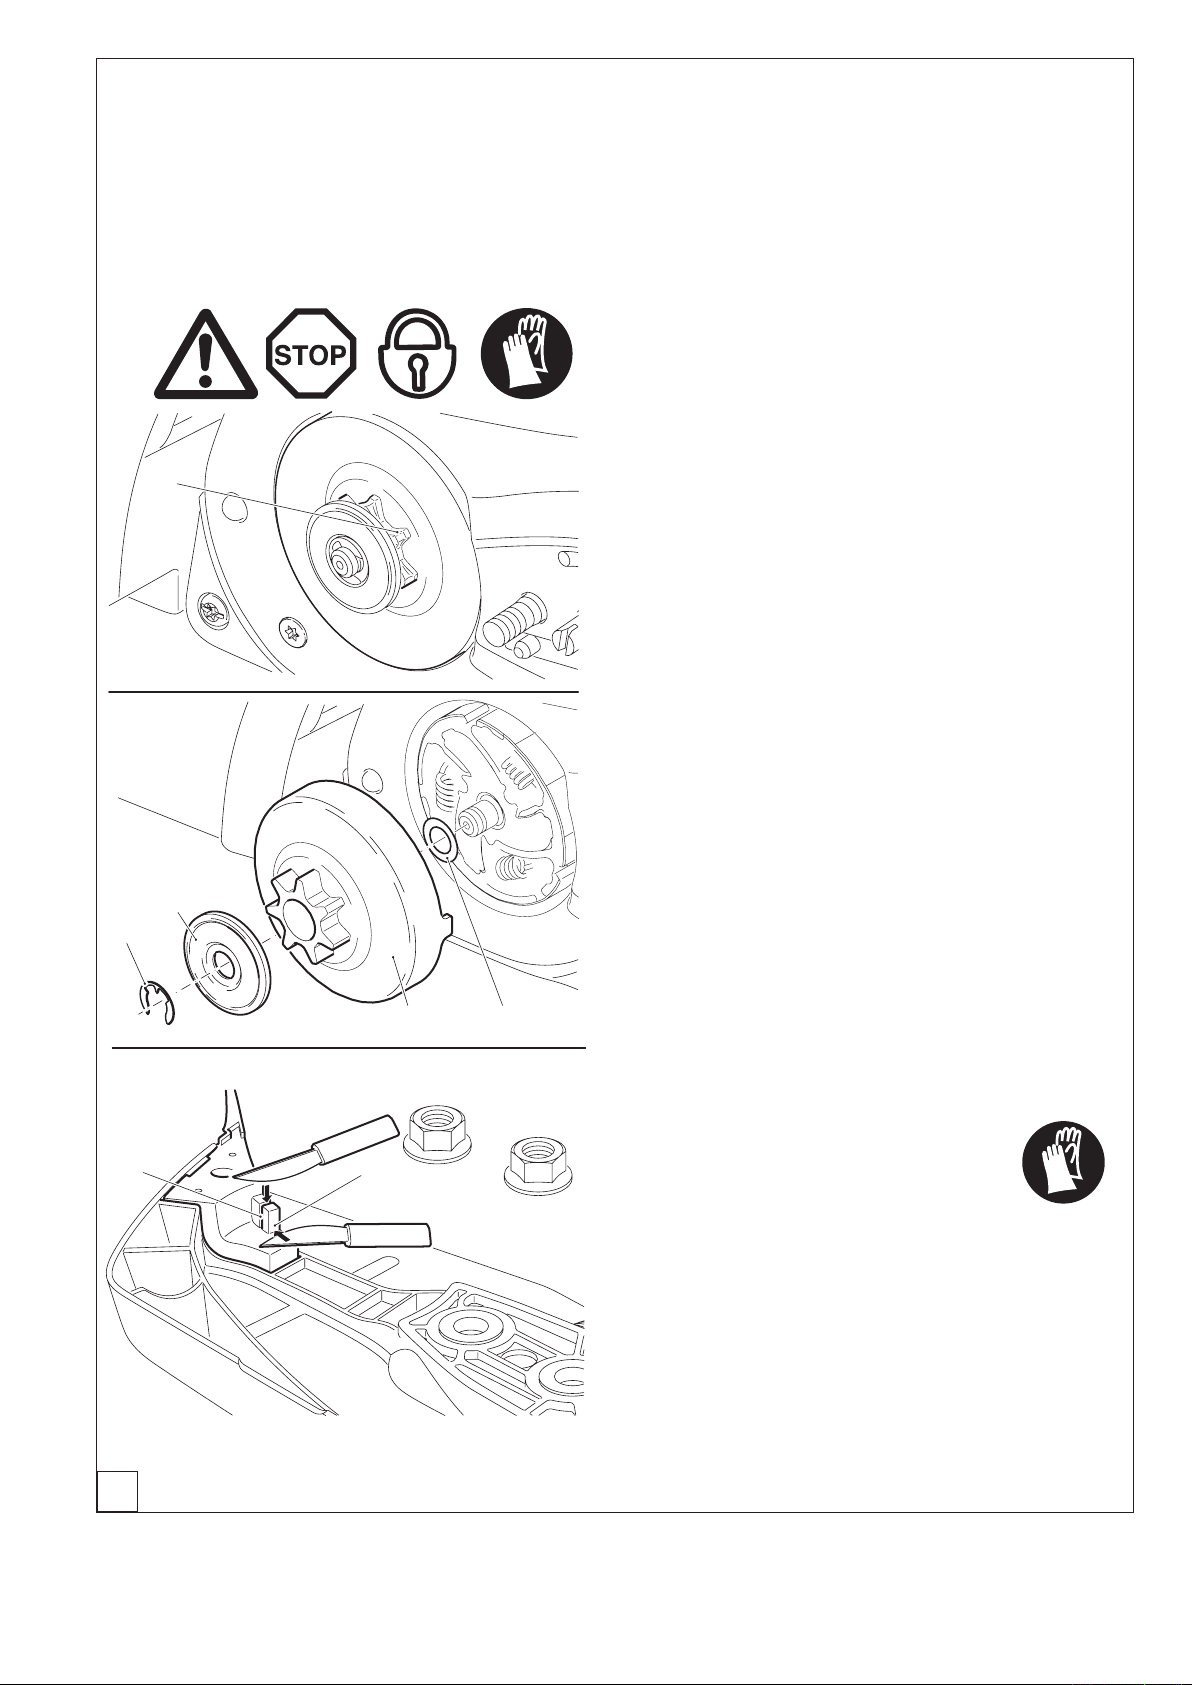
8
12 13
11
9
14
15
Nouvelle chaîne de sciage
ATTENTION: Utiliser uniquement des chaînes et guides autorisés pour cette scie (voir Extrait de la liste des pièces de
rechange) !
En changeant le type de chaîne, il faut adapter le tambour d’embrayage complet (12) au type de chaîne. Remplacer si
nécessaire le tambour d’embrayage complet.
IMPORTANT: Si vous changez le type de chaîne de .325” à 3/8”, il vous faudra modier le déecteur de copeaux. Se
reporter à « Note concernant le changement de type de chaîne ».
Avant de monter une nouvelle chaîne de sciage, il faut vérier
l’état du pignon.
Des pignons usés (8) provoquent des détériorations sur une
nouvelle chaîne de sciage et doivent impérativement être
remplacées.
Enlever la protection de pignon (voir chapitre „MISE EN ROUTE“ B).
Enlever la chaîne de sciage et le guide-rail de chaîne.
Enlever la rondelle de sûreté (9).
ATTENTION: La rondelle de sûreté saute de la rainure. En
l’enlevant, la bloquer avec le pouce pour ne pas qu’elle saute.
Enlever la rondelle-couvercle (11).
En cas d’usure du pignon (8), il faut remplacer le tambour
d’embrayage complet (12) (n° de commande voir „Extrait de la
liste des pièces de rechange“).
Monter la rondelle de butée (13), le nouveau tambour
d’embrayage complet (12), le disque de protection (11) et la
nouvelle rondelle de sûreté (9) (n° de commande voir „Extrait
de la liste des pièces de rechange“).
Montage du guide de chaîne, de la chaîne de sciage et de la
protection du pignon voir chapitre „MISE EN ROUTE A-H“.
NOTE: Ne pas utiliser de chaîne neuve sur un pignon rodé.
Changer le pignon au plus tard après deux chaînes usées.
Faire tourner la chaîne à demi-gaz pendant quelques minutes
de façon à ce que l’huile de chaîne de sciage se répartisse
régulièrement.
Contrôler fréquemment la tension de la chaîne car les nouvelles
chaînes de sciage ont en général tendance à s’allonger (voir
Contrôle de la tension de la chaîne).
C
Note concernant le changement
de type de chaîne
Porter obligatoirement des gants de protection!
- Avant d’utiliser une chaîne de
d’abord la partie marquée du déecteur de copeaux (14)!
- Couper d’abord le long du repère (
tranchant et séparer ensuite le morceau par une coupe
latérale.
NOTE:
Pour modier le type de chaîne en .325”, il faut monter un nouveau déecteur de copeaux (n° de commande, voir « Extrait de
la liste de pièces détachées »).
3/8”, il est impératif de couper
15) avec un couteau
69

70
5
3
6
4
1
2
5
3
4
5a
Nettoyage du ltre d’air
ATTENTION: En cas d’utilisation d’air comprimé pour le nettoyage, utiliser impérativement des lunettes de protection
pour éviter toute blessure au niveau des yeux !
Ne pas nettoyer le ltre à air à l’essence.
Desserrer les attaches de capot (1) avec la clé universelle et
enlever le capot (2).
Appuyer sur le bouton multi-positions (3) vers le haut (position Starter) pour éviter que des saletés ne tombent dans le
carburateur.
Décrocher l’attache (4) avec le doigt ou avec la clé universelle
dans le sens de la èche.
Retirer le ltre à air (5) vers le haut.
Enlever le pré-ltre (5a) du capot (2).
ATTENTION : Couvrir l’orice d’aspiration d’un chiffon propre
pour empêcher que des particules de saleté ne tombent dans
le carburateur.
Utilisation des ltres: Le ltre en voile est destiné aux utilisations sèches ou poussiéreuses. Le ltre en nylon (disponible
comme accessoires) est destiné pour des conditions de travail
humides. Le pré-ltre éloigne les copeaux et empêche la neige
poudreuse de pénétrer en hiver.
Séparer la partie supérieure et inférieure du ltre à air comme
montré sur la photo.
Nettoyage du ltre en voile : Frapper le ltre avec précaution
ou aspirer doucement de l’intérieur avec de l’air comprimé. Ne
pas nettoyer avec une brosse pour ne pas enfoncer la poussière
dans le tissu. Laver les ltres en nylon fortement encrassés dans
une eau savonneuse tiède avec du produit de nettoyage pour
vaisselle courant. Ne nettoyer le ltre en voile que si une perte
de puissance sensible survient pendant la coupe. Remplacer le
ltre si aucune amélioration n’est sensible après le nettoyage.
Nettoyage du ltre en nylon: Nettoyer au moyen d’un pinceau,
d’une brosse souple ou de l’intérieur avec de l’air comprimé avec
précaution. Laver le ltre en nylon fortement encrassé dans une
eau savonneuse mélangée à du produit de nettoyage pour vaisselle courant. En cas de salissure importante, nettoyer souvent
(plusieurs fois par jour), car un ltre à air propres garantissent
le bon fonctionnement du moteur.
Nettoyage du pré-ltre: Laver le pré-ltre encrassé dans une
eau savonneuse tiède avec un produit à laver la vaisselle courant.
Bien sécher le ltre à air.
Rassembler la partie supérieure et inférieure.
Remttre le pré-ltre dans le capot.
Avant de monter le ltre à air, contrôler la présence éventuelle
de saletés dans le clapet de l’étrangleur. Le nettoyer si nécessaire avec un pinceau.
ATTENTION: Remplacer aussitôt le ltre à air endommagé!
Des morceaux de tissu déchirés et des particules de
salissure grossières peuvent détériorer le moteur.
Placer le ltre à air (5) et appuyer sur les attaches de capot (4)
dans le sens de la èche jusqu’à ce qu’elles s’enclenchent.
Appuyer sur le bouton multi-positions (3) vers le bas et enfoncer une fois l’accélérateur (6) pour désactiver la position
demi-gaz.
Poser le capot (2) et le xer avec les attaches de capot (1).
A

8
9
7
11
10
12
B
Remplacement de bougie
ATTENTION
Les bougies d’allumage ou la che de la bougie ne doivent
pas être touchés le moteur en marche (haute tension).
N’effectuer des travaux de maintenance que si le moteur
est arrêté. Risque de brûlure lorsque le moteur est chaud:
porter absolument vos gants de protection!
En cas de détérioration du corps isolant, d’usure importante des
électrodes resp. d’électrodes très encrassées ou pleines d’huile,
il faut procéder à un remplacement de la bougie.
Retirer le capot (voir „Nettoyage du ltre à air“).
Retirer la che de la bougie (7) de la bougie. Démonter la
bougie uniquement avec la clé combinée comprise dans la
fourniture.
Ecartement des électrodes
L’écartement des électrodes doit être de .020" (0,5 mm).
ATTENTION: N’utilisez comme rechange que les bougies NGK
BPMR 7A ou BOSCH WSR 6F.
C
Vérication de l’étincelle d’allumage
Pousser la bougie d’allumage dévissée (8) contre la clé (à partir
du trou de la bougie) avec la cosse de bougie d’allumage bien
xée au moyen de la pince isolée.
Mettre le bouton multi-positions (9) sur ON.
Tirer fortement sur le cordon de lancement.
En fonctionnement correct, l’étincelle doit être visible sur les
électrodes.
Vérication des vis du silencieux
D
Enlever la tôle de maintien (10), dévisser à cette n les vis (11,
court) et (12, longue).
Les vis du silencieux sont maintenant accessibles par les trous
du sac et il est possible de contrôler s’ils sont bien place. Les
resserrer à la main si elles sont desserrées.
71
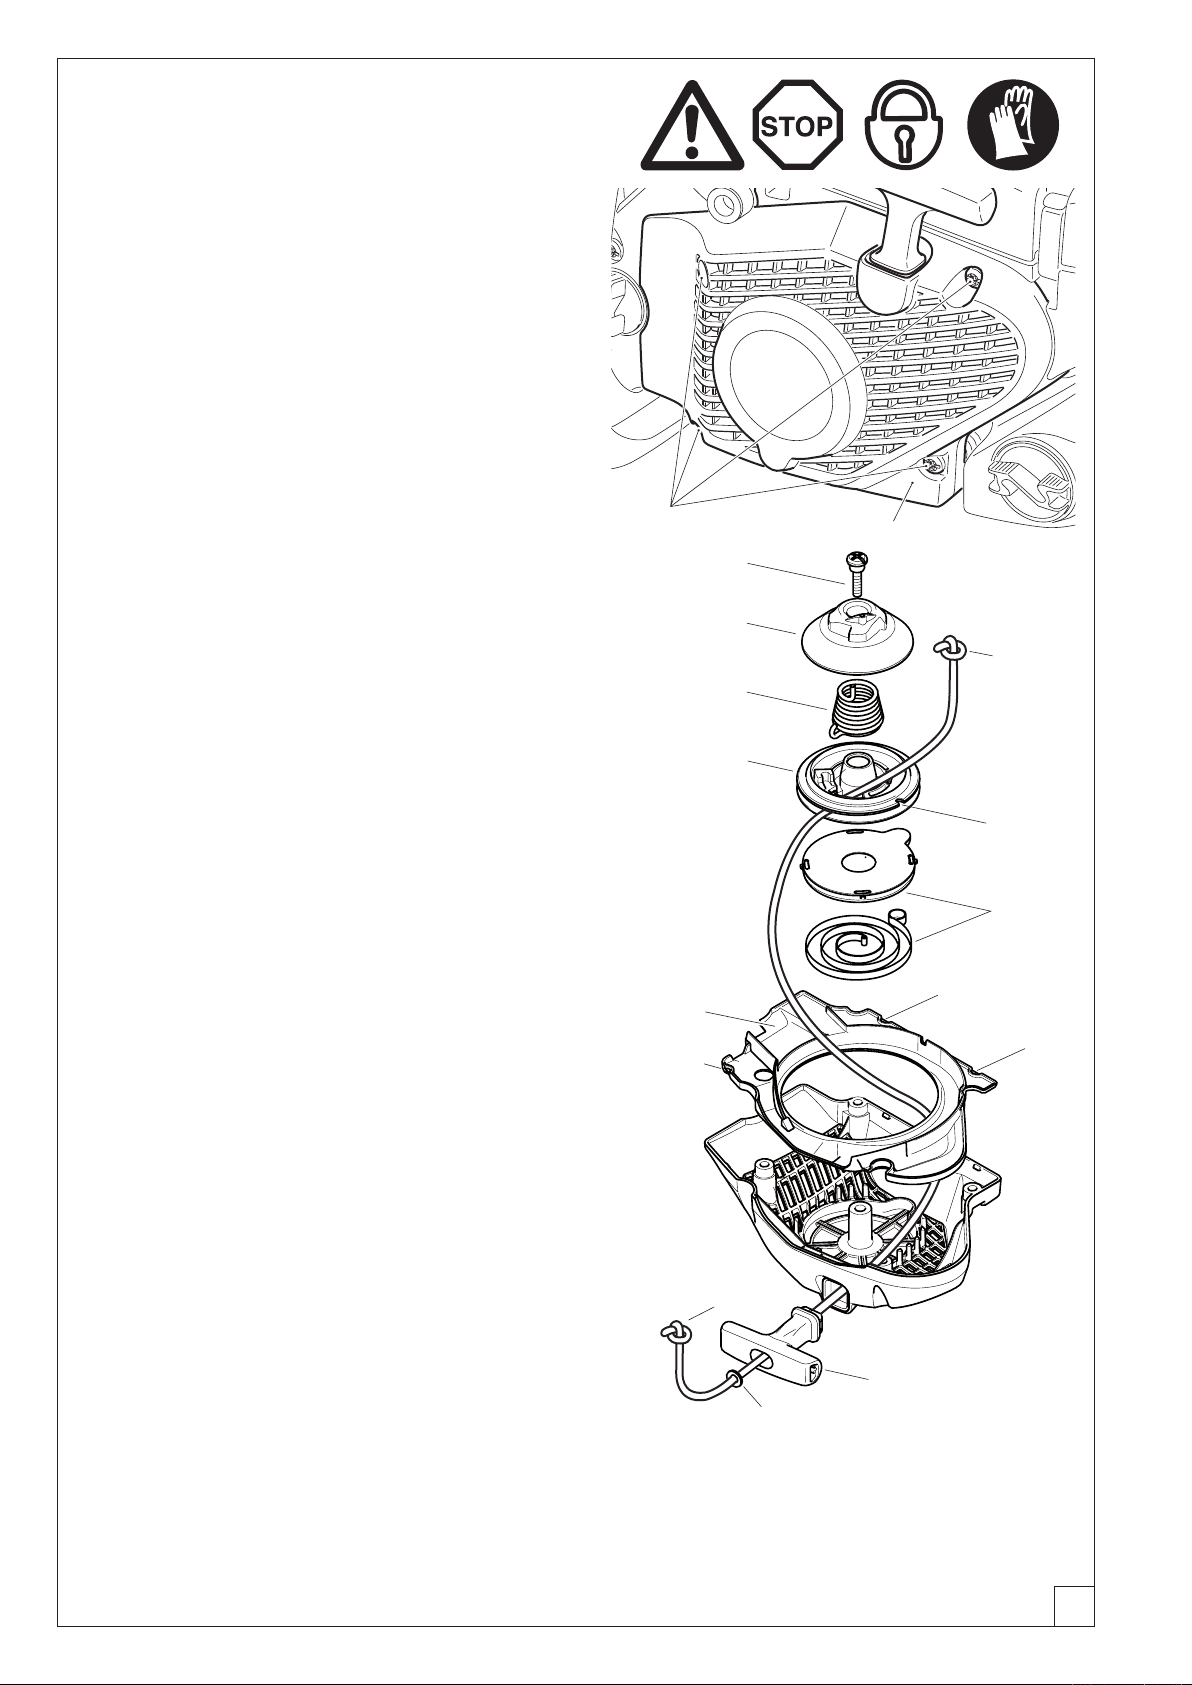
72
1
2
7
8
6
5
14
13
4
4
4
9
10
12
11
3
Remplacement du cordon de lancement / Remplacer la cassette de ressort de rappel / Remplacer
le ressort de démarrage
Dévisser les quatre vis (1).
Retirer le carter du ventilateur (2).
Enlever le déecteur de ventilateur (3) du carter.
ATTENTION: Risque de blessure! Dévisser la vis (7) seulement lorsque le ressort de rappel est détendu!
En cas de remplacement du cordon de lancement, même si
celui-ci n’est pas déchiré, détendre le ressort de rappel du
tambour d’enroulement (13).
Pour cela, tirer entièrement le cordon hors du carter du ventilateur depuis la poignée de lancement.
Tenir le tambour d’enroulement d’une main, enfoncer le cordon
dans l’échancrure (14) de l’autre main.
Tourner le tambour d’enroulement avec précaution jusqu’à ce
que le ressort d’appel soit entièrement détendu.
Dévisser la vis (7) et retirer l’entraîneur (8) et le ressort (6).
Enlever le tambour d’enroulement avec précaution.
Enlever les vieux restes de cordon.
Enler le nouveau cordon (0.14" (3,5 mm) de ø, 43.3" (1100 mm)
de longueur) comme montré sur la gure (en n’oubliant pas la
rondelle (10)) et nouer les deux extrémités.
Insérer le nœud (11) dans le tambour d’enroulement (5).
Insérer le nœud (12) dans la poignée de lancement (9).
Poser le tambour, le tourner légèrement jusqu’à ce que le ressort
de rappel s’enclenche.
Introduire la vis (6) dans l’entraîneur (8) et les placer dans
le tambour d’enroulement (5) en tournant légèrement dans le
sens inverse des aiguilles. Placer la vis (7) et visser à bloc.
Enlever le cordon dans le creux (14) du tambour d’enroule-
ment et tourner le tambour avec le cordon trois fois dans le
sens des aiguilles.
Tenir le tambour d’enroulement de la main gauche, et démêler
le cordon de la main droite, bien le tirer et le tenir.
Relâcher le tambour avec précaution. Ce faisant, le cordon
s’enroule sur le tambour dû à la tension du ressort.
Répéter une fois cette opération. La poignée de lancement
doit être maintenant verticale au carter du ventilateur.
INDICATION: Si la corde de lancement est tirée fortement, le
tambour d’enroulement doit pouvoir faire un moins un 1/4 de
tour contre l’effort de ressort.
ATTENTION: Risque de blessure! Bloquer la poignée de
lancement tirée. Elle peut rebondir en arrière si vous relâchez
par inadvertance le tambour d’enroulement.
Remplacer la cassette de ressort de rappel
Démonter le carter du ventilateur et le tambour d’enroulement
(voir ci-dessus).
ATTENTION: Risque de blessure ! Un ressort cassé peut
sauter. Porter impérativement des lunettes et des gants
de protection!
Frapper légèrement le carter du ventilateur avec toutes la surface
d’appui du côté creux sur du bois et le maintenir avant tout.
Soulever maintenant le carter du ventilateur avec précaution
et progressivement étant donné que la cassette de ressort
de rappel (13) tombée peut se détendre au cas où le ressort
de rappel est sorti de la cassette en plastique.
Introduire avec précaution la nouvelle cassette de ressort de
rappel et l’enfoncer jusqu’à ce qu’elle s’enclenche.
Poser le tambour d’enroulement en tournant légèrement jusqu’à ce que le ressort de rappel s’agrippe.
Monter le ressort (6) et l’entraîneur (8) et bien visser avec la
vis (7).
Tendre le ressort (voir ci-dessus).
Remplacer le ressort de démarrage
NOTE: Si le ressort du système de démarrage facile à ressort
est cassé, il faudra déployer davantage d’efforts pour démarrer le moteur et une forte résistance se fera sentir en tirant sur
la poignée de lancement. Si vous constatez ce changement
dans le comportement de lancement, contrôlez impérativement le ressort (6) et remplacez-le si nécessaire.
Montage du carter du ventilateur
Introduire le déecteur de ventilateur (3) dans le carter du ven-
tilateur, en laissant les trois évidements (4) s’enclencher.
Orienter le carter du ventilateur sur le carter, exercer une
légère contre-pression en tirant sur le cordon de lancement
jusqu’à ce que le dispositif de lancement s’enclenche.
Bien serrer les vis (1).
A
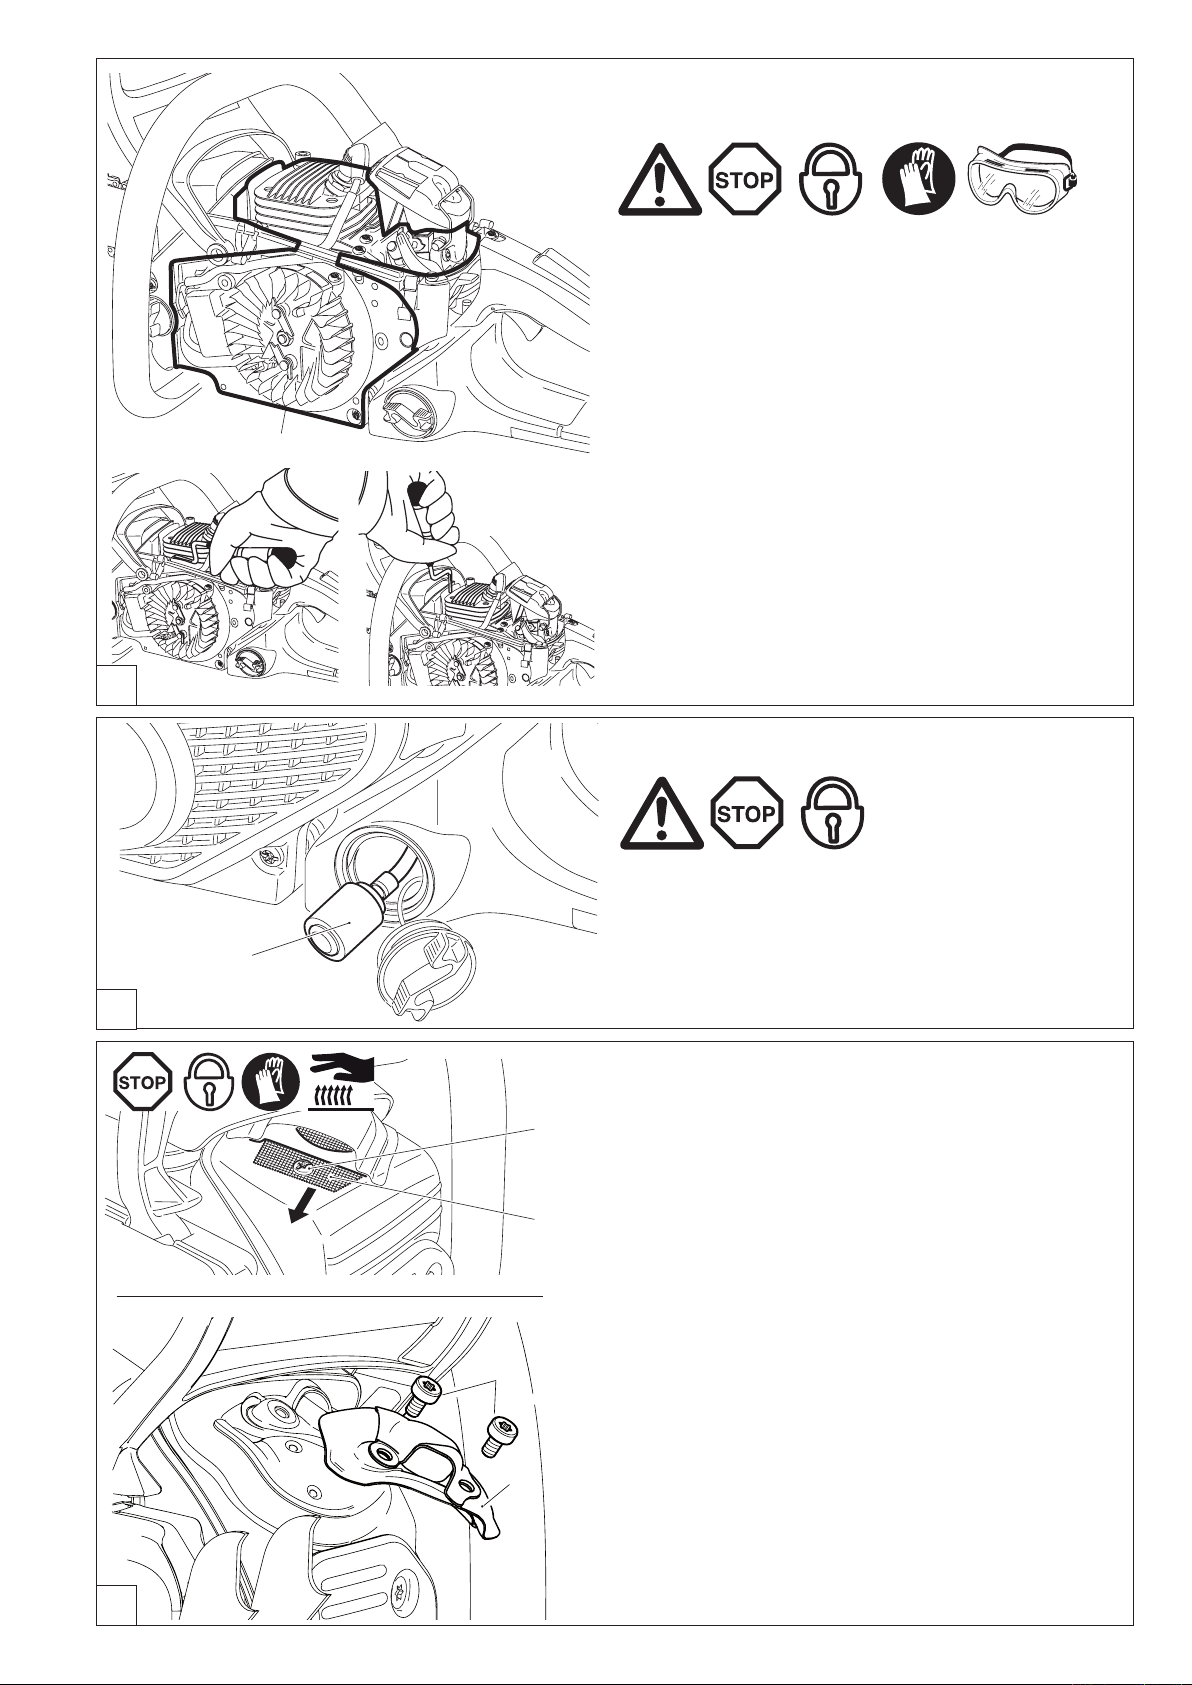
B
15
14
17
16
17
16
Nettoyage de l’espace cylindre
Si la tronçonneuse est utilisée pendant une durée prolongée,
de la poussière et des copeaux peuvent se déposer sur le
cylindre et provoquer la surchauffe du moteur. Le nettoyeur
d’ailettes de cylindre sert à enlever les dépôts entre les ailettes
de cylindre ou entre le cylindre et la plaque d’arrêt.
Retirer le capot.
Enlever le carter du ventilateur.
ATTENTION: En cas d’utilisation d’air comprimé pour le
nettoyage, utiliser impérativement des lunettes de protection
pour éviter toute blessure au niveau des yeux!
Toute la zone dégarnie (14) peut être nettoyée avec une brosse
et de l’air comprimé. Pour nettoyer les ailettes du cylindre, il est
possible d’utiliserune brosse à bouteille.
Avec le nettoyeur d’ailettes de cylindre (Accessoires, non
compris dans la livraison), nettoyer la zone entre les ailettes
de cylindre ou entre le cylindre et la plaque d’arrêt.
Procéder en douceur. S’assurer de ne pas endommager le
câble de court-circuit et le câble d’allumage.
C
Remplacement de la crépine d’aspiration
Le ltre feutre (15) de la crépine d’aspiration peut se boucher
pendant l’utilisation. Pour assurer une alimentation sans
problème du carburant vers le carburateur, la crépine d’aspiration
devra être remplacée environ tous les 3 mois.
Pour remplacer, tirer la crépine d’aspiration par l’ouverture du
bouchon du réservoir avec un crochet en l métallique ou une
pince pointue.
Changement / nettoyage du pare-étincelles
Il faut vérier et nettoyer régulièrement le pare-étincelles.
Desserrer le vis (16) et enlever le pare-étincelles (17).
ATTENTION
nettoyer le pare-étincelles car vous pourriez endommager ou
déformer les ls du pare-étincelles.
Remontez le pare-étincelles et serrez la vis.
: N'utilisez pas d'objets coupants ou pointus pour
Changement / nettoyage du pare-étincelles
Modèles avec catalyseur (DCS5121)
Il faut vérier et nettoyer régulièrement le pare-étincelles.
Desserrer les vis (16) et enlever le pare-étincelles (17).
ATTENTION
nettoyer le pare-étincelles car vous pourriez endommager ou
déformer les ls du pare-étincelles.
: N'utilisez pas d'objets coupants ou pointus pour
D
Remontez le pare-étincelles et serrez les vis.
Information concernant le catalyseur: Le catalyseur réduit la
teneur en éléments toxiques des gaz d’échappement.
73

74
Indications de maintenance et d’entretien périodiques
De manière à garantir une longue durée de vie et le plein fonctionnement des dispositifs de sécurité et à éviter des détériorations, il
faut effectuer régulièrement les travaux de maintenance décrits ci-dessous. Les réclamations ne pourront être reconnues comme telles
si ces travaux ont été effectuées régulièrement et correctement. Des accidents risquent de se produire en cas de non-observation.
Les utilisateurs de tronçonneuses doivent effectuer que les travaux de maintenance et d’entretien qui sont décrits dans la instructions
d’emploi. Les travaux non compris dans cette liste ne doivent être exécutés que dans un atelier spécialisé de MAKITA.
Page
Généralités Tronçonneuse entière Nettoyer l’extérieur et vérier si elle n’est pas détériorée.
En cas de détériorations, faire effectuer immédiatement les
réparations par un spécialiste.
Chaîne de sciage Raffûter régulièrement, remplacer à temps 66-67
Frein à chaîne Faire vérier régulièrement par l’atelier spécialisé
Guide de chaîne Tourner an que les surfaces de
roulement sollicitées s’usent de manière régulière. 59,68
Cordon de lancement Vérier s’il n’est pas détérioré. Le remplacer en cas de
détérioration. 72
Avant toute mise Chaîne de sciage Vérier le tranchant et si elle n’est pas détériorée. 66-67
en route Contrôler la tension de la chaîne. 59
Guide de la chaîne Vérier s’il n’est pas détérioré
Graissage de la chaîne Vérier le fonctionnement 62
Frein de chaîne Vérier le fonctionnement 64
Bouton multi-positions,
Touche de blocage
de sécurité
Levier de gaz Vérier le fonctionnement 63
Fermeture réservoirs
huile et carburant Vérier l’étanchéité et la présence de fuites
Journellement Filtre à air Nettoyer (plusieurs fois par jour si nécessaire) 70
Rail guide de la chaîne Vérier si il n’est pas détérioré, nettoyer l’orice d’entrée d’huile 68
Support, rail guide de chaîne Nettoyer, particulièrement la rainure d’alimentation d’huile 62, 68
Vitesse de rotation à vide Contrôler (la chaîne ne doit pas être entraînée) 65
Toutes les semaines Carter du ventilateur Nettoyer pour garantir un parfait guidage de l’air de
refroidissement. 55, 73
l’espace cylindre Nettoyer pour garantir un parfait guidage de l’air de
refroidissement. 73
Bougie Vérier, le cas échéant, remplacer 71
Silencieux Vérier s’il n’est pas encrassé, nettoyer le pare-étincelles 71
Pare-étincelles Nettoyer ou remplacer si nécessaire 73
Capteur de chaîne Vérier 58
Vis et écrous Vérier l’état et le serrage correct
Tous les 3 mois Crépine d’aspiration Remplacer 73
Réservoirs carburant/huile Nettoyer
Tous les ans Tronçonneuse entière Faire vérier par un atelier spécialisé
Stockage Tronçonneuse entière Nettoyer l’extérieur et vérier si elle n’est pas détériorée.
En cas de détériorations, faire effectuer immédiatement les
réparations par un spécialiste.
Chaîne de sciage et rail Démonter, nettoyer et légèrement huiler
guide de la chaîne Nettoyer la rainure de guidage du rail guide de la chaîne 68
Réservoirs carburat/huile Vidanger et nettoyer
Carburateur Le laisser se vider en marche
Service d’atelier, pièces de rechange et garantie
Maintenance et réparations
La maintenance et la remise en état de tronçonneuses modernes ainsi que les éléments les plus importants de la sécurité exigent
une formation professionnelle qualiée et un atelier équipé d’outillage spécial et d’appareils de contrôle.
Tous les travaux qui ne sont pas décrits dans ce manuel d’utilisation doivent être effectués par un atelier spécialisé MAKITA.
Le spécialiste dispose de la formation, de l’expérience et des équipements nécessaires pour vous apporter chaque fois la solution
économique la plus avantageuse et vous apporte une aide d’assistance en pratique et en conseil.
La garantie s’annule en cas de tentatives de réparation effectuées par des tiers ou des personnes autorisées.
Veuillez relever sur le répertoire des points de service ci-jointe l’atelier spécialisé le plus proche de chez vous.

Pièces de rechange
Le fonctionnement permanent able et la sécurité de votre appareil dépend aussi de la qualité des pièces de rechange utilisées.
N’utilisez que des pièces de rechange d’origine MAKITA, signalées par
Seules les pièces d’origine proviennent de la chaîne de production de l’appareil et vous assurent donc la qualité optimale du matériau,
du respect des dimensions et du fonctionnement et une sécurité irréprochables.
Les pièces accessoires et de rechange d’origine vous sont proposées par votre vendeur spécialisé. Il dispose des listes de pièces
de rechange nécessaires pour déterminer le numéro de la pièce de rechange nécessaire, et vous informera à fur et à mesure des
améliorations de détail et des nouveautés dans l’offre des pièces de rechange.
Veuillez aussi noter, qu’en utilisant des pièces qui ne sont pas d’origine de MAKITA vous perdez tout droit à la garantie de l’organisation
MAKITA.
Garantie
MAKITA garantit un qualité irréprochable et supporte les frais pour une amélioration par remplacement des pièces défectueuses
dans le cas de défauts de matériel ou de fabrication qui se présentent dans le délai de garantie après le jour de vente. Veuillez noter
que dans certains pays, il existe des conditions de garantie spéciques. Adressez vous, en cas de doute, à votre vendeur. En tant
que vendeur du produit, il doit vous assurer la garantie.
• Non respect de la manual d’emploi.
• Non exécution des travaux de maintenance et réparations nécessaires.
• Détériorations par suite d’un réglage non conforme du carburateur.
• Usure normale.
• Surcharge manifeste par dépassement permanent de la limite supérieure de la puissance.
• Utilisation de types de chaînes et de guides de la chaîne non agréés.
• Utilisation de longueurs de chaînes et de guides de la chaînes non admises.
• Forçage, traitement non conforme, emploi non autorisé ou cas d’accidents.
• Dégâts de surchauffe par suite d’encrassements sur les ailettes du cylindre et du carter du ventilateur.
• Interventions de personnes non compétentes ou essais de réparations non conformes.
• Utilisation de pièces de rechange non appropriées resp. de pièces non d’origine MAKITA, dans la mesure où elles sont sources
de détériorations.
• Utilisation de produits de fonctionnement inadaptés ou superposés.
• Détériorations provenant de conditions d’utilisation du magasin de location.
• Endommagements causés par xation dévissée et non resserrée à temps.
Les travaux de nettoyage, d’entretien et de réglage ne sont pas reconnus comme prestations de garantie. Tout travail au titre de la
garantie est à effectuer par le vendeur spécialiste MAKITA.
Recherche de pannes
Panne Système Observation Origine
Chaîne ne démarre pas Frein de chaîne Moteur tourne Frein de chaîne enclenché
Moteur ne démarre pas Système Allumage existe Défaut dans l’alimentation du carburant,sys-
ou démarre difcilement d’allumage tème de compression, défaut mécanique
Pas d’allumage Commutateur STOP enclenché, défaut ou
court-circuit dans le câblage, che de bougie,
bougie défectueuse
Alimentation Réservoir carburant bouton multi-positions en position Starter,
carburant rempli carburateur defectueux, crépine d’aspiration
bouchée, conduite de carburant sectionnée ou
coincée
Système de A l’intérieur de l’appareil Joint du pied de cylindre défectueux, bagues à
compression lèvres endommagées, segments de cylindre ou
de pistons endommagés
A i'extérieur de l’appareil Bougie n’est pas étanche
Défaut Lanceur n’accroche pas Ressort dans le démarreur brisé, pièces
mécanique brisées à l’intérieur du moteur
Problèmes de Carburateur Carburant dans réservoir Réglage du carburateur non correct
démarrage à chaud Etincelle existante
Moteur démarre, mais Alimentation Carburant dans réservoir Réglage du ralenti non correct, crépine
s’arrête immédiatement carburant d’aspiration ou carburateur encrassé
après Aération réservoir défectueux, conduite
carburant interrompue, câble défectueux,
bouton multi-positions défectueux.
Manque puissance Plusieurs sys- Appareil tourne Filtre à air encrassé, faux réglage du
tèmes peuvent au ralenti carburateur, silencieux bouché, tuyau
être mis en cause d’échappement des gaz dans le cylindre est
bouché, pare-étincelles bouché.
Pas de graissage Réservoir d’huile, Pas d’huile de chaîne Réservoir d’huile vide
de la chaîne pompe d’huile sur la chaîne de sciage Rainure d’alimentation d’huile encrassée
Vis de réglage de la pompe à huile déréglée
75

76
Extrait de la liste des pièces de rechange
29
36
30
31
32 33/34
28
2220
876
5
23
1
2
3
14
16
12
13
4
15
22
24
25
26
27
35
17
10
11
9
18
19
N’utilisez que des pièces de rechange d’origine MAKITA. Pour les réparations et
la rechange pour d’autres pièces, votre atelier spécialisé MAKITA est compétent.
DCS460
DCS5121

Extrait de la liste des pièces de rechange
N’utilisez que des pièces de rechange d’origine MAKITA. Pour les réparations et
la rechange pour d’autres pièces, votre atelier spécialisé MAKITA est compétent.
DCS460
DCS5121
Pos. N°MAKITA pcs. Désignation
1 445 040 641 1
445 045 641 1
2 513 486 666 1
513 486 672 1
1 443 045 661 1
2 513 496 664 1
3 952 010 640 1 Protège-guide pour 16"
952 020 650 1 Protège-guide pour 18"
4 957 213 600 1
5 923 208 004 2
6 941 719 131 1 Clé combinée Ouverture 19/13
7 940 827 000 1
8 944 340 001 1
9 010 114 010 1
10 181 114 202 1 Bouchon du réservoir d’essence complet
11 963 229 036 1 O-Ring 29,3x3,6 mm
12 170 114 061 1
13 963 225 030 1
14 965 603 021 1
15 181 164 020 1 C
16 181 173 240 1
16 181 173 190 1
17 181 163 050 1 Cassette de ressort d’appel complète
18 181 163 080 1
19 181 163 090 1 Entraîneur
Guide à êtoile .325", 16"
Guide à êtoile .325", 18"
Chaîne de sciage .325", pour 16"
Chaîne de sciage .325", pour 18"
Guide à êtoile 3/8", 18"
Chaîne de sciage 3/8", pour 18"
Protection cpl. roue à chaîne
Ecrou hexag. M8
Tournevis coudé
Tournevis pour carburateur
Crépine d’aspiration
Capuchon cpl. réservoir huile
O-Ring 25x3 mm
Bougie
ordon de lancement 3,5x1100 mm
Filtre à air (nylon)
Filtre à air (voile)
Ressort
Accessoires (non compris dans la livraison)
28 953 100 090 1 Jauge de mesure des chaînes
29 953 004 010 1 Manche de lime
30 953 003 100 1 Lime ronde ø 11/64", (4,5 mm)
31 953 003 040 1 Lime ronde ø 7/32", (5,5 mm)
32 953 003 060 1 Lime plate
33 953 030 020 1 Porte lime 11/64”
34 953 009 000 1 Porte lime
35 944 500 795 1 Nettoyeur d’ailettes de cylindre
36 950 233 210 1 Tachymètre
- 949 000 035 1 Nourrice combinée
(pour 5l carburant,
2,5l huile de chaîne de sciage)
7/32”
20 181 223 310 1 Tambour d’accouplement cpl., .325", 7 dents
181 223 320 1 Tambour d’accouplement cpl., 3/8", 7 dents
21 927 408 000 1 Rondelle de sûreté
22 021 224 011 1 Disque
23 181 174 250 1 Pare-étincelles complet
24 181 174 470 1 Pare-étincelles complet
(pour les modèles avec catalysateur)
25 181 250 030 1 Rive dentée
26 181 250 020 1 Rive dentée
27 181 250 011 1 Rive dentée
77

78
Notes

Notes
79

80
Makita U.S.A., Inc.
14930 Northam Street
La Mirada
CA 90638-5753
USA
Makita Canada Inc.
DOLMAR Division
1950 Forbes Street
Whitby, Ontario
Canada, L1N 7B7
Specications subject to change without notice
Changements sans préavis
Form: 995 705 258 (5.10 GB, F)
 Loading...