

Page 1
GB
Cordless Chain Saw INSTRUCTION MANUAL
UA
Бездротова ланцюгова пила ІНСТРУКЦІЯ З ЕКСПЛУАТАЦІЇ
PL
Akumulatorowa pilarka łańcuchowa
RO
Ferăstrău cu lanţ cu acumulator MANUAL DE INSTRUCŢIUNI
DE
Akku-Kettensäge BEDIENUNGSANLEITUNG
HU
Akkumulátoros láncfűrész HASZNÁLATI KÉZIKÖNYV
SK
Ručná reťazová píla NÁVOD NA OBSLUHU
CZ
Akumulátorová řetězová pila NÁVOD K OBSLUZE
INSTRUKCJA OBSŁUGI
BUC121
BUC122
1
Page 2
1
2
3
1 008565
2
1
3
4 008568
1
2
2 008572
3
2
1
5 008630
1
2
3 008566
1
3
2
6 008631
2
3
1
7 008569 8 008570
2
1
9 008587
2
Page 3
10 008570
1
2
3
11 008571
2
1
12 008574
1
13 008575
16 008634
14 008576 15 001742
17 008573 18 008633
1
2
1
19 006927 20 006929 21 008578
3
Page 4
1
2
22 008579
1
25 008582
1
2
3
28 008586
1
23 008580 24 008581
1
1
2
26 008635
1
29 001145
27 008584
1
2
30 008585
4
Page 5
ENGLISH
1-1. Red part
1-2. Button
1-3. Battery cartridge
2-1. Lock-off button
2-2. Switch trigger
3-1. Sprocket cover
3-2. Knob
4-1. Cutter
4-2. Guide bar
4-3. Arrow
5-1. Spring
5-2. Sprocket
5-3. Boss
Explanation of general view
6-1. Spring
6-2. Guide bar
6-3. Boss
7-1. Sprocket cover
7-2. Hook
7-3. Hole
11-1. Oil tank cap
11-2. Oil inspection window
11-3. Oil tank opening
12-1. Tip guide
13-1. Lower guide
17-1. Battery cartridge
17-2. Scabbard (chain cover)
22-1. Push nut
22-2. Slotted bit screwdriver
23-1. Filter
25-1. Filter
26-1. Push nut
27-1. Sprocket
27-2. Locking ring
28-1. Locking ring
28-2. Sprocket
28-3. Washer
29-1. Limit mark
30-1. Brush holder cap
30-2. Screwdriver
SPECIFICATIONS
Chain speed per minute (min-1) 4.8 m/s (290 m/min) 5.0 m/s (300 m/min)
Saw chain
• Due to our continuing programme of research and development, the specifications herein are subject to change without notice.
• Note: Specifications may differ from country to country.
Symbols
The following show the symbols used for the equipment.
Be sure that you understand their meaning before use.
・ Read instruction manual.
・ Wear eye protection.
・ Wear ear protection.
・ Wear a helmet, goggles and ear
protection.
・ Use appropriate protection for foot-leg
and hand-arm.
・ Do not expose to rain.
・ Hold the saw with both hands while
working! One-handed use is extremely
hazardous!
・ This saw is to be used by properly
trained operators only.
・ Only for EU countries
Do not dispose of electric equipment
together with household waste material!
In observance of European Directive
2002/96/EC on waste electric and
Model BUC121 BUC122
Length of guide bar 115 mm
Overall length 422mm 422mm
Net weight 2.4 kg 2.5 kg
Rated voltage D.C. 14.4 V D.C. 18 V
Type 25 AP
Pitch 1/4"
No. of drive links 42
END005-2
electronic equipment and its
implementation in accordance with
national law, electric equipment that
have reached the end of their life must
be collected separately and returned to
an environmentally compatible
recycling facility.
Intended use
The tool is intended for cutting lumbers and logs.
For Model BUC121
For European countries only
Noise
The typical A-weighted noise level determined according
to EN60745-2-13:
Sound pressure level (L
Uncertainty (K) : 2 dB(A)
) : 84.0 dB(A)
pA
The noise level under working may exceed 85 dB (A).
Wear ear protection.
5
ENE031-1
ENG101-2
Page 6

Vibration
ENG221-1
The vibration total value (tri-axial vector sum)
determined according to EN60745-2-13:
Work mode : cutting wood
Vibration emission (a
Uncertainty (K) : 1.5 m/s
) : 4.2 m/s
h
2
2
For Model BUC122
ENG101-2
For European countries only
Noise
The typical A-weighted noise level determined according
to EN60745-2-13:
Sound pressure level (L
Uncertainty (K) : 2 dB(A)
) : 84.6 dB(A)
pA
The noise level under working may exceed 85 dB (A).
Wear ear protection.
ENG221-1
Vibration
The vibration total value (tri-axial vector sum)
determined according to EN60745-2-13:
Work mode : cutting wood
Vibration emission (a
Uncertainty (K) : 1.5 m/s
) : 4.3 m/s
h
2
2
ENH016-5
EC-DECLARATION OF CONFORMITY
The undersigned, Kato, as authorized by, declare that
the MAKITA machines,
EU model identification No.:M6 08 02 24243 083
BUC121
complies with the standard safety and health
requirements of the pertinent EU guidelines:
EU machinery guideline 98/37/EC, Noise emission
2000/14/EG, EU EMC guideline.
The requirements of the above EU guidelines were
implemented chiefly on the basis of the following
standards: EN60745-2-13, EN 55014, ENISO11681.
The conformity assessment procedure 2000/14/EG was
performed per Annex V. The measured sound power
level (Lwa) is 92.0 dB(A). The guaranteed sound power
level (Ld) is 94 dB(A). The EU Type-Examination per
98/37/EG was performed by: TÜV Product Service
GmbH, Zertifizierungsstelle, Ridlerstraße 31, D-80339
München.
000230
Responsible Manufacturer:
Makita Corporation
3-11-8, Sumiyoshi-cho, Anjo, Aichi, JAPAN
Authorized Representative in Europe:
Makita International Europe Ltd.
Michigan Drive, Tongwell, Milton Keynes, Bucks MK15
8JD, ENGLAND
Tomoyasu Kato CE2007
Director
ENH016-5
EC-DECLARATION OF CONFORMITY
The undersigned, Kato, as authorized by, declare that
the MAKITA machines,
EU model identification No.:M6 08 02 24243 083
BUC122
complies with the standard safety and health
requirements of the pertinent EU guidelines:
EU machinery guideline 98/37/EC, Noise emission
2000/14/EG, EU EMC guideline.
The requirements of the above EU guidelines were
implemented chiefly on the basis of the following
standards: EN60745-2-13, EN 55014, ENISO11681.
The conformity assessment procedure 2000/14/EG was
performed per Annex V. The measured sound power
level (Lwa) is 92.7 dB(A). The guaranteed sound power
level (Ld) is 95 dB(A). The EU Type-Examination per
98/37/EG was performed by: TÜV Product Service
GmbH, Zertifizierungsstelle, Ridlerstraße 31, D-80339
München.
Tomoyasu Kato CE2007
000230
Director
Responsible Manufacturer:
Makita Corporation
3-11-8, Sumiyoshi-cho, Anjo, Aichi, JAPAN
Authorized Representative in Europe:
Makita International Europe Ltd.
Michigan Drive, Tongwell, Milton Keynes, Bucks MK15
8JD, ENGLAND
GEB037-1
Chain saw safety warnings:
DO NOT let comfort or familiarity with product
(gained from repeated use) replace strict adherence
to chain saw safety rules. If you use this tool
unsafely or incorrectly, you can suffer serious
personal injury.
1. Keep all parts of the body away from the saw
chain when the chain saw is operating. Before
you start the chain saw, make sure the saw
chain is not contacting anything. A moment of
inattention while operating chain saws may cause
entanglement of your clothing or body with the
saw chain.
2. Always hold the chain saw with your right
hand on the rear handle and your left hand on
the front handle. Holding the chain saw with a
reversed hand configuration increases the risk of
personal injury and should never be done.
3. Wear safety glasses and hearing protection.
Further protective equipment for head, hands,
legs and feet is recommended. Adequate
protective clothing will reduce personal injury by
flying debris or accidental contact with the saw
chain.
6
Page 7
4. Do not operate a chain saw in a tree. Operation
of a chain saw while up in a tree may result in
personal injury.
5. Always keep proper footing and operate the
chain saw only when standing on fixed, secure
and level surface. Slippery or unstable surfaces
such as ladders may cause a loss of balance or
control of the chain saw.
6. When cutting a limb that is under tension be
alert for spring back. When the tension in the
wood fibres is released the spring loaded limb
may strike the operator and/or throw the chain
saw out of control.
7. Use extreme caution when cutting brush and
saplings. The slender material may catch the
saw chain and be whipped toward you or pull you
off balance.
8. Carry the chain saw by the front handle with
the chain saw switched off and away from
your body. When transporting or storing the
chain saw always fit the guide bar cover.
Proper handling of the chain saw will reduce the
likelihood of accidental contact with the moving
saw chain.
9. Follow instructions for lubricating, chain
tensioning and changing accessories.
Improperly tensioned or lubricated chain may
either break or increase the chance for kickback.
10. Keep handles dry, clean, and free from oil and
grease. Greasy, oily handles are slippery causing
loss of control.
11. Cut wood only. Do not use chain saw for
purposes not intended. For example: do not
use chain saw for cutting plastic, masonry or
non-wood building materials. Use of the chain
saw for operations different than intended could
result in a hazardous situation.
12. Causes and operator prevention of kickback:
Kickback may occur when the nose or tip of the
guide bar touches an object, or when the wood
closes in and pinches the saw chain in the cut.
Tip contact in some cases may cause a sudden
reverse reaction, kicking the guide bar up and back
towards the operator.
Pinching the saw chain along the top of the guide
bar may push the guide bar rapidly back towards
the operator.
Either of these reactions may cause you to lose
control of the saw which could result in serious
personal injury. Do not rely exclusively upon the
safety devices built into your saw. As a chain saw
user, you should take several steps to keep your
cutting jobs free from accident or injury.
Kickback is the result of tool misuse and/or
incorrect operating procedures or conditions and
can be avoided by taking proper precautions as
given below:
− Maintain a firm grip, with thumbs and fingers
encircling the chain saw handles, with both
hands on the saw and position your body and
arm to allow you to resist kickback forces.
Kickback forces can be controlled by the
operator, if proper precautions are taken. Do
not let go of the chain saw.
008625
− Do not overreach and do not cut above
shoulder height.. This helps prevent
unintended tip contact and enables better
control of the chain saw in unexpected
situations.
− Only use replacement bars and chains
specified by the manufacturer.. Incorrect
replacement bars and chains may cause
chain breakage and/or kickback.
− Follow the manufacturer’s sharpening
and maintenance instructions for the saw
chain. Decreasing the depth gauge height
can lead to increased kickback.
ADDITIONAL SAFETY RULES
1. Read the instruction manual in order to familiarize
yourself with operation of the chain saw.
2. Before using the chain saw for the first time,
arrange to have instruction in its operation. If this
is not possible, at least practice cutting round
timber on a trestle before beginning work.
3. The chain saw must not be used by children or
young persons under 18 years of age. Young
persons over 16 years of age may be exempted
from this restriction if they are undergoing training
under the supervision of an expert.
4. Working with the chain saw requires a high level
of concentration. Do not work with the saw if you
are not feeling fit and well. Carry out all work
calmly and carefully.
5. Never work under the influence of alcohol, drugs
or medication.
Proper use
1. The chain saw is intended solely for cutting wood.
Do not use it for example to cut plastic or porous
concrete.
2. Only use the chain saw for operations described
in this instruction manual. Do not, for example,
use it to trim hedges or for similar purposes.
7
Page 8
3. The chain saw must not be used for forestry work,
i.e. for felling and limbing standing timber. The
chain saw cable does not provide the operator
with the mobility and safety required for such
work.
4. The chain saw is not intended for commercial use.
5. Do not overload the chain saw.
Personal protective equipment
1. Clothing must be close-fitting, but must not
obstruct mobility.
2. Wear the following protective clothing during
work:
• A tested safety helmet, if a hazard is
presented by falling branches or similar;
• A face mask or goggles;
• Suitable ear protection (ear muffs, custom or
mouldable ear plugs). Octave brand analysis
upon request.
• Firm leather safety gloves;
• Long trousers manufactured from strong
fabric;
• Protective dungarees of cut-resistant fabric;
• Safety shoes or boots with non-slip soles,
steel toes, and cut-resistant fabric lining;
• A breathing mask, when carrying out work
which produces dust (e.g. sawing dry wood).
Safe working practices
1. Do not operate the chain saw in the vicinity of
flammable dust or gases, as the motor generates
sparks and presents a risk of explosion.
2. Work only on firm ground and with a good footing.
Pay particular attention to obstacles (e.g. the
cable) in the working area. Take particular care
where moisture, ice, snow, freshly cut wood or
bark may make surfaces slippery. Do not stand on
ladders or trees when using the saw.
3. Take particular care when working on sloping
ground; rolling trunks and branches pose a
potential hazard.
4. Clean the area to be cut of foreign objects such as
sand, stones, nails, wire, etc. Foreign objects
damage the bar and chain, and can lead to
dangerous kickback.
5. Take particular care when cutting in the vicinity of
wire fences. Do nut cut into the fence, as the saw
may kick back.
6. Do not cut into the ground.
7. Cut pieces of wood singly, not in bunches or
stacks.
8. Avoid using the saw to cut thin branches and roots,
as these can become entangled in the chain saw.
Loss of balance presents a hazard.
9. Use a secure support (trestle) when cutting sawn
timber.
10. Do not use the chain saw to prise off or brush
away pieces of wood and other objects.
11. Guide the chain saw such that no part of your
body is within the extended path of the saw chain
(see figure).
006909
Kickback
1. Hazardous kickback may arise during work with
the chain saw. Kickback arises when the tip of the
bar (in particular the upper quarter) comes into
contact with wood or another solid object. This
causes the chainsaw to be deflected in the
direction of the operator.
006919
2. In order to avoid kickback, observe the following:
• Never begin the cut with the tip of the bar.
• Never use the tip of the bar for cutting. Take
particular care when resuming cuts which
have already been started.
• Start the cut with the chain running.
• Always sharpen the chain correctly. In
particular, set the depth gauge to the correct
height (refer to "Sharpening the chain " for
details).
• Never saw through several branches at a
time.
• When limbing, take care to prevent the bar
from coming into contact with other branches.
• When bucking, keep clear of adjacent trunks.
Always observe the bar tip.
• Use a trestle.
Transport and storage
1. Carry the chain saw by the front handle only, with
the bar pointing backwards.
2. Keep the chain saw in a secure, dry and locked
room out of the reach of children. Do not store the
chain saw outdoors.
SAVE THESE INSTRUCTIONS.
8
Page 9

WARNING:
MISUSE or failure to follow the safety rules stated in
this instruction manual may cause serious personal
injury.
ENC007-2
IMPORTANT SAFETY
INSTRUCTIONS
FOR BATTERY CARTRIDGE
1. Before using battery cartridge, read all
instructions and cautionary markings on (1)
battery charger, (2) battery, and (3) product
using battery.
2. Do not disassemble battery cartridge.
3. If operating time has become excessively
shorter, stop operating immediately. It may
result in a risk of overheating, possible burns
and even an explosion.
4. If electrolyte gets into your eyes, rinse them
out with clear water and seek medical
attention right away. It may result in loss of
your eyesight.
5. Do not short the battery cartridge:
(1) Do not touch the terminals with any
conductive material.
(2) Avoid storing battery cartridge in a
container with other metal objects such as
nails, coins, etc.
(3) Do not expose battery cartridge to water
or rain.
A battery short can cause a large current
flow, overheating, possible burns and
6. Do not store the tool and battery cartridge in
7. Do not incinerate the battery cartridge even if
8. Be careful not to drop or strike battery.
even a breakdown.
locations where the temperature may reach or
exceed 50 ゚ C (122 ゚ F).
it is severely damaged or is completely worn
out. The battery cartridge can explode in a fire.
SAVE THESE INSTRUCTIONS.
Tips for maintaining maximum battery life
1. Charge the battery cartridge before
completely discharged.
Always stop tool operation and charge the
battery cartridge when you notice less tool
power.
2. Never recharge a fully charged battery
cartridge.
Overcharging shortens the battery service life.
3. Charge the battery cartridge with room
temperature at 10 ゚ C - 40 ゚ C (50 ゚ F - 104 ゚ F).
Let a hot battery cartridge cool down before
charging it.
9
Page 10

Parts supplied
008588
Top handle
1
Battery cartridge
2
Sprocket cover
3
Front hand guard
4
Guide bar
5
Tip guard
6
Saw chain
7
008589
1
2
13
3
9
10
4
5
8
12
6
7
11
knob
8
Lock off button
9
Front handle
10
Switch trigger
11
Chain cover
12
Carabiner or rope
13
attachment point
FUNCTIONAL DESCRIPTION
CAUTION:
• Always be sure that the tool is switched off and the
battery cartridge is removed before adjusting or
checking function on the tool.
Installing or removing battery cartridge
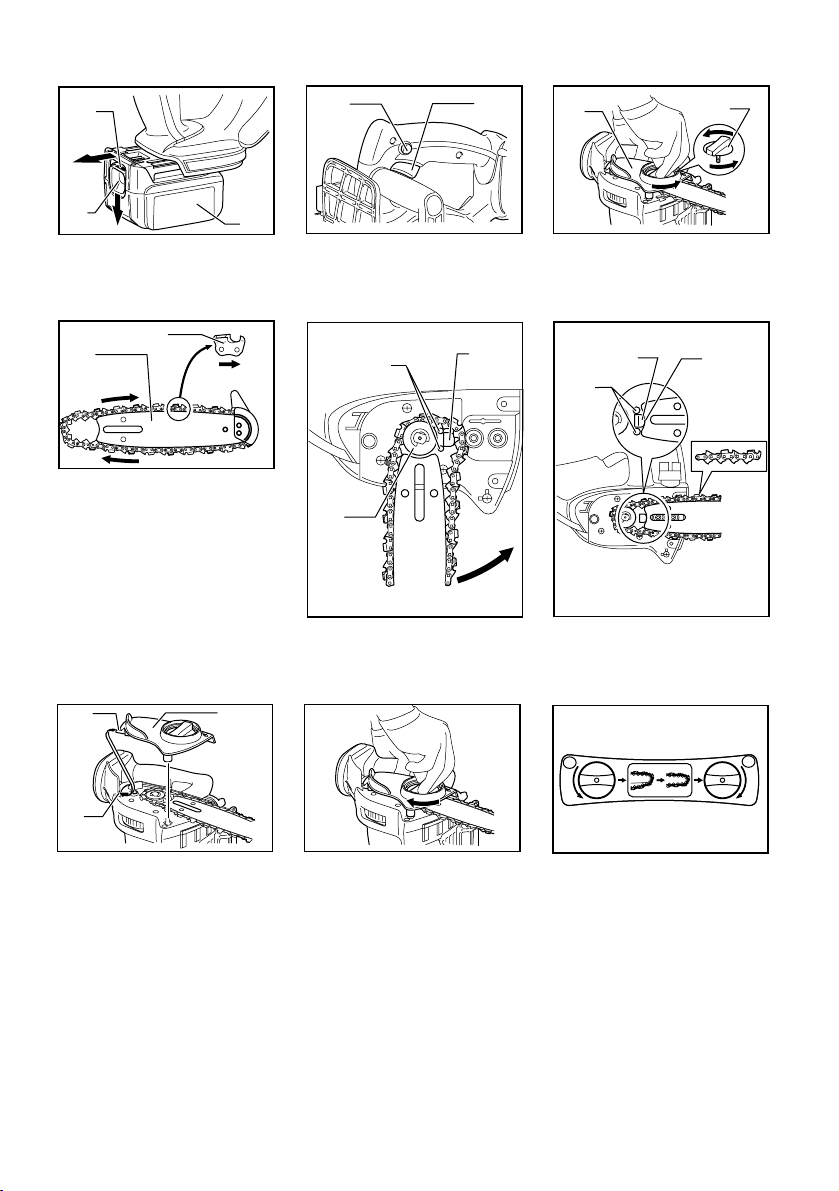
Fig.1
• Always switch off the tool before installation or
removal of the battery cartridge.
• To remove the battery cartridge, withdraw it from
the tool while sliding the button on the front of the
cartridge.
• To insert the battery cartridge, align the tongue on
the battery cartridge with the groove in the housing
and slip it into place. Always insert it all the way
until it locks in place with a little click. If you can
see the red part on the upper side of the button, it
is not locked completely. Insert it fully until the red
part cannot be seen. If not, it may accidentally fall
out of the tool, causing injury to you or someone
around you.
10
Page 11

• Do not use force when inserting the battery
cartridge. If the cartridge does not slide in easily, it
is not being inserted correctly.
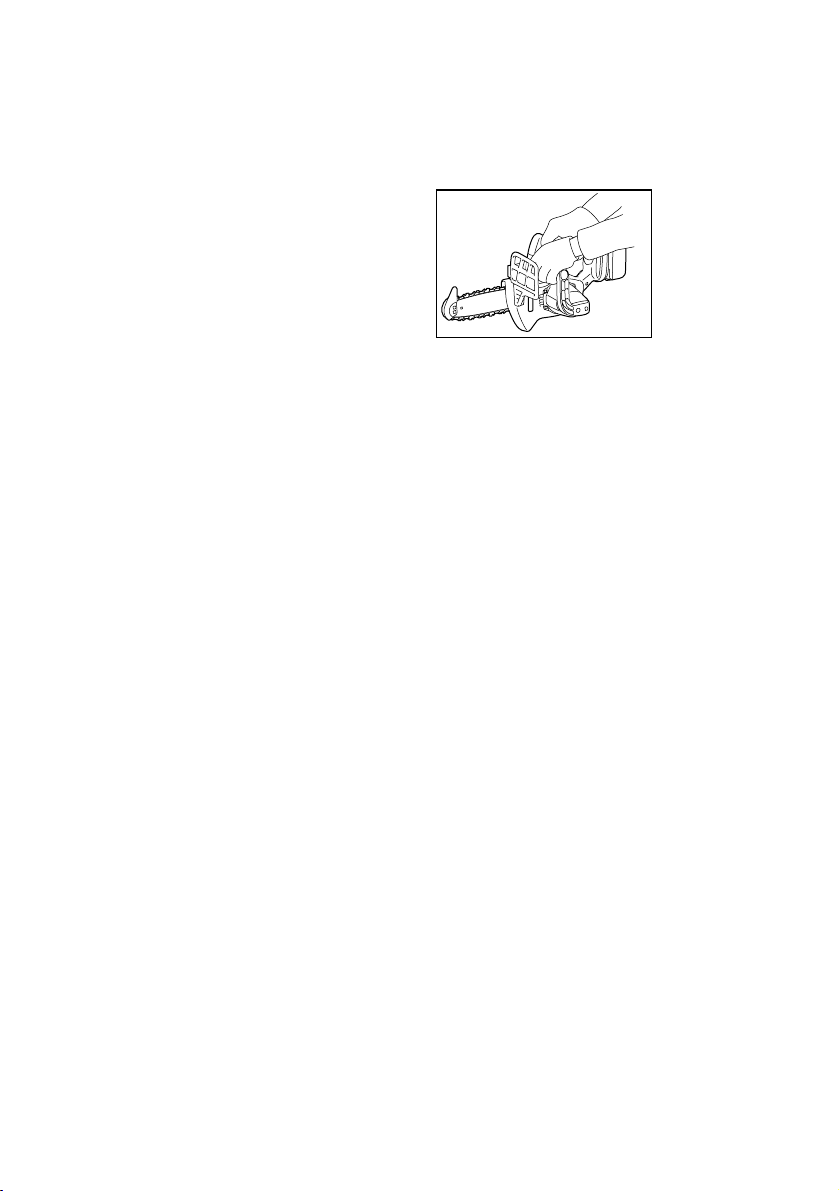
Switch action
CAUTION:
• Before inserting the battery cartridge into the tool,
always check to see that the switch trigger
actuates properly and returns to the "OFF" position
when released.
Fig.2
To prevent the switch trigger from being accidentally
pulled, a lock-off button is provided.
To start the tool, depress the lock-off button and pull the
switch trigger. Release the switch trigger to stop.
ASSEMBLY
CAUTION:
• Always be sure that the tool is switched off and the
battery cartridge is removed before carrying out
any work on the tool.
Installing or removing saw chain
CAUTION:
• Always be sure that the tool is switched off and the
battery cartridge is removed before installing or
removing the saw chain.
• Always wear gloves when installing or removing
the saw chain.
• Use only saw chain and guide bar with bar tip
designed for this chain saw (see the Extract from
the spare parts list).
• In order to prevent kickback, do not remove the bar
tip or replace the guide bar with one without a bar
tip.
Fig.3
Loosen the screw by turning counterclockwise the knob
until the sprocket cover comes off.
Remove the sprocket cover.
Remove saw chain and guide bar from the tool.
Fig.4
Fit in one end of the saw chain on the top of guide bar.
At this time, fit the saw chain as shown in the figure
because it rotates in the direction of arrow.
Fig.5
Place the saw chain so that the spring and boss are
positioned inside it and fit in the other end of saw chain
around the sprocket as shown in the figure.
Fig.6
While turning the guide bar counterclockwise, install it so
that the end of guide bar contacts the spring.
Fig.7
Insert the hook of sprocket cover into the hole in the tool
and then place the sprocket cover on the tool.
Fig.8
Turn the knob clockwise to tighten the screw firmly.
Adjusting saw chain tension
Fig.9
Just a slight loosening of the screw allows the saw chain
tension to be adjusted. After adjusting, retighten the
screw firmly.
Fig.10
CAUTION:
• For a while after a new saw chain is installed, it
tends to become loosened. From time to time
check the saw chain tension before use.
• Low tension of saw chain may cause coming out of
place.
• Installing or removing saw chain should be carried
out in a clean place free from sawdust and the like.
OPERATION
Lubrication
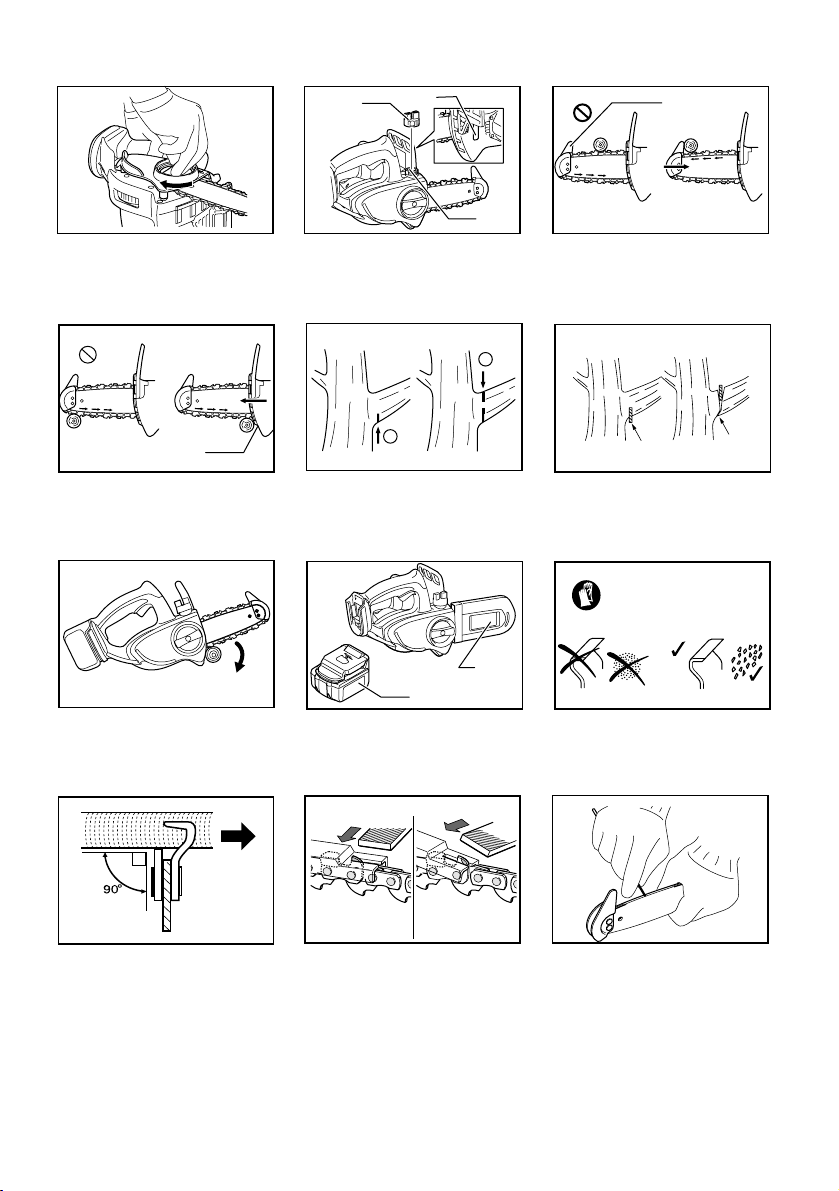
Fig.11
Saw chain is automatically lubricated when the tool is in
operation.
Check the amount of remaining oil in the oil tank through
the oil inspection window.
To refill the tank, remove the cap from the oil tank
opening. The oil tank capacity is 80 ml.
After refilling the tank, always screw the provided oil tank
cap on the chain saw.
CAUTION:
• When filling the chain saw with chain oil for the first
time, or refilling the tank after it has been
completely emptied, add oil up to the bottom edge
of the filler neck. The oil delivery may otherwise be
impaired.
• As a saw chain oil, use oil exclusively for Makita
chain saws or oil available in market.
• Never use oil including dust and particles or
volatile oil.
• When pruning trees, use botanical oil. Mineral oil
may harm trees.
• Never force the chain saw when pruning trees.
• Before cutting out, make sure that the provided oil
tank cap is screwed in place.
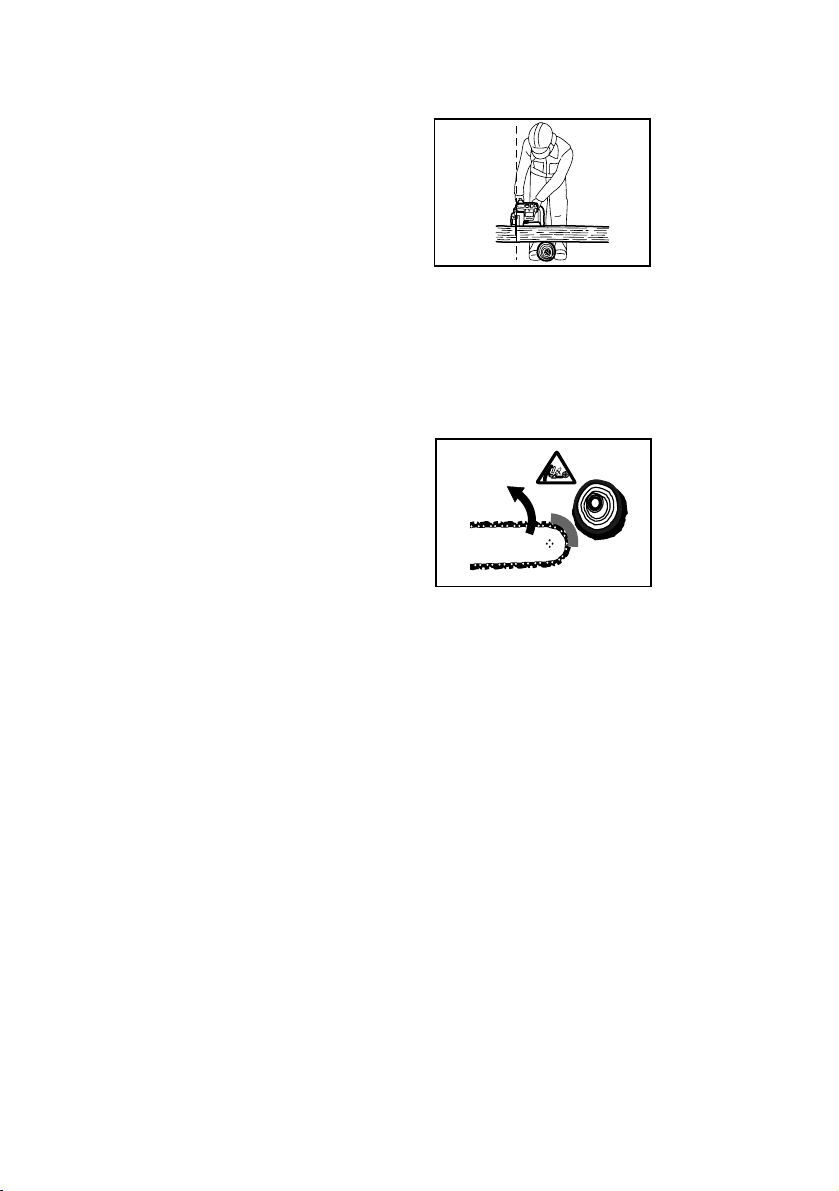
Hold the chain saw away from the tree. Start it and wait
until lubrication on saw chain is adequate.
Bring the tip guide/lower guide into contact with the
branch to be cut before switching on. Cutting without
bringing the tip guide/lower guide into contact with the
branch may cause the guide bar to wobble, resulting in
injury to operator.
Saw the wood to be cut by just moving it down.
11
Page 12

Pruning trees
Fig.12
Fig.13
CAUTION:
• Keep all parts of the body away from the saw chain
when the motor is operating.
• Hold the chain saw firmly with both hands when
the motor is running.
• Do not overreach. Keep proper footing and
balance at all times.
Bring the tip guide/lower guide into contact with the
branch to be cut before switching on. Cutting without
bringing the tip guide/lower guide into contact with the
branch may cause the guide bar to wobble, resulting in
injury to operator.
When cutting thick branches, first make a shallow
undercut and then make the finish cut from the top.
Fig.14
If you try to cut off thick branches from the bottom, the
branch may close in and pinch the saw chain in the cut.
If you try to cut off thick branches from the top without a
shallow undercut, the branch may splinter.
Fig.15
If you cannot cut the timber right through with a single
stroke:
Apply light pressure to the handle and continue sawing
and draw the chain saw back a little; then apply the
spike a little lower and finish the cut by raising the
handle.
Fig.16
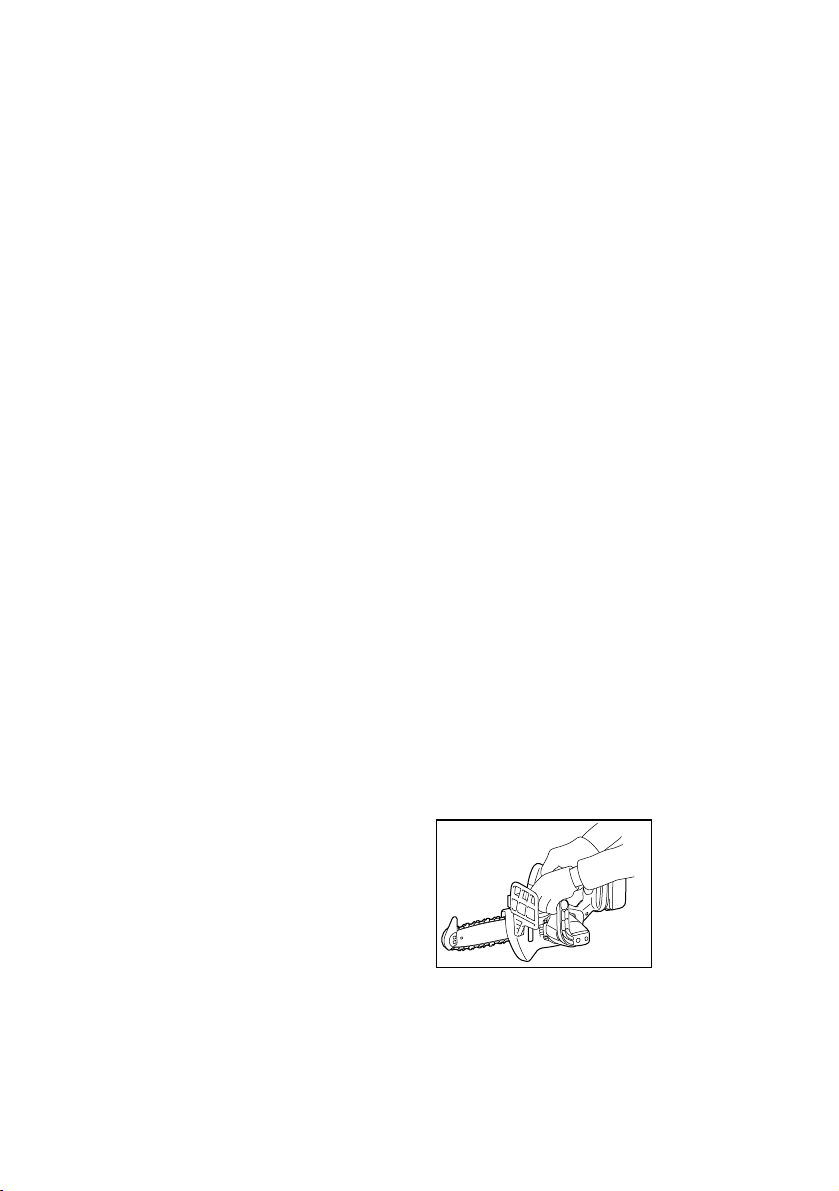
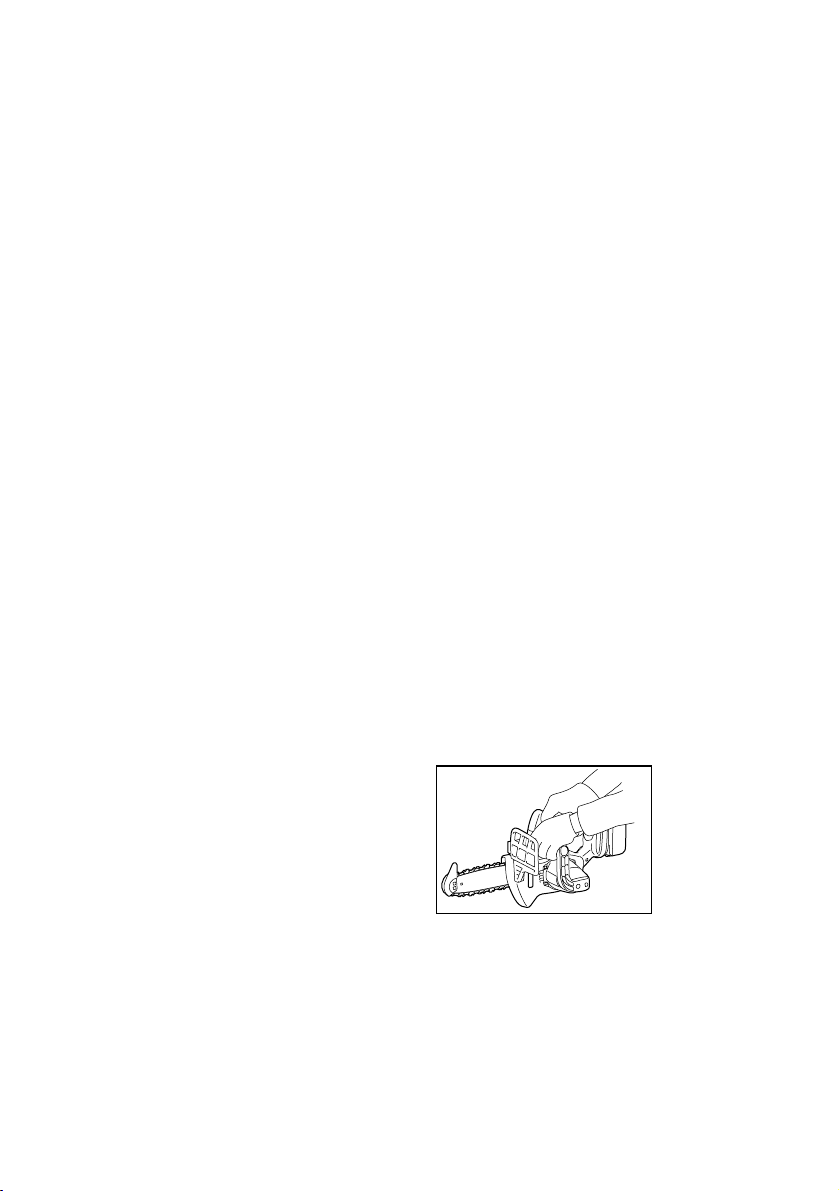
Carrying tool
Fig.17
Always remove the battery cartridge from the tool and
overlap the guide bar with the scabbard before carrying
the tool. Also cover the battery cartridge with the battery
cover.
MAINTENANCE
CAUTION:
• Always be sure that the tool is switched off and the
battery cartridge is removed before attempting to
perform inspection or maintenance.
• Always wear gloves when performing any
inspection or maintenance.
Sharpening the saw chain
CAUTION:
• Always remove the battery cartridge and wear
safety gloves when performing work on the saw
chain.
Fig.18
Sharpen the saw chain when:
− Mealy sawdust is produced when damp wood is
cut;
− The chain penetrates the wood with difficulty, even
when heavy pressure is applied;
− The cutting edge is obviously damaged;
− The saw pulls to the left or right in the wood. The
reason for this behaviour is uneven sharpening of
the saw chain, or damage to one side only.
Sharpen the saw chain frequently, but remove only a
little material each time.
Two or three strokes with a file are usually sufficient for
routine resharpening. When the saw chain has been
resharpened several times, have it sharpened in a
MAKITA specialist repair shop.
File and file guiding
− Use a special round file (optional accessory) for
saw chains, with a diameter of 4 mm, to sharpen
the chain. Normal round files are not suitable.
Fig.19
− The file should only engage the material on the
forward stroke. Lift the file off the material on the
return stroke.
− Sharpen the shortest cutter first. The length of this
cutter is then the gauge dimension for all other
cutters on the saw chain.
− Guide the file as shown in the figure.
− The file can be guided more easily if a file holder
(accessory) is employed. The file holder has
markings for the correct sharpening angle of 30 °
(align the markings parallel to the saw chain) and
limits the depth of penetration (to 4/5 of the file
diameter).
Guide the file as shown in the figure.
− After sharpening the chain, check the height of the
depth gauge using the chain gauge tool (optional
accessory).
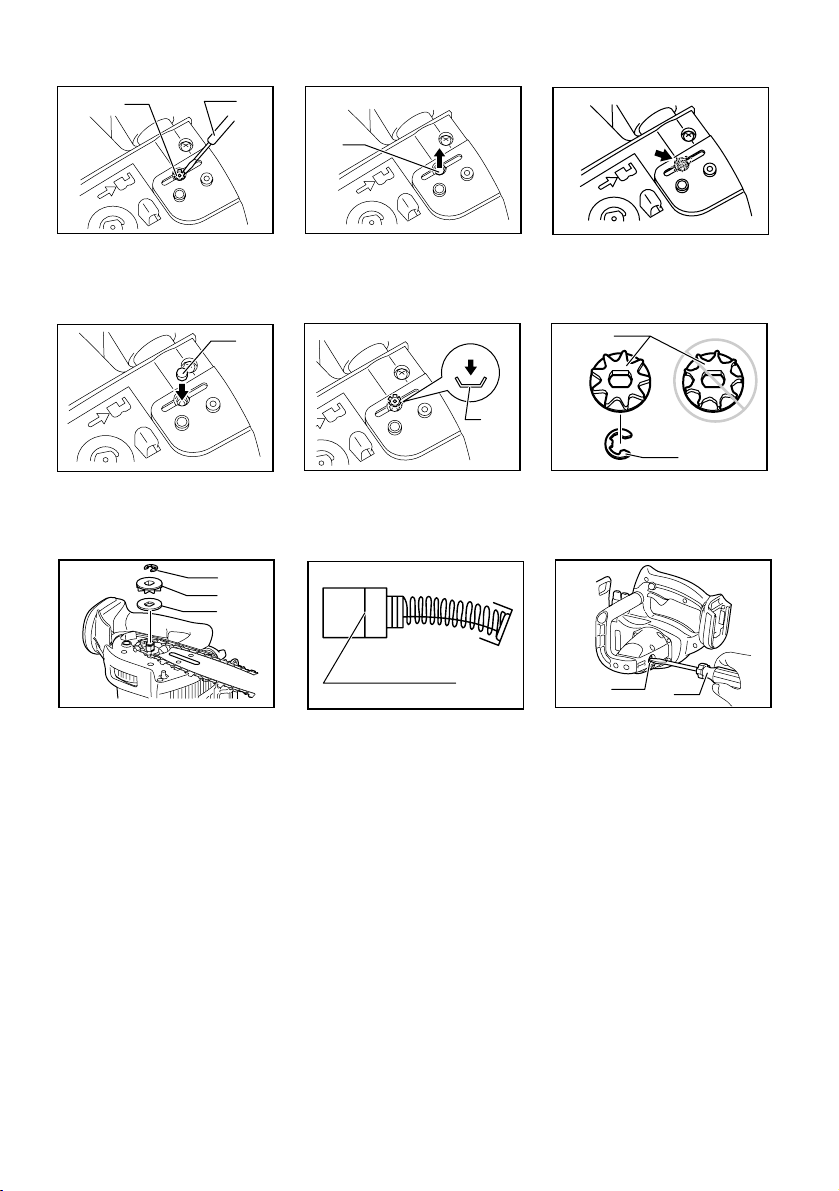
Fig.20
− Remove any projecting material, however small,
with a special flat file (optional accessory).
− Round off the front of the depth gauge again.
− Wash away dust and particles from saw chain after
adjusting the height of depth gauge.
Cleaning guide bar
Fig.21
Chips and sawdust will build up in the guide bar groove,
clogging it and impairing oil flow. Always clean out the
chips and sawdust when sharpening or replacing the
saw chain.
Cleaning the oil filter at the oil discharge hole
Small dust or particles may be built up in the oil filter at
the oil discharge hole during operation.
Small dust or particles built up in the oil filter may impair
the oil discharge flow and cause an insufficient
lubrication on the whole saw chain.
12
Page 13

When a poor chain oil delivery occurs at the top of
guide bar, clean the filter as follows.
Remove the battery cartridge from the tool.
Remove the sprocket cover and saw chain from the tool.
(Refer to the section titled " Installing or removing saw
chain ".)
Fig.22
Remove the push nut using a slotted bit screwdriver with
a slender shaft or the like.
Fig.23
Take the filter out of the chain saw and remove small
dust or particles from it. When the filter is too dirty,
replace it with a new one.
Insert the battery cartridge into the tool.
Fig.24
Pull the switch trigger to flow built-up dust or particles off
the oil discharge hole by discharging chain oil.
Remove the battery cartridge from the tool.
Fig.25
Insert the cleaned oil filter into the oil discharge hole.
When the filter is too dirty, replace it with a new one.
Fig.26
Insert the push nut with its correct side facing up as
shown in the figure into the oil discharge hole to secure
the filter. When the filter cannot be secured with a
disfigured push nut, replace the push nut with a new
one.
Reinstall the sprocket cover and saw chain on the tool.
Replacing the sprocket
Before fitting a new saw chain, check the condition of the
sprocket.
Fig.27
CAUTION:
• A worn sprocket will damage a new saw chain.
Have the sprocket replaced in this case. The
sprocket need to be installed so that it always
faces as shown in the figure.
Fig.28
Always fit a new locking ring when replacing the
sprocket.
Replacing carbon brushes
Fig.29
Remove and check the carbon brushes regularly.
Replace when they wear down to the limit mark. Keep
the carbon brushes clean and free to slip in the holders.
Both carbon brushes should be replaced at the same
time. Use only identical carbon brushes.
Use a screwdriver to remove the brush holder caps.
Take out the worn carbon brushes, insert the new ones
and secure the brush holder caps.
Fig.30
Storing tool
Clean the tool before storing. Remove any chips and
sawdust from the tool after removing the sprocket cover.
After cleaning the tool, run it under no load to lubricate
the saw chain and guide bar.
Cover the guide bar with the scabbard.
Remove oil from the oil tank to empty it and place the
chain saw with the tank cap facing upward.
To maintain product SAFETY and RELIABILITY, repairs,
any other maintenance or adjustment should be
performed by Makita Authorized Service Centers,
always using Makita replacement parts.
ACCESSORIES
CAUTION:
• These accessories or attachments are
recommended for use with your Makita tool
specified in this manual. The use of any other
accessories or attachments might present a risk of
injury to persons. Only use accessory or
attachment for its stated purpose.
If you need any assistance for more details regarding
these accessories, ask your local Makita Service Center.
• Various type of Makita genuine batteries and
chargers
• Saw chain
• Scabbard
• Guide bar complete
• File
13
Page 14
УКРАЇНСЬКА
1-1. Червона частина
1-2. Кнопка
1-3. Касета з акумулятором
2-1. Кнопка блокування вимкненого
положення
2-2. Кнопка вимикача
3-1. Кришка зірочки
3-2. Ручка
4-1. Різак
4-2. Шина
4-3. Стрілка
5-1. Пружина
5-2. Зірочка
5-3. Втулка
Пояснення до загального виду
6-1. Пружина
6-2. Шина
6-3. Втулка
7-1. Кришка зірочки
7-2. Скоба
7-3. Отвір
11- 1. Кришечка мастильного бака
11- 2. Оглядове вікно мастильного
бака
11- 3. Отвір мастильного бака
12-1. Кінцева
напрямна
13-1. Нижня напрямна
17-1. Касета з акумулятором
17-2. Піхви (чохол для пили)
22-1. Натискна гайка
22-2. Викрутка із шліцованим
наконечником
23-1. Фільтр
25-1. Фільтр
26-1. Натискна гайка
27-1. Зірочка
27-2. Стопорне кільце
28-1. Стопорне кільце
28-2. Зірочка
28-3. Шайба
29-1. Обмежувальна відмітка
30-1. Ковпачок щіткотримача
30-2. Викрутка
ТЕХНІЧНІ ХАРАКТЕРИСТИКИ
Швидкість ланцюга за хвилину (хв.-1) 4,8 м/с (290 м/хв.) 5,0 м/с (300 м/хв.)
Ланцюгова пила
• Через те, що ми не припиняємо програми досліджень і розвитку, наведені тут технічні характеристики можуть бути змінені
без попередження.
• Примітка. У різних країнах технічні характеристики можуть бути різними.
Символи
Далі наведені символи, які застосовуються для
позначення обладнання. Перед користуванням
переконайтеся, що Ви розумієте їхнє значення.
・ Прочитайте дану інструкцію.
・ Вдягайте засоби захисту очей.
・ Вдягайте засоби захисту вух.
・ Обов'язково одягайте шолом,
・ Використовуйте належний захист ніг
・ Не залишайте
・ Під час роботи тримайте пилу обома
Модель BUC121 BUC122
Довжина шини 115 мм
Кількість приводних ланок 42
Загальна довжина 422мм 422мм
Чиста вага 2,4 кг 2,5 кг
Номінальна напруга 14,4 В пост. Ток а 18 В пост. Ток а
Тип 25 AP
Крок 1/4"
END005-2
・ Цю пилу може використовувати
тільки належним чином навчений
персонал.
・ Тільки для країн ЄС
Не викидайте електричне
обладнання разом з побутовим
сміттям!
Відповідно до Європейської
директиви 2002/96/EC про утилізацію
електричного
та електронного
обладнання та її застосуванням
згідно з нормами національного
окуляри та засоби захисту органів
слуху.
та рук.
інструмент під дощем.
законодавства, електрообладнання,
яке вийшло з ладу, необхідно збирати
окремо та відправляти на переробне
підприємство, яке відповідає вимогам
охорони довкілля.
Призначення
руками! Експлуатація за допомогою
тільки однієї руки є вкрай
небезпечною!
Інструмент призначено для різання пиломатеріалу та
колод.
ENE031-1
14
Page 15

Для моделі BUC121
ENG101-2
Для Європейських країн тільки
Шум
Рівень шуму за шкалою А у типовому виконанні
визначений відповідно до EN60745-2-13:
Рівень звукового тиску (L
Погрішність (К): 2 дБ(A)
) : 84.0 дБ(A)
pA
Рівень шуму під час роботи може перевищувати 85
дБ (А).
Користуйтеся засобами захисту слуху.
ENG221-1
Вібрація
Загальна величина вібрації (сума трьох векторів)
визначається згідно EN60745-2-13:
Режим роботи: пиляння деревини
Вібрація (a
Похибка (К): 1.5 м/с
) : 4.2 м/с
год
2
2
Для моделі BUC122
ENG101-2
Для Європейських країн тільки
Шум
Рівень шуму за шкалою А у типовому виконанні
визначений відповідно до EN60745-2-13:
Рівень звукового тиску (L
Погрішність (К): 2 дБ(A)
) : 84.6 дБ(A)
pA
Рівень шуму під час роботи може перевищувати 85
дБ (А).
Користуйтеся засобами захисту слуху.
ENG221-1
Вібрація
Загальна величина вібрації (сума трьох векторів)
визначається згідно EN60745-2-13:
Режим роботи: пиляння деревини
Вібрація (a
Похибка (К): 1.5 м/с
) : 4.3 м/с
год
2
2
ENH016-5
ДЕКЛАРАЦІЯ ВІДПОВІДНОСТІ ЄС
Я, Като, уповноважений заявити, що обладнання
компанії МАКІТА,
Ідентифікаційний номер моделі ЄСM6 08 02 24243
083
BUC121
відповідає стандартним вимогам безпеки й охорони
праці, відзначеним у нормативних документах ЄС:
Стандарт ЄС щодо механічного устаткування
98/37/EC, Утворення шуму 2000/14/EG, стандарт EU
EMC.
Вимоги зазначених вище нормативів ЄС були
запроваджені головним чином спираючись на
стандарти: EN60745-2-13, EN 55014, ENISO11681.
Процедуру оцінки відповідності 2000/14/EG було
виконано
шуму (Lwa) 92.0 складає дБ(A). Гарантований рівень
звукової потужності (Ld) становить 94 дБ(A). Типові
випробування ЄС згідно з 98/37/EG проведено: TÜV
Product Service GmbH, Zertifizierungsstelle,
відповідно до Додатка V. Заміряний рівень
Ridlerstraße 31, D-80339 München.
Том оя су Като CE2007
000230
Директор
Виконавчий виробник:
Makita Corporation
3-11-8, Sumiyoshi-cho, Anjo, Aichi, ЯПОНІЯ
Повноважний представник у Європі:
Makita International Europe Ltd.
Michigan Drive, Tongwell, Milton Keynes, Bucks MK15
8JD АНГЛІЯ
ENH016-5
ДЕКЛАРАЦІЯ ВІДПОВІДНОСТІ ЄС
Я, Като, уповноважений заявити, що обладнання
компанії МАКІТА,
Ідентифікаційний номер моделі ЄСM6 08 02 24243
083
BUC122
відповідає стандартним вимогам безпеки й охорони
праці, відзначеним у нормативних документах ЄС:
Стандарт ЄС щодо механічного устаткування
98/37/EC, Утворення шуму 2000/14/EG, стандарт EU
EMC.
Вимоги зазначених вище нормативів ЄС були
запроваджені головним чином спираючись на
стандарти: EN60745-2-13, EN 55014, ENISO11681.
Процедуру оцінки відповідності 2000/14/EG було
виконано
відповідно до Додатка V. Заміряний рівень
шуму (Lwa) 92.7 складає дБ(A). Гарантований рівень
звукової потужності (Ld) становить 95 дБ(A). Типові
випробування ЄС згідно з 98/37/EG проведено: TÜV
Product Service GmbH, Zertifizierungsstelle,
Ridlerstraße 31, D-80339 München.
Том оя су Като CE2007
000230
Директор
Виконавчий виробник:
Makita Corporation
3-11-8, Sumiyoshi-cho, Anjo, Aichi, ЯПОНІЯ
Повноважний представник у Європі:
Makita International Europe Ltd.
Michigan Drive, Tongwell, Milton Keynes, Bucks MK15
8JD АНГЛІЯ
GEB037-1
Попередження з техніки
безпеки для ланцюгової пили:
НІКОЛИ НЕ СЛІД втрачати пильності та
розслаблюватися при користуванні виробом (що
приходить при частому користуванні), слід
завжди строго додержуватися правил безпеки
під час користування ланцюговою пилою. У разі
небезпечного або неправильного користування
15
Page 16
цим інструментом, можна здобути серйозних
поранень.
1. Коли ланцюгова пила працює, слід забрати
усі частини тіла від пильного ланцюга.
Перед тим, як запускати ланцюгову пилу
слід перевірити, щоб пильний ланцюг
нічого не торкався. Відволікання на короткий
час під час роботи пили може призвести до
того, що одяг буде затягнено пильним
ланцюгом.
2. Слід завжди тримати ланцюгову пилу
правою рукою за задню ручку, а лівою – за
передню. Якщо пилу тримати по-іншому, то це
підвищує ризик травм, тому цього ніколи
неможна робити.
3. Слід одягати засоби захисту органів зору та
слуху. Також рекомендується
використовувати засоби захисту голови,
рук, ніг та ступнів. Належний
знижує кількість травм від сміття. Що
розлітається, або від випадкового контакту з
пильним ланцюгом.
4. Заборонено користуватись пилою,
знаходячись на дереві. Робота із пилою на
дереві може призвести до травм.
5. Слід завжди твердо стояти на ногах, та
працювати пилою стоячи на стійкій,
надійній та рівній поверхні. Робота
слизьких або нестійких поверхнях, таких як
драбини, може призвести до втрати рівноваги
та контролю над пилою.
6. Під час різання гілки, що знаходиться під на
тяжінням, слід остерігатись відскоку. Коли
натяг волокон деревини знімається, то
натягнута гілка може вдарити оператора та/або
відкинути пилу із втратою контролю над нею.
7.
Слід бути дуже обережнім під час обрізання
кущів та порості. Гнучкі гілки можуть бути
затягнені в пильний ланцюг та їх може
потягнути у напрямку до оператора, або
оператора може потягнути, і він втратить
рівновагу.
8. Ланцюгову пилу слід переносити за
передню ручку у вимкненому стані,
відвернувши її від тіла. Під час
або зберігання пили на неї слід завжди
встановлювати кожух для шини. Вірне
поводження із ланцюговою пилою знизить
вірогідність випадкового контакту із пильним
ланцюгом, що рухається.
9. Виконуйте вимоги інструкцій щодо
змащування, натягу ланцюга та заміни
приналежностей. Невірно натягнута або
змащена пила може або зламатись, або буде
підвищено ризик віддачі
10. Ручки повинні бути сухими, чистими та не
бути забрудненими мастило або жиром.
Жирні або забруднені мастилом ручки є
захисний одяг
на
перевезення
.
слизькими, що призводить до втрати контролю
над інструментом.
11. Можна різати тільки деревину. Пильний
ланцюг слід застосовувати тільки за їх
призначенням. Наприклад: Заборонено
використовувати ланцюгову пилу для
різання пластика або не дерев
будівельні матеріали. Використання
ланцюгової пили не за призначенням може
призвести до створення небезпечної ситуації.
12. Причини та заходи запобігання віддачі:
Якщо кінець шини торкається якогось предмета,
або коли дерев’яна деталь закривається та
защипає ланцюг в пропилі, може трапитись
віддача.
Торкання кінцем в деяких випадках може
призвести до раптової
шину буде підкинуто догори та назад в напрямку
оператора.
Затискання пильного ланцюга у верхній частині
шини може призвести то різкого штовхання
шини в напрямку оператора.
Будь-яка з цих реакцій може призвести до
втрати контролю над пилою, що в свою чергу
може призвести до серйозних травм. Не слід
суцільно покладатись на засоби безпеки,
встановлені на пилі. Як користувач ланцюгової
пили, ви повинні вжити декілька заходів, щоб
захиститись від нещасних випадків або
поранень під час пиляння.
Причинами віддачі є неправильне користування
інструментом та/або неправильний порядок
експлуатації або умови експлуатації, але їх
можна уникнути дотримуючись запобіжних
заходів, що наведені
− Слід міцно триматись за ручки пили усіма
пальцями обох рук, та розташовувати своє
тіло таким чином, щоб було можливо
протистояти силі віддачі. Оператор може
контролювати силу віддачі, якщо було
вжито належних заходів. Неможна
відпускати пилу.
008625
− Неможна тягнутись або пиляти вище
рівня плечей.. Це дає можливість
запобігти випадкове торкання кінцем шини,
а також дозволяє ліпше контролювати
ланцюгову пилу в непередбачених
16
зворотної реакції, коли
нижче:
’яні
Page 17

ситуаціях.
− Можна використовувати тільки вказані
виробником запасні шини та ланцюги..
Використання невірних запасних шин та
ланцюгів може призвести до поламки
ланцюга та/або віддачі.
− Слід дотримуватись інструкцій
виробника щодо заточування та
обслуговування пили. Зменшення
висоти калібру глибини може призвести до
посилення віддачі.
ДОДАТКОВІ ПРАВИЛА
БЕЗПЕКИ
1. Слід уважно прочитати ці інструкції для того,
щоб ознайомитись з принципом роботи
ланцюгової пили.
2. Перед користуванням ланцюгової пили у
перший раз, здобудьте інструкції з її
експлуатації. Якщо це неможливо, слід хоча б
потренуватися різати колоди на козлах перед
початком роботи.
3. Забороняється дітям та підліткам молодше 18
років користуватися ланцюговою пилою.
заборону може бути знято з юнаків старше 16
років під час проходження практики під
наглядом майстра.
4. Користування ланцюговою пилою потребує
високого рівня зосередженості. Не слід
користуватися пилою, якщо ви почуваєте себе
не готовими до роботи. Всю роботу слід
виконувати спокійно та обережно.
5. Забороняється працювати після прийняття
алкоголю або ліків.
Правильне використання
1. Ланцюгова пила призначена виключно для
різання деревини. Забороняється
застосовувати її наприклад для різання
пластмаси або пористого бетону.
2. Використовуй ланцюгову пилу тільки для
виконання операцій, зазначених у цих
інструкціях. Слід здійснювати , а не ,
наприклад, користайся нею для підрізання
огорожі або для подібної мети.
3. Ланцюгову пилу не слід використовувати у
лісівництві, а саме для звалювання та
розрізування стоячого лісу. Кабель ланцюгової
пили не забезпечує оператора рухливістю та
безпекою, які необхідні для такої роботи.
4. Ланцюгова пила не призначена для
промислового застосування.
5. Не слід перенавантажувати ланцюгову пилу.
Засоби індивідуального захисту
1. Одяг повинен щільно прилягати до тіла, але не
повинен заважати руху.
2. Нижче наведено захисний одяг, який слід
одягати під час роботи:
• Випробуваний захисний шолом, якщо існує
загроза падіння гілок або т.і.;
• Маску або окуляри;
• Відповідні засоби захисту органів слуху
(захисні навушники, звичайні або
формувальні навушники). Октавний
аналізатор звуку за проханням.
• Щільні шкіряні захисні рукавиці;
• Довгі штани виготовлені із міцної тканини;
• Захисний робочий одяг із стійкої к прорізам
тканини;
• Захисні черевики або взуття з неслизькою
підошвою, черевики з металевим носком та
одяг із стійкої к прорізам тканини;
• Дихальна маска під час виконання робіт, що
супроводжуються утворенням пилу
(наприклад пиляння сухої деревини).
Заходи безпечної роботи
1. Не слід користатися ланцюговою пилою
поблизу приміщень де знаходяться займисті
пил або гази, тому що під час роботи двигуна
утворюється іскра, що становить ризик
Цю
вибуху.
2. Працювати слід на твердому ґрунті та з
надійною опорою. Звертай особливу увагу на
перешкоди (наприклад кабель), що
знаходяться в робочій зоні. Приділяй особливу
увагу, якщо
через вологу, лід, сніг, свіжо
відрізану деревину або кору, поверхні стануть
слизькими. Не слід користуватися пилою на
сходах або на дереві.
3. Приділяй особливу увагу під час робити на
похилому ґрунті; стовбури та гілки, що
катаються, можуть становити небезпеку.
4. Зону, що буде різатися слід почистити від
сторонніх предметів, таких як
дроти, цвяхи і т.д. Сторонні предмети можуть
ушкодити шину або ланцюг та призвести до
небезпечної віддачі.
5. Слід бути дуже уважними під час різання біля
дротових парканів. Слід уникати врізання у
паркан, це може призвести до віддачі пили.
6. Не слід врізатися у землю.
7. Слід різати частини деревини
зв'язках або штабелях.
8. Не слід різати пилою тонкі гілки та коріння,
вони можуть застрягти в ланцюговій пилі. Не
слід втрачати рівновагу, це дуже небезпечно.
9. Під час різання пиломатеріалу слід
користатися надійною опорою (козла).
10. Не слід використовувати пилу для зняття або
змітання часток деревини
або інших предметів.
11. Спрямовуйте ланцюгову пилу таким чином,
щоб жодна з частин вашого тіла не
знаходилась на широкому шляху ланцюга пили
(дивись малюнок).
пісок, каміння,
по одинці, а не у
17
Page 18

006909
Віддача
1. Під час роботи з ланцюговою пилою може
статися небезпечна віддача. Віддача виникає,
коли кінець шини (особливо верхня чверть)
торкається деревини або іншого твердого
предмету. Це призводить до того, що
ланцюгова пила прогинається у бік оператора.
006919
2. Для того, щоб запобігти виникнення віддачі,
слід дотримуватись зазначених нижче правил:
• Ніколи не слід починати різання кінцем
шини.
• Ніколи не слід різати кінцем шини.
Особливу увагу слід приділяти поновленню
вже початих прорізів.
• Починай різати при працюючому ланцюгу.
• Слід завжди правильно загострювати
ланцюг. Особливо, слід встановити
правильну висоту обмежувача глибини
(подробиці дивись у розділі "Загострення
ланцюга").
• Ніколи не слід прорізати одночасно
декілька гілок.
• Під час обрізки суків, слід стежити, щоб
шина не торкалась інших гілок.
• Під час розпилювання на колоди слід бути
обережними зі стовбурами, що знаходяться
поруч. Слід завжди слідкувати за
наконечником шини.
• Користуйся козлами.
Транспортування та зберігання
1. Ланцюгову пилу слід тримати тільки за
передню ручку таким чином, щоб шина була
спрямована назад.
2. Ланцюгову пилу слід зберігати у надійному,
сухому та замкнутому приміщенні, щоб діти не
змогли її дістати. Не слід зберігати ланцюгову
пилу зовні.
ЗБЕРІГАЙТЕ ЦІ ВКАЗІВКИ
УВАГА:
НЕДОТРИМАННЯ правил техніки безпеки,
наведених у цій інструкції з експлуатації, може
призвести до серйозного травмування.
ENC007-2
ВАЖЛИВІ ІНСТРУКЦІЇ БЕЗПЕКИ
ДЛЯ КАСЕТИ АКУМУЛЯТОРА
1. Перед тим як користуватися касетою
акумулятора, слід прочитати усі інструкції
та попереджуючі відмітки щодо (1)
зарядний пристрій акумулятора, (2)
акумулятор та (3) вироби, що працюють від
акумулятора.
2. Не слід розбирати касету акумулятора.
3. Якщо період роботи дуже покоротшав, слід
негайно припинити користування. Це може
призвести до ризику перегріву, опіку та
навіть вибуху.
4. Якщо
електроліт потрапив до очей, слід
промити їх чистою водою та негайно
звернутися за медичного закладу. Це може
призвести до втрати зору.
5. Не замкніть касету акумулятора.
(1) Не слід торкатися клем будь яким
струмопровідним матеріалом.
(2) Не слід зберігати касету акумулятора в
ємності з іншими металевими
предметами, такими як цвяхи, монети і
т.д.
(3) Не залишайте касету акумулятора під
дощем, запобігайте контакту з водою.
Коротке замикання може призвести до
великого струму, перегріву, можливих
опіків та навіть виходу з ладу.
6. Не слід зберігати інструмент та касету з
акумулятором в містах, де температура
може сягнути та перевищити 50гр.゚ C (122 ゚
F).
7. Не слід спалювати
касету з акумулятором
навіть, якщо вона була неодноразово
пошкоджена або повністю спрацьована.
Касета з акумулятором може вибухнути в
огні.
8. Не слід кидати або ударяти акумулятор.
ЗБЕРІГАЙТЕ ЦІ ВКАЗІВКИ
Поради по забезпеченню максимального
строку експлуатації акумулятора
1. Касету з акумулятором слід заряджати до
того, як він розрядиться повністю.
18
Page 19

Завжди слід зупинити роботу інструменту
та зарядити акумулятор, якщо ви помітили
зменшення потужності інструменту.
2. Ніколи не слід заряджати повторно
повністю заряджену касету з акумулятором.
Перезарядження скорочує строк
експлуатації акумулятора.
3. Касету з акумулятором слід заряджати при
кімнатній температурі 10 ゚ C - 40 ゚ C (50 ゚ F 104 ゚ F). Перед тим як заряджати касету з
акумулятором слід
остигне.
залишити її доки вона не
19
Page 20

Запчастини, що поставляються
1
2
008588
Верхня ручка
1
Касета з акумулятором
2
Кришка зірочки
3
Передня захисна
4
огорожа для рук
Шина
5
Кожух наконечника
6
Ланцюгова пила
7
008589
4
5
8
13
3
9
12
10
6
7
11
Ручка
8
Кнопка блокування
9
вимкненого положення
Передня ручка
10
Кнопка вимикача
11
Кришка ланцюга
12
Місце для закріплення
13
карабіна або мотузки
ІНСТРУКЦІЯ З ВИКОРИСТАННЯ
ОБЕРЕЖНО:
• Завжди перевіряйте, щоб прилад був
вимкнений, а касета з акумулятором була знята,
перед регулюванням або перевіркою
функціонування інструмента.
Встановлення та зняття касети з
акумулятором.
Fig.1
• Перед тим, як встановлювати або знімати
касету з акумулятором, інструмент слід завжди
вимикати.
• Для того, щоб зняти касету з акумулятором, її
слід витягти з інструмента, натиснувши кнопку
спереду касети.
• Для того, щоб вставити касету з акумулятором,
слід сумістити шпонку касети з батареями із
пазом в корпусі та вставити касету. Касету слід
завжди вставляти до упору доки не почується
щиглик, і касету буде заблоковано в робочому
положенні. Якщо на верхній частині кнопки
20
Page 21

видна червона частина, це означає, що вона
заблокована неповністю. Вставте касету
повністю, доки червону частину не буде видно.
Якщо цього не зробити, то касета може
випадково випасти з інструмента та поранити
вас або людей, що знаходяться поряд.
• Не застосовуйте силу, вставляючи касету з
акумулятором. Якщо касета не вставляється
легко, то це означає, що ви її невірно
вставляєте.
Дія вимикача.
ОБЕРЕЖНО:
• Перед тим, як вставляти касету з акумулятором
в інструмент, слід перевірити належну роботу
курка вмикача, тобто щоб він повертався у
положення "ВИМК.", коли його відпускають.
Fig.2
Для того, щоб запобігти випадковому натисканню
курка вмикача, є кнопка блокування вимкненого
положення.
Для того, щоб запустити інструмент, слід натиснути
на кнопку блокування вимкненого положення та
натиснути на курок вмикача. Для зупинення роботи
курок слід відпустити.
КОМПЛЕКТУВАННЯ
ОБЕРЕЖНО:
• Завжди перевіряйте, щоб прилад був
вимкнений, а касета з акумулятором була знята,
перед тим, як проводити будь-які роботи на
інструменті.
Встановлення та зняття пильного ланцюга
ОБЕРЕЖНО:
• Завжди перевіряйте, щоб прилад був
вимкнений, а касета з акумулятором була знята,
перед встановленням або зняттям пильного
ланцюга.
• Під час встановлення або зняття пильного
ланцюга на руки повинні бути вдягнені рукавиці.
• Використовуйте тільки шину та наконечник, які
підходять для даного пильного ланцюга (див.
виписку з переліку запчастин).
• Для того, щоб запобігти віддачі, неможна
знімати наконечник шини, або заміняти шину на
таку, що не має наконечника.
Fig.3
Послабте гвинт, повернувши ручку по годинниковій
стрілці, доки не зніметься кришка зірочки.
Зніміть кришку зірочки.
Зніміть з інструмента пильний ланцюг та шину.
Fig.4
Встановіть кінець пильного ланцюга на верхню
частину шини. Тепер пильний ланцюг слід
встановити, як показано на малюнку, оскільки він
обертається у напрямку, що вказаний стрілкою.
Fig.5
Розташуйте ланцюг таким чином, щоб пружина та
втулка були розташовані всередині ланцюга, а потім
надіньте другий кінець на зірочку, як показано на
малюнку.
Fig.6
Повертаючи шину по годинниковій стрілці, її слід
встановити таким чином, щоб кінець шини торкався
пружини.
Fig.7
Вставте гак кришки зірочки в отвір в інструменті, а
потім встановіть кришку зірочки на інструмент.
Fig.8
Поверніть ручку по годинниковій стрілці для того,
щоб щільно затягнути гвинт.
Регулювання натягу пильного ланцюга
Fig.9
Просто невелике послаблення гвинта дозволяє
відрегулювати натяг пильного ланцюга. Після
регулювання затягніть гвинт.
Fig.10
ОБЕРЕЖНО:
• Протягом деякого часу після встановлення
пильний ланцюг послаблюється. Слід
періодично перевіряти натяг пильного ланцюга
перед використанням.
• Слабкий натяг пильного ланцюга може
призвести до того, що він зіскочить.
• Встановлювати або знімати пильний ланцюг
слід у чистому місці, у якому немає тирси та ін.
ЗАСТОСУВАННЯ
Змащування
Fig.11
Пильний ланцюг автоматично змащується під час
роботи інструмента.
Перевірте кількість мастила в мастильному баку,
поглянувши в оглядове вікно.
Для того, щоб залити бак, слід зняти кришку з
горловини бака. Об’єм мастильного бака – 80 мл.
Після заправки бака слід завжди загвинчувати
кришку мастильного бака на ланцюговій пилі.
ОБЕРЕЖНО:
• Під час першого заливання мастила для
пильного ланцюга або під час заправки пустого
бака, мастило слід заливати до рівня нижньої
частини заливної горловини. Інакше постачання
21
Page 22

мастила може бути утрудненим.
• У якості мастила для ланцюга слід
використовувати тільки мастило Makita для
ланцюгових пил, що продається на ринку.
• Заборонено використовувати мастило, що
містить частки пилу або летуче мастило.
• Під час обрізання дерев слід використовувати
ботанічне мастило. Мінеральне мастило може
пошкодити дерева.
• Заборонено натискати на ланцюгову пилу із
силою під час обрізання дерев.
• Перед тим, як щось вирізати, слід перевірити,
щоб було належним загвинчено кришку
мастильного бака.
Слід тримати пилу на відстані від дерева. Запустіть її
та заждіть, Доки пильний ланцюг буде достатньо
змащений.
Перед тим як вмикати пилу, слід піднести напрямну
наконечника або нижню напрямну до гілки, що
різатиметься. Різання без піднесення напрямної
наконечника або нижньої напрямної до гілки може
спричинити коливання шини, що може призвести до
поранення оператора.
Дерево слід пиляти просто пересуваючи пилу
додолу.
Підрізування дерев
Fig.12
Fig.13
ОБЕРЕЖНО:
• Коли працює мотор, слід забрати усі частини
тіла від пильного ланцюга.
• Коли працює мотор, слід міцно тримати
ланцюгову пилу обома руками.
• Не слід тягнутись занадто далеко. Слід завжди
твердо стояти на ногах та тримати рівновагу.
Перед тим як вмикати пилу, слід піднести напрямну
наконечника або нижню напрямну до гілки, що
різатиметься. Різання без піднесення напрямної
наконечника або нижньої напрямної до гілки може
спричинити коливання шини, що може призвести до
поранення оператора.
Під
час різання товстих гілок, спочатку слід зробити
неглибокий надріз знизу гілки, а потім остаточно
відрізати гілку зверху.
Fig.14
Якщо намагатись різати товсті гілки знизу, то гілка
може опуститись та затиснути в розрізі пильний
ланцюг.
Якщо гілку різати зверху, не зробивши неглибокий
надріз знизу, то гілка може розщепитись.
Fig.15
Якщо дерево розрізати за один прохід неможливо:
трохи натисніть на ручку та продовжуйте пиляти й
відтягніть пилу трохи назад; потім встановіть шип
нижче та закінчіть різання піднімаючи ручку.
Fig.16
Перенесення верстата
Fig.17
Перед тим, як переносити інструмент, слід завжди
знімати касету з акумулятором, а шину закривати
піхвами. Касету з акумулятором слід також закрити
кришкою.
ТЕХНІЧНЕ ОБСЛУГОВУВАННЯ
ОБЕРЕЖНО:
• Завжди перевіряйте, щоб прилад був
вимкнений, а касета з акумулятором була знята,
перед проведенням перевірки або
обслуговування.
• Під час перевірки або обслуговування слід бути
у захисних рукавицях.
Заточка ланцюгової пили
ОБЕРЕЖНО:
• При виконанні робіт на ланцюговій пилі з неї
слід завжди знімати касету з акумулятором та
вдягати захисні рукавиці.
Fig.18
Пильний ланцюг слід заточити, коли:
− Під час пиляння сирого дерева утворюється
борошниста тирса;
− Ланцюг входить в дерево на силу, навіть якщо
на пилу натиснути;
− Ріжуча кромка явно пошкоджена;
− Пилу в дереві тягне вправо або вліво. Причина
такої поведінки - нерівномірна заточка пильного
ланцюга або пошкодження однієї сторони.
Слід часто заточувати пилу, але при цьому
кожного разу слід сточувати небагато металу.
Для повсякденного заточування зазвичай вистачає
двох або трьох проходів напилком. Після того, як
ланцюгову пилу було заточено декілька разів, її слід
заточити в спеціалізованій майстерні MAKITA.
Напилок та направляння напилка
− Для заточки пильних ланцюгів слід
використовувати спеціальний круглий
(додаткова приналежність) для пильних
ланцюгів, що має діаметр 4 мм. Звичайні круглі
напилки є непридатними.
Fig.19
− Напилок повинен обробляти матеріал під час
руху уперед. На зворотному русі напилок слід
піднімати над матеріалом.
− Спочатку слід заточити найкоротший різак.
Довжина цього різака потім є стандартною
довжиною для решти різаків на пильному
ланцюзі.
− Направляйте напилок як показано на малюнку.
− Напилок легше направляти, якщо
використовувати держак
22
для напилка
напилок
Page 23

(додаткова приналежність). На держаку для
напилка є мітки вірного кута заточки 30 ° (слід
виставити мітки паралельно пильному ланцюгу),
та віт також обмежує глибину проникнення (на
4/5 діаметра напилка).
Направляйте напилок як показано на малюнку.
− Після заточки ланцюга слід перевірити висоту
глибиноміра, використовуючи щуп для пильного
ланцюга (додаткова приналежність).
Fig.20
− Слід видалити матеріал, що виступає, однак це
слід робити за допомогою спеціального
плаского напилка (додаткова приналежність).
− Ще раз закругліть передню частину
глибиноміра.
− Після регулювання висоти глибиноміра з
пильного ланцюга слід зчистити пил та тирсу.
Чищення шини
Fig.21
Друзки та тирса накопичуються в пазу шини,
забиваючи її та блокуючи потік мастила. Під час
заточки або заміни пильного ланцюга слід завжди
вичищати тирсу та друзки.
Чищення мастильного фільтра та отвору
злива мастила.
Протягом роботи в мастильному фільтрі та отворі
злива мастила може накопичитись мілкий пил або
частки.
Мілкий пил або частки, що накопичуються в
мастильному фільтрі, перешкоджають постачання
мастила та призводять до недостатнього змащення
усього пильного ланцюга.
У разі недостатнього постачання мастила у верхню
частину шини слід очистити фільтр наступним чином.
Зніміть касету
Зніміть кришку зірочки та пильний ланцюг з
інструмента. (Див. розділ "Встановлення та зняття
пильного ланцюга").
Fig.22
Зніміть натискну гайку за допомогою викрутки із
шліцованим наконечником та тонким стрижнем або
подібну.
Fig.23
Витягніть фільтр з пили та видаліть з нього частки
мілкого пилу. Коли фільтр стає занадто брудним, його
слід замінити.
Вставте касету з акумулятором в інструмент.
Fig.24
Натисніть на курок вмикача для того, щоб змити
накопичений пил шляхом упорскування мастила для
ланцюга.
Зніміть касету з батареєю з інструмента.
з батареєю з інструмента.
Fig.25
Вставте очищений мастильний фільтр в отвір злива
мастила. Коли фільтр стає занадто брудним, його
слід замінити.
Fig.26
Вставте натискну гайку в отвір упорскування мастила
відповідною поверхнею догори, як показано на
малюнку, для того, щоб закріпити фільтр. Якщо
фільтр не може бути закріплений деформованою
натискною гайкою, її слід замінити.
Встановіть на місце кришку зірочки та пильний
ланцюг.
Заміна зірочки
Перед тим, як встановлювати новий ланцюг, слід
перевірити стан зірочки.
Fig.27
ОБЕРЕЖНО:
• Зношена зірочка пошкодить новий пильний
ланцюг. В такому випадку слід замінити зірочку.
Зірочку слід встановлювати так, щоб її лицьова
сторона була розташована як вказано на
малюнку.
Fig.28
У разі заміни зірочки слід завжди замінювати
стопорне кільце.
Заміна вугільних щіток
Fig.29
Регулярно знімайте та перевіряйте вугільні щітки.
Замінюйте їх, коли знос сягає граничної відмітки.
Вугільні щітки повинні бути чистими та вільно
рухатись у щіткотримачах. Одночасно треба
замінювати обидві вугільні щітки. Використовуйте
лише однакові вугільні щітки.
Для видалення ковпачків щіткотримачів користуйтесь
викруткою. Видаліть зношені вугільні щітки, вставте
нові та закріпіть ковпачки щіткотримачів.
Fig.30
Зберігання інструмента
Перед зберіганням інструмент треба вичистити.
Після зняття кришки зірочки з інструмента необхідно
видалити всі щіпки та тирсу. Після чищення
інструмента йому слід дати попрацювати без
навантаження для того, щоб змастити пильний
ланцюг та шину.
Закрийте шину піхвами.
Для спорожнення вилийте мастило з мастильного
бака, та встановіть ланцюгову пилу так, щоб
кришечка
Для того, щоб підтримувати БЕЗПЕКУ та
НАДІЙНІСТЬ, ремонт, технічне обслуговування або
регулювання мають виконувати уповноважені центри
обслуговування "Макіта", де використовуються лише
стандартні запчастини "Макіта".
23
бака була спрямована вгору.
Page 24

ОСНАЩЕННЯ
ОБЕРЕЖНО:
• Це оснащення або приладдя рекомендовано
для використання з інструментами "Макіта", що
описані в інструкції з експлуатації.
Використання якогось іншого оснащення або
приладдя може спричинити травмування.
Оснащення або приладдя слід використовувати
лише за призначенням.
У разі необхідності, отримати допомогу в більш
детальному ознайомленні з оснащенням звертайтесь
до місцевого Сервісного центру "Макіта".
• Різні типи оригінальних акумуляторів та
зарядних пристроїв виробництва компанії
Makita
• Ланцюгова пила
• Піхви
• Шина у зборі
• Напилок
24
Page 25
POLSKI
1-1. Czerwony element
1-2. Przycisk
1-3. Akumulator
2-1. Przycisk blokady
2-2. Spust przełącznika
3-1. Pokrywa koła łańcuchowego
3-2. Gałka
4-1. Ostrze
4-2. Prowadnica
4-3. Strzałka
5-1. Sprężyna
5-2. Koło łańcuchowe
5-3. Piasta
6-1. Sprężyna
Objaśnienia do widoku ogólnego
6-2. Prowadnica
6-3. Piasta
7-1. Pokrywa koła łańcuchowego
7-2. Hak
7-3. Otwór
11-1. Korek wlewu oleju
11-2. Okienko sprawdzania poziomu
oleju
11-3. Korek wlewu oleju
12-1. Prowadnica górna
13-1. Prowadnica dolna
17-1. Akumulator
17-2. Pochwa (osłona łańcucha)
22-1. Nakrętka dociskowa
22-2. Wkrętak do wierteł szczelinowych
23-1. Filtr
25-1. Filtr
26-1. Nakrętka dociskowa
27-1. Koło łańcuchowe
27-2. Pierścień zabezpieczający
28-1. Pierścień zabezpieczający
28-2. Koło łańcuchowe
28-3. Podkładka
29-1. Znak ograniczenia
30-1. Pokrywka uchwytu szczotki
30-2. Śrubokręt
SPECYFIAKCJE
Prędkość łańcucha na minutę (min-1) 4,8 m/s (290 m/min) 5,0 m/s (300 m/min)
Łańcuch tnący
• W związku ze stale prowadzonym przez naszą firmę programem badawczo-rozwojowym, niniejsze specyfikacje mogą ulec zmianom
bez wcześniejszego powiadomienia.
• Uwaga: Specyfikacje mogą różnić się w zależności od kraju.
Symbole
Poniżej pokazano symbole zastosowane na urządzeniu.
Przed użyciem należy zapoznać się z ich znaczeniem.
・ Przeczytać instrukcję obsługi.
・ Stosuj środki ochrony oczu.
・ Stosuj środki ochrony uszu.
・ Noś kask, okulary ochronne i
ochraniacze na uszy.
・ Stosuj odpowiednie środki ochrony stóp
i nóg, oraz dłoni i ramion.
・ Należy chronić przed deszczem.
・ Podczas pracy należy koniecznie
trzymać pilarkę obydwiema dłońmi!
Obsługa narzędzia tylko jedną ręką jest
bardzo niebezpieczna!
・ Piła ta może być obsługiwana tylko
przez odpowiednio przeszkolonych
operatorów.
Model BUC121 BUC122
Długość prowadnicy 115 mm
Długość całkowita 422mm 422mm
Ciężar netto 2,4 kg 2,5 kg
Napięcie znamionowe Prąd stały 14,4 V Prąd stały 18 V
Typ 25 AP
Podziałka 1/4"
Liczba ogniw napędowych 42
END005-2
・ Tylko dla krajów UE
Nie usuwać sprzętu elektrycznego
razem z innymi odpadami
gospodarstwa domowego!
Przestrzegając Europejskiej Dyrektywy
2002/96/EC o odpadach elektrycznych i
elektronicznych oraz jej wprowadzenia
w życie zgodnie z prawem narodowym,
sprzęt elektryczny o zakoń
czonym
okresie eksploatacyjnym należy
gromadzić oddzielnie i zwracać do
organizacji zajmujących się zbieraniem
zużytego sprzętu.
ENE031-1
Przeznaczenie
Narzędzie to jest przeznaczone do cięcia tarcicy i kłód
drewna.
25
Page 26
Dla modelu BUC121
ENG101-2
Tylko dla krajów europejskich
Poziom hałasu i drgań
Typowy równoważny poziom dźwięku A określony w
oparciu o EN60745-2-13:
Poziom ciśnienia akustycznego (L
Niepewność(K): 2 dB(A)
) : 84.0 dB (A)
pA
Poziom hałasu podczas pracy może przekraczać 85 dB
(A).
Nosić ochronniki słuchu
ENG221-1
Drgania
Całkowita wartość poziomu drgań (suma wektorów w 3
osiach) określona zgodnie z normą EN60745-2-13:
Tryb pracy: cięcie drewna
Wytwarzanie drgań (a
Niepewność (K) : 1.5 m/s
) : 4.2 m/s
h
2
2
Dla modelu BUC122
ENG101-2
Tylko dla krajów europejskich
Poziom hałasu i drgań
Typowy równoważny poziom dźwięku A określony w
oparciu o EN60745-2-13:
Poziom ciśnienia akustycznego (L
Niepewność(K): 2 dB(A)
) : 84.6 dB (A)
pA
Poziom hałasu podczas pracy może przekraczać 85 dB
(A).
Nosić ochronniki słuchu
ENG221-1
Drgania
Całkowita wartość poziomu drgań (suma wektorów w 3
osiach) określona zgodnie z normą EN60745-2-13:
Tryb pracy: cięcie drewna
Wytwarzanie drgań (a
Niepewność (K) : 1.5 m/s
) : 4.3 m/s
h
2
2
ENH016-5
DEKLARACJA ZGODNOŚCI Z NORMAMI WE
Niżej podpisana osoba, posiadająca upoważnienie, p.
Kato, oświadcza, że poniższe urządzenia firmy MAKITA:
Nr identyfikacyjny modelu na rynek UE: M6 08 02
24243 083
BUC121
zgodne ze standardowymi wymogami bezpieczeństwa i
ochrony zdrowia obowiązujących wytycznych UE:
wytyczną maszynową UE 98/37/EC, wytyczną o emisji
hałasu 2000/14/EG, wytyczną EU EMC.
Wymogi stawiane przez podane powyżej wytyczne
zostały uwzględnione głównie w oparciu o następujące
normy: EN60745-2-13, EN 55014, ENISO11681.
Procedura oceny zgodności 2000/14/EG została
przeprowadzona zgodnie z Aneksem V. Zmierzony
poziom mocy akustycznej (Lwa) wynosi 92.0dB(A).
Gwarantowany poziom mocy akustycznej (Ld) wynosi
94 dB(A). Badanie typu na rynek UE zgodnie z
dyrektywą 98/37/EG zostało przeprowadzone przez:
TÜV Product Service GmbH, Zertifizierungsstelle,
Ridlerstraße 31, D-80339 München.
Tomoyasu Kato CE2007
000230
Dyrektor
Odpowiedzialny producent:
Makita Corporation
3-11-8, Sumiyoshi-cho, Anjo, Aichi, JAPAN
Autoryzowany przedstawiciel na Europę:
Makita International Europe Ltd.
Michigan Drive, Tongwell, Milton Keynes, Bucks MK15
8JD, ANGLIA
ENH016-5
DEKLARACJA ZGODNOŚCI Z NORMAMI WE
Niżej podpisana osoba, posiadająca upoważnienie, p.
Kato, oświadcza, że poniższe urządzenia firmy MAKITA:
Nr identyfikacyjny modelu na rynek UE: M6 08 02
24243 083
BUC122
zgodne ze standardowymi wymogami bezpieczeństwa i
ochrony zdrowia obowiązujących wytycznych UE:
wytyczną maszynową UE 98/37/EC, wytyczną o emisji
hałasu 2000/14/EG, wytyczną EU EMC.
Wymogi stawiane przez podane powyżej wytyczne
zostały uwzględnione głównie w oparciu o następujące
normy: EN60745-2-13, EN 55014, ENISO11681.
Procedura oceny zgodności 2000/14/EG została
przeprowadzona zgodnie z Aneksem V. Zmierzony
poziom mocy akustycznej (Lwa) wynosi 92.7dB(A).
Gwarantowany poziom mocy akustycznej (Ld) wynosi
95 dB(A). Badanie typu na rynek UE zgodnie z
dyrektywą 98/37/EG zostało przeprowadzone przez:
TÜV Product Service GmbH, Zertifizierungsstelle,
Ridlerstraße 31, D-80339 München.
Tomoyasu Kato CE2007
000230
Dyrektor
Odpowiedzialny producent:
Makita Corporation
3-11-8, Sumiyoshi-cho, Anjo, Aichi, JAPAN
Autoryzowany przedstawiciel na Europę:
Makita International Europe Ltd.
Michigan Drive, Tongwell, Milton Keynes, Bucks MK15
8JD, ANGLIA
GEB037-1
Ostrzeżenia dotyczące
bezpieczeństwa obsługi pilarki
łańcuchowej:
NIE WOLNO pozwolić, aby wygoda lub rutyna
(nabyta w wyniku wielokrotnego używania
narzędzia) zastąpiły ścisłe przestrzeganie zasad
bezpieczeństwa obsługi piły. Używanie tego
narzędzia w sposób niebezpieczny lub niewłaściwy
26
Page 27
grozi poważnymi obrażeniami ciała.
1. Gdy silnik jest włączony, należy trzymać
wszystkie części ciała z dala od łańcucha
tnącego. Przed rozpoczęciem pracy z pilarką
łańcuchową, należy upewnić się, że łańcuch
niczego nie dotyka. Podczas pracy z taką pilarką
chwila nieuwagi może spowodować pochwycenie
części ubrania lub ciała.
2. Prawa ręka powinna zawsze spoczywać na
tylnym uchwycie, a lewa na przednim.
Trzymanie pilarki łańcuchowej odwrotnie
zwiększa ryzyko powstania obrażeń ciała i
absolutnie nie powinno być praktykowane.
3. Używać okularów ochronnych i ochraniaczy
na uszy. Zaleca się uż
wyposażenia chroniącego głowę, ręce, nogi i
stopy. Odpowiednia odzież ochronna obniża
ryzyko powstania obrażeń ciała powodowanych
odpryskami lub przypadkowym dotknięciem
łańcucha.
4. Nie wolno pracować z pilarką łańcuchową na
drzewach. Pracując z pilarką na drzewie możesz
się poranić.
5. Należy zawsze stać pewnie i obsługiwać
pilarkę łańcuchową tylko stojąc na stałej,
bezpiecznej i równej powierzchni. Œliskie lub
niepewne podłoże, np. drabina może
spowodować utratę równowagi lub panowania
nad pilarką.
6. Podczas cięcia napr
uważać na ich powracanie na
miejsce/odskakiwanie . Kiedy naprężenie gałęzi
zostanie zwolnione, gałąź może uderzyć
obsługującego, a także wyrwać mu pilarkę spod
kontroli.
7. Należy bardzo uważać podczas cięcia krzaków
i młodych drzewek. Cienkie gałązki mogą być
chwytane przez łańcuch tnący i uderzać Cię, albo
pociągać wytrącając Cię z równowagi.
8. Pilarkę łańcuchową należy przenosić
wyłączoną, trzymając ją za uchwyt przedni i z
dala od siebie. Podczas transportowania lub
przechowywania pilarki łańcuchowej, pokrywa
prowadnicy musi być zawsze założona.
Prawidłowe obchodzenie się z pilarką zmniejsza
prawdopodobieństwo przypadkowego dotykania
poruszającego się łańcucha.
9. Smarowanie, napinanie łańcucha i wymianę
osprzętu należy przeprowadzać zgodnie z
instrukcjami. Nieprawidłowo napięty lub
nasmarowany łańcuch może się zerwać albo
powodować odrzucanie.
10. Uchwyty powinny być zawsze suche, czyste i
wolne od olejów i smarów. Tłuste uchwyty są
śliskie i uniemożliwiają panowanie nad
narzędziem.
11. Dozwolone jest cięcie wyłącznie drewna. Nie
używaj tej pilarki niezgodnie z jej
ywanie dodatkowego
ężonych gałęzi należy
przeznaczeniem. Na przykład: nie używaj jej
do cięcia tworzyw sztucznych, cegieł i innych
materiałów budowlanych innych niż drewno.
Używanie pilarki łańcuchowej do innych,
niezgodnych z przeznaczeniem celów może
stwarzać niebezpieczne sytuacje.
12. Przyczyny odrzutu narzędzia i zapobieganie
temu zjawisku przez operatora:
Odrzut może powstawać, kiedy nosek lub
końcówka prowadnicy dotyka czegoś, lub kiedy
łańcuch zakleszczy się w ciętym drewnie.
Kontakt z końcówką prowadnicy może nieraz
powodować gwałtowną reakcję wstecz, przez co
prowadnica podskoczy do tyłu w kierunku
obsługującego.
Zakleszczenie się łańcucha u góry prowadnicy
może gwałtownie popchnąć prowadnicę w
kierunku obsługującego.
Każda z tych reakcji może spowodować utratę
panowania nad pilarką, co grozi poważnym
zranieniem. Nie wolno polegać wyłącznie na
urządzeniach zabezpieczających, w które Twoja
pilarka jest wyposażona. Użytkownik pilarki
łańcuchowej musi podjąć szereg kroków, aby nie
dopuszczać do wypadków i obrażeń podczas
pracy.
Odrzut jest wynikiem nieprawidłowej eksploatacji
narzędzia i/lub niewłaściwych procedur lub
warunków jego obsługi. Można go uniknąć
podejmując podane poniżej, odpowiednie środki
ostrożności:
− Należy trzymać narzędzie silnie oburącz;
kciuki i inne palce muszą obejmować
uchwyty pilarki, a całe ciało i ramiona
powinny być tak ułożone, aby
powstrzymywać odrzuty. Siły odrzutu mogą
być opanowywane, jeśli obs
odpowiedni przygotowany. Pilarki nie wolno
wypuszczać.
008625
− Nie wolno sięgać pilarką zbyt daleko i nie
tnij powyżej wysokości ramion.. W ten
sposób zapobiegniesz przypadkowemu
dotykaniu końcówką prowadnicy; łatwiej jest
też panować nad pilarką w
niespodziewanych sytuacjach.
− Stosuj wyłącznie zamienne prowadnice i
łańcuchy zalecane przez producenta..
27
ługujący będzie
Page 28

Stosowanie nieodpowiednich prowadnic i
łańcuchów może powodować zrywanie się
łańcucha oraz/lub odrzuty.
− Należy przestrzegać instrukcji producenta
dotyczących ostrzenia i konserwacji
pilarki łańcuchowej. Zmniejszenie
wysokości ogranicznika głębokości cięcia
może powodować silne odrzuty.
DODATKOWE ZALECENIA
DOTYCZĄCE BEZPIECZEŃSTWA
1. Aby zapoznać się z obsługą pilarki łańcuchowej,
należy przeczytać jej instrukcję obsługi.
2. Przed przystąpieniem do użytkowania pilarki
łańcuchowej po raz pierwszy warto wziąć udział w
instruktażu z zakresu jej obsługi. Jeżeli nie ma
takiej możliwości, przed przystąpieniem do pracy
dobrze jest poćwiczyć cięcie drewnianych
okrąglaków na koziołku.
3. Dzieciom i młodzieży poniżej 18 roku życia nie
wolno obsługiwać pilarki łańcuchowej. Młode
osoby powyżej 16 roku życia można wyłączyć z
tego zastrzeżenia, jeżeli odbywają szkolenie pod
nadzorem fachowca.
4. Praca z u
dużego skupienia. Nie wolno przystępować do
pracy z użyciem pilarki w przypadku osłabienia
lub choroby. Wszelkie czynności powinny być
wykonywane spokojnie i ostrożnie.
5. Osobom pod wpływem alkoholu, narkotyków lub
przyjmującym leki nie wolno podejmować pracy.
Właściwa eksploatacja
1. Pilarka łańcuchowa jest przeznaczona wyłącznie
do cięcia drewna. Nie wolno jej używać,
przykładowo, do cięcia tworzyw sztucznych lub
porowatego betonu.
2. Omawianą pilarkę łańcuchową można używać
wyłącznie do operacji opisanych w niniejszej
instrukcji obsługi. Przykładowo, nie,wolno używać
jej do przycinania żywopłotu lub tym podobnych
celów.
3. Omawianej pilarki łańcuchowej nie wolno używać
do prac w lesie, tzn. do wyrębu i okrzesywania
drzew. Kabel pilarki łańcuchowej nie zapewnia
operatorowi odpowiedniej mobilności i
bezpieczeństwa, jakie są wymagane przy tego
typu pracach.
4. Pilarka łańcuchowa nie jest przeznaczona do
użytku komercyjnego.
5. Pilarki łańcuchowej nie wolno przeciążać.
Sprzęt ochrony osobistej
1. Ubranie powinno przylegać do ciała, ale nie może
krępować ruchów.
2. Podczas pracy należy korzystać z następujących
środków ochrony:
życiem pilarki łańcuchowej wymaga
• Atestowany kask ochronny, jeżeli występuje
zagrożenie ze strony spadających gałęzi lub
tym podobne;
• Maska twarzowa lub gogle;
• Odpowiednia ochronę uszu (nauszniki,
tradycyjne lub plastyczne zatyczki do uszu).
Na życzenie analiza oktawowa.
• Porządne, skórzane rękawice ochronne;
• Długie spodnie z mocnego materiału;
• Kombinezon ochronny wykonany z
antyprzecięciowego materiału;
• Obuwie ochronne z antypoślizgową podeszwą,
stalowymi noskami i wyściółką z materiału
odpornego na przecięcia;
• Maska oddechowa, gdy podczas pracy
powstaje pył (np. trociny).
Bezpieczeństwo pracy w praktyce
1. Nie wolno używać pilarki w pobliżu łatwopalnych
pyłów i gazów, ponieważ silnik wytwarza iskry i
stwarza zagrożenie wybuchem.
2. Podczas pracy należy stać na twardym gruncie,
zapewniwszy stopom dobre oparcie. Zwracać
szczególną uwagę na przeszkody w miejscu
pracy (np. przewód). Zachować wyjątkową
ostrożność, gdy podłoże jest śliskie w wyniku
panującej wilgoci, zalegającego lodu, śniegu,
świeżo ściętego drewna lub kory. Nie wolno
używać pilarki stojąc na drabinie lub na drzewie.
3. Zachować szczególną ostrożność podczas pracy
na pochyłościach. Staczające się kłody i gałęzie
stanowią potencjalne zagrożenie.
4. Obszar w którym będzie wykonywane ci
należy oczyścić z piasku, kamieni, gwoździ,
drutów itp. Mogą one bowiem spowodować
uszkodzenie prowadnicy i łańcucha oraz
prowadzić do niebezpiecznego odrzutu.
5. Należy zachować szczególną ostrożność podczas
cięcia w pobliżu płotów z siatki drucianej. Nie
wolno wcinać się w płot, gdyż może dojść do
odrzutu piły.
6. Nie wolno wcinać się w grunt.
7. Elementy drewniane należy ciąć pojedynczo,
nigdy w wiązkach lub w stertach.
8. Unikać używania pilarki do cięcia cienkich gałęzi i
korzeni, ponieważ mogą one zaplątać się w
łańcuch. To z kolei grozi utratą równowagi.
9. W przypadku cięcia pocię
tego drewna należy
korzystać z bezpiecznej podpory (koziołka).
10. Nie wolno używać pilarki łańcuchowej do
usuwania kawałków drewna lub innych
przedmiotów.
11. Pilarkę łańcuchową należy prowadzić w taki
sposób, aby żadna część ciała nie znajdowała się
na przedłużonej drodze łańcucha tnącego (patrz
rysunek).
ęcie
28
Page 29
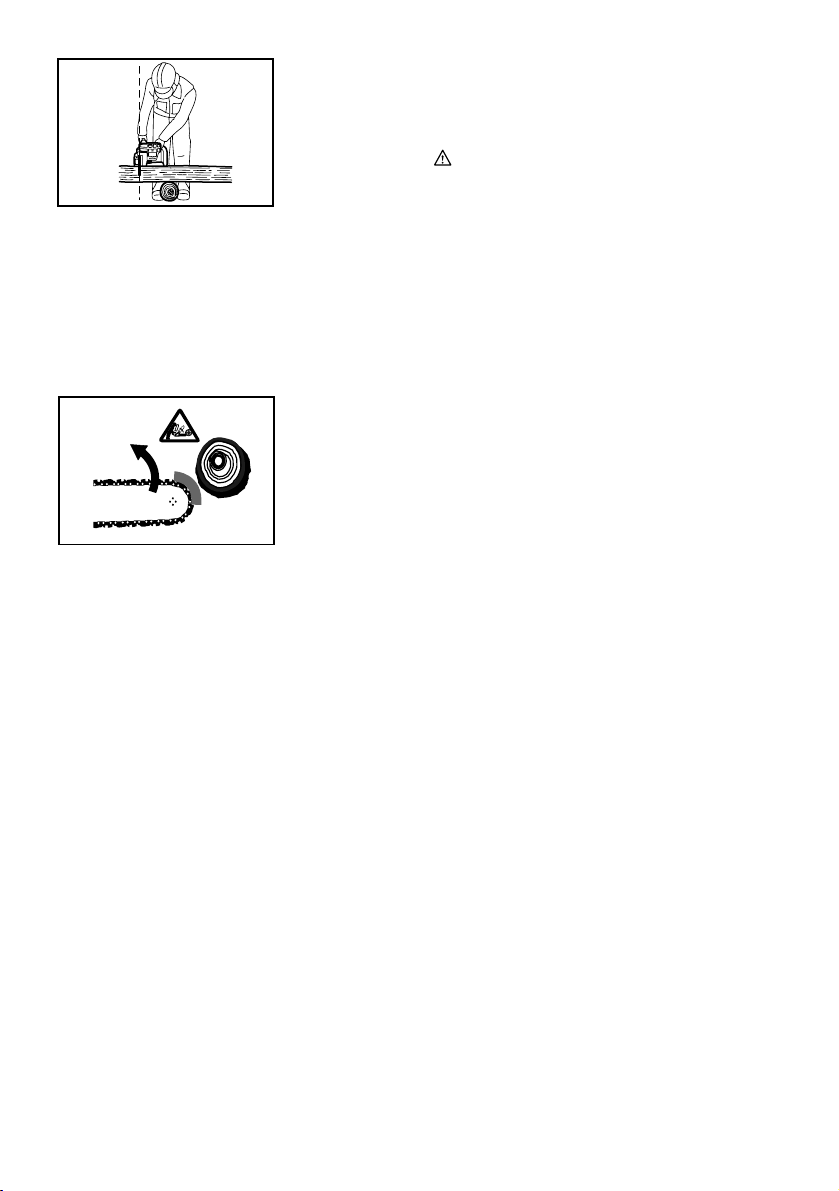
006909
Odrzut
1. Podczas pracy z użyciem pilarki łańcuchowej
może wystąpić niebezpieczny odrzut. Odrzut
powstaje, gdy czubek prowadnicy (w
szczególności górna ćwiartka) zetknie się z
drewnem lub innym sztywnym obiektem.
Powoduje on odchylenie pilarki łańcuchowej w
kierunku operatora.
006919
2. W celu uniknięcia odrzutu należy przestrzegać
poniższych zasad:
• Nie wolno rozpoczynać cięcia końcówką
prowadnicy.
• Nie używać podczas cięcia końcówki
prowadnicy. Zachować szczególną ostrożność
przy wznawianiu rozpoczętych cięć.
• Rozpoczynać operację cięcia, gdy łańcuch
jest w ruchu.
• Zawsze prawidłowo ostrzyć łańcuch. W
szczególności, ustawić odpowiednią
wysokość ogranicznika głębokości (szczegóły
w części zatytułowanej „Ostrzenie łańcucha”).
• Nie wolno przecinać kilku gałęzi na raz.
• Podczas okrzesywania zachować ostrożność,
aby prowadnica nie stykała się z innymi
gałęziami.
• W przypadku przecinania dłużycy stać z dala
od sąsiednich kłód. Zawsze obserwować
końcówkę prowadnicy.
• Używać koziołka.
Przewożenie i przechowywanie
1. Pilarkę łańcuchową należy przenosić trzymając ją
tylko za uchwyt przedni w taki sposób, aby
prowadnica była skierowana w tył.
2. Pilarkę łańcuchową należy przechowywać w
bezpiecznym, suchym i zamykanym
pomieszczeniu, do którego dzieci nie mają
dostępu. Pilarki łańcuchowej nie wolno
przechowywać na dworze.
ZACHOWAĆ INSTRUKCJE
OSTRZEŻENIE:
NIEPRAWIDŁOWE STOSOWANIE lub
nieprzestrzeganie zasad bezpieczeństwa
określonych w niniejszej instrukcji obsługi może
spowodować poważne obrażenia ciała.
ENC007-2
WAŻNE ZASADY
BEZPIECZEŃSTWA
DOTYCZĄCE AKUMULATORA
1. Przed użyciem akumulatora zapoznać się z
wszystkimi zaleceniami i znakami
ostrzegawczymi na (1) ładowarce, (2)
akumulatorze i (3) wyrobie, w którym będzie
używany akumulator.
2. Akumulatora nie wolno rozbierać.
3. Jeżeli czas pracy uległ znacznemu skróceniu,
należy natychmiast przerwać pracę. Może
bowiem dojść do przegrzania, ewentualnych
poparzeń, a nawet eksplozji.
4. W przypadku przedostania się elektrolitu do
oczu, przemyć je wodą i niezwłocznie uzyskać
pomoc lekarską. Może on bowiem
spowodować utratę wzroku.
5. Nie doprowadzać do zwarcia akumulatora:
(1) Nie dotykać styków przedmiotami
wykonanymi z materiałów
przewodzących.
(2) Unikać przechowywania akumulatora w
pojemniku z metalowymi przedmiotami,
typu gwoździe, monety itp.
(3) Chronić akumulator przed deszczem lub
wodą.
Zwarcie prowadzi do przepływu prądu
elektrycznego o duż
ym natężeniu i
przegrzania akumulatora, co w
konsekwencji może grozić poparzeniami a
nawet awarią urządzenia.
6. Narzędzia i akumulatora nie wolno
przechowywać w miejscach, w których
temperatura osiąga bądź przekracza 50 ゚ C
(122 ゚ F).
7. Akumulatorów nie wolno palić, również tych
poważnie uszkodzonych lub całkowicie
zużytych. W ogniu mogą one bowiem
eksplodować.
8. Chronić akumulator przed upadkiem i
uderzeniami.
ZACHOWAĆ INSTRUKCJE
29
Page 30

Wskazówki dotyczące zachowania
maksymalnej trwałości akumulatora
1. Akumulator należy naładować zanim zostanie
do końca rozładowany.
Gdy zauważysz spadek mocy narzędzia,
przerwij pracę i naładuj akumulator.
2. Nie wolno ładować powtórnie w pełni
naładowanego akumulatora.
Przeładowanie akumulatora skraca jego czas
eksploatacji.
3. Akumulator ładować w temperaturze
mieszczącej się w przedziale 10 ゚ C - 40 ゚ C
(50 ゚ F - 104 ゚ F). Gdy akumulator jest gorący,
przed przystąpieniem do jego ładowania
odczekać, aż ostygnie.
30
Page 31

Dostarczone części w zestawie
1
2
008588
Uchwyt górny
1
Akumulator
2
Pokrywa koła łańcuchowego
3
Osłona ręki przedniej
4
Prowadnica
5
Osłona końcówki
6
Łańcuch tnący
7
008589
4
5
8
13
3
9
12
10
6
7
11
Gałka
8
Przycisk blokady
9
Uchwyt przedni
10
Spust przełącznika
11
Osłona łańcucha
12
Zatrzask lub punkt
13
zaczepienia liny
OPIS DZIAŁANIA
UWAGA:
• Przed przystąpieniem do regulacji lub przeglądu
narzędzia upewnić się, czy jest ono wyłączone i
czy został wyjęty akumulator.
Wkładanie i wyjmowanie akumulatora
Rys.1
• Przed włożeniem lub wyjęciem akumulatora należy
koniecznie wyłączyć narzędzie.
• W celu wyjęcia akumulatora przesunąć przycisk
znajdujący się w przedniej jego części i wysunąć
go.
• Aby włożyć akumulator, wystarczy wyrównać
występ na akumulatorze z rowkiem w obudowie i
wsunąć go na swoje miejsce. Akumulator wsunąć
do oporu, aż wskoczy na swoje miejsce, co jest
sygnalizowane delikatnym kliknięciem. Jeżeli
element w kolorze czerwonym w górnej części
przycisku jest widoczny, akumulator nie jest
całkowicie zablokowany. Należy go wsunąć do
oporu, aż czerwony element przestanie być
31
Page 32

widoczny. W przeciwnym razie może przypadkowo
wypaść z narzędzia, raniąc operatora lub osoby
postronne.
• Przy wkładaniu akumulatora nie wolno używać siły.
Jeżeli akumulator nie wchodzi swobodnie, nie
został prawidłowo włożony.
Włączanie
UWAGA:
• Przed włożeniem akumulatora do narzędzia
zawsze sprawdź, czy język spustowy wyłącznika
działa prawidłowo i po zwolnieniu powraca do
położenia „OFF".
Rys.2
Urządzenie wyposażone jest w przycisk blokady
załączenia, który zapobiega przypadkowemu
pociągnięciu za język spustowy przełącznika.
Aby uruchomić urządzenie, należy zwolnić przycisk
blokady i pociągnąć za język spustowy wyłącznika. W
celu zatrzymania urządzenia wystarczy zwolnić język
spustowy przełącznika.
MONTAŻ
UWAGA:
• Przed przystąpieniem do jakichkolwiek czynności
związanych z obsługą narzędzia należy koniecznie
upewnić się, czy jest ono wyłączone i czy
akumulator został wyjęty.
Montaż lub demontaż łańcucha tnącego
UWAGA:
• Przed przystąpieniem do montażu lub demontażu
łańcucha tnącego należy zawsze upewnić się, czy
urządzenie jest wyłączone i odłączone od
zasilania.
• Do montażu lub demontażu łańcucha tnącego
należy zawsze zakładać rękawice.
• Używać tylko łańcucha tnącego i prowadnicy z
końcówką przeznaczoną do tego typu pilarki
łańcuchowej (patrz Wyciąg z wykazu części
zamiennych).
• Aby zapobiec odrzutowi, nie zdejmuj nigdy
końcówki prowadnicy, ani nie zakładaj prowadnicy
bez końcówki.
Rys.3
Poluzuj śrubę obracając pokrętło w lewo, aż odłączy się
osłona koła łańcuchowego.
Ściągnij pokrywę koła łańcuchowego.
Zdejmij łańcuch tnący oraz prowadnicę.
Rys.4
Umieść jeden koniec łańcucha na górnej powierzchni
prowadnicy. Teraz załóż łańcuch tnący jak pokazano na
rysunku, ponieważ obraca się on zgodnie z kierunkiem
strzałki.
32
Rys.5
Ułóż łańcuch w ten sposób, aby sprężyna i piasta
znajdowały się w środku, a drugi koniec łańcucha załóż
na koło łańcuchowe, jak na rysunku.
Rys.6
Obracaj prowadnicę w lewo i jednocześnie zamocuj ją
tak, aby jej koniec stykał się ze sprężyną.
Rys.7
Wsuń zaczep osłony koła łańcuchowego do otworu w
narzędziu, a następnie załóż osłonę.
Rys.8
Obracaj pokrętło w prawo, aby śruba została silnie
dokręcona.
Regulacja naciągu łańcucha
Rys.9
Niewielkie poluzowanie tej śruby umożliwia
wyregulowanie naprężenia łańcucha. Po wyregulowaniu,
śrubę należy mocno dokręcić.
Rys.10
UWAGA:
• Wkrótce po założeniu nowego łańcucha tnącego,
jego naprężenie może się zmniejszyć. Od czasu
do czasu należy kontrolować naciąg łańcucha
przed przystąpieniem do pracy.
• Słabe naprężenie może powodować spadanie
łańcucha.
• Montaż i demontaż łańcucha tnącego należy
przeprowadzić w czystym miejscu, gdzie nie ma
trocin i innych zanieczyszczeń.
DZIAŁANIE
Smarowanie
Rys.11
Podczas pracy łańcuch tnący jest smarowany
automatycznie.
Ilość oleju pozostałą w zbiorniczku, należy sprawdzać
zaglądając do okienka.
Aby uzupełnić olej w zbiorniczku, odkręć korek wlewu.
Zbiorniczek mieści 80 ml. oleju.
Po napełnieniu zbiorniczka, należy zawsze zakręcić
korek wlewu.
UWAGA:
• W przypadku pierwszego napełnienia pilarki
olejem do smarowania łańcucha lub uzupełniania
zbiornika po jego całkowitym opróżnieniu należy
nalać olej do poziomu dolnej krawędzi szyjki wlewu.
W przeciwnym razie dostarczanie oleju może ulec
pogorszeniu.
• Do smarowania należy używać wyłącznie oleju do
pilarek łańcuchowych firmy Makita, lub olejów
dostępnych na rynku.
Page 33

• Nie wolno używać oleju zanieczyszczonego pyłem
i innymi cząstkami, ani też olejów lotnych.
• Do przycinania drzew, należy używać oleju
roślinnego. Olej mineralny może szkodzić
roślinom.
• Podczas przycinania, nie wolno używać siły.
• Przed przystąpieniem do cięcia, należy sprawdzić,
czy korek wlewu oleju jest zakręcony.
Należy stanąć z pilarką z dala od drzewa. Następnie
należy uruchomić pilarkę i zaczekać, aż łańcuch tnący
zostanie wystarczająco nasmarowany.
Przed włączeniem narzędzia proszę przybliżyć
prowadnicę górną/dolną do gałęzi, która ma być ścięta.
Rozpoczęcie ścinania gałęzi, gdy prowadnica
górna/dolna nie jest do niej przytknięta, może
spowodować bicie wzdłużne, powodując obrażenia u
operatora.
Drewno należy odcinać tylko przesuwając pilarkę do
doł
u.
Okrzesywanie drzew
Rys.12
Rys.13
UWAGA:
• Gdy silnik jest włączony, należy trzymać wszystkie
części ciała z dala od łańcucha tnącego.
• Gdy silnik jest włączony, należy trzymać pilarkę
mocno oburącz.
• Nie przeceniać swoich możliwości. Należy stać
pewnie, aby nie stracić równowagi.
Przed włączeniem narzędzia proszę przybliżyć
prowadnicę górną/dolną do gałęzi, która ma być ścięta.
Rozpoczęcie ścinania gałęzi, gdy prowadnica
górna/dolna nie jest do niej przytknięta, może
spowodować bicie wzdłużne, powodując obrażenia u
operatora.
Podczas ścinania grubych gałęzi proszę najpierw
wykonać płytkie podcięcie, po czym zakończyć ścinanie
od góry.
Rys.14
Przy próbie ścinania grubych gałęzi od spodu gałąź
może się zamknąć i zakleszczyć łańcuch tnący.
Przy próbie ścinania grubych gałęzi od góry bez
wstępnego podcięcia, gałąź może się rozszczepić.
Rys.15
Jeżeli nie jesteś w stanie przeciąć drewna jednym
ruchem:
Kontynuuj cięcie wywierając niewielki nacisk na uchwyt i
powoli wycofuj pilarkę, po czym umieść ostrze nieco
niżej i dokończ ścinanie, podnosząc lekko uchwyt.
Rys.16
Przenoszenie narzędzia
Rys.17
Przed przenoszeniem narzędzia należy zawsze wyjąć
akumulator i nałożyć pochwę na prowadnicę. Natomiast
na akumulator należy założyć jego osłonę.
KONSERWACJA
UWAGA:
• Przed przystąpieniem do przeglądu narzędzia lub
jego konserwacji upewnić się, czy jest ono
wyłączone i czy akumulator został wyjęty.
• Do przeprowadzenia przeglądu bądź konserwacji
należy zawsze zakładać rękawice.
Ostrzenie łańcucha pilarki
UWAGA:
• Podczas wykonywania czynności
konserwacyjnych przy pilarce łańcuchowej, należy
zawsze nosić rękawice ochronne, a akumulator
musi być wyjęty.
Rys.18
Łańcuch wymaga naostrzenia, gdy:
− Podczas cięcia wilgotnego drewna powstają
mączne trociny;
− Łańcuch wchodzi w drewno z trudem, nawet gdy
wywierany jest duży nacisk;
− Krawędź rzazu jest w sposób wyraźny
uszkodzona;
− Piła w drewnie ciągnie w lewą bądź w prawą
stronę. Powodem takiego zachowania jest
nierównomierne naostrzenie łańcucha pilarki lub
uszkodzenie powstałe tylko z jednej strony.
Łańcuch pilarki należy często ostrzyć, zbierając za
każdym razem tylko niewielką ilość materiału.
W przypadku rutynowego ostrzenia zwykle wystarczają
dwa lub trzy pociągnięcia pilnikiem. Gdy łańcuch pilarki
był ostrzony już kilka razy, należy zlecić jego naostrzenie
w specjalistycznym punkcie serwisowym narzę
MAKITA.
Pilnik i prowadzenie pilnika
− Do ostrzenia łańcucha należy używać specjalnego
pilnika okrągłego do łańcuchów tnących pilarek, o
średnicy 4 mm (nie ma go w zestawie). Zwykłe
pilniki okrągłe nie nadają się do tego celu.
Rys.19
− Pilnik powinien zbierać materiał tylko przy ruchu w
przód. Przy ruchu powrotnym pilnik należy unosić
ponad powierzchnię materiału.
− Ostrzenie należy zacząć od najkrótszego zęba
tnącego. Długość tego zęba stanowi odniesienie
dla pozostałych zębów łańcucha.
− Pilnik należy prowadzić zgodnie z rysunkiem.
− Pilnik można łatwiej prowadzić za pomocą
prowadnika (nie ma w zestawie). Prowadnik pilnika
posiada znaczniki do prawidłowego kąta ostrzenia
30° (znaczniki powinny być równoległe do
łańcucha pilarki); prowadnik ogranicza również
głębokość penetracji (do 4/5 średnicy pilnika).
Pilnik należy prowadzić zgodnie z rysunkiem.
33
dzi
Page 34

− Po naostrzeniu łańcucha należy sprawdzić
wysokość ogranicznika głębokości za pomocą
specjalnego głębokościomierza do łańcuchów (nie
ma w zestawie).
Rys.20
− Zadziory, obojętnie jak małe, należy usunąć
specjalnym pilnikiem płaskim (nie ma w zestawie).
− Ponownie należy zaokrąglić przednią część
ogranicznika głębokości.
− Po wyregulowaniu wysokości ogranicznika
głębokości, należy oczyścić łańcuch tnący z pyłu,
wiórów, itp.
Czyszczenie prowadnicy
Rys.21
Wiórki i trociny zbierają się w rowku
prowadnicy,zatykając go i pogarszając przepływ oleju.
Podczas ostrzenia lub wymiany łańcucha tnącego
zawsze oczyszczaj narzędzie z wiórek i trocin.
Czyszczenie filtra oleju znajdującego się przy
otworze spustowym oleju
Podczas eksploatacji maszyny w filtrze oleju, w okolicy
otworu spustowego może się gromadzić pył i niewielkie
zanieczyszczenia.
Pył i niewielkie zanieczyszczenia gromadzące się w
filtrze oleju mogą pogarszać jego przepływ, powodując
tym samym niewystarczające smarowanie całego
łańcucha tnącego.
Jeżeli do górnej części prowadnicy dociera zbyt mała
ilość oleju, wyczyść filtr w następujący sposób.
Wyjmij z narzędzia akumulator.
Zdejmij z narzędzia pokrywę koła łańcuchowego i
łańcuch tnący. (Sięgnij do części zatytułowanej "Montaż
lub demontaż łańcucha tnącego")
Rys.22
Odkręć nakrętkę dociskową przy pomocy cienkiego
śrubokręta płaskiego lub podobnego przyrządu.
Rys.23
Wyjmij filtr z pilarki łańcuchowej i usuń z niego pył i
niewielkie zanieczyszczenia. Gdy filtr jest zbyt
zanieczyszczony, wymień go na nowy.
Włóż do narzędzia akumulator.
Rys.24
Pociągnij za język spustowy wyłącznika, aby usunąć
nagromadzony pył i zanieczyszczenia poprzez
spuszczenie oleju do pilarek łańcuchowych.
Wyjmij z narzędzia akumulator.
Rys.25
Proszę umieścić wyczyszczony filtr oleju w otworze
spustowym oleju. Gdy filtr jest zbyt zanieczyszczony,
wymień go na nowy.
34
Rys.26
Aby ponownie zamocować filtr, włóż nakrętkę dociskową
na otwór spustowy oleju tak, aby skierowana była ku
górze - jak pokazano na ilustracji. Jeżeli nakrętka jest
zniekształcona i nie gwarantuje solidnego zamocowania
filtra, wymień ją na nową.
Zamontuj ponownie pokrywę koła łańcuchowego i
łańcuch tnący.
Wymiana koła łańcuchowego
Przed zamontowaniem nowego łańcucha tnącego
należy sprawdzić stan koła łańcuchowego.
Rys.27
UWAGA:
• Zużyte koło łańcuchowe spowoduje uszkodzenie
nowego łańcucha tnącego. W takim przypadku
koło łańcuchowe należy wymienić. Koło
łańcuchowe musi być zamontowane w położeniu
pokazanym na rysunku.
Rys.28
Podczas wymiany koła łańcuchowego należy zawsze
zamontować nowy pierścień zabezpieczający.
Wymiana szczotek węglowych
Rys.29
Systematycznie wyjmować i sprawdzać szczotki
węglowe. Wymieniać je, gdy ich zużycie sięga znaku
granicznego. Szczotki powinny być czyste i łatwo
wchodzić w uchwyty. Należy wymieniać obydwie
szczotki jednocześnie. Stosować wyłącznie identyczne
szczotki węglowe.
Do wyjęcia pokrywek uchwytów szczotek używać
śrubokrętu. Wyjąć zużyte szczotki węglowe, włożyć
nowe i zabezpieczyć pokrywkami uchwytów szczotek.
Rys.30
Przechowywanie narzędzia
Przed odłożeniem pilarki do przechowywania, należy ją
oczyścić. Po zdjęciu osłony koła łańcuchowego, należy
usunąć wióry, pył, itd. Po wyczyszczeniu należy pilarkę
uruchomić bez obciążenia, aby został nasmarowany
łańcuch i prowadnica.
N prowadnicę należy założyć pochwę.
Ze zbiorniczka należy usunąć olej i ułożyć pilarkę
korkiem wlewu oleju ku górze.
Dla zachowania BEZPIECZEŃSTWA i
NIEZAWODNOŚCI wyrobu, naprawy oraz inne prace
konserwacyjne i regulacyjne powinny być wykonywane
przez Autoryzowane Centra Serwisowe Makita,
wyłącznie przy użyciu części zamiennych Makita.
Page 35

AKCESORIA (WYPOSAŻENIE
DODATKOWE)
UWAGA:
• Zaleca się stosowanie wymienionych akcesoriów i
dodatków razem z elektronarzędziem Makita
opisanym w niniejszej instrukcji. Stosowanie
jakichkolwiek innych akcesoriów i dodatków może
stanowić ryzyko uszkodzenia ciała. Stosować
akcesoria i dodatki w celach wyłącznie zgodnych z
ich przeznaczeniem.
W razie potrzeby, wszelkiej pomocy i szczegółowych
informacji na temat niniejszych akcesoriów udzielą
Państwu lokalne Centra Serwisowe Makita.
• Różne typy oryginalnych akumulatorów i
ładowarek marki Makita
• Łańcuch tnący
• Pochwa
• Kompletna prowadnica
• Pilnik
35
Page 36

ROMÂNĂ
1-1. Porţiune roşie
1-2. Buton
1-3. Cartuşul acumulatorului
2-1. Buton de deblocare
2-2. Trăgaciul întrerupătorului
3-1. Capacul roţii de lanţ
3-2. Buton rotativ
4-1. Cuţit
4-2. Lamă de ghidare
4-3. Săgeată
5-1. Arc
5-2. Roată de lanţ
5-3. Vârf
Explicitarea vederii de ansamblu
6-1. Arc
6-2. Lamă de ghidare
6-3. Vârf
7-1. Capacul roţii de lanţ
7-2. Agăţătoare
7-3. Orificiu
11- 1. Bu şon rezervor ulei
11-2. Vizor de inspecţie a uleiului
11-3. Orificiu rezervor ulei
12-1. Ghidajul vârfului
13-1. Ghidaj inferior
17-1. Cartuşul acumulatorului
17-2. Teacă (apărătoare de lanţ)
22-1. Piuliţă de apăsare
22-2. Şurubelniţă cu vârf plat
23-1. Filtru
25-1. Filtru
26-1. Piuliţă de apăsare
27-1. Roată de lanţ
27-2. Inel de blocare
28-1. Inel de blocare
28-2. Roată de lanţ
28-3. Şaibă
29-1. Marcaj limită
30-1. Capacul suportului pentru perii
30-2. Şurubelni
ţă
SPECIFICAŢII
Viteza de rotaţie a lanţului pe minut (min-1) 4,8 m/s (290 m/min) 5,0 m/s (300 m/min)
Lanţ de ferăstrău
• Datorită programului nostru continuu de cercetare şi dezvoltare, caracteristicile pot fi modificate fără o notificare prealabilă.
• Notă: Specificaţiile pot varia în funcţie de ţară.
Simboluri
Mai jos sunt prezentate simbolurile de pe echipament.
Asiguraţi-vă că înţelegeţi sensul acestora înainte de
utilizare.
・ Citiţi manualul de instrucţiuni.
・ Purtaţi viziera.
・ Purtaţi mijloace de protecţie a auzului.
・ Purtaţi cască, ochelari şi protecţie
antifonică.
・ Utilizaţi protecţii adecvate pentru
picioare şi labele picioarelor şi pentru
mâini şi braţe.
・ Nu expuneţi la ploaie.
・ În timpul lucrului, ţineţi ferăstrăul cu
ambele mâini ! Manipularea cu o
singură mâna este extrem de
periculoasă!
・ Acest ferăstrău este destinat folosirii
numai de către operatori corespunzător
instruiţi.
Model BUC121 BUC122
Lungimea lamei de ghidare 115 mm
Lungime totală 422mm 422mm
Greutate netă 2,4 kg 2,5 kg
Tensiune nominală 14,4 V cc. 18 V cc.
Tip 25 AP
Pas 1/4"
Nr. organelor de transmisie
END005-2
・ Doar pentru ţările din UE
42
Nu eliminaţi echipamentele electrice la
fel ca reziduurile menajere !
Conform cu Directiva Europeană
2002/96/EC privitoare la echipamente
electrice şi electronice scoase din uz şi
conform cu legile naţionale,
echipamentele electrice care au ajuns
la finalul duratei de viaţă trebuie să fie
strânse separat şi trebuie să fie
transmise la o unitate de reciclare.
Destinaţia de utilizare
Maşina este destinată tăierii cherestelei şi buştenilor.
Pentru modelul BUC121
Numai pentru ţările europene
Emisie de zgomot
Nivelul de zgomot normal ponderat A determinat în
conformitate cu EN60745-2-13:
Nivel de presiune acustică (L
Eroare (K): 2 dB(A)
) : 84.0 dB (A)
pA
Nivelul de zgomot în timpul funcţionării poate depăşi 85
dB (A).
36
ENE031-1
ENG101-2
Page 37

Purtaţi antifoane.
ENG221-1
Vibraţii
Valoarea totală a vibraţiilor (suma vectorilor tri-axiali)
determinată conform EN60745-2-13:
Mod de funcţionare: tăierea lemnului
Emisia de vibraţii (a
Incertitudine (K): 1.5 m/s
): 4.2 m/s
h
2
2
Pentru modelul BUC122
ENG101-2
Numai pentru ţările europene
Emisie de zgomot
Nivelul de zgomot normal ponderat A determinat în
conformitate cu EN60745-2-13:
Nivel de presiune acustică (L
Eroare (K): 2 dB(A)
) : 84.6 dB (A)
pA
Nivelul de zgomot în timpul funcţionării poate depăşi 85
dB (A).
Purtaţi antifoane.
ENG221-1
Vibraţii
Valoarea totală a vibraţiilor (suma vectorilor tri-axiali)
determinată conform EN60745-2-13:
Mod de funcţionare: tăierea lemnului
Emisia de vibraţii (a
Incertitudine (K): 1.5 m/s
): 4.3 m/s
h
2
2
ENH016-5
CE-DECLARAŢIE DE CONFORMITATE
Subsemnatul, Kato, în calitate de persoană autorizată,
declar că maşinile MAKITA,
Nr. EU de identificare a modelului: M6 08 02 24243
083
BUC121
respectă normele standard de siguranţă şi sănătate ale
directivelor UE relevante:
Directiva UE pentru maşini 98/37/CE, Directiva UE
pentru emisii de zgomot 2000/14/CE, Directiva UE
pentru compatibilitate electromagnetică.
Cerinţele directivelor UE mai sus menţionate au fost
implementate în principal pe baza următoarelor
standarde: EN60745-2-13, EN 55014, ENISO11681.
Procedura de evaluare a conformităţii 2000/14/CE a fost
realizată conform Anexei V. Nivelul de zgomot măsurat
(Lwa) este 92.0 dB(A). Nivelul de putere acustică
garantată (Ld) este de 94 dB(A). Examinarea EU de tip
în conformitate cu 98/37/CE a fost executată de: TÜV
Product Service GmbH, Zertifizierungsstelle,
Ridlerstraße 31, D-80339 München.
000230
Producător responsabil:
Makita Corporation
3-11-8, Sumiyoshi-cho, Anjo, Aichi, JAPONIA
Reprezentant autorizat în Europa:
Tomoyasu Kato CE2007
Director
37
Makita International Europe Ltd.
Michigan Drive, Tongwell, Milton Keynes, Bucks MK15
8JD, ANGLIA
ENH016-5
CE-DECLARAŢIE DE CONFORMITATE
Subsemnatul, Kato, în calitate de persoană autorizată,
declar că maşinile MAKITA,
Nr. EU de identificare a modelului: M6 08 02 24243
083
BUC122
respectă normele standard de siguranţă şi sănătate ale
directivelor UE relevante:
Directiva UE pentru maşini 98/37/CE, Directiva UE
pentru emisii de zgomot 2000/14/CE, Directiva UE
pentru compatibilitate electromagnetică.
Cerinţele directivelor UE mai sus menţionate au fost
implementate în principal pe baza următoarelor
standarde: EN60745-2-13, EN 55014, ENISO11681.
Procedura de evaluare a conformităţii 2000/14/CE a fost
realizată conform Anexei V. Nivelul de zgomot măsurat
(Lwa) este 92.7 dB(A). Nivelul de putere acustică
garantată (Ld) este de 95 dB(A). Examinarea EU de tip
în conformitate cu 98/37/CE a fost executată de: TÜV
Product Service GmbH, Zertifizierungsstelle,
Ridlerstraße 31, D-80339 München.
Tomoyasu Kato CE2007
000230
Director
Producător responsabil:
Makita Corporation
3-11-8, Sumiyoshi-cho, Anjo, Aichi, JAPONIA
Reprezentant autorizat în Europa:
Makita International Europe Ltd.
Michigan Drive, Tongwell, Milton Keynes, Bucks MK15
8JD, ANGLIA
GEB037-1
Avertizări privind siguranţa
pentru lanţul ferăstrăului:
NU permiteţi comodităţii şi familiarizării cu produsul
(obţinute prin utilizare repetată) să înlocuiască
respectarea strictă a normelor de securitate pentru
ferăstrăul cu lanţ. Dacă folosiţi aceasta maşină
incorect sau fără a respecta normele de securitate,
puteţi suferi vătămări corporale grave.
1. Ţineţi toate părţile corpului la distanţă de
ferăstrăul cu lanţ în timpul funcţionării lanţului.
Înainte de a porni lanţul ferăstrăului
asiguraţi-vă că acesta nu atinge nimic. Un
moment de neatenţie în timp ce utilizaţi ferăstrăul
cu lanţ poate produce prinderea hainelor sau
corpului dumneavoastră cu lanţul ferăstrăului.
2. Ţineţi întotdeauna ferăstrăul cu lanţ cu mâna
dreaptă pe mânerul din spate şi cu mâna
stângă pe mânerul din faţă. Ţinerea ferăstrăului
Page 38

cu o configuraţie inversată a mâinilor creşte riscul
de rănire corporală şi nu trebuie făcută niciodată.
3. Purtaţi viziera şi mijloace de protecţie a
auzului. Suplimentar este recomandat
echipamentul de protecţie pentru cap, mâini,
labele picioarelor şi picioare. Îmbrăcămintea
adecvată de protecţie va reduce riscul rănirii
personale datorită resturilor proiectate sau
contactului accidental cu lanţul ferăstrăului.
4. Nu utilizaţi ferăstrăul cu lanţ în copac.
Utilizarea ferăstrăului cu lanţ sus în copac poate
produce vătămarea corporală.
5. Păstraţi întodeauna un sprijin adecvat pentru
picoare şi utilizaţi ferăstrăul cu lanţ doar stând
pe o suprafaţă fixă, sigură şi orizontală.
Suprafeţele alunecoase sau instabile cum ar fi
scările pot produce pierderea echilibrului sau a
controlului ferăstrăului cu lanţ.
6. Când tăiaţi o ramură care este tensionată aveţi
grijă la destinderea acesteia. Atunci când este
eliminată tensiunea din fibrele lemnului, ramura
arcuită poate lovi operatorul şi/sau produce
aruncarea ferăstrăului cu lanţ în afara controlului.
7. Fiţi extrem de precauţi atunci când tăiaţi
tufişuri sau pomi tineri. Materialul suplu poate
prinde lanţul ferăstrăului şi poate fi biciuit către
dumneavoastră sau vă poate trage şi
dezechilibra.
8. Transportaţi ferăstrăul cu lanţ ţinând-ul de
mânerul din faţă, oprit şi la depărtare de
corpul dumneavoastră. Întotdeauna montaţi
capacul barei de ghidaj când transportaţi sau
depozitaţi ferăstrăul cu lanţ. Manipularea
adecvată a ferăstrăului cu lanţ va reduce
probabilitatea contactului accidental cu lanţul în
mişcare al ferăstrăului.
9. Respectaţi instrucţiunile pentru lubrifiere,
tensionarea lanţului şi schimbarea
accesoriilor. Lanţul tensionat sau lubrifiat
necorespunzător se poate rupe sau poate creşte
posibilitatea producerii unui recul.
10. Ţineţi mânerele uscate, curate şi fără ulei sau
vaselină. Mânerele unsuroase, uleioase sunt
alunecoase şi pot produce pierderea controlului.
11. Tăiaţi numai lemn. Nu folosiţi ferăstrăul cu lanţ
în alte scopuri decât cele pentru care a fost
destinat. De exemplu: nu utilizaţi feră
lanţ pentru tăierea plasticului, zidăriei sau
materialelor de construcţie care nu sunt
lemnoase. Utilizarea ferăstrăului pentru
operaţiuni diferite faţă de cele pentru care a fost
destinat poate avea ca rezultat producerea unei
situaţii periculoase.
12. Cauzele şi modul de prevenire al reculului:
Reculul poate apărea când nasul sau vârful barei
de ghidare atinge un obiect sau când lemnul se
strânge şi prinde lanţul ferăstrăului în tăietură.
În unele cazuri, contactul vârfului poate produce o
străul cu
reacţie inversă neaşteptată, smucind bara de
ghidare în sus şi înapoi, pe direcţia operatorului.
Strangularea lanţului ferăstrăului de-a lungul părţii
superioare a barei de ghidare poate împinge brusc
bara de ghidare înapoi spre operator.
Oricare dintre aceste reacţii poate produce
pierderea controlului asupra ferăstrăului, ceea ce
poate produce vătămarea corporală gravă. Nu vă
bazaţi exclusiv pe dispozitivele de siguranţă
încorporate în ferăstră
cu lanţ, trebuie să parcurgeţi câteva etape pentru a
meţine activitatea de tăiere fără accidente sau
răniri.
Reculul este rezultatul utilizării incorecte a maşinii
şi/sau al procedeelor sau condiţiilor de lucru
necorespunzătoare, putând fi evitat prin adoptarea
unor măsuri de precauţie adecvate prezentate în
continuare:
− Menţineţi o prindere fermă, cu degetele mari
şi celelalte degete înconjurând mânerele
ferăstrăului cu lanţ, cu ambele mâini pe
ferăstrău şi poziţionaţi-vă corpul şi braţul
astfel încât să permită opunerea la forţele de
recul. Forţele de recul pot fi controlate de
operator, dacă sunt luate măsurile de
precauţie adecvate. Nu scăpaţi ferăstrăul cu
lanţ.
008625
− Nu vă întindeţi şi nu tăiaţi deasupra
înălţimii umărului.. Aceasta vă va ajuta să
preveniţi contactul neintenţionat al vârfului şi
va permite un control mai bun al ferăstrăului
cu lanţ în situaţii neprevăzute.
− Pentru înlocuire, utilizaţi doar bare şi
lanţuri recomandate de producător..
Barele şi lanţurile de schimb incorecte pot
produce ruperea lanţului şi/sau reculul.
− Pentru ascuţirea şi întreţinerea
ferăstrăului cu lanţ, respectaţi
instrucţiunile producătorului. Scăderea
înălţimii indicatorului de adâncime poate
conduce la recul mă
u. Ca utilizator de ferăstrău
rit.
NORME SUPLIMENTARE DE
SECURITATE
38
Page 39

1. Citiţi manualul de instrucţiuni pentru a vă
familiariza cu operarea ferăstrăului cu lanţ.
2. Înainte de a folosi pentru prima dată ferăstrăul cu
lanţ, aveţi grijă să beneficiaţi de un instructaj cu
privire la operarea acestuia. Dacă acest lucru nu
este posibil, exersaţi cel puţin tăierea unor buşteni
rotunzi pe o capră înainte de a începe lucrul.
3. Ferăstrăul cu lanţ nu trebuie folosit de copii sau
adolescenţi cu vârstă mai mică de 18 ani.
Adolescenţii cu vârstă mai mare de 16 ani pot fi
exceptaţi de la această restricţie în cazul în care
beneficiază de instructaj sub supravegherea unui
expert.
4. Lucrul cu ferăstrăul cu lanţ necesită un nivel înalt
de concentrare. Nu lucraţi cu ferăstrăul dacă nu
vă simţi
ţi apt şi sănătos. Executaţi fiecare lucrare
calm şi cu atenţie.
5. Nu lucraţi niciodată sub influenţa alcoolului,
drogurilor sau medicamentelor.
Folosirea corectă
1. Ferăstrăul cu lanţ este destinat numai pentru
tăierea lemnului. Nu-l folosiţi, de exemplu, pentru
tăierea plasticului sau betonului poros.
2. Folosiţi ferăstrăul cu lanţ numai pentru operaţiile
descrise în acest manual de instrucţiuni. Nu
folosiţi ferăstrăul, de exemplu, pentru tăierea
gardurilor vii sau în alte scopuri similare.
3. Ferăstrăul cu lanţ nu trebuie utilizat pentru lucrări
forestiere, adică pentru tăierea şi debitarea
arborilor în picioare. Cablul ferăstrăului cu lanţ nu
conferă utilizatorului mobilitatea şi siguranţa
necesare pentru astfel de lucrări.
4. Ferăstrăul cu lanţ nu este destinat pentru uz
comercial.
5. Nu suprasolicitaţi ferăstrăul cu lanţ.
Echipament personal de protecţie
1. Îmbrăcămintea trebuie să fie strânsă pe corp, însă
nu trebuie să incomodeze mişcările.
2. Folosiţi următorul echipament de protecţie în
timpul lucrului:
• O cască de protecţie omologată, dacă există
risc de cădere a crengilor sau alte riscuri
similare;
• O mască de protecţie sau ochelari de
protecţie;
• Mijloace de protecţie a auzului adecvate (căşti
antifonice, dopuri pentru urechi personalizate
sau modelabile). Analizor de octavă la cerere.
• Mănuşi de protecţie din piele groasă;
• Pantaloni lungi fabricaţi din ţesătură
rezistentă;
• Salopetă de protecţie din ţesătură rezistentă la
tăiere;
• Încălţăminte de protecţie sau cizme cu tălpi
antiderapante, bombeu de oţel şi căptuşeală
din ţesătură rezistentă la tăiere;
• O mască respiratoare, când executaţi lucrări
cu degajare de praf (de exemplu, la tăierea
lemnului uscat).
Tehnici de lucru sigure
1. Nu folosiţi ferăstrăul cu lanţ în apropierea
pulberilor sau gazelor inflamabile, deoarece
motorul produce scântei şi prezintă risc de
explozie.
2. Lucraţi numai pe un teren stabil şi cu o poziţie
stabilă a picioarelor. Acordaţi o atenţie deosebită
obstacolelor (de exemplu, cablul) din perimetrul
de lucru. Aveţi deosebită grijă în porţiunile în care
umiditatea, gheaţa, zăpada, lemnul proaspăt tăiat
sau scoarţa de copac pot alcătui suprafeţe
alunecoase. Nu vă urcaţi pe scări sau copaci
atunci când folosiţi ferăstrăul.
3. Aveţi deosebită grijă atunci când lucraţi pe un
teren înclinat; rostogolirea trunchiurilor şi crengilor
prezintă un potenţial pericol.
4. Curăţaţi porţiunea de tăiat de obiecte străine, cum
ar fi nisip, pietre, cuie, cabluri etc. Obiectele
stră
ine vor deteriora lama şi lanţul, putând
provoca reculuri periculoase.
5. Aveţi deosebită grijă atunci când tăiaţi în
vecinătatea gardurilor de sârmă. Nu tăiaţi în gard,
deoarece ferăstrăul poate recula.
6. Nu tăiaţi în pământ.
7. Tăiaţi bucăţile de lemn individual, şi nu în legături
sau în stive.
8. Evitaţi utilizarea ferăstrăului pentru tăierea
ramurilor subţiri şi a rădăcinilor, deoarece acestea
se încurcă în ferăstrăul cu lanţ. Pierderea
echilibrului este periculoasă.
9. Folosiţi un suport sigur (capră) atunci când tăiaţi
buşteni.
10. Nu folosiţi ferăstrăul cu lanţ pentru a ridica sau
mătura bucăţi de lemn sau alte obiecte.
11. Gh id aţi ferăstrăul cu lanţ astfel încât nicio parte a
corpului dumneavoastră să nu se afle în calea
ferăstrăului cu lanţ (vezi figura).
006909
Recul
1. În timpul lucrului cu ferăstrăul cu lanţ pot apărea
reculuri periculoase. Reculul apare atunci când
vârful lamei (în special partea superioară) intră în
contact cu lemnul sau un alt obiect solid. Aceasta
are ca efect devierea ferăstrăului cu lanţ în
39
Page 40
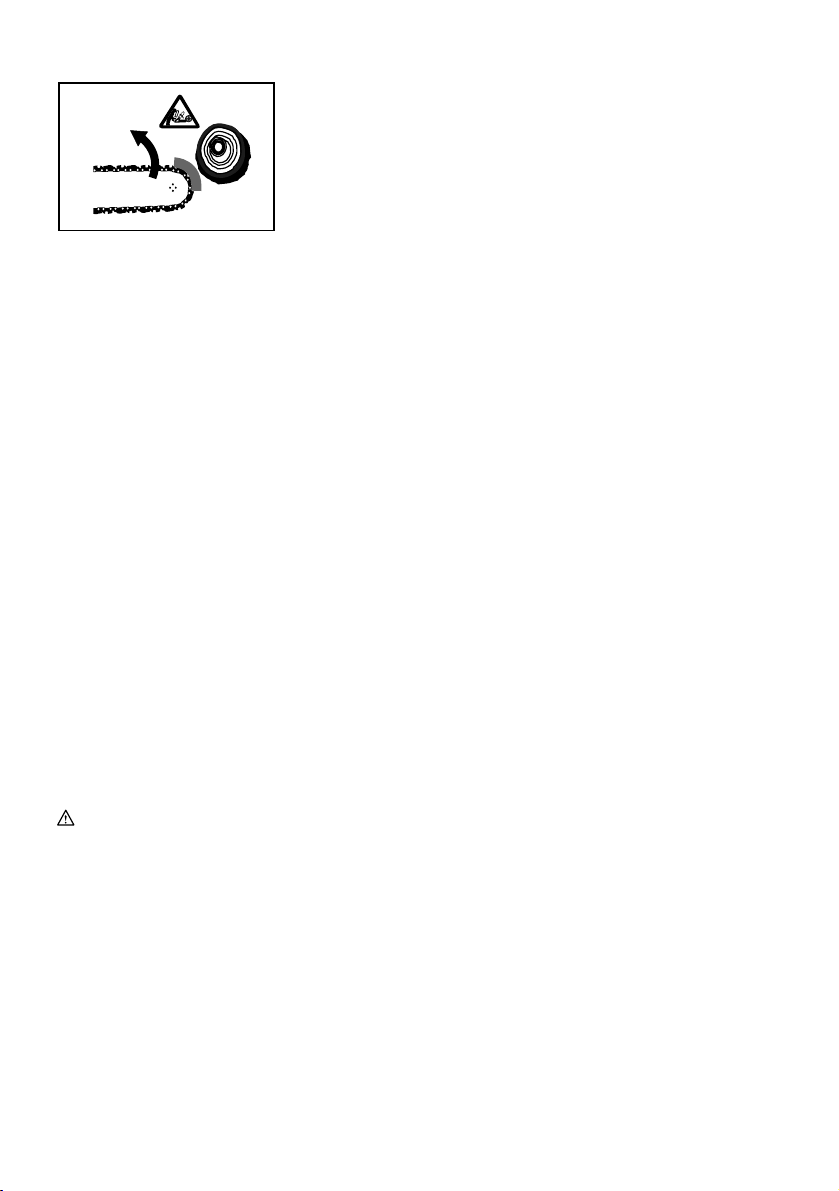
direcţia utilizatorului.
006919
2. Pentru a evita reculul, respectaţi următoarele
indicaţii:
• Nu începeţi niciodată tăierea cu vârful lamei.
• Nu folosiţi niciodată vârful lamei pentru tăiere.
Aveţi deosebită grijă atunci când reluaţi tăierile
întrerupte.
• Începeţi tăierea cu lanţul în funcţiune.
• Ascuţiţi întotdeauna corect lanţul. În particular,
ajustaţi calibrul de reglare a adâncimii la
înălţimea corectă (consultaţi "Ascuţirea
lanţului" pentru detalii).
• Nu tăiaţi niciodată mai multe crengi
concomitent.
• Când debitaţi, aveţi grijă să nu permiteţi lamei
să intre în contact cu alte crengi.
• Când retezaţi, nu vă apropiaţi de trunchiurile
adiacente. Supravegheaţi permanent vârful
lamei.
• Folosiţi o capră.
Transport şi depozitare
1. Transportaţi ferăstrăul cu lanţ numai de mânerul
din faţă, cu lama îndreptată înapoi.
2. Păstraţi ferăstrăul cu lanţ într-un spaţiu sigur,
uscat şi încuiat la care nu au acces copiii. Nu
depozitaţi ferăstrăul cu lanţ în aer liber.
PĂSTRAŢI ACESTE
INSTRUCŢIUNI
AVERTISMENT:
Utilizarea necorespunzătoare sau nerespectarea
regulilor din manualul de instrucţiuni poate cauza
vătămări personale grave
ENC007-2
INSTRUCŢIUNI IMPORTANTE
PRIVIND SIGURANŢA
PENTRU CARTUŞUL
ACUMULATORULUI
1. Înainte de a folosi cartuşul acumulatorului,
citiţi toate instrucţiunile şi atenţionările de pe
(1) încărcătorul acumulatorului, (2) acumulator
şi (3) produsul care foloseşte acumulatorul.
2. Nu dezmembraţi cartuşul acumulatorului.
3. Dacă timpul de funcţionare s-a redus excesiv,
întrerupeţi imediat funcţionarea. Aceasta
poate prezenta risc de supraîncălzire, posibile
arsuri şi chiar explozie.
4. Dacă electrolitul pătrunde în ochi, clătiţi bine
ochii cu apă curată şi consultaţi imediat un
medic. Există risc de orbire.
5. Nu scurtcircuitaţi cartuşul acumulatorului:
(1) Nu atingeţi bornele cu niciun material
conductor.
(2) Evitaţi depozitarea cartuşului
acumulatorului la un loc cu alte obiecte
metalice cum ar fi cuie, monede etc.
(3) Nu expuneţi cartuşul acumulatorului la
apă sau ploaie.
Un scurtcircuit al acumulatorului poate
provoca un flux puternic de curent
electric, supraîncălzire, posibile arsuri şi
6. Nu depozitaţi maşina şi cartuşul
7. Nu incineraţi cartuşul acumulatorului chiar
8. Aveţi grijă să nu scăpaţi pe jos sau să loviţi
chiar defectarea maşinii.
acumulatorului în spaţii în care temperatura
poate atinge sau depăşi 50 ゚ C (122 ゚ F).
dacă acesta este grav deteriorat sau complet
uzat. Cartuşul acumulatorului poate exploda
în foc.
acumulatorul.
PĂSTRAŢI ACESTE
INSTRUCŢIUNI
Sfaturi pentru obţinerea unei durate maxime
de exploatare a acumulatorului
1. Încărcaţi cartuşul acumulatorului înainte de a
se descărca complet.
Întrerupeţi întotdeauna funcţionarea maşinii şi
încărcaţi cartuşul acumulatorului când
observaţi o scădere a puterii maşinii.
2. Nu reîncărcaţi niciodată un acumulator
complet încărcat.
Supraîncărcarea va scurta durata de
exploatare a acumulatorului.
3. Încărcaţi cartuşul acumulatorului la
temperatura camerei, între 10 ゚ C - 40 ゚ C (50 ゚
F - 104 ゚ F). Lăsaţi un acumulator fierbinte să
se răcească înainte de a-l încărca.
40
Page 41

Piese livrate
1
2
008588
Mâner superior
1
Cartuşul acumulatorului
2
Capacul roţii de lanţ
3
Apărătoare anterioară
4
pentru mână
Lamă de ghidare
5
Apărătoare de capăt
6
Lanţ de ferăstrău
7
008589
4
5
8
13
3
9
12
10
6
7
11
Buton rotativ
8
Buton de deblocare
9
Mâner frontal
10
Trăgaciul întrerupătorului
11
Apărătoare de lanţ
12
Punct de prindere
13
carabinieră sau frânghie
DESCRIERE FUNCŢIONALĂ
ATE NŢIE:
• Asiguraţi-vă întotdeauna că maşina este oprită şi
cartuşul acumulatorului este scos înainte de a
ajusta sau verifica funcţionarea maşinii.
Instalarea sau scoaterea cartuşului
acumulatorului
Fig.1
• Opriţi întotdeauna maşina înainte de a instala sau
scoate cartuşul acumulatorului.
• Pentru a scoate cartuşul acumulatorului, extrageţi-l
din maşină în timp ce glisaţi butonul de pe partea
frontală a cartuşului.
• Pentru a introduce cartuşul acumulatorului, aliniaţi
limba de pe cartuşul acumulatorului cu canelura
din carcasă şi introduceţi-l în locaş. Introduceţi-l
întotdeauna complet, până când se înclichetează
în locaş. Dacă puteţi vedea porţiunea roşie din
partea superioară a butonului, acesta nu este
blocat complet. Introduceţi-l complet, până când
porţiunea roşie nu mai este vizibilă. În caz contrar,
41
Page 42

acesta poate cădea accidental din maşină
provocând rănirea dumneavoastră sau a
persoanelor din jur.
• Nu forţaţi introducerea cartuşului acumulatorului.
Dacă acesta nu glisează uşor, înseamnă că a fost
introdus incorect.
Acţionarea întrerupătorului
ATE NŢIE:
• Înainte de a introduce cartuşul acumulatorului în
maşină, verificaţi întotdeauna dacă butonul
declanşator funcţionează corect şi revine în poziţia
"OFF" (oprit) când este eliberat.
Fig.2
Pentru a preveni acţionarea accidentală a butonului
declanşator este prevăzut un buton de deblocare.
Pentru a porni maşina, apăsaţi butonul de deblocare şi
acţionaţi butonul declanşator. Eliberaţi butonul
declanşator pentru a opri maşina.
MONTARE
ATE NŢIE:
• Asiguraţi-vă întotdeauna că maşina este oprită şi
cartuşul acumulatorului este scos înainte de a
executa orice lucrări la maşină.
Montarea sau demontarea lanţului de
ferăstrău
ATE NŢIE:
• Asiguraţi-vă întotdeauna că maşina este oprită şi
cartuşul acumulatorului este scos înainte de a
monta sau demonta lanţul de ferăstrău.
• Purtaţi întotdeauna mănuşi atunci când montaţi
sau demontaţi lanţul de ferăstrău.
• Utilizaţi numai un lanţ de ferăstrău şi o lamă de
ghidare cu vârful lamei conceput special pentru
acest ferăstrău cu lanţ (vezi extrasul din lista
pieselor de schimb).
• Pentru a preveni recularea, nu îndepărtaţi vârful
lamei sau nu înlocuiţi lama de ghidare cu una fără
vârf de lamă.
Fig.3
Slăbiţi şurubul rotind butonul rotativ in sens antiorar
până când apărătoarea roţii de lanţ se desface.
Îndepărtaţi apărătoarea roţii de lanţ.
Scoateţi din maşină lanţul de ferăstrău şi lama de
ghidare.
Fig.4
Montaţi un capăt al lanţului de ferăstrău pe partea
superioară a lamei de ghidare. În această etapă, montaţi
lanţul de ferăstrău ca în figură, deoarece acesta se
roteşte în sensul indicat de săgeată.
Fig.5
Amplasaţi lanţul de ferăstrău astfel încât arcul şi vârful
să fie poziţionate în interiorul acestuia şi montaţi celălalt
capăt al lanţului de ferăstrău în jurul roţii de lanţ, aşa
cum este arătat în figură.
Fig.6
În timp ce rotiţi lama de ghidare în sens antiorar,
montaţi-o astfel încât capătul lamei de ghidare să intre în
contact cu arcul.
Fig.7
Introduceţi cârligul apărătorii roţii de lanţ în gaura din
maşină şi apoi amplasaţi-o pe maşină.
Fig.8
Rotiţi butonul rotativ în sens orar pentru a strânge ferm
şurubul.
Reglarea tensionării lanţului de ferăstrău
Fig.9
Doar o mică slăbire a şurubului permite reglarea
tensionării lanţului de ferăstrău. După reglare, strângeţi
din nou ferm şurubul de strângere.
Fig.10
ATE NŢIE:
• După ce a fost montat un lanţ de ferăstrău nou, o
perioadă acesta are tendinţa de a se slăbi.
Verificaţi din când în când tensionarea lanţului de
ferăstrău înainte de utilizare.
• Lanţul de ferăstrău slăbit poate sări de la locul său.
• Montarea sau demontarea lanţului de ferăstrău
trebuie executată într-un spaţiu curat, fără praf sau
alte asemenea impurităţi.
FUNCŢIONARE
Lubrifierea
Fig.11
Lanţul de ferăstrău este lubrifiat automat atunci când
maşina este în funcţiune.
Verificaţi cantitatea de ulei rămasă în rezervor prin
vizorul de inspecţie a uleiului.
Pentru a reumple rezervorul, scoateţi buşonul de la
orificiul rezervorului de ulei. Capacitatea rezervorului de
ulei este de 80 ml.
După reumplerea rezervorului, înşurubaţi întotdeauna
buşonul livrat al rezervorului de ulei pe ferăstrăul cu lanţ.
ATE NŢIE:
• Atunci când alimentaţi ferăstrăul cu lanţ pentru
prima dată cu ulei de lanţ sau când reumpleţi
rezervorul după golirea completă a acestuia,
turnaţi ulei până la marginea inferioară a gâtului de
umplere. În caz contrar, alimentarea cu ulei poate fi
defectuoasă.
• Utilizaţi întotdeauna ulei pentru Makita sau ulei
disponibil pe piaţă ca ulei pentru ferăstraiele cu
lanţ.
42
Page 43

• Nu utilizaţi niciodată ulei cu praf sau particule sau
ulei volatil.
• Când curăţaţi arborii de crengi, utilizaţi întotdeauna
ulei vegetal. Uleiul mineral poate fi dăunător pentru
pomi.
• Nu forţaţi ferăstrăul cu lanţ când curăţaţi pomii de
crengi.
• Înainte de tăiere, asiguraţi-vă că buşonul livrat al
rezervorului de ulei este înşurubat la locul său.
Ţineţi ferăstrăul cu lanţ la distanţă de pom. Porniţi-l şi
aşteptaţi până când lanţul de ferăstrău este lubrifiat
corespunzător.
Aduceţi ghidajul vârfului/ghidajul inferior în contact cu
creanga de tăiat înainte de a porni maşina. Executarea
tăierii fără aducerea ghidajului vârfului/ghidajului inferior
în contact cu creanga poate provoca oscilaţia lamei de
ghidare şi vătămarea operatorului.
Tăiaţi lemnul care trebuie tăiat prin simpla deplasare
spre în jos a ferăstrăului cu lanţ.
Tăierea pomilor
Fig.12
Fig.13
ATE NŢIE:
• Feriţi toate părţile corpului din calea lanţului de
ferăstrău în timpul funcţionării motorului.
• Ţineţi ferm ferăstrăul cu lanţ cu ambele mâini în
timpul funcţionării motorului.
• Nu vă întindeţi excesiv. Menţineţi-vă permanent
echilibrul şi sprijiniţi-vă ferm pe picioare.
Aduceţi ghidajul vârfului/ghidajul inferior în contact cu
creanga de tăiat înainte de a porni maşina. Executarea
tăierii fără aducerea ghidajului vârfului/ghidajului inferior
în contact cu creanga poate provoca oscilaţia lamei de
ghidare şi vătămarea operatorului.
Atunci când tăiaţi crengi groase, executaţi întâi o scurtă
tăietură de jos şi apoi executaţi tăierea finală de sus.
Fig.14
Dacă încercaţi să tăiaţi crengi groase de jos în sus,
creanga se poate lăsa în jos şi poate strânge lanţul de
ferăstrău în tăietură.
Dacă încercaţi să tăiaţi crengi groase de sus în jos, fără
a executa o tăietură scurtă de jos, creanga se poate
despica.
Fig.15
Dacă nu puteţi tăia complet buştenii dintr-o singură
mişcare:
Aplicaţi o uşoară presiune asupra mânerului şi continuaţi
să tăiaţi trăgând puţin înapoi ferăstrăul cu lanţ; apoi
aplicaţi gheara puţin mai jos şi terminaţi tăierea prin
ridicarea mânerului.
Fig.16
Transportarea maşinii
Fig.17
Scoateţi întotdeauna cartuşul acumulatorului din maşină
şi acoperiţi lama de ghidare cu teaca înainte de a
transporta maşina. De asemenea, acoperiţi cartuşul
acumulatorului cu capacul acumulatorului.
ÎNTREŢINERE
ATE NŢIE:
• Asiguraţi-vă întotdeauna că maşina este oprită şi
cartuşul acumulatorului este scos înainte de a
executa lucrările de inspecţie şi întreţinere.
• Purtaţi întotdeauna mănuşi când executaţi orice
lucrare de inspecţie şi întreţinere.
Ascuţirea lanţului de ferăstrău
ATE NŢIE:
• Scoateţi întotdeauna cartuşul acumulatorului şi
purtaţi mănuşi de protecţie atunci când executaţi
lucrări la lanţul de ferăstrău.
Fig.18
Ascuţiţi lanţul de ferăstrău atunci când:
− La tăierea lemnului umed se produce rumeguş
făinos;
− Lanţul penetrează lemnul cu dificultate, chiar dacă
se aplică o forţă puternică;
− Muchiile tăietoare sunt deteriorate vizibil;
− Ferăstrăul trage spre stânga sau spre dreapta la
tăierea lemnului. Cauza acestui comportament
este ascuţirea neuniformă a lanţului de ferăstrău,
sau deteriorarea unei singure laturi.
Ascuţiţi frecvent lanţul de ferăstrău, însă îndepărtaţi
doar o cantitate mică de material de fiecare dată.
Două sau trei curse ale pilei sunt suficiente de obicei
pentru o ascuţire de rutină. După ce lanţul de ferăstrău a
fost reascuţ
acestuia la un atelier de reparaţii specializat MAKITA.
Pila şi ghidarea pilei
− Utilizaţi pentru ascuţirea lanţului o pilă rotundă
Fig.19
− Pila trebuie să aşchieze materialul numai la cursa
− Ascuţiţi întâi cuţitul cel mai scurt. Lungimea acestui
− Ghidaţi pila după cum se vede în figură.
− Pila poate fi ghidată mai uşor dacă se foloseşte un
43
it de mai multe ori, solicitaţi ascuţirea
specială (accesoriu opţional) pentru lanţuri de
ferăstrău, cu un diametru de 4 mm. Pilele rotunde
normale nu sunt adecvate.
de avans. Ridicaţi pila de pe material la cursa de
revenire.
cuţit devine astfel dimensiunea etalon pentru toate
celelalte cuţite ale lanţului de ferăstrău.
suport de pilă (accesoriu). Suportul de pilă dispune
de marcaje pentru unghiul corect de ascuţire de
30° (aliniaţi marcajele paralel cu lanţul de
ferăstrău) şi limitează adâncimea de penetrare (la
Page 44

4/5 din diametrul pilei).
Ghidaţi pila după cum se vede în figură.
− După ascuţirea lanţului, verificaţi înălţimea
calibrului de adâncime utilizând instrumentul de
etalonare a lanţului (accesoriu opţional).
Fig.20
− Îndepărtaţi orice proeminenţă de material, oricât de
mică, cu o pilă plată specială (accesoriu opţional).
− Rotunjiţi din nou muchia frontală a calibrului de
adâncime.
− Înainte de a regla adâncimea de tăiere, îndepărtaţi
prin spălare praful şi particulele de pe lanţul de
ferăstrău.
Curăţarea lamei de ghidare
Fig.21
Aşchiile şi rumeguşul se vor acumula în canelura lamei
de ghidare, ancrasând-o şi perturbând fluxul de ulei.
Eliminaţi întotdeauna aşchiile şi rumeguşul atunci când
ascuţiţi sau înlocuiţi lanţul de ferăstrău.
Curăţarea filtrului de ulei de la orificiul de
evacuare a uleiului
În timpul funcţionării, în filtrul de ulei de la orificiul de
evacuare a uleiului se pot acumula particulele mici de
praf sau impurităţi.
Particulele mici de praf sau impurităţi acumulate în filtrul
de ulei pot perturba fluxul de evacuare a uleiului şi pot
cauza o lubrifiere insuficientă a întregului lanţ de
ferăstrău.
Dacă intervine o alimentare defectuoasă cu ulei de lanţ
a lamei de ghidare, curăţaţi filtrul după cum urmează.
Scoateţi cartuşul acumulatorului din maşină.
Demontaţi apărătoarea roţii de lanţ şi lanţul de ferăstrău
de pe maşină. (Consultaţi paragraful intitulat "Montarea
sau demontarea lanţului de ferăstrău".)
Fig.22
Scoateţi piuliţa de apăsare utilizând o şurubelniţă cu vârf
plat în combinaţie cu o tijă subţire sau ceva asemănător.
Fig.23
Scoateţi filtrul din ferăstrăul cu lanţ şi îndepărtaţi
particulele mici de praf sau impurităţi de pe acesta. Dacă
filtrul este prea murdar, înlocuiţi-l cu unul nou.
Introduceţi în maşină cartuşul acumulatorului.
Fig.24
Trageţi butonul declanşator pentru a elimina, prin
scurgerea uleiului de lanţ, particulele de praf sau
impurităţi acumulate în orificiul de evacuare a uleiului.
Scoateţi cartuşul acumulatorului din maşină.
Fig.25
Introduceţi filtrul de ulei curăţat în orificiul de evacuare a
uleiului. Dacă filtrul este prea murdar, înlocuiţi-l cu unul
nou.
Fig.26
Introduceţi piuliţa de apăsare cu faţa corectă orientată în
sus, după cum se vede în figură, în orificiul de evacuare
a uleiului pentru a fixa filtrul. Dacă filtrul nu poate fi fixat
cu o piuliţă de apăsare deformată, înlocuiţi piuliţa de
apăsare cu una nouă.
Reinstalaţi apărătoarea roţii de lanţ şi lanţul de ferăstrău
pe maşină.
Înlocuirea roţii de lanţ
Înainte de a instala un lanţ de ferăstrău nou, verificaţi
starea roţii de lanţ.
Fig.27
ATE NŢIE:
• O roată de lanţ uzată va deteriora un lanţ de
ferăstrău nou. În acest caz, înlocuiţi roata de lanţ.
Roata de lanţ trebuie montată astfel încât să arate
întotdeauna la fel ca în figură.
Fig.28
Instalaţi întotdeauna un inel de blocare nou atunci când
înlocuiţi roata de lanţ.
Înlocuirea periilor de carbon
Fig.29
Detaşaţi periile de carbon şi verificaţi-le în mod regulat.
Schimbaţi-le atunci când s-au uzat până la marcajul
limită. Periile de carbon trebuie să fie în permanenţă
curate şi să alunece uşor în suport. Ambele perii de
carbon trebuie să fie înlocuite simultan cu alte perii
identice.
Folosiţi o şurubelniţă pentru a îndepărta capacul
suportului periilor de carbon. Scoateţi periile de carbon
uzate şi fixaţi capacul pentru periile de carbon.
Fig.30
Depozitarea maşinii
Curăţaţi maşina înaintea depozitării. Îndepărtaţi aşchiile
şi rumeguşul de pe maşină după ce aţi demontat
apărătoarea roţii de lanţ. După curăţarea maşinii, utilizaţi
maşina în gol pentru a lubrifia lanţul de ferăstrău şi lama
de ghidare.
Acoperiţi lama de ghidare cu teaca.
Scoateţi uleiul din rezervorul de ulei pentru a-l goli şi
puneţi ferăstrăul cu lanţ cu buşonul rezervorului orientat
în sus.
Pentru a menţine siguranţa şi fiabilitatea maşinii,
reparaţiile şi reglajele trebuie să fie efectuate numai la
Centrele de service autorizat Makita, folosindu-se piese
de schimb Makita.
ACCESORII
ATE NŢIE:
• Folosiţi accesoriile sau piesele auxiliare
recomandate pentru maşina dumnavoastră în
acest manual. Utilizarea oricăror alte accesorii sau
piese auxiliare poate cauza vătămări. Folosiţi
44
Page 45

accesoriile pentru operaţuinea pentru care au fost
concepute.
Dacă aveţi nevoie de asistenţă sau de mai multe detalii
referitoare la aceste accesorii, adresaţi-vă centrului local
de service Makita.
• Diverse tipuri de acumulatoare şi încărcătoare
originale Makita
• Lanţ de ferăstrău
• Teacă
• Lamă de ghidare completă
• Pilă
45
Page 46

DEUTSCH
1-1. Roter Bereich
1-2. Taste
1-3. Akkublock
2-1. Entsperrungstaste
2-2. Schalter
3-1. Kettenradschutz
3-2. Knopf
4-1. Sägezahn
4-2. Führungsschiene
4-3. Pfeil
5-1. Feder
5-2. Kettenrad
5-3. Ansatz
6-1. Feder
Erklärung der Gesamtdarstellung
6-2. Führungsschiene
6-3. Ansatz
7-1. Kettenradschutz
7-2. Haken
7-3. Loch
11-1. Öltankdeckel
11-2. Ölprüffenster
11-3. Öltanköffnung
12-1. Endführung
13-1. Untere Führung
17-1. Akkublock
17-2. Schienenschutz
(Schutzabdeckung)
22-1. Druckmutter
22-2. Schlitzschraubendreher
23-1. Filter
25-1. Filter
26-1. Druckmutter
27-1. Kettenrad
27-2. Arretierring
28-1. Arretierring
28-2. Kettenrad
28-3. Unterlegscheibe
29-1. Grenzmarke
30-1. Kohlenhalterdeckel
30-2. Schraubenzieher
TECHNISCHE DATEN
Kettengeschwindigkeit pro Minute (min-1) 4,8 m/s (290 m/min) 5,0 m/s (300 m/min)
Sägekette
• Aufgrund der laufenden Forschung und Entwicklung unterliegen die hier aufgeführten technischen Daten Veränderungen ohne
Hinweis
• Anm.: Die technischen Daten können für verschiedene Länder unterschiedlich sein.
Symbole
Nachstehend sind Symbole aufgeführt, auf die Sie beim
Werkzeuggebrauch stoßen können. Sie sollten noch vor
Arbeitsbeginn ihre Bedeutung kennen.
・ Lesen Sie die Bedienungsanleitung.
・ Tragen Sie eine Schutzbrille.
・ Tragen Sie einen Gehörschutz.
・ Tragen Sie stets Helm, Schutzbrille und
Gehörschutz.
・ Tragen Sie geeignete
Schutzausrüstung für Füße und Beine
und für Hände und Arme.
・ Setzen Sie die Säge keinem Regen
aus.
・ Halten Sie die Säge beim Arbeiten mit
beiden Händen fest! Das Erfassen der
Säge mit nur einer Hand ist äußerst
gefährlich!
Modell BUC121 BUC122
Länge der Führungsschiene 115 mm
Anz. Antriebsverbindungen 42
Gesamtlänge 422mm 422mm
Netto-Gewicht 2,4 kg 2,5 kg
Nennspannung Gleichspannung 14,4 V Gleichspannung 18 V
Typ 25 AP
Kettenteilung 1/4"
END005-2
・ Diese Säge darf ausschließlich von
entsprechend ausgebildeten Personen
benutzt werden.
・ Nur für EU-Länder
Entsorgen Sie die elektrische
Einrichtung nicht zusammen mit dem
Hausmüll!
Auf Anordnung des Europarats
2002/96/EC über die Entsorgung von
elektrischen und elektronischen
Einrichtungen und ihrer Durchführung
übereinstimmend mit den nationalen
Gesetzen, müssen die elektrischen
Einrichtungen, nachdem sie ausgedient
haben, gesondert gesammelt und der
ökologischen Wiederverwertung
zugeführt werden.
Verwendungszweck
Das Werkzeug wurde für das Schneiden von Stämmen
und Holzscheiten entwickelt.
ENE031-1
46
Page 47

Für Modell BUC121
Nur für europäische Länder
Geräusche
ENG101-2
durchgeführt von: TÜV Product Service GmbH,
Zertifizierungsstelle, Ridlerstraße 31, D-80339
München.
Die typischen A-bewerteten Geräuschpegel, bestimmt
gemäß EN60745-2-13:
Schalldruckpegel (L
Abweichung (K): 2 dB (A)
Unter Arbeitsbedingungen kann der Schalldruckpegel 85
dB (A) überschreiten.
Verwenden Sie Hilfsmittel für den Gehörschutz.
Schwingung
Schwingungsgesamtwerte (Vektorsumme dreier
Achsen) nach EN60745-2-13:
Arbeitsmodus: Schneiden von Holz
Schwingungsausgabe (a
Abweichung (K): 1.5 m/s
Für Modell BUC122
Nur für europäische Länder
Geräusche
Die typischen A-bewerteten Geräuschpegel, bestimmt
gemäß EN60745-2-13:
Schalldruckpegel (L
Abweichung (K): 2 dB (A)
Unter Arbeitsbedingungen kann der Schalldruckpegel 85
dB (A) überschreiten.
Verwenden Sie Hilfsmittel für den Gehörschutz.
Schwingung
Schwingungsgesamtwerte (Vektorsumme dreier
Achsen) nach EN60745-2-13:
Arbeitsmodus: Schneiden von Holz
Schwingungsausgabe (a
Abweichung (K): 1.5 m/s
ÜBEREINSTIMMUNGSERKLÄRUNG MIT DEN
EU-NORMEN
): 84.0 dB (A)
pA
) : 4.2 m/s
h
2
): 84.6 dB (A)
pA
) : 4.3 m/s
h
2
000230
Verantwortlicher Hersteller:
Makita Corporation
ENG221-1
3-11-8, Sumiyoshi-cho, Anjo, Aichi, JAPAN
Autorisierte Vertretung in Europa:
Makita International Europe Ltd.
Michigan Drive, Tongwell, Milton Keynes, Bucks MK15
8JD, ENGLAND
2
ÜBEREINSTIMMUNGSERKLÄRUNG MIT DEN
EU-NORMEN
Der Unterzeichnende, Kato, bevollmächtigt durch
ENG101-2
ENG221-1
2
ENH016-5
MAKITA, erklärt, dass die Geräte der Marke MAKITA,
Nr. der EU-Baumusterprüfbescheinigung: M6 08 02
24243 083
BUC122
den grundlegenden Sicherheits- und
Gesundheitsanforderungen der einschlägigen
EU-Richtlinien entsprechen:
EU-Maschinenrichtlinie 98/37/EC, Geräuschemission
2000/14/EG, EU-EMV-Richtlinie.
Zur sachgerechten Umsetzung der Anforderungen
dieser EU-Richtlinien wurden maßgeblich folgende
Normen herangezogen: EN60745-2-13, EN 55014,
ENISO11681. Das Verfahren zur Konformitätsbewertung
2000/14/EG erfolgte nach Anhang V. Der gemessene
Schallleistungspegel (Lwa) beträgt 92.7 dB(A). Der
garantierte Schallleistungspegel (Ld) beträgt 95 dB(A).
Die EU-Baumusterprüfung nach 98/37/EG wurde
durchgeführt von: TÜV Product Service GmbH,
Zertifizierungsstelle, Ridlerstraße 31, D-80339
München.
Der Unterzeichnende, Kato, bevollmächtigt durch
MAKITA, erklärt, dass die Geräte der Marke MAKITA,
Nr. der EU-Baumusterprüfbescheinigung: M6 08 02
24243 083
BUC121
den grundlegenden Sicherheits- und
Gesundheitsanforderungen der einschlägigen
EU-Richtlinien entsprechen:
EU-Maschinenrichtlinie 98/37/EC, Geräuschemission
2000/14/EG, EU-EMV-Richtlinie.
Zur sachgerechten Umsetzung der Anforderungen
000230
Verantwortlicher Hersteller:
Makita Corporation
3-11-8, Sumiyoshi-cho, Anjo, Aichi, JAPAN
Autorisierte Vertretung in Europa:
Makita International Europe Ltd.
Michigan Drive, Tongwell, Milton Keynes, Bucks MK15
8JD, ENGLAND
dieser EU-Richtlinien wurden maßgeblich folgende
Normen herangezogen: EN60745-2-13, EN 55014,
ENISO11681. Das Verfahren zur Konformitätsbewertung
2000/14/EG erfolgte nach Anhang V. Der gemessene
Schallleistungspegel (Lwa) beträgt 92.0 dB(A). Der
garantierte Schallleistungspegel (Ld) beträgt 94 dB(A).
Die EU-Baumusterprüfung nach 98/37/EG wurde
47
Tomoyasu Kato CE2007
Direktor
Tomoyasu Kato CE2007
Direktor
ENH016-5
Page 48

GEB037-1
Sicherheitshinweise zu
Kettensägen:
Lassen Sie sich NIE durch Bequemlichkeit oder (aus
fortwährendem Gebrauch gewonnener) Vertrautheit
mit dem Gerät dazu verleiten, die Sicherheitsregeln
für das Arbeiten mit Kettensägen zu missachten.
Wenn Sie dieses Werkzeug leichtsinnig oder nicht
ordnungsgemäß verwenden, können Menschen
schwere Verletzungen erleiden.
1. Halten Sie mit allen Körperteilen Abstand zur
Sägekette, wenn der Motor der Kettensäge
läuft. Stellen Sie vor dem Starten der
Kettensäge sicher, dass die Sägekette frei ist
und keinerlei Gegenstände berührt. Beim
Arbeiten mit Kettensägen kann schon der
kürzeste Moment an Unaufmerksamkeit zur einer
Berührung zwischen Sägekette und Kleidung
oder Körper führen.
2. Halten Sie die Kettensäge stets mit der
rechten Hand am hinteren Griff und mit der
linken Hand am vorderen Griff. Ein Erfassen
der Kettensäge mit der linken Hand am hinteren
Griff und mit der rechten Hand am vorderen Griff
führt zu einer deutlich höheren Verletzungsgefahr
und hat zu unterbleiben.
3. Tragen Sie eine Schutzbrille und einen
Gehörschutz. Außerdem wird das Tragen von
Schutzausrüstung für Kopf, Hände, Beine und
Füße empfohlen. Bei geeigneter Schutzkleidung
verringert sich das Verletzungsrisiko durch
herumfliegende Sägeabfälle oder durch
versehentlichen Kontakt mit der Sägekette.
4. Benutzen Sie die Kettensäge nicht bei
Aufenthalt auf einem Baum. Bei Benutzung
einer Kettensäge bei Aufenthalt auf einem Baum
kann es zu Verletzungen kommen.
5. Achten Sie immer auf einen sicheren Stand,
die Benutzung der Kettensäge ist nur dann
zulässig, wenn Sie auf einer festen, sicheren
und waagerechten Fläche stehen. Auf
rutschigen und instabilen Standflächen, wie z. B.
auf einer Leiter, können Sie das Gleichgewicht
und die Kontrolle über die Kettensäge verlieren.
6. Achten Sie beim Sägen von unter Spannung
stehenden Ästen auf ein mögliches
Zurückschnellen. Wenn die Spannung im Holz
frei wird, kann der Bediener der Säge vom unter
Spannung stehenden Ast getroffen werden oder
die Säge kann außer Kontrolle geraten.
7. Beim Sägen von Gebüsch und jungen Bäumen
ist besondere Vorsicht geboten. Die Sägekette
kann das schlanke Material erfassen und in Ihre
Richtung peitschen oder Sie aus dem
Gleichgewicht bringen.
8. Tragen Sie die Kettensäge immer
ausgeschaltet und am vorderen Griff und vom
Körper entfernt. Transportieren und lagern Sie
die Kettensäge immer mit aufgesetztem
Schutz über dem Sägeschwert. Durch einen
sachgemäßen Umgang mit der Kettensäge
können Sie eine Berührung der sich bewegenden
Sägekette vermeiden.
9. Halten Sie die Anweisungen für Schmierung,
Spannen der Kette und Austausch von
Zubehörteilen ein. Eine unsachgemäß
geschmierte oder unsachgemäß gespannte
Sägekette kann reißen oder einen Rückschlag
verursachen.
10. Halten Sie die Griffe trocken und sauber und
frei von Öl und Schmierfett. Fettige oder ölige
Griffe sind schlüpfrig, wodurch Sie die Kontrolle
über die Säge verlieren können.
11. Die Säge darf ausschließlich für das
Schneiden von Holz verwendet werden.
Verwenden Sie die Kettensäge ausschließlich
für den vorgesehenen Zweck. Beispiel: Mit
dieser Kettensäge ist das Schneiden von
Kunststoffen, Ziegeln oder Baumaterialien, die
nicht aus Holz sind, unzulässig. Die
zweckentfremdete Verwendung der Kettensäge
ist gefährlich.
12. Ursachen für Rückschläge und geeignete
Vorkehrungen:
Wenn die Nase oder die Spitze des Sägeschwerts
ein Objekt berührt oder wenn sich das Holz in den
Schnitt biegt und die Sägekette einklemmt, kann
es zu einem Rückschlag kommen.
Wenn die Spitze mit Gegenständen in Berührung
kommt, kann es zu einer plötzlichen
Bewegungsumkehr kommen, wodurch das
Sägeschwert nach oben und in Richtung des
Bedieners gestoßen wird.
Wenn die Sägekette oben am Sägeschwert
eingeklemmt wird, kann das Sägeschwert plötzlich
nach hinten in Richtung des Bedieners gedrückt
werden.
All diese Reaktionen können zu einem Verlust der
Kontrolle über die Säge und dadurch zu schweren
Verletzungen führen. Verlassen Sie sich nicht
ausschließlich auf die Sicherheitsvorrichtungen der
Säge. Als Benutzer einer Kettensäge müssen Sie
bezüglich Arbeitsschutz mehrere Dinge beachten:
Rückschlag wird durch eine zweckentfremdete
Nutzung des Werkzeugs und/oder unsachgemäße
Bedienschritte oder -umstände verursacht und
kann durch die unten aufgeführten Maßnahmen
vermieden werden:
− Halten Sie die Säge mit beiden Händen und
mit festem Griff und legen Sie dabei Finger
und Daumen um die Griffe der Kettensäge,
halten Sie Körper und Arme so, dass Sie
Rückschlagkräften standhalten können. Bei
48
Page 49

sachgerechter Vorgehensweise kann der
Bediener auf sichere Weise mit
Rückschlagkräften umgehen. Lassen Sie die
Kettensäge niemals einfach los.
008625
− Beugen Sie sich nicht zu weit nach vorn
und sägen Sie nicht über Schulterhöhe..
Dadurch können unbeabsichtigte
Berührungen der Schwertspitze mit
Gegenständen vermieden werden.
Außerdem kann die Kettensäge in
unerwarteten Situationen besser unter
Kontrolle gehalten werden.
− Verwenden Sie ausschließlich die vom
Hersteller vorgeschriebenen
Ersatzschwerter und –ketten.. Nicht
zugelassene Ersatzschwerter und –ketten
können zu einem Riss der Kette und/oder
Rückschlag führen.
− Halten Sie die Vorschriften des Herstellers
für das Schärfen und die Wartung der
Sägekette ein. Bei Absenken des
Tiefenanschlags kann es zu höheren
Rückschlagkräften kommen.
ZUSÄTZLICHE
SICHERHEITSREGELN
1. Lesen Sie diese Betriebsanleitung, um sich mit
der Handhabung der Kettensäge vertraut zu
machen.
2. Vor der ersten Inbetriebnahme der Kettensäge
sollten Sie sich deren Arbeitsweise erklären
lassen. Falls das nicht möglich ist, üben Sie vor
Beginn der Arbeit zumindest das Ablängen von
Rundholz auf einem Sägebock.
3. Kinder und Jugendliche unter 18 Jahren dürfen
die Kettensäge nicht bedienen. Jugendliche über
16 Jahren sind von diesem Verbot ausgenommen,
wenn Sie zum Zwecke der Ausbildung unter
Aufsicht eines Fachkundigen stehen.
4. Das Arbeiten mit der Kettensäge erfordert ein
hohes Maß an Aufmerksamkeit. Nur in guter
körperlicher Verfassung arbeiten. Führen Sie alle
Arbeiten ruhig und sorgfältig aus.
5. Arbeiten Sie niemals unter Einfluss von Alkohol,
Drogen oder Medikamenten.
Bestimmungsgemäßer Gebrauch
1. Die Kettensäge wurde eigens für das Sägen von
Holz entwickelt. Verwenden Sie sie
beispielsweise nicht zum Sägen von Kunststoff
oder porösem Beton.
2. Verwenden Sie die Kettensäge nur für Arbeiten,
die in dieser Betriebsanleitung beschrieben sind.
Verwenden Sie sie zum Beispiel nicht zum
Heckenschneiden oder ähnlichem.
3. Die Kettensäge darf nicht für Forstarbeiten, d. h.
zum Fällen und Entasten von Nutzholz verwendet
werden. Die Kabelverbindung gewährleistet dem
Bediener nicht die notwendige Beweglichkeit und
Sicherheit, die für diese Arbeiten erforderlich ist.
4. Die Kettensäge ist nicht für den gewerblichen
Gebrauch bestimmt.
5. Die Kettensäge nicht überlasten.
Persönliche Schutzausrüstung
1. Die Kleidung muss eng anliegen, darf jedoch nicht
die Bewegungsfreiheit einschränken.
2. Tragen Sie bei der Arbeit folgende
Schutzkleidung:
• einen geprüften Schutzhelm, wenn mit
herabfallenden Ästen oder Ähnlichem zu
rechnen ist;
• Einen Gesichts- oder Augenschutz;
• Geeigneten Gehörschutz
(Gehörschutzkapseln, maßgeschneiderte
oder formbare Gehörschutzstöpsel).
Oktavbandanalyse auf Anfrage
• Schutzhandschuhe aus festem Leder;
• eine lange Hose aus festem Stoff;
• eine Sicherheits-Latzhose mit Schnittschutz;
• Sicherheitsschuhe oder -stiefel mit
rutschfesten Sohlen, Stahlkappen und
schnittfestem Futter;
• eine Atemmaske für Arbeiten mit
Staubentwicklung (z. B. Sägen von trockenem
Holz).
Sicheres Arbeiten
1. Betreiben Sie die Kettensäge nicht in der Nähe
von entzündlichem Staub oder Gasen, da der
Motor Funken erzeugt. Explosionsgefahr!
2. Arbeiten Sie nur auf stabilem Untergrund und
achten Sie dabei auf sicheren Stand. Achten Sie
besonders auf Hindernisse (z. B. das Kabel) im
Arbeitsbereich. Seien Sie besonders vorsichtig
bei Glätte durch Nässe, Eis, Schnee, frisch
geschnittenes Holz oder frisch geschälte Rinde.
Nicht auf Leitern oder Bäumen mit der Säge
arbeiten.
3. Seien Sie besonders vorsichtig, wenn Sie in
schrägem Gelände arbeiten, da heranrollende
Baumstämme und Äste eine mögliche Gefahr
darstellen.
49
Page 50
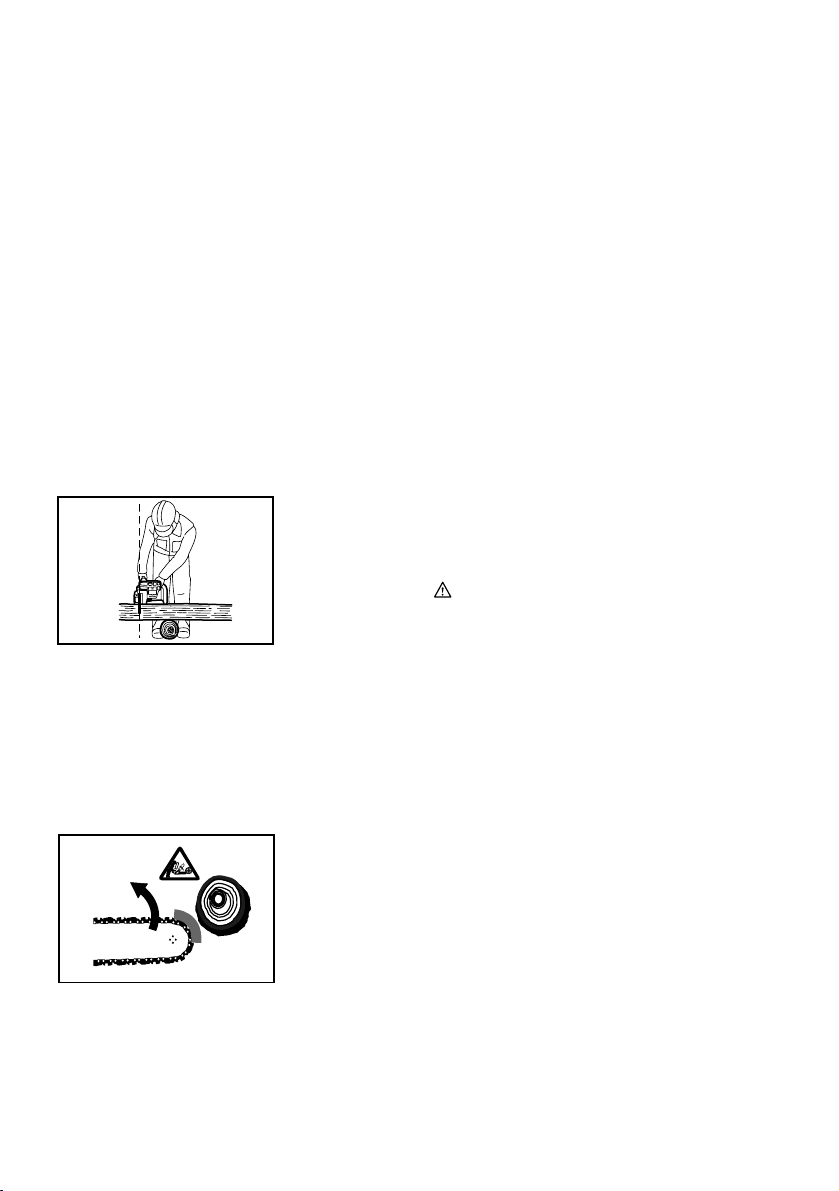
4. Säubern Sie den Schnittbereich von
Fremdkörpern wie Sand, Steinen, Nägeln, Draht,
etc. Fremdkörper beschädigen die Sägeschiene
und Sägekette und können zum gefährlichen
Rückschlag führen.
5. Seien Sie besonders vorsichtig, wenn Sie in der
Nähe von Drahtzäunen sägen. Sägen Sie nicht in
den Zaun, da sonst ein Rückschlagen der Säge
möglich ist.
6. Sägen Sie niemals in den Untergrund.
7. Sägen Sie Holzstücke stets einzeln, niemals in
Bündeln oder Stapeln.
8. Vermeiden Sie das Sägen von dünnen Ästen und
Wurzeln, da sich diese in der Kettensäge
verfangen können. Gefahr durch Verlust des
Gleichgewichts.
9. Verwenden Sie beim Sägen von Schnittholz eine
sichere Auflage (Sägebock).
10. Verwenden Sie die Kettensäge nicht zum
Abhebeln oder Wegschaufeln von Holzstücken
und sonstigen Gegenständen.
11. Führen Sie die Kettensäge so, dass sich kein
Körperteil im verlängerten Schwenkbereich der
Sägekette befindet (siehe Abbildung).
006909
Rückschlag
1. Beim Arbeiten mit der Kettensäge kann es zum
gefährlichen Rückschlag kommen. Dieser
Rückschlag entsteht, wenn die Schienenspitze
(insbesondere das obere Viertel) mit Holz oder
einem anderen festen Gegenstand in Berührung
kommt. Dies führt dazu, dass die Kettensäge in
Richtung des Bedieners ausschlägt.
006919
2. Um einen Rückschlag zu vermeiden, beachten
Sie Folgendes:
• Setzen Sie niemals mit der Schienenspitze
zum Schnitt an.
• Sägen Sie niemals mit der Schienenspitze.
Seien Sie besonders vorsichtig, wenn Sie
bereits begonnene Schnitte fortsetzen.
• Beginnen Sie den Schnitt mit laufender
Sägekette.
• Die Sägekette stets richtig schärfen. Dabei ist
besonders auf die richtige Höhe des
Tiefenanschlags zu achten (weitere
Informationen siehe "Schärfen der Kette").
• Niemals mehrere Äste auf einmal durchsägen.
• Achten Sie beim Entasten darauf, dass die
Sägeschiene nicht mit anderen Ästen in
Berührung kommt.
• Beim Ablängen von angrenzenden
Baumstämmen fernhalten. Achten Sie stets
auf die Schienenspitze.
• Verwenden Sie einen Sägebock.
Transport und Aufbewahrung
1. Tragen Sie die Kettensäge nur am vorderen Griff,
so dass die Sägeschiene nach hinten zeigt.
2. Bewahren Sie die Kettensäge in einem sicheren,
trockenen und abschließbaren Raum, außerhalb
der Reichweite von Kindern, auf. Lagern Sie die
Kettensäge nicht im Freien.
BEWAHREN SIE DIESE
ANWEISUNGEN AUF.
WARNUNG:
Die FALSCHE VERWENDUNG oder Nichtbefolgung
der in dieser Anleitung aufgeführten
Sicherheitsgrundsätze kann ernste Verletzungen zur
Folge haben.
ENC007-2
WICHTIGE
SICHERHEITSANWEISUNGEN
FÜR AKKUBLOCK
1. Lesen Sie vor der Verwendung des
Akkublocks alle Anweisungen und
Sicherheitshinweise für (1) das Akkuladegerät,
(2) den Akku und (3) das Produkt, für das der
Akku verwendet wird.
2. Der Akkublock darf nicht zerlegt werden.
3. Falls die Betriebsdauer erheblich kürzer wird,
beenden Sie den Betrieb umgehend.
Andernfalls besteht die Gefahr einer
Überhitzung sowie das Risiko möglicher
Verbrennungen und sogar einer Explosion.
4. Wenn Elektrolyt in Ihre Augen gerät, waschen
Sie diese mit klarem Wasser aus, und suchen
Sie sofort einen Arzt auf. Andernfalls können
Sie Ihre Sehfähigkeit verlieren.
50
Page 51

5. Der Akkublock darf nicht kurzgeschlossen
werden.
(1) Die Kontakte dürfen nicht mit leitendem
Material in Berührung kommen.
(2) Der Akkublock darf nicht in einem
Behälter aufbewahrt werden, in dem sich
andere metallische Gegenstände wie
beispielsweise Nägel, Münzen usw.
befinden.
(3) Der Akkublock darf weder Feuchtigkeit
noch Regen ausgesetzt werden.
Ein Kurzschluss des Akkus kann zu
hohem Kriechstrom, Überhitzung,
möglichen Verbrennungen und sogar zu
6. Werkzeug und Akkublock dürfen nicht an
7. Selbst wenn der Akkublock schwer
8. Lassen Sie den Akku nicht fallen, und
einer Zerstörung des Geräts führen.
Orten aufbewahrt werden, an denen die
Temperatur 50 ゚ C (122 ゚ F) oder höher
erreichen kann.
beschädigt oder völlig verbraucht ist, darf er
nicht angezündet werden. Der Akkublock kann
in den Flammen explodieren.
vermeiden Sie Schläge gegen den Akku.
BEWAHREN SIE DIESE
ANWEISUNGEN AUF.
Tipps für den Erhalt der maximalen
Akku-Nutzungsdauer
1. Laden Sie den Akkublock auf, bevor er ganz
entladen ist.
Beenden Sie stets den Betrieb des Werkzeugs,
und laden Sie den Akkublock auf, sobald Sie
eine verringerte Werkzeugleistung bemerken.
2. Laden Sie einen voll geladenen Akkublock
nicht noch einmal auf.
Eine Überladung verkürzt die Lebensdauer
des Akkus.
3. Laden Sie den Akkublock bei einer
Zimmertemperatur von 10 ゚ C - 40 ゚ C (50 ゚ F 104 ゚ F) auf. Lassen Sie einen heißen
Akkublock vor dem Aufladen abkühlen.
51
Page 52
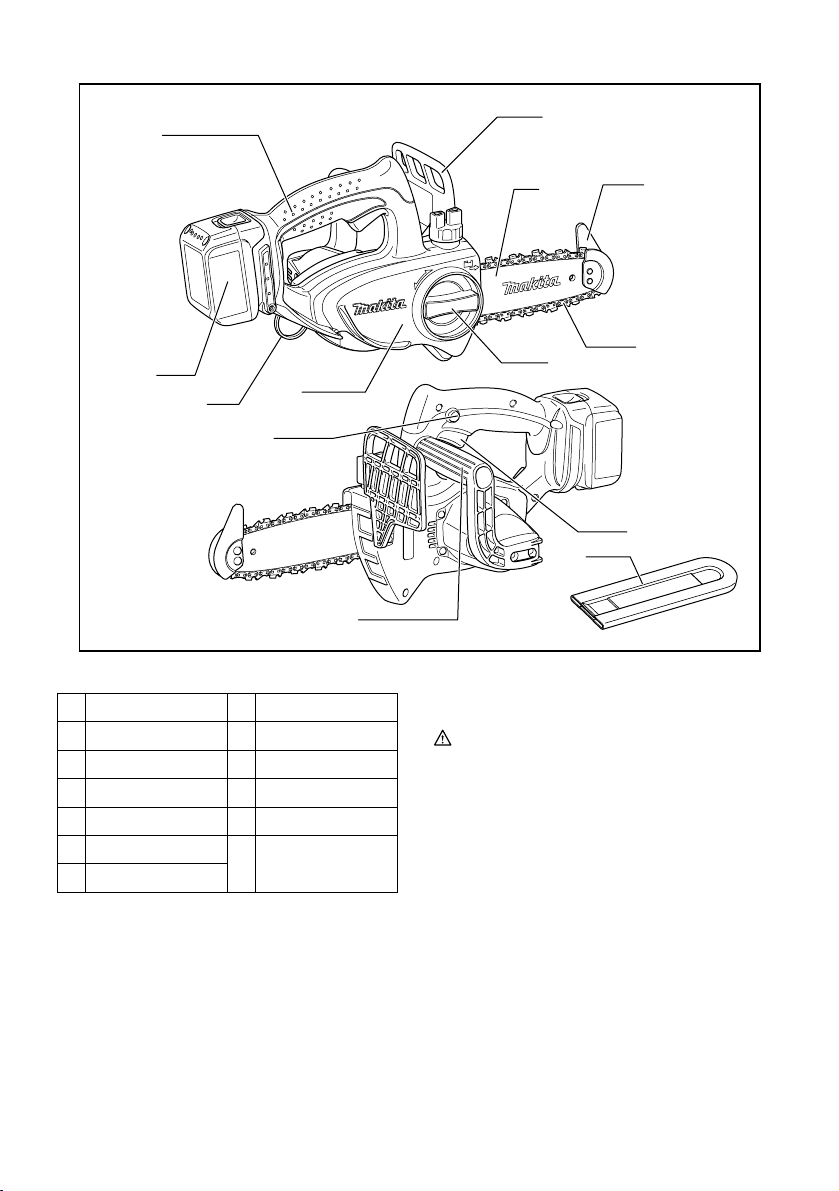
Lieferumfang
1
2
008588
Aufsatzgriff
1
Akkublock
2
Kettenradschutz
3
Vorderer Handschutz
4
Führungsschiene
5
Spitzenschutz
6
Sägekette
7
008589
4
5
8
13
3
9
12
10
6
7
11
Knopf
8
Entsperrungstaste
9
Vorderer Griff
10
Schalter
11
Kettenschutzabdeckung
12
Karabiner- oder
13
Seilbefestigung
FUNKTIONSBESCHREIBUNG
ACHTUNG:
• Schalten Sie das Werkzeug stets aus und
entfernen Sie den Akkublock, bevor Sie
Einstellungen oder eine Funktionsprüfung des
Werkzeugs vornehmen.
Montage und Demontage des Akkublocks
Abb.1
• Schalten Sie das Werkzeug stets aus, bevor Sie
den Akkublock einsetzen oder entfernen.
• Zur Entfernung des Akkublocks müssen Sie diesen
aus dem Gerät herausziehen, während Sie die
Taste auf der Vorderseite des Blocks schieben.
• Zum Einsetzen des Akkublocks müssen Sie die
Zunge des Akkublocks an der Rille im Gehäuse
ausrichten und in die gewünschte Position
schieben. Setzen Sie den Block immer ganz ein,
bis er mit einem Klick einrastet. Wenn Sie den
roten Bereich oben auf der Taste sehen können, ist
der Block nicht ganz eingerastet. Setzen Sie ihn
ganz ein, bis der rote Bereich nicht mehr zu sehen
52
Page 53

ist. Andernfalls kann der Block versehentlich aus
dem Werkzeug fallen und Sie oder Personen in
Ihrem Umfeld verletzen.
• Wenden Sie beim Einsetzen des Akkublocks keine
Gewalt an. Wenn der Block nicht leicht
hineingleitet, wird er nicht richtig eingesetzt.
Einschalten
ACHTUNG:
• Achten Sie vor dem Einsetzen des Akkublocks in
das Werkzeug darauf, dass sich der
Auslöseschalter korrekt bedienen lässt und beim
Loslassen auf die Position "OFF" (AUS)
zurückkehrt.
Abb.2
Damit der Auslöseschalter nicht versehentlich betätigt
wird, befindet sich am Werkzeug eine Entsperrungstaste.
Um das Werkzeug zu starten, drücken Sie zuerst die
Entsperrungstaste und betätigen den Auslöseschalter.
Lassen Sie zum Ausschalten des Werkzeugs den
Auslöseschalter los.
MONTAGE
ACHTUNG:
• Schalten Sie das Werkzeug stets aus, und
entfernen Sie den Akkublock, bevor Sie Arbeiten
am Werkzeug ausführen.
Montage und Demontage der Sägekette
ACHTUNG:
• Schalten Sie das Werkzeug aus und entnehmen
Sie den Akkublock, bevor Sie die Sägekette
einsetzen oder entfernen.
• Tragen Sie während der Montage oder Demontage
der Sägekette stets Handschuhe.
• Verwenden Sie nur die Kettensäge und
Führungsschiene mit der für diese Kettensäge
geeigneten Schienenspitze (siehe Auszug aus
Ersatzteilliste).
• Um einen Rückschlag zu vermeiden, entfernen Sie
weder die Schienenspitze noch ersetzen Sie die
Führungsschiene gegen eine ohne
Schienenspitze.
Abb.3
Lösen Sie die Schraube durch Drehen des Knaufs
entgegen dem Uhrzeigersinn, bis die
Kettenradabdeckung herauskommt.
Entfernen Sie den Kettenradschutz.
Entfernen Sie die Sägekette und die Führungsschiene
vom Werkzeug.
Abb.4
Setzen Sie das eine Ende der Sägekette am oberen
Ende der Führungsleiste ein. Setzen Sie in diesem Fall
die Sägekette wie in der Abbildung dargestellt ein, da
53
diese sich in Pfeilrichtung dreht.
Abb.5
Platzieren Sie die Sägekette so, dass die Feder und der
Ansatz innerhalb positioniert sind und in das andere
Ende der Sägekette um die Kettenradabdeckung
passen, wie in der Abbildung dargestellt.
Abb.6
Installieren Sie die Führungsschiene, während Sie diese
entgegen dem Uhrzeigersinn drehen, dass das Ende
der Führungsschiene die Feder berührt.
Abb.7
Setzen die den Haken der Kettenradabdeckung in die
Öffnung im Werkzeug ein, und bringen Sie anschließend
die Kettenradabdeckung auf dem Werkzeug an.
Abb.8
Drehen Sie den Knauf im Uhrzeigersinn, um die
Schraube festzuziehen.
Einstellen der Kettenspannung
Abb.9
Wird die Schraube leicht gelöst, kann die Spannung der
Sägekette eingestellt werden. Ziehen Sie die Schraube
nach dem Einstellen wieder fest an.
Abb.10
ACHTUNG:
• Eine Weile nach dem Einbau einer neuen
Sägekette, kann sich diese lösen. Prüfen Sie
daher vor der Inbetriebnahme von Zeit zu Zeit die
Kettenspannung.
• Eine geringe Spannung der Sägekette kann ein
Verrutschen verursachen.
• Die Montage oder Demontage der Sägekette sollte
an einem sauberen Ort, frei von Sägemehl und
Ähnlichem, erfolgen.
ARBEIT
Schmierung
Abb.11
Die Sägekette wird automatisch geschmiert, wenn das
Werkzeug in Betrieb ist.
Prüfen Sie das Volumen des verbliebenen Öls im Öltank
über das Ölprüffenster.
Entfernen Sie zum Nachfüllen des Tanks die Kappe von
der Öltanköffnung. Der Öltank hat eine Kapazität von 80
ml.
Schrauben Sie nach dem Wiederbefüllen des Öltanks
immer den mitgelieferten Öltankdeckel auf die
Kettensäge.
ACHTUNG:
• Wenn die Kettensäge das erste Mal mit Kettenöl
befüllt wird oder der Tank vorher komplett entleert
wurde, dann unbedingt Öl bis zur Unterkante des
Einfüllstutzens einfüllen. Ansonsten kann die
Page 54

Ölzufuhr beeinträchtigt werden.
• Verwenden Sie als Sägekettenöl ausschließlich Öl
für Kettensägen von Makita oder auf dem Markt
erhältliches Öl.
• Verwenden Sie niemals Öl mit Staub und
Schmutzpartikeln oder flüchtiges Öl.
• Verwenden Sie beim Schneiden von Bäumen
pflanzliches Öl. Mineralöl kann Bäume
beschädigen.
• Verwenden Sie die Kettensäge beim Schneiden
von Bäumen niemals mit Gewalt.
• Überprüfen Sie vor dem Schneiden, dass der
mitgelieferte Öltankdeckel aufgeschraubt ist.
Halten Sie die Kettensäge vom Baum weg. Starten Sie
die Säge und warten Sie, bis die Schmierung an der
Sägekette ausreichend ist.
Bringen Sie die Endführung/untere Führung in Kontakt
mit dem Ast, bevor Sie die Säge betätigen. Wenn Sie
sägen, ohne die Endführung/untere Führung in Kontakt
mit dem Ast gebracht zu haben, kann die
Führungsschiene hin- und herschlagen, was zu
Verletzungen führen kann.
Sägen Sie das zu schneidende Holz, indem Sie es nach
unten bewegen.
Beschneiden von Bäumen
Abb.12
Abb.13
ACHTUNG:
• Halten Sie bei laufendem Motor alle Körperteile
entfernt von der Sägekette.
• Halten Sie die Kettensäge bei laufendem Motor mit
beiden Händen fest.
• Überdehnen Sie Ihren Standbereich nicht. Achten
Sie jederzeit auf sicheren Stand und sichere
Balance.
Bringen Sie die Endführung/untere Führung in Kontakt
mit dem Ast, bevor Sie die Säge betätigen. Wenn Sie
sägen, ohne die Endführung/untere Führung in Kontakt
mit dem Ast gebracht zu haben, kann die
Führungsschiene hin- und herschlagen, was zu
Verletzungen führen kann.
Um dicke Äste zu sägen, machen Sie zunächst einen
flachen Schnitt von unten und dann den endgültigen
Schnitt von oben.
Abb.14
Wenn Sie versuchen, dicke Äste von unten zu
schneiden, kann sich der Ast absenken und die
Sägekette im Schnitt verfangen.
Wenn Sie versuchen, dicke Äste ohne flachen
Unterschnitt von oben zu schneiden, kann der Ast
splittern.
Abb.15
Wenn Sie Holz nicht in einem einzelnen Durchgang
durchsägen können:
Üben Sie leichten Druck auf den Griff aus und sägen Sie
weiter, wobei Sie die Kettensäge leicht vor- und
zurückbewegen; setzen Sie die Spitze dann etwas tiefer
an und beenden Sie den Schnitt, indem Sie den Griff
anheben.
Abb.16
Transport des Werkzeugs
Abb.17
Entnehmen Sie vor dem Transport immer den Akkublock
aus dem Werkzeug und decken Sie die
Führungsschiene mit dem Schienenschutz ab. Schützen
Sie auch den Akkublock mit der Akkuabdeckung.
WARTUNG
ACHTUNG:
• Schalten Sie das Werkzeug stets aus und
entfernen Sie den Akkublock, bevor Sie
Inspektionen oder Wartungsarbeiten am Werkzeug
vornehmen.
• Tragen Sie während der Inspektion oder Wartung
immer Handschuhe.
Schärfen der Sägekette
ACHTUNG:
• Entfernen Sie immer den Akkublock und tragen Sie
stets Schutzhandschuhe, wenn Sie Arbeiten an der
Kettensäge durchführen.
Abb.18
Die Sägekette schärfen, wenn:
− mehlige Sägespäne beim Sägen von feuchtem
Holz entstehen,
− die Sägekette auch bei stärkerem Druck nur
mühevoll ins Holz zieht,
− die Schnittkante sichtbar beschädigt ist,
− die Säge im Holz einseitig nach links oder rechts
verläuft. Die Ursache hierfür liegt in einer
ungleichmäßigen Schärfung der Sägekette oder in
einer einseitigen Beschädigung.
Schärfen Sie die Sägekette häufig, aber entfernen
Sie dabei nur wenig Material.
Für das einfache Nachschärfen genügen meist zwei bis
drei Feilenstriche. Lassen Sie nach mehrmaligem
Schärfen die Sägekette in einer MAKITA Fachwerkstatt
nachschärfen.
Feile und Feilenführung
− Verwenden Sie zum Schärfen eine
Spezial-Sägekettenrundfeile (optionales Zubehör)
mit einem Durchmesser von 4 mm. Normale
Rundfeilen sind nicht geeignet.
Abb.19
− Die Feile sollte nur im Vorwärtsstrich in das
Material greifen. Beim Zurückführen die Feile vom
Material abheben.
− Schärfen Sie den kürzesten Hobelzahn zuerst. Die
Länge dieses Zahnes ist dann das Anschlagmaß
für alle anderen Hobelzähne der Sägekette.
54
Page 55

− Führen Sie die Feile wie in der Abbildung
dargestellt.
− Ein Feilenhalter (Zubehör) erleichtert die
Feilenführung. Er besitzt Markierungen für den
korrekten Schärfwinkel von 30° (Markierungen
parallel zur Sägekette ausrichten) und begrenzt die
Eindringtiefe (4/5 des Feilendurchmessers).
Führen Sie die Feile wie in der Abbildung dargestellt.
− Nach dem Nachschärfen der Sägekette die Höhe
des Tiefenanschlags mit der Kettenmesslehre
(optionales Zubehör) prüfen.
Abb.20
− Entfernen Sie jeglichen Überstand, auch wenn
noch so gering, mit einer Spezial-Flachfeile
(optionales Zubehör).
− Runden Sie den Tiefenanschlag vorne wieder ab.
− Waschen Sie jeglichen Staub und Schmutz von der
Sägekette, nachdem Sie die Höhe der Tiefenlehre
eingestellt haben.
Reinigen der Führungsschiene
Abb.21
Späne und Sägemehl bilden sich in der
Führungsschienennut, verstopfen sie und
beeinträchtigen den Ölfluss. Entfernen Sie beim
Schärfen und Ersetzen der Sägekette immer Späne und
Sägemehl.
Reinigen des Ölfilters an der Ölablassöffnung
Staub und kleine Partikel können sich während des
Betriebs am Ölfilter an der Ölablassöffnung bilden.
Staub und kleine Partikel, die sich im Ölfilter gebildet
haben, können den Ölabfluss beeinträchtigen und an
der gesamten Sägekette zu unzureichender Schmierung
führen.
Wenn die Führungsschiene oben nicht ausreichend mit
Kettenöl geschmiert wird, reinigen Sie den Filter wie
folgt.
Entfernen Sie den Akkublock aus dem Werkzeug.
Entfernen Sie den Kettenradschutz und die Sägekette
vom Werkzeug. (Siehe Abschnitt " Montage und
Demontage der Sägekette ".)
Abb.22
Entfernen Sie die Druckmutter mit Hilfe eines
Schlitzschraubendrehers mit einem schlanken Schaft
o.ä.
Abb.23
Nehmen Sie den Filter aus der Kettensäge und
entfernen Sie Staub und kleine Partikel. Wenn der Filter
zu verschmutzt ist, ersetzen Sie ihn durch einen neuen.
Setzen Sie den Akkublock in das Werkzeug ein.
Abb.24
Ziehen Sie den Auslöseschalter, um angesammelten
Staub oder Partikel durch Ablassen von Kettenöl aus der
Ölablassöffnung zu spülen.
Entfernen Sie den Akkublock aus dem Werkzeug.
Abb.25
Bringen Sie den gereinigten Ölfilter in der
Ölablassöffnung an. Wenn der Filter zu verschmutzt ist,
ersetzen Sie ihn durch einen neuen.
Abb.26
Bringen Sie die Druckmutter zur Sicherung des Filters in
der Ölablassöffnung mit der richtigen Seite nach oben
an, wie in der Abbildung gezeigt. Wenn der Filter mit
einer verformten Druckmutter nicht gesichert werden
kann, ersetzen Sie die Druckmutter durch eine neue.
Bringen Sie den Kettenradschutz und die Sägekette
wieder am Werkzeug an.
Austauschen des Kettenrads
Bevor Sie eine neue Sägekette auflegen, überprüfen Sie
den Zustand des Kettenrades.
Abb.27
ACHTUNG:
• Ein abgenutztes Kettenrad führt an einer neuen
Kette zu Beschädigungen. Lassen Sie das
Kettenrad unbedingt auswechseln. Das Kettenrad
muss so, wie in der Abbildung dargestellt installiert
werden.
Abb.28
Setzen Sie beim Wechsel des Kettenrades immer einen
neuen Sicherungsring ein.
Kohlenwechsel
Abb.29
Nehmen Sie die Kohlen regelmäßig heraus und
wechseln Sie sie. Wenn sie bis zur Grenzmarke
verbraucht sind, müssen sie ausgewechselt werden. Die
Kohlen müssen sauber sein und locker in ihre Halter
hineinfallen. Die beiden Kohlen müssen gleichzeitig
ausgewechselt werden. Verwenden Sie ausschließlich
gleiche Kohlen.
Schrauben Sie mit einem Schraubenzieher den
Kohlenhalterdeckel ab. Wechseln Sie die
verschlissenen Kohlen, legen Sie neue ein und
schrauben Sie den Deckel wieder auf.
Abb.30
Aufbewahrung des Werkzeugs
Reinigen Sie das Werkzeug vor der Lagerung. Entfernen
Sie Späne und Sägemehl vom Werkzeug, nachdem Sie
die Kettenradabdeckung entfernt haben. Betreiben Sie
das Werkzeug nach dem Reinigen ohne Last, um die
Sägekette und die Führungsschiene zu schmieren.
Decken Sie die Führungsschiene mit dem
Schienenschutz ab.
Leeren Sie den Öltank und lagern Sie die Kettensäge
mit dem Tankdeckel nach oben.
Zur Aufrechterhaltung der SICHERHEIT und
ZUVERLÄSSIGKEIT des Produkts müssen die
Reparaturen und alle Wartungen und Einstellungen von
den autorisierten Servicestellen der Firma Makita und
55
Page 56

unter Verwendung der Ersatzteile von Makita
durchgeführt werden.
ZUBEHÖR
ACHTUNG:
• Für Ihr Werkzeug Makita, das in dieser Anleitung
beschrieben ist, empfehlen wir folgende
Zubehörteile und Aufsätze zu verwenden. Bei der
Verwendung anderer Zubehörteile oder Aufsätze
kann die Verletzungsgefahr für Personen drohen.
Die Zubehörteile und Aufsätze dürfen nur für ihre
festgelegten Zwecke verwendet werden.
Wenn Sie nähere Informationen bezüglich dieses
Zubehörs benötigen, wenden Sie sich bitte an Ihre
örtliche Servicestelle der Firma Makita.
• Verschiedene Arten von Makita-Originalakkus und
-Ladegeräten
• Sägekette
• Schienenschutz
• Führungsschiene komplett
• Feile
56
Page 57

MAGYAR
1-1. Piros rész
1-2. Gomb
1-3. Akkumulátor
2-1. Kireteszelőgomb
2-2. Kapcsoló kioldógomb
3-1. Lánckerék fedél
3-2. Gomb
4-1. Vágószem
4-2. Vezetőrúd
4-3. Nyíl
5-1. Rugó
5-2. Lánckerék
5-3. Kiemelkedés
Az általános nézet magyarázata
6-1. Rugó
6-2. Vezetőrúd
6-3. Kiemelkedés
7-1. Lánckerék fedél
7-2. Övtartó
7-3. Furat
11-1. Olajtartály záró sapkája
11-2. Olajvizsgáló ablak
11-3. Olajtartály nyílása
12-1. Felső vezetősín
13-1. Alsó vezetősín
17-1. Akkumulátor
17-2. Védőtok (láncvédő)
22-1. Nyomóanya
22-2. Hornyoltfejű csavarhúzó
23-1. Szűrő
25-1. Szűrő
26-1. Nyomóanya
27-1. Lánckerék
27-2. Zárógyűrű
28-1. Zárógyűrű
28-2. Lánckerék
28-3. Csavaralátét
29-1. Határjelzés
30-1. Kefetartó sapka
30-2. Csavarhúzó
RÉSZLETES LEÍRÁS
Láncsebesség percenként (min-1) 4,8 m/s (290 m/perc) 5,0 m/s (300 m/perc)
Fűrészlánc
• Folyamatos kutató- és fejlesztőprogramunk eredményeként az itt felsorolt tulajdonságok figyelmeztetés nélkül megváltozhatnak.
• Megjegyzés: A tulajdonságok országról országra különbözhetnek.
Jelképek
A követk ezőkben a berendezésen használt jelképek
láthatók. A szerszám használata előtt bizonyosodjon
meg arról hogy helyesen értelmezi a jelentésüket.
・ Olvassa el a használati utasítást.
・ Viseljen szemvédõt.
・ Viseljen fülvédõt.
・ Viseljen sisakot, védőszemüveget és
fülvédőt.
・ Viseljen megfelelõ lábfej-láb és kéz-kar
védõruhát.
・ Ne tegye ki a szerszámot esőnek.
・ Munka közben tartsa két kézzel a
láncfûrészt! Ellenkezõ esetben fennáll a
sérülés kockázata!
・ Csak jól képzett személyek
használhatják ezt a láncfûrészt.
・ Csak az EU országaiban
Ne dobjon ki elektromos berendezést
háztartási hulladékkal együtt!
Tekintettel az elektronikus és
Modell BUC121 BUC122
Láncvezető hossza 115 mm
Teljes hossz 422mm 422mm
Tiszta tömeg 2,4 kg 2,5 kg
Névleges feszültség 14,4 V, egyenáram 18 V, egyenáram
Típus 25 AP
Osztás 1/4"
Láncszemek száma 42
END005-2
elektromos hulladékokkal foglalkozó
2002/96/EC európai uniós irányelvre és
annak a nemzeti törvényekkel
összhangban történő alkalmazására, az
életkora végét elérő elektromos
berendezéseket elkülönítve kell
begyűjteni és természetbarát
újrafelhasználó üzemben feldolgozni.
Rendeltetésszerű használat
A szerszám farönkök és gömbfa vágására szolgál.
A modellhez BUC121
Csak európai országokra vonatkozóan
Zaj
A tipikus A-súlyozású zajszint, a EN60745-2-13 szerint
meghatározva:
Hangnyomásszint (L
Bizonytalanság (K) : 2 dB(A)
) : 84.0 dB (A)
pA
A zajszint a munkavégzés során meghaladhatja a 85 dB
(A) értéket.
Használjon személyi hallásvédelmi segédeszközt.
57
ENE031-1
ENG101-2
Page 58

Vibráció
ENG221-1
A vibráció teljes értéke (háromtengelyű vektorösszeg) az
EN60745-2-13 szerint lett meghatározva:
Mûködési mód: favágás
Vibráció kibocsátás (a
Bizonytalanság (K): 1.5 m/s
) : 4.2 m/s
h
2
2
A modellhez BUC122
ENG101-2
Csak európai országokra vonatkozóan
Zaj
A tipikus A-súlyozású zajszint, a EN60745-2-13 szerint
meghatározva:
Hangnyomásszint (L
Bizonytalanság (K) : 2 dB(A)
) : 84.6 dB (A)
pA
A zajszint a munkavégzés során meghaladhatja a 85 dB
(A) értéket.
Használjon személyi hallásvédelmi segédeszközt.
ENG221-1
Vibráció
A vibráció teljes értéke (háromtengelyű vektorösszeg) az
EN60745-2-13 szerint lett meghatározva:
Mûködési mód: favágás
Vibráció kibocsátás (a
Bizonytalanság (K): 1.5 m/s
) : 4.3 m/s
h
2
2
ENH016-5
Az Európai Közösség (EC) előírásainak való
megfelelési nyilatkozat
Alulírott Kato, mint felhatalmazott kijelentem, hogy a
következő Makita gépek,
EU típusazonosítási szám: M6 08 02 24243 083
BUC121
megfelel a következő vonatkozó EU irányelvek
biztonsági és egészségvédelmi követelményeinek:
98/37/EC EU gépészeti irányelv, 2000/14/EG
zajkibocsátásra vonatkozó irányelv, EU EMC irányelv.
A fenti EU irányelvek követelményei elsősorban a
következő szabványok betartásával lettek megvalósítva:
EN60745-2-13, EN 55014, ENISO11681. A 2000/14/EG
szerinti megfelelés értékelési eljárás az V. függelék
szerint történt. A mért hangteljesítményszint (Lwa) 92.0
dB(A). A garantált hangteljesítményszint (Ld) 94 dB(A).
Az EU típusvizsgálatot a 98/37/EG-nek megfelelően a
következő helyen végezték: TÜV Product Service GmbH,
Zertifizierungsstelle, Ridlerstraße 31, D-80339
München.
000230
Felelős gyártó:
Makita Corporation
3-11-8, Sumiyoshi-cho, Anjo, Aichi, JAPAN
Hivatalos képviselő Európában:
Makita International Europe Ltd.
Michigan Drive, Tongwell, Milton Keynes, Bucks MK15
Tomoyasu Kato CE2007
Igazgató
58
8JD, ENGLAND
ENH016-5
Az Európai Közösség (EC) előírásainak való
megfelelési nyilatkozat
Alulírott Kato, mint felhatalmazott kijelentem, hogy a
következő Makita gépek,
EU típusazonosítási szám: M6 08 02 24243 083
BUC122
megfelel a következő vonatkozó EU irányelvek
biztonsági és egészségvédelmi követelményeinek:
98/37/EC EU gépészeti irányelv, 2000/14/EG
zajkibocsátásra vonatkozó irányelv, EU EMC irányelv.
A fenti EU irányelvek követelményei elsősorban a
következő szabványok betartásával lettek megvalósítva:
EN60745-2-13, EN 55014, ENISO11681. A 2000/14/EG
szerinti megfelelés értékelési eljárás az V. függelék
szerint történt. A mért hangteljesítményszint (Lwa) 92.7
dB(A). A garantált hangteljesítményszint (Ld) 95 dB(A).
Az EU típusvizsgálatot a 98/37/EG-nek megfelelően a
következő helyen végezték: TÜV Product Service GmbH,
Zertifizierungsstelle, Ridlerstraße 31, D-80339
München.
Tomoyasu Kato CE2007
000230
Igazgató
Felelős gyártó:
Makita Corporation
3-11-8, Sumiyoshi-cho, Anjo, Aichi, JAPAN
Hivatalos képviselő Európában:
Makita International Europe Ltd.
Michigan Drive, Tongwell, Milton Keynes, Bucks MK15
8JD, ENGLAND
GEB037-1
A láncfűrész biztonsági
figyelmeztetései:
NE HAGYJA, hogy (a termék többszöri
használatából eredõ) kényelem és megszokás váltsa
fel az láncfûrész biztonsági elõírásainak szigorú
betartását. Ha ezt a szerszámot felelõtlenül és
helytelenül használja, akkor komoly személyi
sérüléseket szenvedhet.
1. A láncfûrész mûködésekor tartsa távol a
testrészeit a fûrészlánctól. Mielõtt fûrészelni
kezd a láncfûrésszel, Ellenõrizze, hogy az nem
érintkezik semmivel. Egy figyelmetlen
pillanatban munka közben becsípheti a ruháját
vagy valamely testrészét a láncfûrész.
2. Mindig tartsa a fûrészt jobb kézzel a hátsó
fogantyújánál és bal kézzel az elsõ
fogantyún.Ha fordított kézelhelyezést alkalmaz
tartáskor, megnöveli a személyi sérülés veszélyét,
amit soha ne tegyen.
Page 59

3. Viseljen védõszemüveget és fülvédõt. A fejen,
kézen, lábfejen és lábon további
védõfelszerelés viselése javasolt. A megfelelõ
védõruha viselete csökkenti a személyi sérülés
kockázatát a törmelék által, illetve a láncfûrésszel
való véletlenszerű érintkezést.
4. Ne vágjon bele a fûrésszel egy élõ fába. Ha
még áll a fa, veszélyes láncfûrésszel vágni.
5. Mindig álljon stabilan munka közben, és a
fûrészt alkalmazza kizárólag stabil,
biztonságos és sima felületen állva. A csúszó
vagy nem stabil felületek, mint a létrák, az
egyensúly és a láncfûrész kontrolljának
elvesztését okozhatják.
6. Feszültség alatt lévõ gally vágásakor legyen
résen, hogy hátraugorhasson. Amikor kioldódik
a farostokból, az eséssel meglendült gally
megütheti a kezelõt és / vagy a láncfûrészt
kezelhetetlenné teheti.
7. Legyen nagyon óvatos ágak és suhángok
vágásakor. A gyenge anyagba beakadhat a
láncfûrész és Ön felé verõdhet vagy kiránthatja az
egyensúlyából.
8. A láncfûrészt hordja az elsõ fogantyúnál tartva,
kikapcsolva, és a testétõl távol. A láncfûrész
szállítása vagy tárolása alatt mindig illessze rá
a láncvezetõ tetejét. A láncfûrész megfelelõ
kezelése lecsökkenti a véletlenszerû érintkezés
esélyét a mozgó láncfûrésszel.
9. A szerszám kenésekor, a lánc kifeszítésekor
vagy tartozékcsere alatt kövesse az
utasításokat. A nem szakszerûen kifeszített vagy
megkent lánc elszakadhat vagy megnöveli a
visszarúgás kockázatát.
10. A fogantyúkat tartsa szárazon, tisztán és olaj-
és zsírmentesen. A zsíros, olajos fogantyúk
csúszósak, és a kontroll elvesztését okozzák.
11. Csak fa vágására alkalmazza. Ne használja a
láncfûrészt a rendeltetésétõl eltérõ módon.
Például: Ne alkalmazza a láncfûrészt mûanyag,
kõmûvesmunka vagy nem fa építõanyagokra.
A láncfûrész nem rendeltetésszerû alkalmazása
veszélyes helyzetet okozhat.
12. A visszarúgás okai és annak megelőzése a
kezelő által:
Visszarúgást okozhat, ha a láncvezető orra vagy
hegye egy tárggyal érintkezik, vagy ha a fa lezárul
és becsípi a fűrészt a vágásba.
A heggyel való érintkezés időnként fordított
reakciót idéz elő, felfele rúgva a láncvezetőt és
hátra a kezelő felé.
Ha a láncfűrész a láncvezető felső részénél
csípődik be, ez gyorsan hátrafelé tolhatja a
láncvezetőt a kezelő irányába.
Ezek a reakciók mindenike a fûrész kontrolljának
elvesztését okozhatja, ami komoly személyi
sérülést okozhat. Ne támaszkodjon kizárólag a
fûrészbe épített biztonsági szerkezetre. Láncfûrész
kezelõként tegyen meg néhány lépést a vágási
munkálatok balesetmentessége és a sérülés
elkerülésének érdekében.
A visszarúgás a szerszám helytelen használatának
és/vagy a hibás megmunkálási eljárásnak vagy a
nem megfelelő munkaviszonyok eredménye és az
alább leírt óvintézkedések betartásával
elkerülhető:
− Tartsa erõsen, a hüvelykujjakkal és ujjaival
körülfogva a láncfûrész fogantyúit, két kézzel
a fûrészen, és úgy helyezkedjen el, hogy
ellenállhasson a visszarúgási erõnek. A
visszarúgási erõ szabályozható a kezelõ által,
ha megfelelõ intézkedéseket tesz. Ne
engedje el a láncfûrészt.
008625
− Ne terjedjen a vágási mûvelet a
vállmagasságon túl.. Ez a segítség
megelõzi a nem szándékos hegyérintkezést,
és lehetõvé teszi a láncfûrész jobb
szabályozását váratlan helyzetekben.
− Csak a gyártó által elõírt láncvezetõvel és
lánccal cserélje le.. A hibás láncvezetõ- és
lánccsere a lánc elszakadását és / vagy
visszarúgást okozhat.
− Kövesse a gyártó élezési és karbantartási
utasításait. A mélységmérõ magasságának
csökkentése növelt visszarúgást okozhat.
KIEGÉSZÍTŐ BIZTONSÁGI
ELŐÍRÁSOK
1. Olvassa el a Használati utasítást, hogy
megismerkedjen a láncfűrész működésével.
2. Mielőtt először használja a láncfűrészt, legyen
tisztában annak használatával. Ha ez nem
lehetséges, akkor a munka megkezdése előtt
legalább gyakoroljon egy kicsit egy fűrészbakra
fektetett, fatörzsön.
3. 18 év alatti fiatalok vagy gyerekek nem
használhatják a láncfűrészt. 16 év feletti fiatalok
mentesülhetnek ezen tilalom alól, ha szakember
részvételével betanításban részesülnek.
4. A láncfűrésszel való munkavégzés nagy fokú
összpontosítást igényel. Ne használja a
láncfűrészt ha nem érzi jól magát vagy rossz a
közérzete. Minden munkát nyugodtan és
elővigyázatosan végezzen.
59
Page 60

5. Soha ne végezzen munkát alkohol, kábítószer
vagy gyógyszer hatása alatt.
Megfelelő használat
1. A láncfűrész kizárólag faanyagok fűrészelésére
szolgál. Ne használja másra, például műanyag
vagy porózus beton vágására.
2. A láncfűrészt csak a jelen Használati utasításban
leírt műveletek végzésére használja. Ne
használja például sövényvágásra vagy hasonló
célokra.
3. A láncfűrész nem használható erdészeti
munkákra, pl. élőfa kivágására vagy gallyazására.
A láncfűrész csatlakozózsinórja nem biztosítja a
kezelő számára az ilyesfajta munkák végzéséhez
szükséges mozgékonyságot és biztonságot.
4. A láncfűrész nincs ipari felhasználásra tervezve.
5. Ne terhelje túl a láncfűrészt.
Személyi védelmi eszközök
1. A munkaruha testhezálló kell legyen, de ne
akadályozza a mozgást.
2. Munkavégzéshez viselje az alábbi védőruházatot:
• Bevizsgált védősisakot, ha fennáll az ágak
vagy hasonló tárgyak lehullásának veszélye;
• Arcmaszkot vagy védőszemüveget;
• Alkalmas zajvédelmi felszerelést (fülvédőt,
méretre szabott vagy formázható füldugót).
Kérésre oktávtartomány-elemzést végzünk.
• Ta rt ós, bőrből készült védőkesztyűt;
• Erős anyagból készült hosszúnadrágot;
• Vágásálló kezeslábast;
• Csúszásmentes talppal, acél orr-résszel és
vágásálló szövetbéléssel ellátott védőlábbelit;
• Gázálarcot, ha a munkavégzés
porképződéssel jár (pl. száraz fa fűrészelése).
A biztonságos munkavégzés módja
1. Ne használja a láncfűrészt gyúlékony por vagy
gázok jelenlétében, mivel a motor szikrázik, és
ezért robbanásveszélyes.
2. Csak szilárd talajon dolgozzon, ahol jól meg tudja
vetni a lábát. Különösen ügyeljen az akadályokra
(ilyen pl. a kábel is) a munkaterületen. Legyen
nagyon óvatos ott, ahol a nedvesség, jég, hó, a
frissen kivágott fa vagy a kérge csúszóssá tehetik
a talajt. Létrán vagy fa tetején állva ne használja a
fűrészt.
3. Legyen különösen elővigyázatos, ha lejtős
területen dolgozik; a guruló fatörzsek és ágak
potenciális veszélyforrást jelentenek.
4. Tisztítsa meg a munkaterületet az idegen
tárgyaktól, pl. homoktól, kövektől, szegektől,
vezetékektől, stb. Az idegen tárgyak kárt tehetnek
a láncvezetőben és a láncban, és veszélyes
visszarúgásokat idézhetnek elő.
5. Legyen különösen óvatos amikor drótkerítés
közelében dolgozik a fűrésszel. Ha belevág a
kerítésbe, a fűrész visszarúghat.
6. Ne vágjon bele a talajba.
7. A fadarabokat egyenként fűrészelje, ne
kötegekben vagy rakásban.
8. Kerülje vékony gallyak vagy gyökerek
fűrészelését, mivel ezek belegabalyodhatnak a
láncfűrészbe. Az egyensúly elvesztése
veszélyes.
9. Fűrészelt fa vágásához használjon biztonságos
alátámasztást (fűrészbakot).
10. Ne használja a láncfűrészt fadarabok vagy más
tárgyak lefeszítésére vagy félresöprésére.
11. A láncfűrészt úgy irányítsa, hogy semelyik
testrésze ne keresztezze a láncfűrész
mozgáspályájának meghosszabbított vonalát
(lásd az ábra).
006909
Visszarúgás
1. A láncfűrész használata során veszélyes
visszarúgások fordulhatnak elő. Visszarúgás
akkor következik be, amikor a láncvezető hegye
(különösen annak felső része) fába vagy más
kemény tárgyba ütközik. Ekkor a láncfűrész a
kezelő irányába lökődik.
006919
2. A visszarúgások elkerülése érdekében tartsa be a
következőket:
• Soha ne kezdje a vágást a láncvezető
hegyével.
• Soha ne használja fűrészelésre a láncvezető
hegyét. Legyen különösen óvatos, amikor
egy már megkezdett vágásba szeretne
folytatni.
• A vágást mozgó lánccal kezdje el.
• Mindig megfelelően élezze meg a fűrészláncot.
Különösen fontos, hogy a mélységbeállítót
állítsa a helyes méretre (tájékozódjon a "A
fűrészlánc megélezése" fejezetben a
részletekről).
60
Page 61

• Soha ne vágjon egyszerre több ágat.
• Gallyazáskor ügyeljen arra, hogy közben a
láncvezető ne érjen hozzá más ágakhoz.
• Aprításkor maradjon távol a szomszédos
rönköktől. Mindig figyeljen oda a láncvezető
hegyére.
• Használjon fűrészbakot.
Szállítás és tárolás
1. A láncfűrészt csak az elülső fogantyúnál fogva
szabad vinni, hátrafelé néző láncvezetővel.
2. A láncfűrészt biztonságos, száraz és zárható
helyiségben kell tárolni, ahol gyerekek nem
tudnak hozzáférni. Ne tárolja a láncfűrészt a
szabadban.
ŐRIZZE MEG EZEKET AZ
UTASÍTÁSOKAT
FIGYELMEZTETÉS:
Az ebben a használati utasításban közölt szabályok
ELKERÜLÉSE vagy be nem tartása komoly személyi
sérülést eredményezhet.
ENC007-2
FONTOS BIZTONSÁGI
SZABÁLYOK
AZ AKKUMULÁTORRA
VONATKOZÓAN
1. Az akkumulátor használata előtt
tanulmányozza át az akkumulátortöltőn (1), az
akkumulátoron (2) és az akkumulátorral
működtetett terméken (3) olvasható összes
utasítást és figyelmeztető jelzést.
2. Ne szerelje szét az akkumulátort.
3. Ha a működési idő nagyon lerövidült, azonnal
hagyja abba a használatot. Ez a túlmelegedés,
esetleges égések és akár robbanás
veszélyével is járhat.
4. Ha elektrolit kerül a szemébe, mossa ki azt
tiszta vízzel és azonnal keressen orvosi
segítséget. Ez a látásának elvesztését
okozhatja.
5. Ne zárja rövidre az akkumulátort:
(1) Ne érjen az érintkezőkhöz elektromosan
vezető anyagokkal.
(2) Ne tárolja az akkumulátort más
fémtárgyakkal, mint pl. szegekkel,
érmékkel, stb. egy helyen.
(3) Ne tegye ki az akkumulátort víznek vagy
esőnek.
Az akkumulátor rövidre zárása nagy
áramerősséggel, túlmelegedéssel,
esetleges égésekkel és akár
meghibásodással is járhat.
6. Ne tárolja a szerszámot vagy az akkumulátort
olyan helyen, ahol a hőmérséklet elérheti vagy
meghaladhatja az 50 ゚ C-ot (122 ゚ F).
7. Ne égesse el az akkumulátort még akkor sem,
ha az komolyan megsérült vagy teljesen
elhasználódott. Az akkumulátor a tűzben
felrobbanhat.
8. Vigyázzon, nehogy leejtse vagy megüsse az
akkumulátort.
ŐRIZZE MEG EZEKET AZ
UTASÍTÁSOKAT
Tippek a maximális élettartam eléréséhez
1. Töltse fel az akkumulátort még mielőtt tejesen
lemerülne.
Mindig kapcsolja ki a szerszámot és töltse fel
az akkumulátort amikor érzi, hogy csökkent a
szerszám teljesítménye.
2. Soha ne töltse újra a teljesen feltöltött
akkumulátort.
A túltöltés csökkenti az akkumulátor
élettartamát.
3. Az akkumulátort szobahőmérsékleten töltse
10 ゚ C - 40 ゚ C (50 ゚ F - 104 ゚ F) közötti
hőmérsékleten. Hagyja, hogy a forró
akkumulátor lehűljön, mielőtt elkezdi azt
feltölteni.
61
Page 62

Szállított alkatrészek
008588
Felső markolat
1
Akkumulátor
2
Lánckerék fedél
3
Elülső kézvédő
4
Vezetőrúd
5
Hegyvédő
6
Fűrészlánc
7
008589
1
2
13
3
9
10
4
5
8
12
6
7
11
Gomb
8
Kireteszelőgomb
9
Elülső markolat
10
Kapcsoló kioldógomb
11
Láncvédő burkolat
12
Karabiner vagy a kötél
13
rögzítési pontja
MŰKÖDÉSI LEÍRÁS
VIGYÁZAT:
• Minden esetben ellenőrizze, hogy a szerszám ki
van kapcsolva és az akkumulátor eltávolításra
került mielőtt beállít vagy ellenőriz valamilyen
funkciót a szerszámon.
Az akkumulátor behelyezése és eltávolítása
Fig.1
• Mindig kapcsolja ki az eszközt mielőtt behelyezi
vagy eltávolítja az akkumulátort.
• Az akkumulátor eltávolításához húzza azt ki a
szerszámból, az akkumulátor elején található
gombot elcsúsztatva.
• Az akkumulátor behelyezéséhez illessze az
akkumulátor hornyolt nyelvét a szerszám
burkolatán található vájathoz és csúsztassa a
helyére. Egészen addig tolja be, amíg egy kis
kattanással be nem akad. Ha látható a piros rész
a gomb felső oldalán, akkor nem kattant be
teljesen. Nyomja be teljesen amíg a piros rész nem
látszik. Ha ez nem történik meg, akkor az
62
Page 63

akkumulátor kieshet a szerszámból, Önnek vagy a
környezetében másnak sérüléseket okozva.
• Ne erőltesse az akkumulátort a behelyezéskor. Ha
az akkumulátor nem csúszik be könnyedén, akkor
az rosszul lett behelyezve.
A kapcsoló használata
VIGYÁZAT:
• Mielőtt behelyezi az akkumulátort a szerszámba,
mindig ellenőrizze, hogy a kioldókapcsoló
hibátlanul működik és az "OFF" állásba áll
felengedéskor.
Fig.2
Egy kireteszelőgomb szolgál annak elkerülésére, hogy a
kioldókapcsolót véletlenül meghúzzák.
A szerszám bekapcsolásához nyomja le a
kireteszelőgombot és húzza meg a kioldókapcsolót.
Engedje fel a kioldókapcsolót a leállításhoz.
ÖSSZESZERELÉS
VIGYÁZAT:
• Minden esetben ellenőrizze, hogy a szerszám ki
van kapcsolva és az akkumulátor eltávolításra
került mielőtt bármilyen műveletet végez a
szerszámon.
A fűrészlánc felhelyezése és eltávolítása
VIGYÁZAT:
• Minden esetben ellenőrizze, hogy a szerszám ki
van kapcsolva és az akkumulátor eltávolításra
került mielőtt felhelyezi vagy eltávolítja a
fűrészláncot.
• Mindig viseljen kesztyűt a fűrészlánc
felhelyezésekor vagy eltávolításakor.
• Csak az ehhez a láncfűrészhez tervezett
fűrészláncot és heggyel felszerelt láncvezetőt
használjon (tájékozódjon a Kivonatos pótalkatrész
listából).
• A visszarúgás elkerülése érdekében ne távolítsa el
a hegyet vagy cserélje ki a láncvezetőt egy olyanra
amelyiken nincs hegy.
Fig.3
Lazítsa meg a csavart úgy, hogy az óramutató járásával
ellentétesen elforgatja a gombot addig, amíg a
lánckerék fedele lejön.
Távolítsa el a lánckerék fedelét.
Vegye le a fűrészláncot és a láncvezetőt a szerszámról.
Fig.4
Illessze a lánc egyik végét a láncvezető végére. Ekkor
helyezze fel a fűrészláncot az ábrának megfelelően
mivel az a nyíl irányába fog forogni.
Fig.5
Helyezze el a fűrészláncot úgy, hogy a rugó és a
kiemelkedés benne legyenek, és illessze a fűrészlánc
másik végét a lánckerék köré, az ábrán látható módon.
Fig.6
A láncvezetőt az óramutató járásával ellentétesen
elforgatva helyezze fel úgy, hogy a láncvezető vége
érintkezzen a rugóval.
Fig.7
Illessze a lánckerék fedelén található kampót a
szerszámon található lyukba, majd helyezze a lánckerék
fedelét a szerszámra.
Fig.8
Forgassa el a gombot az óramutató járásának irányába
a csavar meghúzásához.
A fűrészlánc feszességének beállítása
Fig.9
A fűrészlánc feszességének beállításához elegendő
csak egy kicsit meglazítani a csavart. A beállítás után
újrahúzza meg a csavart.
Fig.10
VIGYÁZAT:
• Az új fűrészlánc a felszerelését követően
nemsokkal meglazulhat. A használat előtt időről
időre ellenőrizze a fűrészlánc feszességét.
• Ha a fűrészlánc feszessége alacsony, az
elmozdulhat a helyéről.
• A fűrészlánc felhelyezését és levételét tiszta,
fűrészportól és más hasonló szennyeződésektől
mentes helyen kell elvégezni.
ÜZEMELTETÉS
Kenés
Fig.11
A fűrészlánc kenése a szerszám működése közben
automatikusan történik.
Az olajellenőrző ablakon át ellenőrizze az olajtartályban
maradt olaj mennyiségét.
A tartály újratöltéséhez vegye le a sapkát az olajtartály
nyílásáról. Az olajtartály kapacitása 80 ml.
A tartály feltöltése után mindig csavarja vissza az
olajtartály fedelét a láncfűrészre.
VIGYÁZAT:
• Amikor a láncfűrészbe először tölt olajat, vagy újra
feltölti a tartályt úgy, hogy előtte ki volt ürítve, a
töltőnyak alsó széléig öntse az olajat. Ellenkező
esetben az olajtovábbítás romolhat.
• Láncolajként használjon kizárólag Makita
láncfűrészekhez való olajat, vagy a
kereskedelemben kapható olajat.
• Soha ne használjon porral szennyezett vagy
illékony olajat.
63
Page 64

• Fák metszésekor használjon növényi olajat. Az
ásványi olaj károsíthatja a fákat.
• Fák metszésekor soha ne erőltesse a láncfűrészt.
• Kivágás előtt ellenőrizze, hogy az olajtartály
sapkája a helyén van.
Tartsa el a láncfűrészt a fától. Indítsa be és várja meg,
amíg a fűrészlánc kenése megfelelő.
A felső vezetősínt/alsó vezetősínt hozza érintkezésbe a
levágni kívánt ággal még a fűrész bekapcsolása előtt.
Ha úgy kezdi el a vágást, hogy a felső vezetősínt/alsó
vezetősínt nem hozta érintkezésbe az ággal, akkor a
vezetősín kilenghet, ami a fűrész kezelőjének sérülését
okozhatja.
Fűrészelje a vágni kívánt fát úgy, hogy csak lefelé
mozgatja azt.
Fák metszése
Fig.12
Fig.13
VIGYÁZAT:
• A motor működésekor tartsa távol a testrészeit a
fűrészlánctól.
• A motor működésekor a láncfűrészt erősen fogja
mindkét kezével.
• Ne hajoljon előre túlságosan. Mindig álljon
biztosan es vigyázzon az egyensúlyára.
A felső vezetősínt/alsó vezetősínt hozza érintkezésbe a
levágni kívánt ággal még a fűrész bekapcsolása előtt.
Ha úgy kezdi el a vágást, hogy a felső vezetősínt/alsó
vezetősínt nem hozta érintkezésbe az ággal, akkor a
vezetősín kilenghet, ami a fűrész kezelőjének sérülését
okozhatja.
Vastag ágak vágásakor előbb készítsen sekély
alávágást és ezután fejezze be a vágást felülről.
Fig.14
Ha a vastag ágakat alulról próbálja meg átvágni, akkor
az ág összeszorulhat és a lánc beszorulhat a
fűrészjáratba.
Ha a vastag ágakat felülről, de alávágás nélkül próbálja
meg átvágni, akkor az ág forgácsolódhat.
Fig.15
Ha a fát nem tudja egy ütemben átvágni:
Kissé nyomja le a fűrészt a markolatánál és folytassa a
vágást, a fűrészt kicsit visszahúzva; ezután nyomja
lejjebb a fűrész hegyét és fejezze be a vágást a markolat
felemelésével.
Fig.16
A szerszám szállítása
Fig.17
A szerszám szállítása előtt mindig távolítsa el az
akkumulátort, és a láncvezetőt fedje le a védőtokkal. Az
akkumulátorra is tegye rá a fedelét.
KARBANTARTÁS
VIGYÁZAT:
• Minden esetben ellenőrizze, hogy a szerszám ki
van kapcsolva és az akkumulátor eltávolításra
került mielőtt átvizsgálja a szerszámot vagy annak
karbantartását végzi.
• A szerszám átvizsgálásához vagy
karbantartásához mindig vegyen fel védőkesztyűt.
A fűrészlánc élezése
VIGYÁZAT:
• Mindig vegye ki az akkumulátort, és vegyen fel
védőkesztyűt amikor munkákat végez a
fűrészláncon.
Fig.18
Élezze meg a fűrészláncot, ha:
− Lisztszerű fűrészpor képződik nedves fa
vágásakor;
− A lánc nehezen hatol be a fába, még ha erős
nyomást alkalmaznak is;
− A vágóélen látható sérülések vannak;
− A fűrész balra vagy jobbra húz a fában. Az ilyen
viselkedés oka a fűrészlánc egyenetlen élezése,
vagy csak az egyik oldal sérülése.
Gyakran élezze a fűrészláncot, de mindig csak egy
kevés anyagot távolítson el.
Két vagy három húzás egy reszelővel általában
elegendő a szokásos újraélezéshez. Miután a
fűrészláncot többször újraélezte, éleztesse meg egy
MAKITA szakszervizben.
Reszelő és a reszelő vezetése
− A fűrészláncok élezéséhez speciális kerek reszelőt
(opcionális kiegészítő) használjon, melynek
átmérője 4 mm. A normál kerek reszelők nem
megfelelőek.
Fig.19
− A reszelőnek csak az előretolásakor kell anyagot
eltávolítania. Visszahúzáskor emelje fel a reszelőt
az anyagról.
− Előbb a legrövidebb vágószemet élezze meg.
Ezen vágószem hossza ezután viszonyítási alapul
szolgál a lánc többi vágószemének élezésekor.
− A resze lőt az ábrán látható módon vezesse.
− A reszelőt könnyebb vezetni, ha reszelőfogót
(kiegészítő) használ. A reszelőfogón meg van
jelölve a helyes, 30 °-os élezési szög (a jelzéseket
igazítsa a fűrészlánccal párhuzamosan) és
korlátozva van a behatolási mélység (a reszelő
átmérőjének 4/5-ére).
A res zel őt az ábrán látható módon vezesse.
− A lánc megélezése után ellenőrizze a
mélységmérő magasságát a láncellenőrző
eszközzel (opcionális kiegészítő).
64
Page 65

Fig.20
− Távolítsa el az esetleges sorját, bármilyen kevés is
legyen az, egy speciális lapos reszelővel
(opcionális kiegészítő).
− Újból kerekítse le a mélységmérő elülső részét.
− A mélységmérő magasságának beállítását
követően mossa le a szemcséket a fűrészláncról.
A láncvezető tisztítása
Fig.21
A forgács és a fűrészpor felgyülemlik a láncvezető
vájatában, eltömíti azt, és akadályozza az olaj áramlását.
Mindig távolítsa el a forgácsot es a fűrészport amikor
élezi vagy cseréli a fűrészláncot.
Az olajszűrő és az olajkieresztő nyílás
tisztítása
Az olajszűrőben az olajkieresztő nyílásnál por vagy más
szemcsék halmozódhatnak fel a működés során.
Az olajszűrőben felhalmozódott por vagy szemcsék
ronthatják az áramlást az olajkieresztő nyíláson át, és a
fűrészlánc elégtelen kenését okozhatják.
Amikor a láncvezető felső részén a láncolaj továbbítása
elégtelen, tisztítsa meg a szűrőt a következő módon.
Vegye ki az akkumulátort a szerszámból.
Távolítsa el a lánckerék fedelét és a fűrészláncot a
szerszámról. (Tájékozódjon "A fűrészlánc felhelyezése
és eltávolítása" fejezetből.)
Fig.22
Távolítsa el a nyomóanyát egy vékonyszárú hornyoltfejű
csavarhúzóval, vagy más megfelelő szerszámmal.
Fig.23
Vegye ki a szűrőt a láncfűrészből és távolítsa el belőle a
port vagy a szemcséket. Ha a szűrő túl koszos, cserélje
ki egy újra.
Helyezze be az akkumulátort a szerszámba.
Fig.24
Húzza meg a kioldókapcsolót a lerakódott por vagy
szemcsék eltávolításához az olajkieresztő nyílásból a
láncolaj kieresztésével.
Vegye ki az akkumulátort a szerszámból.
Fig.25
Helyezze a megtisztított olajszűrőt az olajkieresztő
nyílásba. Ha a szűrő túl koszos, cserélje ki egy újra.
Fig.26
A szűrő rögzítéséhez helyezze vissza a nyomóanyát úgy,
hogy az ábrának megfelelően a megfelelő oldala nézzen
felfelé az olajkieresztő nyílásba. Ha a szűrő nem
rögzíthető, mert a nyomóanya eldeformálódott, akkor
cserélje egy újra a nyomóanyát.
Helyezze vissza a lánckerék fedelét és a fűrészláncot a
szerszámra.
A lánckerék cseréje
Mielőtt felrakja az új fűrészláncot, ellenőrizze a
lánckerék állapotát.
Fig.27
VIGYÁZAT:
• Az elkopott lánckerék károsítja az új fűrészláncot.
Ebben az esetben cserélje ki a lánckereket. A
lánckereket mindig úgy kell felszerelni, hogy az
ábrán látható módon álljon.
Fig.28
A fogaskerék cseréjekor mindig új reteszelőgyűrűt
helyezzen fel.
A szénkefék cseréje
Fig.29
A szénkeféket cserélje és ellenőrizze rendszeresen.
Cserélje ki azokat amikor lekopnak egészen a határjelzésig.
Tartsa tisztán a szénkeféket és biztosítsa hogy szabadon
mozoghassanak tartójukban. Mindkét szénkefét
egyszerre cserélje ki. Használjon egyforma szénkeféket.
Csavarhúzó segítségével távolítsa el a kefetartó
sapkákat. Vegye ki a kopott szénkeféket, tegye be az
újakat és helyezze vissza a kefetartó sapkákat.
Fig.30
A szerszám tárolása
Tárolás előtt tisztítsa meg a szerszámot. A lánckerék
fedelének levétele után távolítsa el a forgácsot és a
fűrészport a szerszámról. A szerszámot a tisztítás után
működtesse terhelés nélkül, hogy megtörténjen a
fűrészlánc és a láncvezető kenése.
Fedje le a láncvezetőt a védőtokkal.
Távolítsa el az olajat az olajtartályból annak kiürítéséhez,
majd tegye le a láncfűrészt úgy, hogy a tartály sapkája
felfelé nézzen.
A termék BIZTONSÁGÁNAK és MEGBÍZHATÓSÁGÁNAK
fenntartásához, a javításokat, bármilyen egyéb
karbantartást vagy beszabályozást a Makita Autorizált
Szervizközpontoknak kell végrehajtaniuk, mindig Makita
pótalkatrászek használatával.
TARTOZÉKOK
VIGYÁZAT:
• Ezek a tartozékok vagy kellékek ajánlottak az
Önnek ebben a kézikönyvben leírt Makita
szerszámához. Bármely más tartozék vagy kellék
használata személyes veszélyt vagy sérülést
jelenthet. A tartozékot vagy kelléket használja
csupán annak kifejezett rendeltetésére.
Ha bármilyen segítségre vagy további információkra van
szüksége ezekkel a tartozékokkal kapcsolatban,
keresse fel a helyi Makita Szervizközpontot.
• Különböző típusú eredeti Makita akkumulátorok és
töltők
• Fűrészlánc
• Védőtok
• Teljes láncvezető
• Reszelő
65
Page 66

SLOVENSKÝ
1-1. Červená časť
1-2. Tlačidlo
1-3. Kazeta akumulátora
2-1. Tlačidlo odomknutia
2-2. Spúšť
3-1. Kryt reťazového kolesa
3-2. Gombík
4-1. Diamantová rezačka
4-2. Vodiaca lišta
4-3. Šipka
5-1. Pružina
5-2. Reťazové koleso
5-3. Výčnelok
Vysvetlenie všeobecného zobrazenia
6-1. Pružina
6-2. Vodiaca lišta
6-3. Výčnelok
7-1. Kryt reťazového kolesa
7-2. Hák
7-3. Otvor
11-1. Veko olejovej nádržky
11-2. Okienko na kontrolu oleja
11-3. Otvor olejovej nádržky
12-1. Horné pravítko
13-1. Dolné pravítko
17-1. Kazeta akumulátora
17-2. Pošva (kryt reťaze)
22-1. Prítlačná matica
22-2. Drážkovaný skrutkovač
23-1. Filter
25-1. Filter
26-1. Prítlačná matica
27-1. Reťazové koleso
27-2. Poistný krúžok
28-1. Poistný krúžok
28-2. Reťazové koleso
28-3. Podložka
29-1. Medzná značka
30-1. Veko držiaka uhlíka
30-2. Šraubovák
TECHNICKÉ ÚDAJE
Rýchlosť reťaze za minútu (min-1) 4,8 m/s (290 m/min.) 5,0 m/s (300 m/min.)
Pílová reťaz
• Vzhľadom k neustálemu výskumu a vývoju tu uvedené technické údaje podliehajú zmenám bez upozornenia.
• Poznámka: Technické údaje sa možu pre rozne krajiny líšiť.
Symboly
Nižšie sú uvedené symboly, s ktorými sa môžete pri
použití nástroja stretnúť. Je dôležité, aby ste skôr, než s
ním začnete pracovať, pochopili ich význam.
・ Prečítajte si návod na používanie.
・ Používajte ochranu očí.
・ Používajte ochranu uší.
・ Používajte ochrannú prilbu, okuliare a
chrániče sluchu.
・ Používajte primeranú ochranu pre
chodidlá-nohy a ruky-ramená.
・ Nevystavujte dažďu.
・ Pri práci držte pílu oboma rukami!
Používanie jednou rukou je mimoriadne
nebezpečné!
・ Túto pílu môžu obsluhovať len
primerane zaškolení pracovníci.
・ Len pre štáty EU
Nevyhadzujte elektrické zariadenia
spolu s domácim odpadom!
Podľa Nariadenia Európskej rady
Model BUC121 BUC122
Dĺžka vodiacej tyče 115 mm
Celková dĺžka 422mm 422mm
Hmotnosť netto 2,4 kg 2,5 kg
Menovité napätie Jednosmerný prúd 14,4 V Jednosmerný prúd 18 V
Druh 25 AP
Stúpanie závitu 1/4"
Počet vodiacich článkov 42
END005-2
2002/96/EC o likvidácii elektrických a
elektronických zariadení a ich
prevádzkovania v súlade s národnými
zákonmi, elektrické zariadenia musia
byť potom, čo doslúžia,
zhromažďované samostatne a vrátené
na ekologickú recykláciu.
Určené použitie
Tento nástroj je určený na rezanie stavebného dreva a
brvien.
Pro Model BUC121
Len pre Európske krajiny
Hluk
Typická hladina akustického tlaku záťaže A určená
podľa EN60745-2-13:
Hladina akustického tlaku (L
Neurčitosť (K): 2 dB(A)
Úroveň hluku pri práci môže prekročiť 85 dB (A).
Používajte pomôcky na ochranu sluchu.
66
) : 84.0 dB (A)
pA
ENE031-1
ENG101-2
Page 67

Vibrácie
ENG221-1
Celková hodnota vibrácií (trojosový vektorový súčet)
určená podľa normy EN60745-2-13:
Pracovný režim: rezanie dreva
Vyžarovanie vibrácií (a
Neurčitosť (K) : 1.5 m/s
) : 4.2 m/s
h
2
2
Pro Model BUC122
ENG101-2
Len pre Európske krajiny
Hluk
Typická hladina akustického tlaku záťaže A určená
podľa EN60745-2-13:
Hladina akustického tlaku (L
Neurčitosť (K): 2 dB(A)
) : 84.6 dB (A)
pA
Úroveň hluku pri práci môže prekročiť 85 dB (A).
Používajte pomôcky na ochranu sluchu.
ENG221-1
Vibrácie
Celková hodnota vibrácií (trojosový vektorový súčet)
určená podľa normy EN60745-2-13:
Pracovný režim: rezanie dreva
Vyžarovanie vibrácií (a
Neurčitosť (K) : 1.5 m/s
) : 4.3 m/s
h
2
2
ENH016-5
PREHLÁSENIE O ZHODE S NORMAMI EU
Dolupodpísaný Kato je oprávnený prehlásiť, že prístroje
spoločnosti MAKITA,
Identifikačné číslo modelu EÚ: M6 08 02 24243 083
BUC121
vyhovuje štandardným bezpečnostným a zdravotným
požiadavkám príslušných smerníc EÚ:
Smernica EÚ pre strojové zariadenia 98/37/EC, Emisie
hluku 2000/14/EG, Smernica EÚ EMC.
Požiadavky horeuvedených smerníc EÚ boli
implementované predovšetkým na základe
nasledujúcich noriem: EN60745-2-13, EN 55014,
ENISO11681. Postup hodnotenia zhody 2000/14/EG bol
vykonaný podľa Prílohy V. Nameraná hladina
akustického výkonu (Lwa) je 92.0 dB(A). Garantovaná
hladina akustického výkonu (Ld) je 94 dB(A). Typovú
skúšku EÚ podľa 98/37/EG vykonal: TÜV Product
Service GmbH, Zertifizierungsstelle, Ridlerstraße 31,
D-80339 München.
000230
Zodpovedný výrobca:
Makita Corporation
3-11-8, Sumiyoshi-cho, Anjo, Aichi, JAPONSKO
Autorizovaný zástupca v Európe:
Makita International Europe Ltd.
Michigan Drive, Tongwell, Milton Keynes, Bucks MK15
8JD, ANGLICKO
Tomoyasu Kato CE2007
riaditeľ
ENH016-5
PREHLÁSENIE O ZHODE S NORMAMI EU
Dolupodpísaný Kato je oprávnený prehlásiť, že prístroje
spoločnosti MAKITA,
Identifikačné číslo modelu EÚ: M6 08 02 24243 083
BUC122
vyhovuje štandardným bezpečnostným a zdravotným
požiadavkám príslušných smerníc EÚ:
Smernica EÚ pre strojové zariadenia 98/37/EC, Emisie
hluku 2000/14/EG, Smernica EÚ EMC.
Požiadavky horeuvedených smerníc EÚ boli
implementované predovšetkým na základe
nasledujúcich noriem: EN60745-2-13, EN 55014,
ENISO11681. Postup hodnotenia zhody 2000/14/EG bol
vykonaný podľa Prílohy V. Nameraná hladina
akustického výkonu (Lwa) je 92.7 dB(A). Garantovaná
hladina akustického výkonu (Ld) je 95 dB(A). Typovú
skúšku EÚ podľa 98/37/EG vykonal: TÜV Product
Service GmbH, Zertifizierungsstelle, Ridlerstraße 31,
D-80339 München.
Tomoyasu Kato CE2007
000230
riaditeľ
Zodpovedný výrobca:
Makita Corporation
3-11-8, Sumiyoshi-cho, Anjo, Aichi, JAPONSKO
Autorizovaný zástupca v Európe:
Makita International Europe Ltd.
Michigan Drive, Tongwell, Milton Keynes, Bucks MK15
8JD, ANGLICKO
GEB037-1
Bezpečnostné výstrahy pre
reťazovú pílu:
NIKDY nepripustite, aby pohodlie a blízka znalosť
produktu (získané opakovaným používaním)
nahradili presné dodržiavanie bezpečnostných
pravidiel pre reťazovú pílu. V prípade nebezpečného
alebo nesprávneho používania tohto nástroja
môžete utrpieť vážne telesné poranenie.
1. Ak je motor v prevádzke, nepribližujte sa
žiadnou časťou tela k reťazovej píle. Pred
spustením reťazovej píly skontrolujte, či sa
píla ničoho nedotýka. Chvíľa nepozornosti
počas práce s reťazovou pílou môže zapríčiniť
zamotanie vášho odevu alebo tela do reťaze píly.
2. Reťazovú pílu vždy držte pravou rukou za
zadnú rukoväť a ľavou rukou za prednú
rukoväť. Pri opačnom držaní reťazovej píly sa
zvyšuje riziko osobného poranenia, preto by sa
nemalo nikdy používať.
3. Používajte chránič zraku a sluchu. Odporúča
sa používať ďalšie ochranné vybavenie pre
hlavu, ruky, nohy a chodidlá. Primeraný
ochranný odev znižuje riziko osobného poranenia
67
Page 68

od odletujúcich triesok spôsobeného náhodným
kontaktom s reťazovou pílou.
4. Nepoužívajte reťazovú pílu na strome. Pri
používaní reťazovej píle na strome môže dojsť k
osobnému poraneniu.
5. Vždy používajte vhodnú obuv a pracujte s
reťazovou pílou, len ak stojíte na pevnom,
bezpečnom a rovnom povrchu. Pri pošmyknutí
alebo práci na nestabilnom povrchu môže dôjsť k
strate rovnováhy alebo kontroly nad reťazovou
pílou.
6. Pri rezaní napnutého konára dávajte pozor na
spätný švih. Pri uvoľnení napätia vo vláknach
dreva môže uvoľnená vetva udrieť obsluhujúceho
a/alebo spôsobiť stratu kontroly na reťazovou
pílou.
7. Pri rezaní kríkov a porastu buďte zvlášť
opatrní. Tenké materiály sa môžu zachytiť o reťaz
píly a šľahnúť smerom k vám alebo spôsobiť
stratu rovnováhy.
8. Reťazovú pílu prenášajte vo vypnutom stave
za prednú rukoväť a držte ju pritom od tela. Pri
prenášaní alebo odložení reťazovej píly vždy
nasaďte kryt vodiacej lišty. Správne
zaobchádzanie s reťazovou pílou znižuje
pravdepodobnosť náhodného kontaktu s
pohybujúcou sa reťazou píly.
9. Pri mazaní, nastavovaní napnutia reťaze a
výmene príslušenstva postupujte podľa
pokynov. Nesprávne napnutá alebo namazaná
reťaz sa môže pretrhnúť alebo zvýšiť riziko
spätného nárazu.
10. Rukoväte udržiavajte suché, čisté a bez oleja a
mastnoty. Mastne alebo zaolejované rukoväte sú
šmykľavé a môžu spôsobiť stratu kontroly.
11. Režte len drevo. Nepoužívajte reťazovú pílu na
iné ako určené účely. Napríklad: nepoužívajte
reťazovú pílu na rezanie plastov, muriva alebo
nedrevených stavebných materiálov. Pri
používaní reťazovej píly na iné ako stanovené
účely by mohlo dôjsť k nebezpečným situáciám.
12. Príčiny spätného nárazu a ako im obsluha
zabráni:
Keď sa predná časť alebo hrot vodiacej lišty
dotkne nejakého objektu alebo keď drevo uzavrie a
priškrtí reťaz píly v reze, môže dôjsť k spätnému
nárazu.
Pri kontakte hrotu môže v niektorých prípadoch
dôjsť k náhlej spätnej reakcii a úderu vodiacej lišty
nahor a dozadu smerom k obsluhujúcej osobe.
Pri priškrtení reťaze píly pozdĺž horného okraja
vodiacej lišty môže dôjsť k rýchlemu nadskočeniu
vodiacej lišty dozadu smerom k obsluhujúcej
osobe.
Obe tieto reakcie môžu spôsobiť stratu vašej
kontroly nad pílou a následné vážne osobné
poranenie. Nespoliehajte sa výhradne na
bezpečnostné vybavenie namontované na píle.
Ako užívateľ reťazovej píly musíte vykonať
niekoľko krokov, aby pri rezaní nedošlo k nehode
alebo poraneniu.
Spätný náraz je výsledok nesprávneho používania
nástroja a/alebo nesprávnych prevádzkových
postupov alebo podmienok a možno sa mu vyhnúť
vykonaním príslušných protiopatrení uvedených
nižšie:
− Udržiavajte pevný úchop pričom palec a prsty
obopínajú rukoväte píly, obe ruky sú na píle a
ste v postoji tela a polohe rúk, ktoré
umožň
ujú vzdorovať silám spätných nárazov.
Sily spätných nárazov môže mať pod
kontrolou obsluhujúca osoba, ak vykoná
príslušné opatrenia. Reťazovú pílu
neuvoľnite.
008625
− Nedosahuje príliš vysoko ani nerežte nad
výškou pliec.. Zabránite tak neúmyselnému
kontaktu hrotu a umožníte lepšiu kontrolu
nad reťazovou pílou v nečakaných
situáciách.
− Používajte len náhradné lišty a reťaze
určené výrobcom.. Nesprávne náhradné
lišty a reťaze môžu spôsobiť pretrhnutie
reťaze a/alebo spätný náraz.
− Pri ostrení a údržbe dodržiavajte pokyny
výrobcu pre reťazovú pílu. Pri zmenšení
výšky hĺbkového dorazu sa môže zvýšiť
pravdepodobnosť spätného nárazu.
ĎALŠIE BEZPEČNOSNÉ
ZÁSADY
1. Prečítajte si návod na používanie a oboznámte sa
s činnosťou reťazovej píly.
2. Pred prvým použitím reťazovej píly si pripravte
pokyny na jej používanie. Ak to nie je možné, pred
začatím práce si aspoň nacvičte rezanie
okrúhleho brvna na stojane.
3. Reťazovú pílu nesmú používať deti a osoby
mladšie ako 18 rokov. Osoby staršie ako 16 rokov
môžu toto obmedzenie obísť, ak podstúpia
zaškolenie pod dohľadom odborníka.
4. Pri práci s reťazovou pílou sa vyžaduje vysoký
stupeň koncentrácie. Ak sa necítite dobre alebo
ste unavení, nepracujte s pílou. Všetky úkony
vykonávajte pokojne a dôkladne.
68
Page 69

5. Nikdy nepracujte pod vplyvom alkoholu, drog
alebo liekov.
Správne používanie
1. Táto reťazová píla je určená výhradne a rezanie
dreva. Nepoužívajte ju na rezanie plastu alebo
porézneho betónu.
2. Reťazovú pílu používajte len pre operácie
popísané v tomto návode na použitie.
Nepoužívajte ju, napríklad, na orezávanie živého
plotu a podobné účely.
3. Reťazová píla sa nesmie používať na lesnícke
práce, t.j. na porážanie a odvetvovanie dreva na
pni. Kábel reťazovej píly nezaisťuje obsluhe
dostatočnú mobilitu a bezpečnosť pre takýto typ
práce.
4. Reťazová píla nie je určená na komerčné
použitie.
5. Reťazovú pílu nepreťažujte.
Osobné ochranné pomôcky
1. Odev musí byť priliehavý, ale nesmie brániť v
pohybe.
2. Pri práci noste nasledujúce ochranné odevy:
• Testovanú bezpečnostnú helmu, ak hrozí
riziko padajúcich vetiev a pod.;
• Tvárovú masku alebo okuliare;
• Vhodné chrániče sluchu (zátky do uší,
prispôsobené alebo formovateľné ušné
vložky). Analýza oktávového kmitočtového
pásma na požiadanie.
• Pevné kožené ochranné rukavice;
• Dlhé nohavice vyrobené z pevných vlákien;
• Ochrannú kombinézu z netrhavej tkaniny;
• Bezpečnostné topánky alebo čižmy s
nešmykľavými podošvami, oceľovými špicami
a podšívkou z netrhavej tkaniny;
• Dýchaciu masku, keď vykonávate prácu, pri
ktorej sa vytvára prach (napr. pílenie suchého
dreva).
Bezpečné pracovné postupy
1. Nepoužívajte reťazovú pílu v blízkosti horľavého
prachu alebo plynov, lebo jej motor vytvára iskry,
čo predstavuje riziko explózie.
2. Pracujte len na pevnej zemi a s dostatočne
pevným postavením. Venujte zvýšenú pozornosť
prekážkam (napr. káblu) na pracovnom mieste.
Zvlášť buďte opatrní na miestach, kde môže byť
klzký povrch kvôli vlhkosti, ľadu, snehu, čerstvo
rezanému drevu alebo kôre. Pílu nepoužívajte,
keď stojíte na rebríku alebo strome.
3. Zvlášť buďte opatrní pri práci v šikmom teréne,
kotúľajúce sa kmene a vetvy znamenajú
potenciálne riziko.
4. Odstráňte z plochy, ktorú chcete rezať, všetky
cudzie objekty, ako piesok, kamene, klince drôty a
pod. Cudzie objekty môžu poškodiť lištu a reťaz a
viesť k nebezpečnému spätnému nárazu.
5. Zvlášť buďte opatrní pri rezaní v blízkosti
drôtených plotov. Nezarežte do plota, píla sa
môže odraziť späť.
6. Nezarežte do zeme.
7. Kusy dreva režte po jednom, nie po zväzkoch
alebo hromadách.
8. Podľa možností nepoužívajte pílu na rezanie
tenkých vetiev a koreňov, tieto sa môžu zamotať
do reťazovej píly. Strata rovnováhy predstavuje
riziko.
9. Pri rezaní reziva použite bezpečnú oporu (stojan).
10. Nepoužívajte reťazovú pílu na vypačovanie alebo
odmetanie kusov dreva či iných objektov.
11. Re ťazovú pílu veďte tak, aby žiadna časť vášho
tela nebola v predĺženej dráhe pílovej re
(pozrite obrázok).
006909
Spätný náraz
1. Pri práci s reťazovou pílou môže nastať
nebezpečný spätný náraz. Spätný náraz vzniká,
keď sa hrot lišty (najmä jej hornej štvrtiny) dostane
do kontaktu s drevom alebo iným pevným
predmetom. To spôsobí vychýlenie reťazovej píly
v smere obsluhujúcej osoby.
006919
2. Aby ste predišli spätným nárazom, dodržiavajte
nasledujúce pokyny:
• Nikdy nezačínajte rez hrotom lišty.
• Nikdy na rezanie nepoužívajte hrot lišty.
Zvlášť buďte opatrní pri pokračovaní v reze,
ktorý ste už raz začali.
• Rez začínajte s bežiacou reťazou.
• Reťaz vždy správne naostrite. Predovšetkým
nastavte hĺbkový doraz na správnu hĺbku
(podrobnosti nájdete v časti "Ostrenie
reťaze").
• Nikdy nepíľte niekoľko vetiev naraz.
69
ťaze
Page 70

• Pri odvetvovaní dbajte na to, aby lišta neprišla
do kontaktu s inými vetvami.
• Pri skracovaní výrezov sa vyhýbajte
susedným kmeňom. Stále sledujte hrot lišty.
• Použite stojan.
Prevoz a skladovanie
1. Reťazovú pílu prenášajte len za prednú rúčku,
pričom lišta smeruje dozadu.
2. Reťazovú pílu uchovávajte v bezpečnej, suchej a
uzamknutej miestnosti mimo dosahu detí.
Reťazovú pílu neskladujte vo vonkajších
priestoroch.
TIETO POKYNY USCHOVAJTE.
VAROVANIE:
NESPRÁVNE POUŽÍVANIE alebo nedodržovanie
bezpečnostných zásad uvedených v tomto návode
môže viesť k vážnemu zraneniu.
ENC007-2
DÔLEŽITÉ BEZPEČNOSTNÉ
POKYNY
PRE JEDNOTKU
AKUMULÁTORA
1. Pred použitím jednotky akumulátora si
prečítajte všetky pokyny a záručné poznámky
na (1) nabíjačke akumulátorov, (2)
akumulátore a (3) produkte používajúcom
akumulátor.
2. Jednotku akumulátora nerozoberajte.
3. Ak sa doba prevádzky príliš skráti, ihneď
prerušte prácu. Môže nastať riziko prehriatia,
možných popálením či dokonca explózie.
4. V prípade zasiahnutia očí elektrolytom ich
vypláchnite čistou vodou a okamžite
vyhľadajte lekársku pomoc. Môže dôjsť k
strate zraku.
5. Jednotku akumulátora neskratujte:
(1) Nedotýkajte sa konektorov žiadnym
vodivým materiálom.
(2) neskladujte jednotku akumulátora v obale
s inými kovovými predmetmi, napríklad
klincami, mincami a pod.
(3) Jednotku akumulátora nevystavujte vode
či dažďu.
Skrat akumulátora môže spôsobiť veľký
tok prúdu, prehriate, možné popáleniny či
6. Neskladujte nástroj ani jednotku akumulátora
7. Jednotku akumulátora nespaľujte, ani keď je
dokonca poruchu.
na miestach s teplotou presahujúcou 50 ゚ C
(122 ゚ F).
vážne poškodená alebo úplne vydratá.
Jednotka akumulátora môže v ohni
explodovať.
8. Dávajte pozor, aby akumulátor nespadol alebo
nenarazil do niečoho.
TIETO POKYNY USCHOVAJTE.
Rady pre udržanie maximálnej životnosti
akumulátora
1. Akumulátor nabite ešte predtým, ako sa úplne
vybije.
Vždy prerušte prácu s nástrojom a nabite
jednotku akumulátora, keď spozorujete nižší
výkon nástroja.
2. Nikdy nenabíjate plne nabitú jednotku
akumulátora.
Prebíjanie skracuje životnosť akumulátora.
3. Jednotku akumulátora nabíjajte pri izbovej
teplote pri 10 ゚ C - 40 ゚ C (50 ゚ F - 104 ゚ F). Pred
nabíjaním nechajte jednotku akumulátora
vychladnúť.
70
Page 71

Dodané diely
1
2
008588
Horná rúčka
1
Kazeta akumulátora
2
Kryt reťazového kolesa
3
Kryt prednej rukoväte
4
Vodiaca lišta
5
Chránič hrotu
6
Pílová reťaz
7
008589
4
5
8
13
3
9
12
10
6
7
11
Gombík
8
Tlačidlo odomknutia
9
Predná rukoväť
10
Spúšť
11
Kryt reťaze
12
Bod pripojenia karabíny
13
alebo lana
POPIS FUNKCIE
POZOR:
• Pred úpravou alebo kontrolou funkčnosti nástroja
vždy skontrolujte, či je nástroj vypnutý a blok
akumulátora je vybratý.
Inštalácia alebo demontáž kazety akumulátora
Fig.1
• Pred vložením alebo vyberaním kazety
akumulátora prístroj vždy vypnite.
• Ak chcete odstrániť blok akumulátora, vytiahnite
ho z nástroja, pričom posúvajte tlačidlo na prednej
strane bloku.
• Blok akumulátora vložíte tak, že zarovnáte jazýček
na bloku s drážkou v lôžku a nasuniete ho na
miesto. Vždy zatlačte úplne, kým s cvaknutím
nezapadne na miesto. Ak vidíte červenú časť na
hornej strane tlačidla, nie je správne zapadnutý.
Vložte ho úplne, aby červenú časť nebolo vidieť. V
opačnom prípade môže náhodne vypadnúť z
nástroja a ublížiť vám alebo osobám v okolí.
71
Page 72

• Kazetu akumulátora nevkladajte nasilu. Ak sa
nedá nasunúť ľahko, nevkladáte ho správne.
Zapínanie
POZOR:
• Pred vložením bloku akumulátora do nástroja sa
vždy presvedčite, či vypínač funguje správne a po
uvoľnení sa vráti do pozície "OFF".
Fig.2
Aby nedochádzalo náhodnému potiahnutiu spúšťacieho
spínača, nachádza sa tu odomykacie tlačidlo.
Ak chcete spustiť nástroj, stlačte odomykacie tlačilo a
potiahnite spúšťací spínač. Zastavíte ho uvoľnením
spínača.
MONTÁŽ
POZOR:
• Pred vykonaním akejkoľvek práce na nástroji vždy
skontrolujte, či je nástroj vypnutý a kazeta
akumulátora je vybratá.
Vloženie alebo vybratie pílovej reťaze
POZOR:
• Pred vyberaním alebo namontovaním pílovej
reťaze musí byť prístroj vždy vypnutý a batéria
vybratá.
• Pri montáži alebo demontáži pílovej reťaze
používajte vždy ochranné rukavice.
• Používajte výhradne pílovú reťaz s vodiacou tyčou,
ktorá má hrot určený pre túto pílovú reťaz (pozri
časť zoznamu náhradných dielov).
• Aby ste zabránili bočným nárazom, hrot tyče
neodstraňujte a tyč nevymieňajte za takú, ktorá
nemá hrot.
Fig.3
Uvoľnite skrutku otáčaním tlačidla proti smeru pohybu
hodinových ručičiek, kým sa kryt reťazového kolesa
neuvoľní.
Vyberte kryt reťazového kolesa.
Odstráňte pílovú reťaz a vodiacu tyč z nástroja.
Fig.4
Jeden koniec pílovej reťaze nasaďte na hornú časť
vodiacej tyče. Teraz založte reťaz podľa obrázka,
nakoľko sa otáča v smere šípky.
Fig.5
Pílovú reťaz umiestnite tak, aby sa pružina a výčnelok
nachádzali v nej a druhý koniec pílovej reťaze pripevnite
okolo reťazového kolesa, podľa vyobrazenia.
Fig.6
Otáčajte vodiacu tyč proti smeru pohybu hodinových
ručičiek a pritom ju namontuje tak, aby sa koniec
vodiacej tyče dotýkal pružiny.
Fig.7
Vsuňte háčik krytu reťazového kolesa do otvoru v
nástroji a umiestnite kryt reťazového kolesa na nástroj.
Fig.8
Otáčaním tlačidla v smere pohybu hodinových ručičiek
pevne utiahnite skrutku.
Nastavenie napätie pílovej reťaze
Fig.9
Nepatrným uvoľnením skrutky je možné nastavovať
napnutie pílovej reťaze. Po nastavení túto skrutku znova
pevne utiahnite.
Fig.10
POZOR:
• Chvíľu po namontovaní novej pílovej reťaze sa táto
zvykne trochu uvoľniť. Pred použitím niekedy
skontrolujte napnutie pílovej reťaze.
• Slabé napnutie pílovej reťaze môže spôsobiť je
úplné uvoľnenie.
• Montáž a demontáž pílovej reťaze sa vykonáva na
čistom mieste bez pilín a podobne.
PRÁCA
Mazanie
Fig.11
Pílová reťaz sa automaticky maže počas činnosti
nástroja.
Skontrolujte množstvo zostávajúceho oleja v olejovej
nádržke cez okienko na kontrolu oleja.
Ak chcete doplniť nádržku, odstráňte veko z otvoru
olejovej nádržky. Kapacita olejovej nádržky je 80 ml.
Po doplnení nádržky vždy zaskrutkujte príslušné veko
olejovej nádržky na reťazovú pílu.
POZOR:
• Pri prvom plnení oleja do píly alebo pri dopĺňaní
nádrže po úplnom vyprázdnení doplňte olej až po
spodnú hranu hrdla lievika. Prívod oleja môže byť
v opačnom prípade narušený.
• Ako olej pre reťazovú pílu používajte olej určený
výhradne pre reťazové píly Makita alebo olej
dostupný na trhu.
• Nikdy nepoužívajte olej obsahujúci prášok a
čiastočky alebo prchavý olej.
• Pri prerezávaní stromov používajte botanický olej.
Minerálny olej môže poškodiť stromy.
• Pri prerezávaní stromov reťazovú pílu nikdy
netlačte silou.
• Pred rezaním vždy skontrolujte, či je príslušné
veko olejovej nádržky priskrutkované na svojom
mieste.
Reťazovú pílu držte ďalej od stromu. Spustite ju a
počkajte, kým dôjde k dostatočnému namazaniu pílovej
reťaze.
72
Page 73

Pred zapnutím priložte hornú/dolnú lištu k vetve, ktorú
budete píliť. Pri rezaní musí byť horná/dolná lišta v
kontakte s vetvou, v opačnom prípade by sa vodiaca tyč
mohla rozkmitať a zraniť operátora.
Pílené drevo režte len pohybom nadol.
Vyvetvovanie stromov
Fig.12
Fig.13
POZOR:
• Ak je motor píly v prevádzke, nepribližujte sa telom
k pílovej reťazi.
• Ak je motor v prevádzke, pílu držte pevne obidvomi
rukami.
• Nepíľte príliš vysoko. Vždy stojte pevne a
udržiavajte rovnováhu.
Pred zapnutím priložte hornú/dolnú lištu k vetve, ktorú
budete píliť. Pri rezaní musí byť horná/dolná lišta v
kontakte s vetvou, v opačnom prípade by sa vodiaca tyč
mohla rozkmitať a zraniť operátora.
Pri pílení hrubých konárov urobte najprv plytké
podrezanie a potom konečný rez zhora.
Fig.14
Ak chcete odrezať hrubé konáre zospodu, konár sa
môže zalomiť v pílovej reťazi.
Ak sa snažíte odrezať hrubé konáre zvrchu bez plytkého
podrezania, konár sa môže rozštiepiť.
Fig.15
Ak drevo nemôžete prerezať priamo jediným rezom:
Ľahko zatlačte na rukoväť a pokračujte v pílení, pílu
mierne potiahnite späť; potom hrot posuňte trochu nižšie
a dokončite rez zdvihnutím rukoväte.
Fig.16
Prenášanie nástroja
Fig.17
Pred prenášaním prístroja vždy vyberte batériu z
nástroja a vodiacu tyč zakryte pošvou. Batériu tiež
prikryte krytom pre batériu.
ÚDRŽBA
POZOR:
• Pred vykonaním kontroly alebo údržby vždy
skontrolujte, či je nástroj vypnutý a blok
akumulátora je vybratý.
• Pri kontrole alebo údržbe používajte vždy rukavice.
Ostrenie pílovej reťaze
POZOR:
• Pri práci na pílovej reťazi vždy vyberte batériu a
používajte ochranné rukavice.
Fig.18
Reťaz ostrite, keď:
− pri rezaní vlhkého dreva vznikajú prachové piliny;
− reťaz vniká ťažko do dreva aj pri veľkom tlaku;
− rezacia hrana je zjavne poškodená;
− píla ťahá v dreve napravo alebo naľavo. Dôvodom
je nerovnomerne nabrúsená reťaz alebo
poškodenie na jednej jej strane.
Pílovú reťaz ostrite často, ale vždy odstráňte len
trochu materiálu.
Dva alebo tri ťahy brúskou zvyčajne stačia na bežné
ostrenie. Ak bola reťaz preostrená niekoľkokrát,
nechajte ju naostriť v servise MAKITA.
Brúska a vedenie brúsky
− Na ostrenie pílových reťazí používajte špeciálnu
okrúhlu brúsku (voliteľné príslušenstvo) s
priemerom 4 mm. Bežné okrúhle brúsky nie sú
vhodné.
Fig.19
− Brúska by sa mala pohybovať po materiále len
smerom dopredu. Pri návrate do východiskovej
polohy zdvihnite brúsku z materiálu.
− Najprv naostrite najkratší nôž. Dĺžka tohto noža je
potom kontrolným rozmerom pre všetky ostatné
nože na reťazi.
− Brúskou pohybujte podľa obrázka.
− Táto brúska sa dá viesť omnoho ľahšie, ak má
držiak (voliteľné príslušenstvo). Držiak brúsky má
značky pre správny uhol ostrenia 30° (zarovnajte
značky rovnobežne s reťazou) a obmedzenie
vniknutia (na 4/5 priemeru brúsky).
Brúskou pohybujte podľa obrázka.
− Po naostrení reťaze skontrolujte výšku hĺbkového
dorazu pomocou náradia na kontrolu reťaze
(voliteľné príslušenstvo).
Fig.20
− Osobitným plochým pilníkom odstráňte všetko, čo
prečnieva, aj keď len malé (voliteľné
príslušenstvo).
− Znovu zaoblite prednú časť hĺbkového dorazu.
− Po nastavení hĺbky hĺbkového dorazu zmyte z
reťazovej píly prach a čiastočky.
Čistenie vodiacej tyče
Fig.21
Triesky a piliny sa nahromadia v ryhe vodiacej tyče,
zapchajú ju a narušia tok oleja. Pri ostrení alebo výmene
reťaze pílu vždy očistite od triesok alebo pilín.
Čistenie olejového filtra na olejovom
vypúšťacom otvore
V olejovom filtri na olejovom vypúšťacom otvore sa
môžu počas prevádzky usadiť malé častice alebo prach.
Prach alebo iné častice v olejovom filtri môžu zhoršiť
vypúšťanie oleja a spôsobiť nedostatočné mazanie celej
reťaze.
73
Page 74

V prípade nedostatočného prívodu oleja na reťaz na
hrote vodiacej tyče vyčistite filter uvedeným spôsobom.
Z prístroja vyberte batériu.
Z prístroja vyberte kryt reťazového kolesa a reťaz.
(Podľa časti "Montáž alebo demontáž pílovej reťaze".)
Fig.22
Prítlačnú maticu vyberte pomocou plochého
skrutkovača so štíhlym vretenom alebo podobným.
Fig.23
Filter vyberte z píly a odstráňte z neho piliny alebo
nečistoty. Ak je filter príliš špinavý, vymeňte ho.
Vložte batériu do nástroja.
Fig.24
Potiahnite prepínač a vypustite reťazový olej, aby sa z
olejového vypúšťacieho otvoru vyplavili usadené
nečistoty.
Z prístroja vyberte batériu.
Fig.25
Vyčistený olejový filter vložte do olejového vypúšťacieho
otvoru. Ak je filter príliš špinavý, vymeňte ho.
Fig.26
Podľa obrázku vložte prítlačnú maticu správnou stranou
nahor do olejového vypúšťacieho otvoru, aby ste zaistili
filter. Ak je matica deformovaná a nie je možné filter
zaistiť, vymeňte prítlačnú maticu.
Na prístroj opäť namontujte kryt reťazového kolesa a
reťaz.
Výmena reťazového kolesa
Pred vložením novej reťaze skontrolujte stav reťazového
kolesa.
Fig.27
POZOR:
• Opotrebované reťazové koleso poškodí novú
pílovú reťaz. V tomto prípade vymeňte reťazové
koleso. Reťazové koleso sa musí namontovať
takým spôsobom, aby vždy smerovalo tak, ako je
to na vyobrazení.
Fig.28
Pri výmene reťazového kolesa vymeňte vždy aj poistný
krúžok.
Výmena uhlíkov
Fig.29
Uhlíky pravidelne vyberajte a kontrolujte. Ak sú
opotrebované až po medznú značku, vymeňte ich.
Uhlíky musia byť čisté a musia voľne zapadať do svojich
držiakov. Oba uhlíky treba vymieňať súčasne.
Používajte výhradne rovnaké uhlíky.
Pomocou šraubováka odskrutkujte veká uhlíkov. Vyjmite
opotrebované uhlíky, vložte nové a zaskrutkujte veká
naspäť.
Fig.30
Skladovanie prístroja
Pred skladovaním nástroj vyčistite. Po vybratí
reťazového kolesa z nástroja odstráňte všetky triesky a
piliny. Po vyčistení nástroja ho spustite bez záťaže, aby
sa premazala pílová reťaz a vodiaca tyč.
Vodiacu tyč zakryte pošvou.
Odstráňte olej z olejovej nádržky, aby bola úplne
prázdna, potom odložte reťazovú pílu s vekom nádržky
otočeným smerom nahor.
Kvôli zachovaniu BEZPEČNOSTI a SPOĽAHLIVOSTI
výrobkov musia byť opravy a akákoľvek ďalšia údržba či
nastavovanie robené autorizovanými servisnými
strediskami firmy Makita a s použitím náhradných dielov
Makita.
PRÍSLUŠENSTVO
POZOR:
• Pre váš nástroj Makita, opísaný v tomto návode,
doporučujeme používať toto príslušenstvo a
nástavce. Pri použití iného príslušenstva či
nástavcov može hroziť nebezpečenstvo zranenia
osôb. Príslušenstvo a nástavce sa možu používať
len na účely pre ne stanovené.
Ak potrebujete bližšie informácie týkajúce sa tohoto
príslušenstva, obráťte sa na vaše miestne servisné
stredisko firmy Makita.
• Rôzne druhy originálnych blokov akumulátorov a
nabíjačiek
• Pílová reťaz
• Pošva
• Úplná vodiaca tyč
• Brúska
74
Page 75

ČESKÝ
1-1. Červená část
1-2. Tlačítko
1-3. Akumulátor
2-1. Odjišťovací tlačítko
2-2. Spoušť
3-1. Kryt řetězového kola
3-2. Knoflík
4-1. Řezný nástroj
4-2. Vodicí tyč
4-3. Šipka
5-1. Pružina
5-2. Řetězové kolo
5-3. Výčnělek
Legenda všeobecného vyobrazení
6-1. Pružina
6-2. Vodicí tyč
6-3. Výčnělek
7-1. Kryt řetězového kola
7-2. Hák
7-3. Otvor
11- 1. Ví čko olejové nádrže
11- 2. Pr ůzor pro kontrolu hladiny oleje
11-3. Otvor olejové nádrže
12-1. Přední vodítko
13-1. Dolní vodítko
17-1. Akumulátor
17-2. Pouzdro (kryt řetězu)
22-1. Tlačná matice
22-2. Plochý šroubovák
23-1. Filtr
25-1. Filtr
26-1. Tlačná matice
27-1. Řetězové kolo
27-2. Pojistný kroužek
28-1. Pojistný kroužek
28-2. Řetězové kolo
28-3. Podložka
29-1. Mezní značka
30-1. Víčko držáku uhlíku
30-2. Šroubovák
TECHNICKÉ ÚDAJE
Otáčky řetězu za minutu (min-1) 4,8 m/s (290 m/min) 5,0 m/s (300 m/min)
Pilový řetěz
• Vzhledem k neustálému výzkumu a vývoji zde uvedené technické údaje podléhají změnám bez upozornění.
• Poznámka: Technické údaje se mohou pro různé země lišit.
Symboly
Níže jsou uvedeny symboly, se kterými se můžete při
použití nástroje setkat. Je důležité, abyste dříve, než s
ním začnete pracovat, pochopili jejich význam.
・ Přečtěte si návod k obsluze.
・ Používejte ochranu zraku.
・ Používejte ochranu sluchu.
・ Používejte helmu, brýle a ochranu
・ Používejte vhodnou ochranu nohou a
・ Nevystavujte nástroj dešti.
・ Při práci držte pilu oběma rukama!
・ Tuto pilu smí obsluhovat pouze vhodně
・ Pouze pro země EU
Model BUC121 BUC122
Délka meče 115 mm
Celková délka 422mm 422mm
Hmotnost netto 2,4 kg 2,5 kg
Jmenovité napětí 14,4 V DC 18 V DC
Typ 25 AP
Rozteč 1/4"
Počet vodicích článků 42
END005-2
2002/96/EC o likvidaci elektrických a
elektronických zařízení a jejího
provádění v souladu s národními
zákony, elektrická zařízení musí být
poté, co doslouží, shromažďována
samostatně a vrácena k ekologické
recyklaci.
Určení nástroje
Nástroj je určen k řezání dříví a kmenů.
sluchu.
Pro Model BUC121
Pouze pro evropské země
rukou.
Hluk
Typická A-vážená hladina hluku stanovená podle
EN60745-2-13:
Hladina akustického tlaku (L
Obsluha pily jednou rukou je
mimořádně nebezpečná!
Nejistota (K): 2 dB(A)
Hladina hluku během provozu může překročit 85 dB(A).
Používejte pomůcky na ochranu sluchu.
vyškolení pracovníci.
Nevyhazujte elektrická zařízení spolu s
domovním odpadem!
Podle Nařízení Evropské rady
Vibrace
Celková hodnota vibrací (triaxiální vektorový součet)
určený v souladu s EN60745-2-13:
Pracovní režim: řezání dřeva
75
): 84.0 dB(A)
pA
ENE031-1
ENG101-2
ENG221-1
Page 76

Vibrační emise (a
Nejistota (K): 1.5 m/s
h
): 4.2 m/s
2
2
Pro Model BUC122
ENG101-2
Pouze pro evropské země
Hluk
Typická A-vážená hladina hluku stanovená podle
EN60745-2-13:
Hladina akustického tlaku (L
Nejistota (K): 2 dB(A)
): 84.6 dB(A)
pA
Hladina hluku během provozu může překročit 85 dB(A).
Používejte pomůcky na ochranu sluchu.
ENG221-1
Vibrace
Celková hodnota vibrací (triaxiální vektorový součet)
určený v souladu s EN60745-2-13:
Pracovní režim: řezání dřeva
Vibrační emise (a
Nejistota (K): 1.5 m/s
h
): 4.3 m/s
2
2
ENH016-5
PROHLÁŠENÍ O SHODĚ S NORMAMI EU
Níže podepsaný, Kato, jako pověřená osoba, prohlašuje,
že stroje MAKITA
Identifikační číslo modelu pro EU: M6 08 02 24243
083
BUC121
splňuje standardní bezpečnostní a zdravotní požadavky
příslušných směrnic EU:
Směrnice EU o strojních zařízeních 98/37/EC, směrnice
2000/14/EG o emisích hluku a směrnice EU o
elektromagnetické kompatibilitě.
Požadavky výše uvedených směrnic EU byly
realizovány především na základě následujících norem:
EN 60745-2-13, EN 55014, EN ISO 11681. Postup
hodnocení shody 2000/14/EG byl proveden podle
přílohy V. Změřená hladina akustického výkonu (Lwa) je
92.0 dB(A). Garantovaná hladina akustického výkonu
(Ld) je 94 dB(A). Přezkoumání typu EU podle normy
98/37/EG provedla společnost: TÜV Product Service
GmbH, Zertifizierungsstelle, Ridlerstraße 31, D-80339
München, Německo.
000230
Odpovědný výrobce:
Makita Corporation
3-11-8, Sumiyoshi-cho, Anjo, Aichi, JAPONSKO
Oprávněný zástupce v Evropě:
Makita International Europe Ltd.
Michigan Drive, Tongwell, Milton Keynes, Bucks MK15
8JD, VELKÁ BRITÁNIE
Tomoyasu Kato CE2007
ředitel
ENH016-5
PROHLÁŠENÍ O SHODĚ S NORMAMI EU
Níže podepsaný, Kato, jako pověřená osoba, prohlašuje,
že stroje MAKITA
Identifikační číslo modelu pro EU: M6 08 02 24243
083
BUC122
splňuje standardní bezpečnostní a zdravotní požadavky
příslušných směrnic EU:
Směrnice EU o strojních zařízeních 98/37/EC, směrnice
2000/14/EG o emisích hluku a směrnice EU o
elektromagnetické kompatibilitě.
Požadavky výše uvedených směrnic EU byly
realizovány především na základě následujících norem:
EN 60745-2-13, EN 55014, EN ISO 11681. Postup
hodnocení shody 2000/14/EG byl proveden podle
přílohy V. Změřená hladina akustického výkonu (Lwa) je
92.7 dB(A). Garantovaná hladina akustického výkonu
(Ld) je 95 dB(A). Přezkoumání typu EU podle normy
98/37/EG provedla společnost: TÜV Product Service
GmbH, Zertifizierungsstelle, Ridlerstraße 31, D-80339
München, Německo.
Tomoyasu Kato CE2007
000230
ředitel
Odpovědný výrobce:
Makita Corporation
3-11-8, Sumiyoshi-cho, Anjo, Aichi, JAPONSKO
Oprávněný zástupce v Evropě:
Makita International Europe Ltd.
Michigan Drive, Tongwell, Milton Keynes, Bucks MK15
8JD, VELKÁ BRITÁNIE
GEB037-1
Bezpečnostní upozornění pro
řetězovou pilu:
NEDOVOLTE, aby pohodlnost nebo pocit znalosti
výrobku (získaný na základě předchozího použití)
vedl k zanedbání bezpečnostních pravidel platných
pro řetězovou pilu. Budete-li tento nástroj používat
nebezpečným nebo nesprávným způsobem, můžete
utrpět vážné zranění.
1. Je-li řetěz pily v pohybu, udržujte všechny
končetiny mimo dosah řetězu. Před zapnutím
řetězové pily se ujistěte, že se řetěz ničeho
nedotýká. Budete-li při používání řetězové pily
jen chvíli nepozorní, může dojít ke kontaktu řetězu
s vaším oblečením nebo tělem.
2. Řetězovou pilu držte vždy pravou rukou za
zadní rukojeť a levou rukou za přední rukojeť.
Budete-li řetězovou pilu držet obráceně, bude
hrozit větší nebezpečí úrazu, proto se tomu
vyhněte.
76
Page 77

3. Používejte ochranu zraku a sluchu.
Doporučuje se také dodatečná ochrana hlavy,
rukou a nohou. Adekvátní oblečení zamezí
zranění odlétávajícími třískami a nechtěnému
kontaktu s řetězem pily.
4. Nepoužívejte řetězovou pilu na stromě. Při
použití řetězové pily na stromě může dojít ke
zranění.
5. Udržujte správný postoj a používejte
řetězovou pilu jen tehdy, stojíte-li na stabilním,
jistém a rovném povrchu. Kluzký nebo
nestabilní povrch, například žebřík, může
způsobit ztrátu rovnováhy nebo kontroly nad
pilou.
6. Při řezání napnuté větve dávejte pozor na
zpětný ráz. Když se napětí ve dřevě uvolní,
napnutá větev může zasáhnout obsluhu nebo
způsobit ztrátu kontroly nad pilou.
7. Při řezání keřů a malých stromů
mimořádné pozornosti. Pružný materiál může
pilu zachytit a vymrštit se nebo způsobit, že
ztratíte rovnováhu.
8. Při přenášení držte řetězovou pilu za přední
rukojeť, nechte ji vypnutou a držte ji tak, aby
mířila směrem od vašeho těla. Při přepravě
nebo skladování vždy nasaďte kryt vodicí lišty.
Správnou manipulací s řetězovou pilou lze snížit
riziko nechtěného kontaktu s pohybujícím se
řetězem pily.
9. Dodržujte pokyny týkající se mazání, napínání
řetězu a výměny příslušenství. Nesprávně
napnutý nebo namazaný řetěz se může
přetrhnout nebo zvýšit pravděpodobnost
zpětného rázu.
10. Udržujte rukojeti suché, čisté a chraňte je před
olejem a mazivem. Mastné rukojeti jsou kluzké a
mohou způsobit ztrátu kontroly nad nástrojem.
11. Řezejte pouze dřevo. Nepoužívejte
pilu k účelům, pro které není určena. Příklad:
nepoužívejte řetězovou pilu k řezání plastu,
zdiva nebo nedřevěných stavebních materiálů.
Použití řetězové pily k účelu, ke kterému není
určena, může mít nebezpečné následky.
12. Příčiny a prevence zpětného rázu:
Když se špička vodicí lišty dotkne předmětu nebo
když dřevo sevře řetěz pily v řezu, může dojít k
zpětnému rázu.
Při kontaktu špičky může dojít k náhlé zpětné
reakci, kdy se vodicí lišta zvedne nahoru a směrem
k uživateli.
Při sevření řetězu pily v horní části vodicí lišty
může dojít k rychlému pohybu vodicí lišty směrem
k uživateli.
V těchto situacích můžete ztratit kontrolu nad pilou,
což může mít za následek vážné zranění.
Nespoléhejte se jen na bezpečnostní zařízení,
která jsou součástí pily. Jako uživatelé řetězové
pily byste měli podniknout veškerá opatření, která
dbejte
řetězovou
77
jsou nutná k zamezení nehody nebo zranění.
Zpětný ráz je důsledkem špatného použití a/nebo
nesprávných pracovních postupů či podmínek. Lze
se mu vyhnout přijetím odpovídajících opatření,
která jsou uvedena níže:
− Udržujte pevné sevření tak, aby palce a prsty
objímaly rukojeti pily. Držte pilu oběma
rukama a stůjte tak, abyste mohli odolat
případnému zpětnému rázu. Jsou-li učiněna
vhodná opatření, obsluha může zpětný ráz
kontrolovat. Nepouštějte pilu.
008625
− Nepřesahujte a neřežte ve výšce nad
úrovní ramen.. To vám pomůže zabránit
nechtěnému kontaktu špičky s okolím a
budete moci řetězovou pilu lépe ovládat v
neočekávaných situacích.
− Používejte pouze náhradní lišty a řetězy
doporučené výrobcem.. Při použití
nesprávných náhradních lišt a řetězů může
dojít k přetržení řetězu nebo zpětnému rázu.
− Dodržujte pokyny výrobce týkající se
broušení a údržby řetězu pily. Zmenšení
výšky hloubkového dorazu může mít za
následek větší zpětný ráz.
DOPLŇKOVÁ BEZPEČNOSTNÍ
PRAVIDLA
1. Přečtěte si návod k obsluze, abyste se seznámili s
provozem řetězové pily.
2. Před prvním použitím řetězové pily absolvujte
školení v používání pily. Pokud takové školení
není možné, před zahájením práce si minimálně
vyzkoušejte řezání kulatiny na kozlíku.
3. Řetězovou pilu nesmí používat děti a osoby
mladší 18 let. Mladiství starší 16 let mohou být
tohoto omezení zproštěni, pokud pod dohledem
odborníka absolvují školení.
4. Práce s řetězovou pilou vyžaduje vysokou
koncentraci. Nepracujte s pilou, pokud se necítíte
v pořádku. Veškerou práci provádějte s rozvahou
a klidně.
5. Nikdy nepracujte pod vlivem alkoholu, drog nebo
léků.
Page 78

Správné použití
1. Řetězová pila je určena výhradně k řezání dřeva.
Nepoužívejte ji například k řezání plastů nebo
porézního betonu.
2. Řetězovou pilu používejte pouze k činnostem
popsaným v tomto návodu k obsluze. Pilu
například nepoužívejte k seřezávání živých plotů
nebo k podobným účelům.
3. Řetězovou pilu není povoleno používat pro
lesnické práce, tj. pro kácení a odvětvování
stojících stromů. Kabel řetězové pily nenabízí
pracovníkovi možnost pohybu a bezpečnost,
které jsou pro takovou práci nutné.
4. Řetězová pila není určena pro komerční použití.
5. Nepřetěžujte řetězovou pilu.
Osobní ochranné prostředky
1. Oděv musí být těsně přilehající, nesmí však
omezovat pohyblivost.
2. Při práci používejte následující ochranné
prostředky:
• Testovanou ochrannou přilbu, pokud existuje
riziko padání větví nebo podobné nebezpečí;
• Obličejový štít nebo brýle;
• Vhodnou ochranu sluchu (klapky na uši,
upravené nebo tvarovatelné ucpávky do uší);
Analýza oktávového pásma je k dispozici na
požadavek.
• Pevnou koženou ochrannou obuv;
• Dlouhé kalhoty vyrobené z odolné látky;
• Ochrannou kombinézu z látky odolné proti
prořezání;
• Ochrannou obuv nebo holínky s
prostiskluzovou podrážkou, ocelovou špičkou
a podšívkou z látky odolné proti prořezání;
• Dýchací masku při provádění práce, při které
vzniká prach (např. při řezání suchého dřeva).
Bezpečné pracovní postupy
1. Neprovozujte řetězovou pilu v blízkosti hořlavého
prachu nebo plynů. Motor vytváří jiskry a
představuje riziko výbuchu.
2. Pracujte pouze na pevném povrchu a zaujměte
dobrý postoj. Zvýšenou pozornost věnujte
překážkám (např. kabelu) na pracovišti. Zvýšenou
pozornost věnujte místům, kde vlhkost, sníh,
čerstvě uřezané dřevo nebo kůra může způsobit
kluzkost. Při práci s pilou nestůjte na žebříku ani
na stromě.
3. Zvýšené opatrnosti dbejte při práci na svahu;
kutálející se kmeny a větve představují
potenciální riziko.
4. Očistěte oblast řezání od cizích předmětů, jako je
například písek, kameny, hřebíky, dráty, apod.
Tyto mohou poškodit meč a řetěz a způsobit
nebezpečný zpětný ráz.
5. Zvýšenou opatrnost zachovávejte při ř
blízkosti drátěných plotů. Neřežte do plotu. V
opačném případě může dojít ke zpětnému rázu
ezání v
pily.
6. Neřežte do země.
7. Dřevo řežte po jednotlivých kusech a nikoliv ve
svazcích.
8. Pilou neřežte tenké větve a kořeny, protože by
mohlo dojít k jejich zamotání do pilového řetězu.
Ztráta rovnováhy představuje riziko.
9. Při zpracovávání řeziva používejte bezpečnou
podpěru (kozlík).
10. Řetězovou pilu nepoužívejte k páčení ani
odmetání kusů dřeva nebo jiných předmětů.
11. Řetězovou pilu veďte tak, aby se do prodloužené
dráhy řetězové pily nedostala žádná část vašeho
těla (viz obrázek).
006909
Zpětný ráz
1. Během práce s řetězovou pilou může dojít k
nebezpečnému zpětnému rázu. Zpětný ráz vzniká,
pokud se špička meče (zejména horní čtvrtina)
dostane do styku s dřevem nebo jiným pevným
předmětem. Následně dochází k vychýlení
řetězové pily ve směru obsluhy.
006919
2. Dodržujte následující pokyny, aby nedošlo ke
zpětnému rázu:
• Nikdy nezačínejte řez špičkou meče.
• Nikdy při řezání nepoužívejte špičku meče.
Zvláštní opatrnost zachovávejte při
pokračování v řezech, které jste již začali.
• Řez zahajte při běžícím řetězu.
• Řetěz vždy ostřete správným způsobem.
Velice důležité je nastavení hloubkového
dorazu na správnou výšku (podobnosti viz
„Ostření řetězu").
• Nikdy současně neřežte několik větví.
• Při odvětvování dávejte pozor, aby se meč
nedostal do kontaktu s dalšími větvemi.
78
Page 79

• Při druhování se držte mimo sousední kmeny.
Vždy pozorujte špičku meče.
• Použijte kozlík.
Přeprava a skladování
1. Řetězovou pilu přenášejte pouze za přední
držadlo a meč mějte otočen směrem dozadu.
2. Řetězovou pilu vždy ukládejte v bezpečné, suché
a uzamčené místnosti mimo dosah dětí.
Řetězovou pilu neskladujte ve venkovních
prostorách.
TYTO POKYNY USCHOVEJTE.
VAROVÁNÍ:
NESPRÁVNÉ POUŽÍVÁNÍ nebo nedodržování
bezpečnostních zásad uvedených v tomto návodu
může vést k vážnému zranění.
ENC007-2
DŮLEŽITÉ BEZPEČNOSTNÍ
POKYNY
AKUMULÁTOR
1. Před použitím akumulátoru si přečtěte
všechny pokyny a varovné symboly na (1)
nabíječce, (2) baterii a (3) výrobku
využívajícím baterii.
2. Akumulátor nedemontujte.
3. Pokud se příliš zkrátí provozní doba
akumulátoru, přerušte okamžitě provoz. V
opačném případě existuje riziko přehřívání,
popálení nebo dokonce výbuchu.
4. Budou-li vaše oči zasaženy elektrolytem,
vypláchněte je čistou vodou a okamžitě
vyhledejte lékařskou pomoc. Může dojít ke
ztrátě zraku.
5. Akumulátor nezkratujte:
(1) Nedotýkejte se svorek žádným vodivým
materiálem.
(2) Akumulátor neskladujte v nádobě s jinými
kovovými předměty, jako jsou hřebíky,
mince, apod.
(3) Nevystavuje akumulátor vodě a dešti.
Zkrat baterie může způsobit velký průtok
proudu, přehřívání, možné popáleniny a
6. Neskladujte nástroj a akumulátor na místech,
7. Nespalujte akumulátor, ani když je vážně
8. Dávejte pozor, abyste baterii neupustili ani s ní
poruchu.
kde může teplota překročit 50
poškozen nebo úplně opotřeben. Akumulátor
může v ohni vybuchnout.
nenaráželi.
゚ C (122 ゚ F).
TYTO POKYNY USCHOVEJTE.
Tipy k zajištění maximální životnosti
akumulátoru
1. Akumulátor nabijte před tím, než dojde k
úplnému vybití baterie.
Pokud si povšimnete sníženého výkonu
nástroje, vždy jej zastavte a dobijte
akumulátor.
2. Nikdy nenabíjejte úplně nabitý akumulátor.
Přebíjení zkracuje životnost akumulátoru.
3. Akumulátor nabíjejte při pokojové teplotě v
rozmezí od 10 ゚ C do 40 ゚ C (50 ゚ F - 104 ゚ F).
Před nabíjením nechejte horký akumulátor
zchladnout.
79
Page 80

Součásti dodávky
1
2
008588
Horní držadlo
1
Akumulátor
2
Kryt řetězového kola
3
Přední ochrana rukou
4
Vodicí tyč
5
Chránič hrotu
6
Pilový řetěz
7
008589
4
5
8
13
3
9
12
10
6
7
11
Knoflík
8
Odjišťovací tlačítko
9
Přední držadlo
10
Spoušť
11
Kryt řetězu
12
Karabina nebo místo
13
připojení lana
POPIS FUNKCE
POZOR:
• Před nastavováním nástroje nebo kontrolou jeho
funkce se vždy přesvědčte, zda je nástroj vypnutý
a je odpojen jeho akumulátor.
Instalace a demontáž akumulátoru
Fig.1
• Před instalací nebo demontáží akumulátoru vždy
nástroj vypněte.
• Při demontáži akumulátoru je nutno během
vysunování z nástroje posunout tlačítko na přední
straně akumulátoru.
• Při instalaci akumulátoru vyrovnejte jazýček na
akumulátoru s drážkou ve skříni a zasuňte jej na
místo. Akumulátor zasunujte vždy až na doraz,
dokud není zajištěn na svém místě a nezazní malé
cvaknutí. Pokud není tlačítko úplně zajištěno, je na
jeho horní straně vidět červená část. Zasuňte jej
tak, aby nebyla vidět červená část. V opačném
případě může akumulátor vypadnout a způsobit
zranění vám nebo okolostojícím osobám.
80
Page 81

• Při vkládání akumulátoru nepoužívejte příliš velkou
sílu. Pokud nelze akumulátor snadno zasunout,
není vkládán správně.
Zapínání
POZOR:
• Před vložením akumulátoru do nástroje vždy
zkontrolujte správnou funkci spouště a zda se po
uvolnění vrací do vypnuté polohy.
Fig.2
Jako prevence náhodného stisknutí spouště je k
dispozici odjišťovací tlačítko.
Chcete-li nástroj uvést do chodu, stiskněte odjišťovací
tlačítko a poté spoušť. Chcete-li nástroj vypnout,
uvolněte spoušť.
MONTÁŽ
POZOR:
• Před prováděním libovolných prací na nástroji se
vždy přesvědčte, zda je nástroj vypnutý a je
odpojen jeho akumulátor.
Instalace a demontáž pilového řetězu
POZOR:
• Před instalací a demontáží pilového řetězu se vždy
přesvědčte, zda je nástroj vypnutý a je odpojen
akumulátor.
• Při instalaci a demontáži pilového řetězu vždy
používejte ochranné rukavice.
• Používejte pouze pilový řetěz a meč s nástavcem
na špičce určený pro tuto řetězovou pilu (viz výtah
ze seznamu náhradních dílů).
• Nedemontujte nástavec na špičce meče ani
nevyměňujte meč za jiný bez nástavce na špičce,
aby nedošlo ke zpětnému rázu.
Fig.3
Otáčením proti směru hodinových ručiček povolujte
šroub, dokud se neuvolní kryt řetězového kola.
Demontujte kryt řetězového kola.
Demontujte pilový řetěz a meč z nástroje.
Fig.4
Umístěte jeden konec pilového řetězu na horní stranu
meče. Nyní upevněte pilový řetěz jak je ilustrováno na
obrázku, protože se otáčí ve směru šipky.
Fig.5
Umístěte pilový řetěz tak, aby se pružina a výstupek
nacházely uvnitř něj a druhý konec řetězu obtočte okolo
řetězového kola, jak je ilustrováno na obrázku.
Fig.6
Otáčejte mečem proti směru hodinových ručiček a
nainstalujte jej tak, aby se konec meče dotýkal pružiny.
Fig.7
Vložte háček krytu řetězového kola do otvoru v nástroji a
poté nasaďte kryt řetězového kola na nástroj.
Fig.8
Otáčením knoflíku ve směru hodinových ručiček pevně
dotáhněte šroub.
Úprava napnutí pilového řetězu
Fig.9
Mírné povolení šroubu umožňuje provést seřízení
napnutí pilového řetězu. Po seřízení šroub opět pevně
dotáhněte.
Fig.10
POZOR:
• Po určitou dobu od instalace nového pilového
řetězu tento vykazuje tendenci k povolování. Čas
od času před zahájením používání zkontrolujte
napnutí pilového řetězu.
• Nízké napnutí pilového řetězu může způsobit jeho
smeknutí.
• Instalaci a demontáž pilového řetězu je třeba
provádět na čistém místě prostém pilin a
podobných materiálů.
PRÁCE
Mazání
Fig.11
Pilový řetěz je během provozu nástroje automaticky
promazáván.
Zkontrolujte zbývající množství oleje v nádrži pomocí
kontrolního průzoru.
Chcete-li nádrž doplnit, odšroubujte víčko z otvoru
olejové nádrže. Nádrž má objem 80 ml.
Po doplnění nádrže vždy našroubujte na řetězovou pilu
dodané víčko olejové nádrže.
POZOR:
• Při prvním plnění řetězové pily řetězovým olejem
nebo doplňování nádrže po úplném vyprázdnění
nalévejte olej až k dolnímu okraji plnicího hrdla. V
opačném případě mohou vzniknout problémy s
přívodem oleje.
• Pro mazání pilového řetězu používejte výlučně olej
určený pro řetězové pily Makita nebo oleje běžně
dostupné na trhu.
• Nikdy nepoužívejte olej, který obsahuje prach a
částice nečistot ani těkavý olej.
• Při prořezávání stromů používejte rostlinný olej.
Minerální olej může stromy ohrozit.
• Při prořezávání stromů nikdy netlačte na řetězovou
pilu silou.
• Před zahájením řezání se přesvědčte, zda bylo na
své místo našroubováno víčko olejové nádrže.
Držte řetězovou pilu mimo dosah stromu. Uveďte pilu do
chodu a počkejte, dokud nebude dosaženo
dostatečného promazání pilového řetězu.
81
Page 82

Před uvedením do provozu přiložte přední vodítko/dolní
vodítko k uřezávané větvi. Pokud zahájíte řezání bez
kontaktu předního vodítka/dolního vodítka s větví, může
dojít k viklání meče a následně zranění pracovníka.
Řežte dřevo pohybem pily dolů.
Prořezávání stromů
Fig.12
Fig.13
POZOR:
• Je-li motor řetězové pily v provozu, udržujte
všechny končetiny mimo dosah řetězu.
• Je-li motor řetězové pily v provozu, držte řetězovou
pilu pevně oběma rukama.
• Nezacházejte příliš daleko. Neustále udržujte
řádné postavení nohou a rovnováhu.
Před uvedením do provozu přiložte přední vodítko/dolní
vodítko k uřezávané větvi. Pokud zahájíte řezání bez
kontaktu předního vodítka/dolního vodítka s větví, může
dojít k viklání meče a následně zranění pracovníka.
Při řezání silných větví nejdříve proveďte mělký řez
zespodu a poté řez dokončete shora.
Fig.14
Budete-li řezat silné větve zespodu, může se řez ve
větvi zavřít a skřípnout pilový řetěz.
Pokud budete řezat silné větve shora bez mělkého řezu
zespodu, může se větev rozštípnout.
Fig.15
Celý kmen nelze přeřezat najednou:
Vyviňte na držadlo mírný tlak, pokračujte v řezání a poté
řetězovou pilu mírně vytáhněte; poté přiložte hrot o
trochu níže a dokončete řez zvednutím držadla.
Fig.16
Přenášení nástroje
Fig.17
Před přenášením nástroje z něj vždy vyjměte
akumulátor a nasaďte na meč pouzdro. Do obalu
umístěte rovněž akumulátor.
ÚDRŽBA
POZOR:
• Před zahájením kontroly nebo údržby nástroje se
vždy přesvědčte, zda je nástroj vypnutý a je
odpojen akumulátor.
• Při provádění kontrol a údržby vždy používejte
ochranné rukavice.
Ostření pilového řetězu
POZOR:
• Před prováděním prací na pilovém řetězu vždy
vyjměte akumulátor a používejte ochranné
rukavice.
Fig.18
Pilový řetěz je nutno naostřit v následujících
případech:
− Při řezání vlhkého dřeva vznikají moučné piliny.
− Řetěz proniká obtížně do dřeva, a to i při vyvinutí
silného tlaku.
− Řezná hrana je viditelně poškozena.
− Pila v dřevě táhne doleva nebo doprava. Důvodem
tohoto chování je nerovnoměrné naostření
pilového řetězu nebo jednostranné poškození.
Pilový řetěz ostřete často, ale při každém ostření
odstraňujte pouze malé množství materiálu.
Při běžném přeostřování obvykle dostačují dvě nebo tři
přetažení pilníkem. Po několika přeostřeních pilového
řet
ězu jej nechejte naostřit ve specializované opravně
společnosti MAKITA.
Pilník a vedení pilníku
− Při ostření řetězu používejte speciální kruhový
pilník (volitelné příslušenství) na pilové řetězy o
průměru 4 mm. Běžné kruhové pilníky nejsou
vhodné.
Fig.19
− Pilník by měl na materiál působit pouze při pohybu
směrem dopředu. Při přesunování pilníku zpět jej
zvedněte z povrchu materiálu.
− Nejdříve naostřete nejkratší řezný nástroj. Délka
tohoto řezného nástroje poté určuje rozměr pro
všechny ostatní řezné nástroje pilového řetězu.
− Pilník veďte tak, jak je ilustrováno na obrázku.
− Pilník lze vést snadněji při použití držáku pilníku
(příslušenství). Držák pilníku je opatřen značkami
pro správný úhel ostření 30° (značky umístěte
rovnoběžně s pilovým řetězem) a omezuje hloubku
průniku (na 4/5 průměru pilníku).
Pilník veďte tak, jak je ilustrováno na obrázku.
− Po naostření řetězu zkontrolujte výšku
hloubkového dorazu pomocí řetězové m
(volitelné příslušenství).
ěrky
Fig.20
− Speciálním plochým pilníkem (volitelné
příslušenství) odstraňte případný přebytečný
materiál.
− Opět zaoblete přední stranu hloubkového dorazu.
− Před seřizováním výšky hloubkového dorazu
odstraňte z pilového řetězu prach a částice
nečistot.
Čištění meče
Fig.21
V drážce meče se hromadí třísky a piliny, kterou tak
ucpávají a brání průtoku oleje. Při ostření a výměně
pilového řetězu vždy odstraňte nahromaděné třísky a
piliny.
82
Page 83

Čištění olejového filtru na výstupu oleje
Během provozu se na olejovém filtru umístěném na
výstupu oleje může nahromadit drobný prach nebo
materiál.
Drobný prach nebo částice nahromaděné na olejovém
filtru mohou negativně ovlivnit průtok oleje a vést k
nedostatečnému mazání celého pilového řetězu.
Pokud na horní straně meče dochází k nedostatečnému
přívodu oleje, vyčistěte následujícím způsobem filtr.
Vyjměte z nástroje akumulátor.
Demontujte z nástroje kryt řetězového kola a pilový řetěz.
(Viz odstavec „Instalace a demontáž pilového řetězu".)
Fig.22
Demontujte tlačnou matici pomocí plochého šroubováku
se štíhlým hrotem nebo podobného nástroje.
Fig.23
Vyjměte z řetězové pily filtr a očistěte jej od drobného
prachu a částic. Je-li filtr příliš znečištěný, vyměňte jej za
nový.
Vložte do přístroje akumulátor.
Fig.24
Stisknutím spouště odstraňte pomocí vytékajícího
řetězového oleje prach nebo částice nahromaděné na
výstupu oleje.
Vyjměte z nástroje akumulátor.
Fig.25
Vložte vyčištěný olejový filtr do výstupu oleje. Je-li filtr
příliš znečištěný, vyměňte jej za nový.
Fig.26
Zajistěte filtr vložením tlačné matice do výstupu oleje
správnou stranou směřující nahoru, jak je ilustrováno na
obrázku. Pokud filtr nelze zajistit z důvodu
zdeformované tlačné matice, vyměňte tlačnou matici za
novou.
Namontujte na nástroj kryt řetězového kola a pilový
řetěz.
Výměna řetězového kola
Před nasazením nového pilového řetězu zkontrolujte
stav řetězového kola.
Fig.27
POZOR:
• Opotřebené řetězové kolo způsobí poškození
nového pilového řetězu. V tomto případě nechejte
vyměnit řetězové kolo. Řetězové kolo je nutno
nainstalovat, aby bylo vždy orientováno tak, jak je
ilustrováno na obrázku.
Fig.28
Při výměně řetězového kola vždy použijte nový pojistný
prstenec.
Výměna uhlíků
Fig.29
Uhlíky pravidelně vyjímejte a kontrolujte. Jsou-li
opotřebené až po mezní značku, vyměňte je. Uhlíky
musí být čisté a musí volně zapadat do svých držáků.
Oba uhlíky je třeba vyměňovat současně. Používejte
výhradně stejné uhlíky.
Pomocí šroubováku odšroubujte víčka uhlíků. Vyjměte
opotřebené uhlíky, vložte nové a zašroubujte víčka
nazpět.
Fig.30
Uložení nástroje
Před uložením nástroje jej vyčistěte. Po demontáži krytu
řetězového kola z nástroje odstraňte případné třísky a
piliny. Po vyčištění nástroje jej spusťte bez zatížení, aby
došlo k promazání pilového řetězu a meče.
Nasaďte na meč pouzdro.
Vyprázdněte olejovou nádrž a položte řetězovou pilu tak,
aby víčko nádrže směřovalo nahoru.
Kvůli zachování BEZPEČNOSTI a SPOLEHLIVOSTI
výrobku musí být opravy a veškerá další údržba či
seřizování prováděny autorizovanými servisními
středisky firmy Makita a s použitím náhradních dílů
Makita.
PŘÍSLUŠENSTVÍ
POZOR:
• Pro váš nástroj Makita, popsaný v tomto návodu,
doporučujeme používat toto příslušenství a
nástavce. Při použití jiného příslušenství či
nástavců může hrozit nebezpečí zranění osob.
Příslušenství a nástavce lze používat pouze pro
jejich stanovené účely.
Potřebujete-li bližší informace ohledně tohoto
příslušenství, obraťte se na vaše místní servisní
středisko firmy Makita.
• Různé typy originálních akumulátorů a nabíječek
Makita
• Pilový řetěz
• Pouzdro
• Kompletní meč
• Pilník
83
Page 84

884778-974
Makita Corporation Anjo, Aichi, Japan
http://www.makita.co.jp/global/index.html
84
 Loading...