

Page 1
INSTRUCTION MANUAL
MANUEL D'INSTRUCTION
MANUAL DE INSTRUCCIONES
Cordless Blower
Souffleur sans Fil
Sopladora Inalámbrica
BUB360
UB360D
IMPORTANT: Read Before Using.
IMPORTANT: Lire avant usage.
IMPORTANTE: Leer antes de usar.
011049
1
Page 2

ENGLISH (Original instructions)
SPECIFICATIONS
Model BUB360 UB360D
Capacities
No load speed (RPM)
Overall length
Net weight 3.1 kg (6.8 lbs) 3.1 kg (6.8 lbs)
Rated voltage D.C. 36 V D.C. 36 V
• Due to our continuing program of research and development, the specifications herein are subject to change without notice.
• Specifications and battery cartridge may differ from country to country.
• Weight, with battery cartridge, according to EPTA-Procedure 01/2003
Standard battery cartridges BL3626 BL3622A
IMPORTANT SAFETY
INSTRUCTIONS
When using an electrical appliance, basic
precautions should always be followed, including
the following:
READ ALL INSTRUCTIONS.
BEFORE USING THIS APPLIANCE
WARNING - To reduce the risk of fire, electric shock,
or injury:
1. Do not leave appliance when battery fitted.
Remove battery from appliance when not in
use and before servicing.
2. Do not expose to rain. Store indoors.
3.
Do not allow to be used as a toy. Close attention
is necessary when used by or near children.
4. Use only as described in this manual. Use only
manufacturer's recommended attachments.
5. Do not use with damaged battery. If appliance
is not working as it should, has been dropped,
damaged, left outdoors, or dropped into water,
return it to a service center.
6.
Do not put any object into openings. Do not use
with any opening blocked; keep free of dust, lint,
hair, and anything that may reduce air flow.
7.
Keep hair, loose clothing, fingers, and all parts
of body away from openings and moving parts.
8. Use extra care when cleaning on stairs.
9. Use only the charger supplied by the
manufacturer to recharge.
SAVE THESE INSTRUCTIONS.
This appliance is intended for commercial use.
Air volume (HIGH) 4.4 m3/min (160 ft3/min) 4.4 m3/min (160 ft3/min)
Air volume (LOW) 2.6 m3/min (92 ft3/min) 2.6 m3/min (92 ft3/min)
HIGH 17,000 /min 17,000 /min
LOW 10,000 /min 10,000 /min
(without long nozzle) 436 mm (17-1/8") 439 mm (17-1/4")
(with long nozzle) 921 mm (36-1/4") 924 mm (36-3/8")
USA018-2
BLOWER SAFETY WARNINGS
1. Always use protective goggles, a cap and
mask when using the blower. Ordinary eye or
sun glasses are NOT safety glasses.
2. Never point the nozzle at anyone in the vicinity
when using the blower.
3. Never block suction inlet and/or blower outlet.
• Do not block suction inlet or blower outlet
to clean up in dusty areas.
• Do not use the blower with a tapered
nozzle smaller than the original one, such
as a new nozzle obtained by attaching an
extra diameter-reduced hose or smaller
hose to the nozzle top end.
• Do not Use the blower to inflate balls,
rubber boat or the similar.
Increased motor revolution may cause dangerous
fan breakage and result in serious personal injury.
Heated motor and control circuit may cause a fire.
4. AVOID UNINTENTIONAL STARTING. Do not
carry battery fitted tool with finger on switch.
5. Some material contains chemicals which may
be toxic. Take caution to prevent dust
inhalation and skin contact. Follow material
supplier safety data.
SAVE THESE INSTRUCTIONS.
WARNING:
DO NOT let comfort or familiarity with product
(gained from repeated use) replace strict adherence
to safety rules for the subject product. MISUSE or
failure to follow the safety rules stated in this
instruction manual may cause serious personal
injury.
2
USB101-2
Page 3
USD301-1
Symbols
The followings show the symbols used for tool.
・ volts
・ direct current
・ no load speed
・ revolutions or reciprocation per minute
ENC007-7
IMPORTANT SAFETY
INSTRUCTIONS
FOR BATTERY CARTRIDGE
1. Before using battery cartridge, read all
instructions and cautionary markings on (1)
battery charger, (2) battery, and (3) product
using battery.
2. Do not disassemble battery cartridge.
3. If operating time has become excessively
shorter, stop operating immediately. It may
result in a risk of overheating, possible burns
and even an explosion.
4. If electrolyte gets into your eyes, rinse them
out with clear water and seek medical
attention right away. It may result in loss of
your eyesight.
5. Do not short the battery cartridge:
(1) Do not touch the terminals with any
conductive material.
(2) Avoid storing battery cartridge in a
container with other metal objects such as
nails, coins, etc.
(3) Do not expose battery cartridge to water
or rain.
A battery short can cause a large current flow,
overheating, possible burns and even a
breakdown.
6. Do not store the tool and battery cartridge in
locations where the temperature may reach or
exceed 50 ゚ C (122 ゚ F).
7. Do not incinerate the battery cartridge even if
it is severely damaged or is completely worn
out. The battery cartridge can explode in a fire.
8. Be careful not to drop or strike battery.
9. Do not use a damaged battery.
SAVE THESE INSTRUCTIONS.
Tips for maintaining maximum battery life
1. Charge the battery cartridge before
completely discharged.
Always stop tool operation and charge the
battery cartridge when you notice less tool
power.
2. Never recharge a fully charged battery
cartridge.
Overcharging shortens the battery service life.
3. Charge the battery cartridge with room
temperature at 10 ゚ C - 40 ゚ C (50 ゚ F - 104 ゚ F).
Let a hot battery cartridge cool down before
charging it.
4. Charge the battery cartridge once in every six
months if you do not use it for a long period of
time.
FUNCTIONAL DESCRIPTION
CAUTION:
• Always be sure that the tool is switched off and the
battery cartridge is removed before adjusting or
checking function on the tool.
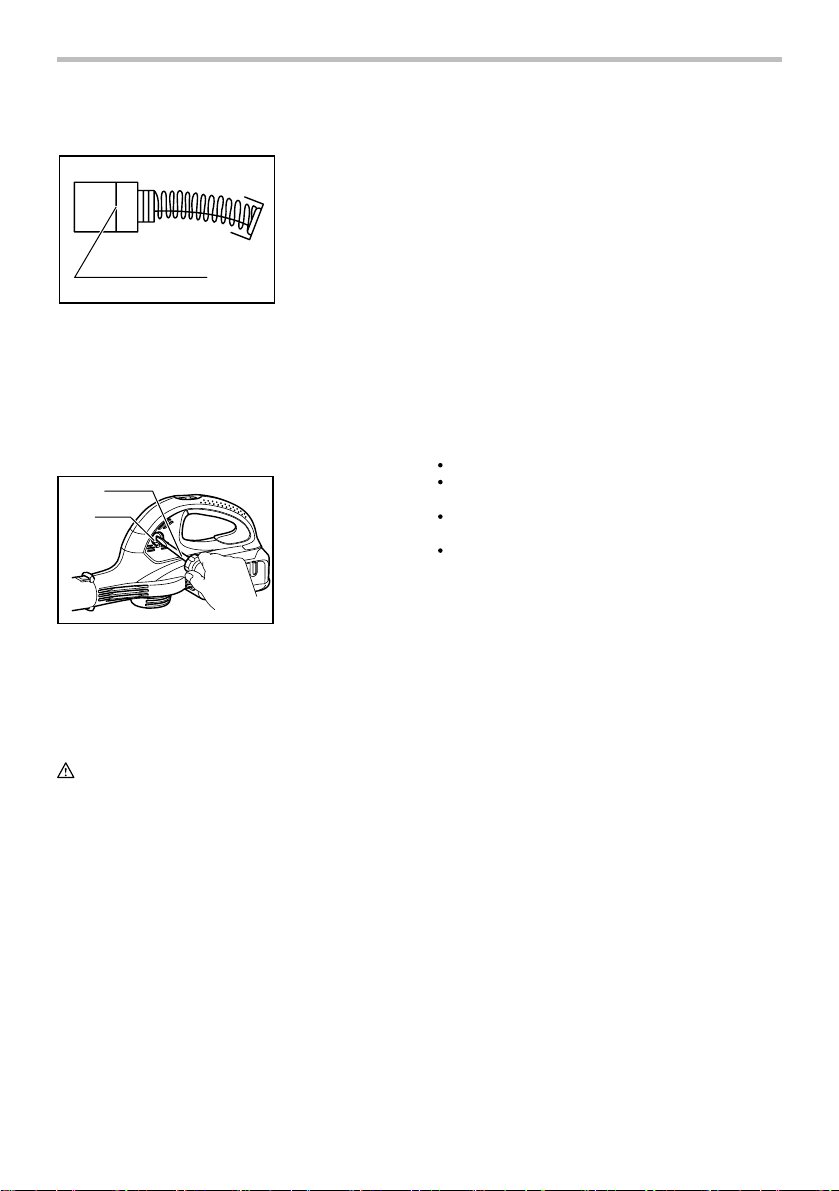
Installing or removing battery cartridge
CAUTION:
• Hold the tool and the battery cartridge firmly
when installing or removing battery cartridge.
Failure to hold the tool and the battery cartridge
firmly may cause them to slip off your hands and
result in damage to the tool and battery cartridge
and a personal injury.
1. Red part
1
2. Button
3. Battery cartridge
3
011050
Always switch off the tool before insertion or
•
removal of the battery cartridge.
• To remove the battery cartridge, withdraw it from
the tool while sliding the button on the front of the
cartridge.
• To insert the battery cartridge, align the tongue on
the battery cartridge with the groove in the housing
and slip it into place. Always insert it all the way
until it locks in place with a little click. If you can see
the red part on the upper side of the button, it is not
locked completely. Insert it fully until the red part
cannot be seen. If not, it may accidentally fall out of
2
3
Page 4
the tool, causing injury to you or someone around
you.
• Do not use force when inserting the battery
cartridge. If the cartridge does not slide in easily, it
is not being inserted correctly.
Battery protection system
The battery cartridge is equipped with the protection
system, which automatically cuts off the output power for
its long service life.
The tool may stop during operation when the tool and/or
battery are placed under the following situation. This is
caused by the activation of protection system and does
not show the tool trouble.
• When the tool is overloaded:
At this time, press the "OFF" button and
remove causes of overload and then press
the "HIGH/LOW" button again to restart.
When the tool does not work even after
pressing the "HIGH/LOW" button, the battery
power auto-stop is still at work. Charge the
battery cartridge before use.
• When the remaining battery capacity becomes low:
Recharge the battery cartridge.
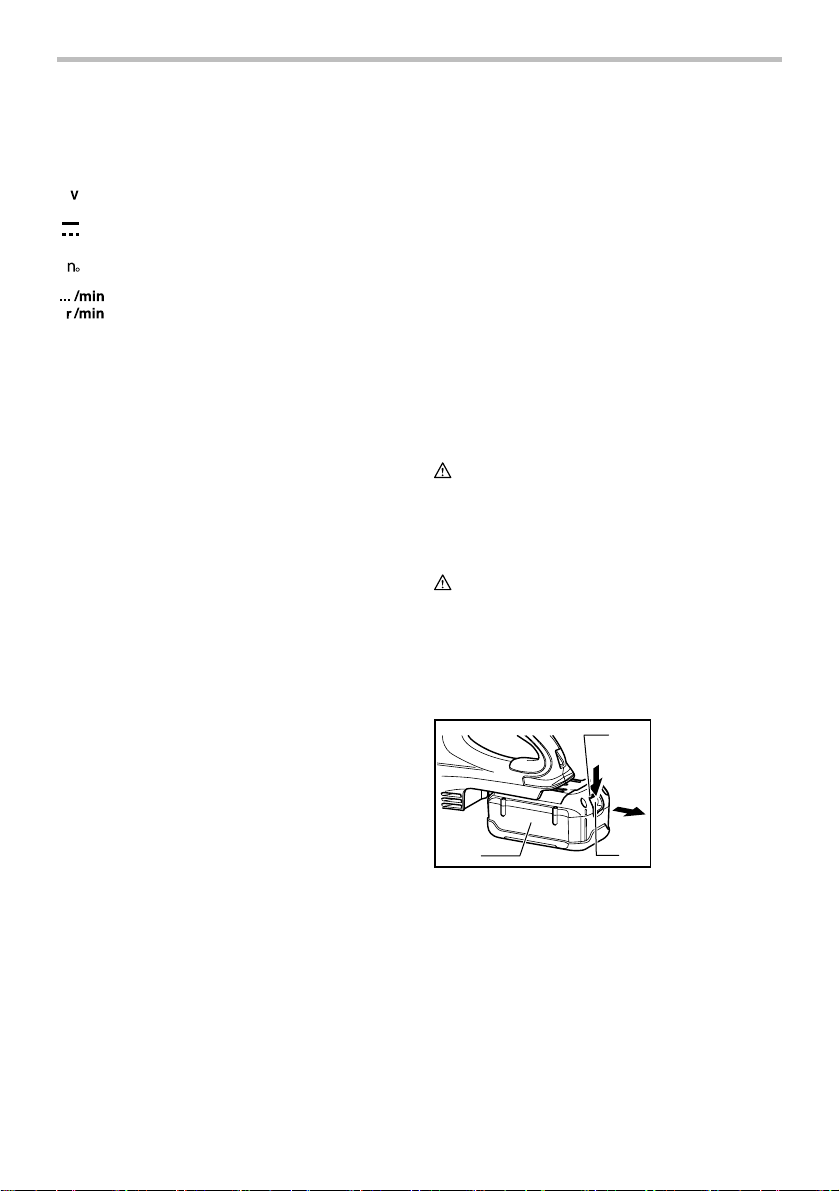
Switch action
1. HIGH/LOW
button
2. OFF button
011052
1
2
To start the tool, simply press the "HIGH/LOW" button. To
switch off, press the "OFF" button. To change the tool
speed, press the "HIGH/LOW" button. The first press on
this button is for high speed and the second press for low
speed and then each press on this button repeats the
high/low speed cycle alternatively.
Battery remaining capacity indicator (only for
models with Battery BL3622A)
Battery BL3622A is equipped with the battery remaining
capacity indicator.
1. Indicator lamps
1
2
011715
Press the CHECK button to indicate the battery
remaining capacity. The indicator lamps will then light for
approx. three seconds.
Indicator lamps
Lighted Off Blinking
EF
011713
When only the lowermost indicator lamp (next to
•
the "E") blinks, or when none of the indicator lamps
light, the battery capacity has run out, so the tool
does not operate. In these cases, charge the
battery or replace the empty battery with a fully
charged one.
• When two or more indicator lamps do not light even
after charging is complete, the battery has reached
the end of its service life.
• When the upper two and lower two indicator lamps
light alternately, the battery may have
malfunctioned. Contact your local Makita
authorized service center.
NOTE:
• The indicated capacity may be lower than the
actual level during use or immediately after using
the tool.
• Depending on the conditions of use and the
ambient temperature, the indication may differ
slightly from the actual capacity.
2. CHECK button
Remaining capacity
70% to 100%
45% to 70%
20% to 45%
0% to 20%
Charge the battery.
The battery may have
malfunctioned.
4
Page 5
ASSEMBLY
CAUTION:
• Always be sure that the tool is switched off and the
battery cartridge is removed before carrying out
any work on the tool.
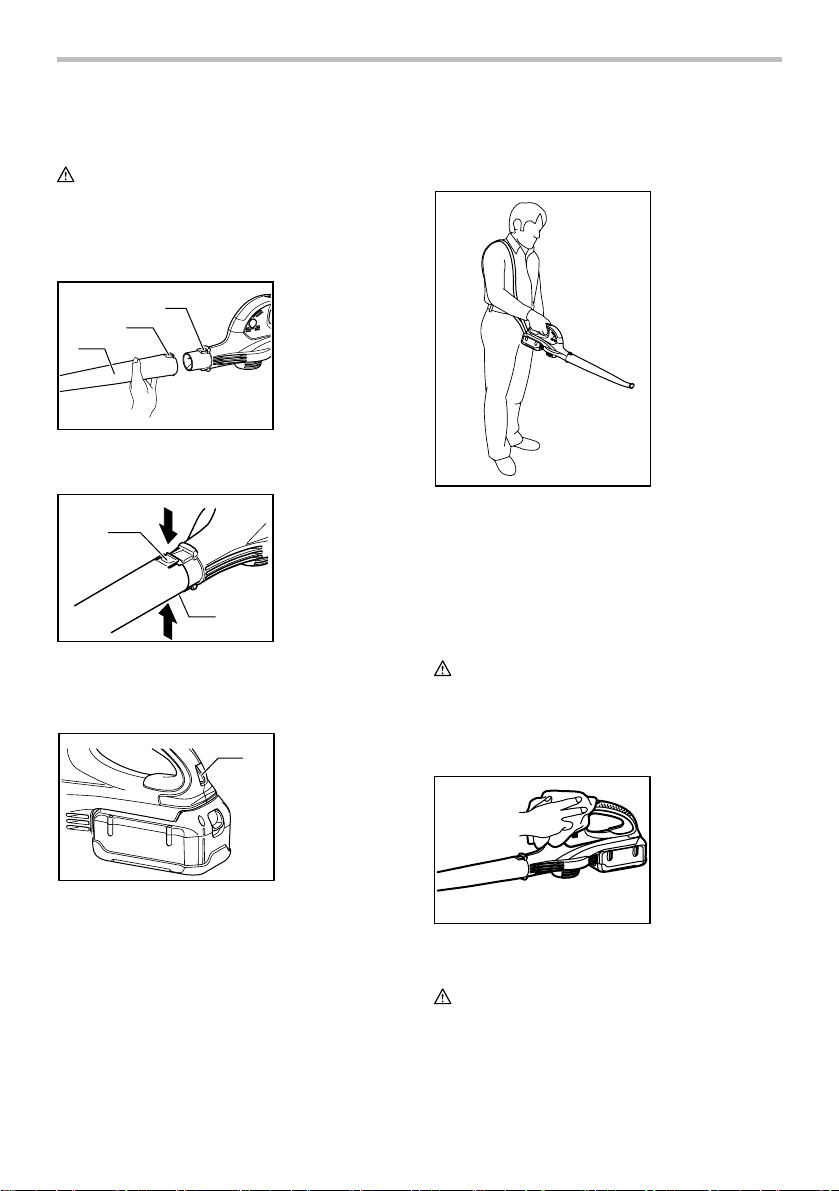
Installing or removing the long nozzle
1. Hook
1
2
3
2. Button
3. Long nozzle
OPERATION
Blowing
011051
To install the long nozzle, push in onto the blower outlet
of the tool all the way.
1
011055
To remove the long nozzle, press its both buttons and
with the buttons being pressed pull it out.
1. Button
1
Installing the shoulder strap
1. Hanger
1
011057
Pull the hanger out of the tool.
Hook the shoulder strap onto the hanger of the tool.
Before use, adjust the length of strap so that it is easy to
work with it.
011054
Hold the blower firmly with a hand and perform the
blowing operation by moving it around slowly
When blowing around a building, a big stone or a vehicle,
direct the nozzle away from them.
When performing an operation in corner, start from the
corner and then move to wide area.
MAINTENANCE
CAUTION:
• Always be sure that the tool is switched off and the
battery cartridge is removed before attempting to
perform inspection or maintenance.
Cleaning
011053
From time to time, wipe off the outside of the tool using a
cloth dampened in soapy water.
CAUTION:
• Never use gasoline, benzine, thinner, alcohol or the
like. Discoloration, deformation or cracks may
result.
5
Page 6
Replacing carbon brushes
1. Limit mark
1
001145
Remove and check the carbon brushes regularly.
Replace when they wear down to the limit mark. Keep
the carbon brushes clean and free to slip in the holders.
Both carbon brushes should be replaced at the same
time. Use only identical carbon brushes.
Use a screwdriver to remove the brush holder caps. Take
out the worn carbon brushes, insert the new ones and
secure the brush holder caps.
1
2
011056
1. Screwdriver
2. Brush holder cap
To maintain product SAFETY and RELIABILITY, repairs,
any other maintenance or adjustment should be
performed by Makita Authorized or Factory Service
Centers, always using Makita replacement parts.
OPTIONAL ACCESSORIES
CAUTION:
• These accessories or attachments are
recommended for use with your Makita tool
specified in this manual. The use of any other
accessories or attachments might present a risk of
injury to persons. Only use accessory or
attachment for its stated purpose.
If you need any assistance for more details regarding
these accessories, ask your local Makita Service Center.
• Long nozzle
• Shoulder strap
• Various type of Makita genuine batteries and
chargers
• Battery adapter
NOTE:
• Some items in the list may be included in the tool
package as standard accessories. They may differ
from country to country.
MAKITA LIMITED ONE YEAR WARRANTY
Warranty Policy
Every Makita tool is thoroughly inspected and tested
before leaving the factory. It is warranted to be free of
defects from workmanship and materials for the period
of ONE YEAR from the date of original purchase.
Should any trouble develop during this one year period,
return the COMPLETE tool, freight prepaid, to one of
Makita’s Factory or Authorized Service Centers. If
inspection shows the trouble is caused by defective
workmanship or material, Makita will repair (or at our
option, replace) without charge.
This Warranty does not apply where:
repairs have been made or attempted by others:
repairs are required because of normal wear and
tear:
the tool has been abused, misused or improperly
maintained:
alterations have been made to the tool.
IN NO EVENT SHALL MAKITA BE LIABLE FOR ANY
INDIRECT, INCIDENTAL OR CONSEQUENTIAL
DAMAGES FROM THE SALE OR USE OF THE
PRODUCT. THIS DISCLAIMER APPLIES BOTH
DURING AND AFTER THE TERM OF THIS
WARRANTY.
MAKITA DISCLAIMS LIABILITY FOR ANY IMPLIED
WARRANTIES, INCLUDING IMPLIED WARRANTIES
OF "MERCHANTABILITY" AND "FITNESS FOR A
SPECIFIC PURPOSE," AFTER THE ONE YEAR TERM
OF THIS WARRANTY.
This Warranty gives you specific legal rights, and you
may also have other rights which vary from state to
state. Some states do not allow the exclusion or
limitation of incidental or consequential damages, so
the above limitation or exclusion may not apply to you.
Some states do not allow limitation on how long an
implied warranty lasts, so the above limitation may not
apply to you.
EN0006-1
6
Page 7

FRANÇAIS (Mode d’emploi original)
SPÉCIFICATIONS
Modèle BUB360 UB360D
Capacités
Vitesse à vide (T/MIN)
Longueur totale
Batteries standard BL3626 BL3622A
• Étant donné l'évolution constante de notre programme de recherche et de développement, les spécifications contenues dans ce
manuel sont sujettes à modification sans préavis.
• Les caractéristiques techniques et la batterie peuvent varier suivant les pays.
• Poids, batterie comprise, conforme à la procédure EPTA de 01/2003
Volume d’air (vitesse supérieure)
Volume d’air (vitesse inférieure)
Grande 17 000 /min 17 000 /min
Bas 10 000 /min 10 000 /min
(sans l’embout allongé) 436 mm (17-1/8") 439 mm (17-1/4")
(avec l’embout allongé) 921 mm (36-1/4") 924 mm (36-3/8")
Poids net 3,1 kg (6,8 lbs) 3,1 kg (6,8 lbs)
Tension nominale C.C. 36 V C.C. 36 V
USA018-2
CONSIGNES DE SÉCURITÉ
IMPORTANTES
Lors de l'utilisation d'un appareil électrique, vous
devez toujours prendre des précautions de base,
dont les suivantes:
LISEZ TOUTES LES
INSTRUCTIONS.
AVANT D'UTILISER CET
4,4 m3/min (160 pi3/min) 4,4 m3/min (160 pi3/min)
2,6 m3/min (92 pi3/min) 2,6 m3/min (92 pi3/min)
bouchée ; gardez ces dernières exemptes de
poussières, charpies, cheveux ou tout objet
pouvant réduire la circulation de l'air.
7. Gardez les cheveux, les vêtements amples, les
doigts et toute autre partie du corps à l'écart
des ouvertures et des pièces en mouvement.
8. Soyez tout particulièrement prudent lorsque
vous nettoyez sur les marches d'un escalier.
9. Utilisez uniquement le chargeur fourni par le
fabricant pour recharger la batterie.
CONSERVEZ CE MODE D'EMPLOI.
Cet appareil est destiné à un usage commercial.
APPAREIL
AVERTISSEMENT - Pour réduire les risques
d'incendie, de choc électrique ou de blessure :
1. Ne quittez pas l'appareil alors que la batterie y
est insérée. Retirez la batterie de l'appareil
après l'utilisation et avant de le faire réparer.
2. Ne l'exposez pas à la pluie. Rangez-le à
l'intérieur.
3. Ne laissez pas les enfants l'utiliser comme
jouet. Une attention particulière est nécessaire
lors de l'utilisation par les enfants ou à
proximité des enfants.
4. Utilisez l'outil uniquement de la façon décrite
dans ce manuel. Utilisez uniquement les
accessoires recommandés par le fabricant.
5. Ne l'utilisez pas avec une batterie
endommagée. Si l'appareil ne fonctionne pas
bien, s'il a été échappé, endommagé, laissé à
l'extérieur ou échappé dans l'eau, retournez-le
à un centre de service après-vente.
6. Ne mettez rien dans les ouvertures. N'utilisez
jamais l'outil si une des ouvertures est
CONSIGNES DE SÉCURITÉ
POUR LE SOUFFLEUR
1. Portez toujours des lunettes de sécurité, un
casque et un masque antipoussières lorsque
vous utilisez le souffleur. Les lunettes
ordinaires et les lunettes de soleil ne sont PAS
des lunettes de sécurité.
2. Ne pointez jamais la buse vers les personnes
présentes lorsque vous utilisez le souffleur.
3. N’obstruez jamais l’entrée d’aspiration et/ou la
sortie d’air du souffleur.
• N’obstruez pas l’entrée d’aspiration ou la
sortie d’air du souffleur pour nettoyer dans
une zone poussiéreuse.
• N’utilisez pas le souffleur avec un embout
conique plus petit que l’original, par
exemple avec un nouvel embout obtenu en
fixant un tuyau supplémentaire au
diamètre plus petit ou encore un tuyau
plus petit à l’extrémité de l’embout.
USB101-2
7
Page 8

• N’utilisez pas le souffleur pour gonfler les
ballons, bateaux pneumatiques ou autres
objets similaires.
L’accélération du moteur pourrait entraîner un
dangereux bris du ventilateur et provoquer des
blessures graves. Une surchauffe du moteur et du
circuit de commande peut provoquer un incendie.
4. PRÉVENEZ TOUT DÉMARRAGE ACCIDENTEL.
Ne laissez pas le doigt sur l’interrupteur
lorsque vous transportez l’outil et que la
batterie est installée.
5. Certains matériaux contiennent des produits
chimiques qui peuvent être toxiques. Prenez
les précautions nécessaires pour éviter
l'inhalation de ces poussières ou leur contact
avec la peau. Conformez-vous aux consignes
de sécurité du fournisseur du matériau.
CONSERVEZ CE MODE
D'EMPLOI.
AVERTISSEMENT:
NE VOUS LAISSEZ PAS tromper (au fil d'une
utilisation répétée) par un sentiment d'aisance ou de
familiarité avec le produit en négligeant les
consignes de sécurité qui accompagnent le produit.
L’utilisation non sécuritaire ou incorrecte de cet
outil comporte un risque de blessure grave.
USD301-1
Symboles
Les symboles utilisés pour l'outil sont indiqués ci-dessous.
・ volts
・ courant continu
・ vitesse à vide
・ tours ou alternances par minute
ENC007-7
CONSIGNES DE SÉCURITÉ
IMPORTANTES
POUR LA BATTERIE
1. Avant d'utiliser la batterie, lisez toutes les
instructions et précautions relatives (1) au
chargeur de batterie, (2) à la batterie, et (3) à
l'outil utilisant la batterie.
2. Ne démontez pas la batterie.
3. Cessez immédiatement l'utilisation si le temps
de fonctionnement devient excessivement
court. Il y a risque de surchauffe, de brûlures,
voire d'explosion.
4.
Si l'électrolyte pénètre dans vos yeux, rincez-les
à l'eau claire et consultez immédiatement un
médecin. Il y a risque de perte de la vue.
5. Ne court-circuitez pas la batterie :
(1) Ne touchez les bornes avec aucun
matériau conducteur.
(2) Évitez de ranger la batterie dans un
conteneur avec d'autres objets
métalliques, par exemple des clous, des
pièces de monnaie, etc.
(3) Évitez d'exposer la batterie à l'eau ou à la
pluie.
Un court-circuit de la batterie pourrait
provoquer un fort courant, une surchauffe,
parfois des brûlures et même une panne.
6. Ne rangez pas l'outil ou la batterie dans des
endroits où la température risque d'atteindre
ou de dépasser 50 ゚ C (122 ゚ F).
7. Ne jetez pas la batterie au feu même si elle est
sérieusement endommagée ou complètement
épuisée. La batterie peut exploser au contact
du feu.
8. Prenez garde d'échapper ou de heurter la
batterie.
9. N'utilisez pas une batterie si elle est
endommagée.
CONSERVEZ CE MODE
D'EMPLOI.
Conseils pour obtenir la durée de service
maximale de la batterie
1. Rechargez la batterie avant qu'elle ne soit
complètement déchargée.
Arrêtez toujours l'outil et rechargez la batterie
quand vous remarquez que la puissance de
l'outil diminue.
2. Ne rechargez jamais une batterie
complètement chargée.
La surcharge réduit la durée de service de la
batterie.
3. Rechargez la batterie à une température
ambiante comprise entre 10 ゚ C et 40 ゚ C (50 ゚
F - 104 ゚ F). Si la batterie est chaude, laissez-la
refroidir avant de la recharger.
4. Rechargez la batterie tous les six mois si
l'appareil n'est pas utilisé pendant de longues
périodes.
8
Page 9

DESCRIPTION DU
FONCTIONNEMENT
ATT EN TI ON :
• Assurez-vous toujours que l'outil est hors tension et
que sa batterie est retirée avant de l'ajuster ou de
vérifier son fonctionnement.
Installation ou retrait de la batterie
ATT EN TI ON :
• Tenez fermement l’outil et la batterie lors de
l’installation ou du retrait de cette dernière.
Sinon, l’outil et la batterie pourraient vous glisser
des mains, ce qui risque d’endommager l’outil et la
batterie, ou encore de provoquer des blessures.
1. Partie rouge
1
2. Bouton
3. Batterie
• Lorsque l'outil est surchargé:
• Lorsque la batterie est presque vide:
Lorsque cela se produit, appuyez sur le
bouton d’arrêt « OFF » et supprimez les
causes de surcharge, puis appuyez de
nouveau sur le bouton de mise en marche «
HIGH/LOW » pour redémarrer. Si l’outil ne
fonctionne pas même lorsque vous avez
appuyé sur le bouton « HIGH/LOW », l’arrêt
automatique de l’alimentation de la batterie
fonctionne toujours. Rechargez la batterie
avant utilisation.
Rechargez la batterie.
Interrupteur
1. Bouton de mise
1
2
2. Bouton d’arrêt
en marche
HIGH/LOW
« OFF »
3
011050
Mettez toujours l'outil hors tension avant d'insérer
•
ou de retirer la batterie.
• Pour retirer la batterie, sortez-la de l'outil tout en
faisant glisser le bouton à l'avant de la batterie.
• Pour insérer la batterie, alignez sa languette sur
l'entaille qui se trouve à l'intérieur du carter, puis
glissez la batterie pour la mettre en place.
Insérez-la toujours bien à fond, jusqu'à ce qu'elle
se verrouille en émettant un léger clic. Si vous
pouvez voir la partie rouge de la face supérieure du
bouton, la batterie n'est pas parfaitement
verrouillée. Insérez-la à fond, jusqu'à ce que la
partie rouge ne soit plus visible. Sinon, elle risque
de tomber accidentellement de l'outil, en vous
blessant ou en blessant une personne se trouvant
près de vous.
• N'appliquez pas une force excessive lors de
l'insertion de la batterie. Si la batterie ne glisse pas
aisément, c'est qu'elle n'est pas insérée
correctement.
2
Système de protection de la batterie
La batterie est équipée du système de protection qui
coupe automatiquement la puissance de sortie pour lui
assurer une longue durée de service.
L'outil peut s'arrêter pendant l'utilisation lorsque l'outil
et/ou la batterie sont dans la situation suivante. Cela est
dû à l'activation du système de protection et n'indique
pas le problème de l'outil.
011052
Pour démarrer l’outil, appuyez simplement sur le bouton
de mise en marche « HIGH/LOW ». Pour l’éteindre,
appuyez sur le bouton d’arrêt « OFF ». Pour changer la
vitesse, appuyez sur le bouton « HIGH/LOW ». Lorsque
vous appuyez sur ce bouton pour la première fois, vous
actionnez la vitesse supérieure. La deuxième fois que
vous l’appuyez, vous actionnez la vitesse inférieure. Par
la suite, chaque fois que vous appuyez sur ce bouton,
vous alternez entre la vitesse supérieure et la vitesse
inférieure.
9
Page 10

Indicateur de capacité résiduelle de batterie
(seulement pour les modèles équipés de la
batterie BL3622A)
La batterie BL3622A est munie d’un indicateur de
capacité résiduelle.
1. Témoins
1
2
011715
Appuyez sur le bouton CHECK pour connaître la
capacité résiduelle de la batterie. Les témoins
s’allumeront alors pendant environ trois secondes.
Témoins
Allumé
EF
011713
Si vous constatez que seul le dernier témoin (près
•
de la lettre « E ») clignote, ou encore si aucun des
témoins ne s’allume, la capacité de la batterie est
épuisée et l’outil ne peut fonctionner. Dans ce cas,
rechargez la batterie ou remplacez la batterie
épuisée par une autre chargée à pleine capacité.
• Si deux témoins ou plus restent éteints même
après une recharge complète, la batterie a atteint la
fin de sa durée de vie.
• Lorsque les deux premiers et deux derniers
témoins clignotent en s’alternant, il est possible que
la batterie présente un défaut de fonctionnement.
Communiquez avec le centre de service Makita
agréé de votre région.
NOTE:
• La capacité relevée durant l’utilisation ou
immédiatement après l’utilisation de l’outil peut être
inférieure à la capacité réelle.
• Selon les conditions d’utilisation et la température
ambiante, il est possible que la capacité relevée
ARRÊT
Clignotement
2. Bouton CHECK
Capacité résiduelle
70 % à 100 %
45 % à 70 %
20 % à 45 %
0 % à 20 %
Chargez la batterie.
La batterie peut avoir
présenté un défaut
de fonctionnement.
soit légèrement différente par rapport à la capacité
réelle.
ASSEMBLAGE
ATT EN TI ON :
• Assurez-vous toujours que l'outil est hors tension et
que sa batterie est retirée avant d'effectuer tout
travail dessus.
Installation ou retrait de l’embout allongé
1. Crochet
1
2
3
011051
Pour installer l’embout allongé, insérez-le sur la sortie
d’air du souffleur en poussant jusqu'au fond.
1
1
011055
Pour retirer l’embout, appuyez sur les deux boutons et,
en les maintenant enfoncés, tirez sur l’embout.
2. Bouton
3. Embout allongé
1. Bouton
Installation de la bandoulière.
1. Étrier de fixation
1
011057
Tirez sur l’étrier de fixation pour l’extraire de l’outil.
Fixez la bandoulière sur l’étrier de fixation de l’outil.
Avant de l’utiliser, réglez la longueur de la bandoulière
pour vous permettre de travailler dans une position
confortable.
10
Page 11

UTILISATION
Soufflage
011054
Tenez le souffleur fermement d’une main et procédez à
l’opération de soufflage en le déplaçant lentement.
Lors du soufflage autour d’un édifice, d’une grande pierre
ou d’un véhicule, ne dirigez pas l’embout dans leur
direction.
Lorsque vous travaillez dans un coin, commencez par le
coin puis passez à la zone plus ouverte.
Remplacement des charbons
1. Trait de limite
d'usure
1
001145
Retirez et vérifiez régulièrement les charbons.
Remplacez-les lorsqu'ils sont usés jusqu'au trait de limite
d'usure. Maintenez les charbons propres et en état de
glisser aisément dans les porte-charbon. Les deux
charbons doivent être remplacés en même temps.
N'utilisez que des charbons identiques.
Utilisez un tournevis pour retirer les bouchons de
porte-charbon. Enlevez les charbons usés, insérez-en
de nouveaux et revissez solidement les bouchons de
porte-charbon.
1
2
1. Tournevis
2. Bouchon de
porte-charbon
ENTRETIEN
ATT EN TI ON :
• Assurez-vous toujours que l'outil est hors tension et
que la batterie est retirée avant d'y effectuer tout
travail d'inspection ou d'entretien.
Nettoyage
011053
Essuyez régulièrement l’extérieur du souffleur avec un
chiffon imprégné d’eau savonneuse.
ATT EN TI ON :
• N'utilisez jamais d'essence, de benzine, de solvant,
d'alcool ou d'autres produits similaires. Une
décoloration, une déformation, ou la formation de
fissures peuvent en découler.
011056
Pour maintenir la SÉCURITÉ et la FIABILITÉ du produit,
les réparations, tout autre travail d'entretien ou de
réglage doivent être effectués dans un centre de service
Makita agréé ou un centre de service de l'usine Makita,
exclusivement avec des pièces de rechange Makita.
ACCESSOIRES EN OPTION
ATT EN TI ON :
•
Ces accessoires ou pièces complémentaires sont
recommandés pour l'utilisation avec l'outil Makita spécifié
dans ce mode d'emploi. L'utilisation de tout autre
accessoire ou pièce complémentaire peut comporter un
risque de blessure. N'utilisez les accessoires ou pièces
qu'aux fins auxquelles ils ont été conçus.
Si vous désirez obtenir plus de détails concernant ces
accessoires, veuillez contacter le centre de service
après-vente Makita le plus près.
• Embout allongé
• Bandoulière
• Les divers types de batteries et chargeurs Makita
authentiques
• Adaptateur de batterie
11
Page 12

NOTE:
A
À
A
• Certains éléments de la liste peuvent être inclus
avec l’outil comme accessoires standard. Ils
peuvent varier suivant les pays.
GARANTIE LIMITÉE D’UN AN MAKITA
Politique de garantie
Chaque outil Makita est inspecté rigoureusement et
testé avant sa sortie d’usine. Nous garantissons qu’il
sera exempt de défaut de fabrication et de vice de
matériau pour une période d’UN AN à partir de la date
de son achat initial. Si un problème quelconque devait
survenir au cours de cette période d’un an, veuillez
retourner l’outil COMPLET, port payé, à une usine ou à
un centre de service après-vente Makita. Makita
réparera l’outil gratuitement (ou le remplacera, à sa
discrétion) si un défaut de fabrication ou un vice de
matériau est découvert lors de l’inspection.
Cette garantie ne s’applique pas dans les cas où:
des réparations ont été effectuées ou tentées par
un tiers:
des réparations s’imposent suite à une usure
normale:
l’outil a été malmené, mal utilisé ou mal entretenu:
l’outil a subi des modifications.
MAKITA DÉCLINE TOUTE RESPONSABILITÉ POUR
TOUT DOMMAGE ACCESSOIRE OU INDIRECT LIÉ À
LA VENTE OU À L’UTILISATION DU PRODUIT. CET
VIS DE NON-RESPONSABILITÉ S’APPLIQUE À LA
FOIS PENDANT ET APRÈS LA PÉRIODE COUVERTE
PAR CETTE GARANTIE.
MAKITA DÉCLINE TOUTE RESPONSABILITÉ QUANT
TOUTE GARANTIE TACITE, INCLUANT LES
GARANTIES TACITES DE “QUALITÉ MARCHANDE”
ET “ADÉQUATION À UN USAGE PARTICULIER”
PRÈS LA PÉRIODE D’UN AN COUVERTE PAR
CETTE GARANTIE.
Cette garantie vous donne des droits spécifiques
reconnus par la loi, et possiblement d’autres droits, qui
varient d’un État à l’autre. Certains États ne permettant
pas l’exclusion ou la limitation des dommages
accessoires ou indirects, il se peut que la limitation ou
exclusion ci-dessus ne s’applique pas à vous. Certains
États ne permettant pas la limitation de la durée
d’application d’une garantie tacite, il se peut que la
limitation ci-dessus ne s’applique pas à vous.
EN0006-1
12
Page 13

ESPAÑOL (Instrucciones originales)
ESPECIFICACIONES
Modelo BUB360 UB360D
Capacidades
Velocidad sin carga (r.p.m.)
Longitud total
Cartuchos de batería estándar BL3626 BL3622A
• Debido a nuestro programa continuo de investigación y desarrollo, las especificaciones aquí dadas están sujetas a cambios sin
previo aviso.
• Las especificaciones y el cartucho de la batería pueden variar de país a país.
• Peso de acuerdo al procedimiento de EPTA-01/2003 incluyendo el cartucho de la batería
INSTRUCCIONES IMPORTANTES
DE SEGURIDAD
Al usar cualquier aparato eléctrico, siempre deben
seguirse las precauciones básicas, incluyendo las
siguientes:
LEA TODAS LAS
INSTRUCCIONES
ANTES DE USAR ESTE
APARATO
ADVERTENCIA - Para reducir el riesgo de incendio,
descarga eléctrica o lesión:
1. No deje el aparato con la batería puesta. Retire
la batería del aparato cuando no lo use y antes
de hacer algún mantenimiento.
2. No exponga el aparato a la lluvia. Almacene en
interiores.
3. No permita que sea utilizado como un juguete.
Se requiere de una supervisión cuidadosa
durante el uso al haber niños cerca.
4. Use solamente como se describe en este
manual. Sólo use aditamentos recomendados
por el fabricante.
5. No use con batería dañada. Si el aparato no
está funcionando como debiera, se ha dejado
caer, se ha dañado, se ha dejado a la
intemperie o ha caído sobre el agua, llévelo a
un centro de servicio.
6. No coloque ningún objeto sobre las rendijas
de ventilación. No use cuando cualquiera de
las rendijas esté bloqueada; mantenga libre de
Volumen de aire alto (HIGH) 4,4 m3/min (160 ft3/min) 4,4 m3/min (160 ft3/min)
Volumen de aire bajo (LOW) 2,6 m3/min (92 ft3/min) 2,6 m3/min (92 ft3/min)
Peso neto 3,1 kg (6,8 lbs) 3,1 kg (6,8 lbs)
Tensión nominal 36 V c.c. 36 V c.c.
Alta 17 000 r/min 17 000 r/min
Baja 10 000 r/min 10 000 r/min
(sin la boquilla grande) 436 mm (17-1/8") 439 mm (17-1/4")
(con la boquilla grande) 921 mm (36-1/4") 924 mm (36-3/8")
USA018-2
polvo, hilachas, cabello y cualquier otra cosa
que pudiera reducir el flujo de aire.
7. Mantenga el cabello suelto, la ropa holgada,
las uñas y todas las partes del cuerpo alejadas
de las rendijas y las partes móviles.
8. Tenga especial cuidado al estar limpiando
sobre escaleras.
9. Use solo el cargador que se proporciona por
el fabricante para recargar.
GUARDE ESTAS
INSTRUCCIONES.
Este aparato está diseñado para uso comercial
solamente.
ADVERTENCIAS DE SEGURIDAD
PARA LA SOPLADORA
1. Siempre use gafas protectoras, gorra y
máscara al usar la sopladora. Las gafas
normales o las gafas de sol NO constituyen
gafas de seguridad.
2. Nunca apunte la boquilla en dirección de
alguna persona al estar de cerca durante el
uso de la sopladora.
3. Nunca obstruya el acceso de succión ni la
boquilla de la sopladora.
• No obstruya la entrada de succión ni la
salida de la sopladora al limpiar en áreas
empolvadas.
• No use la sopladora con una boquilla
cónica menor que el tamaño de la original,
tal como las boquillas nuevas que se
obtienen al fijar una manguera adicional de
diámetro reducido o una manguera de
13
USB101-2
Page 14

diámetro menor en el extremo superior de
la boquilla.
• No use el soplador para inflar pelotas,
lanchas inflables ni objetos similares.
El aumento de las revoluciones en el motor puede
que cause una rotura peligrosa del ventilador
resultando en lesiones graves a la persona. El
sobrecalentamiento del motor y del circuito de
control puede que genere un incendio.
4. EVITE EL ENCENDIDO ACCIDENTAL. No
cargue la herramienta con el dedo en el
interruptor al estar la batería puesta.
5. Algunos materiales contienen sustancias
químicas que pueden ser tóxicas. Tome
precauciones para evitar la inhalación de
polvo o que éste tenga contacto con la piel.
Consulte la información de seguridad del
proveedor de los materiales.
GUARDE ESTAS
INSTRUCCIONES.
ADVERTENCIA:
NO DEJE que la comodidad o familiaridad con el
producto (a base de utilizarlo repetidamente)
sustituya la estricta observancia de las normas de
seguridad para dicho producto. El MAL USO o el no
seguir las normas de seguridad establecidas en este
manual de instrucciones puede ocasionar graves
lesiones personales.
USD301-1
Símbolos
A continuación se muestran los símbolos utilizados para
la herramienta.
・ volts o voltios
・ corriente directa o corriente continua
・ velocidad en vacío o sin carga
・ revoluciones o alternaciones por minuto,
frecuencia de rotación.
ENC007-7
INSTRUCCIONES IMPORTANTES
DE SEGURIDAD
PARA CARTUCHO DE BATERÍA
1. Antes de utilizar el cartucho de batería, lea
todas las instrucciones e indicaciones de
precaución sobre (1) el cargador de baterías,
(2) la batería, y (3) el producto con el que se
utiliza la batería.
2. No desarme el cartucho de batería.
3. Si el tiempo de operación se ha acortado en
exceso, deje de operar de inmediato. Podría
correrse el riesgo de sobrecalentamiento,
posibles quemaduras e incluso explosión.
4. En caso de que ingresen electrolitos en sus
ojos, enjuáguelos bien con agua limpia y
consulte de inmediato a un médico. Podría
perder la visión.
5. No cortocircuite el cartucho de batería:
(1) No toque las terminales con ningún
material conductor.
(2) Evite guardar el cartucho de batería en un
cajón junto con otros objetos metálicos,
tales como clavos, monedas, etc.
(3) No exponga la batería de cartucho a la
lluvia o nieve.
Un corto circuito en la batería puede causar un
flujo grande de corriente, sobrecalentamiento,
posibles quemaduras y aún descomposturas.
6. No guarde la herramienta ni el cartucho de
batería en lugares donde la temperatura pueda
alcanzar o exceder los 50 ゚ C (122 ゚ F).
7. Nunca incinere el cartucho de batería incluso
en el caso de que esté dañado seriamente o ya
no sirva en absoluto. El cartucho de batería
puede explotar si se tira al fuego.
8. Tenga cuidado de no dejar caer ni golpear el
cartucho de batería.
9. No use una batería dañada.
GUARDE ESTAS
INSTRUCCIONES.
Consejos para alargar al máximo la vida útil
de la batería
1. Cargue el cartucho de batería antes de que se
descargue completamente.
Pare siempre la operación y cargue el
cartucho de batería cuando note menos
potencia en la herramienta.
2. No cargue nunca un cartucho de batería que
esté completamente cargado.
La sobrecarga acortará la vida de servicio de
la batería.
3. Cargue el cartucho de batería a temperatura
ambiente de 10 ゚ C - 40 ゚ C (50 ゚ F - 104 ゚ F). Si
un cartucho de batería está caliente, déjelo
enfriar antes de cargarlo.
4. Recargue el cartucho de la batería una vez
cada seis meses si no se va a usar por un
periodo extenso.
14
Page 15

DESCRIPCIÓN DEL
FUNCIONAMIENTO
PRECAUCIÓN:
• Asegúrese siempre de que la herramienta esté
apagada y el cartucho de batería extraído antes de
realizar cualquier ajuste o comprobación en la
herramienta.
Instalación o desmontaje del cartucho de
batería
PRECAUCIÓN:
• Sujete la herramienta y el cartucho de la batería
con firmeza al colocar o quitar el cartucho. Si
no se sujeta con firmeza la herramienta y el
cartucho de la batería, puede ocasionar que se
resbalen de sus manos resultando en daños a la
herramienta y al cartucho, así como lesiones a la
persona.
1. Parte roja
1
2. Botón
3. Cartucho de
batería
3
011050
Apague siempre la herramienta antes de insertar o
•
desmontar el cartucho de bateria.
• Para extraer la batería, retírela de la herramienta
deslizando el botón que se encuentra en el frente
de la batería.
• Para colocar la batería, alinee la lengüeta de la
batería con la canaleta de la carcasa y colóquela
en su lugar. Asegúrese siempre de que está
insertando la batería hasta el final, en donde hace
tope y emite un pequeño chasquido. Si todavía
puede ver la parte roja en la parte de arriba del
botón, significa que no está completamente
trabada. Empújela suavemente hacia adentro
hasta que no pueda ver la parte roja. Si esto no
sucede, puede que accidentalmente se caiga de la
herramienta ocasionando daños personales a
usted o a terceros.
• No emplee fuerza cuando inserte el cartucho de
batería. Si el cartucho no se desliza al interior
fácilmente, será porque no se está insertando
correctamente.
2
Sistema de protección de la batería
El cartucho de la batería cuenta con un sistema de
protección el cual automáticamente interrumpe el
suministro eléctrico para prolongar su vida útil.
Puede que la herramienta detenga la operación cuando
ésta y/o la batería se sometan a las siguientes
circunstancias. Esto se activa mediante el sistema de
protección y no indica que haya problemas con la
herramienta.
• Cuando hay sobrecarga en la herramienta:
Presione el botón de apagado “OFF”
inmediatamente y despeje las causas de
sobrecarga, y luego presione el botón de
activación “HIGH/LOW” (ALTO /BAJO) para
reiniciar. Cuando la herramienta no opera
incluso tras presionar el botón de activación
“HIGH/LOW”, el sistema de interrupción
automática de la batería se encuentra aún
activo. Recargue el cartucho de batería antes
de continuar la operación.
• Cuando la carga restante en la capacidad de la
batería es baja:
Recargue el cartucho de la batería.
Accionamiento del interruptor
1. Botón
HIGH/LOW para
volúmen
ALTO/BAJO de
aire
2. Botón “OFF” de
apagado
011052
1
2
Para encender la herramienta, simplemente presione el
botón de activación “HIGH/LOW”. Para apagar, presione
el botón de apagado “OFF”. Para cambiar la velocidad
en la herramienta, vuelva a presionar el botón de
activación “HIGH/LOW”. La primera vez que el botón se
presione se obtendrá la velocidad mayor y la segunda
vez que se presione se obtendrá la velocidad menor, y
cada vez que se presione el botón, se alternará entre
estas dos velocidades.
15
Page 16

Indicador de capacidad restante de batería
(sólo para modelos con Batería BL3622A)
La Batería BL3622A viene equipada con un indicador de
capacidad restante de batería.
1. Luces
indicadoras
1
2
011715
Oprima el botón de verificación “CHECK” para que se
indique la capacidad restante de la batería. Las luces
indicadoras se encenderán por tres segundos
aproximadamente.
Luces indicadoras
Encendido APAGADO Intermitencia
EF
011713
•
Cuando sólo la luz indicadora de más abajo (enseguida
del símbolo “E”) se enciende de forma intermitente, o
cuando ninguna de las luces indicadores se enciende,
significa que la capacidad de la batería se ha agotado,
por lo que la herramienta no se activará. En este caso,
recargue la batería o reemplácela con una que se
encuentra completamente recargada.
• Cuando dos o más de las luces indicadoras no se
encienden incluso con un recargado completo de la
batería, significa que se ha acabado el tiempo de
vida útil de la batería.
• Cuando las luces indicadores de más arriba se
encienden de forma alterna, puede que haya un
defecto en el funcionamiento de la batería.
Póngase en contacto con su centro de servicio
autorizado de Makita.
NOTA:
• Puede que la capacidad indicada sea menor al
nivel real durante el uso o inmediatamente tras
haber utilizado la herramienta.
2. Botón de
verificación
“CHECK”
Capacidad restante
70% a 100%
45% a 70%
20% a 45%
0% a 20%
Recargue la batería.
Puede que haya un
defecto en el funcionamiento
de la batería.
• Dependiendo de las condiciones de uso y de la
temperatura ambiental, puede que el nivel indicado
difiera ligeramente de la capacidad real de la
batería.
ENSAMBLE
PRECAUCIÓN:
• Asegúrese siempre de que la herramienta esté
apagada y el cartucho de batería extraído antes de
realizar cualquier trabajo en la misma.
Instalación y desinstalación de la boquilla
larga
1. Gancho
1
2
3
011051
Para instalar la boquilla larga, presiónela completamente
dentro de la salida de aire de la herramienta.
1
1
011055
Para desinstalar la boquilla grande, presione ambos
botones mientras que la saca jalando.
Instalación de la correa para hombro
011057
Jale el colgador hacia afuera de la herramienta.
Enganche la correa para hombro en el colgador de la
herramienta.
Antes de usar, ajuste la longitud de la correa de tal forma
que resulte fácil la operación con ésta.
16
2. Botón
3. Boquilla larga
1. Botón
1. Colgador
1
Page 17

OPERACIÓN
Soplado
011054
Sujete la herramienta con firmeza con una mano y
realice las operaciones de soplado al moverla alrededor
lentamente.
Al soplar alrededor de algún edificio, roca grande o
vehículo, no apunte la boquilla directamente a estos
objetos.
Al soplar en una esquina, comience desde el interior de
la esquina desplazándose hacia afuera.
MANTENIMIENTO
PRECAUCIÓN:
• Asegúrese siempre de que la herramienta esté
apagada y el cartucho de batería extraído antes de
intentar realizar una inspección o mantenimiento.
Limpieza
011053
De vez en vez, limpie el exterior de la herramienta
usando un paño húmedo y agua enjabonada.
PRECAUCIÓN:
• Nunca use gasolina, bencina, diluyente (tíner),
alcohol o sustancias similares. Puede que esto
ocasione grietas o descoloramiento.
Reemplazamiento de las escobillas de carbón
1. Marca límite
1
001145
Extraiga e inspeccione de forma periódica las escobillas
de carbón. Sustitúyalas cuando se hayan gastado hasta
la marca límite. Mantenga las escobillas de carbón
limpias de forma que entren libremente en los
portaescobillas. Ambas escobillas de carbón deberán
ser sustituidas al mismo tiempo. Utilice únicamente
escobillas de carbón originales e idénticas.
Utilice un destornillador para quitar las tapas de los
portaescobillas. Extraiga las escobillas gastadas, inserte
las nuevas y vuelva a colocar las tapas.
1
2
011056
Para mantener la SEGURIDAD y FIABILIDAD del
producto, las reparaciones, y cualquier otra tarea de
mantenimiento o ajuste deberán ser realizadas en
Centros de Servicio Autorizados por Makita, empleando
siempre repuestos Makita.
1. Destornillador
2. Tapa del carbón
ACCESORIOS OPCIONALES
PRECAUCIÓN:
• Estos accesorios o aditamentos (incluidos o no)
están recomendados para utilizar con su
herramienta Makita especificada en este manual.
El empleo de cualesquiera otros accesorios o
acoplamientos conllevará un riesgo de sufrir
heridas personales. Utilice los accesorios o
acoplamientos solamente para su fin establecido.
Si necesita cualquier ayuda para más detalles en
relación con estos accesorios, pregunte a su centro de
servicio Makita local.
• Boquilla larga
• Correa de hombros
• Diferentes tipos de baterías y cargadores genuinos
de Makita
17
Page 18

• Adaptador de batería
NOTA:
• Algunos de los artículos en la lista puede que
vengan junto con el paquete de la herramienta
como accesorios incluidos. Puede que estos
accesorios varíen de país a país.
GARANTÍA LIMITADA MAKITA DE UN AÑO
Ésta Garantía no aplica para México
Política de garantía
Cada herramienta Makita es inspeccionada y probada
exhaustivamente antes de salir de fábrica. Se
garantiza que va a estar libre de defectos de mano de
obra y materiales por el periodo de UN AÑO a partir de
la fecha de adquisición original. Si durante este
periodo de un año se desarrollase algún problema,
retorne la herramienta COMPLETA, porte pagado con
antelación, a una de las fábricas o centros de servicio
autorizados Makita. Si la inspección muestra que el
problema ha sido causado por mano de obra o
material defectuoso, Makita la reparará (o a nuestra
opción, reemplazará) sin cobrar.
Esta garantía no será aplicable cuando:
se hayan hecho o intentado hacer reparaciones
por otros:
se requieran reparaciones debido al desgaste
normal:
la herramienta haya sido abusada, mal usada o
mantenido indebidamente:
se hayan hecho alteraciones a la herramienta.
EN NINGÚN CASO MAKITA SE HARÁ
RESPONSABLE DE NINGÚN DAÑO INDIRECTO,
FORTUITO O CONSECUENCIAL DERIVADO DE LA
VENTA O USO DEL PRODUCTO.
ESTA RENUNCIA SERÁ APLICABLE TANTO
DURANTE COMO DESPUÉS DEL TÉRMINO DE
ESTA GARANTÍA.
MAKITA RENUNCIA LA RESPONSABILIDAD POR
CUALQUIER GARANTÍA IMPLÍCITA, INCLUYENDO
GARANTÍAS IMPLÍCITAS DE “COMERCIALIDAD” E
“IDONEIDAD PARA UN FIN ESPECÍFICO”, DESPUÉS
DEL TÉRMINO DE UN AÑO DE ESTA GARANTÍA.
Esta garantía le concede a usted derechos legales
específicos, y usted podrá tener también otros
derechos que varían de un estado a otro. Algunos
estados no permiten la exclusión o limitación de daños
fortuitos o consecuenciales, por lo que es posible que
la antedicha limitación o exclusión no le sea de
aplicación a usted. Algunos estados no permiten
limitación sobre la duración de una garantía implícita,
por lo que es posible que la antedicha limitación no le
sea de aplicación a usted.
EN0006-1
18
Page 19

19 20
Page 20

< USA only >
WARNING
Some dust created by power sanding, sawing, grinding, drilling, and other
construction activities contains chemicals known to the State of California
to cause cancer, birth defects or other reproductive harm. Some examples
of these chemicals are:
• lead from lead-based paints,
• crystalline silica from bricks and cement and other masonry products, and
• arsenic and chromium from chemically-treated lumber.
Your risk from these exposures varies, depending on how often you do this
type of work. To reduce your exposure to these chemicals: work in a well
ventilated area, and work with approved safety equipment, such as those
dust masks that are specially designed to filter out microscopic particles.
< Sólo en los Estados Unidos >
ADVERTENCIA
Algunos polvos creados por el lijado, aserrado, esmerilado, taladrado y
otras actividades de la construcción contienen sustancias químicas
reconocidas por el Estado de California como causantes de cáncer, defectos
de nacimiento y otros peligros de reproducción. Algunos ejemplos de estos
productos químicos son:
• plomo de pinturas a base de plomo,
• sílice cristalino de ladrillos y cemento y otros productos de albañilería, y
• arsénico y cromo de maderas tratadas químicamente.
El riesgo al que se expone varía, dependiendo de la frecuencia con la que
realice este tipo de trabajo. Para reducir la exposición a estos productos
químicos: trabaje en un área bien ventilada y póngase el equipo de seguridad
indicado, tal como las máscaras contra polvo que están especialmente
diseñadas para filtrar partículas microscó
picas.
Makita Corporation
3-11-8, Sumiyoshi-cho,
Anjo, Aichi 446-8502 Japan
884967E945 BUB360-1
www.makita.com
 Loading...