

Page 1
GB
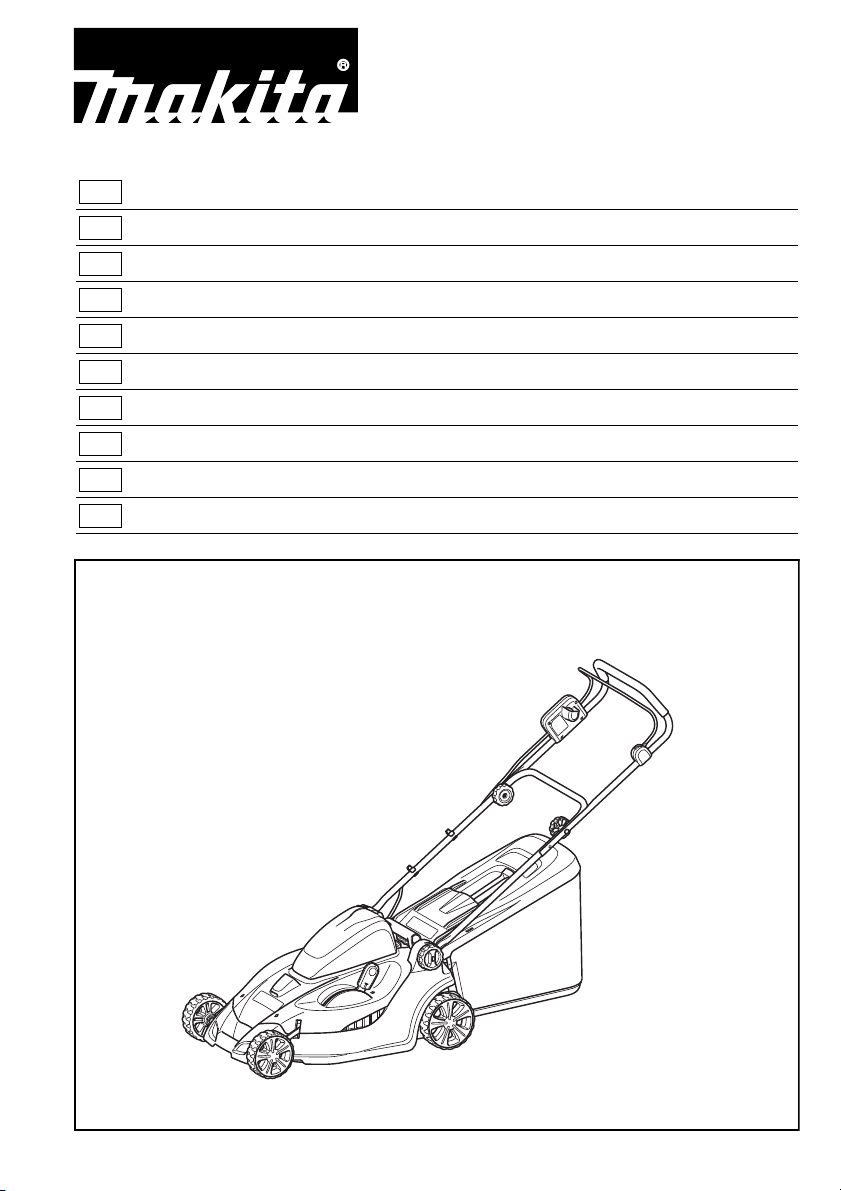
BLM430
LM430D
Cordless Lawn Mower Instruction Manual
F
Tondeuse Sans Fil Manuel d’instructions
D
Akku Rasenmäher Betriebsanleitung
I
Tosaerba a batteria Istruzioni per l’uso
NL
Snoerloze grasmaaier Gebruiksaanwijzing
E
Cortadora de Cesped Manual de instrucciones
P
Cortadora de Grama a Bateria Manual de instruções
DK
Akku-plæneklipper Brugsanvisning
GR Μηχανή γκαζόν με μπαταρία Οδηγίες χρήσεως
TR Akülü Çim Biçme Makinesi Kullanma kılavuzu
Page 2
1
3
2
1
5
6
7
3
8
012296
4
23
012297 012379
9
45
2
012380
11
10
012381
Page 3
6
4
12
012383
12
7
8
012384
012297
3
Page 4
15
13
14
9
10 11
012303 011715
012603
16
17
4
Page 5
12
18
19
20
21
18
22
22
23
18
21
22
24
25
9
13 14
012386 012606
012385
25
9
15 16
012421 012605
5
Page 6
17
24
23
21
18
012389
18
27
26
28
012304
6
Page 7
19
29
30
31
28
27
012601
32
20
33
012302
7
Page 8
21
32
33
34
012301
22
8
012382
Page 9
32
34
23
24 25
012307
012309012604
9
Page 10
36
26
37
35
20
23
012298
32
27
10
34
012602
Page 11

28 29
38
012600 012420
11
Page 12

Symbols
END016-2
The followings show the symbols used for the equipment. Be sure that you understand their meaning before
use.
Symboles
Nous donnons ci-dessous les symboles utilisés pour l’outil. Assurez-vous que vous en avez bien compris la
signification avant d’utiliser l’outil.
Symbole
Die folgenden Symbole werden für die Maschine verwendet. Machen Sie sich vor der Benutzung unbedingt
mit ihrer Bedeutung vertraut.
Simboli
Per questo utensile vengono usati i simboli seguenti. Bisogna capire il loro significato prima di usare l’utensile.
Symbolen
Voor dit gereedschap worden de volgende symbolen gebruikt. Zorg ervoor dat u de betekenis van deze symbolen begrijpt alvorens het gereedschap te gebruiken.
Símbolos
A continuación se muestran los símbolos utilizados con esta herramienta. Asegúrese de que entiende su significado antes de usarla.
Símbolos
O seguinte mostra os símbolos utilizados para a ferramenta. Certifique-se de que compreende o seu significado antes da utilização.
Symboler
Nedenstående symboler er anvendt i forbindelse med denne maskine. Vær sikker på, at De har forstået symbolernes betydning, før maskinen anvendes.
Σύμβολα
Τα ακόλουθα δείχνουν τα σύμβολα που χρησιμοποιούνται για το μηχάνημα. Βεβαιωθείτε ότι καταλαβαίνετε τη
σημασία τους πριν από τη χρήση.
Semboller
Aşağıdakiler makinanız için kullanılan sembolleri göstermektedir. Kullanmadan önce manalarını
anladığınızdan emin olunuz.
• Take particular care and attention.
• Veuillez être prudent et rester attentif.
• Besondere Umsicht und Aufmerksamkeit erforderlich.
• Prestare una particolare cura e attenzione.
• Wees vooral voorzichtig en let goed op.
• Preste cuidado y atención especiales.
• Tenha muito cuidado e atenção.
• Udvis særlig forsigtighed og opmærksomhed.
• Απαιτούνται ιδιαίτερη φροντίδα και προσοχή.
• Çok dikkatli kullanın.
12
Page 13

• Read instruction manual.
• Lire le mode d’emploi.
• Bitte Bedienungsanleitung lesen.
• Leggete il manuale di istruzioni.
• Lees de gebruiksaanwijzing.
• Lea el manual de instrucciones.
• Leia o manual de instruções.
• Læs brugsanvisningen.
• Διαβάστε τις οδηγίες χρήσης.
•El kitabını okuyun.
• Danger; be aware of thrown objects.
• Danger : prenez garde aux objets éjectés.
• Gefahr durch herausgeschleuderte Objekte.
• Pericolo: fare attenzione agli oggetti scagliati.
• Gevaar; pas op voor rondvliegende voorwerpen.
• Peligro; tenga cuidado con los objetos que salen lanzados.
• Perigo: tenha cuidado com objectos atirados.
• Fare: Vær opmærksom på flyvende genstande.
• Κίνδυνος. Να προσέχετε για εκτοξευόμενα αντικείμενα.
•Tehlike; sıçrayan nesnelerden korunun.
• The distance between the tool and bystanders must be at least 15 m.
• La distance entre l’outil et les personnes présentes doit être d’au moins 15 m.
• Der Abstand zwischen der Maschine und Umstehenden sollte mindestens 15 m betragen.
• La distanza tra il tosaerba e gli astanti deve essere di almeno 15 m.
• Omstanders moeten een afstand van zeker 15 meter bewaren tot het gereedschap.
• La distancia entre la herramienta y los transeúntes deberá ser de 15 m por lo menos.
• Deve-se manter uma distância de pelo menos 15 m entre a ferramenta e os espectadores.
• Afstanden mellem maskinen og omkringstående skal være mindst 15 m.
• Η απόσταση ανάμεσα στο εργαλείο και τους παρευρισκόμενους πρέπει να είναι τουλάχιστον
15 μέτρα.
• Alet ile etrafındaki kişiler arasında en az 15 m olmalıdır.
13
Page 14

• Never put your hands and feet near the blade under the mower.
• Ne mettez jamais les mains ou les pieds près de la lame sous la tondeuse.
• Halten Sie niemals Ihre Hände und Füße in die Nähe des Messers unter dem Mäher.
• Non si devono mai mettere le mani e i piedi vicino alla lama sotto il tosaerba.
• Breng nooit uw handen of voeten dichtbij het snijblad onder de grasmaaier.
• No ponga nunca sus manos ni pies cerca de la cuchilla debajo del cortacésped.
• Nunca aproxime as mãos ou os pés da lâmina localizada embaixo do cortador de relva.
• Anbring aldrig hænder og fødder i nærheden af bladet under plæneklipperen.
• Μη βάζετε ποτέ τα χέρια ή τα πόδια σας κοντά στη λάμα κάτω από τη μηχανή γκαζόν.
• Ellerinizi ve ayaklarınızı asla makinenin altındaki bıçaklara yaklaştırmayın.
• Remove the lock key before inspecting, adjusting, cleaning, servicing, leaving and storing the
mower.
• Retirez la clé de sécurité avant d’inspecter, de régler, de nettoyer, de réparer, de laisser sans
surveillance ou de ranger la tondeuse.
• Entfernen Sie den Sperrschlüssel, bevor Sie den Mäher überprüfen, einstellen, reinigen,
warten, verlassen und lagern.
• Rimuovere la chiave di blocco prima di ispezionare, regolare, pulire, fare la manutenzione,
lasciare e immagazzinare il tosaerba.
• Verwijder de contactsleutel vóór het inspecteren, bijstellen, reinigen, onderhoud, achterlaten
of opbergen van de grasmaaier.
• Retire la llave de bloqueo antes de inspeccionar, ajustar, limpiar, hacer el servicio de mantenimiento, dejar y almacenar el cortacésped.
• Remova a chave de segurança antes de realizar uma inspecção, ajuste, limpeza,
manutenção, armazenamento ou quando não estiver em utilização.
• Fjern låsenøglen, inden du inspicerer, justerer, rengør, servicerer, forlader og stiller plæneklipperen til opbevaring.
• Βγάλτε το κλειδί ασφάλισης πριν εκτελέσετε εργασίες επιθεώρησης, ρύθμισης, καθαρισμού
και σέρβις στη μηχανή γκαζόν και πριν απομακρυνθείτε από τη μηχανή γκαζόν ή την
αποθηκεύσετε.
• Kontrol, ayarlama, temizleme, servis, kenara kaldırma ve depolama işlemlerinden önce kilit
anahtarını çıkarın.
14
Page 15

• Only for EU countries
Cd
Ni-MH
Li-ion
Do not dispose of electric equipment or battery pack together with household waste material!
In observance of European Directive 2002/96/EC on waste electric and electronic equipment, 2006/66/EC on batteries and accumulators and waste batteries and accumulators and
their implementation in accordance with national laws, electric equipment and battery pack
that have reached the end of their life must be collected separately and returned to an environmentally compatible recycling facility.
• Uniquement pour les pays de l’UE
Ne pas jeter les appareils électriques et les batteries avec les ordures ménagères !
Conformément aux directives européennes 2002/96/CE (relative aux déchets d’équipements
électriques et électroniques) et 2006/66/CE (relative aux piles et accumulateurs ainsi qu’aux
déchets de piles et accumulateurs), ainsi qu’à leur application en conformité avec les lois
nationales, les appareils électriques et batteries qui ont atteint la fin de leur durée de service
doivent être collectés séparément et renvoyés à un établissement de recyclage respectueux
de l’environnement.
• Nur für EG-Länder
Werfen Sie Elektrogeräte oder Akkus nicht in den Hausmüll!
Gemäß der Europäischen Richtlinie 2002/96/EG über Elektro- und Elektronik-Altgeräte,
2006/66/EG über Batterien, Akkus sowie verbrauchte Batterien und Akkus und ihre Umsetzung gemäß den Landesgesetzen müssen Elektrogeräte und Akkus, die das Ende ihrer Lebensdauer erreicht haben, getrennt gesammelt und einer umweltgerechten RecyclingEinrichtung zugeführt werden.
• Soltanto per i Paesi dell’unione europea
Questo apparecchio elettrico o la batteria non devono essere gettati via con i rifiuti domestici.
In osservanza alla Direttiva Europea 2002/96/CE sugli apparecchi elettrici ed elettronici di
scarto, 2006/66/CE sulle batterie e gli accumulatori, e sulle batterie e gli accumulatori esausti, e la sua implementazione secondo le leggi locali, gli apparecchi elettrici e le batterie che
hanno raggiunto la fine della loro vita di servizio devono essere raccolti separatamente e portati in un centro di smaltimento ecocompatibile.
• Alleen voor EU-landen
Geef elektrisch gereedschap of accu’s niet met het huisvuil mee!
Volgens de Europese richtlijn 2002/96/EC inzake oude elektrische en elektronische apparaten, richtlijn 2006/66/EC inzake batterijen en accu’s en wegwerpbatterijen, en de toepassing daarvan binnen de nationale wetgeving, dienen gebruikte elektrisch apparaten en accu’s
die het einde van hun levensduur hebben bereikt, gescheiden te worden ingezameld en te
worden afgevoerd naar een recyclebedrijf dat voldoet aan de geldende milieu-eisen.
• Sólo para países de la Unión Europea
¡No tire aparatos eléctricos ni baterías a la basura con los residuos domésticos!
En conformidad con la Directiva Europea 2002/96/EC sobre residuos de aparatos eléctricos
y electrónicos y la Directiva Europea 2006/66/EC sobre baterías y acumuladores y residuos
de baterías y de acumuladores y su aplicación de acuerdo con la legislación nacional, los
aparatos eléctricos y las baterías cuya vida útil haya llegado a su fin se deberán recoger por
separado y trasladar a una planta de reciclaje que cumpla con las exigencias ecológicas.
• Apenas para os países da União Européia
Não deite equipamentos eléctricos nem baterias no lixo doméstico!
De acordo com as directivas europeias 2002/96/CE sobre ferramentas eléctricas e electrónicas usadas e 2006/66/CE sobre baterias e acumuladores e respectivos resíduos e a implementação dessas directivas conforme a lei nacional, as ferramentas eléctricas e as baterias
que atingem o fim de sua vida útil devem ser recolhidas em separado e encaminhadas a
uma instalação de reciclagem compatível com os regulamentos sobre o meio ambiente.
• Gælder kun lande i EU
Undlad at bortskaffe elektrisk udstyr eller akkuer sammen med almindeligt husholdningsaffald.
I henhold til EU-direktiv 2002/96/EC angående brugt elektrisk og elektronisk udstyr, 2006/66/
EC angående batterier og akkumulatorer og brugte batterier og iværksættelse af bortskaffelse af batterier og akkumulatorer i overensstemmelse med nationale love, skal elektrisk
udstyr og akkuer, der har nået slutningen af deres levetid, indsamles separat og afhændes til
en genbrugsfacilitet, som er miljømæssigt kompatibel.
15
Page 16

• Μόνο για χώρες ΕΕ
Μην απορρίπτετε ηλεκτρικό εξοπλισμό ή μπαταρίες μαζί με τα οικιακά απόβλητα!
Σύμφωνα με την Ευρωπαϊκή Οδηγία 2002/96/ΕΚ περί αποβλήτων ειδών ηλεκτρικού και
ηλεκτρονικού εξοπλισμού και την Οδηγία 2006/66/EΚ περί μπαταριών και συσσωρευτών και
αποβλήτων μπαταριών και συσσωρευτών και την εφαρμογή τους σύμφωνα με την εθνική
νομοθεσία, απαιτείται συλλογή του ηλεκτρικού εξοπλισμού και των μπαταριών, το όριο ζωής
των οποίων έχει λήξει, ξεχωριστά και επιστροφή τους σε εγκατάσταση ανακύκλωσης
συμβατή με την προστασία του περιβάλλοντος.
• Sadece AB ülkeleri için
Elektrik donanımını veya pilleri evsel atıklarla birlikte bertaraf etmeyiniz!
Atık elektrikli ve elektronik donanımlar konusundaki 2002/96/EC sayılı, piller ve
akümülatörler ve atık piller ve atık akümülatörler konusundaki 2006/66/EC sayılı Avrupa
Direktifleri ve bunların ulusal yasalara uygulanmaları uyarınca, kullanım ömürleri biten
elektrikli donanımların ve pillerin ayrı toplanmaları ve çevreye uyumlu bir geri kazanım
tesisine getirilmeleri gereklidir.
16
Page 17

ENGLISH (Original instructions)
Explanation of general view
1 Battery cover locking lever
2 Battery cartridge
3 Battery cover
4 Lock key
5 Battery converter (BCV01)
6 Installation hole
7 Hook
8 Product mounting adapter of the
BCV01
9Cord
10 Slit
11 Upper holders
12 Battery converter (BCV02)
13 Switch button
SPECIFICATIONS
Model BLM430 / LM430D
Mowing width 430 mm
No load speed 3,600 min
Dimensions (L x W x H)
Net weight 17.9 kg
Rated voltage D.C. 36 V
Warning: Use only the battery cartridge(s) described.
• Due to our continuing program of research and devel-
opment, the specifications herein are subject to change
without notice.
• Specifications and battery cartridge may differ from
country to country.
• Weight, with battery cartridge, according to EPTA-Pro-
cedure 01/2003
Standard battery cartridge(s)
IMPORTANT SAFETY INSTRUCTIONS
WARNING! Read all safety warnings and all
instructions. Failure to follow the warnings and instruc-
tions may result in electric shock, fire and/or serious
injury.
Save all warnings and instructions for future reference.
1. Do not insert key into mower until it is ready to
be used.
2. This appliance is not intended for use by per-
sons (including children) with reduced physical,
sensory or mental capabilities, or lack of experi-
ence and knowledge, unless they have been
given supervision or instruction concerning use
of the appliance by a person responsible for
their safety.
3. Children should be supervised to ensure that
they do not play with the appliance.
4. Never allow children or people unfamiliar with
these instructions to use the machine. Local reg-
ulations can restrict the age of the operator.
14 Switch lever
15 Mowing height adjusting lever
16 Indicator lamps
17 CHECK button
18 Lower handle
19 Groove on the deck
20 Clamping screw
21 Upper handle
22 Screw holes
23 Clamping nut
24 Screw
25 Holders
26 Screwdriver
27 Blade
during operation
when stored 490 mm – 500 mm x 460 mm x 810 mm
GEB091-5
28 Bolt
29 Inner flange
30 Arrow
31 Outer flange
32 Rear guard
33 Groove
34 Grass basket
35 Expand
36 Move down forward
37 Pivot back
38 Front grip
–1
1,450 mm – 1,490 mm x 460 mm x 950 mm – 1,020 mm
BL3626 / BL3622A
5. Never operate the machine while people, especially children, or pets are nearby.
6. Keep in mind that the operator or user is responsible for accidents or hazards occurring to other
people or their property.
7. While operating the machine always wear substantial footwear and long trousers. Do not operate the machine when barefoot or wearing open
sandals. Avoid wearing clothing or jewelry that
is loose fitting or that has hanging cords or ties.
They can be caught in moving parts.
8. Operate the machine only in daylight or in good
artificial light.
9. Avoid operating the machine in wet grass.
10. Never operate the mower in the rain.
11. Battery tool use
– Recharge only with the charger specified by
the manufacturer. A charger that is suitable for
one type of battery pack may create a risk of fire
when used with another battery pack.
– Use power tools only with specifically desig-
nated battery packs. Use of any other battery
packs may create a risk of injury and fire.
12. Always keep a firm hold on the handle.
13. Always be sure of your footing on slopes.
14. Walk, never run.
15. Don’t grasp the exposed cutting blades or cutting edges when picking up or holding the appliance.
16. Physical condition — Do not operate mower
while under the influence of drugs, alcohol, or
any medication.
17
Page 18

17. Keep guards in place and in working order.
18. Keep hands and feet away from rotating blades.
Caution — Blades coast after turn off.
19. Remove key before servicing, cleaning or
removing material from the gardening appliance.
20. Use only the manufacturer genuine blades specified in this manual.
21. Check the blades carefully for cracks or damage
before operation. Replace cracked or damaged
blades immediately.
22. Be sure the area is clear of other people before
mowing. Stop mower if anyone enters the area.
23. Remove foreign matters such as rocks, wire,
bottles, bones and large sticks from the work
area before mowing to prevent personal injury or
damage to the mower.
24. Stop operation immediately if you notice anything unusual. Switch off the mower and remove
the key from the appliance. Then inspect the
mower.
25. Never attempt to make wheel height adjustments
while mower is running.
26. Release switch lever and wait for blade rotation
to stop before crossing driveways, walks, roads,
and any gravel-covered areas.
Also remove key if you leave it, reach to pick up
or remove something out of your way, or for any
other reason that may distract you from what
you are doing.
27. Objects struck by the lawn mower blade can
cause severe injuries to persons. The lawn
should always be carefully examined and
cleared of all objects prior to each mowing.
28. If lawn mower strikes a foreign object, follow
these steps:
– Stop the mower, release the switch lever and
wait until the blade comes to a complete stop.
– Remove the lock key and the battery car-
tridge.
– Thoroughly inspect the mower for any dam-
age.
– Replace the blade if it is damaged in any way.
Repair any damage before restarting and continuing to operate the mower.
29. Check the rear bag frequently for wear or deterioration. For storage, always make sure the rear
bag is empty. Replace a worn bag with a new factory replacement bag for safety.
30. Stop the motor and remove key whenever you
leave the equipment, before cleaning the mower
housing, and before making any repairs or
inspections.
31. Use extreme caution when reversing or pulling
the machine towards you.
32. Stop the blade(s) if the machine has to be tilted
for transportation when crossing surfaces other
than grass, and when transporting the machine
to and from the area to be used.
33. Never operate the machine with defective guards
or shields, or without safety devices, for example deflectors and/or grass collector, in place.
34. Switch on the motor carefully according to
instructions and with feet well away from the
blade(s).
35. Do not tilt the machine when switching on the
motor, except if the machine has to be tilted for
starting. In this case, do not tilt it more than
absolutely necessary and lift only the part, which
is away from the operator.
36. Do not start the machine when standing in front
of the discharge opening.
37. Do not put hands or feet near or under rotating
parts. Keep clear of the discharge opening at all
times.
38. Do not transport the machine while the mower is
turned on.
39. Stop the machine, and remove the disabling
device. Make sure that all moving parts have
come to a complete stop
– whenever you leave the machine,
– before clearing blockages or unclogging
chute,
– before checking, cleaning or working on the
machine,
– after striking a foreign object. Inspect the
machine for damage and make repairs before
restarting and operating the machine;
40. If the machine starts to vibrate abnormally
(check immediately)
– inspect for damage,
– replace or repair any damaged parts,
– check for and tighten any loose parts.
41. Be careful during adjustment of the machine to
prevent entrapment of the fingers between moving blades and fixed parts of the machine.
42. Mow across the face of slopes, never up and
down. Exercise extreme caution when changing
direction on slopes. Do not mow excessively
steep slopes.
43. Do not wash with a hose; avoid getting water in
motor and electrical connections.
44. Check the blade mounting bolt at frequent intervals for proper tightness.
45. Keep all nuts, bolts, and screws tight to be sure
the equipment is in safe working condition.
46. Always allow the machine to cool down before
storing.
47. When servicing the blades be aware that, even
though the power source is switched off, the
blades can still be moved.
48. Replace worn or damaged parts for safety. Use
only genuine replacement parts and accessories.
SAVE THESE INSTRUCTIONS.
WARNING:
DO NOT let comfort or familiarity with product
(gained from repeated use) replace strict adherence
to safety rules for the subject product. MISUSE or
failure to follow the safety rules stated in this instruction manual may cause serious personal injury.
18
Page 19

ENC007-7
IMPORTANT SAFETY INSTRUCTIONS
FOR BATTERY CARTRIDGE
1. Before using battery cartridge, read all instructions and cautionary markings on (1) battery
charger, (2) battery, and (3) product using battery.
2. Do not disassemble battery cartridge.
3. If operating time has become excessively
shorter, stop operating immediately. It may
result in a risk of overheating, possible burns
and even an explosion.
4. If electrolyte gets into your eyes, rinse them out
with clear water and seek medical attention right
away. It may result in loss of your eyesight.
5. Do not short the battery cartridge:
(1) Do not touch the terminals with any conduc-
tive material.
(2) Avoid storing battery cartridge in a container
with other metal objects such as nails, coins,
etc.
(3) Do not expose battery cartridge to water or
rain.
A battery short can cause a large current flow,
overheating, possible burns and even a breakdown.
6. Do not store the tool and battery cartridge in
locations where the temperature may reach or
exceed 50°C (122°F).
7. Do not incinerate the battery cartridge even if it
is severely damaged or is completely worn out.
The battery cartridge can explode in a fire.
8. Be careful not to drop or strike battery.
9. Do not use a damaged battery.
SAVE THESE INSTRUCTIONS.
Tips for maintaining maximum battery life
1. Charge the battery cartridge before completely
discharged.
Always stop tool operation and charge the battery cartridge when you notice less tool power.
2. Never recharge a fully charged battery cartridge.
Overcharging shortens the battery service life.
3. Charge the battery cartridge with room temperature at 10°C – 40°C (50°F – 104°F).
Let a hot battery cartridge cool down before
charging it.
4. Charge the battery cartridge once in every six
months if you do not use it for a long period of
time.
FUNCTIONAL DESCRIPTION
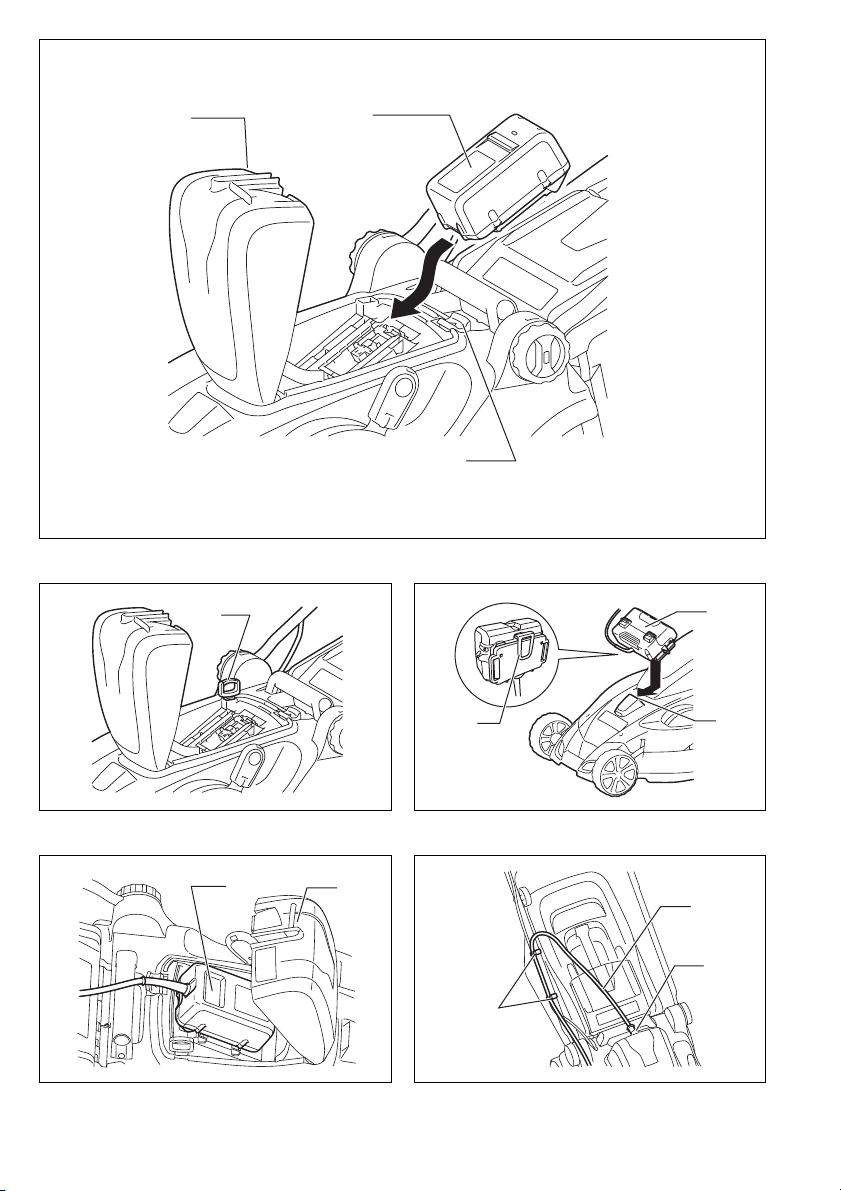
Installing or removing battery cartridge (Fig. 1 &
2)
CAUTION:
• Always switch off the tool before installing or removing
the battery cartridge.
• Make sure that you lock the battery cover before use.
Otherwise, mud, dirt, or water may cause damage to
the product or the battery cartridge.
To install the battery cartridge;
1. Pull the battery cover locking lever toward yourself
and open the battery cover.
2. Insert the battery cartridge in the direction shown in
the figure until a click is heard.
3. Insert the lock key in the place shown in the figure
as far as it will go.
4. Close the battery cover and push it on until it is
latched with the locking lever.
To remove the battery cartridge from the mower;
1. Pull the battery cover locking lever toward yourself
and open the battery cover.
2. Pull out the lock key.
3. Withdraw it from the tool while sliding the button on
the front of the cartridge.
4. Close the battery cover.
Battery converters (optional accessory)
WARNING:
• Before installing or removing the battery converters
BCV01/BCV02, remove the lock key.
BCV01 (optional accessory) (Fig. 3, 4 & 5)
WARNING:
• When using the BCV01, never attach it to any part of
your body. Attaching the BCV01 to any part of your
body may cause a serious injury.
Slide the battery converter BCV01 into the installation
hole until it stops.
Open out the battery cover on the mower and then slide
all the way and click the product mounting adapter of the
BCV01 into the battery port on the mower.
Run the cord of the BCV01 through the slit in the battery
cover and close the battery cover.
Fit the cord of the BCV01 into the upper holders on the
handle.
NOTE:
• When using the battery converter BCV01 (optional
accessory), hook the power cord to the designated
holder on the mower. Failure to do so may cause the
cord to be cut off.
To remove the BCV01 from the mower, open out the battery cover and then press the hook on the battery mounting side of the BCV01.
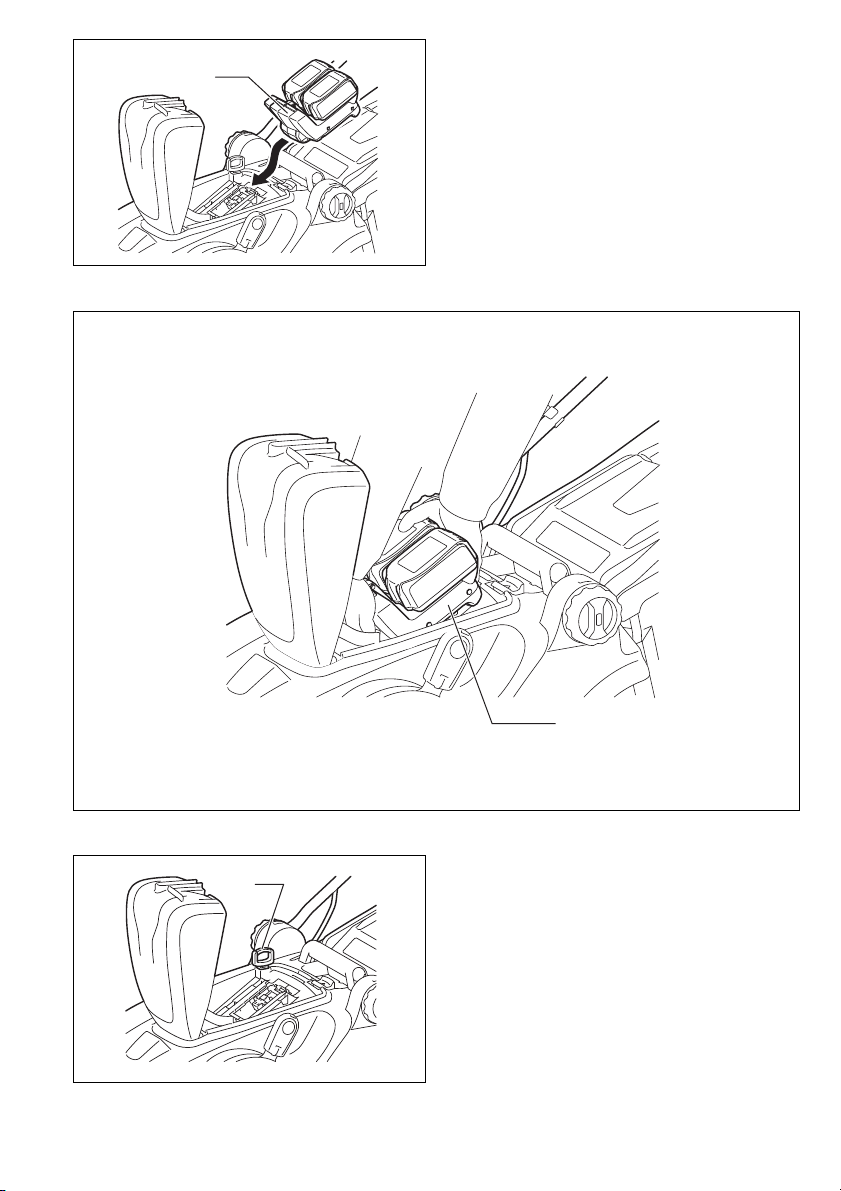
BCV02 (optional accessory) (Fig. 6 & 7)
Open the battery cover and click in the BCV02 into the
battery port on the mower.
Close the battery cover.
To remove the BCV02, press on the hook of the BCV02
and withdraw it with both hands.
19
Page 20

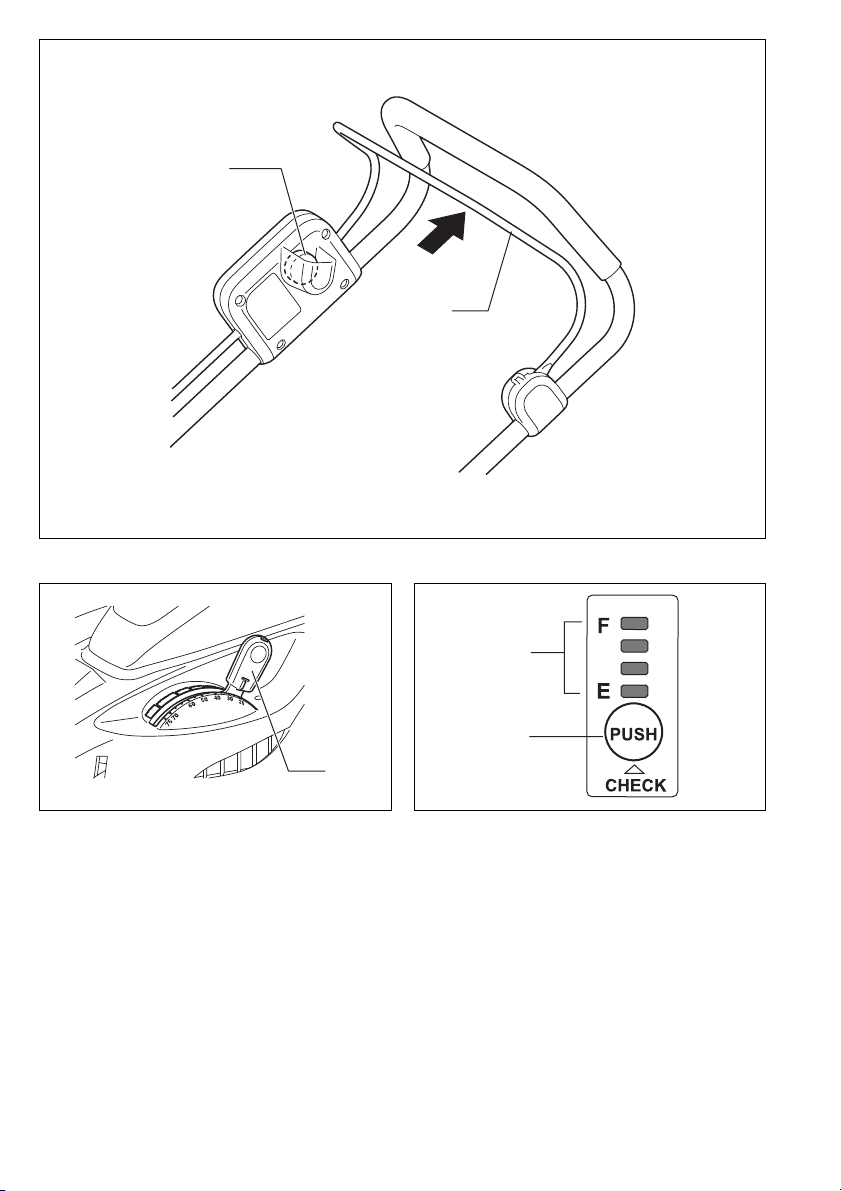
Power switch action (Fig. 8 & 9)
Lighted
Off
Blinking
E
F
011713
WARNING:
• Before inserting the battery cartridge in the tool,
always check to see that the switch lever actuates
properly and returns to the original position when
released. Operating a tool with a switch that does not
actuate properly can lead to loss of control and serious
personal injury.
NOTE:
• Trying to mow much grass at a time may not allow the
motor to start due to the overload. At this time, change
the mowing height to higher level to restart.
• The mower does not start without pressing the switch
button even if the switch lever is squeezed.
This mower is equipped with the interlock switch and
handle switch. If you notice anything unusual with either
of these switches, stop operation immediately and have
them checked by your nearest Makita Authorized Service
Center.
1. Insert the lock key into the interlock switch.
2. Depress the switch button.
3. Pull the switch lever toward you while depressing
the switch button.
4. Release the switch button as soon as the motor
starts running. The mower will continue to run until
you release the switch lever.
5. Release the switch lever to stop the motor.
6. When not in use, remove the lock key. Store the lock
key in a safe place out of reach of children.
Adjusting the mowing height (Fig. 10)
WARNING:
• Never put your hand or leg under the mower unit when
adjusting the mowing height.
• Always make sure that the lever fits in the groove properly before operation.
The mowing height can be adjusted in the range of
between 20 mm – 75 mm.
1. Remove the lock key.
2. Pull the mowing height adjusting lever toward your-
self and move it to your desired mowing height.
Make sure that the protrusion on the mowing height
adjusting lever fits in the groove in the mower.
NOTE:
• The mowing height figures should be used just as a
guideline, as the state of the lawn or ground may cause
lawn height to be slightly different to the set height figure.
• Try a test mowing of grass in a less conspicuous place
to get your desired height.
Battery protection system
Lithium-ion batteries are equipped with a protection system. This system automatically cuts off power to the tool
to extend battery life.
The tool will automatically stop during operation if the
tool and/or battery are placed under one of the following
conditions:
• Overloaded:
The tool is operated in a manner that causes it to draw
an abnormally high current.
In this situation, release the trigger switch on the tool
and stop the application that caused the tool to become
overloaded. Then pull the trigger switch again to
restart.
If the tool does not start, the battery is overheated. In
this situation, let the battery cool before pulling the trigger switch again.
• Low battery voltage:
The remaining battery capacity is too low and the tool
will not operate. In this situation, remove and recharge
the battery.
Battery remaining capacity indicator (only for
models with Battery BL3622A) (Fig. 11)
Battery BL3622A is equipped with the battery remaining
capacity indicator.
Press the CHECK button to indicate the battery remaining capacity. The indicator lamps will then light for
approx. three seconds.
Indicator lamps
Remaining capacity
70% to 100%
45% to 70%
20% to 45%
0% to 20%
Charge the battery.
The battery may have
malfunctioned.
• When only the lowermost indicator lamp (next to the
“E”) blinks, or when none of the indicator lamps light,
the battery capacity has run out, so the tool does not
operate. In these cases, charge the battery or replace
the empty battery with a fully charged one.
• When two or more indicator lamps do not light even
after charging is complete, the battery has reached the
end of its service life.
• When the upper two and lower two indicator lamps light
alternately, the battery may have malfunctioned. Contact your local Makita authorized service center.
NOTE:
• The indicated capacity may be lower than the actual
level during use or immediately after using the tool.
• Depending on the conditions of use and the ambient
temperature, the indication may differ slightly from the
actual capacity.
20
Page 21

ASSEMBLY
WARNING:
• Always be sure that the lock key and battery cartridge are removed before carrying out any work on
the mower. Failure to remove the lock key and the bat-
tery cartridge may result in serious personal injury from
accidental start-up.
• Never start the tool unless it is completely assem-
bled. Operation of the tool in a partially assembled
state may result in serious personal injury from accidental start-up.
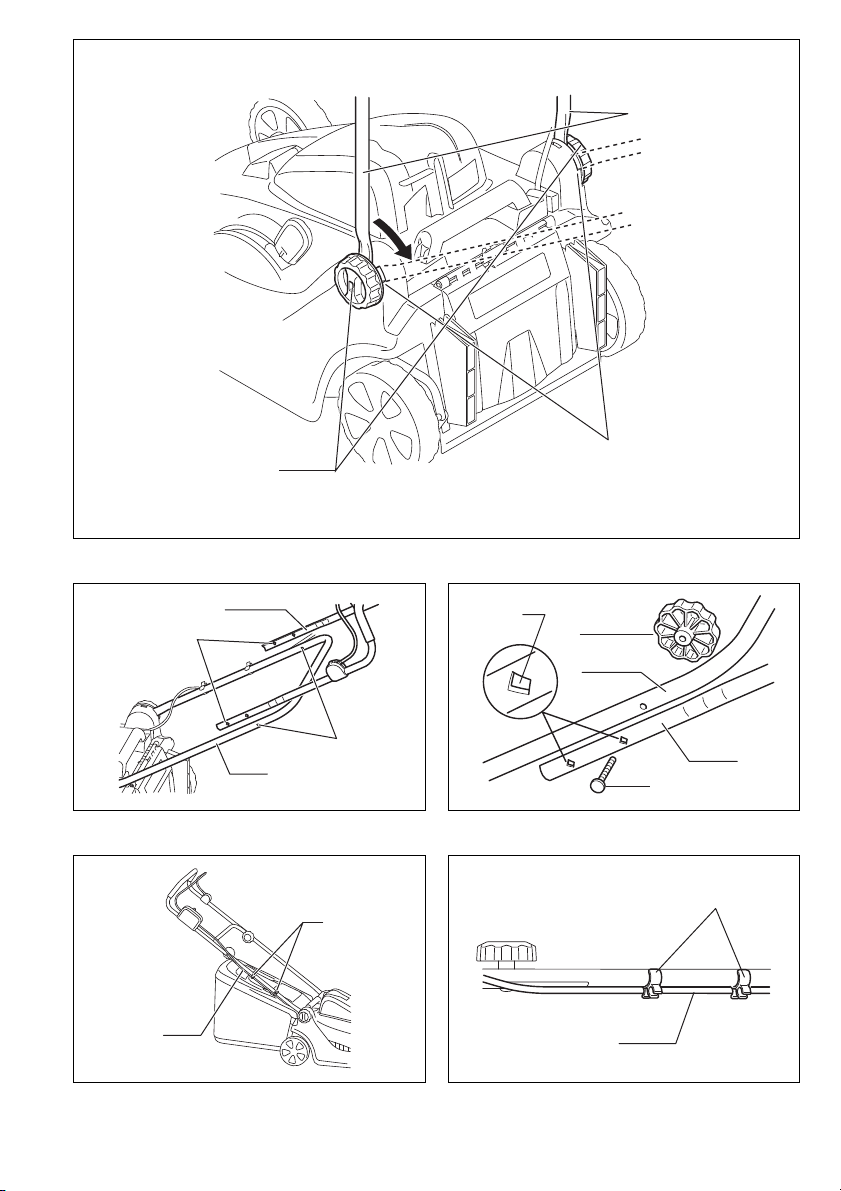
Installing the handle (Fig. 12, 13, 14, 15, 16 & 17)
WARNING:
• When installing handles, position the wires so that they
are not caught by anything in between the handles.
1. Loosen the clamping screws (two pcs).
Expand the lower handle to its both sides and with it
expanded in that position pivot it backward and then fit it
in the groove in the deck.
2. Tighten the clamping screws on both sides to secure
the lower handle.
3. Raise the upper handle and align the screw holes in
the upper handle with those in the lower handle and
then secure it with the supplied screws and clamping nuts.
NOTE:
• At this time, keep a firm grip on the upper handle so
that it does not drop off your hand.
NOTE:
• Install the upper handle so that the direction of the
upper handle and the power supply cord are positioned
as shown in the figure.
NOTE:
• The upper handle has two holes each on both sides.
Using the different position holes for the screws and
clamping nuts allows the handle height adjustment.
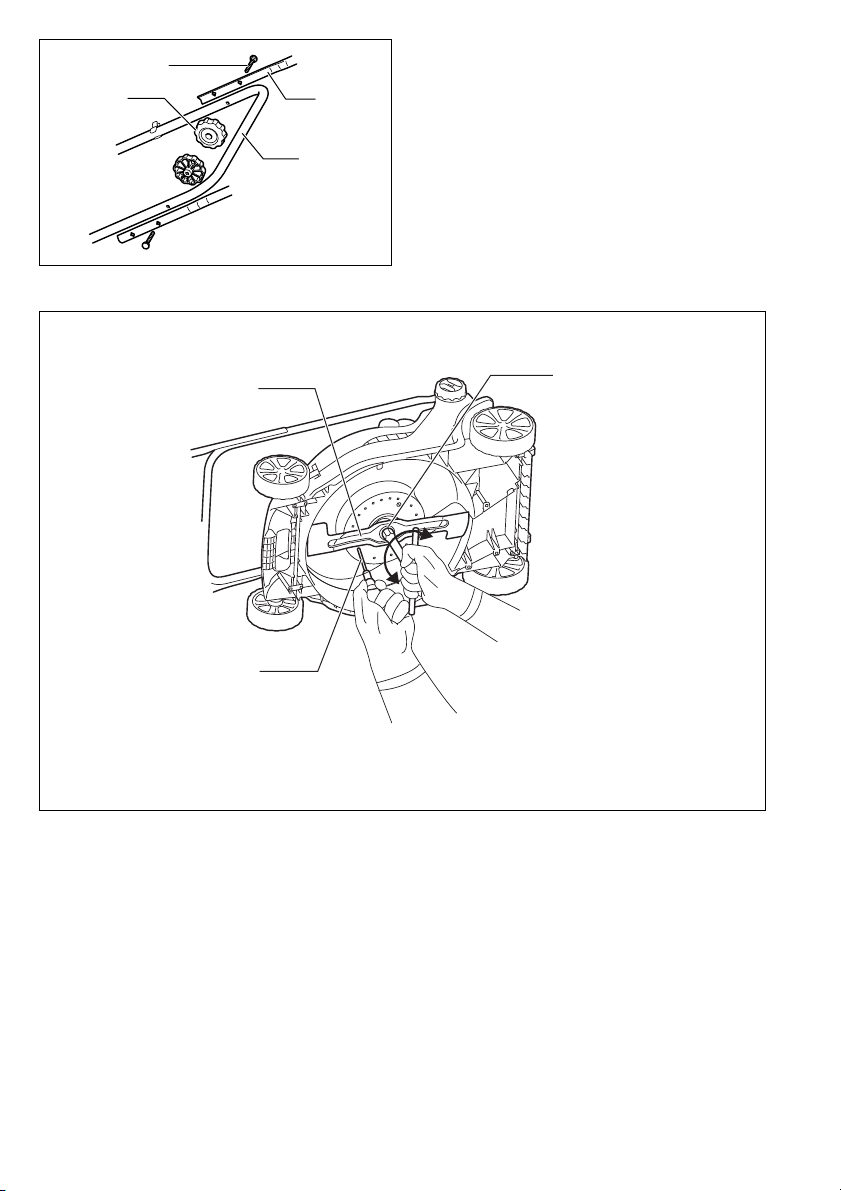
Removing or installing the blade (Fig. 18 & 19)
WARNING:
• Always remove the lock key and battery cartridge when
removing or installing the blade. Failure to remove the
lock key and battery cartridge may cause a serious
injury.
• The blade coasts for a few seconds after releasing the
switch. Make sure that the blade has come to a complete stop.
• Always wear gloves when handling the blade.
1. Put the mower on its side so that the mowing height
adjusting lever is placed on the upper side.
2. To lock the blade, insert a screwdriver available or
the similars in market into a hole in the mower.
3. Loosen the bolt counterclockwise with the wrench.
4. Remove the bolt, outer flange, blade and inner
flange in order.
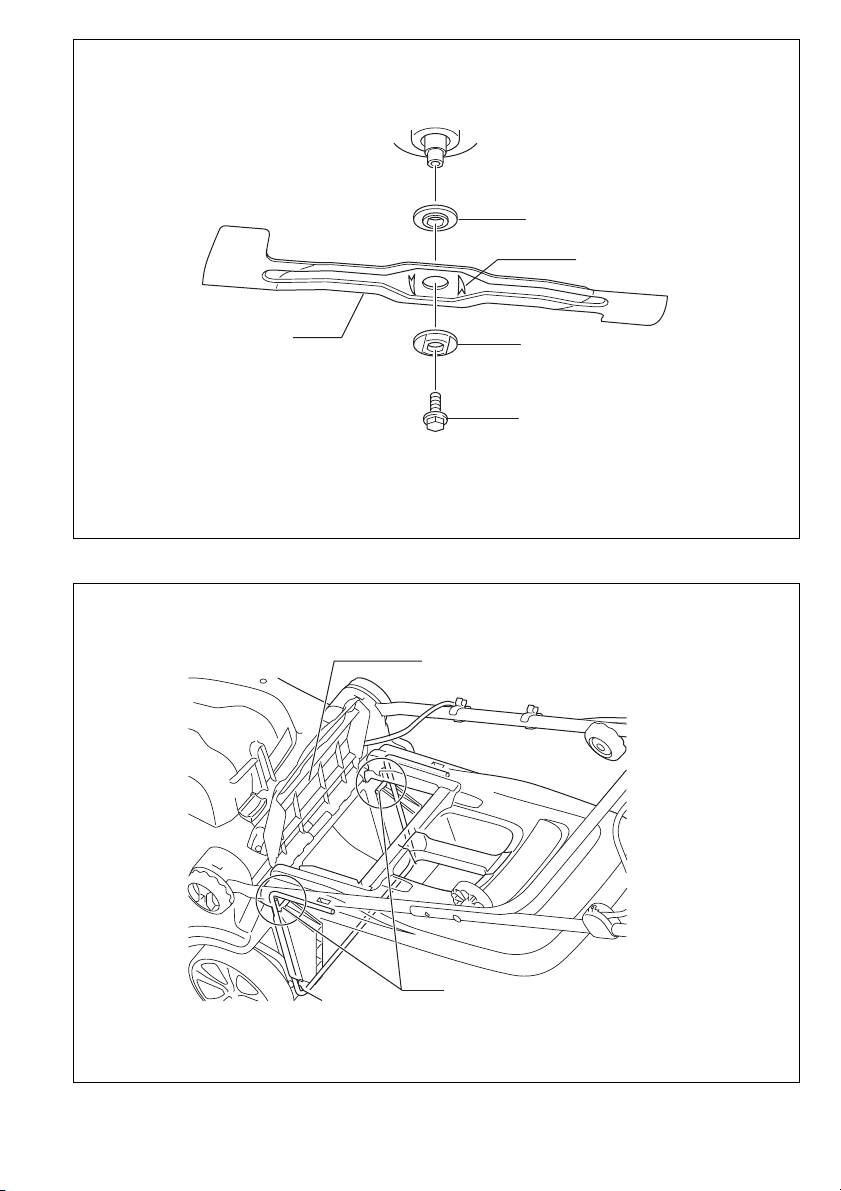
To install the blade, take the blade removal procedure in
reverse.
WARNING:
• Install the inner flange, the blade and the outer flange
carefully as these have a top/bottom facing.
• Tighten the bolt clockwise firmly to secure the blade.
• Put the blade so that the blade side with a rotational
direction arrow faces outward.
• Make sure that the blade is installed securely.
• Always take away the screwdriver or similars inserted
in a hole to lock the blade.
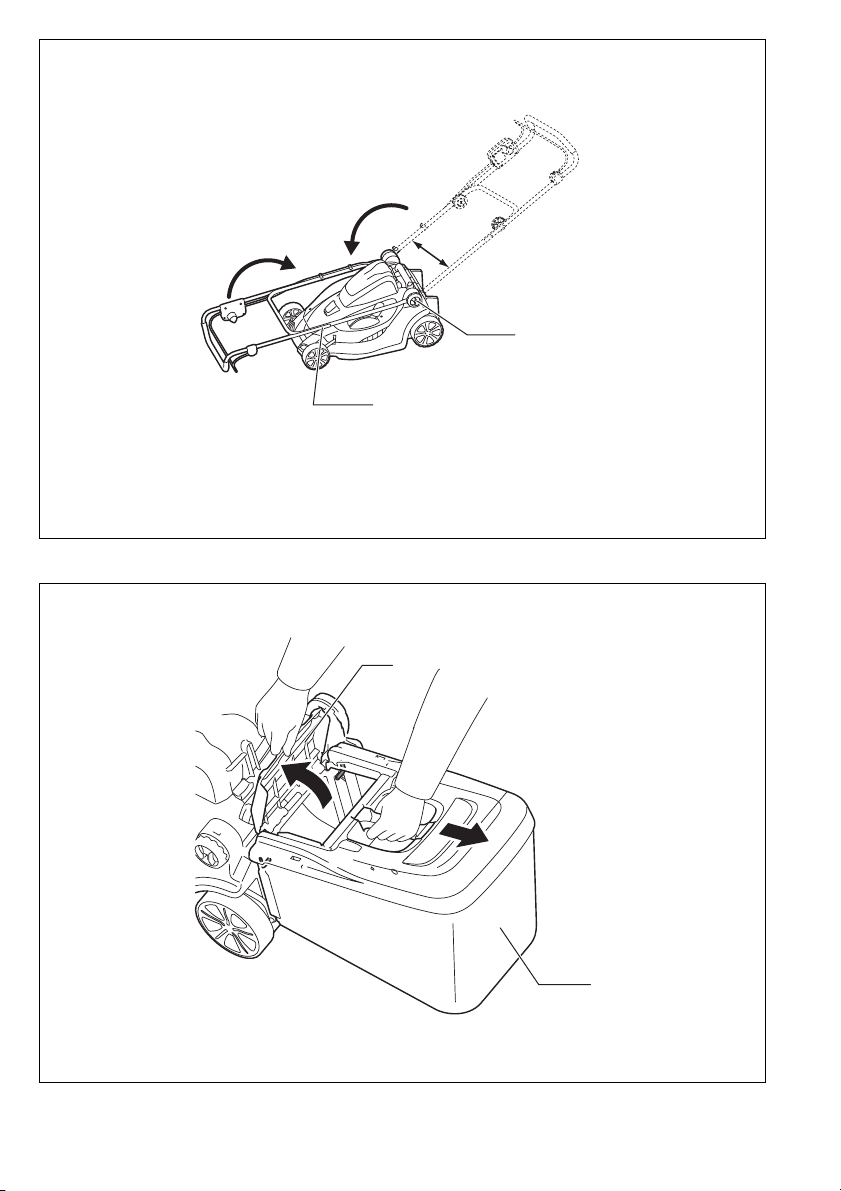
Installing the grass basket (Fig. 20 & 21)
Remove the lock key.
Raise the rear guard of the mower unit and hook the
grass basket on the groove of the mower unit.
OPERATION
Mowing
WARNING:
• Before mowing, clear away sticks and stones from
mowing area. Furthermore, clear away any weeds from
mowing area in advance.
• Always wear the safety goggles or safety glasses with
side shields when operating the mower.
Firmly hold the lawn mower handle with both hands
when mowing.
The front wheel outside edges of the main unit provide a
guideline to mowing width. Using the two front wheel outside edges as a guideline, mow in strips, overlapping by
one half to one third the previous strip, to mow the lawn
evenly.
Periodically check the level of the grass basket, and
empty before it becomes full. Before every periodical
checks, be sure to stop the mower and remove the lock
key and the battery cartridge.
NOTE:
• Using the lawn mower with the grass basket full prevents smooth blade rotation and places an extra load
on the motor, which may cause breakdown.
Mowing a long-grass lawn (Fig. 22)
Do not try to cut long grass all in one go. Instead, mow
the lawn in stages, leaving it for a day or two between
mows, until the lawn is evenly short.
NOTE:
• Mowing long grass to a short length all in one go may
cause the grass to die and/or block up the inside of the
main unit.
Emptying the grass basket (Fig. 23)
WARNING:
• To reduce a risk of accident, regularly check the grass
basket for any damage or weakened strength and
replace it if necessary.
1. Release the switch lever.
2. Remove the lock key.
3. Open the rear guard and take out the grass basket
with its handle.
4. Empty the grass basket.
21
Page 22

MAINTENANCE & STORAGE
WARNING:
• Always be sure that the lock key and battery cartridge
are removed from the mower before storage or
attempting to perform inspection or maintenance.
• Wear gloves when performing inspection or maintenance.
CAUTION:
• Never use gasoline, benzine, thinner, alcohol or the
like. Discoloration, deformation or cracks may result.
MAINTENANCE
1. REMOVE THE LOCK KEY. Store it in a safe place
out of the reach of children.
2. Clean your mower using only mild soap and a damp
cloth. Do not spray or pour water on your mower
when cleaning.
3. Turn mower on its side and clean grass clippings
that have accumulated on the underside of mower
deck.
4. Check all nuts, bolts, knobs, screws, fasteners etc.
for tightness.
5. Inspect moving parts for damage, breakage, and
wear. Have repairs made on any damaged or missing parts.
6. Before storing the mower, remove the battery car-
tridge from it.
7. Store mower indoors in a cool, dry and locked place.
Don’t store the mower and charger in locations
where the temperature may reach or exceed 40°C
(104°F).
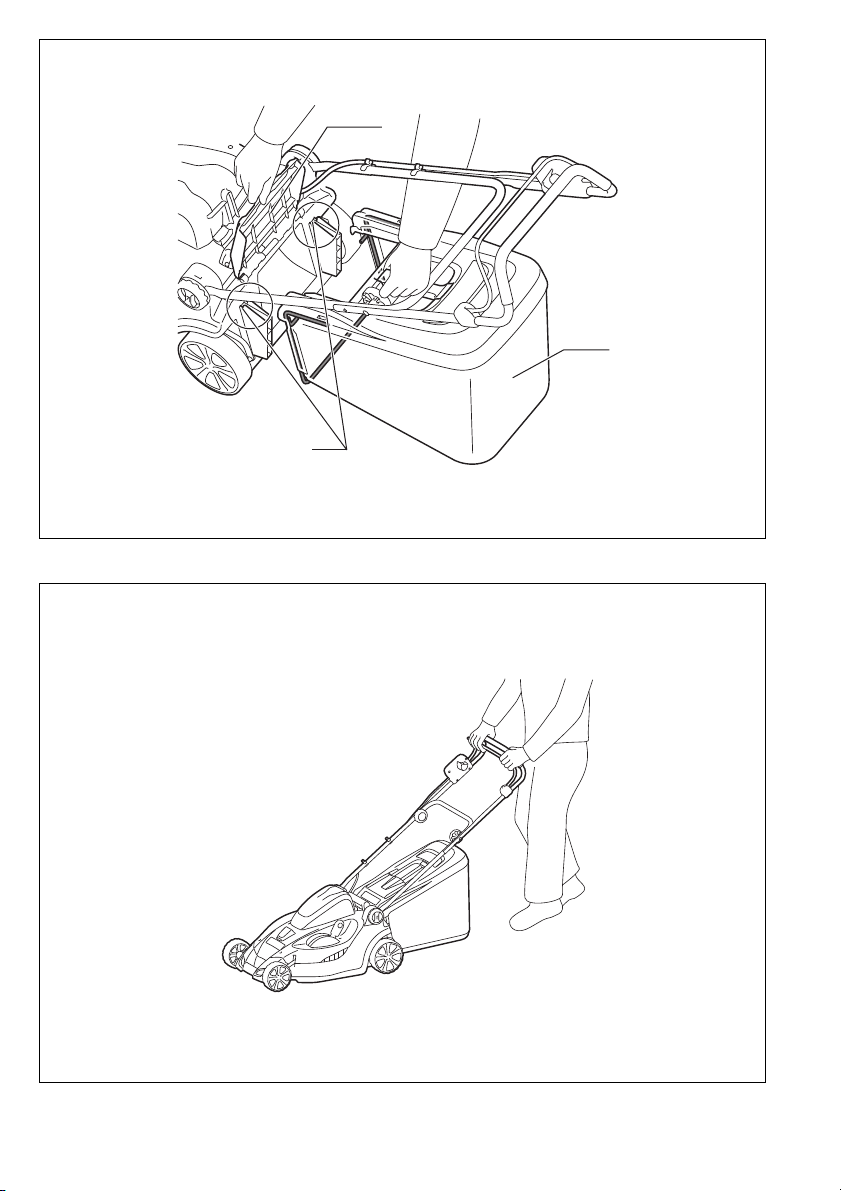
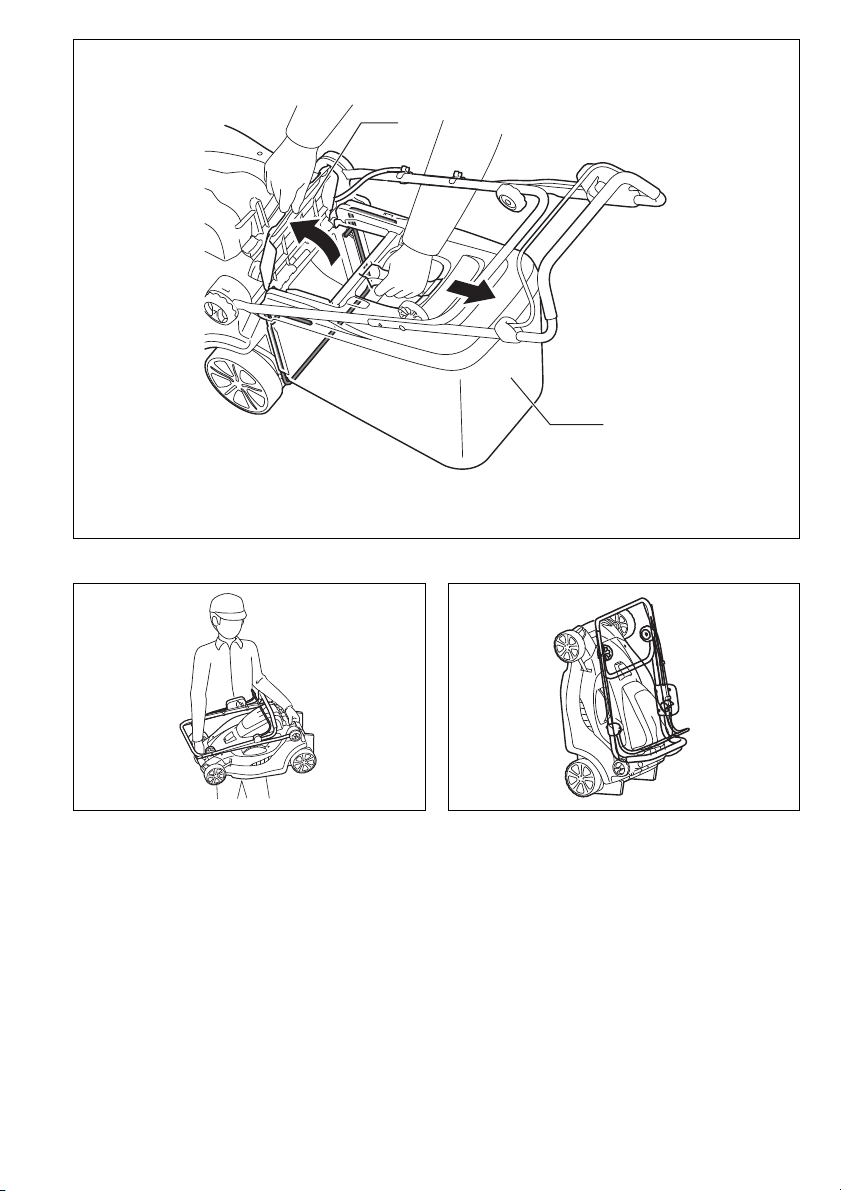
Storage (Fig. 24, 25, 26, 27, 28 & 29)
WARNING:
• When carrying or storing the mower, do not hold the
folded handles but the front grip of the mower. Holding
the folded handles may cause a serious injury or damage to the mower.
The mower can be stored in upright position.
1. Loosen the clamping screw, expand the lower han-
dle to both sides and then move down the handle
forward.
NOTE:
• At this time, keep a firm grip on the lower handle so
that it does not fall down to the far side from the tool.
2. Loosen the clamping nut and pivot the upper handle
back.
3. Take off the grass basket and put the mower in the
upright position.
NOTE:
• When putting the mower in the upright position, do not
hold the handle but use the front grip of the mower.
4. Store the grass basket between the handle and the
mower body.
To maintain product SAFETY and RELIABILITY, repairs,
any other maintenance or adjustment should be performed by Makita Authorized Service Centers, always
using Makita replacement parts.
22
Page 23

TROUBLE SHOOTING
012350
Before asking for repairs, conduct your own inspection first. If you find a problem that is not explained in the manual,
do not attempt to dismantle the tool. Instead, ask Makita Authorized Service Centers, always using Makita replacement parts for repairs.
Malfunction status Cause Action
Battery cartridge is not installed. Install the battery cartridge.
Mower does not start.
Motor stops running after a little use.
It does not reach maximum RPM.
Cutting tool does not rotate:
Stop the machine immediately!
Abnormal vibration:
Stop the machine immediately!
Cutting tool and motor cannot stop:
Remove the battery immediately!
Battery problem (under voltage)
The lock key is not inserted. Insert the lock key.
Battery’s charge level is low.
Cutting height set is too low. Raise the height.
Battery is installed improperly.
Battery power is dropping.
The drive system does not work
correctly.
Foreign object such as a branch is
jammed near the blade.
The drive system does not work
correctly.
Blade is imbalanced, excessively or
unevenly worn.
Electric or electronic malfunction.
Recharge the battery. If recharging is
not effective, replace battery.
Recharge the battery. If recharging is
not effective, replace battery.
Install the battery cartridge as
described in this manual.
Recharge the battery. If recharging is
not effective, replace battery.
Ask your local authorized service
center for repair.
Remove the foreign object.
Ask your local authorized service
center for repair.
Replace the blade.
Remove the battery and ask your
local authorized service center for
repair.
OPTIONAL ACCESSORIES
CAUTION:
• These accessories or attachments are recommended for use with your Makita tool specified in this manual. The use
of any other accessories or attachments might present a risk of injury to persons. Only use accessory or attachment
for its stated purpose.
If you need any assistance for more details regarding these accessories, ask your local Makita Service Center.
• Blade
• Makita genuine battery and charger
NOTE:
• Some items in the list may be included in the tool package as standard accessories. They may differ from country to
country.
23
Page 24

ENG905-1
Noise
The typical A-weighted noise level determined according
to EN60335:
Sound pressure level (L
Sound power level (L
Uncertainty (K) : 3 dB (A)
Vibration
The vibration total value (tri-axial vector sum) determined
according to EN60335:
Vibration emission (a
Uncertainty (K) : 1.5 m/s
• The declared vibration emission value has been measured in accordance with the standard test method and
may be used for comparing one tool with another.
• The declared vibration emission value may also be
used in a preliminary assessment of exposure.
WARNING:
• The vibration emission during actual use of the power
tool can differ from the declared emission value
depending on the ways in which the tool is used.
• Be sure to identify safety measures to protect the operator that are based on an estimation of exposure in the
actual conditions of use (taking account of all parts of
the operating cycle such as the times when the tool is
switched off and when it is running idle in addition to
Wear ear protection
) : 80 dB (A)
pA
) : 93 dB (A)
WA
) : 2.5 m/s2 or less
h
2
ENG900-1
ENG901-1
the trigger time).
ENH217-1
For European countries only
EC Declaration of Conformity
We Makita Corporation as the responsible manufacturer declare that the following Makita machine(s):
Designation of Machine:
Cordless Lawn Mower
Model No./ Type: BLM430, LM430D
Specifications: see “SPECIFICATIONS” table.
are of series production and
Conforms to the following European Directives:
2000/14/EC, 2006/42/EC
And are manufactured in accordance with the following
standards or standardised documents:
EN60745, EN60335
The technical documentation is kept by our authorised
representative in Europe who is:
Makita International Europe Ltd.
Michigan Drive, Tongwell,
Milton Keynes, Bucks MK15 8JD, England
The conformity assessment procedure required by Directive 2000/14/EC was in Accordance with annex VI. Notified Body:
TÜV Rheinland LGA Products GmbH
Am Grauen Stein 29
51105 Köln Germany
Identification number 0197
Measured Sound Power Level: 93 dB (A)
Guaranteed Sound Power Level: 94 dB (A)
7.9.2011
Tomoyasu Kato
Director
Makita Corporation
3-11-8, Sumiyoshi-cho,
Anjo, Aichi, 446-8502, JAPAN
24
Page 25

NEDERLANDS (Originele instructies)
Verklaring van algemene gegevens
1 Accudeksel-borghendel
2 Accu
3 Accudeksel
4 Contactsleutel
5 Accudraaghouder (BCV01)
6 Aanbrengopening
7 Haak
8 Productbevestigingsadapter
van de BCV01
9 Snoer
10 Sleuf
11 Bovenste snoerhouders
12 Accudraaghouder (BCV02)
13 Schakelknop
TECHNISCHE GEGEVENS
Model BLM430 / LM430D
Maaibreedte 430 mm
Toerental onbelast 3 600 min
Afmetingen (L x B x H)
Netto gewicht 17,9 kg
Nominale spanning DC 36 V
Waarschuwing: Gebruik alleen de voorgeschreven
• In verband met ononderbroken research en ontwikke-
ling behouden wij ons het recht voor bovenstaande
technische gegevens te wijzigen zonder voorafgaande
kennisgeving.
• De technische gegevens de accu kunnen van land tot
land verschillen.
• Gewicht, inclusief accu, volgens de EPTA-procedure
01/2003
Standaardaccu(’s)
accu(’s).
BELANGRIJKE
VEILIGHEIDSVOORSCHRIFTEN
WAARSCHUWING! Lees alle veiligheidswaar-
schuwingen en alle instructies. Het niet volgen van de
waarschuwingen en instructies kan leiden tot elektrische
schokken, brand en/of ernstig letsel.
Bewaar alle waarschuwingen en instructies om in de
toekomst te kunnen raadplegen.
1. Steek de contactsleutel pas in de grasmaaier
wanneer die geheel voor gebruik gereed is.
2. Dit apparaat is niet geschikt voor gebruik door
personen (inclusief kinderen) met beperkte
fysieke, zintuiglijke of verstandelijke vermogens,
of gebrek aan ervaring of kennis van zaken, ten-
zij onder toezicht of na degelijk onderricht
betreffende bediening van het apparaat, door
een persoon die verantwoordelijk is voor hun
veiligheid.
14 Schakelhendel
15 Maaihoogte-instelhendel
16 Status van lampjes
17 CHECK-knop
18 Onderste handgreep
19 Gleuf in het maaierhuis
20 Klemschroef
21 Bovenste handgreep
22 Schroefgaten
23 Klemmoer
24 Schroef
25 Snoerhouders
26 Schroevendraaier
27 Snijblad
tijdens gebruik
bij opslag 490 mm – 500 mm x 460 mm x 810 mm
GEB091-5
28 Bout
29 Binnenflens
30 Pijl
31 Buitenflens
32 Achterscherm
33 Gleuf
34 Grasmand
35 Zijwaarts uitschuiven
36 Voorwaarts neerklappen
37 Terugklappen
38 Voorste handvat
–1
1 450 mm – 1 490 mm x 460 mm x 950 mm – 1 020 mm
BL3626 / BL3622A
3. Houd toezicht op kinderen, om te zorgen dat ze
niet met het apparaat gaan spelen.
4. Laat nooit kinderen of anderen die niet vertrouwd zijn met deze instructies het apparaat
bedienen. De toegestane leeftijd van gebruikers
kan ook zijn vastgelegd in de plaatselijke wetgeving.
5. Gebruik het apparaat nooit met personen, in het
bijzonder kinderen, of huisdieren dicht in de
buurt.
6. Onthoud dat de bediener of gebruiker aansprakelijk is voor ongelukken met letsel aan andere
personen of schade aan hun eigendommen.
7. Draag bij gebruik van dit apparaat altijd stevig
schoeisel en een lange broek. Gebruik het apparaat niet wanneer u op blote voeten loopt of
open sandalen draagt. Draag geen loshangende
kleding, shawls of kettingen, of ceintuurs met
bandjes die los bengelen. Loshangende kleding
of sieraden kunnen door de bewegende delen
gegrepen worden.
8. Gebruik het apparaat alleen bij daglicht of helder
kunstlicht.
9. Gebruik het apparaat niet wanneer het gras nat
is.
10. Gebruik de grasmaaier nooit in de regen.
49
Page 26

11. Voor apparatuur met accu’s
– Gebruik voor het opladen alleen het door de
fabrikant voorgeschreven oplaadapparaat.
Een acculader die geschikt is voor een bepaald
type accu kan brandgevaarlijk zijn bij gebruik met
een ander type accu.
– Gebruik elektrische apparatuur alleen op
accu’s die daar specifiek voor zijn ontworpen.
Gebruik van andere accu’s of batterijen kan
gevaar voor letsel of brandgevaar opleveren.
12. Houd de handgreep altijd stevig vast.
13. Zorg dat u stevig staat op hellingen of glooiingen.
14. Loop gewoon en ga niet rennen.
15. Raak het snijblad of andere scherpe randen niet
aan bij het optillen of meedragen van het apparaat.
16. Lichamelijke conditie — Gebruik de grasmaaier
niet onder de invloed van alcohol, stimulerende
of verdovende middelen, of na het innemen van
medicijnen.
17. Zorg dat de beveiligingsdelen zijn aangebracht
en in goede staat verkeren.
18. Houd uw handen en voeten uit de buurt van het
snijblad en de draaiende delen. Let op — Na uitschakelen blijven de snijbladen nog even doordraaien.
19. Verwijder de contactsleutel vóór het bijstellen of
schoonmaken van de grasmaaier, en ook wanneer u er materiaal uit moet verwijderen.
20. Gebruik uitsluitend de in deze handleiding door
de fabrikant voorgeschreven snijbladen.
21. Controleer vóór het gebruik zorgvuldig de snijbladen op barsten of andere beschadigingen.
Vervang gebarsten of beschadigde snijbladen
onmiddellijk.
22. Zorg dat er geen andere personen in de buurt
zijn voordat u met maaien begint. Staak het
maaien wanneer er iemand nadert.
23. Verwijder vóór het maaien eerst obstakels en
voorwerpen zoals stenen, ijzerdraad, glas, botten en grote takken uit uw werkgebied, om
schade aan de grasmaaier en letsel te voorkomen.
24. Stop onmiddellijk met maaien wanneer u iets
vreemds bemerkt. Schakel de grasmaaier uit en
verwijder de contactsleutel uit het apparaat.
Inspecteer vervolgens de grasmaaier.
25. Probeer nooit om de wielhoogte bij te stellen terwijl de grasmaaier werkt.
26. Laat de schakelhendel los en wacht tot het snijblad gestopt is voordat u een tuinpad, trottoir,
oprijlaan, straat of weg oversteekt, of enig terrein waar grind ligt.
Verwijder ook de contactsleutel wanneer u de
grasmaaier achterlaat, wanneer u een voorwerp
uit uw baan gaat verwijderen of in enige andere
situatie waarbij u afgeleid kunt worden.
27. Als het snijblad van de grasmaaier een hard
voorwerp raakt en wegslingert, zou dat ernstige
verwondingen kunnen veroorzaken. Controleer
altijd vóór het maaien het gras op voorwerpen
die hinder of gevaar kunnen veroorzaken en verwijder ze op afdoende wijze.
28. Als de grasmaaier een obstakel raakt, gaat u als
volgt te werk:
– Stop de grasmaaier, laat de schakelhendel los
en wacht tot het snijblad helemaal tot stilstand is gekomen.
– Verwijder eerst de contactsleutel en dan de
accu.
– Controleer de grasmaaier zorgvuldig op
beschadigingen.
– Vervang het snijblad als het op enige wijze
beschadigd is.
Zorg dat alle schade is hersteld alvorens u de
grasmaaier opnieuw start om die te gebruiken.
29. Controleer de grasopvangzak achteraan regelmatig op slijtage of schade. Vóór opslag van het
apparaat zorgt u eerst dat de grasopvangzak
helemaal leeg is. Vervang een versleten zak door
een nieuwe, van de fabriek bestelde zak, voor uw
veiligheid.
30. Stop de motor en verwijder de contactsleutel
wanneer u het apparaat achterlaat, vóór het reinigen van de buitenkant van de grasmaaier en
voordat u enige inspectie of reparatie uitvoert.
31. Wees uiterst voorzichtig wanneer u het apparaat
achteruit laat rijden of naar u toe trekt.
32. Stop de snijblad(en) wanneer u het apparaat
moet kantelen om het te verplaatsen over een
ander oppervlak dan gras, en ook wanneer u het
apparaat vervoert van of naar het te maaien terrein.
33. Gebruik het apparaat in geen geval wanneer de
beveiligingskappen of schermen defect zijn, of
wanneer beveiligingsdelen zoals de keerschotten en/of grasvanger afwezig zijn.
34. Schakel de motor zorgvuldig in volgens de voorschriften, met uw voeten op veilige afstand van
de snijblad(en).
35. Kantel het apparaat niet wanneer u de motor
inschakelt, behalve wanneer het noodzakelijk is
het apparaat ietwat te kantelen om de motor te
starten. In dat geval kantelt u het apparaat niet
verder dan strikt noodzakelijk en tilt u alleen het
van u afgerichte deel ietwat omhoog.
36. Start het apparaat niet terwijl u recht voor de uitblaasopening staat.
37. Steek nooit uw handen of voeten onder of vlakbij
de draaiende onderdelen. Blijf steeds uit de
buurt van de uitblaasopening.
38. Vervoer het apparaat niet terwijl de grasmaaier is
ingeschakeld.
39. Stop het apparaat en verwijder het blokkerende
voorwerp. Let goed op dat alle bewegende
onderdelen volledig tot stilstand zijn gekomen
– wanneer u het apparaat achterlaat,
– voor het opheffen van een blokkering of het
vrijmaken van de grasafvoerbaan,
– voor het controleren, reinigen of werken aan
het apparaat,
– na het raken van een obstakel. Inspecteer het
apparaat op schade en verricht de nodige
reparaties alvorens u het apparaat opnieuw
start en weer in gebruik neemt;
50
Page 27

40. Als het apparaat heftig gaat trillen of schudden
(onmiddellijk controleren)
– inspecteer rondom op schade,
– vervang of repareer alle beschadigde delen,
– controleer op loszittende delen en zet die
goed vast.
41. Wees uiterst voorzichtig tijdens het bijstellen
van het apparaat, om te voorkomen dat uw vingers bekneld raken tussen de bewegende en
vaste delen van het apparaat.
42. Maai altijd horizontaal langs een glooiing, nooit
omhoog en omlaag. Wees uiterst voorzichtig
wanneer u op een hellend vlak van richting verandert. Probeer niet om te maaien op al te steile
hellingen.
43. Niet besproeien of afspoelen met een tuinslang;
zorg dat er geen water in de motor en elektrische
contacten komt.
44. Controleer regelmatig of de snijbladbevestigingsbout stevig vast zit.
45. Zorg dat alle moeren, bouten en schroeven stevig zijn aangedraaid, om het apparaat veilig te
kunnen gebruiken.
46. Laat het apparaat altijd eerst afkoelen voordat u
het opbergt.
47. Onthoud goed bij onderhoud aan de snijbladen
dat ook als de stroom is uitgeschakeld, de snijbladen nog wel kunnen bewegen.
48. Vervang alle versleten of beschadigde onderdelen, voor uw veiligheid. Gebruik uitsluitend originele vervangingsonderdelen en accessoires.
BEWAAR DEZE VOORSCHRIFTEN.
WAARSCHUWING:
Laat u NIET misleiden door een vals gevoel van comfort en bekendheid met het gereedschap (na veelvuldig gebruik) en neem alle veiligheidsvoorschriften
van het betreffende gereedschap altijd strikt in acht.
VERKEERD GEBRUIK of het niet naleven van de veiligheidsvoorschriften in deze gebruiksaanwijzing
kan leiden tot ernstige verwondingen.
ENC007-7
BELANGRIJKE
VEILIGHEIDSVOORSCHRIFTEN
VOOR ACCU
1. Lees alle voorschriften en waarschuwingen op
(1) de acculader, (2) de accu, en (3) het product
waarvoor de accu wordt gebruikt, aandachtig
door alvorens de acculader in gebruik te nemen.
2. Neem de accu niet uit elkaar.
3. Als de gebruikstijd van een opgeladen accu aan-
zienlijk korter is geworden, moet u het gebruik
ervan onmiddellijk stopzetten. Voortgezet
gebruik kan oververhitting, brandwonden en
zelfs een ontploffing veroorzaken.
4. Als er elektrolyt in uw ogen is terechtgekomen,
spoel dan uw ogen met schoon water en roep
onmiddellijk de hulp van een dokter in. Elektrolyt
in de ogen kan blindheid veroorzaken.
5. Voorkom kortsluiting van de accu:
(1) Raak de accuklemmen nooit aan met een
geleidend materiaal.
(2) Bewaar de accu niet in een bak waarin andere
metalen voorwerpen zoals spijkers, munten
e.d. worden bewaard.
(3) Stel de accu niet bloot aan water of regen.
Kortsluiting van de accu kan oorzaak zijn van
een grote stroomafgifte, oververhitting, brandwonden, en zelfs defecten.
6. Bewaar het gereedschap en de accu niet op
plaatsen waar de temperatuur kan oplopen tot
50°C of hoger.
7. Werp de accu nooit in het vuur, ook niet wanneer
hij zwaar beschadigd of volledig versleten is. De
accu kan namelijk ontploffen in het vuur.
8. Wees voorzichtig dat u de accu niet laat vallen
en hem niet blootstelt aan schokken of stoten.
9. Gebruik nooit een beschadigde accu.
BEWAAR DEZE VOORSCHRIFTEN.
Tips voor een maximale levensduur van de accu
1. Laad de accu op voordat hij volledig ontladen is.
Stop het gebruik van het gereedschap en laad de
accu op telkens wanneer u vaststelt dat het vermogen van het gereedschap is afgenomen.
2. Laad een volledig opgeladen accu nooit opnieuw
op.
Als u de accu te veel oplaadt, zal hij minder lang
meegaan.
3. Laad de accu op bij een kamertemperatuur tussen 10°C en 40°C.
Laat een warme accu afkoelen alvorens hem op
te laden.
4. Laad de accu zeker elk half jaar een keer op, ook
als u deze geruime tijd lang niet gebruikt.
BESCHRIJVING VAN DE FUNCTIES
Installeren of verwijderen van de accu (Fig. 1 en
2)
LET OP:
• Schakel het gereedschap altijd uit alvorens de accu te
installeren of te verwijderen.
• Zorg dat u voor gebruik het accudeksel stevig afsluit.
Anders zou er regen, vocht of vuil in kunnen komen en
het apparaat of de accu kunnen beschadigen.
Voor aanbrengen van de accu:
1. Trek de accudeksel-borghendel naar u toe en open
het accudeksel.
2. Plaats de accu in de richting die in de afbeelding is
aangegeven, totdat u een klik hoort.
3. Steek de contactsleutel in op de plaats die in de
afbeelding is aangegeven, zover de sleutel gaat.
4. Sluit het accudeksel en druk het aan totdat het is
vergrendeld met de borghendel.
Om de accu uit de grasmaaier te verwijderen:
1. Trek de accudeksel-borghendel naar u toe en open
het accudeksel.
2. Trek eerst de contactsleutel er uit.
3. Schuif de accu uit het apparaat terwijl u de knop
voorop de accu verschoven houdt.
4. Sluit het accudeksel.
51
Page 28

Accudraaghouders (optionele accessoire)
WAARSCHUWING:
• Alvorens u de accudraaghouder BCV01/BCV02 aanbrengt of uitneemt, verwijdert u eerst de contactsleutel
uit het apparaat.
BCV01 (optionele accessoire) (Fig. 3, 4 en 5)
WAARSCHUWING:
• Bij gebruik van de BCV01 mag u die niet op enig deel
van uw lichaam dragen. Als u de BCV01 dicht op uw
lichaam meedraagt, kan dat tot ernstig letsel leiden.
Schuif de accudraaghouder BCV01 in de aanbrengopening totdat de houder niet verder gaat.
Klap het accudeksel van de grasmaaier open en schuif
dan de productbevestigingsadapter van de BCV01 in de
accuhouder van de grasmaaier.
Leid het snoer van de BCV01 door de sleuf in het accudeksel en sluit het accudeksel.
Leid het snoer van de BCV01 door de bovenste snoerhouders aan de handgreep.
OPMERKING:
• Bij gebruik van de accudraaghouder BCV01 (optionele
accessoire) haakt u het stroomsnoer in de daarvoor
bestemde snoerhouder van de grasmaaier. Als u dit
nalaat, bestaat de kans dat het snoer doorgesneden
wordt.
Om de BCV01 uit de grasmaaier te verwijderen, klapt u
het accudeksel open en drukt u op de haak aan de accubevestigingskant van de BCV01.
BCV02 (optionele accessoire) (Fig. 6 en 7)
Open het accudeksel en klik de BCV02 in de accubevestigingsopening van de grasmaaier.
Sluit het accudeksel.
Om de BCV02 te verwijderen, drukt u op de haak van de
BCV02 en trekt u die er met beide handen uit.
Werking van de stroomschakelaar (Fig. 8 en 9)
WAARSCHUWING:
• Alvorens u de accu in het apparaat plaatst, controleert u altijd even of de schakelhendel naar behoren werkt en bij loslaten naar de uitgangsstand
terugkeert. Bediening van het apparaat met een scha-
kelhendel die niet goed werkt kan leiden tot ongecontroleerde bewegingen, met kans op ernstig lichamelijk
letsel.
OPMERKING:
• Wanneer u te veel gras tegelijk probeert te maaien, kan
de motor soms niet starten, vanwege overbelasting. In
dat geval stelt u de maaihoogte hoger in, om het vervolgens opnieuw te proberen.
• De grasmaaier start niet zonder dat u de schakelknop
indrukt, ook al trekt u de schakelhendel in.
Deze grasmaaier is voorzien van een contactslotschakelaar en een handgreepschakelaar. Als er iets niet in orde
is met een van deze twee schakelaars, staakt u dan
onmiddellijk het gebruik en laat u ze controleren bij uw
dichtstbijzijnde erkende Makita servicecentrum.
1. Steek de contactsleutel in het contactslot.
2. Druk de schakelknop in.
3. Trek de schakelhendel naar u toe terwijl u de scha-
kelknop ingedrukt houdt.
4. Laat de schakelknop los zodra de motor op toeren
komt. De grasmaaier zal blijven werken totdat u de
schakelhendel loslaat.
5. Laat de schakelhendel los om de motor te stoppen.
6. Verwijder altijd de contactsleutel wanneer u het
apparaat niet gebruikt. Bewaar de contactsleutel op
een veilige plaats, buiten bereik van kinderen.
Afstellen van de maaihoogte (Fig. 10)
WAARSCHUWING:
• Steek bij het afstellen van de maaihoogte nooit uw
hand of voet onder de grasmaaier.
• Controleer vóór het gebruik zorgvuldig of de hendel
juist in de gleuf valt.
De maaihoogte is instelbaar binnen een bereik van
20 mm – 75 mm.
1. Verwijder de contactsleutel.
2. Trek de maaihoogte-instelhendel naar u toe en stel
in op de gewenste maaihoogte.
Zorg dat de uitstekende nok op de maaihoogte-instelhendel precies in de gleuf van het grasmaaierhuis valt.
OPMERKING:
• De aanduidingen voor de maaihoogte moeten slechts
als richtlijn beschouwd worden, aangezien de toestand
van het gazon of de grond de uiteindelijke hoogte van
het gras kan doen afwijken van de gekozen hoogtewaarde.
• Met een maaiproef in een minder opvallende plaats
kunt u door uitproberen de gewenste hoogte vinden.
Accubeveiligingssysteem
Lithiumionenaccu’s zijn voorzien van een beveiligingssysteem. Dat systeem kan automatisch de stroomtoevoer van het apparaat afsluiten om de levensduur van de
accu te verlengen.
Het gereedschap kan tijdens gebruik automatisch stoppen wanneer het gereedschap en/of de accu aan één
van de volgende omstandigheden wordt blootgesteld:
• Overbelasting:
Als het gereedschap wordt gebruikt op een manier die
een abnormaal hoge stroomsterkte vergt.
In dat geval laat u de trekschakelaar van het gereedschap los en verhelpt u de oorzaak van de overbelasting. Vervolgens drukt u de trekschakelaar weer in om
het gereedschap te herstarten.
Als het gereedschap niet start, kan de accu oververhit
zijn. In dat geval laat u de accu even afkoelen voordat
u de trekschakelaar opnieuw indrukt.
• Onvoldoende accuspanning:
Als de resterende accuspanning onvoldoende is, zal
het gereedschap niet starten. In dat geval verwijdert u
de accu en laadt u die opnieuw op.
52
Page 29

Aanduiding van de resterende acculading (alleen
Aan
Uit
Knipperen
011713
bij modellen met accu type BL3622A) (Fig. 11)
De accu van type BL3622A is voorzien van een resterende acculadingsaanduiding.
Druk op de CHECK-knop om de resterende acculading
te zien. Dan gaan de lampjes ongeveer drie seconden
lang branden.
Status van lampjes
Resterende lading
E
• Wanneer alleen het onderste lampje knippert (naast de
letter “E”), of wanneer geen van de lampjes brandt, is
de acculading leeg en werkt het gereedschap niet
meer. In dit geval, laadt u de accu op of vervangt u de
lege accu door een volledig opgeladen accu.
• Wanneer twee of meer lampjes niet branden, ook niet
nadat het opladen voltooid is, heeft de accu het einde
van zijn levensduur bereikt.
• Wanneer de bovenste twee en de onderste twee lampjes beurtelings branden, kan een storing in de accu
opgetreden zijn. Neem contact op met uw dichtstbijzijnde erkende Makita-servicecentrum.
OPMERKING:
• De aangegeven accuspanning kan tijdens of vlak na
gebruik van het apparaat wat lager uitvallen dan de feitelijke accuspanning.
• Afhankelijk van de gebruiksomstandigheden en de
omgevingstemperatuur, kan de aanduiding iets verschillen van de werkelijke acculading.
F
70% t/m 100%
45% t/m 70%
20% t/m 45%
0% t/m 20%
Laad de accu op.
Er kan een storing in de
accu zijn opgetreden.
INEENZETTEN
WAARSCHUWING:
• Zorg er altijd voor dat de contactsleutel en de accu
zijn verwijderd, alvorens u enig werk aan de grasmaaier gaat uitvoeren. Als u vergeet de contactsleutel
en de accu te verwijderen, kan dat leiden tot ernstige
verwondingen als de maaier plotseling zou starten.
• Start nooit het apparaat voordat het geheel naar
behoren is gemonteerd. Gebruik van het apparaat in
een deels gemonteerde staat kan leiden tot ernstige
verwondingen als het apparaat plotseling zou starten.
Aanbrengen van de handgreep (Fig. 12, 13, 14,
15, 16 en 17)
WAARSCHUWING:
• Bij het aanbrengen van de handgrepen leidt u de snoeren zo dat ze niet verward of bekneld kunnen raken
door voorwerpen tussen de handgrepen.
1. Draai de klemschroeven los (twee stuks).
Schuif de onderste handgreep aan beide kanten zijwaarts uit en klap de handgreep in die stand geheel
terug en pas deze in de gleuf in het maaierhuis.
2. Draai de klemschroeven aan beide zijden vast om
de onderste handgreep vast te zetten.
3. Til de bovenste handgreep op, zodanig dat de
schroefgaten in de bovenste handgreep samenvallen met die in de onderste handgreep en zet deze
beide dan vast met de bijgeleverde schroeven en
klemmoeren.
OPMERKING:
• Houd hierbij de bovenste handgreep stevig vast, zodat
de handgreep niet uit uw hand wegglijdt.
OPMERKING:
• Monteer de bovenste handgreep zo dat de richting
daarvan en het verloop van het stroomsnoer overeen
komen met die getoond in de afbeelding.
OPMERKING:
• De bovenste handgreep heeft aan allebei de kanten
twee schroefgaten. Door de gaten op verschillende
plaatsen te gebruiken voor de schroeven en klemmoeren kunt u de lengte van de handgreep bepalen.
Verwijderen en aanbrengen van het snijblad
(Fig. 18 en 19)
WAARSCHUWING:
• Verwijder altijd eerst de contactsleutel en de accu voordat u het snijblad gaat verwijderen of installeren. Als u
vergeet de contactsleutel en de accu te verwijderen,
kan dat leiden tot ernstig letsel.
• Na het loslaten van de schakelhendel kan het snijblad
nog enkele seconden doordraaien. Let op dat het snijblad volledig tot stilstand is gekomen.
• Draag voor het hanteren van het snijblad altijd een
paar handschoenen.
1. Leg de grasmaaier zodanig op zijn zijkant, dat de
maaihoogte-instelhendel boven komt.
2. Om het snijblad te blokkeren, steekt u een gewone,
algemeen verkrijgbare schroevendraaier e.d. in een
opening in de grasmaaier.
3. Draai de bout linksom los met de sleutel.
4. Verwijder de bout, de buitenflens, het snijblad en de
binnenflens, in die volgorde.
Voor het weer aanbrengen van het snijblad verricht u de
stappen voor het verwijderen in omgekeerde volgorde.
WAARSCHUWING:
• Let goed op bij het installeren van de binnenflens, het
snijblad en de buitenflens, want die hebben alle een
vaste boven/onderkant.
• Draai de bout rechtsom stevig aan om het snijblad vast
te zetten.
• Plaats het snijblad zo, dat de kant met de draairichtingspijl naar buiten wijst.
• Let op dat het snijblad stevig is vastgezet.
• Verwijder vooral de schroevendraaier e.d. uit de opening waarmee u het snijblad had geblokkeerd.
53
Page 30

Aanbrengen van de grasmand (Fig. 20 en 21)
Verwijder de contactsleutel.
Til het achterscherm van de grasmaaier op en haak de
grasmand in de gleuf van de grasmaaier.
BEDIENING
Maaien
WAARSCHUWING:
• Voor het maaien verwijdert u alle takken en stenen van
het te maaien terrein. Bovendien kunt u beter ook van
tevoren alle onkruid uit het te maaien grasveld wieden.
• Draag bij het maaien altijd een veiligheidsbril met volledig gesloten zijkantbescherming.
Houd bij het maaien de grasmaaier stevig met beide
handen aan de handgreep vast.
De buitenranden van de voorwielen van de grasmaaier
geven een richtlijn voor de maaibreedte. Met de buitenranden van de beide voorwielen als richtlijn maait u het
gras in stroken, waarbij elke maaistrook de vorige met
een-derde tot de helft overlapt, voor een gelijkmatig
gemaaid gazon.
Controleer regelmatig de inhoud van de grasmand en
leeg die voordat de mand overvol raakt. Vóór elke periodieke inspectie dient u de grasmaaier uit te schakelen en
de contactsleutel en de accu te verwijderen.
OPMERKING:
• Als u de grasmaaier gebruikt met een overvolle grasmand kan het snijblad niet soepel draaien, hetgeen de
motor overmatig belast, waardoor de kans op defecten
toeneemt.
Maaien van lang gras (Fig. 22)
Probeer niet om erg lang gras in één keer kort te maaien.
Maai uw gazon liever in meerdere fasen, met een dag of
twee tussen de maaibeurten, tot uw gehele gazon gelijkmatig kort is.
OPMERKING:
• Als u erg lang gras in één keer helemaal kort maait,
kan het gras verdorren en kan het inwendige van de
grasmaaier verstopt raken door het gemaaide gras.
Legen van de grasmand (Fig. 23)
WAARSCHUWING:
• Om ongelukken te voorkomen, controleert u regelmatig
de grasmand op schade of verzwakking door slijtage
en vervangt u die wanneer nodig.
1. Laat de schakelhendel los.
2. Verwijder de contactsleutel.
3. Open het achterscherm en verwijder de grasmand
aan het handvat.
4. Leeg de grasmand.
ONDERHOUD EN OPSLAG
WAARSCHUWING:
• Zorg altijd dat de contactsleutel en de accu uit de grasmaaier zijn verwijderd voordat u die opbergt, of voordat
u inspectie of onderhoud gaat verrichten.
• Draag handschoenen bij het verrichten van inspectie of
onderhoud.
LET OP:
• Gebruik nooit benzine, wasbenzine, thinner, alcohol en
dergelijke. Hierdoor kunnen verkleuring, vervormingen
en barsten worden veroorzaakt.
ONDERHOUD
1. VERWIJDER DE CONTACTSLEUTEL. Bewaar
deze op een veilige plaats, buiten bereik van kinderen.
2. Maak uw grasmaaier schoon met een vochtige doek
en wat mild zeepsop. Sproei of giet geen water over
uw grasmaaier wanneer u die schoonmaakt.
3. Leg de grasmaaier op zijn kant en verwijder de grassprieten die er aan de onderkant in en rond het
maaimechanisme vastgeraakt zijn.
4. Controleer of alle moeren, bouten, knoppen, schroeven en andere bevestigingspunten stevig vast zitten.
5. Inspecteer de bewegende onderdelen op schade,
defecten en slijtage. Als er onderdelen beschadigd
zijn of ontbreken, laat u die dan repareren of vervangen.
6. Alvorens u de grasmaaier opbergt, verwijdert u de
accu uit het apparaat.
7. Berg de grasmaaier binnenshuis op, in een koele,
droge en veilig afgesloten ruimte. Berg de grasmaaier en de acculader niet op in een plaats waar
de temperatuur tot boven de 40°C kan stijgen.
Opslag (Fig. 24, 25, 26, 27, 28 en 29)
WAARSCHUWING:
• Voor het optillen of meedragen van de grasmaaier pakt
u niet de ingeklapte bovenhandgrepen vast, maar het
voorste handvat, vooraan de grasmaaier. Als u de
ingeklapte bovenhandgrepen vastpakt, kan dat leiden
tot letsel, of schade aan de grasmaaier.
De grasmaaier kan in rechtopstaande stand worden
bewaard.
1. Draai de klemschroef los, schuif de onderste handgreep naar weerszijden uiteen en klap dan de handgreep omlaag en naar voren.
OPMERKING:
• Houd hierbij de onderste handgreep stevig vast, zodat
de handgreep niet naar de andere kant van het apparaat valt.
2. Draai de klemmoer los en klap de bovenste handgreep terug.
3. Verwijder de grasmand en plaats de grasmaaier in
rechtopstaande stand.
OPMERKING:
• Voor het rechtop zetten van de grasmaaier pakt u niet
de bovenhandgreep vast, maar gebruikt u het voorste
handvat van de grasmaaier.
4. Berg de grasmand op tussen de handgreep en het
hoofddeel van de grasmaaier.
Om de VEILIGHEID en BETROUWBAARHEID van het
gereedschap te handhaven, dienen alle reparaties,
onderhoud en afstellingen te worden uitgevoerd door
een erkend Makita-servicecentrum, en altijd met gebruikmaking van originele Makita vervangingsonderdelen.
54
Page 31

STORINGEN OPLOSSEN
012350
Alvorens u verzoekt om reparatie, kunt u zelf als volgt het probleem opsporen en verhelpen. Als u met een probleem
kampt dat in deze handleiding niet voorkomt, probeert u dan in geen geval om het apparaat te demonteren. Laat reparaties over aan een erkend Makita-servicecentrum, en dit uitsluitend met gebruik van originele Makita vervangingsonderdelen.
Storing of probleem Oorzaak Oplossing
Er is geen accu geplaatst. Plaats een accu in het apparaat.
Laad de accu opnieuw op. Als
opladen het probleem niet verhelpt,
vervangt u dan de accu door een
nieuwe.
Laad de accu opnieuw op. Als
opladen het probleem niet verhelpt,
vervangt u dan de accu door een
nieuwe.
Installeer de accu zoals beschreven
in deze handleiding.
Laad de accu opnieuw op. Als
opladen het probleem niet verhelpt,
vervangt u dan de accu door een
nieuwe.
Verzoek uw plaatselijke erkende
onderhoudsdienst om reparatie.
Verwijder het hinderlijke voorwerp.
Verzoek uw plaatselijke erkende
onderhoudsdienst om reparatie.
Vervang het snijblad.
Verwijder de accu en verzoek uw
plaatselijke erkende onderhoudsdienst om reparatie.
De grasmaaier start niet.
Na kortstondig gebruik stopt de
motor al gauw.
Het maximale toerental wordt niet
bereikt.
Het maaimechanisme draait niet:
Stop de machine onmiddellijk!
Abnormale trillingen:
Stop de machine onmiddellijk!
Het maaimechanisme en de motor
kunnen niet gestopt worden:
Verwijder onmiddellijk de accu!
Probleem met de accu (onvoldoende
spanning)
De contactsleutel is niet ingestoken. Steek de contactsleutel er in.
De accuspanning is te gering.
De maaihoogte is te laag ingesteld. Kies een grotere maaihoogte.
De accu is niet juist aangebracht.
De accuspanning valt weg.
Het aandrijfsysteem werkt niet goed.
Een hinderlijk voorwerp zoals een tak
is vastgeraakt dichtbij het snijblad.
Het aandrijfsysteem werkt niet goed.
Het snijblad is uit evenwicht, of er is
overmatige of ongelijkmatige slijtage.
Elektrische of elektronische storing.
OPTIONELE ACCESSOIRES
LET OP:
• Deze accessoires of hulpstukken worden aanbevolen voor gebruik met het Makita gereedschap dat in deze
gebruiksaanwijzing is beschreven. Bij gebruik van andere accessoires of hulpstukken bestaat er gevaar voor persoonlijke verwonding. Gebruik de accessoires of hulpstukken uitsluitend voor hun bestemde doel.
Raadpleeg het dichtstbijzijnde Makita-servicecentrum voor verder advies of bijzonderheden omtrent deze accessoires.
• Snijblad
• Originele Makita accu en oplader
OPMERKING:
• Sommige van de onderdelen in deze lijst kunnen bijgeleverd zijn als standaard-accessoires. Deze accessoires kunnen per land verschillend zijn.
55
Page 32

ENG905-1
Geluidsniveau
De typisch, A-gewogen geluidsniveaus vastgesteld volgens EN60335:
Geluidsdrukniveau (L
Geluidsvermogenniveau (L
Onnauwkeurigheid (K): 3 dB (A)
Trilling
De totaalwaarde van de trillingen (triaxiale vectorsom)
vastgesteld volgens EN60335:
Trillingsemissie (a
Onnauwkeurigheid (K): 1,5 m/s
• De opgegeven trillingsemissiewaarde is gemeten volgens de standaardtestmethode en kan worden gebruikt
om dit gereedschap te vergelijken met andere gereedschappen.
• De opgegeven trillingsemissiewaarde kan ook worden
gebruikt voor een beoordeling vooraf van de blootstelling.
Draag oorbeschermers
): 80 dB (A)
pA
): 93 dB (A)
WA
): 2,5 m/s2 of lager
h
2
ENG900-1
ENG901-1
WAARSCHUWING:
• De trillingsemissie tijdens het gebruik van het elektrisch
gereedschap in de praktijk kan verschillen van de
opgegeven trillingsemissiewaarde afhankelijk van de
manier waarop het gereedschap wordt gebruikt.
• Zorg ervoor dat veiligheidsmaatregelen worden getroffen ter bescherming van de operator die zijn gebaseerd
op een schatting van de blootstelling onder praktijkomstandigheden (rekening houdend met alle fasen van de
bedrijfscyclus, zoals de tijdsduur gedurende welke het
gereedschap is uitgeschakeld en stationair draait,
naast de ingeschakelde tijdsduur).
ENH217-1
Alleen voor Europese landen
EU-Verklaring van Conformiteit
Wij, Makita Corporation, als de verantwoordelijke
fabrikant, verklaren dat de volgende Makita
machine(s):
Aanduiding van de machine:
Snoerloze grasmaaier
Modelnr./Type: BLM430, LM430D
Technische gegevens: zie de tabel “TECHNISCHE
GEGEVENS”.
in serie zijn geproduceerd en
Voldoen aan de volgende Europese richtlijnen:
2000/14/EC, 2006/42/EC
En zijn gefabriceerd in overeenstemming met de volgende normen of genormaliseerde documenten:
EN60745, EN60335
De technische documentatie wordt bewaard door onze
erkende vertegenwoordiger in Europa, te weten:
Makita International Europe Ltd.
Michigan Drive, Tongwell,
Milton Keynes, Bucks MK15 8JD, Engeland
De conformiteitsbeoordelingsprocedure vereist door
Richtlijn 2000/14/EC was in Overeenstemming met
annex VI. Verwittigde instantie:
TÜV Rheinland LGA Products GmbH
Am Grauen Stein 29
51105 Köln Duitsland
Identificatienummer 0197
Gemeten geluidsvermogenniveau: 93 dB (A)
Gegarandeerd geluidsvermogenniveau: 94 dB (A)
7.9.2011
56
Tomoyasu Kato
Directeur
Makita Corporation
3-11-8, Sumiyoshi-cho,
Anjo, Aichi, 446-8502, JAPAN
Page 33

Makita Corporation
Anjo, Aichi, Japan
885081A990
IDE
www.makita.com
 Loading...