

Page 1

FGC287-1
QUICK REFERENCE GUIDE FOR MACINTOSH
Thank you for purchasing Finale 2011.
We’d like to take this opportunity to welcome
you to the world’s most widely used family
of music notation software, and offer our
assistance in getting started. This guide is
intended to visually demonstrate how to
accomplish common tasks quickly and easily,
and point you to additional helpful resources
should you need them. Thanks again for your
support and best wishes with your music!
®
—Your friends at MakeMusic
Page 2

Quick Reference Guide for Macintosh
Getting Started 1
A. Using the Document Setup Wizard . . . . . . . . . . . . 1
Finale Screen View 2
Navigating Your Music 3
A. Choosing a view . . . . . . . . . . . . . . . . . . . . . . . . . . .3
B. To Zoom In and Zoom Out . . . . . . . . . . . . . . . . . . .4
C. To Drag the Visible Score Region . . . . . . . . . . . . .4
D. To Switch Pages . . . . . . . . . . . . . . . . . . . . . . . . . . . .4
Entering the Music: Simple Entry 5
A. To enter notes with your mouse . . . . . . . . . . . . . .5
B. To enter notes with your mouse
and computer keyboard . . . . . . . . . . . . . . . . . . . . . 6
C. To type notes into the score with
your computer keyboard. . . . . . . . . . . . . . . . . . . . .7
D. To play notes into the score with
a MIDI keyboard . . . . . . . . . . . . . . . . . . . . . . . . . . . .8
Selecting Music 11
A. To select . . . . . . . . . . . . . . . . . . . . . . . . . . . . . . . . . 11
B. To expand selection . . . . . . . . . . . . . . . . . . . . . . . .12
Copying, Pasting, and Inserting 13
A. To drag-copy . . . . . . . . . . . . . . . . . . . . . . . . . . . . . 13
B. To copy using the clipboard . . . . . . . . . . . . . . . . .13
C. To insert music . . . . . . . . . . . . . . . . . . . . . . . . . . . .14
D. Filtering . . . . . . . . . . . . . . . . . . . . . . . . . . . . . . . . .15
Transposing 16
Working with Measures 17
A. To add measures . . . . . . . . . . . . . . . . . . . . . . . . . .17
B. To insert measures . . . . . . . . . . . . . . . . . . . . . . . . 17
C. To fit a certain number
of measures per system . . . . . . . . . . . . . . . . . . . . 18
D. To adjust the measure layout manually . . . . . . .18
Markings and Text 21
A. Adding expressions . . . . . . . . . . . . . . . . . . . . . . . 21
B. Adding articulations . . . . . . . . . . . . . . . . . . . . . . .22
C. Adding slurs and hairpins . . . . . . . . . . . . . . . . . . 22
D. Adding text . . . . . . . . . . . . . . . . . . . . . . . . . . . . . . 23
Key Signatures, Time
Signatures, and Clefs 24
A. To define a key signature . . . . . . . . . . . . . . . . . . . 24
B. To define a time signature . . . . . . . . . . . . . . . . . .24
C. To define a clef change . . . . . . . . . . . . . . . . . . . .24
Lyrics, Chords, and Repeats 25
A. To type-in lyrics . . . . . . . . . . . . . . . . . . . . . . . . . . .25
B. To type-in chord symbols . . . . . . . . . . . . . . . . . .26
C. To create repeats with 1st and 2nd endings . . . .26
Playback 27
Page Layout 29
Sharing Your Music 30
A. To print your score . . . . . . . . . . . . . . . . . . . . . . . .30
B. To export an audio file . . . . . . . . . . . . . . . . . . . . .30
More Finale Help Resources 31
EFFICI ENCY TIP S:
Using Contextual Menus 32
Metatools 33
A. Using Articulation and Expression metatools . . 33
B. Using Smart Shape metatools . . . . . . . . . . . . . .34
C. Common metatools . . . . . . . . . . . . . . . . . . . . . . . . 34
D. Using metatools with Simple Entry . . . . . . . . . . 35
Multiple Voices: Layers 8
Playing-in Music: HyperScribe 9
A. To record a performance . . . . . . . . . . . . . . . . . . . . .9
B. To set the smallest note value . . . . . . . . . . . . . . . . 9
C. To record into two staves . . . . . . . . . . . . . . . . . . .10
D. To change the recording tempo and countoff . . .10
Working with Staves 19
A. To insert staves . . . . . . . . . . . . . . . . . . . . . . . . . . . 19
B. To delete staves . . . . . . . . . . . . . . . . . . . . . . . . . . .19
C. To apply staff styles . . . . . . . . . . . . . . . . . . . . . . . .19
D. To hide an empty staff in a system . . . . . . . . . . . 20
E. To move staves . . . . . . . . . . . . . . . . . . . . . . . . . . .20
M AC I N T O S HTa b l e o f C o n T e n T s M AC I N T O S H Ta b l e o f C o n T e n T s
A. Playback Controls . . . . . . . . . . . . . . . . . . . . . . . . . 27
B. To change the playback tempo . . . . . . . . . . . . . . .27
C. Human Playback . . . . . . . . . . . . . . . . . . . . . . . . . .28
Online customer service and technical support:
www.finalemusic.com/support
7615 Golden Triangle Drive, Suite M
Eden Prairie, MN 55344-3848
MakeMusic
www.finalemusic.com
Page 3
Getting Started
Finale Screen View
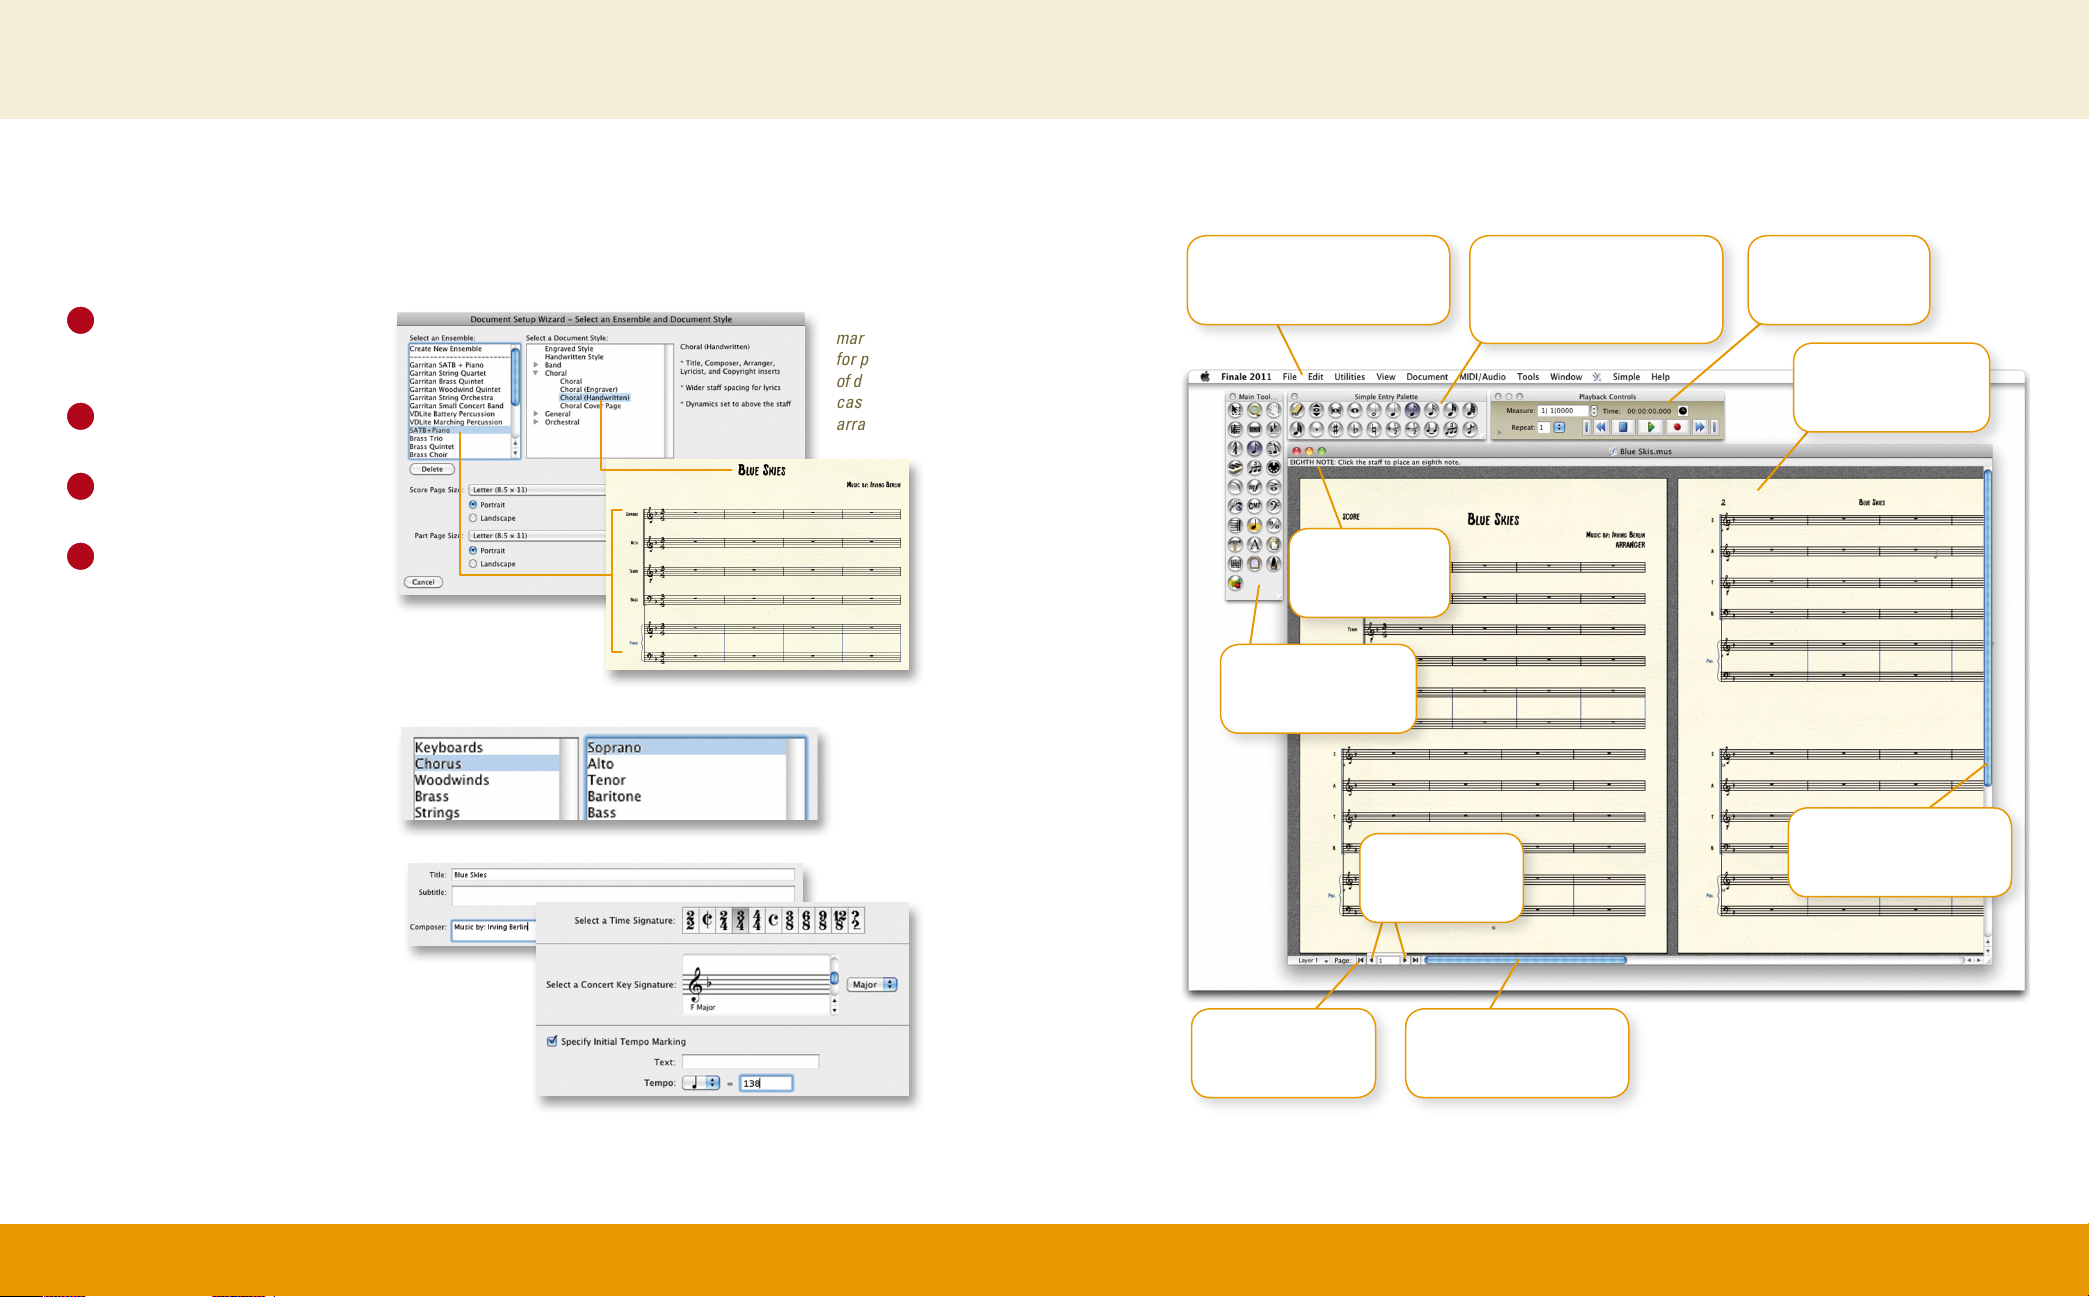
A. Using the Document Setup Wizard
Finale’s Document Setup Wizard is usually the fastest way to begin a new score.
The pages in this wizard allow you to quickly specify all the basic score elements.
1
From the File menu, choose
New > Document with Setup
Wizard.
2
Choose the Ensemble and
Document Style and click Next.
3
Select your instruments and
click Next.
4
On pages 3 and 4, choose the
desired score elements, and
click Finish.
Pages 3 and 4 allow you
to specify the:
• Title
• Credits and copyright
• Key signature
• Time signature
• Tempo indication
• Pickup measure
• Number of measures
Document Styles
include fonts and
markings designed
for particular types
of documents, in this
case, a choral jazz
arrangement.
When you open a new score, the following menus, palettes, and controls appear. These
elements form a framework for all of Finale’s features and functions.
Menu bar
These menus include standard
operations and editing commands.
Message bar
This bar identifies
the selected tool.
Main tool palette
This palette contains
all of Finale’s tools.
Page scroll
Use these buttons
to navigate pages.
Simple Entry palette
Use this palette to choose note
durations, accidentals, etc.
while entering with Simple Entry.
Playback controls
Use these to start
and stop playback.
Document window
The active document
appears in this window.
Vertical scroll
Use this scroll bar to position
the document vertically.
Page counter
This counter identifies
the current page.
Search for “Setup Wizard” in the User Manual for details.
1 M AC I N T O S HG e T T i n G s T a r T e d 2M AC I N T O S H f i n a l e s C r e e n V i e w
Horizontal scroll
Use this scroll bar to position
the document horizontally
Page 4
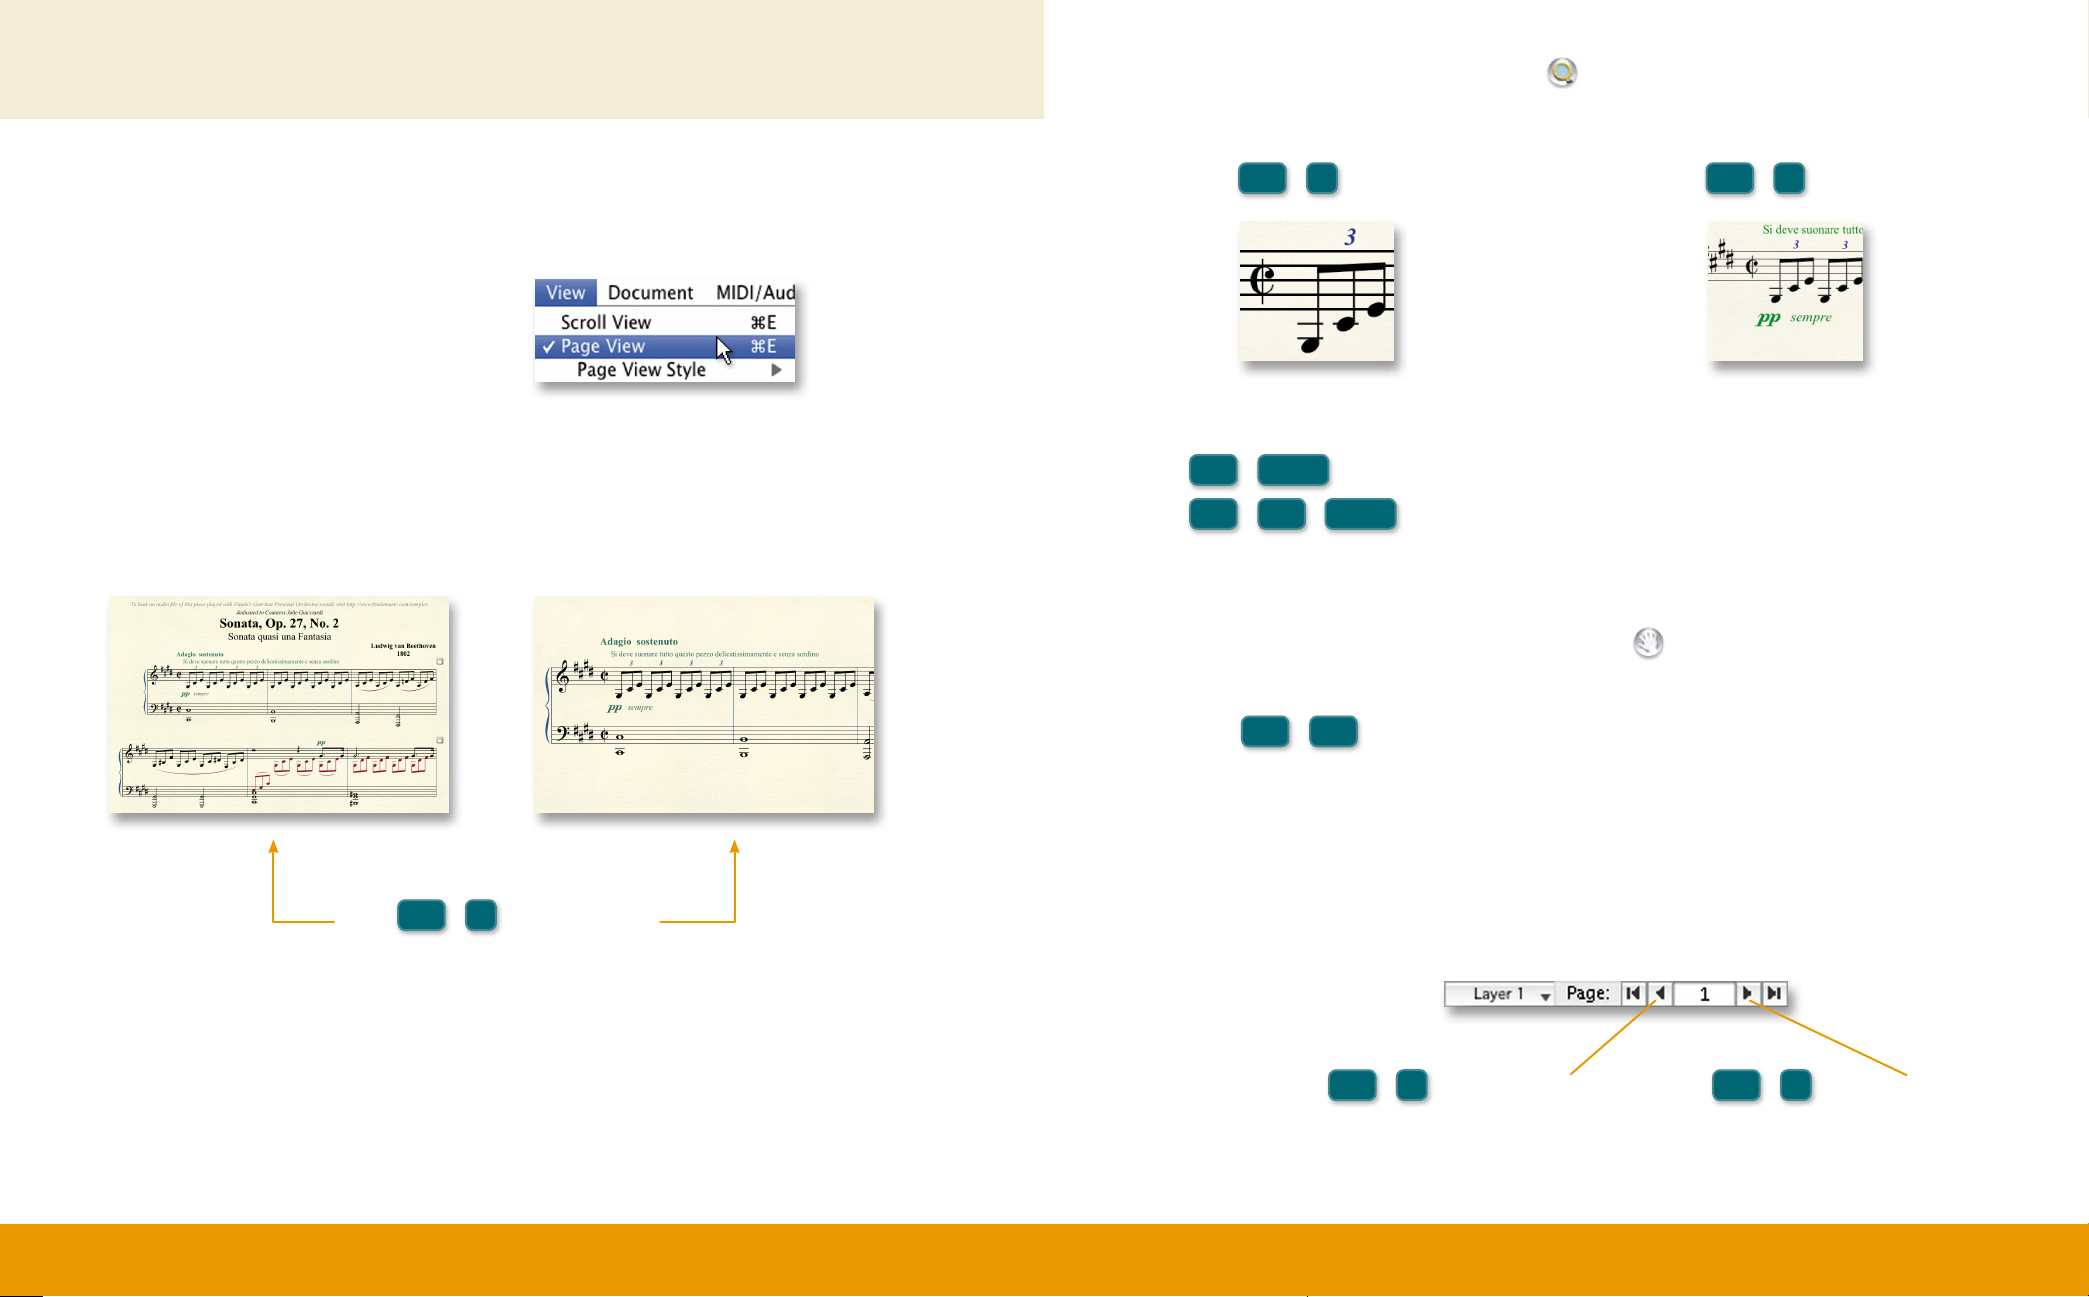
Navigating Your Music
Getting the best view of your score in progress is crucial to working with Finale efficiently.
A. Choosing a view
The two main views in Finale are Page
View and Scroll View. From the View menu,
choose Scroll View or Page View.
Page View
displays your music exactly as it will appear
on the printed page. Use this view for system
and page layout.
Scroll View
displays your music in one continuous
horizontal system, free from page constraints.
B. To Zoom In and Zoom Out
You can find zoom commands under the View menu, but to save time, use keyboard shortcuts.
command
+
=
⌘
+
to zoom in
To zoom in and out using your mouse cursor:
command
command
shift
⌘
+
option
⌘
+
+ click to zoom-in to the position clicked.
shift
+
+ click to zoom-out.
Press
command
—
–
⌘
+
to zoom outPress
For more, search “Zoom” in the User Manual.
Search “Views” in the User Manual for more details.
command
E
+
⌘
Press
to switch between
Page View and Scroll View
C. To Drag the Visible Score Region
Use Finale’s Hand Grabber tool to reposition your view of the score.
command
Press
option
⌘
+
+ click and drag to move the score.
Search for “Hand Grabber” in the User Manual for more information.
D. To Switch Pages
In Page View, use the arrow buttons in the lower left corner of your screen to navigate
between pages. Or, use the keystrokes listed here:
Press
command
⌘
Page
Up
+
to move to previous page. Press
command
Search for “Page View” in the User Manual for more information.
Page
Down
⌘
+
to move to next page.
3 M AC I N T O S Hn aV i G a T i n G Yo u r M u s i C 4M AC I N T O S H n aV i G a T i n G Yo u r M u s i C
Page 5
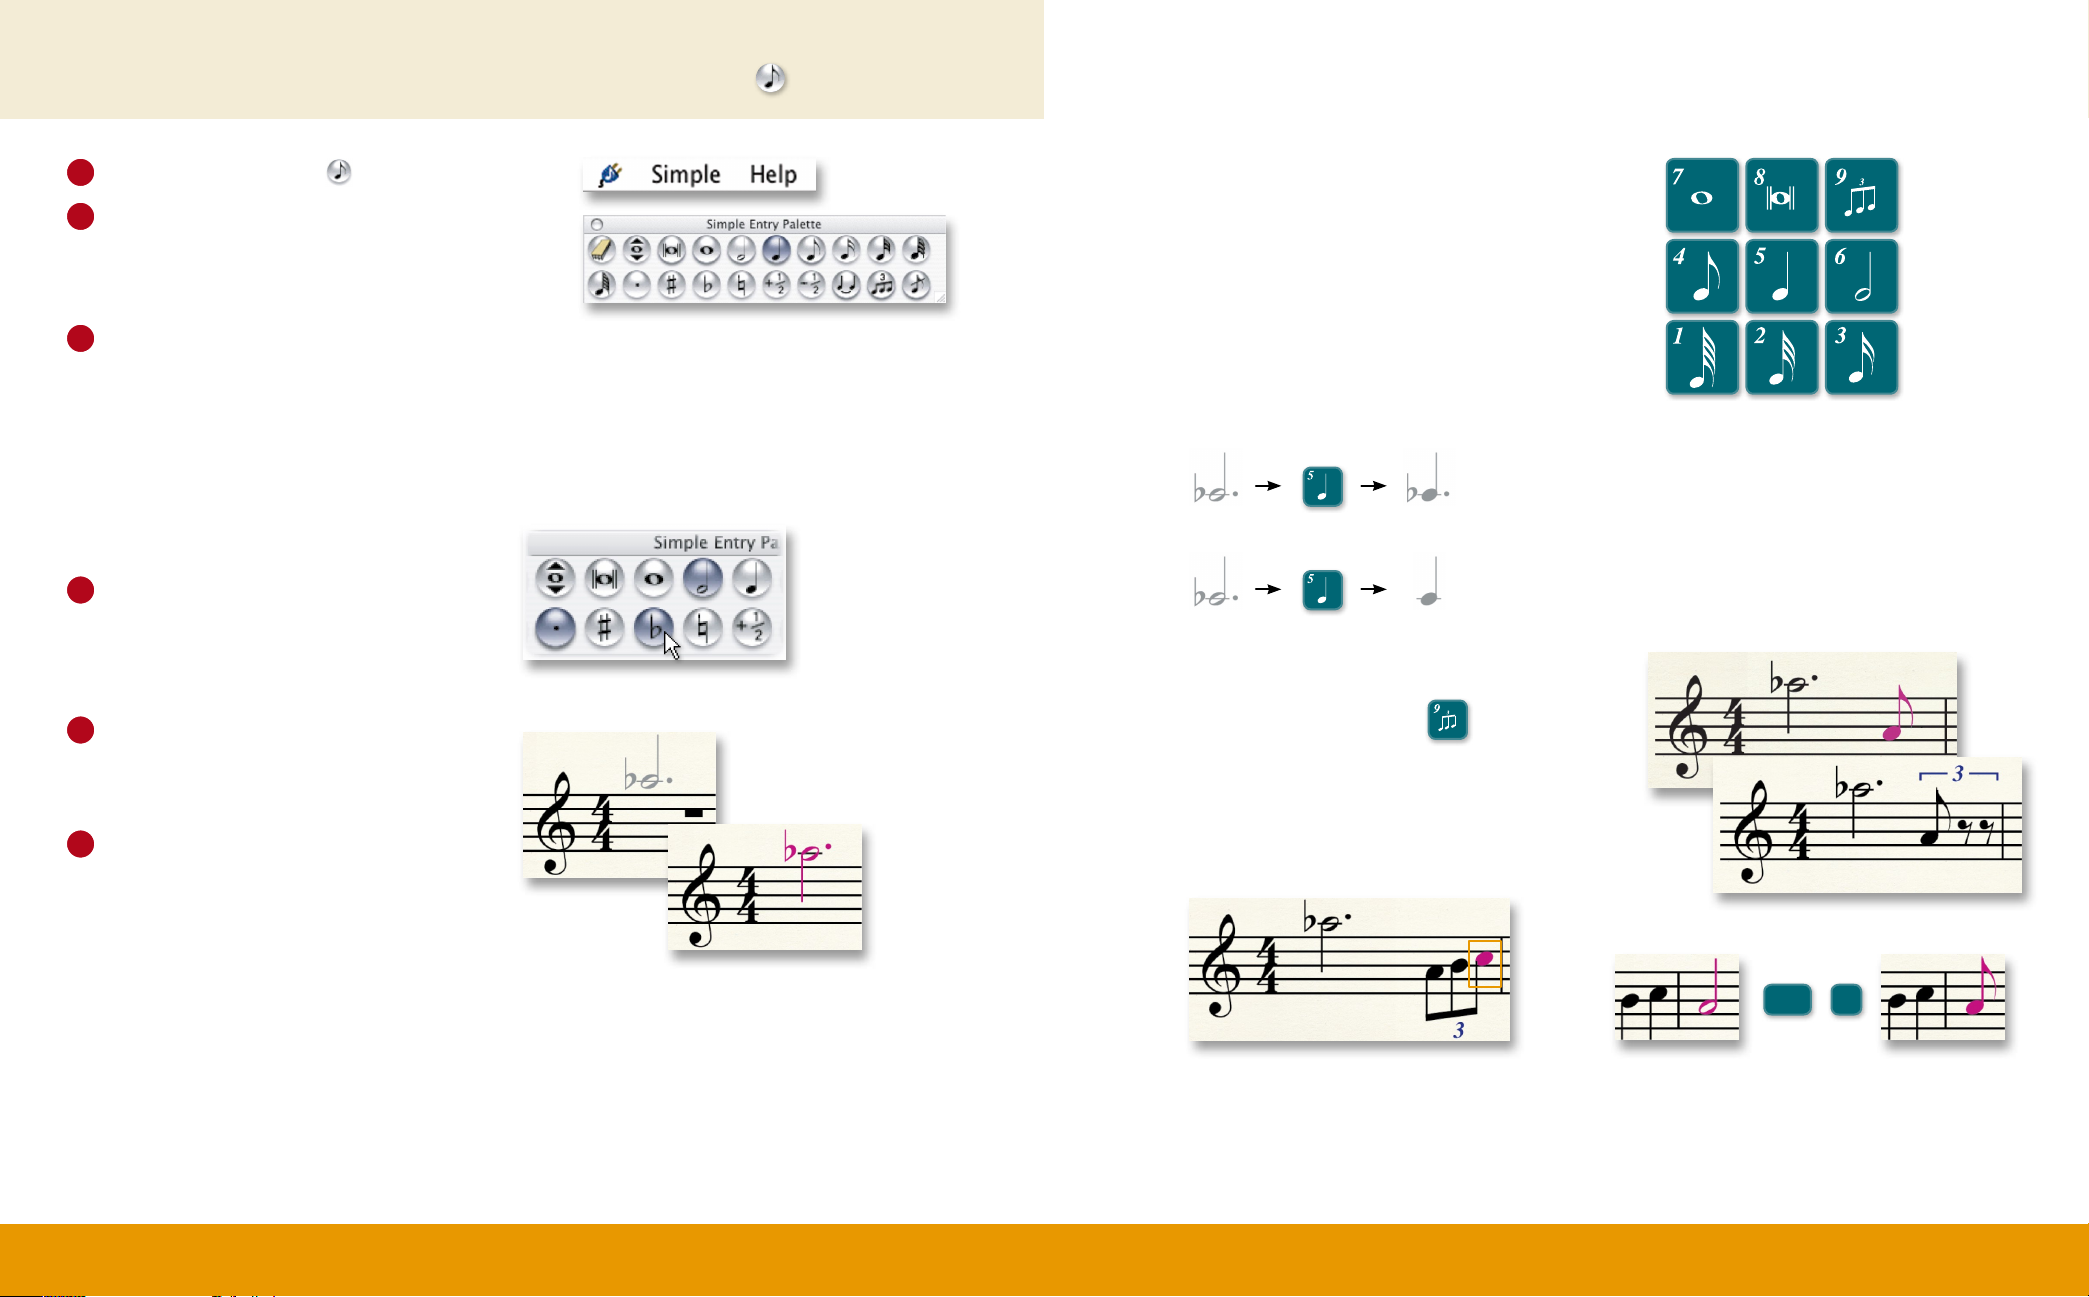
Entering the Music: Simple Entry
B. To enter notes with your mouse and computer keyboard
1
Click the Simple Entry tool .
2
Observe the Simple menu (a) at the top
of your screen. You will use this menu to
change settings and refer to keyboard
shortcuts.
3
Observe the Simple Entry palette (b), which
you will use to specify note durations and
other note properties.
A. To enter notes with
your mouse
1
Click the note duration in the Simple Entry
palette, as well as the accidental, tie, tuplet,
or grace note.
2
Position your mouse cursor where you
would like to enter the note.
a.
b.
note durations before you click them in.
Use the image to the right as a guide.
Use your numeric keypad (c) to choose
c.
To remove extra tools, double-press as
shown below.
Notebook users, use the “Laptop Shortcut
Table” to improve the efficiency of your smaller
keyboard. Choose Simple > Simple Entry Options
and click Edit Keyboard Shortcuts. Under
Keyboard Shortcut Set, click the Select popup
menu and choose Laptop Shortcut Table.
To change the selected duration.
Tip: Double-click
one of these tools
to de-select all other
tools in the Simple
Entry palette.
Enter a note and then press 9
(press once)
(press twice)
To select only the duration and remove the dot and flat.
to create a triplet.
3
Click to enter the note. Finale flips the stem
direction when appropriate.
option
Notes are purple when you enter them,
indicating they can be edited with a keystroke...
5 M AC I N T O S He n T e r i n G T h e M u s i C : s i M p l e e n T r Y 6M AC I N T O S H e n T e r i n G T h e M u s i C : s i M p l e e n T r Y
Change the duration of the note you just
entered by pressing Option+# (1-8).
All Simple Entry keyboard shortcuts are listed under the Simple menu.
4
+
Page 6
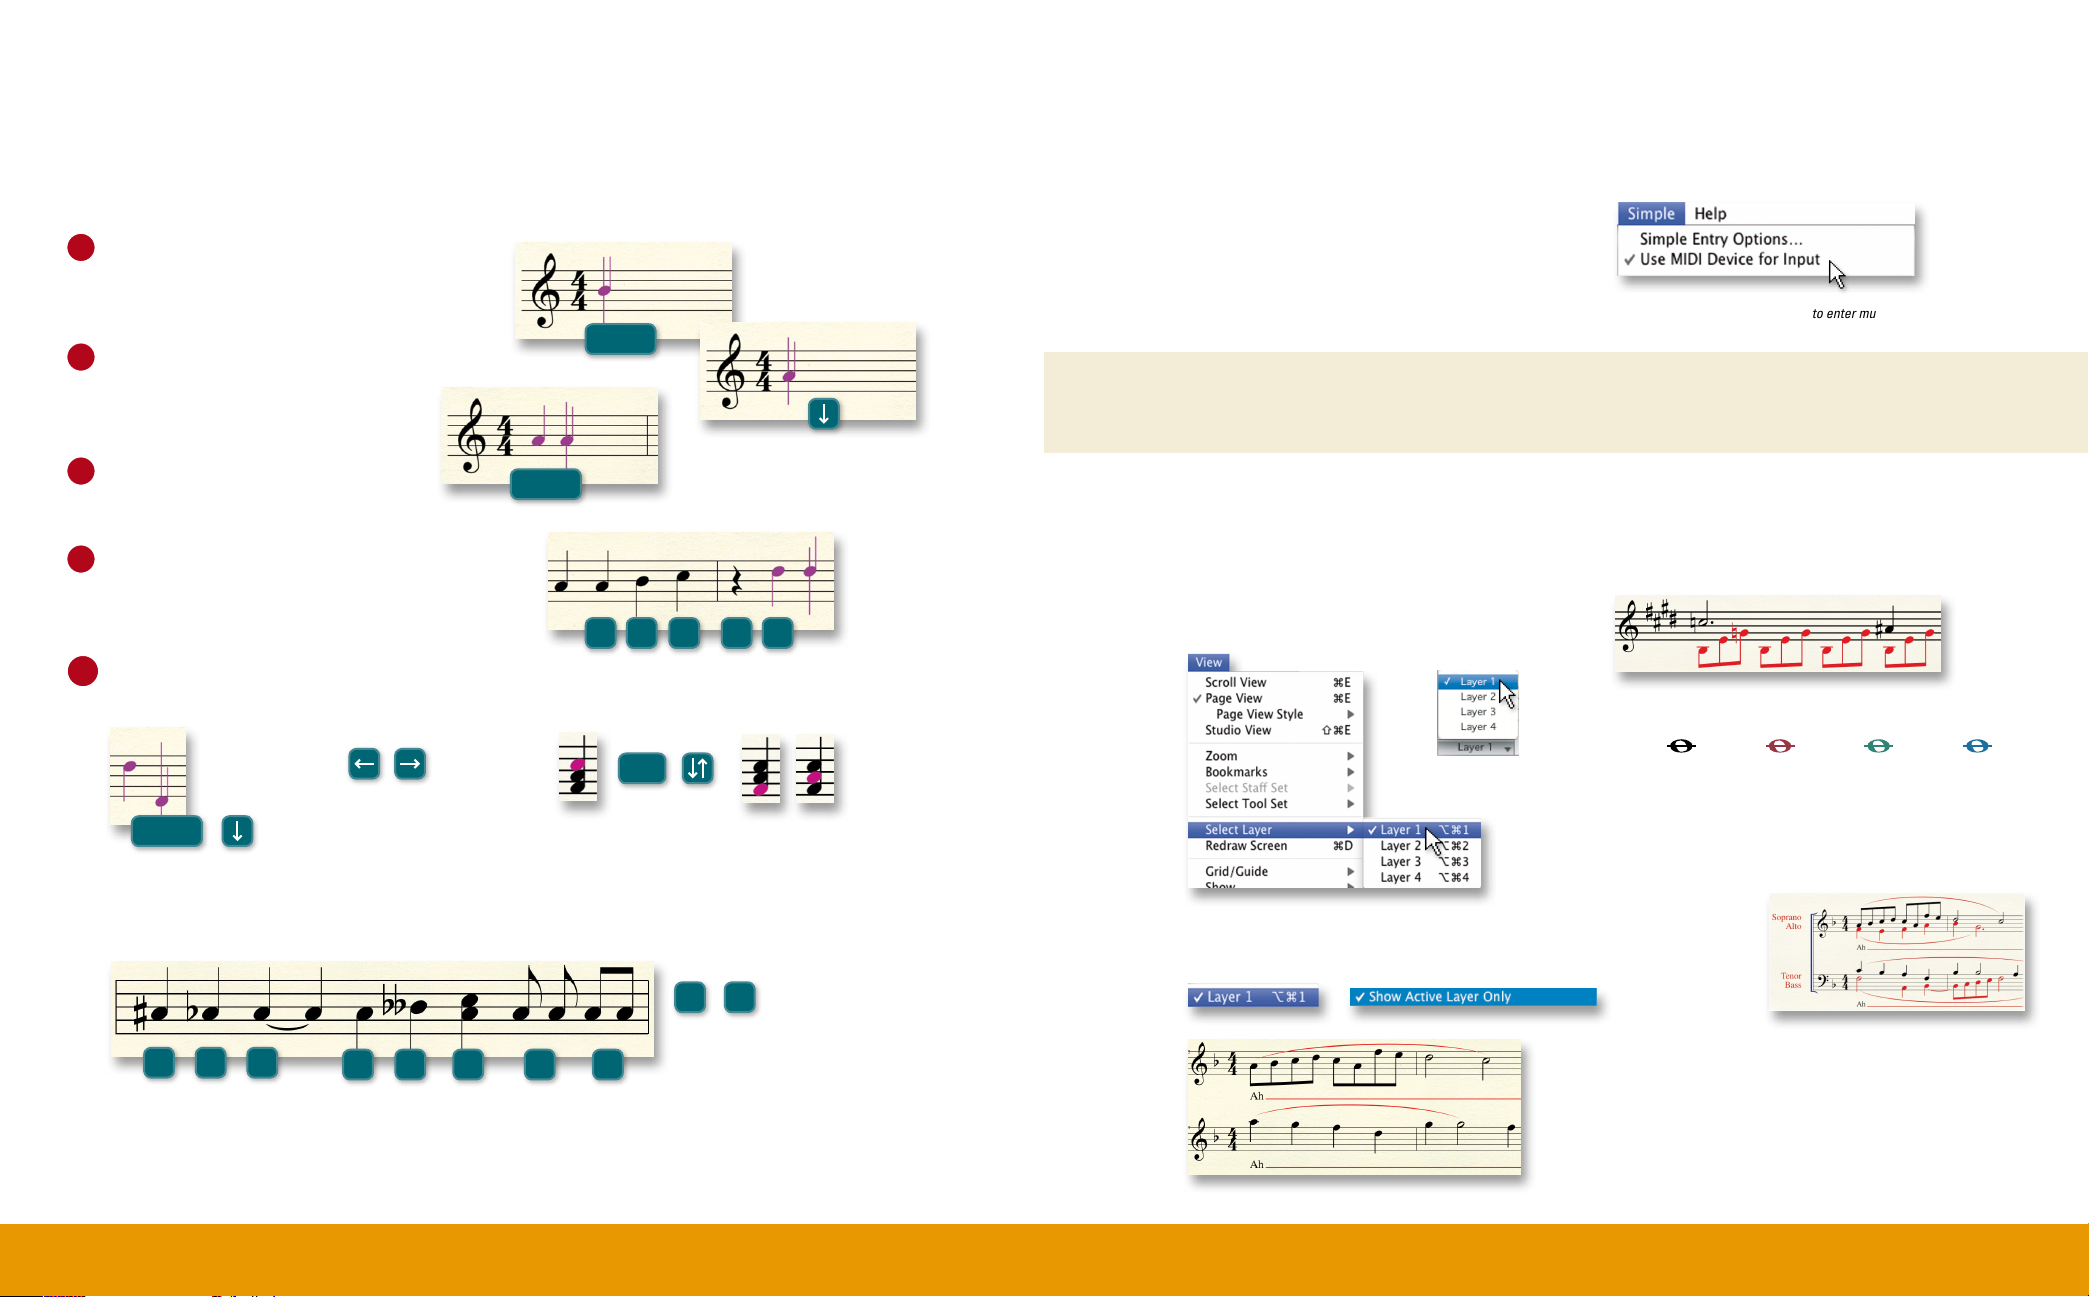
C. To type notes into the score with your
computer keyboard
Using your computer keyboard to type notes into the score
is faster than clicking. When you have typed the duration:
1
Press Enter to activate the Simple Entry
Caret, which is Finale’s entry cursor.
enter
2
Use the up and down arrows
to choose the pitch.
3
Press Enter to enter the note.
4
Or, simply type the letter of the
desired pitch, 0 (zero) for a rest.
enter
A B C 0 D
D. To play notes into the score with a MIDI keyboard
You can use your MIDI keyboard (or other MIDI device) to quickly enter notes.
With the caret active, simply play the desired note or chord to add it to the score.
Check Simple > Use MIDI Device for Input,
to use a MIDI keyboard for note entry.
See “Speedy Entry” and “HyperScribe” in the User Manual for other ways to enter music using a MIDI keyboard.
Multiple Voices: Layers
When a second voice with a different rhythm is required within a measure, like the eighth notes
shown in red below, enter the notes in a new layer. Each layer is a rhythmically independent
voice. Simply choose the new layer and enter as you would normally.
Layers can be chosen from the View menu,
or the layer popup at the bottom of the screen.
5
Press Shift-down arrow to move
the caret down an octave.
shift
Sharp
See “Simple Entry” in the User Manual for more information.
+
=
+
—
–
FlatTAdd tie
Moves selection
left/right.
L
Flip stem\Flip
enharmonic
3
Add interval
third (number
row)
command
+
⌘
Moves selection up/down.
+ –
Half step
increase
/ /
Break/join beam
(numpad)
Half step
decrease
(numpad)
From the Document menu, choose Show Active Layer
Only to work with a single layer independently.
+
Show Active Layer Only allows you to edit or clear individual
layers without affecting the hidden layers. (Compare to figure
above). Be sure to uncheck Show Active Layer Only before printing.
Layers can be identified by note color.
Layer 1 Layer 2 Layer 3 Layer 4
Always use layers 1 and 2 first when notating
multiple voices. Use layer1 for the higher
voice. If there are three or four voices in a
single staff, then use layers 3 and 4 as needed.
See “Multiple Voices” in the User Manual for more information.
7 M AC I N T O S He n T e r i n G T h e M u s i C : s i M p l e e n T r Y 8M AC I N T O S H M u lT i p l e V o i C e s : l aY e r s
Page 7

Playing-in Music: HyperScribe
HyperScribe® allows you to record directly from your MIDI keyboard into the score.
To configure your MIDI keyboard (or other external MIDI device) for use with Finale,
see “Setting up your MIDI system” in the Tutorials section of the Finale User Manual.
A. To record a performance
1
Click the HyperScribe tool .
2
Click a measure.
3
Wait for two countoff measures
and begin playing.
C. To record into two staves
1
Click the HyperScribe tool .
2
From the HyperScribe menu, choose Record
Mode > Split Into Two Staves.
3
Enter the split point (middle C = 60)
and click OK.
4
Record your performance.
D. To change the recording tempo and countoff
4
When you’re done, click the score
to stop recording.
B. To set the smallest
note value
Since a live performance is never perfect,
Finale rounds-off your performance to the
note value you choose. For example, if your
piece does not include any notes shorter
than an eighth note, tell Finale this by
specifying eighth as the smallest note value
to ensure there will not be sixteenth notes in
the transcription. This setting is configured in
the Quantization Settings dialog box.
Choose MIDI/Audio > Quantization Settings to open
this dialog box.
Results of your HyperScribe
recording depend on the
Smallest Note Value selected
and other quantization settings.
If you are transcribing a busy passage, you may want to record at a slower tempo for greater
accuracy. You can do this, and make additional adjustments to aspects of your recording session
in the Playback and/or Click and Click and Countoff dialog boxes.
1
Click the HyperScribe tool .
2
From the HyperScribe menu, choose
Beat Source > Playback and/or Click (a).
3
Select Use This Tempo, and enter the
desired recording tempo in the adjacent
text box (b). Be sure the correct main
beat duration is selected below.
4
Click Click and Countoff.
5
After Measures, enter the desired
number of countoff measures (c).
6
Click OK twice to return to the score.
b.
a.
c.
9 M AC I N T O S Hp l aY i n G - i n M u s i C : h Y p e r s C r i b e 10M AC I N T O S H p l aY i n G - i n M u s i C : h Y p e r s C r i b e
Page 8

Selecting Music
B. To expand selection
The Selection tool is Finale’s universal editing tool. It can be used to select, move, delete, copy,
paste, or otherwise edit any region of measures and virtually any individual item in the score.
Tip: See “Selecting Music” in the User Manual for more details.
A. To select
Click on the staff lines (without
clicking on a note) to select a full
measure. (Click only once.)
Click outside and above the staff and
drag diagonally across any measure
region (partial or whole measures) to
select a measure region.
Click
Drag
Use keyboard shortcuts to expand or contract the selected region on a single staff...
To next beat
To end of measure
To end of score
To beginning of score
option
shift
shift
+
shift
shift
+
+
end
+
home
+
Release
...or on multiple staves.
shift
+
shift
+
(again)
Double-click a full measure to
select a measure stack. Copying
measure-specific items or deleting full
measures requires a stack selection.
A selected region including full measures in every staff is called a measure stack and is indicated
by highlighting that extends from the top to the bottom staff, including the area between staves.
11 M AC I N T O S Hs e l e C T i n G M u s i C 12M AC I N T O S H s e l e C T i n G M u s i C
Page 9

Copying, Pasting, and Inserting
Finale offers a great deal of control over copying, inserting and pasting (replacing).
A. To drag-copy
If the source and target regions are both
visible on your screen, quickly copy music
by dragging the selected region.
1
Click and hold
2
Drag
3
Release
Tip: See “Copying Music” in the
User Manual for more details.
Click and hold
Release
Drag
C. To insert music
When you copy and paste, Finale overwrites the content in the target region. When you insert,
all subsequent music is pushed towards the end of the score, usually increasing the total number
of measures.
command
+
⌘
A red insertion bar indicates the inserted music will nudge music towards
the end of the score. Full measures will not be inserted.
click and drag to insert instead of paste.
B. To copy using
the clipboard
If the source and target regions are not
both visible on your screen, copy music
to the clipboard, then paste the contents
of the clipboard to the target region.
Existing music is replaced.
command
1
2
Select the target
command
3
13 M AC I N T O S HC o p Y i n G , p a s T i n G , a n d i n s e r T i n G 14M AC I N T O S H C o p Y i n G , p a s T i n G , a n d i n s e r T i n G
⌘
⌘
C
+
+ V
command
⌘
command
C
+
Select the target
V
⌘
+
A green insertion bar appears when copying
and inserting stacks. It indicates Finale will
insert the full measure(s), pushing subsequent
measures towards the end of the score.
Page 10

D. Filtering
You can copy specific score elements
using the Edit Filter dialog box.
1
From the Edit menu, choose Edit Filter.
2
In the Edit Filter dialog box, check the items
you want to copy. (Click None to uncheck all).
3
Click OK.
To copy measure settings,
a full measure stack must
be selected.
Transposing
To transpose:
1
Click the Selection tool .
2
Select a region of music.
3
From the Utilities menu, choose Transpose.
4
Select the interval from the Interval
popup menu.
5
Click OK.
To quickly transpose:
1
Click the Selection tool .
2
Select a region of music.
3
Press...
6
to transpose down a step.
4
Copy the music as you would normally.
command
Press
15 M AC I N T O S HC o p Y i n G , p a s T i n G , a n d i n s e r T i n G 16M AC I N T O S H T r a n s p o s i n G
option
⌘
+
shift
+
to open the Edit Filter dialog box.
+ F
Finale uses the filter while
copying whenever Use Filter is
checked under the Edit menu.
7
to transpose up a step.
8
to transpose down an octave.
9
to transpose up an octave.
This method transposes the music diatonically within the key signature. To change
the key, use the Selection tool context menu or the Key Signature tool. To configure
a transposing staff, use the Staff tool.
Page 11

Working with Measures
A. To add measures
To add measures at the end of the score:
1
From the Edit menu, choose Add Measures.
2
Type the number of measures you would
like to add.
3
Click OK.
B. To insert measures
To insert new empty measures
anywhere in the score:
1
Select a measure. (Inserted measures
will appear before this one.)
2
From the Edit menu, choose Insert
Measure Stack.
C. To fit a certain number
of measures per system
1
Select the measures you would like to fit.
2
From the Utilities menu, choose Fit Measures.
3
Type the number of measures and click OK.
Finale automatically adjusts
the measure layout to fit
the specified number of
measures throughout the
selected region.
3
Type the number of measures you
would like to Insert.
4
Click OK.
D. To adjust the measure layout manually
You can move individual measures from one system to the next, or to the previous.
1
Select the measure(s).
2
17 M AC I N T O S Hw o r k i n G w i T h M e a s u r e s 18M AC I N T O S H w o r k i n G w i T h M e a s u r e s
Press
command
+
⌘
to move to the next system, or
command
⌘
to move to the previous.
+
Tip: To add a pickup measure, from the
Document menu, choose Pickup Measure.
Tip: See “Measure Layout” in the User Manual for more details
Page 12

Working with Staves
Use the Staff tool to easily insert, delete, or edit staves. When you click the Staff tool, the Staff menu
appears at the top of your screen. The following instructions assume the Staff tool is selected.
A. To insert staves
1
Select a measure region in a staff. The
inserted staff will appear above this one.
2
From the Staff menu, choose New Staves
(with Setup Wizard).
B. To delete staves
1
Click the Staff Handle for the staff you would
like to delete.
Press
command
2
the staff and repositions adjacent staves
accordingly.
C. To apply staff styles
delete
⌘
+
. Finale removes
Alternatively,
control-click a
staff handle and
choose Delete
Staves and
Reposition.
D. To hide an empty staff in a system
1
Select a region including the empty staves.
2
From the Staff menu, choose Hide Empty Staves.
3
To show hidden staves, control-click this handle and choose Show All.
This dashed line
indicates hidden
empty staves
Staff Styles can be used to apply a notation
style, such as the following, to a portion
of a staff.
1
Select the measure region.
2
From the Staff menu, choose Apply Staff
Style To > Score and Parts.
3
Choose the desired Staff Style and click OK.
1 and 2-bar repeats X noteheads Change transposition
Rhythmic notation Slash notation Force hide staff (cutaway)
19 M AC I N T O S Hw o r k i n G w i T h s T aV e s 20M AC I N T O S H w o r k i n G w i T h s T aV e s
E. To move staves
Click a staff handle and drag
to move it vertically for one
system only. (Double-click
the handle and drag to position
the staff in all systems.)
See “To move staves”in the User Manual for more details.
Page 13

Markings and Text
Most markings and text are added with
one of three tools; the Expression tool,
Articulation tool, or Smart Shape tool. In
this section, you will learn how to easily
add these figures, and which tool to use.
A. Adding expressions
Six different types of figures are added with
expressions, each with its own category:
F
Adagio = 40
accel.
con brio
arco
A
Articulation Tool
Expression Tool
Smart Shape Tool
To add an expression:
1
Click the Expression tool .
2
Double-click the score.
3
Choose the category.
4
Double-click the expression.
B. Adding articulations
Articulations are markings attached to a single note, including:
If you don’t see the expression or
articulation you need, click Create
to define a new custom marking.
To add an articulation to a single note:
1
Click the Articulation tool .
2
Click the note.
3
Double-click the articulation.
Ornaments
Accents
Staccato
Tenuto
To add an articulation to multiple notes:
1
Click the Articulation tool .
2
Drag-select a region of notes.
3
Click Select.
4
Double-click the articulation.
5
Click OK.
To add multiple expressions:
1
Note: Expressions and articulations affect playback.
21 M AC I N T O S HM a r k i n G s a n d T e x T 22M AC I N T O S H Ma r k i n G s a n d T e x T
Click the Expression tool .
2
Drag-select a region of notes.
3
Choose the category.
4
Double-click the expression.
C. Adding slurs and hairpins
Lines, curves, and other shapes are added with the
Smart Shape tool.
To add a Smart Shape:
1
Click the Smart Shape tool .
2
Choose the desired tool from the
Smart Shape palette.
3
Double-click and drag to add the
Smart Shape.
Trills Glissandi Ottavas (8va/8vb)
Hairpins Slurs
Drag the diamond
handles to adjust
the slur contour.
Page 14

D. Adding text
Titles, subtitles, composer, arranger, lyricist,
and other text that does not need to adjust
with the music is added with the Text tool.
To set or edit a document’s title page text:
1
From the File Menu, choose File Info.
2
Enter the page text information in the File
Info dialog box.
3
Click OK.
Titles
Subtitles
Composer
Key Signatures, Time Signatures, and Clefs
To change the key, time, or clef:
1
Choose the Selection tool .
2
Control-click a measure.
3
Choose the Key Signature, Time Signature or
Clef command and choose the desired option.
A. To define a key signature
1
Click the Key Signature tool .
2
Double-click a measure.
3
Use the slider next to the key signature
preview to specify the key.
B. To define a time signature
1
Click the Time Signature tool .
2
Double-click a measure.
3
Use the Number of Beats slider to specify the
number of beats per measure.
Time Signatures
Key Signatures Clef Changes
To add other text on a page:
1
Double-click to display the text frame.
2
Type the desired text, or, choose an insert.
To add a text insert, choose Text > Insert.
To enter Lyrics, use the Lyrics tool .
Inserts are placeholders for standard text
like titles, page number, or current date.
4
Click OK.
C. To define a clef change
1
Click the Clef tool .
2
Double-click a measure.
3
Double-click the desired clef.
To create a mid-measure clef change, select a
partial measure before you double-click.
4
Use the Beat Duration slider to specify the
duration of each beat (e.g. eighth, quarter, etc.).
5
Click OK.
See “Selecting Music” in the
User Manual for information on
how to select partial measures.
23 M AC I N T O S HM a r k i n G s a n d T e x T 24M AC I N T O S H k e Y s i G n a T u r e s , T i M e s i G n aT u r e s , a n d C l e f s
Page 15

Lyrics, Chords, and Repeats
A. To type-in lyrics
1
After the notes are entered, click
the Lyrics tool .
Chords & Fretboards
B. To type-in chord symbols
1
Click the Chord tool .
2
Click to display a cursor above the staff.
3
Type the chord root and suffix.
For example,“Amin7”.
Type:
“Amin7 [spacebar]”
2
From the Lyrics menu, check Type Into Score.
3
Click a note to display a blinking cursor
beneath the staff.
4
Type a syllable and then press spacebar
to advance. Use - (dash) to add hyphens
between syllables.
Type:
“The [spacebar] fall [-] ing [spacebar] leaves”
The Lyrics window allows you to easily
edit syllables, paste text from other
programs, and click-assign lyrics.
Lyrics Repeats
4
Press spacebar. Finale converts your text
to a chord symbol.
When typing chord symbols, use “b” for flat
and “#” for sharp.
To show guitar fretboards, from the
Chord menu, choose Show Fretboards.
C. To create repeats with 1st and 2nd endings
1
Click the Repeat tool .
2
Select the first ending measures.
3
From the Repeat menu, choose Create First
and Second Endings.
4
Select the first measure of the repeated
section.
5
From the Repeat menu, choose Create
Format Repeat Bar.
Search “Lyrics window” in the User Manual for more details.
25 M AC I N T O S HlY r i C s , C h o r d s , a n d r e p e aT s 26M AC I N T O S H lY r i C s , C h o r d s , a n d r e p e aT s
Page 16

Playback
A. Playback Controls
The Playback Controls give
you standard buttons for
controlling the playback
of your score.
C. Human Playback
®
The proper performance of any piece of music depends on the genre and style. For example,
you wouldn’t expect a jazz piece to be performed the same way as a classical sonata. Tell
Finale how you want your piece performed using Human Playback. Human Playback performs
the music in the style specified, and even interprets the markings you’ve added. To choose
a Human Playback style, from the MIDI/Audio menu, choose Human Playback, and then select
the desired style.
Press
+
spacebar
option
shift
and click a measure to start and pause playback.
spacebar
+
spacebar
+
Click the speaker icon in the Playback Controls and
choose Leftmost Measure to begin playback at the
leftmost visible measure.
+
click and drag to spot-check.
+
to spot-check a single staff.
Hold down
option
Press
B. To change the playback tempo
If you have not defined a tempo marking
1
In the Playback Controls, click the expand triangle , then click the Tempo popup menu and choose
the desired note duration.
2
Enter the number of beats per minute in the adjacent text box.
Tempo marking expressions override the tempo indicated in the Playback Controls.
See “Tempo Marks” in the Finale User Manual.
To enable or disable Human Playback
1
Click the From the MIDI/Audio menu, choose
Human Playback and then select the desired style.
2
To turn off Human Playback, from the MIDI/Audio
menu, choose Human Playback > None.
Choose MIDI/Audio menu > Human Playback > Jazz to activate
the Swing option in the expanded Playback Controls.
27 M AC I N T O S Hp l aY b a C k 28M AC I N T O S H p l aY b a C k
Page 17

Page Layout
Sharing Your Music
Adjusting the position of systems and page margins should be the final step before printing your
score. Use the following techniques to finalize the page layout:
Click and drag these handles
to adjust the position of the page
margins for this page.
Click and drag these handles
to adjust the system’s top margin.
Click and drag a system to adjust
the position of the system, which
also adjusts all subsequent systems
vertically.
A. To print your score
To print, press
command
P
+
⌘
and click OK.
B. To export an audio file
1
From the File menu, choose Export
to Audio File.
2
Choose a location and filename.
3
Click the Format popup menu and select
the desired file format.
4
Click Save.
To create a PDF, instead of clicking Print,
click PDF and choose Save as PDF.
See “Printing”in the User Manual for details.
Anyone can open, view, play and print your Finale files by downloading
the free Finale Reader™ at www.finalemusic.com/reader.
Click the Staff tool to show
staff handles, which allow you
to adjust the vertical position of
staves within systems. See “To
move staves” on page 20 of this
guide for details.
See “Page Layout” in the User Manual for more details on laying out your pages.
29 M AC I N T O S Hpa G e l aY o u T 30M AC I N T O S H s h a r i n G Y o u r M u s i C
option
+ click and drag to move
a system independently.
These icons represent systems
whose measure layout has
been locked. Finale’s automatic
music spacing features will not
adjust the measure layout of
locked systems.
Page 18

EFFICIENCY TIPS
More Finale Help Resources Using Contextual Menus
To open the Finale User Manual:
From the Help menu, choose User Manual, or click a help button
Click here to learn how to get the
most of the Finale User Manual.
control
+ click to open contextual menus, which allow you to quickly...
Transpose, add repeats, insert
measures, and make other
changes to measure regions...
Change the key...
Edit or delete text...
Click here to visit the Finale Forums
to connect with a global online
community of Finale users.
Click here to visit the online
Knowledge Base to browse common
troubleshooting solutions.
Click here to visit the Finale blog
for more tips.
From the Help menu, choose QuickStart Videos to watch helpful demos about how to use Finale.
31 M AC I N T O S HM o r e f i n a l e h e l p r e s o u r C e s 32MA C I N T O S H e f f i C i e n C Y T i p s : u s i n G C o n T e x T u a l M e n u s
or, choose from one of the many other options. By context-clicking a region you can perform
a multitude of additional tasks:
• Edit measure attributes
• Change the barline style
• Create or break multimeasure rests
• Cut, copy, or paste
• Add, insert, or delete measures
• Change the key, meter, or clef
• Apply alternate notation
• Add repeats
• Transpose
Page 19

EFFICIENCY TIPS
Metatools
Metatools are programmable keyboard shortcuts you can use to quickly add markings to your score.
A. Using Articulation and Expression metatools
To add an articulation or expression
using a metatool:
1
Click the Articulation or Expression tool .
2
Hold down the metatool key and click.
Use the same method to quickly enter key signatures, time
signatures, and clefs (with their respective tool chosen).
S
+ click
“S” is the default Articulation metatool
key for a staccato marking.
B. Using Smart Shape metatools
Use metatools for slurs, hairpins, lines, and other shapes as a convenient substitute for clicking
icons on the Smart Shape palette and using the Custom Smart Shape tool.
S
+ double-click
To add a slur using a metatool:
1
Click the Smart Shape tool .
2
Hold down the S key.
3
Double-click a note, holding on the second
click, and drag to the destination note.
4
Release the mouse button.
Simply hold down the metatool key and
double-click to add note-attached Smart
Shapes, like tab slides.
(hold on 2nd click)
Release
Drag
“S” is the default Smart Shape metatool
key for slur markings.
To add the marking to multiple notes:
1
Hold down the metatool key.
2
Click and drag to surround notes in a box.
3
Release the mouse button.
See section “C” for more metatool keys and to find a listing of all articulation and expression metatools.
S
+ click
Drag
Release
C. Common metatools
S X A Z
9 8 7 6
S
T 8
>
5 E W Q F K J 7
5 4 3 2
P
Search for “metatools” in the User Manual for more information, including how to program custom metatool keystrokes.
F G H S
<
G
Articulation and expression metatools
are listed in the Articulation Selection
and Expression Selection dialog boxes.
Look to the upper right of each listing.
33 M AC I N T O S He f f i C i e n C Y T i p s : M e Ta T o o l s 34M AC I N T O S H e f f i C i e n C Y T i p s : M e Ta T o o l s
Page 20

D. Using metatools with Simple Entry
4
3
?
n
n
n
b
f
Articulations and Expressions, as well as key, clef, and time signature changes can be added
using metatool keys while entering notes in Simple Entry.
1
Choose the Simple Entry tool .
2
Select a note and press
Or,
X
to add an expression
to add an articulation—laptop users press ~.
*
shift
shift
shift
3
Press the metatool key, in this case,S.
4
Or, if you don’t know the key, press Enter.
5
Highlight the option from the list and press Enter.
+
+
+
option
option
option
C
+
for a clef change
K
+
for a key signature change
+ T
for a key signature change
*
X
or
then metatool key
or
enter
35 M AC I N T O S He f f i C i e n C Y T i p s : M e Ta T o o l s
 Loading...