

Page 1

ADOBE® FRAMEMAKER® PUBLISHING SERVER 12
Page 2

Legal notices
Legal notices
For legal notices, see http://help.adobe.com/en_US/legalnotices/index.html.
Last updated 1/16/2014
Page 3

Contents
Chapter 1: Getting Started
Resources . . . . . . . . . . . . . . . . . . . . . . . . . . . . . . . . . . . . . . . . . . . . . . . . . . . . . . . . . . . . . . . . . . . . . . . . . . . . . . . . . . . . . . . . . . . . . . . . . . . . . . . . . . . . . .1
Activation and registration . . . . . . . . . . . . . . . . . . . . . . . . . . . . . . . . . . . . . . . . . . . . . . . . . . . . . . . . . . . . . . . . . . . . . . . . . . . . . . . . . . . . . . . . . . . . . .1
Help and support . . . . . . . . . . . . . . . . . . . . . . . . . . . . . . . . . . . . . . . . . . . . . . . . . . . . . . . . . . . . . . . . . . . . . . . . . . . . . . . . . . . . . . . . . . . . . . . . . . . . . . .2
Services, downloads, and extras . . . . . . . . . . . . . . . . . . . . . . . . . . . . . . . . . . . . . . . . . . . . . . . . . . . . . . . . . . . . . . . . . . . . . . . . . . . . . . . . . . . . . . . . .2
Chapter 2: Introduction
FrameMaker Publishing Server . . . . . . . . . . . . . . . . . . . . . . . . . . . . . . . . . . . . . . . . . . . . . . . . . . . . . . . . . . . . . . . . . . . . . . . . . . . . . . . . . . . . . . . . . .4
Accessing the FrameMaker Publishing Server . . . . . . . . . . . . . . . . . . . . . . . . . . . . . . . . . . . . . . . . . . . . . . . . . . . . . . . . . . . . . . . . . . . . . . . . . . . .6
FrameMaker Publishing Server dashboard . . . . . . . . . . . . . . . . . . . . . . . . . . . . . . . . . . . . . . . . . . . . . . . . . . . . . . . . . . . . . . . . . . . . . . . . . . . . . . .7
Chapter 3: Installation and setup
Install FrameMaker Publishing Server 12 . . . . . . . . . . . . . . . . . . . . . . . . . . . . . . . . . . . . . . . . . . . . . . . . . . . . . . . . . . . . . . . . . . . . . . . . . . . . . . . .9
Configure FrameMaker instance . . . . . . . . . . . . . . . . . . . . . . . . . . . . . . . . . . . . . . . . . . . . . . . . . . . . . . . . . . . . . . . . . . . . . . . . . . . . . . . . . . . . . . 10
Enable http with Windows® authentication . . . . . . . . . . . . . . . . . . . . . . . . . . . . . . . . . . . . . . . . . . . . . . . . . . . . . . . . . . . . . . . . . . . . . . . . . . . . 10
Install a command line tool . . . . . . . . . . . . . . . . . . . . . . . . . . . . . . . . . . . . . . . . . . . . . . . . . . . . . . . . . . . . . . . . . . . . . . . . . . . . . . . . . . . . . . . . . . . 11
Manually install FMPS12 website in IIS, if necessary . . . . . . . . . . . . . . . . . . . . . . . . . . . . . . . . . . . . . . . . . . . . . . . . . . . . . . . . . . . . . . . . . . . . 11
Enable http ports for FMPS access from other network machines . . . . . . . . . . . . . . . . . . . . . . . . . . . . . . . . . . . . . . . . . . . . . . . . . . . . . . . 11
Enable email . . . . . . . . . . . . . . . . . . . . . . . . . . . . . . . . . . . . . . . . . . . . . . . . . . . . . . . . . . . . . . . . . . . . . . . . . . . . . . . . . . . . . . . . . . . . . . . . . . . . . . . . . 12
Enable browse functionality through Java™ applet . . . . . . . . . . . . . . . . . . . . . . . . . . . . . . . . . . . . . . . . . . . . . . . . . . . . . . . . . . . . . . . . . . . . 12
iii
Chapter 4: Creating and managing publication tasks
Publishing . . . . . . . . . . . . . . . . . . . . . . . . . . . . . . . . . . . . . . . . . . . . . . . . . . . . . . . . . . . . . . . . . . . . . . . . . . . . . . . . . . . . . . . . . . . . . . . . . . . . . . . . . . . 13
Scheduling . . . . . . . . . . . . . . . . . . . . . . . . . . . . . . . . . . . . . . . . . . . . . . . . . . . . . . . . . . . . . . . . . . . . . . . . . . . . . . . . . . . . . . . . . . . . . . . . . . . . . . . . . . . 16
Chapter 5: Reusing tasks
Tem p la te s . . . . . . . . . . . . . . . . . . . . . . . . . . . . . . . . . . . . . . . . . . . . . . . . . . . . . . . . . . . . . . . . . . . . . . . . . . . . . . . . . . . . . . . . . . . . . . . . . . . . . . . . . . . . 18
Presets . . . . . . . . . . . . . . . . . . . . . . . . . . . . . . . . . . . . . . . . . . . . . . . . . . . . . . . . . . . . . . . . . . . . . . . . . . . . . . . . . . . . . . . . . . . . . . . . . . . . . . . . . . . . . . . 19
Chapter 6: Logs
Specify default log settings . . . . . . . . . . . . . . . . . . . . . . . . . . . . . . . . . . . . . . . . . . . . . . . . . . . . . . . . . . . . . . . . . . . . . . . . . . . . . . . . . . . . . . . . . . . 21
View logs . . . . . . . . . . . . . . . . . . . . . . . . . . . . . . . . . . . . . . . . . . . . . . . . . . . . . . . . . . . . . . . . . . . . . . . . . . . . . . . . . . . . . . . . . . . . . . . . . . . . . . . . . . . . 21
Chapter 7: Working with FMPS using the APIs
API methods . . . . . . . . . . . . . . . . . . . . . . . . . . . . . . . . . . . . . . . . . . . . . . . . . . . . . . . . . . . . . . . . . . . . . . . . . . . . . . . . . . . . . . . . . . . . . . . . . . . . . . . . . 22
FMPS troubleshooting . . . . . . . . . . . . . . . . . . . . . . . . . . . . . . . . . . . . . . . . . . . . . . . . . . . . . . . . . . . . . . . . . . . . . . . . . . . . . . . . . . . . . . . . . . . . . . . . 27
Last updated 1/16/2014
Page 4

Chapter 1: Getting Started
Resources
Before you begin working with FrameMaker Publishing Server 12, take a few moments to read an overview of
activation and the many resources available to you. You have access to instructional videos, plug-ins, templates, user
communities, seminars, tutorials, RSS feeds, and much more.
Activation and registration
To review complete system requirements and recommendations for your Adobe® FrameMaker® Publishing Server 12
software, see the FrameMaker Publishing Server product page at
System requirements
FrameMaker Publishing Server is available in English only. Before you install FrameMaker Publishing Server 12 ensure
that your computer meets the following minimum system requirements:
www.adobe.com/products/fmserver.
1
Hardware Intel Pentium 4 processor or above, with 3 GB RAM and 6 GB free disk space. If you copy your source
documents to the server that hosts FrameMaker Publishing Server, allocate additional disk space.
Operating System Windows Server 2012 R2 or Windows Server 2008 R2
RAM 1 GB or more
Hard Disk Space 6 GB of available hard-disk space; additional free space required during installation (cannot install on
a volume that uses a case-sensitive file system or on removable flash storage devices)
Screen Resolution 1024x768 screen resolution (1280x800 recommended) with 16-bit video card.
Activation FrameMaker Publishing Server does not work without activation. Broadband Internet connection is
required for registration, software activation, validation of subscriptions, and access to Online Services. Phone
activation is not available.
Browsers Microsoft Internet Explorer 10 or 9 or the latest Google Chrome, Mozilla Firefox, Apple Safari
Installation
You can install FMPS on a machine that meets the “System requirements” on page 1 and then access it over the network
using other machines. For more information on installation, see “Installation and setup” on page 9.
License activation
During the installation process, your Adobe software contacts an Adobe server to complete the license activation
process. No personal data is transmitted. For more information on product activation, visit the Adobe website at
www.adobe.com/go/activation.
Last updated 1/16/2014
Page 5

USING FRAMEMAKER PUBLISHING SERVER
Getting Started
Register
Register your product to receive complimentary installation support, notifications of updates, and other services.
❖ To register, follow the onscreen instructions in the Registration dialog box, which appears when you first start the
software.
2
If you postpone registration, you can register at any time by choosing Help > Registration.
Help and support
Community Help
Community Help is an integrated environment on Adobe.com that gives you access to community-generated content
moderated by Adobe and industry experts. Comments from users help guide you to an answer. Search Community
Help to find the best content on the web about Adobe products and technologies, including these resources:
• Videos, tutorials, tips and techniques, blogs, articles, and examples for designers and developers.
• Complete online Help, which is updated regularly and may contain more information than the Help delivered with
FrameMaker Publishing Server 12.
• When you are connected to the Internet and you select help in FrameMaker, your web browser opens a Help page
on the Adobe website.
• To view FrameMaker help when you are not connected to the Internet, download the Help PDF of FrameMaker
on your computer.
For more information on the offline Help, see Offline Help.
• All other content on Adobe.com, including knowledgebase articles, downloads and updates, Adobe Developer
Connection, and more.
Use the Help search field in your product’s user interface to acces
the Adobe.com site and also in websites that have useful information about your product. Moderators continue to
identify the most relevant web content for your product. You can add comments to online Help and view comments
added by other users. For a video of Community Help, see www.adobe.com/go/learn_community_help_en.
s Community Help. You can search for content within
Other resources
Online Help also includes a link to the complete, updated PDF version of Help.
Visit the Adobe Support website at www.adobe.com/support to learn about free and paid technical support options.
Services, downloads, and extras
You can enhance your product by integrating various services, plug-ins, and extensions in your product. You can also
download samples and other assets to help you get your work done.
Adobe downloads
Vi si t www.adobe.com/go/downloads to find free updates, trials, and other useful software.
Last updated 1/16/2014
Page 6

USING FRAMEMAKER PUBLISHING SERVER
Getting Started
Adobe Labs
Adobe Labs at www.adobe.com/go/labs gives you the opportunity to experience and evaluate new and emerging
technologies and products from Adobe. At Adobe Labs, you have access to resources such as these:
• Prerelease software and technologies
• Code samples and best practices to accelerate your learning
• Early versions of product and technical documentation
• Forums, wiki-based content, and other collaborative resources to help you interact with like-minded users
Adobe Labs fosters a collaborative software development process. In this environment, customers quickly become
productive with new products and technologies. Adobe Labs is also a forum for early feedback. The Adobe
development teams use this feedback to create software that meets the needs and expectations of the community.
Adobe TV
Visit Adobe T V at http://tv.adobe.com to view instructional and inspirational videos.
3
Last updated 1/16/2014
Page 7

Chapter 2: Introduction
FrameMaker Publishing Server
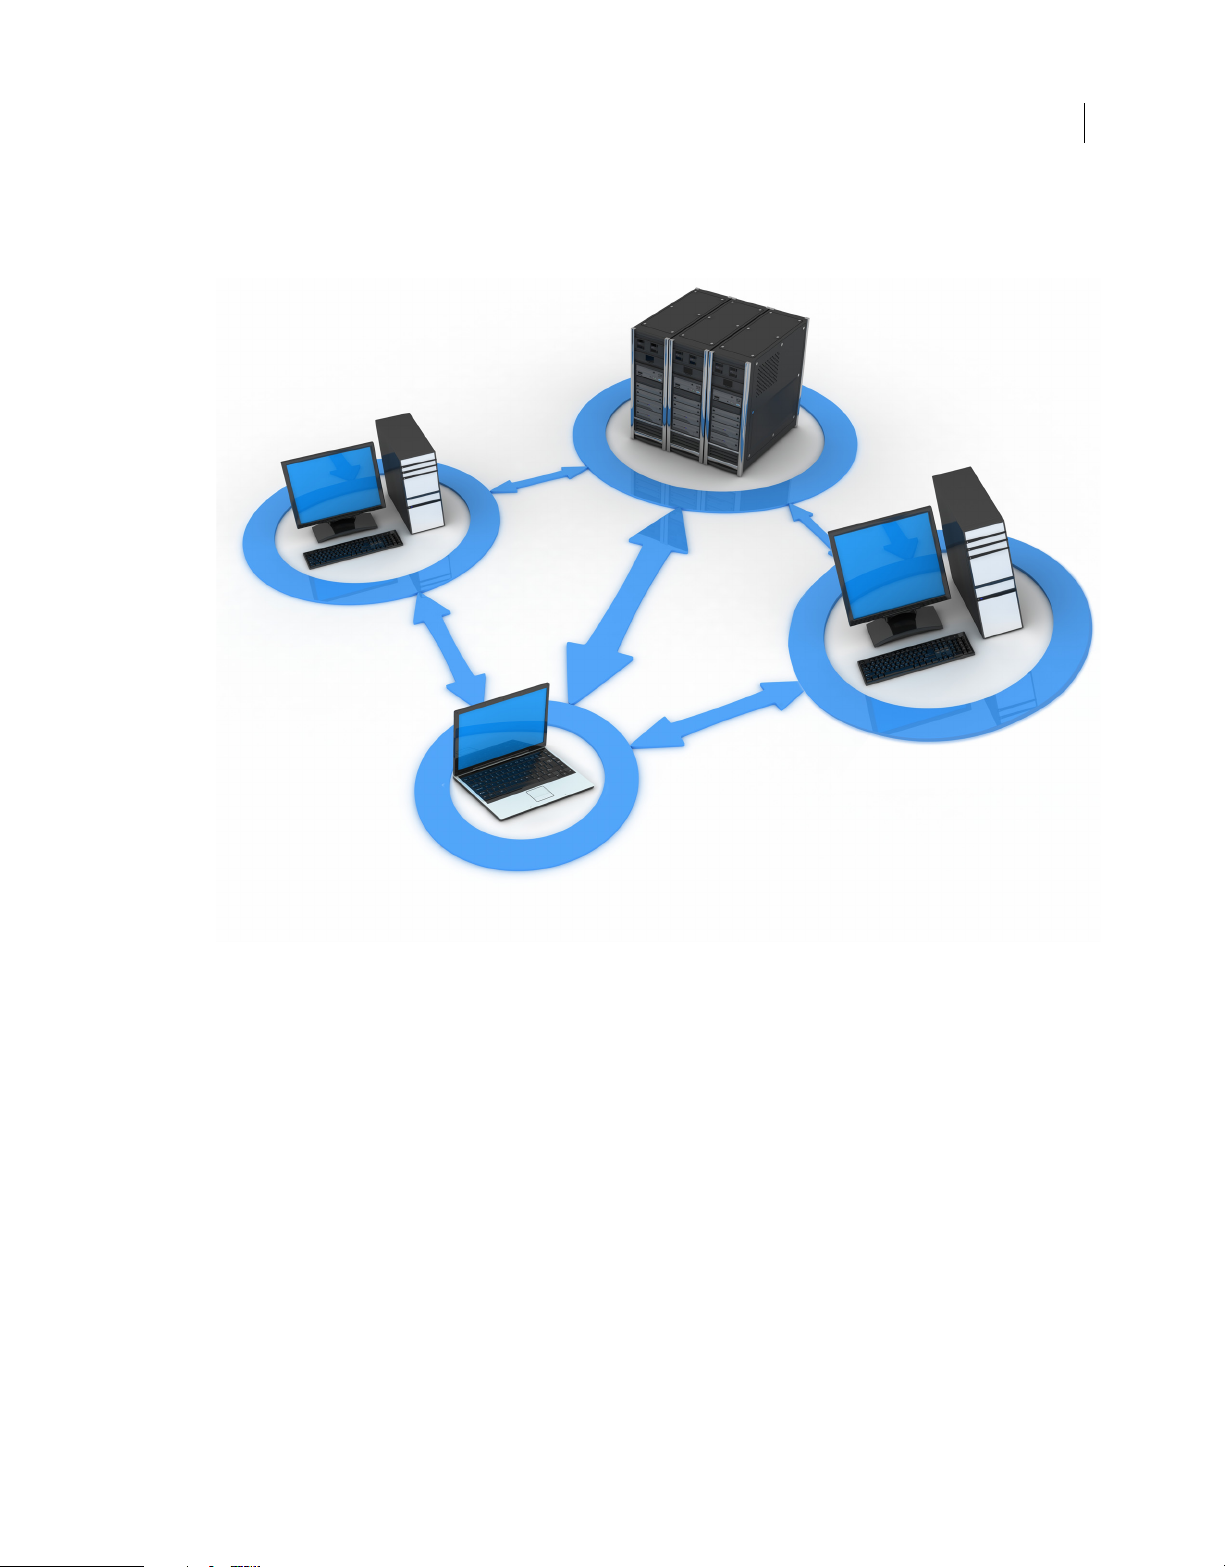
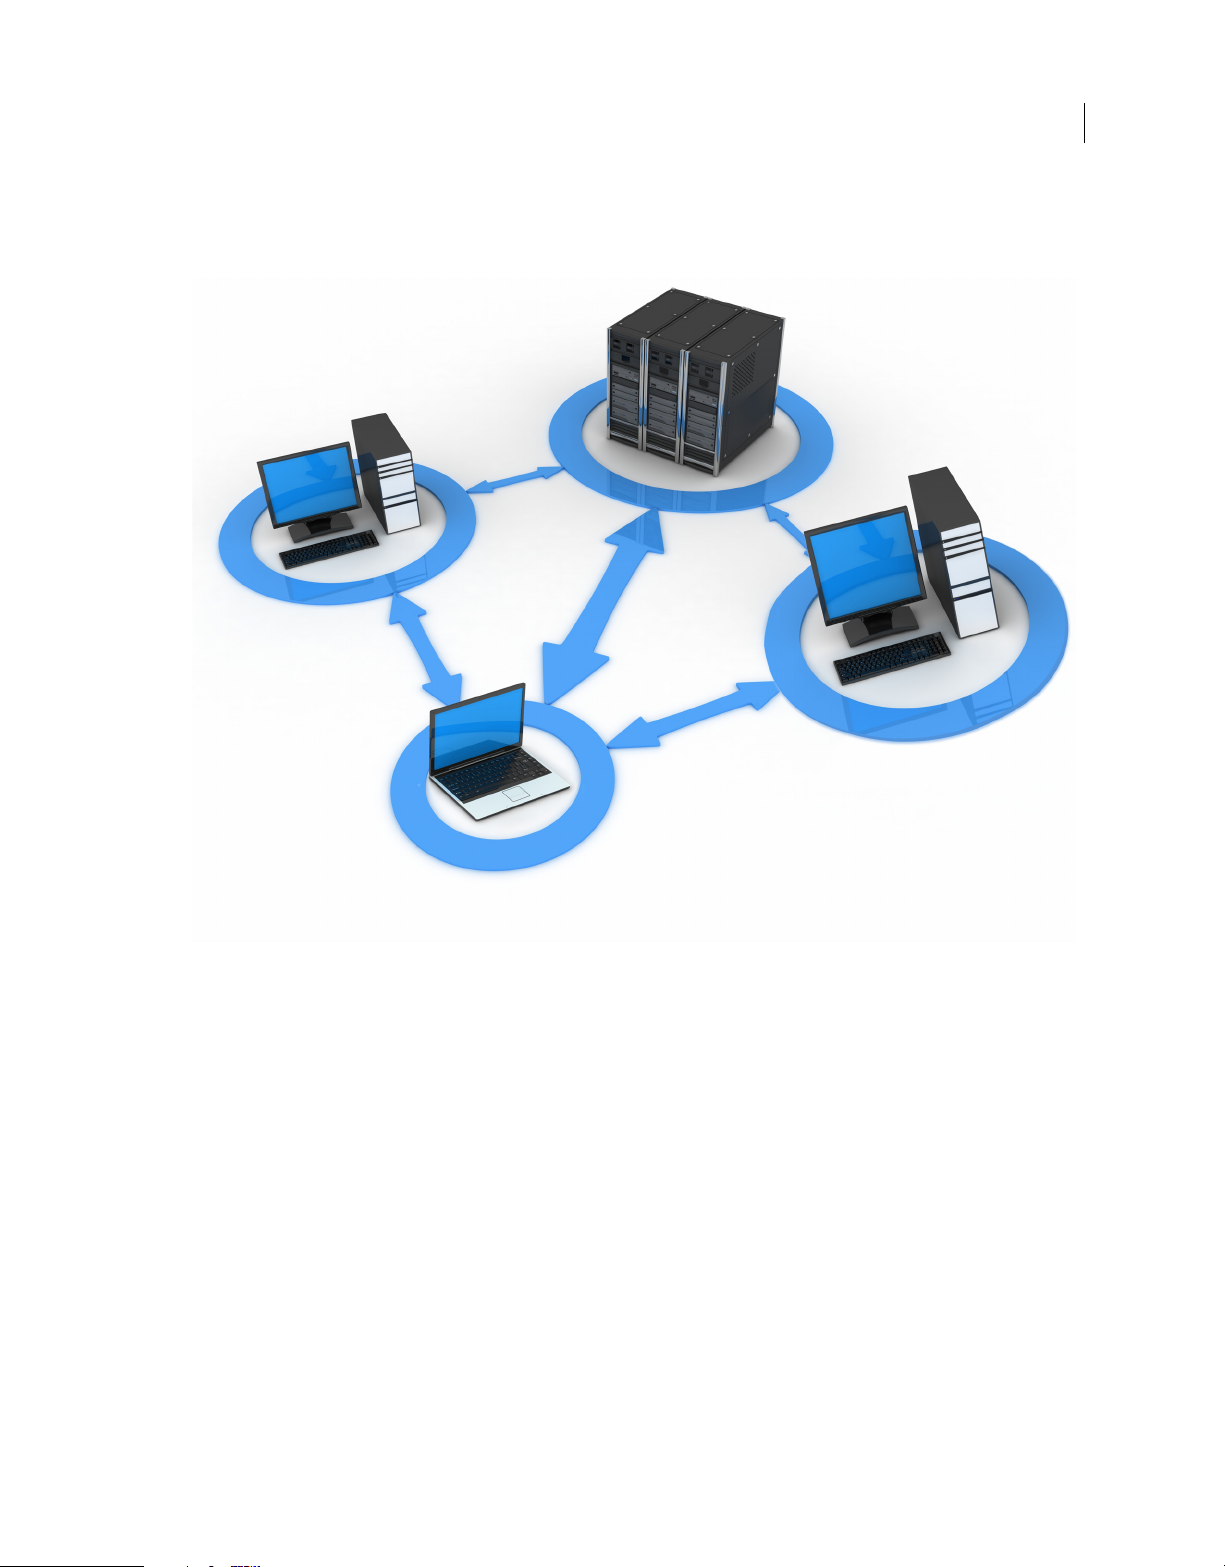
Adobe FrameMaker Publishing Server 12 (FMPS) is a server-based, automated multi-channel and multi-device
publishing solution. FMPS enables publication departments centralize and automate multichannel publication tasks
from Adobe FrameMaker documents. With FMPS, you can create multiple output formats, each with its own custom
FMPS settings. These output formats include Adobe PDF, WebHelp, Adobe AIR-based Help, Native Mobile App, and
ePub, Responsive HTML Help for device-independent content delivery.
With centralized and automated publications, it is easy to integrate and synchronize publication of technical documents
with product build schedules. FMPS integrates with EMC Documentum®, Microsoft® SharePoint, and
Experience Manager that enable you to manage publication tasks and enforce version control.
With ExtendScript Toolkit integrated with FMPS, you can create custom publication tasks that work with source files
in XML and FrameMaker formats. By creating reusable publication task settings, you can quickly set up custom
publication environments and schedule the build processes to run daily, weekly, or at any defined intervals.
Adobe
4
What’s new in FrameMaker Publishing Server 12
1 Out of the box integration with AEM: In addition to Sharepoint and Documentum®, FMPS has out of the box
support for Adobe Experience Manager. Built atop the industry-leading JSR-283-compliant CRX content repository,
Adobe Experience Manager (AEM and formerly CQ) provides a complete suite of applications for the Web
Experience Management (WEM) of organizations.
2 Web int erfa ce : FMPS has a web-based interface, which lets you install FMPS as a website on a server and let multiple
users access it on the network through their browser.
Using the web-based interface of FMPS:
• You can now publish content over the network
• Multiple users can publish simultaneously
• Multi-channel, multi-device publishing is supported
• A new Web API lets you build an integrated publishing workflow from any CMS to FMPS
Last updated 1/16/2014
Page 8
FRAMEMAKER
PUBLISHING SERVER
USER 1
USER 2
USER 3
USING FRAMEMAKER PUBLISHING SERVER
Introduction
5
FMPS is installed on a server and multiple users access it using its web-based interface or the APIs and a command line utility to work
collaboratively
For more information, see the video FrameMaker Publishing Server 12: Automated publishing delivered remotely
3 The FMPS dashboard: FMPS provides a simple, web-based user interface that enables you to create, manage, and
schedule publication tasks.
Last updated 1/16/2014
Page 9
USING FRAMEMAKER PUBLISHING SERVER
Introduction
FMPS dashboard accessed on a browser
4 ResponsiveHelp output: FrameMaker Publishing Server supports ResponsiveHelp output. ResponsiveHelp is
based on a single Responsive layout, which scales to different screen sizes, such as for tablets, mobiles, and other
devices automatically.
6
5 Templates and presets: In FMPS, you can create and use templates and presets to save time in creating tasks.
Templates are reusable publication tasks that you can run with or without modifications. Presets help you populate
values in the fields of repetitive tasks, modify the values where required, and then run the tasks.
See video: FrameMaker Publishing Server 12: PDF pre-sets and templates
For more information, see “Te
6 Email notifications and logs: FrameMaker Publishing Server includes extensive logging features. These logs are
available in the Task window and are also e-mailed to the email IDs you specify. You can use the information in the
logs to troubleshoot any publication task errors, and fix errors, such as unresolved cross-references, in the source
documents. You can define FrameMaker Publishing Server logs to have extensive reports including the number of
markers, pages, and so on.
For more information, see “Log
7 Web API s: Using the Web APIs provided with FMPS, you can build your custom client including your web interface
and CMS integration. For more information, see “W
interface is also built using the same set of Web APIs.
m pl a te s ” on page 18 and“Presets” on page 19.
s” on page 21.
orking with FMPS using the APIs” on page 22. The FMPS user
Accessing the FrameMaker Publishing Server
You access FMPS by logging in to the server that hosts it. Using the Web user interface of FMPS, you can access it
remotely from any machine.
Last updated 1/16/2014
Page 10
FRAMEMAKER
PUBLISHING SERVER
USER 1
USER 2
USER 3
USING FRAMEMAKER PUBLISHING SERVER
Introduction
7
After installing FMPS on a server, various users can access its web user interface or using the APIs and command line over the network
FMPS is configured to automatically start when you log in to the host.
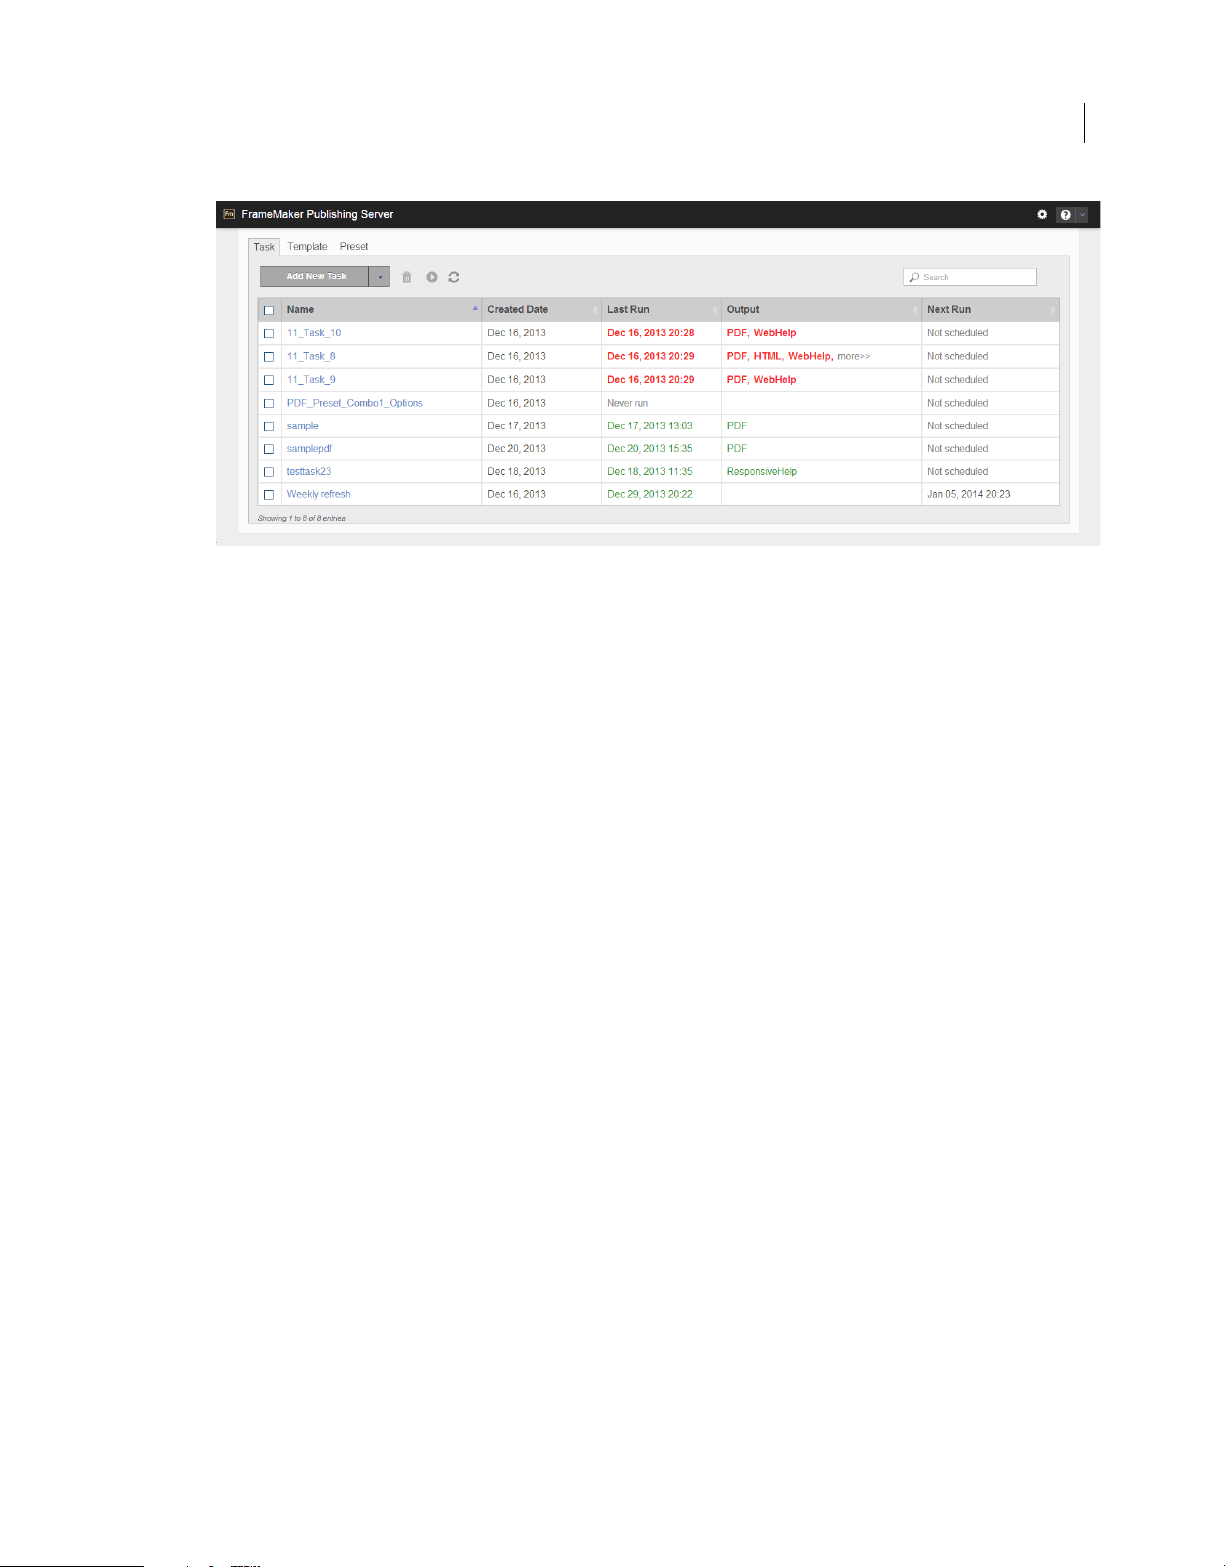
FrameMaker Publishing Server dashboard
FMPS provides a simple, web-based user interface using which you can:
• Create, manage, and schedule publication tasks
• Create and use templates for quickly executing reusable publication tasks
• Create and use presets to quickly apply and populate settings to the repetitive tasks with similar settings
• Manage and view task logs
Once you have installed FMPS on a machine, you can access it on the network from any machine to use it.
Last updated 1/16/2014
Page 11

A
B C
D
USING FRAMEMAKER PUBLISHING SERVER
Introduction
8
Adobe FrameMaker Publishing Server 12 dashboard
A. Add New dropdown - depending on which tab you are in this drop-down allows you to create and duplicate Tasks, Templates, and Pres
B. The Run button: To run tasks, select one or more tasks and click Run C. Incrememtal search: Search for a Task, Template, or Preset name
depending on the tab you are on) - as you type text, FMPS finds matches for the text and displays them in the list D. Autorefresh settings: You
(
an enable autorefresh for FMPS and specify the number of seconds after which FMPS autorefreshes
c
ets
By clicking on the column names, you can sort the list of tasks by that column. The tasks are color coded: green are
successful, red are failed, and orange are queued.
For more information on:
• Installing FMPS, see “Installation and setup” on page 9.
• Using FMPS through a browser on a client machine “Creating and managing publication tasks” on page 13
• Using FMPS through the APIs on a client machine“Working with FMPS using the APIs” on page 22
Related topics
“Creating and managing publication tasks” on page 13
“Create a task” on page 13
“Tasks” on page 13
Autorefresh of the FMPS interface
The FMPS web interface’s autorefresh is disabled by default. You can set it to autorefresh every 10-500 seconds.
1 Click settings ( )
The Settings dialog appears.
2 In the Settings dialog, select Duration and enter the number of seconds after which you want FMPS web interface
to autorefresh. You can enter a number from 10 to 500.
3 Click Save.
Note: Y
ou can also manually refresh FMPS by clicking the refresh button on the FMPS dashboard.
Last updated 1/16/2014
Page 12

Chapter 3: Installation and setup
To work with FrameMaker Publishing Server, do the following:
1 “Install FrameMaker Publishing Server 12” on page 9
2 “Configure FrameMaker instance” on page 10
3 “Enable http with Windows® authentication” on page 10(Optional - if you want to restrict access by switching on the
authentication)
4 “Install a command line tool” on page 11 (Install a free command line tool, such as cURL, to access the Fr ameMaker
Publishing Server 12 using the command line.)
5 “Manually install FMPS12 website in IIS, if necessary” on page 11
6 “Enable http ports for FMPS access from other network machines” on page 11 (Optional)
7 “Enable email” on page 12 (Optional)
8 “Enable browse functionality through Java™ applet” on page 12
Note: For information on issues during installation, see “FMPS troubleshooting” on page 27
9
Install FrameMaker Publishing Server 12
To install FMPS 12, complete the following steps:
1 Run the installation exe. The following products get installed with FMPS:
a FrameMaker 12
b RoboHelp 11
c Acrobat 11
d FrameMaker Server components (Installer also installs MS® deploy, registers IIS and its components for FMPS
use, and installs basic website - the application settings of that website need to be edited manually in IIS).
2 Unzip the following rar file (don’t change its location - the rar file and its unzipped contents should be in the same
folder, which is www):
Program Files (x86)\Adobe\FrameMakerPublishingServer12\www\WebServerUI.rar
3 Under IIS > sites > fmps12> Application Settings (Under ASP.NET) change the following settings:
a Debug: Set the value to true to allow debugging.
b DebugLog: Enter path of the debug log that gets populated with error messages.
c FMPSBaseDir: The directory that would contain all the tasks-related data
d FMPSDomain: The domain name of FMPS. Use the network domain the machine belongs to or workgroup
name if the machine is not on a domain.
e FMPSHelpDataEnabled: Set this to true to enable Server Help to be viewable by any user.
f FMPSPassword: Password associated with the user name entered in FMPSUserName.
g FMPSSchFolder: This folder contains FMPS scheduled tasks
Last updated 1/16/2014
Page 13

USING FRAMEMAKER PUBLISHING SERVER
Installation and setup
h FMPSUserName: user name for accessing FMPS (do not add the domain name here)
Note: For running the tasks, user should be logged into the system using the account being set up as FMPSUserName.
4 Go to Application pools > fmps12 > Advanced Settings > Process Model > Identity > Custom Account and set
credentials as following:
a User name: Enter <domain>\<username> keeping them same as the details entered in the step 3.
b Password: Enter the password you entered in step 3.
c Confirm Password: Re-enter your password.
5 Ensure that Enable 32-Bit Application is set to True. (Application Pools > fmps12> Advanced Settings)
6 In a browser, open the website http://localhost:6234/index.html.
Note: 6234 is the default port. You can configure a different port, in which case you should replace 6234 in all the
examples in this document with the configured port number.
The browser displays FMPS website's index.html page.
Configure FrameMaker instance
10
To optimize the performance of FrameMaker in automated publishing tasks, make the following changes to
FrameMaker configuration. These changes are essential to run scheduled tasks on FMPS and modify the behavior in
the following ways.
FMPS ignores unresolved cross-references, unresolved text insets, and missing graphics.
• To use MathML, accept the EULA in FrameMaker. <take the EULA steps from FM UG and paste here>
• Check all source documents for errors before initiating a build task.
• FMPS automatically opens and closes FrameMaker and RoboHelp instances. You cannot control these operations.
• FMPS does not report missing fonts. Ensure that the machine that hosts FMPS has all the required fonts.
Enable http with Windows® authentication
1 Open Web.config file at the following location:
Program Files (x86)\Adobe\FrameMakerPublishingServer12\www
2 Locate the following two lines and comment them out to disable them:
<endpoint address="fmserver/v1" binding="webHttpBinding" contract="Server.IWebService"
behaviorConfiguration="webhttp" />
<endpoint address="" binding="webHttpBinding" contract="Server.IWebPage"
behaviorConfiguration="webhttp" />
3 Locate the following lines and enable them by removing the commenting:
<!--<endpoint address="fmserver/v1" binding="webHttpBinding" contract="Server.IWebService"
behaviorConfiguration="webhttp" bindingConfiguration="securehttp"/>-->
<!--<endpoint address="" binding="webHttpBinding" contract="Server.IWebPage"
behaviorConfiguration="webhttp" bindingConfiguration="securehttp"/>-->
4 In the IIS > fmps12, select Authentication (under IIS).
Last updated 1/16/2014
Page 14

USING FRAMEMAKER PUBLISHING SERVER
Installation and setup
5 Disable Anonymous authentication.
6 Enable Windows® authentication.
7 If you do not enable authentication, while using the FMPS using API commands, you do not need to pass the
authentication-related parameters. For more information, see
“Working with FMPS using the APIs” on page 22.
Install a command line tool
Install a command line tool, such as cURL, to pass commands to FMPS. cURL is a freeware command line tool.
Manually install FMPS12 website in IIS, if necessary
If FMPS fails to install the IIS website, you can execute the deploy command to install the website. To manually install
the FMPS12 website, log in as Admin and complete the following steps:
1 Go to FMPS12 installation folder. (Program Files (x86)\Adobe\FrameMakerPublishingServer12\deploy)
2 Run the bat file in with the following syntax (log in as an Admin to run this command):
deploy.bat addsite -sitename <newsite> -port 6234 -physicalpath "<path>" addpool[or setpool]
-poolname <newpool>
11
In this command, provide values for newsite, path, and newpool.
Enable http ports for FMPS access from other network machines
To allow Win Server (example) for port access 6234, check if the http ports for FMPS access from other machines is
enabled. If it is not, enable the http ports for FMPS access.
1 Click Start, type Firewall.cpl, and then click OK.
2 Click Advanced Settings.
3 Check if an inbound traffic rule is already enabled or not. If it is not,
a Right click Inbound Rules on the left pane.
b If a new rule by the name FMPS Port Open exists and is checked. the ports are already enabled and you do not
need to go ahead with this task. If such a rule is not visible, create a new rule by following rest of this task.
c Select New Rule.
d Select Port.
e Under Specific Ports enter your port number (Default is 6234. All the examples in this document use the port as
6234. If you have set the port to something else, replace 6234 in the examples with your port number).
f Continue with "Next" until the end of the wizard. Name the rule when prompted.
4 Check if your port is now accessible - if required, restart the Windows® Firewall service (under Services).
Last updated 1/16/2014
Page 15

USING FRAMEMAKER PUBLISHING SERVER
Installation and setup
Enable email
Complete the following steps to enable email notifications of tasks (such as “Run successful” and “Run failed.”):
1 Open server.ini on the following location:
Program Files (x86)\Adobe\FrameMakerPublishingServer12\
2 Locate the following flag and set its value to your mail server (Example: inner-relay-1.corp.abc.com):
server
Note: Now you can specify email IDs for notifications while creating tasks.
Enable browse functionality through Java™ applet
Note: You need to have the latest JRE installed on your client machines to use this functionality.
When you launch the FMPS website, the browser prompts you for permission to run Java™ applet. Allow the browser
to run the Java™ applet to enable browse functionality in FMPS.
Otherwise, while opening various files FMPS, enter the path and name of the files manually.
12
Last updated 1/16/2014
Page 16

Chapter 4: Creating and managing publication tasks
Publishing
Tasks
You remotely define the publication tasks in Adobe FrameMaker Publishing Server and schedule them to run at the
required interval. A task is a complete collection of all the build information that is required to run a publication task.
For more information, see FrameMaker Publishing Server 12: Automated publishing delivered remotely
Typically, you define a task for each book or s ource document that you want to create outputs from. For example, if you
have a bo ok f ile from w hic h you w ant to create Adobe PDF, WebHelp, Ado be A IR, and Ecl ipseHelp o utpu ts, you sp eci fy
the following:
Input Source Location of the source document or book. You can specify sources from the local file system, a network
or WebDAV folder, an EMC Documentum® repository, a Microsoft® SharePoint repository, or Adobe Experience
Manager (AEM).
13
Output formats Output formats required and their settings such as PDF settings and RoboHelp settings.
Online Help formats such as WebHelp, Adobe AIR-based Help, ePub, and EclipseHelp are defined in the RoboHelp
project settings.
Presets Presets for PDF and RoboHelp tasks include settings such as Job settings, Display settings, PDF Bookmarks
settings, and DITAVAL file to use. Preset help you apply these settings to repetitive and similar tasks and save time.
Output location The location where you want the output from the build process saved. You can specify the output
location as a folder in the local file system, a network or WebDAV folder, or an EMC Documentum®, Microsoft®
SharePoint repository, or Adobe Experience Manager.
Scheduling Schedule to run the task and the frequency.
Create a task
1 On the FrameMaker Publishing Server dashboard, select Task.
2 In the Task tab, select Add New Task.
3 On the New Task screen, specify a name for the publication task.
Tasks in the task queue are listed with the task name. Provide intuitive task names that indicate the type of document
and the output formats to easily identify your task from the queue.
4 Click the browse button next to the Input Source field. The Specify Input Source dialog appears. Enter the following
details in it:
a An input source file (BOOK, DITAMAP, FM, or MIF files). Enter full path and name of the input file.
b Enter login credentials to access the input file if there are any. For example, login information is required to access
files over the network or the CMS.
c If your input file is on a CMS, select CMS and specify the CMS details, such as login information, server, and
workspace.
Last updated 1/16/2014
Page 17

USING FRAMEMAKER PUBLISHING SERVER
Creating and managing publication tasks
5 To edit book settings, click the Modify link in front of Book Settings. In the Book Settings dialog, double-click the
entries in the Don’t Include list to include them in the Book. Double-click the entries in the Include list to exclude
them from the Book.
6 To add an output type, specify an output type, preset, and then click the browse button next to the Output File Path
field. The Specify Output dialog appears. Enter the following details in it:
Note: FrameMaker Publishing Server overwrites any files with the newly generated outputs. To keep the output files
from an earlier publication task, move them to another folder. You can run a post-publish command as part of the
publication task to move the output files to another location after the publication task is completed.
a Specify the destination file path where the output file is saved.
b If necessary, enter login credentials to save the output file. For example, login information is required save output
files on the network or on the CMS.
c To save output file to a CMS, select CMS and enter the CMS details.
Note: To generate the Native Mobile App output, you need additional software and settings. For details, see “Extra
settings for Native mobile app” on page 15. To generate .mobi files, you need to install KindleGen and specify its path
in RoboHelp. For more information, see RoboHelp documentation.
7 To add more output types, click Add Another Output and repeat step 5.
8 (Optional) Enter the path and name of a Pre-Publish ExtendScript to specify any automation script that you created.
For example, if you have defined conditional text settings to two different output formats—a PDF output with
screenshots, and an online Help output without screenshots, specify the Show/Hide setting in the ExtendScript
script for each output format.
14
9 (Optional) Enter the name and path of a Post-Publish Script to specify any system command that you want to run
on the outputs after the publication task is run. You can create a batch script and provide its path so that FrameMaker
Publishing Server runs the script after the publication task is completed.
10 Select Schedule Task to add it to the publication queue.
11 (Optional) In Send Log in Email, specify the email addresses where you want to send the task log. Use semicolons
between multiple email IDs.
12 To add or delete information in the task logs, click Modify in front of Log Settings. In the Log Settings dialog,
double-click on the entries in the Don’t Include list to include them in the task logs. Double-click on the entries in
the Include list to exclude them from the task logs.
13 Click Save.
You can also create a task from a template. For more information, see “Create a task from a template” on page 19.
More Help topics
“Extra settings for Native mobile app” on page 15
“RoboHelp settings” on page 15
“Scheduling” on page 16
Last updated 1/16/2014
Page 18

USING FRAMEMAKER PUBLISHING SERVER
Creating and managing publication tasks
Extra settings for Native mobile app
To create a native mobile app, FrameMaker Publishing Server requires PhoneGap SDK and other apps and additional
de
tails in the settings.xml file.
1 Download and unzip the following on your computer:
a PhoneGap SDK
b Android™ SDK
c Oracle Java™ SDK
d Apache Ant
2 Locate the settings.xml file in FrameMaker’s Install directory at \fminit\RH_DEFAULT_PROJECT and specify the
following options:
Tag Valu e
15
PhoneGapFolder Folder on your computer where you’ve downloaded and
LDPIIcon A png file for application icon for LDPI (low) android mobile
MDPIIcon A png file for application icon for MDPI (medium) android
HDPIIcon A png file for application icon for HDPI (high) android mobile
PackageName A unique identifier of the application in addition to the
AppName The name of the application
AppVersionString A version string for the application
JDKPath Folder on your computer where the Oracle Java™ software
AntPath Folder on your computer where you’ve downloaded and
AndroidPath Folder on your computer where the Android™ software
SSLName Name of the SSL of the multiscreen HTML 5 in the RoboHelp
u
nzipped the PhoneGap software development kit
screen density
mobile screen density
screen density
application’s name, for example com.example.myapp
development kit is installed
unzipped Apache Ant
elopment kit is installed
dev
project, which you are using for publishing
If you are using the default project shipped with TCS, the SSL
name is Multiscreen_HTML5.
RoboHelp settings
To create online Help formats, FrameMaker Publishing Server uses project settings that you define in RoboHelp. You
ca
n define a standard RoboHelp project with all the required output formats, and then use the RoboHelp Project (.XPJ
file) as the template for online Help output.
Typically, you author content in FrameMaker, and then define the conversion settings to link or import content from
F
rameMaker to RoboHelp. In such scenarios, you define your conversion settings that include the following:
• Style mapping between FrameMaker and RoboHelp
• Cascading style sheets (CSS) for the online Help format that you create from RoboHelp
Last updated 1/16/2014
Page 19

USING FRAMEMAKER PUBLISHING SERVER
Creating and managing publication tasks
• RoboHelp Project File (XPJ) that contains the definitions for output formats
Run tasks from the list
❖ On the FrameMaker Publishing Server dashboard, select the tasks from the task list and click Run.
Duplicate a task
An easy way to create multiple tasks is to make a copy of a task you defined, and then make the necessary changes for
the new task.
1 On the FrameMaker Publishing Server dashboard, do one of the following:
• Click a task name and in the Task dialog click Duplicate.
• Select a task and then select Duplicate Task from the Add New Task dropdown.
2 Edit the name and other details of the task and click Save.
Edit a task
1 On the FrameMaker Publishing Server interface, click on a task name.
The Task dialog appears.
16
2 Make the required changes in the task and click Save.
Delete a task
❖ On the FrameMaker Publishing Server dashboard, select one or more tasks and click Delete.
Note: If you delete a task when it is currently running, the task is removed, but the current run is allowed to complete.
Scheduling
Typically, you create publication settings for recurring tasks. With FrameMaker Publishing Server, you can create
multiple publication tasks and schedule them to run at specified intervals. In a typical technical publications
department, many teams create automated builds that are then run at the required intervals. You can specify the
inte rval s as on ce, da ily, we ekl y, or mont hly. A pub lic ation task req uires a de fin ed sche dul e to run or a us er c an r un them
manually. For more information on running tasks manually, see
After you schedule a task to run, FrameMaker Publishing Server adds these as scheduled tasks to the Windows® Task
Scheduler. You can view and edit these tasks from Windows® Task Scheduler independent of FrameMaker Publishing
Server. The scheduled tasks appear with the name of the task and the user name associated with the task.
Keep in mind the following when you determine the build schedules:
• Each source document requires a separate publication task. If you have a large documentation set that heavily uses
single-sourcing approach, you will need to create as many publication tasks as the number of book files.
• Builds are queued—if you want to run an immediate publication task when a large number of builds are in the
queue, you will have to wait for the builds in the queue to be completed before you can run your publication task.
“Run tasks from the list” on page 16.
• If you require daily builds, consult with other teams so that your build schedule doesn’t clash with theirs. If you
schedule a large build in the day time, chances are that a once-only build task you want to run urgently will have to
wait until the build queue is completed. A good way to ensure that daily build schedules do not affect other build
tasks is to plan your daily builds to run in after-office hours.
Last updated 1/16/2014
Page 20

USING FRAMEMAKER PUBLISHING SERVER
Creating and managing publication tasks
Create a schedule for run
1 On the Task dialog, click the link next to Scheduling. The link could be:
• Not Scheduled: If the task is not scheduled
• A description of the scheduled task, such as 20:23 every SUN of every week if the task is scheduled
2 On the Schedule window, select the required interval, and specify the options.
3 Click Save.
View the schedules for tasks
FrameMaker Publishing Server lists all the tasks that are defined for the server, and shows their run status. In addition
to the list of all tasks, you can see the next run status of each task in the Next Run column of the Tasks dashboard.
17
Last updated 1/16/2014
Page 21

Chapter 5: Reusing tasks
In FMPS, you can reuse publishing tasks using templates and presets and save time.
See video: FrameMaker Publishing Server 12: PDF pre-sets and templates
Templates
Templates are reusable publication tasks that you can run with or without modifications.
Templates include the following information:
• Book settings: Settings such as whether or not to apply master pages and update cross references in the source book
• Output settings: Output directory and types of outputs to create
• Scripts: Pre-publish and post publish scripts to run
• E-mail: email IDs to notify the progress of tasks
• Private or shared: Private templates are visible and accessible for the creator of the template only. Shared templates
are visible and accessible to all the users.
• Log settings (for more information, see “Logs” on page 21.)
18
Create a template
1 Select the Template tab.
2 Click Add New Template and enter the settings for the Template.
3 If you want to make your template available for others, select Shared.
4 Click Save.
Run a template from the Template tab
• In the Template tab, select a Template in the list and click Run.
Run a template
1 In the Template tab, click a Template’s name.
The template details open.
2 If necessary, edit the template details.
3 Click Run.
Duplicate a template
To create a template similar to an existing one, you can duplicate it.
1 In the Template tab, do one of the following:
• Click a Template’s name and in the Template dialog, click Duplicate.
Last updated 1/16/2014
Page 22

USING FRAMEMAKER PUBLISHING SERVER
Reusing tasks
• Select a Template and select Add New Template > Duplicate Template.
2 The template details open with the same task settings and name of the task duplicated with the suffix “-copy.”
3 Modify the settings and the name of the Template and click Save.
Create a task from a template
By creating a task from a template, you can use the template with minimal changes.
1 In the Template tab, select a Template in the list.
2 In the Add New Template drop-down, select Create Task From Template.
The Task dialog appears.
3 Modify the details as appropriate and click Save.
Presets
In FMPS, you can create presets for PDF and RoboHelp tasks to save time. Presets include settings such as:
19
• Job settings
• Display settings
• PDF Bookmarks settings
• DITAVAL file to use
For repetitive tasks with the same settings, you can create and apply the presets to populate all the settings to save time.
You can create private or shared presets. Private presets are visible and accessible for the creator of preset only. Shared
presets are visible and accessible to all the users but can be edited only by the users who created them.
In addition to presets, you can also create Templates for reusable tasks.
Add a preset
1 Select the Presets tab.
2 Using the Add New drop-down, select Add New PDF Preset\Add New RoboHelp Preset and enter the name and
settings for the preset.
3 If you want to make your preset available for others, select Shared. If you do not select Shared, your preset is visible
and available to you only.
4 Click Save.
Edit a preset
1 On the Presets tab, click on a preset’s name.
The PDF\RoboHelp Presets dialog appears.
2 Make the required changes and click Save.
Last updated 1/16/2014
Page 23

USING FRAMEMAKER PUBLISHING SERVER
Reusing tasks
Delete presets
❖ Do one of the following:
• On the Presets tab, select the presets to be deleted and click Delete.
• In the PDF\RoboHelp Presets dialog, click Delete.
20
Last updated 1/16/2014
Page 24

Chapter 6: Logs
FrameMaker Publishing Server includes extensive logging features. You can use the FrameMaker Publishing Server
logs to troubleshoot any publication task errors, and fix errors in the source documents such as unresolved crossreferences. You can define FrameMaker Publishing Server logs to have extensive reports including the number of
markers, pages, and so on.
You can specify the log settings for each publication task, or can use the default log settings for all tasks.
Specify default log settings
1 In the Task dialog, click the Modify link next to Log Settings.
2 In the Log Settings dialog, double-click the entries in the Don’t Include list to include them in the log. Double-click
the entries in the Include list to exclude them from the log.
3 Click Save.
21
View logs
You can view the logs from the publication tasks completed in two ways:
In the Task dialog In the Task dialog, click on the Log tab. The Log tab displays all the logs relevant to the task in a
reverse chronological order.
In the FrameMaker Publishing Server application folder You can access the publication task logs from the application
installation folder: %appdata%\Roaming\Adobe\FrameMakerPublishingServer\12\ServerData.
You can use log parsers to quickly collect publication-related reports from these logs.
Last updated 1/16/2014
Page 25

Chapter 7: Working with FMPS using the APIs
API methods
From a client machine, you can query the FMPS using the following methods on IIS to create, retrieve, update, or delete
(CRUD) resources. According to the REST protocol, everything on the server, such as tasks, presets, and templates, is
treated as a resource. For more information on the REST protocol, see
http://en.wikipedia.org/wiki/Representational_state_transfer
In the Web API URLs and task types table, the various GET, POST, DELETE, and PUT requests map to CRUD
f
ramework as following:
Type of task CRUD aspect
Post Create
Get Retrieve
22
Put Update
Delete Delete
CRUD framework
The FMPS APIs manage the FMPS according to the CRUD (Create, Read, Update, Delete) framework. For more
information on the CRUD framework, see http://en.wikipedia.org/wiki/Create,_read,_update_and_delete
Following are the commands mapping to the CRUD framework:
CRUD aspect FMPS Web API command
CREATE
RETRIEVE curl.exe -k --dump-header h_Tasks.txt -v -u
UPDATE curl.exe -k --dump-header h_edit_task.txt -v -u
DELETE curl.exe -k --dump-header h_delete_task.txt -v -u
curl.exe -k --dump-header h_create_task.txt -v -u
<domain>\<username>:<password> --ntlm -H "Content-Type:
application/XML" -X POST --data <TaskSample>.xml
http://localhost:6234/fmserver/v1/Tasks
<domain>\<username>:<password> --ntlm
http://localhost:6234/fmserver/v1/Tasks
<domain>\<username>:<password> --ntlm -H "Content-Type:
application/XML" -X PUT --data <TaskSample>.xml
http://localhost:6234/fmserver/v1/Tasks/<TaskName>
<domain>\<username>:<password> --request DELETE
http://localhost:6234/fmserver/v1/Tasks/<TaskName>
Last updated 1/16/2014
Page 26

USING FRAMEMAKER PUBLISHING SERVER
Working with FMPS using the APIs
Web API URLs and task types
The following table includes URLs of each of the Web APIs available to you for building your own FMPS custom client.
Each URL represents a Web API that you can query. The methods, such as Get and Post, are the type of operations you
are performing on the Web API. The URLs include parameters that you can pass for the task.
Cr eate and upd ate (Post and Put ) requ est s have pa ramet ers passed in the body of the HTTP re que st as a n XM L or JS ON
file as well as in the URL. Get and Delete have parameters in the URLs only. The various task type links in the Help
URL include the schema required for the various tasks.
FMPS supports the following Web APIs :
Note: The following example commands use cURL. You can use any other command line tool and modify the commands
accordingly.
23
Web API URL (links work on a machine with
FMPS installed)
http://localhost:6234/fmserver/v1/{TYPE}/presets Get Retrieve all presets of type PDF or ROBO
http://localhost:6234/fmserver/v1/{TYPE}/presets/
{NAME}
http://localhost:6234/fmserver/v1/cmsinfolist Get Get list of CMS registered for FMPS. This comes
http://localhost:6234/fmserver/v1/kill/tasks/{TASK
NAME}
http://localhost:6234/fmserver/v1/meta/tasks/{TA
SKNAME}
http://localhost:6234/fmserver/v1/meta/template
tasks/{TEMPLATENAME}?shared={SHARED}
http://localhost:6234/fmserver/v1/run/tasks/{TAS
KNAME}
http://localhost:6234/fmserver/v1/run/templateta
sks/{TEMPLATENAME}?shared={SHARED}
Tas k Type Description
Post Create a preset of type PDF or ROBO
Get Retrieve a preset of type PDF or ROBO
Put Edit a preset of type PDF or ROBO
Delete Delete a preset of type PDF or ROBO
from the cmsinfolist.xml in FMPS installation
Post Kill an already running Task
Get Retrieve meta info of a task: Creator, Created, Last
Run
Get Retrieve meta info of a task: Creator, Created, Last
Run
Optional Parameter Shared=true needs to be
passed in the URL to indicate a shared template
Post Run a task
Post Run a Template Task with template parameters.
This creates a temporary task that would be run
immediately.
Optional Parameter Shared=true needs to be
passed in the URL to indicate a shared template
http://localhost:6234/fmserver/v1/tasks?taskinfo=
{TASKINFO}&metainfo={METAINFO}&schedulingin
fo={SCHEDULINGINFO}&statusinfo={STATUSINFO}
http://localhost:6234/fmserver/v1/tasks Post Create a task with the settings specified in the
Get Retrieve list of all Tasks detailsOptional
Parameter(s):
metainfo=true needs to be passed in the URL to
retrieve Creator, Created, Last Run
schedulinginfo=true needs to be passed in
the URL to retrieve schedule of the task
statusinfo=true needs to be passed in the URL
to retrieve running status of the Task
given file.
Last updated 1/16/2014
Page 27

USING FRAMEMAKER PUBLISHING SERVER
Working with FMPS using the APIs
24
Web API URL (links work on a machine with
FMPS installed)
http://localhost:6234/fmserver/v1/tasks/{TASKNA
ME}?metainfo={METAINFO}&schedulinginfo={SCH
EDULINGINFO}&statusinfo={STATUSINFO}
http://localhost:6234/fmserver/v1/tasks/{TASKNA
ME}
http://localhost:6234/fmserver/v1/tasks/{TASKNA
ME}/logs
http://localhost:6234/fmserver/v1/tasks/{TASKNA
ME}/logs/{LOGNAME}
http://localhost:6234/fmserver/v1/tasks/{TASKNA
ME}/statuses
http://localhost:6234/fmserver/v1/tasks/{TASKNA
ME}/statuses/{STATUSNAME}
http://localhost:6234/fmserver/v1/templatetasks?
shared={SHARED}&templateinfo={TEMPLATEINFO
}&metainfo={METAINFO}
Task Type Description
Get Retrieve the given Task details
Optional Parameter(s):
metainfo=true needs to be passed in the URL to
retrieve Creator, Created, Last Run
schedulinginfo=true needs to be passed in
the URL to retrieve schedule of the task
statusinfo=true needs to be passed in the URL
to retrieve running status of the Task
Put Edit a task with the settings specified in the given
file.
Delete Delete a specific task
Get Retrieve the list of all logs of the given Task
Get Retrieve a specific log of the given Task
Get Retrieve the list of all status logs of the given Task
Get Retrieve a specific status log of the given Task
Get Retrieve list of all TemplateTasks details
Optional Parameter(s):
shared=true needs to be passed in the URL to
indicate a shared template
metainfo=true needs to be passed in the URL to
retrieve Creator, Created
templateinfo=true needs to be passed in the
URL to retrieve details of the Template Task
http://localhost:6234/fmserver/v1/templatetasks?
shared={SHARED}
http://localhost:6234/fmserver/v1/templatetasks/
{TEMPLATENAME}?shared={SHARED}&metainfo={
METAINFO}
http://localhost:6234/fmserver/v1/templatetasks/
{TEMPLATENAME}?shared={SHARED}
http://localhost:6234/fmserver/v1/schedulinginfo
/tasks/{TASKNAME}
Post Create a template task with the settings specified
in the given file.
Optional Parameter Shared=true needs to be
passed in the URL to indicate a shared template
Get Retrieve meta info of a task: Creator, Created
Delete Delete a template task with the specified name
Optional Parameter Shared=true needs to be
passed in the URL to indicate a shared template
Put Modify a template task with the settings specified
in the given file.
Optional Parameter Shared=true needs to be
passed in the URL to indicate a shared template
Get Retrieve schedule of a Task
Put Modify schedule of a Task
Last updated 1/16/2014
Page 28

USING FRAMEMAKER PUBLISHING SERVER
Working with FMPS using the APIs
Help URL
The Help URL (Localhost:6234\fmserver/v1/help) gives you a list of all the Web APIs available to you. :
When you click a Post or Put link, you can see:
• The sample XML and JSON schema of the file you need to pass with the parameters for creating\modifying a task.
• The sample response XML and JSON schema files.
When you click a Get link, you see the sample response schemas. For Get requests, the body for request and response
is empty.
Enable the Help URL
As explained in the step 3 of “Install FrameMaker Publishing Server 12” on page 9, add the following value to the
application settings of FMPS and set it to true:
FMPSHelpDataEnabled
Using command line to manage tasks with FrameMaker Publishing Server
Note: In the following commands, you will use the username and password fields only if you have enabled authentication.
Otherwise, you do not pass domain, username, password, and --ntlm.
25
Create a task for the FMPS
1 Create a .xml or JSON file specifying Task Name, Input File, Output file, and your email ID where FMPS will send
notifications about the task. Following is the example content for the XML input file:
Last updated 1/16/2014
Page 29

USING FRAMEMAKER PUBLISHING SERVER
Working with FMPS using the APIs
<Task xmlns:i="http://www.w3.org/2001/XMLSchema-instance">
<Name>Task_Epub</Name>
<FMServerTask xmlns:i="http://www.w3.org/2001/XMLSchema-instance">
<Version>12</Version>
<Jobs>
<Job>
<Input>
<InputFile>C:\Sample.Book</InputFile>
<UpdateBook></UpdateBook>
</Input>
<Outputs>
<Output>
<OutputFile>C:\Epub\</OutputFile>
<OutputFormat>RH_EPUB</OutputFormat>
<Configuration>
<RH_CONFIGURATION>
</RH_CONFIGURATION>
</Configuration>
</Output>
</Outputs>
</Job>
</Jobs>
<Notification>
<Emails>
<Email>your@email.com</Email>
</Emails>
</Notification>
</FMServerTask>
</Task>
26
2 Pass the following command with the appropriate values to create a task. Replace <TaskSample>.xml with the
XML\JSON file’s name you created in step 1.
curl.exe -k --dump-header h_create_task.txt -v -u <domain>\<username>:<password> --ntlm -H
"Content-Type: application/XML" -X POST --data <TaskSample>.xml
http://localhost:6234/fmserver/v1/Tasks
The task is created. When this task runs successfully. System returns the code 200. The task gets created in 2 places
in FMPS Base DIR you specified during application settings. The created task now appears in your UI: console page.
Retrieve all your tasks
• Pass the following command with the appropriate credentials and domain name.
curl.exe -k --dump-header h_Tasks.txt -v -u <domain>\<username>:<password> --ntlm
http://localhost:6234/fmserver/v1/Tasks
Retrieve a particular task
• Pass the following command with the appropriate credentials, domain name, and task name.
curl.exe -k --dump-header h_Tasks.txt -v -u <domain>\<username>:<password> --ntlm
http://localhost:6234/fmserver/v1/Tasks/<taskname>
Last updated 1/16/2014
Page 30

USING FRAMEMAKER PUBLISHING SERVER
Working with FMPS using the APIs
Modify a task
• To modify a task you have already created, edit the XML\JSON file you passed to create the task and pass it again
using the following command:
curl.exe -k --dump-header h_edit_task.txt -v -u <domain>\<username>:<password> --ntlm -H
"Content-Type: application/XML" -X PUT --data <TaskSample>.xml
http://localhost:6234/fmserver/v1/Tasks/<TaskName>
Note: The command to modify a task is similar to the command for creating a task. You just replace POST with PUT.
Delete a task
• To Delete a task you have already created, pass the following command:
curl.exe -k --dump-header h_delete_task.txt -v -u <domain>\<username>:<password> --request
DELETE http://localhost:6234/fmserver/v1/Tasks/<TaskName>
See all the Web APIs
All the web APIs are listed at the Help URL:
Localhost:6234\fmserver/v1/help
27
FMPS troubleshooting
Issue Resolution
Not able to use the Browse URL
functionality in FMPS
Do not see IIS installed after the
installation of FMPS12
Task APIs giving unknown error Open the debug log from the path of the mentioned variable "debuglog" in IIS ->
Task/log/file not getting created
or deleted using the APIs
Error Object reference not
set to an instance of an
object
Even after specifying poolname
in the deploy settings, tasks get
created with DefaultAppPool as
user
Enable JavaScript™ in your browser
When you click the Browse button again, the browser prompts you to accept to
run the Java™ Applet. Click Yes.
Could be resolved by one of the following:
• Restart the machine.
• Run aspnet_regiis -i in
C:\Windows\Microsoft.NET\Framework\v4.X.XXXXX
FMPS12 website . Location of debuglog is according to what you specified in the
application settings. The debuglog mentions the error details.
Ensure the domain\user running the task has full permissions
The website type you are accessing is not correct.
Ensure that the http port is open and https is correctly configured.
Select IIS > Website > Basic Settings and set the pool to the desired poolname.
Need to create an application
pool in the IIS
Need to know which ports are
being used by FMPS website
For more information, see “Manually install FMPS12 website in IIS, if necessary ” on
page 11
Select IIS > FMPS website > Bindings
For advanced settings: IIS -> FMPS website -> Advanced Settings
Last updated 1/16/2014
Page 31

USING FRAMEMAKER PUBLISHING SERVER
Working with FMPS using the APIs
Issue Resolution
28
Not getting notification emails
after task completion
Server 500 error and the Server
console does not appear in the
browser
After changing the password,
FMPS stopped working with the
message: Service not
available
Not able to see the Math ML
equations in the published
documents
Nothing happens on running a
task - Command prompt is not
launched.
.
Your virus scan may be blocking the emails. Set up your virus scan to allow the emails.
Restart the IIS.
Enter your user name and password once again:
Select IIS > Application Pools > Advanced Settings > Identity > Custom Account
and enter user name and password.
Start FrameMaker and select Special > MathML. If the EULA pops up, accept it.
Ensure that JRE is installed on the machine. If it is not, install JRE.
Enable 32-bit applications
1. Select IIS > Application Pools.
2. Select fmps12 and then select Advanced Settings.
3. Select IIS > Application Pools.
4. If Enable 32-Bit Applications is set to false, change it to true and restart the
application pool.
Last updated 1/16/2014
 Loading...