

Page 1

ADOBE FRAMEMAKER 8
USER GUIDE
Page 2

© 2007 Adobe Systems Incorporated. All rights reserved.
Adobe® FrameMaker® 8 User Guide for Windows® and UNIX®.
If this guide is distributed with software that includes an end-user agreement, this guide, as well as the software described in it, is furnished under license and may be used or
copied only in accordance with the terms of such license. Except as permitted by any such license, no part of this guide may be reproduced, stored in a retrieval system, or transmitted, in any form or by any means, electronic, mechanical, recording, or otherwise, without the prior written permission of Adobe Systems Incorporated. Please note that the
content in this guide is protected under copyright law even if it is not distributed with software that includes an end-user license agreement.
The content of this guide is furnished for informational use only, is subject to change without notice, and should not be construed as a commitment by Adobe Systems Incorporated. Adobe Systems Incorporated assumes no responsibility or liability for any errors or inaccuracies that may appear in the informational content contained in this guide.
Please remember that existing artwork or images that you may want to include in your project may be protected under copyright law. The unauthorized incorporation of such
material into your new work could be a violation of the rights of the copyright owner. Please be sure to obtain any permission required from the copyright owner.
Any references to company names in sample templates are for demonstration purposes only and are not intended to refer to any actual organization.
Adobe, the Adobe logo, Acrobat, Distiller, Flash, FrameMaker, Illustrator, PageMaker, Photoshop, PostScript, Reader, Garamond, Kozuka Mincho, Kozuka Gothic, MinionPro,
and MyriadPro are trademarks of Adobe Systems Incorporated.
Microsoft, Windows, and Windows Vista are either registered trademarks or trademarks of Microsoft Corporation in the United States and/or other countries. Solaris is a
trademark or registered trademark of Sun Microsystems, Inc. in the United States and other countries. UNIX is a trademark in the United States and other countries, licensed
exclusively through X/Open Company, Ltd. SVG is a trademark of the World Wide Web Consortium; marks of the W3C are registered and held by its host institutions MIT,
INRIA, and Keio. All other trademarks are the property of their respective owners.
This product contains either BISAFE and/or TIPEM software by RSA Data Security, Inc.
This product contains color data and/or the Licensed Trademark of The Focoltone Colour System.
PANTONE® Colors displayed in the software application or in the user documentation may not match PANTONE-identified standards. Consult current PANTONE Color Publications for accurate color. PANTONE® and other Pantone, Inc. trademarks are property of Pantone, Inc. © Pantone, Inc. 2003. Pantone, Inc. is the copyright owner of color data
and/or software which are licensed to Adobe Systems Incorporated to distribute for use only in combination with Adobe FrameMaker. PAN TONE C olor Data and /or Soft ware
shall not be copied onto another disk or into memory unless as part of the execution of Adobe FrameMaker software.
Software is produced under Dainippon Ink and Chemicals Inc.'s copyrights of color-data-base derived from Sample Books.
This product contains ImageStream® Graphics and Presentation Filters Copyright ©1991-1996 Inso Corporation and/or Outside In® Viewer Technology ©1992-1996 Inso Corporation. All Rights Reserved.
This product includes software developed by the Apache Software Foundation (http://www.apache.org/).
Certain Spelling portions of this product is based on Proximity Linguistic Technology. ©Copyright 1990 Merriam-Webster Inc. ©Copyright 1990 All rights reserved. Proximity
Technology A Division of Franklin Electronic Publishers, Inc. Burlington, New Jersey USA. ©Copyright 2003 Franklin Electronic Publishers Inc.©Copyright 2003 All rights
reserved. Proximity Technology A Division of Franklin Electronic Publishers, Inc. Burlington, New Jersey USA. Legal Supplement ©Copyright 1990/1994 Merriam-Webster
Inc./Franklin Electronic Publishers Inc. ©Copyright 1994 All rights reserved. Proximity Technology A Division of Franklin Electronic Publishers, Inc. Burlington, New Jersey
USA. ©Copyright 1990/1994 Merriam-Webster Inc./Franklin Electronic Publishers Inc. ©Copyright 1997All rights reserved. Proximity Technology A Division of Franklin
Electronic Publishers, Inc. Burlington, New Jersey USA ©Copyright 1990 Merriam-Webster Inc. ©Copyright 1993 All rights reserved. Proximity Technology A Division of
Franklin Electronic Publishers, Inc. Burlington, New Jersey USA. ©Copyright 2004 Franklin Electronic Publishers Inc. ©Copyright 2004 All rights reserved. Proximity
Technology A Division of Franklin Electronic Publishers, Inc. Burlington, New Jersey USA. ©Copyright 1991 Dr. Lluis de Yzaguirre I Maura ©Copyright 1991 All rights reserved.
Proximity Technology A Division of Franklin Electronic Publishers, Inc. Burlington, New Jersey USA. ©Copyright 1990 Munksgaard International Publishers Ltd. ©Copyright
1990 All rights reserved. Proximity Technology A Division of Franklin Electronic Publishers, Inc. Burlington, New Jersey USA. ©Copyright 1990 Van Dale Lexicografie bv
©Copyright 1990 All rights reserved. Proximity Technology A Division of Franklin Electronic Publishers, Inc. Burlington, New Jersey USA. ©Copyright 1995 Van Dale
Lexicografie bv ©Copyright 1996 All rights reserved. Proximity Technology A Division of Franklin Electronic Publishers, Inc. Burlington, New Jersey USA. ©Copyright 1990
IDE a.s. ©Copyright 1990 All rights reserved. Proximity Technology A Division of Franklin Electronic Publishers, Inc. Burlington, New Jersey USA. ©Copyright 1992
Hachette/Franklin Electronic Publishers Inc. ©Copyright 2004 All rights reserved. Proximity Technology A Division of Franklin Electronic Publishers, Inc. Burlington, New
Jersey USA. ©Copyright 1991 Text & Satz Datentechnik ©Copyright 1991 All rights reserved. Proximity Technology A Division of Franklin Electronic Publishers, Inc. Burlington,
New Jersey USA. ©Copyright 2004 Bertelsmann Lexikon Verlag ©Copyright 2004 All rights reserved. Proximity Technology A Division of Franklin Electronic Publishers, Inc.
Burlington, New Jersey USA. ©Copyright 2004 MorphoLogic Inc. ©Copyright 2004 All rights reserved. Proximity Technology A Division of Franklin Elect ronic Publishers, Inc.
Burlington, New Jersey USA. ©Copyright 1990 William Collins Sons & Co. Ltd. ©Copyright 1990 All rights reserved. Proximity Technology A Division of Franklin Electronic
Publishers, Inc. Burlington, New Jersey USA. ©Copyright 1993-95 Russicon Company Ltd. ©Copyright 1995 All rights reserved. Proximity Technology A Division of Franklin
Electronic Publishers, Inc. Burlington, New Jersey USA. ©Copyright 2004 IDE a.s. ©Copyright 2004 All rights reserved. Proximity Technology A D ivision of Franklin El ectronic
Publishers, Inc. Burlington, New Jersey USA. The Hyphenation portion of this product is based on Proximity Linguistic Technology. ©Copyright 2003 Franklin Electronic
Publishers Inc.©Copyright 2003 All rights reserved. Proximity Technology A Division of Franklin Electronic Publishers, Inc. Burlington, New Jersey USA. ©Copyright 1984
William Collins Sons & Co. Ltd. ©Copyright 1988 All rights reserved. Proximity Technology A Division of Franklin Electronic Publishers, Inc. Burlington, New Jersey USA.
©Copyright 1990 Munksgaard International Publishers Ltd. ©Copyright 1990 All rights reserved. Proximity Technology A Division of Franklin Electronic Publishers, Inc.
Burlington, New Jersey USA. ©Copyright 1997 Van Dale Lexicografie bv ©Copyright 1997 All rights reserved. Proximity Technology A Division of Franklin Electronic
Publishers, Inc. Burlington, New Jersey USA. ©Copyright 1984 Editions Fernand Nathan ©Copyright 1989 All rights reserved. Proximity Technology A Division of Franklin
Electronic Publishers, Inc. Burlington, New Jersey USA. ©Copyright 1983 S Fischer Verlag ©Copyright 1997 All rights reserved. P
Electronic Publishers, Inc. Burlington, New Jersey USA. ©Copyright 1989 Zanichelli ©Copyright 1989 All rights reserved. Proximity Technology A Division of Franklin
Electronic Publishers, Inc. Burlington, New Jersey USA. ©Copyright 1989 IDE a.s. ©Copyright 1989 All rights reserved. Proximity Technology A D ivision of Franklin El ectronic
Publishers, Inc. Burlington, New Jersey USA. ©Copyright 1990 Espasa-Calpe ©Copyright 1990 All rights reserved. Proximity Technology A Division of Franklin Electronic
Publishers, Inc. Burlington, New Jersey USA. ©Copyright 1989 C.A. Stromberg AB. ©Copyright 1989 All rights reserved. Proximity Technology A Division of Franklin E lectronic
Publishers, Inc. Burlington, New Jersey USA.
Portions of Adobe Acrobat include technology used under license from Autonomy, and are copyrighted.
Adobe Systems Incorporated, 345 Park Avenue, San Jose, California 95110, USA.
Notic e to U.S. gov ernment end user s. The so ftware a nd document ation are “Comm ercial Items,” as that te rm is de fined at 48 C.F.R. §2.101, consisting of “Commercial Computer
Software” and “Commercial Computer Software Documentation,” as such terms are used in 48 C.F.R. §12.212 or 48 C.F.R. §227.7202, as applicable. Consistent with 48 C.F.R.
§12.212 or 48 C.F.R. §§227.7202-1 through 227.7202-4, as applicable, the Commercial Computer Software and Commercial Computer Software Documentation are being
licensed to U.S. Government end users (a) only as Commercial items and (b) with only those rights as are granted to all other end users pursuant to the terms and conditions
herein. Unpublished-rights reserved under the copyright laws of the United States. For U.S. Government End Users, Adobe agrees to comply with all applicable equal opportunity
laws including, if appropriate, the provisions of Executive Order 11246, as amended, Section 402 of the Vietnam Era Veterans Readjustment Assistance Act of 1974 (38 USC 4212),
and Section 503 of the Rehabilitation Act of 1973, as amended, and the regulations at 41 CFR Parts 60-1 through 60-60, 60-250, and 60-741. The affirmative action clause and
regulations contained in the preceding sentence shall be incorporated by reference.
roximity Technology A Division of Franklin
Page 3

Contents
Chapter 1: Getting started
Installation . . . . . . . . . . . . . . . . . . . . . . . . . . . . . . . . . . . . . . . . . . . . . . . . . . . . . . . . . . . . . . . . . . . . . . . . . . . . . . . 1
Adobe Help . . . . . . . . . . . . . . . . . . . . . . . . . . . . . . . . . . . . . . . . . . . . . . . . . . . . . . . . . . . . . . . . . . . . . . . . . . . . . . . 2
What's new . . . . . . . . . . . . . . . . . . . . . . . . . . . . . . . . . . . . . . . . . . . . . . . . . . . . . . . . . . . . . . . . . . . . . . . . . . . . . . . 3
Chapter 2: FrameMaker basics
The Welcome Screen . . . . . . . . . . . . . . . . . . . . . . . . . . . . . . . . . . . . . . . . . . . . . . . . . . . . . . . . . . . . . . . . . . . . . . 5
About the workspace . . . . . . . . . . . . . . . . . . . . . . . . . . . . . . . . . . . . . . . . . . . . . . . . . . . . . . . . . . . . . . . . . . . . . 5
Understanding the structured workspace . . . . . . . . . . . . . . . . . . . . . . . . . . . . . . . . . . . . . . . . . . . . . . . . . 12
Working with unstructured FrameMaker documents . . . . . . . . . . . . . . . . . . . . . . . . . . . . . . . . . . . . . . 19
Working with structured FrameMaker documents . . . . . . . . . . . . . . . . . . . . . . . . . . . . . . . . . . . . . . . . . 32
About structured documents . . . . . . . . . . . . . . . . . . . . . . . . . . . . . . . . . . . . . . . . . . . . . . . . . . . . . . . . . . . . . 56
Working with XML documents . . . . . . . . . . . . . . . . . . . . . . . . . . . . . . . . . . . . . . . . . . . . . . . . . . . . . . . . . . . 68
Word processing . . . . . . . . . . . . . . . . . . . . . . . . . . . . . . . . . . . . . . . . . . . . . . . . . . . . . . . . . . . . . . . . . . . . . . . . . 71
Text formatting . . . . . . . . . . . . . . . . . . . . . . . . . . . . . . . . . . . . . . . . . . . . . . . . . . . . . . . . . . . . . . . . . . . . . . . . . 101
Multiple Undo/Redo . . . . . . . . . . . . . . . . . . . . . . . . . . . . . . . . . . . . . . . . . . . . . . . . . . . . . . . . . . . . . . . . . . . . 141
iii
Chapter 3: Unicode support
About Unicode support . . . . . . . . . . . . . . . . . . . . . . . . . . . . . . . . . . . . . . . . . . . . . . . . . . . . . . . . . . . . . . . . . 152
FrameMaker features supporting Unicode content . . . . . . . . . . . . . . . . . . . . . . . . . . . . . . . . . . . . . . . 153
Setting up your computer and keyboard to work with multiple languages . . . . . . . . . . . . . . . . 155
Chapter 4: FrameMaker tables
About tables . . . . . . . . . . . . . . . . . . . . . . . . . . . . . . . . . . . . . . . . . . . . . . . . . . . . . . . . . . . . . . . . . . . . . . . . . . . . 157
Inserting tables . . . . . . . . . . . . . . . . . . . . . . . . . . . . . . . . . . . . . . . . . . . . . . . . . . . . . . . . . . . . . . . . . . . . . . . . . 158
Converting between text and tables . . . . . . . . . . . . . . . . . . . . . . . . . . . . . . . . . . . . . . . . . . . . . . . . . . . . . 162
Copying, moving, and removing tables . . . . . . . . . . . . . . . . . . . . . . . . . . . . . . . . . . . . . . . . . . . . . . . . . . 164
Changing the look of tables . . . . . . . . . . . . . . . . . . . . . . . . . . . . . . . . . . . . . . . . . . . . . . . . . . . . . . . . . . . . . 164
Positioning tables on a page . . . . . . . . . . . . . . . . . . . . . . . . . . . . . . . . . . . . . . . . . . . . . . . . . . . . . . . . . . . . 167
Adjusting rows and columns . . . . . . . . . . . . . . . . . . . . . . . . . . . . . . . . . . . . . . . . . . . . . . . . . . . . . . . . . . . . 170
Sorting columns and rows . . . . . . . . . . . . . . . . . . . . . . . . . . . . . . . . . . . . . . . . . . . . . . . . . . . . . . . . . . . . . . . 174
Rotating cells and tables . . . . . . . . . . . . . . . . . . . . . . . . . . . . . . . . . . . . . . . . . . . . . . . . . . . . . . . . . . . . . . . . 175
Controlling page breaks in tables . . . . . . . . . . . . . . . . . . . . . . . . . . . . . . . . . . . . . . . . . . . . . . . . . . . . . . . . 176
Positioning and autonumbering text within cells . . . . . . . . . . . . . . . . . . . . . . . . . . . . . . . . . . . . . . . . .178
Working with ruling and shading . . . . . . . . . . . . . . . . . . . . . . . . . . . . . . . . . . . . . . . . . . . . . . . . . . . . . . . . 180
Redefining (updating) table formats . . . . . . . . . . . . . . . . . . . . . . . . . . . . . . . . . . . . . . . . . . . . . . . . . . . . . 183
Renaming and deleting table formats . . . . . . . . . . . . . . . . . . . . . . . . . . . . . . . . . . . . . . . . . . . . . . . . . . . 185
Creating table formats . . . . . . . . . . . . . . . . . . . . . . . . . . . . . . . . . . . . . . . . . . . . . . . . . . . . . . . . . . . . . . . . . . 185
Working with tables in structured documents . . . . . . . . . . . . . . . . . . . . . . . . . . . . . . . . . . . . . . . . . . . . 186
Inserting structured tables . . . . . . . . . . . . . . . . . . . . . . . . . . . . . . . . . . . . . . . . . . . . . . . . . . . . . . . . . . . . . . 187
Filling in structured tables with text and graphics . . . . . . . . . . . . . . . . . . . . . . . . . . . . . . . . . . . . . . . . 189
Copying, moving, and removing structured tables . . . . . . . . . . . . . . . . . . . . . . . . . . . . . . . . . . . . . . . 194
Page 4

Applying different formats to structured tables . . . . . . . . . . . . . . . . . . . . . . . . . . . . . . . . . . . . . . . . . . 194
Positioning structured tables on a page . . . . . . . . . . . . . . . . . . . . . . . . . . . . . . . . . . . . . . . . . . . . . . . . . . 195
Adjusting rows and columns in structured tables . . . . . . . . . . . . . . . . . . . . . . . . . . . . . . . . . . . . . . . . 197
Rotating cells and tables in structured documents . . . . . . . . . . . . . . . . . . . . . . . . . . . . . . . . . . . . . . . 199
Chapter 5: Cross-references and footnotes
Inserting cross-references . . . . . . . . . . . . . . . . . . . . . . . . . . . . . . . . . . . . . . . . . . . . . . . . . . . . . . . . . . . . . . . 201
Working with cross-reference markers . . . . . . . . . . . . . . . . . . . . . . . . . . . . . . . . . . . . . . . . . . . . . . . . . . . 203
Displaying the source of a cross-reference . . . . . . . . . . . . . . . . . . . . . . . . . . . . . . . . . . . . . . . . . . . . . . . 203
Editing cross-references . . . . . . . . . . . . . . . . . . . . . . . . . . . . . . . . . . . . . . . . . . . . . . . . . . . . . . . . . . . . . . . . . 204
Creating cross-reference formats . . . . . . . . . . . . . . . . . . . . . . . . . . . . . . . . . . . . . . . . . . . . . . . . . . . . . . . . 205
Using building blocks for source information . . . . . . . . . . . . . . . . . . . . . . . . . . . . . . . . . . . . . . . . . . . . 206
Editing cross-reference formats . . . . . . . . . . . . . . . . . . . . . . . . . . . . . . . . . . . . . . . . . . . . . . . . . . . . . . . . . . 208
Maintaining cross-references . . . . . . . . . . . . . . . . . . . . . . . . . . . . . . . . . . . . . . . . . . . . . . . . . . . . . . . . . . . . 208
Resolving cross-references . . . . . . . . . . . . . . . . . . . . . . . . . . . . . . . . . . . . . . . . . . . . . . . . . . . . . . . . . . . . . . 209
Working with footnotes . . . . . . . . . . . . . . . . . . . . . . . . . . . . . . . . . . . . . . . . . . . . . . . . . . . . . . . . . . . . . . . . . 211
Changing footnote formats . . . . . . . . . . . . . . . . . . . . . . . . . . . . . . . . . . . . . . . . . . . . . . . . . . . . . . . . . . . . . 213
Working with endnotes . . . . . . . . . . . . . . . . . . . . . . . . . . . . . . . . . . . . . . . . . . . . . . . . . . . . . . . . . . . . . . . . . 216
Working with cross-references in structured documents . . . . . . . . . . . . . . . . . . . . . . . . . . . . . . . . . . 217
Inserting element-based cross-references in structured documents . . . . . . . . . . . . . . . . . . . . . . 219
Working with ID values in structured documents . . . . . . . . . . . . . . . . . . . . . . . . . . . . . . . . . . . . . . . . . 221
Resolving cross-references in structured documents . . . . . . . . . . . . . . . . . . . . . . . . . . . . . . . . . . . . . 222
Working with footnotes in structured documents . . . . . . . . . . . . . . . . . . . . . . . . . . . . . . . . . . . . . . . . 223
Working with endnotes in structured documents . . . . . . . . . . . . . . . . . . . . . . . . . . . . . . . . . . . . . . . . 225
iv
Chapter 6: Variables and equations
About variables . . . . . . . . . . . . . . . . . . . . . . . . . . . . . . . . . . . . . . . . . . . . . . . . . . . . . . . . . . . . . . . . . . . . . . . . . 226
Inserting variables . . . . . . . . . . . . . . . . . . . . . . . . . . . . . . . . . . . . . . . . . . . . . . . . . . . . . . . . . . . . . . . . . . . . . . 228
Editing variables . . . . . . . . . . . . . . . . . . . . . . . . . . . . . . . . . . . . . . . . . . . . . . . . . . . . . . . . . . . . . . . . . . . . . . . . 229
Deleting variables . . . . . . . . . . . . . . . . . . . . . . . . . . . . . . . . . . . . . . . . . . . . . . . . . . . . . . . . . . . . . . . . . . . . . . . 230
Converting variables to text . . . . . . . . . . . . . . . . . . . . . . . . . . . . . . . . . . . . . . . . . . . . . . . . . . . . . . . . . . . . . 230
Updating system variables on body or reference pages . . . . . . . . . . . . . . . . . . . . . . . . . . . . . . . . . . 230
Importing variable definitions . . . . . . . . . . . . . . . . . . . . . . . . . . . . . . . . . . . . . . . . . . . . . . . . . . . . . . . . . . . 231
Changing variable definitions . . . . . . . . . . . . . . . . . . . . . . . . . . . . . . . . . . . . . . . . . . . . . . . . . . . . . . . . . . . 232
Creating variables for running headers and footers . . . . . . . . . . . . . . . . . . . . . . . . . . . . . . . . . . . . . . . 234
Working with variables in structured documents . . . . . . . . . . . . . . . . . . . . . . . . . . . . . . . . . . . . . . . . . 237
About Equations . . . . . . . . . . . . . . . . . . . . . . . . . . . . . . . . . . . . . . . . . . . . . . . . . . . . . . . . . . . . . . . . . . . . . . . . 239
Using the Equations palette . . . . . . . . . . . . . . . . . . . . . . . . . . . . . . . . . . . . . . . . . . . . . . . . . . . . . . . . . . . . . 239
Inserting math elements . . . . . . . . . . . . . . . . . . . . . . . . . . . . . . . . . . . . . . . . . . . . . . . . . . . . . . . . . . . . . . . . 243
Creating equations in structured documents using elements . . . . . . . . . . . . . . . . . . . . . . . . . . . . . 283
Chapter 7: Filter By Attribute
About Filter By Attribute . . . . . . . . . . . . . . . . . . . . . . . . . . . . . . . . . . . . . . . . . . . . . . . . . . . . . . . . . . . . . . . . 286
Build a filter . . . . . . . . . . . . . . . . . . . . . . . . . . . . . . . . . . . . . . . . . . . . . . . . . . . . . . . . . . . . . . . . . . . . . . . . . . . . . 287
Apply a filter . . . . . . . . . . . . . . . . . . . . . . . . . . . . . . . . . . . . . . . . . . . . . . . . . . . . . . . . . . . . . . . . . . . . . . . . . . . . 292
Save a document after applying a filter . . . . . . . . . . . . . . . . . . . . . . . . . . . . . . . . . . . . . . . . . . . . . . . . . . 292
Page 5

Modify a filter . . . . . . . . . . . . . . . . . . . . . . . . . . . . . . . . . . . . . . . . . . . . . . . . . . . . . . . . . . . . . . . . . . . . . . . . . . . 293
Delete a filter . . . . . . . . . . . . . . . . . . . . . . . . . . . . . . . . . . . . . . . . . . . . . . . . . . . . . . . . . . . . . . . . . . . . . . . . . . . 293
Additional information . . . . . . . . . . . . . . . . . . . . . . . . . . . . . . . . . . . . . . . . . . . . . . . . . . . . . . . . . . . . . . . . . . 293
Chapter 8: Conditional text
About conditional text . . . . . . . . . . . . . . . . . . . . . . . . . . . . . . . . . . . . . . . . . . . . . . . . . . . . . . . . . . . . . . . . . . 296
Planning conditional documents . . . . . . . . . . . . . . . . . . . . . . . . . . . . . . . . . . . . . . . . . . . . . . . . . . . . . . . . 298
Creating, changing, and deleting condition tags . . . . . . . . . . . . . . . . . . . . . . . . . . . . . . . . . . . . . . . . .299
Using Boolean expressions to generate conditional output . . . . . . . . . . . . . . . . . . . . . . . . . . . . . . . 302
Applying and removing condition tags . . . . . . . . . . . . . . . . . . . . . . . . . . . . . . . . . . . . . . . . . . . . . . . . . . 303
Working in conditional documents . . . . . . . . . . . . . . . . . . . . . . . . . . . . . . . . . . . . . . . . . . . . . . . . . . . . . . 305
Editing elements in conditional structured documents . . . . . . . . . . . . . . . . . . . . . . . . . . . . . . . . . . . 309
Chapter 9: Graphics and anchored frames
About Graphics . . . . . . . . . . . . . . . . . . . . . . . . . . . . . . . . . . . . . . . . . . . . . . . . . . . . . . . . . . . . . . . . . . . . . . . . . 310
Using the drawing tools . . . . . . . . . . . . . . . . . . . . . . . . . . . . . . . . . . . . . . . . . . . . . . . . . . . . . . . . . . . . . . . . . 313
About graphic elements in structured documents . . . . . . . . . . . . . . . . . . . . . . . . . . . . . . . . . . . . . . . 345
About Anchored Frames . . . . . . . . . . . . . . . . . . . . . . . . . . . . . . . . . . . . . . . . . . . . . . . . . . . . . . . . . . . . . . . . 345
Creating anchored frames . . . . . . . . . . . . . . . . . . . . . . . . . . . . . . . . . . . . . . . . . . . . . . . . . . . . . . . . . . . . . . . 346
Editing anchored frames . . . . . . . . . . . . . . . . . . . . . . . . . . . . . . . . . . . . . . . . . . . . . . . . . . . . . . . . . . . . . . . . 359
Preparing anchored frames for tagged PDF . . . . . . . . . . . . . . . . . . . . . . . . . . . . . . . . . . . . . . . . . . . . . . 360
Anchored frames in structured documents . . . . . . . . . . . . . . . . . . . . . . . . . . . . . . . . . . . . . . . . . . . . . . 361
v
Chapter 10: Color
About Color . . . . . . . . . . . . . . . . . . . . . . . . . . . . . . . . . . . . . . . . . . . . . . . . . . . . . . . . . . . . . . . . . . . . . . . . . . . . 364
Color models . . . . . . . . . . . . . . . . . . . . . . . . . . . . . . . . . . . . . . . . . . . . . . . . . . . . . . . . . . . . . . . . . . . . . . . . . . . 364
Planning to use color . . . . . . . . . . . . . . . . . . . . . . . . . . . . . . . . . . . . . . . . . . . . . . . . . . . . . . . . . . . . . . . . . . . . 364
Using color libraries . . . . . . . . . . . . . . . . . . . . . . . . . . . . . . . . . . . . . . . . . . . . . . . . . . . . . . . . . . . . . . . . . . . . . 365
Applying colors and tints . . . . . . . . . . . . . . . . . . . . . . . . . . . . . . . . . . . . . . . . . . . . . . . . . . . . . . . . . . . . . . . . 366
Defining and modifying colors and tints . . . . . . . . . . . . . . . . . . . . . . . . . . . . . . . . . . . . . . . . . . . . . . . . . 368
Viewing colors . . . . . . . . . . . . . . . . . . . . . . . . . . . . . . . . . . . . . . . . . . . . . . . . . . . . . . . . . . . . . . . . . . . . . . . . . . 370
Printing color documents . . . . . . . . . . . . . . . . . . . . . . . . . . . . . . . . . . . . . . . . . . . . . . . . . . . . . . . . . . . . . . . 371
Postprocessing color documents . . . . . . . . . . . . . . . . . . . . . . . . . . . . . . . . . . . . . . . . . . . . . . . . . . . . . . . . 376
Printing to typesetters (Windows) . . . . . . . . . . . . . . . . . . . . . . . . . . . . . . . . . . . . . . . . . . . . . . . . . . . . . . . 376
Chapter 11: Page layout and templates
About page layout . . . . . . . . . . . . . . . . . . . . . . . . . . . . . . . . . . . . . . . . . . . . . . . . . . . . . . . . . . . . . . . . . . . . . . 377
Changing the basic page layout of a document . . . . . . . . . . . . . . . . . . . . . . . . . . . . . . . . . . . . . . . . . .380
Creating and editing custom master pages . . . . . . . . . . . . . . . . . . . . . . . . . . . . . . . . . . . . . . . . . . . . . . 389
Aligning text across columns . . . . . . . . . . . . . . . . . . . . . . . . . . . . . . . . . . . . . . . . . . . . . . . . . . . . . . . . . . . . 394
About multiflow documents . . . . . . . . . . . . . . . . . . . . . . . . . . . . . . . . . . . . . . . . . . . . . . . . . . . . . . . . . . . . 397
Working with reference pages . . . . . . . . . . . . . . . . . . . . . . . . . . . . . . . . . . . . . . . . . . . . . . . . . . . . . . . . . . . 404
About Templates . . . . . . . . . . . . . . . . . . . . . . . . . . . . . . . . . . . . . . . . . . . . . . . . . . . . . . . . . . . . . . . . . . . . . . . . 408
Using templates . . . . . . . . . . . . . . . . . . . . . . . . . . . . . . . . . . . . . . . . . . . . . . . . . . . . . . . . . . . . . . . . . . . . . . . . 409
Creating templates . . . . . . . . . . . . . . . . . . . . . . . . . . . . . . . . . . . . . . . . . . . . . . . . . . . . . . . . . . . . . . . . . . . . . . 410
Organizing templates in a folder . . . . . . . . . . . . . . . . . . . . . . . . . . . . . . . . . . . . . . . . . . . . . . . . . . . . . . . . . 413
Creating templates for generated files . . . . . . . . . . . . . . . . . . . . . . . . . . . . . . . . . . . . . . . . . . . . . . . . . . . 414
Page 6

Creating templates to change conditional text settings . . . . . . . . . . . . . . . . . . . . . . . . . . . . . . . . . . 414
Changing templates for blank paper and text files . . . . . . . . . . . . . . . . . . . . . . . . . . . . . . . . . . . . . . . 414
Importing and updating formats . . . . . . . . . . . . . . . . . . . . . . . . . . . . . . . . . . . . . . . . . . . . . . . . . . . . . . . . 415
About import and update settings . . . . . . . . . . . . . . . . . . . . . . . . . . . . . . . . . . . . . . . . . . . . . . . . . . . . . . 416
Chapter 12: Tables of contents and indexes
About Tables of Contents . . . . . . . . . . . . . . . . . . . . . . . . . . . . . . . . . . . . . . . . . . . . . . . . . . . . . . . . . . . . . . . 418
About generated files . . . . . . . . . . . . . . . . . . . . . . . . . . . . . . . . . . . . . . . . . . . . . . . . . . . . . . . . . . . . . . . . . . . 418
Preparing the sources for TOCs and other generated lists . . . . . . . . . . . . . . . . . . . . . . . . . . . . . . . . . 420
Generating TOCs and other lists . . . . . . . . . . . . . . . . . . . . . . . . . . . . . . . . . . . . . . . . . . . . . . . . . . . . . . . . . 421
Updating and editing TOCs and lists . . . . . . . . . . . . . . . . . . . . . . . . . . . . . . . . . . . . . . . . . . . . . . . . . . . . . 423
Troubleshooting TOCs and lists . . . . . . . . . . . . . . . . . . . . . . . . . . . . . . . . . . . . . . . . . . . . . . . . . . . . . . . . . . 425
Embedding TOCs in a document . . . . . . . . . . . . . . . . . . . . . . . . . . . . . . . . . . . . . . . . . . . . . . . . . . . . . . . . 426
About indexes . . . . . . . . . . . . . . . . . . . . . . . . . . . . . . . . . . . . . . . . . . . . . . . . . . . . . . . . . . . . . . . . . . . . . . . . . . 427
Adding index markers . . . . . . . . . . . . . . . . . . . . . . . . . . . . . . . . . . . . . . . . . . . . . . . . . . . . . . . . . . . . . . . . . . . 428
Generating indexes . . . . . . . . . . . . . . . . . . . . . . . . . . . . . . . . . . . . . . . . . . . . . . . . . . . . . . . . . . . . . . . . . . . . . 432
Updating and editing indexes . . . . . . . . . . . . . . . . . . . . . . . . . . . . . . . . . . . . . . . . . . . . . . . . . . . . . . . . . . . 434
Creating a master TOC or index for several books . . . . . . . . . . . . . . . . . . . . . . . . . . . . . . . . . . . . . . . .436
Troubleshooting indexes . . . . . . . . . . . . . . . . . . . . . . . . . . . . . . . . . . . . . . . . . . . . . . . . . . . . . . . . . . . . . . . . 437
Adding custom marker types . . . . . . . . . . . . . . . . . . . . . . . . . . . . . . . . . . . . . . . . . . . . . . . . . . . . . . . . . . . . 440
Adding titles and other static text to lists and indexes . . . . . . . . . . . . . . . . . . . . . . . . . . . . . . . . . . . . 441
Formatting lists and indexes . . . . . . . . . . . . . . . . . . . . . . . . . . . . . . . . . . . . . . . . . . . . . . . . . . . . . . . . . . . . . 441
Changing the sort order of indexes . . . . . . . . . . . . . . . . . . . . . . . . . . . . . . . . . . . . . . . . . . . . . . . . . . . . . . 449
Working with group titles in indexes . . . . . . . . . . . . . . . . . . . . . . . . . . . . . . . . . . . . . . . . . . . . . . . . . . . . . 451
Working with TOCs in structured documents . . . . . . . . . . . . . . . . . . . . . . . . . . . . . . . . . . . . . . . . . . . .453
Generating TOCs and other lists in structured documents . . . . . . . . . . . . . . . . . . . . . . . . . . . . . . . . 454
Updating and editing lists in structured documents . . . . . . . . . . . . . . . . . . . . . . . . . . . . . . . . . . . . . . 455
Adding index marker elements in structured documents . . . . . . . . . . . . . . . . . . . . . . . . . . . . . . . . . 456
Formatting lists and indexes in structured documents . . . . . . . . . . . . . . . . . . . . . . . . . . . . . . . . . . . . 458
Troubleshooting TOCs and lists in structured documents . . . . . . . . . . . . . . . . . . . . . . . . . . . . . . . . . 459
Embedding TOCs in structured documents . . . . . . . . . . . . . . . . . . . . . . . . . . . . . . . . . . . . . . . . . . . . . . 460
vi
Chapter 13: Books
About book files . . . . . . . . . . . . . . . . . . . . . . . . . . . . . . . . . . . . . . . . . . . . . . . . . . . . . . . . . . . . . . . . . . . . . . . . 462
Building books . . . . . . . . . . . . . . . . . . . . . . . . . . . . . . . . . . . . . . . . . . . . . . . . . . . . . . . . . . . . . . . . . . . . . . . . . . 462
Working with files in a book window . . . . . . . . . . . . . . . . . . . . . . . . . . . . . . . . . . . . . . . . . . . . . . . . . . . . 465
Determining how documents and pages are numbered . . . . . . . . . . . . . . . . . . . . . . . . . . . . . . . . . . 468
Inserting numbering in your documents . . . . . . . . . . . . . . . . . . . . . . . . . . . . . . . . . . . . . . . . . . . . . . . . . 470
Changing the format of files in a book . . . . . . . . . . . . . . . . . . . . . . . . . . . . . . . . . . . . . . . . . . . . . . . . . . . 472
Using book-wide commands . . . . . . . . . . . . . . . . . . . . . . . . . . . . . . . . . . . . . . . . . . . . . . . . . . . . . . . . . . . . 473
Updating books . . . . . . . . . . . . . . . . . . . . . . . . . . . . . . . . . . . . . . . . . . . . . . . . . . . . . . . . . . . . . . . . . . . . . . . . 473
Comparing books . . . . . . . . . . . . . . . . . . . . . . . . . . . . . . . . . . . . . . . . . . . . . . . . . . . . . . . . . . . . . . . . . . . . . . . 474
Troubleshooting books . . . . . . . . . . . . . . . . . . . . . . . . . . . . . . . . . . . . . . . . . . . . . . . . . . . . . . . . . . . . . . . . . 475
About structured book files . . . . . . . . . . . . . . . . . . . . . . . . . . . . . . . . . . . . . . . . . . . . . . . . . . . . . . . . . . . . . 476
Generating and updating structured books . . . . . . . . . . . . . . . . . . . . . . . . . . . . . . . . . . . . . . . . . . . . . . 477
Working with book structure . . . . . . . . . . . . . . . . . . . . . . . . . . . . . . . . . . . . . . . . . . . . . . . . . . . . . . . . . . . . 478
Page 7

Chapter 14: Revision management
About revision management . . . . . . . . . . . . . . . . . . . . . . . . . . . . . . . . . . . . . . . . . . . . . . . . . . . . . . . . . . . . 482
About change bars . . . . . . . . . . . . . . . . . . . . . . . . . . . . . . . . . . . . . . . . . . . . . . . . . . . . . . . . . . . . . . . . . . . . . . 482
Comparing document versions . . . . . . . . . . . . . . . . . . . . . . . . . . . . . . . . . . . . . . . . . . . . . . . . . . . . . . . . . . 484
Determining the number of words and characters . . . . . . . . . . . . . . . . . . . . . . . . . . . . . . . . . . . . . . . 487
Track Edited Text . . . . . . . . . . . . . . . . . . . . . . . . . . . . . . . . . . . . . . . . . . . . . . . . . . . . . . . . . . . . . . . . . . . . . . . . 487
Chapter 15: Managing files using WebDAV
File management using WebDAV (Windows) . . . . . . . . . . . . . . . . . . . . . . . . . . . . . . . . . . . . . . . . . . . . . 492
Getting started with workgroup management . . . . . . . . . . . . . . . . . . . . . . . . . . . . . . . . . . . . . . . . . . . 493
Managing document links . . . . . . . . . . . . . . . . . . . . . . . . . . . . . . . . . . . . . . . . . . . . . . . . . . . . . . . . . . . . . . 498
Chapter 16: Importing, linking, and exporting
About importing files into FrameMaker . . . . . . . . . . . . . . . . . . . . . . . . . . . . . . . . . . . . . . . . . . . . . . . . . . 501
Choosing the right method for importing and linking . . . . . . . . . . . . . . . . . . . . . . . . . . . . . . . . . . . . 501
Using Copy and Paste . . . . . . . . . . . . . . . . . . . . . . . . . . . . . . . . . . . . . . . . . . . . . . . . . . . . . . . . . . . . . . . . . . . 502
Using the Import command to import text . . . . . . . . . . . . . . . . . . . . . . . . . . . . . . . . . . . . . . . . . . . . . . . 502
Using the Import command to import graphics . . . . . . . . . . . . . . . . . . . . . . . . . . . . . . . . . . . . . . . . . . 508
Using drag and drop (Windows) . . . . . . . . . . . . . . . . . . . . . . . . . . . . . . . . . . . . . . . . . . . . . . . . . . . . . . . . . 511
Using OLE (Windows) . . . . . . . . . . . . . . . . . . . . . . . . . . . . . . . . . . . . . . . . . . . . . . . . . . . . . . . . . . . . . . . . . . . 512
Using graphic insets (UNIX) . . . . . . . . . . . . . . . . . . . . . . . . . . . . . . . . . . . . . . . . . . . . . . . . . . . . . . . . . . . . . . 514
Exporting text and graphics . . . . . . . . . . . . . . . . . . . . . . . . . . . . . . . . . . . . . . . . . . . . . . . . . . . . . . . . . . . . . 515
Importing text into structured documents . . . . . . . . . . . . . . . . . . . . . . . . . . . . . . . . . . . . . . . . . . . . . . . 516
Inserting imported graphic elements into structured documents . . . . . . . . . . . . . . . . . . . . . . . . . 518
Using the File Import feature . . . . . . . . . . . . . . . . . . . . . . . . . . . . . . . . . . . . . . . . . . . . . . . . . . . . . . . . . . . . 519
Importing SWF files into FrameMaker documents (Windows) . . . . . . . . . . . . . . . . . . . . . . . . . . . . . 522
Importing three-dimensional objects into FrameMaker documents (Windows) . . . . . . . . . . . 524
vii
Chapter 17: Hypertext and view-only documents
About online systems . . . . . . . . . . . . . . . . . . . . . . . . . . . . . . . . . . . . . . . . . . . . . . . . . . . . . . . . . . . . . . . . . . . 528
Preparing areas for becoming active . . . . . . . . . . . . . . . . . . . . . . . . . . . . . . . . . . . . . . . . . . . . . . . . . . . . . 529
Inserting hypertext commands . . . . . . . . . . . . . . . . . . . . . . . . . . . . . . . . . . . . . . . . . . . . . . . . . . . . . . . . . . 532
Creating hypertext links . . . . . . . . . . . . . . . . . . . . . . . . . . . . . . . . . . . . . . . . . . . . . . . . . . . . . . . . . . . . . . . . . 536
Creating button matrices . . . . . . . . . . . . . . . . . . . . . . . . . . . . . . . . . . . . . . . . . . . . . . . . . . . . . . . . . . . . . . . . 540
Creating pop-up menus . . . . . . . . . . . . . . . . . . . . . . . . . . . . . . . . . . . . . . . . . . . . . . . . . . . . . . . . . . . . . . . . . 541
Creating alert messages . . . . . . . . . . . . . . . . . . . . . . . . . . . . . . . . . . . . . . . . . . . . . . . . . . . . . . . . . . . . . . . . . 543
Creating ways to start or open . . . . . . . . . . . . . . . . . . . . . . . . . . . . . . . . . . . . . . . . . . . . . . . . . . . . . . . . . . . 544
Creating ways to close or exit . . . . . . . . . . . . . . . . . . . . . . . . . . . . . . . . . . . . . . . . . . . . . . . . . . . . . . . . . . . . 546
Testing and troubleshooting hypertext documents . . . . . . . . . . . . . . . . . . . . . . . . . . . . . . . . . . . . . . 547
Adding hypertext links to generated files . . . . . . . . . . . . . . . . . . . . . . . . . . . . . . . . . . . . . . . . . . . . . . . . 548
Working in view-only documents and books . . . . . . . . . . . . . . . . . . . . . . . . . . . . . . . . . . . . . . . . . . . . .551
Working with FluidView format . . . . . . . . . . . . . . . . . . . . . . . . . . . . . . . . . . . . . . . . . . . . . . . . . . . . . . . . . . 553
Inserting hypertext command elements in structured documents . . . . . . . . . . . . . . . . . . . . . . . . 555
Chapter 18: HTML, XML, and Adobe PDF conversion
About HTML . . . . . . . . . . . . . . . . . . . . . . . . . . . . . . . . . . . . . . . . . . . . . . . . . . . . . . . . . . . . . . . . . . . . . . . . . . . . 556
About Adobe PDF . . . . . . . . . . . . . . . . . . . . . . . . . . . . . . . . . . . . . . . . . . . . . . . . . . . . . . . . . . . . . . . . . . . . . . . 575
About tagged Adobe PDF . . . . . . . . . . . . . . . . . . . . . . . . . . . . . . . . . . . . . . . . . . . . . . . . . . . . . . . . . . . . . . . 581
Page 8

Defining a tagged Adobe PDF file . . . . . . . . . . . . . . . . . . . . . . . . . . . . . . . . . . . . . . . . . . . . . . . . . . . . . . . 582
Troubleshooting and tips on PDF conversion . . . . . . . . . . . . . . . . . . . . . . . . . . . . . . . . . . . . . . . . . . . . 582
Saving structured documents as Adobe PDF . . . . . . . . . . . . . . . . . . . . . . . . . . . . . . . . . . . . . . . . . . . . .583
Defining PDF job options . . . . . . . . . . . . . . . . . . . . . . . . . . . . . . . . . . . . . . . . . . . . . . . . . . . . . . . . . . . . . . . 584
Chapter 19: Processing XML
Migration from unstructured FrameMaker to XML . . . . . . . . . . . . . . . . . . . . . . . . . . . . . . . . . . . . . . . . 586
XML with FrameMaker . . . . . . . . . . . . . . . . . . . . . . . . . . . . . . . . . . . . . . . . . . . . . . . . . . . . . . . . . . . . . . . . . . 619
XML with XSL transformation . . . . . . . . . . . . . . . . . . . . . . . . . . . . . . . . . . . . . . . . . . . . . . . . . . . . . . . . . . . . 621
XML with Cascading Style Sheets . . . . . . . . . . . . . . . . . . . . . . . . . . . . . . . . . . . . . . . . . . . . . . . . . . . . . . . . 622
XML with Schema . . . . . . . . . . . . . . . . . . . . . . . . . . . . . . . . . . . . . . . . . . . . . . . . . . . . . . . . . . . . . . . . . . . . . . . 622
Chapter 20: UNIX macros and utilities
About the UNIX version of FrameMaker . . . . . . . . . . . . . . . . . . . . . . . . . . . . . . . . . . . . . . . . . . . . . . . . . . 625
Using UNIX keyboard macros . . . . . . . . . . . . . . . . . . . . . . . . . . . . . . . . . . . . . . . . . . . . . . . . . . . . . . . . . . . . 625
Capturing UNIX screen images . . . . . . . . . . . . . . . . . . . . . . . . . . . . . . . . . . . . . . . . . . . . . . . . . . . . . . . . . . 630
Performing command-line operations with fmbatch (UNIX) . . . . . . . . . . . . . . . . . . . . . . . . . . . . . . 630
Printing with fmprint (UNIX) . . . . . . . . . . . . . . . . . . . . . . . . . . . . . . . . . . . . . . . . . . . . . . . . . . . . . . . . . . . . . 636
Copying file hierarchies with fmcopy (UNIX) . . . . . . . . . . . . . . . . . . . . . . . . . . . . . . . . . . . . . . . . . . . . . 636
Inverting images with fminvert (UNIX) . . . . . . . . . . . . . . . . . . . . . . . . . . . . . . . . . . . . . . . . . . . . . . . . . . . 636
Converting color images to monochrome (UNIX) . . . . . . . . . . . . . . . . . . . . . . . . . . . . . . . . . . . . . . . . . 637
viii
Chapter 21: Creating accessible documents (Windows)
Authoring for accessibility . . . . . . . . . . . . . . . . . . . . . . . . . . . . . . . . . . . . . . . . . . . . . . . . . . . . . . . . . . . . . . . 638
Using accessibility features in FrameMaker . . . . . . . . . . . . . . . . . . . . . . . . . . . . . . . . . . . . . . . . . . . . . . . 638
Setting your FrameMaker workspace for high-contrast viewing . . . . . . . . . . . . . . . . . . . . . . . . . . . 639
Preparing documents for accessibility . . . . . . . . . . . . . . . . . . . . . . . . . . . . . . . . . . . . . . . . . . . . . . . . . . . 639
Testing accessibility in files using a screen reader . . . . . . . . . . . . . . . . . . . . . . . . . . . . . . . . . . . . . . . . 640
Chapter 22: Structured authoring using DITA
Introduction . . . . . . . . . . . . . . . . . . . . . . . . . . . . . . . . . . . . . . . . . . . . . . . . . . . . . . . . . . . . . . . . . . . . . . . . . . . . 642
About DITA in FrameMaker 8 . . . . . . . . . . . . . . . . . . . . . . . . . . . . . . . . . . . . . . . . . . . . . . . . . . . . . . . . . . . . 653
Using DITA in FrameMaker 8 . . . . . . . . . . . . . . . . . . . . . . . . . . . . . . . . . . . . . . . . . . . . . . . . . . . . . . . . . . . . . 656
Tips . . . . . . . . . . . . . . . . . . . . . . . . . . . . . . . . . . . . . . . . . . . . . . . . . . . . . . . . . . . . . . . . . . . . . . . . . . . . . . . . . . . . 670
Chapter 23: Adobe Technical Communication Suite features in Adobe FrameMaker
Creating and editing images using RoboScreen Capture . . . . . . . . . . . . . . . . . . . . . . . . . . . . . . . . . 671
Inserting and editing Adobe Captivate demos . . . . . . . . . . . . . . . . . . . . . . . . . . . . . . . . . . . . . . . . . . .672
Launch Adobe Acrobat Connect from Adobe FrameMaker . . . . . . . . . . . . . . . . . . . . . . . . . . . . . . . 674
Sending PDFs for review . . . . . . . . . . . . . . . . . . . . . . . . . . . . . . . . . . . . . . . . . . . . . . . . . . . . . . . . . . . . . . . . 675
Appendix A: Typing in dialog boxes . . . . . . . . . . . . . . . . . . . . . . . . . . . . . . . . . . . . . . . . . . . 677
About typing in dialog boxes . . . . . . . . . . . . . . . . . . . . . . . . . . . . . . . . . . . . . . . . . . . . . . . . . . . . . . . . . . . . 677
Windows . . . . . . . . . . . . . . . . . . . . . . . . . . . . . . . . . . . . . . . . . . . . . . . . . . . . . . . . . . . . . . . . . . . . . . . . . . . . . . . 677
UNIX . . . . . . . . . . . . . . . . . . . . . . . . . . . . . . . . . . . . . . . . . . . . . . . . . . . . . . . . . . . . . . . . . . . . . . . . . . . . . . . . . . . 679
Appendix B: Keyboard shortcuts . . . . . . . . . . . . . . . . . . . . . . . . . . . . . . . . . . . . . . . . . . . . . 681
Keyboard shortcuts for Windows . . . . . . . . . . . . . . . . . . . . . . . . . . . . . . . . . . . . . . . . . . . . . . . . .681
Keyboard shortcuts for UNIX . . . . . . . . . . . . . . . . . . . . . . . . . . . . . . . . . . . . . . . . . . . . . . . . . . . . . . . . . . . . 738
Page 9

Shortcuts for specific keyboards . . . . . . . . . . . . . . . . . . . . . . . . . . . . . . . . . . . . . . . . . . . . . . . . . . . . . . . . . 775
Working with structure . . . . . . . . . . . . . . . . . . . . . . . . . . . . . . . . . . . . . . . . . . . . . . . . . . . . . . . . . . . . . . . . . . 786
Index . . . . . . . . . . . . . . . . . . . . . . . . . . . . . . . . . . . . . . . . . . . . . . . . . . . . . . . . . . . . . . . . . . . . . 788
ix
Page 10

Chapter 1: Getting started
If you haven't installed your new software, begin by reading some information on installation and other preliminaries. Before you begin working with your software, take a few moments to read an overview of Adobe® Help® and
of the many resources available to users. You have access to plug-ins, templates, user communities, seminars,
tutorials, RSS feeds, and much more.
Installation
Requirements
To review complete system requirements and recommendations for your Adobe software, see the Read Me file on
the installation CD.
Install the software
1 Close any other Adobe applications open on your computer.
2 Insert the installation disc into your CD drive, and follow the on-screen instructions.
Note: For more information, see the Read Me file on the installation CD.
1
Activate the software
If you have a single-user retail license for your Adobe software, you will be asked to activate your software; this is a
simple, anonymous process that you must complete within 30 days of starting the software.
For more information on product activation, see the Read Me file on your installation CD, or visit the Adobe website
at www.adobe.com/go/activation.
1 If the Activation dialog box isn't already open, choose Help > Activate.
2 Follow the on-screen instructions.
Note: If you want to install the software on a different computer, you must first deactivate it on your computer. Choose
Help > Deactivate.
Register
Register your product to receive notifications of updates and other services.
To register, follow the on-screen instructions in the Registration dialog box, which appears after you install and
activate the software.
If you postpone registration, you can register at any time by choosing Help > Registration.
Page 11

ADOBE FRAMEMAKER 8
User Guide
Adobe Help
Adobe Help resources
Documentation for your Adobe software is available in a variety of formats.
In-product and LiveDocs Help
In-product Help provides access to all documentation and instructional content available at the time the software
ships. It is available through the Help menu in your Adobe software.
LiveDocs Help includes all the content from in-product Help, plus updates and links to additional instructional
content available on the web. For some products, you can also add comments to the topics in LiveDocs Help. Find
LiveDocs Help for your product in the Adobe Help Resource Center, at www.adobe.com/go/documentation.
Think of Help, both in the product and on the web, as a hub for accessing additional content and communities of
users. The most complete and up-to-date version of Help is always on the web.
PDF documentation
The in-product Help is also available as a PDF that is optimized for printing. Other documents, such as installation
guides and white papers, may also be provided as PDFs. All documents available in the OnlineManuals folder in the
previous versions of Adobe FrameMaker® are posted on the Adobe web.
2
All PDF documentation is available through the Adobe Help Resource Center, at www.adobe.com/go/
documentation.
To see the PDF documentation included with your software, look in the Documents folder on the installation or
content CD.
Printed documentation
Printed editions of the product Help are available for purchase in the Adobe Store, at www.adobe.com/go/store. You
can also find books published by Adobe publishing partners in the Adobe Store.
A printed Getting Started Guide is also included with the software.
Customer support
Visit the Adobe Support website, at www.adobe.com/support, to find troubleshooting information for your product
and to learn about free and paid technical support options. Follow the Training link for access to Adobe Press books,
a variety of training resources, Adobe software certification programs, and more.
Downloads
Visit www.adobe.com/go/downloads to find free updates, tryouts, and other useful software. In addition, the Adobe
Store (at www.adobe.com/go/store) provides access to thousands of plug-ins from third-party developers, helping
you to automate tasks, customize workflows, create specialized professional effects, and more.
Page 12

ADOBE FRAMEMAKER 8
User Guide
Adobe Labs
Adobe Labs® gives you the opportunity to experience and evaluate new and emerging technologies and products
from Adobe.
At Adobe Labs, you have access to resources such as these:
• Prerelease software and technologies
• Code samples and best practices to accelerate your learning
• Early versions of product and technical documentation
• Forums, wiki-based content, and other collaborative resources to help you interact with like-minded developers
Adobe Labs fosters a collaborative software development process. In this environment, customers quickly become
productive with new products and technologies. Adobe Labs is also a forum for early feedback, which the Adobe
development teams use to create software that meets the needs and expectations of the community.
Visit Adobe Labs at www.adobe.com/go/labs.
User communities
User communities feature forums, blogs, and other avenues for users to share technologies, tools, and information.
Users can ask questions and find out how others are getting the most out of their software. User-to-user forums are
available in English, French, German, and Japanese; blogs are posted in a wide range of languages.
3
To participate in forums or blogs, visit www.adobe.com/communities.
What's new
Top new features of Adobe FrameMaker 8
Unicode support Support for the Unicode text encoding standard lets you author content in multiple languages. All
features in FrameMaker, such as find and change, markers, hypertext, and catalog entries, support Unicode. You can
export to PDF with Unicode bookmarks, tags, comments, and so on. You can import or export Unicode content from
other applications. Additional dictionaries help you author content in more languages.
Enhanced conditional text features Single-sourcing of documents is enhanced by the following features:
• Manage condition tags, using the new Manage Conditional Tag dialog box.
• Add new condition tags, using the new Add Conditional Tag dialog box.
• Rename condition tags.
• Use the New Color button in the Edit Conditional Tag dialog box to define a new color for a condition tag.
• Visually distinguish text with multiple condition tags, as the color of the text depends on the set of tags applied to
the text. For more information, see “Appearance of text with multiple condition tags” on page 307.
• Build Boolean expressions with complex combinations of condition tags and Boolean operators to generate condi-
tional output.
Page 13

ADOBE FRAMEMAKER 8
User Guide
Enhanced Structured/XML authoring Structured authoring is improved with the following enhancements:
• XML roundtripping is enhanced to preserve XML comments as markers. System variables and Processing
Instructions (PIs) are also roundtripped.
• You can import element formatting from CSS into DTD, so you can ensure consistent formatting across different
XML applicati ons. The CS S file c an be refere nced i n the X ML docu ment or manua lly importe d. Mu ltip le CSS files
can be imported sequentially, for multi-level formatting.
• Support for single-sourcing workflows lets you filter structured documents. The single-sourcing workflows are
preserved across other XML applications, which use attribute values for filtering XML documents.
Filter By Attribute You can filter structured documents based on attribute values using complex Boolean expres-
sions. Multiple expressions can be created and saved for generating different outputs.
Track Text E dits You can track text edits made in a document. The added and deleted text are highlighted for visual
distinction. You can navigate through the edited sections and accept or reject specific changes. You can also preview
the document to see its original or final state. The changed information is preserved in the XML roundtrip.
DITA application pack The in-built DITA application pack and a DITA menu, facilitate DITA authoring. You can
generate a FrameMaker document directly from a DITA Map. You can use the standard FrameMaker features while
authoring DITA content.
3D workflows (Windows® only) You can insert 3D objects (U3D format) in FrameMaker 8 documents only. You can
also set parameters, such as default view, rendering mode, background color, and lighting scheme for the 3D object.
You can publish the document in PDF format with active 3D models. The 3D objects are preserved in the XML
roundtrip.
4
Support for SWF files (Windows only) You can create documents with SWF files, such as Adobe Captivate® movies.
The SWF object is preserved in the XML roundtrip.
HTTP file path support (Windows only) You can specify an HTTP path to import graphics into a document, either
by copying or by reference. The HTTP path is preserved in the XML roundtrip.
Enhanced WebDAV support The WebDAV support is extended to allow authoring and editing of XML files located
on the Web-based Distributed Authoring and Versioning (WebDAV) server.
Import of Office 2007 content (Windows only) You can import content from Microsoft® Word® and Microsoft
Excel® 2007.
Page 14

Chapter 2: FrameMaker basics
The Welcome Screen
By default, the Welcome Screen appears when you open FrameMaker only when Adobe Flash® Player is installed in
your machine. If you want, you can prevent the Welcome Screen from appearing using the following steps.
To prevent the display of the Welcome Screen:
Select File > Preferences > General.
1
The Preferences dialog box appears.
2 Select the Don't Show Welcome Screen option if you don’t want this dialog box to appear when you open
the software.
3 Click Set.
The Welcome Screen isn’t displayed the next time you open FrameMaker.
Note: You can also select the Don’t Show Welcome Screen Again option in the Welcome Screen.
5
About the workspace
The Adobe FrameMaker workspace comprises structured and unstructured interfaces. A workspace includes a
Document window with formatted contents or the Structure View window with the Element Catalog. When you
work in the unstructured workspace, the only window available is the Document window, which displays the content
of your document as it will appear on a printed page or online. Alternatively, the Document window and the
Structure View window are available when you work in the structured workspace. These windows help you organize
elements in a valid structure.
When you open the application for the first time, FrameMaker provides you with the option to work in the Unstructured FrameMaker workspace, or in the Structured FrameMaker workspace. You can change the interface you work
in by selecting the desired workspace. After you select the workspace, FrameMaker opens in the selected mode in
each successive launch of the application, regardless of the structure status of the document you open.
To switch between unstructured FrameMaker and structured FrameMaker:
Select File > Preferences > General (Windows), or File > Preferences (UNIX®).
1
2 In the Product Interface list, select FrameMaker or Structured FrameMaker.
3 Click Set. You are prompted to restart FrameMaker for the preference change to take effect.
Components of the FrameMaker workspace
FrameMakercomprises several components and operations common to the structured and unstructured
workspaces.
Page 15

ADOBE FRAMEMAKER 8
User Guide
Document window
A Document window appears when you open a structured or unstructured FrameMaker document. The window
shows the document with its text formatted, its graphics and other items in place, and everything laid out in a page
design. If more than one document is open, a Document window appears for each one.
Customizing the document display in the Document window
You can change the way each document window looks in the following ways:
• Zooming in and out
• Changing the preset display units
• Showing and hiding window guides
• Changing the set of menu commands
Zooming in and out
You can zoom in to focus on details or zoom out to see more. The Zoom pop-up menu, in both the Document
window and Structure View for structured documents, shows the current zoom setting.
B
B
C
C
A
A
6
A. Zoom pop-up menu B. Zoom Out button C. Zoom In button
You can change the zoom setting of one or more documents in a book by selecting the documents in the book
window and choosing a command from the View > Zoom menu.However, the Fit Page In Window, Fit Window to
Page, and Fit Window To Text Frame will affect only selected documents that are open.
To change the zoom setting:
❖ Do one of the following:
• To magnify text and objects, click the Zoom In button. FrameMaker zooms in on the area of the page containing
the insertion point or selection. If the document doesn’t contain an insertion point or a selection, FrameMaker
zooms in on the center of the page.
• To decrease the magnification, click the Zoom Out button.
• To display text and objects at a particular magnification, select a percentage from the Zoom pop-up menu.
• To display the entire page in the current window, select Fit Page In Window from the Zoom pop-up menu.
To resize the window to the size of the page:
❖ Select Fit Window To Page from the Zoom pop-up menu. If the view options are set to display facing pages, the
window is resized to accommodate two pages side by side.
To resize the window to the size of the text frame:
❖ Select Fit Window To Text Frame from the Zoom pop-up menu.
Page 16

To change the available zoom settings:
Select Set from the Zoom pop-up menu.
1
2 Do one of the following:
ADOBE FRAMEMAKER 8
User Guide
• To change the available zoom settings, select the percentage you want to change and enter the new percentage.
Enter any percentage from 25% to 1600%. The values are sorted in the ascending order, so you can enter values in
any text box.
• To return to the default percentages, click Get Defaults.
Note: You can customize the default zoom settings. For information, see the online manual Customizing FrameMaker
on the Adobe website: www.adobe.com/devnet/framemaker/pdfs/Customizing_Frame_Products.pdf.
3 Click Set.
To make 100% zoom match the page size in Windows:
1 Select File > Preferences > General.
2 For Monitor Size, specify the diagonal size of your monitor, and then click OK.
If screen-to-paper fidelity is not critical, you may want to leave Monitor Size set to Default. This ensures cross-application compatibility, which is important if you frequently edit embedded OLE objects within a document.
7
Changing the preset display units
Some text boxes in dialog boxes require a unit of measurement (such as points or inches) for the value you enter. You
can specify the default units for font size and line spacing (font size units) and for other measurements (display
units). The default units of measurement appear after the values in the text boxes. If you enter a value without a unit
of measurement, FrameMaker uses the default unit.
To change the preset units:
Make the appropriate document window or book window active. If a book window is active, select the documents
1
you want to work in.
2 Select View > Options.
3 Specify values for Display Units and Font Size Units, and then click Set.
To enter different units in a text box:
❖ Enter one of the following abbreviations for the units along with the numeric value:
• cm to specify centimeters
• mm to specify millimeters
• " or in to specify inches
• pc, pi, or pica to specify picas
• pt or point to specify points
• dd to specify didots
• cc or cicero to specify ciceros
• Q to specify Q units (refers to font size and line spacing for Japanese language only)
FrameMaker converts the entry to the preset display units when you click a command button in the dialog box.
Page 17

ADOBE FRAMEMAKER 8
User Guide
For example, if your document’s display units are picas and if you want to set a paragraph indent of 1 inch, enter 1"
in the First Indent text box. When you click Apply, the measurement changes to the number of picas that corresponds to 1 inch.
Showing and hiding window guides
You may want to show several visual guides in the document window. The following types of guides are available:
• Borders around text frames, graphic frames, and imported objects
• Markers, paragraph returns, and other symbols in running text
• Rulers along the top and left side of the window
You can also show a grid of horizontal and vertical lines for drawing, resizing, and aligning graphics. For information
on this grid, see “Using grids” on page 311.
The visual guides are all nonprinting, so you do not need to hide them when you print.
To show or hide visual guides:
1 Make the appropriate document window or book window active. If a book window is active, select the documents
you want to affect.
2 Do the following:
8
• To show or hide borders, select View > Borders. (If the book window is active, select View > Show Borders or
View > Hide Borders.)
• To show or hide the text symbols, select View > Text Symbols. The following symbols may appear in the
document window.
• To show or hide the rulers, select View > Rulers.
Text symbol Meaning
End of paragraph
End of flow and end of table cell
Tab
Anchored frame and table anchor
Marker
Forced return
Manual equation alignment point
Nonbreaking space
Discretionary hyphen
Suppress hyphenation
To change the spacing of ruler or grid intervals:
1
Make the appropriate document window or book window active. If a book window is active, select the documents
you want to affect.
2 Select View > Options.
3 Select a new setting from the Rulers pop-up menu or from the Grid pop-up menu, and click Set.
Page 18

ADOBE FRAMEMAKER 8
User Guide
Changing the set of menu commands
You can display a subset of menu commands called quick menus. The quick menus do not have commands for
formatting text, editing some aspects of graphics, and inserting some objects such as markers and variables.
If you do not see all the menu commands described in this manual, you may have the quick menus displayed.
Note: If you’re using a structured document, your application developer may have changed the commands available in
the complete menus.
To display the quick menus:
❖ Select View > Menus > Quick.
To return to the complete menus:
❖ Select View > Menus > Complete.
To customize menus:
❖ Add, move, or remove menus and commands as described in the online manual Customizing FrameMaker.
This manual is available on the Adobe website: www.adobe.com/devnet/framemaker/pdfs/
Customizing_Frame_Products.pdf.
9
File display options
FrameMaker contains an option that allows you to display the file name before the path in the frame titles of
document windows, so that you can see the file name if a long path name would otherwise hide it.
• In Windows, there is a new flag, DisplayFileLeafFirst, in the initialization file, maker.ini. If the value
On, the file name in the document or book window title is shown in the format filename pathname. This format
is
is also used to display the file name in the dialog that lists all open files. By default the value is set to
Off, the line
is marked as a comment, and the file name is displayed in the format pathname filename, as previously.
• In UNIX, there is a new boolean xresource, Maker.displayFileLeafFirst. When this is set to True, the
file name in the document or book window title is shown in the format filename pathname. By default the value
is set to
False, and the file name is displayed in the format pathname filename, as previously.
The flag does not affect how the root name of the folder or directory tree is shown in individual file names inside the
book window.
Paging through a document in the Document window
You can page through a Document window using controls in the status bar.
B
A
A. Previous Page button B. Next Page button
You can also define how FrameMaker displays pages when you scroll—up and down, left and right, or two pages at
a time.
If the document you are paging through is part of an open book, FrameMaker may display an alert message
prompting you to choose to open the next or previous document in the book. For example, if you click the Previous
Page button on the first page of a document, clicking Yes in the alert message box will open the previous document
in the book. The last page of that document will appear.
Page 19

ADOBE FRAMEMAKER 8
User Guide
To go to another page:
❖ Do one of the following:
• To go to the next page, click the Next Page button.
• To go to the previous page, click the Previous Page button.
• To go to the first page in the document, Shift-click the Previous Page button.
• To go to the last page in the document, Shift-click the Next Page button.
• To go to a specific page or the page containing a specific line number, click in the Page Status area, specify the page
or line number you want to display, and click Go.
• To go to the page containing the insertion point, click in the Page Status area, click Page Containing the Insertion
Point, and click Go.
• To move quickly through the pages, scroll vertically.
You can click or select in the Structure View to display the corresponding page in the document window.
This is often the quickest way to go to the page you want. For information on working in Structure View, see “The
Structure View window” on page 12.
To set how pages scroll:
1 Make the appropriate document window or book window active. If a book window is active, select the documents
you want to affect.
2 Choose View > Options.
3 Choose one of the following options from the Page Scrolling pop-up menu:
10
• To display pages from top to bottom (for example, page 2 below page 1), choose Vertical.
• To display pages from left to right (for example, page 2 to the right of page 1), choose Horizontal.
• To display pages two at a time, side by side, choose Facing Pages.
• To display as many pages as will fit in the window from left to right, choose Variable.
4 Click Set.
To make pages display more quickly:
❖ Do the following:
• Open the document by bypassing the update of imported graphics, cross-references, and text insets. (Opening a
document without updating references makes a document open faster but may slow down the display of
individual pages.) For more information on this, see “Opening documents without updating references” on
page 23.
• Turn off the display of graphics by choosing View > Options, deselecting the Graphics option, and clicking Set.
The graphics also do not appear in print.
• Display small text as gray bars by choosing File > Preferences > General, entering a point size in the Greek Screen
Text Smaller text box, and clicking Set. Whenever text in your document is displayed in a point size smaller than
the size you specified, it appears on the screen as a gray bar.
Using command shortcuts
You can use the following types of shortcuts in a structured or unstructured document:
• Keyboard shortcuts for all commands (for a list of these shortcuts, see the online Help).
Page 20

ADOBE FRAMEMAKER 8
User Guide
• The QuickAccess bar, which has several pages of commands for working with documents and editing text,
graphics, and tables
• The Formatting bar, which contains text formatting commands
• The Track Text Edit bar, which contains commands for tracking, accepting, and rejecting text edits
• The context pop-up menus, which have commands that are useful at the location of the pointer
Important: When using structured documents, keep in mind that shortcuts have the same effect on your document’s
structure as their menu-command equivalents. For example, if you paste an element using a context menu, the element
may not be valid at its new location. Or if you change text to italics using a QuickAccess command, you may be
overriding an element’s format rules.
You can view multiple documents in different tabs. When you select the Tabbed Bar option in the View menu, the
tabs of open FrameMaker document windows appears.
FrameMaker also provides a formatting bar for quickly modifying a paragraph’s spacing, alignment, or tab stops. You
should use this bar only in an unstructured document, because in structured documents these properties are usually
handled by elements. For more information, see “Changing text without using the catalogs” on page 103.
Note: If you select text to which different font types, font sizes, and paragraph tags have been applied, the Paragraph
Format, Font Name, and Font Size menus in the Formatting bar will display blank entries. For example, if you select
text containing font sizes 12 and 14, the entry in the Font Size menu will appear blank.
11
Using the QuickAccess bar
You can keep the QuickAccess bar open in the workspace and click commands as you need them. See the Quick
Reference Card for a list of the available commands.
To display the QuickAccess bar:
❖ Select View > QuickAccess bar.
To use the QuickAccess bar:
❖ Do any of the following:
• To select a command from the bar, click the command button.
• To display a different group of commands, click on the bar.
• To change to vertical or horizontal orientation, click on the bar.
• To view help for the commands, click on the bar.
To close the QuickAccess bar:
❖ Do one of the following:
• (Windows) Select View > QuickAccess bar.
• (UNIX) Place the pointer on the bar and press Control+c.
Using context menus
The context menus contain commands for the item under the pointer—for example, text, a graphic, selected table
cells, or the document as a whole when the pointer is in the margin.
To display a context menu:
❖ Right-click.
Page 21

ADOBE FRAMEMAKER 8
User Guide
Understanding the structured workspace
About the structured workspace
When you work with structured documents, you’ll use the Document window and the Structure View window with
the Element Catalog. These windows help you organize elements in a valid structure.
12
Contents and structure information
To work with the structured workspace, you must be in the Structured FrameMaker interface. For information on
working in Structured FrameMaker, see “About the workspace” on page 5.
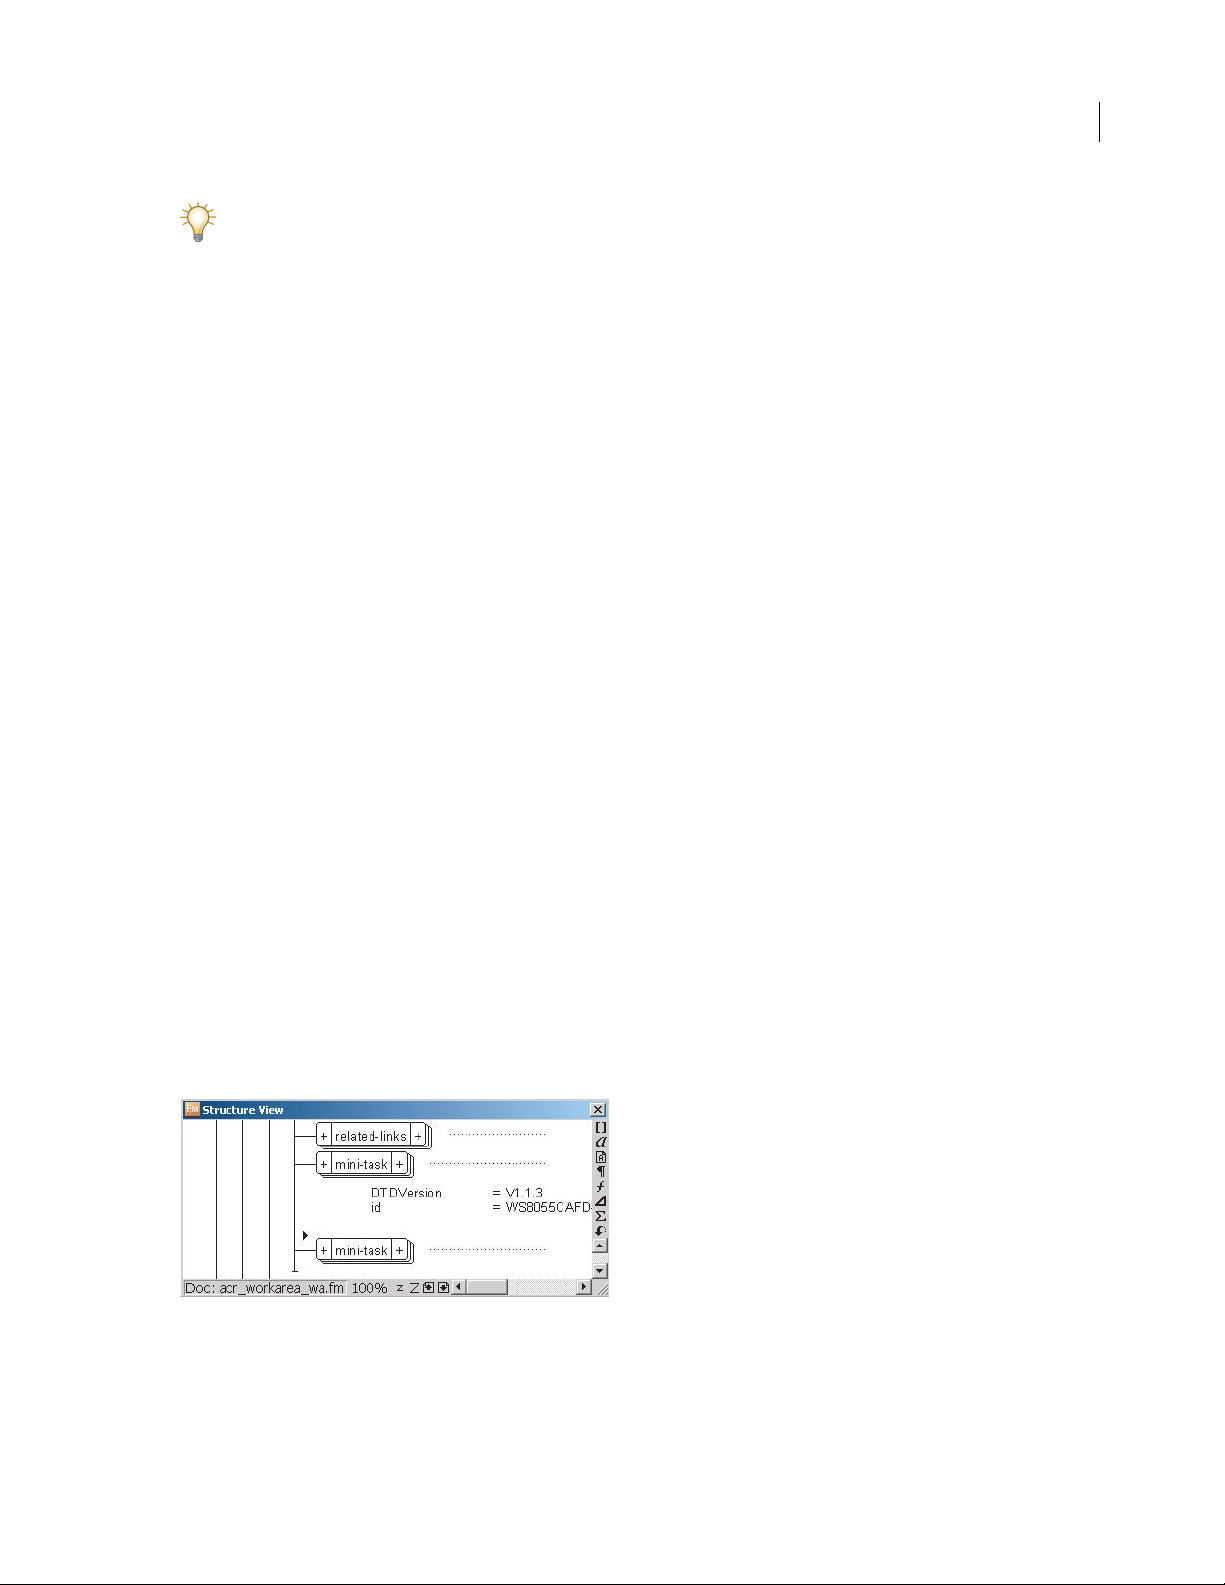
The Structure View window
The Structure View window shows a hierarchy of elements for the document (or the flow within a document) that
has the insertion point or selection. The view uses bubbles to represent elements and their relationship to one
another, and it identifies errors in the document’s structure. You can also display attributes in the Structure View.
The document window and Structure View are both editable, and anything you do in one is mirrored in the other.
You can have the two views open side by side, to keep track of both contents and structure. If you click or select in
one view, an insertion point or selection appears at the equivalent place in the other view, and any editing you do in
one is reflected in the other. If you click or select in an unstructured flow in a document window, the Structure View
is empty.
Note: If you are using the OpenWindows windows system for UNIX, you cannot resize the Structure View window when
the pushpin feature is turned on.
To display the Structure View:
❖ Click the Structure View button at the upper right corner in the document window.
Page 22
ADOBE FRAMEMAKER 8
User Guide
You edit text and other contents in the document window. You can edit the structure of a document in either view,
but it’s usually easier to make your changes in the Structure View, where you can drag and drop bubbles to rearrange
elements or select bubbles to edit them in other ways.
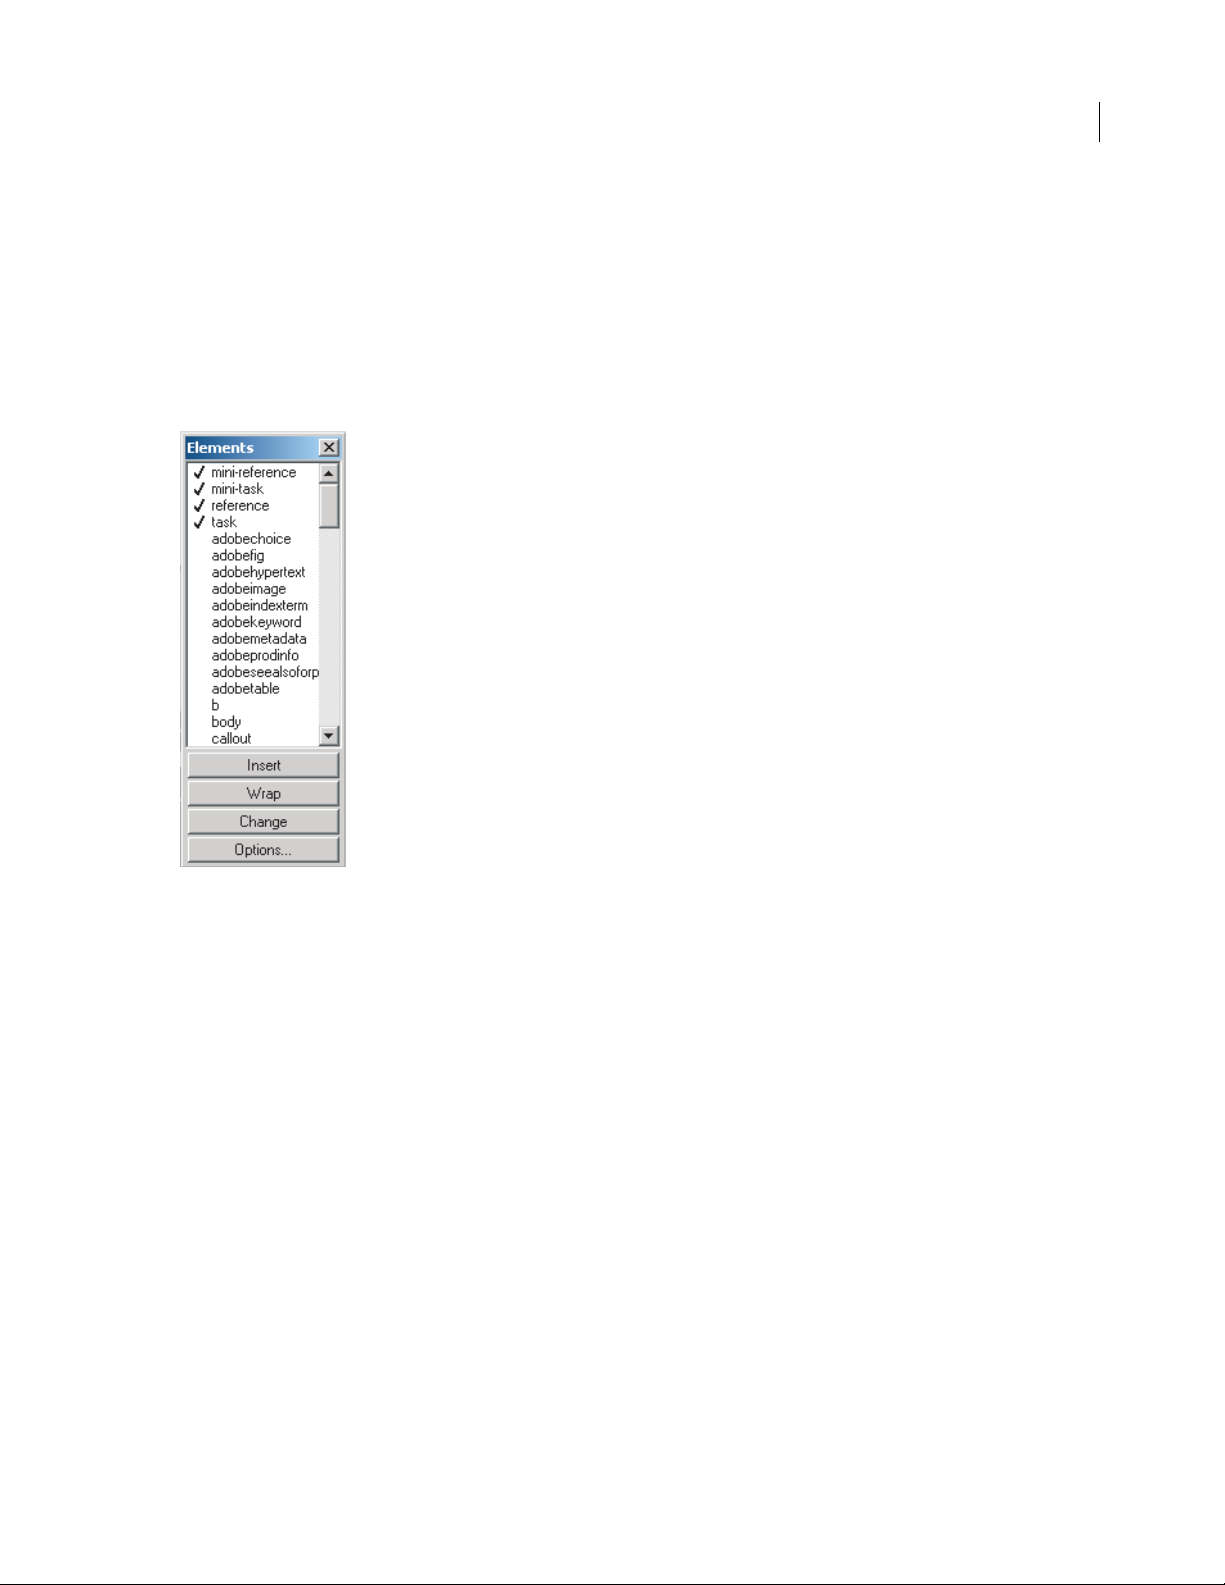
The structured document’s Element Catalog
A structured document’s Element Catalog lists the elements you can use at the current location, provides commands
for adding and editing elements, and may display other information about the current location, such as whether you
can type text.
13
Element Catalog
To display the Element Catalog:
❖ Click the Element Catalog button at the upper right in the document window.
The information in the Element Catalog comes from content rules in the definition for the current element—
the element with the insertion point or selection. The current location is the position of the insertion point or
selection in that element.
The catalog is initially preset to show only the elements that are valid at the current location, though you can have it
display more elements if you want greater flexibility (see “Changing the scope of elements available in a structured
document” on page 18).
The catalog is empty if you click or select in an unstructured flow, if the document does not have any element definitions, or if no more elements are required at the current location and no optional elements are available.
The Element Catalog uses the following symbols to identify whether an element is valid:
Heavy check mark The element is valid at the current location. If you insert the element, the current (parent)
element will be correct and complete up to this location.
Plus sign (+) The element is an inclusion (SGML only) in the current element and is valid at the current location.
The plus sign always appears next to a heavy check mark. Inclusions are valid only in SGML documents, so this sign
will not appear in XML documents.
Page 23
ADOBE FRAMEMAKER 8
User Guide
Even though inclusions are as valid as elements identified with just a heavy check mark, you might find it helpful
to list inclusions separately (see “Changing the scope of elements available in a structured document” on page 18).
If a document has many inclusions, it can be difficult to find other valid elements in the catalog.
Question mark (?) The element is a possible replacement for the element right after the insertion point or for the
selected elements. It is valid at the current location, but will make child elements after it invalid. If you insert an
element with a question mark, the current (parent) element will be complete and correct up to this location, but
you’ll have to correct errors after the new element.
Light check mark The element is valid later in the current element. If you insert one of these elements, the current
(parent) element will be correct but incomplete up to this location. You’ll have to go back and fill in missing
child elements.
No symbol If an element in the catalog has no symbol, it is not valid at the current location or later in the current
element. It may be valid earlier in the current element or outside the element.
The Element Catalog may also include the following indicators to provide other information about the
current location:
<TEXT> You can type text at this point.
<UNDEFINED> The current element does not have a definition in the document. The element was probably pasted
from a document with different element definitions. (This does not appear when the catalog is set to display all
elements.)
14
<INVALID> The contents of the current element are invalid. (This does not appear when the catalog is set to display
all elements.)
You can use buttons in the Element Catalog to insert an empty element, wrap an element around contents, and
change the type of an existing element. For details on working with the catalog, see “About elements” on page 521.
Customizing the display of the structured workspace
You can customize the FrameMaker workspace by showing element boundaries and other guides in a document
window, showing attributes for new elements in the Structure View, and changing the set of menus in the menu bar.
Collapsing and expanding elements
You can collapse an element bubble in the Structure View to stack the element and all of its descendants into a single
bubble. This does not affect the placement of the insertion point, the contents of the element, or the way in which
the element appears in the document window.
Collapsed element
Page 24
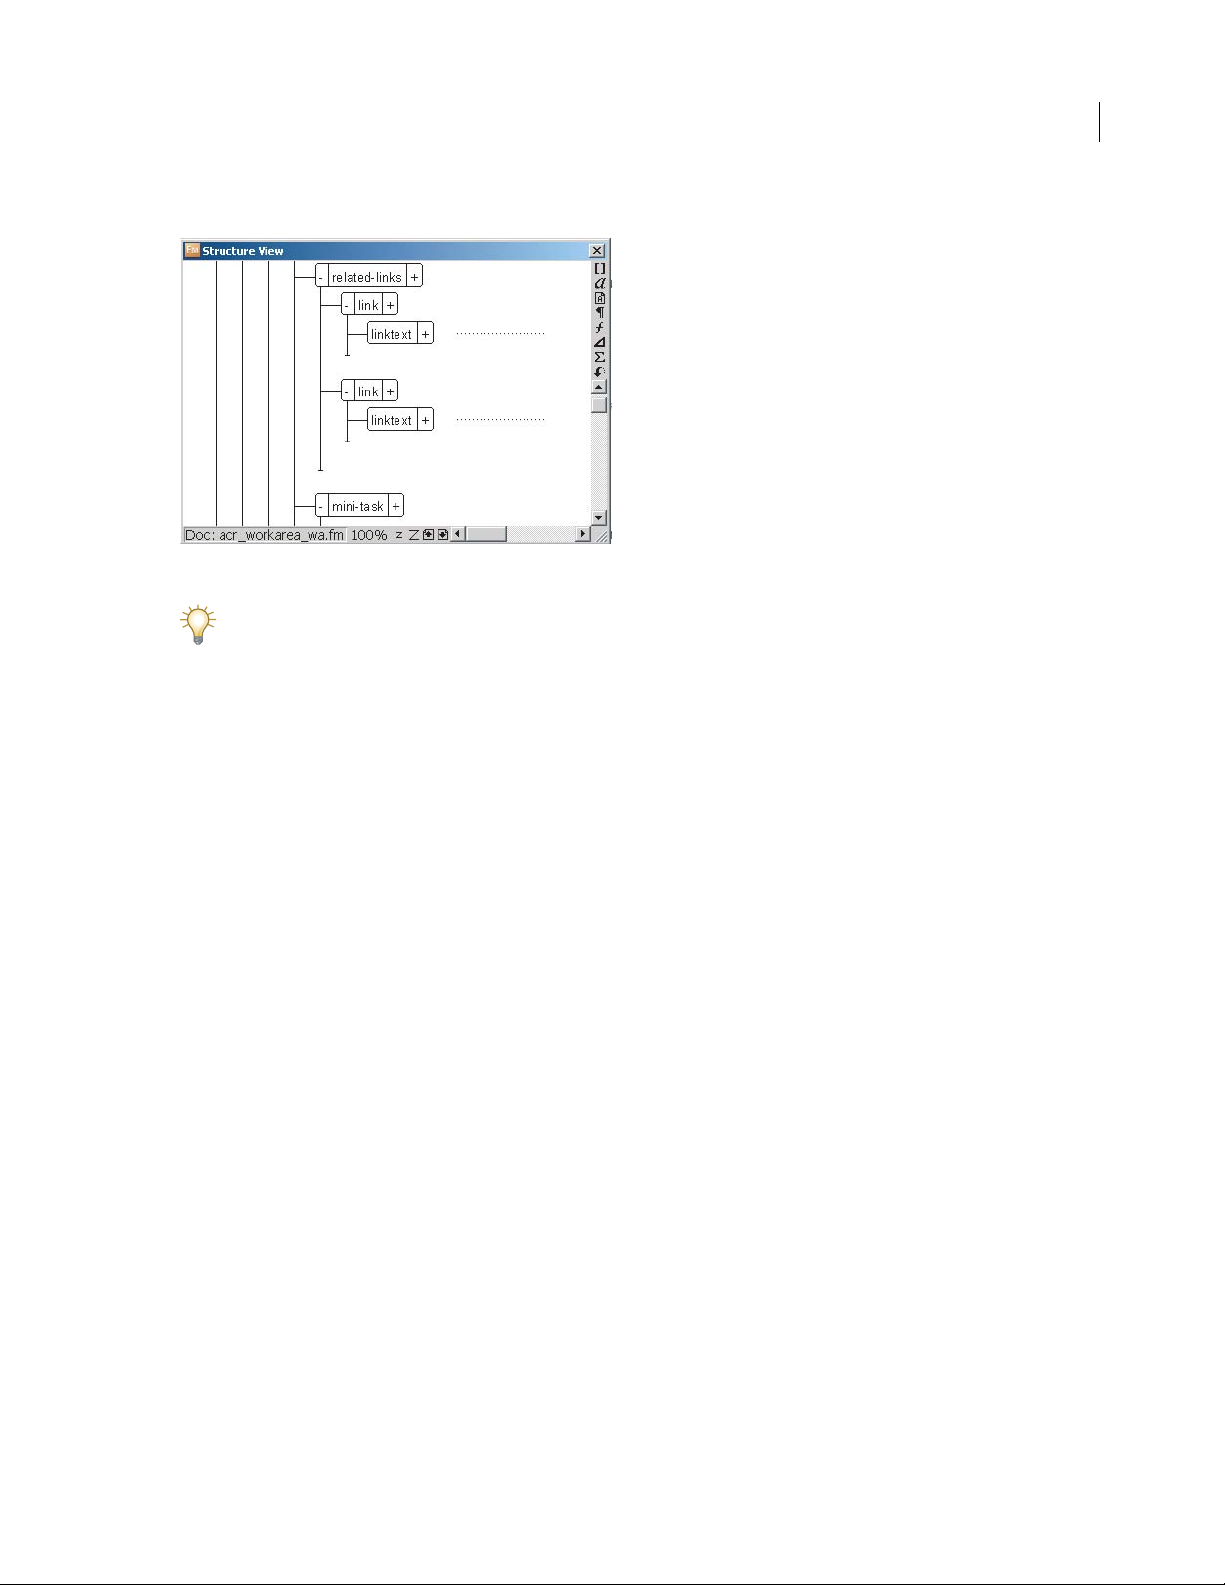
ADOBE FRAMEMAKER 8
Expanding an element shows all the bubbles again.
Expanded element
Collapsing elements gives you a higher-level look at a document’s structure and makes it easier to move elements
around. You may find it especially helpful to collapse long lists of items and procedures with many steps.
When an element has descendants, a plus sign or minus sign appears on the left side of the element’s bubble:
User Guide
15
• A plus sign (+) appears when the element is collapsed, indicating that more element bubbles are available for
viewing. The plus sign is red if there is invalid content anywhere inside the collapsed element.
• A minus sign (–) appears when the element is expanded.
To collapse or expand an element:
❖ Click the minus sign or plus sign on the left side of the element’s bubble.
To collapse or expand an element and all its siblings:
❖ Shift-click the minus sign or plus sign on the left side of the element’s bubble.
Showing and hiding attributes for an element
An element may be defined to have attributes, which provide supplemental information about the element. For
example, an attribute might describe the draft version of a Chapter element or the level of classification of a Memo
element. For more information on the uses of attributes, see “Attributes for elements” on page 522.
You can show all of an element’s attributes, none of its attributes, or only the attributes that are required or have a
value. You can also show or hide attributes for all new elements you add to a document (see “Changing the scope of
elements available in a structured document” on page 20).
When an element is defined to have attributes, a plus sign or minus sign appears on the right side of the
element’s bubble:
• A plus sign (+) appears when some or all of the attributes are hidden, indicating that more attributes are available
for viewing.
• A minus sign (–) appears when all the attributes are showing.
Page 25
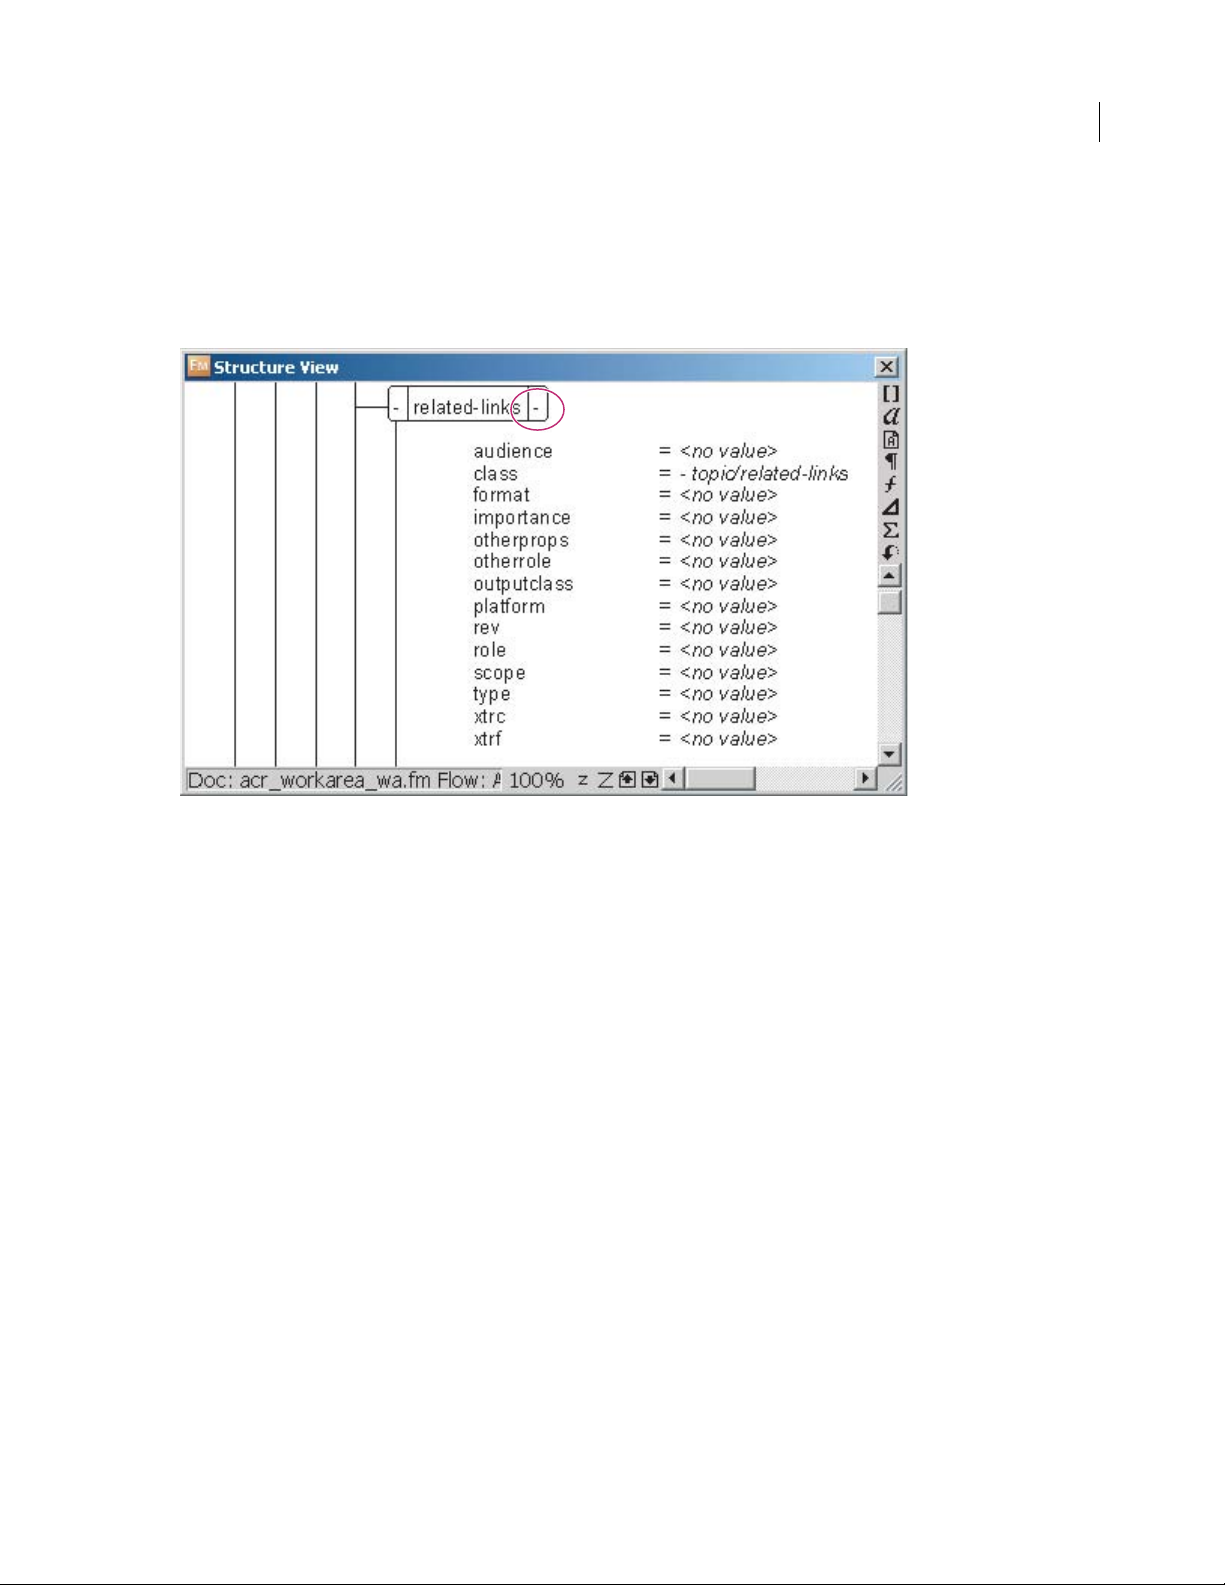
ADOBE FRAMEMAKER 8
User Guide
To show or hide attributes for an element:
❖ Click the plus sign or minus sign on the right side of the element’s bubble.
As you click the sign, you cycle through three possible displays. Clicking a minus sign hides the attributes. If no
attributes are showing, clicking a plus sign shows attributes that are required or have a value. If some attributes are
already showing, clicking a plus sign shows all the attributes.
16
Click the minus sign to the right of the element to hide attributes. The sign will become a plus sign. Click the plus sign to show attributes that
are required or have an attribute. The sign then becomes a minus sign. Click the minus sign again to show all attributes.
To show or hide attributes for an element and all its siblings:
❖ Shift-click the plus sign or minus sign on the right side of the element’s bubble.
Showing and hiding element boundaries
Element boundaries mark each element’s beginning and end in a document window. Working with boundaries
showing can help you see how a document’s contents fit into its elements, and can make it easier to place an insertion
point properly or to make the right selection.
For most elements, the boundaries can appear as opening and closing brackets ( [ ] ) or as two boxes with an element
tag. For some elements (graphics, footnotes, markers, tables, and equations), the element’s location can be marked
only by one box with a tag. Table parts themselves, such as table titles and cells, do not display element boundaries.
However, element boundaries do display inside of table parts.
When elements are inside other elements, their brackets or tags nest to show the hierarchy.
Note: The brackets and tags that mark element boundaries are characters that both print and occupy document space.
You may wish to hide them before printing to prevent them from printing and to view a document layout that is not
altered by the element boundaries.
To show or hide bracket element boundaries:
Make the appropriate document window or book window active. If a book window is active, select the documents
1
you want to affect.
Page 26
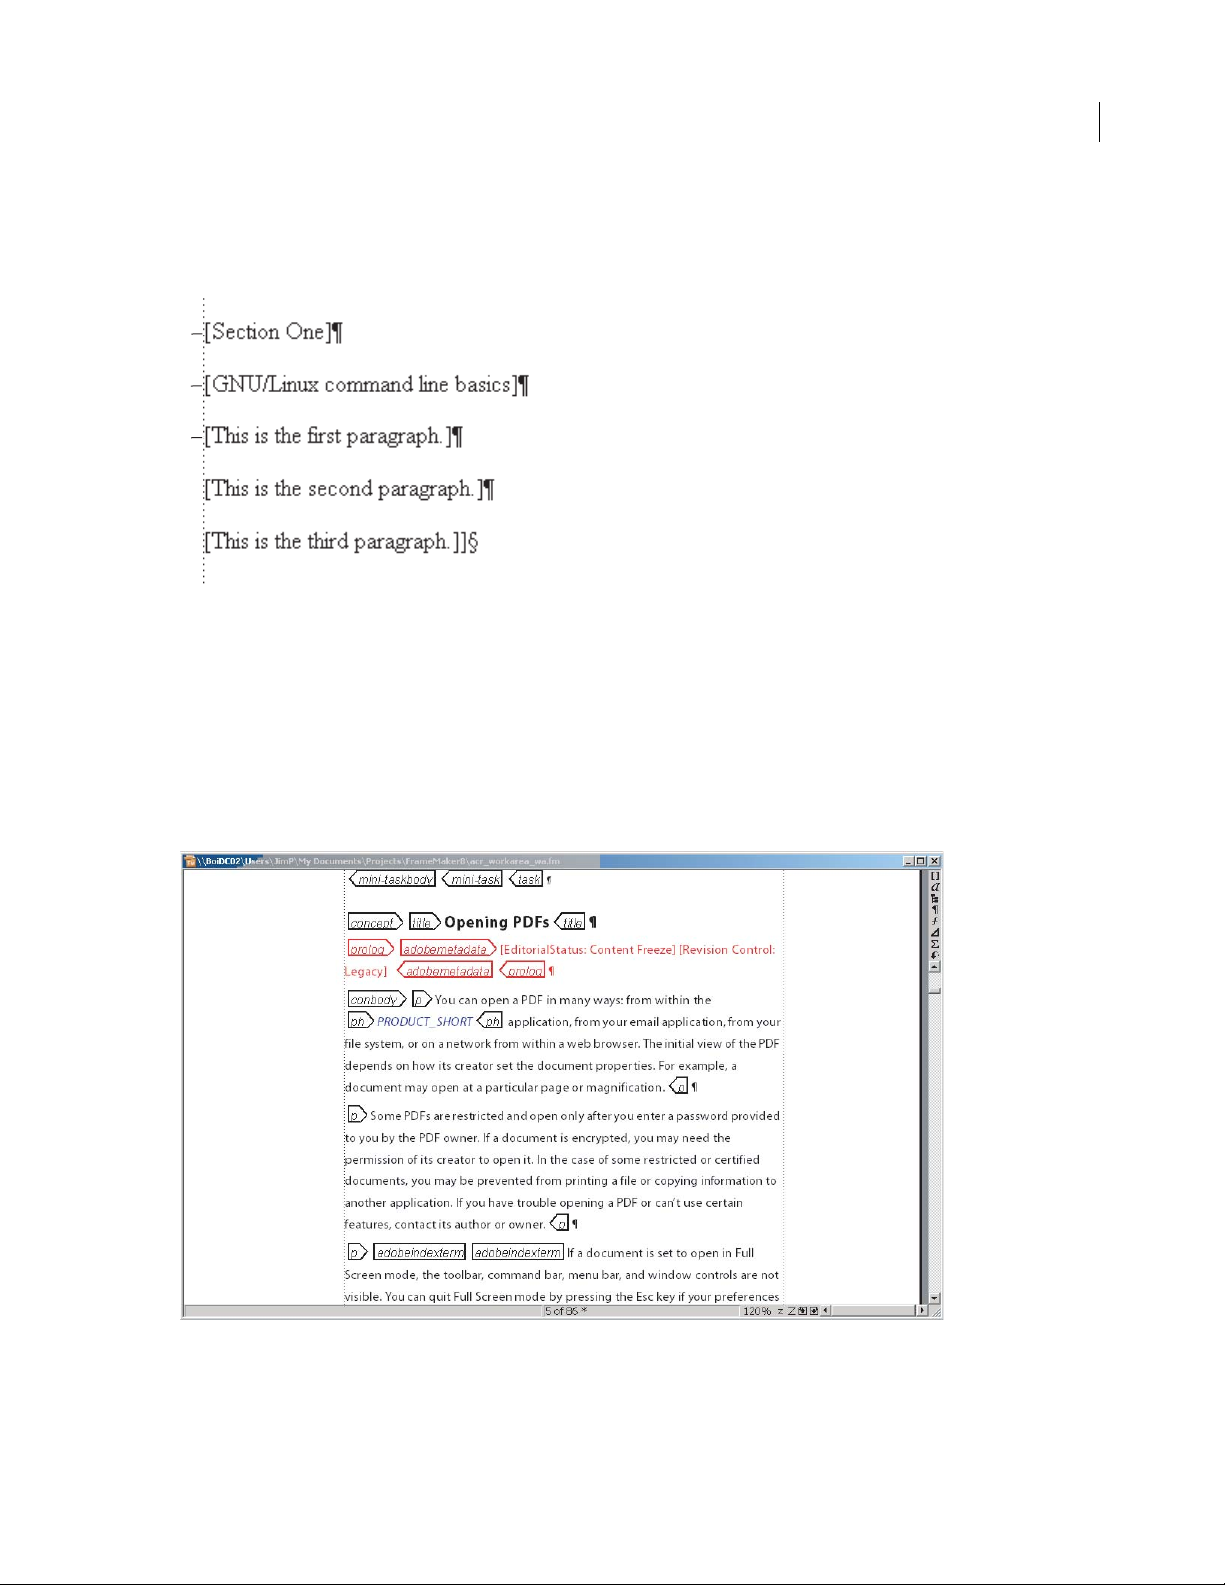
ADOBE FRAMEMAKER 8
User Guide
2 Select View > Element Boundaries. (If the book window is active, select View > Show Element Boundaries or
View > Hide Element Boundaries.)
Most types of elements have an opening bracket ( [ ) and a closing bracket ( ] ).
A
B
C
A. Section element B. Head element C. Para element
To show or hide tag element boundaries:
1 Make the appropriate document window or book window active. If a book window is active, select the documents
you want to affect.
2 Sel ect View > E lemen t Bou ndari es (as Tags ). If the b oo k wi ndow is ac tive, selec t Vi ew > Sh ow E lemen t Bou ndar ie s
(as Tags) or View > Hide Element Boundaries (as Tags).
17
Most types of elem ents have an op ening bound ary tag and a c losing boundar y tag. Some ele ment s, such as footnotes,
have no boundary tags. They appear as a single tag.
Tag element boundar ie s
Page 27

ADOBE FRAMEMAKER 8
User Guide
Showing and hiding attributes for new elements
You can show or hide attributes for new elements in the Structure View. The view can display all the attributes in the
flow, none of the attributes, or only the attributes that are required or have a value. This setting applies to new
elements as you enter them.
You can also show or hide attributes for an individual element (see “Showing and hiding attributes for an element”
on page 17).
To show or hide attributes for new elements:
1 Make the appropriate document window or book window active. If a book window is active, select the documents
you want to affect.
2 Select View > Attribute Display Options, choose the display option you want, and click Set.
Changing the scope of elements available in a structured document
When adding elements to a structured document, you may want to insert only elements that are valid at the current
location. (These are the elements that have heavy check marks, heavy check marks and a plus sign, and question
marks in the Element Catalog.) If you prefer to add elements this way, you can work from the beginning of a
document to the end and be sure that its structure is valid at every point along the way.
There may be times when you want to work more loosely though, and in these cases you can make more elements
available. For example, some draft documents may not need to adhere strictly to a predefined structure, but will
follow the structure only as a guideline. Or you may plan to make your document conform to a structure but do not
have all the information you need to complete it from start to finish.
18
When more elements are available, the additional elements appear in the Element Catalog and are available if you
insert elements from the keyboard. You can also list inclusions after other valid elements in the catalog.
The Element Catalog displays symbols to identify valid elements (see “Using the structured document’s Element
Catalog” on page 15). When showing invalid elements, you can still use the symbols as suggestions for building a
valid structure.
To change the scope of elements available:
1 Make the appropriate document window or book window active. If a book window is active, select the documents
you want to affect.
2 Select Element > Set Available Elements. You can also click Options in the Element Catalog.
3 Select one of the following options in the Show Tags For area:
• To show only elements that are valid for the current location, select Valid Elements for Working Start to Finish.
Use this option if you plan to go through a document from start to finish and fill in the elements in their correct
order and hierarchy.
• To show elements that are valid for the current location or later in the current element, select Valid Elements for
Working in Any Order. Use this setting if you plan to build a valid document but not necessarily by working from
start to finish. This is helpful if you don’t have all the information you need.
• To show elements allowed anywhere in the current element, select Elements Allowed Anywhere in Parent.
Use this setting if you want more flexibility for filling in elements. You can insert elements that are invalid and
correct the errors later.
• To show all elements defined for the document, select All Elements. Use this setting if you’re not building a valid
document, if you want flexibility and will correct errors later, if you’re wrapping elements around contents, or if
you want to see what’s available elsewhere in the document.
Page 28

ADOBE FRAMEMAKER 8
User Guide
• To show a set of elements that you specify, select Customized List. Use this setting to work with a subset of the
elements, to display elements in a fixed order, or to work with a list that is static instead of context-sensitive.
4 If you selected Customized List, click Edit and create or change a list of elements.
To move element tags between the Show and Don’t Show lists, use the arrow buttons or double-click the element tags.
Transfer all of the elements from one list to another by holding down Shift as you click an arrow button. Click the
Move Up and Move Down buttons to arrange the elements in the Show list in the order you want them to appear in
the Element Catalog. Click Set when the list is the way you want it.
Note: A customized list of tags is always the same regardless of the location of the insertion point, so be careful to include
all the tags you’ll need. The only indication of validity is a check mark next to a tag.
5 To list inclusions separately in the Element Catalog, turn on List After Other Valid Elements.
This groups the inclusions right after the other valid elements. Use this setting if you have a large number of inclusions that you rarely need.
6 Click Set.
Working with unstructured FrameMaker documents
19
Creating documents
You can create a document by using a template that defines how a document looks. Or you can start with the equivalent of a blank paper. When you create a document, a document window appears. For information about the
Document window, see “Document window” on page 6.
In FrameMaker, you can create either structured or unstructured documents. Structured documents are required for
working with SGML and XML formats, while unstructured documents are not set up for exporting to SGML or
XML. For information on working with structured documents, see “Working with structured FrameMaker
documents” on page 32.
Creating documents from templates
Templates are the foundation of the FrameMaker approach to document publishing. They affect every aspect
of a document’s appearance and help to keep that appearance consistent from one page to the next and from
one document to another. Unstructured FrameMaker comes with Standard Templates for letters, memos, fax,
envelope, reports, outlines, pagination sheet, newsletters, and books. However, you can use any document as a
template. If the document contains text and graphics, you can delete them and then insert your own.
To create a document from a template:
Choose File > New > Document. In UNIX, you can also click New in the main FrameMaker window.
1
2 Navigate to the document you want to use as a template (either the standard ones or your own). If you want to use
a standard template—one in the FrameMaker Templates folder—but the contents of another folder appear in the
New dialog box, navigate to the Templates folder in one of the following locations:
• (Windows) The FrameMaker8 folder.
• (UNIX) The fminit/language/Templates directory within the FrameMaker installation location. (In the path
above, replace language with the name of the language you’re using—for example, usenglish or ukenglish.)
Page 29

ADOBE FRAMEMAKER 8
User Guide
3 Select a template and click New (Windows) or Create (UNIX). The new, untitled document contains the formats
and content from the template.
To view information about the standard templates, choose File > New > Document, click Explore Standard
Templates, and select a template in the scroll list. After viewing the information, click Create to create an
empty document from the selected template, or click Show Sample to view a document that contains sample text
and graphics.
Creating documents from blank paper
If no standard template or other existing document looks the way you want, you can use a blank paper document. A
document created from blank paper includes a few basic formats. You can use these formats as is, change them, or
create new ones.
You can customize the document FrameMaker uses to create portrait, landscape, and custom documents.
For details, see “Changing templates for blank paper and text files” on page 414.
To create a document from blank paper:
1 Choose File > New > Document. In UNIX, you can also click New in the main FrameMaker window.
2 Do one of the following:
• To create a standard one-column document, click Portrait or Landscape.
• To create a document with exactly the page size, margins, and number of columns you want, click Custom.
20
3 If you clicked Custom, do the following and then click Create:
• Choose a preset page size or enter the width and height for the pages.
• Enter the number of columns and a gap. The gap is the space between columns.
• Enter values for the margins, as measured from the edge of the page.
• Select a pagination option. If you select Double-Sided, choose Right 1st Page or Left 1st Page from the pop-up
menu to determine the side on which the document starts.
• Choose the display units for the document. Display units are the units that FrameMaker uses when it measures
distances in your document. These display units appear in dialog boxes and in the document window’s status bar.
For information, see “Changing the preset display units” on page 7.
Opening documents
In addition to FrameMaker documents, you can open text files, files in MIF (Maker Interchange Format), files in
MML (Maker Markup Language), and XML and SGML documents in Structured FrameMaker. You can also open
files created in other applications, such as Microsoft Word, if the required filter is installed. Much of the file’s
formatting is retained when you open the file. For information on filters, see the online manual Using Filters.
When you open a document, a Document window appears.
To open a file:
Select File > Open. In UNIX, you can also click Open in the main FrameMaker window.
1
2 Locate the document you want to open and click Open. If FrameMaker displays an alert message or a dialog box
before opening the document, see “Messages and dialog boxes that may appear when opening documents” on
page 21.
Page 30

ADOBE FRAMEMAKER 8
User Guide
Opening a document usually updates graphics imported by reference, text insets, cross-references, and system
variables (if there are any). For information on preventing automatic updating of references, see “Opening
documents without updating references” on page 23 and “Suppressing automatic updating of cross-references” on
page 209.
You can limit the files listed in the Open dialog box by entering wildcards (regular expressions in UNIX) in
the Open File Named text box. For example, if you enter *.new, you see any folder or document that has the
extension .new. If you enter Chapter?, you see any folder or document whose name consists of Chapter followed by
a single character. To re-display the entire contents of the folder, enter * in the text box.
To open a recently opened document:
1 Go to the bottom of the File menu, which lists the last five files you opened.
2 Select the file.
Messages and dialog boxes that may appear when opening documents
If one of the following alert messages or dialog boxes appears, you must click OK or provide more information before
continuing.
Missing fonts or font metric information If you click OK to continue, new fonts replace the missing ones. As a result,
line breaks, page breaks, and the width of text lines may change (see “Troubleshooting unavailable fonts” on page 21).
21
Missing imported graphics Skip the missing graphic or specify a new location for it (see “Locating missing graphics”
on page 510).
Missing text insets Click OK to continue opening the file. You can locate the insets later (see “Locating the source
of unresolved text insets” on page 507).
Tex t f ile Specify how to convert the text lines to paragraphs. For details, see “Opening text files” on page 22.
Unresolved cross-references Click OK to continue opening the file. You can resolve the cross-references later
(see “Resolving cross-references” on page 209).
Unknown file type Select a file type in the list and click Convert to continue opening the document.
Troubleshooting unavailable fonts
You may get an alert message that indicates the document you’re opening uses unavailable fonts. Fonts can become
unavailable for a number of reasons: the document may have been edited on a different system with fonts not
installed on the system you’re using; a font may have been removed or become damaged; the default printer for your
system may have been changed.
If the Remember Missing Font Names option in the Preferences dialog box is selected, FrameMaker preserves the
names of unavailable fonts. If missing font names are remembered, the original fonts will reappear when you open
the document on a computer that has the fonts installed, even if you save the document with substitute fonts.
To fix the problem of missing fonts, consider the following options:
Check for damaged fonts Determine whether the fonts that are unavailable in FrameMaker are installed on your
system and available in another application. If another application can use fonts that FrameMaker cannot use, the
fonts may be damaged. Reinstall them using the original media. For more information on troubleshooting font
problems, isolating damaged fonts or a damaged fonts folder, or reinstalling Type 1 fonts, see the Adobe Web site.
Page 31

ADOBE FRAMEMAKER 8
User Guide
Remap unavailable fonts If you cannot install or reinstall the unavailable fonts, you may want to permanently remap
the unavailable fonts to available fonts, so that the alert message does not appear when you open the document. You
do this by deselecting the Remember Missing Font Names option in the Preferences dialog box before you open the
file. However, be aware that doing this will cause you to lose the original font information referenced in the
document.
Switch printers (Windows only) FrameMaker reads font information stored in the printer driver so that it can make
fonts stored at the printer available for use within FrameMaker. In some cases, changing the default printer can
change one or more fonts available in FrameMaker.
Obtain and install the missing fonts For example, if you and a co-worker are editing the same documents, and you
would like to use the same fonts as your co-worker, consider purchasing and installing copies of the fonts.
Opening text files
Text-only f iles do not contain g raphics or formatting information. When you open a text-only file, you may be asked
to confirm that it is a text file.
To open a text file:
1 Select File > Open, and open a .txt file (see “Opening documents” on page 20). The Unknown File Type dialog
box appears.
22
2 Select the Text option.
3 Click Convert. The Reading Text File dialog box appears.
4 Select one of the following options:
• To break the text into paragraphs only at blank lines, select Merge Lines into Paragraphs. Use this option for a
paragraph-oriented text file such as a file containing document text.
• To break the text into paragraphs at the end of each line, select Treat Each Line As a Paragraph. Use this option
for a line-oriented text file, such as a file containing computer code.
• To convert the text into a table, select the Convert Text to Table. Use this option if the content of your source file
is tabulated.
5 Select the desired Encoding scheme. By default, the Japanese encoding scheme is selected.
6 Click Read. The text appears in a document that is created from a special template. You can customize the template
so that documents created from text files are formatted differently (see“Changing templates for blank paper and text
files” on page 414).
7 If you selected the Convert Text to Table option, the Convert to Table dialog box appears.
8 Select the desired options and click Convert. The text file content is converted into a table and opened as a
FrameMaker document.
Opening documents that are in use
You can avoid making changes to documents that are already opened by others.
A lock file (*.lck) is created every time you open a document. This lock file prevents others from making changes to
the file while you work in it. A lock file is in the same folder as the original document, and is removed when you close
the document.
In Windows, you can turn off file locking. For details, see “Using files across platforms” on page 31.
Page 32

ADOBE FRAMEMAKER 8
User Guide
If you try to open a document that’s already open and if you have write permission to the document, a dialog box
appears, showing the name of the document, who opened it last and when, and the computer on which it is open.
You might also see this dialog box after a system crash when you open a document you were last using.
To open a document that’s already in use:
Open the file (see “Opening documents” on page 20).
1
2 Do one of the following:
• If you want to look at the file but not change it, click Open for Viewing Only, and then click Continue. The
document appears in View Only format.
• If you want to edit a copy of the file, click Open Copy for Editing, and then click Continue.
• If you want to edit the file and you know that no one else is using it, click Reset File Lock and Open, and then click
Continue. Use this option after a system crash to open a document that was open at the time of the crash.
Opening documents in an earlier version of FrameMaker
Using FrameMaker 8 you can open .fm files you created using FrameMaker 7. However, if you want to open .fm files
you created using FrameMaker 6 or earlier, you must save them as MIF files. You can then open these MIF files in
FrameMaker 8.
23
Opening documents without updating references
A d ocum ent can open sl owl y if it contai ns m any c ros s-refe rence s to oth er f ile s, l arge impor ted graphi cs, or m any te xt
insets. You can open a document faster by bypassing the update of imported graphics, cross-references, and text
insets. However, if you use this method to open documents, keep in mind that FrameMaker will not warn you about
missing items or unresolved cross-references. For this reason, you should occasionally open a document in the
normal way.
To open a document without updating references:
1 Choose File > Open, and select the file you want to open.
2 Do one of the following:
• (Windows) Control-click Open.
• (UNIX) Shift-click Open.
After the file is open, FrameMaker will import and display graphics as needed on a page-by-page basis. You can
manually update cross-references and text insets by using Edit > Update References. If the page display is too slow,
reopen the document in the usual way. For displaying pages faster, see “Customizing the document display in the
Document window” on page 6.
Opening files after a system crash
If your system crashes, an automatically saved file will contain recent changes to the file. A file is saved
automatically in the following situations:
• If you selected Automatic Save in the General Preferences dialog box, autosave files (whose filename contains
.auto) are created at regular intervals.
• If your s yst em b eco mes uns table, Frame Maker t ries to c reate a recover f ile ( who se f ilen ame contai ns .recover) with
your most recent changes.
Page 33

To reopen a file after a system crash:
Open the file you were working on last (see “Opening documents” on page 20).
1
2 Do one of the following:
ADOBE FRAMEMAKER 8
User Guide
• If a recover file exists, open it when prompted and check whether your latest changes are there. If they are, save the
recover file with the same name as the document you were originally working on and then delete the recover file.
• If no recover file exists, open the autosave file when prompted and save it with the same name as the file you were
originally working on. The autosave file contains all the changes you made up until the time of the last automatic
save. The amount of work lost depends on the time interval you set between saves and when your system crashed.
Saving documents
You can save a document using its current name and location, or save a copy of the document using a different name
or location. You can save a document in several formats, including Hypertext Markup Language (HTML), Extensible
Markup Language (XML), and Portable Document Format (PDF).
When a document or a book needs to be saved, an asterisk (*) appears in the Page Status area of the status bar.
An asterisk indicates unsaved changes.
24
It’s a good idea to avoid using accented characters, symbols, and other special characters in your filenames.
You may encounter problems if you try to open the file in another operating system.
To save a document:
1 Do one of the following:
• To overwrite the current version on the disk, choose File > Save.
• To save the file in a different folder or using a different name, choose File > Save As.
2 If you choose the Save As command, or if the file has never been saved, specify the new filename and location. If
you want to save the file in a different format, choose the format from the pop-up menu (see “File formats you can
save in” on page 25).
3 Click Save. If you choose Text Only format, you must specify how to treat the text and tables in the document (see
“Saving documents in Text Only format” on page 26).
To save a book :
1 Do one of the following:
• To overwrite the current version on the disk, choose File > Save Book.
• To save the file in a different folder or using a different name, choose File > Save Book As.
2 If you choose the Save Book As command, or if the file has never been saved, specify the new filename
and location.
Note: The Save Book As command saves the book file only, not the files in the book. If you are saving the book to a new
location, you will need to open and save each file individually.
To save all open documents:
❖ Hold down Shift and choose File > Save All Open Files.
Page 34

ADOBE FRAMEMAKER 8
User Guide
To return to the saved version of your document:
❖ Choose File > Revert to Saved and click OK.
File formats you can save in
You can use the Save As command to save a file in the following formats:
Document 8.0 Saves the FrameMaker 8 document or book as a document or book that you can open and edit in
FrameMaker 8.
View Only 8.0 Produces a book or document that users can open but can’t edit. If you accidentally save a file in View
Only format, you can make it editable by pressing Esc Shift+f l (lowercase L) k. Then you can save the document or
book in Document or Book format.
Document 7.0 Saves the FrameMaker 8 document or book as a 7.0 document or book that you can open and edit in
FrameMaker 7.0. FrameMaker 8 specific features are ignored in FrameMaker 7.0.
MIF 8.0 Creates a text file containing FrameMaker 8 statements that describe all text and graphics. To avoid
overwriting your original document, save the MIF file under a different name. (For example, add a .mif extension to
the name.) For information on MIF, see the online manual MIF Reference.
MIF 7.0 Creates a text file containing FrameMaker 7.0 statements that describe all text and graphics. To avoid
overwriting your original document, save the MIF file under a different name. (For example, add a .mif extension to
the name.) For information on MIF, see the online manual MIF Reference.
25
Tex t O nly Creates a text file without graphics or formatting information. To avoid overwriting your original
document, save the text file under a different name. (For example, add a .text extension to the name.) For information, see “Saving documents in Text Only format” on page 26.
PDF Creates a Portable Document Format (PDF) file that can be viewed in Adobe Acrobat® and other applications
that support PDF files (see “About Adobe PDF” on page 575).
SGML Creates an SGML file with the contents, elements, and attributes from your document (see “Opening and
saving structured files” on page 60).
HTML Creates an HTML document that can be viewed on the World Wide Web. For information on adjusting the
mapping of paragraph and character tags to predefined HTML elements, see “Adjusting HTML mappings” on
page 561.
Note: When you save a structured FrameMaker document as HTML, all attributes with the same name are mapped to
the same value, even if the attributes have different values for different elements. To use different values for these
attributes after exporting, use a text editor to edit the resulting file.
XML Creates an XML document that can be used for data exchange and viewed on the World Wide Web. For more
information, see “Saving a structured document in SGML or XML format” on page 63.
Other file formats Create files that can be read by other applications. For example, you can save in Rich Text Format
(RTF), which is supported by many word processors, or in any other format for which an export filter is installed.
Most formatting is preserved, and formats are usually converted to word-processing styles. For details, see the online
manual Using Filters and “Using Save As to export to other formats” on page 515.
®
Note: You can use the Print command to save a PostScript
file (see “Creating PostScript files” on page 30).
Filename extensions for saved files (Windows)
When you save a file for the first time in Windows, FrameMaker automatically adds these extensions: .fm for
documents, .book for b ook files, and .mif for MIF files. With these extensions, the files will continue to be recognized
as FrameMaker files by the Windows operating system.
Page 35

ADOBE FRAMEMAKER 8
User Guide
If you don’t want these special extensions to be added to the filenames you assign, enclose the filenames in double
quotation marks. Windows won’t recognize a file without one of these extensions as a FrameMaker file, but you’ll
still be able to open the file in FrameMaker.
If you assign an extension that’s registered by another application (for example, .doc), your extension won’t be
replaced by the FrameMaker extension.
Saving documents in Text Only format
Saving a document in Text Only format creates a text file with the text encoding of your choice: ANSI (Windows),
ISO Latin-1 (UNIX), or ASCII. (On Japanese-language systems, you can also use JIS, Shift-JIS, or EUC. On other
Asian-language systems, you can use encodings for the supported languages.) Only ordinary text—text in text
frames and tables—is saved; graphics, text in graphic callouts, footnotes, and formatting information are not saved.
Reformat line lengths and hyphenation as needed before saving the file (see“Changing indents and alignment” on
page 111 and “Changing hyphenation and line breaks” on page 119).
If some characters are not available in the text encoding that you choose, those characters will be replaced in the text
file. For example, when you save a document in Text Only format using ANSI (Windows), ISO Latin-1 (UNIX), or
ASCII encoding, spaces (including thin, en, em, and numeric spaces) are converted to regular spaces.
To save a document as text only:
1 Choose File > Save As.
2 Specify the filename and location, and choose Text Only format.
26
3 Click Save.
4 Do one of the following:
• To break each line into a separate paragraph, click At the End of Each Line. This option maintains a file’s original
line breaks and blank lines. Use this option for a line-oriented file such as computer code.
• To merge adjacent lines into paragraphs and insert a carriage return only at blank lines, click Only Between
Paragraphs. Use this option for paragraph-oriented files, such as files containing document text.
5 If you want to save table text, select Include Text from Table Cells. Then do the following:
• Specify the order in which you want the table cells saved (row by row or column by column).
• Choose whether to separate cells with tabs or with carriage returns by choosing items from the pop-up menus.
6 If the text file will be used on a platform that uses a different text encoding, choose an appropriate encoding from
the Text Encoding pop-up menu.
7 Click Save.
Exporting XML from unstructured documents
You can export both structured and unstructured files to XML. The mapping used by the export to specify what
element to create for each paragraph tag in the source FrameMaker file is defined on a reference page, and the export
function creates an XML file and a corresponding cascading style sheet (CSS), which can be used with the document.
For information on exporting structured documents as XML, see “Saving a structured document in SGML or XML
format” on page 63.
To save a document in XML format:
1 Do one of the following:
• Select File > Save As XML.
Page 36

ADOBE FRAMEMAKER 8
User Guide
• Select File > Save As and choose XML from the pop-up menu. Give the filename an extension of .xml.
2 Specify the file location.
3 Click Save.
Backing up and saving automatically
FrameMaker can back up and save your work automatically.
To specify an automatic save option:
1 Do one of the following:
• (Windows) Choose File > Preferences > General.
• (UNIX) Choose File > Preferences.
2 Do the following:
• To create a backup file every time you save, select Automatic Backup on Save. This creates a copy of the file before
your latest changes are saved. If a backup file already exists, the new backup file overwrites it. (The filenames of
backup files contain .backup.)
• To create an autosave file at regular intervals, select Automatic Save and enter an interval (in minutes) in the text
box. This causes a copy of the file to be saved periodically without your having to choose File > Save. (The
filenames of autosave files contain .auto.) When you save manually or revert to the last-saved version with the
Revert to Saved command, the autosave file is deleted.
3 Click Set.
27
Adding metadata to a document
FrameMaker includes built-in support for Extensible Metadata Platform (XMP). Metadata, or file information,
is descriptive information that can be searched and processed by a computer. Use it to provide information about the
contents of a document, and to preserve information about a document that will be opened in other Adobe applications. If you export the file to PDF, much of this metadata will appear in Acrobat.
Metadata tags travel with the document and describe its content. By embedding them in your documents, you make
the documents easier to track, manage, and retrieve.
Note: Metadata in a book file may override metadata in a document file. If your document is part of a book file, you
may want to open the book file and select the document before you add metadata.
To add metadata to a document:
Make the appropriate document window or book window active. If a book window is active, select the documents
1
you want to affect.
2 Choose File > File Info.
3 Enter the desired information in the text box next to any or all categories.
4 For Marked, choose Yes if the document is copyrighted, or No if the document is explicitly in the public domain.
Choose Unknown if you’re not sure.
5 Click Set.
Page 37

ADOBE FRAMEMAKER 8
User Guide
Printing documents
When you print a document, you can specify options such as how many copies to print and whether to print crop
marks and registration marks. The available options vary slightly with the platform and the printer you are using.
When you’re working with structured documents, element boundaries, either as brackets or as tags, are printable
characters. If you’re showing these boundaries in the document window, you may want to hide them before you print
(see “Showing and hiding element boundaries” on page 16).
Note: For PostScript printing, FrameMaker recommends a PostScript Level 2 or higher output device. Make sure you use
a print driver and PPD for such a device.
For information on printing a book made up of several documents, see “Printing from a book window” on page 467.
Important: If you have turned off graphics in the View Options dialog box, graphics will not appear in the
printed document.
Note: The Printing feature supports the Unicode text encoding standard.
To print a document:
1 Choose File > Print.
2 Specify the page range you want to print.
3 Select other print options, and then click Print.
In UNIX, if you want to change the print settings for a document but don’t want to print it yet, change the settings
in the Print dialog box and click Save Settings Only.
28
Print options
The following print options are available for all printers. All these options are in the Print dialog box. For information
on additional options available for your printer, see your printer documentation.
Note: (Windows) FrameMaker products for Windows have no control over the abilities or limitations of any printer
driver. FrameMaker products can only support printer drivers that have been approved for use in the version of Windows
FrameMaker is running on. If you are using an outdated printer driver, you may experience problems, such as lost
graphics and characters and the inability to open documents. See the Adobe Web site for information on installing the
latest PostScript drivers.
Collating To print one complete copy before printing the next copy, select Collate when you’re printing multiple
copies. Printing might be slower when Collate is selected.
Printing double-sided To print a double-sided document when you’re not using a duplex printer, print the odd-
numbered pages, turn the paper over in the printer, and print the even-numbered pages. Depending on how your
printer produces pages, you may n eed to sele ct L ast Shee t First be fore you click Pr int, b ecaus e turning the pap er ov er
in the printer may reverse the page order.
Changing page order To print a document starting with the last page, select Last Sheet First.
Printing more quickly To print a document more quickly, select Low-Resolution Images. In Windows, imported
images are printed as gray boxes. In UNIX, they are printed with lower resolution.
Printing crop marks and registration marks To print a document with crop marks and registration marks, choose an
option from the Registration Marks pop-up menu. In some instances, you may want to scale down the printed page
image so that crop marks and registration marks will fit on the page.
Page 38

You can choose between Western and Tombo (Japanese) crop marks.
ADOBE FRAMEMAKER 8
User Guide
29
Chapter 1: Color and
Commercial Printing
1
Chapter 1: Color and
Commercial Printing
1
Western and Tombo crop marks
Reducing or enlarging the page image To print a reduced or enlarged page image centered on the page, enter a
percentage in the Scale text box.
Printing thumbnails To print thumbnails (small images of several pages on one page), enter values in the Thumb-
nails text boxes. In the Rows text box, enter the number of thumbnails you want to print down the page. In the Cols
text box, enter the number of thumbnails you want to print across the page.
Chapter
1
C
OLOR AND
C
OMMERCIAL
P
RINTING
1
1
1
1
1
Thumbnails
Skipping blank pages (Windows) To prevent printing blank pages, select Skip Blank Pages.
Printing colors in black and white To ensure that colored items (FrameMaker drawn images and text) are printed in
black and white rather than in shades of gray, do one of the following:
• (Windows) Select Spot Color As Black/White.
• (UNIX) Edit the beginning of the ps_prolog file in $FMHOME/fminit. The ps_prolog file contains instructions
for changing print settings. Changes to the file take effect immediately. To make changes without affecting other
users, save a copy of the file with the changes to your personal fminit folder (~/fminit/ps_prolog).
Feeding paper manually To print the document on paper that is not in your printer’s paper cassette, do one of
the following:
• (Windows) Choose File > Print Setup. Choose Manual Feed from the Source pop-up menu, and click OK.
• (UNIX) Select Manual Feed.
Note: (Windows) The Print Document dialog box in FrameMaker contains some options that may also appear in the
Windows printer Properties dialog box, such as the number of copies. When you print a document, FrameMaker printer
settings override Windows printer settings.
Page 39

ADOBE FRAMEMAKER 8
User Guide
Changing paper size (UNIX) To print the document on a different paper size, choose a paper size from the Paper Size
pop-up menu, or type the dimensions in the Width and Height text boxes. Because these dimensions describe the
physical size of the paper in the printer’s paper cassette (not the orientation of the document), the Width setting
should always match the width of the edge of the paper that feeds into the printer.
If your document’s pages are larger than the size of the paper, you’ll see an alert message. If you decide to print the
document, the printer crops the document.
Downloading fonts (UNIX) To cho ose the fonts to downl oad to the pr inte r, cho ose from t he Downlo ad Roman Fonts
pop-up menu. You don’t need to download fonts that are already in the printer’s memory or on a hard disk attached
to the printer. For example, if your printer contains the Standard 35 fonts, choose All but Standard 35. To enable
subsetting and downloading of Asian fonts, select the Download Asian Fonts option. If your document includes
TrueType fonts and you’re printing to a PostScript Level 1 printer, select the Download TrueType as Type 1 option.
The Standard 35 fonts (Avant Garde, Bookman, Courier, Helvetica, Helvetica Narrow, New Century Schoolbook,
Palatino, Symbol, Times, Zapf Chancery, and Zapf Dingbats font families) are usually included with
PostScript printers.
You can modify the UNIX font configuration file (fontlist) to override the Download options in the Print dialog box.
To print out a list of resident fonts on a PostScript printer, print the printerfont.ps script located in the
$FMHOME/fminit/pstools folder.
30
Using a different printer (UNIX) To use a different printer, choose the printer name from the Destination pop-up
menu. All printers configured for your computer should appear in the pop-up menu. If a printer doesn’t appear, or
if you’re using a special printing script (for example, to send a fax), choose Other Printer from the pop-up menu and
type the appropriate parameters into the text box that appears.
Creating PostScript files
You can create a description of a document called a PostScript file (also called a print file). You might use a PostScript
file to download the document later to a PostScript printer or to send the document to a service provider for
typesetting. In addition, you can create an Adobe PDF file; see “Enabling and disabling SWF file embedding in
PDFs” on page 580.
To create a single print file from a document:
1 Choose File > Print.
2 Do one of the following and then click Print:
• (Windows) Select Print to File and enter the path and filename in the text box, or click Browse to specify a folder
and filename.
• (UNIX) Choose PostScript File from the Destination pop-up menu and enter the path and filename in the text
box, or click Browse to specify a directory and filename.
You might want to enter a .ps extension for your PostScript file.
To create a single print file for a book:
In the book window, choose File > Print Book, or select the documents you want to print and choose File > Print
1
Selected Files.
Page 40

ADOBE FRAMEMAKER 8
2 Do one of the following and then click Print:
User Guide
• (Windows) Select Print to File and enter the path and filename in the text box, or click Browse to specify a folder
and filename. Choose Single File from the Save Book As (or Save Selected Files As) pop-up menu. Then click
Print.
• (UNIX) Choose Single PostScript File from the Destination pop-up menu and enter the path and filename in the
text box, or click Browse to specify a directory and filename. Then click Print.
To create a series of separate print files for a book:
In the book window, choose File > Print Book, or select the documents you want to print and choose File > Print
1
Selected Files.
2 Do one of the following:
• (Windows) Select Print to File and enter the path and filename in the text box, or click Browse to select a folder
and type a filename. Choose Single File or Separate File for Each Document from the Save Book As or Save
Selected Files As pop-up menu. Then click Print.
• (UNIX) Choose PostScript File for Each Document from the Destination pop-up menu, and then click Print.
Using files across platforms
You help keep FrameMaker files fully compatible across platforms with compatibility preferences. For more information on cross-platform and network compatibility, see the online manual Wo r k i n g o n Mu lt iple Plat f o r ms, which
is located in the OnlineManuals folder.
31
To change compatibility preferences:
1 Do one of the following:
• (Windows) Choose File > Preferences > General.
• (UNIX) Choose File > Preferences.
2 Do the following:
• To preserve the names of unavailable fonts when FrameMaker substitutes existing fonts, select Remember Missing
Font Names. The original fonts will reappear when you open the document on a system that has the missing fonts
installed. For more information, see “Troubleshooting unavailable fonts” on page 21.
• (Windows) To display errors that FrameMaker finds as it opens files, select Show File Translation Errors.
• (Windows) To specify another platform with which to maintain filename compatibility, choose a setting from the
Cross-Platform pop-up menu.
• (Windows) To warn a user on a network before opening and modifying the document if it is already open for
another user, select Network File Locking.
• (Windows) To add a FrameImage facet to bitmap graphics imported by copying, select Save FrameImage with
Imported Graphics. Each graphic will be saved in its native format and in FrameImage format (a format that is
supported on all platforms). When you open the document on another computer or on a platform that doesn’t
support the native format, the FrameImage copy will be used.
3 Click Set. The settings take effect immediately.
Page 41

ADOBE FRAMEMAKER 8
User Guide
Closing documents
You can close a document at any time. If you have unsaved changes, you’ll be asked whether you want to save the
changes. (A document with unsaved changes contains an asterisk in the Page Status area of its status bar.)
If imported graphics, text insets, cross-references, or system variables were updated when you opened your
document, the document is marked as changed (with an asterisk in the status bar) when it opens. Similarly, because
printing a document causes cross-references (if there are any) to be updated, printing a file may also cause a
document to be marked as changed.
To close a document:
❖ Choose File > Close.
To close all open documents:
❖ Hold down Shift and choose File > Close All Open Files.
Working with structured FrameMaker documents
Elements in structured documents
You can add elements to a document to build its structure, and you can edit existing elements in many ways.
The Structured FrameMaker interface guides you so that you build a structure that is valid.
32
If you create a FrameMaker document by opening a structured file, you do not need to add elements to it. The
document already has elements generated from the structured markup. But you can edit the document’s elements,
and add more elements, just as if you had created the document in FrameMaker.
About elements
To build a document’s structure, you can either add elements to the document and then fill in the contents, or select
existing contents and wrap them in elements.
A structured document has element definitions stored in its Element Catalog. These definitions describe the
allowable contents for each type of element the document can have, and they may also specify attributes and
formatting for the elements. If all the elements in a document have contents and attributes that meet these specifications, the document is valid.
Valid contents for elements
An element’s definition has content rules that determine what the element can contain. For example, the definition
of a Section element might specify that a Section must begin with a Head element, then must have a Para element,
and then can have any combination of Para, Figure, and other Section elements. A Para element might allow text and
CrossRef elements, in any order.
Page 42

ADOBE FRAMEMAKER 8
User Guide
You don’t need to know the specifics about whether or where your contents will be valid. Use the Element Catalog
as a guide—it lists elements that are valid for the current location and tells when text is allowed. (Valid elements have
a heavy check mark in the catalog.)
Valid contents for the current location
Two classes of elements
Elements fall into two basic classes determined by their allowable contents:
• A container element can hold text, other elements, or both. Container elements build the document’s structure.
In a typical document, most elements are containers—such as heads, paragraphs, sections, and tables. These
elements are represented in the Structure View by bubbles with round corners.
• An object element is a single object—a marker, cross-reference, system variable, equation, or anchored frame. You
cannot type in these elements or add child elements to them. Object elements are represented by bubbles with
square corners.
33
Section
Head
Para
CrossRef
A. Containers have round-cornered bubbles.
B. Object elements have square-cornered bubbles.
A
B
A container element can be defined to remain empty. For example, a table cell might be empty as part of a table’s
design. If an element is defined as empty, its text snippet in the Structure View is <EMPTY>. If an element contains
only spaces or nonprintable characters such as tabs, the snippet is <WHITESPACE>.
Page 43

ADOBE FRAMEMAKER 8
User Guide
Attributes for elements
An element can have attributes, which provide information about the element that is not part of the element’s
contents. You can show attributes and their values in the Structure View.
Attributes are optional—it is up to the developer to define them for an element. Your document might use attributes
for several purposes:
• To control the formatting of an element. For example, a Type attribute in a List element might have two possible
values—Bulleted and Numbered—that determine whether the list has bulleted or numbered items. Or a Prefix
attribute in a Note element might provide text such as Important to display at the beginning of the note.
List
Type = Numbered
ListItem
ListItem
9.2.2.1 When to Install Door Panels
Install door panels under the following conditions:
1. when a door panel has been removed to be repaired or unjammed
2. when a damaged door panel is being replaced with a new one
Attributes can provide formatting information.
1. when a door panel has been
2. when a damaged door panel
34
• To record descriptive information about an element. For example, an attribute called Security in a Memo element
might describe the level of classification for the memo, such as TopSecret. An attribute value can even affect how
the file is processed—a TopSecret value, for example, might trigger a custom routine that hides the element when
the document is displayed.
• To store source and destination information for elements, typically for cross-referencing. For example, a Section
element might have an ID attribute that stores a unique value. A Cross-Reference element that points to the
Section stores the same value in a Reference attribute, to maintain the connection between the elements. This use
of attributes conforms to structured requirements.
You typically enter and edit the values for attributes, unless the attributes are defined to be read-only. (ID attributes
used in cross-references are often read-only so that they will be generated by FrameMaker.)
Adding elements
To add an element to a document, you either insert an empty element and enter contents, or wrap an element around
existing contents. If the element has been defined to have attributes, you can also provide attribute values as you add
the element.
Note: Before you can begin, your document must have element definitions in its Element Catalog. If necessary, import
the element definitions from a structured template (see “Importing element definitions” on page 44).
The Element Catalog shows the elements that are available at the current location. You can change the scope of
elements available—for example, to show elements that are not valid at the current location (see “Changing the scope
of elements available in a structured document” on page 18).
Ask your application developer for a summary of what each element can contain. It may be helpful to refer to this
information as you work.
Page 44

ADOBE FRAMEMAKER 8
User Guide
When you add an element, you may see text or other elements inserted along with it. For example, if you insert
a Note element, the word Note may appear, or if you insert a List element, a ListItem child element may appear. An
element’s definition determines whether text or child elements are inserted automatically.
Note: Element names support the Unicode text encoding standard.
Adding elements to an empty document
You add structure to an empty document by inserting elements one at a time. You can enter all the elements in their
correct order and hierarchy as you go along, or you can work more loosely, concentrating on contents rather than on
structure, and then validate later to correct errors.
To add elements to an empty document:
1 If the document does not have element definitions, import the definitions (see “Importing element definitions”
on page 44).
2 Specify the scope of elements available (see “Changing the scope of elements available in a structured document”
on page 18).
3 Insert elements from the Element Catalog (see “Adding elements” on page 34). Begin at the highest-level element
and then let the catalog guide you.
4 If necessary, supply attribute values (see “Assigning attribute values” on page 46).
5 Add contents to the elements. You can add contents as you insert elements, or later.
Validate the document and correct any errors (see “Validating documents” on page 52).
35
Adding elements to a document with contents
You add structure to an existing unstructured document by wrapping its contents in a hierarchy of elements.
The conversion process retains formatting in paragraphs, tables, and in objects of all types (cross reference, marker,
graphic, equation, footnote, system variable, Rubi and Rubi group). (If the document has a conversion table, you can
apply the table to the document to give it structure, rather than adding structure manually. See “Adding structure to
documents using conversion tables” on page 66.)
Enhanced conversion to structure
The conversion tool that allows you to add structure to unstructured documents is enhanced in several ways:
• The root element can now be specified in the conversion table and added automatically, where it was previously
necessary to add it manually after performing the conversion.
Specify “
second column.
• The conversion process can now retain formatting in paragraphs, tables, and in objects of all types (cross
reference, marker, graphic, equation, footnote, system variable, Rubi and Rubi group).
document and EDD.
For additional details of conversion table specifications and how the conversion is performed, see Appendix A,
“Conversion Tables for Adding Structure to Documents,” in the Structure Application Developer’s Guide.
RE:RootElement” in the first column of the conversion table, and the name of the root element in the
Use the FrameMaker utility "Create and Apply Formats" before conversion to turn format overrides and untagged
formatted text into named paragraph and character formats, which can be carried forward into the structured
Page 45

ADOBE FRAMEMAKER 8
User Guide
To add elements to a document with contents:
If the document does not have element definitions, import the definitions (see “Importing element definitions”
1
on page 44).
2 Specify the scope of elements available (see “Changing the scope of elements available in a structured document”
on page 18). You may find it easier to use the All Elements option.
3 Select contents and wrap them in elements from the Element Catalog (see “Adding elements” on page 34). Begin
at the lowest levels and work your way up.
4 If necessary, supply attribute values (see “Assigning attribute values” on page 46).
5 Change the NoName element to the valid highest-level element. The NoName element is created as the
highest-level element once you wrap your initial content. Change elements with default tags (such as TABLE)
to valid elements.
6 Validate the document and correct any errors (see “Validating documents” on page 52).
Inserting elements
You can insert an empty element and then fill it in with contents. If you have turned on element boundaries, then
once you insert an element, a pair of element boundaries appears in the document window, and a new bubble appears
in the Structure View.
36
9.1.1 [[Chapter Ove
9.1.1.1 [[Procedu
[This chapter descr
AstroLiner T440B
[ ]]
Empty element boundaries (left) and bubble for the new element (right)
Section
Head
Para
Para
If you haven’t yet fully planned your document, you may want to insert just the high-level elements, such as Section
and Head elements, and then use this structure as an outline for developing the document.
To insert an element using the Element Catalog:
1 Click where you want to insert the element. If you’re inserting it between other elements, you might find it easier
to work in the Structure View rather than the document window.
2 Select an element tag in the Element Catalog, and click Insert. If only one element appears in the catalog, you can
click Insert without selecting it.
You can also double-click an element tag to insert the element.
3 If the Attributes for New Element dialog box appears, enter attribute values for the element and click Insert
Element (see “Entering attribute values as you insert elements” on page 46).
This dialog box appears only if the element has attributes and if an option is set in the New Element Options dialog
box to prompt for attribute values when you insert new elements.
4 If you inserted a table, a marker, a graphic, or a cross-reference, provide more information about the element in
the dialog box that appears.
Page 46

ADOBE FRAMEMAKER 8
User Guide
To insert an element using the keyboard:
Click where you want to insert the element, and press Control+1 (one).
1
2 Start typing the element’s tag until it appears in the Tag area of the document window’s status bar. The elements
available are the same ones that currently appear in the Element Catalog.
Element tag
You can also type lowercase letters to search forward or uppercase letters to search backward through the elements
that begin with those letters, or you can use the up and down arrow keys to scroll through all the elements.
3 Press Return. If you decide to cancel, press Esc (Windows) or Control+c (UNIX).
Pressing Return to insert elements
In many cases, pressing Return inserts an element automatically. Whenever you press Return, FrameMaker
checks the current element’s definition for the following conditions—in the following order—and may insert a
child element:
One valid element If only one child element is valid at the current location, pressing Return adds that element. For
example, after you add a Section, a Head might be the only element permitted next. This technique can also work to
create repeating elements, where pressing Return inserts the same type of element. Body paragraphs and list items
are often defined as a repeating element.
37
More than one valid element If more than one child element is valid, pressing Return highlights the Tag area
to prompt you for an element tag. You can type until the tag you want appears, and then press Return to insert
the element.
End of an element If the insertion point is at the end of an element and no more child elements are valid, pressing
Return looks for valid elements in ancestors after this location. If a valid element is found, the insertion point moves
to the ancestor and the element is inserted (if only one is valid) or the Tag area is highlighted (if more than one
element is valid).
Other conditions If none of the preceding conditions are true, pressing Return causes a beep and no element
is inserted.
Wrapping elements around existing contents
You can add structure to contents already in a document by wrapping a new element around the contents.
The contents can be any part of a document, including other elements.
When you wrap an element, a pair of element boundaries appears around the contents in the document window (if
element boundaries are showing), and a new bubble appears in the Structure View. The element’s contents are
formatted as specified in the element’s format rules.
9.1.1 [[Chapter Ove
9.1.1.1 [[Procedu
[This chapter descr
AstroLiner T440B
[The procedures f ]
Section
Head
Para
Para
The pr
Element boundary (left) and Bubble for the new element (right)
Page 47

ADOBE FRAMEMAKER 8
User Guide
Note: You cannot wrap contents in elements that are for parts of tables (such as rows or cells), but you can wrap text or
other elements that are within a cell or a table title element. If you want to convert text and elements to a table,
use Table > Convert to Table rather than wrapping (see “Converting text to tables” on page 162).
After wrapping an element, you may need to edit the document to correct structure errors. For example, if you wrap
Para elements in a Section element that requires a Head element, you’ll need to insert the Head. For help on finding
and correcting structure errors, see “Finding and correcting errors” on page 51.
To wrap an element using the Element Catalog:
Select the contents you want to wrap in an element. If you’re selecting text, use the document window. If you’re
1
selecting entire elements, you may find it easier to use the Structure View.
2 Select an element tag in the Element Catalog, and click Wrap. If only one element appears in the catalog, you can
click Wrap without selecting it.
You can also double-click an element tag to wrap an element around the selection.
3 If the Attributes for New Element dialog box appears, enter attribute values for the element and click Insert
Element (see “Entering attribute values as you insert elements” on page 46).
This dialog box appears only if the element has attributes and if an option is set in the New Element Options dialog
box to prompt for attribute values when you insert elements (see “Setting options for inserting new elements” on
page 39).
38
To wrap an element using the keyboard:
Select the contents you want to wrap in an element and press Control+2.
1
2 Start typing the element’s tag until it appears in the Tag area of the document window’s status bar. The elements
available are the same ones that currently appear in the Element Catalog.
Element tag
You can also type lowercase letters to search forward or uppercase letters to search backward through the elements
that begin with those letters, or you can use the up and down arrow keys to scroll through all the elements.
3 Press Return. If you decide to cancel, press Esc (Windows) or Control+c (UNIX).
When wrapping elements throughout a document
Wrapping is useful for providing an existing unstructured document with a structure. (For an overview of this
process, see “Adding elements to a document with contents” on page 35.) It’s easiest to wrap the document’s contents
by starting at the lowest levels and working your way up, as follows:
• Begin by working in the document window and wrapping text ranges, system variables, and other items that are
inside paragraphs. Don’t worry about errors you see in the Structure View. You’ll correct many of these errors
when you wrap the lowest levels in parent elements, and you can correct the other errors when you’re finished.
• Next, wrap paragraphs, headings, and other paragraph-level items in their elements.
• Finally, work in the Structure View and wrap the elements you have so far in parent elements, such as Section
and List.
If you find yourself wrapping selections in the same type of element over and over again, you can repeat the last
Element Catalog command by pressing Esc e e.
Page 48

ADOBE FRAMEMAKER 8
User Guide
When you wrap the first element in the document, the Structure View immediately changes to show a default invalid
structure, as follows:
• A highest-level element is added with the tag NoName, unless you begin by wrapping the contents in a valid
highest-level element. NoName is a placeholder for your valid highest-level element.
• All tables become structured and are given default element tags, such as TABLE and ROW.
• Objects become elements with default tags such as CROSSREF, GRAPHIC, and EQUATION.
• Footnotes become FOOTNOTE.
• Rubi text becomes RUBI and RUBIGRP elements.
Note: Variables and markers do not become structured object elements.
You can correct the structure of the document when you’re finished wrapping elements.
If your application developer has set up a conversion table for the document, you can apply the table to wrap
elements throughout the document all at one time (see “Adding structure to documents using conversion tables” on
page 66). This is much faster than wrapping manually.
Setting options for inserting new elements
There is seldom a right or wrong way to add new elements to a document. For example, you might prefer to enter
attribute values later rather than when you first add elements. And you might find it distracting to have child
elements inserted automatically along with the elements you add.
39
To set options for inserting new elements:
1 Make the appropriate document window or book window active. If a book window is active, select the documents
you want to affect.
2 Choose Element > New Element Options.
3 Specify how you want to be prompted for attribute values when you add new elements:
• To enter all possible attribute values as you add elements, select Always Prompt for Attribute Values.
• To enter only required attribute values as you add elements, select Prompt for Required Attribute Values.
• To enter attribute values after adding elements, select Do Not Prompt for Attribute Values.
4 To allow FrameMaker to insert child elements automatically for new elements, select Allow Automatic Insertion
of Children.
An element’s definition may specify a sequence of child elements to insert. For example, a List might have an Item
that is inserted along with it, and that Item might have a Para.
5 Click Set.
To speed up the process of adding new elements, select Do Not Prompt for Attribute Values and Allow Automatic
Insertion of Children.
Editing elements
You can edit a document’s structure in many ways—including changing an element to a different type, rearranging
elements, and splitting and merging elements.
Page 49

ADOBE FRAMEMAKER 8
User Guide
After editing one part of a document, you may need to edit the document further to correct content errors. For
example, if you split a Section element in two, you may need to add a Head element for the new second Section. Use
the Structure View as a guide for finding errors as you work, or validate the document when you’re finished.
Changing elements to another type
You can change an existing element to another element of the same type. For example, you may want to convert a
Para element into a Head element, or a series of Para elements into ListItem elements that you plan to wrap in a List
element.
However, not all elements can be converted to other elements. For example, if you change a Para element containing
text to a Marker element containing the same text, the name of the element will change, but the text will not be
converted to marker text.
Note: If you want to change contents to a table, use Table > Convert to Table to convert text rather than changing an
element (see “Converting text to tables” on page 162).
To change an element using the Element Catalog:
1 Select the element. You can select more than one element, even if the elements do not have the same tag. All the
elements will be changed to the new type of element. However, the elements’ children are not changed, but they may
become invalid due to the changed parent.
2 Select an element tag in the Element Catalog and click Change. The element’s bubble in the Structure View
changes to the new tag, and the contents are formatted as specified in the new element’s format rules. Attributes in
the element may become invalid.
40
To change an element using the keyboard:
1 Select the element and press Control+3.
2 Start typing the tag of the new element until it appears in the Tag area of the document window’s status bar.
The elements available are the same ones that currently appear in the Element Catalog.
Element tag
You can also type lowercase letters to search forward or uppercase letters to search backward through the elements
that begin with those letters, or you can use the up and down arrow keys to scroll through all the elements.
3 Press Return. If you decide to cancel, click in the document without pressing Return.
You can use Edit > Find/Change to change many occurrences of an element at one time (see “Finding elements and
attributes” on page 49). For example, if you’ve imported new element definitions that use an element named Par
instead of Para, you can change all Para elements to Par.
Page 50

ADOBE FRAMEMAKER 8
User Guide
Merging two or more elements into one
You can merge two or more elements into a single element. For example, you might combine two Section
elements into one. Merging puts the contents of the second element (including any child elements) at the end of the
first element.
41
Section
Head
Para
Section
Head
Section
Head
Para
Head
Para
List
Merging two Sections, before and after
You may need to edit the document after merging elements.
Note: If you want to combine table cells, use Table > Straddle rather than merging the cells (see “Straddling and unstraddling cells in structured tables” on page 198). You cannot combine other table parts.
To merge two or more elements into one:
1 Select the elements you want to merge. The elements can be of different types, but they must be siblings and next
to each other in their parent element.
2 Choose Element > Merge.
Merging retains the attributes for the first element only.
Splitting elements in two
You can split an element into two elements that have the same tag and are at the same level. For example, you might
split a Section element in two.
Section
Para
Para
List
Section
HeadHead
Para
Section
Para
List
Splitting a Section, before and after
You may need to edit the document after splitting an element. In the example above, after splitting you would add a
Head for the new second Section.
Note: You cannot split an element that is a table part (such as a row or cell).
To split an element in two:
1 Click where you want to split the element. The contents after the insertion point will go in the new
second element.
2 Choose Element > Split.
Page 51

ADOBE FRAMEMAKER 8
User Guide
Splitting might result in two elements with identical attributes. However, if the original attribute had a Unique ID
attribute, the second element loses its ID value.
Unwrapping the contents of elements
Unwrapping deletes an element but leaves its contents in the same place in the document. You usually unwrap
elements as part of a larger editing process. For example, if you plan to convert ListItem elements into Para elements,
you might need to unwrap the parent List element first. Then use Edit > Find/Change to convert the ListItem
elements to Para elements.
42
Para
List
ListItem
ListItem
ListItem
ListItem
Unwrapping ListItems, before and after
Para
ListItem
ListItem
ListItem
ListItem
You may need to edit the document after unwrapping an element. For this example, you would change the ListItem
elements to valid elements or rewrap them.
Note: You cannot unwrap an element that is a table part (such as a row or cell).
To unwrap the contents of an element:
Select the element with the contents you want to unwrap. For example, if you’re unwrapping ListItem elements in
1
a List, select the List element.
2 Choose Element > Unwrap.
Moving elements
You can move an element to another location in a document by dragging its bubble in the Struc ture View. When you
move an element, its contents, including descendants, all move along with it. This does not affect the contents of the
Clipboard.
If you’re moving an element that has many descendants, collapse the element first (see “Collapsing and expanding
elements” on page 14).
You can also move an element by cutting it to the Clipboard and pasting, even across documents. If you paste an
element from another document, the element may not be defined in your document. If you don’t plan to add a
definition for the element, change the element to a valid one. You cannot cut and paste elements in a book file.
Page 52

ADOBE FRAMEMAKER 8
To move an element by dragging:
❖ Drag the element’s bubble to the location you want. As you drag, the pointer changes to a solid up-and-down
arrowhead, and an arrow moves to indicate where the bubble will go if you release the mouse button.
User Guide
43
Section
Head
Para
List
Para
Para
List
Section
Head
Para
Para
Para
List
Moving a List, before and after
If the element is valid in the location where the arrow points, a check mark or question mark appears in the bubble.
These symbols have the same meanings as they do in the Element Catalog (see “ The structured document’s Element
Catalog” on page 13).
To nudge an element one place:
❖ Drag the element’s bubble slightly to one side or up or down. As you drag a small distance, the pointer changes to
a single arrow. (If you drag too far, the arrow changes to an up-and-down arrowhead.)
Section
Head
Para
List
Para
Section
Head
Para
Para
List
Nudging a List one place, before and after
When you release, the element moves one place in the indicated direction, as follows:
• Moving an element up puts it right above the sibling right before it. Moving an element down puts it below the
sibling after it.
• Moving an element to the left makes it a child of its parent. Moving an element to the right makes it a child of the
sibling after it.
Copying elements
You can use the Structure View to make a copy of an existing element and put the copy in a new location. This does
not affect the contents of the Clipboard.
When you copy an element, the element’s contents are copied along with it. Generally, the element’s attributes are
also copied—but if you duplicate an element with an ID attribute, the ID value is discarded in the copy.
If you’re copying an element that has many descendants, collapse the element first (see “Collapsing and expanding
elements” on page 14).
You can also copy an element by copying it to the Clipboard and pasting, even across documents. If you paste an
element from another document, the element may not be defined in your document. If you don’t plan to add a
definition for the element, change the element to a valid one. You cannot copy and paste elements in a book file.
Page 53

ADOBE FRAMEMAKER 8
User Guide
To copy an element by dragging:
❖ Do one of the following:
• (Windows) Hold down Alt and drag the bubble to the location you want.
• (UNIX) Hold down Control and use the middle mouse button to drag the bubble to the location you want.
As you drag the bubble, the pointer changes to a hollow, stacked up-and-down arrowhead, and a horizontal arrow
moves to indicate where the copy will go if you release the mouse button.
44
Section
Head
Para
List
Para
List
Copying a List, before and after
Section
Head
Para
List
Para
List
If the element is valid in the location where the arrow points, a check mark or question mark appears in the bubble.
These symbols have the same meanings as they do in the Element Catalog (see “ The structured document’s Element
Catalog” on page 13).
Importing element definitions
A document’s element definitions describe allowable contents for each type of element, and may also describe how
the elements are formatted and whether they have attributes for storing supplemental information. Before you can
add elements to a document, the document must have element definitions in its Element Catalog.
If you’re not sure whether a document has element definitions, open the Element Catalog and click in a text flow.
If you see elements in the catalog, the document has definitions. You may need to select the All Elements option to
get elements to appear (use Element > Set Available Elements).
Usually you import definitions from a template, but your developer may ask you to import them directly from
the EDD.
To import element definitions:
1 Open the template or EDD with the element definitions. The template or EDD must be named and saved.
2 Open the document or book that you want to update. If a book window is active, select the documents you want
to update.
3 In the document or book you’re updating, choose File > Import > Element Definitions.
4 Choose the template or EDD from the Import from Document pop-up menu. The menu lists all open,
named documents.
5 If you want to remove special formatting and book-related changes in the document, do the following:
• To remove format rule overrides, select While Updating, Remove Format Rule Overrides. Use this setting if you
have made text or paragraph formatting changes to elements and now want to return to the formatting described
in the element definitions. See “About formatting overrides” on page 52 for cautions on this.
• To remove element information derived from a book file, select While Updating, Remove Information Inherited
from Book. Use this setting if the document used to be included in a book but is now a stand-alone document.
Page 54

ADOBE FRAMEMAKER 8
User Guide
6 Click Import. FrameMaker adds the definitions to the document’s Element Catalog, replacing any definitions that
are already there. Then it validates the document so that errors are identified in the Structure View, and reapplies
format rules from the definitions.
Removing elements
You can remove any element, with or without its contents. For example, you may want to delete a Section element
and its contents, or delete the Section but leave the contents in place, so you can put them in a different element.
For elements that are defined to contain text or other elements (round-cornered bubbles in the Structure View), you
can also delete the contents and leave the empty element in the document. But you cannot do this for elements that
are a single object (square-cornered bubbles). Because these elements do not have contents, you must delete the
entire element.
To remove an element and its contents:
❖ Select the element and press Delete.
To remove an element but not its contents:
❖ Select the element and choose Element > Unwrap. The contents may be reformatted as defined by their
new context.
45
To remove the contents of an element but not the element itself:
❖ Select the contents and press Delete. For details on selecting contents, see “Placing the insertion point” on page 71
and “Selecting text” on page 75.
To remove an element and its contents and replace it with another element:
❖ Select the element. Then select the replacement element in the Element Catalog, and click Insert. A new empty
element replaces the selected element and its contents.
Removing all elements from a document
There may be times when you want to remove all elements from a document so you can base the document on
paragraph and character formats rather than on elements.
To remove all elements from a document:
❖ Choose Special > Remove Structure from Flow. If the document has additional structured flows, repeat this
command for each flow.
FrameMaker removes all elements from the current text flow. If the formatting was created or modified by format
change lists in the element catalog, the removed elements become format overrides in the document.
Note: If you want to create named formats for each removed element variation and save them in the catalog, use the
Create & Apply Formats command.
Page 55

ADOBE FRAMEMAKER 8
User Guide
Assigning attribute values
Attributes store supplementary information about an element that does not appear with the contents of the
document. You can see attributes and their values in the Structure View. (See “Showing and hiding attributes for new
elements” on page 18 for details on displaying attributes.)
Chapter
ID = <no value>
DraftVersion = Alpha Draft
XRefLabel = <no value>
Title
ChapNumber
ChapName
Attributes in the Structure View
An attribute’s definition specifies the type of values that are acceptable (such as text or numeric) and might include
a list of possible values or a numeric range.
The definition also determines whether the value is optional, required, or read-only, and it might provide a default
value. You can assign values to an attribute if the attribute is not read-only.
46
If an attribute’s current value does not conform to the specifications in its definition, the attribute is invalid. For
information on finding and correcting problems with attributes, see “Finding and correcting errors” on page 51.
Note: You may want to let FrameMaker provide the values for ID and ID Reference attributes used in cross-referencing.
(In fact, these attributes are often defined to be read-only.)
Entering attribute values as you insert elements
You may want to enter some attribute values as you insert elements, particularly for required attributes and attributes
that affect formatting. Optional attributes might wait for a later pass.
Some font property values used in an element definition document (EDD) require that you use specific units.
For example, if the Offset Horizontal value is set as a percentage of an em space, typing 5pt will create an offset of 5
em spaces instead of 5 points.
Do not use multibyte (Asian-language) characters when entering attribute values. These characters may not be
exported to SGML correctly because multibyte characters are not supported in the SGML workflow.
Note: Attribute names support the Unicode text encoding standard.
To enter attribute values as you insert an element:
Make sure you are prompted for attribute values when you insert elements (see “Setting options for inserting new
1
elements” on page 39).
2 Insert the element (see “Inserting elements” on page 36). If attributes are defined for the element, the Attributes
for New Element dialog box appears, listing all the attributes (except read-only ones) defined for the element.
3 For each attribute value you want to provide, select the attribute in the Attribute Name scroll list, enter the value
in the Attribute Value text box, and click Set Value. If an attribute is required, you must enter a value for the element
to be valid.
Page 56

ADOBE FRAMEMAKER 8
User Guide
If an attribute has a set of predefined values, choose from the Attribute Value pop-up menu rather than entering
avalue.
Attribute Value pop-up menu
The value you can enter, such as text or a number, is determined by the attribute’s type. For details on attribute types,
see “Types of attributes” on page 48.
A description of the selected attribute (its type, whether a value is required, and so on) appears in the dialog box
below the Attribute Value area.
4 Click Insert Element.
Entering or editing attribute values for elements already in a document
You can enter and edit attribute values for elements already in a document if the attributes are not read-only.
If you need to change an attribute name rather than a value, use Edit > Find/Change (see “Changing elements or
attributes you find” on page 50). You may need to do this if you imported element definitions that use different
attribute names with identical meanings, such as Security instead of SecurityLevel. The new attribute name must be
defined for the element.
47
To enter or edit an attribute value for an element already in a document:
Select the element with the attribute value you want to change.
1
You can select more than one element of the same type, and apply the change to all. The elements must be
contiguous. For example, if several Para elements in a row have a Security attribute, you can change the value of that
attribute for all the Para elements at one time.
2 Display the Attributes dialog box by doing one of the following:
• Click the Attributes button at the upper right corner in the document window. When you open the dialog box
this way, you can keep it open to edit attribute values for more than one element.
• Double-click an attribute name or value in the Structure View. Or, click in the element, press Control+7, type the
name of the attribute to edit, and press Return. When you open the dialog box this way, you’ll close it after editing
attribute values for the element.
3 For each attribute value you want to enter or edit, select the attribute in the Attribute Name scroll list, enter the
value in the Attribute Value text box, and click Set Value.
If an attribute has a set of predefined values, choose from the Attribute Value pop-up menu rather than entering
avalue.
4 If you displayed the Attributes dialog box by double-clicking in the Structure View or pressing Control+7,
click Done.
To remove an attribute value:
❖ Select the value in the Attributes dialog box, and click Delete Value.
You can use Edit > Find/Change to edit attribute values for many occurrences of an element at one time (see
“Changing elements or attributes you find” on page 50).
Page 57

ADOBE FRAMEMAKER 8
User Guide
Types of attributes
An attribute’s type determines the kind of values that are allowed in the attribute. For example, the value version 1 is
not valid for an attribute defined as an integer, but the value 1 is valid. Numeric types (such as integer or real) can
also be limited to a predefined range by their attribute definition.
Choice An attribute with a list of predefined values.
ID Reference An attribute with a value that is a Unique ID value from another element. It is typically used for
element-based cross-references.
ID References An attribute with a value of one or more Unique ID values from another element. (Your
developer may specify this attribute if you’re exporting to a structured application that uses multiple values for
source information.)
Integer An attribute with a whole number value (no decimal parts). Examples of valid integers are 22, -22, and +322.
An integer can be defined to fall within a range.
Integers An attribute with a value of one or more integers. Enter each number on a separate line in the Attribute
Value text box.
Real An attribute with a real number value, with or without a decimal part (the value can also be expressed in scien-
tific notation). Examples of valid real numbers are 2, 22.4, -0.22, and 2.3e-1. A real number can be defined to fall
within a range.
48
Reals An attribute with a value of one or more real numbers. Enter each number on a separate line in the Attribute
Value text box.
String An attribute with a value of a series of characters (text).
Strings An attribute with a value of one or more strings. Enter each string on a separate line in the Attribute Value
text box.
Unique ID An attribute with a value of a unique text string. An element can have only one ID attribute (which can
be of type Unique ID or Unique IDs). All ID values must be unique in the document or book. An element with a
Unique ID attribute can be the source for an element-based cross-reference.
Unique IDs An attribute with a value of one or more unique text strings. Enter each string on a separate line in the
Attribute Value text box. (Your developer may specify this attribute if you’re exporting to a structured application
that uses multiple values for source information.)
Copying attribute values
You can use the Clipboard to copy and paste attribute values from one element to another. If you paste values to an
element that does not have corresponding attributes defined, the attributes will be invalid. To preserve elementbased cross-references, an ID attribute value is not pasted.
If you copy an attribute from another document, the attribute may not be defined in the current document.
To copy attribute values:
1
Select the element with the attribute values you want to copy, and choose Edit > Copy Special > Attribute Values.
All attribute values associated with the element are copied to the Clipboard.
2 Select a different element and choose Edit > Paste.
Page 58

ADOBE FRAMEMAKER 8
To delete an undefined attribute copied from another document:
❖ Select the element with the undefined attribute, open the Attributes dialog box, select the attribute, and click
User Guide
Delete Attribute. In the next dialog box that appears, remove the attribute for the current element or for all elements
that have the attribute.
Improved validation of EDD attributes
When validating the elements in an EDD, attributes in if-then clauses were not validated in earlier versions of
FrameMaker. For example, suppose that the possible values of an attribute are
[attrval = “D”]
. This was not previously flagged as an error when the element definitions were imported. It is
A or B or C, and a context rule says If
now correctly reported as an invalid structure.
Similarly, if an element’s text formatting rules or prefix/suffix rules use attribute names in the context specifications,
the attribute name and case must match the attribute definition in the element’s definition.
If an attribute’s value is changed to the same value it previously had, the action is not flagged as a change. This
enhances performance by eliminating unnecessary value checking.
Finding elements and attributes
You can search for elements and attributes in a structured document to help keep track of these items or to make
changes to them quickly. This is especially useful when you want to apply the same change to more than one occurrence of an element or attribute.
49
You can also search for many other items in FrameMaker, including strings of text, specific formatting, unresolved
cross-references, and objects (such as anchored frames) that are not elements. See “Searching for any item” on
page 77.
Note: The Find/Change feature supports the Unicode text encoding standard.
Searching for element tags, attribute names, or attribute values
You can search for an element tag, attribute name, and attribute value either separately or in combination. For
example, you can search for an element tagged List to find each List element, or you might limit the search to find
only List elements that have a Security attribute set to Classified.
To search for an element tag, attribute name, or attribute value:
Choose Edit > Find/Change.
1
2 Choose Element from the Find pop-up menu.
3 Select the options you want in the Find Element dialog box.
The settings can be used in many combinations. These are a few examples:
• To find any element, leave all three text boxes empty.
• To find a specific element, type an element tag but leave the Attribute Name and Attribute Value text boxes empty.
• To find any element with a specific attribute, type an attribute name but leave the Element Tag and Attribute Value
text boxes empty.
• To find any element with a specific attribute value, type an attribute value but leave the Element Tag and Attribute
Name text boxes empty.
• To find a specific combination of element and attribute, type an element tag and choose an attribute name.
Page 59

ADOBE FRAMEMAKER 8
User Guide
• To find a specific combination of element and attribute value, type an element tag and choose an attribute name
and an attribute value. (If the attribute type is Choice, type the value.)
• To find a specific element with an attribute that has no value, type an element tag, choose an attribute name, and
choose <No Value> from the Attribute Value pop-up menu.
Leave a text box empty if you do not want to restrict the search. An empty text box has the same effect as searching
for any element, or choosing either <Any Attribute> or <Any Value>.
4 Click Set.
5 In the Find/Change dialog box, select Consider Case, Whole Word, Use Wildcards, or Find Backward.
6 Click Find.
Note: FrameMaker normally begins searching at the insertion point and continues throughout the document. When a
search reaches the end of the document, it continues at the beginning. After searching the main f low, it looks at other text
frames and text lines. Because a search is flow by flow, it may appear to jump around the document.
To search for the next occurrence of the item:
❖ Click Find Again in the Find/Change dialog box, or choose Edit > Find Next.
To reverse the search direction:
❖ Select Find Backward in the Find/Change dialog box and click Find.
50
To cancel a search:
❖ Do one of the following:
• (Windows) Press Esc.
• (UNIX) Press Control+c.
Changing elements or attributes you find
After you find an element, attribute, or attribute value, you can change it to another element, attribute, or value. For
example, you can quickly and globally change the value of a SecurityLevel attribute from Declassified to Top Secret.
When changing items in a docume nt, you can change each oc currence of the item as it is found or have FrameMaker
automatically make the change throughout the document.
If you’ve pasted material from another document or have imported new element definitions, the Find/Change
command is a powerful clean-up tool for returning your document to its proper state. For example, if you paste a
table from an unstructured document, the table and its parts receive default, invalid element tags. You can use
Find/Change to change CELL elements, for example, to TableCell elements.
To change an element or attribute you find:
Choose Edit > Find/Change.
1
2 In the Find/Change dialog box, choose Element from the Find pop-up menu.
3 Se lec t the option s you w ant in the Find Ele ment di alo g box, an d click Set . Th en c hoo se a n optio n fr om the C hange
pop-up menu in the Find/Change dialog box, and type the replacement tag or value.
Page 60

ADOBE FRAMEMAKER 8
User Guide
The Find Element dialog box and the Change pop-up menu work together. These are a few examples of combinations you can use:
• To change one element to another, type an element tag in the Find Element dialog box but leave Attribute Name
and Attribute Value empty. Then choose Element Tag To in the Change pop-up menu and type an element tag.
• To change one attribute to another, type an attribute name but leave Element Tag and Attribute Value empty. Then
choose Attribute Name To and type an attribute name that is defined for this element.
• To change one attribute value to another, type an attribute value but leave Attribute Name and Attribute Value
empty. Then choose Attribute Value To and type a value.
• To change an attribute with a specific name to a certain value, type an attribute name but leave Element Tag and
Attribute Value empty. Then choose Attribute Value To and type a value.
• To change a specific element with a specific attribute value to another element, type an element tag and choose
an attribute name and attribute value. Then choose Element Tag To in the Change pop-up menu and type an
element tag.
• To remove an attribute value, type an attribute value but leave Element Tag and Attribute Name empty. Then
choose Attribute Value To and leave the Choose text box empty.
If you try to make a change that is not allowed—for example, if you try to remove an element tag—an alert message
appears explaining the problem.
51
4 Click Find.
5 When FrameMaker finds the element or attribute, do one of the following:
• To make the change but not continue searching for other occurrences of the item, click Change.
• To make the change and continue searching for other occurrences, click Change & Find.
• To change all occurrences of the item, specify all occurrences in the document or only occurrences in the current
selection and click Change All.
Important: When you change all occurrences, you cannot undo the changes with Edit > Undo. Consider saving the
document and then manually changing several occurrences of the text. When you’re confident that the changes are
exactly what you want, click Change All.
To delete an element you find:
❖ Choose To Text from the Change pop-up menu, leave the Change text box empty, and click Change. You can also
simply press Delete.
Finding and correcting errors
An error in a structured flow can be a structure problem, such as an element in an invalid location, or an invalid
attribute, such as an attribute with a missing required value. Your element definitions have content rules and attribute
information that describe what is correct for your document.
You can use the Structure View to find errors in elements and attributes. When a collapsed element has invalid
content in its structure, the plus sign on the left of the element name is red. You can also validate a document to find
errors. After you know where the errors are located, use the Element Catalog and the Structure View as guides to
help you correct them.
If you’ve made any formatting changes to text in elements, the elements may not conform to their format rules. For
information on removing format rule overrides, see “Removing format rule overrides in structured documents” on
page 140.
Page 61

ADOBE FRAMEMAKER 8
User Guide
Using the Structure View to find errors
When an element doesn’t conform to content rules and attribute descriptions in the document’s element definitions,
the Structure View identifies the error for you.
Missing elements If an element is missing one or more child elements required by the element definitions, a small
red hole appears on the vertical line where the child element should be.
Section
Para
At least one required child element is missing.
Elements at an invalid location If an element is at a location not allowed by the content rules, the vertical line next
to it is broken from the position of that element to the end of the parent element.
ListItem
Para
ListItem
The Para element is invalid at this location.
52
Undefined elements If an element is not defined for the document, its bubble is red. This may happen if you have
pasted the element from another document.
Invalid attributes If an attribute has an invalid value or is not defined for the document, it appears with a red x to
the left of the attribute name and its value is red.
Chapter
x DraftVersion = Alpha Draft
XRefLabel = <no value>
The DraftVersion attribute is invalid.
Attributes missing a required value If an attribute does not have a value, <no value> appears to the right of the
attribute name. If the attribute requires a value, <no value> is red and a red hole appears to the left of it.
Chapter
DraftVersion = Alpha Draft
XRefLabel = <no value>
The XRefLabel attribute is missing a required value.
Validating documents
When FrameMaker validates a document, it searches for elements that do not conform to content and attribute rules
in the document’s element definitions. If FrameMaker finds an error, it selects the element and describes the error.
Page 62

ADOBE FRAMEMAKER 8
User Guide
You can validate an entire document, the current flow, or the current element. If you validate the current element,
FrameMaker does not check the descendants of the element’s child elements. For example, if you validate the Section
element below, FrameMaker makes sure that the Head element, the two Para elements, and the List element are valid,
but does not check the List Item elements in List.
Section
Head
Para
Para
List
ListItem
ListItem
Only the section’s child elements are validated.
When a door
When a oor
If the document has conditional text, only the versions that are showing are validated.
53
You can also validate an entire book including all its files, only the book file, or only the current element in the book
file (see “Validating structured books” on page 480).
To validate a document:
1 Choose Element > Validate.
2 Select Entire Document, Entire Book, Current Flow, or Current Element to specify the scope of the validation.
3 To exclude missing elements or attribute values from the search, select Ignore Missing Elements or Ignore Missing
Attribute Values.
If these settings are selected, FrameMaker does not look for places where a required child element or a required
attribute value is missing. You may want to select these if you are not trying to build a complete document yet.
4 Click Start Validating.
FrameMaker starts checking at the beginning of the current element. If you’re validating only the current element,
it checks the element with the insertion point or the selected element. If more than one element is selected, it checks
the first element in the selection.
5 If FrameMaker finds an error, click Start Validating again when you’re ready to continue validating.
The top of the Element Validation dialog box shows the tag of the element and a brief message about the problem.
(See “Validation error messages” on page 54 for descriptions of the messages that can appear.)
Element and error identified
You can correct the error, ignore it, or click Allow as Special Case. If you mark it as a special case, FrameMaker won’t
identify the error the next time you validate the document.
Page 63

ADOBE FRAMEMAKER 8
User Guide
6 Repeat step 5 until FrameMaker does not find any more errors.
When FrameMaker reaches the end of the document, it returns to the beginning and continues validating. When
FrameMaker reaches the end of a flow, it continues to the next one.
Note: When validating a book, FrameMaker tells you if a file in the book has invalid content, but for a more detailed
evaluation, you must open and validate the file.
While validating the elements in an EDD, attributes in if-then clauses are validated. For example, suppose that the
possible values of an attribute are A or B or C, and a context rule says
If [attrval = “D”]. This is flagged as an
error and reported as an invalid structure when the element definitions are imported.
Similarly, if an element’s text formatting rules or prefix/suffix rules use attribute names in the context specifications,
the attribute name and case must match the attribute definition in the element’s definition.
If an attribute’s value is changed to the same value it previously had, the action is not flagged as a change. This
enhances performance by eliminating unnecessary value checking.
To clear all special cases:
1 Choose Element > Validate.
2 Click Clear Special Cases. FrameMaker clears the special cases in the document, the flow, or the element—
whichever scope is selected in the dialog box.
54
Validation error messages
The following error messages can appear at the top of the Element Validation dialog box. (In the descriptions, tag
represents an element tag, name represents an attribute name, and value represents an attribute value.)
Current flow is unstructured. The current flow does not have elements in it.
Element is undefined The element is not defined in the document. You may have copied this element from another
document.
Missing element before tag At least one required element is missing before the specified element.
More contents required at end At least one more child element is required at the end of the current element.
No current element There is no insertion point or selection. (This message appears when the scope is set to Current
Element.)
No current flow There is no insertion point or selection. (This message appears when the scope is set to
Current Flow.)
Not highest-level element The element is not permitted at the highest level in the document.
<TEXT> not permitted in this element The element contains text, but text is not allowed.
<TEXT> not valid at this position The element is allowed to have text but not at this location.
The name attribute refers to an undefined ID value The attribute is an ID Reference and refers to a Unique ID value
that doesn’t exist in the document (or in the book, if you’re validating a book).
The name attribute is undefined for this element The definition of this element does not include a name attribute.
This element should be a type The element is the wrong type, where type can be graphic, marker, cross-reference,
equation, or system variable. For example, a cross-reference element might consist of text instead of a cross-reference.
Value must be a type for name attribute The attribute value is the wrong type for the attribute.
Value for name attribute must be in the range from n to n The attribute’s numeric value is out of the specified range.
Page 64

ADOBE FRAMEMAKER 8
User Guide
Value for name attribute is not one of the allowed choices The attribute’s value must match a value from the pop-up
menu of valid choices.
Value for name attribute must be unique A Unique ID value must be unique for all elements in the document
or book.
Value require d for name attribute. The attribute does not have a required value.
tag excluded in this element The tag element is not allowed because of an exclusion rule for the parent or one of
its ancestors.
tag not permitted in this element The tag element is not allowed anywhere in the parent element.
tag not valid at this position The tag element is allowed in the parent element but not at the current location.
Correcting errors in elements
After you have identified errors in elements and attributes, use the Element Catalog and Structure View as guides for
correcting them.
To correct an element in an invalid location:
❖ Move the element to a valid location (see “Moving elements” on page 42), or change it to an element that is valid
for its current location (see “Changing elements to another type” on page 40).
You can select an invalid element, or if you’re validating, FrameMaker selects the element for you. When the element
is selected, the Element Catalog shows which elements are valid at that location.
55
List
ListItem
ListItem
Head
ListItem
ListItem
ListItem is valid at this location.
To correct a structure with a missing child element:
❖ Insert the required element (see “Inserting elements” on page 36).
You can click where an element is missing, or if you’re validating, FrameMaker places the insertion point there
for you. When the insertion point is at the location of the missing element, the Element Catalog shows which
elements are valid at that location.
Section
Para
List
ListItem
ListItem
Head is required at this location.
To correct an element with invalid contents (with the text snippet <INVALID CONTENT>):
❖ Change it to an element that allows those contents (see “Changing elements to another type” on page 40).
Page 65

ADOBE FRAMEMAKER 8
User Guide
To correct an invalid attribute value:
❖ Change the value to one that is valid for the attribute (see “Entering or editing attribute values for elements already
in a document” on page 47).
To remove an undefined attribute:
❖ Select the element with the undefined attribute, open the Attributes dialog box, select the attribute, and click
Delete Attribute. In the next dialog box that appears, remove the attribute for the current element or for all elements
that have the attribute.
To resolve a cross-reference with an invalid ID:
❖ Select the cross-reference, choose Special > Cross-Reference, and change to a source that has a valid ID (see
“Maintaining cross-references” on page 208).
About structured documents
Almost all documents have an implicit structure. In each type of document, the contents naturally consist of logical
units that appear in a consistent order and with a particular hierarchy. In FrameMaker, you can work with a
document’s structure explicitly by organizing the contents of the document—its sections, heads, paragraphs, figures,
tables, and so on—in logical units called elements. (See “About elements” on page 32). Together, the elements form
the hierarchy that represents the structure.
56
For example, a Section element for a section of a book might include a Head element with heading text, a Para
element with body text, and a List element that contains several ListItem elements with text.
A
B
C
D
E
A. Section element that contains everything in the section B. Head element C. Para element D. List element
E. ListItem elements in the List element
Structured formats in FrameMaker
Using FrameMaker, you can import and export structured documents in either SGML or XML (including XHTML
1.0) format. Once you import a structured file, it is no longer an SGML or XML file; it is a structured FrameMaker
document. To return it to its original format, save it as SGML or XML (see “Saving a structured document in SGML
or XML format” on page 63).
Page 66

ADOBE FRAMEMAKER 8
User Guide
About SGML
Standard Generalized Markup Language (SGML) is the international standard for all markup languages for data
exchange and storage.
SGML is a descriptive, rather than procedural, markup language, meaning the same document can be processed by
different systems, each applying different processing instructions to relevant sections. You can transfer SGML
documents from one system (hardware and software environment) to another without any loss of data.
SGML was the first language to instigate the Document Type Definition (DTD), which formally defines
the document by its components and structure. Documents of the same type can then be verified and
processed uniformly.
A document that conforms to the structure of a DTD is said to be valid.
About XML
Extensible Markup Language (XML) is a generalized format for representing structured information, especially for
the Web. Like HTML and SGML, XML requires the use of elements and structure. However, XML differs from
HTML in that it is extensible—users may define custom sets of element tags. XML is a subset of SGML, and can be
used for essentially the same purposes as SGML, without many of the complex SGML features.
You can use XML for storing data in an XML repository, which lets you easily reuse materials, search for text, collaborate with other authors, and manage documents. You can also use XML and the template-driven workflow in
FrameMaker for multichannel publishing.
57
An XML document that conforms to the structure of a DTD is said to be valid. An XML document that uses tags
that conform to the standard XML specifications is said to be well-formed.
About XHTML 1.0
Extensible HyperText Markup Language (XHTML) is an extension of HTML that is based on XML and is designed
to work with XML-based applications. It can be viewed, edited, and validated with standard XML tools. Using
XHTML is an easy way to migrate from HTML to XML while retaining your content’s forward and backward
compatibility. For more information on HTML, see “About HTML” on page 556.
About structured templates
A template is a document that stores properties you use in more than one place. You can create a new document from
a template to give it all the template’s properties, or you can import specific properties from the template later.
FrameMaker templates give your documents their layout and formatting, and specify their structure requirements.
Structured FrameMaker comes with Structured Templates for letters, memos, fax, envelope, reports, outlines,
newsletters, books, FAQs, and Single source book.
Templates can store the following properties:
• Element definitions that specify allowable contents, attributes, and formatting for elements
• Paragraph, character, and table formats that work with formatting information in the element definitions
• Page layouts that determine the number and position of columns on pages, and background items such as
running headers
• Reference pages that store repeatedly used graphics and formatting information
• Variables you use as placeholders for text that FrameMaker updates
• Formatting information for cross-references, equations, and conditional text
Page 67

ADOBE FRAMEMAKER 8
User Guide
• Definitions for colors you can apply to text and objects
• Document-wide settings, including footnote properties, custom marker types, and feathering options for
line spacing
• Specifications for combined Japanese and Western fonts (on Japanese-language systems)
Note: If you’re working with structured files, an application developer may have set up special documents that handle the
translation to and from the structured application. These documents may include a template that formats the structured
files in FrameMaker. This template is applied automatically when you import from the structured application.
Using structured documents in FrameMaker
In the typical workflow, you begin working with structured documents by creating a new document (most often
from a template) or by opening an existing document in Structured FrameMaker.
A structured document contains more than just the elements and contents you add to it. It can also store page
layouts, catalogs of element definitions and formats, and other properties that facilitate and even automate your
work. These properties normally come from the document’s template.
58
A template provides a foundation for other documents.
Creating documents from a structured template
When you create a document from a structured template, the document is an exact copy of the template, including
its element definitions and other properties and any contents it might have.
Typically, you use a custom template that is part of your application, but FrameMaker also comes with some
predefined structured templates for reports, viewgraphs, and outlines.
As you work in the template, FrameMaker helps you organize elements in a valid structure and formats
everything for you automatically—you don’t need to know XML or SGML syntax to create XML- or SGMLcompatible documents.
Page 68

ADOBE FRAMEMAKER 8
User Guide
Your developer may provide documentation that describes how to work with the elements defined for the application. If you want to create a document that will not be structured, either use an unstructured template or start with
the equivalent of a blank piece of paper. For more information, see “Creating documents” on page 19.
To create a document from a structured template:
Make sure you are running Structured FrameMaker. If you are not running Structured FrameMaker, choose File
1
> Preferences > General, select Structured FrameMaker for Product Interface, click Set, and restart FrameMaker.
2 Choose File > New > Document. In UNIX, you can also click New in the main FrameMaker window.
3 Navigate to the template you want. If you want to use a structured template that came with Structured
FrameMaker, navigate to the Structured folder in the Templates folder in one of the following locations:
• (Windows) The FrameMaker8 folder
• (UNIX) The fminit/language/Templates/Structured folder within the FrameMaker installation folder (where
language is the name of the language you’re using—for example, usenglish)
4 Select the template and click New (Windows) or Create (UNIX).
5 When the template opens, resize the document window so that you can clearly see the page. Then click the
Structure View button in the upper right corner of the document window to display the Structure View, which
shows the structure hierarchy. Position the two windows so that you can see both at once. You can also click the
Element Catalog button to display the Element Catalog.
59
A
A. Template in a document window B. Element catalog C. Structure view
B
C
6 Do any of the following:
• Add text for each required element and any optional elements you want. You can add text by clicking to place the
insertion point in the document window (see “Working with text in structured documents” on page 95 and
“Entering text in a structured document” on page 99).
• Add new elements from the Element Catalog (see “Adding elements” on page 34).
Page 69

ADOBE FRAMEMAKER 8
User Guide
• In the Structure View, expand the elements by clicking the + (plus sign) on the left side of the element bubbles;
collapse them by clicking the - (minus sign) on the left side (see “Collapsing and expanding elements” on page 14).
• View the element’s attributes by clicking the + (plus sign) on the right side of the element bubbles (see “Showing
and hiding attributes for an element” on page 15).
• Change an element’s attributes (see “Assigning attribute values” on page 46).
• Rearrange or restructure elements or sections in the document (see “Moving elements” on page 42).
• Add cross references (see “Working with cross-references in structured documents” on page 217).
• Manipulate the current structure—change an element to another type, merge two elements, split an element in
two, or wrap an element in a new parent element (see “Editing elements” on page 39).
• Validate the document to ensure that it has a valid structure for export to XML or SGML (see “Finding and
correcting errors” on page 51).
• Save or export the document to XML or SGML (see “Saving a structured document in SGML or XML format” on
page 63).
Creating a new structured document
To create a structured document from scratch, make sure you have an EDD and a structure application available (see
“About structured applications” on page 61). You can use the EDD file and sample structure application included
with FrameMaker (see the folders located in the Structure folder), or you can create your own. For information on
creating a structured application and EDD, see the Structured Application Developer’s Guide, located in the Online-
Manuals folder in the FrameMaker8 folder.
60
To create a new structured document:
1 Make sure you are running Structured FrameMaker.
2 Choose File > New > Document.
3 Select Portrait, Landscape, or Custom to set the page dimensions.
4 Open a structured document or EDD that includes the elements you want to use, and then import elements into
the new document (see ““Importing element definitions” on page 44).
5 Add text and elements to the document (see “Adding elements” on page 34).
6 Save the document as a structured FrameMaker document or in the desired format (see “Saving a structured
document in SGML or XML format” on page 63).
Opening and saving structured files
You can open and work with any structured file in FrameMaker, as long as the file has an associated application.
The contents, elements, and attributes from the file are preserved, and the file appears just like a regular FrameMaker
document.
Using Structured FrameMaker you can open XML and SGML documents. After editing the structured file, you can
save it back to its original format, such as XML or SGML; any changes you made to contents, elements, and attributes
will usually be preserved. (See your developer about limitations your application may have on mapping between
structured files and FrameMaker.)
Page 70

ADOBE FRAMEMAKER 8
User Guide
About structured applications
A structured application is a collection of files that describes how to process a structured file in FrameMaker. The
application usually includes a DTD, which defines the elements and attributes, and other items, such as read/write
rules and an import template.
To be able to work with a structured file, you need to have an application associated with the file. A developer
typically sets up this application for you and may associate it with the appropriate files. You can also select the application yourself as you open or save, or change the application while the file is open.
Important: Use the application that was designed for the file. If you’re not sure which one to use, ask your
application developer.
You can open an SGML or XML file without using an application—for example, if you’re just browsing the file, or if
you don’t know which application to use and will select one later. The file will have structure but only basic default
formatting (with all text in body paragraphs), and objects such as tables and graphics will generally not be imported.
You’ll be able to edit the structure and contents of the file, but you may not be able to save it back to the structured
format (XML or SGML), because some mapping information may be unavailable.
An SGML or XML file does not include any specifications on how its contents are to be formatted, but your structured application may have a template that formats the file in FrameMaker. If you use an application that does not
have a template, the file opens using basic default formatting.
61
Opening structured files
You can open a structured file just as you open any other kind of file. A new FrameMaker document appears, with
all the contents of the structured file.
If you want to view or edit the structure markup directly, you can also open the file as text (see “Opening SGML,
XML, MIF, and MML files as text” on page 68).
Default encoding settings for opening structured files are ISO-8859-1 for SGML and UTF-8 for XML. If the original
files have different encoding settings, FrameMaker uses those settings instead of the default settings.
To open a structured file:
1 In Structured FrameMaker, choose File > Open. On UNIX systems, you can also click Open in the main
FrameMaker window.
2 Locate the file you want to open and click Open. If the file has an associated application, the document opens and
you’re ready to begin.
3 If the Use Structure Application dialog box appears, choose an application name from the Use Structured Appli-
cation pop-up menu and click Set. Then do one of the following:
• To associate an application with the file, choose the name of an application.
• To use default mapping and no read/write rules, choose <No Application>. You may want to use this option to
browse a file you don’t plan to save.
Note: When characters in an original XML file don’t map into the FrameMaker document, the characters are marked
as unknown. They don’t appear in FrameMaker, but they are preserved on XML export.
Converting structured files to FrameMaker format without opening
You can convert one or more structured files to FrameMaker without having to open them. The files you convert
should either be the only contents of a single folder or all have a unique filename extension in a folder, and they
should all use the same structured application.
Page 71

ADOBE FRAMEMAKER 8
To convert structured files to FrameMaker format:
Choose StructureTools > Utilities > Convert Structured Documents.
1
2 Choose an application for the converted files from the Application pop-up menu.
3 In the Input Structured Documents area, specify the location and filename extension of the original files. If you
User Guide
need to look for the location, click Browse and navigate to it.
The filename extension is required. You can type an asterisk (*) in the Suffix text box to convert all files in the folder.
4 In the Output FrameMaker Files area, specify a location and filename extension for the FrameMaker files. If you
need to look for the location, click Browse and navigate to it.
The filename extension is optional. If you leave the Suffix text box empty, the converted files will have no extension.
If you type *, the files will have the same extension as the original structured files. If you use *, store the structured
files in a different folder from the converted files.
5 To overwrite an existing batch of converted files in the output folder, select Allow Existing Files to Be Overwritten.
Important: Use this option for overwriting an earlier version of converted files with the same name. Be careful not to
overwrite the original structured files. Either store the structured files in a separate folder or give them a different
filename extension.
6 Click Convert.
62
Changing the associated structured application
After you open a structured file, you can change the application associated with it. The new application is used for
the file when you next open the file or save it as a structured document.
FrameMaker 8 allows you to associate a structured book with the DITA-Book- FM application, or a structured
document with a DITA-Map-FM or DITA-Topic-FM application. Use the DITA-Book- FM application to build a
FrameMaker book that contains all of the files in an open DITA map (<dita>, <ditamap>, or <map>). The element
definition document (EDD) and structured template used in this application can be customized for hardcopy or PDF
output. Use the DITA-Map-FM application to create and edit DITA maps (both .map and .ditamap files). Use the
DITA-Topic-FM application to author topic, concept, reference, or task information types. If needed, the EDD and
structured template can be optimized for screen viewing or topic proofing.
Important: Consult your developer before changing the application. For best results, use the application that was
designed for the file.
If you need to change the application for a group of files, you can ask a developer to specify this in an application
definition file so that you don’t need to change it in each file manually.
To change the associated structured application:
Click in the document you want to change.
1
2 Select StructureTools > Set Structured Application, choose the name of the application from the Set Structured
Application pop-up menu, and click Set.
Converting structured FrameMaker documents to SGML or XML
You can conve rt one or more s tru ctu red doc ume nts to SGML or X ML, wit hout h aving to s ave the m in div idually. The
files you convert should either be the only contents of a single folder or all have a filename extension that is unique
in a folder, and they should all use the same structured application.
For information on opening SGML or XML files as text, see “Opening SGML, XML, MIF, and MML files as text” on
page 68.
Page 72

ADOBE FRAMEMAKER 8
To convert FrameMaker documents to a structured format:
Choose StructureTools > Utilities > Convert Documents to Structured Format.
1
2 Choose an application for the converted files from the Application pop-up menu.
3 In the Input FrameMaker Files area, specify the location and filename extension of the FrameMaker files. If you
User Guide
need to look for the location, click Browse and navigate to it.
The filename extension is required. You can type an asterisk (*) in the Suffix text box to convert all files in the folder.
4 In the Output Structured Documents area, specify a location and filename extension for the converted files. If you
need to look for the location, click Browse and navigate to it.
The filename extension is optional. If you leave the Suffix text box empty, the converted files will have no extension.
If you type *, the files will have the same extension as the FrameMaker files. If you use *, store the FrameMaker files
in a different folder from the converted files.
5 To overwrite an existing batch of converted files in the output folder, select Allow Existing Files to Be Overwritten.
Important: Use this option for overwriting an earlier version of converted files with the same name. Be careful not to
overwrite the FrameMaker files. Either store those files in a separate folder or give them a different filename extension.
6 Click Convert.
63
Saving a structured document in SGML or XML format
You can save any structured FrameMaker document as SGML or XML. The contents, elements, and attributes from
the document are preserved; however, formatting is not preserved. You can save to a different structured document
type than the original (such as SGML to XML), but you may encounter errors due to differences in DTDs.
When you save Unicode content as an XML file, Adobe FrameMaker 8 specifies the encoding automatically.
By default, Adobe FrameMaker 8 uses the UTF-8 encoding format.
Before saving a document as SGML or XML, you should validate it and correct any errors in the elements and
attributes (see “Validating documents” on page 52). Otherwise, the markup may be invalid.
When saving structured XML documents, make sure valid XML element names start with a letter and contain only
alphanumeric characters, periods, or hyphens. Spaces, underscores, and other characters in XML element names are
invalid characters, and are either converted to hyphens (-) or generate errors.
Headings, tables, and reference pages are not used in XML export, and the default tag names are simply the
format names.
Default encoding settings for exporting structured documents are ISO-8859-1 for SGML and UTF-8 for XML. If the
structured document is an imported SGML or XML file, FrameMaker uses the encoding settings in the original file
instead of the default settings.
To save a document in SGML or XML format:
Select File > Save As.
1
2 Specify a filename and location. You may want to add the appropriate extension (such as .sgm or .xml) to
the filename.
3 Select SGML or XML from the pop-up menu and click Save. If the document has an application associated with
it, the document is saved.
Page 73

ADOBE FRAMEMAKER 8
User Guide
4 If the Set Structured Application dialog box appears, choose an application name from the Set Structured Appli-
cation pop-up menu and click Continue. Then do one of the following:
• To associate an application with the document, choose the name of an application.
• To use default mapping and no read/write rules, choose <No Application>.
If FrameMaker finds any structure errors when you save a document, it lists error messages in a view-only error log.
If a message refers to an error in the FrameMaker document, the message is linked to the document. For most errors,
you can click the message to go to the location of the problem.
When you open the structured documents, import element definitions into them (see “Importing element definitions” on page 44). You’ll probably also need to make a few corrections to their structure.
Importing properties from a template
You can import element definitions and other properties into your document from any FrameMaker document.
Typically, this other document is a template that you did not use for creating the document. (If you created your
document from the appropriate template, you don’t need to import properties; the document already has the
properties it needs.)
If your document’s template has been revised, you should import from the template again to update your document.
You can also import properties into all the files in a book at once (see “Importing formats into a structured book” on
page 481).
64
Importing formats
You can import a wide variety of formatting information—including page layouts, paragraph and table formats,
variable and color definitions, and conditional text settings.
To import formats:
Open the template with the formats. The template must be named and saved.
1
2 Open the document or book that you want to update. If a book window is active, select the documents you want to
update.
3 In the document or book you’re updating, choose File > Import > Formats.
4 Choose the template from the Import from Document pop-up menu. The menu lists all open, named documents.
You can also choose the current document to reapply the formats the document already has. This is useful mainly
for removing formatting changes, as described in step 6.
5 Select the Import and Update settings you want to apply to the current document. See “Importing format settings”
on page 65 for details on the settings.
• If you’re updating cross-reference formats, math definitions, or variable definitions, and if any of these items uses
character formats, also select Character Formats so that any new formats are added to the document.
• If the HTML mappings have been modified, select Reference Pages.
6 If you want to remove formatting changes that are not saved in catalog formats, do the following:
• To remove page breaks that are not part of a paragraph format, select Manual Page Breaks.
• To remove paragraph, character, page layout, and table formatting overrides, select Other Format/Layout
Overrides.
Page 74

ADOBE FRAMEMAKER 8
User Guide
Important: In most cases, you should not select Other Format/Layout Overrides in a structured document because the
element definitions may use format overrides. See “About formatting overrides” on page 66 for more information.
7 Click Import.
Importing format settings
When you import formats, FrameMaker merges the new formatting information into the document. For example,
if you import table formats, the formats are added to the Table Catalog. If a format already in the catalog has the same
name as an imported format, the imported format replaces the original one. But any formats not overwritten remain
in the catalog.
Paragraph formats The template’s Paragraph Catalog is merged into the document, and all formats in the catalog are
reapplied in the document.
Character formats The template’s Character Catalog is merged into the document, and all formats in the catalog are
reapplied in the document.
Page layouts The template’s master pages are merged into the document, and body pages are updated with the
master page changes. If the template and the document both have a master page with the same name, the master page
of the template replaces that of the document. FrameMaker copies the change bar properties, all the settings in the
Page Size and Pagination dialog boxes, and most settings in the View Options dialog box.
Tab le f orm ats The template’s Table Catalog and ruling styles are merged into the document, and all formats in the
catalog are reapplied in the document.
65
Color definitions The template’s color definitions and views are merged into the document.
Reference pages The template’s reference pages (except for FrameMath™ reference pages) are merged into the
document. If the template and the document both have a reference page with the same name, the reference page of
the template replaces that of the document. To import the FrameMath reference pages, select Math Definitions.
Document properties The template’s custom marker types and footnote properties; the volume, chapter, page,
paragraph, footnote, and table footnote numbering styles in the Numbering Properties dialog box; the characters in
the Allow Line Breaks After setting in the Text Options dialog box; and the Feather settings in the Line Layout dialog
box are merged into the document. The PDF Setup settings (other than the bookmark settings) are also merged into
the document. On Japanese-language systems, the rubi properties and kumihan rules (Japanese-language
typesetting rules) are also merged into the document.
Variable definitions The template’s variable definitions are merged into the document.
Cross-reference formats The template’s cross-reference formats are merged into the document, and internal cross-
references are updated.
Conditional text settings The template’s condition tags and Show/Hide settings are merged into the document.
Math definitions The template’s equation size and font settings, custom math element definitions, and FrameMath
reference pages are copied into the document. If any custom math elements in the document are deleted when the
reference pages are merged, FrameMaker replaces the math elements in equations with the name of the math
element enclosed in question marks.
Note: In FrameMaker equations, the term “math element” refers to part of an expression. A math element is not a structural element.
Combined fonts On Asian-language systems, the specifications of combined fonts are merged into the document.
Page 75

ADOBE FRAMEMAKER 8
User Guide
About formatting overrides
The formatting information for a document can come from format rules in element definitions and from predefined
formats stored in catalogs. It is possible for a document to have overrides to both sources of information:
• A format rule override is a deviation from a text element’s format rules. For example, if the rules specify a
paragraph format for an element and you apply a different format, or if the rules specify boldface text and you
change the text to italics, you are overriding the element’s format rules.
• A format override is a deviation from a catalog format for text or a table. For example, a paragraph format may
specify the Times font family. If you change some text that uses that format to the Palatino font (without saving
the change in the format), you are overriding the format. Format rules often use a few catalog formats and specify
format overrides to them as needed to describe many different formatting variations.
Generally, you should not introduce either type of override into your structured document. Let the document handle
the formatting automatically, and see your application developer if you’d like to change any of the formatting
properties.
If your document does have overrides, you can remove them throughout the document all at once when you import
and update.
Important: If you need to remove both kinds of overrides from a document, import formats and remove format
overrides first, and then import element definitions and remove format rule overrides. Removing the rule overrides last
ensures that the elements will conform to their format rules.
66
Adding structure to documents using conversion tables
If an application developer has set up a conversion table for a document, you can use the table to wrap contents in
elements throughout the document in one operation. This is a quick way to turn an unstructured document with
contents into a structured document.
When you apply a conversion table to a document, FrameMaker uses elements throughout the document but does
not put definitions in the Element Catalog. To do that, you’ll still need to import the element definitions.
You’ll probably need to make a few corrections to structure that was added from a conversion table. For information
on validating and editing structured documents, see “Validating documents” on page 52 and “Editing elements” on
page 529.
About conversion tables
A conversion table identifies types of contents by their paragraph and character tags, and specifies the particular
elements for those contents; it might also specify parent elements. A paragraph tagged Body might be wrapped in an
element tagged Para, for example, and a Head and the Para elements that follow it might be wrapped in a parent
Section element.
Note: The Conversion Tables feature supports the Unicode text encoding standard.
Because conversion tables work with paragraph and character tags, they are particularly helpful when these tags have
been used consistently in a document.
Even if paragraph and character tags are not consistent in the document, you may still want to use a conversion
table to wrap basic contents such as body paragraphs. Then wrap the rest of the contents manually (see “Wrapping
elements around existing contents” on page 37).
Page 76

ADOBE FRAMEMAKER 8
User Guide
Applying a conversion table to a document or a book
A conversion table can quickly add structure to the current document or to the book and its files. FrameMaker puts
the structured version of the document in a new unnamed file.
To apply a conversion table to a document:
1 Open the document or book you want to add structure to, and open the file with the conversion table.
2 Make sure that the document is not already structured by clicking in the main flow and looking in the Structure
View. If the view is empty, the document is unstructured.
3 In the document you’re adding structure to, choose StructureTools > Utilities > Structure Current Document or
Structure Current Book.
4 Choose the file with the conversion table from the Conversion Table Document pop-up menu and click Set.
FrameMaker applies the conversion table to the document.
If FrameMaker finds any errors in the table, it creates an error report in an unnamed document. Ask your developer
to correct the errors and then apply the table again.
5 Save the newly structured document or documents.
6 Import element definitions into the document (see “Importing element definitions” on page 44). In most cases,
you’ll also need to make corrections and refinements to the new structure.
67
Applying a conversion table to a group of documents
You can add structure to one or more documents without having to open them. The documents should either be the
only contents of a single folder or all have a filename extension that is unique in a single folder.
For more information on conversion tables, see the Structured Application Developer’s Guide, located in the Online-
Manuals folder.
To apply a conversion table to a group of documents:
1 Open the file with the conversion table.
2 Choose StructureTools > Utilities > Structure Documents.
3 Choose the file with the conversion table from the Conversion Table Document pop-up menu.
4 In the Input Unstructured Files area, specify the location and filename extension of the documents you’re adding
structure to. If you need to look for the location, click Browse and navigate to it.
Applying a conversion table to a group of documents
Page 77

ADOBE FRAMEMAKER 8
User Guide
The filename extension is optional. You can leave the Suffix text box empty to add structure to all documents in
the folder.
5 In the Output Structured Files area, specify a location for the structured versions of the documents. If you need
to look for the location, click Browse and navigate to it.
6 To overwrite an existing batch of structured files in the output folder, select Allow Existing Files to
Be Overwritten.
7 Click Add Structure.
Working with XML documents
About Element Definition Document (EDD) and Document Type Definition (DTD)
Element definitions are defined in an Element Definition Document (EDD), which is normally embedded in the
template. The EDD contains both structural rules for the document (Document Type Definition or DTD) and
styling rules, which dictate how elements of a specific type are styled. An application developer generally creates the
EDD from an existing DTD file or from scratch. For more information, see the Structured Application Developer’s
Guide located in the OnlineManuals folder.
68
All structured documents in FrameMaker use elements. Each element has a name, or tag, such as Section, Head, or
List. The element tags that are available are determined by the document’s element definitions.
You can add and edit elements in a structured document, as well as work with the contents in more conventional
ways. Structured FrameMaker templates contain definitions of all the elements that can be used in the document as
well as the document’s page layout and formatting. For more information about working with Elements, see
“Elements in structured documents” on page 32.
Opening SGML, XML, MIF, and MML files as text
SGML, XML, MIF, and MML are all text formats, so you can open them as text. SGML and XML are structured
document formats that contain the content of a document (the styling is typically defined by a template, which
contains the page layout and element definitions). For more information, see “Structured formats in FrameMaker”
on page 56. MIF lets you exchange information between FrameMaker and other applications. MML is a markup
language you can use with any text editor to create simple, unstructured FrameMaker documents.
When you open an SGML, XML, MIF, or MML file, it is normally opened in the FrameMaker format. You may want
to open one of these files as text to view or edit the markup.
Markup in an SGML file
Page 78

To open an SGML, XML, MIF, or MML file as text:
Select File > Open and choose the file you want to open.
1
2 Do one of the following:
ADOBE FRAMEMAKER 8
User Guide
• (Windows) Control-click Open.
• (UNIX) Shift-click Open.
3 In the Reading Text File dialog box, select an option for reading the file and click Read.
Importing CSS element styles into an EDD file (Windows)
You can import element formatting from CSS into EDD to ensure consistent formatting across different XML applications. The CSS file can be referenced in the XML document or manually imported. Multiple CSS files can be
imported sequentially for multi-level formatting.
When importing element styles, FrameMaker retains the context information (element property or selector) from
the CSS and imports it into the appropriate EDD contexts.
Note: FrameMaker imports style information only at the element level.
You can also set CSS2 preferences in XML using Structured FrameMaker. For more information, see the
Structured FrameMaker Developer's Guide, located in the Documents folder.
69
1 Open the EDD file in structured FrameMaker.
2 Select StructureTools > Import CSS Styles. The Import CSS dialog box appears.
3 Select a CSS file, and click Open.
4 If the Structured Application element in the EDD file doesn’t define an application name, the Use Structured
Application dialog box appears. Select the application that was used to create the EDD file. Click Continue.
The CSS file is imported into the EDD file.
Note: If the EDD already contains formatting rules, the CSS properties are appended to the existing rules. If the CSS
properties overlap some of the existing rules, the CSS properties replace the existing rules in the EDD. The EDD doesn’t
support all properties and selectors defined in CSS 2.0. If a property or selector in the CSS file can’t be mapped to an
equivalent EDD rule, that property or selector is ignored. No error is displayed when this happens, and no error log is
created.
After importing the CSS styles, you can import element definitions from the EDD into a template and use the
template to open an XML file.
As an alternative to the CSS import process, you can use FrameMaker to open an XML file that already has CSS styles
associated with it. When you open the XML file, FrameMaker reads the DTD and CSS files and generates a
temporary template that is used to open the XML file.
About CSS export
You can export XML style information available in your document for all elements using the Cascading Style Sheets
2 (CSS2) format, to an EDD file. You can then import these CSS Style definitions from the EDD file to new XML
files. Cascading Style Sheets let authors attach styles, such as fonts and spacing, to structured XML files. CSS2 format
is a W3C standard.
Page 79

ADOBE FRAMEMAKER 8
User Guide
When you choose the Generate CSS2 command, styles from well-formed structured documents are generated, based
on the formatting information available in the EDD associated with the source document. FrameMaker exports style
information only at the element level. For example, if you apply a style to only one particular word in the Text
element, that one instance of style is not exported.
You can set CSS2 preferences in the XML application. For example, you can determine whether the CSS2 file is
automatically generated when you export to XML. For more information, see the Structured Application Developer's
Guide, located in the OnlineManuals folder.
To export CSS for a FrameMaker XML file:
1 Open the template or document with an associated EDD in Structured FrameMaker.
2 Select StructureTools > Generate CSS2.
About XML namespaces
An XML namespace is a collection of names for specific element types and attribute names within an XML
document. The scope of a namespace extends beyond its containing document.
Because a single XML document can contain elements and attributes that can be used by multiple software applications, you can use namespaces to differentiate which elements and attributes are to be used by which applications.
Software applications that process XML use namespaces to recognize which tags and attributes they are designed
to process.
70
Names from XML namespaces may appear as qualified names, which contain a single colon, separating the name
into a namespace prefix and a local part. The prefix, which is mapped to a Uniform Resource Identifier (URI)
reference, selects a namespace. The combination of the universally managed URI namespace and the document's
own namespace produces identifiers that are universally unique.
Using XML namespaces in FrameMaker
FrameMaker supports namespace usage for all elements in an XML document. When you import an XML document
containing namespaces, all namespace information is preserved.
You can view, edit, add, or delete namespaces to an XML document in Structured FrameMaker using the
Namespaces command. You can also use this command to view the definition of the prefix on an element tag and
select the element that defines the prefix.
By default, namespaces in FrameMaker are handled as namespaces, appearing in the Namespaces dialog box.
However, you can disable namespaces in the application and have them handled as attributes instead, appearing in
the Structure View.
To view or edit namespaces:
Open the document in Structured FrameMaker.
1
2 Select an element in the Structure View.
Note: Elements that contain namespaces appear in Structure View with an asterisk (*) next to their names.
3 Choose Element > Namespaces.
4 In the Namespaces dialog box, click Select Defining Element to view the namespace for the selected element in
the Structure View.
5 Make any desired changes to the Declared Namespaces, Prefix, or Path and then click Add, Change, or Delete. To
close without saving your changes, close the dialog box without clicking an option.
Page 80

ADOBE FRAMEMAKER 8
User Guide
Word processing
For editing text, FrameMaker is flexible and straightforward. You can add or delete text, and you can copy or move
it to another location.
FrameMaker includes the following powerful editing tools:
• T he F ind/ Chan ge co mman d, w hi ch c an fi nd no t onl y tex t but also i tems suc h as c hara cter f orma ts, parag rap h tags ,
anchored frames, and the contents of the Clipboard
• The Spelling Checker, which can find and correct misspellings and common typing errors such as extra spaces
and repeated words
• The Thesaurus, which defines words and provides synonyms, antonyms, and related words
Note: The Find/Change, Spelling Checker, dictionary, and thesaurus features support the Unicode text
encoding standard.
Placing the insertion point
Click to put the insertion point in any text in the document window. The insertion point marks where you enter
or edit text. When you click on a special text item such as a cross-reference, variable, or text inset, you select the
entire item.
71
The location of the insertion point determines the current paragraph—the paragraph to which paragraph formatting
commands are applied.
If you can’t place the insertion point in or next to text, the text might be background text that was typed on a master
page. You can display the master page that contains the text and put the insertion point in the text on that page (see
“Displaying master pages” on page 383). In other cases, you might not be able to place the insertion point in text
because the text is automatically generated (for example, paragraph autonumbers or cross references) or because it’s
repeated from the previous page (for example, table titles or table headings).
Entering and editing text
You enter text by typing in the document window. As you type, the text flows to another line or column. Press Return
only when you want to begin a new paragraph. When you reach the end of a page, FrameMaker automatically creates
a new page. If you want to force a line or page break at a specific location, see “Changing hyphenation and line
breaks” on page 119 or “Changing page and column breaks” on page 120.
To adjust the space between paragraphs, change the spacing properties in the paragraph format rather than press
Return repeatedly. For details, see “Changing spacing” on page 115.
Along with the standard charac ters on your ke yboard, you can type bullets, mathematical symbols, spaces of various
widths, international characters, and other special characters.
Many features make typing easier. For example, Smart Quotes inserts the appropriate left or right quotation mark
when you type a straight quotation mark. Smart Spaces prevents you from typing more than one space in a row.
Using tabs
Each time you press Tab, a tab symbol is embedded in the text. The symbol does not appear in the printed
document, but it is visible on-screen when text symbols are visible.
Page 81

ADOBE FRAMEMAKER 8
User Guide
If the current paragraph has tab stops set, FrameMaker moves the insertion point and text one tab stop each time
you press Tab. If tab stops are not set, pressing Tab doesn’t move the insertion point and text. If you press Tab more
times than you have tab stops, the Tab symbols overlap. If you later add tab stops to the paragraph, FrameMaker
positions the text correctly at the tab stops.
FrameMaker uses tab stops that are absolute rather than relative. With relative tab stops, each time you press Tab, the
insertion point moves to the next available tab stop. With absolute tab stops, the nth tab on a line moves the insertion
point to the nth stop. If that tab stop is to the left of the insertion point, the insertion point does not move.
World’s Major MountainsWorld’s Major Mountains
Mount Everest 29,028 ft
Press Tab three times to move to the third tab stop.
For information on the types of tab stops you can add to a paragraph, see “Changing tab stops” on page 113.
Typing special characters
You use combinations of keys to type bullets, dashes, fixed-width spaces, and accented characters such as ç, ñ, and
ö. If the Symbol font is installed on your system, you can type any of the symbols in that font—for example,
∞. If the Zapf Dingbats font (or any other “picture” font) is installed on your system, you can type any of the
and
special symbols in that font—for example, ▲ ✌ ■ ✓. In FrameMaker 8, character (ALT) sequences are not implemented for Dingbats and Symbol fonts, as Microsoft® Windows® provides Unicode equivalents of codepage 1252 for
these fonts, by default. The character (ALT) sequences are implemented for the MakerRoman font family only.
©, ∴,
72
You can typ e bul lets and dashes. You can also ty pe fixed-width spaces. For a list of char acters in the Symbol and Z apf
Dingbats fonts, a list of accented characters in the standard character set, and information on inserting the Euro
currency symbol, see the online manual FrameMaker Character Sets.
Note: Some special characters are entered or displayed differently in dialog boxes. In Windows, you enter a sequence of
ch ara cte rs beg inn ing with a bac ksla sh (\ ); the se se quen ces are liste d in “App endi x A: Typi ng i n di alog boxe s” o n pa ge 677.
On UNIX systems, the backslash sequences may appear in text boxes, even though you don’t have to type the sequences
to enter the characters
To type a bullet (•):
❖ Press Control+q Shift+%. You can also press Meta+period (UNIX).
To type an em dash (—):
❖ Press Control+q Shift+q.
To type an en dash (–):
❖ Press Control+q Shift+p.
Typing special spaces
When you press the spacebar, you insert a proportional space (whose width depends on the characters on either side
of it). You can also insert special fixed-width spaces—for example, to increase the space between two words. When
you type a special space between two words, the words always remain together on one line.
Page 82

ADOBE FRAMEMAKER 8
User Guide
You can use the following types of special spaces:
• An em space is the same width as the point size of the font you use. For example, if you use a 10-point font, an em
space is 10 points wide.
• An en space is half the width of an em space.
• A numeric space is the same width as the font’s zero (0) character. All digits are typically the same width. This
space is useful for aligning numbers in a column without using tabs.
• A thin space is one-twelfth the width of an em space. A thin space is often used when a very small space is needed
to separate two characters—for example, between a number and the unit of measure that follows it, or between
characters that appear too close together—for example, /).
• A nonbreaking space is the same width as the default space width for the font.
To type an em space:
❖ Do one of the following:
• (Windows) Press Esc space m or Control+Shift+space.
• (UNIX) Press Esc space m.
To type an en space:
❖ Do one of the following:
• (Windows) Press Esc space n or Alt+Control+space.
• (UNIX) Press Esc space n.
73
To type a numeric space:
❖ Press Esc space 1 (one).
To type a thin space:
❖ Press Esc space t.
To type a nonbreaking space:
❖ Press Control+space.
A nonbreaking space symbol appears when text symbols are visible.
Using Smart Spaces or Smart Quotes
When Smart Spaces is on, you can’t type more than one proportional space in a row. However, you can type multiple
fixed-width spaces (see “Typing special spaces” on page 72).
When Smart Quotes is on, FrameMaker uses a curved left or right quotation mark whenever you press the , , or
key. If you prefer to use straight quotation marks, turn off Smart Quotes. You can use combinations of keys to type
curved quotation marks when Smart Quotes is off, or to type straight quotation marks when Smart Quotes is on.
Smart Quotes doesn’t apply to text in dialog boxes. For information on typing quotation marks and apostrophes in
dialog boxes, see the online manual FrameMaker Character Sets and “Appendix A: Typing in dialog boxes” on
page 677.”
Note: For information on customizing quotation marks for languages other than US English in Windows or on UNIX
systems, see the online manual Customizing FrameMaker. This manual is available on the Adobe website:
www.adobe.com/devnet/framemaker/pdfs/Customizing_Frame_Products.pdf.
Page 83

ADOBE FRAMEMAKER 8
User Guide
To turn Smart Spaces or Smart Quotes on or off:
Make the appropriate document window or book window active. If a book window is active, select the documents
1
you want to affect.
2 Choose Format > Document > Text Options.
3 Change the Smart Spaces or Smart Quotes option and click Apply. When you select Smart Quotes, FrameMaker
doesn’t change any quotation marks that are already in the document. To find straight quotation marks and
apostrophes, and change them to curved quotation marks and apostrophes, use the Spelling Checker (see “Checking
spelling” on page 85) or the Find/Change command (see “Searching for any item” on page 77).
To enter straight and curved quotation marks in Windows:
❖ Do one of the following:
To type With Smart Quotes on, press With Smart Quotes off, press
Control+ Control+
Esc
Control+ Control+
Control+q plus (+) Control+q plus (+)
74
and and and
and and Alt+Control+ and Alt+Control+
To enter straight and curved quotation marks on UNIX systems:
❖ Do one of the following:
To type With Smart Quotes on, press With Smart Quotes off, press
Control+ Control+
Control+
Control+ Control+
Control+q plus (+) Control+q plus (+)
and and and
and and Meta+ and Meta+
Typing special text items
In addition to text, you can insert special text items such as cross-references, footnotes, variables, and markers.
Inserting a variable automatically places the date, time, page count, filename, or text that you define into a document.
FrameMaker updates variables when they change. Markers can be used to generate lists and indexes and to insert
hypertext commands.
To insert a special text item:
❖ Choose the appropriate command from the Special menu. For information, see the following:
• On cross-references, see “Inserting cross-references” on page 201.
• On footnotes, see “Working with footnotes” on page 211.
• On variables, see “About variables” on page 226.
Page 84

ADOBE FRAMEMAKER 8
User Guide
• On markers for generated lists and indexes, see “Preparing documents for a list of markers” on page 421 and
“About indexes” on page 427.
• On markers for hypertext commands, see “Inserting hypertext commands” on page 532.
Selecting text
You usually select text before you edit it. You also select text before you change its format, such as its font size or style.
Selected text is highlighted.
For information on selecting text in tables, see “Typing and selecting text in tables” on page 158.
To select tex t :
❖ Do one of the following:
• To select a range of text, drag through the text (or click one end of the text and Shift-click the other).
• To select a word, double-click it.
• To select a paragraph, triple-click it.
• To select all the text in a flow, click in the flow and choose Edit > Select All in Flow.
• To shorten or extend an existing selection, Shift-click at the new beginning or end of the selection.
75
Copying, moving, and deleting text
You use the Edit menu commands to cut, copy, and paste text to and from the Clipboard. When you use Edit > Cut
or Edit > Copy, the cut or copied text remains on the Clipboard until you choose Cut or Copy again.
Pasted text always retains its character format properties. If the pasted text contains paragraph symbols , the
paragraph format associated with each paragraph is also pasted. Otherwise, the pasted text takes the paragraph
format of the paragraph in which it’s pasted.
You copy text more quickly if you bypass the Clipboard. You can do this, however, only if the original text and the
new location are visible and exist in the same document. You must use the Clipboard to copy and paste text from one
document to another.
Note: Text pasted into a new document retains the character and paragraph tags that were assigned to it in the original
document. The tags of the pasted text may not be similarly defined in the new document. An asterisk appears next to
the tag name in the status bar when the cursor is within the pasted text to indicate that the text has no equivalent tag in
the current document.
To copy text quickly without using the Clipboard:
❖ Put the insertion point where you want to insert the copied text, and then do one of the following:
• (Windows) Hold down Alt and select the text you want to copy.
• (UNIX) Hold down Control and use the middle mouse button to select the text you want to copy.
To delete or replace text:
❖ Select the text and do one of the following:
• To delete the text, press Delete. You can also choose Edit > Clear.
• To replace the text, type the new text.
Page 85

ADOBE FRAMEMAKER 8
User Guide
If the text you delete or replace contains the end of a paragraph and the paragraph symbol, the beginning of the
paragraph is merged with the next paragraph. If you didn’t intend to combine the two paragraphs, immediately
choos e Edit > Undo. Then sel ect the te xt you want to d elete or re place (but not the parag raph symbol), and tr y again.
To delete a page of text:
❖ Do one of the following:
• To delete both the page and its text, choose Special > Delete Pages. If the page contains the beginning of a table
that continues on another page, the entire table is deleted.
• To delete just the text on a page, select the text and press Delete.
For information on deleting empty pages at the end of a document, see “Adding and deleting empty pages” on
page 382.
Entering rubi text for Japanese
Rubi text—small characters that appear above other characters—is used in Japanese-language documents to indicate
pronunciation. Rubi text can also be used with English language documents.
A
76
B
A. Rubi text B. Oyamoji text
If either Japanese or English fonts are installed on your system, FrameMaker provides commands for entering rubi
and for specifying how you want the rubi to appear. For information on adjusting the size, location, and spacing of
rubi text, see “Adjusting spacing in Japanese documents” on page 117.
To type rubi:
1 Select the characters above which you want to type rubi. The selected text cannot contain a paragraph symbol
or a forced return symbol .
2 Choose Special > Rubi and type the text. (If the Rubi command doesn’t appear on the Special menu, press Esc s r
instead of choosing Special > Rubi.) The rubi appears above the selected characters. If the selected characters span
two lines, the characters will all appear on the same line.
Note: If the rubi collides with the preceding line of text, either set the line spacing large enough to accommodate the rubi
(at least 150% of the font size) or turn off fixed line spacing (see “Adjusting vertical spacing” on page 115).
3 To return to the regular text when you finish typing the rubi, click in it or choose Special > Rubi again.
About searching
In addition to text, you can search for any of the following items:
Tex t f ormats and tags Character format properties, or specific paragraph or character tags. In structured
FrameMaker, Element appears right after text, so you can search for element tag, attribute name, attribute value, or
simultaneously for all three.
For information on how to find and then replace text formats, see “Globally applying formats to text” on page 106.
Page 86

ADOBE FRAMEMAKER 8
User Guide
Markers Any markers regardless of their marker types, markers of a specific type, or markers that contain
specified text.
Cross-references Any cross-references regardless of their formats, cross-references that use a specific format, or
unresolved cross-references—cross-references that FrameMaker is unable to update. When an unresolved crossreference is found, the marker text of the cross-reference appears in the Find text box.
Tex t i nsets Any text imported by reference. You can also search for unresolved text insets—insets that cannot be
updated from their sources. However, you can’t search for graphics subscribers or OLE linked objects. (To list OLE
links in Windows, choose Edit > Links.)
Var iabl es Any variables regardless of their variable names, or specific variables.
Rubi Any rubi text, when Japanese fonts are installed on your system.
Anchored frames You can find graphics by searching for the anchored frames that contain them. Graphics placed in
non-anchored frames will not be found.
Footnotes Any text or table footnotes.
Tab le s Any tables regardless of their table format tags, or tables with a specific tag.
Conditional text Any conditional text regardless of its condition tags, text with specific condition tags, or uncondi-
tional text. FrameMaker cannot find conditional table rows or hidden conditional text.
77
Automatic hyphen Words that are hyphenated automatically.
Text and character format on the Clipboard Text that matches the Clipboard’s text, capitalization, and character
formatting.
Searching through a document
If you are searching in a document, FrameMaker begins searching at the insertion point and continues through the
document. It searches only pages of the type the insertion point is on—for example, only body pages or only master
pages. When FrameMaker reaches the end of the document, it continues the search at the beginning. After searching
the main text flow, it searches other text in the document. Because FrameMaker searches flow by flow rather than
page by page, it may appear to jump around within the document while searching.
Searching throughout a book
If you are searching throughout a book, FrameMaker begins searching from the active document (or from the first
document of the book if the book window is active) and continues searching until all documents in the book
have been searched. If a document cannot be opened, the document is skipped and a message appears in the Book
Error Log.
Note: When you are searching through a book, you cannot search the master or reference pages.
For more information on working with book-wide features, see “Using book-wide commands” on page 473.
Searching for any item
Wh en y ou sea rch for an it em, y ou c an cus tom ize the searc h by con side ring c ase, m atc hing whol e wor ds on ly, o r us ing
wildcards. Wildcards let you search for character patterns and for text that appears at the beginning or end of a line.
When FrameMaker finds an item, you can replace the item or continue searching for other occurrences of the item.
You can search for an item in the selection, in the document, or throughout the entire book. For more information
on searching throughout a book, see “Searching throughout a book” on page 77.
Page 87

ADOBE FRAMEMAKER 8
User Guide
FrameMaker 8 uses the UTF-8 encoding format. Therefore, every character in a .fm or XML document containing
Unicode encoded text uses multiple bytes. As a result, only the string entered in the Find field is used to perform the
search operation.
You can specify a search string which includes a range of characters. For example, you can specify a string such as
"[d-w]" to locate text containing characters between "d" and "w". However, searching in a range is applicable only to
Unicode characters, and users can search for any character that belongs to the Basic Multilingual Plane (BMP).
Unicode code points can also be used for performing search and replace operations. For example, you can provide
\uXXXX as the input to locate a character that has code point XXXX. Thus, to search for letter "A" whose code point
is u+0041 you can specify \u0041 in the Find/Change dialog box.
You can also use wild card characters while searching for Unicode text.
To search for any item:
1 Do one of the following:
• To search in a document, click where you want to begin the search.
• To search within a selection, select the text.
• To search throughout the entire book, open the book or a document that belongs to the book.
• To search through one or more documents in the book, select the documents in the book window.
2 Choose Edit > Find/Change.
78
3 Specify whether you want to search through the book, document, or selection. The Selection option lets you
search through selected text if text is selected in a document, or it lets you search selected files if one or more book
files are selected.
4 Choose the item you want to find from the Find pop-up menu (see “About searching” on page 76).
5 Do one of the following:
• If you chose Text, Paragraph Tag, Character Tag, Marker of Type, Marker Text, Cross-Reference of Format,
Variable of Name, or Table Tag from the Find pop-up menu, enter the particular item you want to find in the Find
text box.
• If you chose Character Format or Conditional Text from the Find pop-up menu, enter additional information in
the dialog box that appears. For information, see “Searching for character format properties” on page 80 and
“Searching for conditional text” on page 82.
• If you chose any other item from the Find pop-up menu, skip step 6 and proceed to step 7.
6 If you entered text in the Find text box, customize the search by doing the following:
• To find or ignore an item with specific capitalization, select or turn off Consider Case. For example, if you enter
MAIN in the Find text box and Consider Case is selected, you won’t find Main. If Consider Case is turned off,
you’ll find MAIN, Main, and main.
• To match only a complete word, enter the word in the Find text box and select Whole Word. For example, if you
enter phone in the Find text box and select Whole Word, you won’t find telephone.
• To find a set of characters that may be part of a longer word or part of more than one word, turn off Whole Word.
For example, if you enter old in the Find text box and turn off Whole Word, you’ll find words such as bold and
oldest as well as old.
Page 88

ADOBE FRAMEMAKER 8
User Guide
• To find an item by using wildcards, enter the text and wildcards in the Find text box and select Use Wildcards. For
example, if you enter Number[1-9] in the Find text box and select Use Wildcards, you’ll find all occurrences of
the word Number followed by any number between 1 and 9. For information, see “Using wildcards in a search” on
page 79.
Note: In Asian documents with multibyte characters, the bracket characters [ ] do not work as wildcards.
7 Click Find. If FrameMaker finds an exact match, it displays the page that contains the item and selects the item.
For information on how FrameMaker searches in a document or book, see “Searching through a document” on
page 77 or “Searching throughout a book” on page 77.
To find the next occurrence of an item:
❖ Click Find in the Find/Change dialog box or choose Edit > Find Next.
To reverse the search direction:
❖ Select Find Backward in the Find/Change dialog box and click Find.
To cancel a search:
❖ Do one of the following:
• (Windows) Press Esc.
• (UNIX) Press Control+c.
79
Entering text in the Find text box
You can enter any characters in the Find text box. However, the following characters require special treatment:
• To find a single backslash (\), enter two backslashes (\\) in the Find text box. A single backslash usually indicates
a special character.
• To search for a wildcard character as an ordinary character when the Use Wildcards option is selected, precede
the wildcard character with a backslash. For example, to find an asterisk, enter \* in the Find text box.
Searching for special characters and nonprinting symbols
You can search for any text, including single characters, phrases, and special characters that aren’t on your keyboard.
When you enter special characters in a dialog box on UNIX systems, the characters may be represented as a sequence
of characters beginning with a backslash (\). In Windows, you’ll need to type the backslash sequence—see “About
typing in dialog boxes” on page 677.
Using wildcards in a search
When Use Wildcards is selected in the Find/Change dialog box, you can use the following wildcards to find
character patterns.
To find Do this Example
Zero or more characters, excluding
spaces and punctuation
Any single character, excluding spaces
and punctuation
Enter an asterisk (*). f*t finds words such as fit and feet.
Enter a question mark (?). f??t finds four-letter words that begin with f and
end with t—for example, foot and feet.
Page 89

To find Do this Example
ADOBE FRAMEMAKER 8
User Guide
80
One or more spaces and punctuation
characters
Any one of several characters Type the characters within brackets
Any one character not in a specified
group of characters
The beginning of a line Enter a caret (^). ^f finds any word that starts with f at the begin-
The end of a line Enter a dollar sign ($). f$ finds any word that ends with f at the end of a
Enter a vertical bar (|). *a ny| finds words such as any. and many?. If
([and]).
Precede the characters in brackets with
a caret (^).
Whole Word is turned off, it also finds Tiffany, but
not anything.
[rml]ate finds rate, mate, and late. If Whole Word
is turned off, it also finds berate, isolate, and
material.
[^rml]ate finds fate, gate, and date, but not rate,
mate, or late.
ning of a line. You cannot combine this wildcard
with the Whole Word option.
line. You cannot combine this wildcard with the
Whole Word option.
To find nonprinting symbols (such as tab, paragraph, and end-of-flow symbols) and positions (such as the start of a
paragraph or word), use the following character sequences.
To find Enter this sequence
Tab \t
Forced return \r
End of paragraph \p (lowercase)
Start of paragraph \P (uppercase)
End of flow or end of table cell \f
Start of word \<
End of word \>
For example, you could find empty paragraphs by searching for \P\p (beginning of paragraph followed by end
of paragraph).
You can use most of these sequences for both searching and replacing—for example, replacing a forced return
symbol with an end-of-paragraph symbol. However, you cannot replace with the end-of-flow, start-of-paragraph,
start-of-word, or end-of-word sequence.
Searching for character format properties
You can search for any character format property—for example, any text in italics. Or you can search for text with
several properties—for example, 12-point Helvetica bold.
You can also search for text with specific properties and capitalization—for example, the word London in 10-point
italic text. With these specifications, FrameMaker won’t find London if it’s a different size, isn’t italic, or is capitalized
differently.
To search for text with a specific paragraph or character tag, use the Paragraph Tag or Character Tag find options.
Page 90

To search for character format properties:
Click in text with properties similar to (or the same as) the properties you want to find.
1
2 In the Find/Change dialog box, choose Character Format from the Find pop-up menu.
3 Do one of the following:
ADOBE FRAMEMAKER 8
User Guide
• To search for the properties of the current text, leave the properties as they are.
• To search for text with different properties, change the properties to match that format.
• To search for text with some properties specified and some overlooked, set the properties you want to overlook to
As Is. You set a property to As Is by clicking a check box until it is gray (Windows), or dim (UNIX), by choosing
As Is from a pop-up menu, by selecting As Is in a scroll list, or by deleting the text in a text box. For example, if
you don’t care what color is assigned to the text, choose As Is from the Color pop-up menu.
• To find text with only a few properties, set all properties to As Is by pressing Ctrl+Shift+F8 (Windows), or
Shift+F8 (UNIX). Then specify only the properties you want to find.
4 Click Set, and then click Find.
After making some changes in the Find Character Format dialog box, you can reset the dialog box to match the
format of the current text. To do this, press Ctrl+Shift+F9 (Windows), or Shift+F9 (UNIX).
To search for specific text and character format properties:
Copy the text with the character format you want to find. You can copy as much text as you like, but FrameMaker
1
uses only the first 126 characters on the Clipboard.
2 In the Find/Change dialog box, choose Text & Character Formats on Clipboard from the Find pop-up menu.
Don’t type the text you want to find in the Find text box.
3 Click Find.
81
Searching for markers
FrameMaker uses markers for cross-references, indexes, and other purposes. It can find any type of marker or just
the marker type you specify. When text symbols are visible, a symbol indicates a marker.
FrameMaker can also find markers with specific marker text.
To search for a marker:
1 In the Find/Change dialog box, do one of the following:
• To find any marker in the document, choose Any Marker from the Find pop-up menu, and leave the Find text box
blank.
• To find a specific type of marker, choose Marker of Type from the Find pop-up menu, and enter the marker type
in the Find text box.
• To find a marker with specific text, choose Marker Text from the Find pop-up menu, and enter the marker text in
the Find text box.
2 Click Find. If the Marker dialog box is open (Special > Marker), the marker text for the found marker
appears there.
Important: If you want to replace the text in a found marker, use the Marker dialog box to edit the marker text.
If you use the Find/Change dialog box, you’ll replace the marker rather than the marker text.
Page 91

ADOBE FRAMEMAKER 8
User Guide
Searching for conditional text
You can search for visible text that has specific condition tags. When FrameMaker finds visible conditional text, it
selects all adjacent text that uses these condition tags.
FrameMaker cannot find conditional table rows.
To search for conditional text:
1 Make sure that the text with the condition tags you want to find is visible (see “Changing the view of conditional
documents” on page 306).
2 In the Find/Change dialog box, choose Conditional Text from the Find pop-up menu. The Find Conditional Text
dialog box appears.
3 Do the following:
• To find text with a particular condition tag, move the condition tag to the In list.
• To find text that doesn’t have a particular condition tag, move the tag to the Not In scroll list.
• If you don’t care whether found text has a particular tag, move the tag to the As Is scroll list.
• To find all conditional text, move all tags to the As Is scroll list.
• To find unconditional text, select Unconditional.
Note: To move a condition tag between scroll lists, select the tag and click an arrow, or double-click the tag. To move all
tags from one scroll list to another, select a tag in the list and Shift-click an arrow.
82
4 Click Set, and then click Find.
Using the Find/Change command from the keyboard
You can search for items without using the mouse. You use keyboard shortcuts to open the Set Find/Change Parameters dialog box (which contains the same options as the Find/Change dialog box), to move the insertion point
between the options, and to start a search. These keyboard shortcuts are useful in macros that automate finding and
changing. In Windows, you can use a third-party macro application to create macros that work with FrameMaker.
On UNIX systems, you can use File > Utilities > Keyboard Macros (see “Using UNIX keyboard macros” on
page 625).
To use the Find/Change command from the keyboard:
1 In a document window, press Esc f i s.
2 Fill in the Set Find/Change Parameters dialog box as you would the Find/Change dialog box, and then
press Return.
Use keyboard shortcuts to move from setting to setting and to choose items from pop-up menus. For a list of
keyboard shortcuts, see online Help.
3 To start the search, do one of the following:
• (Windows) Press Control+Shift+f.
• (UNIX) Press Esc f i n.
4 To search again, repeat step 3.
Searching for Unicode characters
You can search a FrameMaker document for any character that belongs to the Basic Multilingual Plane (BMP)
Unicode character set by using Unicode code points.
Page 92

ADOBE FRAMEMAKER 8
User Guide
To search for a character with the code point XXXX, you must specify the search string in the format \uXXXX. For
example, to search for the letter A with a code point of u+0041, input the string \u0041.
You can also search for a range of Unicode characters. For example, the search string [d-w] searches for all characters
from ‘d’ to ‘w’. Unicode characters can also be used to define ranges, which translate to Unicode code points. The
specified code points must fall within the BMP Unicode character set. For example, when you specify the string ‘[αγ]’, FrameMaker searches for all characters between code point 03B1 (which is small letter ALPHA) and code point
03B3 (which is small letter GAMMA).
Note: A code point is any value in the Unicode codespace, which is a range of integers from 0 to 10FFFF16. This
particular range is defined for the codespace in the Unicode Standard only. Other character encoding standards may use
other codespaces.
Troubleshooting a search
If you don’t find the item even though you’re sure it’s there, check the Find/Change dialog box for the following
possible problems:
• Did you spell the text in the Find text box correctly?
• Did you include too many or too few spaces? Are they the right type of spaces? When you enter text that includes
spaces in the Find text box, FrameMaker searches for the text with the same number of spaces in the same places.
You can find special spaces, such as em spaces and thin spaces, as well as regular spaces.
83
• Are you using the appropriate options? For example, is Whole Word selected when it should be turned off?
• If your document uses conditional text, is the text for which you’re searching hidden?
• If you’re searching for an item on a master page, is the insertion point on a master page?
• If you want to search throughout the entire book, make sure the Book option is selected in the Find/Change dialog
box.
Changing items you find
After you find an item, you can change it in several ways. Generally, you find text and replace it with other text, but
you can also change the character format of the found item or apply the contents of the Clipboard to the item. For
example, you can copy a variable to the Clipboard and replace a word with the variable. Or you can replace a word
with a graphic in an anchored frame.
You can change each occurrence of the item as it is found, or have FrameMaker automatically make the change
throughout the document, book, or selection.
To change any item:
Specify the item you want to find in the way described in “Searching for any item” on page 77.
1
2 In the Find/Change dialog box, do one of the following:
• To replace the found item with text, choose To Text and type the text in the Change text box. For information, see
“Replacing found items with text” on page 84.
• To change character format properties of the found text, choose Character Format and then specify the properties
in the dialog box that appears. For information, see “Changing character format properties” on page 84.
• To apply the contents of the Clipboard to the found item, choose By Pasting. Then select the item you want to paste
and copy it to the Clipboard.
3 Click Find to find the first match.
Page 93

ADOBE FRAMEMAKER 8
User Guide
4 Do one of the following:
• To change the found occurrence but not continue searching for the item, click Change.
• To continue searching but not change the found occurrence, click Find.
• To change the found occurrence and continue searching for the item, click Change & Find.
• To change all occurrences of the item, specify the scope of the change (all occurrences in the document, book, or
selection) and click Change All. A message will indicate the number of changes made.
Important: When you change all occurrences, FrameMaker may make changes you didn’t intend—for example,
changing occurrences of a word when it is part of a longer word (if you don’t select Whole Word). Also, you can’t undo
th e chan ges. For thes e re aso ns, con sider s aving y our doc ument and then clickin g Find and the n Ch ange to repla ce s eve ral
found occurrences. When you’re confident that FrameMaker will replace only the items you want, click Change All.
If you click Change or Change & Find when no text is selected in the document, FrameMaker inserts or applies the
replacement item at the insertion point.
To delete a found item:
❖ In the Find/Change dialog box, choose To Text from the Change pop-up menu, leave the Change text box empty,
and click Change. You can also simply press Delete.
84
Replacing found items with text
You can replace anything that FrameMaker finds with text. For example, you can replace a word with another word
or replace a marker with a phrase.
If capitalization is important, you can have FrameMaker use the same capitalization that is used in the original text
by selecting the Clone Case option in the Find/Change dialog box. For example, if you select Clone Case and type
tea in the Find text box and coffee in the Change text box, FrameMaker replaces tea with coffee and Tea with Coffee.
You can type any text, including special characters not found on the keyboard—for example, em spaces and
paragraph symbols. For information on these characters, see “Typing special characters” on page 72 and “Typing
special spaces” on page 72. For a list of special characters, see “About typing in dialog boxes” on page 677. To include
a backslash (\) in replacement text, type two backslashes (\\) in the Change text box.
You can’t change marker text (such as an ind ex entr y) by using the Find/Change dialog box. If FrameMake r finds the
marker text you specify, and if you type different text in the Change text box and click Change, FrameMaker replaces
the marker—not the marker text—with the text in the Change text box. To change marker text, use the Special >
Marker command (see “Editing and deleting list entries” on page 424).
Changing character format properties
You can change the character format properties of any text that FrameMaker finds. For example, you can search for
the name of a product and change the text to italic small caps. Or you can search for all text with particular properties
and then change the properties.
To specify the character format properties you want to change:
Do one of the following:
1
• If you’re changing several character format properties, click in text that has a character format similar to the one
you want to apply to the found text.
• If you’re changing one or two character format properties, click in any text.
Page 94

ADOBE FRAMEMAKER 8
User Guide
2 In the Find/Change dialog box, choose To Character Format from the Change pop-up menu, specify the character
format you want to use, and then click Set.
To prevent FrameMaker from applying a property to found text, set the property to As Is. You set a property to As Is
by clicking a check box until it is gray (Windows), or dim (UNIX); by choosing As Is from a pop-up menu; by
selecting As Is i n a scroll list; or by deleting the text in a text b ox. For example, if you don’t care what color is assigned
to the text, choose As Is from the Color pop-up menu. If you want to change all properties to As Is, press
Ctrl+Shift+F8 (Windows), or Shift+F8 (UNIX).
After making some changes in the Change to Character Format dialog box, you can reset the dialog box to match
the format of the current text. To do this, press Ctrl+Shift+F9 (Windows), or Shift+F9 (UNIX).
Checking spelling
The FrameMaker Spelling Checker uses several dictionaries to check text for spelling errors. When the Spelling
Checker finds a questionable word, it suggests the most likely correction along with some other possibilities. You can
select a correction, type your own correction, or leave the word unchanged.
The Spelling Checker helps correct your typing as well as your spelling. For example, you can check for repeated
words, unusual hyphenation or capitalization, straight quotation marks (when curved should be used), and
extra spaces.
85
You can spell-check the current page, the open document, the entire book, or selected files within the book, however,
the spell check will only check on pages of the type you are viewing, for example, master pages or body pages.
Spell-checking throughout a book
If you are spell-checking throughout a book, FrameMaker begins spell-checking from the active document (or from
the first document of the book if the book window is active) and continues spell-checking until all documents in the
book have been checked. If a document cannot be opened, the document will be skipped and a message will appear
in the Book Error Log. When spell-checking throughout a book, you cannot spell-check master or reference pages.
For more information on working with book-wide features, see “Using book-wide commands” on page 473.
About FrameMaker dictionaries
When you spell-check a document, FrameMaker compares each word in it with the words in the
following dictionaries:
• The main dictionary contains words found in a standard dictionary. You can’t add words to or delete words
from this dictionary.
• The default site dictionary contains some technical terms. You can add words common to your site or
workgroup—for example, the company name and product names. In Windows, the site dictionary is normally in
the site.dict file in the FrameMaker dict folder. On UNIX systems, it’s in $FMHOME/fminit/site.dict.
• Yo u r personal dictionary contains words you use often. Because FrameMaker uses this dictionary whenever you
spell-check any document, use this dictionary for words that are neither document-specific nor site-specific (for
example, your name). You can add or delete words. You can also create several personal dictionaries and switch
between them.
• The document dictionary contains words that are acceptable in a particular document. FrameMaker uses this
dictionary regardless of who is editing the document. You can add words to or delete words from it. Unlike the
other dictionaries, the document dictionary is part of the document rather than a separate file.
Page 95

ADOBE FRAMEMAKER 8
User Guide
When you are spell-checking throughout a book, words that are added to your personal dictionary will be applied
to all documents in a book. Words that are added to the document dictionary will be used only in the current
document, not in all the documents in the book. For information on merging your document dictionaries, see
“Managing personal and document dictionaries” on page 91.
In Adobe FrameMaker 8, the dictionaries, hyphenation, and Thesaurus are Unicode-enabled.
New dictionaries have been added for Greek, Russian, Czech, Polish, Hungarian, Turkish, Slovak, Slovenian,
Bulgarian, Croatian, Estonian, Latvian, Lithuanian, and Romanian languages. However, the Thesaurus is not
available for these languages.
Existing dictionaries for the following languages have been updated to Proximity® version 11.0: US English, British
English, German, Swiss-German, French, Canadian-French, Spanish, Catalan (Thesaurus not available), Italian,
Portuguese (Thesaurus not available), Brazilian (Thesaurus not available), Danish, Dutch, Norwegian, Nynorsk
(Thesaurus not available), Finnish (Thesaurus not available), Swedish, New German, New Swiss German, and New
Dutch.
Checking for spelling and typing errors
When you spell-check a document, FrameMaker questions any words that aren’t in one of its dictionaries. If a
questioned word is spelled correctly, you can confirm its spelling by adding the word to your personal dictionary or
to the document dictionary. If a questioned word is misspelled, you can correct it. FrameMaker usually provides
suggestions for the correct spelling.
86
To check and correct spelling:
1 Choose Edit > Spelling Checker.
2 Do one of the following:
• To check all text in a document, click in the document and then click Document in the Spelling Checker
dialog box.
• To check all text on a page, click on the page and then click Current Page in the Spelling Checker dialog box.
• To search throughout the entire book, open the book or a document that belongs to the open book and then click
Book in the Spelling Checker dialog box. For more information, see “Using book-wide commands” on page 473.
• To check specific text, select the text.
• To check a word, place an insertion point in the word.
In most cases, you’ll want to spell-check the text on the body pages. If a body page isn’t displayed, choose View >
Body Pages.
3 Click Start Checking. If you’re checking a selection of text or a single word, Shift-click Start Checking.
FrameMaker begins spell-checking at the insertion point. When it finds a questionable word, the word appears at
the top of the Spelling Checker dialog box. The message to the left of the text box—for example, Misspelling —
explains why the word has been questioned.
Note: FrameMaker does not spell-check superscript and subscript text or manually micropositioned text (for example,
text with a manual baseline shift).
4 Correct or confirm the spelling in one of the following ways:
Page 96

ADOBE FRAMEMAKER 8
User Guide
• To correct a misspelling, make sure the correctly spelled word is in the Correction text box and click Correct. If
the suggested word is not the word you want, you can select a different word in the Correction scroll list or enter
the word in the Correction text box. You can also move the insertion point to the document window and type the
word correctly there.
• To correct a typing error (for example, repeated words such as and and), make sure the correctly typed text is in
the Correction text box and click Correct. FrameMaker lists only one suggestion for mistyped text. If the
suggestion is not correct, you can enter the correct text in the Correction text box, or type it directly in the
document window.
If FrameMaker questions something that you don’t consider to be a typing error, you can turn off the option to find
that type of potential error. For example, you can stop FrameMaker from questioning the use of straight quotation
marks. For information, see “Changing Spelling Checker options” on page 88.
• To add a word to a personal dictionary, make sure the intended word appears next to “Misspelling” at the top of
the Spelling Checker dialog box and click Learn.
• To add a word to a document dictionary, make sure the intended word appears next to “Misspelling” at the top of
the Spelling Checker dialog box and click Allow in Document.
Note: If FrameMaker adds a word that contains uppercase letters to a personal or document dictionary, when Unusual
Capitalization is selected in the Spelling Checker Options dialog box, it considers any other capitalization of the word a
spelling mistake. For example, if FrameMaker learns Tri ni da d, it questions the spelling of TRINIDAD and trinidad.
However, if it learns trinidad, in all lowercase letters, it does not question any type of capitalization of the word.
87
5 If necessary, click Start Checking to find the next questionable word.
When spell-checking a book, an alert message prompts you to save the document before continuing with the next
document. When the last document in the book has been checked, a Spelling OK or Finished checking spelling
message appears.
To check spelling in text insets:
❖ Open the inset’s source file and check the spelling there.
To cancel the Spelling Checker:
❖ Do one of the following:
• (Windows) Press Esc.
• (UNIX) Press Control+c.
Correcting spelling errors automatically
You can have FrameMaker automatically correct future occurrences of a misspelled word or typing error. The error
won’t be questioned in any document you open, and you won’t have to provide the correction. FrameMaker keeps
track of the errors to correct automatically until you exit or until you instruct FrameMaker to stop making the
corrections.
Before you decide to change a particular misspelling or typing error automatically, make sure you know what other
changes will be made. For example, if you use the Automatic Correction option when correcting a repeated word,
FrameMaker will correct every repeated word even though some may be correct (such as had had). Similarly, if thst
is a misspelling of both test and that, you won’t want to change it automatically to either word.
Page 97

ADOBE FRAMEMAKER 8
To correct spelling errors automatically:
Choose Edit > Spelling Checker and click Start Checking.
1
2 When FrameMaker questions a word or typing error, select Automatic Correction and click Correct.
To stop making automatic corrections before exiting:
1 Choose Edit > Spelling Checker and click Dictionaries.
2 In the Dictionary Functions dialog box, click Clear Automatic Corrections, and then click OK.
Changing Spelling Checker options
User Guide
When you spell-check a document, FrameMaker also checks for errors that don’t involve spelling—for example,
repeated words, extra or misplaced spaces, or unusual capitalization. You can specify the kinds of typing errors for
which you want to look.
You can also limit the spell-check so that FrameMaker overlooks certain types of words. For example, you may want
to overlook words that contain numbers.
To change Spelling Checker options:
1 Choose Edit > Spelling Checker and click Options.
2 Do the following:
88
• In the Find area, specify the kinds of typing errors you want to find. For example, select Unusual Capitalization if
you want to find words with uppercase letters in inappropriate locations (for example, GReen).
• In the Ignore area, specify the kinds of words you want to overlook. For example, select Words with Digits if you
want to ignore words that contain numbers.
Keep in mind that the more words FrameMaker overlooks, the greater the possibility that your document will
contain misspelled words. For example, if you choose to ignore words containing a period, you’ll also skip over a
sentence that begins without a space after the preceding period.
• If you change the Spelling Checker options and then want to reset the default options, click Get Defaults. If you
change the Spelling Checker options in Windows, and then exit FrameMaker without resetting the default
options, your current settings become the default options.
3 Click Set.
Rechecking after changing dictionary options
FrameMaker ordinarily rechecks only paragraphs that have been edited since the prior check. If you change options
after spell-checking a document, you may want to run the Spelling Checker again after instructing FrameMaker to
mark all paragraphs for rechecking.
For more information on changing dictionary functions, see “Managing dictionaries” on page 90.
To mark all paragraphs for rechecking:
Make the appropriate document window or book window active. If a book window is active, select the documents
1
you want to affect.
2 Choose Edit > Spelling Checker. If a book window is active, choose Selection to affect only the selected files or
Book to affect the entire book.
3 Click Dictionaries.
4 Select Mark All Paragraphs for Rechecking and click OK.
Page 98

ADOBE FRAMEMAKER 8
User Guide
Assigning text to be ignored by spell-checker
If you don’t want FrameMaker to spell-check certain text, change its Language property to None (see “Checking
spelling in different languages” on page 89). For example, you may not want to spell-check paragraphs of
computer code.
When you set the language of text to None, FrameMaker no longer provides hyphenation for it.
Checking spelling in different languages
All text is assigned a language. When you spell-check, FrameMaker uses the main dictionary of the language
assigned to the text. You can change the language used to spell-check text by changing the language assigned to the
text. You can also add Unicode (UTF-8) encoded words to user and personal dictionaries in FrameMaker.
The FrameMaker CD contains dictionaries for all supported languages. However, the default Windows installation
contains only one dictionary in a single language.
When spell-checking a document with different languages, note the following:
• In an Asian-language document, some special characters may not be displayed in the Spelling Checker as they are
in a Western-language document. For example, a backslash will be displayed as a yen symbol, and a nonbreaking
hyphen will be displayed as a blank.
• In an Asian-language document that contains Roman text, make sure you turn off the Straight Quotes option in
the Spelling Checker dialog box so that the Spelling Checker does not stop on properly spelled words.
89
Changing the language of text in a document
• To change the language of a single paragraph, or of all the paragraphs in a document, use the Language property
in the Default Font properties of the Paragraph Designer (see “Using a designer to change font properties” on
page 108).
• To change the language of a range of text within a paragraph, or the language of a text line, use the Language
property in the Character Designer (see “Using a designer to change font properties” on page 108).
Controlling hyphenation
When you add a word to a personal dictionary, FrameMaker calculates the points at which it can hyphenate the
word. If the suggested hyphenation points aren’t appropriate, you can change them before adding the word. You can
also specify that a word is always or never hyphenated. For example, you can hyphenate heavy-duty wherever it
appears but never hyphenate your company’s name.
After you make hyphenation changes, you should rehyphenate the document. For additional information on
hyphenation, see “Changing hyphenation and line breaks” on page 119.
When you want strict control over hyphenation (for example, before printing the final draft of a book), you may
want to search your document for all hyphens that FrameMaker has inserted automatically. To do this, choose
Automatic Hyphen from the Find pop-up menu in the Find/Change dialog box.
To show a word’s hyphenation points:
❖ Choose Edit > Spelling Checker, type the word in the Word text box, and click Show Hyphenation. If the word is
in the main dictionary or your personal dictionary, FrameMaker uses the dictionary to determine the hyphenation
points. If the word isn’t in one of these dictionaries, FrameMaker calculates the hyphenation points.
Page 99

To change the hyphenation of a word:
Show the word’s hyphenation points as described in the previous procedure.
1
2 Adjust the hyphenation and click Learn. You can add and delete hyphens as necessary.
Reappear cannot be hyphenated as re-appear.
To prevent FrameMaker from ever hyphenating a word:
1 Enter the word in the Correction text box.
2 Click Show Hyphenation.
3 Remove all hyphens from the word.
4 Insert a hyphen at the beginning of the word.
5 Click Learn.
ADOBE FRAMEMAKER 8
User Guide
90
The word “intro” cannot be hyphenated.
To rehyphenate an entire document:
1 Make the appropriate document window or book window active. If a book window is active, select the documents
you want to affect.
2 Choose Edit > Spelling Checker. If a book window is active, choose Selection to affect only the selected files or
Book to affect the entire book.
3 Click Dictionaries.
4 Select Rehyphenate Document, Rehyphenate Selected Files in Book, or Rehyphenate All Files in Book, and then
click OK.
Managing dictionaries
You have editorial control over your document, personal, and site dictionaries. For example, you can add and delete
words and change the hyphenation of words. You can also choose different dictionaries, merge one dictionary into
another, and delete dictionaries.
Page 100

ADOBE FRAMEMAKER 8
Managing personal and document dictionaries
User Guide
FrameMaker automatically creates a personal dictionary for you and a document dictionary for each of your
documents. You can use the Spelling Checker to add or delete words in these dictionaries, or you can manage the
dictionaries directly. When you work with a dictionary directly, you can examine and edit its contents or merge it
with another dictionary. You can create multiple personal dictionaries and then use them one at a time.
If you make changes to either a personal or document dictionary, mark all paragraphs for rechecking before you
spell-check the document again. For instructions, see “Rechecking after changing dictionary options” on page 88.
To delete a word from the personal or document dictionary:
❖ Choose Edit > Spelling Checker, enter the word in the Correction text box, and click Unlearn.
To delete the contents of the document dictionary:
Make the appropriate document window or book window active. If a book window is active, select the documents
1
you want to affect.
2 Choose Edit > Spelling Checker. If a book window is active, choose Selection to affect only the selected files or
Book to affect the entire book.
3 Click Dictionaries.
4 Choose Clear from the Document Dictionary (or Document Dictionaries) pop-up menu and click OK.
91
To delete a personal dictionary:
❖ Delete the file that contains the dictionary. (To find the name of the personal dictionary, choose Edit >
Spelling Checker, and then click Dictionaries. The name of your personal dictionary appears in the Dictionary
Functions dialog box.)
To create another personal dictionary:
1 Place words (with a hyphen at each hyphenation point) in a document. Type as the first line in the document:
<MakerDictionary 2.0>
2 When you save the file, choose Text Only format and click Save. Then click Only between Paragraphs and
click Save.
To use a different personal dictionary:
Choose Edit > Spelling Checker and click Dictionaries. The name of your personal dictionary appears in the
1
Dictionary Functions dialog box.
2 Choose Change Dictionary from the Personal Dictionary pop-up menu and click OK.
3 Specify the name of the file that contains the personal dictionary you want to use.
To check the spelling of a document without using the personal dictionary:
1
Make the appropriate document window or book window active. If a book window is active, select the documents
you want to affect.
2 Choose Edit > Spelling Checker. If a book window is active, choose Selection to affect only the selected files or
Book to affect the entire book.
3 Click Dictionaries.
4 Choose Set to None from the Personal Dictionary pop-up menu and click OK.
 Loading...