

Page 1

Getting Started With
title_pg.fm
Adobe FrameMaker (2015 release)
Page 2

Page 3

Table of Contents
Introduction . . . . . . . . . . . . . . . . . . . . . . . . . . . . . . . . . . . . . . . . . . . . . . . . . . . . . . . . . . . . . . . . . . 1
How to get Adobe FrameMaker (2015 release) .......................................................................................................... 2
Leverage support for Arabic and Hebrew . . . . . . . . . . . . . . . . . . . . . . . . . . . . . . . . . . . . . .3
Bidirectional language support .............................................................................................................................................. 3
Bidirectional content flipping .................................................................................................................................................. 5
Bidirectional language publishing ........................................................................................................................................7
Publish to mobile devices in multiple formats . . . . . . . . . . . . . . . . . . . . . . . . . . . . . . . . .9
Mobile app output .......................................................................................................................................................................... 9
Personalized dynamic content .............................................................................................................................................11
New HTML5 layout ...................................................................................................................................................................... 13
Custom fonts in EPUB files ......................................................................................................................................................14
Attractive customizable WebHelp skins ......................................................................................................................... 15
Reference page image publishing .......................................................................................................................................17
SVG support in responsive HTML5 output ................................................................................................................. 18
Reuse Adobe RoboHelp style mappings .......................................................................................................................18
Reusable publishing elements .............................................................................................................................................18
HTML page template support ............................................................................................................................................... 19
Work smarter, accomplish more . . . . . . . . . . . . . . . . . . . . . . . . . . . . . . . . . . . . . . . . . . . . . 21
Smoother import of Microsoft Word files ..................................................................................................................... 21
Miniature Table of Contents (mini TOC) ...................................................................................................................... 23
Conditional table columns ......................................................................................................................................................25
Enhanced visual conditional indicators ......................................................................................................................... 26
Conditional text at book level ...............................................................................................................................................27
Packager .............................................................................................................................................................................................. 29
Table Enhancements .................................................................................................................................................................30
Improved usability in tables .........................................................................................................................................30
i
Page 4

Automatic insertion of table continuation variables .................................................................................... 31
More out-of-the-box table styles ............................................................................................................................... 33
Enhanced pod support .............................................................................................................................................................. 34
Positioning of Pod ............................................................................................................................................................... 34
Enhanced Color Definition pod .................................................................................................................................. 35
Smart filters in pods ........................................................................................................................................................... 35
Enhanced user interface ..........................................................................................................................................................36
Improved FrameMaker and Adobe Experience Manager connector ....................................................... 38
Experience best-in-class XML authoring . . . . . . . . . . . . . . . . . . . . . . . . . . . . . . . . . . . . . .39
Simplified XML ................................................................................................................................................................................ 39
Simplified XML authoring ..............................................................................................................................................39
Customized environment for simplified XML authoring ..........................................................................40
Enhanced Quick Element Toolbar ............................................................................................................................ 41
DITA 1.3 support ............................................................................................................................................................................. 44
Enhanced Structure View ........................................................................................................................................................ 45
Improved support for inline MathML equations ....................................................................................................46
Faster EDD customization process ....................................................................................................................................47
DITAVAL support in DITA-OT publishing ..................................................................................................................... 48
Comprehensive DITA 1.2 support ....................................................................................................................................... 48
DITA maps preview, including nested maps .............................................................................................................48
Additional resources . . . . . . . . . . . . . . . . . . . . . . . . . . . . . . . . . . . . . . . . . . . . . . . . . . . . . . . . . 51
Version comparison chart ........................................................................................................................................................ 51
Product page ..................................................................................................................................................................................... 51
User guides and Help hub pages ........................................................................................................................................ 51
Legal notices . . . . . . . . . . . . . . . . . . . . . . . . . . . . . . . . . . . . . . . . . . . . . . . . . . . . . . . . . . . . . . . .53
ii
Page 5
Introduction
Introduction
Adobe FrameMaker (2015 release) is now a complete solution for bidirectional technical content. Ensure content is mobile-ready with new HTML5 layout and deliver it as a mobile app
across devices and formats. Personalize content with new dynamic content filters. Author XML
content faster with a simplified environment, enhanced Quick Element toolbar, and DITA 1.3
support. Collaborate efficiently with smoother import of Microsoft Word files. Work productively with enhanced conditional text and mini TOCs. Do more with tables.
This guide presents you an overview of the new features and workflows in FrameMaker (2015
release). A large number of narrated videos make it easy for you to become familiar with the
changes in the UI and help you get started with this release.
Besides this Getting Started Guide, you will find the FrameMaker User Guide and many other
resources at adobe.com. A collection of key FrameMaker resources is presented in the Addi-
tional resources section of this guide.
Page 6

Introduction
How to get Adobe FrameMaker (2015 release)
To try FrameMaker before buying, download a fully functional, 30-day complimentary trial version.
You can bu y Adobe Fr am eMaker (2015 r elease) t hr ough the
online Adobe Store or by calling 800-585-0774. Learn about
other ways to buy FrameMaker (2015 release), including buy-
ing through authorized resellers or purchasing with education or government discounts.
If you already have a license for an earlier version of
FrameMaker, see the following table for special pricing.
Upgrade to Adobe FrameMaker (2015 release)
If you have
Adobe
FrameMaker 12
Adobe
FrameMaker 11
Note: Prices listed are the Adobe direct store prices. Reseller prices may vary. Prices do not include
tax or shipping and handling.
For more information, call us at +1-877-687-1520 or visit the FrameMaker website.
USD EUR AUD YEN
$399 €399 $399 ¥52500
$599 €599 $599 ¥78900
How to get Adobe FrameMaker (2015 release)
2
Page 7
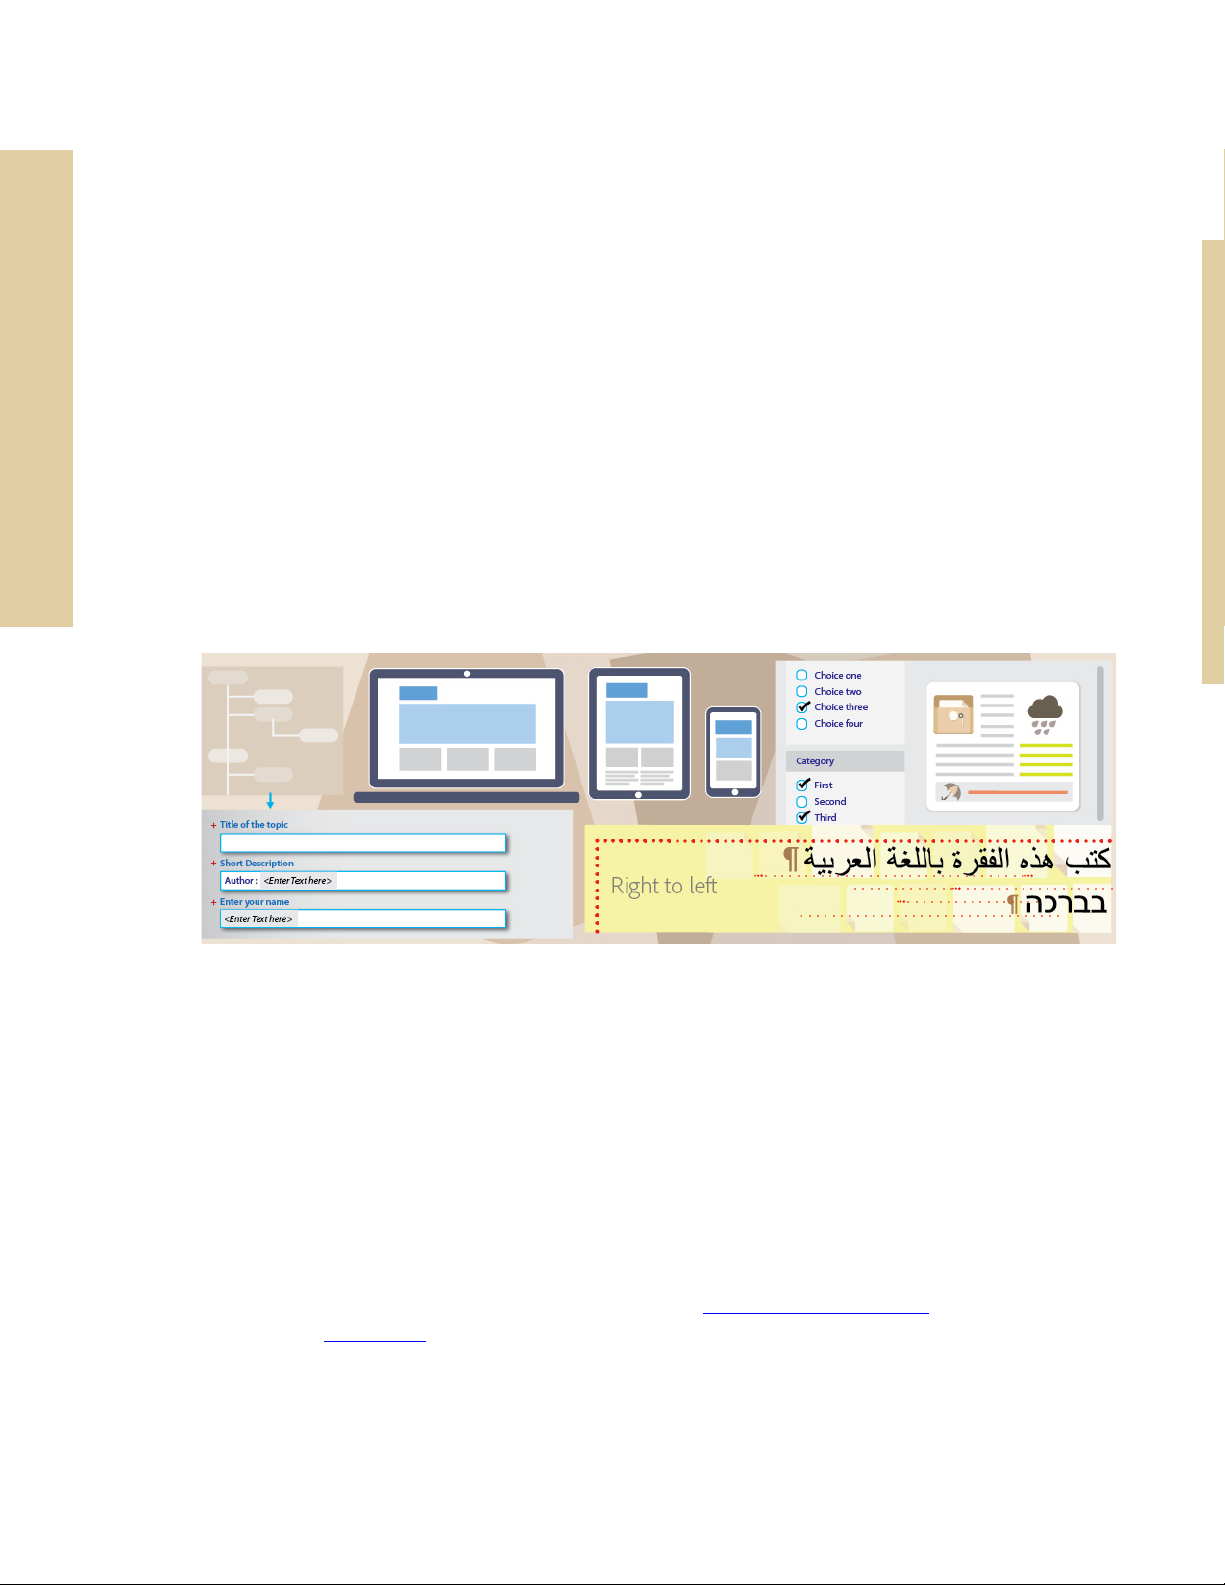
Leverage support for Arabic and Hebrew
Bidirectional language support
After using FrameMaker for so long to author documents in
left-to-right (LTR) languages, now use it to extend your users to
create bidirectional content. This means that you can not only create content in right-to-left (RTL) languages - Arabic and Hebrew,
but a mix of both LTR and RTL languages.
Author a
single document that
includes content in left-to-right languages such as English or German and
right-to-left languages - Arabic or
Hebrew. Create multi-flow documents
that have LTR and RTL content
side-by-side on the same page, or in a
book wherein some chapters are
authored in LTR languages, while others
in RTL languages. The TOC or index in
your document can also be configured
to publish in right-to-left fashion.
• Support for bidirectional content
and not just RTL
• Languages supported - Arabic
and Hebrew
• CJK content mixed with RTL at
document level
Leverage support for Arabic and Hebrew
All of this works out-of-the-box for
unstructured FrameMaker documents.
Page 8
Leverage support for Arabic and Hebrew
You can also author bidirectional content in DITA topics by simply applying the Direction attribute (dir) of any supporting element. Or define this attribute in the EDD to provide bidirectional authoring support in your custom structured applications.
The inheritance model in FrameMaker has been redesigned to support the Direction attribute.
For example, if a Document’s Direction attribute has been set to RTL, and the Direction attribute of a paragraph within the Document has been set to inherit, then the paragraph’s direction will also be set to RTL.
You will now find the numbering styles for - Indic, Hebrew, Abjad, and Alif Ba Ta that you can
use in autonumbering of paragraphs, sections, tables, figures, footnotes, and page numbers.
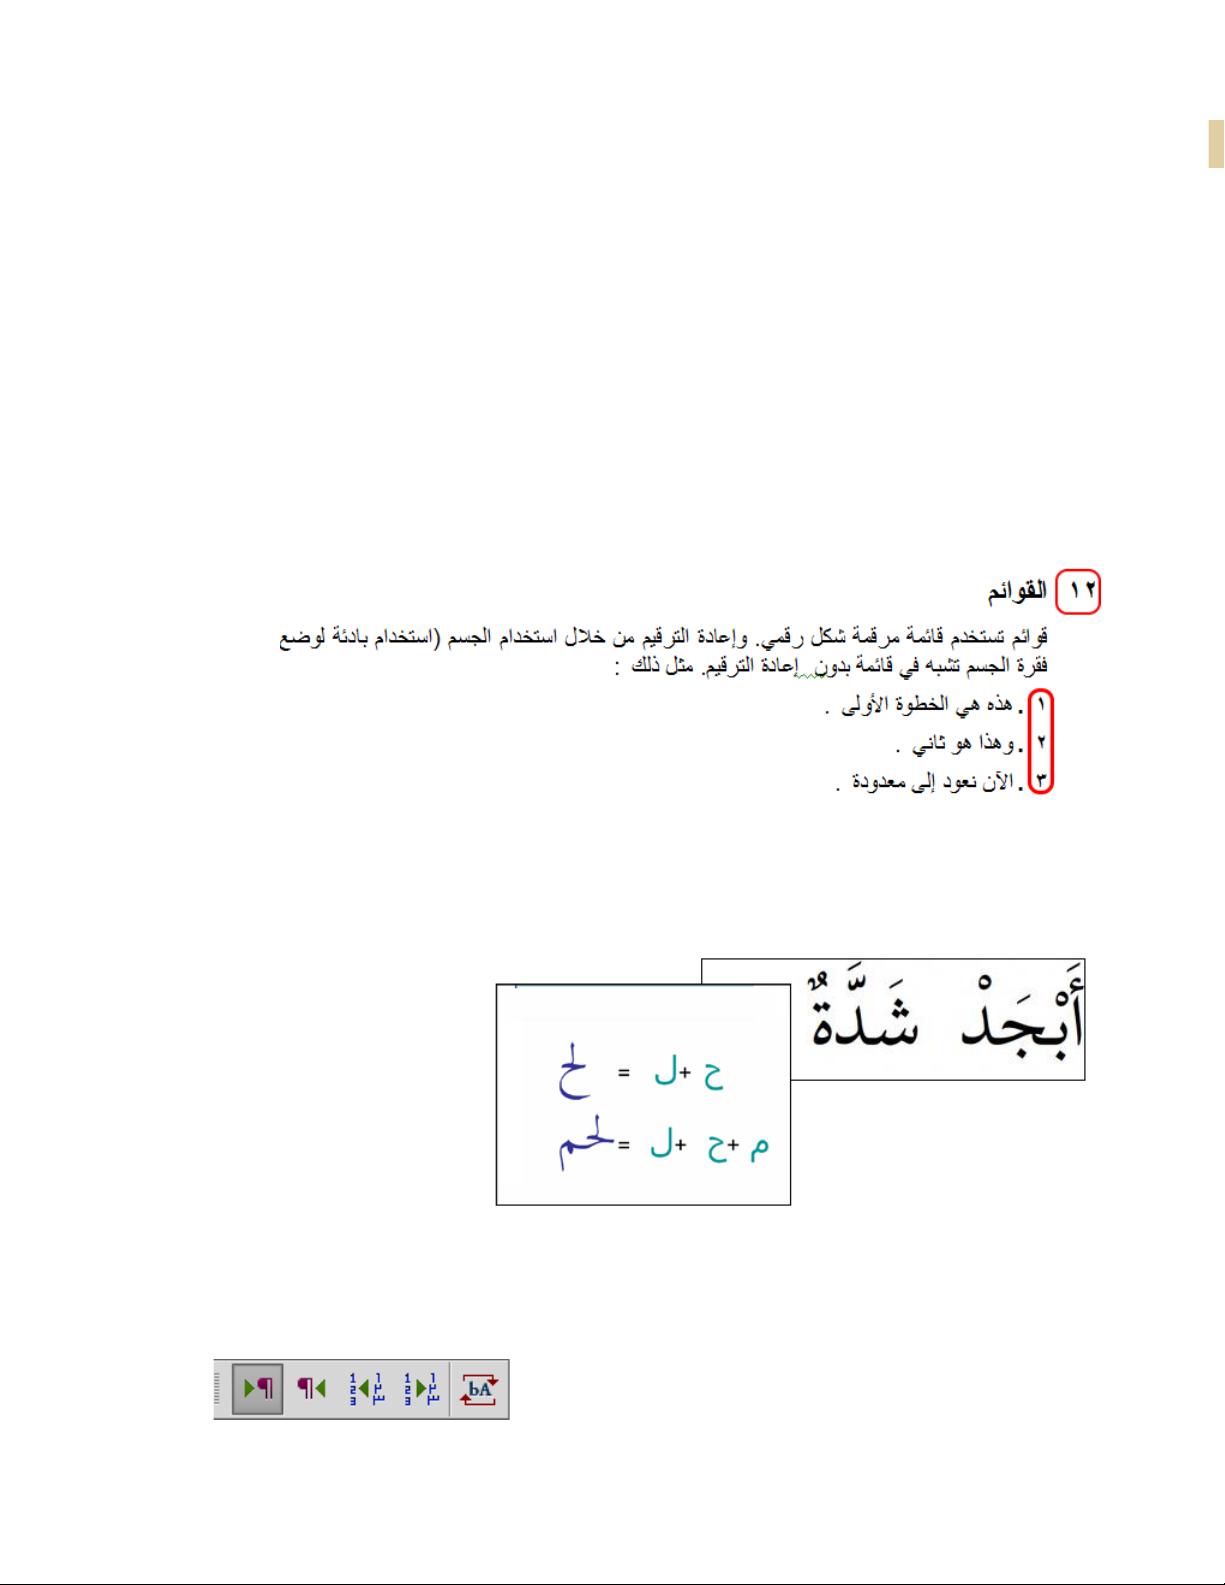
For Arabic language, FrameMaker supports diacritics and standard ligature characters as
shown in the following figure:
A new Direction toolbar had also been added to help you quickly know the direction of your
document, convert digits from English to Arabic or from Arabic to English, and directional
markers for neutral symbols, such as slash or parentheses.
Bidirectional language support
4
Page 9

Leverage support for Arabic and Hebrew
It’s easy to mix Chinese, Japanese, and Korean (CJK) content with LTR or RTL content. This support is available at the document level, but in different paragraphs. This means that within a
document, you can have Chinese content in one paragraph and the next paragraph can have
Arabic content.
To s et t h e d i r ec t io n o f a do c u me n t
1. Create a new document or use an existing document.
2. From the Format menu, choose Direction > Right-to-Left or Left-to-Right.
For more information, see Document Direction in FrameMaker Help.
Bidirectional content flipping
Reduce translation and DTP work with the new Direction property.
Author a document in an LTR language such as English and send it for translation to Arabic or
Hebrew without worrying about the direction of the translated content. Then simply flip the
direction of the translated document and your document is ready to be published.
5
Bidirectional content flipping
Page 10
Leverage support for Arabic and Hebrew
This works just as well for bidirectional documents. In this case, simply flip individual objects,
such as flows, text lines, paragraphs, tables, images, lists, and neutral characters (such as parenthesis).
For images or illustrations, you have a choice of either flipping the image from left to right, or
creating a mirror image. This is extremely helpful when you want to convert a flowchart from
English to Arabic.
Bidirectional content flipping
6
Page 11

Leverage support for Arabic and Hebrew
To f li p a pa ra g ra p h
1. Place the insertion point inside the paragraph.
2. From the Format menu, choose Paragraphs > Designer.
3. In the Paragraph Designer, go to the Direction tab.
4. In the Direction drop-down list, choose Right-to-Left or Left-to-Right.
To flip a table
1. Place the insertion point inside the table.
2. From the Table menu, choose Format > Table Designer.
3. In the Table Designer, go to the Direction tab.
4. In the Direction drop-down list, choose Right-to-Left or Left-to-Right.
To f li p t e x t l i ne s an d te x t fl ow s
1. Select the text line or text flow.
2. From the Graphic menu, choose Object Properties.
3. In the Object Properties dialog box, choose Text Line or Text Frame.
7
Bidirectional content flipping
Page 12
Leverage support for Arabic and Hebrew
4. In the Direction drop-down list, choose Right-to-Left or Left-to-Right.
For more information, see Document Direction in FrameMaker Help.
Bidirectional language publishing
• Publish bidirectional content in
seven new formats - HTML5,
WebHelp, CHM, EPUB, KF8,
MOBI, and as standalone mobile
app for iOS and Android devices
Publish documents with bidirectional content from within FrameMaker in
multiple formats: PDF, Responsive HTML5, WebHelp, CHM, EPUB, KF8,
MOBI, and mobile apps. Optionally, flip the HTML5 layout or use the new
responsive RTL WebHelp layout so that the navigation pane appears on the
right for RTL content, and render smoothly on any device - desktop, table, or
a mobile.
To p ub l i sh b id i re c ti on a l d o c um e nt s
1. From the File menu, choose Publish.
2. In the Publish pod, choose from the available list of output formats.
3. Click Publish.
For more information, see Document Direction in FrameMaker Help.
Bidirectional language publishing
8
Page 13
Publish to mobile devices in multiple formats
Mobile app output
Ensure wider distribution and consumption of content with a simplified mobile app generation
workflow and native integration with Adobe PhoneGap Build. Easily publish and then distribute your content as an installable app on major mobile platforms including, iOS and Android.
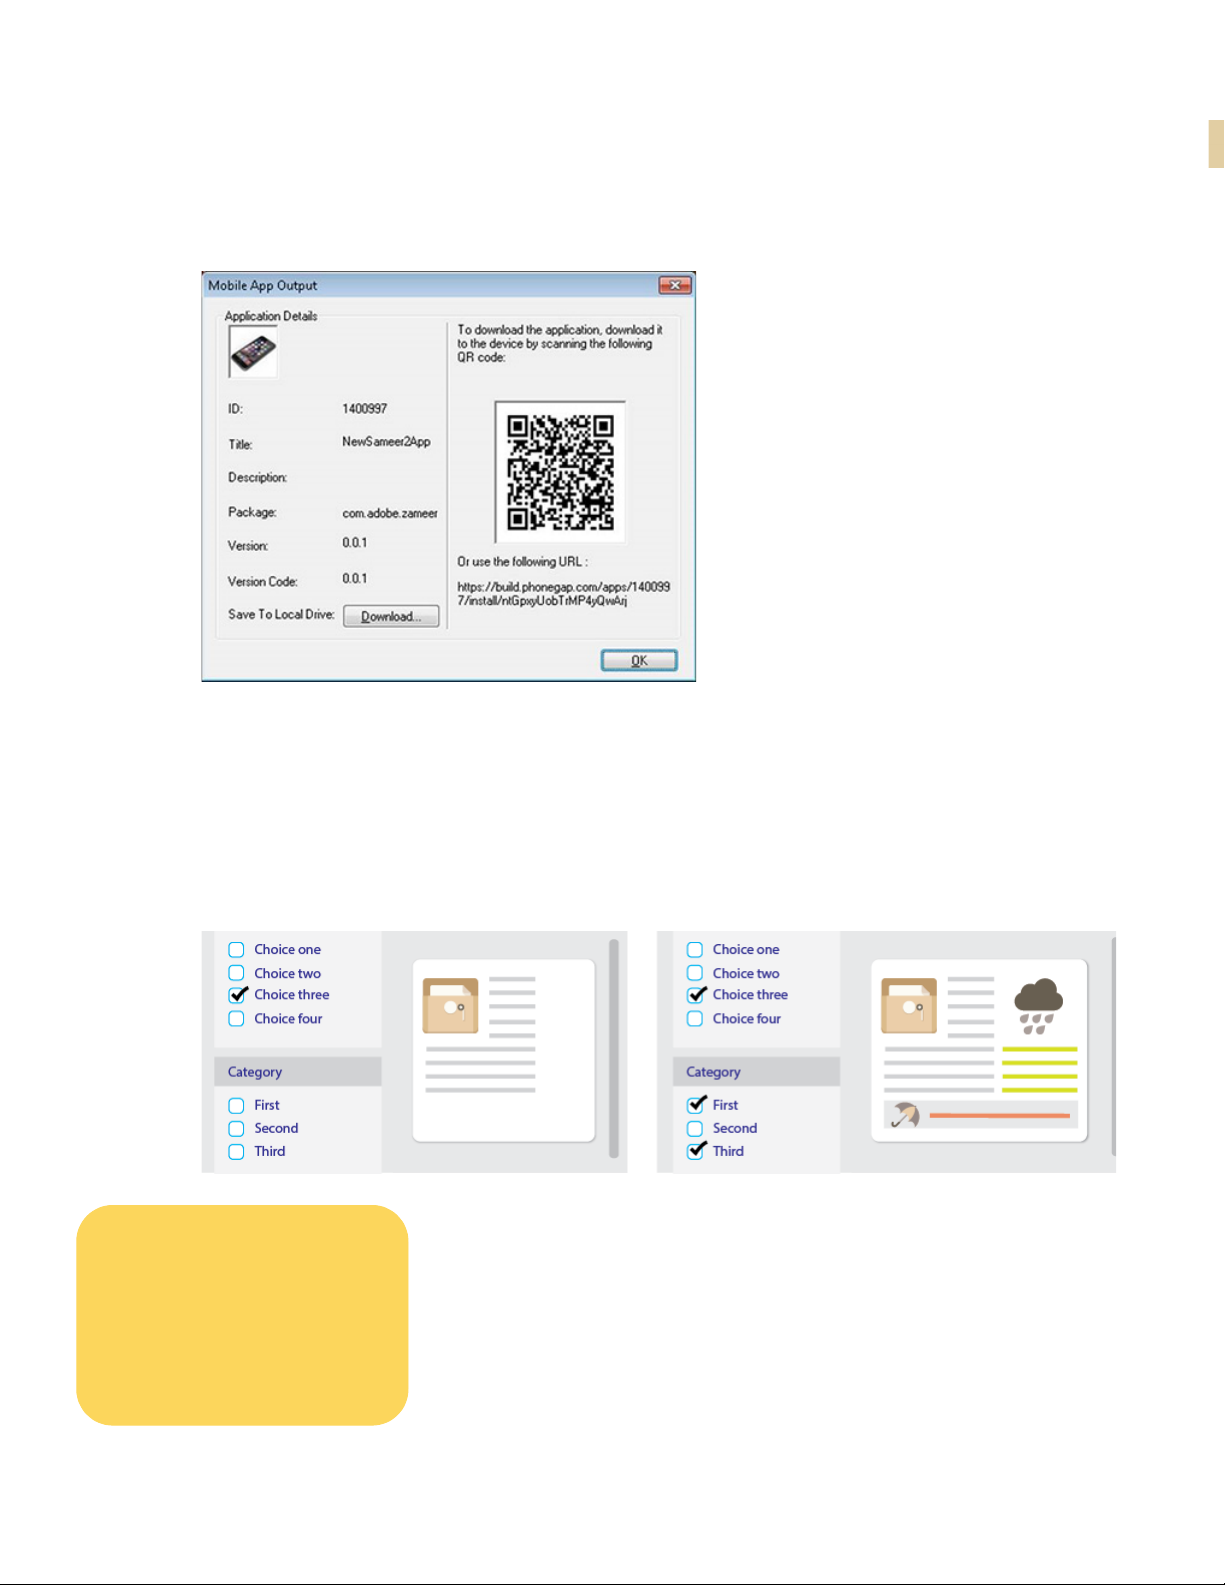
Once the app is generated, you can share the QR code or the app URL with your users to
download the app from the PhoneGap server. Alternatively, you can also publish the app from
PhoneGap on to Google Play store or Apple’s App Store.
Publish to mobile devices in multiple formats
Page 14
Publish to mobile devices in multiple formats
Manage the branding and design standards of the mobile layout
with new easy-to-use responsive layout editor. Leverage the
power of the Responsive HTML5 layout that comes with the new
dynamic content filtering feature that lets your users self-select
the content most relevant to them.
• Native integration with Adobe
PhoneGap Build
• Publish mobile apps using
FrameMaker
Deliver Help content for the audiences that are on the go.
• Easily download the mobile app
by scanning the QR code
To g en e r at e a m o b il e a pp
1. From the File menu, choose Publish.
2. In the Publish pod, choose Mobile App and click Edit Settings.
3. In the Outputs tab of the Publish Settings dialog box, choose Mobile App.
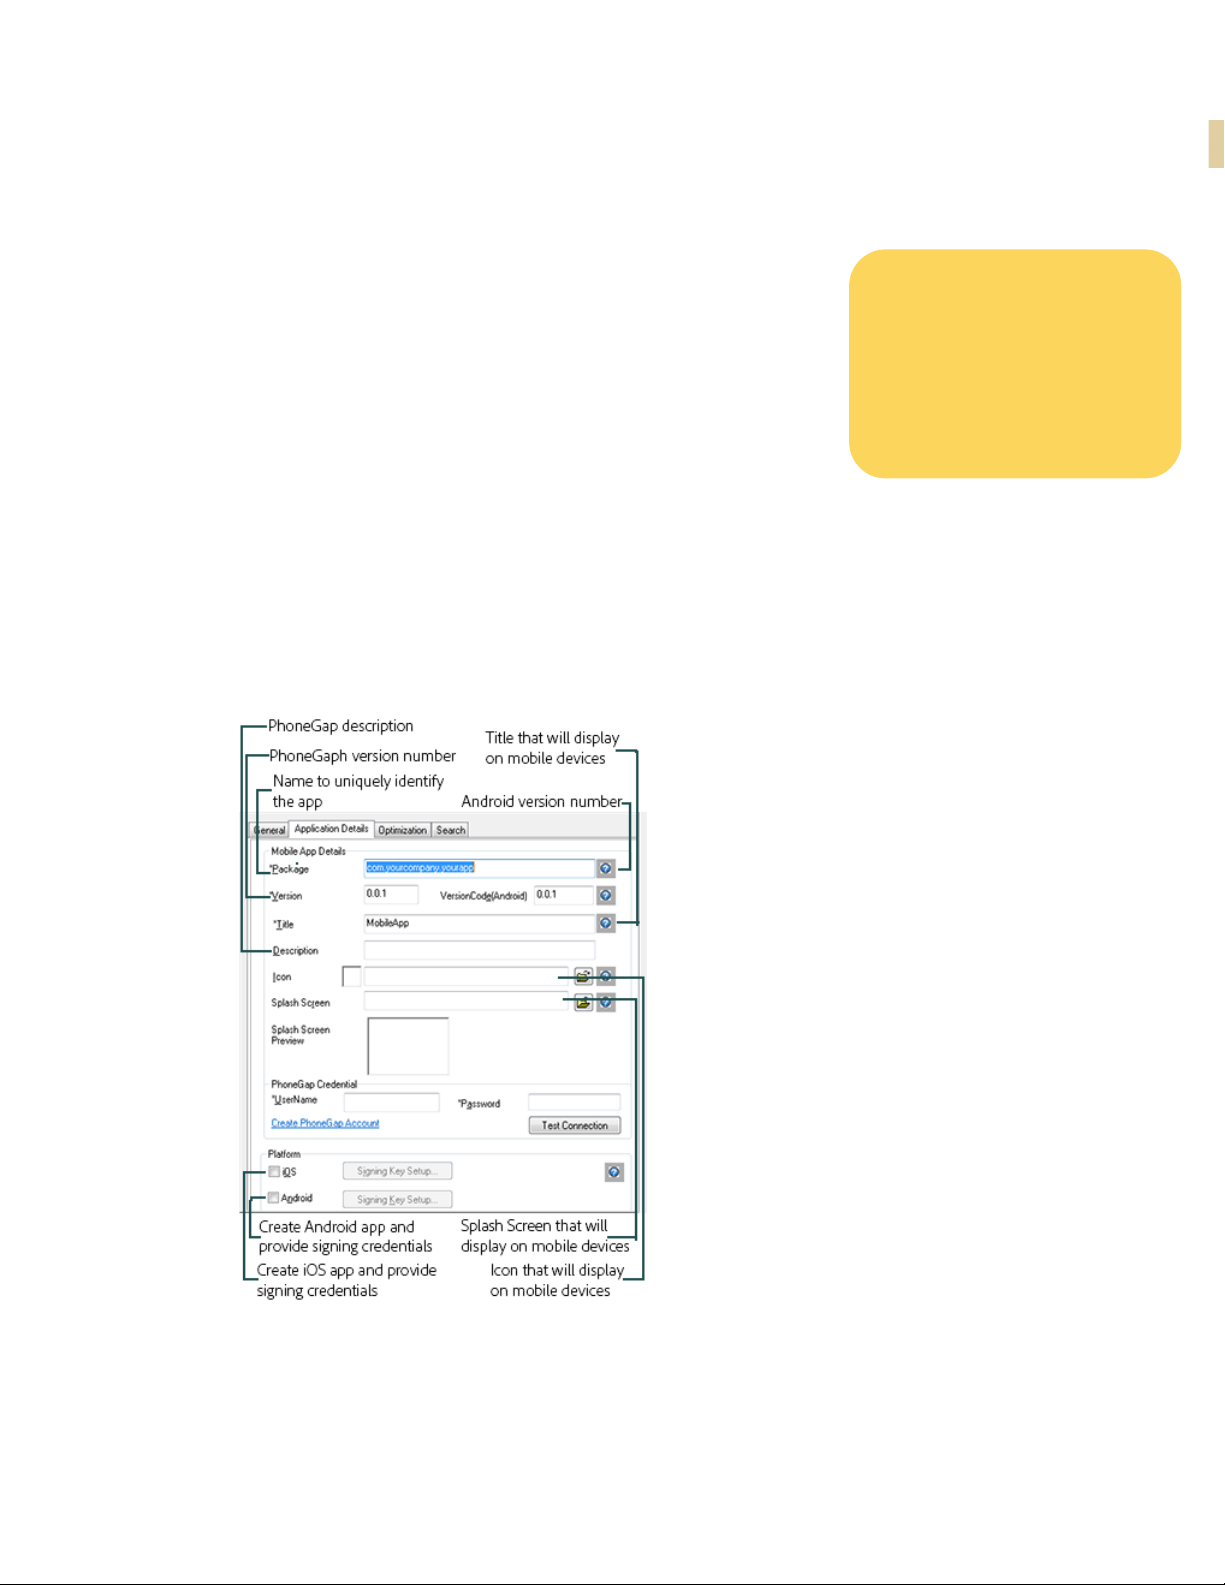
4. Go to the Application Details tab and provide the following details:
5. After you generate the mobile output, you are presented with a dialog that contains the QR
Mobile app output
code and a PhoneGap URL for the app. You can share these with your end-users who can
use these to download the app on their devices.
10
Page 15
Publish to mobile devices in multiple formats
Download the app to your computer or you can use the generated QR code or PhoneGap URL
to share the apps with your users.
For more information, see Generate Mobile app in FrameMaker Help.
Personalized dynamic content
• Easily create content filter criteria using existing conditional
tags and expressions
• Users self-select what they want
to see in final HTML5 output
Add conditions to your content to enable your audience to filter the content and find what is relevant to them - in just a few clicks. Create as
many conditions as you need. And see these conditions then become
the filter criteria in the final output that allow your users to get to the
right information – faster.
11
Personalized dynamic content
Page 16

Publish to mobile devices in multiple formats
Create and apply a dynamic content filter to Responsive HTML5 or Mobile output
1. From the Output tab, choose Responsive Layout or Mobile App.
2. In the General tab of the Settings dialog box, click Use Dynamic Content in the Output.
If you have previously, applied a filter to the current output, click Customize to edit the filter.
3. Enter a title for the filter.
This is displayed as a title for the filter in the output.
4. (Optional) Click Add New Group to create groups for your filter criteria.
5. Select a group and click Add Criteria. You can choose to add conditional tags or conditional
build expressions.
6. Use the arrow keys to move the groups and criteria within the filter.
7. In the output, you can provide users with mutually exclusive criteria (radio buttons) within
a group. Alternatively, you can allow users to multi-select criteria (check boxes). To allow
users to multi-select criteria, select Allow Multiple Selections in a Group.
8. Click Save and click Save and Generate.
For more information, see Generating output in FrameMaker Help.
Personalized dynamic content
12
Page 17
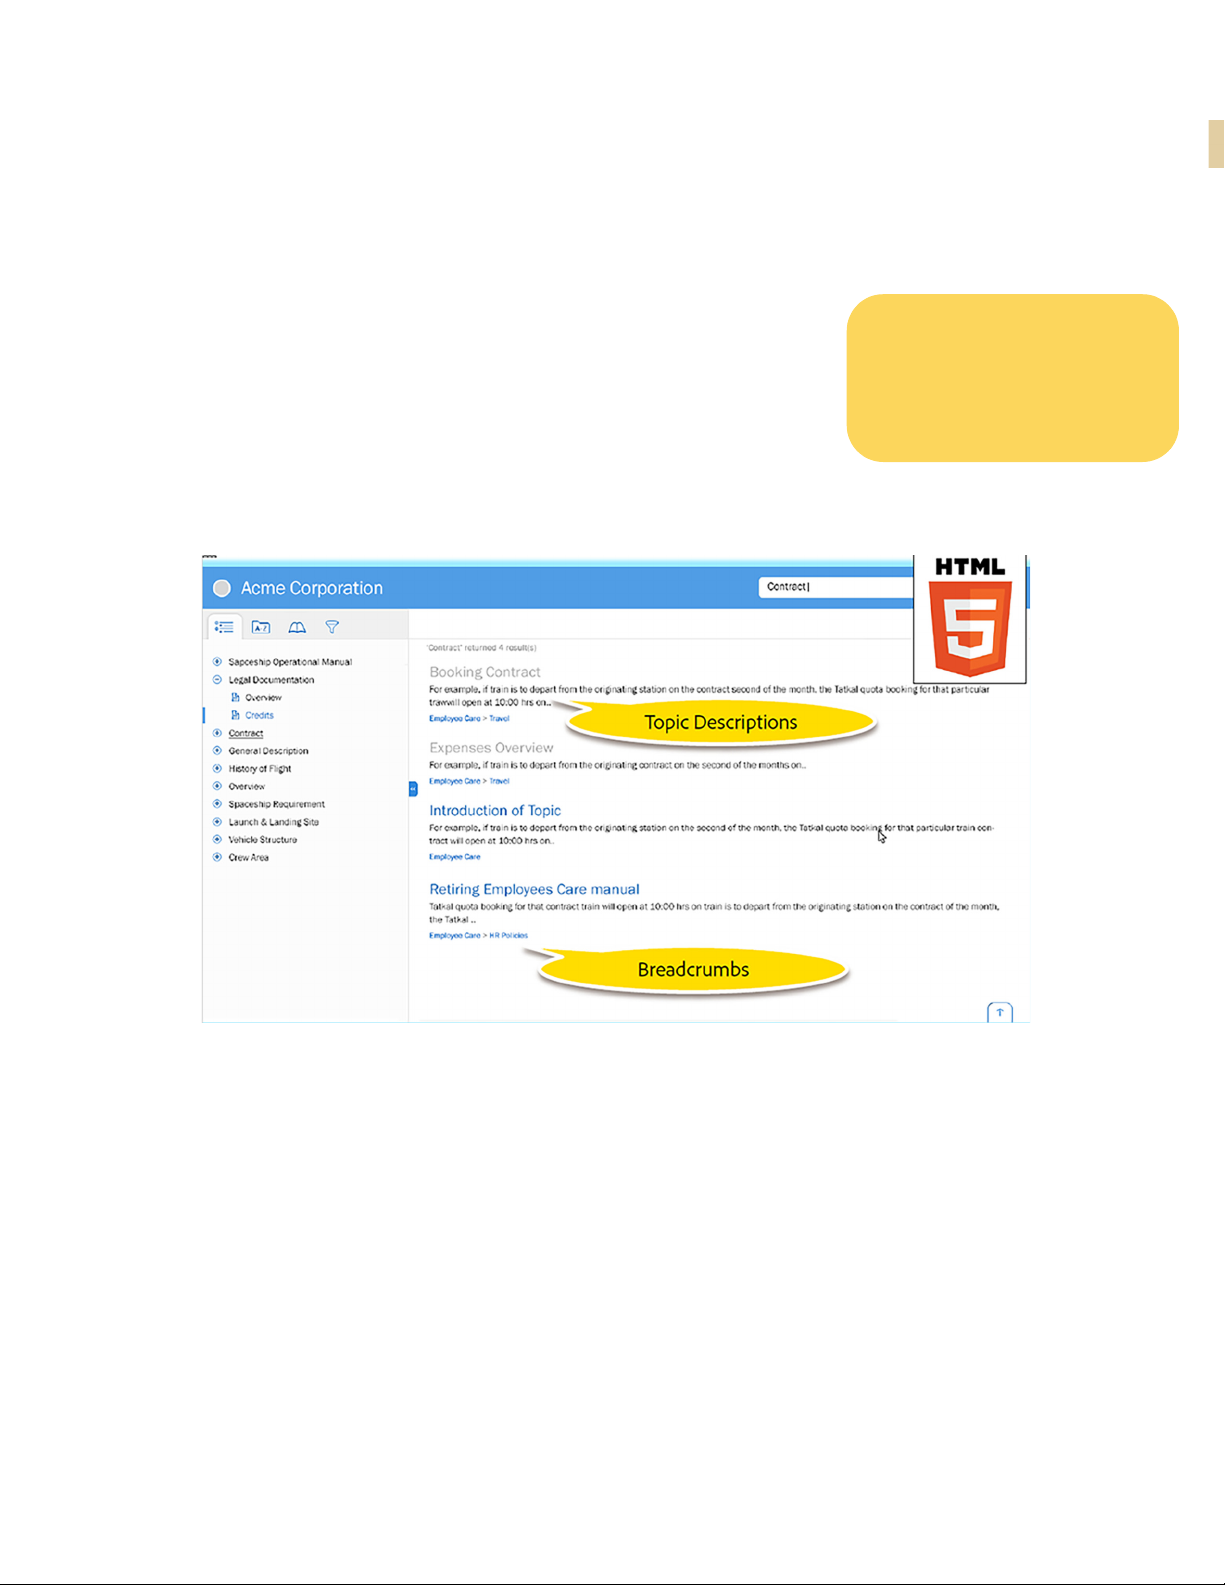
New HTML5 layout
Publish to mobile devices in multiple formats
Use the customizable Responsive HTML5 layouts to deliver an
amazing content consumption experience. With more powerful
search options, configure search to appear on the content or topic
panes, and show informative context and breadcrumbs in the
results. This helps your readers identify the best choice among
results. You can also customize the search context message for each topic.
• Convert layout to RTL language
in a single step
• Easily customize layout to meet
exact branding standards
13
New HTML5 layout
Page 18
Publish to mobile devices in multiple formats
The search results can also be configured to appear on the left pane.
Easily show or hide widgets such as glossary, TOC, index, and filters. Convert the layout to
right-to-left languages (Arabic and Hebrew) to meet the needs of a global audience, just by
changing one property. Also add Facebook and Twitter widgets to your pages to allow users to
share the content that they are reading – with a single click!
Provide your users with a different experience for the device (desktop, tablet, and mobile) that
they use by customizing the function bar, side bar, and TOC in the output.
Along with all these customizations, now you can also create frame-less output, which does
not contain any widgets, function bar, or side bar as shown below.
New HTML5 layout
14
Page 19

Custom fonts in EPUB files
• Use embedded custom fonts for
eBook publishing without worrying about its availability at
end user’s device
dard set by your design style guides.
Note: You must have distribution rights for the embedded font.
Publish to mobile devices in multiple formats
Embed custom fonts in your EPUB output and ensure that your users see
high-quality typography exactly as you intended, whether or not they have
the font installed on their device.
This feature is especially useful if you are using fonts that may not be readily
available to your end users. Use embedded fonts to enhance the branding stan-
15
Embed the fonts in EPUB output
1. From the Output tab, choose eBook.
2. In the Content tab of the eBook Settings dialog box, click Embed Fonts.
3. In the Embed Fonts dialog box, select the fonts to embed in the eBook output.
You can choose the fonts currently used in the project. Alternatively, you can choose from
all fonts available on your computer.
For more information, see Generating output in FrameMaker Help.
Custom fonts in EPUB files
Page 20

Publish to mobile devices in multiple formats
Attractive customizable Responsive HTML5 layouts and WebHelp skins
Give your WebHelp content a new look by choosing from a wide variety of skins from the WebHelp gallery.
And a powerful, yet easy-to-use WebHelp skin editor lets you customize not only your content,
but also the appearance of buttons, labels, fonts, background color, search boxes, and most
components of your online content.
Customize selected Responsive HTML5 layout
1. From the File menu, choose Publish.
2. From the Publish pod, select Responsive HTML5 and open the Publish Settings dialog box.
3. Go to the Output tab.
4. Click the drop-down list in the Manage Layout section.
5. Select Edit.
Attractive customizable Responsive HTML5 layouts and WebHelp skins
16
Page 21

Publish to mobile devices in multiple formats
6. The Layout Customization dialog box allows you to customize the properties of the different components of the selected layout:
•Use the Media Query component based on the targeted devices (desktop, tablet, or
mobile).
• The function bar, side bar, TOC, and filter can be customized by output device.
• Add social icons (Facebook and Twitter) to your output.
Choose a WebHelp skin
1. From the File menu, choose Publish.
2. From the Publish pod, select WebHelp and open the Publish Settings dialog box.
3. Go to the Output tab.
4. Go to the Navigation tab.
5. In the drop-down list in the Skin Selection section, click New.
6. In the Skin Gallery dialog box, select a skin.
17
Attractive customizable Responsive HTML5 layouts and WebHelp skins
Page 22

Publish to mobile devices in multiple formats
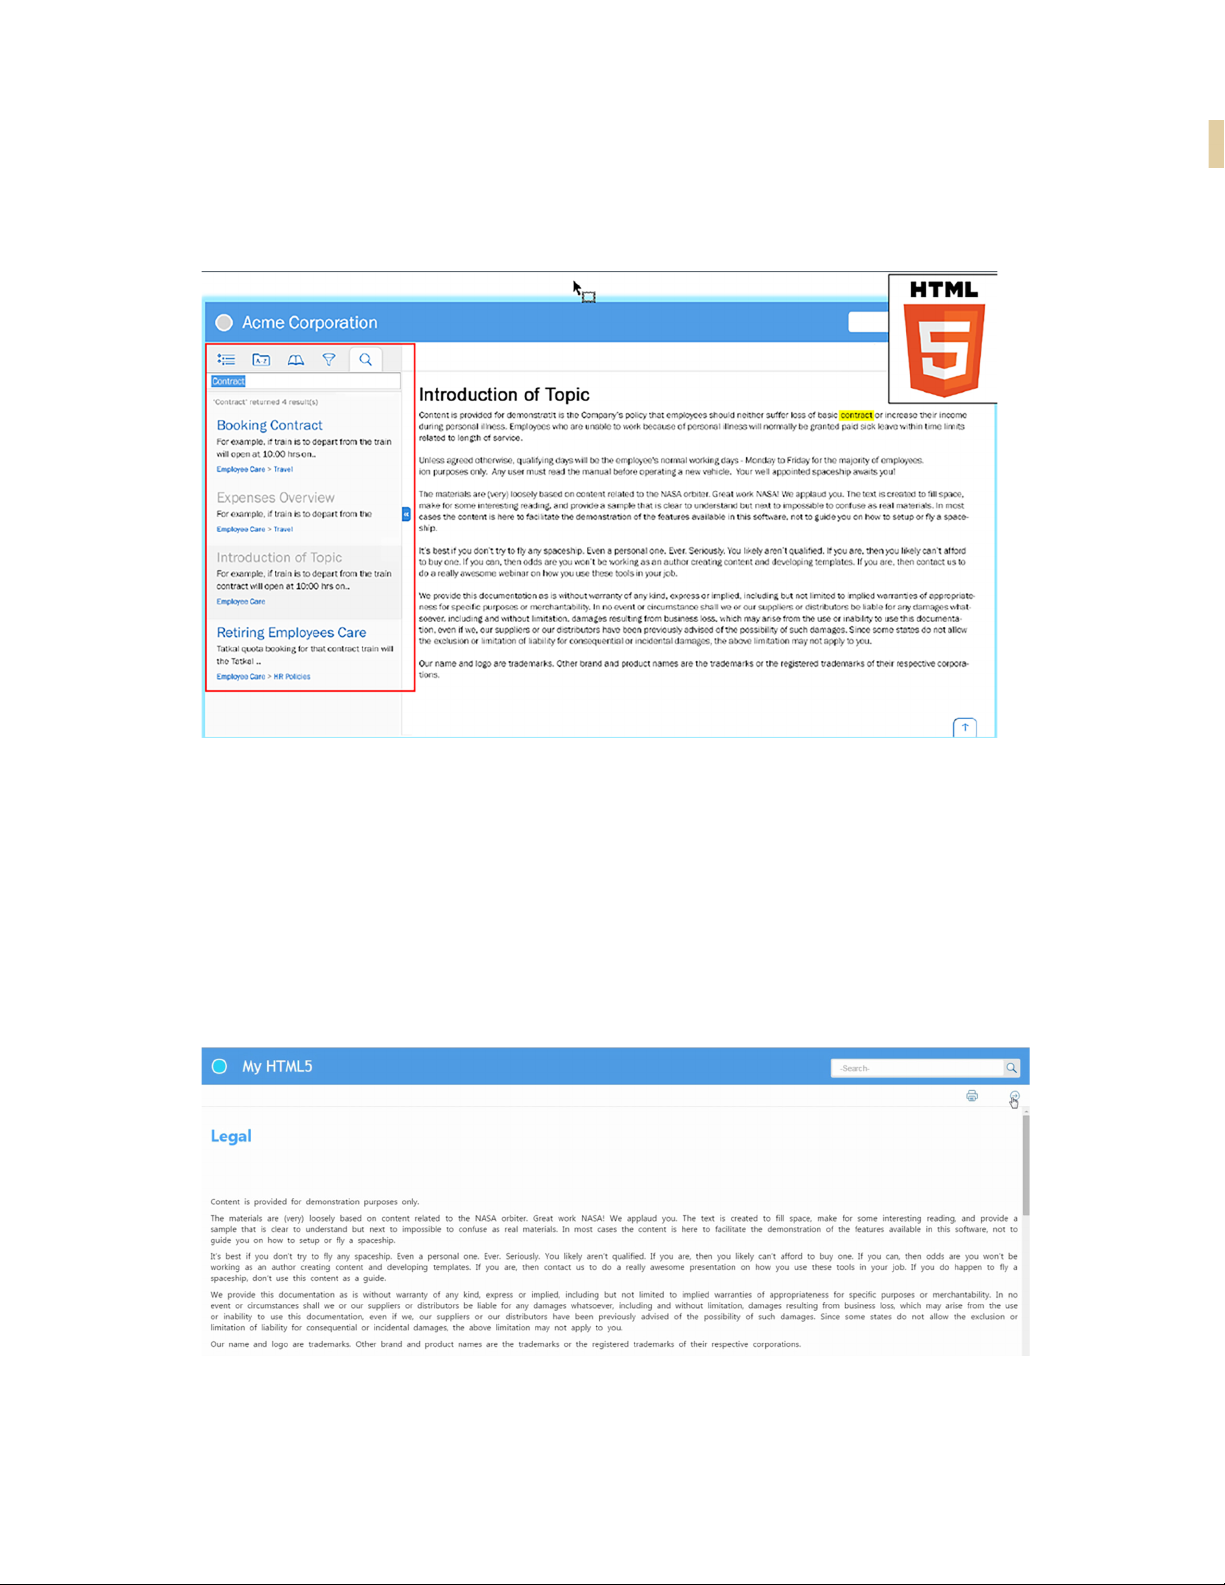
Reference page image publishing
Now, publish reference pages content such as images, headers and footers, and logos, in all
output formats supported by FrameMaker.
SVG support in responsive HTML5 output
Let your end users see top quality images regardless of the screen size and resolution of the
device on which they are being viewed. This because FrameMaker now embeds the entire SVG
code in the final Responsive HTML5 output.
Reuse Adobe RoboHelp style mappings
Work more efficiently by reusing the style mappings that you have already configured in RoboHelp in the native multi-device publishing workflow of Adobe FrameMaker.
Import RoboHelp settings file
1. From the File menu, choose Publish.
2. From the Publish pod, from the Settings drop-down list, select Import ISF File.
3. Select a RoboHelp settings files to import into the current output.
Reusable publishing elements
Reuse elements easily with the enhanced multidevice publishing settings file. Create elements,
such as Responsive HTML5 layouts, WebHelp skins, CSS, and HTML page templates, just once.
Reference page image publishing
18
Page 23

Publish to mobile devices in multiple formats
Then export and import the settings files to use these element across FrameMaker documents
and books.
Import or export style mapping file
1. From the File menu, choose Publish.
2. From the Publish pod, open the Publish Settings dialog box.
3. Go to the Style Mapping tab.
4. In the Output Styles drop-down list, choose the option to import or export a style mapping
file.
HTML page template support
Now improve the usability of your output by adding mini-TOCs, breadcrumbs, and headers and
footers. Create an HTML page template and then easily reuse this across the many
FrameMaker outputs to also give your users a uniform experience.
Apply HTML page template to output
1. From the File menu, choose Publish.
19
HTML page template support
Page 24

Publish to mobile devices in multiple formats
2. From the Publish pod, open the Publish Settings dialog box.
3. Go to the Output tab.
4. In the Options section, select HTML Page Template.
5. Select a page template file.
HTML page template support
20
Page 25

Work smarter, accomplish more
Smoother import of Microsoft Word files
• Map Word and FrameMaker
styles
• Retain format overrides from
Word
• Save import settings as preset
for multiple imports
Collaboration between contributors using Microsoft Word and writer who
publish using Adobe FrameMaker is easier than ever before. The new configurable settings allow you to map styles for paragraphs, characters, or
tables. You can not only speed up the conversion process, but also get rid of
a lot of pre- and post-processing tasks. With the enhanced import process,
you can:
•Map styles for paragraphs, characters, and tables through an intuitive
Word Import dialog box.
• In the Word Import dialog box, get a quick glance of the number of paragraph and character styles that found a match in your FrameMaker document.
•Choose to create new formats from Word document that are not available in the
FrameMaker document.
• Retain formatting form Word document for even those formats that found a match in your
FrameMaker document.
•Import inline styles from Word document into your FrameMaker document.
• Save the import setting as preset for subsequent imports.
•Choose to remove any manual page breaks or even get rid of empty paragraphs in the
imported FrameMaker document.
• Improved handling of table header rows.
Work smarter, accomplish more
Page 26

Work smarter, accomplish more
To i mp o r t a W o rd d o c um e nt
1. Place the insertion point at the required location in a document.
2. From the File menu, choose Import > File.
3. In the Import dialog box, select a Word document and choose Copy Into Document.
4. In the Unknown File Type dialog box, choose Microsoft Word 2007 and click Convert.
Smoother import of Microsoft Word files
22
Page 27

Work smarter, accomplish more
The Word Import dialog displays a message indicating the number of matching paragraph
and character styles.
23
For more information, see Import Microsoft Word files in FrameMaker Help.
Miniature Table of Contents (mini TOC)
Add a mini TOC to your unstructured document to give your readers a quick glance of what’s covered in the document. The mini
TOC feature automatically creates, sorts, and inserts a mini TOC at
a specified location in your document. This eliminates the old,
error-prone techniques of manually creating several lines of
cross-references, which do not update their order automatically if
you change the order of referenced headlines.
You c an also update t he defau lt style a nd format of the mini TOC to suit your needs and publish
it in all supported output formats. If you have updated your document, update the mini TOC
with a single click and save countless hours in production.
• Add a mini TOC in a document
• Place it where you want
• Customize it to match your document’s look and feel
Miniature Table of Contents (mini TOC)
Page 28

Work smarter, accomplish more
Create a mini TOC
Note: You can add a mini TOC in an unstructured document only.
1. Click at the location where you want to
insert the mini TOC.
2. From the Special menu, choose Table
of Contents > Create Mini TOC.
3. Select the paragraph formats you want
to use in the mini TOC.
The screenshot displays a mini TOC within
a document.
Miniature Table of Contents (mini TOC)
24
Page 29

Update a mini TOC
1. Select an existing mini TOC.
2. Right-click and choose Update Mini TOC.
Delete a mini TOC
1. Select an existing mini TOC.
2. Right-click and choose Delete Mini TOC.
Work smarter, accomplish more
For more information, see Generate a miniature table of contents in FrameMaker Help.
Conditional table columns
Present only the required information to your users by hiding the columns in a table that are
not relevant for a particular type of audience.
Apply conditions in columns that will show or hide depending on your intended audience. For
example, you can conditionalize columns by predefined conditions, such as audience, platform,
product, or others.
25
Conditional table columns
Page 30

Work smarter, accomplish more
Enhanced visual conditional indicators
• Know what conditions have
been applied to tables and
graphic objects
• Content remains readable even
when multiple tags are applied
applied on the content at a glance. This feature helps in reducing errors in your final output as
the visual conditional indicators ensure that the intended conditional tag is applied to the content.
FrameMaker has significantly improved the display of conditional indicators to
make it easier to identify portions of content that are tagged for one or more
versions of published output. Now you can easily identify which conditions
have been applied to various types of content, such as images, tables, graphics, and anchored frames.
Use conditional tag formatting rules to easily identify one or more conditions
Enhanced visual conditional indicators
26
Page 31

Work smarter, accomplish more
For more information, see Conditional text in FrameMaker Help.
Conditional text at book level
Now you can eliminate the tedium of applying conditions or
expressions to individual chapters in a book. FrameMaker allows
you to apply common conditions or expressions to all chapters in a
book in a single operation. If a condition or expression is not present in a chapter, FrameMaker creates that expression and applies it
on that chapter.
By applying conditions or expressions directly to books and all their components, you can
expand the power of publishing and also save time. This new functionality significantly
expands your ability to manage projects on a more granular level. You can now publish the
right content, in the right formats, for the right audience.
• Apply common conditions
across chapters with a single
click
• Ensure consistency while applying conditions
27
Conditional text at book level
Page 32

Work smarter, accomplish more
Apply conditional tags at book level
1. Select the .book file.
2. From the View menu, choose Show/Hide
Conditional Text and select the conditions
you want to apply to all files in the book.
3. Select the Update Book After Apply option
and click Apply.
For more information, see Applying conditional
tags at book level in FrameMaker Help.
Conditional text at book level
28
Page 33

Work smarter, accomplish more
Packager
Never miss out a file in your documents, books, or DITA maps when you share them with your
colleagues, subject matter experts, and translators. Create a self-contained package that
includes all dependent files, such as referenced files and images, and configuration files.
29
Create a package
1. Select the book or DITA map.
2. From the File menu, choose Package.
3. In the Package dialog:
Packager
Page 34

Work smarter, accomplish more
4. Click Package.
FrameMaker processes the book file and creates a package in the form of a zip file. Now you
can share the zip file with others or create backup.
For more information, see Create packages in FrameMaker Help.
Table Enhancements
Improved usability in tables
Working with tables has never been so easy. Save authoring time
by using the new and improved user experience when working
with tables. Navigate the table cells using the arrow keys, or add a
row by pressing TAB in the last cell of the last column.
If you want to move or reorganize information within a table, simply drag rows or columns and
drop them onto the rows or columns that you want to replace them with. Or use the Shift key
to simply moves the rows or columns when you drag-and-drop them.
• Conditionalize table columns
• Add table continuation variables
• Navigate using the arrow keys
• Press tab to insert rows
Table Enhancements
30
Page 35

Work smarter, accomplish more
For more information, see Ta bl es in FrameMaker Help.
Automatic insertion of table continuation variables
Improve the readability of large, multi-page tables with table continuation and table sheet variables that you can insert to a new or old table. With a few clicks, you can insert these variables
into all the existing tables in a document or all the tables of a selected format.
31
Table Enhancements
Page 36

Work smarter, accomplish more
Create a table with variables
1. Place the insertion point where you need to insert the table.
2. From the Table menu, choose Insert Table.
3. In the Table Variables section of the Insert Table dialog:
Apply table continuation variables to the inserted table
Apply table sheet variables to the inserted table.
4. Click Insert.
Apply table variables to existing tables
1. From the Table menu, choose Insert Table Variables.
2. In the Table Variables dialog box:
Apply table continuation variables to the inserted table
Apply table sheet variables to the inserted table.
3. And choose to apply the table variable changes to:
All the tables in the document.
Or all the table of a particular format.
Table Enhancements
32
Page 37

For more information, see Ta bl es in FrameMaker Help.
More out-of-the-box table styles
Work smarter, accomplish more
• Apply solid fills in table shading
• New out-of-the-box table styles
information in your table more readable.
You no longer have to restrict yourself to a limited set of table styles.
FrameMaker now gives you a wide range of out-of-the-box table styles that
you can use to improve the visual appeal of your documents. With the
improved table shading, now apply solid colors to table cells and make the
33
Insert a table and apply table styles
1. From the Table menu, choose Insert Table.
2. In the Table Format drop-down list, choose from the updated list of table formats and click
Insert.
For more information, see Ta bl es in FrameMaker Help.
Table Enhancements
Page 38

Work smarter, accomplish more
Enhanced pod support
Highlighting and Positioning of Pod
Did you find it difficult to locate the pod you just added to your workspace? Well, FrameMaker
now makes it easier for you to work with and find the pod that you were looking for. As soon as
you open a pod, FrameMaker adds the highlighted blue boundary to the pod for quick identification.
Notice, the blue highlight boundary indicating the newly opened pod.
Enhanced pod support
34
Page 39

Work smarter, accomplish more
You can also configure the preferences (Preferences > Interface > Hide Pods on Close), so that
you don’t have to search for modaless dialog in the workspace, because they open in the same
location they were when you last closed FrameMaker XML Author. Also, FrameMaker XML
Author remembers the locations of the modal dialogs that you open. This way the dialogs will
appear in the same location the next time you open the dialog or even the next time you open
FrameMaker XML Author.
Enhanced Color Definition pod
You no longer have to guess the percentage of the red, green, or blue colors to create a new
RGB color. The Color Definition dialog has been enhanced to let you specify the RGB color levels in the form of integer values - rather than percentages. If you are the one who likes to work
with the hex code, then use that code to create a new color definition for your document.
35
And easily then compare the new and current color definitions in their adjoining boxes.
Smart filters in pods
Eliminate endless scrolling through long lists in pods with smart filtering (Search as You Type).
Easily find the relevant item in the paragraph, character, and table designers as soon as you
start typing in the text box. The list dynamically filters content to display relevant options.
Enhanced pod support
Page 40

Work smarter, accomplish more
The paragraph tags is filtered to tags starting with the letter H as you start typing.
Enhanced user interface
Make the workspace your own, optimized for the work you do, and configured to exactly what
you want. The latest user interface enhancements make working in the FrameMaker environment easier and more efficient.
Enhanced user interface
36
Page 41

Work smarter, accomplish more
Now resize these dialogs to work on them the way you want to:
• Set Up Table of Contents
• Set Up Mini Table of Contents
• Set Up Standard Index dialog
• Set Up Author Index dialog
• Set Up Subject Index dialog
• Set Up Index Of Markers dialog
• Set Up Index Of References dialog
•DITA Conref dialog
•DITA Cross-Reference dialog
• DITA Link dialog
•Show / Hide Conditional Text dialog
• Cross-Reference dialog
37
Enhanced user interface
Page 42

Work smarter, accomplish more
Improved FrameMaker and Adobe Experience Manager connector
Enjoy significant improvement in performance while carrying out frequently used operations,
such as check-in and check-out, thanks to an enhanced connector between FrameMaker and
Adobe Experience Manager CMS.
Improved FrameMaker and Adobe Experience Manager connector
38
Page 43

Experience best-in-class XML authoring
Simplified XML
Simplified XML authoring
• Easy to fill form-like authoring
environment
• No need to know the underlying
XML structure
• Out-of-the-box forms for DITA
Experience best-in-class XML authoring
Now the subject matter experts and casual authors can create valid XML doc-
uments without worrying about the underlying XML complexities. The simplified XML authoring environment allows you to work faster with an
intuitive user interface, which gives a form-like easy-to-fill authoring experience. The main menu options and the Quick Element Toolbar have been
customized to provide only those options that you would need to work
faster. Use the Quick Element Toolbar to insert objects quickly, such as a
paragraph, section, image, and so on.
Page 44

Experience best-in-class XML authoring
Customized environment for simplified XML authoring
Set up simplified XML authoring environment for your own structured applications - the way you want it! You can set up a powerful, richly formatted, easy-to-fill form-like authoring environment
for your users.
You can give your users a Free flow form, wherein the users can
create content the way they want. For example, in a Free flow form
a user can have an image immediately after a section title without having the section introductory paragraph. The other form that you can provide is the Guided form, wherein the users
must create content in a specific structure. For example, in a Guided form, you can have your
users create a procedure by first writing the step followed by the step result.
You can easily customize the XML authoring environment by integrating XML-based forms
with your structured application, customizing the Quick Element Toolbar to allow users to
insert the most commonly used elements - essentially, easing the XML authoring workflow.
• Free form for free flow authoring
• Guided form for structured
authoring
• Customize QET
Simplified XML
40
Page 45

Experience best-in-class XML authoring
Enhanced Quick Element Toolbar
Make it easy for authors to focus on content, not on validation.
Insert content even more easily with the enhanced,
always-enabled Quick Element Toolbar. The toolbar automatically
identifies the next valid location if the inserted object is invalid at
the current location.
You can qu ic kl y inser t a table, figure, footnote, or any other structured content by using the Quick Element Toolbar while maintaining a valid structural context.
• Configurable QET
• Always insert objects at valid
location
• Out-of-the-box QET for DITA
41
Simplified XML
Page 46

Experience best-in-class XML authoring
Enable the Simplified XML view
1. Open the Preferences dialog box.
Simplified XML
42
Page 47

Experience best-in-class XML authoring
2. Choose Simplified XML and select the Enable Simplified XML view option.
3. Restart FrameMaker.
Author in the Simplified XML view
1. Create a new DITA topic.
2. Click the Author View button in the application bar to switch to the Simplified XML authoring environment.
3. Enter information in the form fields.
43
Simplified XML
Page 48

Experience best-in-class XML authoring
Customize the Simplified XML authoring environment
1. Open the following document:
<Fm Install directory>\Structure\structapps.fm
2. Locate the structured application settings for the DITA topic that you want to customize.
3. Check the file path of the configuration and template files specified under the Form View
category.
4. Update the parameters in the configuration (.ini) file or the associated template.
For more information, see Simplified XML in FrameMaker Help.
DITA 1.3 support
With FrameMaker’s upgrade to DITA 1.3 support, you can now author more custom topic types
defined by the latest DITA specifications. FrameMaker now supports the following new topic
types:
•troubleshooting
•learningObjectMap
DITA 1.3 support
44
Page 49

•learningGroupMap
Experience best-in-class XML authoring
Configure FrameMaker to use DITA 1.3
1. From the DITA menu, choose DITA Options.
2. In the DITA Versions drop-down of the DITA Options dialog box, choose DITA 1.3.
3. You are required to restart FrameMaker to effect the changes.
For more information, see Customizing DITA in FrameMaker Help.
Enhanced Structure View
Working with FrameMaker’s Structure View is even simpler and more convenient.
Now select an element in the Document view and easily
find it in the Structure View. Get a clear visual indicator
when you drop elements at invalid locations in the tree.
Simple right-click options are now available for you to
expand and collapse sibling elements and attributes.
• Highlight current node in Structure view
• Enhanced drag-and-drop
• Expand or collapse child and
sibling elements and attributes
45
Enhanced Structure View
Page 50

Experience best-in-class XML authoring
When scrolling through your document using the mouse or the scroll bars, FrameMaker also
scrolls through the elements in the Structure View. So, the Document View and the Structure
View will always be display in sync.
For more information, see Structured authoring in FrameMaker Help.
Improved support for inline MathML equations
• Create inline MathML equations
• Apply surrounding paragraph’s
settings
• Export equations as vector files
Improved support for inline MathML equations
Leverage FrameMaker’s native integration with MathFlow
Structure and Style editors from Design Science to create
inline equations. The equations now merge with the surrounding paragraph by inheriting paragraph properties such
as font and background color.
46
Page 51

Experience best-in-class XML authoring
Never export your MathML equations as raster in the published output again. Instead, export
them as high quality vector graphics. Also, allow your readers to search for the equations in the
PDF output.
47
Create inline MathML equations.
1. Insert a MathML equation in your document.
2. Select the MathML equation.
3. From the Graphic menu, choose Object Properties or Object Style Designer.
4. In the MathML Equation Properties dialog box:
Improved support for inline MathML equations
Page 52

Experience best-in-class XML authoring
You can also apply these settings globally to all MathML equations created subsequently.
1. Open the Preferences dialog (Edit > Preferences).
2. In the MathFlow settings section of the MathML tab, change the equation settings.
Note: These settings take effect immediately. So you do not need to restart FrameMaker.
For more information, see Format a MathML equation in FrameMaker Help.
Faster EDD customization process
Reduce EDD customization time from hours to minutes by using the script included with
FrameMaker. Once you run the script, you get the Update EDD option under the DITA main
menu. Running this command would automatically change the element definition in all the
relevant places in the DITA 1.2 EDD hierarchy.
Faster EDD customization process
48
Page 53

Experience best-in-class XML authoring
DITAVAL support in DITA-OT publishing
Leverage out-of-the-box support for DITA-OT to seamlessly publish content in various formats,
including PDF, HTML, Microsoft HTML Help (.CHM), and Java Help. Also, conditionalize your
DITA topics and then use DITAVAL files to filer the final DITA-OT output in any of these formats.
To apply a DITAVAL file when generating DITA-OT output
1. From the DITA menu, choose Generate DITA-OT Output.
2. In the Generate DITA-OT Output dialog box, select the output type.
3. In the DitaVal file field, enter the location of the DitaVal file.
Or browse and select the file.
4. Click Build.
For more information, see Generate output using DITA OT in FrameMaker Help.
Comprehensive DITA 1.2 support
Create customized information models by automatically generating DITA 1.2 elements, such as
titles, TOC, indexes, page rounding, and numbering. Publish DITA maps has been simplified.
That’s not all, you can align images in your DITA 1.2 topics by simply setting the align attribute value in the Attributes editor. Or set the align property in the EDD to default all images to
a preset alignment. Also, easily resize the images in the topics by setting the height, width,
scale, and Scalefit attributes in the Attributes editor.
For more information, see About graphic elements in structured documents in FrameMaker Help.
DITA maps preview, including nested maps
Preview of all the direct and nested references in a DITA map in a single document view. And
then simply double-click to open any of these references in a separate document.
49
DITAVAL support in DITA-OT publishing
Page 54

Experience best-in-class XML authoring
To p re vi e w D IT A m ap s
1. To preview the content, choose DITA > Resolve Topicref (s) > Show Content.
2. To hide the preview, choose DITA > Resolve Topicref (s) > Hide Content.
If a DITA map includes references to child maps, the Show and Hide options in the DITA map
will show or hide the topics referenced in the child maps.
To show or hide child maps, ensure that the Include child ditamap option is checked in the
Resolve Topicrefs dialog.
For more information, see Display DITA map content in FrameMaker Help.
DITA maps preview, including nested maps
50
Page 55

Additional resources
More information on the full Adobe Technical Communication Suite and the tools it provides
can be found online.
Version comparison chart
Want to compare the latest version of FrameMaker with the earlier versions, click here.
Product page
• Adobe Technical Communications homepage
• Adobe FrameMaker homepage
• Adobe FrameMaker XML Author homepage
• Adobe FrameMaker Publishing Server homepage
• Adobe RoboHelp homepage
User guides and Help hub pages
• Adobe FrameMaker (2015 release) User Guide
• Adobe FrameMaker Help Hub
• Adobe RoboHelp (2015 release) User Guide
• Adobe RoboHelp Help Hub
Additional resources
Page 56

Additional resources
• Adobe FrameMaker XML Author (2015 release) User Guide
• Adobe FrameMaker XML Author Help Hub
• Adobe FrameMaker Publishing Server (2015 release) User Guide
• Adobe FrameMaker Publishing Server Help Hub
User guides and Help hub pages
52
Page 57

Legal notices
Follow this link: Legal Notices
Legal notices
Page 58

Legal notices
54
 Loading...