

Page 1

Using
ADOBE® FLASH® BUILDERTM 4.7
Page 2

Legal notices
Legal Notices
For legal notices, see http://help.adobe.com/en_US/legalnotices/index.html.
Last updated 12/3/2012
Page 3

Contents
Chapter 1: About Flash Builder
Applications you can build with Flash Builder . . . . . . . . . . . . . . . . . . . . . . . . . . . . . . . . . . . . . . . . . . . . . . . . . . . . . . . . . . . . . . . . . . . . . . . . . . 1
Features that accelerate application development . . . . . . . . . . . . . . . . . . . . . . . . . . . . . . . . . . . . . . . . . . . . . . . . . . . . . . . . . . . . . . . . . . . . . . 2
Features for running and debugging projects . . . . . . . . . . . . . . . . . . . . . . . . . . . . . . . . . . . . . . . . . . . . . . . . . . . . . . . . . . . . . . . . . . . . . . . . . . 2
Flash Builder versions . . . . . . . . . . . . . . . . . . . . . . . . . . . . . . . . . . . . . . . . . . . . . . . . . . . . . . . . . . . . . . . . . . . . . . . . . . . . . . . . . . . . . . . . . . . . . . . . . . 3
Flash Builder configurations . . . . . . . . . . . . . . . . . . . . . . . . . . . . . . . . . . . . . . . . . . . . . . . . . . . . . . . . . . . . . . . . . . . . . . . . . . . . . . . . . . . . . . . . . . . 3
Chapter 2: Getting Started With Flash Builder
Flash Builder perspectives and views . . . . . . . . . . . . . . . . . . . . . . . . . . . . . . . . . . . . . . . . . . . . . . . . . . . . . . . . . . . . . . . . . . . . . . . . . . . . . . . . . . . 5
Flash Builder editors . . . . . . . . . . . . . . . . . . . . . . . . . . . . . . . . . . . . . . . . . . . . . . . . . . . . . . . . . . . . . . . . . . . . . . . . . . . . . . . . . . . . . . . . . . . . . . . . . . 11
Chapter 3: Code Development Tools in Flash Builder
Content Assist, Quick Assist, and Quick Fix . . . . . . . . . . . . . . . . . . . . . . . . . . . . . . . . . . . . . . . . . . . . . . . . . . . . . . . . . . . . . . . . . . . . . . . . . . . . 14
Format, navigate, and organize code . . . . . . . . . . . . . . . . . . . . . . . . . . . . . . . . . . . . . . . . . . . . . . . . . . . . . . . . . . . . . . . . . . . . . . . . . . . . . . . . . . 24
Code inspection, analysis, and fixing . . . . . . . . . . . . . . . . . . . . . . . . . . . . . . . . . . . . . . . . . . . . . . . . . . . . . . . . . . . . . . . . . . . . . . . . . . . . . . . . . . 35
Advanced code editing . . . . . . . . . . . . . . . . . . . . . . . . . . . . . . . . . . . . . . . . . . . . . . . . . . . . . . . . . . . . . . . . . . . . . . . . . . . . . . . . . . . . . . . . . . . . . . . 38
iii
Chapter 4: Using Projects in Flash Builder
Types of projects . . . . . . . . . . . . . . . . . . . . . . . . . . . . . . . . . . . . . . . . . . . . . . . . . . . . . . . . . . . . . . . . . . . . . . . . . . . . . . . . . . . . . . . . . . . . . . . . . . . . . 55
Create projects in Flash Builder . . . . . . . . . . . . . . . . . . . . . . . . . . . . . . . . . . . . . . . . . . . . . . . . . . . . . . . . . . . . . . . . . . . . . . . . . . . . . . . . . . . . . . . 56
Set project properties . . . . . . . . . . . . . . . . . . . . . . . . . . . . . . . . . . . . . . . . . . . . . . . . . . . . . . . . . . . . . . . . . . . . . . . . . . . . . . . . . . . . . . . . . . . . . . . . 62
Project resources . . . . . . . . . . . . . . . . . . . . . . . . . . . . . . . . . . . . . . . . . . . . . . . . . . . . . . . . . . . . . . . . . . . . . . . . . . . . . . . . . . . . . . . . . . . . . . . . . . . . . 63
Manage projects . . . . . . . . . . . . . . . . . . . . . . . . . . . . . . . . . . . . . . . . . . . . . . . . . . . . . . . . . . . . . . . . . . . . . . . . . . . . . . . . . . . . . . . . . . . . . . . . . . . . . 71
Export and import projects . . . . . . . . . . . . . . . . . . . . . . . . . . . . . . . . . . . . . . . . . . . . . . . . . . . . . . . . . . . . . . . . . . . . . . . . . . . . . . . . . . . . . . . . . . . 74
Build projects . . . . . . . . . . . . . . . . . . . . . . . . . . . . . . . . . . . . . . . . . . . . . . . . . . . . . . . . . . . . . . . . . . . . . . . . . . . . . . . . . . . . . . . . . . . . . . . . . . . . . . . . 79
Run and debug applications . . . . . . . . . . . . . . . . . . . . . . . . . . . . . . . . . . . . . . . . . . . . . . . . . . . . . . . . . . . . . . . . . . . . . . . . . . . . . . . . . . . . . . . . . . 95
Export a release version of an application . . . . . . . . . . . . . . . . . . . . . . . . . . . . . . . . . . . . . . . . . . . . . . . . . . . . . . . . . . . . . . . . . . . . . . . . . . . . 102
Package Adobe AIR applications . . . . . . . . . . . . . . . . . . . . . . . . . . . . . . . . . . . . . . . . . . . . . . . . . . . . . . . . . . . . . . . . . . . . . . . . . . . . . . . . . . . . . 106
Create working sets . . . . . . . . . . . . . . . . . . . . . . . . . . . . . . . . . . . . . . . . . . . . . . . . . . . . . . . . . . . . . . . . . . . . . . . . . . . . . . . . . . . . . . . . . . . . . . . . . 109
Chapter 5: Debugging Tools in Flash Builder
The Flash Debug perspective . . . . . . . . . . . . . . . . . . . . . . . . . . . . . . . . . . . . . . . . . . . . . . . . . . . . . . . . . . . . . . . . . . . . . . . . . . . . . . . . . . . . . . . . 110
Debug your application . . . . . . . . . . . . . . . . . . . . . . . . . . . . . . . . . . . . . . . . . . . . . . . . . . . . . . . . . . . . . . . . . . . . . . . . . . . . . . . . . . . . . . . . . . . . . 113
Chapter 6: Profiling Tools in Flash Builder
About profiling and how the profiler works . . . . . . . . . . . . . . . . . . . . . . . . . . . . . . . . . . . . . . . . . . . . . . . . . . . . . . . . . . . . . . . . . . . . . . . . . . . 120
The Flash Profiling perspective and profiler views . . . . . . . . . . . . . . . . . . . . . . . . . . . . . . . . . . . . . . . . . . . . . . . . . . . . . . . . . . . . . . . . . . . . 122
Using the Flash Builder profiler . . . . . . . . . . . . . . . . . . . . . . . . . . . . . . . . . . . . . . . . . . . . . . . . . . . . . . . . . . . . . . . . . . . . . . . . . . . . . . . . . . . . . . 137
Using Adobe Scout with Flash Builder . . . . . . . . . . . . . . . . . . . . . . . . . . . . . . . . . . . . . . . . . . . . . . . . . . . . . . . . . . . . . . . . . . . . . . . . . . . . . . . . 146
Chapter 7: Unit Testing Tools in Flash Builder
FlexUnit test environment . . . . . . . . . . . . . . . . . . . . . . . . . . . . . . . . . . . . . . . . . . . . . . . . . . . . . . . . . . . . . . . . . . . . . . . . . . . . . . . . . . . . . . . . . . . 148
Create FlexUnit tests . . . . . . . . . . . . . . . . . . . . . . . . . . . . . . . . . . . . . . . . . . . . . . . . . . . . . . . . . . . . . . . . . . . . . . . . . . . . . . . . . . . . . . . . . . . . . . . . . 148
Run FlexUnit tests . . . . . . . . . . . . . . . . . . . . . . . . . . . . . . . . . . . . . . . . . . . . . . . . . . . . . . . . . . . . . . . . . . . . . . . . . . . . . . . . . . . . . . . . . . . . . . . . . . . 150
Last updated 12/3/2012
Page 4

USING FLASH BUILDER
Contents
Configure FlexUnit tests . . . . . . . . . . . . . . . . . . . . . . . . . . . . . . . . . . . . . . . . . . . . . . . . . . . . . . . . . . . . . . . . . . . . . . . . . . . . . . . . . . . . . . . . . . . . . 152
View results of a FlexUnit test run . . . . . . . . . . . . . . . . . . . . . . . . . . . . . . . . . . . . . . . . . . . . . . . . . . . . . . . . . . . . . . . . . . . . . . . . . . . . . . . . . . . . 152
FlexUnit support for mobile projects . . . . . . . . . . . . . . . . . . . . . . . . . . . . . . . . . . . . . . . . . . . . . . . . . . . . . . . . . . . . . . . . . . . . . . . . . . . . . . . . . 153
Chapter 8: Develop Web and Desktop Applications in Flash Builder
Basic workflow to develop a browser-based or desktop application . . . . . . . . . . . . . . . . . . . . . . . . . . . . . . . . . . . . . . . . . . . . . . . . . . . 155
Build user interfaces . . . . . . . . . . . . . . . . . . . . . . . . . . . . . . . . . . . . . . . . . . . . . . . . . . . . . . . . . . . . . . . . . . . . . . . . . . . . . . . . . . . . . . . . . . . . . . . . . 156
Generate custom item renderers . . . . . . . . . . . . . . . . . . . . . . . . . . . . . . . . . . . . . . . . . . . . . . . . . . . . . . . . . . . . . . . . . . . . . . . . . . . . . . . . . . . . . 166
Generate event handlers . . . . . . . . . . . . . . . . . . . . . . . . . . . . . . . . . . . . . . . . . . . . . . . . . . . . . . . . . . . . . . . . . . . . . . . . . . . . . . . . . . . . . . . . . . . . 168
Access data services . . . . . . . . . . . . . . . . . . . . . . . . . . . . . . . . . . . . . . . . . . . . . . . . . . . . . . . . . . . . . . . . . . . . . . . . . . . . . . . . . . . . . . . . . . . . . . . . . 169
Monitor applications that access data services . . . . . . . . . . . . . . . . . . . . . . . . . . . . . . . . . . . . . . . . . . . . . . . . . . . . . . . . . . . . . . . . . . . . . . . . 178
Use Flex library projects . . . . . . . . . . . . . . . . . . . . . . . . . . . . . . . . . . . . . . . . . . . . . . . . . . . . . . . . . . . . . . . . . . . . . . . . . . . . . . . . . . . . . . . . . . . . . 181
Create ActionScript library projects . . . . . . . . . . . . . . . . . . . . . . . . . . . . . . . . . . . . . . . . . . . . . . . . . . . . . . . . . . . . . . . . . . . . . . . . . . . . . . . . . . 185
Create custom MXML components . . . . . . . . . . . . . . . . . . . . . . . . . . . . . . . . . . . . . . . . . . . . . . . . . . . . . . . . . . . . . . . . . . . . . . . . . . . . . . . . . . . 186
Create modules . . . . . . . . . . . . . . . . . . . . . . . . . . . . . . . . . . . . . . . . . . . . . . . . . . . . . . . . . . . . . . . . . . . . . . . . . . . . . . . . . . . . . . . . . . . . . . . . . . . . . 187
Integrate Flex with HTML applications . . . . . . . . . . . . . . . . . . . . . . . . . . . . . . . . . . . . . . . . . . . . . . . . . . . . . . . . . . . . . . . . . . . . . . . . . . . . . . . 192
Chapter 9: Develop Mobile Applications in Flash Builder
Differences in mobile, desktop, and browser application development . . . . . . . . . . . . . . . . . . . . . . . . . . . . . . . . . . . . . . . . . . . . . . . 196
Workflow for creating mobile applications . . . . . . . . . . . . . . . . . . . . . . . . . . . . . . . . . . . . . . . . . . . . . . . . . . . . . . . . . . . . . . . . . . . . . . . . . . . 199
Development environment . . . . . . . . . . . . . . . . . . . . . . . . . . . . . . . . . . . . . . . . . . . . . . . . . . . . . . . . . . . . . . . . . . . . . . . . . . . . . . . . . . . . . . . . . . 202
Testing and debugging . . . . . . . . . . . . . . . . . . . . . . . . . . . . . . . . . . . . . . . . . . . . . . . . . . . . . . . . . . . . . . . . . . . . . . . . . . . . . . . . . . . . . . . . . . . . . 217
Installing on devices . . . . . . . . . . . . . . . . . . . . . . . . . . . . . . . . . . . . . . . . . . . . . . . . . . . . . . . . . . . . . . . . . . . . . . . . . . . . . . . . . . . . . . . . . . . . . . . . . 222
Packaging and exporting . . . . . . . . . . . . . . . . . . . . . . . . . . . . . . . . . . . . . . . . . . . . . . . . . . . . . . . . . . . . . . . . . . . . . . . . . . . . . . . . . . . . . . . . . . . . 224
iv
Chapter 10: Using Flash Builder with Flash Professional
Create a Flash Professional project . . . . . . . . . . . . . . . . . . . . . . . . . . . . . . . . . . . . . . . . . . . . . . . . . . . . . . . . . . . . . . . . . . . . . . . . . . . . . . . . . . . 230
Set project properties for Flash Professional projects . . . . . . . . . . . . . . . . . . . . . . . . . . . . . . . . . . . . . . . . . . . . . . . . . . . . . . . . . . . . . . . . . 230
What you can do in a Flash Professional project . . . . . . . . . . . . . . . . . . . . . . . . . . . . . . . . . . . . . . . . . . . . . . . . . . . . . . . . . . . . . . . . . . . . . . 231
Chapter 11: Customizing Flash Builder
Adobe preferences . . . . . . . . . . . . . . . . . . . . . . . . . . . . . . . . . . . . . . . . . . . . . . . . . . . . . . . . . . . . . . . . . . . . . . . . . . . . . . . . . . . . . . . . . . . . . . . . . . 232
Customize the workbench . . . . . . . . . . . . . . . . . . . . . . . . . . . . . . . . . . . . . . . . . . . . . . . . . . . . . . . . . . . . . . . . . . . . . . . . . . . . . . . . . . . . . . . . . . . 232
Flash Builder preferences . . . . . . . . . . . . . . . . . . . . . . . . . . . . . . . . . . . . . . . . . . . . . . . . . . . . . . . . . . . . . . . . . . . . . . . . . . . . . . . . . . . . . . . . . . . . 235
Last updated 12/3/2012
Page 5

Chapter 1: About Flash Builder
Adobe® Flash® Builder™ is an integrated development environment (IDE) for building cross-platform, rich Internet
applications (RIAs) for the desktop and a wide variety of mobile devices. Flash Builder also includes testing, debugging,
and profiling tools that lead to increased levels of productivity and effectiveness.
Flash Builder is built on top of Eclipse, an open-source IDE, and provides all the tools required to develop applications
that use the open-source Flex framework and ActionScript 3.0.
Flash Builder provides full support for building applications using the Apache Flex SDK. When creating a Flex project
in Flash Builder, you can specify to use the Apache Flex SDK. For more information about downloading and using the
Apache Flex SDK, see
Flash Builder runs on Microsoft Windows and Apple Mac OS X, and is available in several versions. Installation
configuration options let you install Flash Builder as a set of plug-ins in an existing Eclipse workbench installation or
create a stand-alone installation that includes the Eclipse workbench.
www.adobe.com/go/apacheflex_download.
1
Applications you can build with Flash Builder
You can build applications that use the Flex framework, MXML, Adobe Flash Player, Adobe AIR, ActionScript 3.0,
and LiveCycle Data Services:
• Flex projects - Create Flex projects that can work with any backend server technology, including Adobe
ColdFusion, LiveCycle Data Services, and PHP.
See “Flex projects” on page 57 and “Develop Web and Desktop Applications in Flash Builder” on page 155.
• ActionScript projects - Create ActionScript projects that use the Flash API (not the Flex framework).
See “ActionScript projects” on page 59.
• Mobile projects - Create Flex mobile applications for the Google Android platform and ActionScript mobile
applications for the Apple iOS platform.
See “Flex mobile projects” on page 58 and “Create ActionScript mobile projects” on page 60.
For more information on developing mobile applications with Flex and Flash Builder, see Developing mobile
applications in Flash Builder.
• Library projects - Create custom code libraries that you can deploy as component library (SWC) files to share
among your applications or distribute to other developers.
See “Use Flex library projects” on page 181 and “Create ActionScript library projects” on page 185.
• Flash Professional projects - Create Flash Professional projects to edit and debug Flash FLA or XFL files created
with Flash Professional CS5.
See “Using Flash Builder with Flash Professional” on page 230.
• Custom MXML components - Create custom components and then easily access them using the Flash Builder
Components view.
See “Create custom MXML components” on page 186.
You can also create custom ActionScript components. See “Create an ActionScript class” on page 65.
Last updated 12/3/2012
Page 6

USING FLASH BUILDER
About Flash Builder
Features that accelerate application development
Flash Builder has the tools you need to develop applications that use the Flex framework and ActionScript 3.0. You can:
• Edit code - Write and edit your application source code using the code development tools in Flash Builder. The
code development tools include code refactoring, code hinting, streamlined code navigation, automatic syntax
error checking, and other features.
See “Code Development Tools in Flash Builder” on page 14.
• Publish source code - Publish your application source code so that users and other developers can view it.
See “Publish source code” on page 94.
• Manage projects, folders, files, and other resources - Create, modify, and delete projects and resources, link to
resources outside your project, and so on.
See “Using Projects in Flash Builder” on page 55.
• Customize the Flash Builder workbench - Customize the workbench to suit your individual development needs.
For example, you can arrange the interface to include your favorite tools in a specific layout.
See “Customize the workbench” on page 232.
2
Features for running and debugging projects
Flash Builder includes building, testing, debugging, and profiling tools that help increase your productivity:
• Build projects - Flash Builder automatically compiles and builds your applications for debugging or production
release. You can also create custom build scripts using Apache Ant.
See “Build projects” on page 79.
• Run applications and manage launch configurations - Run your applications in a web browser, Adobe AIR, or
the stand-alone Flash Player. Create custom launch configurations to control how your applications run.
See “Run and debug applications” on page 95 and “Manage launch configurations” on page 96.
• Debug applications - Debug your applications using the integrated debugging tools.
See “Debugging Tools in Flash Builder” on page 110.
• Test and debug mobile applications - Run and debug your applications on the desktop or on a device.
See “Testing and debugging” on page 217.
• Profile applications - Identify performance bottlenecks and memory leaks by using the profiling tools in Flash
Builder.
See “Profiling Tools in Flash Builder” on page 120.
• Monitor applications that access data services - Use the Network Monitor to generate a detailed audit trail of all
data passed between your application and the back end .
See “Monitor applications that access data services” on page 178.
Last updated 12/3/2012
Page 7

USING FLASH BUILDER
About Flash Builder
Flash Builder versions
Flash Builder is available in two versions: Standard and Premium.
Flash Builder Standard Flash Builder Standard provides a full-featured IDE that allows you to create applications
using the Flex framework and Flash API. Flash Builder Standard also includes MXML, ActionScript, and CSS editors,
as well as debugging tools. Flash Builder Standard provides a library of interactive charts and graphs that enable you
to create rich data dashboards, interactive data analysis, and data visualization components.
Flash Builder Premium In addition to the Standard version features, Flash Builder Premium includes memory and
performance profiling and automated testing tools. Use the Network Monitor to view the data that flows between a
client application and a data service. The FlexUnit test environment allows you to generate and edit repeatable tests.
The repeatable tests can be run from scripts or directly within Flash Builder or outside the Flash Builder environment.
The Command Line Build feature allows you to synchronize a developer’s individual build settings with a nightly
build.
Flash Builder for PHP Standard Flash Builder for PHP Standard provides a full-featured PHP IDE that includes Flash
Builder Standard integrated with Zend Studio 8. You can build mobile, web, and desktop applications using PHP, Flex,
and ActionScript.
Flash Builder for PHP Premium In addition to Standard version capabilities, Flash® Builder™ for PHP Premium
includes professional testing tools, including profilers, network monitoring, an automated testing framework,
integration with FlexUnit testing, and Command Line Build support.
3
For more information on Flash Builder for PHP, see Introducing Flash Builder for PHP.
Flash Builder configurations
Flash Builder provides a single downloadable installer with the following two configuration options:
Stand-alone configuration Installs Flash Builder as a stand-alone integrated development environment (IDE). The
stand-alone configuration is created specifically for developing applications that use the Flex framework and
ActionScript 3.0. This configuration is ideal for new users and users who intend to develop applications using only the
Flex framework and ActionScript 3.0.
Plug-in configuration Configures Flash Builder to run as a plug-in within an existing Eclipse™ installation.
To run the plug-in configuration, you must have Eclipse 3.7 or Eclipse 4.2 installed as follows:
• On Windows, to run Flash Builder 32-bit plug-in configuration, install Eclipse 3.7/4.2 32-bit
• On Windows, to run Flash Builder 64-bit plug-in configuration, install Eclipse 3.7/4.2 64-bit
• On Mac, to run Flash Builder 64-bit configuration, install Eclipse 3.7/4.2 Cocoa 64-bit
The Flash Builder plug-in and stand-alone configurations provide the same functionality. If you aren't sure which
configuration to use, follow these guidelines:
• If you already have Eclipse 3.7 or 4.2 installed, use the plug-in configuration to add Flash Builder features to your
existing copy of Eclipse.
• If you don't have Eclipse installed and your primary focus is on developing Flex and ActionScript applications, use
the Flash Builder stand-alone configuration. This configuration also allows you to install other Eclipse plug-ins to
expand the scope of your development work in the future.
For detailed information about installing Flash Builder, see the Flash Builder 4.7 release notes.
Last updated 12/3/2012
Page 8

Chapter 2: Getting Started With Flash Builder
Flash Builder is an integrated development environment (IDE) for developing applications using the Flex framework
and ActionScript 3.0. You can develop applications for deployment on Adobe Flash Player, desktop applications for
deployment on Adobe AIR, and mobile applications for deployment on various mobile devices.
Note: The information required to use Flash Builder is contained in the Flash Builder documentation. If you are using
other Eclipse plug-ins (such as CVS or Java) with Flash Builder, or you want to extend the Flash Builder plug-ins, see
Adobe Flash Builder Extensibility Reference.
The Flash Builder development environments consists of the following components:
Workbench The term workbench refers to the Flash Builder development environment that contains all the tools to
develop applications. The workbench contains three primary elements: perspectives, editors, and views. You use all
three in various combinations at various points in the application development process.
See “Customize the workbench” on page 232.
4
Note: For more information about some of the Eclipse workbench features, see the Eclipse Workbench User’s Guide at
http://help.eclipse.org/help31/index.jsp.
Perspective A perspective is a group of views and editors in the workbench. Flash Builder contains two perspectives:
The Flash Development perspective for developing applications, and the Flash Debug perspective for debugging
applications. Flash Builder Premium also contains the Flash Profiling perspective.
If you use the Flash Builder plug-in configuration (see “Flash Builder configurations” on page 3), your workbench can
contain additional perspectives such as a Java perspective that contains editors and views used to develop Java
applications.
See “Flash Builder perspectives and views” on page 5.
Editor An editor lets you edit various file types. The editors available to you depend on the number and type of Eclipse
plug-ins installed. Flash Builder contains editors for writing MXML, ActionScript 3.0, and Cascading Style Sheets
(CSS) code.
See “Flash Builder editors” on page 11 and “Code Development Tools in Flash Builder” on page 14.
Views A view typically supports an editor. For example, when editing an ActionScript or MXML file, the supported
views are displayed.
See “Work with views” on page 10.
Note: The term “view” is synonymous with the term “panel” as it is used in earlier versions of Flash Builder, Adobe
Dreamweaver®, and other Adobe development tools.
Workspace Not to be confused with workbench, a workspace is a defined area of the file system that contains the
resources (files and folders) that make up your application projects. You can work with only one workspace at a time;
however, you can select a different workspace each time you start Flash Builder.
See “Move a project from one workspace to another” on page 73 and “Switch the workspace” on page 74.
Resource The term resource is used generically to refer to the files and folders within the projects in a workspace.
See “Project resources” on page 63.
Last updated 12/3/2012
Page 9

USING FLASH BUILDER
Getting Started With Flash Builder
Project All of the resources that make up your applications are contained within projects. You cannot build an
application in Flash Builder without first creating a project. Flash Builder supports various types of projects, depending
on the type of application you are building.
See “Types of projects” on page 55 and “Using Projects in Flash Builder” on page 55.
Launch configuration A launch configuration is created for each of your projects, and it defines project settings that
are used when running and debugging your applications. For example, the names and locations of the compiled
application SWF files are contained in the launch configuration, and you can modify these settings.
See “Manage launch configurations” on page 96.
Flash Builder perspectives and views
To support a particular task or group of tasks, editors and supporting views are combined into a perspective. When you
open a file that is associated with a particular perspective, Flash Builder automatically opens that perspective.
The stand-alone configuration of Flash Builder contains three perspectives:
• Flash Development
See “The Flash Development perspective” on page 5.
5
• Flash Debugging
See “The Flash Debug perspective” on page 110.
• Flash Profiling
See “The Flash Profiling perspective and profiler views” on page 122.
Note: The Flash Profiling perspective is available with Flash Builder Premium.
The Flash Development perspective
The Flash Development perspective includes the editors and views you require to create applications for the Flex
framework. When you create a project, Flash Builder switches into the Development perspective so you can begin
developing your application.
The focal point of the perspective (and the workbench generally) is the editor area. The editor area contains all of the
currently open documents in a multitab interface.
When you create a Flex project, the main MXML application file is opened in the editor area. You can then open and
switch between any of the MXML, ActionScript, and CSS documents you are working in. For more information, see
“Flash Builder editors” on page 11.
The Development perspective contains the editors and the following supporting views:
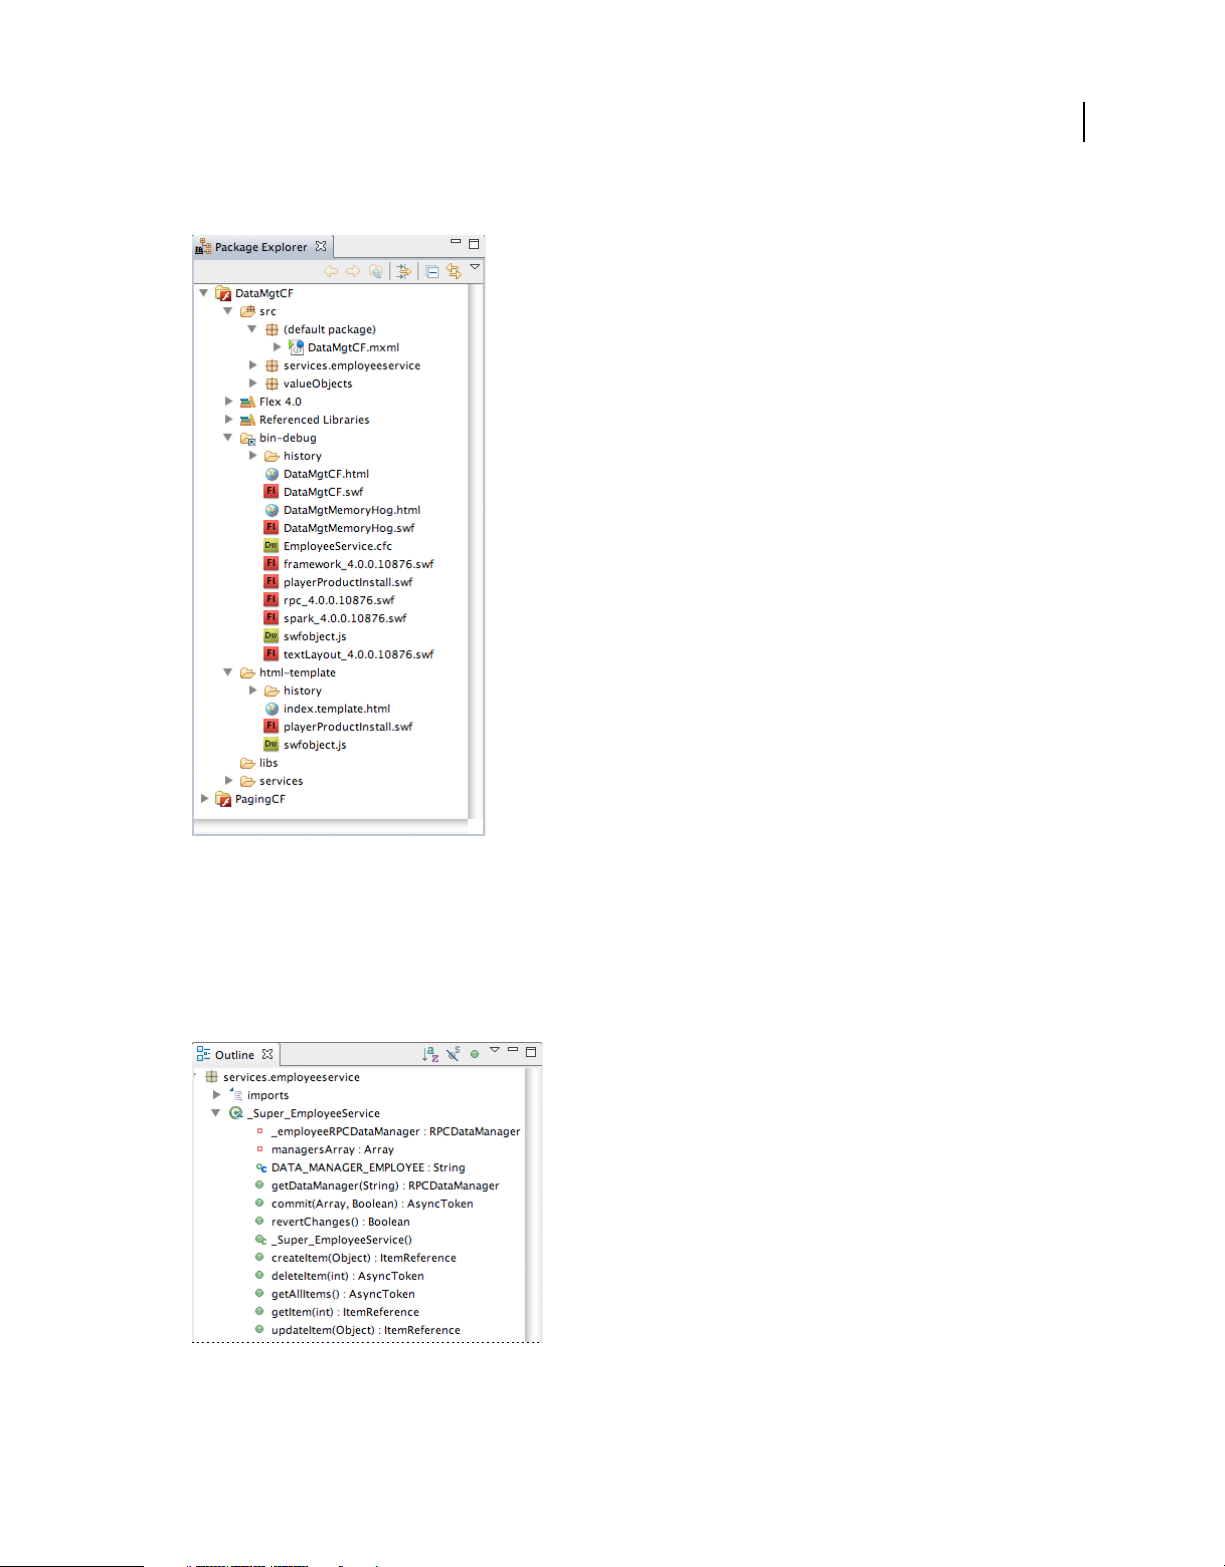
Package Explorer view
The Package Explorer view contains all of the projects and resources in the workspace and is therefore an essential
element of the Flash Builder workbench. It is always displayed in the Development and Debug perspectives.
When you work in the Package Explorer, you can select a resource and view its properties.
1 In the Package Explorer, select a resource.
Last updated 12/3/2012
Page 10
USING FLASH BUILDER
Getting Started With Flash Builder
2 Select File > Properties.
6
For more information about the Package Explorer and working with projects, see “Manage projects” on page 71.
Outline view
The Outline view presents a hierarchical view of the code structure of the selected MXML or ActionScript document
so that you can inspect and navigate the sections or lines of code in the document. The Outline view also displays
syntax error alerts that the compiler generates. This view is also available when you use the ActionScript editor.
For more information about using the Outline view in Source mode, see “Use the Outline view” on page 27.
Last updated 12/3/2012
Page 11
USING FLASH BUILDER
Getting Started With Flash Builder
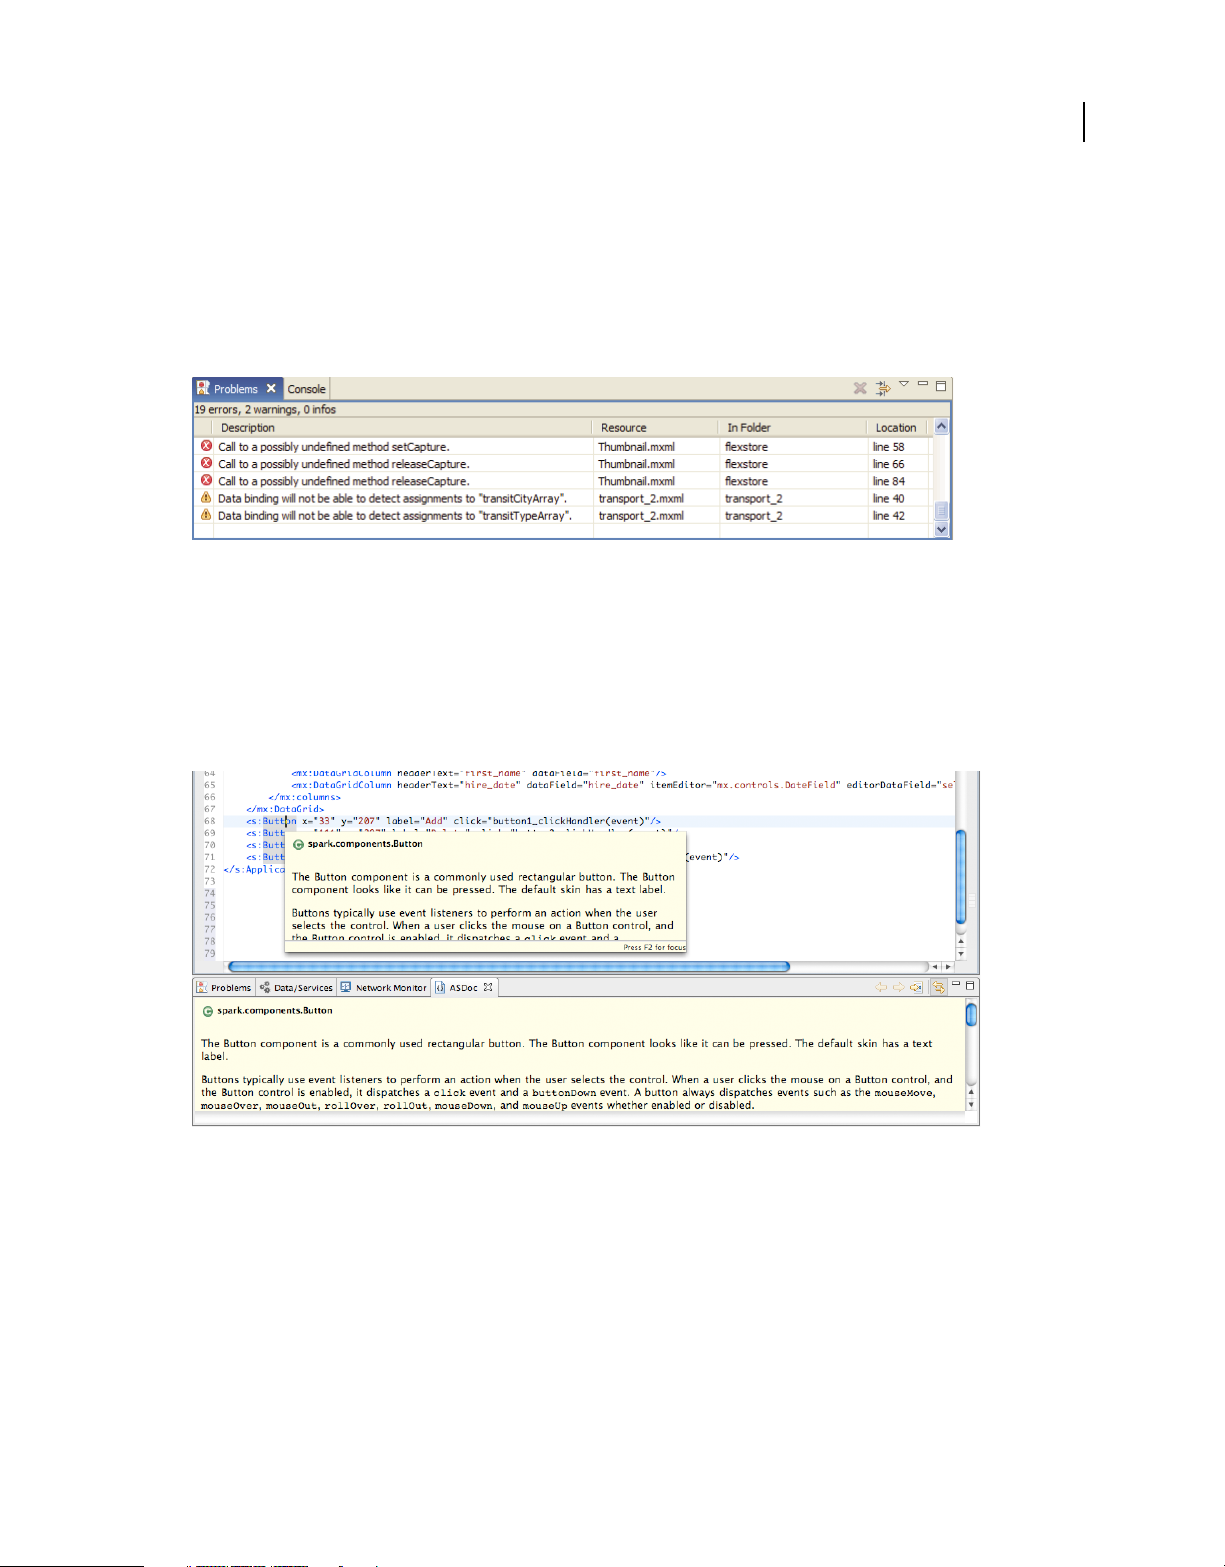
Problems view
As you enter code, the Flash Builder compiler detects syntax and other compilation errors, and these errors are
displayed in the Problems view. The Package Explorer marks nodes that contain errors.
When you debug your applications, errors, warnings, and other information are displayed in the Problems view. Each
error or warning contains a message, the file and folder in which it is located, and its line number in the file. Problems
remain in the Problems view until you correct them or they are otherwise resolved.
Note: You can also optionally add the Tasks and Bookmarks views. These views provide additional shortcuts for
managing and navigating your code. For more information about these views, see
“Use markers” on page 32. For an
introduction to the optional views that are available in Flash Builder, see “Display other workbench views” on page 232.
ASDoc view
As you enter code, or hover over code elements, Flash Builder displays ASDoc content relevant to the code. Flash
Builder also displays the ASDoc content for the selected code in the ASDoc view.
7
For more information, see “Display ActionScript reference summary” on page 17.
Last updated 12/3/2012
Page 12
USING FLASH BUILDER
Getting Started With Flash Builder
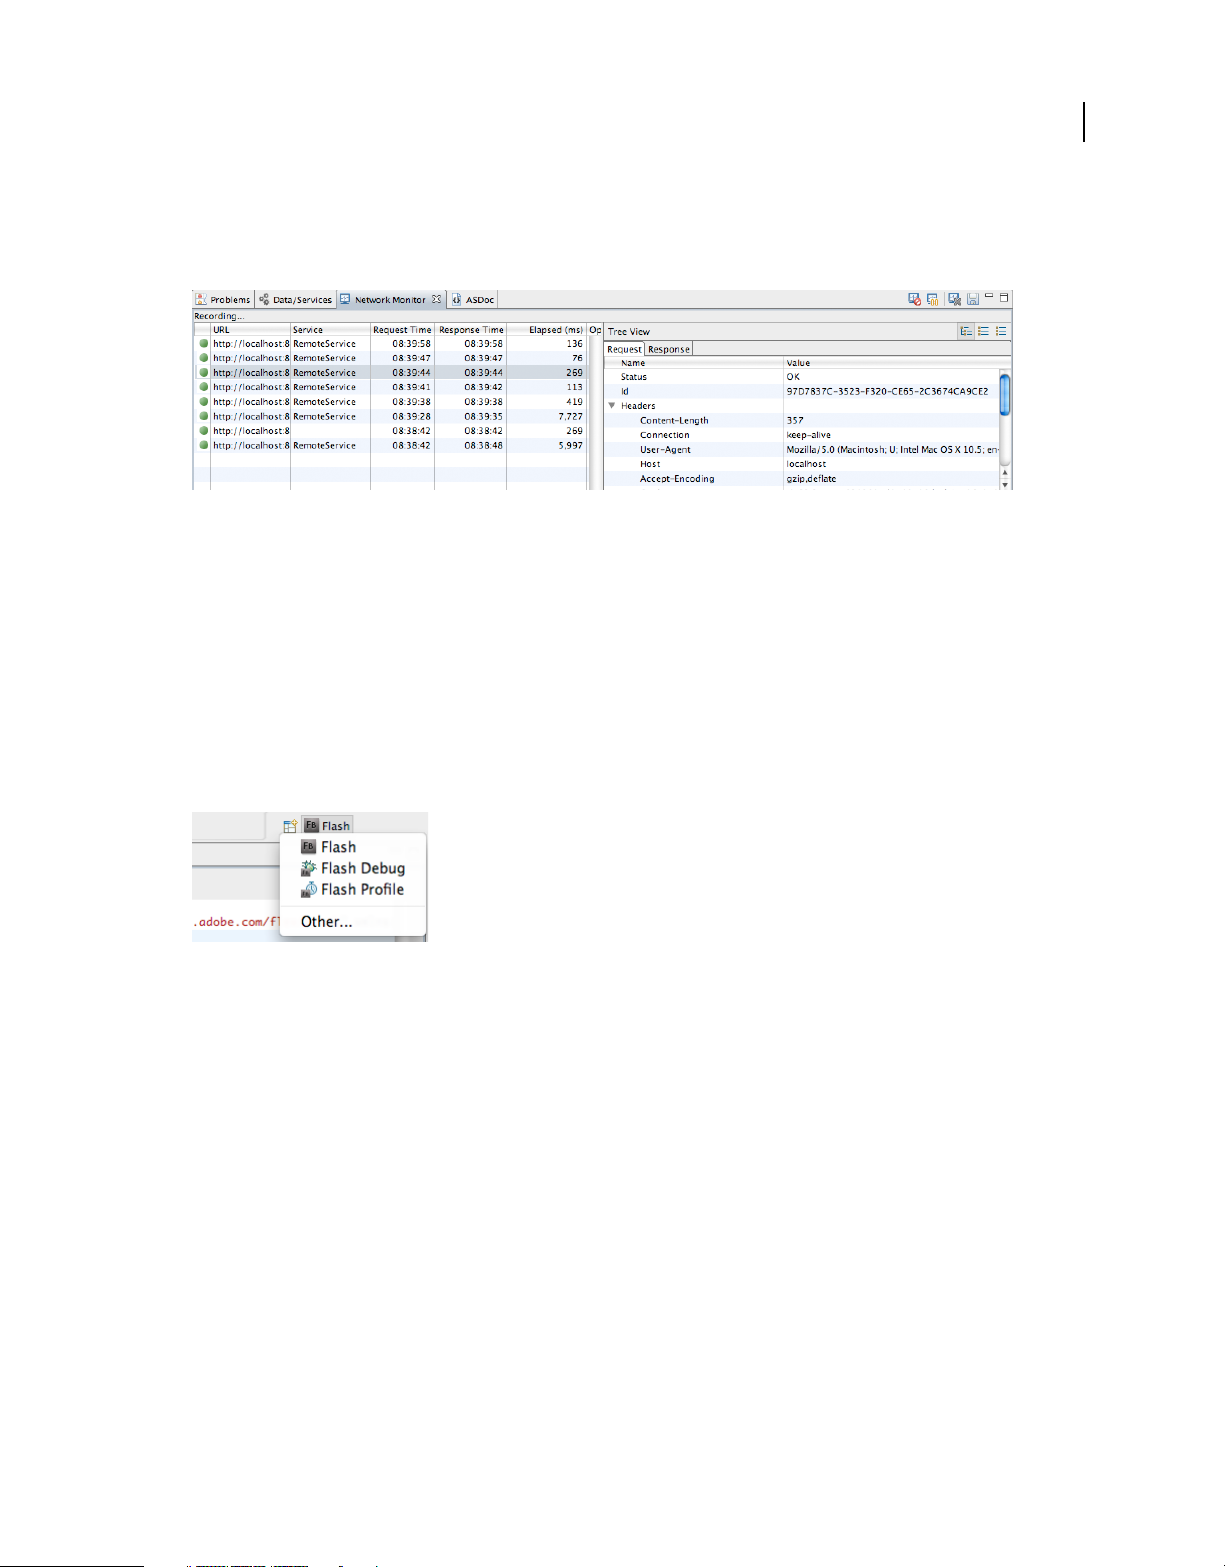
Network Monitor view
The Network Monitor allows you to examine the data that flows between an application and the data service or
services. the Network Monitor is available with Flash Builder Premium.
For more information, see “Monitor applications that access data services” on page 178.
Work with perspectives
Open and switch perspectives
Perspectives change automatically to support the task at hand. For example, when you create a Flex project, the
workbench switches to the Development perspective. When you start a debugging session, the Flash Debug
perspective is displayed when the first breakpoint is encountered.
8
You can also manually switch perspectives yourself by selecting Window > Open Perspective. Or, you can use the
perspective bar, which is located in the main workbench toolbar.
When the perspective opens, its title changes to display the name of the perspective you selected. An icon appears next
to the title, allowing you to quickly switch back and forth between perspectives in the same window. By default,
perspectives open in the same window.
If you use the plug-in configuration of Flash Builder and have other Eclipse plug-ins installed, you can have additional
perspectives. While predefined perspectives are delivered with each Eclipse plug-in, you can customize them or create
your own. To see a complete list of perspectives, select Window
> Open Perspective > Other.
Set a default perspective
The word default in parentheses following the perspective name indicates the default perspective.
1 Open the Preferences dialog and select General > Perspectives.
2 Under Available Perspectives, select the perspective to define as the default, and click Make Default.
3 Click OK.
Open a perspective in a new window
You can specify to open perspectives in a new window.
1 Open the Preferences dialog and select General > Perspectives.
Last updated 12/3/2012
Page 13

USING FLASH BUILDER
Getting Started With Flash Builder
2 Under Open a New Perspective, select In A New Window.
To switch back to the default, select In The Same Window.
3 Click OK.
Customize a perspective
To modify a perspective’s layout, you change the editors and views that are visible in a given perspective. For example,
you could have the Bookmarks view visible in one perspective, and hidden in another perspective.
To create a perspective, do the following:
1 Open an existing perspective.
2 Show views and editors as desired.
3 Select Window > Perspective > Save Perspective As (Window > Save Perspective As in the plug-in configuration of
Flash Builder).
4 In the Save Perspective As dialog box, enter a new name for the perspective, then click OK.
To configure a perspective, do the following:
1 Open the perspective to configure.
2 Select Window > Customize Perspective.
3 Click the Shortcuts tab or the Commands tab, depending on the items you want to add to your customized
perspective.
4 Use the check boxes to select which elements to see on menus and toolbars in the selected perspective.
5 Click OK.
6 Select Window > Save Perspective As.
7 In the Save Perspective As dialog box, enter a new name for the perspective and click OK.
When you save a perspective, Flash Builder adds the name of the new perspective to the Window > Open
Perspective menu.
9
Delete a customized perspective
You can delete perspectives that were previously defined. You cannot delete a perspective you did not create.
1 Open the Preferences dialog and select General > Perspectives.
2 Under Available Perspectives, select the perspective you want to delete.
3 Click Delete, then click OK.
Reset a perspective
You can restore a perspective to its original layout after changing it.
1 Open the Preferences dialog and select General > Perspectives.
2 Under Available perspectives, select the perspective to reset.
3 Click Reset, then click OK.
Last updated 12/3/2012
Page 14

USING FLASH BUILDER
Getting Started With Flash Builder
Work with views
Move and dock views
You can move views to different locations in the workbench, docking or undocking them, as needed.
1 Drag the view by its title bar to the desired location.
As you move the view around the workbench, the pointer changes to a drop cursor. The drop cursor indicates
where you’ll dock the view when you release the mouse button.
You can drag a group of stacked views by dragging from the empty space to the right of the view tabs.
You can also move a view by using the view’s context menu. Open the context menu from the view’s tab, select
> View, move the view to the desired location, and click the mouse button again.
Move
2 (Optional) Save your changes by selecting Window > Save Perspective As.
Rearrange tabbed views
In addition to docking views at different locations in the workbench, you can rearrange the views in a tabbed group of
views.
❖ Click the tab of the view to move, drag the view to the desired location, and release the mouse button. A stack
symbol appears as you drag the view across other view tabs.
10
Switch between views
There are several ways to switch to a different view:
• Click the tab of a different view.
• Select a view from the Flash builder Window menu.
• Use a keyboard shortcut
Use Control+F7 on Windows, Command+F7 on Macintosh. Press F7 to select a view.
For a list of all keyboard shortcuts, go to Help > Key Assist
Create and work with fast views
Fast views are hidden views that you can quickly open and close. They work like other views, but do not take up space
in the workbench while you work.
Whenever you click the fast view icon in the shortcut bar, the view opens. Whenever you click anywhere outside the
fast view (or click Minimize in the fast view toolbar), the view becomes hidden again.
Note: If you convert the Package Explorer view to a fast view, and then open a file from the Package Explorer fast view,
the fast view automatically is hidden to allow you to work with that file.
To create a fast view, do the following:
❖ Drag the view you want to turn into a fast view to the shortcut bar located in the lower-left corner of the workbench
window.
The icon for the view that you dragged appears on the shortcut bar. You can open the view by clicking its icon on
the shortcut bar. As soon as you click outside the view, the view is hidden again.
Last updated 12/3/2012
Page 15

USING FLASH BUILDER
Getting Started With Flash Builder
To remove a fast view to normal view, do the following:
❖ From the view’s context menu, deselect Fast View.
Filter the Tasks and Problems views
You can filter the tasks or problems that are displayed in the Tasks or Problems views. For example, to see only
problems that the workbench has logged, or tasks that you logged as reminders to yourself, filter items according to
which resource or group of resources they are associated with. You can filter by text string in the Description field, by
problem severity, by task priority, or by task status.
1 In Tasks or Problems view taskbar, click Filter.
2 Complete the Filters dialog box and click OK.
For more information about views, see “Work with views” on page 10.
Flash Builder editors
When you develop applications in Flash Builder, you use the MXML, ActionScript 3.0, and CSS editors.
Editors are associated with resource types, and as you open resources in the workbench, the appropriate editor is
opened. Each editor provides the functionality required to author the given resource type.
11
MXML editor You use the MXML editor to edit MXML code and to embed ActionScript and CSS code in
<fx:Script> and <fx:Style> tags.
ActionScript editor You use the ActionScript editor to edit ActionScript class and interface files. You can embed
ActionScript functions into an MXML file by using the
<fx:Script> tag. However, it is a common practice to define
classes in separate ActionScript files and then import the classes into MXML files. Using this method, you can define
most of your applications in ActionScript.
CSS editor You use the CSS editor to display and edit Cascading Style Sheets. You can then apply styles to the visual
elements of your applications. For more information, see Styles and themes.
More Help topics
“Code Development Tools in Flash Builder” on page 14
Flash Builder Tips and Tricks
Using the MXML editor
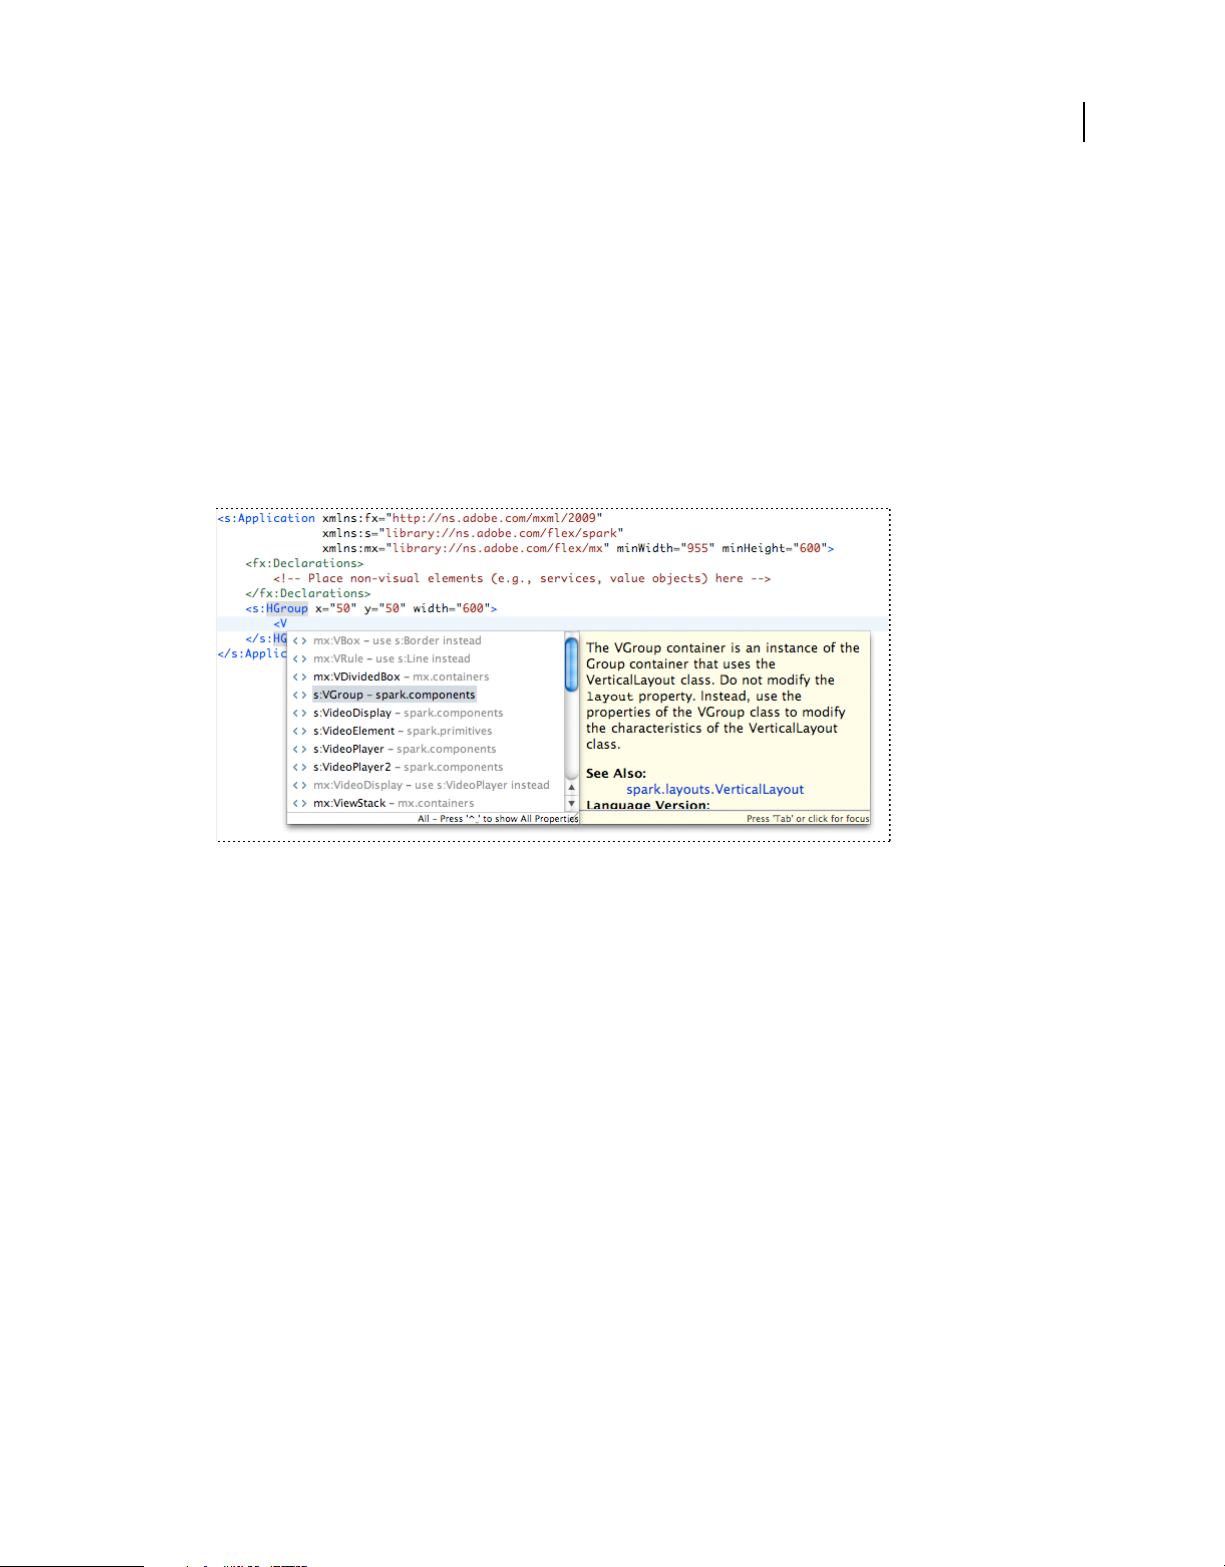
When using the MXML editor, Content Assist helps you add standard Flex containers and controls to your user
interface.
The following example shows how to use Content Assist to insert an <s:VGroup> container into an <s:HGroup>
container. Because HGroup is a Spark component, Content Assist recommends a VGroup container, and not
<mx:VBox>.
1 Open an MXML file in the MXML editor.
The MXML file can be the main application file (a file with an Application container) or a custom MXML
component file.
2 Place the insertion point in the parent container tag.
Last updated 12/3/2012
Page 16
USING FLASH BUILDER
Getting Started With Flash Builder
For example, to insert a VGroup container inside an HGroup parent container, place the insertion point after the
opening
<s:HGroup>
insertion point here
</s:HGroup>
3 Type the component tag.
<s:HGroup> tag:
As you type the tag, Content Assist appears suggesting possible entries. Recommended components are listed in
the normal black type color. Components that are not recommended appear gray.
In this example, VGroup is recommended and VBox is not recommended.
4 If necessary, use the arrow keys to select your tag from the menu, then press Enter.
12
In addition to the standard components, Content Assist lists custom components you defined in separate MXML
and ActionScript files and saved in the current project or in the source path of the current project.
Content Assist can also suggest properties, events, effects, and styles. Press Control+Space to cycle through the
recommendations in Content Assist.
You can change the type and order of recommendations for Content Assist. From the Preferences dialog, select
Flash Builder
> Editors > MXML Code > Advanced.
More Help topics
“Content Assist, Quick Assist, and Quick Fix” on page 14
“Create custom MXML components” on page 186
Associate editors with file types
You can associate editors with various file types in the workbench.
1 Select Window > Preferences.
2 Click the plus button to expand the General category.
3 Click the plus button to expand the Editors category, and then select File Associations.
4 Select a file type from the File Types list.
To add a file type to the list, click Add, enter the new file type in the New File Type dialog box, and then click OK.
Last updated 12/3/2012
Page 17

USING FLASH BUILDER
Getting Started With Flash Builder
5 In the Associated Editors list, select the editor to associate with that file type.
To add an internal or external editor to the list, click Add and complete the dialog box.
6 Click OK.
You can override the default editor preferences from the context menu for any resource in one of the navigation
views. Select Open With from the context menu.
Edit files outside the workbench
You can edit an MXML or ActionScript file in an external editor and then use it in Flash Builder. The workbench
performs any necessary build or update operations to process the changes that you made to the file outside the
workbench.
Refresh an MXML or ActionScript file edited outside the workbench
1 Edit the MXML or ActionScript file in the external editor of your choice.
2 Save and close the file.
3 Start Flash Builder.
4 From one of the navigation views in the workbench, select Refresh from the context menu.
If you work with external editors regularly, you can enable auto-refresh. To do so, select Window > Preferences,
expand the General category, select Workspace, and check Refresh Automatically. When you enable this option,
the workbench records any external changes to the file. The speed with which the auto-refresh happens depends on
your platform.
13
Tiling editors
The workbench lets you open multiple files in multiple editors. But unlike views, editors cannot be dragged outside the
workbench to create new windows. You can, however, tile editors in the editor area, so that you can view source files
side by side.
1 Open two or more files in the editor area.
2 Select one of the editor tabs.
3 Drag the editor over the left, right, upper, or lower border of the editor area.
The pointer changes to a drop cursor, indicating where the editor appears when you release the mouse button.
4 (Optional) Drag the borders of the editor area of each editor to resize the editors as desired.
Maximize a view or editor
There are several ways you can maximize (restore) a view or editor so that it fills the workbench window.
• From the context menu on the view or editor’s title bar, select Maximize (Restore).
• Double-click the tab of a view.
• From the Flash Builder menu, select Window > Maximize/Restore.
• Click the Maximize/Restore icons in the upper-right corner of the view or editor.
Last updated 12/3/2012
Page 18
Chapter 3: Code Development Tools in Flash Builder
You edit MXML, ActionScript, and CSS code in Adobe® Flash® Builder™ with separate editors. The Flash Builder
workbench is both project- and document-centric. The appropriate editor opens automatically because the editors are
associated with resource types. The Flash Builder editors share capabilities, including code hinting, navigation,
formatting, refactoring, and other productivity-enhancing features.
Content Assist, Quick Assist, and Quick Fix
Content Assist
As you enter MXML, ActionScript, and CSS code, hints and ASDoc reference documentation displays to help you
complete your code. This feature is called Content Assist.
14
In the MXML editor, if you type within an MXML component, you are prompted with a list of all properties of that
component. The following example shows code hints for properties of an MXML component:
Last updated 12/3/2012
Page 19
USING FLASH BUILDER
Code Development Tools in Flash Builder
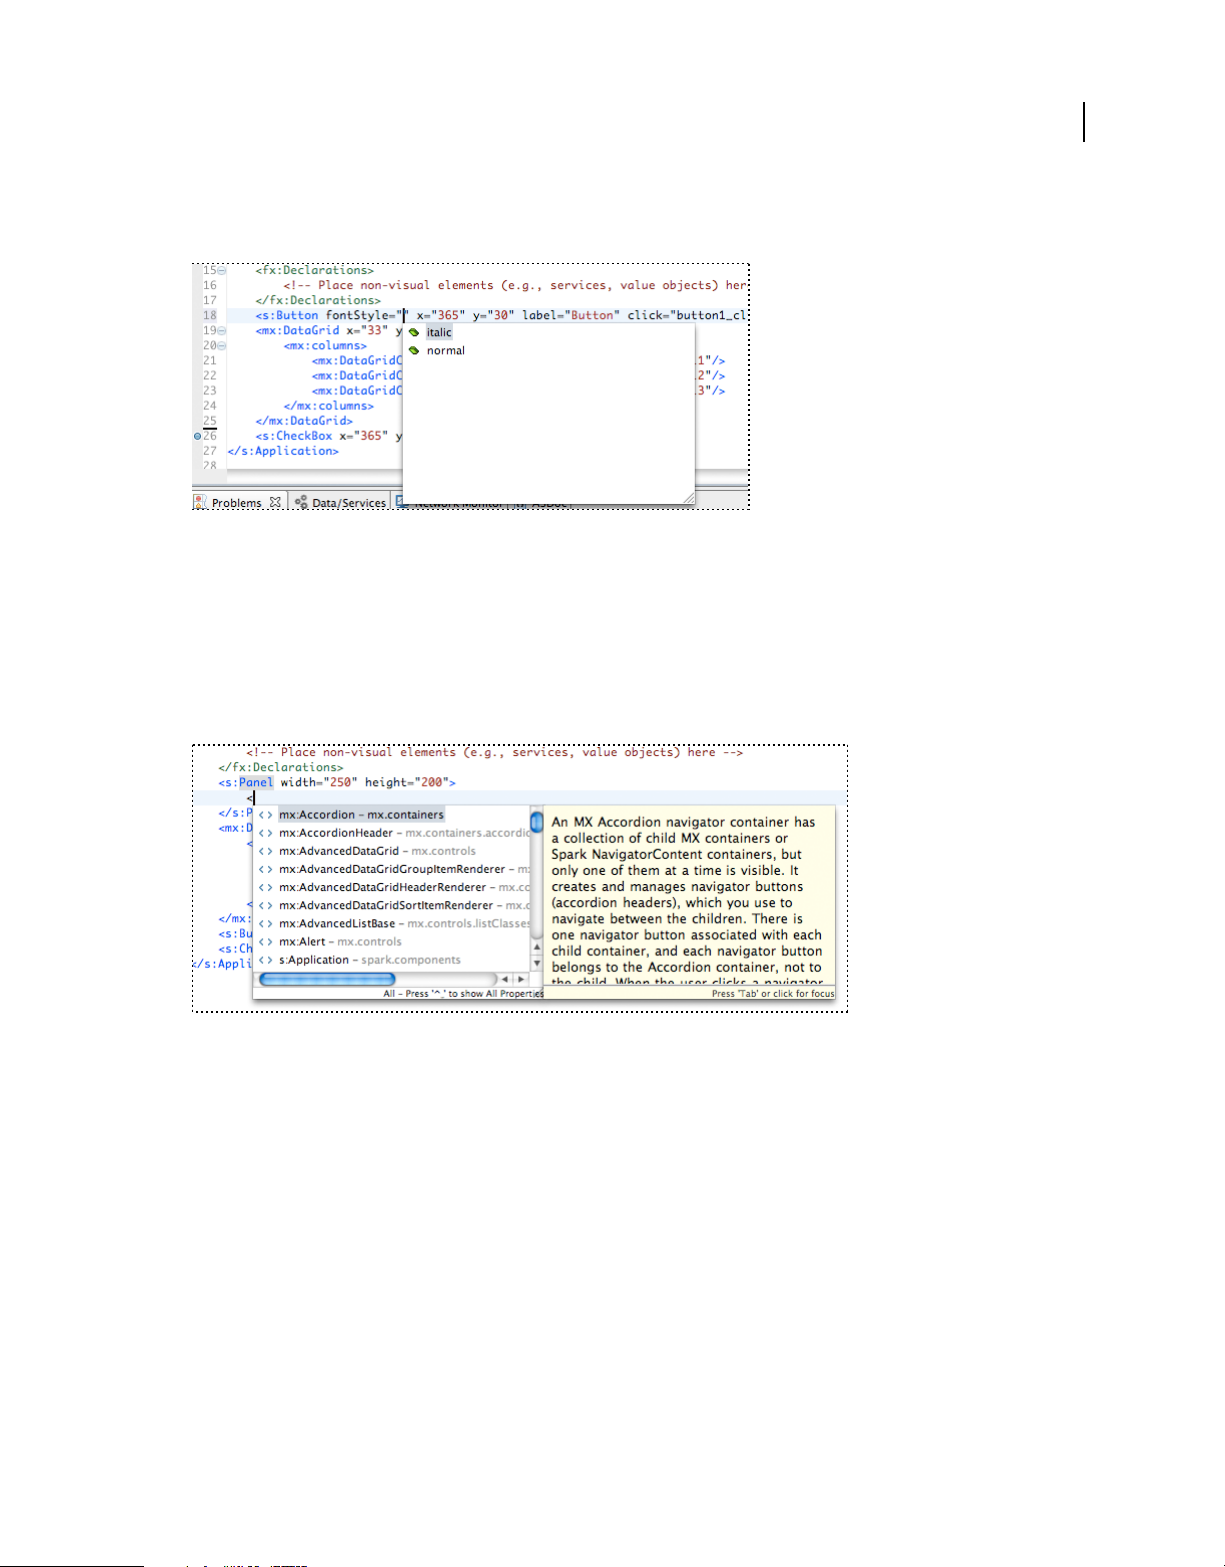
Selecting and entering properties displays possible property values (if predefined values exist). The following example
shows code hints for property values:
Content Assist works similarly for the ActionScript editor and CSS editor.
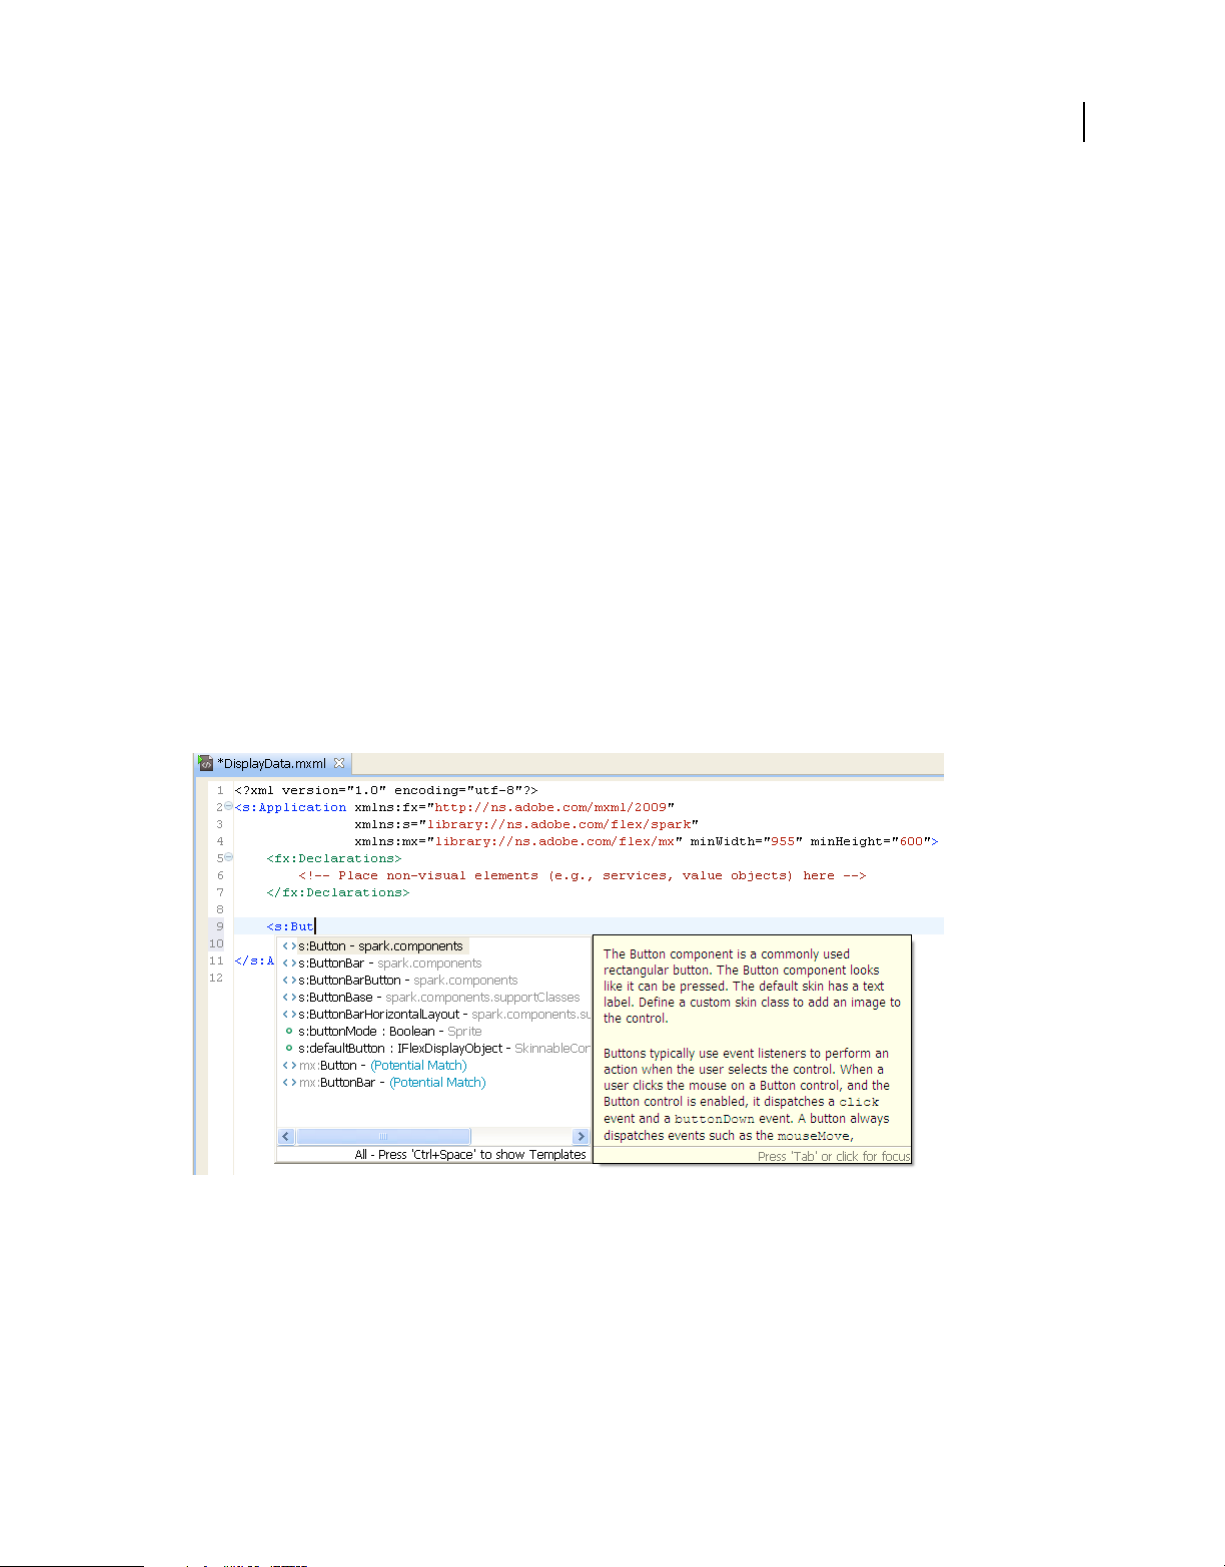
Content Assist in the MXML editor
In the MXML editor, code hints appear automatically as you enter your code. The following example shows the code
hints that are displayed when you add a tag to a Panel tag. It also shows the ASDoc reference documentation. Click
inside the ASDoc content, or press F2 to display the content in a separate, scrollable window. Click outside the ASDoc
window to close it.
15
Content Assist categorizes code hints by type, showing you both visual and nonvisual MXML components, properties,
events, and styles.
By default, Content Assist only displays code hints for recommended types. Recommended types are those components
available in the declared namespace or are otherwise available, depending on the enclosing tags. The components that
are available to you in an application depend on the namespace declaration of the application and also the tags
enclosing the insertion point in the editor.
For example, in some contexts only Spark components are allowed. In other contexts, both Spark and Halo
components are allowed. Content Assist filters the code hints, depending on the context.
Press Control+Space multiple times to cycle through filters for displayed code hints, as listed below:
• Initial display: Recommended types
• All components
• Properties
• Events
Last updated 12/3/2012
Page 20
USING FLASH BUILDER
Code Development Tools in Flash Builder
• Effects
• Styles
• Return to recommended types
Which code hints to display, and the order for cycling through code hints, is a user preference. To change the default
setting from the Preferences dialog, see
“MXML code” on page 238.
Content Assist in the ActionScript editor
Code hints appear automatically as you enter your ActionScript code in the ActionScript editor.
Content Assist filters the code hints, depending on the context. Press Control+Space multiple times to cycle through
filters for displayed code hints, as listed below:
• Templates
• Variables
• Functions
• Classes and Interfaces
• Packages
• Namespaces
Which code hints to display, and the order for cycling through code hints, is a user preference. To change the default
setting from the Preferences dialog, see
“ActionScript code” on page 237.
16
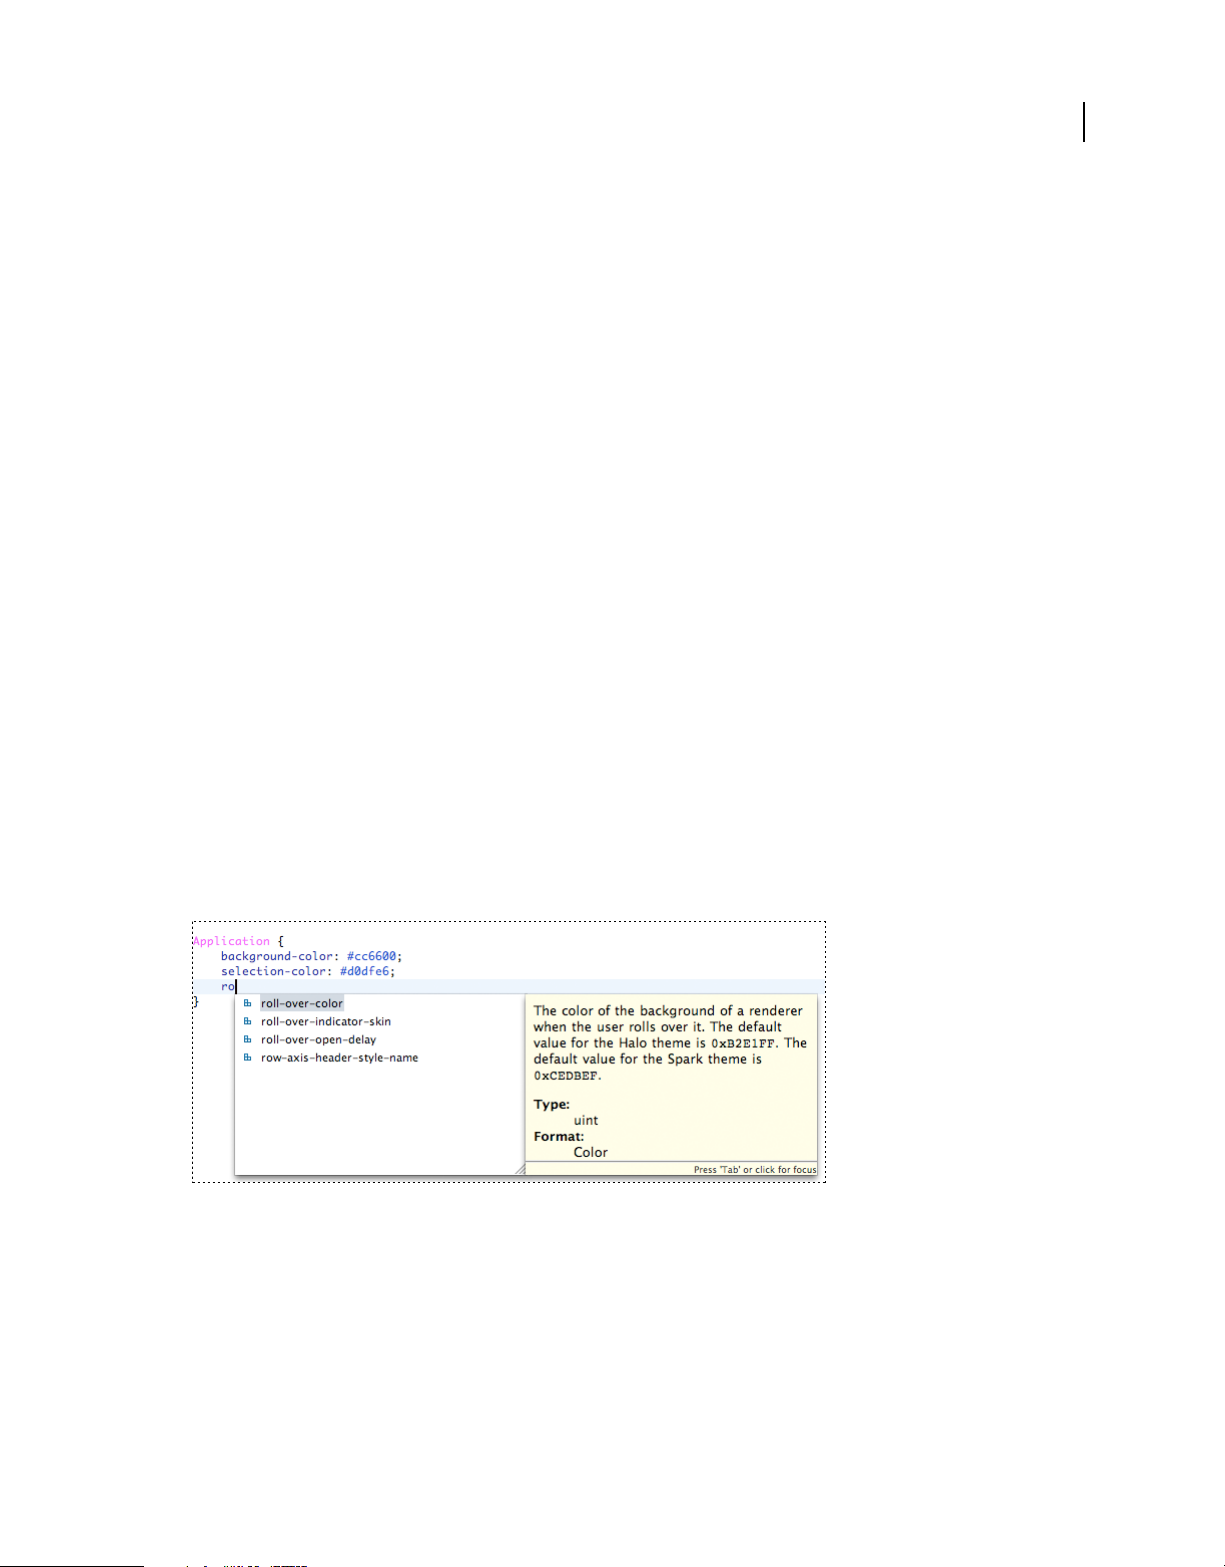
Content Assist in the CSS editor
Content Assist provides hints for CSS styles within embedded <fx:Style> tags or in stand-alone CSS documents, as
the following example shows:
Note: Code hints in CSS documents do not appear until you press Control+Spacebar.
Last updated 12/3/2012
Page 21
USING FLASH BUILDER
Code Development Tools in Flash Builder
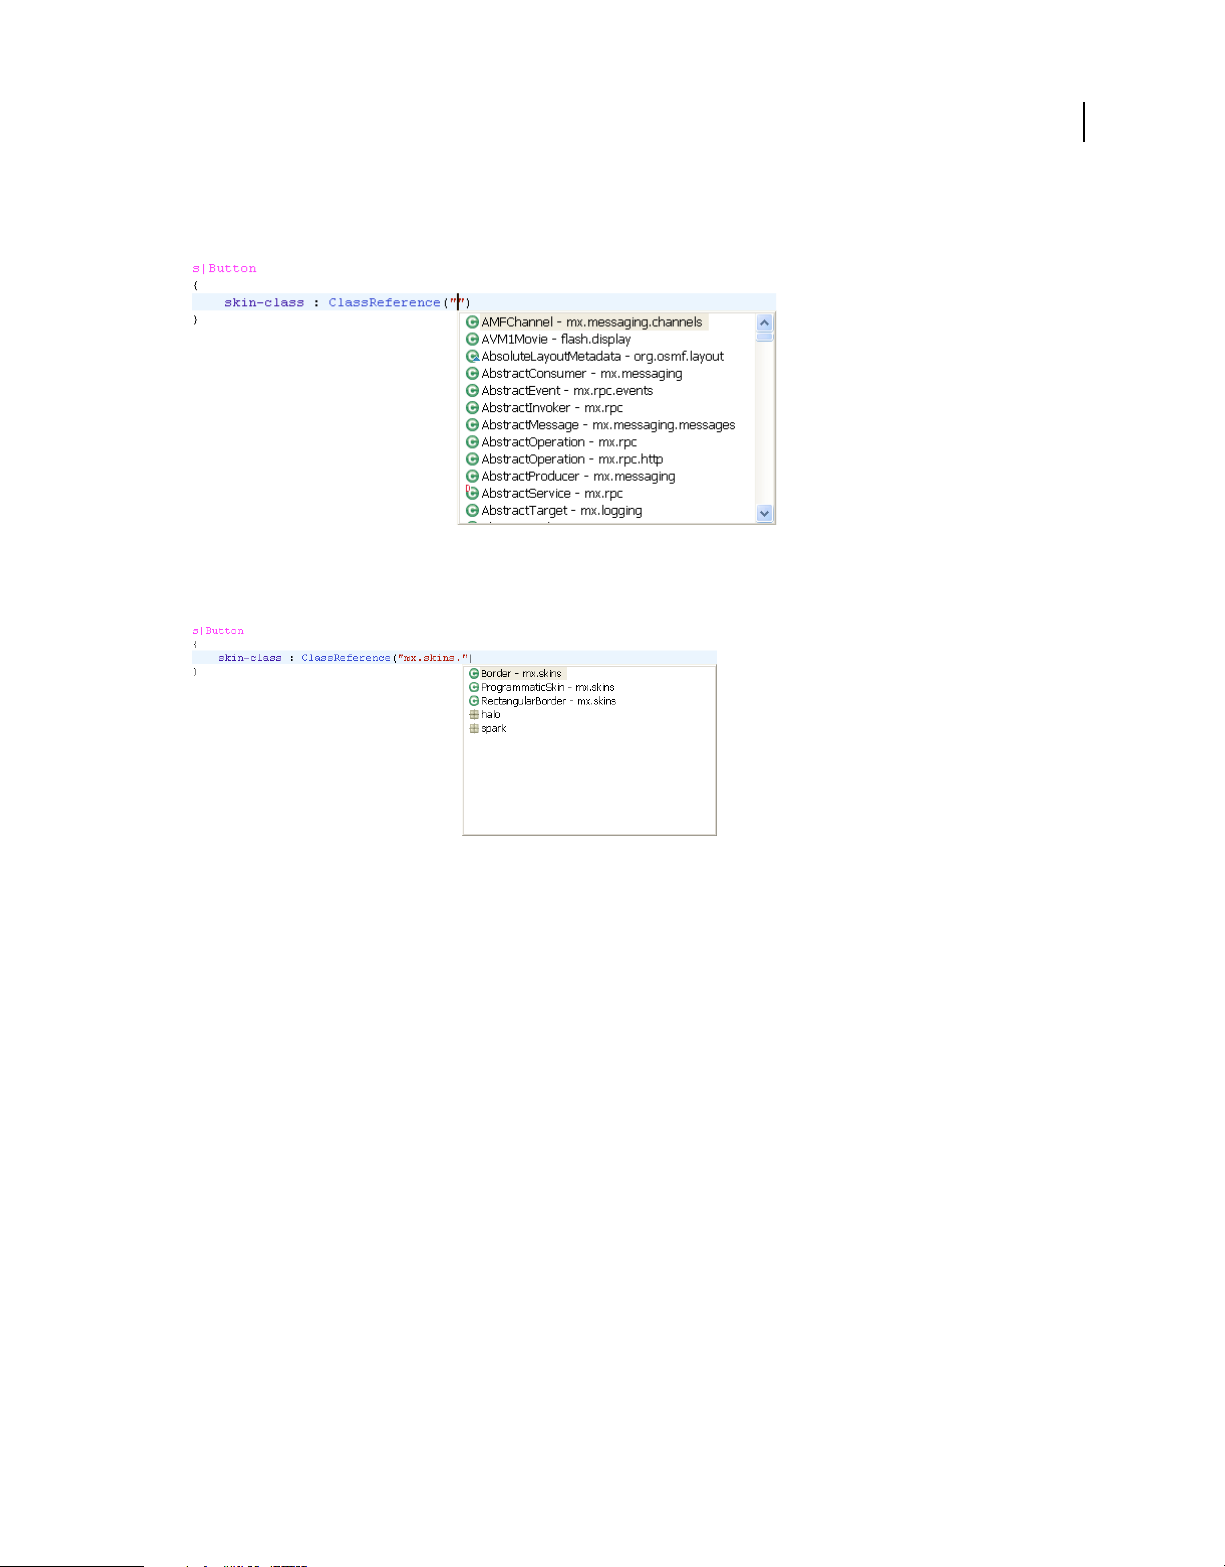
Content Assist also provides hints for component classes within the ClassReference in a CSS document, as the
following example shows:
You can also choose to type the full-qualified class name, then the available classes and packages are displayed as
follows:
17
The ClassReference tag provides hyperlink navigation to let you navigate to the referenced component or skin class.
To do so, press the Control key (Command key for Mac) and move the cursor over the ClassReference tag, the class
name becomes a hyperlink. For more information on hyperlink navigation, see
“Open code definitions” on page 27.
Display ActionScript reference summary
1 Begin entering a line of code that contains either an MXML or ActionScript class. You can also hover over the class.
As you type, ActionScript reference summary for the class displays next to the code hints. If you hover over a class,
just the ActionScript reference summary appears.
2 Click inside the ActionScript reference summary, or press F2 to display the ActionScript reference content in a
separate, scrollable window. When you finish reading the documentation, click outside the window. The ASDoc
window closes.
3 To display the ASDoc view, press Ctrl+3, and type asdoc, and select Views:
Quick Assist
The Quick Assist feature in Adobe Flash Builder provides context-based assistance to help you quickly perform a task.
Quick Assist lets you select an action from a list of actions that are applicable to your current code fragment.
To invoke Quick Assist, do one of the following:
• Select Quick Assist from the context menu in the editor, and select the required option.
• Use the keyboard shortcut Control+1(Windows) or Command+1 (Mac OS), and select the required option.
Last updated 12/3/2012
Page 22

USING FLASH BUILDER
Code Development Tools in Flash Builder
Currently, the following Quick Assist options are available:
Rename in File
Use Quick Assist to rename code elements that have the Rename/Refactor action enabled. That is, variables, methods,
class names, parameters, imports, and states and ActionScript code inside MXML tags.
To rename all instances of a variable or method in your file, place your cursor in the selected variable or method name,
and invoke Quick Assist. Then, select the Rename In File option to rename the variable or method name. Similarly,
you can change the ID property of an MXML component.
Rename in Workspace
Use Quick Assist to rename code elements that have the Rename/Refactor action enabled across files in your
workspace.
To rename all instances of a variable or method in your workspace, place your cursor in the selected variable or method
name, and invoke Quick Assist. Then, select the Rename In Workspace option to rename the variable or method name.
You can update all references to the variable or method in your workspace.
Organize Imports
Place the cursor on any import statement, and invoke Quick Assist. Then, select the option to organize imports. For
more information on organizing import statements, see
“Organize import statements” on page 34.
18
Generate Import Statement
If you have an undefined variable, you can place your cursor anywhere within the line of code and invoke Quick Assist.
You get an option to import the component. If the component has MX and Spark equivalents, both the options appear.
For example, if you have an undefined variable btn in your code:
var btn:Button;
Place your cursor anywhere in the line of code, and press Control +1. You get options to import the Button
component. If you select the Spark Button component, the import statement is created as follows:
import spark.components.Button;
Split Variable Declaration
Use Quick Assist to split a variable into two parts: variable declaration and variable initialization.
Quick Assist appears in the following contexts.
Last updated 12/3/2012
Page 23

USING FLASH BUILDER
Code Development Tools in Flash Builder
Context Example
Local variables inside a function If you have a function, as follows:
public function TestAS()
{
var i:int=10;
}
To split the variable using Quick Assist, place your cursor anywhere within the variable
declaration
variable declaration.
The variable is split as follows:
public function TestAS()
{
var i:int;
i=10;
}
Multiple variables inside a function If you have a function as follows:
public function TestAS()
{
var i:int=10, j:int=20;
}
To split the variables using Quick Assist, place your cursor anywhere within the variable
declaration
to split the variable declaration.
You can split the variable as follows:
public function TestAS()
{
var i:int, j:int=20;
i=10;
}
You can further split the variable j:int=20; by placing your cursor anywhere within the
variable declaration, and press Control+1. Then, select the option to split the variable
declaration.
The variable is split as follows:
public function TestAS()
{
var i:int, j:int;
j=20;
i=10;
}
var i:int=10; and press Control+1. Then, select the option to split the
var i:int=10, j:int=20; and press Control+1. Then, select the option
19
Assign to Variable
When you evaluate an ActionScript expression, if the expression returns a value, you can use Quick Assist to create a
variable for that expression. Quick Assist is not available for methods that do not have a return type or if the return
void.
type is
The name of the variable that is created is derived from the name of the function or identifier in the expression. If the
derived name exists, then the name is incremented.
For example, if you have the following code:
var i:int;
i;
Place your cursor after "i", and invoke Quick Assist. Then, select Assign Statement To A New Local Variable. A
variable
"i2" is created. Because the variable i is already present, the new variable name is incremented to "i2" as
follows:
Last updated 12/3/2012
Page 24

USING FLASH BUILDER
Code Development Tools in Flash Builder
var i:int;
var i2:int = i;
For example, Assign to Variable appears in the following contexts:
Context Example
Literal Expression Quick Assist supports a wide range of simple and complex expressions.
For example, if you have an expression as follows:
100+150
Place your cursor anywhere within the expression, and press Control+1, then you get code
like the following:
var number2:Number = 110 + 500;
Method Call If you have the following code within a method:
var ac:ArrayCollection = new ArrayCollection();
ac.createCursor();
Place your cursor within ac.createCursor(); and press Control+1. Then, select the
option to assign the statement to a new local variable. The local variable is created as follows:
var createCursor:IViewCursor = ac.createCursor();
Property Access If you have the following code within a property:
var ac:ArrayCollection = new ArrayCollection();
ac.source;
Place your cursor anywhere within ac.source, and press Control +1. Then, select the
option to assign the statement to a new local variable. The local variable is created as follows:
var source:Array = ac.source;
20
Convert Local Variable to Field
When you have local variables inside a function, Quick Assist lets you create a field in the class.
For example, if you have a variable inside a function, as follows:
var i:int = 10;
Place your cursor anywhere within the variable definition, and invoke Quick Assist. Then, select Convert Local
Variable To Field. The class field is created as follows:
private var i:int;
The name of the new field is the same name as the local variable, provided there are no conflicts in the class scope. If
the name exists, then the field name is incremented, and you can rename the variable or method in your file.
Convert Local Variable to Parameter
When you have a local variable inside a function, Quick Assist lets you convert the local variable into a parameter.
For example, if you have a variable inside a function, as follows:
public function method():void {
var i:int = 10;
}
Place your cursor anywhere within the variable definition, and invoke Quick Assist. Select Convert Local Variable To
Parameter. The parameter is created as follows:
Last updated 12/3/2012
Page 25

USING FLASH BUILDER
Code Development Tools in Flash Builder
public function method(i:int):void {
i = 10;
}
After the parameter is generated, you can rename all references of the parameter using linked mode.
Convert Anonymous Function to Named Function
When you have an anonymous function, you can quickly convert it to a named function using Quick Assist.
For example, if you have an anonymous function, as follows:
public function method1():void;
{
var foo:Function = function(x:int, y:int, z:int):void;
{
trace(x, y, z);
}
}
Place your cursor within function(), and press Control+1. Then, select Convert Anonymous To Named Function.
The named function is created as follows:
public function method1():void;
{
var foo:Function = fooFunction;
}
protected function fooFunction(x:int, y:int, z:int):void;
{
trace(x, y, z);
}
21
After the function is generated, you can rename all references of the function using linked mode.
Assign Parameter to New or Existing Variable
When you have a function containing a parameter, Quick Assist lets you assign the parameter to a new instance
variable.
For example, if you have a function containing a parameter, arg, as follows:
class A{
function method(arg:String):void {
}
}
Place your cursor within arg, and invoke Quick Assist. Then, select Assign Parameter To New Instance Variable. The
statement is changed to:
class A {
private var arg:String;
function method(arg:String):void {
this.arg = arg;
}
}
If you have instance variables already defined, you can assign the parameter to one of them.
For example, if you have a variable, myArg, defined as:
Last updated 12/3/2012
Page 26

USING FLASH BUILDER
Code Development Tools in Flash Builder
class A {
private var myArg:String;
function method(arg:String):void {
}
}
Place your cursor within arg, and invoke Quick Assist. Quick Assist detects the myArg variable, and shows the option
Assign Parameter To Instance Variable 'myArg'. Selecting this option, changes the statement to:
class A {
private var myArg:String;
function method(arg:String):void {
myArg = arg;
}
}
After the variable is generated, you can rename all references of the variable using linked mode.
Create New Local Variable With Cast Type
Quick Assist lets you quickly create a cast type local variable within a conditional expression.
For example, if you have an if statement:
if(myObject is Button) {
}
22
Or a while statement:
while(myObject is Button) {
}
Place your cursor within the if or why statement, and invoke Quick Assist. Quick Assist shows you the option Create
New Local Variable With Cast Type. Selecting this option generates the following conditional expression:
if(myObject is Button) {
var button:Button = myObject as Button;
}
After the local variable is generated, you can rename all references of the variable using linked mode.
Replace Conditional Statement With If-Else Statement
Quick Assist lets you replace a conditional statement with an if-else statement.
For example, if you have a conditional statement, as follows:
var foo:String = bool?"Yes":"No";
Place your cursor anywhere within the condition statement, bool?"Yes":"No", and invoke Quick Assist. Then, select
Replace Conditional With 'If-Else'. The if-else statement is generated, as follows:
var foo:String;
if (bool)
{
foo = "Yes";
}
else
{
foo = "No";
}
Last updated 12/3/2012
Page 27

USING FLASH BUILDER
Code Development Tools in Flash Builder
Add Else, Else-If, Finally, and Catch statements
If you have an If statement, you can use Quick Assist to add Else and Else-If statements.
For example, when you have an if statement:
var foo:Boolean = false;
if(foo) {
}
Place your cursor within if, and invoke Quick Assist. Quick Assist shows you options to add else and else-if
statements. If you’ve defined an else statement already, then Quick Assist shows you an option to add an else-if
statement.
Similarly, if you’ve defined a try statement, you can add finally and catch statements.
Generate Getter/Setter
Quick Assist lets you generate getters and setters (get and set accessor functions) for class variables.
For example, if you have code like the following:
private var result:ResultEvent;
Place your cursor in the variable, result, and invoke Quick Assist. Then, select the option to create the getter and
setter for result. The Generate Getter/Setter dialog box appears. Using this dialog box, you can specify a new getter and
setter function. For more information on generating getter and setters, see
“Generate get and set accessor functions”
on page 53.
23
Generate functions
Quick Assist lets you generate special functions such as labelFunction, iconFunction, and such.
For example, to create a labelFunction for the following code:
<mx:DataGrid labelFunction="lblfunc" dataTipFunction="tipFunc" />
Place your cursor within "lblfunc", and invoke Quick Assist. Then, select the option to create the labelFunction. Stub
code for the function is generated as follows:
protected function lblfunc(item:Object, column:DataGridColumn):String
{
// TODO Auto-generated method stub
}
Generate event handlers from MXML code
Quick Assist lets you generate event handlers with custom handler names within MXML code.
For example, to generate an event handler on clicking an <mx:Button> tag, enter the following code:
<mx:Button click="clickHandler" />
Then, place your cursor within "clickHandler", invoke Quick Assist, and select generate event handler. The event
handler and stub code are generated as follows:
<mx:Button click="clickHandler(event)" />
protected function clickHandler(event:MouseEvent):void
{
// TODO Auto-generated method stub
}
Last updated 12/3/2012
Page 28
USING FLASH BUILDER
Code Development Tools in Flash Builder
You can also generate an event handler for the following code, by pressing Control+1 anywhere within
"clickHandler(event)".
<mx:Button click="clickHandler(event)" />
To customize the predefined stub code that Flash Builder generates, see “Code templates” on page 38.
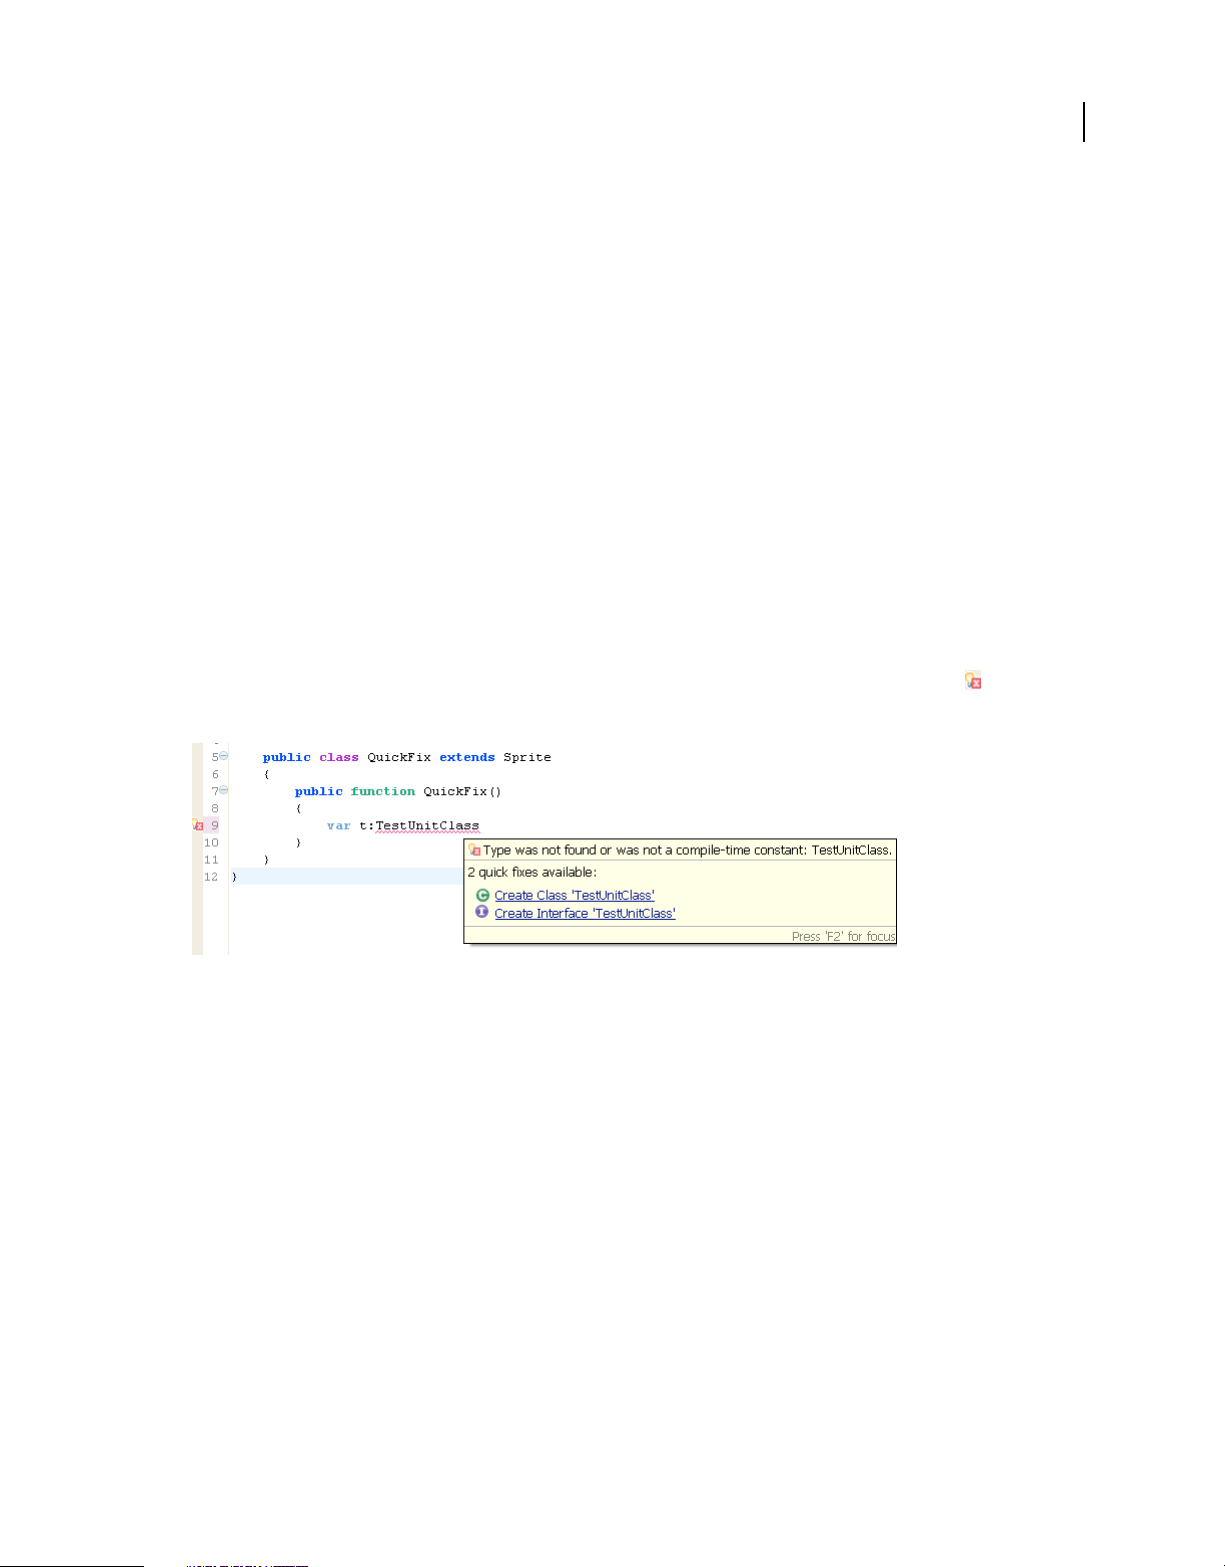
Quick Fix
The Quick Fix feature in Flash Builder identifies unresolved issues in code and prompts you with a list of options to
fix your code. The Quick Fix feature is supported only for ActionScript files or ActionScript code in an MXML file.
For example, when you have code as follows:
import flash.display.Sprite;
public class QuickFix extends Sprite
{
public function QuickFix()
{
var t:TestUnitClass
}
}
Flash Builder identifies the undefined variable by an error indicator with a bulb next to the error icon . When you
hover your pointer over the undefined variable, you see the following Quick Fix options:
24
To use the Quick Fix feature, do any of the following:
• Select Quick Fix/Assist from the context menu in the editor, and select the required option.
• Use the keyboard shortcut Control+1(Windows) or Command+1 (Mac OS), and select the required option.
Format, navigate, and organize code
The Flash Builder editors provide many shortcuts for navigating your code, including folding and unfolding code
blocks, opening the source of code definitions, and browsing and opening types. Code navigation includes the ability
to select a code element (a reference to a custom component in an MXML application file, for example) and go to the
source of the code definition, wherever it is located in the project, workspace, or path.
Multiple line code blocks can be collapsed and expanded to help you navigate, view, and manage complex code
documents. In Flash Builder, expanding and collapsing multiple-line code statements is referred to as code folding and
unfolding.
Last updated 12/3/2012
Page 29
USING FLASH BUILDER
Code Development Tools in Flash Builder
Code formatting, indenting, and commenting
As you write code, Flash Builder automatically indents lines of code to improve readability, adds distinguishing color
to code elements, and provides many commands for quickly formatting your code as you enter it (adding a block
comment, for example).
To change the default formatting, in the Preferences dialog box, select Flash Builder > MXML Code > Formatting. You
can change the order and grouping of the attributes.
When you paste MXML or ActionScript code into the code editor, Flash Builder automatically indents the code
according to your preferences. You can also specify indenting for a selected block of code.
To specify the indentation preferences, in the Preferences dialog, select Flash Builder > Editors. You can specify the
indent type and size.
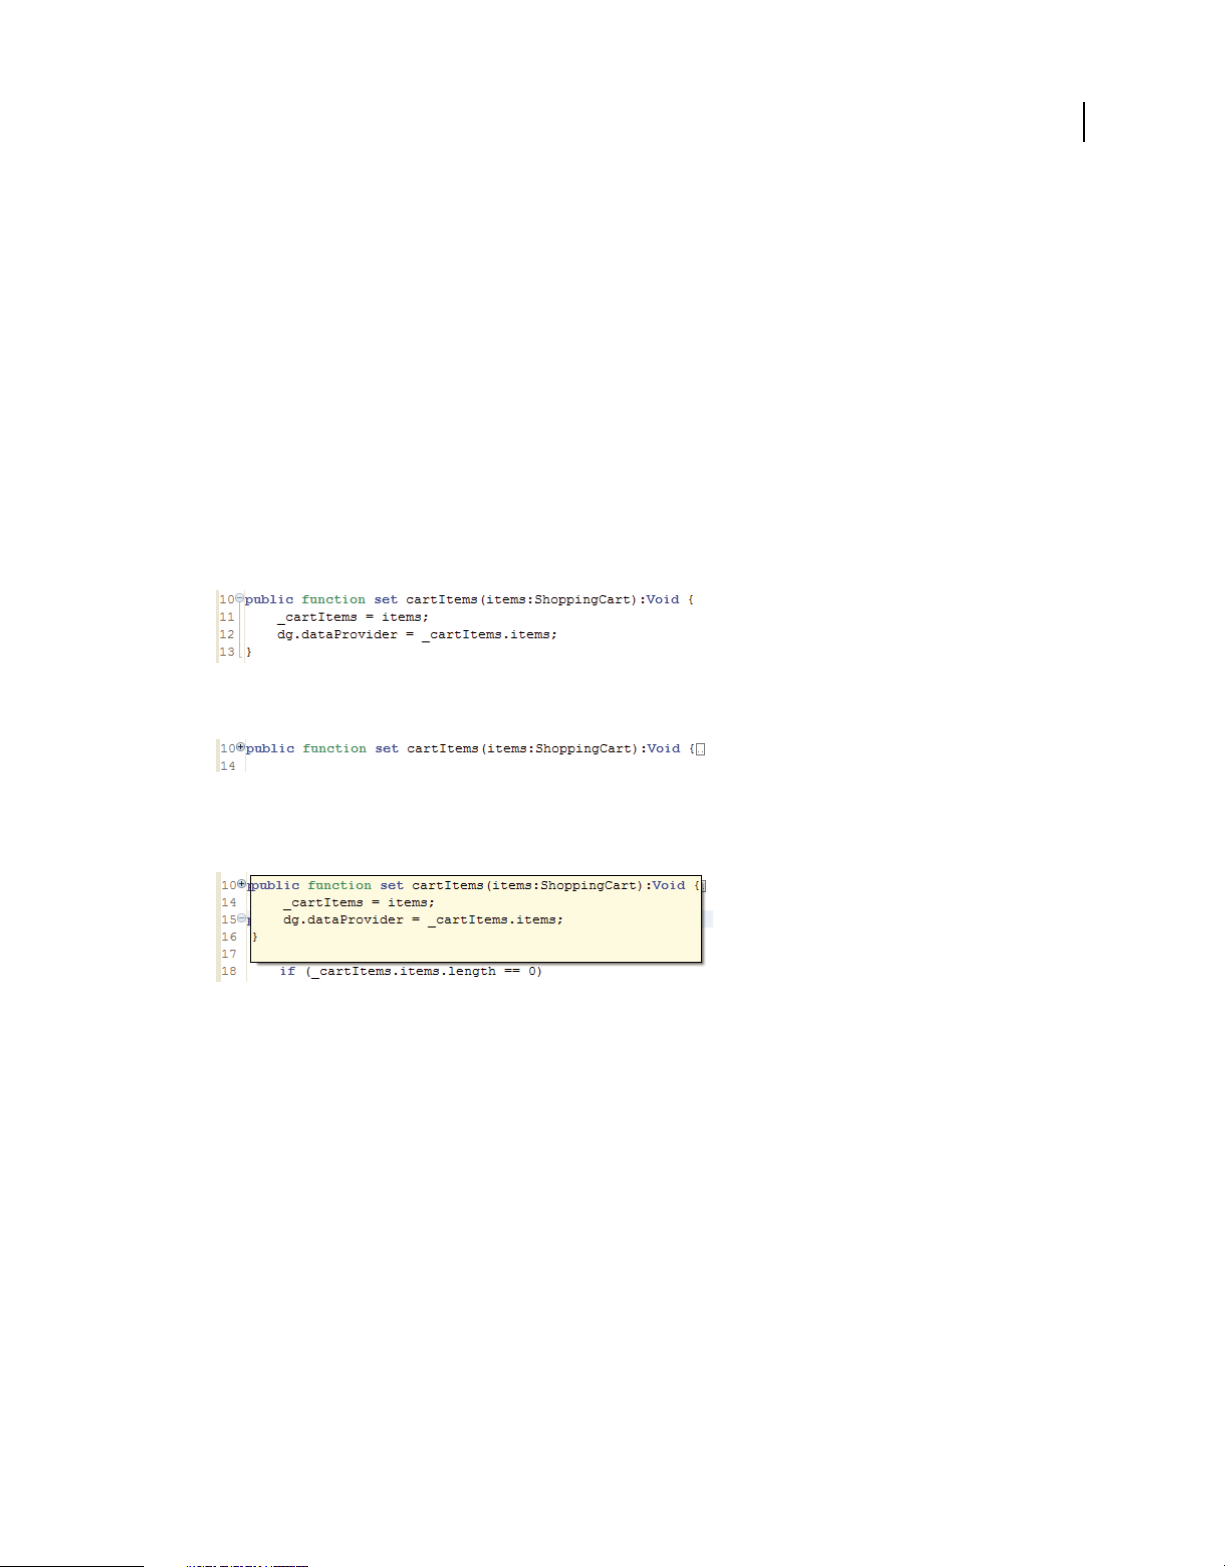
Set, fold, and unfold code blocks
1 In the editor, click the fold symbol (-) or the unfold symbol (+) in the editor’s left margin.
25
Folding a code block hides all but the first line of code.
Unfolding the code block to make it visible again. Hold the mouse over the unfold (+) symbol to show the entire
code block in a tool tip.
2 By default, code folding is turned on in Flash Builder. To turn off code folding, open the Preferences dialog and
select Flash Builder
> Editors, and then deselect the Enable Code Folding option.
Apply syntax coloring preferences
You can easily adjust syntax coloring preferences.
❖ Open the Preferences dialog and select Flash Builder > Editors > Syntax Coloring.
For more information, see “Syntax coloring” on page 239.
Default font colors can also be configured on the Text Editors and Colors and Fonts Preferences pages (see Preferences
> General > Appearance > Colors and Fonts. See also Preferences > General > Editors > Text Editors).
Indent code blocks
The editor automatically formats the lines of your code as you enter it, improving readability and streamlining code
writing. You can also use the Tab key to manually indent individual lines of code.
Last updated 12/3/2012
Page 30

USING FLASH BUILDER
Code Development Tools in Flash Builder
When you copy and paste code blocks into Flash Builder, Flash Builder automatically indents the code according to
your indentation preferences.
If you want to indent a block of code in a single action, you can use the Shift Right and Shift Left editor commands.
Shift a code block to the left or right
1 In the editor, select a block of code.
2 Select Source > Shift Right or Source > Shift Left.
3 Press Tab or Shift Tab to indent or unindent blocks of code.
Set indent preferences
1 Open the Preferences dialog and select Flash Builder > Indentation.
2 Select the indent type (Tabs or Spaces) and specify the IndentSize and Tab Size.
Add comments and comment blocks
You can add or remove comments using options in the Source menu or by using keyboard shortcuts. You can add the
following types of comments:
• Source comment for ActionScript (//)
• Block comment for ActionScript (/* */)
• ASDoc comments for ActionScript (/** */)
• Block comment for MXML (<!---->)
• CDATA block for MXML (<![CDATA[ ]]>)
Comments in ActionScript code can be toggled on or off.
26
Adobe Community Professional, Paul Robertson, blogged about using block selection mode.
Toggle comments in ActionScript code
1 In the editor, select one or more lines of ActionScript code.
2 Press Control+Shift+C (Windows) or Command+Shift+C (Mac OS) to add, or remove, C-style comments.
3 Press Control+/ (Windows) or Command+/ (Mac OS) to add, or remove, C++ style comments.
Add XML comments in MXML code
1 In the editor, select one or more lines of MXML code.
2 Press Control+Shift+C (Windows) or Command+Shift+C (Mac OS) to add a comment.
Add CDATA blocks in MXML code
1 In the editor, select one or more lines of MXML code.
2 Press Control+Shift+D (Windows) or Command+Shift+D (Mac OS) to add a comment.
Navigate and inspect code
With applications of any complexity, your projects typically contain many resources and many lines of code. Flash
Builder provides several features that help you navigate and inspect the various elements of your code.
Last updated 12/3/2012
Page 31

USING FLASH BUILDER
Code Development Tools in Flash Builder
Open code definitions
Flash Builder lets you open the source of an external code definition from where it is referred to in your code. For
example, if you create a custom MXML component and import it into your MXML application you can select the
reference to the MXML component and open the source file in the editor.
Open the source of a code definition
1 Select the code reference in the editor.
2 From the Navigate menu, select Go To Definition.
You can use the keyboard shortcut, F3.
The source file that contains the code definition opens in the editor.
Flash Builder also supports hyperlink code navigation.
Open the source of a code definition using hyperlink navigation
1 Locate the code reference in the editor.
2 Press and hold the Control key (Windows) or Command key (Mac OS) and hold the mouse over the code reference
to display the hyperlink.
3 To navigate to the code reference, click the hyperlink.
27
Use the Outline view
The Outline view is part of the Flash Development perspective (see “The Flash Development perspective” on page 5),
and, therefore, is available when you edit code. You use the Outline view to more easily inspect and navigate the
structure of your MXML, ActionScript, and CSS documents.
The Outline view contains three modes: Class, MXML, and CSS. In Class mode, the Outline view displays the structure
of your code (classes, member variables, functions, and so on). In MXML mode, the Outline view displays the MXML
structure (tags, components, controls, and so on). In CSS mode, CSS selectors and nested properties within them are
displayed.
Selecting an item in the Outline view locates and highlights it in the editor, which makes it much easier to navigate
your code.
Last updated 12/3/2012
Page 32

USING FLASH BUILDER
Code Development Tools in Flash Builder
Outline view in Class mode
When you edit an ActionScript document (or ActionScript contained in an MXML document), the Outline view
displays the structure of your code. This includes import statements, packages, classes, interfaces, variables not
contained in functions, and functions. This view does not include metadata, comments, namespace declarations, and
the content of functions.
In the Outline view, nodes and items in the tree structure represent both the different types of language elements and
their visibility. For example, red icons indicate private elements, green indicates public elements, and yellow indicates
that the element is not private or public.
28
Outline view toolbar in Class mode
In Class mode, the Outline view toolbar contains the sort and filter commands, as the following example shows:
Outline view in MXML mode
When you edit an MXML document, which can contain both MXML and ActionScript code, both the Class and
MXML modes are available in the Outline view.
In MXML mode, each item in the Outline view represents an MXML tag and the following types of tags are displayed:
components, controls, nonvisual tags such as
tags (for example, layout constraints), and compiler tags such as
WebService or State, component properties that are expressed as child
Model, Array, and Script.
Last updated 12/3/2012
Page 33

USING FLASH BUILDER
Code Development Tools in Flash Builder
The Outline view in MXML mode does not show comments, CSS rules and properties, and component properties
expressed as attributes (as opposed to child tags, which are shown).
Outline view toolbar in MXML mode
When the Outline view is in MXML mode, the toolbar menu contains additional commands to switch between the
MXML and class views.
To switch between the two views, from the toolbar menu, select Show MXML View or Show Class View.
Use Quick Outline view in the editor
Within the ActionScript and MXML editors, you can access the Quick Outline view, which displays the Outline view
in Class mode. The Quick Outline view is displayed in a pop-up window within the editor itself, not as a separate view,
and you can use it to quickly navigate and inspect your code.
29
The Quick Outline view contains the same content as the Class mode, but it also includes a text input area that you can
use to filter the displayed items. For example, entering an item name into the Quick Outline view displays only the
items that contain those characters.
Last updated 12/3/2012
Page 34

USING FLASH BUILDER
Code Development Tools in Flash Builder
The Quick Outline view does not contain the commands that let you alphabetically sort or hide items.
As in the Outline view, selecting an item locates and highlights it in the editor.
Open the Quick Outline view
❖ With an ActionScript or MXML document open in the editor, from the Navigate menu, select Quick Outline.
You can also use the keyboard shortcut, Control+O.
Close the Quick Outline view
❖ Navigating outside the Quick Outline view closes the view. You can also press ESC to close the Quick Outline view.
Browse and view classes
The Open Type dialog is available for browsing all available classes (including Flex framework classes) in your project.
Select a class in the Open Type dialog to view the implementation.
30
Open Type dialog
The Open Type dialog is also available for selecting classes as the base class for a new ActionScript class or a new
MXML component.
The Open Type dialog lets you filter the classes that are displayed according to the text and wild cards that you specify.
The dialog uses color coding to indicate recommended types and excluded types. Recommended types display as gray.
Excluded types appear brown.
Recommended types are those classes available in the default namespace for a project. For example, in some contexts
only Spark components are allowed. In other contexts, both Spark and Halo components are allowed.
Excluded types are those classes that are not available in the default namespace for a project.
Last updated 12/3/2012
Page 35

USING FLASH BUILDER
Code Development Tools in Flash Builder
Open the Open Type dialog
• (Browse classes) To browse classes and view their implementation:
1 From the Flash Builder menu, select Navigate > Open Type.
2 (Optional) Type text or select filters to modify the classes visible in the list.
3 Select a class to view the source code.
You cannot modify the source code for classes in the Flex framework.
• (New ActionScript classes) When selecting a base class for a new ActionScript class:
1 Select File > New > ActionScript class.
2 For the Superclass field, click Browse.
3 (Optional) Type text or select filters to modify the classes visible in the list.
4 Select a base class from the list.
• (New MXML components) When selecting a base component for a new MXML component:
1 Select File > New > MXML Component.
2 From the list of projects in your workspace, select a project for new MXML component and specify a filename.
The available base components vary, depending on the namespaces configured for a project.
31
3 For the Based On field, click Browse.
Note: Clear or modify the default base class listed in the Based On field to widen your choices.
4 (Optional) Type text or select filters to modify the classes visible in the list.
5 Select a base component from the list.
Show line numbers
You can add line numbers in the editor to easily read and navigate your code.
❖ From the context menu in the editor margin, select Show Line Numbers.
The editor margin is between the marker bar and the editor.
Last updated 12/3/2012
Page 36

USING FLASH BUILDER
Code Development Tools in Flash Builder
Use markers
Markers are shortcuts to lines of code in a document, to a document itself, or to a folder. Markers represent tasks,
bookmarks, and problems and they are displayed and managed. Selecting markers opens the associated document in
the editor and, optionally, highlights the specific line of code.
With Flash Builder, you must save a file to update problem markers. Only files that are referenced by your application
are checked. The syntax in an isolated class that is not used anywhere in your code is not checked.
The workbench generates the following task and problem markers automatically. You can manually add tasks and
bookmarks.
Tasks Task markers represent a work item. Work items are generated automatically by the workbench. You can add
a task manually to a specific line of code in a document or to the document itself. For example, to remind yourself to
define a component property, you might create a task called “Define skinning properties.” You can also add general
tasks that do not apply directly to resources (for example, “Create a custom component for the employee log-in
prompt”). You use the Task view to manage all the task markers. For more information, see
Problems Problem markers are generated by the compiler and indicate invalid states of various sorts. For example,
syntax errors and warnings generated by the compiler are displayed as problem markers in the Problem view. For more
information, see
Bookmarks You can manually add bookmarks to a line of code or a resource (folder or document). You use
“Filter the Tasks and Problems views” on page 11.
bookmarks as a convenience, to keep track of, and easily navigate to items in your projects. You use the Bookmarks
view to manage all bookmarks. For more information, see
“Add and delete bookmarks” on page 33.
“Add tasks” on page 32.
32
Note: The Tasks and Bookmarks views are not displayed by default in the Flash Development perspective. For more
information about adding these views, see
“Work with views” on page 10.
Navigate markers
Markers are descriptions of and links to items in project resources. Markers are generated automatically by the
compiler to indicate problems in your code, or added manually to help you keep track of tasks or snippets of code.
Markers are displayed and managed in their associated views. You can easily locate markers in your project from the
Bookmarks, Problems, and Tasks views, and navigate to the location where the marker was set.
Go to a marker location
❖ Select a marker in the Bookmarks, Problems, or Tasks views.
The file that contains the marker is located and opened in the editor. If a marker is set on a line of code, that line is
highlighted.
Add tasks
Tasks represent automatically or manually generated workspace items. All tasks are displayed and managed in the
Tasks view (Window
> Other Views > General > Tasks), as the following example shows:
Last updated 12/3/2012
Page 37

USING FLASH BUILDER
Code Development Tools in Flash Builder
Add a task to a line of code or a resource
1 Open a file in the editor, and then locate and select the line of code where you want to add a task; or in the Flex
Package Explorer, select a resource.
2 In the Tasks view, click the Add Task button in the toolbar.
3 Enter the task name, and select a priority (High, Normal, Low), and click OK.
Note: The resource, as shown in the Flex Package Explorer, does not indicate that it was marked. You can view and
manage all task markers in the Task view.
Complete and delete tasks
When a task is complete, you can mark it and then optionally delete it from the Tasks view.
Mark a task as complete
❖ In the Tasks view, select the task in the selection column, as the following example shows:
Delete a task
❖ In the Tasks view, open the context menu for a task and select Delete.
33
Delete all completed tasks
❖ In the Tasks view, open the context menu and select Delete Completed Tasks.
Add and delete bookmarks
You can use bookmarks to track and easily navigate to items in your projects. All bookmarks are displayed and
managed in the Bookmarks view (Window
Add a bookmark to a line of code or a resource
1 Open a file in the editor, and then locate and select the line of code to add a bookmark to.
2 From the main menu, select Edit > Add Bookmark.
3 Enter the bookmark name, and click OK.
A bookmark icon ( ) is added next to the line of code.
Note: The resource, as shown in the Flex Package Explorer, does not indicate that it was marked. You can view and
manage all bookmarks in the Bookmarks view.
> Other Views > General > Bookmarks), as the following example shows:
Delete a bookmark
1 In the Bookmarks view, select the bookmark to delete.
Last updated 12/3/2012
Page 38

USING FLASH BUILDER
Code Development Tools in Flash Builder
2 Right-click (Windows) or Control-click (Mac OS) the bookmark and select Delete.
Organize import statements
You can add, sort, and remove unused import statements in ActionScript and MXML script blocks using the Organize
Imports feature.
To use the Organize Imports feature, with an ActionScript or MXML document that contains import statements open
in the editor, do one of the following:
• Select Organize Imports from the Source menu.
• Use the keyboard shortcut: Control+Shift+O (Windows) or Command+Shift+O (Mac OS)
• Place the cursor on any import statement, and press Control+1. Then, select the option to organize imports.
Add missing import statements
If you have undefined variables within your ActionScript script or MXML script block, you can add all missing import
statements all at once by using the Organize Imports feature.
Resolve ambiguous imports
When you use the Organize Imports feature in the MXML and ActionScript editors, the packages in which the classes
are located are automatically imported into the document.
34
If you declare an ActionScript type that is present in two packages, you can choose the import statement for the
required package. For example,
Button is present in both spark.components and mx.controls packages.
If you have more than one instance of ambiguous import statements, all the unresolved imports are displayed letting
you resolve them one after the other.
Remove unused import statements
Flash Builder places all import statements at the head of an ActionScript document or at the top of the script block of
an MXML document by default.
To remove import statements that are not referenced in your document, keep the document that contains import
statements open in the editor, and use the Organize Imports feature.
Sort import statements
You can quickly sort all the import statements in your ActionScript or MXML script block using the Organize Imports
feature.
Flash Builder sorts the import statements alphabetically by default. To change the default order in which you want
Flash Builder to add the import statements, use the Preferences dialog. To do so, open the Preferences dialog, and select
Flash Builder> Editors > ActionScript Code > Organize Imports. For more information, see
“ActionScript code” on
page 237.
Auto-import missing import statements when copy-pasting ActionScript code
When you copy ActionScript code from an ActionScript document and paste into another ActionScript document,
any missing import statements are automatically added. The missing import statements are added at either the package
level or file level depending on where you paste the code.
Note: This feature is supported only for ActionScript code. If you copy ActionScript code from a file outside Flash Builder
or from a file other than an ActionScript file, then the missing import statements are not added.
Last updated 12/3/2012
Page 39

USING FLASH BUILDER
Code Development Tools in Flash Builder
Consolidate import statements across MXML script blocks
If you have multiple MXML script blocks in a document with multiple import statements defined for each script block,
Flash Builder lets you consolidate all the import statements.
The Consolidate Import Statements Across MXML Script Blocks option in the Organize Imports preferences dialog
box is selected by default. The import statements are consolidated, sorted, and added only once at the top of the first
script block.
Consolidate import statements from the same package using wildcards
If you have multiple import statements from the same package, you can use wildcards in your import statement instead
of repeating the statements multiple times.
You can specify the number of import statements that are allowed for types in the same package before the
<package>.* wildcard is used. For example, if you have multiple import statements from the flash.events package,
Flash Builder consolidates all the import statements as:
import flash.events.*;
By default, Flash Builder applies the <package>.* wildcard if you use more than 99 import statements from the same
package. You can change the default value using the Organize Imports Preferences dialog. For more information, see
“ActionScript code” on page 237.
35
Code inspection, analysis, and fixing
Syntax error checking and highlighting
Flash Builder performs code analysis as you type ActionScript or MXML code and identifies coding syntax errors and
all other errors by default.
Depending on the nature and severity of the errors, your application might not run properly until the errors are
corrected.
Syntax error checking in Flex projects
When code syntax errors are encountered in a Flex project, you are notified in the following ways when you save your file:
• An error indicator is added next to the line of code, as the following example shows:
Last updated 12/3/2012
Page 40

USING FLASH BUILDER
Code Development Tools in Flash Builder
• The Outline view indicates the error with an exclamation mark in the affected lines of code, as the following
example shows:
• The Problems view lists an error symbol and message. Double-clicking the error message locates and highlights the
line of code in the editor, as the following example shows:
Unidentified reference error highlighting
Flash Builder generates error annotations for undefined identifiers in your code.
36
next to the line of code in the editor indicates an error annotation.
Unidentified reference error highlighting also helps you identify places in the code where you can generate stub code
for an undefined method, variable, or class. For more information, see
“Generate from usage” on page 51.
Live Error Highlighting in ActionScript projects
When you type ActionScript code in an ActionScript file or within an ActionScript block in an MXML file, Flash
Builder detects errors as you type. You can quickly identify these errors before saving the file or compiling the code.
An error indicator with a bulb next to the error icon indicates that you can use Quick Fix to fix the problem.
For more information on using the Quick Fix feature, see “Quick Fix” on page 24.
next to the line of code in the editor indicates that there is no Quick Fix option available for that error.
To turn off Live Error Highlighting, select Flash Builder > Editors in the Preferences dialog box, and deselect Report
Problems As You Type. The code errors are then reported only in the Problems view after you save the file.
You can also correct an error using the Quick Fix option in the Problems view. To do so, right-click the error in the
Problems view and select Quick Fix.
Last updated 12/3/2012
Page 41

USING FLASH BUILDER
Code Development Tools in Flash Builder
Find references and refactor code
Flash Builder includes advanced search features that are more powerful than find and replace. To help you understand
how functions, variables, or other identifiers are used, Flash Builder lets you find and mark references or declarations
to identifiers in ActionScript and MXML files, projects, or workspaces. You can use refactor to rename the following
identifiers in your code, and then update all references to them:
• Variables
• Functions
• Types (interface, class)
• Accessors (getter/setter)
• Attributes
• Metadata in MXML (effects, events, styles)
Mark references
1 In Source mode, click the Mark Occurrences button in the toolbar.
2 Click an identifier in the editor. All instances are marked, depending on settings in Preferences.
To change the appearance of marked references, in the Preferences dialog, select General > Editors > Text Editors >
Annotations. For more information on Markers, see
“Use markers” on page 32.
37
Find all references or declarations
1 In Source mode, click an identifier in the editor.
2 Select Search > References or Search > Declarations from the main menu. Then select File, Project, or Workspace.
Matches appear in the Search view.
Refactor your code
1 In Source mode, click an identifier in the editor.
2 Select Source > Refactor > Rename from the main menu.
3 Enter a new name.
Flash Builder checks rename preconditions and prompts you to confirm problems before the rename operation
occurs. Preconditions include the following:
• References cannot be renamed in read-only files.
• All files must be saved.
• If a project has build errors, a warning appears.
• The new name must be within scope, which is determined by the type of element and its location. Name-
shadowing errors are also noted.
• The new name must be a valid identifier.
• The reference defined in a SWC file must include a source attachment.
Last updated 12/3/2012
Page 42

USING FLASH BUILDER
Code Development Tools in Flash Builder
4 To review the change, click Preview to see the original and refactored source, or click OK to proceed with the
change to your code.
38
Refactoring in CSS files
When you have references to ActionScript or MXML files in your CSS files, and you rename or move the ActionScript
or MXML files to a different location. Then, Flash Builder automatically updates the CSS files with references to the
new name or location. You can review the changes in the Preview dialog, and click OK to proceed with the change to
your code.
Advanced code editing
Code templates
Code templates speed-up your coding efforts by letting you auto-insert frequently used coding patterns.
Flash Builder includes a number of predefined code templates. You can also define additional code templates for
commonly used code patterns. To see all the available code templates, open the Preferences dialog box, and select Flash
Builder > Editors > Code Templates.
Adobe Community Professional, Paul Robertson, blogged about using code templates.
MXML, ActionScript, and CSS code templates
The ActionScript, CSS, and MXML code templates are context-based and can be called on pressing Control+Space.
You can use the pre-defined templates that are shipped with Flash Builder or you can create your own.
Insert code templates
To insert a code template in the code editor, type the name of the template in the code editor, and press Control+Space.
Last updated 12/3/2012
Page 43

USING FLASH BUILDER
Code Development Tools in Flash Builder
For example, when writing ActionScript code, say, you use the for loop repeatedly. You can then define a code
template for the
for (var i:int = 0; i < array.length; i++) { }
for loop as follows:
When you use a code template, you don’t have to type the complete code for the for loop. Instead, in the ActionScript
class, type '
for' and press Control+Space. A template option to create the for loop appears. On selecting the code
template, the code that you defined in the template is inserted.
Templates can also contain template variables. A template variable is defined within ${}. The variable is resolved based
on the corresponding variable definition in the editor.
For example, if you define a code template for the for loop as follows:
for (var ${index}:int = 0; ${index} < ${array}.length; ${index}++) { ${cursor} }
And you invoke the code template after defining a variable myArr as follows:
{
var myArr:ArrayCollection = null;
}
Then, ${array} in the code template resolves to myArr, and the resulting code looks like:
{
var myArr:ArrayCollection = null;
for (var ${index}:int = 0; ${index} < myArr.length; ${index}++) { ${cursor} }
}
39
Create and edit code templates
1 Open the Preferences dialog box, and select Flash Builder > Editors > Code Templates.
2 Code templates are categorized as ActionScript, MXML, and CSS code templates. Under each category, you find a
set of predefined code templates. You can edit an existing template or add a new one.
3 To add a new template, select the code template category, and click Add. In the New Template dialog box, enter a
name and brief description for the code template. Then, specify a context in which the code template must be called.
You can specify contexts for ActionScript and MXML code templates.
You can select from the following ActionScript contexts:
• ActionScript: Inserts the code template anywhere in the ActionScript document
• ActionScript statement: Inserts the code template within functions and within elements of a class
• ActionScript members: Inserts the code template only within elements of a class
• ActionScript Package Scope: Inserts the code template within a package, as follows:
Package
{
/* insert code template*/
}
You can select from the following MXML contexts:
• MXML: Inserts the code template anywhere in the MXML document
• MX Component: Inserts the code template within MX components available for Flex 3 SDK
• Spark Components: Inserts the code template within Spark components available for Flex 4 SDK or a higher
SDK version
Last updated 12/3/2012
Page 44

USING FLASH BUILDER
Code Development Tools in Flash Builder
• MXML attributes: Inserts the code template for MXML attributes within MX and Spark components.
4 Enter the code for the template in the Pattern section. To insert variables in the code, click Insert Variable, and
select from a list of predefined variables. The variables are contextual to the template category.
ActionScript templates contain predefined variables that include array, enclosing_method,
enclosing_package, enclosing_type, field, local_var, and var. MXML templates contain predefined
variables that include
5 If you don’t want Flash Builder to automatically insert the code template into your code, deselect the Automatically
fx, mx, s, and tag.
Insert Into Code option.
6 To customize an existing code template, select the template, and click Edit. After editing the template, click OK.
For more information about customizing file templates and template variables, see “Customize file templates” on
page 44 and “Template variables” on page 46.
At any point, you can remove the custom template and restore the predefined code template by clicking Revert To
Default.
By default, you can call all the predefined templates using Content Assist. If you, however, don’t want a specific
template to appear in the Content Assist options, deselect that template in the Existing Templates section.
You can also import and export code templates. You can select one or more templates and export them. The templates
are exported as an XML file.
40
Adobe Community Professional, Paul Robertson, blogged about sharing code templates.
Flash Builder code templates
Flash Builder can automatically generate predefined code in the following scenarios:
• “Generate event handlers” on page 168
• “Generate get and set accessor functions” on page 53
• “Generate from usage” on page 51 (placeholder stub code for an undefined method)
• “Override or implement methods” on page 42
You can customize the predefined code template that Flash Builder generates.
Customize the code template
1 Open the Preferences dialog box, and select Flash Builder > Editors > Code Templates > Flash Builder.
2 Select the name of the code template that you want to customize, and click Edit. For example, to customize the code
that is generated when you generate an event handler, select the event handler template, and click Edit.
3 You can customize the name of the template, the description, and the code pattern.
4 To insert a variable within the code, click Insert Variable, and select the variable. For more information about the
available code variables, see
5 At any point, you can discard the changes by clicking Revert To Default.
6 You can also import and export the code template. You can select one or more templates and export them. The
templates are exported as an XML file.
“Use code variables” on page 41.
Last updated 12/3/2012
Page 45

USING FLASH BUILDER
Code Development Tools in Flash Builder
Use code variables
Code variables for event handlers
Variable Description Example
41
${component_id} Resolves to the unique ID of the
component.
${component_name} Resolves to the name of the tag.
${event_name} Specifies the name of the event. clickEvent, onHover
${event_type} Resolves to the event handler type. Flash Builder designates a default event type for each user interface
${modifiers} Specifies the modifiers for the
generated function.
${method_name} Resolves to the event handler name. For a click event for the Button component, the event handler name can
${namespace} Defines the namespace value for the
generated function.
If the ID of the button component is test, the event handler that is
generated is
If you have not specified an ID value, the auto-generated values are
component1, component2, and so on.
${namespace} ${modifiers}function
${:method_name('${component_id}_${event_name}Handler
')}(${event}:${event_type}):${return_type}
{
// TODO Auto-generated method stub
${cursor}
}
component.
On generating a click event for a button component, an event handler
of type MouseEvent is generated as follows:
button1_clickHandler(event:MouseEvent)
static
be button1_clickHandler
The namespace value can be any of the following:
test_clickHandler.
• protected
• public
• private
The default value is protected.
Example using code variables for event handler functions:
${namespace} ${modifiers}function
${:method_name('${component_id}_${event_name}Handler')}
${event}:${event_type}):${return_type}
{
// TODO Auto-generated method stub
${cursor}
}
Last updated 12/3/2012
Page 46

USING FLASH BUILDER
Code Development Tools in Flash Builder
Code variables for get and set accessor functions
Variable Description Example
42
${metadata} Specifies the metadata tags that are generated Generating get and set accessor functions for a
${asdoc} Specifies the ASDoc that are generated for get and set
accessor functions
${return_type} Resolves to the variable type.
If the variable type is not specified, the generated get
accessor function does not have a return type.
${property}} Resolves to the property name in the getter/setter dialog. For a variable var i:int, i resolves to _i
${argument_type} Resolves to the data type of the generated set function.
Bindable variable
${metadata}
${asdoc}${namespace}
${modifiers}function get
${method_name}()${return_type}
{
return ${property};
}
${metadata}
${asdoc}${namespace}
${modifiers}function get
${method_name}()${return_type}
{
return ${property};
}
Example using code variables for get and set accessor functions:
${asdoc}
${namespace} ${modifiers}function set ${method_name}(value${argument_type}):void
{
if( ${property} !== value)
{
${property} = value;
dispatchEvent(new Event("${event_name}"));
}
}
Code variables for functions in an undefined class
Variable Description Example
${params} For an undefined function that accepts a specified
number of arguments, the generated function has
the same number of arguments with the type.
Override or implement methods
Flash Builder provides you with an option to select and override parent class methods or implement interface methods.
1 Open the Override/Implement Methods dialog box by selecting Override/Implement Methods from the Source
menu. You can also select Source
ActionScript editor.
2 The methods for each parent class are displayed in a tree structure format. For each class, you can select the
methods that you want to override and the methods that you want to implement.
3 You can select the insertion point to insert the selected methods. The default insertion point option depends on
where you place your cursor in the editor while opening the Override/Implement Methods dialog box. The variable
or method closest to the cursor location appears as an insertion point option.
Flash Builder generates the stub code for the selected methods.
> Override/Implement Methods from the context menu of the MXML or
Last updated 12/3/2012
Page 47

USING FLASH BUILDER
Code Development Tools in Flash Builder
To customize the predefined stub code that Flash Builder generates, see “Code templates” on page 38.
Metadata code completion
Flash Builder displays code completion hints for metadata that you use in your MXML and ActionScript documents.
In an MXML document, metadata code hints are displayed within embedded <fx:Metadata> and <fx:Script> tags.
In an ActionScript document, metadata code hints are also displayed for ActionScript language elements like class
names, variables, getters, and setters.
The code hints are contextual to the MXML and ActionScript document, and the code in which the metadata is used.
For example, when you invoke Content Assist within two blank lines of an ActionScript statement, code hints
applicable to only that ActionScript statement appear. To see all the valid code hints applicable to the ActionScript or
MXML document, press Control+Space multiple times to cycle through the available code hints.
Use metadata code completion in MXML documents
In an MXML document or class, you can use metadata code completion in the following ways:
• Enter ’[’ within <fx:Metadata> tags, as follows:
<fx:Metadata>
[
</fx:Metadata>
43
• Enter ’[’ within <fx:Script> tags, as follows:
<fx:Script>
<![CDATA[
[
]]>
</fx:Script>
Use metadata code completion in ActionScript documents
In an ActionScript document, you can use metadata code completion when you enter ’[’ before a class name, variable,
getter, or setter, as follows:
[
class GetSet
{
[
private var privateProperty:String;
[
public function get publicAccess():String
{
return privateProperty;
}
[
public function set publicAccess(setValue:String):void
{
privateProperty = setValue;
}
}
Code completion for custom metadata tags
Flash Builder supports code completion for custom metadata tags that are introduced on using third-party Flex
frameworks.
Last updated 12/3/2012
Page 48

USING FLASH BUILDER
Code Development Tools in Flash Builder
To enable code hints for custom metadata tags in your project, you generate a SWC file containing a metadata.xml
file, as follows:
1 Create a library project. The New Flex Library Project wizard guides you through the steps, prompting you for the
project name, location, and build path information. For more information, see
“Create Flex library projects” on
page 182.
2 Add the metadata.xml file in the src folder under the root folder of your library project. Include all the metadata
tags that you want in the
metadata.xml file.
Add the metadata.properties file (if any) in the appropriate locale folder. For example, locale/en_US or
locale/ja_JP.
For more information about metadata tags, see About metadata tags in the Flex documentation.
3 Include the metadata.xml file in the library SWC file, as follows:
a Select Project > Properties > Flex Library Build Path.
The metadata.xml file that you added appears in the Assets tab.
b Select the metadata.xml file to include in the SWC file, and click OK.
The SWC file is compiled and generated in the output (bin) folder of the library project.
4 Select the locale folder to which you added the metadata.properties file (if any).
5 After generating the SWC file, add it to the build path of your project, as follows:
1 Select Project > Properties > Flex Build Path.
2 Click Add SWC.
3 Enter or browse to the location of the SWC file, and click OK.
Once you add the SWC file to your build path, metadata code completion hints appear for the metadata tags defined
metadata.xml file. You can share the SWC file between your applications or distribute to other developers.
in the
44
Customize file templates
Flash Builder allows you to customize the default information contained in new MXML, ActionScript, and CSS files.
Examples of information you can specify include variables for specifying author and date, variables for opening and
closing tags and attributes, variables for various ActionScript declarations, namespace prefixes, and just about any
content you want to include in a template file. File templates are especially useful for specifying introductory
comments and copyright information.
The content of a new file is specified in a file template available from Preferences > Flash Builder > File Templates.
Templates are available for the following types of files:
Last updated 12/3/2012
Page 49

USING FLASH BUILDER
Code Development Tools in Flash Builder
ActionScript ActionScript file
ActionScript class
ActionScript interface
ActionScript skinnable component
MXML MXML web application
MXML desktop application
MXML component
MXML module
MXML skin
ItemRenderer for Spark components
ItemRenderer for MX components
ItemRenderer for MX DataGrid
ItemRenderer for Advanced DataGrid
ItemRenderer for MX Tree
FlexUnit FlexUnit TestCase class
FlexUnit TestSuite class
FlexUnit4 TestCase class
FlexUnit4 TestSuite class
45
CSS CSS file
After modifying a template, you can export the template so it can be shared with other members of your team.
Modify a file template
1 Select Preferences > Flash Builder > File Templates
2 Expand the file categories and select a file template to modify.
3 Select Edit and modify the template.
You can type directly in the Template editor or select Variables to insert pre-defined data into the template.
4 Click OK to save the changes.
Changes apply to new files.
Export and Import File Templates
1 Select Preferences > Flash Builder > File Templates
2 Expand the file categories and select a file template.
3 Select Export to export a template to the file system, or Import to import a previously exported template.
Templates are exported as XML files.
Restore defaults
Note: Restoring defaults restores all file templates to the default values. You cannot restore a single template to the default
value.
❖ To restore the default templates, open Preferences > Flash Builder > File Templates and select Restore Defaults
Last updated 12/3/2012
Page 50

USING FLASH BUILDER
Code Development Tools in Flash Builder
Template variables
Template variables for all file types
Variable Description Example
${date} Current date Feb 15, 2009
${year} Current year 2009
${time} Current time 3:15 PM
${file_name} Name of the newly created file HelloWorld.mxml
${project_name} Name of the Flex or ActionScript project Hello_World_Project
${user} User name of the author jdoe
46
$$
${dollar}
Dollar symbol $
Template variables for MXML files
Variable Description Example
${application}
${component}
${module}
${xml_tag} XML version
${xmlns} Resolves to the namespace definition, based
Specifies the application, component, or
module MXML tag names.
For a web application, ${application}
expands to “Application.”
For a desktop application, ${application}
expands to “WindowedApplication.”
${component} expands to “Component.”
${module} expands to “Module.”
These tags are typically used to position the
starting and closing tags of a file.
on the project's Flex SDK type and the
namespace prefix defined in Preferences.
The following:
<${application}
${xmlns}${wizard_attributes}${min_size}>
${wizard_tags}
</${application}>
expands to:
<s:Application
xmlns:fx="http://ns.adobe.com/mxml/2009"
xmlns:s="library://ns.adobe.com/flex/spark
"
xmlns:mx="library://ns.adobe.com/flex/halo
" minWidth="1024" minHeight="768">
<s:layout>
<s:BasicLayout/>
</s:layout>
</s:Application>
<?xml version="1.0" encoding="utf-8"?>
For a Flex 4 SDK project:
xmlns="http://ns.adobe.com/mxml/2009"
${min_size} Minimum size of an MXML web application.
${ns_prefix} Namespace prefix for the project’s Flex SDK.
You cannot change the default values for this
variable.
${wizard_attributes} Specifies the position of the attributes
defined by the New File wizard.
Last updated 12/3/2012
minWidth="1024" minHeight="768"
For Flex 3: mx:
For Flex 4: fx:
For a new web application:
${application} ${xmlns}${wizard_attributes}>
expands to:
<Application xmlns="http://ns.adobe.com/mxml/2009"
layout="vertical">
Page 51

USING FLASH BUILDER
Code Development Tools in Flash Builder
Variable Description Example
47
${wizard_tags} Specifies the layout property for containers
defined by the New File wizard
${fx} Prefix for the MXML 2009 language
document namespace. The perfix is as
specified in the MXML document.
${mx} Prefix for the MX document namespace. The
prefix is as specified in the MXML document.
For a new application using Flex 4 SDK:
<s:layout>
<s:BasicLayout/>
</s:layout>
When you use the following Library tag template in an
MXML document:
<${fx}Library>
<${fx}Definition id="${def}">
${cursor}
</${fx}Definition>
</${fx}Library>
A library tag is created as follows:
<fxLibrary>
<fxDefinition id="def">
</fxDefinition>
</fxLibrary>
When you use the following Combobox template in the
MX Components context:
<${mx}ComboBox id="${comboBox}"
rowCount="${rowCount:values(5)}"
dataProvider="${dataProvider}"/>
${cursor}
A combobox is created as follows:
<mx:ComboBox id="comboBox" rowCount="5"
dataProvider="dataProvider"/>
${s} Prefix for the Spark document namespace When you use the Spark Button template in the Spark
Components context:
<${s}Button id="${btn}"
label="${myButton}"
click="${onClick}(${event})"/>
${cursor}
A Spark button is created as follows:
<s:Button id="btn"
label="myButton"
click="onClick(event)"/>
${tag} Fully-qualified tag name for the project’s MX
components.
When you use the List template in the MXML context:
<${list:tag(mx.controls.List)}
id="${myList}">
<${dp:tag(dataProvider)}>
<${arraycollection:tag(mx.collections.Arra
yCollection)}>
${cursor}
</${arraycollection}>
</${dp}>
</${list}>
A list is created as follows:
<s:List id="myList">
<s:dataProvider>
<s:ArrayCollection>
</s:ArrayCollection>
</s:dataProvider>
</s:List>
Last updated 12/3/2012
Page 52

USING FLASH BUILDER
Code Development Tools in Flash Builder
Template variables for ActionScript files
Variable Description Example
${package_declaration} Generates the package declaration. For a file in the com/samples package, generates:
package com.samples
48
${import_declaration} For a new ActionScript class or ActionScript
Interface, generates required import
declarations .
${interface_declaration} For a new ActionScript interface, generates
the interface declaration.
${class_declaration} For a new ActionScript class, generates the
class declaration.
${class_body} Generates all the required statements for a
new class.
${interface_name}
${class_name}
${package_name}
Specifies the interface, class, or package
name.
Typically used when generating comments.
For a subclass of TextBox, generates:
import flex.graphics.TextBox;
For a new Interface that extends IButton interface,
generates:
public interface IMyButton extends IButton
For a new subclass of CheckBox, generates:
public class MyCheckBox extends CheckBox
For a new subclass of Button that implements the IBorder
interface, generates the following for the class body:
public function MyButton()
{
super();
}
public function get
borderMetrics():EdgeMetrics
{
return null;
}
For example, the following template specification:
/*
* ${class_name} implements. . .
*/
generates the following code:
/*
* MyButton implements. . .
*/
${array} Specifies the value of an array The following Fore template
for each (var ${index}:${type} in ${array})
{
${line_selection}
${cursor}
}
iterates over the value of an array using enumeration as
follows:
for each (var i:type in array)
{
}
${enclosing_method} Specifies the enclosing method's name The traceMethod template traces the method as
follows:
trace("${enclosing_type}.${enclosing_metho
d}
${enclosing_method_arguments})");
Last updated 12/3/2012
Page 53

USING FLASH BUILDER
Code Development Tools in Flash Builder
Variable Description Example
49
${enclosing_package} Specifies the package name such as 'xx.yy' of
'xx.yy.class'
${enclosing_type} Specifies the type name such as "class" of
"xx.yy.class"
The package template creates a package as follows:
package ${enclosing_package}
{
/**
* @author ${user}
*/
class ${enclosing_type}
{
${cursor}
}
}
The package template creates a package specifying the
class name as follows:
package ${enclosing_package}
{
/**
* @author ${user}
*/
class ${enclosing_type}
{
${cursor}
}
}
${field} Specifies the class variables The do template creates the do-while loop as follows:
do
{
${line_selection}
${cursor}
} while
(${condition:local_var(Boolean)});
${local_var} Specifies the local variable visible within the
block scope
if template creates an if statement as follows:
if (${condition:local_var(Boolean)})
{
${cursor}
}
${var} Specifies all the visible variables fori template iterates over the value of an array as
follows
for (var ${index}:int = 0; ${index} <
${array}.length; ${index}++)
{
${cursor}
}
Last updated 12/3/2012
Page 54

USING FLASH BUILDER
Code Development Tools in Flash Builder
Template variables for CSS files
Variable Description Example
50
${css_namespaces} Defines namespaces for Spark and Halo style
selectors.
Default values for Flex 3:
""
(In Flex 3, namespace declarations are not required in CSS
files)
Default values for Flex 4:
@namespace s
"library://ns.adobe.com/flex/spark";
@namespace mx
"library://ns.adobe.com/flex/halo";
Template file examples
The following shows an example of an MXML Component file template, followed by a new MXML Component file
generated from the template.
Example File Template for an MXML Component file
${xml_tag}
<!--
* ADOBE SYSTEMS Confidential
*
* Copyright ${year}. All rights reserved.
*
* ${user}
* ${project_name}
* Created ${date}
*
-->
<${component} ${xmlns}${wizard_attributes}>
${wizard_tags}
<${ns_prefix}Script>
<![CDATA[
]]>
</${ns_prefix}Script>
</${component}>
Last updated 12/3/2012
Page 55

USING FLASH BUILDER
Code Development Tools in Flash Builder
New MXML Component file generated from the example template
<?xml version="1.0" encoding="utf-8"?>
<!--
* ADOBE SYSTEMS Confidential
*
* Copyright 2009. All rights reserved.
*
* jdoe
* FileTemplates
* Created Jul 13, 2009
*
-->
<s:Group xmlns:fx="http://ns.adobe.com/mxml/2009"
xmlns:s="library://ns.adobe.com/flex/spark"
xmlns:mx="library://ns.adobe.com/flex/halo" width="400" height="300">
<s:layout>
<s:BasicLayout/>
</s:layout>
<fx:Script>
<![CDATA[
]]>
</fx:Script>
</s:Group>
51
Generate from usage
Use Quick Assist to generate stub code for an undefined method, variable, or class in your code. The generated stub
code can be used as a placeholder for the code that you want to implement later without rendering your code
incompatible. To customize the predefined stub code that Flash Builder generates, see
To invoke Quick Assist, you can use the keyboard shortcut Control+1(Windows) or Command+1 (Mac OS).
Use Quick Assist to generate stub code in the relevant class or MXML script block by selecting any of the following
actions:
Generate Method Creates a method
For example, if you have code as follows:
private function genFunc():void
{
bar();
}
Place your cursor anywhere in the line of code containing bar(); and press Control+1. An option to create a function
appears. On selecting this option, a new function is generated as follows:
private function bar():void{}
You can also generate a function for an undefined function in a referenced class. For example, if you have an undefined
function "setValue()" in the referenced class "MyClass", as follows:
MyClass cls = new MyClass();
cls.setValue(5);
“Code templates” on page 38.
Last updated 12/3/2012
Page 56

USING FLASH BUILDER
Code Development Tools in Flash Builder
Place your cursor anywhere in the line of code containing "setValue" and press Control+1. An option to create a
function appears. On selecting this option, a new function
setValue(int) is generated in the referenced "MyClass"
as follows:
private function setValue(param0:int):void
{
// TODO Auto Generated method stub
}
Generate Variable Creates a property
For example, if you have code, where, i is an undefined variable, as follows:
public function MyClass
{
i;
}
Place your cursor anywhere in the line of code containing i; and press Control+1. You get options to create a local
variable or a field.
Selecting the option to create a local variable, creates the variable as follows:
var i:Object;
52
Selecting the option to create a field, creates a class-level variable as follows:
private var i:Object;
You can also generate a property for an undefined variable in a referenced class. For example, if you have an undefined
variable "aValue" in the referenced class "MyClass", as follows:
MyClass cls = new MyClass();
cls.aValue = "str";
Place your cursor anywhere in the line of code containing aValue, press Control+1, and select Create Field Variable.
A property
private var aValue:String;
Generate Class/Interface Creates a class or interface
aValue of type string is generated in the referenced "MyClass" as follows:
For example, if you have code, where Foo is undefined, as follows:
public function myFunction():Foo;
{
}
Place your cursor anywhere in the line of code containing Foo; and press Control+1. Options to create a class or
interface named
Foo appear. Select one of these options to open either the New ActionScript Class wizard or New
ActionScript Interface wizard. Enter the necessary details and click Finish. After clicking Finish, a class or interface
with the name
Foo is created.
When you generate a new class, you can create an ActionScript class with a parametrized constructor.
For example, if you have code like the following:
Private function func(): void {
New NewClass("str1");
}
Last updated 12/3/2012
Page 57

USING FLASH BUILDER
Code Development Tools in Flash Builder
Place your cursor anywhere in the line of code containing NewClass("str1"), press Control+1, and select Create Class.
An ActionScript class with a parametrized constructor is created. If you, however, specify a superclass for the
ActionScript class, then a parameterized constructor is not generated.
Adobe Community Professional, Paul Robertson, blogged about using Quick Assist for external classes and interfaces.
Generate Event Handler Generates event handler functions
For example, if you have code like the following:
public function MyClass
{
Var button:Button = new Button();
button.addEventListener(DragEvent.DRAG,dragHandlerFunction);
}
Place your cursor anywhere in the line of code containing dragHandlerFunction, and press Control+1. Then, select
the Quick Assist option to create the event handler. The event handler function is created as follows:
protected function dragHandlerFunction (event:DragEvent):void
{
}
Generate Import Statement From Usage Creates an import statement
53
For example, if you have code where the variable type Button is undefined, as follows:
<fx:Script>
<![CDATA[
var btn:Button;
]]>
</fx:Script>
Place your cursor anywhere in the line of code containing var btn:Button, and press Control+1. You get an option
to import
import spark.components.Button;
Button if a class named Button is available in the project. The import statement is created as follows:
You can generate import statements for function arguments, function return types, and such.
Generate get and set accessor functions
Get and set accessor functions (getters and setters) let you keep class properties private to the class. They allow users
of the class to access those properties as if they were accessing a class variable (rather than calling a class method).
Flash Builder can generate ActionScript get and set accessor functions for class variables. You can select a bindable
property and generate get and set accessor functions for that property. You can also specify a custom event name at
the time of generating code.
How to generate get or set accessor functions
1 With an ActionScript file open in the Source Editor, place the cursor on a class variable.
2 Select Source > Generate Getter/Setter from either the Flash Builder menu or the context menu.
3 In the Generate Getter/Setter dialog, specify details for the accessor functions and click OK.
Note: To view the code that is generated, select Preview before clicking OK.
To customize the predefined code that Flash Builder generates, see “Code templates” on page 38.
Last updated 12/3/2012
Page 58

USING FLASH BUILDER
Code Development Tools in Flash Builder
When you generate getters and setters, Flash Builder provides the following options:
• Make the class variable private.
Typically, class variables have private access.
• Rename the class variable, suggesting a leading underscore for the variable name.
By convention, private class variables have a leading underscore.
• Rename the accessor functions.
• Specify a bindable property and a custom event name.
When you specify a bindable property, a [Bindable] tag is defined above the generated accessor function in the
generated code.
• Specify whether to generate both getter and setter accessor functions.
• Specify the namespace value for the accessor function.
• Specify the placement of the accessor function in any of the following locations:
• Before the first method
• After the last method
• Before variable declarations
• Preview the code that is generated.
For more information about get and set accessor functions, see Get and set accessor methods in the ActionScript 3.0
Reference for the Adobe Flash Platform.
54
Last updated 12/3/2012
Page 59

Chapter 4: Using Projects in Flash Builder
Adobe Flash Builder groups the resources (folders and files) that constitute an application into a container called a
project.
Use the Package Explorer view to add, edit, and delete project resources. You can also close projects within a
workspace, import resources, and link to external resources.
Types of projects
Flash Builder supports the following various types of projects, depending on the type of application you are building.
Flex projects
Use a Flex Project wizard to build a web application or a desktop application that is based on the Flex framework. A
web application runs in Adobe Flash Player, while a desktop application runs in Adobe AIR. When creating the
project, you specify whether the project is for web or desktop applications.
55
A Flex project contains a set of properties that control how the application is built, where the built application resides,
how debugging is handled, and the relationships to other projects in the workspace.
A Flex Project contains a default MXML application file. Other MXML files in the project can also be application files.
If you have an ActionScript file in your Flex project, you can set the ActionScript file as the default application by
selecting Set As Default Application from the context menu for the project.
See “Flex projects” on page 57 and “Develop Web and Desktop Applications in Flash Builder” on page 155
Flex Mobile Projects
Use a Flex Mobile Project wizard to create an Adobe AIR application targeted for a Mobile Platform. The application
is based on the Flex framework. You can use Flash Builder to preview, debug, and profile mobile applications from the
desktop or on a device.
A Flex Mobile Project has a single default MXML application file. Typically, a mobile application has a set of View
components that display content on a device. The default MXML application file launches the default View
component.
Flash Builder uses the AIR Debug Launcher (ADL) to preview mobile applications on the desktop. Although not a true
emulation, the ADL allows you to view the application layout and behavior, with options to rotate the application.
You can preview a mobile application on a device connected to the development computer’s USB port. When
previewing on a device, Flash Builder exports the application to the device.
See “Flex mobile projects” on page 58 and Developing mobile applications in Flash Builder.
Flex Library Projects
Use a Flex Library Project wizard to build custom code libraries that you share between applications or distribute to
other developers. Typically, you use library projects to package and distribute components and resources to other
developers.
A library project generates a SWC file, which is an archive file for Flex components and other resources.
Last updated 12/3/2012
Page 60

USING FLASH BUILDER
Using Projects in Flash Builder
See “Use Flex library projects” on page 181.
ActionScript Projects
Use an ActionScript Project wizard to create web or desktop applications that are based on either the Flash APIs or
Adobe AIR APIs. When creating the project, you specify whether the project is for a web or a desktop application.
You work exclusively in the ActionScript editor, the debugging tools as necessary, and then build the project into SWF
files to preview and test your application.
When you create an ActionScript project or a stand-alone ActionScript file to contain functions, a class, or interface,
the Flex development perspective is modified to support the ActionScript editor. The primary supporting views of the
ActionScript editor are the Outline and Problems views.
See “ActionScript projects” on page 59.
ActionScript Mobile Projects
Use an ActionScript Mobile Project wizard to create mobile applications that are based on the Adobe AIR API. When
creating the project you specify a target Mobile Platform and some mobile applications settings. You can use Flash
Builder to preview the mobile application from the desktop or on a device.
Flash Builder uses the Adobe AIR Debug Launcher (ADL) to preview, debug, and profile mobile applications on the
desktop. Although not a true emulation, the ADL allows you to view the application layout and behavior, with options
to rotate the application.
56
You can preview a mobile application on a device connected to the development computer’s USB port. When
previewing on a device, Flash Builder exports the application to the device. You can use Flash Builder to debug the
application exported to a device.
See “Create ActionScript mobile projects” on page 60.
ActionScript Library Projects
Use an ActionScript Project Library wizard to build ActionScript custom code libraries. Typically, you create the
ActionScript Library project, add specific ActionScript classes, and compile the project. Flash Builder then generates
a SWC file that you can distribute to other developers or share between applications.
See “Create ActionScript library projects” on page 185.
Flash Professional Projects
Use a Flash Professional Project wizard to edit, build, or debug FLA or XFL files created in Adobe Flash Professional.
This feature allows Flash Professional developers to take advantage of the editing and debugging environment
available with Flash Builder. Flash Professional projects are available in Flash Builder only if you have Flash
Professional installed.
See “Using Flash Builder with Flash Professional” on page 230.
Create projects in Flash Builder
Flash Builder lets you create different types of projects such as Flex, Flex on mobile, ActionScript, and Adobe AIR
projects, as well as other types of projects. Flash Builder provides you a project-creation wizard that guides you through
the steps, prompting you for the type of project to create, the project name, location, application type (web or desktop),
SDK versions, and other options.
Last updated 12/3/2012
Page 61

USING FLASH BUILDER
Using Projects in Flash Builder
For information about creating an ActionScript project, see “ActionScript projects” on page 59.
For information about creating library projects, see “Use Flex library projects” on page 181.
For information about creating Flash Professional projects, see “Using Flash Builder with Flash Professional” on
page 230.
Flex projects
You can use Flex projects to create Web applications (run in Flash Player) or Desktop applications (runs in Adobe
AIR).There are options to create MX only Flex projects or Spark only projects that use only Spark components.
Create Flex Projects
Use this procedure to create your basic Web or Desktop applications.
1 Select File > New > Flex Project.
2 Enter a project name and location.
The default location is the current workspace.
3 Select either Web or Desktop for the application type.
4 Use either the default Flex SDK, or browse to another installed SDK. Click Next.
5 (Optional) Specify Server Settings.
See “Access data services” on page 169.
57
6 Specify an Output Folder.
If you do not specify an application server, the location is inside your project folder.
If you specify an application server, the output server is outside the project folder. Typically, you place the output
folder with your service files.
7 Click Finish, or click Next to specify additional configuration options.
8 (Optional) Specify Build Paths and other configuration options.
See “Build paths, native extensions, and other project configuration options” on page 61.
9 Click Finish.
Watch the video Build your First Desktop Application with Flash Builder by Adobe Evangelist James Ward.
Create a Flex project that uses only MX components
The MX Only option is useful for creating applications that are similar in design to applications created with the
previous release of Flex (that is, Flex 3), but still have access to the latest Flex and Flash Builder features (such as the
states syntax, advanced CSS, compiler improvements, and other language features).
If you specify MX Only for a project, then Spark components are not available to applications in the project.
You can convert a Flex project to be an MX Only project. However, Flash Builder does not rewrite any code in the
project. Manually update your code to remove any reference to Spark components.
Create an MX Only Flex project
1 Select File > New > Flex Project.
2 Specify Project Location and Server Settings, as described in “Build paths, native extensions, and other project
configuration options” on page 61.
Last updated 12/3/2012
Page 62

USING FLASH BUILDER
Using Projects in Flash Builder
3 In the Build Paths page of the New Flex Project wizard, specify MX Only.
4 Specify other Build Path settings, as described in “Build paths, native extensions, and other project configuration
options” on page 61. Click Finish.
Convert a Flex project to an MX Only Flex project
1 Make the project the active project in Flash Builder:
Typically, you open a source file in the project to make the project active.
2 Select Project > Properties > Flex Build Path.
3 For Component Set, select MX Only. Click OK.
4 Modify any application code in the project that accesses Spark components.
You cannot reference Spark components in an MX Only project.
Create a Flex project that uses only Spark components
The Spark Only option is useful for creating applications that use Flex and Flash Builder features such as the new states
syntax, advanced CSS, compiler improvements, and other language features.
If you specify Spark Only for a project, then MX components that were available with Flex 3 are not available to
applications in the project.
58
1 Select File > New > Flex Project.
2 Specify Project Location and Server Settings, as described in “Flex projects” on page 57.
3 In the Build Paths page of the New Flex Project wizard, specify Spark Only.
4 Specify other Build Path settings, as described in “Build paths, native extensions, and other project configuration
options” on page 61. Click Finish.
Flex mobile projects
Flash Builder lets you create Flex projects targeted for mobile devices. A Flex mobile project creates an Adobe AIR
application that can run on Apple iOS, BlackBerry Tablet OS, and Google Android devices.
Create Flex mobile projects
Use this procedure to create a Flex mobile project for Apple iOS, BlackBerry Tablet OS, and Google Android devices.
1 Select File > New > Flex Mobile Project.
2 Enter a project name and location.
The default location is the current workspace.
3 Use the default Flex 4.6 SDK that supports mobile application development or an Apache Flex SDK. Click Next.
4 Specify Mobile settings:
• Select the platform that your application must target. For more information, see “Choose target platforms” on
page 205.
• Specify an application template.
Fore more information, see “Choose an application template” on page 205.
• Specify permissions.
Last updated 12/3/2012
Page 63

USING FLASH BUILDER
Using Projects in Flash Builder
Select the target platform, and set the permissions for each platform, as required. You can edit the permissions
later in the application descriptor XML file.
For more information, see “Choose mobile application permissions” on page 206.
• Specify platform settings.
Platform settings let you select a target device family. Depending on the platform that you select, you can select
the target device or a target device family.
Note: There are no platform-specific settings for the Google Android or BlackBerry Tablet OS platform.
For more information, see “Choose platform settings” on page 207.
• Specify application settings.
For more information, see “Choose application settings” on page 207.
5 Click Finish or click Next to specify server settings.
6 (Optional) Specify Server Settings.
Fore more information, see “Access data services” on page 169.
7 Specify an Output Folder.
If you do not specify an application server, the location is inside your project folder.
59
If you specify an application server, the output server is outside the project folder. Typically, you place the output
folder with your service files.
8 Click Finish, or click Next to specify additional configuration options.
9 (Optional) Specify Build Paths and other configuration options.
For more information, see “Build paths, native extensions, and other project configuration options” on page 61.
10 Click Finish.
Flex consultant, Brian Telintelo, blogged about creating a mobile application for the Android platform.
For more information on mobile development using Flex and Flash Builder, see Developing mobile applications
in Flash Builder.
More Help topics
“Flex mobile projects” on page 58
ActionScript projects
Use ActionScript projects to create Web or Desktop applications that are based on the AIR SDK. This SDK contains
the Adobe AIR SDK, ASC (ActionScript Compiler), and other required components and files).
Create ActionScript projects
Create an ActionScript application for the Web or Desktop by following these steps:
1 Select File > New > ActionScript Project.
2 Enter a project name and location.
The default location is the current workspace.
3 Select either Web or Desktop for the application type.
Last updated 12/3/2012
Page 64

USING FLASH BUILDER
Using Projects in Flash Builder
4 This project uses the AIR SDK 3.4 by default. Click Check For Updates to check and download an updated version
of the AIR SDK if available.
Click Next.
5 Specify Build Paths.
For more information, see “Build paths, native extensions, and other project configuration options” on page 61.
6 Click Finish.
For more information on coding in ActionScript, see the ActionScript Developer's Guide.
Create ActionScript mobile projects
Create AIR-based ActionScript applications that can run on Apple iOS, BlackBerry Tablet OS, and Google Android
devices by following these steps:
1 Select File > New > ActionScript Mobile Project.
2 Enter a project name and location.
The default location is the current workspace.
3 This project uses the AIR SDK 3.4 by default. Click Check For Updates to check and download an updated version
of the AIR SDK if available.
Click Next.
60
4 Specify Mobile settings:
• Select the platforms that your application must target.
For more information, see “Choose target platforms” on page 205.
• Specify platform permissions.
Select the target platform, and set the permissions for each platform, as required. You can edit the permissions
later in the application descriptor XML file.
For more information, see “Choose mobile application permissions” on page 206.
• Specify platform settings.
For more information, see “Choose platform settings” on page 207.
• Specify application settings.
Select Automatically Reorient if you want your application to rotate when the device rotates.
Select Full Screen if you want your application to display in fullscreen mode on the device.
5 Click Finish, or click Next to specify additional configuration options.
6 (Optional) Specify Build Paths.
See “Build paths, native extensions, and other project configuration options” on page 61.
7 Click Finish.
More Help topics
“Manage launch configurations” on page 96
Last updated 12/3/2012
Page 65

USING FLASH BUILDER
Using Projects in Flash Builder
Build paths, native extensions, and other project configuration options
When you create a Flex or ActionScript project, you can customize its configuration. All additional configuration steps
are optional.
Note: You can also change a project’s configuration after the project has been created by selecting Project > Properties.
Source Path Use the Source tab to add additional source folders to a project. You can reorder the source folders, edit
the location of folders, and remove folders from the source path.
Main source folder, main application file, output folder URL By default, Flash Builder places source files in a projects
src folder.
For Flex projects, the default name of the main MXML application file is the name of the project. You can change these
defaults when creating the project.
When you create a project, Flash Builder runs application files from a default URL based on your project settings.
Specify an output folder URL to override the default settings. The output folder URL is useful when you build and
deploy your application on your project server, but you debug your application on a web server. You then specify the
web server URL as the output folder URL. For example, if you specify
URL, a launch configuration is created with that URL.
See “Set up a project output folder” on page 84 and “Run and debug applications” on page 95.
http://myserver/test.swf as the output folder
61
Library Path Use the Library Path tab to specify the framework linkage and build path libraries
• Component Set
The component set is available only for Flex projects. Typically, you make all components available. In some cases,
you specify MX components only. See
“Component Set (MX + Spark, Spark Only, or MX Only)” on page 82.
• Framework Linkage
For Flex projects, application classes for Flex 4.5 or a higher version of the Flex framework use dynamic linking by
default. For more information, see
“Application Framework Linkage” on page 83.
The following options are available only for Flex projects, and are enabled by default:
• Verify RSL Digests (Recommended For Production)
• Remove unused RSLs
Note: This option is not available for Flex frameworks older than Flex 4.5.
• Use Local Debug SWF RSL When Debugging
• Automatically Determine Library Order Based on Dependencies
• Build Path Libraries
You can add or remove project libraries, SWC library folders, or SWC files to the build path. You can also change
the build path order.
Use the Edit button to change the location of added libraries or folders.
Use the Add Flex SDK button to restore the default SDK for a project if you removed the Flex SDK from the build path.
Native Extensions The Native Extensions tab is available only for mobile projects. Use the Native Extensions tab to
include ActionScript Native Extension (ANE) files to provide native platform capabilities in your applications.
Important: You can create ActionScript extensions only for mobile projects that support Adobe AIR 3.0 or a higher
version.
For more information, see “Add native extensions to a project” on page 203.
Last updated 12/3/2012
Page 66

USING FLASH BUILDER
Using Projects in Flash Builder
Set project properties
Each project has its own set of properties. To set these properties, select the project in the Package Explorer view. Then
select Project
Flex project properties
You can set the following project-specific preferences for Flex projects:
Resource Displays general information about the project, settings for text encoding, and the operating system line
delimiter.
ActionScript Workers Displays information about the ActionScript workers used in the project.
See “Manage ActionScript worker files” on page 68.
Builders Specifies the build tool to use. A standard builder is included in Flash Builder. You can use Apache Ant (an
open-source build tool) to create build scripts or import existing Ant build scripts.
See “Customize builds with Apache Ant” on page 87.
Data Model Available only with LiveCycle Data Services. Specifies the location of the data model file, which contains
service and data type information for LiveCycle Data Services ES.
> Properties from the main menu. You can also select Properties from the context menu for the project.
62
Data/Services For projects that access data services, specifies whether to use the default code generator for accessing
services. You can also specify whether to use a single server instance when accessing services.
See Extending service support in Flash Builder for information on extending Flash Builder to use custom code
generation.
See Using a single server instance for information on using a single server instance when accessing services.
Flex Applications Displays the names of the project files that are set as application files, which can be compiled,
debugged, and run as separate applications.
See “Manage project application files” on page 74.
Flex Build Path Specifies the build path, which specifies where external source and library files are located. You can
modify the build path and also change the name of the output folder.
See “Set up a project output folder” on page 84 and “Build projects manually” on page 86.
Flex Compiler Specifies optional compiler preferences, such as generating an accessible SWF file, enabling compiler
warnings and type checking, specifying additional compiler arguments, Flex SDK version, and sets HTML wrapper
settings.
See “Advanced build options” on page 85.
Flex Modules Specifies modules to build and optimize for the project. For more information about using modules in
Flash Builder, see
Flex Server Specifies the application server type for the project. When you create a project, you specify the application
“Create a separate project for modules in Flash Builder” on page 189.
server type. You can change the application server type for a project here. If you change the application server type for
a project, you may not be able to access data services previously configured.
See “Flex projects” on page 57 and Creating a Flex project to access data services.
Flex Theme Specifies the theme to use for all applications in the project. You can specify one of the themes available
with Flash Builder or import a theme.
Last updated 12/3/2012
Page 67

USING FLASH BUILDER
Using Projects in Flash Builder
See “Use themes” on page 156.
Project References Lists the projects that the current project references.
Run/Debug Settings Manages launch configuration settings.
See “Manage launch configurations” on page 96.
ActionScript project properties
You can set the following project-specific preferences for ActionScript projects:
Resource Displays general information about the project, settings for text encoding, and the operating system line
delimiter.
ActionScript Applications Displays the names of the project files that are set as application files, which can be
compiled, debugged, and run as separate applications.
See “Manage project application files” on page 74.
ActionScript Build Path Specifies the build path, which specifies where external source and library files are located.
You can modify the build path and also change the name of the output folder.
See “Set up a project output folder” on page 84 and “Build projects manually” on page 86.
63
ActionScript Compiler Specifies optional compiler preferences, such as generating an accessible SWF file, enabling
compiler warnings and type checking, specifying additional compiler arguments, AIR SDK version, and sets HTML
wrapper settings.
See “Advanced build options” on page 85.
ActionScript Modules Specifies modules to build and optimize for the project. For more information about using
modules in Flash Builder, see
ActionScript Workers Displays information about the ActionScript workers used in the project.
“Create a separate project for modules in Flash Builder” on page 189.
See “Manage ActionScript worker files” on page 68.
Builders Specifies the build tool to use. A standard builder is included in Flash Builder. You can use Apache Ant (an
open-source build tool) to create build scripts or import existing Ant build scripts.
See “Customize builds with Apache Ant” on page 87.
Project References Lists the projects that the current project references.
Run/Debug Settings Manages launch configuration settings.
See “Manage launch configurations” on page 96.
Project resources
Projects consist of resources (folders and files) that you can manage from the Package Explorer. Projects are contained
within a workspace. The Package Explorer provides a logical representation of the workspace in the file system. The
Package Explorer is refreshed each time you add, delete, or modify a resource.
You can also edit project resources directly in the file system, bypassing Flash Builder and the Package Explorer.
Last updated 12/3/2012
Page 68

USING FLASH BUILDER
Using Projects in Flash Builder
Create or delete files and folders in a project
An application in Flex typically consists of an MXML application file, one or more views (mobile projects only), and
one or more standard Flex components. You can also have one or more custom components defined in separate
MXML, ActionScript, or Flash component (SWC) files. By dividing the application into manageable chunks, you can
write and test each component independently from the others. You can also reuse a component in the same application
or in other applications, which increases efficiency.
You can use Flash Builder to build custom MXML and ActionScript components and then insert them into your
applications. For information on building ActionScript components, see
You can also build an MXML component directly using code.
Create files and folders in a project
1 In the Package Explorer, select File > New > File.
2 If you have multiple projects in your workspace, select the project to which you want to add the file.
3 Enter the filename and click Finish.
You can also add folders and files that are located outside the current project; for more information, see “Link to
resources outside the project workspace” on page 69.
You can add folders to your project as needed. For example, you can create a folder to store all of your data models.
Or, you can organize all the assets that make up the visual design of your application.
“Create an ActionScript class” on page 65.
64
1 In Package Explorer select File > New > Folder.
2 If you have multiple projects in your workspace, select the project to add to the stand-alone folder.
If you create the folder in the source path folder, it is treated like a package name. You can then place source files
inside that folder, which the compiler recognizes.
If you create the folder outside the source path folder, you can later make it the root of a package structure by adding
it to your source path. After you complete this procedure, select Project
> Properties and then select Flex Build Path.
Click Add Folder and navigate to the newly created folder.
3 Enter the folder name and click Finish.
Delete folders and files
Deleting folders and files from your project removes them from the workspace and, therefore, from the file system.
Note: If you delete a linked resource, you delete only the link from your project, not the resource itself (see “Link to
resources outside the project workspace” on page 69). However, if you’ve linked to a folder and you delete any of the files
in it, they are removed from the file system.
1 In the Package Explorer, select the resource to delete.
2 Select Edit > Delete or press the Delete key, and click Yes.
The resource is deleted from the file system.
Create MXML application files
1 In the Package Explorer, select the project to which you want to add the MXML application file.
2 From the Package Explorer context menu, select New > MXML Application.
3 The application file is created in the src folder, by default. You can select a different folder within the project, if
necessary.
Last updated 12/3/2012
Page 69

USING FLASH BUILDER
Using Projects in Flash Builder
4 Specify a name for the application file, and select a Spark Layout, if necessary. For more information about Spark
Layouts, see
5 The following apply only for mobile projects:
a Specify an application ID.
b Specify the application template.
About Spark layouts.
See “Choose an application template” on page 205.
c Specify the mobile application permissions for the Google Android platform.
See “Choose mobile application permissions” on page 206.
d Specify the platform settings.
See “Choose platform settings” on page 207
e Specify the application settings.
See “Choose application settings” on page 207.
6 Click Finish.
Create an ActionScript file
You can use a wizard in Flash Builder to quickly create an ActionScript file for your Flex and ActionScript projects.
65
1 Select File > New > ActionScript File.
2 Select a package name for your ActionScript file. If you don't specify a package, the default package is selected. If
you specify a package folder that does not exist, the wizard creates it.
3 Name the ActionScript file.
4 Click Finish.
Create an ActionScript class
You can use a wizard in Flash Builder to quickly create ActionScript classes for your Flex and ActionScript projects.
The wizard also provides an easy way to generate stubs for functions that must be implemented.
1 Select File > New > ActionScript Class.
2 Specify the basic properties of your new class in the dialog box, and then click Finish.
After clicking Finish, Flash Builder saves the file in the specified package and opens it in the code editor.
3 Write the definition of your ActionScript class.
For more information, see Create simple visual components in ActionScript.
Create an ActionScript interface
You can use a wizard in Flash Builder to quickly create ActionScript interfaces for your Flex and ActionScript projects.
An interface is a collection of constants and methods that different classes can share.
1 Select File > New > ActionScript Interface.
2 Specify the basic properties of your new interface in the dialog box, and then click Finish.
3 Add any constants or methods to your ActionScript interface that different classes share.
Last updated 12/3/2012
Page 70

USING FLASH BUILDER
Using Projects in Flash Builder
Create an ActionScript skinnable component
You can use a wizard in Flash Builder to quickly create ActionScript components for your Flex projects.
1 Select File > New > ActionScript Skinnable Component.
2 Specify the basic properties of your new skinnable component, and then click Finish.
Flash Builder creates an ActionScript class that extends from the base component or the skinnable component. By
default, the base component is
spark.components.supportClasses.SkinnableComponent. You can, however,
change the base component to any other component that is a subclass of the skinnable component.
You can also add any ActionScript interfaces that the new skinnable component can implement. For more
information on creating ActionScript interfaces, see
“Create an ActionScript interface” on page 65.
The SkinnableComponent is created in the selected location and package. A reference to the component is added
automatically, by default, in the main MXML file.
Using ActionScript Workers
Flash Builder supports multi-thread ActionScript programing by letting you run an ActionScript program as a worker.
A worker runs in parallel to the main ActionScript program, and can communicate with the main ActionScript
program and other ActionScript workers.
ActionScript workers let you create more responsive games and applications by offloading tasks and computations to
the background workers. The workers run concurrently, making your game-play more responsive. To understand
more about ActionScript workers, see
Using workers for concurrency.
66
For a video on creating and using ActionScript workers, see this video by Adobe Evangelist Lee Brimelow.
Create an ActionScript worker
You can use a wizard in Flash Builder to create an ActionScript worker for your Flex and ActionScript projects by
following these steps:
1 Select File > New > ActionScript Worker.
2 Specify a package name for your ActionScript worker. If you don't specify a package, the class is declared in the
default package. If you specify a package folder that does not exist, the wizard creates it.
3 Name the ActionScript worker file.
4 An ActionScript worker extends from the flash.display.Sprite class by default. So, you can select only those
classes that extend from Sprite.
5 Add any interface that contains constants and methods that you want to use in your ActionScript worker.
6 Specify any of the following code generation options:
Generate Constructor from Superclass Generates a constructor with a super() call. If the superclass constructor
takes arguments, the arguments are included in the generated constructor and passed up in the super() call.
Generate Functions Inherited from Interfaces Generates function stubs for each interface method. The stubs
include a return statement that returns null (or 0 or false for primitive types) so that the stubs compile.
Generate Comments Inserts a "//TODO: implement function" in the generated functions or constructors.
7 Specify the ActionScript worker usage. For more information, see “Specify ActionScript worker usage” on page 67.
8 Click Finish to save the worker (.as filename extension) in the specified package and open it in the code editor.
9 Write the code for your ActionScript worker.
Last updated 12/3/2012
Page 71

USING FLASH BUILDER
Using Projects in Flash Builder
Flash Builder provides ActionScript worker code templates that let you quickly add code for a worker file. For more
information on using code templates, see
“Code templates” on page 38.
To convert an existing ActionScript class into a worker, follow these steps:
1 In the Package Explorer, select the ActionScript class that you want to convert into an ActionScript worker.
2 From the Package Explorer context menu, select Set As ActionScript Worker.
Whenever you create an ActionScript worker, the worker file is added to the list of ActionScript workers in the Project
Properties dialog box.
Specify ActionScript worker usage
When you create an ActionScript worker, edit the worker, or convert an ActionScript class to a worker, you can specify
the worker usage.
You can choose to embed the worker or load it externally by selecting one of the following options:
Embedded Worker Generates a SWF file for the ActionScript worker class that you want to embed. The SWF file is
generated in the "workerswfs" folder of your project, instead of a user-selected output folder.
When you choose to embed a worker, Flash Builder generates a class named Workers.as. The generated class contains
code to embed the SWF file and also create a getter method. You can use the getter method to access the ByteArray
class of the embedded ActionScript worker.
67
Important: You should not modify the contents of automatically generated class.
For example, if you create an embedded ActionScript worker called “MyWorker”, code like the following is generated:
public class Workers
{
[Embed(source="../workerswfs/MyWorker.swf", mimeType="application/octet-stream")]
private static var MyWorker_ByteClass:Class;
public static function get MyWorker():ByteArray
{
return new MyWorker_ByteClass();
}
}
Whenever you add, rename, move, or delete an ActionScript worker, Flash Builder modifies the generated code in the
Workers.as file.
If a file named Workers.as exists in the project, Flash Builder generates the class with these filenames in the specified
order:
1 WorkersManager.as
2 WorkersHolder.as
If files with all these names exist, then Flash Builder generates the class with a unique filename by appending numbers
to these filenames sequentially. For example, Workers1.as, WorkersManager1.as, WorkersHolder1.as, Workers2.as,
and so on. You can choose to rename these files if you want; Flash Builder remembers and uses the new filename to
generate code.
When you run or debug the project containing an embedded ActionScript worker, the "workerswfs" folder contains
the debug SWF files. When you export a release build, the release SWF files overwrite the debug SWF files in the
"workerswfs" folder.
Externally Loaded Worker Generates the SWF file for the ActionScript worker class in a user-selected output folder.
Last updated 12/3/2012
Page 72

USING FLASH BUILDER
Using Projects in Flash Builder
When you run or debug a project with an externally loaded ActionScript worker, the debug SWF files are generated in
the "bin-debug" folder and the release SWF files in the "release" folder.
Manage ActionScript worker files
The project’s Properties dialog box lets you manage the worker files in your ActionScript or Flex project.
1 In the Package Explorer, select a project.
2 Select Project > Properties from the main menu or select Properties from the context menu. The project’s
Properties dialog box appears.
3 In the left pane, select ActionScript Workers.
4 Add, edit, or remove worker files as needed, and click OK.
Add an ActionScript worker or convert an ActionScript class to a worker
Flash Builder provides you with an option to convert an ActionScript class in your project to a worker.
1 Go to the project’s Properties dialog box and select ActionScript Workers.
2 Click Add.
3 Click Browse to select the class that you want to set as an ActionScript worker. Flash Builder displays only those
classes that extend from Sprite and Public classes.
4 Specify the worker usage. For more information, see “Specify ActionScript worker usage” on page 67.
Alternatively, you can also use the context menu for a project in the Package Explorer, select Set As ActionScript
Worker, and specify the worker usage preference.
68
Search for resources in the workbench
Flash Builder provides a search tool that lets you quickly locate resources.
To search the document that is currently open in the editor, do the following
1 Open the document to search.
2 Do either of the following:
• Press Control+F (Windows) or Command+F (Mac OS)
• Select Edit > Find/Replace.
3 Enter the text string to locate.
4 (Optional) Enter the replacement text string.
5 (Optional) Set the advanced search criteria.
6 Click Find, Replace, Replace All, or Replace/Find.
If the text string is located in the document, it is highlighted and, optionally, replaced.
Note: To do an incremental find, press Control+J (Windows) or Command+J (Mac OS).
To search all resources in the workspace, Flash Builder includes advanced search features that are more powerful than
find and replace. Flash Builder lets you find and mark references or declarations to identifiers in ActionScript and
MXML files, projects, or workspaces. For more information, see
Search for files
❖ Select Search > Search to conduct complex searches for files.
“Find references and refactor code” on page 37.
Last updated 12/3/2012
Page 73

USING FLASH BUILDER
Using Projects in Flash Builder
Note: Click Customize to define what kinds of search tabs are available in the Search dialog box.
Use the Search view
The Search view displays the results of your search.
Open a file from the list
❖ Double-click the file.
Remove a file from the list
❖ Select the file to remove and click Remove Selected Matches.
Remove all files from the list
❖ Click Remove All Matches.
Navigate between matched files
❖ Click Show Next Match or Show Previous Match.
View previous searches
❖ Click the Down Arrow next to Show Previous Searches and select a search from the pull-down list.
69
Return to the Search view after closing it
1 Select Window > Show View > Other.
2 Expand the General category, select Search, and click OK.
Link to resources outside the project workspace
You can create links to resources outside the project and workspace location. You can link to folders and files anywhere
on the file system. This option is useful when you have resources that are shared between your projects. For example,
you can share a library of custom Flex components or ActionScript files among many different Flex projects.
Folders that contain linked resources are marked in the Package Explorer (as the following example shows), so that
you can distinguish between normal and linked resources.
Other examples for linking resources include a folder of image file assets, or situations when the output folder is not
in the project root folder.
When you work with shared resources, the changes you make to the source folders and files affect all of the projects
that are linked to them. Be cautious when you delete linked resources from your projects. In some cases you merely
delete the link reference, and in others you delete the source itself. For more information, see
on page 64.
“Delete folders and files”
Note: A best practice is to link other projects to your Library Project. Linked resources are encouraged only for third-party
libraries with a SWC file.
Link to resources outside the project workspace
1 In the Package Explorer, select the project to add linked resources to.
Last updated 12/3/2012
Page 74

USING FLASH BUILDER
Using Projects in Flash Builder
2 Select File > New > Folder (or File).
3 Select the project or project folder to add the linked resources to.
4 Enter the folder or filename. The folder or filename you enter can be different from the name of the folder or file
you are linking to.
5 Click the Advanced button.
6 Select Link to folder in the file system. Enter or browse to the resource location.
7 Click Finish to link the resource to your project.
Use a path variable to link to resources
Rather than linking to resources by entering the full path to the local or network folder where you store your files, you
can define path variables. For more information, see
1 In the Package Explorer, select the project to add linked resources to.
Path variables can also be used in certain project settings, such as the library path and source path.
2 Select File > New > Folder (or File if you want to add files).
3 Select the project or project folder to add the linked resources to.
4 Click the Advanced button to display the advanced options.
5 Select Link to folder in the file system. Click the Variables button.
6 Select a defined path variable, or click New to create a path variable.
If you selected a defined path variable, skip to step 9. If you clicked New, you’ll see the New Variable dialog box.
“Create a path variable” on page 85.
70
7 Enter the path variable name and enter or browse to the file or folder location.
Click OK to create the path variable.
8 Select the new path variable in the Select Path Variable dialog box and click OK.
9 Click Finish to complete the link to the resource.
You can also define and manage path variables by using the Flash Builder workbench preferences (Open the
Preferences dialog and select General > Workspace > Linked Resources).
Move or share resources between projects in a workspace
Move resources
When you work with multiple projects in a workspace, you can move resources from one project to another.
1 In the Package Explorer, select the resource to move.
2 Do one of the following:
• Drag the resource to a new project.
• Cut and paste the resource to another project.
When moving resources between projects, you can choose to update references.
Note: You can move both normal resources and linked resources. For information about linking resources, see “Link
to resources outside the project workspace” on page 69.
Last updated 12/3/2012
Page 75

USING FLASH BUILDER
Using Projects in Flash Builder
Share resources
To share resources between projects, place all shared resources into folders that can then be linked to each project by
using the project’s source path. This is the best method for using shared resources such as classes, MXML components,
and images. Updates to these resources are immediately available to all projects that use them. When your projects are
compiled, the shared resources are added to the SWC file.
Add an external resource folder to the source path
1 Select the project in the Package Explorer.
2 Select Project > Properties > Flex Build Path (or ActionScript Build Path if you are working with an ActionScript
project).
3 On the build path properties page, select the Source Path tab.
4 Click the Add Folder button.
5 Enter or and browse to the folder’s path, and click OK.
The folder is added to the source path.
You can also use the Source Path properties tab to edit, delete, or reorder items in the source path.
Folders that are added to the source path are marked in the Package Explorer.
71
Refresh resources in the workspace
As you edit, add, or delete a project’s resources, the workbench automatically refreshes the various views that display
these resources. For example, when you delete a file from your project, that change is immediately reflected in the
Package Explorer.
You can also edit resources outside Flash Builder, directly in the file system. These changes are visible only inside Flash
Builder after you refresh the workspace.
By default, in the stand-alone configuration of Flash Builder, the workspace is refreshed automatically. This option is
configurable in Flash Builder preferences. Open the Preferences dialog and select General
change the Flash Builder default behavior so that it never refreshes the workspace automatically.
Manually refresh the workspace
❖ In the Package Explorer, select Refresh from the context menu. All project resources in the workspace are refreshed.
Turn off automatic refresh preference
1 Open the Preferences dialog and select General > Workspace.
2 Deselect Refresh Automatically.
> Workspace. You can also
Manage projects
You use the Package Explorer to add and import resources into projects, export projects, and move and delete
resources.
Last updated 12/3/2012
Page 76

USING FLASH BUILDER
Using Projects in Flash Builder
Projects in Package Explorer
All projects in a workspace are displayed in the Package Explorer, as the following example shows. The Package
Explorer provides a tree view of projects from both a physical view and logical (flat) view. Using this view, you manage
your projects by adding and deleting resources (folders and files), importing and linking to external resources, and
moving resources to other projects in the workspace.
72
Highlights of the Package Explorer include:
• Displaying ActionScript packages in either a hierarchical or flat presentation.
Use the Package Explorer’s menu to specify the package presentation.
• Flex project libraries and ActionScript libraries are represented in two top-level nodes.
Flex project libraries have one node for the Flex SDK and the other for referenced libraries. Similarly, ActionScript
project libraries have one node for the AIR SDK and the other for referenced libraries.
You can expand a library’s contents and open editors to view attachments.
• Error and warning badges on Package Explorer nodes notify you of problems within a package.
• You can limit which projects and resources are visible.
You can create a working set (a collection of resources), create display filters, and sort resources by name and type.
These options are available from the Package Explorer menus. For more information about modifying views, see
“Customize the workbench” on page 232.
• You can expand ActionScript, MXML, and CSS files and see a tree view of their contents.
From the Package Explorer, you can open the project resources for editing. For example, you can edit MXML and
ActionScript in
Flash Builder editors, see
Then you add projects, files, and folders, and organize and manage them as needed.
Most menu commands that you use in the Package Explorer view are also available from the view’s context menu.
<fx:Script> blocks and CSS in <fx:Style> blocks. For more information about working with the
“Flash Builder editors” on page 11 and “Build user interfaces” on page 156.
Last updated 12/3/2012
Page 77

USING FLASH BUILDER
Using Projects in Flash Builder
More Help topics
“Project resources” on page 63
Move a project from one workspace to another
You use a combination of deleting and importing operations to move a project from one workspace to another. When
you delete a project from a workspace, you can remove it from the workspace but leave it in the file system. After you
remove a project from one workspace, you can import it into another.
Specify an SDK for a project
Flex projects
When creating a Flex project, Flash Builder uses the default SDK that is available in your Flash Builder installation.
You can, however, specify to use a Flex SDK that is not available in your Flash Builder installation.
For example, if you want to compile your project using an Apache Flex SDK, follow these steps:
1 Download the Apache Flex SDK from www.adobe.com/go/apacheflex_flashbuilder.
2 Add the downloaded SDK to your Flash Builder installation by selecting Project > Properties > Flex Compiler, and
clicking Configure Flex SDKs.
3 In the Project Properties dialog box, select Flex Compiler > Use a specific SDK, and select the SDK to use.
For more information about installing and using the Flex SDK, see “Installed Flex SDKs” on page 241.
73
ActionScript projects
ActionScript projects use the AIR SDK. For more information on the AIR SDK, see “Installed AIR SDK” on page 241.
Note: You cannot use a Flex SDK with an ActionScript project.
Delete a project
When you delete a project, you remove the project from the current workspace. You can also remove the project from
the file system at the same time.
Instead of deleting the project from the workspace, you can close the project. Closing the project lets you keep a
reference to it in your workspace and also free some system resources.
1 In the Package Explorer, select the project to delete.
2 Select Edit > Delete from the main menu.
3 Select an option:
Also Delete Contents Under Directory Permanently removes the project from the workspace and the file system.
Do Not Delete Contents Removes the project from the workspace but not from the file system.
Close and open projects
To save memory and improve build time without deleting a project, you can close it. When you close a project, you
collapse the project and its resources, however, the name remains visible in the Package Explorer. A closed project
requires less memory than an open project, and is excluded from builds. You can easily reopen the closed project.
1 In the Flex Package Explorer, select the project to close or reopen.
Last updated 12/3/2012
Page 78

USING FLASH BUILDER
Using Projects in Flash Builder
2 From the Package Explorer context menu, select Close Project or Open Project.
Switch the main application file
When you create a project, the main application file is generated for you. By default, it is named after the project. The
main application file is the entry point into your applications and becomes the basis of the application SWF file.
However, as you add files to your application, you might want to designate a different file as the main application file.
If you prefer to set multiple files as application files so that each application file is built in to a separate SWF file, see
“Manage project application files” on page 74.
1 In the Package Explorer, select the MXML application file that you want to make the main application file.
2 From the Package Explorer context menu, select Set as Default Application.
You can manage the application files in your project by selecting Project > Properties > Flex Applications (or
ActionScript Applications if you’re working with an ActionScript project).
Manage project application files
Usually, a project has a single main application file, which serves as the entry point to your application. The Flash
Builder compiler uses this file to generate the application SWF file.
74
For example, you can have a complex application with many custom MXML components that represent distinct but
interrelated application elements. You can create an application file that contains a custom component and then build,
run, and test it separately.
By default, whenever you add an MXML application file to your Flex project, you can run the application, and it is
added to the list of project application files. All files defined as application files must reside in your project’s source
folder.
You can manage the list of application files by selecting a project and viewing its properties.
1 In the Package Explorer, select a project.
2 Select Project > Properties from the main menu or select Properties from the context menu.
3 In the Project Properties dialog box, select Flex Applications (or ActionScript Applications if you are working with
an ActionScript project).
4 Add and remove application files as needed. Click OK.
Switch the workspace
You can work in only one workspace at a time. When you install and run Flash Builder for the first time, you are
prompted to create a workspace, which becomes the default workspace. You can create other workspaces and switch
among them by either selecting the workspace when you start Flash Builder or by selecting File
> Switch Workspace.
Export and import projects
Flash Builder lets you export and import projects in FXP format, ZIP format, and from open file directories. The FXP
format is an archive format that includes project folders, files, and metadata about the project. Flash Builder exports
Flex projects in the FXP format and Flex library projects in the FXPL format. ActionScript projects can only be
exported as an archive file, typically in the ZIP format.
Last updated 12/3/2012
Page 79

USING FLASH BUILDER
Using Projects in Flash Builder
Importing and exporting projects allow you to transfer projects securely and safely between different computers and
users.
Note: You can also use the Eclipse Export wizard to export Flex projects and Flex library projects in ZIP format (used in
Flex Builder 3) or other archive formats.
Export projects
Flash Builder can export various projects in addition to Eclipse export functions.
Export a Flex project or Flex library project as an FXP file
Some Flex projects require special handling upon import. See “Projects requiring special handling” on page 78
1 In Flash Builder, select File > Export Flash Builder Project.
You can also use the context menu for a project in the Package Explorer. Select Export > Flash Builder > Flash
Builder Project.
2 In the Export Flex Project wizard, select the project to export.
All available projects for export are listed in the Project pop-up menu.
3 Browse to the location on your file system to which you want to export the FXP file.
4 (Optional) Select Validate Project Compilation.
Use this option to confirm that your project compiles without errors. If there are errors, you can still export the
project.
75
5 Click Finish.
For server projects, absolute paths to server resources are saved as path variables. When you later import the
project, you specify values for the path variables.
Export an ActionScript project in ZIP format (or other archive format)
1 In Flash Builder, select File > Export > Other.
2 In the Export wizard, select General > Archive File, and click Next.
3 Select the project and files to export:
• In the leftmost panel, expand the project to specify project folders to include
• In the rightmost panel, for each selected folder, specify the files to include.
4 Browse to a location to save the exported project and specify a filename.
5 Specify archive file options and click Finish.
Import projects
Flash Builder can import Flex projects, Flex library projects, and ActionScript projects that were previously exported
from Flash Builder. You can import multiple versions of the same Flex project or Flex library project.
Import a Flex project or a Flex library project
You can import a project from an exported FXP file or by navigating to a folder containing the project.
1 From the Flash Builder menu, select File > Import.
You can also use the context menu for the Package Explorer to import a project.
Last updated 12/3/2012
Page 80

USING FLASH BUILDER
Using Projects in Flash Builder
2 (Project folder) If you are importing from an existing project folder, select Project Folder, and navigate to the folder
containing the project.
3 (FXP file) If you are importing from an FXP file, select File and navigate to the location of the file.
If an FXP file contains more than one project, you can select individual projects to import.
4 (Library project or FXPL project) If you are importing a library project, you have the option to import the contents
into an existing project.
5 (FXP file) If a project by the same name exists in the workspace, specify the import method:
• Import as New Project: Flash Builder appends a numeric identifier to the project name. Previous versions of the
project are preserved.
In the Extract To field, specify a location in which to extract the file. Typically, this location is a directory in your
Flash Builder workspace representing a project folder. You can specify a new project folder or overwrite an
existing project folder.
• Overwrite existing project: Select the project to overwrite. The previous version of the project is permanently
removed.
6 (Path variables) If you are importing a project that defines path variables, update path variables for the project.
Projects compiled for ColdFusion, PHP, LiveCycle Data Services, or other server technologies use path variables to
access a web server and server resources. Other projects can have user-defined path variables.
76
Select each path variable and provide a valid value for the variable.
7 Click Finish.
8 (PHP server projects) If you are importing a project of application server type PHP, then install or update your
Zend installation.
The Zend dialog guides you through the process.
Note: If you cancel the process in the Zend dialog, manually install or update your Zend framework. You cannot
access PHP services unless the Zend Framework is properly installed and configured. See Installing Zend Framework
for information on installing, configuring, and troubleshooting your Zend Framework installation.
9 (Server projects) Deploy services.
a Manually place services under the web root of the server. Use the same directory structure that was used in the
original project.
b In the Data/Services view, from the context menu for a service, select Refresh.
Import a Flex 3 project
You can import a Flex 3 project into Flash Builder 4.6 using Flex 3 Compatibility Mode. In this case, the namespaces
and components are unchanged from Flex 3. However, you can take advantage of the compiler available with Flex 4.6.
New documents created in Flex 3 Compatibility Mode use MX components and the following namespace:
mx="http://www.adobe.com/2006/mxml"
1 In Flash Builder, select File > Import Flex Project.
2 Navigate to the previously exported Flex 3 project ZIP file, or browse to the Flex 3 Project folder.
3 Click Finish.
4
In the Choose Flex SDK Version dialog, make sure that Flex 4 SDK is specified. Select Use Flex 3 Compatibility Mode.
5 Select OK.
Last updated 12/3/2012
Page 81

USING FLASH BUILDER
Using Projects in Flash Builder
For more information about using Flash Builder 4 for your existing Flex 3 projects, see the Adobe DevNet article:
Moving existing Flex projects from Flex Builder 3 to Flash Builder 4
Import an ActionScript project
Use the Eclipse wizard to import an ActionScript project.
1 In Flash Builder, select File > Import > Other > General > Archive File.
You can also use the context menu for the Package Explorer to import an ActionScript project.
2 In the Import Flex Project dialog box, select the ZIP file you want to import.
3 Click Finish.
Import projects exported with the Eclipse Export wizard
If you have a project that was exported using Eclipse’s Export wizard, use the Eclipse Import wizard to import the
project. Select File
For more information, see the Eclipse documentation for importing projects. This documentation is available as Help
in the Eclipse Import and Export wizards.
If the project contained services created with Flash Builder tools for accessing data services, then you manually have
to add the services. Copy the server files in the services folder to an appropriate server. Use the service properties for
a server from the Data/Service view to determine the service location.
> Import > General. Then navigate to the appropriate format for your project.
77
If you exported a PHP project that uses the Zend Framework, install the Zend Framework on the target server. Modify
amf-config.ini file that configures the Zend Framework. For zend_path, specify the absolute path to the Zend
the
installation directory.
For information on installing, configuring, and troubleshooting your Zend Framework installation, see Installing
Zend Framework.
Import projects into multiple workspaces
When you import a project, it is imported into a Flash Builder workspace. A project can be imported into multiple
workspaces. In this scenario, the project files exist on disk in one location, but are referenced by each workspace.
Changes you make to a project apply to all workspaces.
Import source files into a new project
If you have source files and assets on your file system, but are not in a project, you can create a project for these files.
1 From the Flash Builder menu, select File > New > Project.
Project can be a Flex project, Flex library project, or ActionScript project.
2 In the New Project wizard, specify the source and output folder settings to the appropriate location in your file
system.
Note: You could also accept the default wizard locations and move the source files accordingly.
Compare changes in a project
If you import multiple versions of a project you can compare, copy, or merge the contents of the versions. You can
only compare different versions of the same project.
1 In the Package Explorer, select one of the projects you want to compare.
2 Open the Package Explorer context menu and select Compare Project With Version.
Last updated 12/3/2012
Page 82

USING FLASH BUILDER
Using Projects in Flash Builder
The Compare Viewer launches, allowing you to compare the project with other versions of the project.
3 Select the version for comparison, which opens the Eclipse Compare Editor.
4 In the compare editor, navigate to the file you want to compare and from the context menu, select Show Content
Comparison.
The Compare Editor displays both versions of the file, with differences highlighted.
You can use Compare Editor options to copy or merge differences in the file. See the Eclipse documentation on the
Compare Editor for details.
Projects requiring special handling
Some Flex projects require special handling upon import and export. For example:
• The project references an earlier version of the Flex SDK
• The project references service files for access to server-side data
• The Zend Framework configuration for access to PHP services needs to be updated
• The project uses LiveCycle Data Services links to a data model file.
When exporting or importing a Flex project, some contents of the project require special handling.
78
• Different versions of the Flex SDK
You can import a Flex project that references a version of the Flex SDK that is not installed with your Flash Builder.
“Installed Flex SDKs” on page 241 for information on downloading and installing additional versions of the
See
Flex SDK. If Flash Builder cannot find a specific version of the Flex SDK, browse to the location of the SDK.
• Service files
Flex server projects that connect to data services, such as ColdFusion or BlazeDS, contain a services folder whose
ActionScript class reference deployed server files. When exporting the project, Flash Builder exports the services
folder but ensure that a server and the corresponding server-side files exist when importing. Upon import, you
might have to manually deploy the server-side files and also update the server addresses in classes in the server-side
files.For projects that connect to services using LiveCycle Data Services or BlazeDS, make sure that service
destinations are available on the target server.
• Zend Framework
Flex projects that connect to data services using PHP and the Zend Framework contain two configuration files.
Upon import, examine these files to make sure that they are configured properly for your system:
amf-config.ini
gateway.php
See Installing Zend Framework
for information on installing, configuring, and troubleshooting your Zend Framework installation.
• Data model files (LiveCycle Data Services)
A Flex project that uses LiveCycle Data Services links to a data model file. Upon export and subsequent import,
Flash Builder references the actual data model file and not a link to it. If you want to use a linked file, and not the
one packaged with the exported project, then change the data model file using project properties. Select Project
> Data Model and make the changes.
Properties
>
Last updated 12/3/2012
Page 83

USING FLASH BUILDER
Using Projects in Flash Builder
Build projects
Adobe® Flash® Builder™ automatically builds and exports your projects into applications, creating application and
library files, placing the output files in the proper location, and alerting you to any errors encountered during
compilation.
There are several options for modifying the build settings to control how your projects are built in to applications. For
example, you can set build preferences on individual projects or on all the projects in your workspace. You can also
modify the build output path, change the build order, and so on. You can also create custom build instructions using
third-party build tools such as the Apache Ant utility.
When your applications are ready to be released, you have the option of publishing all or selected parts of the
application source code. Users can view your application source code in a web browser, similar to the way they are able
to view HTML source code.
Understand how projects are built and exported
A typical workflow consists of building your Flex and ActionScript projects with the Build Automatically option
enabled. During the development process, Flash Builder gives you errors and warnings in the Problems view. When
you run your application, a debug version of the SWF file is placed in the project output (bin) folder along with
required assets and an HTML wrapper. This build contains debug information and is suitable for developer use only.
For more information about exporting projects, see
“Export and import projects” on page 74.
79
When your application is ready to deploy, you create an optimized, release-quality version of your application using
the Export Release Build wizard. This stores the SWF file in the bin-release folder. Since debug information is removed,
the file size is smaller. This version is a production build that end users can view. For Adobe AIR projects, AIR
applications are exported to an AIR file. You use Export Release Build to create a digitally signed AIR file, which users
must install before running an application (similar to an install.exe).
For library projects, you do not have to export. The SWC file built by a Flex library project is suitable for both developer
and production use. For more information, see
“Use Flex library projects” on page 181.
Build basics
MXML and ActionScript 3.0 are compiled languages. Compiled languages are different from interpreted languages,
such as JavaScript, that can be executed by their runtime environments. That is, MXML and ActionScript 3.0 must be
converted into a compiled format before Flash Player can run them. This process, along with the generation of related
output files, is called building.
Flash Builder automatically builds your projects whenever a file in your project is changed and saved. You also have
the option of building your applications manually. Understanding the build process and the output files that are
generated helps you to diagnose and repair project configuration problems, if any.
Flex projects Source files and embedded assets (such as images) are compiled into a single output SWF file. The SWF
file can be run directly in the stand-alone Flash Player or in a web browser through an HTML wrapper file that is also
generated by the build. These files are generated into the project’s output folder. The output folder is named bin, by
default, but you can rename it.
ActionScript 3.0 projects Like Flex projects, ActionScript 3.0 projects compile source files and embedded assets into a
SWF file.
Flex library projects For library projects, source files are components and related resources. When library projects are
built, a SWC file is generated into the output folder. A SWF file is archived into a SWC file containing components,
resources, and a catalog.xml file that is the manifest of the elements contained within the SWF file.
Last updated 12/3/2012
Page 84

USING FLASH BUILDER
Using Projects in Flash Builder
Automatic builds
In the stand-alone configuration of Flash Builder, the option to Build Automatically is selected, by default, and your
applications are built automatically. In the plug-in configuration, select the Build Automatically option. Deselecting
the Build Automatically option prevents the compiler from identifying syntax errors. The Problems view then does
not display warning and error messages as you enter code. Only when you compile the project, the Problems view
displays any warning and error messages. It is therefore recommended to set Flash Builder to build automatically.
Advanced project build options
With the advanced build options, you can control the timing and scope of your builds. For example, you can build a
single project, all projects in the workspace, or create a working set (a collection) of projects to build. All build
commands are accessible from the Project menu, as shown in the following example.
80
The Flash Builder compiler is incremental. It builds only those resources that have been added or affected by updates
and ignores all others. This saves time and system resources. You have the option, however, to rebuild all the resources
in the project. You do this by performing a clean build. You might do this if your application is behaving erratically
during testing and you want to eliminate all potential sources of the problem by discarding and rebuilding all the files
in your project. For more information, see
If you create dependencies between separate projects in the workspace, the compiler automatically determines the
order in which the projects are built, so these dependencies resolve properly. You can, however, override the default
build order and manually set the order in which the projects in your workspace are built.
You can also modify the build path, application list, and compiler settings for each project in the workspace.
“Advanced build options” on page 85.
More Help topics
“Build projects manually” on page 86
“Advanced build options” on page 85
Build errors displayed in the Problems view
Errors encountered by the compiler during builds appear in the Problems view, which is included in the Development
and Debugging perspectives, and in the code editor, where lines of code containing errors are marked with an x, as in
the following example:
Last updated 12/3/2012
Page 85

USING FLASH BUILDER
Using Projects in Flash Builder
More Help topics
“Filter the Tasks and Problems views” on page 11
Eclipse environment errors in the log file
Sometimes you encounter errors thrown by the Eclipse environment. These errors most often occur when resources
such as SWC files are not found at runtime. In these cases, you can see the error messages in the Eclipse Error Log file.
The default location of this log file on Windows is c:\Documents and Settings\user_name\workspace\.metadata\.log.
For Macintosh, the default location is also in the workspace directory, but files and directories that begin with a dot
are hidden by default.
Custom build scripts with Apache Ant
You can modify and extend the standard build process by using Apache Ant, which is an open-source Java-based build
tool. For more information about creating custom builders, see
“Customize builds with Apache Ant” on page 87.
Compiler options
You can modify the default Flex compiler or ActionScript compiler settings that Flash builder uses.
To view or modify the default settings, from the Flash Builder menu, select Project > Properties, and then select Flex
Compiler or ActionScript Compiler, as required.
81
Flex SDK version
For Flex projects, Flash Builder uses Flex 4.6 as the default SDK. If your project, however, uses a specific version, such
as Flex 3.5, Flash Builder compiles applications in the project using the specified Flex SDK.
You can change the default setting to use a specific Flex SDK, or to compile using Flex 3 compatibility. Specifying
backward compatibility affects some behavior such as the layout rules, padding and gaps, skins, and other style
settings. In addition, it affects the rules for parsing properties files. Setting the compatibility version does not enforce
all differences that exist between the versions. For more information, see Backward compatibility.
AIR SDK
For ActionScript projects, Flash Builder uses the AIR SDK that contains the ActionScript compiler. For more
information, see
Adobe Flash Player options
The default version of Flash Player that the compiler uses is the minimum version required by the SDK used for
compilation.
You can specify a specific version of Flash Player that you want to target for the application. Features requiring a later
version of Flash Player are not compiled into the application.
Compiler options
Flash Builder provides check boxes for the following compiler options:
“Installed AIR SDK” on page 241.
• Use Flash Text Engine in MX components
This option is available only for Flex projects. The Flash Text Engine (FTE) is a library that provides text controls
with a rich set of formatting options. All Spark components in the spark.components package support FTE. See
Some MX controls provide support for FTE. MX controls that support FTE use the same embedded fonts as Spark
components using FTE. See Using FTE in MX controls.
Last updated 12/3/2012
Page 86

USING FLASH BUILDER
Using Projects in Flash Builder
• Copy non-embedded files to output folder
• Generate accessible SWF file
This option is available only for Flex projects. Selecting this option enables accessibility features when compiling
the application or SWC file. For information on using accessibility features with Flex, see Accessible applications .
• Enable strict type checking
When strict type checking is enabled, the compiler prints undefined property and function calls. The compiler also
performs compile-time type checking on assignments and options supplied to method calls.
• Enable warnings
This option enables specified warnings. For more information, see Viewing warnings and errors.
You can also specify multi-line compiler arguments that are available with the command-line, mxmlc compiler. You
can set the values of most options in the Additional Compiler Arguments field by using the same syntax as on the
command line. For information about the syntax for setting options in the Flex Compiler dialog box, see About the
command-line compilers.
In the Additional Compiler Arguments field, you can substitute a path to the SDK directory by using the ${flexlib}
token, as the following example shows:
-include-libraries "${flexlib}/libs/automation.swc" "${flexlib}/libs/automation_agent.swc"
82
HTML wrapper
In addition to generating SWF files for web applications, the Flash Builder compiler also generates an HTML wrapper
that you can use when you deploy the application. The following options are available:
• Generate HTML wrapper file
• Check target player version
When enabled, the compiled application checks for the correct version of Flash Player.
If Express Install is enabled, the application runs a SWF file in the existing Flash Player to upgrade users to the latest
version of the player.
• Enable integration with browser navigation
This option enables deep linking. Deep linking lets users navigate their interactions with the application by using
the Back and Forward buttons in their browser.
Command-line access to the Flex framework compilers
You have direct command-line access to use the Flex framework compilers (mxmlc and compc). For more
information, see About the command-line compilers in
Using Adobe Flex 4.6.
Customize project builds
Flash Builder allows you to build your applications automatically using the default project settings. Using the default
project settings is the recommended approach to building your applications. You can, however, customize project
builds to suit your needs. For example, you can change the default output folder or modify the compiler options.
Component Set (MX + Spark, Spark Only, or MX Only)
By default Flex projects have the entire component set available to applications in the project. The component set
includes Spark components introduced with Flex 4 as well as MX components that were available with Flex 3.
Last updated 12/3/2012
Page 87

USING FLASH BUILDER
Using Projects in Flash Builder
In some scenarios, you may want to use only the MX components that were available with Flex 3, or only the Spark
components introduced with Flex 4. For example, suppose you have an existing Flex 3 project and you do not want to
introduce the new Spark components. But you do want to take advantage of features introduced with Flex 4 and Flash
Builder 4, such as the new states syntax, compiler improvements, and other language features. In this scenario, you
select the MX Only component set. When you select the MX Only component set, all Spark related libraries are
removed from the build path. If you convert a Flex 4 project to MX Only, Flash Builder does not modify any of the
code in the project. You must manually update your code to remove any references to Spark components and libraries.
Similarly, if you select the Spark Only component set, only the Spark components are used, and any MX-related
libraries are removed from the build path.
Application Framework Linkage
By default, application classes for Flex 4 and higher versions of the Flex framework use dynamic linking. Rather than
compiling all classes into the application SWF file (static linking), some classes are loaded from the framework runtime
shared library (RSL). Applications built with dynamic linking have smaller SWFs, which means they download faster.
However, these applications use more memory because all framework classes are loaded, not just the classes you need.
For more information, see Runtime Shared Libraries.
You can modify a project’s properties to customize this behavior for all applications in a project. After selecting a
project, from the Flash Builder menu, select Project
> Properties > Flex Build Path > Library Path.
83
By default, Flash Builder uses the default behavior of the Flex SDK for framework linkage. For Flex 4 and higher
versions, the default behavior is dynamic linking of RSLs. For Flex 3, the default behavior is static linking. Use the
Framework Linkage drop-down list to override the default behavior.
For Flex 4.5 SDK and higher versions of the Flex framework, the following options are enabled by default:
• Verify RSL Digests (Recommended For Production)
Verifies that the digest of the RSL matches the digest that was stored in the application at compile time when the
application was linked to the cross-domain RSL. For more information, see About RSL digests.
• Remove Unused RSLs
Removes RSLs that are not used during compile time. Only the RSLs that are used are copied to the output folder.
This option is available only for Flex 4.5 SDK and higher versions of the Flex framework, not older Flex frameworks.
You can, however, force-load an unused RSL during compile time by double-clicking the project library path. Then,
select Force Load RSL in the Library Path Item Options dialog box.
You can specify the application domain in which the cross-domain RSLs have to be loaded. You can select Default,
Current, Parent, or Top-Level as the application domain.
For example, if a module uses a specific RSL, you can select Current as the application domain. Then, the specified
RSL is accessible only to that module and not to the application loading the module. Unloading the module
automatically unloads the associated RSL also.
Note: Cross-domain RSLs and application domains are supported only in Flex 4.5 SDK and higher versions of the Flex
framework, not older Flex frameworks. If you are importing a project that was built using a Flex framework that used
standard RSLs, then Flash Builder automatically converts the standard RSLs into cross-domain RSLs.
For more information, see Compile with standard or cross-domain RSLs in Flash Builder.
• Use Local Debug SWF RSL When Debugging
Use local RSLs when debugging the application. Using local RSLs allows you to step into debug RSL files. This
option is ignored when exporting a release build.
Last updated 12/3/2012
Page 88

USING FLASH BUILDER
Using Projects in Flash Builder
• Automatically Determine Library Order Based On Dependencies
If enabled, Flash Builder determines the library order, based on dependencies in the libraries. To customize the
library order, disable this option and use the up and down buttons to specify a library order.
Enable and disable automatic builds
In the stand-alone configuration of Flash Builder, your projects are built automatically. In the plug-in configuration,
select this option yourself. Flash Builder is designed to automatically build your projects; turning this option off
prevents the compiler from identifying syntax errors and displaying warning and error messages as you enter code.
For more information about building your projects manually, see
“Build projects manually” on page 86.
Do one of the following:
• Select Project > Build Automatically.
• Open the Preferences dialog and select the General > Workspace. Select or deselect the Build Automatically option.
The Build Automatically option affects all projects in the workspace.
Set up a project output folder
When you create a project in Flash Builder, by default, the build output is generated into the output folder.
You can change the name of this folder when you create the project or after the project is created. You can either create
a folder or select an existing folder in the workspace.
84
1 In the Flex Package Explorer, select a project.
2 Right-click (Control-click on Macintosh) and select Properties from the context menu.
The Project Properties dialog box appears.
3 Select the Flex Build Path properties page.
4 Change the existing output folder by entering a new name or by navigating to an existing folder in your project and
selecting it.
Note: You cannot change the output folder of an LiveCycle Data Services ES application in this manner because its
location is controlled by the server and is accessible only through the project’s Flex-config.xml file.
5 Click OK.
The new output folder replaces the existing output folder.
Important: When you change the name of the output folder, the original output folder and all of its contents are deleted.
Rebuild the project to regenerate the application SWF file and HTML wrapper files.
Modify a project build path
Each project has its own build path, which is a combination of the source path and the library path. (Library project
build paths are a little more complex. For more information, see
source path is the location of the project MXML and ActionScript source files. The library path is the location of the
base Flex framework classes and any custom Flex components that you have created, in the form of SWC files.
Modify the source path
1 Select a project in the Flex Package Explorer.
2 Right-click (Control-click on Macintosh) and select Properties from the context menu. The Project Properties
dialog box appears.
“Create Flex library projects” on page 182.) The
Last updated 12/3/2012
Page 89

USING FLASH BUILDER
Using Projects in Flash Builder
3 Select the Flex Build Path properties page. (If you’re working with an ActionScript project, select the ActionScript
Build Path properties page.)
4 Add a folder to the source path by clicking the Add Folder button.
5 Enter a name for the folder or click the Browse button to select the location of the custom classes.
You can also use path variables rather than entering the full path to the file system. You can either enter the name
of an existing path variable or create a path variable; for more information, see
6 Modify the source path as needed, and click OK.
“Create a path variable” on page 85.
Modify the library path
1 Follow steps 1 through 3 of the previous procedure to access the Flex Build Path properties page.
2 Click the Library Path tab.
The library path contains references to the Flex framework classes, which are contained in SWC files. A SWC file
is an archive file for Flex components and other assets. For more information, see
“Use SWC files in your projects”
on page 184.
You can edit the path to the framework or, if you created custom Flex components, add new folders or SWC files
to the library path. You can also remove items from the path.
85
3 Modify the library path as needed, and click OK.
Create a path variable
Rather than linking to resources by entering the full path to the local or network folder where you store your files, you
can define path variables. For example, you can define a path variable called Classes and then set the path to a folder
on the file system. You then select Classes as the location of the new linked folder. If the folder location changes, you
can update the defined path variable with the new location and all the projects that are linked to Classes continue to
access the resources.
Set or create a path variable
1 Select a project in the Flex Package Explorer.
2 Right-click (Control-click on Macintosh) and select Properties from the context menu. The Project Properties
dialog box appears.
3 Select the Flex Build Path properties page. (If you’re working with an ActionScript project, select the ActionScript
Build Path properties page.)
4 You can create a path variable for any item on the path (including folders in the source path and SWC folders,
projects, and SWC files in the library path). For example, in the Source Path tab, click Add Folder. The Add Folder
dialog box appears.
5 Enter a path variable using the following format: ${pathvariablename}.
Note: If the variable does not exist, the path entry fails. The list of existing resource variables is available by selecting
> Preferences from the main menu and then selecting General > Workspace > Linked Resources. You can
Window
also manage linked resource variables on this properties page.
6 Click OK to add the path variable to the path.
Advanced build options
Flash Builder has advanced options for customizing project builds. You can, for example, builds projects manually,
change the default build order of projects in the workspace, and create custom builders using the Apache Ant utility.
Last updated 12/3/2012
Page 90

USING FLASH BUILDER
Using Projects in Flash Builder
Build projects manually
When you build projects manually, you can control the timing and scope of the build. For example, you can build a
single project, all projects in the workspace, or create a working set of projects or selected project resources and build
only those projects and resources. A working set is a collection of workspace resources (projects, files, and folders) that
you can select and group together and work with as you see fit. For more information about working sets, see
working sets” on page 109.
Build a single project
1 In the Flex Package Explorer, select the project you want to build.
2 Select Project > Build Project from the main menu.
The selected project is built, and new or updated release and debug application files are added to the project output
folder.
Note: If any of your project files need to be saved, you are prompted to do so before the build begins. To bypass this
save prompt, you can set workspace preferences to save files automatically before a build begins.
Build all projects in the workspace
❖ Select Project > Build All from the main menu.
All projects in the workspace are built and application files are added to each project output folder. You are then
prompted to save files if you have not already chosen to save files automatically before a build begins.
“Create
86
Build a working set
Do either of the following:
• Select Project > Build Working Set > Select Working Set from the main menu. Click New to create a working set.
For more information about creating a working set, see
“Create working sets” on page 109.
• Choose an existing working set by selecting Project > Build Working Set > Select Working Set from the main menu.
All projects in the working set are built and the application files are added to the project output folder.
Save project resources automatically
When you build your projects manually, you are prompted to save all resources before the build begins. To bypass this
prompt, you can set workspace preferences to automatically save project resources.
1 Open the Preferences dialog, select General > Workspace.
2 Select the Save Automatically Before Build option.
3 (Optional) You can modify how often resources are saved by entering a value (in minutes) for the Workspace Save
Interval.
Perform a clean build
After a project has been built, subsequent builds affect only the resources that have been added or modified. To force
the Flash Builder compiler to rebuild all resources in a project, you can perform a clean build. You can perform a clean
build if, for example, you want to eliminate all potential sources of a problem you encountered when testing your
application.
1 Select Project > Clean from the main menu.
2 Select the project (or projects) whose build files you want to discard and rebuild from scratch.
3 Click OK.
Last updated 12/3/2012
Page 91

USING FLASH BUILDER
Using Projects in Flash Builder
Change the project build order
Flash Builder lets you create relationships between projects when working with multiple projects in the workspace. For
example, you can import ActionScript classes from one project into another. Creating relationships between projects
affects the order in which your projects are built.
By default, the compiler builds related projects in the order required to build them all properly. For example, if a
project refers to classes contained in another project, the project containing the classes is built first. In most cases,
relying on the compiler to build projects in the proper order is sufficient and your applications is generated
successfully.
You can, however, change the build order. For example, you can change the build order if you created a custom Ant
builder and associated it with a project in your workspace, and you have to build that project before other projects are
built. For more information about creating custom builders, see
1 Open the Preferences dialog and select General > Workspace > Build Order.
The Build Order dialog box displays the following options:
Use Default Build Order The default build order is dictated by the dependencies between projects and is handled by
the compiler.
Project Build Order You can manually set the build order for all the projects in the workspace. You can also remove
a project from the build order list; it will still be built, but only after all the projects in the build order list.
“Customize builds with Apache Ant” on page 87.
87
Max Iterations When Building With Cycles If your projects contain cyclic references (something you should avoid),
you can set the number of build attempts so that the compiler can properly build all the projects. The default
maximum number of iterations is 10.
2 Modify the build order as needed, and click OK.
Customize builds with Apache Ant
By creating a custom builder, you can modify and extend the standard build process. Flash Builder contains a standard
build script that is used to compile your applications. If needed, you can create custom build scripts using Apache Ant,
which is an open-source Java-based build tool.
You can apply custom builders to all the Flash Builder project types.
Create a builder
1 In the Flex Package Explorer, select a project and then right-click (Control-click on Macintosh) to display the
context menu and select Properties.
2 Select the Builders properties page. If you’re using other Eclipse plug-ins, there can be more than one builder listed.
Flash Builder provides a builder named Flex, which you cannot modify.
3 Select New.
4 In the Choose Configuration Type dialog box, select the appropriate configuration type. Flash Builder supports the
program type. Select it and click OK to continue. From the new builder properties page, you define the builder
properties and reference the Ant script (an XML file).
5 Click OK to apply it to the project.
Detailed information about working with Ant build scripts can be found in the Eclipse documentation at
help.eclipse.org/help31/index.jsp.
Last updated 12/3/2012
Page 92

USING FLASH BUILDER
Using Projects in Flash Builder
Using multiple SDKs in Flash Builder
Flash Builder lets you change the version of the SDK that you use to compile your projects. You can select the SDK
when you first create a project or at any time you are working on a project.
The combination of a framework and the compiler make up the SDK. If you select the Flex 4 SDK, then you are using
the 4 version of the Flex framework SWC files, and the 4 version of the Flex compiler. You cannot use, for example,
the Flex 4 compiler with the Flex 3 framework SWC files.
Using a different SDK can be useful if you are given a project that was developed using Flex Builder 3 (which uses the
Flex 3 SDK), but you are running Flash Builder 4 (which uses the Flex 4 SDK by default). By selecting an older SDK to
build with, you can maintain projects that have not been updated to be compatible with the latest version of the SDK.
In addition, if you are currently working on a project for the Flex 3 SDK, but want to use the Flash Builder 4 features,
you can upgrade your edition of Flash Builder, but then select the older SDK as the de1fault SDK.
If you develop a project and then change the SDK, Flash Builder performs a full rebuild, not an incremental build. As
a result, Flash Builder flags any differences that would throw compiler errors as if the project had been developed under
the original SDK.
Flash Builder also regenerates all supporting files for the projects. These include the history management and deep
linking files used by the HTML wrapper. For Flex 4 SDK projects, Flash Builder creates the Flex 4 SDK–compatible
history.swf, history.html, and history.js history management files in the html-templates directory. For Flex 3 SDK
projects, Flash Builder creates the Flex 3 SDK–compatible deep-linking history.htm, history.js. and historyFrame.html
files in the html-templates/history directory.
88
In addition, the availability of Flash Builder options change depending on the selected SDK. For example, if you add a
module to your project with a project that uses the Flex 3 SDK, Flash Builder does not let you select whether you want
to optimize that module or not. You must do this manually.
For more information about the differences between the Flex 4 SDK and the Flex 3 SDK, see Backward compatibility.
When you create a Flex project, Flash Builder uses the default SDK. The default is the latest SDK that shipped with
Flash Builder, but you can change it to any SDK that is visible in the list of available SDKs in Flash Builder.
When you create a Flex library project or ActionScript project, you can select which SDK you want that project to use
in the New Flex Library Project and New ActionScript Project dialog boxes.
Add a Flex SDK to the list of available SDKs
1 Open the Preferences dialog and select Flash Builder > Installed Flex SDKs.
The currently installed SDKs are listed. The default SDK has a check mark next to its name.
2 Click Add.
3 Enter the location of the SDK in the Flex SDK Location field.
4 Enter a name for the SDK in the Flex SDK Name field. Do not use the name of an existing SDK for this field.
5 Click OK to save your changes.
6 Click OK again to add the new SDK to the list of available SDKs. This list is maintained in the Flash Builder
workspace, across Flex projects. The next time you create a project, the list of available SDKs includes this new SDK.
Change the SDK version for the current project
1 Select Project > Properties.
2 Select Flex Compiler.
3 Click Use a Specific SDK.
Last updated 12/3/2012
Page 93

USING FLASH BUILDER
Using Projects in Flash Builder
4 Select the SDK you want to use from the drop-down list. If the SDK you want to use is not in the drop-down list,
click the Configure Flex SDKs link.
5 Click OK.
Flash Builder applies the new SDK to the current project. Errors and warnings can appear if the project uses code
that is not compatible with the new SDK.
Select a new default SDK
1 Open the Preferences dialog, select Flash Builder > Installed Flex SDKs.
The default SDK has a check mark next to its name.
2 Select the check box next to an SDK. This SDK becomes the default SDK. It is also applied to any project that has
the Use Default SDK option selected in the Flex Compiler dialog box, including the current project. If the current
project is set to use a specific SDK, then it continues to use that specific SDK, even if you change the workspace’s
default SDK to a different one.
3 Click OK to save your changes.
4 Click OK again.
Alternatives to using project references
Project references can affect build order, so Flash Builder provides alternatives to using project references.
89
Flex Library projects The preferred way to create a reusable library. Flash Builder creates a project reference to ensure
that the SWC project is built before the main project that includes it on the library path. Also, because Flash Builder
adds it to the library path, code hints appear in the main project for the classes in the SWC project.
Source path The recommended way to include code in your project that is not under the same folder structure. This
enables code hints in the project files and classes in related files, and the compiler knows where to find the source code.
You can add any number of source paths to your project and they are displayed as linked folders in the Package
Explorer.
Flash Builder command line build using Apache Ant
Flash Builder provides the Ant task <fb.exportReleaseBuild>. Use this task to implement command line builds that
synchronize a developer’s individual build settings with the nightly build. Alternatively, you can use the <mxmlc> task
in custom scripts for nightly builds.
Note: Command line build support is available only in Flash Builder Premium.
<fb.exportReleaseBuild> task
Using the <fb.exportReleaseBuild> task ensures that the nightly build’s settings exactly match the settings used by
developers during their daily work.
For example, if a developer changes the library path of a Flex project, the new library path is written to the Flash Builder
project. When the nightly build machine runs <fb.exportReleaseBuild>, that task loads the Flash Builder project and
all of its settings.
Another advantage of using <fb.exportReleaseBuild> is that it automatically takes care of additional “housekeeping”
tasks normally included in a Flash Builder build, such as:
• Automatically compile associated library projects
• Copy assets such as JPEGs, and so on, into the output directory
Last updated 12/3/2012
Page 94

USING FLASH BUILDER
Using Projects in Flash Builder
• Copy the HTML template, including macro substitution based on the compilation results (such as width and
height)
Note: The <fb.exportReleaseBuild> task requires you to install Flash Builder on the nightly build machine.
<mxmlc> task
If you write a custom script that uses the <mxmlc> task (for example, an Ant script), then you do not need to install
Flash Builder on the build machine. However, the build machine is required to have the Flex SDK available. Thus, the
build machine can be on a Linux platform.
However, the disadvantage of this approach is that you have two sets of build settings to synchronize. That is, one in
Flash Builder, used by developers during their daily work, and another on your nightly build machine.
<fb.exportReleaseBuild> usage
1 Install Flash Builder on a build machine.
2 Write build.xml with fb.exportReleaseBuild as a target. For example:
<?xml version="1.0"?>
<project default="main">
<target name="main">
<fb.exportReleaseBuild project="MyProject" />
</target>
</project>
90
build.xml specifies to run a command line build of your Flex project, using the settings saved in your project files.
“Parameters for fb.exportReleaseBuild task” on page 91 for details on available parameters.
See
3 Create a nightly build script that tells Eclipse to look for a build file and execute its target.
The following examples specify build.xml as a build file, which executes MyTarget.
If your nightly build script is on a Macintosh platform, you could run the following script:
WORKSPACE="$HOME/Documents/Adobe Flash Builder"
# works with either FlashBuilder.app or Eclipse.app
"/Applications/Adobe Flash Builder/FlashBuilder.app/Contents/MacOS/FlashBuilder" \
--launcher.suppressErrors \
-noSplash \
-application org.eclipse.ant.core.antRunner \
-data "$WORKSPACE" \
-file "$(pwd)/build.xml" MyTarget
If your nightly build is on a Windows platform, you could run the following batch file:
set WORKSPACE=%HOMEPATH%\Adobe Flash Builder
REM works with either FlashBuilderC.exe or eclipsec.exe
"C:\Program Files\Adobe\Adobe Flash Builder 4.6\FlashBuilderC.exe" ^
--launcher.suppressErrors ^
-noSplash ^
-application org.eclipse.ant.core.antRunner ^
-data "%WORKSPACE%" ^
-file "%cd%\build.xml" MyTarget
Last updated 12/3/2012
Page 95

USING FLASH BUILDER
Using Projects in Flash Builder
fb.running Ant property
The fb.running Ant property has a value of true when Flash Builder is running. You can use this property when
running scripts inside Flash Builder. For example:
<target name="myFlashBuilderTasks" if="fb.running">
<fb.exportReleaseBuild ... />
</target>
Eclipse Ant Tasks
Eclipse provides several Ant tasks you can incorporate as targets in your build script. For example:
• eclipse.incrementalBuild
• elicpse.refreshLocal
• eclipse.convertpath
For more information on these scripts, see the Eclipse documentation.
Parameters for fb.exportReleaseBuild task
Attribute Description Required? Default Value
91
application The name of the application to compile. You can specify
just the application name with no path or extension (for
example: app1). To avoid ambiguity in naming, you can
specify full path, relative to the project root (for example:
src/app1.mxml).To compile all applications, specify ‘*’, or
omit this attribute. When running against an AIR project,
you can only specify a single application. The ‘*’ value is
not allowed.
basefilename For mobile and AIR desktop projects only: The name of
the package to export. Specify the package name
without the filename extension.
certificate For mobile and AIR projects: When exporting an AIR or
native-installer file, the path to the certificate used to
sign the package.
Note: If omitted, the value of the certificate attribute in
the project's .actionScriptProperties file is used. If the
certificate attribute does not exist in the
.actionScriptProperties file, an error message displays.
destdir Specifies the output folder to export the release package.
The folder can be a relative path or an absolute path. If
you specify a relative path, it is relative to the root of the
project.
failonerror Indicates whether compilation errors cause the build to
fail.
locale Specifies the locale, for example, en-US. This value is
passed to the compiler using the compiler’s -locale flag.
If specified, this locale value overrides any locale that has
been specified in Flash Builder’s Additional Compiler
Arguments field.
No The default application of the project.
Yes The name of the selected application
No n/a
No "bin-release" for Web projects and "" (
indicates root of the project) for all
other project types
No true
No n/a
Last updated 12/3/2012
Page 96

USING FLASH BUILDER
Using Projects in Flash Builder
Attribute Description Required? Default Value
92
packagetype For mobile and AIR desktop projects: Specifies the
package type to use when exporting the release
package.
For mobile projects, you can specify "air", "airi", or
"platform" package types. When you specify "air", a
single platform-independent AIR file is generated. When
you specify "airi", an airi file is generated for each
platform. When you specify "platform", a platformspecific file is generated for each platform. For example,
an APK file is generated for the Android platform and an
IPA file is generated for the iOS platform.
For AIR desktop projects, you can specify "air","airi", or
"native" package types. Each option generates only one
file.
password For AIR projects only: The password for the certificate
that is used to sign the AIR file. If this argument is
omitted, an error message displays.
Caution: Specifying a literal value for a password can
compromise security.
platform For mobile projects only: Specifies the target platform to
export the release build. You can specify the platform as
"android", "ios", or "qnx". Use a comma-separated list to
specify multiple platforms.
Note: For a mobile project with "air" package type, this
attribute is not required.
project The project to build. Specify the name of a project in your
Flash Builder workspace, without a path. For example,
"MyFlexProject".
Yes n/a
No n/a
Yes n/a
Yes n/a
publishsource Whether to publish the source of the application,
allowing the user to view source files using the context
menu View Source.
timestamp For AIR projects only: Indicates whether the generated
AIR file includes a timestamp.
Note: If omitted, the value of the timestamp attribute in
the project's .actionScriptProperties file is used. If the
timestamp attribute does not exist in the project's
.actionScriptProperties file, the default value "false" is
used.
verbose The <fb.exportReleaseBuild> task outputs additional
information. For example, it lists the files that were
packaged into the AIR file and how long each step of the
process took.
No false
No false
No false
Specify platform-specific attributes for mobile projects
You can export release packages to multiple platforms at the same time by specifying platform-specific attributes. You
can use platform-specific attributes by specifying the platform-specific prefix. For example, to use the "certificate"
attribute for the Android platform, specify "android.certificate", and for the iOS platform, specify "ios.certifcate".
Last updated 12/3/2012
Page 97

USING FLASH BUILDER
Using Projects in Flash Builder
Android platform
Attribute Description Required?
93
android.airDownloadURL The URL to download the Adobe AIR Runtime if it is not installed on
a user's device when launching the application.
Note: If you do not specify this attribute, then the default Android
Market URL is used.
android.certificate The path to the certificate that is used to sign the APK file.
You specify this attribute when you set the "packagetype" as
"platform" and one of the target platforms is Android.
android.password The password for the certificate that is used to sign the APK file. If
this attribute is omitted, an error message appears.
No
Yes, if you have not defined the
certificate path for the Android
platform in the
.actionScriptProperties file.
Yes
iOS platform
Attribute Description Required?
ios.certificate The path to the certificate (.p12 filename extension) that is used to
sign the IPA file.
You specify this attribute when you set the "packagetype" as
"platform" and one of the target platforms is Apple iOS.
ios.packagetype The package type that is used when exporting an IPA file. Specify
the package type as "adhoc" for ad-hoc packaging and "appstore"
for packaging to the Apple App store.
ios.password The password for the certificate that is used to sign the IPA file. If
this argument is omitted, an error message displays.
ios.provisioning The path to the provisioning file (.mobileprovision filename
extension) that is used to sign the IPA file.
Yes, if you have not defined the
certificate path in the
.actionScriptProperties file.
Yes, if you have not defined the
package type in the
.actionScriptProperties file.
Yes
Yes, if you have not defined the
provisioning file path in the
.actionScriptProperties file.
Export Release Build wizard
When you run the Export Release Build wizard (Project > Export Release Build), the settings you make in the wizard
are saved in the .actionScriptProperties file. A command-line build that uses fb.exportReleaseBuild task picks up the
settings from the wizard. The Export Release Build wizard saves the following settings:
• View Source
The source files you specify for View Source are saved. If you specify the publishsource parameter to
fb.exportReleaseBuild, then the wizard includes these files as viewable source files.
Important: For server projects, you can select the services folder when exporting source files. Exporting files that
implement services has security implications. These files can expose access to your database, including user names and
passwords. See Exporting source files with release version of an application.
• For Adobe AIR projects, any additional output files that you specify in the wizard to include with the AIR or AIRI file.
Run command line builds on Linux and other platforms
The <fb.exportReleaseBuild> task is only supported on Windows and Mac platforms.
However, if you are writing a build script for another platform, use the -dump-config option to the mxmlc or compc
compiler to write compiler configuration settings to a file. You can then use the -load-config option to read the
configuration options.
Last updated 12/3/2012
Page 98

USING FLASH BUILDER
Using Projects in Flash Builder
Modify the configuration settings in the file as necessary. For example, change <debug>true</debug> to
<debug>false</debug> if your nightly build is supposed to do a release build.
Run a command line build using Flash Builder compiler settings
1 In Flash Builder, select Project > Properties > Flex Compiler
2 In Additional Compiler Arguments, specify the following argument:
-dump-config pathname, where pathname specifies the absolute path to a file on your system.
3 Apply the changes in the Project window.
The compiler settings are written to the specified file. Remove the -dump-config argument after you have verified
that the file has been written.
4 Modify the configuration settings as necessary.
5 In your build script, run the compiler so it includes the saved compiler settings:
mxmlc -load-config pathname
Limitations to command line builds
There are a few limitations to running command line builds using the <fb.exportReleaseBuild> task.
94
Run command line builds on 64-bit platforms
Flash Builder runs on platforms that implement 32-bit Java. To run a command line build on platforms that support
64-bit Java (for example, Mac OS X 10.6), add
java -d32 ...
-d32 to the command-line options that are passed to Java. For example:
Publish source code
When your applications are ready to be released, Flash Builder lets you choose whether users can view source code and
assets in the application. As with HTML, users can access and view the source in a web browser by selecting View
Source from the context menu. The source viewer formats and colors the code so that it is easy to read. It is also a
convenient way to share code with other Flex and ActionScript 3.0 developers.
Enable the view source option
1 With the completed application project open in the editor, select Project > Export Release Build.
2 Select Enable View Source or Include Source for ActionScript projects.
3 Click Choose Source Files.
4 In the Publish Application Source dialog box, select the application file or files to include in the View Source menu.
By default, the main application file is selected.
Important: For server projects, you can select the services folder when exporting source files. Exporting files that
implement services has security implications. These files can expose access to your database, including user names and
passwords. See Exporting source files with release version of an application.
5 (Optional) Change the source output folder. By default, a source view folder is added to the project output folder.
6 Click OK.
Last updated 12/3/2012
Page 99

USING FLASH BUILDER
Using Projects in Flash Builder
When users run your application, they can access the source code by selecting View Source from the context menu.
The source code appears in the default web browser as a source tree that reflects the structure of the resources
(packages, folders, and files) contained in your application (the ones that you decided to publish). Selecting a source
element displays the code in the browser. Users can also download the entire set of source files by selecting the
Download.zip file link.
Note: Because of Internet Explorer security restrictions, you are sometimes unable to view the source on your local
development computer. If so, deploy the application to a web server to view the source.
Add the view source menu to ActionScript projects
In Flex projects, you add the View Source option to your application with the Export Release Build wizard. In
ActionScript applications, you add this option manually.
The Flex framework contains the following function that you can use in an ActionScript application’s constructor to
enable the view source menu:
com.adobe.viewsource.ViewSource.addMenuItem(obj:InteractiveObject, url:String,
hideBuiltins:Boolean = true)
You can use the code in your ActionScript applications as shown here:
package {
import flash.display.MovieClip;
import com.adobe.viewsource.ViewSource;
public class MyASApp extends MovieClip
{
public function MyASApp()
{
ViewSource.addMenuItem(this, "srcview/index.html");
// ... additional application code here
}
}
}
95
This example demonstrates adding the view source menu using the default location of the source folder (srcview). If
you change the location of the source folder, make sure that your code uses the correct location.
Run and debug applications
Your applications are run (and debugged) based on a launch configuration. When you create new Flex and
ActionScript applications, a launch configuration specifies the location of the built applications files and the main
application file. You can modify the launch configuration or create custom launch configurations. For more
information, see
You can run your projects in a number of ways in Flash Builder. For example, you can use the Run command, which
is available from the workbench main menu and toolbar, from the Flex Package Explorer, and code editor pop-up
menus.
“Create custom launch configurations” on page 99.
Last updated 12/3/2012
Page 100

USING FLASH BUILDER
Using Projects in Flash Builder
Note: The Run button has two elements: the main action button, and a pop-up menu that shows the application files in
the project that can be run or debugged. When you click the main action button, the default application file is run.
Alternatively, you can click the pop-up menu and select any of the application files in the project and create or edit a
launch configuration in the Create, Manage, and Run Configurations dialog box.
Manage launch configurations
Launch configurations are used both to run and to debug applications. Flash Builder provides a default launch
configuration for Flex and ActionScript applications.
A launch configuration defines the project name, main application file, and the path to the run and debug versions of
the application. Flash Builder contains a default application launch configuration that is used to create launch
configurations automatically for each of your projects.
Create or edit launch configurations to run or debug web applications
When you create and build a project, it is ready to be run or debugged. Both running and debugging of the applications
in your project are controlled by a launch configuration. By default, Flash Builder creates a launch configuration for
each of the application files in your project the first time you run or debug them. The configurations are based on the
default application configuration, and you can edit them as necessary.
Launch configurations are managed in the Create, Manage, and Run Configurations dialog box.
96
1 In the Flex Package Explorer, select a project.
2 With a project file open in the code editor, select Run > Run Configurations.
3 Select the launch configuration to edit.
Last updated 12/3/2012
 Loading...