

Page 1

Using
ADOBE® ENCORE® CS5
Page 2

Legal notices
Legal notices
For legal notices, see http://help.adobe.com/en_US/legalnotices/index.html.
Last updated 4/29/2011
Page 3

Contents
Chapter 1: What’s new
Auto-fix subtitle frame gaps for blu-ray discs (Encore CS5.1) . . . . . . . . . . . . . . . . . . . . . . . . . . . . . . . . . . . . . . . . . . . . . . . . . . . . . . . . . . . . 1
Option to change the media cache location (Encore CS5.1) . . . . . . . . . . . . . . . . . . . . . . . . . . . . . . . . . . . . . . . . . . . . . . . . . . . . . . . . . . . . . 1
Multi-page menus for Blu-ray discs . . . . . . . . . . . . . . . . . . . . . . . . . . . . . . . . . . . . . . . . . . . . . . . . . . . . . . . . . . . . . . . . . . . . . . . . . . . . . . . . . . . . . 1
Flash DVD enhancements . . . . . . . . . . . . . . . . . . . . . . . . . . . . . . . . . . . . . . . . . . . . . . . . . . . . . . . . . . . . . . . . . . . . . . . . . . . . . . . . . . . . . . . . . . . . . 1
Export DDP image to hard disk . . . . . . . . . . . . . . . . . . . . . . . . . . . . . . . . . . . . . . . . . . . . . . . . . . . . . . . . . . . . . . . . . . . . . . . . . . . . . . . . . . . . . . . . . 2
Synchronize timelines with the asset’s frame rate and dimensions . . . . . . . . . . . . . . . . . . . . . . . . . . . . . . . . . . . . . . . . . . . . . . . . . . . . . . 2
Open and edit projects across platforms . . . . . . . . . . . . . . . . . . . . . . . . . . . . . . . . . . . . . . . . . . . . . . . . . . . . . . . . . . . . . . . . . . . . . . . . . . . . . . . 2
Set 24p frame rate for Blu-ray projects . . . . . . . . . . . . . . . . . . . . . . . . . . . . . . . . . . . . . . . . . . . . . . . . . . . . . . . . . . . . . . . . . . . . . . . . . . . . . . . . . 2
Out-of-process transcoding . . . . . . . . . . . . . . . . . . . . . . . . . . . . . . . . . . . . . . . . . . . . . . . . . . . . . . . . . . . . . . . . . . . . . . . . . . . . . . . . . . . . . . . . . . . . 2
Red 4K import . . . . . . . . . . . . . . . . . . . . . . . . . . . . . . . . . . . . . . . . . . . . . . . . . . . . . . . . . . . . . . . . . . . . . . . . . . . . . . . . . . . . . . . . . . . . . . . . . . . . . . . . . 2
AVCHD passthrough . . . . . . . . . . . . . . . . . . . . . . . . . . . . . . . . . . . . . . . . . . . . . . . . . . . . . . . . . . . . . . . . . . . . . . . . . . . . . . . . . . . . . . . . . . . . . . . . . . . 3
Chapter 2: Workflow and workspace
Workflow . . . . . . . . . . . . . . . . . . . . . . . . . . . . . . . . . . . . . . . . . . . . . . . . . . . . . . . . . . . . . . . . . . . . . . . . . . . . . . . . . . . . . . . . . . . . . . . . . . . . . . . . . . . . . 4
Workspace basics . . . . . . . . . . . . . . . . . . . . . . . . . . . . . . . . . . . . . . . . . . . . . . . . . . . . . . . . . . . . . . . . . . . . . . . . . . . . . . . . . . . . . . . . . . . . . . . . . . . . . 5
Managing workspaces . . . . . . . . . . . . . . . . . . . . . . . . . . . . . . . . . . . . . . . . . . . . . . . . . . . . . . . . . . . . . . . . . . . . . . . . . . . . . . . . . . . . . . . . . . . . . . . . 13
iii
Chapter 3: Planning the project
Planning the content . . . . . . . . . . . . . . . . . . . . . . . . . . . . . . . . . . . . . . . . . . . . . . . . . . . . . . . . . . . . . . . . . . . . . . . . . . . . . . . . . . . . . . . . . . . . . . . . 14
Balancing file size and quality . . . . . . . . . . . . . . . . . . . . . . . . . . . . . . . . . . . . . . . . . . . . . . . . . . . . . . . . . . . . . . . . . . . . . . . . . . . . . . . . . . . . . . . . . 15
Bit budgeting . . . . . . . . . . . . . . . . . . . . . . . . . . . . . . . . . . . . . . . . . . . . . . . . . . . . . . . . . . . . . . . . . . . . . . . . . . . . . . . . . . . . . . . . . . . . . . . . . . . . . . . . 18
Chapter 4: Creating projects and importing assets
Working with projects . . . . . . . . . . . . . . . . . . . . . . . . . . . . . . . . . . . . . . . . . . . . . . . . . . . . . . . . . . . . . . . . . . . . . . . . . . . . . . . . . . . . . . . . . . . . . . . . 22
Aspect ratios . . . . . . . . . . . . . . . . . . . . . . . . . . . . . . . . . . . . . . . . . . . . . . . . . . . . . . . . . . . . . . . . . . . . . . . . . . . . . . . . . . . . . . . . . . . . . . . . . . . . . . . . . 26
Importing . . . . . . . . . . . . . . . . . . . . . . . . . . . . . . . . . . . . . . . . . . . . . . . . . . . . . . . . . . . . . . . . . . . . . . . . . . . . . . . . . . . . . . . . . . . . . . . . . . . . . . . . . . . . 29
Adobe Dynamic Link . . . . . . . . . . . . . . . . . . . . . . . . . . . . . . . . . . . . . . . . . . . . . . . . . . . . . . . . . . . . . . . . . . . . . . . . . . . . . . . . . . . . . . . . . . . . . . . . . 35
Working in the Project panel . . . . . . . . . . . . . . . . . . . . . . . . . . . . . . . . . . . . . . . . . . . . . . . . . . . . . . . . . . . . . . . . . . . . . . . . . . . . . . . . . . . . . . . . . . 40
Manage the Project panel . . . . . . . . . . . . . . . . . . . . . . . . . . . . . . . . . . . . . . . . . . . . . . . . . . . . . . . . . . . . . . . . . . . . . . . . . . . . . . . . . . . . . . . . . . . . 41
Viewing and editing XMP metadata . . . . . . . . . . . . . . . . . . . . . . . . . . . . . . . . . . . . . . . . . . . . . . . . . . . . . . . . . . . . . . . . . . . . . . . . . . . . . . . . . . . 43
Transcript metadata in Flash output . . . . . . . . . . . . . . . . . . . . . . . . . . . . . . . . . . . . . . . . . . . . . . . . . . . . . . . . . . . . . . . . . . . . . . . . . . . . . . . . . . . 46
Transcoding in Encore . . . . . . . . . . . . . . . . . . . . . . . . . . . . . . . . . . . . . . . . . . . . . . . . . . . . . . . . . . . . . . . . . . . . . . . . . . . . . . . . . . . . . . . . . . . . . . . . 46
Transcoding presets . . . . . . . . . . . . . . . . . . . . . . . . . . . . . . . . . . . . . . . . . . . . . . . . . . . . . . . . . . . . . . . . . . . . . . . . . . . . . . . . . . . . . . . . . . . . . . . . . . 48
Chapter 5: Menus
Menu basics . . . . . . . . . . . . . . . . . . . . . . . . . . . . . . . . . . . . . . . . . . . . . . . . . . . . . . . . . . . . . . . . . . . . . . . . . . . . . . . . . . . . . . . . . . . . . . . . . . . . . . . . . . 53
Creating menus . . . . . . . . . . . . . . . . . . . . . . . . . . . . . . . . . . . . . . . . . . . . . . . . . . . . . . . . . . . . . . . . . . . . . . . . . . . . . . . . . . . . . . . . . . . . . . . . . . . . . . 61
Multi-page menus for blu-ray discs . . . . . . . . . . . . . . . . . . . . . . . . . . . . . . . . . . . . . . . . . . . . . . . . . . . . . . . . . . . . . . . . . . . . . . . . . . . . . . . . . . . . 65
Using Photoshop to create menus . . . . . . . . . . . . . . . . . . . . . . . . . . . . . . . . . . . . . . . . . . . . . . . . . . . . . . . . . . . . . . . . . . . . . . . . . . . . . . . . . . . . 66
Edit menus . . . . . . . . . . . . . . . . . . . . . . . . . . . . . . . . . . . . . . . . . . . . . . . . . . . . . . . . . . . . . . . . . . . . . . . . . . . . . . . . . . . . . . . . . . . . . . . . . . . . . . . . . . . 70
Styling and transforming menu objects . . . . . . . . . . . . . . . . . . . . . . . . . . . . . . . . . . . . . . . . . . . . . . . . . . . . . . . . . . . . . . . . . . . . . . . . . . . . . . . 75
Apply styles and transformations . . . . . . . . . . . . . . . . . . . . . . . . . . . . . . . . . . . . . . . . . . . . . . . . . . . . . . . . . . . . . . . . . . . . . . . . . . . . . . . . . . . . . 76
Adding text to menus . . . . . . . . . . . . . . . . . . . . . . . . . . . . . . . . . . . . . . . . . . . . . . . . . . . . . . . . . . . . . . . . . . . . . . . . . . . . . . . . . . . . . . . . . . . . . . . . 78
Last updated 4/29/2011
Page 4

USING ENCORE
Contents
Add and format text . . . . . . . . . . . . . . . . . . . . . . . . . . . . . . . . . . . . . . . . . . . . . . . . . . . . . . . . . . . . . . . . . . . . . . . . . . . . . . . . . . . . . . . . . . . . . . . . . . 83
Button subpictures . . . . . . . . . . . . . . . . . . . . . . . . . . . . . . . . . . . . . . . . . . . . . . . . . . . . . . . . . . . . . . . . . . . . . . . . . . . . . . . . . . . . . . . . . . . . . . . . . . . 86
Menu color sets . . . . . . . . . . . . . . . . . . . . . . . . . . . . . . . . . . . . . . . . . . . . . . . . . . . . . . . . . . . . . . . . . . . . . . . . . . . . . . . . . . . . . . . . . . . . . . . . . . . . . . 90
Button routing . . . . . . . . . . . . . . . . . . . . . . . . . . . . . . . . . . . . . . . . . . . . . . . . . . . . . . . . . . . . . . . . . . . . . . . . . . . . . . . . . . . . . . . . . . . . . . . . . . . . . . . 94
Creating styles for menu elements . . . . . . . . . . . . . . . . . . . . . . . . . . . . . . . . . . . . . . . . . . . . . . . . . . . . . . . . . . . . . . . . . . . . . . . . . . . . . . . . . . . . 96
Video and audio in menus . . . . . . . . . . . . . . . . . . . . . . . . . . . . . . . . . . . . . . . . . . . . . . . . . . . . . . . . . . . . . . . . . . . . . . . . . . . . . . . . . . . . . . . . . . . . 98
Menu timing and looping . . . . . . . . . . . . . . . . . . . . . . . . . . . . . . . . . . . . . . . . . . . . . . . . . . . . . . . . . . . . . . . . . . . . . . . . . . . . . . . . . . . . . . . . . . . . 102
Menu templates . . . . . . . . . . . . . . . . . . . . . . . . . . . . . . . . . . . . . . . . . . . . . . . . . . . . . . . . . . . . . . . . . . . . . . . . . . . . . . . . . . . . . . . . . . . . . . . . . . . . . 104
Chapter indexes . . . . . . . . . . . . . . . . . . . . . . . . . . . . . . . . . . . . . . . . . . . . . . . . . . . . . . . . . . . . . . . . . . . . . . . . . . . . . . . . . . . . . . . . . . . . . . . . . . . . . 107
Using After Effects to enhance menus . . . . . . . . . . . . . . . . . . . . . . . . . . . . . . . . . . . . . . . . . . . . . . . . . . . . . . . . . . . . . . . . . . . . . . . . . . . . . . . . 109
Chapter 6: Timelines and slide shows
Timeline basics . . . . . . . . . . . . . . . . . . . . . . . . . . . . . . . . . . . . . . . . . . . . . . . . . . . . . . . . . . . . . . . . . . . . . . . . . . . . . . . . . . . . . . . . . . . . . . . . . . . . . . 113
Create and manage timelines . . . . . . . . . . . . . . . . . . . . . . . . . . . . . . . . . . . . . . . . . . . . . . . . . . . . . . . . . . . . . . . . . . . . . . . . . . . . . . . . . . . . . . . . 117
Editing assets in timelines . . . . . . . . . . . . . . . . . . . . . . . . . . . . . . . . . . . . . . . . . . . . . . . . . . . . . . . . . . . . . . . . . . . . . . . . . . . . . . . . . . . . . . . . . . . 120
Slide show basics . . . . . . . . . . . . . . . . . . . . . . . . . . . . . . . . . . . . . . . . . . . . . . . . . . . . . . . . . . . . . . . . . . . . . . . . . . . . . . . . . . . . . . . . . . . . . . . . . . . . 125
Editing slide shows . . . . . . . . . . . . . . . . . . . . . . . . . . . . . . . . . . . . . . . . . . . . . . . . . . . . . . . . . . . . . . . . . . . . . . . . . . . . . . . . . . . . . . . . . . . . . . . . . . 127
Chapter points . . . . . . . . . . . . . . . . . . . . . . . . . . . . . . . . . . . . . . . . . . . . . . . . . . . . . . . . . . . . . . . . . . . . . . . . . . . . . . . . . . . . . . . . . . . . . . . . . . . . . . 130
iv
Chapter 7: Audio and subtitles
Audio clips . . . . . . . . . . . . . . . . . . . . . . . . . . . . . . . . . . . . . . . . . . . . . . . . . . . . . . . . . . . . . . . . . . . . . . . . . . . . . . . . . . . . . . . . . . . . . . . . . . . . . . . . . . 133
Subtitle basics . . . . . . . . . . . . . . . . . . . . . . . . . . . . . . . . . . . . . . . . . . . . . . . . . . . . . . . . . . . . . . . . . . . . . . . . . . . . . . . . . . . . . . . . . . . . . . . . . . . . . . . 135
Subtitle scripts . . . . . . . . . . . . . . . . . . . . . . . . . . . . . . . . . . . . . . . . . . . . . . . . . . . . . . . . . . . . . . . . . . . . . . . . . . . . . . . . . . . . . . . . . . . . . . . . . . . . . . 139
Subtitle colors . . . . . . . . . . . . . . . . . . . . . . . . . . . . . . . . . . . . . . . . . . . . . . . . . . . . . . . . . . . . . . . . . . . . . . . . . . . . . . . . . . . . . . . . . . . . . . . . . . . . . . . 146
Navigation for audio and subtitle tracks . . . . . . . . . . . . . . . . . . . . . . . . . . . . . . . . . . . . . . . . . . . . . . . . . . . . . . . . . . . . . . . . . . . . . . . . . . . . . . 148
Closed captions basics . . . . . . . . . . . . . . . . . . . . . . . . . . . . . . . . . . . . . . . . . . . . . . . . . . . . . . . . . . . . . . . . . . . . . . . . . . . . . . . . . . . . . . . . . . . . . . . 150
Chapter 8: Creating and managing links
Navigation . . . . . . . . . . . . . . . . . . . . . . . . . . . . . . . . . . . . . . . . . . . . . . . . . . . . . . . . . . . . . . . . . . . . . . . . . . . . . . . . . . . . . . . . . . . . . . . . . . . . . . . . . . 151
Setting navigation and properties . . . . . . . . . . . . . . . . . . . . . . . . . . . . . . . . . . . . . . . . . . . . . . . . . . . . . . . . . . . . . . . . . . . . . . . . . . . . . . . . . . . . 153
Playlists and chapter playlists . . . . . . . . . . . . . . . . . . . . . . . . . . . . . . . . . . . . . . . . . . . . . . . . . . . . . . . . . . . . . . . . . . . . . . . . . . . . . . . . . . . . . . . . 158
Working in the Flowchart . . . . . . . . . . . . . . . . . . . . . . . . . . . . . . . . . . . . . . . . . . . . . . . . . . . . . . . . . . . . . . . . . . . . . . . . . . . . . . . . . . . . . . . . . . . . 160
User operations . . . . . . . . . . . . . . . . . . . . . . . . . . . . . . . . . . . . . . . . . . . . . . . . . . . . . . . . . . . . . . . . . . . . . . . . . . . . . . . . . . . . . . . . . . . . . . . . . . . . . 166
Chapter 9: Testing and building the final product
Testing Encore projects . . . . . . . . . . . . . . . . . . . . . . . . . . . . . . . . . . . . . . . . . . . . . . . . . . . . . . . . . . . . . . . . . . . . . . . . . . . . . . . . . . . . . . . . . . . . . . 168
Security and additional content . . . . . . . . . . . . . . . . . . . . . . . . . . . . . . . . . . . . . . . . . . . . . . . . . . . . . . . . . . . . . . . . . . . . . . . . . . . . . . . . . . . . . . 173
Building the finished project . . . . . . . . . . . . . . . . . . . . . . . . . . . . . . . . . . . . . . . . . . . . . . . . . . . . . . . . . . . . . . . . . . . . . . . . . . . . . . . . . . . . . . . . . 175
Exporting projects to Flash format . . . . . . . . . . . . . . . . . . . . . . . . . . . . . . . . . . . . . . . . . . . . . . . . . . . . . . . . . . . . . . . . . . . . . . . . . . . . . . . . . . . 178
Chapter 10: Keyboard shortcuts
Using keyboard shortcuts . . . . . . . . . . . . . . . . . . . . . . . . . . . . . . . . . . . . . . . . . . . . . . . . . . . . . . . . . . . . . . . . . . . . . . . . . . . . . . . . . . . . . . . . . . . . 186
Last updated 4/29/2011
Page 5

Chapter 1: What’s new
Auto-fix subtitle frame gaps for blu-ray discs (Encore CS5.1)
Automatically resize one or both the flanking subtitle clips such that the gap separating them is five frames. The
automatic adjustment eliminates chances of errors due to insufficient gaps between subtitle clips, which prevent a bluray disc from burning.
Use Auto Fix Subtitle Frame Gaps for all timelines on blu-ray discs, except for timelines with frame dimensions
720x480. For more information, see
Option to change the media cache location (Encore CS5.1)
“Automatically fix subtitle frame gaps for Blu-ray discs” on page 138.
1
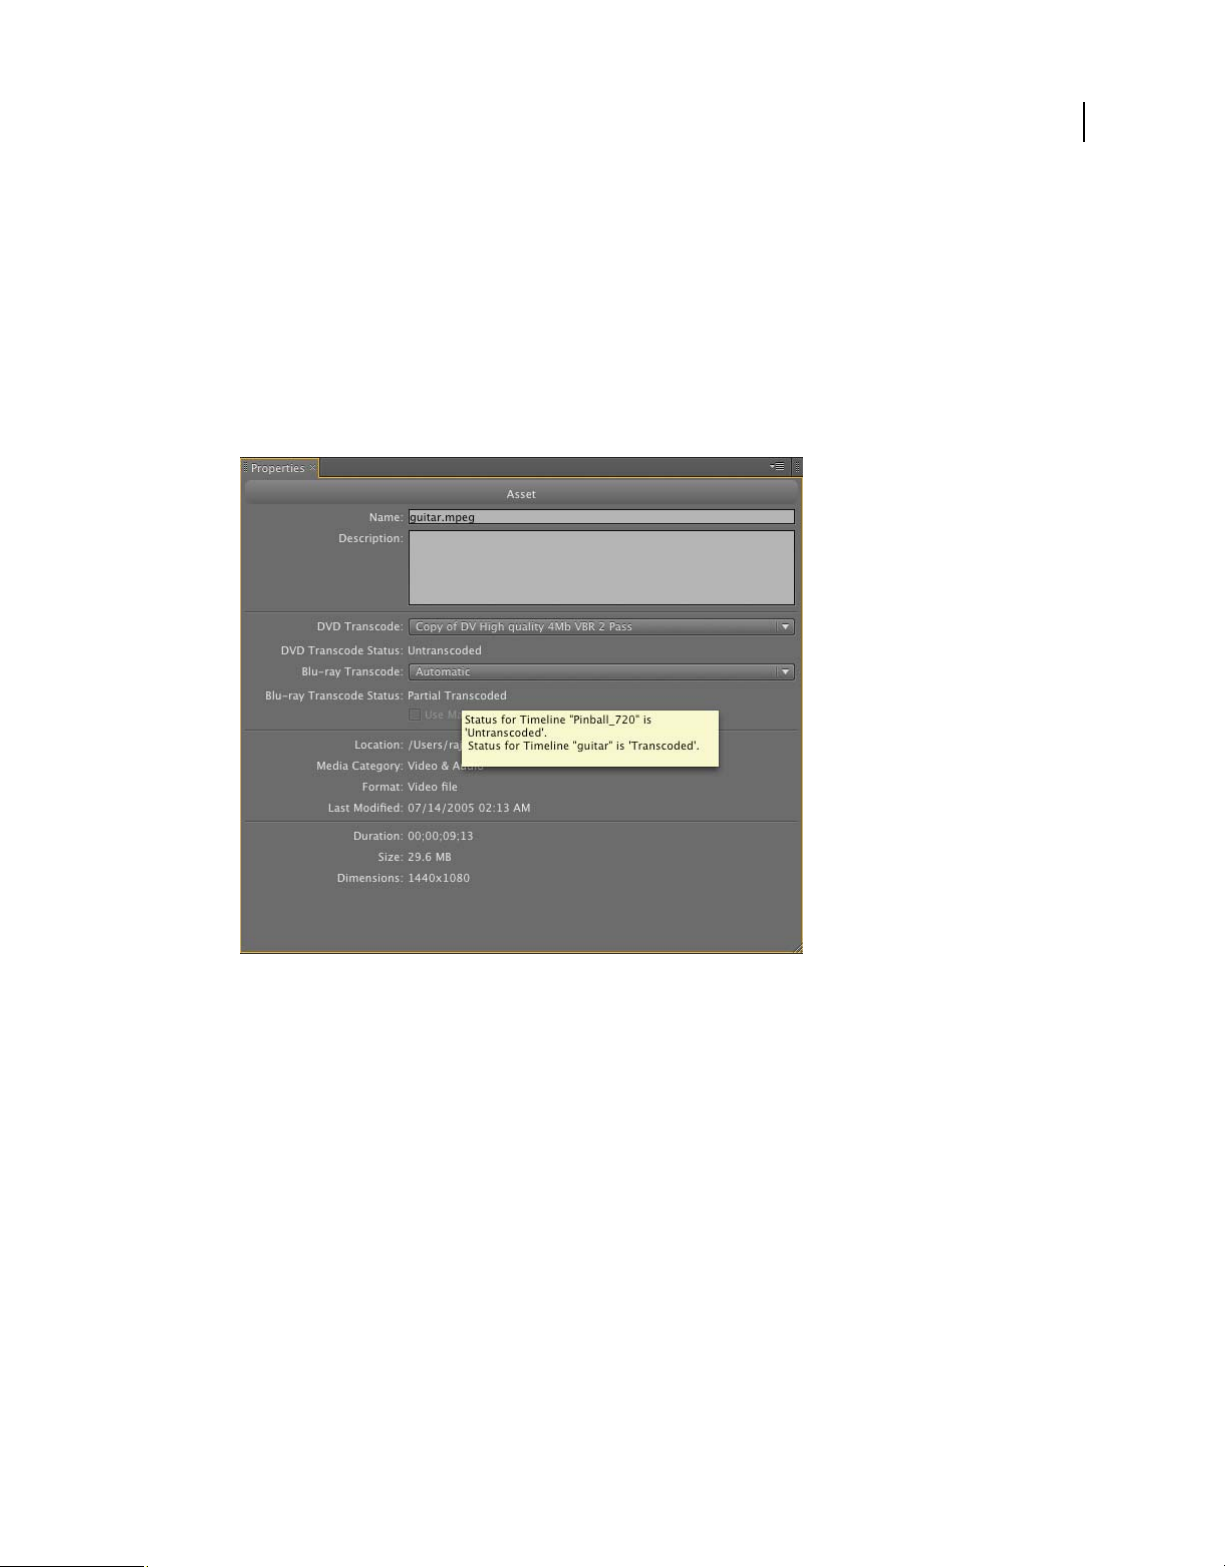
When importing media files (in certain formats), change the media cache location from within Adobe® Encore® CS5.1
to improve the performance of previews. The flexibility provided by the feature lets you configure the media cache
location in a separate machine to offset memory overheads on the production machine.
A media cache database retains links to the cached media files. The database shares the links with Adobe Media
Encoder, After Effects, Adobe Premiere Pro, and Soundbooth to let each application use the same media files. Sharing
the same cache files ensures database consistency across applications. For more information, see
preferences” on page 11
“Set Media
Multi-page menus for Blu-ray discs
A multi-page menu is a single PSD file containing multiple pages that are linked to each other. A page is a layer group
in the PSD file containing buttons. The buttons link to parts of the menu, or to a chapter point in the timeline. Multipage menus can be created in Encore, or imported from Photoshop. For more information, see
blu-ray discs” on page 65.
“Multi-page menus for
Flash DVD enhancements
Search text subtitles in Flash DVD. The new Flash DVD player has customizable playback controls that help you
readily navigate and search content in the movie. Performance enhancements ensure smoother playback at low
bandwidths, and reduced glitch at chapter markers during streaming. For more information, see
output files” on page 181.
“Play Flash DVD
Last updated 4/29/2011
Page 6

USING ENCORE
What’s new
Export DDP image to hard disk
Directly export DDP images to your computer’s hard disk, and deliver it to the replication facility using FTP. Delivery
through electronic media is faster, and does not involve the extra hardware associated with DLT. For more
information, see
“Build a DVD or Blu-ray disc” on page 175.
Synchronize timelines with the asset’s frame rate and dimensions
Encore also allows you to use the same asset in multiple timelines that can have different frame rates or dimensions.
In such cases, Encore transcodes these assets for each timeline with the frame rate and dimensions of the timeline in
which it is placed.
For assets with different frame rates and dimensions, Encore creates timelines that are synchronized with the asset’s
properties. The synchronization helps provide real-time playback, and better accuracy in subtitle positioning.
2
Open and edit projects across platforms
Open an Encore project created in Mac on a Windows machine, and the other way round. Also, you can open and edit
projects created in Encore CS4 and earlier versions. For more information, see
platforms” on page 24.
“Open and edit projects across
Set 24p frame rate for Blu-ray projects
Encore automatically chooses the relevant 24 fps transcoding preset when you use the Transcode Now option to
transcode the asset. For Blu-ray assets that are not legal, the default values for transcoding are used.
Out-of-process transcoding
Out-of-process transcoding enables you to transcode assets in the Adobe Media Encoder application in the Transcode
Now workflow. When you enable out-of-process transcoding, the Adobe Media Encoder (AME) is launched as a
separate process. For more information, see
“Out-of-process transcoding” on page 48.
Red 4K import
Movie frames shot using Red cameras can be imported into Encore from Premiere Pro at their full resolution (4K)
using Dynamic Link. Encore provides an improved quality of playback for these high resolution files.
Last updated 4/29/2011
Page 7

USING ENCORE
What’s new
AVCHD passthrough
Encore does not transcode Blu ray legal (as per BD spec) AVCHD files (MTS,M2TS) when building a blu ray. For more
information, see
“AVCHD passthrough” on page 177.
3
Last updated 4/29/2011
Page 8
Chapter 2: Workflow and workspace
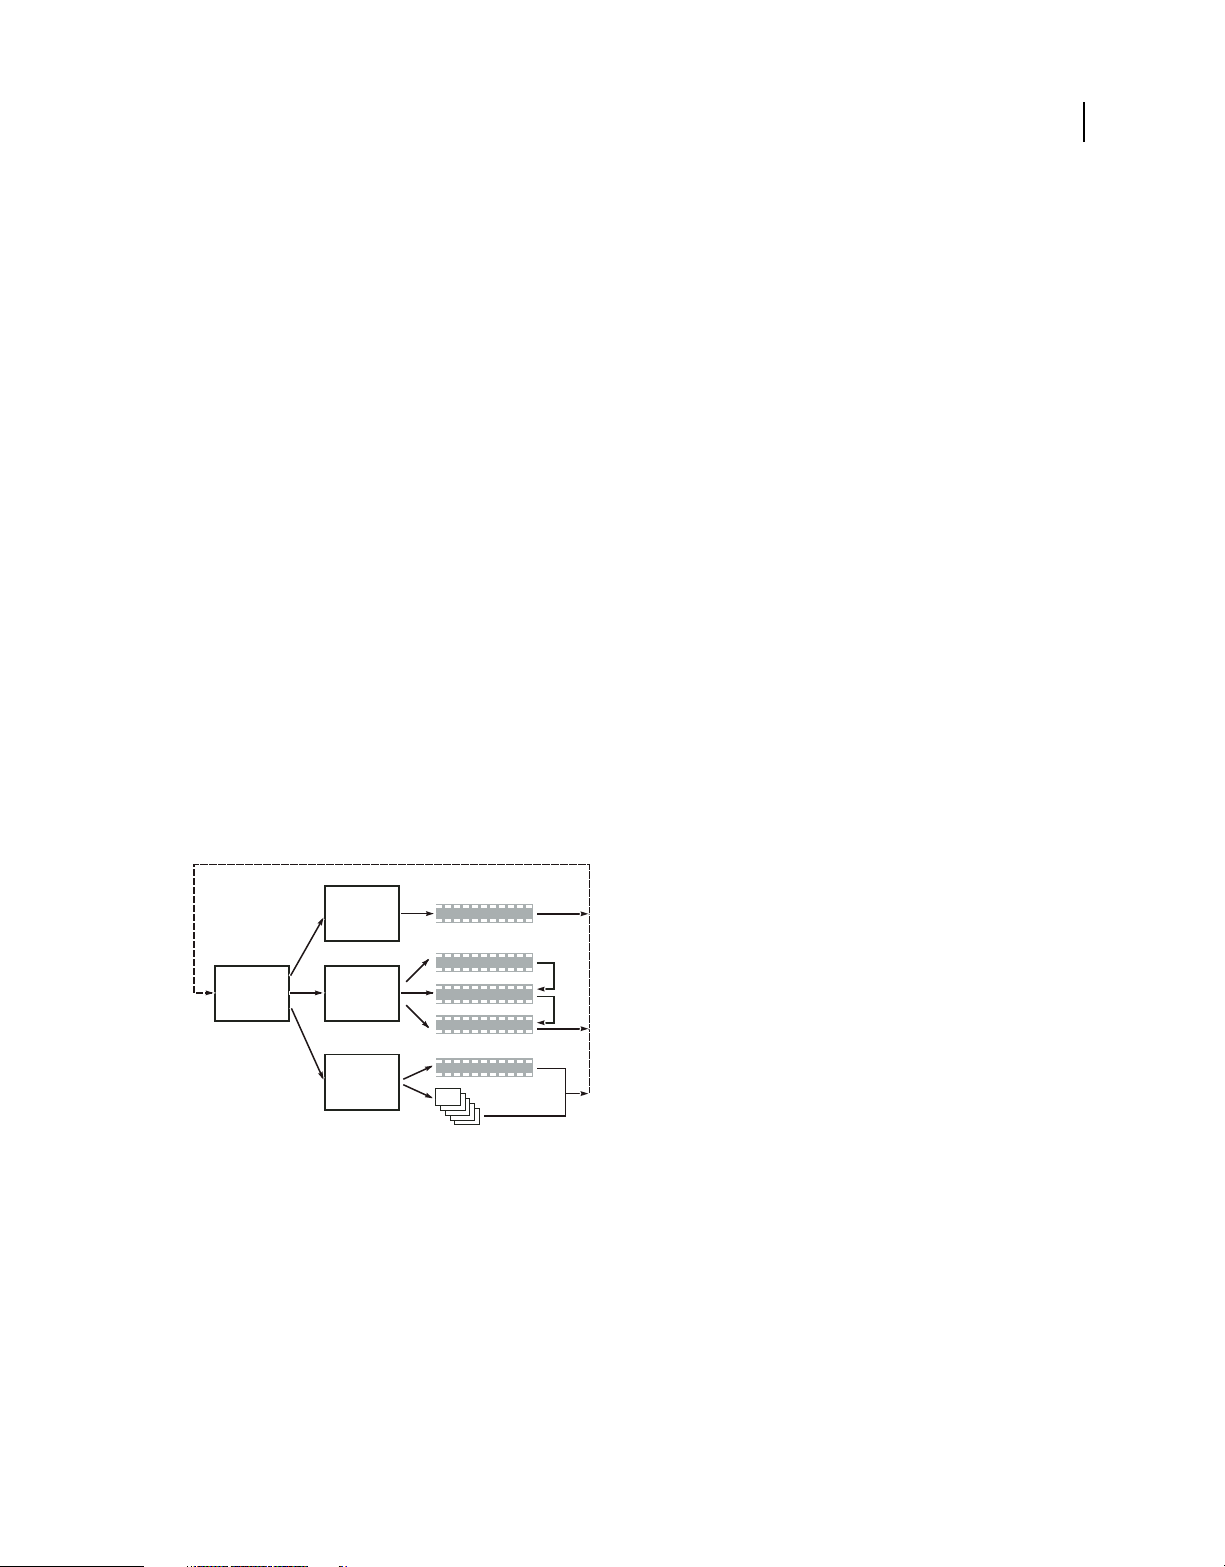
Adobe® Encore® provides a flexible workspace that you can quickly optimize for your working style.
Workflow
Workflow and workspace basics
Encore lets you create many different kinds of projects for DVDs, Blu-ray discs, or interactive Adobe Flash® files.
Whether the content is a feature film, a wedding, a training course, or an art collection, the basic steps for creating a
project are the same.
Note: For a video tutorial about creating projects in Encore, see www.adobe.com/go/vid0239. For an overview of Encore,
see www.adobe.com/go/lrvid4226_enc.
Although the order of the tasks can vary somewhat from project to project, authoring with Encore involves the
following basic tasks:
4
Plan the project
Regardless of the project's complexity, it is helpful to plan the content and flow of your project. Whether you sketch
each of the elements, create a flowchart, or use a spreadsheet to map the path through the content, drafting a navigation
scenario can help you clarify your ideas and anticipate problems before you start. For information, see
“About
planning” on page 14.
1
2
3
Simple sketch of intended navigation scheme
1a
2a
2b
2c
3a
3b
Import assets
Prepare your source material (assets) for the project, and import them into Encore. The assets include any video, still
images, audio, and subtitles for your project. You can import Adobe Premiere® Pro sequences without rendering them
through the Adobe Dynamic Link. For information, see
“Import assets and menus” on page 31.
Create project elements and add assets
An Encore project includes element types such as timelines and slide shows. You add assets to these elements to
include the assets in the project. Depending upon an asset’s type, you can add it to timelines, slide shows, menus,
playlists, and chapter playlists. For information, see
“About timelines” on page 113, “About slide shows” on page 125,
“Playlists” on page 158, and “Chapter playlists” on page 159.
Last updated 4/29/2011
Page 9

USING ENCORE
Workflow and workspace
Create menus
The menus give the viewer access to the content. You can create menus directly in Encore, customize predesigned
menus included with the software, or create and edit menus in Adobe Photoshop®. For information, see
menus” on page 53.
Specify navigation
Menus provide the main way for viewers to navigate through the content. In addition to menus, you also use other
types of navigation settings, such as end actions and overrides, to guide the viewer. Encore gives you several methods
for setting the navigation—you can drag between the elements and buttons in Menu Viewer, use the Properties panel,
or work with navigation in Flowchart. For a typical project, you’ll set navigation with all of these methods, choosing
whichever is most convenient at the time. For information, see
Make video and audio compatible (transcoding)
If you imported video and audio files that aren’t DVD or Blu-ray Disc-compatible, Encore transcodes the files before
you burn the disc. You can let Encore determine the best settings for transcoding or select the options you feel are best
for your project. For information, see
Preview the project
You should preview and check a project throughout the authoring process, especially before you burn the disc.
Previewing lets you experience the project as a viewer would, using the remote control to move through it. The Check
Project feature verifies technical details and informs you of any problems, such as broken links or invalid end actions.
For information, see
“Preview a project” on page 169, and “Check a project” on page 172.
“About transcoding” on page 46.
“Project navigation and links” on page 151.
“About
5
Burn the disc
You can build and burn the DVD or Blu-ray disc directly from Encore. Or, if you plan to use a replication facility, you
can write to a DLT drive, prepare a folder, or create a DVD or Blu-ray image to give to the replicator. For information,
“Build a DVD or Blu-ray disc” on page 175.
see
Export to Flash format
You can export your final projects to a Flash format for interactive viewing on the web. For information, see
“Exporting projects to Flash format” on page 178.
More Help topics
Create Encore projects video
Workspace basics
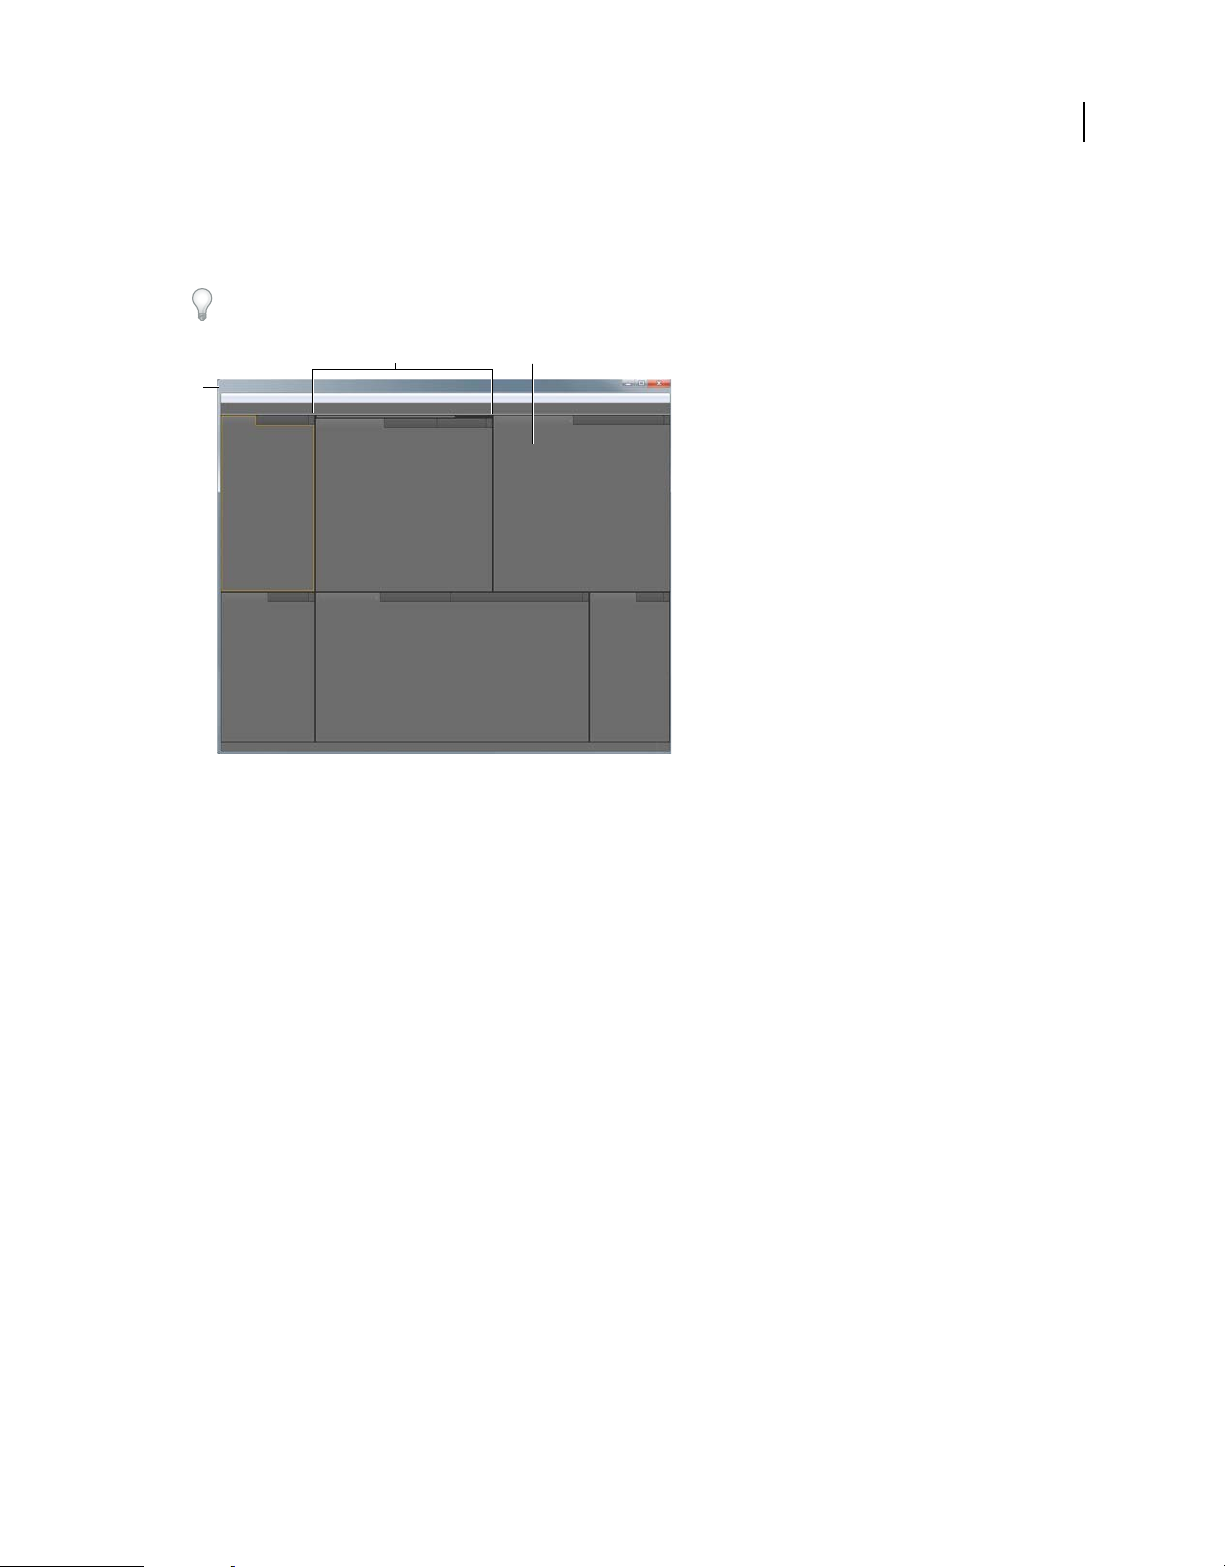
About workspaces
Adobe video and audio applications provide a consistent, customizable workspace. Although each application has its
own set of panels (such as Project, Metadata, and Timeline), you move and group panels in the same way across
products.
The main window of a program is the application window. Panels are organized in this window in an arrangement
called a workspace. The default workspace contains groups of panels as well as panels that stand alone.
Last updated 4/29/2011
Page 10
USING ENCORE
Workflow and workspace
You customize a workspace by arranging panels in the layout that best suits your working style. As you rearrange
panels, the other panels resize automatically to fit the window. You can create and save several custom workspaces for
different tasks—for example, one for editing and one for previewing.
You can use floating windows to create a workspace more like workspaces in previous versions of Adobe applications,
or to place panels on multiple monitors.
BC
A
6
Example workspace
A. Application window B. Grouped panels C. Individual panel
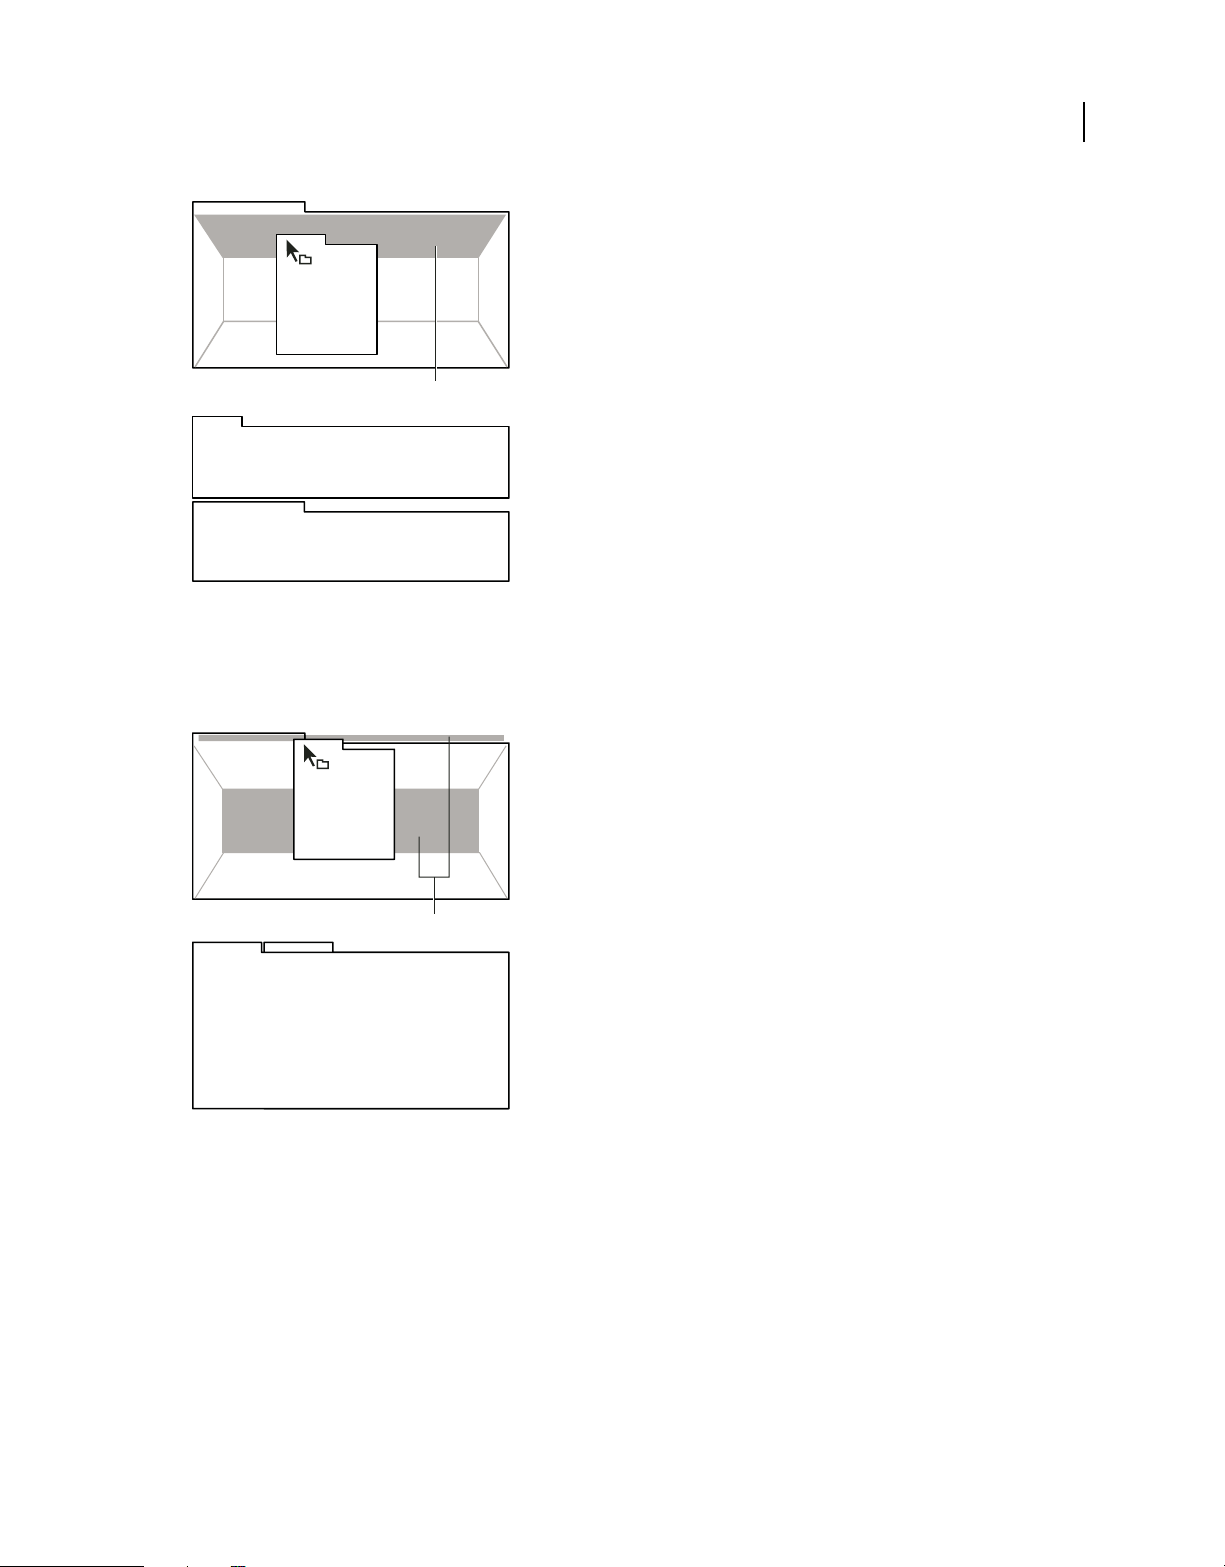
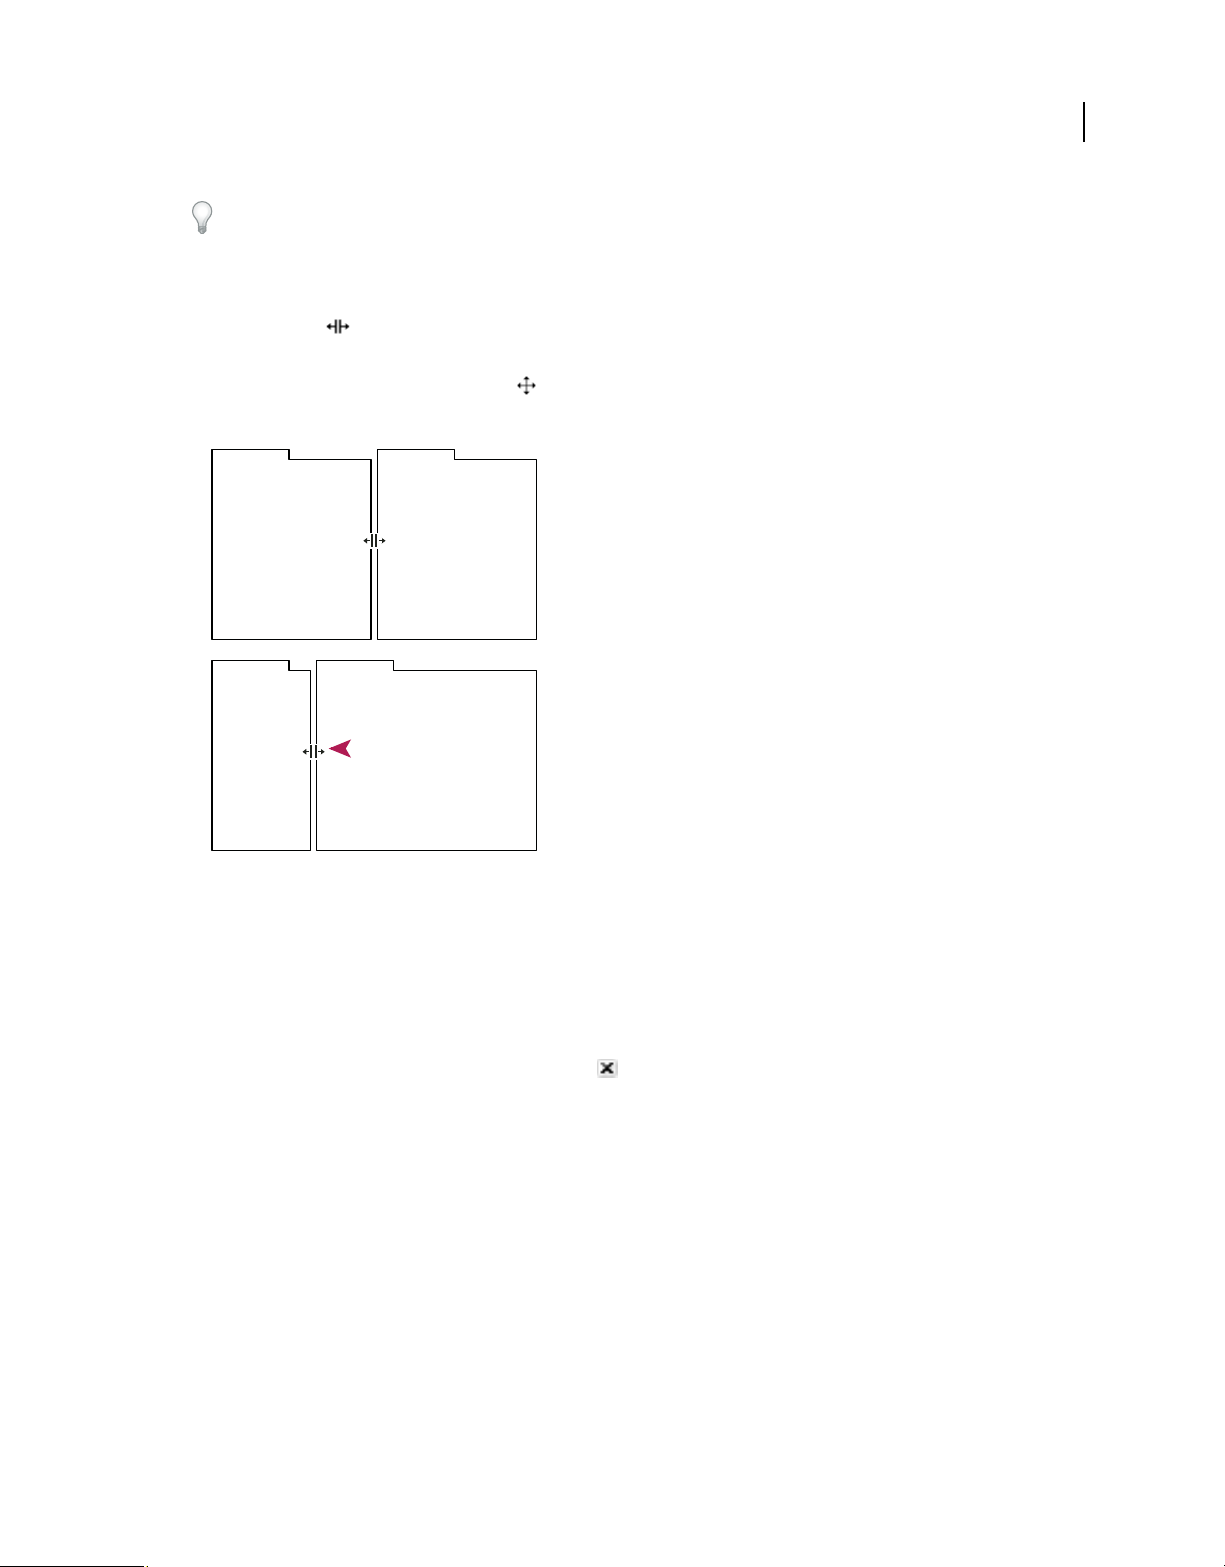
Dock, group, or float panels
You can dock panels together, move them into or out of groups, and undock them so they float above the application
window. As you drag a panel, drop zones—areas onto which you can move the panel—become highlighted. The drop
zone you choose determines where the panel is inserted, and whether it docks or groups with other panels.
Docking zones
Docking zones exist along the edges of a panel, group, or window. Docking a panel places it adjacent to the existing
group, resizing all groups to accommodate the new panel.
Last updated 4/29/2011
Page 11
USING ENCORE
Workflow and workspace
A
B
C
Dragging panel (A) onto docking zone (B) to dock it (C)
Grouping zones
Grouping zones exist in the middle of a panel or group, and along the tab area of panels. Dropping a panel on a
grouping zone stacks it with other panels.
7
A
B
C
Dragging panel (A) onto grouping zone (B) to group it with existing panels (C)
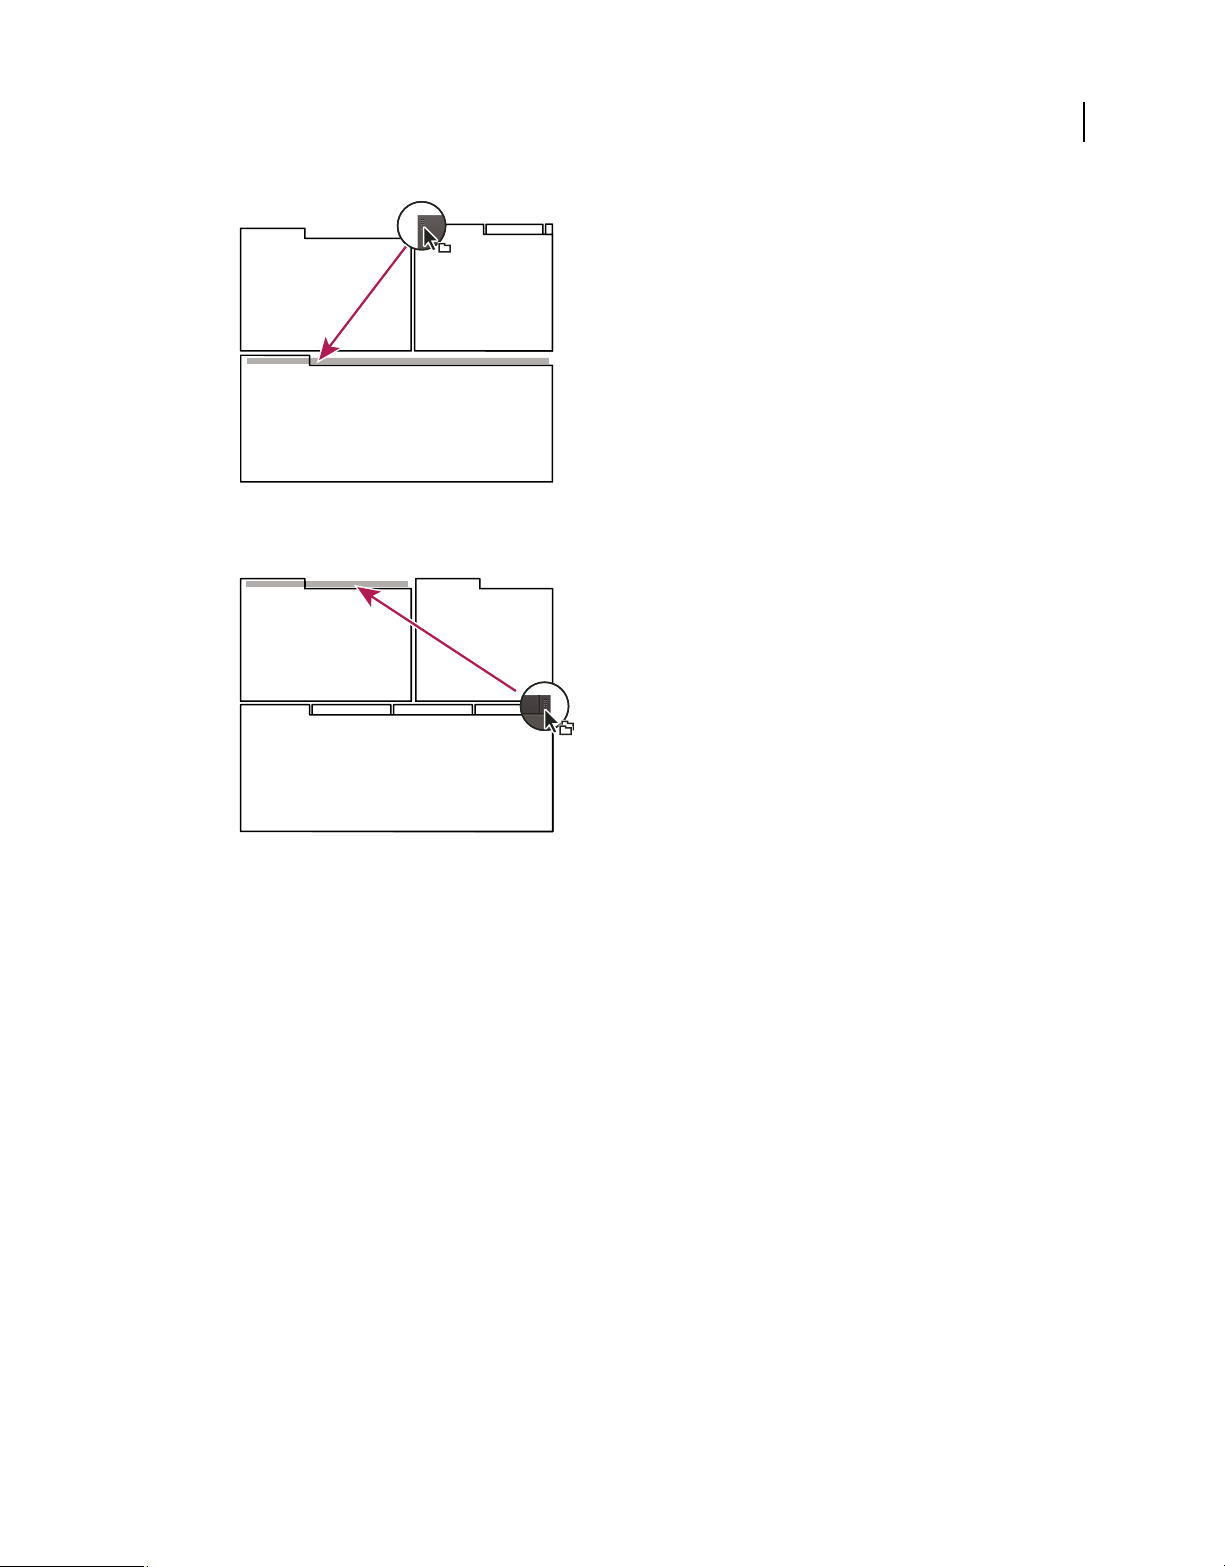
Dock or group panels
1 If the panel you want to dock or group is not visible, choose it from the Window menu.
2 Do one of the following:
•
To move an individual panel, drag the gripper area in the upper-left corner of a panel’s tab onto the desired drop zone.
Last updated 4/29/2011
Page 12
USING ENCORE
Workflow and workspace
Drag panel gripper to move one panel
• To move an entire group, drag the group gripper in the upper-right corner onto the desired drop zone.
8
Drag group gripper to move entire group
The application docks or groups the panel, according to the type of drop zone.
Undock a panel in a floating window
When you undock a panel in a floating window, you can add panels to the window and modify it similarly to the
application window. You can use floating windows to use a secondary monitor, or to create workspaces like the
workspaces in earlier versions of Adobe applications.
❖ Select the panel you want to undock (if it’s not visible, choose it from the Window menu), and then do one of the
following:
• Choose Undock Panel or Undock Frame from the panel menu. Undock Frame undocks the panel group.
• Hold down Ctrl (Windows®) or Command (Mac OS®), and drag the panel or group from its current location.
When you release the mouse button, the panel or group appears in a new floating window.
• Drag the panel or group outside the application window. (If the application window is maximized, drag the
panel to the Windows taskbar.)
Resize panel groups
When you position the pointer over dividers between panel groups, resize icons appear. When you drag these icons,
all groups that share the divider are resized. For example, suppose your workspace contains three panel groups stacked
vertically. If you drag the divider between the bottom two groups, they are resized, but the topmost group doesn’t
change.
Last updated 4/29/2011
Page 13
USING ENCORE
Workflow and workspace
To quickly maximize a panel beneath the pointer, press the accent key. (Do not press Shift.) Press the accent key again
to return the panel to its original size.
1 Do either of the following:
• To resize either horizontally or vertically, position the pointer between two panel groups. The pointer becomes a
double-arrow
.
• To resize in both directions at once, position the pointer at the intersection between three or more panel groups.
The pointer becomes a four-way arrow
2 Hold down the mouse button, and drag to resize the panel groups.
A
.
9
B
Dragging divider between panel groups to resize them horizontally
A. Original group with resize icon B. Resized groups
Open, close, and scroll to panels
When you close a panel group in the application window, the other groups resize to use the newly available space.
When you close a floating window, the panels within it close, too.
• To open or close a panel, choose it from the Window menu.
• To close a panel or window, click its Close button .
• To see all the panel tabs in a narrow panel group, drag the horizontal scroll bar.
• To bring a panel to the front of a group of panels, do one of the following:
• Click the tab of the panel you want in front.
• Hover the cursor above the tab area, and turn the mouse scroll wheel. Scrolling brings each panel to the front, one
after another.
• Drag tabs horizontally to change their order.
• To reveal panels hidden in a narrow panel group, drag the scroll bar above the panel group.
Last updated 4/29/2011
Page 14

USING ENCORE
Workflow and workspace
Drag horizontal scroll bar to see all panels in narrow group
Working with multiple monitors
To increase the available screen space, use multiple monitors. When you work with multiple monitors, the application
window appears on one monitor, and you place floating windows on the second monitor. Monitor configurations are
stored in the workspace.
More Help topics
“Dock, group, or float panels” on page 6
Use context, panel, and viewer menus
In addition to the menus at the top of your screen, Encore also provides context, panel, and viewer menus. Context
menus contain commands relative to the active tool or selection. Panel menus contain commands relevant to the active
panel. You use the viewer menus to choose which item to display in the viewer, or to close items.
10
Use a context or panel menu
❖ Do one of the following:
• To use a context menu, position the pointer over the active window or selection and right-click (Windows) or
Control-click (Mac® OS). Choose a menu item, or click outside the menu to close it.
• To use a panel menu, click the triangle in the upper-right corner of a panel, and then choose a menu item or
click outside the menu to close it.
Use a viewer menu
Encore provides viewers for its timelines, slide shows, menus, and chapter playlists. Viewers are panels in which you
edit a type of DVD or Blu-ray element. Slideshow Viewer, for example, lets you edit slide shows. You can set the Encore
preferences to specify whether items of the same type open in a single viewer or in multiple viewers. For viewers with
multiple items open, use the viewer menu to select the item you want to work with.
❖ Click the triangle in the Viewer tab, and choose the element you want to work with. You can also close the current
item or all the items.
Tools panel overview
You use the Tools panel when working in the Menu Viewer and the Flowchart. It contains tools to select layers or
objects in a menu, enter text, zoom in and out, and move objects in the Flowchart. It also contains shortcuts for editing
a menu in Photoshop and previewing a project. (See
projects” on page 135, and “About creating menus in Photoshop” on page 66.)
“About text in menus” on page 78, “About subtitles in DVD
Last updated 4/29/2011
Page 15

USING ENCORE
Workflow and workspace
A B C D E F G H I
Tools panel
A. Selection tool B. Direct Select tool C. Move tool D. Rotate tool E. Text tool F. Vertical Text tool G. Zoom tool H. Edit Menu in Photoshop
I. Preview
Set preferences for workspace
You can set numerous preferences for your workspace. These include adjusting the brightness of the user interface and
controlling the default television standard used for creating projects.
Set workspace appearance preferences
Appearance preferences include software-wide settings that affect your workspace.
1 Choose Edit > Preferences > Appearance (Windows) or Encore > Preferences > Appearance (Mac OS).
2 Set any of the following options:
Brightness Use the slider to set the brightness of the interface. Click Default to return the brightness to the factory
default.
Separate Viewers For Specifies how new timelines, menus, slide shows, and chapter playlists are opened. In Encore,
you edit each element type in its own viewer. Timelines, for example, are edited in the Timeline viewer. Select an
option to open that element type in a new viewer; deselect an option to open all elements of that type in a single
viewer. For example, to open all menus in a single Menu Viewer, deselect Menus. When a single viewer contains
more than one item, use its viewer menu to access the desired element. For more information, see
menu” on page 10.
“Use a viewer
11
Show Tool Tips Specifies whether tool tips (brief labels or explanations) appear as the pointer moves over tools and
other interface elements. This setting is enabled by default.
Beep On Render Completion Specifies whether Encore beeps when it finishes building a project or transcoding a
file. Select the option to enable the beep.
Set Media preferences
Media preferences include settings for clearing the Adobe media cache database file and specifying the location for the
Encore Library file.
1 Choose Edit > Preferences > Media (Windows) or Encore > Preferences > Media (Mac OS).
2 Set any of the following options:
Library Content Specifies the location of the Library folder for functional content, such as predesigned menus and
buttons. Files in this Library folder appear in the Library panel.
Resource Central Content Lets you change the location of the media database from within Encore. When Encore
imports audio and video in certain formats, it processes and caches versions of these items for easy access when
generating previews.
The media cache improves the performance of previews, because the system does not reprocess audio and video
items for each preview. A media cache database retains links to each cached media file. This database is shared with
Adobe Media Encoder, After Effects, Adobe Premiere Pro, and Soundbooth.
Each application can read from and write to the same set of cached media files. If you change the location of the
database from within any application, the location is updated for the other applications simultaneously. Each
application can use its own cache folder. However, the same database tracks all the applications.
Last updated 4/29/2011
Page 16

USING ENCORE
Workflow and workspace
Do one of the following:
• To move the media cache or the media cache database, click the corresponding Browse button.
• To remove conformed and indexed files from the cache and their entries from the database, click Clean.
Clean Database Frees up additional disc space by removing old files in the media cache database shared by Adobe
audio and video applications. The database tracks media accelerator files that improve performance and speed. For
example, if Adobe Premiere Pro creates a conformed audio file, and you import media with that audio into Encore,
Encore uses the file from Adobe Premiere Pro instead of creating a new conformed file. The media cache database
informs Encore of the conformed file’s location.
Write XMP IDs to Files On Import Automatically inserts a unique document ID into each imported file. These IDs
ensure that all Adobe Production Premium applications access the same cached previews and conformed audio
files, preventing additional rendering and conforming. This is a global setting—a change in one Production
Premium application affects all the others. This setting also results in new file modification dates when IDs are
initially inserted.
To save rendering time when transferring a project to another machine, move both cached and original files.
Set General preferences
General preferences include default settings for the software regardless of the project you’re working on.
12
1 Choose Edit > Preferences > General (Windows) or Encore > Preferences > General (Mac OS).
2 Set any of the following options:
Default Television Standard Specifies the default TV standard (either NTSC or PAL) for new projects. Encore
determines the default setting according to the operating system’s language.
Playback Quality Specifies the playback quality for the Preview and Monitor panels, as well as thumbnails. Select
the desired setting from the menu: High to display video at full resolution; Draft to display video at one-half
resolution; and Automatic to use draft quality for playback, which changes to high quality when the playback is
paused or stopped.
Desktop Display Mode (Windows only) Sets one of three options for playback through a graphics display card:
• Compatible Displays video on the desktop in a nonaccelerated manner. This mode is appropriate for use on a
graphics card that does not support Direct3D 9.0 acceleration. This option is the lowest-performance display mode.
• Standard Uses hardware capabilities on Direct3D 9.0-capable graphics cards to accelerate video playback on the
desktop.
• Accelerated GPU Effects Uses advanced hardware features present in the newest generation of Direct3D 9.0-
capable graphics cards to accelerate video playback as well as several effects on the desktop.
Reset Warning Dialogs Enables all dialog boxes that you previously disabled by selecting Don’t Show Again.
Last updated 4/29/2011
Page 17

USING ENCORE
Workflow and workspace
Managing workspaces
Choose a workspace
Each Adobe video and audio application includes several predefined workspaces that optimize the layout of panels for
specific tasks. When you choose one of these workspaces, or any custom workspaces you’ve saved, the current
workspace is redrawn accordingly.
❖ Open the project you want to work on, choose Window > Workspace, and select the desired workspace.
Save, reset, or delete workspaces
Save a custom workspace
As you customize a workspace, the application tracks your changes, storing the most recent layout. To store a specific
layout more permanently, save a custom workspace. Saved custom workspaces appear in the Workspace menu, where
you can return to and reset them.
❖ Arrange the frames and panels as desired, and then choose Window > Workspace > New Workspace. Type a name
for the workspace, and click
Note: (After Effects, Premiere Pro, Encore) If a project saved with a custom workspace is opened on another system, the
application looks for a workspace with a matching name. If it can’t find a match (or the monitor configuration doesn’t
match), it uses the current local workspace.
OK.
13
Reset a workspace
Reset the current workspace to return to its original, saved layout of panels.
❖ Choose Window > Workspace > Reset workspace name.
Delete a workspace
1 Choose Window > Workspace > Delete Workspace.
2 Choose the workspace you want to delete, and then click OK.
Note: You cannot delete the currently active workspace.
Last updated 4/29/2011
Page 18

Chapter 3: Planning the project
You can design, author, and build media projects in Adobe® Encore® for high-definition Blu-ray Disc and standarddefinition DVD. Encore gives you options to burn directly to a disc or other types of output for disc replication. As an
added bonus, you can export Blu-ray and DVD projects to Flash format for interactive viewing on the web.
Planning the content
About planning
The first task of authoring the project is planning. This planning can be as minimal as deciding to use a template to
organize your family’s vacation photos and video, or as robust as using project-management software to coordinate a
production team creating an interactive kiosk.
Whatever the scope of planning, you should understand what the project will contain and how you want to present it.
By the end of the planning stage, you should have a good understanding of the following parameters.
14
The navigation scheme
A well-produced project employs a hierarchy of navigation that gives the viewer clear and easy access to the content.
Think through your project. After you decide which clips you want to include, you need to determine how the viewer
will access those clips. Whether you use a spreadsheet or a pencil sketch, it is worth the time to draft your navigation
scheme before you start.
The intended playback environment
Is the project intended for television viewing? Will it play unattended in a kiosk? Is it for use in an educational setting
on computers? The playback environment affects your approach to navigation and the design of the menus as well as
the content. If the project will be used only on a computer (on the desktop or in a web browser), you can include ROM
content that a television DVD or Blu-ray player cannot access. For instance, you can include PDFs of exercises in an
educational DVD to be used on the computer. If you’re planning to export your project to Flash format, you can embed
web links that connect your project to other areas in your website.
Types and amount of content to be included
To make certain decisions—for instance, about disc size and video data rate—you need to know how much content
you must fit on the disc and what type it is (such as standard-definition or high-definition video). Small projects that
include mostly audio might fit on a single-layer DVD, whereas projects containing feature-length movies and many
supplemental materials might require a dual-layer or dual-sided DVD or a Blu-ray disc.
More Help topics
“Embed web links in your Flash project” on page 181
“Tips for creating Flash projects” on page 180
“About bit budgeting” on page 18
Last updated 4/29/2011
Page 19

USING ENCORE
Planning the project
Planning with the Flowchart
The Flowchart feature provides a visual interface that helps you to plan and manage the creation of the project. Use
the Flowchart from the initial stages of the project, when you determine navigation and begin organizing assets.
Note: If you’re new to authoring these types of projects, plan your navigation scheme on paper and start using the
Flowchart after you are familiar with the different element types and their properties.
The Flowchart displays the content of the project graphically, in a tree structure, detailing the navigation between the
different elements. This visual representation can help you to see areas where the navigation is cluttered and you want
to refine. Beyond providing a visual representation of the project, the Flowchart also lets you perform many authoring
tasks, such as setting project navigation.
If your project contains multiple hierarchical objects, use the zoom controls on the flowchart panel to view the relevant
parts of the flowchart. In addition, the tool tips show asset names when you hover the mouse over them.
For a video tutorial about using the Flowchart to plan your projects, see www.adobe.com/go/vid0240.
More Help topics
“Flowchart overview” on page 160
Flowchart planning video
15
Balancing file size and quality
File size and quality
Authoring a DVD or Blu-ray project involves striking a balance between two competing properties: file size and video
quality. As quality increases, so does file size. You want to achieve the highest possible quality for your content while
keeping the file sizes small enough so that all of the content will fit on the disc. This balance is achieved by manipulating
the video content’s data rate—either automatically (by letting Encore set the data rate) or directly (by setting the
transcoding settings or using a third-party application).
You determine the optimal data rate through the process of bit budgeting. To understand bit budgeting, you first need
to understand the variables involved: disc size, types and amounts of assets (audio, video, and motion menus), and data
rates and transcoding. Once familiar with the variables involved, you’ll be able to produce a bit budget to guide you in
producing high-quality projects that fit within the allotted disc space.
More Help topics
“About transcoding” on page 46
Determining disc size
Before you can prepare a bit budget, you must determine the size of disc on which to distribute your project. Encore
can create projects for 25-GB Blu-ray discs and for a variety of DVD disc sizes. The size you choose is based on the
amount of video and the replication method.
Typically, a Blu-ray disc can hold 135 minutes of high-definition video using MPEG-2 plus 2 hours of standarddefinition bonus material, or it can hold a total of 10 hours of standard-definition content. Encore also supports H.264
encoding for Blu-ray projects, which provides better quality at lower bit rates than MPEG-2 and therefore more video
time. Desktop DVD burners use a recordable DVD-5 disc (DVD+/-R), which has a 4.7-GB capacity and can hold
approximately 2
hours of high-quality, standard-definition video.
Last updated 4/29/2011
Page 20

USING ENCORE
Planning the project
Encore also supports DLT (digital linear tape), which requires a DLT drive connected to your computer, as well as
dual-layer DVDs and dual-sided DVDs. Check your DVD recorder’s documentation to see if it can create dual-sided
or dual-layer discs. If your disc recorder cannot produce these discs, Encore can still create the project files for them,
but you’ll need to replicate the disc at a replication facility.
When preparing a project for dual-layer or dual-sided DVDs, keep the following information in mind:
Dual-layer disc Encore supports DVD-R DL and DVD+R DL discs; check your recorder’s documentation to see what
type of DVDs (+R or -R) it requires. To replicate dual-layer DVDs at a replication facility, you first must write your
project to two separate DLTs, one tape for each layer of the disc, using the DVD Master output option. (See
“Build a
DVD or Blu-ray disc” on page 175 and “Specify a layer break for dual-layer DVDs” on page 178.)
Note: Be aware that +R discs may be incompatible with some DVD players. Before duplicating a large quantity of discs,
it’s worthwhile to create a sample disc and test it on several different DVD players. Replication facilities, whose
paramount purpose is duplicating discs, create discs with the widest possible compatibility.
Dual-sided disc For dual-sided DVDs, you must create two separate projects. If you will replicate the DVDs at an
outside facility, use the DVD Master output option to write each project to its own DLT. (See
“Build a DVD or Blu-ray
disc” on page 175 and “Replicating discs” on page 178.)
Dual-sided, dual-layer disc In this case, you need to build two projects, each producing two tapes. The first two tapes
represent the two layers of the first project (Side 1). The other two tapes represent the two layers of the second project
(Side 2).
16
Set the disc size for DVD projects
By setting the disc size for your DVD project at the beginning of the authoring process, Encore can calculate how much
space is used for each asset you add to the project and how much space remains free.
1 Choose Window > Build.
2 In the Build panel, choose DVD from the Format menu, and scroll down to the Disc Info section.
3 Choose a size from the Size menu. To enter a custom disc size, choose Custom and then type a size in the text box.
4 If you want to create a dual-sided disc, specify which side this project is for.
5 Close the Build panel and save the project.
More Help topics
“Check the space remaining on your disc” on page 16
Check the space remaining on your disc
The Build panel displays the available space and the used space for the specified disc size during the authoring process.
The display conveys size information only and has no bearing on quality. Encore calculates the free space using the
transcoding data rate (whether it was set automatically or manually). It then combines this estimated bit rate with the
actual bit rate of any transcoded clips and, based on the disc size, calculates the space remaining on your disc.
Last updated 4/29/2011
Page 21

USING ENCORE
Planning the project
When transcoding assets, Encore attempts to maintain the highest quality (highest data rate) for the amount of video
in the project. If you continue to add video to a project, the program lowers the video data rate to squeeze in the
additional content. Encore will warn you if quality dips below a certain level once you build the project or run Check
Project. For more information, see
❖ Choose Window > Build to display the Build panel, and scroll down to the Disc Info section. Encore displays the
amounts of used video space, free space, and space used for ROM content. Respectively, the “thermometer” graphic
uses blue, white, and green colors to show the amounts.
“About transcoding” on page 46.
Asset types and amounts
Of all the content types, the video portion occupies the most disc space. Depending on the data rate, 1 minute of
standard-definition video for DVD projects can occupy up to 73.5 MB, at a rate of 9.8 megabits per second (Mbps).
One minute of high-definition video for a Blu-ray project can occupy from 270 to 405 MB (using rates of 36 Mbps and
54 Mbps). One minute of compressed audio, on the other hand, occupies only 11.5 MB. Still menus are negligible in
terms of size. (See
The amount of video in a project directly affects the optimal data rate. You need an accurate tally of the amount of
video in a project to develop a bit budget and to choose a disc size. If the project contains 1 hour of video, for example,
it can be transcoded at twice the data rate as a project with 2 hours of video content. Although the video content in
each project occupies the same amount of disc space, the quality of the hour-long video will be superior (though not
necessarily by a factor of 2).
“Average asset size” on page 19.)
17
More Help topics
“About transcoding” on page 46
Data rates
Data rates, usually expressed in Mbps (megabits per second, or 1,000,000 bits per second), specify the amount of data
contained in an asset stream and directly affect the quality of video. The data rate is used during transcoding to
compress the asset. For video assets, the Encore transcode presets use data rates ranging from 15 to 40 Mbps for
Blu-ray projects and from 4 to 9
40 Mbps for Blu-ray projects or 9.0
Mbps. Typical data rates for video range between 4 and 6 Mbps. If bit budgeting targets a data rate less than 6 Mbps,
2.0
consider using variable bit rate (VBR) encoding. For more information about VBR, see
page 18. For more information about transcoding, see “About transcoding” on page 46.
Although data rates are a general indicator of quality, there are no hard-and-fast rules to equate data rate to quality.
That is, a data rate of 4
of compression used as well as data rate. For example, video of a seated person shot against a solid background can
probably be compressed to a lower data rate than a fast-paced car chase with constantly changing visuals, with no
noticeable differences in quality.
Mbps may or may not produce a high-quality asset; quality depends on the image data and type
Mbps for DVD projects. You can edit the presets’ data rates, but you cannot exceed
Mbps for DVD projects, nor can you go below the Encore minimum data rate of
“Calculate a bit budget” on
Last updated 4/29/2011
Page 22

USING ENCORE
Planning the project
Bit budgeting
About bit budgeting
Bit budgeting, or estimating the amount of space your project will occupy, is an important part of planning. Bit
budgeting helps you strike a balance between the quantity and quality of content and determine the optimal video data
rate. If your project includes minimal amounts of content, you can encode that content at a higher data rate (which
translates to higher quality) to take advantage of all available space. Conversely, if your project contains a large amount
of content, you need to use a lower data rate (which translates to lower quality) to squeeze it all onto the disc.
Encore automatically tracks bit budgeting during the authoring process. For small projects with limited content,
simply checking the amount of available space on the Build panel during the authoring process is usually sufficient to
track your space usage. For large, complex projects, though, bit budgeting becomes much more important to the
authoring process, providing a check against the actual data rates achieved.
Generally, for projects with less than 2 hours of video, you can skip bit budgeting and let Encore set the data rate
automatically.
Calculate a bit budget
Bit budgeting provides a target video data rate for the project. You can either use a pencil and paper to quickly develop
one, or you can create a spreadsheet to do the calculations for you.
18
When bit budgeting for projects to be distributed on 4.7-GB DVDs that contain a single stream of compressed audio,
you can use the simplified formula of 560 / x = bit rate in Mbps, where “x” represents minutes of video.
1 Calculate the total disc space available for the entire project.
2 Calculate the disc space available for video. You achieve this by calculating the space required for audio, slide shows,
subtitles, and motion menus (other types of content are negligible in terms of bit budgeting), and subtracting that
amount from the total disc space. For more information, see
Note: If you include ROM content, make sure to include it in the space calculation. (See “Add ROM content to the
disc” on page 174.)
3 Calculate the target data rate of the video. You determine this by dividing the amount of space available for video
by the amount of video in the project.
4 Determine the maximum video bit rate by subtracting the combined audio and subtitle rate from the data rate limit.
(For example, if your combined audio and subtitle rate is 3.0
rate limit gives you a video rate of 6.8
within the disc data rate limit. If your target data rate is below 6
encoding. When you use VBR encoding, you specify the maximum video data rate. (The average data rate is the
target, but the maximum rate provides some flexibility when encoding.)
Note: Keep your calculations simple by working with megabits (Mbits) and not megabytes (MB) when bit budgeting.
Mbps denotes megabits per second. Also, hard-disk capacity is typically calculated as a power of 2 (1
= 1024 bytes), while optical disc (DVD) capacity is labeled as a power of 10 (1
power-of-10 scheme for bit budgeting. The following conversion factors will aid in the calculations: 1
= 1,000,000,000 bytes = 8,000,000,000
bits; 1,000,000 bits = 1 Mbit.
Mbps.) Your goal is to determine the highest possible target video data rate
“Average asset size” on page 19.
Mbps, subtracting that from the 9.8 Mbps DVD data
Mbps, consider using variable bit rate (VBR)
KB = 2^10 bytes
KB = 10^3 bytes = 1,000 bytes). Use the
GB = 10^9 bytes
Last updated 4/29/2011
Page 23

USING ENCORE
Planning the project
Average asset size
Use the following averages for bit budgeting:
Audio If compressed using the Dolby® Digital Stereo standard, audio is generally 192,000 bits per second
Mbps). Use 0.192 Mbps or reference the settings for the audio encoder you plan to use.
(0.192
Subpictures Insignificant in terms of bit budgeting, unless you include subtitles. If you do include subtitles, use
Mbps per subpicture stream for calculations.
0.010
Motion menus Typically have a data rate of 8 Mbps for the transcoded standard-definition video or 40 Mbps for high
definition; add this to the audio data rate. (If the video is already DVD- or Blu-ray-compliant, then it won’t be
transcoded, and you should use the data rate of the video file.)
Still menus Typically insignificant in terms of bit budgeting and can usually be left out of the calculation. Still menus
KB in size.
average 230
Slide shows The asset size for a slide show depends on whether you include transitions or the Random Pan & Zoom
effect:
• If the slide show contains no transitions or effects, the slides are written to the disc as MPEG stills, which require
minimal space. Stills average 230
number of images, however, you should include them in your calculation.
• If the slide show includes transitions, then Encore writes both stills and transcoded MPEG video files for the
transitions. For example, if a given image appears for 10 seconds, with a 2-second transition at the beginning and
the end, then the still is written to the disc (displayed for 6 seconds) as well as two 2-second MPEG video files that
contain the transition frames.
• If the slide show includes pan and zoom, then Encore transcodes the stills into an MPEG video file. Slide shows with
pan and zoom, in essence, become video content and require the same space allotment as video files. For example,
a 5-minute slide show that uses pan and zoom throughout counts as 5 minutes of video content for bit-budgeting
purposes.
KB in size, which is typically negligible for bit budgeting. If you have a large
19
Sample budget #1
Bit budgeting for a simple DVD project containing 2 hours and 13 minutes of standard-definition video, without any
audio, to be distributed on a 4.7-GB disc proceeds as follows:
1 Calculate the total available disc space in bits. A 4.7 GB disc contains 4,700,000,000 bytes; each byte contains 8 bits.
bits.
4,700,000,000 x 8 = 37,600,000,000
2 Calculate the disc space available for video. Combine the size of the audio, subtitles, motion menus, and 4% of the
disc capacity (for overhead, just to be safe), and then subtract that sum from the total available space you calculated
in step 1. Since this example has no audio, subtitles, or motion menus, you subtract only the 4% for overhead
bits) to get a value of 36,096,000,000 bits.
(1,504,000,000
3 Calculate the data rate of the video. Divide the disc space available for video that you determined in step 2 by the
amount of video (in seconds) the project contains. 36,096,000,000
bps. Divide the bps amount by 1 million bits per Mbit to convert the video data rate to Mbps.
4,523,308.27
Mbps.
4,523,308.27 / 1,000,000 = 4.5
4 Determine the maximum video data rate. Subtract the combined audio, subtitles, and motion menu data rates, zero
in this instance, from the maximum DVD video data rate of 9.8
close to the maximum rate for DVD, you can lower it to 9.0
The video will fit on the disc using a data rate of 4.5 Mbps. This data rate (4.5 Mbps) is low enough (below 6 Mbps)
that you should use VBR encoding. The maximum video data rate for VBR encoding is 9.0
Last updated 4/29/2011
bits / (133 minutes x 60 seconds per minute) =
Mbps. 9.8 Mbps - 0 = 9.8 Mbps. Because this is very
Mbps to be safe.
Mbps.
Page 24

USING ENCORE
Planning the project
Sample budget #2
Proceed as follows for bit budgeting of a 120-minute standard-definition video with three audio tracks, two subtitle
tracks, two motion menus, and a 1-minute movie preview to be burned to an 8.54-GB DVD:
1 Calculate the total available disc space in bits. An 8.54-GB disc contains 8,540,000,000 bytes; each byte contains
bits. 8,540,000,000 x 8 = 68,320,000,000 bits = 68,320 Mbits.
8
2 Calculate the disc space available for video. Combine the size of the audio, subtitles, motion menus, movie preview,
and 4% of the disc capacity (for overhead, just to be safe), and then subtract that sum from the total available space
you calculated in step
• Three 120-minute audio streams, two with a data rate of 0.192 Mbps, and one with a rate of 0.448 Mbps: 2 x
minutes x 60 seconds per minute x 0.192 Mbps) + (120 minutes x 60 seconds per minute x 0.448 Mbps) =
(120
Mbits.
5,990.4
• Two subtitles with a data rate of 0.010 Mbps: 2 x (120 minutes x 60 seconds per minute) x 0.010 Mbps =
Mbits.
144
• Two 24-second motion menus with an estimated data rate of 8 Mbps: 2 x (24 seconds x 8 Mbps) = 384 Mbits.
• One-minute movie preview with a data rate of 4.5 Mbps: 60 seconds x 4.5 Mbps = 270 Mbits.
• 4% overhead: 0.04 x 68,320,000,000 bits = 2,732,800,000 bits = 2,732.8 Mbits.
• Total audio, subtitles, motion menus, preview, and overhead sizes: 5,990.4 Mbits + 144 Mbits + 384 Mbits +
Mbits + 2,732.8 Mbits = 9,521.2 Mbits.
270
• Disc space available for video: 68,320 Mbits - 9,521 Mbits = 58,799 Mbits.
3 Calculate the data rate of the video. Divide the disc space available for video that you determined in step 2 by the
amount of video (in seconds) the project contains: 58,799
Mbps.
8.16
4 Determine the maximum video data rate. Subtract the combined audio and subtitles data rates from the maximum
DVD video data rate of 9.8
The video will fit on the disc using a data rate of 8.16 Mbps, which is below the maximum video data rate of 8.95.
Furthermore, because the target video data rate of 8.16
1.
Mbits / (120 minutes x 60 seconds per minute) =
Mbps: 9.8 Mbps - (0.192 + 0.192 + 0.448 + 0.010 + 0.010) = 8.95 Mbps.
Mbps is above 6 Mbps, you do not need to use VBR.
20
Sample budget #3
Here is an example of a bit budget for a Blu-ray Disc project that contains 2 hours and 7 minutes of high-definition (HD)
video and audio, one 30-second HD motion menu with 30 seconds of audio, and one HD pan-and-zoom slide show
containing 50 slides and 8 minutes of audio (total slide show duration is 8 minutes), to be distributed on a 25-GB disc:
1 Total available disc space is 24.5 GB (25-GB disc capacity minus a very conservative 2% overhead of 0.5 GB).
2 Space required for the audio, motion menu, and slide show:
• 127-minute audio stream with a data rate of 0.192 Mbps = 127 minutes x 60 seconds x 0.192 = 1,463.04 Mbits;
divided by 8 bits = 182.88 MB, rounded off to 183 MB.
• 30-second menu audio stream = 30 seconds x 0.192 Mbps = 5.76 Mbits; divided by 8 bits = 0.72 MB, rounded
off to 1 MB.
• 8-minute slide show audio stream = 8 minutes x 60 seconds x 0.192 Mbps = 92.16 Mbits; divided by 8 bits =
11.52 MB, rounded off to 12 MB.
• 30-second motion menu at 40 Mbps = 1,200 Mbits; divided by 8 bits = 150 MB.
Last updated 4/29/2011
Page 25

USING ENCORE
Planning the project
• 8-minute slide show video (all pan and zoom) at 20 Mbps = 8 minutes x 60 seconds x 20 Mbps = 9,600 Mbits;
divided by 8 bits = 1,200 MB or 1.2 GB.
• Total disc space required = 183 MB + 1 MB + 12 MB + 150 MB + 1,200 MB = 1,546 MB or 1.546 GB.
3 Calculate amount of disc space available for video by subtracting the total disc space required in step 2 from the
total available disc space in step 1:
• 24.5 GB available space - 1.546 GB required = 22.954 GB available for video.
4 Calculate the data rate of the video by dividing the disc space available for video (in step 3) by the amount of video
(in seconds) the project contains.
• 183,632 Mbits available (22.954 GB x 1,000 MB/GB x 8 bits per byte) divided by 7,620 seconds of video (127
minutes x 60 seconds per minute) = 24.10 Mbps.
• 127 minutes of video at 24.10 Mbps = 22.96 GB.
(127 x 24.10 x 60 seconds = 183,642 Mbits, divided by 8 = 22,955.25 MB, divided by 1,000 = 22.96 GB).
5 Determine the maximum video data rate for this project by subtracting the combined audio data rates from the
disc’s maximum video data rate of 40
Mbps.
• 40 Mbps - 0.576 Mbps (0.192 + 0.192 + 0.192) = 39.424 Mbps
So the video will fit on the disc using the video data rate of 24.10 Mbps, which is below the maximum video data
rate of 39.424 Mbps.
21
Last updated 4/29/2011
Page 26

Chapter 4: Creating projects and importing assets
After planning the navigation of your project and preparing the content, you’re ready to begin. First, you’ll create an
Adobe® Encore® project, and then import the assets.
Working with projects
About projects
Encore files are called projects. A project stores links to all the content you intend to include, as well as the menus and
timelines (which combine video or stills, audio, and subtitles). Encore creates a folder for your project in the same
location as the project file.
You can create projects for playing on standard-definition DVDs and for playing on high-definition Blu-ray discs. You
can author a project for Blu-ray and then output a standard-definition version of the same project to DVD, or vice
versa. The Project Settings dialog box lets you easily switch between authoring modes. Once authoring is complete,
you can build your projects for final output onto a disc, in a folder, or as an image. In addition, you can export any
project into a Flash format for interactive viewing on the web. For a video tutorial on authoring for Blu-ray discs, see
www.adobe.com/go/lrvid4079_enc.
22
A project must conform to one of two TV standards, either NTSC (National Television Standards Committee) or PAL
(Phase Alternating Line). TV standards are the specifications to which any video intended for broadcast in a certain
country or region must conform. These specifications include specific frame rate and frame size requirements of the
video. Your final output from Encore will comply with one of these standards.
TV standard Blu-ray Disc frame rate Blu-ray Disc frame size Aspect ratio Regions
NTSC 23.976p
24p
29.97i
59.94p
PAL 25i
50p
TV standard DVD frame rate DVD frame size Aspect ratio Regions
NTSC 29.97 fps 720 x 480 pixels 4:3 or 16:9 North America, Japan
PAL 25 fps 720 x 576 pixels 4:3 or 16:9 Europe
Note: The preceding table specifies output requirements. Requirements for imported assets vary. See “Supported file
formats for import” on page 29.
720 x 480 pixels
1280 x 720 pixels
1440 x 1080 pixels
1920 x 1080 pixels
720 x 576 pixels
1280 x 720 pixels
1440 x 1080 pixels
1920 x 1080 pixels
4:3 or 16:9 North America, Japan
4:3 or 16:9 Europe
Last updated 4/29/2011
Page 27
USING ENCORE
Creating projects and importing assets
Set 24p frame rate for Blu-ray projects
Encore automatically chooses the relevant 24 fps transcoding preset when you use the Transcode Now option to
transcode the asset. For Blu-ray assets that are not legal, the default values for transcoding are used.
When you create a Blu-ray NTSC-compliant project, you can change the default transcoding settings to a frame rate
of 24. You can configure the frame rate for an entire project in the New Project dialog box when you create a project.
1 Do one of the following:
• Click New Project in the startup screen.
• Select File > New > Project.
23
2 In the New Project dialog box, select the following under Project Settings:
• Authoring Mode: Blu-ray
• Television Standard: NTSC
3 Click Default Transcode Settings.
4 In the Video Transcoding group, select 24 from the Frame Rate pop-up menu, and click OK.
In addition to specifying the default transcode settings for the entire project, you can also specify 24p frame rate for
each NTSC video asset.
❖ Do one of the following to set the frame rate as 24 for NTSC video assets:
• Select an NTSC video asset in the project, and select File > Transcode Settings.
• Right-click the video asset in the Project panel, and select Transcode Settings from the context menu.
Last updated 4/29/2011
Page 28

USING ENCORE
Creating projects and importing assets
Open and edit projects across platforms
Open an Encore project created in Mac on a Windows machine, and the other way round. Also, you can open and edit
projects created in Encore CS4 and earlier versions. When copying, ensure that you maintain the relative path between
the project file and the project folder.
You might have to retranscode assets for cross-platform projects in the following cases:
• Using a common server to transfer files across Windows and Mac machines.
• Opening projects created in CS4 and earlier versions that contain Blu-ray assets.
• When there are timestamp changes of the transcoded assets, such as when you transfer the assets using FTP.
Working with Resource Central
The Resource Central panel connects you to the latest, dynamically updated content on the Adobe website. With
Resource Central, you can access product-related news and tutorials using the Resource Central panel in Adobe
Encore®. You can browse through a vast library of templates and other assets that you can download right into your
project. Resource Central also helps you get updated information about events and product updates.
Search in Resource Central
1 Select Windows > Resource Central Viewer to display the Resource Central panel.
2 Type in your search text and press Enter.
3 Navigate through the search results and click to select the pages that you want to view.
24
Download assets from Resource Central
You can browse through different categories of assets that are dynamically updated in the Resource Central and
download the ones you require. You can download assets such as menus in high definition and standard definition.
1 Select Window > Resource Central Viewer to display the Resource Central panel.
2 To search for the assets, do one of the following:
• Type the asset type that you want to search in the search box and press Enter.
• Select the asset type from the Resource Central panel.
3 Browse through the assets to select the asset you want to download.
4 Click the down arrow button to download the asset into your project.
Create and open projects
Before you can import your assets, you need to create or open a project. You can have only one project open at a time.
For a video tutorial on creating a project in Encore, see
More Help topics
“About transcoding” on page 46
“Transcode settings” on page 47
“Preset options for audio” on page 50
www.adobe.com/go/lrvid4227_enc.
Last updated 4/29/2011
Page 29

USING ENCORE
Creating projects and importing assets
Create a new project
When you create a project, Encore prompts you to select an authoring mode (DVD or Blu-ray) and a default TV
standard. You can also assign automatic transcoding settings for the maximum audio/video bit rate and audio
transcoding scheme. You can change these settings later by choosing File
1 Choose File > New > Project.
2 In the Basic tab of the New Project dialog box, type a project name (Encore assigns the extension “.ncor” to the end
of the filename) and specify a project location.
3 Select DVD or Blu-ray for the authoring mode, and select a television standard (NTSC or PAL).
4 For Blu-ray projects, select a frame rate, dimensions, and codec.
5 Optionally, in the Advanced tab, do the following:
• Select a Maximum Audio/Video Bitrate value (these data rate values are different for DVD and Blu-ray projects)
and an Audio Transcoding Scheme.
• If you have installed third-party cards for video capture and playback, select the player. You can change this
setting later. See
6 Click OK to create the project file and folder.
“Using third-party hardware and player” on page 168
> Project Settings.
25
Set a default TV standard preference
If you generally create projects using the same TV standard, you can set the default standard (the standard used for
new projects) in the Preferences dialog box. A project can conform to only one TV standard.
❖ To set the TV standard preference for new projects, choose Edit > Preferences > General (Windows) or Encore >
Preferences
> General (Mac OS). Specify your TV standard and click OK.
Open an existing project
• To open an existing project, choose File > Open Project. Navigate to the project you want to open, and click Open.
• To open a recently saved project, choose File > [filename] (Windows) or File > Open Recent Project > [filename]
OS). Encore lists the last five projects (four projects on Mac OS) you saved in the order in which you saved
(Mac
them.
Move or rename projects
Each project requires a project file (with the .ncor file-name extension) that contains links to—and instructions for
using—the various assets in the project. Projects also require a project folder (named to match the project and at the
same folder level as the project file), which stores previews, transcoded assets, and other files used in the project. You
can move a project file and its folder as long as you keep the relative positions the same. If you must rename a project,
make sure that you match the new project filename with the new project folder name.
Move a project
❖ To move the project, drag the folder and file to a new location, or copy and paste them in the new location. Make
sure that their relative positions remain the same; that is, they should both be in the same parent folder.
Note: When you open a project file you’ve moved, a dialog box may appear if the application can’t locate specific
assets. You can either relink them in the dialog box, select Offline to open the project without them, or select Skip or
Skip All to temporarily set the assets offline (so that the next time you open the project, Encore prompts you again to
locate the assets). When working with offline assets, use the Locate Asset command to relink them before you build or
preview the project.
Last updated 4/29/2011
Page 30
USING ENCORE
Creating projects and importing assets
Rename a project
❖ To rename the project, select the file and folder in Microsoft® Windows® Explorer or the Mac OS Finder and enter
matching names (make sure to leave the .ncor extension in the project filename).
Aspect ratios
Pixel and screen aspect ratios
Digital video uses two types of aspect ratios: pixel aspect ratios and screen aspect ratios (also referred to as frame aspect
ratios). Although related, they describe distinct properties. The pixel aspect ratio describes the pixel dimensions within
the screen, while screen aspect ratio details the screen dimension relationship.
Pixel aspect ratios
Pixel aspect ratios describe the width-to-height ratio of the pixels that make up a video or still-image file. Pixels are
either square or nonsquare (rectangular). Square pixels have a ratio of 1:1. In the film and video industry, however, the
:1 is dropped and ratios are expressed as a single number. The following table lists the nonsquare pixel aspect ratios for
the two TV standards for standard-definition video.
26
TV Standard Fullscreen pixel aspect ratio Widescreen pixel aspect ratio
NTSC 0.9 1.22
PAL 1.066 1.422
A B C D
A 720 x 480 pixel image can have a screen aspect ratio of either
A. 4:3, or D. 16:9, depending on whether it has a pixel aspect ratio of B. 0.9, or C. 1.22.
The type of pixels in an image, combined with its dimensions, determine its screen aspect ratio. An NTSC 720 x 480
pixel video, for example, displays as widescreen if it contains nonsquare pixels with a ratio of 1.22. This video displays
as a regular 4:3 screen if it contains nonsquare pixels with a ratio of 0.9. Encore lets you specify the pixel aspect ratio
of imported assets.
High-definition video and still images have either square 1:1 pixel aspect ratios or a 1.333 anamorphic pixel aspect
ratio. They come in three sizes (1280 x 720 or 1920 x 1080 with square aspect ratios, and 1440 x 1080 pixels with
anamorphic aspect ratios), and fit in a 16:9 screen aspect ratio.
Last updated 4/29/2011
Page 31

USING ENCORE
Creating projects and importing assets
Screen aspect ratios
Screen aspect ratios (also known as frame aspect ratios) describe the width-to-height ratio of an image or device. A
standard television has a 4:3 ratio (referred to as fullscreen), and a widescreen television has a 16:9 ratio. These ratios
are also noted as 1.33 for fullscreen (4 / 3 = 1.33) and 1.78 for widescreen. (Film, which includes a majority of
widescreen content, actually uses screen aspect ratios ranging from 1.66 to 1.85, or even 2.35 for scope footage.
However, these all work well within the format and can be considered widescreen.)
The screen aspect ratio is determined by two factors: the resolution of the image and the size of the pixels within it, or
the pixel aspect ratio. As the resolution for a given asset is constant (for example, 720 x 480), Encore sets screen aspect
ratios based on the asset’s pixel aspect ratio.
Note: Assets in a DVD project that share a timeline must have the same aspect ratio. This restriction does not apply to
your Blu-ray projects.
About still-image pixels
Most digital still cameras and graphic applications use square pixels. You should set the pixel aspect ratio of still-image
assets to square to ensure that they display correctly. An exception to this rule are files created in
Photoshop® CS3 and Adobe Photoshop CS2. Photoshop lets you work in nonsquare pixels when creating
Adobe
images for DVDs and video. Use the Photoshop preset that matches your project. For example, if you’re working with
NTSC DV footage at 720 x 480, you’d use the NTSC DV 720 x 480 (With Guides) preset.
27
Specify an asset’s pixel aspect ratio
You can mix assets with different pixel aspect ratios in the same project. Encore interprets each asset’s pixel aspect ratio
on import. Occasionally, an asset may contain incorrect information which, in turn, prevents Encore from identifying
it correctly. If you need to change an asset’s pixel aspect ratio, you can use the Interpret Footage command to specify it.
Changing the pixel aspect ratio for a video asset used in a timeline changes that timeline’s screen aspect ratio. To
change the screen aspect ratio for a still timeline, see “Specify the screen aspect ratio” on page 28.
1 Select the file in the Project panel.
2 Choose File > Interpret Footage.
3 In the Interpret Footage dialog box, select Conform To, and then choose the appropriate pixel aspect ratio:
• Square Pixels (1.0) for a standard-definition or high-definition file created using square pixels.
• SD NTSC (0.9091) or SD PAL (1.0940) for a standard-definition file created using nonsquare pixels with an
aspect ratio of 0.9091 (NTSC) or 1.0940 (PAL).
• SD NTSC Widescreen (1.2121) or SD PAL Widescreen (1.4587) for a standard-definition file created using
nonsquare pixels with an aspect ratio of 1.2121 (NTSC) or 1.4587 (PAL).
• HD Anamorphic (1.333) for a high-definition file created using nonsquare pixels with an aspect ratio of 1.333.
4 Click OK.
Last updated 4/29/2011
Page 32

USING ENCORE
Creating projects and importing assets
Specify the screen aspect ratio
Encore determines the screen aspect ratio for you. You can, however, change it if necessary. The type of asset
determines how you specify the screen aspect ratio. For menus, and timelines containing still images but no video, you
specify the screen aspect ratio in the Properties panel. For timelines with video, you specify the screen aspect ratio by
setting the pixel aspect ratio of the video asset. However, in a DVD project, you must keep the same aspect ratio for
the assets that share a timeline. For more information about setting the ratio for video timelines, see
“Specify an asset’s
pixel aspect ratio” on page 27.
1 Select the menu or still timeline in the Project panel.
2 Click the desired screen aspect ratio (4:3 or 16:9) in the Properties panel.
Note: When you change the aspect ratio in the Properties panel, Encore actually changes the asset’s pixel aspect ratio,
which in turn affects the screen aspect ratio.
Widescreen content on fullscreen TVs
There are several different methods used to convert widescreen content to 4:3 format for display. Some of the methods
convert the widescreen format to fullscreen format and store the converted fullscreen video on the disc. The preferred
method stores the original widescreen video on the disc, and the player converts it as necessary during playback to a
fullscreen device. Encore stores the original widescreen footage on the disc and instructs the player to letterbox it on
playback to a 4:3 TV, regardless of the player’s settings.
28
If you’re working with widescreen footage, you typically work with and store the content in its widescreen format and
let the player convert it during playback.
DVD players use the following methods to convert widescreen video for display on a 4:3 device:
Pan and scan Crops the widescreen video to fit the fullscreen frame. Pan and scan loses the visual data outside of the
4:3 frame. Traditionally, an editor or technician guides the pan-and-scan process during conversion from film to TV
formats. DVD players use an automatic pan and scan. Automatic pan and scan (limited to horizontal tracking of the
full height of the picture) crops the image that is stored on the DVD in widescreen format, and displays it on 4:3
devices.
Note: If a set-top DVD player is set to pan and scan, Encore overrides the player and displays the footage in letterbox
format.
Letterbox Shrinks the image until it fits the 4:3 format horizontally and displays black bars in the blank spaces at the
top and bottom of the frame. The resolution of the image is lowered, but the image remains whole—no cropping
occurs. DVD players use automatic letterbox to display footage stored as widescreen on 4:3 devices.
Last updated 4/29/2011
Page 33
USING ENCORE
Creating projects and importing assets
A B
C D
16:9 NTSC footage
A. Original B. Displayed by a DVD player using the original widescreen format on a widescreen TV C. Using automatic pan and scan to crop
the image on a 4:3 TV D. Using automatic letterbox to reduce resolution and display the entire image on a 4:3 TV
29
Importing
Supported file formats for import
Imported files may require transcoding. DVD- or Blu-ray Disc-compliant assets typically do not require transcoding,
while noncompliant assets do.
Supported video file formats
You can import any of the following types of video files:
• AVI (Windows)
• DV-AVI (Mac OS)
• H.264
• MPEG-2 (including MPG, MPV, and M2V)
• Apple QuickTime® (MOV; including Reference Movies)—requires QuickTime installed on Windows systems
• WMV (Windows Media File)
Video must conform to one of the following frame rates and frame sizes, depending on the TV standard you plan to
use for the project.
Frame rates and sizes for standard-definition video formats are as follows.
Last updated 4/29/2011
Page 34

USING ENCORE
Creating projects and importing assets
Standard NTSC PAL
30
Frame rate (frames per second) 29.97
23.976*
23.978*
24*
Frame size (pixels) 720 x 480
720 x 486
704 x 480
25
720 x 576
704 x 576
Frame rates and sizes for high-definition video formats are as follows.
Standard NTSC PAL
Frame rate (frames per second) 23.976p
29.97i
59.94p
Frame size (pixels) 720 x 480
1280 x 720
1440 x 1080
1920 x 1080
25i
50p
720 x 576
1280 x 720
1440 x 1080
1920 x 1080
Note: If the high-definition video assets that you import are H.264 encoded, transcode them to 23.976 fps if assets have
24 fps frame rate. Encore cannot burn a Blu-ray project with H.264 assets set to 24 fps.
Supported still-image formats
You can import any of the following types of still-image files:
• Adobe Photoshop (PSD), RGB color space
• Bitmap (BMP)
• GIF
• JPEG
• PICT
• Portable Network Graphics (PNG)
• Targa (TGA)
• TIFF
Note: PSD files must be 8-bit when imported as image assets; when imported as menus they can be 8-bit or 16-bit.
TIFF files cannot be imported as menus.
Supported audio file formats
You can import any of the following types of audio files:
• AC3 (Dolby® Digital)
• Audio Interchange File Format (AIF, AIFF; not AIFF-C)
• Digital Theater Sound (DTS)
Last updated 4/29/2011
Page 35

USING ENCORE
Creating projects and importing assets
• mp3
• MPG or M2P (including MPEG-1, MPA, Layer II)
• QuickTime (MOV)
• WAV (32-bit floating-point files are transcoded; 96-kHz 16/24-bit files are not transcoded)
• WMA
Note: DTS audio files will not play during Preview in Encore, even though they will play from the burned disc.
Advantages of transcoding before or after import
A DVD or Blu-ray Disc player can play only video that conforms to certain standards. However, video does not need
to be Blu-ray Disc- or DVD-compliant before you import it (though it does need to have the correct frame rate and
frame size). Encore includes a transcoding engine that can compress (or transcode) files for DVD or Blu-ray Disc
playback. You can transcode video before you import it (in a video-editing application), on import, or when you are
ready to build the final project.
Whether you transcode before or after import is up to you. Encore handles both transcoded and untranscoded files
equally well.
Transcoding before import
Importing transcoded DVD- or Blu-ray Disc-compliant content allows you to work with the exact assets that will
appear on the disc. Also, because the content is already compliant, the time it takes to build the project will be reduced.
31
Note: In certain instances, Encore needs to transcode DVD- or Blu-ray Disc-compliant files. For example, if the data rate
of a DVD-compliant file is too high for the amount of content, the program transcodes the file to bring its data rate down.
Transcoding after import
Allowing Encore to transcode your content gives you more flexibility in placing chapter points (markers within the
timeline of the video), inserting subtitles, and trimming your files. The MPEG-2 compression scheme used in
transcoding divides the footage into chunks, called a group of pictures (GOP). Once transcoded, you can place chapter
points and trim only at the header of each GOP, not at specific frames within the group. If you haven’t transcoded the
file, you are not restricted by GOP headers. In addition, when Encore does transcode the file, it creates GOP headers
at every chapter point you set. (See
Nontranscoded files also give you more flexibility at build time. In large projects, you often need to adjust the video
data rate to fit all the video and audio assets on the DVD. If a file is already transcoded, you might have to transcode
it again at a lower data rate, or lower the data rate of the other content to reduce file size.
“Add chapter points” on page 131.)
More Help topics
“Transcoding in Encore” on page 46
Import assets and menus
Assets can include any combination of the supported content types. You can use video and audio files for your
program content or for motion and sound in menus. You can use still images for menu and program content. You can
import files stored on your local drive or a network drive.
You can save a step by importing content directly to a timeline, slide show, or menu. The content must be of the
appropriate type to use these shortcuts. While you can import any supported file type as a timeline, you can import
only still images as a slide show and only PSD files as a menu.
Last updated 4/29/2011
Page 36

USING ENCORE
Creating projects and importing assets
For a list of supported file types, see “Supported file formats for import” on page 29.
Import as an asset
1 Make sure that the Project panel is active, and choose File > Import As > Asset.
2 Navigate to the file or files that you want to import, select them, and click Open.
You can also drag an asset from Microsoft Windows Explorer or the Mac OS Finder into the Project panel.
Import as a timeline
When you import an asset as a timeline, Encore places both the asset and its timeline in the Project panel. The timeline
also appears in the Timeline panel. For more information, see
1 Choose File > Import As > Timeline.
2 Navigate to the file you want to import, select it, and then click Open.
“About timelines” on page 113.
Import still images as a slide show
When you import image files as a slide show, Encore places both the images and the slide show in the Project panel.
The slide show also appears in the Slideshow panel, where you do a majority of slide show authoring. For more
information, see
“About slide shows” on page 125.
32
Encore creates a single FLV file for a slide show resulting in seamless playback without any glitch or pauses during slide
transition.
1 Choose File > Import As > Slideshow.
2 Navigate to the image files you want to import, select them, and then click Open. You can select multiple,
discontiguous files by holding down Ctrl (Windows) or Command (Mac
OS) and clicking them.
Import a PSD file as a menu
Menus are an essential element in your project content because they provide the viewer with access to the content
contained on the disc. You can customize the templates included with Encore, build menus within the program using
your imported assets, or assemble your menus in Photoshop and import them into Encore.
Encore interacts closely with Photoshop. If you follow a specific layer-naming convention for the menus you create in
Photoshop, Encore recognizes those layers as specific menu elements, such as buttons and subpictures. (See
name prefixes for menus” on page 68.) Also, because Encore creates all menus as PSD (Photoshop) files, you update
your menus in Photoshop, directly from Encore. Photoshop files imported as menus appear both in the Project panel
and in the Menus panel and, upon import, automatically open in the Menu Editor.
1 Choose File > Import As > Menu.
2 Navigate to the PSD file or files you want to import, select them, and click Open.
When dragging the file from Windows Explorer or the Mac OS Finder to the Project tab, Encore imports a PSD file
as a menu. However, when holding down Alt (Windows) or Option (Mac OS) as you drag the file, a PSD file is
imported as a still image, and not as a menu.
“Layer
Last updated 4/29/2011
Page 37

USING ENCORE
Creating projects and importing assets
Import a PSD file as a pop-up menu
You can import a PSD file to set it as a Blu-ray pop-up menu. For a pop-up menu, the image background of the PSD
file is ignored. See
1 On Windows, choose File > Import As > Pop-up Menu. On Mac OS, right-click the Project panel, and select Import
> Pop-up Menu.
As
2 Navigate to the PSD file or files you want to import, select them, and click Open.
“Blu-ray pop-up menus” on page 98
Importing from Adobe Premiere Pro
You can import movie files from Adobe Premiere® Pro into Encore through the Adobe Dynamic Link without
rendering. When you export from Adobe
original file in Encore. Even though you can import an empty sequence from Adobe
timelines based on these empty sequences. Thus, you cannot link the imported sequence as the motion background
for menus that you create. For more information, see
page 123.
Movie frames shot using Red cameras can be imported into Encore from Premiere Pro at their full resolution (4K)
using Dynamic Link. Encore provides an improved quality of playback for these high resolution files.
Encore chapter markers in Adobe Premiere Pro (formerly called DVD markers) are used to create corresponding
chapter points in Encore. If the Name fields for the markers do not contain any text, Encore autogenerates names for
the chapter points, such as “Chapter 1,” “Chapter 2,” and so on.
Premiere Pro using the Adobe Dynamic Link, you can open and edit the
Premiere Pro, you cannot create
“Edit clips in Adobe Premiere Pro and Adobe After Effects” on
33
Note: Although DVD markers are not recognized by Encore in files exported from previous versions of
Premiere Pro, files containing numbered markers with text in the Chapter fields are recognized as Encore chapter
Adobe
markers. (Using numbered markers instead of Encore chapter markers in Adobe
For an introductory video tutorial about creating DVDs using your Adobe Premiere Pro video files, see
www.adobe.com/go/vid0257.
For a video tutorial about using Adobe Dynamic Link between Encore and Adobe Premiere Pro, see
www.adobe.com/go/vid0250.
Premiere Pro is not recommended.)
More Help topics
Video on creating DVDs with Adobe Premiere Pro files
Dynamic Link video
Importing from Adobe After Effects
You can import a file from Adobe After Effects®, either as a discrete movie file, or as an Adobe Dynamic Link. The
Dynamic Link option provides the most workflow-friendly import. It lets you import an After Effects
Adobe
composition without rendering it. Using Adobe
needed to update either file until you build the project.
Note: Adobe Dynamic Link is available only if Adobe Creative Suite Production Premium is installed.
If you want to import a discrete movie from After Effects, export an AVI, MPEG, H.264, or MOV file using the
Composition
heading and select Project Link from the Embed menu. See After
movie files.
> Make Movie command. When the Render Queue panel opens, click the text next to the Output Module
Dynamic Link, you can switch between Encore and After Effects as
Effects Help for more information on exporting
Last updated 4/29/2011
Page 38

USING ENCORE
Creating projects and importing assets
Note: When importing files, Encore can create chapter points from layer-time markers. To import the markers, Encore
requires that they contain text in the Chapter field. It names each chapter point using this text. For information on layertime markers, see Markers in Adobe After Effects Help.
For a video tutorial about using Adobe Dynamic Link between Adobe After Effects and Encore, see
www.adobe.com/go/vid0250.
More Help topics
Adobe Dynamic Link video
Add items or sets to the Library
The Library panel contains predesigned templates for menus and other design elements, such as buttons, images, and
shapes. If you have still images, logos, buttons, and menus that you use frequently, you can store them in the Library,
where you can quickly access them from any project. To keep them organized, you can group them into sets. The
Library imports layered Photoshop files, as well as BMP, GIF, JPEG, PNG, and TIFF images.
The Library categorizes items you add based on their content. Menus and buttons require special layer-name prefixes.
“About menus” on page 53.)
(See
Category File type File must contain
34
Menu PSD, EM At least one button layer set—layer sets with
Button PSD A single layer set with the (+) prefix before its
Image PSD, BMP, GIF, JPEG, PNG, TIFF Image file, or a PSD file not imported as a
Replacement Layers PSD A single-layer PSD file with a (!) in the name; or
Background PSD Background layer only.
Layer set PSD A single layer set without the button layer-
Text PSD A single text layer. (No background layer.)
Vector Shape PSD A single vector-shape layer. (No background
names that begin with the (+) prefix—and at
least one additional layer that serves as the
background of the menu.
Also, any PSD file containing the keyword
“menu” in its metadata is categorized as a
menu.
layer name. The layer set may contain
subpicture layers and video thumbnail layers.
(No background layer.)
menu or button.
a file with a single layer set, with a layer named
(!), without the button flag.
name prefix. (No background layer.)
layer.)
Add an item to the library
Add items and sets to the Library in any of the following ways:
• In the Menu Viewer or the Project panel, select the button, layer, or layer set you want to add, and then drag it to
the list of items in the Library.
• In the Project panel, select a still image or menu, and then drag it to the list of items in the Library.
Last updated 4/29/2011
Page 39

USING ENCORE
Creating projects and importing assets
• From Windows Explorer or the Mac OS Finder, drag the item to the Library.
• In the Library, click the New Item button , navigate to the file you want to add, and click Open.
Encore uses the letters “HD” in the filenames of predesignated high-definition assets, so they’re easier to locate for
Blu-ray projects.
Create a new Library set
❖ Choose New Set from the Library panel menu. Type a name for the new set, and click OK.
Adobe Dynamic Link
About Dynamic Link (Production Premium or Master Collection only)
In the past, sharing media assets among post-production applications has required you to render and export your work
from one application before importing it into another. This workflow was inefficient and time-consuming. If you
wanted to change the original asset, you rendered and exported the asset again. Multiple rendered and exported
versions of an asset consume disk space, and they can lead to file-management challenges.
Dynamic Link, a feature of Adobe Creative Suite Production Premium and Master Collection, offers an alternative to
this workflow. You can create dynamic links between After Effects, Adobe Premiere Pro, and Encore. Creating a
dynamic link is as simple as importing any other type of asset. Dynamically linked assets appear with unique icons and
label colors to help you identify them. Dynamic links are saved in projects generated by these applications.
35
Changes you make in After Effects to a dynamically linked composition appear immediately in the linked clips in
Adobe Premiere Pro or Encore. Changes you make to dynamically linked sequences in Adobe Premiere Pro appear
immediately in After Effects and Encore. You don’t have to render or save changes first.
Online resources about Dynamic Link
For a video tutorial introducing Dynamic Link, see the Adobe website.
John Dickinson provides a video tutorial on the Motionworks website that shows how to use Dynamic Link between
After Effects and Premiere Pro and between After Effects and Encore.
Tim Kolb provides a video tutorial on the Adobe websitethat demonstrates the creation of an interactive DVD menu
with Premiere Pro and Encore, using Dynamic Link.
Linking to and from Adobe Premiere Pro
You can send selected clips from Adobe Premiere Pro into After Effects as a composition or nested composition,
replacing the clips in Adobe Premiere Pro with a dynamically linked composition.
With Dynamic Link, you can also send sequences from Adobe Premiere Pro into Encore for authoring to DVD, Bluray Disc, or SWF files.
In addition to using Dynamic Link, you can share content among applications in any of the following ways:
• copying and pasting between After Effects and Adobe Premiere Pro
• exporting After Effects projects to Adobe Premiere Pro
• using the Capture In Adobe Premiere Pro command in After Effects
• importing Adobe Premiere Pro projects into After Effects
Last updated 4/29/2011
Page 40

USING ENCORE
Creating projects and importing assets
Linking to and from After Effects
When you dynamically link to an After Effects composition from Adobe Premiere Pro or Encore, it appears in the host
application Project panel. You can use the dynamically linked composition as you would any other asset. When you
insert a linked composition into the host application timeline, a linked clip appears in the Timeline panel. A linked clip
is simply a reference to the linked composition in the Project panel. After Effects renders the linked composition on a
frame-by-frame basis during playback in the host application.
There are two restrictions on the use of dynamically linked clips between After Effects and Adobe Premiere Pro. Both
of these restrictions also apply in reverse: they remain true if you switch composition and sequence:
• If a sequence contains a composition, do not include that sequence, or any sequence in which the sequence is
nested, in any dynamic link from the project of the included composition.
• If a sequence contains a composition, do not include links from that composition, or any composition nested in
that composition, back to any sequence.
In Adobe Premiere Pro, you can do any of the following with a dynamically linked After Effects composition:
• preview it in the Source Monitor
• set In and Out points for it
• add it to a sequence
• edit it with Adobe Premiere Pro tools
When you add a linked composition that contains both video and audio to a sequence, Adobe Premiere Pro inserts
linked video and audio clips in the timeline. You can unlink the video from the audio to edit the clips separately.
36
In Encore, you can do any of the following with a dynamically linked After Effects composition:
• create a motion menu with it
• insert it into a timeline
• edit it with Encore tools
You can add a linked After Effects composition that contains both video and audio to an Encore timeline. Encore
inserts separate video and audio clips in the timeline.
You can create After Effects compositions from Encore menus, even without Dynamic Link.
Linking to and from Encore
From Encore, you can do any of the following with dynamically linked clips:
• edit a sequence in Adobe Premiere Pro using the Edit Original command
• edit an After Effects composition using the Edit Original command
• update the markers in Encore to match the Encore chapter markers in a sequence in Adobe Premiere Pro
Color and Dynamic Link
After Effects works with the RGB (red, green, blue) color model. Adobe Premiere Pro, however, works with the YUV
color model. When you work with a dynamically linked composition, Adobe Premiere Pro either converts it to YUV
or retains the RGB colors, depending on the output format.
Dynamically linked compositions are rendered in the color depth of the After Effects project (8, 16, or 32 bpc,
depending on project settings). Set the After Effects project color depth to 32 bpc if you’re working with HDR (high
dynamic range) assets.
Last updated 4/29/2011
Page 41

USING ENCORE
Creating projects and importing assets
In Adobe Premiere Pro, select a sequence. Then, choose Sequence > Sequence Settings. In the Video Previews pane,
select Maximum Bit Depth and Maximum Render Quality to have Adobe Premiere Pro process at the highest possible
quality. However, these options slow processing.
Saving and Dynamic Link
Save your After Effects project at least once before creating a dynamic link from Adobe Premiere Pro or Encore to a
composition within it. After that, you do not have to save changes to the After Effects project to see the changes in a
linked composition in Adobe Premiere Pro or Encore.
Using the Save As command to create a copy of an After Effects project does not change dynamic links made to the
original project. Adobe Premiere Pro and Encore projects continue to use the original project, not the copy, as the
sources for their linked compositions. You can, however, relink a dynamically linked clip to a composition in the copy
at any time.
Note: In After Effects, you can choose File > Increment And Save. The newly saved open project continues to serve frames
to any client projects containing dynamically linked compositions from the open After Effects project.
Saving and Dynamic Link (Production Premium or Master Collection only)
You must save your After Effects project at least once before you can create a dynamic link from Adobe Premiere Pro
or Encore to a composition within it. However, you don’t have to subsequently save changes to an After
to see changes to a linked composition in Adobe Premiere Pro or Encore.
Effects project
37
If you use the Save As command to copy an After Effects project that contains compositions referenced by Dynamic
Link, then Adobe Premiere Pro or Encore uses the original composition—not the new copy—as its source for the
linked composition. You can relink a composition to the new copy at any time.
Dynamic Link performance (Production Premium or Master Collection only)
A linked clip can refer to a complex source composition. Actions you perform on the complex source composition
require additional processing time. After Effects takes time to apply the actions and make the final data available to
Adobe Premiere Pro or Encore. In some cases, the additional processing time delays preview or playback.
To reduce playback delays, do one of the following:
• take the linked composition offline
• disable a linked clip to temporarily stop referencing a composition
• render the composition and replace the dynamically linked composition with the rendered file
If you commonly work with complex source compositions, try adding RAM or a faster processor.
Color and Dynamic Link (Production Premium or Master Collection only)
After Effects works with the RGB (red, green, blue) color model. Adobe Premiere Pro, however, works with the YUV
color model. When you work with a dynamically linked composition, Adobe Premiere Pro either converts it to YUV
or retains the RGB colors, depending on the output format.
Dynamically linked compositions are rendered in the color depth of the After Effects project (8, 16, or 32 bpc,
depending on project settings). Set the After Effects project color depth to 32 bpc if you’re working with HDR (high
dynamic range) assets.
In Adobe Premiere Pro, choose Project > Project Settings > Video Rendering, and select Maximum Bit Depth to have
Adobe Premiere Pro process at the highest possible quality. However, this option may slow processing.
Last updated 4/29/2011
Page 42

USING ENCORE
Creating projects and importing assets
Create a dynamically linked composition from Adobe Premiere Pro or Encore
Creating a new dynamically linked composition from Adobe Premiere Pro or Encore launches After Effects. After
Effects then creates a project and composition with the dimensions, pixel aspect ratio, frame rate, and audio sample
rate of the originating project. (If After Effects is already running, it creates a composition in the current project.) The
new composition name is based on the Adobe Premiere Pro or Encore project name, followed by Linked Comp [x].
1 In Adobe Premiere Pro or Adobe Encore, choose File > Adobe Dynamic Link > New After Effects Composition.
2
If the After Effects Save As dialog box appears, enter a name and location for the After Effects project, and click Save.
When you create a dynamically linked After Effects composition, the composition duration is set to 30 seconds. To
change the duration, select the composition in After Effects, choose Composition > Composition Settings. Click the
Basic tab, and specify a new value for Duration.
Link to an existing composition
For best results, match composition settings (such as dimensions, pixel aspect ratio, and frame rate) to the settings in
the Adobe Premiere Pro or Encore project.
❖ Do one of the following:
• In Adobe Premiere Pro or Encore, choose File > Adobe Dynamic Link > Import After Effects Composition. Choose
an After Effects project file (.aep), and then choose one or more compositions.
• In Adobe Premiere Pro or Encore, choose an After Effects project file and click Open. Then choose a composition
in the displayed dialog box and click OK.
• Drag one or more compositions from the After Effects Project panel to the Adobe Premiere Pro Project panel or
the Encore Project panel.
• Drag an After Effects project file into the Adobe Premiere Pro Project panel. If the After Effects project file contains
multiple compositions, the Import Composition dialog box opens.
Note: You can link to a single After Effects composition multiple times in a single Adobe Premiere Pro project. In an
Adobe Encore project, however, you can link to an After Effects composition only once.
38
If you create a dynamically linked composition from Encore, turn off subpicture highlight layers in After Effects, so
that you can control their display in Encore.
Dynamically linked After Effects compositions
Delete a dynamically linked composition or clip (Production Premium or Master Collection only)
You can delete a linked composition from an Encore project if the composition isn’t used in the project. You can delete
a linked composition from an Adobe Premiere Pro project at any time, even if the composition is used in a project.
You can delete linked clips from the timeline of an Adobe Premiere Pro sequence or from an Encore menu or timeline
at any time.
❖ In Adobe Premiere Pro or Encore, select the linked composition or clip and press the Delete key.
Last updated 4/29/2011
Page 43

USING ENCORE
Creating projects and importing assets
Modify a dynamically linked composition in After Effects (Production Premium or Master Collection only)
Use the Edit Original command in Adobe Premiere Pro or Encore to modify a linked After Effects composition. Once
the composition is open in After Effects, you can change the composition without having to use the Edit Original
command again.
1 Select the After Effects composition in the Adobe Premiere Pro or Encore Project panel, or choose a linked clip in
the Timeline, and choose Edit > Edit Original.
2 Change the composition in After Effects. Then, switch back to Adobe Premiere Pro or Encore to view your changes.
The changes made in After Effects appear in Adobe Premiere Pro. Adobe Premiere Pro stops using any preview files
rendered for the clip before the changes.
Note: You can change the name of the composition in After Effects after creating a dynamic link to it from
Premiere Pro. Adobe Premiere Pro does not update the linked composition name in the Project panel.
Adobe
Premiere Pro does retain the dynamic link, however.
Adobe
Offline compositions and Dynamic Link (Production Premium or Master Collection only)
Adobe Premiere Pro and Encore display dynamically linked compositions as offline in any of the following
circumstances:
39
• You’ve renamed, moved, or deleted the After Effects project that contains the composition.
• You’ve purposely taken the composition offline.
• You’ve opened the project that contains the composition on a system on which Production Premium or Master
Collection isn’t installed.
• You’re working with a project trimmed by the Adobe Premiere Pro Project Manager. Project Manager does not
move the After Effects source compositions to the trimmed project folder. Move the composition manually.
Offline compositions appear with an Offline icon in the Adobe Premiere Pro Project panel. In Encore, the
thumbnail preview displays the Offline icon when an offline asset is selected in the Project panel. If you’re working
with an offline composition, you can relink it to the original After Effects composition. You can also choose to relink
a linked composition to a different source composition.
Take a dynamically linked composition offline
If you are experiencing jerky playback, you can take a dynamically linked composition offline. Also, you can share your
project without having to open it on a system with Production Premium or Master Collection installed. You can take
a dynamically linked composition offline. When you take a composition offline, you sever the dynamic link with After
Effects. The linked composition is replaced in the Project panel with an offline composition.
You can temporarily suppress a linked clip in Adobe Premiere Pro by selecting the clip and choosing Clip > Enable.
To relink the clip, choose Clip > Enable again (a check mark next to the command indicates that the clip is enabled).
1 In Premiere Pro, select the composition in the Project panel.
2 Choose Project > Make Offline.
Last updated 4/29/2011
Page 44
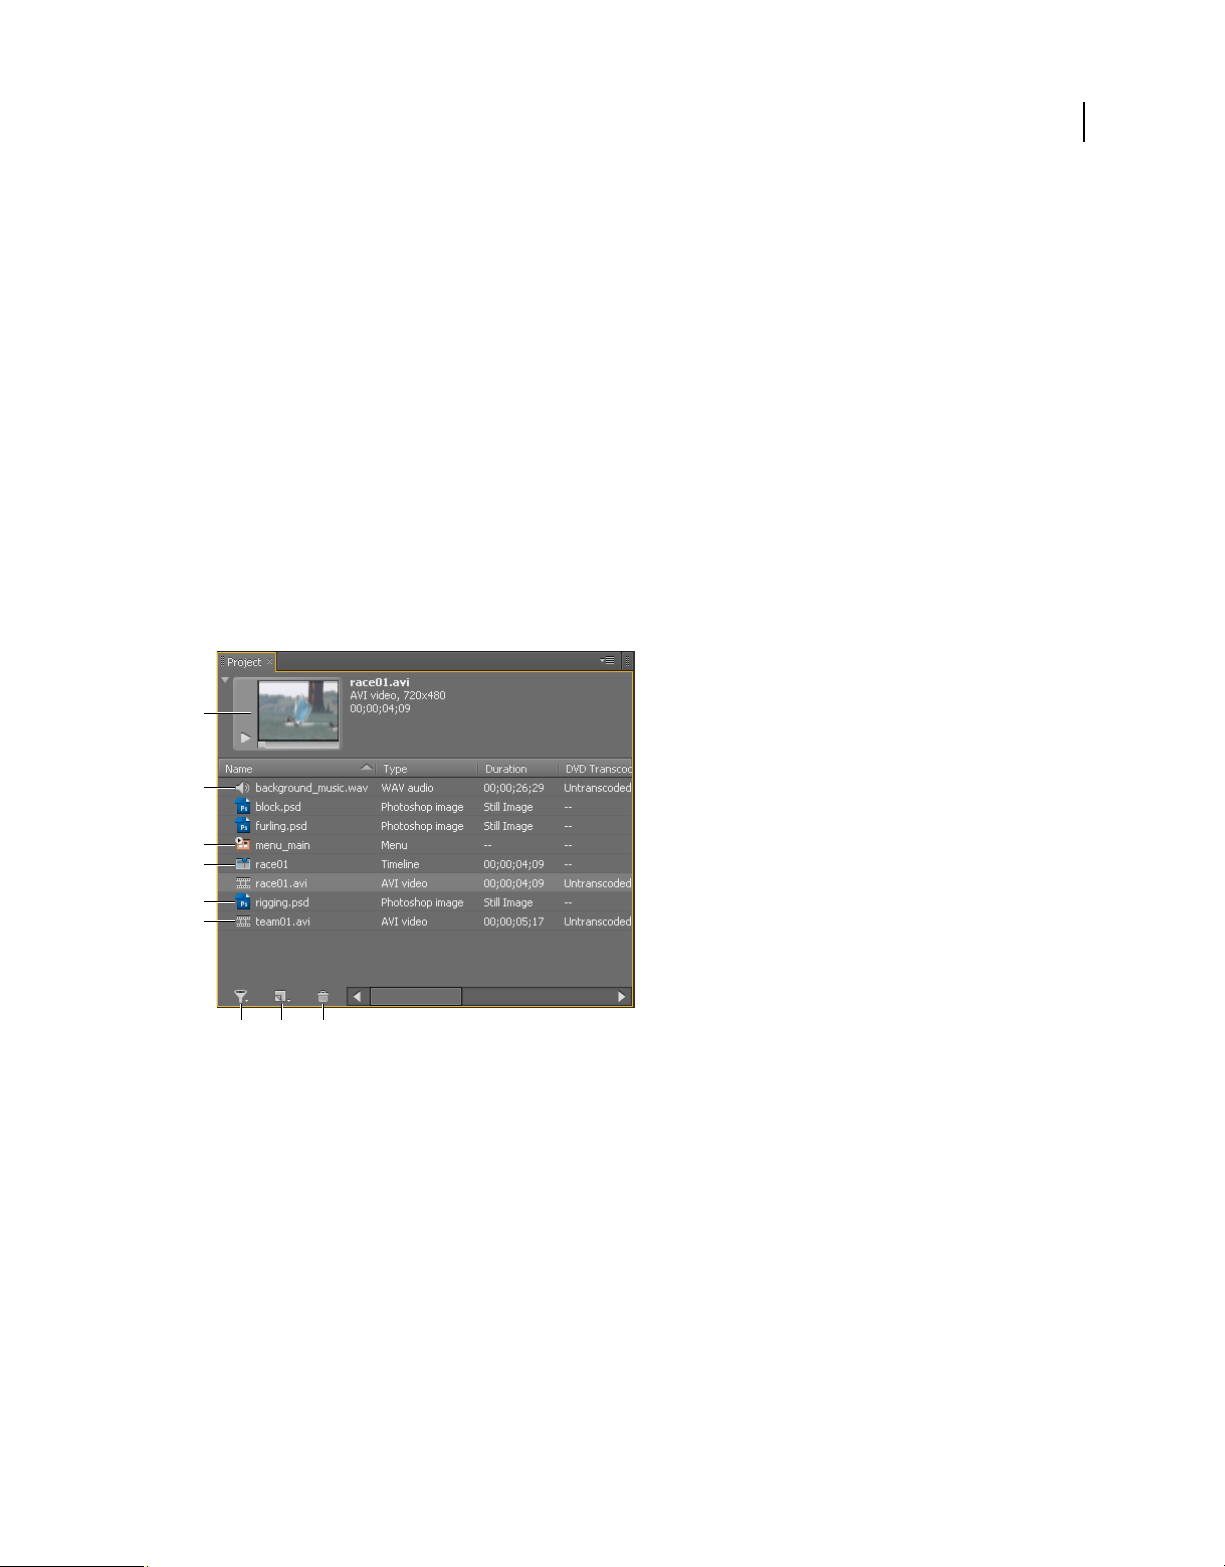
USING ENCORE
Creating projects and importing assets
Relink a dynamically linked composition
❖ Do one of the following:
• In Adobe Premiere Pro, select the composition and choose Project > Link Media. In thedisplayed dialog box, select
an After Effects project. Adobe Premiere Pro automatically relinks the composition.
• In Encore, right-click the composition and choose Locate Asset. In the Locate Asset dialog box, locate the
composition you want to link to, and then click Select (Windows) or Open (Mac OS).
Working in the Project panel
About the Project panel
The Project panel contains all the audio, video, and still-image assets you can use for a project. It also lists the timelines,
menus, slide shows, playlists, and chapter playlists created for the project. Each asset you bring into Encore is identified
by a representative icon in the asset list. The list can be customized to group assets into various categories, and to group
them into folders you create.
40
A
B
C
D
E
F
G
H I
Project panel
A. Preview B. Audio C. Menu D. Timeline E. Still image F. Video G. Toggle display of different item types H. Create a new item (If nothing
is selected in the Project panel, Encore uses the default assets from the Library panel.) I. Delete
When you select an asset, a thumbnail preview appears in the upper-left corner of the Project panel. If the asset
contains video or audio, a play controller appears below it so that you can preview the asset. Next to the thumbnail is
information about the displayed asset. If you select more than one asset, the text next to the thumbnail indicates the
number of assets selected.
Note: You import subtitle script files directly into the timeline in which they belong, not the Project panel. (See “About
subtitles in DVD projects” on page 135.)
Last updated 4/29/2011
Page 45

USING ENCORE
Creating projects and importing assets
Project panel columns
The Project panel contains the following columns, which provide information about the assets you’ve imported. To
show or hide any of these columns, right-click (Windows) or Control-click (Mac
a column name from the context menu.
Name Displays the name of the asset or element. You can rename any element.
Type Displays the asset type or element type.
Duration Displays the duration of the asset or element, where applicable, in the format hours; minutes; seconds;
frames.
Dimensions Displays the dimensions of the image, in pixels. This field is useful for identifying still-image assets that
are not the correct size for the broadcast standard for the project.
DVD Transcode Status Displays the DVD transcoded state of the asset: transcoded or untranscoded.
DVD Transcode Settings This column displays the DVD setting used to encode the asset. (See “About transcoding” on
page 46.)
Blu-ray Transcode Status Displays the Blu-ray transcoded state of the asset: transcoded or untranscoded.
Blu-ray Transcode Settings This column displays the Blu-ray setting used to encode the asset. (See “About
transcoding” on page 46.)
OS) on a column header and choose
41
Size Displays the file size of the asset.
Bitrate Displays the bit rate of the selected asset. (For untranscoded assets, the bit rate is an estimate.)
Media Category Displays the asset type. This category is useful for sorting your assets according to their status as audio
or video files, or both.
Description Displays any comments you add to this row. You may type up to 254 characters in the Properties panel.
Last Modified Displays date and time of the last modification to the file.
File Path Displays the system location of the asset. This column is blank if Encore can’t find the asset. (See “Locate a
missing asset” on page 43.)
Manage the Project panel
Customize the Project panel
You can customize the Project panel columns to best suit your working style and needs.
Sort items
❖ Click the column name representing the category by which you want to sort the items. Successive clicks sort them
alternately in ascending or descending order.
Hide or show a column
❖ Right-click (Windows) or Control-click (Mac OS) anywhere in a column header, and choose the column you want
to hide or show. Alternatively, right-click or Control-click the name of a column, and choose Hide This.
Note: A check mark next to the column name indicates that the column is shown.
Last updated 4/29/2011
Page 46

USING ENCORE
Creating projects and importing assets
Hide or show types of items
❖ Choose the item type from the Toggle Display Of Different Item Types menu at the bottom of the Project panel.
Resize columns
❖ Position the cursor over the right edge of the column you want to resize, and when the cursor becomes a resize
, drag the edge. You can also double-click on the right edge of the column you want to resize. The panel
cursor
resizes to the length of the longest line of text in that column.
Rearrange columns
❖ Drag the column name to a different location along the column header.
Organize items in the Project panel
To help organize the numerous elements of a project listed in the Project panel, you can group your assets, menus, and
timelines into folders. You can nest folders within other folders as well.
Create a folder
• To create a folder at the root level in the Project panel, make sure that nothing is selected, and then choose File >
> Folder.
New
• To create a folder at a specific level of the hierarchy, select an item currently at that level, and then choose File >
> Folder.
New
• You can also create a folder by clicking the Create A New Item button at the bottom of the Project panel and
choosing Folder from its menu. Type a name for the folder and click OK.
42
Rename a folder
1 Select a folder in the Project panel, and then choose Edit > Rename.
2 Type a new name, and click OK.
Show or hide the contents of a folder
❖ Click the triangle to the left of the folder icon.
Preview assets in the Project panel
You can preview any asset from the Asset Preview thumbnail in the upper-left corner of the Project panel. Text next
to the thumbnail displays the filename and file format of the selected asset. It also displays, if applicable, the duration,
image dimensions, and frame rate of the selected asset. If you are previewing video footage, you can either view a
particular frame or set the footage to play from any point in its progression.
Note: If a still image (such as a TIFF file) doesn’t match the project aspect ratio, Encore crops or mattes it to fit the project’s
frame size. Using the Still Clip Properties panel, you can control how the image is placed in a timeline, such as whether it
is scaled and cropped or matted with black. (See
Preview a video or audio asset
1 To preview a video or audio asset, select the asset you want to view.
2 Do any of the following:
• To begin playing the asset, click the Play button .
“Scale and crop still images” on page 124.)
Last updated 4/29/2011
Page 47

USING ENCORE
Creating projects and importing assets
• To pause playback, click the Pause button .
• To play from a specific location, whether the asset is currently playing or paused, drag the current-time indicator
until you reach the location you want to play from. If the preview was paused when you began dragging, click
the Play button, and if the preview was playing when you began dragging, stop dragging for playback to resume.
Preview a still asset
❖ Select the asset you want to view.
Show or hide the preview thumbnail
❖ Click the triangle in the upper-left corner of the Project panel.
Locate a missing asset
If Encore cannot find an asset when you open a project, the Locate Asset dialog box appears. You can then choose to
select the missing asset, skip the file, or work offline. Missing or offline assets names appear italicized in the Project
panel.
1 Click the Project panel, and select the missing asset.
2 Choose File > Locate Asset.
3 Navigate to the location of the missing asset, select it, and then click Select.
43
Replace an asset
You can work with offline assets in the Project panel. You can use a placeholder for the offline asset and, when you are
ready to work with the actual offline asset, you replace the placeholder with the asset.
1 In the Project panel, select the placeholder asset.
2 Choose File > Replace Asset.
3 Navigate to the location of the asset you want to use as a replacement, select it, and then click Open.
Viewing and editing XMP metadata
About the Metadata panel and XMP
To streamline your workflow and organize your files, use XMP metadata. Metadata is a set of descriptive information
about a file. Video and audio files automatically include basic metadata properties, such as date, duration, and file type.
You can add details with properties such as location, director, copyright, and much more.
With the Metadata panel, you can share this information about assets throughout Adobe video and audio applications.
Unlike conventional clip properties, which are limited to only one application’s Project or Files panel, metadata
properties are embedded in source files, so the data automatically appears in other applications. This sharing of
metadata lets you quickly track and manage video assets as they move through your production workflow.
Note: Properties in the Metadata panel also appear in Adobe Bridge, providing additional details that help you quickly
browse assets.
For a video about the Metadata panel, see the Adobe website.
Last updated 4/29/2011
Page 48

USING ENCORE
Creating projects and importing assets
About schemas and properties
A metadata schema is a collection of properties specific to a given workflow. The Dynamic Media schema, for example,
includes properties like Scene and Shot Location that are ideal for digital video projects. Exif schemas, by contrast,
include properties tailored to digital photography, like Exposure Time and Aperture Value. More general properties,
like Date and Title, appear in the Dublin Core schema. To display different properties, see
metadata” on page 44.
For information about a specific schema and property, hover the pointer over it in the Metadata panel. For most
items, a tool tip appears with details.
“Show or hide XMP
About the XMP standard
Adobe applications store metadata using the Extensible Metadata Platform (XMP). XMP is built on XML, which
facilitates the exchange of metadata across a variety of applications and publishing workflows. Metadata in most other
formats (such as Exif, GPS, and TIFF) automatically transfers to XMP so you can more easily view and manage it.
In most cases, XMP metadata is stored directly in source files. If a particular file format doesn’t support XMP, however,
metadata is stored in a separate sidecar file.
Project assets without corresponding files don’t support XMP. Examples from Adobe Premiere Pro include Bars and
Tone, Universal Counting Leader, Color Matte, Titles, Black Video, and Transparent Video.
44
To customize the creation and exchange of metadata, use the XMP Software Development Kit. For more information
about XMP, see Extensible Metadata Platform.
Show or hide XMP metadata
To optimize the Metadata panel for your workflow, show or hide entire schemas or individual properties, displaying
only those that you need.
1 From the options menu for the Metadata panel, select Metadata Display.
2 To show or hide schemas or properties, select or deselect them from the list.
Save, switch, or delete metadata sets
If you use multiple workflows, each requiring different sets of displayed metadata, you can save sets and switch
between them.
1 From the options menu for the Metadata panel, select Metadata Display.
2 Do any of the following:
• To save a customized set of displayed metadata, click Save Settings. Then enter a name, and click OK.
• To display a previously saved set of metadata, select it from the menu.
• To delete a previously saved set of metadata, select it from the menu, and click Delete Settings.
Create schemas and properties
If you have a unique, customized workflow that the default metadata options don’t address, create your own schemas
and properties.
1 From the options menu for the Metadata panel, select Metadata Display.
2 Click New Schema, and enter a name.
3 In the list, click Add Property to the right of the schema name.
Last updated 4/29/2011
Page 49

USING ENCORE
Creating projects and importing assets
4 Enter a property name, and select one of the following for Type:
Integer Displays whole numbers that you drag or click to change.
Real Displays fractional numbers that you drag or click to change.
Text Displays a text box (for properties similar to Location).
Boolean Displays a check box (for On or Off properties).
Edit XMP metadata
In Adobe video applications, similarly named properties are linked in the Metadata and Project panels. However, the
Metadata panel provides more extensive properties and lets you edit them for multiple files simultaneously.
Note: Instead of a Project panel, Soundbooth uses the Files panel.
1 Select the desired files or clips.
2 In the Metadata panel, edit text or adjust values as needed.
If you selected multiple items, the panel displays properties as follows:
• If a property matches for all items, the matching entry appears.
• If a property differs, <Multiple Values> appears. To apply matching values, click the text box, and type.
45
Search XMP metadata
1 Select the files or clips you want to search.
2 In the search box at the top of the Metadata panel, enter the text you want to find.
The list of metadata collapses to reveal only properties that contain your search string.
3 (Adobe Premiere Pro only) To navigate through the search results, click the Previous and Next buttons to
the right of the search box, or press Tab.
4
To exit the search mode and return to the full list of metadata, click the close button to the right of the search box.
Last updated 4/29/2011
Page 50
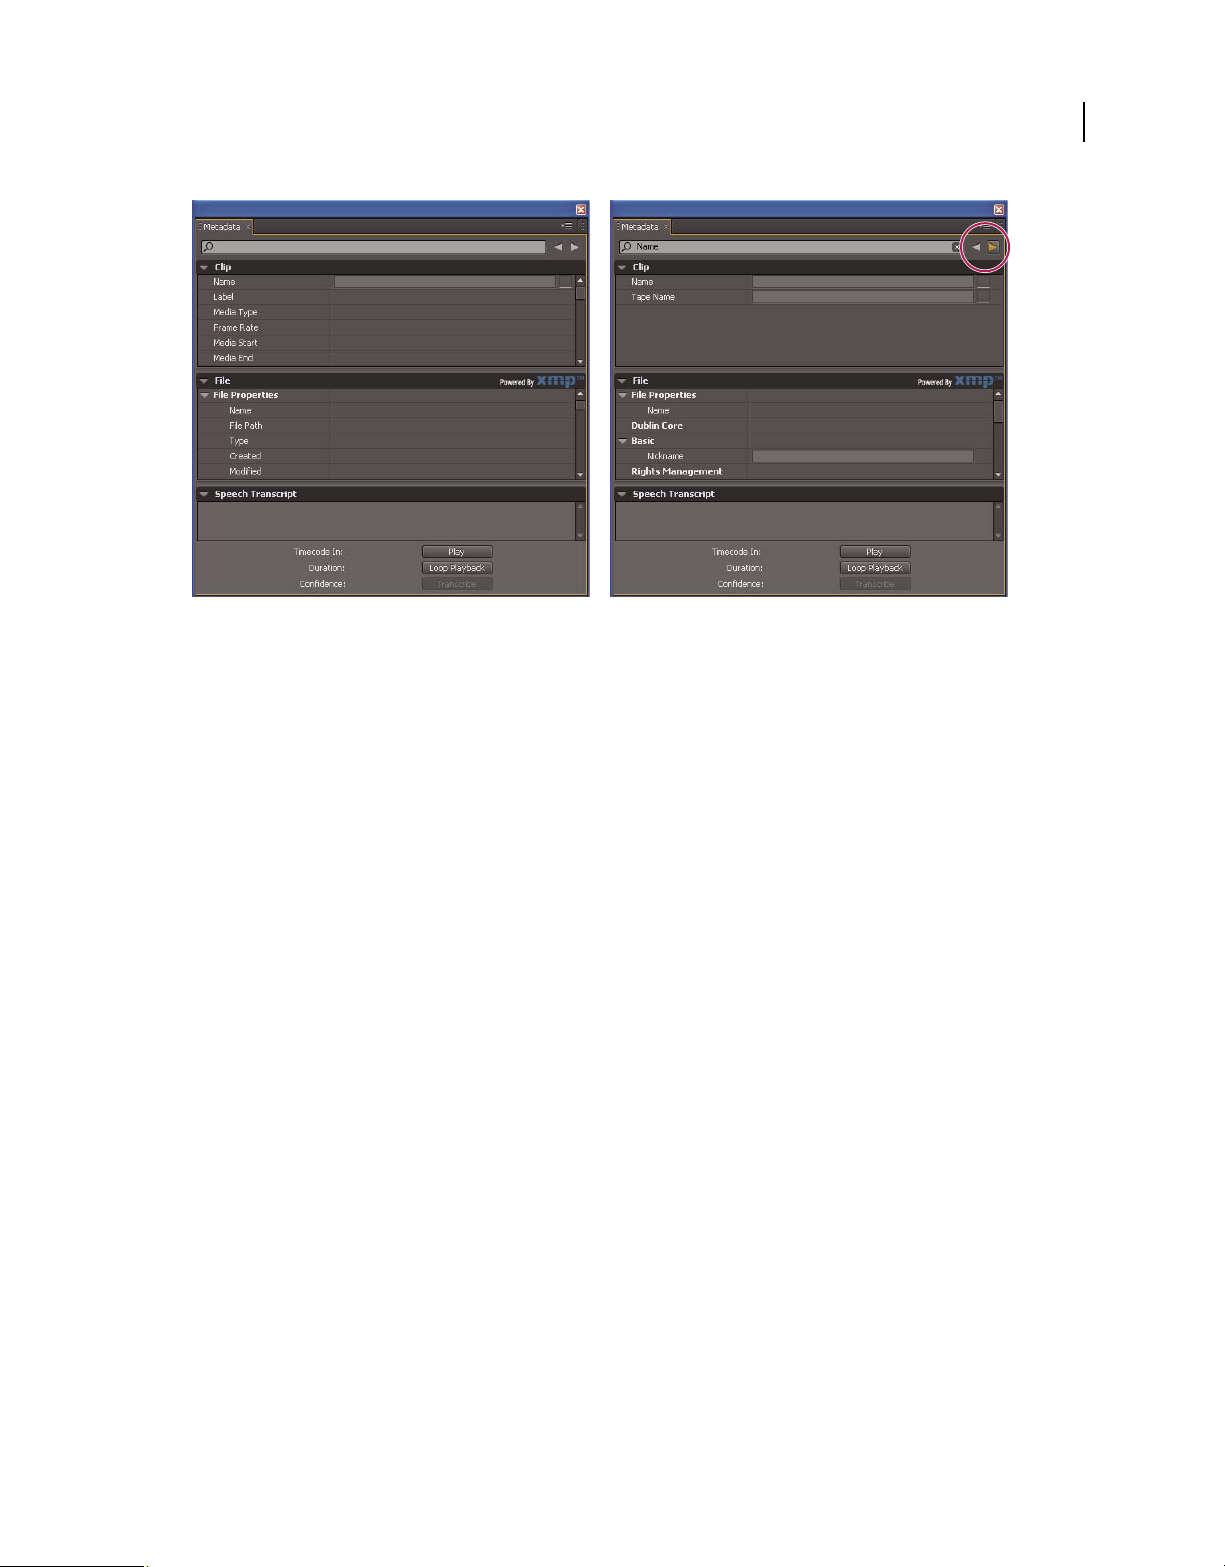
USING ENCORE
Creating projects and importing assets
A B
Metadata panel
A. Before search, all properties appear B. After search, only properties with search string appear. In Adobe Premiere Pro, Previous and Next
buttons navigate through search results.
46
Transcript metadata in Flash output
Adobe Premiere Pro and Soundbooth let you convert spoken words into text transcripts, which you edit and search
just like other metadata properties. This powerful technology lets you navigate to time locations at which specific
words are spoken, helping you better align edits, advertising, and subtitles.
When you import assets from Premiere Pro, metadata including the speech transcripts that you created for these assets
is imported. The transcript metadata is embedded chapter-wise in your Flash output when you export the project to
Flash. You can search the Flash files for specific words and locate the scene in which the speech occurs.
In addition, you can use Adobe® Bridge® to search for and access your project files, preview and apply settings, run
batch processes, and tag assets with XMP metadata panel in Encore.
Because the videos that you upload to websites contain searchable metadata, search engines such as Google can locate
and present the videos that contain the specified search term.
Transcoding in Encore
About transcoding
Transcoding is the process by which Encore converts your original, non-DVD-compliant or non-Blu-ray Disccompliant video and audio asset files to the compliant elements that are burned to the disc. (Files that are already
compliant do not require transcoding.) The transcoding feature of Encore is flexible enough for a variety of users. New
users unfamiliar with transcoding can let the application manage the process entirely, while those with more
experience can control it precisely. If you choose to manage transcoding yourself, Encore provides DVD-compliant
and Blu-ray Disc-compliant transcode presets customized for several different quality and storage requirements. You
can also create your own custom transcode presets.
Last updated 4/29/2011
Page 51

USING ENCORE
Creating projects and importing assets
You can work with your original, untranscoded files throughout the production process; Encore performs any
required transcoding when you build the final project. If you want more control over transcoding, however, you can
choose to transcode at any time on a per-item basis. If a transcoded version of a file is available, Encore uses that
version for authoring, previewing, and building; if no transcoded version is available, the application uses the original
file for authoring and previewing, and transcodes the files as necessary when building.
More Help topics
“Transcode assets from the Project panel” on page 47
Transcode settings
You can specify an item’s transcode settings (by using a preset) from the DVD Transcode Settings or Blu-ray
Transcode Settings columns in the Project panel. (Separate columns, DVD Transcode Status, and Blu-ray Transcode
Status, display either Transcoded or Untranscoded to show the item’s current state.) When you specify a preset, that
preset’s data rate is used, not the data rate you calculated in bit budgeting.
Assets are designated as follows in the DVD Transcode Settings and Blu-ray Transcode Settings columns:
Automatic Displayed for all non-DVD-compliant or non-Blu-ray Disc-compliant assets by default.
For assets with the Automatic designation, Encore determines the optimal settings for transcoding. Encore bases these
settings on the number, length, and size of the assets and the available disc space. (See
page 18.) You can override the Automatic data rate setting by specifying the Maximum Audio/Video Bitrate on the
Advanced tab of the Project Settings dialog box. Alternatively, you can specify a transcode preset for any of these assets.
“About bit budgeting” on
47
Important: Set the encoding profile as Main for your H.264 video assets in your Blu-ray projects. You cannot burn a Bluray Disc if you set the encoding profile as High. See
[A transcode preset name] Displayed for all non-DVD-compliant or non-Blu-ray Disc-compliant assets for which you
“Preset options for video” on page 49
have specified a Project Transcode Preset.
Don’t Transcode Displayed for those assets that are already DVD-compliant or Blu-ray Disc-compliant. You can
override this setting and specify Automatic or a transcode preset, if desired.
Note: DVD/Blu-ray Disc-compliant, audio-only files that don’t match the audio encoding preference are the exception;
Encore assigns these audio files a designation of Automatic. You can override this setting and specify either Don’t
Transcode or a transcode preset. (Dolby® Digital 5.1 AC3 files retain the Don’t Transcode designation for quality
purposes; this designation can also be overridden to transcode to Dolby® Stereo format.)
N/A Displayed for those items, such as menus and timelines, that don’t require transcoding.
Transcode assets from the Project panel
You can assign transcode settings and transcode individual assets directly from the Project panel. Upon transcoding a
file, Encore updates the project link so that it points to the transcoded file. Consequently, unless you delete the original
file, you can revert transcoded assets to their original version. Encore transcodes in the background, so you can
continue to work while transcoding.
Note: If Encore is transcoding an asset in the background, you cannot delete timelines associated with the asset or assign
a different preset.
The data rate calculated for the Automatic transcode setting, determined by Encore, appears in the Bitrate column in
the Project panel. You can specify the maximum automatic data rate using the Advanced tab in the Project Settings
dialog box.
Last updated 4/29/2011
Page 52

USING ENCORE
Creating projects and importing assets
Assign a transcode setting to an asset
1 In the Project panel, right-click (Windows) or Control-click (Mac OS) the asset you want to transcode, and choose
Transcode Settings.
2 In the Transcode Settings dialog box, choose a transcode preset from one of the Quality Preset menus for DVD
Transcoding or Blu-ray Transcoding, and then click OK. (For information on editing the presets, see
project transcode presets” on page 48.)
“About
Override the Automatic data rate setting
❖ To specify the maximum audio/video transcoding bit rate that Encore uses automatically, choose File > Project
Settings, click the Advanced tab, choose the data rate limit from the Maximum Audio/Video Bitrate menu, and
then click
OK.
Transcode an asset
1 In the Project panel, right-click (Windows) or Control-click (Mac OS) the asset you want to transcode.
2 Choose Transcode Now. The asset is transcoded, and the Transcode Status column displays Transcoded. The
transcoded asset is now used for authoring, previewing, and building.
Revert a transcoded asset to the original asset
1 In the Project panel, right-click (Windows) or Control-click (Mac OS) the asset you want to replace.
2 Choose Revert To Original.
48
Out-of-process transcoding
Out of process transcoding enables you to transcode assets in the Adobe Media Encoder application in the Transcode
Now workflow. When you enable out-of-process transcoding, the Adobe Media Encoder (AME) is launched as a
separate process.
Out-of-process transcoding runs independent of the Encore process. The memory in the Encore process is not
consumed when transcoding.
Note: Out of process transcoding option is used only in the Transcode Now workflow, and not in the Build workflow.
Out-of-process transcoding is disabled by default. To enable out-of-process transcoding, perform the following steps.
1 Select Edit > Preferences > General.
2 Select Transcode Assets Using Adobe Media Encoder Application.
Transcoding presets
About project transcode presets
You work with presets in the Export Settings dialog box. (To open it, choose File > Edit Quality Presets.) The left
portion of the dialog box displays either the source or the output, while the right portion lists the various settings
available. Use the Source tab to see the original, and use the Output tab to preview the effects of your selections.
The default parameters in the Project Transcode Presets dialog box are designed to achieve optimal quality for various
project types. You can save, import, export, and delete presets.
Last updated 4/29/2011
Page 53

USING ENCORE
Creating projects and importing assets
If you are experienced with MPEG-2 or H.264 encoding, you can further fine-tune your projects for specific playback
situations by creating custom presets. You create a custom preset by adjusting the video and audio parameters of any
of the existing presets. Once you save this custom preset, you can use it in later projects or share it with other users.
Note: All available transcode presets are based on the project settings. For example, if you choose PAL project settings,
then only PAL-compatible presets are available.
49
A
Project Transcode Presets dialog box
A. Source or output image B. Preset settings
B
More Help topics
“About transcoding” on page 46
Preset options for video
Depending on the preset you’ve selected, the Video tab of the Project Transcode Presets dialog box contains some or
all of the following options:
Codec Displays the codec based on the export format you specified.
Frame Dimensions [Pixels] Specifies the frame dimension of the video.
Frame Rate [fps] Specifies the frame rate in frames per second.
Last updated 4/29/2011
Page 54

USING ENCORE
Creating projects and importing assets
Quality Specifies the encoding quality. Quality values range from 1 to 5, with higher values increasing quality and
render time.
Note: H.264 does not have settings for Quality, M frames, or N frames.
Field Order Specifies which field of a frame occurs first. Use the same settings as the source. Only appears if you select
Interlaced as the Program Sequence option.
Pixel Aspect Ratio Specifies the pixel aspect ratio. See “Specify an asset’s pixel aspect ratio” on page 27.
Profile Specifies the encoding profile for generating the video stream. Applicable for H.264 encoding only.
Note: For Blu-ray projects, the encoding profile must be Main when you select H.264 as the encoding format. You cannot
burn a Blu-ray disc when the encoding profile for a H.264 video asset is set to High.
Bitrate Encoding Specifies the compression technique used. Constant Bit Rate (CBR) compresses data to a fixed rate.
CBR keeps the rate constant by varying the amount of compression (and thereby quality) as required by the specified
data rate. Variable bit rate (VBR) compresses data to fit between a fixed minimum and fixed maximum rate. VBR
allows the compression to vary, which can result in better quality than CBR.
Bitrate [Mbps] Specifies the number of Mbps you want the encoded file to have. Only appears if you select CBR as the
Bitrate Encoding option.
The following options appear only if you select VBR as the Bitrate Encoding option:
50
Encoding Passes Specifies the number of times the encoder analyzes the clip before encoding. Enabled for VBR only.
Target Bitrate [Mbps] Specifies the number of Mbps you want the encoded file to have. For VBR, the target provides
an average bit rate. (See
Maximum Bitrate [Mbps] Used with VBR only. Specifies the maximum number of Mbps you want the encoder to
“Calculate a bit budget” on page 18.)
allow. The maximum allowable rate is 40.0 Mbps for Blu-ray Disc assets and 9.0 Mbps for DVD assets, providing a
safety margin.
Minimum Bitrate [Mbps] Used with VBR only. Specifies the minimum number of Mbps you want the encoder to allow.
The minimum bit rate must be at least 0.192 Mbps for Blu-ray Disc assets and 1.5 Mbps for DVD assets.
M frames Specifies the number of B frames between consecutive I and P frames.
N frames Specifies the number of frames between I frames. This value must be a multiple of the M frames value.
Preset options for audio
The Audio tab of the Export Settings dialog box contains the following options, depending on the codec chosen:
Audio format Specifies the codec the encoder uses to compress the audio:
Note: NTSC discs must contain either PCM Audio or Dolby® Digital; they cannot contain only MPEG audio. This
restriction does not apply to PAL discs.
• Dolby® Digital is a high-quality encoding format developed for multichannel digital sound and the most common
encoder for DVD-video. Encore encodes Dolby® Digital 2.0 (stereo) audio files.
• MainConcept MPEG Audio uses MPEG-1 Layer II audio in stereo.
• PCM (Pulse-Code Modulation) Audio is a lossless audio format sampled at 48 kHz in Encore. Files of this format
tend to be large, occupying more disc space than the other encoder formats.
Note: MPEG Audio is not available for Blu-ray MPEG-2 or H.264.
Codec Specifies the codec for encoding the clip’s audio.
Last updated 4/29/2011
Page 55

USING ENCORE
Creating projects and importing assets
Audio Layer Specifies the audio layer used for encoding.
Frequency Specifies the audio sample rate in kHz.
Bitrate [Kbps] Specifies the output bit rate of the audio. This option is only available for Dolby® Digital and
MainConcept MPEG Audio codecs.
View a preset’s parameters
1 Choose File > Edit Quality Presets.
2 In the Export Settings section, choose a preset from the Preset menu and view its properties listed under Summary.
OK to close the dialog box.
Click
Note: The estimated file size per second is displayed at the bottom of the dialog box. If you change a preset’s parameter
that affects file size, such as target bit rate, the estimate updates to reflect your change.
Create a custom preset
1 Choose File > Edit Quality Presets.
2 In the Export Settings section, choose MPEG2 Blu-ray, MPEG2 DVD, or H.264 Blu-ray from the Format menu,
and choose the preset you want to edit from the Preset menu.
3 If applicable, type a comment in the Comment box.
4 Click either the Audio or Video tab and adjust an option as desired. (See “Preset options for video” on page 49 and
“Preset options for audio” on page 50.)
5 When you finish adjusting the options, click the Save Preset button .
6 Type a name for your preset, and click OK.
Your new preset appears in the Presets menu in the Export Settings dialog box.
51
7 Click OK to close the Project Transcode Presets dialog box.
Export and import presets
After you fine-tune a preset for a project, you can export it for use in other projects.
Export a preset
1 Choose File > Edit Quality Presets.
2 In the Export Settings section, choose the preset you want to export from the Presets menu.
3 Alt-click (Windows) or Option-click (Mac OS) the Save Preset button to display the Export Preset dialog box.
4 Choose the location to save the preset, name it, and then click Save.
Import a preset
1 Choose File > Edit Quality Presets.
2 In the Export Settings section, click the Import Preset button to open the Import Preset dialog box.
3 Navigate to the location of the preset, select it, and then click Open.
4 Enter a name for the imported preset, and then click Open.
Last updated 4/29/2011
Page 56

USING ENCORE
Creating projects and importing assets
Delete custom presets
1 Choose File > Edit Quality Presets.
2 In the Export Settings section, do one of the following:
• To delete a single preset, choose the preset you want to delete from the Preset menu, and then click the Delete
Preset button
. Click OK to confirm the deletion.
• To delete all custom presets, Ctrl-Alt-click (Windows) or Command-Option-click (Mac OS) the Delete Preset
button. Click Yes to confirm the deletion.
Specify a pre- or post-encoding task
Included with the transcode presets are pre- and post-encoding tasks. You can use these tasks to make changes to the
asset either before or after it’s transcoded. You can specify that a text log of errors, warnings, and settings be saved with
the transcoded file. When you add encoding tasks to a preset, you generate a custom preset.
1 Choose File > Edit Quality Presets.
2 Select the transcode preset you want to add a task to.
3 To add the post-encoding task of logging, click the Others tab and select the Log File Details checkbox. Then select
the details you want logged.
4 Click OK.
5 In the Choose Name dialog box, enter a name for the custom preset, select Save Filter Settings and/or Save Other
Tasks, and click OK.
52
Last updated 4/29/2011
Page 57

Chapter 5: Menus
Menus contain navigation buttons that give viewers access to the contents. Menu buttons can play a movie or
individual chapter, jump to other menus, set active audio and subtitle tracks, or play back special features. Menus can
range from a single button on a plain background to a flashy screen with moving images and buttons that change as
you select them.
Encore provides you multiple options to create and edit menus. You can create simple, basic menus with predesigned
assets in Adobe® Encore® or edit them in Adobe
advanced animations using Adobe
Encore uses the Photoshop file format for menus, providing you complete control in creating and enhancing your
menus in Encore, Photoshop, or After
asset from Encore and edit it Photoshop to fine-tune the designs. You can then take it to After
animations of your choice, and then import into Encore as the final menu. In the entire workflow, Encore treats the
menu that you are creating as a PSD file. For a video tutorial about working with menus, see
www.adobe.com/go/lrvid4228_enc.
After Effects®.
Effects. For example, you can start with a basic menu based on a predefined
Photoshop®. Further, you can add audio and video to your menus and
Effects to add
53
Menu basics
About menus
The main menu in an Adobe® Encore® project is usually the first screen the viewer sees. Depending upon the
complexity of the contents, your project can contain a single menu or multiple menus. Many projects require that
buttons on the main menu link to additional menus, called submenus. For example, a main menu can have buttons to
play the entire movie, select chapters, and set audio and subtitle options.
Main menus and submenus give viewers access to contents.
You can have your project display other types of menus (or video, for that matter) before leading to the main menu.
For example, the startup screen can have a single-button welcome menu or a multi-button menu to choose the
appropriate language.
Parts of a menu
A menu consists of a background, buttons, and button subpictures. Button subpictures change the appearance of
buttons when the viewer selects or activates the button with the remote control or mouse. (See
states” on page 54.)
“Button subpicture
Last updated 4/29/2011
Page 58

USING ENCORE
Menus
A B C
Menu
A. Buttons lead to content B. Subpicture highlights button when selected or activated C. Background
Types of menus
A menu can include text, still images, motion footage, and audio. Depending on its composition, a menu is considered
either a still menu or a motion menu:
Still menu A menu composed of static images. It contains no moving footage or audio.
54
Motion menu A menu that includes moving footage or audio. A video can play in the background of the menu. Menu
buttons can include thumbnail versions of the movies to which they’re linked. You can even include audio, such as
music or narration, while the menu is displayed.
Buttons display thumbnail versions of linked video.
Blu-ray pop-up menu A “button over video” menu that is available only for the Blu-ray Disc. Blu-ray pop-up menus
can be associated with one or more timelines. See
“Blu-ray pop-up menus” on page 98.
Button subpicture states
Button subpictures let you change the look of buttons in response to the remote control or mouse. Each button has
three possible states:
Normal Displayed when the button is not selected by the remote control or mouse.
Selected Triggered when the viewer navigates to the button with the remote control or mouse. When a menu opens,
one button is always preselected.
Last updated 4/29/2011
Page 59

USING ENCORE
Menus
Activated Triggered when the viewer presses Enter on the remote control after navigating to the button or when the
viewer clicks the button with the mouse. Depending upon the player that the viewer is using, the display time of the
activated state can be very short, so designers often make the selected and activated state the same.
The Adobe predesigned menus and buttons include subpictures. You can let Encore create subpictures for you by
using the Create Subpicture command or the Convert To Button command. You can design your own subpictures in
Adobe Photoshop. (See
“About creating menus in Photoshop” on page 66.)
More Help topics
“About button subpictures” on page 86
Menu Viewer overview
The Menu Viewer provides a canvas for creating and modifying a menu. You can place, move, resize, flip, rotate, or
delete buttons, and you can add text. When creating and editing a menu in the Menu Viewer, you frequently use other
panels. For example, you can use the Project panel to drag and drop video clips, audio clips, and images onto a menu.
You can use the Library panel to add content, including predesigned templates and buttons, to your menu. You use
the Layers panel to view, navigate, and edit the layer structure of a menu. Use the Properties panel to change motion
and navigation options for either menus or menu buttons.
You can display the Menu Viewer on an attached DV device (IEEE 1394). In the Audio/Video Out panel of the
Preferences dialog box, select the Show Menu Editor On DV Hardware option.
55
A CB
Menu Viewer
A. Selected object B. Show Safe Area C. Subpicture display buttons
The Menu Viewer contains the following controls:
Zoom Level Controls the magnification of the menu. Choose a preset zoom level, or type a value from 25% to 1600%
and press Enter. You can also choose Fit to view the entire menu, even if you resize the Menu Viewer.
Note: You can also press the + (plus) key to zoom in and the - (minus) key to zoom out. For more keyboard shortcuts, see
“Using keyboard shortcuts” on page 186.
Correct Menu Pixels For TV Display Toggles between displaying the menu as it will appear on a television monitor
(default setting) and displaying the menu’s true dimensions and uncorrected pixel aspect ratio (if different from the
project frame size).
Last updated 4/29/2011
Page 60

USING ENCORE
Menus
Show Safe Area Displays guides that mark the action safe areas and title safe areas. Television monitors reduce the
visible area of footage and menus. You should keep important visual elements within the outer guide, and keep text
and buttons within the inner guide. (The actual amount that is clipped varies from monitor to monitor.)
Show Button Routing Displays remote control routing and button numbers of all buttons in the menu. You can
customize the routing only if the Automatically Route Buttons menu property is turned off. (See
“Change the routing
order” on page 95.)
Show Guides Displays any guides you added to the menu for aligning buttons and objects.
New Guide Displays the New Guide dialog box, where you can specify the type of guide (horizontal or vertical) you
want to add and its position in pixels coordinates within the menu. Guides are saved with the menu and can be viewed
in Photoshop.
Show Normal Subpicture Highlight Displays the normal (unselected) state of all buttons.
Show Selected Subpicture Highlight Displays the selected (highlighted) state of all buttons.
Show Activated Subpicture Highlight Displays the activated state of all buttons.
To improve performance, turn off the display of subpictures when they’re not needed.
In addition, Encore has added a special feature in the Menu Viewer to highlight any buttons that overlap each other
with a bright red outline, making it easier to avoid potential linking problems.
56
Library panel overview
The Library panel includes predesigned menus that represent a wide spectrum of visual styles and themes, such as
Education, Corporate, or Wedding. You can create menus based on these predesigned templates or customize menus
using other design elements, such as buttons, images, and shapes. You can create menu templates and add your own
design elements to the Library panel so that menus and designs that you use frequently are right at hand.
Many menus have a companion submenu that reflects the same style and contains a different number of buttons. The
menus include buttons with subpictures (for highlighting when the button is selected) and fully styled placeholders for
text. The buttons on some menus provide a thumbnail layer for video.
Last updated 4/29/2011
Page 61

USING ENCORE
C
Menus
57
B
D
E
F
Library panel
A. Name of currently displayed set B. Preview of selected item C. Panel menu with additional options D. Buttons to display different types of
items E. Predesigned items F. Buttons to place, replace, add, and remove items
A
The Library panel contains the following controls:
Set Displays the currently selected set. Items in the Library panel are organized into thematic sets, such as Education,
Corporate, or Wedding. You can create your own sets or add to the existing sets.
Panel menu Contains commands to add or delete items or sets and to rename existing sets. It also includes commands
for undocking and closing the panel or the frame containing the panel.
Category buttons Display predesigned items of a specific type: Menus , Buttons , Images ,
Backgrounds , Layer Sets , Text Items , Shapes , and Replacement Layers . Shift-click to view additional
categories. Alt-click (Windows) or Option-click (Mac OS) to view all categories together.
Place
Places the selected item in the currently displayed menu. Buttons are added on the left edge of the title safe guide
without overlapping previously placed buttons. Images, shapes, and layer sets are centered in the middle of the menu.
Replace Replaces the objects selected in the menu with the item selected in the Library panel. The Replace button
resizes the Library panel item to fit the dimensions of the object in the menu. You can also use the Replace button to
replace a menu with another menu while preserving links and text. (See
“Replace a menu with another menu” on
page 74.)
Set Background Replaces the background layer of the currently active menu. This option is enabled only if a
background is selected in the Library panel.
New Menu Creates a new menu using the selected menu or background.
New Item Opens a dialog box to let you select a file. Once selected, adds the item to the Library panel and copies
the item to the Library set folder.
Delete Item Removes the selected item from the panel. You can delete only items you’ve created.
More Help topics
“About menu templates” on page 104
Last updated 4/29/2011
Page 62

USING ENCORE
Menus
Set Library panel default menus and buttons
Each thematic set in the Library panel has a default menu, background, and button that Encore uses when you create
a new menu or button. You can specify the defaults for each set. You can also add your own menu or button to the
panel (using the panel’s New Item button) and set it as a default. A star in the icon adjacent to a button, background,
or menu name identifies it as the default for the set.
Encore uses these defaults of the currently selected set to create a new menu or button whenever you choose the
> New Menu command, click the Create A New Item button in the Project panel and choose Menu, or drag an
Menu
asset from the Project panel directly to a menu in the Menu Viewer.
Set a default menu in the Library panel
❖ In the Library panel, right-click (Windows) or Control-click (Mac OS) the menu template or background that you
want to be the default menu, and choose Set As Default Menu.
Set a default button in the Library panel
❖ In the Library panel, right-click (Windows) or Control-click (Mac OS) the button that you want to be the default,
and choose Set As Default Button.
Layers panel overview
Encore uses the Photoshop® file structure for creating menus. The Layers panel in Encore displays the contents of the
Photoshop file that is used as the basis for the menu. Therefore, you can edit menus in either program without losing
the layer organization. The Layers panel is especially useful when working on multilayered menus, such as menu
templates.
58
Each object you add to a menu appears on a separate layer in the Layers panel. Selecting objects in the Menu Viewer
is sometimes easier when you use the Layers panel. Regardless of where an object is in the stacking order, you can
quickly select it by selecting its layer in the Layers panel. When you select a layer or layer set, selection handles appear
on the element in the Menu Viewer. You can isolate elements to change them together or individually, view only
specific layers while hiding others, and lock layers or layer sets so that their elements cannot be modified. The Layers
panel is especially useful when working on menus with a lot of layers, such as menu templates.
You can design entire menu templates in Photoshop, import them into your Encore projects, and save them in the
Library panel for reuse.
A B C
D
E
F
G
H
Layers panel
A. Display/Hide column B. Lock/Unlock column C. Button/Object column D. Layer set E. Button layer set F. Text layer G. Subpicture layers
H. Open/Close layer set
Last updated 4/29/2011
Page 63

USING ENCORE
Menus
The three columns adjacent to the layers let you selectively hide, display, or lock the contents of layers and layer sets,
as well as convert objects to buttons and convert button sets to individual elements. Clicking the column next to a layer
turns the option on or off.
Display/Hide column Hides or displays the layer in the Menu Viewer. The Eye icon next to a layer indicates that it
is visible. Hiding layers lets you work on a layer in isolation and makes it easier to adjust a layer that is behind other
objects.
Note: You cannot hide button layer sets, only the elements within them. You also cannot use the Display/Hide column
on subpicture layers—layers with names that begin with (=1), (=2), or (=3). To hide or display subpicture layers, you use
the Show Normal Subpicture Highlight button
, Show Selected Subpicture Highlight button , and Show Activated
Subpicture Highlight button in the Menu Viewer. (See “Button subpicture states” on page 54.)
Lock/Unlock column Locks or unlocks a layer in the Menu Viewer so that it can’t be selected, moved, or modified.
Locking layers or layer sets protects the elements from accidental changes. The Lock icon
Button/Object column Converts the layer to a button or back to an object. The Button icon indicates that the layer
indicates that it is locked.
is a button. Converting an object to a button creates a new button layer set with a plus-sign prefix (+) added to its name.
Converting a button set to an object removes the prefix from the layer set name, but leaves the button elements
grouped in a layer set.
59
Use guides to position menu items
Guides help you position items in menus. You can add, move, remove, or lock guides, and turn them on or off. Guides
are visible only in the Menu Viewer. You do not see them when previewing or in the final product. Guides have an
optional setting that makes objects you drag snap to them. The selection boundary and the center point of objects, as
well as the baseline of type, snap to the guides.
You place guides at pixel locations in the menu, the zero point being the upper-left corner of the menu.
The guides you create are specific to that menu. They are saved in the menu and transfer with a menu between Encore
and Photoshop. Any changes you make to the guides in either program transfer with the menu.
Note: When setting guides to align objects in several menus, it is important to remember that you place guides at the pixel
location of the menu, not the screen. Therefore, if you have menus created using square pixels in the same project as
menus using rectangular pixels, guides placed at the same pixel location in each menu can result in different locations on
the screen. For example, horizontal guides placed at 75 pixel do not line up between a 720 x 534-pixel menu (square
pixels) and a 720 x 480-pixel menu (rectangular pixels).
Add a guide
1 Open the menu to which you want to add guides.
2 Choose View > New Guide or click the New Guide button at the bottom of the Menu viewer.
3 Select Horizontal Guide or Vertical Guide orientation, enter a position, and click OK.
Move a guide
❖ Using a selection tool, position the pointer over the guide. When the pointer turns into a double-headed arrow,
move the guide.
Remove guides
• To delete a single guide, using a selection tool, drag the guide completely outside the Menu Viewer.
• To remove all guides, choose View > Clear Guides.
Last updated 4/29/2011
Page 64

USING ENCORE
Menus
Set snap-to or lock guides
❖ Do one of the following:
• To set snap-to guides on or off, choose View > Snap To Guides.
• To lock guides, choose View > Lock Guides.
Show or hide guides
❖ Do one of the following:
• Choose View > Show Guides.
• Click the Show Guides button at the bottom of the Menu Viewer.
Name menus and buttons
To make menus and buttons easier to identify, you can change their default names in the Properties panel.
60
Properties panel for selected menu (left) and selected button (right)
More Help topics
“Renumber buttons” on page 94
Name and describe menus
Names and descriptions of menus can help keep your project organized. In addition, you can use the Description field
to add special notes or to embed web links in a Flash project. (See
page 181.)
1 Select the menu in the Project panel or Menus panel.
2 In the Properties panel, select the current name and type a new name.
3 In the Description box, type any notes about the menu.
To rename a menu or button, you can also right-click (Windows) or Control-click (Mac OS) it and choose Rename.
Type the new name in the dialog box, and click OK.
“Embed web links in your Flash project” on
Last updated 4/29/2011
Page 65

USING ENCORE
Menus
Name a menu button
By default, button names match the text on the buttons. If you change one, the other updates automatically. You can
unlink the button name from the button text and name the button independently. You can also set a button name to
match the name of the element that the button is linked to.
1 In the Menu Viewer, select the button.
2 On the Basic tab of the Properties panel, do one of the following:
• To rename the button without affecting the text on the button in the menu, deselect Sync Button Text And
Name and type a name in the Name box.
• To match the button name with the name of the element linked to, deselect Sync Button Text And Name, and
select Set Name From Link.
• To match the button name and button text, select Sync Button Text And Name, and deselect Set Name From
Link.
Sync Button Text And Name is selected by default and affects only the topmost text layer in the button layer set.
Set Name From Link is deselected by default.
Choose Edit > Preferences > Menus (Windows) or Encore > Preferences > Menus (Mac OS) to change the
default settings of the Set Name From Link and Sync Button Text And Name options.
61
• To add a web link to the Flash output, select Enable Weblink For Flash, and then enter the URL for the link.
Specify the default button for a menu
Each time a menu appears, one button appears highlighted (selected) for the viewer. By default, this is button number
1. When a link leads to a menu, it may designate that a different button appear highlighted. That link setting replaces
the default button only for that viewing of the menu.
Note: Default menu button settings are ignored in Flash projects.
1 Select the menu in the Project panel or Menus panel.
2 In the Properties panel, from the Default Button menu, select the number of the button that you want to be the
highlighted button by default. (For information on assigning different numbers to the buttons in the menu, see
“Renumber buttons” on page 94.)
For menus that let the viewer select audio and subtitle tracks, you can choose to highlight the active track’s button, as
a point of reference for the viewer. Choose Active Audio Track or Active Subtitle Track from the Default Button menu.
More Help topics
“Indicate the active audio or subtitle track” on page 150
Creating menus
Methods for creating menus
You can create menus using any of the following methods:
Predesigned menus You can customize the numerous predesigned menus included in the Library panel and on the
application DVD. These menus give your project a professional look quickly and easily.
Last updated 4/29/2011
Page 66

USING ENCORE
Menus
Predesigned buttons and backgrounds You can start with a predesigned menu background and use the predesigned
buttons included in the Library panel to create menus right in Encore.
Assets from projects You can compose a menu using any visual asset that you import into your project. You can use
both still and moving images for either the background or buttons.
Photoshop You can design menus in Photoshop and import them as menu assets into your project.
When you create a new menu, Encore automatically assigns a menu name based on the asset’s filename. You can
change this name and add a description in the Properties panel. (See
“Name menus and buttons” on page 60.)
More Help topics
“Create menus using predesigned assets” on page 62
“Add objects to a menu” on page 63
“About creating menus in Photoshop” on page 66
Create menus using predesigned assets
An easy way to begin a project is to base your menu on the predesigned menus, buttons, images, and shapes found in
the Library panel.
62
In addition to standard definition, Encore provides an assortment of high-definition menu templates and other assets,
and distinguishes them with an “HD” in their names. These can be used for any type of project (DVD, Blu-ray, or
Flash) and Encore will automatically scale them to the desired menu size when you build the project.
Note: You can use standard-definition menu templates in Blu-ray projects, but rather than scaling up, Encore will create
a standard-definition menu on the Blu-ray disc.
More Help topics
“Add objects to a menu” on page 63
“About creating menus in Photoshop” on page 66
Create a menu based on a predesigned menu
You can create a menu quickly using predefined menus from the Library panel. You can use a menus as is, just
changing the text, or you can swap out images that better reflect the look and feel of your project. The buttons on the
Library panel let you view the elements of the current set by type: menus, buttons, images, backgrounds, layer sets, text,
shapes, and replacement layers.
When you select an item, its preview appears at the top of the panel. Many menus have a companion submenu that
reflects the same style and contains a different number of buttons. The menus include buttons with subpictures (for
highlighting when the button is selected) and fully styled placeholders for text. The buttons on some menus provide a
thumbnail layer for video.
Note: Menus in the Library panel can be saved as regular menus (PSD) or as menu templates (EM). Regular menus
include a background and buttons, but no settings or links are stored. Menu templates include additional information
such as menu settings and background video and audio clips. (See
“About menu templates” on page 104.)
1 In the Library panel, select the set you want to view from the Set menu, and then click the Toggle Display Of Menus
to display the predesigned menus.
button
2 Select the menu that you want to use, and click the New Menu button at the bottom of the Library panel. (Press
the Up Arrow and Down Arrow keys to browse through the templates.)
Last updated 4/29/2011
Page 67

USING ENCORE
Menus
The new menu appears in the Menu Viewer, and the menu is added to the Project panel.
3 Edit the menu to suit the needs of your project:
• Edit the text. In the Tools panel, click the appropriate text tool. Then, click in the menu to create a new text
object, or click an existing text layer and edit the text as desired.
• Delete or duplicate buttons as desired. (See “Cut, copy, or duplicate a menu object” on page 74.)
• Set links from the buttons to other submenus or to items in the Project panel. (See “Buttons and navigation” on
page 155.)
Create a menu based on a background and other assets
Instead of using a predesigned menu template to create a menu, you can piece together a menu starting with a
predesigned background, and then add buttons, images, shapes, and replacement layers included with Encore. These
objects are located in the Library panel.
63
Sample buttons and design items from Library panel
Each button includes subpictures that define how the button looks when selected (highlighted) or activated. The
buttons are in layer sets together with the subpictures, so you can adjust individual elements or the entire button easily
using the Layers panel.
1 In the Library panel, select the set that you want to view from the Set menu, and then click the Toggle Display Of
Backgrounds button
2 Select the background you want to use, and click the New Menu button at the bottom of the panel.
.
A new menu appears in the Menu Viewer, and the menu is added to the Project panel.
3 Add buttons and other design elements as desired.
For example, to add a predesigned button, click the Toggle Display Of Buttons icon in the Library panel, and
then drag a button from the list into the Menu Viewer.
4 Edit the menu items as needed.
Add objects to a menu
You can add still images, buttons, or other assets to a menu. The technique you use depends on the source of the object.
To automatically create buttons and build the links to those assets, simply drag the assets (such as video, menus, or
timelines) to a menu.
Last updated 4/29/2011
Page 68

USING ENCORE
Menus
Buttons, in order to function as individual navigation links, cannot overlap each other. As you add buttons to a menu,
Encore highlights any that overlap with a bright red outline.
Predesigned high-definition assets in the Library panel are marked with an “HD” in their names. You can use them
for any type of project (DVD, Blu-ray, or Flash).
More Help topics
“About replacement layers” on page 106
“Library panel overview” on page 56
“Move objects in a menu” on page 71
Add objects from the Library panel to a menu
1 Open the menu to which you want to add a Library panel element.
2 In the Library panel, select the set you want to view from the Set menu, and then click any of the icons to display
the items for that type.
For example, click the Toggle Display Of Buttons icon to display only buttons.
Shift-click any of the icons to view multiple categories. Alt-click (Windows) or Option-click (Mac OS) any of the
icons to view all categories.
64
3 Select the desired item in the Library panel, and either click the Place button or drag the item from the panel to
the Menu Viewer. Repeat until you have placed all the items you need.
If you click the Place button repeatedly, Encore aligns buttons in a grid, starting along the left edge of the title-safe
guide. You can then select them and move them as a group.
4 Position and resize the items as needed.
Add assets from the Project panel to a menu
1 Create or open a menu.
2 Drag the asset (such as a video file, timeline, or menu) from the Project panel to the menu in the Menu Viewer.
If you drag a timeline or slide show to a blank area in the menu, Encore creates a button that is set as the default button
for the set selected in the Library panel, and links it to the destination. If you drag a video file, a timeline is also created.
If you drag such an asset to an existing button, its contents and link are replaced.
Add still images to the menu background
You can include still images in a menu as part of the background.
1 Open an existing menu or create a new one.
2 In the Project panel, drag the desired image to the Menu Viewer.
3 Using the Direct Select tool , position and size the image as necessary.
(If you want to use the still image as a button, select the image and choose Object > Convert To Button.)
Note: You can also drag an image from Adobe Bridge directly to the menu.
Last updated 4/29/2011
Page 69

USING ENCORE
Menus
Multi-page menus for blu-ray discs
A multi-page menu is a single PSD file containing multiple pages that are linked to each other. A page is a layer group
in the PSD file containing buttons. The buttons link to parts of the menu, or to a chapter point in the timeline.
Note: Multi-page menus are supported only on blu-ray discs. For DVDs, a multi-page menu is converted to a single-page
menu with no changes in functionality.
Buttons in page other than Page 0 are designated as Page <Page Number>: Scene <Scene Number> in the Properties
panel. Flowcharts work with multi-page menus in the same was as they do for single page menus. As with single-page
menus, you cannot use the pick whip for multi-page pop-up menus.
Note: Animated buttons are not supported by multi-page menus.
Create a multi-page menu in Encore
1 Select Window > Library.
2 Drag a menu from the Library panel to the Menu panel. This menu provides the template for the new pages that
you create.
3 Select Menu > Add New Page.
4 In the Layers panel, double-click the page. In the Rename Layer dialog, enter a name for the page.
5 Create new buttons on the page, or copy buttons from other pages.
6 Link the buttons to pages, buttons, chapter points, or assets.
7 To navigate the pages in the menu, use the Show Previous Page and Show Next Page buttons in the menu editor.
The navigation provides you with the browsing sequence of the pages.
65
Create chapter index for multi-page menus
1 Create a menu, and convert the buttons to chapter buttons using the property panel.
2 Create a timeline with chapter markers.
3 Link the first chapter button to the first chapter marker in the timeline.
4 Select Menu > Create Multi Page Chapter Index.
Hide buttons in the Flowchart view
1 Select the thumbnail of the menu containing the buttons that you want to hide.
2 Right-click the thumbnail.
3 Clear Show Buttons.
Delete pages from menus
1 In the Project panel, double-click the menu containing the page you want to delete.
2 Click inside the Menu editor.
3 In the Layers panel, select the page you want to delete.
4 Press Delete.
Last updated 4/29/2011
Page 70

USING ENCORE
Menus
Multi-page menu display
If you have not customized the browsing sequence, the first page of the multi-page menu (Page 0) is displayed first
when the user opens the disc. Thereafter, the pages are browsed sequentially. The ordering of the pages in the layer
panel (ascending order), decides the default navigation for the pages. You can override the default navigation by
linking the pages according to your requirement using buttons.
66
Layers view of the multi-page menu
Note: There is no group called Page 0. Page 0 is a logical container unlike other pages. Layers that lay outside the layer
groups for pages belong to Page 0.
More Help topics
“Create a multi-page menu in Photoshop” on page 68
Using Photoshop to create menus
About creating menus in Photoshop
Encore is designed to work directly with Adobe Photoshop to build and edit menus and buttons. You can create entire
menus or elements for menus (such as buttons and backgrounds) in Photoshop and import them directly into Encore.
You can also edit Encore menus at any time in Photoshop, and have the changes updated immediately.
Last updated 4/29/2011
Page 71

USING ENCORE
Menus
Menus, including the menus created in Encore, use the Photoshop PSD file format. All layers and layer sets you create
in Photoshop remain intact when you import them into a project. If you follow the layer-naming convention, Encore
automatically recognizes button sets, button subpictures, replacement layers, and video thumbnails. After importing,
you can edit or modify the menu, or return to Photoshop to fine-tune it using the extensive design tools in Photoshop.
Visit Resource Center on the Adobe website to view a tutorial about editing menus in Photoshop.
When creating menus in Photoshop, consider the following:
Menu size Set the size and pixel aspect ratio of your background images and menus to match the frame dimensions
and pixel aspect ratio of your TV standard. Photoshop includes preset image sizes for digital video projects.
67
Format Frame dimensions (in
pixels)
NTSC fullscreen (standard definition) 720 x 480 0.9 720 x 534
NTSC widescreen (standard definition) 720 x 480 1.2 854 x 480
PAL fullscreen (standard definition) 720 x 576 1.07 768 x 576
PAL widescreen (standard definition) 720 x 576 1.42 1024 x 576
High-definition formats 1280 x 720 1.0 1280 x 720
1440 x 1080 1.33 1920 x 1080
1920 x 1080 1.0 1920 x 1080
Button size Create buttons at least 70 x 60 pixels in size to guarantee their visibility on a television.
Number of buttons Include no more than 36 buttons for a fullscreen (4:3 aspect ratio) menu or 18 buttons for a
Pixel aspect ratio Equivalent frame dimensions in
square pixels
widescreen (16:9) aspect ratio.
Graphic elements Use vector shapes and masks, rather than bitmaps, where possible, because scaling these elements
does not affect their quality. If creating pixelated content, such as buttons and logos, make sure that you create them
at the largest size needed for the disc. If you want to resize some elements, it is better to scale a pixelated object down,
rather than up. (Scaling images up can cause quality loss; scaling images down does not.)
RGB color Create your images using RGB color. Convert any CMYK images to RGB before importing them into
Encore.
NTSC colors Use only NTSC-safe colors if you want to play your project on an NTSC television display. You can create
colors in your graphics application that are beyond the color range that NTSC televisions can display. These colors can
cause an unwanted halo effect. Use RGB values from 0 through 255.
Horizontal lines Set lines at three pixels or greater. Horizontal lines thinner than three pixels flicker when displayed
on a television screen.
Font size Use a font size of 20 points or greater to ensure that the viewer can comfortably read titles and button text.
For a video tutorial on creating menus in Photoshop, see www.adobe.com/go/vid0241.
More Help topics
Video about creating menus in Photoshop
Last updated 4/29/2011
Page 72

USING ENCORE
Menus
Create a multi-page menu in Photoshop
Prefix the name of the group with (#) for Encore to recognize the group as a page.
1 Open a file in Photoshop, and select Window > Layers.
2 Click inside the Layers panel, and select Layer > New > Group.
3 In the New Group dialog, enter (#) <Page Name>. For example, to name the page Page 1, enter (#) Page 1.
4 Create button groups within the page.
5 Repeat the steps to create as many pages as you require.
Duplicate the page layer, and rename the buttons if you are planning to maintain a uniform appearance across
pages.
6 Save the menu in the corresponding Library folder as a PSD file.
7 Open Encore, and select Windows > Library.
8 In the Set menu, select the category in which you have saved the PSD file. For example, if you had saved your file
in the Corporate folder, select Corporate.
9 Select the PSD in the library panel, and drag it to the menu panel.
10 Link the buttons to pages, buttons, chapter points, or assets.
11 To navigate the pages in the menu, use the arrow buttons. The navigation provides you with the browsing sequence
of the pages.
Note: The icon <insert image> denotes a multi-page menu, and the icon <insert image> denotes a multi-page pop-up menu.
68
Layer name prefixes for menus
For Encore to recognize the components of a menu from Photoshop, add predefined prefixes to the layer names. The
prefixes identify the layers as button sets, video thumbnails, replacement layers, and button subpictures. This lets you
import a finished menu that is ready to use in the project. You can also manipulate and change elements from within
Encore.
Instead of creating menus from scratch in Photoshop and adding all the prefixes manually, you may want to open a
menu template that’s similar to the one you want to create, save it as a Photoshop file, and then edit the exported file
in Photoshop.
Last updated 4/29/2011
Page 73

USING ENCORE
Menus
69
Layers panel in Photoshop (left) compared to the same layers in Layers panel in Encore (right)
The following layer-name prefixes identify the components of your menu.
Menu item Photoshop component Layer-name prefix Example
Button Name Layer set that contains button components (+) (+)Daisy button 1
Chapter Button Layer set that links to the chapter in a timeline or slide
show when chapter indexes are created
See “About chapter indexes” on page 107
Next Button Layer set that links to the next submenu when chapter
indexes are created
Previous Button Layer set that links to the previous submenu when
chapter indexes are created
Main Button Layer set that links to the main menu when chapter
indexes are created
Button Text Text layers within the button layer set Daisy button
Button Image Image layers within the button layer set Daisy image
Button Subpictures (optional) Single-color image layers. Each layer represents one color
of the three-color button subpictures
See “Create subpictures in Photoshop” on page 87
(+#) (+#)Chapter 1
(+>) (+>)Next
(+<) (+<)Previous
(+^) (+^)Main Menu
(=1)
(=2)
(=3)
(=1)Text highlight
(=2)Daisy outline
(=3)Check mark
Last updated 4/29/2011
Page 74

USING ENCORE
Menus
Menu item Photoshop component Layer-name prefix Example
70
Video Thumbnail (optional) Image layer within the layer set that serves as a
Replacement Layer Layer that acts as a drop zone for images
Other design elements or text
(such as logo or menu title)
placeholder for video
See “Create video thumbnail buttons” on page 99
See “About replacement layers” on page 106
Individual layer None required Summer Flowers
(%) (%)Daisy thumbnail
(!) (!)Daisy image
Edit a menu in Photoshop
As your project evolves, you may want to change elements in a menu. Encore is designed to work directly with
Photoshop. Without closing the project, you can jump to Photoshop to refine any menu, even menus created in
Encore. Once you save the changes in Photoshop, the changes automatically appear in Encore.
1 Select the menu that you want to edit in either the Project or Menus panel.
2 Choose Edit > Edit Menu In Photoshop, or click the Edit Menu In Photoshop button in the Tools panel.
Photoshop starts, displaying the selected menu.
3 Make changes as necessary.
4 In Photoshop, choose File > Save, and then File > Close.
Photoshop saves the file to the project folder. It does not overwrite the original file that you imported into your project.
Note: When you import a menu into Encore, it creates a copy of the menu. The Edit Menu In Photoshop command opens
this copy, not the original file. Photoshop saves any changes to the copy. If you want to update the original as well, be sure
to first save the copy so that your project contains the revised menu. Once the copy is saved, you can also save changes to
the original file by choosing File
> Save As In Photoshop or Menu > Save Menu As File In Encore.
Edit menus
Select objects
To edit objects on a menu, you need to select them first using one of the selection tools. The Tools panel contains two
selection tools for editing objects:
Selection tool Selects an entire button set (a button, its text, and subpictures together) so that it can be manipulated
as a unit.
Direct Select tool Selects individual layers so that they can be manipulated on their own.
Note: The Move tool does not select objects. The Move tool is used for moving objects after you select them. (See “Move
menu objects or layer sets” on page 71.)
Last updated 4/29/2011
Page 75

USING ENCORE
Menus
AB
Selecting objects
A. Selected button B. Selected layer
When selecting objects, remember that each object is on a separate layer and that the layers are stacked one on top of
another. Using the selection tools, you can select objects on lower layers as long as you click at a point where no other
object overlaps. Using the Layers panel, you can easily select objects individually, even when several elements overlap.
1 Open the menu that you want to modify.
2 Do one of the following:
• Click an object directly in the Menu Viewer using either the Selection tool to select a button or the Direct
Select tool to select a layer. Shift-click each additional object that you want to select.
• Using the Selection tool, drag a box (or marquee) around one or more objects in the Menu Viewer.
• In the Layers panel, click the object’s layer or the layer set. Shift-click each additional layer or layer set that you
want to select.
Selection handles appear on all the selected items in the Menu Viewer. When you select a button, a heavy outline
appears. This outline encompasses all elements within the button.
71
Move objects in a menu
When a menu contains multiple objects, it’s often difficult to select just the object you want to move. The Layers panel
or context menu can help you isolate an object before moving it.
Move menu objects or layer sets
1 Open the menu that you want to modify.
2 In the Menu Viewer or Layers panel, use a selection tool to select the object or layer set you want to move. (See
“Select objects” on page 70.)
3 In the Menu Viewer, do one of the following:
• Drag the button set or object in the menu using the appropriate selection tool. Shift-drag to constrain the
movement horizontally, vertically, or diagonally. To create a copy and move the copy to a new location, hold
down Alt (Windows) or Option (Mac
• To prevent a different object from being selected, click the Move tool in the Tools panel, and then drag
anywhere in the Menu Viewer to move the selected object.
• Press an arrow key to nudge an object one pixel at a time. Press Shift+arrow key to move an object 10 pixels at
a time.
OS) and drag it.
Last updated 4/29/2011
Page 76
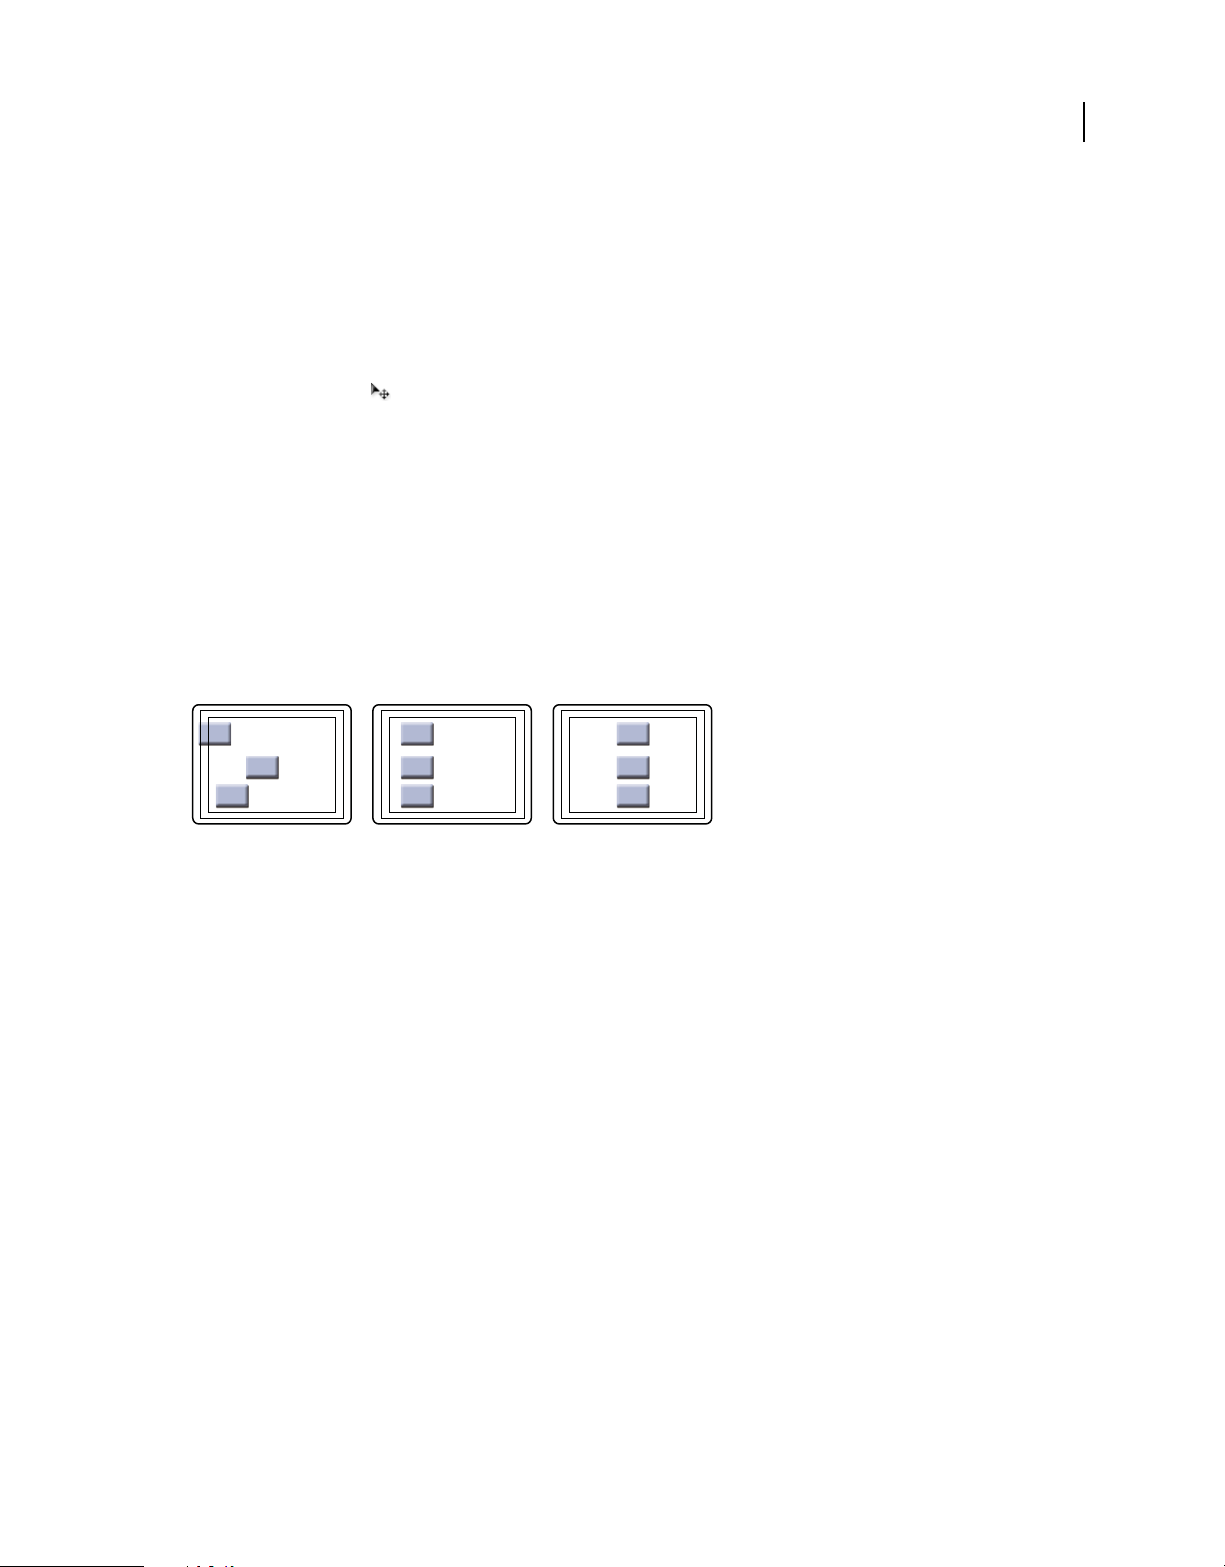
USING ENCORE
Menus
Move an object within a stack
In some cases, you may not be able to click directly on a layer to select it because the layer is obscured by overlapping
layers. Using the context menu lets you select a layer within a stack in the Menu Viewer. To prevent another layer from
being selected accidentally when you try to move the layer within a stack, you use the Move tool.
1 Using a selection tool, right-click (Windows) or Control-click (Mac OS) the stacked objects in the Menu Viewer.
2 Choose Select from the context menu, and then choose a named object in the list.
3 Click the Move tool , and then drag the object to the desired location. To view a menu of the object’s layers,
Ctrl+right-click (Windows) or Command+Control-click (Mac OS).
Another way to select an object within a stack is by using the Layers panel.
Align menu objects
Using the Align command, you can easily align buttons and subpictures with each other or with other design elements
in a menu. Encore gives you several options for aligning objects. You can align the left, center, or right edges on the
vertical axis; or you can align the top, middle, or bottom on the horizontal axis. You can either align the objects relative
to each other or align them to the title safe area. Alignment always occurs within a rectangle, either to the title safe area
or the bounding box that encompasses all the objects. The Align Center option, for example, centers the objects within
this rectangle.
72
A B C
Comparison of the Align Center command with and without Relative To Safe Areas selected
A. Original position B. Align Center with Relative To Safe Areas off C. Align Center with Relative To Safe Areas on
1 Open the menu that you want to modify.
2 In the Menu Viewer or Layers panel, select the objects you want to align.
3 Choose Object > Align > Relative To Safe Areas if you want the objects aligned to the title safe area and the option
is not already selected.
Note: A check mark next to the Relative To Safe Areas indicates it is turned on. To turn the option off, choose it again
> Align > Relative To Safe Areas).
(Object
4 Choose Object > Align and one of the following options:
Left Aligns the left sides of the selected objects to either the left side of the title safe area or the leftmost object.
Center Aligns on a vertical axis the center of the selected objects to either the center of the title safe area or to the
center of a bounding box that encompasses all the objects.
Right Aligns the right side of the selected objects to either the right side of the title safe area or the rightmost object.
Top Aligns the top of the selected objects to either the top of the title safe area or the topmost object.
Middle Aligns on a horizontal axis the middle of the selected objects to either the center of the title safe area or the
center of a bounding box that encompasses all the objects.
Bottom Aligns the bottom of the selected objects to either the bottom of the title safe area or the lowest object.
Last updated 4/29/2011
Page 77

USING ENCORE
Menus
Distribute menu objects
If you want a series of buttons or objects to be evenly spaced, you don’t need to calculate the appropriate distance
between them. The distribute options can place them evenly apart for you, either horizontally or vertically. You can
choose to distribute them between the two outermost objects or between the borders of the title safe area.
A B C
Distributed objects
A. Original position B. Distribute Vertically with Relative To Safe Areas turned off C. Distribute Vertically with Relative To Safe Areas turned
on
1 Open the menu that you want to modify.
2 In the Menu Viewer or Layers panel, select the objects you want to distribute.
3 Choose Object > Distribute > Relative To Safe Areas if you want the objects distributed relative to the title safe area
and the option is not already selected.
Note: A check mark next to the Relative To Safe Areas indicates it is turned on. To turn the option off, choose it again.
73
4 Choose Object > Distribute, and then choose one of the following from the list that appears:
Vertically Distributes the objects evenly between the top and bottom boundaries of the title-safe area (if Relative
To Safe Areas is turned on) or between the topmost and bottommost objects (if Relative To Safe Areas is turned off).
Horizontally Distributes the objects evenly between the left and right boundaries of the title-safe area (if Relative
To Safe Areas is turned on) or between the leftmost and rightmost objects (if Relative To Safe Areas is turned off).
Change the stacking order of menu objects
As in Photoshop, the stacking order in the Layers panel determines whether the content of a layer or layer set appears
in front of or behind other elements in the menu. When you create or import a menu, the background is always the
bottommost layer. A menu can have only one background, and it must remain the bottom layer.
Comparison of object in front (left) and sent backward with Arrange command (right)
1 Open the menu that you want to modify.
2 In the Menu Viewer, select the object you want to move in the stacking order.
Last updated 4/29/2011
Page 78

USING ENCORE
Menus
3 Choose Object > Arrange, and then choose one of the following:
• Bring To Front to move the selected item to the front.
• Bring Forward to move the selected item one level forward.
• Send Backward to move the selected item one level backward.
• Send To Back to move the selected item to the back.
More Help topics
“Move an object within a stack” on page 72
Cut, copy, or duplicate a menu object
1 Open the menu that you want to modify.
2 In the Menu Viewer or Layers panel, select the object.
3 Do one of the following:
• To remove the object, choose Edit > Clear, or press the Delete key.
• To duplicate the object, choose Edit > Duplicate. Encore duplicates the object, offsetting it from the original. If
the object was in a layer set, it copies the object to the top layer of the same layer set.
• To copy the object and move it to a new location, hold down Alt (Windows) or Option (Mac OS) and drag the
object.
• To copy the object and paste it into the same menu, choose Edit > Copy. Then choose Edit > Paste.
• To copy the object and paste into a different menu, choose Edit > Copy. Then open the other menu in the Menu
Viewer, and without selecting anything, choose Edit
original menu.
> Paste. The object is pasted in the same position as in the
74
Move or copy a menu object into another layer set
1 Open the menu that you want to modify.
2 In the Menu Viewer or Layers panel, select the object.
For multilayered menus, it is easier to use the Layers panel to select the object.
3 Choose Edit > Cut to move the object or Edit > Copy to copy it.
4 In the Layers panel, open the layer set into which you want to add the object, and select any object in the layer set.
5 Choose Edit > Paste.
Encore adds the object to the top layer of the layer set. You can also use the Object > Arrange commands to change the
order of objects.
Replace a menu with another menu
If you want to change the menu design after you create a menu, you can use the Replace Menu command. When you
replace a menu, Encore preserves menu settings, including button links, button order, and loop count.
1 Open the menu in the Menu Viewer.
2 Specify the replacement menu by doing one of the following:
• Select a menu template in the Library panel, and click the Replace button .
Last updated 4/29/2011
Page 79

USING ENCORE
Menus
• Choose Menu > Replace Menu, navigate to the desired menu, and click Open.
The appearance and layout of the menu are replaced by those of the new menu. If the new replacement menu
contains more buttons than exist in the original menu, the extra buttons link to no destination. If the replacement
menu contains fewer buttons, the buttons from the original menu are preserved, but in the style of the default
button in the replacement menu. Both the original menu and its replacement must have at least one button.
Convert an object to a button
When you convert an object to a button, Encore creates a layer set with the prefix denoting a button set (+) attached
to the name. It places the object into the layer set and creates a subpicture for the button. If you convert an object’s
layer set into a button, Encore creates a subpicture layer only if one doesn’t already exist.
1 Open the menu that you want to modify.
2 In the Menu Viewer or Layers panel, select the object you want to convert to a button. Select multiple objects to
convert them all to buttons at the same time or select a layer set to convert the entire set into a button.
3 Choose Object > Convert To Button, or click the Button column next to the image layer in the Layers panel.
Note: Buttons cannot overlap other buttons in order to function as individual links. Encore highlights overlapping
buttons in red to use as a guide and a reminder.
75
Convert a button or replacement layer to an object
When you convert a button to an object, you remove linking and navigation capabilities from the button. When you
convert a replacement layer to an object, you remove the ability to replace the layer’s contents by dragging and
dropping.
1 Open the menu that you want to modify.
2 In the Menu Viewer or Layers panel, select one or more buttons or replacement layers that you want to convert to
objects.
3 Choose Object > Convert To Object.
More Help topics
“Convert an object to a button” on page 75
Styling and transforming menu objects
About predefined styles
Styles let you quickly change the appearance of a layer or object in a menu. Styles are predesigned Photoshop layer
effects, such as shadows, glows, bevels, overlays, and strokes, that you can apply to most layers in a menu. Once applied,
the effects are linked to the object. When you move or edit the object, the effects change with the object.
Last updated 4/29/2011
Page 80

USING ENCORE
Menus
AB
C
D
EFG
Styles panel
A. Name of currently displayed set B. Preview of selected style C. Panel menu with additional options D. Buttons to display different types of
styles: Image, Text, and Shape E. Apply Style F. New Item G. Delete Item
76
The Styles panel divides styles into three categories: Image, Text, and Shape. You can apply any style to an individual
layer, except subpicture highlight layers—layers with the (=1), (=2), or (=3) prefix. When styles are applied to layer sets
or buttons, they affect the layers within the set according to their style category. The layers they affect depend upon the
category:
Image Applies the style to all layers in a layer set (except highlight layers).
Text Applies the style to the first text layer in a layer set that is not a highlight layer.
Shapes Applies the style to the first shape layer in a layer set that is not a highlight layer.
Styles generally fully replace any existing effects applied to a layer. The Styles panel includes a few styles that add to the
existing effects in a layer rather than completely restyle it. Additive styles have a plus sign (+) at the beginning of their
names. You can create your own styles and add them to the Styles panel, or group styles into sets. (See
“About creating
styles” on page 96.)
Apply styles and transformations
Apply a style to a button or layer set
1 Select the button in the Menu Viewer or in the Layers panel.
2 In the Styles panel, select the style, and click the Apply Style button .
If your menu contains a styled layer that you like, you can quickly create a new style by dragging the layer directly
to the Styles panel. The new style contains any effects applied to the layer. (See “About creating styles” on page 96.)
Add a drop shadow
Drop shadows add depth to a menu. You can apply the drop shadow effect to any object in the menu, be it text, buttons,
or other graphic element.
Last updated 4/29/2011
Page 81

USING ENCORE
Menus
Encore gives you extensive control over the look of the shadow, letting you specify its color, opacity, angle, offset, size,
and spread. You apply drop shadows to individual elements or to layer sets. Because the effect is applied to the element,
when you move or resize the element, or edit the text, the drop shadow moves, resizes, or changes shape accordingly.
If you apply a drop shadow to a button or layer set, Encore applies it to the bottommost layer.
The Styles panel contains many predesigned Photoshop layer effects, including drop shadows, that let you quickly
change the look of a button or other element. See “About predefined styles” on page 75.
1 Open the menu containing the buttons you want to modify.
2 In the Layers panel, click the layer of the element to which you want to add a drop shadow. If the element is in a
layer set, you may need to open the layer set first.
3 Choose Object > Drop Shadow, and select Drop Shadow in the Drop Shadow dialog box.
4 To change the color, click the color swatch.
5 In the Color Picker dialog box, adjust the color using one of the following methods (the color you select appears in
the top half of the color swatch; the original color remains in the bottom half):
• Locate the color range you want by dragging the triangle sliders on the color spectrum bar, and then click a color
in the color field.
• Click the buttons for Hue, Saturation, and Brightness, or Red, Green, and Blue (the color field changes for each
button you click), and then click in the color field to select a new color.
• Change the number values by either clicking each one and typing a new value, or by dragging the double-arrow
pointer left or right over the number to decrease or increase the value.
• Type a new hexadecimal color value in the # text box.
6 Click OK to close the Color Picker.
The new color replaces the original color in the Drop Shadow dialog box.
77
7 To change the other properties of the drop shadow, drag the double-arrow pointer left or right over a value to
decrease or increase it. You can click the Preview option off and on to see the before and after effects of each
property.
Opacity Sets the opacity of the shadow.
Angle Specifies the lighting angle of the shadow.
Distance Specifies how far the shadow should be offset from the object.
Size Sets the size of the shadow.
Spread Expands the boundaries of the shadow.
8 To apply the drop shadow, click OK.
Drop shadows applied using Object > Drop Shadow may be replaced or removed when you apply a predefined style.
You can edit the drop shadow in Photoshop when you’re editing the menu.
Rotate menu objects
1 In the Menu Viewer, select one or more objects.
2 Do one of the following:
• To rotate in 90° increments, choose Object > Rotate > 180°, 90° CW (clockwise), or 90° CCW (counter-
clockwise).
Last updated 4/29/2011
Page 82

USING ENCORE
Menus
• To rotate in any increment, click the Rotate tool in the Tools panel, and drag from outside one of the object’s
eight selection handles (the pointer becomes a curved, two-sided arrow). Drag left to rotate counterclockwise or
right to rotate clockwise. Holding down the Shift key constrains rotation to 45° increments. Items rotate around
their center points.
Resize (scale) menu objects
As you fine-tune your menu, you often need to adjust the size of the elements. You scale objects on a menu manually
with the mouse. You can scale multiple objects or layer sets together as a group.
1 Open the menu that you want to modify.
2 In the Menu Viewer or Layers panel, select the objects you want to scale.
3 Do one of the following:
• Drag a handle.
• To proportionally scale the object, Shift-drag a handle.
• To scale from the object’s center point, hold down the Alt key (Windows) or Option key (Mac OS) and drag a
handle. (The center point maintains its position on the page.)
• To scale proportionally from the object’s center point, hold down Shift-Alt (Windows) or Shift-Option
OS) and drag a handle. (The center point maintains its position on the page.)
(Mac
Note: If multiple items are selected, dragging the handle of one object scales all the objects at the same time.
78
Flip menu objects
You can flip an object in a menu either horizontally or vertically.
A B C
Comparison of flipping object horizontally and vertically
A. Object as originally placed B. Flipped horizontally C. Flipped vertically
1 Open the menu containing the object you want to flip.
2 In the Menu Viewer or Layers panel, select the object (or objects) you want to flip.
3 Choose either Object > Flip Horizontal or Object > Flip Vertical.
Adding text to menus
About text in menus
Encore lets you type text directly onto a menu. You can type text either horizontally or vertically, and either freely or
constrained to a bounding box. In addition to providing standard control over the appearance of the type, Encore also
lets you transform a text block as if it were an object. You can edit the text you add to a menu in either Encore or
Photoshop. Any changes you make to the text in Photoshop appear in the Encore menu.
Last updated 4/29/2011
Page 83

USING ENCORE
Menus
The Tools panel contains two different text tools: the Text tool and the Vertical Text tool . Using either tool, you
can enter text either freely or within a bounding box.
To enter text freely, you simply click where you want the text to begin. You control how the text wraps by using the
Enter key. The text is not constrained. Typing text freely is convenient for quickly entering single words, such as on
buttons.
To enter text within a bounding box, you first drag the pointer to define the text block. When you type, the text wraps
when it reaches the edge of the box. While you can continue to enter text when the type hits the bottom (or edge for
vertical type), Encore displays only the text that fits in the box. The bounding box can be useful when trying to arrange
type in a specific area of the menu. You can resize the bounding box, which causes the text to reflow, changing the line
endings and possibly how many lines of text display.
Comparison of entering text freely (left) or within bounding box (right)
Note: Encore supports Text On A Path created in Photoshop, even though it does not provide the layout tools to create it
from scratch.
79
To exit text mode and commit the text changes, you can press the Esc key. (For more keyboard shortcuts, see “Using
keyboard shortcuts” on page 186.)
Character panel overview
Encore gives you advanced typographic control over your text. Using the Character panel, you can kern, track, shift
the baseline, and scale text. You can set type attributes before you enter characters, or you can restyle and reformat
existing text. The Character panel also provides various formatting options for Asian text. Most of the options in the
panel let you either type a value or select from a menu of preset values. (To apply formatting options, see
on page 85.)
E
A
B
C
D
F
“Format text”
Character panel with Asian text options displayed
A. Fonts and font attributes B. Font Style buttons C. Alignment options D. Asian Text options E. Character panel menu F. Text Anti-alias
Mode options
Last updated 4/29/2011
Page 84

USING ENCORE
Menus
Fonts and font attributes
The Character panel gives you precise control over individual characters including font, size, color, leading, kerning,
tracking, and baseline shift. You can also stretch or shrink the type using horizontal or vertical scaling and apply color.
(To apply font attributes, see
A
B
“Format text” on page 85.)
80
C
D
E
F
Fonts and font attributes in the Character panel
A. Font B. Font Style C. Font Size D. Kerning E. Vertical Scale F. Baseline Shift G. Leading H. Tracking I. Horizontal Scale J. Color
G
H
I
J
Font Specifies the font for the text.
Font Style Determines the font style, such as Medium, Oblique, Bold, or Bold Oblique. (The options depend upon the
selected font.)
Font Size Sets the point size of the font.
Kerning Kerns the letters on either side of the insertion point. Kerning sets the space between specific letter pairs.
To give the appearance of more even spacing, some letter pairs look better if pushed closer together, such as “VA” or
“Te.” A positive value loosens the space between letter pairs; a negative value tightens the space. Most fonts come with
preset kerning values for specific letter pairs. Metric uses the font’s original kerning values.
Note: You cannot apply kerning across a range of selected characters. Kerning works only when an insertion point is
placed between a pair of characters.
Vertically Scale Stretches or shrinks the text vertically, relative to the baseline.
Baseline Shift Shifts type from its baseline. A positive value raises the type; a negative value lowers it.
Leading Sets the leading (the amount of space between lines of type measured baseline to baseline). Auto sets the
leading at 120% of the font size of the text. If characters on a line have different settings, Encore uses the largest leading
value for the entire line.
Tracking Applies tracking values to insert or remove space evenly through the selected text. Positive tracking
values move the characters apart; negative tracking values move characters closer together.
Horizontally Scale Stretches or shrinks the text horizontally.
Color Applies color to the text. Click the color to display the Color Picker dialog box.
Font style buttons
The style buttons on the Character panel let you apply multiple type styles to text. (To apply font styles, see “Format
text” on page 85.)
Last updated 4/29/2011
Page 85

USING ENCORE
Menus
A B C D E F G H
Font style buttons in the Character panel
A. Faux Bold B. Faux Italic C. All Caps D. Small Caps E. Superscript F. Subscript G. Underline H. Strike through
Faux Bold Applies a simulated or faux bold style to the selected text. (To apply the actual bold style included with
the font, if any, choose it from the Font Style pop-up menu on the Character panel.)
Faux Italic Applies a simulated or faux italic style to the selected type. (To apply the actual italic style included with
the font, if any, choose it from the Font Style pop-up menu on the Character panel.)
All Caps Capitalizes all the letters in the selected text.
Small Caps Replaces all the lowercase letters in the selected text with small capitals.
Superscript Converts the selected text to a superscript. Superscript characters are reduced in size and shifted above
the type baseline.
Subscript Converts the selected text to a subscript. Subscript characters are reduced in size and shifted below the
type baseline.
Underline Underlines the selected text.
81
Strike Through Changes the selected text to strike through characters.
Alignment options
The alignment options on the Character panel set the alignment for an entire paragraph. In vertical text blocks, the
alignment options change to match the orientation of the text. Align Left and Align Right become Align Top and Align
Bottom, while Center Align and Justify Last Left adjust text between the top and bottom of the text block. (To apply
alignment options, see
A B C D E F G H
Alignment options in the Character panel
A. Align Left B. Align Center C. Align Right D. Justify Last Left E. Align Top F. Align Center G. Align Bottom H. Justify Last Top
“Format text” on page 85.)
Text anti-alias options
Anti-aliasing smooths the jagged edges of text by softening the color transition between the edge pixels of the
characters and the background pixels. Anti-aliasing applies to all the characters in the text block. (To apply antialiasing, see
Anti-aliasing options in Character panel
“Format text” on page 85.)
The Text Antialias Mode option in the Character panel has five possible settings:
None Turns off anti-aliasing for all characters in the text block.
Sharp Slightly reduces the jagged edges of the characters, applying the minimal amount of anti-aliasing.
Crisp Sharpens the edges of the characters.
Last updated 4/29/2011
Page 86

USING ENCORE
Menus
Strong Makes the characters appear heavier.
Smooth Makes the characters appear smoother by softening the transition between the edge pixels and the
background.
Asian text options
The Character panel includes several options for formatting Chinese, Japanese, and Korean (CJK) characters (also
known as double-byte or multibyte characters). You can toggle the display of these options within the panel by choosing
Show Asian Text Options from the Character panel menu. (The Character panel menu contains additional options for
Asian text. To apply the Asian text options, see
Asian text options in Character panel
Tsume Reduces the space around a character by the specified percentage. Encore reduces the spacing around both
sides of the character equally. The greater the percentage, the tighter the compression between characters. At 100%
(the maximum value), there is no space between the character’s bounding box and its em box.
Kinsoku Shori Determines line breaks in Japanese type. Characters that cannot begin a line or end a line are known as
kinsoku characters. Encore includes weak and maximum kinsoku sets. The None option turns off the use of kinsoku
shori. The options JIS Weak or JIS Maximum prevent the following characters from beginning or ending a line.
“Format text” on page 85.)
82
JIS Weak set JIS Maximum set
Characters that can’t begin a line Characters that can’t begin a line
Characters that can’t end a line Characters that can’t end a line
Mojikumi Determines spacing between punctuation, symbols, numbers, and other character classes in Japanese type.
Encore includes several predefined mojikumi sets.
• None turns off the use of mojikumi.
• Mojikumi Set 1 uses half-width spacing for punctuation.
• Mojikumi Set 2 uses full-width spacing for all characters except the last character in the line.
• Mojikumi Set 3 uses half-width spacing for punctuation and full-width spacing for other characters, including the
last character in the line.
• Mojikumi Set 4 uses full-width spacing for all characters.
Push In First Prioritizes moving characters up to the previous line to prevent prohibited kinsoku characters from
ending or beginning a line.
Last updated 4/29/2011
Page 87

USING ENCORE
Menus
Push Out First Prioritizes moving characters down a line to prevent prohibited kinsoku characters from ending or
beginning a line.
Push Out Only Always moves characters down a line to prevent prohibited kinsoku characters from ending or
beginning a line.
Burasagari Allows single-byte periods, double-byte periods, single-byte commas, and double-byte commas to fall
outside the paragraph bounding box.
Bottom-To-Bottom Leading Measures the space between lines of type from baseline to baseline. (The bottom of most
characters rests on the baseline.)
Top-To-Top Leading Measures the spacing between lines of type from the top of one line to the top of the next line.
Vertical text options
The Character panel menu contains several options that apply to vertical text. You can rotate characters, control line
breaks, and set the method used to calculate leading. (To apply character options, see
Rotate Character Changes the orientation of the selected characters from vertical to horizontal. Each character rotates
90º on its own axis within the line of type, resulting in one character placed above the next. You cannot rotate
horizontal text or double-byte characters. (Full-width characters are only available in Chinese, Japanese, and Korean
fonts.) Therefore, any double-byte characters in the selected range will not be rotated.
“Format text” on page 85.)
83
Original text (left) and text with rotation applied (right)
Tate-chuu-yoko (Also called kumimoji and renmoji) Changes the orientation of the characters from vertical to
horizontal. The characters rotate 90º as a group. You can select, edit, and format the rotated text just as you do the
vertically oriented characters. These features are often used to combine Asian and Roman characters and cannot be
applied to horizontal text.
Original text (left) and text with tate-chuu-yoko applied (right)
Add and format text
Add text to a menu
1 Open the menu to which you want to add text.
Last updated 4/29/2011
Page 88

USING ENCORE
Menus
2 Select either the Vertical Text or Horizontal Text tool from the Tools panel. The pointer changes to an I-beam
within a dotted box. The small horizontal line near the bottom of the I-beam marks the baseline on which the text
rests.
3 Do one of the following:
• Position the baseline of the I-beam pointer where you want the text to be located, and click to set the entry point
for the text. The insertion point appears.
• Drag the I-beam pointer to define the bounding box for the text. When you release the mouse button, the
insertion point appears. Its location is determined by the alignment option set in the Character panel.
4 In the Character panel, select the attributes you want for the text. (See “Character panel overview” on page 79.)
You can change the orientation of vertical text by using the Rotate Character command in the Character panel menu.
5 Type the desired text.
To exit text mode and commit the text changes, you can press the Esc key. (For more keyboard shortcuts, see “Using
keyboard shortcuts” on page 186.)
Resize the text bounding box
1 Open the menu containing the text block.
2 Select either the Vertical Text or Horizontal Text tool from the Tools panel.
3 Click an insertion point in the text.
The text bounding box appears.
84
Note: If you don’t see a bounding box, you entered the text freely and must manually change the line breaks.
4 Position the pointer over a selection handle. When it changes to a double-headed arrow, drag the handle to resize
the bounding box. The text reflows within the box.
Resizing a text bounding box with overflowed text
Important: Be sure to use a text tool when resizing the text block. If you drag a bounding box handle using a selection
tool, it scales the text as if it were an object, and the text does not reflow.
Select text
Before you can format or change type, you must select it. To change a range of characters, a word, or paragraph within
a text block, you select the text using the Text tool. You use the Direct Select tool or the text layer in the Layers panel
to select the entire block of text.
You can drag, scale, rotate, align, and distribute a text block as you would to transform any other object in the menu.
Last updated 4/29/2011
Page 89

USING ENCORE
Menus
More Help topics
“Character panel overview” on page 79
Select individual characters, words, or paragraphs
1 Open the menu that you want to edit.
2 Select a text tool from the Tools panel, and do one of the following:
• Drag-select the type. (Shift-click to extend or reduce an existing selection.)
• Double-click a word to select it.
• To select one word to the right, click an insertion point and press Shift+Ctrl+Right Arrow (Windows) or
Shift+Command+Right Arrow (Mac
• To select one word to the left, click an insertion point and press Shift+Ctrl+Left Arrow (Windows) or
Shift+Command+Left Arrow (Mac
• To select just the line, triple-click a line within a paragraph.
• To select the entire paragraph, quadruple-click within a paragraph.
• To select the previous paragraph, click an insertion point at the beginning of a paragraph, and press
Shift+Ctrl+Up Arrow (Windows) or Shift+Command+Up Arrow (Mac
• To select the next paragraph, click an insertion point at the end of a paragraph, and press Shift+Ctrl+Down
Arrow (Windows) twice or Shift+Command+Down Arrow (Mac
For more keyboard shortcuts on selecting text, such as entire blocks of text, see “Keys for working with text in menus
and subtitles” on page 188.
OS).
OS).
OS).
OS) twice.
85
Transform a text block
1 Open the menu that you want to edit.
2 Select the text block by using one of the following techniques:
• Click the text directly in the Menu Viewer using the Direct Select tool .
• In the Layers panel, click the text layer.
3 Transform the text block as you would any other object. (See “Styling and transforming menu objects” on page 75.)
Format text
You use the Character panel to change the font and other text attributes.
Change the attributes of characters, words, or paragraphs
1 Open the menu that you want to edit.
2 Select the characters, words, or paragraphs you want to change.
3 In the Character panel, select the type attributes you want for the text. (See “Character panel overview” on page 79.)
Change the attributes of all the text in a text block
1 Open the menu that you want to edit.
2 Do one of the following actions:
• Click an insertion point within the text block using the appropriate text tool, and choose Edit > Select All.
• Using the Direct Select tool , click the text block or button containing the text block.
Last updated 4/29/2011
Page 90

USING ENCORE
Menus
• In the Layers panel, click the text’s layer or the layer set containing the text.
3 In the Character panel, select the type attributes you want for the text. (See “Character panel overview” on page 79.)
Button subpictures
About button subpictures
A DVD or Blu-ray Disc player uses button subpictures to highlight buttons. A button subpicture defines the appearance
of a button when it’s selected, activated, or in its normal (unselected) state. All the predesigned buttons included with
Encore come with button subpictures. Encore can create subpictures for a button and update the text in the button
subpictures automatically any time you change the text on the button. For full control over the design of button
subpictures, you can create them in Photoshop. (See
You can create button subpictures from predesigned buttons in the Library panel, the Object > Create Subpicture
command, or by designing new in Photoshop. Regardless of how you create your button subpictures, you set the colors
used for button subpictures in the Color Set dialog box. (See
Create automatic button subpictures
The easiest way to create a button subpicture is to use the Object > Create Subpicture command. This command
creates a single-color image of the button. It bases the shape of the created subpicture on the text and image layers that
are set as visible within the button layer set. Before you use the command, you can hide layers in the button set using
the Layers panel. You can then control which elements Encore uses to create the button subpictures.
“Create subpictures in Photoshop” on page 87.)
“About color sets for menus” on page 90.)
86
The colors displayed for each button state come from the color definitions in the color set, not from the button itself.
By default, Encore uses the Automatic color set, which is based on the colors of the subpicture layers of the button.
You can design more complex, three-color button subpictures in Photoshop. (See
on page 87.)
Note: The predefined menus and buttons in the Library panel include button subpictures.
1 Open the menu. In the Menu Viewer, select a button.
2 If you want to create button subpictures based only on certain layers, use the Layers panel to hide the button layers
you don’t want used.
3 Choose Object > Create Subpicture.
4 In the Properties panel, select a color group from the Highlight pop-up menu.
Encore assigns the selected Color Group to the button. (See “About color sets for menus” on page 90.)
Note: If the Highlight pop-up menu is dimmed, the menu is using the Automatic color set. (See “Base a new color set on
the Automatic color set” on page 92.)
“Create subpictures in Photoshop”
Paste an image as a subpicture
The Paste As Subpicture command lets you quickly create a single-color subpicture from a layer in the menu.
You can create invisible buttons by using the Paste As Subpicture command in a layer without any buttons selected.
1 Open the menu.
2 In the Layers panel, select the layer you want to use as a subpicture, and choose Edit > Copy.
Last updated 4/29/2011
Page 91

USING ENCORE
Menus
3 Select the button layer set into which you want to paste the new subpicture.
4 Choose Edit > Paste As Subpicture.
The image is pasted into the button layer set and is given the subpicture prefix (=1).
5 In the Properties panel, select the desired color group from the Highlight pop-up menu.
Encore assigns the selected Color Group to the button. (See “About color sets for menus” on page 90.)
Note: If the Highlight option is dimmed in the Properties panel, the menu is using the Automatic color set. (See “Base a
new color set on the Automatic color set” on page 92.)
Update subpicture text automatically
The button property Create Text Subpicture can automatically generate a subpicture for button text. Any time you
change the text, it regenerates the subpicture for you—you don’t have to manually update the subpicture layers. This
option is very useful as you develop the menus in a project or if you create menus to be customized by others.
1 In the Menus panel, select the menu containing the buttons with subpicture text.
2 In the lower section of the panel, select all the buttons that you want updated automatically.
3 In the Properties panel, select Create Text Subpicture.
87
Create subpictures in Photoshop
Subpictures can be difficult to understand, especially if you are accustomed to creating rollovers for web pages.
Although on the surface subpictures and web-page rollovers appear alike—they both indicate button status—the DVD
requirements make subpictures very different.
The first concepts you need to understand are as follows:
• The subpicture is like a transparent overlay that sits on top of the menu.
• The DVD or Blu-ray Disc player uses the same overlay for all three button states. (Even the normal state uses the
same subpicture.)
• The color set, not the colors in your original image, ultimately control the colors displayed in the subpicture.
(Technically, the subpicture overlay is a two-bit indexed image.)
• The subpicture is limited to three colors (each represented by a layer in the button set), but you can change those
three colors and their visibility for each state in the color set. (DVD regulations allow only a limited bandwidth for
button subpictures and subtitles.)
Think of the subpicture as a paint-by-number image, with areas designated for colors 1, 2, or 3. The color set is the
color key that determines what colors (if any) are used for colors 1, 2, and 3. In addition, all three colors can have
different definitions and opacity settings in each button state. By varying the color definitions for each state, you
can change the colors of each area; by varying the opacity of the colors in each state, you control whether or not that
area is even visible in a particular state.
You build the image used for the subpicture by creating separate layers for each color. The layer names must include
the following prefixes: (=1) for areas using color 1, (=2) for areas using color 2, and (=3) for areas using color 3.
Last updated 4/29/2011
Page 92
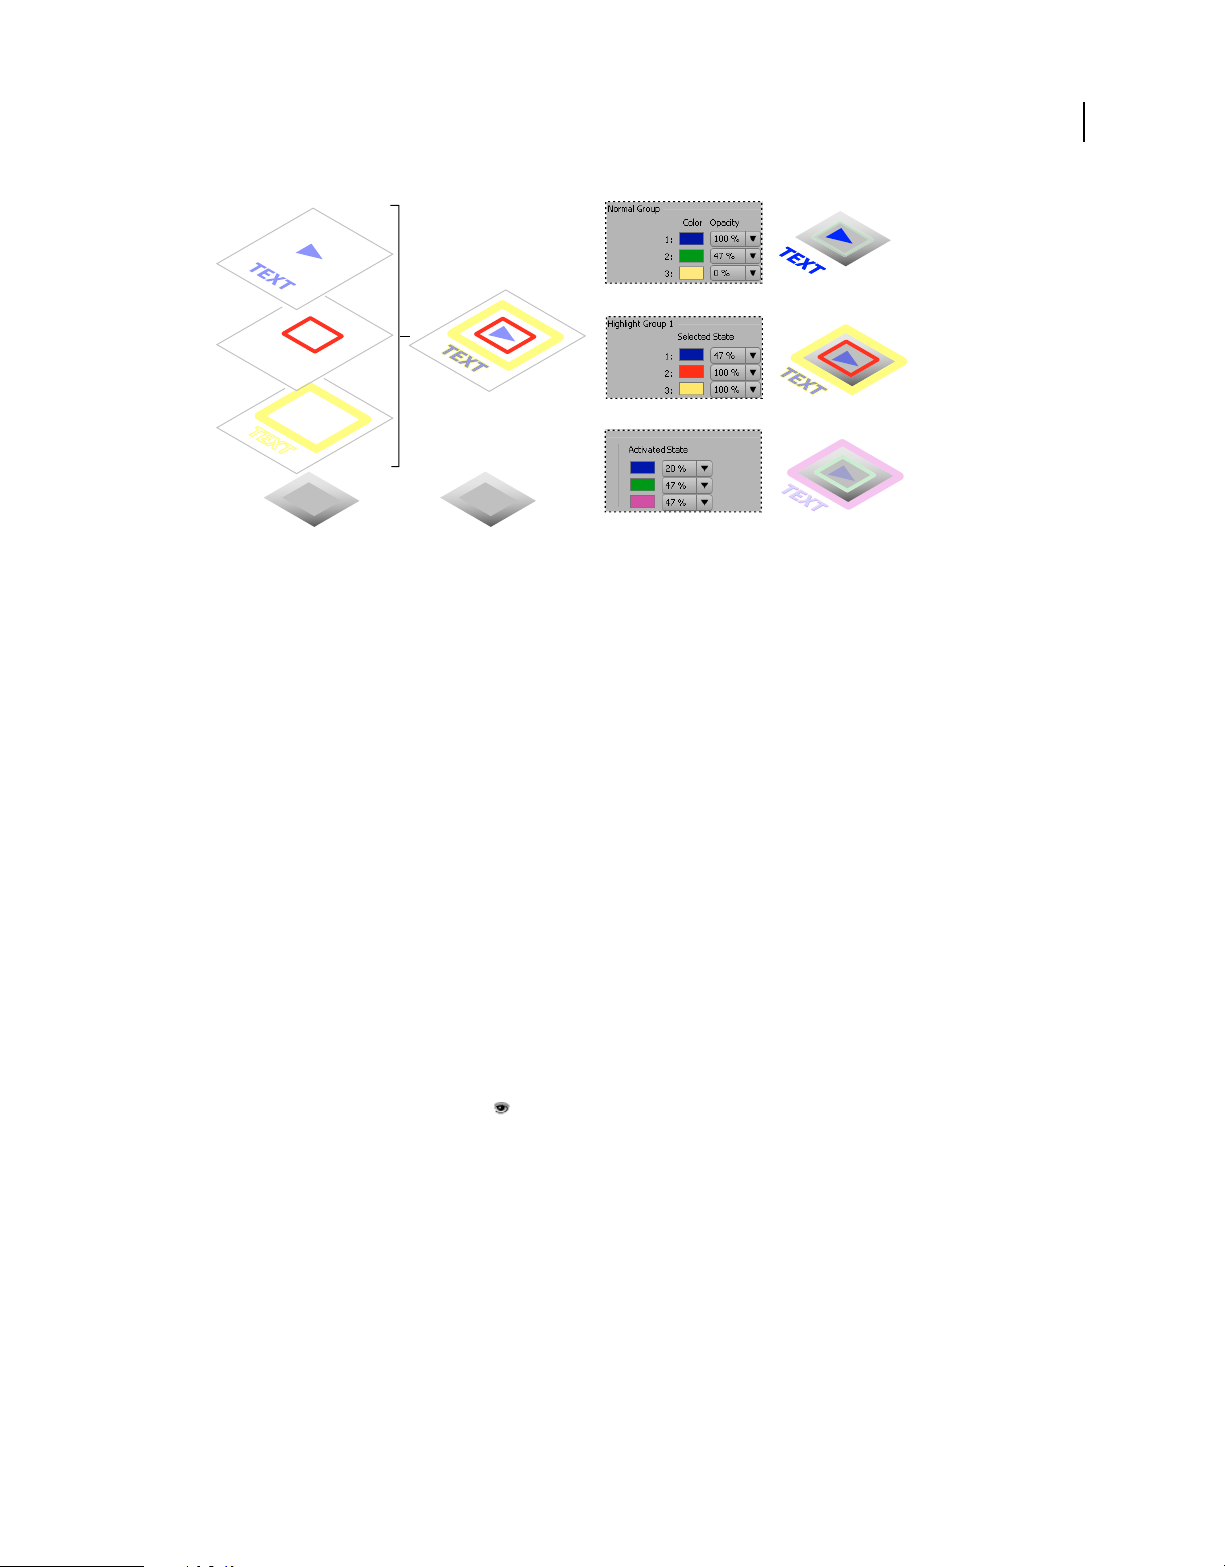
USING ENCORE
Menus
(=1)
(=2)
(=3)
A B C D
Relationship between subpicture layers in button set and color set definitions
A. Separate layers for each color (1, 2, and 3) B. All three layers combine to create overlay C. Colors and opacity specified in Encore menu
color set D. Same overlay used, but highlight definitions change in each state: Normal (top), Selected (middle), Activated (bottom)
Guidelines for creating subpictures
Keep in mind the following guidelines as you create the subpicture layers:
88
Same overlay used for all states The same image or overlay is used for all three states of a button (normal, selected,
and activated).
Layers flattened into single overlay The subpicture layers you create are flattened into a single image in the build
process.
Top layer wins If subpicture layers in a button layer set overlap, the top layer takes precedence when the layers are
flattened into the final overlay.
Layers part of button layer set The subpicture layers for a button must be contained within that button’s layer set.
Solid colors only Elements on these layers must use solid colors and sharp edges. Use one solid color per layer. Do not
use gradients, feathering, or anti-aliasing on the subpicture layers. Color gradations are not possible in subpictures.
Color definitions control look in button states Although you create layers for each color, the color numbers (1, 2, or
3), not the color values you used, are stored in the overlay. The color set is the color key or index, and contains the
color values. (As mentioned below, Encore will automatically generate a color set based on the color in each layer.)
Layer visibility controlled in color set You use the opacity setting in the color set to control the visibility of elements in
each state. You do not use the Eye icon
Different color definitions for each state Colors are defined in the Encore Menu Color Set dialog box. For each color,
in the Layers panel in Photoshop.
you can specify a different color and opacity setting. By varying the colors and their opacity in each state, the
highlighting can look quite different, even though it uses the same overlay. For example, color 1 might be transparent
for the normal state (opacity set to zero), red for the selected state, and blue for the activated state. So all elements on
layers with the (=1) prefix would not appear in the normal state, would be red in the selected state, and blue in the
activated state.
Automatic color set generated from layers While the colors you use in the layers do not become part of the actual
subpicture overlay, Encore does create a color set based on those values. By applying the colors you want for the
selected state of the button to the three layers, you are able to design the highlight color in Photoshop and save time
editing the color set in Encore. (For more information, see
“About color sets for menus” on page 90.)
Last updated 4/29/2011
Page 93

USING ENCORE
Menus
Layers represent areas of color, not states It is important to understand that the subpicture layers represent color
areas that correspond to the color set. They do not represent the activation states of the button.
Therefore, while the same subpicture overlay is used for each state, you can vary which elements in the subpicture are
visible by changing the opacity and color definitions in each state.
Create a subpicture in Photoshop
1 In either the Project or Menus panel, select the menu containing buttons that need subpictures.
2 Choose Edit > Edit Menu In Photoshop or click the Edit Menu In Photoshop tool in the Tools panel.
Photoshop starts, displaying the selected menu.
3 In the Photoshop Layers panel, select the button layer set for which you want to create a subpicture.
4 Create a new layer and add the prefix (=1) to the beginning of the name.
On this layer, create the subpicture elements that you want displayed using color 1. Elements should consist of a
single, solid color, without gradients, feathering, or anti-aliasing. Remember that you can control the visibility of
these elements in each state in the color set. If necessary, you can create more that one layer for this color (for
example, if you want text and a button outline in this color). Each layer for this color should have the same prefix.
Set the color and opacity of all elements on the layer as you want the layer to appear in the selected state. (All items
should use the same values.) When you import the menu, Encore automatically generates a color set using this
color definition and opacity value for the selected and activated state. (See
“Automatic color set” on page 92.)
89
5 If you want a multicolored subpicture, repeat steps 3 and 4 for colors 2 and 3, using the layer-name prefixes (=2)
for color 2 and (=3) for color 3.
6 If you want to create subpictures for another button, repeat steps 3 through 5.
7 In Photoshop, choose File > Save, and then File > Close.
Photoshop saves the file to the project folder. It does not overwrite the original file that you imported into your
project.
Note: When you import a menu into Encore, it creates a copy of the menu. The Edit In Photoshop command opens
this copy, not the original file. Photoshop saves any changes to the copy. If you want to update the original as well, it
is important to first save the copy so that your project contains the revised menu. Once saved, you can also save the
changes to the original file using the File
> Save As command in Photoshop or the Menu > Save Menu As File
command in Encore.
8 Define the colors and opacity values used in each button state, and assign a highlight group to each button as
desired. See
“Base a new color set on the Automatic color set” on page 92 and “Assign color sets and highlight
groups” on page 93.
You can let Encore automatically generate a subpicture for the text of a button. The advantage of using this button
property is that it regenerates the subpicture for you if you edit the text. See “Update subpicture text automatically”
on page 87.
View subpictures
You can view the subpictures in the Menu Viewer in each of the button states. These views show the subpictures of all
the buttons at the same time using the menu’s assigned color set and each button’s Highlight group. To preview the
subpictures with the mouse or a simulated remote control, see
“Preview a project” on page 169.
1 Open the menu that you want to preview.
Last updated 4/29/2011
Page 94

USING ENCORE
Menus
2 At the bottom of the Menu Viewer, click one of the following buttons to see the subpictures of all the buttons for a
particular state:
Shows the button subpictures using the Normal color settings from the color set.
Shows the button subpictures using the Selected color settings from the color set.
Shows the button subpictures using the Activated color settings from the color set.
To improve menu display performance, turn off the subpicture views when you’re finished viewing subpictures.
Menu color sets
About color sets for menus
Color sets specify the colors used in subpictures. Each menu can reference only one color set. However, a project can
contain any number of sets. To maintain a consistent look throughout a project, a common approach is to use the same
color set for all menus in a project. Using a limited number of color sets makes it easy to change the highlighting colors
for the entire project at once.
90
Encore includes a predefined color set and generates an automatic color set when you import a menu. (See “Automatic
color set” on page 92.) You can modify the default set or create your own sets. Once defined, you can save color sets
and use them in other projects.
A color set consists of a maximum of 15 colors, each with its own opacity setting. The colors are divided among one
color group for the normal state and two highlight groups. Each highlight group contains up to six colors: three for the
selected state and three for the activated states. Any button can reference either of the highlight groups. You can use
the highlight groups to distinguish between different types of buttons on the same menu. For example, you could
assign Highlight Group 1 to the main navigation buttons in the menu (such as Play Movie), while using Highlight
Group 2 for the common navigation buttons (such as Next and Previous).
Last updated 4/29/2011
Page 95

USING ENCORE
Menus
B
C
91
A
D
E
Menu Color Set dialog box
A. New color set B. Active menu C. Currently applied color set (and Color Set menu) D. Normal group E. Highlight group 1 and 2 F. Preview
state buttons
F
The Menu Color Set dialog box contains the following options:
New Color Set Creates a color set based on the current color definitions, and adds its name to the Color Set pop-up
menu.
Color Set menu Lets you choose a color set to display and apply to the currently active menu.
Delete Color Set Deletes the currently displayed color set.
Export To Color Set File Saves the current color set in a file so that it can be used in other projects. (A color set file has
the .cs extension added to its name.)
Import From Color Set File Imports the color set you specify.
Normal Group Sets the colors and opacity values for the subpictures in the normal, unselected state.
Highlight Group 1 and 2 Sets the colors and opacity values for the subpictures in the selected and activated states. A
button can reference one of these two groups.
Define a menu color set
When you define a color set, the colors are applied to the currently active menu.
1 Open the menu for which you want to create the color set, and then choose Menu > Edit Menu Color Set.
2 Click the New Color Set button .
3 Type the name of the new color set, and click OK.
4 Click Preview to preview the colors in the menu as you create them. Click the Normal button , the Selected
button , or the Activated button (below the Preview option) to see the colors for each state.
5 Click the color swatch of any color you want to change. The Color Picker dialog box appears.
Last updated 4/29/2011
Page 96

USING ENCORE
Menus
6 If you want to limit your color selection to NTSC-safe colors, choose RGB colors from 0 through 255.
7 Adjust the color using one of the following methods (the color you select appears in the top half of the color swatch.
The original color remains in the bottom half.):
• Locate the color range you want using the triangle sliders on the color spectrum bar, and then click the desired
color in the color field.
• Change the numeric values for H (hue), S (saturation), B (brightness), R (red), G (green), or B (blue).
8 Click OK. The new color replaces the original color in the Menu Color Set dialog box.
9 Choose the desired opacity level from the Opacity pop-up menu adjacent to the color swatch.
10 To set the Activated State colors to the same values as the Selected State colors, select Use Selected Colors For
Activated Colors.
11 Repeat steps 5 through 10 for any color you want to change.
12 Click OK when you have defined all the colors to your satisfaction.
Encore applies the new color set to the currently open menu.
Automatic color set
When you import a menu into your project, Encore looks at the colors and opacity settings in the subpicture layers
and automatically generates a color set based on those values. The Automatic color set is different from other color
sets. You cannot edit the automatic color set directly. However, the automatic color set is updated when you edit the
menu in Photoshop using the Edit Menu In Photoshop command.
92
Note: Designing your subpictures in Photoshop and using the Automatic color set in Encore is a much simpler approach
than creating them in Encore.
To generate the Automatic color set, Encore reads the color and opacity settings in each subpicture layer in the menu,
starting at the bottommost button (the button listed closest to the Background in the Layers panel), moving up:
• Highlight Group 1 is assigned the values from the bottommost button. Specifically, the layer with the prefix (=1)
sets the values for color 1. Layers with prefixes (=2) and (=3) set the values for color 2 and color 3. The Selected and
Activated states are set to the same values.
• Highlight Group 2 is assigned the color values from the first button containing subpicture color values that are
different from the bottommost button. The Selected and Activated states are set to the same values.
• Normal group is set to 0% opacity (fully transparent), but uses the color values of the default color set.
Upon import, Encore not only generates the automatic color set, it also applies the appropriate highlight group to
each button. If the subpicture colors in a button do not match either of the two highlight groups, Encore assigns
Highlight Group 1 to them.
Base a new color set on the Automatic color set
The Automatic color set of each menu is automatically generated from the subpicture layers of the menus. To create
an independent copy of an Automatic color set, create a color set based on the Automatic color set of the menu. This
new set behaves like the regular color set, and can be assigned to other menus.
1 Select the menu containing the Automatic color set you want to copy in the Project or Menus panel.
2 Choose Menu > Edit Menu Color Set.
3 Click the New Color Set button , type a new name, and click OK.
4 Adjust the colors and opacity settings as needed. (See “About color sets for menus” on page 90.)
Last updated 4/29/2011
Page 97

USING ENCORE
Menus
5 Click OK when you have defined all the colors to your satisfaction. Encore applies the new colors to the menu.
To dynamically update the color set to reflect changes you make in Photoshop, switch back to the Automatic color
set.
Assign color sets and highlight groups
To each menu, you can apply one color set. To each button within the menu, you can apply one highlight group. Use
the Properties panel to change the color set of a menu or the highlight group assigned to its buttons. Select multiple
menus or buttons to change the color set of several menus at once or the highlight group of the buttons.
Change the color set of menus
1 In the Menus panel, select the menu that you want to change. (Shift-click or Ctrl+Command-click to select
additional menus.)
2 In the Properties panel, select the desired color set from the Color Set pop-up menu at the bottom of the panel.
Encore assigns the selected color set to the menu, changing the colors used for the subpictures of its buttons.
Note: If you choose the Automatic color set, Encore generates a unique color set based on the colors used in the subpicture
layers of each individual menu. (See
“Automatic color set” on page 92.)
93
Change the color group of buttons
1 In the Menus panel, select the appropriate menu. To select additional menus, Ctrl-click (Windows) or Command-
click (Mac
2 Select the button you want to change. To select additional buttons, Ctrl-click (Windows) or Command-click
(Mac
3 In the Properties panel, select the desired color group from the Highlight pop-up menu. Encore assigns the selected
Color Group to the subpicture of the button or buttons.
OS).
OS).
Share color sets between projects
You can share color sets between projects. You can export a customized color set from one project, and import the
color set into another project.
Export a color set
1 Open a menu that uses the color set you want to export.
2 Choose Menu > Edit Menu Color Set.
3 Select the color set from the Color Set menu.
4 Click the Export To Color Set Files button .
5 Type a new name for the color set, browse for the appropriate folder in which to save it, and click Save.
Encore saves the color set, adding the extension .cs to the filename.
6 Click OK.
Import a color set
1 Open a menu to which you want to apply the imported color set.
2 Choose Menu > Edit Menu Color Set.
Last updated 4/29/2011
Page 98

USING ENCORE
Menus
3 Click the Import Color Set From File button , locate and select the file, and click Open.
4 Click OK.
Encore applies the color set to the active menu.
Button routing
Renumber buttons
Encore assigns each button a number. Viewers can select buttons by using the remote control. You can renumber
buttons within a menu. Button numbers must start at 1 and be sequential (no gaps between numbers).
1 Open the menu and select the button in the Menu Viewer.
2 Choose a new number from the Number pop-up menu in the Properties panel.
Encore renumbers the other buttons as necessary.
Specify an offset for the button numbers
To increase the button numbers so that they can match, for example, a scene or chapter number, you can specify an
offset for the menu. The offset changes the effective starting point of the numbers.
94
1 Select the menu in the Project panel or Menus panel.
2 In the Properties panel, type a number for Offset.
Change the routing preferences
Routing is the button-to-button path the cursor follows when moved by the arrow buttons of a remote control. For
most projects, Encore can determine the standard routing pattern for you. If your project has special requirements or
an unusual arrangement of buttons, you can customize the routing.
Encore provides four preset routing patterns. The default routing is a circular movement through the buttons on the
same row or column. Right or left arrows move across the row in the appropriate direction, returning to the beginning
of the same row. Up and down arrows follow the same rules and move up or down until the end of the column,
returning to the top or bottom of the column in a circular fashion.
Using a preferences setting, you can change the routing so that when an arrow button reaches the end of a row or
column, it moves to the beginning of the next row or column. You can also change the routing to be only horizontal
or vertical, limiting movement, for example, across a row and not up or down.
1 Choose Edit > Preferences > Menus (Windows) or Encore > Preferences > Menus (Mac OS).
2 Click the routing preferences to select or deselect them.
3 Choose the desired wrap options from the appropriate pop-up menu.
4 Click OK.
Last updated 4/29/2011
Page 99

USING ENCORE
Menus
A B
C D
Comparison of the preset routing options for remote control buttons
A. Wrap around left/right, wrap within the same row (default) B. Wrap around left/right, wrap to the next row C. Wrap around up/down,
wrap within same column D. Wrap around up/down, wrap to next column
Exclude Previous and Next buttons from button routing
Excluding Previous and Next buttons from auto-routing, the default links from first and last chapter buttons are used.
1 Choose Edit > Preferences > Menus (Windows) or Encore > Preferences > Menus (Mac OS).
2 Deselect Exclude Next/Previous Buttons.
95
Change the routing order
When you turn off automatic routing, you can manually set the path for the remote control through the menu buttons.
You display the routing icons in the Menu Viewer.
A
B
C
Routing icon
A. Button number B. Button selected by remote control arrow C. Arrow on remote control
The Routing icon shows you the number of the button. An arrow points from the center of the icon and contains a
button number. The arrow represents the navigation button on the remote control. The button number represents the
button to which that arrow on the remote control leads. To set a navigation arrow to a specific button, you simply drag
it to the button.
1 Open the menu containing the buttons whose routing order you want to change.
2 Click the Show Button Routing button at the bottom of the Menu Viewer.
Encore displays a routing icon in each button.
3 In the Properties panel, click Automatically Route Buttons to deselect it.
4 Place the Selection tool over the routing arrow you want to modify. The Selection tool changes from a pointer to a
hand. Drag it to the button you want to be next in the routing order. Repeat this step until you have modified the
routing of all the buttons you want to change.
Last updated 4/29/2011
Page 100

USING ENCORE
Menus
Set a button to activate automatically
Normally, a button is activated when a viewer navigates to it with the remote control, and then presses Enter. You can
set a button to activate automatically when the viewer simply navigates to it. The Auto Activate option is often used
for arrow buttons and for creating hidden navigation (called Easter eggs).
An advanced authoring technique uses multiple versions of a menu that change when the viewer selects certain
buttons. Instead of using subpictures to highlight a button, the buttons auto activate when selected and link to another
version of the menu. The advantage to this approach is that you can use different images to simulate button selection.
The drawback is that any video or audio playing in the background is interrupted.
1 In the Menus panel, select the desired menu or double-click the menu to open it in the Menu Viewer.
2 Select the button you want to auto activate. (In the Menu Viewer, use the Selection tool , not the Direct Select
tool, so that you select the entire button set.)
3 In the Properties panel, select Auto Activate to turn on the option for the selected button.
Creating styles for menu elements
96
About creating styles
Styles let you quickly change the appearance of an element in a menu. You can create your own styles and add them to
style sets in the Encore Styles panel.
You create a style from a Photoshop file containing a single layer with layer styles (effects) applied to it. The layer
type—image, text, or shape—determines its category in the Styles panel.
A style can either replace all the effects in a layer or add to the existing effects. Except for simple styles, you generally
want a style to replace existing effects so that you get the same results each time you use it. You can control how a style
changes a layer by the effects you include in the layer. You can also show or hide these layers in the Photoshop Layers
panel. When creating a style, you can use either of the following methods:
• To entirely replace existing effects, you simply include the desired effects in the layer in the Photoshop file.
• To add to existing layer effects, you first apply all possible effects to the layer in the Photoshop file. You then hide
the effects that are not part of the style definition by using the Eye icon in the Layers panel. Hidden effects indicate
to Encore that those effects remain unchanged in the layer being styled. The predefined styles included with Encore
that add effects, rather than completely restyle a layer, have names that begin with a plus sign (+).
Last updated 4/29/2011
 Loading...