

Page 1

Using
ADOBE
®
ELEMENTS ORGANIZER 8
Page 2

Copyright
© 2009 Adobe Systems Incorporated. All rights reserved.
Using Adobe® Elements Organizer 8
This guide is licensed for use under the terms of the Creative Commons Attribution Non-Commercial 3.0 License. This License allows users to copy, distribute,
and transmit the user guide for noncommercial purposes only so long as (1) proper attribution to Adobe is given as the owner of the user guide; and (2) any
reuse or distribution of the user guide contains a notice that use of the user guide is governed by these terms. The best way to provide notice is to include the
following link. To view a copy of this license, visit
http://creativecommons.org/licenses/by-nc-sa/3.0/
Adobe, the Adobe logo, Adobe Premiere, Acrobat, Flash, Illustrator, Photoshop, Reader, and XMP are either registered trademarks or trademarks of Adobe
Systems Incorporated in the United States and/or other countries. Windows and Windows Vista are either registered trademarks or trademarks of Microsoft
Corporation in the United States and/or other countries. All other trademarks are the property of their respective owners.
Adobe Systems Incorporated, 345 Park Avenue, San Jose, California 95110, USA.
Page 3

Contents
Chapter 1: Getting started with Elements Organizer
What to do first . . . . . . . . . . . . . . . . . . . . . . . . . . . . . . . . . . . . . . . . . . . . . . . . . . . . . . . . . . . . . . . . . . . . . . . . . . . . . . . . . . . . . . . . . . . . . . . . . . . . . . . . 1
Using Help and getting support . . . . . . . . . . . . . . . . . . . . . . . . . . . . . . . . . . . . . . . . . . . . . . . . . . . . . . . . . . . . . . . . . . . . . . . . . . . . . . . . . . . . . . . . 2
Chapter 2: Elements Organizer workspace
About workspaces . . . . . . . . . . . . . . . . . . . . . . . . . . . . . . . . . . . . . . . . . . . . . . . . . . . . . . . . . . . . . . . . . . . . . . . . . . . . . . . . . . . . . . . . . . . . . . . . . . . . . 4
Getting started with your Adobe ID . . . . . . . . . . . . . . . . . . . . . . . . . . . . . . . . . . . . . . . . . . . . . . . . . . . . . . . . . . . . . . . . . . . . . . . . . . . . . . . . . . . . 9
Using Elements Organizer and Adobe Premiere Elements together . . . . . . . . . . . . . . . . . . . . . . . . . . . . . . . . . . . . . . . . . . . . . . . . . . . . 10
Chapter 3: Import photos and videos
About getting photos and videos . . . . . . . . . . . . . . . . . . . . . . . . . . . . . . . . . . . . . . . . . . . . . . . . . . . . . . . . . . . . . . . . . . . . . . . . . . . . . . . . . . . . . 14
Cameras and card readers . . . . . . . . . . . . . . . . . . . . . . . . . . . . . . . . . . . . . . . . . . . . . . . . . . . . . . . . . . . . . . . . . . . . . . . . . . . . . . . . . . . . . . . . . . . . 17
Scanners . . . . . . . . . . . . . . . . . . . . . . . . . . . . . . . . . . . . . . . . . . . . . . . . . . . . . . . . . . . . . . . . . . . . . . . . . . . . . . . . . . . . . . . . . . . . . . . . . . . . . . . . . . . . . 21
Local files, CDs, DVDs, and video . . . . . . . . . . . . . . . . . . . . . . . . . . . . . . . . . . . . . . . . . . . . . . . . . . . . . . . . . . . . . . . . . . . . . . . . . . . . . . . . . . . . . . 22
Mobile phone cameras . . . . . . . . . . . . . . . . . . . . . . . . . . . . . . . . . . . . . . . . . . . . . . . . . . . . . . . . . . . . . . . . . . . . . . . . . . . . . . . . . . . . . . . . . . . . . . . 28
iii
Chapter 4: Viewing and fixing photos and videos in Elements Organizer
Viewing photos and videos in the Elements Organizer . . . . . . . . . . . . . . . . . . . . . . . . . . . . . . . . . . . . . . . . . . . . . . . . . . . . . . . . . . . . . . . . . 29
Viewing video projects . . . . . . . . . . . . . . . . . . . . . . . . . . . . . . . . . . . . . . . . . . . . . . . . . . . . . . . . . . . . . . . . . . . . . . . . . . . . . . . . . . . . . . . . . . . . . . . 36
View video and full-screen images . . . . . . . . . . . . . . . . . . . . . . . . . . . . . . . . . . . . . . . . . . . . . . . . . . . . . . . . . . . . . . . . . . . . . . . . . . . . . . . . . . . . 37
Pinning photos to a map . . . . . . . . . . . . . . . . . . . . . . . . . . . . . . . . . . . . . . . . . . . . . . . . . . . . . . . . . . . . . . . . . . . . . . . . . . . . . . . . . . . . . . . . . . . . . 43
Viewing media files in Date view . . . . . . . . . . . . . . . . . . . . . . . . . . . . . . . . . . . . . . . . . . . . . . . . . . . . . . . . . . . . . . . . . . . . . . . . . . . . . . . . . . . . . . 45
Fixing photos and videos in Elements Organizer . . . . . . . . . . . . . . . . . . . . . . . . . . . . . . . . . . . . . . . . . . . . . . . . . . . . . . . . . . . . . . . . . . . . . . . 49
Chapter 5: Tagging and organizing photos and videos
Tagging photos and videos . . . . . . . . . . . . . . . . . . . . . . . . . . . . . . . . . . . . . . . . . . . . . . . . . . . . . . . . . . . . . . . . . . . . . . . . . . . . . . . . . . . . . . . . . . . 52
Editing keyword tags, categories, and subcategories . . . . . . . . . . . . . . . . . . . . . . . . . . . . . . . . . . . . . . . . . . . . . . . . . . . . . . . . . . . . . . . . . . 66
Creating albums . . . . . . . . . . . . . . . . . . . . . . . . . . . . . . . . . . . . . . . . . . . . . . . . . . . . . . . . . . . . . . . . . . . . . . . . . . . . . . . . . . . . . . . . . . . . . . . . . . . . . . 70
Creating and editing smart albums . . . . . . . . . . . . . . . . . . . . . . . . . . . . . . . . . . . . . . . . . . . . . . . . . . . . . . . . . . . . . . . . . . . . . . . . . . . . . . . . . . . 75
Editing albums and album categories . . . . . . . . . . . . . . . . . . . . . . . . . . . . . . . . . . . . . . . . . . . . . . . . . . . . . . . . . . . . . . . . . . . . . . . . . . . . . . . . . 76
Chapter 6: Finding media files in Elements Organizer
Searching for media files in Elements Organizer . . . . . . . . . . . . . . . . . . . . . . . . . . . . . . . . . . . . . . . . . . . . . . . . . . . . . . . . . . . . . . . . . . . . . . . 80
Finding media files by keyword tags . . . . . . . . . . . . . . . . . . . . . . . . . . . . . . . . . . . . . . . . . . . . . . . . . . . . . . . . . . . . . . . . . . . . . . . . . . . . . . . . . . 83
Finding media files by content, type, and metadata . . . . . . . . . . . . . . . . . . . . . . . . . . . . . . . . . . . . . . . . . . . . . . . . . . . . . . . . . . . . . . . . . . . 86
Finding photos using a map . . . . . . . . . . . . . . . . . . . . . . . . . . . . . . . . . . . . . . . . . . . . . . . . . . . . . . . . . . . . . . . . . . . . . . . . . . . . . . . . . . . . . . . . . . 91
Chapter 7: Managing files and catalogs
Managing catalogs . . . . . . . . . . . . . . . . . . . . . . . . . . . . . . . . . . . . . . . . . . . . . . . . . . . . . . . . . . . . . . . . . . . . . . . . . . . . . . . . . . . . . . . . . . . . . . . . . . . 93
Moving, copying, and renaming files . . . . . . . . . . . . . . . . . . . . . . . . . . . . . . . . . . . . . . . . . . . . . . . . . . . . . . . . . . . . . . . . . . . . . . . . . . . . . . . . . . 99
Grouping photos in stacks . . . . . . . . . . . . . . . . . . . . . . . . . . . . . . . . . . . . . . . . . . . . . . . . . . . . . . . . . . . . . . . . . . . . . . . . . . . . . . . . . . . . . . . . . . . 102
Grouping photos in version sets . . . . . . . . . . . . . . . . . . . . . . . . . . . . . . . . . . . . . . . . . . . . . . . . . . . . . . . . . . . . . . . . . . . . . . . . . . . . . . . . . . . . . 106
About Video Scene Groups and Scene Groups . . . . . . . . . . . . . . . . . . . . . . . . . . . . . . . . . . . . . . . . . . . . . . . . . . . . . . . . . . . . . . . . . . . . . . . 110
Filenames and versions . . . . . . . . . . . . . . . . . . . . . . . . . . . . . . . . . . . . . . . . . . . . . . . . . . . . . . . . . . . . . . . . . . . . . . . . . . . . . . . . . . . . . . . . . . . . . . 111
Page 4

USING ELEMENTS ORGANIZER 8
Contents
Adding captions and notes . . . . . . . . . . . . . . . . . . . . . . . . . . . . . . . . . . . . . . . . . . . . . . . . . . . . . . . . . . . . . . . . . . . . . . . . . . . . . . . . . . . . . . . . . . 114
File information . . . . . . . . . . . . . . . . . . . . . . . . . . . . . . . . . . . . . . . . . . . . . . . . . . . . . . . . . . . . . . . . . . . . . . . . . . . . . . . . . . . . . . . . . . . . . . . . . . . . . 117
Backup and synchronize catalogs, albums, and files . . . . . . . . . . . . . . . . . . . . . . . . . . . . . . . . . . . . . . . . . . . . . . . . . . . . . . . . . . . . . . . . . . 118
Reconnecting files . . . . . . . . . . . . . . . . . . . . . . . . . . . . . . . . . . . . . . . . . . . . . . . . . . . . . . . . . . . . . . . . . . . . . . . . . . . . . . . . . . . . . . . . . . . . . . . . . . . 126
Chapter 8: Projects in Elements Organizer
Elements Organizer projects overview . . . . . . . . . . . . . . . . . . . . . . . . . . . . . . . . . . . . . . . . . . . . . . . . . . . . . . . . . . . . . . . . . . . . . . . . . . . . . . . 130
Create and share an online album . . . . . . . . . . . . . . . . . . . . . . . . . . . . . . . . . . . . . . . . . . . . . . . . . . . . . . . . . . . . . . . . . . . . . . . . . . . . . . . . . . . . 131
Creating photo calendar . . . . . . . . . . . . . . . . . . . . . . . . . . . . . . . . . . . . . . . . . . . . . . . . . . . . . . . . . . . . . . . . . . . . . . . . . . . . . . . . . . . . . . . . . . . . 134
Creating photo books, greeting cards, and photo collage . . . . . . . . . . . . . . . . . . . . . . . . . . . . . . . . . . . . . . . . . . . . . . . . . . . . . . . . . . . . . 134
Creating slide shows . . . . . . . . . . . . . . . . . . . . . . . . . . . . . . . . . . . . . . . . . . . . . . . . . . . . . . . . . . . . . . . . . . . . . . . . . . . . . . . . . . . . . . . . . . . . . . . . . 134
Create instant movies . . . . . . . . . . . . . . . . . . . . . . . . . . . . . . . . . . . . . . . . . . . . . . . . . . . . . . . . . . . . . . . . . . . . . . . . . . . . . . . . . . . . . . . . . . . . . . . 148
Create a flip book . . . . . . . . . . . . . . . . . . . . . . . . . . . . . . . . . . . . . . . . . . . . . . . . . . . . . . . . . . . . . . . . . . . . . . . . . . . . . . . . . . . . . . . . . . . . . . . . . . . . 148
Chapter 9: Printing and sharing photos
Printing photos . . . . . . . . . . . . . . . . . . . . . . . . . . . . . . . . . . . . . . . . . . . . . . . . . . . . . . . . . . . . . . . . . . . . . . . . . . . . . . . . . . . . . . . . . . . . . . . . . . . . . 150
Print options . . . . . . . . . . . . . . . . . . . . . . . . . . . . . . . . . . . . . . . . . . . . . . . . . . . . . . . . . . . . . . . . . . . . . . . . . . . . . . . . . . . . . . . . . . . . . . . . . . . . . . . . 158
Sharing through Photoshop.com . . . . . . . . . . . . . . . . . . . . . . . . . . . . . . . . . . . . . . . . . . . . . . . . . . . . . . . . . . . . . . . . . . . . . . . . . . . . . . . . . . . . 159
Sharing photos using online services . . . . . . . . . . . . . . . . . . . . . . . . . . . . . . . . . . . . . . . . . . . . . . . . . . . . . . . . . . . . . . . . . . . . . . . . . . . . . . . . . 160
Sharing maps of photos . . . . . . . . . . . . . . . . . . . . . . . . . . . . . . . . . . . . . . . . . . . . . . . . . . . . . . . . . . . . . . . . . . . . . . . . . . . . . . . . . . . . . . . . . . . . . 164
Sharing photos by e-mail . . . . . . . . . . . . . . . . . . . . . . . . . . . . . . . . . . . . . . . . . . . . . . . . . . . . . . . . . . . . . . . . . . . . . . . . . . . . . . . . . . . . . . . . . . . . 164
Sharing video online . . . . . . . . . . . . . . . . . . . . . . . . . . . . . . . . . . . . . . . . . . . . . . . . . . . . . . . . . . . . . . . . . . . . . . . . . . . . . . . . . . . . . . . . . . . . . . . . 170
Sharing media files to mobile phones and players . . . . . . . . . . . . . . . . . . . . . . . . . . . . . . . . . . . . . . . . . . . . . . . . . . . . . . . . . . . . . . . . . . . . 170
Viewing and sharing photos on Media Center computers . . . . . . . . . . . . . . . . . . . . . . . . . . . . . . . . . . . . . . . . . . . . . . . . . . . . . . . . . . . . . 170
Exporting photos . . . . . . . . . . . . . . . . . . . . . . . . . . . . . . . . . . . . . . . . . . . . . . . . . . . . . . . . . . . . . . . . . . . . . . . . . . . . . . . . . . . . . . . . . . . . . . . . . . . . 172
Burn media files to a DVD/Blu Ray Disc . . . . . . . . . . . . . . . . . . . . . . . . . . . . . . . . . . . . . . . . . . . . . . . . . . . . . . . . . . . . . . . . . . . . . . . . . . . . . . . 173
Burn media files to a CD/DVD . . . . . . . . . . . . . . . . . . . . . . . . . . . . . . . . . . . . . . . . . . . . . . . . . . . . . . . . . . . . . . . . . . . . . . . . . . . . . . . . . . . . . . . . 173
iv
Chapter 10: Elements Organizer keyboard shortcuts
Keys for navigating . . . . . . . . . . . . . . . . . . . . . . . . . . . . . . . . . . . . . . . . . . . . . . . . . . . . . . . . . . . . . . . . . . . . . . . . . . . . . . . . . . . . . . . . . . . . . . . . . . 174
Keys for viewing photos (Elements Organizer) . . . . . . . . . . . . . . . . . . . . . . . . . . . . . . . . . . . . . . . . . . . . . . . . . . . . . . . . . . . . . . . . . . . . . . . . 174
Keys for viewing the calendar (Date view) . . . . . . . . . . . . . . . . . . . . . . . . . . . . . . . . . . . . . . . . . . . . . . . . . . . . . . . . . . . . . . . . . . . . . . . . . . . . 175
Keys for editing photos (Elements Organizer) . . . . . . . . . . . . . . . . . . . . . . . . . . . . . . . . . . . . . . . . . . . . . . . . . . . . . . . . . . . . . . . . . . . . . . . . . 175
Keys for finding photos . . . . . . . . . . . . . . . . . . . . . . . . . . . . . . . . . . . . . . . . . . . . . . . . . . . . . . . . . . . . . . . . . . . . . . . . . . . . . . . . . . . . . . . . . . . . . . 176
Page 5

Chapter 1: Getting started with
1
Elements
Elements Organizer is an integral part of both Adobe® Photoshop® Elements and Adobe® Premiere® Elements software.
You import, manage, and view your photos and video clips in Elements Organizer. To do more extensive editing, you
work with your photos and clips in the Photoshop Elements Editor or the Adobe Premiere Elements Editor. For
complete information on working in the Editors, see the Help for each Editor.
Organizer
What to do first
Check the system requirements
If you’re not sure Photoshop Elements or Adobe Premiere Elements can run on your computer, review the complete
system requirements and recommendations for your Adobe software. See the ReadMe file included on your software
CD installation disc.
Install the software
1 Close any other Adobe applications open on your computer.
2 Insert the installation disc into your disc drive, and follow the onscreen instructions.
Do I need to uninstall my previous version of Photoshop Elements or Adobe Premiere Elements? If you’ve installed a
trial version of the software, it’s a good idea to uninstall it first. However, it’s not necessary to uninstall a previous
version.
How do I uninstall a previous version? In the Windows® OS (XP), click the Start menu, and then choose Control Panel.
In the Control Panel dialog box, double-click Add Or Remove Programs. In the Add Or Remove Programs dialog box,
select the version of the software that you want to uninstall, and click Remove. You’ll see a dialog box asking you if you
really want to remove the application from your computer. Click “Yes” to uninstall.
Register
After installing, register your software to receive complimentary installation support, notifications of updates, and
other services.
Note: Users in non-US locations, can register at any time by choosing Help > Registration.
ReadMe file
The installation CD contains the ReadMe file for your software. (This file is also copied to the application folder during
product installation.) Open the file to read important information.
Sign up with your Adobe ID
Important: Photoshop Elements free online benefits and Photoshop Elements Plus are available in the United States only.
Internet access required.
Page 6

USING ELEMENTS ORGANIZER 8
Getting started with Elements Organizer
Sign up with your Adobe ID to receive free online benefits, such as 2 GB of free storage, automatic online backup, and
automatic syncing of your photos and video clips on multiple computers. You also receive benefits such as tutorials
that appear when you need them, access to your photos and videos at Photoshop.com, and a personal URL for sharing
your photo/video albums. If you purchased Photoshop Elements 8 Plus, sign up with your Adobe ID to receive all the
above plus additional storage space, artwork, and tutorials.
How do I sign up? Click the link on the Welcome screen or in the menu bar to sign up with your Adobe ID. You can
sign up at any time on the Welcome screen. To view the Welcome screen, click the Welcome screen icon in the menu
bar. If you don't have an Adobe ID, click the link on the Welcome screen or in the menu bar to create one. You can
display the Welcome screen any time by clicking the Home icon in the menu bar.
More Help topics
“Backup and synchronize catalogs, albums, and files” on page 118
New and enhanced features
Visit www.adobe.com/go/learn_pse_features_en to learn about the new and enhanced features of
Photoshop Elements. Improving your photos and doing more with them is easier than ever.
Visit www.adobe.com/go/learn_pre_features_en to learn about the new and enhanced features of
Adobe Premiere Elements.
2
Using Help and getting support
Learning Photoshop Elements and Adobe Premiere Elements
How do I ask a question? You can ask questions to and get advice from other Adobe Photoshop Elements and
Premiere Elements users at www.adobe.com/go/forums.
Adobe
Using Elements Organizer Help
Photoshop Elements Help is available in several ways. To access Help, choose Help > Elements Organizer Help (or
press the F1 key on your keyboard). If your computer is connected to the Internet, Elements
launches Help on the web.
For the complete Help for Elements Organizer, see Elements Organizer, Photoshop Elements Editor, or
Premiere Elements Editor Help systems.
Adobe
Help on the web www.adobe.com/go/learn_org_en is the most comprehensive and up-to-date version of
Elements Organizer Help. Your computer must be connected to the Internet to access Help on the web. Use the Search
field to search within Photoshop Elements Help. Browse all topics in Photoshop Elements Help.
Help in the application Help in the application provides access to key tasks and concepts. If you aren’t connected to
the Internet, Elements
complete Help available on the web.
Help PDF Help is also available as a PDF that is optimized for printing. Visit
www.adobe.com/go/learn_org_printpdf_en, or click the Help PDF link at the top of each Help page. The Help PDF is
the best way to access the most comprehensive Help when you don’t have an Internet connection.
Organizer launches Help in the application. Help in the application is a small subset of the
Organizer automatically
Links in the application Some Help links are within Elements Organizer. Clicking these links takes you to the
corresponding topic in either the Help on the web or Help in the application.
Page 7

USING ELEMENTS ORGANIZER 8
Getting started with Elements Organizer
Note: If you try to access a Help topic that only exists in Help on the web, Elements Organizer displays the URL and a
link to the complete Help on the web.
Tips for searching Help
• If you search using a phrase, such as “shape tool”, place quotation marks around the phrase. The search returns only
those topics containing all the words in the phrase.
• Make sure that the search terms are spelled correctly.
• If a search term doesn’t yield results, try using a synonym, such as “web” instead of “Internet.”
• If you find a topic you want to view again, bookmark it for easy access later.
Print a Help topic To print a topic from Help, use the Print command in the browser.
How to search for troubleshooting topics You can view top issues and search for common problems and error
messages by going to
Forum You can access the Elements user community forum through the application. To access the forum page for
www.adobe.com/support/photoshopelements and www.adobe.com/support/premiereelements.
Adobe Premiere Elements, select Help > Forum > Premiere Elements. To access the forum page for Photoshop
Elements, select Help > Forum > Photoshop Elements. If your computer is connected to the Internet,
Organizer launches the forum page. The forum is used to ask other Adobe Premiere Elements and
Elements
Photoshop Elements users for suggestions on your designs. You can also post useful tips and tricks that help other
users.
3
Look for software updates If your computer is connected to the Internet, you’ll receive notifications whenever
Photoshop Elements or Adobe Premiere Elements is updated. You can also find out about the latest updates by going
www.adobe.com/downloads/updates.
to
How do I get customer support?
You can get support by contacting Adobe directly or submitting a web case. Visit www.adobe.com/support/contact for
contact information. Visit the Adobe Support website at www.adobe.com/go/support. Adobe Support has
troubleshooting information and also information about free and paid technical support options.
Page 8
Chapter 2: Elements Organizer workspace
Use the Elements Organizer workspace for finding, organizing, and sharing your photos and media files. Use the
Photoshop Elements Editor for creating, editing, and fixing photos and the Adobe Premiere Elements Editor for
editing video.
To open a photo or video file for editing:
1 Select a photo or video.
2 Click the triangle beside the Fix tab, and select one of the following depending on the media file you want to edit:
Full Photo Edit Launches Photoshop Elements Editor in the Full Edit mode to edit a photo.
Quick Photo Edit Launches Photoshop Elements Editor in the Quick Edit mode to edit a photo.
Guided Photo Edit Launches Photoshop Elements Editor in the Guided Edit mode to edit a photo.
Edit Videos Launches Adobe Premiere Elements Editor to edit a video file.
When you are working in the Editor workspace, click the Organizer button to open the Elements Organizer
workspace.
4
If both the Elements Organizer and the Photoshop Elements Editor, or the Elements Organizer and Adobe Premiere
Elements Editor are open, you can move between the workspaces. To move between the workspaces, click the
corresponding button in the Windows® OS taskbar.
About workspaces
The Welcome screen
When you start Photoshop Elements or Premiere Elements, the Welcome screen opens by default. The Welcome
screen is a convenient starting place, or hub, for major tasks.
Note: You can log in with your Adobe ID to access free online benefits. You can also access Photoshop Elements 8 and
Adobe Premiere Elements 8 Plus features. These features are available in the United States only. Internet access required.
Click a button to open the workspace you need. For example, click Organize to open the Elements Organizer and
import, tag, or organize your photos and media files. Or, click Edit to open the Editor and enhance your media files or
add special effects.
You can close or reopen the Welcome screen at any time by clicking the Welcome Screen button . It’s not necessary
to return to the Welcome screen to open other workspaces.
More Help topics
“Sign up with your Adobe ID” on page 1
Page 9

USING ELEMENTS ORGANIZER 8
Elements Organizer workspace
Disable tracking of information
The Welcome screen by default records and relays some usage information to Adobe to assist in the improvement of
the Welcome screen experience. The Welcome screen usage data is anonymous and does not link the information to
your personal data or your Adobe ID account information. Usage information from the Photoshop Elements Editor,
Adobe Premiere Elements Editor, or Elements
Welcome screen:
1 In Windows XP, click start > Run (or in Windows Vista choose Start) and type regedit.exe, and click OK.
The Windows Registry Editor opens. Using the tree navigator on the left navigate to
HKEY_CURRENT_USER\Software\Adobe\Elements Organizer\8.0\Organizer.
2 Right click the right panel, and select New > DWORD Value.
A new DWORD Value with the name New Value #1 is created.
3 Rename New Value #1 to DisableTracking.
4 Double-click DisableTracking.
The Edit DWORD Value dialog opens.
5 Enter 1 in the Value Data field, click OK, and close the Registry Editor.
Organizer is not tracked. To disable the tracking of information in the
5
Elements Organizer workspace
For a video overview, see www.adobe.com/go/lrvid2312_pse8_en.
Use Elements Organizer to find, organize, and share your photos and media files. Use the Media Browser in Elements
Organizer to view thumbnails of the media files you’ve imported. You can view a large thumbnail of a single media file
or smaller thumbnails of many media files. You specify the thumbnail size by using the thumbnail slider. If you prefer
viewing your media files by date, use the Date in the Organizer view to work with your files in a calendar format.
The Media Browser lists all the photos, as well as videos and PDF files that you’ve imported. Imported items appear in
one comprehensive window that you can easily browse and filter. It can even show thumbnails of files stored remotely,
such as those files that you want to keep on CDs.
To change the brightness of the Elements Organizer workspace:
1 Select Edit > Preferences > General.
2 In the Preferences window, specify the User Interface brightness and the Grid brightness.
You can fix the most common problems in the media files by using the tools in the Fix tab of the Task pane. For more
complex editing, you can select a photo or video in Elements Organizer, and in the Fix tab:
• Click Full Photo Edit, Quick Photo Edit, or Guided Photo Edit to work with photos. The photo opens in the
Photoshop Elements Editor workspace.
• Click Edit Videos to work with video files. The video file opens in the Adobe Premiere Elements Editor workspace.
You can create projects, from printed photo books to computer slide shows, from the Create tab of the Task pane.
Finally, you can share your photos, videos, and projects with others, by using any of the tools in the Share tab of the
Task pane.
Page 10
USING ELEMENTS ORGANIZER 8
Elements Organizer workspace
6
A
B
C
D
E
F
G
H
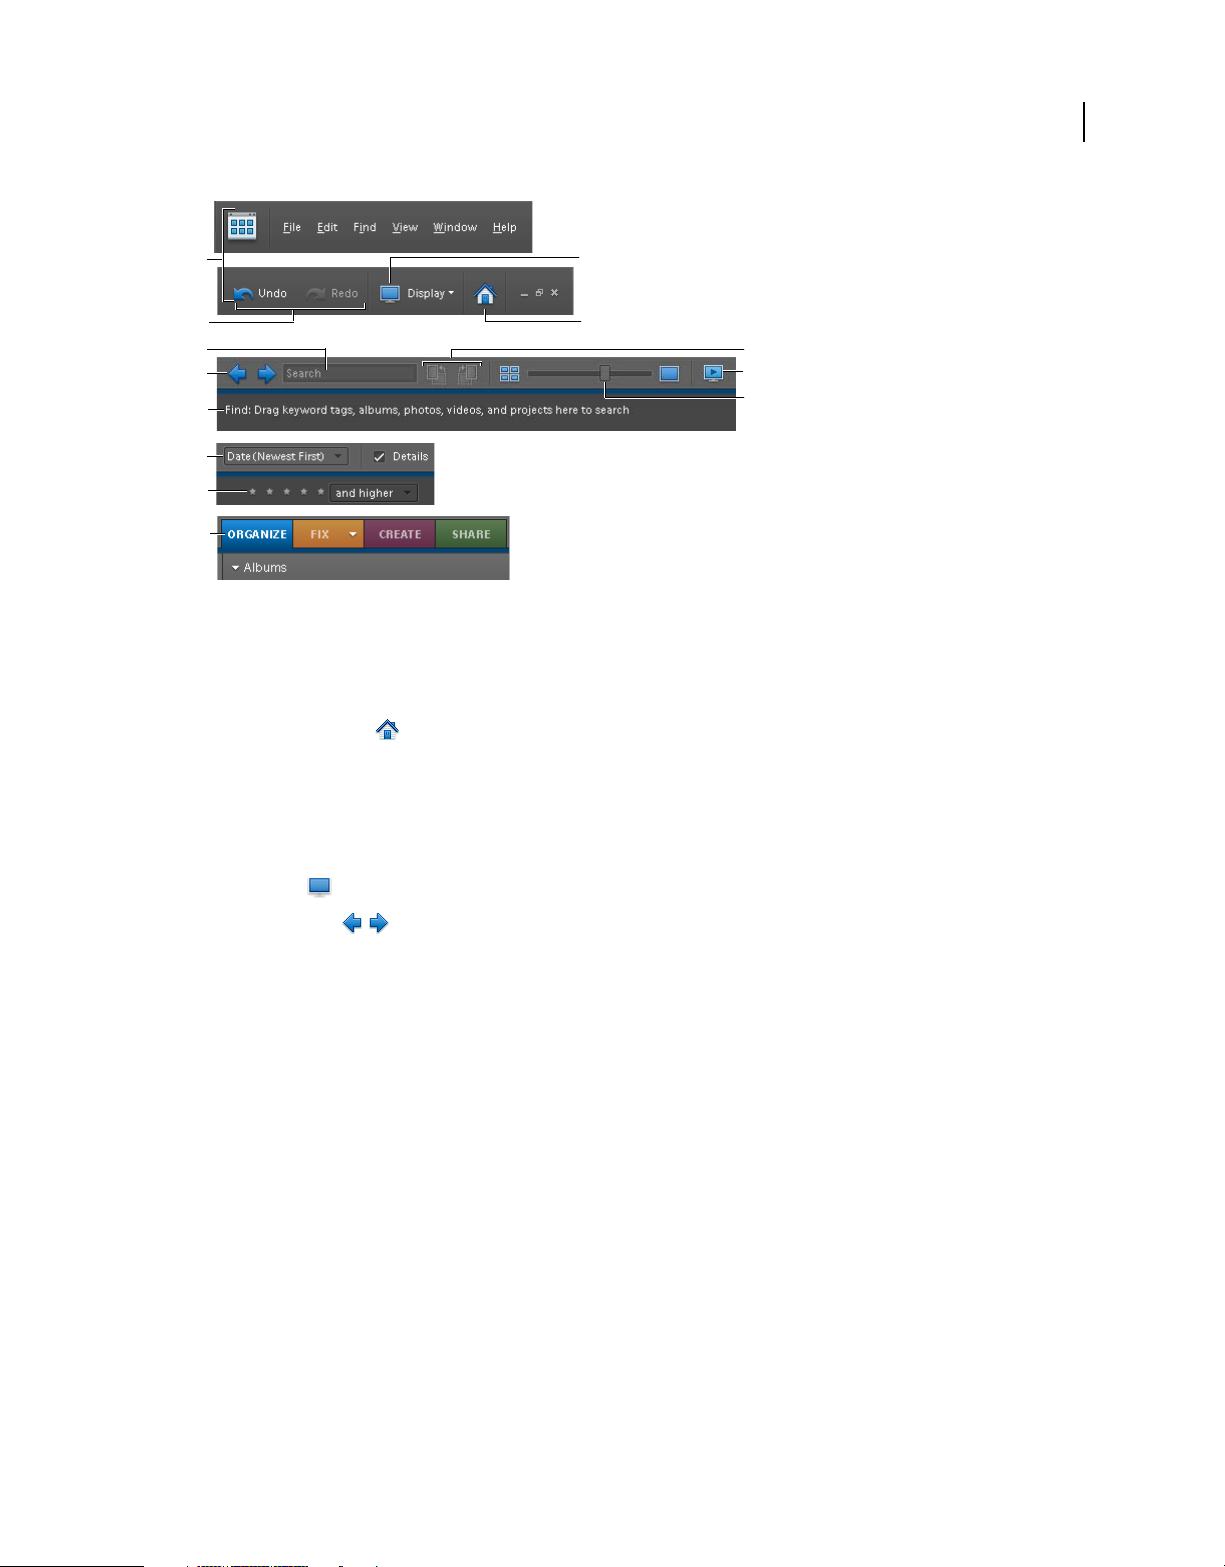
Elements Organizer buttons and menu bar
A. Left and right side of menu bar B. Undo and Redo buttons C. Text Search D. Back To Previous View and Forward To Next View buttons
E. The Find bar F. Media Browser Arrangement menu G. Star ratings filter H. The four tabs of the Task Panel I The Display menu
J. Welcome screen button K. Rotate Left and Rotate Right buttons L. View, Edit, Organize In Full Screen M. Adjust Size Of Thumbnail slider
I
J
K
L
M
The Elements Organizer workspace has the following components:
Welcome Screen button
Displays the Welcome screen with select tools for one of the primary tasks: Organize and Edit.
Note: Users in the United States can also sign in with an Adobe ID. This service is not available in countries outside the
United States.
Menu bar Contains menus for performing tasks. Elements Organizer organizes the menus by topic: File, Edit, Find,
View, Window, and Help.
Display button Opens menu of views of the Media Browser.
Navigation buttons Take you back to the previous view, or forward to the next view, of the Media Browser.
Find bar Drag a photo, video, album icon, or keyword tag icon here to search for photos or media files.
Media Browser Displays your photos, video files, audio files, and video projects in the Elements Organizer, either one
at a time or in a grid of thumbnails.
Task pane Contains the Organize, Fix, Create, and Share tabs, and the panels or buttons for each tab.
Status bar In the Media Browser, the status bar displays the number of items selected and the number of items
contained in the Media Browser arrangement.
Note: If you change your Windows theme while the Elements Organizer is open, the Organizer workspace could appear
distorted after the change. Close the Elements Organizer and relaunch it to return it to its normal appearance.
More Help topics
“View and find media files in Date view” on page 45
Work with the Task pane in Elements Organizer
In the Elements Organizer, the Task pane appears on the right side of the Media Browser. It contains a tab for each of
the basic steps of media file editing: Organize, Fix, Create, and Share. You can open the Task pane to access the tabs,
or close it to expand the Media Browser.
Page 11
USING ELEMENTS ORGANIZER 8
Elements Organizer workspace
Tabs in the Task Pane with the Organize tab selected.
Show or hide the Task pane
❖ Select Window > Show/Hide Task Pane.
Use panels in the Organize tab
The Organize tab stores multiple panels. The Albums and Keyword Tags panels cannot be removed from it.
A
B
C
D
7
The Organize tab
A. Adjust panel height B. Collapse or expand panel C. Selected keyword tag D. Show or hide Task panel
❖ Do any of the following:
• To collapse or expand a panel, click the triangle beside the panel’s name in the Organize tab.
• To show or hide the Properties panel, select Window > Properties.
• To move the Properties panel into or out of the Task pane, double-click the panel’s title bar.
Use tools in the Fix, Create, and Share tabs
1 In the Task pane, click the Fix, Create, or Share tab.
2 Click a button for any of the tools listed on that tab.
Use context menus
You can use context menus in both the Editor and Elements Organizer workspaces. Context-sensitive menus display
commands that are relevant to the active tool, selection, or panel. These menus are often another way to access the
commands in the window menus.
Page 12
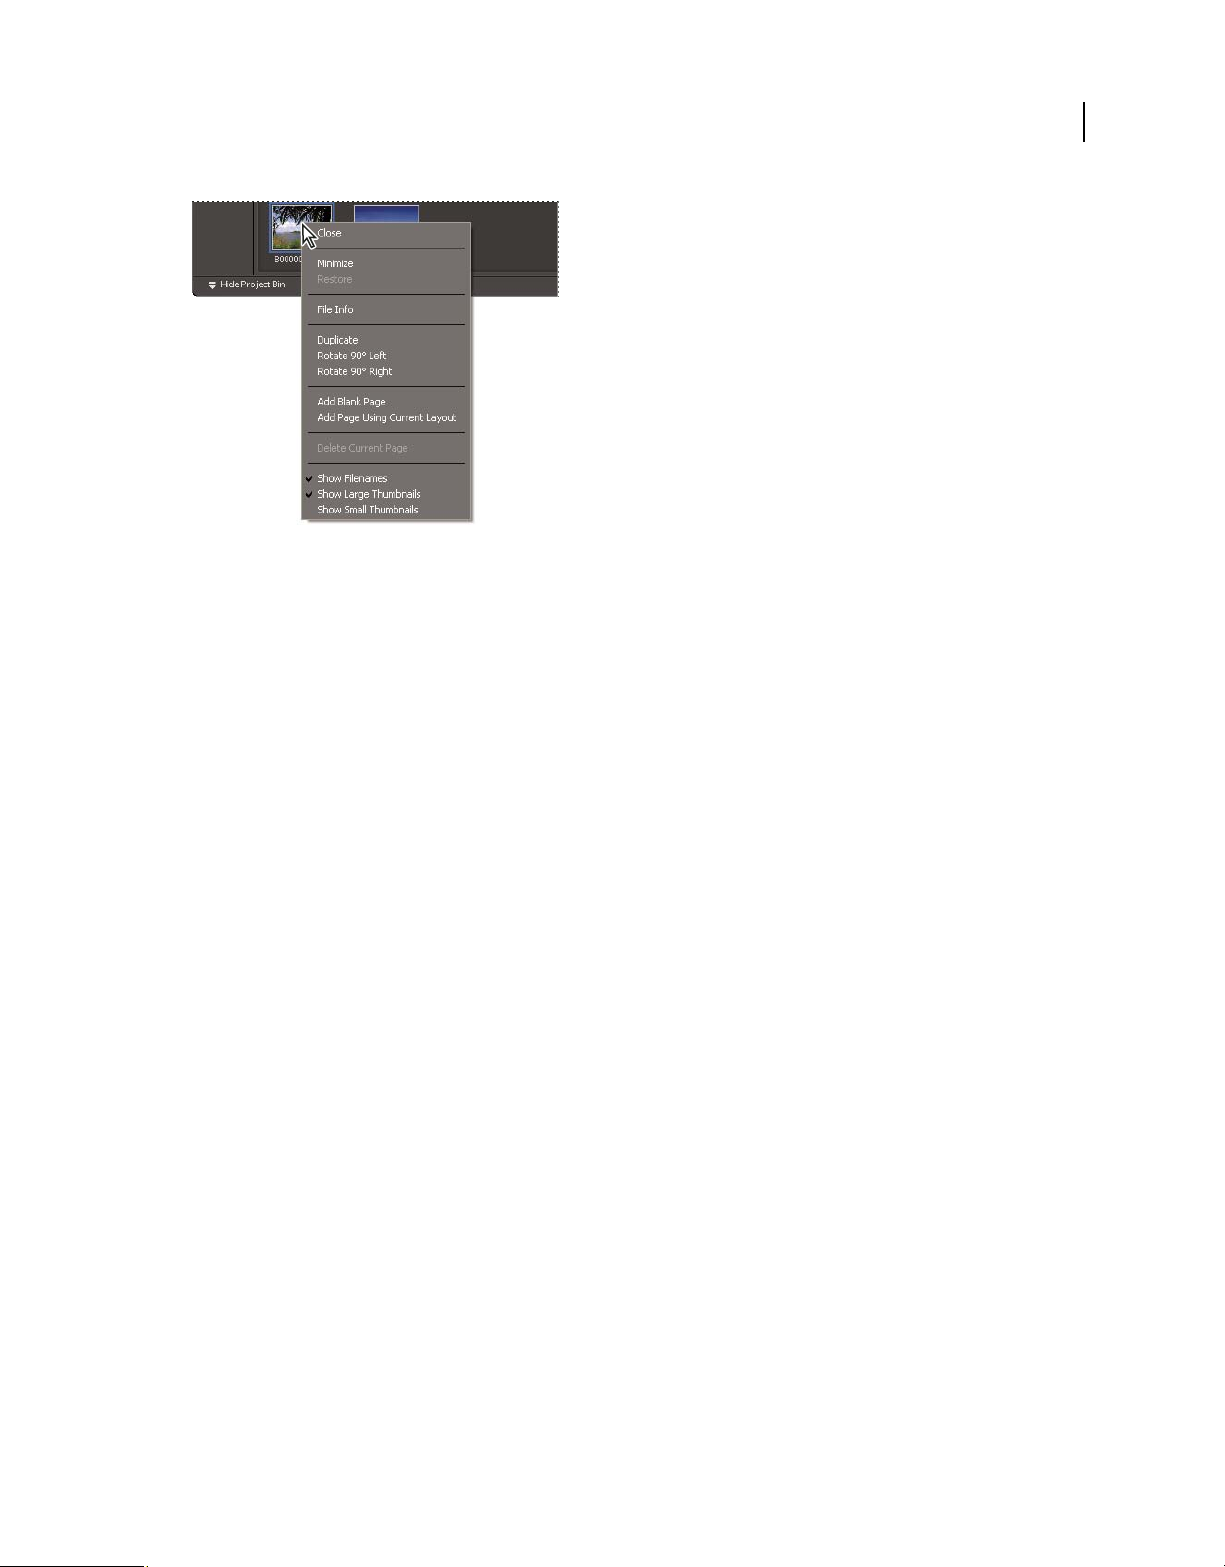
Right-click to open a context menu. This menu appears in the Project Bin in Full Edit.
1 Position the pointer over an image or panel item.
Note: Not all panels offer context menus.
2 Right-click and choose a command from the menu.
USING ELEMENTS ORGANIZER 8
Elements Organizer workspace
8
Using keyboard commands and modifier keys
You can use keyboard shortcuts in both the Editor and Elements Organizer workspaces. Keyboard commands let you
quickly execute commands without using a menu; modifier keys let you alter how a tool operates. When available, the
keyboard command appears to the right of the command name in the menu.
More Help topics
“Keys for navigating” on page 174
Undo, redo, or cancel operations
Many operations can be undone or redone. Available memory may limit your ability to use these options.
1 To undo or redo an operation, Choose Edit > Undo or choose Edit > Redo.
2 To cancel an operation, hold down the Esc key until the operation in progress has stopped.
Exit Photoshop Elements or Adobe Premiere Elements
To exit Photoshop Elements or Adobe Premiere Elements, close each workspace—closing one does not automatically
close another.
1 In any workspaces, do one of the following:
• Choose File > Exit.
• Click the Close button in the upper-right corner of the workspace.
2 When closing the Editors, confirm whether you want to save any of the opened files.
Page 13

USING ELEMENTS ORGANIZER 8
Elements Organizer workspace
Getting started with your Adobe ID
Account creation and management
You can create an Adobe ID through the Welcome screen. There are two types of accounts, a Free account and a Plus
account.
Free account provides 2.0 GB online storage and an automatic backup. The Plus account provides 20 GB online
storage, new tutorials, artwork, and online album templates delivered to the software installed on your machine.
If you want to change your personal details after creating an Adobe ID, sign in using your Adobe ID. You can also
change your personal details in the Organizer view.
1 Do one of the following:
• On the Welcome screen, click Manage My Adobe ID, and enter your password.
• In the Organizer view, click the text Welcome, <Your First Name> located above the Full Screen View of Photos
icon
2 Select Personal Info, and change your details.
Create an Adobe ID
1 Click Create New Adobe ID on the Welcome screen.
2 Enter your personal details such as name, e-mail address, password, and personal URL, and click Create Account.
3 Click Free account or Upgrade to Plus account. A verification mail is sent to your E-mail ID. Log in to your E-mail
account and follow the instructions in the mail to activate your new Adobe ID.
. Enter your password.
9
More Help topics
“Sign up with your Adobe ID” on page 1
Manage your account
After you create an account, you can change your personal details. Sign in using your Adobe ID and change the
required details. You can change the details from the Welcome screen, Elements Organizer, or Photoshop Elements
workspace.
1 On the Welcome screen, click Manage My Adobe ID, and enter your password.
2 Select Personal Info, and change your details.
Sign in with your Adobe ID
1 Make sure that your computer is connected to the Internet, and then start Adobe Photoshop Elements or Adobe
Premiere Elements.
2 In the Welcome screen, enter your Adobe ID and password, and click Sign In.
The Welcome screen changes and greets you with the message Welcome, [user name]. Generally, Elements Organizer
remembers that you have an Adobe ID and automatically signs you in if your computer is connected to the Internet.
Important: Photoshop Elements free online benefits and Photoshop Elements Plus are available in the United States only.
Internet access required.
Page 14

USING ELEMENTS ORGANIZER 8
Elements Organizer workspace
View your albums on Photoshop.com
You can view your backed up albums on the Internet from any computer, even one that doesn’t have
Organizer installed.
Elements
1 Make sure that the computer is connected to the Internet, open a web browser, and go to Photoshop.com.
The web browser must have cookies enabled.
2 On the Photoshop.com home page, click Sign In and enter your Adobe ID.
3 After your Photoshop.com page opens, click My Albums.
You can view and navigate through all the photos and albums you’ve backed up to Photoshop.com.
Launch the Inspiration Browser
The Inspiration Browser enables you to access and organize tutorials that contain ideas and ways to do more with your
media files.
❖ To launch the Inspiration Browser, do any of the following:
• In Elements Organizer, click the icon or words that appear in the lower-right area of the status bar. A small dialog
opens with options.
• Select Help > Elements Inspiration Browser.
If you are not already signed in with your Adobe ID, a dialog box opens up, enabling you to sign in.
10
Using Elements Organizer and Adobe Premiere Elements together
About Elements Organizer and Adobe Premiere Elements
Here are a few ways you can share files between Elements Organizer and Adobe® Premiere® Elements:
• Organize your photos, video files, and audio clips in Elements Organizer, and drag them onto the Adobe Premiere
Elements Media panel.
• Right-click the media file, and select Edit With Premiere Elements.
• Create a slide show in Elements Organizer with captions, transitions, effects, music, narration, graphics, and titles.
After creating the slide show, bring the slide show into Adobe Premiere Elements for further editing. Or, bring
individual photos or video files into Adobe Premiere Elements, and create the slide show there.
• You can edit video files through the Fix tab in Elements Organizer.
• Customize DVD menu templates in Elements Organizer, and use the templates in your Adobe Premiere Elements
project. (DVD templates are PSD files stored in the Adobe Premiere Elements application folder.)
• Create an Elements Organizer file with your video project’s settings, enhance it in Elements Organizer, and use it
in Adobe Premiere Elements. You can also create instant movies through the Create tab in Elements Organizer.
Page 15

USING ELEMENTS ORGANIZER 8
Elements Organizer workspace
Arrange your work area
To share files between Elements Organizer and Adobe Premiere Elements, it’s useful to have both programs open and
accessible on your computer monitor.
1 Start Elements Organizer and Adobe Premiere Elements.
2 If your screen is maximized, click the Restore button in the upper-right corner of each application window.
3 Position the application windows side by side or overlap them slightly.
However, trying to access the following options in the Share tab, launches Adobe Premiere Elements:
• Burn Video/DVD BluRay
• Online Video Sharing
• Mobile Phones and Players
Differences in file type support
Elements Organizer and Adobe Premiere Elements support many of the same file types, which makes the transfer of
most files between the two programs easy and efficient. For example, you can catalog Photoshop (PSD) files in the
Elements Organizer and then add them as still images to a project in Adobe Premiere Elements.
11
All file types that are supported in Photoshop Elements and Adobe Premiere Elements can be imported into Elements
Organizer. The file support is irrespective of the application installed (Photoshop Elements and Adobe Premiere
Elements). The following table gives a list of the supported file types:
Images Audio Video
Jpe Wma avi
jpeg wav mpe
jpg MP3 asf
pdf M4a aac
tif Ac3 flv
crw mpa MPEG
nef M2a Mpg
raf Aiff Mp2
orf Aif wmv
mrw MPEG M4v
dcr Mpe Mov
mos mov M2p
raw Vob
pef M2t
srf mpv
dng Mod
x3f 3g2
cr2 3gp
Page 16
Images Audio Video
erf MP4
sr2 Mpeg4
kdc M1v
mfw F4v
mef Tod
arw h.264
bmp Avc
rle M2ts
dib dv
gif swf
wbm flm
wbmp 3gpp
tga M2v
USING ELEMENTS ORGANIZER 8
Elements Organizer workspace
12
vda Mp1
icb mts
vst F4v
pxr Tod
pcx
mef
pse
psd
pdd
flm
png
Photoshop Elements Editor, Adobe Premiere Elements, and Elements Organizer do not recognize the following file
types:
Elements Organizer Photoshop Elements Editor Adobe Premiere Elements
MOD (.mod; JVC Everio)
TIFF with LZW compression (.tif) TIFF with LZW compression (.tif)
EPS (.eps) Illustrator (.ai) Illustrator (.ai)
AIFF (.aiff) AIFF (.aiff)
Dolby audio (.ac3) Dolby audio (.ac3)
Flash video (.flv) Flash video (.flv)
MPEG (.mp3, .mp4) MPEG (.mp3, .mp4)
Page 17

USING ELEMENTS ORGANIZER 8
Elements Organizer workspace
Elements Organizer Photoshop Elements Editor Adobe Premiere Elements
Windows Media (.wmv, .wma) Windows Media (.wmv, .wma)
Note: Elements Organizer catalogs video AVI files properly and they play correctly. However, audio AVI files appear as
broken video thumbnail icons. Also, Colors created in a file’s spot channels in Photoshop are not displayed when the file
is imported into Elements
Organizer.
The Photoshop Elements Editor can import individual video frames from ASF, AVI, MPEG, and Windows Media
files. (Choose File > Import > Frame From Video.)
13
Page 18

Chapter 3: Import photos and videos
Use the Elements Organizer to bring media files into catalogs from any source, whether a camera, scanner, CD, folder
on your hard disk, or mobile phone. However, if you simply want to start editing a media file on your hard disk, and
you know its filename and location, you can use the Open or Place commands in the Photoshop Elements Editor to
browse to the file.
About getting photos and videos
Bringing photos and videos into the Elements Organizer
Use the Elements Organizer to add photos and videos to a catalog. If you choose the File > Import or File > Open
command in the Editor, select the Include In The Elements Organizer option when you save the file to add it to your
catalog.
If you have a system of folders on your computer that you want to continue using for organizational purposes, you can
use the Elements Organizer’s Folder Location view to view your files as they appear on your hard disk. From the Folder
Location view, you can also instantly tag your images with their folder names.
14
When you choose the File > Get Photos And Videos command to bring a media file from your hard disk into a
catalog, the Elements Organizer creates a link to the media file —it does not copy or move the original image unless
you specify it. When you get a media file from a CD, DVD, or device such as a scanner, camera, card reader, or phone,
the Elements Organizer first copies the media file into a folder on your hard disk and then creates a link to that copy.
Important: If you delete the original file from your hard disk, you cannot edit it, even though its thumbnail may remain
in a catalog.
When downloading media files from a camera, card reader, or mobile phone, it is recommended that you organize the
media files during the import process. You can divide these media files into Place and Family folders, and then name
them accordingly.
More Help topics
“View and manage files by folder location” on page 33
“Tagging photos and videos” on page 52
“Move files in a catalog” on page 99
Set file preferences
Setting the file preferences determines how files are managed.
1 In the Elements Organizer, choose Edit > Preferences > Files.
2 Choose any of the following options, and then click OK:
Use “Last Modified” Date If EXIF Date Is Not Found Uses the modification date to store and organize photos that don’t
contain EXIF (EXchangeable Image Format) data. If deselected, the file is stored with an unknown date.
Page 19

USING ELEMENTS ORGANIZER 8
Import photos and videos
Import EXIF Caption Imports any caption that was stored with the media file in the camera. Deselect this option if you
want to delete this information, and type your own caption for each media file. (Note that caption data may be stored
in different places in a file. Deselecting this option only blocks EXIF caption data.)
Automatically Search For And Reconnect Missing Files Searches for missing, disconnected files. Select this option to
avoid getting messages about disconnected files.
Automatically Prompt To Back Up Files And Catalog Prompts you to back up files when you open a catalog with more
than 500 transactions, including acquired photos and edits.
Enable Multisession Burning To CD/DVD Allows burning (copying) files onto a disc multiple times, enabling you to use
as much free space on the disc as possible. Normally, you can only burn a CD or DVD one time, and any unused space
is lost.
Rotate JPEGs Using Orientation Metadata This option speeds up the rotating of photos in the Media Browser by using
lower resolution thumbnails. Select this option if you rotate JPEG images regularly. Deselect this option if you want to
view higher resolution thumbnails.
Rotate TIFFs Using Orientation Metadata This option speeds up the rotating of photos in the Media Browser by using
lower resolution thumbnails. Select this option if you rotate TIFF images regularly. Deselect this option if you want to
view higher resolution thumbnails.
Folders For Saved Files Specifies the default folder location where projects and other saved files are stored. To change
the location, click Browse and navigate to a new location.
15
Preview File Size Specifies the size of preview files used by the Elements Organizer when storing media files offline.
If you have changed the settings and are having trouble importing your media files, try clicking the Restore Default
Settings button in the Preferences dialog box to restore the original preferences.
More Help topics
“Set the size for preview files” on page 26
“Reconnecting missing files in the Elements Organizer” on page 126
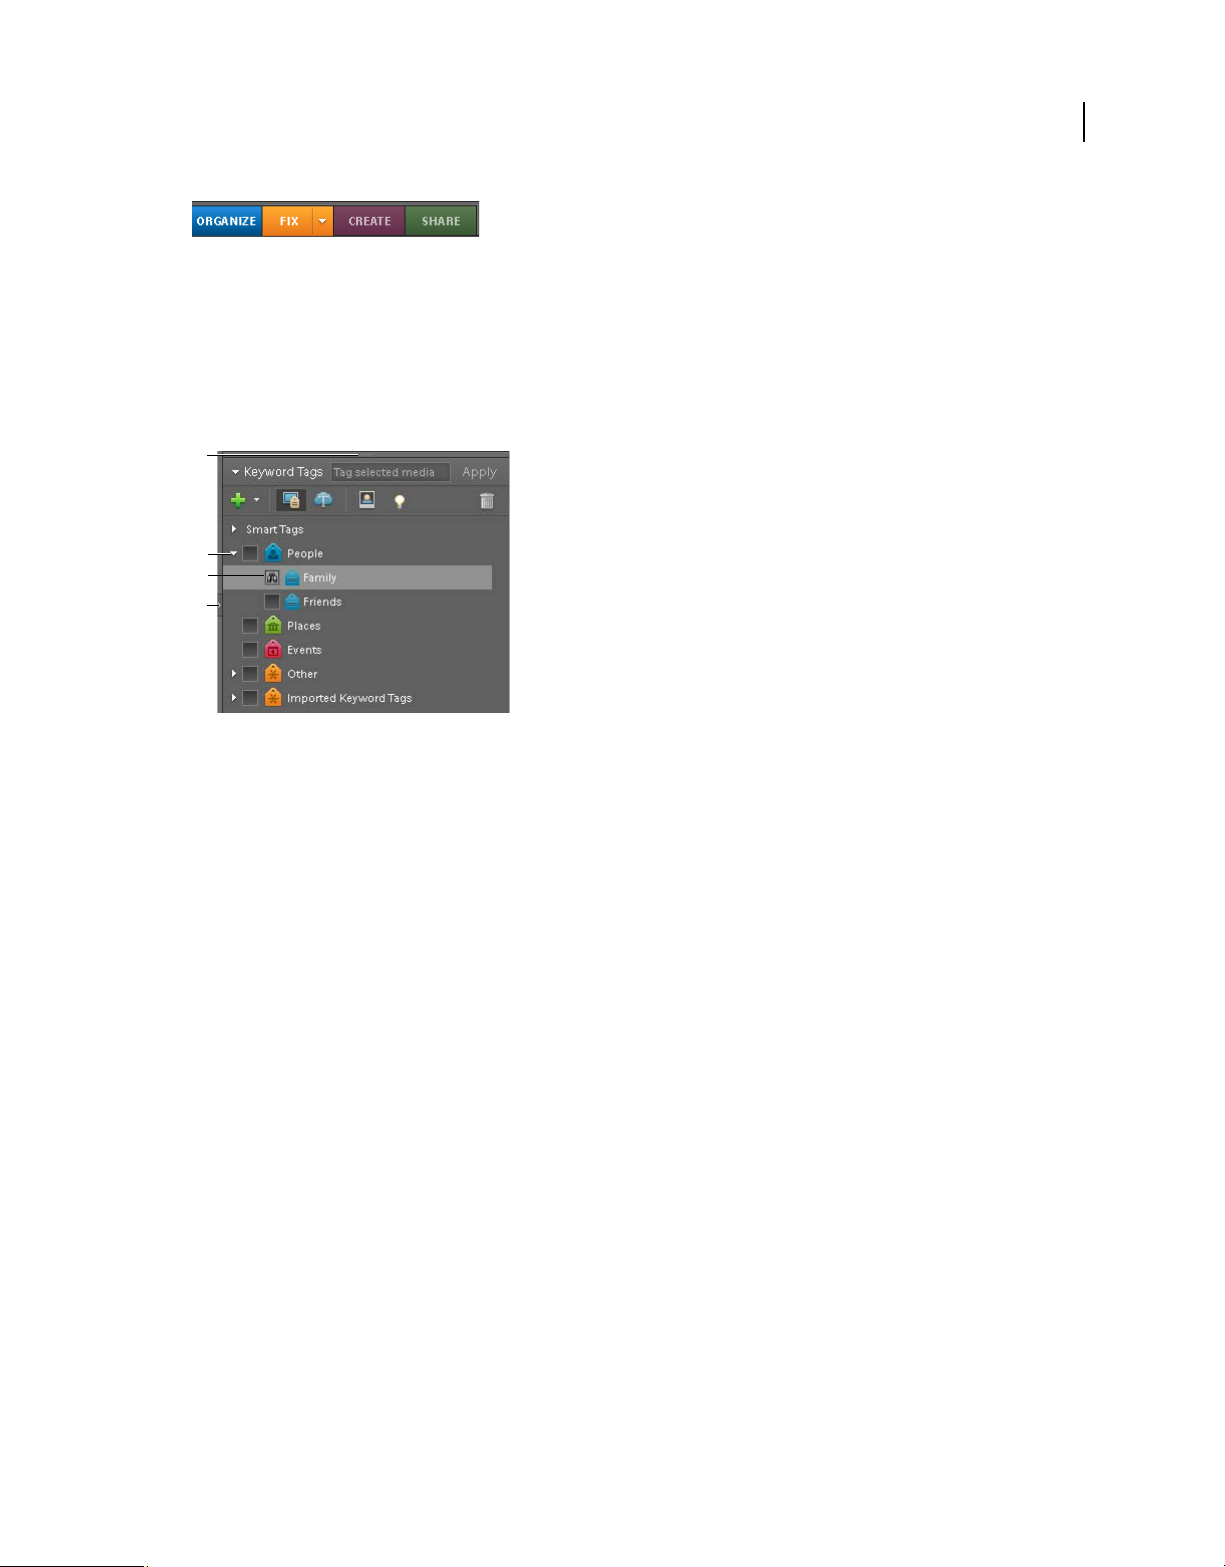
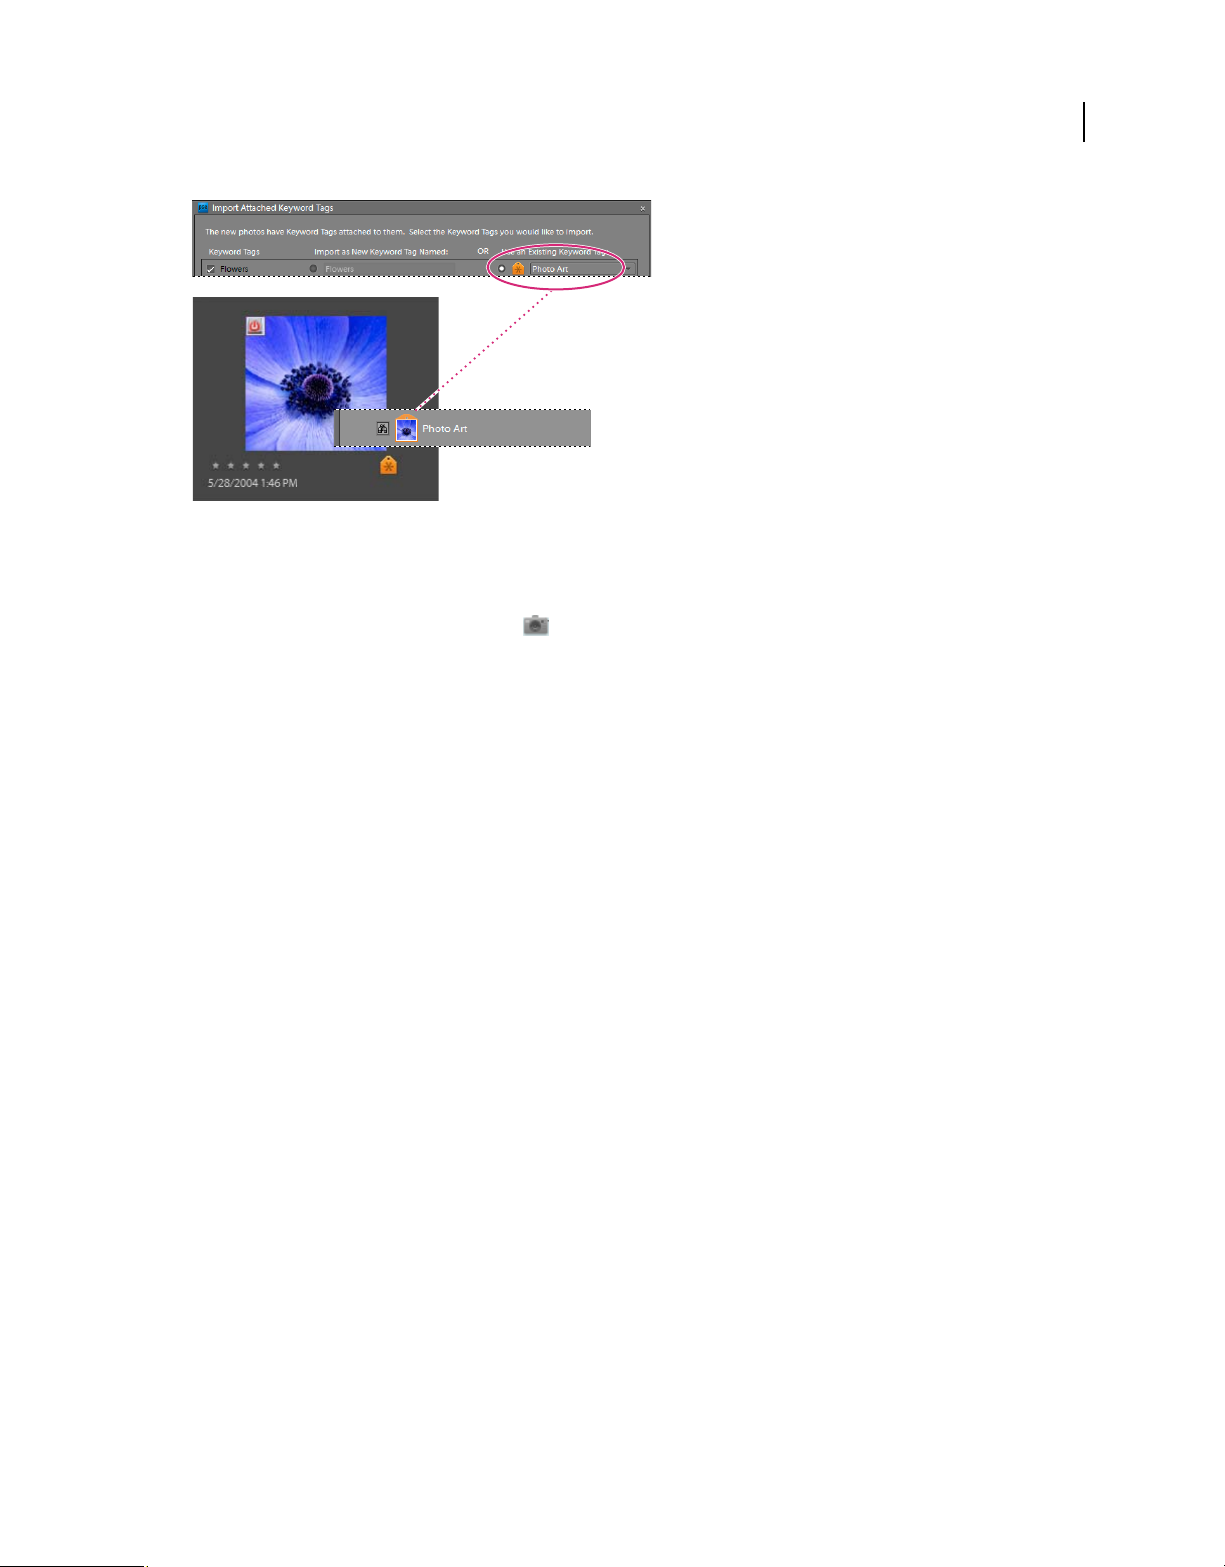
Import tags attached to media files
When you receive media files that contain keyword tags or keyword metadata, you can import them with the media
file. You can decide whether to keep the attached keyword tag, rename the keyword tag, or map it to one of your own
keyword tags. If you import a new keyword tag, it appears in your Keyword Tags panel, and you can use it to tag other
media files.
Page 20
USING ELEMENTS ORGANIZER 8
Import photos and videos
An imported tag appears in the Keyword Tags panel.
1 Ensure that the camera or card reader is connected to your computer, or the media files you want to import are
copied to your computer.
2 In the Elements Organizer, choose File > Get Photos And Videos, and select any method for getting photos and
videos.
Note: If the media files include tags or keyword metadata, the Import Attached Keyword Tags dialog box appears.
16
3 Do one of the following:
• Select the tags you want to import. The tags you select are added to the Keyword Tags panel when the media files
are imported. If a tag has an asterisk (*), you already have a tag of the same name in your catalog. The existing tag
is attached to the media files.
• Click Advanced for additional options.
4 If you selected Advanced, do any of the following, and click OK:
• Select the tags you want to import by clicking the boxes next to the tag names. When you select a tag, the options
to the right of the tag become active.
• To rename a tag you are importing, select the tags you want to import by clicking the boxes next to the tag names.
Click the button to the right of the tag under Import As New Keyword Tag Named, and type a name in the textbox.
Organizer adds a tag with the new name to your catalog and attaches the tag to the imported media files.
Elements
• To map an imported tag to an existing tag in your catalog, select the tags you want to import. Click the button in
the right column under Use An Existing Keyword Tag and choose a tag from the pop-up menu. The tag name you
choose gets attached to the imported media files instead of the original tag name.
• Click Reset To Basic to clear your changes and return to the Import Attached Keyword Tags dialog box.
Note: If the media files you are importing have many tags attached, a dialog box appears. You can choose to import all
the tags or none of them. If you prefer to select individual tags to import, close the dialog box and undo the import by
choosing Edit
> Undo Import Media. You can also undo the import by selecting the entire import batch and deleting it
from the catalog. Then, reimport the media files in smaller batches.
More Help topics
“About keyword tags” on page 52
Page 21
USING ELEMENTS ORGANIZER 8
Import photos and videos
Cameras and card readers
About cameras and card readers
You can download (copy) media files from cameras and card readers in several ways:
• Copy media files from your camera or card reader, and import them directly into the Elements Organizer using the
options in the Photo Downloader dialog box. This method is recommended because it is quick and easy, and lets
you organize your media files when importing them.
• Use the software that came with your digital camera to download pictures onto your computer, and then bring
them into Elements
command in the Elements Organizer.
• If your camera or card reader displays as a drive in My Computer, you can drag the files from there directly into
the Elements Organizer. Or you can drag them into a folder on your hard drive, and then bring them into
Organizer using the File > Get Photos And Videos > From Files And Folders command in the
Elements
Elements Organizer.
In some cases, you need to install the software driver that came with your camera before you can download media
files to your computer. You might also need to set the camera and card reader preferences in Elements
Organizer using the File > Get Photos And Videos > From Files And Folders
Organizer.
17
More Help topics
“Bringing photos and videos into the Elements Organizer” on page 14
“Get media files from files and folders” on page 23
“Set camera and card reader preferences” on page 20
Get media files from a digital camera or card reader
For a video about this process, see www.adobe.com/go/lrvid2311_pse8_en.
1 Connect your camera or card reader to your computer. (See the documentation that came with your device, if
necessary.)
The Windows AutoPlay dialog box opens with a list of options for getting the photos.
2 In the Windows AutoPlay dialog box, select the Elements Organizer option.
The Photo Downloader dialog box opens if Elements Organizer is running. You can also choose File > Get Photos
And Videos > From Camera Or Card Reader to open the Photo Downloader.
3 In the Photo Downloader dialog box under Source, choose from the Get Photos From menu to specify where to
copy/import the photos from.
4 In the Import Settings area, set the following options:
Location Specifies the folder to which the media files are downloaded. To change the default folder location, click
Browse, and specify a new location.
Create Subfolder(s) Creates a subfolder using the naming scheme chosen from the pop-up menu. If you choose
Custom Name, type a subfolder name in the box.
If you are using keyboard shortcuts to create subfolders (Alt+C) or rename files (Alt+R), press the spacebar to expand
the menu. Then, use the arrow keys to select an option.
Page 22

USING ELEMENTS ORGANIZER 8
Import photos and videos
Rename Files Changes the filenames using the naming scheme selected from the pop-up menu. If you choose Custom
Name, type a base filename and a starting number for assigning sequentially numbered filenames to the media files.
Note: If the name you entered exists, the copied image filename is appended with “-1”, or another appropriately
numbered designator.
Preserve Current Filename In XMP Select this option to use the current filename as the filename stored in the metadata
of the media file.
Delete Options Specifies whether to leave the media files on your camera or card, verify and delete the files, or delete
the files after they are copied. Deleting the files automatically avoids having to delete the media files by using your
camera. Media files that you do not import into Elements
Automatic Download Imports your media files instantly the next time Elements Organizer is selected in the Windows
Organizer are not deleted from the device.
AutoPlay dialog box. This option uses the Automatic Download values specified in the Camera or Card Reader
preferences.
5 (Optional) For more download options, click the Advanced Dialog button.
6 Click Get Photos.
The media files are copied to your hard drive. If the media files you copied contain keyword metadata, the Import
Attached Tags dialog box appears; specify whether to copy the tags.
18
7 Click OK in the Files Successfully Copied dialog box. You can choose to show only the new files in the Media
Browser.
You can change the settings specified here at a later time. In Elements Organizer, choose Edit > Preferences > Camera
or Card Reader.
More Help topics
“Set advanced photo downloading options” on page 18
Set advanced photo downloading options
The Advanced dialog box of the Adobe Photo Downloader offers all the options in the Standard dialog box plus several
additional options. For example, you can view all of the media files stored on a device or preview videos before
importing them. You can also add copyright metadata, specify an album for the imported photos, and automatically fix
red eye as the images are imported. The settings you specify in this dialog box retain their values until you reset them.
1 In the Standard Photo Downloader dialog box, click Advanced Dialog.
Thumbnail images of every file on your device appear.
2 To show or hide different file types, click the Image , Video , or Audio buttons. If the device contains
duplicate files, the Duplicate button is also available.
Note: Duplicate files are files that are already in the Elements Organizer or have already been copied to your hard disk.
If you download duplicate files, they are copied to your hard drive, but are not added to the Elements Organizer.
3 Select media files (photos or videos) to download by doing any of the following:
• To select individual media files, click the boxes below each thumbnail.
• To select multiple media files, drag a rectangle around their thumbnails. Then right-click and select Check Selected,
or click a box below one of the selected media files to check them all.
• To select all media files, click Check All. To deselect all images, click Uncheck All.
Page 23

USING ELEMENTS ORGANIZER 8
Import photos and videos
4 To rotate one or more media files, select them by clicking the media files (not the check boxes). Then, click the
Rotate Left button
5 In the Save Options section, do any of the following:
or the Rotate Right button .
• Specify a destination to copy the media files. Click Browse and navigate to the location you want.
• Choose an option for naming subfolders from the Create Subfolder(s) menu. The Custom Groups (Advanced)
option creates a subfolder with the group name format you select in the Group Name box. The group tag name
helps you find and distinguish photos within a category.
Note: If you switch to the Standard dialog box, Custom Groups settings are lost.
• Choose a naming scheme from the Rename Files menu if you want to rename the media files during import. If you
choose Custom Name, type a base filename and a starting number for assigning sequentially numbered filenames
to the media files.
Note: If the name you entered exists, the copied image filename is appended with “-1” or another appropriately numbered
designator.
6 In the Advanced Options section, select any of the following:
Automatically Fix Red Eyes Applies the Fix Red Eye command to all selected photos.
Note: Automatically removing red eye on a large number of image files increases the amount of time required to import
your photos.
19
Automatically Suggest Photo Stacks Combines selected photos into suggested photo stacks based on visual similarity.
Make Group Custom Name A Tag Applies the custom name tag of the specified group to the selected photos. Use this
option only if you have specified custom names to custom groups. Applying tags while downloading helps you find
photos more easily in the Elements Organizer.
Import Into Album Lets you specify or create an album to import the photos into. Click Settings to select or create an
album and then click OK.
7 From the menu at the bottom of the Advanced Options section, choose an option to specify what
Organizer should do after copying photos: leave the original files alone, verify that the import was
Elements
successful and then delete the original files, or immediately delete the original files.
8 To add metadata, select a template to use and type in the following fields:
Creator Specifies the file creator. Information typed into this field is appended to the creator metadata in the file.
Copyright Specifies the date and other relevant information to protect your photos. Information typed into this field
overwrites any data already in the copyright metadata in the file.
9 (Optional) To automatically download media files in Elements Organizer after a device is connected, select
Automatic Download. Automatic download options are set in the Camera Or Card Reader preferences.
10 Click Get Photos.
More Help topics
“Designate an album during photo download” on page 74
“Set camera and card reader preferences” on page 20
Page 24
USING ELEMENTS ORGANIZER 8
Import photos and videos
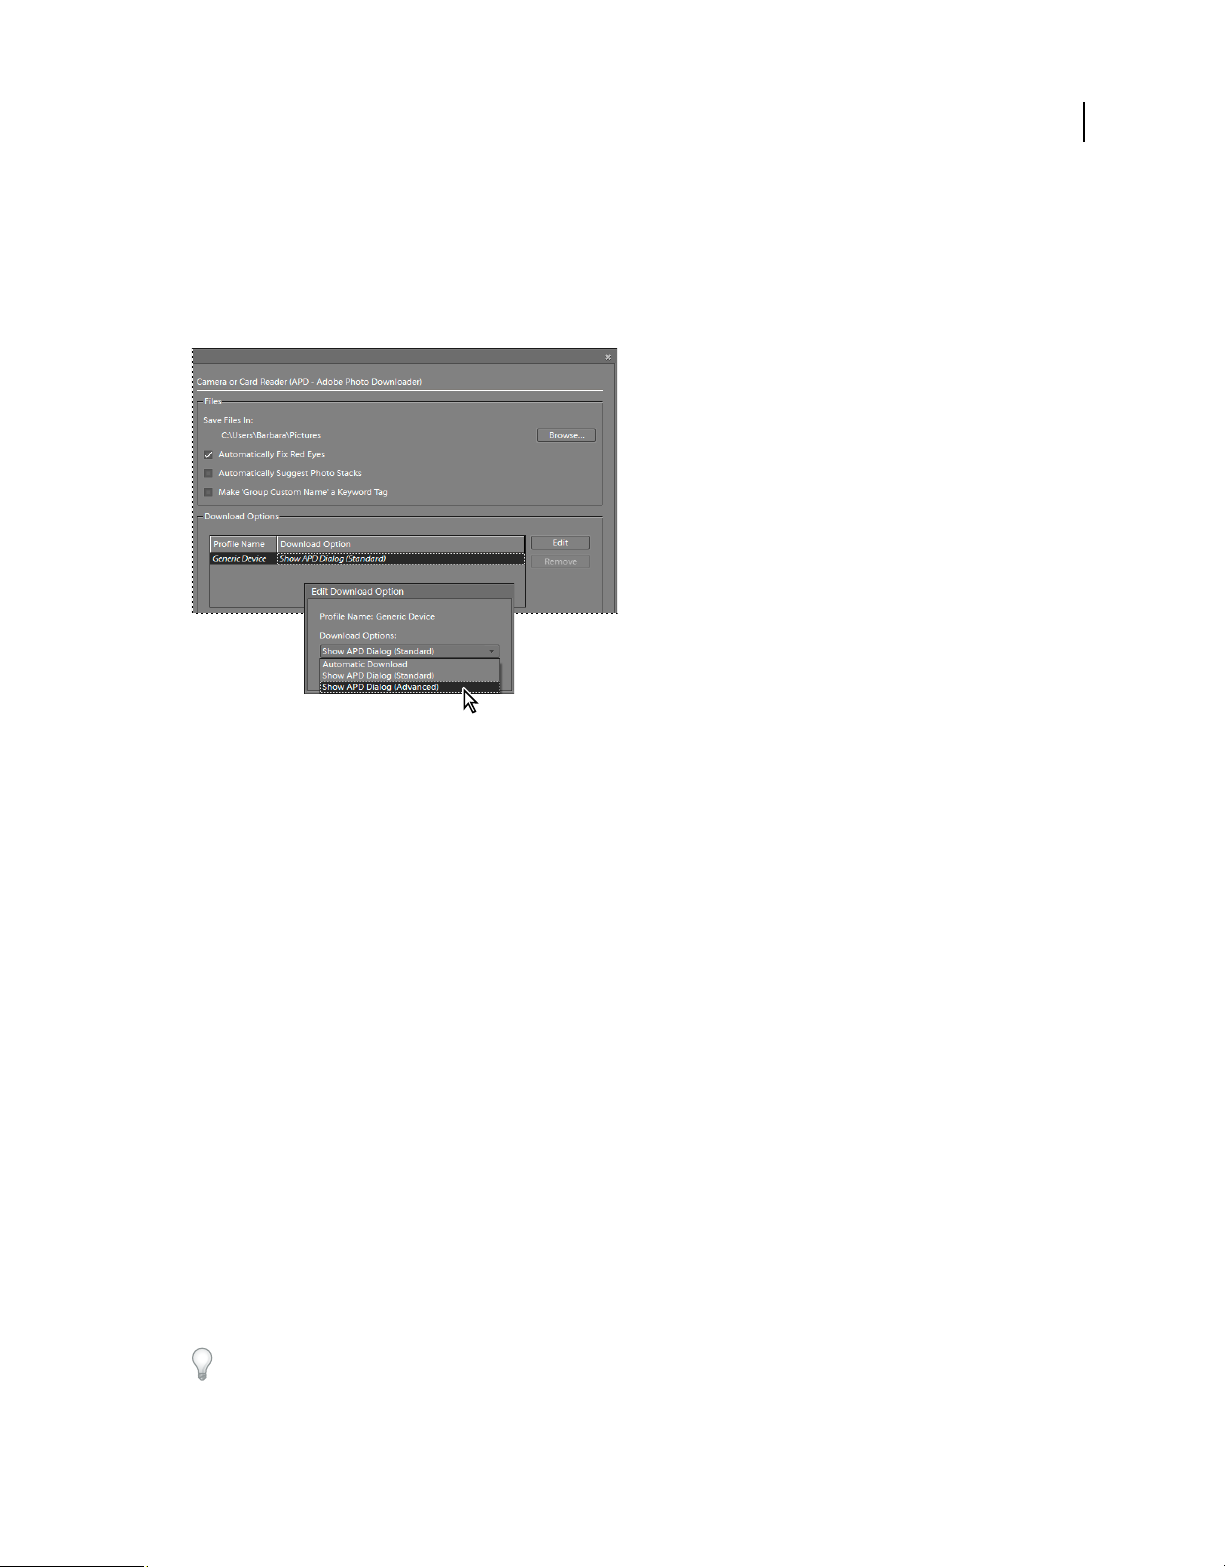
Set camera and card reader preferences
Elements Organizer enables you to set preferences for a device. These preferences apply if you select the
Organizer option in the Windows Auto Play dialog box that appears when a device is connected. The
Elements
preferences remain intact until you change them. If you use a different camera or card reader, make sure to set
preferences specifically for that device.
20
Setting preferences for getting photos from digital cameras and card readers.
1 In Elements Organizer, choose Edit > Preferences > Camera Or Card Reader.
2 Set file-specific import options:
Save Files In Specifies where the files are copied to on your hard drive. Click Browse to specify a new location.
Automatically Fix Red Eyes Fixes red eye problems as the files are downloaded.
Automatically Suggest Photo Stacks Suggests photo stacks for you according to date and visual similarity.
Make Group Custom Name A Keyword Tag Applies the custom name tag of the specified group to the selected photos.
Use this option only if you have specified custom names to custom groups. Applying tags while downloading helps
you find photos more easily in the Elements Organizer.
3 To edit the options for a specific device, select the device profile, and click Edit. Choose a download option from
the menu that appears, and click OK. To delete a device from this list, select it, and click Remove.
4 To specify default values for automatic downloads, set any of the following:
Begin Download Specifies when a download begins after a device is connected.
Create Subfolder(s) Using Specifies if and how to separate and name folders containing media files shot on different
dates.
Delete Options Specifies if and how to delete the original media files from your camera after copying them to your
hard disk.
Copy New Files Only (Ignore Already Imported Files) Causes the downloader to ignore files that are already on your
hard disk.
If you have changed the settings and are having trouble getting your media files, click Restore Default Settings to
restore the original preferences.
Page 25
USING ELEMENTS ORGANIZER 8
Import photos and videos
Scanners
About scanning
Elements Organizer connects to your scanner so that you can get images of your photos, negatives, and slides. You can
get images from scanners in two ways:
• Use the scanner driver plug-in module that came with your scanner. This software is either compatible with
Organizer or uses the TWAIN® interface to scan and open images directly in Elements Organizer.
Elements
• Use the standalone scanning software that came with your scanner to scan and save your images. You can then
bring the images into Elements
Folders command.
In Windows® XP and Windows Vista®, you can set preferences so that Elements Organizer starts as soon as your
computer detects that your scanner is attached. See Windows Help for more information.
Before you try to scan and open your photos in Elements Organizer, make sure that you’ve installed all the software
that came with your scanner. Carefully read any documentation that came with your scanner to make sure that it’s
connected properly to your computer. In Windows, if the Preferences dialog box appears on your screen after you
click Get Photos, set your scanner preferences.
Organizer using the File > Get Photos And Videos > From Files And
21
Get photos from scanners
1 Make sure that your scanner is connected and switched on.
2 In the Elements Organizer, select File > Get Photos And Videos > From Scanner from the pop-up menu.
Note: You can also get photos from a scanner from within Full Edit.
3 If the Get Photos From Scanner dialog box appears, choose the name of the scanner from the Scanner menu.
Note: If you get a None Detected message in the Scanner menu, make sure that the scanner is on and properly connected
to your computer.
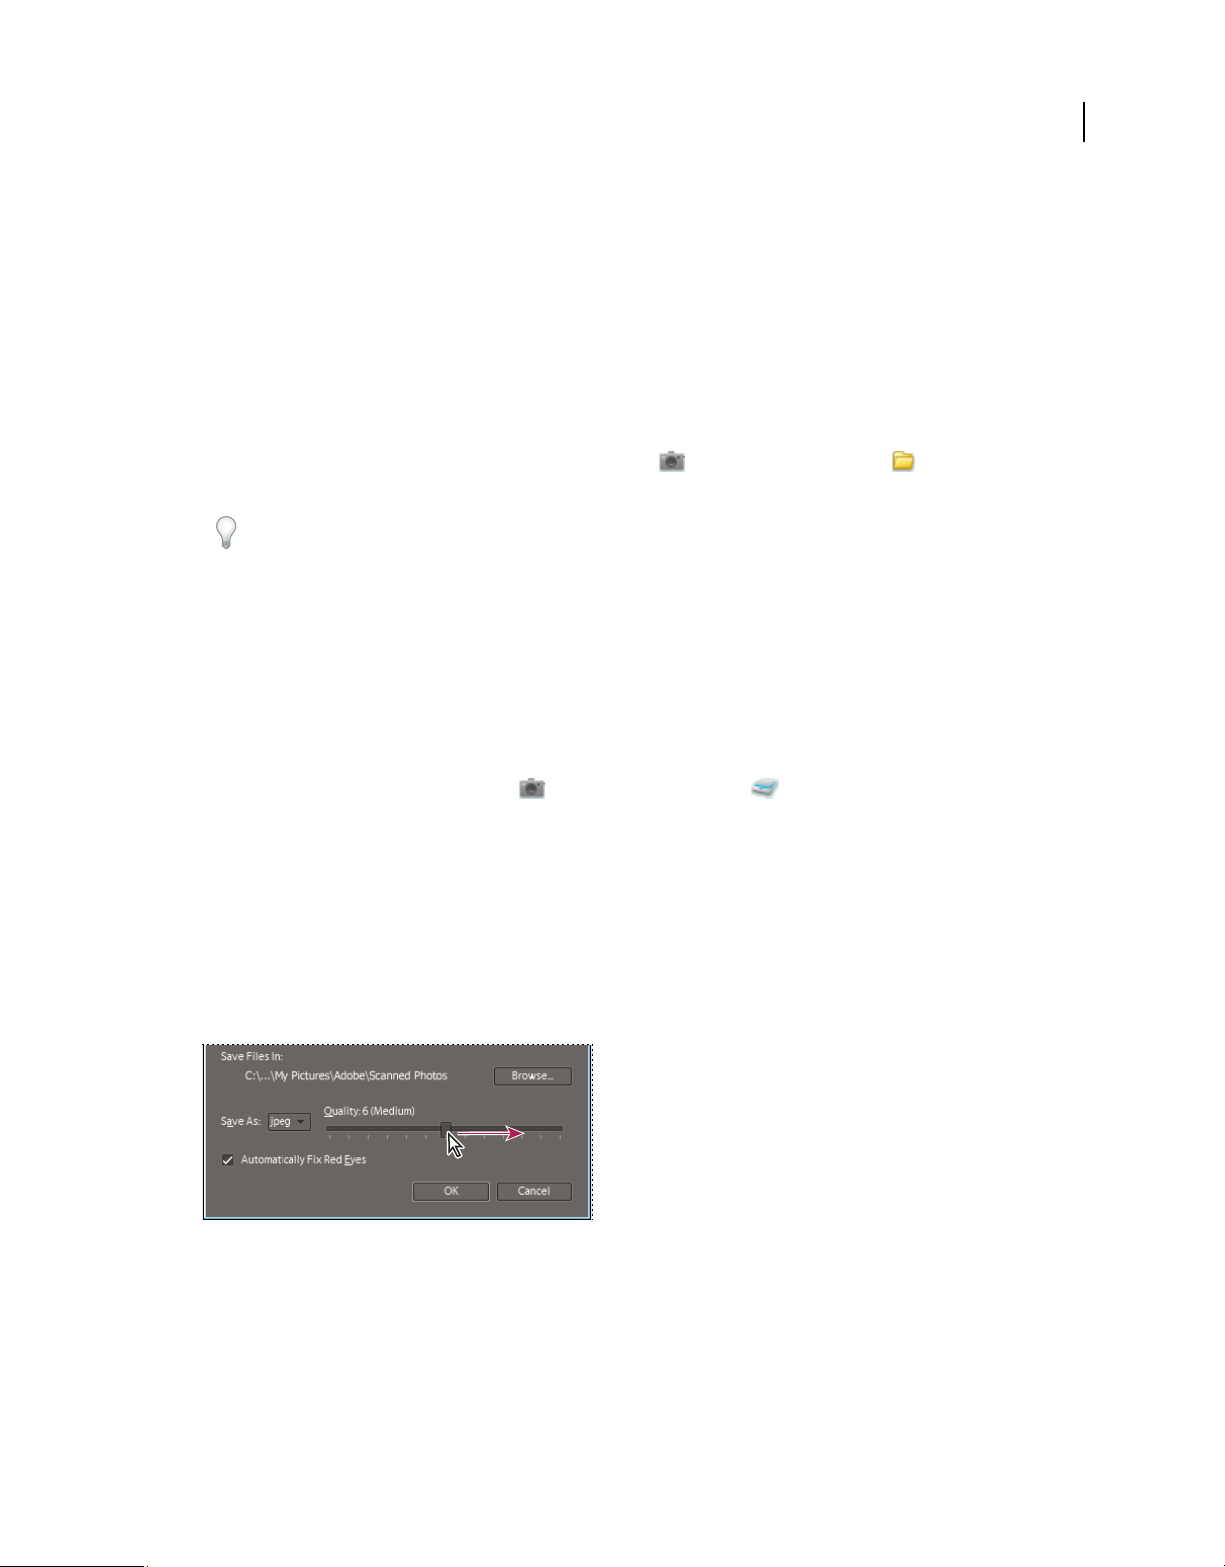
4 Click Browse to select a location for saving the photos.
5 Choose a file format from the Save As menu. JPEG, the default format, is usually the best choice. If you choose
JPEG, drag the Quality slider to the setting you want. The higher the quality, the larger the file size.
Drag the Quality slider to increase or decrease the file size and quality.
6 Click OK. If you’re using a scanner with a TWAIN driver, Elements Organizer launches the driver that came with
your scanner. Follow the instructions that came with the driver software to scan your photo. Typically, you can also
select an area to scan or correct any color issues that you may see.
Page 26

USING ELEMENTS ORGANIZER 8
Import photos and videos
Note: In Windows XP, Elements Organizer launches the Windows XP scanning interface if you’re using a WIA
(Windows Imaging Architecture) scanner. You can find instructions in Windows XP online Help. In scanners that
support TWAIN, a vendor-specific user interface is launched.
After the photo is scanned, a preview of the scan is displayed in the Getting Photos dialog box. Elements Organizer
assigns the import date to the photos.
More Help topics
“Change the date and time of files” on page 112
Set scanner preferences
1 In the Elements Organizer, choose Edit > Preferences > Scanner.
2 Choose the name of your scanner from the Scanner menu.
Note: Each time you connect to a different scanner, you need to select the device from the list. The connected scanner is
indicated to help you identify it.
3 Choose a file format from the Save As menu. JPEG, the default format, is usually the best choice. If you choose
JPEG, drag the Quality slider to the setting you want. The higher the quality, the larger the file size.
4 Select a location to store your scanned photos, and then click OK.
22
Scan photos into the Editor using a TWAIN driver
TWAIN is a software driver used for acquiring images captured by certain scanners, digital cameras, and frame
grabbers. For your TWAIN device to work with Elements
manager and TWAIN data source.
Before you can use the scanner to bring images into Elements Organizer, you must install the TWAIN device and its
software, and then restart your computer. (See the documentation provided by your device manufacturer for
installation information.)
❖ In the Elements Organizer, choose File > Get Photos And Videos, and choose the device you want to use from
the submenu.
After the image is scanned, it appears in an untitled Elements Organizer window.
Note: After pressing the scanning button for the first time on some scanners, such as the Canon MP960, the scanning
progress bar will open behind Photoshop Elements. You can reduce the Photoshop Elements window to bring the progress
bar forward.
Organizer, the manufacturer must provide a source
Local files, CDs, DVDs, and video
Using watched folders
The Elements Organizer automatically detects media files being added to any of its watch folders. By default, the My
Pictures folder is watched, but you can add additional folders to the Elements Organizer’s watch list.
You can choose to have media files that are added to a watch folder automatically added to a catalog. Or, you can opt
to be asked before new media files are added to a catalog. When asked, either click Yes to add the media files to your
catalog, or click No to leave them out. Whether or not media files are brought into the Elements Organizer, they
remain in their folders unless you delete them.
Page 27
USING ELEMENTS ORGANIZER 8
Import photos and videos
Add folders to the watched folders list
1 Choose File > Watch Folders.
2 Click Add, and then browse to the folder.
3 Select the folder, and then click OK. The folder name appears in the Folders To Watch list.
To quickly add watch folders when the Elements Organizer is in Folder Location view, right-click a folder and choose
Add To Watched Folders.
Change Watch Folders settings
1 Choose File > Watch Folders.
2 Choose one of the following options:
• Notify Me to choose whether files are added to your catalog.
• Automatically Add Files To Organizer to have the media files added to your catalog as soon as they are detected.
Get media files from files and folders
For a video about this process, see www.adobe.com/go/lrvid2310_pse8_en.
23
You can bring media files into Elements Organizer from a hard disk or optical diskette drive in your computer.
Note: After dragging photos from Windows Explorer into the Media Browser, Windows Explorer can become
unresponsive until the media files have been imported. You can toggle to any Photoshop Elements dialog box that opens
during the import by pressing Alt-Tab. You can also click the Elements Organizer icon in the Windows taskbar.
❖ Do one of the following:
• Drag the media files from Windows Explorer to Elements Organizer workspace.
• Select File > Get Photos And Videos> From Files And Folders.
Note: This method enables you to navigate to the relevant location on your computer and import media files.
• Select File> Get Photos And Videos > By Searching.
Note: This method enables you to search for media files and import them to the Elements Organizer Workspace.
• Select the Add Unmanaged Files To Catalog option from the Folder Location view of the Media Browser.
Press Ctrl+Alt+3 to change to the Folder Location view.
More Help topics
“Move files in a catalog” on page 99
“Import tags attached to media files” on page 15
“Reconnecting missing files in the Elements Organizer” on page 126
“Create and attach keyword tags based on folder names” on page 64
Browse to files on your computer
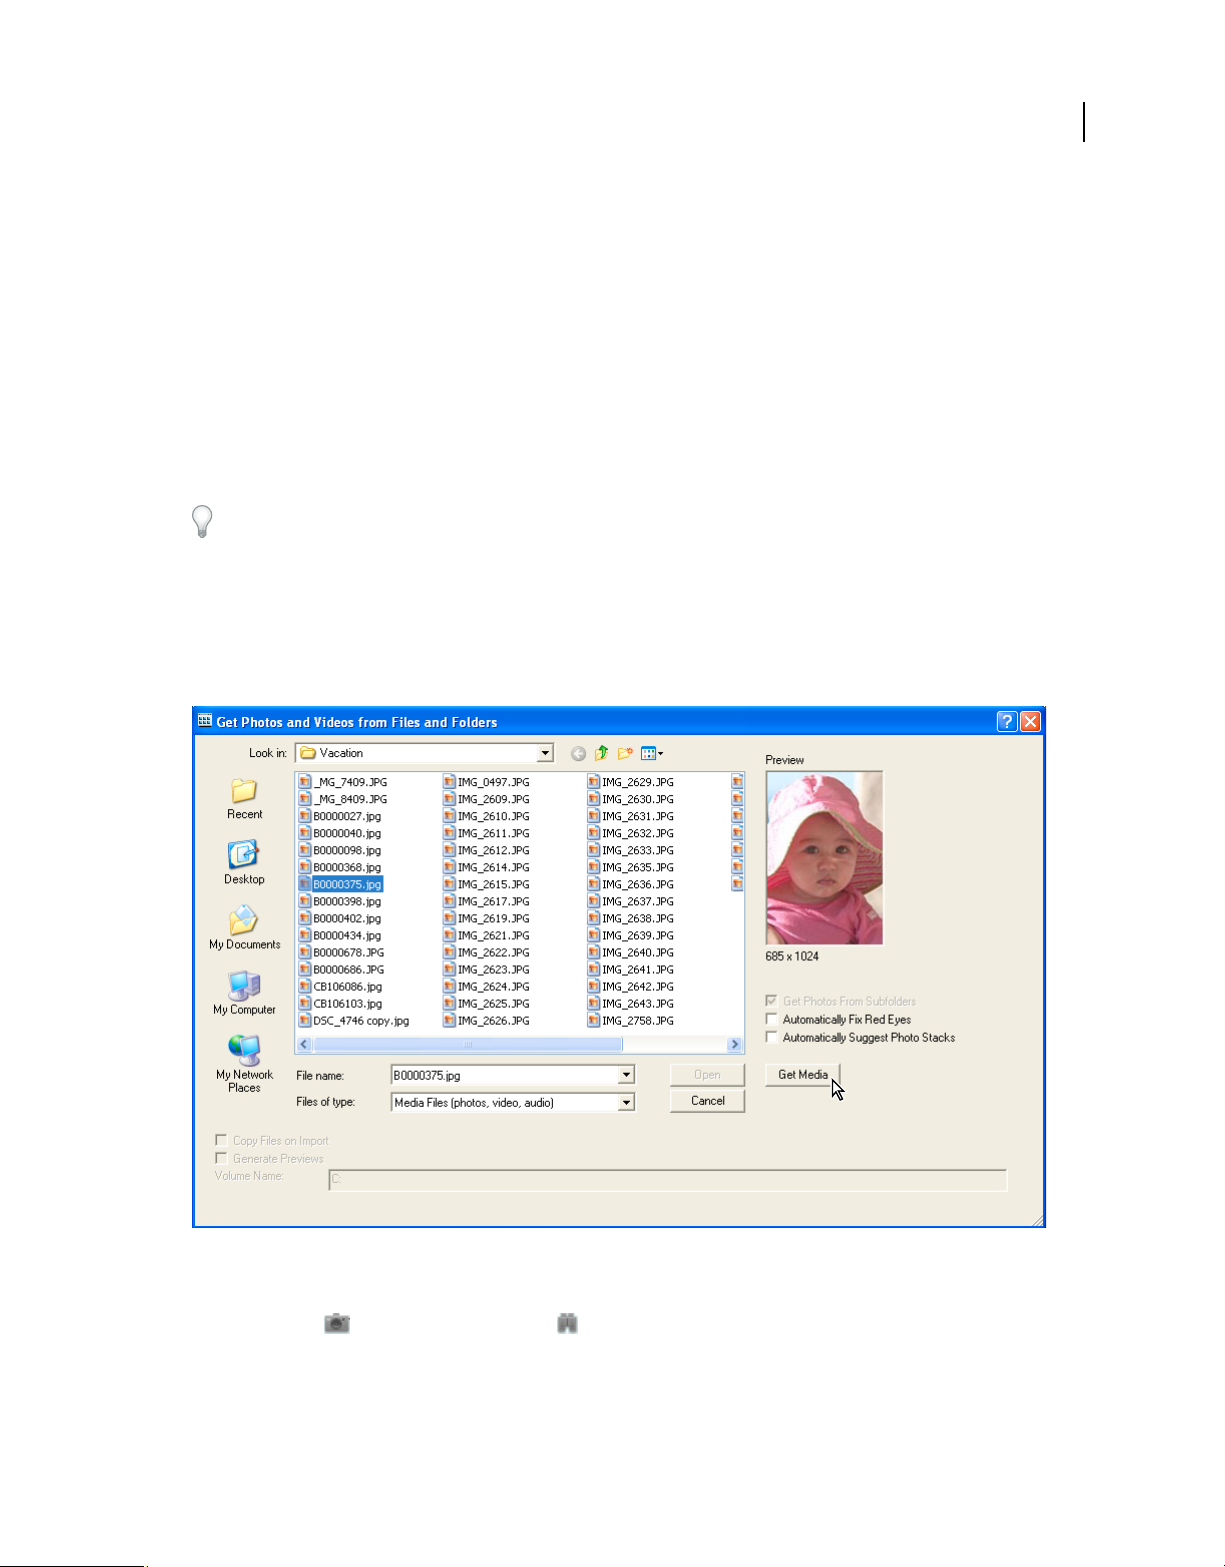
1 In the Elements Organizer, choose File > Get Photos And Videos > From Files And Folders from the menu.
Page 28
USING ELEMENTS ORGANIZER 8
Import photos and videos
2 In the dialog box, navigate to the folder that contains the files you want to bring into the Elements Organizer. Use
the Look In menu and the other navigation controls along the top and left.
3 Hold the pointer over a file to display information about the photo, or select it to display a preview.
4 Do one of the following to select photos:
• To get a single media file, select it.
• To get multiple media files, Ctrl-click to select the files you want. Or, click the first file, and then Shift-click the last
file in the list that you want.
• To get all the media files in a folder, navigate up one level from your current level in the Get Photos And Videos
From Files And Folders dialog box and select the desired folder. To get photos from subfolders within the folder,
select Get Photos From Subfolders.
You can import a PDF file or a Photoshop Elements project in PDF format. Text in imported PDF files becomes part
of the image (you can’t edit the text).
5 Set file-specific import options:
Automatically Fix Red Eyes Fixes red eye problems as the files are downloaded.
Automatically Suggest Photo Stacks Suggests photo stacks for you according to date and visual similarity.
6 Click Get Media. The media files appear in the Elements Organizer.
24
Importing photos by using the Look In menu and clicking Get Media.
Search for files on your computer
1 Choose File > Get Photos And Videos > By Searching.
Page 29
USING ELEMENTS ORGANIZER 8
Import photos and videos
A
B
C
D
E
25
F
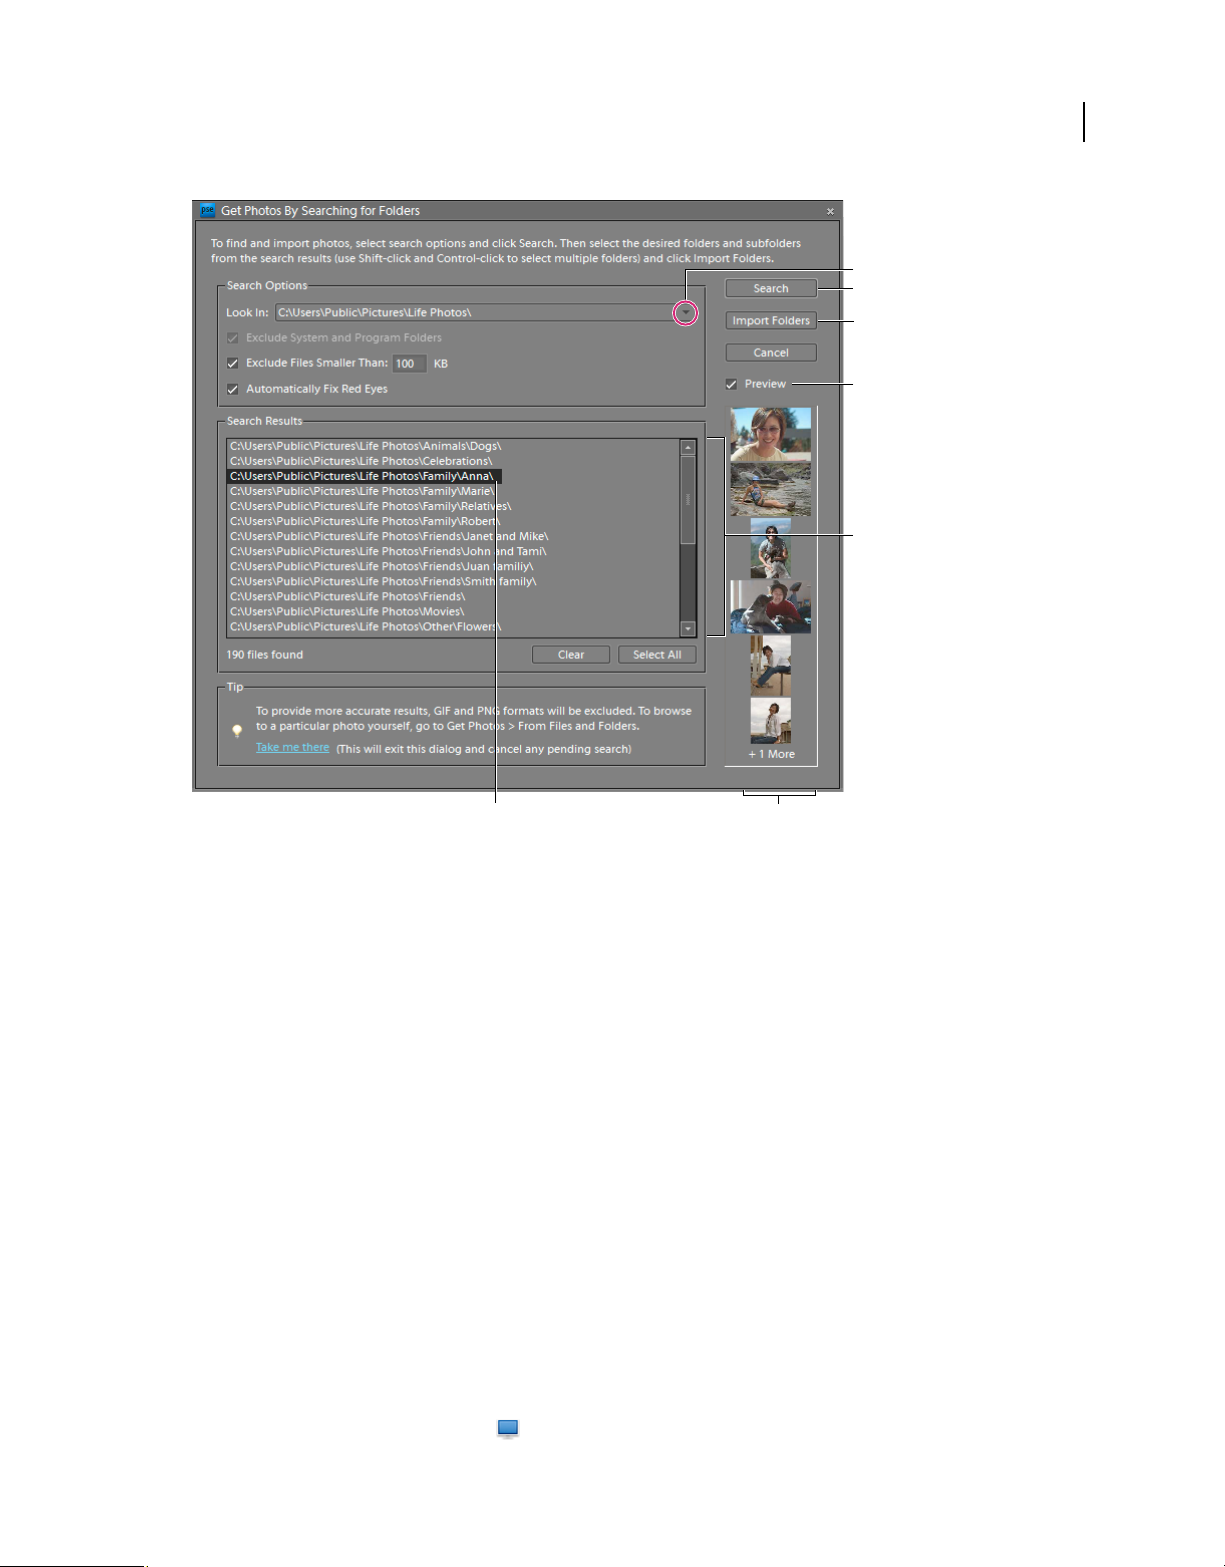
Searching for photos on your computer
A. Search location B. Search button C. Import selected folder from the Search Results window D. Preview lets you view photo thumbnails.
E. Search Results window F. Folder selected for import G. Thumbnails of photos in selected folder
G
2 Select a search option from the Look In menu.
3 Select options to limit your search:
Exclude System And Program Folders Excludes folders from the search that are unlikely to contain your media files.
Exclude Files Smaller Than Includes files large enough to be full-resolution photos. Enter a minimum file size, in
kilobytes, in the KB textbox.
Note: By default, removable media (such as CDs and DVDs) and network drives are not searched.
4 Click Search. The search may take a while. Click Stop Search if you want to stop the search.
The search returns all folders that contain photos and video files.
5 Click a folder to select it. To select more than one folder, press Ctrl and click another folder name. You can preview
the items in a folder by clicking the folder name in the list.
6 (Optional) Select Automatically Fix Red Eyes to fix photos with red eye problems as they are imported into the
Elements Organizer.
7 Click the Import Folders button. The photos appear in the Media Browser.
Note: If the photos you import have tags attached to them, the Import Attached Tags dialog box appears.
Add files from specific folders
1 In the Elements Organizer, from the Display menu, select Folder Location.
Page 30

USING ELEMENTS ORGANIZER 8
Import photos and videos
The folder hierarchy panel opens on the left side of the Media Browser.
2 In the folder hierarchy panel, browse to the folder containing the files you want to import.
3 Right click the folder, and choose Add Unmanaged Files To Catalog.
The Getting Photos dialog box will report whether files were imported.
4 Click OK.
If files were imported, the folder’s icon changes from an Unmanaged Folder icon to a Managed Folder icon .
About preview files
When you import photos, you can choose to download to your computer full-resolution copies of the master photos
(default) or low-resolution copies, called preview files. Preview files appear in your catalog as space-saving copies of
the high-resolution originals. When you perform an operation that requires the original photo, you are asked to insert
the disc containing the offline photo. You can then decide whether to use the preview file or bring in a full-resolution
copy of the photo.
If you choose to use preview files, you need to assign an Offline Volume Name to the CD or DVD containing the
master files. Make sure to write the Offline Volume Name on the CD or DVD, so that when Elements
requests the master disc (it provides the reference name for you), you can insert the correct disc.
Organizer
26
Set the size for preview files
1 In the Elements Organizer, choose Edit > Preferences > Files.
2 Under Offline Volumes, choose the pixel dimensions for the preview files. A 640 x 480 size is good in most cases.
Use a smaller size if you want to conserve space on your computer, or a larger size for better display quality.
Get photos from a CD or DVD
You can copy photos from a CD or DVD onto your hard disk and into the Elements Organizer. You can make fullresolution copies, as you might for editing purposes, or, to save disk space, low-resolution offline copies called preview
files.
1 In the Elements Organizer, select File > Get Photos And Videos > From Files And Folders.
2 Navigate to your CD or DVD drive, and select the photos you want to copy.
3 (Optional) Select either of the following:
Copy files on import Makes a full-resolution copy of the file on your hard disk.
Generate previews Makes a low-resolution copy of the file on your hard disk, saving disk space.
4 (Optional) If you’re keeping a master photo offline, type in a volume name for the CD or DVD on which it resides,
and write this name on the disc itself. This will make it easy for you to find and download the master when
prompted.
5 (Optional) Select Automatically Fix Red Eyes if you would like Elements Organizer to repair red eyes as soon as the
photos are brought into the Elements Organizer.
Note: This option is not enabled for offline files.
6 (Optional) Select Automatically Suggest Photo Stacks if you would like Elements Organizer to group visually
similar photos, letting you decide whether to place any such groups into stacks.
7 Click Get Media to bring your photos into the Elements Organizer.
Page 31

USING ELEMENTS ORGANIZER 8
Import photos and videos
If the photos contain keyword metadata, the Import Attached Tags dialog box appears.
Note: A preview file has the CD icon in its thumbnail. Its file location refers to the drive into which the CD containing
its master file was inserted.
History information showing the offline Volume Name for an offline photo in the Elements Organizer.
More Help topics
“Create and attach keyword tags based on folder names” on page 64
“Import tags attached to media files” on page 15
27
Get photos from a video
You can capture frames from your digital videos if they are saved in a file format that Elements Organizer can open,
including ASF, AVI, MPEG, MPG, M1V, and WMV. Captured photos are saved with the name of the video file plus
a number (for example, videoclip01, videoclip02, and so forth).
Note: To create photos from the broadest range of video formats, install the latest version of standard video software, such
as QuickTime or Windows Media Player.
Getting still photos from a video clip.
1 In the Editor, choose File > Import > Frame From Video.
2 In the Frame From Video dialog box, click the Browse button to navigate to the video from which you want to
acquire still frames, and then click Open.
Page 32

USING ELEMENTS ORGANIZER 8
Import photos and videos
3 To start the video, click Play .
4 To get a frame of the video as a still image, click the Grab Frame button or press the spacebar when the frame is
visible on the screen. You can move forward and backward in the video to capture additional frames.
Note: Some video formats don’t support rewinding or fast-forwarding. In these cases, the Rewind and Fast
Forward buttons are not available.
5 When you have all the frames you want, click Done.
6 Select File > Save to save each still file to a folder on your computer.
Mobile phone cameras
About mobile phone cameras
If you have a mobile phone with a built-in camera, you might be able to transfer the media files into your catalog. Make
sure your phone saves media files in a file format you can import into your catalog. To find out what file format your
phone uses, see the instructions that came with the phone.
To get photos into your catalog, use one of the following methods.
28
Direct transfer If you have a phone compliant with NOKIA® PC Suite 6.5 or higher, or if your phone stores media files
on a removable flash or memory card, you can bring media files from your phone directly into Elements
using the Adobe Photo Downloader. To determine how your phone stores photos, see the instructions that came with
your phone.
Cable or wireless transfer Transfer the images to your hard disk using cable or wireless transfer. For more
information, consult the phone manufacturer or the instructions that came with your phone. After you transfer the
photos to your computer, in the Elements Organizer use the File
media files into your catalog. For some mobile phone cameras, the Adobe Photo Downloader appears automatically
when you connect via cable or wireless, and you won’t need to select File
Note: Not all phones and carriers allow you to transfer media files to your computer using the methods described above.
Your carrier or phone manufacturer can tell you what options are available to you. You can also refer to the Adobe
website for the latest information.
> Get Photos And Videos command to bring the
> Get Photos And Videos.
Organizer by
Page 33

Chapter 4: Viewing and fixing photos and videos in Elements Organizer
You can use the Elements Organizer to view and sort media files in various ways and to fix the most common
photographic problems. In the Media Browser, you can keep track of your photos, video files, and audio files, with
thumbnail icons that display the creation date, keyword tags, captions, and other information about a file. For example,
different views let you display only video files, show photos side by side, show photos by geographical location, or view
photos on a map.
The tools in the Fix panel of the Elements Organizer quickly correct the most common problems in photographs. At
the click of a button, for example, you can remove a green tint from a photo, improve its contrast, or remove the red
from the pupils of its subjects.
Viewing photos and videos in the Elements Organizer
29
About the Media Browser
For a video overview, see www.adobe.com/go/lrvid2313_pse8_en.
The Media Browser shows thumbnails of your media files in the central area of the Elements Organizer. (To return to
the Media Browser from Date view, select
thumbnails of photos, video files, and audio files in your catalogs. You can select items in the Media Browser to attach
tags to them, add them to projects, or edit them.
Display > Media Browser.) Use the Media Browser to view and find
Page 34

Viewing and fixing photos and videos in Elements Organizer
USING ELEMENTS ORGANIZER 8
30
B
C
D
E
A
The Media Browser displays your photos for easy access.
A. Adjust Thumbnail Size slider B. Rotate Left and Rotate Right C. Back To Previous View D. Find bar E. Main window
More Help topics
“About keyword tags” on page 52
“About the Timeline” on page 81
“Search using the Find bar” on page 82
“Find media files using the Search box” on page 86
“Viewing media files in full screen or side by side” on page 38
Open the Media Browser
❖ To open the Media Browser from the Date view of the Elements Organizer, do one of the following:
• Select Display > Media Browser.
• Click Return To Media Browser toward the bottom of the Organizer.
Page 35

Viewing and fixing photos and videos in Elements Organizer
USING ELEMENTS ORGANIZER 8
Set Media Browser viewing preferences
1 In the Media Browser, choose Edit > Preferences > General.
2 Specify options as desired, such as the following:
• To order pictures within a day so that the newest pictures appear first, choose Show Newest First Within Each Day.
• To rescale photos more than 100% of actual size, up to the maximum size of the space available, select Allow Photos
To Resize. Deselect this option to display small images at their actual size even when more space is available for
display.
• To re-enable dialog boxes that you had chosen not to display again, click Reset All Warning Dialogs.
Media Browser icons
Some of the following icons appear only when you select the Details option, and others appear at all times:
Stack icon Indicates that the thumbnail represents a stack of photos.
Version Set icon Indicates that the thumbnail represents a stack of edited versions of a photo.
Video Scene Group icon Indicates that the thumbnail represents a rendition of a video scene group.
Video icon Indicates that the thumbnail represents a video clip.
31
Disc icon Indicates that the thumbnail represents an offline photo.
Audio icon Indicates that the thumbnail includes an audio caption.
Multiple Keyword Tag icon Indicates that keyword tags are attached to the media file. Place the pointer over the
tag icon to see the keyword tags attached.
Keyword Tag icons , , , Indicate the specific keyword tags that are attached to the media file.
Album icon Indicates that the photo is part of an album. Place the pointer over the icon to see the album name.
Hidden photo icon Indicates that the thumbnail is a hidden file.
Project icon Indicates that the thumbnail is used in a project.
Photo Project icon Indicates that the photo is part of a multiple page project.
Rating stars Shows the rating of the photo, on a scale of five stars.
Select a Media Browser view
❖ Choose Display > [display option].
Choose from the following display options:
Thumbnail View Displays thumbnails of your media files in the sort order you specify.
Import Batch Displays media files in the batches in which they were imported and shows how the media files were
imported.
Folder Location Displays media files by the folders in which they are stored.
Date View Opens Date view from any Media Browser view. Displays a calendar showing thumbnails on the dates
when the media files were taken.
Media Browser Opens Media Browser Thumbnail view from Date view.
Page 36

Viewing and fixing photos and videos in Elements Organizer
USING ELEMENTS ORGANIZER 8
Choosing from the Media Browser Display menu displays different views in the Timeline and Media Browser.
Hide and show media files in the Media Browser
For a video about this process, see www.adobe.com/go/lrvid2316_pse8_en.
You can mark media files to hide them from view in the Media Browser without deleting them from your hard disk.
Alternately, you can make hidden files reappear temporarily, or unmark them so that the files always remain visible.
Hide media files by marking them
1 Select the media files you want to hide. Shift-click the first and last media file of a group of adjacent files to select
the entire group. Ctrl-click non-adjacent files to select them.
2 Choose Edit > Visibility > Mark As Hidden to mark the media files for hiding.
A Hidden icon appears in the lower-left corner of each media file selected.
32
3 To hide the selected media files in the Elements Organizer, choose Edit > Visibility, and then select Hide Hidden
Files.
You can also right-click on the thumbnails and select the Visibility command from the context menu.
Show media files marked as hidden
❖ Choose Edit > Visibility, and then choose one of the following:
Show All Files Shows hidden files along with non-hidden files.
Show Only Hidden Files Shows only hidden files in the Elements Organizer.
You can also right-click on the thumbnails and select the Visibility command from the context menu.
Remove the Hidden mark from the media files
1 In the Media Browser, show the media files marked as hidden.
2 Select the media files from which you want to remove the Hidden mark . Shift-click the first and last photo of
a group of adjacent photos to select the entire group. Ctrl-click nonadjacent photos to select them.
3 Choose Edit > Visibility > Mark As Visible.
You can also right-click on the thumbnails and select the Visibility command from the context menu.
Page 37

Viewing and fixing photos and videos in Elements Organizer
USING ELEMENTS ORGANIZER 8
View and manage files by folder location
The Folder Location view in the Elements Organizer splits the Media Browser into two sections: a folder hierarchy
panel, and an image thumbnail panel. From this view, you can manage folders, add files to your catalog, automatically
tag files using their folder name as the keyword tag, and add or remove folders from Watched Folder status.
By default, the folder hierarchy panel displays all of the folders on your hard disk. Folders containing managed files
have a Managed folder icon
automatically. Watched folders have a Watched folder icon . Elements Organizer automatically imports
compatible files saved in watched folders. Folders that are both managed and watched have a Watched And Managed
folder icon
. By default, the image thumbnail panel displays thumbnails for all files on the hard disk, starting with
those in the selected folder. You can change this to have it show thumbnails for only the files in the selected folder.
Note: You can change the default view for each panel by choosing Edit > Preferences > Folder Location View and selecting
the options you want.
1 In the Media Browser, select Folder Location from the Display menu in the upper-right corner of the
Organizer.
The Folder hierarchy appears on the left side of the Organizer and the image thumbnails appear in the center.
2 Do one of the following to specify which files appear in the image thumbnail panel:
• To view in the image thumbnail panel only the files in the selected folder, right-click in the folder hierarchy panel
and deselect Show All Files. (It is deselected when a check mark does not appear beside it.)
• To view all of your managed files in the image thumbnail panel, right-click in the folder hierarchy panel and select
Show All Files. (It is selected when a check mark appears beside it.)
If you want to search all of your managed files while in Folder Location view, you need to select Show All Files.
. Managed files are those you have imported into a catalog, either manually or
33
3 To find the folder location of a file, click the file’s thumbnail in the image thumbnail panel. The file’s folder is
highlighted in the left panel.
4 To find files in a specific folder, click the folder in the folder hierarchy panel. Thumbnails for the files in that folder
appear in the image thumbnail panel, grouped under the folder name.
5 To instantly tag files by their folder locations, click the Instant Keyword Tag icon to the upper right of the image
thumbnail panel for each folder group you want to tag.
6 To manage files and folders, select a folder and do any of the following:
• To move a file to a different folder, drag the file’s thumbnail from the image thumbnail panel to a folder in the folder
hierarchy panel.
• To view the folder in Explorer, right-click in the folder hierarchy panel and choose Reveal In Explorer.
• To add or remove the folder from watched-folder status, right-click in the left panel, and choose Add To Watched
Folders or Remove From Watched Folders.
• To add files in the folder to your catalog, right-click in the folder hierarchy panel and choose Add Unmanaged Files
To Catalog.
• To rename the folder, right-click in the folder hierarchy panel and choose Rename Folder. Then type a new name.
• To delete the folder, right-click in the folder hierarchy panel and choose Delete Folder.
7 To create a new folder, right-click in the folder hierarchy panel and choose New Folder.
Page 38

Viewing and fixing photos and videos in Elements Organizer
USING ELEMENTS ORGANIZER 8
More Help topics
“Using watched folders” on page 22
“Get media files from files and folders” on page 23
“About keyword tags” on page 52
“Create and attach keyword tags based on folder names” on page 64
Specify media types to view
❖ In the Media Browser, choose View > Media Types > [type of file].
Note: After you import items, all media types appear in the Media Browser temporarily.
Sort files in the Media Browser
❖ Choose a sort option from the Media Browser Arrangement menu from the upper-right corner of the Media
Browser. You can choose from the following sort options:
Date (Newest First) Shows the most recently taken or imported media files first. (Within a given day, the media files
are shown in the order they were taken, oldest first, unless otherwise specified in the General Preferences dialog box.)
Newest-first order is convenient when you need to attach tags to the media files, you imported most recently.
34
Date (Oldest First) Shows all the media files in chronological order.
Album Order Shows media files in the order in which you placed them in an album (available only when an album is
selected).
The Media Browser Arrangement menu sorts the thumbnails in chronological, reverse-chronological, or album order.
Resize, refresh, or hide thumbnails
You can change the size of thumbnails, or refresh them after editing the media files in another application. In addition,
you can quickly rotate the thumbnails so they appear correctly in the window.
• To incrementally change the size of the thumbnail, drag the thumbnail slider in the shortcuts bar.
Drag the thumbnail slider to the right to increase thumbnail size.
• To display the smallest thumbnails possible, click the button to the left of the slider.
• To display a single media file, click the button to the right of the slider.
• To refresh the thumbnail view, choose View > Refresh.
Page 39

Viewing and fixing photos and videos in Elements Organizer
USING ELEMENTS ORGANIZER 8
• To rotate an image counterclockwise, click Rotate Left at the top of the Media Browser; to rotate an image
clockwise, click Rotate Right .
More Help topics
“Update an item’s thumbnail” on page 113
Select items in the Media Browser
For a video about this process, see www.adobe.com/go/lrvid2314_pse8_en.
Select a media file in the Media Browser to work with it. A selected thumbnail is highlighted with a dark blue outline.
❖ Do one of the following:
• To select a single item, click its thumbnail.
• To select multiple adjacent items, hold down Shift and click the first and last items you want to select.
• To select multiple nonadjacent items, hold down Ctrl and click the items you want.
• To select or deselect all items in the Media Browser, choose Edit > Select All, or Edit > Deselect.
35
Display and edit media file details
You can choose to display details for each thumbnail, and also how certain details are displayed in the Media Browser.
Also, you can add and edit captions including audio captions, and add and edit date and time information.
More Help topics
“About file information (metadata)” on page 117
“Change the date and time of files” on page 112
Specify format of date and details font
1 Select Edit > Preferences > General.
2 In the Display Options area, specify the format of dates and the font used to display details, by selecting any of the
following:
Date Format (This option is not available in all locales.) Select MM/DD/YYYY or DD/MM/YYYY format.
Use System Font Choose this option to display details in the system font.
Adjust Date And Time By Clicking On Thumbnail Dates Select this option to edit the date and time details for any
photograph by clicking on them.
View or hide media file details
Select or deselect the Details box to the upper right of the Media Browser.
Page 40

Viewing and fixing photos and videos in Elements Organizer
USING ELEMENTS ORGANIZER 8
Edit media file details
You can edit information related to a media file. For example, you can edit date, attached tags, filename, caption, and
audio caption.
❖ In the Media Browser, do one of the following:
• To edit or add a text caption, select the Details check box, and click the Single Photo View button . Click the
caption, or click Click Here To Add Caption.
• To add, listen to, or edit an audio caption, select the Details check box, and click the Single Photo View button. Click
B
.
D
C
the Record Audio Caption button
A
36
Photo details
E
A. Date and time B. Albums to which the photo belongs. C. Keyword tags attached to the photo D. Scroll to previous or next photo. E. Click
to add or change caption. F. Click to add or play audio caption.
F
• To change the date assigned to a media file, select the thumbnail, choose Edit > Adjust Date And Time. Specify the
options from the dialog boxes that appear.
You can change dates by a single click. To enable this feature, select Edit > Preferences > General. In the preferences
dialog, select Adjust Date And Time By Clicking On Thumbnail Dates. Click the date and make the required changes.
Viewing video projects
Elements Organizer displays the list of projects you have created using Adobe Premiere Elements. However, you
cannot rename, edit, or add media files to these projects in Elements Organizer. To edit or add media files to these
projects, launch Adobe Premiere Elements. To view the video projects created in Adobe Premiere Elements:
1 In Elements Organizer, expand Albums (click the triangle beside Albums). Elements Organizer displays a list of
albums and the option Video Projects.
2 Expand Video Projects (click the triangle beside Projects) to view a list of the video projects.
3 Select the project you want to work with, and right-click on the project to open a context menu with the following
options:
Open With Premiere Elements Select this option to view the project in the Timeline.
Find Items In <project name> Video Project Select this option to view the media associated with the project.
Page 41

Viewing and fixing photos and videos in Elements Organizer
Viewing video projects created in Adobe Premiere Elements
View video and full-screen images
USING ELEMENTS ORGANIZER 8
37
View video files
In the Media Browser, the first frame of a video clip appears as the clip’s thumbnail. The filmstrip icon identifies a
video clip in the Media Browser.
1 Double-click the video clip in the Media Browser.
Note: To view QuickTime movies in Elements Organizer, you must have the QuickTime player installed on your
computer. If it is not already installed, download and run the QuickTime installer from
www.apple.com/quicktime/download.
2 When the Elements Organizer Media Player appears, click the Play button to start the video. To view it frame-by-
frame, drag the position slider. If you have a long video clip, it could jump over a few frames.
AB C DA E
F
G
Photoshop Elements Media Player
A. Start and End buttons B. Record C. Play button D. Stop button E. Elapsed time F. Drag the position slider through the video clip
G. Volume control
3 Click the Close button to close the Elements Organizer Media Player.
You can create still shots from the frames of a video clip by choosing File > Import > Frame From Video in the Editor.
The file formats that can be played in the Elements Organizer depend on the applications installed, as follows:
Only Photoshop Elements is installed In this case, only file formats (video and audio) that can be played using non-
royalty based filters play in Elements
QuickTime) on the system, then it plays in Elements
Only Adobe Premiere Elements is installed In this case, all file formats (video and audio) play in Elements Organizer.
Organizer. If a particular file format gets any other supported filter (for example,
Organizer as well.
Page 42

Viewing and fixing photos and videos in Elements Organizer
Both Photoshop Elements and Adobe Premiere Elements are installed In this case, all file formats (video and audio)
play in Elements
Organizer.
USING ELEMENTS ORGANIZER 8
Viewing media files in full screen or side by side
The Full Screen and Compare Photos Side By Side views enable viewing media files without the distraction of interface
items, such as windows and menus.
The View, Edit, Organize In Full Screen option displays a set of media files as a full-screen slide show. You can
customize the slide show—for example you can:
• Play an audio file as you view the images.
• Display thumbnails of the selected files in a filmstrip along the right side of the screen.
• Add effects to the media files
.After deciding on the photos you want in your slide show, you can make the necessary edits to them. You can send
them directly from this view to the Slide Show Editor. To create a slide show, right-click and select the option Create
Slide Show.
38
Full Screen view
To view a media file in Full Screen view, do one of the following:
• Select the media file you want to view, and click the View, Edit, Organize In Full Screen icon .
• In the upper-right corner of the Organizer, select Display > View, Edit, Organize In Full Screen.
• Press F11.
The Compare Photos Side By Side command displays two photos simultaneously. Compare Photos Side By Side view
is useful when you want to focus on details and differences between photos. You can select two or more photos to
compare.
Page 43

Viewing and fixing photos and videos in Elements Organizer
USING ELEMENTS ORGANIZER 8
To Compare photos, do one of the following:
• In the upper right of the Organizer, select Display > Compare Photos Side By Side (This option is not available in
all locales.)
• Select two photos and Press F12.
In Compare Photos Side By Side view, the currently selected photo has a blue border. When you click the Next Media
button
, the selected photo changes. The next photo in the selection is displayed. If you have enabled the filmstrip
option, click any image in the filmstrip to view it in place of the selected image (the one with the blue border).
39
Use Compare Photos Side By Side view to analyze composition and details. Image 1 is marked for printing.
While you are in View, Edit, Organize In Full Screen view or Compare Photos Side By Side view you can view the
following:
Quick Edit panel Enables you to edit the displayed media file.
Quick Organize panel Enables you to create and apply tags to media files. It also enables adding media files to existing
albums.
Control bar Displays all the navigation icons and control icons that enable you to access the required panels and
dialogs.
Page 44

Viewing and fixing photos and videos in Elements Organizer
USING ELEMENTS ORGANIZER 8
You can switch back and forth between views by clicking the View, Edit, Organize In Full Screen button or the
Compare Photos Side By Side button .
More Help topics
“About slide shows” on page 134
Quick Edit panel
While in View, Edit, Organize In Full Screen view or Compare Photos Side By Side view, you can edit the displayed
photo using the Quick Edit panel. The Quick Edit panel is displayed on the left side of the screen and is minimized by
default. The Quick Edit panel is also minimized when you don’t move your mouse for a couple of seconds. To
maximize, move the mouse over the panel or click the Toggle Quick Edit panel in the Full Screen preview bar. Click
the Auto Hide button
The following table describes some of the icons in the Quick Edit panel and their functionality:
Icon Functionality
to make the Quick Edit panel visible all the time.
40
Auto Smart Fix,
Auto Color,
Auto Level,
Auto Contrast,
Auto Sharpen,
Auto Red Eye Fix,
Edit Photos,
Edit Videos,
Mark for Print,
Improves issues in images caused by poor exposure, contrast, color balance, and color
saturation
Improves color in the photo with Auto Color
Improves tonal range of the photo with Auto Levels
Improves contrast with Auto Contrast
Sharpens photos
Removes red eye
Launches Photoshop Elements Editor
Launches Adobe Premiere Elements
Marks the media file for printing
Note: Select a star to set a rating to the displayed photo. If the photo has a rating you want to clear, click the golden star
farthest to the right.
Quick Organize panel
Quick Organize panel in View, Edit, Organize In Full Screen view or Compare Photos Side By Side view facilitates
creating and adding keyword tags to the displayed media file. The Quick Organize panel is displayed on the left side
of the screen and is minimized by default. The Quick Organize panel is also minimized when you don’t move your
mouse for a couple of seconds. To maximize, move the mouse over the panel or click the Toggle Quick Organize panel
in the Full Screen preview bar.
The Quick Organize panel has the following sub panels:
Albums Displays a list of existing albums. Albums associated with the displayed media file are highlighted.
Keyword tags Displays a list of keyword tags in the Tag Cloud view. Tags associated with the media file are
highlighted.
Page 45

Viewing and fixing photos and videos in Elements Organizer
USING ELEMENTS ORGANIZER 8
The Quick Organize panel enables you to perform the following tasks:
• Add the displayed media file to an existing album. For example, to add the displayed media file to the album
“Disneyland” click Disneyland in the Albums sub panel.
• Create keyword tags and apply the tags to the displayed media file.
To create and apply a new tag to the displayed media file:
1 In the Keyword Tags sub panel, type the name of the tag in the Tag Media textbox. For example, if you want to
create a keyword tag named Holiday, type Holiday in the textbox.
2 Click the Apply icon .
The created tag is applied to the displayed media.
To apply an existing tag to the displayed media file, click the tag name in the Keyword Tags sub panel. The tag is
highlighted.
Control bar
The Control bar contains icons for navigating through the media files, playing a media file, and so on. The control bar
disappears from view when you don’t move your mouse for a couple of seconds. (To make it reappear, move the
mouse.)
41
The Control bar consists of the following icons:
Toggle Film Strip icon Enables you to toggle between viewing and hiding images in a film strip. Click to display all the
images in a strip of thumbnails on the right side of the screen. Click again to hide the images.
Toggle Quick Edit panel Enables you to toggle between viewing and hiding the Quick Edit panel. Click to view the
Quick Edit panel on the left side of the screen. Click again to hide the Quick Edit panel.
Toggle Quick Organize panel Enables you to toggle between viewing and hiding the Quick Organize panel. Click to
view the Quick Organize panel on the left side of the screen. Click again to hide the Quick Organize panel.
Previous Displays the previous media file.
Next Displays the next media file.
Play Plays the media file.
Open Settings Dialog Displays the Full Screen View Options dialog box.
Transitions Displays the Select Transition dialog box.
Toggle Properties panel Enables you to toggle between viewing and hiding the Properties panel.
View, Edit, Organize In Full Screen Enables you to switch to Full Screen view from Compare Photos Side by Side view.
Compare Photos Side By Side Enables you to switch to Compare Photos Side by Side view.
Sync Panning And Zooming In Side By Side View Synchronizes panning and zooming when photos are displayed in
the Compare Photos Side by Side view. For example, if you click this icon, and use the mouse to zoom in, then both
the images are simultaneously zoomed in.
More Help topics
“Full-screen display options” on page 42
“Applying transitions to media files” on page 42
Page 46

Viewing and fixing photos and videos in Elements Organizer
USING ELEMENTS ORGANIZER 8
Full-screen display options
Options in the Full Screen View Options dialog box
Background Music Specifies which audio file to play during a slide show. To choose a different file, click Browse, and
locate and select the file you want.
Play Audio Captions Specifies that audio captions of the selected files play during the slide show. You can use mp3,
WAV, and WMA files for audio captions.
Page Duration Specifies how long each image displays on-screen before the next image appears or fades in.
Include Captions Displays captions at the bottom of the screen.
Allow Photos To Resize Resizes photos to fit the screen.
Allow Videos To Resize Resizes videos to fit the screen.
Show Filmstrip Displays all the selected images in a strip of thumbnails on the right side of the screen. To choose which
image is displayed in full screen, click a thumbnail.
Allow Videos To Resize Resizes videos to fit the screen.
Start Playing Automatically Starts the slide show as soon as the image appears in Full Screen view. When this option
is selected, don’t click the Play button to start the slide show.
42
Repeat Slide Show Plays the slide show over and over until you stop it.
Properties panel options
The properties panel displays the properties associated with a media file. Click the Toggle Properties Panel icon to
view the properties panel. It consists of the following options:
General Displays the general properties of a media file such as, filename, rating, caption, and notes.
Metadata Displays the metadata associated with the file. Click Complete to view the complete details, or click Brief to
view a limited set of metadata associated with the file.
Keywords Displays the keywords associated with the media file.
History Displays the history of the file such as, the modified date, and imported date.
Applying transitions to media files
1 Click the Select Transitions icon in the Control bar.
2 Select one of the following options and click OK. You can move the mouse over the thumbnails to preview the
transitions.
• Classic
• Fade In/Out
• Pan And Zoom
• 3D Pixelate
The selected transition is applied to the displayed media file. You can view the effect.
Note: Pan and Zoom transition and 3D Pixelate transitions support only photos.
Page 47

Viewing and fixing photos and videos in Elements Organizer
USING ELEMENTS ORGANIZER 8
About Transitions and OpenGL
What is Open Graphics Library (OpenGL)? A cross-platform software library that computer programs can use to
communicate with your display driver.
For Pan And Zoom and 3D-Pixelate transitions, your computer should have OpenGL Version 1.2 or higher. OpenGL
version depends on the display card drivers installed on your system. If you see a warning that your system does not
support OpenGL, ensure that you have the most recent driver for your display card installed. Display card
manufacturers update many of their drivers frequently to keep up with new operating system and program features.
Before you update the drivers, determine the version of the current display driver.
Determine the version of the display driver in Windows XP
1 Right-click the desktop, and choose Properties.
2 Select Settings, and Advanced.
3 Depending on your graphics display card, different tabs display. Choose Adapter > Properties for the card data that
includes the amount of memory on the card. Choose Driver for the driver details, including the driver version.
Determine the version of the display driver in Windows Vista
1 Right-click your desktop, and choose Personalize.
2 Select Display Settings > Advanced Settings. The Adapter tab displays your card data, which includes the amount
of memory on the card.
3 Choose Properties > Driver to get the driver version.
Check the display card manufacturer's website for a more recent driver. Driver updates provide installation
instructions with the download, or the instructions are downloaded with the driver.
43
Pinning photos to a map
View photos in Map view
In the Map view of the Elements Organizer, you can arrange photos by geographic location. You can pin photos to
points on a map, with pins that can open photos taken at a location. After your map of photos is complete, you can
share it on the web or from a CD. You can also find photos by navigating to map areas that contain pinned photos.
Page 48

Viewing and fixing photos and videos in Elements Organizer
A
B
G
C
D
E
H
F
Map view
A. Pin generated by dropping a photo onto the map B. Click pin to view associated photos C. The Move tool moves pins D. The Hand tool
moves the map E. Zoom tools F. Limits search to map area G. Drag to enlarge or shrink map H. Share photos I. Display Standard, Satellite,
or Hybrid map view
I
USING ELEMENTS ORGANIZER 8
1 In the Elements Organizer, click Window > Show Map.
2 Photos that have been placed on the map are represented by a red pin in Map view. Locations that have pins in close
proximity show a three-pin cluster in Map view.
3 To change how the Map view looks, do any of the following:
• Click the Zoom In or Zoom Out buttons to zoom in or out by clicking on the map.
• Click the Hand tool to drag the map in any direction.
• Click the Map menu to select the type of view: Map (standard), Satellite (aerial photo), or Hybrid (composite of the
first two options).
4 To view the photos on the map, do any of the following:
• Place the cursor over a pin. If more than one photo displays in the thumbnail viewer, click the Previous button
or Next button to go backward or forward.
•
Select Limit Search To Map Area to view (in the Media Browser) all the photos related to the pins visible on the map.
5 You can also navigate to a particular place on the map by right-clicking a photo or a tag that has a location assigned
to it, and then choosing Show On Map.
44
More Help topics
“Share maps of photos on a website or in a file” on page 164
“Find photos using a map” on page 91
Add a photo to a map
In Map view of the Elements Organizer, you can drag photos from the Media Browser directly onto the map.
1 In Map View, use the Hand , Zoom In , and Zoom Out tools to navigate to the spot where you want to
place the photo.
2 Select one or more photos in the Media Browser.
Page 49

Viewing and fixing photos and videos in Elements Organizer
USING ELEMENTS ORGANIZER 8
3 Drag the photo to a location on the map. You can also right-click a photo and choose Place On Map. You then enter
an address to look up on the map and place the pin.
Note: Placing or moving a pin for a photo will not change the GPS Latitude or GPS Longitude metadata, if any, originally
embedded in the photo.
More Help topics
“Attach keyword tags to media files” on page 54
“Find photos using a map” on page 91
Remove a pin from a map
1 In Map view, select the pin you want to remove.
2 Right-click and choose Remove From Map.
Change a pin location on a map
1 In Map view, select the Move tool.
2 Drag the pin to a new location.
Note: Placing or moving a pin for a photo will not change the GPS Latitude or GPS Longitude metadata, if any, originally
embedded in the photo.
45
Viewing media files in Date view
View and find media files in Date view
In Date view, you can browse through your media files chronologically or find the media files from a particular day,
month, or year. When you’ve found the day you’re looking for, you can view that day’s media files as a mini-slide show.
You can also maintain a track of recurring events, such as holidays and birthdays, and add notes to any day. In Date
view, you can do many of the same operations on media files that you can do from the Media Browser.
Page 50

Viewing and fixing photos and videos in Elements Organizer
USING ELEMENTS ORGANIZER 8
CAB
F
46
D
E
Date view
A. Click to select a month B. Click to select a year. C. Date currently selected D. Click to view previous/next month. E. Click to choose Year,
Month, or Day view. F. Click to select a date. G. Click to view previous/next day. H. Number of photos for selected date. I. Controls for viewing
slide show. J. Add an event. K. Enter a daily note
G
H
I
J
K
Note: You cannot print the Date view calendar. To create a wall calendar, click the Photo Calendar button on the
Create tab.
1 Click Display > Date View on the upper-right side of the Organizer. Date view opens, displaying the month and
day of the currently selected media file in the Media Browser.
2 Click the Year , Month , or Day button at the bottom of the Date view.
3 Navigate to the month and day you want to view by doing one of the following:
• Click the Previous button or Next button to go forward or backward. Hold down the button to move
rapidly.
• Click the year and choose a year from the list that appears. A photo icon beside a year indicates that the year
contains media files.
• In Month view, click the name of the month and choose a month from the list that appears. A photo icon beside
a month indicates that the month contains media files.
• Click the date display on the upper-right side, and then select the date you want to find in the Set Date dialog box.
• In Year or Month view, double-click a day. The calendar switches to Day view and displays the first media file for
that day.
4 If there are multiple media files in the day, you can view the day’s media files by doing any of the following:
• In Day view, click the thumbnail view of a media file in the column to the right.
• In Day view, select Display > View, Edit, Organize In Full Screen to view the media files for the selected day
in Full Screen view.
• In Year or Month view, click Play below the media file, and view all the media files for the selected day as a slide show.
Page 51

Viewing and fixing photos and videos in Elements Organizer
USING ELEMENTS ORGANIZER 8
5 In Day view, to view a photo in the Media Browser, click the Return To Media Browser button to the lower right
of the photo.
Many of the commands you use in the Media Browser can be used also in Date view. Right-click a media file to see a
menu of commands available.
More Help topics
“Send photos to online printing services” on page 161
“Viewing media files in full screen or side by side” on page 38
Change the media file shown in a calendar date
By default, Date view shows the first media file scanned or shot on a particular date. If the default is not representative
of the group of media files taken that day, you can choose another.
❖ In Date view, do one of the following:
• In Month or Year view, use the slide show controls to find the media file you want to use. Right-click the media file
in the slide show window, and choose Set As Top Of Day.
• In Day view, select the media file in the thumbnail list. Right-click the media file or the thumbnail, and choose Set
As Top Of Day.
47
Selecting an image in Day view.
View media files with unknown dates
You can view media files in the Date view if they contain the year associated with them. If the year is unknown, the
media file does not appear in Date view at all.
❖ In Date view, do one of the following:
• If the media file has a year and month, but not a day, click the Unknown Date icon . The icon appears in the
upper-right corner of the month in Month view or year in Year view.
Page 52

Viewing and fixing photos and videos in Elements Organizer
USING ELEMENTS ORGANIZER 8
• If the media file has a year, but not a month or day, click the Unknown Date icon. The icon appears in the upper-
right corner of the year in Year view.
• If the icon represents more than one media file, click the icon and view the media files in a slide show.
More Help topics
“Change the date and time of files” on page 112
Add a daily note to Date view
In Date view, you can write notes and keep track of a day’s events. You might want to write notes about the media files
you took that day. A daily note is different from a caption because it corresponds to a day in the calendar, rather than
to a particular media file. You can access daily notes only in Date view.
1 In Date view, select a day.
2 Type the note in the Daily Note box.
You can add a daily note to any day in Date view, even if it doesn’t have media files. In Month view, a Note icon
appears on each day that has a daily note.
48
Add an event in Date view
In Date view, you can track your daily events or yearly events, such as birthdays.
Adding an event to the calendar.
1 In Date view, select a day.
2 Do one of the following:
• Click the Event icon .
• In Month or Year view, right-click a day and choose Add Event from the context menu.
3 Type a name for the event in the Event Name box.
4 If necessary, change the dates shown in the pop-up menus.
5 If the event is annual, select Repeating Event. If desired, type a year indicating when the repeating event ends.
OK.
Click
In the calendar Month and Year views, holidays and events are displayed in special colors.
Page 53

Viewing and fixing photos and videos in Elements Organizer
USING ELEMENTS ORGANIZER 8
You can use the Date View option in the Preferences dialog box to add, remove, and edit events.
Add or change a caption in Date view
1 In Date view, display the media file containing the caption you want to edit.
2 Click the Day button to open Day view.
3 Type text in the Caption box in the lower-right corner.
Set Date view preferences
1 Choose Edit > Preferences > Date View.
2 Select Use Monday As First Day Of The Week to start each week on Monday; otherwise, each week starts on
Sunday.
3 In the Holidays list, select the holidays you want noted in the calendar.
4 Add, delete, and edit events by doing any of the following:
• To add an event, click New and enter information in the Create New Event dialog box.
• To edit an event, select the event and click Edit. Change the information in the Edit Event dialog box.
• To delete an event, select it in the list and click Delete.
5 Click OK to close the Preferences dialog box.
49
Fixing photos and videos in Elements Organizer
Using the tools in the Fix tab of the Elements Organizer, you can quickly correct the most common problems in
photographs. Customizable versions of some of these tools are also available in the Editor, but the simple versions here
are designed to make corrections quickly and easily.
Click the Fix tab to view a list of tools that facilitate fixing your media files.
You can make elaborate changes to photographs using the Photoshop Elements Editor. Do one of the following to
launch the Photoshop Elements Editor:
• Click the Fix tab, and click Edit Photos.
• Click the triangle beside Fix, and select Full Photo Edit , Quick Photo Edit , or Guided Photo Edit .
You can make elaborate changes to the video files using the Adobe Premiere Elements Editor. Do one of the following
to launch the Adobe Premiere Elements Editor:
• Click the Fix tab, and click Edit Videos .
• Click the triangle beside Fix, and select Edit Videos.
Make quick adjustments using Auto Smart Fix
Auto Smart Fix analyzes photos and corrects problems commonly caused by poor exposure, contrast, color balance,
and color saturation.
1 Click the Fix tab to open it.
Page 54

Viewing and fixing photos and videos in Elements Organizer
USING ELEMENTS ORGANIZER 8
2 Select one or more photos in the Media Browser. (Ctrl-click photos to select more than one.)
3 On the Fix tab, click Auto Smart Fix.
Auto Smart Fix creates copies of the selected photos, makes the adjustments in the copies, and saves the copies to the
version sets of the photos on which they are based.
Correct color with Auto Color
Auto Color analyzes photos and corrects common problems in color balance, such as the greenish tint in photos taken
under fluorescent lamps, or the bluish tint in photos taken outdoors while using indoor-lighting camera settings.
1 Click the Fix tab to open it.
2 Select one or more photos in the Media Browser. (Ctrl-click photos to select more than one.)
3 On the Fix tab, click Auto Color.
Auto Color creates copies of the selected photos, corrects the color in the copies, and saves the copies to the version
sets of the photos on which they are based.
Set levels with Auto Levels
Auto Levels analyzes photos and corrects common problems in luminance, such as the lack of detail in photos that
were under- or overexposed.
50
1 Click the Fix tab to open it.
2 Select one or more photos in the Media Browser. (Ctrl-click photos to select more than one.)
3 On the Fix tab, click Auto Levels.
Auto Levels creates copies of the selected photos, adjusts the luminance levels in the copies, and saves the copies in the
version sets of the photos on which they are based.
Improve contrast with Auto Contrast
Auto Contrast analyzes photos and corrects common contrast problems, such as the lack of distinction between bright
and dark areas.
1 Click the Fix tab to open it.
2 Select one or more photos in the Media Browser. (Ctrl-click photos to select more than one.)
3 On the Fix tab, click Auto Contrast.
Auto Contrast creates copies of the selected photos, adjusts the contrast in the copies, and saves the copies in the
version sets of the photos on which they are based.
Sharpen photos with Auto Sharpen
Auto Sharpen analyzes photos and corrects common focus problems, such as blurriness caused by poor camera focus.
1 Click the Fix tab to open it.
2 Select one or more photos in the Media Browser. (Ctrl-click photos to select more than one.)
3 On the Fix tab, click Auto Sharpen.
Auto Sharpen creates copies of the selected photos, sharpens the focus in the copies, and saves the copies in the version
sets of the photos on which they are based.
Page 55

Viewing and fixing photos and videos in Elements Organizer
USING ELEMENTS ORGANIZER 8
Remove red eye with Auto Red Eye Fix
Auto Red Eye Fix finds red pupils in photo subjects and changes them to a natural black.
1 Click the Fix tab to open it.
2 In the Media Browser, select one or more photos in which a subject or subjects have red pupils. (Ctrl-click photos
to select more than one.)
3 On the Fix tab, click Auto Red Eye Fix.
Auto Red Eye Fix creates copies of the selected photos, changes red pupils to black in the copies, and saves the copies
in the version sets of the photos on which they are based.
Crop photos
You can trim photos using the Crop tool.
1 Click the Fix tab, and in the Media Browser, select a single photo.
2 On the Fix tab, click Crop .
The Crop Photo window displays the photo and enables you to do the following:
• Crop the photo by activating the Crop Tool .
• Specify the aspect ratio.
• Rotate the photo using the rotate icons , .
3 Click Apply to apply the changes and click OK to return to the Elements Organizer.
51
Rotate photos
For a video about this process, see www.adobe.com/go/lrvid2315_pse8_en.
1 In the Media Browser, select one or more photos. Shift-click to select adjacent photos, or Ctrl-click to select
nonadjacent photos.
2 In the shortcuts bar, do one of the following:
• To rotate the photo counterclockwise by 90 degrees, click the Rotate Left button .
• To rotate the photo clockwise by 90 degrees, click the Rotate Right button .
Page 56

Chapter 5: Tagging and organizing photos and videos
You can use keyword tags to identify photos and videos with keywords and retrieve individual media files or albums.
Like physical photo albums, in Adobe® Elements Organizer 8 albums let you group photos and other media files by
category, and to place them in a desired order.
Tagging photos and videos
About keyword tags
Keyword tags are personalized keywords, such as “Dad” or “Florida,” that you attach to photos, video files, audio clips,
PDFs, and projects in the Media Browser. Keyword tags enable you to easily organize and find the tagged files. When
you use keyword tags, there’s no need to manually organize your media files in subject-specific folders or rename files
with content-specific names. Instead, you can simply attach one or more keyword tags to each media file. Then, you
can retrieve the media files you want by selecting one or more keyword tags in the Keyword Tags panel. You can also
find media files with specific keyword tags when you type a keyword in the Search textbox.
52
For example, you can create a keyword tag called “Anna” and attach it to every media file featuring your sister, Anna.
Then, to instantly find all the media files of Anna that are stored on your computer, select the tag ‘Anna’ in the
Keyword Tags panel.
You can create keyword tags using any keywords you want. For example, you can create keyword tags for individual
people, places, and events. When media files have multiple keyword tags, you can select a combination of keyword tags
to find a particular person at a particular place or event. For example, you can search for all “Anna” keyword tags and
all “Marie” keyword tags to find all pictures of Anna with daughter, Marie. Or search for all “Anna” keyword tags and
all “Cabo” keyword tags to find all the pictures of Anna vacationing in Cabo San Lucas.
More Help topics
“Find media files by their keyword tags” on page 62
“Find media files using the Search box” on page 86
“Attach keyword tags to media files” on page 54
Using the Keyword Tags panel
You create and work with keyword tags in the Keyword Tags panel of the Organize tab.
Page 57

Tagging and organizing photos and videos
USING ELEMENTS ORGANIZER 8
A
B
C
D
E
The Keyword Tags panel
A. Smart Tags B. Category C. Keyword Tag D. Subcategory E. Triangle expands or collapses the keyword tags in that category or subcategory.
In the Keyword Tags panel, Elements Organizer includes four default categories: Smart Tags, People, Places, Events,
and Other. In addition, if you import media files that already have tags attached, those tags appear under an Imported
Tags category. You can organize tags under these categories and create your own categories and subcategories.
You can perform the following tasks in the Keyword Tags panel:
53
• View all the keyword tags, tag categories, and tag subcategories. Click the triangle next to a category or
subcategory to expand or collapse the keyword tags under it.
• Create, edit, and delete keyword tags.
• Organize keyword tags within the categories and subcategories.
• Scroll up and down the list of keyword tags.
• Hide all keyword tags by clicking the triangle next to Keyword Tags.
More Help topics
“Set preferences for the Keyword Tags and Albums panel” on page 70
“Find media files by their keyword tags” on page 62
Create a keyword tag
You can create new keyword tags, under any category or subcategory, to organize media files you’ve recently added to
your catalog. New keyword tags have a question mark icon
.
Page 58

Tagging and organizing photos and videos
USING ELEMENTS ORGANIZER 8
The Create Keyword Tag dialog box lets you create keyword tags.
1 Click the New button in the Keyword Tags panel of the Organize tab and choose New Keyword Tag.
2 In the Create Keyword Tag dialog box, use the Category menu to choose a category or subcategory in which to place
the tag.
3 In the Name box, type a name for the keyword tag.
4 To associate the tag with a place on a map, click Place On Map, type an address, and click Find.
5 In the Note box, type any information you want to add about the tag. (For example, you could write that the tag
represents vacation photos.)
6 Click OK.
The keyword tag appears in the Keyword Tags panel under the category or subcategory you selected.
54
Note: The first time you attach a keyword tag to a media file, that media file becomes the icon for that keyword tag. To
change the icon, see
“Change a keyword tag icon” on page 66.
More Help topics
“Create tags quickly” on page 63
“Quick Organize panel” on page 40
Attach keyword tags to media files
Once you have created a keyword tag, you can attach it to media files associated with the tag. You can attach multiple
keyword tags to a media file. If you attach three keywords tags to a media file, you can see all the keyword tags on that
media file. If you attach more than three keyword tags, keyword tag icon
tag to a media file, that photo becomes the icon for that tag. If you drag multiple media files to a keyword tag, the first
media file you selected becomes the icon for that tag.
1 In the Media Browser, select the media files to which you want to attach the tag. (To select more than one photo,
Ctrl-click the media files.)
2 To attach one media file to one tag, do one of the following:
• Drag the tag from the Keyword Tags panel onto the selected media files.
• Drag the media files onto the tag in the Keyword Tags panel.
3 To attach keyword tags to multiple media files, do one of the following:
• Drag the tag from the Keyword Tags panel onto one of the selected media files.
is displayed. The first time you attach a
Page 59

Tagging and organizing photos and videos
USING ELEMENTS ORGANIZER 8
• Select one or more keyword tags, and then drag the tags onto one of the selected media files.
Dragging multiple keyword tags to multiple photos.
55
• Select one or more keyword tags, and then drag the photos onto one of the selected tags in the Keyword Tags panel.
To apply a tag to all the media files in an album, click the album in the Albums panel. Select all the media files in the
Media Browser. Select the keyword tag from the Keyword Tags panel, and attach the tag to them.
4 To correlate media files in Map view with a tag, do one of the following:
• Double-click a Places tag, and then drag a media file (that has a location tag) from the Media Browser to a location
on the map.
• Select a media file, and drag it to a location on the map.
• Select multiple media files, and drag them to a location on the map.
• Drag any tag to a location on the map.
More Help topics
“Remove keyword tags from photos” on page 69
“Change a keyword tag icon” on page 66
About View Keyword Tag Cloud
View Keyword Tag Cloud enables you to view a list of keyword tags attached to media files. The keyword tags are
listed alphabetically. You can apply keywords tags to media files from this view. You can also edit and delete the
existing keyword tags from this view. Click a keyword tag to view the photos and media files attached to that tag. The
font size of the keyword tags changes depending on the frequency of the usage. For example, you assign the keyword
tag “vacation”, to most of the media files. Then, the font size of the tag “vacation” is larger than the other keyword tags.
Note: Smart Tags do not appear in the list of keywords displayed in the Tag Cloud view.
Apply a keyword tag in Tag Cloud view
1 Select the media files you want to tag.
Page 60

Tagging and organizing photos and videos
USING ELEMENTS ORGANIZER 8
2 Drag the tag from the Tag cloud view list onto the selected media files.
Edit or delete a keyword tag
1 Double-click the keyword tag you want to edit. A textbox appears.
2 Do one of the following:
• To edit the keyword tag, type in the textbox.
• To delete a keyword tag, click the Delete icon that appears beside the keyword tag.
About smart tags
Smart tags enable you to easily find media files (photos and videos) by quality and content. Auto-Analyzer enables:
• Analyzing media files.
• Identifying photographs and scenes based on a quality such as shaky, dark, or bright.
You can find the best media files and eliminate the bad ones. You can use these tags for sorting the assets based on their
quality. To view the media files that have been auto analyzed, select the Smart Tags option in Elements Organizer
interface.
Important: You cannot create, edit, or delete smart tags. However, you can remove or apply smart tags from the
individual clips.
56
The content analysis for Auto-Analyzer can be manual or automatic. In the manual mode, you can assign smart tags
to selected assets. In the automatic mode, a background process analyzes and assigns Smart tags to the assets.
Assign smart tags manually
1 In the Media Browser, select the media files to which you want to attach a smart tag. (To select more than one file,
Ctrl-click the files.)
2 To attach a single tag to a single media file, do one of the following:
• Drag the tag from the Smart Tags panel onto the selected media file.
• Drag the media files onto the tag in the Smart Tags panel.
3 To attach Smart Tags to multiple media files, do one of the following:
• Drag the tag from the Smart Tags panel onto one of the selected media file.
• Select one or more smart tags, and drag the smart tags onto any of the selected media files.
• Select one or more smart tags, and then drag the media files onto one of the selected tags in the Smart Tags panel.
To apply a tag to all the media files in an album, click the album in the Albums panel. Select all the media files in the
Media Browser. Select the smart tag from the Keyword Tags panel, and attach the tag to them.
Auto-Analyzer
Auto-Analyzer assigns smart tags to media files automatically. Auto-Analyzer can be set as a background task, or you
can manually run auto-analyzer. To enable Auto-Analyzer as a background task, click Edit > Preferences > AutoAnalyzer Options. Select Analyze All Media In Catalog Automatically. You can also specify the filters for AutoAnalyzer.
1 To run Auto-Analyzer manually, in the Media Browser, select the media file to which you want to assign a smart
tag automatically. (To select more than one file, Ctrl-click the files.)
2 Right-click the media file, and select Run Auto-Analyzer.
Page 61

Tagging and organizing photos and videos
USING ELEMENTS ORGANIZER 8
Auto-Analyzer analyzes the media file and assigns the relevant smart tags.
People recognition
When you use the Find People For Tagging command, Elements Organizer detects and identifies people in photos and
enables tagging them with the person’s name. Tagging makes it easier for you to sort photos efficiently and select the
required photos to create albums quickly. By default, all the new people tags are created in People Category of the
Keyword Tags panel. You can reorganize these tags by moving to any other category or subcategory.
Note: By default, Elements Organizer automatically recognizes people. However, if you want to disable this option, click
Edit > Preferences > Auto-Analyzer options, and deselect Recognize People Automatically.
Find people for tagging
1 In the Media Browser, select the photos of people you want to tag.
2 To start People recognition, do one of the following:
• Choose Find > Find People For Tagging.
• Click the Start People Recognition icon in the Keyword Tags panel.
If the Elements Organizer is idle for a few minutes, a teaser with the text, “Who is this?” Or “Is this Gina?”(name of the
person) is displayed. You can start people recognition from here as well.
57
Note: You can control the appearance of teasers that are shown in Media Browser. Click Edit > Preferences > Keyword
Tags And Albums. In People Recognition Hints, select Hide to disable viewing the teasers.
Elements Organizer processes the photos and searches for people. The first photo is displayed in the People
Recognition - Full size view dialog box. Faces of people in the photo are indicated by a square box. This square box has
a black textbox with a tool tip reading “Who is this?” Or “Is this Gina?” (name of the person) along with the Confirm
and Reject icons.
Note: If you have already named a few people and Elements Organizer recognizes the person, the tool tip displays the
names. You can select the name if it matches the person.
Page 62

Tagging and organizing photos and videos
USING ELEMENTS ORGANIZER 8
58
People Recognition - Full Size View window
3 Type the name of the person (for example, Ron) or select one of the options from the suggestions:
• If you want to move to the next photo, click the Next icon.
• If you want to name more photos or identify more people, click Name More People. For more information, see
“Name more people” on page 59.
• If you want to tag a person who is not detected, click Add Missing Person. Drag the square to the face, and label the
person.
4 After labeling all the faces, click Done.
View items that include a single person
1 Right-click or double-click a named person and select Show More <name of the person>. For example, “Show More
Mary”. Thumbnails of more items that include this person are displayed under the following tabs:
Confirmed Displays items that you have already confirmed. Confirmed items are tagged with the person’s name. For
example, Elements
Organizer displays the thumbnails that were confirmed as Mary and also enables you to reject items
that are not Mary’s. The message, “Are any of these not Mary?” is displayed.
Page 63

Tagging and organizing photos and videos
USING ELEMENTS ORGANIZER 8
Unconfirmed Displays items that you have not confirmed. On confirmation, the item is tagged with the person’s
name. For example, thumbnails of people that Elements Organizer identifies are displayed with the message, “Which
of these is Mary?”. If Elements Organizer is not sure that an item matches a person, it displays that photo as a darkened
item. You can confirm that these photos are of the same person. Unconfirmed faces appear darkened and have cross
mark.
2 You can do one of the following:
• If it is not the correct person, click the Reject icon in the Confirmed tab to reject the faces that are not Mary’s.
• Click the Confirm icon in the Unconfirmed tab to confirm the faces that match Mary’s.
Note: You can reject items that are tagged by mistake. You can also ignore people whom you do not know. For more
information see “Naming people” on page 60.
3 Click Save after you have confirmed or rejected all the faces. A confirmation window is displayed reading, “You
have completed all of Mary’s faces. Would you like to find more people?”
Name more people
• In the People Recognition - Full size view dialog box, click Name More People. Depending on the type of
information you want to complete people recognition, one of the following dialog boxes is displayed:
• People Recognition - Confirm Groups Of People
• People Recognition - Name People
• People Recognition
Note: If you double-click a thumbnail, you can see the full-size view of the photo.
59
Confirming groups of people
The People Recognition - Confirm Groups Of People dialog box enables you to confirm groups of people. For
example, if you have named Joan, Sam, and Mary, the dialog box displays items that contain them for confirmation.
• Elements Organizer identifies faces of Joan, Sam, and Mary, and displays the following:
• Groups of thumbnails of Joan, Sam, or Mary.
• Items that include a single person.
• Click the Reject icon to confirm the faces that are not Joan, Sam, or Mary, and click Save.
More faces are displayed for confirmation.
Page 64

Tagging and organizing photos and videos
USING ELEMENTS ORGANIZER 8
60
People Recognition - Confirm Groups Of People Window
Naming people
Elements Organizer identifies people that have not been tagged and displays them in the People Recognition - Name
People dialog box.
Page 65

Tagging and organizing photos and videos
USING ELEMENTS ORGANIZER 8
61
People Recognition - Name People dialog box
People who are not named are displayed with a question mark.
Do one of the following:
• Click the question mark and name the people or select a name from the displayed names and click Save.
• Right-click on a thumbnail and select one of the relevant options:
Is A Person Select this option if the item shown is a person’s face.
Not A Person Select this option if the object shown is not a person’s face.
Ignore Select this option if the person shown is not someone you want to name and tag.
Show In Full Size View Displays the People Recognition - Full Size View dialog box.
Note: You can also double-click the photo to view the Full Size View dialog box.
Confirming photos that are not people
Elements Organizer identifies the following and displays them in the People Recognition dialog box:
• Thumbnails that are of not any person
• Thumbnails that have not been named as people or ignored earlier
Elements Organizer asks you to confirm the thumbnails that are people and name them.
Page 66

Tagging and organizing photos and videos
USING ELEMENTS ORGANIZER 8
62
People Recognition dialog box for confirming people
• The message, “Which of these are people to recognize and name” is displayed and the images are displayed. The
thumbnails of such images are darkened with a cross mark by default because Elements
Organizer does not
recognize it as a person’s face.
• Confirm the people in this list, click the Confirm icon .
Note: When you move the mouse over the Reject icon , it changes to the Confirm icon . By default, the faces in
this view are rejected.
• Click Save.
Find media files by their keyword tags
❖ In the Keyword Tags panel of the Organize tab, do one of the following:
• Double-click a tag.
• Click the box next to one or more tags.
• Drag one or more tags from the Keyword Tags panel to the Find bar toward the top of the Media Browser.
• Type the name of the tag in the Search box.
When you begin typing the name of the tag in the box, a list of tags that match the typed letters is populated. For
example, if you type D, all tags beginning with the letter D are displayed. You can select the required tag.
Page 67

Tagging and organizing photos and videos
USING ELEMENTS ORGANIZER 8
The application finds all media files that have any of those keyword tags attached. If you select a keyword tag category
or subcategory that itself has nested subcategories, the application displays all photos in the hierarchy. For example,
assume that you have a ‘Wedding’ subcategory that contains the keyword tags ‘Bride’ and ‘Groom’. If you select the
‘Wedding’ subcategory, Elements Organizer displays all media files tagged ‘Bride’ or ‘Groom’.
63
To start a search, drag a keyword tag to the find bar (top) or click the square next to a keyword tag (bottom). Elements Organizer displays Media
files with the tag attached.
More Help topics
“Find media files using the Search box” on page 86
Create, apply, and delete tags quickly
The Keyword Tags textbox in Elements Organizer interface enables creating, applying, and deleting tags quickly. This
textbox displays a subset of the list of existing tags based on the letter you type. For example, if you type the letter S,
the textbox populates a list of tags beginning with the letter S. You can view a subset of this list. You can select an
existing tag from this list and apply it to the selected set of assets or create a tag and apply it.
Creating, applying, and deleting tags
Create tags quickly
1 Select a media file.
Page 68

Tagging and organizing photos and videos
USING ELEMENTS ORGANIZER 8
2 Type the name of the tag in the Keyword Tags textbox.
3 Click Create New Tag <tag name>.
4 Click Apply.
Apply tags quickly
1 Select the assets you want to tag, and do one of the following:
• Type the name of the tag in the Keyword Tags textbox.
• Type a letter, for example, A, to view a list of tags beginning with the letter A. Select the tag you want to use.
2 Click the Apply button.
The tags are applied to the selected assets.
Delete tags quickly
1 Do one of the following:
• Type the name of the tag in the Keyword Tags textbox.
• Type a letter, for example, A, to view a list of tags beginning with the letter A.
2 Click the Delete icon that appears beside the tag name.
64
Create a new keyword tag category or subcategory
1 In the Keyword Tags panel of the Organize tab, click the New button and choose either New Category or New
Sub-Category.
2 Do one of the following:
• To create a new category, type its name in the Category Name box. Click Choose Color and specify the color you
want to appear on the keyword tags in that category. Then click to select an icon from the Category Icon list.
• To create a new subcategory, type its name in the Sub-Category Name box. Then use the Parent Category Or Sub-
Category menu to choose a category in which to place the subcategory.
3 Click OK.
The new category or subcategory appears in the Keyword Tags panel.
Note: You can edit or delete a subcategory. However, its icon always appears as a plain tag; you cannot add a photo to it.
More Help topics
“Using the Keyword Tags panel” on page 52
Create and attach keyword tags based on folder names
You can automatically create a keyword tag with the same name as a folder on your hard disk and attach that tag to all
the managed files in that folder (managed files are those that you’ve added to your Elements
Creating and attaching tags this way is useful when you’ve used descriptive folder names to organize the media files
on your hard disk, and you want to quickly tag your managed media files with those same folder names.
Organizer catalog).
1 In the Media Browser, choose Display > Folder Location.
The Media Browser displays managed media files according to which folder they are in, with the folder’s full path listed
above the media files it contains.
Page 69

Tagging and organizing photos and videos
USING ELEMENTS ORGANIZER 8
2 In the folder tree on the left, select the folder containing the media files you want to tag. Thumbnails of the managed
media files in that folder appear in the Media Browser.
3 Click the Instant Keyword Tag button on the right side of the separator bar that lists the folder’s path.
All of the items in that folder are selected, and the Create And Apply New Keyword Tag dialog box is filled in with the
name of that folder.
4 Choose a category or subcategory from the Category menu.
5 (Optional) If you want to change the name, type a new name in the Name box.
6 In the Note box, type any information you want to add about the tag. (For example, you could write that the tag
represents media files of your favorite restaurant.)
7 Click OK.
The tag appears in the Keyword Tags panel under the category or subcategory you selected and is applied to all items
in that folder. Notice that the tag uses the first photo in the folder as its icon.
65
In Folder Location view, the Media Browser shows the folder’s path and the photos in the folder. Click the Instant Tag button to quickly create
and apply keyword tags that reflect your photos’ folder organization.
8 Repeat steps 2 through 7 for each folder you want to tag with an instant tag.
More Help topics
“Using the Keyword Tags panel” on page 52
“Change a keyword tag icon” on page 66
“View and manage files by folder location” on page 33
Page 70

Tagging and organizing photos and videos
USING ELEMENTS ORGANIZER 8
Editing keyword tags, categories, and subcategories
Change a keyword tag icon
By default, Photoshop Elements creates an icon for a keyword from the first photo to which you’ve attached the tag.
You can change this icon to one that better represents the tag.
1 Select the tag in the Keyword Tags panel of the Organize tab.
2 Click the New button , and select Edit from the menu.
3 Click Edit Icon in the Edit Keyword Tag dialog box.
4 To use a different photo for the icon, do one of the following:
• Click Find to display all the media files with that tag. Select a photo and click OK, or use the arrows next to the Find
button to page through and select the photo you want to use.
• Click Import, locate and select a photo, and click OK.
Note: An imported photo can be used for the icon, but the tag is not automatically attached to the imported photo. You
can attach the tag to that photo manually.
5 To change the portion of the photo included in the icon, resize or move the cropping marquee (the dotted outline):
• To resize, move the pointer to a corner of the marquee; when the pointer changes to a double-headed arrow, drag
the corner. You cannot resize imported tag icons.
• To move the marquee, place the pointer inside it; when the pointer changes to a hand, drag the marquee.
66
Resizing the cropping marquee (left); moving the cropping marquee (right).
6 Click OK, and then click OK again in the Edit Keyword Tag dialog box.
More Help topics
“Using the Keyword Tags panel” on page 52
Page 71

Tagging and organizing photos and videos
USING ELEMENTS ORGANIZER 8
Edit a keyword tag category or subcategory
You can change the name of a category or subcategory, or the location of the category or subcategory.
1 Select the category or subcategory in the Keyword Tags panel. Click the New button , and select Edit from
the menu or right-click a category and select Edit <name> Category.
2 Do any of the following, and click OK:
• To change its name, type a new name in the Category box or the Sub-Category Name box.
• To change the category or subcategory that a subcategory is listed under, select one from the Parent Category Or
Sub-Category menu. Select None (Convert To Category) to change a subcategory to a category.
You can also drag a category or subcategory into another one.
• (Categories only) To change the color of the keyword tags in a category, click Choose Color. Specify a new color
from the Photoshop Elements Color Picker. Click OK.
• (Categories only) To change a category icon, click to select a new icon from the Category Icon list.
A
67
B
C
Editing a category icon starting from a keyword tag
A. Changing a tag to a subcategory B. Changing a subcategory to a category C. Changing the category icon
To add your own category icons to the list, place 20 x 20 pixel images in PNG format. Place the images in the Program
Files\Adobe\Elements Organizer 8.0\Assets\caticons folder.
More Help topics
“Using the Keyword Tags panel” on page 52
Page 72

Tagging and organizing photos and videos
USING ELEMENTS ORGANIZER 8
Reorganize keyword tags, categories, and subcategories by dragging
By default, keyword tags and subcategories are listed in alphabetical order. However, you can change their order by
dragging.
1 Choose Edit > Preferences > Keyword Tags and Albums.
2 In the Enable Manual Sorting Option area, select Manual for Categories, Sub-Categories, and Keyword Tags, and
then click OK.
3 In the Keyword Tags panel, select one or more keyword tags, categories, or subcategories.
4 Drag the selected items to a new location by doing one of the following:
• To reorder keyword tags within a category or subcategory, drag the tag until you see a gray line, and then release
the mouse button. The tag will appear directly under the gray line.
• To move a tag to a new category, drag the tag over the category you want to move it to; when the category becomes
highlighted, release the mouse button.
• To reorder categories or subcategories, drag the category or subcategory until you see a gray line. When you release
the mouse button, the category or subcategory will appear directly under the gray line.
• To embed categories or subcategories into other categories, drag them to the category or subcategory you want, and
when the destination category or subcategory becomes highlighted, release the mouse button.
Note: If you make a mistake moving a category or subcategory, making it a subcategory or sub-subcategory, select it and
click the New button
using the Parent Category Or Sub-category menu.
and select Edit from the menu in the Keyword Tags panel. Then specify the correct location
68
When you move a category or subcategory, the keyword tags it contains move with it.
Note: You can’t move keyword tags, categories, or subcategories into the Favorites category or move keyword tags from
Favorites into other categories.
More Help topics
“Using the Keyword Tags panel” on page 52
“Set preferences for the Keyword Tags and Albums panel” on page 70
Change a keyword tag to a subcategory or vice versa
❖ Do one of the following in the Organize tab:
• Right-click a keyword tag in the Keyword Tags panel, and choose Change [name] Keyword Tag To A Sub-
Category.
• Right-click a subcategory in the Keyword Tags panel, and choose Change [name] Sub-Category To A Keyword
Tag. The subcategory cannot have any keyword tags or subcategories under it.
More Help topics
“Using the Keyword Tags panel” on page 52
Delete a category or subcategory
1 Select one or more categories or subcategories in the Keyword Tags panel.
2 Click the Delete button in the Keyword Tags panel, and then click OK to confirm the deletion.
Page 73

Tagging and organizing photos and videos
USING ELEMENTS ORGANIZER 8
More Help topics
“Using the Keyword Tags panel” on page 52
Remove keyword tags from photos
❖ Depending on the view in the Media Browser, do one of the following:
• To remove a keyword tag from one photo in thumbnail view, right-click the media file and choose Remove
Keyword Tag
• To remove a keyword tag from one photo in larger views, right-click a category icon under the media file and
choose Remove [name] Keyword Tag.
Depending on your view, you can hold the pointer over the category icon to display a list of keyword tags attached to
the media file.
• To remove a keyword tag from multiple media files in any view, Ctrl-click to select the media files. Then right-click
one of the selected media files and choose Remove Keyword Tag from Selected Items
More Help topics
“Using the Keyword Tags panel” on page 52
> [tag name].
> [tag name].
69
Write keyword tag information into your files
When you e-mail or export tagged JPEG, TIFF, or PSD files from Elements Organizer, tag information is automatically
included as an IPTC (International Press Telecommunications Council) keyword in these output files so that when the
recipient imports the media file and is prompted to import the associated tags, the tags are attached in their version of
Organizer.
Elements
If you want to e-mail or share a media file without using the Elements Organizer e-mail or export features, you can
manually write the tag information into the IPTC Keyword section in the header of the file.
❖ In the Media Browser, select one or more files and choose File > Write Keyword Tag And Properties Info To Photo.
Import and export keyword tags
Importing and exporting keyword tags can help you share media files with others of similar interests. For example,
suppose you have created a set of keyword tags for media files related to your hobby. If you save your tag set, your
friends with the same hobby can import those tags into their Keyword Tags panel and apply them to their own media
files. Alternately, you can import your friends’ keyword tags and apply them to your own media files. You and your
friends could then use keywords you have in common to search for media files related to the hobby you share.
More Help topics
“Using the Keyword Tags panel” on page 52
Export keyword tags
You can save your current set of keyword tags, including the entire hierarchy of categories and subcategories in your
Keyword Tags panel and the tag icons, so that you can share it with someone else. The exported tags file is saved as an
XML (Extensible Markup Language) file.
Note: Exporting tags does not export the photos associated with the tags.
1 Click the New button in the Keyword Tags panel and choose Save Keyword Tags To File.
Page 74

Tagging and organizing photos and videos
USING ELEMENTS ORGANIZER 8
2 Choose one of the following and click OK:
Export All Keyword Tags Creates a file that contains all of the keyword tags and tag hierarchy.
Export Specified Keyword Tags Creates a file that contains all keyword tags and the tag hierarchy of the category or
subcategory you select from the list.
3 In the Save Keyword Tags To File dialog box that appears, choose a location and enter a name for the file. Then
click Save.
Import keyword tags
You can import an existing set of keyword tags (saved as an XML file using Save Keyword Tags To File), including the
entire hierarchy of categories and subcategories and the icons.
Keyword tags can also be imported by importing images that have other tags in them already. For example, when
media files are e-mailed, exported, and edited, or tag information is added, keyword tags are attached.
Note: Importing keyword tags does not import the photos associated with the tags.
1 In the Keyword Tags panel, click the New button and choose From File.
2 Select the XML (Extensible Markup Language) file in the Import Keyword Tags From File dialog box containing
the keyword tags, categories, and subcategories, and then click Open.
70
Set preferences for the Keyword Tags and Albums panel
1 In the Elements Organizer, choose Edit > Preferences > Keyword Tags And Albums.
2 Specify how to order keyword tags, categories, subcategories, albums, and album categories: alphabetically or
manually. If you select Manual for a tag type, you can arrange that tag type in the Keyword Tags panel in the order
you want by dragging it.
3 Specify how to display keyword tags: by name only or with a small or large icon in addition to the name. Click OK.
More Help topics
“Using the Keyword Tags panel” on page 52
Creating albums
About albums
Important: U.S. Elements Organizer users can back up albums to Photoshop.com. Not only does backing up protect the
photos in your albums, but it also lets you conveniently share your photos via the Internet. Photoshop Elements free online
benefits and Photoshop Elements Plus are available in the United States only. Internet access required. See
creation and management” on page 9 and “Backup and synchronize catalogs, albums, and files” on page 118.
Elements Organizer Albums are like physical photo albums where you can store and organize photos in groups of your
choosing. For example, you can create an album called “Ten Best Vacation Photos” and organize the photos from the
tenth best photo to the very best photo. You can display the album in Full Screen view or make a project based on that
album.
“Account
Each photo in an album has a number in the upper-left corner, representing its order. You can drag the photos within
an album to arrange them into any order you want. You can add a photo to more than one album. For example, the
same photo might appear as the first photo in one album and the last photo in another.
Page 75

Tagging and organizing photos and videos
USING ELEMENTS ORGANIZER 8
You can organize albums in groups. You also can create multiple levels of album categories. For example, you can have
an album category titled, “My Asia Trip,” containing the album “Ten Best Japan Photos,” along with another album
called “Ten Best China Photos,” and so on for each country in Asia you visited.
You can create smart albums by setting criteria for photos to be included in them, rather than by manually selecting
specific photos. The contents of smart albums are automatically updated as matching criteria are added to photos. For
example, if you create a smart album that includes all photos with the keyword tag, “Chiara,” additional photos are
added to that album as you give them that keyword tag.
More Help topics
“Attach keyword tags to photos in an album” on page 79
“Create albums from keyword tags” on page 79
“About keyword tags” on page 52
Using the Albums panel
You create and work with albums in the Albums panel of the Organize tab.
71
A
B
C
D
The Albums panel
A. Album B. Find check area C. Album category D. Triangle expands or collapses the albums in that group
• Create, edit, and delete albums.
• View albums and album categories. Scroll up and down the list of albums, as needed. Click the triangle beside
an album category to expand or collapse the albums under it.
• Organize albums within album categories.
• Display photos in albums.
Important: It’s recommended to put your photos in albums. Only the photos in albums can be backed up and
synchronized to Photoshop.com. Photoshop Elements free online benefits and Photoshop Elements Plus are available in
the United States only. Internet access required.
More Help topics
“Select items in the Media Browser” on page 35
“Set preferences for the Keyword Tags and Albums panel” on page 70
Page 76

Tagging and organizing photos and videos
USING ELEMENTS ORGANIZER 8
Create an album or an album category
For a video about this process, see www.adobe.com/go/lrvid2302_pse8_en.
You can create a new album or a group of new albums at any time. For example, you might create an album category
called “Vacations” and create separate albums within it, one for each vacation you photograph.
Create an album
Note: It’s possible to create an album when downloading photos into Elements Organizer. See “Designate an album
during photo download” on page 74.
1 Click the Create New Album Or Album Category button in the Albums panel of the Organize tab, and choose
New Album .
2 (Optional) From the Album Category menu, select a category for the album.
3 In the Album Name box, type a name for the album.
Note: Select Backup/Synchronize, to enable the protection and synchronization of the album. Selecting this option
automatically uploads and updates the album as you edit, add, or remove photos.
4 Drag photos into the Items area, and click Done.
The album appears in the Albums panel under the album category you specified.
72
Create an album category
1 Click the Create New Album Or Album Category button in the Albums panel of the Organize tab, and choose
New Album Category.
2 In the Create Album Category box, type a name for the album category.
3 (Optional) From the Parent Album Category menu, choose a category into which you’d like to nest your album
category.
4 Click OK.
The album category appears in the Albums panel under the album category you specified.
Add a photo to an album
In Elements Organizer, you can add photos to albums. You can add multiple photos to one or more albums.
Important: It’s recommended to put your photos in albums. Only the photos in albums can be backed up and
synchronized to Photoshop.com. Photoshop Elements free online benefits and Photoshop Elements Plus are available in
the United States only. Internet access required.
1 In Elements Organizer, click the Show All button (if it appears in the find bar) to display all photos in the Media
Browser.
2 Do one of the following:
• Drag the photo from the Media Browser into the album in the Albums panel.
• Drag the album from the Albums panel onto the photo in the Media Browser.
Note: You can also add photos to an album when copying and importing images to Elements Organizer. See “Designate
an album during photo download” on page 74.
Page 77

Tagging and organizing photos and videos
USING ELEMENTS ORGANIZER 8
Dragging a photo into an album; after dragging, the photo becomes part of the album.
Display photos in an album
Because items in an album are displayed in a custom order, and the same item might be in multiple albums, you can
view only one album at a time.
73
❖ In the Albums panel, do one of the following:
• Click an album.
• Drag the album from the Albums panel to the find bar near the top of the Media Browser.
Click an album to start a search.
To see which albums a photo is in, hold the pointer over the album icon under the photo in the Media Browser or
use the Properties panel.
Change the order of photos in an album
You can place the photos in an album in any order.
1 Select an album from the Albums panel.
2 In the Media Browser Arrangement menu in the upper-right area of the Media Browser, select Album Order.
Page 78

Tagging and organizing photos and videos
USING ELEMENTS ORGANIZER 8
3 Select one or more photos, drag the selection between any two photos in the album. You can also drag the selection
before the first or after the last photo in the album.
Sort photos in an album
You can sort the photos within an album in chronological, reverse-chronological, or album order.
1 Select an album from the Albums panel.
2 In the Media Browser Arrangement menu in the upper-right area of the Media Browser, select Date (Newest First),
Date (Oldest First), or Album Order.
Add photos to multiple albums
1 In the Media Browser, click the Show All button (if it appears in the find bar) to display all photos in the Media
Browser.
2 Select one or more photos. The selected photos are outlined in blue.
3 Select one or more album names in the Albums panel. Shift-click to select adjacent items or Ctrl-click to select
nonadjacent items.
4 Add the photos to the albums by doing one of the following:
• Drag the photos into any of the selected albums in the Albums panel.
• Drag the albums from the Albums panel onto any of the selected photos.
74
Designate an album during photo download
1 Make sure that the Photo Downloader is in the Advanced Dialog mode. If necessary, click Advanced Dialog.
2 In the Advanced Options section, select Import Into Album.
3 Click Settings and do any of the following in the Select An Album dialog box:
• To import photos into a specific album, select the album in the dialog box.
• To import photos into a new album, click Create New Album and then type a name to overwrite the generic
“New Album” name in the dialog box.
4 Click OK.
Export or import an album structure
You can share album structures with others by exporting yours or importing theirs. For example, suppose you have a
set of albums representing different museums you’ve visited with friends. By saving and exporting your album set,
your friends, who have also visited those museums, can import that album structure (not the photos in it) and use it
for their photos. Alternately, you can import the album structure of one of your friends and apply it to your photos.
Export an album structure
You can save your current set of albums and album category names, including their organization in the Albums panel
and their icons, and then share this structure with someone else.
Note: Exporting an album does not export the photos associated with the album.
1 In the Albums panel, click the New button and choose Save Albums To File.
Page 79

2 Choose one of the following and click OK:
Export All Albums Creates a file that contains your entire album hierarchy.
Tagging and organizing photos and videos
USING ELEMENTS ORGANIZER 8
75
Export Specified Album Category
3 In the Save Album to File dialog box that appears, choose a location and enter a name for the file. Then click Save.
Creates a file that contains the hierarchy of the album category you select from the list.
The file is saved as an XML file.
Import an album structure
You can import an existing hierarchy of album categories into the Albums panel, where you can use it for your own
photos.
Note: Importing an album does not import the photos associated with the album.
1 In the Albums panel, click the New button and choose From File.
2 Select the exported XML file in the Import Albums From File dialog box containing the album and album category
names, and click Open.
Creating and editing smart albums
About smart albums
Like albums, smart albums contain photos of your choosing. However, instead of selecting individual photos or groups
of photos, with smart albums, you set the criteria for inclusion. After you set the criteria, any photo in a catalog that
matches the criteria of a smart album will appear automatically in that smart album. As you add new photos to the
catalog, those photos matching the smart album criteria will also appear automatically in the smart album. Smart
albums keep themselves up-to-date.
A
B
C
A. Albums panel heading B. Smart album C. Album category
Create a smart album
1 Select the types of photos you want in your smart album by doing any of the following:
• If you want the smart album to include only photos with certain keyword tags, select those keyword tags from the
Keyword Tags panel.
• If you want the smart album to include only photos with certain star ratings, in the star ratings filter menu, click
the desired star, then select And Higher, And Lower, or Only from the menu next to the stars.
• If you want the smart album to include only photos within a certain folder, select Display > Folder Location.
Then, click the icon for the desired folder.
• If you want the smart album to include only photos you place into a certain album, select that album.
Page 80

Tagging and organizing photos and videos
USING ELEMENTS ORGANIZER 8
Note: You can apply more than one criterion to your selection. For example, you can select a folder or album and one or
more keyword tags.
2 In the Albums panel, click the Create A New Album Or Album Category button . Then, select New Smart
Album.
The New Smart Album dialog box opens.
3 Type a name for your smart album and click OK.
More Help topics
“Attach keyword tags to media files” on page 54
“Find items with star ratings attached” on page 84
“View and manage files by folder location” on page 33
“Create an album or an album category” on page 72
Edit a smart album
1 In the Albums panel, select the smart album you want to edit.
2 (Optional) To change the name of a smart album, in the Albums panel, select Edit from the menu. Type a new
name for the smart album, and click OK.
3 Toward the upper left of the Media Browser, select Options > Modify Search Criteria.
4 Modify the search criteria for the smart album by adding or removing keyword tags, albums, folders, or star ratings.
5 Right-click the smart album in the Albums panel, and select Save Current Search To [name] Album.
76
Editing albums and album categories
Remove photos from an album
1 In the Media Browser, select the photos you want to remove from an album.
2 Do one of the following:
• Right-click the photo, and choose Remove From Album > [album name].
• If the album icon associated with the photo is visible, right-click the icon and choose Delete [album
name] Album.
More Help topics
“About albums” on page 70
“Add a photo to an album” on page 72
Page 81

Tagging and organizing photos and videos
USING ELEMENTS ORGANIZER 8
Merge albums
The Merge Albums command lets you merge multiple albums into a single album. For example, if you create a “Cars”
album, and then later inadvertently create an “Automobiles” album for the same photos, you can merge both albums
into one. When you merge albums, all photos are placed into one album and the other album is removed. Photos are
placed in the order they appear in the Albums panel. You can rearrange the order before or after you merge.
1 In the Albums panel, select the albums you want to merge. Click the album name to select an album, Shift-click to
select contiguous albums, or Control-click to select noncontiguous albums.
2 Right-click and choose Merge Albums.
3 From the list, choose the album into which you want to merge the selected albums, and click OK.
More Help topics
“About albums” on page 70
“Using the Albums panel” on page 71
Change an album’s properties
1 Select an album from the Albums panel of the Organize tab.
2 Right-click the album and choose Edit [album name] Album. Or select Edit on the Albums panel.
3 Do any of the following in the Album Details panel, and click Done:
• Choose a new location from the Album Category.
• Type a new name in the Album Name box.
77
More Help topics
“About albums” on page 70
“Using the Albums panel” on page 71
Delete an album or album category
Deleting an album or album category removes the album, category, and any albums in the category, but not the photos
in them. Note that you cannot delete an album category and an album in another category at the same time.
1 In the Albums panel, click the album name to select an album or album category. Shift-click to select multiple
albums or Ctrl-click to select multiple noncontiguous albums.
2 Click the Delete button in the Albums panel.
More Help topics
“About albums” on page 70
“Using the Albums panel” on page 71
Change the order of items in an album
When you change the order of items in an album, you change the viewing order. This is an easy way to reorder the
items in a project you’re planning to make.
1 In the Albums panel, click the album name to select the album.
Page 82

Tagging and organizing photos and videos
USING ELEMENTS ORGANIZER 8
2 If necessary, select Album Order from the Media Browser Arrangement menu in the upper-right corner of the
Media Browser.
3 In the Media Browser, do one of the following:
• Drag the photos to their new locations within the album.
78
Dragging a photo in an album (top). After dragging, the photo appears in its new position and its order number (circled) is changed (bottom).
• To reset the order of items to oldest first, select Date (Oldest First) from the Media Browser Arrangement menu.
More Help topics
“About albums” on page 70
“Using the Albums panel” on page 71
Reorganize albums and album categories
By default, top-level albums are listed in alphabetical order followed by album categories in alphabetical order. You
can change their order, but you can’t place albums after album categories.
1 Choose Edit > Preferences > Keyword Tags And Albums.
2 Under Enable Manual Sorting Option, select Manual for Album Categories and Albums, and then click OK.
3 In the Albums panel, select one or more albums and album categories.
4 Drag the items to their new location in the albums hierarchy.
When you move an album category, the items it contains move with it.
Note: You can’t move a lower-level album or album category to the top level by dragging. Instead, change its group to Top
level in the Edit Album or Edit Album Category dialog box.
Page 83

Tagging and organizing photos and videos
USING ELEMENTS ORGANIZER 8
More Help topics
“About albums” on page 70
“Using the Albums panel” on page 71
“Set preferences for the Keyword Tags and Albums panel” on page 70
Attach keyword tags to photos in an album
Like albums, keyword tags provide a way of organizing photos and other media files. Keyword tags as well as albums
can be associated with the same item. In fact, you can apply a keyword tag to a photo even when you are viewing that
photo in its album.
1 In the Albums panel, click the album name to display the photos in that album.
2 Click the Keyword Tags panel.
3 Choose Edit > Select All to select all the items in the Media Browser.
4 Select and attach the keyword tags to the photos.
More Help topics
“About albums” on page 70
79
“Using the Albums panel” on page 71
“Attach keyword tags to media files” on page 54
Create albums from keyword tags
1 In the Organize tab, click the triangle next to Keyword Tags to expand the panel.
2 Click the box to the left of a keyword tag name to select it. The Media Browser shows all the photos with that tag
attached.
3 Choose Edit > Select All to select all the items in the Media Browser.
4 On the Organize tab, click the triangle next to Albums to expand the panel.
5 Do one of the following:
• Drag the photos into one or more albums in the Album panel.
• Create a new album and drag the photos into it.
More Help topics
“About albums” on page 70
“Using the Albums panel” on page 71
Page 84

Chapter 6: Finding media files in Elements Organizer
In the Elements Organizer, you can find photos and media files by date, star rating, album, folder location, filename,
media type, keyword tag, text, or other criteria. You can also sort files in any grouping in chronological, reversechronological, or album order.
Sometimes you need to find the actual file of photos or media. The reason can be that you are uploading the file to a
server or embedding it into the layout of a document.
1 In Elements Organizer, select the photo or media clip whose file you want to find.
2 Press Alt + Enter to open the Properties - General window.
3 Click the Reveal in Explorer icon.
Note: In addition to using the Elements Organizer to import media files, you can bring them into Adobe® Elements
Organizer 8 by using the File
file and are best used if you already know the precise path and filename for the file you seek.
> Open or File > Place commands in the Editor. These commands allow you to browse to a
80
More Help topics
“View or edit file information in the Elements Organizer” on page 117
Searching for media files in Elements Organizer
Options for finding media files in Elements Organizer
Elements Organizer enables you to find media files in several ways:
Timeline Click a month or set a range to find photos and media files chronologically by date, import batch, or folder
location.
Find bar Drag a photo, keyword tag, project, or album onto the find bar to find matching or similar photos and media
files.
Find menu Use the commands in this menu to find media files by date, caption or note, filename, history, version,
media type, metadata, or visual similarity. You can even find photos with faces for tagging (see
tagging” on page 57). Commands are also available for finding photos and media files that have unknown dates and
times, no keyword tags, or are not in any album.
View menu Use the commands in this menu to show types of files such as photo, video, audio, project, and PDF files.
The View menu also has options for showing media files that have been marked as “hidden” (See
marked as hidden” on page 32).
Albums panel Select an album to view only the media files within it.
“Find people for
“Show media files
Keyword Tags panel Select a keyword tag to see only the media files with that tag.
Star rating filter View only those media files with a star rating greater than, equal to, or less than the number of stars
you specify.
Page 85

Finding media files in Elements Organizer
Textbox Type text to find media files with matching text whether it’s in the filename, metadata, caption, note, date, or
USING ELEMENTS ORGANIZER 8
album name.
About the Timeline
Elements Organizer automatically organizes all of your media files in the Media Browser Timeline, even if the media
files are not tagged. The Timeline is divided into months and years—you can view images from a particular month and
year by clicking that month in the Timeline. The height of each bar in the Timeline is proportional to the number of
files in each month, based on date, batch, or location. You can also select a range of time in the Timeline to display
media files taken or scanned within that range. When you hold the pointer over a bar in the Timeline, a tool tip shows
its range.
A C D E F
B
G
81
Using the Timeline
A. Timeline arrow B. Dark area indicating photos out of set range C. End point markers D. Date marker E. Timeline bar F. Partially blank
bar G. Tool tip identifying bar range
You can use the Timeline with keyword tags to refine searches. For example, to find pictures of Courtney taken over
a span of time, search using the Courtney keyword tag. Click any month in the Timeline containing media files of
Courtney.
A partially blank bar in the Timeline indicates that you have media files that are not currently in the search results.
Use the Display menu (in the upper-right corner of the Organizer) to specify whether you want to view and find
media files by thumbnail view, import batch, or folder location.
Selecting a view of the Media Browser with the Display menu.
More Help topics
“Find media files using keyword tags” on page 83
View and find media files using the Timeline
1 Make sure that the Timeline is visible in the Media Browser. If necessary, choose Window > Timeline.
2 Select Display, and select Thumbnail View, Import Batch, or Folder Location.
Page 86

Finding media files in Elements Organizer
USING ELEMENTS ORGANIZER 8
This sets whether each bar in the Timeline represents a month, batch, or folder.
3 Do one of the following:
• Use the arrows at the ends of the Timeline to navigate to the part of the Timeline that you want to search.
• Click a bar in the Timeline, or drag the date marker to view media files relating to that bar.
• Drag the Timeline end-point markers to view a range.
• (For date-based arrangements only) Choose Find > Set Date Range. Type both a start date and end date to specify
the range you want to view, and click OK. To reset the date range, choose Find
> Clear Date Range.
Elements Organizer displays media files within the set range in the Media Browser. You can drag the end-point
markers to refine your range.
82
Using Find > Set Date Range to set a date range.
Search using the Find bar
The Find bar performs quick searches when you drag keyword tags onto it. When not in use, the Find bar is a
horizontal bar above the Media Browser. When you drag a tag onto it, the Find bar automatically expands so that you
can see the keyword tags you’ve added to the search. To refine a search, drag more keyword tags onto the Find bar.
You can also use the Find bar to search for the media files used in an album or project.
Dragging a keyword tag onto the Find bar
1 Make sure that the Media Browser and the Keyword Tags panel are open.
Page 87

Finding media files in Elements Organizer
USING ELEMENTS ORGANIZER 8
2 Drag a tag onto the Find bar. The search starts immediately, and the Find bar expands to show the tag it is using to
perform the search.
3 (Optional) Drag more keyword tags onto the Find bar to refine your search. You can drag more than one tag to the
Find bar at a time. Shift-click to select adjacent keyword tags or Control-click to select nonadjacent tags.
4 To start a new search, right-click a tag, category, or subcategory, and choose the New Search Using [tag, category,
or subcategory name] Keyword Tag command from the context menu.
5 To close the Find bar, click Show All.
More Help topics
“About keyword tags” on page 52
“Exclude media files from a search” on page 85
Finding media files by keyword tags
Find media files using keyword tags
Keyword tags let you quickly find photos and other files. When you use keyword tags to find photos and media files,
the find bar expands to display the keyword tags you’ve selected. Searches begin as soon as you select the tags in the
Keyword Tags panel.
83
Search for media files with specific keyword tags by clicking the box next to the tag’s name.
• In the Keyword Tags panel, click the square next to the tag’s name, or drag the tag icon to the find bar. You can
include multiple keyword tags in a search.
Elements Organizer finds media files that have the keyword tags attached. If no photo matches all the tags in your
search criteria, the Media Browser displays closely matching media files containing a subset of the keyword tags.
• To define a range of time for the search, specify a Date option in the Media Browser Arrangement menu, and then
drag the Timeline end-point markers to the beginning and end of the range you want.
• To remove a tag from the search, double-click the tag in the find bar. (Or click the Back button in the shortcuts bar
to remove the last tag you added.)
• To exclude media files with certain keyword tags from the search, right-click those tags in the Keyword Tags panel
and choose Exclude Photos With [tag, category, or subcategory name] From Search Results.
Page 88

Finding media files in Elements Organizer
USING ELEMENTS ORGANIZER 8
Note: Using the Exclude Photos command, you can search for media files that have, for example, only you in them. You
do this by searching for your tag, and then excluding the entire People tag category. The results are media files that have
only you in them and no other people.
More Help topics
“Search using the Find bar” on page 82
“About keyword tags” on page 52
“Find media files by details (metadata)” on page 90
Display views of keyword tag search results
When you search using keyword tags, Elements Organizer groups the results of the search in views of best matches,
close matches, and groups that do not match. By default, the Media Browser displays the view of best matches. You
can select other views.
1 Click Options next to the Show All button to open the search criteria pop-up menu.
2 Select either Hide Best Match Results, or Show Results That Do Not Match. Results are grouped as follows:
Best matches These media files are tagged with all the search criteria keyword tags. As you add more keyword tags to
refine your search, fewer best matches appear.
84
Close matches Media files tagged with one or more (but not all) of the search criteria keyword tags are called close
matches. Closely matching media files have a blue circle with a white check mark in their thumbnails
if you search using more than one Place category tag, photos with just one of the Place category keyword tags show up
as best matches. Select this group to view media files containing any of the keyword tags you searched for.
To automatically display close matches after a search, choose Edit > Preferences > General, select Show Closely
Matching Sets For Searches, and then click OK.
Not matching These media files don’t have any of the search criteria keyword tags attached to them. They have a Not
icon in their thumbnails
.
. For example,
Find untagged media files
❖ In the Media Browser, choose Find > Untagged Items.
All the media files in your catalog that don’t have keyword tags assigned to them appear in the Media Browser.
Clear a keyword tag search
❖ To return to all the media files in your catalog, click Show All.
Search based on a selected keyword tag
❖ Right-click a tag and then choose New Search Using [tag, category, or subcategory name].
Find items with star ratings attached
The star ratings filter helps you find your favorite (or least favorite) photos, video clips, audio clips, and projects. Also,
you can use the star ratings filter in combination with keyword tags as search criteria.
1 In the Media Browser, select one of the stars in the star ratings filter.
Page 89

2 In the ranking menu next to the star ratings filter, select one of the options.
Selecting an option from the ranking menu.
More Help topics
“About keyword tags” on page 52
“Search using the Find bar” on page 82
Finding media files in Elements Organizer
USING ELEMENTS ORGANIZER 8
85
Exclude media files from a search
You can exclude media files from your search results. For example, you can search the Friends subcategory and find
media files of all but one of your friends by applying the Exclude From Search Results command to that friend’s tag.
You can also exclude an entire category or subcategory from your search.
1 Do one of the following:
• In the Keyword Tags panel, right-click the tag of the media files you want to exclude from a search, and choose
Media With [keyword tag, category, or subcategory name] From Search Results.
Exclude
• Right-click one or more keyword tags in the find bar and choose Exclude Photos With [keyword tag, category, or
subcategory name]. Or, double-click the tag to remove it from the find bar.
2 To undo the exclude command from a tag, click the Exclude icon next to the tag in the Keyword Tags panel.
You can also find photos with a specific person or subject alone by excluding a category or subcategory and searching
for a tag within the excluded category or subcategory. For example, to find photos that contain only your friend
Chiara, not photos with Chiara and other friends, search for the Chiara keyword tag and apply the Exclude command to
the Friends subcategory. Elements
also have other keyword tags from the Friends subcategory.
More Help topics
“Edit a keyword tag category or subcategory” on page 67
Organizer finds the photos with only the Chiara keyword tag, excluding photos that
Page 90

Finding media files in Elements Organizer
USING ELEMENTS ORGANIZER 8
Finding media files by content, type, and metadata
Find media files using the Search box
Various search criteria enable you to search for media files efficiently and easily. You can use the Search box to run a
text-based search. Type a name or word, and Elements Organizer displays media files that match the text across a wide
range of criteria. Matches can include the following items:
• Author
• Captions
• Dates
• Date formats
• Filenames
• Keyword tags
• Metadata
• Notes
• Album names
• Album groups
• Camera information
• Camera make
• Camera models
• Folders
• Formats
The text search also supports the operators: “AND,” “OR,” or “NOT” if a space precedes and follows them. The
following table details the search criteria that can be used to run a text-based search:
86
Search Criteria Description Format Example
Date Displays media elements that match
the specified date.
• Date:dd/mm/yyyy
• Date:mm/dd/yyyy
• Date:yyyy
• Date:this year
• Date:last year
• Date:today
• Date:last week
Tag Displays media elements that match
the specified tag.
Filename Displays media elements that match
the specified filename.
Caption Displays media elements that match
the specified caption.
Tag:<tag name> Tag:People
Filename:<filename> Filename:_MG_7409.jpg or
Filename:_MG_7409
Caption:<caption> Caption:Disneyland
Page 91

Finding media files in Elements Organizer
USING ELEMENTS ORGANIZER 8
Search Criteria Description Format Example
87
Make Displays media elements that match
the specified make of a camera.
Model Displays media elements that match
the specified model of a camera.
Author Displays media elements that match
the specified name of the author.
Notes Displays media elements that match
the specified notes.
Make:<make of the camera> Make:Canon
Model:<model name> Model:Canon EOS 5D
Author:<name of the author> Author:James
Notes:<notes> Notes:Trip to Disneyland
The Search box also populates a list of existing tags based on the letter you type. For example, to search for photos and
videos that have been tagged with "Disneyland", type the letter D in the Search box. The Search box displays a list of
tags beginning with the letter D. As you type in more text, the list changes dynamically to display tags that match the
text being entered. If you click any item in the list, a search for that tag is performed, and the results are displayed in
Elements Organizer.
Find media files by caption or note
You can search for captions or notes using either the Caption Or Note command or the Metadata command. If you
want to search for a caption or note along with one or more other search criteria, use the Metadata command.
1 In the Media Browser, choose Find > By Caption Or Note.
2 In the Find By Caption Or Note dialog box, type a word or phrase in the textbox.
3 Select one of the following, and click OK:
Match Only The Beginning Of Words In Captions And Notes Finds media files and other files with notes or captions
containing the beginning letters of the words you type.
Match Any Part Of Any Word In Captions And Notes Finds photos and other files with notes or captions containing any
portion of the words you type.
More Help topics
“Add captions to files” on page 114
“Add a note to a file” on page 115
Find media files by filename
You can search by filename using either the Filename command or the Metadata command. If you want to search by
filename along with one or more other search criteria, use the Metadata command.
1 In the Elements Organizer, choose Find > By Filename.
2 Type a word in the Find By Filename dialog box to search for files with names that contain the word, and then
OK.
click
You can also type a file extension (JPEG, BMP, and so on) in the Find By Filename dialog box to find files of a certain
file type.
More Help topics
“About filenames and versions” on page 111
Page 92

Finding media files in Elements Organizer
USING ELEMENTS ORGANIZER 8
Find all version sets
When you search for all version sets, Elements Organizer displays the top photos of each set. You can expand each set
as desired.
1 In the Media Browser, choose Find > All Version Sets.
2 To expand a version set, right-click it and choose Version Set > Expand Items In Version Set.
Find photos by visual similarity
You can search for images containing similar subjects, color, or general appearance.
❖ In the Media Browser, do one of the following:
• Drag one to four images onto the find bar.
• Select one to four images, and choose Find > By Visual Similarity With Selected Photo(s) And Video(s).
Photos with similar visual appearance are displayed in decreasing order of similarity. A similarity percentage appears
in the lower-left corner of each image.
88
Find photos with similar appearances by dragging a photo onto the find bar.
More Help topics
“Search using the Find bar” on page 82
“Exclude media files from a search” on page 85
Page 93

Finding media files in Elements Organizer
USING ELEMENTS ORGANIZER 8
Find photos used in projects
❖ Do one of the following:
• In the Media Browser, right-click the project and choose Show Project Items In Media Browser. The photos appear
in the Media Browser. This command is useful if you want to edit the captions or make other changes to the photos
in your project.
• Drag the project onto the find bar to display the photos in the Media Browser.
• Choose Find > By History > Used In Projects. A list of projects appears. Double-click an item, or select one or more
items and click
You can also find out whether a photo is used in a project by looking under History in the Properties panel.
OK to view the media used in the project.
More Help topics
“Exclude media files from a search” on page 85
Find files by media type
You can choose to view just one type of media file in the Media Browser. When you select a media type, you can
perform other searches that look only for the type of media you want. If you want to search by media type along with
one or more other search criteria, use the Find
> By Details (Metadata) command.
89
❖ In the Media Browser, choose Find > By Media Type, and then choose one of the following options:
Photos Displays just photos.
Video Displays thumbnails of video clips (the first frame of the video clip is shown).
Audio Displays audio clips.
Projects Displays projects you made using previous versions of Elements Organizer.
PDF Displays PDF files.
Items With Audio Captions Displays photos and projects to which you’ve attached audio captions.
The files of the selected media type appear in the Media Browser.
More Help topics
“Exclude media files from a search” on page 85
Find media files in an album or smart album
If you want to search in an album for one or more additional search criteria, use the Find > By Details (Metadata)
command. Otherwise, follow these steps:
1 In the Media Browser, do one of the following:
• Drag an album or smart album icon onto the find bar.
• Right-click an album or smart album icon and choose Find Items In [album name].
• Choose Find > Items Not In Any Album to find photos not used in any albums.
Page 94

Finding media files in Elements Organizer
Click an album or smart album to view images in that album.
2
To cancel the search and show your catalog, click the Show All button or double-click the album name in the find bar.
USING ELEMENTS ORGANIZER 8
Note: You cannot search for photos using both smart album criteria and keyword tag criteria. Use one or the other.
More Help topics
“About albums” on page 70
“Find media files by their keyword tags” on page 62
90
“Search using the Find bar” on page 82
Find media files by details (metadata)
You can search by file details or metadata available in your images. Searching by metadata is useful when you want to
search using multiple criteria at once. For example, if you want to find all photos taken on 12/31/05 that include the
“Mom” tag, you can search for both capture date and keyword tags in the Find By Details (Metadata) dialog box.
Searchable metadata includes criteria such as filename, file type, tags, collections, notes, author, and capture date, as
well as camera model, shutter speed, and F-stop, among others.
Note: Searching for camera raw files will also find TIFF files with a .tif extension.
Search for a variety of photo details at once using the Find By Details (Metadata) dialog box.
1 In the Media Browser, choose Find > By Details (Metadata).
Page 95

Finding media files in Elements Organizer
2 In the Find By Details (Metadata) dialog box, select a metadata type from the first pop-up menu.
3 In the second pop-up menu, select a range for the search, such as Starts With, Is Greater Than, or Contains. This
range tells Elements
a second pop-up menu.
4 In the third pop-up menu, type or choose the metadata name or value that you want to find.
5 To include other metadata values in your search, click the plus (+) sign to the right of the third pop-up menu and
specify new values for the two or three pop-up menus that appear.
6 To remove metadata from your search, click the minus (-) sign to the right of the third pop-up menu for the
metadata you want to remove.
7 Click Search.
8 To modify the search, click Options > Modify Search Criteria in the find bar and make changes as desired; then
OK.
click
Organizer how to use the text that you enter in the third pop-up menu. Not all criteria include
USING ELEMENTS ORGANIZER 8
Find media files by history
Elements Organizer helps you keep track of where you got media files, how you used them, and how you shared or
exported them. You can use this stored history to find photos and media files.
91
1 In the Media Browser, choose Find > By History. You can search by any of the criteria commands listed in the By
History submenu.
2 In the Select One Or More Groups You [Imported, E-mailed, etc.] dialog box, select one or more items in the list,
OK.
and click
Note: To permanently remove a particular history reference from the list, select the list item in the Select One Or More
Groups You [Imported, E-mailed, etc.] dialog box, and then click the Delete button or press Delete on your keyboard. The
Delete button is not available for searches based on Imported On, or Used In Projects histories.
Find media files with unknown dates or times
❖ In the Media Browser, choose Find > Items With Unknown Date Or Time. The Media Browser displays the media
files in which date or time is set to unknown.
More Help topics
“View and find media files using the Timeline” on page 81
Finding photos using a map
Find photos using a map
You can find photos that you’ve pinned to a map.
1 In Elements Organizer, click Window > Show Map.
2 Select the Limit Search To Map Area option.
Page 96

3 Use the Zoom or Hand tools to display the map area you want.
Elements Organizer displays the photos pinned to the map area you navigated to.
More Help topics
“Pinning photos to a map” on page 43
Finding media files in Elements Organizer
USING ELEMENTS ORGANIZER 8
92
Page 97

Chapter 7: Managing files and catalogs
After you bring your media files into a catalog, and have used the Elements Organizer to organize them, you can also
use the Elements Organizer to manage those files in various ways. For example, you can group related photos—such
as several shots of the same subject taken in quick succession with different exposure settings or camera angles—into
stacks. Similarly, you can group edited versions of the same photo into version sets. You can also use the Elements
Organizer to view and change file information, captions, and notes.
For more information about bringing media files into a catalog, see “Bringing photos and videos into the Elements
Organizer” on page 14. For more information about organizing media files, see “About keyword tags” on page 52 and
“About albums” on page 70.
Managing catalogs
About catalogs
A catalog can represent all the media files you have stored on your computer and other storage media, or any subset
of them. Although most people prefer to have only a single catalog referencing all their media, it is possible to create
more than one catalog, each for a unique set of files.
93
Important: Elements Organizer users in the United States can backup/synchronize media files in their catalog with their
Elements membership. The backup/synchronization feature only works with files in one catalog. So, it’s important for
U.S. users to avoid creating multiple catalogs. For more information, see
files” on page 118.
Once your files are in a catalog, you can use the Elements Organizer to search them, sort them, and fix them. You can
also collect them into albums, or group them by keyword tag or star rating. You can use catalogs and the Elements
Organizer even if you prefer to store your originals on CDs or in a system of folders on your hard disk.
When you start Elements Organizer and bring in media files, a catalog is automatically created for you. The catalog
keeps track of the photos, video files, audio clips, and projects on your computer and on other media such as CDs or
DVDs. The catalog contains information about each photo and media file, but it doesn’t contain the actual media files.
The Photoshop Elements catalog references the photo files, video files, and audio files on your computer and displays a thumbnail of each in the
Media Browser.
“Backup and synchronize catalogs, albums, and
Page 98

USING ELEMENTS ORGANIZER 8
Managing files and catalogs
Important: Media files remain where they are originally stored; they do not reside in Elements Organizer. Instead,
Organizer creates links to the original files. If you delete an original file, Elements Organizer will not be able to
Elements
access it.
Your catalog is like a database that contains links to your media files. These links inform Elements Organizer about
the media file’s location, file format, what keyword tags are attached to it, date the media file was taken, and so on. All
of this information gives you flexibility in managing, identifying, and organizing media files.
Although you automatically create a catalog when you start Elements Organizer and bring in media files, it’s possible
to create more than one catalog. Most people don’t need or want multiple catalogs. However, multiple catalogs are
useful, for example, if friends or family members share Elements
Organizer on the same computer and want their own,
separate sets of photos, video files, and keyword tag organization schemes. Or, perhaps you want one catalog of workrelated media files and one catalog of personal media files.
94
When you create different catalogs, you can use different keyword tags and photos in each catalog.
Information contained in catalogs
Elements Organizer saves the following information about the photos, video files, and audio clips in your catalog:
• The path and name of the file.
• The path and filename of any associated audio file.
• The path, filename, and volume name of the original, full-resolution file (if the original file is stored offline on a CD
or DVD).
• The path and filename of the original, unedited file (if the file has been edited).
• The name of any camera or scanner associated with the batch of imported media files.
• Captions you’ve added to a media file.
• Notes you’ve added to a media file.
• The media type—that is, whether it’s a photo, video files, audio clip, or project.
• The date and time the media file was created and whether its date is completely or only partially known.
Page 99

USING ELEMENTS ORGANIZER 8
Managing files and catalogs
• Keyword tags that have been applied to the media file.
• Albums in which the media file is included.
• The media file’s history: whether it was printed on a local printer, exported, shared by e-mail or online, sent to an
online photo-finishing service using Adobe Photoshop Services. The history also shows whether the media file was
received from an online source, and what batch it was imported in (including import date and time).
• Edits that have been applied to the media file (such as rotation, cropping, and fixing red eye).
• The pixel dimensions of any photos and video files.
• Project settings (project type, whether captions are displayed, showing page numbers, and so on).
• Metadata including pixel dimensions, EXIF, copyright, IPTC information, and file format information.
Create a catalog
If you have multiple catalogs, you can open only one catalog at a time. You cannot move media files or keyword tags
between catalogs, and you cannot search across multiple catalogs.
1 In the Media Browser or Date view, choose File > Catalog.
2 To choose a preset location for the catalog, select Catalogs Accessible By All Users or Catalogs Accessible By The
Current User. To select a custom location, choose Custom Location, click Browse, and browse to the location.
3 Click New, type a name for the catalog in the Enter A Name For The New Catalog dialog box, and then click OK.
95
Rename a catalog
You can rename a catalog through the Catalog Manager.
1 Make sure the Photoshop Elements Editor is closed.
2 In the Elements Organizer, choose File > Catalog.
3 In the Catalog Manager, select the name of a catalog from the list.
4 Click Rename. Then type the new name, and click OK.
5 Click Cancel to close the Catalog Manager.
Remove a catalog
1 Make sure the Photoshop Elements Editor is closed.
2 Select File > Catalog.
3 Make sure more than one catalog is listed in the Catalog Manager. Create a new catalog, if necessary. See “Create a
catalog” on page 95.
4 Open a catalog other than the one you want to remove. See “Open a catalog” on page 97.
5 In the Catalog Manager, highlight the catalog you want to remove.
6 Click Remove. Then click Yes.
7 To close the Catalog Manager, click Cancel.
Page 100

USING ELEMENTS ORGANIZER 8
Managing files and catalogs
Optimize a catalog
You can reduce the amount of space used by a catalog and improve its performance by optimizing it.
1 Make sure the Photoshop Elements Editor is closed.
2 Select File > Catalog.
3 In the Catalog Manager, select the catalog you want to optimize.
4 Click Optimize.
A dialog box will report when the catalog and thumbnail cache have been optimized.
Repair a catalog
When your catalog is damaged by a power failure or technical glitch, Elements Organizer displays a message saying
that there’s a problem with the catalog. Use the Repair command to fix it. Photoshop Elements can find and repair
errors in a catalog database or thumbnail cache.
1 Make sure the Photoshop Elements Editor is closed.
2 Select File > Catalog.
3 In the Catalog Manager, select the catalog you want to repair.
4 Click Repair.
One of three dialog boxes will open. The first three of these allow you to select Re-index Visual Similarity Data.
96
5 Do one of the following:
• If a dialog box reports No Errors Were Found In The Catalog, click OK or Repair Anyway.
• If a dialog box reports that the catalog doesn’t have errors, but the thumbnail cache does, click Delete Thumbnail
Cache if you want Photoshop Elements to delete and regenerate the cache.
• If a dialog box reports that errors were found, click OK or Cancel. If errors were also found in the thumbnail cache,
Photoshop Elements deletes the cache and regenerates it.
• If a dialog box reports that the catalog is unrecoverable, consider loading a backup of the catalog.
Convert a catalog
You can convert catalogs made with previous versions of Photoshop Elements, or with Photoshop Album, so that you
can use them in the current version of Photoshop Elements.
1 Select File > Catalog.
2 Click Convert.
The Convert Catalog dialog box opens and searches the default locations for the catalogs of Photoshop Elements and
Photoshop Album.
3 (Optional) To browse additional locations for catalogs, click Find More Catalogs, and browse to the locations.
4 Select a catalog from the list to convert, and click Convert.
5 To close the Convert Catalog dialog box, click Done.
 Loading...